Samsung Electronics Co SMTI5343 Internet Phone User Manual 02 HR80 RX Block Diagram
Samsung Electronics Co Ltd Internet Phone 02 HR80 RX Block Diagram
UserManual.wiki
>
Samsung Electronics Co
>
SMTI5343 User Manual
>
User Manual Part 1
Contents
1.
User Manual Part 1
2.
User Manual Part 2
User Manual Part 1
Navigation menu
Upload a User Manual
Namespaces
Wiki Guide
HTML
PDF
Info
Views
User Manual
Discussion / Help
Navigation
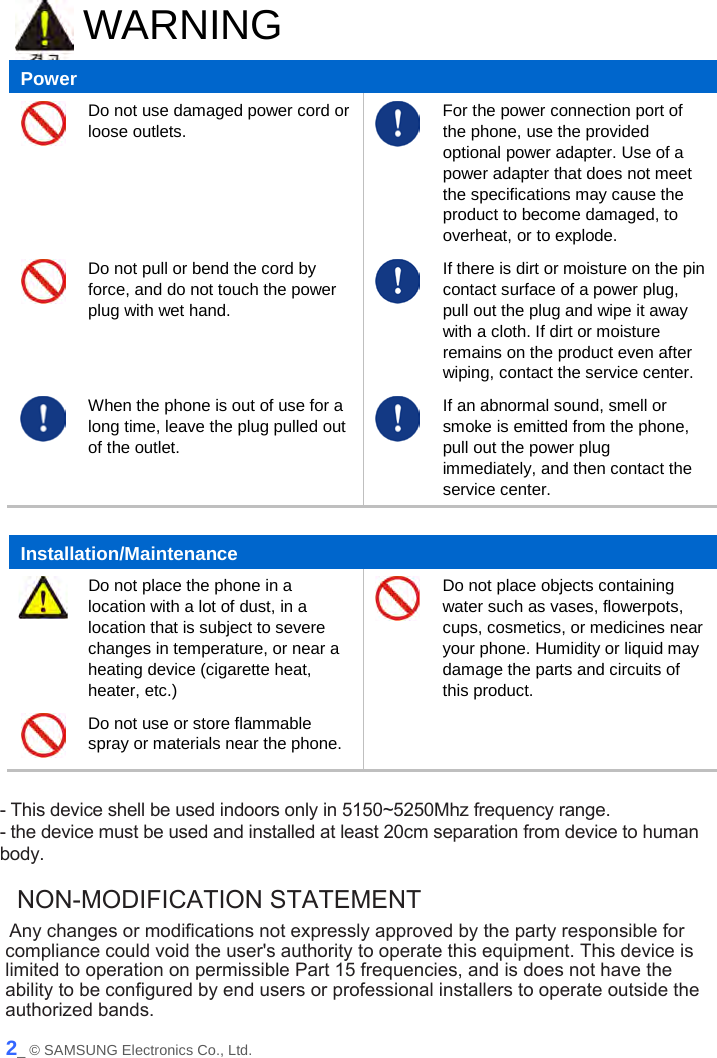
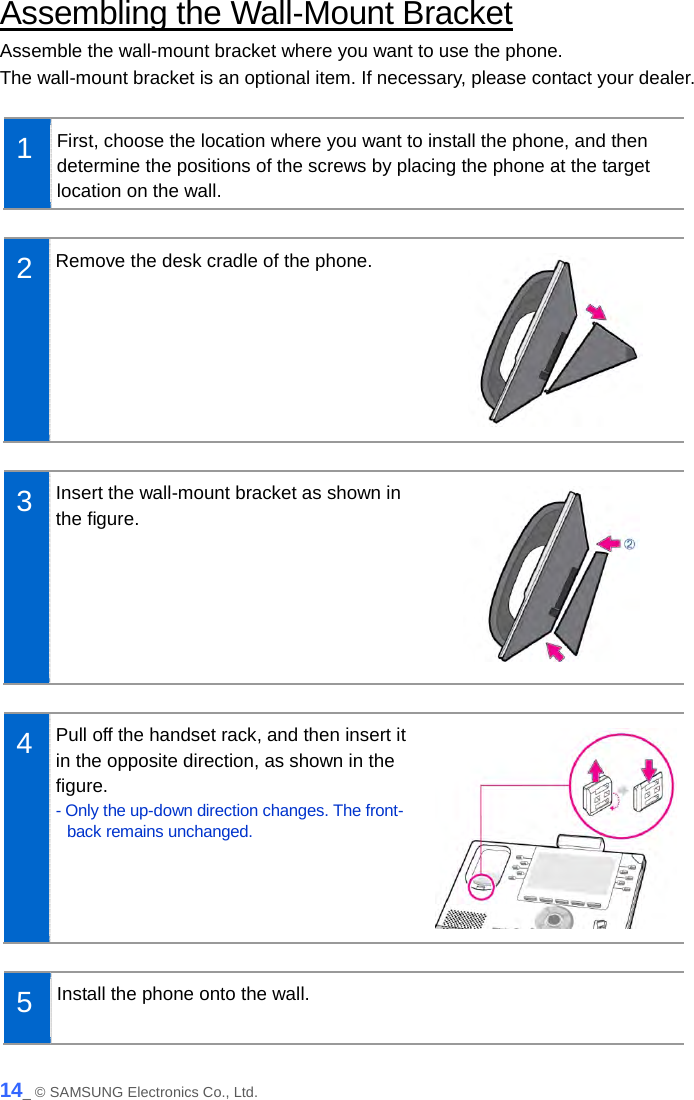
![Detachment from the Wall-Mount Bracket This section describes how to detach the phone from the wall-mount bracket. 1 You can detach the phone from the bracket by pressing the [Push] section at the bottom of the bracket. - Detach the phone more easily by pulling the entire bottom of the bracket instead of only the [Push] section. 2 Remove the handset hook and insert it again by changing its direction. SMT-i5343 User Guide _15](https://usermanual.wiki/Samsung-Electronics-Co/SMTI5343.User-Manual-Part-1/User-Guide-2186137-Page-18.png)
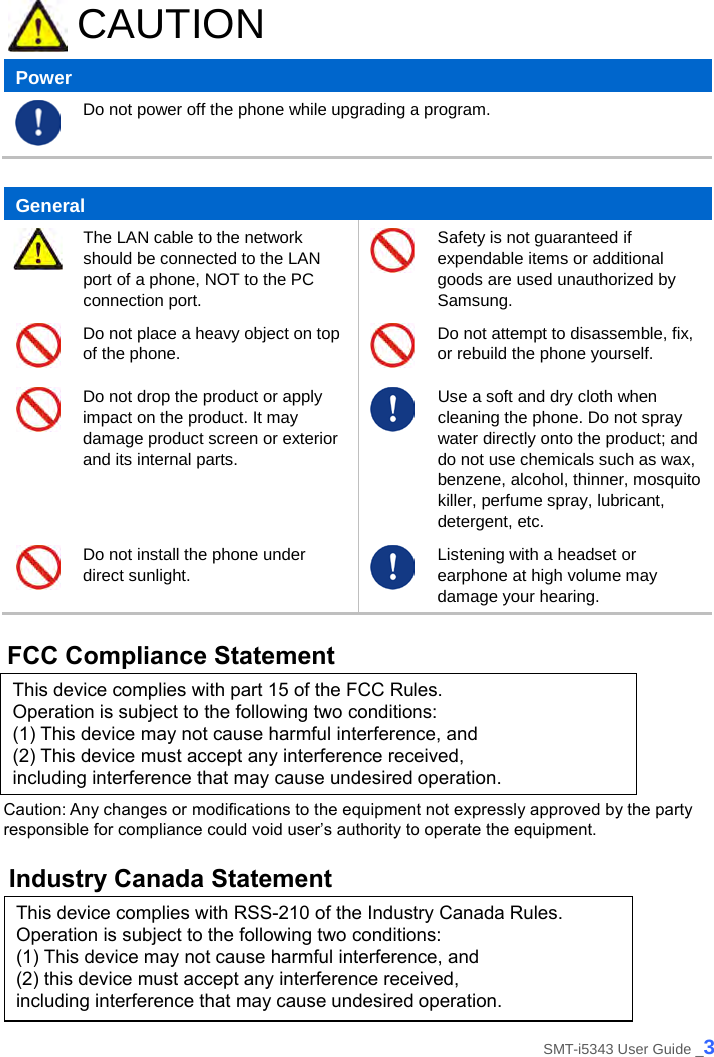
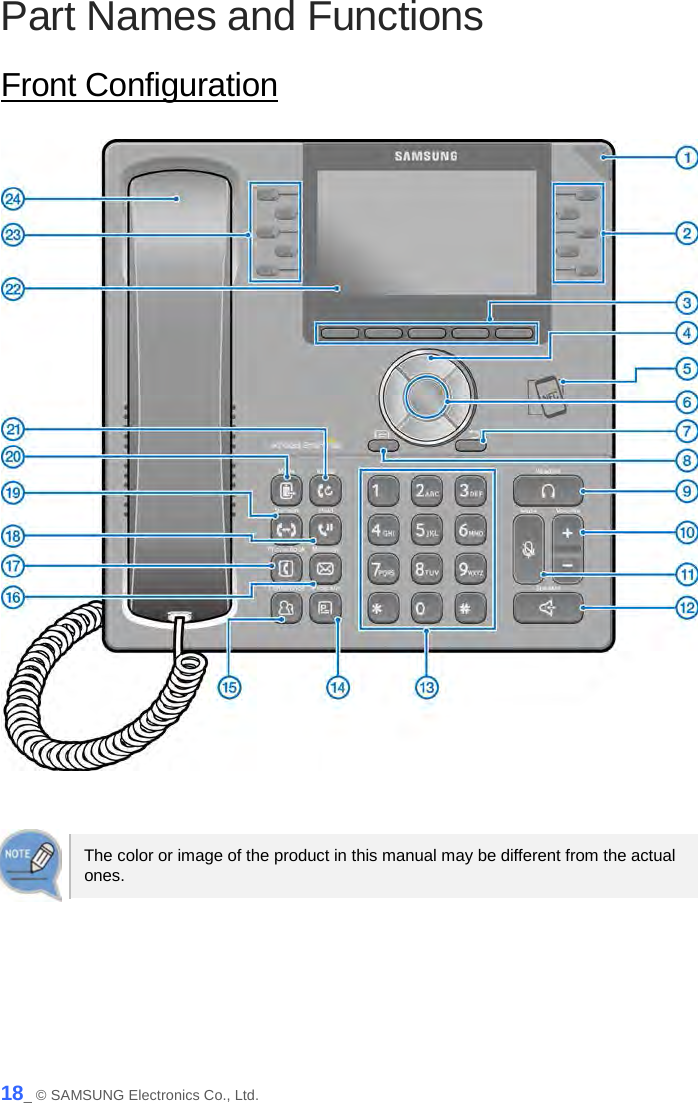
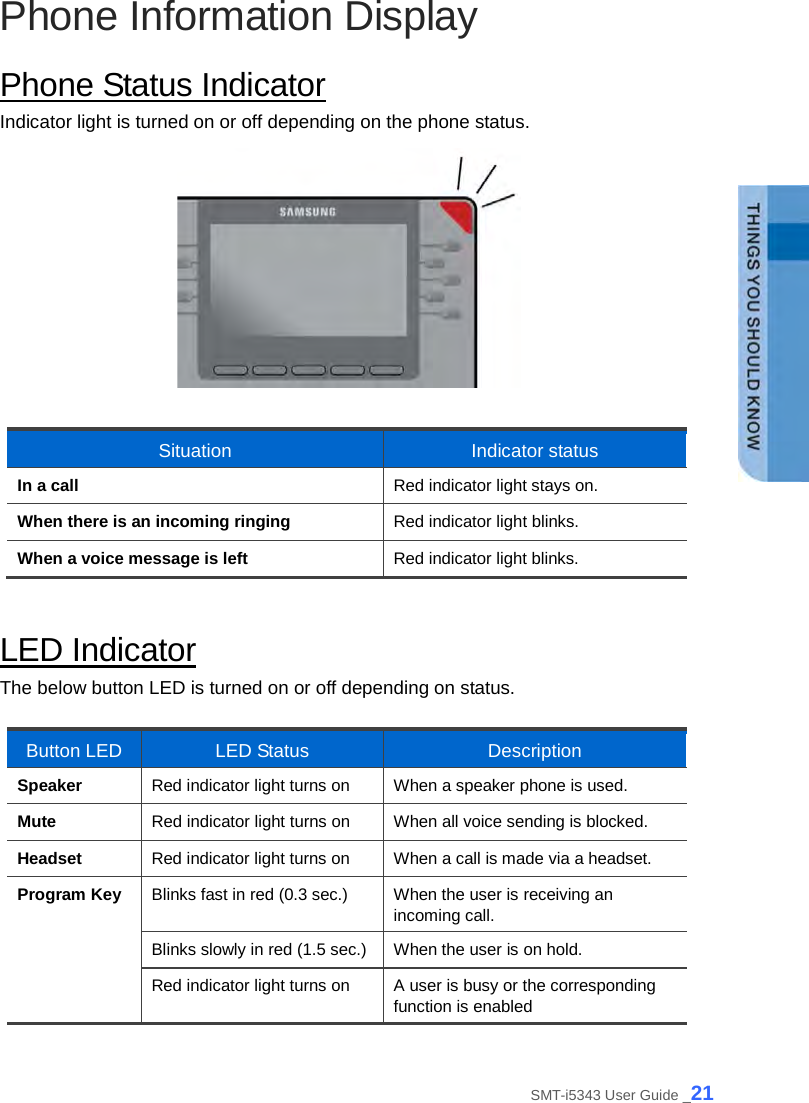
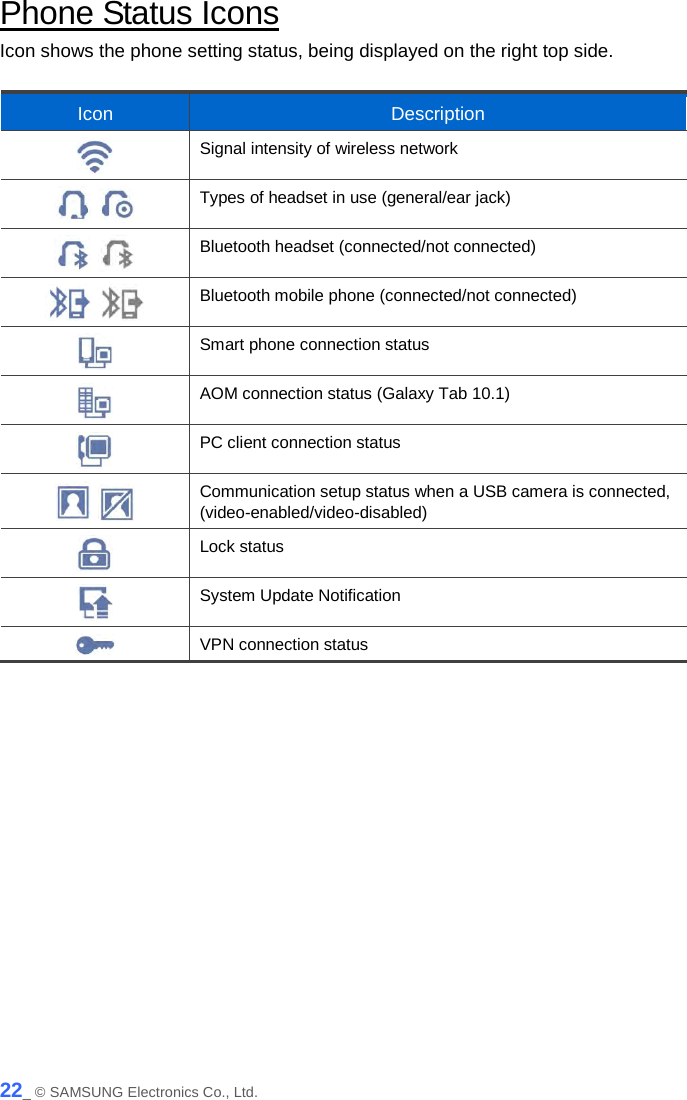
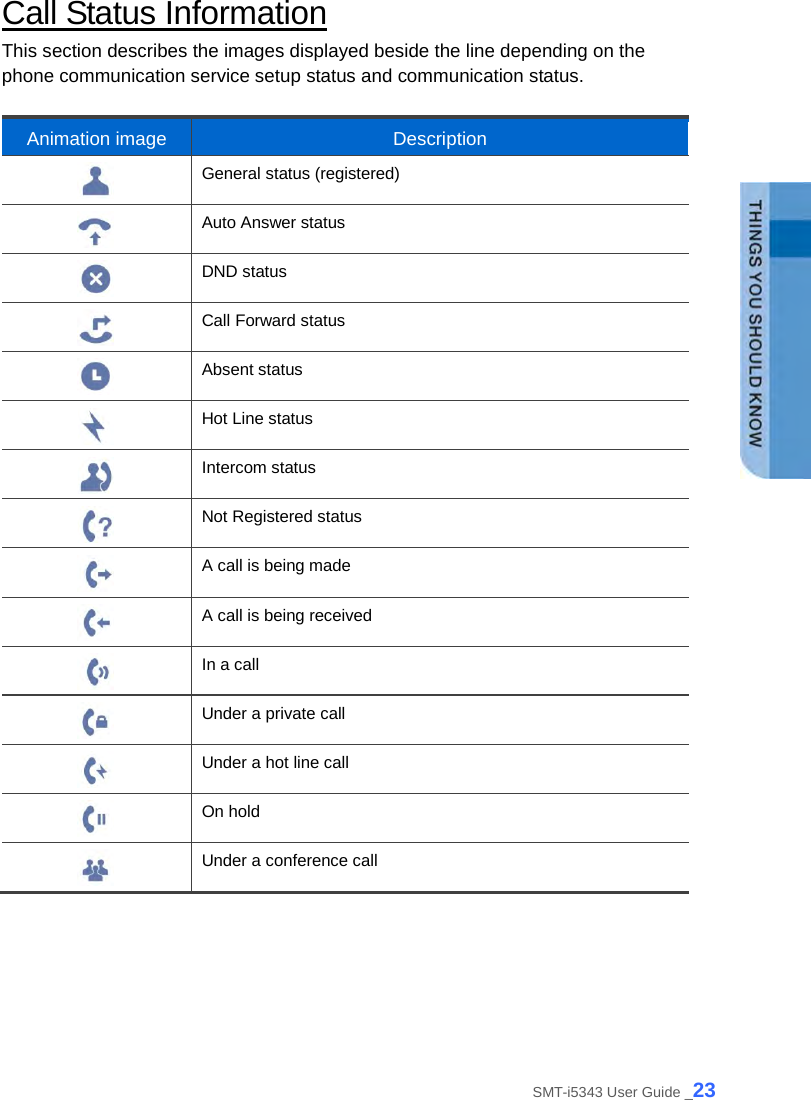
![THINGS YOU SHOULD KNOW Key Functions IP Network The SMT-i5343 phone enables voice telecommunication through an already-installed data network, without requiring the installation of an additional telephone line. Therefore, it does not require the additional expense of maintaining telephone numbers, and can save on telephone costs for the businesses, and people, that use international phone calls frequently. Screen The SMT-i5343 phone displays various functions on the LCD screen. You can enjoy the functions easily using the navigation button, [OK] button, or the soft buttons that is on the right and bottom of the screen. Program Key You can assign a frequently used function to each button. For details about how to set up the function, contact the administrator. Bluetooth Headset A user can talk to a counterpart by connecting a wireless Bluetooth headset to the phone. Bluetooth Smart Phone Mode Connect the phone and a smartphone via Bluetooth, then you can use the phone to take the call received to the smartphone and you can also use the call move function. 16_ © SAMSUNG Electronics Co., Ltd.](https://usermanual.wiki/Samsung-Electronics-Co/SMTI5343.User-Manual-Part-1/User-Guide-2186137-Page-19.png)
![Video Call By connecting USB camera to the phone, you can make and receive video calls with other video-call enabled people. Call Park If you must interrupt a call, you can put the call on hold or transfer it to another person using the Call Park or Call transferring function. Conference During a call, you can have a conference call with others by pressing the [Conference] button. Call Forward A call can be forwarded to another number when the call cannot be received. DND If this function is selected, the phone does not ring even when a call is placed to the phone. USB Charging With a phone to which a power adaptor is connected, you can use the USB charging function. (When PoE is connected, the USB charging function is not available during call.) SMT-i5343 User Guide _17](https://usermanual.wiki/Samsung-Electronics-Co/SMTI5343.User-Manual-Part-1/User-Guide-2186137-Page-20.png)
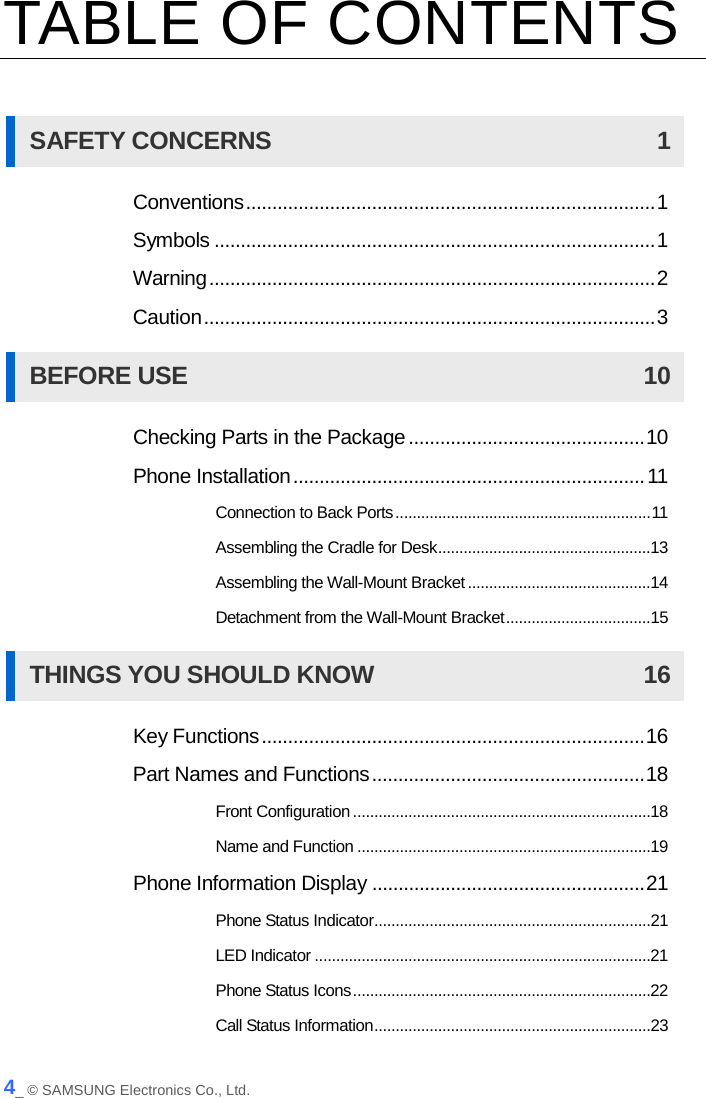
![Supplementary Functions Menu Supplementary functions menu is a user convenience function available per phone conditions. It is provided via interworking with the system, and displayed as a menu on the right side of a screen. Supplementary functions menu varies depending on system version. Usage of Supplementary Functions Menu While pressing the [Function] soft button at the bottom of screen, press the right selection button of the menu you want to use. Supplementary Functions Menu of Waiting Screen Supplementary Functions Menu of Communication Status 24_ © SAMSUNG Electronics Co., Ltd.](https://usermanual.wiki/Samsung-Electronics-Co/SMTI5343.User-Manual-Part-1/User-Guide-2186137-Page-27.png)
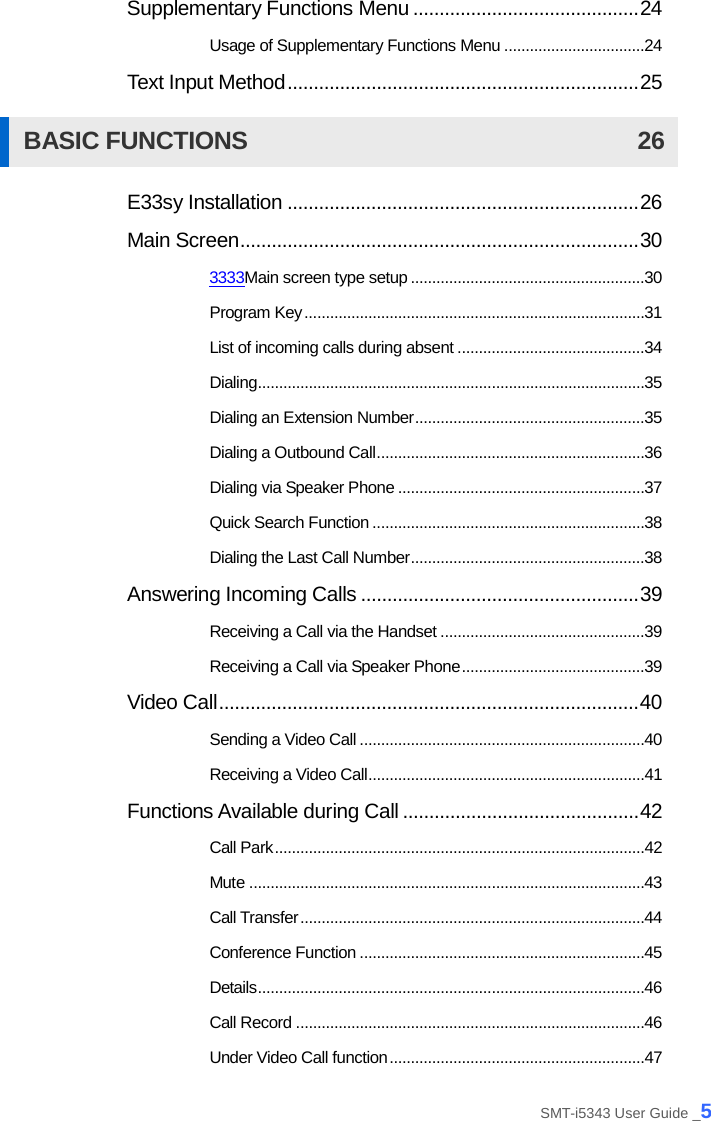
![Text Input Method Using the dial buttons and navigation buttons on the phone, the user can easily enter or modify the Korean, English, numbers, and special characters. 1 Whenever the user presses the dial button [*] on a text input screen, the input mode is changed in sequence. The input mode status is displayed as an icon in the status area of the top-right corner of the LCD. 2 Korean characters, the English alphabet and numbers can be input using the dial buttons. - Inputting special characters: Press the [#] button to select the special character input mode, and select characters using the navigation button to input or modify them. : Korean input mode : Alphabet input mode-uppercase : Alphabet input mode-lowercase : Number input Navigation button Dial button SMT-i5343 User Guide _25](https://usermanual.wiki/Samsung-Electronics-Co/SMTI5343.User-Manual-Part-1/User-Guide-2186137-Page-28.png)
![BASIC FUNCTIONS Easy Installation In the phone initialization status, a user can easily register to the system. If incorrect information is entered during easy installation, the phone may not be properly registered or there may be a network fault. Make sure to enter the information provided by the system administrator. The SMT-i5343 phone supports 3 types of phone registration. Settings Description General A user directly enters the system information and phone registration information for registration. - SIP server information - SIP registration information - Time server information Server A phone is registered by using the information from the environment server. PnP (Plug & Play) A phone is automatically registered if the system supports PnP. - To use the PnP function, a system administrator must configure an environment for PnP in advance. Contact the administrator to check whether the PnP environment is configured. 1 When the power is connected during initialization status, the [Easy Install] soft menu is displayed at the bottom of screen. Start easy installation by pressing the soft button. After connecting the LAN cable, press the [>] soft button to go to the next step. - In the phone initialization status, the default language is English. 26_ © SAMSUNG Electronics Co., Ltd.](https://usermanual.wiki/Samsung-Electronics-Co/SMTI5343.User-Manual-Part-1/User-Guide-2186137-Page-29.png)
![2 After selecting a language to use for the phone, press the [>] soft button. - When the phone is connected to the system after easy installation, the language may be changed depending on the administrator’s settings. 3 After selecting the setup method, press the [>] soft button. Depending on the selected setup method, the easy installation step is changed. - Select one out of General/Server/PnP. 4 When the setup method is [Server] - An ID or password is not required for phone registration using a MAC address. - Contact the system administrator about whether to use an ID or password and regarding environment server address. When the setup method is [PnP] - If the setup method is PnP, the network connection type is fixed to DHCP and network setup step is omitted. When the setup method is [General] - SIP registration server setup: Enter the SIP server information. - SIP registration information setup: Enter the phone registration information. - Time server setup: Enter the address and update interval of time server. Press the [>] soft button. SMT-i5343 User Guide _27](https://usermanual.wiki/Samsung-Electronics-Co/SMTI5343.User-Manual-Part-1/User-Guide-2186137-Page-30.png)
![5 Enter the network information. When the setup method is [Wired] - Select one out of DHCP/Static/PPPoE. - Make sure to contact the system administrator because network connection may be failed if incorrect information is entered. When the setup method is [Wireless] - When Wi-Fi is selected, nearby APs are automatically searched. - Wi-Fi is working properly when the AC adaptor is connected. - After selecting an AP to connect in the searched list, connect to it in the STATIC or DHCP mode. 6 Enter the VLAN information. - Make sure to contact the system administrator because network connection may be failed if incorrect information is entered. 7 Enter the 802.1x information and press the [>] soft button. - Make sure to contact the system administrator because network connection may be failed if incorrect information is entered. 28_ © SAMSUNG Electronics Co., Ltd.](https://usermanual.wiki/Samsung-Electronics-Co/SMTI5343.User-Manual-Part-1/User-Guide-2186137-Page-31.png)
![8 After configuring LLDP, Complete easy installation by pressing the [Done] soft button, then the phone is restarted. - To modify already entered information, select [No] and press the [<] soft button. SMT-i5343 User Guide _29](https://usermanual.wiki/Samsung-Electronics-Co/SMTI5343.User-Manual-Part-1/User-Guide-2186137-Page-32.png)
![Main Screen You can set up the phone main screen per your preference. Main screen type setup 1 Go to [Menu] [Settings] [Screen] [Main Screen Type]. 2 When you select a main screen type other than ‘Line+Program Key’, ‘Program Key’, you can select a background screen option. - When you select [Wallpaper], the image selected in [Menu] [Settings] [Screen] [Background Image] is set to the background screen of the selected type. - When you select [Widget], a default background screen for each main screen type is used. 30_ © SAMSUNG Electronics Co., Ltd.](https://usermanual.wiki/Samsung-Electronics-Co/SMTI5343.User-Manual-Part-1/User-Guide-2186137-Page-33.png)
![Program Key Program key is used to specify a frequently used function to a program key button. When you press a specified button, the assigned function is executed. You can register up to 10 keys. For details about how to use per program key type, refer to the ‘Subscriber Service’ part of the annex. The program key button setup function may not be available depending on system. If this function does not work properly, contact the system administrator. Retrieving Program Key 1 If you select ‘Line+Program Key’, ‘Program Key’ in [Menu] [Settings] [Screen] [Main Screen Type], you can retrieve the configured program key in the main screen. 2 Press the [Program Key] button to retrieve. SMT-i5343 User Guide _31](https://usermanual.wiki/Samsung-Electronics-Co/SMTI5343.User-Manual-Part-1/User-Guide-2186137-Page-34.png)
![Adding Program Key 1 Press the [Program Key] button. 2 Select an empty button to which you want to add a function by using the left/right program key. - An empty button without a registered function is displayed as [+]. 3 Select a function to register. 4 After entering the name and value, press the [Save] button. 32_ © SAMSUNG Electronics Co., Ltd.](https://usermanual.wiki/Samsung-Electronics-Co/SMTI5343.User-Manual-Part-1/User-Guide-2186137-Page-35.png)
![Editing/Deleting Program Key 1 Press the left/right program key button of a button to edit. 2 After editing in the program key setup screen, press the [Save] button. - To delete a program key function, press the [Delete] button. SMT-i5343 User Guide _33](https://usermanual.wiki/Samsung-Electronics-Co/SMTI5343.User-Manual-Part-1/User-Guide-2186137-Page-36.png)
![List of incoming calls during absent You can easily check the incoming calls, messages, or voice messages received during absent on the main screen. 1 If calls, SMS, or voice messages are received during absent, the total number is displayed beside the counterpart’s phone number. 2 When you press the left button beside the phone number, each received number of calls, messages, or voice messages during absent is displayed. Use the right button to check the details of each type. 3 If you select ‘Call During Absent’, you can check the details by going to [History] [Missed]. If you select ‘Received Messages’, you can check the details by going to [Message] [Inbox]. If you select ‘Voice Messages’, you can check the details by going to the voicemail box. 34_ © SAMSUNG Electronics Co., Ltd.](https://usermanual.wiki/Samsung-Electronics-Co/SMTI5343.User-Manual-Part-1/User-Guide-2186137-Page-37.png)
![Dialing This section describes how to make a call to an extension number or outbound number. An extension line is the telephone line through which a call can be placed to another internal phone connected to the system of the office. An outbound line is the telephone line where the user can make or receive a call to/from outside (e.g. home), which is directly connected to the switching system of a central office. Dialing an Extension Number 1 Pick up the handset, check whether the dial tone is audible, and then press the extension number. 2 When you press the [Voice Call] soft button at the bottom of screen, you can hear a call connection tone. 3 If the other party receives the call, begin the conversation. SMT-i5343 User Guide _35](https://usermanual.wiki/Samsung-Electronics-Co/SMTI5343.User-Manual-Part-1/User-Guide-2186137-Page-38.png)
![Dialing a Outbound Call 1 Pick up the handset, and check whether the dial tone is audible. 2 Press a key specified by the manufacturer to make an outbound call (e.g. ‘9’) 3 When you press the [Voice Call] soft button at the bottom of screen, you can hear a call connection tone. 4 If the other party receives the call, begin the conversation. As the outbound call number may vary per system, contact the system administrator. 36_ © SAMSUNG Electronics Co., Ltd.](https://usermanual.wiki/Samsung-Electronics-Co/SMTI5343.User-Manual-Part-1/User-Guide-2186137-Page-39.png)
![Dialing via Speaker Phone 1 Press the [Speaker] button without picking up a handset. 2 Press a phone number and select the [Voice Call] soft button at the bottom of screen, then you can hear a call connection tone. 3 Start the conversation when the other party answers the phone. - If the handset is picked during a call, the speaker is turned off, and the conversation can be continued through the handset. 4 When a call ends, press the [Speaker] button again. - If a handset is being used, hang up. SMT-i5343 User Guide _37](https://usermanual.wiki/Samsung-Electronics-Co/SMTI5343.User-Manual-Part-1/User-Guide-2186137-Page-40.png)
![Quick Search Function You can make a call by searching for a phone number saved in the contacts or call log. 1 On the dial input screen, enter the phone number to call. Once you enter a phone number, the search result is displayed at the bottom of screen. 2 Move to a phone number you want by using the navigation button. And press the [Voice Call]/[Video Call] soft button, then a call is made to the selected number. Dialing the Last Call Number 1 When you press the [History] soft button at the bottom of waiting screen, the recent call log is displayed. 2 Move to a phone number you want by using the navigation button. And press the [Voice Call]/[Video Call] soft button, then a call is made to the selected number. 38_ © SAMSUNG Electronics Co., Ltd.](https://usermanual.wiki/Samsung-Electronics-Co/SMTI5343.User-Manual-Part-1/User-Guide-2186137-Page-41.png)
![Answering Incoming Calls This section describes how to answer a call. Receiving a Call via the Handset 1 Pick up the handset when a phone rings. 2 Converse with the counterpart. 3 Hang up the handset when the call ends. Receiving a Call via Speaker Phone 1 When the phone rings, press the [Speaker] button. 2 Converse with the counterpart. - If the handset is picked during a call, the speaker is turned off, and the conversation can be continued through the handset. 3 When a call ends, press the [Speaker] button again. SMT-i5343 User Guide _39](https://usermanual.wiki/Samsung-Electronics-Co/SMTI5343.User-Manual-Part-1/User-Guide-2186137-Page-42.png)
![Video Call If a USB camera is connected to the phone, you can make a video call. - A USB camera required for video call is not included in this product. Purchase it separately. - For the types of USB camera which can be used in the phone, contact the system administrator. - The video call function is available from V2.0 version or later. Sending a Video Call You can send a video call if your counterpart has a phone that supports video call. 1 In the video call mode, your video is displayed at the right bottom of screen. - After entering a phone number, you can start a video call using the [Video Call] soft button. 2 When a video call is connected, the other party’s image is displayed on the left, and the user’s image is at the bottom right of the screen. - During video call, you can turn on/off your video using the [Video Off]/[Video On] soft button. 40_ © SAMSUNG Electronics Co., Ltd.](https://usermanual.wiki/Samsung-Electronics-Co/SMTI5343.User-Manual-Part-1/User-Guide-2186137-Page-43.png)
![Receiving a Video Call You can talk via the video call received from the other party. 1 You will be notified when there is an incoming video call. 2 When a video call is connected, the other party’s image is displayed on the left, and the user’s image is at the bottom right of the screen. - During video call, you can turn on/off your video using the [Video Off]/[Video On] soft button. SMT-i5343 User Guide _41](https://usermanual.wiki/Samsung-Electronics-Co/SMTI5343.User-Manual-Part-1/User-Guide-2186137-Page-44.png)
![Functions Available during Call The functions below are convenient to use while making a call via an extension or outbound line. Call Park A call can be held temporarily to make the caller wait, and then the conversation can be continued when convenient. 1 To hold the current call, press the [Hold] button during call. 2 The ‘Hold’ message is displayed. 3 The call can be resumed by pressing the [Hold] button again. 42_ © SAMSUNG Electronics Co., Ltd.](https://usermanual.wiki/Samsung-Electronics-Co/SMTI5343.User-Manual-Part-1/User-Guide-2186137-Page-45.png)
![Mute This function is used to silence the user’s voice during a call via an extension line, but the user can still hear the voice of the other party. 1 To block your voice during call, press the [Mute] button. - Now the counterpart cannot hear your voice. 2 The ‘Mute’ message is displayed. 3 When you press the [Mute] button again, the function is cleared. SMT-i5343 User Guide _43](https://usermanual.wiki/Samsung-Electronics-Co/SMTI5343.User-Manual-Part-1/User-Guide-2186137-Page-46.png)
![Call Transfer A current call can be transferred to another extension or outbound line’s subscriber. 1 To transfer a call, press the [Transfer] button. 2 After hearing a dial tone, dial the phone numbers of the other conference participants. - If you need to transfer a call to a phone number in an outbound line, enter the outbound call number first and then enter the phone number. 3 When a ring back tone is heard from the other subscriber, put down the handset. - Alternately, wait until the called party receives the call, and then hang up the phone after telling him/her about it. If the subscriber who received a transferred call is busy or does not receive the call: To return to the original call, press the [end call] button. Then you can retry by press the [Transfer] button again to retry, or, return to the existing call by pressing the [Hold] button. 44_ © SAMSUNG Electronics Co., Ltd.](https://usermanual.wiki/Samsung-Electronics-Co/SMTI5343.User-Manual-Part-1/User-Guide-2186137-Page-47.png)
![Conference Function During a call, other subscribers of extension line can be invited to participate in a conference call. 1 Press the [Conference] button during a call. - If the system does not support the conference function, the conference call is not available. 2 After hearing a dial tone, dial the phone numbers of the other conference participants. 3 When a call is connected, start to talk by pressing the [Conference] button. - You can add a subscriber in the same manner during conference call. (To know the maximum number of conference participants, contact the system administrator.) To support the conference call service, the phone number should be registered with the system. If this function does not work properly, contact the system administrator. SMT-i5343 User Guide _45](https://usermanual.wiki/Samsung-Electronics-Co/SMTI5343.User-Manual-Part-1/User-Guide-2186137-Page-48.png)
![Details Displays the counterpart’s information on the screen during communication. When the information is received, the counterpart’s detail information is displayed on the screen. Call Record If the phone is connected to Samsung Communicator, you can record a call. 1 In the communication status, go to [Function] [Record] and press the right selection button. Then you can start recording. 2 To stop recording, go to [Temporary Service] [Stop] and press the right selection button. - You can check the recorded file via the [View Recordings] function of the Samsung Communicator. 46_ © SAMSUNG Electronics Co., Ltd.](https://usermanual.wiki/Samsung-Electronics-Co/SMTI5343.User-Manual-Part-1/User-Guide-2186137-Page-49.png)
![Under Video Call function The video call function is available from V2.0 version or later. Video Swap During video call, if you press the [Function] soft button and select [Video Swap], you can switch your video with the counterpart’s video. Video Off During video call, you can turn a video off by pressing the [Video Off] soft button. - If you press [Video On] at the bottom of screen, the video off function is cleared. - If you press [< >] (screen zoom in) at the bottom of screen, you can see the video call screen in full screen. When you press [> <] (screen zoom out), it returns back to the default screen. SMT-i5343 User Guide _47](https://usermanual.wiki/Samsung-Electronics-Co/SMTI5343.User-Manual-Part-1/User-Guide-2186137-Page-50.png)
![Video PIP ON/OFF During video call, if you press the [Function] soft button and select [PIP OFF], your video disappears from the screen. - In the PIP OFF status, if you select [Function] [PIP ON], your video appears again. 48_ © SAMSUNG Electronics Co., Ltd.](https://usermanual.wiki/Samsung-Electronics-Co/SMTI5343.User-Manual-Part-1/User-Guide-2186137-Page-51.png)
![Call Transfer You can move a call back and forth between the IP phone and mobile phone. 1 Go to [Menu] [Settings] [Bluetooth & Headset] After setting the [Bluetooth Mode] to the smartphone, connect your smartphone to the IP phone. - For more information about how to setup, refer to the ‘Bluetooth & Headset’ part of this manual. 2 During communication using the IP phone, if you press the [Move] button, you can still talk through the smartphone. 3 During communication using the smartphone, if you press the [Headset] button, you can still talk through the IP phone. SMT-i5343 User Guide _49](https://usermanual.wiki/Samsung-Electronics-Co/SMTI5343.User-Manual-Part-1/User-Guide-2186137-Page-52.png)
![Volume Control The user can adjust the volume of a handset, speaker and tone sound. Volume Control of a Handset 1 The user can adjust the volume in the following way while making a call via a handset. 2 To increase the volume of a handset, press the upper part (+) of the [Volume] button. 3 To decrease the volume, press the lower part (-) of the [Volume] button. Volume Control of a Speaker 1 The user can adjust the volume of a speaker in the following way while calling. 2 To increase the speaker volume, press the upper part (+) of the [Volume] button. 50_ © SAMSUNG Electronics Co., Ltd.](https://usermanual.wiki/Samsung-Electronics-Co/SMTI5343.User-Manual-Part-1/User-Guide-2186137-Page-53.png)
![3 To decrease the speaker volume, press the lower part (-) of the [Volume] button. Volume Control of Ringing Sound 1 To increase the volume of the ringtone, press the upper part (+) of the [Volume] button while the bell is ringing. 2 To decrease the volume of the ringtone, press the lower part (-) of the [Volume] button while the bell is ringing. By pressing the [Volume] button in standby mode, the user can also adjust the key tone volume. SMT-i5343 User Guide _51](https://usermanual.wiki/Samsung-Electronics-Co/SMTI5343.User-Manual-Part-1/User-Guide-2186137-Page-54.png)
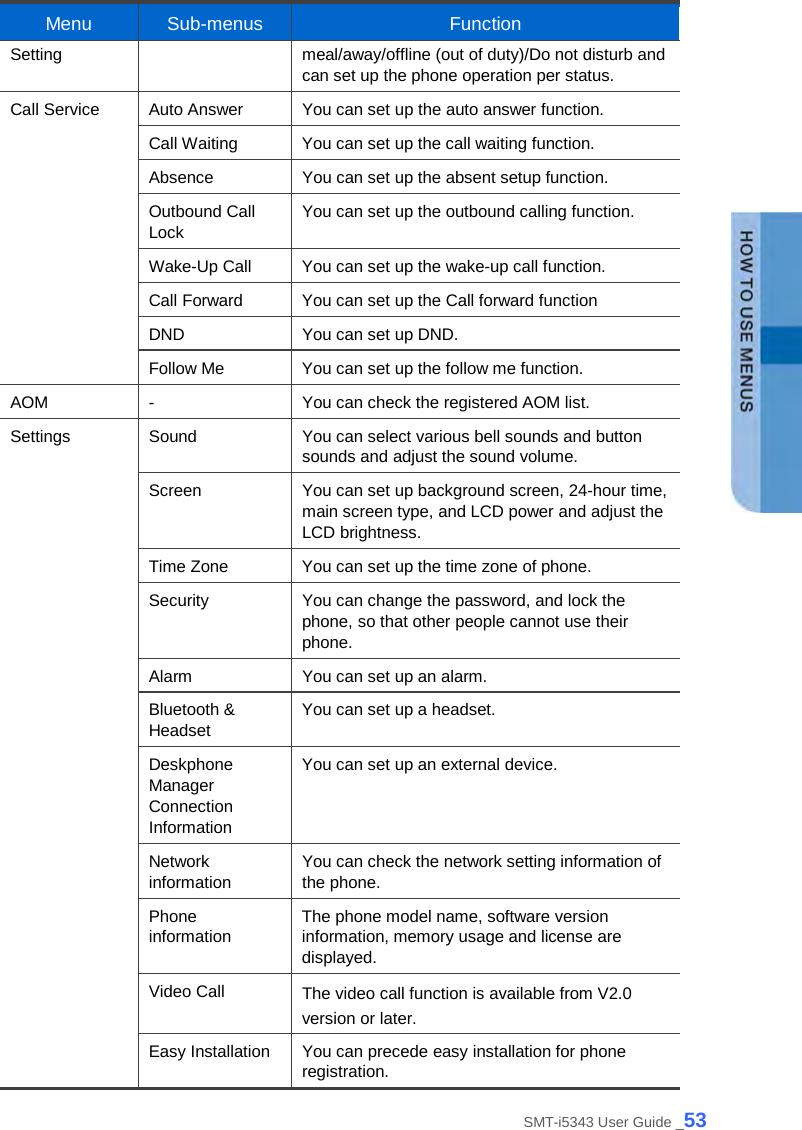
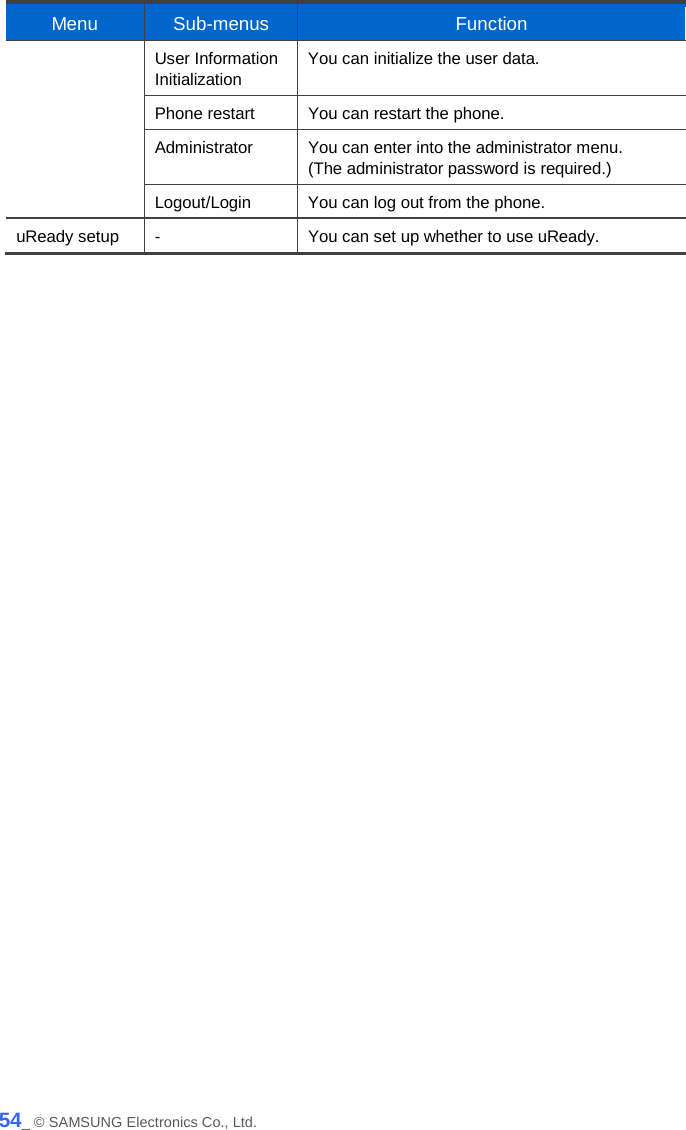
![HOW TO USE MENUS This section describes menu functions. Call, phone, and setup are displayed as a menu. Menu Structure Clicking the [Menu] soft button when a phone is in standby mode displays menus on a screen. The desired menu can be selected by using the navigation button or the selection button on the right side of screen or the soft button at the bottom of screen. Menu Sub-menus Function Contacts - This function provides save, search and registering function of the phone address book. You can search for a user registered in the directory server. History - You can check the recent outgoing/incoming history. Message - You can write and save a message. News & Notice Notice You can check a notice. News You can check news. Browser - You can search and use the information provided from the browser server. Language - You can select a system language either Korean or English. Presence - You can change your status to online/meeting/ 52_ © SAMSUNG Electronics Co., Ltd.](https://usermanual.wiki/Samsung-Electronics-Co/SMTI5343.User-Manual-Part-1/User-Guide-2186137-Page-55.png)
![Contacts [Phone Contacts] Using the contacts, the user can easily manage phone numbers, email ID, fax numbers, and photos, etc. In addition, calls can easily be made using the contacts. [Directory Service] You can search the users registered in the directory server. The directory service is displayed only when the system supports it. For information on the specific server, contact the server administrator. SMT-i5343 User Guide _55](https://usermanual.wiki/Samsung-Electronics-Co/SMTI5343.User-Manual-Part-1/User-Guide-2186137-Page-58.png)
![Viewing a Phone Number You can view the phone number saved in the contacts. 1 Select [Menu] [Contacts]. 2 The list of saved phone numbers is displayed. When you select a target and press the [OK] button, the detail information is displayed. - [Outbox]: You can make a call to the selected phone number. Search Phone Number You can search a phone number saved in the contacts by using a name or number. 1 Press the [Menu] [Contacts] [Search] soft button. 2 Enter a name or phone number and press [OK] button to display a list of the searched phone numbers. - You can search the number by entering just a part of the name to search. - After selecting a name in the search list, press the [OK] button. Then, the detail information of phone number is displayed. 56_ © SAMSUNG Electronics Co., Ltd.](https://usermanual.wiki/Samsung-Electronics-Co/SMTI5343.User-Manual-Part-1/User-Guide-2186137-Page-59.png)
![Adding a Phone Number The phone numbers of up to 500 people can be saved. 1 Press the [Menu] [Contacts] [Edit Mode] [Add Contact] soft button. 2 Enter the name and phone number information, etc. and press the [Save] soft button. - You can set up the numbers (company, mobile phone, home, fax, others), e-mail, memo, bell sound, buddy ID and register photos. Editing Contacts You can edit a phone number registered in the contacts. 1 Press the [Menu] [Contacts] [Edit Mode] soft button, select a phone number to edit, and press the [Edit] soft button. 2 Enter the modified information and press the [Save] soft button. SMT-i5343 User Guide _57](https://usermanual.wiki/Samsung-Electronics-Co/SMTI5343.User-Manual-Part-1/User-Guide-2186137-Page-60.png)
![Deleting Phone Number You can delete a phone number registered in the contacts. 1 Go to [Menu] [Contacts] [Edit Mode] select a phone number to delete and press the [Delete] soft button. 2 Click the [Delete] soft button to delete the phone number. Add Group This is the function used to add a new group. 1 Press the [Menu] [Contacts] [Groups] [Add Group] soft button. 2 Enter a new group name and press the [Save] soft button. - You can set up the group name and bell sound. 58_ © SAMSUNG Electronics Co., Ltd.](https://usermanual.wiki/Samsung-Electronics-Co/SMTI5343.User-Manual-Part-1/User-Guide-2186137-Page-61.png)
![Delete Group This is the function used to delete an existing group. 1 Go to [Menu] [Contacts] [Groups] select a group to delete and press the [Delete Group] soft button. 2 Click the [Delete] soft button to delete the phone number. - The members of the deleted group are moved to the unspecified group. SMT-i5343 User Guide _59](https://usermanual.wiki/Samsung-Electronics-Co/SMTI5343.User-Manual-Part-1/User-Guide-2186137-Page-62.png)
![History The recently incoming/outgoing calls, incoming calls during absence and all the received/sent messages are displayed. Up to 500 records can be saved. Select [Menu] [History]. By using the navigation button, you can move to Total/Received/Sent/Absence/Message. - [All]: The recently sent/received calls and messages are displayed. - [Inbox]: The recently received calls and messages are displayed. - [Outbox]: The recently sent calls and messages are displayed. - [Missed]: The list of received calls during absence is displayed. - [Message]: The recently sent/received messages are displayed. - If you move to a desired phone number by using the navigation button and press either the [OK] button or the right selection button, the detail information is retrieved. 60_ © SAMSUNG Electronics Co., Ltd.](https://usermanual.wiki/Samsung-Electronics-Co/SMTI5343.User-Manual-Part-1/User-Guide-2186137-Page-63.png)
![Message You can manage voice messages by connecting to the Voicemail Box. You can also send and receive text messages and save a created message temporarily. Voice Message You can save or check a voice message. Select [Menu] [Message] [Voice Message], then you can go to the Voicemail Box. Check voice messages by following instructions. SMT-i5343 User Guide _61](https://usermanual.wiki/Samsung-Electronics-Co/SMTI5343.User-Manual-Part-1/User-Guide-2186137-Page-64.png)
![Creating a Message This is the function used to create and save a message to send. 1 Press the [Menu] [Message] [New] soft button. 2 After creating a message, specify a recipient by pressing the [+] soft button at the right. - [Save]: By pressing the below soft button, you can save a created message into the temporary box. - [Load]: By pressing the below soft button, you can retrieve the message stored in the temporary box. 3 After entering a calling number and called number, press the [OK] soft button and then [Send] soft button. Then the message is transmitted. - [Search]: You can search a phone number in the contacts. - A message can be sent up to 10 people at a time. The calling line is subject to charge. A user can change a calling number, but the actual line to be charged can be changed only through the calling line change. 62_ © SAMSUNG Electronics Co., Ltd.](https://usermanual.wiki/Samsung-Electronics-Co/SMTI5343.User-Manual-Part-1/User-Guide-2186137-Page-65.png)
![Received Messages You can save and check a received message. 1 Select [Menu] [Message] [Inbox]. 2 The list of received messages is displayed. - [Delete]: You can delete a selected message. - [Delete All]: You can delete all the messages. 3 To view all message information, select the message and then press [OK] button. - [Forward]: You can forward a message to others by pressing the below soft button. - [Reply]: You can reply to a counterpart who sent a message. - [Delete]: You can delete a message. SMT-i5343 User Guide _63](https://usermanual.wiki/Samsung-Electronics-Co/SMTI5343.User-Manual-Part-1/User-Guide-2186137-Page-66.png)
![Sent Messages You can save and check a sent message. 1 Select [Menu] [Message] [Outbox]. 2 Lists of sent messages are displayed. - [Delete]: You can delete a selected message. - [Delete All]: You can delete all the messages. 3 To view all message information, select the message and then press [OK] button. - [Forward]: You can forward a message to others by pressing the below soft button. - [Reply]: You can reply to a counterpart who sent a message. - [Delete]: You can delete a message. The reception check function is displayed only when it is supported in the system. If this function does not work properly, contact the system administrator. 64_ © SAMSUNG Electronics Co., Ltd.](https://usermanual.wiki/Samsung-Electronics-Co/SMTI5343.User-Manual-Part-1/User-Guide-2186137-Page-67.png)
![Storage Box This is the function used to save a created message temporarily. 1 Select [Menu] [Message] [Draft]. 2 A temporarily saved message is displayed. 3 To view all message information, select the message and then press [OK] button. - [Forward]: You can forward a message to others by pressing the below soft button. - [Edit]: You can edit a message. - [Delete]: You can delete a message. SMT-i5343 User Guide _65](https://usermanual.wiki/Samsung-Electronics-Co/SMTI5343.User-Manual-Part-1/User-Guide-2186137-Page-68.png)
![News & Notice Notice You can check a notice. 1 Select [Menu] [News & Notice] [Notice]. 2 To view the detail of notice, select a notice and then press [OK] button. News You can check news. 1 Select [Menu] [News & Notice] [News]. 2 To view the detail of notice, select a notice and then press [OK] button. 66_ © SAMSUNG Electronics Co., Ltd.](https://usermanual.wiki/Samsung-Electronics-Co/SMTI5343.User-Manual-Part-1/User-Guide-2186137-Page-69.png)
![Browser The user can search and use the information provided from XML browser. Available information and related services may differ per server construction. Select [Menu] [Browser]. - Using a navigation button, you can move among the items displayed on the screen. - When you select a desired item and press the [OK] button, the link or command of the item is executed. - You cannot use the menu if there is no browser server. To find out more about the server setup, contact the server administrator. - The browser service varies depending on the server. For information about the service, contact the server administrator. SMT-i5343 User Guide _67](https://usermanual.wiki/Samsung-Electronics-Co/SMTI5343.User-Manual-Part-1/User-Guide-2186137-Page-70.png)
![Presence Setting This is used to change various buddy setups. Status setup You can change your status information that is shown to your counterpart buddy. Go to [Menu] [Presence Setting] Select a desired status and press the [OK] button. - You can check it on a waiting screen during presence status setup. Icon Description Online Connected to a presence server. In Conference Status of meeting attendance Meal Out to have a meal. Busy Busy, as a result of another job. If the status of a user is set to Busy, then Call Transfer may have been set. Offline (out of duty) Logout status Select this status to log out from the presence server. The user has logged in, but ‘offline’ status is shown to buddy users. Do Not Disturb ‘Do not disturb’ status. After logging out from the presence server, Auto Login does not work until next login. 68_ © SAMSUNG Electronics Co., Ltd.](https://usermanual.wiki/Samsung-Electronics-Co/SMTI5343.User-Manual-Part-1/User-Guide-2186137-Page-71.png)
![Status Additional Function You can set up the additional functions of a status. 1 Go to [Menu] [Presence Setting] Select a desired status. Press the [Action Edit] soft button. 2 Set up a status by pressing the [Add] soft button at the bottom of presence setup screen. Press the [Save] soft button after adding an additional function. Operation Usage Setup You can set up whether to use an additional function for each status. 1 Go to [Menu] [Presence Setting] Select a desired status. Press the [Action Edit] soft button. 2 Set up a status by pressing the [Add] soft button at the bottom of presence setup screen. Press the [Save] soft button after adding an additional function. SMT-i5343 User Guide _69](https://usermanual.wiki/Samsung-Electronics-Co/SMTI5343.User-Manual-Part-1/User-Guide-2186137-Page-72.png)
![3 When you press the [Action On] soft button at the bottom of presence setup screen, the operation configured for the status is used. 4 When you press the [Action Off] soft button at the bottom of presence setup screen, the operation configured for the status is stopped. Function Initialization You can initialize the additional functions of a status. 1 Press the [Menu] [Presence Setting] [Function Initialization] soft button. 2 When you press the [OK] soft button in the below popup window, all the actions configured for a selected status are deleted. 70_ © SAMSUNG Electronics Co., Ltd.](https://usermanual.wiki/Samsung-Electronics-Co/SMTI5343.User-Manual-Part-1/User-Guide-2186137-Page-73.png)
![Login Setup 1 Press the [Menu] [Presence Setting] [Login] soft button. 2 After entering an ID and password, select the Auto Login function. Press the [Login] button and save the login information. And then log into the presence server. - If login is not successful after setting Auto Login, check the account information. If the problem continues, contact the administrator. - After login, your presence status is displayed on the waiting screen. Logout Setup 1 Press the [Menu] [Presence Setting] [Logout] soft button. 2 If logout is configured, the user status is not displayed to a buddy. SMT-i5343 User Guide _71](https://usermanual.wiki/Samsung-Electronics-Co/SMTI5343.User-Manual-Part-1/User-Guide-2186137-Page-74.png)
![Buddy Registration You can register a new buddy. 1 Select [Menu] [Contacts] A desired user [Edit] [Add Field] soft button. 2 Press the [Buddy ID] among the items. 3 When the buddy ID is displayed in the contact screen, enter the buddy ID. After entering the buddy ID, press the [Save] soft button. - The buddy ID can be English or number. Retrieving Buddy Status You can retrieve the status of a registered buddy. 1 When you select [Menu] [Contacts] soft button, the current status of a buddy is displayed beside the user. - The buddy status is not displayed if the user logs out. - Call Available: If the phone icon is blue, the user can take a call. - In a Call: If the phone icon is red, the user is busy. 72_ © SAMSUNG Electronics Co., Ltd.](https://usermanual.wiki/Samsung-Electronics-Co/SMTI5343.User-Manual-Part-1/User-Guide-2186137-Page-75.png)
![Deleting a Buddy You can delete a registered buddy. 1 Select [Menu] [Contacts] A desired user [Edit] soft button. 2 After selecting [Buddy ID], press the [Delete Field] soft button to delete the buddy ID. 3 If you press the [Save] soft button after deleting the buddy ID, the history of buddy ID deletion is saved. SMT-i5343 User Guide _73](https://usermanual.wiki/Samsung-Electronics-Co/SMTI5343.User-Manual-Part-1/User-Guide-2186137-Page-76.png)
![Call Service You can set up Auto Answer, Call Waiting, absence, outbound call lock, and wake-up call. (The function may vary depending on each system.) Auto Answer 1 Select [Menu] [Call Service] [Auto Answer]. - If Auto Answer is enabled, a call is automatically connected if there is an incoming call. 2 When you press the [OK] soft button in the below popup window, it becomes Auto Answer status. - You can disable the service in the same manner. 74_ © SAMSUNG Electronics Co., Ltd.](https://usermanual.wiki/Samsung-Electronics-Co/SMTI5343.User-Manual-Part-1/User-Guide-2186137-Page-77.png)
![Call Waiting 1 Select [Menu] [Call Service] [Call Waiting]. - When the Call Waiting is enabled, you can receive a new incoming call by making a current call standby. 2 When you press the [OK] soft button in the below popup window, it becomes Call Waiting status. - You can disable the service in the same manner. Absence 1 Select [Menu] [Call Service] [Absence]. - When the absence is enabled, your absence is notified to a caller when there is an incoming call. 2 When you press the [OK] soft button in the below popup window, it becomes absence status. - You can disable the service in the same manner. SMT-i5343 User Guide _75](https://usermanual.wiki/Samsung-Electronics-Co/SMTI5343.User-Manual-Part-1/User-Guide-2186137-Page-78.png)
![Outbound Call Lock 1 Select [Menu] [Call Service] [Outbound Call Lock]. - When this service is enabled, an outgoing call is restricted. 2 If you enable this service by using the navigation button and enter a password, an outgoing call is restricted. When you press the [OK] soft button in the below popup window, it becomes Call Waiting status. - You can disable the service in the same manner. Wake-Up Call 1 Select [Menu] [Call Service] [Wake-Up Call]. 2 You can enable this service using the navigation button and set the repeat setting to either at one specific time or everyday. When you press the below [Save] soft button, wake-up call is enabled. - Repeat Setting [Once]: When you enter month, date, hour, and minute, the wake-up call rings once at the specified time. (e.g. 06181500-June 18 3:00 pm) - Repeat Setting [Repeat]: When you enter hour and minute,the wake-up call rings every day at the specified time. (e.g. 1502-3:02 pm) 76_ © SAMSUNG Electronics Co., Ltd.](https://usermanual.wiki/Samsung-Electronics-Co/SMTI5343.User-Manual-Part-1/User-Guide-2186137-Page-79.png)
![Call Forward 1 Select [Menu] [Call Service] [Call Forward]. 2 Select a call forward type. - You can set up All Forward, Busy Forward, No Answer Forward, Unreachable Forward, Group Forward, or VM Forward. 3 You can enable the Service Mode using the navigation button, and register a Destination Number. - You can disable the service in the same manner. SMT-i5343 User Guide _77](https://usermanual.wiki/Samsung-Electronics-Co/SMTI5343.User-Manual-Part-1/User-Guide-2186137-Page-80.png)
![DND 1 Select [Menu] [Call Service] [DND]. 2 When you press the below [Save] soft button, the DND function is enabled. Follow Me 1 Select [Menu] [Call Service] [Follow Me]. 2 When you enable the Use Service by using the navigation button and enter the forward number and password, then the service is enabled. When you press the below [Save] soft button, the Follow Me function is enabled. - You can disable the service in the same manner. 78_ © SAMSUNG Electronics Co., Ltd.](https://usermanual.wiki/Samsung-Electronics-Co/SMTI5343.User-Manual-Part-1/User-Guide-2186137-Page-81.png)
![AOM AOM Select [Menu] [AOM]. If an AOM device is connected, you can retrieve or modify the AOM button function. [Retrieving AOM Device Information] 1 After selecting an AOM device by using the navigation button, press the [AOM Info] soft button. 2 The detail information of a selected AOM device is displayed. SMT-i5343 User Guide _79](https://usermanual.wiki/Samsung-Electronics-Co/SMTI5343.User-Manual-Part-1/User-Guide-2186137-Page-82.png)
![[AOM Button Setting] 1 To change the AOM button function, move to a desired AOM button and press the [OK] button. 2 After moving to a desired AOM button by using the navigation button, press the [OK] soft button. 3 Enter the information and press the [Save] soft button. - If the entered information is not correct, the AOM button function cannot be registered. - [Delete]: You can delete a registered AOM button function. The AOM button setup function may not be available depending on system. If this function does not work properly, contact the system administrator. For detail information about how to use the AOM button function, refer to the SCM operation manual. 80_ © SAMSUNG Electronics Co., Ltd.](https://usermanual.wiki/Samsung-Electronics-Co/SMTI5343.User-Manual-Part-1/User-Guide-2186137-Page-83.png)
![[Editing AOM Button] 1 After moving to a desired AOM button by using the navigation button, press the [OK] or [Edit] button. - [Device]: You can select another AOM device. (Up to 4 AOM devices are supported.) - [>][<]: You can move the location of the AOM button by page. - [Edit]: You can edit the AOM button function. 2 You can modify the information of a selected AOM button. SMT-i5343 User Guide _81](https://usermanual.wiki/Samsung-Electronics-Co/SMTI5343.User-Manual-Part-1/User-Guide-2186137-Page-84.png)
![[AOM Function/Operation] 1 Select an empty AOM button number and press the [Add] soft button. - You can move to a desired number in the AOM device by pressing the number. 2 When you press the [Key Select] soft button at the bottom of screen, the [Please Press AOM key] popup window is displayed. Press the corresponding number of AOM device. 3 When you press the key of AOM device, the below popup window is displayed at the bottom of screen. In the popup window, press the [OK] soft button. 4 Enter the information and press the [Save] soft button. - If the entered information is not correct, the AOM button function cannot be registered. 82_ © SAMSUNG Electronics Co., Ltd.](https://usermanual.wiki/Samsung-Electronics-Co/SMTI5343.User-Manual-Part-1/User-Guide-2186137-Page-85.png)
![Settings You can set up screen, sound, language, password and lock and retrieve the phone information. Sound Volume Select [Menu] [Settings] [Sound] [Volume]. By pressing the navigation button, you can set the volume of a handset (receiver), speaker, ringtone, key tone, headset, message alert, and alarm respectively. Ring Tone Select [Menu] [Settings] [Sound] [Ring Tone]. You can set up a ringtone. Key Tone Select [Menu] [Settings] [Sound] [Key Tone]. You can set up a key tone. SMT-i5343 User Guide _83](https://usermanual.wiki/Samsung-Electronics-Co/SMTI5343.User-Manual-Part-1/User-Guide-2186137-Page-86.png)
![Short Message Tone Select [Menu] [Settings] [Sound] [Short Message Tone]. You can set up a message alert sound. System Ring Tone Select [Menu] [Settings] [Sound] [System Ring Tone]. You can set up a system ring tone. 84_ © SAMSUNG Electronics Co., Ltd.](https://usermanual.wiki/Samsung-Electronics-Co/SMTI5343.User-Manual-Part-1/User-Guide-2186137-Page-87.png)
![Screen Brightness Select [Menu] [Settings] [Screen] [Brightness]. You can adjust the brightness of the LCD screen by pressing a navigation button. The screen brightness may affect the lifetime of the LCD. Background Image You can set up the Background Image of the LCD screen. Select [Menu] [Settings] [Screen] [Background Image]. By pressing the navigation button, the user can change the background image and time display. By using the widget, you can display a digital clock, analog clock, world time clock, or calendar. 24-Hour Time Select [Menu] [Settings] [Screen] [24-Hour Time]. SMT-i5343 User Guide _85](https://usermanual.wiki/Samsung-Electronics-Co/SMTI5343.User-Manual-Part-1/User-Guide-2186137-Page-88.png)
![Making LCD screen dark Select [Menu] [Settings] [Screen] [LCD Dim]. - Screen dim: After 30 seconds/After 1 minute/ After 3 minutes Making LCD screen dark-brightness Select [Menu] [Settings] [Screen] [LCD Dim Level]. - Screen dim-brightness: Full/Low/Medium/High LCD screen off Select [Menu] [Settings] [Screen] [LCD Off]. Select the time when the LCD screen will be turned off. - Screen off: After 30 seconds/After 1 minute/ After 3 minutes/After 10 minutes/User Configuration Changing the default settings for the screen menu may affect the lifetime of the LCD and, therefore, do not change them if possible. Below are shown the default LCD power settings. - Screen dim: After 30 seconds - Screen dim-brightness: Medium - Screen off: User Configuration (08:00 to 18:00) Using the LCD power setting function helps extend the lifetime of the LCD. 86_ © SAMSUNG Electronics Co., Ltd.](https://usermanual.wiki/Samsung-Electronics-Co/SMTI5343.User-Manual-Part-1/User-Guide-2186137-Page-89.png)
![Main Screen Type Select [Menu] [Settings] [Screen] [Main Screen Type]. SMT-i5343 User Guide _87](https://usermanual.wiki/Samsung-Electronics-Co/SMTI5343.User-Manual-Part-1/User-Guide-2186137-Page-90.png)
![Time Zone Settings Select [Menu] [Settings] [Time Zone] [Time Update]. You can select either system settings (Default) or User settings. Time Area Setup Select [Menu] [Settings] [Time Zone] [Time Area Select]. You can select a region. Selecting a City Select [Menu] [Settings] [Time Zone] [Time City Select]. You can select a city. 88_ © SAMSUNG Electronics Co., Ltd.](https://usermanual.wiki/Samsung-Electronics-Co/SMTI5343.User-Manual-Part-1/User-Guide-2186137-Page-91.png)
![Security To lock the menu or change a password, you must enter a password. The user can set a password which is then used to set the functions of the phone, and the lock function. This prevents other people from using the phone. - The default password is [0000]. Phone Lock Select [Menu] [Settings] [Security] [Phone Lock]. You can set up the menu lock. Change Password Select [Menu] [Settings] [Security] [Change Password]. You can change a password. - You can enter up to 16 characters for the password. SMT-i5343 User Guide _89](https://usermanual.wiki/Samsung-Electronics-Co/SMTI5343.User-Manual-Part-1/User-Guide-2186137-Page-92.png)
![Alarm Editing/Adding an Alarm Select [Menu] [Settings] [Alarm]. You can set up an alarm. - [Edit]: You can edit an existing alarm. - [Add]: You can add a new alarm. When it becomes the time where an alarm is set, the alarm message is displayed and there is an alarm sound. - You can set up the alarm volume by going to [Menu] [Settings] [Sound] [Volume] [Alarm]. Deleting an Alarm Select [Menu] [Settings] [Alarm]. You can delete an alarm. - [Delete]: You can delete an existing alarm. - [Delete All]: You can delete all existing alarms. 90_ © SAMSUNG Electronics Co., Ltd.](https://usermanual.wiki/Samsung-Electronics-Co/SMTI5343.User-Manual-Part-1/User-Guide-2186137-Page-93.png)
![Bluetooth & Headset Select [Menu] [Settings] [Bluetooth & Headset]. You can set up a function related to the headset and Bluetooth. Using Hardware Headset Key Select [Menu] [Settings] [Bluetooth & Headset] [Use Hardware Headset Key]. You can set up whether to use the phone headset key. [Use Hardware Headset Key] You can select whether to use the headset button. If the headset key mode is set to ‘Used’, you can set up whether to use a headset by pressing the [Headset] button on the waiting screen. Headset Mode Select [Menu] [Settings] [Bluetooth & Headset] [Headset Mode]. You can adjust settings for the headset type to be used in the phone. Bluetooth Mode Select [Menu] [Settings] [Bluetooth & Headset] [Bluetooth Mode]. You can select a Bluetooth mode out of ‘Not Used’, ‘Headset’, or ‘Smart Phone’. SMT-i5343 User Guide _91](https://usermanual.wiki/Samsung-Electronics-Co/SMTI5343.User-Manual-Part-1/User-Guide-2186137-Page-94.png)
![- A Bluetooth headset is provided separately. - The method of use and support may differ depending on the type of Bluetooth headset. Refer to the user manual of the Bluetooth device. Bluetooth Connection Select [Menu] [Settings] [Bluetooth & Headset] [Bluetooth Connection]. [Bluetooth mode is ‘Headset’] 1 After searching nearby Bluetooth devices, the connection information is displayed. 2 After selecting a Bluetooth headset to connect to the phone, press the [Pairing] button. After checking it is the correct device, press the [Register] button. - The Bluetooth headset to connect must be in the pairing waiting mode. 92_ © SAMSUNG Electronics Co., Ltd.](https://usermanual.wiki/Samsung-Electronics-Co/SMTI5343.User-Manual-Part-1/User-Guide-2186137-Page-95.png)
![3 Once the Bluetooth headset is connected, you can talk through the headset. - When you calling via a Bluetooth headset, red light turns on the [Headset] button. - If you do not use the Bluetooth headset, the headset button is blinking. 4 When you press the [Disconnect] button, the device is disconnected. 5 When you press the [Remove] button, the device is deleted from the search list as well as it is disconnected. [Bluetooth mode is ‘Smart Phone’] 1 To connect a smartphone to the phone, press [Wait Pairing] and start Bluetooth search in your smartphone. SMT-i5343 User Guide _93](https://usermanual.wiki/Samsung-Electronics-Co/SMTI5343.User-Manual-Part-1/User-Guide-2186137-Page-96.png)
![2 When the smartphone is connected, you can use the call move function between the phone and smartphone. - In the phone waiting screen, you can see ‘Bluetooth’ information is displayed under your phone number. - When a call is received to the smartphone, there is a ringtone both at the phone and smartphone and you can select either one to receive the call. - While talking through the smartphone, you can press the [Headset] button to move the call to the phone. You can also move a call from the phone to the smartphone by pressing the [Move] button. 3 When you press the [Disconnect] button, the device is disconnected. 4 When you press the [Remove] button, the device is deleted from the search list as well as it is disconnected. 94_ © SAMSUNG Electronics Co., Ltd.](https://usermanual.wiki/Samsung-Electronics-Co/SMTI5343.User-Manual-Part-1/User-Guide-2186137-Page-97.png)
![Bluetooth Bell If the [Menu] [Settings] [Bluetooth & Headset] [Bluetooth Mode] is set to Smart Phone, you can set up [Bluetooth Bell]. - The default is ‘Mute’. Bluetooth is the name for a short-range radio networking technology that operates at 2.4 GHz to support wireless connection of various devices within a specific distance. - Bluetooth may cause RF interference between low-power devices using the same frequency band such as the devices for industrial, scientific and medical use, microwave oven and wireless LAN units. - Use Bluetooth devices at least 5 meters away from the wireless LAN area. - Abnormal operation or noise may occur depending on the environment. - If the user’s obstructs signal transmission, abnormal operation or noise may occur. - If a part of body contacts the radio transmission/receipt part of Bluetooth or a mobile phone, abnormal operation or noise may occur. - Noise may occur depending on the position of the user if the reception power is reduced due to radio obstacles, e.g. walls and partitions. - It may be difficult to talk due to the noise from the surroundings when the user is in a noisy area or outdoors. SMT-i5343 User Guide _95](https://usermanual.wiki/Samsung-Electronics-Co/SMTI5343.User-Manual-Part-1/User-Guide-2186137-Page-98.png)
![Deskphone Manager Connection Information Deskphone Manager When you select [Menu] [Settings] [Deskphone Manager Information], you can check the connection information of a mobile device. - [Disconnect]: A mobile device is disconnected. Simple Connection Mode If you select [Menu] [Settings] [Deskphone Manager Information] [Simple Connection Mode], the Bluetooth mode of phone is changed to Smart Phone. - When you select [Simple Connection Mode], you cannot change the Bluetooth mode in [Menu] [Settings] [Bluetooth & Headset]. 96_ © SAMSUNG Electronics Co., Ltd.](https://usermanual.wiki/Samsung-Electronics-Co/SMTI5343.User-Manual-Part-1/User-Guide-2186137-Page-99.png)
![Network information When you select [Menu] [Settings] [Network Information], the IP address, DSN information, or LAN connection status information, etc. is displayed. Phone Information When you select [Menu] [Settings] [Phone Information], the phone model name or software version information is displayed. - [License]: You can check the phone license information. SMT-i5343 User Guide _97](https://usermanual.wiki/Samsung-Electronics-Co/SMTI5343.User-Manual-Part-1/User-Guide-2186137-Page-100.png)
![Video Call The video call function is available from V2.0 version or later. 1 Select [Menu] [Settings] [Video Call Setting]. You can set up the video call mode. 2 You can set up whether to turn off a video. Easy Installation Select [Menu] [Settings] [Easy Install]. - Refer to the ‘Basic Functions’ ‘Easy Installation’ of this manual. 98_ © SAMSUNG Electronics Co., Ltd.](https://usermanual.wiki/Samsung-Electronics-Co/SMTI5343.User-Manual-Part-1/User-Guide-2186137-Page-101.png)