Samsung Electronics Co SMTI5343 Internet Phone User Manual 02 HR80 RX Block Diagram
Samsung Electronics Co Ltd Internet Phone 02 HR80 RX Block Diagram
Contents
- 1. User Manual Part 1
- 2. User Manual Part 2
User Manual Part 1

http://www.emc2000.co.kr
EMC compliance Ltd.
480-5 SHIN-DONG, YEONGTONG-GU, SUWON-CITY, GYEONGGI-DO, KOREA 443-390
82 31 336 9919 (Main) 0505 299 8311 (Fax)
This test report shall not be reproduced except in full, Without the written approval.
User manual

SMT-i5343
User Guide

COPYRIGHT
This guide is proprietary to SAMSUNG Electronics Co., Ltd. and is protected
by copyright.
No information contained herein may be copied, translated, transcribed or
duplicated for any commercial purposes or disclosed to the third party in
TRADEMARKS
Product names mentioned in this manual may be trademarks and/or registered
trademarks of their respective companies.
This guide may be changed for product improvement, standardization or other
technical reasons
without prior notice.
For further information on the updated guide or the contents contained in the
guide,
please contact your Authorized Samsung Reseller.
©2013 SAMSUNG Electronics Co., Ltd. All rights reserved.
SAFETY CONCERNS
The purpose of the Safety Concerns section is to ensure the safety of users and
prevent property damage. Please read this document carefully for proper use.
Conventions
Warning
Provides information or instructions that you should follow in order to avoid
personal injury or fatality.
Caution
Provides information or instructions that you should follow in order to avoid a
service failure or damage to your phone.
Note
Indicates additional information for referrence.
Checks
Provides the operator with checkpoints for stable system operation.
Symbols
Caution
Indication of a general caution
Restriction
Indication for prohibiting an action for a product
Instruction
Indication for commanding a specifically required action
SMT-i5343 User Guide _1
Warning
WARNING
Power
Do not use damaged power cord or
loose outlets.
For the power connection port of
the phone, use the provided
optional power adapter. Use of a
power adapter that does not meet
the specifications may cause the
product to become damaged, to
overheat, or to explode.
Do not pull or bend the cord by
force, and do not touch the power
plug with wet hand.
If there is dirt or moisture on the pin
contact surface of a power plug,
pull out the plug and wipe it away
with a cloth. If dirt or moisture
remains on the product even after
wiping, contact the service center.
When the phone is out of use for a
long time, leave the plug pulled out
of the outlet.
If an abnormal sound, smell or
smoke is emitted from the phone,
pull out the power plug
immediately, and then contact the
service center.
Installation/Maintenance
Do not place the phone in a
location with a lot of dust, in a
location that is subject to severe
changes in temperature, or near a
heating device (cigarette heat,
heater, etc.)
Do not place objects containing
water such as vases, flowerpots,
cups, cosmetics, or medicines near
your phone. Humidity or liquid may
damage the parts and circuits of
this product.
Do not use or store flammable
spray or materials near the phone.
2_ © SAMSUNG Electronics Co., Ltd.
NON-MODIFICATION STATEMENT
Any changes or modifications not expressly approved by the party responsible for
compliance could void the user's authority to operate this equipment. This device is
limited to operation on permissible Part 15 frequencies, and is does not have the
ability to be configured by end users or professional installers to operate outside the
authorized bands.
- This device shell be used indoors only in 5150~5250Mhz frequency range.
- the device must be used and installed at least 20cm separation from device to human
body.
Caution
CAUTION
Power
Do not power off the phone while upgrading a program.
General
The LAN cable to the network
should be connected to the LAN
port of a phone, NOT to the PC
connection port.
Safety is not guaranteed if
expendable items or additional
goods are used unauthorized by
Samsung.
Do not place a heavy object on top
of the phone.
Do not attempt to disassemble, fix,
or rebuild the phone yourself.
Do not drop the product or apply
impact on the product. It may
damage product screen or exterior
and its internal parts.
Use a soft and dry cloth when
cleaning the phone. Do not spray
water directly onto the product; and
do not use chemicals such as wax,
benzene, alcohol, thinner, mosquito
killer, perfume spray, lubricant,
detergent, etc.
Do not install the phone under
direct sunlight.
Listening with a headset or
earphone at high volume may
damage your hearing.
SMT-i5343 User Guide _3
Industry Canada Statement
This device complies with RSS-210 of the Industry Canada Rules.
Operation is subject to the following two conditions:
(1) This device may not cause harmful interference, and
(2) this device must accept any interference received,
including interference that may cause undesired operation.
This device complies with part 15 of the FCC Rules.
Operation is subject to the following two conditions:
(1) This device may not cause harmful interference, and
(2) This device must accept any interference received,
including interference that may cause undesired operation.
Caution: Any changes or modifications to the equipment not expressly approved by the party
responsible for compliance could void user’s authority to operate the equipment.
FCC Compliance Statement
TABLE OF CONTENTS
SAFETY CONCERNS 1
Conventions .............................................................................. 1
Symbols .................................................................................... 1
Warning ..................................................................................... 2
Caution ...................................................................................... 3
BEFORE USE 10
Checking Parts in the Package ............................................. 10
Phone Installation ................................................................... 11
Connection to Back Ports ............................................................ 11
Assembling the Cradle for Desk .................................................. 13
Assembling the Wall-Mount Bracket ........................................... 14
Detachment from the Wall-Mount Bracket .................................. 15
THINGS YOU SHOULD KNOW 16
Key Functions ......................................................................... 16
Part Names and Functions .................................................... 18
Front Configuration ...................................................................... 18
Name and Function ..................................................................... 19
Phone Information Display .................................................... 21
Phone Status Indicator................................................................. 21
LED Indicator ............................................................................... 21
Phone Status Icons ...................................................................... 22
Call Status Information ................................................................. 23
4_ © SAMSUNG Electronics Co., Ltd.

Supplementary Functions Menu ........................................... 24
Usage of Supplementary Functions Menu ................................. 24
Text Input Method ................................................................... 25
BASIC FUNCTIONS 26
E33sy Installation ................................................................... 26
Main Screen ............................................................................ 30
3333Main screen type setup ....................................................... 30
Program Key ................................................................................ 31
List of incoming calls during absent ............................................ 34
Dialing........................................................................................... 35
Dialing an Extension Number ...................................................... 35
Dialing a Outbound Call ............................................................... 36
Dialing via Speaker Phone .......................................................... 37
Quick Search Function ................................................................ 38
Dialing the Last Call Number ....................................................... 38
Answering Incoming Calls ..................................................... 39
Receiving a Call via the Handset ................................................ 39
Receiving a Call via Speaker Phone ........................................... 39
Video Call ................................................................................ 40
Sending a Video Call ................................................................... 40
Receiving a Video Call ................................................................. 41
Functions Available during Call ............................................. 42
Call Park ....................................................................................... 42
Mute ............................................................................................. 43
Call Transfer ................................................................................. 44
Conference Function ................................................................... 45
Details ........................................................................................... 46
Call Record .................................................................................. 46
Under Video Call function ............................................................ 47
SMT-i5343 User Guide _5

Call Transfer ................................................................................. 49
Volume Control ....................................................................... 50
Volume Control of a Handset ...................................................... 50
Volume Control of a Speaker....................................................... 50
Volume Control of Ringing Sound ............................................... 51
HOW TO USE MENUS 52
Menu Structure ....................................................................... 52
Contacts .................................................................................. 55
History ..................................................................................... 60
Message ................................................................................. 61
News & Notice ........................................................................ 66
Browser ................................................................................... 67
Presence Setting .................................................................... 68
Call Service ............................................................................. 74
Auto Answer ................................................................................. 74
Call Waiting .................................................................................. 75
Absence ....................................................................................... 75
Outbound Call Lock ..................................................................... 76
Wake-Up Call ............................................................................... 76
Call Forward ................................................................................. 77
DND .............................................................................................. 78
Follow Me ..................................................................................... 78
AOM ........................................................................................ 79
Settings ................................................................................... 83
Sound ........................................................................................... 83
Screen .......................................................................................... 85
Time Zone .................................................................................... 88
Security ........................................................................................ 89
Alarm ............................................................................................ 90
6_ © SAMSUNG Electronics Co., Ltd.

Bluetooth & Headset .................................................................... 91
Deskphone Manager Connection Information ............................ 96
Network information ..................................................................... 97
Phone Information ....................................................................... 97
Video Call ..................................................................................... 98
Easy Installation ........................................................................... 98
User Information Initialization ...................................................... 99
Phone restart ................................................................................ 99
Administrator ................................................................................ 99
Logout ........................................................................................100
Login ...........................................................................................100
uReady setup ....................................................................... 101
INTEROPERATION SERVICE 102
Web Interoperation ............................................................... 102
System Configuration Diagram .................................................102
How to Use Menus ....................................................................103
Key Functions ............................................................................104
Phone Information .....................................................................105
Call Service ................................................................................106
Network Setting ..........................................................................109
Advanced ................................................................................... 111
Contacts ..................................................................................... 115
Call History ................................................................................. 116
Phone Settings ........................................................................... 117
Programmable Key ....................................................................121
AOM ...........................................................................................130
Phone Management ..................................................................131
Smart Phone Interoperation (SDM) .................................... 134
System Configuration Diagram .................................................134
Key Functions ............................................................................134
SMT-i5343 User Guide _7

Registration Methods .................................................................135
Deregistration .............................................................................148
Dashboard..................................................................................149
Contacts .....................................................................................150
Call Log ......................................................................................160
Program Key ..............................................................................162
Settings ......................................................................................165
SUBSCRIBER SERVICE 171
Call related service ............................................................... 172
Call Forward ...............................................................................172
Call Park .....................................................................................174
Auto Answer ...............................................................................175
Call Pickup .................................................................................175
Outbound Call Lock ...................................................................176
Call Transfer ...............................................................................176
Call Waiting ................................................................................177
Callback ......................................................................................177
DND ............................................................................................178
Auto Retry ..................................................................................179
Last Call Redial ..........................................................................179
Barge In ......................................................................................180
No Ring ......................................................................................180
Multi-Ring ...................................................................................181
Mobile Extension (MOBEX) ......................................................182
Intercom .....................................................................................182
Malicious Call Tracking ..............................................................182
Extension Announcement..........................................................183
CLI Control .................................................................................183
Conference Features ........................................................... 184
8_ © SAMSUNG Electronics Co., Ltd.

Voicemail Interoperation ...................................................... 185
Answering Machine Emulation (AME) ......................................185
Call Recording ...........................................................................186
Deflect to Voicemail ...................................................................186
Transfer to Voicemail .................................................................186
Other ..................................................................................... 187
Function Allocation Initialization .................................................187
Changing Password ..................................................................187
Hot Desking................................................................................187
Extension Group Login/Logout ..................................................188
Absence .....................................................................................188
Account Code ............................................................................188
Wake-Up Call .............................................................................189
Language Selection ...................................................................189
TROUBLESHOOTING 190
ANNEX 192
Product Specifications .......................................................... 192
SMT-i5343 User Guide _9
BEFORE USE
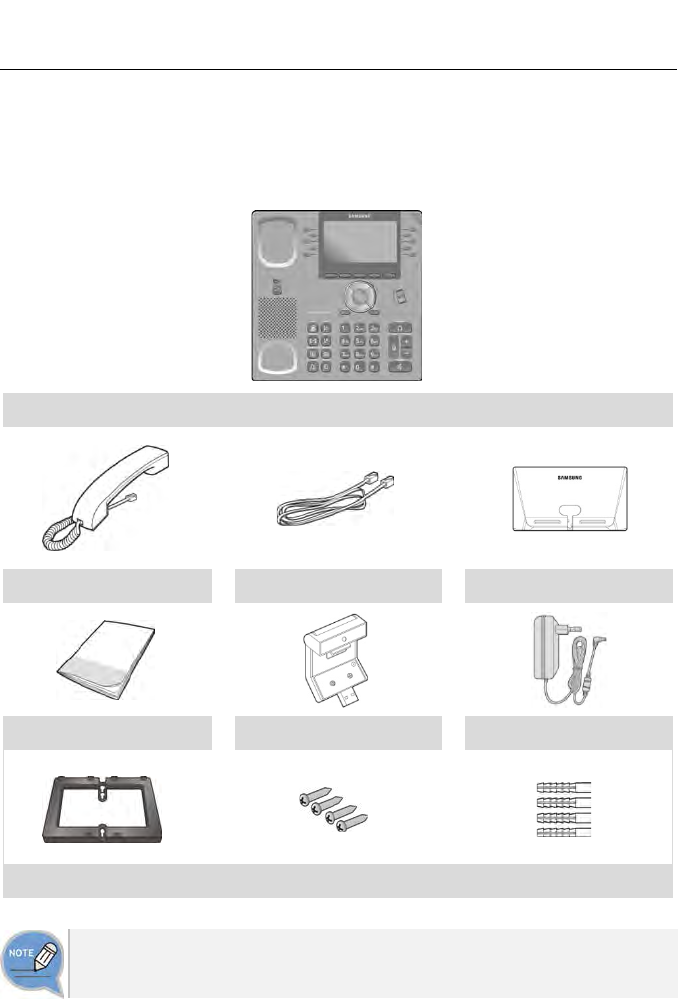
Checking Parts in the Package
Phone Body
Handset LAN Cable Phone Cradle
Quick Guide Camera (option) Power Adaptor (option)
Wall-Mount Bracket (option)
- If any components are damaged or missing, contact the dealer.
- The camera and power adaptor are options. If necessary, contact the dealer.
10_ © SAMSUNG Electronics Co., Ltd.
Phone Installation
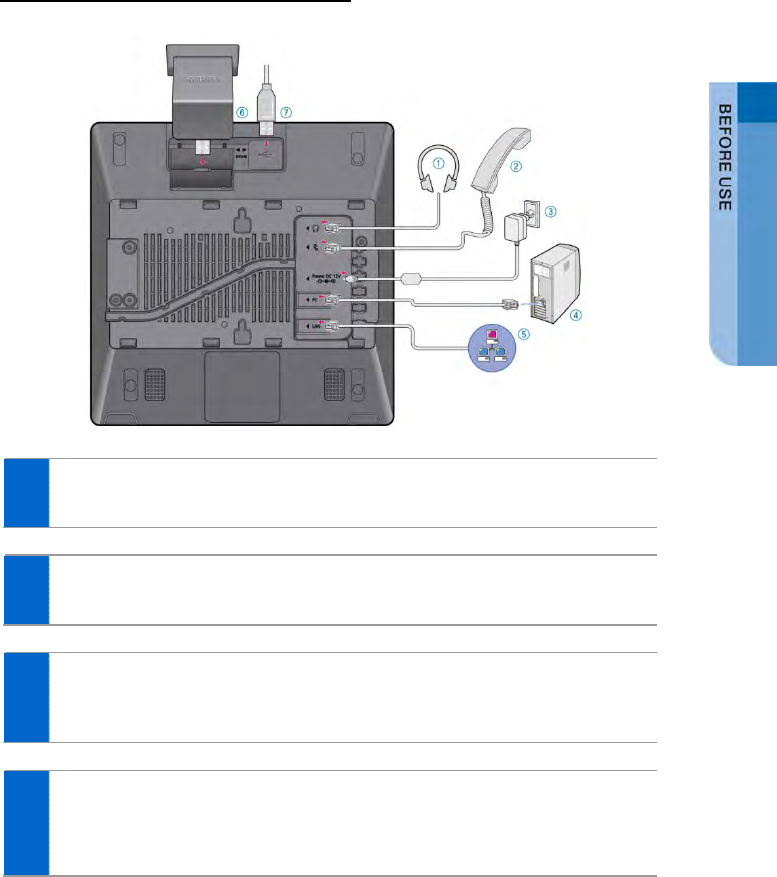
Connection to Back Ports
1 If a headset is used, connect it to the headset port.
2 Connect a handset to the handset port of the phone.
3 Connect one end of the PC connection LAN cable, which was provided
with the phone, to the PC connection port of the phone.
Connect the other end to the PC network port.
4 Connect the LAN cable connected to the network to the LAN
connection port of the phone.
- When power is supplied from the LAN port (PoE), the phone is booted upon LAN
connection.
SMT-i5343 User Guide _11
5 If PoE is not supported, connect the power adapter to the power
connection port. When the plug of the connected power adapter is
plugged into the outlet, the phone is booted up. (The power adapter is
purchased separately.)
- When connecting the power cable, make it go through the center hole of phone
cradle.
6 For video call, connect a camera to the camera connection port.
7 If a USB is used, connect a USB to the USB connection port.
12_ © SAMSUNG Electronics Co., Ltd.
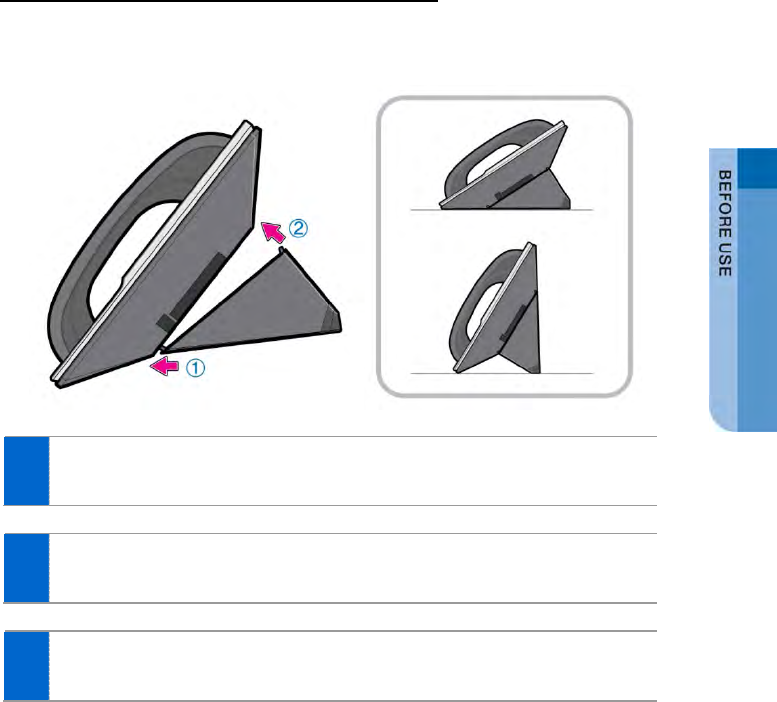
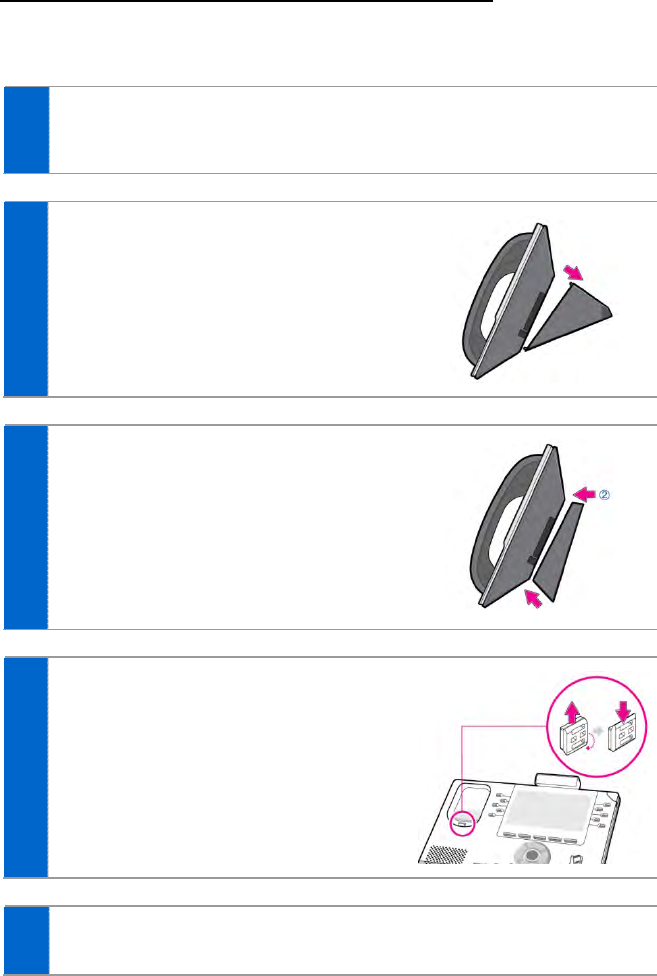
Assembling the Cradle for Desk
The installation angle of a phone can be changed depending on the assembly
direction of the cradle.
1 Fix one latch of the cradle to the top or bottom groove of the phone.
2 Push the remaining latch into the remaining groove on the opposite side.
3 Place the phone on the installation location and check whether it shakes.
SMT-i5343 User Guide _13
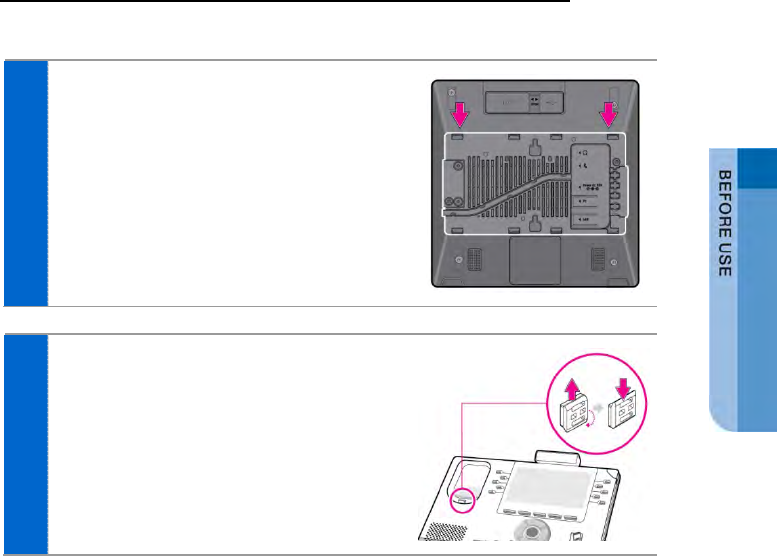
Assembling the Wall-Mount Bracket
Assemble the wall-mount bracket where you want to use the phone.
The wall-mount bracket is an optional item. If necessary, please contact your dealer.
1 First, choose the location where you want to install the phone, and then
determine the positions of the screws by placing the phone at the target
location on the wall.
2 Remove the desk cradle of the phone.
3 Insert the wall-mount bracket as shown in
the figure.
4 Pull off the handset rack, and then insert it
in the opposite direction, as shown in the
figure.
- Only the up-down direction changes. The front-
back remains unchanged.
5 Install the phone onto the wall.
14_ © SAMSUNG Electronics Co., Ltd.
Detachment from the Wall-Mount Bracket
This section describes how to detach the phone from the wall-mount bracket.
1 You can detach the phone from the bracket
by pressing the [Push] section at the
bottom of the bracket.
- Detach the phone more easily by pulling the
entire bottom of the bracket instead of only the
[Push] section.
2 Remove the handset hook and insert it
again by changing its direction.
SMT-i5343 User Guide _15
THINGS YOU SHOULD
KNOW
Key Functions
IP Network
The SMT-i5343 phone enables voice telecommunication through an
already-installed data network, without requiring the installation of an
additional telephone line. Therefore, it does not require the additional
expense of maintaining telephone numbers, and can save on
telephone costs for the businesses, and people, that use
international phone calls frequently.
Screen
The SMT-i5343 phone displays various functions on the LCD screen.
You can enjoy the functions easily using the navigation button, [OK]
button, or the soft buttons that is on the right and bottom of the
screen.
Program Key
You can assign a frequently used function to each button.
For details about how to set up the function, contact the
administrator.
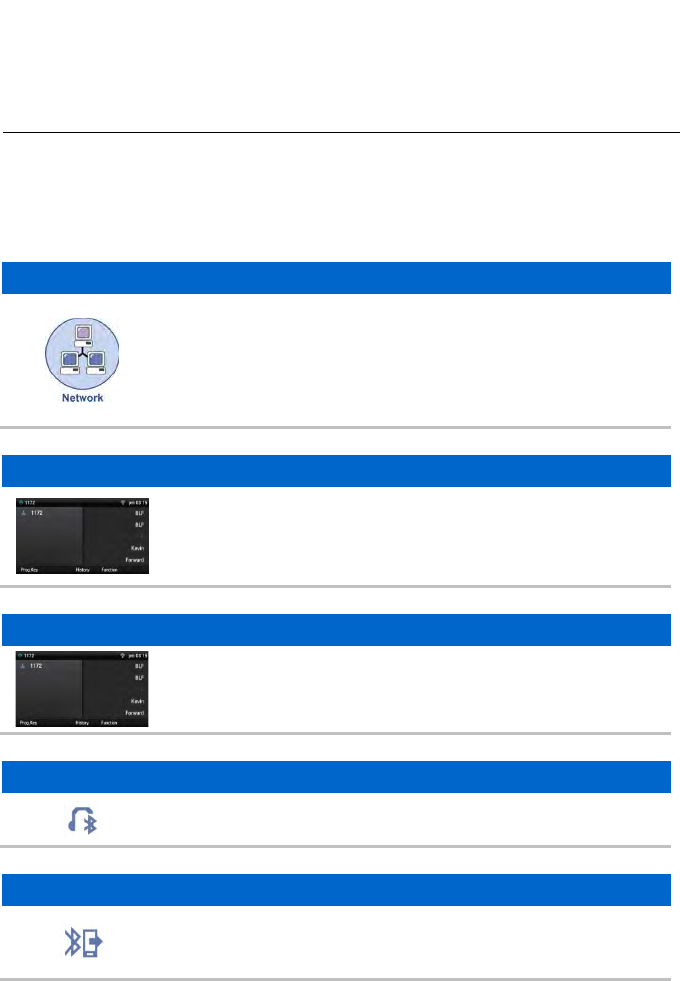
Bluetooth Headset
A user can talk to a counterpart by connecting a wireless Bluetooth
headset to the phone.
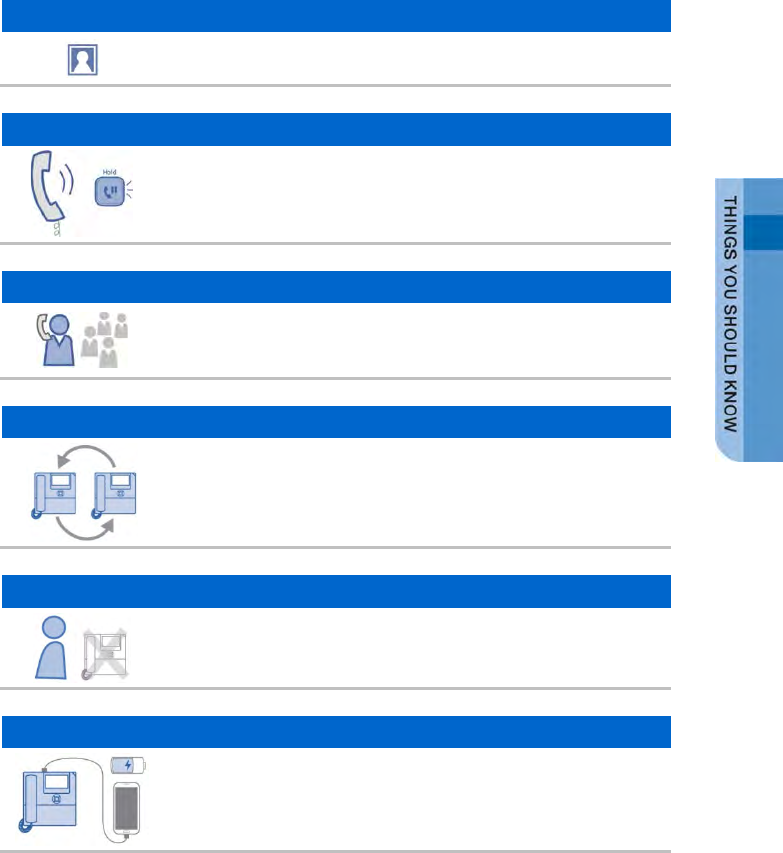
Bluetooth Smart Phone Mode
Connect the phone and a smartphone via Bluetooth, then you can
use the phone to take the call received to the smartphone and you
can also use the call move function.
16_ © SAMSUNG Electronics Co., Ltd.
Video Call
By connecting USB camera to the phone, you can make and receive
video calls with other video-call enabled people.
Call Park
If you must interrupt a call, you can put the call on hold or transfer it
to another person using the Call Park or Call transferring function.
Conference
During a call, you can have a conference call with others by pressing
the [Conference] button.
Call Forward
A call can be forwarded to another number when the call cannot be
received.
DND
If this function is selected, the phone does not ring even when a call
is placed to the phone.
USB Charging
With a phone to which a power adaptor is connected, you can use
the USB charging function. (When PoE is connected, the USB
charging function is not available during call.)
SMT-i5343 User Guide _17
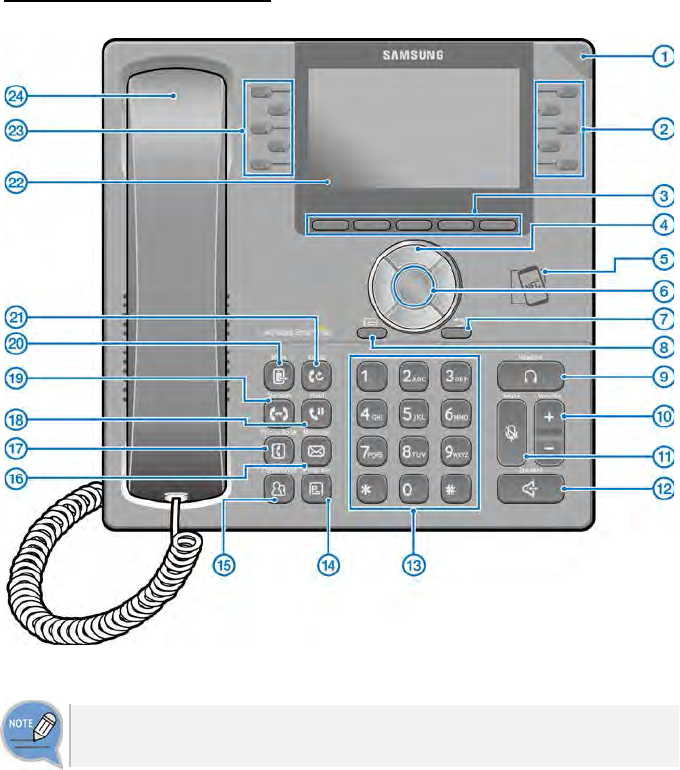
Part Names and Functions
Front Configuration
The color or image of the product in this manual may be different from the actual
ones.
18_ © SAMSUNG Electronics Co., Ltd.
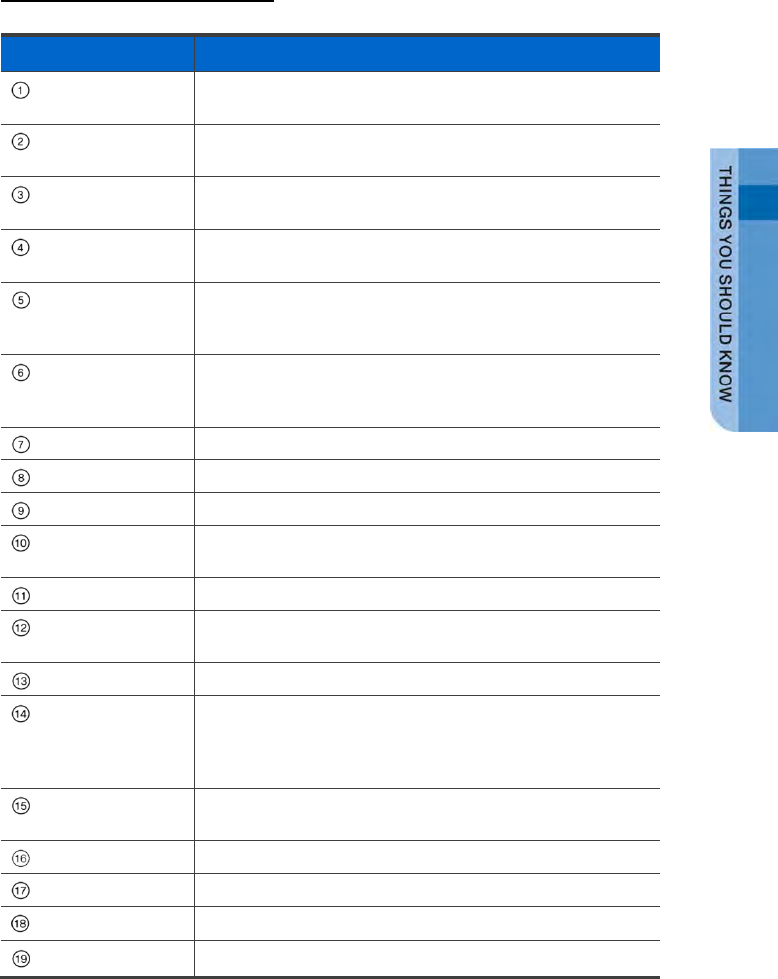
Name and Function
Button
Function
Phone Status
Indicator
A LED shows the phone status (busy, ringing, receiving an
internal message, etc.).
Right Program key This button is used to select desired function from the menus
displayed on the LCD screen.
Soft button This button is used to select desired function from the menus
displayed on the LCD screen.
Direction key This button is used to edit the contents on the screen or move
between menu items.
NFC
Communication
Unit
If a smart phone is connected to the NFC communication
through tagging, non-contact LAN communication is possible
with the smart phone.
OK button This button is used to select/save an item where a cursor is
located in the menu status or to check the caller information
from an outbound line while receiving an incoming call.
Back button
This button moves to a previous item.
Menu button
This button displays menu items.
Headset button
This button is used to talk using a headset
Volume button This button is used to control the volume of the handset,
speaker, key tone, etc.
Mute button
This button silences the voice of the user to the called party.
Speaker button This button is used to converse via a speaker phone instead of
a handset.
Dial button
This button is used to enter numbers and characters.
Program button You can assign a frequently used function to each button.
When you press a specified button, the assigned function is
executed. For details about how to set this function, contact
the administrator.
Conference button This button is used to make a conference call by calling other
subscribers during call.
Message button
This button displays the message menu.
Contacts button
This button displays the contact menu.
Hold button This button is used to hold a call temporary without hanging up.
Transfer button This button is used to transfer a call to someone else.
SMT-i5343 User Guide _19
Button Function
Move button If a UE is connected to a smartphone via FMC subscriber,
NFC or Bluetooth (smartphone mode), a call can be switched
between connected devices using the Move button.
Redial button This button is used to call a previous number.
LCD screen The configuration of LCD screen is as follows:
- On the top of the screen, the icons representing phone
function settings are displayed.
- On the main screen, selectable menus, the call processing
status, or various messages are displayed.
Left Program key This button is used to select desired function from the menus
displayed on the LCD screen.
Handset Handset transfers the caller’s voice.
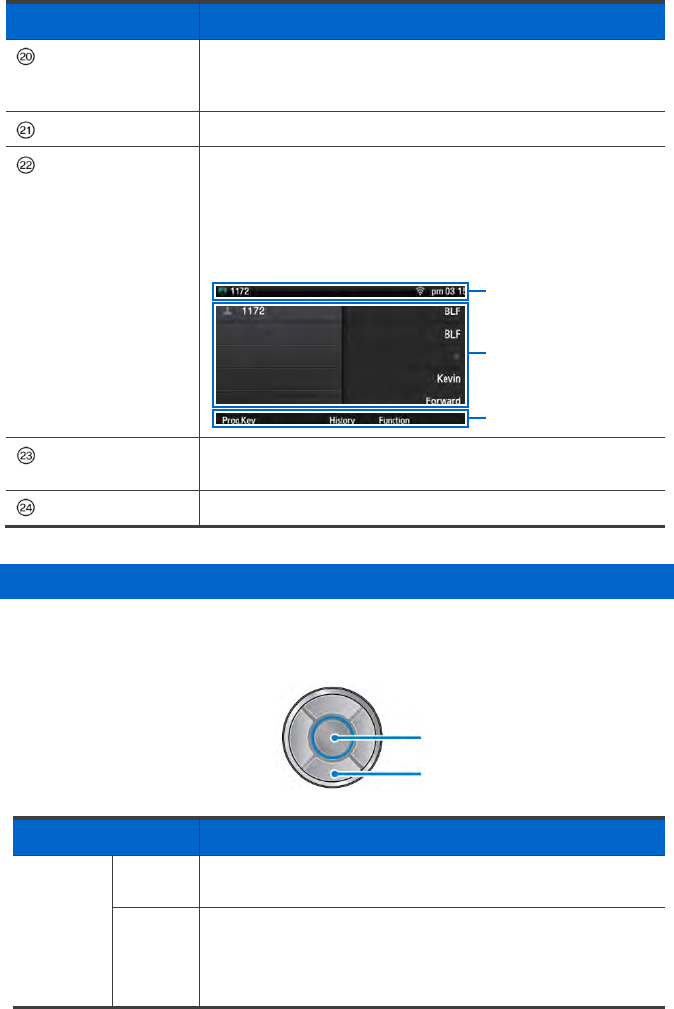
Navigation button
The SMT-i5343 phone has navigation buttons that allow users to use its functions
easily.
Button Function
Navigation Direction
key
This button is used to edit the contents on the screen or move
between menu items.
OK - This button is used to select or save the item where a cursor
is placed in a menu mode.
- This button is used to check the caller information received
from an outbound line during receiving.
Status Screen
Main Screen
Soft Menu Screen
Direction key
OK button
20_ © SAMSUNG Electronics Co., Ltd.
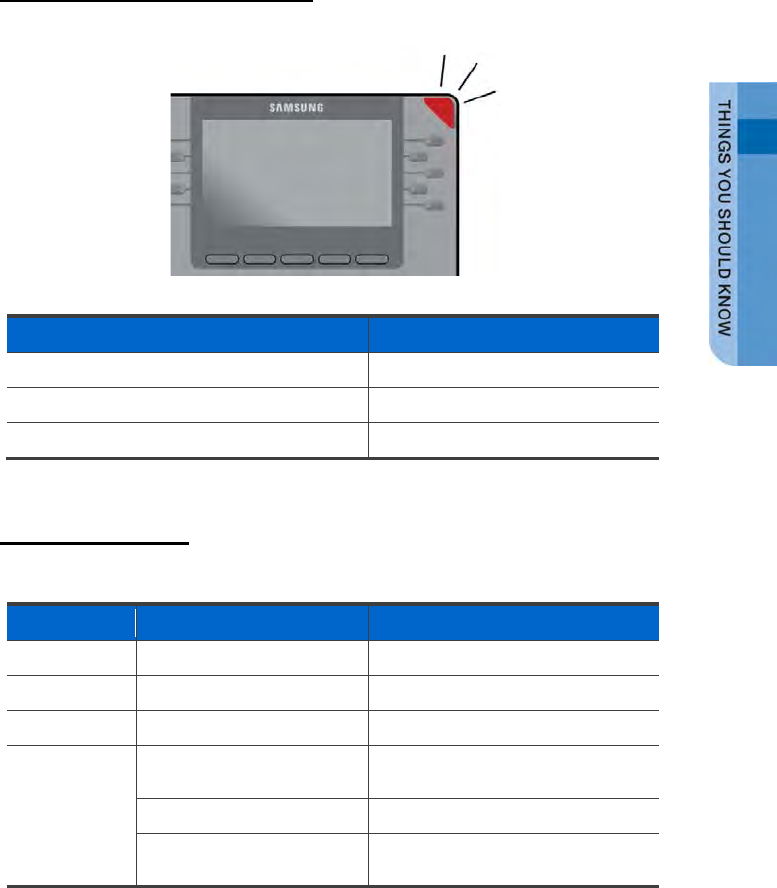
Phone Information Display
Phone Status Indicator
Indicator light is turned on or off depending on the phone status.
Situation
Indicator status
In a call Red indicator light stays on.
When there is an incoming ringing Red indicator light blinks.
When a voice message is left Red indicator light blinks.
LED Indicator
The below button LED is turned on or off depending on status.
Button LED
LED Status
Description
Speaker Red indicator light turns on When a speaker phone is used.
Mute Red indicator light turns on When all voice sending is blocked.
Headset Red indicator light turns on When a call is made via a headset.
Program Key Blinks fast in red (0.3 sec.) When the user is receiving an
incoming call.
Blinks slowly in red (1.5 sec.) When the user is on hold.
Red indicator light turns on A user is busy or the corresponding
function is enabled
SMT-i5343 User Guide _21

Phone Status Icons
Icon shows the phone setting status, being displayed on the right top side.
Icon
Description
Signal intensity of wireless network
Types of headset in use (general/ear jack)
Bluetooth headset (connected/not connected)
Bluetooth mobile phone (connected/not connected)
Smart phone connection status
AOM connection status (Galaxy Tab 10.1)
PC client connection status
Communication setup status when a USB camera is connected,
(video-enabled/video-disabled)
Lock status
System Update Notification
VPN connection status
22_ © SAMSUNG Electronics Co., Ltd.
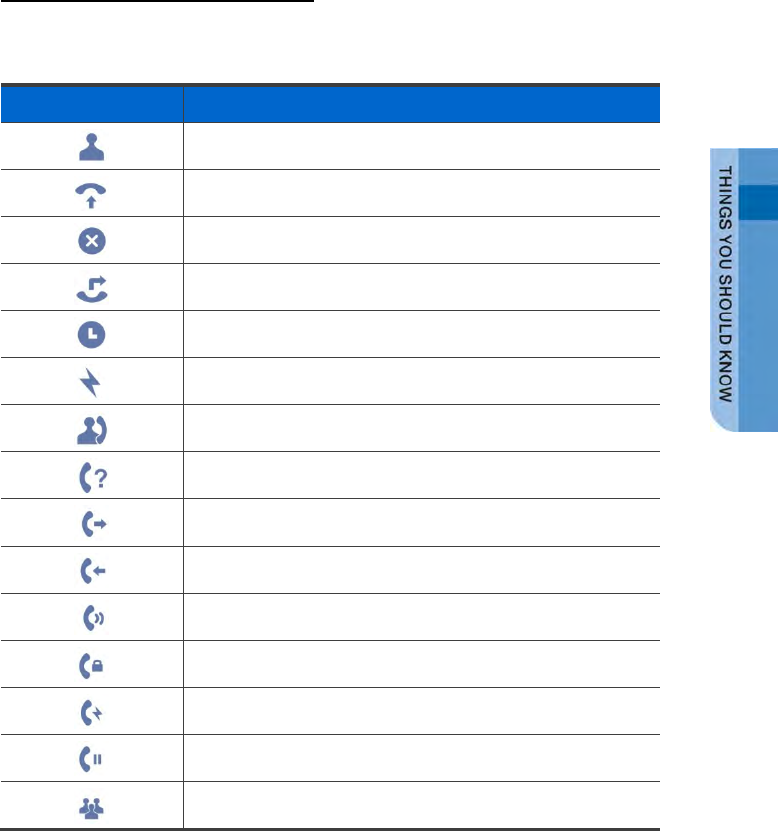
Call Status Information
This section describes the images displayed beside the line depending on the
phone communication service setup status and communication status.
Animation image
Description
General status (registered)
Auto Answer status
DND status
Call Forward status
Absent status
Hot Line status
Intercom status
Not Registered status
A call is being made
A call is being received
In a call
Under a private call
Under a hot line call
On hold
Under a conference call
SMT-i5343 User Guide _23

Supplementary Functions Menu
Supplementary functions menu is a user convenience function available per phone
conditions.
It is provided via interworking with the system, and displayed as a menu on the right
side of a screen.
Supplementary functions menu varies depending on system version.
Usage of Supplementary Functions Menu
While pressing the [Function] soft button at the bottom of screen, press the right
selection button of the menu you want to use.
Supplementary Functions Menu of Waiting Screen
Supplementary Functions Menu of Communication Status
24_ © SAMSUNG Electronics Co., Ltd.
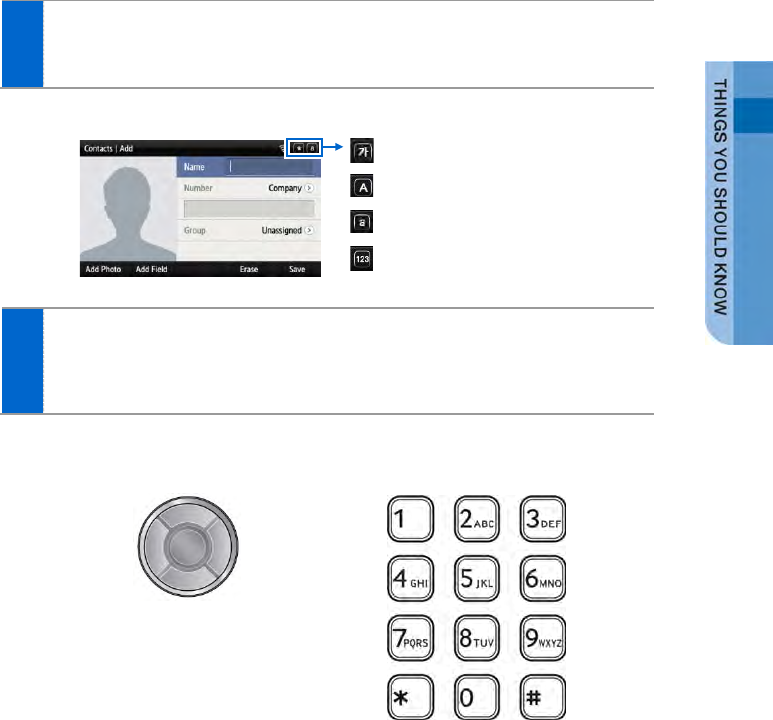
Text Input Method
Using the dial buttons and navigation buttons on the phone, the user can easily
enter or modify the Korean, English, numbers, and special characters.
1 Whenever the user presses the dial button [*] on a text input screen, the
input mode is changed in sequence. The input mode status is displayed as
an icon in the status area of the top-right corner of the LCD.
2 Korean characters, the English alphabet and numbers can be input using
the dial buttons.
- Inputting special characters: Press the [#] button to select the special character input
mode, and select characters using the navigation button to input or modify them.
: Korean input mode
: Alphabet input mode-uppercase
: Alphabet input mode-lowercase
: Number input
Navigation button Dial button
SMT-i5343 User Guide _25

BASIC FUNCTIONS
Easy Installation
In the phone initialization status, a user can easily register to the system.
If incorrect information is entered during easy installation, the phone may not be
properly registered or there may be a network fault. Make sure to enter the
information provided by the system administrator.
The SMT-i5343 phone supports 3 types of phone registration.
Settings Description
General A user directly enters the system information and phone registration
information for registration.
- SIP server information
- SIP registration information
- Time server information
Server A phone is registered by using the information from the environment
server.
PnP
(Plug &
Play)
A phone is automatically registered if the system supports PnP.
- To use the PnP function, a system administrator must configure an
environment for PnP in advance. Contact the administrator to check
whether the PnP environment is configured.
1 When the power is connected during
initialization status, the [Easy Install] soft
menu is displayed at the bottom of
screen. Start easy installation by pressing
the soft button.
After connecting the LAN cable, press the
[>] soft button to go to the next step.
- In the phone initialization status, the default
language is English.
26_ © SAMSUNG Electronics Co., Ltd.
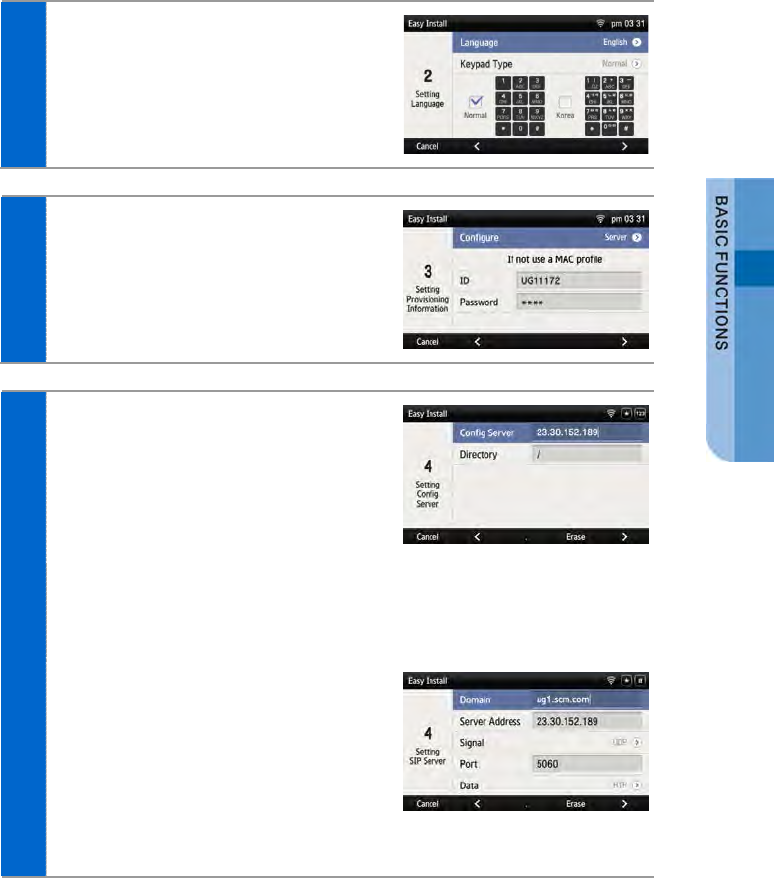
2 After selecting a language to use for the
phone, press the [>] soft button.
- When the phone is connected to the system
after easy installation, the language may be
changed depending on the administrator’s
settings.
3 After selecting the setup method, press
the [>] soft button. Depending on the
selected setup method, the easy
installation step is changed.
- Select one out of General/Server/PnP.
4 When the setup method is [Server]
- An ID or password is not required for phone
registration using a MAC address.
- Contact the system administrator about
whether to use an ID or password and
regarding environment server address.
When the setup method is [PnP]
- If the setup method is PnP, the network
connection type is fixed to DHCP and network
setup step is omitted.
When the setup method is [General]
- SIP registration server setup: Enter the SIP
server information.
- SIP registration information setup: Enter the
phone registration information.
- Time server setup: Enter the address and
update interval of time server.
Press the [>] soft button.
SMT-i5343 User Guide _27
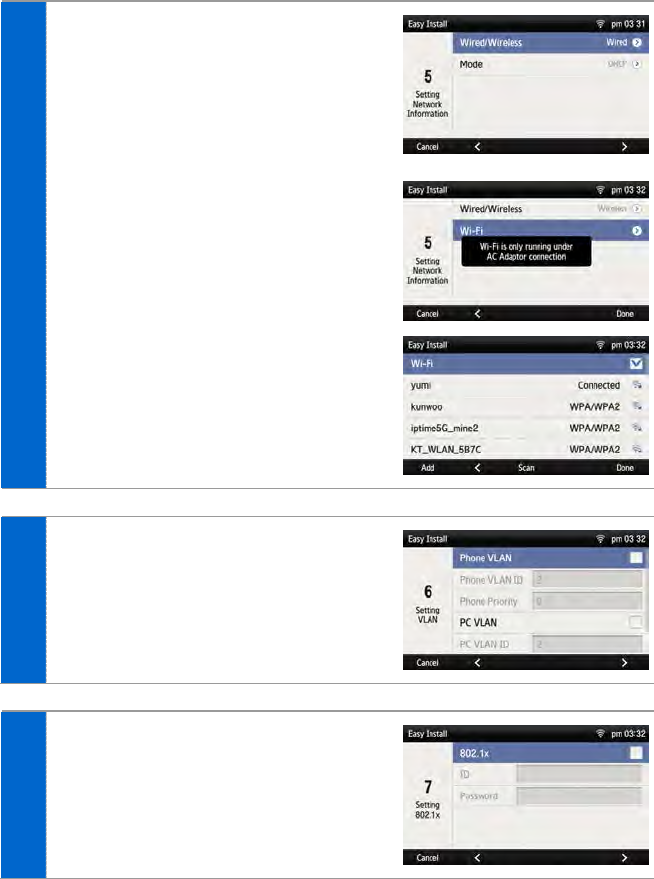
5 Enter the network information.
When the setup method is [Wired]
- Select one out of DHCP/Static/PPPoE.
- Make sure to contact the system administrator
because network connection may be failed if
incorrect information is entered.
When the setup method is [Wireless]
- When Wi-Fi is selected, nearby APs are
automatically searched.
- Wi-Fi is working properly when the AC adaptor
is connected.
- After selecting an AP to connect in the
searched list, connect to it in the STATIC or
DHCP mode.
6 Enter the VLAN information.
- Make sure to contact the system administrator
because network connection may be failed if
incorrect information is entered.
7 Enter the 802.1x information and press
the [>] soft button.
- Make sure to contact the system administrator
because network connection may be failed if
incorrect information is entered.
28_ © SAMSUNG Electronics Co., Ltd.
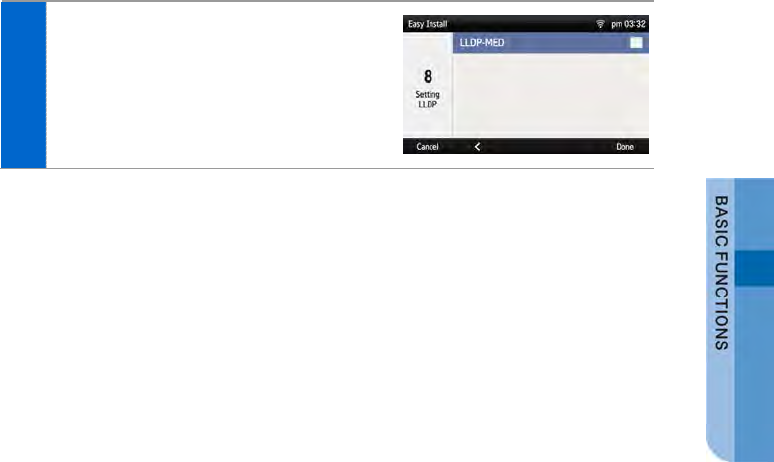
8 After configuring LLDP, Complete easy
installation by pressing the [Done] soft
button, then the phone is restarted.
- To modify already entered information, select
[No] and press the [<] soft button.
SMT-i5343 User Guide _29
Main Screen
You can set up the phone main screen per your preference.
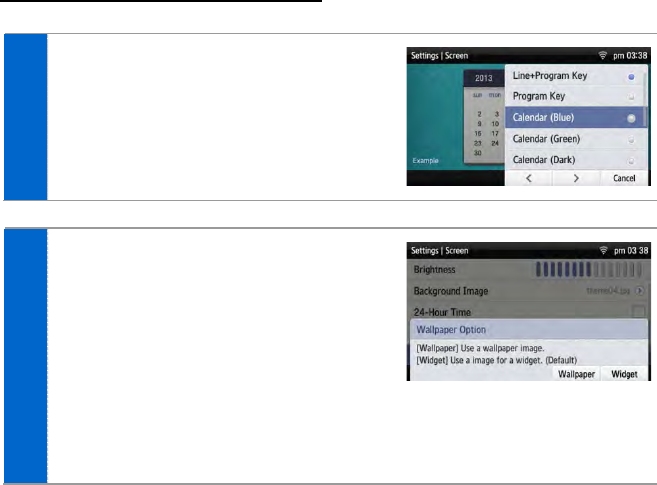
Main screen type setup
1 Go to [Menu] [Settings] [Screen]
[Main Screen Type].
2 When you select a main screen type other
than ‘Line+Program Key’, ‘Program
Key’, you can select a background screen
option.
- When you select [Wallpaper], the image
selected in [Menu] [Settings] [Screen]
[Background Image] is set to the
background screen of the selected type.
- When you select [Widget], a default
background screen for each main screen type
is used.
30_ © SAMSUNG Electronics Co., Ltd.
Program Key
Program key is used to specify a frequently used function to a program key button.
When you press a specified button, the assigned function is executed.
You can register up to 10 keys.
For details about how to use per program key type, refer to the ‘Subscriber
Service’ part of the annex. The program key button setup function may not be
available depending on system. If this function does not work properly, contact the
system administrator.
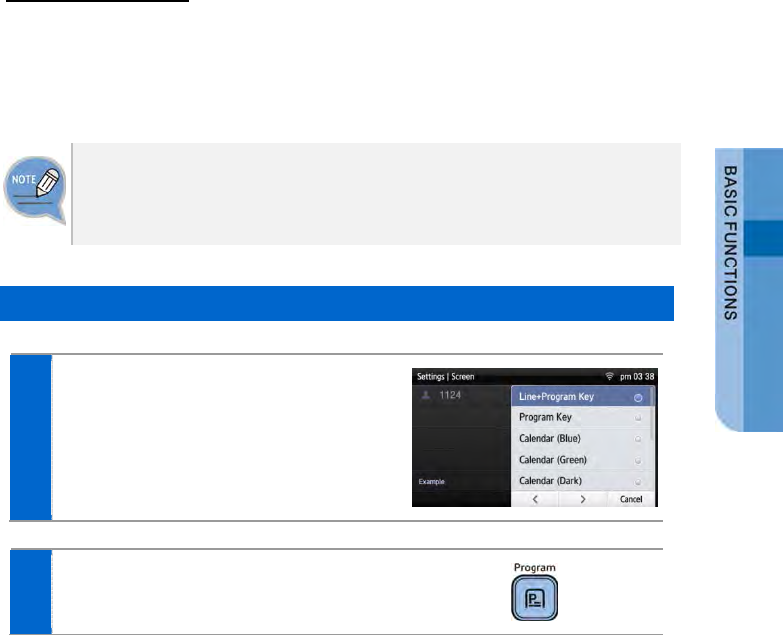
Retrieving Program Key
1 If you select ‘Line+Program Key’,
‘Program Key’ in [Menu] [Settings]
[Screen] [Main Screen Type], you can
retrieve the configured program key in the
main screen.
2 Press the [Program Key] button to
retrieve.
SMT-i5343 User Guide _31

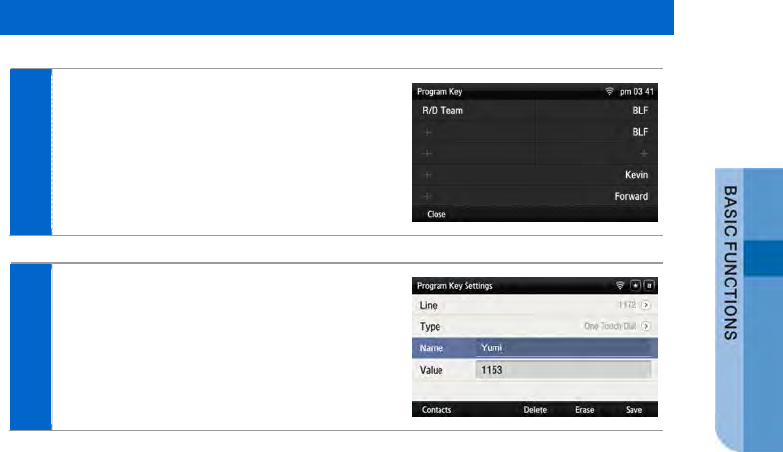
Adding Program Key
1 Press the [Program Key] button.
2 Select an empty button to which you want
to add a function by using the left/right
program key.
- An empty button without a registered function is
displayed as [+].
3 Select a function to register.
4 After entering the name and value, press
the [Save] button.
32_ © SAMSUNG Electronics Co., Ltd.
Editing/Deleting Program Key
1 Press the left/right program key button of
a button to edit.
2 After editing in the program key setup
screen, press the [Save] button.
- To delete a program key function, press the
[Delete] button.
SMT-i5343 User Guide _33
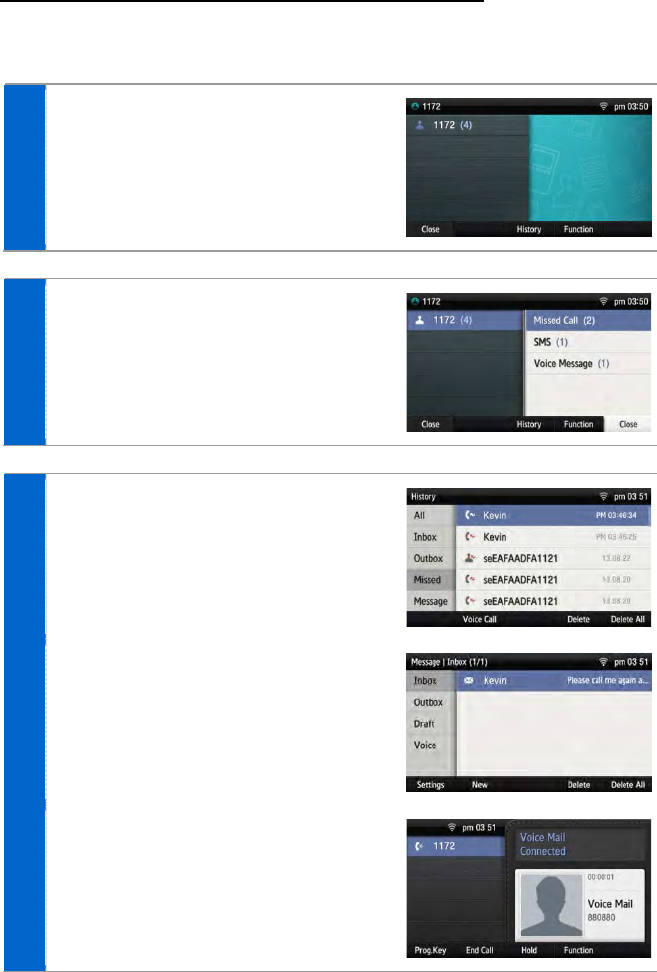
List of incoming calls during absent
You can easily check the incoming calls, messages, or voice messages received
during absent on the main screen.
1 If calls, SMS, or voice messages are
received during absent, the total number
is displayed beside the counterpart’s
phone number.
2 When you press the left button beside the
phone number, each received number of
calls, messages, or voice messages
during absent is displayed.
Use the right button to check the details of
each type.
3 If you select ‘Call During Absent’, you can
check the details by going to [History]
[Missed].
If you select ‘Received Messages’, you
can check the details by going to
[Message] [Inbox].
If you select ‘Voice Messages’, you can
check the details by going to the voicemail
box.
34_ © SAMSUNG Electronics Co., Ltd.
Dialing
This section describes how to make a call to an extension number or outbound
number.
An extension line is the telephone line through which a call can be placed to
another internal phone connected to the system of the office.
An outbound line is the telephone line where the user can make or receive a call
to/from outside (e.g. home), which is directly connected to the switching system of
a central office.
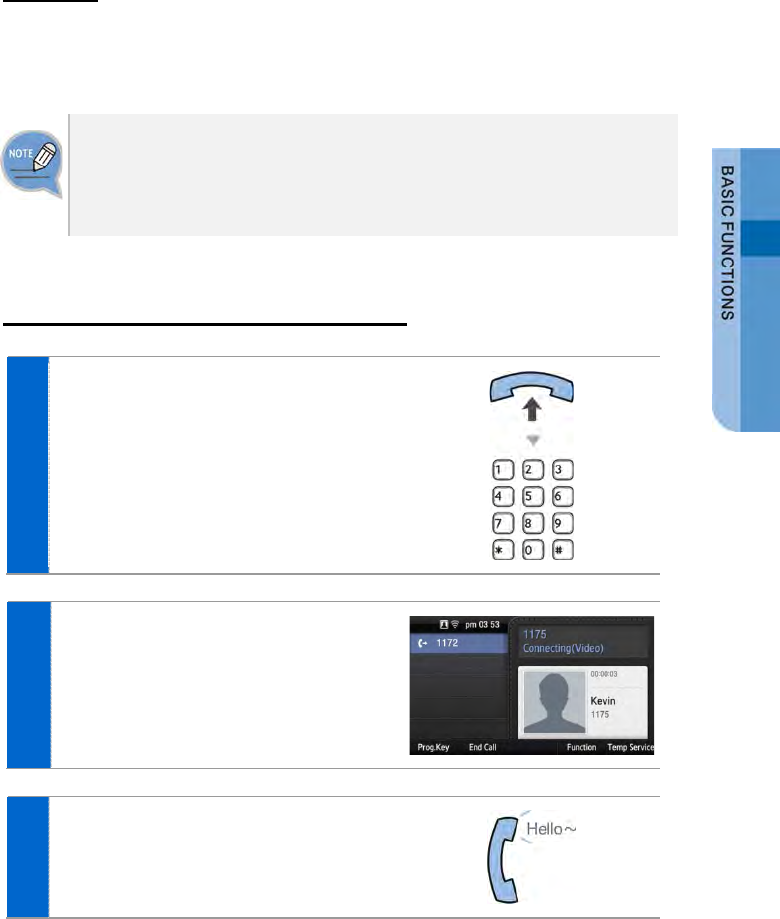
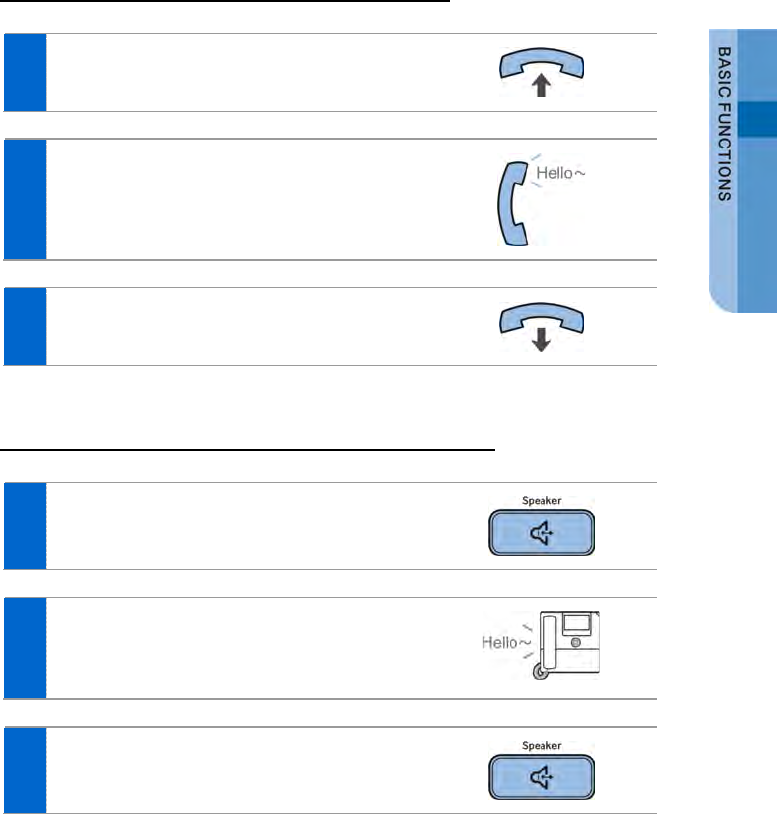
Dialing an Extension Number
1 Pick up the handset, check whether the
dial tone is audible, and then press the
extension number.
2 When you press the [Voice Call] soft
button at the bottom of screen, you can
hear a call connection tone.
3 If the other party receives the call, begin
the conversation.
SMT-i5343 User Guide _35
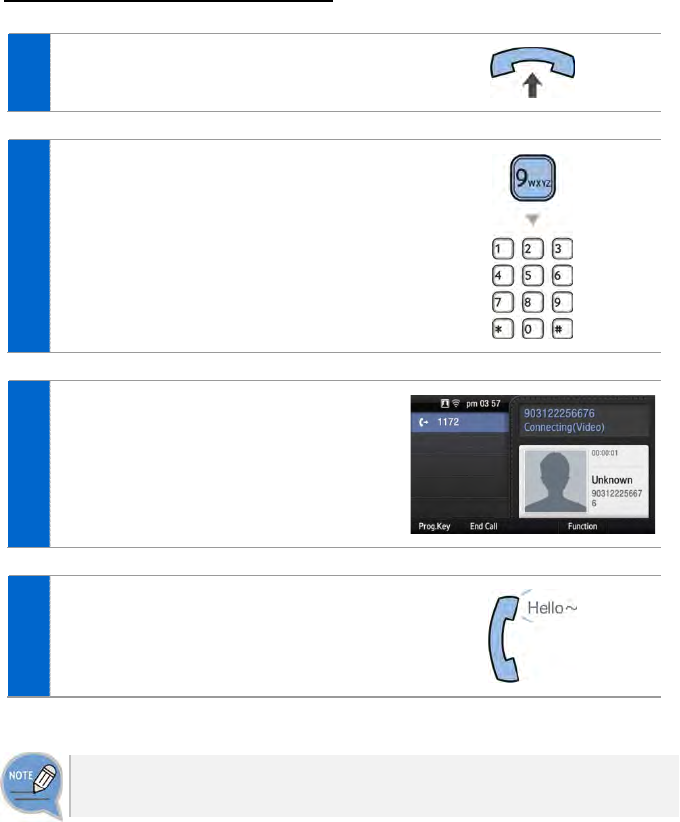
Dialing a Outbound Call
1 Pick up the handset, and check whether
the dial tone is audible.
2 Press a key specified by the manufacturer
to make an outbound call (e.g. ‘9’)
3 When you press the [Voice Call] soft
button at the bottom of screen, you can
hear a call connection tone.
4 If the other party receives the call, begin
the conversation.
As the outbound call number may vary per system, contact the system
administrator.
36_ © SAMSUNG Electronics Co., Ltd.
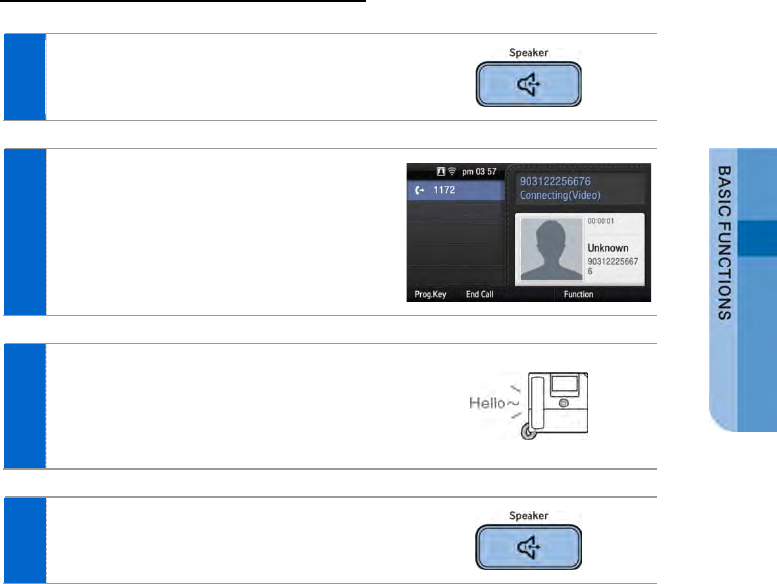
Dialing via Speaker Phone
1 Press the [Speaker] button without
picking up a handset.
2 Press a phone number and select the
[Voice Call] soft button at the bottom of
screen, then you can hear a call
connection tone.
3 Start the conversation when the other
party answers the phone.
- If the handset is picked during a call, the
speaker is turned off, and the conversation can
be continued through the handset.
4 When a call ends, press the [Speaker]
button again.
- If a handset is being used, hang up.
SMT-i5343 User Guide _37
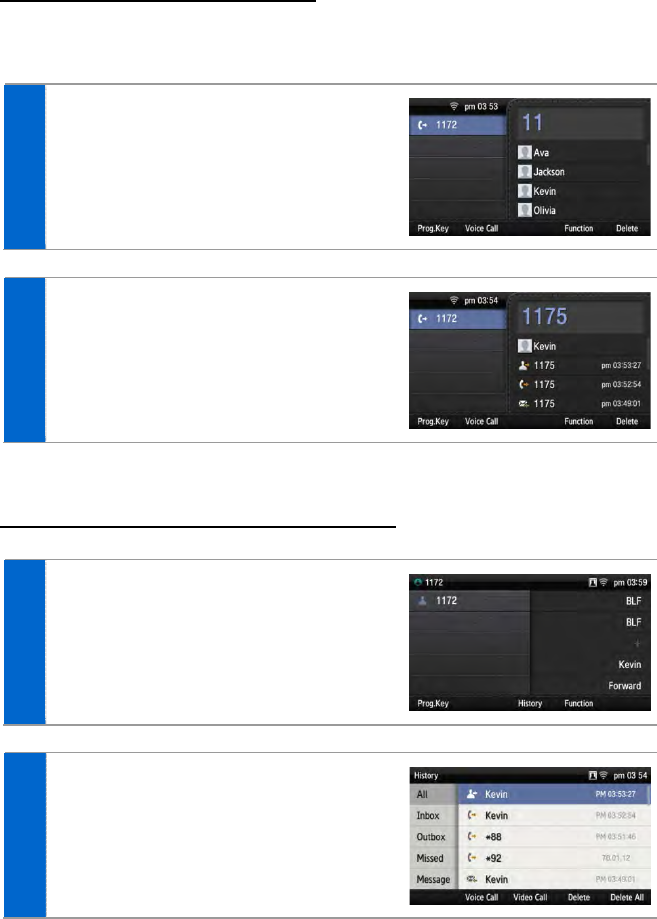
Quick Search Function
You can make a call by searching for a phone number saved in the contacts or call
log.
1 On the dial input screen, enter the phone
number to call. Once you enter a phone
number, the search result is displayed at
the bottom of screen.
2 Move to a phone number you want by
using the navigation button. And press the
[Voice Call]/[Video Call] soft button, then
a call is made to the selected number.
Dialing the Last Call Number
1 When you press the [History] soft
button at the bottom of waiting screen,
the recent call log is displayed.
2 Move to a phone number you want by
using the navigation button. And press the
[Voice Call]/[Video Call] soft button, then
a call is made to the selected number.
38_ © SAMSUNG Electronics Co., Ltd.
Answering Incoming Calls
This section describes how to answer a call.
Receiving a Call via the Handset
1 Pick up the handset when a phone rings.
2 Converse with the counterpart.
3 Hang up the handset when the call ends.
Receiving a Call via Speaker Phone
1 When the phone rings, press the [Speaker]
button.
2 Converse with the counterpart.
- If the handset is picked during a call, the speaker is
turned off, and the conversation can be continued
through the handset.
3 When a call ends, press the [Speaker]
button again.
SMT-i5343 User Guide _39

Video Call
If a USB camera is connected to the phone, you can make a video call.
- A USB camera required for video call is not included in this product.
Purchase it separately.
- For the types of USB camera which can be used in the phone, contact the
system administrator.
- The video call function is available from V2.0 version or later.
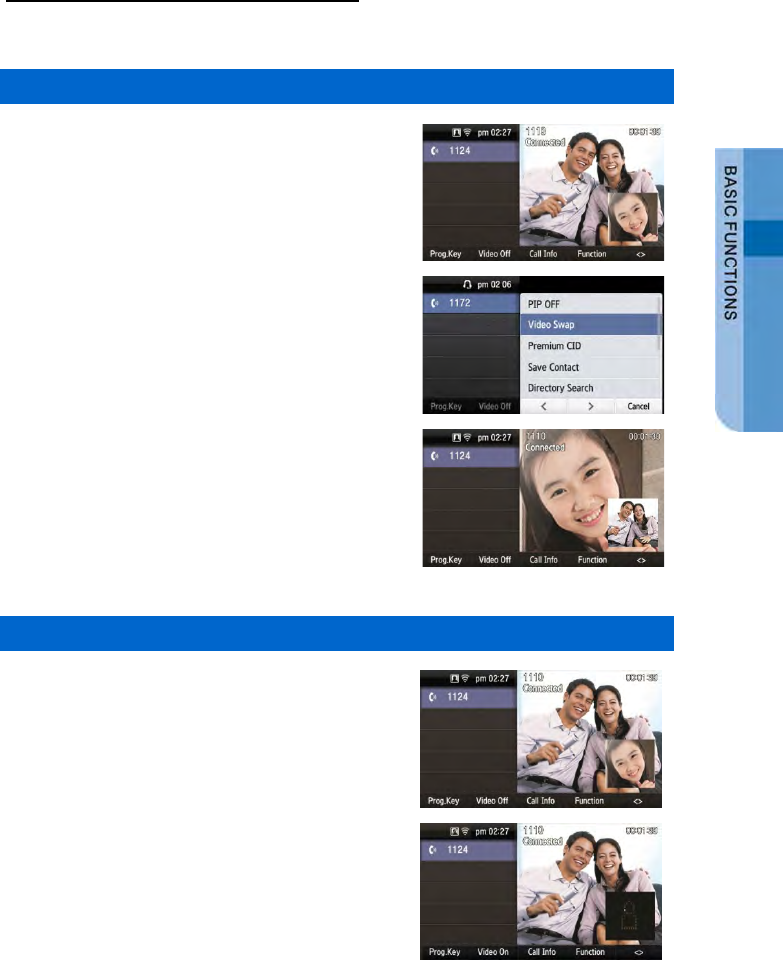
Sending a Video Call
You can send a video call if your counterpart has a phone that supports video call.
1 In the video call mode, your video is
displayed at the right bottom of screen.
- After entering a phone number, you can start a
video call using the [Video Call] soft button.
2 When a video call is connected, the other
party’s image is displayed on the left, and
the user’s image is at the bottom right of
the screen.
- During video call, you can turn on/off your video
using the [Video Off]/[Video On] soft button.
40_ © SAMSUNG Electronics Co., Ltd.
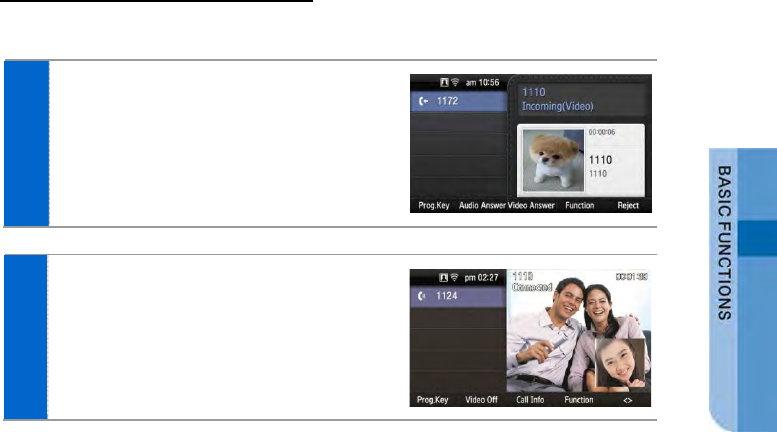
Receiving a Video Call
You can talk via the video call received from the other party.
1 You will be notified when there is an
incoming video call.
2 When a video call is connected, the other
party’s image is displayed on the left, and
the user’s image is at the bottom right of
the screen.
- During video call, you can turn on/off your video
using the [Video Off]/[Video On] soft button.
SMT-i5343 User Guide _41
Functions Available during Call
The functions below are convenient to use while making a call via an extension or
outbound line.
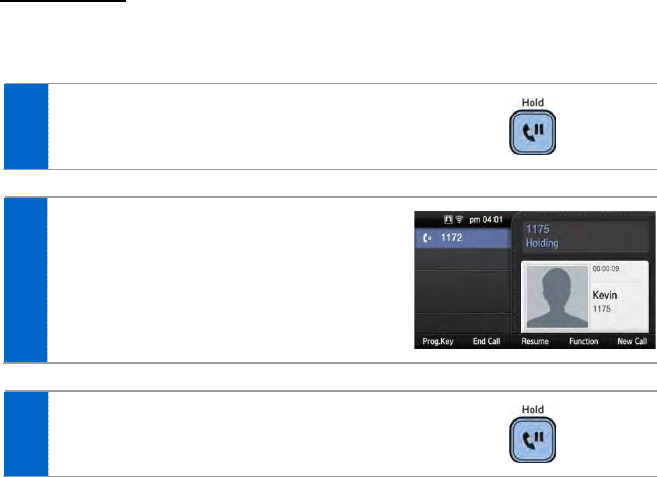
Call Park
A call can be held temporarily to make the caller wait, and then the conversation
can be continued when convenient.
1 To hold the current call, press the
[Hold] button during call.
2 The ‘Hold’ message is displayed.
3 The call can be resumed by pressing the
[Hold] button again.
42_ © SAMSUNG Electronics Co., Ltd.
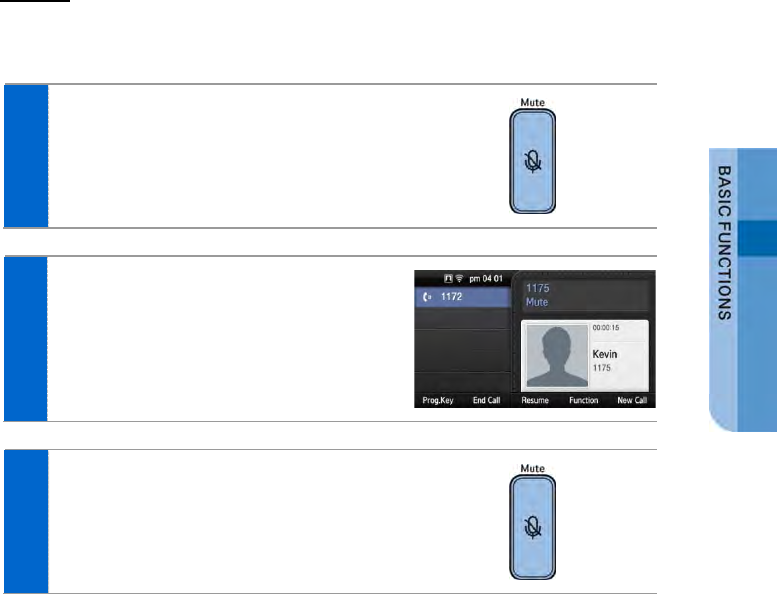
Mute
This function is used to silence the user’s voice during a call via an extension line,
but the user can still hear the voice of the other party.
1 To block your voice during call, press the
[Mute] button.
- Now the counterpart cannot hear your voice.
2 The ‘Mute’ message is displayed.
3 When you press the [Mute] button again,
the function is cleared.
SMT-i5343 User Guide _43
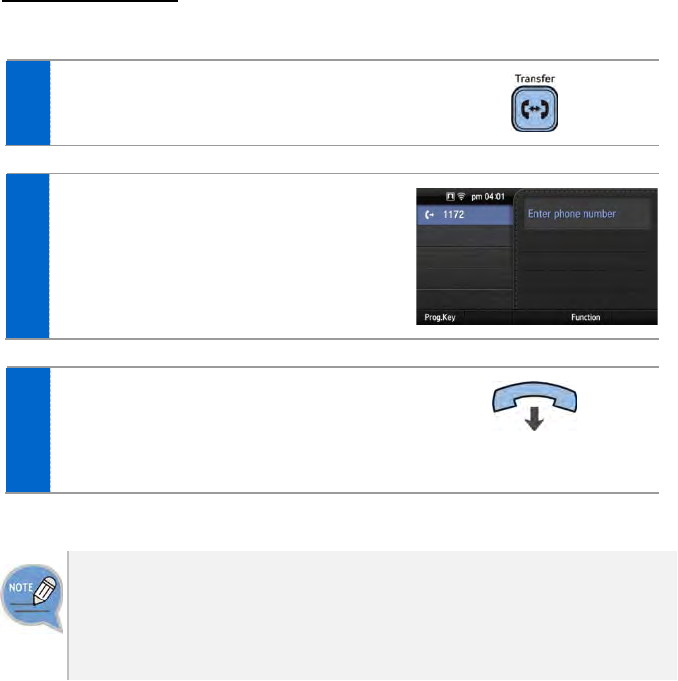
Call Transfer
A current call can be transferred to another extension or outbound line’s subscriber.
1 To transfer a call, press the [Transfer]
button.
2 After hearing a dial tone, dial the phone
numbers of the other conference
participants.
- If you need to transfer a call to a phone number
in an outbound line, enter the outbound call
number first and then enter the phone number.
3 When a ring back tone is heard from the
other subscriber, put down the handset.
- Alternately, wait until the called party receives
the call, and then hang up the phone after telling
him/her about it.
If the subscriber who received a transferred call is busy or does not receive
the call:
To return to the original call, press the [end call] button. Then you can retry by
press the [Transfer] button again to retry, or, return to the existing call by pressing
the [Hold] button.
44_ © SAMSUNG Electronics Co., Ltd.
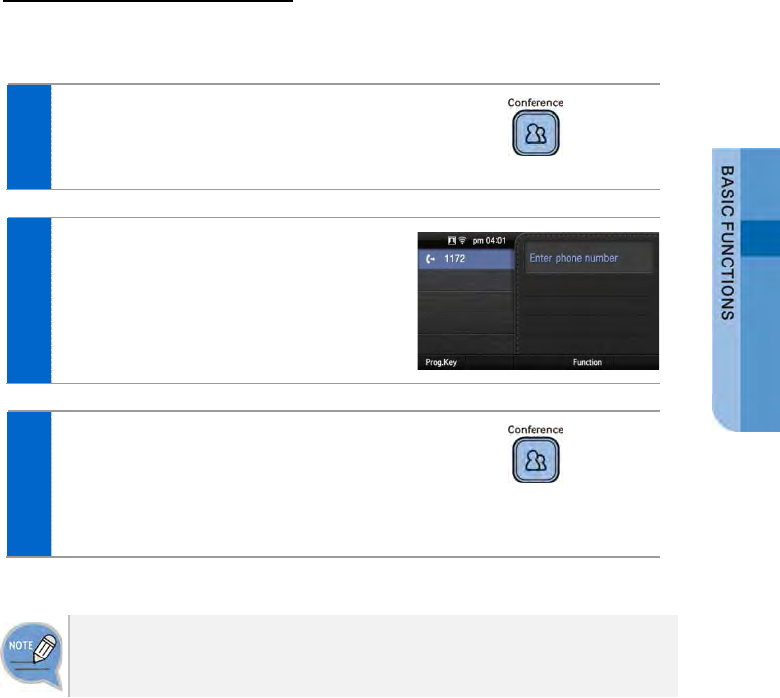
Conference Function
During a call, other subscribers of extension line can be invited to participate in a
conference call.
1 Press the [Conference] button during a
call.
- If the system does not support the conference
function, the conference call is not available.
2 After hearing a dial tone, dial the phone
numbers of the other conference
participants.
3 When a call is connected, start to talk by
pressing the [Conference] button.
- You can add a subscriber in the same manner
during conference call. (To know the maximum
number of conference participants, contact the
system administrator.)
To support the conference call service, the phone number should be registered
with the system. If this function does not work properly, contact the system
administrator.
SMT-i5343 User Guide _45
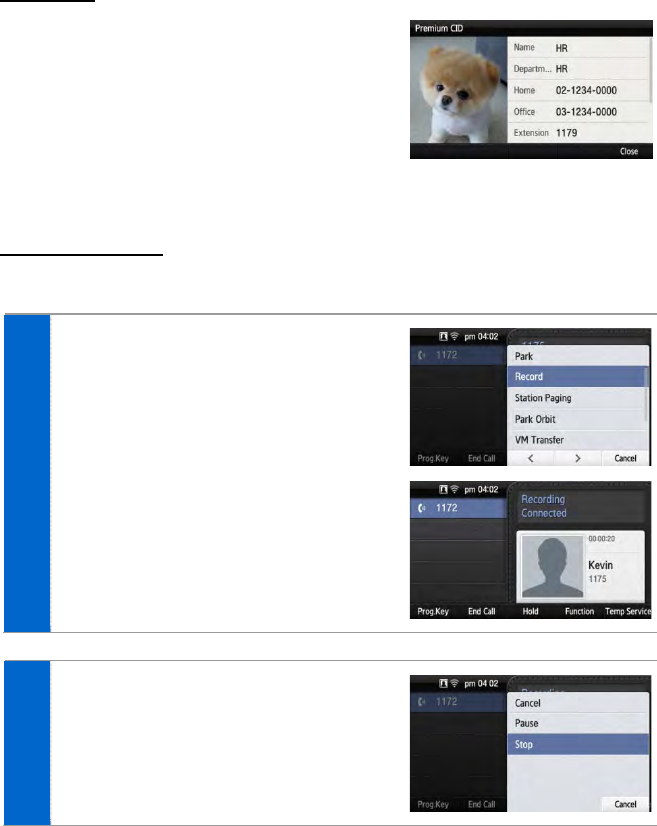
Details
Displays the counterpart’s information on the
screen during communication.
When the information is received, the
counterpart’s detail information is displayed on
the screen.
Call Record
If the phone is connected to Samsung Communicator, you can record a call.
1 In the communication status, go to
[Function] [Record] and press the
right selection button. Then you can start
recording.
2 To stop recording, go to [Temporary
Service] [Stop] and press the right
selection button.
- You can check the recorded file via the [View
Recordings] function of the Samsung
Communicator.
46_ © SAMSUNG Electronics Co., Ltd.
Under Video Call function
The video call function is available from V2.0 version or later.
Video Swap
During video call, if you press the [Function] soft
button and select [Video Swap], you can switch
your video with the counterpart’s video.
Video Off
During video call, you can turn a video off by
pressing the [Video Off] soft button.
- If you press [Video On] at the bottom of screen, the
video off function is cleared.
- If you press [< >] (screen zoom in) at the bottom of
screen, you can see the video call screen in full screen.
When you press [> <] (screen zoom out), it returns
back to the default screen.
SMT-i5343 User Guide _47
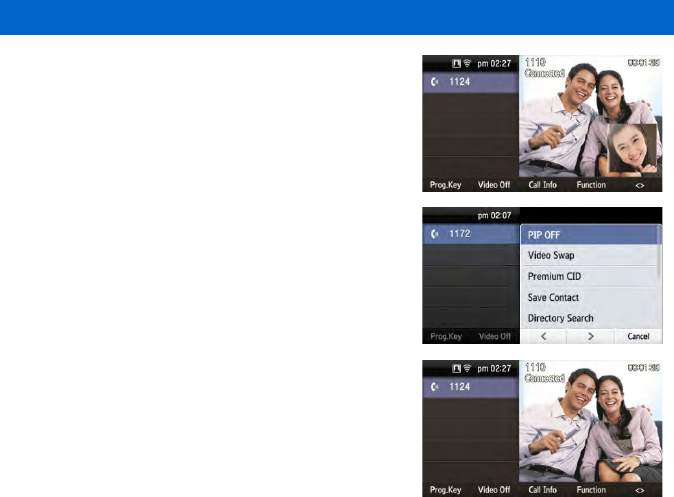
Video PIP ON/OFF
During video call, if you press the [Function] soft
button and select [PIP OFF], your video
disappears from the screen.
- In the PIP OFF status, if you select [Function]
[PIP ON], your video appears again.
48_ © SAMSUNG Electronics Co., Ltd.
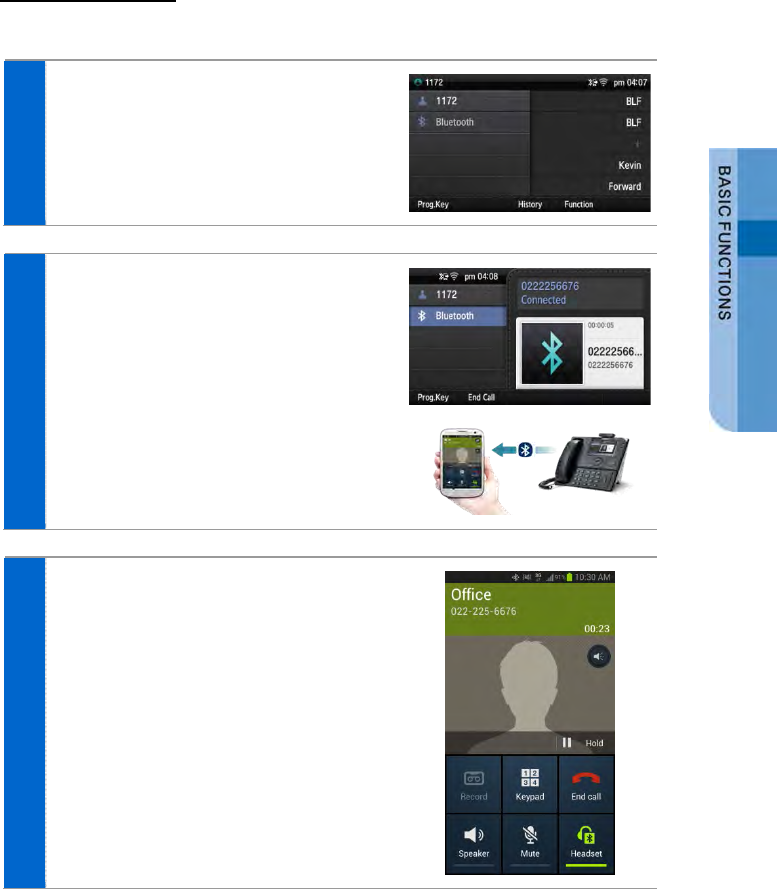
Call Transfer
You can move a call back and forth between the IP phone and mobile phone.
1 Go to [Menu] [Settings] [Bluetooth
& Headset] After setting the [Bluetooth
Mode] to the smartphone, connect your
smartphone to the IP phone.
- For more information about how to setup, refer
to the ‘Bluetooth & Headset’ part of this manual.
2 During communication using the IP phone,
if you press the [Move] button, you can
still talk through the smartphone.
3 During communication using the
smartphone, if you press the
[Headset] button, you can still talk
through the IP phone.
SMT-i5343 User Guide _49
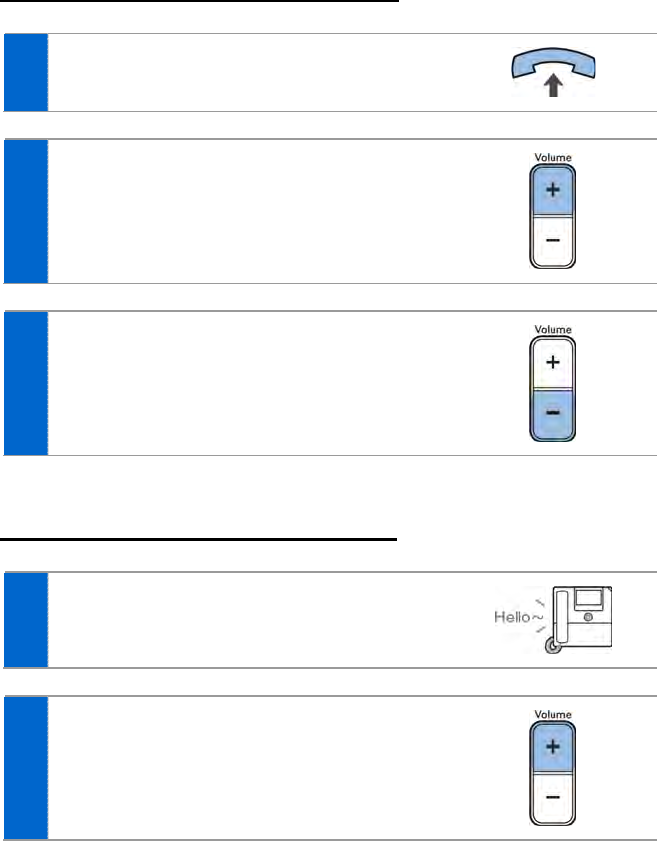
Volume Control
The user can adjust the volume of a handset, speaker and tone sound.
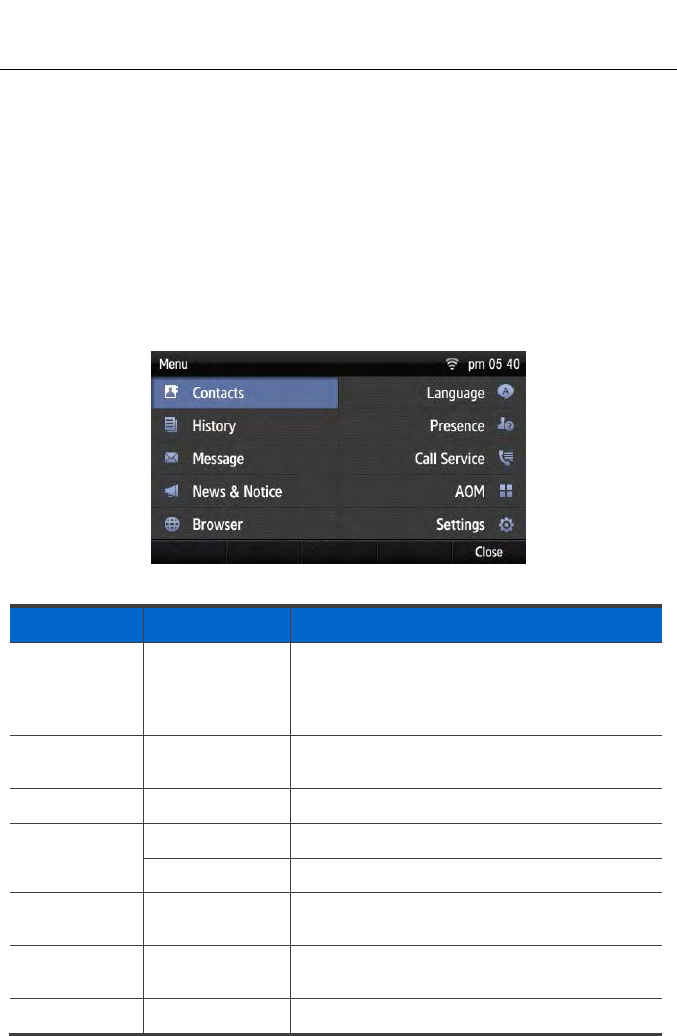
Volume Control of a Handset
1 The user can adjust the volume in the following
way while making a call via a handset.
2 To increase the volume of a handset, press the
upper part (+) of the [Volume] button.
3 To decrease the volume, press the lower part (-)
of the [Volume] button.
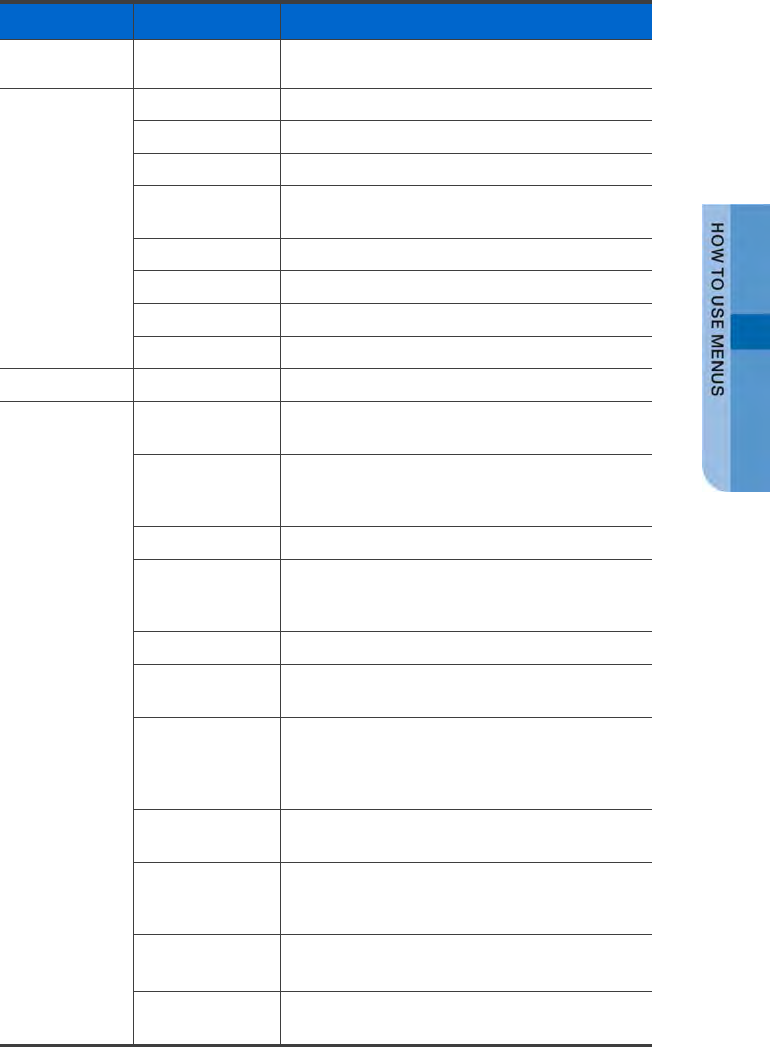
Volume Control of a Speaker
1 The user can adjust the volume of a speaker in
the following way while calling.
2 To increase the speaker volume, press the
upper part (+) of the [Volume] button.
50_ © SAMSUNG Electronics Co., Ltd.
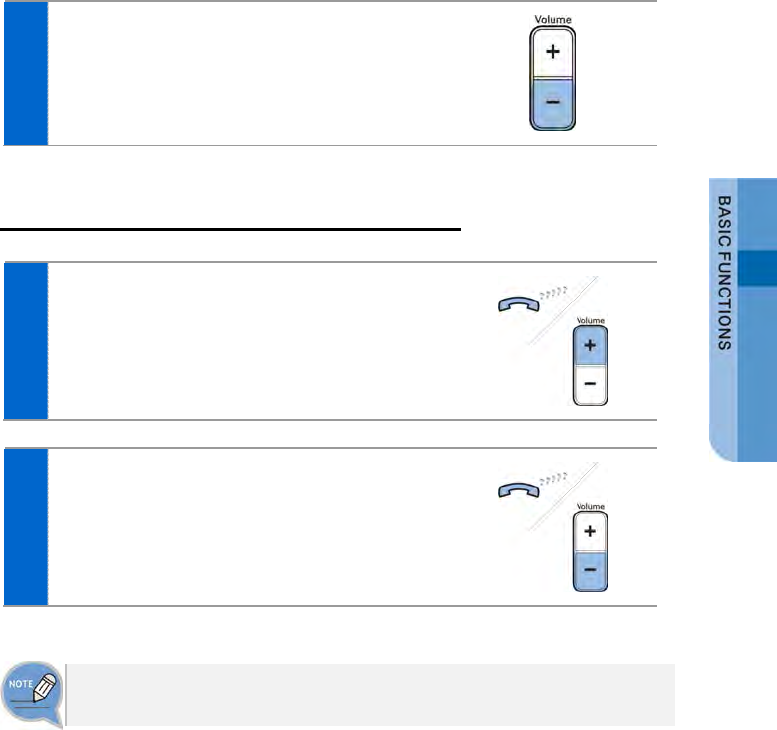
3 To decrease the speaker volume, press the
lower part (-) of the [Volume] button.
Volume Control of Ringing Sound
1 To increase the volume of the ringtone, press
the upper part (+) of the [Volume] button while
the bell is ringing.
2 To decrease the volume of the ringtone, press
the lower part (-) of the [Volume] button while
the bell is ringing.
By pressing the [Volume] button in standby mode, the user can also adjust the
key tone volume.
SMT-i5343 User Guide _51
HOW TO USE MENUS
This section describes menu functions. Call, phone, and setup are displayed as a
menu.
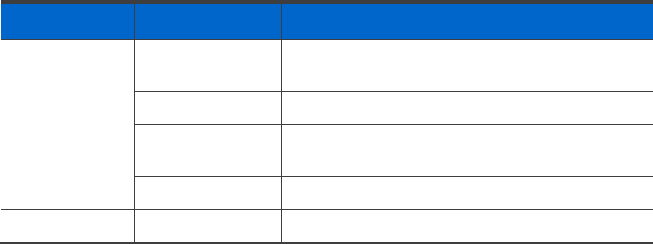
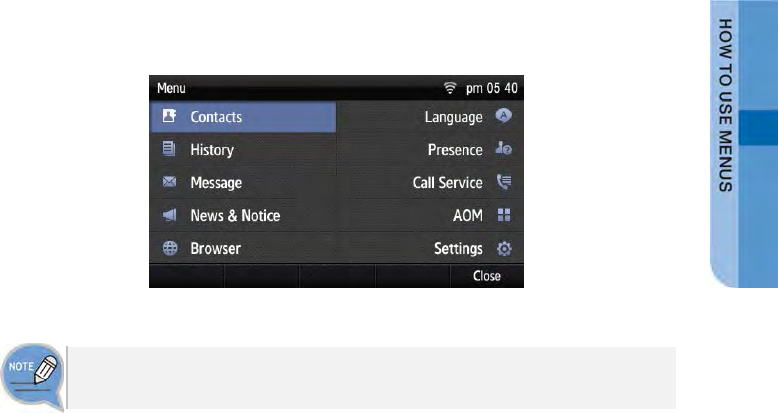
Menu Structure
Clicking the [Menu] soft button when a phone is in standby mode displays menus
on a screen. The desired menu can be selected by using the navigation button or
the selection button on the right side of screen or the soft button at the bottom of
screen.
Menu Sub-menus Function
Contacts - This function provides save, search and
registering function of the phone address book.
You can search for a user registered in the
directory server.
History - You can check the recent outgoing/incoming
history.
Message - You can write and save a message.
News & Notice Notice You can check a notice.
News You can check news.
Browser - You can search and use the information provided
from the browser server.
Language - You can select a system language either Korean
or English.
Presence - You can change your status to online/meeting/
52_ © SAMSUNG Electronics Co., Ltd.
Menu Sub-menus Function
Setting
meal/away/offline (out of duty)/Do not disturb and
can set up the phone operation per status.
Call Service
Auto Answer
You can set up the auto answer function.
Call Waiting You can set up the call waiting function.
Absence You can set up the absent setup function.
Outbound Call
Lock
You can set up the outbound calling function.
Wake-Up Call You can set up the wake-up call function.
Call Forward You can set up the Call forward function
DND
You can set up DND.
Follow Me You can set up the follow me function.
AOM - You can check the registered AOM list.
Settings Sound You can select various bell sounds and button
sounds and adjust the sound volume.
Screen You can set up background screen, 24-hour time,
main screen type, and LCD power and adjust the
LCD brightness.
Time Zone You can set up the time zone of phone.
Security You can change the password, and lock the
phone, so that other people cannot use their
phone.
Alarm
You can set up an alarm.
Bluetooth &
Headset
You can set up a headset.
Deskphone
Manager
Connection
Information
You can set up an external device.
Network
information
You can check the network setting information of
the phone.
Phone
information
The phone model name, software version
information, memory usage and license are
displayed.
Video Call The video call function is available from V2.0
version or later.
Easy Installation You can precede easy installation for phone
registration.
SMT-i5343 User Guide _53
Menu Sub-menus Function
User Information
Initialization
You can initialize the user data.
Phone restart
You can restart the phone.
Administrator You can enter into the administrator menu.
(The administrator password is required.)
Logout/Login You can log out from the phone.
uReady setup
-
You can set up whether to use uReady.
54_ © SAMSUNG Electronics Co., Ltd.
Contacts
[Phone Contacts]
Using the contacts, the user can easily manage phone numbers, email ID, fax
numbers, and photos, etc.
In addition, calls can easily be made using the contacts.
[Directory Service]
You can search the users registered in the directory server.
The directory service is displayed only when the system supports it.
For information on the specific server, contact the server administrator.
SMT-i5343 User Guide _55

Viewing a Phone Number
You can view the phone number saved in the contacts.
1 Select [Menu] [Contacts].
2 The list of saved phone numbers is
displayed.
When you select a target and press the
[OK] button, the detail information is
displayed.
- [Outbox]: You can make a call to the selected
phone number.
Search Phone Number
You can search a phone number saved in the contacts by using a name or number.
1 Press the [Menu] [Contacts]
[Search] soft button.
2 Enter a name or phone number and press
[OK] button to display a list of the
searched phone numbers.
- You can search the number by entering just a
part of the name to search.
- After selecting a name in the search list, press
the [OK] button. Then, the detail information of
phone number is displayed.
56_ © SAMSUNG Electronics Co., Ltd.
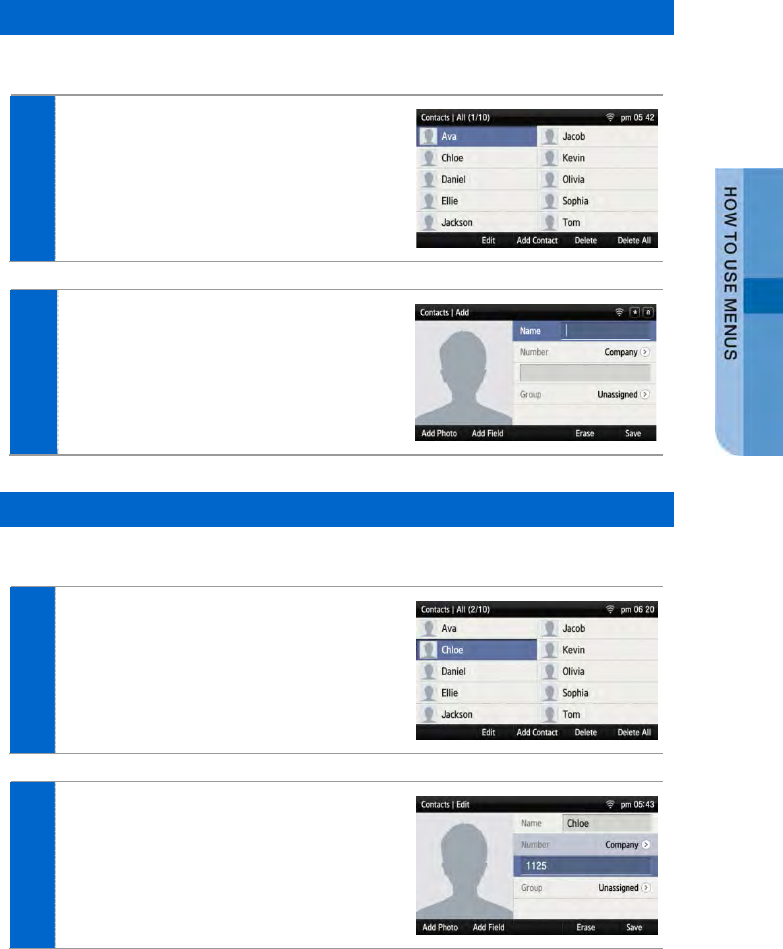
Adding a Phone Number
The phone numbers of up to 500 people can be saved.
1 Press the [Menu] [Contacts]
[Edit Mode] [Add Contact] soft button.
2 Enter the name and phone number
information, etc. and press the [Save] soft
button.
- You can set up the numbers (company, mobile
phone, home, fax, others), e-mail, memo, bell
sound, buddy ID and register photos.
Editing Contacts
You can edit a phone number registered in the contacts.
1 Press the [Menu] [Contacts]
[Edit Mode] soft button, select a phone
number to edit, and press the [Edit] soft
button.
2 Enter the modified information and press
the [Save] soft button.
SMT-i5343 User Guide _57
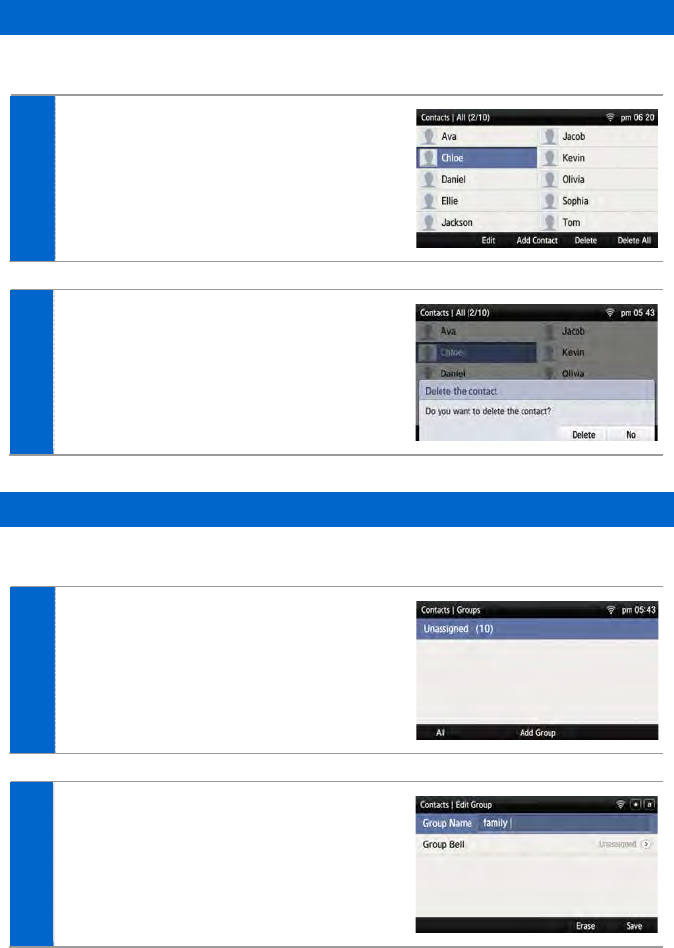
Deleting Phone Number
You can delete a phone number registered in the contacts.
1 Go to [Menu] [Contacts]
[Edit Mode] select a phone number to
delete and press the [Delete] soft button.
2 Click the [Delete] soft button to delete the
phone number.
Add Group
This is the function used to add a new group.
1 Press the [Menu] [Contacts]
[Groups] [Add Group] soft button.
2 Enter a new group name and press the
[Save] soft button.
- You can set up the group name and bell sound.
58_ © SAMSUNG Electronics Co., Ltd.
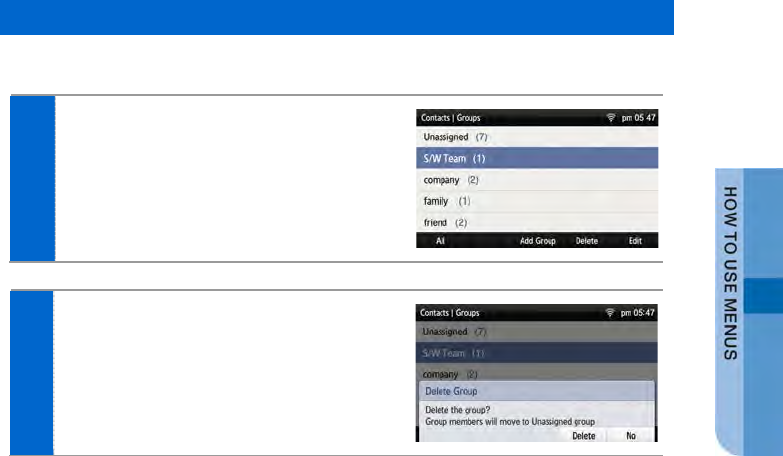
Delete Group
This is the function used to delete an existing group.
1 Go to [Menu] [Contacts] [Groups]
select a group to delete and press the
[Delete Group] soft button.
2 Click the [Delete] soft button to delete the
phone number.
- The members of the deleted group are moved
to the unspecified group.
SMT-i5343 User Guide _59
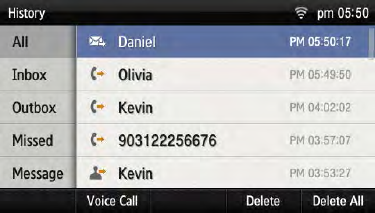
History
The recently incoming/outgoing calls, incoming calls during absence and all the
received/sent messages are displayed. Up to 500 records can be saved.
Select [Menu] [History]. By using the navigation button, you can move to
Total/Received/Sent/Absence/Message.
- [All]: The recently sent/received calls and messages are displayed.
- [Inbox]: The recently received calls and messages are displayed.
- [Outbox]: The recently sent calls and messages are displayed.
- [Missed]: The list of received calls during absence is displayed.
- [Message]: The recently sent/received messages are displayed.
- If you move to a desired phone number by using the navigation button and press either the [OK]
button or the right selection button, the detail information is retrieved.
60_ © SAMSUNG Electronics Co., Ltd.
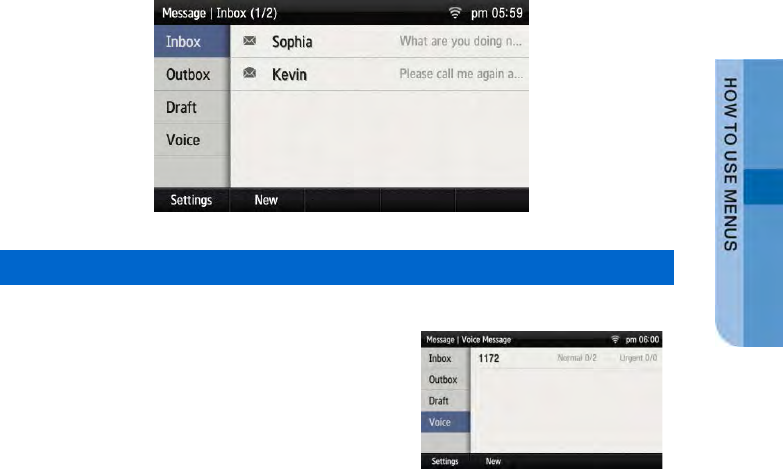
Message
You can manage voice messages by connecting to the Voicemail Box. You can also
send and receive text messages and save a created message temporarily.
Voice Message
You can save or check a voice message.
Select [Menu] [Message] [Voice
Message], then you can go to the Voicemail Box.
Check voice messages by following instructions.
SMT-i5343 User Guide _61
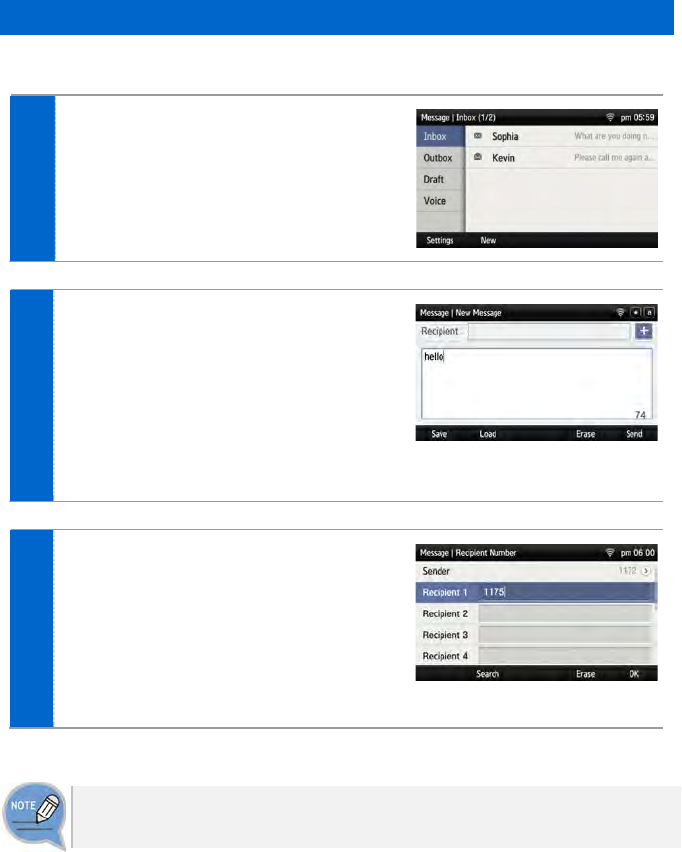
Creating a Message
This is the function used to create and save a message to send.
1 Press the [Menu] [Message] [New]
soft button.
2 After creating a message, specify a
recipient by pressing the [+] soft button at
the right.
- [Save]: By pressing the below soft button, you
can save a created message into the temporary
box.
- [Load]: By pressing the below soft button, you
can retrieve the message stored in the
temporary box.
3 After entering a calling number and called
number, press the [OK] soft button and
then [Send] soft button.
Then the message is transmitted.
- [Search]: You can search a phone number in
the contacts.
- A message can be sent up to 10 people at a
time.
The calling line is subject to charge. A user can change a calling number, but the
actual line to be charged can be changed only through the calling line change.
62_ © SAMSUNG Electronics Co., Ltd.
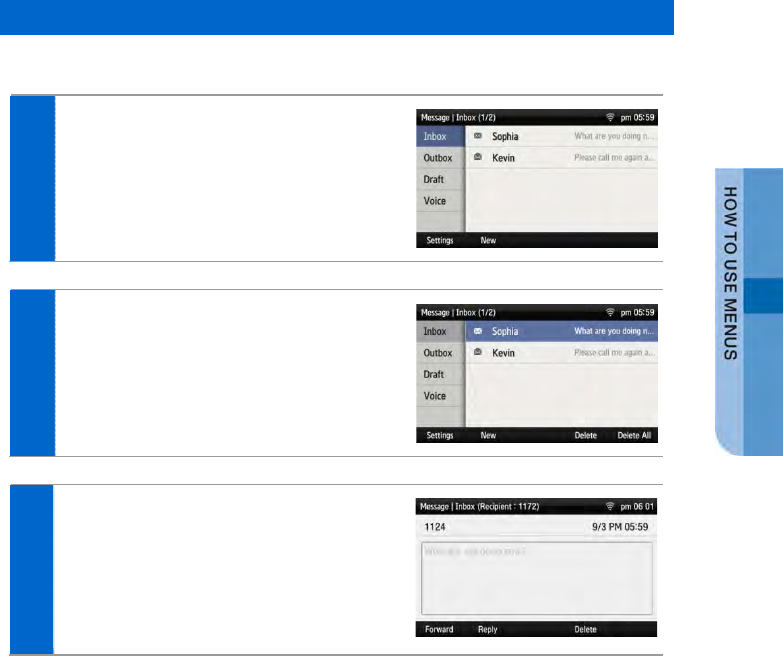
Received Messages
You can save and check a received message.
1 Select [Menu] [Message] [Inbox].
2 The list of received messages is
displayed.
- [Delete]: You can delete a selected message.
- [Delete All]: You can delete all the messages.
3 To view all message information, select
the message and then press [OK] button.
- [Forward]: You can forward a message to
others by pressing the below soft button.
- [Reply]: You can reply to a counterpart who
sent a message.
- [Delete]: You can delete a message.
SMT-i5343 User Guide _63
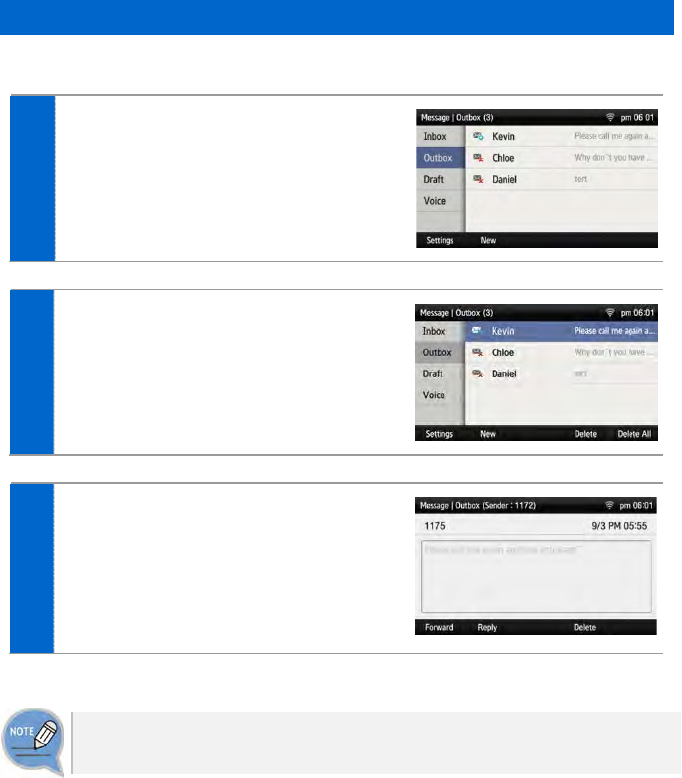
Sent Messages
You can save and check a sent message.
1 Select [Menu] [Message] [Outbox].
2 Lists of sent messages are displayed.
- [Delete]: You can delete a selected message.
- [Delete All]: You can delete all the messages.
3 To view all message information, select
the message and then press [OK] button.
- [Forward]: You can forward a message to
others by pressing the below soft button.
- [Reply]: You can reply to a counterpart who
sent a message.
- [Delete]: You can delete a message.
The reception check function is displayed only when it is supported in the system.
If this function does not work properly, contact the system administrator.
64_ © SAMSUNG Electronics Co., Ltd.
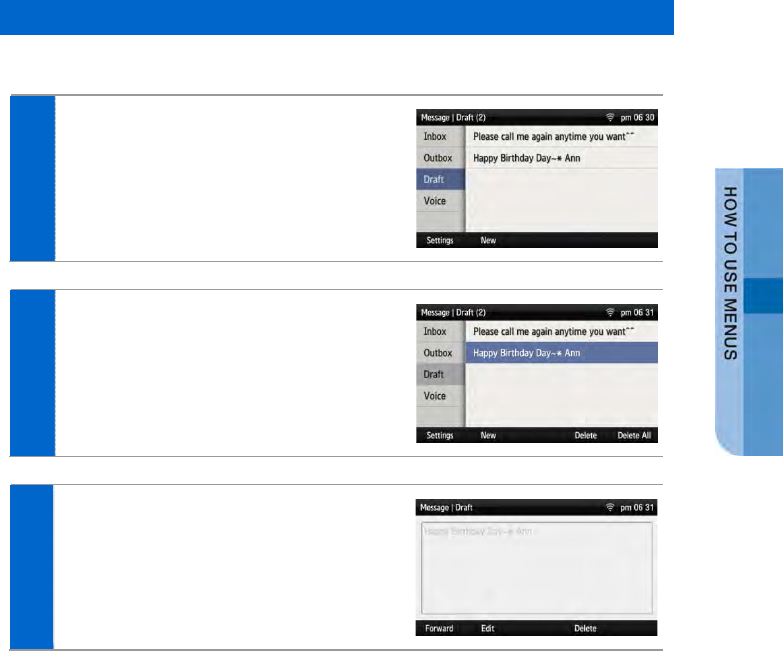
Storage Box
This is the function used to save a created message temporarily.
1 Select [Menu] [Message] [Draft].
2 A temporarily saved message is
displayed.
3 To view all message information, select
the message and then press [OK] button.
- [Forward]: You can forward a message to
others by pressing the below soft button.
- [Edit]: You can edit a message.
- [Delete]: You can delete a message.
SMT-i5343 User Guide _65
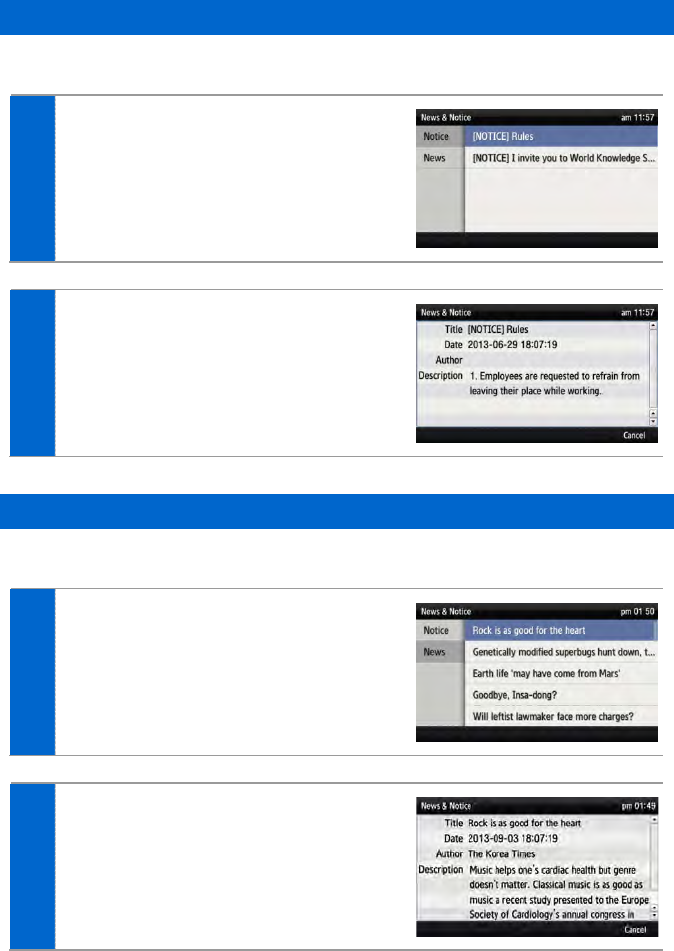
News & Notice
Notice
You can check a notice.
1 Select [Menu] [News & Notice]
[Notice].
2 To view the detail of notice, select a notice
and then press [OK] button.
News
You can check news.
1 Select [Menu] [News & Notice]
[News].
2 To view the detail of notice, select a notice
and then press [OK] button.
66_ © SAMSUNG Electronics Co., Ltd.
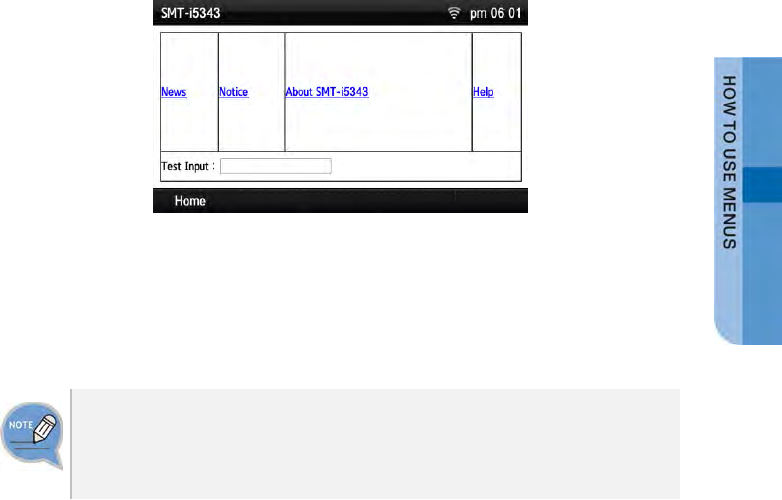
Browser
The user can search and use the information provided from XML browser. Available
information and related services may differ per server construction.
Select [Menu] [Browser].
- Using a navigation button, you can move among the items displayed on the screen.
- When you select a desired item and press the [OK] button, the link or command of the item is
executed.
- You cannot use the menu if there is no browser server. To find out more about
the server setup, contact the server administrator.
- The browser service varies depending on the server. For information about the
service, contact the server administrator.
SMT-i5343 User Guide _67
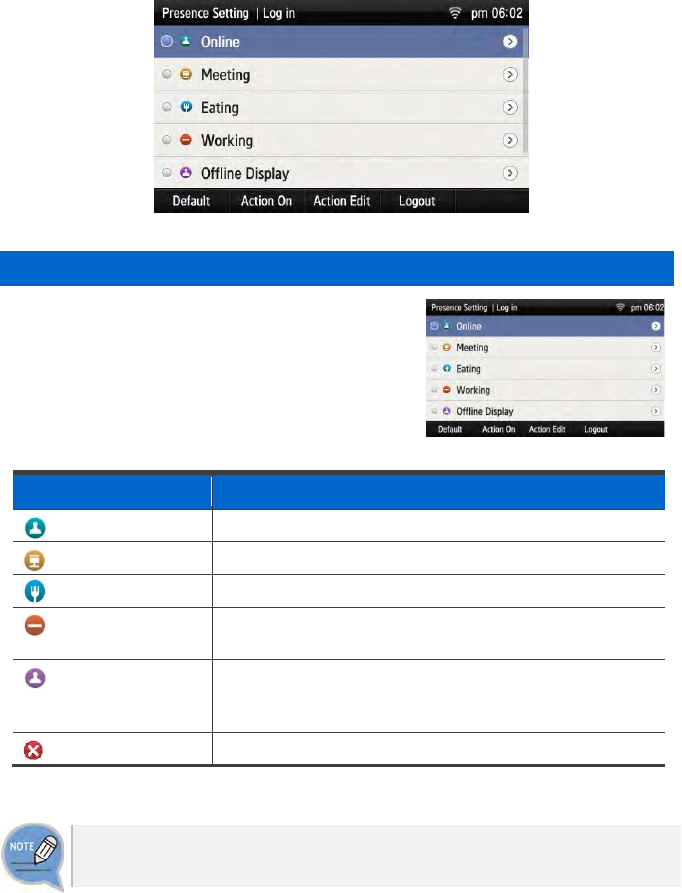
Presence Setting
This is used to change various buddy setups.
Status setup
You can change your status information that is
shown to your counterpart buddy.
Go to [Menu] [Presence Setting] Select a
desired status and press the [OK] button.
- You can check it on a waiting screen during presence
status setup.
Icon
Description
Online Connected to a presence server.
In Conference Status of meeting attendance
Meal
Out to have a meal.
Busy Busy, as a result of another job. If the status of a user is set
to Busy, then Call Transfer may have been set.
Offline (out of duty) Logout status Select this status to log out from the presence
server. The user has logged in, but ‘offline’ status is shown
to buddy users.
Do Not Disturb
‘Do not disturb’ status.
After logging out from the presence server, Auto Login does not work until next
login.
68_ © SAMSUNG Electronics Co., Ltd.

Status Additional Function
You can set up the additional functions of a status.
1 Go to [Menu] [Presence Setting]
Select a desired status. Press the
[Action Edit] soft button.
2 Set up a status by pressing the [Add] soft
button at the bottom of presence setup
screen.
Press the [Save] soft button after adding
an additional function.
Operation Usage Setup
You can set up whether to use an additional function for each status.
1 Go to [Menu] [Presence Setting]
Select a desired status. Press the
[Action Edit] soft button.
2 Set up a status by pressing the [Add] soft
button at the bottom of presence setup
screen.
Press the [Save] soft button after adding
an additional function.
SMT-i5343 User Guide _69
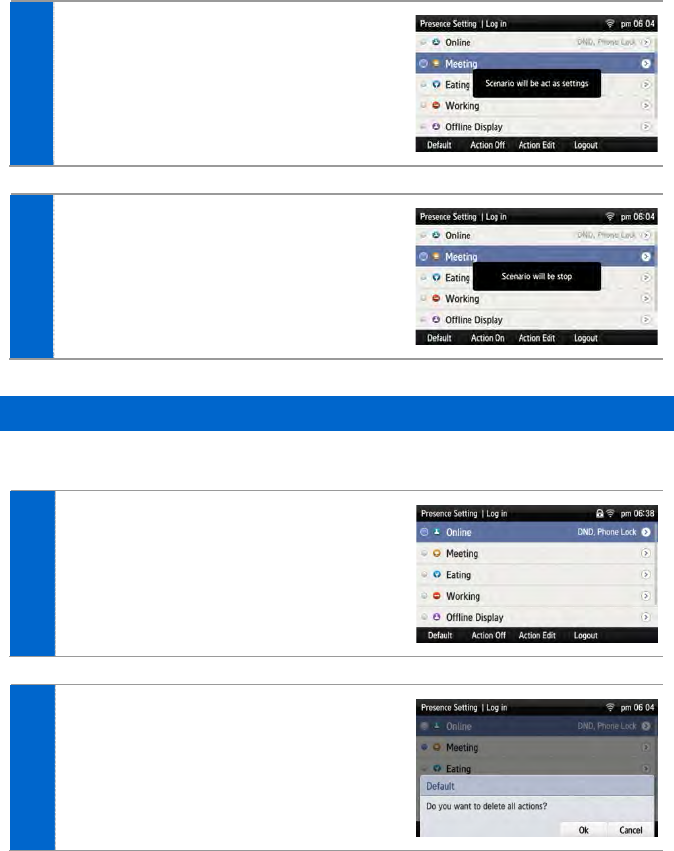
3 When you press the [Action On] soft
button at the bottom of presence setup
screen, the operation configured for the
status is used.
4 When you press the [Action Off] soft
button at the bottom of presence setup
screen, the operation configured for the
status is stopped.
Function Initialization
You can initialize the additional functions of a status.
1 Press the [Menu] [Presence Setting]
[Function Initialization] soft button.
2 When you press the [OK] soft button in
the below popup window, all the actions
configured for a selected status are
deleted.
70_ © SAMSUNG Electronics Co., Ltd.
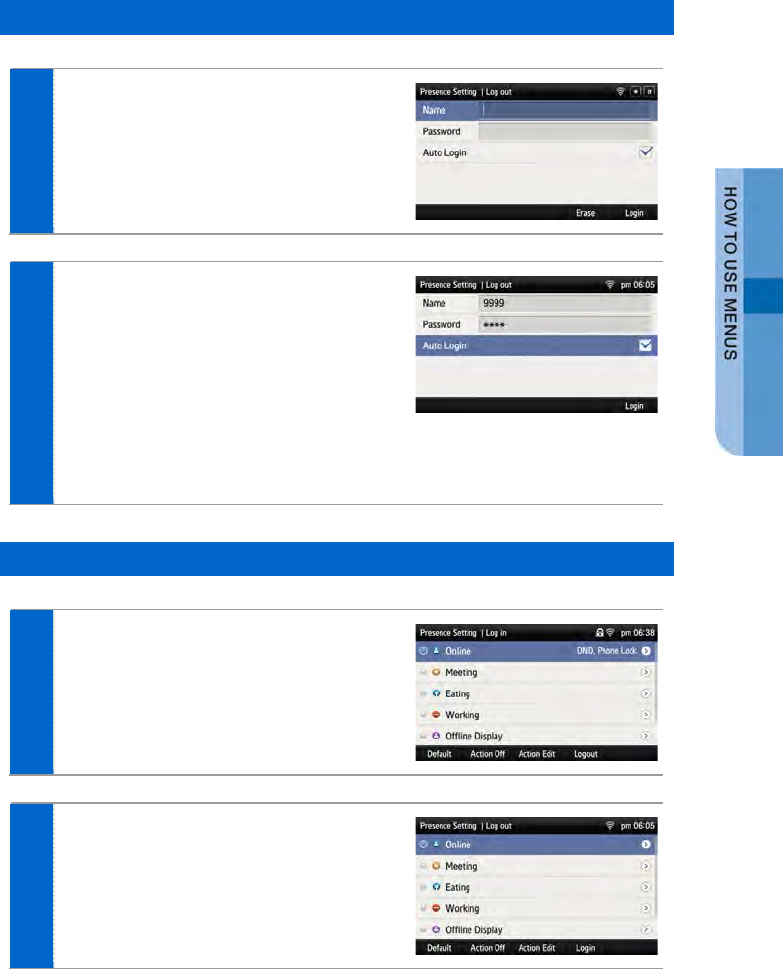
Login Setup
1 Press the [Menu] [Presence Setting]
[Login] soft button.
2 After entering an ID and password, select
the Auto Login function.
Press the [Login] button and save the
login information. And then log into the
presence server.
- If login is not successful after setting Auto Login,
check the account information. If the problem
continues, contact the administrator.
- After login, your presence status is displayed on
the waiting screen.
Logout Setup
1 Press the [Menu] [Presence Setting]
[Logout] soft button.
2 If logout is configured, the user status is
not displayed to a buddy.
SMT-i5343 User Guide _71

Buddy Registration
You can register a new buddy.
1 Select [Menu] [Contacts]
A desired user [Edit] [Add Field]
soft button.
2 Press the [Buddy ID] among the items.
3 When the buddy ID is displayed in the
contact screen, enter the buddy ID.
After entering the buddy ID, press the
[Save] soft button.
- The buddy ID can be English or number.
Retrieving Buddy Status
You can retrieve the status of a registered buddy.
1 When you select [Menu] [Contacts]
soft button, the current status of a buddy
is displayed beside the user.
- The buddy status is not displayed if the user
logs out.
- Call Available: If the phone icon is blue,
the user can take a call.
- In a Call: If the phone icon is red, the user
is busy.
72_ © SAMSUNG Electronics Co., Ltd.
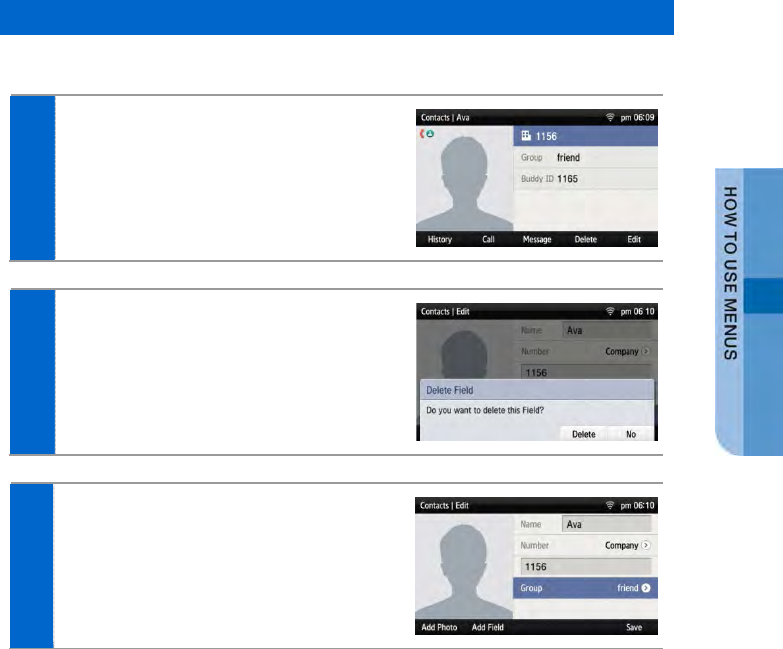
Deleting a Buddy
You can delete a registered buddy.
1 Select [Menu] [Contacts]
A desired user [Edit] soft button.
2 After selecting [Buddy ID], press the
[Delete Field] soft button to delete the
buddy ID.
3 If you press the [Save] soft button after
deleting the buddy ID, the history of buddy
ID deletion is saved.
SMT-i5343 User Guide _73
Call Service
You can set up Auto Answer, Call Waiting, absence, outbound call lock, and wake-
up call. (The function may vary depending on each system.)
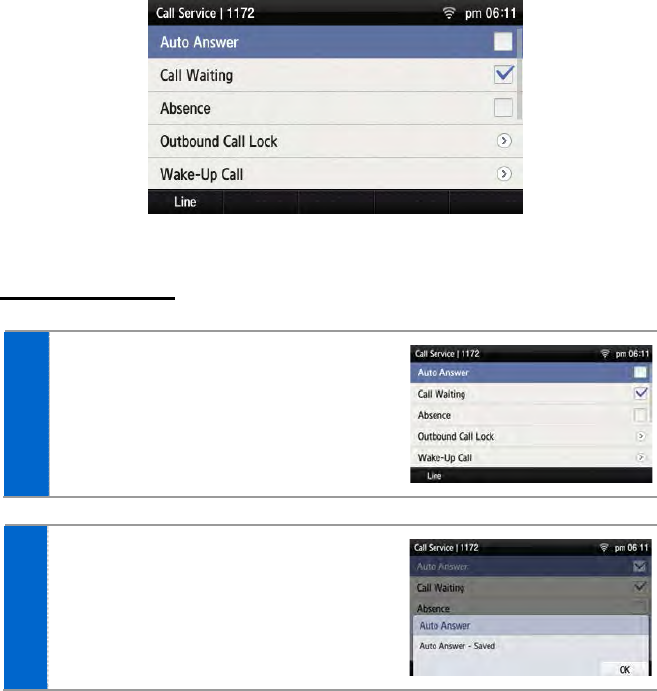
Auto Answer
1 Select [Menu] [Call Service]
[Auto Answer].
- If Auto Answer is enabled, a call is automatically
connected if there is an incoming call.
2 When you press the [OK] soft button in
the below popup window, it becomes Auto
Answer status.
- You can disable the service in the same
manner.
74_ © SAMSUNG Electronics Co., Ltd.
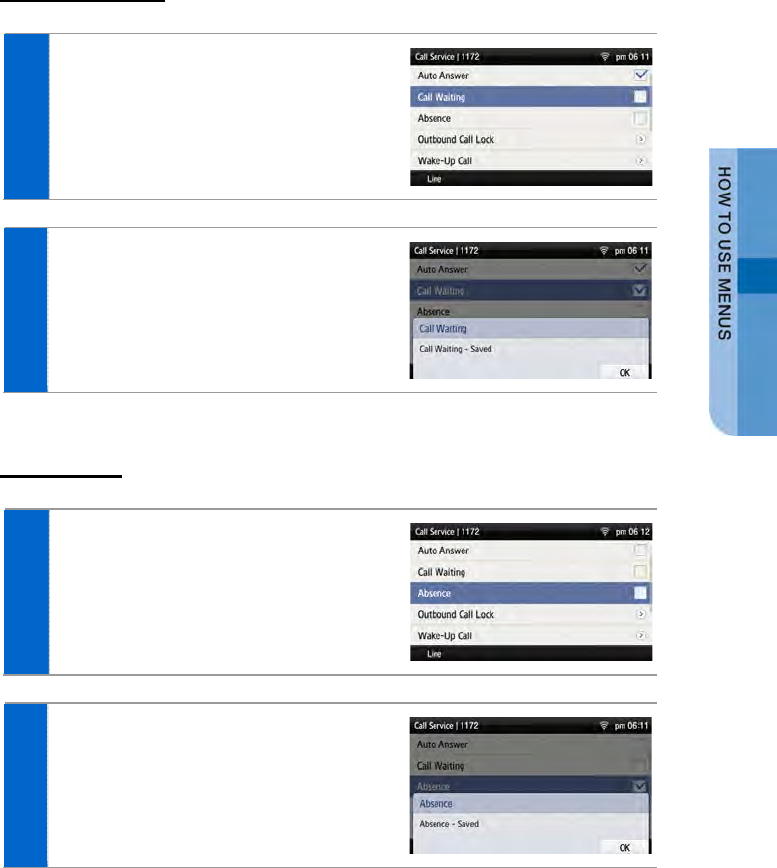
Call Waiting
1 Select [Menu] [Call Service]
[Call Waiting].
- When the Call Waiting is enabled, you can
receive a new incoming call by making a
current call standby.
2 When you press the [OK] soft button in
the below popup window, it becomes Call
Waiting status.
- You can disable the service in the same
manner.
Absence
1 Select [Menu] [Call Service]
[Absence].
- When the absence is enabled, your absence is
notified to a caller when there is an incoming
call.
2 When you press the [OK] soft button in
the below popup window, it becomes
absence status.
- You can disable the service in the same
manner.
SMT-i5343 User Guide _75

Outbound Call Lock
1 Select [Menu] [Call Service]
[Outbound Call Lock].
- When this service is enabled, an outgoing call
is restricted.
2 If you enable this service by using the
navigation button and enter a password,
an outgoing call is restricted.
When you press the [OK] soft button in
the below popup window, it becomes Call
Waiting status.
- You can disable the service in the same
manner.
Wake-Up Call
1 Select [Menu] [Call Service]
[Wake-Up Call].
2 You can enable this service using the
navigation button and set the repeat
setting to either at one specific time or
everyday. When you press the below
[Save] soft button, wake-up call is
enabled.
- Repeat Setting [Once]: When you enter month,
date, hour, and minute, the wake-up call rings
once at the specified time. (e.g. 06181500-June
18 3:00 pm)
- Repeat Setting [Repeat]: When you enter hour
and minute,the wake-up call rings every day at
the specified time. (e.g. 1502-3:02 pm)
76_ © SAMSUNG Electronics Co., Ltd.
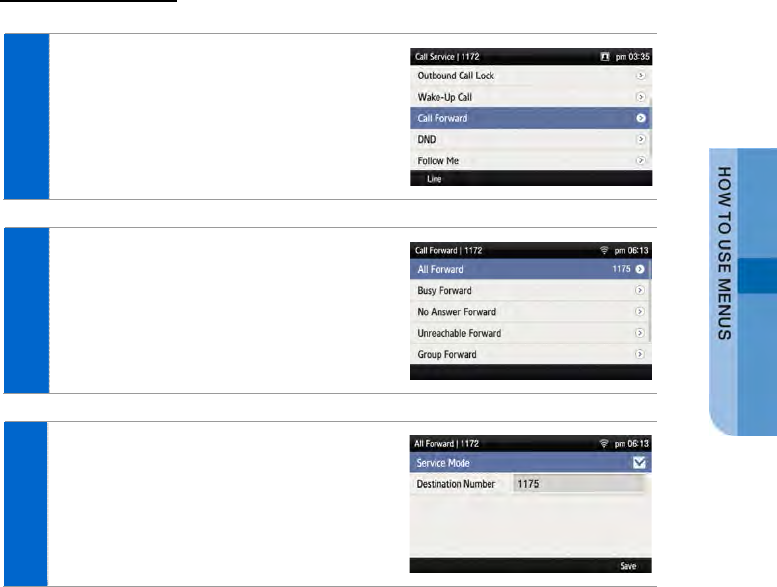
Call Forward
1 Select [Menu] [Call Service]
[Call Forward].
2 Select a call forward type.
- You can set up All Forward, Busy Forward, No
Answer Forward, Unreachable Forward, Group
Forward, or VM Forward.
3 You can enable the Service Mode using
the navigation button, and register a
Destination Number.
- You can disable the service in the same
manner.
SMT-i5343 User Guide _77
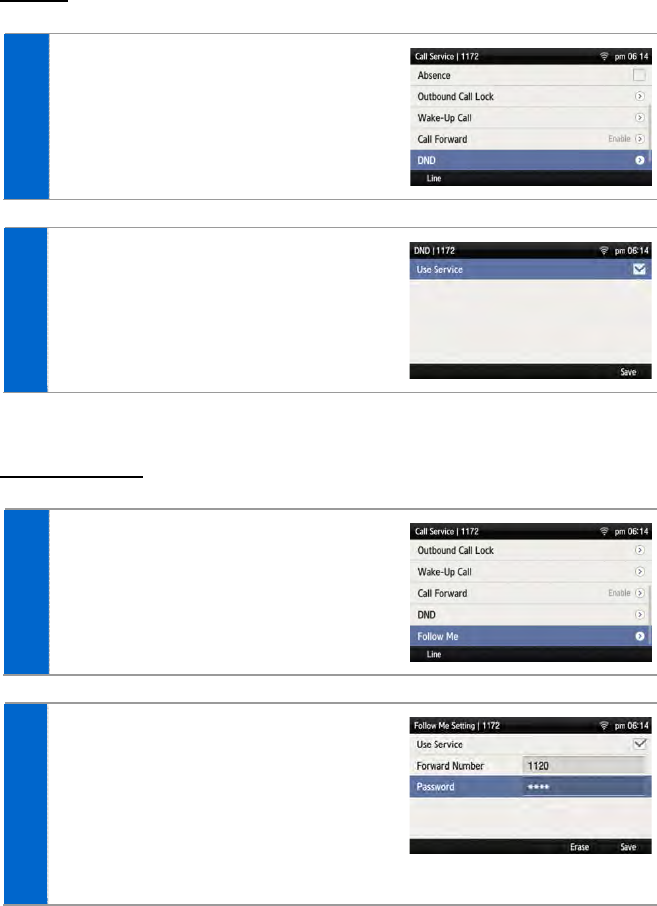
DND
1 Select [Menu] [Call Service] [DND].
2 When you press the below [Save] soft
button, the DND function is enabled.
Follow Me
1 Select [Menu] [Call Service]
[Follow Me].
2 When you enable the Use Service by
using the navigation button and enter the
forward number and password, then the
service is enabled. When you press the
below [Save] soft button, the Follow Me
function is enabled.
- You can disable the service in the same
manner.
78_ © SAMSUNG Electronics Co., Ltd.
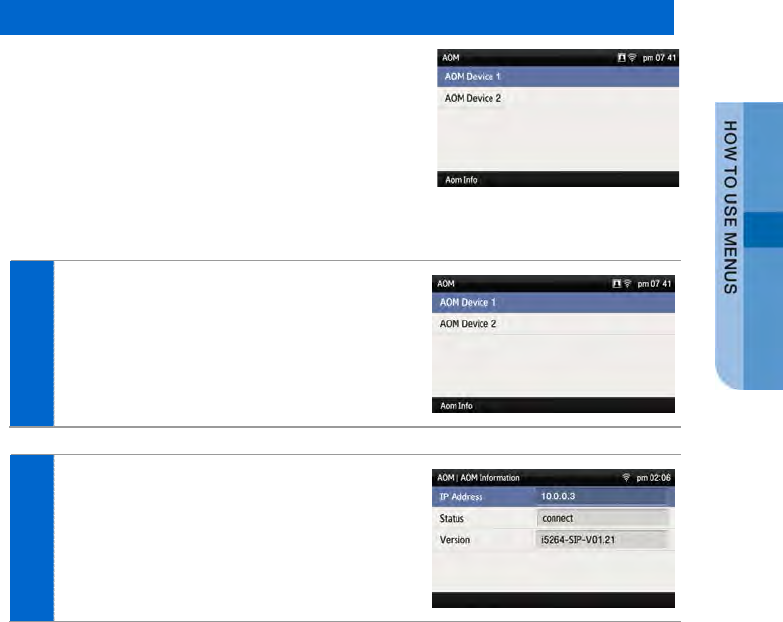
AOM
AOM
Select [Menu] [AOM].
If an AOM device is connected, you can retrieve or
modify the AOM button function.
[Retrieving AOM Device Information]
1 After selecting an AOM device by using the
navigation button, press the [AOM Info] soft
button.
2 The detail information of a selected AOM
device is displayed.
SMT-i5343 User Guide _79
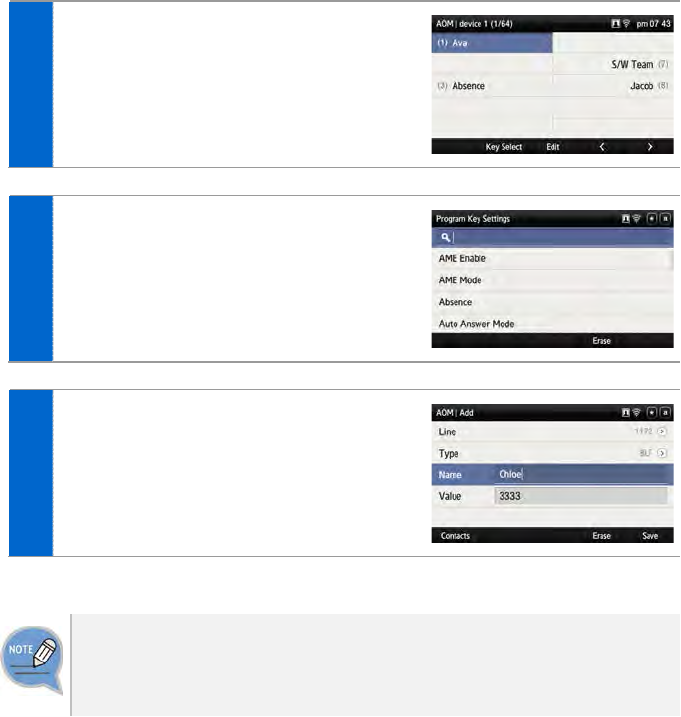
[AOM Button Setting]
1
To change the AOM button function, move to
a desired AOM button and press the [OK]
button.
2 After moving to a desired AOM button by
using the navigation button, press the [OK]
soft button.
3 Enter the information and press the [Save]
soft button.
- If the entered information is not correct, the AOM
button function cannot be registered.
- [Delete]: You can delete a registered AOM button
function.
The AOM button setup function may not be available depending on system.
If this function does not work properly, contact the system administrator.
For detail information about how to use the AOM button function, refer to the SCM
operation manual.
80_ © SAMSUNG Electronics Co., Ltd.
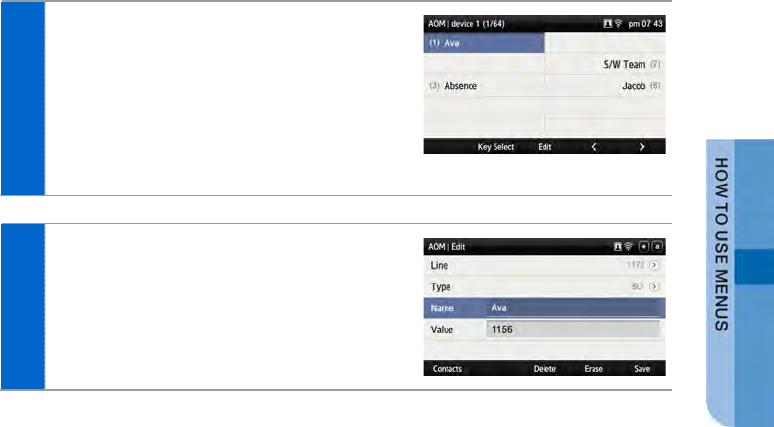
[Editing AOM Button]
1 After moving to a desired AOM button by
using the navigation button, press the [OK]
or [Edit] button.
- [Device]: You can select another AOM device.
(Up to 4 AOM devices are supported.)
- [>][<]: You can move the location of the AOM
button by page.
- [Edit]: You can edit the AOM button function.
2 You can modify the information of a selected
AOM button.
SMT-i5343 User Guide _81
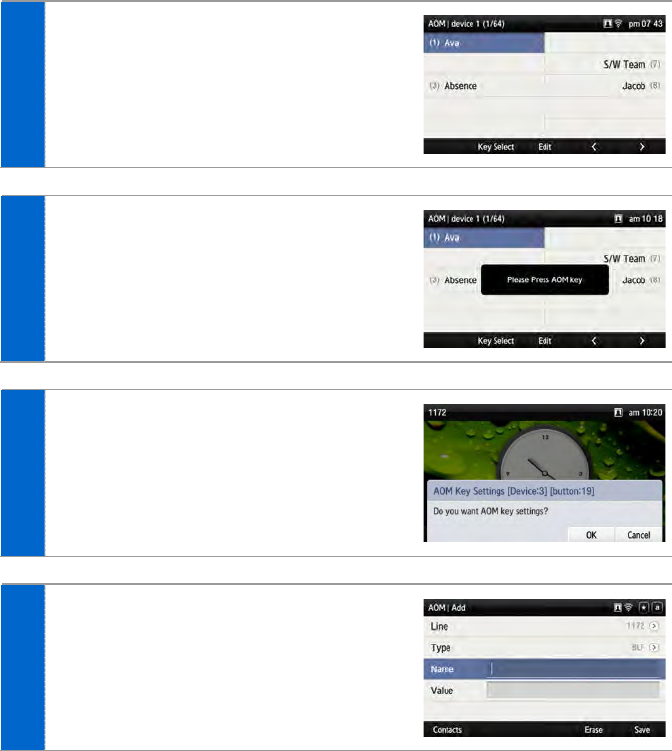
[AOM Function/Operation]
1 Select an empty AOM button number and
press the [Add] soft button.
- You can move to a desired number in the AOM
device by pressing the number.
2 When you press the [Key Select] soft
button at the bottom of screen, the [Please
Press AOM key] popup window is
displayed. Press the corresponding number
of AOM device.
3 When you press the key of AOM device, the
below popup window is displayed at the
bottom of screen. In the popup window,
press the [OK] soft button.
4 Enter the information and press the [Save]
soft button.
- If the entered information is not correct, the AOM
button function cannot be registered.
82_ © SAMSUNG Electronics Co., Ltd.
Settings
You can set up screen, sound, language, password and lock and retrieve the phone
information.
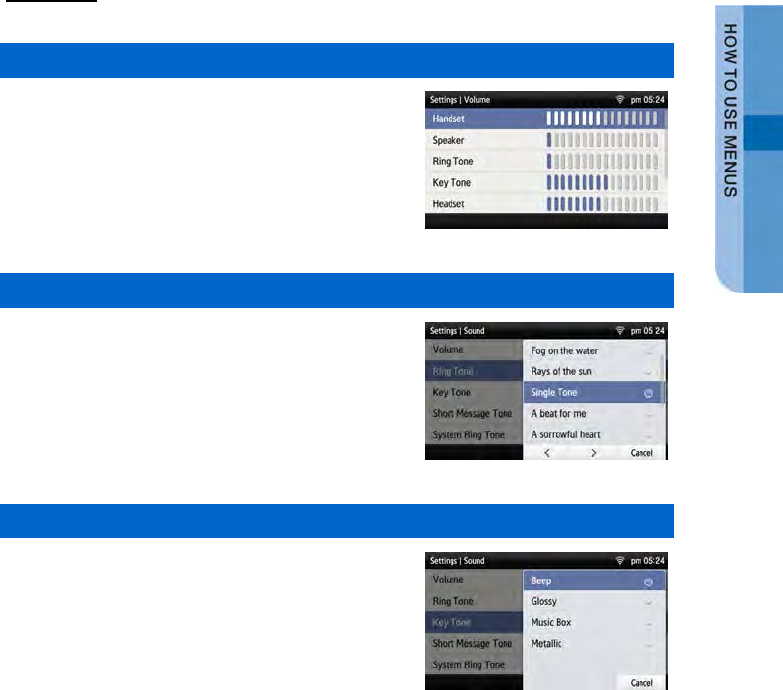
Sound
Volume
Select [Menu] [Settings] [Sound]
[Volume].
By pressing the navigation button, you can set
the volume of a handset (receiver), speaker,
ringtone, key tone, headset, message alert, and
alarm respectively.
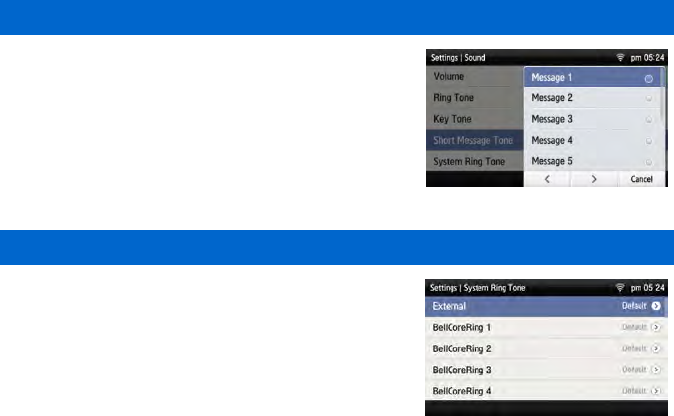
Ring Tone
Select [Menu] [Settings] [Sound]
[Ring Tone].
You can set up a ringtone.
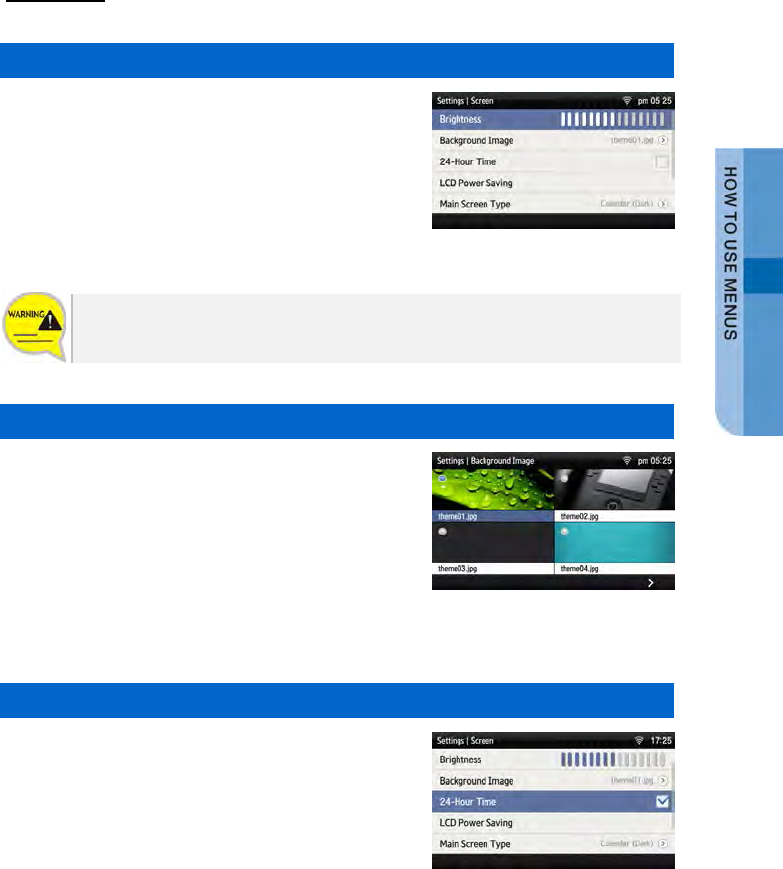
Key Tone
Select [Menu] [Settings] [Sound]
[Key Tone].
You can set up a key tone.
SMT-i5343 User Guide _83
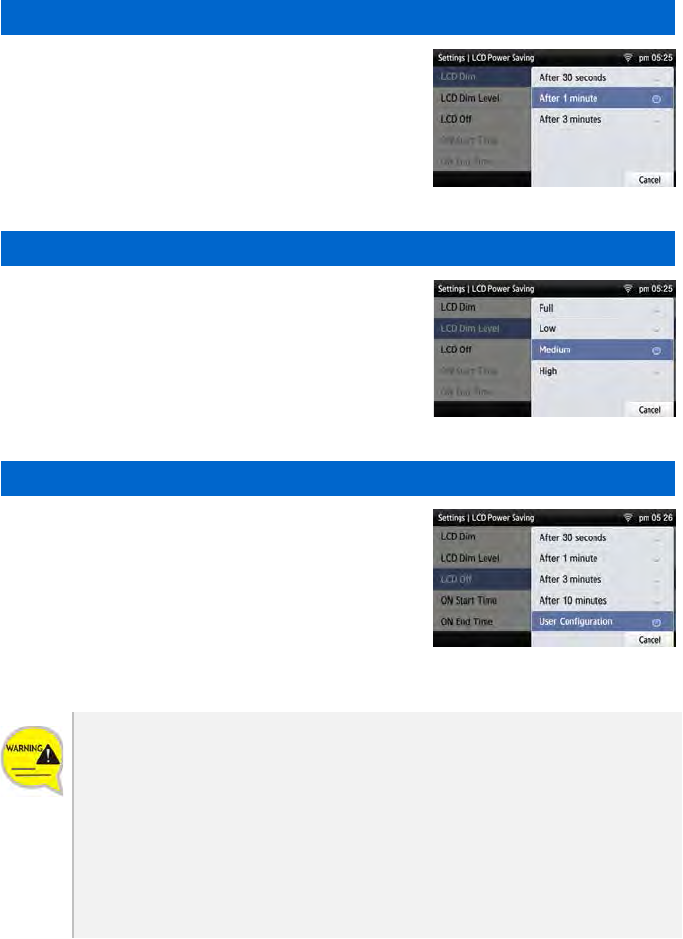
Short Message Tone
Select [Menu] [Settings] [Sound]
[Short Message Tone].
You can set up a message alert sound.
System Ring Tone
Select [Menu] [Settings] [Sound]
[System Ring Tone].
You can set up a system ring tone.
84_ © SAMSUNG Electronics Co., Ltd.
Screen
Brightness
Select [Menu] [Settings] [Screen]
[Brightness].
You can adjust the brightness of the LCD screen
by pressing a navigation button.
The screen brightness may affect the lifetime of the LCD.
Background Image
You can set up the Background Image of the LCD
screen.
Select [Menu] [Settings] [Screen]
[Background Image].
By pressing the navigation button, the user can
change the background image and time display.
By using the widget, you can display a digital
clock, analog clock, world time clock, or calendar.
24-Hour Time
Select [Menu] [Settings] [Screen]
[24-Hour Time].
SMT-i5343 User Guide _85
Making LCD screen dark
Select [Menu] [Settings] [Screen]
[LCD Dim].
- Screen dim: After 30 seconds/After 1 minute/
After 3 minutes
Making LCD screen dark-brightness
Select [Menu] [Settings] [Screen]
[LCD Dim Level].
- Screen dim-brightness: Full/Low/Medium/High
LCD screen off
Select [Menu] [Settings] [Screen]
[LCD Off].
Select the time when the LCD screen will be
turned off.
- Screen off: After 30 seconds/After 1 minute/
After 3 minutes/After 10 minutes/User Configuration
Changing the default settings for the screen menu may affect the lifetime of the
LCD and, therefore, do not change them if possible.
Below are shown the default LCD power settings.
- Screen dim: After 30 seconds
- Screen dim-brightness: Medium
- Screen off: User Configuration (08:00 to 18:00)
Using the LCD power setting function helps extend the lifetime of the LCD.
86_ © SAMSUNG Electronics Co., Ltd.

Main Screen Type
Select [Menu] [Settings] [Screen]
[Main Screen Type].
SMT-i5343 User Guide _87
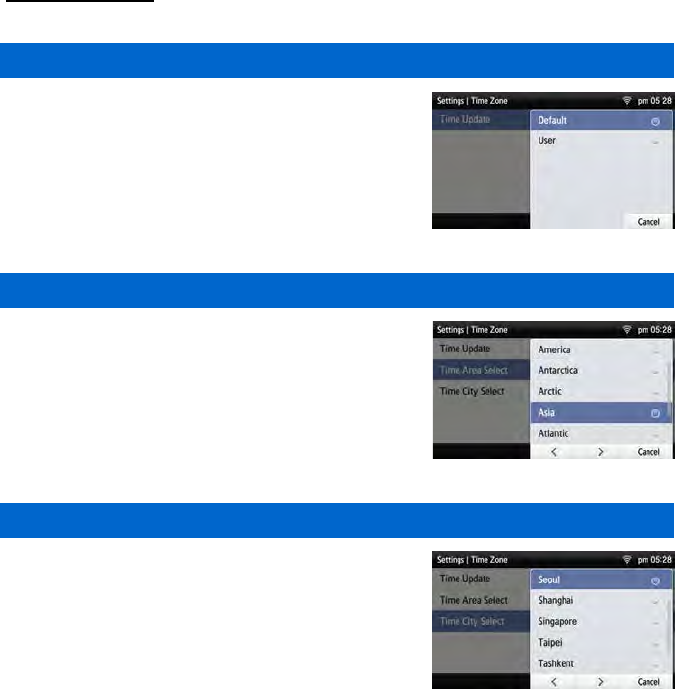
Time Zone
Settings
Select [Menu] [Settings] [Time Zone]
[Time Update].
You can select either system settings (Default) or
User settings.
Time Area Setup
Select [Menu] [Settings] [Time Zone]
[Time Area Select].
You can select a region.
Selecting a City
Select [Menu] [Settings] [Time Zone]
[Time City Select].
You can select a city.
88_ © SAMSUNG Electronics Co., Ltd.
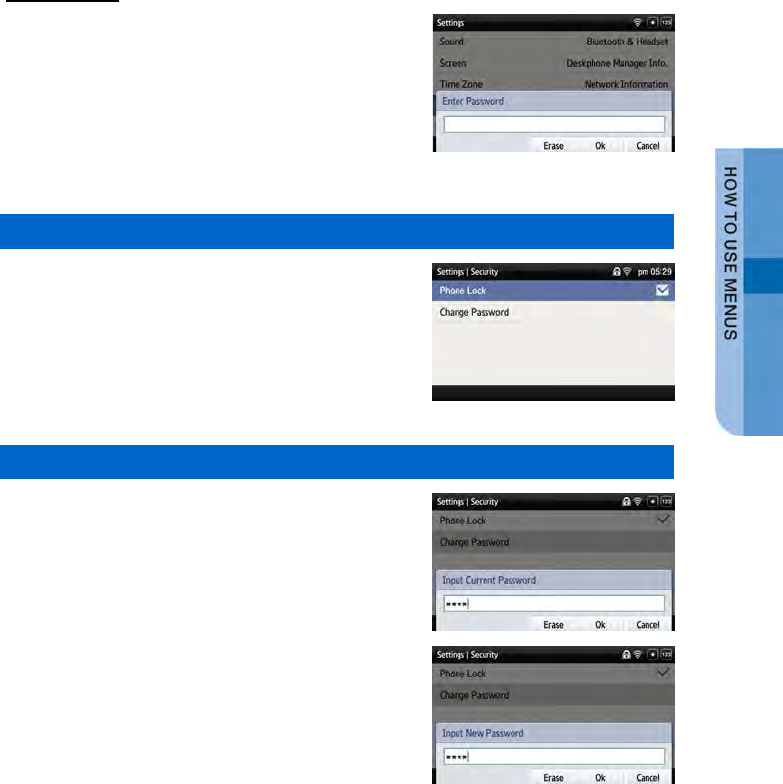
Security
To lock the menu or change a password, you must
enter a password.
The user can set a password which is then used
to set the functions of the phone, and the lock
function. This prevents other people from using
the phone.
- The default password is [0000].
Phone Lock
Select [Menu] [Settings] [Security]
[Phone Lock].
You can set up the menu lock.
Change Password
Select [Menu] [Settings] [Security]
[Change Password].
You can change a password.
- You can enter up to 16 characters for the password.
SMT-i5343 User Guide _89
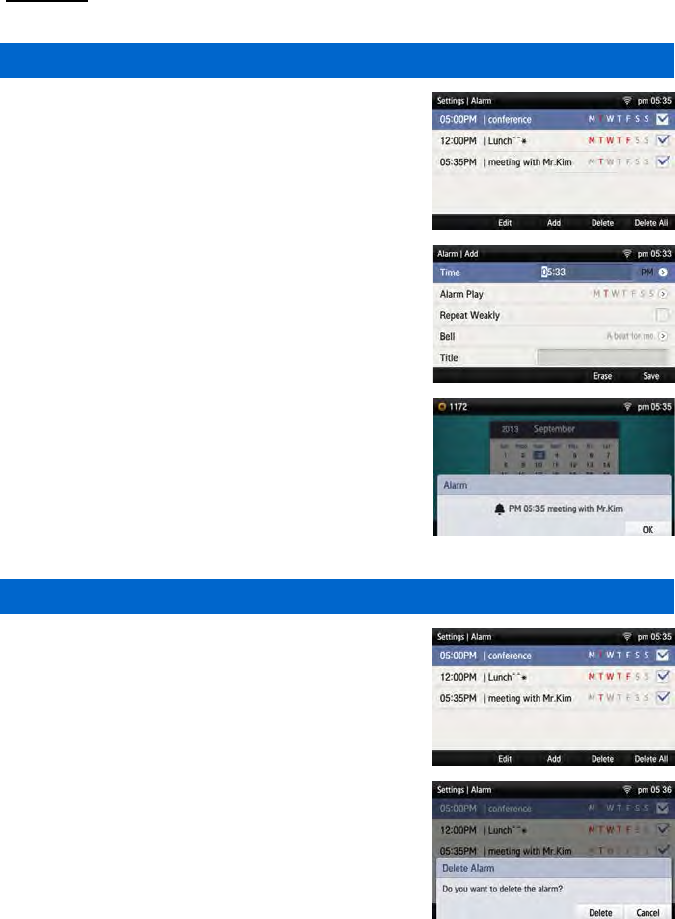
Alarm
Editing/Adding an Alarm
Select [Menu] [Settings] [Alarm].
You can set up an alarm.
- [Edit]: You can edit an existing alarm.
- [Add]: You can add a new alarm.
When it becomes the time where an alarm is set,
the alarm message is displayed and there is an
alarm sound.
- You can set up the alarm volume by going to [Menu]
[Settings] [Sound] [Volume] [Alarm].
Deleting an Alarm
Select [Menu] [Settings] [Alarm].
You can delete an alarm.
- [Delete]: You can delete an existing alarm.
- [Delete All]: You can delete all existing alarms.
90_ © SAMSUNG Electronics Co., Ltd.

Bluetooth & Headset
Select [Menu] [Settings] [Bluetooth &
Headset].
You can set up a function related to the headset
and Bluetooth.
Using Hardware Headset Key
Select [Menu] [Settings] [Bluetooth &
Headset] [Use Hardware Headset Key].
You can set up whether to use the phone headset
key.
[Use Hardware Headset Key]
You can select whether to use the headset button. If the headset key mode is set to
‘Used’, you can set up whether to use a headset by pressing the [Headset] button
on the waiting screen.
Headset Mode
Select [Menu] [Settings] [Bluetooth &
Headset] [Headset Mode].
You can adjust settings for the headset type to be
used in the phone.
Bluetooth Mode
Select [Menu] [Settings] [Bluetooth &
Headset] [Bluetooth Mode].
You can select a Bluetooth mode out of ‘Not
Used’, ‘Headset’, or ‘Smart Phone’.
SMT-i5343 User Guide _91
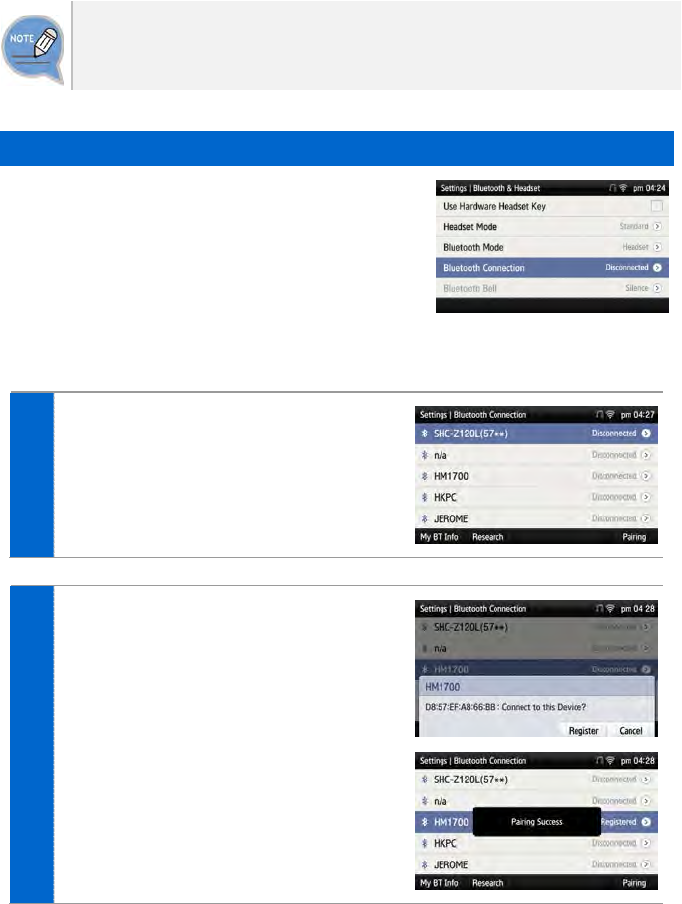
- A Bluetooth headset is provided separately.
- The method of use and support may differ depending on the type of Bluetooth
headset. Refer to the user manual of the Bluetooth device.
Bluetooth Connection
Select [Menu] [Settings] [Bluetooth &
Headset] [Bluetooth Connection].
[Bluetooth mode is ‘Headset’]
1 After searching nearby Bluetooth devices,
the connection information is displayed.
2 After selecting a Bluetooth headset to
connect to the phone, press the [Pairing]
button.
After checking it is the correct device,
press the [Register] button.
- The Bluetooth headset to connect must be in
the pairing waiting mode.
92_ © SAMSUNG Electronics Co., Ltd.
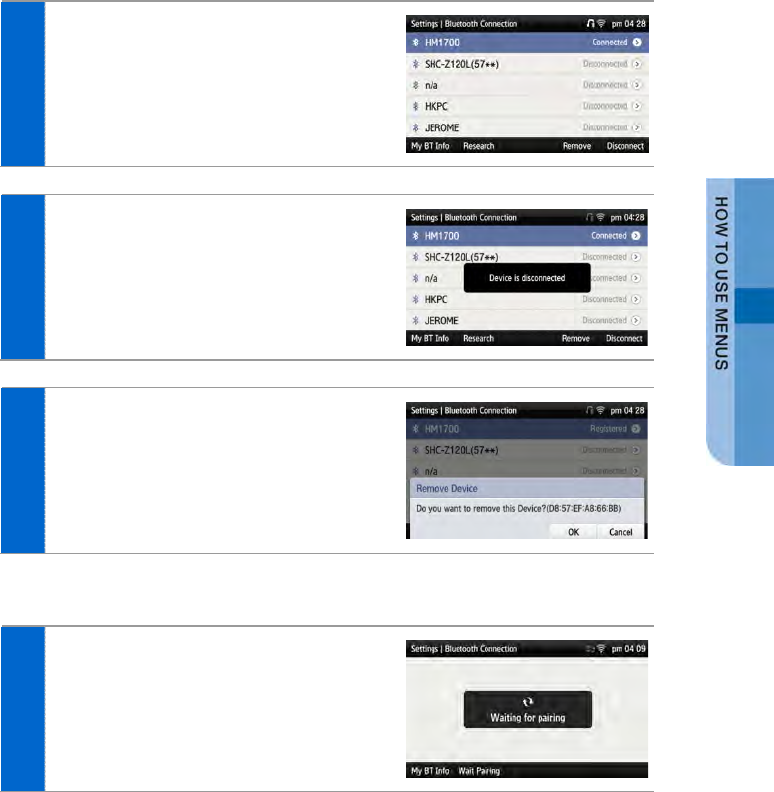
3 Once the Bluetooth headset is connected,
you can talk through the headset.
- When you calling via a Bluetooth headset, red
light turns on the [Headset] button.
- If you do not use the Bluetooth headset, the
headset button is blinking.
4 When you press the [Disconnect] button,
the device is disconnected.
5 When you press the [Remove] button, the
device is deleted from the search list as
well as it is disconnected.
[Bluetooth mode is ‘Smart Phone’]
1 To connect a smartphone to the phone,
press [Wait Pairing] and start Bluetooth
search in your smartphone.
SMT-i5343 User Guide _93
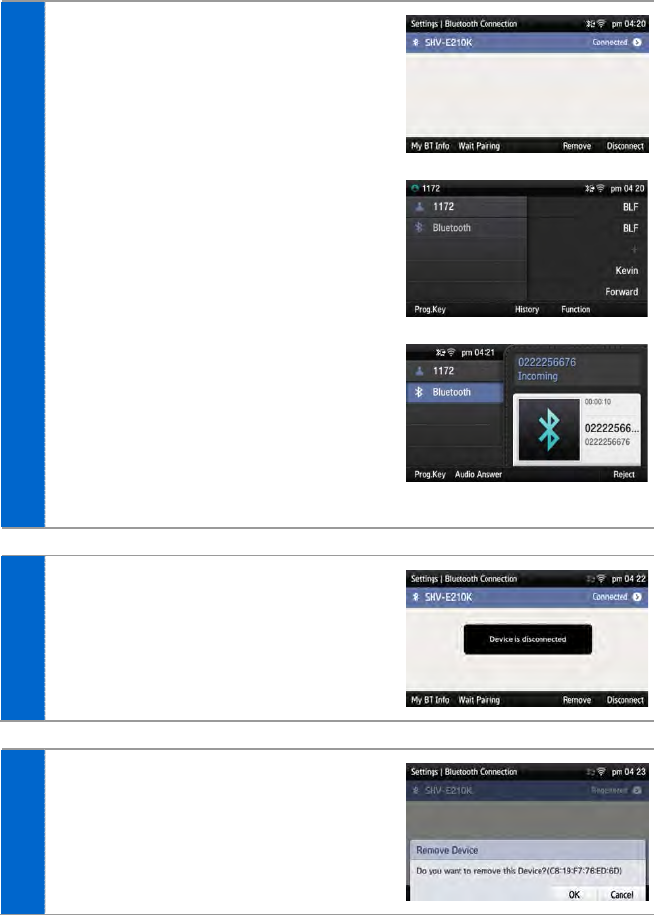
2 When the smartphone is connected, you
can use the call move function between
the phone and smartphone.
- In the phone waiting screen, you can see
‘Bluetooth’ information is displayed under your
phone number.
- When a call is received to the smartphone,
there is a ringtone both at the phone and
smartphone and you can select either one to
receive the call.
- While talking through the smartphone, you can
press the [Headset] button to move the call to
the phone. You can also move a call from the
phone to the smartphone by pressing the
[Move] button.
3 When you press the [Disconnect] button,
the device is disconnected.
4 When you press the [Remove] button, the
device is deleted from the search list as
well as it is disconnected.
94_ © SAMSUNG Electronics Co., Ltd.
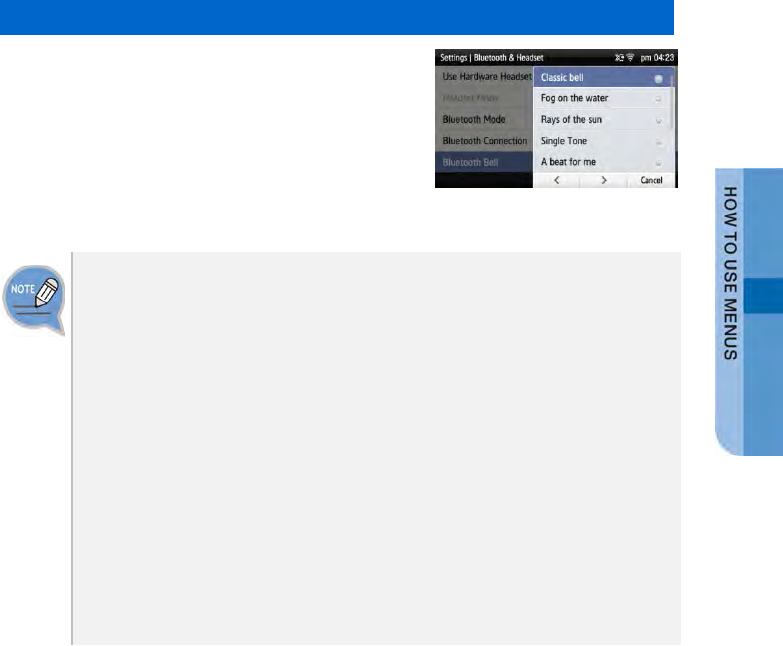
Bluetooth Bell
If the [Menu] [Settings] [Bluetooth &
Headset] [Bluetooth Mode] is set to Smart
Phone, you can set up [Bluetooth Bell].
- The default is ‘Mute’.
Bluetooth is the name for a short-range radio networking technology that operates
at 2.4 GHz to support wireless connection of various devices within a specific
distance.
- Bluetooth may cause RF interference between low-power devices using the
same frequency band such as the devices for industrial, scientific and medical
use, microwave oven and wireless LAN units.
- Use Bluetooth devices at least 5 meters away from the wireless LAN area.
- Abnormal operation or noise may occur depending on the environment.
- If the user’s obstructs signal transmission, abnormal operation or noise may
occur.
- If a part of body contacts the radio transmission/receipt part of Bluetooth or a
mobile phone, abnormal operation or noise may occur.
- Noise may occur depending on the position of the user if the reception power is
reduced due to radio obstacles, e.g. walls and partitions.
- It may be difficult to talk due to the noise from the surroundings when the user is
in a noisy area or outdoors.
SMT-i5343 User Guide _95
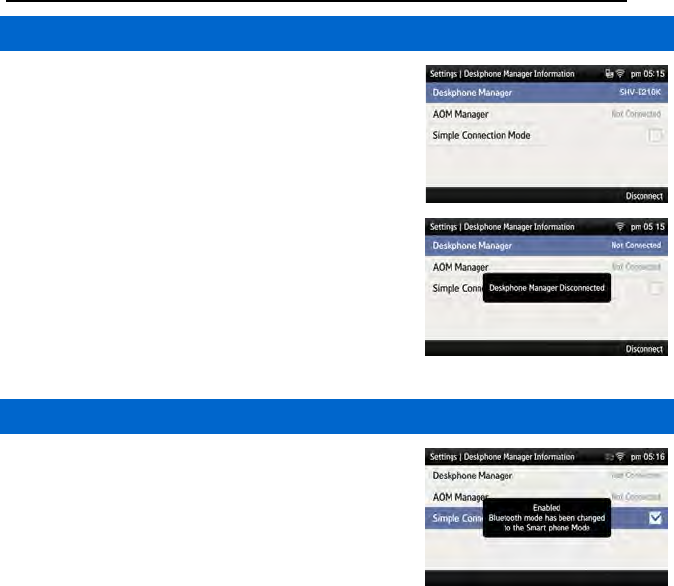
Deskphone Manager Connection Information
Deskphone Manager
When you select [Menu] [Settings]
[Deskphone Manager Information], you can
check the connection information of a mobile
device.
- [Disconnect]: A mobile device is disconnected.
Simple Connection Mode
If you select [Menu] [Settings]
[Deskphone Manager Information]
[Simple Connection Mode], the Bluetooth mode
of phone is changed to Smart Phone.
- When you select [Simple Connection Mode], you
cannot change the Bluetooth mode in [Menu]
[Settings]
[Bluetooth & Headset].
96_ © SAMSUNG Electronics Co., Ltd.
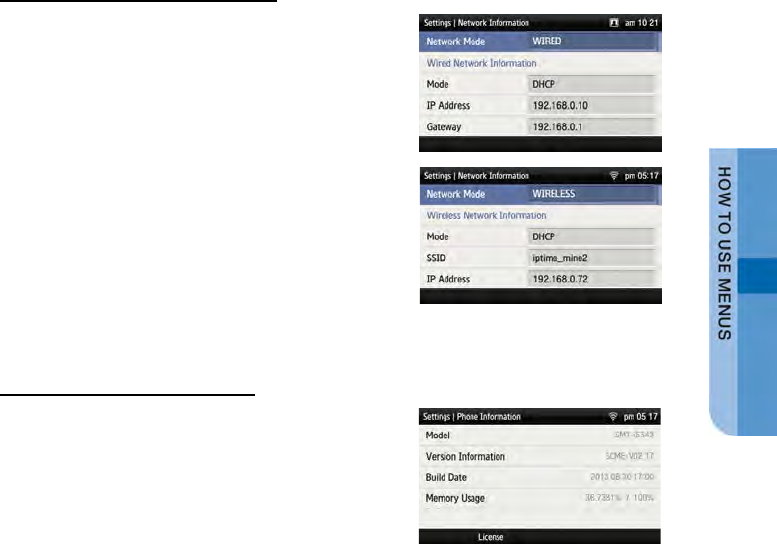
Network information
When you select [Menu] [Settings]
[Network Information], the IP address, DSN
information, or LAN connection status
information, etc. is displayed.
Phone Information
When you select [Menu] [Settings]
[Phone Information], the phone model name or
software version information is displayed.
- [License]: You can check the phone license
information.
SMT-i5343 User Guide _97
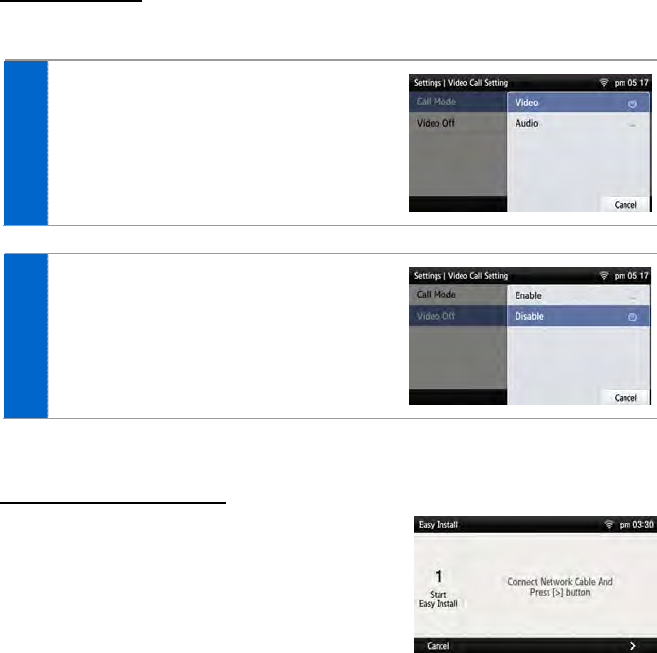
Video Call
The video call function is available from V2.0 version or later.
1 Select [Menu] [Settings]
[Video Call Setting].
You can set up the video call mode.
2 You can set up whether to turn off a video.
Easy Installation
Select [Menu] [Settings] [Easy Install].
- Refer to the ‘Basic Functions’ ‘Easy Installation’ of
this manual.
98_ © SAMSUNG Electronics Co., Ltd.