Samsung Electronics Co SQ10 Notebook Personal Computer User Manual Manual pp 11 to 20
Samsung Electronics Co Ltd Notebook Personal Computer Manual pp 11 to 20
Contents
Manual pp 11 to 20
Using Your Documentation 1
Using Your Documentation
Congratulations on your purchase of a notebook computer with the Windows® XP
operating system. Whether you are new to using a portable computer or are an
experienced user, this user’s manual can help you get the most from your computer.
Manual Documentation Conventions
Information Icons
Three icons and their associated messages appear in this manual. The information
icons are placed before the step/information they apply to:
Warning:
Indicates the possibility of personal injury.
Caution:
Warns you of possible damage to equipment or data.
Note:
Informs you of special circumstances.
Keyboard Conventions
Keys that you need to press to perform certain functions are displayed in the manual
using a small graphic of the button. For example:
indicates the control key (Ctrl on the keyboard).
If you need to press two keys at the same time, the key names are shown joined by a
plus sign. For example:
means that you should press the Alt key and hold it and then press the Pg Up key.
+
2 Users Manual
CD-ROM Device Naming Convention
In many installation programs you will have to get a program from the CD-ROM
device. The program installation sequence assumes that the CD is drive d:\, however
this is not always the case. The name of the CD-ROM drive is the letter following the
letter assigned to your last HDD. For instance, if you have one HDD with two
partitions, the HDD is drives C: and D: and the CD-ROM drive is then drive E.
Touchpad Conventions
You may be asked to click or double-click on items on the display screen. As a general
note the touchpad actions act much in the same way as a wheel mouse, any differences
are explained fully.
The object that needs to be clicked upon will be displayed in Bold text or shown in a
small figure such as the “Start Button” shown on the right => .
Table 1. Touchpad Click Conventions
Almost all "Windows" programs will display the name/function of a button or
icon if you place the touchpad pointer on the item you want information about.
Software User Documentation
Your computer is shipped from the factory with several software programs installed.
The software may include its own online or printed documentation. Refer to the
documentation or the Help options in the software for more information.
The figures and illustrations in this manual may not be identical to those on
your system.
General Icon Note:
Some of the Icons used in Windows XP may be placed on the taskbar by
selecting (ex: Place the volume icon in the taskbar) in the properties dialog
box.
Action Process
Click Depress the touchpad left button and release
Double-Click Quickly click the left touchpad button two times
Introducing Your Computer 3
Introducing Your Computer
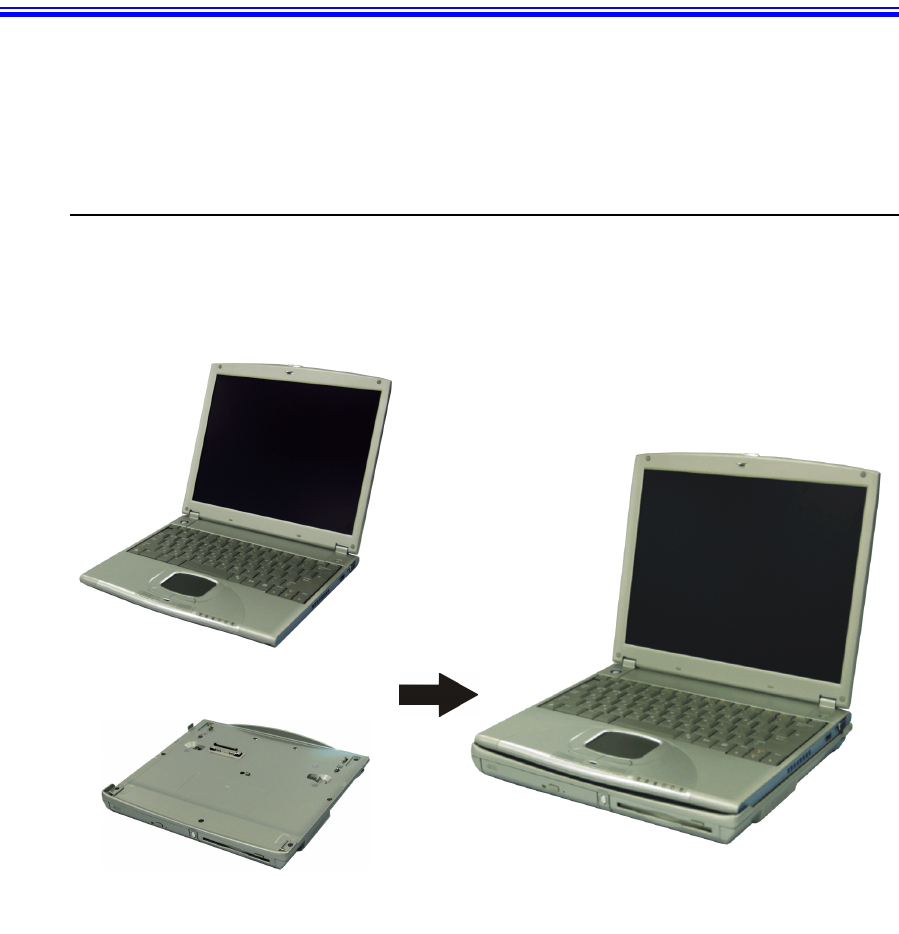
Your lightweight portable notebook computer includes many features to meet your
computing needs at home and/or on the road. The computer is a very slim lightweight
notebook computer with a docking station that has peripheral devices that allow it to
perform all of the functions of a desktop computer.
Where Everything Is
The following sections, PC Equipment Locations and Docking Station Equipment
Locations will explain the details of the notebook computer and the docking station as
well as other basic operations to dock and undock the computer.
Docking Station
Notebook Computer
+
4 Users Manual
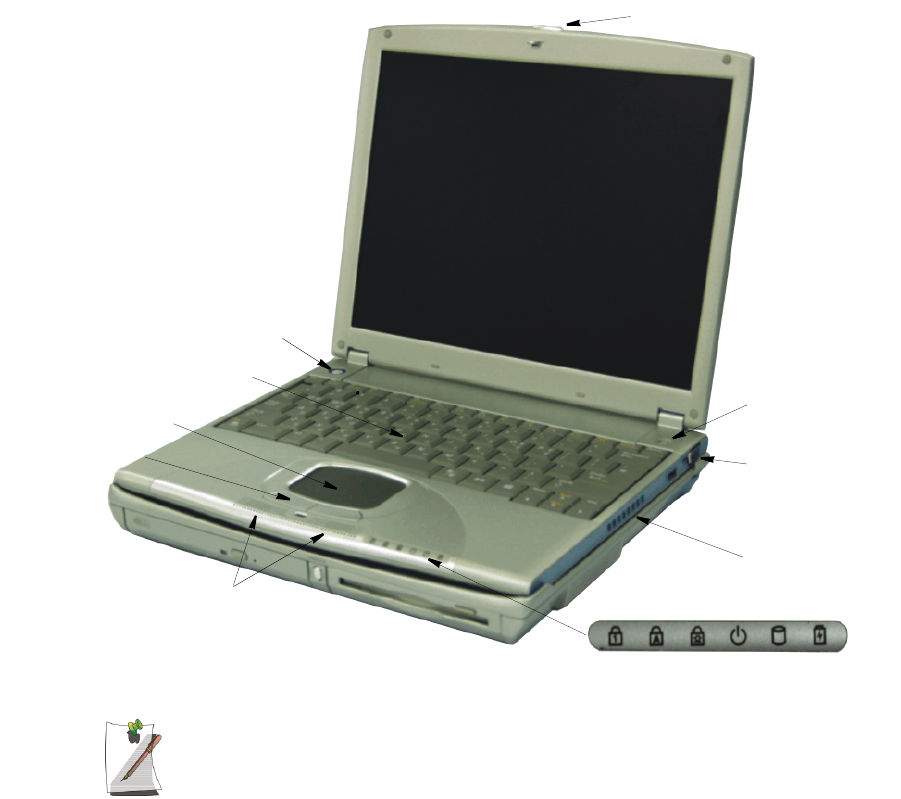
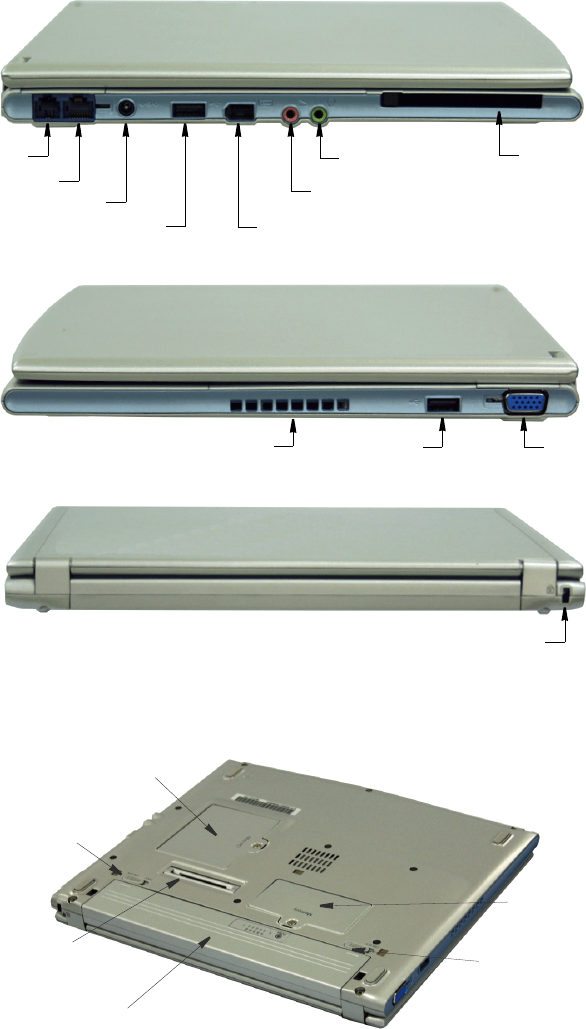
Notebook Equipment Location
Front Side
Unavailable Ports while Notebook is docked
The Lan and Video ports are unavailable on the Notebook while it is docked
due to the configuration of the docking station, however they are duplicated on
the docking station.
Internet Button
LEDs
Touchpad
Speakers
Touchpad Buttons
Keyboard
Power Button
LCD Display
Fan Vent
Video Port
LCD Latch
USB Connection
Introducing Your Computer 5
Left Side
Right Side
Back Side
Bottom Side
The figure below is the bottom view of the PC without the Docking Station attached.
PC Card Slot
LAN Port
PC DC-in Port
USB Port IEEE 1394 Port (6 Pin)
Modem Port
Microphone Port
Headphone Port
Fan Vent USB Port External Monitor Port
Security Lock Slot
Battery
Battery Latch
Mini PCI Compartment
Docking Connector
Battery Latch
Memory Module
Compartment
6 Users Manual
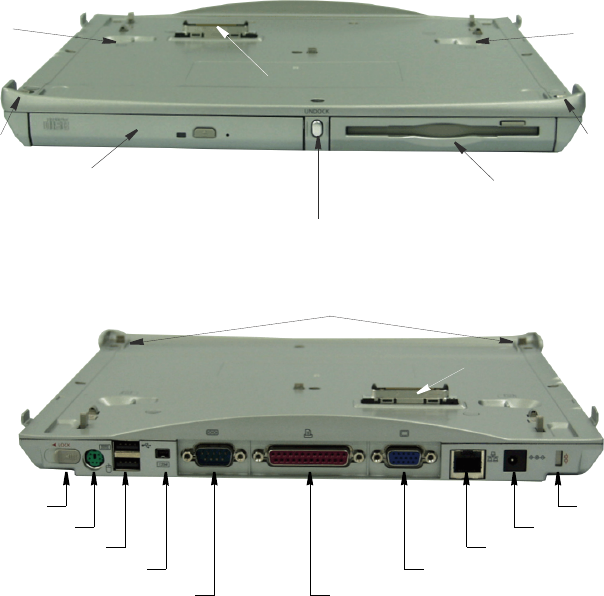
Docking Station Equipment Location
Front Side
The figures in this section show you the location of important items on the docking
station. See “Using the Multi-Bays in the Docking Station” on page 34.
Back Side
3.5" Multi-Bay
Release Latch
5.25" Multi-Bay
Release Latch
Docking Connector
Undock Computer Button
5.25 Multi-Bay
(CD/DVD ROM Drive installed)
3.5 Multi-Bay
(FDD installed)
Docking HookDocking Hook
Security Lock Port
LAN Port
DC-in Port
Docking Hooks
PS/2 Port
USB Ports (2)
1394 Port (4 Pin)
Security Lock Latch
Serial Port Printer Port
Docking Connector
External Monitor Port

Introducing Your Computer 7
Top Side
Bottom Side
Speaker
Docking Hook
Docking Hook
Undock Computer Button
5.25 Multi-Bay
(CD/DVD ROM Drive installed)
3.5 Multi-Bay
(FDD installed)
3.5" Multi-Bay
Release Latch
5.25" Multi-Bay
Release Latch
Docking Release Lever
SPDIF Port
Speaker (Woofer)
Speaker
8 Users Manual
Docking/Undocking your Computer
The docking station allows you to use this system as a desktop PC.
Connect the AC adapter to the docking station when it is connected to the
computer.
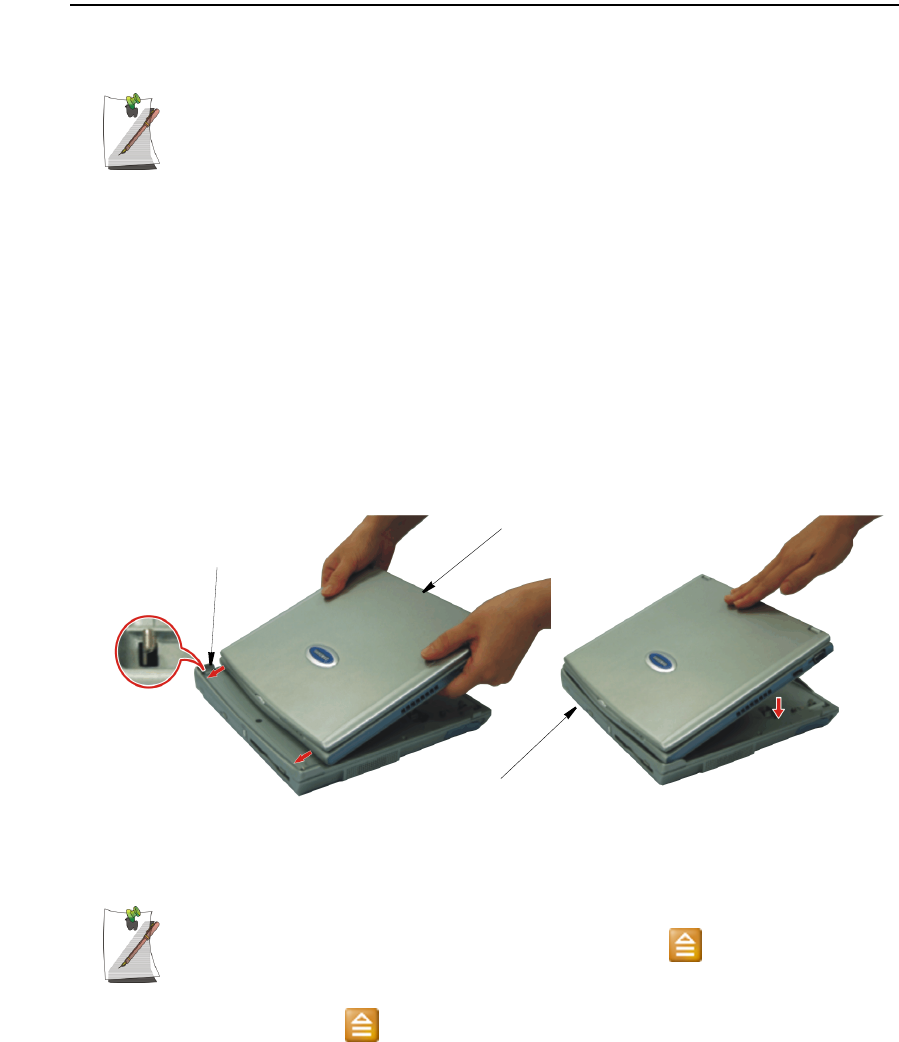
Docking your Computer
You may dock your computer while the computer is off or on, however the preferred
and safer method is with the power off.
To install your computer into the docking station with the power off, complete the
following:
1. Disconnect the AC adapter from the system.
2. Place the front part of a system onto the docking hooks at the front of the docking
station.
3. Press down on the rear of the computer until it clicks fully home into the docking
station
To dock your computer with the power on simply place the computer on the docking
hooks and press down on the area above the keyboard.
Dock Change
When the docking station is connected properly the Icon is displayed in
the start menu. Press the system on both sides, not the middle, to ensure that
the docking connector is completely mated to the system. When the system
is undocked the icon will no longer be displayed in the start menu.
Front of the System
Back of the System
Docking Hook
Introducing Your Computer 9
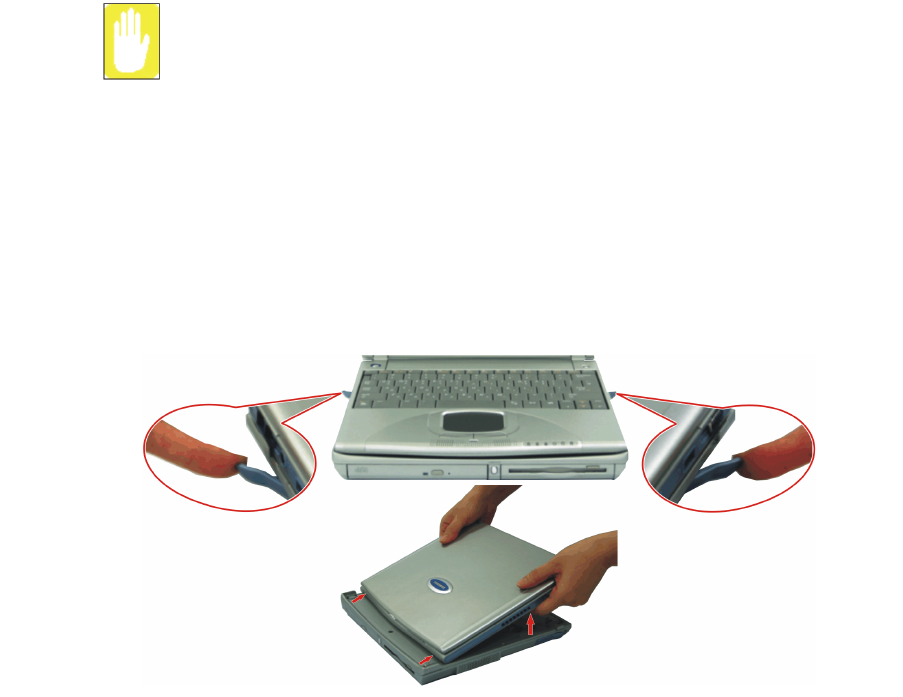
Undocking your Computer
Do not detach the computer if battery power is less than 20% power. The
system may crash and you will lose any unsaved data.
Power Off
To remove your computer from the docking station with the power off, complete the
following steps.
1. Turn off the system.
2. Disconnect the AC adapter.
3. Grab the two docking release levers and pull them out until they click. The
computer will pop up approximately 1 cm.
4. Tilt the system up at the back.
5. After tilting remove the system by sliding/lifting out toward the back of the
docking station.
6. Connect the AC adapter to the system.
10 Users Manual
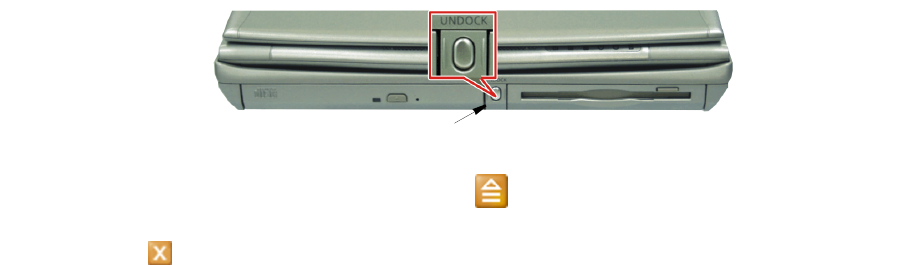
Power On
To remove your computer from the docking station with the power on, complete the
following steps:
1. Press the Undock Computer button on front of the docking station for one second.
- or -
1. Click Start > Undock Computer ( )
2. When the “Undock Complete” message balloon is displayed on the screen, click
to close the message balloon.
3. Pull the two release levers outward until they click, the computer will pop up
approximately 1 cm.
4. Tilt the system up at the back.
5. After tilting, remove the system by sliding/lifting out toward the back of the
docking station.
6. Connect the AC adapter to the system.
Undock Computer Button