Samsung Electronics Co SQ10 Notebook Personal Computer User Manual Manual pp 31 to 40
Samsung Electronics Co Ltd Notebook Personal Computer Manual pp 31 to 40
Contents
Manual pp 31 to 40
Using the Keyboard 21
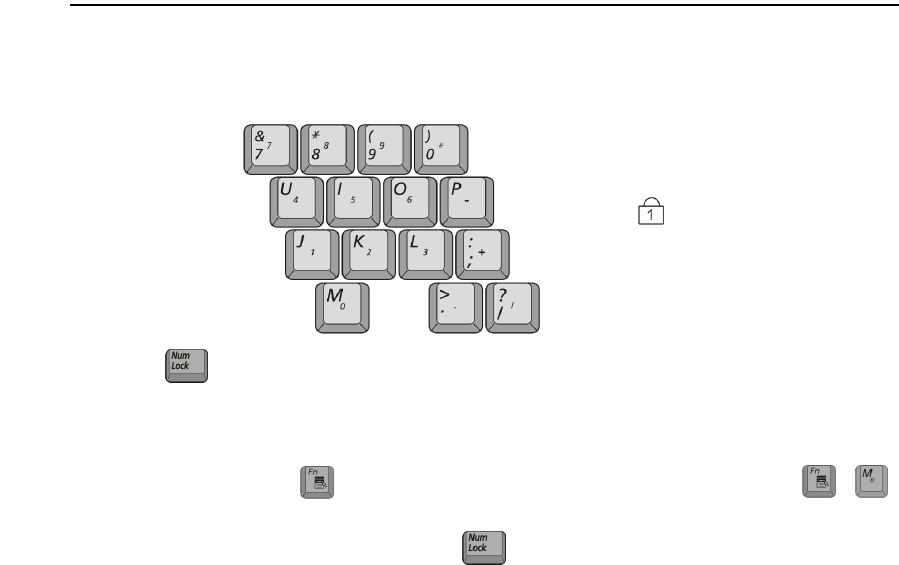
Using the Numeric Keypad
Your keyboard includes a numeric keypad, which is a group of keys that you can set to
type numbers and mathematical symbols, such as the plus sign. A number or symbol
on the right corner of each keypad key shows its numeric function.
Press to turn on the embedded numeric keypad. The numeric functions of the
keypad are enabled and the Num Lock LED turns on. (See “Reading the System Status
LEDs” on page 27 for the location of the Num Lock LED.)
While the numeric functions are enabled, you can temporarily return a key to its normal
function by pressing and the key. For example to type the letter m, press ,
this operation displays the letter m.
To turn the numeric keypad off, press again. The Num Lock LED turns off.
Num Lock LED
+
22 Users Manual
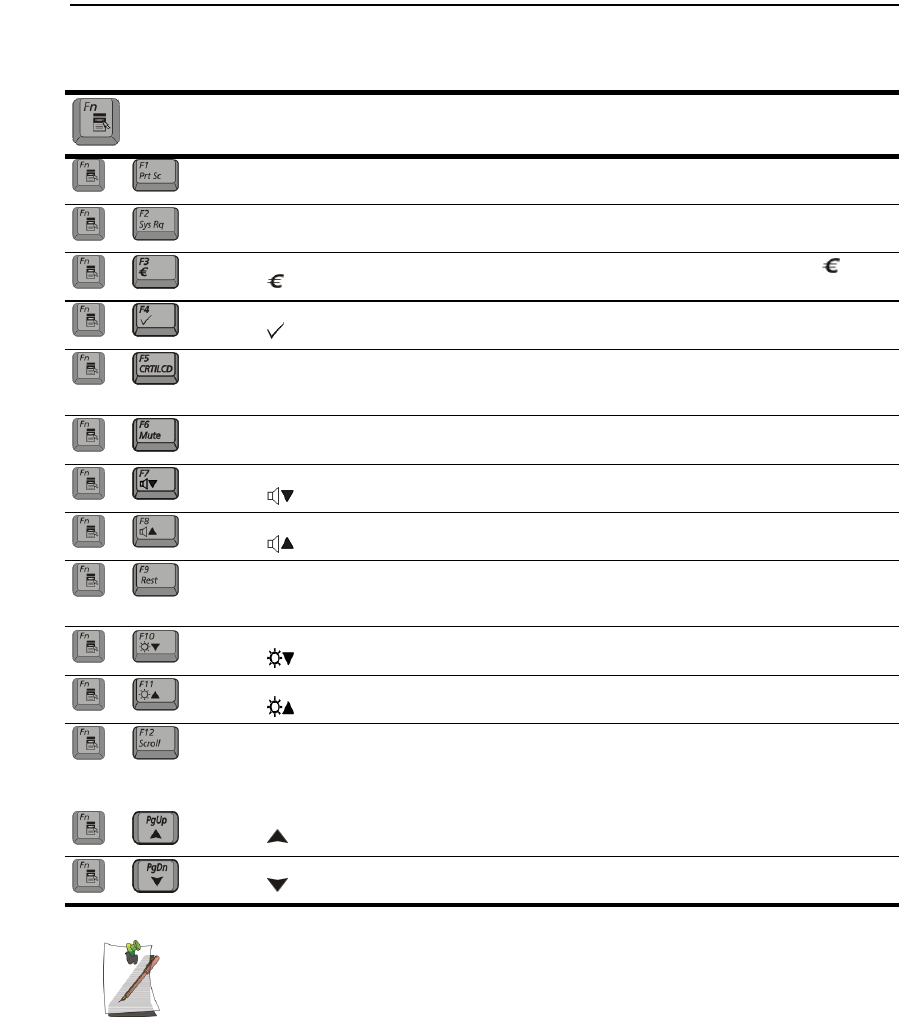
Using Special Function Keys
The function key in combination with another key activates special functions.
Table 2. Description of Special Function Key Combinations
When you press a function key combination, the system sound may be
temporarily muted.
Key
Combinations
Key
Name Key Function
F1
Prt Sc
Print screen: Takes a picture of the open screen, which you can paste
into many graphics programs.
F2
Sys Rq
System request: Reserved for use in software programs.
F3 Euro key: This key combination can generate Euro Mark as
other Eurokey. ✯Configuration Dependant
F4 SENS keyboard: Gives the user the ability to quick launch a program using
the SENS keyboard key combination.
F5
CRT/LCD
CRT/LCD: Switches the display between the LCD, the external
monitor, and simultaneous display on both the LCD and
the external monitor.
F6
Mute
Mute: Turns the audio output on and off.
F7 Volume down: Decreases the audio volume.
F8 Volume up: Increases the audio volume.
F9
Rest
Rest: Puts the computer into Suspend mode. To resume
normal operation, press the power button. (See “Power
Management” on page 43.)
F10 Brightness down: Decreases the LCD brightness.
F11 Brightness up: Increases the LCD brightness.
F12
Scroll
Scroll: In some applications, sets the cursor-control keys to
scroll the page up or down while the cursor position does
not change. Pressing key combination again turns off the
scrolling function.
PgUp PgUp: In some applications, moves cursor up one screen, not
necessarily a full page.
PgDn PgDn: In some applications, moves cursor down one screen,
not necessarily a full page.
+
+
+
+
+
+
+
+
+
+
+
+
+
+
Using the Keyboard 23
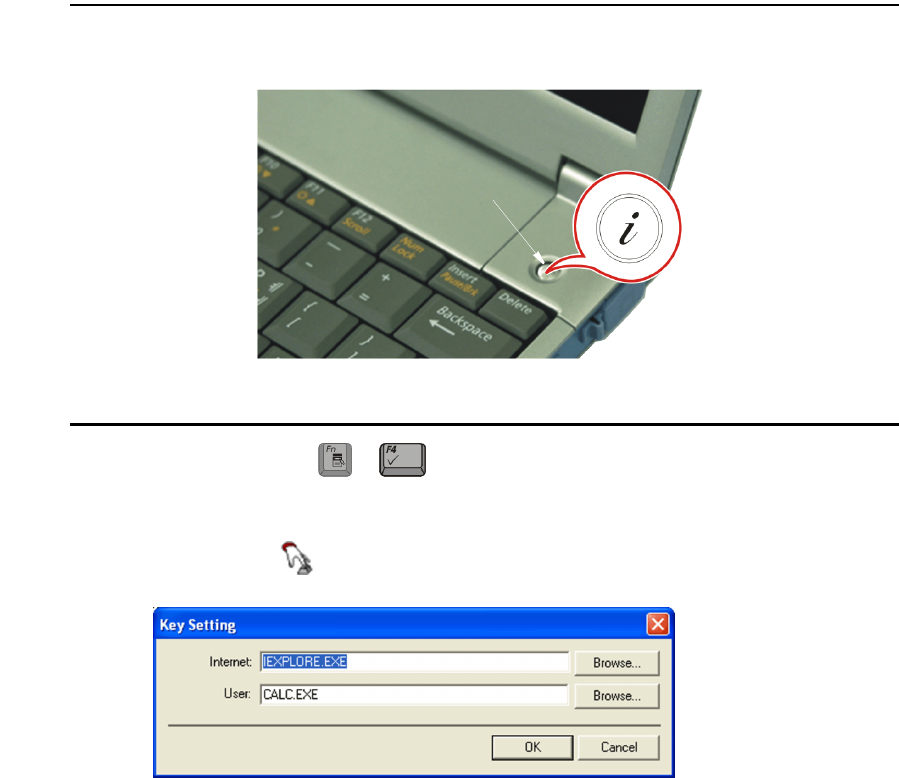
Internet Quick Start Button
Use the internet quick start button to start your connection to the internet just by
pressing one button.
User Defined Key (SENS Keyboard)
You may program the key combination or the “Internet Quick Start
Button” to start any program you have installed on your computer.
To reprogram the Sens Keyboard, follow the steps below:
1. Double-Click icon on the Windows taskbar, the Key Setting window is
displayed.
2. Select Button you wish to reprogram from the drop down menus in the Key
Setting window.
3. Use the Browse button to locate the program you wish to assign to the SENS
Keyboard button selected.
4. Click on your program choice to select it.
5. Click Open.
6. Click OK to close window and complete programming the Sens Keyboard.
Internet Quick
Start Button
+
24 Users Manual
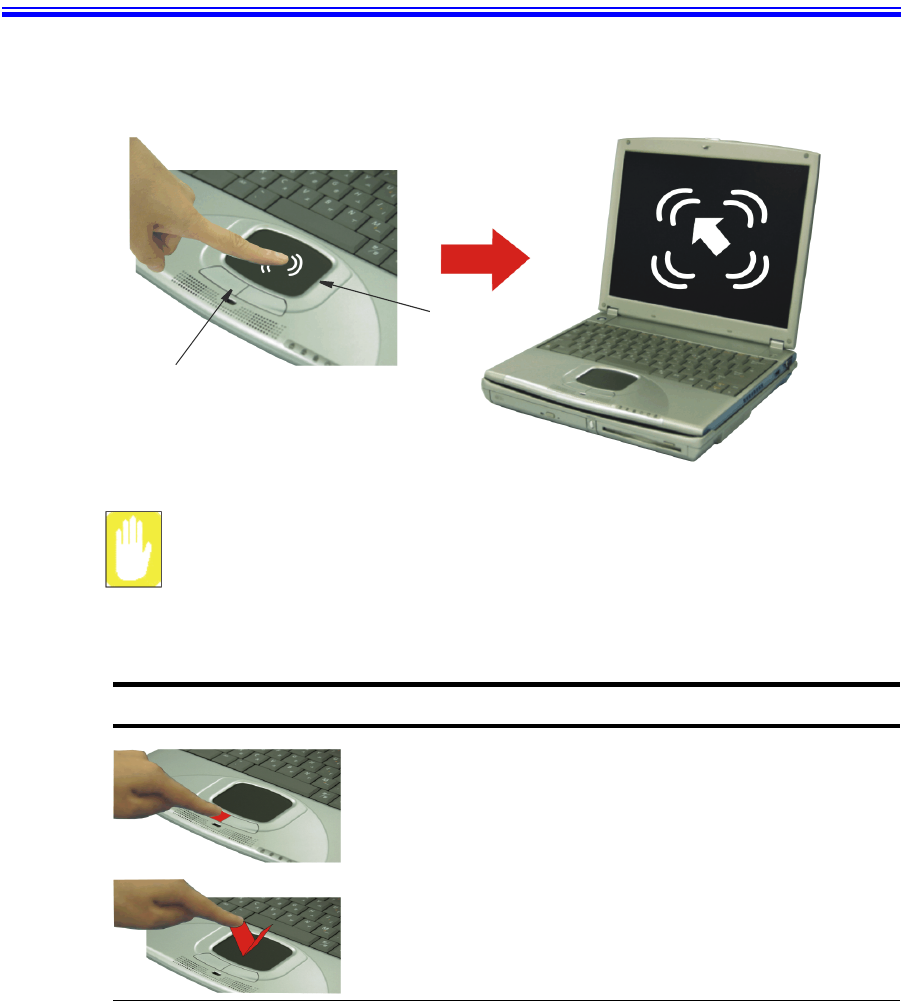
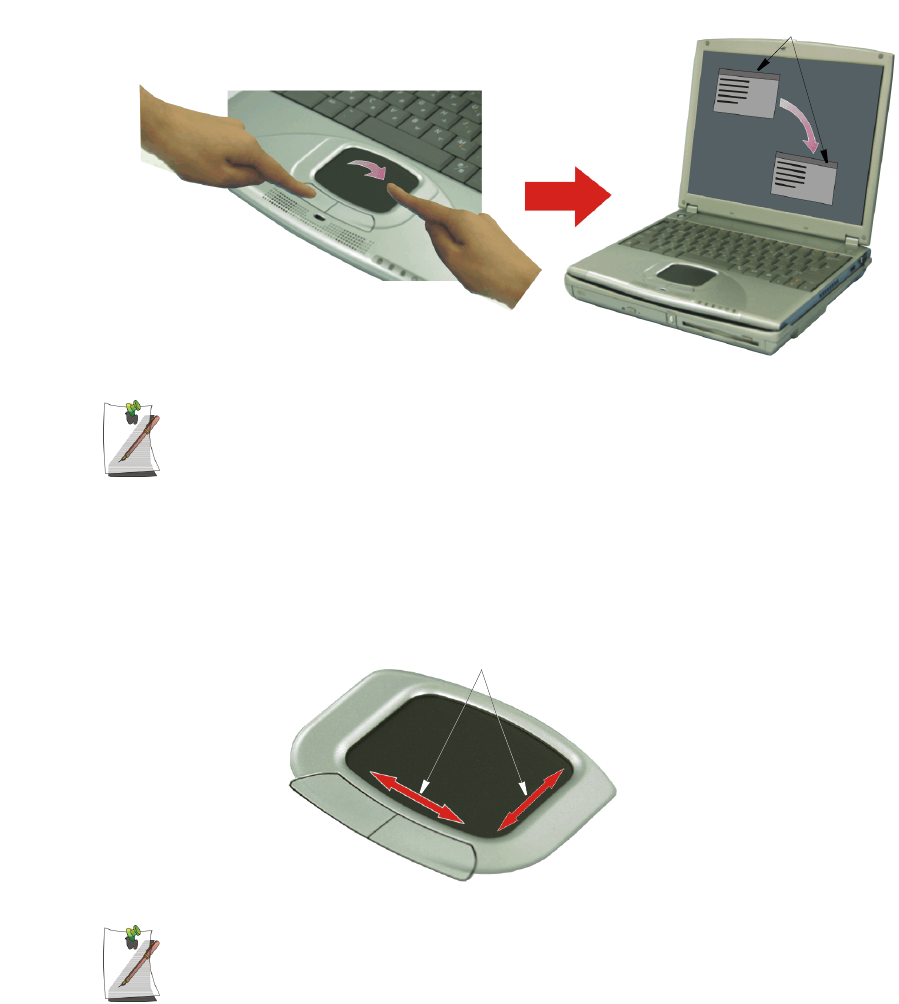
Using the Touchpad
Your computer is equipped with a touchpad, which is an integrated-pointing device
that is used to perform standard mouse functions. The touchpad is an advanced and
reliable pointing device that works with a touch of your finger.
Touchpad Precautions:
Do not use sharp, magnetic or heavy items on your touchpad doing so may
cause damage.
Press on the touchpad gently. The touchpad responds to light pressure.
The following sections will basically explain how to use the touchpad.
Table 3. Using the Touchpad
Action Process and Comment
Click/Tap Process
Depress the touchpad left button and release or position the pointer
over the object and Quickly tap the touchpad once with your finger.
This action is called clicking.
Comment
This will cause a process to begin or select an object on the screen.
Touchpad buttons
Touchpad

Using the Touchpad 25
PS/2 Mouse:
You may change the setup in Setup > Advanced Menu
Disabled prevents both the touchpad and external PS/2 port from functioning.
Single mouse (default) enables the external PS/2 port or the touchpad, and
external PS/2 port has priority. Dual Mouse allows the use of both the
touchpad and PS/2 port.
Drag (Move)
To move a window to change the view on the desktop, complete the following:
1. Click the window title bar or icon in the bottom of the window which you want
to drag using the touchpad.
2. Press the left touchpad button and hold it.
Double-Click/Tap Process
Quickly click the left touchpad button two times or position the pointer
over the object and Quickly tap the touchpad twice with your finger.
This action is called Double-clicking.
Comment
This will cause a process to begin or open a file folder.
Click-Hold Process
Depress the left touchpad button and do not release.
Comment
This is used to move/drag objects to new locations. See “Drag (Move)”
on page 25.
Right-Click Process
Position the pointer over the object. Quickly press and release the right
button once.
This action is called Right-clicking.
Comment
This is usually used to obtain information about an object or access a
short cut menu.
Action Process and Comment
26 Users Manual
3. Drag the window using the touchpad.
Area or multiple item selection:
The drag function may be used to select an area or multiple items in an area
by clicking in one area and then dragging to create a selection window. The
items inside the window will be selected.
Scroll
The touchpad has a scroll function. Scroll along the right edge of the touchpad to scroll
up and down. Scroll along the bottom edge of the touchpad to scroll right and left.
However, this function may not work in some programs.
Touchpad Buttons:
You can use the buttons below the touchpad in the same way you would use
standard wheel mouse buttons. For more information on these features and
other features supported by your mouse driver such as button assignment,
see the Mouse properties in the Control Panel.
If the scroll function does not work, you must install the “Touchpad Driver” from the
system software CD, however, bear in mind all programs do not support scrolling.
22 Drag your finger to
move the window
11 Click the Window
Title Bar and Hold
1
Cursor in Windows
Title Bar
2
Scroll Directions
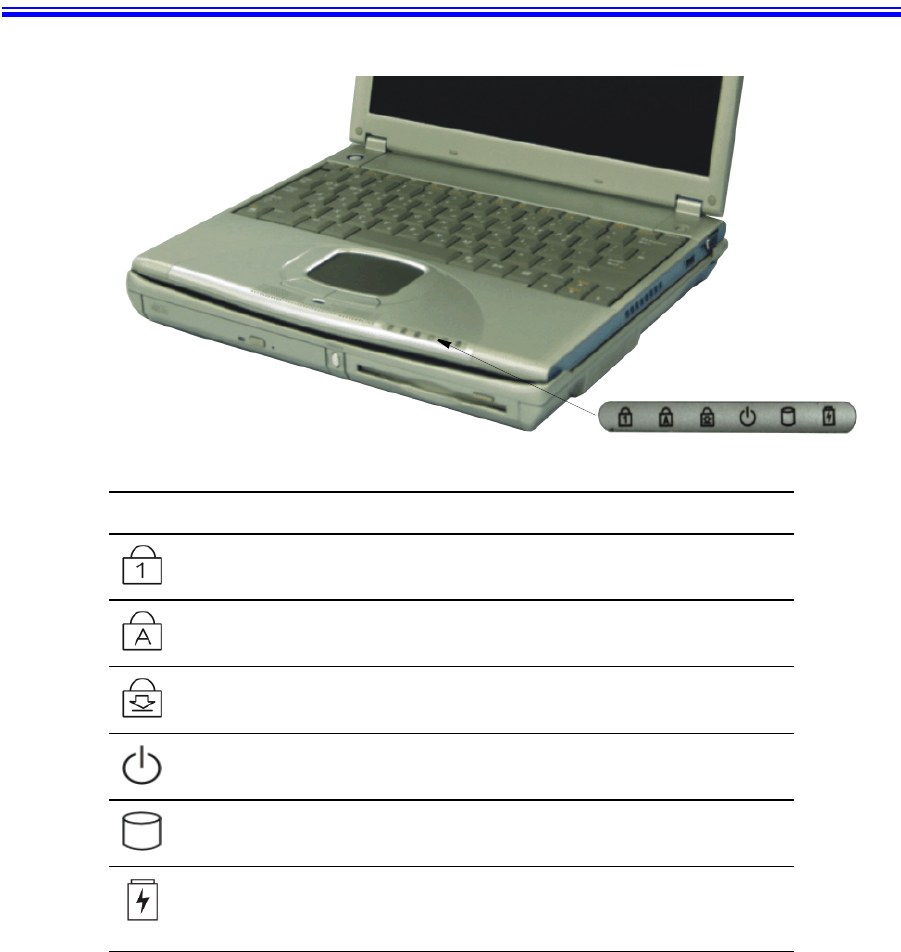
Reading the System Status LEDs 27
Reading the System Status LEDs
System Status LEDs show the status of computer functions.
Table 4. LED Functions
LED Name Function
Num Lock Changes a portion of the keyboard to a numeric keypad.
See “Using the Numeric Keypad” on page 21.
Caps Lock Changes all alpha or letter input into capital letters.
No changes occur to numeric and special keys.
Scroll Lock Scroll lock in certain software.
Power Green: - System power on.
Blinking: - Standby mode
HDD Using Hard disk.
AC Adapter/
Battery
Charging
Green: - Battery Fully Charged / AC Plugged In
Amber: - Battery Charging
LED Off: - AC Unplugged
LEDs
Chewhere Maverick +
28 Users Manual
Connecting to the Internet
This section explains how to connect you to the internet. For details on how to establish
the connection contact the Internet Service Provider [ISP] or system administrator
[SysAdmin].
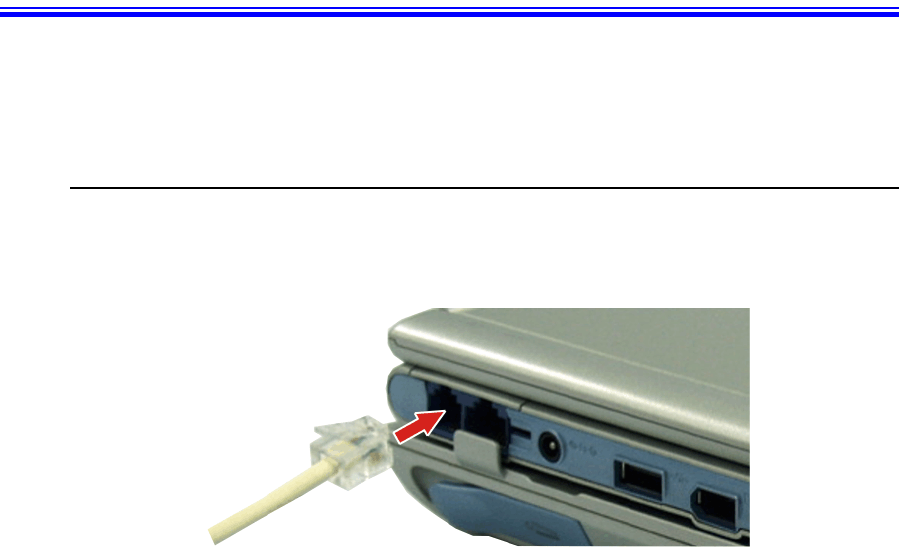
Using the Modem
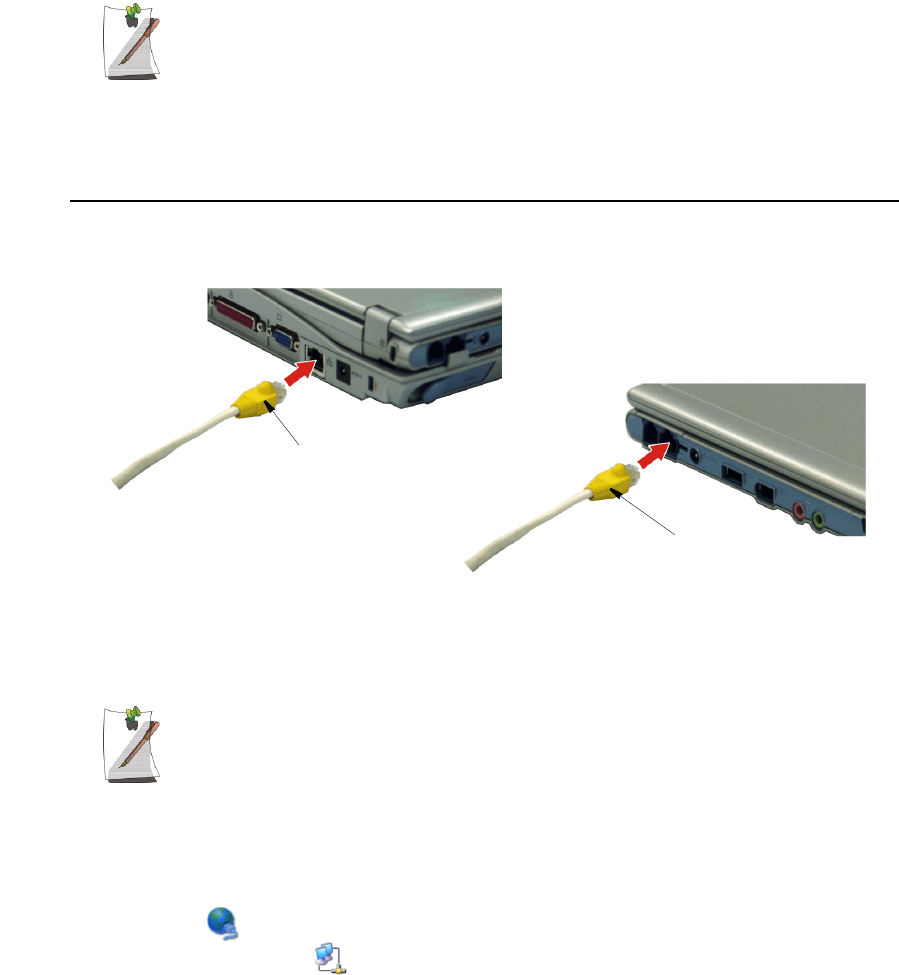
Install the Modem cable by simply plugging the cable into the modem slot as shown in
the figure below.
Your Notebook computer will have a Modem/LAN installed.
1. Contact your Internet Service Provider to obtain information or CD required to
make the connection in your area.
2. After the cable is connected create a “Dialup” connection by clicking
Start > Control Panel > Network and Internet Connections.
3. Click Set up or change your Internet connection > Setup to start the connection
wizard.
4. Follow the instructions in provided in the New Connection Wizard.
Connecting to the Internet 29
Precautions Before Use
Country Selection
Country Selection:
Because your computer is very mobile you must ensure you select the country
you are calling from is selected correctly, otherwise you may experience
connection problems.
To change the country selection proceed as follows:
1. Start > Control Panel > Network and Internet Connections.
2. Click Phone and Modem Options.
3. Click on the connection you wish to edit in the Locations: box.
4. Click Edit in the Dialing Rules Tab
5. Select the Country/region you are calling from in the General tab.
6. Click OK to close the "Edit Locations" box.
7. Click OK to close “Phone and Modem Options” box.
Digital Phone Lines:
If you connect the modem to a digital phone line (such as a company
4-wire system), the modem may be damaged.
DOS support
•Windows XP: Does not support pure DOS mode and the modem does not
support a DOS box in Windows. So you cannot use a
communication application which runs under DOS.
Using the Modem on a PBX system
If you use a Windows Communication Program:
Follow the instructions below.
1. Click Start > Control Panel > Network and Internet Connections.
2. Click Phone and Modem Options.
3. Click Properties in the Modems tab section.
4. Check off “Wait for dial tone before dialing” check box in the Modem tab section.
5. Click OK to close the dialog box.
6. Click OK to close “Modem Properties” dialog box.
30 Users Manual
If you use a simple terminal program (i.e. hyper terminal):
Type the “ATX3&W” or “ATX3” command as an initialization command.
MODEM Notes:
1. In order to use the 56K feature, be sure to check if the standards supported
by the on-line service provider and the modem are identical.
2. If you use a PBX phone system, you can not connect using the 56K mode.
3. Internationally connected calls will be limited to 33.6K (Max.)
Using the LAN
Install the LAN cable by simply plugging the cable into the slot on the left side of the
computer if undocked or the back of the docking station.
Your computer’s LAN adapter is ready to use for most situations, however if your
system does not have a DHCP server or you wish to personally configure your LAN
connection, proceed as outlined in “Configuring Network Environment” below.
Network Protocols:
You may need to consult your SysAdmin if their network network protocols and
settings are required for your LAN environment.
Configuring Network Environment
Configure the Network Adapter as follows:
1. Click Start > Control Panel > Network and Internet Connections
2. Click icon (Network Connections)
3. Double-Click the icon (Labeled Local Area Network).
Inserting Lan Cable
with System Undocked
Inserting Lan Cable
with System Docked