Samsung Electronics Co SSAR2001 RFID User Manual
Samsung Electronics Co Ltd RFID Users Manual
UserManual.wiki
>
Samsung Electronics Co
>
SSAR2001 User Manual
User manual
Navigation menu
Upload a User Manual
Namespaces
Wiki Guide
HTML
PDF
Info
Views
User Manual
Discussion / Help
Navigation


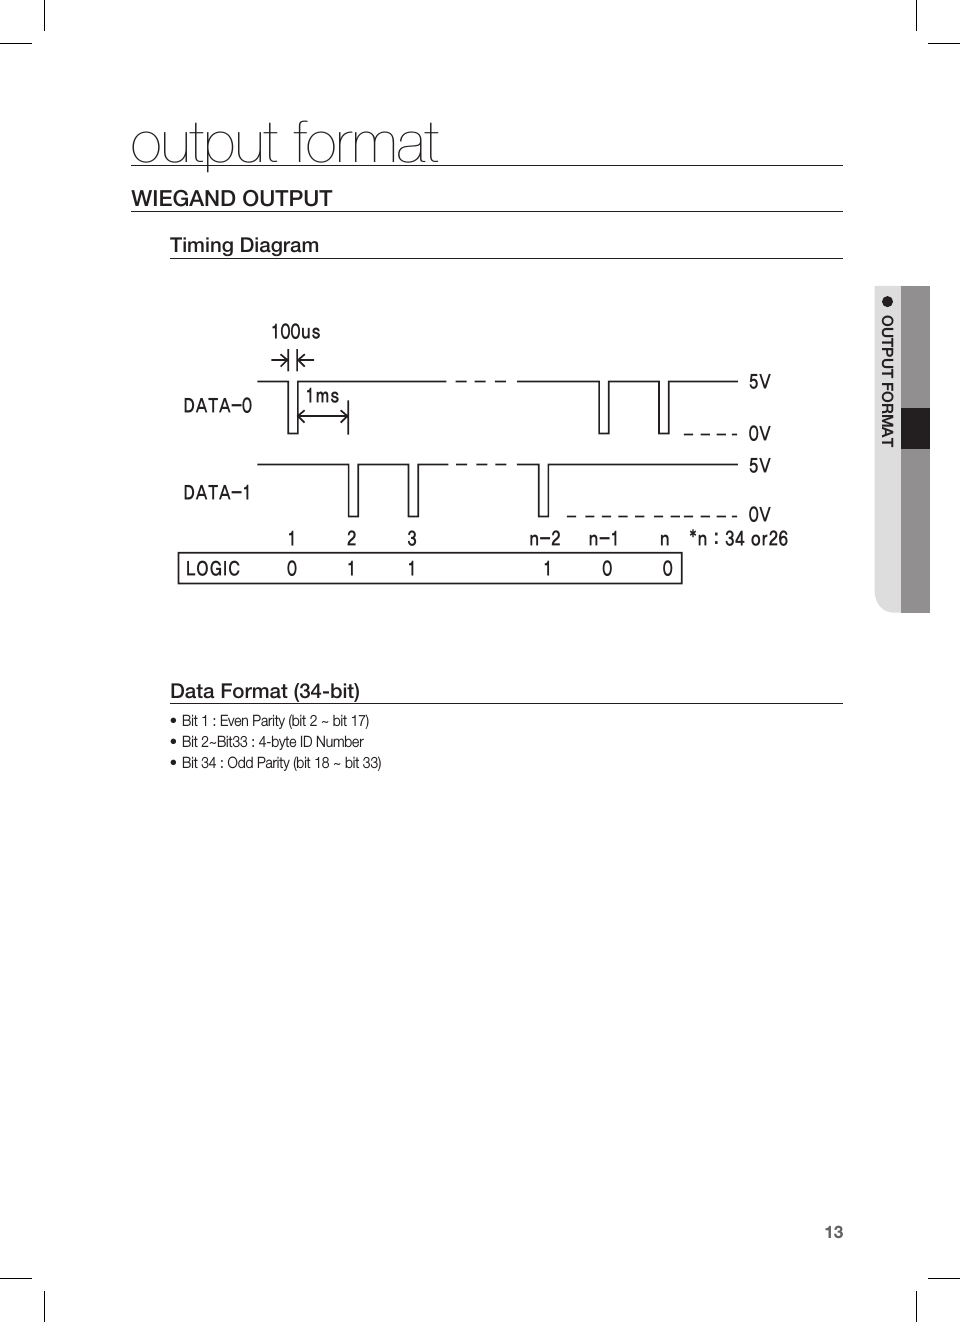
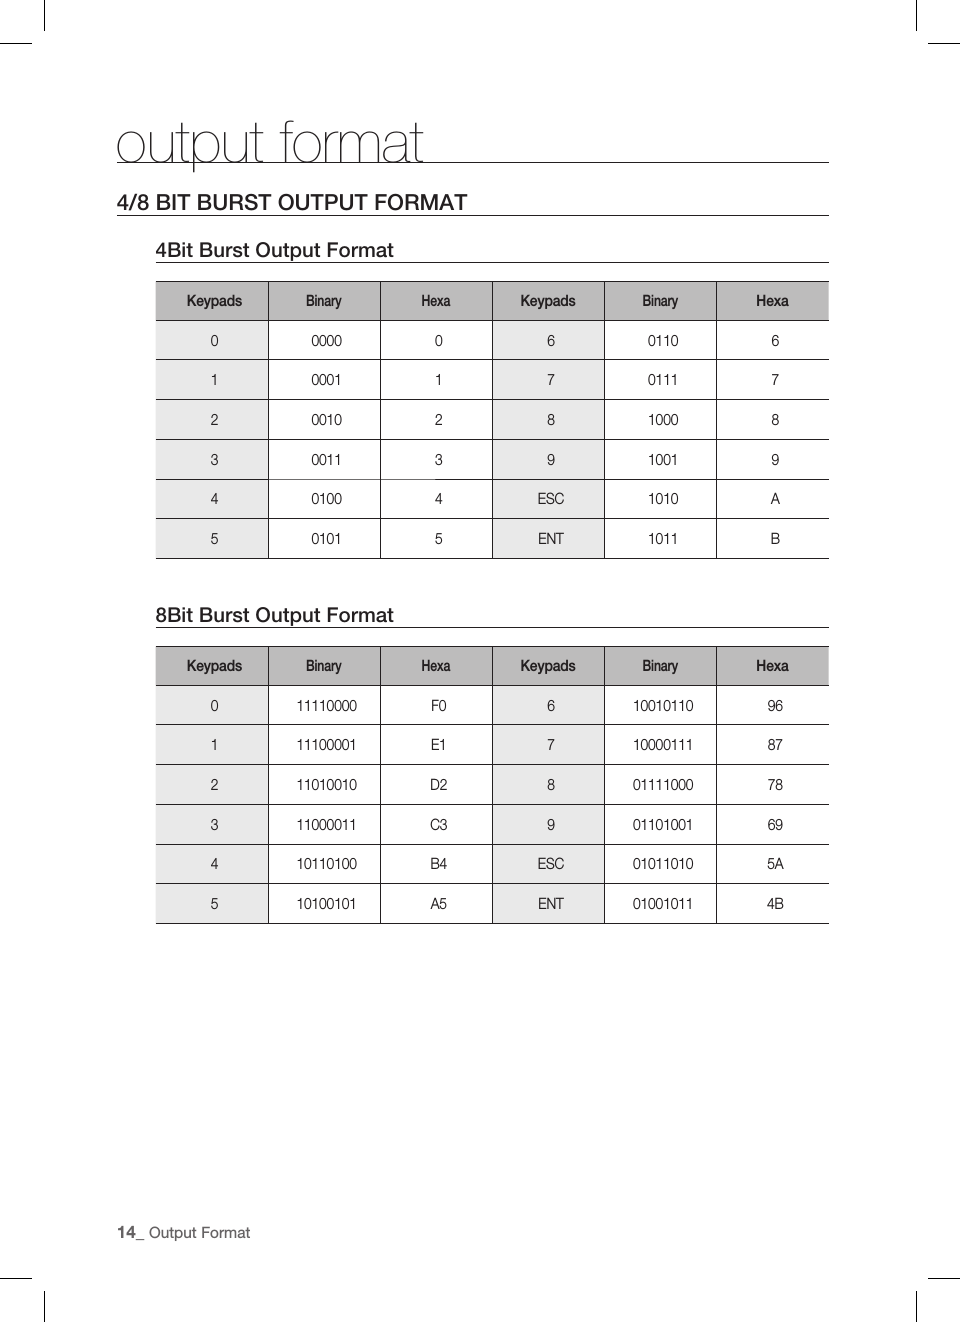
![English5PRODUCT INTRODUCTION FEATURESThis product is an elegant-looking proximity reader equipped with the built-in keypad, which has the maximum of 10cm (4”) read range. It is also supported by backlighting on the keypad, enabling stable operation at night. This product permits user access through authentication of the contactless card and personal identifi cation number using the keypad. Red, green and orange LED indicators and the built-in buzzer ensure reliable and accurate operations.13.56 MHz [MIFARE] Contactless Smart Card & PIN ReaderCompatible with ISO14443 Type A34 bit Wiegand & RS-232 Data Output4/8 Bit Burst Output Format supportedNumeric keypad with backlighting for night operationControl of External LED IndicatorsControl of External BuzzerTamper SwitchReverse Polarity ProtectionWHAT’S INCLUDEDCheck if the following items are included in the product package.X Y Z[ \ ]^ _ `lzj lu{WzzhTyYWWXMain Unit Rear Panel O-ring (x5)3.5 x 40mm Screws (x4)3.5 x 12mm Screws (x4)6 x 30mm Plastic Anchor (x4)Cables (x3) CD ManualxGnQuick Guide◆◆◆◆◆◆◆◆◆product introduction](https://usermanual.wiki/Samsung-Electronics-Co/SSAR2001/User-Guide-1190807-Page-5.png)
![6_ Product Introductionproduct introductionAT A GLANCEFront/Rear1LED Displays the status of the system operation.2Keypad Used to enter the ID/password.32-PIN Connector Can be connected to the power cable.48-PIN Connector Connected to the tamper, LED and buzzer control connection cables.5Output Selection Switch Switch that allows you to select an output from 8 bit, 4 bit Burst and Wiegand.6Tamper Switch Tamper switch.7Fixing Screw Screws for fi xing the devices.XYZ[\]^_`lzj lu{WzzhTyYWWX347856](https://usermanual.wiki/Samsung-Electronics-Co/SSAR2001/User-Guide-1190807-Page-6.png)
![8_ Installation and External Connectioninstallation and external connectionINSTALLATIONAttach the provided rear panel to the wall and drill two 6-32 holes and one 1/2 inch hole on it. (See [Figure 1])Refer to [Figure 2] below on how to secure the rear panel to the wall using the provided screws.Apply each of 5 O-rings to the corresponding point as shown in [Figure 2].Fix the main unit with the rear panel by inserting the main unit’s cables into the center hole and pushing the main unit towards the rear panel.Once the main unit is fi xed with the rear panel, it will not be loosened. Please check if the device is operating properly before fi xing it.If you try to remove the rear panel once it is fi xed, the lock parts of the rear panel will break, resulting in a situation where the whole rear panel must be replaced.1.2.3.4.J2.05"(52mm) 1.85"(47mm)3.03"(77mm)1.52"(38.5mm) 1.52"(38.5mm)1.55"(39.5mm)1.79"(45.5mm)O-ringO-ringO-ringO-ringO-ring6-32 hole6-32 hole1/2” hole[Figure 1] [Figure 2]](https://usermanual.wiki/Samsung-Electronics-Co/SSAR2001/User-Guide-1190807-Page-8.png)
![English9INSTALLATION AND EXTERNAL CONNECTIONPRECAUTIONS ON INSTALLATIONIF INSTALLING ON A METAL WALLIf you install the reader on a metal wall, the read range may be reduced.To avoid this problem, it is recommended to insert the spacer between the metal wall and the reader as shown below.IF INSTALLING MORE THAN ONE READER SIDE BY SIDE OR FRONT AND BACKIf you install more than one reader side by side or front and back, the read range may be reduced. In this case, if you present a card to one reader, the other reader may recognize the same card, meaning both readers read the same card simultaneously.To avoid this problem, keep at least 20 cm of space between the two readers.zzhTyYWWXXYZ[\]^_`lzj lu{WSpacerReaderMetal WallBACK TO BACKINSTALLATIONSIDE BY SIDEINSTALLATIONzzhTyYWWXXYZ[\]^_`lzj lu{WzzhTyYWWXXYZ[\]^_`lzj lu{WzzhTyYWWXXYZ[\]^_`lzj lu{W<Front and Back><Side by Side>Minimum 20cmMinimum 20cm#Reader 1#Reader 2#Reader 1#Reader 2](https://usermanual.wiki/Samsung-Electronics-Co/SSAR2001/User-Guide-1190807-Page-9.png)
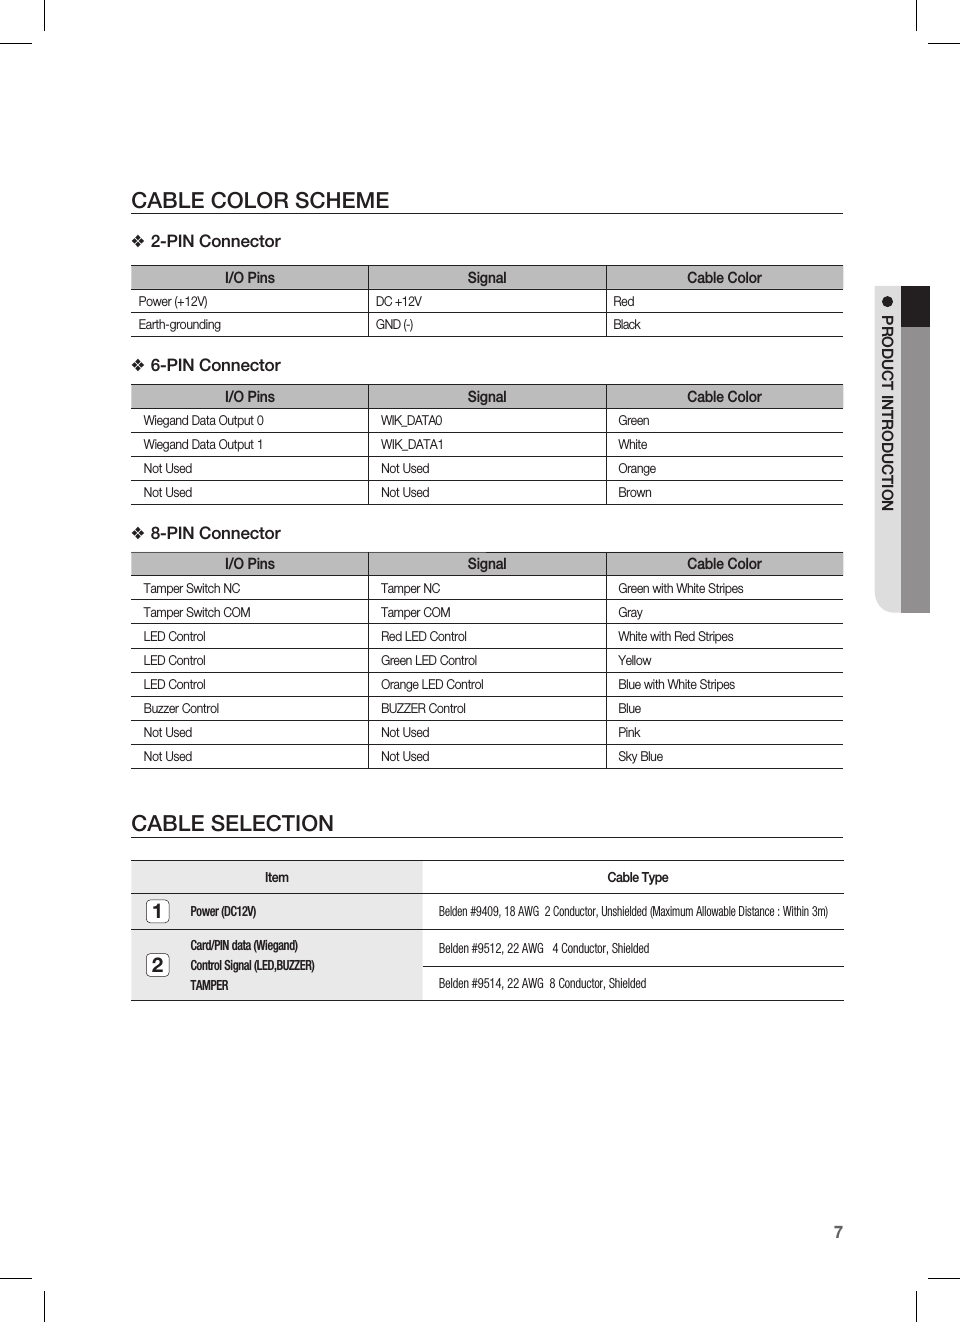
![10_ Installation and External Connectioninstallation and external connectionEXTERNAL CONNECTIONWIRING DIAGRAMCategoryCable ColorPower Supply UnitConnect the DC+12V to the red line.Connect GND to the black line.Wiegand ConnectionConnect the green line of the product to the Wiegand D0 input port of the controller.Connect the white line of the product to the Wiegand D1 input port of the controller.LED ControlEnables you to turn on or off the LED indicators.To control green indicator, connect the yellow line to the controller’s output (relay). Connect the blue with white stripes to control the orange indicator, connect the white with red stripes to control the red indicator. (see page 12)Buzzer Control Enables you to turn on or off the buzzer. To control the buzzer, connect the blue line to the controller’s output (relay). (see page 12)Tamper Control Connect the COM port (gray line) of the product’s tamper switch to GND; connect the NC port (green line with white stripe) of the tamper switch to the input port of the controller.X Y Z[ \ ]^ _ `lzj lu{WzzhTyYWWXWiegand Data 0 OutWiegand Data 1 OutPOWERCONTROLLERSSA-R2001Red BlackDC +12V GNDTamper Switch Out(NC) Tamper Switch Out(COM) Buzzer Control In LED Control In(Red) LED Control In(Green) LED Control In(Orange) GreenWhiteGreen with white stripesGrayBlueWhite with red stripesYellowBlue with white stripes](https://usermanual.wiki/Samsung-Electronics-Co/SSAR2001/User-Guide-1190807-Page-10.png)
![12_ InitializationinitializationBASIC OPERATIONSInitial State (when the power is supplied)When you apply power to the product, it will sound beep three times before entering Standby with the red indicator turned on.Using the cardPresent the card to the product until you hear a beep and the green indicator turns on.The reader keeps the green indicator turned on while transferring the card data to the controller.When it is done, the green indicator turns off and for receiving the next card, the red indicator stays ON.Using the keypadHold down the keypad until you hear a beep. The reader transfers the keypad data to the controller.If the output format of the keypad is the option to 26bit Wiegand, pressing any key of the keypad turns on orange indicator, and green indicator blinks when [ENT] is pressed after the input. The red indicator stays on after transferring data to the controller. By default, it is 8-bit burst. Hence, keypad input and pressing [ENT] will blink the green indicator only when you change the option to 26bit Wiegand.LED ControlYou can control the red, green and orange indicators as necessary.To control the red indicator, connect the relay output NO port of the controller to the red indicator control input line (white line with red stripes), and connect the GND line to the COM line. Set I/O of the controller; now you can control turning on/off the indicators.You can turn on/off the indicators according to the I/O settings of the controller, which can be applied to various situations.For more information about the I/O settings of the controller, refer to the user manual of the controller.Connect the yellow line for the green indicator, or the blue with white stripes for the orange indicator, to the COM port of the controller.Buzzer ControlConnect the buzzer control input line (blue) to the NO port of the controller relay output, and GND to the COM port.You can confi gure the I/O settings of the controller so that it beeps. If the product continues to beep, it means that the buzzer control is working properly.The controller can use the I/O settings to set the buzzer control so that it sounds an additional beep for authorized or unauthorized access upon user authentication.Furthermore, you can make various modifi cations according to the different I/O settings of the controller.For more information about the I/O settings of the controller, refer to the user manual of the controller.Card reading is not available while the buzzer control is sounding the buzzer.Tamper ControlYou can set the signal that you want to output if the device is dismantled forcibly.Connect the COM port (gray line) of the product’s tamper switch to GND; connect the NC port (green with white stripe) of the tamper switch to the input port of the controller. If the tamper of the reader operates, the controller produces an input signal and generates the corresponding output depending on the controller setting.X Y Z[ \ ]^ _ `lzj lu{WzzhTzYWWWCardXYZ[\]^_`lzjlzjWizzhTzYWWW](https://usermanual.wiki/Samsung-Electronics-Co/SSAR2001/User-Guide-1190807-Page-12.png)