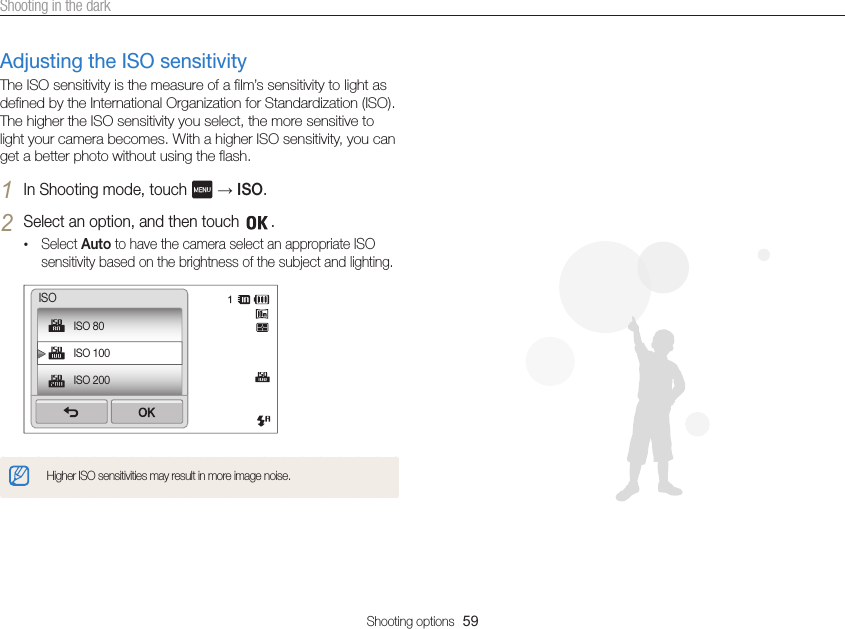
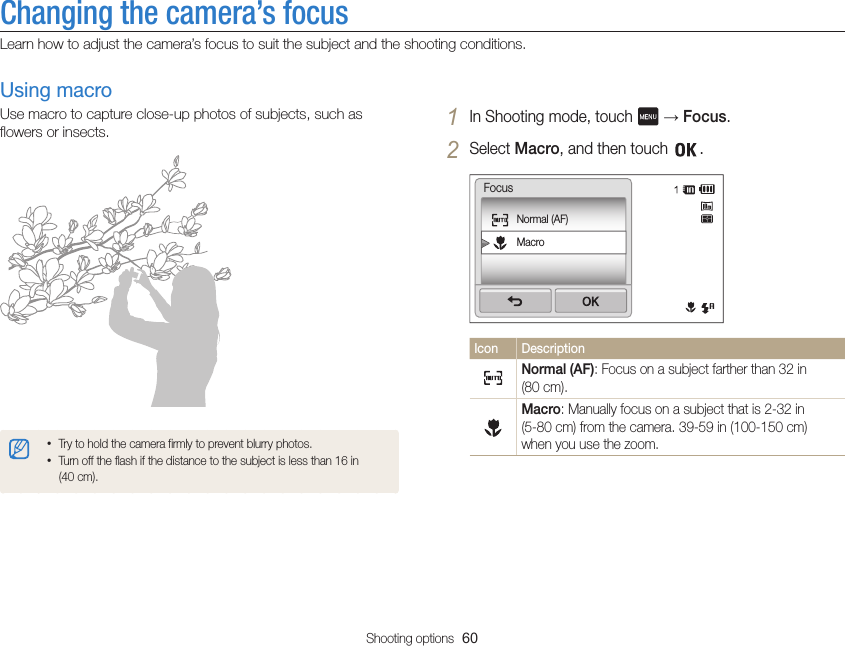
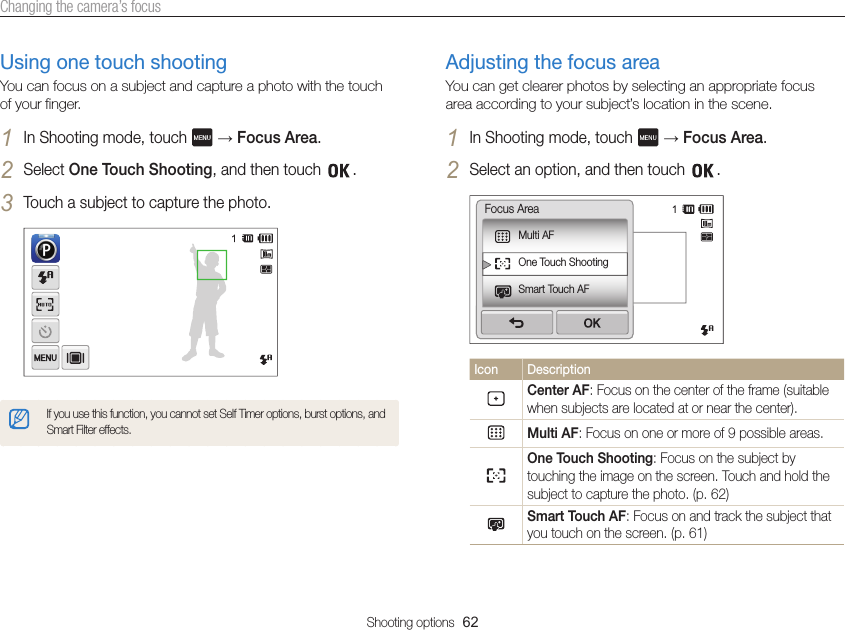
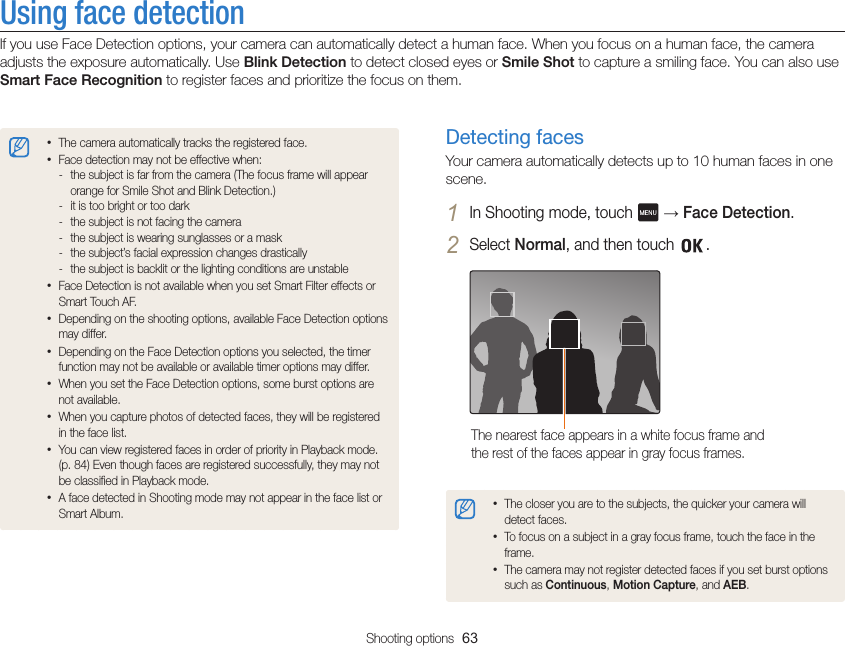
Samsung Electronics Co ST200F Digital camera User Manual 1 of 2
Samsung Electronics Co Ltd Digital camera 1 of 2
UserManual.wiki
>
Samsung Electronics Co
>
ST200F User Manual
>
User manual 1 of 2
Contents
1.
User manual 1 of 2
2.
User manual 2 of 2
User manual 1 of 2
Navigation menu
Upload a User Manual
Namespaces
Wiki Guide
HTML
PDF
Info
Views
User Manual
Discussion / Help
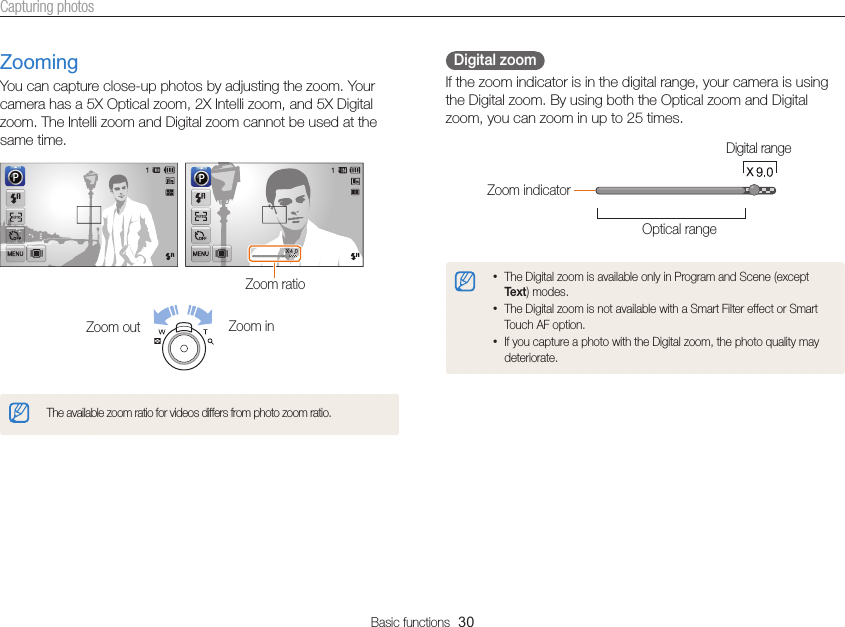
Navigation
![6Icons used in this manualIcon FunctionAdditional informationSafety warnings and precautions[ ] Camera buttons. For example, [Shutter] represents the shutter button.( ) Page number of related information→The order of options or menus you must select to perform a step; for example: Touch → Photo Size (represents Touch , and then touch Photo Size).*Annotation](https://usermanual.wiki/Samsung-Electronics-Co/ST200F.User-manual-1-of-2/User-Guide-1594220-Page-7.png)
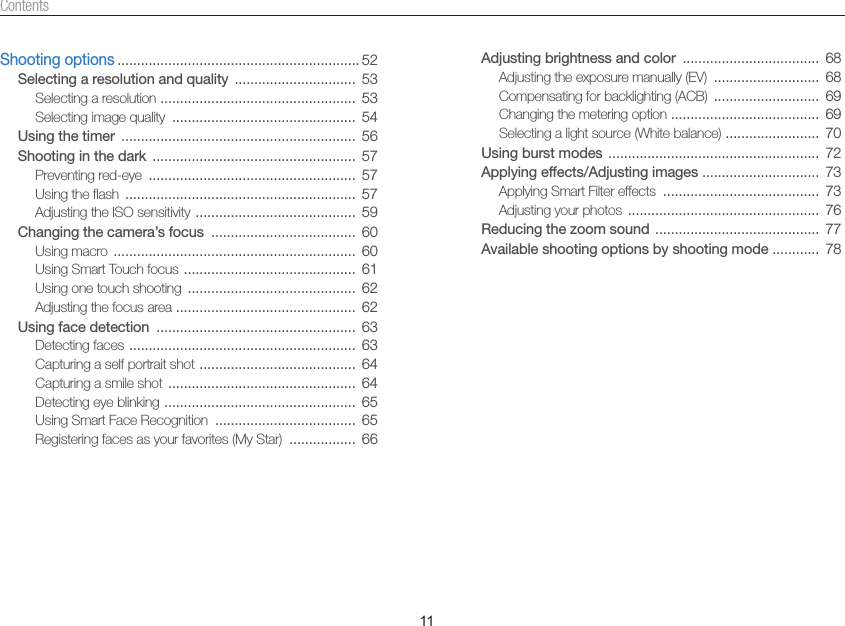
![7Pressing the shutter• Half-press [Shutter]: press the shutter halfway down• Press [Shutter]: press the shutter all the way downHalf-press [Shutter] Press [Shutter]Subject, background, and composition• Subject: the main object in a scene, such as a person, animal, or still life• Background: the objects around the subject• Composition: the combination of a subject and backgroundCompositionBackgroundSubjectExposure (Brightness)The amount of light that enters your camera determines the exposure. You can alter the exposure with shutter speed, aperture value, and ISO sensitivity. By altering the exposure, your photos will be darker or lighter.Normal exposure Overexposure (too bright)Expressions used in this manual](https://usermanual.wiki/Samsung-Electronics-Co/ST200F.User-manual-1-of-2/User-Guide-1594220-Page-8.png)
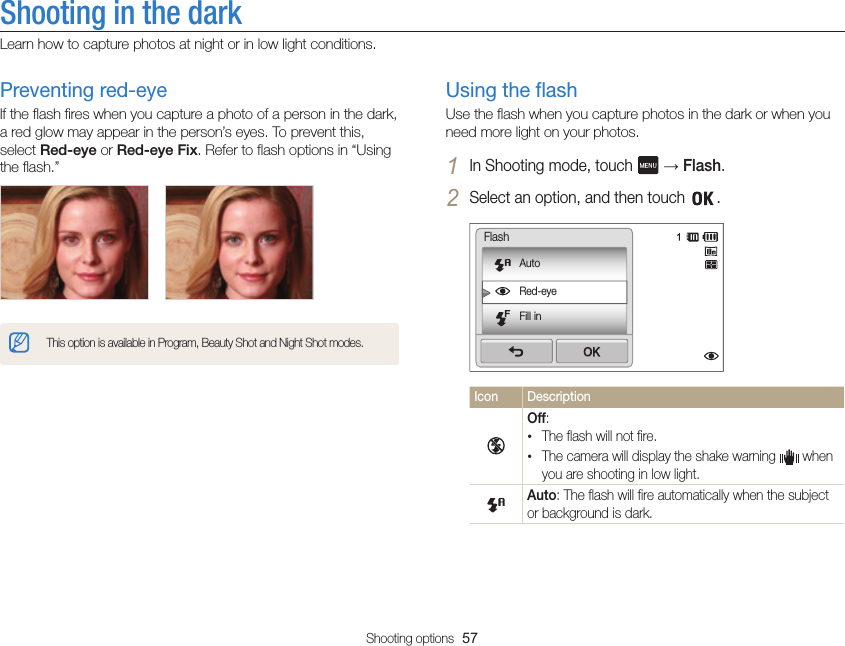
![8Basic troubleshootingLearn to solve common problems by setting shooting options.The subject’s eyes appear red.Red eye is caused by the eyes reflecting light from the camera flash.•Set the flash option to Red-eye or Red-eye Fix. (p. 57)•If the photo has already been captured, select Red-eye Fix in the edit menu. (p. 97)Photos have dust spots.If dust particles are present in the air, you may capture them in photos when you use the flash.•Turn off the flash or avoid capturing photos in a dusty place.•Set ISO sensitivity options. (p. 59)Photos are blurred. Blurring can occur if you capturing photos in low light conditions or hold the camera incorrectly. Use the DIS function or half-press [Shutter] to ensure the subject is focused. (p. 33)Photos are blurred when shooting at night.As the camera tries to let in more light, the shutter speed slows. This can make it difficult to hold the camera steady long enough to take a clear picture and may result in camera shake.•Select Night Shot mode. (p. 39)•Turn on the flash. (p. 57)•Set ISO sensitivity options. (p. 59)•Use a tripod to prevent your camera from shaking.Subjects come out too dark because of backlighting.When the light source is behind the subject or when there is a high contrast between the light and dark areas, the subject may appear too dark.•Avoid shooting toward the sun.•Select Backlight in Scene mode. (p. 38)•Set the flash option to Fill in. (p. 57)•Adjust the exposure. (p. 68)•Set the Auto Contrast Balance (ACB) option. (p. 69)•Set the metering option to Spot if a bright subject is in the center of the frame. (p. 69)](https://usermanual.wiki/Samsung-Electronics-Co/ST200F.User-manual-1-of-2/User-Guide-1594220-Page-9.png)
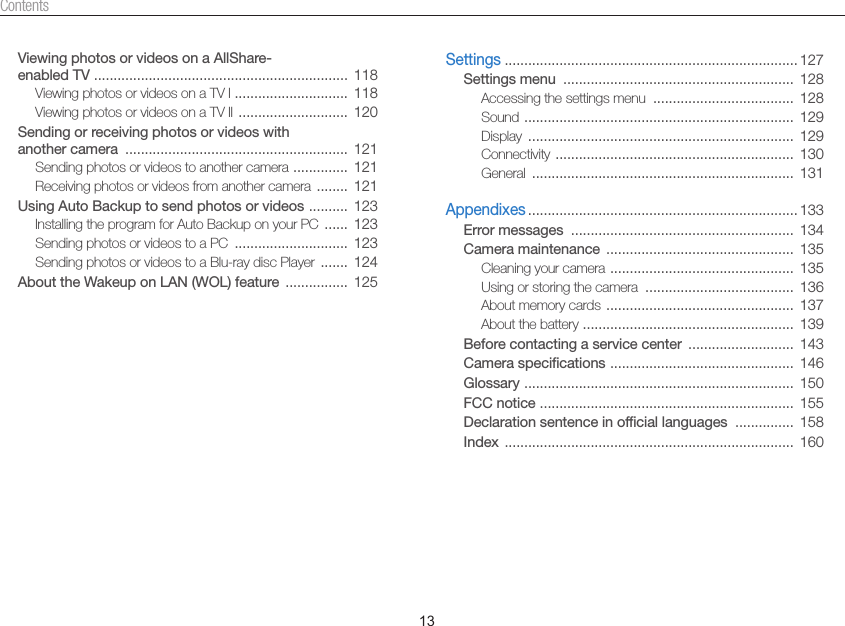

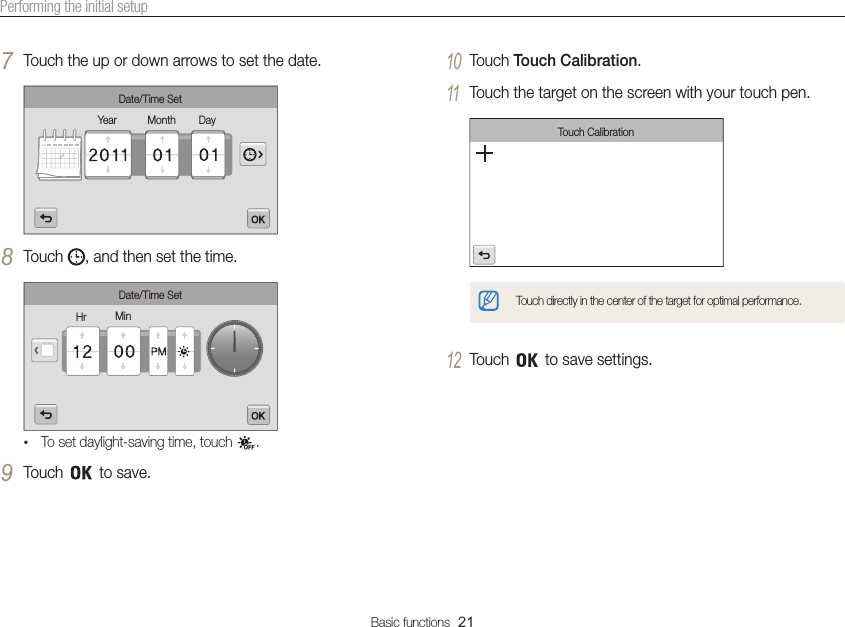
![Basic functions 19Charging the battery and turning on your cameraTurning on your cameraPress [POWER] to turn your camera on or off.• The initial setup screen appears when you turn on the camera for the first time. (p. 20) Turning on your camera in Playback mode Press [Playback]. The camera turns on and immediately accesses Playback mode.If you turn on your camera by pressing and holding [Playback] for about 5 seconds, the camera does not emit any sounds.Charging the batteryBefore you use the camera for the first time, you must charge the battery. When connecting the USB cable to the camera, insert the smaller connector into the camera and the other connector into the power adapter.Indicator light• Red LED is on: Charging• Red LED is off: Fully chargedUse only the AC adapter and USB cable supplied with your camera. If you use another AC adapter (such as SAC-48), the camera battery may not charge or work properly.](https://usermanual.wiki/Samsung-Electronics-Co/ST200F.User-manual-1-of-2/User-Guide-1594220-Page-20.png)
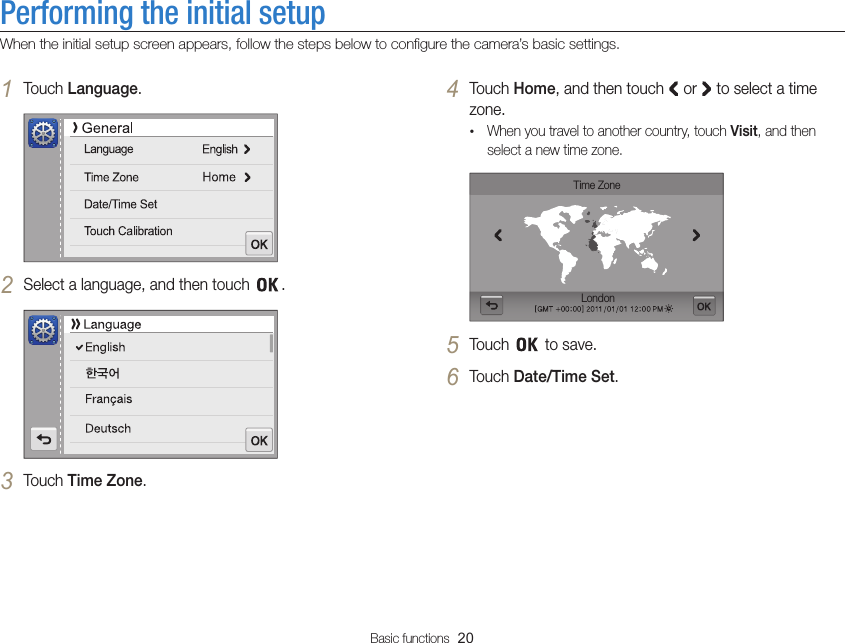
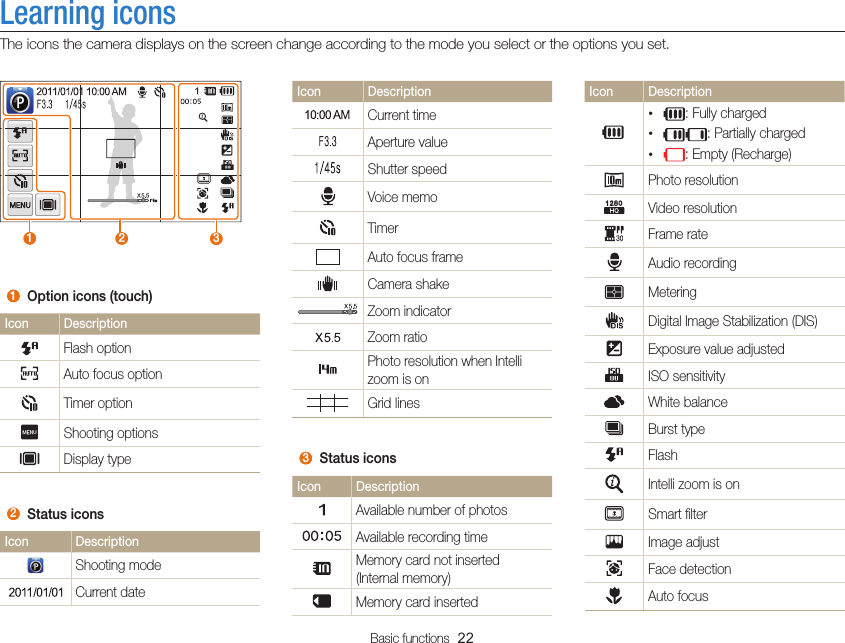
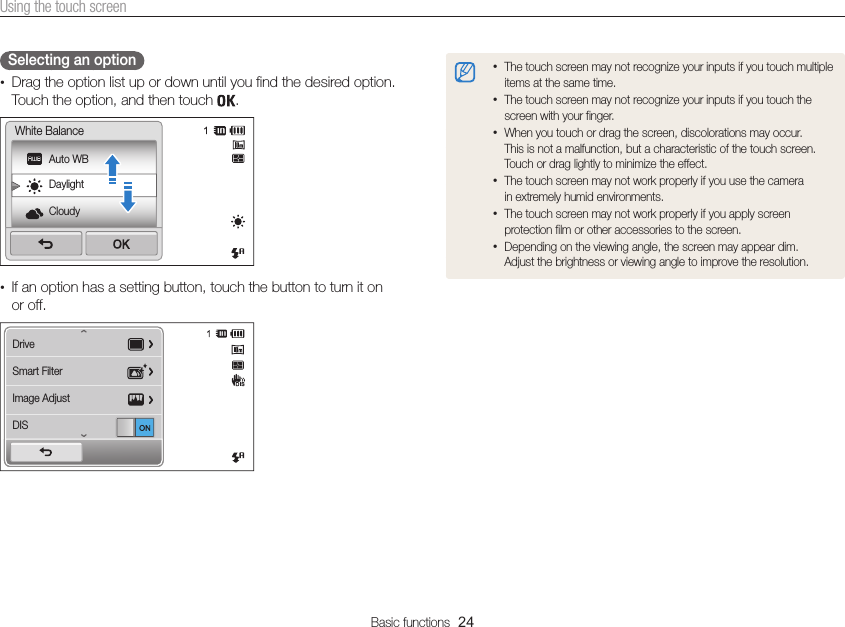
![Basic functions 26Using the Home screenYou can select a shooting mode or access the settings menu by touching the icons on the Home screen.Accessing the Home screenIn Shooting or Playback mode, press [HOME]. Press [HOME] again to return to the previous mode.Smart Auto Smart movie WebProgramSettingsAlbumAuto BackupEmail 1 2 No. Description 1 Touch an icon to access a mode or function.•Scroll to another page by dragging or flicking the touch pen on the screen. 2 The number of the current page. ( )Icons on the Home screenIcon DescriptionSmart Auto: Capture a photo by letting the camera select a scene mode automatically. (p. 36)Program: Capture a photo by manually setting options. (p. 40)Smart movie: Record a video by letting the camera select a scene mode automatically. (p. 42)Web: Access a web site to upload photos and videos stored on the camera. (p. 115)Email: Send photos stored on the camera as email attachments. (p. 111)Auto Backup: Send new photos and videos to a PC or Blu-ray disc player wirelessly. (p. 123)Album: View files by category in Smart album. (p. 84)Settings: Adjust settings to match your preferences. (p. 128)Remote Viewfinder: Use a mobile phone as a remote shutter release via an ad-hoc wireless network. (p. 116)Camera to Camera : Connect your camera to another camera via a wireless network to share photos and videos. (p. 121)](https://usermanual.wiki/Samsung-Electronics-Co/ST200F.User-manual-1-of-2/User-Guide-1594220-Page-27.png)
![Basic functions 29Capturing photosLearn how to capture photos easily and quickly in Smart Auto mode.3 Half-press [Shutter] to focus.•A green frame means the subject is in focus.•A red frame means the subject is out of focus.4 Press [Shutter] to capture a photo.See page 33 for tips to get clearer photos.1 On the Home screen, touch .Smart Auto Smart movie WebProgramSettingsAlbumAuto BackupEmail2 Align your subject in the frame.](https://usermanual.wiki/Samsung-Electronics-Co/ST200F.User-manual-1-of-2/User-Guide-1594220-Page-30.png)
![Basic functions 33 Holding your camera correctly Ensure nothing is blocking the lens. Half-pressing the shutter button Half-press [Shutter] to adjust the focus. The camera adjusts the focus and exposure automatically.The camera sets the aperture value and shutter speed automatically.Focus frame•Press [Shutter] to capture the photo if the focus frame appears in green.•Change the composition and half-press [Shutter] again if the focus frame appears in red. Reducing camera shake Set the Digital Image Stabilization option to reduce camera shake. (p. 32) When is displayed Camera shakeWhen you shoot in the dark, avoid setting the flash option to Slow Sync or Off. The aperture remains open longer and it may be harder to hold the camera steady long enough to take a clear picture.•Use a tripod or set the flash option to Fill in. (p. 57)•Set ISO sensitivity options. (p. 59)Tips for getting a clearer photo](https://usermanual.wiki/Samsung-Electronics-Co/ST200F.User-manual-1-of-2/User-Guide-1594220-Page-34.png)
![Basic functions 34 Preventing your subject from being out of focus It may be difficult to get your subject in focus when: -there is little contrast between the subject and background (for example, when your subject is wearing clothing that is similar in color to the background) -the light source behind the subject is too bright -the subject is shiny or reflective -the subject includes horizontal patterns, such as blinds -the subject is not positioned in the center of the frameUse the focus lockHalf-press [Shutter] to focus. When the subject is in focus, you can reposition the frame to change the composition. When you are ready, press [Shutter] to capture your photo.•When you capture photos in low lightTurn on the flash. (p. 57)•When subjects are moving rapidlyUse the Continuous or Motion Capture function. (p. 72)](https://usermanual.wiki/Samsung-Electronics-Co/ST200F.User-manual-1-of-2/User-Guide-1594220-Page-35.png)
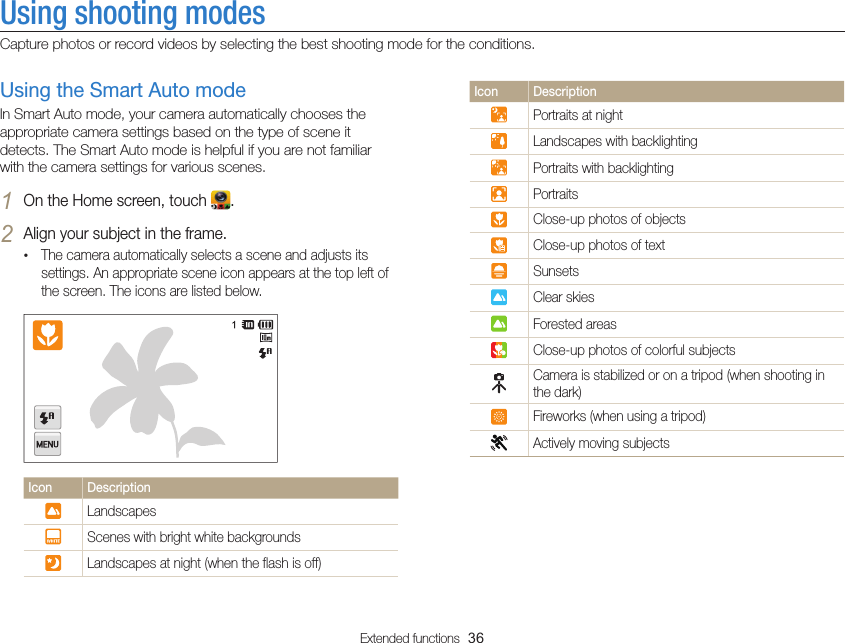
![Extended functions 37Using shooting modes3 Half-press [Shutter] to focus.•In several scenes, the camera automatically captures a photo when you half-press [Shutter].4 Press [Shutter] to capture the photo.•If the camera does not recognize an appropriate scene mode, it uses the default settings for the Smart Auto mode.•Even if it detects a face, the camera may not select a portrait mode depending on the subject's position or lighting.•The camera may not select the correct scene depending on the shooting conditions, such as camera shake, lighting, or distance to the subject.•Even if you use a tripod, the camera may not detect the mode if the subject is moving.•In Smart Auto mode, the camera consumes more battery power, because it changes settings often to select appropriate scenes.Using the Simple Shot modeIn Simple Shot mode, you can capture photos with simple adjustments to brightness and color.1 On the Home screen, touch .2 Drag the sliders or touch the sample photos to adjust Brightness and Color.BrightnessColor3 Align your subject in the frame, and then half-press [Shutter] to focus.4 Press [Shutter] to capture the photo.](https://usermanual.wiki/Samsung-Electronics-Co/ST200F.User-manual-1-of-2/User-Guide-1594220-Page-38.png)
![Extended functions 38Using shooting modesUsing the Scene modeIn Scene mode, you can capture a photo with options that are preset for a specific scene.1 On the Home screen, touch .2 Touch a scene.Option DescriptionLandscape: Capture still-life scenes and landscapes.Sunset: Capture scenes at sunset, with natural-looking reds and yellows.Dawn: Capture scenes at sunrise.Backlight: Capture backlit subjects.Beach & Snow: Reduce underexposure of subjects caused by sunlight reflected from sand or snow.Text: Clearly capture text from printed or electronic documents.3 Align your subject in the frame, and then half-press [Shutter] to focus.4 Press [Shutter] to capture the photo.Using the Close Up modeIn Close Up mode, you can capture close-up photos of subjects, such as flowers or insects.1 On the Home screen, touch .2 Align your subject in the frame, and then half-press [Shutter] to focus.3 Press [Shutter] to capture the photo.](https://usermanual.wiki/Samsung-Electronics-Co/ST200F.User-manual-1-of-2/User-Guide-1594220-Page-39.png)
![Extended functions 39Using shooting modesUsing the Beauty Shot modeIn Beauty Shot mode, you can capture a portrait with options to hide facial imperfections.1 On the Home screen, touch .2 Drag the sliders or touch the sample photos to adjust Face Tone and Face Retouch.•For example, increase the Face Tone setting to make skin appear lighter.Face ToneFace Retouch 3 Align your subject in the frame, and then half-press [Shutter] to focus.4 Press [Shutter] to capture the photo.When using the Beauty Shot mode, the focus distance will be set to Auto Macro.Using the Night Shot modeIn Night Shot mode, you can use a slow shutter speed to extend the time the shutter stays open. Increase the aperture value to prevent overexposure.1 On the Home screen, touch .2 Drag the dials on the screen to the arrow directions below to adjust shutter speed and aperture value.Shutter speedAperture value3 Align your subject in the frame, and then half-press [Shutter] to focus.4 Press [Shutter] to capture the photo.Use a tripod to prevent blurry photos.](https://usermanual.wiki/Samsung-Electronics-Co/ST200F.User-manual-1-of-2/User-Guide-1594220-Page-40.png)
![Extended functions 40Using shooting modesUsing the Program modeIn Program mode, you can set most options, except the shutter speed and aperture value, which the camera sets automatically.1 On the Home screen, touch .2 Touch , and then set desired options. (For a list of options, refer to page 52.)3 Align your subject in the frame, and then half-press [Shutter] to focus.4 Press [Shutter] to capture the photo. Setting the user buttons In Program mode, you can add shortcuts for your favorite options to the left side of the screen.1 In Shooting mode, touch → My screen → .2 Touch and hold any icon, except one of the icons in the column on the far left.OK Cancel Reset My screenEV](https://usermanual.wiki/Samsung-Electronics-Co/ST200F.User-manual-1-of-2/User-Guide-1594220-Page-41.png)
![Extended functions 41Using shooting modes3 Drag the icon into a desired box on the left.•To remove shortcuts, drag an icon to the right.OK Reset CancelEV My screen4 Touch to save.You can create up to 3 shortcuts.Using the Movie modeIn Movie mode, you can record high-definition videos of up to 20 minutes in length. The camera saves recorded videos as MP4 (H.264) files.•H.264 (MPEG-4 part10/AVC) is a high-compression video format established by the international standard organizations ISO-IEC and ITU-T.•Some memory cards may not support high definition recording. In this case, set a lower resolution.•Memory cards with slow writing speeds will not support high-resolution videos and high-speed videos. To record high-resolution or high-speed videos, use memory cards with faster writing speeds.1 On the Home screen, touch .2 Touch , and then set desired options. (For a list of options, refer to page 52.)3 Press [Shutter] or touch to start recording.4 Press [Shutter] again or touch to stop recording.](https://usermanual.wiki/Samsung-Electronics-Co/ST200F.User-manual-1-of-2/User-Guide-1594220-Page-42.png)
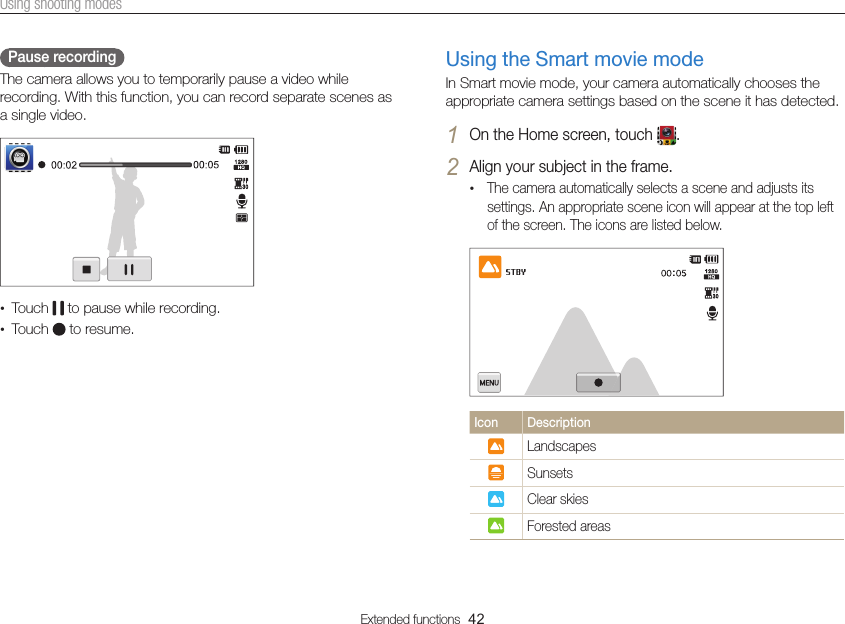
![Extended functions 43Using shooting modes3 Press [Shutter] or touch to start recording.4 Press [Shutter] again or touch to stop recording.•If the camera does not recognize an appropriate scene mode, it uses the default settings for the Smart movie mode.•The camera may not select the correct scene depending on the shooting conditions, such as camera shake, lighting, and distance to the subject.•Smart filter effects are not available in Smart Movie mode.](https://usermanual.wiki/Samsung-Electronics-Co/ST200F.User-manual-1-of-2/User-Guide-1594220-Page-44.png)
![Extended functions 44Using the Object Highlight modeThe Object Highlight mode makes the subject more discernible by adjusting the depth of field.1 On the Home screen, touch .2 Position the camera according to the optimum distance displayed on the screen.•The optimum distance will vary, based on the zoom ratio you use.3 Drag the sliders or touch the sample photos to adjust Blur and Tone.BlurTone4 Half-press [Shutter] to focus.•When the camera can apply the Object Highlight effect, will appear.•When the camera cannot apply the Object Highlight effect, will appear. If this occurs, adjust the distance from the camera to the subject.5 Press [Shutter] to capture the photo.•Available resolutions in Object Highlight mode are and .•If the shooting distance is not within the optimum range, you can capture a photo but the Object Highlight effect will not be applied.•The Object Highlight effect cannot be used in dark places.•The Object Highlight effect cannot be used with the Optical zoom at 3X or higher.•Digital zoom is not available in Object Highlight mode.•Use a tripod to prevent camera shake as the camera captures 2 consecutive photos to apply the effect.•The subject and the background should have a significant contrast in color.•Subjects should be positioned far away from the background for the greatest effect.Using effect modesCapture photos or record videos with various effects.](https://usermanual.wiki/Samsung-Electronics-Co/ST200F.User-manual-1-of-2/User-Guide-1594220-Page-45.png)
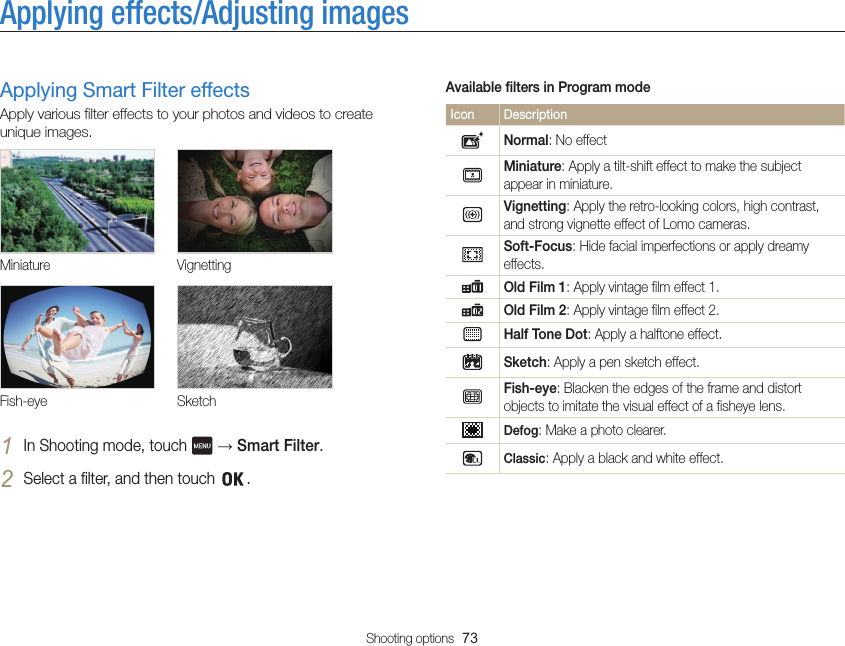
![Extended functions 45Using effect modesUsing the Photo Filter modeIn Photo Filter mode, you can apply various filter effects to your photos.Miniature VignettingFish-eye Sketch1 On the Home screen, touch .2 Touch a desired filter.•To view the original photo, touch Before.•To view the photo with the filter effect, touch After.Using the Magic Frame Shot modeIn Magic Frame Shot mode, you can apply various frame effects to your photos. The shape and the feel of the photos will change according to the frame you select.1 On the Home screen, touch .2 Select a desired frame.3 Align your subject in the frame, and then half-press [Shutter] to focus.4 Press [Shutter] to capture the photo.In Magic Frame shot mode, the resolution is automatically set to .](https://usermanual.wiki/Samsung-Electronics-Co/ST200F.User-manual-1-of-2/User-Guide-1594220-Page-46.png)
![Extended functions 46Using effect modesBefore AfterOption DescriptionMiniature Apply a tilt-shift effect to make the subject appear in miniature.Vignetting Apply the retro-looking colors, high contrast, and strong vignette effect of Lomo cameras.Soft-Focus Hide facial imperfections or apply dreamy effects.Old Film 1 Apply vintage film effect 1.Old Film 2 Apply vintage film effect 2.Half Tone Dot Apply a halftone effect.Sketch Apply a pen sketch effect.Fish-eye Blacken the edges of the frame and distort objects to imitate the visual effect of a fisheye lens.Option DescriptionDefog Make image clearer.Classic Apply a black and white effect.Retro Apply a sepia tone effect.Negative Apply a negative film effect.3 Align your subject in the frame, and then half-press [Shutter] to focus.4 Press [Shutter] to capture the photo.•To apply filter effects to saved photos, touch .•When you select Sketch, the resolution will change to and below.•When you select Fish-eye, the resolution will change to and below.](https://usermanual.wiki/Samsung-Electronics-Co/ST200F.User-manual-1-of-2/User-Guide-1594220-Page-47.png)
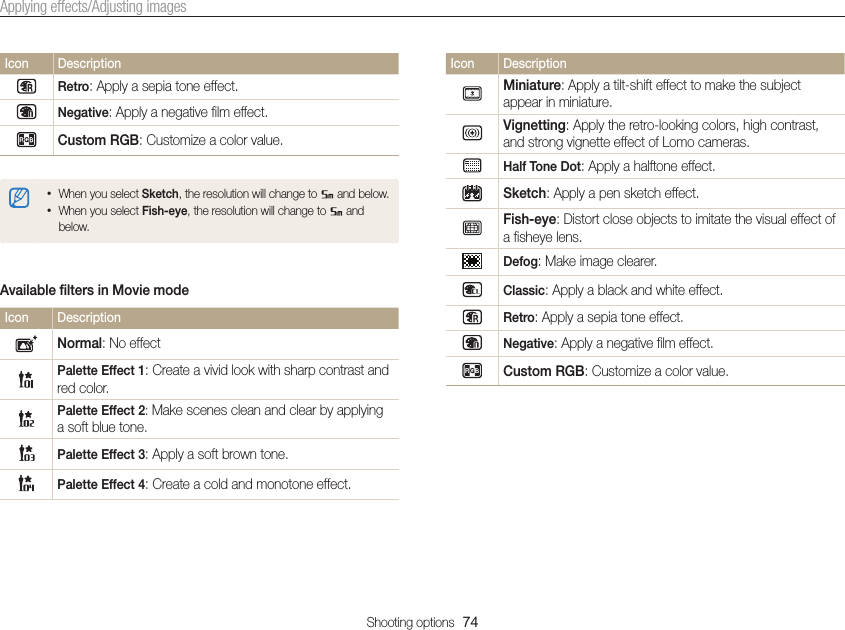
![Extended functions 47Using effect modesUsing the Movie Filter modeIn Movie Filter mode, you can record videos with various filter effects.1 On the Home screen, touch .2 Touch a desired filter.Option DescriptionMiniature Apply a tilt-shift effect to make the subject appear in miniature.Vignetting Apply the retro-looking colors, high contrast, and strong vignette effect of Lomo cameras.Half Tone Dot Apply a halftone effect.Sketch Apply a pen sketch effect.Fish-eye Distort close objects to imitate the visual effect of a fisheye lens.Defog Make the image clearer.Option DescriptionClassic Apply a black and white effect.Retro Apply a sepia tone effect.Negative Apply a negative film effect.3 Press [Shutter] or touch to start recording.4 Press [Shutter] again or touch to stop recording.•If you select Miniature, the speed of the video will increase.•If you select Miniature, the camera will not record sound.•If you select Miniature, Vignetting, Half Tone Dot, Sketch, Fish-eye, or Defog, the recording speed will be set to and the recording resolution will be set to less than .](https://usermanual.wiki/Samsung-Electronics-Co/ST200F.User-manual-1-of-2/User-Guide-1594220-Page-48.png)
![Extended functions 48Using effect modesUsing the Vignetting modeIn Vignetting mode, you can capture a photo or record a video with a vignetting effect.1 On the Home screen, touch .2 Select (photo) or (movie).3 Drag the sliders or touch the sample photos to adjust Level, Brightness, and Contrast.•To view the original photo, touch Before.•To view the photo with the Vignetting effect, touch After.LevelBefore AfterBrightnessContrast4 Align your subject in the frame, and then half-press [Shutter] to focus.5 Press [Shutter] to capture the photo.To apply the Vignetting effect to saved photos in Shooting mode, touch .](https://usermanual.wiki/Samsung-Electronics-Co/ST200F.User-manual-1-of-2/User-Guide-1594220-Page-49.png)
![Extended functions 49Using effect modesOption DescriptionPalette Effect 1 Create a vivid look with sharp contrast and a red color.Palette Effect 2 Make scenes clean and clear by applying a soft blue tone.Palette Effect 3 Apply a soft brown tone.Palette Effect 4 Create a cold and monotone effect.3 Press [Shutter] or touch to start recording.4 Press [Shutter] again or touch to stop recording.Using the Palette Effect modeIn Palette Effect mode, you can record a video with effects to make specific colors stand out.1 On the Home screen, touch .2 Touch a desired palette.](https://usermanual.wiki/Samsung-Electronics-Co/ST200F.User-manual-1-of-2/User-Guide-1594220-Page-50.png)
![Extended functions 50Recording a voice memo1 On the Home screen, touch .2 Press [Shutter] or touch to start recording.•Touch to pause or touch to resume.•Each memo can be up to 10 hours long if memory is available.3 Press [Shutter] again or touch to stop recording.To view the list of saved voice memos, touch .Recording voice memosLearn how to record a voice memo that you can play back later. You can also add a voice memo to a photo to remind you of shooting conditions.You will get the best sound quality when you speak 16 in (40 cm) away from the camera.](https://usermanual.wiki/Samsung-Electronics-Co/ST200F.User-manual-1-of-2/User-Guide-1594220-Page-51.png)
![Extended functions 51Recording voice memosAdding a voice memo to a photoIn Program mode, you can add a voice memo to a captured photo.1 On the Home screen, touch .2 Touch , and then touch the setting button next to Memo.3 Align your subject in the frame, and then capture a photo.•The camera begins to record a voice memo right after you capture the photo.4 Record a short voice memo (10 seconds maximum).•Press [Shutter] to stop recording a voice memo before the 10 seconds are up.You cannot add voice memos to photos in the burst mode.](https://usermanual.wiki/Samsung-Electronics-Co/ST200F.User-manual-1-of-2/User-Guide-1594220-Page-52.png)
![Shooting options 56Using the timerLearn how to set the timer to delay shooting.3 Press [Shutter] to start the timer.•The AF-assist light/timer lamp blinks. The camera will automatically capture a photo at the specified time.•Press [Shutter] to cancel the timer.•Depending on the Face Detection option you have selected, the timer function or some of its options may not be available.•Timer options are not available if you set Burst options.1 In Shooting mode, touch → Timer.2 Select an option, and then touch .10 Sec2 SecDoubleTimerIcon DescriptionOff: The timer is not active.10 Sec: Capture a photo after a 10-second delay.2 Sec: Capture a photo after a 2-second delay.Double: Capture one photo after a 10-second delay and another photo after a 2-second delay.Available options may differ depending on the shooting mode.](https://usermanual.wiki/Samsung-Electronics-Co/ST200F.User-manual-1-of-2/User-Guide-1594220-Page-57.png)
![Shooting options 61Changing the camera’s focus•If you do not touch any area on the screen, the focus frame will appear in the center of the screen.•Tracking a subject may fail when: - the subject is too small - the subject moves excessively - the subject is backlit or you are shooting in a dark place - colors or patterns on the subject and the background are the same - the subject includes horizontal patterns, such as blinds - the camera shakes excessively•When tracking a subject fails, the focus frame will appear as a white single-line frame ( ).•If the camera fails to track the subject, you must reselect the subject to track.•If the camera fails to focus, the focus frame will change to a red single-line frame ( ).•If you use this function, you cannot set self timer options, Face Detection options, Smart Filter options, and burst options.Using Smart Touch focusSmart Touch AF allows you to track and auto focus on your subject, even when you are moving.1 In Shooting mode, touch → Focus Area.2 Select Smart Touch AF, and then touch .3 Touch the subject you want to track in the touch area.•The white frame means that your camera is tracking the subject.•The green frame means that your subject is in focus when you half-press [Shutter].](https://usermanual.wiki/Samsung-Electronics-Co/ST200F.User-manual-1-of-2/User-Guide-1594220-Page-62.png)
![Shooting options 64Using face detectionCapturing a smile shotThe camera automatically releases the shutter when it detects a smiling face.1 In Shooting mode, touch → Face Detection.2 Select Smile Shot, and then touch .3 Compose your shot.•The camera automatically releases the shutter when it detects a smiling face.When your subject smiles broadly, your camera can detect the smile more easily.Capturing a self portrait shotTake photos of yourself. The focus distance will be set to close-up and your camera will emit a beep.1 In Shooting mode, touch → Face Detection.2 Select Self-Portrait, and then touch .3 When you hear a quick beep, press [Shutter].When faces are located in the center, the camera beeps rapidly.If you turn Volume off in the sound settings, the camera will not emit a beep. (p. 129)](https://usermanual.wiki/Samsung-Electronics-Co/ST200F.User-manual-1-of-2/User-Guide-1594220-Page-65.png)
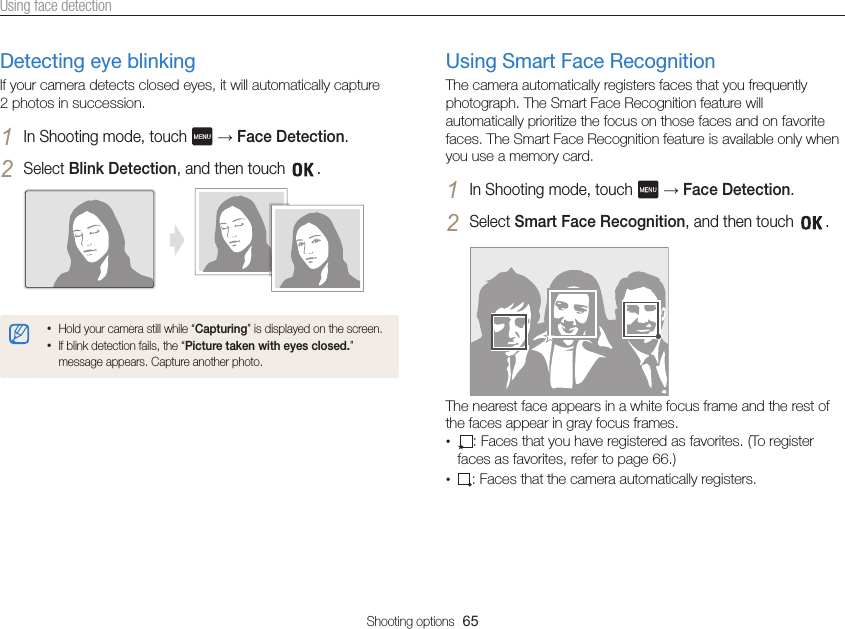
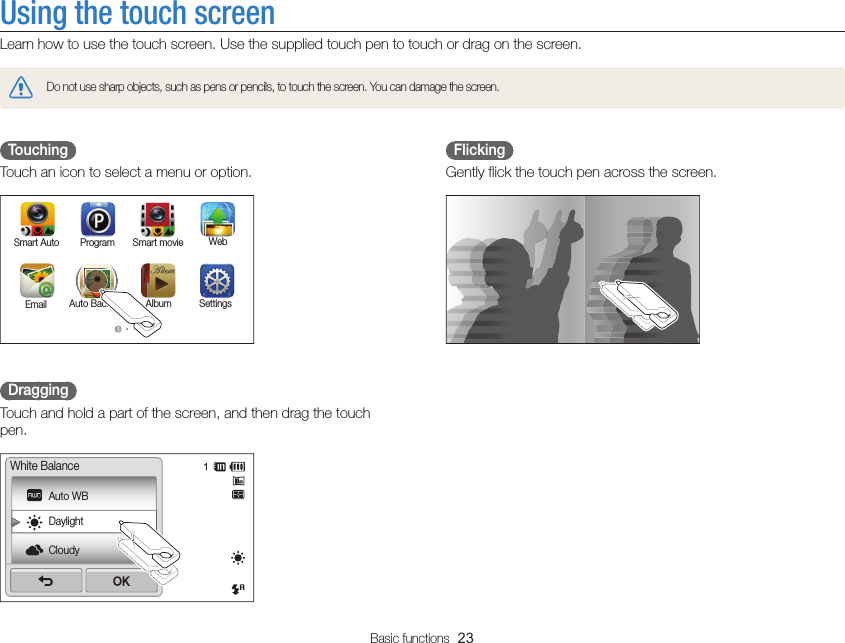
![Shooting options 66Using face detectionRegistering faces as your favorites (My Star)You can register your favorite faces to prioritize the focus and exposure on those faces. This feature is available only when you use a memory card.1 In Shooting mode, touch → Smart FR Edit.2 Select My Star, and then touch .3 Align your subject’s face with the oval guideline, and then press [Shutter] to register the face.•If the subject’s face is not aligned with the oval guideline, the white frame will not appear.•Capture photos of one person at a time when registering faces.•Capture 5 photos the subject’s face for best results: one each from the front, left, right, above, and below.•When capturing photos from the left, right, above, and below, instruct the subject not to turn his or her face more than 30 degrees.•You can register a face even if you capture one photo of the subject's face.•The camera may recognize and register faces incorrectly depending on lighting conditions, drastic changes in the subject's pose or face, and whether or not the subject is wearing glasses.•The camera can automatically register up to 14 faces. If the camera recognizes a new face when 14 faces have already been registered, it will replace the lowest priority face with the new one.•The camera can detect up to 5 favorite faces in one scene.](https://usermanual.wiki/Samsung-Electronics-Co/ST200F.User-manual-1-of-2/User-Guide-1594220-Page-67.png)

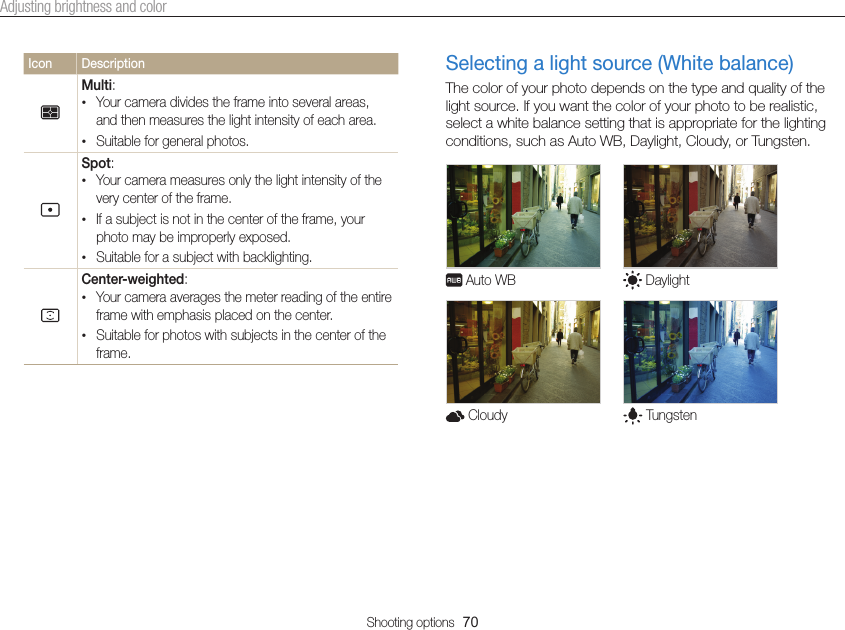
![Shooting options 71Adjusting brightness and color1 In Shooting mode, touch → White Balance.2 Select an option, and then touch .DaylightCloudyFluorescent_HWhite BalanceIcon Description Auto WB: Automatically set the White Balance based on the lighting conditions.Daylight: For outdoor photos on a sunny day.Cloudy: For outdoor photos on a cloudy day or in shadows.Fluorescent_H: For shooting under a daylight fluorescent or 3-way fluorescent light.Fluorescent_L: For shooting under white fluorescent light.Tungsten: For shooting indoor photos under incandescent bulbs or halogen lamps.Custom Set: Use White Balance settings that you defined. Defining your own white balance You can customize the White Balance by capturing a photo of a white surface, such as a piece of paper, under the lighting conditions in which you intend to capture a photo. The White Balance feature will help your camera reproduce the colors that are in the scene accurately in your photo.1 In Shooting mode, touch → White Balance.2 Select Custom Set, and then touch .3 Aim the lens at a piece of white paper, and then press [Shutter].](https://usermanual.wiki/Samsung-Electronics-Co/ST200F.User-manual-1-of-2/User-Guide-1594220-Page-72.png)
![Shooting options 72Using burst modesIt can be difficult to capture photos of fast-moving subjects or capture natural facial expressions and gestures of your subjects in photos. In these cases, select one of the burst modes to rapidly capture multiple photos.Icon Description Single: Capture a single photo.Continuous:•While you are pressing [Shutter], the camera continuously captures photos.•The maximum number of photos depends on the capacity of your memory card.Motion Capture: While you are pressing [Shutter], the camera captures VGA photos (6 photos per second; maximum of 30 photos).AEB:•Capture 3 consecutive photos, each with a different exposure: normal, underexposed, and overexposed.•Use a tripod to prevent blurry photos. •You can use the flash, timer, ACB, and Smart Filter only when you select Single.•When you select Motion Capture, your camera will set the resolution to VGA and set the ISO sensitivity to Auto. •Depending on the Face Detection option you selected, some burst options may not be available.1 In Shooting mode, touch → Drive.2 Select an option, and then touch .ContinuousMotion CaptureAEBDrive](https://usermanual.wiki/Samsung-Electronics-Co/ST200F.User-manual-1-of-2/User-Guide-1594220-Page-73.png)

![Playback/Editing 81Viewing photos or videos in Playback modeLearn how to play back photos, videos, or voice memos and how to manage files.2 Drag the image left or right to move to another file.•To skip files quickly, tilt the camera to the direction you want to flip files. (p. 82)•You can also touch and hold the left end or right end of the screen to skip files quickly.•You can also drag the slider left or right to move to the previous or next file.Starting Playback modeView photos or play videos and voice memos stored in your camera.1 Press [Playback].•The most recent file will be displayed.•If the camera is off, it will turn on and display the most recent file.•To view files by category, touch on the Home screen. (p. 84)•To send an email, touch → Share → Email. To upload the file to the web sites, touch → Share → an web site.](https://usermanual.wiki/Samsung-Electronics-Co/ST200F.User-manual-1-of-2/User-Guide-1594220-Page-82.png)