Samsung Electronics Co ST80 Digital Camera User Manual 09 SAMSUNG ST80 User s Manual
Samsung Electronics Co Ltd Digital Camera 09 SAMSUNG ST80 User s Manual
UserManual.wiki
>
Samsung Electronics Co
>
ST80 User Manual
User manual
Navigation menu
Upload a User Manual
Namespaces
Wiki Guide
HTML
PDF
Info
Views
User Manual
Discussion / Help
Navigation

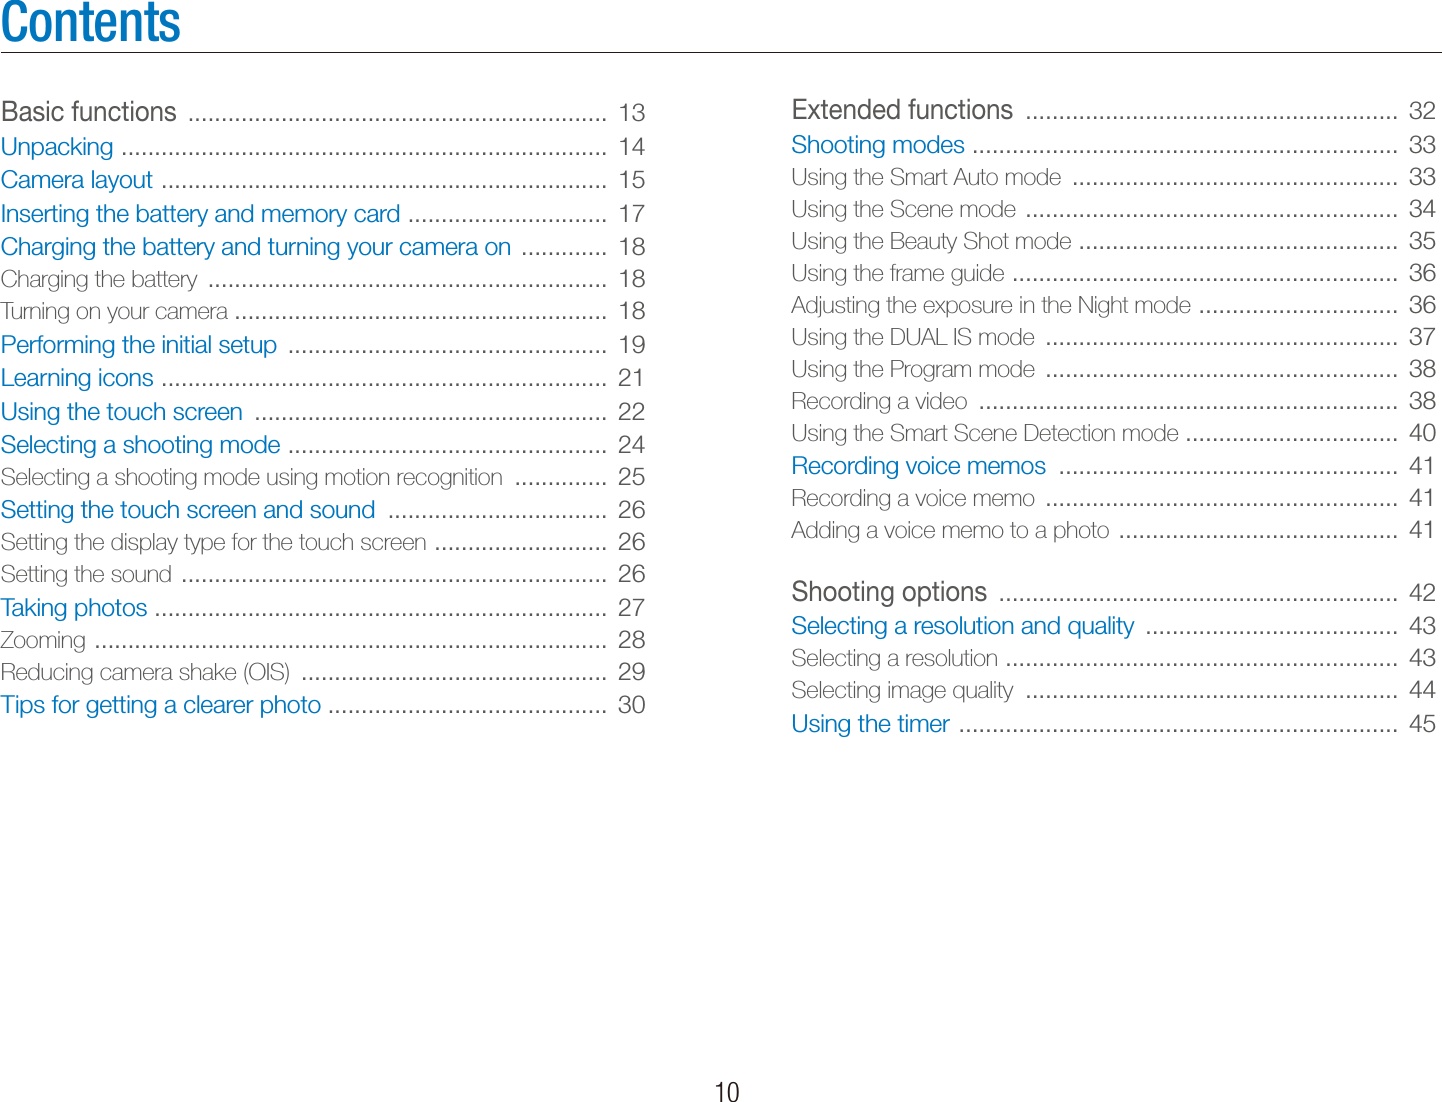
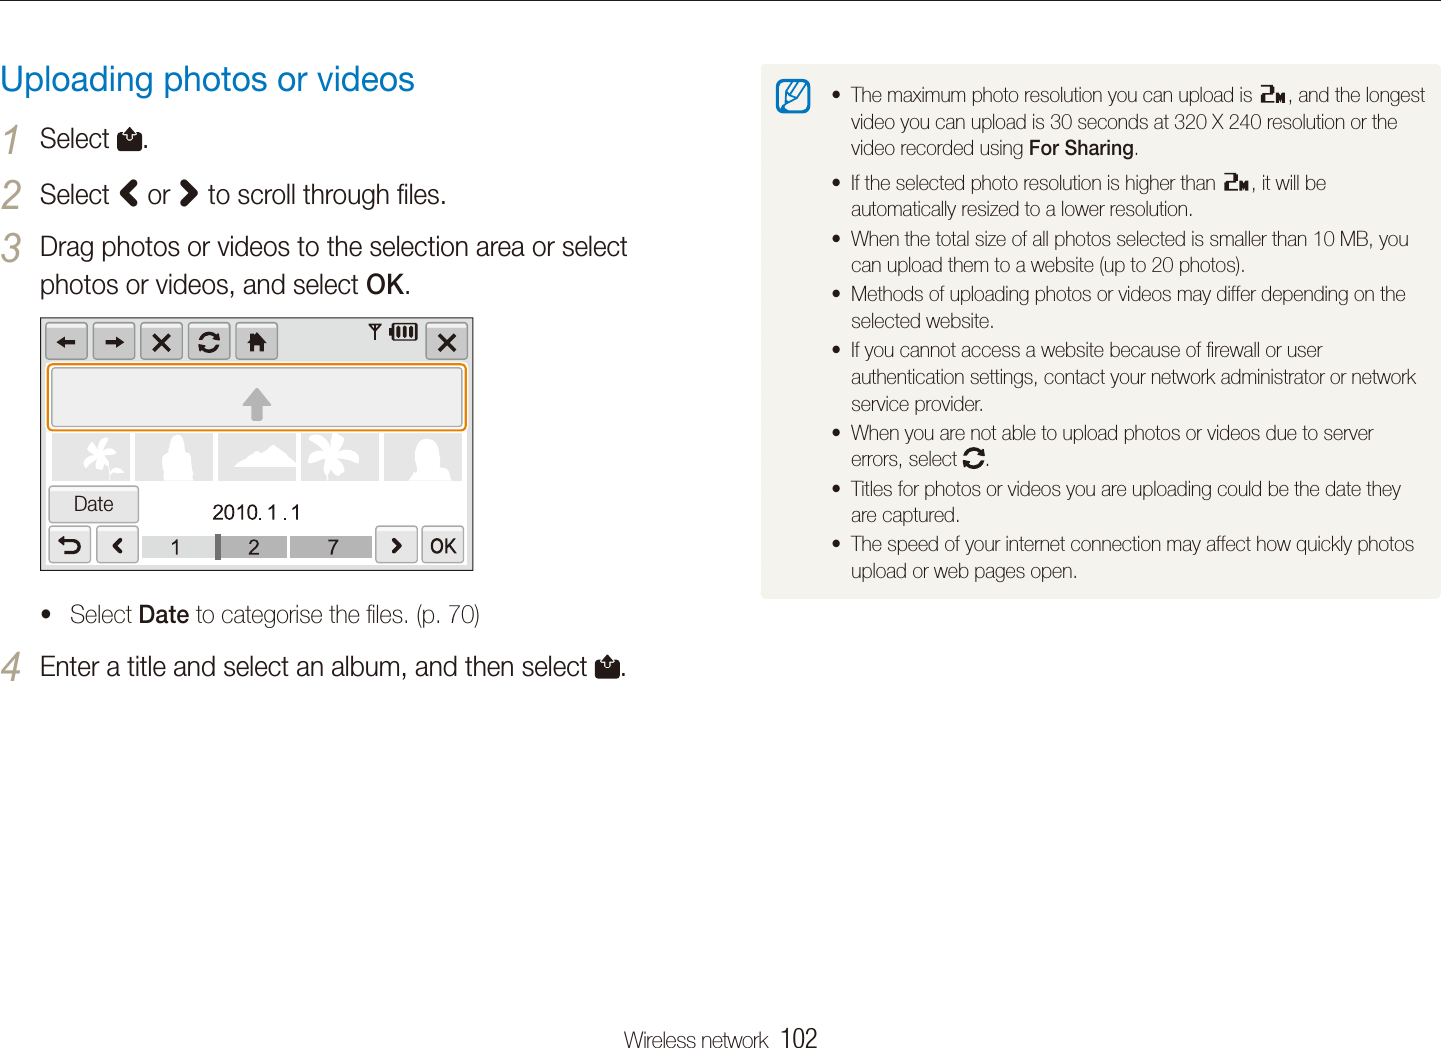
![6Indications used in this manualShooting mode IndicationSmart Auto SAuto aProgram pScene sDUAL IS dSmart Scene DetectionDMovie vShooting mode iconsThese icons indicate that a function is available in the corresponding modes. The s mode may not support functions for all scenes.e.g.)Available in the Program, DUAL IS, Movie, and Smart Scene Detection modesIcons used in this manualIcon FunctionAdditional informationSafety warnings and precautions[] Camera buttons; for example: [Shutter] (represents the shutter button)() Page number of related informationThe order of options or menus you must select to perform a step; for example: Select > (represents Select >, and then )*AnnotationAbbreviations used in this manualAbbreviation DefinitionACB Auto Contrast BalanceAEB Auto Exposure BracketAF Auto FocusAP Access PointDIS Digital Image StabilizationDLNA Digital Living Network AllianceDPOF Digital Print Order FormatEV Exposure ValueOIS Optical Image StabilizationWB White Balance](https://usermanual.wiki/Samsung-Electronics-Co/ST80/User-Guide-1288454-Page-7.png)
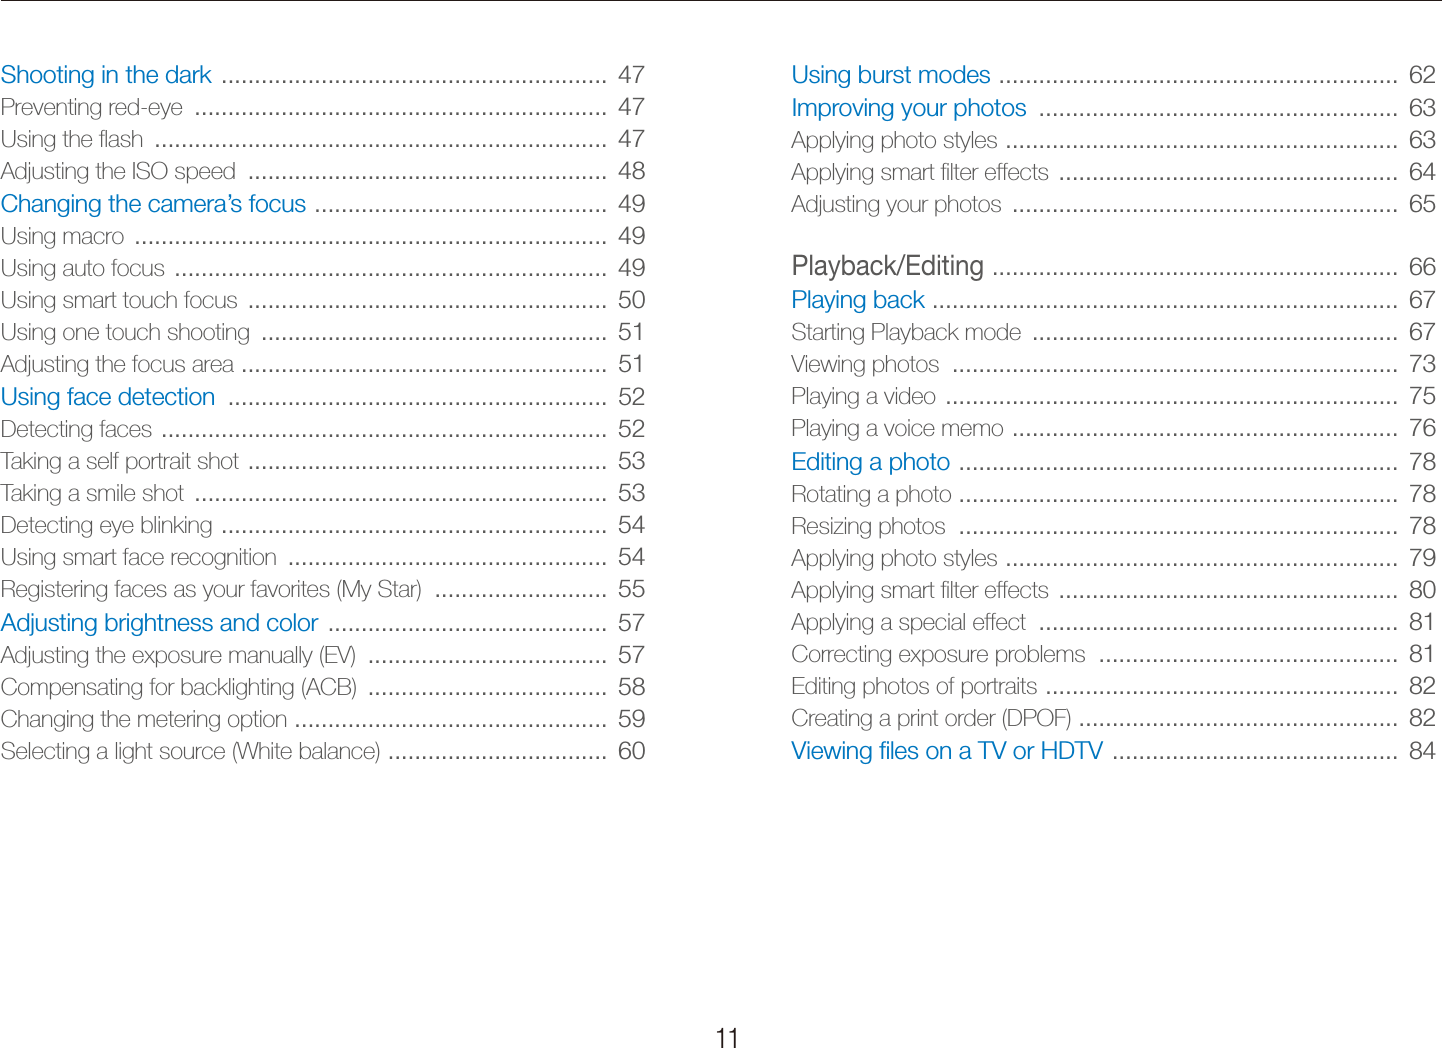
![7Pressing the shutterHalf-press [t Shutter]: press the shutter halfway downPress [t Shutter]: press the shutter all the way downHalf-press [Shutter] Press [Shutter]Subject, background, and compositionSubjectt : the main object of a scene, such as a person, animal, or still life Backgroundt : the objects around the subjectCompositiont : the combination of a subject and backgroundSubjectBackgroundCompositionExpressions used in this manualExposure (Brightness)The amount of light that enters your camera determines the exposure. You can alter the exposure with shutter speed, aperture value, and ISO speed. By altering the exposure, your photos will be darker or lighter.Normal exposure Overexposure (too bright)](https://usermanual.wiki/Samsung-Electronics-Co/ST80/User-Guide-1288454-Page-8.png)
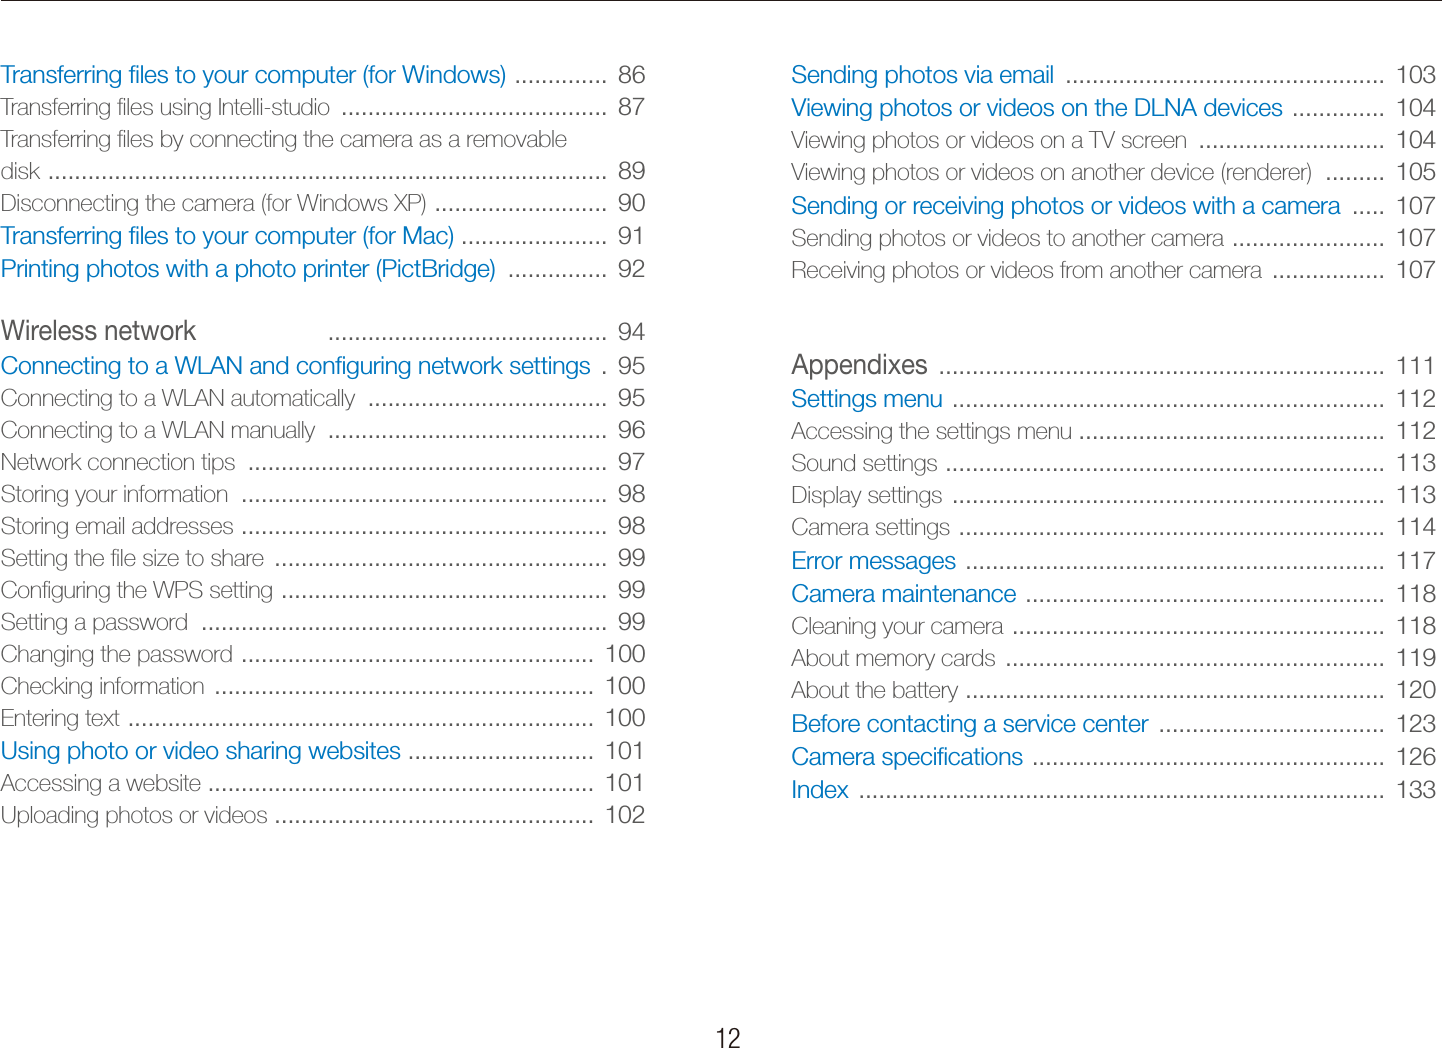
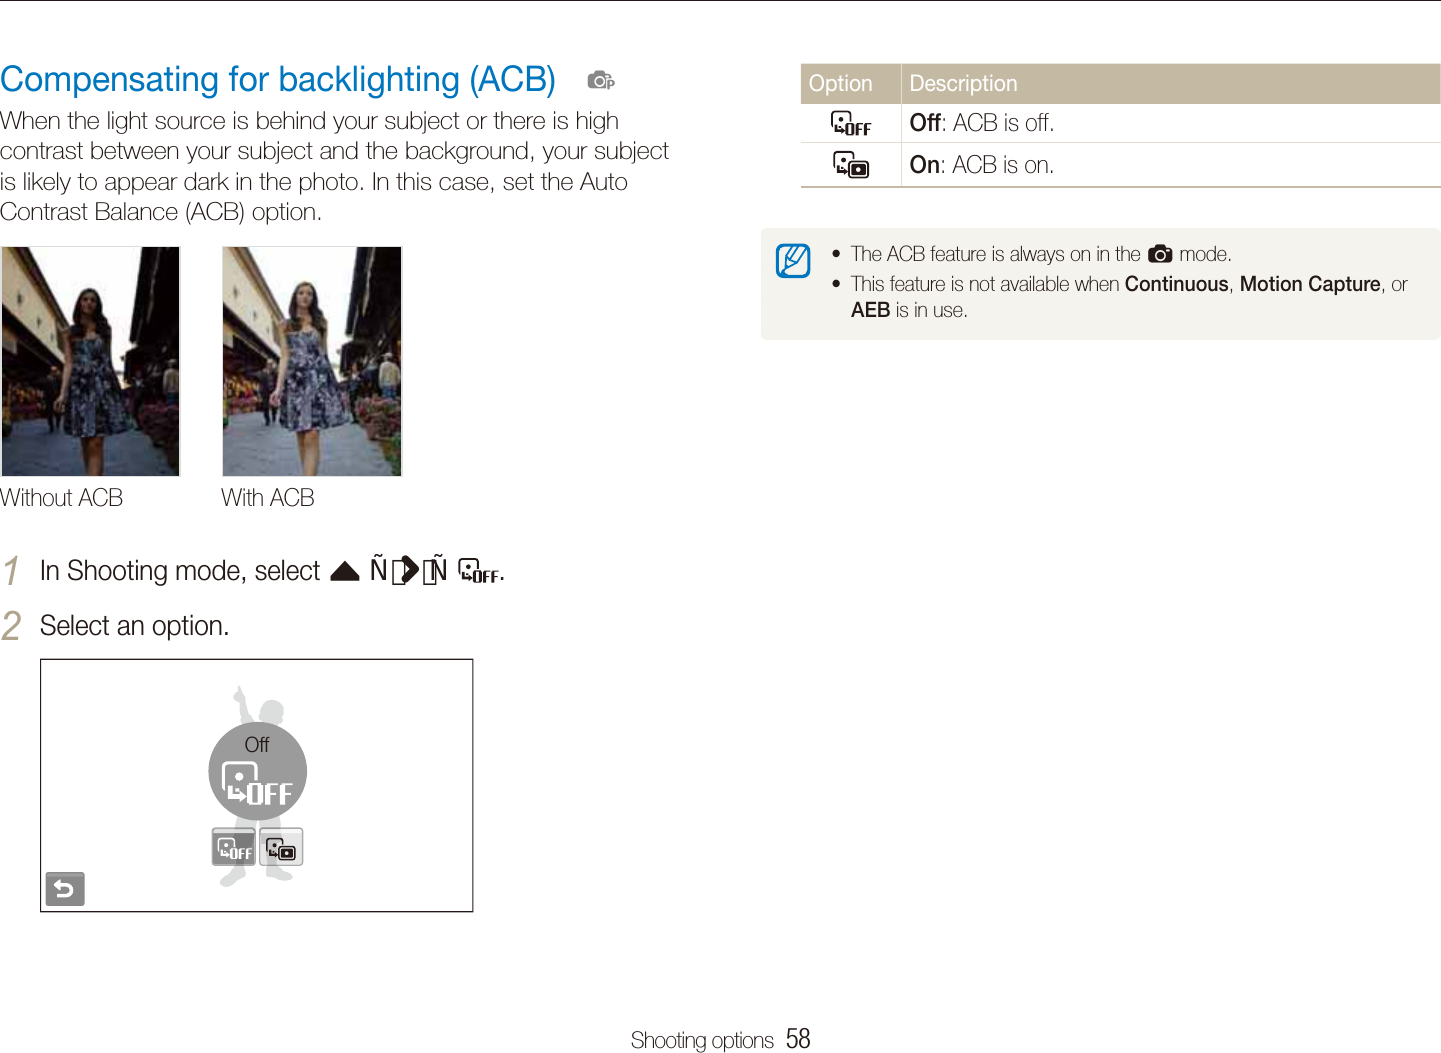
![8Common questionsYou can get answers to common questions. Solve problems easily by setting shooting options.The subject's eyes appear red.This is caused by a reflection from the camera flash.Set the flash option to t Red-eye or Red-eye Fix. (p. 47)If the photo has already been taken, select t Red-eye Fix in the edit menu. (p. 82)Photos have dust spots. Dust particles floating in the air may be captured in photos when using the flash.Turn off the flash or avoid taking photos in a dusty place.tSet ISO speed options. (p. t 48)Photos are blurred. This may be caused by taking photos in low light conditions or holding the camera incorrectly. Press [t Shutter] halfway down to make sure the subject is focused. (p. 30)Use the td mode. (p. 37)Photos are blurred when shooting at night.As the camera tries to let in more light, the shutter speed slows.This can make it difficult to steady the camera and may result in camera shake.Select t Night in the s mode. (p. 36)Turn on the flash. (p. t 47)Set ISO speed options. (p. t 48)Use a tripod to prevent your camera from shaking.tSubjects come out too dark because of backlighting.When the light source is behind the subject or when there is a high contrast between the light and dark areas, the subject may come out shaded.Avoid shooting in front of the sun.tSelect t Backlight in the s mode. (p. 34)Set the flash option to t Fill in. (p. 47)Adjust the exposure. (p. t 57)Set the Auto Contrast Balance (t ACB) option. (p. 58)Set the metering option to t Spot if a bright subject is in the center of the frame. (p. 59)](https://usermanual.wiki/Samsung-Electronics-Co/ST80/User-Guide-1288454-Page-9.png)

![Basic functions 18Charging the battery and turning your camera onTurning on your cameraPress [POWER] to turn your camera on or off.The initial setup screen appears when you turn on the camera tfor the first time. (p. 19) Turning on your camera in Playback mode Press [Playback]. The camera turns on and accesses Playback mode immediately.When you turn on your camera by pressing and holding [Playback] for about 5 seconds, the camera does not emit any camera sounds.Charging the batteryBefore using the camera for the first time, you must charge the battery. Attach the USB cable to the AC adapter and then plug the end of cable with the indicator light into your camera.Indicator lightRedt : ChargingGreent : Fully charged](https://usermanual.wiki/Samsung-Electronics-Co/ST80/User-Guide-1288454-Page-19.png)


![Basic functions 27Taking photosLearn basic actions to take photos easily and quickly in the Auto mode.Make sure that the camera is in the 1 a mode (Auto), the camera’s default shooting mode. If not, select the mode icon t a.Align your subject in the frame.2 Half-press [3 Shutter] to focus.A green frame means the subject in focus.tPress [4 Shutter] to take a photo.See page 30 for tips to get clearer photos.](https://usermanual.wiki/Samsung-Electronics-Co/ST80/User-Guide-1288454-Page-28.png)
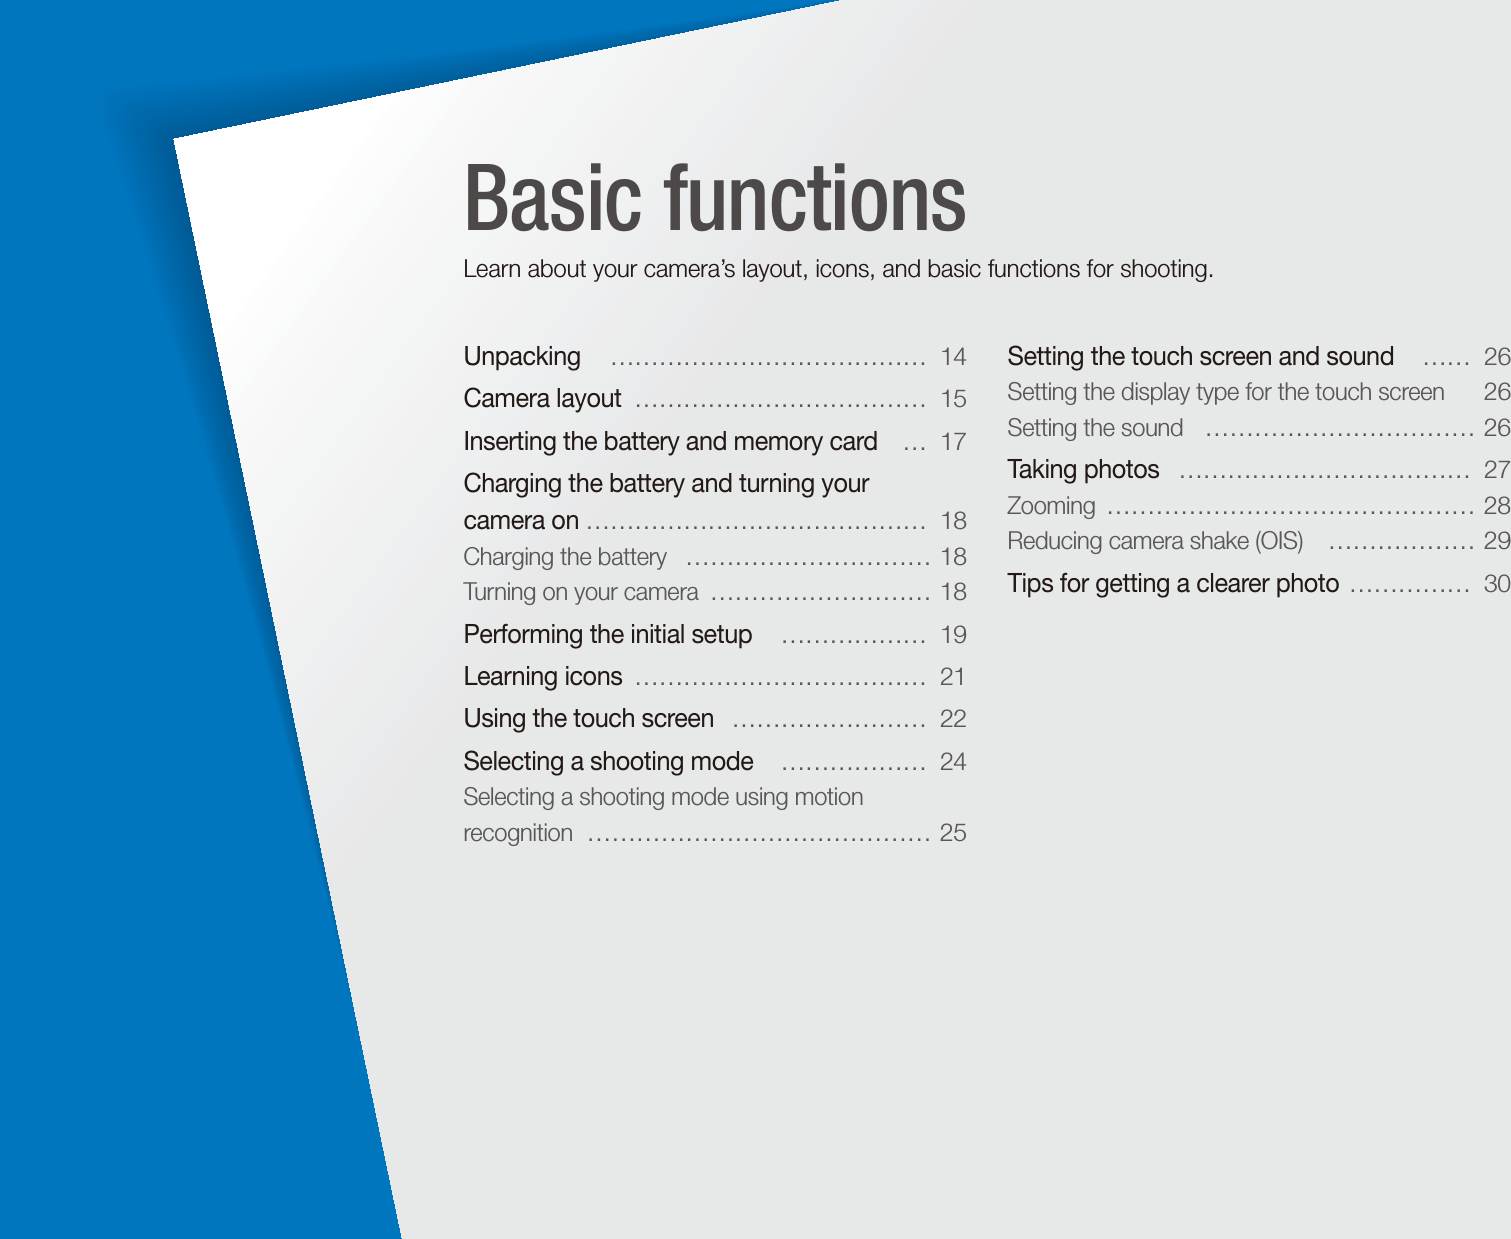
![Basic functions 28Taking photosZoomingYou can shoot close-up photos by adjusting the zoom. Your camera has a 7X optical zoom and 5X digital zoom. By using both, you can zoom in up to 35 times. Rotate [Zoom] right to zoom in on your subject. Rotate [Zoom] left to zoom out.Zoom inZoom outZoom ratioThe zoom ratio available for videos differs. Digital zoom If the zoom indicator is in the digital range, your camera is using the digital zoom. The picture quality may deteriorate when you use the digital zoom.Optical rangeZoom indicatorDigital rangeThe digital zoom is not available when using tS, d, s (in some scenes), v, and D modes and when used with Face Detection, and Smart Filter.It may take longer to save a photo when using the digital zoom.t](https://usermanual.wiki/Samsung-Electronics-Co/ST80/User-Guide-1288454-Page-29.png)
![Basic functions 30 Holding your camera correctly Make sure nothing is blocking the lens. Half-pressing the shutter button Half-press [Shutter] and adjust the focus. Focus and exposure will be adjusted automatically.The aperture value and shutter speed are automatically set.Focus framePress [t Shutter] to take the photo if displayed in green.Change the frame and thalf-press [Shutter] again if displayed in red. Reducing camera shake Set the Optical Image Stabilization option to treduce camera shake optically. (p. 29)Select the td mode to reduce camera shake both optically and digitally. (p. 37) When h is displayed Camera shakeWhen shooting in the dark, avoid setting the flash option to Slow Sync or Off. The aperture remains open longer and it may be harder to hold the camera still.Use a tripod or set the flash option to t Fill in. (p. 47)Set ISO speed options. (p. t 48)Tips for getting a clearer photo](https://usermanual.wiki/Samsung-Electronics-Co/ST80/User-Guide-1288454-Page-31.png)
![Basic functions 31 Preventing your subject from being out of focus It may be difficult to get your subject in focus when: there is little contrast between the subject and background -(When your subject is wearing a color of clothing that is similar to the background)the light source behind the subject is too bright -the subject is shiny -the subject includes horizontal patterns, such as blinds -the subject is not positioned in the center of the frame -Use the focus lockHalf-press [Shutter] to focus. When the subject is in focus, you can reposition the frame to change the composition. When you are ready, press [Shutter] to take your photo.When you take photos in low lighttTurn on the flash. (p. 47)When subjects are moving fasttUse the continuous or motion capture function. (p. 62)](https://usermanual.wiki/Samsung-Electronics-Co/ST80/User-Guide-1288454-Page-32.png)
![Extended functions 34Shooting modesUsing the Scene modeTake a photo with options preset for a specific scene.In Shooting mode, select 1 a s.Select a scene.2 SceneThis mode allows you to choose an appropriate scene for a variety of situations.For the t Beauty Shot mode, see “Using the Beauty Shot mode” on page 35.For the t Frame Guide mode, see “Using the frame guide” on page 36.For the t Night mode, see “Adjusting the exposure in the Night mode” on page 36.Align your subject in the frame and half-press [3 Shutter] to focus.Press [4 Shutter] to take the photo.Half-press [3 Shutter] to focus.Press [4 Shutter] to take the photo. If the camera does not recognize a proper scene mode, tS will not change and the default settings will be used.Even if there is a face detected, the camera may not select a portrait tmode depending on the subject's position or lighting.The camera may not select the correct scene depending on shooting tenvironments, such as camera shake, lighting and distance to the subject.Even if you use a tripod, the t mode may not be detected depending on the subject's movement.](https://usermanual.wiki/Samsung-Electronics-Co/ST80/User-Guide-1288454-Page-35.png)
![Extended functions 35Shooting modesTo hide facial imperfections, select 3 f an option.Select a higher setting to hide a greater number of timperfections.Level 3Align your subject in the frame and half-press [4 Shutter] to focus.Press [5 Shutter] to take the photo.The focus distance will be set to Auto Macro.Using the Beauty Shot modeTake a photo of a person with options to hide facial imperfections.In Shooting mode, select 1 a s .To make the subject's skin tone appear lighter (face 2 only), select f an option.Select a higher setting to make skin tone appear lighter.tLevel 2](https://usermanual.wiki/Samsung-Electronics-Co/ST80/User-Guide-1288454-Page-36.png)
![Extended functions 36Shooting modesAdjusting the exposure in the Night modeIn the Night mode, you can catch brief flashes of light as curved streaks by extending the exposure. Use a slow shutter speed to extend the time until the shutter closes. Increase the aperture value to prevent overexposure. In Shooting mode, select 1 a s .Select 2 f Aperture.Aperture Shutter SpeedSelect an option.3 Using the frame guideWhen you want another person to take a photo of you, you can compose the scene with the frame guide feature. The frame guide will help the other person take a photo of you by showing the part of the pre-composed scene.In Shooting mode, select 1 a s .Align your subject in the frame and press [2 Shutter].Transparent guides will appear on the left and right of the tframe.Cancel Frame: BackAsk another person to take a photo.3 The person must align the subject in the frame by using the tguides, and then press [Shutter] to take the photo.To cancel the guides, select 4 .](https://usermanual.wiki/Samsung-Electronics-Co/ST80/User-Guide-1288454-Page-37.png)
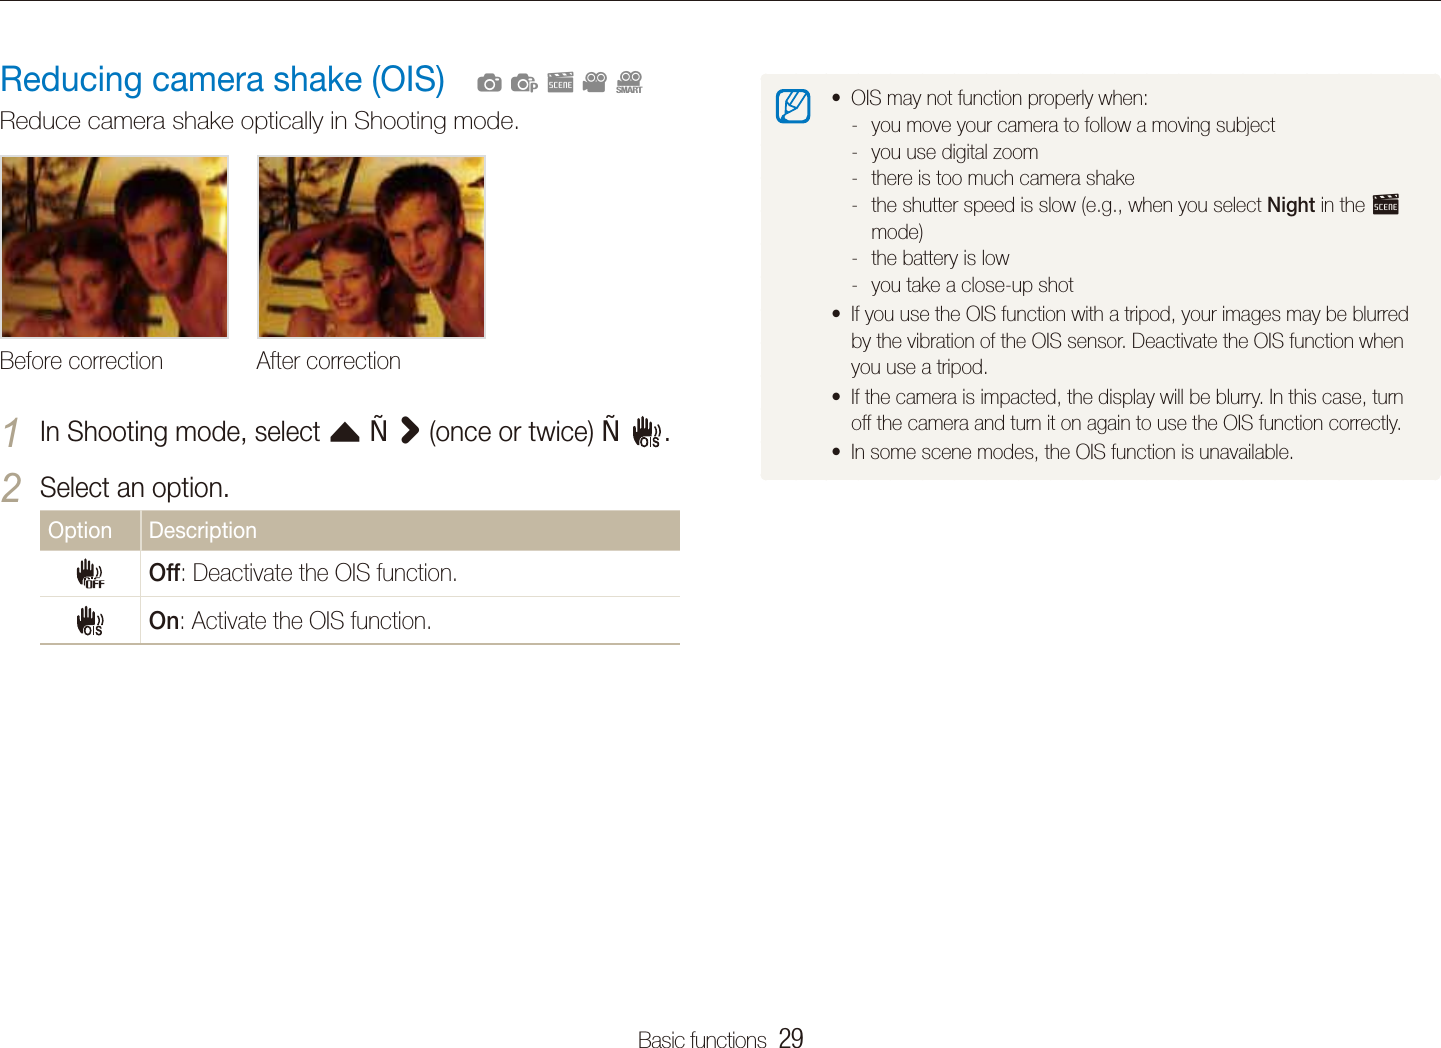
![Extended functions 37Shooting modesUsing the DUAL IS modeReduce camera shake and prevent blurred photos with Optical and Digital Image Stabilization functions. Before correction After correctionIn Shooting mode, select 1 a d.Align your subject in the frame and half-press [2 Shutter] to focus.Press [3 Shutter] to take the photo.The digital zoom will not work in this mode.tThe camera will correct photos optically only when you take them with ta light source that is brighter than fluorescent light.If your subject is moving rapidly, the photo may be blurry.tSet the Optical Image Stabilization option to reduce camera shake in tdifferent shooting modes. (p. 29)Select 4 f Shutter Speed.1.0 2.0 4.0 8.0 16.0Shutter SpeedApertureSelect a value to adjust the shutter speed and select 5 .Align your subject in the frame and half-press [6 Shutter] to focus.Press [7 Shutter] to take the photo.Use a tripod to prevent your photos from blurring.](https://usermanual.wiki/Samsung-Electronics-Co/ST80/User-Guide-1288454-Page-38.png)
![Extended functions 38Shooting modesRecording a videoRecord videos of up to 20 minutes in length in high definition. The recorded video is saved as an H.264 (MPEG-4.AVC) file. H.264 (MPEG-4 part10/AVC) is a high-compression video format testablished by international standard organizations ISO/IEC and ITU-T.When the Optical Image Stabilization (t ) is activated, your video may be recorded with the OIS operation sound.The zoom sound may be recorded if you use the zoom while trecording a video.In Shooting mode, select 1 a v.Select 2 f a frame rate (the number of frames per second).As the number of frames increases, action appears more tnatural, but the file size is increased.30 FPS is available only when the video resolution is 320 X 240.Using the Program modeSet various options (except for shutter speed and aperture value) in the Program mode.In Shooting mode, select 1 a p.Set options. (For a list of options, refer to “2 Shooting options.”)Align your subject in the frame and half-press [3 Shutter] to focus.Press [4 Shutter] to take the photo.](https://usermanual.wiki/Samsung-Electronics-Co/ST80/User-Guide-1288454-Page-39.png)
![Extended functions 39Shooting modes To pause recording The camera allows you to pause temporarily while recording a video. With this function, you can record your favorite scenes as a single video.Select to pause while recording. Select to resume.Stop: ShutterSelect 3 > a sound option.Option DescriptionOff: Record a video without sound.On: Record a video with sound.Zoom Mute: Record a video without sound while zooming.Set other options as desired. (For options, refer to 4 “Shooting options.”)Press [5 Shutter] to start recording.Press [6 Shutter] again to stop recording.](https://usermanual.wiki/Samsung-Electronics-Co/ST80/User-Guide-1288454-Page-40.png)
![Extended functions 40Shooting modesPress [3 Shutter] to start recording.Press [4 Shutter] again to stop recording. If the camera does not recognize a proper scene mode, tD will not change and the default settings will be used.The camera may not select the correct scene depending on shooting tenvironments, such as camera shake, lighting and distance to the subject.Using the Smart Scene Detection modeIn this mode, your camera automatically chooses the appropriate camera settings based on a detected type of scene.In Shooting mode, select 1 a D.Align your subject in the frame.2 The camera selects a scene automatically. An appropriate tmode icon will appear at the top left of the screen.Icon DescriptionAppears when recording videos of landscapes.Appears when recording videos of clear skies.Appears when recording videos of forested areas.Appears when recording videos of sunsets.](https://usermanual.wiki/Samsung-Electronics-Co/ST80/User-Guide-1288454-Page-41.png)
![Extended functions 41Recording voice memosLearn how to record a voice memo that you can play back at any time. You can add a voice memo to a photo as a short reminder of shooting conditions. You will get the best sound quality when recording 40 cm away from the camera. apsdAdding a voice memo to a photoIn Shooting mode, select 1 f . (In some modes, select f > (repeatedly) .) MemoAlign your subject in the frame and take a photo.2 You will begin recording a voice memo right after taking the tphoto.Record a short voice memo (10 seconds maximum).3 Press [t Shutter] to stop recording a voice memo.Recording a voice memoIn Shooting mode, select 1 f . (In some modes, select f > (repeatedly) .) RecordPress [2 Shutter] to record.Select t to pause and to resume.The available recording time will be displayed on the top of tthe screen.You can record voice memos of up to 10 hours in length.tPress [3 Shutter] to stop.Select 4 to switch to Shooting mode.](https://usermanual.wiki/Samsung-Electronics-Co/ST80/User-Guide-1288454-Page-42.png)
![Shooting options 45Using the timerLearn how to set the timer to delay shooting. SapsdvDPress [3 Shutter] to start the timer. The AF-assist light/timer lamp blinks. The camera will tautomatically take a photo at the specified time.Select the timer icon or press [t Shutter] to cancel the timer.Depending on the selected face defection option, the timer is not tavailable or some timer options are not available.In Shooting mode, select 1 .Select an option. 2 OffOption DescriptionOff: The timer is not active.10 Sec: Take a photo in 10 seconds.2 Sec: Take a photo in 2 seconds.Double: Take a photo in 10 seconds and take another in 2 seconds.Motion Timer: Detect your movement and then take a photo. (p. 46)The options may differ depending on the shooting mode.](https://usermanual.wiki/Samsung-Electronics-Co/ST80/User-Guide-1288454-Page-46.png)
![Shooting options 46Using the timerPose for your photo while the AF-assist light/timer lamp 5 is blinking.The AF-assist light/timer lamp will stop blinking just before the tcamera automatically takes a photo.The motion timer may not work when:you are more than 3 m away from the cameratyour movements are too subtletthere is too much light or backlightt Using the motion timer In Shooting mode, select 1 .Press [2 Shutter].Stand within 3 m from the camera within 6 seconds after 3 pressing [Shutter].Make a motion, such as waving your arms, to activate 4 the timer.The AF-assist light/timer lamp will start to blink rapidly when tthe camera detects you.The detection range of the motion timer](https://usermanual.wiki/Samsung-Electronics-Co/ST80/User-Guide-1288454-Page-47.png)
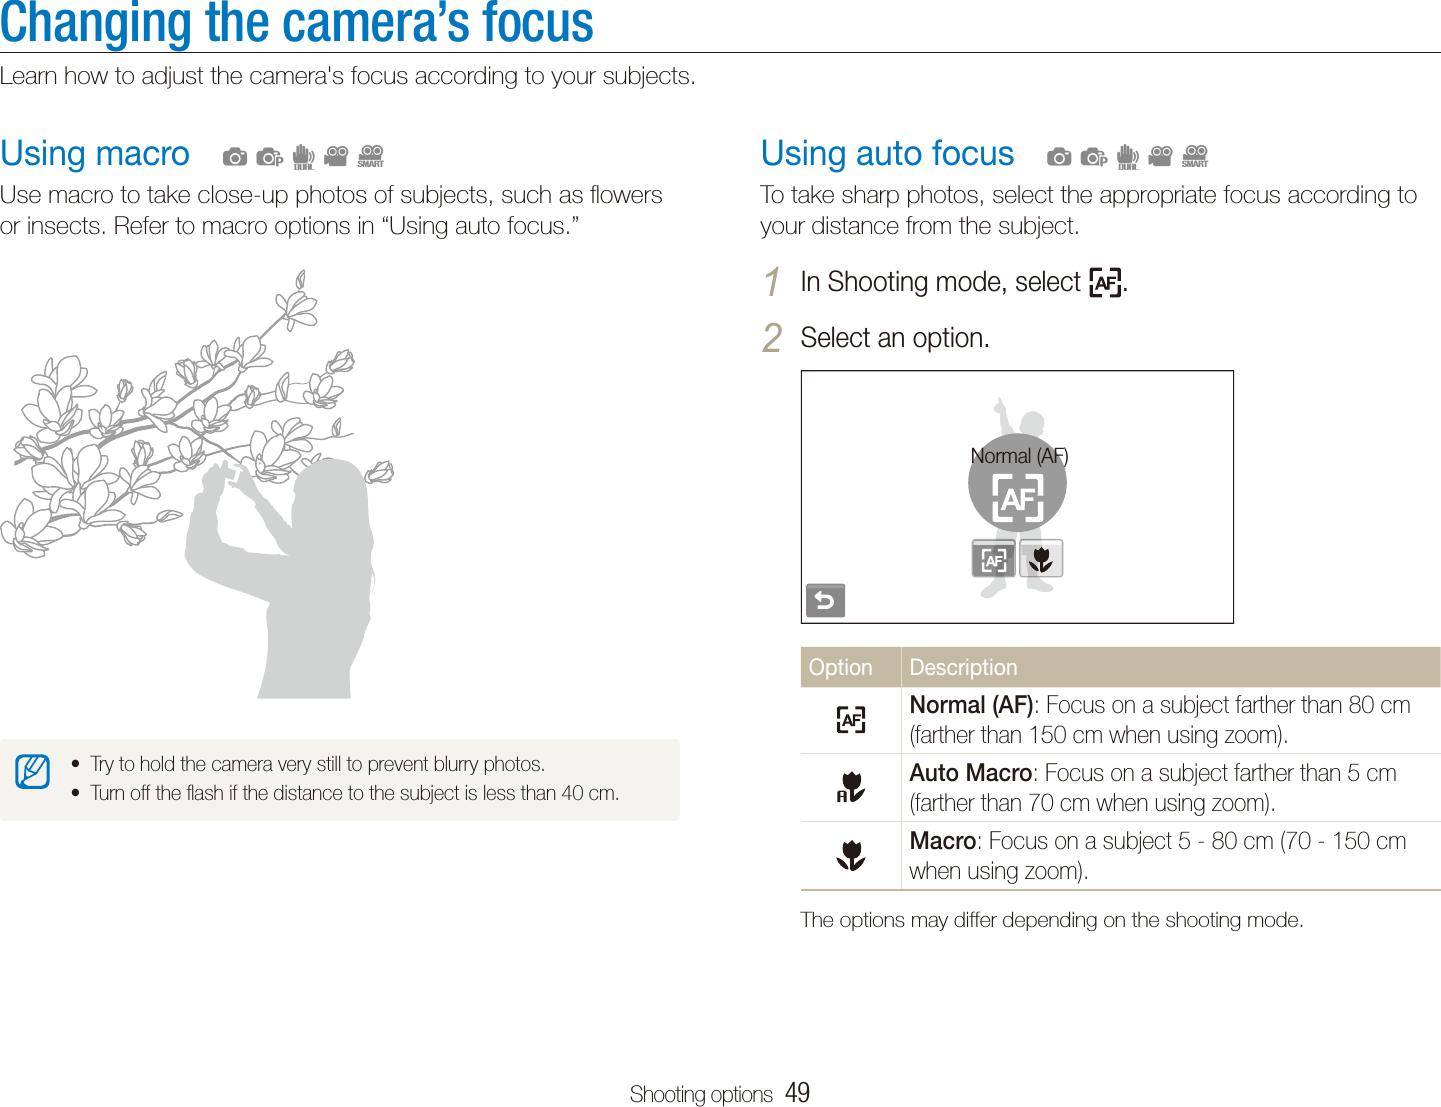
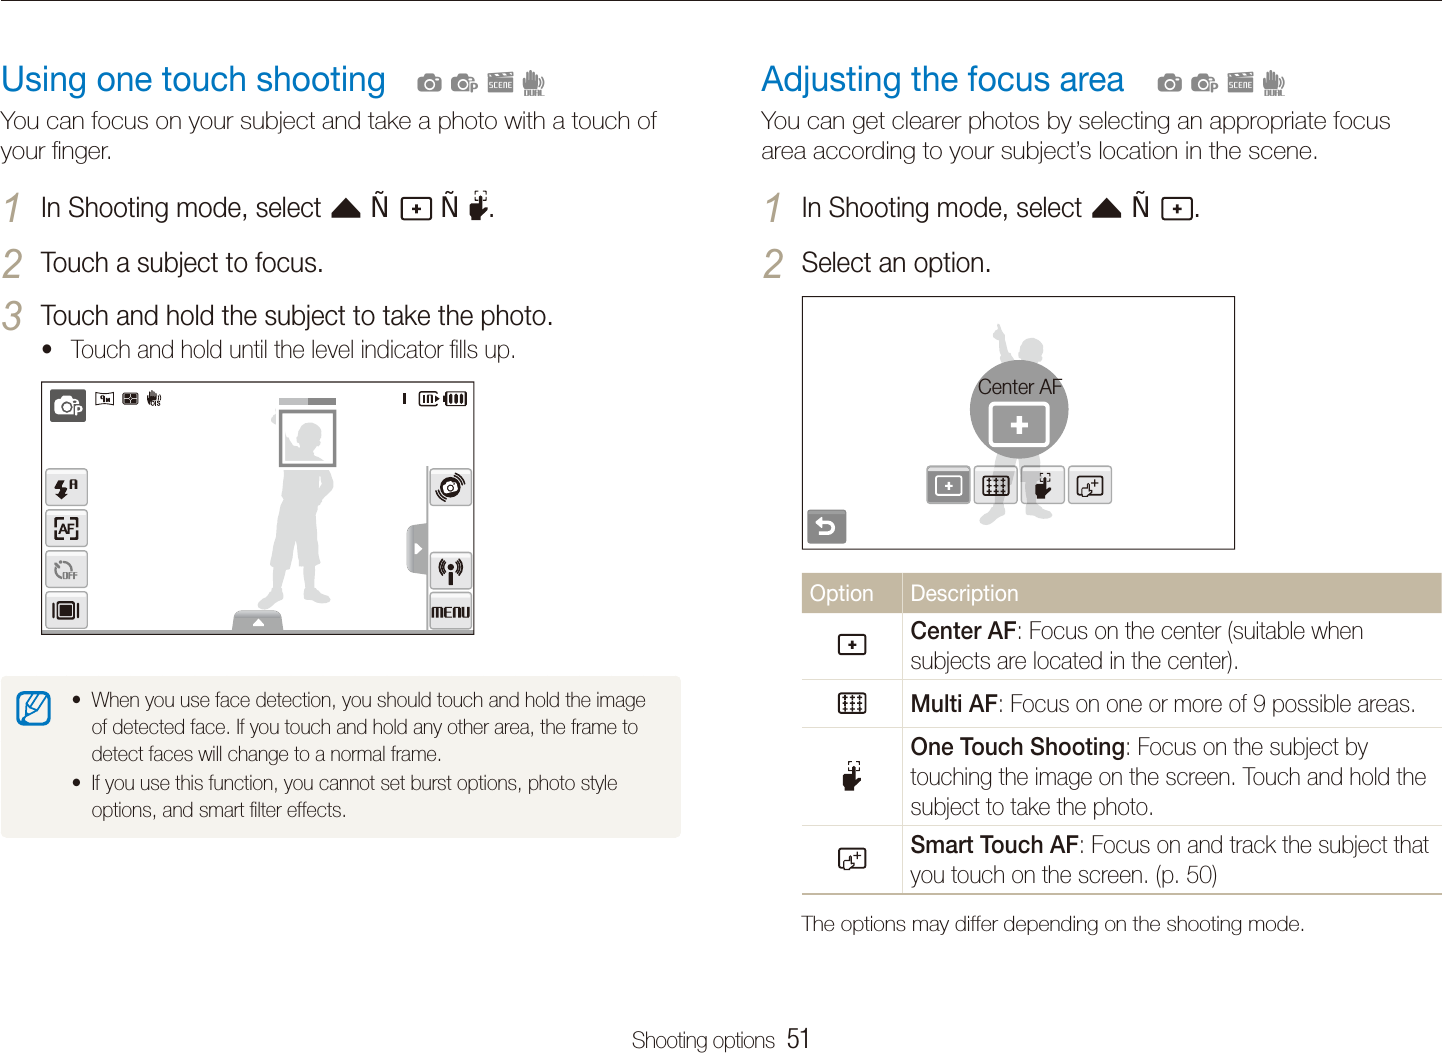
![Shooting options 50Changing the camera’s focusIf you do not touch any area on the screen, the focus frame will tappear in the center of the screen.Tracking a subject may fail when:tthe subject is too small or the subject moves -the subject is backlit or you are shooting in a dark place -colors or patterns on the subject and the background are the same -the camera shakes excessively - In these cases, the focus frame will appear as a white single-line frame.If the camera fails to track the subject, you must reselect the subject tto track. If the camera fails to fix the focus, the focus frame will change to a red tsingle-line frame.If you use this function, you cannot set face detection, photo style toptions, and smart filter effects.Using smart touch focusSmart Touch AF allows you to track and auto focus on your subject, even when you are moving.In Shooting mode, select 1 f .Touch the subject you want to track in the touch area 2 (indicated by a frame).A focus frame will appear on the subject and will follow the tsubject as you move the camera.The white frame means that your camera is tracking the tsubject.The green frame means that your subject is in focus when you thalf-press [Shutter]. apsd](https://usermanual.wiki/Samsung-Electronics-Co/ST80/User-Guide-1288454-Page-51.png)
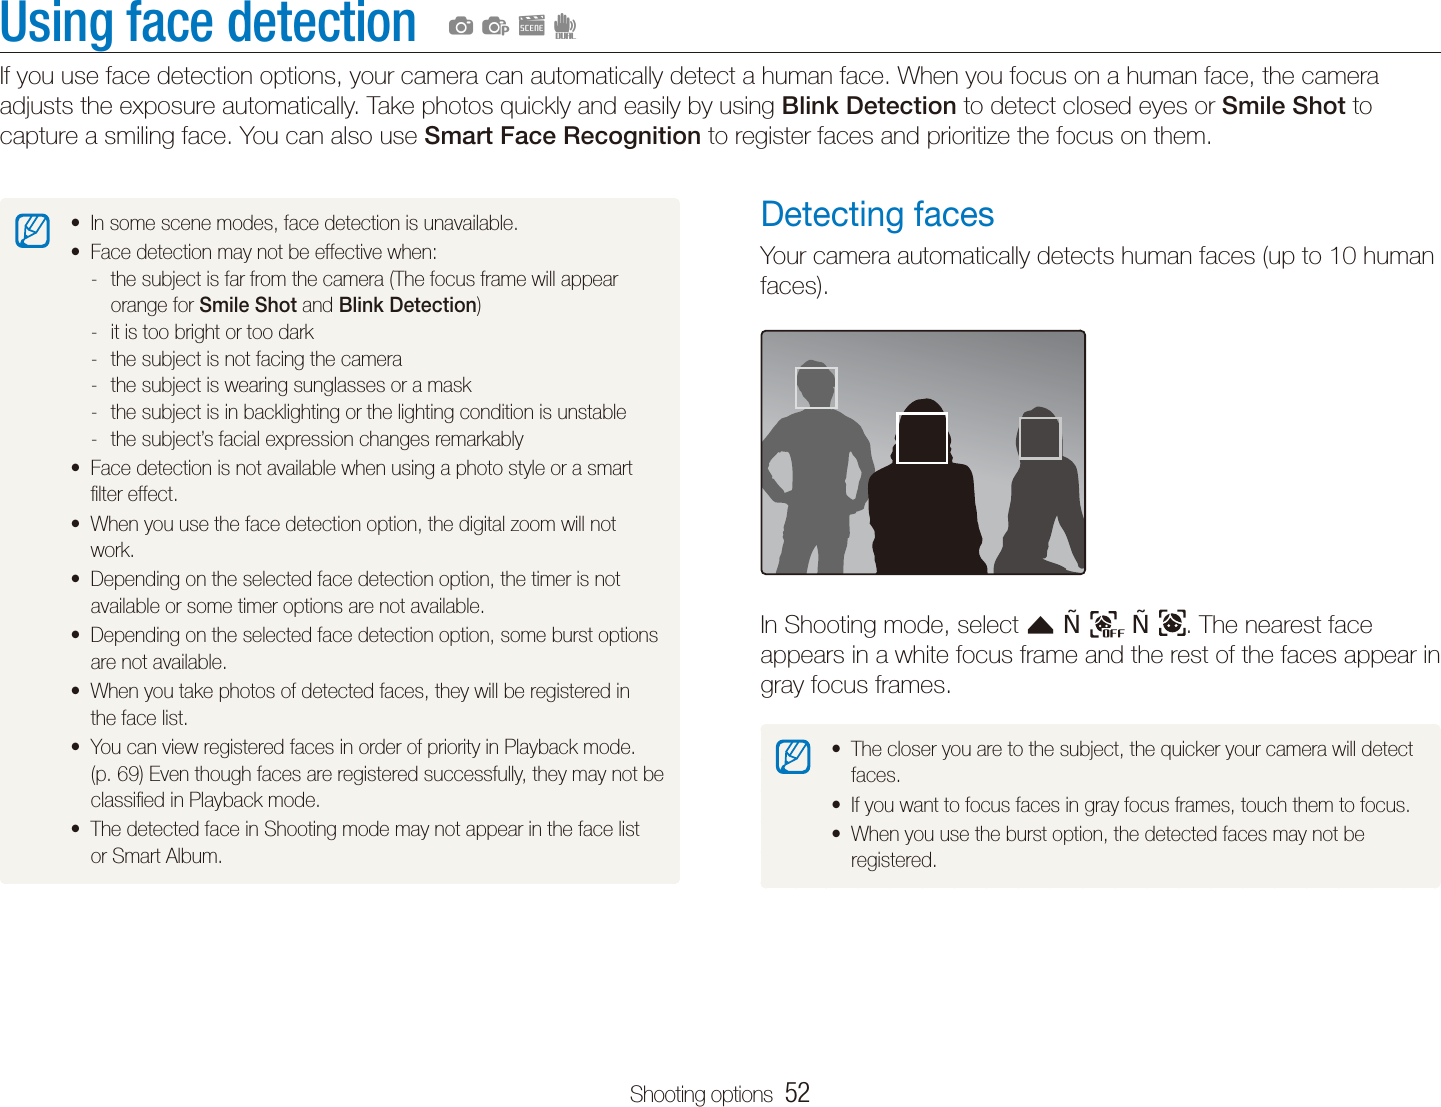
![Shooting options 53Using face detectionTaking a smile shotThe camera automatically releases the shutter when it detects a smiling face. In Shooting mode, select f . When your subject smiles broadly, your camera can detect the smile more easily.Taking a self portrait shotTake photos of yourself. The focus distance will be set to close-up and your camera will emit a beep.In Shooting mode, select 1 f .When you hear a quick beep, press [2 Shutter].To turn the beep on or off, select Self-Portrait in the sound settings. (p. 113)](https://usermanual.wiki/Samsung-Electronics-Co/ST80/User-Guide-1288454-Page-54.png)

![Shooting options 55Using face detectionRegistering faces as your favorites (My Star)You can register your favorite faces to prioritize the focus and exposure on those faces. This feature is available only when you use a memory card.In Shooting mode, select 1 f > . (In some modes, select f .) Align your subject’s face with the oval guideline and 2 press [Shutter] to register the face.If the subject’s face is not aligned with the oval guideline, the twhite frame will not appear.You can take photos of a subject’s face directly from the front, tto the left side, to the right side, from above, or from below.Take photos of one person at a time when registering faces.tThe camera may recognize and register faces incorrectly depending ton lighting conditions, remarkable changes in the subject's pose or face, and whether or not the subject is wearing glasses. The camera can automatically register up to 14 faces. If the camera trecognizes a new face when there are 14 registered faces, it will replace the face in the lowest priority with the new one. The camera can detect up to 10 faces in one scene.t](https://usermanual.wiki/Samsung-Electronics-Co/ST80/User-Guide-1288454-Page-56.png)
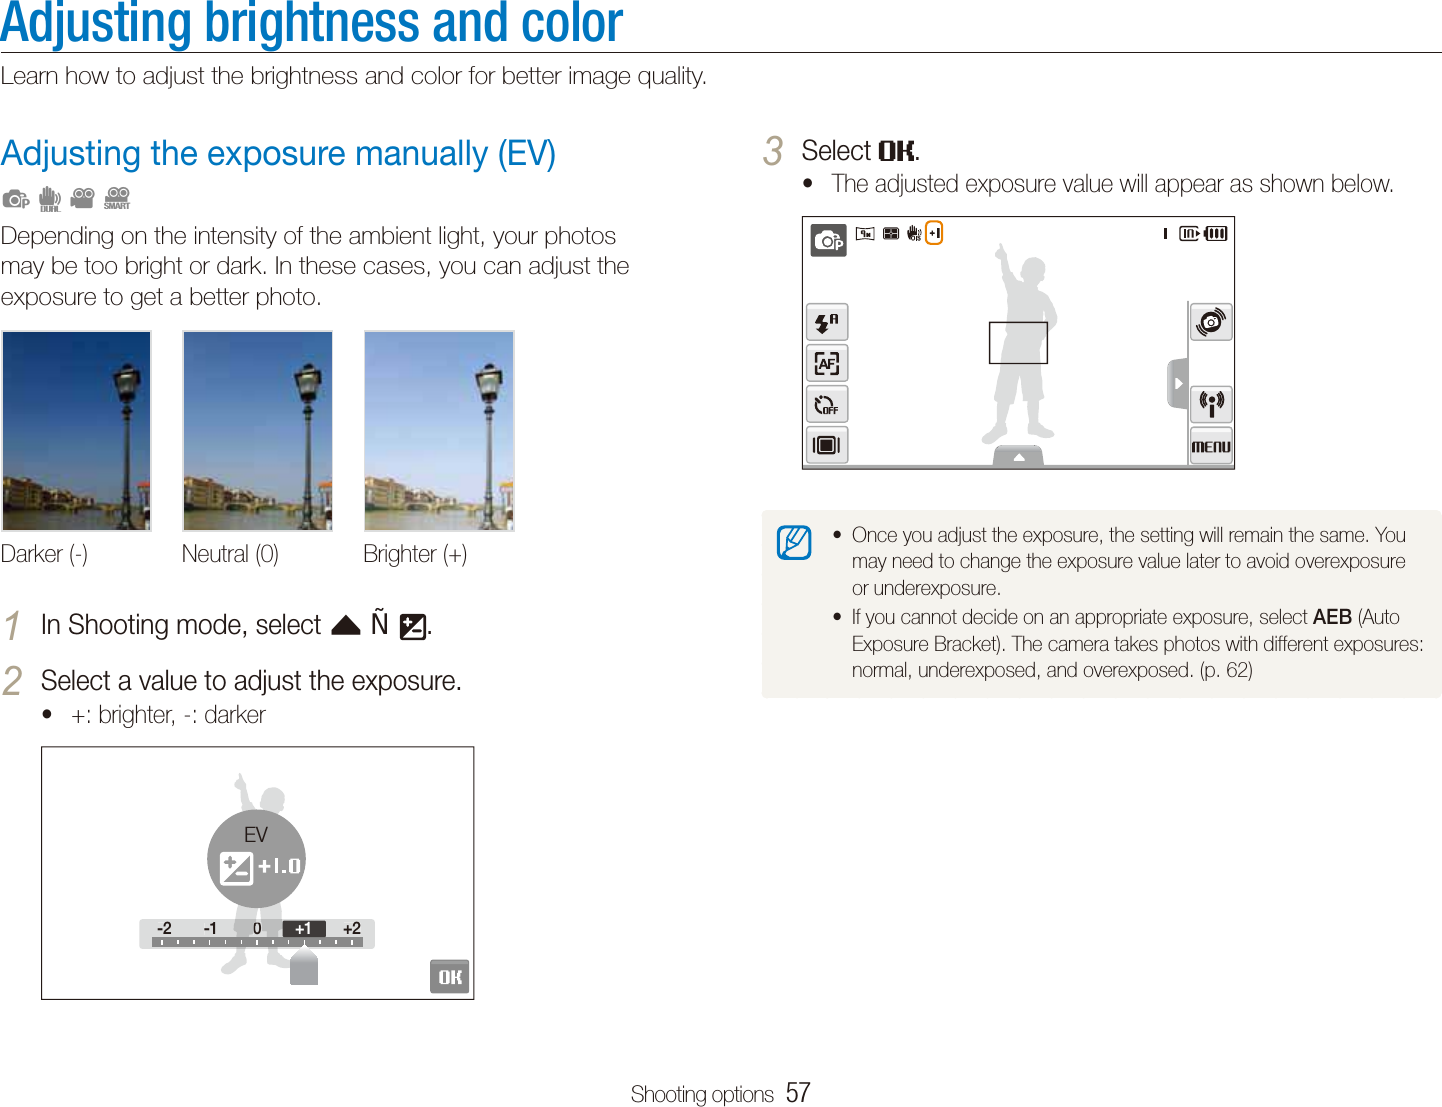
![Shooting options 61Adjusting brightness and color Defining your own white balance You can customize the white balance by taking photos of a white surface, such as a piece of paper. This will help you to match the colors in your photo with the actual scene according to your lighting condition.In Shooting mode, select 1 f .Aim the lens at a piece of white paper.2 Press [3 Shutter].](https://usermanual.wiki/Samsung-Electronics-Co/ST80/User-Guide-1288454-Page-62.png)
![Shooting options 62Using burst modesIt can be difficult to take photos of fast-moving subjects or capture natural facial expressions and gestures of your subjects in photos. In these cases, select one of the burst modes. psOption DescriptionMotion Capture: While you are pressing [Shutter], the camera takes VGA photos (6 photos per second; maximum of 30 photos).AEB:Take 3 photos with different exposures: normal, tunderexposed, and overexposed.Use a tripod to prevent blurry photos.tThe options may differ depending on the shooting mode.You can use the flash, timer, and ACB only when you select tSingle.When you select t Motion Capture, the resolution will be set to VGA and the ISO speed will be set to Auto.Depending on the selected face detection option, some burst toptions are not available.In Shooting mode, select 1 f > (once or twice) .Select an option.2 SingleOption DescriptionSingle: Take a single photo.Continuous:While you are pressing [t Shutter], the camera takes photos continuously.The maximum number of photos depends on the tcapacity of your memory card.](https://usermanual.wiki/Samsung-Electronics-Co/ST80/User-Guide-1288454-Page-63.png)
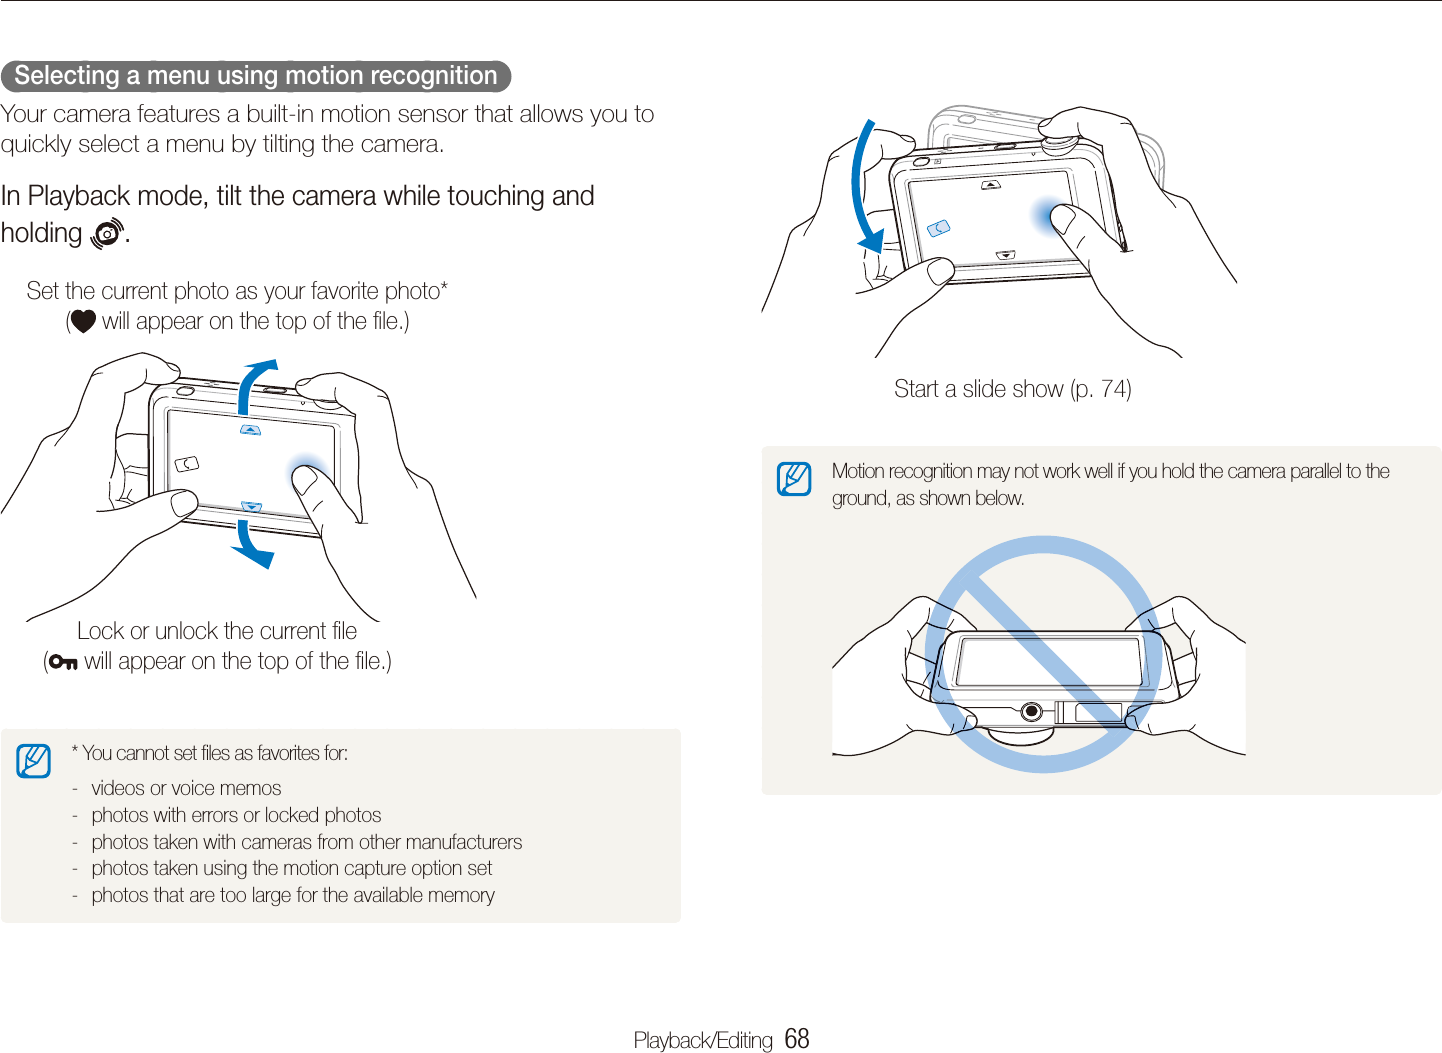
![Playback/Editing 67Playing backLearn actions to play back photos, videos, or voice memos, and managing files. Viewing files using motion recognition You can view files by tilting the camera.Motion recognition may not work well if you hold the camera tparallel to the ground.When you rotate the camera 90t o or 180o while viewing a photo, the camera will automatically change the orientation of the displayed photo according to the camera direction.To deactivate this function, select t M . Gesture View Off in Playback mode.Starting Playback modeView photos or play videos and voice memos stored in your camera.Press [1 Playback].The most recent file you have taken or recorded will be tdisplayed.If the camera is off, it will turn on.tDraw a horizontal bar left or right to scroll through files.2 Select t< to view the previous file. Hold to view files quickly.Select t> to view the next file. Hold to view files quickly.If you want to view files stored in the internal memory, remove your tmemory card.The camera will not properly play back files that are too large or those ttaken with cameras from other manufacturers.](https://usermanual.wiki/Samsung-Electronics-Co/ST80/User-Guide-1288454-Page-68.png)
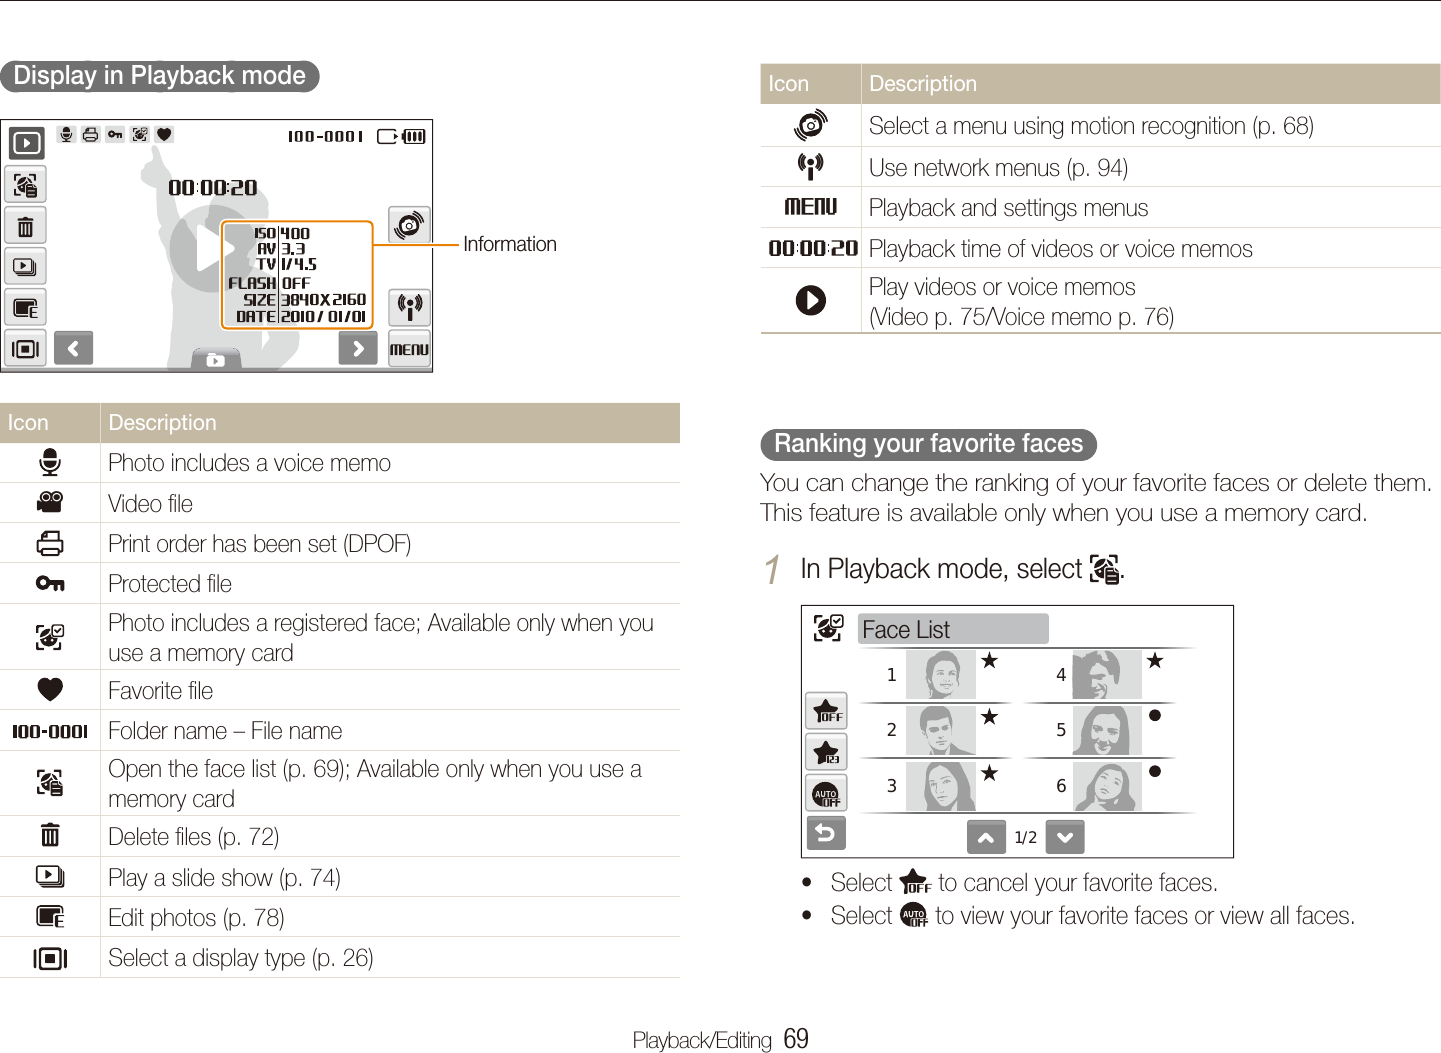
![Playback/Editing 70Playing backOption DescriptionType View files by the file type.Date View files by the date they were saved.Color View files by the dominant color of the image.Week View files by the weekday they were saved.Favorite View your favorite files.Face View files by recognized faces and favorite faces. (Up to 20 people)It may take some time for the camera to open Smart Album or to change the category and reorganize files.Select a date, file type, weekday, color, or face.2 You can also touch and hold t< or > to scroll through dates, file types, weekdays, colors, or faces.Select 3 < or > to scroll through files.Select 4 to return to the normal view.Once you select a category and a menu that displays thumbnails (such as deleting multiple files or protecting selected files), the camera will display all files sorted by category or only those that match the category option. Select 2 a face.1234Edit Ranking Select 3 , or . to change the ranking of the face and select . Viewing files by category in Smart Album View and manage files by categories, such as date, file type, or week.In Playback mode, select 1 a category.You can also access Smart Album by rotating [t Zoom] left.29 61720TypeDateColorWeekFavorite Face](https://usermanual.wiki/Samsung-Electronics-Co/ST80/User-Guide-1288454-Page-71.png)
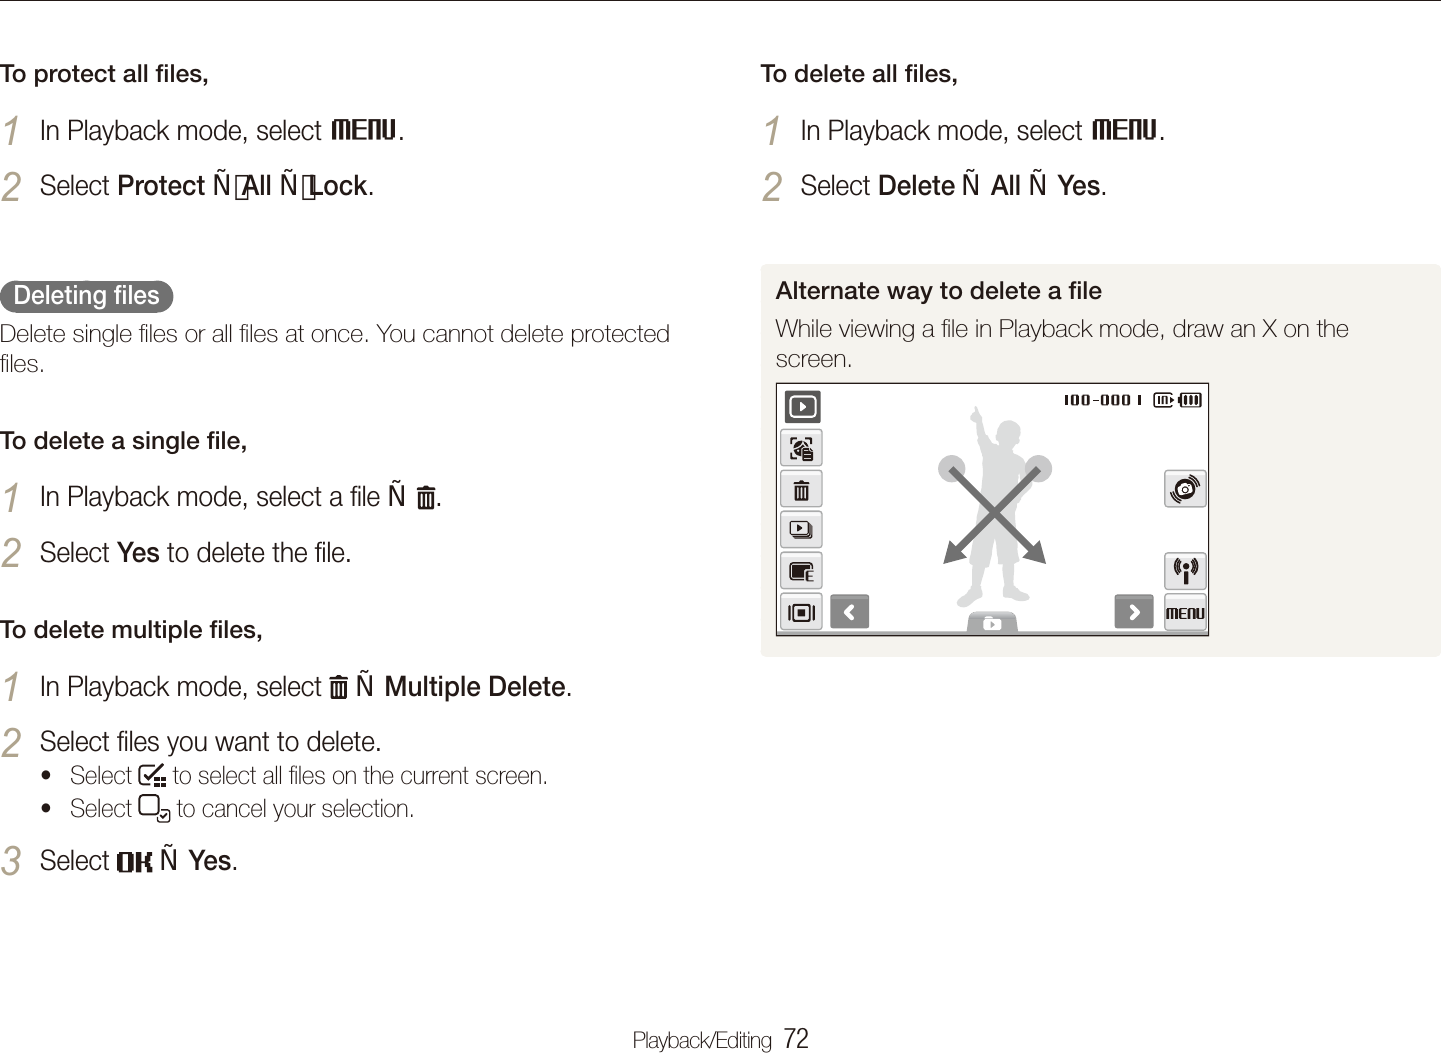
![Playback/Editing 71Playing back Protecting files Protect your files from accidental deletion.To select and protect files,In Playback mode, select 1 M.Select 2 Protect Select.Select files you want to protect.3 Select t to select all files.Select t to cancel your selection.Select 4 . Viewing files as thumbnails Scan thumbnails of files.In Playback mode, rotate [Zoom] left to display 9 or 16 thumbnails (rotate [Zoom] right to return to the previous mode).29 61720To Do thisScroll through files Select < or >.View a file Select a thumbnail.Delete files Select . (p. 72)Select a category Select .](https://usermanual.wiki/Samsung-Electronics-Co/ST80/User-Guide-1288454-Page-72.png)
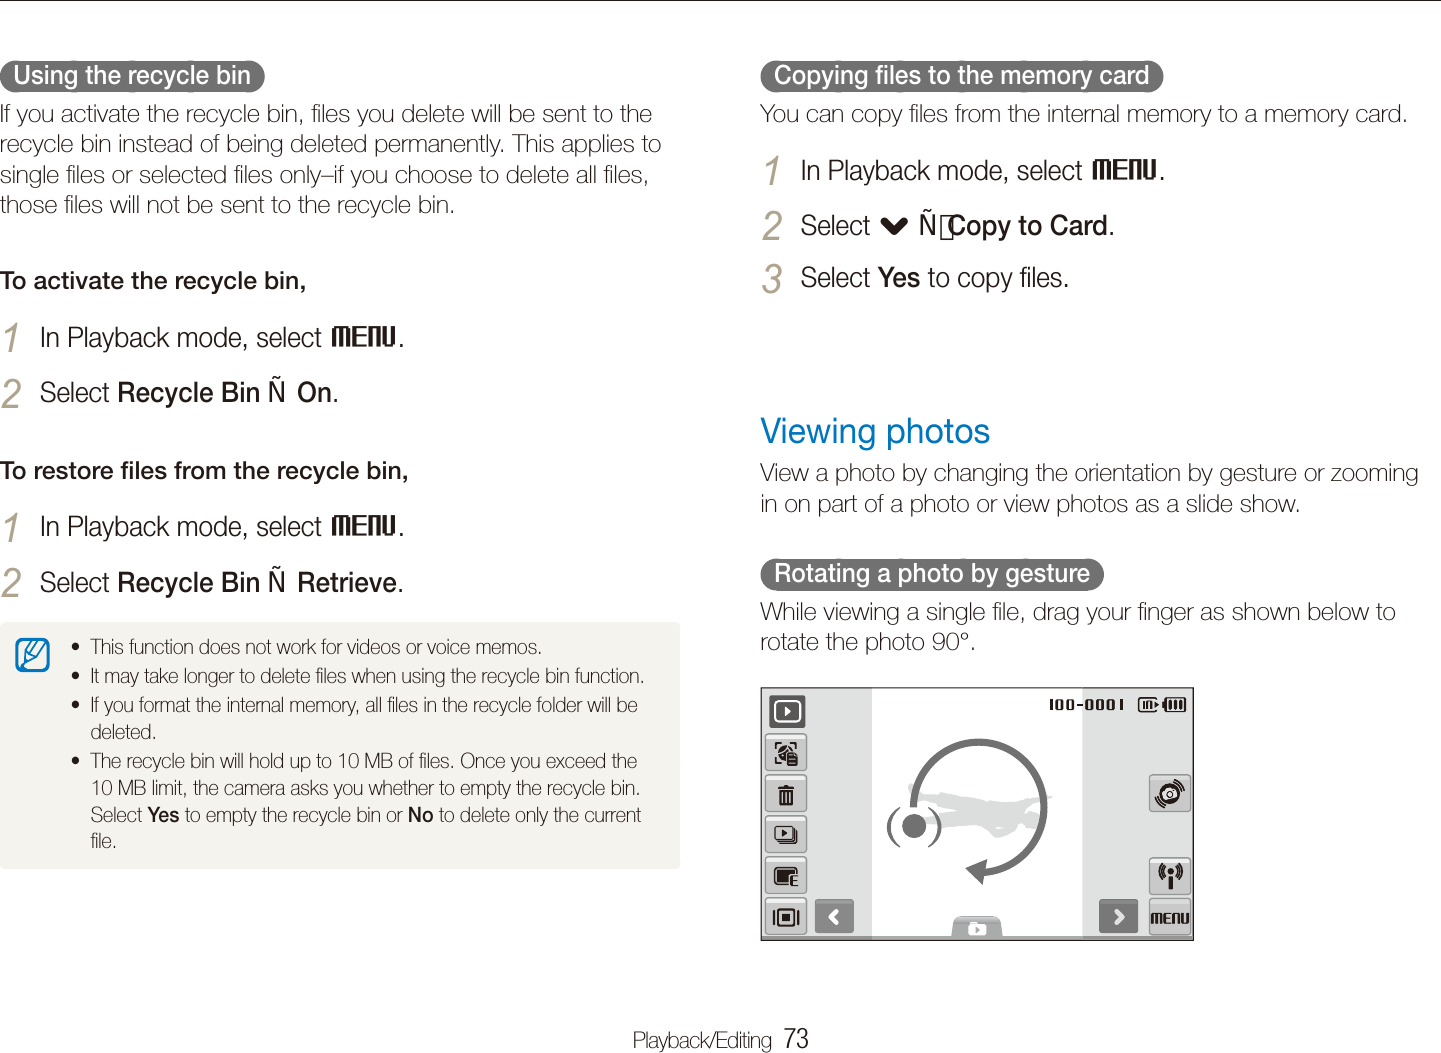
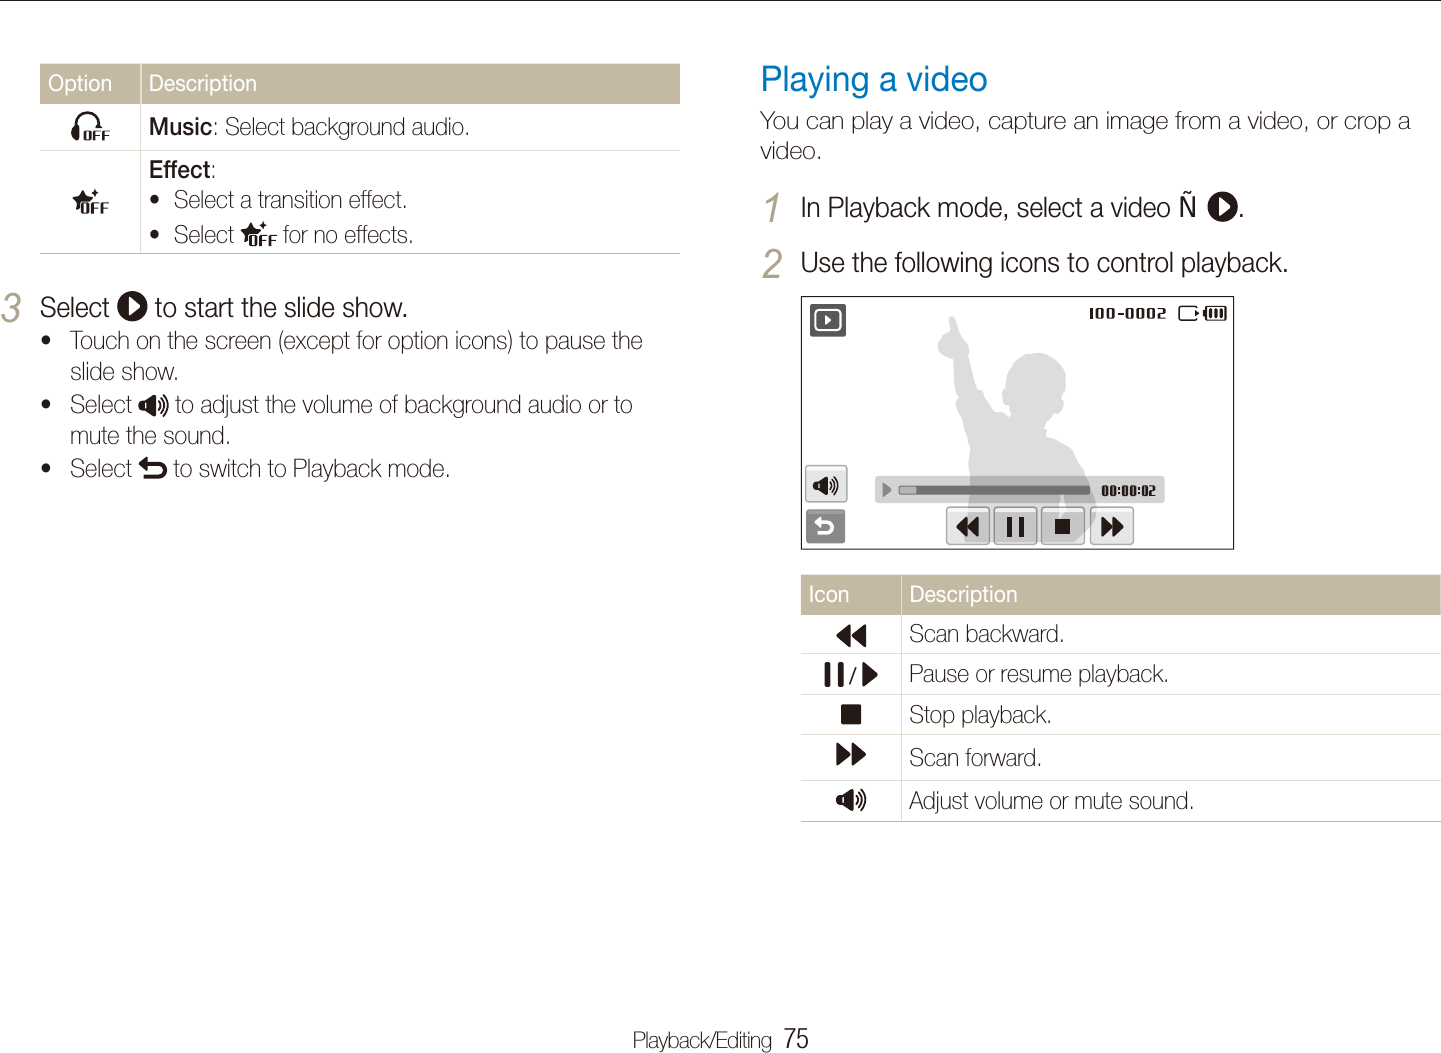
![Playback/Editing 74Playing back Starting a slide show You can apply effects and audio to your slide show. This function does not work for videos or voice memos.In Playback mode, select 1 .Set a slide show effect.2 Option DescriptionImages: Select photos (up to 2.000) for your slide show.Play Mode: Select whether or not to loop the slide show.Interval: Set the interval between photos. This will be available when t is selected in the Effect menu.When used with an effect option other than t , the interval will be set to 1 sec. Enlarging a photo In Playback mode, rotate [Zoom] right to enlarge a photo (rotate [Zoom] left to reduce a photo).The enlarged area and zoom ratio are indicated on the top of the screen. The maximum zoom ratio may vary depending on the resolution. Select arrows to move the enlarged area.Icon DescriptionDelete the file.Crop the enlarged photo (it will be saved as a new file).Go back to the original view.](https://usermanual.wiki/Samsung-Electronics-Co/ST80/User-Guide-1288454-Page-75.png)
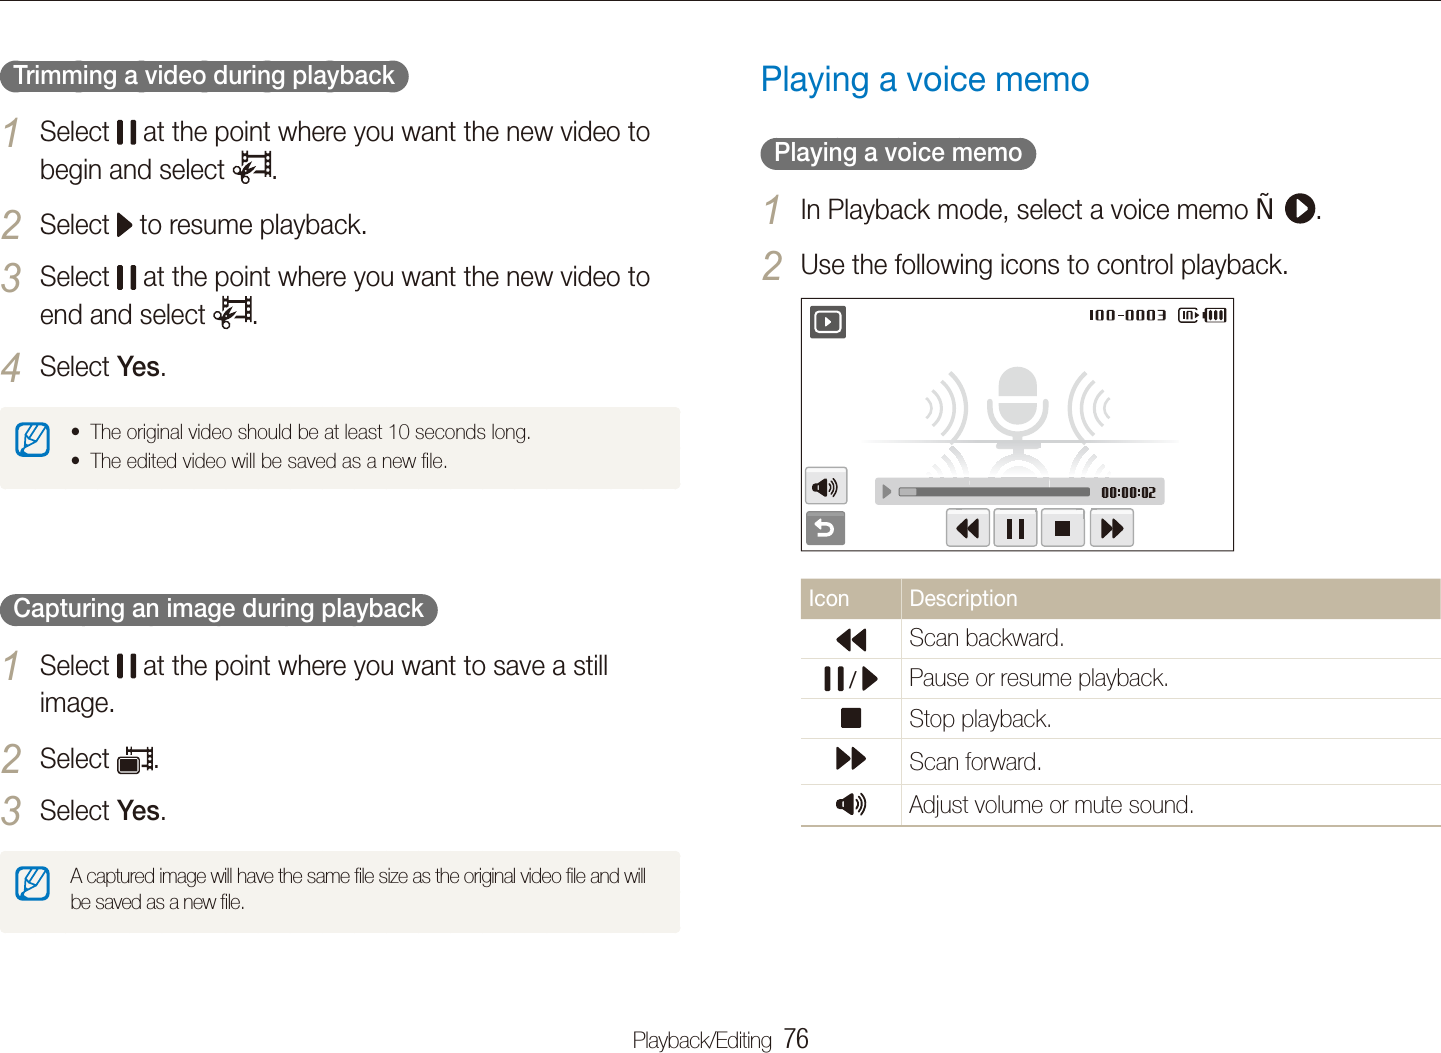
![Playback/Editing 77Playing back Playing a voice memo added to a photo In Playback mode, select a photo that includes a voice 1 memo .Use the following icons to control playback.2 Icon Description / Pause or resume playback.Stop playback.Adjust volume or mute sound. Adding a voice memo to a photo In Playback mode, select a photo 1 M.Select 2 Voice Memo On.Press [3 Shutter] to record a short voice memo (10 seconds maximum).Press [t Shutter] to stop recording a voice memo.](https://usermanual.wiki/Samsung-Electronics-Co/ST80/User-Guide-1288454-Page-78.png)
![Playback/Editing 84Viewing files on a TV or HDTVPlay back photos or videos by connecting your camera to a TV using the A/V cable.View photos or play videos using the touch screen on 8 your camera.The touch screen will function as the controller for the TV tscreen. Locate the option you want on the TV screen and touch where the option is located on the camera screen. When a pointer appears on the option on the TV screen, select on the camera screen.On some TVs, digital noise may occur or part of an image may not tappear.Images may not appear centered on the TV screen depending on tyour TV settings.You can capture photos or videos while the camera is connected tto a TV.In Shooting or Playback mode, select 1 M .Select2 .(twice)Video Out.Select a video signal output according to your country or 3 region. (p. 115)Turn off your camera and TV.4 Connect your camera to your TV using the A/V cable.5 Video AudioTurn on your TV and select the video output mode using 6 the TV remote control.Turn on your camera and press [7 Playback].](https://usermanual.wiki/Samsung-Electronics-Co/ST80/User-Guide-1288454-Page-85.png)


![Appendixes 124Camera specificationsShutter speedAutot : 1/8 - 1/2,000 sec.Programt : 1 - 1/2,000 sec.Nightt : 8 - 1/2,000 sec.Fireworkst : 2 sec.ExposureControl Program AEMetering Multi, Spot, Center-weightedCompensation ±2EV (1/3EV steps)ISO equivalent Auto, 80, 100, 200, 400, 800, 1600, 3200FlashMode Off, Auto, Red-eye, Fill in, Slow Sync, Red-eye FixRange Wide: 0.3 m - 3.2 m (ISO Auto)tTele: 0.5 m - 1.9 m (ISO Auto)tRecharging time Approx. 4 sec.Shake reduction DUAL IS [Optical Image Stabilization (OIS) + Digital Image Stabilization (DIS)]Image sensorType 1/2.3" (Approx. 7.76 mm) CCDEffective pixels Approx. 14.2 mega-pixelsTotal pixels Approx. 14.5 mega-pixelsLensFocal lengthSchneider-KREUZNACH lens f = 5.6 - 39.2 mm (35 mm film equivalent: 31 - 217 mm)F-stop range F3.3 (W) - F5.5 (T)Digital zoom Still image mode: 1.0X - 7.0XtPlay mode: 1.0X - 13.5X (depending on image size)tDisplayType WVGA AMOLEDFeature 3.7" (9.4 cm) Wide Full Touch Screen PanelFocusingTypeTTL auto focus (Multi AF, Center AF, Face Recognition AF, Face Detection AF, Smart Touch AF, One Touch Shooting)RangeWide (W) Tele (T)Normal 80 cm - infinity 150 cm - infinityMacro 5 cm - 80 cm 70 cm - 150 cmAuto Macro 5 cm - infinity 70 cm - infinity](https://usermanual.wiki/Samsung-Electronics-Co/ST80/User-Guide-1288454-Page-124.png)
![Appendixes 128Correct Disposal of This Product (Waste Electrical & Electronic Equipment) (Applicable in the European Union and other European countries with separate collection systems)This marking on the product, accessories or literature indicates that the product and its electronic accessories (e.g. charger, headset, USB cable) should not be disposed of with other household waste at the end of their working life. To prevent possible harm to the environment or human health from uncontrolled waste disposal, please separate these items from other types of waste and recycle them responsibly to promote the sustainable reuse of material resources. Household users should contact either the retailer where they purchased this product, or their local government office, for details of where and how they can take these items for environmentally safe recycling. Business users should contact their supplier and check the terms and conditions of the purchase contract. This product and its electronic accessories should not be mixed with other commercial wastes for disposal.Correct disposal of batteries in this product(Applicable in the European Union and other European countries with separate battery return systems)This marking on the battery, manual or packaging indicates that the batteries in this product should not be disposed of with other household waste at the end of their working life. Where marked, the chemical symbols Hg, Cd or Pb indicate that the battery contains mercury, cadmium or lead above the reference levels in EC Directive 2006/66. If batteries are not properly disposed of, these substances can cause harm to human health or the environment. To protect natural resources and to promote material reuse, please separate batteries from other types of waste and recycle them through your local, free battery return system.This Class [B] digital apparatus complies with Canadian ICES-003.Samsung Eco-markIt is Samsung’s own symbol mark is used to effectively communicate Samsung’s environmental friendly product activities to the consumers. The mark represents Samsung’s continuous effort on development of environmental conscious products.](https://usermanual.wiki/Samsung-Electronics-Co/ST80/User-Guide-1288454-Page-128.png)