Samsung Electronics Co WB1100F Digital Camera User Manual
Samsung Electronics Co Ltd Digital Camera
UserManual.wiki
>
Samsung Electronics Co
>
WB1100F User Manual
User Manual.pdf
Navigation menu
Upload a User Manual
Namespaces
Wiki Guide
HTML
PDF
Info
Views
User Manual
Discussion / Help
Navigation
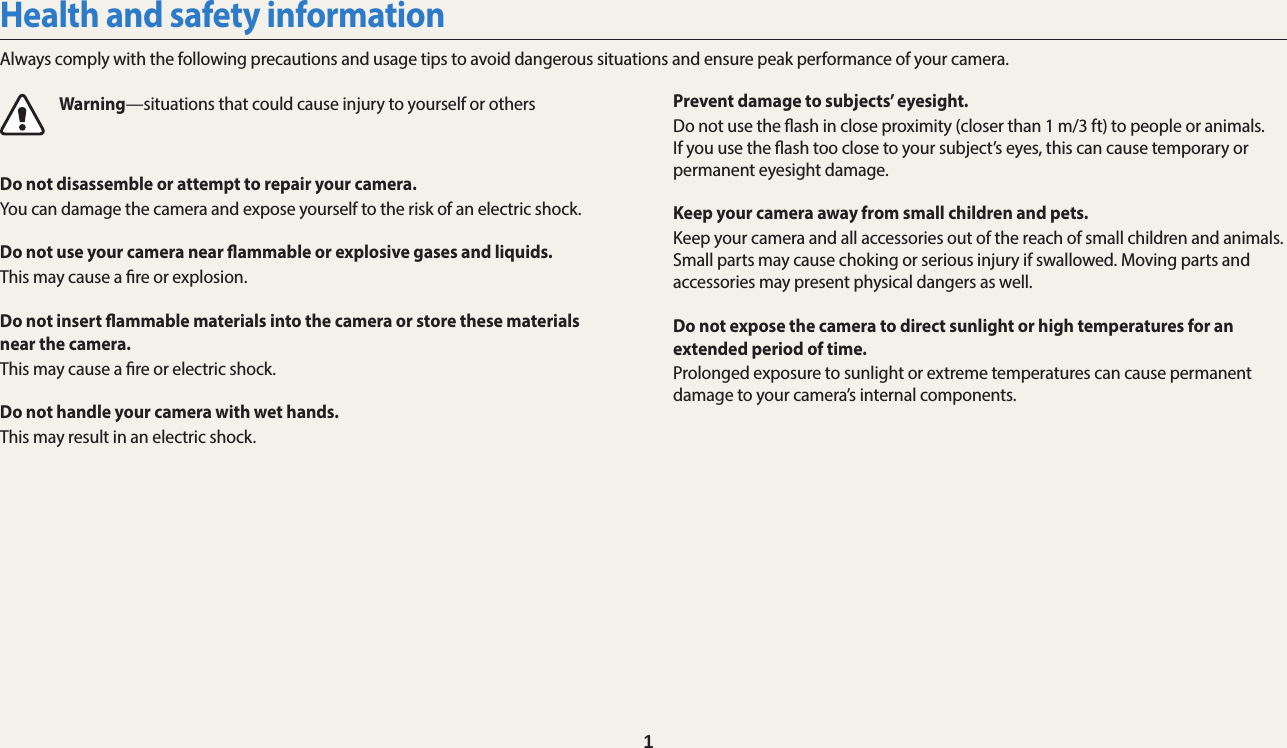
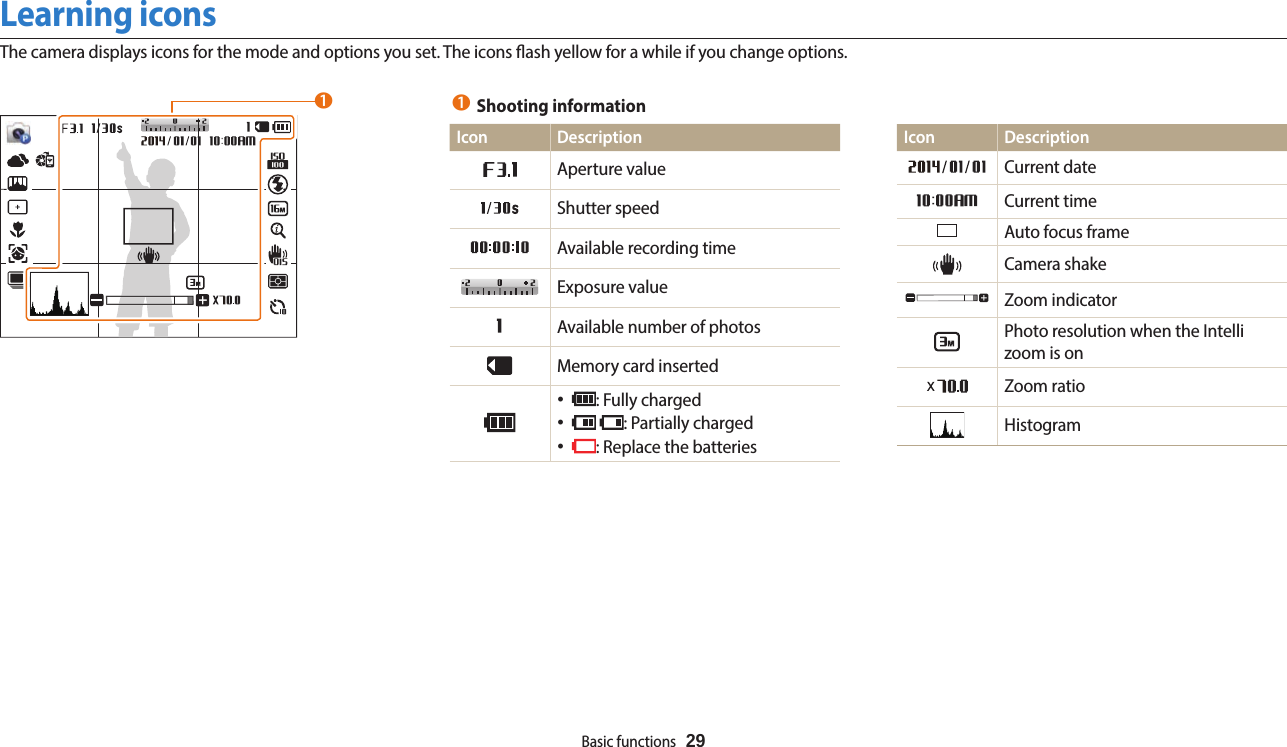
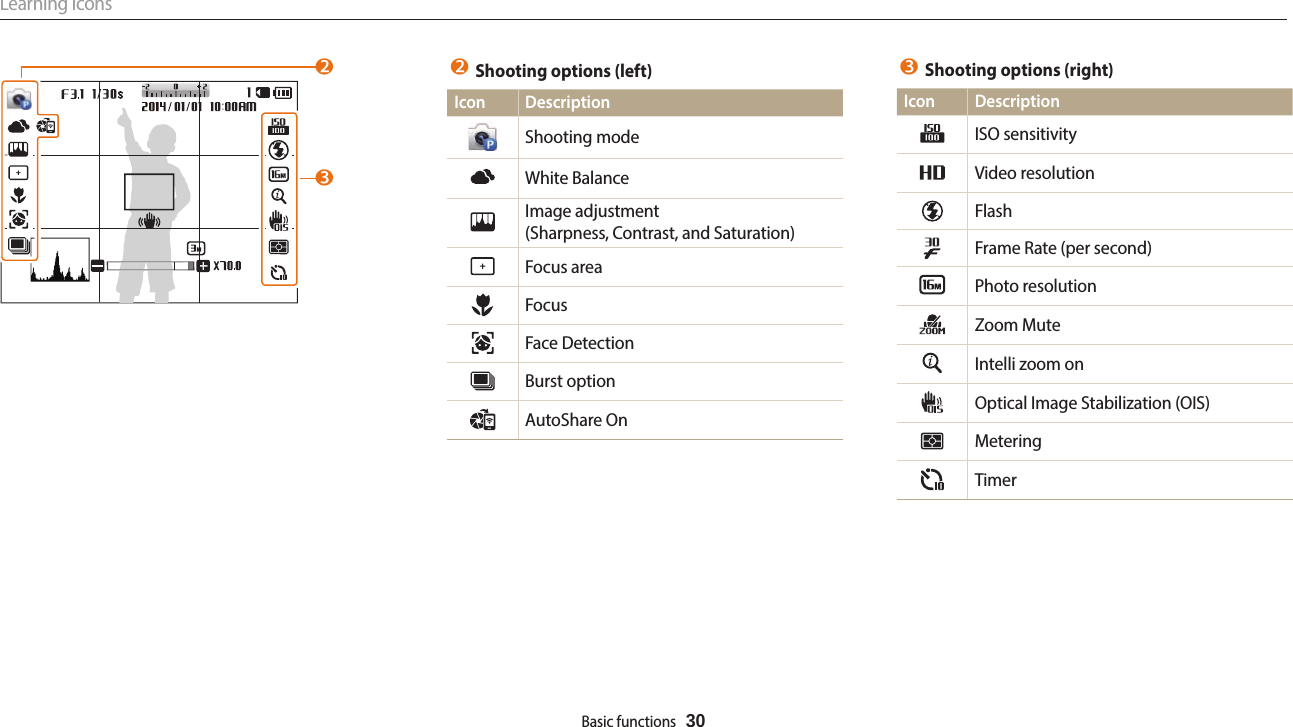
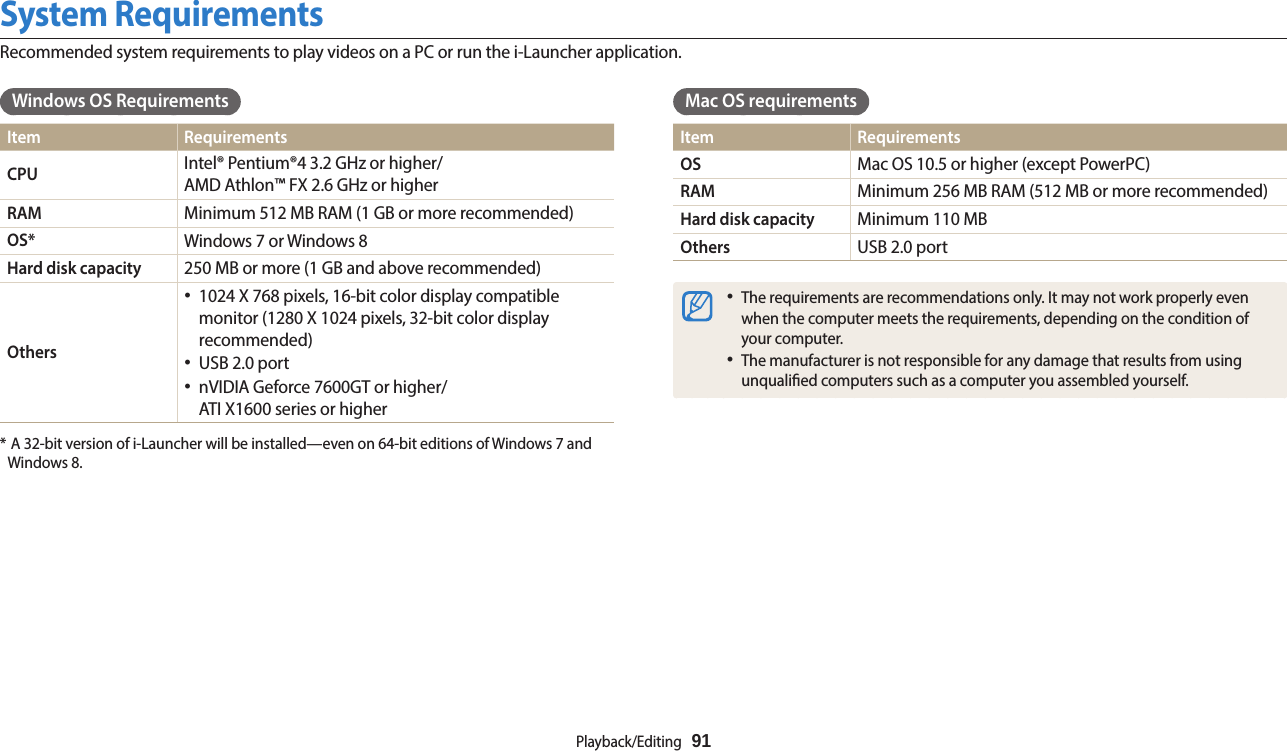
![6Indicators used in this manualShooting mode IndicatorSmart AutoProgramSmartPanoramaMagic PlusSettingsMovieWi-FiShooting mode iconsThese icons appear in the text when a function is available in a mode. See the example below. Note: The or mode may not support functions for all scenes or modes.For example:Shooting options 673 Press [F/t] to adjust the exposure.• The photo will be brighter as the exposure value increases. Back SetEV : +14 Press [o] to save your settings.• Once you adjust the exposure, the setting will be stored automatically. You may need to change the exposure value later to avoid overexposure or underexposure.• If you cannot decide on an appropriate exposure, select the AEB (Auto Exposure Bracket) option. The camera will capture 3 consecutive photos, each with a dierent exposure: normal, underexposed, and overexposed. (p. 72)Adjusting the exposure manually (EV)Depending on the intensity of the ambient light, your photos may be too bright or dark. In these cases, you can adjust the exposure to get a better photo. Darker (-) Neutral (0) Brighter (+)1 In Shooting mode, press [m].2 Select EV. Adjusting brightness and colorLearn how to adjust the brightness and color for better image quality.Available in Program and Movie modesIcons used in this manualIcon FunctionAdditional informationSafety warnings and precautions[ ] Camera buttons. For example, [Shutter] represents the shutter button.( ) Page number of related information→The order of options or menus you must select to perform a step; for example: Select Face Detection → Normal (represents Select Face Detection, and then select Normal).*Annotation](https://usermanual.wiki/Samsung-Electronics-Co/WB1100F/User-Guide-2165773-Page-7.png)
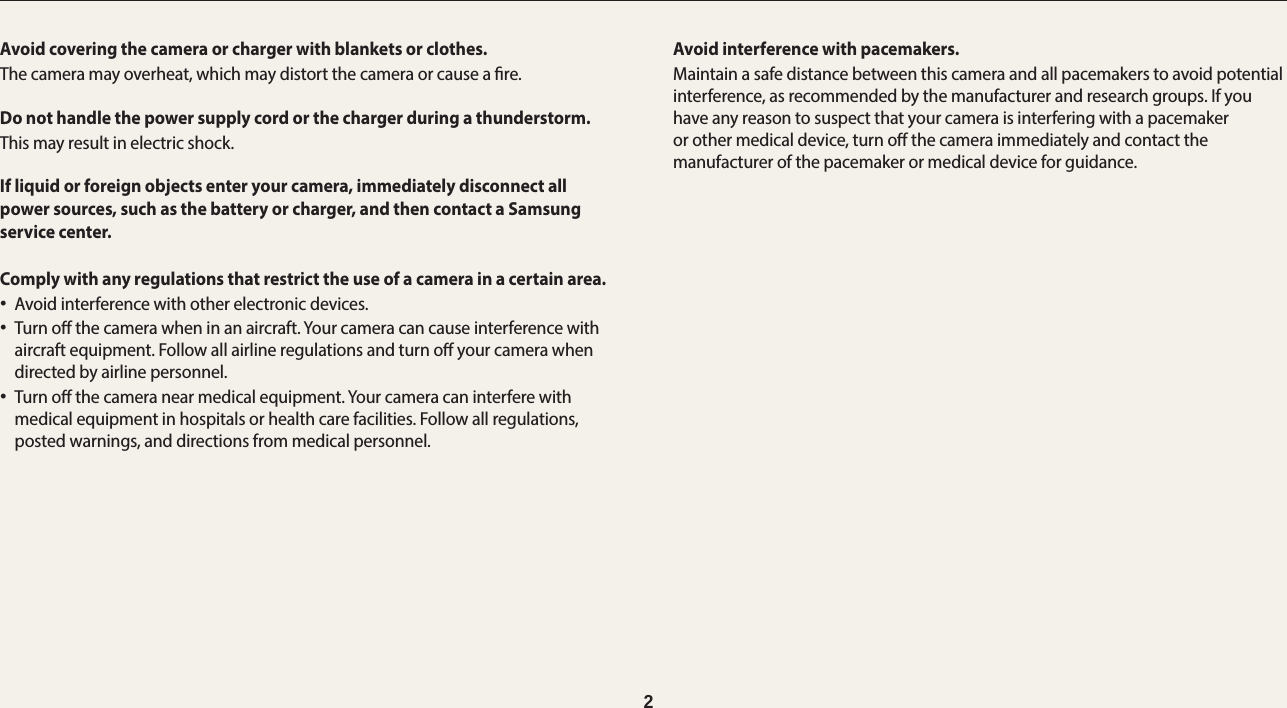
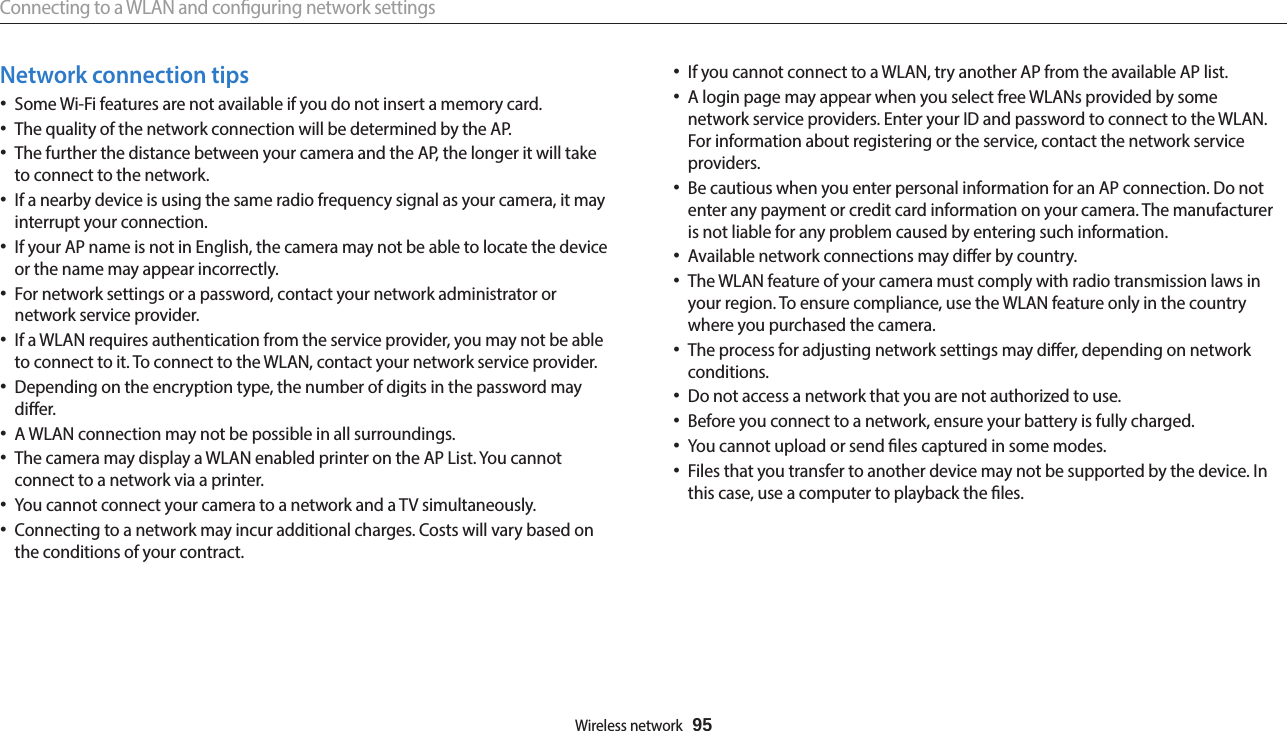
![7Expressions used in this manualPressing the shutter•Half-press [Shutter]: Press the shutter halfway down•Press [Shutter]: Press the shutter all the way downHalf-press [Shutter]Press [Shutter]Subject, background, and composition•Subject: The main object in a scene, such as a person, animal, or still life •Background: The objects around the subject•Composition: The combination of a subject and backgroundCompositionBackgroundSubjectExposure (Brightness)The amount of light that enters your camera determines the exposure. You can alter the exposure by changing the shutter speed, aperture value, or ISO sensitivity. By altering the exposure, your photos will be darker or lighter. Normal exposure Overexposure (too bright)](https://usermanual.wiki/Samsung-Electronics-Co/WB1100F/User-Guide-2165773-Page-8.png)
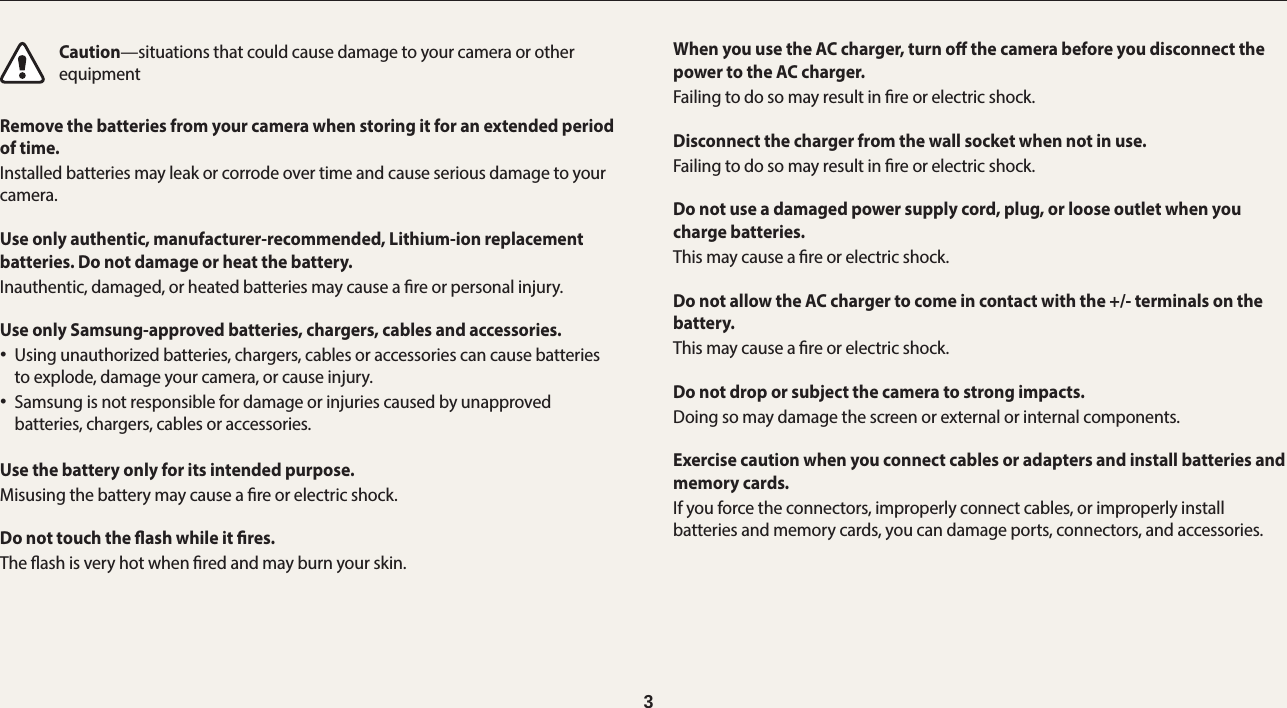
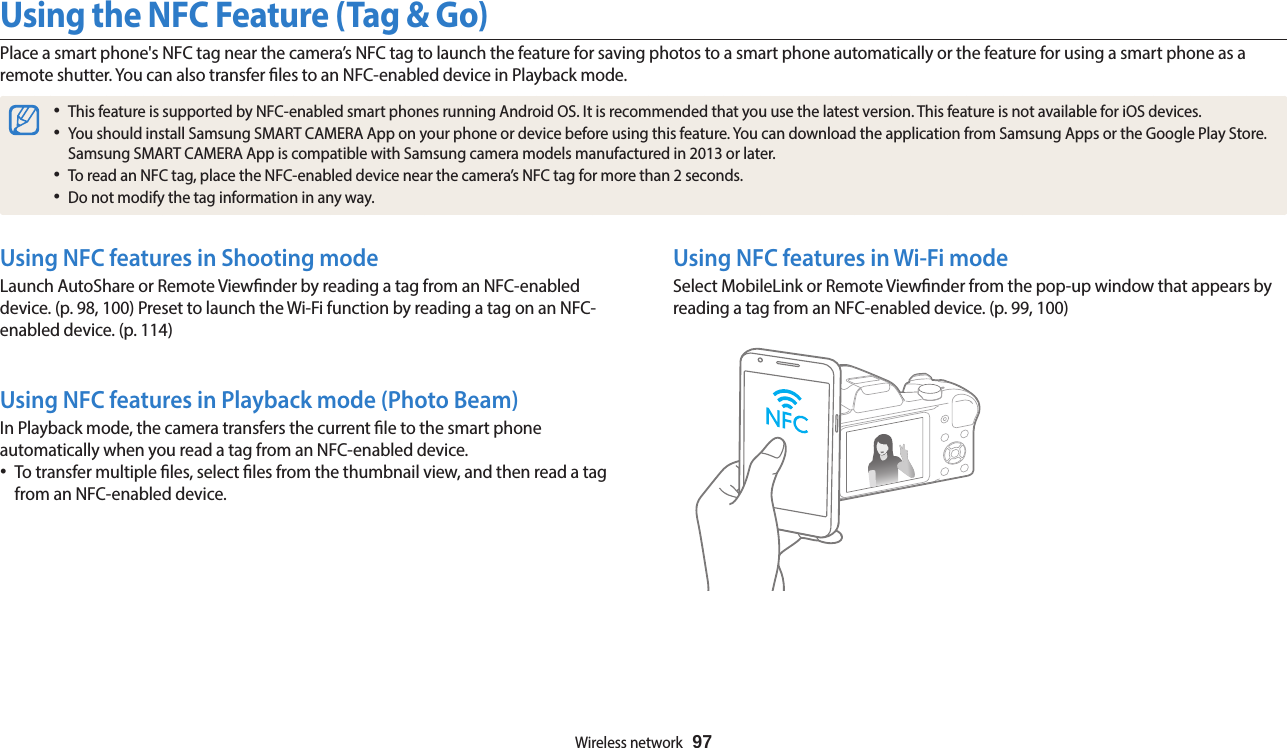
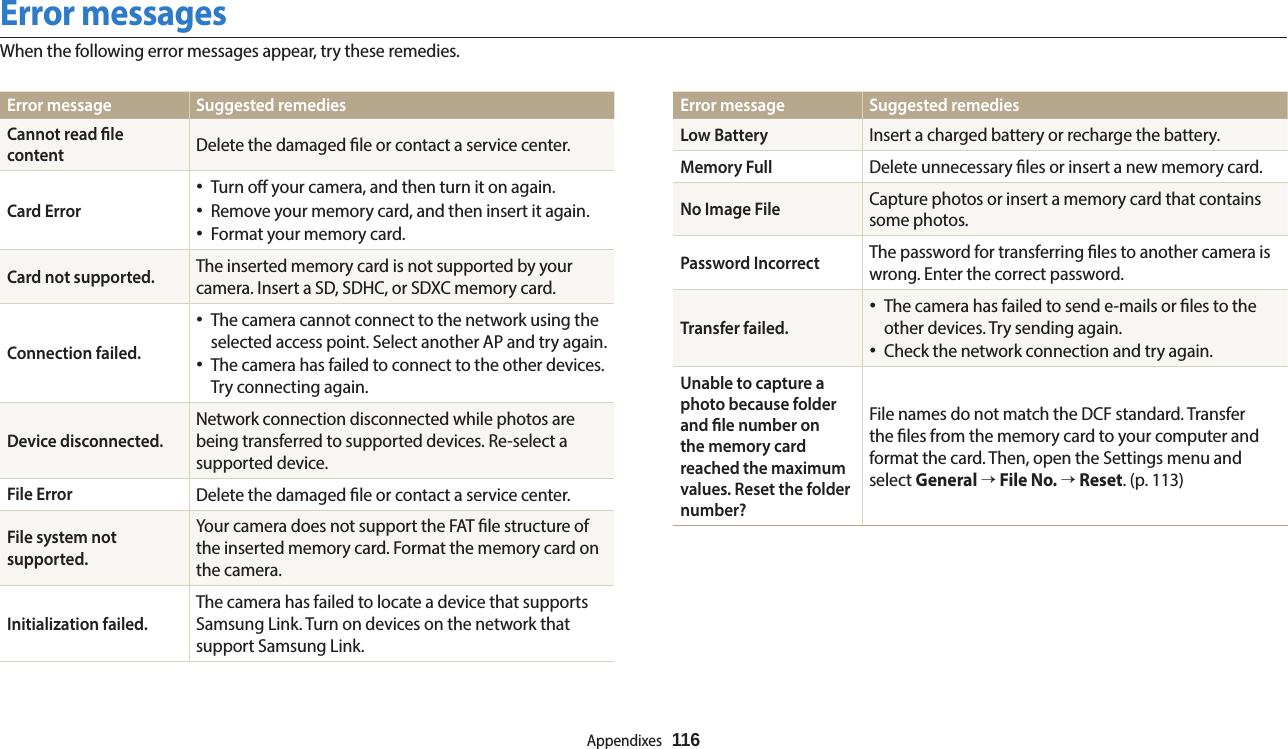
![13Basic troubleshootingLearn to solve common problems by setting shooting options.The subject’s eyes appear red.Red eye occurs when the subject's eyes reect light from the camera ash.•Set the ash option to Red-eye or Red-eye Fix. (p. 57)•If the photo has already been captured, select Red-eye Fix in the edit menu. (p. 86)Photos have dust spots. If dust particles are present in the air, you may capture them in photos when you use the ash.•Turn o the ash or avoid capturing photos in a dusty place.•Set ISO sensitivity options. (p. 59)Photos are blurred. Blurring can occur if you capture photos in low light conditions or hold the camera incorrectly.Use the OIS function or half-press [Shutter] to ensure the subject is in focus. (p. 41)Photos are blurred when shooting at night.As the camera tries to let in more light, the shutter speed slows. This can make it dicult to hold the camera steady long enough to capture a clear photo and may result in camera shake.•Select Night in mode. (p. 47)•Turn on the ash. (p. 58)•Set ISO sensitivity options. (p. 59)•Use a tripod to prevent your camera from shaking.Subjects come out too dark because of backlighting.When the light source is behind the subject or when there is a high contrast between light and dark areas, the subject may appear too dark.•Avoid shooting toward the sun.•Set the ash option to Fill in. (p. 58)•Adjust the exposure. (p. 67)•Set the Auto Contrast Balance (ACB) option. (p. 68)•Set the metering option to Spot if a subject is in the center of the frame. (p. 68)](https://usermanual.wiki/Samsung-Electronics-Co/WB1100F/User-Guide-2165773-Page-14.png)
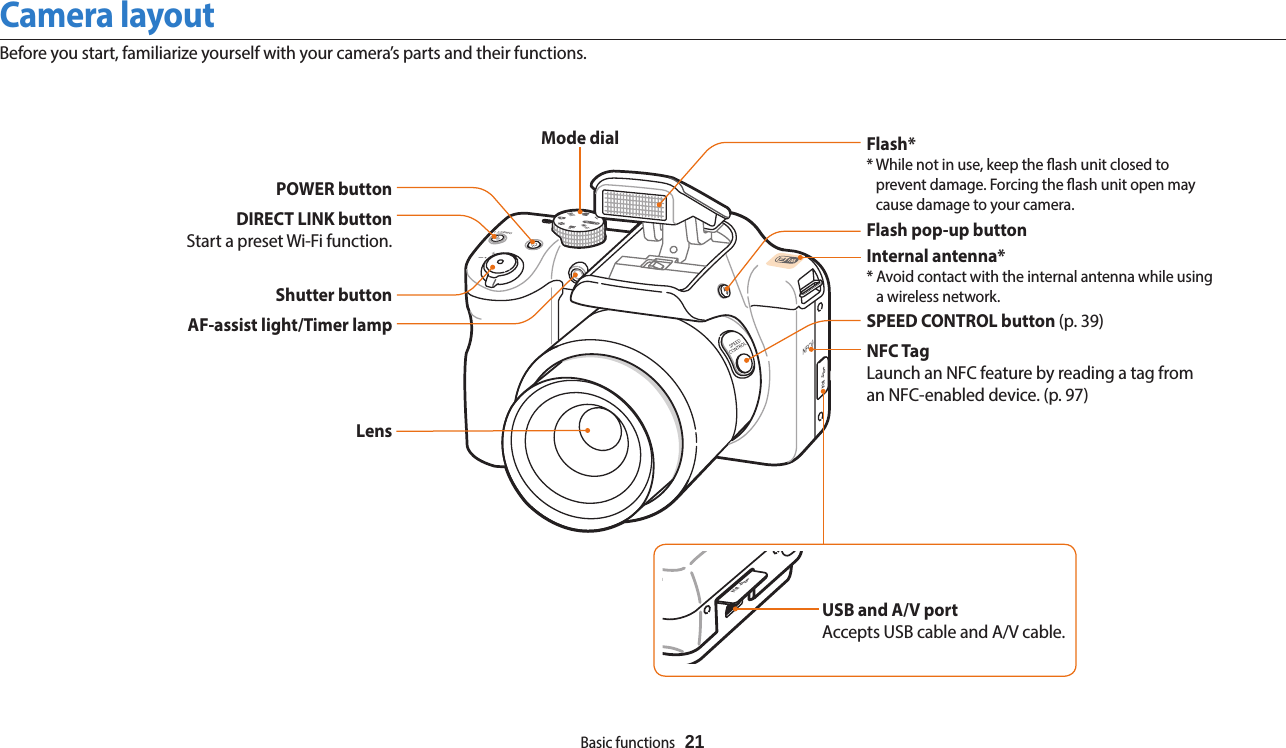
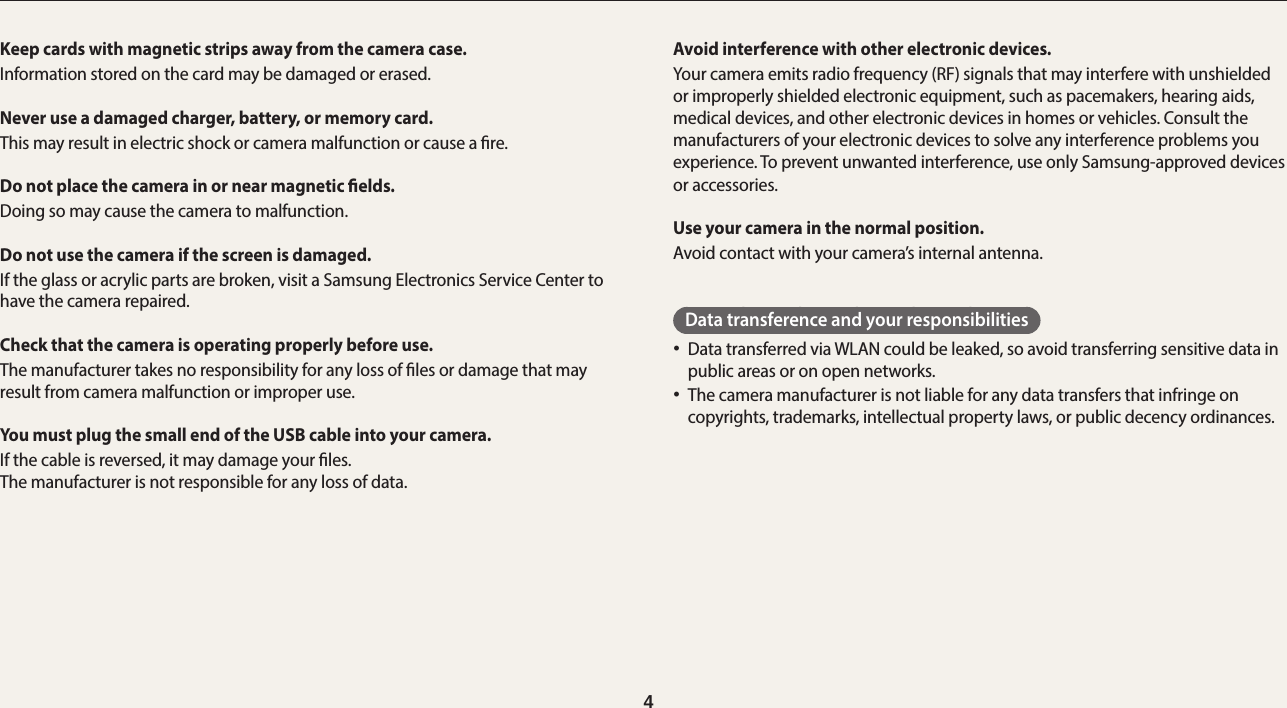
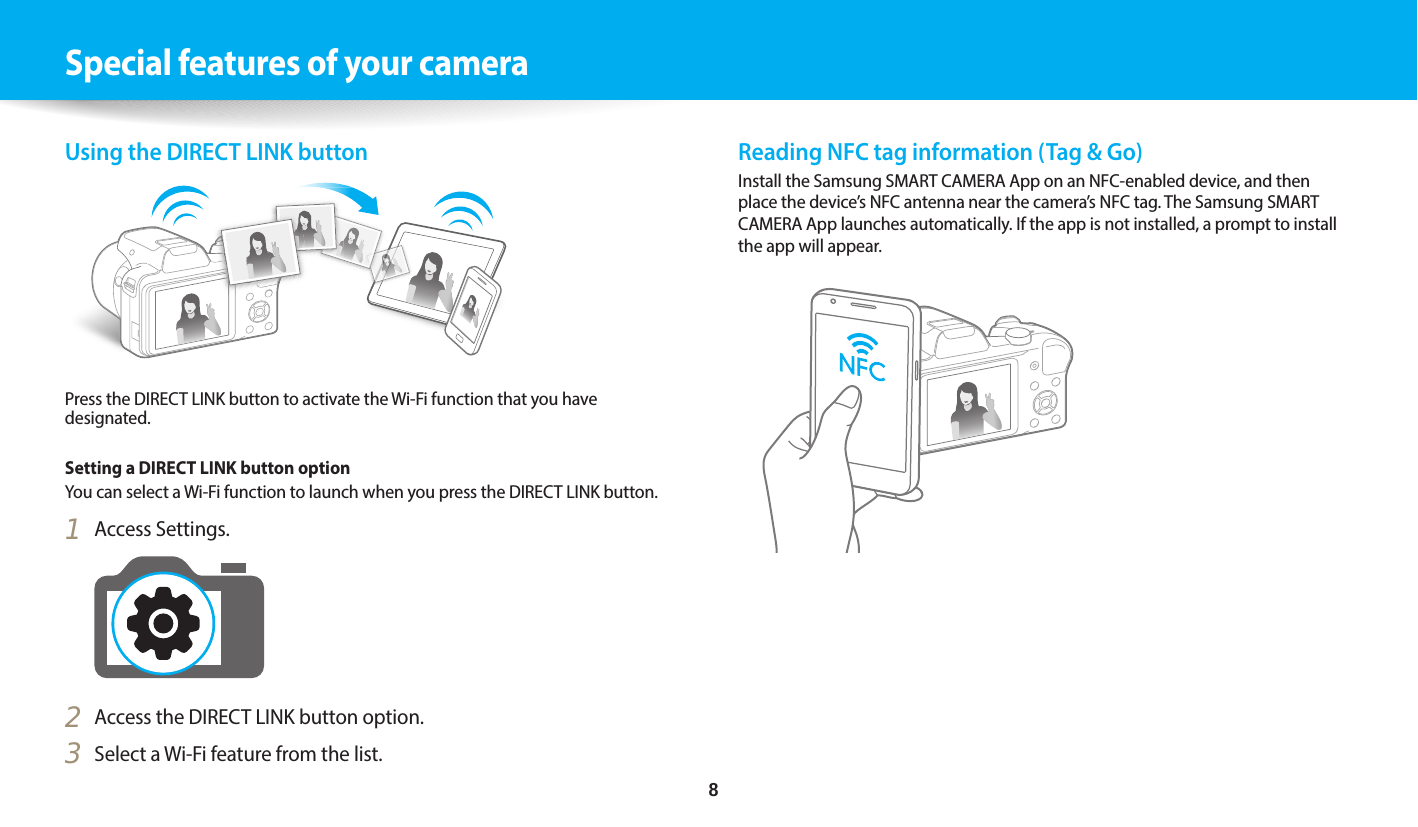
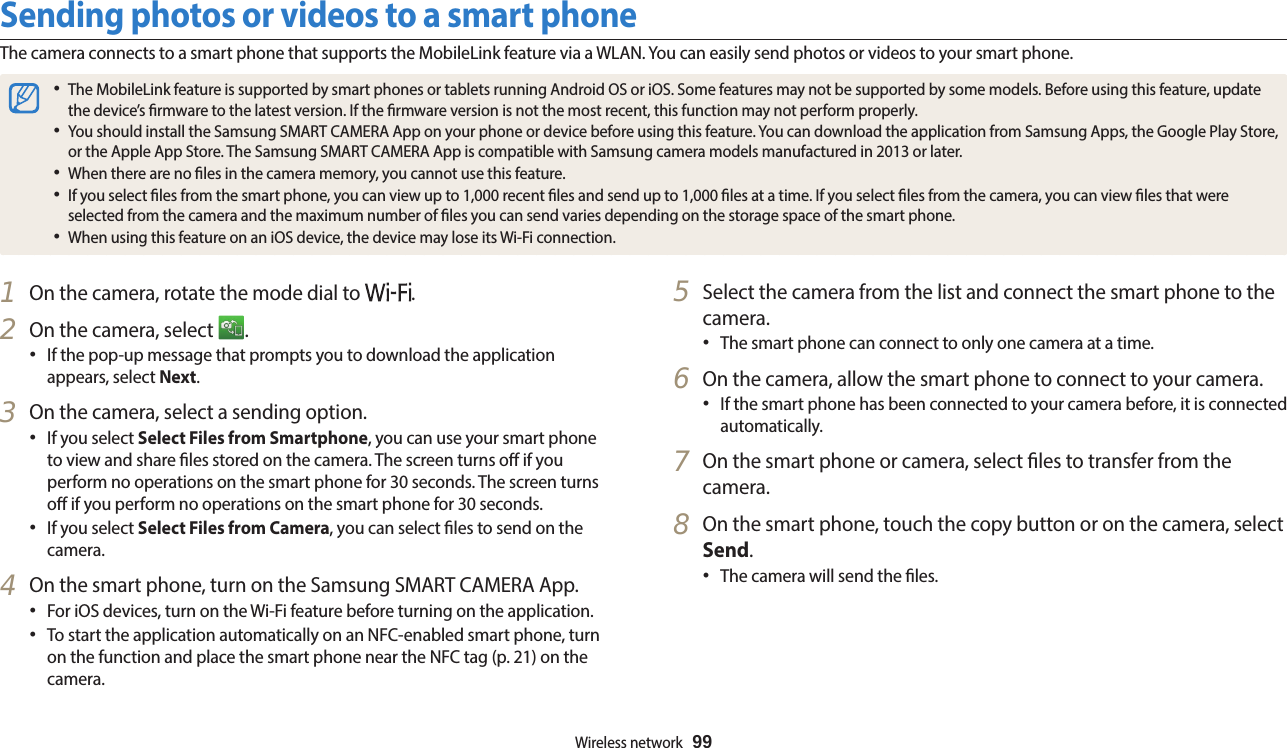
![Camera layoutBasic functions 23Using the DIRECT LINK buttonYou can turn on the Wi-Fi feature conveniently with [DIRECT LINK].Press [DIRECT LINK] to activate the Wi-Fi function that you have designated. Press [DIRECT LINK] again to return to the previous mode.Setting a DIRECT LINK button optionYou can select a Wi-Fi function to launch when you press [DIRECT LINK].1 Rotate the mode dial to .2 Select General → DIRECT LINK (Wi-Fi Button).3 Select a Wi-Fi feature. (p. 114)ButtonsButton Description Start recording a video. Access options or menus.Go back.Basic functions Other functionsDChange the display option. Move upcChange the macro option. Move downFChange the ash option. Move lefttChange the timer option. Move rightConrm the highlighted option or menu.Enter Playback mode.Delete les in Playback mode.](https://usermanual.wiki/Samsung-Electronics-Co/WB1100F/User-Guide-2165773-Page-24.png)
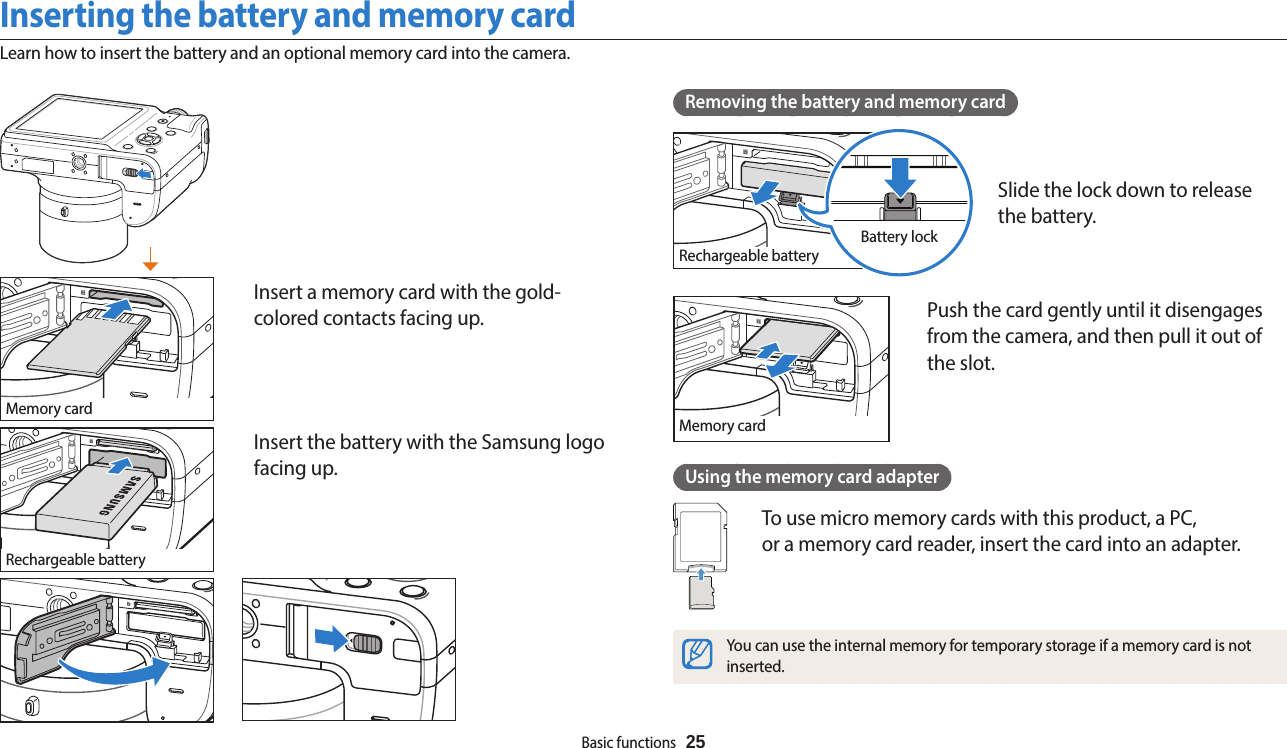
![Basic functions 26Charging the battery and turning on your cameraTurning on your cameraPress [X] to turn your camera on or o.•The initial setup screen appears when you turn on the camera for the rst time. (p. 27)Turning on your camera in Playback modePress [P]. The camera turns on and immediately accesses Playback mode.If you turn on your camera by pressing and holding [P] until the status lamp blinks, the camera does not emit any sounds.Charging the batteryBefore you use the camera for the rst time, you must charge the battery. Plug the small end of the USB cable into your camera, and then plug the other end of the USB cable into the AC adapter.Status lamp•Red light on: Charging•Red light o: Fully chargedUse only the AC adapter and USB cable supplied with your camera. If you use another AC adapter (such as AD5055), the camera battery may not charge or work properly.](https://usermanual.wiki/Samsung-Electronics-Co/WB1100F/User-Guide-2165773-Page-27.png)
![Basic functions 271 Press [c] to select Time Zone, and then press [t] or [o].2 Press [F/t] to select a time zone, and then press [o].Cancel SetHomeLondon3 Press [c] to select Date/Time Set, and then press [t] or [o].Cancel SetDate/Time SetYear Month Day Hour Min DST4 Press [F/t] to select an item.5 Press [D/c] to set the date, time, and daylight-saving time, and then press [o].Performing the initial setupWhen the initial setup screen appears, follow the steps below to congure the camera’s basic settings. The default language is preset for the country or region where the camera is sold. You can change the language as desired by selecting Language.](https://usermanual.wiki/Samsung-Electronics-Co/WB1100F/User-Guide-2165773-Page-28.png)
![Performing the initial setupBasic functions 286 Press [c] to select Date Type, and then press [t] or [o].7 Press [D/c] to select a date type, and then press [o].Date TypeBack SetYYYY/MM/DDMM/DD/YYYYDD/MM/YYYY8 Press [c] to select Time Type, and then press [t] or [o].9 Press [D/c] to select a time type, and then press [o].10 Press [r] to nish the initial setup. The screen may dier depending on the language you selected.](https://usermanual.wiki/Samsung-Electronics-Co/WB1100F/User-Guide-2165773-Page-29.png)
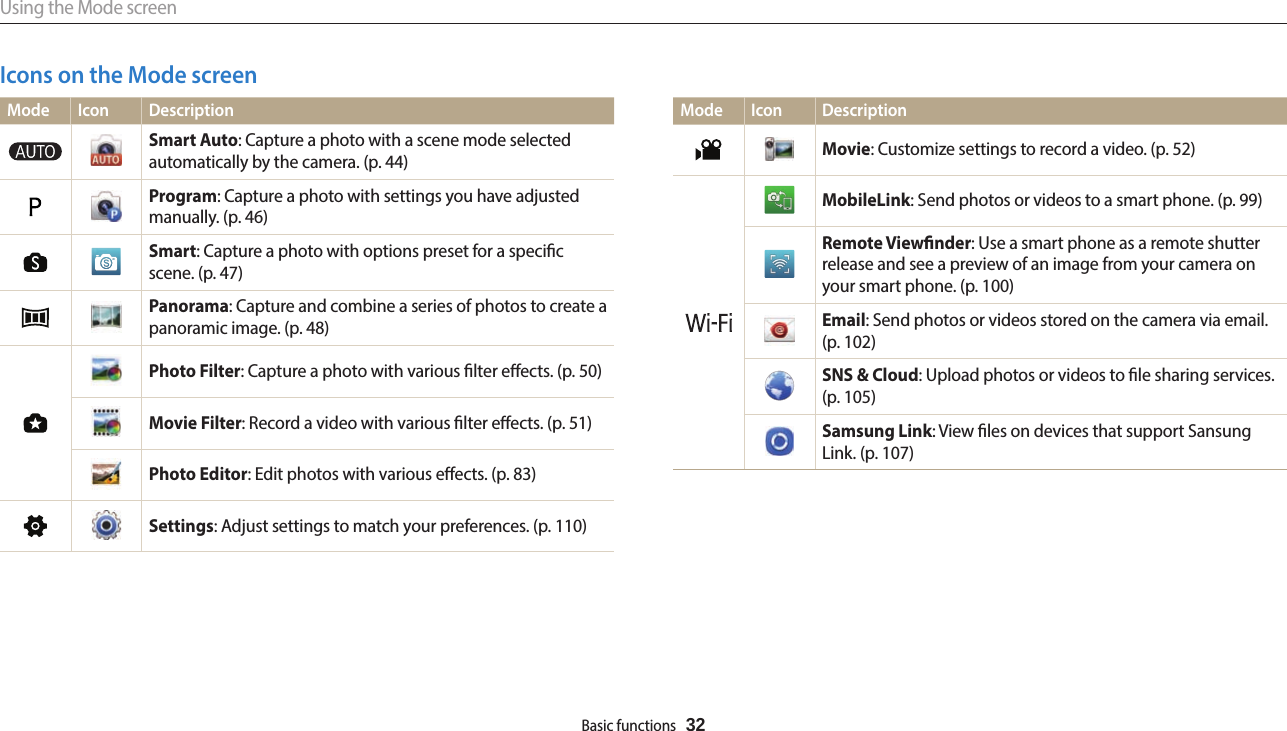
![Basic functions 31Selecting a Mode ScreenIn Shooting or Playback mode, rotate the mode dial to display a Mode Screen. You can select an icon on the Mode screen in Magic Plus mode.12Photo EditorPhoto FilterMovie Filter▲ For example: When you select Photo Filter in Magic Plus mode.No. Description1Current Mode screen•Rotate the mode dial to go to another mode screen.2Mode icons•Press [D/c/F/t] to scroll to a desired mode, and then press [o] to access the mode.Using the Mode screenUse the mode dial to select a shooting mode or function. Rotate the mode dial to a desired mode. You can also select an icon on the Mode screen in some modes.](https://usermanual.wiki/Samsung-Electronics-Co/WB1100F/User-Guide-2165773-Page-32.png)
![Basic functions 33Selecting options or menusTo select an option or a menu, press [m], and then press [D/c/F/t] or [o].Going back to the previous menuPress [r] to go back to the previous menu.Half-press [Shutter] to return to Shooting mode.1 In Shooting or Playback mode, press [m].2 Select an option or a menu.•To move up or down, press [D] or [c].•To move left or right, press [F] or [t].3 Press [o] to conrm the highlighted option or menu.](https://usermanual.wiki/Samsung-Electronics-Co/WB1100F/User-Guide-2165773-Page-34.png)
![Selecting options or menusBasic functions 34 For example, to select a White Balance option in Program mode:1 Rotate the mode dial to .2 Press [m].Exit SelectAutoShareEVWhite BalanceISOFlashFocus3 Press [D/c] to select White Balance, and then press [t] or [o].4 Press [F/t] to select a White Balance option.Back SetWhite Balance : Daylight5 Press [o] to save your settings.](https://usermanual.wiki/Samsung-Electronics-Co/WB1100F/User-Guide-2165773-Page-35.png)
![Basic functions 35Setting the display and soundLearn how to change the basic display information and sound settings.About histogramsA histogram is a graph that illustrates how light is distributed in your photo. If the histogram has a high peak on the left, the photo is underexposed and will appear dark. A peak on the right of the graph means that the photo is overexposed and will appear washed out. The height of the peaks is related to color information. The more of a particular color, the taller the peak. Under-exposed Well-exposed Over-exposedSetting the display typeYou can select a display type for the Shooting or Playback mode. Each type displays dierent shooting or playback information. See the table below.Press [D] repeatedly to change the display type.Mode Display typeShooting•Hide all information about shooting options.•Show all information about shooting options.•Show all information about shooting options and a histogram.Playback•Hide all information about the current le.•Hide all information about the current le except basic information.•Show all information about the current le.](https://usermanual.wiki/Samsung-Electronics-Co/WB1100F/User-Guide-2165773-Page-36.png)
![Setting the display and soundBasic functions 36Setting the option display viewYou can hide or show the option display appearing in some modes.Press [o] repeatedly.•Hide the option display.•Show the option display.Option displaySmart : Beauty FaceSet▲ For example, in modeSetting the soundTurn the sound your camera emits when you perform functions on or o.1 Rotate the mode dial to .2 Select Sounds → Beep Sound.3 Select an option.Option DescriptionO The camera does not emit any sounds.On The camera emits sounds.](https://usermanual.wiki/Samsung-Electronics-Co/WB1100F/User-Guide-2165773-Page-37.png)
![Basic functions 371 Rotate the mode dial to .2 Align your subject in the frame.3 Half-press [Shutter] to focus.•A green frame means the subject is in focus.•A red frame means the subject is out of focus.4 Press [Shutter] to capture a photo.5 Press [P] to view the captured photo.•To delete the photo, press [f], and then select Ye s .6 Press [P] to return to Shooting mode.See page 41 for tips to get clearer photos. Capturing photosLearn how to capture photos easily and quickly in Smart Auto mode.](https://usermanual.wiki/Samsung-Electronics-Co/WB1100F/User-Guide-2165773-Page-38.png)
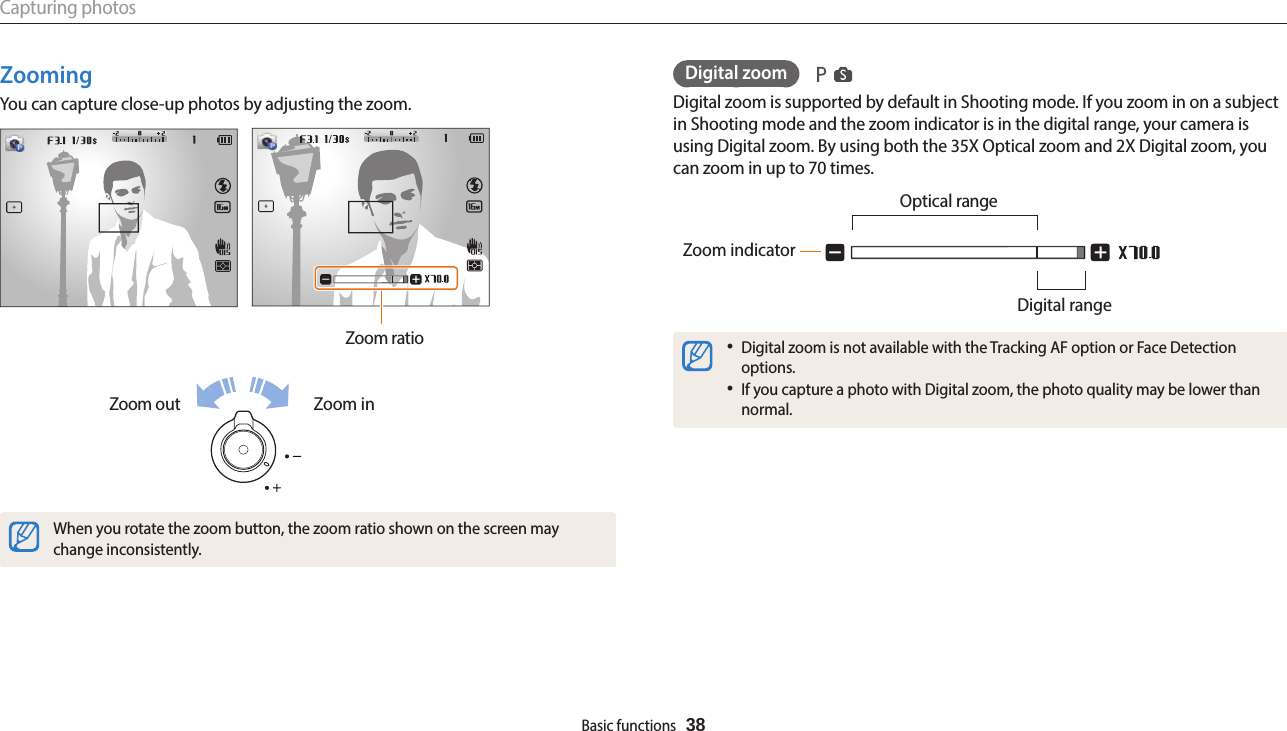
![Capturing photosBasic functions 39Intelli zoomIf the zoom indicator is in the Intelli range, your camera is using Intelli zoom. Photo resolution varies according to the zoom rate if you use Intelli zoom. By using both Optical zoom and Intelli zoom, you can zoom in up to 70 times.Zoom indicatorOptical rangeIntelli rangePhoto resolution when the Intelli zoom is on•Depending on the shooting options you selected, Intelli zoom is not available.•Intelli zoom helps you capture a photo with less quality deterioration than Digital zoom. However, the photo quality may be lower than when you use Optical zoom.•Intelli zoom is available only when you set a 4:3 resolution ratio. If you set another resolution ratio with Intelli zoom on, Intelli zoom will be turned o automatically.•Intelli zoom is always on in mode. Setting Intelli zoom1 In Shooting mode, press [m].2 Select Intelli Zoom.3 Select an option.Icon DescriptionO: The Intelli zoom is deactivated.On: The Intelli zoom is activated.Changing the zoom speedWhen you use the zoom button with [SPEED CONTROL], the speed of the zoom is changed.•Photo recording mode: the zoom function works faster.•Video recording mode: the zoom function works slower.](https://usermanual.wiki/Samsung-Electronics-Co/WB1100F/User-Guide-2165773-Page-40.png)
![Capturing photosBasic functions 40Reducing camera shake (OIS) In Shooting mode, you can set either the Optical Image Stabilizer (OIS) or the Dual Image Stabilizer (Dual IS) to reduce or eliminate picture blurriness from camera shake. Before correction After correction1 In Shooting mode, press [m].2 Select OIS.3 Select an option.Icon DescriptionO: OIS is deactivated.On: OIS is activated.Dual IS: The Dual Image Stabilizer (Dual IS) is activated.•OIS may not function properly when:-you move your camera to follow a moving subject-you use Digital zoom-there is too much camera shake-the shutter speed is slow (for example, when you capture night scenes)-the battery is low-you capture a close-up shot•If you use the OIS function with a tripod, your images may be blurred by the vibration of the OIS sensor. Deactivate the OIS function when you use a tripod.•If the camera is hit or dropped, the display will be blurry. If this occurs, turn o the camera, and then turn it on again.](https://usermanual.wiki/Samsung-Electronics-Co/WB1100F/User-Guide-2165773-Page-41.png)
![Basic functions 41 Holding your camera correctlyEnsure nothing is blocking the lens, ash, or microphone. Half-pressing the shutter buttonHalf-press [Shutter] and adjust the focus. The camera adjusts the focus and exposure automatically.The camera sets the aperture value and shutter speed automatically.Focus frame•Press [Shutter] to capture the photo if the focus frame appears in green.•Change the composition and half-press [Shutter] again if the focus frame appears in red. Reducing camera shake•Set the Optical Image Stabilization option to reduce camera shake digitally. (p. 40)•Set the Dual IS option to reduce camera shake both optically and digitally. (p. 40) When is displayedCamera shakeWhen you shoot in the dark, avoid setting the ash option to Slow Sync or O. The aperture remains open longer and it may be harder to hold the camera steady long enough to capture a clear photo.•Use a tripod or set the ash option to Fill in. (p. 58)•Set ISO sensitivity options. (p. 59)Tips for getting a clearer photo](https://usermanual.wiki/Samsung-Electronics-Co/WB1100F/User-Guide-2165773-Page-42.png)
![Basic functions 42 Preventing your subject from being out of focusIt may be dicult to get your subject in focus when:-there is little contrast between the subject and background (for example, when your subject is wearing clothing that is similar in color to the background)-the light source behind the subject is too bright-the subject is shiny or reective-the subject includes horizontal patterns, such as blinds-the subject is not positioned in the center of the frame•When you capture photos in low lightTurn on the ash. (p. 58)•When subjects are moving rapidlyUse the Continuous or Motion Capture function. (p. 71)Using the focus lockHalf-press [Shutter] to focus. When the subject is in focus, you can reposition the frame to change the composition. When you are ready, press [Shutter] to capture your photo.](https://usermanual.wiki/Samsung-Electronics-Co/WB1100F/User-Guide-2165773-Page-43.png)
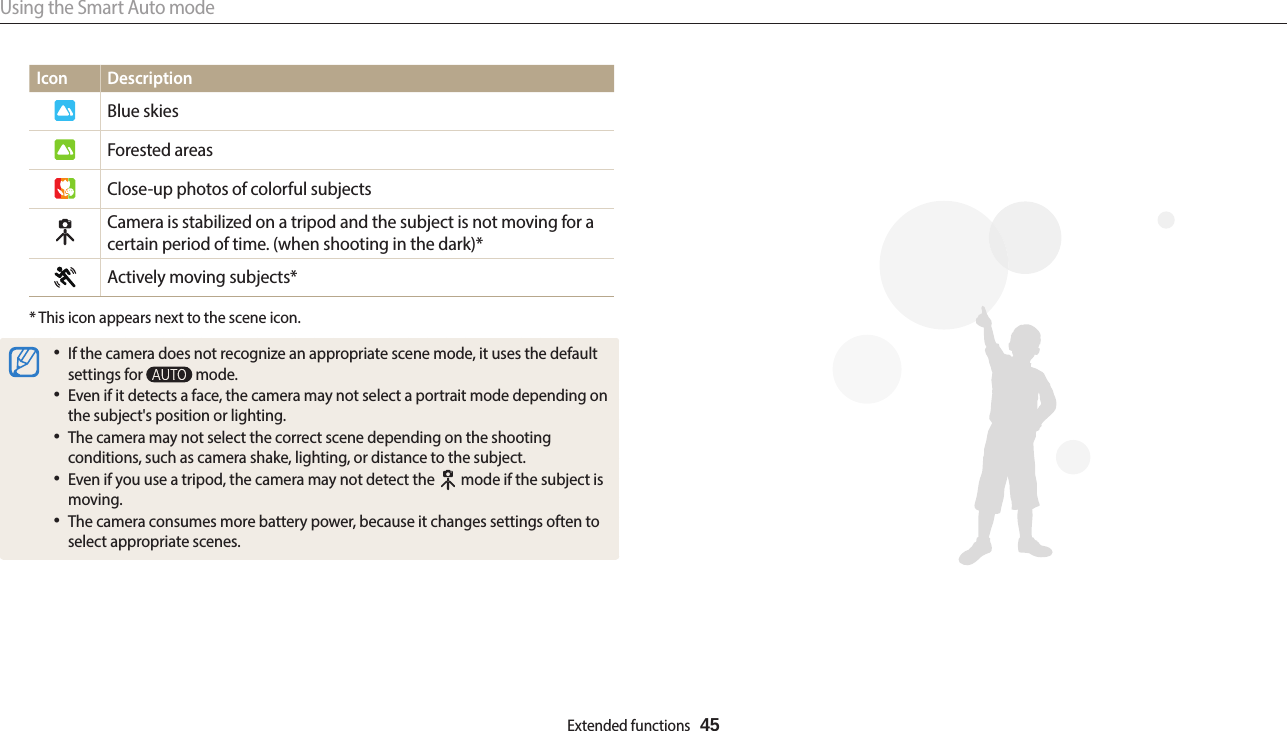
![Extended functions 44Using the Smart Auto modeIn Smart Auto mode, your camera automatically chooses the appropriate camera settings based on the type of scene it detects. The Smart Auto mode is helpful if you are not familiar with the camera settings for various scenes.Icon DescriptionLandscapesScenes with bright white backgroundsLandscapes at nightPortraits at nightLandscapes with backlightingPortraits with backlightingPortraitsClose-up photos of objectsClose-up photos of textSunsetsIndoors, darkPartially litClose-up with spot lightingPortraits with spot lighting1 Rotate the mode dial to .2 Align your subject in the frame.•The camera automatically selects a scene. An appropriate scene icon appears at the top left of the screen. The icons are listed below.3 Half-press [Shutter] to focus.4 Press [Shutter] to capture the photo.](https://usermanual.wiki/Samsung-Electronics-Co/WB1100F/User-Guide-2165773-Page-45.png)
![Extended functions 463 Align your subject in the frame, and then half-press [Shutter] to focus.4 Press [Shutter] to capture the photo.1 Rotate the mode dial to .2 Set the desired options. •For a list of options, refer to "Shooting options". (p. 53)Using the Program modeIn Program mode, you can set most options, except the shutter speed and aperture value, which the camera sets automatically.](https://usermanual.wiki/Samsung-Electronics-Co/WB1100F/User-Guide-2165773-Page-47.png)
![Extended functions 47Option DescriptionNight Capture multiple photos in low light conditions without a ash. The camera combines them to create a single image that is brighter and has less blurring.Macro Capture small or close-up subjects.Light Trace Capture scenes with the light trailing in low-light conditions.3 Align your subject in the frame, and then half-press [Shutter] to focus.4 Press [Shutter] to capture the photo.1 Rotate the mode dial to .2 Select a scene.Smart : Beauty FaceSetOption DescriptionBeauty Face Capture a portrait with options to hide facial imperfections.Action Freeze Capture subjects moving at high speed.Sunset Capture scenes at sunset, with natural-looking reds and yellows.Landscape Capture still-life scenes and landscapes.Silhouette Capture subjects as dark shapes against a light background.Fireworks Capture scenes with reworks.Using the Smart modeIn Smart mode, you can capture a photo with options that are preset for a specic scene.](https://usermanual.wiki/Samsung-Electronics-Co/WB1100F/User-Guide-2165773-Page-48.png)
![Extended functions 484 With [Shutter] pressed, slowly move the camera in the direction that will let it capture the rest of the panorama.•Arrows pointing in the direction of motion are displayed, and the entire shooting image is displayed in the preview box. •When the viewnder is aligned with the next scene, the camera captures the next photo automatically.Shakiness: A atter line represents less camera shake.5 When you are nished, release [Shutter].•When you have captured all the necessary shots, the camera combines them into one panoramic photo. Shooting example1 Rotate the mode dial to .2 Align your subject in the frame, and then half-press [Shutter] to focus.•Align the camera with the far left or the far right, or very top or bottom, of the scene you want to capture.3 Press and hold [Shutter] to start shooting.Using the Panorama modeIn Panorama mode, you can capture a wide panoramic scene in a single photo. Panorama mode captures and combines a series of photos to create a panoramic image.](https://usermanual.wiki/Samsung-Electronics-Co/WB1100F/User-Guide-2165773-Page-49.png)
![Extended functions 50Using the Photo Filter modeApply various lter eects to your photos to create unique images.Miniature VignettingFish-eye Classic1 Rotate the mode dial to .2 Select .3 Select an eect.Option DescriptionMiniatureApply a tilt-shift eect to make the subject appear in miniature. (The top and bottom of the photo will be blurred.)Vignetting Apply the retro-looking colors, high contrast, and strong vignette eect of Lomo cameras.Fish-eye Distort close objects to imitate the visual eect of a sheye lens.Classic Apply a black and white eect.Retro Apply a sepia tone eect.Cross Filter Add lines that radiate outward from bright objects to imitate the visual eect of a cross lter.4 Align your subject in the frame, and then half-press [Shutter] to focus.5 Press [Shutter] to capture a photo.•Depending on the option you select, the resolution may change to or less automatically.•To apply lter eects to saved photos, press [m], and then select Open Image → a desired image. The camera will save edited photos as new les.Using the Magic Plus mode Capture a photo or record a video with various eects.](https://usermanual.wiki/Samsung-Electronics-Co/WB1100F/User-Guide-2165773-Page-51.png)
![Using the Magic Plus mode Extended functions 51Using the Movie Filter modeApply various lter eects to your videos to create unique images.1 Rotate the mode dial to .2 Select .3 Select an eect.Option DescriptionMiniatureApply a tilt-shift eect to make the subject appear in miniature. (The top and bottom of the photo will be blurred.)Vignetting Apply the retro-looking colors, high contrast, and strong vignette eect of Lomo cameras.Fish-eye Distort close objects to imitate the visual eect of a sheye lens.Classic Apply a black and white eect.Retro Apply a sepia tone eect.Palette Eect 1 Create a vivid look with sharp contrast and strong color.Palette Eect 2 Make scenes clean and clear.Palette Eect 3 Apply a soft brown tone.Palette Eect 4 Create a cold and monotone eect.4 Press (Video recording) or [Shutter] to start recording.5 Press (Video recording) or [Shutter] again to stop recording.•If you select Miniature, playback speed will increase.•If you select Miniature, you cannot record sound in the video.•Depending on the option you select, the recording resolution may change to or less automatically.](https://usermanual.wiki/Samsung-Electronics-Co/WB1100F/User-Guide-2165773-Page-52.png)
![Extended functions 521 Rotate the mode dial to .2 Set desired options.•For a list of options, refer to "Shooting options". (p. 53)3 Press (Video recording) or [Shutter] to start recording.4 Press (Video recording) or [Shutter] again to stop recording.You can start recording a video in some modes by pressing (Video recording) without having to rotate the mode dial to .Pause recordingThe camera allows you to temporarily pause a video while recording. With this function, you can record separate scenes as a single video.•Press [o] to pause while recording.•Press [o] to resume.Using the Movie modeIn Movie mode, you can customize settings to record HD (1280 X 720) videos of up to 20 minutes in length. The camera saves recorded videos as MP4 (H.264) les. •MP4 (H.264) is a high-compression video format established by the international standards organizations ISO-IEC and ITU-T.•If you use memory cards with slow write speeds, the camera may not save videos properly. Video recordings may be corrupted or fail to play back correctly.•Memory cards with slow write speeds will not support high-resolution videos. To record high-resolution videos, use memory cards with faster write speeds.•If you use the zoom function when recording a video, the camera may record the noise of the zoom operating. Use the Zoom Mute function not to record zoom noise. (p. 73)](https://usermanual.wiki/Samsung-Electronics-Co/WB1100F/User-Guide-2165773-Page-53.png)
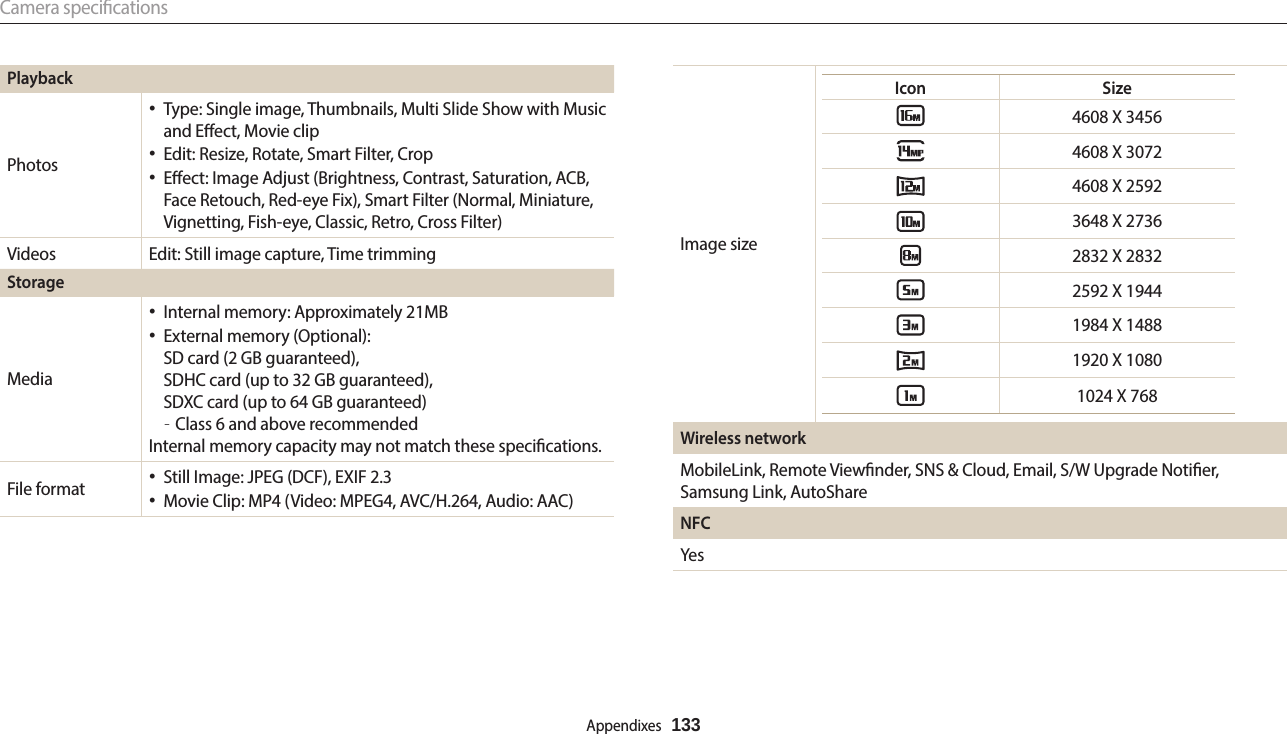
![Shooting options 54Selecting a resolutionAs you increase the resolution, your photo or video will include more pixels, so it can be printed on larger paper or displayed on a larger screen. When you use a high resolution, the le size will also increase.Setting the photo resolution1 In Shooting mode, press [m].2 Select Photo Size. 3 Select an option.Icon Description4608 X 3456: Print on A1 paper.4608 X 3072: Print on A1 paper in wide ratio (3:2).4608 X 2592: Print on A1 paper in panorama ratio (16:9) or play back on an HDTV.3648 X 2736: Print on A2 paper.2832 X 2832: Print on A3 paper in 1:1 ratio.2592 X 1944: Print on A4 paper.1984 X 1488: Print on A5 paper.1920 X 1080: Print on A5 paper in panorama ratio (16:9) or play back on an HDTV.1024 X 768: Attach to an email. Setting the video resolution1 In Shooting mode, press [m].2 Select Movie Size.3 Select an option.Icon Description1280 X 720: HD les to play back on an HDTV.640 X 480: SD les to play back on an analog TV.320 X 240: Post on a web page.For Sharing: Post on a website using the wireless network (30 seconds maximum). Selecting a resolution and qualityLearn how to change the image resolution and quality settings.](https://usermanual.wiki/Samsung-Electronics-Co/WB1100F/User-Guide-2165773-Page-55.png)
![Selecting a resolution and qualityShooting options 55Setting the photo qualitySet the photo quality settings. Higher image quality settings will result in larger le sizes. The camera compresses and saves the photos you capture in the JPEG format.1 In Shooting mode, press [m].2 Select Quality.3 Select an option.Icon DescriptionSuper Fine: Capture photos in super high quality.Fine: Capture photos in high quality.Normal: Capture photos in normal quality.](https://usermanual.wiki/Samsung-Electronics-Co/WB1100F/User-Guide-2165773-Page-56.png)
![Shooting options 561 In Shooting mode, press [t]. Exit SetTimer : O2 Select an option.Icon DescriptionO: The timer is not active.10 Sec: Capture a photo after a 10-second delay.2 Sec: Capture a photo after a 2-second delay.Double: Capture one photo after a 10-second delay and another photo after a 2-second delay.Available options may dier depending on the shooting conditions.3 Press [Shutter] to start the timer.•The AF-assist light/timer lamp blinks. The camera will automatically capture a photo after the specied time has elapsed.•Press [Shutter] or [t] to cancel the timer.•Depending on the Face Detection options you selected, the timer function may not be available.•Timer options are not available if you set burst options.•In some modes, you can also set the timer option by pressing [m], and then selecting Timer.Using the timerLearn how to set the timer to delay shooting.](https://usermanual.wiki/Samsung-Electronics-Co/WB1100F/User-Guide-2165773-Page-57.png)
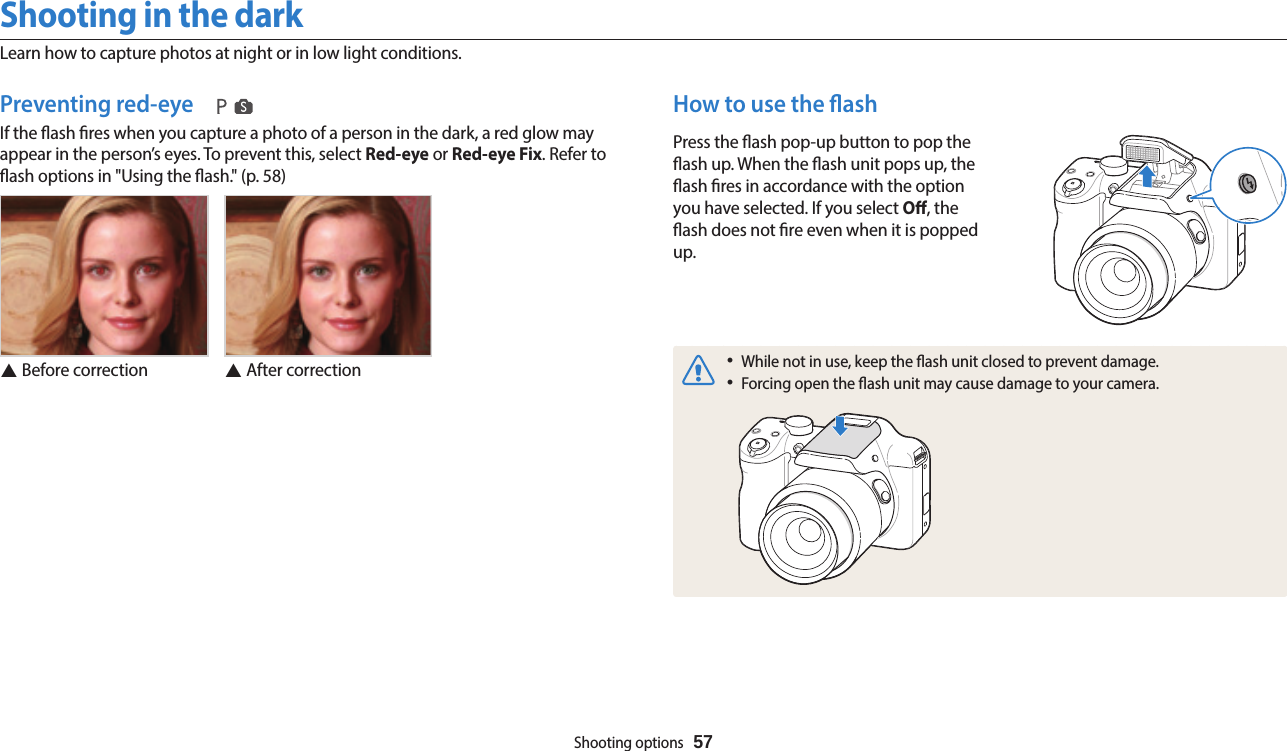
![Shooting in the darkShooting options 58Using the ashUse the ash when you capture photos in the dark or when you need more light in your photos.1 Press [F] to pop the ash up when it is need.2 In Shooting mode, press [F].Exit SetFlash : Auto 3 Select an option.Icon DescriptionO:•The ash will not re.•The camera will display the shake warning when you are shooting in low light.Auto: The ash will re automatically when the subject or background is dark.Red-eye:•The ash will re twice when the subject or background is dark to reduce the red-eye eect.•There is an interval between the 2 bursts of the ash. Do not move until the ash res a second time.Fill in:•The ash always res.•The camera automatically adjusts the intensity of the ash.Slow Sync:•The ash res and the shutter stays open longer.•This option is recommended when you want to capture more ambient light to reveal more details in the background.•Use a tripod to prevent your photos from blurring.•The camera will display the shake warning when you are shooting in low light.](https://usermanual.wiki/Samsung-Electronics-Co/WB1100F/User-Guide-2165773-Page-59.png)
![Shooting in the darkShooting options 59Icon DescriptionRed-eye Fix:•The ash res twice when the subject or background is dark. The camera corrects red-eye through its advanced software analysis.•There is an interval between the 2 bursts of the ash. Do not move until the ash res a second time.Available options may dier depending on the shooting conditions.•Flash options are not available if you set burst options or select Self-Portrait or Blink Detection.•Make sure that your subjects are within the recommended distance from the ash. (p. 132)•If light from the ash is reected or there is a substantial amount of dust in the air, tiny spots may appear in your photo.•In some modes, you can also set the ash option by pressing [m], and then selecting Flash.Adjusting the ISO sensitivityThe ISO sensitivity is the measure of a lm’s sensitivity to light as dened by the International Organization for Standardization (ISO). The higher ISO sensitivity you select, the more sensitive to light your camera becomes. Use a higher ISO sensitivity to capture better photos and reduce camera shake when not using the ash.1 In Shooting mode, press [m].2 Select ISO.3 Select an option.•Select to use an appropriate ISO sensitivity based on the brightness of the subject and lighting.•Higher ISO sensitivities may result in more image noise.•If you set the ISO option to , the resolution may change to or smaller.](https://usermanual.wiki/Samsung-Electronics-Co/WB1100F/User-Guide-2165773-Page-60.png)
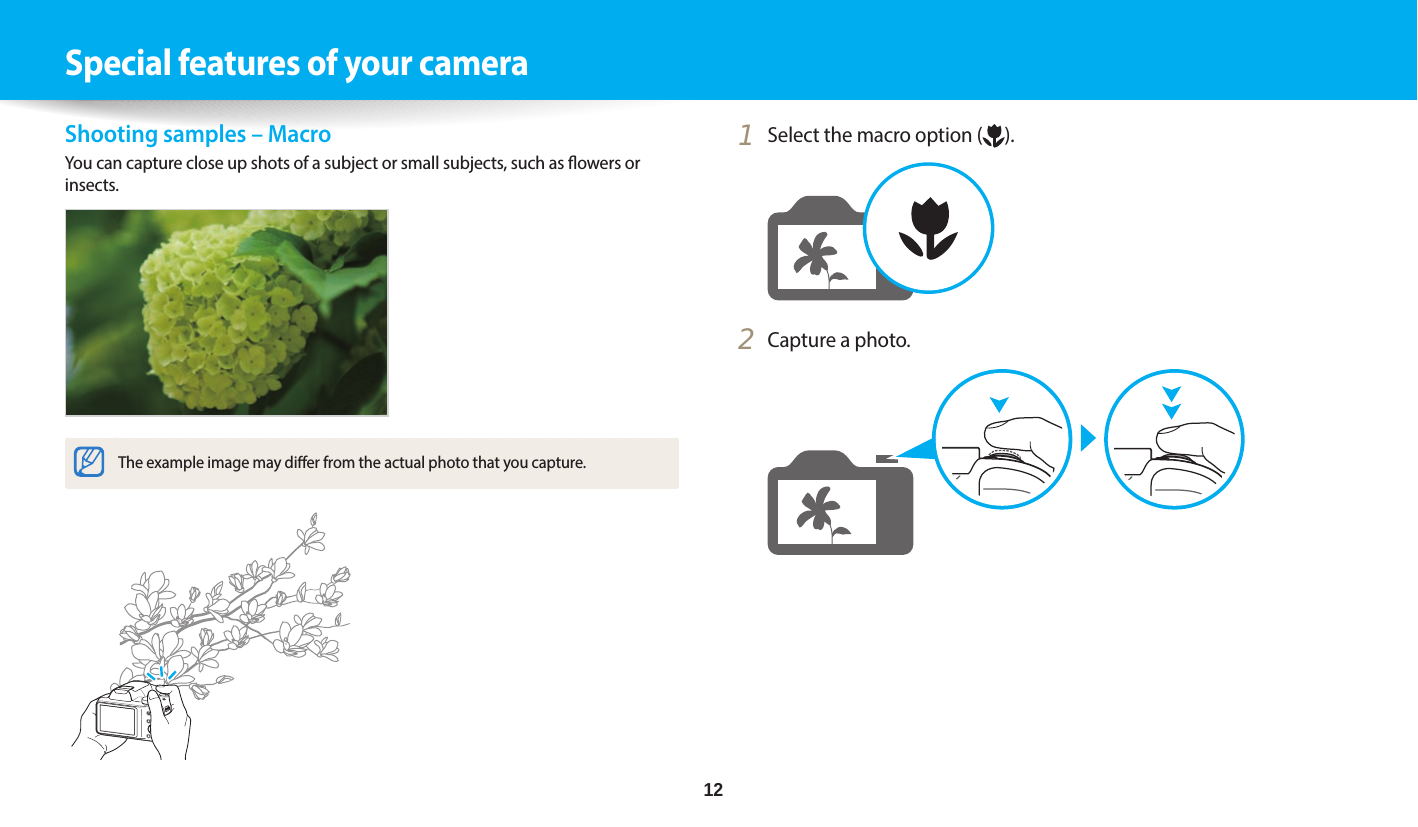
![Shooting options 60Changing the camera’s focus Learn how to adjust the camera’s focus to suit the subject and the shooting conditions.Changing the focus optionYou can get clearer photos by selecting an appropriate focus option according to the distance between the camera and subjects.1 In Shooting mode, press [c]. Exit SetFocus : Normal (AF) Using macroUse macro to capture close-up photos of subjects, such as owers or insects. (Refer to "Changing the focus option".)•Try to hold the camera rmly to prevent blurry photos.•Turn o the ash if the distance to the subject is less than 40 cm.](https://usermanual.wiki/Samsung-Electronics-Co/WB1100F/User-Guide-2165773-Page-61.png)
![Changing the camera’s focus Shooting options 61Adjusting the focus areaYou can get clearer photos by selecting an appropriate focus area according to your subject's location in the scene.1 In Shooting mode, press [m].2 Select Focus Area.3 Select an option.Icon DescriptionCenter AF: Focus on the center of the frame (suitable when subjects are located at or near the center).Multi AF: Focus on one or more of 9 possible areas.Selection AF: Focus on the area that you select. (p. 62)Tracking AF: Focus on and track the subject. (p. 62)Available shooting options may dier depending on the shooting conditions. 2 Select an option.Icon DescriptionNormal (AF): Focus on a subject farther than 31 in. (80 cm) away. Farther than 59 in. (150 cm) away when you use the zoom.Macro: Focus on a subject that is 4-31 in. (10-80 cm) from the camera. 59-138 in. (150-350 cm) when you use the zoom.Auto Macro: •Focus on a subject farther than 0.4 in. (1 cm) away. Farther than 59 in. (150 cm) away when you use the zoom. •It is set automatically in some shooting modes.Super Macro: Focus on a subject that is 0.4 in. (1 cm) from the camera.Available options may dier depending on the shooting conditions.In some modes, you can also set the focus option by pressing [m], and then selecting Focus.](https://usermanual.wiki/Samsung-Electronics-Co/WB1100F/User-Guide-2165773-Page-62.png)
![Changing the camera’s focus Shooting options 62Using tracking auto focusTracking AF allows you to track and auto focus on your subject, even when you are moving.1 In Shooting mode, press [m].2 Select Focus Area → Tracking AF.3 Focus on the subject you want to track, and then press [o].•A focus frame appears on the subject and follows the subject as you move the camera.•The white frame means that your camera is tracking the subject.•When you half-press [Shutter], the green frame means that your subject is in focus.•The red frame means that your camera failed to focus.4 Press [Shutter] to capture the photo.Focusing on a selected areaYou can focus on an area that you have selected.1 In Shooting mode, press [m].2 Select Focus Area → Selection AF.3 Press [o], and then press [D/c/F/t] to move the frame to a desired area.Move Set4 Press [o].5 Press [Shutter] to capture the photo.•Press [o] to change the focus area.If you use this function, you cannot set Face Detection options, Timer options, and Intelli zoom.](https://usermanual.wiki/Samsung-Electronics-Co/WB1100F/User-Guide-2165773-Page-63.png)
![Shooting options 64Detecting facesYour camera automatically detects up to 10 human faces in one scene.1 In Shooting mode, press [m].2 Select Face Detection → Normal.The face nearest the camera or nearest the center of the scene appears in a white focus frame and the rest of the faces appear in gray focus frames.The closer you are to the subjects, the quicker your camera will detect faces.Capturing a self portrait shotCapture photos of yourself. The camera sets the focus distance to close-up, and then emits a beep when ready. 1 In Shooting mode, press [m].2 Select Face Detection → Self-Portrait.3 Compose your shot with the lens facing you.4 When you hear a quick beep, press [Shutter].When faces are located in the center, the camera beeps rapidly.If you turn Volume o in the sound settings, the camera will not emit a beep. (p. 111)Using Face DetectionIf you use Face Detection options, your camera can automatically detect a human face. When you focus on a human face, the camera adjusts the exposure automatically. Use Blink Detection to detect closed eyes or Smile Shot to capture a smiling face.](https://usermanual.wiki/Samsung-Electronics-Co/WB1100F/User-Guide-2165773-Page-65.png)
![Using Face DetectionShooting options 65Capturing a smile shotThe camera automatically releases the shutter when it detects a smiling face.1 In Shooting mode, press [m].2 Select Face Detection → Smile Shot.3 Compose your shot.•The camera automatically releases the shutter when it detects a smiling face.When your subject smiles broadly, your camera can detect the smile more easily.Detecting eye blinkingIf your camera detects closed eyes, it will automatically capture 2 photos in succession.1 In Shooting mode, press [m].2 Select Face Detection → Blink Detection.](https://usermanual.wiki/Samsung-Electronics-Co/WB1100F/User-Guide-2165773-Page-66.png)
![Shooting options 673 Press [F/t] to adjust the exposure.•The photo will be brighter as the exposure value increases. Back SetEV : +14 Press [o] to save your settings.•Once you adjust the exposure, the setting will be stored automatically. You may need to change the exposure value later to avoid overexposure or underexposure.•If you cannot decide on an appropriate exposure, select the AEB (Auto Exposure Bracket) option. The camera will capture 3 consecutive photos, each with a dierent exposure: normal, underexposed, and overexposed. (p. 71)Adjusting the exposure manually (EV)Depending on the intensity of the ambient light, your photos may be too bright or dark. In these cases, you can adjust the exposure to get a better photo. Darker (-) Neutral (0) Brighter (+)1 In Shooting mode, press [m].2 Select EV. Adjusting brightness and colorLearn how to adjust the brightness and color for better image quality.](https://usermanual.wiki/Samsung-Electronics-Co/WB1100F/User-Guide-2165773-Page-68.png)
![Adjusting brightness and colorShooting options 68Changing the metering optionThe metering mode refers to the way in which a camera measures the quantity of light. The brightness and lighting of your photos will vary depending on the metering mode you select.1 In Shooting mode, press [m].2 Select Metering.3 Select an option.Icon DescriptionMulti:•Your camera divides the frame into several areas, and then measures the light intensity of each area.•Suitable for general photos.Spot:•Your camera measures only the light intensity at the very center of the frame.•If a subject is not in the center of the frame, your photo may be improperly exposed.•Suitable for a subject with backlighting.Center-weighted:•Your camera averages the meter reading of the entire frame with emphasis placed on the center.•Suitable for photos with subjects in the center of the frame. Compensating for backlighting (ACB)When the light source is behind your subject or there is high contrast between your subject and the background, your subject is likely to appear dark in the photo. In this case, set the Auto Contrast Balance (ACB) option.▲ Without ACB ▲ With ACB1 In Shooting mode, press [m].2 Select ACB. 3 Select an option.Icon DescriptionO: ACB (Auto Contrast Balance) is deactivated.On: ACB (Auto Contrast Balance) is activated.•The ACB feature is always on in mode.•The ACB feature is not available when you set burst options.](https://usermanual.wiki/Samsung-Electronics-Co/WB1100F/User-Guide-2165773-Page-69.png)
![Adjusting brightness and colorShooting options 691 In Shooting mode, press [m].2 Select White Balance.3 Select an option.Icon DescriptionAuto WB: Automatically set the White Balance based on the lighting conditions.Daylight: For outdoor photos on a sunny day.Cloudy: For outdoor photos on a cloudy day or in shadows.Fluorescent_H: For shooting under a daylight uorescent or 3-way uorescent light.Fluorescent_L: For shooting under white uorescent light.Tungsten: For shooting indoor photos under incandescent bulbs or halogen lamps.Custom Set: To use White Balance settings that you dene. (p. 70)Color Temp.: To adjust the color temperature of the light source. (p. 70)Selecting a White Balance settingThe color of your photo depends on the type and quality of the light source. If you want the color of your photo to be realistic, select a White Balance setting that is appropriate for the lighting conditions, such as Auto WB, Daylight, Cloudy, or Tungsten. Auto WB Daylight Cloudy Tungsten](https://usermanual.wiki/Samsung-Electronics-Co/WB1100F/User-Guide-2165773-Page-70.png)
![Adjusting brightness and colorShooting options 70Adjusting color temperature1 In Shooting mode, press [m].2 Select White Balance → Color Temp..3 Press [F/t] to adjust the color temperature to match your light source.•You can get a warmer photo with a higher value, and a cooler photo with a lower value. Back SetColor Temp. : 6500K4 Press [o] to save your settings.Dening your own White BalanceYou can customize the White Balance by capturing a photo of a white surface, such as a piece of paper, under the lighting conditions in which you intend to capture a photo. The White Balance feature will help you to match the colors in your photo with the actual scene.1 In Shooting mode, press [m].2 Select White Balance → Custom Set.3 Aim the lens at a piece of white paper, and then press [Shutter].](https://usermanual.wiki/Samsung-Electronics-Co/WB1100F/User-Guide-2165773-Page-71.png)
![Shooting options 711 In Shooting mode, press [m].2 Select Drive.3 Select an option.Icon Description Single: Capture a single photo. Continuous:•While you are pressing [Shutter], the camera continuously captures photos.•The maximum number of photos depends on the capacity of your memory card.Icon Description Motion Capture: While you are pressing [Shutter], the camera captures photos (5 photos per second; maximum of 30 photos).AEB:•Capture 3 consecutive photos, each with a dierent exposure: normal, underexposed, and overexposed.•Use a tripod to prevent blurry photos. •You can use the ash, timer, OIS, and ACB only when you select Single.•When you select Motion Capture, your camera will set the resolution to and set the ISO sensitivity to Auto. •Depending on the Face Detection option you selected, some Burst options may not be available.Using burst modes (continuous, motion capture, AEB)It can be dicult to capture photos of fast-moving subjects or capture natural facial expressions and gestures of your subjects in photos. Also, it can be dicult to adjust the exposure correctly and select a proper light source. In these cases, select one of the burst modes.](https://usermanual.wiki/Samsung-Electronics-Co/WB1100F/User-Guide-2165773-Page-72.png)
![Shooting options 721 In Shooting mode, press [m].2 Select Image Adjust.3 Select an option.•Sharpness•Contrast•Saturation Image AdjustSharpnessContrastSaturationBack Set4 Press [F/t] to adjust each value.Sharpness Description-Soften the edges on your photos (suitable for editing the photos on your computer).+Sharpen the edges to improve the clarity of your photos. This may also increase the noise in your photos.Contrast Description-Decrease the color and brightness.+Increase the color and brightness.Saturation Description-Decrease the saturation.+Increase the saturation.5 Press [o] to save your settings.Select 0 if you do not want to apply any eects (suitable for printing).Adjusting imagesAdjust the sharpness, contrast, or saturation of your photos.](https://usermanual.wiki/Samsung-Electronics-Co/WB1100F/User-Guide-2165773-Page-73.png)
![Shooting options 731 In Shooting mode, press [m].2 Select Voice.3 Select an option.Icon DescriptionZoom Mute: The camera stops recording sound temporarily when you use the zoom.O: Record a video without sound.On: Record a video with sound.•Do not block the microphone when you use the Voice function.•Recordings made with Voice may dier from actual sounds.Reducing the sound of the zoomWhen you use the zoom while recording videos, the camera can record the sound of the zoom. Use the Zoom Mute function not to record zoom noise.](https://usermanual.wiki/Samsung-Electronics-Co/WB1100F/User-Guide-2165773-Page-74.png)
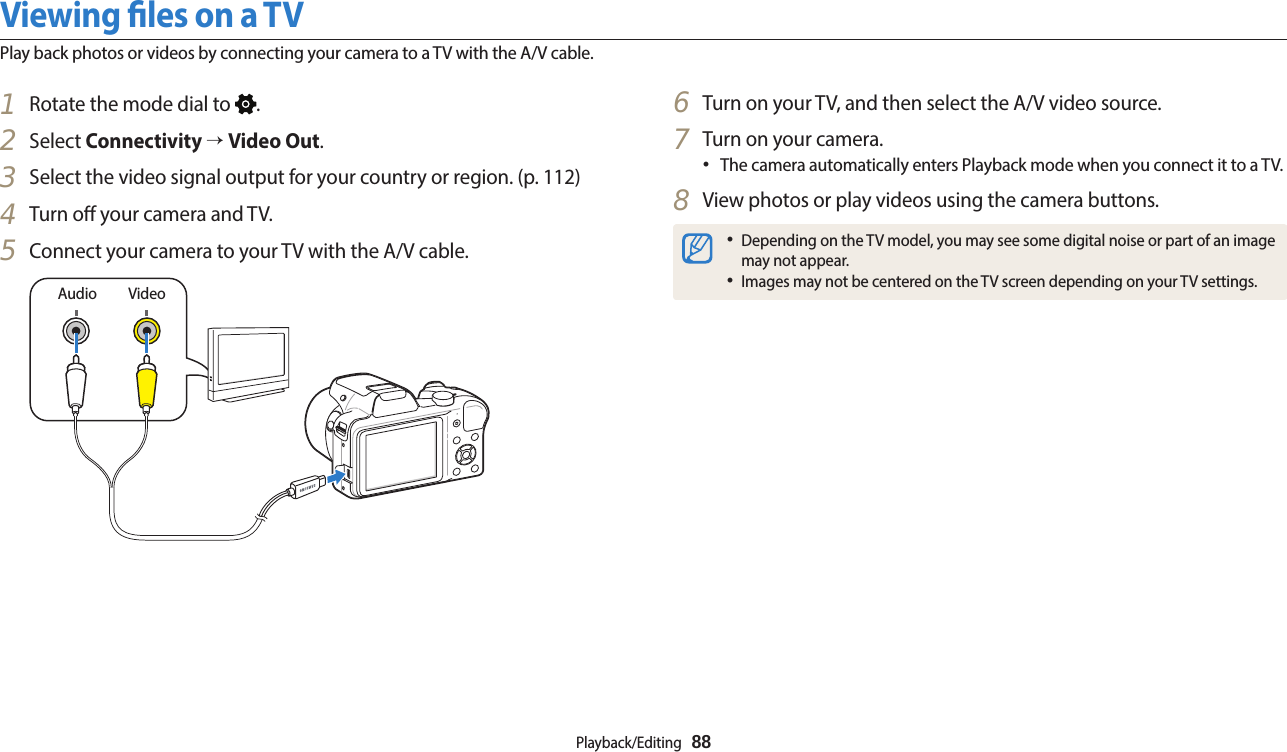
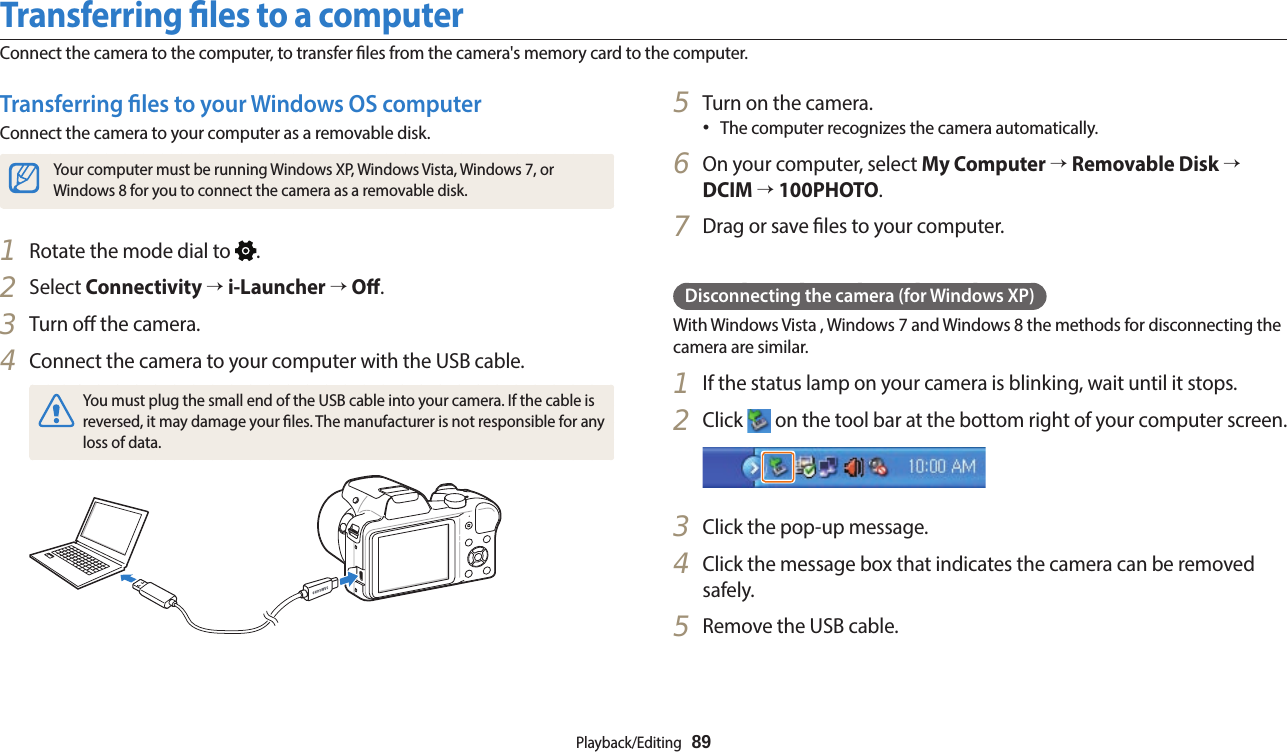
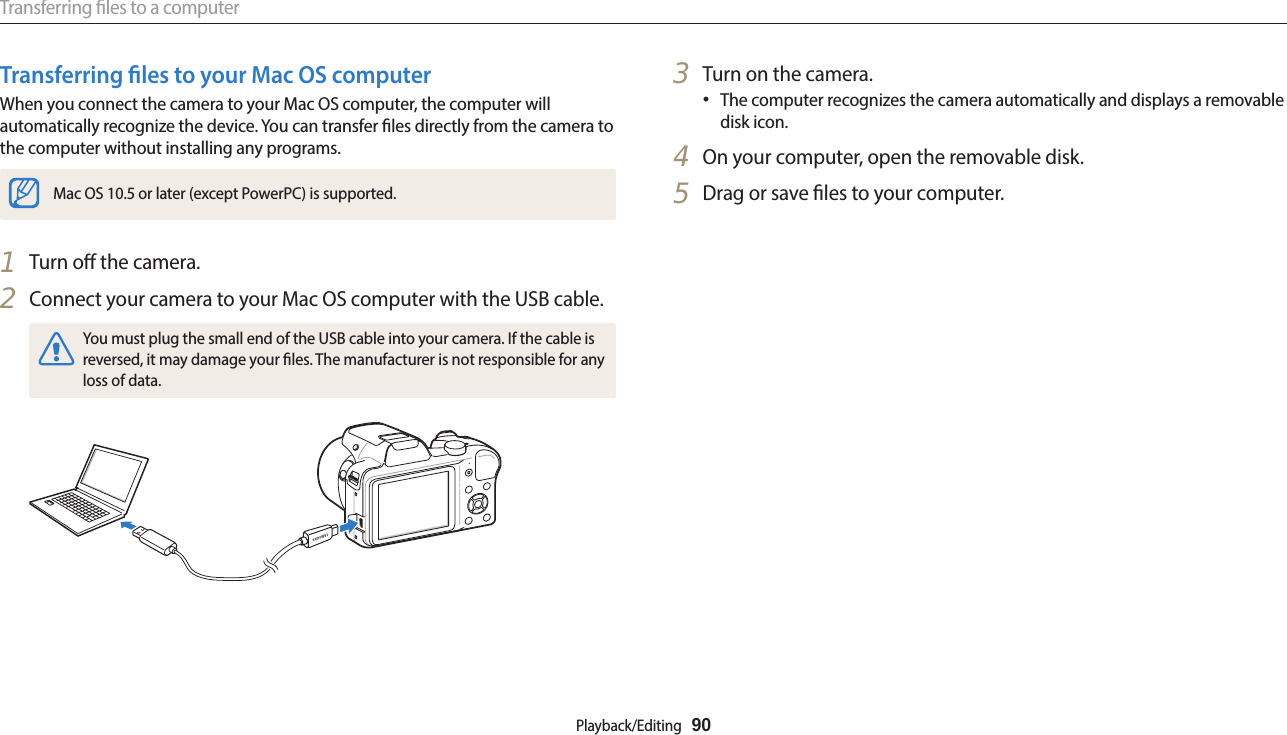
![Playback/Editing 75Viewing photos or videos in Playback modeLearn how to play back photos or videos and how to manage les.Photo le informationFile InformationHistogramMemory in useAlbum/Zoom InIcon DescriptionCurrent le/Total lesFolder name–File nameProtected leTo display le information on the screen, press [D].Starting Playback modeView photos or play videos stored in your camera.1 Press [P].•The most recent le will be displayed.•If the camera is o, it will turn on and display the most recent le.2 Press [F/t] to scroll through les.•Press and hold [F/t] to scroll through les quickly.•If you want to view les stored in the internal memory, remove your memory card.•You may not be able to edit or play back les that were captured with other cameras, due to unsupported sizes (image size, etc) or codecs. Use a computer or another device to edit or play back these les.•Photos or videos captured in portrait orientation do not rotate automatically and are displayed in landscape orientation by the camera and other devices.](https://usermanual.wiki/Samsung-Electronics-Co/WB1100F/User-Guide-2165773-Page-76.png)
![Viewing photos or videos in Playback modePlayback/Editing 76Video le informationPlay CaptureFile InformationAlbumIcon DescriptionCurrent le/Total lesFolder name-File nameCurrent playback timeVideo lengthProtected leTo display le information on the screen, press [D].Viewing les as thumbnailsScan thumbnails of les.In Playback mode, rotate [Zoom] to the left to view thumbnails (12 at a time). Rotate [Zoom] to the left once more to display more thumbnails (24 at a time). Rotate [Zoom] to the right to return to the previous view.MenuMove to the desired le, and then press [o] to display it in full screen view.Press [D/c/F/t] to scroll through les.](https://usermanual.wiki/Samsung-Electronics-Co/WB1100F/User-Guide-2165773-Page-77.png)
![Viewing photos or videos in Playback modePlayback/Editing 77Viewing les by category View les by category, such as date or le type.1 In Playback mode, rotate [Zoom] to the left.2 Press [m].3 Select Filter → a category.AllDate File TypeBack SetFilterIcon DescriptionAll: View les normally.Date : View les by the date they were saved.File Type: View les by the le type.4 Scroll to a desired list, and then press [o] to open the list.5 Scroll to a desired le, and then press [o] to view the le.6 Rotate [Zoom] to the left to return to the previous view, and then press [r].•If you change the category, it may take some time for the camera to reorganize les depending on the number of les.•If you delete a category classied by Date or File Type, all les in the category will be deleted.](https://usermanual.wiki/Samsung-Electronics-Co/WB1100F/User-Guide-2165773-Page-78.png)
![Viewing photos or videos in Playback modePlayback/Editing 78Protecting lesProtect a le from accidental deletion.1 In Playback mode, select a le to protect.2 Press [m], and then select Protect → On .3 Repeat steps 1 and 2 to protect additional les.You cannot delete, resize, or rotate a protected le.Deleting lesSelect les to delete in Playback mode.Deleting a single leYou can select one le, and then delete it.1 In Playback mode, select a le, and then press [f].2 When the pop-up message appears, select Yes .You can also delete les in Playback mode by pressing [m], and then selecting Delete → Delete → Yes.Deleting multiple lesYou can select multiple les, and then delete them at once.1 In Playback mode, press [f].•When in thumbnails view, press [m], select Delete → Select, and then skip to step 3, or press [f], select Select, and then skip to step 3.2 When the pop-up message appears, select Multiple Delete.3 Scroll to each le you want to delete, and then press [o].•Press [o] again to cancel your selection.4 Press [f].5 When the pop-up message appears, select Yes .](https://usermanual.wiki/Samsung-Electronics-Co/WB1100F/User-Guide-2165773-Page-79.png)
![Viewing photos or videos in Playback modePlayback/Editing 79Deleting all lesYou can select all les, and then delete them at once.1 In Playback mode, press [m].•When in thumbnails view, press [m], select Delete → Delete All, and then skip to step 3, or press [f], select Delete All, and then skip to step 3.2 Select Delete → Delete All.3 When the pop-up message appears, select Yes .•All unprotected les are deleted.Copying les to a memory cardCopy les from the internal memory to a memory card.1 In Playback mode, press [m].2 Select Copy to Card.Viewing photosEnlarge part of a photo or view photos as a slide show.Enlarging a photoIn Playback mode, rotate [Zoom] to the right to enlarge a portion of the photo. Rotate [Zoom] to the left to zoom out.Enlarged areaBack Crop](https://usermanual.wiki/Samsung-Electronics-Co/WB1100F/User-Guide-2165773-Page-80.png)
![Viewing photos or videos in Playback modePlayback/Editing 80To DescriptionMove the enlarged area Press [D/c/F/t].Trim the enlarged photoPress [o], and then select Ye s . (The trimmed photo will be saved as a new le. The original photo is retained in its original form.)When you view photos that were captured by another camera, the zoom ratio may dier.Viewing panoramic photosView photos captured in Panorama mode.1 In Playback mode, press [F/t] to scroll to a desired panoramic photo.•The entire panoramic photo appears on the screen.2 Press [o].•The camera automatically scrolls through the photo from left to right for a horizontal panoramic photo and from top to bottom for a vertical panoramic photo. The camera then switches to Playback mode.•While playing back a panoramic photo, press [o] to pause or resume from pausing.•After you have paused the playback of a panoramic photo, press [D/c/F/t] to move the photo horizontally or vertically, depending on the direction you moved when capturing the photo.3 Press [r] to return to Playback mode.The camera automatically scrolls through the panoramic photo only if the longest side of the photo is two or more times longer than the shortest side.](https://usermanual.wiki/Samsung-Electronics-Co/WB1100F/User-Guide-2165773-Page-81.png)
![Viewing photos or videos in Playback modePlayback/Editing 81Playing a slide showApply eects and audio to a slide show of your photos. The slide show function does not work for videos.1 In Playback mode, press [m].2 Select Slide Show Options.•Skip to step 5 to start a slide show with no eects.3 Select a slide show eect option.* DefaultOption DescriptionPlay Mode Set whether or not to repeat the slide show. (One Play*, Repeat)Interval•Set the interval between photos. (1 sec*, 3 sec, 5 sec, 10 sec)•You must set the Eect option to O to set the interval.Music Set background audio.Eect•Set a scene change eect between photos. (O, Calm*, Relax, Lively, Sweet, Shine)•Select O to cancel eects.•When you use the Eect option, the interval between photos will be set to 1 second.4 Press [m] or [r].5 Select Start Slide Show.6 View the slide show.•Press [o] to pause the slide show.•Press [o] again to resume the slide show.•Press [r] to stop the slide show and return to Playback mode.•Rotate [Zoom] to the left or right to adjust the volume level.](https://usermanual.wiki/Samsung-Electronics-Co/WB1100F/User-Guide-2165773-Page-82.png)
![Viewing photos or videos in Playback modePlayback/Editing 82Playing a videoIn Playback mode, you can view a video, and then capture or trim parts of the playing video. You can save the captured or trimmed segments as new les.1 In Playback mode, select a video, and then press [o].2 View the video.Stop PauseCurrent playback time/Video lengthTo DescriptionScan backwardPress [F]. Each time you press [F], you change the scan speed in this order: 2X, 4X, 8X.Pause or resume playback Press [o].Scan forwardPress [t]. Each time you press [t], you change the scan speed in this order: 2X, 4X, 8X. Adjust the volume level Rotate [Zoom] to the left or right.You can scan backwards or forwards or pause the video after at least 2 seconds have elapsed from the starting point.](https://usermanual.wiki/Samsung-Electronics-Co/WB1100F/User-Guide-2165773-Page-83.png)
![Playback/Editing 83Editing a photoLearn how to edit photos.•The camera will save edited photos as new les.•When you edit photos, the camera will automatically convert them to a lower resolution. Photos that you rotate or resize manually are not automatically converted to a lower resolution.Rotating a photo1 Rotate the mode dial to .2 Select .3 Rotate [Zoom] to the left, and then select a photo.4 Select Rotate → an option.Cancel SaveRotate : Right 90˚5 Press [c] to save.•The camera will overwrite the original le.•In Playback mode, press [m], and then select Rotate to rotate a photo.Resizing photosChange the size of a photo and save it as a new le.1 In Playback mode, select a photo, and then press [m].2 Select Resize.3 Select an option. Back Set2592 X 19441984 X 14881024 X 768ResizeAvailable resize options dier depending on the original size of the photo.](https://usermanual.wiki/Samsung-Electronics-Co/WB1100F/User-Guide-2165773-Page-84.png)
![Editing a photoPlayback/Editing 84Applying Smart Filter eectsApply special eects to your photos.1 Rotate the mode dial to .2 Select .3 Rotate [Zoom] to the left, and then select a photo.4 Select Smart Filter → an option.Cancel SetSmart Filter : MiniatureOption DescriptionNormal No eectMiniatureApply a tilt-shift eect to make the subject appear in miniature. (The top and bottom of the photo will be blurred.)Vignetting Apply the retro-looking colors, high contrast, and strong vignette eect of Lomo cameras.Fish-eye Distort close objects to imitate the visual eect of a sheye lens.Classic Apply a black and white eect.Retro Apply a sepia tone eect.Cross Filter Add lines that radiate outward from bright objects to imitate the visual eect of a cross lter.5 Press [c] to save.](https://usermanual.wiki/Samsung-Electronics-Co/WB1100F/User-Guide-2165773-Page-85.png)
![Editing a photoPlayback/Editing 85Adjusting your photosLearn how to adjust the brightness, contrast, or saturation or how to correct the red-eye eect. If the center of a photo is dark, you can adjust it to be brighter. The camera will save an edited photo as a new le, but may convert it to a lower resolution. •You can adjust brightness, contrast, and saturation and apply Smart Filter eects at the same time.•You cannot apply the ACB, Face Retouch, and Red-eye Fix eects at the same time.Adjusting brightness, contrast, or saturation1 Rotate the mode dial to .2 Select .3 Rotate [Zoom] to the left, and then select a photo.4 Select an adjusting option.Icon DescriptionBrightnessContrastSaturation5 Press [F/t] to adjust the option.6 Press [o].7 Press [c] to save.Adjusting dark subjects (ACB)1 Rotate the mode dial to .2 Select .3 Rotate [Zoom] to the left, and then select a photo.4 Select ACB.5 Press [c] to save.](https://usermanual.wiki/Samsung-Electronics-Co/WB1100F/User-Guide-2165773-Page-86.png)
![Editing a photoPlayback/Editing 86Retouching faces1 Rotate the mode dial to .2 Select .3 Rotate [Zoom] to the left, and then select a photo.4 Select Face Retouch.5 Press [F/t] to adjust the option.•As the number increases, the skin tone becomes brighter and smoother.6 Press [c] to save.Removing red-eye1 Rotate the mode dial to .2 Select .3 Rotate [Zoom] to the left, and then select a photo.4 Select Red-eye Fix.5 Press [c] to save.](https://usermanual.wiki/Samsung-Electronics-Co/WB1100F/User-Guide-2165773-Page-87.png)
![Playback/Editing 87Editing a videoWhile playing back a video, you can trim the video or capture an image from the video. Capturing an image from video1 While viewing a video, press [o] at the point where you want to capture an image.2 Press [c].•The resolution of the captured image will be the same as the original video.•The captured image is saved as a new le.Trimming a video1 In Playback mode, select a video, and then press [m].2 Select Trim Movie.3 Press [o] to start playing the video.4 Press [o] → [c] at the point where you want the trimming to begin.5 Press [o] to resume playing the video.6 Press [o] → [c] at the point where you want the trimming to end.7 Press [c] to trim.8 When the pop-up message appears, select Yes .•The original video should be at least 10 seconds long.•The camera will save the edited video as a new le and leave the original video intact.](https://usermanual.wiki/Samsung-Electronics-Co/WB1100F/User-Guide-2165773-Page-88.png)

![Wireless network 93Connecting to a WLAN and conguring network settingsLearn to connect via an access point (AP) when you are in a range of a WLAN. You can also congure network settings. Icon DescriptionAd hoc APSecured APWPS APSignal strengthPress [t] to open network setting options.•When you select a secured AP, a pop-up window appears. Enter the required passwords to connect to the WLAN. For information about entering text, refer to "Entering text". (p. 96)•When a login page appears, refer to "Using the login browser". (p. 94)•When you select an unsecured AP, the camera will connect to the WLAN.•If you select a WPS prole supported AP, select → WPS PIN connection, and then enter a PIN on the AP device. You can also connect to a WPS prole supported AP by selecting → WPS button connection on the camera, and then pushing the WPS button on the AP device. •If a pop-up message about data collection regulations appears, read and agree to it. Connecting to a WLAN1 Rotate the mode dial to .2 Select , , or .3 Follow the on-screen instructions until the Wi-Fi Setting screen appears. •The camera automatically searches for available AP devices.•In some modes, press [m], and then select Wi-Fi Setting. 4 Select an AP.Wi-Fi SettingRefreshSamsung 1Samsung 2Samsung 3Samsung 4Back Manual•Select Refresh to refresh the list of connectable APs.•Select Add wireless network to add an AP manually. The AP name must be in English to add the AP manually.](https://usermanual.wiki/Samsung-Electronics-Co/WB1100F/User-Guide-2165773-Page-94.png)
![Connecting to a WLAN and conguring network settingsWireless network 94Setting network options1 In the Wi-Fi Setting screen, move to an AP, and then press [t].2 Select each option, and then enter the required information.Option DescriptionNetwork Password Enter the network password.IP Setting Set the IP address automatically or manually.Manually setting the IP address1 In the Wi-Fi Setting screen, move to an AP, and then press [t].2 Select IP Setting → Manual.3 Select each option, and then enter the required information.Option DescriptionIP Enter the static IP address.Subnet Mask Enter the subnet mask.Gateway Enter the gateway.DNS Server Enter the DNS address.Using the login browserYou can enter your login information via the login browser when connecting to some APs, sharing sites, or cloud servers.Button Description[D/c/F/t]Move to an item or scroll the page.[o] Select an item.[m]Access the following options:•Previous Page: Move to the previous page.•Next Page: Move to the next page.•Reload: Reload the page.•Stop: Stop loading the page.•Exit: Close the login browser.[f] Close the login browser.•You may not be able to select some items depending on the page you connected to. This does not indicate a malfunction.•The login browser may not close automatically after you log into some pages. If this occurs, close the login browser by pressing [f], and then proceed with the desired operation.•It may take longer to load the login page due to the page size or network speed. If this occurs, wait until the login information input window appears.](https://usermanual.wiki/Samsung-Electronics-Co/WB1100F/User-Guide-2165773-Page-95.png)
![Connecting to a WLAN and conguring network settingsWireless network 96Entering textLearn how to enter text. The icons in the table below let you move the cursor, change the case, etc. Press [D/c/F/t] to move to a desired key, and then press [o] to enter the key.Cancel BackspaceDoneIcon DescriptionDelete the last letter.Move the cursor.In ABC mode, change the case.Enter ".com".Switch between Symbol mode and ABC mode.Enter a space.Done Save the displayed text.View the entering text guide.•You can use only the English alphabets in some modes, regardless of the display language.•To move to Done directly, press [P].•You can enter up to 64 characters.•The screen may dier depending on the input mode.](https://usermanual.wiki/Samsung-Electronics-Co/WB1100F/User-Guide-2165773-Page-97.png)
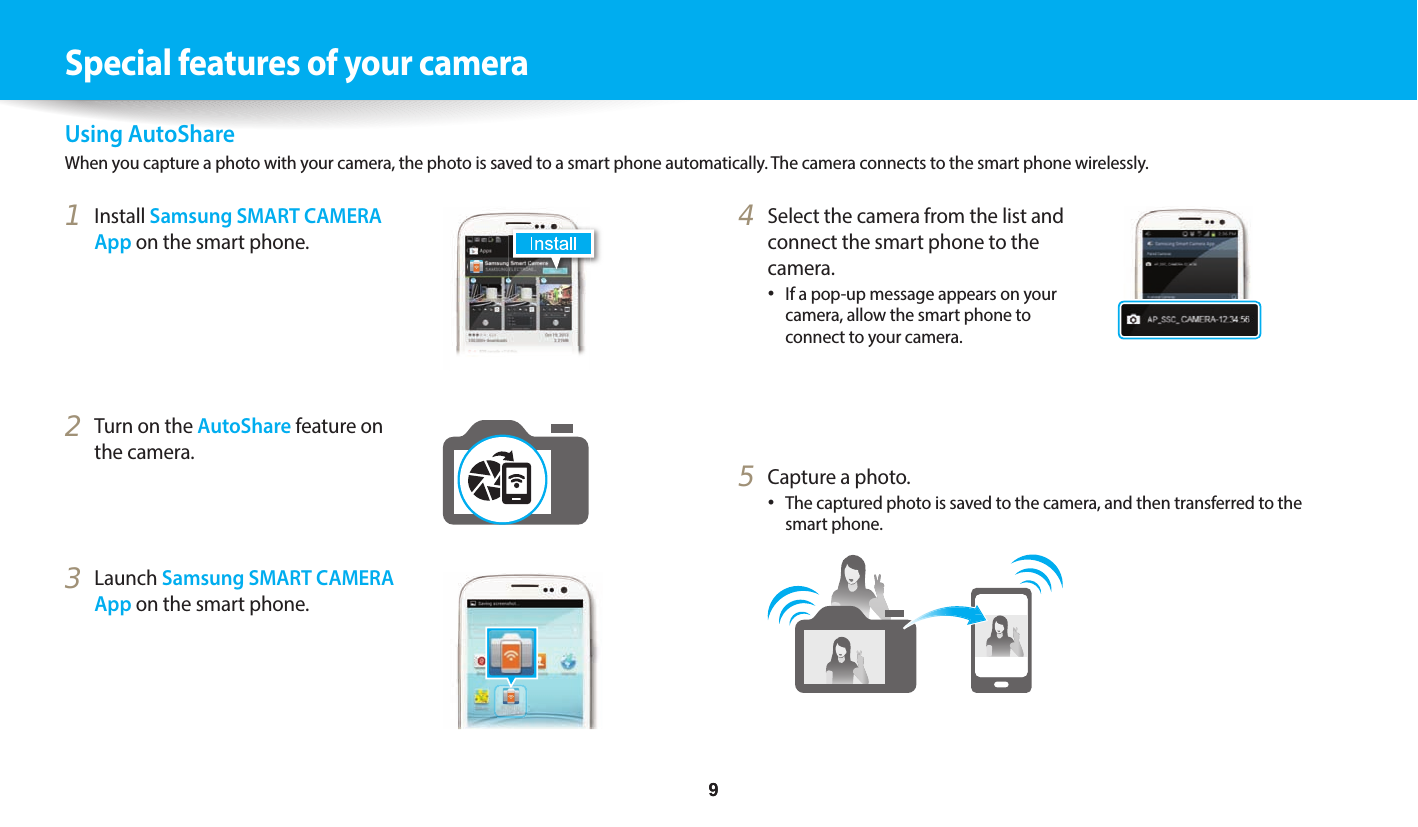
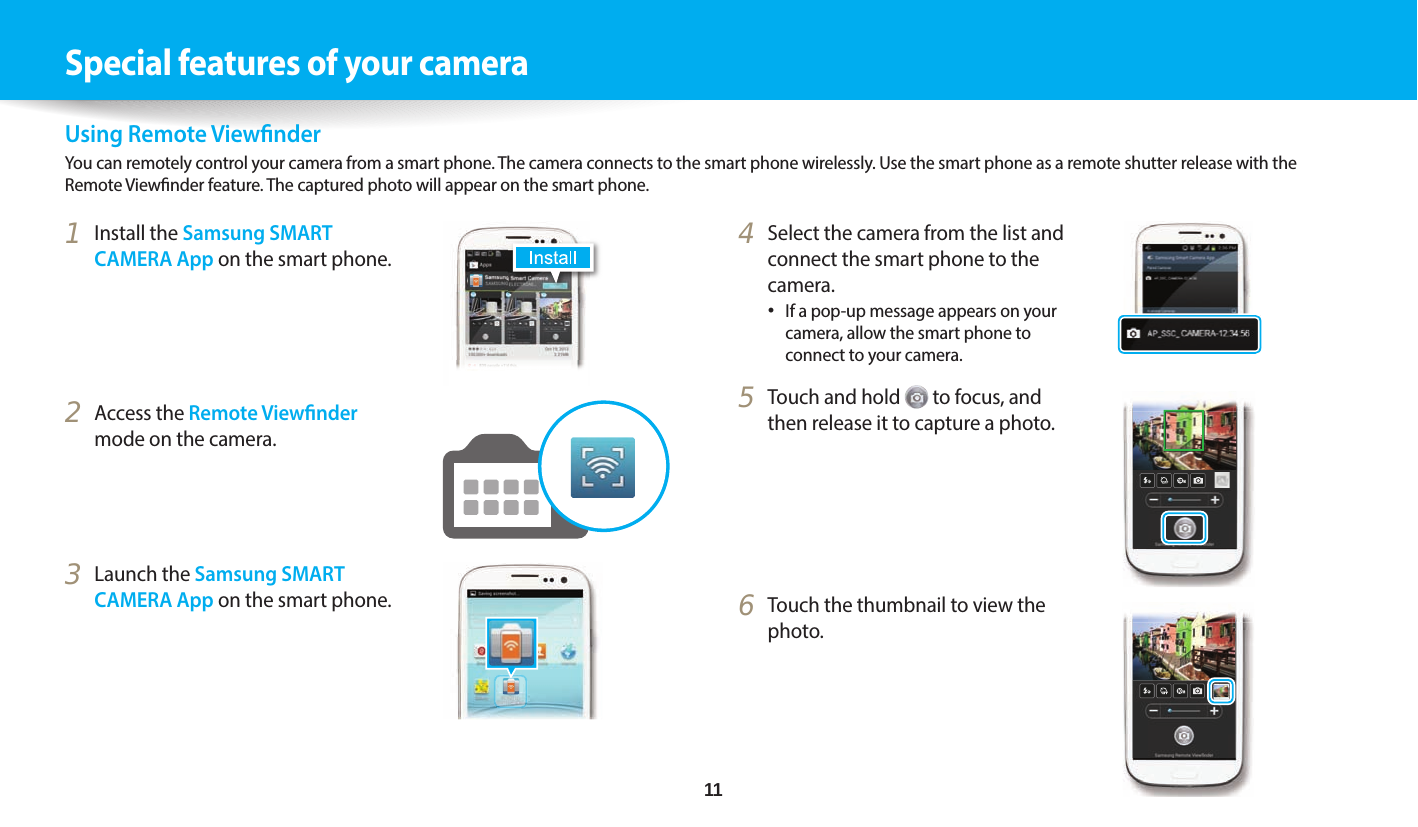
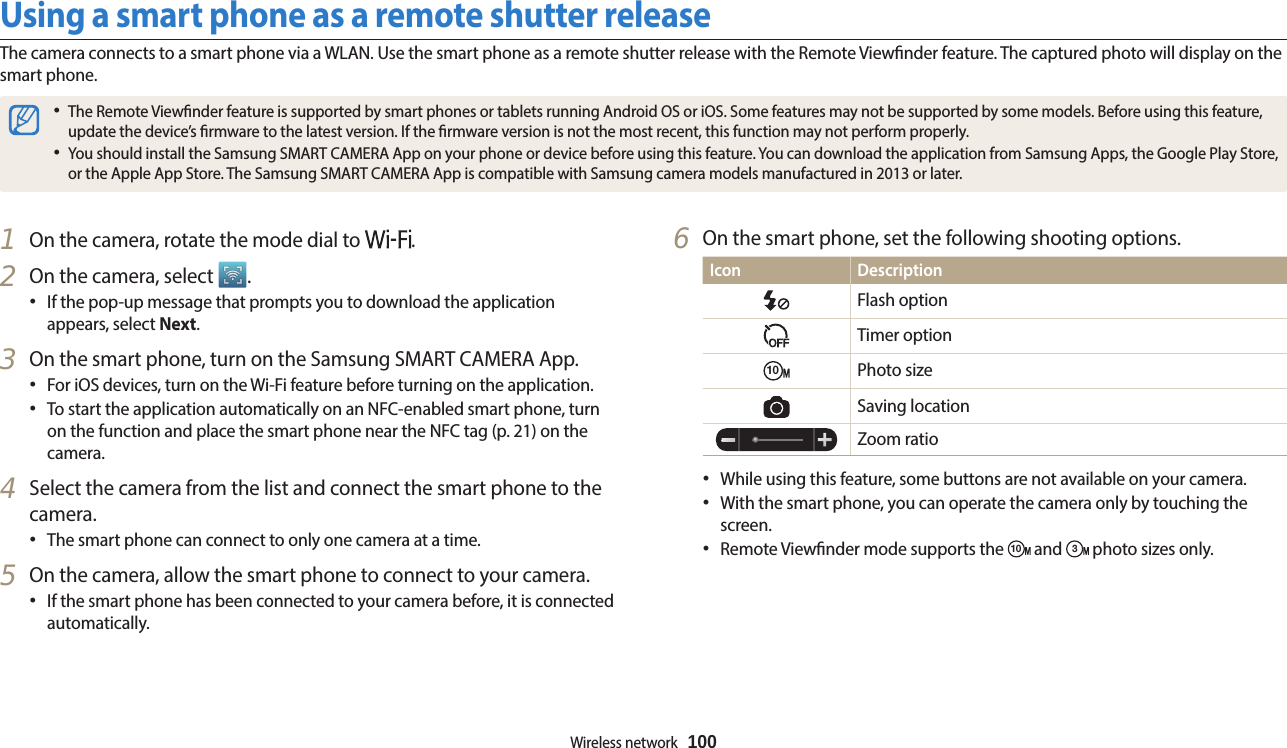
![Wireless network 98Saving les to a smart phone automaticallyThe camera connects to a smart phone that supports the AutoShare feature via a WLAN. When you capture a photo with your camera, the photo is saved to the smart phone automatically.•The AutoShare feature is supported by smart phones or tablets running Android OS or iOS. Some features may not be supported by some models. Before using this feature, update the device’s rmware to the latest version. If the rmware version is not the most recent, this function may not perform properly. •You should install the Samsung SMART CAMERA App on your phone or device before using this feature. You can download the application from Samsung Apps, the Google Play Store, or the Apple App Store. The Samsung SMART CAMERA App is compatible with Samsung camera models manufactured in 2013 or later.•This feature is not available with the internal memory in some Shooting modes. •If you set this function, the setting is maintained even when you change the Shooting mode. •This feature may not be supported in some modes. 5 On the camera, allow the smart phone to connect to your camera.•If the smart phone has been connected to your camera before, it is connected automatically.•An icon that shows the connection status ( ) will appear on the camera’s screen.6 On the camera, capture a photo.•The captured photo is saved to the camera, and then transferred to the smart phone. •If you recorded a video, it is saved only to the camera.1 On the camera, in Shooting mode, press [m].2 On the camera, select AutoShare → On.•If the pop-up message that prompts you to download the application appears, select Next.3 On the smart phone, turn on the Samsung SMART CAMERA App. •For iOS devices, turn on the Wi-Fi feature before turning on the application. •To start the application automatically on an NFC-enabled smart phone, turn on the function and place the smart phone near the NFC tag (p. 21) on the camera. 4 Select the camera from the list and connect the smart phone to the camera.•The smart phone can connect to only one camera at a time.](https://usermanual.wiki/Samsung-Electronics-Co/WB1100F/User-Guide-2165773-Page-99.png)
![Wireless network 102Changing email settingsIn the email menu, you can change settings for storing your information. You can also set or change the email password. For information about entering text, refer to "Entering text". (p. 96)Storing your information1 Rotate the mode dial to .2 Select .3 Connect to a WLAN. (p. 93) 4 Press [m].5 Select Sender Setting.6 Select the Name box, enter your name, and then select Done.NameEmailBackSave ResetSender Setting7 Select the Email box, enter your email address, and then select Done.8 Select Save to save your changes.•To delete your information, select Reset.Sending photos or videos via emailYou can change settings in the email menu and send photos or videos stored on the camera via email.](https://usermanual.wiki/Samsung-Electronics-Co/WB1100F/User-Guide-2165773-Page-103.png)
![Sending photos or videos via emailWireless network 103Setting an email password1 Rotate the mode dial to .2 Select .3 Connect to a WLAN. (p. 93) 4 Press [m].5 Select Setting Password → On.•To deactivate the password, select O.6 When the pop-up appears, select OK.•The pop-up disappears automatically even if you do not select OK.7 Enter a 4-digit password.8 Enter the password again.9 When the pop-up appears, select OK.If you forget your password, you can reset it by selecting Reset on the password setting screen. When you reset the information the previously saved user’s setting information, email address, and recently sent email list will be deleted.Changing the email password1 Rotate the mode dial to .2 Select .3 Connect to a WLAN. (p. 93)4 Press [m].5 Select Change Password.6 Enter your current 4-digit password.7 Enter a new 4-digit password.8 Enter the new password again.9 When the pop-up appears, select OK.](https://usermanual.wiki/Samsung-Electronics-Co/WB1100F/User-Guide-2165773-Page-104.png)
![Sending photos or videos via emailWireless network 104Sending photos or videos via email You can send photos or videos stored on the camera via email. For information about entering text, refer to "Entering text". (p. 96)1 Rotate the mode dial to .2 Select .3 Connect to a WLAN. (p. 93)4 Select the Sender box, enter your email address, and then select Done.•If you have previously saved your information, it will be inserted automatically. (p. 102)•To use an address from the list of previous senders, select → an address.5 Select the Receiver box, enter an email address, and then select Done.•To use an address from the list of previous recipients, select → an address.•Select to add additional recipients. You can input up to 30 recipients.•Select to delete an address from the list.6 Select Next.7 Scroll to les to send, and then press [o].•You can select up to 20 les. The total size must be 7 MB or less.8 Select Next.9 Select the comment box, enter your comments, and then select Done.10 Select Send.•The camera will send the email.•Even if a photo appears to have transferred successfully, errors with the recipient’s email account may cause the photo to be rejected or recognized as spam.•You may not be able to send an email if no network connection is available or if your email account settings are incorrect.•You cannot send an email if the combined le sizes exceed the 7MB. The maximum photo resolution of photos you can send is 2M. The maximum resolution of videos you can send is . If the selected photo has a resolution higher than 2M, it will be automatically resized to a lower resolution.•If you cannot send an email because of rewall or user authentication settings, contact your network administrator or network service provider.•When there are no les in the camera memory, you cannot use this feature.•You can also send an email in Playback mode by pressing [m], and then selecting Share(Wi-Fi) → Email.](https://usermanual.wiki/Samsung-Electronics-Co/WB1100F/User-Guide-2165773-Page-105.png)
![Using photo or video sharing services Wireless network 106•You can set an upload folder for Facebook by pressing [m], and then selecting Upload Folder (Facebook) on the sharing service's list screen.•You cannot upload les if the le size exceeds the limit. The maximum resolution of photos you can upload is 2M. The maximum resolution of videos you can upload is . If the selected photo has a resolution higher than 2M, it will be automatically resized to a lower resolution. (On some sharing services, the maximum photo resolution may vary.)•The method of uploading photos or videos may dier depending on the selected sharing service.•If you cannot access a sharing service because of rewall or user authentication settings, contact your network administrator or network service provider.•Uploaded photos or videos may be automatically titled with the date they were captured.•The speed of your internet connection may aect how quickly photos upload or web pages open.•When there are no les in the camera memory, you cannot use this feature.•You can also upload photos or videos to le sharing services in Playback mode by pressing [m], and then selecting Share(Wi-Fi) → a sharing service. •You cannot upload videos to some sharing services.](https://usermanual.wiki/Samsung-Electronics-Co/WB1100F/User-Guide-2165773-Page-107.png)
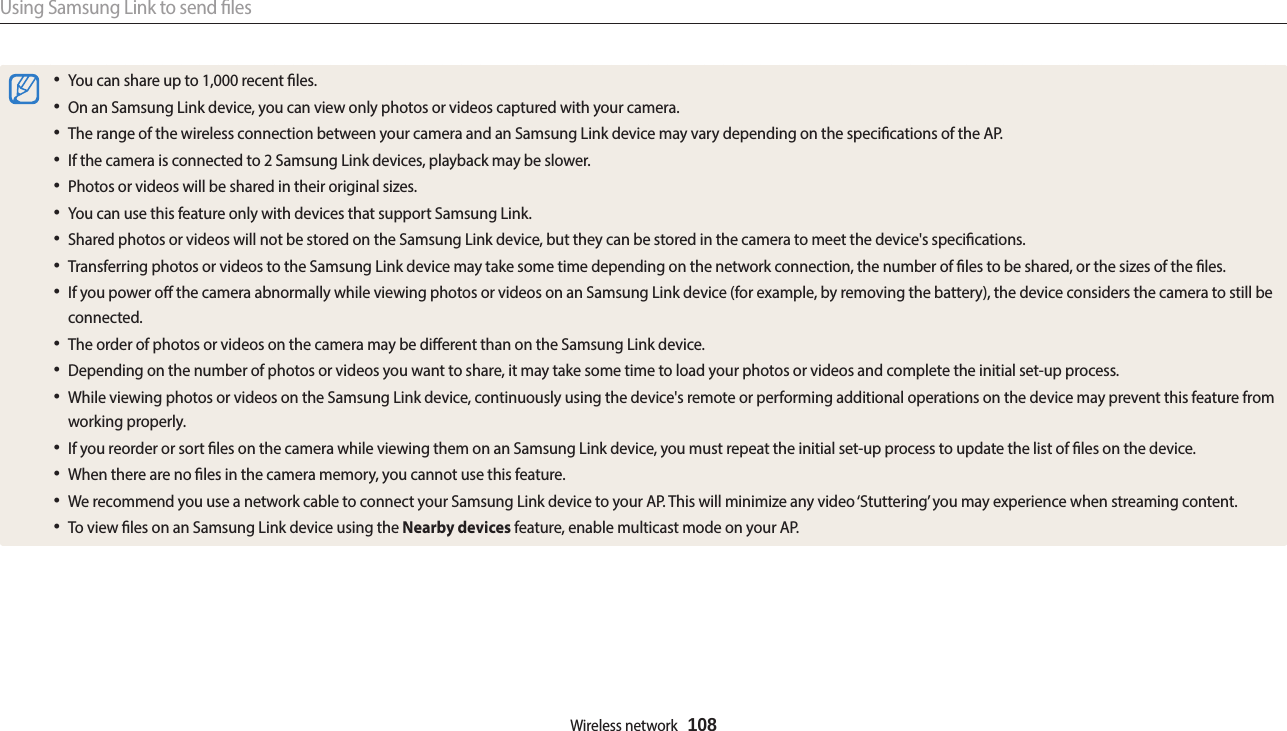
![Wireless network 107Viewing photos or videos on devices that support Samsung Link1 Rotate the mode dial to .2 Select → Nearby devices.•If the guide message appears, select OK.•The camera will automatically attempt to connect to a WLAN via the most recently connected AP device. •If the camera has not previously been connected to a WLAN, it will search for available AP devices. (p. 93)•You can set to allow only selected devices or all devices to connect by pressing [m], and then selecting DLNA Access Control on the screen.•A sharing le list is created. Wait until other devices can nd your camera.3 Connect the Samsung Link device to a network, and then turn on the Samsung Link feature.•Refer to your device's user manual for more information.4 On the camera, allow the Samsung Link device to connect to your camera.5 On the Samsung Link device, select a camera to connect to.6 On the Samsung Link device, browse the shared photos or videos.•For information about searching for the camera and browsing the photos or videos on the Samsung Link device, refer to the device's user manual.•Videos may not play smoothly depending on the type of Samsung Link device or the network condition. If this happens, re-record the video in (640 X 480) or smaller quality and play it again. If videos do not play smoothly on your device over the wireless connection, try connecting the camera to the device with an A/V cable.AP The camera is connected to a TV that supports Samsung Link via WLAN.Using Samsung Link to send lesYou can view les on an Samsung Link device connected to the same AP.](https://usermanual.wiki/Samsung-Electronics-Co/WB1100F/User-Guide-2165773-Page-108.png)
![Settings 1103 Select an item.Back SelectMediumOnSound 1OOnVolumeBeep SoundShutter SoundStart SoundAF SoundSounds4 Select an option.Back SetOLowMediumHighVolume5 Press [r] to return to the previous screen.Accessing the settings menu1 Rotate the mode dial to .2 Select a menu.SettingsSoundsDisplayConnectivityGeneralIcon DescriptionSounds: Set various camera sounds and the volume. (p. 111)Display: Customize the display settings. (p. 111)Connectivity: Set the connection options. (p. 112)General: Change the settings for the camera system such as memory format and default le name. (p. 113)Settings menuLearn to congure your camera's settings.](https://usermanual.wiki/Samsung-Electronics-Co/WB1100F/User-Guide-2165773-Page-111.png)
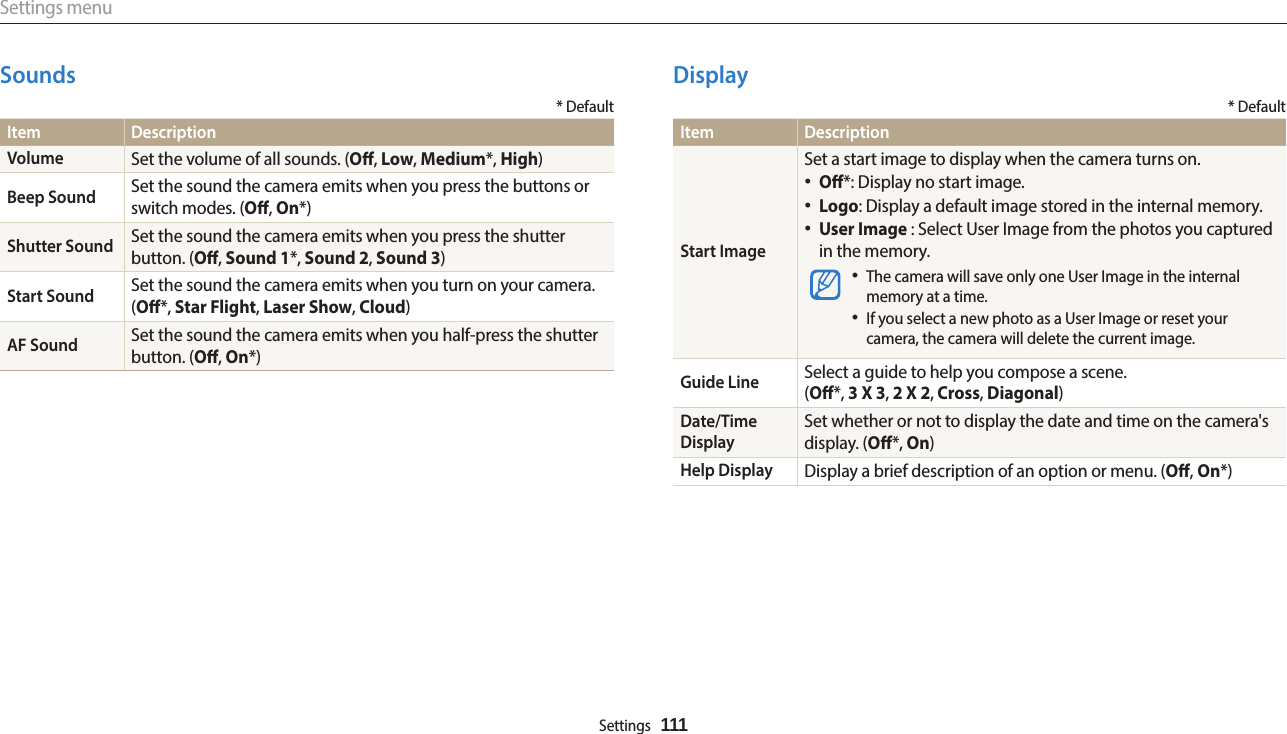
![Settings menuSettings 112Connectivity* DefaultItem DescriptionVideo OutSet the video signal output for your region.•NTSC: USA, Canada, Japan, Korea, Taiwan, Mexico, etc•PAL (supports only BDGHI): Australia, Austria, Belgium, China, Denmark, England, Finland, France, Germany, Italy, Kuwait, Malaysia, Netherlands, New Zealand, Norway, Singapore, Spain, Sweden, Switzerland, Thailand, etci-Launcher Set i-Launcher to launch automatically when you connect your camera to your computer. (O, On*)* DefaultItem DescriptionDisplay BrightnessAdjust the brightness of the screen. (Auto*, Dark, Normal, Bright)Normal is xed in Playback mode even if you have selected Auto. Quick ViewSet whether or not to review a captured image before returning to the Shooting mode. (O, On*)This feature does not work in some modes.Auto Display OIf you perform no operations for 30 seconds, the camera automatically switches to Auto Display O mode. (O*, On)In Auto Display O mode, press any button other than [X] to resume using the camera.](https://usermanual.wiki/Samsung-Electronics-Co/WB1100F/User-Guide-2165773-Page-113.png)
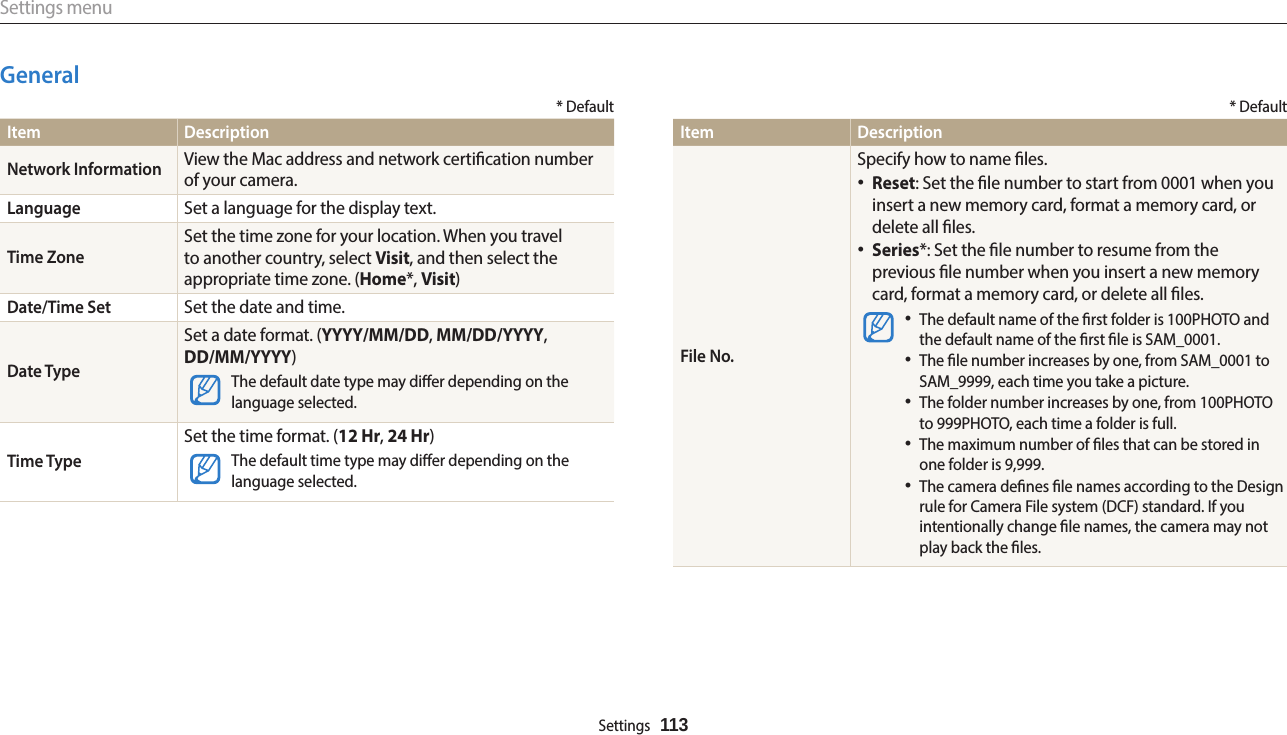
![Settings menuSettings 114* DefaultItem DescriptionLive view NFCSet a Wi-Fi function to launch by reading a tag from an NFC-enabled device in Shooting mode. (AutoShare, Remote Viewnder*)AF Lamp Set a light to turn o automatically in dark places to help you focus. (O, On*)FormatFormat the memory. Formatting will delete all les, including protected les. (Yes , No*)Errors can occur if you use a memory card formatted by another brand of camera, a memory card reader, or a computer. Please format memory cards in the camera before using them to capture photos.ResetReset menus and shooting options. Date and time, language, and video output settings will not be reset. (Yes, No*)Open Source Licenses Show the Open source licenses information.* DefaultItem DescriptionImprintSet whether or not to display the date and time on captured photos. (O*, Date, Date & Time)•The date and time will be displayed on the bottom right corner of the photo.•Some printer models may not print the date and time properly.•The photo will not display the date and time if:-you select mode Auto Power OSet the camera to turn o automatically when you perform no operations for a specied period. (O, 1 min, 3 min*, 5 min, 10 min)•Your settings will not change when you replace the battery.•The camera will not turn o automatically when the camera is connected to a computer or WLAN or when you are playing a slide show or videos.DIRECT LINK (Wi-Fi Button)Start a preset Wi-Fi function by pressing [DIRECT LINK]. (AutoShare, MobileLink*, Remote Viewnder, Email, SNS & Cloud, Samsung Link)](https://usermanual.wiki/Samsung-Electronics-Co/WB1100F/User-Guide-2165773-Page-115.png)
![Camera specicationsAppendixes 132FlashMode O, Auto, Red-eye, Fill in, Slow Sync, Red-eye FixRange•Wide: 31-236 in. (0.8–6 m) (ISO Auto)•Tele: 59-118 in. (1.5 –3 m) (ISO Auto)Recharging time Approximately 5 sec.Shake reductionDual IS [OIS(Optical Image Stabilization) + DIS(Digital Image Stabilization)]EectPhoto Shooting mode•Photo Filter (Smart Filter): Miniature, Vignetting, Fish-eye, Classic, Retro, Cross Filter•Image Adjust: Sharpness, Contrast, SaturationVideo Shooting modeMovie Filter (Smart Filter): Miniature, Vignetting, Fish-eye, Classic, Retro, Palette Eect 1, Palette Eect 2, Palette Eect 3, Palette Eect 4White BalanceAuto WB, Daylight, Cloudy, Fluorescent_H, Fluorescent_L, Tungsten, Custom Set, Color Temp.Date ImprintingDate & Time, Date, OShootingPhotos•Modes: Smart Auto (Portrait, Night Portrait, Night, Backlight Portrait, Backlight, Landscape, White, Macro, Macro Text, Tripod, Action, Macro Color, Natural Green, Blue Sky, Sunset, Low Light, Spot Light, Spot Light Macro, Spot Light Portrait), Program, Smart (Beauty Face, Action Freeze, Sunset, Landscape, Silhouette, Fireworks, Night, Macro, Light Trace), Panorama, Magic Plus (Photo Filter, Movie Filter, Photo Editor)•Burst: Single, Continuous, AEB, Motion Capture•Timer: O, 10 Sec, 2 Sec, DoubleVideos•Modes: Movie, Magic Plus (Movie Filter) •Format: MP4 (H.264) (Max recording time: 20 min)•Size: 1280 X 720, 640 X 480, 320 X 240, 240 Web •Frame Rate : 30fps•Voice: On, O, Zoom Mute•Video editing (embedded): Pause during recording](https://usermanual.wiki/Samsung-Electronics-Co/WB1100F/User-Guide-2165773-Page-133.png)