Samsung Electronics Co WB850F Digital Camera User Manual
Samsung Electronics Co Ltd Digital Camera
UserManual.wiki
>
Samsung Electronics Co
>
WB850F User Manual
>
User Manual
Contents
1.
Manual
2.
User Manual
User Manual
Navigation menu
Upload a User Manual
Namespaces
Wiki Guide
HTML
PDF
Info
Views
User Manual
Discussion / Help
Navigation

![6Indicators used in this manualShooting mode IndicatorSmart AutoProgramAperture Priority, Shutter Priority, ManualSceneMagic PlusWi-FiGPSMovieShooting mode iconsThese icons appear in the text when a function is available in a mode. See the example below. Note: The , mode may not support functions for all scenes.For example:Available in Program, Aperture Priority, Shutter Priority, DUAL IS, and Movie modesIcons used in this manualIcon FunctionAdditional informationSafety warnings and precautions[ ] Camera buttons. For example, [Shutter] represents the shutter button.( ) Page number of related information→The order of options or menus you must select to perform a step; for example: Select → Photo Size (represents Select , and then select Photo Size).*Annotation](https://usermanual.wiki/Samsung-Electronics-Co/WB850F.User-Manual/User-Guide-1709527-Page-7.png)
![7Pressing the shutter• Half-press [Shutter]: press the shutter halfway down• Press [Shutter]: press the shutter all the way downHalf-press [Shutter] Press [Shutter]Subject, background, and composition• Subject: the main object in a scene, such as a person, animal, or still life • Background: the objects around the subject• Composition : the combination of a subject and backgroundComposition BackgroundSubjectExposure (Brightness)The amount of light that enters your camera determines the exposure. You can alter the exposure with shutter speed, aperture value, and ISO sensitivity. By altering the exposure, your photos will be darker or lighter. Normal exposure Overexposure (too bright)Expressions used in this manual](https://usermanual.wiki/Samsung-Electronics-Co/WB850F.User-Manual/User-Guide-1709527-Page-8.png)
![8Basic troubleshootingLearn to solve common problems by setting shooting options.The subject’s eyes appear red.Red eye occurs when the subject's eyes reflect light from the camera flash.•Set the flash option to Red-eye or Red-eye Fix. (p. 60)•If the photo has already been captured, select Red-eye Fix in the edit menu. (p. 97)Photos have dust spots.If dust particles are present in the air, you may capture them in photos when you use the flash.•Turn off the flash or avoid capturing photos in a dusty place.•Set ISO sensitivity options. (p. 62)Photos are blurred. Blurring can occur if you capture photos in low light conditions or hold the camera incorrectly.•Use the OIS function or half-press [Shutter] to ensure the subject is focused. (p. 31)•Use the mode. (p. 46)Photos are blurred when shooting at night.As the camera tries to let in more light, the shutter speed slows. This can make it difficult to hold thecamera steady long enough to take a clear picture and may result in camera shake.•Select Night in mode. (p. 36)•Turn on the flash. (p. 60)•Set ISO sensitivity options. (p. 62)•Use a tripod to prevent your camera from shaking.Subjects come out too dark because of backlighting.When the light source is behind the subject or when there is a high contrast between light and dark areas, the subject may appear too dark.•Avoid shooting toward the sun.•Select Backlight in mode. (p. 36)•Set the flash option to Fill in. (p. 60)•Adjust the exposure. (p. 72)•Set the metering option to Spot if a subject is in the center of the frame. (p. 73)](https://usermanual.wiki/Samsung-Electronics-Co/WB850F.User-Manual/User-Guide-1709527-Page-9.png)
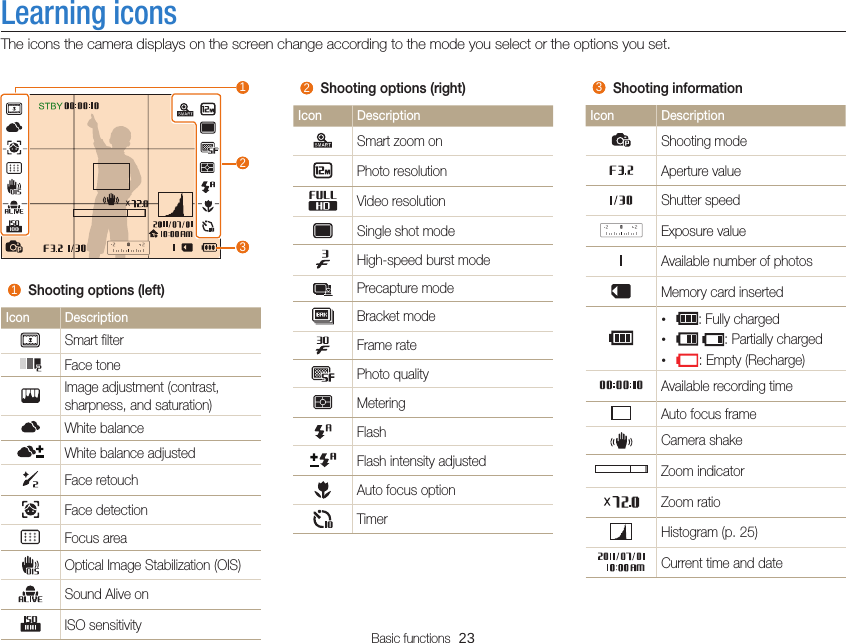
![10Contents Extended functions .........................................................35Using the Smart Auto mode ......................................... 36Using the Scene mode ................................................. 38Using the 3D Photo mode ............................................39Using the HDR mode ..................................................39Using the Magic Frame mode ......................................40Using the Beauty Shot mode ........................................ 41Using the Zooming Shot mode .....................................42Using the Program mode ............................................. 43Using the Aperture Priority, Shutter Priority, or Manual mode ................................................................ 44Using the Aperture Priority mode ...................................45Using the Shutter Priority mode .....................................46Using the Manual mode ............................................... 47Using the DUAL IS mode ............................................. 48Using the Panorama mode ..........................................49Using the 2D or 3D Panorama mode ............................49Using the Action Panorama mode .................................51Using the Movie mode .................................................52Recording high-speed videos ....................................... 54Using the Smart Scene Detection mode .......................55Using the Creative Movie Maker mode .......................56Making a movie with the Creative Movie Maker ..............56View a movie made in Creative Movie Maker mode ........ 57Basic functions ................................................................ 14Unpacking .................................................................... 15Camera layout ..............................................................16Inserting the battery and memory card ........................ 19Charging the battery and turning on your camera ....... 20Charging the battery .................................................... 20Turning on your camera ...............................................20Performing the initial setup ..........................................21Learning icons .............................................................. 23Selecting options or menus .........................................24Using [MENU] ............................................................. 24Using [Fn] ................................................................... 26Setting the display and sound ..................................... 27Setting the display type ................................................ 27Setting the sound ........................................................ 28Capturing photos ..........................................................29Zooming ..................................................................... 30Reducing camera shake (OIS) ...................................... 32Tips for getting a clearer photo .................................... 33](https://usermanual.wiki/Samsung-Electronics-Co/WB850F.User-Manual/User-Guide-1709527-Page-11.png)
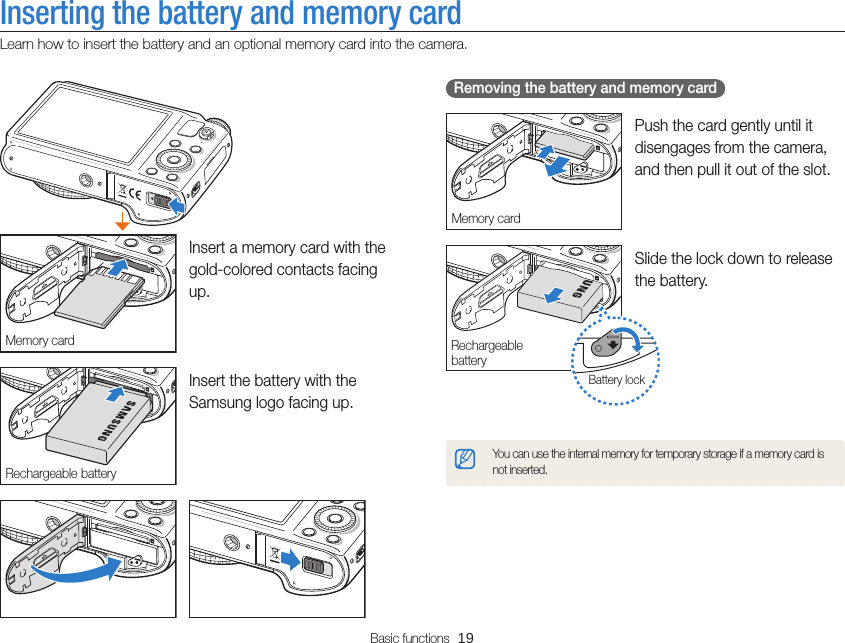
![Unpacking ………………………………… 15Camera layout ……………………………… 16Inserting the battery and memory card … 19Charging the battery and turning on your camera ………………………………… 20Charging the battery ……………………… 20Turning on your camera ………………… 20Performing the initial setup ……………… 21Learning icons ……………………………… 23Selecting options or menus ……………… 24Using [MENU] …………………………… 24Using [Fn] ………………………………… 26Setting the display and sound …………… 27Setting the display type …………………… 27Setting the sound ………………………… 28Capturing photos ………………………… 29Zooming ………………………………… 30Reducing camera shake (OIS) …………… 32Tips for getting a clearer photo …………… 33Basic functionsLearn about your camera’s layout, icons, and basic functions for shooting.](https://usermanual.wiki/Samsung-Electronics-Co/WB850F.User-Manual/User-Guide-1709527-Page-15.png)

![Basic functions 20Charging the battery and turning on your cameraTurning on your cameraPress [POWER] to turn your camera on or off.• The initial setup screen appears when you turn on the camera for the first time. (p. 19) Turning on your camera in Playback mode Press [ ]. The camera turns on and immediately accesses Playback mode.If you turn on your camera by pressing and holding [ ] for about 5 seconds, the camera does not emit any sounds.Charging the batteryBefore you use the camera for the first time, you must charge the battery. Plug the small end of the USB cable into your camera, and then plug the other end of the USB cable into the AC adapter.Indicator light•Red light on: Charging•Red light off: Fully charged•Red light blinking: ErrorUse only the AC adapter and USB cable supplied with your camera. If you use another AC adapter (such as SAC-48), the camera battery may not charge or work properly.](https://usermanual.wiki/Samsung-Electronics-Co/WB850F.User-Manual/User-Guide-1709527-Page-21.png)
![Basic functions 21Performing the initial setupWhen you turn on your camera for the first time, the initial setup screen appears. Follow the steps below to configure the camera’s basic settings.4 Press [ / ] to select Home, and then press [ ].•When you travel to another country, select Visit, and then select a new time zone.5 Press [ / ] to select a time zone, and then press [ ].•To set daylight-savings time, press [ ].Back DSTTime Zone : HomeLondon1 Verify that Language is highlighted, and then press [] or [ ].2 Press [ / / / ] to select a language, and then press [ ].3 Press [ ] to select Time Zone, and then press [ ] or [].](https://usermanual.wiki/Samsung-Electronics-Co/WB850F.User-Manual/User-Guide-1709527-Page-22.png)
![Basic functions 22Performing the initial setup6 Press [ ] to select Date/Time Set, and then press [] or [ ].Exit SetDate/Time SetYear Month Day Hour Min•The screen may differ depending on the language selected.7 Press [ / ] to select an item.8 Press [ / ] to set the date and time, and then press [].9 Press [ ] to select Date Type, and then press [ ] or [].10 Press [ / ] to select a date type, and then press [].LanguageTime ZoneDate/Time SetDate TypeEnglishLondon2011/01/01Back SetYYYY/MM/DDMM/DD/YYYYDD/MM/YYYY•The default date type may differ depending on the language selected.11 Press [ ] to switch to Shooting mode.](https://usermanual.wiki/Samsung-Electronics-Co/WB850F.User-Manual/User-Guide-1709527-Page-23.png)
![Basic functions 24Selecting options or menusTo select an option or a menu, press [ ] or [ ]. Going back to the previous menu Press [ ] again to go back to the previous menu.Half-press [Shutter] to return to Shooting mode.Using [MENU]To select options, press [ ], and then rotate the navigation button or press [ / / / ] or [ ].1 In Shooting mode, press [ ].2 Rotate the navigation button or press [ / / / ] to scroll to a menu or an option.or3 Press [ ] to confirm the highlighted option or menu.](https://usermanual.wiki/Samsung-Electronics-Co/WB850F.User-Manual/User-Guide-1709527-Page-25.png)
![Basic functions 25Selecting options or menus4 Rotate the navigation button or press [ / ] to select White Balance, and then press [ ] or [ ].Photo SizeQualityEVISOWhite BalanceSmart FilterFace DetectionExit Move5 Rotate the navigation button or press [ / ] to select a White Balance option.Back AdjustWhite Balance : Daylight6 Press [ ] to save your settings.7 Press [ ] to return to Shooting mode. For example, to select a White Balance option in Program mode: 1 Rotate the mode dial to .2 Press [ ].Exit MovePhoto SizeQualityEVISOWhite BalanceSmart FilterFace Detection3 Rotate the navigation button or press [ / ] to select , and then press [ ] or [ ].](https://usermanual.wiki/Samsung-Electronics-Co/WB850F.User-Manual/User-Guide-1709527-Page-26.png)
![Basic functions 26Selecting options or menusUsing [Fn]You can access shooting options by pressing [ ], but some options are not available. For example, to select a White Balance option in Program mode: 1 Rotate the mode dial to .2 Press [ ].Photo Size : 4096X3072Exit Move3 Press [ / ] to scroll to .White Balance : Auto WBExit Move4 Rotate the navigation button or press [ / ] to select a White Balance option.White Balance : DaylightExit Move5 Press [ ] to save your settings.](https://usermanual.wiki/Samsung-Electronics-Co/WB850F.User-Manual/User-Guide-1709527-Page-27.png)
![Basic functions 27Setting the display and soundLearn how to change the basic display information and sound settings. About histograms A histogram is a graph that illustrates how light is distributed in your photo. If the histogram has a high peak on the left, the photo is underexposed and will appear dark. A peak on the right of the graph means that the photo is overexposed and will appear washed out. The height of the peaks is related to color information. The more of a particular color, the taller the peak. Under-exposed Well-exposed Over-exposedSetting the display typeYou can select a display type for the Shooting or Playback mode. Each type displays different shooting or playback information. See the table below.Press [ ] repeatedly to change the display type.Show all photographic information.Mode DescriptionShooting•Hide all information about shooting.•Hide information about shooting, except the information on the bottom line.•Display all information about shooting.•Display histogram. Playback•Hide all information about the current file.•Display information about the current file, except the shooting settings and histogram.•Display all information about the current file.](https://usermanual.wiki/Samsung-Electronics-Co/WB850F.User-Manual/User-Guide-1709527-Page-28.png)
![Basic functions 28Setting the display and soundSetting the soundTurn on or off the sound your camera emits when you perform functions.1 In Shooting or Playback mode, press [ ].2 Select → Beep Sound.3 Select an option.Option DescriptionOff The camera does not emit any sounds.On The camera emits sounds.](https://usermanual.wiki/Samsung-Electronics-Co/WB850F.User-Manual/User-Guide-1709527-Page-29.png)
![Basic functions 29Capturing photosLearn how to capture photos easily and quickly in Smart Auto mode.3 Half-press [Shutter] to focus.•A green frame means the subject is in focus.•A red frame means the subject is out of focus.4 Press [Shutter] to capture a photo.5 Press [ ] to view the captured photo.•To delete the photo, press [ ], and then select Yes.6 Press [ ] to return to Shooting mode.See page 31 for tips to get clearer photos.1 Rotate the mode dial to .2 Align your subject in the frame.](https://usermanual.wiki/Samsung-Electronics-Co/WB850F.User-Manual/User-Guide-1709527-Page-30.png)
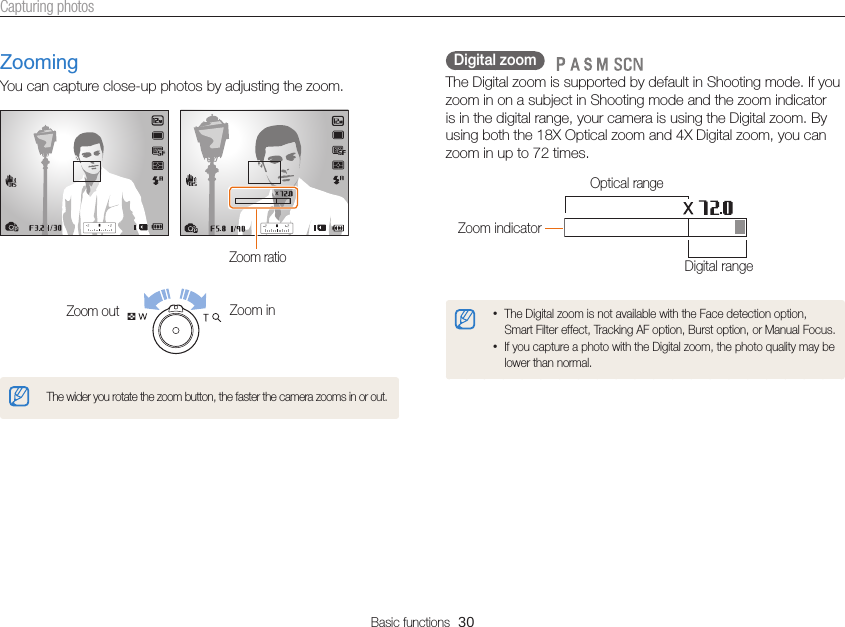
![Basic functions 31Capturing photos Smart zoom You can use 24X Smart zoom which lets you zoom in with less degradation of picture quality than the Optical zoom and Digital zoom. By using both the Smart zoom and Digital zoom, you can zoom in up to 72 times.Smart rangeDigital rangeZoom indicator•Smart zoom is not available with the Face detection option, Smart Filter effect, Tracking AF option, Burst option, or Manual Focus.•If you capture a photo with the Smart zoom, the photo quality may be lower than normal. Setting Smart zoom 1 In Shooting mode, press [ ].2 Select → Smart Zoom.3 Select an option.Icon DescriptionOff: The Smart zoom is deactivated.On: The Smart zoom is activated.](https://usermanual.wiki/Samsung-Electronics-Co/WB850F.User-Manual/User-Guide-1709527-Page-32.png)
![Basic functions 32Capturing photosReducing camera shake (OIS)Reduce camera shake optically in Shooting mode. Before correction After correction1 In Shooting mode, press [ ].2 Select or → OIS.3 Select an option.Icon DescriptionOff: OIS is deactivated.On: OIS is activated. •OIS may not function properly when: - you move your camera to follow a moving subject - you use the Digital zoom - there is too much camera shake - the shutter speed is slow (for example, when you capture night scenes) - the battery is low - you capture a close-up shot•If you use the OIS function with a tripod, your images may be blurred by the vibration of the OIS sensor. Deactivate the OIS function when you use a tripod.•If the camera is hit or dropped, the display will be blurry. If this occurs, turn off the camera, and then turn it on again.](https://usermanual.wiki/Samsung-Electronics-Co/WB850F.User-Manual/User-Guide-1709527-Page-33.png)
![Basic functions 33 Holding your camera correctly Ensure nothing is blocking the lens, flash, or microphone. Half-pressing the shutter button Half-press [Shutter] and adjust the focus. The camera adjusts the focus and exposure automatically.The camera sets the aperture value and shutter speed automatically.Focus frame•Press [Shutter] to capture the photo if the focus frame appears in green.•Change the composition and half-press [Shutter] again if the focus frame appears in red. Reducing camera shake •Set the Optical Image Stabilization option to reduce camera shake optically. (p. 30)•Select the mode to reduce camera shake both optically and digitally. (p. 46) When is displayed Camera shakeWhen you shoot in the dark, avoid setting the flash option to Slow Sync or Off. The aperture remains open longer and it may be harder to hold the camera steady long enough to capture a clear photo.•Use a tripod or set the flash option to Fill in. (p. 60)•Set ISO sensitivity options. (p. 62)Tips for getting a clearer photo](https://usermanual.wiki/Samsung-Electronics-Co/WB850F.User-Manual/User-Guide-1709527-Page-34.png)
![Basic functions 34 Preventing your subject from being out of focus It may be difficult to get your subject in focus when: -there is little contrast between the subject and background (for example, when your subject is wearing clothing that is similar in color to the background) -the light source behind the subject is too bright -the subject is shiny or reflective -the subject includes horizontal patterns, such as blinds -the subject is not positioned in the center of the frame•When you capture photos in low lightTurn on the flash. (p. 60)•When subjects are moving rapidlyUse the High-speed burst mode or Precapture function. (p. 77)Using the focus lockHalf-press [Shutter] to focus. When the subject is in focus, you can reposition the frame to change the composition. When you are ready, press [Shutter] to capture your photo.](https://usermanual.wiki/Samsung-Electronics-Co/WB850F.User-Manual/User-Guide-1709527-Page-35.png)
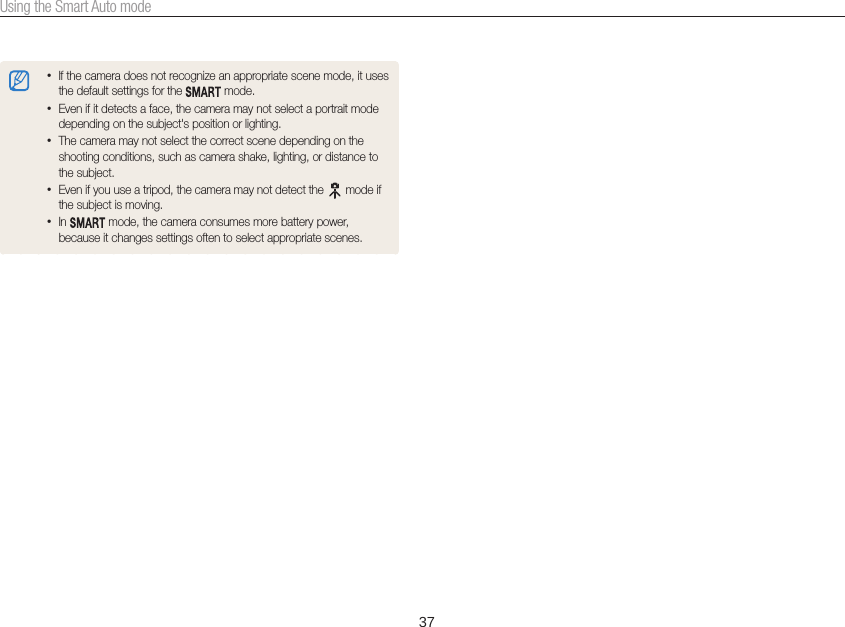
![36Using the Smart Auto modeIn Smart Auto mode, your camera automatically chooses the appropriate camera settings based on the type of scene it detects. The Smart Auto mode is helpful if you are not familiar with the camera settings for various scenes.Icon DescriptionPortraits with backlightingPortraitsClose-up photos of objectsClose-up photos of textSunsetsBlue skiesForested areasClose-up photos of colorful subjectsCamera is stabilized or on a tripod (when shooting in the dark)Actively moving subjectsFireworks (when using a tripod)3 Half-press [Shutter] to focus.4 Press [Shutter] to capture the photo.1 Rotate the mode dial to .2 Align your subject in the frame.•The camera automatically selects a scene. An appropriate scene icon appears at the bottom left of the screen. The icons are listed below.Icon DescriptionLandscapesScenes with bright white backgroundsLandscapes at night (when the flash is off)Portraits at nightLandscapes with backlighting](https://usermanual.wiki/Samsung-Electronics-Co/WB850F.User-Manual/User-Guide-1709527-Page-37.png)
![38Using the Scene modeIn Scene mode, you can capture a photo with options that are preset for a specific scene.Option DescriptionText Clearly capture text from printed or electronic documents.Sunset Capture scenes at sunset, with natural-looking reds and yellows.Dawn Capture scenes at sunrise.Backlight Capture backlit subjects.Beach & SnowReduce underexposure of subjects caused by sunlight reflected from sand or snow.Zooming Shot Capture scenes with blurred edges.•To change a scene mode, press [ ], and then select . You can select any of the scenes listed.3 Align your subject in the frame, and then half-press [Shutter] to focus.4 Press [Shutter] to capture the photo.1 Rotate the mode dial to .2 Select a scene.3D PhotoOption Description3D Photo Capture scenes with a 3D effect (the 3D effect works only on a 3D TV or 3D monitor).HDR Capture scenes with emphasis on mid-tones, by minimizing the dark and bright areas.Magic Frame Capture scenes with various frame effects.Beauty ShotCapture a portrait with options to hide facial imperfections.Night Capture scenes at night or in low lighting (using a tripod is recommended).Landscape Capture still-life scenes and landscapes.](https://usermanual.wiki/Samsung-Electronics-Co/WB850F.User-Manual/User-Guide-1709527-Page-39.png)
![39Using the Scene modeUsing the HDR modeIn HDR(High Dynamic Range) mode, your camera captures two photos with different exposures, and then overlays the bright area of the underexposed photo and the dark area of the overexposed photo. You can capture photos with soft, rich colors. Without HDR effect With HDR effect1 Rotate the mode dial to .2 Select HDR.3 Align your subject in the frame, and then half-press [Shutter] to focus.4 Press [Shutter] to capture the photo.•The camera captures 2 photos, and then automatically merges them into a single photo.Using the 3D Photo modeIn 3D Photo mode, you can capture scenes with a 3D effect.1 Rotate the mode dial to .2 Select 3D Photo.3 Align your subject in the frame, and then half-press [Shutter] to focus.4 Press [Shutter] to capture the photo.•The camera captures 2 photos in both JPEG and MPO file formats.•In 3D Photo mode, the resolution is automatically set to .•In 3D Photo mode, some shooting options are not available.•You can view an MPO file that supports the 3D effect only on an MPO-compatible display, such as a 3D TV or 3D monitor. On your camera's display, you can view only JPEG files.•Use proper 3D glasses when you view an MPO file on a 3D TV or 3D monitor.](https://usermanual.wiki/Samsung-Electronics-Co/WB850F.User-Manual/User-Guide-1709527-Page-40.png)
![40Using the Scene mode•The HDR effect may be affected by camera shake, lighting, movement of the subject, and the shooting environment.•You cannot use the flash when you use the HDR mode.•It may take longer to save a photo using the HDR mode.•When you use the HDR mode, the preview image on the screen and the captured photo may appear slightly larger than a photo captured without this effect.•When you capture a moving subject using the HDR mode, an afterimage may appear.Using the Magic Frame modeIn Magic Frame mode, you can apply various frame effects to your photos. The shape and the feel of the photos will change according to the frame you select.1 Rotate the mode dial to .2 Select Magic Frame.3 Press [ ].4 Select → Frame.5 Select an option.FrameQualityOISWall ArtOld FilmRippleFull MoonOld RecordMagazineSunny DayBack Set6 Press [ ] to return to Shooting mode.7 Align your subject in the frame, and then half-press [Shutter] to focus.8 Press [Shutter] to capture the photo.In Magic Frame mode, the resolution is automatically set to .](https://usermanual.wiki/Samsung-Electronics-Co/WB850F.User-Manual/User-Guide-1709527-Page-41.png)
![41Using the Scene modeUsing the Beauty Shot modeIn Beauty Shot mode, you can capture a portrait with options to hide facial imperfections. 1 Rotate the mode dial to .2 Select Beauty Shot.3 Press [ ].4 Select → Face Tone.5 Select an option.•For example, increase the face tone setting to make skin appear lighter.Back SetFace ToneFace RetouchFace DetectionSmart FR EditPhoto SizeQualityFocus AreaOffLevel 1Level 2Level 36 Select Face Retouch.7 Select an option.•For example, increase the face retouch setting to hide more imperfections.Back SetFace ToneFace RetouchFace DetectionSmart FR EditPhoto SizeQualityFocus AreaOffLevel 1Level 2Level 38 Press [ ] to return to Shooting mode.9 Align your subject in the frame, and then half-press [Shutter] to focus.10 Press [Shutter] to capture the photo.When you use the Beauty Shot mode, the focus distance will be set to Auto Macro.](https://usermanual.wiki/Samsung-Electronics-Co/WB850F.User-Manual/User-Guide-1709527-Page-42.png)
![42Using the Scene modeUsing the Zooming Shot modeIn Zooming Shot mode, you can emphasize the center of a photo by blurring the edges. Without Zooming Shot effect With Zooming Shot effect1 Rotate the mode dial to .2 Select Zooming Shot.3 Align your subject in the frame, and then half-press [Shutter] to focus.4 Press [Shutter] to capture the photo.In Zooming Shot mode, the resolution is automatically set to or below.](https://usermanual.wiki/Samsung-Electronics-Co/WB850F.User-Manual/User-Guide-1709527-Page-43.png)
![43Using the Program modeIn Program mode, you can set most options, except the shutter speed and aperture value, which the camera sets automatically.1 Rotate the mode dial to .2 Set the desired options. (For a list of options, refer to "Shooting options" starting on page 56.)3 Align your subject in the frame, and then half-press [Shutter] to focus.4 Press [Shutter] to capture the photo.](https://usermanual.wiki/Samsung-Electronics-Co/WB850F.User-Manual/User-Guide-1709527-Page-44.png)
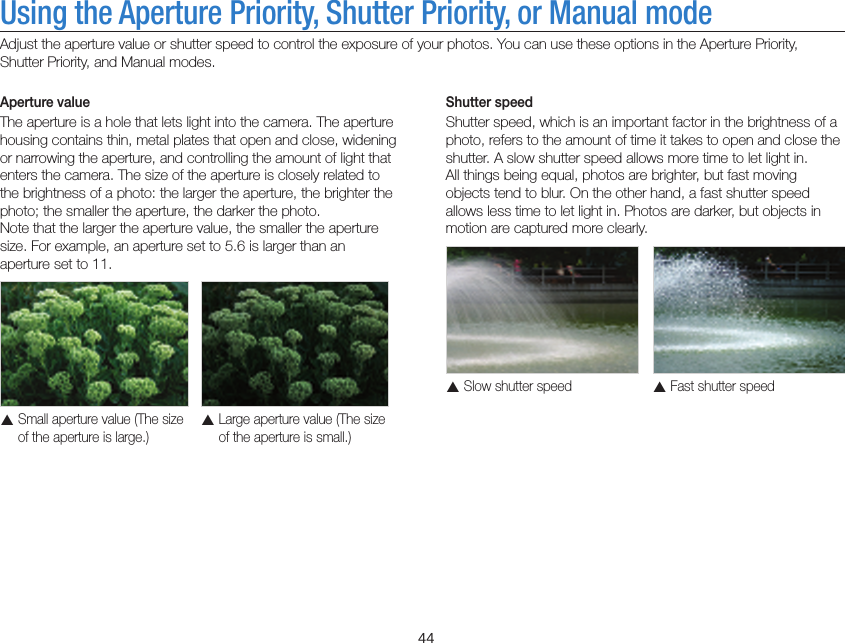
![45Using the Aperture Priority, Shutter Priority, or Manual mode4 Set options. (For a list of options, refer to “Shooting options” starting on page 56.)5 Align your subject in the frame, and then half-press [Shutter] to focus.6 Press [Shutter] to capture the photo.Using the Aperture Priority modeThe Aperture Priority mode allows you to set the aperture value manually while the camera automatically selects an appropriate shutter speed.1 Rotate the mode dial to .2 Select Aperture Priority.•To select another mode when the mode dial is set to , press [ ], and then select → a mode.3 Press [ ], and then rotate the navigation button or press [ / ] to adjust the aperture value.•See page 42 for more information about the aperture value.](https://usermanual.wiki/Samsung-Electronics-Co/WB850F.User-Manual/User-Guide-1709527-Page-46.png)
![46Using the Aperture Priority, Shutter Priority, or Manual mode4 Set options. (For a list of options, refer to “Shooting options” starting on page 56.)5 Align your subject in the frame, and then half-press [Shutter] to focus.6 Press [Shutter] to capture the photo.Using the Shutter Priority modeThe Shutter Priority mode allows you to set the shutter speed manually while the camera automatically selects an appropriate aperture value.1 Rotate the mode dial to .2 Select Shutter Priority.•To select another mode when the mode dial is set to , press [ ], and then select → a mode.3 Press [ ], and then rotate the navigation button or press [ / ] to adjust the shutter speed.•See page 42 for more information about the shutter speed.](https://usermanual.wiki/Samsung-Electronics-Co/WB850F.User-Manual/User-Guide-1709527-Page-47.png)
![47Using the Aperture Priority, Shutter Priority, or Manual modeUsing the Manual modeThe Manual mode allows you to adjust both the aperture value and the shutter speed manually.1 Rotate the mode dial to .2 Select Manual.•To select another mode when the mode dial is set to , press [ ], and then select → a mode.3 Press [ ] to select the aperture value or shutter speed.4 Rotate the navigation button or press [ / ] to adjust the aperture value or shutter speed.5 Set options. (For a list of options, refer to “Shooting options” starting on page 56.)6 Align your subject in the frame, and then half-press [Shutter] to focus.7 Press [Shutter] to capture the photo.](https://usermanual.wiki/Samsung-Electronics-Co/WB850F.User-Manual/User-Guide-1709527-Page-48.png)
![48Using the DUAL IS modeReduce camera shake and prevent blurred photos with Optical and Digital Image Stabilization functions. Before correction After correction1 Rotate the mode dial to .2 Align your subject in the frame, and then half-press [Shutter] to focus.3 Press [Shutter] to capture the photo.•The Digital zoom and Smart zoom are not available in mode. •The camera will correct photos optically only when the light source is brighter than fluorescent light.•If your subject is moving rapidly, the photo may be blurry.•Set the Optical Image Stabilization option to reduce camera shake in different shooting modes. (p. 30)](https://usermanual.wiki/Samsung-Electronics-Co/WB850F.User-Manual/User-Guide-1709527-Page-49.png)
![49Using the Panorama modeIn Panorama mode, you can capture a wide panoramic scene in a single photo. Capture and combine a series of photos to create a panoramic image.7 With [Shutter] pressed, slowly move the camera in the direction that will let it capture the rest of the panorama.•In 3D Panorama mode, you can capture a scene only in horizontal directions.•When the viewfinder is aligned with the next scene, the camera captures the next photo automatically.8 When you are finished, release [Shutter].•When you have captured all the necessary shots, the camera combines them into one panoramic photo.Using the 2D or 3D Panorama modeIn Panorama mode, you can capture a normal or 3D panoramic photo. Shooting example1 Rotate the mode dial to .2 Press [ ].3 Select → Panorama → Live Panorama or 3D Panorama.4 Press [ ] to return to Shooting mode.5 Align your subject in the frame, and then half-press [Shutter] to focus.•Align the camera with the far left or the far right, or very top or bottom, of the scene you want to capture.6 Press and hold [Shutter] to start shooting.](https://usermanual.wiki/Samsung-Electronics-Co/WB850F.User-Manual/User-Guide-1709527-Page-50.png)
![51Using the Panorama modeUsing the Action Panorama modeIn Action Panorama mode, you can capture and combine a series of photos of a moving subject. Shooting example1 Rotate the mode dial to .2 Press [ ].3 Select → Panorama → Action Panorama.4 Press [ ] to return to Shooting mode.5 Align your subject in the frame, and then half-press [Shutter] to focus.•Align the camera with the far left or the far right side of the scene you want to capture.6 Press and hold [Shutter] to start shooting.7 With [Shutter] pressed, slowly move the camera in the direction that will let it capture the rest of the panorama.•If there is more than one moving subject, the camera may not recognize the correct subject.•If subjects are outside of the guide frame while capturing, the camera does not capture the movement of the subjects.8 When you are finished, release [Shutter].•The camera automatically combines the shots into one photo.•For best results when capturing panoramic photos, avoid the following: - moving the camera too quickly or too slowly - moving the camera too little to capture the next image - moving the camera at irregular speeds - shaking the camera - changing the camera direction while capturing a photo - shooting in dark places - capturing moving subjects nearby - shooting conditions where the brightness or color of light is changing•The camera may take time to save panoramic photos.•In Action Panorama mode, some shooting options are not available.](https://usermanual.wiki/Samsung-Electronics-Co/WB850F.User-Manual/User-Guide-1709527-Page-52.png)
![52Using the Movie modeIn Movie mode, you can customize settings to record full HD videos of up to 20 minutes in length. The camera saves recorded videos as MP4 (H.264) files. •H.264 (MPEG-4 part10/AVC) is a high-compression video format established by the international standards organizations ISO-IEC and ITU-T.•Some memory cards may not support high definition recording. If your card does not, set a lower resolution.•Memory cards with slow writing speeds will not support high-resolution videos and high-speed videos. To record high-resolution or high-speed videos, use memory cards with faster write speeds.•If you activate the OIS function while recording a video, the camera may record the operating sound of the OIS function.•If you use the zoom function when recording a video, the camera may record the noise of the zoom operating. To decrease zoom noise, use the Sound Alive function. See Steps 3 and 4 below.5 Set desired options. (For a list of options, refer to "Shooting options" starting on page 56.)6 Press (Video recording) to start recording.7 Press (Video recording) again to stop recording.•You can start recording a video in some modes by pressing (Video recording) without having to rotate the mode dial to .•The video frame size may appear smaller while you are recording a video depending on the video resolution and frame rate.•If you perform no operations for approximately 3 minutes while recording a video, the screen will become dim. To activate the screen, perform any camera operation. If you operate POWER, Zoom, Shutter, or Video recording button, the camera will carry out the assigned function, even when the screen is dim.1 Rotate the mode dial to .2 Press [ ].3 Select → Voice.4 Select a Sound Alive option.Icon DescriptionSound Alive Off: Turn off the Sound Alive function to record the zoom noise.Sound Alive On: Turn on the Sound Alive function to reduce the zoom noise.Mute: Do not record sounds.•Do not block the microphone when you use the Sound Alive function.•Recordings made with Sound Alive may differ from actual sounds.](https://usermanual.wiki/Samsung-Electronics-Co/WB850F.User-Manual/User-Guide-1709527-Page-53.png)
![53Using the Movie mode Pause recording The camera allows you to temporarily pause a video while recording. With this function, you can record separate scenes as a single video.• Press [ ] to pause while recording.• Press [ ] to resume. Capturing still images while recording a video You can capture still images while recording a video without switching to the photo shooting modes (up to 6 photos). This feature is available only when you use a memory card.Images captured while recording a video• Press [Shutter] to capture images while recording a video.• Captured images will be saved automatically.•Captured images will be automatically resized, depending on the size of the recorded video.•You cannot capture still images while recording high-speed videos.•You cannot capture still images when you pause the video recording.•The quality of images captured while recording a video may be lower than those captured normally.](https://usermanual.wiki/Samsung-Electronics-Co/WB850F.User-Manual/User-Guide-1709527-Page-54.png)
![54Using the Movie modeRecording high-speed videosYou can record high-speed videos by setting frame rates. High-speed videos will be played in slow motion at 30 FPS, regardless of the frame rate of the video.•Memory cards with slow write speeds do not support high-speed videos.•You cannot set Smart Filter effects or Smart Scene Detection mode when recording high-speed videos.•The camera does not record audio when recording high-speed videos.•The image quality of high-speed video may be lower than normal speed video.1 Rotate the mode dial to .• mode only allows you to record a high-speed video.2 Press [ ], and then select a frame rate.Icon Descripion440fps: Record 440 frames per second (for up to 10 seconds).250fps: Record 250 frames per second (for up to 10 seconds).30fps: Record 30 frames per second (for up to 20 minutes). 30fps is not a high-speed recording option.3 Press (Video recording) to start recording.4 Press (Video recording) again to stop recording.](https://usermanual.wiki/Samsung-Electronics-Co/WB850F.User-Manual/User-Guide-1709527-Page-55.png)
![55Using the Movie modeUsing the Smart Scene Detection modeIn Smart Scene Detection mode, your camera automatically chooses the appropriate camera settings based on the scene it has detected.1 Rotate the mode dial to .2 Press [ ].3 Select → Smart Scene Detection → On.4 Press [ ] to return to Shooting mode.5 Align your subject in the frame.•The camera automatically selects a scene. An appropriate scene icon will appear at the bottom left of the screen.Icon DescriptionLandscapesSunsetsBlue skiesForested areas6 Press (Video recording) to start recording.7 Press (Video recording) again to stop recording.•If the camera does not recognize an appropriate scene mode, it uses the default settings for the Smart Scene Detection mode.•The camera may not select the correct scene depending on the shooting conditions, such as camera shake, lighting, and distance to the subject.•Smart Filter effects are not available in Smart Scene Detection mode.](https://usermanual.wiki/Samsung-Electronics-Co/WB850F.User-Manual/User-Guide-1709527-Page-56.png)
![56Making a movie with the Creative Movie Maker1 Rotate the mode dial to .2 Select + Movie Creation.3 Select Select, and then select files.•You must select at least 2 files.•If you select a folder, every photo in the folder will be selected.•If you select a video, every photo captured while recording the video will be selected.•Select Shuffle to let the camera select photos and videos randomly. The movie cannot exceed 2 minutes 30 seconds in length.SelectShuffleBack SetSelect image•You cannot select photos captured in Panorama mode, videos made in Creative Movie Maker mode, videos recorded with some Smart Filter effects (Miniature, Vignetting, Half Tone Dot, Sketch, or Fish-eye), or some high-speed videos (440fps).•You can select up to 60 photos and 10 videos.4 Press [ ] to confirm the selection.5 Press [ ] to select Theme, and then select a theme.6 Press [ ] to select Music, and then select music.7 Press [ ] to select Movie Size, and then select a movie size.8 Press [ ] to select Creation, and then select Creation Start.•If your camera does not have enough available memory to store the movie, you cannot select Creation Start. Delete files from the memory card to make more memory available. (p. 89)•If the pop-up message appears when you select Creation Start, select a smaller movie size in the Movie Size option.•The video rendering may take longer depending on the number and size of the selected files.•Press [ ] to cancel the video rendering.Using the Creative Movie Maker modeIn the Creative Movie Maker mode, you can easily make movies from the photos and videos stored on your memory card.](https://usermanual.wiki/Samsung-Electronics-Co/WB850F.User-Manual/User-Guide-1709527-Page-57.png)
![57Using the Creative Movie Maker modeView a movie made in Creative Movie Maker mode1 Rotate the mode dial to .2 Press [ / ] to select a movie.3 Press [ ] to play the movie.To view the movie in Playback mode, press [ ]. (p. 84)](https://usermanual.wiki/Samsung-Electronics-Co/WB850F.User-Manual/User-Guide-1709527-Page-58.png)

![Shooting options 59Selecting a resolution and qualityLearn how to change the image resolution and quality settings. Setting the video resolution 1 In Shooting mode, press [ ].2 Select → Movie Size.3 Select an option.Icon Description1920X1080: High-quality HD files to play back on an HDTV.1280X720: HD files to play back on an HDTV.640X480: SD files to play back on an analog TV.If a memory card is not inserted, the camera supports only .Selecting a resolutionAs you increase the resolution, your photo or video will include more pixels, so it can be printed on larger paper or displayed on a larger screen. When you use a high resolution, the file size will also increase. Setting the photo resolution 1 In Shooting mode, press [ ].2 Select → Photo Size. 3 Select an option.Icon Description4096X3072: Print on an A1 paper.4096X2736: Print on an A2 paper in wide ratio (3:2).3648X2736: Print on an A2 paper.4096X2304: Print on an A2 paper in panorama ratio (16:9) or play back on an HDTV.2592X1944: Print on an A4 paper.1984X1488: Print on an A5 paper.1920X1080: Print on an A5 paper in panorama ratio (16:9) or play back on an HDTV.1024X768: Attach to an email.](https://usermanual.wiki/Samsung-Electronics-Co/WB850F.User-Manual/User-Guide-1709527-Page-60.png)
![Shooting options 60Selecting a resolution and qualitySetting the photo qualitySet the photo quality setting. Higher image quality settings will result in larger file sizes. The camera compresses and saves the photos you capture in the JPEG format.1 In Shooting mode, press [ ].2 Select → Quality.3 Select an option.Icon DescriptionSuper Fine: Capture photos in super high quality.Fine: Capture photos in high quality.Normal: Capture photos in normal quality.](https://usermanual.wiki/Samsung-Electronics-Co/WB850F.User-Manual/User-Guide-1709527-Page-61.png)
![Shooting options 61Using the timerLearn how to set the timer to delay shooting. 3 Press [Shutter] to start the timer.•The AF-assist light/timer lamp blinks. The camera will automatically capture a photo after the specified time has elapsed.•Press [Shutter] or [ ] to cancel the timer.•Depending on the Face Detection options you selected, the timer function may not be available.1 In Shooting mode, press [ ].Timer : OffBack Set2 Select an option.Icon DescriptionOff: The timer is not active.10 Sec: Capture a photo after a 10-second delay.2 Sec: Capture a photo after a 2-second delay.](https://usermanual.wiki/Samsung-Electronics-Co/WB850F.User-Manual/User-Guide-1709527-Page-62.png)
![Shooting options 62Shooting in the darkLearn how to capture photos at night or in low light conditions.Using the flashUse the flash when you capture photos in the dark or when you need more light in your photos.1 In Shooting mode, press [ ].Move AdjustFlash : Auto2 Select an option.Icon DescriptionOff:•The flash will not fire.•The camera will display the shake warning when you are shooting in low light.Auto: In Smart Auto mode, the camera will select a proper flash setting for the scene it detects.Auto: The flash will fire automatically when the subject or background is dark. Preventing red-eyeIf the flash fires when you capture a photo of a person in the dark, a red glow may appear in the person’s eyes. To prevent this, select Red-eye or Red-eye Fix. Refer to flash options in “Using the flash.” Before correction After correction](https://usermanual.wiki/Samsung-Electronics-Co/WB850F.User-Manual/User-Guide-1709527-Page-63.png)
![Shooting options 63Shooting in the dark•Flash options are not available if you set Burst options or select Self-Portrait or Blink Detection. •Make sure that your subjects are within the recommended distance from the flash. (p. 131)•If light from the flash is reflected or there is a substantial amount of dust in the air, tiny spots may appear in your photo. Adjusting the flash intensity Adjust the flash intensity to avoid over-exposed or under-exposed photos.1 In Shooting mode, press [ ].2 Scroll to an option.3 Press [ ].Icon DescriptionRed-eye: •The flash will fire twice when the subject or background is dark to reduce the red-eye effect.•There is an interval between the 2 bursts of the flash. Do not move until the flash fires a second time.Fill in:•The flash always fires.•The camera automatically adjusts light intensity.Slow Sync:•The flash fires and the shutter stays open longer.•This option is recommended when you want to capture more ambient light to reveal more details in the background.•Use a tripod to prevent your photos from blurring.•The camera will display the shake warning when you are shooting in low light.Red-eye Fix:•The flash fires twice when the subject or background is dark. The camera corrects red-eyes through its advanced software analysis.•There is an interval between the 2 bursts of the flash. Do not move until the flash fires a second time.Available options may differ depending on the shooting conditions.](https://usermanual.wiki/Samsung-Electronics-Co/WB850F.User-Manual/User-Guide-1709527-Page-64.png)
![Shooting options 64Shooting in the dark4 Rotate the navigation button or press [ / ] to adjust the intensity.Back SetFlash : AutoFlash Strength5 Press [ ] to save your settings.•Adjusting the flash intensity may not be effective if: - the subject is too close to the camera - you set a high ISO sensitivity - the exposure value is too big or too small•In some shooting modes, you cannot use this function.Adjusting the ISO sensitivityThe ISO sensitivity is the measure of a film’s sensitivity to light as defined by the International Organization for Standardization (ISO). The higher ISO sensitivity you select, the more sensitive to light your camera becomes. Use a higher ISO sensitivity to capture better photos and reduce camera shake when not using the flash.1 In Shooting mode, press [ ].2 Select → ISO.3 Select an option.•Select to use an appropriate ISO sensitivity based on the brightness of the subject and lighting.Higher ISO sensitivities may result in more image noise.](https://usermanual.wiki/Samsung-Electronics-Co/WB850F.User-Manual/User-Guide-1709527-Page-65.png)
![Shooting options 65Changing the camera’s focusLearn how to adjust the camera’s focus to suit the subject and the shooting conditions.Using auto focusTo capture sharp photos, select the appropriate focus option according to your distance from the subject.1 In Shooting mode, press [ ].Back SetFocus : Auto Focus (Normal) Using macroUse macro to capture close-up photos of subjects, such as flowers or insects.•Try to hold the camera firmly to prevent blurry photos.•Turn off the flash if the distance to the subject is less than 16 in. (40 cm)](https://usermanual.wiki/Samsung-Electronics-Co/WB850F.User-Manual/User-Guide-1709527-Page-66.png)
![Shooting options 66Changing the camera’s focus Adjusting the focus distance manually 1 In Shooting mode, press [ ].2 Scroll to Manual Focus.3 Press [ ].4 Rotate the navigation button or press [ / ] to adjust the focus distance.Back SetFocus : Manual Focus5 Press [ ] to save your settings.•When you adjust the focus distance manually and the subject is out of focus, the photo may become blurry.•If you use this function, you cannot set focus area options and Face Detection options. 2 Select an option.Icon Description Auto Focus (Normal): Focus on a subject farther than 31 in. (80 cm) away. Farther than 138 in. (350 cm) away when you use the zoom.Manual Focus: Focus on a subject by adjusting the focus distance manually. (p. 64)Macro: Manually focus on a subject that is 2-31 in. (5-80 cm) from the camera. 71-138 in. (180-350 cm) when you use the zoom.Auto Macro: Focus on a subject farther than 2 in. (5 cm) away. Farther than 71 in. (180 cm) away when you use the zoom.Available options may differ depending on the shooting conditions.](https://usermanual.wiki/Samsung-Electronics-Co/WB850F.User-Manual/User-Guide-1709527-Page-67.png)
![Shooting options 67Changing the camera’s focusUsing tracking auto focusTracking AF allows you to track and auto focus on your subject, even when you are moving.1 In Shooting mode, press [ ].2 Select → Focus Area → Tracking AF.3 Press [ ] to return to Shooting mode.4 Focus on the subject you want to track, and then press [].•A focus frame appears on the subject and follows the subject as you move the camera.•The white frame means that your camera is tracking the subject.•When you half-press [Shutter], the green frame means that your subject is in focus.5 Press [Shutter] to capture the photo. Focusing on a selected areaYou can focus on an area that you have selected.1 In Shooting mode, press [ ].2 Select → Focus Area → Selection AF.3 Press [ ] to return to Shooting mode.4 Press [ ], and then rotate the navigation button or press [ / / / ] to move the frame to a desired area.Set5 Press [ ].6 Press [Shutter] to capture the photo.•Press [ ] to change the focus area.If you use this function, you cannot set Face Detection options, Burst options, Smart zoom options, and Smart Filter effects.](https://usermanual.wiki/Samsung-Electronics-Co/WB850F.User-Manual/User-Guide-1709527-Page-68.png)
![Shooting options 68Changing the camera’s focus•If you do not select a focus area, the focus frame will appear in the center of the screen.•Tracking a subject may fail when: - the subject is too small - the subject moves excessively - the subject is backlit or you are shooting in a dark place - colors or patterns on the subject and the background are the same - the subject includes horizontal patterns, such as blinds - the camera shakes excessively•When tracking a subject fails, the focus frame will appear as a white single-line frame ( ).•If the camera fails to track the subject, you must reselect the subject to track.•If the camera fails to focus, the focus frame will change to a red single-line frame ( ).•If you use this function, you cannot set Face Detection options, Burst options, Smart zoom, and Smart Filter effects.Adjusting the focus areaYou can get clearer photos by selecting an appropriate focus area according to your subject's location in the scene.1 In Shooting mode, press [ ].2 Select → Focus Area.3 Select an option.Icon DescriptionCenter AF: Focus on the center of the frame (suitable when subjects are located at or near the center).Multi AF: Focus on one or more of 9 possible areas.Selection AF: Focus on the area that you select. (p. 65) Tracking AF: Focus on and track the subject. (p. 65)Available shooting options may differ depending on the shooting mode.](https://usermanual.wiki/Samsung-Electronics-Co/WB850F.User-Manual/User-Guide-1709527-Page-69.png)
![Shooting options 69Using Face DetectionIf you use Face Detection options, your camera can automatically detect a human face. When you focus on a human face, the camera adjusts the exposure automatically. Use Blink Detection to detect closed eyes or Smile Shot to capture a smiling face. You can also use Smart Face Recognition to register faces and prioritize the focus on them. Detecting facesYour camera automatically detects up to 10 human faces in one scene.1 In Shooting mode, press [ ].2 Select → Face Detection → Normal.The face nearest the camera or nearest the center of the scene appears in a white focus frame and the rest of the faces appear in gray focus frames.•The closer you are to the subjects, the quicker your camera will detect faces.•If you have set Burst options, the camera may not register detected faces.•When your camera detects a face, it tracks the detected face automatically. •Face Detection may not be effective when: - the subject is far from the camera (The focus frame will appear orange for Smile Shot and Blink Detection.) - it is too bright or too dark - the subject is not facing the camera - the subject is wearing sunglasses or a mask - the subject’s facial expression changes drastically - the subject is backlit or the lighting conditions are unstable•Face Detection is not available when you set Smart Filter effects, Image adjustment, Selection AF, Tracking AF, or Manual Focus.•Depending on the shooting options you selected, available Face Detection options may differ.•Depending on the Face Detection options you selected, the timer function may not be available.•When you set Face Detection options, the AF area is automatically set to Multi AF.•Depending on the Face Detection options you selected, Burst options may not be available.•When you capture photos of detected faces, they will be registered in the face list.•You can view registered faces in order of priority in Playback mode. (p. 85) Even though faces are registered successfully, they may not be classified in Playback mode.•A face detected in Shooting mode may not appear in the face list or Smart Album.](https://usermanual.wiki/Samsung-Electronics-Co/WB850F.User-Manual/User-Guide-1709527-Page-70.png)
![Shooting options 70Using Face DetectionCapturing a self portrait shotCapture photos of yourself. The camera sets the focus distance to close-up, and then emits a beep when ready. 1 In Shooting mode, press [ ].2 Select → Face Detection → Self-Portrait.3 Press [ ] to return to Shooting mode.4 Compose your shot with the lens facing you.5 When you hear a quick beep, press [Shutter].When faces are located in the center, the camera beeps rapidly.If you turn Volume off in the sound settings, the camera will not emit a beep. (p. 112) Capturing a smile shotThe camera automatically releases the shutter when it detects a smiling face.1 In Shooting mode, press [ ]].2 Select → Face Detection → Smile Shot.3 Press [ ] to return to Shooting mode. 4 Compose your shot.•The camera automatically releases the shutter when it detects a smiling face.When your subject smiles broadly, your camera can detect the smile more easily.](https://usermanual.wiki/Samsung-Electronics-Co/WB850F.User-Manual/User-Guide-1709527-Page-71.png)
![Shooting options 71Using Face DetectionUsing Smart Face RecognitionThe camera automatically registers faces that you frequently photograph. The Smart Face Recognition feature will automatically prioritize the focus on those faces and on favorite faces. The Smart Face Recognition feature is available only when you use a memory card.1 In Shooting mode, press [ ].2 Select → Face Detection → Smart Face Recognition.• : Faces that you have registered as favorites. (To register faces as favorites, refer to page 70.)• : Faces that the camera has automatically registered.Detecting eye blinkingIf your camera detects closed eyes, it will automatically capture 2 photos in succession.1 In Shooting mode, press [ ].2 Select → Face Detection → Blink Detection.•Hold your camera still while “Capturing” is displayed on the screen.•If Blink Detection fails, the “Picture taken with eyes closed.” message appears. Capture another photo.](https://usermanual.wiki/Samsung-Electronics-Co/WB850F.User-Manual/User-Guide-1709527-Page-72.png)
![Shooting options 72Using Face DetectionRegistering faces as your favorites (My Star)You can register your favorite faces to prioritize the focus and exposure on those faces. This feature is available only when you use a memory card.1 In Shooting mode, press [ ].2 Select → Smart FR Edit → My Star.3 Align your subject’s face with the oval guideline, and then press [Shutter] to register the face.Set•Capture photos of one person at a time when registering faces.•Capture 5 photos of the subject’s face for best results: one each from the front, left, right, above, and below.•When capturing photos from the left, right, above, and below, instruct the subject not to turn his or her face more than 30 degrees.•You can register a face even if you capture only one photo of the subject's face.•The camera may recognize and register faces incorrectly depending on lighting conditions, drastic changes in the subject's pose or face, and whether or not the subject is wearing glasses.•The camera can automatically register up to 12 faces. If the camera recognizes a new face when 12 faces have already been registered, it will replace the lowest priority face with the new one.](https://usermanual.wiki/Samsung-Electronics-Co/WB850F.User-Manual/User-Guide-1709527-Page-73.png)
![Shooting options 73Using Face Detection4 When you are finished capturing the photos, the face list appears.•Your favorite faces are indicated with a on the face list.•You can register up to 8 favorite faces.•The flash will not fire when you register a favorite face.•If you register the same face twice, you can delete one of the faces in the face list. Viewing your favorite faces 1 In Shooting mode, press [ ].2 Select → Smart FR Edit → Face List.•To change the ranking of your favorite faces, press [ ], and then select Edit Ranking. (p. 85)•To delete a favorite face, press [ ], and then select Delete. (p. 86)](https://usermanual.wiki/Samsung-Electronics-Co/WB850F.User-Manual/User-Guide-1709527-Page-74.png)
![Shooting options 74Adjusting brightness and colorLearn how to adjust the brightness and color for better image quality.3 Select a value to adjust the exposure.•The photo will be brighter as the exposure value increases.Back SetEV : 14 Press [ ] to save your settings.•Once you adjust the exposure, the setting will be stored automatically. You may need to change the exposure value later to avoid overexposure or underexposure.•If you cannot decide on an appropriate exposure, select the AE BKT (Auto Exposure Bracket) option (p. 79), and then capture bracketed photos. The camera will capture 3 consecutive photos, each with a different exposure: normal, underexposed, and overexposed. (p. 78)Adjusting the exposure manually (EV) Depending on the intensity of the ambient light, your photos may be too bright or dark. In these cases, you can adjust the exposure to get a better photo. Darker (-) Neutral (0) Brighter (+)1 In Shooting mode, press [ ].2 Select or → EV.](https://usermanual.wiki/Samsung-Electronics-Co/WB850F.User-Manual/User-Guide-1709527-Page-75.png)
![Shooting options 75Adjusting brightness and colorIcon Description Spot:•Your camera measures only the light intensity at the very center of the frame.•If a subject is not in the center of the frame, your photo may be improperly exposed.•Suitable for a subject with backlighting.Center-weighted:•Your camera averages the meter reading of the entire frame with emphasis placed on the center.•Suitable for photos with subjects in the center of the frame.Changing the metering option The metering mode refers to the way in which a camera measures the quantity of light. The brightness and lighting of your photos will vary depending on the metering mode you select.1 In Shooting mode, press [ ].2 Select or → Metering.3 Select an option.Icon Description Multi:•Your camera divides the frame into several areas, and then measures the light intensity of each area.•Suitable for general photos.](https://usermanual.wiki/Samsung-Electronics-Co/WB850F.User-Manual/User-Guide-1709527-Page-76.png)
![Shooting options 76Adjusting brightness and colorSelecting a White Balance settingThe color of your photo depends on the type and quality of the light source. If you want the color of your photo to be realistic, select a White Balance setting that is appropriate for the lighting conditions, such as Auto WB, Daylight, Cloudy, or Tungsten. Auto WB Daylight Cloudy Tungsten 1 In Shooting mode, press [ ].2 Select or → White Balance.3 Select an option.Icon Description Auto WB: Automatically set the White Balance based on the lighting conditions.Daylight: For outdoor photos on a sunny day.Cloudy: For outdoor photos on a cloudy day or in shadows.Fluorescent_H: For shooting under a daylight fluorescent or 3-way fluorescent light.Fluorescent_L: For shooting under white fluorescent light.Tungsten: For shooting indoor photos under incandescent bulbs or halogen lamps.Custom Set: To use White Balance settings that you define. (p. 75)Color Temp.: To adjust the color temperature of the light source. (p. 76)](https://usermanual.wiki/Samsung-Electronics-Co/WB850F.User-Manual/User-Guide-1709527-Page-77.png)
![Shooting options 77Adjusting brightness and color Customizing preset White Balance options 1 In Shooting mode, press [ ].2 Select or → White Balance.3 Scroll to a desired option.4 Press [ ].5 Press [ / / / ] to adjust the value on the coordinates.•G: Green•A: Amber•M: Magenta•B: BlueBack SetWhite Balance : Daylight6 Press [ ] to save your settings. Defining your own White Balance You can customize the White Balance by capturing a photo of a white surface, such as a piece of paper, under the lighting conditions in which you intend to capture a photo. The White Balance feature will help you to match the colors in your photo with the actual scene.1 In Shooting mode, press [ ].2 Select or → White Balance.3 Scroll to Custom Set.4 Aim the lens at a piece of white paper, and then press [Shutter].](https://usermanual.wiki/Samsung-Electronics-Co/WB850F.User-Manual/User-Guide-1709527-Page-78.png)
![Shooting options 78Adjusting brightness and color Adjusting color temperature 1 In Shooting mode, press [ ].2 Select or → White Balance.3 Scroll to Color Temp..4 Press [ ].5 Rotate the navigation button or press [ / ] to adjust the color temperature to match your light source.•You can capture a warmer photo with a higher color temperature setting (more yellow/red), and a cooler photo with a lower color temperature setting (more blue).Back SetWhite Balance : Color Temp.6 Press [ ] to save your settings.](https://usermanual.wiki/Samsung-Electronics-Co/WB850F.User-Manual/User-Guide-1709527-Page-79.png)
![Shooting options 79Using burst modesIt can be difficult to capture photos of fast-moving subjects or capture natural facial expressions and gestures of your subjects in photos. Also, it can be difficult to adjust the exposure correctly and select a proper light source. In these cases, select one of the burst modes. 3 Align your subject in the frame, and then half-press [Shutter] to focus.4 Press and hold [Shutter].•While you are pressing [Shutter], the camera captures photos continuously.•You can use the flash, Smart Zoom, Face Detection options, and Smart Filter options only when you select Single.•It may take longer to save the photos depending on the memory card capacity and performance.•The camera always displays captured photos before returning to Shooting mode.Capturing photos in the High-speed burst mode1 In Shooting mode, press [ ].2 Select an option.Icon Description 10fps: Capture 10 photos per second continuously.(You can capture up to 8 photos in one burst.)5fps: Capture 5 photos per second continuously.(You can capture up to 8 photos in one burst.)3fps: Capture 3 photos per second continuously.(You can capture up to 8 photos in one burst.)Single: Capture a single photo. Single is not a high-speed burst option.](https://usermanual.wiki/Samsung-Electronics-Co/WB850F.User-Manual/User-Guide-1709527-Page-80.png)
![Shooting options 80Using burst modesCapturing photos in the Precapture modeIn Precapture mode, the camera starts shooting before you even press the shutter all the way down. If you do not want to miss the first couple of important shots, simply use this mode and select the photo with the best results after shooting.1 In Shooting mode, press [ ].2 Select Precapture.3 Align your subject in the frame, and then half-press [Shutter] to focus.•The camera captures 7 photos continuously. If you release [Shutter] too fast, the camera captures less than 7 photos.4 Press [Shutter].•The camera capture the last photo and then saves all of the captured photos while you are half-pressing [Shutter].•If you do not press [Shutter] all the way down, the photos captured while you are half-pressing [Shutter] will not be saved.Capturing bracketed photosYou can use the automatic bracketing feature to capture multiple photos of the same subject with different setting values slightly modified, such as exposure or white balance.1 In Shooting mode, press [ ].2 Select Bracket.3 Align your subject in the frame, and then half-press [Shutter] to focus.4 Press [Shutter].•The camera captures 3 photos continuously.Use a tripod to prevent blurry photos.](https://usermanual.wiki/Samsung-Electronics-Co/WB850F.User-Manual/User-Guide-1709527-Page-81.png)