Samsung Electronics Co YPN1 Personal Navigation Device with Bluetooth User Manual YPN1 USA ENGLISH0 0 indd
Samsung Electronics Co Ltd Personal Navigation Device with Bluetooth YPN1 USA ENGLISH0 0 indd
Users Manual
Personal
Navigation
Device
user manual
YP-N1

features of your new personal navigation devices
You have chosen a cutting-edge navigation system.
Congratulations! Please enjoy using it. This navigation system leads you
straight to your destination, whether you are traveling by car or on foot.
You may navigate and plan your route with an easy to use and intuitive
interface, just by using your fi nger. You may also use this application
to plan your trip to suit your personal preferences and interests and to
save interesting destinations before you set off on your trip. This manual
leads you through the main features of the system.
WHAT IS GPS (GLOBAL POSITIONING SYSTEM)
It means a system that provides the location,
height and velocity of the receiver based on
the signals from 4 or more GPS satellites.
EASY-TO-USE NAVIGATION
The easy-to-use intuitive menu enables
users to use the various functions easily
while driving a car.
FAST AND PRECISE PATH SEARCH
You can fi nd the optimal path to stopover
and destination so that you can reach the
destination faster and more conveniently.
If you drive away from the recommended
path, new path is automatically found in a
short time.
EASY DESTINATION SEARCH
You can easily search for a destination
by selecting a location from the map, or
specifying address, POI, or Favorites.
REAL-TIME VOICE ANNOUNCEMENT
Rest areas and gas stations as well as the
path are also announced in real-time.
BLUETOOTH COMPLIANCE (YP-N1BZ ONLY)
You can register a Bluetooth hands-free
(mobile phone) to the product and connect it
via Bluetooth wireless connection.
2 _ features of your new personal navigation devices
safety information _ 3
safety information
What the icons and signs in this user manual mean :
WARNING
Means that death or serious personal injury is a risk.
CAUTION
Means that there is a potential risk for personal injury or
material damage.
CAUTION
To reduce the risk of fi re, explosion, electric shock, or
personal injury when using your product, follow these
basic safety precautions:
NOTE
Means hints or referential pages that may be helpful to
operate the player.
Do NOT attempt.
Do NOT disassemble.
Do NOT touch.
Follow directions explicitly.
Unplug the power plug from the wall socket.
Call the service center for help.
These warning signs are here to prevent injury to you and others.
Please follow them explicitly. After reading this section, keep it in a safe place for
future reference.
4 _ safety information
safety information
This manual describes how to properly use your product. Read it carefully to
avoid damaging the product and injuring yourself.
Pay particular attention to the following serious warnings:
PROTECT YOURSELF
Only use an authorized charger to charge the product. Do not use
unauthorized power adapter to charge the product.
Do not connect multiple power cords to one wall outlet using a multi-tap.
Do not operate the product or stare at the screen while driving.
Avoid bending the power cord or placing a heavy object over the power cord.
Do not get the product wet or drop it in water. If the product gets wet, do
not switch it on because you could get an electric shock. Instead, contact a
Samsung Service Center near you.
Do not place the product in damp, dusty, or sooty areas because these
environments could lead to fi re or electric shock.
Do not pull the power cord out by holding the plug. If the cable is damaged, it
may cause a fi re or electric shock.
Since the map of this product may differ from the actual road information,
follow traffi c regulations in a real road situation for your safety.
Unplug the power cord when you do not use this product or it is lightning or
thunder storming.
safety information _ 5
PROTECT YOURSELF
Do not tap on the power cord with wet hands.
Do not disassemble, repair, or modify this product on your own.
If the system emits smoke, or unusual noise, or smells of burning, turn
the system off immediately, disconnect the power sources, and contact
Samsung customer service.
PROTECT YOUR PRODUCT
Do not leave the product in temperatures above 95°F (35°C), such as a
sauna or a parked car.
Do not drop the product or place heavy objects on top of it.
Prevent any foreign particles or dust from entering into the product.
Do not place the product near magnetic objects.
Do not remove the SD memory card during operation of the navigation
system.
Be sure to backup important data. Samsung is not responsible for
data loss.
Use only accessories provided by or approved by Samsung.
Start the engine after disconnecting the vehicle charger. Otherwise, the
product may be damaged.
Do not spray water on the product. Never clean the product with chemical
substances such as benzene or thinner, as it may cause fi re, electric
shock or deteriorate the surface.
CAUTION
CAUTION

6 _ safety information
PRECAUTIONS FOR ROUTE GUIDANCE
Some part of the map of this product may differ from the actual road
conditions and the information provided by the route guidance may be
incorrect. In this case, please drive according to the actual road situation
and traffi c regulations.
If the condition of the road guided by the route guidance is not good due
to bad weather, use alternative road depending on situation.
The position indicated by the GPS may be incorrect depending on the
surrounding terrain condition and weather. In this case, since the current
location is incorrect, the route guide may provide incorrect information.
For newly built or expanded roads, the route guidance may provide
incorrect information. In this case, correct information will be given by the
route guidance as soon as the road of the map becomes consistent with
the real road.
The read condition is subject to change at any time. It is recommended to
keep your map up to date for safe driving. The route guidance is for your
reference while driving.
CAUTION
NOTE

contents
THE BASICS
11
11 What’s included
12 Your personal navigation device
14 Cradle
15 Using the touch screen
16 screen displays
17 Installing the device onto your
vehicle
18 Separating the device from your
vehicle
19 Charging the battery
20 Charging the battery using the car
charger
21 Hardware power on/off switch
22 Using SD memory card
24 Installing external-type GPS antenna
(Not Supplied)
25 Installing TMC antenna
26 Changing the settings and
preperences
26 Map Settings
28 Display Settings
30 Route Settings
31 Sound Settings
32 General Settings
34 Language & Unit Settings
35 System Settings
36 About
37 Usingnavigation system
37 Zooming in/out the map
38 Controlling the volume
39 GPS data/traffi c infomation
40 Resetting the system

contents
USING THE NAVIGATION
41
41 Planning a route
42 Specifying a start point
43 Adding a stopover
43 Removing a stopover
43 Changing the fi nal destination
44 Saving locations in favorite
45 Saving the location of safety
camera
46 Saving the locations of home and
work place
47 Finding an address
48 Finding home or workplace
49 Finding out favorites
50 Finding a recently visited place
51 Finding POI (point of interest)
53 Coordinates
54 Route settings
54 Recalculate
55 Itinerary
56 Edit route
58 Clear route
58 Route Info
59 Simulation
59 Turn view
60 Manage track logs

contents
MORE THAN
NAVIGATION
62
62 Using Bluetooth
62 What is Bluetooth?
63 Bluetooth specifi cation
64 Using mobile phone
64 To pair a mobile phone
65 To search for a new mobile phone
65
To remove a mobile phone from the list
65 To rename a device
66 To pair a mobile phone
67 To search for a new mobile phone
67
To remove a mobile phone from the list
67 To rename a device
68 To redial using the recent call number
68 To answer an incoming call
68 To switch a call
69 To switch to the mobile phone while
talking on the hands-free device
(YP-N1)
69 To switch to the hands-free device
(YP-N1) while talking on the mobile
phone
69 To disconnect the mobile phone
70 To use the tone keyboard
70 To view my device information

contents
CONNECTING TO
YOUR PC
71
71 PC requirements
72 Connecting to your PC
73 Disconnecting from your PC
74 Using the map manager
TROUBLESHOOTING
76
APPENDIX
79
79 Menu tree
80 Product specifi cations
82 Contact samsung world wide
the basics _ 11
01 THE BASICS
the basics
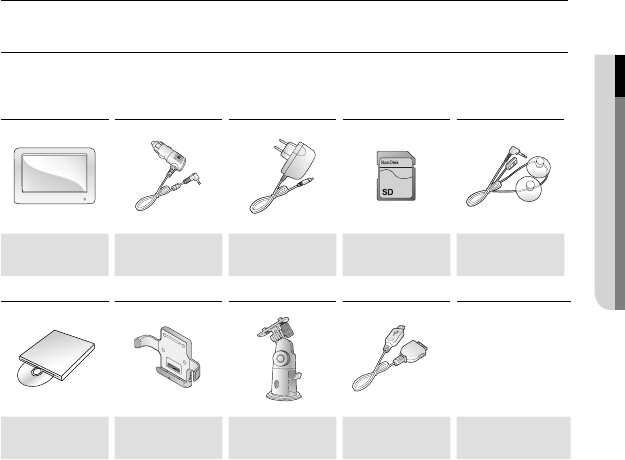
WHAT’S INCLUDED
Your new Personal Navigation Device comes with these accessories.
If you’re missing any of these items, contact a Samsung Service center near you.
Personal
Navigation Device
Car Charger
Power Adapter SD Memory Card
TMC antenna
Installation CD Car Cradle Cradle USB Cable Carrying Case
(YP-N1BZ only)
The accessories in your box may look slightly different than these.
12 _ the basics
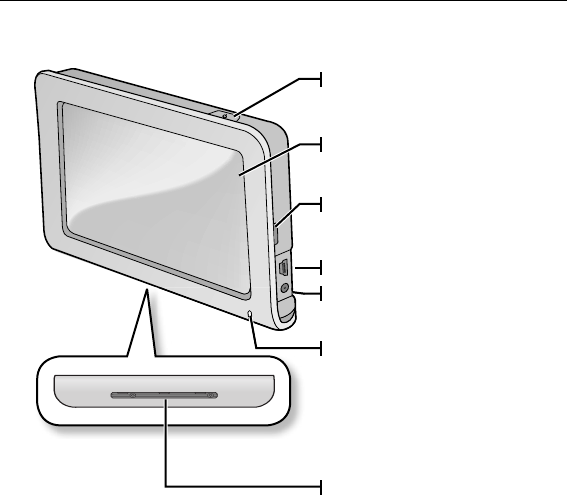
YOUR PERSONAL NAVIGATION DEVICE
Power button
Press and briefl y hold for power on/off
Touch screen display
Fixing Groove
Use it to fi x the main body on the
cradle.
USB Connection port
Battery indicator
It is turned on when the power adapter
or car charger is connected.
Charging : Red
Charge Complete : Green
Power Connection port
Connect the power adapter or car
charger here.
Fixing Groove
Use it to fi x the main body on the
cradle.
the basics _ 13
01 THE BASICS
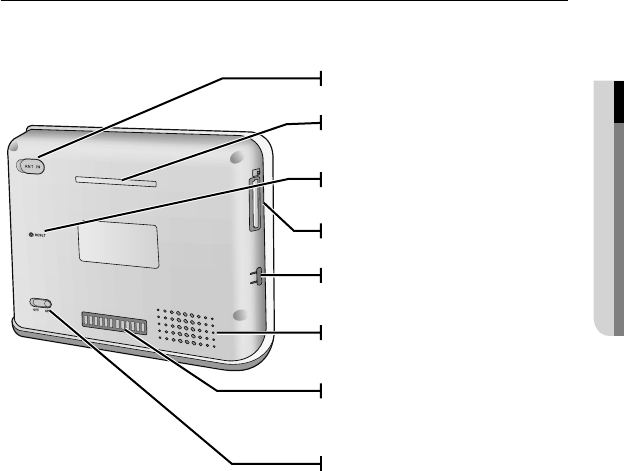
YOUR PERSONAL NAVIGATION DEVICE (Continued)
SD
GPS antenna (not supplied)
input connection port
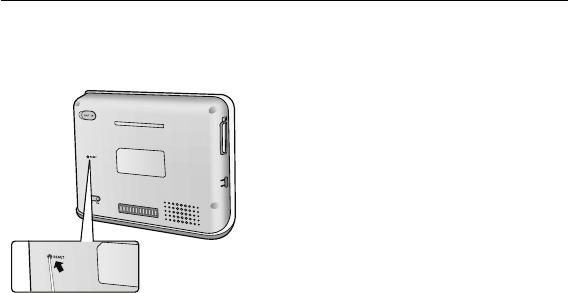
Reset hole
Press with a pointed object to reset
SD Memory card slot
Fixing Groove
Use it to fi x the main body on the
cradle.
Speaker
Cradle connecter terminal
Port connecting the main unit and the
cradle.
Hardware Power On/Off switch
To use the device on the built-in
battery power without connecting
an external power source, you have
to slide the Hardware Power On/Off
Switch to On.
Fixing Groove
Use it to fi x the main body on the
cradle.
14 _ the basics
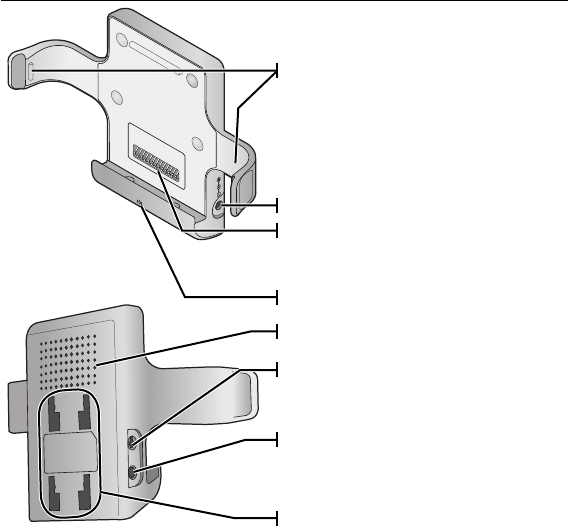
CRADLE
Side fi xing parts
Use it to fi x the main body on the cradle.
Main unit connector terminal
Port connecting the main unit and the cradle so
as to provide speaker and power connections.
Power connection port
Microphone
Speaker
TMC connection port
If you connect a TMC antenna, traffi c and
living information is provided.
External microphone connection port
You can connect a microphone and use it
to talk over the phone using the Bluetooth
function (YP-N1BZ only).
Cradle fi xing grooves
Fixing Groove used to fi x the cradle over the
stand.
the basics _ 15
01 THE BASICS
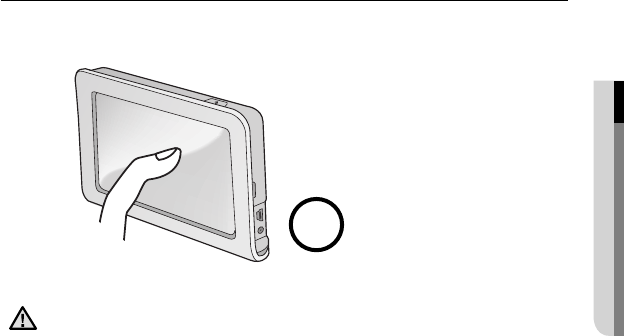
USING THE TOUCH SCREEN
Tap on over the screen with your fi nger tips.
Using a sharp object to tap on on the screen may cause damage to it.
Avoid tap on the touch screen with dirty fi ngers.
CAUTION
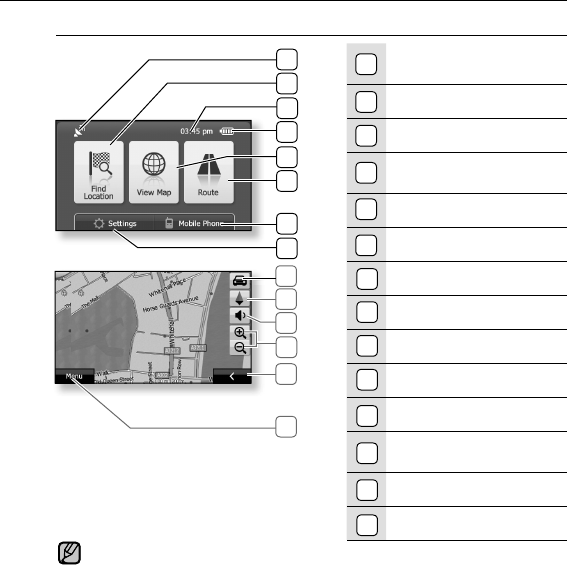
SCREEN DISPLAYS
Main (Driving Mode)
GPS Signal Reception
Status
Find Location button
Current Time
Remaining Battery
Capacity
View Map button
Route button
Mobile phone button
Settings button
GPS button
Zoom-In/Zoom-Out Button
Volume Control button
Show/Hide Setup Route
Buttons
Compass
MENU button
The Blue tooth function supports only these models. (YP-N1BZ)
1
2
3
4
7
8
9
5
6
10
11
NOTE
16 _ the basics
12
13
14
5
6
1
2
7
8
4
3
13
9
10
12
14
11
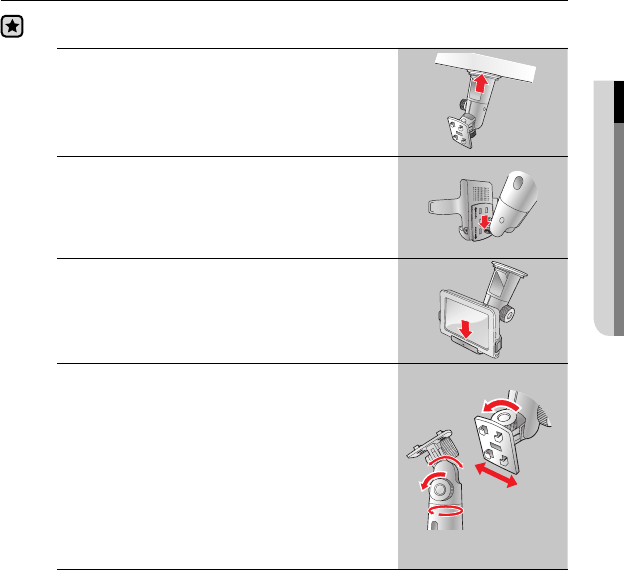
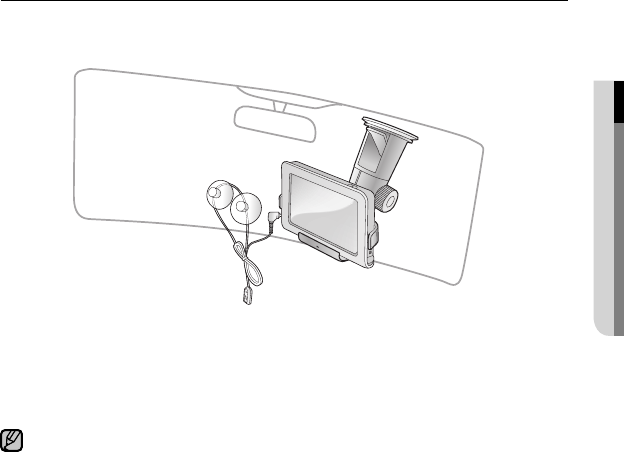
INSTALLING THE DEVICE ONTO YOUR VEHICLE
Before you start - Select a position to install the cradle that will not block driver’s
field of vision and clean the place before installation.
1.
Attach the suction cup to the place you selected
completely and push the locking tab in the
direction of the arrow shown by the fi gure.
The suction cup is secured.
2. Insert the catches of the stand to the Cradle
Fixing Grooves and slide the cradle so that
the catches are in the CLOSE position.
3. Insert the main unit into the cradle.
Put the main body into the cradle until it clicks
at the both side of the fi xing parts in order to
secure the installation.
4.
Adjust the angle of the support to facilitate
your visibility.
Release the adjustment screw 1 counterclockwise
slightly and adjust the angle between the 180
degrees in vertical and 360 degrees in horizontal. If
you fi nd a comfortable angle, fasten the adjustment
screw 1 by turning it clockwise.
Release the adjustment screw 2
counterclockwise slightly and adjust the
angle between the 180 degrees in horizontal.
If you fi nd a comfortable angle, fasten the
adjustment screw 2 by turning it clockwise.
the basics _ 17
01 THE BASICS
18 _ the basics
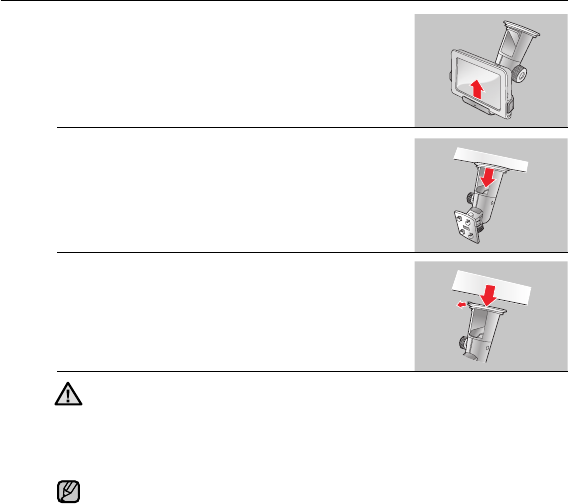
SEPARATING THE DEVICE FROM YOUR VEHICLE
1. Pull the both sides of fi xing parts of the cradle
outward and separate the main unit from the
cradle.
2. Pull the locking tab in the direction of the
arrow shown by the fi gure.
The suction cup is released.
3. Remove the suction cup by holding the
projected part.
The cradle is separated.
Install the cradle to a position that does not block driver’s fi eld of vision and
will not cause an injury of the driver or follow passenger even if it falls.
Note that the adsorption of the suction cup may decrease when the
temperature difference between outside and inside is high.
Separate the cradle from the vehicle for long time of no use.
The adsorption of the suction cup is the best when the temperature of the
inside car is between 10~50ºC.
CAUTION
NOTE
the basics _ 19
01 THE BASICS
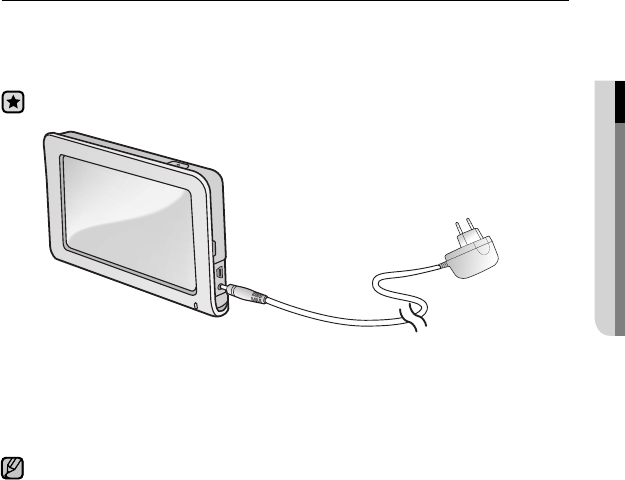
CHARGING THE BATTERY
Charge it before using the player for the fi rst time and when you haven’t used it
for a long time.
The battery for your mp3 player will fully charge in about three and a half hours,
although total charging time varies depending on your PC environment.
Before you start - Slide the Hardware Power On/Off Switch to OFF.
1. Connect the power adapter jack (A) to the Power connection port.
2. Plug the power adapter plug (B) to the wall outlet.
The LED turns on in red while charging the better and it turns to green when it is fully
charged.
It is recommended using the device by connecting it to a power source when you
use it in a house or vehicle where power source is available and moving the device
is not frequently required.
The battery may be discharged when you first use this product. Fully recharge the
battery before use.
NOTE
A
B

20 _ the basics
CHARGING THE BATTERY USING THE CAR CHARGER
The battery for your mp3 player will fully charge in about three and a half hours.
1. Install the main unit into the cradle.
2. Connect the car charger jack (A) to the Power connection port of the cradle.
3. Plug the car charger plug (B) into the cigar jack of the vehicle.
CARING FOR THE BATTERY
Your battery will last longer if you follow these simple guidelines for caring for
and storing it.
• Recharge and store the battery within the temperature range of 40°F~95°F
(5°C~35°C ).
• Do not charge the battery longer than 12 hours.
A
B
the basics _ 21
01 THE BASICS
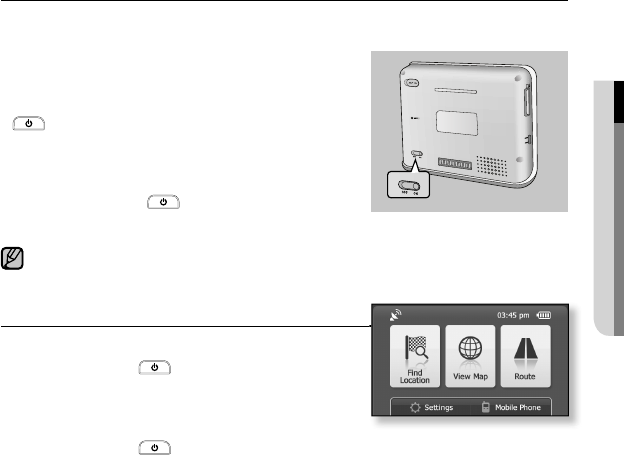
HARDWARE POWER ON/OFF SWITCH
To use the built-in battery power without connecting the power adapter or car
charger, you have to slide the Hardware Power On/Off switch to On.
To turn the Hardware Power On/Off Switch on
Slide the Hardware Power On/Off switch to ON.
Alternatively you can turn the power on by pressing the
button.
To turn the Hardware Power On/Off Switch off
Slide the Hardware Power On/Off switch to OFF.
Even if you press the button, the power will not be
turned on.
When the product is left unused for an extended time, slide the Power On/Off switch
to OFF to avoid discharged battery.
TURNING THE POWER ON & OFF
To turn the power on
Press and hold the button.
The power is turned on.
To turn the power off
Press and hold the button.
The power is turned off.
NOTE
SD

22 _ the basics
USING SD MEMORY CARD
Before you start - Insert or remove the SD memory card only when the power is
turned off.
Removing the SD memory card
Press the SD memory card tip slightly.
The SD memory card pops up.
Inserting the SD memory card
Insert the SD memory card as shown by the
fi gure.
Insert SD memory card so that the label faces
forward.
write protection switch
A SD card supports a mechanical write
protection switch. Setting the switch prevents
accidental erasure of fi les recorded on the SD
card.
To enable writing, move the switch up to the
direction of terminals. To set write protection,
move the switch down.
the basics _ 23
01 THE BASICS
USING SD MEMORY CARD (Continued)
The SD memory card may have insuffi cient free space as it has stored the
map data. In this case, purchase another one in the Internet shopping mall
or digital camera shop.
If an adapter is required for the memory card you have purchased, make
sure to use the memory card by using an appropriate adapter. If you use a
non-compatible card, it may be damaged or you will not be able to remove it.
Do not remove the memory card while the navigation system is running.
Do not insert a memory card upside down or in a wrong direction.
Unsupported memory cards
Some SD memory cards, if thick out of the specifi cation or with a label
attached onto it, may not be removed.
This product supports up to 4GB of memory capacity.
Memory cards other than SD such as T-Flash are not supported.
When you keep or carry a memory card, package it with the memory card
case because the data may be damaged by antistatic electricity.
Please note that manufacturer shall not be liable to the data loss due to the
damage of the memory card.
If you turn the main unit on under no memory card inserted, the icon
appears on the screen.
CAUTION
NOTE
24 _ the basics
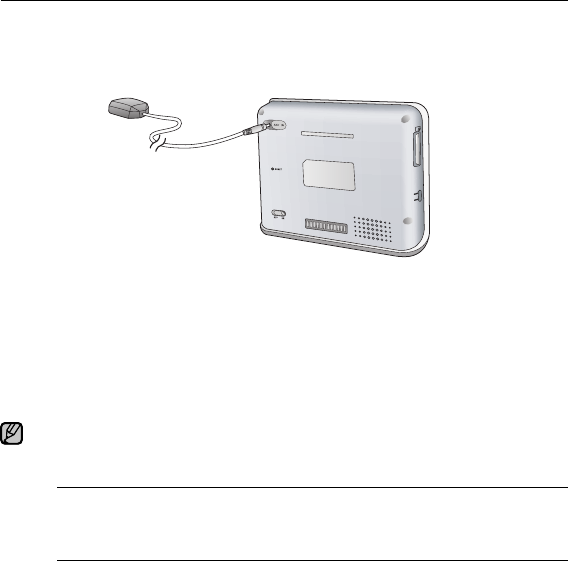
INSTALLING EXTERNAL-TYPE GPS ANTENNA (NOT SUPPLIED)
Installing en external-type SPG antenna when the received GPS signal strength
weak, will provide better GPS signal sensitivity.
1. Connect the GPS antenna jack (A) to the GPS antenna input connection
port of the main unit.
2. Install the GPS antenna (B) on the roof of the vehicle or a metal part of the
hood.
3. Arrange the GPS antenna cable so that it will not disturb driving.
The external-type GPS antenna is unbundled. You can purchase one in a navigation
device shop.
Recommended GPS antenna models
SD
NOTE
the basics _ 25
01 THE BASICS
INSTALLING TMC ANTENNA
If you install TMC antenna, you can use useful information such as traffi c and
living information.
1. Clean up the windshield.
2. Attach the TMC antenna (A) to the windshield.
3. Connect the TMC antenna jack (B) to the TMC connection port (C) of the
cradle.
Arrange the TMC antenna cable so that it will not disturb your driving.
In some areas, the TMC reception sensitivity may not be good enough.
NOTE
26 _ the basics
CHANGING THE SETTINGS AND PREPERENCES
Your Personal Navigation Device comes with settings and preferences that
were set up at the factory, but you can change these pre-set values to truly
customize your product.
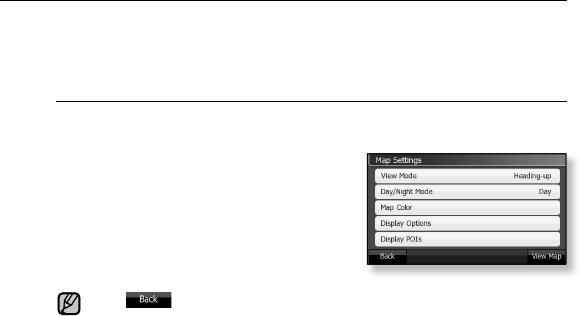
Map Settings
You can confi gure map settings such as View Mode, Day/Night Mode,
Map Color, etc.
1. Tap “Settings” button in the main menu.
The “Settings” window appears.
2. Tap “Map” button.
The “Map” settings window appears.
3. Confi gure the settings you want by
tapping on a desired button.
Tap button to move to the previous screen.
If you tap “View Map” button in the Map Settings window, you can move to
the map screen.
NOTE
the basics _ 27
01 THE BASICS
CHANGING THE SETTINGS AND PREPERENCES (continued)
Map setting options
View Mode : Select one from “Heading-up, North-up, and 3D” and tap OK button.
“Heading-up” rotates the map so that the vehicle always moves upward. (The
most popular mode). “North-up” fi xes the map regardless of the heading of the
vehicle so that north of the map is located on top. “3D” mode enables the user to
view the map in 3D. You can switch the mode by tapping on the compass icon on
the map screen.
Day/Night Mode :Select one from “Day, Night, and Auto” and tap OK button.
“Auto” mode automatically switches to Day or Night mode according to the actual
time. (Time is automatically set through GPS.)
Map Color : Select a map color by tapping on the button and select the
OK button.
Display Options : Select one from “Alternative Road Names, Show Street Labels,
and Textured Polygons” and tap OK button. “Alternative Road Names” determines
which road name will be displayed when there are more then a name for a road.
“Show Street Labels” shows street names. “Textured Polygons” shows roads in a
graphical form.
Display POIs : You can select interest information items (Services,
Transportation, etc.) to be displayed. Select an item you want and tap on either
the Show or Hide button.
The items marked with are displayed on the map.
28 _ the basics
CHANGING THE SETTINGS AND PREPERENCES (continued)
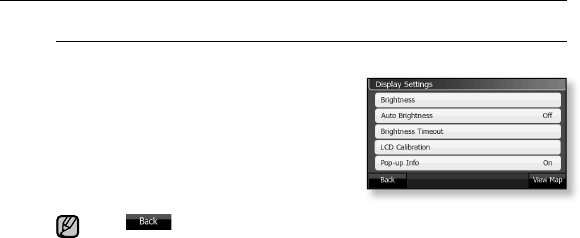
Display Settings
You can confi gure screen settings such as Brightness, Auto Brightness, etc.
1. Tap “Settings” button in the main menu.
The “Settings” window appears.
2. Tap “Display” button.
The “Display” settings window appears.
3. Confi gure the settings you want by
tapping on a desired button.
Tap button to move to the previous screen.
If you tap “View Map” button in the Display Settings window, you can move
to the map screen.
NOTE
the basics _ 29
01 THE BASICS
CHANGING THE SETTINGS AND PREPERENCES (continued)
Display setting options
Brightness : You can adjust the screen brightness depending on the surrounding
brightness that changes according to the time.
Tap , button to adjust the brightness to the level you want, and tap OK
button.
Auto Brightness : This function automatically detects surrounding brightness and
adjust the screen brightness accordingly. Select either “On” or “Off”.
Brightness Timeout : If no button is pressed within the time set shown below, the
display screen will automatically turn off. Select one from “Always On, 15 Sec, 30
Sec, and 1 min” and tap OK button.
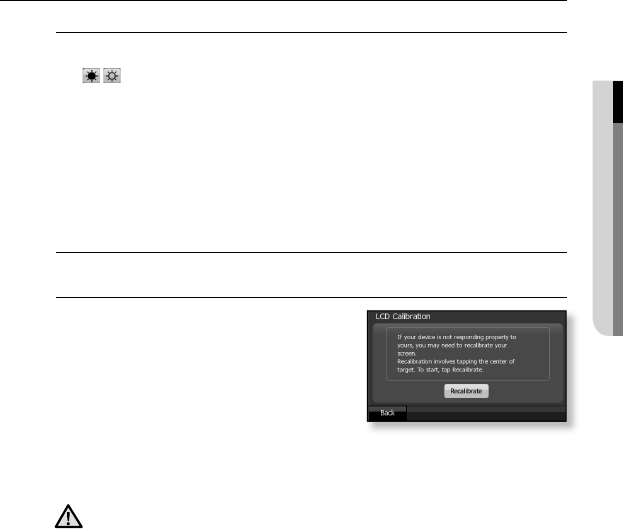
LCD Calibration : If the tapping point is incorrectly set, you can reset it into focus.
Pop-up Info : You can determine whether to display information such as address,
fi rm name, etc. Select either “On” or “Off”.
LCD Calibration Settings
1. Tap LCD Calibration button.
The LCD calibration confi rmation screen
appears.
2. Point on the center of focus using a
ball-point pen.
The location of the focus changes as
shown in the fi gure. If you tap on the focus
5 times, the setting confi rmation message appears.
3. To save the new focus setting, tap on any point on the screen.
The setup is completed and the product returns to the previous menu.
Using a sharp object to touch on the screen may cause damage to it.
CAUTION
30 _ the basics
CHANGING THE SETTINGS AND PREPERENCES (continued)
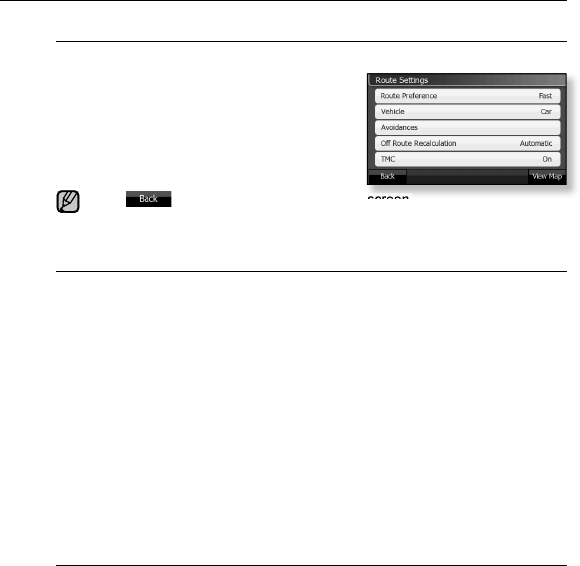
Route Settings
You can confi gure route related options such as Route Preference, Vehicle, etc.
1. Tap “Settings” button in the main menu.
The “Settings” window appears.
2. Tap “Route” button.
The “Route” settings window appears.
3. Confi gure the settings you want by
tapping on a desired button.
Tap button to move to the previous screen.
If you tap “View Map” button in the Route Settings window, you can move
to the map screen.
Route setting options
Route Preference : Select one from “Fast, Short, or Economical” and tap OK button. “Fast”
option provides the fastest route, “Short” provides the shortest route, and “Economical”
provides the cheapest route that requires the minimum gas consumption.
Vehicle : Select one from “Car, Taxi, Bus, Lorry, Emergency, Pedestrian, and Bicycle” and
tap OK button.
Avoidances : Select one from “Unpaved Roads, Motorways, Ferries, U-turns, Permit
needed, Toll roads” not to listen to information about the selection in the route guidance and
tap OK button.
Off Route Recalculation : Select one from “Automatic, Ask First, and Off” and tap OK
button. The “Automatic” option automatically fi nds a new route when you drive out of the
recommended route. The “Ask First” mode will ask you fi rst to determine whether to fi nd a
new route again. The “Off” mode will not fi nd a new route even if you drive away from the
recommended route.
TMC : You can confi gure traffi c information provision function. “Exclude selected station”
provides traffi c information including the selected area. “Show excluded stations” allows
you to confi rm the area included in the traffi c information provision area. The “Automatic”
option of “Recalculation to avoid traffi c” enables fi nding a route avoiding traffi c-jammed
area, while the “Disabled” option fi nds a route regardless of traffi c information.
NOTE

the basics _ 31
01 THE BASICS
CHANGING THE SETTINGS AND PREPERENCES (continued)
Sound Settings
You can confi gure volume and sound settings.
1. Tap “Settings” button in the main menu.
The “Settings” window appears.
2. Tap “Sound” button.
The “Sound” settings window appears.
3. Confi gure the settings you want by
tapping on a desired button.
Tap button to move to the previous screen.
If you tap “View Map” button in the Sound Settings window, you can move
to the map screen.
Sound setting options
Volume : You can control the volume level. Tapping on the button turns the
volume up, while tapping on the button turns the volume down. To select the
Mute function, press the button so that the icon appears. To cancel the
Mute function, tap button so that the icon changes to .
Dynamic Volume : You can setup the volume so that the volume rises as the
velocity increases. Select “On” to automatically adjust the volume according to the
velocity. Select “Off” to keep the volume level steady.
Touch Tones : You can determine whether to enable or disable the touch tone.
Select either “On, or Off”.
Voice Guidance Attention Tone : Select one from “Single Tone, Dual Tone,
and Off” and tap OK button. “Single Tone” sounds an alarm once before voice
guidance. “Dual Tone” sounds an alarm twice before voice guidance.
“Off” does not sound an alarm before voice guidance.
NOTE
32 _ the basics
CHANGING THE SETTINGS AND PREPERENCES (continued)
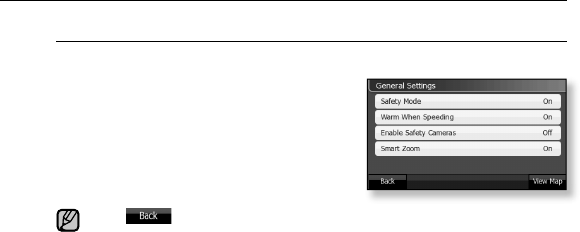
General Settings
You can confi gure Safety Mode and Warn When Speeding settings.
1. Tap “Settings” button in the main menu.
The “Settings” window appears.
2. Tap “General” button.
The “General” settings window appears.
3. Confi gure the settings you want by
tapping on a desired button.
Tap button to move to the previous screen.
If you tap “View Map” button in the General Settings window, you can move
to the map screen.
NOTE

the basics _ 33
01 THE BASICS
CHANGING THE SETTINGS AND PREPERENCES (continued)
General setting options
Safety Mode : You can confi gure the touch screen so that it does not work while
driving for safety purposes. To use the Safety Mode, select “Yes”. Otherwise,
select “No”.
Warn When Speeding : You can set the alarm so that it sounds when you are
driving faster than the speed limit. Select either “On, or Off”.
To Setup Options
Tap “Options” button and set a speed limit by using the and buttons.
Using the “Speeding tolerance” option, you can set an allowed margin for the
speed limit in percentage. (Example: If you set the “Speeding tolerance” option
to “10%”, an alarm sounds when you drive faster than 88km on a road where
the speed limit is 80km.) Using the “Alternative speed limit” option, you can
setup a speed limit in Km/h.
Enable Safety Cameras :
You can determine whether to display the Safety
Cameras (speedcam). Select either “On, or Off”.
If you set the Enable Safety Cameras option to “On”, a confi rmation message will
appear saying that it can be illegal in some areas. To display Safety Cameras, select
“Yes”. Otherwise, select “No”.
Smart Zoom : This function automatically zooms in the map when turning your
vehicle such as turning left, turning right and making a U-turn. After that, the map
is automatically zoomed out so that you can view more far distance on the map.
Select either “On” or “Off”.
34 _ the basics
CHANGING THE SETTINGS AND PREPERENCES (continued)
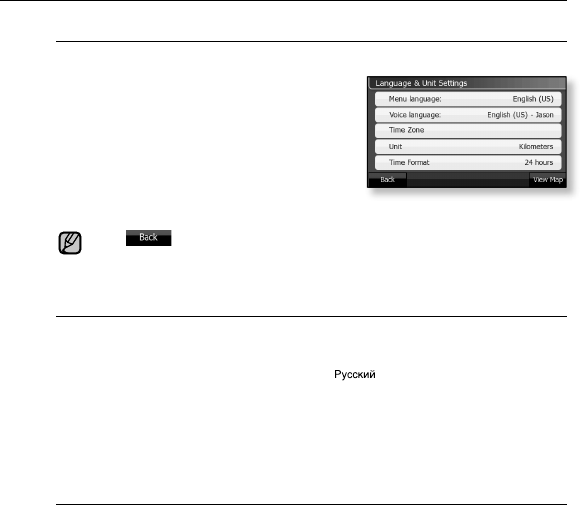
Language & Unit Settings
You can set the language, time, and unit of distance.
1. Tap “Settings” button in the main menu.
The “Settings” window appears.
2. Tap “Language & Unit” button.
The “Language & Unit” settings window
appears.
3. Confi gure the settings you want by
tapping on a desired button.
Tap button to move to the previous screen.
If you tap “View Map” button in the Language & Unit Settings window, you
can move to the map screen.
Language setting options
Menu language : You can select a language for the screen display.
“English(AU), English(UK), English(US), Español, Français, Hebrew, Hrvatski,
Italiano, Magyar, Nederlands, Norsk, Polski, Português, Română, Slovenský,
Suomi, Svenska, Türkçe, Vlaams, Ελληνικά, ”
Voice language : You can select a language and voice type (male / female) for
the voice guidance.
Time Zone : You can select your time zone depending on your location.
Unit : You can setup so that the distance is displayed in “Miles” or “Kilometres”.
Time Format : “12 hours” option shows time in 12 hours and “24 hours” shows
time in 24 hours.
NOTE
the basics _ 35
01 THE BASICS
CHANGING THE SETTINGS AND PREPERENCES (continued)
System Settings
You can confi gure various system settings.
1. Tap “Settings” button in the main menu.
The “Settings” window appears.
2. Tap “System” button.
The “System” settings window appears.
3. Confi gure the settings you want by
tapping on a desired button.
Tap button to move to the previous screen.
If you tap “View Map” button in the System Settings window, you can move
to the map screen.
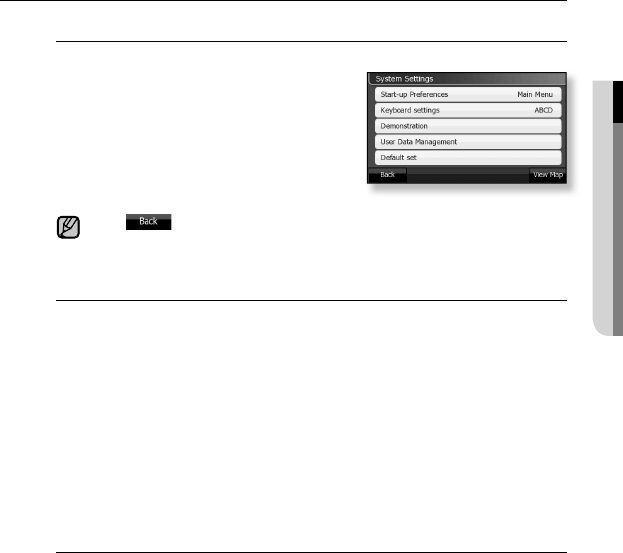
System setting options
Start-up Preferences : You can select the start menu that appears when you turn
the power on. Select one from “Main Menu, Map, and Find Location” and tap OK
button.
Keyboard settings : You can setup the keyboard to be displayed on the text
input screen.
Demonstration : You can view a driving simulation.
User Data Management : You can save data such as route and user settings
into an SD memory card and read and delete the data saved in the memory card.
Select one from “Backup Data, Restore Data, and Clear Data” and tap OK button.
Select “Backup Data” to backup data into a memory card. Select “Restore Data” to
restore data using the backup fi le. Select “Clear Data” to delete data. The saved
data appears as “iGO-backup.db” fi le in the <Removable Disk> on a PC. You can
copy the “iGO-backup.db” fi le into the PC for later use.
Default set :
You can restore all settings to default values. Select either “Yes” or “No”.
NOTE
36 _ the basics
CHANGING THE SETTINGS AND PREPERENCES (continued)
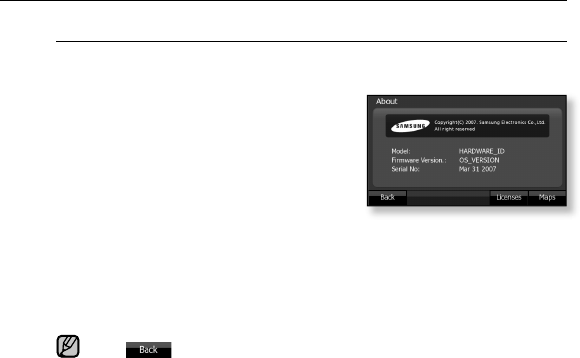
About
You can view system related information such as model name, fi rmware
version, serial number, etc.
1. Tap “Settings” button in the main menu.
The “Settings” window appears.
2. Tap “About” button.
The “About” window appears.
You can view model name, fi rmware
version, and serial number.
For the procedures to upgrade the
fi rmware, refer to the fi rmware upgrade instructions. X Page 69
3. Tap on the “Licenses” tab.
You can view available maps.
4. Tap on the “Maps” tab.
You can view area supported by the navigation function.
Tap button to move to the previous screen.
NOTE
the basics _ 37
01 THE BASICS
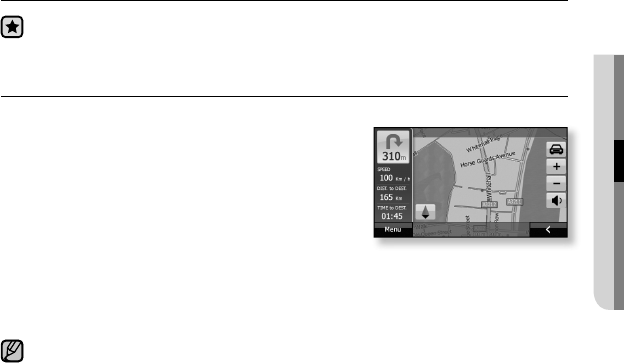
USING NAVIGATION SYSTEM
Before you start - Before using the navigation system, set the Language and Time
Zone. (See Page 35)
1. Tap “View Map” button in the main menu.
You will see a map on the screen.
2. Select a desired destination by tapping on or
dragging it.
3. Tap “Route To” button.
The route from the current location to destination is
automatically searched for.
4. Start driving.
The navigation system starts automatically.
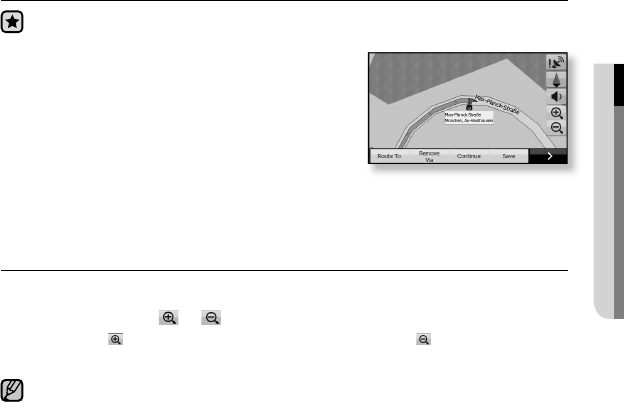
ZOOMING IN/OUT THE MAP
You can zoom in or out the map.
To zoom in or out, tap or button on the right side of the map.
Tapping on the button zooms in the map, while tapping on the button zooms out
the map.
If you select <Settings>-><General> and set <Smart Zoom> to <On>, The map is
automatically zoomed in when you turn your vehicle such as turn left, turn right and
make a U-turn. After that, the map is automatically zoomed out so that you can view
more far distance on the map.
NOTE
38 _ the basics
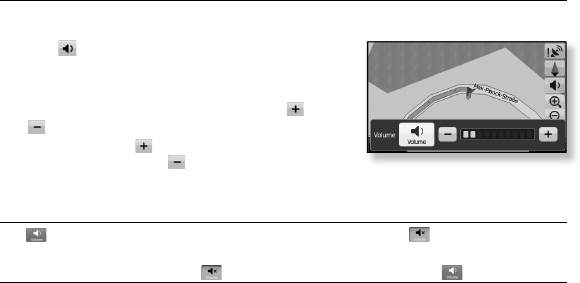
CONTROLLING THE VOLUME
You can control the volume of the touch tone and voice guidance.
1. Tap button on the right side
of the map.
The volume control window appears.
2. Adjust the volume by tapping on the and
buttons.
Tapping on the button turns the volume up,
while tapping on the button turns the volume
down.
To use the Mute function
Tap button in the volume control menu. If the icon changes to ,
the sound will be muted.
To cancel the Mute function, tap button so that the icon changes to .

the basics _ 39
01 THE BASICS
GPS DATA/TRAFFIC INFOMATION
You can view GSP information such as accuracy, position, etc.
1. Tap button on the right side
of the map.
The GPS information screen appears.
2. To view traffi c information, tap
“Traffi c Info” button.
Traffi c Events are listed.
Distance: You can view traffi c information near you
fi rst.
Type: You can view traffi c information by type.
40 _ the basics
RESETTING THE SYSTEM
When the product does not work properly or cannot be turned off, you can reset
the product.
Press the Reset hole with a sharp
object.
The system will be initialized.
Your settings and data will not be affected.
SD
using the navigation _ 41
02 USING THE NAVIGATION
using the navigation
Before you start - Check if the SD memory card is inserted in the device.
Connect the power or turn the device on and then check the charge status.
PLANNING A ROUTE
You can select a desired destination on the map, based on the current location.
1. Tap “View Map” button in the main menu.
You will see a map on the screen.
2. Select a desired destination by tapping on or
dragging it.
3 . Tap “Route To” button.
The route from the current location to destination is
automatically searched for.
The current location is marked with a blue fl ag and the destination is marked with a
red fl ag.
4. Start driving.
The navigation system starts automatically.
If the “Calculating route…” message appears, please wait for a moment. It takes
some time to search for a route.
The route search time differs, depending on the distance and the route settings.
NOTE

42 _ using the navigation
SPECIFYING A START POINT
You can select a desired destination on the map, based on the current location.
1. Tap “View Map” button in the main menu.
You will see a map on the screen.
2.
Select a start point by tapping on or dragging it.
3. Tap “Start” button.
The start point will be marked with a blue fl ag.
4. Select a desired destination by tapping on or
dragging it.
5. Tap “Route To” button.
The route from the start point to the destination is automatically searched for.
The destination is marked with a red fl ag.
using the navigation _ 43
02 USING THE NAVIGATION
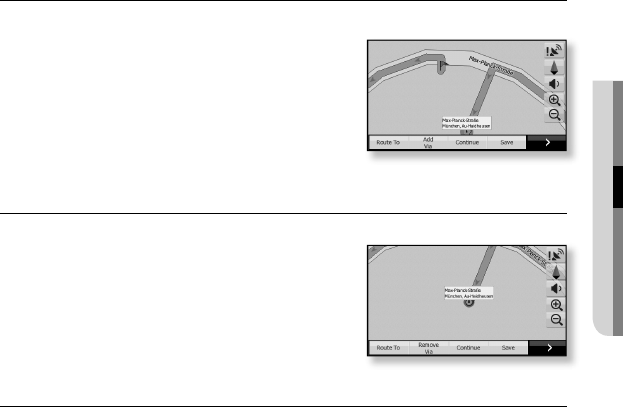
ADDING A STOPOVER
You can add a stopover between the start point and the destination.
1.
When the navigation route is set, select a
stopover by tapping on or dragging it.
You will see a map on the screen.
2. Tap “Add Via” button.
The stopover is marked with a white fl ag and the
navigation route is recalculated.
You can add stopovers on and on.
REMOVING A STOPOVER
You can delete a start point, destination or stopover.
1. Select a stopover to delete on the map.
2. Tap “Remove Via” button.
The selected stopover is removed.
CHANGING THE FINAL DESTINATION
You can change a fi nal destination.
1. When the navigation route is set, select a fi nal destination by tapping on or
dragging it.
2. Tap “Continued” button.
The initial destination is changed to a stopover and marked with a white fl ag.
The fi nal destination is marked with a red fl ag.
44 _ using the navigation
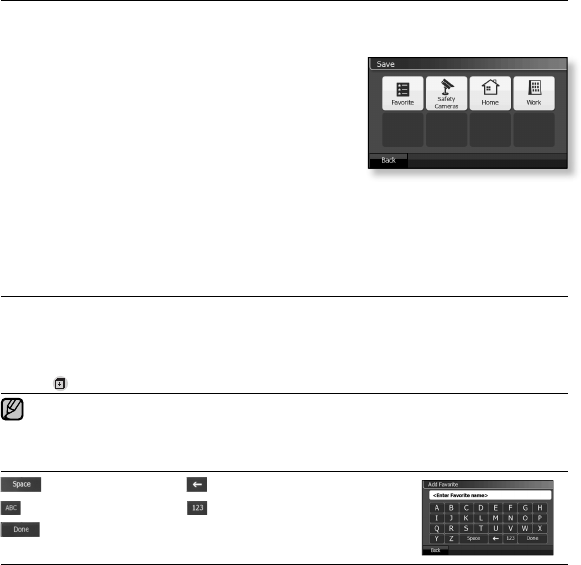
SAVING LOCATIONS IN FAVORITE
You can save your favorite destinations to quickly access them when planning
your route.
1. Select a desired location by tapping on or
dragging it.
You can also search for a location you want by using
the “Find Location” function. (See page 51~57)
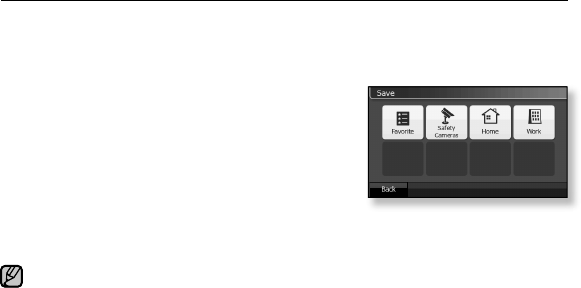
2. Tap “Save” button.
The Save window appears.
3. Tap “Favorite” button.
The text input mode appears.
4. Enter a name for the Favorite location using the keyboard and tap “Done”
button.
The Favorite location name and address confi rmation window appears.
Favorite options
Rename : You can rename a Favorite location name..
Delete : You can delete a saved location from Favorite. When the deletion confi rmation
message appears, select “Yes” or “No”.
View Map : You can view the Favorite location on the map. The Favorite location is marked
with the icon.
To search for a saved Favorite location, search for the location using the Find Location
Favorites in the main menu. (See page 53)
Button Description of Text/Number Input Mode
Space Delete
Switches to text keyboard Switches to numeric keypad
Completes your input
The search can be performed even if you just enter a part of a keyword.
NOTE
using the navigation _ 45
02 USING THE NAVIGATION
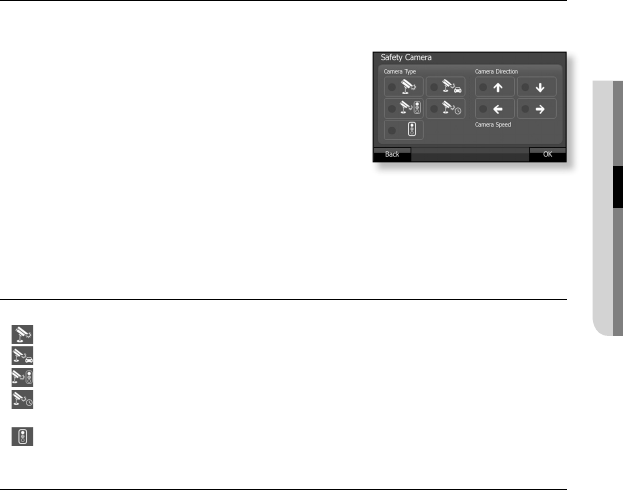
SAVING THE LOCATION OF SAFETY CAMERA
You can save and refer to information of the safety camera including position,
type, direction and speed limit for your safe driving.
1. Select a desired location by tapping on or
dragging it.
You can also search for a location you want by
using the “Find Location” function.
(See page 51~57)
2. Tap “Save” button.
The Save window appears.
3. Tap “Safety Cameras” button.
The “Safety Cameras” setup window appears.
4. Set the camera type, direction and speed and tap [OK] button.
When done, the product will return to the previous menu.
Safety Camera options
Camera Type : allows you to set the type of the safety camera.
Fixed
Removable
Red-light
Section : a section-detection camera that measures the average speed between the
two end points of the section
Normal Traffi c Light
Camera Direction : allows you to set the direction of the safety camera.
Camera Speed : allows you to set the speed limit.
46 _ using the navigation
SAVING THE LOCATIONS OF HOME AND WORK PLACE
You can save the locations of your home and work place for later use.
You can follow the same instruction to save the locations of both home and
workplace. Let us take a home for example.
1. Select a desired location by tapping on or
dragging it.
You can also search for a location you want by
using the “Find Location” function.
(See page 51~57)
2. Tap “Save” button.
The Save window appears.
3. Tap “HOME” button.
The selected location is saved.
To fi nd out the location of home or workplace, navigate in “Find Location -> HOME or
WORK” in the main menu. (See page 52)
NOTE
using the navigation _ 47
02 USING THE NAVIGATION
FINDING AN ADDRESS
You can fi nd out the address of a destination.
1. Tap “Find Location” button in the main menu.
The “Find Location” window appears.
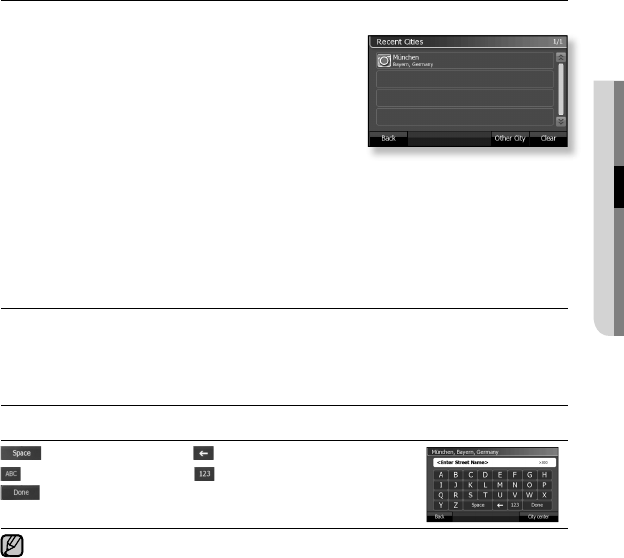
2. Tap “Address” button.
You will see a list of recently visited cities.
3. Tap on the city to fi nd.
The character input mode appears.
4. Enter desired characters (street number) using the screen keyboard.
Ex) Entering “A” on the keyboard will display a list of all street names including “A”.
5. Select a desired street name in the list.
The number input mode appears.
6. Enter the street number and tap “Done” button.
The selected address will be displayed in a map.
Address options
Other City : allows you to search for other city.
Clear : allows you to remove the list of recently visited cities.
Find intersection : allows you to search for an intersection.
Change Country : allows you to search for other country.
City center : you can use the map to mark the center of a specifi c city.
Button Description of Text/Number Input Mode
Space Delete
Switches to text keyboard Switches to numeric keypad
Completes your input
The search can be performed even if you just enter a part of a keyword.
Characters available to input are displayed in white and, those unavailable, in grey.
Grey characters could not be entered by tapping on them.
NOTE
48 _ using the navigation
FINDING HOME OR WORKPLACE
You can easily fi nd out the location of home or workplace once it is memorized.
Before you start - You should have saved the location of home or workplace.
(See page 50).
You can follow the same instruction to fi nd out the locations of both home and
workplace. Let us take a home for example.
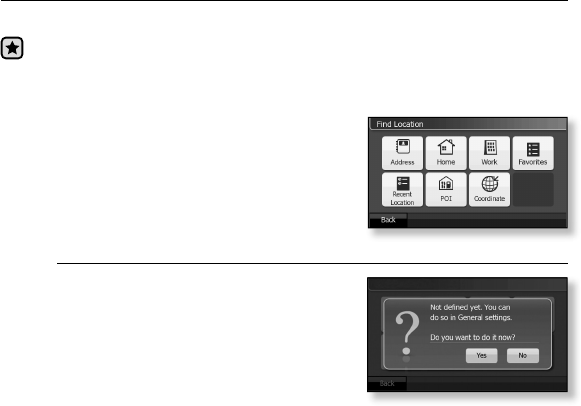
1. Tap “Find Location” button in the main menu.
The “Find Location” window appears.
2. Tap “Home” button.
Mark the location of your home on the map.
If the location of home or workplace is not memorized
1. Tap “Find Location” button in the main
menu.
The “Find Location” window appears.
2. Tap “Home” button.
The setting confi rmation message
appears.
3. Tap “Yes” button.
The current location is saved as home.
Find Location
using the navigation _ 49
02 USING THE NAVIGATION
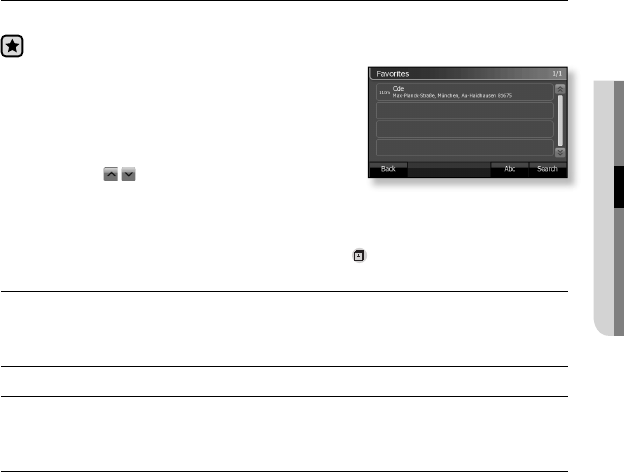
FINDING OUT FAVORITES
You can easily fi nd out the locations listed in Favorites.
Before you start - Add frequently visited places to the Favorites list.(See page 49)
1. Tap “Find Location” button in the main menu.
The “Find Location” window appears.
2. Tap “Favorites” button.
The “Favorites” list appears.
3.
Select a desired address in the “Favorites” list.
Using the , buttons to move up or down.
The “View Favorite” window appears.
4. Tap “OK” button.
The selected location is marked on the map.
Locations in the Favorites list are marked with the icon.
Favorites options
ABC/Distance : tapping on the “ABC” button will sort the list in alphabetical order. Tapping
on the “Distance” button will sort the list from the nearest to the farthest.
Search : the character input mode appears. You can enter an address in the Favorite list to
fi nd it out.
View Favorite options
Rename : the character input mode appears. You can edit addresses in the Favorite list.
Delete : Delete : you can remove an address(es) in the Favorite list. When the confi rmation
window appears, select “Yes” or “No”.
OK: completes your changes and returns to the map.

50 _ using the navigation
FINDING A RECENTLY VISITED PLACE
You can fi nd a recently visited place.
1. Tap “Find Location” button in the main menu.
The “Find Location” window appears.
2. Tap “Recent Location” button.
The “Recent Location” list appears.
3. Select a desired address in the
“Recent Location” list.
Using the , buttons to move up or down.
The selected location is marked on the map.
Recent Location option
Clear : allows you to remove the list of recently visited places.
using the navigation _ 51
02 USING THE NAVIGATION
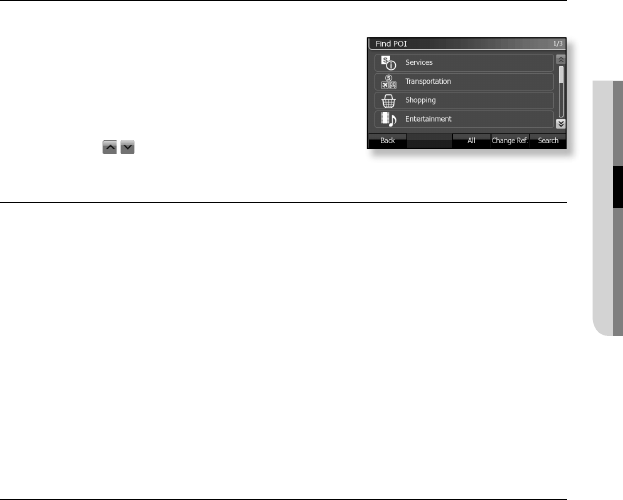
FINDING POI (POINT OF INTEREST)
You can search for desired service or transportation information by POI.
1. Tap “Find Location” button in the main menu.
The “Find Location” window appears.
2. Tap “POI” button.
The “POI” list appears.
3. Select a desired item in the “POI” list.
Using the , buttons to move up or down.
A detailed list appears.
POI
Searvice : Service: you can fi nd gas stations, car repair shops, tourist attractions and etc
by the service type.
Transportation : you can fi nd major transportation facilities such as airports and railway
stations and etc.
Shopping : you can fi nd shopping malls, outlets, etc.
Entertainment : you can fi nd leisure places such as parks, zoos and cinemas.
Culture : you can fi nd places for cultural life such as museums, concert halls, libraries, etc.
Sports & Recreation : you can fi nd recreation places such as golf clubs, swimming pools,
gymnasiums, etc.
Emergency Government : you can fi nd emergency services such as hospitals, police
stations, public offi ces, etc.
Food & Drink : you can fi nd food restaurants serving food and beverages.
Lodging : you can fi nd sleeping accommodation such as hotels and camp sites.
Natural landmark : you can fi nd places of note such as famous mountains and
landscapes.
52 _ using the navigation
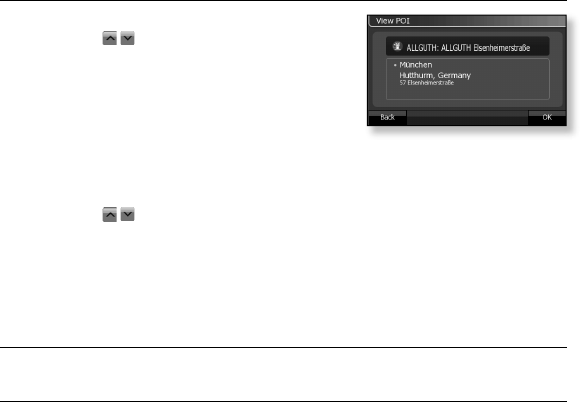
FINDING POI (POINT OF INTEREST) (Continued)
4. Tap on a desired item.
Using the , buttons to move up or down.
A list of names and addresses appears.
Change Ref. : you can select one from “Current
GPS, Cursor, Destination and Address”. “Current
GPS” informs you of the current location detected
by the GPS satellite. “Cursor” indicates the location
you selected on the map. “Destination: indicates the
predefi ned location.
“Address” enables you to fi nd a place by the address.
5. Tap on a desired address.
Using the , buttons to move up or down.
The “View POI” window appears.
<Dial> : you can use Bluetooth to place a phone call by selecting a number in a
phone book (if any). (YP-N1BZ only)
6. Tap on OK to check your current position on the map.
The selected location is marked on the map.
Find POI options
All : displays all POIs without grouping by the category in alphabetical order.
Search : the character input mode appears. You can enter a POI name to fi nd it.
using the navigation _ 53
02 USING THE NAVIGATION
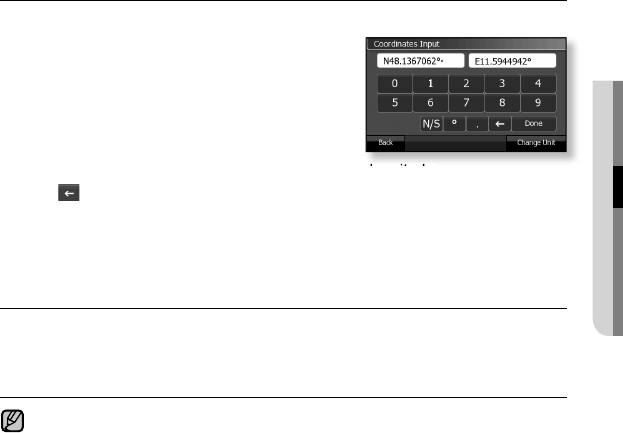
COORDINATES
You can fi nd a location by entering latitude and longitude.
1. Tap “Find Location” button in the main menu.
The “Find Location” window appears.
2. Tap “Coordinate” button.
The “Coordinate” number input mode appears.
3. Tap on either the left or right input box.
When “▪” blinks at the ending digit, it is selected.
4. Tap on either “N/S” or “E/W” to select latitude or longitude.
5. Tap button to delete a number.
Numbers are cleared one by one from the end. The letters of “N, S, E, W” are not
cleared.
6.
Enter numbers and symbols using the keyboard and tap “Done” button.
The input coordinates of latitude and longitude are marked on the map.
Coordinate option
Change Unit : you can select a display form of latitude and longitude. Select a desired item
and tap on OK.
“DD.DDDD” indicates an angle, “DD MM.MMM” is an angle and minute, “DD MM SS.S”
displays an angle, minute and second.
Enter a valid coordinate. Otherwise, it will not be marked on the map.
NOTE
54 _ using the navigation
ROUTE SETTINGS
You can confi gure the settings of navigation routes.
Before you start - you should have set at least one route. (See page 46)
You can just use Edit Route and Mange Track Logs menus if no route has been set.
Recalculate
1. Tap “Route” button in the main menu.
The “Route” window appears.
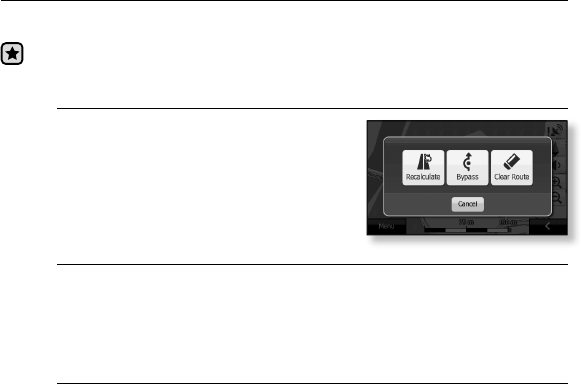
2. Tap “Recalculate” button.
You will see the Route Recalculation
window.
3. Select a desired item.
Recalculate options
Recalculate : reconfi gures a set route.
Bypass : You can choose to block the calculated route for a given distance and
force an alternative route. Select either 1 km, 2 km, 5 km, 10 km or 30 km.
Clear Route : clears a set route.
Drop next via : Drop next via : the Drop Next Via button pops up for a route with a
stopover. Use this if you want to skip over the stopover.
using the navigation _ 55
02 USING THE NAVIGATION
ROUTE SETTINGS (Continued)
Itinerary
You can check the itinerary for the selected route and view a summary
of distances and addresses for each midway stop.
1. Tap “Route” button in the main menu.
The “Route” window appears.
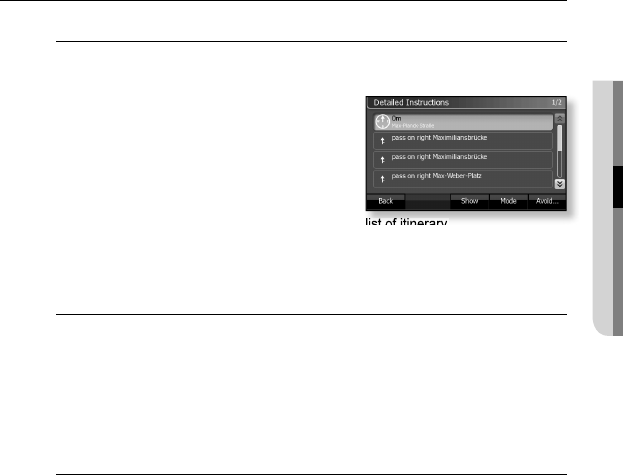
2. Tap “Itinerary” button.
The “Itinerary” list appears.
3. Tap Mode button to select a desired
mode.
Detailed Instructions : you can view a detailed list of itinerary.
Instructions : you can view a list of itinerary.
Route Summary : you can view a summary of distances and addresses for
each stopover.
Itinerary options
Show : tapping on the Show button under Itinerary will mark the selected location
on the map.
Mode : select one from Detailed Instructions, Instructions and Route Summary.
Avoid… : you can confi gure the navigation settings so that you can bypass a
traffi c congestion.
Select one from Manoeuvre, Road, 1 km, 2 km, 5 km, 10 km and 30 km.
Select Manoeuvre if you want to select a route to avoid in the Itinerary list.
Select Road if you want to select a road to avoid in the Itinerary list.
The “Avoid…” function will not work in front of a traffi c-congested area.
56 _ using the navigation
ROUTE SETTINGS (Continued)
Edit Route
This provides management of change route, change order and deletion
of stopovers.
To add a route
1. Tap “Route” button in the main menu.
The “Route” window appears.
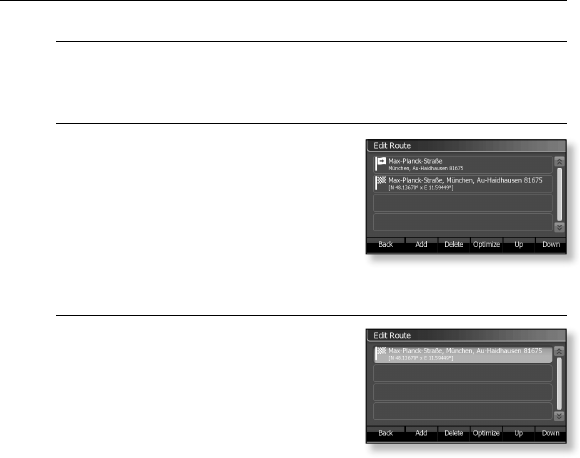
2. Tap “Edit Route” button.
The “Edit Route” list appears.
3. Tap “Add” button.
The “Find Location” window appears.
4. Refer to pages 51 to 57 to add a route.
To delete a route
1. Tap “Route” button in the main menu.
The “Route” window appears.
2. Tap “Edit Route” button.
The “Edit Route” list appears.
3. Select a route to delete in the
“Edit Route” list.
4. Tap “Delete” button.
The selected route will be removed.
using the navigation _ 57
02 USING THE NAVIGATION
ROUTE SETTINGS (Continued)
Edit Route(Continued)
To set an optimized route
1. Tap “Route” button in the main menu.
The “Route” window appears.
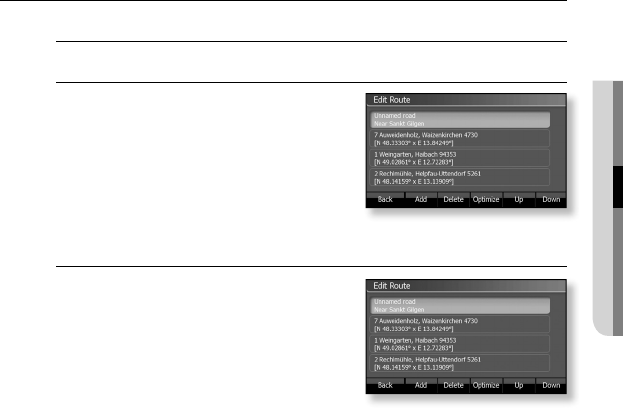
2. Tap “Edit Route” button.
The “Edit Route” list appears.
3. Tap “Optimise” button.
This will set the most effective route
regarding distance, time and fuel to take.
To change the order of route
1. Tap “Route” button in the main menu.
The “Route” window appears.
2. Tap “Edit Route” button.
The “Edit Route” list appears.
3. Select a route to change the order of
in the “Edit Route” list.
4. Tap “Up” or “Down” button.
Tapping on “Up” will move one level up in the list and “Down” will move one
level down.
58 _ using the navigation
ROUTE SETTINGS (Continued)
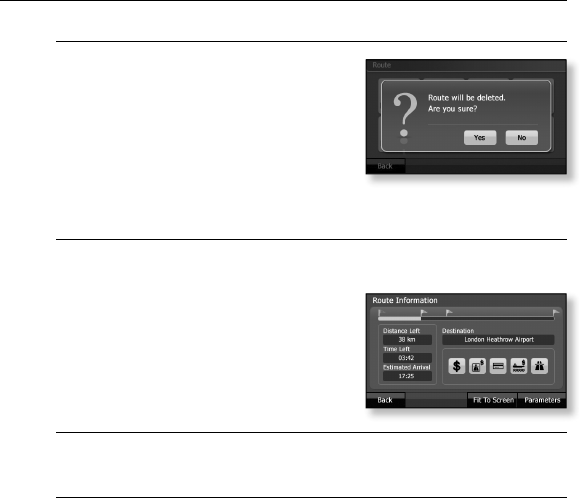
Clear Route
You can remove a set route.
1. Tap “Route” button in the main menu.
The “Route” window appears.
2. Tap “Clear Route” button.
The confi rmation message pops up.
3. Tap “Yes” button.
clears a set route.
Route Info
You can check the distance, time to take and estimated arrival time of a
set route.
1. Tap “Route” button in the main menu.
The “Route” window appears.
2. Tap “Route Info” button.
The Route Information window appears.
You can check the distance, time to take
and estimated arrival time of a set route.
Route Info options
Fit To Screen : displays a set route on the map so that it fi ts the screen.
Parameters : you can set route options including Route Preference and Vehicle.
(See page 32)
using the navigation _ 59
02 USING THE NAVIGATION
ROUTE SETTINGS (Continued)
Simulation
You can preview the course of a set route as if you are in the actual
driving.
1. Tap “Route” button in the main menu.
The “Route” window appears.
2. Tap “Simulation” button.
The “Simulation” window appears.
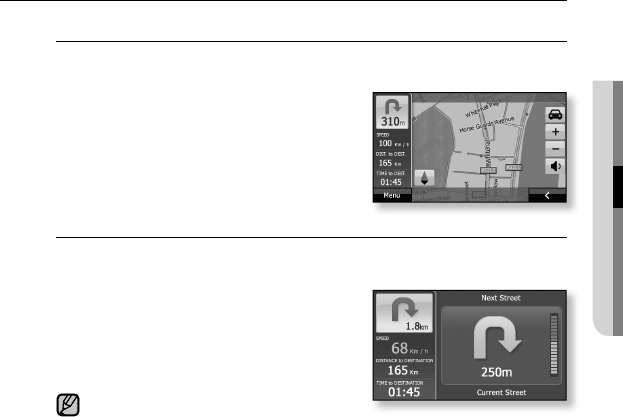
Turn View
You can view the navigation screen in a symbol system rather than the
typical map.
1. Tap “Route” button in the main menu.
The “Route” window appears.
2. Tap “Turn View” button.
The navigation symbol system appears.
Tap on any area if you want to switch to
the map display.
NOTE

60 _ using the navigation
ROUTE SETTINGS (Continued)
Manage Track Logs
You can keep track of and check route logs for later use.
To record navigation tracks
1. Tap “Route” button in the main menu.
The “Route” window appears.
2. Tap “Manage Track Logs” button.
Track Logs are listed.
3. Tap “Record” button.
A map screen appears where you can record
the navigation tracks.
To stop recording
Tap “Stop Recording” button.

using the navigation _ 61
02 USING THE NAVIGATION
ROUTE SETTINGS (Continued)
Manage Track Logs
To play a track log
1. Select a desired item in “Track Logs” list.
2. Tap “Replay” button.
The selected log will be played.
To remove a log
1. Select an item to delete in “Track Logs” list.
2. Tap “Delete” button.
The selected log will be removed.
To check a log
1. Select a desired item in “Track Logs list.
2. Tap “Info” button.
The Information window appears. You can check the route information
including the recording start and end times, time to take, average speed and
total distance.
3. Tap “Colour on the map” button if you want to specify a route display
color on the map.
The selected route will be displayed in the selected colour.
Track Information options
Rename : the character input mode appears. You can change the log
name. (See page 51)
Fit To Screen : displays an entire track log on the map so that it fi ts the screen.
Export : You can store the track log on a memory card. When the Track Log
confi rmation message appears, tap OK button. The confi rmation message also
appears for an existing log fi le.

62 _ more than navigation
more than navigation
USING BLUETOOTH
Add a Bluetooth-compliant a hands-free (mobile phone) to your product before
you can confi gure the wireless connection. When the connection is successfully
made, you are now ready for wireless communications.
What is Bluetooth?
Bluetooth is a computing and telecommunications industry specifi cation
that describes how mobile phones, computers and PDAs can easily
interconnect with each other and with home and business phones and
computers using a short wireless connection.
y The Bluetooth device can cause a noise or malfunction, depending on
the use conditions.
When the user hold the product in one hand and take a mobile phone in the
other hand, this will interfere with the wireless connection or if part of the user‘s
body tap ones on the transmission system of the product or mobile phone
Electrical variation from electrical jamming by the wall, corner or offi ce
partitioning Electrical interference from the same frequency-band devices
including medical equipment, microwave oven and wireless LAN.
y The farther the distance between product and mobile phone is, the lower
the quality is and if the distance exceeds a certain limit, the connection
will be lost.
y When pairing the Bluetooth device with the product, make it within a
short distance as possible.
y In week electric-fi eld areas such as inside the lift or in the subway, the
Bluetooth connection may not work properly.
The Bluetooth function of the player are optimized with Samsung products.
If used with third party products, the Bluetooth function may not work properly.
NOTE

more than navigation _ 63
03 MORE THAN NAVIGATION
USING BLUETOOTH (Continued)
Bluetooth Specifi cation
The performance of a Bluetooth device can vary, depending on the
specifi cation. This product is compliant with the standard Bluetooth
specifi cations.
y Specifi cations for certain purposes : In general, the transmission
output is great, causing less reduction of the signal strength but
requiring more power from the battery.
y Standard Specifi cations: The transmission output is comparatively
low, which causes more reduction of the signal strength but
minimizes the power consumption to increase the useful time.
Set off the Bluetooth mode when it is left unused. Tap on the Enable
Bluetooth button on your mobile phone. When the V mark disappears, the
Bluetooth mode will be set off. Set off the Bluetooth mode. Using Bluetooth
reduces the battery usable time.
NOTE
64 _ more than navigation
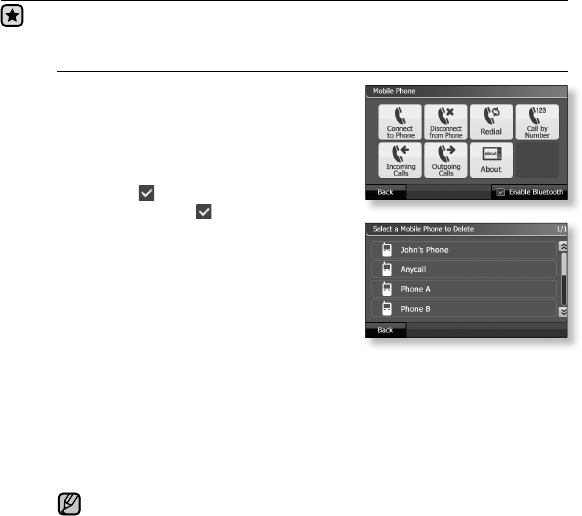
USING MOBILE PHONE
Before you start - Check if your mobile phone is available for pairing with
a Bluetooth device. (refer to the user guide for the mobile phone)
To pair a mobile phone
(You only heave to pair it once)
1. Tap “Mobile Phone” button in the
main menu.
The “Mobile Phone” window appears.
2. Tap “Enable Bluetooth” button to
check it .
The check mark indicates the Bluetooth
mode is available and unchecking it will
set off the Bluetooth mode.
3. Tap Connect to Phone button.
4. Press the Search button.
Make sure that the mobile phone to
connect should support the Bluetooth
function.
You will see a list of mobile phones that
support Bluetooth.
5. Tap on a mobile phone to pair.
The password input window appears on the mobile phone.
6. Enter 0000 for the password.
The mobile phone is paired and ready for connection with the
product.
For instructions on pairing the product, refer to the user guide of your
mobile phone.
In some mobile phones, the functions of search device and mobile
conversation (placing/receiving calls) can not work properly due to
difference of the hands-free system.
NOTE
more than navigation _ 65
03 MORE THAN NAVIGATION
USING MOBILE PHONE (Continued)
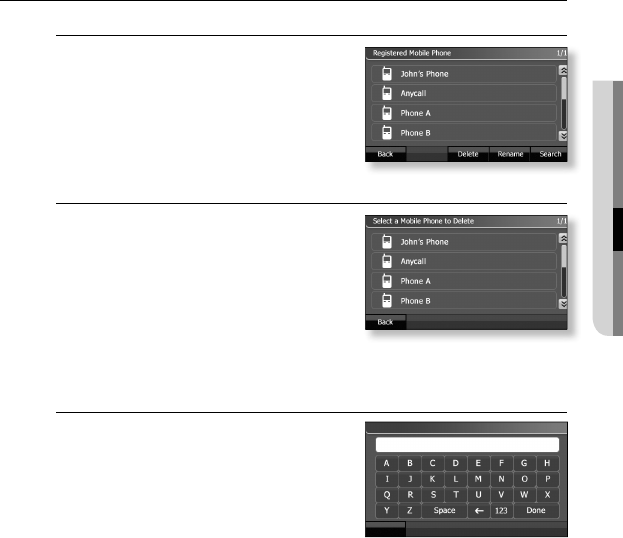
To search for a new mobile phone
1. Tap on the Connect to Phone button in
the Mobile Phone window.
You will see a list of registered mobile
phones.
2. Tap Search button.
Selecting <YES> will delete the existing list
and display a new list of mobile phones.
To remove a mobile phone from the list
1. Tap on the Connect to Phone button in
the Mobile Phone window.
You will see a list of registered mobile
phones.
2. Tap Delete button.
The Select a Mobile Phone to Delete
window appears.
3. Tap on a mobile phone to delete.
The selected mobile phone will be removed.
To rename a device
1. Tap on the Connect to Phone button in
the Mobile Phone window.
You will see a list of registered mobile
phones.
2. Tap on the “Rename” button.
The character input mode appears.
3. Tap on a mobile phone to rename.
4. Rename the device.
Refer to page 00 for the character input.
Add Favorite
<Enter Favorite name>
Back

66 _ more than navigation
USING MOBILE PHONE (Continued)
Before you start - Check if your mobile phone is available for pairing with
a Bluetooth device. (refer to the user guide for the mobile phone)
To pair a mobile phone
(You only heave to pair it once)
1. Tap “Mobile Phone” button in the
main menu.
The “Mobile Phone” window appears.
2. Tap “Enable Bluetooth” button to
check it .
The check mark indicates the Bluetooth
mode is available and unchecking it will
set off the Bluetooth mode.
3. Tap Connect to Phone button.
4. Press the Search button.
Make sure that the mobile phone to
connect should support the Bluetooth
function.
You will see a list of mobile phones that
support Bluetooth.
5. Tap on a mobile phone to pair.
The password input window appears on the mobile phone.
6. Enter 0000 for the password.
The mobile phone is paired and ready for connection with the
product.
For instructions on pairing the product, refer to the user guide of your
mobile phone.
In some mobile phones, the functions of search device and mobile
conversation (placing/receiving calls) can not work properly due to
difference of the hands-free system.
NOTE

more than navigation _ 67
03 MORE THAN NAVIGATION
USING MOBILE PHONE (Continued)
To search for a new mobile phone
1. Tap on the Connect to Phone button in
the Mobile Phone window.
You will see a list of registered mobile
phones.
2. Tap Search button.
Selecting <YES> will delete the existing list
and display a new list of mobile phones.
To remove a mobile phone from the list
1. Tap on the Connect to Phone button in
the Mobile Phone window.
You will see a list of registered mobile
phones.
2. Tap Delete button.
The Select a Mobile Phone to Delete
window appears.
3. Tap on a mobile phone to delete.
The selected mobile phone will be removed.
To rename a device
1. Tap on the Connect to Phone button in
the Mobile Phone window.
You will see a list of registered mobile
phones.
2. Tap on the “Rename” button.
The character input mode appears.
3. Tap on a mobile phone to rename.
4. Rename the device.
Refer to page 00 for the character input.
Add Favorite
<Enter Favorite name>
Back
68 _ more than navigation
USING MOBILE PHONE (Continued)
To redial using the recent call number
Tap on the Redial button in the Mobile
Phone window.
The product places a call using the recent call
number.
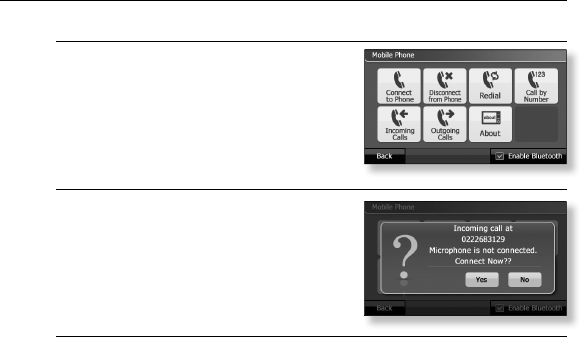
To answer an incoming call
1. You will see the confi rmation message
when you get an incoming call.
2. Tap on the Yes button.
You can now make conversations with the
other person.
To switch a call
Ex) If you get a call at xxx-xxxx-5678 while making phone conversations
at xxx-xxxx-1234
1. You will see the incoming call message for 5678 while making
conversations at 1234.
2. Tap Yes button.
The call at 1234 will automatically switch to call-waiting mode and you can
make conversations at 5678.
3. If you make the call at 5678 wait and return to 1234, tap on the
Mobile Phone button in the main menu.
The Option menu appears.
4. “Tap on the Switch Call button.
The call at 5678 switches to call-waiting mode and you can make
conversations at 1234.

more than navigation _ 69
03 MORE THAN NAVIGATION
USING MOBILE PHONE(Continued)
To switch to the mobile phone while talking on the
hands-free device (YP-N1)
1. Tap Mobile Phone button while making conversations.
The Option menu appears.
2. Tap Voice to Phone button.
You can make conversations on the mobile phone.
To switch to the hands-free device (YP-N1) while
talking on the mobile phone
1. Tap Mobile Phone button while making conversations.
The Option menu appears.
2. Tap Voice to Handsfree button.
You can make conversations on the hands-free device.
To disconnect the mobile phone
Tap on the Disconnect to Phone button in
the Mobile Phone window.
The mobile phone will be disconnected.

70 _ more than navigation
USING MOBILE PHONE (Continued)
To use the tone keyboard
You should use the tone keyboard for ARS service or for additional
numbers such as extension.
1. Tap Mobile Phone button in the main menu while making
conversations.
The Option menu appears.
2. Tap “Tone Keyboard” button.
The number input mode appears.
3. Enter a number or numbers.
Use the <= button if you entered a wrong number.
To view my device information
Tap on the About button in the Mobile Phone window.
You can view your device information including device name, Bluetooth address
and Bluetooth class.

smart2go™ Setup Assistant _ 71
04 CONNECTING TO YOUR PC
connecting to your pc
PC REQUIREMENTS
Your PC system must meet the following minimum specifi cations in order to
install :
• Pentium 300MHz or higher
• USB Port 2.0
• Windows XP or higher
• 100MB of free hard disc space
• CD Rom Drive (2X or higher)
• Resolution 1024 X 768 or higher
72 _ smart2go™ Setup Assistant
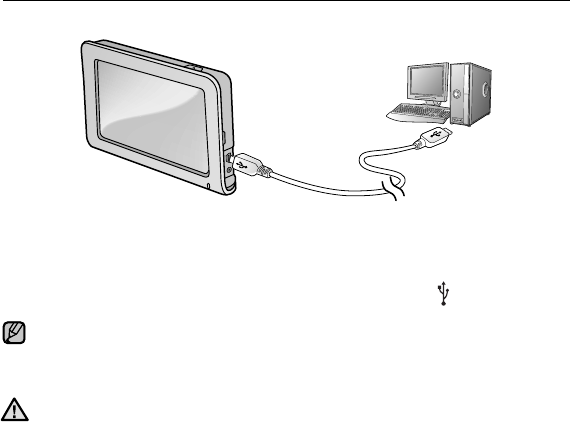
CONNECTING TO YOUR PC
1. Connect the USB cable to to the USB Connection Port of the device.
2. Connect the other end of the USB cable to the USB port ( ) on your PC.
If you use an USB hub for the connection, USB communications may not work
properly. Connect the USB cable directly to the USB port of your PC.
If you connect the device through a USB hub, the connection may be unstable.
Please connect the device to the computer directly.
Do not disconnect the USB cable during fi le transfer. Disconnecting during transfer
may damage the device or your PC.
CAUTION
NOTE
smart2go™ Setup Assistant _ 73
04 CONNECTING TO YOUR PC
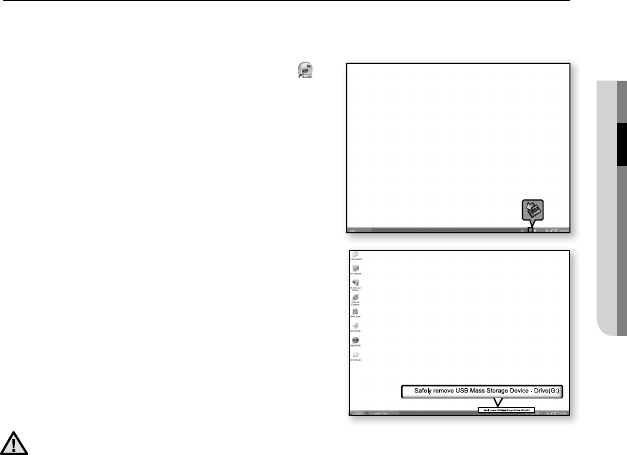
DISCONNECTING FROM YOUR PC
Follow the steps below to prevent damage to the player and data when
disconnecting from your PC.
1. Place the mouse cursor on top of the
icon on the taskbar at the bottom right
corner of the desktop and click the left
mouse button.
2. Click the <Safely Remove USB Mass
Storage Device Drive> message.
3. Disconnect the player from your PC.
Do not disconnect the player from the PC during fi le transfer. This may cause
damage to data and the device.
You cannot remove the hardware while the CD is installed on your PC. Please retry
after the installation is fi nished.
CAUTION
1
2
74 _ smart2go™ Setup Assistant
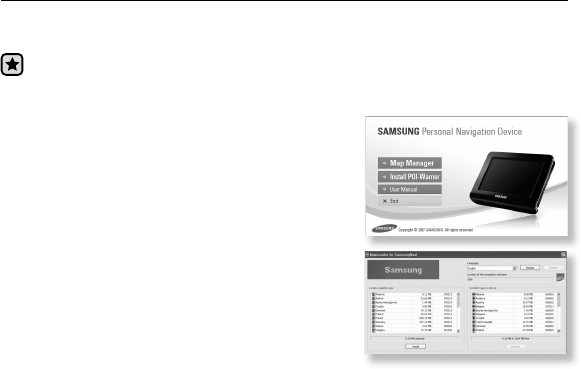
USING THE MAP MANAGER
The Map Manager installs those data on the memory card, together with the
program fi les of your navigation software and the voice fi les for guidance.
Before you start – Insert the installation DVD provided with the device into the
DVD-ROM drive. DVD를 CD-ROM에 넣으면 인식하지 못하므로 반드시 DVD-
ROM에 넣어 주세요.
1. Click “Map Manager”.
Device에 IGO 프로그램이 설치되어 있지 않은 경
우 에러 메시지가 나타납니다.
PC에 데이터가 백업되어 있지 않은 경우 백업
확인 창이 나타납니다. “OK” 버튼을 터치하면 데
이터 백업이 시작됩니다.
설치 DVD 내의 프로그램이 최신 버전일 경우 프
로그램 업데이트 확인 창이 나타납니다. “OK” 버
튼을 터치하면 프로그램 업데이트가 시작됩니다.
2. Select the language of the installation
program.
3. 왼쪽의 “Locally available maps” 창에서 원하
는 지도를 선택한 후 “Install” 버튼을 클릭하
세요.
오른쪽의 “Installed maps on device” 창에 설치됩니다.

smart2go™ Setup Assistant _ 75
04 CONNECTING TO YOUR PC
USING THE MAP MANAGER (Continued)
4. 사용하지 않는 지도를 삭제하려면 오른쪽의 “Installed maps on device” 창
에서 삭제할 지도를 선택한 후 “Remove” 버튼을 클릭하세요.
선택한 지도가 삭제됩니다. 단, “Locally available maps”에 없는 지도를 삭제한 경
우 “Locally available maps”에 자동으로 백업됩니다.
5. Device의 지도 데이터를 PC에 백업하려면 “Backup”을 클릭하세요. 백업
된 지도 데이터를 Device로 복구시키려면 ‘Restore”를 클릭하세요.
최신 버전 지도는 ↑ 아이콘으로 표시되고, 구 버전 지도는 ↓ 아이콘으로 표시됩
니다.
“Locally available maps”과 “Installed maps on device”의 지도 버전이 동일한 경우
설치되지 않습니다.
“Installed maps on device”의 지도가 “Locally available maps”의 지도보다 최신 버
전일 경우 설치되지 않습니다.
“Locally available maps”의 지도는 PC의 <Documents and Settings> <BIGFOOT>
<My Documents> <iGO 2006>에서 확인할 수 있습니다.
초기 화면의 “Install POI-Warner”를 클릭하면 항상 최신 버전의 단속 카메라 위치
를 제공 받을 수 있는 프로그램이 설치됩니다.
NOTE

76 _ troubleshooting
troubleshooting
If you have a problem with your new Personal Navigation Device, check for a solution in
this list. If the problem persists, contact a Samsung Service Center near you.
PROBLEM SOLUTION
The product does not
turn on.
If the product ran out of the battery, it doesn’t
turn on. Recharge the battery and try again.
Press the Reset hole to initiate the settings.
Check if the Hardware Power On/Off switch is
positioned to On.
y
y
y
The product just turns
off.
If the battery is used up, the product
automatically turns off. Recharge it and try
again.
y
The battery usable time
is different from that
specifi ed in the user
guide.
The battery usable time can differ, depending
on the use conditions such as volume level, LCD
brightness, Bluetooth mode, etc.
A recharged battery can have less usable time
if it is exposed to low or high temperature for an
extended time.
y
y
Nothing is displayed on
the screen.
If the product is exposed to the direct light
(sunlight, etc), the display may be unclear.
y
The navigation system
does not work.
Check if your SD memory card has a map fi le stored.
Check if your SD memory card is damaged.
If it is damaged, contact the store where you
purchased it.
Check if the battery has an appropriate
remaining capacity.
y
y
y

troubleshooting _ 77
05 TROUBLESHOOTING
PROBLEM SOLUTION
No sound is output.
Check if the volume is set to the minimum.
Check if the Mute function is selected and if so,
set it off.
y
The menu or voice
guidance language is
different.
In the main menu, select Settings → Language
& Unit and change the settings of Menu
Language or Voice Language.
y
Loading a map fi le does
not work.
Check if you properly inserted the SD memory
card into the memory card slot on the product.
Check the USB cable if it’s correctly connected
and try again.
Check if your SD memory card has an
appropriate free space.
y
y
y
A fi le(s) or data is
missing.
Make sure the USB cable should keep
connected during the fi le or data transfer
process. Otherwise, it can cause missing fi le
or data, or even critical damage to the SD
memory card. Samsung Electronics has no
responsibility for missing data in any way. So
please take caution.
y
The fi le transfer rate is
too low.
If you are running multiple programs including
Smart2go™ Setup Assistant on your PC, the
fi le transfer rate will be low. So make sure to
exit unnecessary programs before proceeding.
y
The program does not
work at all.
Please refer to the recommended ‘PC
Requirements’ section in this guide.
y

78 _ troubleshooting
PROBLEM SOLUTION
Connection between
PC and product is not
made.
Press <Start> on the desktop to launch
Windows Update. Check all of critical updates
and service pack patches before updating
the system. Restarts your system and try to
connect again.
y
Heat emits from the
product.
Heat can be emitted during the recharging
process. Heat has nothing to do with the
performance and useful life of the product. You
don’t need to worry about.
y
Bluetooth connections
could not be made.
Check if your mobile phone supports the
Bluetooth function.
Check if your mobile phone is already connected
to other device. If so, disconnect it and try again.
Check if the Enable Bluetooth option is checked
with V in the Mobile Phone window. If it is not
checked with V, Bluetooth connection will not be
made.
The Bluetooth connection can be set off if you turn
off and restart the product or mobile phone. In this
case, make the connection again.
y
y
y
y
appendix _ 79
06 APPENDIX
appendix
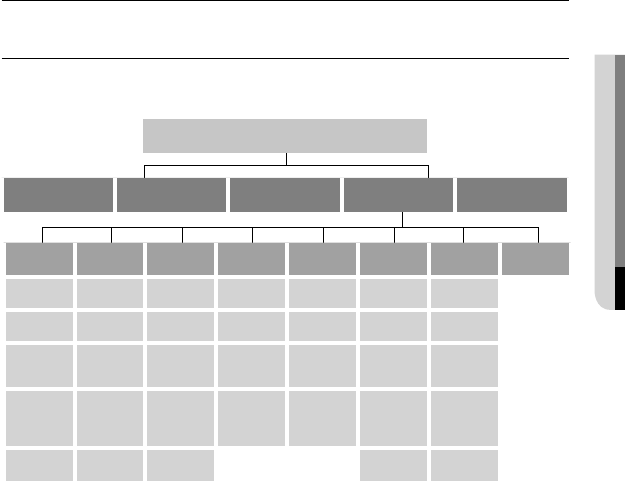
MENU TREE
Here’s a quick look at how the menus and functions are organized on your new
Personal Navigation Device.
Menu Select Screen
Find Location View Map Route Settings Mobile Phone
Map Display Route Sound General Language &
Unit System About
View Mode Brightness Route
Preference Volume Safety
Mode
Menu
language
Start-up
Preferences
Day/Night
Mode
Auto
Brightness Vehicle Dynamic
Volume
Warn When
Speeding
Voice
language
Keyboard
settings
Map Color Brightness
Timeout Avoidances Touch
Tones
Enable
Safety
Cameras
Time Zone
Demonstration
Display
Options
LCD
Calibration
Off Route
Recalculation
Voice
Guidance
Attention
Tone
Smart
Zoom Unit
User Data
Management
Display
POIs Pop-up Info TMC Time
Format Default set

80 _ appendix
PRODUCT SPECIFICATIONS
Model Name YP-N1
Power AC Adapter: 8.4V/1A
Car Power Adapter: 6V ~ 36V
Built-in Battery Power 1700 mAh 3.7V Built-in Lithium-Polymer battery
CPU S3C2440-400MHz high performance CPU
LCD 4.3” WQVGA(480x272) TFT LCD (280 cd/m2)
with Touch Screen panel Backlight control
Audio System
internal 0.9W amplify inside a Set.
1.2W Speaker inside Cradle.
Echo cancellation with TMC1182.
GPS Module GPS engine : SiRF III
Frequency :1575.42 MHz
C/A code : 1.023 MHz Chip rate
Channel : 20 Channels access
Sensitivity : -159 dBm
GPS Performance Acquisition times (Cold : 45 sec / Warm : 35 sec /
Hot start : 8 sec)
Accuracy (Position : 10 metes,
: Velocity : 0.5 m/sec)
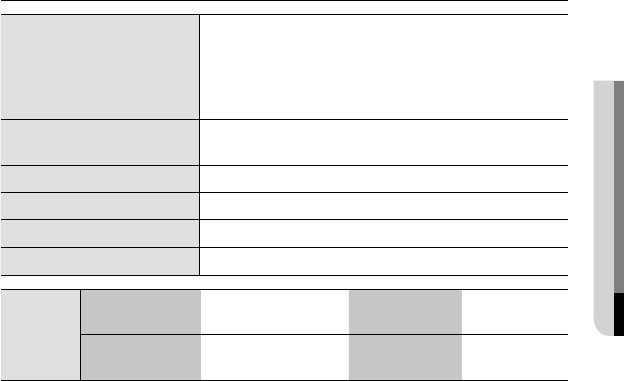
appendix _ 81
06 APPENDIX
PRODUCT SPECIFICATIONS (CONTINUED)
I/O Interface
support SD memory card
Support USB 2.0
Exteral TMC Ant
Operation time 4 hours (condition: Backlight minimum
보관 온도 0~45
Case Plastics
Weight 205 g
Dimension (WxHxD) 122X84X19.5 mm
Blue -
tooth
Frequency
Range
Transmit/Receive
: 2402~2480 MHz
Spec Version
Supported
Version 2.0
+ EDR
Module Transmission
Output
TMC Useable
Sensitiivity
2.4 mW
The contents of this Manual are subject to change without prior notice for further
improvement.

CONTACT SAMSUNG WORLD WIDE
If you have any questions or comments relating to Samsung products, please
contact the SAMSUNG customer care center.
Country Customer Care Center Web Site
CANADA 1-800-SAMSUNG (7267864) www.samsung.com/ca
MEXICO 01-800-SAMSUNG (7267864) www.samsung.com/mx
U.S.A 1-800-SAMSUNG (7267864) www.samsung.com
ARGENTINE 0800-333-3733 www.samsung.com/ar
BRAZIL 0800-124-421, 4004-0000 www.samsung.com/br
CHILE 800-726-7864 (SAMSUNG) www.samsung.com/cl
COSTA RICA 0-800-507-7267 www.samsung.com/latin
ECUADOR 1-800-10-7267 www.samsung.com/latin
EL SALVADOR 800-6225 www.samsung.com/latin
GUATEMALA 1-800-299-0013 www.samsung.com/latin
JAMAICA 1-800-234-7267 www.samsung.com/latin
PANAMA 800-7267 www.samsung.com/latin
PUERTO RICO 1-800-682-3180 www.samsung.com/latin
REP. DOMINICA 1-800-751-2676 www.samsung.com/latin
TRINIDAD & TOBAGO 1-800-7267-864 www.samsung.com/latin
VENEZUELA 0-800-100-5303 www.samsung.com/latin
COLOMBIA 01-8000112112 www.samsung.com.co
BELGIUM 02 201 2418 www.samsung.com/be
CZECH REPUBLIC 844 000 844 www.samsung.com/cz
DENMARK 70 70 19 70 www.samsung.com/dk
FINLAND 030-6227 515 www.samsung.com/fi
FRANCE 3260 SAMSUNG or 08 25 08 65 65
(0,15/Min) www.samsung.com/fr
GERMANY 01805-121213 ( 0,14/Min) www.samsung.de
HUNGARY 06-80-SAMSUNG (7267864) www.samsung.com/hu
ITALIA 800-SAMSUNG (7267864) www.samsung.com/it

Country Customer Care Center Web Site
LUXEMBURG 0032 (0)2 201 24 18 www.samsung.lu
NETHERLANDS 0900 20 200 88 ( 0,10/Min) www.samsung.com/nl
NORWAY 815-56 480 www.samsung.com/no
POLAND 0 801 801 881 www.samsung.com/pl
PORTUGAL 80 8 200 128 www.samsung.com/pt
SLOVAKIA 0800-SAMSUNG (726786) www.samsung.com/sk
SPAIN 902 10 11 30 www.samsung.com/es
SWEDEN 0771-400 200 www.samsung.com/se
U.K 0870 SAMSUNG (7267864) www.samsung.com/uk
Republic of Ireland 0818 717 100 www.samsung.com/uk
Switzerland 0800-7267864 www.samsung.com/ch
RUSSIA 8-800-200-0400 www.samsung.ru
KAZAHSTAN 8-800-080-1188 www.samsung.kz
UZBEKISTAN 8-800-120-0400 www.samsung.uz
UKRAINE 8-800-502-0000 www.samsung.com/ur
LITHUANIA 8-800-77777 www.samsung.lt
LATVIA 800-7267 www.samsung.com/lv/index.htm
ESTONIA 800-7267 www.samsung.ee
AUSTRALIA 1300 362 603 www.samsung.com/au
CHINA 800-810-5858, 010-6475 1880 www.samsung.com.cn
HONG KONG 3698 -4698 www.samsung.com/hk
INDIA 3030 8282, 1800 110011 www.samsung.com/in
INDONESIA 0800-112-8888 www.samsung.com/id
JAPAN 0120-327-527 www.samsung.com/jp
MALAYSIA 1800-88-9999 www.samsung.com/my
PHILIPPINES 1800-10-SAMSUNG (7267864) www.samsung.com/ph
SINGAPORE 1800-SAMSUNG (7267864) www.samsung.com/sg
THAILAND 1800-29-3232, 02-689-3232 www.samsung.com/th
TAIWAN 0800-329-999 www.samsung.com/tw
VIETNAM 1 800 588 889 www.samsung.com/vn
SOUTH AFRICA 0860 7267864 (SAMSUNG) www.samsung.com/za
U.A.E 800SAMSUNG (7267864)
8000-4726 www.samsung.com/mea
EUROPE ONLY
This marking shown on the product or its literature, indicates that it should not
be disposed with other household wastes at the end of its working life.
To prevent possible harm to the environment or human health from uncontrolled
waste disposal, please separate this from other types of wastes and recycle it
responsibly to promote the sustainable reuse of material resources.
Household users should contact either the retailer where they purchased this
product, or their local government offi ce, for details of where and how they can
take this item for environmentally safe recycling.
Business users should contact their supplier and check the terms and
conditions of the purchase contract.
This product should not be mixed with other commercial wastes for disposal.

SAFETY INFORMATION
FCC
This device complies with part 15 of the FCC Rules.
Operation is subject to the following two conditions:
(1) This device may not cause harmful interference, and
(2) this device must accept any interference received, including interference
that may cause undesired operation.
Caution: Any changes or modifi cations in construction of this device which are
not expressly approved by the party responsible for compliance could void the
user’s authority to operate the equipment.
Note: This equipment has been tested and found to comply with the limits for
a Class B digital device, pursuant to part 15 of the FCC Rules. These limits
are designed to provide reasonable protection against harmful interference
in a residential installation. This equipment generates, uses and can radiate
radio frequency energy and, if not installed and used in accordance with the
instructions, may cause harmful interference to radio communications, However,
there is no guarantee that interference will not occur in a particular installation.
If this equipment does cause harmful interference to radio or television
reception, which can be determined by turning the equipment off and on, the
user is encouraged to try to correct the interference by one or more of the
following measures:
- Reorient or relocate the receiving antenna.
- Increase the separation between the equipment and receiver.
- Connect the equipment to an outlet on a circuit different from that to which
the receiver is connected.
- Consult the dealer or an experienced radio/TV technician for help.

SAFETY INFORMATION (CONTINUED)
FCC
Any changes or modifi cations not expressly approved by the grantee of this
device could void the user’s authority to operate the device.
Compliance
This product conforms to the following.
Council Directive: Directive 89/336/EEC, 92/31/EEC (EMC)
Declaration of Conformity
Name: Samsung Electronics Co., Ltd
Address: 416, Maetan-3Dong, Yeongtong-Gu, Suwon City, Kyungki-Do, Korea
442-742 declares under its sole responsibility that the product
Trade Name: Samsung Electronics Co., Ltd
Model Number: YP-U3 has been tested according to the FCC/CISPR22/95
requirements for Class B devices and found compliant with the following
standards:
EMI/EMC: FCC Part 15 Subpart B
This device complies with part 15 of the FCC Rules.
Operation is subject to the following two conditions:
1. This device may not cause harmful interference, and
2. This device must accept any interference received, including interference that
may cause undesirable operation.
Party Responsible for Product Compliance
Samsung Electronics America
QA Lab.
3351 Michelson Dr. Suite #290
Irvine, CA92612