Samsung Electronics Co YPP3 BLUETOOTH MP3 PLAYER User Manual YP P3
Samsung Electronics Co Ltd BLUETOOTH MP3 PLAYER YP P3
UserManual.wiki
>
Samsung Electronics Co
>
YPP3 User Manual
User manual
Navigation menu
Upload a User Manual
Namespaces
Wiki Guide
HTML
PDF
Info
Views
User Manual
Discussion / Help
Navigation
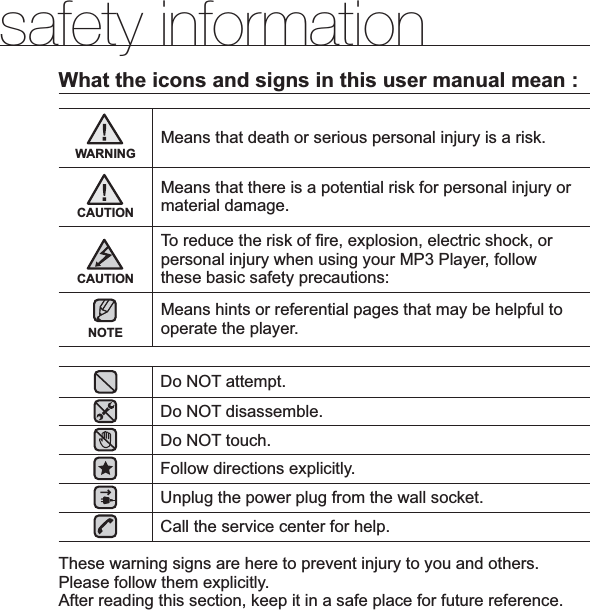


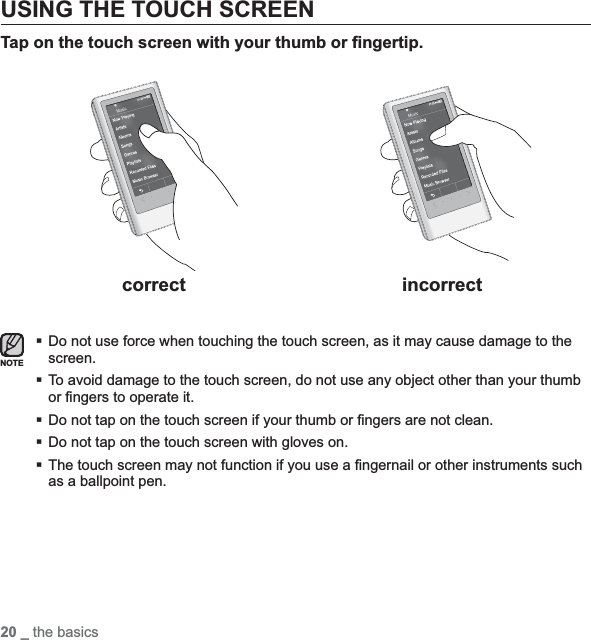
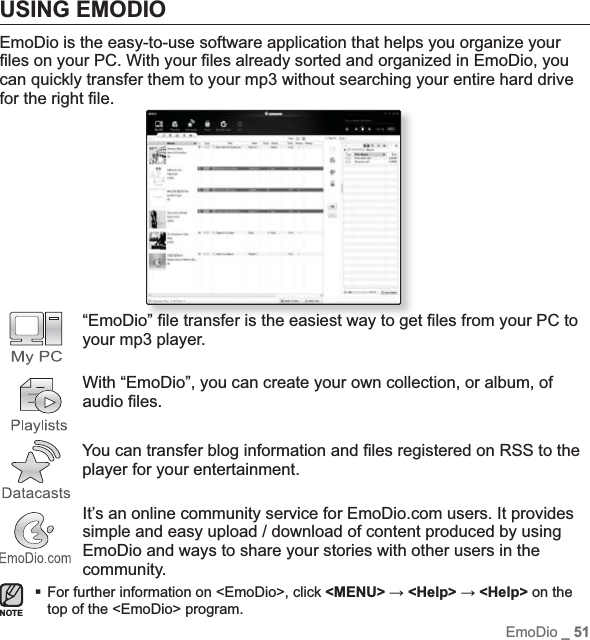
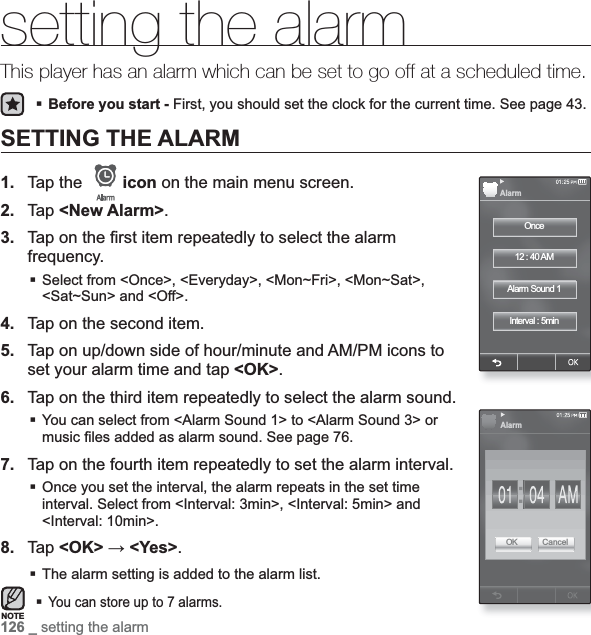
![the basics _ 17CARING FOR THE BATTERYYour battery will last longer if you follow these simple guidelines for caring and storing the player.•Recharge the battery within the temperature range of 40°F~95°F (5°C~35°C ).•Do not overcharge (longer than 12 hours).Excessive charging or discharging may shorten the battery’s life. •Battery life naturally shortens slowly over time.If you are charging the player while it is connected to a laptop computer, make sure the laptop’s battery is also fully charged or that the laptop is plugged into its power source.The battery is not charged in the PC Standby mode or when the hardware is safely removed.TURNING THE POWER ON & OFFTurning the Power onPress and hold the [ ]button.Turning the Power offPress and hold the [ ] button.Your mp3 player will be automatically turned off when none of the buttons and icons have been pressed for a speci¿ c length of time in the pause mode. The factory setting for <Auto Power Off> is 1 minute, but you can change this length of time. See page 44 for more information.NOTENOTE](https://usermanual.wiki/Samsung-Electronics-Co/YPP3/User-Guide-1034965-Page-17.png)
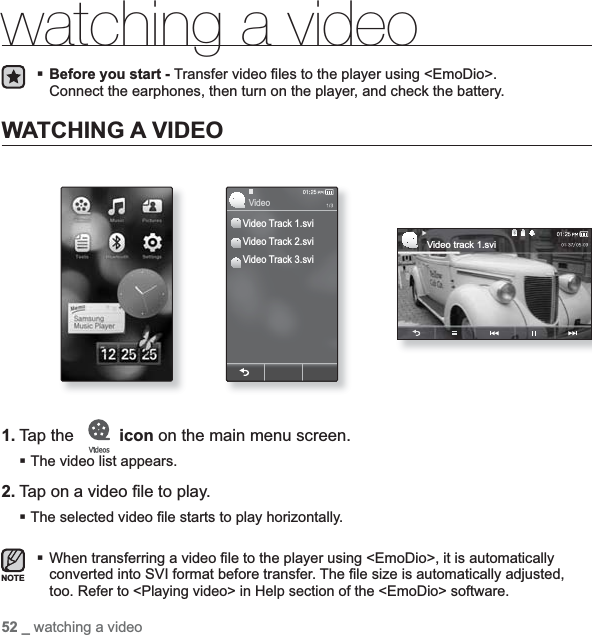
![18 _ the basicsCONTROLLING THE VOLUMEYou can adjust the volume while a ¿ le is stopped or in its playback.Press the [ ], [ ] button.The range of volume is set between 0 to 30.DISABLING THE BUTTONSThe hold function disables all the other buttons and icons on the mp3 player, so that if you accidentally bump one-while working out, for example-your music won’t be interrupted.1. Press the [] button.2. To release the hold function, press the []button twice.If <Touch Screen Only> is selected from <Settings> ĺ <System> ĺ<Hold Option>, locks only the touch screen and allows operation of , and buttons. See page 44.NOTEVideo track 1.svi](https://usermanual.wiki/Samsung-Electronics-Co/YPP3/User-Guide-1034965-Page-18.png)
![the basics _ 19BROWSING FOR FILES USING “File Browser”Search easily for ¿ les using the “File Browser” function.1. Tap the icon on the main menu screen.2. Tap on a selected folder to bring up the ¿ le list.3. Tap on a desired ¿ le.The ¿ le will start playing.<My Pack> of <File Browser> is where DNSe ¿ les transferred by <EmoDio> are stored. For further information on DNSe, refer to <Using TTS(Text to Speech) and myDNse> <DNSe (Digital Natural Sound engine)> in the Help section of the <EmoDio> software.DELETING FILES WITH “File Browser”Follow the steps 1-2 above.3. Tap the [] icon.4. Tap <Delete>.5. Tap on a desired ¿ le.6. Tap <OK> and tap <Yes>.The selected ¿ le is deleted.The selected ¿ le cannot be deleted while its playing back.Once ¿ les are deleted, they cannot be recovered.NOTECAUTIONNOTEVideoMusicPlaylistsPicturesTextsDatacastsGamesReceived FilesFile BrowserVideo Track 1.sviVideo Track 2.sviVideo Track 3.sviVideoAdd to PlaylistDelete](https://usermanual.wiki/Samsung-Electronics-Co/YPP3/User-Guide-1034965-Page-19.png)
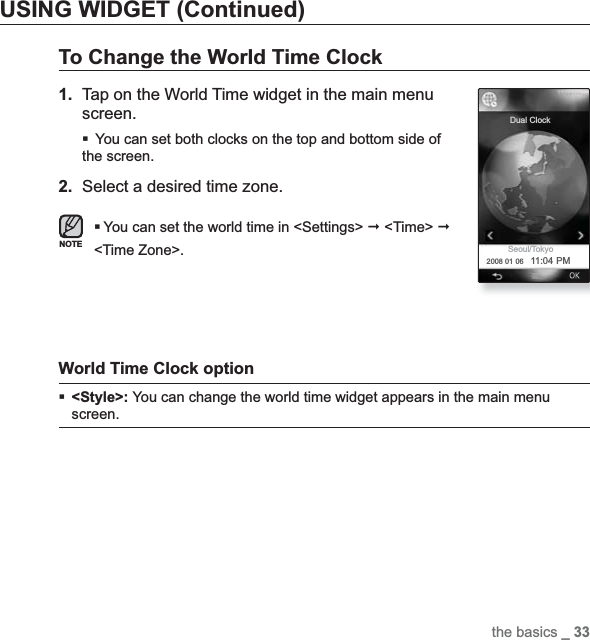
![the basics _ 31USING WIDGET (Continued)To Set the Current Time1. Tap on digital or analogue clock widget on the main menu screen.2. Tap the [] icon.3. Tap on up/down side of the digits of <Year>,<Month>,<Day>,<Hour>,<Min> and <AM/PM>icon to set the current time.4. Tap <OK>.You can set the current time in <Settings> <Time> <Date/Time Setting> too.Clock Option <Style>: You can change the style of Clock widget in the main menu screen.NOTEDate/Time](https://usermanual.wiki/Samsung-Electronics-Co/YPP3/User-Guide-1034965-Page-31.png)
![32 _ the basicsUSING WIDGET (Continued)To Select the Slideshow Folder1. Tap on the Slideshow widget in the main menu screen.2. Tap on the touch screen and tap the [] icon.3. Tap <Select Slideshow Folder>.4. Check a desired picture folder to select as the slideshow folder.Selected folder’s pictures are displayed randomly in the slideshow.Selecting a folder will select all ¿ les and subfolders in the folder.Slideshow option <Change Frame>: You can change the frame shape of the slideshow widget appears in the main menu screen.NOTESelect Slideshow Fold..Change Frame](https://usermanual.wiki/Samsung-Electronics-Co/YPP3/User-Guide-1034965-Page-32.png)
![the basics _ 35USING WIDGET (Continued)To input a memo1. Tap on the Memo widget in the main menu screen.2. Tap the [ ] icon.3. Tap <New>.3. Using the keyboard dialog, input your memo and tap <OK>.Memo options <Style>: You can change the background color of the memo widget of the main menu screen.<Set as Main Memo>: To display a memo on the main menu screen, the memo should be set as the main memo. Select a memo by tapping on it.<Delete>: Deletes selected memo from the list. Tap on a memo to be deleted, and then tap <OK>.](https://usermanual.wiki/Samsung-Electronics-Co/YPP3/User-Guide-1034965-Page-35.png)
![36 _ the basicsUSING THE QUICK TRAYProvides a quick access of moving to main menu, selecting sound output, hold/Display off, and Bluetooth pairing. To use the Quick TrayYou can use the quick tray in all screens except the main menu screen.To open the Quick TrayIn a screen other than the main menu screen, tap on the top side of the touch screen to display the quick tray.To close the Quick TrayTap on the touch screen area other than the Quick Tray.1HOLD / Display Off2Connecting / Disconnecting Bluetooth Device3Setting the Sound Output4Moving the Main MenuVideo Track 1.sviVideo Track 2.sviVideo Track 3.svi4123[Quick Tray Screen]](https://usermanual.wiki/Samsung-Electronics-Co/YPP3/User-Guide-1034965-Page-36.png)
![the basics _ 37USING THE QUICK TRAY (Continued)Moving the Main MenuTapping on the [ ] icon in the quick tray will move to the main menu screen.Setting the Sound OutputTapping on the [ ] icon in the quick tray allows you to select sound output from speaker or earphones. Select among [ ] (Auto), [] (Earphones), and [ ] (Speaker) icons. See page 40.HOLD / Display OffTapping on the [ ] icon in the quick tray will lock all buttons and turn off the screenConnecting / Disconnecting Bluetooth Device Tapping on the [ ] icon in the quick tray will try to connect to the recently connected device automatically, or try to disconnect the currently connected Bluetooth device.If the Bluetooth device is not registered, you cannot connect to the device.](https://usermanual.wiki/Samsung-Electronics-Co/YPP3/User-Guide-1034965-Page-37.png)
![the basics _ 39CHANGING THE SETTINGS AND PREFERENCESYour mp3 player comes with settings and preferences that were set up at the factory, but you can change these pre-set values to truly customize your player.1.Tap the icon on the main menu screen.2.Tap on a desired item in the setting list3. Tap on a desired setting option.4. Set the options you prefer.If the <Settings> screen is open and you don’t push any buttons for about 1 minute, the unsaved settings will be lost, and the player will return to the previous function.Sound Setting Options You can set the master EQ, touch tone, volume limit, etc. Master EQ : You can optimize sound settings. Select the desired frequency and its level then tap <OK>. Thefrequencies that can be adjusted are <60Hz>, <150Hz>, <400Hz>, <1.1KHz>, <3.5KHz>, <8KHz> and <14KHz>.Touch Tone : You can adjust the volume of the sound and vibration settings for your tapping on the screen buttons. Select from 0~7 for volume, and 0~5 for vibration.Noti¿ cation/Alert tone: You can adjust the volume of the sound and vibration settings for alert and con¿ rm pop-ups. Select from 0~7 for volume, and 0~5 for vibration.NOTE[Setting list]SoundDisplayLanguageTimeSystemSettingsMaster EQTouch ToneNotification/Alert ToneWise VolumeOutputSound](https://usermanual.wiki/Samsung-Electronics-Co/YPP3/User-Guide-1034965-Page-39.png)
![46 _ the basicsCHANGING THE SETTINGS AND PREFERENCES (Continued)My Name Setting1.Tap <My Info>.2.Tap on the input area below the <My Name>.3.Enter your name using the keyboard dialogue, and then tap <OK>.[ ] : The input mode switches from uppercase English to lowercase English and to number.[ ] : You can delete the characters one at a time.[, ] : Moves the cursor backward / forward.Once you completed the name setting, you will see your name when you turn on the player.My Birthday SettingBefore you start - First, you should set the clock for the current time. See page 43.1.Tap <My Info>.2.Tap on top and bottom side of each <Year>, <Month> and <Day> icons below the <My Birthday> to set your birthday.3.Tap <OK>.Once you completed the birth date setting, you will be reminded of your birthday when you turn on the player.My NameMy BirthdayMy InfoMy NameMy BirthdayMy Info](https://usermanual.wiki/Samsung-Electronics-Co/YPP3/User-Guide-1034965-Page-46.png)
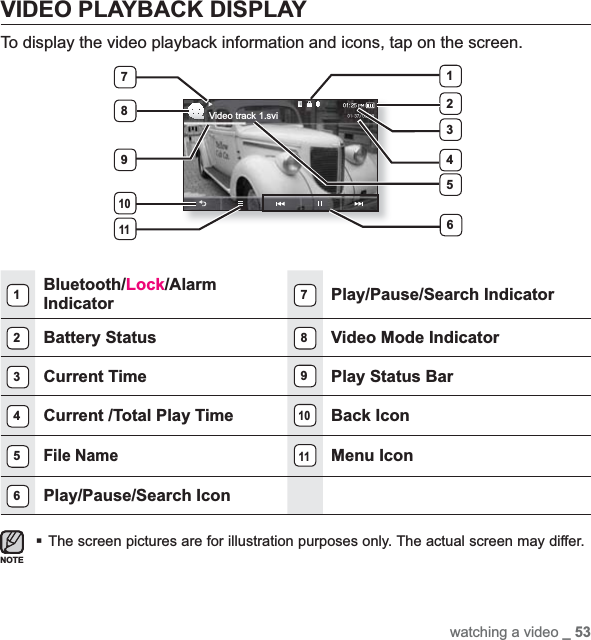
![watching a video _ 55USING THE VIDEO MENUTo set a bookmarkOnce you bookmark a speci¿ c scene that you want to see again, you can enjoy it at any time you want.1. Tap the [ ] icon at the scene you want during video playback.2. Tap <Bookmark> ĺ <Add>.The currently played/stopped point is set to a bookmark.You will see the [ | ] symbol on the play status bar.A bookmark can be set one for each video ¿ le, and you can set a maximum of 100 bookmarks.The bookmark point can be slightly different from the actual point.To move to (play) / remove the bookmark1. Tap the [ ] icon on the video playback screen.2. Tap <Bookmark> ĺ <Go to> or<Delete>.When you selected <Go to> then it will move to the selected bookmark and start playing from that bookmark.<Delete> will remove the selected bookmark from the video ¿ le.NOTEBookmarkAddSound EffectDisplayBookmarkAddGo toDelete](https://usermanual.wiki/Samsung-Electronics-Co/YPP3/User-Guide-1034965-Page-55.png)
![56 _ watching a videoUSING THE VIDEO MENU (Continued)To set the Digital Natural Sound engine (DNSe)Select the right sound for each video genre.1. Tap the [] icon on the video playback screen.2. Tap <DNSe>.3. Tap on a desired DNSe.Select from <Normal>, <Drama> and <Action>.What is DNSe?Digital Natural Sound Engine (DNSe) is a sound effect function for MP3 players developed by Samsung. It provides various sound settings to enhance the type of music you’re listening to.NOTENormalDramaActionDNSe](https://usermanual.wiki/Samsung-Electronics-Co/YPP3/User-Guide-1034965-Page-56.png)
![watching a video _ 57USING THE VIDEO MENU (Continued)To set the play speedSpeed up or slow down your favorite video by adjusting the play speed.1. Tap the [] icon on the video playback screen.2. Tap <Sound Effet> ĺ <Play Speed>.3. Select a desired play speed and tap <Yes>.Select from <Slow 5>, <Slow 4>,<Slow 3>, <Slow 2>, <Slow 1>, <Normal>, <Fast 1>, <Fast 2>, <Fast 3>, <Fast 4>, <Fast 5>.Some ¿ les may not allow all of <Slow 5> ~ <Fast 5> playback speeds.To set the VibeWooferYou can experience various vibration effects according to the strength of the sound beat.1. Tap the [] icon on the video playback screen.2. Tap <Sound Effet> ĺ <VibeWoofer>ĺ<On>.NOTEBookmarkSound EffectPlay SpeedVibeWooferBookmarkSound EffectPlay SpeedVibeWoofer](https://usermanual.wiki/Samsung-Electronics-Co/YPP3/User-Guide-1034965-Page-57.png)
![58 _ watching a videoUSING THE VIDEO MENU (Continued)To select the screen sizeYou can select the display size of the video playback.1. Tap the [] icon on the video playback screen.2. Tap <Display> ĺ <Screen Size>.3. Tap on a desired Screen Size.Select from <Actual>, <Standard>, <Full> and <Zoom>.Screen Size Menu <Standard> <Full> <Zoom>For some video ¿ les, <Screen Size> or other related menus may not be displayed.NOTEDisplayScreen SizeBrightnessColor Tone](https://usermanual.wiki/Samsung-Electronics-Co/YPP3/User-Guide-1034965-Page-58.png)
![watching a video _ 59USING THE VIDEO MENU (Continued)To adjust the brightnessYou can adjust the brightness of the video screen.1. Tap the [] icon on the video playback screen.2. Tap <Display> ĺ<Brightness>.3. Select a desired brightness and tap <Yes>.Select a level from <0-10>.The brightness adjustment menu only applies to the video screen.To set the display offYou can turn off the touch screen and only listen to the sound for power saving purpose.1. Tap the [] icon on the video playback screen.2. Tap <Display> ĺ<Display Off>.The touch screen turns off.To turn the screen back on, tap on the touch screenNOTEDisplayScreen SizeBrightnessColor ToneDisplayScreen SizeBrightnessColor Tone](https://usermanual.wiki/Samsung-Electronics-Co/YPP3/User-Guide-1034965-Page-59.png)
![60 _ watching a videoUSING THE VIDEO MENU (Continued)To set the horizontal strokeYou can fast forward through a ¿ le at various intervals when you touch the screen to the left or right. Skip a whole ¿ le or skip several seconds at a time.1. Tap the [ ] icon on the video playback screen.2. Tap <Horizontal Stroke>.3. Tap on a desired horizontal stroke.Select from <1 File>, <Seek>, <10sec Skip>, <30sec Skip> and <1min Skip>.When the <Seek> option is set, sliding your ¿ nger to the left / right cycles through the <x2> ĺ <x4> ĺ <x8> playback speeds.The horizontal stroke interval can be different from the actual skip interval, depending on the ¿ le.NOTE1 FileSeek10sec SkipHorizontal Stroke](https://usermanual.wiki/Samsung-Electronics-Co/YPP3/User-Guide-1034965-Page-60.png)
![watching a video _ 61USING THE VIDEO MENU (Continued)To connect a Bluetooth stereo headsetYou can directly connect to a registered Bluetooth headset during video playback.Before you start - Use only a Bluetooth-certi¿ ed stereo headset.Check if to make sure your Bluetooth stereo headset has been registered. <Connect to Headset> appears when there is a registered headset. For more information, refer to <Using a Bluetooth Stereo Headset>. See page 92.1. Tap the [] icon on the video playback screen.2. Tap <Connect to Headset>.If <Bluetooth Mode> is set to <Off>, it will be changed to <On>.When the connection is successfully done, you will see the [ ] icon on the screen.You can enjoy listening to audio on video ¿ le via the Bluetooth headset.To disconnect the Bluetooth stereo headset1. Tap the [] icon on the video playback screen.2. Tap <Disconnect Headset> ĺ<Yes>.The Bluetooth headset is disconnected. You can not select <DNSe> and <Sound Effect> while the player is connecting to the Bluetooth stereo headset in video mode.NOTESound EffectDisplayHorizontal StrokeConnect to HeadsetSound EffectDisplayHorizontal StrokeDisconnect Headset](https://usermanual.wiki/Samsung-Electronics-Co/YPP3/User-Guide-1034965-Page-61.png)
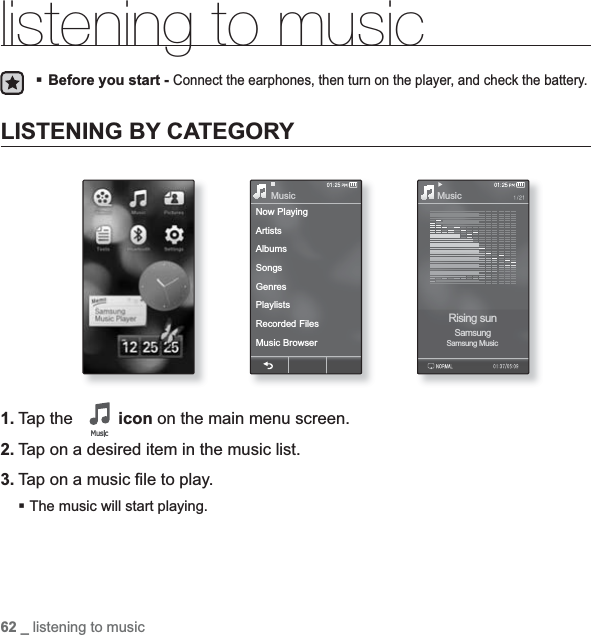
![listening to music _ 63LISTENING BY CATEGORY (Continued)Music ListFile information including the artist name, album name, music title and genre will be displayed according to the ID3 Tag information on the appropriate music ¿ le. A ¿ le without an ID3 Tag is displayed as [Unknown].Now Playing : Plays a recently played ¿ le or moves to the playback screen of the current ¿ le.Artists : To play by artistAlbums : To play by album. The album cover image will be displayed.Songs : To play in numeric or alphabetical order Genres : To play by genrePlaylists : To play by Playlist.Recorded Files : Shows all recorded ¿ les.Music Browser : Shows all the music ¿ les stored in the Music Folder.MP3, WMA and AAC music ¿ les are compatible with the player. What is an ID3 Tag?This is what is attached to an MP3 to carry information relevant to the ¿ le such as the title, artist, album, year, genre and a comment ¿ eld.NOTE](https://usermanual.wiki/Samsung-Electronics-Co/YPP3/User-Guide-1034965-Page-63.png)
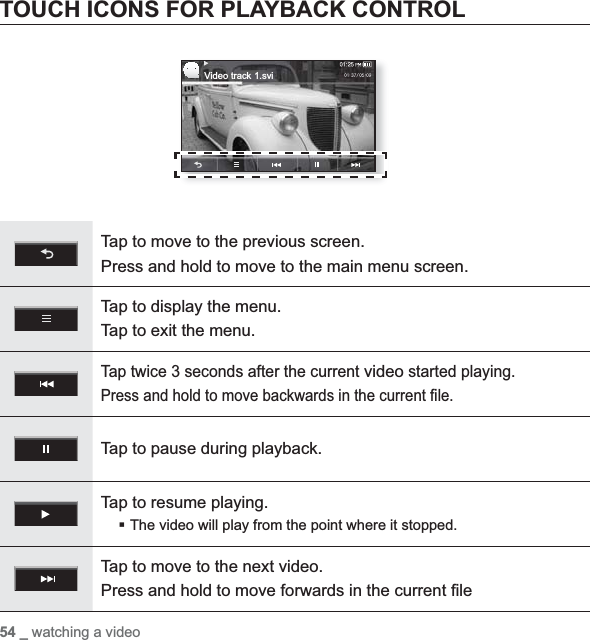
![listening to music _ 65TOUCH ICONS FOR PLAYBACK CONTROLTap to move to the previous screen.Press and hold to move to the main menu screen.Tap to display the menu.Tap to exit the menu.Tap after 3 seconds of play to start playing the current track.Tap twice after 3 seconds of play to return to the previous ¿ le.Press and hold to move backwards in the current ¿ le.Tap to pause during playback.Tap to resume playing.The music will play from the point where it stopped. Tap to move to the next track.Press and hold to move forwards in the current ¿ le..When playing VBR ¿ les, the previous track may not play even if you tap the [ ]icon within 3 seconds of the play.CAUTIONMusicRising sun](https://usermanual.wiki/Samsung-Electronics-Co/YPP3/User-Guide-1034965-Page-65.png)
![66 _ listening to musicREPEATING A SECTIONThis function enables you to listen to speci¿ c parts of a track repeatedly. It’s helpful when learning a language, for example.1. Tap the [ ] icon at the beginning of the section you want to repeat.The starting point is set and <Rep A> will appear.2. Tap the [ ] icon again to set the ending of the section you want to repeat.<Rep AB> will appear and the speci¿ ed section starts to play repeatedly.To cancel RepeatingTap the [ ] icon again during Section Repeat. Section Repeat will be canceled.Section Repeat will be automatically canceled in the following case.-The starting point of the section repeat is set but the ending point is not set until after the current track ends.- The end point is set for less than 3 seconds of playback after the start point.NOTEMusicRising sunRep A](https://usermanual.wiki/Samsung-Electronics-Co/YPP3/User-Guide-1034965-Page-66.png)
![listening to music _ 67CREATING A PLAYLIST ON YOUR MP3 PLAYERIf you’ve already downloaded ¿ les to your mp3 player, you can create a “Favorites” playlist without EmoDio or your PC.1. Tap the icon on the main menu screen.2. Tap <Music Browser> in the music list.3Tap the [] icon.4. Tap <Add to Playlist>.5. Tap on a desired playlist number.6. Tap on ¿ les to add to the playlist.Tap the [ ] icon to add all ¿ les.7. Tap <OK>.The selected ¿ le is included in the playlist.You can check the playlist in <Music> ĺ <Playlists> ĺ <Playlist 1> to <Playlist 5> in the main menu.You can add up to 200 music ¿ les to each playlist.For information on how to create a playlist in <EmoDio> and transfer it to the player, refer to <My Album> in Help section of the <EmoDio> software.NOTESong 1Song 2Song 3Song 4Song 5Song 6Song 7MusicAdd to Playlist](https://usermanual.wiki/Samsung-Electronics-Co/YPP3/User-Guide-1034965-Page-67.png)
![listening to music _ 69DELETING A FILE FROM THE PLAYLIST1. Tap the icon on the main menu screen.2. Tap <Playlists>.3. Tap on a desired playlist number.4Tap the [] icon.5. Tap <Delete>.6. Tap on a desired playlist number.7. Tap on a ¿ le to be deleted to select it.Tap the [ ] icon to add all ¿ les.8. Tap <OK> and tap <Yes>.The selected ¿ le is deleted from the playlist.The selected ¿ le in the playlist cannot be deleted while its playing back.Song 1Song 2Song 3Song 4Song 5Song 6Playlist 1Add to PlaylistDeleteNOTE](https://usermanual.wiki/Samsung-Electronics-Co/YPP3/User-Guide-1034965-Page-69.png)
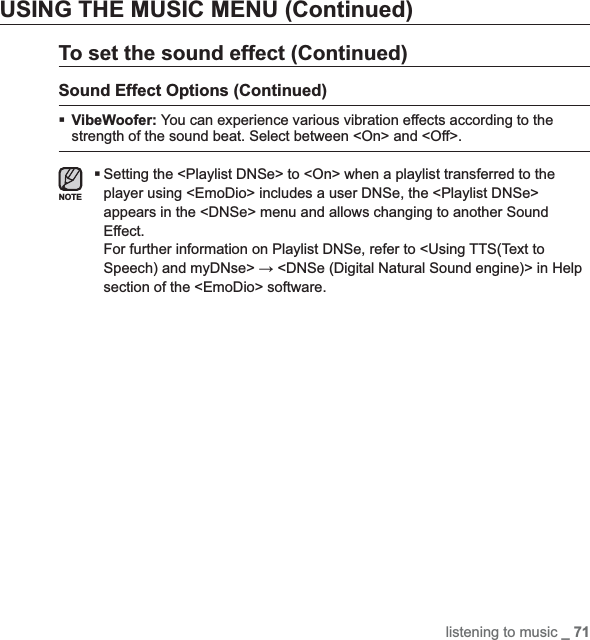
![70 _ listening to musicUSING THE MUSIC MENUThe Music menu allows you manage all facets of listening - from repeating tracks and albums to choosing the background on the screen as you listen.To set the sound effectYou can select the sound effect for your favorite music ¿ le.1. Tap the [] icon on the music play screen.2. Tap <Sound Effect>.3. Tap on a desired sound effect.Sound Effect OptionsStreet Mode: Allows you to hear the music outdoors clearly by ¿ ltering out some of the street noise. Select from 0~2.Playlist DNSe: If a playlist transferred to the player using <EmoDio> includes a user DNSe, the Sound Effect will be set to the Playlist DNSe. If you select <Off>, it will be changed to the previous sound effect.Play Speed: Speed up or slow down your favorite music by adjusting the play speed. Select from <Slow 3>, <Slow 2>, <Slow 1>, <Normal>, <Fast 1>, <Fast 2>, <Fast 3>.Audio Upscaler: This function reconstructs the sound source lost by WMA / MP3 encoding close to its original. The Audio Upscaler only functions with music ¿ les of low quality. Select either <Off> or <On>.MusicSound EffectStreet ModePlaylist DNSePlay SpeedAudio UpscalerVibeWooferAdd to Playlist](https://usermanual.wiki/Samsung-Electronics-Co/YPP3/User-Guide-1034965-Page-70.png)
![72 _ listening to musicUSING THE MUSIC MENU (Continued)To set the Digital Natural Sound engine (DNSe)Select the right sound for each music genre.1. Tap the [] icon on the music play screen.2. Tap <DNSe>.3. Tap on one of the DNSe options.Select from <Auto>, <Normal>, <Studio>, <Rock>, <Classical>, <Jazz>, <Ballad>, <Club>, <Rhythm & Blues>, <Dance>, <Café>, <Concert Hall>, <Church> and <myDNSe>.Selecting <myDNSe> allows setting up user DNSe. See page 73.If you select <Speaker> for the sound output, the DNSe will be set to <Normal> automatically.What is DNSe?Digital Natural Sound Engine (DNSe) is a sound effect function for MP3 players developed by Samsung. It provides various sound settings to enhance the type of music you’re listening to.NOTEMusicAutoNormalStudioRockClassicalJazzBalladDNSe](https://usermanual.wiki/Samsung-Electronics-Co/YPP3/User-Guide-1034965-Page-72.png)
![listening to music _ 73USING THE MUSIC MENU (Continued)To select myDNSeYou can set a user DNSe on your player or the user DNSe transferred from <EmoDio>.1. Tap the [] icon on the music play screen.2. Tap <DNSe> ĺ <myDNSe>.3. Tap on a desired user DNSe.The selected user DNSe is set.myDNSe OptionsYou can set <EQ>, <3D&Bass>, <Concert hall> and <Clarity> when you have selected <myDNSe>. Select a desired user DNSe in the myDNSe list and tap the [ ] icon.EQ : You can adjust individual frequencies to adjust the sound to your preference.3D&Bass : Sets 3D sound effect and bass enhancement.Concert hall : You can adjust the concert hall size and the level as if you are listening to music in a real concert hall.Clarity : You can enjoy clearer sound with improved quality. For further information on setting a user DNSe using <EmoDio>, refer to <Using TTS(Text to Speech) and myDNse> ĺ <DNSe (Digital Natural Sound engine)> in Help section of the <EmoDio> software.Up to 97 user DNSe settings excluding <User 1> to <User 3> can be transferred to the player.NOTEMusicClubRhythm & BluesDanceCaféConcert HallChurchmyDNSeDNSe](https://usermanual.wiki/Samsung-Electronics-Co/YPP3/User-Guide-1034965-Page-73.png)
![74 _ listening to musicUSING THE MUSIC MENU (Continued)To set the play modeSelect playback mode such as repeat settings.1. Tap the [] icon on the music play screen.2. Tap <Play Mode>.3. Tap on a desired play mode.Play Mode OptionsNormal : Plays all ¿ les of the current music list in order one time.Repeat : Repeats playing all ¿ les of the current music list.Repeat One : Repeats playing one ¿ le.ShufÀ e : Repeats playing all ¿ les of the current music list at random.MusicSound EffectDNSePlay ModeNormalRepeatRepeat OneShuffle](https://usermanual.wiki/Samsung-Electronics-Co/YPP3/User-Guide-1034965-Page-74.png)
![listening to music _ 75USING THE MUSIC MENU (Continued)To select the music play screenChoose a background image from those provided, or choose an image of your own to be displayed as you listen to music.1. Tap the [] icon on the music play screen.2. Tap <Music Play Screen>.3. Select a desired music play screen and tap <OK>.Music Play Screen OptionsSelect from <Spectrum>, <Passionate>, <Sweet>, <Quiet>, <Cheerful>, <Mood Tag> and <Album Art>.Mood Tag : Music playback screen appears by the genre or other music style information set by EmoDio. For further information, refer to EmoDio. A ¿ le without a <Mood Tag> information is displayed as <Spectrum>.Album Art : The album cover image displays if an album cover image is included in the ID3 Tag information of the music ¿ le.Album cover images less than 200 pixel (horizontal) x 200 pixel(vertical) in size are supported.What is an ID3 Tag?This is what is attached to an MP3 to carry information relevant to the such as the title, artist, album, year, genre and a comment ¿ eld.NOTEMusicSound EffectDNSePlay ModeMusic Play ScreenAdd to AlarmHorizontal StrokeAdd to Playlist](https://usermanual.wiki/Samsung-Electronics-Co/YPP3/User-Guide-1034965-Page-75.png)
![76 _ listening to musicUSING THE MUSIC MENU (Continued)To add to alarm soundYou can add your favorite music ¿ le to the alarm sound list, so it can be heard the next time the alarm goes off. See page 126 to set the alarm.1. Select a music ¿ le to add to the alarm sound and tap the [] icon.2. Tap <Add to Alarm> ĺ <OK>.The selected music will be added to the alarm sound list.One music ¿ le can be added to the alarm sound.To set the horizontal strokeYou can set the stroke interval of scrolling music ¿ le playback by sliding your ¿ nger to the left or right.1. Tap the [] icon on the music play screen.2. Tap <Horizontal Stroke>.3. Tap on a desired horizontal stroke.Select from <1 File>, <5sec Skip>, <10sec Skip>, <30sec Skip> and <1min Skip>.If the ¿ le was developed with a variable bit rate(VBR), the actual length of the horizontal stroke may not be exactly what you select.NOTEMusicSound EffectDNSePlay ModeMusic Play ScreenAdd to AlarmHorizontal StrokeAdd to PlaylistMusic1 File5sec Skip10sec Skip30sec Skip1min SkipSound EffectHorizontal Stroke](https://usermanual.wiki/Samsung-Electronics-Co/YPP3/User-Guide-1034965-Page-76.png)
![listening to music _ 77USING THE MUSIC MENU (Continued)Before you start - Use only the Bluetooth-certi¿ ed stereo headset.Check if your Bluetooth stereo headset has been registered.<Connect to Headset> appears when there is a registered headset. For more information, refer to <Using a Bluetooth Stereo Headset>. See page 92.To connect a Bluetooth stereo headsetYou can connect directly to the registered Bluetooth stereo headset during music playback.1. Tap the [ ] icon on the music play screen.2. Tap <Connect to Headset>.If <Bluetooth Mode> is set to <Off>, it will be changed to <On>.When the connection is successfully done, you will see the [ ] icon on the screen.You can listen to music through the Bluetooth headset.To disconnect the Bluetooth stereo headset1. Tap the [] icon on the music play screen.2. Tap <Disconnect Headset> ĺ <Yes>.The Bluetooth headset is disconnected.You can not select <Sound Effect> and <DNSe> while the player is connecting to the Bluetooth stereo headset in music mode.NOTEMusicSound EffectDNSePlay ModeMusic Play ScreenAdd to AlarmHorizontal StrokeConnect to HeadsetAdd to Playlist](https://usermanual.wiki/Samsung-Electronics-Co/YPP3/User-Guide-1034965-Page-77.png)
![78 _ viewing picturesviewing picturesBefore you start -Transfer picture ¿ les to the player using <EmoDIo>. Connect the earphones, then turn on the player, and check the battery.VIEWING PICTURES1. Tap the icon on the main menu screen.2. Tap on a desired picture ¿ le.To move to the previous/next pictureTap [ , ] icon on the picture view screen.The previous/next picture will be displayed.[] will be displayed if the JPG ¿ les have the wrong thumbnail information.Some pictures can be displayed slowly.When transferring a picture to the player using <EmoDio>, it is automaticallyconverted into JPG format before transfer. The ¿ le size is automatically adjusted, too.For more information, refer to <Viewing pictures> in the Help section of the <EmoDio> software.NOTE](https://usermanual.wiki/Samsung-Electronics-Co/YPP3/User-Guide-1034965-Page-78.png)

![viewing pictures _ 81ENLARGING A PICTUREYou can zoom in a picture.Tap the [ ] icon on the picture view screen.Each time you press the [ ] icon, the size of the picture is enlarged in the sequence of <x2> ĺ <x3> ĺ <x4>.To cancel the picture enlarging, tap on the touch screen and tap the [] icon.To view the enlarged photo1. Tap on the enlarged picture twice.Tap once to display the picture information and icons or tap twice to display the move icon.2. Tap the [,,,] icon to move the picture in a desired direction.Picture 1](https://usermanual.wiki/Samsung-Electronics-Co/YPP3/User-Guide-1034965-Page-81.png)
![82 _ viewing picturesUSING THE PICTURE MENUTo watch a slideshow1. Tap the [] icon on the picture view screen.2. Tap <Start Slideshow>.The [ ] icon on the screen appears on the screen, and the slideshow will start.You can also start a slideshow by tapping the [ ] icon on the preview screen.To stop the slideshowTap on the screen in the slideshow mode.This will stop the slideshow.To set the slideshow speed1. Tap the [] icon on the picture view screen.2. Tap <Slideshow Speed>.3. Tap on a desired speed.Select from <Fast>, <Normal>, and <Slow>.NOTEStart SlideshowSlideshow SpeedSet as Booting ImageFastNormalSlow](https://usermanual.wiki/Samsung-Electronics-Co/YPP3/User-Guide-1034965-Page-82.png)
![viewing pictures _ 83USING THE PICTURE MENU (Continued)To rotate a pictureYou can rotate a picture for your convenience.1. Tap the [] icon on the picture view screen.2. Tap <Rotate>.3. Tap on a desired angle.Select from <Left 90°>, <Right 90°>, and <180°>.To select the picture view mode1. Tap the [] icon on the picture view screen.2. Tap <View Mode>.3. Tap on a desired mode.Select from <Auto> and <Horizontal>.If you select <Auto>, a picture of greater width than height is displayed vertically and a picture of greater height than width is displayed horizontally.Start SlideshowSlideshow SpeedRotateLeft 90°Right 90°180°Start SlideshowSlideshow SpeedRotateView ModeAutoHorizontal](https://usermanual.wiki/Samsung-Electronics-Co/YPP3/User-Guide-1034965-Page-83.png)
![84 _ viewing picturesUSING THE PICTURE MENU (Continued)To select a picture as a background imageYou can save selected picture as the touch screen’s background image and in <Skin> folder.1. Select a picture to set as a background image and tap the [] icon.2. Tap <Select as My Skin> ĺ <Yes>.Selected picture ¿ le is saved as the background and in the <Skin> folder under the Pictures.An enlarged picture is saved as enlarged.To select a picture as a booting imageYou can set a desired picture to a booting image for the screen.1. Select a desired picture ¿ le for the booting image, then tap on the [] icon.2. Tap <Set as Booting Image> ĺ <Yes>.The selected picture is set to a booting image.An enlarged picture is saved as enlarged.Start SlideshowSlideshow SpeedRotateView ModeSet as My SkinSet as Booting ImageStart SlideshowSlideshow SpeedRotateView ModeSet as My SkinSet as Booting ImageNOTENOTE](https://usermanual.wiki/Samsung-Electronics-Co/YPP3/User-Guide-1034965-Page-84.png)
![reading text _ 85reading textWhether it’s a novel, the manuscript of a new story, or your research paper, your mp3 player allows you to read it… all while listening to music!Before you start - Connect the earphones, then turn on the player, and check the battery.Transfer text ¿ les to the player using <EmoDio>. Set a preferred text language for text in <Settings> ĺ<Language> ĺ<Contents>. See page 42.READING TEXT1. Tap the icon on the main menu screen.2. Tap on a desired text ¿ le.The text ¿ le is displayed in full screen.Tap on the touch screen to display the Text icons.Your mp3 player supports the TXT ¿ le format in Text mode.To move to previous/next pageTap the [Ż,Ź] icon on the bottom of the touch screen.NOTEMy doggy likes to disco dance.He boogies every night.He dances in his doghousetill the early morning light.The other dogs come runningwhen they hear my doggy swing.A few will bring play their The others dance and sing.They pair off with their partnersas their tails begin to wag.My doggy likes to disco dance.He boogies every night.My doggy likes to disco dance.He boogies every night.](https://usermanual.wiki/Samsung-Electronics-Co/YPP3/User-Guide-1034965-Page-85.png)
![86 _ reading textUSING THE TEXT MENUTo set a bookmarkSet a bookmark to return to that point in the text at any time.1. Tap the [ ] icon at the desired page.2. Tap <Add Bookmark>.The current text screen is set to a bookmark with the [] symbol displayed on the top left corner.The bookmark can be set one for each text ¿ le, and you can set a maximum of 100 bookmarks.To move to/remove the bookmark1. Tap the [ ] icon on the text view screen.2. Tap <Go to Bookmark> or <Delete Bookmark>.When you selected <Go to Bookmark> then it will move to the selected bookmark and <Delete Bookmark> will remove the selected bookmark from the text ¿ le.NOTE§ÿ¨Æ 1My doggy likes to disco dance.He boogies every night.He dances in his doghousetill the early morning light.The other dogs come runningwhen they hear my doggy A few will bring play their The others dance and sing.They pair off with their partnersas their tails begin to wag.My doggy likes to disco dance.HeMy Add BookmarkText 1§ÿ¨Æ 1My doggy likes to disco dance.He boogies every night.He dances in his doghousetill the early morning light.The other dogs come runningwhen they hear my doggy A few will bring play their The others dance and sing.ThasMyHeMy Add BookmarkGo to BookmarkDelete BookmarkText 1](https://usermanual.wiki/Samsung-Electronics-Co/YPP3/User-Guide-1034965-Page-86.png)
![reading text _ 87USING THE TEXT MENU (Continued)To set the text viewer colorChoose what color you’d like the text to appear.1. Tap the [] icon on the text view screen.2. Tap <Text Viewer Color>.3. Select a desired color for the text viewer and tap <OK>.Select from <Type 1> to <Type 7>.The selected text viewer color is displayed.§ÿ¨Æ 1My doggy likes to disco dance.He boogies every night.He dances in his doghousetill the early morning light.The other dogs come runningwhen they hear my doggy A few will bring play their The others dance and sing.ThasMyHeMy Text Viewer ColorFont sizeView ModeText 1My doggy likes to disco He boogies every night.He dances in his doghousetill the early morning light.The other dogs come Type 1OK CancelText Viewer Color](https://usermanual.wiki/Samsung-Electronics-Co/YPP3/User-Guide-1034965-Page-87.png)
![88 _ reading textUSING THE TEXT MENU (Continued)To change the font sizeYou can change the font size of the text.1. Tap the [] icon on the text view screen.2. Tap <Font Size>.3. Select a desired font size and tap <OK>.Select from <Small>, <Medium> and <Large>.The font size is changed.To set the Text View ModeYou can view text horizontally or vertically.1. Tap the [] icon on the text view screen.2. Tap <Vertical> or <Horizontal>.Select <Normal> to view the text vertically and select <Horizontal> to rotate the text horizontally.My doggy likes to disco He boogies every night.He dances in his doghousetill the early morning light.The other dogs come SmallOK CancelFont Size§ÿ¨Æ 1My doggy likes to disco dance.He boogies every night.He dances in his doghousetill the early morning light.The other dogs come runningwhen they hear my doggy A few will bring play their The others dance and sing.ThasMyHeMy View ModeText 1VerticalHorizontal](https://usermanual.wiki/Samsung-Electronics-Co/YPP3/User-Guide-1034965-Page-88.png)
![reading text _ 89USING THE TEXT MENU (Continued)To listen to TTS (Text to Speech)Using the TTS function of <EmoDio>, you can convert text into a voice ¿ le in TTS format and you can also listen to it in the player after transferring.Before you start - Transfer TTS ¿ les to the player using <EmoDio>.1. Tap the icon on the main menu screen.2. Tap on a desired TTS ¿ le.You can listen to a text ¿ le.Tap the [ ] icon to set a bookmark.You can adjust the view mode, play speed and Horizontal stroke by tapping the [ ] icon.For further information on TTS function of <EmoDio>, refer to <Using TTS(Text to Speech) and myDNSe> ĺ <Using TTS(Text to Speech)> in the Help section of the <EmoDio> software.NOTE](https://usermanual.wiki/Samsung-Electronics-Co/YPP3/User-Guide-1034965-Page-89.png)
![92 _ using bluetoothUSING A BLUETOOTH STEREO HEADSETYou can use a Bluetooth stereo headset to let you enjoy music with high quality stereo sound, all without wires!Before you start - If the player is connected to a Bluetooth mobile phone or external device, set the connection to off ¿ rst. Ensure that the Bluetooth device to connect is ready for pairing. (refer to the device’s user manual)To register the Bluetooth Stereo Headset(you only need to register it once)1. Tap the icon on the main menu screen.2. Tap <Yes>.The <Bluetooth Mode> is set to <On>.The icon appears.3. Set the stereo headset ready for pairing.To set the headset ready for the pairing mode, refer to the headset’s user manual.4. Tap <Stereo Headset> and tap the [] icon.This player automatically starts to search for any Bluetooth device even if the [ ] icon was not pressed.The headset to be registered will be listed.Stereo HeadsetMobile PhoneFile TransferBluetooth ModeBluetooth SettingsBluetooth](https://usermanual.wiki/Samsung-Electronics-Co/YPP3/User-Guide-1034965-Page-92.png)
![94 _ using bluetoothUSING A BLUETOOTH STEREO HEADSET (Continued)To connect the registered Bluetooth stereo headset1. Tap the icon on the main menu screen.2. Tap <Stereo Headset>.3. Tap on the stereo headset to connect.When the connection is successfully done, you will see the [ ] icon.You can connect up to 2 headsets.4. Play a ¿ le of your choice.You can listen to the music using a stereo headset.If you can’t ¿ nd the desired headset to connect, register it ¿ rst. See page 92.If you turn off the player or the headset, and then turn it on, the bluetooth communication may be disconnected. If you want to listen to the music again using the stereo headset, repeat the instructions above.When two headsets are connected, the ¿ rst-connected headset alone can be enabled for functional operation such as play/stop and volume control. For more information, refer to the headset’s user manual.Bluetooth-compliant Stereo HeadsetsCompany Model Company ModelPlantronicsPULSAR 590 LUBIX NC1wiREVO S300 SAMSUNG SBH-170Sony EricssonHBH-DS970 Jabra BT-620SSONY DR-BT30Q Motorola HT-820Fusion NFC BT-55DNOTESBH-170Stereo Headset](https://usermanual.wiki/Samsung-Electronics-Co/YPP3/User-Guide-1034965-Page-94.png)
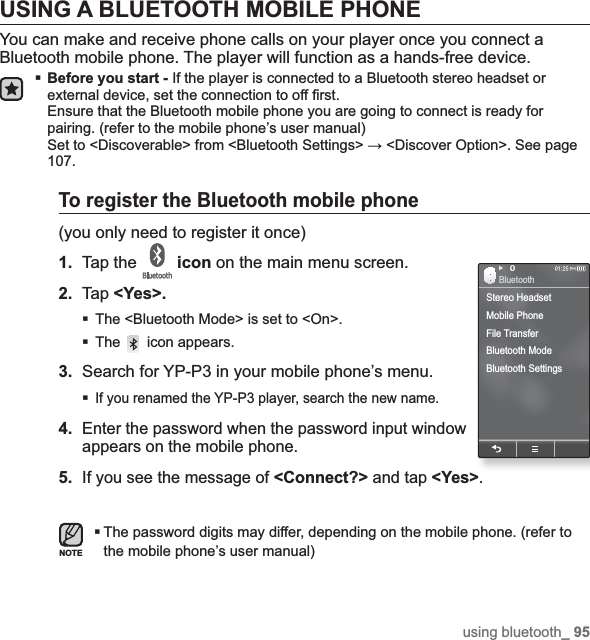
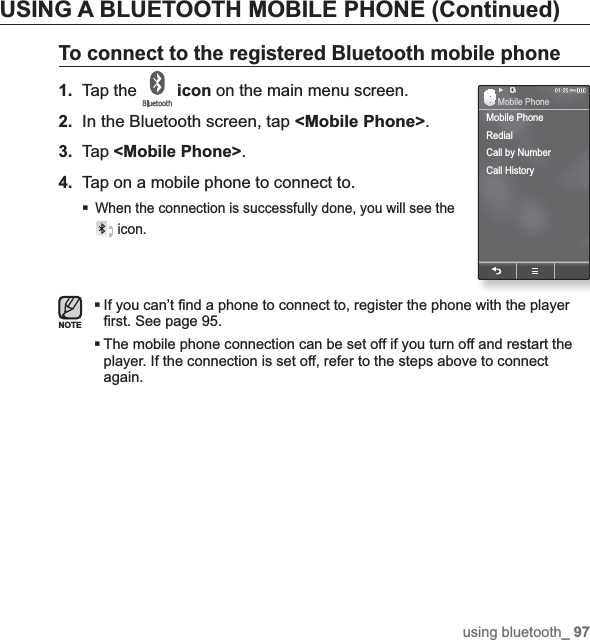
![98 _ using bluetoothUSING A BLUETOOTH MOBILE PHONE (Continued)To dial the last used number1.In the Bluetooth screen, tap <Mobile Phone>.2. Tap <Redial>.You are now placing a call to the last used phone number.The recent call history may appear depending on the mobile phone. Select the latest phone number in the call history to call.To make a call using the player1.In the Bluetooth screen, tap <Mobile Phone>.2. Tap <Call by Number>.3. Enter the phone number for the other person.4. Tap the [ ] icon.You are now placing a call to the other person.If the connected mobile phone has set shortcut numbers, you can directly make a call on the player by pressing and holding the last number of the shortcut.To end the phone callTap <Disconnect > while making conversations.The call is hung up.NOTEMobile PhoneRedialCall by NumberCall HistoryMobile Phone](https://usermanual.wiki/Samsung-Electronics-Co/YPP3/User-Guide-1034965-Page-98.png)
![using bluetooth_ 99USING A BLUETOOTH MOBILE PHONE (Continued)To make a call using the phone number list1.In the Bluetooth screen, tap <Mobile sPhone>.2. Tap <Call History >.3.Select a desired phone number and tap the [ ]icon.You are now placing a call to the other person.To delete a phone number in the phone number list1.In the <Call History>, select a phone number to delete and tap the[ ]icon.2. Tap <Delete>.If you want to delete all numbers in the phone number list, select<Delete All>.3. Tap <Yes>.The selected number will be deleted.Mobile PhoneRedialCall by NumberCall HistoryMobile Phone](https://usermanual.wiki/Samsung-Electronics-Co/YPP3/User-Guide-1034965-Page-99.png)
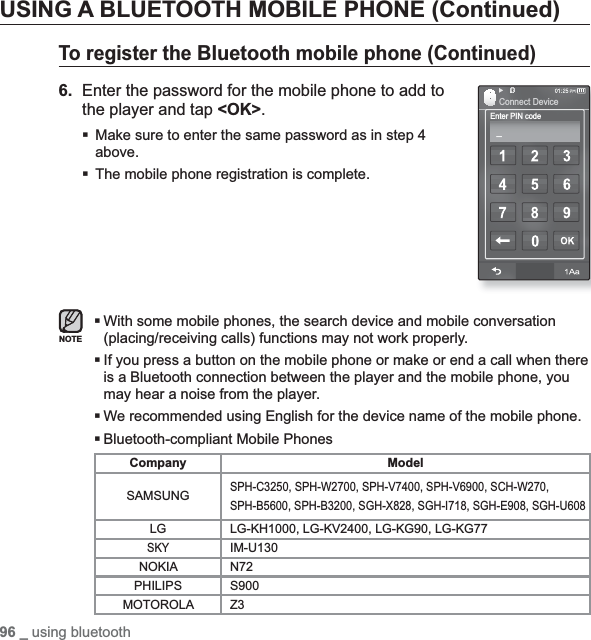
![100 _ using bluetoothUSING A BLUETOOTH MOBILE PHONE (Continued)To answer the phone1.You will see <Connect?> when you have an incoming call.2. Tap <Yes>.You can now make conversations.To switch to the mobile phone while talking on the player (YP-P3)While talking on the player, tap <Voice to Phone>.You can now make conversations on the mobile phone.To switch to the player (YP-P3) while talking on the mobile phoneWhile talking on the mobile phone, tap <Voice to Hands-free>.You can now make conversations on the hands-free device.To adjust the volumeWhile talking on the hands-free, press the [ +, – ] button to adjust the volume.You can select the volume from 0 to 30.](https://usermanual.wiki/Samsung-Electronics-Co/YPP3/User-Guide-1034965-Page-100.png)
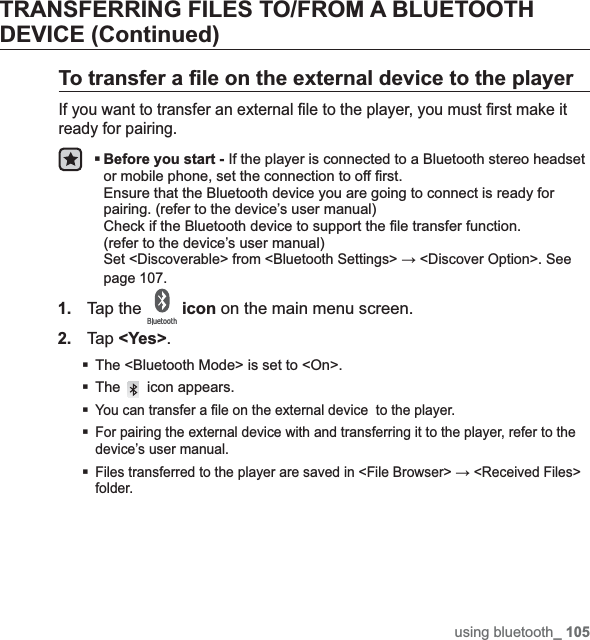
![using bluetooth_ 101TRANSFERRING FILES TO/FROM A BLUETOOTH DEVICEYou can transfer music, picture and video ¿ les to Bluetooth-compliant external devices such as an MP3 player, mobile phone, etc. to the player or vice versa.Before you start - If the player is connected to a Bluetooth stereo headset or mobile phone, set the connection to off ¿ rst.Ensure that the Bluetooth device you are going to connect is ready for pairing. (refer to the device’s user manual)Check if the Bluetooth device to support the ¿ le transfer function. (refer to the device’s user manual)To register an external device on the player(you only need to register it once)1. Tap the icon on the main menu screen.2. Tap <Yes>.The <Bluetooth Mode> is set to <On>.The icon appears.3. Set the external device so it is ready for pairing.For information on setting the external device so it is ready for pairing, refer to the device’s user manual.4.Tap <File Transfer> and tap the [ ]icon.This player automatically starts to search for any Bluetooth device even if the [ ] icon was not pressed.The device to be registered will be listed.Stereo HeadsetMobile PhoneFile TransferBluetooth ModeBluetooth SettingsBluetooth](https://usermanual.wiki/Samsung-Electronics-Co/YPP3/User-Guide-1034965-Page-101.png)
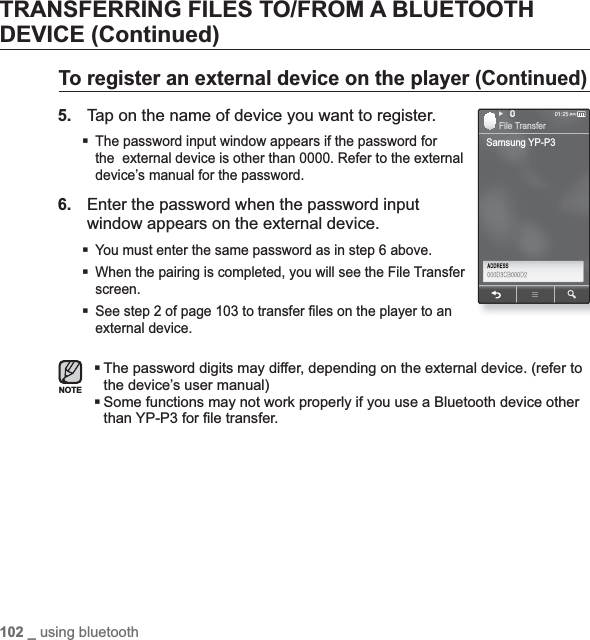
![using bluetooth_ 103TRANSFERRING FILES TO/FROM A BLUETOOTH DEVICE (Continued)To transfer a ¿ le on the player to the external deviceBefore you start - If you can’t ¿ nd the external device to connect to, register it with the player ¿ rst. See page 101. Ensure that the Bluetooth device you are connecting is ready for pairing. (refer to the device’s user manual)1.In the Bluetooth screen, tap <File Transfer>.2.Tap on an external device to connect to.When the connection is completed, you will see the File Transfer screen.3.Select a desired folder and tap <OK>4.Select a ¿ le to transfer and tap <OK>.The selected ¿ les on the player will be transferred to the external device.When the ¿ le transfer is done, tap the [ ] icon to exit the ¿ le transfer mode. See page 104.DRM ¿ les (chargeable) can not be played on the player.The connection can be set off if you turn off and restart the player or external device. If the connection is set off, refer to the steps above to connect again.NOTEEx) <File Transfer> screen of the playerVideoMusicPlaylistsPicturesTextsDatacastsGamesReceived FilesFile Transfer](https://usermanual.wiki/Samsung-Electronics-Co/YPP3/User-Guide-1034965-Page-103.png)
![104 _ using bluetoothTRANSFERRING FILES TO/FROM A BLUETOOTH DEVICE (Continued)To cancel transferring the ¿ leTap <Cancel> during the transfer.The ¿ le transfer is stopped.To exit the File Transfer mode1.Press and hold the [ ]icon in the ¿ le list window.Each time you tap the [ ] icon, the player will return to the previous screen and you will see the ¿ le transfer close window.2.Tap <Yes>.The ¿ le transfer mode is closed.](https://usermanual.wiki/Samsung-Electronics-Co/YPP3/User-Guide-1034965-Page-104.png)
![106 _ using bluetoothUSING THE BLUETOOTH MENUTo disconnect the Bluetooth Device1. Tap the icon on the main menu screen.2. Tap the [ ] icon.3. Tap <Disconnect>.4. Tap <Yes>.The currently connected device will be disconnected.To check the Bluetooth Device connected1. Tap the icon on the main menu screen.2. Tap the [] icon.3. Tap <Connected Device>.You can see information of the connected device.You can disconnect or check the connected device only when connecting Bluetooth stereo headset or mobile phone.NOTE§ÿ¨Æ 1DisconnectConnected DeviceStereo HeadsetMobile PhoneFile TransferBluetooth ModeBluetooth SettingsBluetooth§ÿ¨Æ 1DisconnectConnected DeviceStereo HeadsetMobile PhoneFile TransferBluetooth ModeBluetooth SettingsBluetooth](https://usermanual.wiki/Samsung-Electronics-Co/YPP3/User-Guide-1034965-Page-106.png)
![using bluetooth_ 107BLUETOOTH SETTINGSBefore you start - Set <Bluetooth Mode> to <On>.1. Tap the icon on the main menu screen.2. Tap <Bluetooth Settings>.3. Set the options you prefer and tap <OK>.Bluetooth Settings OptionsDiscover Option : You can set the Bluetooth device to detect this player. <Discoverable> sets it to detect and <Non-Discoverable> turns off detection.Delete Device : You can delete a registered device in the player. Tap the [ ]icon to delete all of the registered devices. See page 108.My Device Info. : You can check the name and address of your player.Stereo HeadsetMobile PhoneFile TransferBluetooth ModeBluetooth SettingsBluetooth](https://usermanual.wiki/Samsung-Electronics-Co/YPP3/User-Guide-1034965-Page-107.png)
![108 _ using bluetoothBLUETOOTH SETTINGS (Continued)To delete a Bluetooth device1. Tap <Delete Device>.You will see the list of the registered devices.2. Select a device to remove and tap the [ ] icon.Tap the [ ] icon to delete all of the registered devices.3. Tap <Yes>.The selected device will be removed.To rename a Bluetooth device1. Tap <My Device Info.>.2. Tap the [] icon.3. Rename the device by tapping on the number or character icon.[1Aa] : The input mode switches from number to uppercase English and to lowercase English.[] : You can delete the characters one at a time.[ – ] : You can add space between characters.You can insert ‘–‘.[OK] : Con¿ rm your change.E.g. To enter “YPS5”-Move to the corresponding key icon and tap on it.(once) ¨(3 times) ¨(once) ¨(3 times) ¨(twice)¨(once)Discover OptionDelete DeviceMy Device lnfo.Bluetooth SettingsEdit Device NameMy Device Info.Samsung YP-P3](https://usermanual.wiki/Samsung-Electronics-Co/YPP3/User-Guide-1034965-Page-108.png)

![112 _ listening to FM radioTO SEARCH FOR FM STATIONSPress and hold the [,] icon and then release in Manual mode.The search will stop at the frequency nearest from the point the button is released.OR,Tap the [,] icon shortly to progress through the frequencies one by one in Manual mode.Moves to frequencies whenever the icon is pressed.FM Radio](https://usermanual.wiki/Samsung-Electronics-Co/YPP3/User-Guide-1034965-Page-112.png)
![listening to FM radio _ 113RECORDING FM RADIOTo record FM Radio broadcasting You can record a FM radio program at any time while listening to the radio.1. Select a radio frequency to record and tap the [] icon.2. Tap <Yes>.To stop recording1. Tap the [] icon during the recording.A message appears asking you if you want to listen to the ¿ le you just recorded.2. Tap <Yes> or <No>.Selecting <Yes> will play the just recorded ¿ le.Selecting <No> will not play the recorded ¿ le.Recorded ¿ le is saved in MP3 format.The recorded ¿ le is stored in <File Browser> ĺ <Recorded Files> ĺ <FM Radio>.Each recording ¿ le can be as long as 5 hours.You can make a recording for up to approximately 18 hours (based on 128Kbps, 1GB)You can store a maximum of 999 ¿ les by the date for FM radio recording.NOTEFM RadioFM Radio](https://usermanual.wiki/Samsung-Electronics-Co/YPP3/User-Guide-1034965-Page-113.png)
![114 _ listening to FM radioUSING THE FM RADIO MENUTo switch to Preset ModeSelect this mode if you want to search through your saved FM presets one preset at a time.1. Tap the [] icon in Manual mode.2. Tap <Go to Preset Mode>.FM radio reception will start.Preset frequencies are stored in numeric sequence.To switch to Manual ModeSelect this mode if you want to manually search through the FM band one frequency at a time.1. Tap the [] icon in Preset mode.2. Tap <Go to Manual Mode>.NOTEFM RadioFM Radio](https://usermanual.wiki/Samsung-Electronics-Co/YPP3/User-Guide-1034965-Page-114.png)
![listening to FM radio _ 115USING THE FM RADIO MENU (Continued)To store stations in the preset memoryYou can store up to 30 stations in your MP3 player’s memory and return to them with the press of just one number. Manual - choose only the stations you want to store1. Select a frequency to preset in Manual mode and tap [] icon.2. Tap <Add to Preset>.The selected station is set as a preset number.Automatic – automatically store all the stations the player receives1. Tap the [] icon on the FM Radio screen.2. Tap <Auto Preset> ĺ <Yes>.Up to 30 frequencies are automatically set.To cancel Auto PresetIf you want to cancel the auto preset, tap the [] icon.The auto preset setting is canceled, and only frequencies set up to that point are stored.You may want to re-set the stored stations if you’re going to listen to your MP3 player in a different city. To delete the preset stations and store new ones, simply repeat the process.FM RadioGo to Preset ModeAdd to PresetAuto PresetFM SensitivityFM RegionNOTE](https://usermanual.wiki/Samsung-Electronics-Co/YPP3/User-Guide-1034965-Page-115.png)
![116 _ listening to FM radioUSING THE FM RADIO MENU (Continued)To listen to preset stationsTap on a desired preset number in Preset mode.You can listen to the radio frequency that is previously stored for the number.Tap the [,] icon to move to the previous or the next number list.To delete a preset Follow the steps below to delete frequencies while listening to FM Radio.1. Tap the [] icon in Preset mode.2. Tap <Delete from Preset>.3. Tap on a frequency to delete.4. Tap <Yes>.The selected preset number is deleted. When a preset frequency is deleted, the numbers of the following presets are moved up by one.FM RadioFM RadioGo to Manual ModeDelete from PresetAuto PresetFM SensitivityFM Region](https://usermanual.wiki/Samsung-Electronics-Co/YPP3/User-Guide-1034965-Page-116.png)
![listening to FM radio _ 117USING THE FM RADIO MENU (Continued)To set the FM sensitivityTo receive more or fewer FM radio frequencies, adjust the <FM Sensitivity>.1. Tap the [] icon on the FM Radio screen.2. Tap <FM Sensitivity>.3. Tap on a desired reception sensitivity.Select from <High>, <Middle> and <Low>.If you select <High>, more frequencies will be received.To set the FM regionYou can change an FM region setting in preparation for overseas travel.1. Tap the [] icon on the FM Radio screen.2. Tap <FM Region>.3. Tap on a desired FM region.Select from <Korea/US>, <Japan> and <Other Countries>.Frequency range by region- Korea/US: Search for FM frequencies in 100 kHz increments between 87.5 MHz~108.0 MHz.- Japan: Search for FM frequencies in 100 kHz increments between 76.0 MHz~108.0 MHz.- Other Countries: Search for FM frequencies in 50 kHz increments between 87.50 MHz~108.00 MHz.FM region can be deleted or changed according to the target region of the player. Your previously stored radio frequencies will be deleted when you change the <FM Region> on your player.NOTEFM RadioHighMiddleLowGo to Preset ModeFM SensitivityFM RadioKorea/USJapanOther CountriesGo to Preset ModeFM Region](https://usermanual.wiki/Samsung-Electronics-Co/YPP3/User-Guide-1034965-Page-117.png)
![118 _ using the sketchbookusing the sketchbookYou can scribble, draw freely and decorate a selected picture in your style.USING THE SKETCHBOOK1. Tap the icon on the main menu screen.2. Tap <New Picture>.3. Using various drawing tools, scribble what you want and tap <OK>.Tap on [ ] icon to open a picture from the saved ¿ les.NOTE](https://usermanual.wiki/Samsung-Electronics-Co/YPP3/User-Guide-1034965-Page-118.png)
![120 _ voice recordingvoice recordingYou can make a voice recording.VOICE RECORDINGTo make a voice recording1. Tap the icon on the main menu screen.2. Tap the [ ] icon and tasp <Yes>.Recording starts.Do not put the microphone too close to or far away from your mouth as it may cause a poor recording.Voice recording does not perform properly when the battery is low.NOTE](https://usermanual.wiki/Samsung-Electronics-Co/YPP3/User-Guide-1034965-Page-120.png)
![voice recording _ 121VOICE RECORDING (Continued)To stop voice recording1. Tap the [ ] icon during the recording.A message appears asking you if you want to listen to the ¿ le you just recorded.2. Tap <Yes> or <No>.Selecting <Yes> will play the just recorded ¿ le.Selecting <No> will not play the recorded ¿ le.Recorded ¿ le is saved in MP3 format.The recorded ¿ le is stored in <File Browser> ĺ <Recorded Files> ĺ <VOICE>.Each recording ¿ le can be as long as 5 hours.You can make a recording for up to approximately 18 hours (based on 128Kbps, 1GB)You can store a maximum of 999 ¿ les by the date for voice recording.NOTERecord Voice](https://usermanual.wiki/Samsung-Electronics-Co/YPP3/User-Guide-1034965-Page-121.png)
![setting the alarm _ 127SETTING THE ALARM (Continued)To turn of an alarmThe player will sound the alarm when it reaches the scheduled time. To end the alarm, tap <Alarm Off>. And to sound the alarm again, tap on the alarm interval. To delete an alarm setting1. Tap on an alarm setting to delete on the alarm screen.2. Tap the [] icon and tap <Yes>.Tap the [ ] icon to delete all of the alarm setting.The selected alarm will be deleted.If the player is connected to the PC, the alarm function does not work.CAUTIONNew AlarmAM 12:35Alarm](https://usermanual.wiki/Samsung-Electronics-Co/YPP3/User-Guide-1034965-Page-127.png)
![128 _ viewing the address bookviewing the address bookYou can download the address book using Bluetooth function to check the phone number and directly call the other person on the player.Before you start - First, use the Bluetooth-based ¿ le transfer function to download the address book from an external device. For more information, refer to <To transfer a ¿ le on the external device to the player>. See page 103.You must pair your mobile phone with the player before you make a call in the address book window.For more information, refer to <Using A Bluetooth Mobile Phone>. See page 95.VIEWING THE ADDRESS BOOK1. Tap the icon on the main menu screen.2. Tap on a name to check.The selected address information will appear.To make a call in the address book1. Tap on a name to make a call in the Address Book screen.2. Select a desired phone number and tap the [] icon.You are now placing a call to the other person. The address book will be displayed in alphabetical order.The address book ¿ les transferred to the player are saved in <File Browser> ĺ<Received Files> folder.Only the vCard ¿ le format is supported for the address book.NOTE](https://usermanual.wiki/Samsung-Electronics-Co/YPP3/User-Guide-1034965-Page-128.png)
![130 _ troubleshootingupgrading fi rmware Future upgrades may be available for this player to enhance performance and compatibility.1. Connect the player to your PC with the USB cable.<EmoDio> will automatically start when the player is connected to your PC.If the program does not start automatically, double click the <EmoDio> icon on the desktop.2. Click the [MENU] button on the top of the <EmoDio> program.3. Select [Portable Device] ĺ[Update Firmware].If there is a ¿ rmware update available, you can update the ¿ rmware.4. Click the [OK] button. Updated ¿ rmware software is transferred to the player.5. After disconnecting the USB cable, the player will be turned off automatically.6. Press and brieÀ y hold the button.The ¿ rmware will be upgraded.Check the battery charge status of the player. If the battery is not suf¿ ciently charged, the ¿ rmware will not be upgraded.You need to have at least 50 MB of free space on the player for the upgrade.NOTE](https://usermanual.wiki/Samsung-Electronics-Co/YPP3/User-Guide-1034965-Page-130.png)