Samsung BD UP5000 User Manual DVD PLAYER Manuals And Guides L0801367
SAMSUNG DVD Systems Manual L0801367 SAMSUNG DVD Systems Owner's Manual, SAMSUNG DVD Systems installation guides
User Manual: Samsung BD-UP5000 BD-UP5000 SAMSUNG DVD PLAYER - Manuals and Guides View the owners manual for your SAMSUNG DVD PLAYER #BDUP5000. Home:Electronics Parts:Samsung Parts:Samsung DVD PLAYER Manual
Open the PDF directly: View PDF ![]() .
.
Page Count: 68

key features of f N@W
Player Features
Supports a Variety of Video Disc Types
Supports BD, HD DVD, DVDVideo, DVD-RW/-R (V mode and finalizedonly).
HDMI (High Definition Multimedia Interface)
HDMi reduces picture noise by allowing a pure digital video/audio signal path from the player to your TV.
Simplay HD
Simplay HD guarantees that this player has been tested according to
specifications aimed at maximizing the deliveryof HD content.
Blu-ray Disc Features
Blu-ray Discs can store 25 GB (single layer)or 50 GB (dual layer)on a single sided disc -about 5 to 10 times the
capacity of a DVD. Blu-ray Discs also support the highest quality HD video available in the industry - Large capacity
means no compromise on video quality. Furthermore, a Blu-ray Disc hasthe same familiar sizeand look as DVD.
HD DVD Features
HD DVD is the newest, high definition entry to the popular DVD format.
A HD DVD (duaNayer)disc can store up to 30 GB of data, and a single layer HD DVDcan store up to 15 GB. On
one side of a single layer HD DVD, up to 8 hours of high resolution video source with 1125 scanning lines, and up to
48 hours of standard resolution with 525 scanning lines can be stored.
* The following BD/HD DVDDisc features are disc dependant and will vary.
Appearance and navigation of features will also vary from disc to disc.
Not all discs will have the features described below.
Video highlights
The BD-ROM/HD DVD-ROM format for movie distribution supports three highly advanced video codecs, including
AVC, VC-1, and MPEG-2.
HD video resolutions are also available:
• 1920x1080 HD
• 1280 x 720 HD
For High-Definition Playback
To view high-definition contents on a BD/HD DVD Disc, an HDTV (High DefinitionTelevision) is required.
Some BD/HD DVD discs may require using the player's HDMI OUTto view high-definition content. The ability to
view high-definition content on BD/HD DVDdiscs may be limited depending on the resolution of your TV.
2 English
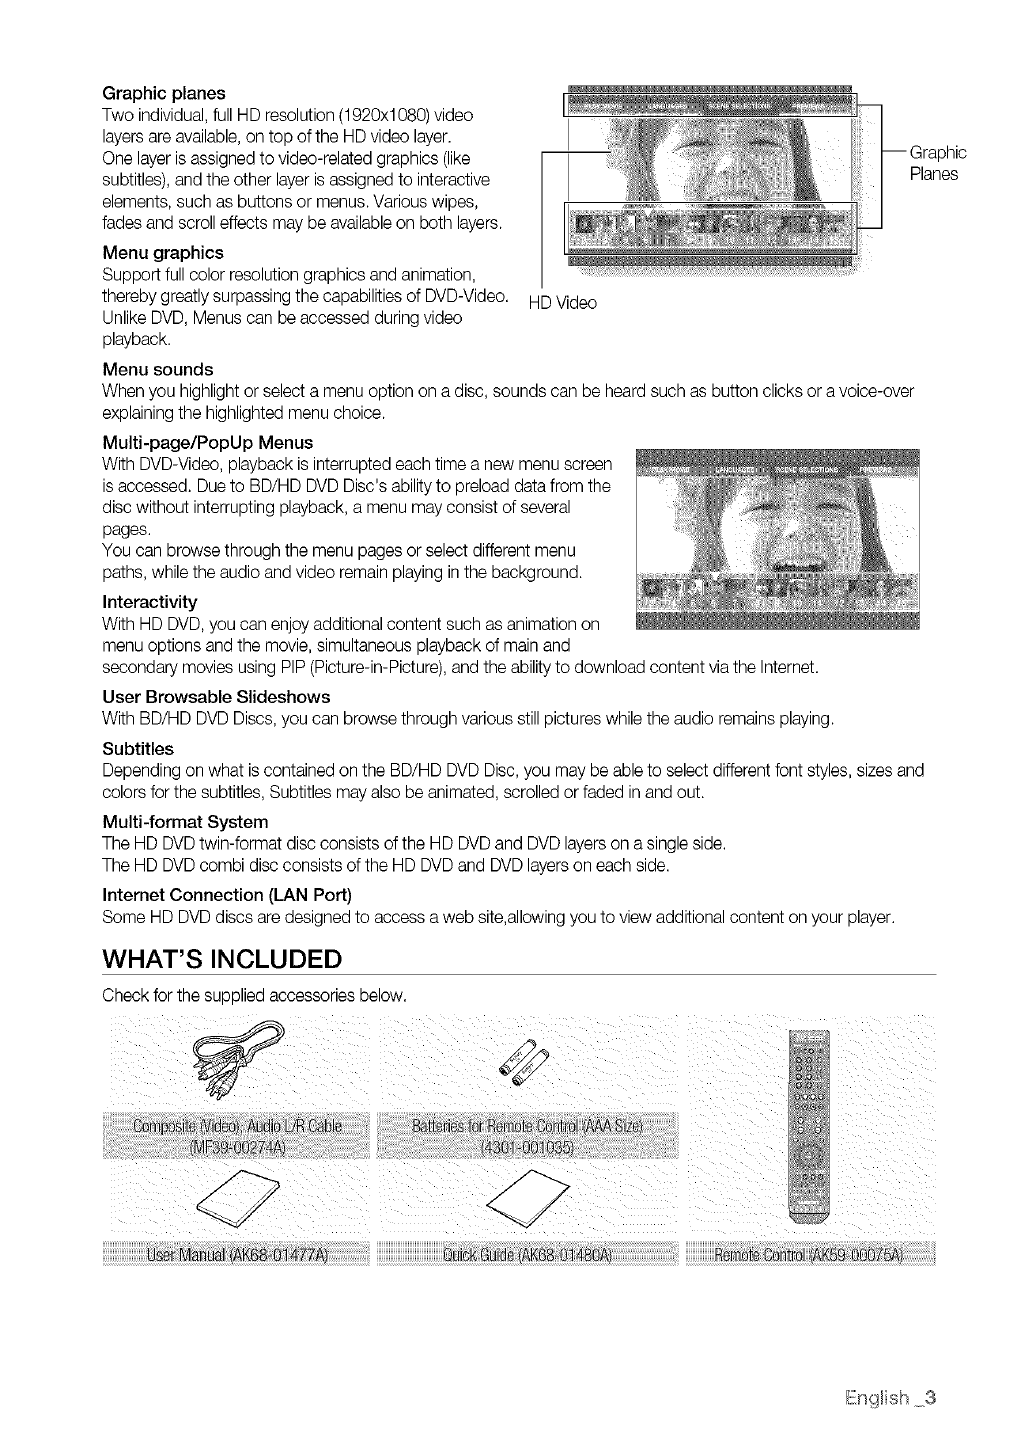
Graphic planes
Two individual, full HD resolution (1920xl 080)video
layers are available, on top of the HD video layer.
One layer is assigned to video-related graphics (like
subtitles), and the other layer is assigned to interactive
elements, such as buttons or menus. Various wipes,
fades and scroll effects may be available on both layers.
Menu graphics
Support full color resolution graphics and animation,
thereby greatly surpassing the capabilities of DVD-Video.
Unlike DVD, Menus can be accessed during video
playback.
Menu sounds
[
Planes
When you highlight or select a menu option on a disc, sounds can be heard such as button clicks or a voice-over
explainingthe highlighted menu choice.
Multi-page/PopUp Menus
With DVD-Video, playback is interrupted each time a new menu screen
is accessed. Due to BD/HD DVD Disc's ability to preload data from the
disc without interrupting playback, a menu may consist of several
pages.
You can browse through the menu pages or select different menu
paths, while the audio and video remain playing inthe background.
Interactivity
With HD DVD,you can enjoy additional content such as animation on
menu options and the movie, simultaneous playback of main and
secondary movies using PIP (Picture-in-Picture),and the ability to download content via the Internet.
User Browsable Slideshows
With BD/HD DVD Discs, you can browse through various still pictures while the audio remains playing.
Subtitles
Depending on what iscontained on the BD/HD DVD Disc, you may be able to select different font styles, sizes and
colors for the subtitles, Subtitles may also be animated, scrolled or faded in and out.
Multi-format System
The HD DVDtwin-format disc consists of the HD DVDand DVD layers on a single side.
The HD DVD combi disc consists of the HD DVDand DVD layers on each side.
Internet Connection (LAN Port)
Some HD DVDdiscs are designed to access a web site,allowing you to view additional content on your player.
WHAT'S INCLUDED
Check for the supplied accessories below.
English 3
, fetv nforrn t on
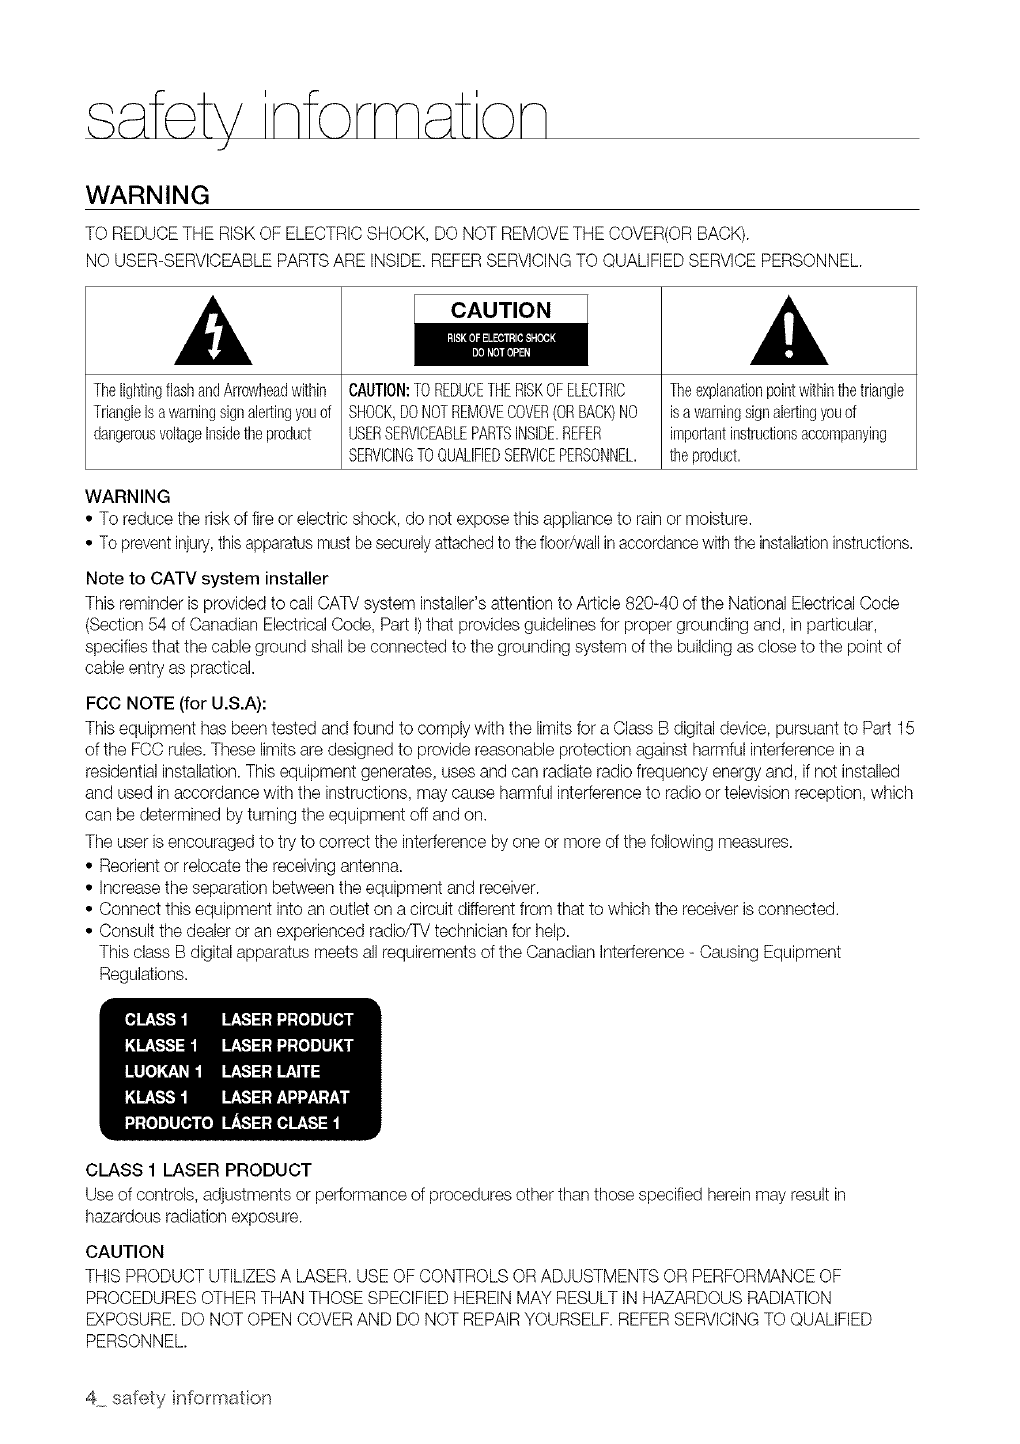
WARNING
TO REDUCE THE RISK OF ELECTRICSHOCK, DO NOT REMOVE THE COVER(ORBACK).
NO USER-SERVICEABLEPARTS ARE INSIDE.REFERSERVICING TO QUALIFIEDSERVICE PERSONNEL.
CAUTION
TilelightingflashandArrowheadwithin
TriangleIsawarningsignalertingyouof
dangerousvoltageInsidetheproduct
CAUTION:TOREDUCETHERISKOFELECTRIC
SHOCK,DONOTREMOVECOVER(ORBACK)NO
USERSERVICEABLEPARTSINSIDE.REFER
SERVICINGTOQUALIFIEDSERVICEPERSONNEL.
Theexplanationpointwithinthetriangle
isa warningsignalertingyouof
importantinstructionsaccompanying
theproduct.
WARNING
•To reduce the risk of fire or electric shock, do not expose this appliance to rain or moisture.
• To preventinju% thisapparatusmust besecurelyattachedto thefloor/wall inaccordancewiththe installationinstructions.
Note to CATV system installer
This reminder isprovided to call CATV system installer's attention to Article 820-40 of the National Electrical Code
(Section 54 of Canadian Electrical Code, Part I)that provides guidelines for proper grounding and, in particular,
specifies that the cable ground shall be connected to the grounding system of the building as close to the point of
cable entry as practical.
FCC NOTE (for U.S.A):
This equipment has been tested and found to comply with the limits for a Class B digital device, pursuant to Part 15
of the FCC rules. These limits are designed to provide reasonable protection against harmful interference in a
residential installation.This equipment generates, uses and can radiate radio frequency energy and, if not installed
and used in accordance with the instructions, may cause harmful interference to radio or television reception, which
can be determined by turning the equipment off and on.
The user is encouraged to try to correct the interference by one or more of the following measures.
• Reorient or relocate the receiving antenna.
• Increase the separation between the equipment and receiver.
• Connect this equipment into an outlet on a circuit different from that to which the receiver is connected.
• Consult the dealer or an experienced radio/TV technician for help.
This class B digital apparatus meets all requirements of the Canadian Interference - Causing Equipment
Regulations.
CLASS 1 LASER PRODUCT
Use of controls, adjustments or performance of procedures other than those specified herein may result in
hazardous radiation exposure.
CAUTION
THIS PRODUCT UTILIZESA LASER. USE OF CONTROLS OR ADJUSTMENTS OR PERFORMANCEOF
PROCEDURESOTHER THAN THOSE SPECIFIEDHEREIN MAY RESULT IN HAZARDOUS RADIATION
EXPOSURE.DO NOTOPEN COVER AND DO NOT REPAIRYOURSELF. REFERSERVICINGTO QUALIFIED
PERSONNEL.
4 safety [ffo_mato[_
Note:
• ThisunitcanbeusedonlywherethepowersupplyisAC120V,60Hz.Itcannotbeusedelsewhere.
• ThisDuoHDplayerisdesignedandmanufacturedtorespondtotheRegionManagementInformation.
IftheRegionnumberofaBD/DVDdiscdoesnotcorrespondtotheRegionnumberofthisDuoHDplayer,the
DuoHDplayercannotplaythedisc.
• Theproductunitaccompanyingthisusermanualislicensedundercertainintellectualpropertyrightsofcertain
thirdparties.ThisproductiscoveredbyoneormoreofthefollowingU.S.patents:
5,060,2205,457,6695,561,6495,705,7825,987,4176,043,9126,222,9836,272,0968,377,5246,377,531
6,385,5876,389,5706,408,4086,468,5326,473,7368,477,5016,480,8296,558,5208,556,5216,556,522
6,578,1636,594,2088,631,1106,658,5886,674,6978,674,9576,687,4556,697,3078,707,9856,721,243
6,721,4936,728,4746,741,5356,744,7136,744,9726,765,8536,765,8536,771,8906,771,8916,775,485
6,778,7556,788,6298,788,6306,795,6376,810,2018,862,2566,868,0546,894,9638,937,552
ThisproductiscoveredbythefollowingU.S.patents:
US4,930,158US4,930,160
Thislicenseislimitedtoprivatenon-commercialusebyend-userconsumersforlicensedcontents.
Norightsaregrantedforcommercialuse.Thelicensedoesnotcoveranyproductunitotherthanthisproductunit
andthelicensedoesnotextendtoanyunlicensedproductunitorprocessconformingtoISO/IEC11172-3orISO/
IEC13818-3usedorsoldincombinationwiththisproductunit.
Thelicenseonlycoverstheuseofthisproductunittoencodeand/ordecodeaudiofilesconformingtotheISO/IEC
11172-3orISO/IEC13818-3.Norightsaregrantedunderthislicenseforproductfeaturesorfunctionsthatdonot
conformtotheISO/IEC11172-3orISO/IEC13818-3.
PRECAUTIONS
Important Safety Instructions
Read these operating instructions carefully before using the unit. Follow allthe safety instructions listed below. Keep
theseoperatinginstructionshandyfor futurereference.
1) Read these instructions.
2) Keep these instructions.
3) Heed all warnings.
4) Follow all instructions.
5) Do not use this apparatus near water.
6) Clean only with dry cloth.
7) Do not block any ventilation openings, Install inaccordance with the manufacturer's instructions.
8) Do not install near any heat sources such as radiators, heat registers, or other apparatus (including amplifiers)
that produce heat.
9) Do not defeat the safety purpose of the polarized or grounding- type plug. A polarized plug has two blades with
one wider than the other. A grounding type plug hastwo blades and a third grounding prong. The wide blade
or the third prong are provided for your safety. Ifthe provided plug does not fit into your outlet, consult an
electrician for replacement of the obsolete outlet.
10) Protect the power cord from being walked on or pinched particularly at plugs, convenience receptacles, and
the point where they exit from the apparatus.
11) Only use attachments/accessories specified by the manufacturer.
12) Use only with the cart, stand, tripod, bracket, or table specified by the manufacturer,
or sold with the apparatus. When a cart is used, usecaution when moving the cart/
apparatus combination to avoid injury from tip-over.
13) Unplug this apparatus during lightning storms or when unused for long periods of
time.
14) Refer all servicing to qualified service personnel. Servicing is required when the apparatus has been damaged
in any way, such as power-supply cord or plug is damaged, liquid has been spilled or objects have falleninto
the apparatus the apparatus has been exposed to rain or moisture, does not operate normally, or has been
dropped.
English 5
s fetv nform t on
J
Handling Cautions
• Before connecting other components to this Duo HD player, be sure to turn them all off.
• Do not move the Duo HD player while a disc is being played as the disc may be scratched or broken, or the Duo
HD player internal parts may be damaged.
• Do not put a flower vase filled with water or any small metal objects on the Duo HD player.
• Be careful not to put your hand into the disc tray.
• Do not place anything other than the disc in the disc tray.
• Exterior interference such as lightning and static electricity can affect normal operation of this Duo HD player. If
this occurs, turn the Duo HD player off and on again with the POWER button, or disconnect and then reconnect
the AC power cord to the AC power outlet. The Duo HD player will operate normally.
• Be sure to remove the disc and turn off the Duo HD player after use.
• Disconnect the AC power cord from the AC outlet when you don't intendto use the Duo HD player for long
periods of time.
• Clean the disc by wiping in a straight linefrom the insideto the outside of the disc.
• Do not expose the player to liquid.
• When the AC plug is connected to a wall outlet, the player will still draw power (standby mode) when it isturned
off.
Maintenance of Cabinet
Forsafety reasons, be sure to disconnect the AC power cord from the AC outlet.
• Do not use benzene, thinner, or other solvents for cleaning.
• Wipe the cabinet with a soft cloth.
Restrictions on Playback
• This player may not respond to all operating commands because some Blu-ray, HD DVD, DVD, CD discs allow
specific or limited operation and features during playback.
Please note that this is not a defect in the player.
• Samsung cannot assure that this player will play every disc bearing the Blu-ray, HD DVD, DVD or CD logo
because disc formats evolve, and problems and errors may occur during the creation of BD, HD DVD, DVD, CD
software and/or the manufacture of discs.
This player also operates differently than a standard DVD player or other AV equipment. Please contact the
SAMSUNG customer care center ifyou have questions or encounter difficulty in playing Blu-ray, HD DVD, DVD,
CD discs in this player. Also, refer to the rest of this Manual for additional information on playback restrictions.
6 safety [ffo_mato[_
contents
KEY FEATURES OF YOUR NEW DUO
HD PLAYER
3 What's included
SAFETY INFORMATION
ii
4 Warning
5Precautions
GETTING STARTED
/
DESCRIPTION
iii
REMOTE CONTROL
i
CONNECTIONS
BASIC FUNCTIONS OF YOUR
DUO HD PLAYER
ii
SYSTEM SETUP
LANGUAGE SETUP
9Before Reading the User's Manual
10 Disc Type and Characteristics
13 Disc Storage & Management
14 Front Panel
14 Front Panel Display
15 Rear Panel
16 Tour of the Remote Control
18 Setting the Remote Control
18 Regarding the Battery
19 Controllable TV Codes
20 Connecting to a TV with an HDMI Cable
21 HDMI Auto Detection Function
22 Connecting to a TV with DVl Cable
23 Connecting to a TV (Component)
24 Connecting to a TV (S-Video)
25 Connecting to a TV(Video)
26 Connecting to an Audio System (2 Channel
Amplifier)
27 Connecting to an Audio System (7.1
Channel Amplifier)
28 Connecting to an Audio System (Dolby
Digital, DTS Amplifier)
29 Connecting to an Audio System (HDMI
supported Amplifier)
30 Connecting to the Internet
31 Before Playing
32 On-Screen Menu Navigation
32 Playing a Disc
33 To play a twin-format HD DVD disc
33 Using the Search and Skip Functions
34 Slow Motion Play/Step Motion Play
35 Setting the Clock
36 Setting up the Language Options
English 7
oontents
AUDIO SETUP 37 Setting up the Audio Options
39 Setting up the Speaker Options
DISPLAY SETUP
ii
ii
HDMI SETUP
ii
PARENTAL SETUP
NETWORK SETUP
PERSISTENT STORAGE
MANAGEMENT
SYSTEM UPGRADE
ii
WATCHING A MOVIE
ii
LISTENING TO MUSIC
TROUBLESHOOTING
APPENDIX
40 Setting up the Video display/output Options
43 Setting up the HDMI setup options
45 Setting up the Parental Lock
47 TCP/IP Setting
48 Proxy Setting
48 Cookie Setting
49 Network Throughput
49 NTP Server Setting
49 Mac Address
50 System Device Management
51 Firmware Upgrade
53 System Information
54 Using the Display Function
55 Using the Disc Menu & Popup/Title Menu
56 Repeat Play
57 Selecting the Audio Language
58 Selecting the Subtitle Language
59 Changing the Camera Angle
59 Using the Cursor Function
60 Playing an Audio CD(CD-DA)
60 Audio CD(CD-DA) Screen Elements
61 Buttons on the Remote Control used for
Audio CD (CD-DA) disc playback
61 Repeat Audio CD(CD-DA)
63 Troubleshooting
65 Specifications
8 contents
aett na started
BEFORE READING THE USER'S MANUAL
Make sure to check the following terms before reading the user manual.
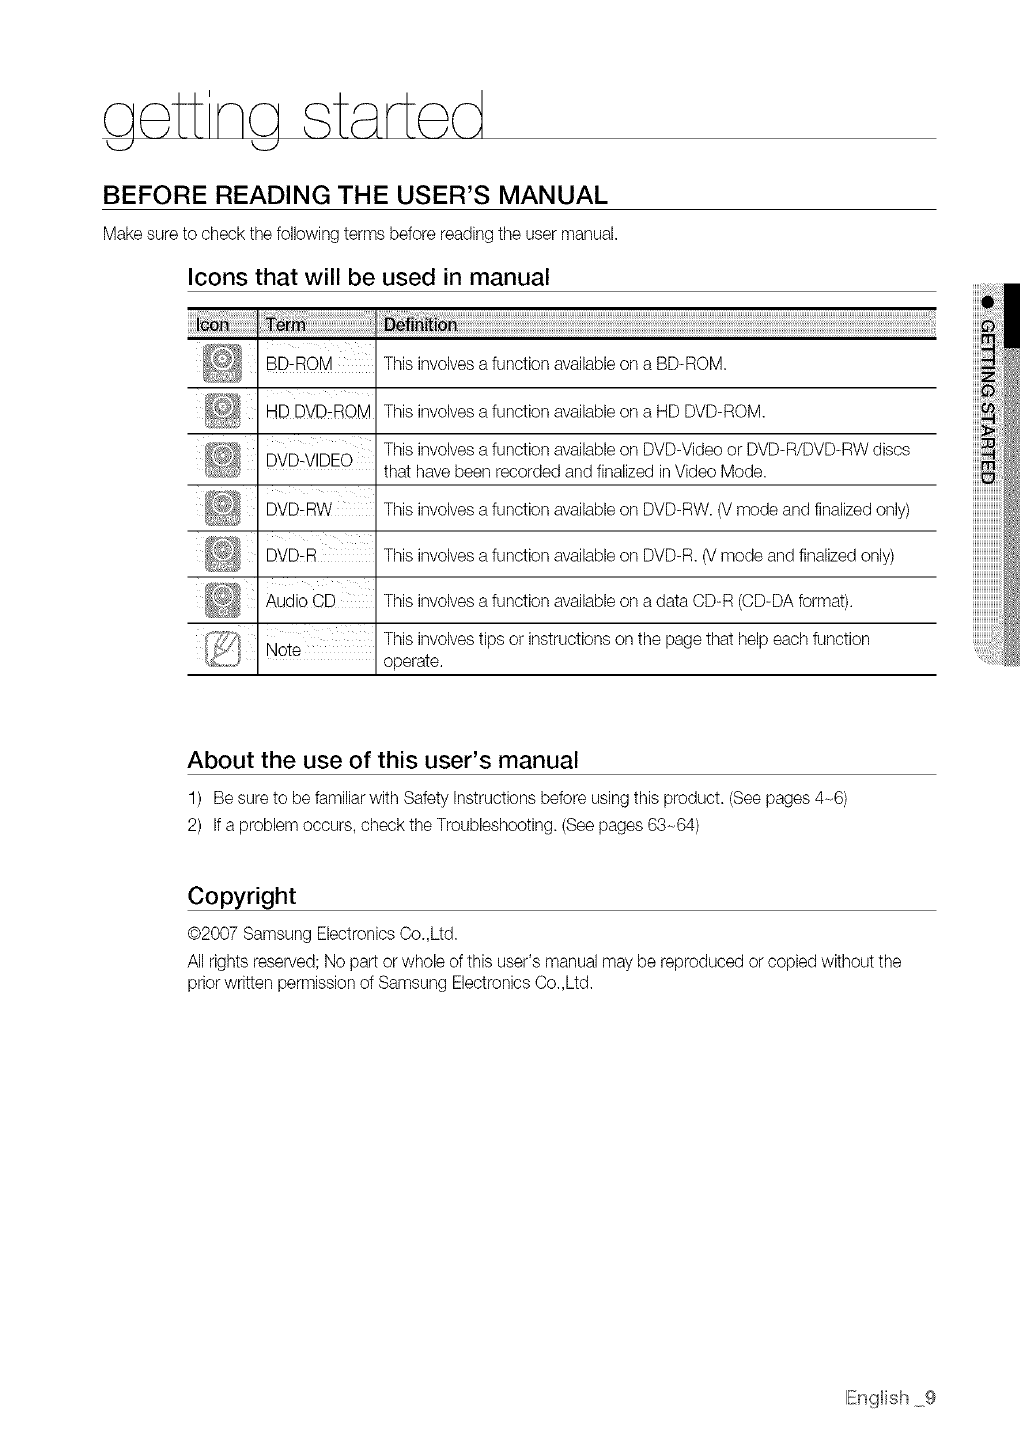
Icons that will be used in manual
BD_ROM This involvesa function availableon a BD-ROM.
HD DVD:IRoM This involves a function availableon a HD DVD-ROM.
This involvesa function availableon DVD-Video or DVD-R/DVD-RW discs
DVD-VIDEO that have been recorded and finalized in Video Mode.
BVD:A% This involvesa function availableon DVD-RW. (V mode and finalized only)
DVD:A This involves a function availableon DVD-R. (Vmode and finalized only)
_,udioCD This involvesa function availableon a data CD-R (CD-DA format).
Note This involvestips or instructions on the page that help each function
operate.
About the use of this user's manual
1) Be sure to be familiar with Safety Instructions before using this product. (See pages 4-6)
2) Ifa problem occurs, check the Troubleshooting. (Seepages 63-64)
Copyright
@2007 Samsung Electronics Co.,Ltd.
All rights reserved; No part or whole of this user's manual may be reproduced or copied without the
prior written permission of Samsung Electronics Co.,Ltd.
IEngfish 9
aett na started
DISC TYPE AND CHARACTERISTICS
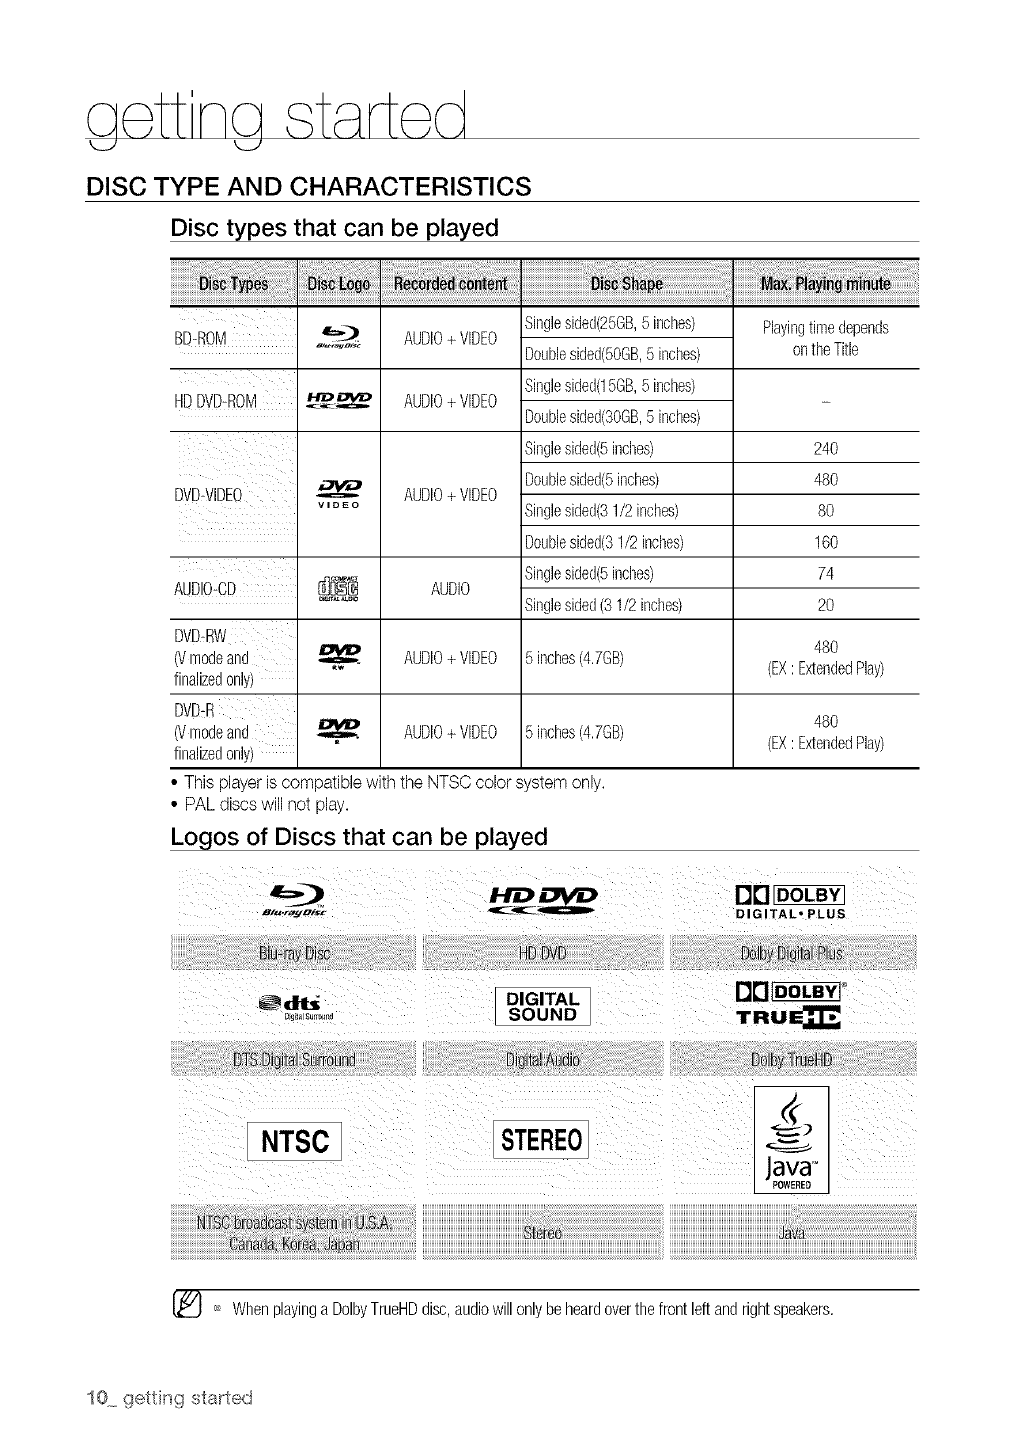
Disc types that can be played
HDDVD-ROM
DVD:VIDEQ
AUDIO-CD
AUDIO+ VIDEO
AUDIO+ VIDEO
AUDIO+ VIDEO
Singleslded(25GB,5 inches)
Doublesided(5OGB,5 inches)
Singlesided(15GB,5 inches)
Doublesided(3OGB,5 inches)
Singlesided(5inches)
Doublesided(5inches)
Singlesided(31/2inches)
Doublesided(31/2inches)
Singlesided(5inches)
Singlesided(31/2 inches)
Playingtimedepends
ontheTitle
24O
48O
8O
160
74
2O
48O
(EX: ExtendedPlay)
_ AUDIO
DVD#iW
6/modeand AUDIO+ VIDEO 5 inches(4.7GB)
finalizedonly}
DVD_R
6/modeand _ AUDIO+VIDEO 5 inches(4.7GB) 480
finalizedonly} (EX: ExtendedPlay}
• This player is compatible with the NTSC color system only.
• PAL discs will not play.
Logos of Discs that can be played
'_ Whenplayinga DolbyTrueHDdisc,audiowillonlybeheardoverthefrontleft andrightspeakers,
10 getting stabted
Discs that cannot be played
• Blu-rayDiscswith a regioncode otherthan "RegionA".
• BD-R,BD-RE
• DVD-Videowith a regionnumber otherthan "1" or "ALL"
• HD DVD-R
• DVD-RAM
• 3.9 GB DVD-RDisc for Authoring.
• DVD-RW(VRmode)
• DVD-ROM/PD/MV-Disc,etc
• CVD/OD-ROM/OD-RW/CDV/CD-G/CDq/LD
[Note]
• Some commercial discs and HD DVD/DVD discs )urchased outside your region may not be playable
with this product. When these discs are played, either "No disc." or "Please check the regional code
of the disc." will be displayed.
• If a DVD-R/-RW disc has not been recorded properly in DVD video format, it will not be playable.
• The unit cannot play CD-R and DVD-RW/-R recorded content such as divx, avi, mpg, mov, wma,
mp3,dJgitalphoto view(JPEG) file.
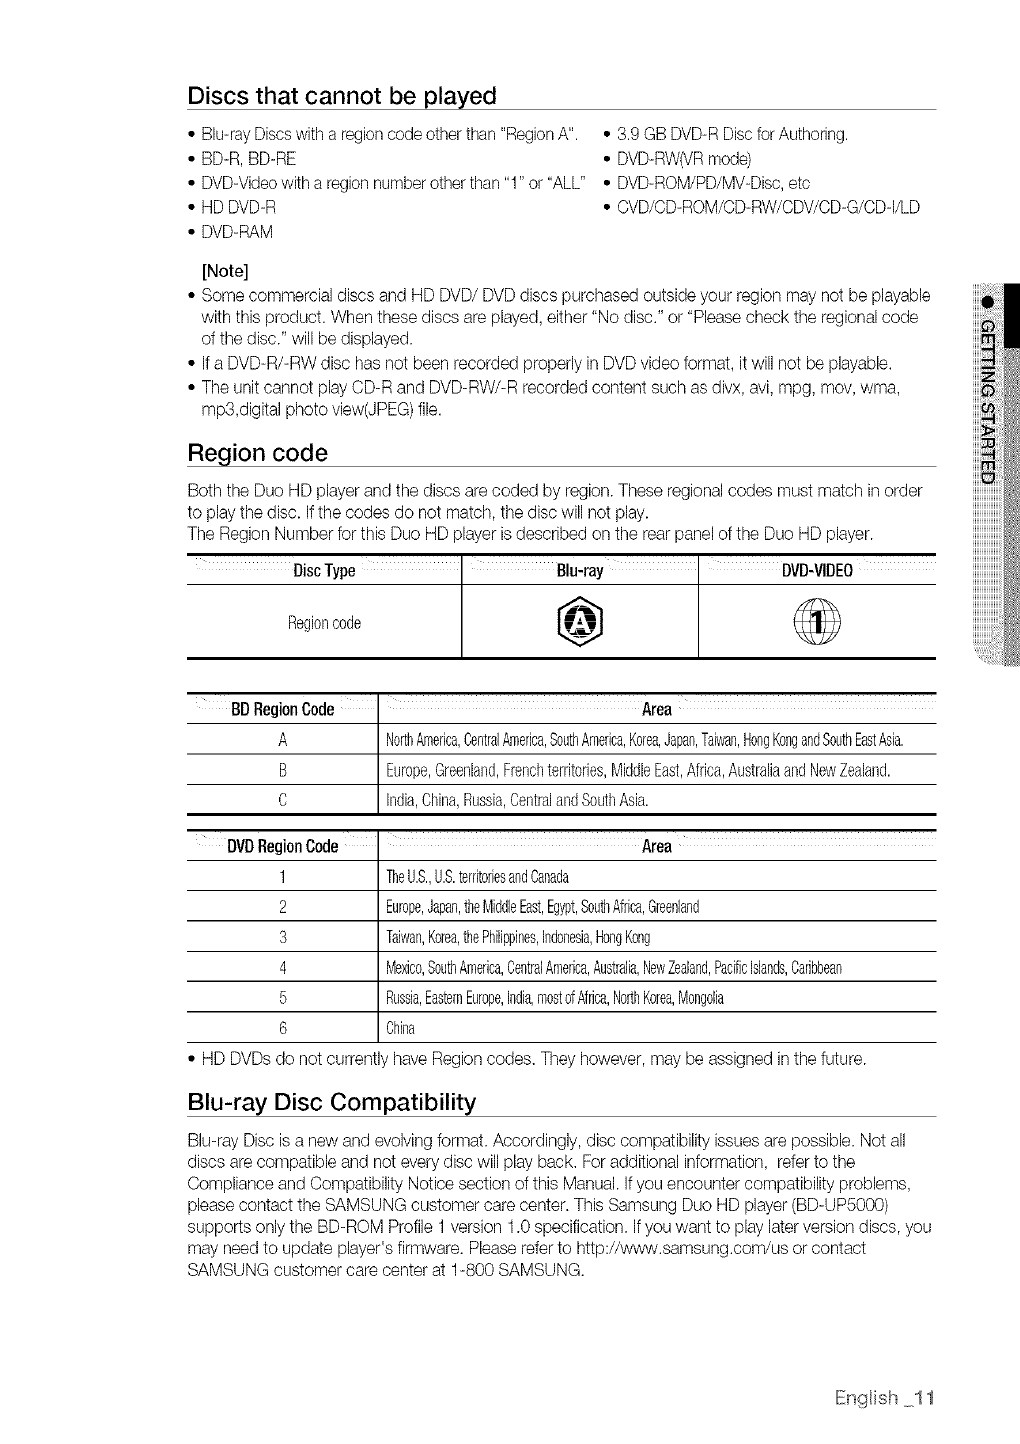
Region code
Both the Duo HD player and the discs are coded by region. These regional codes must match in order
to play the disc. Ifthe codes do not match, the disc will not play.
The Region Number for this Duo HD player is described on the rear panel of the Duo HD player.
DiscType Blu-ray DVD-VIDEO
Regoncode @
BDRegionCode Area
A I NorthAmerica,CentralAmerica,SouthAmerica,Korea,Japan,Taiwan,HongK0ngandSouthEastAsia.
I
B Europe,Greenland,Frenchterritories,MiddleEast,Africa,AustraliaandNewZealand.
C nda, Chna,Russa, CentraandSouthAsa.
DVDRegionCode ' Area
1 TheU.S.,U.S.territoriesandCanada
2 Europe,Japan,tileMiddleEast,Egypt,SouthAfrica,Greenland
3 Taiwan,Korea,thePhilippines,Indoneda,HongKong
4 Mexico,SouthAmerica,CentralAmerica,Australia,NewZealand,PacificIslands,Caribbean
5 Rusda,EasternEurope,india,mostofAfrica,NorthKorea,Mongolia
6 China
• HD DVDsdo not currently have Region codes. They however, may be assigned in the future.
Blu-ray Disc Compatibility
Blu-ray Disc is a new and evolving format. Accordingly, disc compatibility issues are possible. Not all
discs are compatible and not every disc will play back. Foradditional information, refer to the
Compliance and Compatibility Notice section of this Manual. If you encounter compatibility problems,
please contact the SAMSUNG customer care center. This Samsung Duo HD player (BD-UP5000)
supports only the BD-ROM Profile 1 version 1.0 specification. If you want to play later version discs, you
may need to update player's firmware. Please refer to http://st,Nw.samsung.com/us or contact
SAMSUNG customer care center at 1-800 SAMSUNG.
IEnglish 11
aett na staffed
HD DVD Disc Compatibility
HD DVD is a new format, disc compatibility issues with new and existing format discs are possible.
Not all discs are compatible. If you experience compatibility problems, please contact SAMSUNG
Customer Service.
Playbackmaynotworkfor sometypesof discs,orwhenspecificoperations,suchas anglechangeandaspect
ratioadjustment,arebeingperformed.Informationaboutthediscsiswrittenindetailonthe box.Pleaserefer
to thisif necessary.
_ Donotallowthediscto becomedirtyor scratched.Fingerprints,dirt,dust,scratchesor depositsofcigarette
smokeontherecordingsurfacemaymakeit impossibleto usethediscfor playback.
_ DiscswithPALprogramsrecordedonthemcannotbeplayedusingthis product.
_ Whena BD-Javatitleis played,loadingmaytakelongerthana normaltitle,orsomefunctionsmayperfoNnslowly.
_ Disks that are embedded with the networking features can display a download loading
message in addition to the disk loading message at the start.
Disc Types
.t. BD-ROM
Blu-ray Disc Read Only Memory. A BD-ROM disc contains pre-recorded data. Although a BD-ROM
may contain any form of data, most BD-ROM discs will contain movies in High Definition format, for
playback on Duo HD player's. This unit can play back pre-recorded commercial BD-ROM discs.
¢ HD DVD
• HD DVD or High-Definition DVDis a high-density optical disc format designed for the storage of
data and high-definition video.
• HD DVD has a single-layercapacity of 15GB and a dual-layer capacity of 30GB.
¢ DVD-Video
• A digital versatile disc (DVD)can contain up to 135-minutes of images, 8 audio languages and 32
subtitle languages. It is equipped with MPEG-2 picture compression and Dolby Digitalsurround,
allowing you to enjoy vivid and clear theatre quality images.
• When switching from the first layer to the second layer of a dual-layered DVDVideo disc, there
may be momentary distortion in the image and sound. This is not a malfunction of the unit.
• Once a DVD-RW/-R recorded in Video Mode is finalized, it becomes DVD-Video. Pre-recorded
(pre-stamped) commercial DVDs with movies are also referred to as DVD-Videos. This unit can
play back pre-recorded commercial DVD discs (DVD-Video discs) with movies.
•**oAudio CD
• An audio disc on which 44.1kHz PCM Audio is recorded.
• This unit can play back CD-DA format audio CD-R discs.
• The unit may not be able to play some CD-R discs due to the condition of the recording.
•***CD-R
• Use a 700MB(80 minutes) CD-R disc. If possible, do not usea 800MB(90 minutes) or above disc,
as the disc may not play back.
• If the CD-R disc was not recorded as a closed session, you may experience delays when playing
back the beginning of the disc or all recorded files may not play.
• Some CD-R discs may not be playable with this unit, depending on the device which was used to
burn them. For contents recorded on CD-R media from CDs for your personal use,playabilitymay
vary depending on contents and discs.
¢ DVD-R Disc Playback
• Once a DVD-R recorded in Video Mode is finalized, it becomes DVD-Video.
• Thisunit can playback DVD-Rdiscs recordedand finalizedwith a SamsungDVDvideo recorder.It may
not be ableto playsome DVD-Rdiscs dependingon the disc and the conditionof the recording.
12 getting sta_ted

o_oDVD-RW Disc Playback
• Playback can be performed with DVD-RWdiscs in the Video Mode and finalized only.
• Once a DVD-RW recorded in Video Mode is finalized, it becomes DVD-Video.Ability to play back
may depend on recording conditions.
Disc Format
o**oDVD-RW/-R (V)
• This is a format that is used for recording data on a DVD-RW or DVD-R disc. The disc can be
played by this Duo HD playeronce it has been finalized.
• If a disc that has been recorded in Video Mode by a different maker's recorder but has not been
finalized, it cannot be played by this Duo HD player.
DISC STORAGE & MANAGEMENT
Disc Handling
• Use discs with regular shapes. If an irregular disc (adisc with a special shape)
isused, this Duo HD player may be damaged. GOx
o,*oHolding discs
• Avoidtouchingthe surfaceof adiscwhererecordingis performed.
Blu-ray/HD DVD Discs
• If the player is not used for a long period of time, remove the Blu-ray/HD
DVD Disc from the player and store it in itscase.
• Be careful not to leave fingerprints or scratches on the surface of the Blu-ray/HD DVD Disc.
o**oDVD-RW and DVD-R
• Clean with an optional PD disc cleaner (LF-K200DCA1 where available).Do not use cleaners or
cloths for CDs to clean DVD-RW/-R discs.
DVD-Video, Audio-CD
• Wipeoffdirt or contaminationonthe discwith asoft cloth.
Cautions on handling discs
• Do not write on the printed side with a ball-point pen or pencil.
• Do not use record cleaning sprays or antistatic. Also, do not use volatile
chemicals, such as benzene or thinner.
• Do not apply labels or stickers to discs. (Do not use discs fixed with exposed
tape adhesive or leftover peeled-off stickers.)
• Do not use scratch-proof protectors or covers.
• Do not use discs printed with label printers availableon the market.
• Do not load warped or cracked discs.
Disc Storage
Becareful not to harm the disc because the data on these discs is highlyvulnerable to the environment.
• Do not keep under direct sunlight.
• Keep in a cool ventilated area.
• Store vertically.
• Keep in a clean protection jacket.
• Ifyou move your Duo HD playersuddenlyfrom a cold placeto a warm place,condensation maygenerate
on the operating parts and lens and cause abnormaldisc playback. If this occurs,wait for two hours before
connecting the plug to the power outlet. Then insert thedisc and try to playback again.
IEnglish 13
description
I
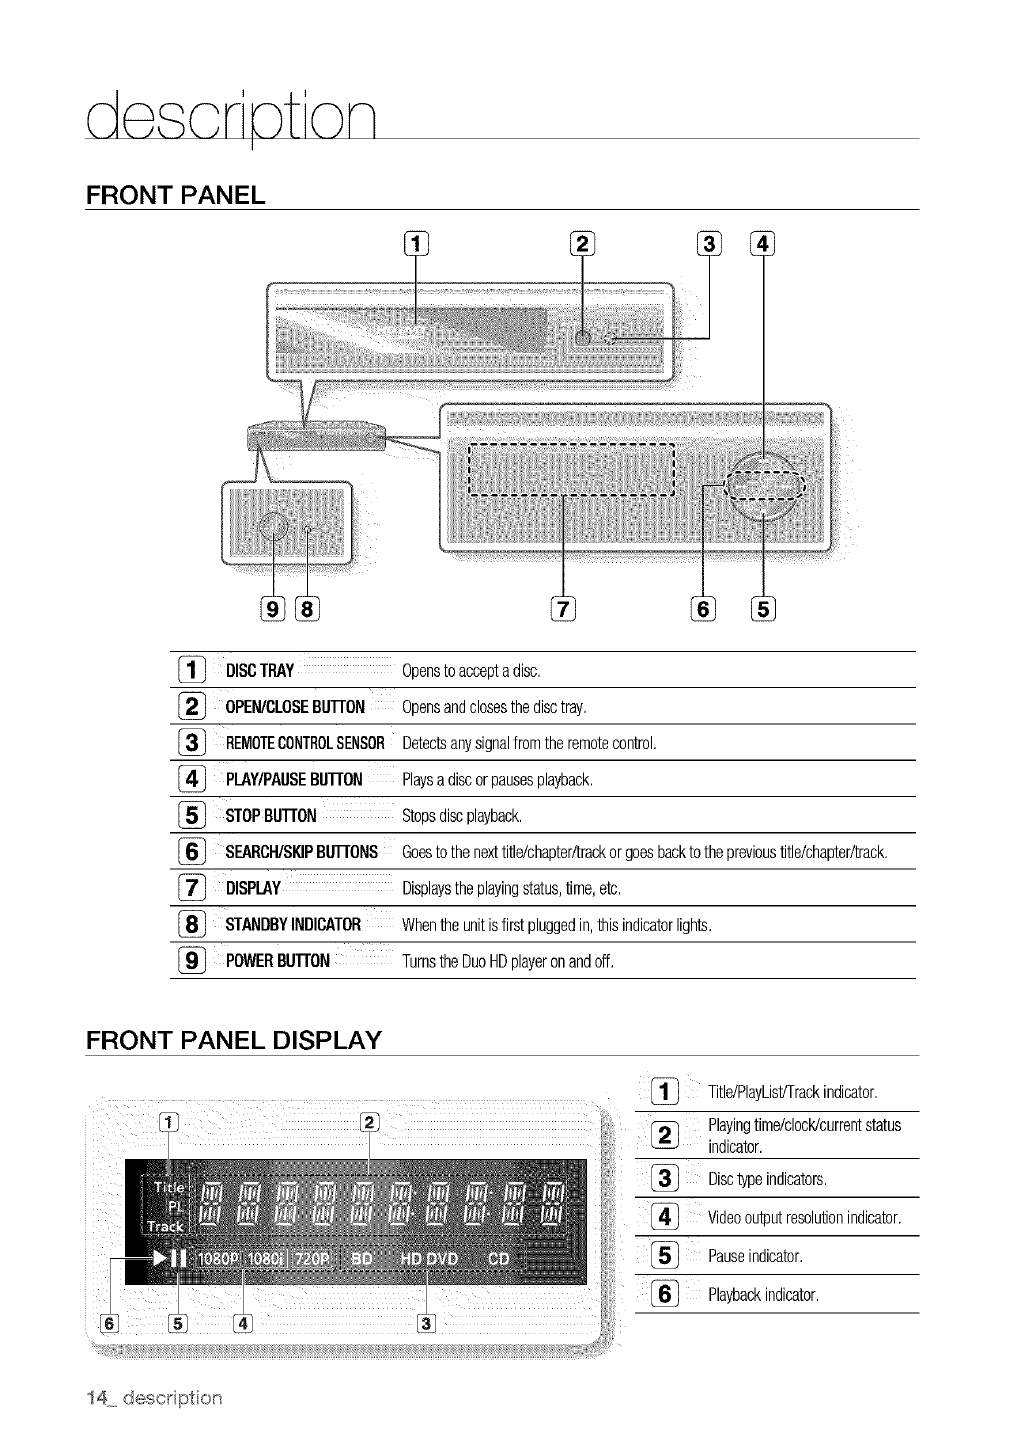
FRONT PANEL
[_ DISCTRAY Opensto acceptadisc,
[_ OPEN/CLOSEBIJI-rON Opensandclosesthedisctray,
_} REMOTECONTROLSENSORDetectsanysignalfromtheremotecontrol,
_} PLAY/PAUSEBIJI-rON Playsa discorpausesplayback,
[_ STOPBtlrroN Stopsdiscplayback,
[_ SEARCH/SKIPBUTIONS Goesto thenexttitle/chapter/trackorgoesbacktotheprevioustitle/chapter/track,
[_ DISPLAY Displaystheplayingstatus,time,etc,
STANDBYINDICATOR Whentheunitisfirstpluggedin,thisindicatorlights,
_} POWERBUI-rON TurnstheDuoHDplayeronandoff,
FRONT PANEL DISPLAY
Title/PlayListiTrackindicator,
Playingtirne/cloctdcurrentstatus
indicator,
Disctypeindicators,
[_ Videooutputresolutionindicator,
[_ Pauseindicator,
Playbackindicator,
REAR PANEL
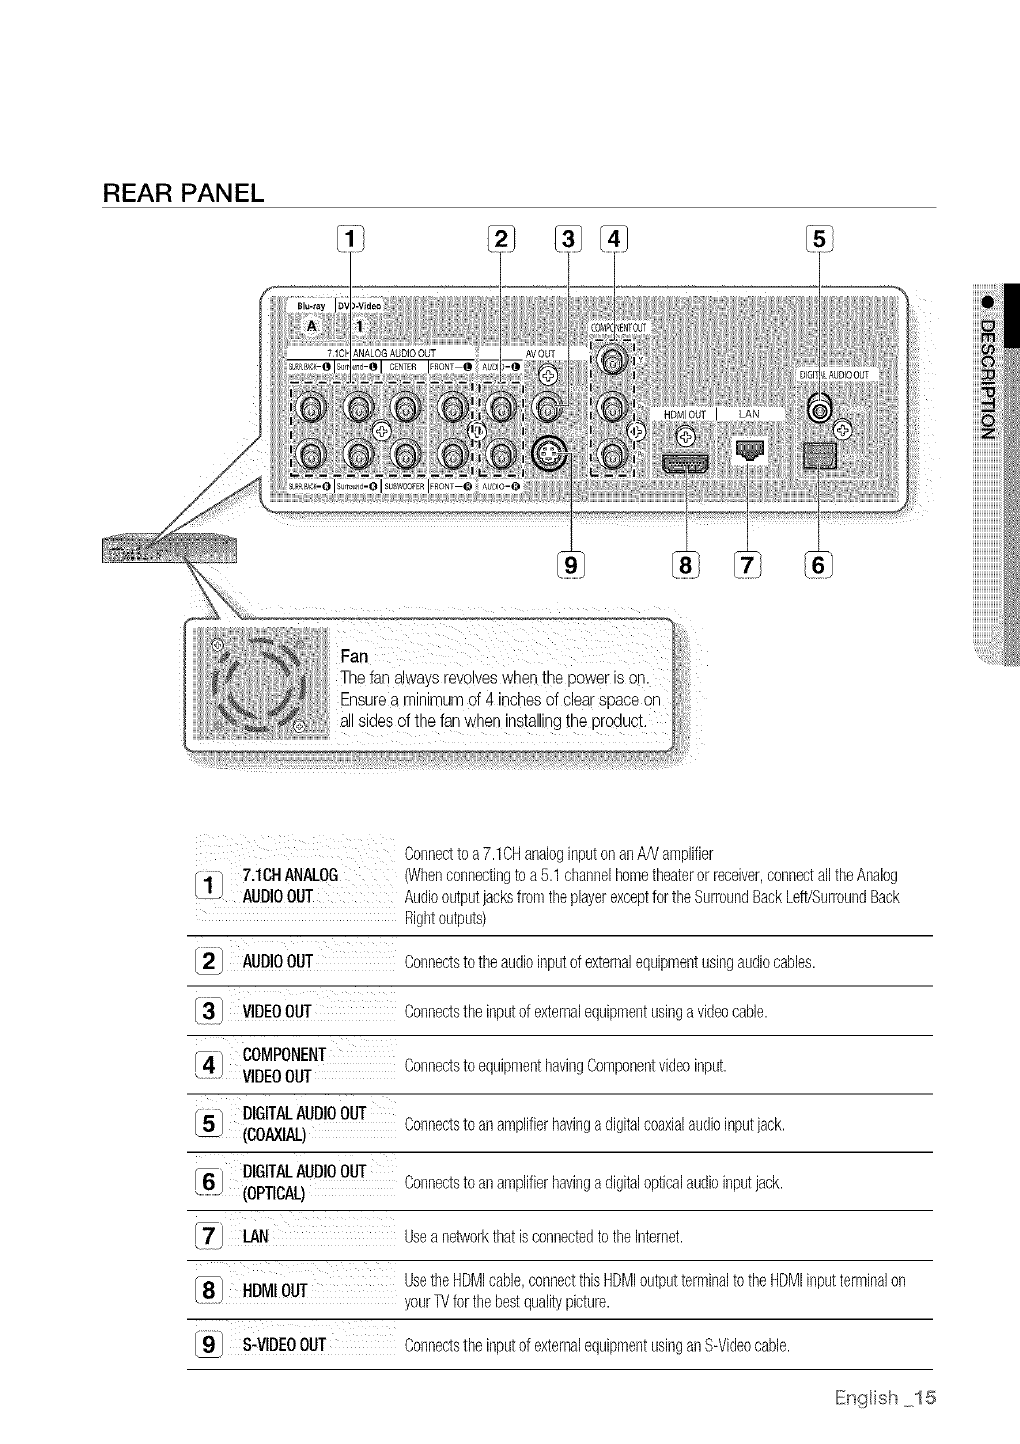
Fan
Connectto a7.1CHanaloginputonanA/Vamplifier
{H/ 7,16HANALOG (Whenconnectingtoa 5.1channelhometheaterorreceiver,connectalltheAnalog
_z_ AUDIOOUT AudiooutputjacksfromtheplayerexceptfortheSurroundBackLeft/SurroundBack
Rightoutputs)
I_ AUDIOouT Connectsto theaudioinputofexternalequipmentusingaudiocabbs.
[3] VIDEOOUT Connectstheinputof externalequipmentusingavideocable.
[4 i COMPONENT
_J VIDEOOUT Connectsto equipmenthavingComponentvideoinput.
_/DIGITAL AUDIOOUT
_ (COAXIAL)Connects to anamplifierhavingadigitalcoaxialaudioinputjack.
D,G,TALAUD,Oout
v j (OPTICAL) Connectsto anamplifierhavingadigitalopticalaudioinputjack.
7] I.AN Usea networkthatis connectedto theInternet.
___} HI)M!OH UsetheHDMIcable,connectthisHDMIoutputterminaltotheHDMIinputterminalon
your]V forthebestqualitypicture.
I9] S-VIDEOOUT Connectstheinputof externalequipmentusinganS-Videocable.
IEnglish 15

o
©
o
Installing batteries in the Remote Control
1. Lift the Cover at the back of the 2. Install two AAA size batteries, 3. Replace the Cover.
remote control upward as shown: Make SUre to match the '!+" and "-!' ends AsSUming typical W USagelthe batteries
Of the batteries With the diagram inSide last for about Oneyearl
OPEN/CLOSE Buttons I
To open and close the disc tray.
POWER Button
NUMBER Buttons
CANCEL Button
SLOW Button
Eachtimethisbuttonis pressed,the discwillplayslowly.
REVERSE/FORWARD SKIP Buttons
Pressto skipbackwardsorforwards.
TV INPUT SEL. Button
After setup, allows you to set the input source on your TV.
When the TV INPUT SEL. button is selected on the remote
control, the DIRECTION(up/down/lefVright) and ENTER
buttons operate your TV's menu screen, but not the player.
To enable the remote to control the Duo HD Player again,
press the RETURN button.
STEP Button
Eachtimethis buttonispressed,a new framewillappear.
STOP Button
Pressto stopa disc.
,-I
O
C
O
"11
-1-
m
m
O
m
O
O
z
O
I--
©
O
©
,-i 4-
©
REVERSE/FORWARD SEARCH Buttons PLAY/PAUSE Button
Pressto searcha discbackwardsorforwards. Pressto play/pausea disc.
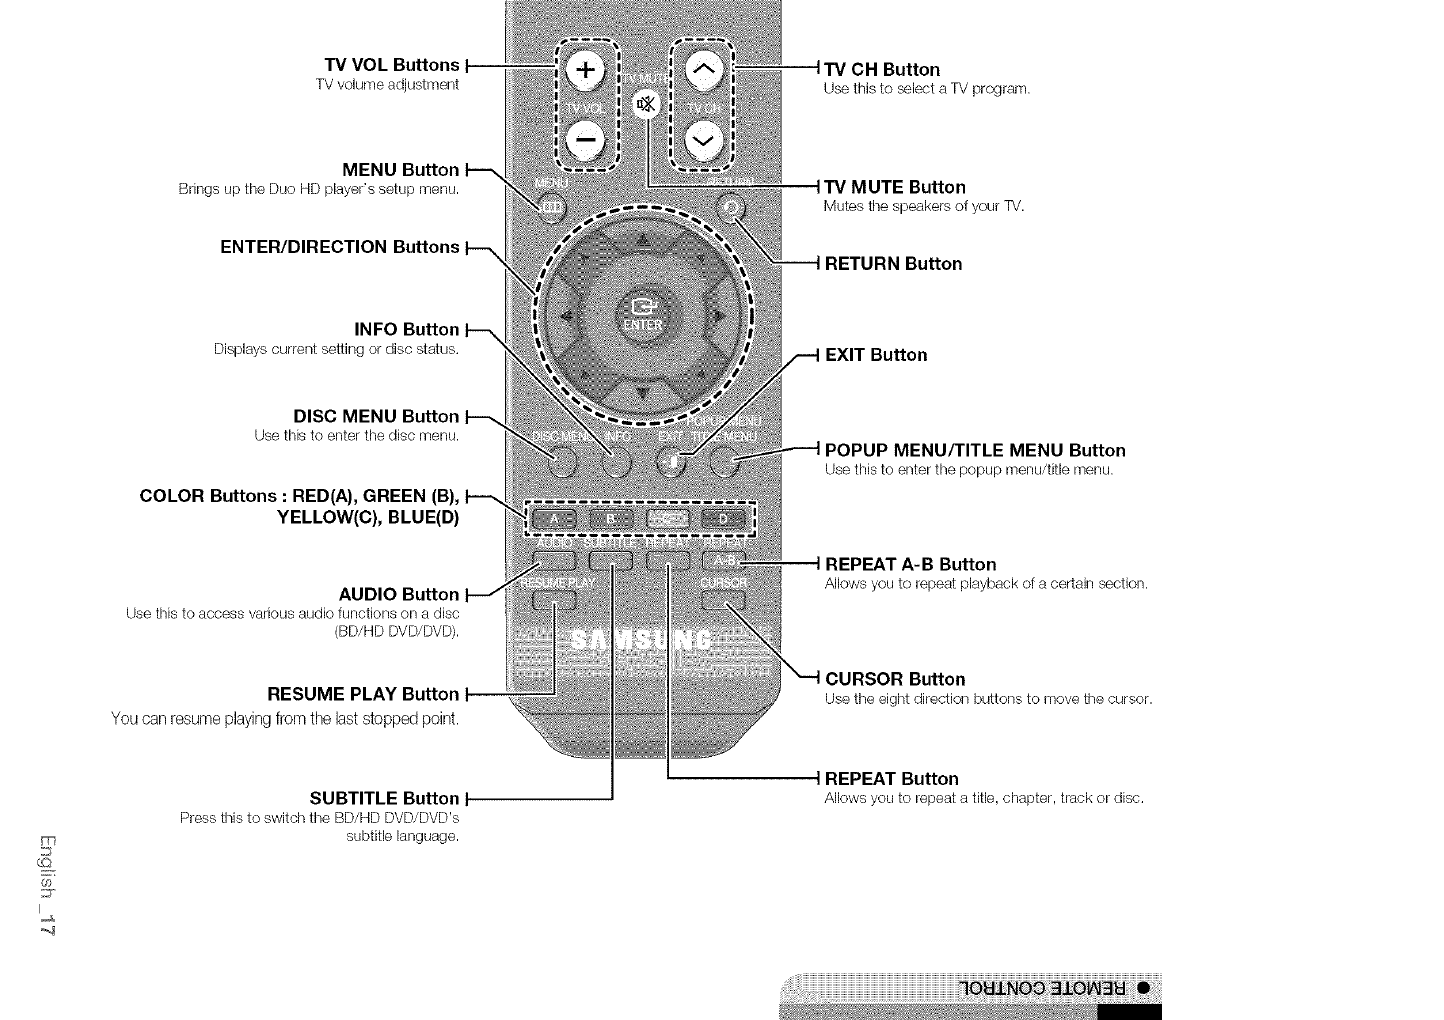
TV VOL Buttons I 1TV CH Button
TVvolumeadjustment Usethis toselecta TVprogram.
_qq
B
Q
MENU Button
Bringsup theDuo HDplayer'ssetupmenu.
ENTER/DIRECTION Buttons
INFO Button
Displayscurrentsettingordisc status.
DISC MENU Button
Usethis to enterthe discmenu.
COLOR Buttons : RED(A), GREEN (B),
YELLOW(C), BLUE(D)
AUDIO Button
Use this to access various audio functions on a disc
(BD/HD DVD!DVD).
RESUME PLAY Button I
You can resumeplayingfrom the laststopped point.
SUBTITLE Button I
Press this to switch the BD/HD DVD/DVD's
subtitle language.
tTV MUTE Button
Mutes tile speakers of your TV.
RETURN Button
EXIT Button
POPUP MENU/TITLE MENU Button
Usethisto enterthe popupmenu/titlemenu.
tREPEAT A-B Button
Allowsyouto repeatplaybackof a certainsection.
CURSOR Button
Usetheeightdirectionbuttonsto movethecursor.
tREPEAT Button
Allowsyouto repeata title,chapter,trackor disc.
SETTING THE REMOTE CONTROL
You can control certain functions of your TV with this remote control.
Control function buttons include :TV POWER, CH AV, VOL + -, TV MUTE, TV INPUT SEL., DIRECTION/
ENTER button. However, the DIRECTION/ENTER button can only operate when the TV INPUT SEL. button has
been selected.
To determine whether your television is compatible, follow the instructions below.
1. Switch your television on.
2. Point the remote control towards the television.
3. Press and hold the TV POWER button and enter the two-figure code corresponding to the brand of
your television, by pressing the appropriate number buttons. (see the next page for the code list).
Ifyour television is compatible with the remote control, itwill switch off.
It is now programmed to operate with the remote control.
[_ If severalcodesareindicatedforyourtelevisionbrand,try eachoneinturn untilyoufindonethatworks.
If youreplacetheremotecontrol'sbatteries,you mustsetthebrandcodeagain.
You can then control the television using the following buttons after pressing the TV button.
Button Function
IV POWER Usedto switchthetelevisiononandoff.
IV INPUTSEL. Usedto selectan externalsource.
IV VOL(+ -) Usedto adjustthevolumeofthetelevision.
IV OH(^V) Usedto selectthedesiredchannel.
IV MUTE Usedto togglethesoundonandoff.
Usedto moveup/down/left/right(A, v, .q, I_) andtoselectadesireditem.
DIRECTION!ENTER *(onlyworksundertheR/INPUTSEL.buttonselected)
[_ Thefunctionslistedabovewillnotnecessarilyworkonalltelevisions.Ifyouencounterproblems,operatethe
televisiondirectly.
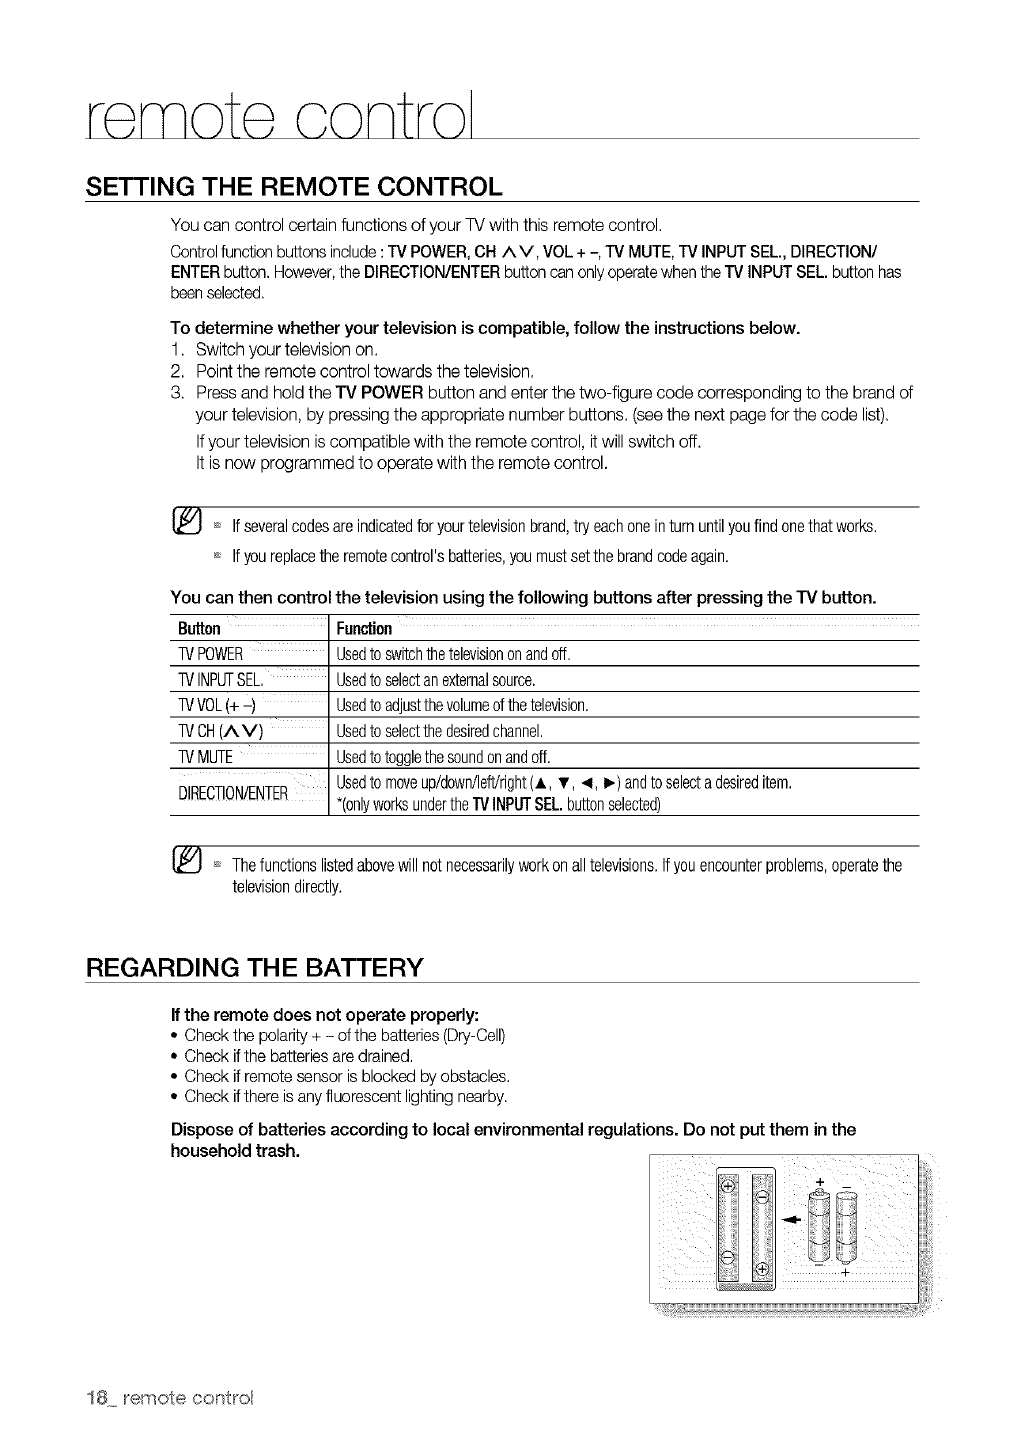
REGARDING THE BATTERY
If the remote does net operate properly:
• Check the polarity+ -of the batteries(Dry-Cell)
• Check if the batteriesare drained.
• Check if remote sensoris blocked by obstacles.
• Check if there is anyfluorescentlightingnearby.
Dispose of batteries according to local environmental regulations. Do not put them in the
household trash.
18 [emote cent[el

CONTROLLABLE TV CODES
SAMSUNG
AIWA
ANAM
BANG & OLlJFSEN
BLAUPUNKT
BRANDT
BRIONVEGA
CGE
CONTINENTAL EDISON
DAEWOO
EMERSON
FERGUSON
FINLUX
FORMENTI
FUJITSU
GRADIENTE
GBUNDIG
HITACHI
IMPERIAL
JVC
LG
LOEWE
LOFWE OPTA
MAGNAVOX
METZ
MITSlJBISHI
MIVAR
NEC
NFWSAN
NOBLEX
NOKIA
NORDMENDE
PANASONIC
PHILIPS
PHONOLA
PIONEER
RADIOLA
RADIOMARELLI
RCA
REX
SABA
SAIORA
SANYO
SCHNEIDER
SELECO
SHARP
SIEMENS
SINGER
SINUDYNE
SONY
TELFAVA
TELEFUNKEN
THOMSON
THOMSON ASIA
TOSHIBA
WEGA
YOKO
ZENITH
TV POWER+01, +02, +03, +04, +05, +06, +07, +08, +09
TV POWER+82
TV POWER+10, +11, +12, +13, +14, +15, +16, +17, +18
TV POWER+57
TV POWER+71
TV POWER+73
TV POWER+57
TV POWER+52
TV POWER+75
TV POWER+19, +20, +23, +24, +25, +26, +27, +28, +29, +30, +31, +32, +33, +34
TV POWER+64
TV POWER+73
TV POWER+06, +49, +57
TV POWER+57
TV POWER+84
TV POWER+70
TV POWER+49, +52, +71
TV POWER+60, +72, +73, +75
TV POWER+52
TV POWER+61, +79
TV POWER+06, +19, +20, +21, +22, +78
TV POWER+06, +69
TV POWER+06, +57
TV POWER+40
TV POWER+57
TV POWER+06, +48, +62, +65
TV POWER+52, +77
TV POWER+83
TV POWER+68
TV POWER+66
TV POWER+74
TV POWER+72, +73, +75
TV POWER+53, +54, +74, +75
TV POWER+06, +55, +56, +57
TV POWER+06, +56, +57
TV POWER+58, +59, +73, +74
TV POWER+06, +56
TV POWER+57
TV POWER+45, +46
TV POWER+74
TV POWER+57, +72, +73, +74, +75
TV POWER+74
TV POWER+41, +42, +43, +44, +48
TV POWER+06
TV POWER+74
TV POWER+36, +37, +38, +39, +48
TV POWER+71
TV POWER+57
TV POWER+57
TV POWER+35, +48
TV POWER+73
TV POWER+67, +73, +75, +76
TV POWER+72, +73, +75
TV POWER+80, +81
TV POWER+47, +48, +49, +50, +51, +52
TV POWER+57
TV POWER+06
TV POWER+63
IEnglish 19
This section involves various methods of connecting the Duo HD player to other
external components such as a TV,
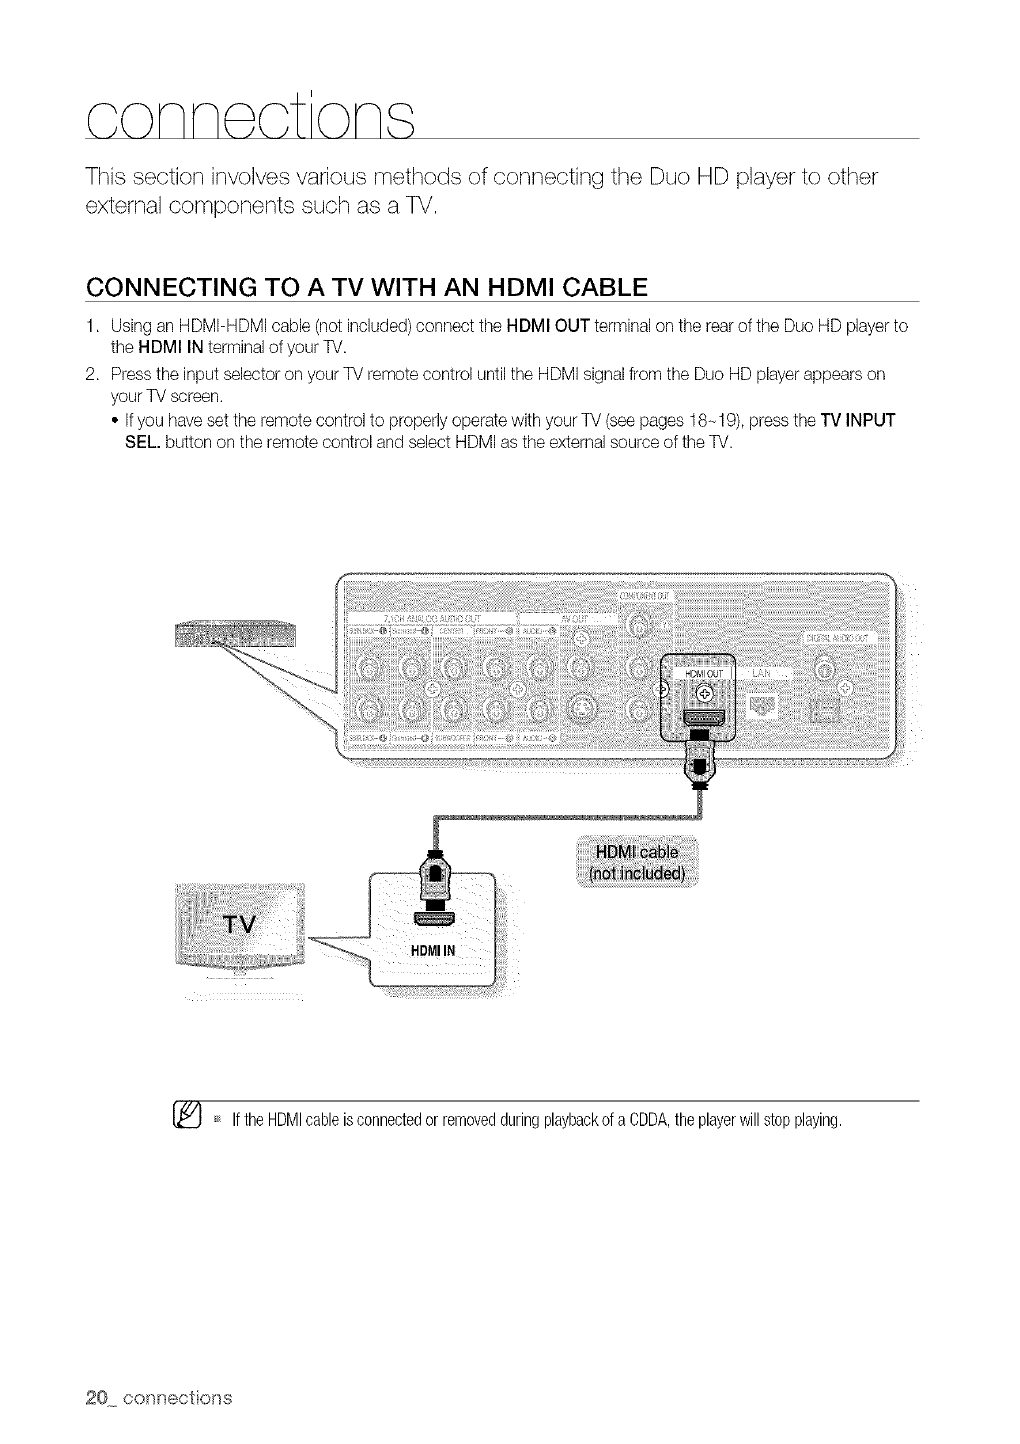
CONNECTING TO A TV WITH AN HDMI CABLE
1. Using an HDMI-HDMI cable (not included) connect the HDMI OUT terminal on the rearof the Duo HD playerto
the HDMI IN terminal of your TV.
2. Press the input selector on your TV remote control until the HDMI signal from the Duo HD player appears on
your TV screen.
• Ifyou have set the remote control to properly operate with your TV (see pages 18-19), press the TV INPUT
SEL. button on the remote control and select HDMI as the external source of the TV.
[_ If theHDMIcableisconnectedor removedduringplaybackof a CDDA,theplayerwillstopplaying.
20 c(x_nect oils
HDMI AUTO DETECTION FUNCTION
The player's video output will automatically change to HDMI output resolution when connecting an HDMI cable
while power is on (see page 42).
DependingonyourTV,certainHDMIoutputresolutionsmaynotwork.
Pleasereferto the user'smanualof yourTV.
Ifan HDMIor HDMI-DVlcableis connectedfromtheplayerto a TV,theDuoHDplayer'soutputissetto HDMI/
DVloutputresolutionautomaticallywithin10 seconds.
If ComponentandHDMIarebothconnected,HDMImodeis automaticallyselected.(Seepage42)
Whenyouconnecttheplayerto theTVusingtheHDMIcablefor thefirsttimeorto a newTV,theHDMIoutput
resolutionwill beautomaticallysetto thehighestprovidedbytheTV.
IfyouconnectaSamsungTVto theDuoHDplayerusingan HDMIcable,theplayercanbe easilyoperated
usingtheTVremotecontrol.(Thisis onlyavailablewithSamsungTVsthatsupporttheAnynet+feature.)(See
pages43-44)
• HDMI (High Definition Multimedia Interface)
HDMI is an interface that enables the digital transmission of video and audio data with just a single
connector.
Using HDMI, the Duo HD player transmits a digital video and audio signal and displays a vivid picture
on a TV having an HDMI input jack.
• HDMI connection description
HDMI connector - Supports video and digitalaudio data (LPCM or Bitstream).
- HDMI outputs only a pure digitalsignal to the TV.
- If your TV does not support HDCP (High-bandwidth DigitalContent Protection), random noise
appears on the screen.
• Why does Samsung use HDMI?
Analog TVs require an analog video/audio signal. However, when playing a BD/HD DVD/DVD,the
data ransmitted to a TV is digital. Therefore either a digital-to-analog converter (in the Duo HD player)
or an analog-to-digital converter (inthe TV) isrequired. During this conversion, the picture quality is
degraded due to noise and signal loss. HDMI technology issupedor because it requires no D/A
conversion and isa pure digital signal from the player to your TV.
• What is the HDCP?
HDCP (High-band width Digital Content Protection) is a system for protecting BD/HD DVD/DVD
content outputted via HDMI from being copied. It provides a secure digital link between a video
source (PC, DVD.etc) and a display device (TV,projector, etc). Content is encrypted at the source
device to prevent unauthorized copies from being made.
• What is Anynet+?
Anynet+ is a convenient function that offers linked operation of this unit through Samsung TVs with the
Anynet+ feature.
- If your Samsung TV has an €l_y,,et÷logo, then it supports the Anynet+ function.
- If you turn on the player and insert a disc, the player will start playing the disc, and the TVwill turn on
automatically and switch to HDMI mode.
- If you turn on the playerand press the Play button with a disc already inserted,the TV will
immediately turn on and switch to HDMI mode.
IEnglish 21
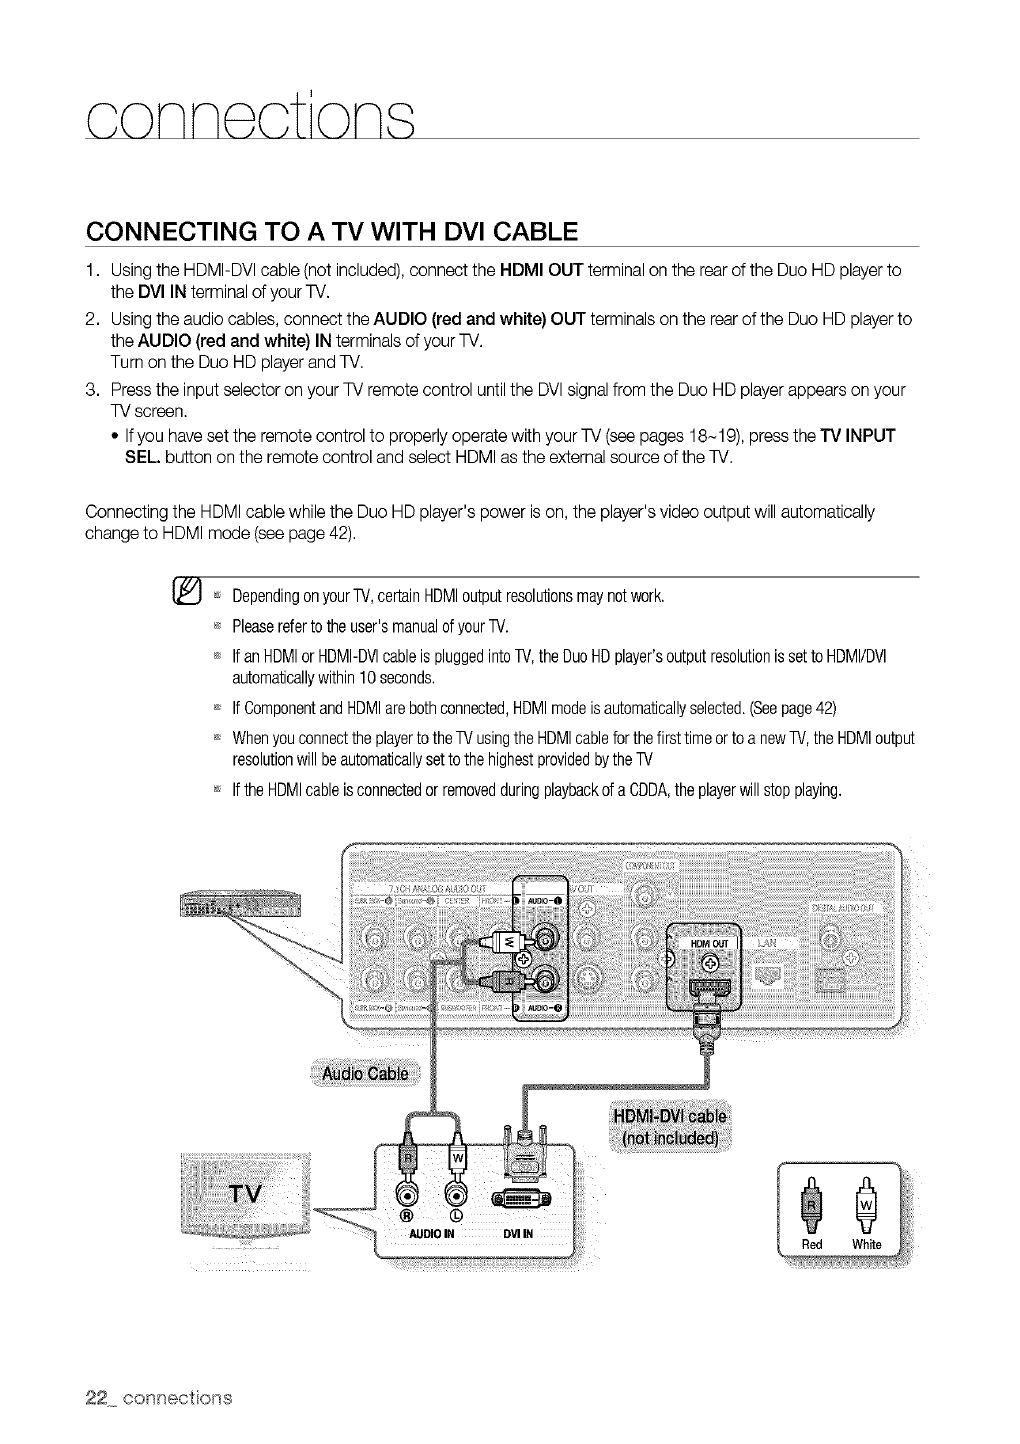
CONNECTING TO A TV WITH DVl CABLE
1. Using the HDMI-DVI cable (not included), connect the HDMI OUT terminal on the rear of the Duo HD player to
the DVl IN terminal of your TV.
2. Using the audio cables, connect the AUDIO (red and white) OUT terminals on the rearof the Duo HD player to
the AUDIO (red and white) IN terminals of your TV.
Turn on the Duo HD player and TV.
3. Press the input selector on your TV remote control until the DVIsignal from the Duo HD playerappears on your
TV screen.
•Ifyou have set the remote control to properly operate with your TV (see pages 18-19), press the TV INPUT
SEL button on the remote control and select HDMI as the external source of the TV.
Connecting the HDMI cable while the Duo HD player's power ison, the player's video output will automatically
change to HDMI mode (see page 42).
[_ Dependingon yourTV,certainHDMIoutputresolutionsmaynotwork.
Pleasereferto theuser'smanualofyourTV.
If anHDMIor HDMI-DVlcableis pluggedintoTV,theDuoHDplayer'soutputresolutionis setto HDMI/DVl
automaticallywithin 10seconds.
If ComponentandHDMIarebothconnected,HDMImodeis automaticallyselected.(Seepage42)
Whenyouconnectthe playertotheTVusingtheHDMIcableforthefirsttimeorto a newTV,the HDMIoutput
resolutionwillbeautomaticallysettothe highestprovidedbytheTV
Ifthe HDMIcableisconnectedor removedduringplaybackda CDDA,the playerwillstopplaying.
AUDIO IN DVIIN 0
Red White
22 conr_ections
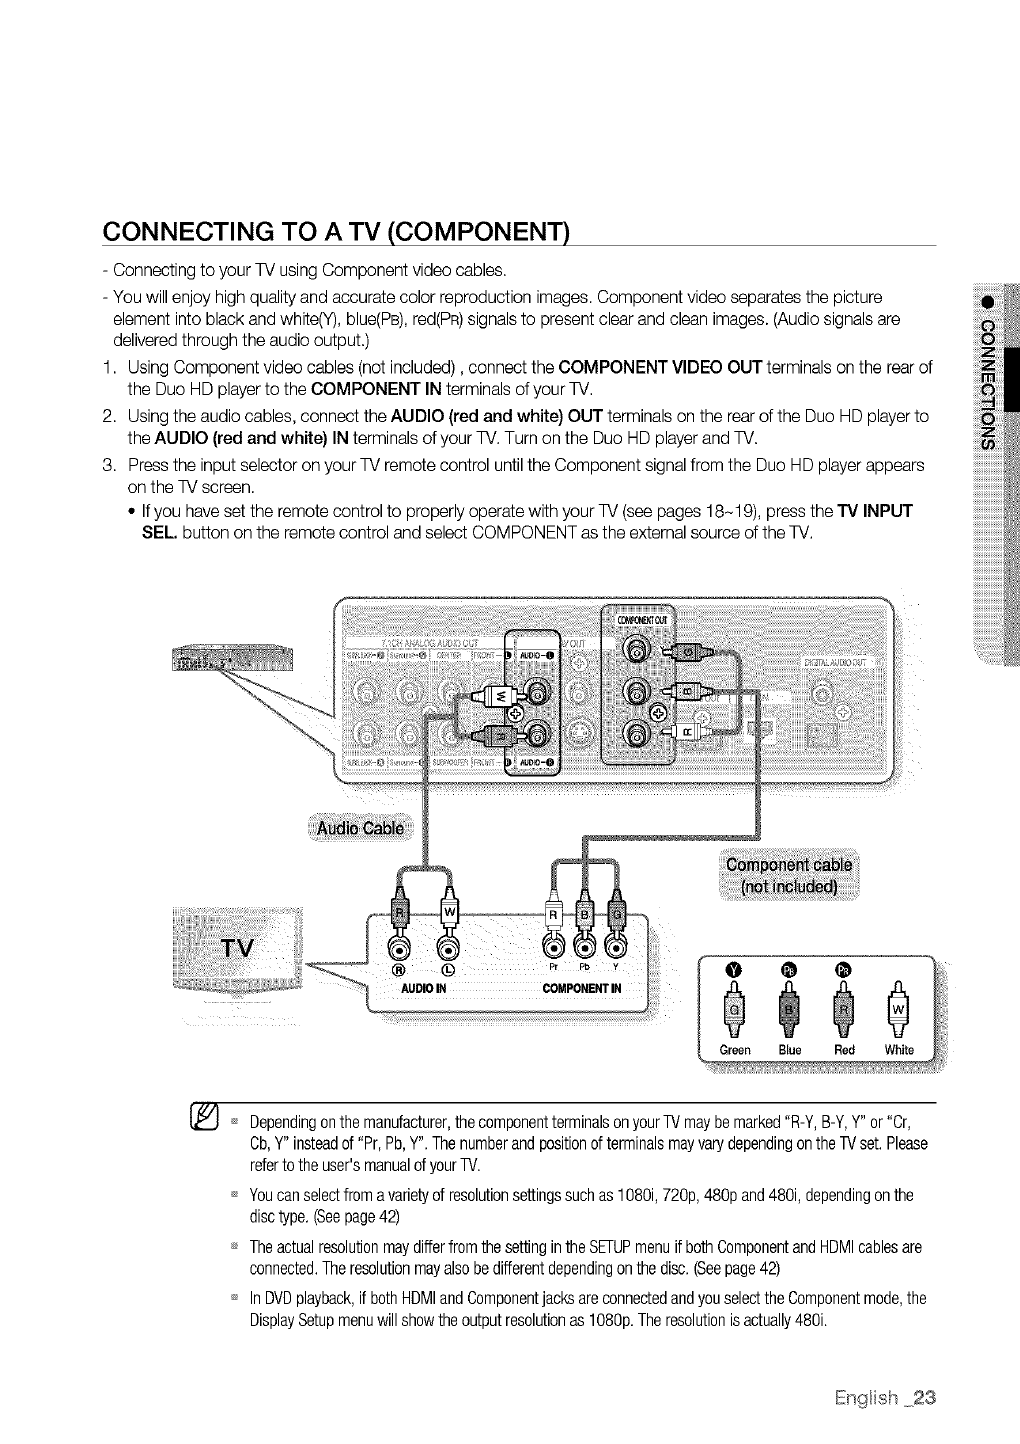
CONNECTING TO A TV (COMPONENT)
Connecting to your TV using Component video cables
You will enjoy high quality and accurate color reproduction images Component video separates the picture
element into black and white(Y) blue(PB) red(PR)signals to present clear and clean images (Audio signals are
delivered through the audio output.)
1 UsingC_mp_nentvide_cab_es(n_tinc_uded) c_nnectthec_MP_NENTv_DE__UTtermina_s_ntherear_f
the Duo HD playerto the COMPONENT IN terminals of your TV
2 Using the audio cables connect the AUDIO (red and white) OUT terminals on the rear of the Duo HD player to
the AUDIO (red and white) IN terminals of your TV Turn on the Duo HD player and TV
3 Press the input selector on your TV remote control until the Component signal from the Duo HD player appears
on the TV screen
• Ifyou have set the remote control to properly operate with your TV (see pages 18-19) press the TV INPUT
SEL button on the remote control and select COMPONENT as the external source of the TV
Dependingonthe manufacturer,thecomponentterminalsonyourTVmaybemarked"R-Y,B-Y,Y" or"Cr,
Cb,Y"insteadof "Pr,Pb,Y",The numberandpositionofterminalsmayvarydependingontheTVset.Please
refertothe user'smanualofyourTV.
Youcanselectfroma varietyof resolutionsettingssuchas 1080i,720p,480p and480i,dependingonthe
disctype,(Seepage42)
TheactualresolutionmaydifferfromthesettingintheSETUPmenuif bothComponentandHDMIcablesare
connected.Theresolutionmayalsobedifferentdependingonthe disc,(Seepage42)
InDVDplayback,if bothHDMIandComponentjacksareconnectedandyouselectthe Componentmode,the
DisplaySetupmenuwillshowtheoutputresolutionas 1080p,Theresolutionisactually480i,
En_lish 23
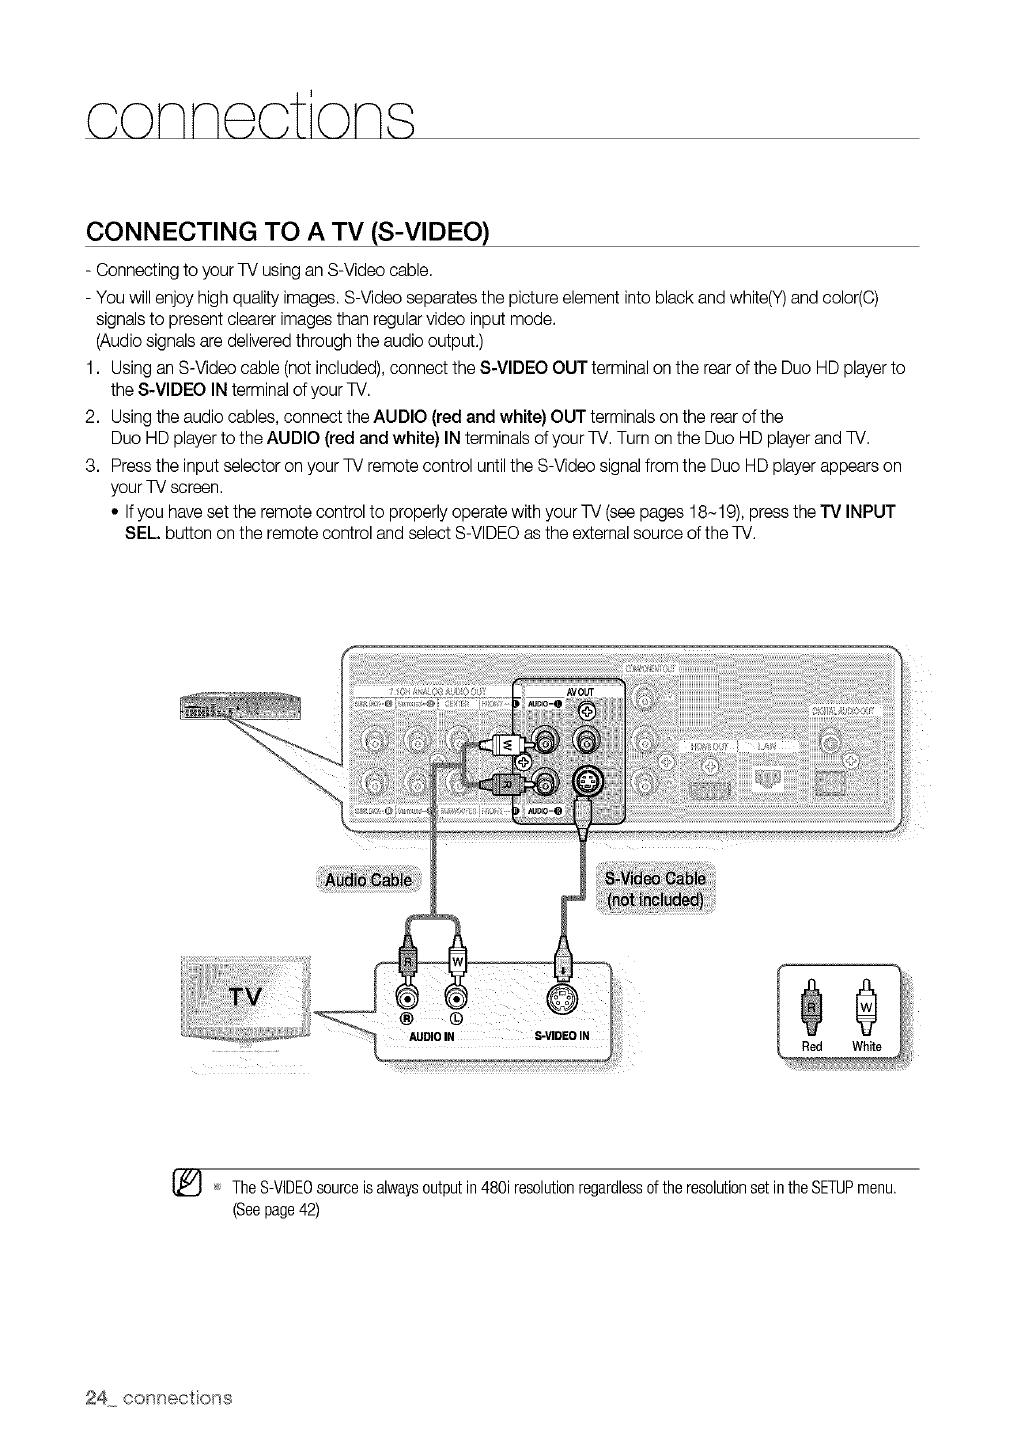
CONNECTING TO A TV (S-VIDEO)
- Connecting to your TV using an S-Video cable.
- You will enjoy high quality images. S-Video separates the picture element into black and white(Y) and color(C)
signalsto present clearer images than regular video input mode.
(Audio signals are delivered through the audio output.)
1. Using an S-Video cable (not included), connect the S-VIDEO OUT terminal on the rear of the Duo HD player to
the S-VIDEO IN terminal of your TV.
2. Using the audio cables, connect the AUDlO (red and white) OUT terminals on the rearof the
Duo HD player to the AUDIO (red and white) IN terminals of your TV. Turn on the Duo HD player and TV.
3. _re__ the input se_ect_r_n y_ur TV rem_te c_ntr__unti_the S-Vide_ _igna_fr_m the Du_ HD p_ayerappears _n
your TV screen.
• Ifyou have set the remote control to properly operate with your TV (see pages 18-19), press the TV INPUT
SEL. button on the remote control and select S-VIDEO as the external source of the TV.
AUDIO IN S-VIDEO IN
[_ TheS-VIDEOsourceis alwaysoutputin480i resolutionregardlessofthe resolutionsetintheSETUPmenu.
(Seepage42)
24 conr_ections
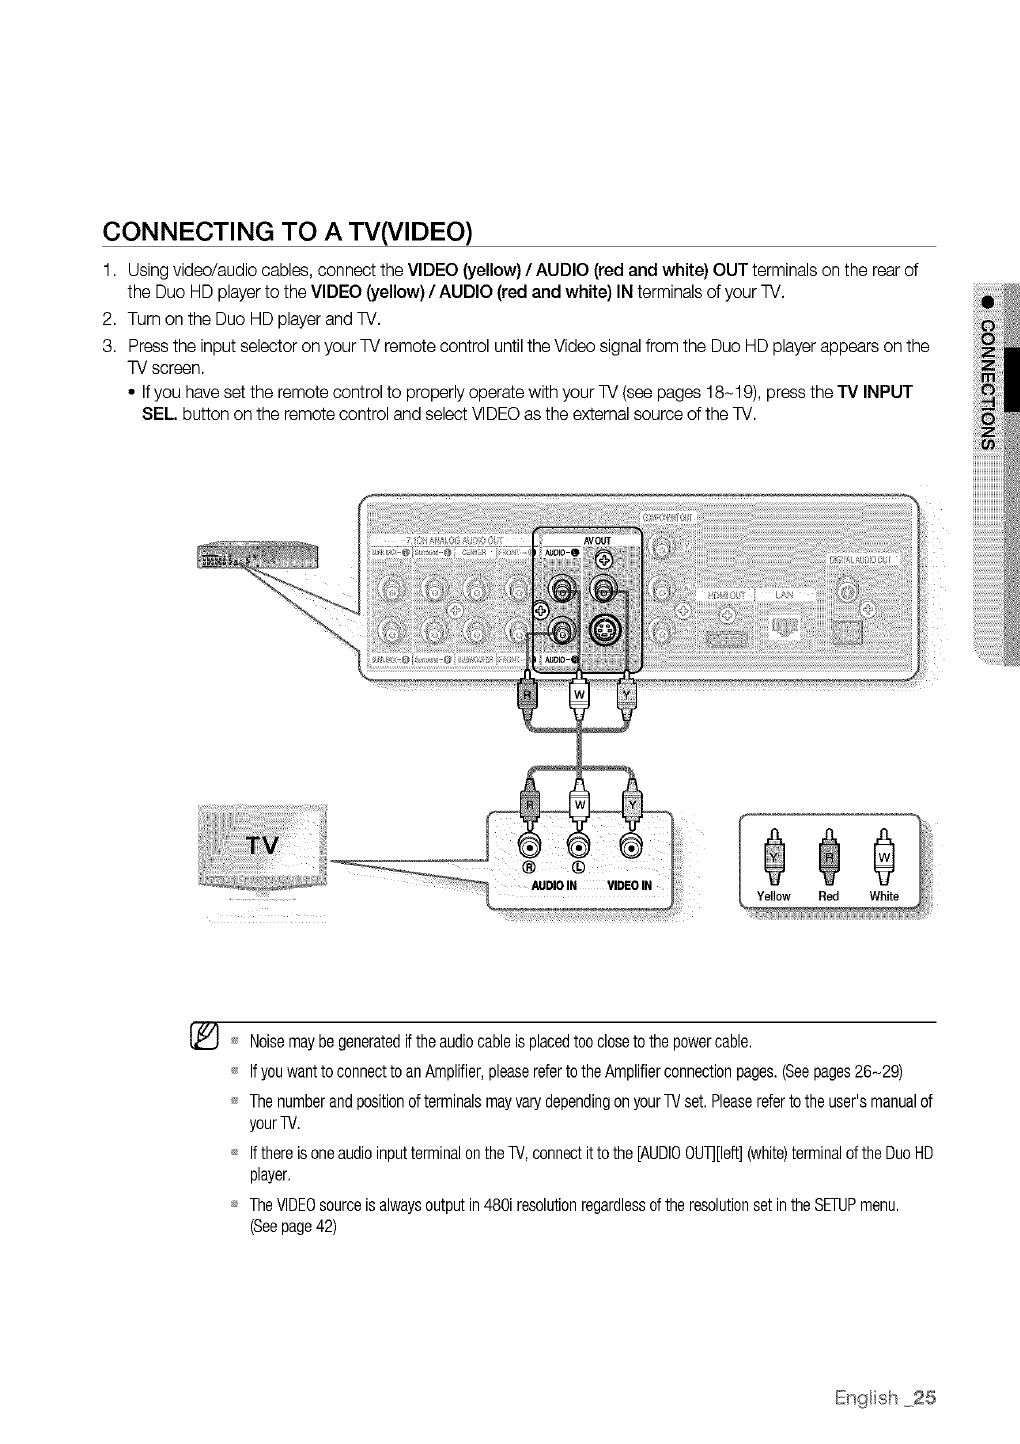
CONNECTING TO ATV(VlDEO)
1. Using video/audio cables, connect the VIDEO (yellow) /AUDIO (red and white) OUT terminals on the rear of
the Duo HD playerto the VIDEO (yellow) /AUDIO (red and white) IN terminals of your TV.
2. Turn on the Duo HD playerand TV.
3. Press the input selector on your TV remote control until the Video signal from the Duo HD player appears on the
TV screen.
• Ifyou have set the remote control to properly operate with your TV (see pages 18-19), press the TV INPUT
SEL button on the remote control and select VIDEO as the external source of the TV.
[_ Noisemaybegeneratedif theaudiocableisplacedtoocloseto thepowercable.
Ifyouwantto connectto anAmplifier,pleasereferto theAmplifierconnectionpages.(Seepages26-29)
ThenumberandpositionofterminalsmayvarydependingonyourTVset.Pleasereferto theuser'smanualof
yourTV.
Ifthereisoneaudioinputterminalon theTV,connectit to the[AUDIOOUT][left](white)terminaloftheDuoHD
player.
TheVIDEOsourceis alwaysoutputin480i resolutionregardlessof theresolutionset intheSETUPmenu.
(Seepage42)
English 25
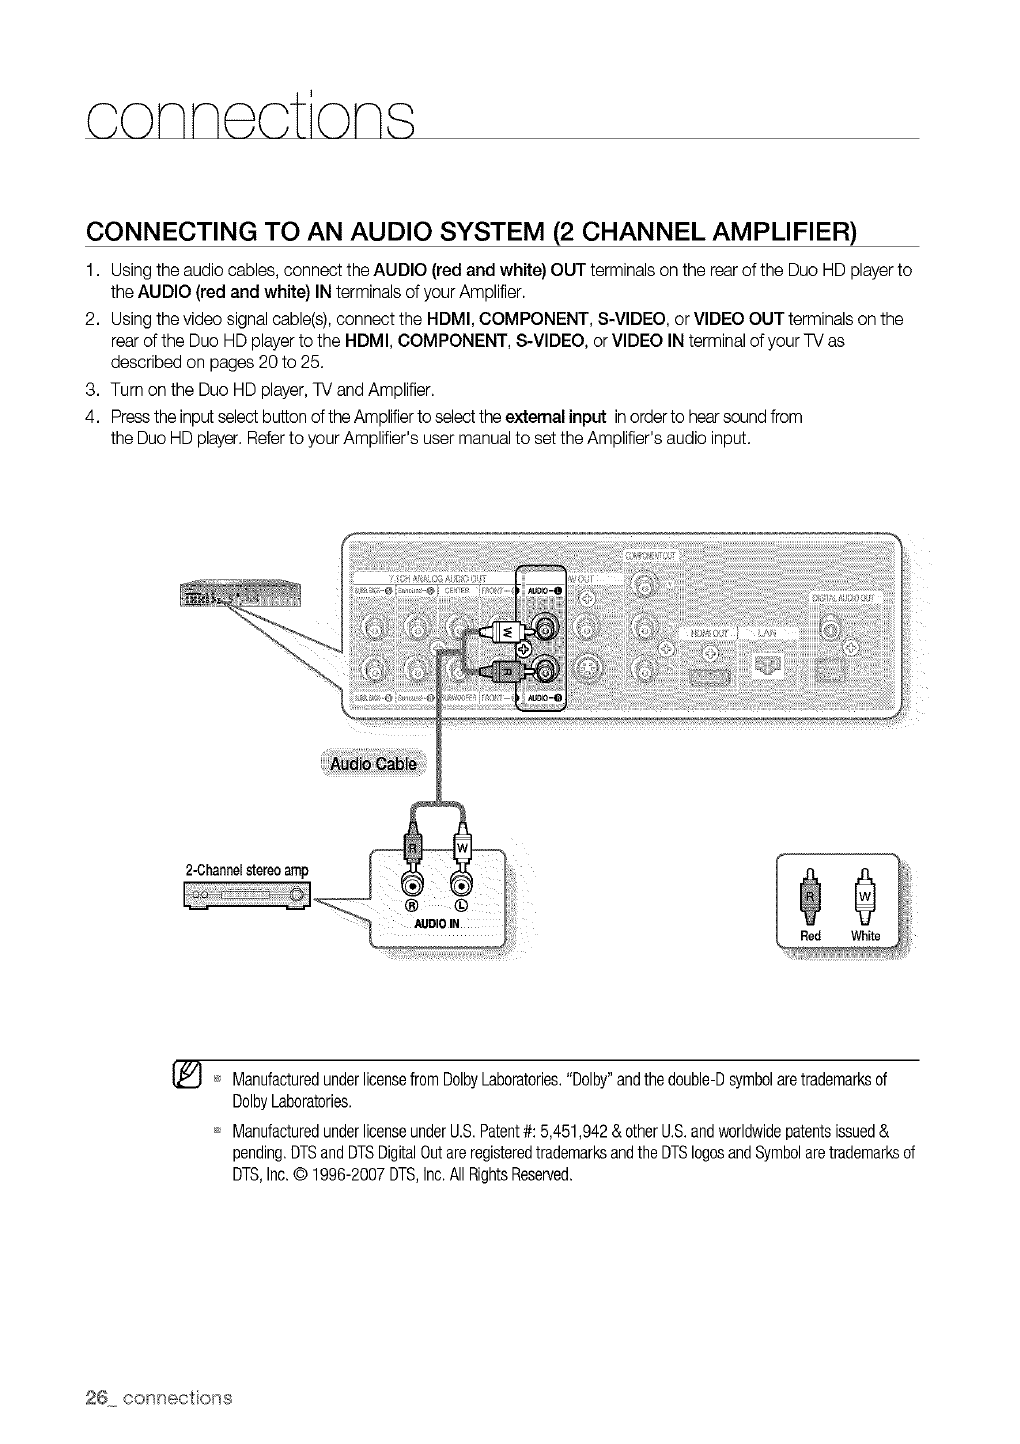
CONNECTING TO AN AUDIO SYSTEM (2 CHANNEL AMPLIFIER)
1. Using the audio cables, connect the AUDIO (red and white) OUT terminals on the rearof the Duo HD player to
the AUDIO (red and white) IN terminals of your Amplifier.
2. Using the vide_ signa_cab_e(s)_c_nnect the HDM__c_MP_NENT_ s-V_DE__ _r V_DE_ _UT termina_s_n the
rear of the Duo HD player to the HDMI, COMPONENT, S-VIDEO, or VIDEO IN terminal of your TV as
described on pages 20 to 25.
3. Turn on the Duo HD player, TV and Amplifier.
4. Pressthe input selectbutton of the Amplifierto selectthe external input in orderto hearsound from
the Duo HD player.Refer to your Amplifier's user manual to set the Amplifier's audio input.
_} ManufacturedunderlicensefromDolbyLaboratories."Dolby"andthe double-Dsymbolaretrademarksof
DolbyLaboratories.
ManufacturedunderlicenseunderU.S.Patent#: 5,451,942& otherU.S.andworldwidepatentsissued&
pending.DTSandDTSDigitalOutareregisteredtrademarksandtheDTSIogosandSymbolaretrademarksd
DTS,Inc.© 1996-2007DTS,Inc.AllRightsReserved.
26 conr_ections
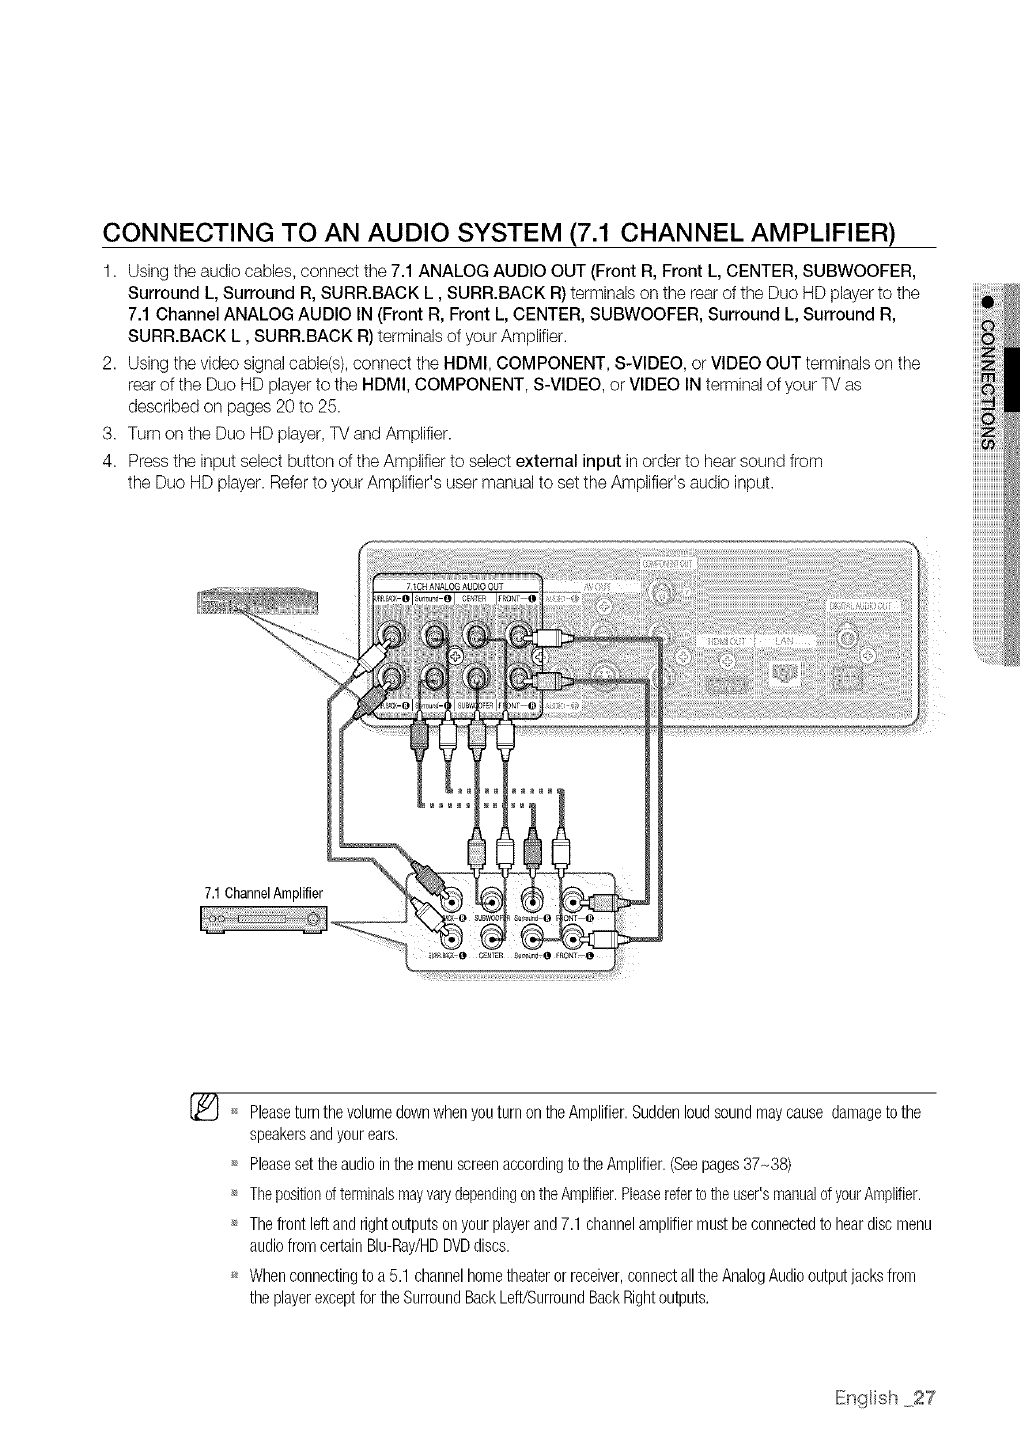
CONNECTING TO AN AUDIO SYSTEM (7.1 CHANNEL AMPLIFIER)
1. Using the audio cables, connect the 7.1 ANALOG AUDIO OUT (Front R, Front L, CENTER, SUBWOOFER,
Surround L, Surround R, SURR.BACK L, SURR.BACK R) terminals on the rear of the Duo HD player to the
7.1 Channel ANALOG AUDIO IN (Front R, Front L, CENTER, SUBWOOFER, Surround L, Surround R,
SURR.BACK L, SURR.BACK R) terminals of your Amplifier.
2. Using the video signal cable(s),connect the HDMI, COMPONENT, S-VIDEO, or VIDEO OUT terminals on the
rear of the Duo HD player to the HDMI, COMPONENT, S-VIDEO, or VIDEO IN terminal of your TV as
described on pages 20 to 25.
3. Turn on the Duo HD player,TV and Amplifier.
4. Press the input select button of the Amplifier to select external input in order to hear sound from
the Duo HD player. Refer to your Amplifier's user manual to set the Amplifier's audio input.
7.1ChannelAmplifier
Pleaseturnthevolumedownwhenyouturnon theAmplifier.Suddenloudsoundmaycausedamageto the
speakersandyourears.
'_ Pleasesettheaudiointhe menuscreenaccordingto theAmplifier.(Seepages37-38)
,_ ThepositiondterminalsmayvarydependingontheAmplifier.Pbaserefertotheuser'smanualofyourAmplifier.
'_ Thefrontleftandrightoutputsonyourplayerand7.1 channelamplifiermustbeconnectedto heardiscmenu
audiofromcertainBlu-Ray/HDDVDdiscs.
_ Whenconnectingto a 5.1 channelhometheaterorreceiver,connectall theAnalogAudiooutputjacksfrom
the playerexceptfor theSurroundBackLeft/SurroundBackRightoutputs.
IEnglish 27
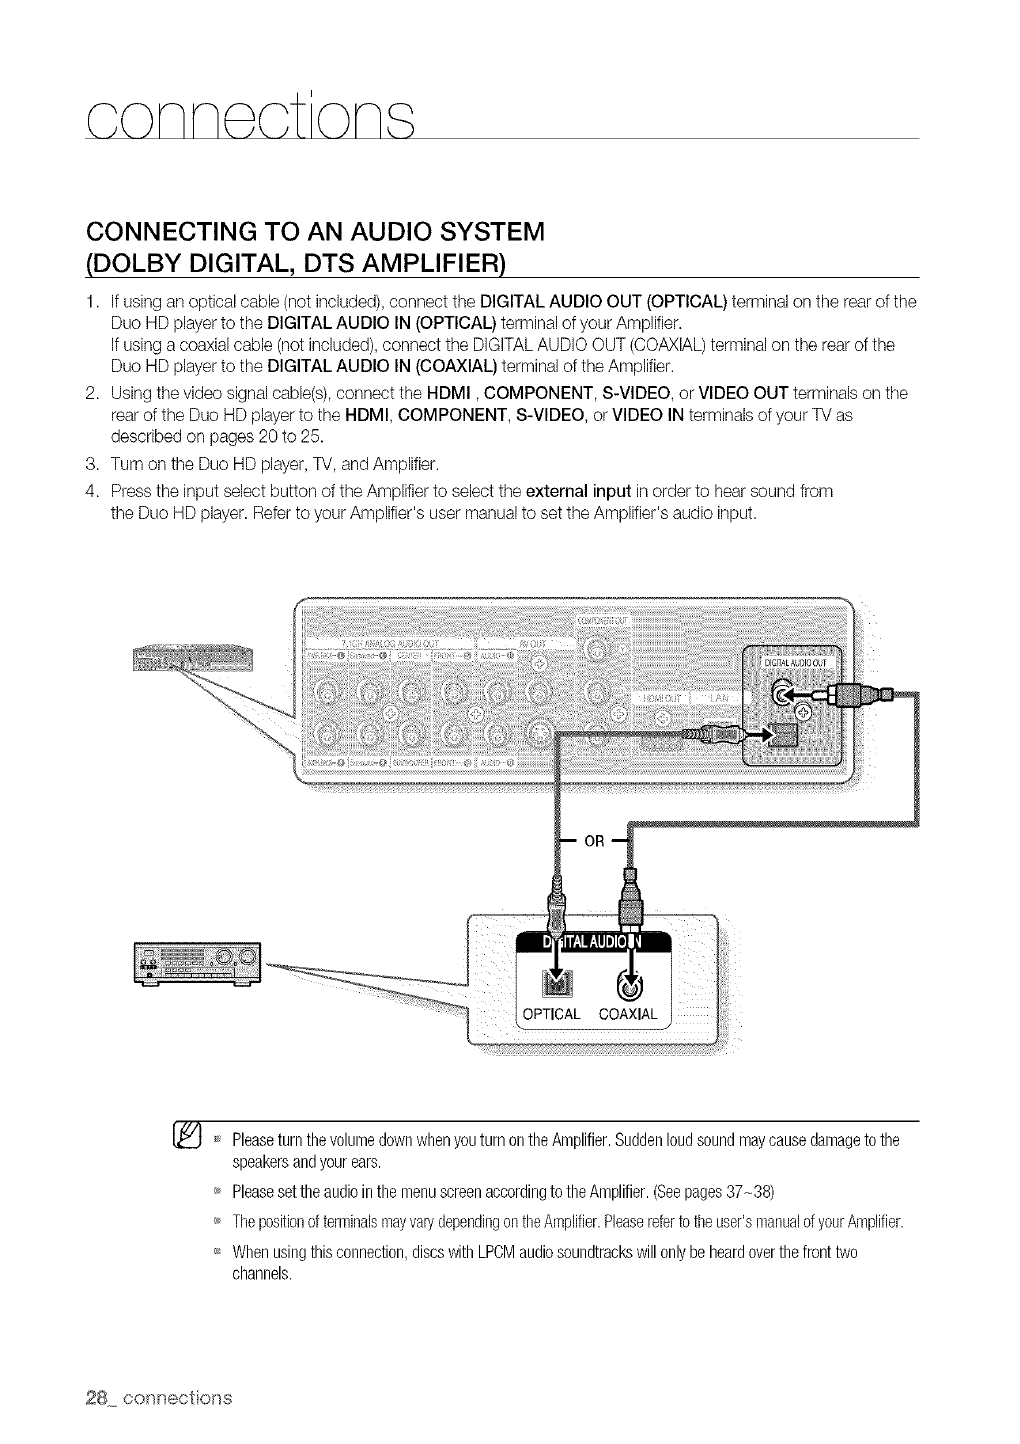
CONNECTING TO AN AUDIO SYSTEM
(DOLBY DIGITAL, DTS AMPLIFIER)
1. If using an optical cable (not included), connect the DIGITAL AUDIO OUT (OPTICAL) terminal on the rear of the
Duo HD player to the DIGITAL AUDIO IN (OPTICAL) terminal of your Amplifier.
If using a coaxial cable (not included), connect the DIGITALAUDIO OUT (COAXIAL)terminal on the rear of the
Duo HD player to the DIGITAL AUDIO IN (COAXIAL) terminal of the Amplifier.
2. Using the video signal cable(s), connect the HDMI, COMPONENT, S-VIDEO, or VIDEO OUT terminals on the
rear of the Duo HD player to the HDMI, COMPONENT, S-VIDEO, or VIDEO IN terminals ofyour TV as
described on pages 20 to 25.
3. Turn on the Duo HD player, TV, and Amplifier.
4. Press the input select button of the Amplifier to select the external input in order to hear sound from
the Duo HD player. Refer to your Amplifier's user manual to set the Amplifier's audio input.
iiii!
[_ _ Pleaseturn thevolumedownwhenyouturn ontheAmplifier.Suddenloudsoundmaycausedamageto the
speakersandyourears.
'_ Pleaseset theaudiointhemenuscreenaccordingto theAmplifier.(Seepages37-38)
,_ ThepositionofterminalsmayvarydependingontheAmplifier.Pleaserefertotheuser'smanualofyourAmplifier.
_ Whenusingthisconnection,discswithLPCMaudiosoundtrackswillonlybeheardoverthefronttwo
channels.
28 connect ons
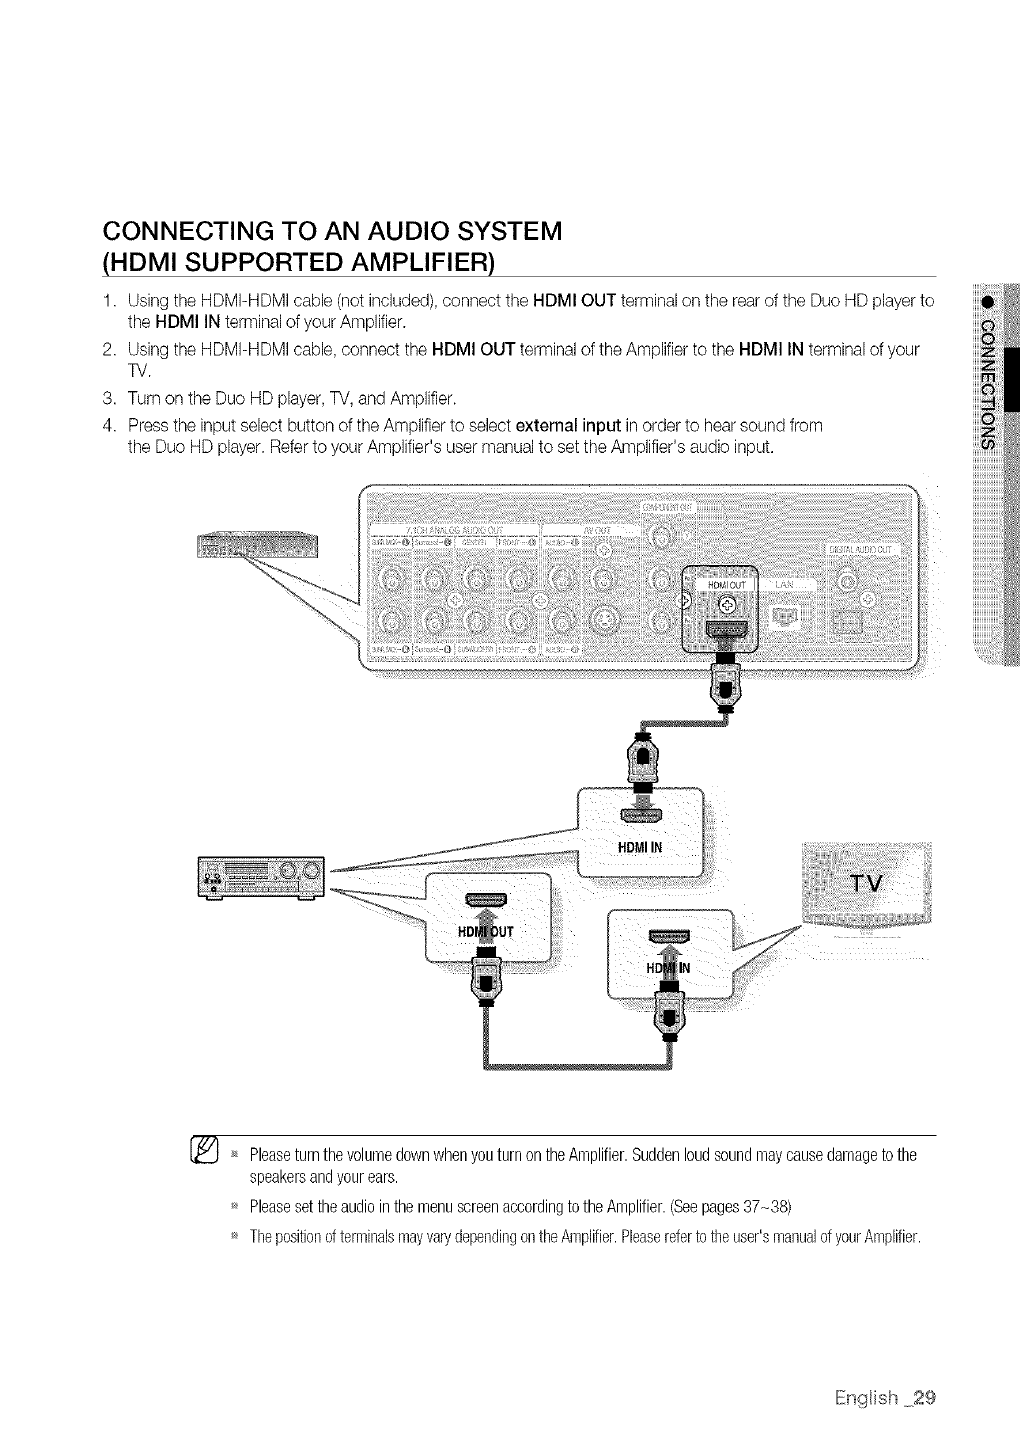
CONNECTING TO AN AUDIO SYSTEM
(HDMI SUPPORTED AMPLIFIER)
1. Using the HDMI-HDMI cable (not included), connect the HDMI OUT terminal on the rear of the Duo HD playerto
the HDMI IN terminal of your Amplifier.
2. Using the HDMI-HDMI cable, connect the HDMI OUT terminal of the Amplifier to the HDMI IN terminal of your
TV.
3. Turn on the Duo HD player,TV, and Amplifier.
4. Press the input select button of the Amplifier to select external input in order to hear sound from
the Duo HD player. Refer to your Amplifier's user manualto set the Amplifier's audio input.
'_ Pleaseturnthevolumedownwhenyouturnon theAmplifier.Suddenloudsoundmaycausedamageto the
speakersandyourears.
_ Pleasesettheaudiointhe menuscreenaccordingto theAmplifier.(Seepages37-38)
_ Thepositionofterminalsmayvan/dependingontheAmplifier.Pleasereferto theuser'smanualofyourAmplifier.
IEnglish 29
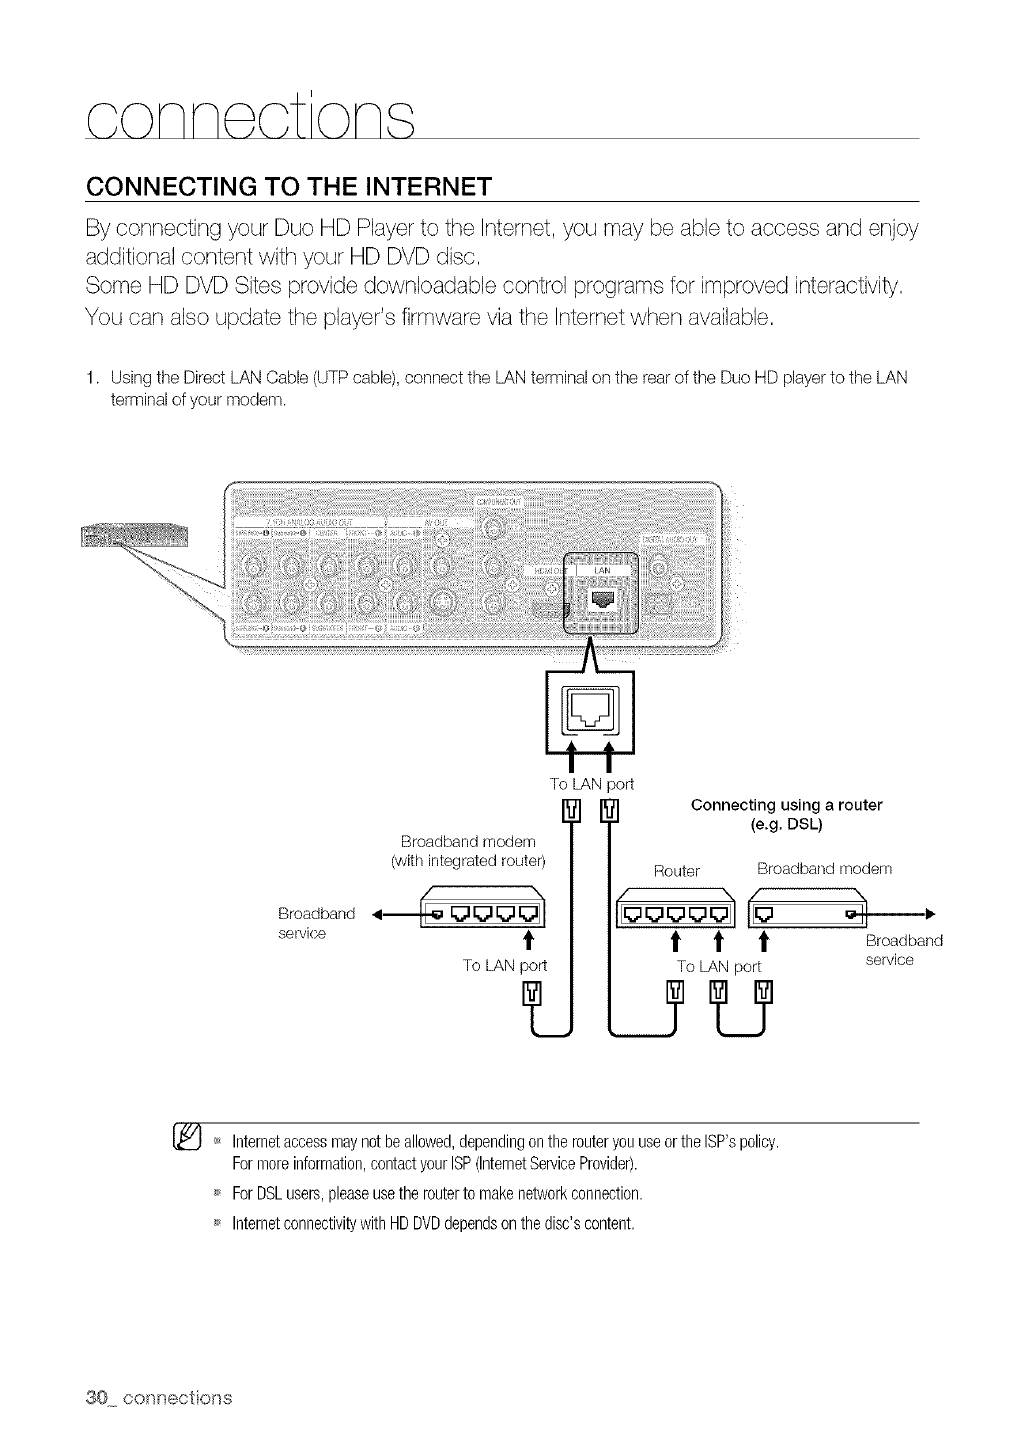
CONNECTING TO THE INTERNET
By connecting your Duo HD Pbyer to the Internet, you may be abb to access and enjoy
additiona] content with your HD DVD disc,
Some HD DVD Sites provide downbadabb contrd programs for improved interactMty,
You can abo update the pbyer's firmware via the Internet when avaibbb,
1. Using the Direct LAN Cable (UTP cable), connect the LAN terminal on the rear of the Duo HD player to the LAN
terminal of your modem.
Broadband
service
To LAN
Broadband modem _
(with integratedrouter) |
To LAN
oort
Connecting using a router
(e.g. DSL)
Router
t t t
To LAN port
Broadbandmodem
Broadband
service
[_ _ Internetaccessmaynotbe allowed,dependingonthe routeryouuseortheISP'spolicy.
Formoreinformation,contactyourISP(InternetServiceProvider).
ForDSLusers,pleaseusetherouterto makenetworkconnection.
IntemetconnectivitywithHDDVDdependsonthedisc'scontent.
30 connect ons
basc funcI ons of your
This section introduces basic playback functions and playback by disc type.
BEFORE PLAYING
•Turn on your TV and set it to the correct Video Input (the input the Duo HD player is connected to).
• If you connected an external Audio System, turn on your Audio System and set itto the correct Audio Input.
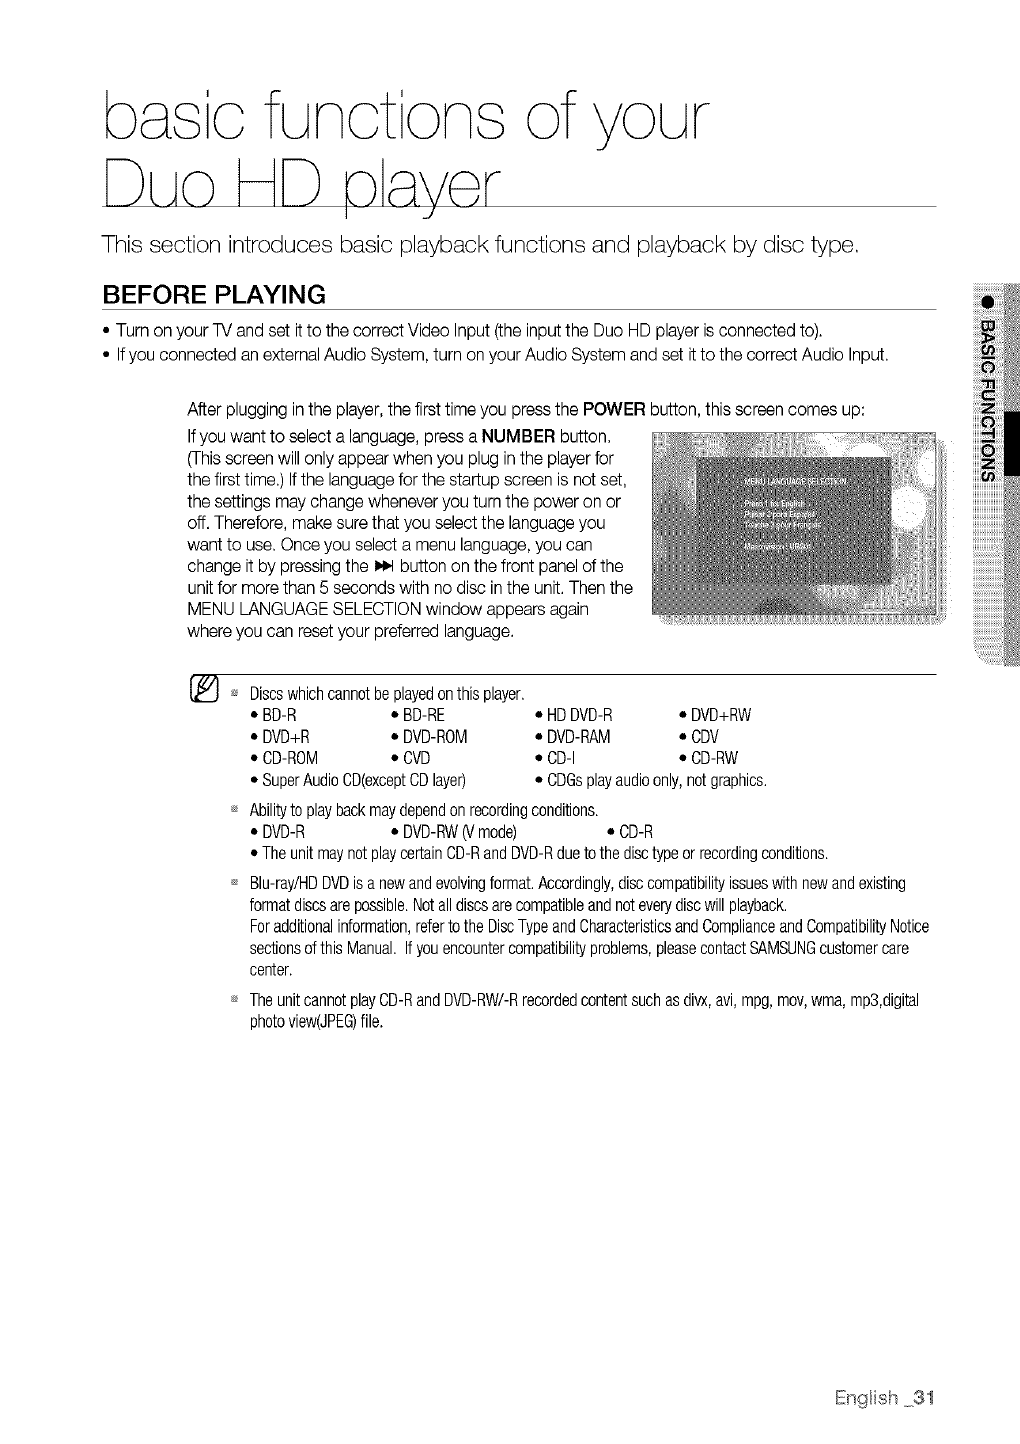
After plugging in the player,the first time you press the POWER button, this screen comes up:
Ifyou want to select a language, press a NUMBER button.
(Thisscreen will only appear when you plug in the player for
the first time.) If the language for the startup screen is not set,
the settings may change whenever you turn the power on or
off. Therefore, make sure that you select the language you
want to use. Once you select a menu language, you can
change it by pressing the 1_ button on the front panel of the
unitfor more than 5 seconds with no disc in the unit. Then the
MENU LANGUAGE SELECTIONwindow appears again
where you can reset your preferred language.
Discswhichcannotbeplayedonthisplayer.
* BD-R * BD-RE * HDDVD-R * DVD+RW
* DVD+R * DVD-ROM * DVD-RAM * CDV
. CD-ROM • CVD • CD-I • CD-RW
• SuperAudioCD(exceptCDlayer) • CDGsplayaudioonly,notgraphics.
Abilityto playbackmaydependon recordingconditions.
. DVD-R • DVD-RW(Vmode) • CD-R
* TheunitmaynotplaycertainCD-RandDVD-Rdueto thedisctypeorrecordingconditions.
Blu-ray/HDDVDis a newandevolvingformat.Accordingly,disccompatibilityissueswith newandexisting
formatdiscsarepossible.Notall discsare compatibleandnoteverydiscwillplayback.
Foradditionalinformation,referto the DiscTypeandCharacteristicsandComplianceandCompatibilityNotice
sectionsof thisManual.If youencountercompatibilityproblems,pleasecontactSAMSUNGcustomercare
center.
Theunit cannotplayCD-RandDVD-RW/-Rrecordedcontentsuchasdivx,avi,mpg,mov,wma,mp3,digital
photoview(JPEG)file.
English 31
bas c funot ons of
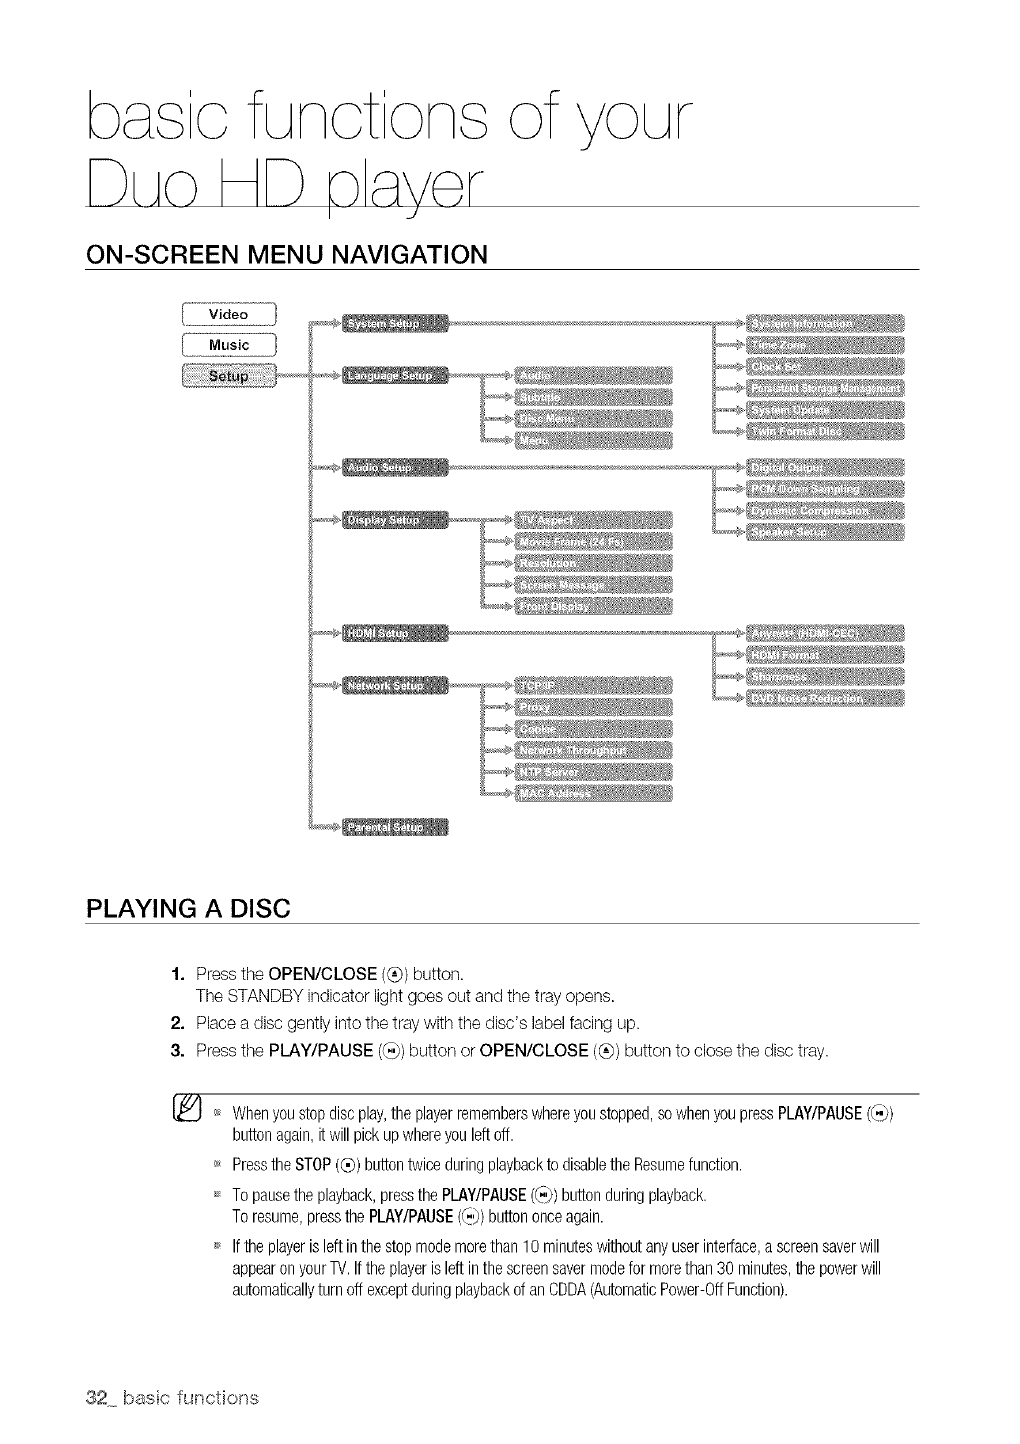
ON-SCREEN MENU NAVIGATION
{ v,doo1
( .°o,c }
PLAYING A DISC
1. Press the OPEN/CLOSE (@) button.
The STANDBY indicator lightgoes out and the tray opens.
2. Place a disc gently into the tray with the disc's labelfacing up.
3. Press the PLAY/PAUSE ((.i))button or OPEN/CLOSE (®) button to close the disc tray.
[_ '_ Whenyoustopdiscplay,theplayerrememberswhereyoustopped,sowhenyoupressPLAY/PAUSE((-))
buttonagain,it will pickupwhereyouleft off.
_ Pressthe STOP(®) buttontwiceduringplaybackto disablethe Resumefunction.
_ Topausethe playback,pressthe PLAY/PAUSE(_,)) buttonduringplayback.
Toresume,pressthe PLAY/PAUSE(_,)) buttononceagain.
_ If theplayeris leftinthestopmodemorethan10 minuteswithoutanyuserinterl:ace,a screensaverwill
appearon yourTV.Iftheplayeris left inthescreensavermodeformorethan30 minutes,thepowerwill
automaticallyturn offexceptduringplaybackof an CDDA(AutomaticPower-OffFunction).
32 base functions
TO PLAY A TWIN-FORMAT HD DVD DISC
To play a twin-format HD DVD disc, you should select HD DVDor DVDbefore inserting the disc.
This can be enabled only for a twin-format HD DVD disc.
1. With the unit in Stop mode, press the MENU button.
2. Press the Av buttons to select Setup, then press the ENTER or • button.
3. Press the • •buttons to select System Setup, then press the ENTER or • button.
4. Press the • • buttons to select Twin Format Disc, then press the ENTER or • button.
5. Select HD DVD or DVD on the menu then press ENTER.
Youcannotchangetheformatduringplayback.
USING THE SEARCH AND SKIP FUNCTIONS
During play, you can search quickly through a chapter or track, and use the skip function to jump to the next
selection.
During playback, press the SEARCH (G G) button.
• Ifyou want to search at a faster speed on the BD/HD DVD/DVD, press this button.
• Ifyou press the SEARCH (_) button,
X2_X4_X8_X16_X32_X128
• Ifyou press the SEARCH ((_,,_})button,
X2_X4_X8_X16_X32_X128
[_ _ Nosoundis heardduringsearchmode.
During playback, press the SKIP (G_) button.
When playing a BD/HD DVD/DVD, if you press the SKIP (_) button, it moves to the next chapter. Ifyou
press the SKIP (_) button, it moves to the beginning of the chapter. One more press makes it move to
the beginning of the previous chapter.
IEnglish 33

bas c funot ons of
SLOW MOTION PLAY/STEP MOTION PLAY
Slow Motion Play
In pause or step mode, press the SLOW button on the remote control for Slow Motion play.
•If you press the SLOW button, 1_1/8 I_ 1/4 I_ 1/2
• To return to normal speed playback, press the PLAY/PAUSE ((_) button.
_ This (®)icon indicates an invalid button press.
Nosound is heardduring slowmode.
_ Slowmotion operatesonly in the forwarddirection.
Step Motion Play
Pressthe STEP button onthe remotecontrol during playfor Step Motionplay.
• Each time the button is pressed a new frame will appear.
• When the STEP button is pressed, the next frame will be activated.
• Press the PLAY/PAUSE (_,}) button to resume normal play.
_ Nosoundis heardduringstepmode.
Stepmotionoperatesonlyintheforwarddirection.
34 base functions
For your convenience, you can set this player's features for the best use in your
home environment.
SETTING THE CLOCK
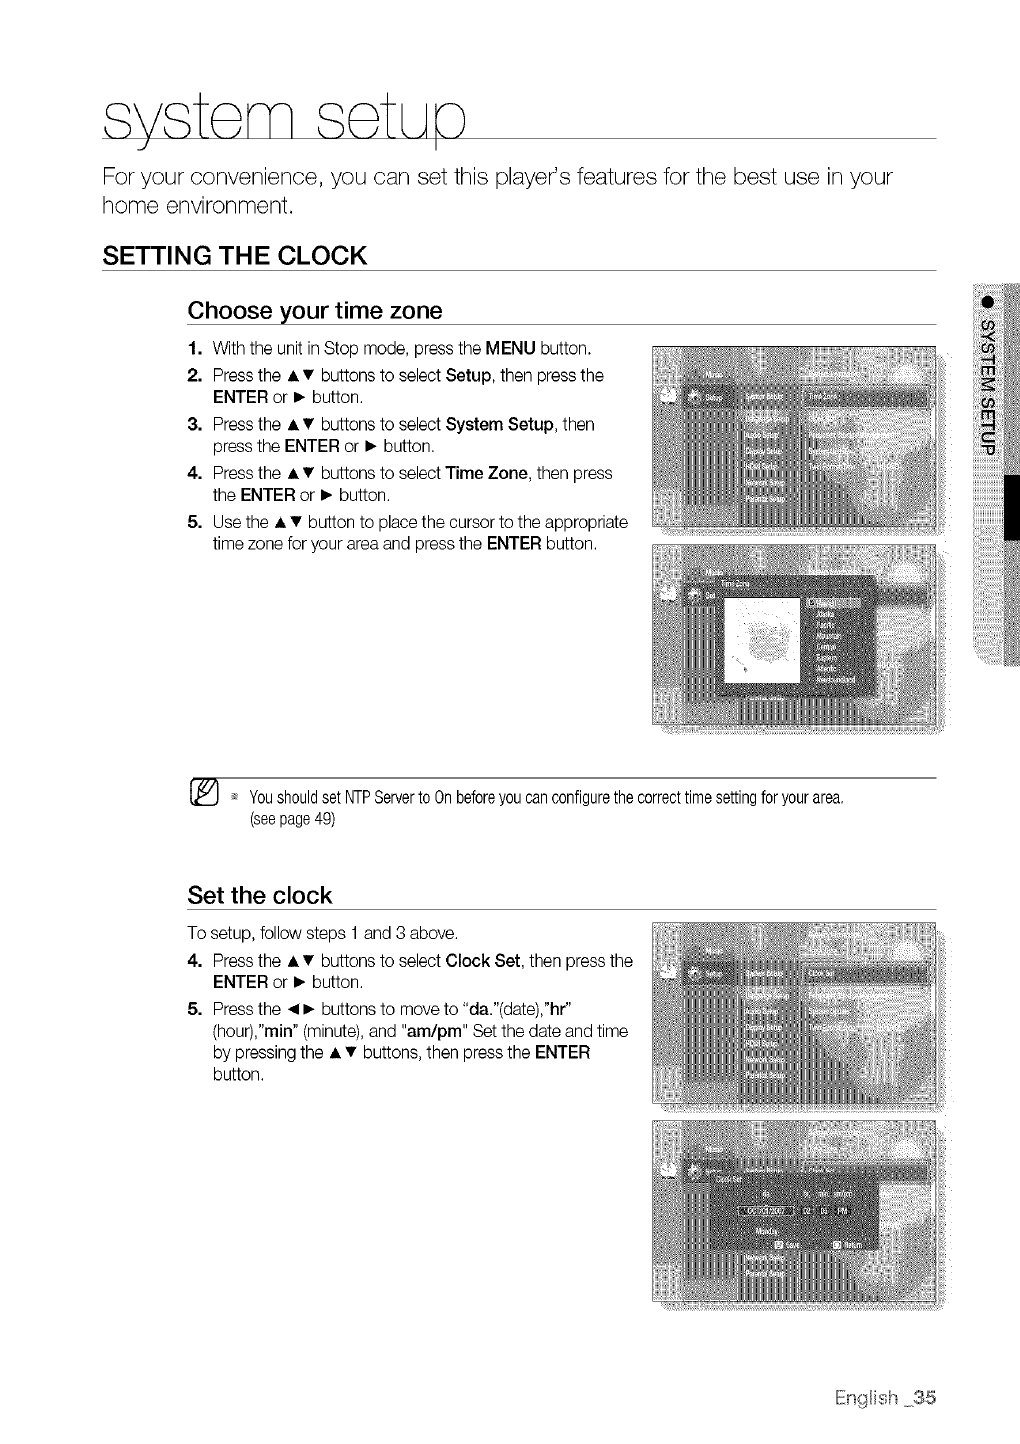
Choose your time zone
1. With the unit in Stop mode, press the MENU button.
2. Press the • •buttons to select Setup, then press the
ENTER or • button.
3. Press the • • buttons to select System Setup, then
press the ENTER or • button.
4. Press the • • buttons to select Time Zone, then press
the ENTER or • button.
5. Use the • • button to place the cursor to the appropriate
time zone for your area and press the ENTER button.
Youshouldset NTPServerto Onbeforeyoucanconfigurethecorrecttimesettingforyourarea.
(seepage49)
Set the clock
To setup, follow steps 1 and 3 above.
4. Press the • • buttons to select Clock Set, then press the
ENTER or • button.
5. Press the _1• buttons to move to "da."(date),"hr"
(hour),"min" (minute), and "am/pm" Set the date and time
by pressing the • • buttons, then press the ENTER
button.
IEn{_Hish35
SETTING UP THE LANGUAGE OPTIONS
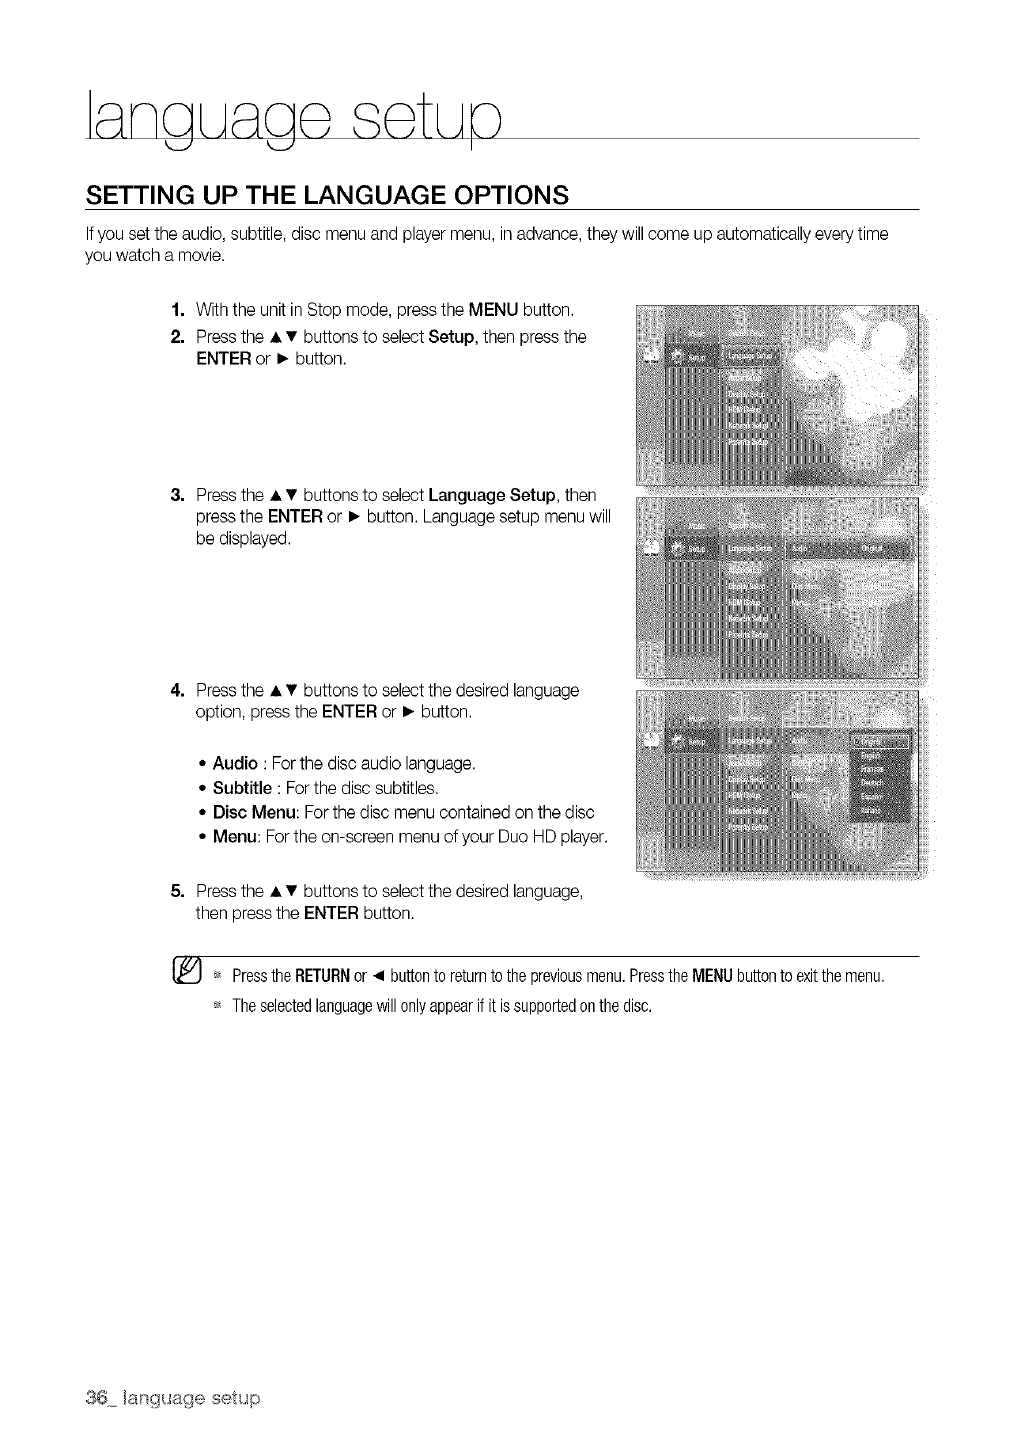
Ifyou set the audio, subtitle, disc menu and player menu, in advance, they will come up automatically every time
you watch a movie.
1. With the unit in Stop mode, press the MENU button.
2. Press the • •buttons to select Setup, then press the
ENTER or • button.
3. Press the • • buttons to select Language Setup, then
press the ENTER or • button. Language setup menu will
be displayed.
4. Press the • • buttons to select the desired language
option, press the ENTER or • button.
• Audio : Forthe disc audio language.
• Subtitle : Forthe disc subtitles.
• Disc Menu: For the disc menu contained on the disc
• Menu: For the on-screen menu of your Duo HD player.
5. Press the • • buttons to select the desired language,
then press the ENTER button.
[_ PresstheRETURNor _1buttonto returnto thepreviousmenu.PresstheMENUbuttonto exitthemenu.
Theselectedlanguagewillonlyappearif it issupportedonthedisc.
aud o setuo
I
SETTING UP THE AUDIO OPTIONS
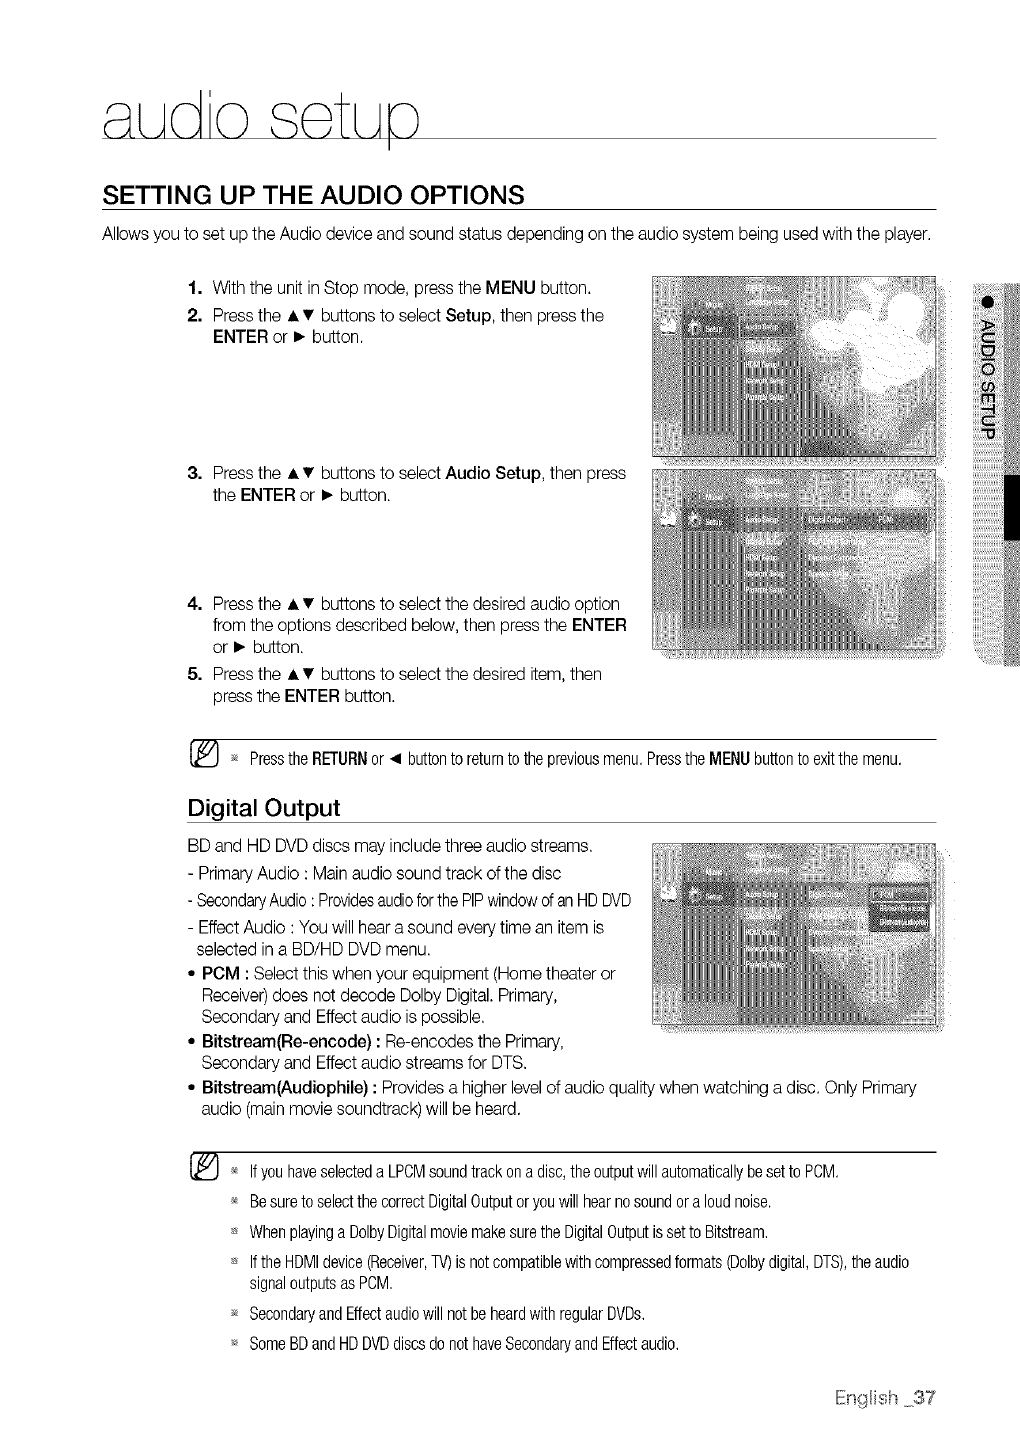
Allows you to set up the Audio device and sound status depending on the audio system being used with the player.
1. With the unit in Stop mode, press the MENU button.
2. Press the • •buttons to select Setup, then press the
ENTER or • button.
3. Press the • • buttons to select Audio Setup, then press
the ENTER or • button.
4. Press the • • buttons to select the desired audio option
from the options described below, then press the ENTER
or • button.
5. Press the • • buttons to select the desired item, then
press the ENTER button.
_ Pressthe RETURNor _1 buttonto returnto thepreviousmenu,Pressthe MENUbuttonto exitthemenu.
Digital Output
BD and HD DVD discs may include three audio streams.
- Primary Audio : Main audio sound track of the disc
- SecondaryAudio: Providesaudioforthe PIPwindowof an HD DVD
- Effect Audio : You will hear a sound every time an item is
selected in a BD/HD DVD menu.
• PCM : Select this when your equipment (Home theater or
Receiver)does not decode Dolby Digital. Primary,
Secondary and Effect audio ispossible.
• Bitstrearn(Re-encode) : Re-encodes the Primary,
Secondary and Effect audio streams for DTS.
• Bitstream(Audiophile) : Provides a higher level of audio quality when watching a disc. Only Primary
audio (mainmovie soundtrack) will be heard.
_* Ifyou haveselecteda LPCMsoundtrackona disc,theoutputwillautomaticallybe setto PCM.
_* Besureto selectthecorrectDigitalOutputor youwillhearno soundor a loudnoise.
Whenplayinga DolbyDigitalmoviemakesuretheDigitalOutputis setto Bitstream.
IftheHDMIdevice(Receiver,TV)isnotcompatiblewithcompressedformats(Dolbydigital,DTS),theaudio
signaloutputsasPCM.
_ SecondaryandEffectaudiowillnotbe heardwithregularDVDs.
_ SomeBDandHDDVDdiscsdonothaveSecondaryandEffectaudio.
IEngHish37
aud o setuo
I
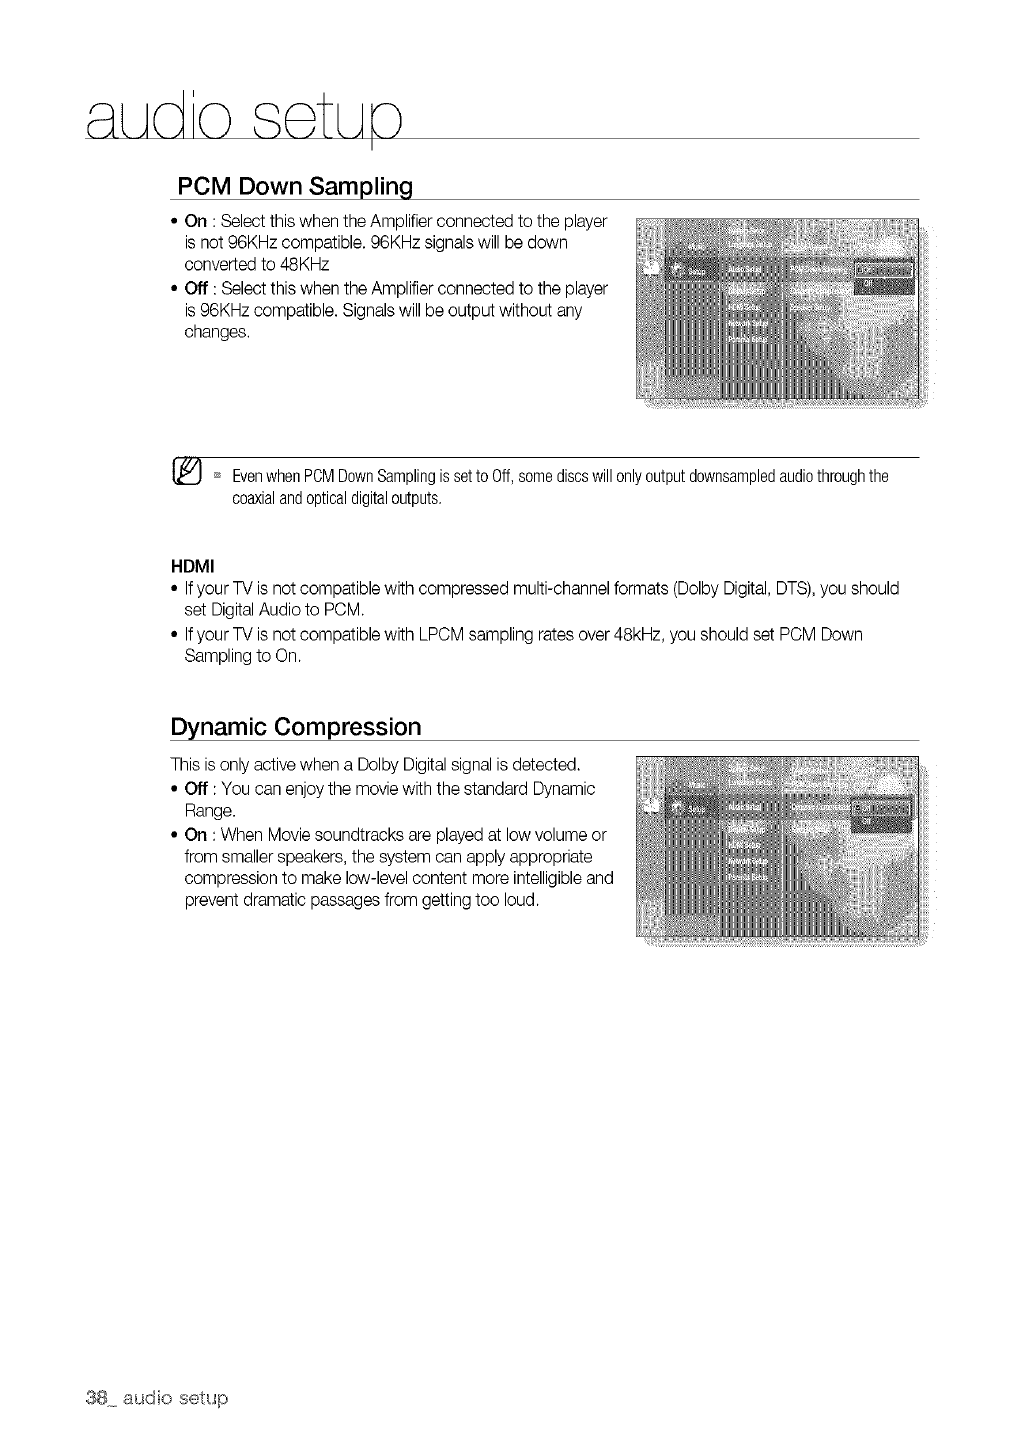
PCM Down Sampling
• On : Select this when the Amplifier connected to the player
is not 96KHz compatible. 96KHz signals will be down
converted to 48KHz
• Off : Select this when the Amplifier connected to the player
is 96KHz compatible. Signals will be output without any
changes.
[_ EvenwhenPCMDownSamplingissetto Off,somediscswillonlyoutputdownsampledaudiothroughthe
coaxialandopticaldigitaloutputs.
HDMI
• If your TV is not compatible with compressed multi-channel formats (Dolby Digital, DTS),you should
set Digital Audio to PCM.
• If your TV is not compatible with LPCM sampling rates over 48kHz, you should set PCM Down
Sampling to On.
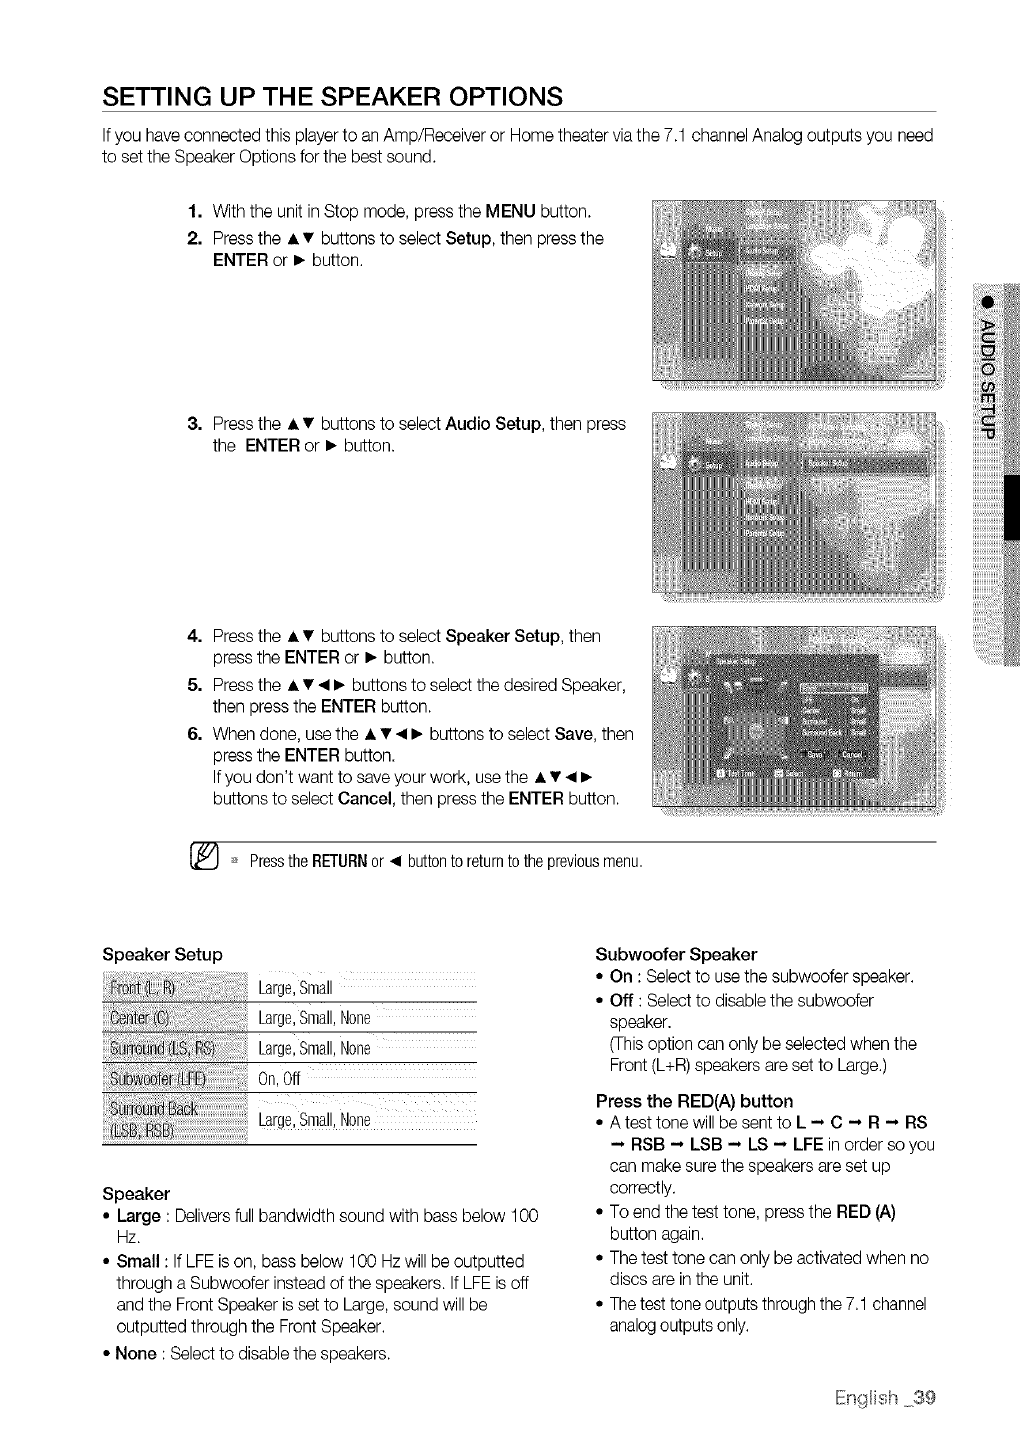
Dynamic Compression
This is only activewhen a Dolby Digital signal is detected.
• Off : You can enjoy the movie with the standard Dynamic
Range.
• On : When Movie soundtracks are played at low volume or
from smaller speakers, the system can apply appropriate
compression to make low-level content more intelligible and
prevent dramatic passages from getting too loud.
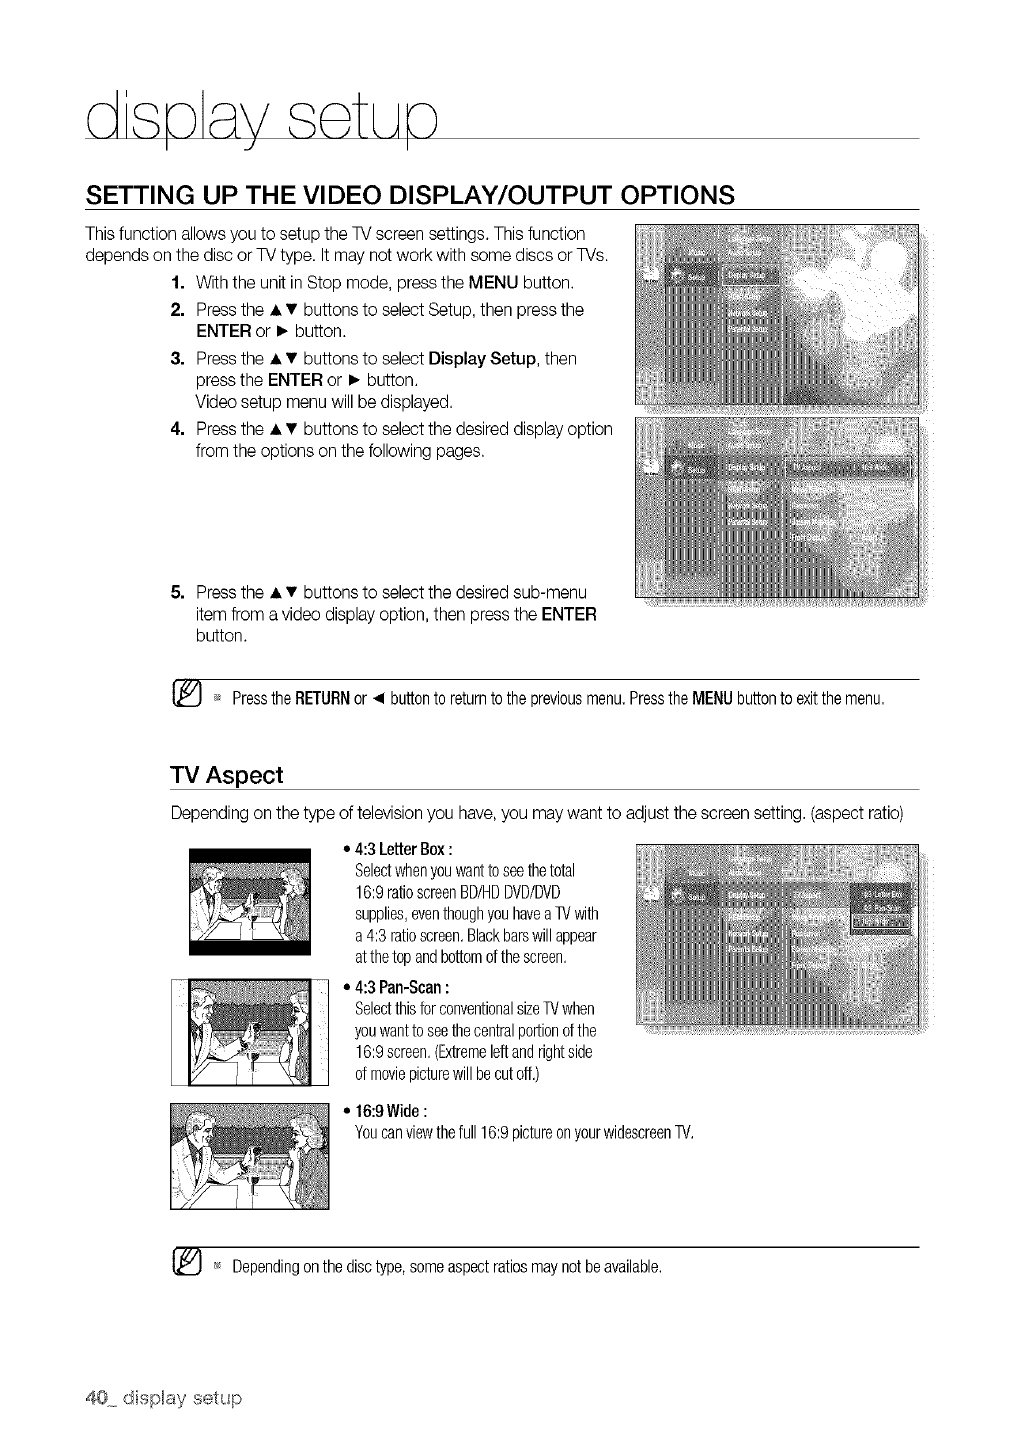
SETTING UP THE SPEAKER OPTIONS
If you have connected this player to an Amp/Receiver or Home theater viathe 7.1 channel Analog outputs you need
to set the Speaker Options for the best sound.
1. With the unit in Stop mode, press the MENU button.
2. Press the • •buttons to select Setup, then press the
ENTER or • button
3 Press the • • buttons to select Audio Setup then press
the ENTER or • button
4. Press the • • buttons to select Speaker Setup, then
press the ENTER or • button.
5. Press the • • _1• buttons to select the desired Speaker,
then )ress the ENTER button.
6. When done, use the • • _1• buttons to select Save, then
press the ENTER button.
If you don't want to saveyour work, use the • • _1•
buttons to select Cancel, then press the ENTER button.
PresstheRETURNor _1 buttonto returnto thepreviousmenu,
Speaker Setup
ro R) Large,Small
LargeSmallNone
r, Large,Small,None
On,Off
ron_
Large,Small,None
Speaker
• Large : Deliversfull bandwidth sound with bass below 1O0
Hz.
• Small : If LFE is on, bass below 1O0 Hz will be outputted
through a Subwoofer instead of the speakers. If LFE is off
and the Front Speaker is set to Large, sound will be
outputted through the Front Speaker.
• None : Select to disable the speakers.
Subwoofer Speaker
• On : Select to usethe subwoofer speaker.
• Off : Select to disable the subwoofer
speaker.
(This option can only be selected when the
Front (L+R)speakers are set to Large.)
Press the RED(A) button
•A test tone will be sent to L -- C -- R -- RS
-- RSB -- LSB -- LS -- LFE in order so you
can make sure the speakers are set up
correctly
• To end the test tone press the RED (A)
button again
• The test tone can only be activated when no
discs are in the unit
• The test tone outputs through the 71 channel
analog outputs only
IEngHish39
d seav setuo
IdI
SETTING UP THE VIDEO DISPLAY/OUTPUT OPTIONS
This function allows you to setup the TV screen settings. This function
depends on the disc or TVtype. It may not work with some discs or TVs.
1. With the unit in Stop mode, press the MENU button.
2. Press the • •buttons to select Setup, then press the
ENTER or • button.
3. Press the • • buttons to select Display Setup. then
press the ENTER or • button.
Video setup menu will be displayed.
4. Press the • • buttons to select the desired display option
from the options on the following pages.
5. Press the • • buttons to select the desired sub-menu
item from a video display option, then press the ENTER
button.
[_ _* PresstheRETURNor _1buttonto returnto thepreviousmenu.PresstheMENUbuttonto exitthemenu.
TV Aspect
Depending on the type of television you have, you may want to adjust the screen setting. (aspect ratio)
• 4:3LetterBox:
Selectwhenyouwantto seethetotal
16:9ratioscreenBD/HDDVD/DVD
supplies,eventhoughyouhaveaTVwith
a 4:3ratioscreen.Blackbarswillappear
atthetopandbottomofthescreen.
• 4:3Pan-Scan:
SelectthisforconventionalsizeW when
youwantto seethecentralportionofthe
16:9screen.(Extremeleftandrightside
of moviepicturewillbecutoff.)
• 16:9Wide:
Youcanviewthefull16:9pictureonyourwidescreenTV,
_ Dependingon thedisctype,someaspectratiosmaynotbeavailable.
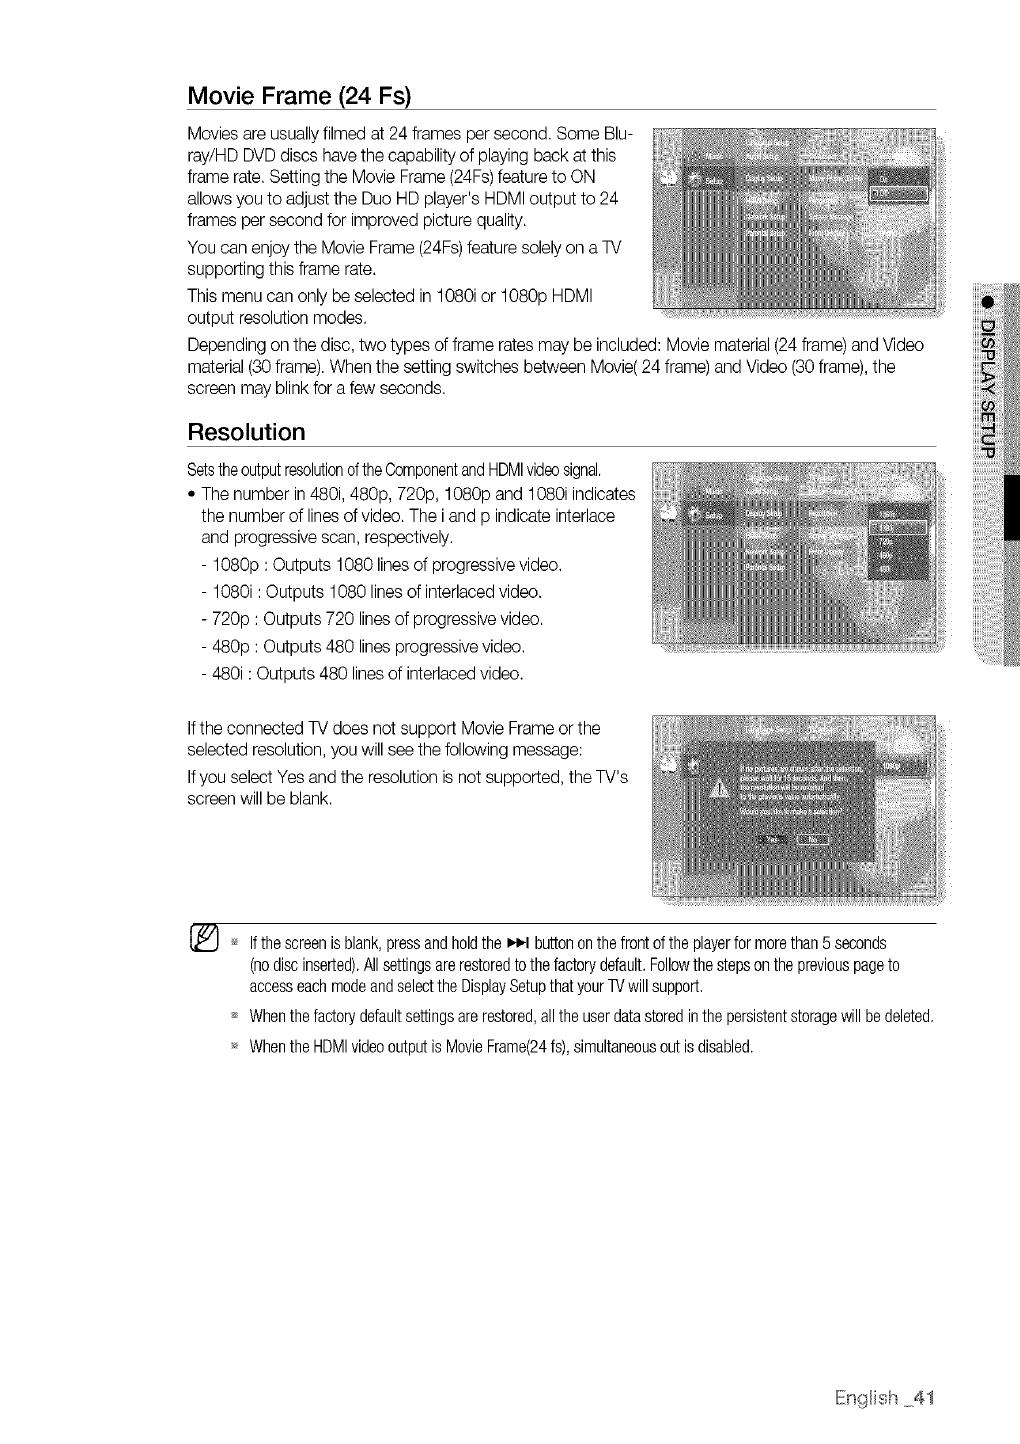
Movie Frame (24 Fs)
Movies are usuallyfilmed at 24 frames per second. Some Blu-
ray/HD DVD discs have the capability of playing back at this
frame rate. Setting the Movie Frame(24Fs)feature to ON
allows you to adjust the Duo HD player's HDMI output to 24
frames per second for improved picture quality.
You can enjoy the Movie Frame (24Fs)feature solely on a TV
supporting this frame rate.
This menu can only be selected in 1080i or 1080p HDMI
output resolution modes.
Depending on the disc, two types of frame rates may be included: Movie material (24 frame) and Video
material (30 frame). When the setting switches between Movie(24 frame) and Video (30 frame), the
screen may blink for a few seconds.
Resolution
Setstheoutputresolutionof theComponentandHDMIvideosignal.
• The number in480i, 480p, 720p, 1080p and 1080i indicates
the number of linesof video. The i and p indicate interlace
and progressive scan, respectively.
- 1080p : Outputs 1080 lines of progressive video.
- 1080i : Outputs 1080 lines of interlaced video.
- 720p : Outputs 720 lines of progressive video.
- 480p : Outputs 480 lines progressive video.
- 480i : Outputs 480 lines of interlaced video.
Ifthe connected TV does not support Movie Frame or the
selected resolution, you will see the following message:
Ifyou select Yes and the resolution is not supported, the TV's
screen will be blank.
_ Ifthescreenis blank,pressandholdthe _1 buttonon thefrontof theplayerfor morethan5 seconds
(nodiscinserted).Allsettingsarerestoredtothefactorydefault.Followthestepsonthepreviouspageto
accesseachmodeandselecttheDisplaySetupthatyourTVwill support,
Whenthefactorydefaultsettingsare restored,all theuserdatastoredinthepersistentstoragewillbe deleted.
_ WhentheHDMIvideooutputis MovieFrame(24fs),simultaneousoutis disabled.
IEngHish 41
disksav set ]o
I ,J I
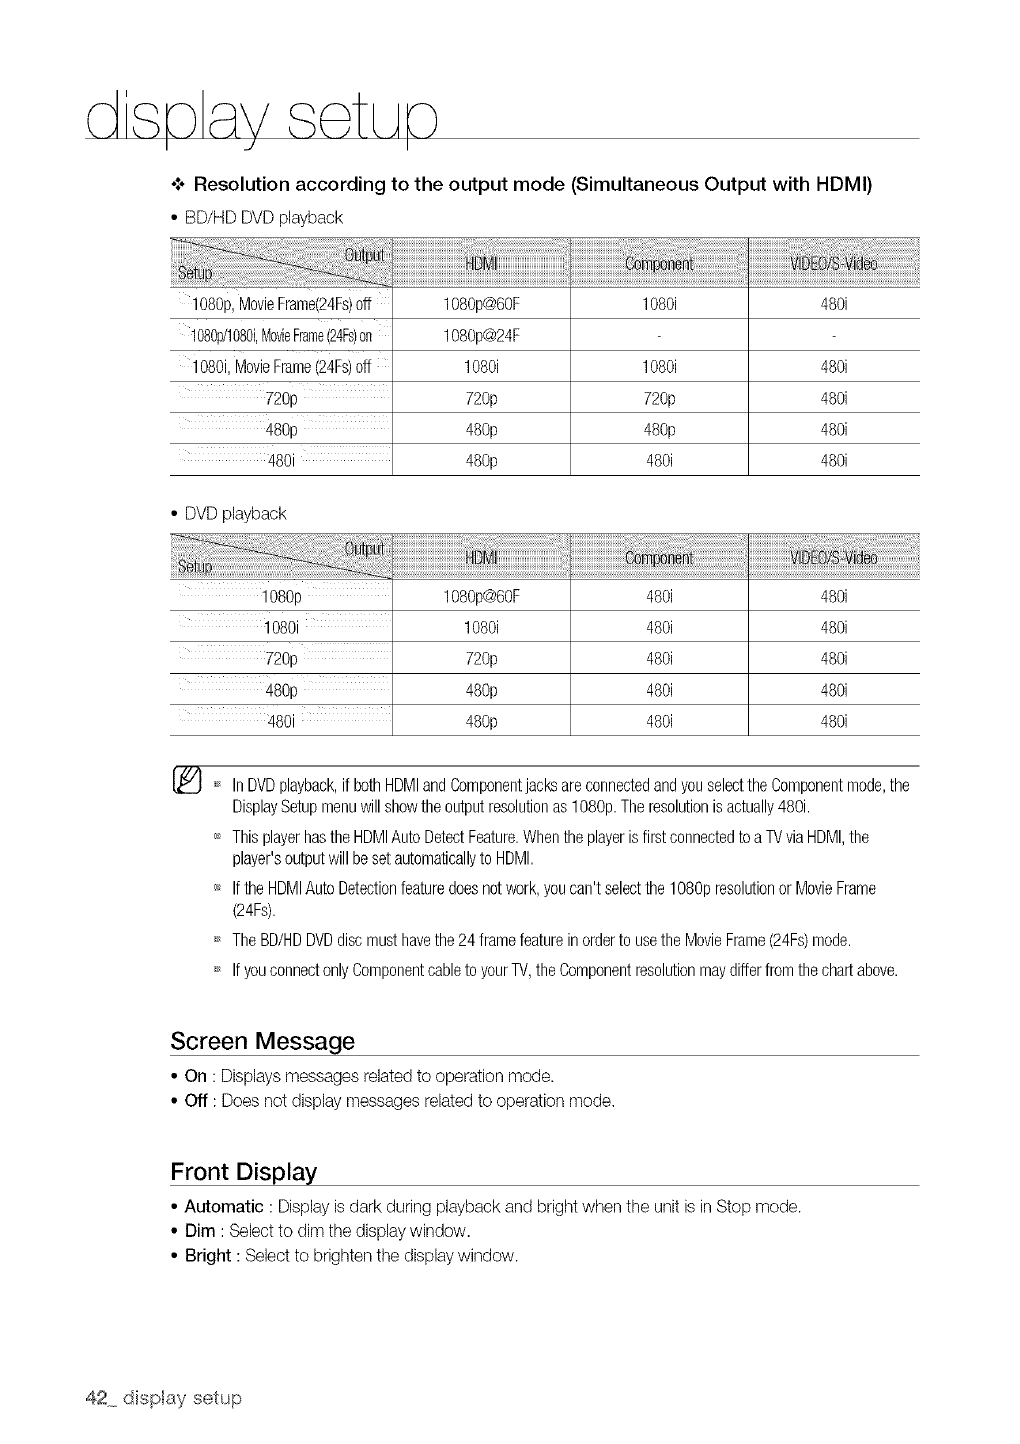
o**oResolution according to the output mode (Simultaneous Output with HDMI)
• BD/HD DVD playback
1080p, MovieFrame(24Fs)off
108@/1080i,MovieFrame(24Fs)on
1080i,MovieFrame(24Fs)Off
720p
10801
1080p@60F
1080p@24F
1080i
72%
48%
48%
480i
1080i 480i
720p 480i
480p 480i
480i 480i 480i
• DVD playback
108% 1080p@60F 480i 480i
1080i 1080i 480i 480i
720p 720p 480i 480i
480p 480i 480i
480i 48% 480i 480i
_ In DVDplayback,if bothHDMIandComponentjacksareconnectedandyouselecttheComponentmode,the
DisplaySetupmenuwillshowtheoutputresolutionas10SOp.Theresolutionis actually480i.
'_ ThisplayerhastheHDMIAutoDetectFeature.Whentheplayeris firstconnectedtoa TVviaHDMI,the
player'soutputwillbesetautomaticallyto HDMI.
_ If theHDMIAutoDetectionfeaturedoesnotwork,youcan't selectthe1080presolutionor MovieFrame
(24Fs).
_ TheBD/HDDVDdiscmusthavethe24 framefeaturein orderto usetheMovieFrame(24Fs)mode.
_ If youconnectonlyComponentcableto yourTV,theComponentresolutionmaydifferfromthechartabove.
Screen Message
• On : Displays messages related to operation mode.
• Off : Does not display messages related to operation mode.
Front Display
• Automatic : Display is dark during playback and bright when the unit is in Stop mode.
• Dim : Select to dim the display window.
• Bright : Select to brighten the display window.
SETTING
1.
2.
3.
4.
UP THE HDMI SETUP OPTIONS
With the unit in Stop mode, press the MENU button.
Press the • • buttons to select Setup, then press the
ENTER or • button.
Press the • • buttons to select HDMI Setup, then press
the ENTER or • button.
HDMI setup menu will be displayed.
Press the • • buttons to select the desired display option
(Anynet or Format), then press the ENTER or • button.
Anynet+ (HDMI-CEC)
When HDMI isset to on, you can operate the Anynet+ function.
• On : Anynet+ functions will work.
• Off :Anynet+ function will not work.
What is Anynet+?
Anynet+ is a convenient function that offers linked operations with other Samsung products with the
Anynet+ feature.
You can operate this unit using a Samsung TV remote control or power on your Samsung TV and Home
theater and start disc playback simply by pressing the PLAY button on the TV's remote.
[_ Thisfunctionisnotavailableif theHDMIcabledoesnotsupportCEC.
To use Anynet+
1. Connect the Duo HD player to a Samsung TV with an HDMI cable. (See pages 20-21)
2. Set the Anynet+ (HDMICEC) to "On" on your Duo HD player.
3. Set the Anynet+ function on your TV. (See the TV instruction manual for more information.)
Anynet+ Functions
• One touch play
You can power on your Samsung TV and Home Theater, and play the disc in this unit simply by
pressing the PLAY button on the TV's remote.
• One touch watching
Select "Watching Duo HD player" or "Connected to Duo HD player" (depending on your TV's menu)in
the Anynet+ menu on the TV. The Duo HD playerwill automatically turn on and the TV will be switched
to HDMI mode.
• Remote control Link
You can operate this player with your Samsung TV remote control.
• Available buttons on the Samsung TV remote: These buttons work the same as this player's remote
control.
IEngHish 43
- Playback control buttons : (_) (::-.__
- Menu operation button: _ _) @ (_
- Numeric buttons :(o)- (t}
- Color buttons : _ _
TV Anynet+ Menu
When pressing the Anynet+ button on your Samsung TV's
remote control, the following On-Screen Display (OSD)will be
shown.
• Duo HD player Menu
- When playing a movie : brings up the disc's menu (same
as DISC MENU button on the Duo HD player's remote
control)
- In Stop mode : brings up the SETUP menu (same as the
MENU button on the Duo HD player's remote control.)
• Duo HD player Operation Menu
- When playing a HD DVD, DVDVIDEO, DVD-RW/-R, BD-ROM :
shows INFOOSD (same as INFO button on the player's remote control)
_ Thesemenuswill varyfromSamsungTVto TV,
HDMI Format
You can optimize the HDMI output for connection to a TV or
Monitor.
• TV : Select if connected to a TV via HDMI.
• Monitor : Select if connected to a Monitor via HDMI.
If the player is connected to a TV, the Monitor option is
unavailable.
Sharpness
To adjust the picture smoothness.
(Low, Middle, High)
DVD Noise Reduction
This setting can be used to reduce image noise on DVD discs
on the screen.(Low, Middle, High)
This feature does not work with BD or HD DVD discs.
44 HDMHsetup
SETTING UP THE PARENTAL LOCK
The Parental Lock function works in conjunction with BD/HD DVD/DVDsthat have been assigned a ratingwhich
helps you control the types of BD/HD DVD/DVDsthat your family watches. There are up to 8 rating levelson a disc.
1. With the unit in Stop mode, press the MENU button.
2. Press the • •buttons to select Setup, then press the
ENTER or • button.
3. Press the • • buttons to select Parental Setup, then
press the ENTER or • button.
When you operate your Duo HD playerfor the first time,
the "Enter New password" message will be displayed.
4. Enter the 4-digit password using the number buttons on
the remote control.
The "Confirm the password" message will be displayed.
Enter your password again.
5. Press the ENTER or • button to select Parental Lock.
6. Press the • • buttons to select On or Off, then press the
ENTER button.
[_ _ Pressthe RETURNor _1 buttonto returnto thepreviousmenu,Pressthe MENUbuttonto exitthe menu,
If you forgot your password
1. Remove the disc,
2. Press and hold the _ button on the front panel for 5 seconds or more,
• All settings will revert to the factory settings,
Whenthefactorydefaultsettingsare restored,all theuserdatastoredinthepersistentstoragewillbe deleted.
IEngHish45
oarenta sotu©
I I
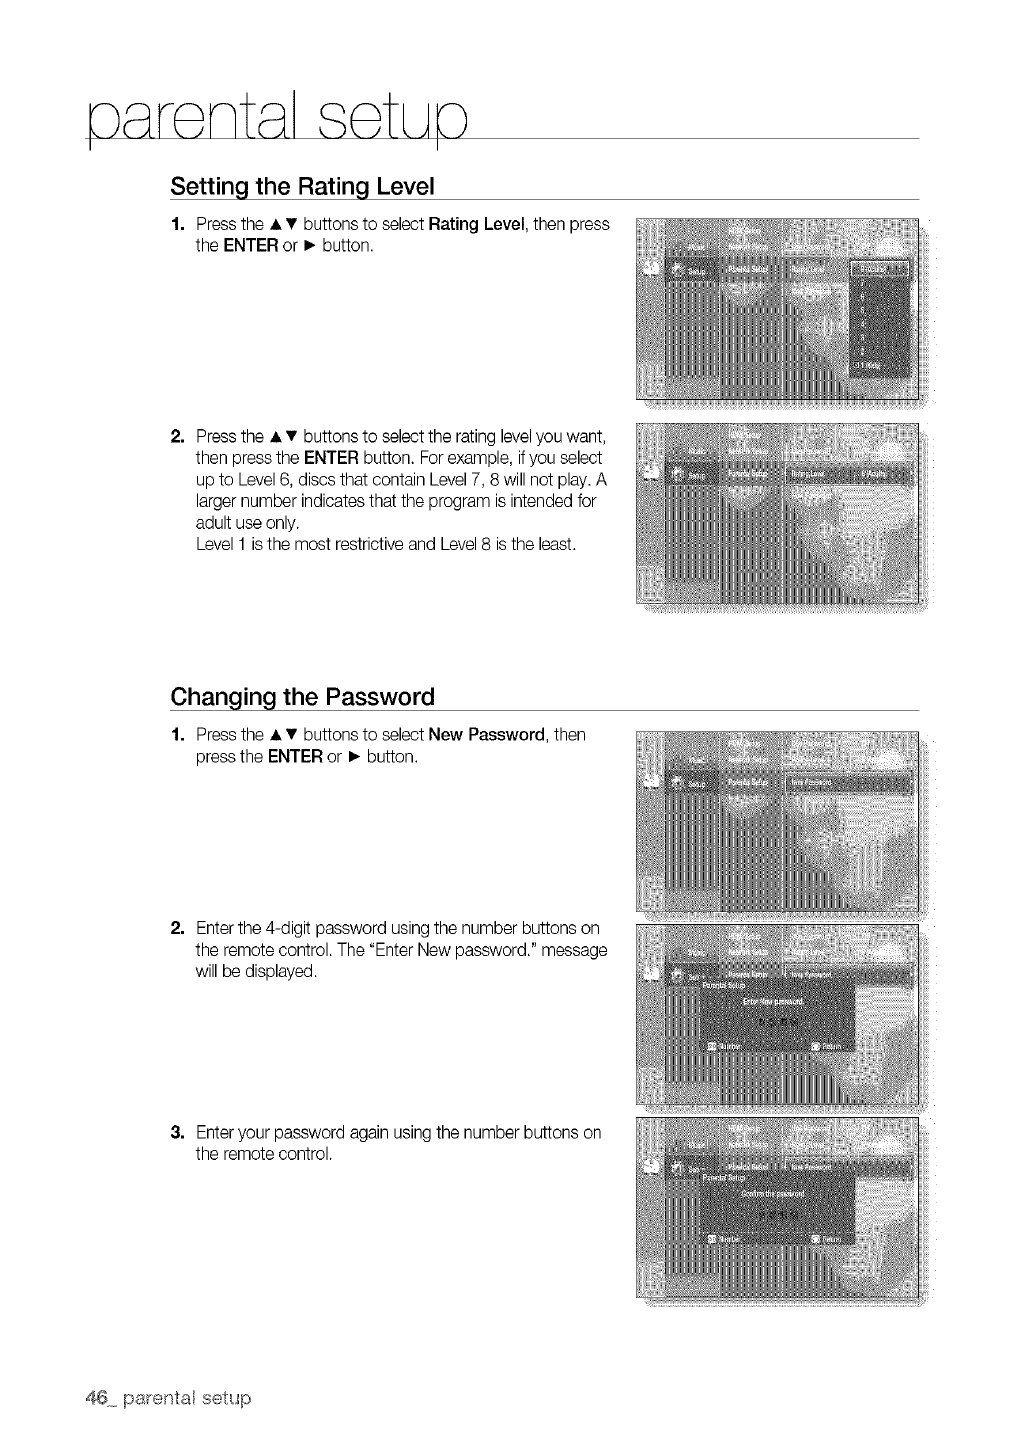
Setting the Rating Level
1. Press the • • buttons to select Rating Level, then press
the ENTER or • button.
2. Press the • • buttons to select the rating levelyou want,
then press the ENTER button. Forexample, ifyou select
up to Level6, discs that contain Level7, 8 will not play.A
larger number indicates that the program is intended for
adult use only.
Level 1 isthe most restrictive and Level8 is the least.
Changing the Password
1. Press the • • buttons to select New Password, then
press the ENTER or • button.
2. Enterthe 4-digit password using the number buttons on
the remote control. The "Enter New password." message
will be displayed.
3. Enteryour password again using the number buttons on
the remote control.
You can enjoy contents provided by the movie studio or update your player via the Internet,
Follow the steps bdow to ensure the best connection to the Internetfor your player,
To obtain information on the proper settings, check the network settings on your computer or
contact your Internet provider,
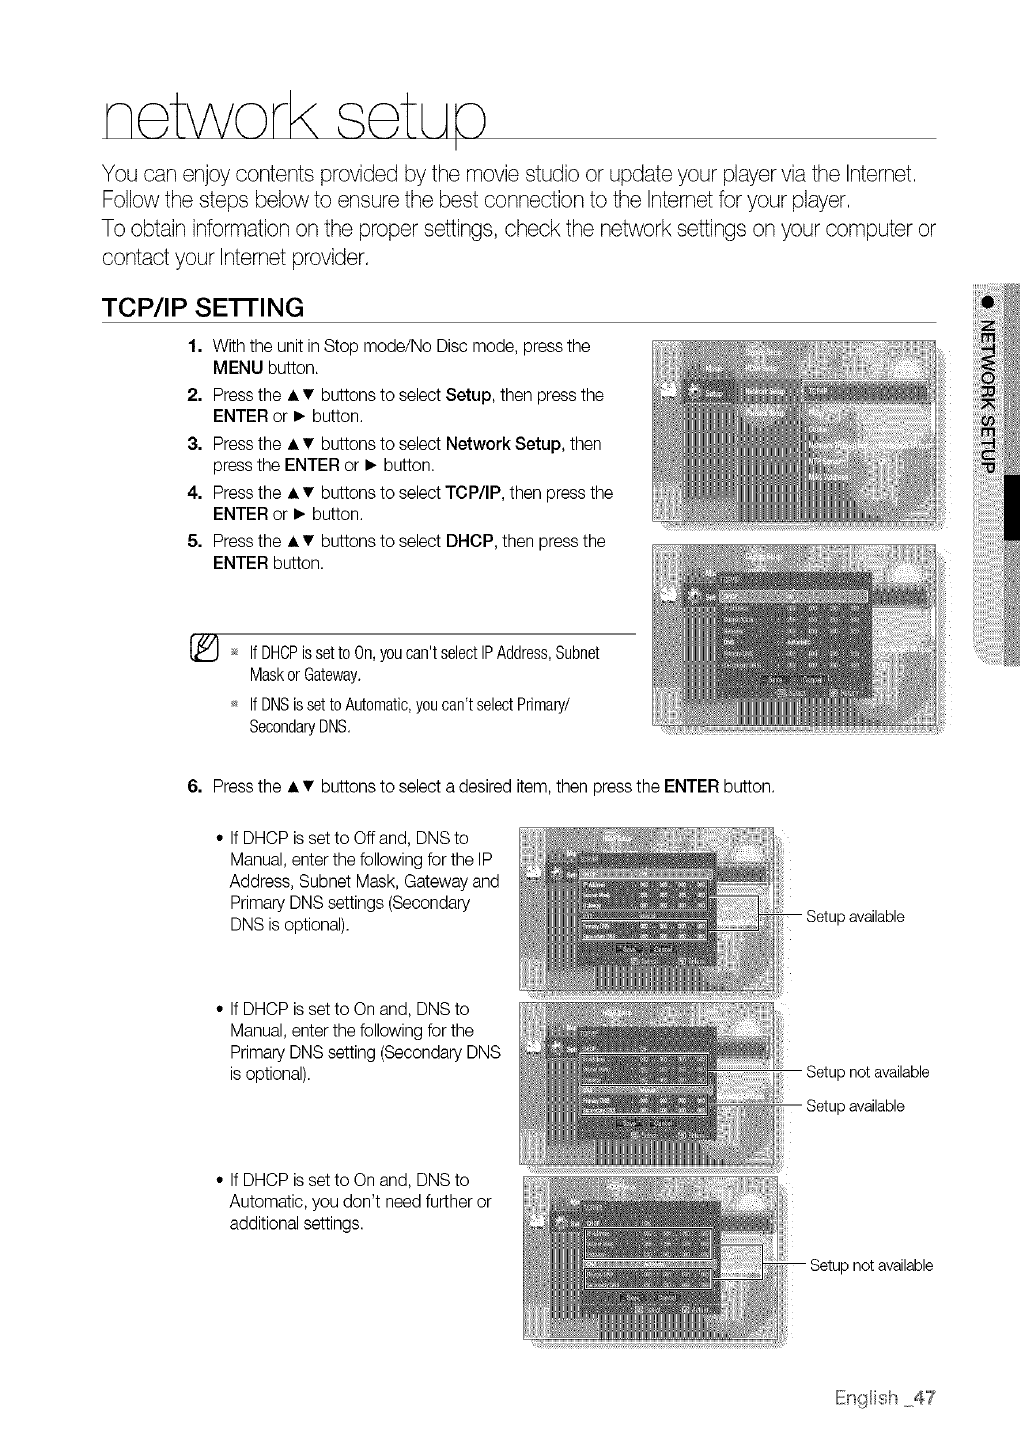
TCP/IP SE'n'ING
1. With the unit in Stop mode/No Disc mode, press the
MENU button.
2. Press the • •buttons to select Setup, then press the
ENTER or • button.
3. Press the • • buttons to select Network Setup, then
press the ENTER or • button.
4. Press the • • buttons to select TCP/IP, then press the
ENTER or • button.
5. Press the • • buttons to select DNCP, then press the
ENTER button.
[_ _ If DHCPisset to On,youcan'tselectIPAddress,Subnet
Maskor Gateway.
If DNSis setto Automatic,youcan't selectPrimary/
SecondaryDNS.
6. Press the • • buttons to select a desired item, then press the ENTER button.
• If DHCP is set to Off and, DNS to
Manual, enter the following for the IP
Address, Subnet Mask, Gateway and
Primary DNSsettings (Secondary
DNS is optional). Setup available
• If DHCP is set to On and, DNS to
Manual, enter the following for the
Primary DNS setting (Secondary DNS
isoptional). Setup not available
Setup available
• If DHCP is set to On and, DNS to
Automatic, you don't need further or
additional settings.
not available
IEngHish47

[_ _* Whenyouselectan item,usethe numberand • •_1• buttons,
7. When done, use the • • buttons to select Save, then press the ENTER button.
8. Ifyou don't want to save your work, usethe • • _1• buttons to select Cancel, then press the
ENTER button.
[_ _ TheIPaddressusedinthis manualisforillustrativepurposesonly,Youmustrefertotheyournetworksettings
forthe actuallPaddress.
ToobtainsettingsforlP address,Subnetmask,GatewayandPrimaryDNS,checkthenetworksettingsinyour
computer,
PROXY SE'n'ING
If you are required to configure the proxy setting, enter the
settings specified by the ISP.
To setup, follow steps 1 to 3 in "TCP/IP Setting" on page 47.
4. Press the • • buttons to select Proxy, then press the
ENTER or • button.
• Server
• Port
• User
• Password
[_ _* Formoreinformation,contactyourISP(InternetServiceProvider).
COOKIE SETTING
A cookie is a small text file that is stored while you are
navigating through web sites.
The cookie can contain information such as user ID,user
settings, etc.
To setup, follow steps 1 to 3 in "TCP/IP Setting" on page 47.
4. Press the • • buttons to select Cookie, then press the
ENTER or • button.
• On : Cookies are used between the player and a Web
page server.
• Off : Cookies are not used. Convenience may be lost for some pages.
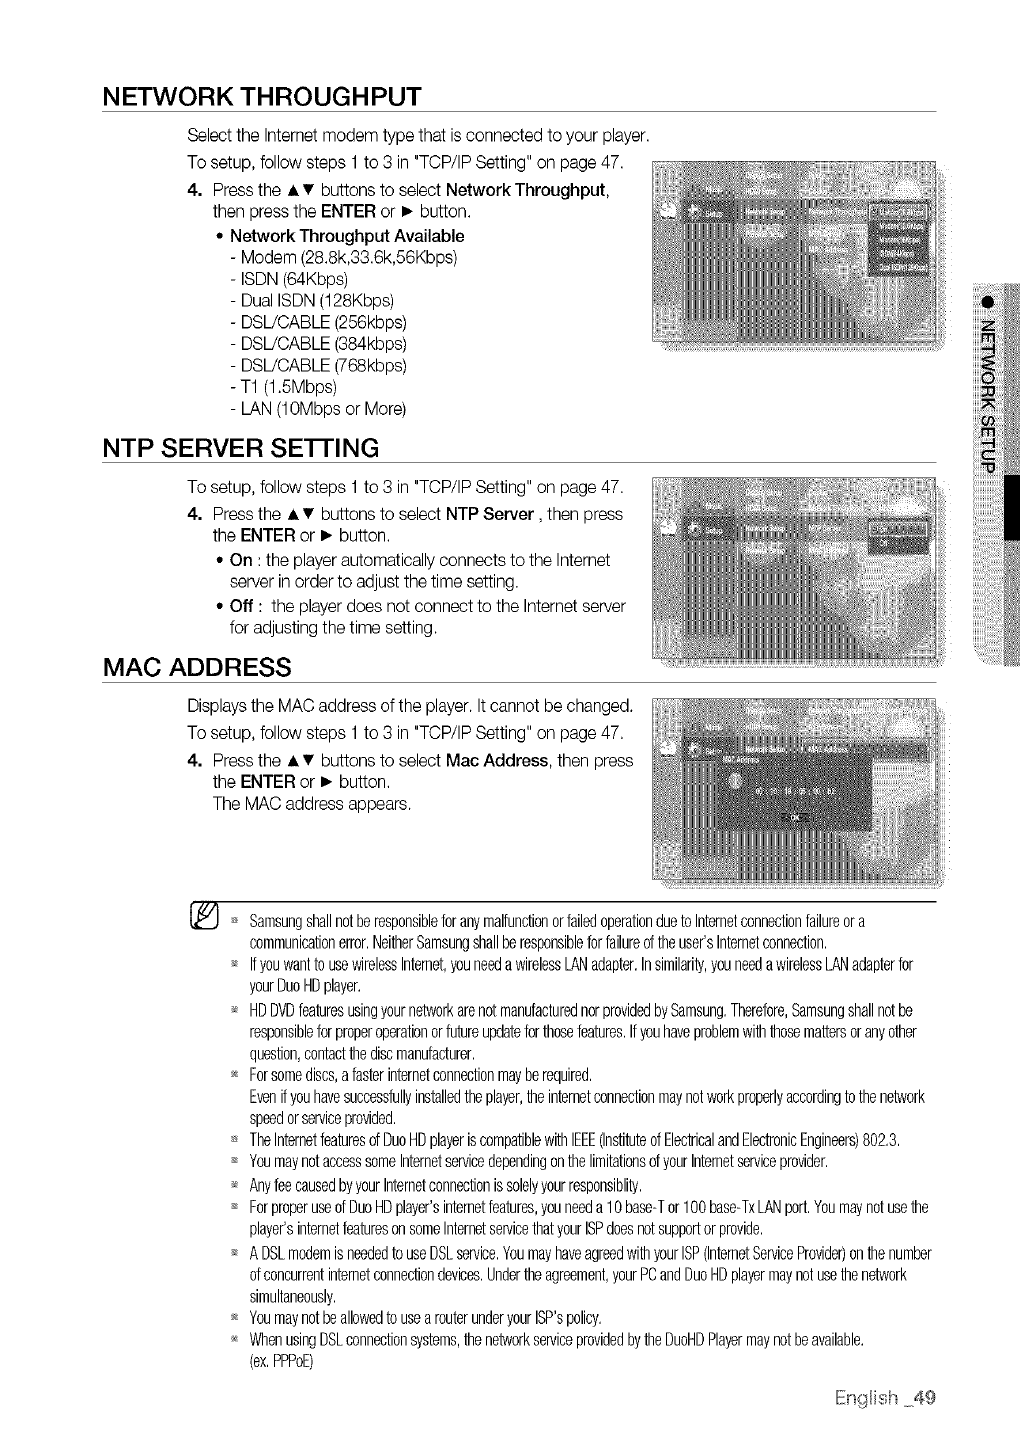
NETWORK THROUGHPUT
Select the Internet modem type that isconnected to your player.
To setup, follow steps 1 to 3 in "TCP/IP Setting" on page 47.
4. Press the • •buttons to select Network Throughput,
then press the ENTER or • button.
• Network Throughput Available
Modem (28.8k,33.6k,56Kbps)
ISDN (64Kbps)
Dual ISDN (128Kbps)
DSL/CABLE (256kbps)
DSL/CABLE (384kbps)
DSL/CABLE (768kbps)
T1 (1.5Mbps)
LAN (10Mbps or More)
NTP SERVER SE'I-FING
To setup, follow steps 1 to 3 in "TCP/IP Setting" on page 47.
4. Press the • • buttons to select NTP Server, then press
the ENTER or • button.
• On :the player automatically connects to the Internet
server in order to adjust the time setting.
• Off : the player does not connect to the Internet server
for adjusting the time setting.
MAC ADDRESS
Displaysthe MAC address of the player. It cannot be changed.
To setup, follow steps 1 to 3 in "TCP/IP Setting" on page 47.
4. Press the • • buttons to select Mac Address, then press
the ENTER or • button.
The MAC address appears.
SamsungshallnotberesponsibleforanymalfunctionorfailedoperationduetoInternetconnectionfaihreora
communicationerror,NeitherSamsungshallberesponsibleforfailureoftheuser'sInternetconnection,
_* Ifyouwantto usewirelessInternet,youneedawirelessLANadapter,Insimilarity,youneedawirelessLANadapterfor
yourDuoHDplayer,
_* HDDVDfeaturesusingyournetworkarenotmanufacturednorprovidedbySamsung,Therefore,Samsungshallnotbe
responsibleforproperoperationorfutureupdateforthosefeatures,Ifyouhaveproblemwiththosemattersoranyother
question,contactthediscmanufacturer,
_* Forsomediscs,afasterinternetconnectionmayberequired,
Evenifyouhavesuccessfullyinstalledtheplayer,theinternetconnectionmaynotworkproperlyaccordingtothenetwork
speedorserviceprovided,
TheInternetfeaturesofDuoHDplayeriscompatiblewithIEEE(InstituteofElectricalandElectronicEngineers)802,3,
YoumaynotaccesssomeInternetservicedependingonthelimitationsofyourInternetserviceprovider,
_* AnyfeecausedbyyourInternetconnectionissolelyyourresponsiblily,
ForproperuseofDuoHDplayer'sinternetfeatures,youneeda10base-Tor100base-TxLANport,Youmaynotusethe
player'sinternetfeaturesonsomeInternetservicethatyourISPdoesnotsupportorprovide,
A DSLmodemisneededto useDSLservice,YoumayhaveagreedwithyourISP(InternetServiceProvider)onthenumber
ofconcurrentinternetconnectiondevices,Undertheagreement,yourPCandDuoHDplayermaynotusethenetwork
simultaneously,
Youmaynotbeallowedto usearouterunderyourISP'spolicy,
_* WhenusingDSLconnectionsystems,thenetworkserviceprovidedbytheDuoHDPlayermaynotbeavailable.
(ex.PPPoE)
IEngHish49
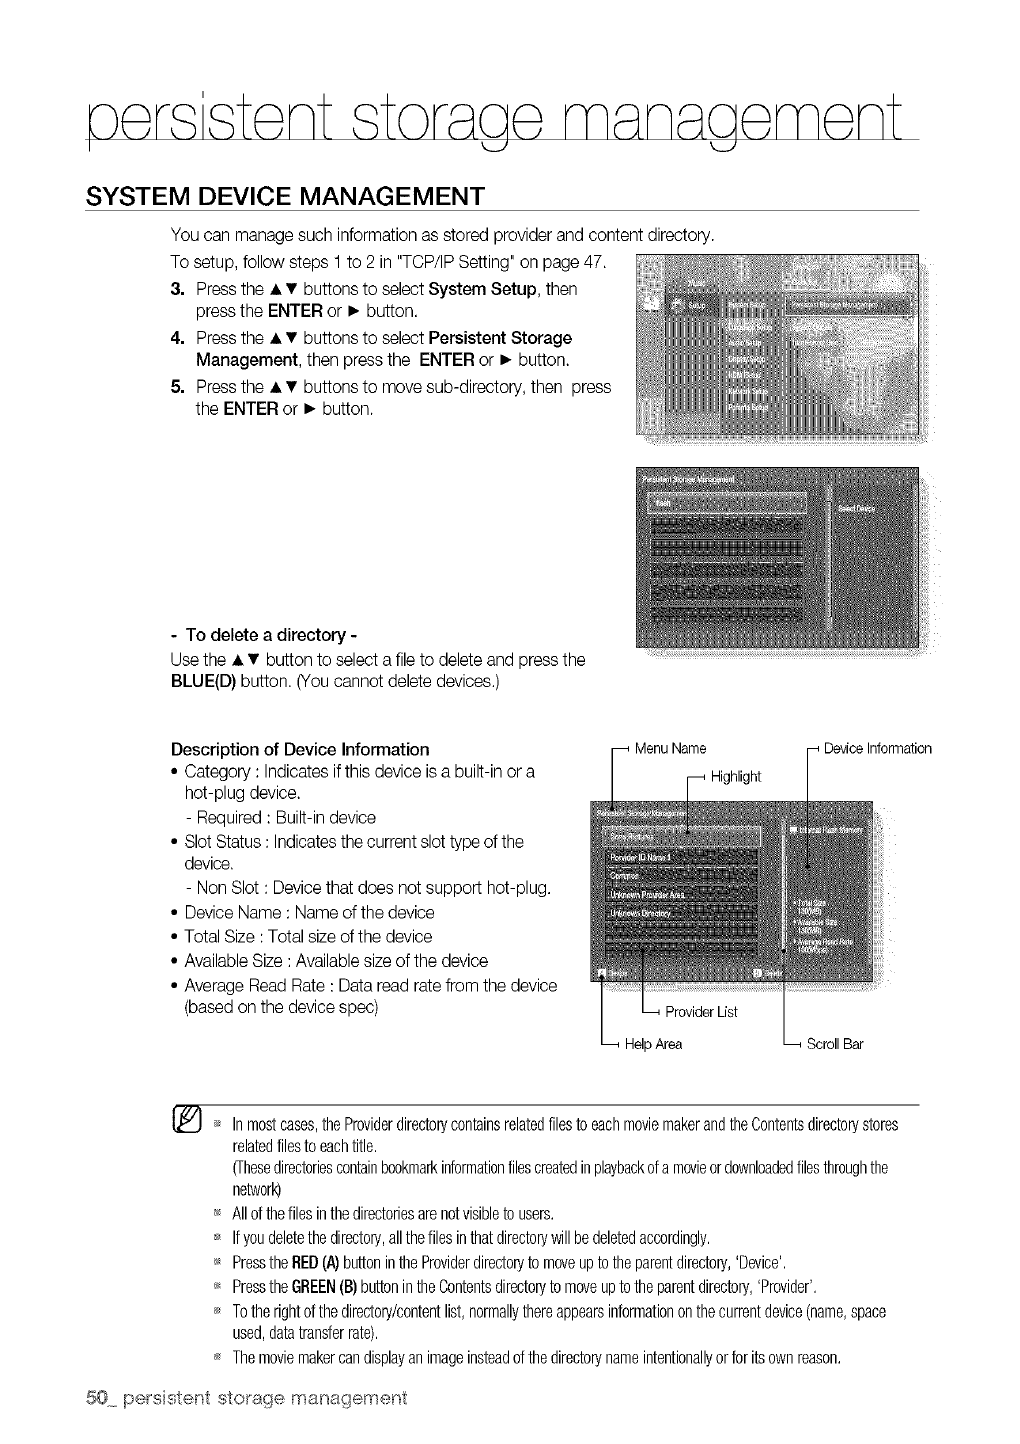
eersistent storaae manaaement
I U
SYSTEM DEVICE MANAGEMENT
You can manage such information as stored provider and content directory.
To setup, follow steps 1 to 2 in "TCP/IP Setting" on page 47.
3. Press the • •buttons to select System Setup, then
press the ENTER or • button.
4. Press the • • buttons to select Persistent Storage
Management, then press the ENTER or • button.
5. Press the • • buttons to move sub-directory, then press
the ENTER or • button.
- To delete a directory -
Use the • • button to select a file to delete and press the
BLUE(D) button. (You cannot delete devices.)
Description of Device Information
• Category : Indicates if this device is a built-in or a
hot-plug device.
- Required : Built-in device
• Slot Status : Indicatesthe current slot type of the
device.
- Non Slot : Device that does not support hot-plug.
• Device Name : Name of the device
• Total Size :Total size of the device
• Available Size :Available sizeof the device
• Average Read Rate : Data read rate from the device
(based on the device spec) ProviderList
Area
Highlight i Device Information
ScrollBar
Inmostcases,theProviderdirectorycontainsrelatedfilestoeachmoviemakerandtheContentsdirectorystores
relatedfilesto eachtitle,
(Thesedirectoriescontainbookmarkinformationfilescreatedinplaybackofa movieordownloadedfilesthroughthe
nelwork)
_ Allof thefilesinthedirectoriesarenotvisibleto users,
Ifyoudeletethedirectory,allthefilesinthatdirectorywillbedeletedaccordingly,
_* Pressthe RED(A)buttonintheProviderdirectoryto moveupto theparentdirectory,'Device',
PresstheGREEN(13)buttonintheContentsdirectoryto moveupto theparentdirectory,'Provider',
Totherightofthedirectory/contentlist,normallythereappearsinformationonthecurrentdevice(name,space
used,datatransferrate),
*_ Themoviemakercandisplayanimageinsteadof thedirectorynameintentionallyorforits ownreason,
50 persistent stora{_e mana_3ement

SamsungmayofferupgradestoyourDuoHDplayer'sfirmwareinthefuture.Toupgradethisfirmwareyoumust:
1. Gotosamsung.comandreferto'SUPPORT'pagetodownloadthefirmwareandburnanupdateCD.
or
2. Connectthisplayer'sLANterminaltotheLANterminalonyourmodem(seepage30)andfollowthesteps
below.
FIRMWARE UPGRADE
1. With the unit in No Disc mode(no disc in the unit), press the
MENU button.
2. Press the • •buttons to select Setup, then press the ENTER
or • button.
3. Press the • • buttons to select System Setup, then press the
ENTER or • button.
iilil
iil
4. Press the • • buttons to select System Update, then press the
ENTER or • button.
5. You will see a window that allows you to check the cable or
network connection status.
• If the upgrade is possible : You will see information on the
current and new versions of firmware in a message box.
• If the upgrade is not possible : You will see the following
description in the message box.
• If the cable is not connected :
"Ethernetcable is not connected. Please, check the
Ethernet cable."
• If the network connection hasfailed :
"This system can not connected to internet for update.
Please, check the network setup"
• If no later version is released (the latest version has been already installed) :
"The latest version of the firmware is already installed. There is no need to update."
• If there isa disc in the player :
"Pleasemaintain "No Disc" state for network update."
This indicates that you must remove all discs from the unit to perform the update.
IEngHish51
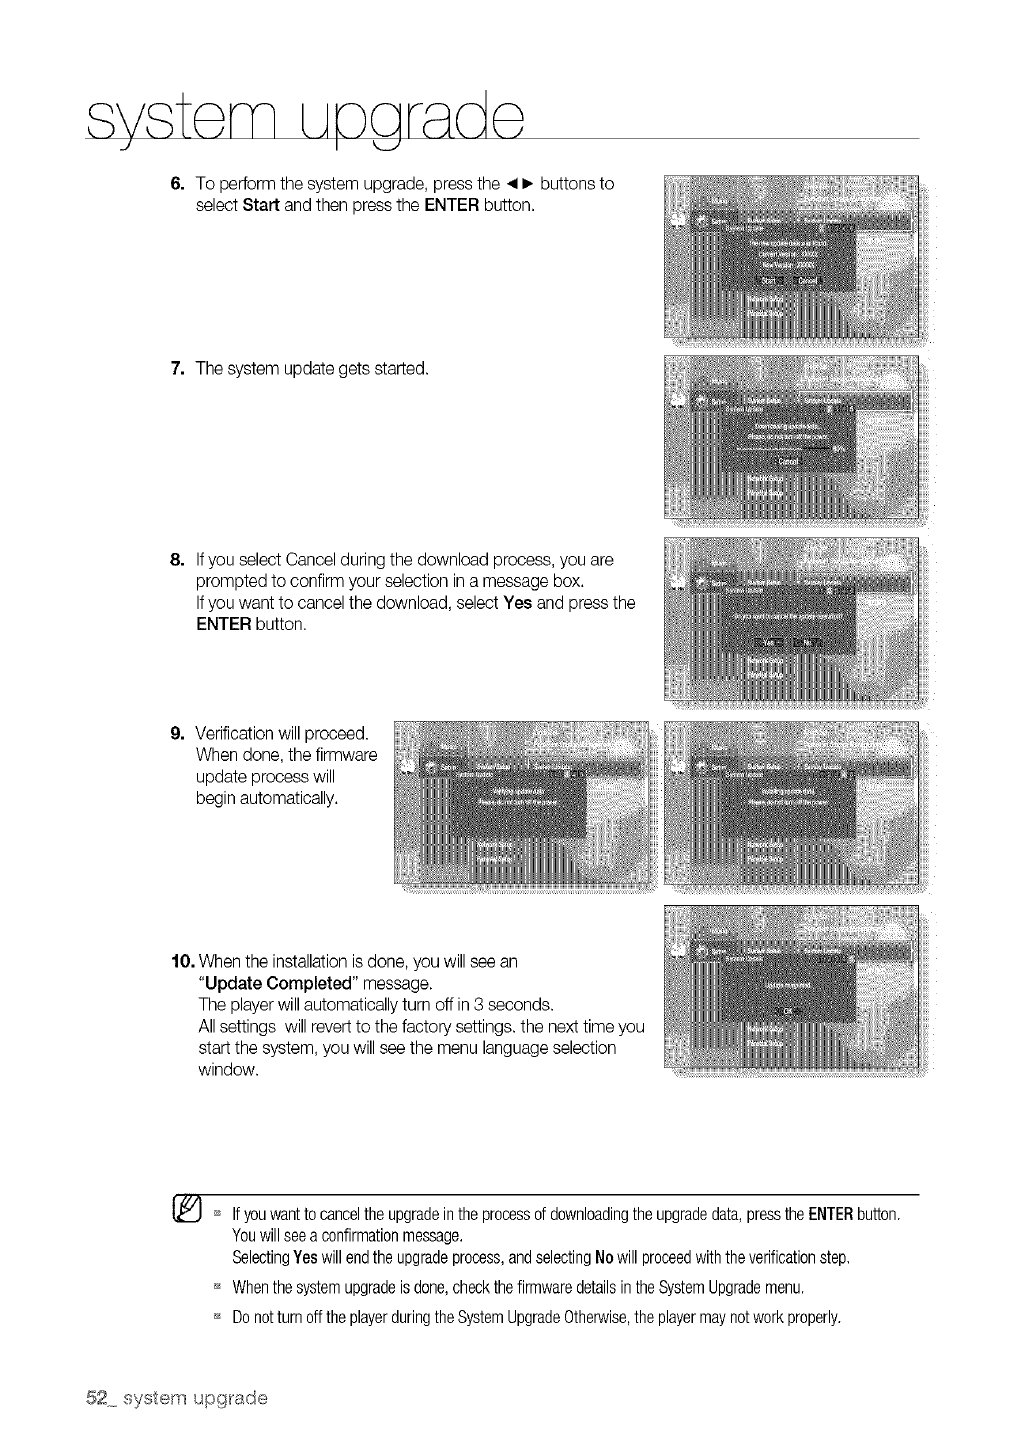
6. To perform the system upgrade, press the _1• buttons to
select Start and then press the ENTER button.
2. The system update gets started.
8. Ifyou select Cancel during the download process, you are
prompted to confirm your selection in a message box.
Ifyou want to cancel the download, select Yes and press the
ENTER button.
9. Verification will proceed.
When done, the firmware
update process will
begin automatically.
10. When the installation is done, you will seean
"Update Completed" message.
The playerwill automatically turn off in 3 seconds.
All settings will revert to the factory settings, the next time you
start the system, you will see the menu language selection
window.
[_ _* If youwantto canceltheupgradeinthe processof downloadingtheupgradedata,presstheENTERbutton.
Youwillseea confirmationmessage,
SelectingYeswill endtheupgradeprocess,andselectingNowill proceedwiththeverificationstep,
_ Whenthesystemupgradeisdone,checkthefirmwaredetailsintheSystemUpgrademenu.
_ Donotturn offtheplayerduringtheSystemUpgradeOtherwise,theplayermaynotworkproperly.
52 system upgrade
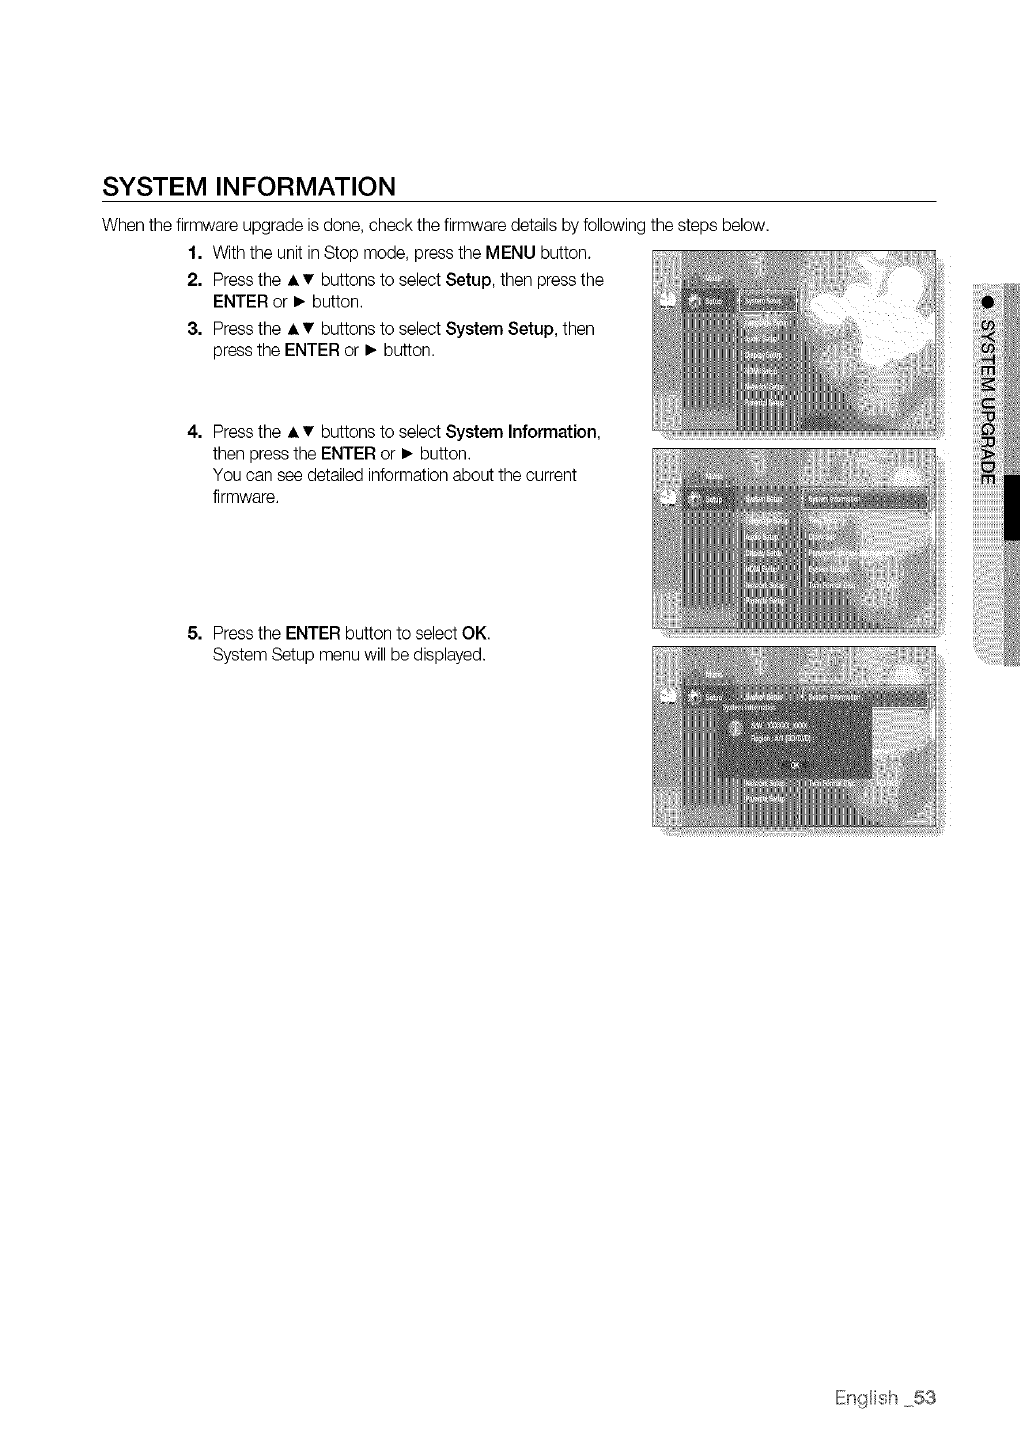
SYSTEM INFORMATION
When the firmware upgrade is done, check the firmware details by following the steps below.
1. With the unit in Stop mode, press the MENU button.
2. Press the • •buttons to select Setup, then press the
ENTER or • button.
3. Press the • • buttons to select System Setup, then
press the ENTER or • button.
4. Press the • • buttons to select System Information,
then press the ENTER or • button.
You can see detailed information about the current
firmware.
5. Press the ENTER button to select OK.
System Setup menu will be displayed.
IEn{_Hish53
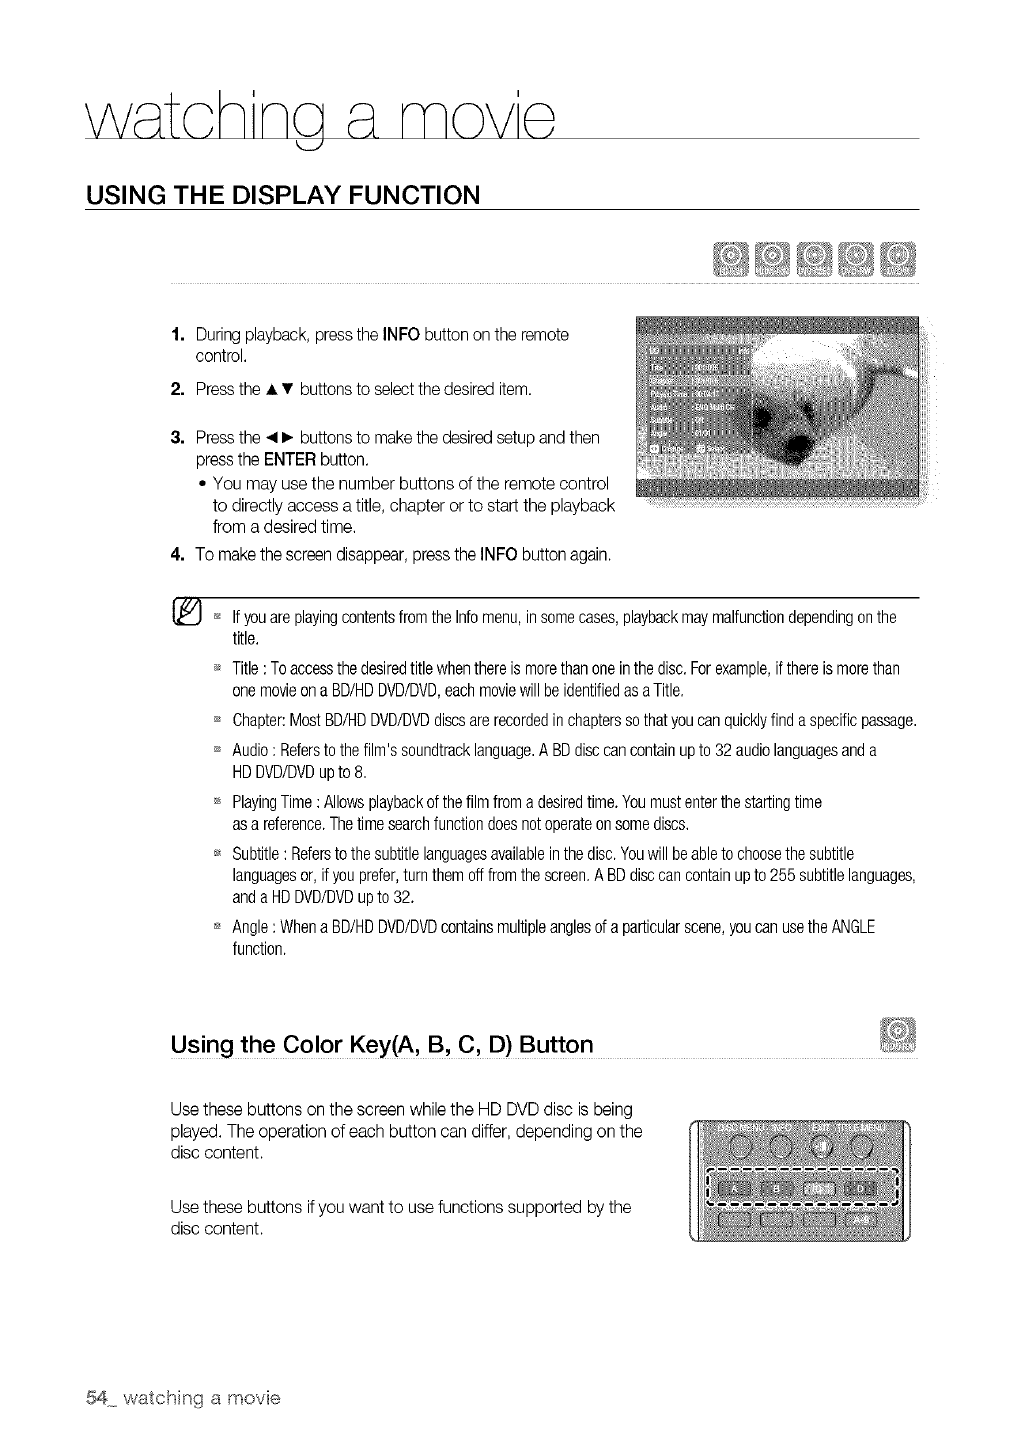
USING THE DISPLAY FUNCTION
1. Duringplayback, press the INFO button on the remote
control.
2. Pressthe • •buttonsto select the desireditem.
3. Pressthe _1• buttonsto makethe desiredsetup and then
pressthe ENTERbutton.
• You may use the number buttons of the remote control
to directly access a title, chapter or to start the playback
from a desired time.
4. To makethe screen disappear,pressthe INFO button again.
If youareplayingcontentsfromthe Infomenu,insomecases,playbackmaymalfunctiondependingonthe
title.
Title: Toaccessthedesiredtitlewhenthereismorethanoneinthedisc.Forexample,if thereismorethan
onemovieona BD/HDDVD/DVD,eachmoviewill beidentifiedas aTitle.
Chapter:MostBD/RDDVD/DVDdiscsare recordedinchapterssothatyoucanquicklyfindaspecificpassage.
Audio: Refersto the film'ssoundtracklanguage.A BDdisccancontainup to 32 audiolanguagesanda
HDDVD/DVDup to 8.
PlayingTime:Allowsplaybackof thefilm froma desiredtime.Youmustenterthestartingtime
asa reference.Thetimesearchfunctiondoesnotoperateonsomediscs.
Subtitle: Refersto the subtitlelanguagesavailableinthedisc.Youwill beableto choosethesubtitle
languagesor,if youprefer,turnthem offfromthescreen.A BDdisccancontainupto 255subtitlelanguages,
anda HDDVD/DVDupto 32.
Angle:Whena BD/RDDVD/DVDcontainsmultipleanglesof a particularscene,youcan usetheANGLE
function.
Using the Color Key(A, B, C, D) Button
Use these buttons on the screen while the HD DVDdisc is being
played. The operation of each button can differ, depending on the
disc content.
Use these buttons ifyou want to usefunctions supported by the
disc content.
54 watching a movie
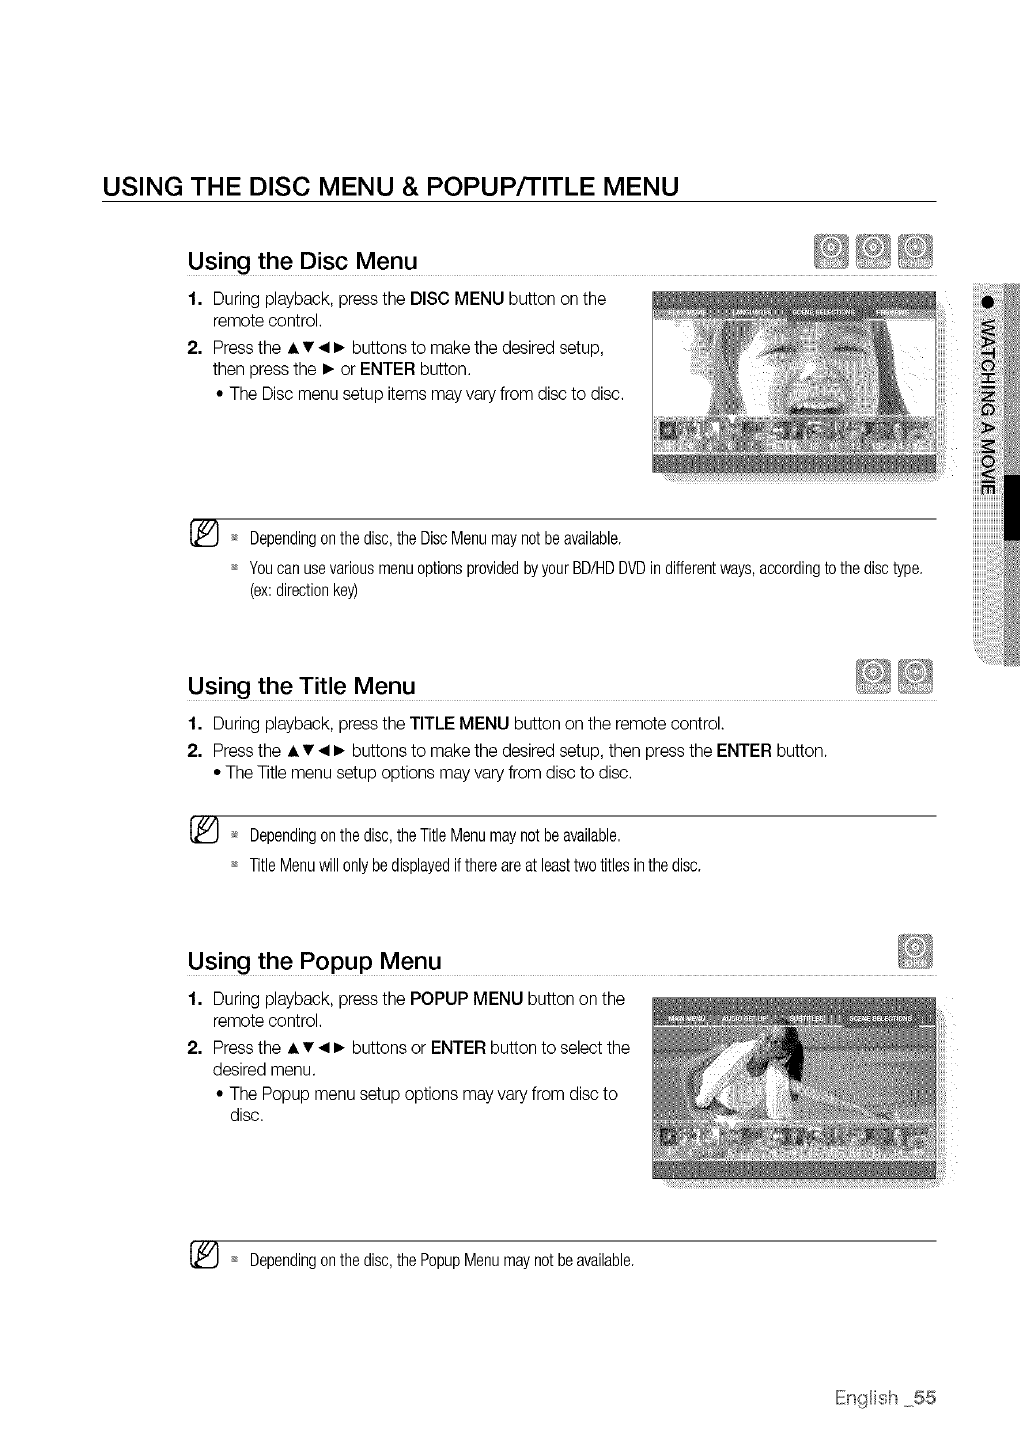
USING THE DISC MENU & POPUP/TITLE MENU
Using the Disc Menu
1. During playback, press the DISC MENU button on the
remote control.
2. Press the • •_1• buttons to make the desired setup,
then press the • or ENTER button.
• The Disc menu setup items may vary from disc to disc.
........
iiiii_i'i
_!!iii!_iii'
_* Dependingonthe disc,theDiscMenumaynotbeavailable.
_* YoucanusevariousmenuoptionsprovidedbyyourBD/HDDVDindifferentways,accordingtothedisctype.
(ex:directionkey)
Using the Title Menu
1. During playback, press the TITLE MENU button on the remote control.
2. Press the • • _1• buttons to make the desired setup, then press the ENTER button.
• The Title menu setup options may vary from disc to disc.
[_ _* Dependingonthe disc,theTitleMenumaynotbeavailable,
_* TitleMenuwillonlybedisplayedif thereareat leasttwo titlesinthedisc.
Using the Popup Menu
1. During playback, press the POPUP MENU button on the
remote control.
2. Press the • • _1• buttons or ENTER button to select the
desired menu.
• The Popup menu setup options may vary from disc to
disc.
[_ Dependingonthe disc,thePopupMenumaynotbeavailable.
IEn{_Hish55
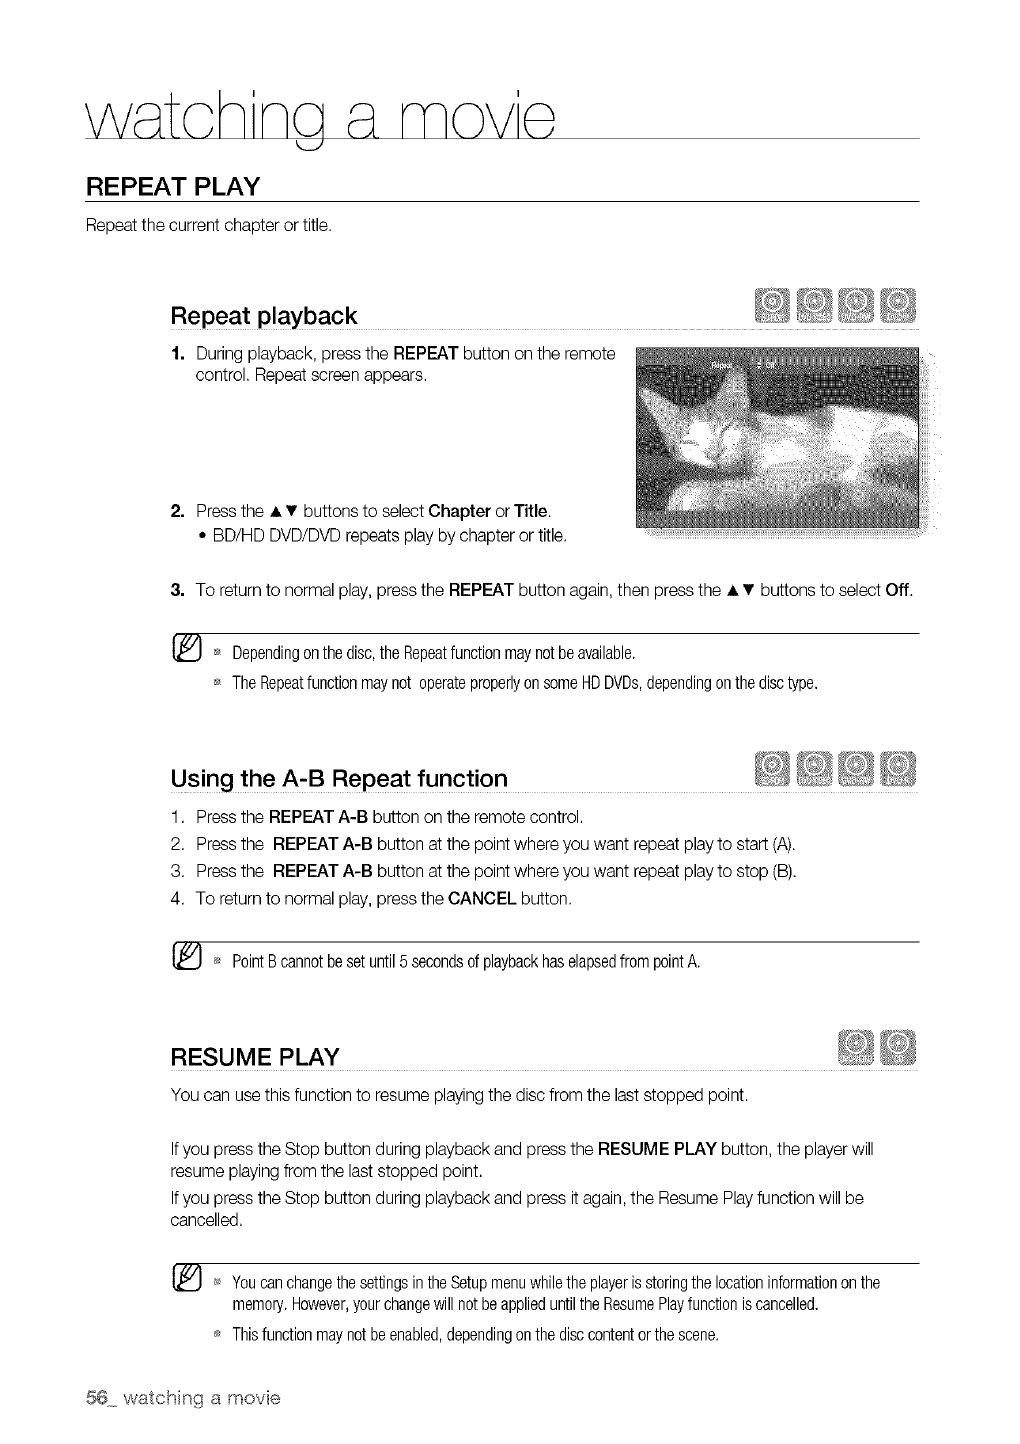
REPEAT PLAY
Repeatthe current chapter or title.
1. During playback, press the REPEAT button on the remote
control. Repeat screen appears.
2. Press the • •buttons to select Chapter or Title.
• BD/HD DVD/DVD repeats play by chapter or title.
8. To returnto normal play, press the REPEAT button again, then press the • • buttons to select Off.
Dependingon thedisc,the Repeatfunctionmaynotbeavailable.
TheRepeatfunctionmaynot operateproperlyonsomeHDDVDs,dependingonthedisctype.
Using the A-B Repeat function
1. Press the REPEAT A-B button on the remote control.
2. Press the REPEAT A-B button at the point where you want repeat play to start (A).
3. Press the REPEAT A-B button at the point where you want repeat playto stop (B).
4. To returnto normal play, press the CANCEL button.
[_ PointBcannotbe setuntil5 secondsof playbackhaselapsedfrompointA.
RESUME PLAY
You can use this function to resume playingthe disc from the last stopped point.
If you press the Stop button during playback and press the RESUME PLAY button, the player will
resume playing from the last stopped point.
If you press the Stop button during playback and press it again, the Resume Play function will be
cancelled.
_ YoucanchangethesettingsintheSetupmenuwhiletheplayeris storingthelocationinformationonthe
memory.However,yourchangewill notbeapplieduntilthe ResumePlayfunctioniscancelled,
Thisfunctionmaynotbeenabled,dependingonthedisccontentorthescene.
56 watching a movie

SELECTING THE AUDIO LANGUAGE
You can select a desired audio language quickly and easily with the AUDIO button.
Using the AUDIO button
1. Press the AUDIO button during playback. The Audio
changes when the button ispressed repeatedly.
• The audio languages are represented by abbreviations.
2. To remove the AUDIO icon, press the CANCEL or RETURN button.
Using the INFO button
1. During playback, press the INFO button on the remote control.
2. Press the • • buttons to select Audio language.
3. Press the _1• buttons on the remote control to select the desired audio.
Thisfunctiondependsonwhat audiolanguagesareencodedonthediscandmaynotbeavailable.
A BDdisccancontainupto 32 audiolanguagesanda HDDVD/DVDup to 8.
Dependingonthe disctype,youcanusetheAudiobuttonto changetheaudiosoundtrackas wellasthe
audiolanguage.
SomeBlu-ray/HDDVDdiscsmayallowyouto selecteitherthemulti-channelLPCMorDolbydigitalaudio
soundtrackin English.
IEn_Hish57
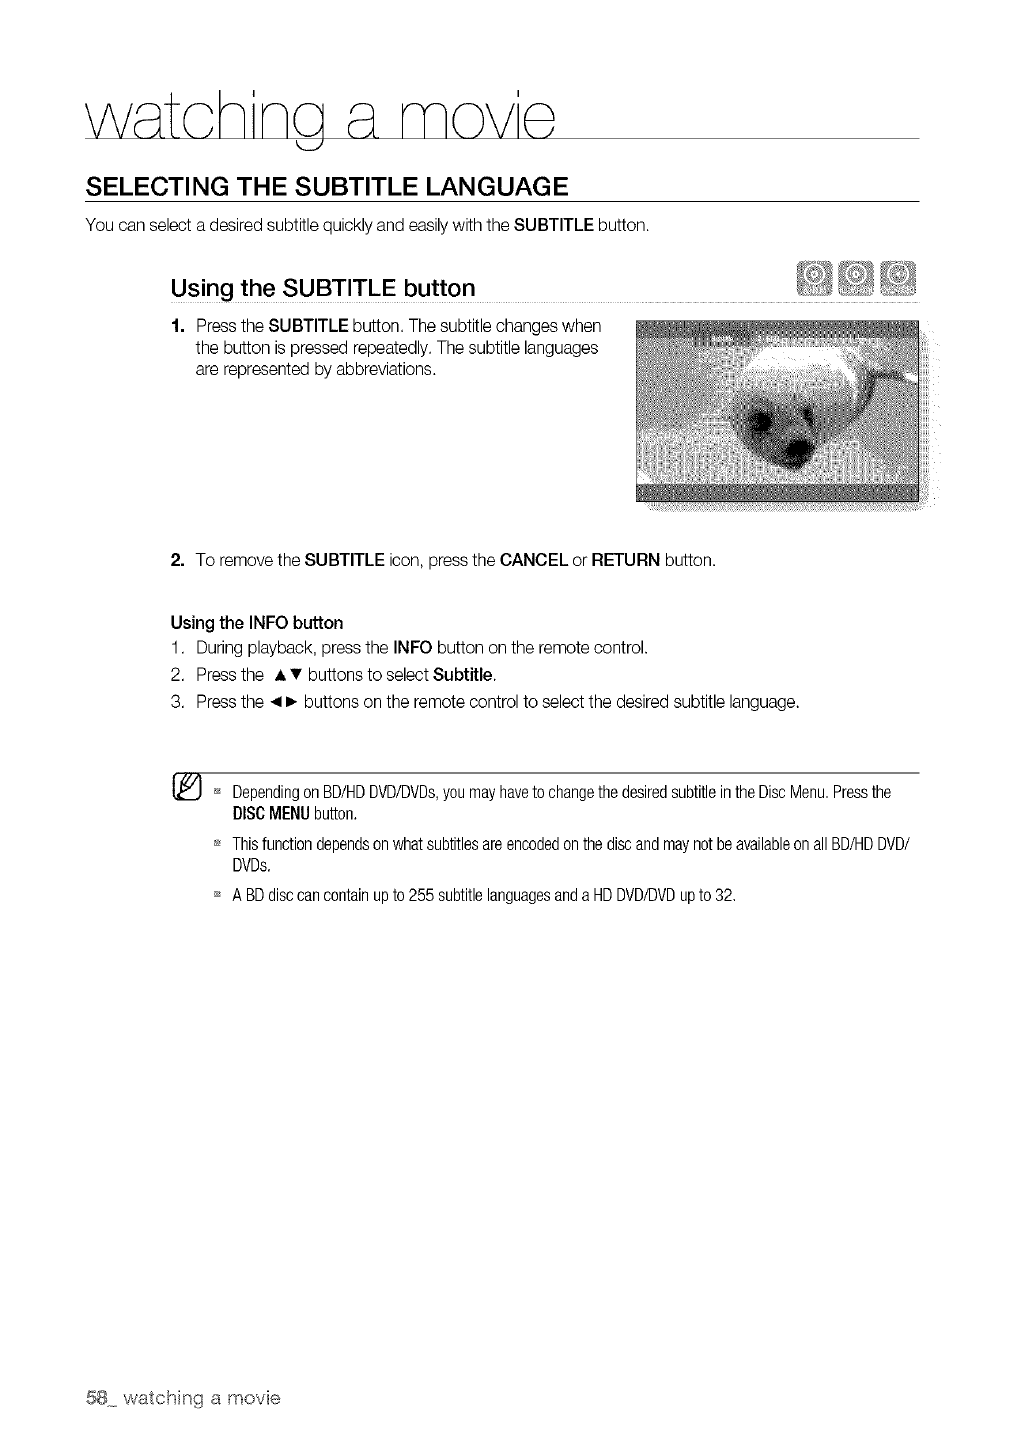
SELECTING THE SUBTITLE LANGUAGE
You can select a desired subtitle quickly and easily with the SUBTITLE button.
Using the SUBTITLE button
1. Press the SUBTITLE button. The subtitle changes when
the button is pressed repeatedly. The subtitle languages
are represented by abbreviations.
2. To remove the SUBTITLE icon, press the CANCEL or RETURN button.
Using the INFO button
1. During playback, press the INFO button on the remote control.
2. Press the • • buttons to select Subtitle.
3. Press the _1• buttons on the remote control to select the desired subtitle language.
[_ _ DependingonBD/HDDVD/DVDs,youmayhaveto changethe desiredsubtitleintheDiscMenu.Pressthe
DISCMENUbutton.
Thisfunctiondependson whatsubtitlesareencodedonthediscandmaynotbeavailableonallBD/HDDVD/
DVDs.
A BDdisccancontainup to 255 subtitlelanguagesanda HDDVD/DVDupto 32,
58 watching a movie
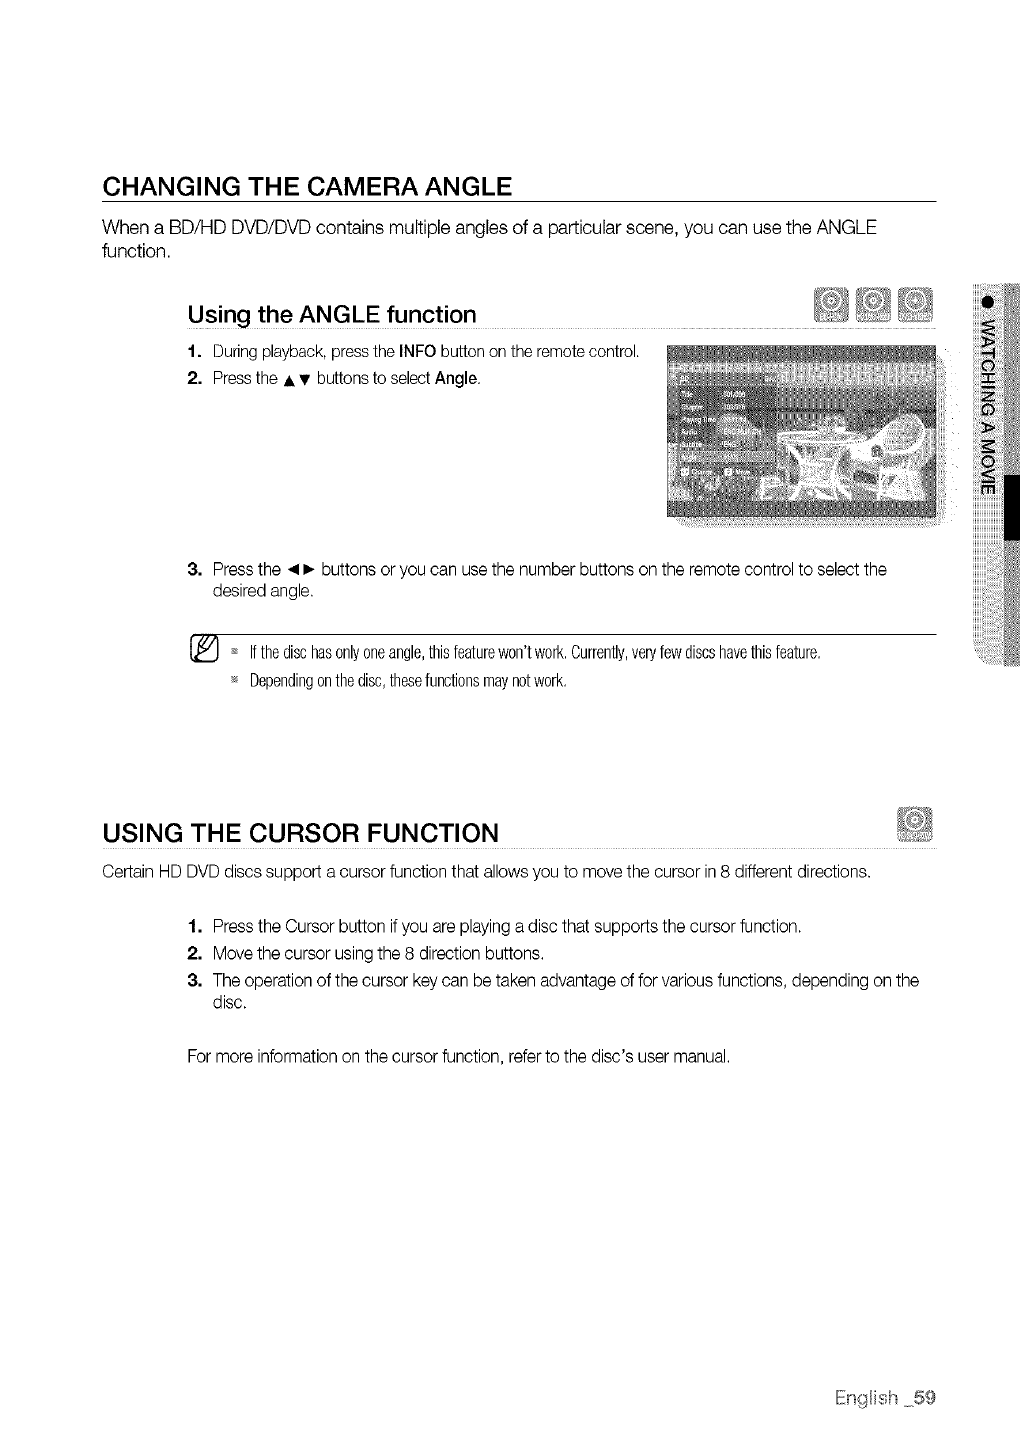
CHANGING THE CAMERA ANGLE
When a BD/HD DVD/DVD contains multiple angles of a particular scene, you can use the ANGLE
function.
Using the ANGLE function
1. During playback,press the INFO button on the remotecontrol.
2. Pressthe • •buttons to selectAngle.
3. Press the _1• buttons or you can use the number buttons on the remote control to select the
desired angle.
[_ Ifthedischas0nlyoneangle,thisfeaturew0n'twork.Currently,veryfewdiscshavethisfeature.
_ Dependingonthedisc,thesefunctionsmaynotwork.
USING THE CURSOR FUNCTION
Certain HD DVD discs support a cursor function that allows you to move the cursor in 8 different directions.
1. Press the Cursor button ifyou are playing a disc that supports the cursor function.
2. Move the cursor using the 8 direction buttons.
3. The operation of the cursor key can be taken advantage of for various functions, depending on the
disc.
Formore information on the cursor function, refer to the disc's user manual.
IEn{_lish59
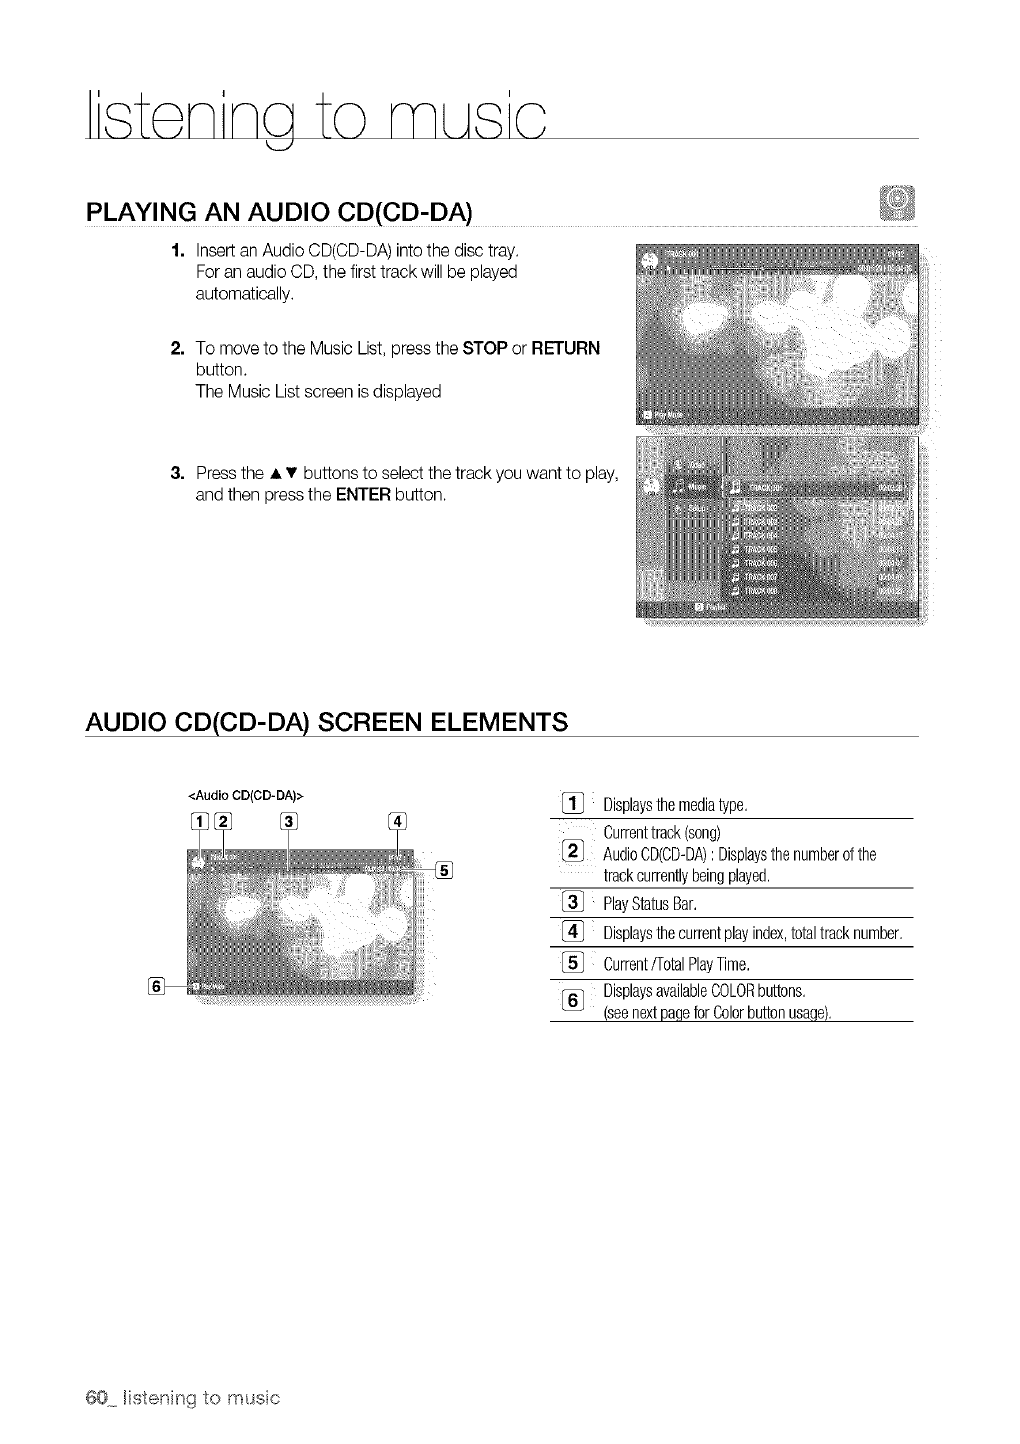
istonna to musio
k_J
PLAYING AN AUDIO CD(CD-DA)
1. Insert an Audio CD(CD-DA) into the disc tray.
For an audio CD, the first track willbe played
automatically.
2. To move to the Music List, press the STOP or RETURN
button.
The Music List screen is displayed
3. Press the • • buttons to select the track you want to play,
and then press the ENTER button.
AUDIO CD(CD-DA) SCREEN ELEMENTS
<Audio CD(CD-DA)> [_ Displaysthemediatype,
Currenttrack(song)
[_ AudioCD(CD-DA): Displaysthenumberofthe
trackcurrentlybeingplayed,
[_ PlayStatusBar,
[_} Displaysthecurrentplayindex,totaltracknumber,
[_ Current/TotalPlayTime,
[_ DisplaysavailableCOLORbuttons,
(seenextpaqeforColorbuttonusage),
@0 Histening to musc
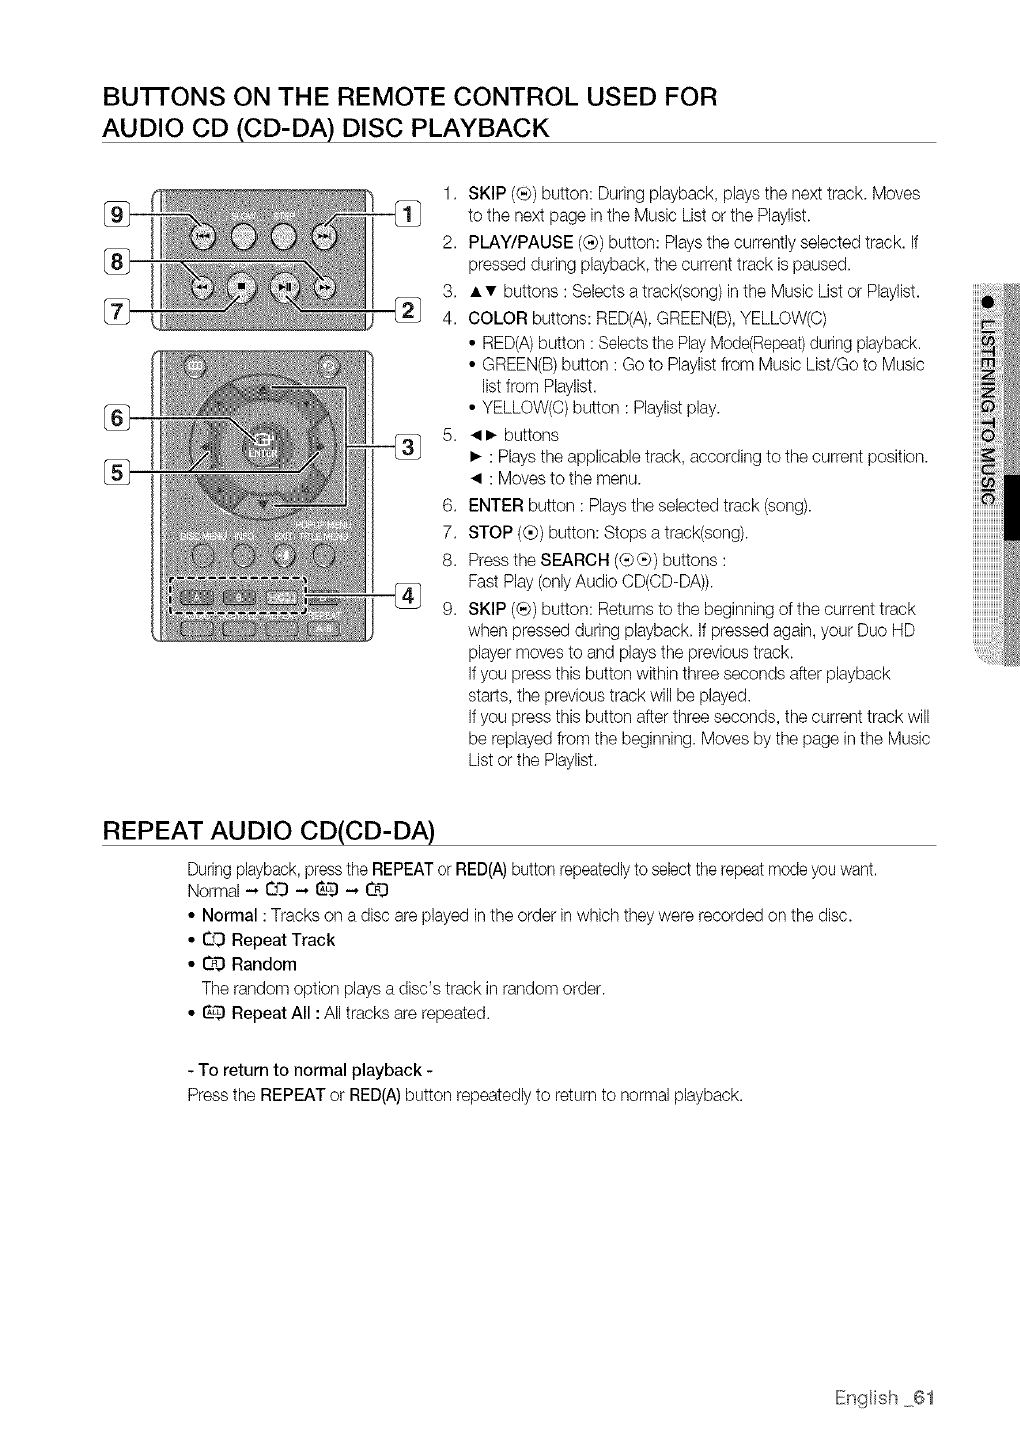
BU'I-FONS ON THE REMOTE CONTROL USED FOR
AUDIO CD (CD-DA) DISC PLAYBACK
®
1. SKIP (®) button: During playback, plays the next track. Moves
to the next page in the Music List or the Playlist.
2. PLAY/PAUSE (®) button: Plays the currently selected track. If
pressed during playback, the current track is paused.
3. AT buttons : Selects a track(song) in the Music List or Playlist.
4. COLOR buttons: RED(A),GREEN(B),YELLOW(C)
• RED(A)button : Selectsthe PlayMode(Repeat)during playback.
• GREEN(B)button : Go to Playlistfrom Music List/Go to Music
listfrom Playlist.
• YELLOW(C)button : Playlistplay.
5. •• buttons
• : Plays the applicable track, according to the current position.
• : Moves to the menu.
6. ENTER button : Plays the selected track (song).
7. STOP (®) button: Stops a track(song).
8. Press the SEARCH (C-}C-_)buttons :
Fast Play (onlyAudio CD(CD-DA)).
9. SKIP (®) button: Returnsto the beginning of the current track
when pressed during playback. If pressed again, your Duo HD
player moves to and plays the previous track.
If you press this button within three seconds after playback
starts, the previous track will be played.
If you press this button after three seconds, the current track will
be replayed from the beginning. Moves by the page in the Music
List or the Playlist.
REPEAT AUDIO CD(CD-DA)
Duringplayback,press the REPEATor RED(A)buttonrepeatedlyto selectthe repeat modeyouwant.
Normal "* _9 "* 6-0 ...*C_
• Normal : Tracks on a disc are played in the order in which they were recorded on the disc.
• Q'9 Repeat Track
•¢__ Random
The random option plays a disc's track in random order.
• 6-0 Repeat All :All tracks are repeated.
-To return to normal playback -
Press the REPEAT or RED(A)button repeatedly to return to normal playback.
IEnglish 61
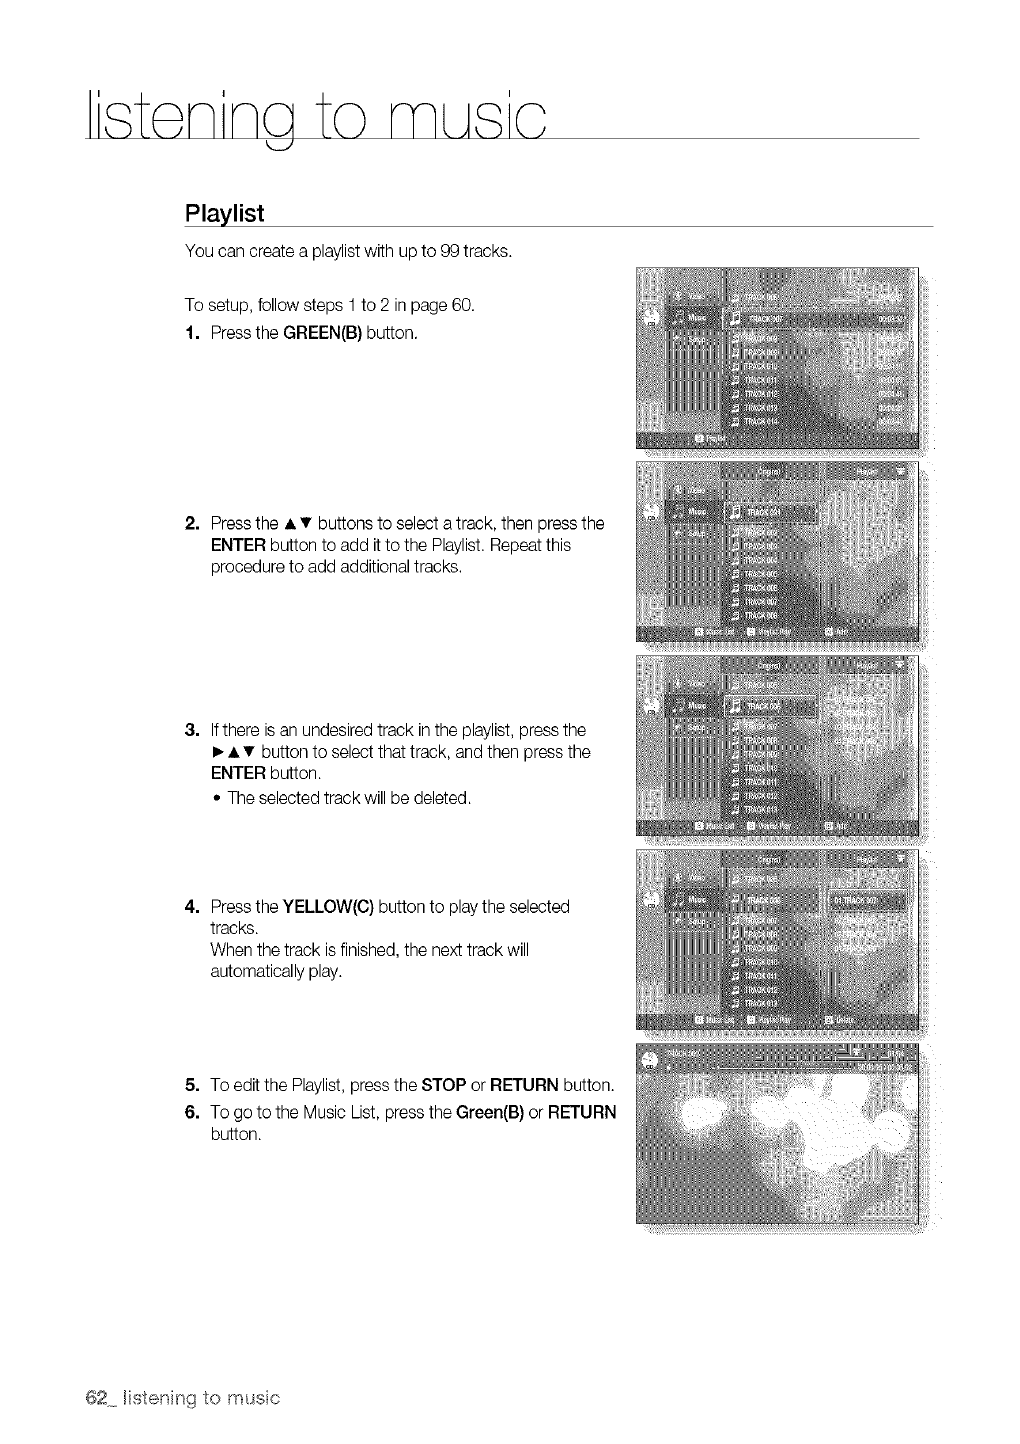
istonna to musio
Playlist
You can create a playlist with up to 99 tracks.
To setup, follow steps 1 to 2 in page 60.
1. Press the GREEN(B) button.
2. Press the • •buttons to select a track, then press the
ENTER button to add it to the Playlist. Repeat this
procedure to add additional tracks.
3. If there is an undesired track in the playlist, press the
• • • button to select that track, and then press the
ENTER button.
• The selected track will be deleted.
4. Press the YELLOW(C) button to play the selected
tracks.
When the track is finished,the next track will
automatically play.
5. To edit the Playlist, press the STOP or RETURN button.
6. To go to the Music List, press the Green(B) or RETURN
button.
ii!iii
62 Histening to musc
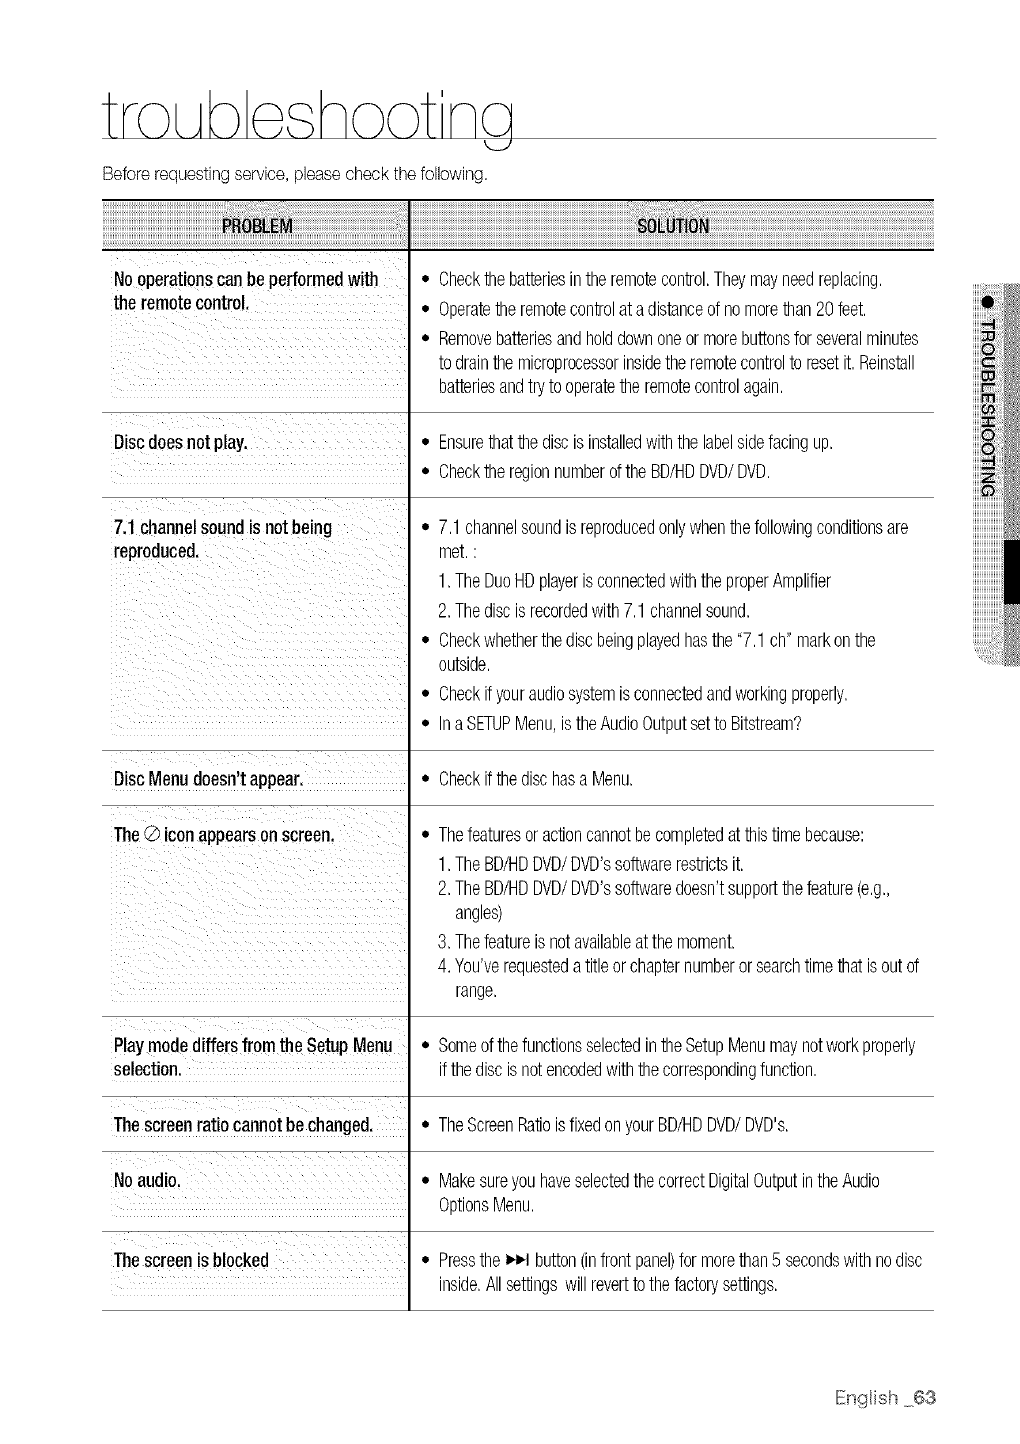
Beforerequestingservice,pleasecheckthefollowing.
Nooperationscanbeperformedwith •
the remotecontrol.
Discdoesnot play.
7.1channelsoundis not being
reproduced.
Checkthebatteriesintheremotecontrol.Theymayneedreplacing.
Operatetheremotecontrolata distanceof nomorethan20feet.
Removebatteriesandholddownoneormorebuttonsfor severalminutes
todrainthemicroprocessorinsidetheremotecontrolto resetit. Reinstall
batteriesandtrytooperatetheremotecontrolagain.
-Ensurethatthediscis installedwiththelabelsidefacingup.
•ChecktheregionnumberoftheBD/HDDVD/DVD.
-7.1channelsoundisreproducedonlywhenthefollowingconditionsare
met.:
1.TheDuoHDplayerisconnectedwiththeproperAmplifier
2.Thediscis recordedwith7.1 channelsound.
•Checkwhetherthediscbeingplayedhasthe"7.1 ch"markonthe
outside.
•Checkifyouraudiosystemis connectedandworkingproperly.
•InaSETUPMenu,istheAudioOutputsetto Bitstream?
DiscMenudoesn'tappear. -Checkifthedischasa Menu,
The@iconappearsonscreen.
i _iiii i I _i i
ii i ii ii ii ii ii ii ii ii ii ii ii ii ii ii ii ii ii iii
Thefeaturesoractioncannotbecompletedatthistimebecause:
1.TheBD/HDDVD/DVD'ssotiwarerestrictsit.
2.TheBD/HDDVD/DVD'ssoftwaredoesn'tsupportthefeature(e.g.,
angles)
3. Thefeatureis notavailableatthemoment.
4. You'verequestedatitleorchapternumberorsearchtimethatisoutof
range.
P!aymodediffersfromthe SetupMenu - SomeofthefunctionsselectedintheSetupMenumaynotworkproperly
selection, if thediscisnotencodedwiththecorrespondingfunction.
The screenratiocannotbechanged. •TheScreenRatioisfixedonyourBD/HDDVD/DVD's.
No audio. -MakesureyouhaveselectedthecorrectDigitalOutputintheAudio
OptionsMenu.
The screenis blocked •Pressthe_,-I button(infrontpanel)formorethan5 secondswithnodisc
inside.Allsettingswillreverttothefactorysettings.
IEnglish 63
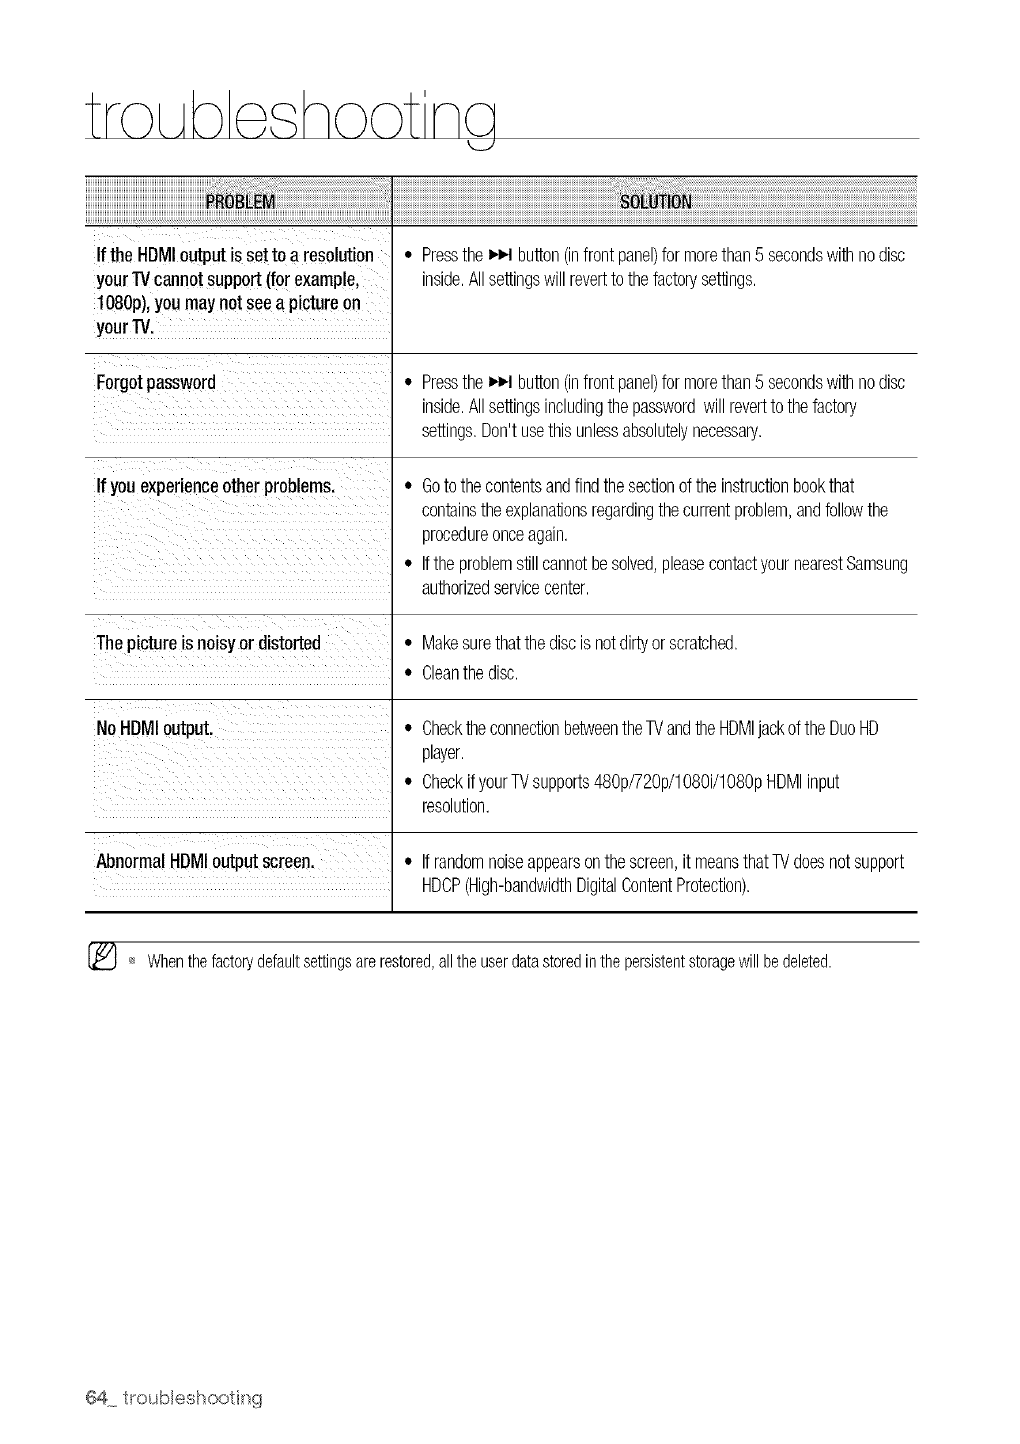
Ifthe HDMIoutput is set to a resolution • Pressthe _J button(infrontpanel)for morethan 5 secondswithnodisc
your TVcannotSupport(forexample, inside,Allsettingswill reverttothefactorysettings,
108Op),youmaynot seea pictureon
Forgotpassword
If youexperienceotherproblems.
Thepictureisnoisyor distorted
NoHDMIoutput.
AbnormalHDMIoutputscreen.
• Pressthe _,_Jbutton(infrontpanel)for morethan5 secondswithnodisc
inside,Allsettingsincludingthepasswordwillreverttothefactory
settings,Don'tusethisunlessabsolutelynecessary,
• Goto thecontentsandfindthesectionoftheinstructionbookthat
containstheexplanationsregardingthecurrentproblem,andfollowthe
procedureonceagain,
• Iftheproblemstillcannotbesolved,pleasecontactyournearestSamsung
authorizedservicecenter,
• Makesurethatthediscisnotdirtyorscratched,
• Cleanthedisc,
• ChecktheconnectionbetweentheTVandtheHDMIjackof theDuoHD
player,
• Checkif yourTVsupports480p/720p/1080i/1080pHDMIinput
resolution,
• Ifrandomnoiseappearsonthescreen,it meansthatTVdoesnotsupport
HDCP(High-bandwidthDigitalContentProtection),
_'_ Whenthefactorydefaultsettingsare restored,alltheuserdatastoredin thepersistentstoragewillbedeleted.
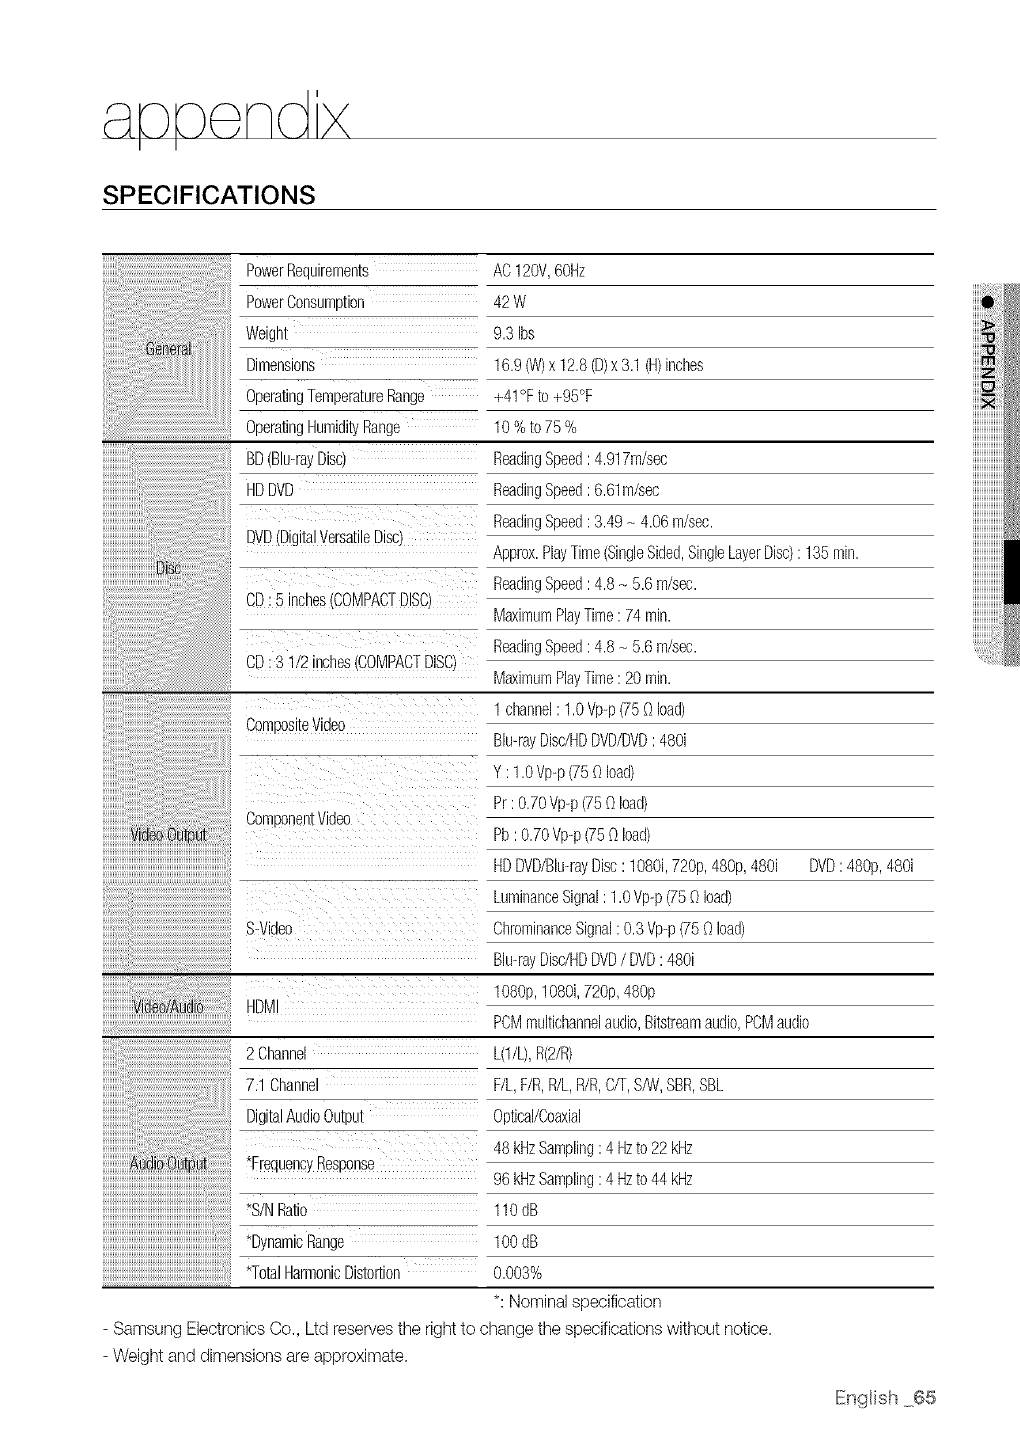
SPECIFICATIONS
PowerReaulrements AC120V,60Hz
PowerConsumuoon 42W
iiiiiiiiiiiiiii@i !i!!i!!i! ! !@ii!ii!ii!ii!ii!ii!ii!iill
iiiiiiiii,,,
Weigm
Dimensions
}peratingTemperatureRange
OperatingHumidityRange
BD(Bbray Disc/
HDDVD
DVD(DigitalVersatileDisc
CD:5 inches(}OMPACTDISC
9.3 Ibs
16.96A/)x12.8(D)x3.1(H)inches
+41°Fto +95°F
10%to75%
ReadingSpeed: 4.917m/sec
ReadingSpeed: 6.61m/sec
ReadingSpeed: 3.49- 4.06m/sec.
Approx.PlayTime(SingleSided,SingleLayerDisc): 135rain.
ReadingSpeed: 4.8- 5.6m/sec.
MaximumPlayTime:74rain.
ReadingSpeed: 4.8- 5.6m/sec.
MaximumPlayTime:20rain.
1channel: 1.0Vp-p(75Oload)
Blu-rayDisdHDDVD/DVD:480i
Y :1.0Vp-p(750load)
Pr: 0.70Vp-p(750 load)
Pb:0.70Vp-p(750 load)
HDDVD/Blu-rayDisc:1080i,720p,48%, 480i DVD: 48%, 480i
LuminanceSignal:1.0Vp@(75Oload)
ChrominanceSignal:0.3Vp@(75Oload)
BGrayDisdHDDVD/DVD:480i
108%, 1080i,72%,48%
PCMmultichanne]audio,Bitstreamaudio,PCMaudio
L(1/L),R(2/R)
F/L,F/R,R/L,R/R,C/T,S/W,SBR,SBL
Optical/Coaxial
48 kHzSampling:4 Hzto 22 kHz
96 kHzSampling:4 Hzto 44 kHz
11ODD
CD:3 1/2inches30MPACTDISC
}omoosl[e Video
ComDonenTVlCleo
S-Videc
HDM
AudioOutput
*S/NRatio
*DynamicRange
*TotalHarmonicDistortion
2 Channe
7 1 Channel
DigitalAudioOutput
*FrequencyResponse
100dB
0.003%
*: Nominal specification
- Samsung Electronics Co., Ltd reserves the right to change the specifications without notice.
- Weight and dimensions are approximate.
IEnglish 65
COPY PROTECTION
• Because AACS (Advanced Access Content
System) is approved as content protection
system for BD and HD DVD format, similar to use
of CSS (Content Scramble System) for DVD
format, certain restrictions are imposed on
playback, analog signal output, etc., of AACS
protected contents. The operation of this product
and restrictions on this product may vary
depending on your time of purchase as those
restrictions may be adopted and/or changed by
AACS afterthe production of this product.
Furthermore, BD-ROM Mark and BD+ are
additionally used as content protection system
for BD format, which imposes certain restrictions
including playback restrictions for BD-ROM Mark
and/or BD+ protected contents. To obtain
additional information on AACS, BD-ROM Mark,
BD+, or this product, please contact SAMSUNG
customer care center.
• Many BD/HD DVD/DVD discs are encoded with
copy protection. Because of this, you should only
connect your Duo HD player directly to your TV,
not to a VCR. Connecting to a VCR results in a
distorted picture from copy-protected BD/HD
DVD/DVD discs.
• This product incorporates copyright protection
technology that is protected by methods claims
of certain U.S. patents and other intellectual
property rights owned by Macrovision
Corporation and other rights owners. Use of this
copyright protection technology must be
authorized by Macrovision Corporation and is
intended for home and other limited viewing uses
only, unless otherwise authorized by Macrovision
Corporation. Reverseengineering or disassembly
isprohibited.
• Under the U.S. Copyright laws and Copyright
laws of other countries, unauthorized recording,
use, display, distribution, or revision of television
programs, videotapes, BDs, HD DVD's, DVDs,
and other materials may subject you to civil and/
or criminal liability.
• For Duo HD Players progressive scan output :
CONSUMERS SHOULD NOTE THAT NOT ALL
HIGH DEFINITIONTELEVISIONSETS ARE
FULLYCOMPATIBLE WITH THIS PRODUCT
AND MAY CAUSE ARTIFACTSTO BE
DISPLAYEDINTHE PICTURE. IN CASE OF
PROGRESSIVESCAN PICTURE PROBLEMS, IT
IS RECOMMENDED THAT THE USER SWITCH
THE CONNECTION TO THE 'STANDARD
DEFINITION'OUTPUT. IFTHEREARE
QUESTIONS REGARDING OUR TV SET
COMPATIBILITYWITH THIS PRODUCT,
PLEASECONTACT OUR CUSTOMER SERVICE
CENTER.
Compliance and Compatibility Notice
NOTALL discs are compatible
• Subjectte the restrictionsdescribedbelowandthosenoted
throughoutthisManual,includingthe DiscTypeand
Characteristicssectionof this Manual,disctypesthatcanbe
playedare:pre-recerdedcommercialBD-ROM,
HDDVD,DVD-Videe,andAudioDDdiscs;DVD-RW/DVD-R
discs;and CD-Rdiscs.
• Discsother than the above cannot and/or is not intended to
beplayed by this player.And some ef the above discs may
not play due to oneor more reasonsprovided below.
• Samsungcannot assure that this playerwill play everydisc
bearingthe BD, HD DVD,DVD-Video,DVD-RW/DVD-R
and CD-Rloges, and this playermaynot respondto all
operatingcommands or operateallfeaturesof everydisc.
Theseand otherdisc compatibilityand playeroperation
issueswith new and existingformat discs are possible
because:
-BD/HD DVDare new and evolvingformats and this player
maynot operate allfeaturesof BD/HD DVDdiscs
becausesome features maybe optional,additional
featuresmay havebeen added to the BD/HD DVD format
after the productien of this player,and certain available
featuresmay besubject to delayedavailability;
- not allnew and existingdisc format versions aresupported
by this player;
-new and existingdisc formats may be revised,changed,
updated, impreved and/or supplemented;
- some discs are produced in a mannerthat allews specific
or limitedoperatienand featureduring playback;
-some featuresmay be optional,additionalfeaturesmay
havebeen added afterthe productionef this playeror
certainavailablefeaturesmaybe subjectto delayed
availability;
-some discs bearingthe BD-ROM, HD DVD, DVD-Video,
DVD-RW/DVD-R and CD-Rloges maystill be non-
standardizeddiscs;
-some discs may not be played depending ontheir physical
state or recordingconditions;
-problemsand error can occur during the creationof BD,
HD DVD,DVDsoftwareand/or the manufactureef discs;
-this playeroperatesdifferentlythan a standard DVD player
or otherAV equipment; and/or
-for reasonsnoted throughoutthis Manualand forother
reason(s)discoveredand posted by SAMSUNGcustomer
care center.
• Ifyou encounter disccompatibilityor playeroperation
problems,pleasecontact SAMSUNGcustemer care center.
Yeumay also contact SAMSUNGcustomer care center for
possibleupdates en this player.
• Foradditionalinfermatienen playbackrestrictionsand disc
compatibility,referto the Precautiens,Before Readingthe
User's Manual,Disc Typesand Characteristics,and Before
Playingsections of this Manual.
This SAMSUNG brand product, as supplied and distributed by SAMSUNG ELECTRONICS AMERICA, INC. (SAMSUNG) and delivered
new, in the original carton to the original consumer purchaser, is warranted by SAMSUNG against manufacturing defects in materials and
workmanship for the following limited warranty period:
One (1) Year Parts /Ninety Days (go) Labor
This limited warranty begins on the originaI date of purchase, and is valid only on products purchased and used in the United States, and
does not include transportation, installation, removal or reinstallation. Warranty repairs must be performed by SAMSUNG's authorized
service center. To receive warranty service, the original dated bill of sate must be presented upon request as proof of purchase to
SAMSUNG or SAMSUNG's authorized service center. Transportation to and from the service center is the responsibility of the purchaser.
SAMSUNG will repair or replace this product, at our option and at no charge with new or reconditioned parts, if found to be defective
during the limited warranty period specified above. The product must be returned during the warranty period with transportation charges
prepaid to SAMSUNG's designated service center. Prior to returning any product for warranty service, the purchaser must contact
SAMSUNG for problem determination and service procedures. SAMSUNG does not warrant uninterrupted or error-free operation of the
product.
All replaced parts and products become the property of SAMSUNG and must be returned to SAMSUNG. Replacement parts and products
assume the remaining original warranty, or ninety (90) days, whichever is longer.
This limited warranty covers manufacturing defects in materials and workmanship encountered in normal, noncommercial use of this
product and shall not apply to the following, including, but not limited to: damage which occurs in shipment; applications and uses for
which this product was not intended; failures or problems which are caused by products or equipment not supplied by SAMSUNG;
accidents, misuse, abuse, neglect, misapplication, fire, water, lightning or other acts of nature; incorrect electrical line voltage, fluctuations
or surges; damage caused by improper or faulty instaIlation; improper connection with any peripheraI; product alteration or modification;
improper or unauthorized repair; cosmetic damage or exterior finish; product with altered serial numbers; failure to follow operating
instructions, customer adjustments, maintenance and environmental instructions that are covered and prescribed in the instruction book;
use of non-SAMSUNG or unauthorized parts, supplies, accessories or equipment which damage this product or result in service problems;
failures or problems due to incompatibility with other equipment.
No person, agent, distributor, dealer or company is authorized to change, modify or extend the terms of these warranties in any manner
whatsoever. The time within which an action must be commended to enforce any obligations of SAMSUNG arising under the warranty or
under any statute, or law of the United States or of any state thereof, is hereby limited to ninety (90) days from the date you discovered or
should have discovered the defect. This limitation does not apply to implied warranties arising under state law, if any.
SAMSUNG does not warrant (i) disc compatibility with new and existing format discs or (ii) error free playback in full compliance with
specifications of the compatible disc formats, and SAMSUNG shall not be liable for any data loss recorded in your discs.
SAMSUNG's responsibility shall be limited to appropriate warranty services during the warranty period through SAMSUNG customer care
center. If you encounter compatibility or data loss problems, please contact SAMSUNG customer care center.
THERE ARE NO EXPRESSWARRANTIESOTHERTHAN THOSE LISTED AND DESCRIBEDABOVE,AND NO WARRANTIES
WHETHEREXPRESS OR IMPLIED, INCLUDING,BUT NOT LIMITED TO, ANY IMPLIED WARRANTIESOF MERCHANTABILITYOR
FITNESS FOR A PARTICULARPURPOSE,SHALLAPPLY AFTER THE EXPRESS WARRANTYPERIODSSTATED ABOVE,AND
NO OTHER EXPRESSWARRANTYOR GUARANTY GIVEN BY ANY PERSON, FIRMOR CORPORATIONWITH RESPECTTO
THIS PRODUCTSHALL BE BINDING ON SAMSUNG.SAMSUNGSHALL NOT BE LIABLE FOR LOSS OF REVENUEOR PROFITS,
FAILURETO REALIZESAVINGSOR OTHER BENEFITS,OR ANY OTHER SPECIAL,INCIDENTALOR CONSEQUENTIAL DAMAGES
CAUSEDBY THE USE, MISUSEOR INABILITYTO USE THIS PRODUCT,REGARDLESSOF THE LEGAL THEORYON WHICH
THECLAIM IS BASED,AND EVENIF SAMSUNGHAS BEEN ADVISEDOF THE POSSIBILITYOF SUCHDAMAGES. NOR SHALL
RECOVERYOF ANY KINDAGAINST SAMSUNGBE GREATERIN AMOUNTTHAN THE PURCHASEPRICEOF THE PRODUCT
SOLD BYSAMSUNGAND CAUSINGTHE ALLEGED DAMAGE.WITHOUT LIMITINGTHE FOREGOING,PURCHASER ASSUMES
ALL RISK AND LIABILITY FOR LOSS, DAMAGEOR INJURYTO PURCHASERAND PURCHASER'SPROPERTYAND TO OTHERS
AND THEIR PROPERTYARISINGOUT OF THE USE, MISUSEOR INABILITYTO USE THIS PRODUCTSOLD BY SAMSUNGNOT
CAUSEDDIRECTLYBY THE NEGLIGENCEOF SAMSUNG.THIS LIMITED WARRANTYSHALLNOT EXTENDTO ANYONE OTHER
THANTHE ORIGINALPURCHASER OF THIS PRODUCT,IS NONTRANSFERABLEAND STATESYOUR EXCLUSIVEREMEDY.
Some states do not allow limitations on how long an impIied warranty lasts, or the exclusion or limitation of incidental or consequential
damages, so the above Iimitations or exclusions may not apply to you. This warranty gives you specific legal rights, and you may also
have other rights which vary from state to state.
To obtain warranty service, please contact SAMSUNG customer care center.
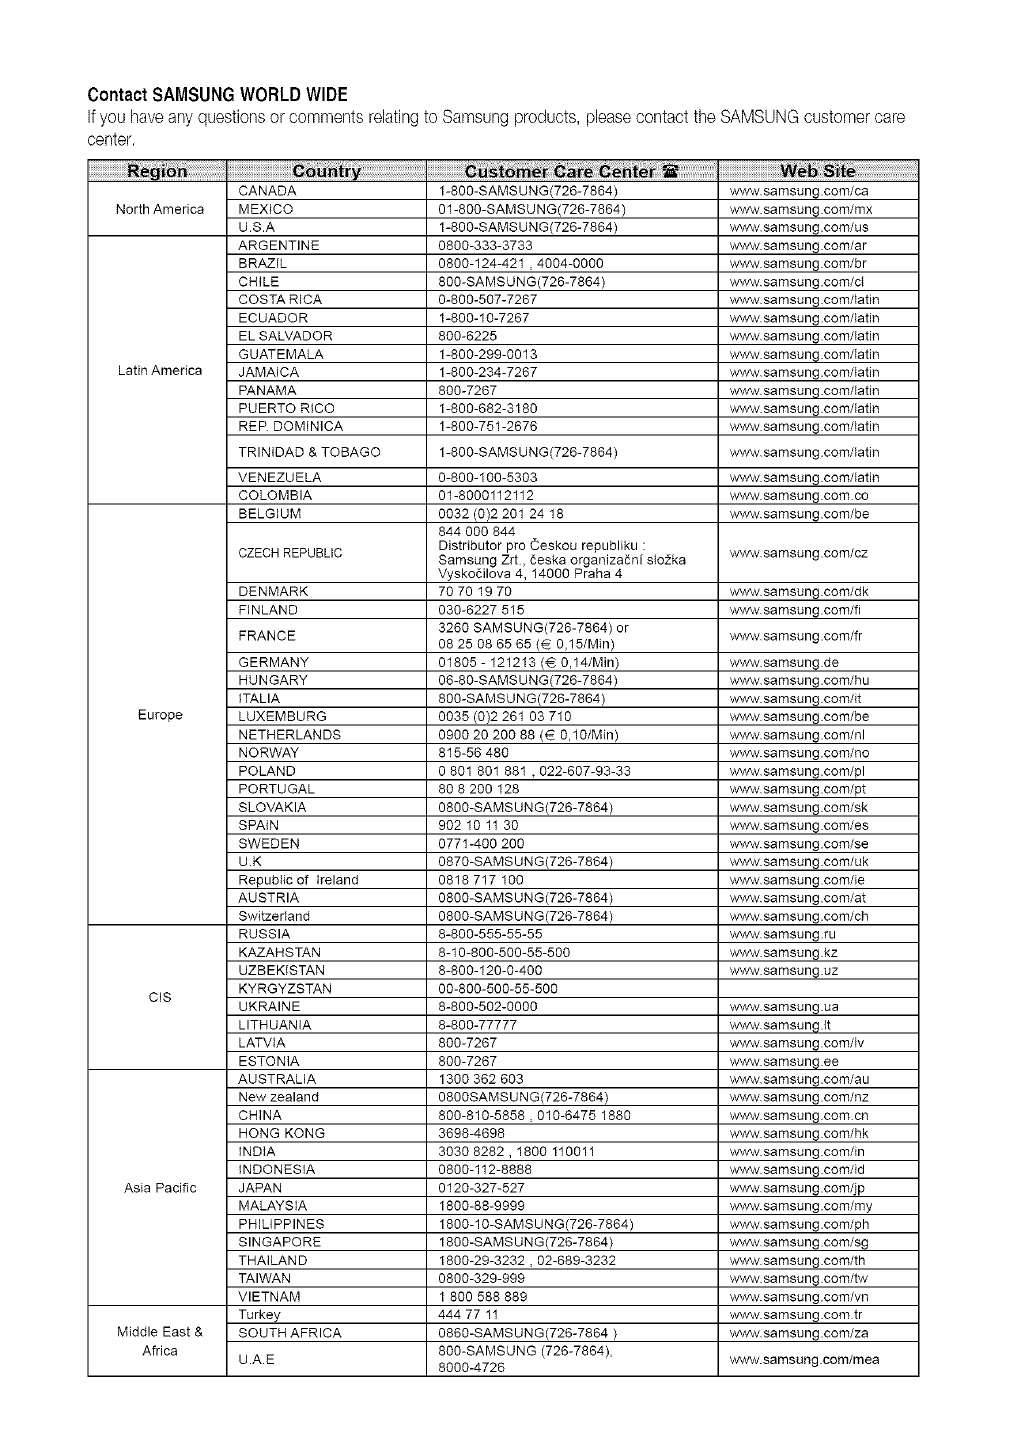
ContactSAMSUNGWORLDWIDE
Ifyou haveanyquestionsorcommentsrelatingto Samsungproducts,pleasecontactthe SAMSUNGcustomercare
center.
North America
Latin America
Europe
CIS
CANADA
MEXICO
U.S.A
ARGENTINE
BRAZIL
CHILE
COSTA RICA
ECUADOR
EL SALVADOR
GUATEMALA
JAMAICA
PANAMA
PUERTO RICO
RER DOMINICA
TRINIDAD & TOBAGO
VENEZUELA
COLOMBIA
BELGIUM
CZECH REPUBLIC
DENMARK
FINLAND
FRANCE
GERMANY
HUNGARY
ITALIA
LUXEMBURG
NETHERLANDS
NORWAY
POLAND
PORTUGAL
SLOVAKIA
SPAIN
SWEDEN
U.K
Repubtic of Ireland
AUSTRIA
Switzerland
RUSSIA
KAZAHSTAN
UZBEKISTAN
KYRGYZSTAN
UKRAINE
LITHUANIA
LATVIA
ESTONIA
AUSTRALIA
New zealand
CHINA
HONG KONG
INDIA
INDONESIA
JAPAN
MALAYSIA
PHILIPPINES
SINGAPORE
THAILAND
TAIWAN
VIETNAM
Turkey
SOUTH AFRICA
U.A.E
Asia Pacific
Middle East &
Africa
1-800-SAMS UNG(726-7864)
01-800-SAMSUNG(726-7864)
1-800-SAMS UNG(726-7864)
0800-333-3733
0800-124-421 , 4004-0000
800-SAMSUNG(726-7864)
0-800-507-7267
1-800-10-7267
800-6225
1-800-299-0013
1-800-234-7267
800-7267
1-800-682-3180
1-800-751-2676
1-800-SAMS UNG(726-7864)
0-800-100-5303
01-8000112112
0032 (0)2 201 24 18
844 000 844
Distributor pro Ceskou republiku :
Samsung Zrt, _eska orgaeiza_ni slo2ka
Vysko_ilova 4, 14000 Praha 4
70 70 19 70
030-6227 515
3260 SAMSUNG(726-7864) or
08 25 08 65 65 (_ 0,15/Min)
01805 - 121213 (_ 0,14/Min)
06-80-SAMS UNG(726-7864)
800-SAMSUNG(726-7864)
0035 (0)2 261 03 710
0900 20 200 88 (€ 0,10/Min)
815-56 480
0 801 801 881 , 022-607-93-33
80 8 200 128
0800-SAMS UNG(726-7864)
902 10 11 30
0771-400 200
0870-SAMS UNG(726-7864)
0818 717 100
0800-SAMS UNG(726-7864)
0800-SAMS UNG(726-7864)
8-800-555-55-55
8-10-800-500-55-500
8-800-120-0-400
00-800-500-55-500
8-800-502-0000
8-800-77777
800-7267
800-7267
1300 362 603
0800SAMS UNG(726-7864)
800-810-5858,010-6475 1880
3698-4698
3030 8282 , 1800 110011
0800-112-8888
0120-327-527
1800-88-9999
1800-10-SAMSUNG(726-7864)
1800-SAMS UNG(726-7864)
1800-29-3232 , 02-689-3232
0800-329-999
1 800 588 889
444 77 11
0860-SAMS U NG (726-7864)
800-SAMSUNG (726-7864),
8000-4726
www samsung.com/ca
www samsung.com/mx
www samsung.com/us
WWWsamsung.com/ar
WWWsamsung.com/br
WWWsamsung.com/ct
ww'w samsung.com/latin
ww'w samsung.com/latin
ww'w samsung.com/Iath_
ww'w samsung.com/Iath_
ww'w samsung.com/tath_
ww'w samsung.com/tath_
w,_v samsung.com/tatin
ww'w samsung.com/latin
w,_v samsung.com/tatin
w,_v samsung.com/tatin
www samsung.com co
www samsung.com/be
ww'w samsung.com/cz
www samsung.com/dk
www samsung.com/fi
www samsung.com/fr
www samsung.de
w,_v samsung.com/hu
w,_v samsung.com/it
www samsung.com/be
www samsung.com/nl
www samsung.com/no
www samsung.com/pl
www samsung.com/pt
www samsung.com/sk
w,_v samsung.com/es
w,_v samsung.com/se
www samsung.com/uk
www samsung.com/ie
www samsung.com/at
www samsung.com/ch
www samsung.ru
www samsung.kz
w,_v samsung.uz
ww'w samsung.ua
www samsung.lt
www samsung.com/Iv
www samsung.ee
www samsung.com/au
w,_v samsung.com/nz
w,_v samsung.com cn
www samsung.com/hk
www samsung.com/in
www samsung.com/id
www samsung.com/jp
www samsung.com/my
www samsung.com/ph
w,_v samsung.com/sg
w,_v samsung.com/th
www samsung.com/tw
www samsung.com/vn
ww'w samsung.com tr
www samsung.com/za
www.samsung com/mea
