Samsung DVD V2000 User Manual DVD/VCR Manuals And Guides L0204164
SAMSUNG DVD/VCR Combo Manual L0204164 SAMSUNG DVD/VCR Combo Owner's Manual, SAMSUNG DVD/VCR Combo installation guides
User Manual: Samsung DVD-V2000 DVD-V2000 SAMSUNG DVD/VCR - Manuals and Guides View the owners manual for your SAMSUNG DVD/VCR #DVDV2000. Home:Electronics Parts:Samsung Parts:Samsung DVD/VCR Manual
Open the PDF directly: View PDF ![]() .
.
Page Count: 57

DVD-V2000
Instruction Manual
--i
_Hi-Fi
V_DEO www.samsungasc.com
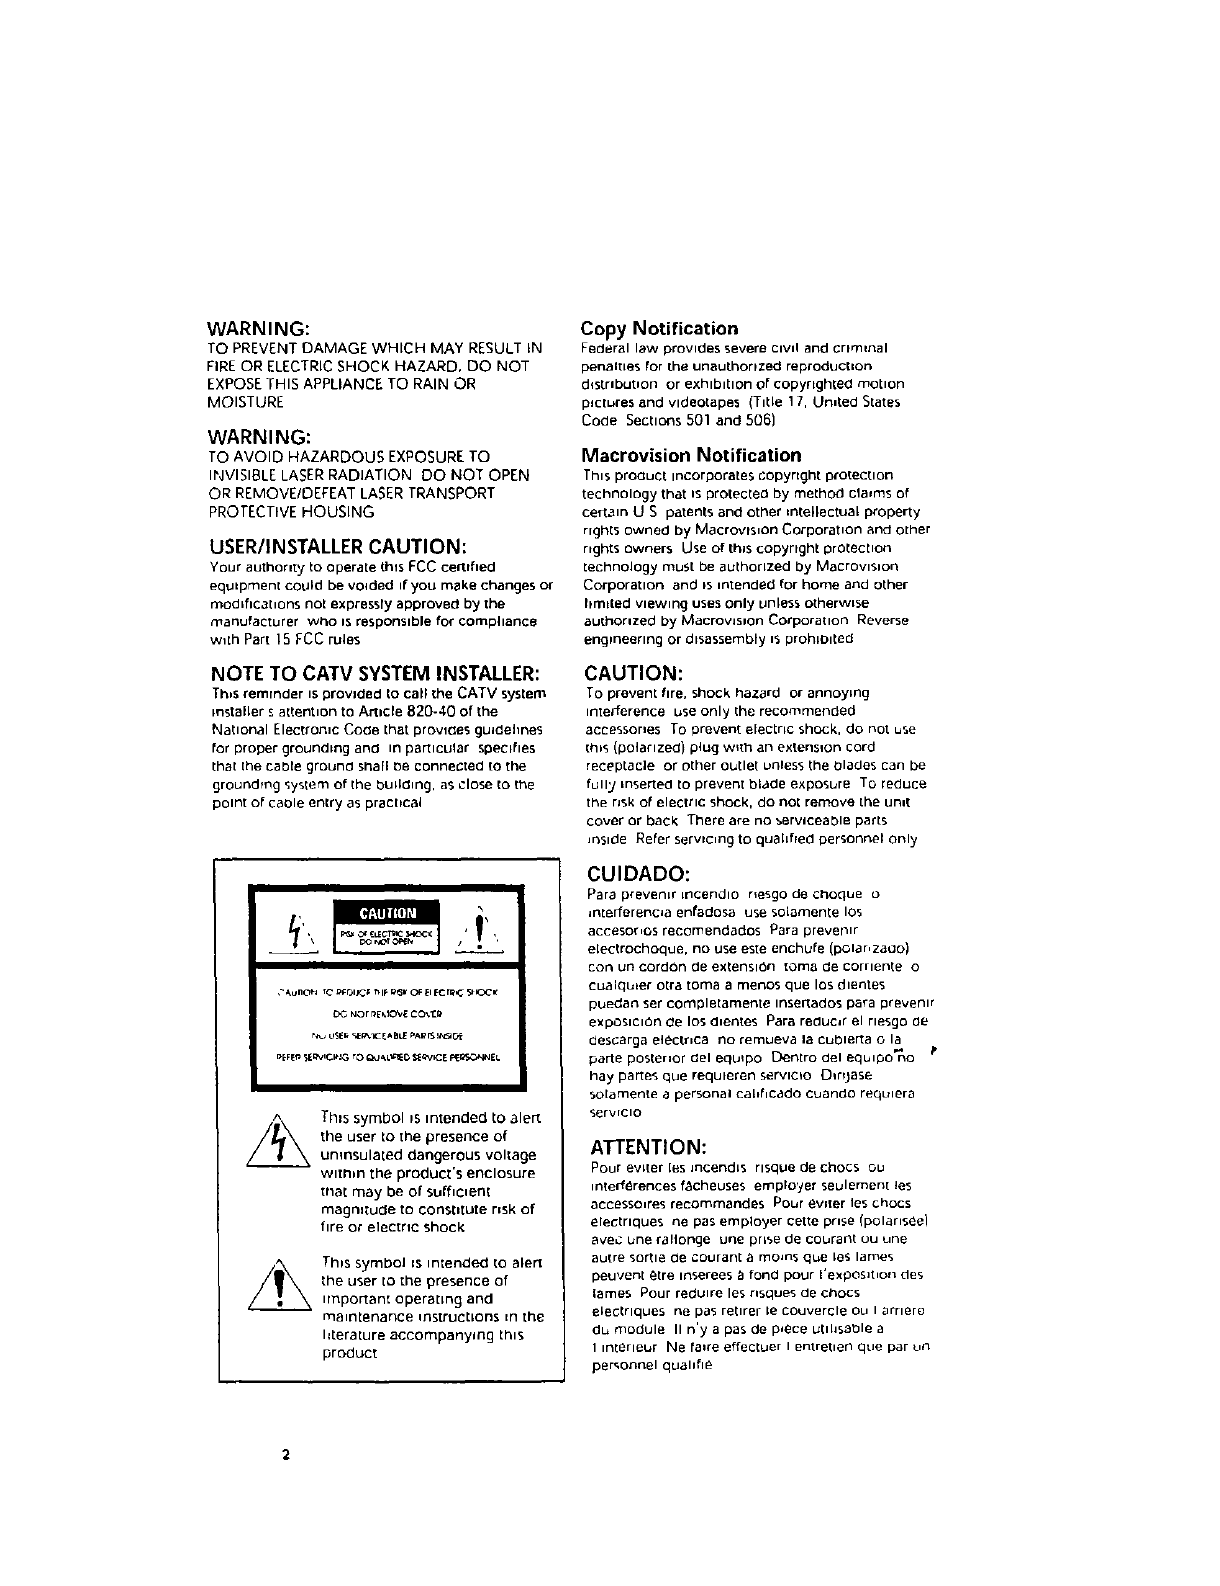
WARNING:
TO PREVENT DAMAGE WHICH MAY RESULT IN
FIRE OR ELECTRIC SHOCK HAZARD, DO NOT
EXPOSE THIS APPLIANCE TO RAIN OR
MOISTURE
WARNING:
TO AVOID HAZARDOUS EXPOSURE TO
INVISIBLE LASER RADIATION DO NOT OPEN
OR REMOVE/DEFEAT LASER TRANSPORT
PROTECTIVE HOUSING
USER/INSTALLER CAUTION:
Your authorety to operate this FCC Certified
equkpment Could be voided if you make changes of
modifications not expressly approved by the
manufacturer who is responsible for ¢omphance
w_th Part 15 ECC rules
NOTE TO CATV SYSTEM INSTALLER:
This remrnder is provided to cat_ the CATV system
installer s attention to Article 820-40 of the
Na(Ional Elect_'onlc Code that provides guldeJines
for proper groundtng and _n particular specifies
that the cable ground shaFI be connected to the
grounding syslem of [he building, as close Io the
point of caole entry as pracltcal
Th_s symbol _s intended to .alert
the user to the presence of
unmsulated dangerous voltage
Within the product's enclosure
that may be Of sufficient
magnrtude to constltLIte risk of
fire or electric shock
Th_s symbol Js intended to alert
the user to the presence of
Importan_ operating and
maintenance iFisEuctlons in the
I:terature accompanying this
product
Copy Notification
Federal law provides severe CiVil and ¢rlmtnal
penalties for the unauthorpzed reproduction
d_strlbutJon or exhlbltlOrl Of copyrighted motion
pictures and videotapes (Title 17, United States
Code Sections 501 and 506)
Macrovision Notification
Th_s product incorporates copyright protection
technology that _s pro(ected by method cla=ms of
certain U S patents and other =ntellectua[ property
rights owned by Macrows_on Corporation and other
rights owners Use of this copyright protection
technology must be authorized by Macrows_on
Corporation and _sintended for home and other
I_mded viewing uses only unless otherwise
authorized by MacrovJslon Corpora{ion Reverse
engineering or disassembly _$ prohloKed
CAUTION:
To prevent fire, shock hazard or annoying
intel_erence use only the recommended
accessories To prevent electric shock, do not use
[h_s (polarized) plug w_h an extension cord
receptacle or other outlet unless the Olades can be
fullj inserted to prevent blade exposure TO reduce
the rJsk of electric shock, do not remove the un=t
cover or back There are no _ervlceabl8 parts
Jnslde Refer servicing to quahfled personnel only
CUIDADO:
Pare prevenlr irlcendlO rlesgo de choque o
_nterferenc_a enfadosa use soiamente los
accesor,os recomendados Para prevel_lr
electrochoque, no use este enchufe (pOlar,zero)
con un cordon de extension tome de corrlen(e o
cualqu_er otra tome a mends que los dlentes
puedan ser completamente insel_ados para prevenlr
exposlcldn de los dlentes Pare reducer el rlesgo de
desGarga electnca no remueva la Cublerta ola
porte posterior del eqblpo Dentro del eqL_lpO no
hay partes que requleren servlclo D_rl_ase
so[amen_e a personal ca[_flcado cuando reqLllera
servlcio
ATTENTION:
Pour eviler [es ]ncendis risque de Chocs OU
inlerferences f_cheuses employei" seulemen[ les
accessoires recommat'ldes Pour evl{er les _hocs
electrlques ne pas employer cette pr_se (polanseel
ave[; L_ne r_llonge une prise de COL_rarttou une
aM[re sortie de cogrant aRIOII_S qLse les lathes
peuvent 6tre inserees b fond pour I'exposlt_on des
lames Pour reduire les rlsques de chocs
electrlques ne pas retlrer le couvercle ou I arrlere
du module II n'y a pas de p_ece Utlhsable a
I interleL_r Ne loire effectuer Ien{retlen que par un
personnel quahfle
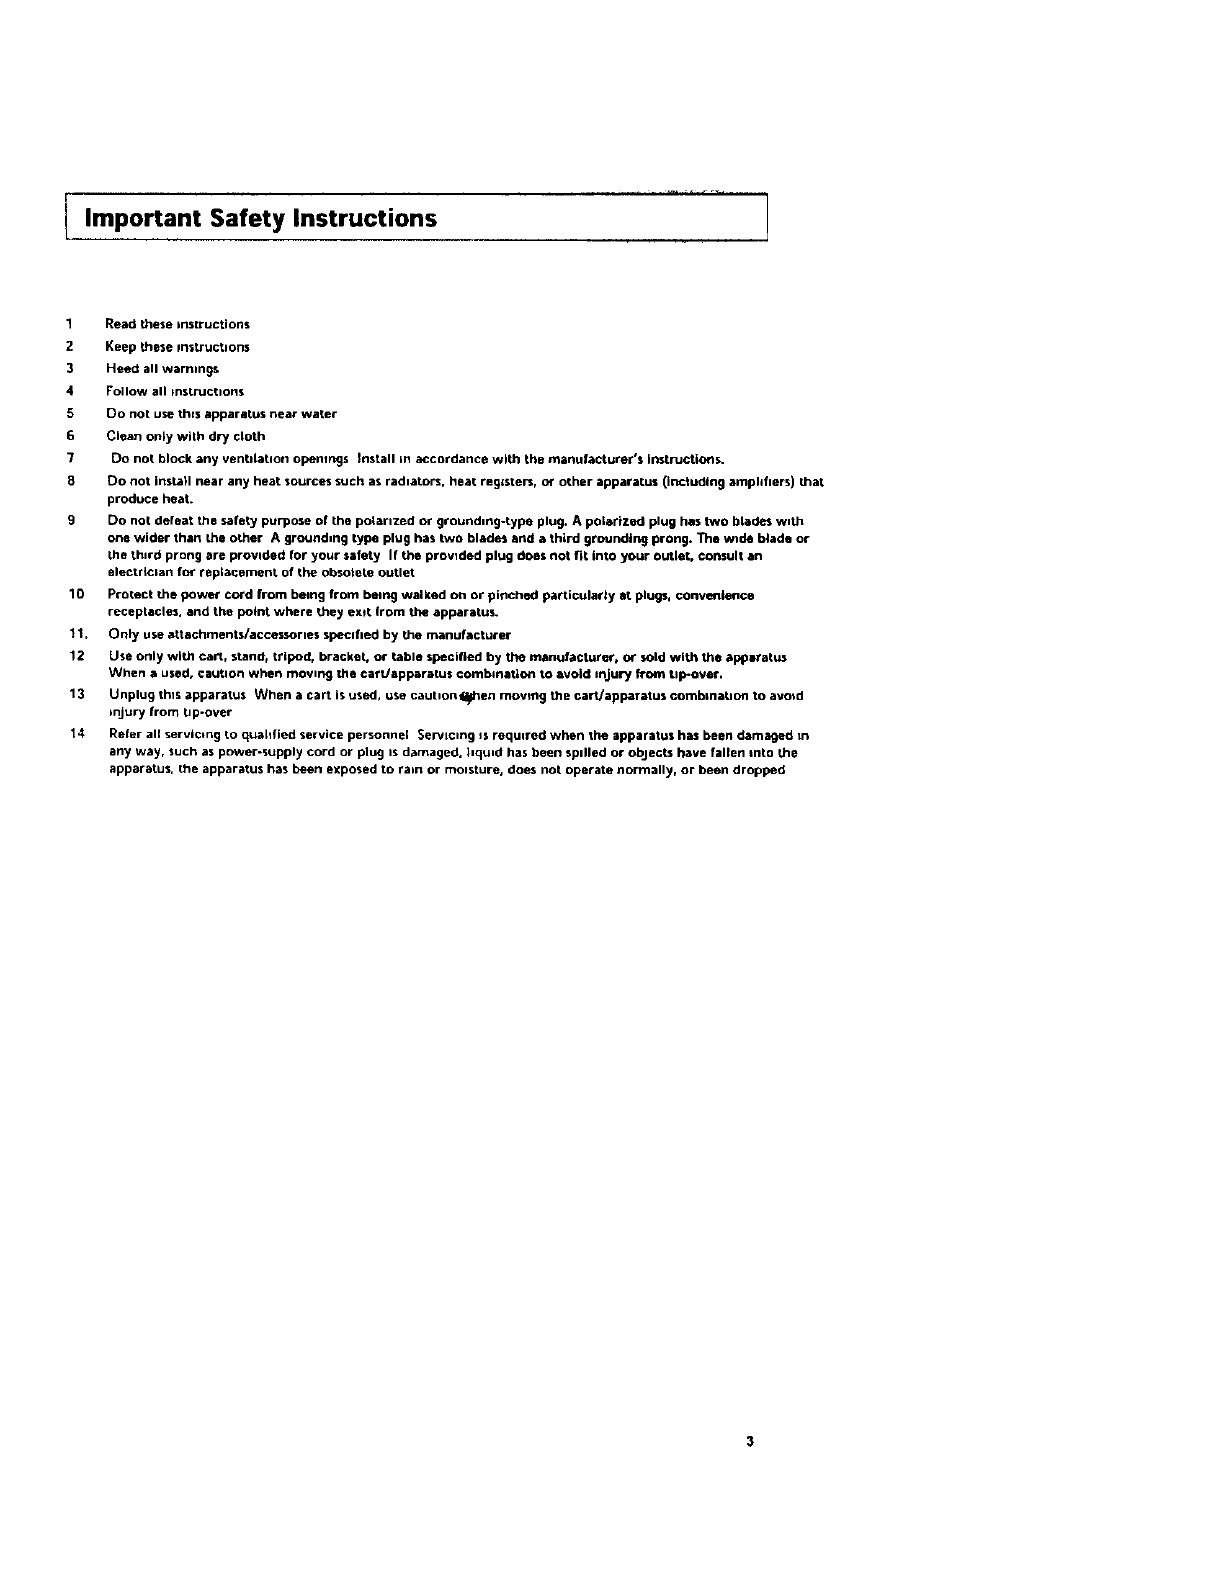
Important Safety Instructions .............................
1 Read these instructions
2 Keep these mstructlom
3 Heed all warnings
4 Follow all instructions
5DO not use this apparltus near water
6 CJean only With dry cloth
7 Do no( block any ventdat_on opemngs Install in accordance with the manufacturer's ths_JCtiOnS.
8 Do not instil near any heat sources such as radiators, heat registers, of other apparatu_ (ir_cthding amplifiers) that
produce heat.
9 Do not defeat the safety purpose of the polarized or grounding-type plug. A polarized plug has two blades with
one wider than the other A grounding type plug has two blades and a third grounding prong. The wide blade or
the third prong are provtded for your safety If the provtded plug does not fit into your outlet, consult an
electrtclan fo_ replacement of the obsotete outlet
10 Protect the power cord from being from betng walked on or pinched particularly at plugs, convenience
receptacles, and the point where they exit from the apparatus.
11. OnFy use attachments/accessories speclhed by the manufacturer
12 Use only with cart, stand, tripod, bracket, or table specified by the manufacturer, or sold with the applwat_
When a used, caution when moving the cartJapparatus combination to avoid injury from tip-over.
13 Unplug this apparatus When acart is used, use cauttonlll_en mowng the cart/apparatus combination to avoid
injury from tip-over
14 Refer all servicing to quaidled service personnel Servicing is required when the apparatus has been damaged in
any way. such as power-supply cord or ptug is damaged, hquld has been spdled or obJeCtS have fallen into the
apparatus, the apparatus has been exposed to rain or moisture, does not operate normally, or been dropped

fTable of Contents 1
Safety ........
•Important Safety Instructions
• Welcome ........
•Feature Summary .........
•Unpacking . .
m Disc Type end Characteristics . . .
• 1 -System Overview .............
• Front Panel Overview . .
• Rear Panel ..
aFront Panel Dnsplay ........
• Remote Control Overview .
•Insert Remote Control Battenea. .
• Usmg theTV Buttons on the Remote ContTot
• 2 - Gettmg Started ...
• Basic Connectlons/AuloSetu
• 3 - Basic Operation
• Deck Control Buttons . ..
• Beaut DVD Playback
• Bas_cVHS Playback
• Basic TV Tuner Operatnons
• 4 -System Setup
•On-Screen Menu NavlgaL_on
• Menu Language
• ManuaICIock Set .
• Tuner Band Settmg
•Auto Channel Memory
• Channel Add/Delete
•RF Output Channel
• Front Panel Dimmer
• Auto Power Off
7
7
7
8
9
g
10
10
11
11
12
13
13
14
14
14
15
16
16
16
17
18
19
20
21
22
22
23
Table of Contents
t 5- DVD Setup ...............................................
• Disc Menu Language .............................................
• Audio Language .................................................
• Subtitle Language ...............................................
• Parental .......................................................
• Digital Output ...................................................
• DTS ..........................................................
• Dynamic Compression ............................................
• TV Aspect Ratio ................................................
• Black Level .....................................................
• AIt Video Out ...................................................
24
24
24
25
26
27
28
29
30
31
31
6 - DVD•Sound Setup ......................................... 32
• A/V Receiver Connections ......................................... 32
7 - DVD Operations .......................................... 33
• Special Playback Features ......................................... 33
• Disc Menu Navigation ............................................ 34
• Screen Fit Playback .............................................. 34
• Title/Chapter/Time Selection ....................................... 35
• Zoom ......................................................... 36
• Angle ......................................................... 36
• Subtitle ....................................................... 37
• Digest Playback ................................................. 37
• A-B Repeat ..................................................... 38
• Repeat Chapter/Title ............................................. , 39
• Audio ........................................................ 39
• Bookmarks ..................................................... 40
• Programmed Playback ............................................ 41
• Random Playback ............................................. 42
• MP3 Playback ............................................... 42
• 3D Sound ...................................................... 43
i!!ii!i! i!i i
i_¸¸_i:_!
iii_iii!
2_
i[
Table of Contents
8 - VCR PZayback ............................................ 44
• Special VGR Playback Features .................................... 44
• Tracking ....................................................... 44
• Auto Play/Rewind ................................................ 45
• S-VHS Playback ................................................ 45
• Vadable Search System ........................................... 46
9 - VCR Recording ........................................... 47
• Basic Recording ................................................. 47
• Special Recording Features ........................................ 48
• One-Touch Recording (OTR) ....................................... 49
• Record Speed .................................................. 49
• 10 - Timer Recording ......................................... 50
•How to Set aTimer Recording ...................................... 50
Appendix A - Advanced Connections ............................. 51
• S-Video/Component Video Connections (for DVD) .................... 51
• Stereo Connections .............................................. 52
• Monitor TV Connections .......................................... 53
• Connecting Other Video Equipment .................................. 54
• Appendix B - Help ............................................ 55
• Technical Specifications ........................................ 55
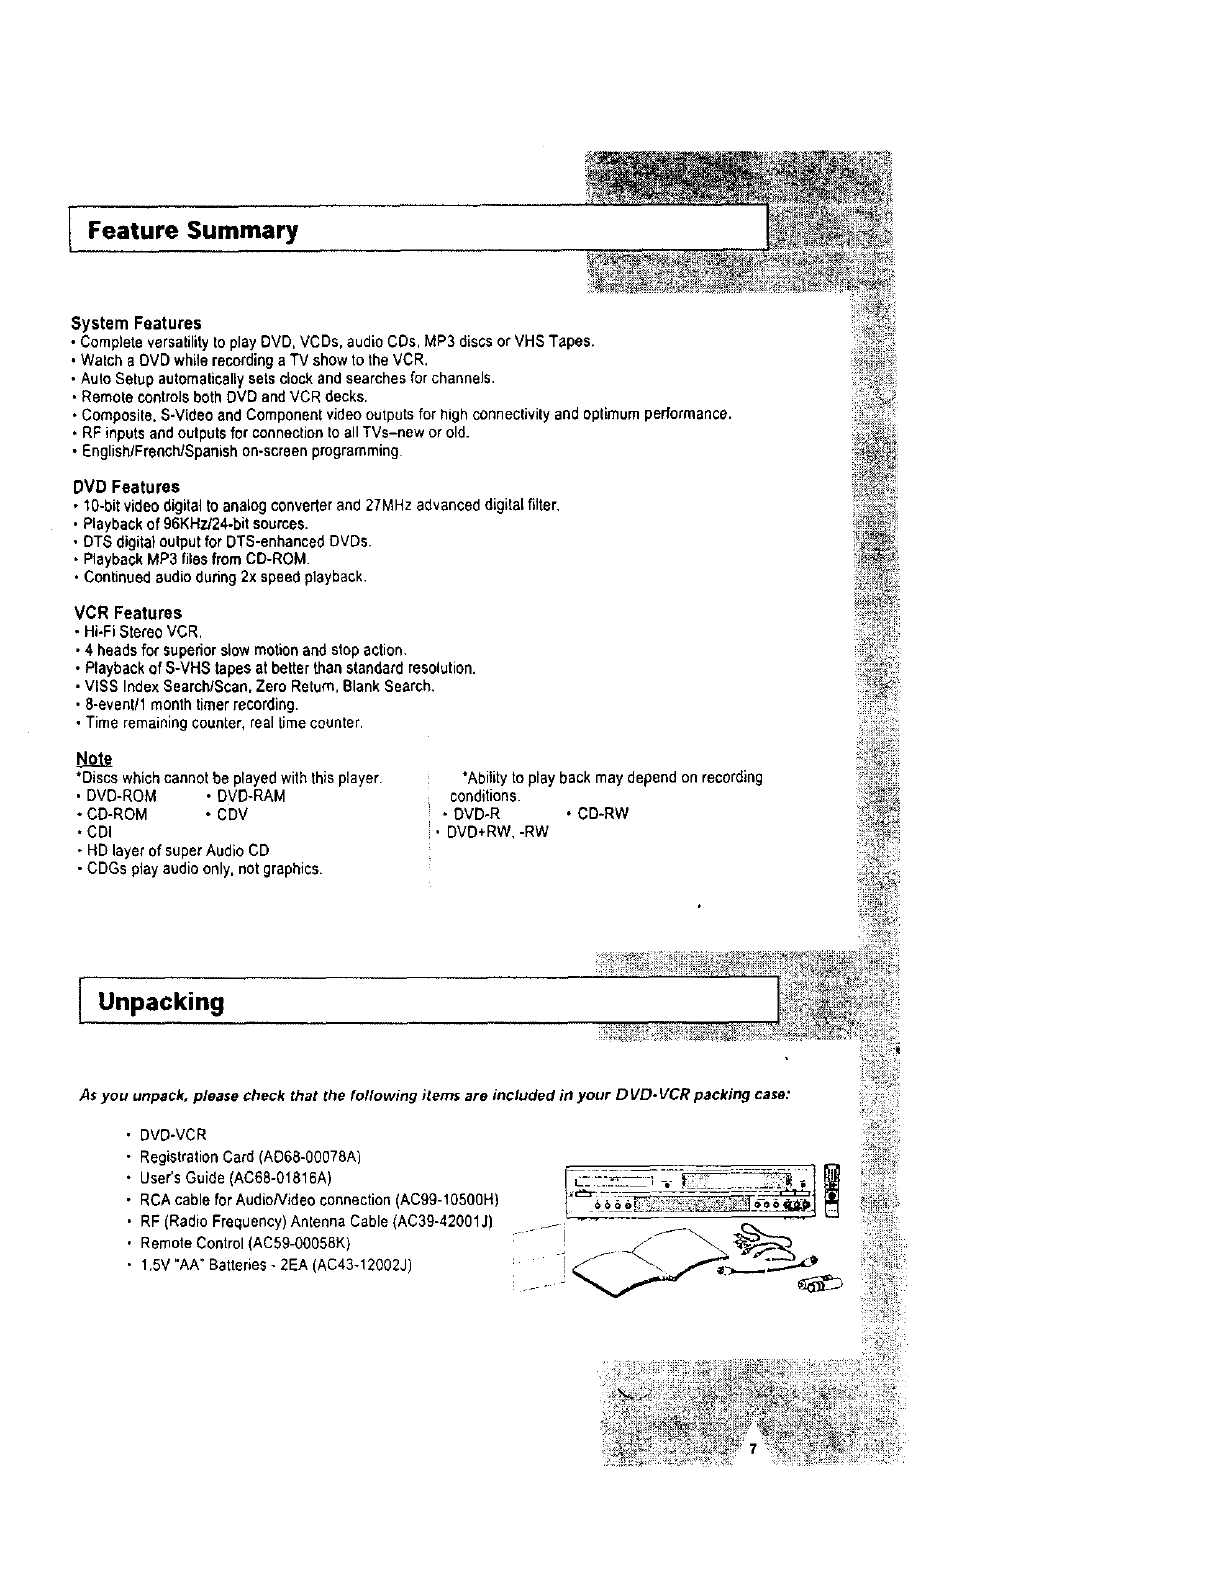
IFeature Summary
System Features
•Complete versatilityto play DVD, VCDs, audio CDs, MP3 discsor VHS Tapes.
• Watch a DVD while recordingaTV show to the VCR.
•Aulo Setup automaticallysets clockand searches for channels•
,Remote controlsboth DVD and VCR decks.
•Composite, S-Video and Componenl video outputs for high connectivityand optimum performance.
•RF inputs and outputs for connectionto all TVs-new or old.
•English/French/Spanish on-screen programming
DVD Features
• 10-bgvideo digital to analog converterand 27MHz advanced digital filter,
•Playback of 96KHz/24.bit sources.
•DTS digital output for DTS-enhanced DVDs.
• Playback MP3 filesfrom CD-ROM.
. Continued audio during 2x speed playback.
VCR Features
•Hi-Fi Stereo VCR.
•4 heads for superiorslow motion and stop action.
• Playback of S-VH$ tapes at betterthan standard resolution.
•VISS Index Search/Scan, Zero Return, Blank Search.
• 8-event/1 month timerrecording.
•Time remaining counter, real time counter•
*Discs which cannot be played with this player
. DVD-ROM • DVD-RAM
• CD-ROM •CDV
• CDI
• HD layer of super Audio CD
• CDGs play audio only, not graphics.
*Abilityto play back may depend on recording
conditions.
• DVD.R •CD-RW
• DVD+RW,-RW
Unpacking
As you unpack, please check that the following items are included in your D VD. VCR packing case:
• DVD-VCR
RegistrationCard (AD68-00078A)
User's Guide (AC68-01816A)
RCA cable for Audio/Videoconnection (AC99-tO500H)
RF (Radio Frequency) Antenna Cable (AC39-42001J)
Remote Control (AC59-00058K)
1.5V "AA" Batteries - 2EA (AC43*12002J)
$$_6I _-e$ =
: _;;s_;),}s r i i
i; i
?
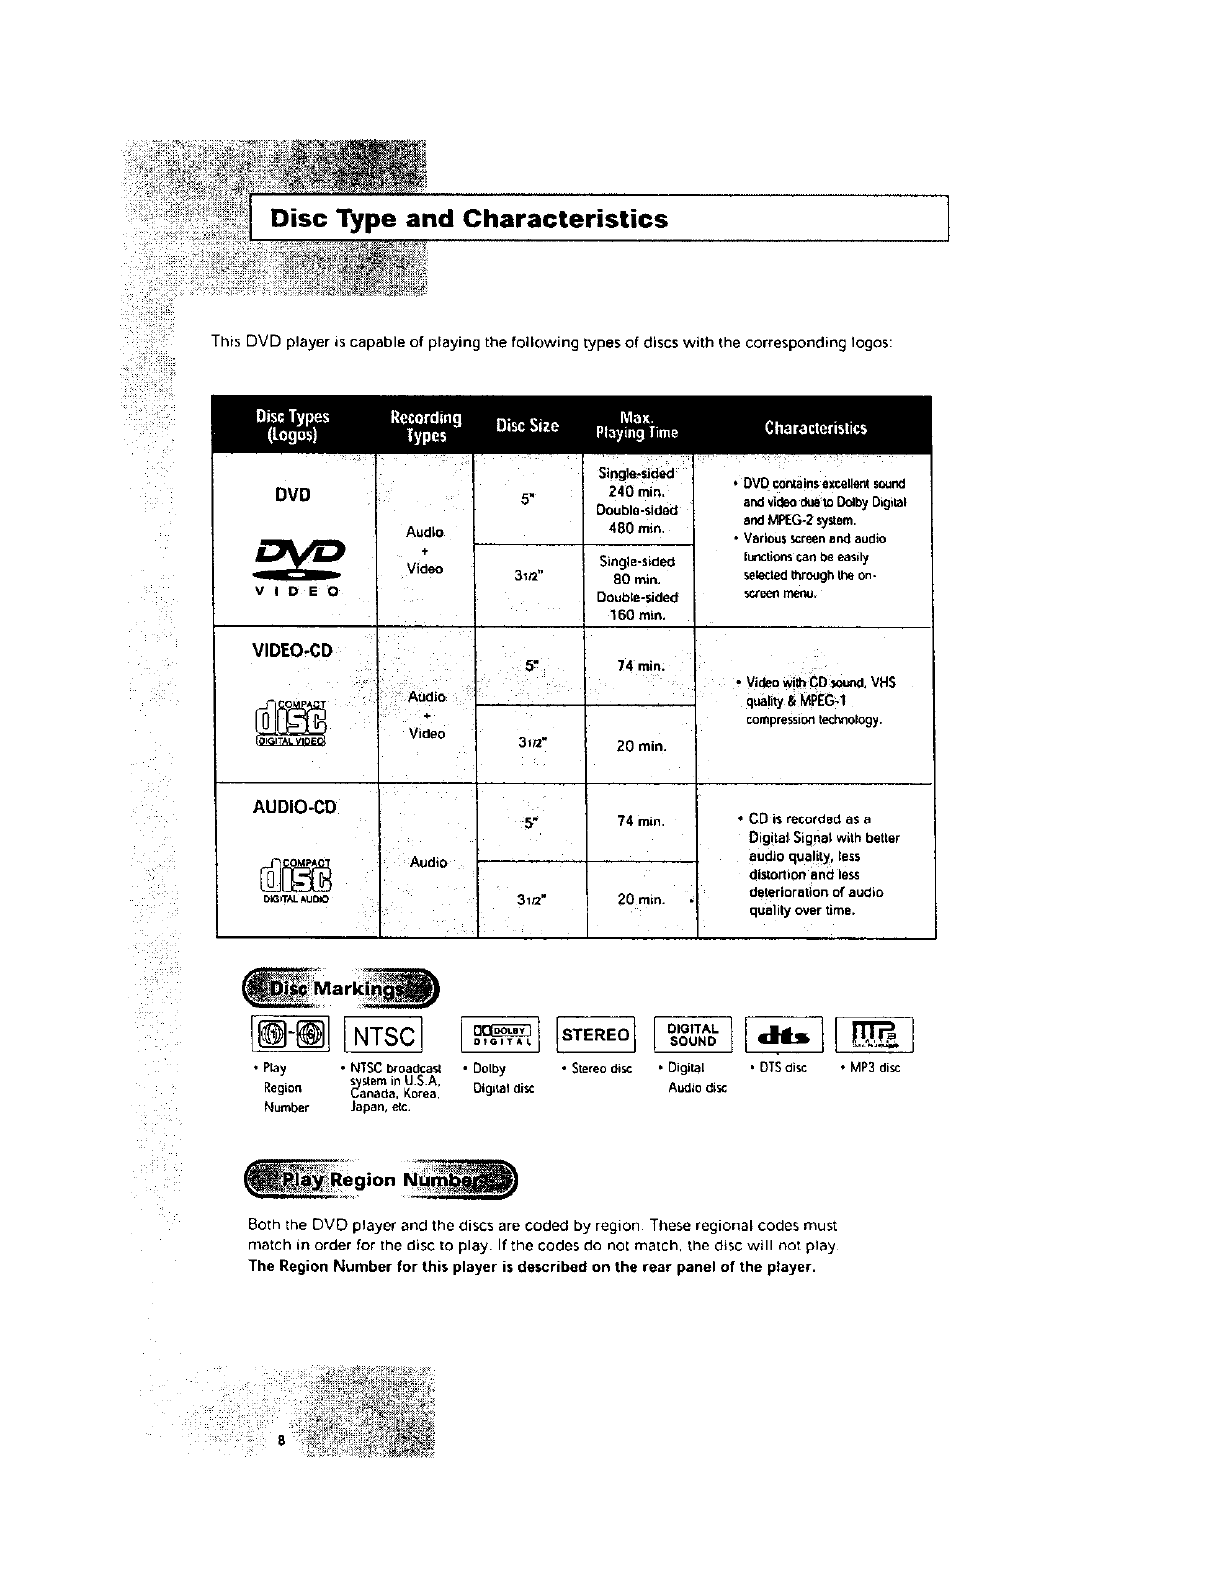
Disc Type and Characteristics ]
This DVD player ascapable of playing the following [ypes of discs with the correspondmg Iogos:
DVD
VID E D
VIDEO-CD
AUDIO-CD
)_Grr,_ AU_
Audio
Video
Audio
Video
Audio
Single-sided
5" 240 rnin,
Double-sided
480 rain
Single-sided
3_/2" 80 min.
Double-sided
160 rain.
5" 74 rain.
3_/z" 20 rain.
5" 74 min
31_" 20 rain
• DVD con_ain$axcellentsound
and videodueto DolbyDigital
and MPEG-2 system.
•VBdou$ screenand audio
lunctions can be easily
selected _rough the on-
v
. Video_h CD sound,VHS
q=Utya,MPEC,.i
compressiontechnology.
•CD is recorded as a
Digital Signal wgh beUer
audio qua!!ty, less
distortion and less
deterioratlon of audio
quality over time.
•Pray • NTSC broadcast • Dolby • Siereo ols¢ - Digital .DTS disc • MP3 disc
s stem in U.S.A
Regmn _/aSnada.Korea OIg$taldl_ Audio disc
Number lapan, e{c.
Both The DVD player and the d_scs are coded by region These regional codes must
match in order for Tile disc to Dlay f the codes do not match. Tne disc will not play
The Region Number for this player is described on the rear panel of the player.
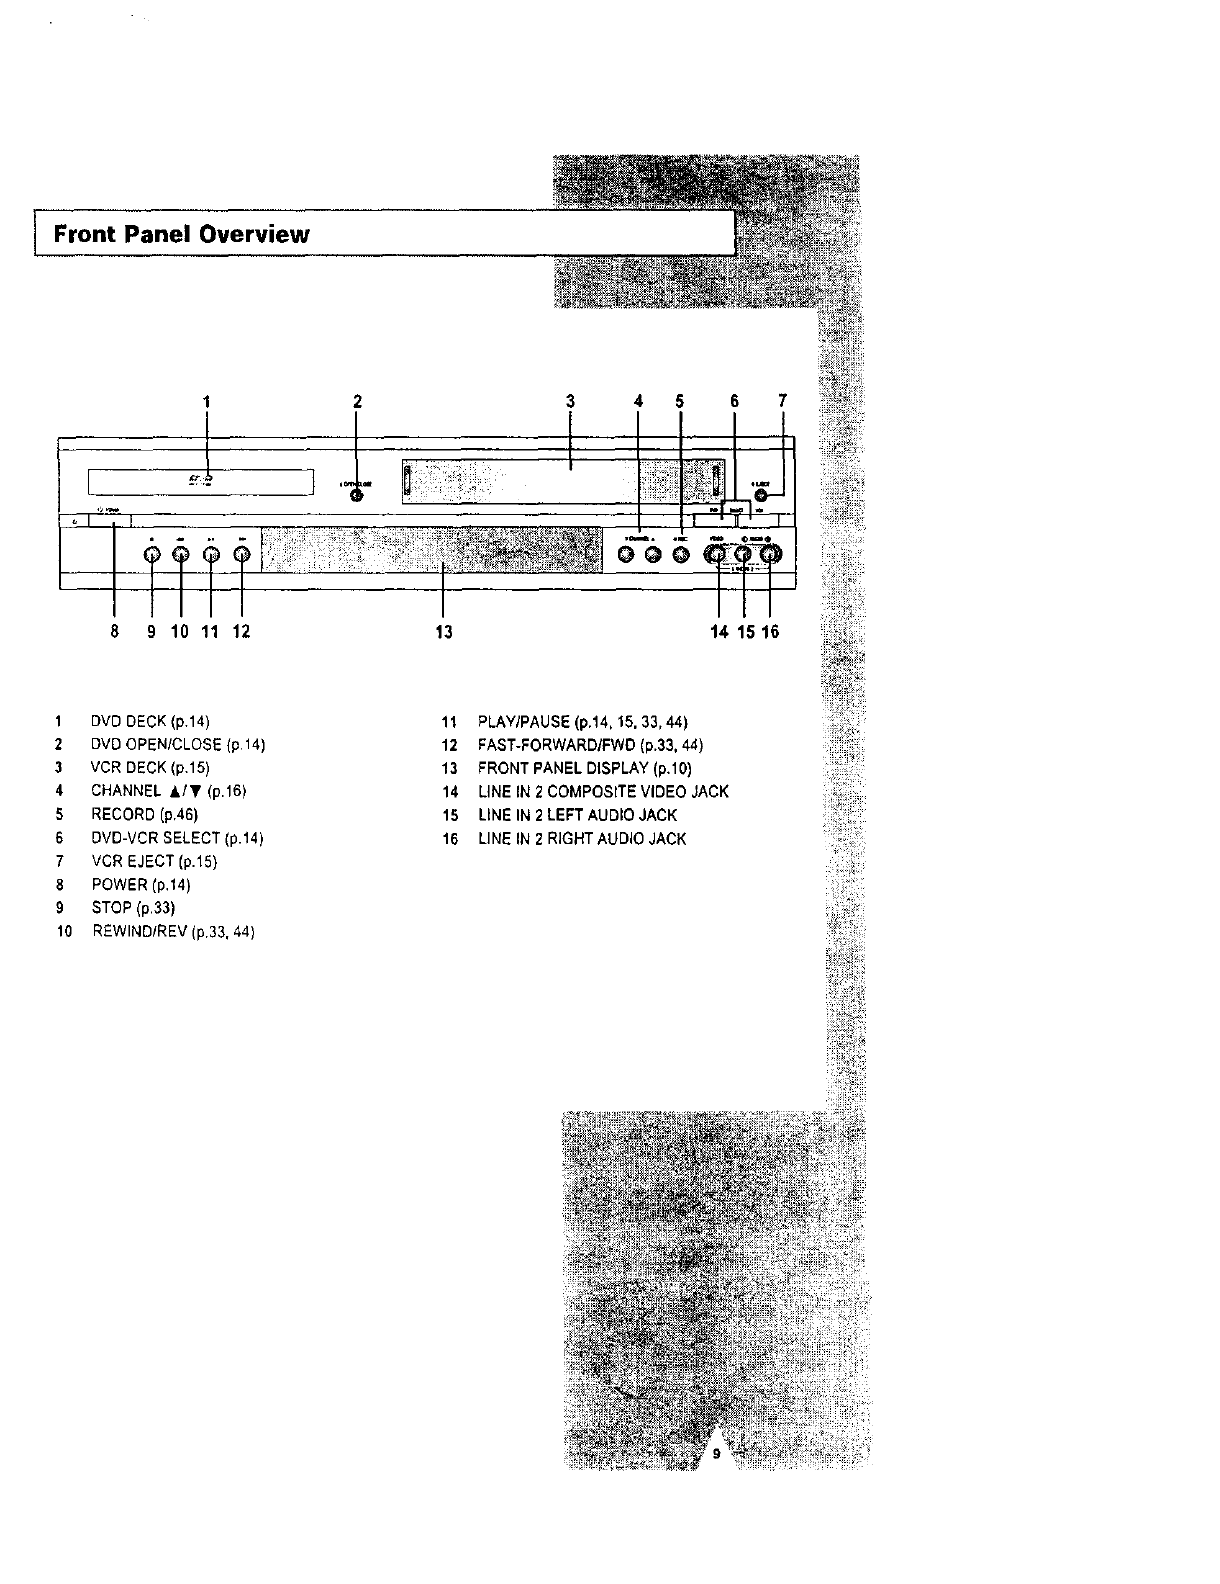
Front Panel Overview
1245 6 7
8 9 10 11 12 13 14 15 16
1DVD DECK (p.14)
2DVD OPEN/CLOSE (p.14)
3VCR DECK (p.15)
4 CHANNEL &/y (p.16)
5 RECORD (p.46)
6 DVD-VCR SELECT (p.14)
7 VCR EJECT (p.15)
8 POWER (p.14)
9 STOP (p.33)
10 REWIND/REV(p.33, 44)
11 PLAY/PAUSE (p.14, 15, 33,44)
12 FAST-FORWARD/FWD (p.33, 44)
13 FRONT PANEL DISPLAY (p.10)
14 LINE IN 2 COMPOSITE VIDEO JACK
15 UNE IN 2 LEFT AUDIO JACK
t6 LINE IN 2 RIGHTAUDIO JACK
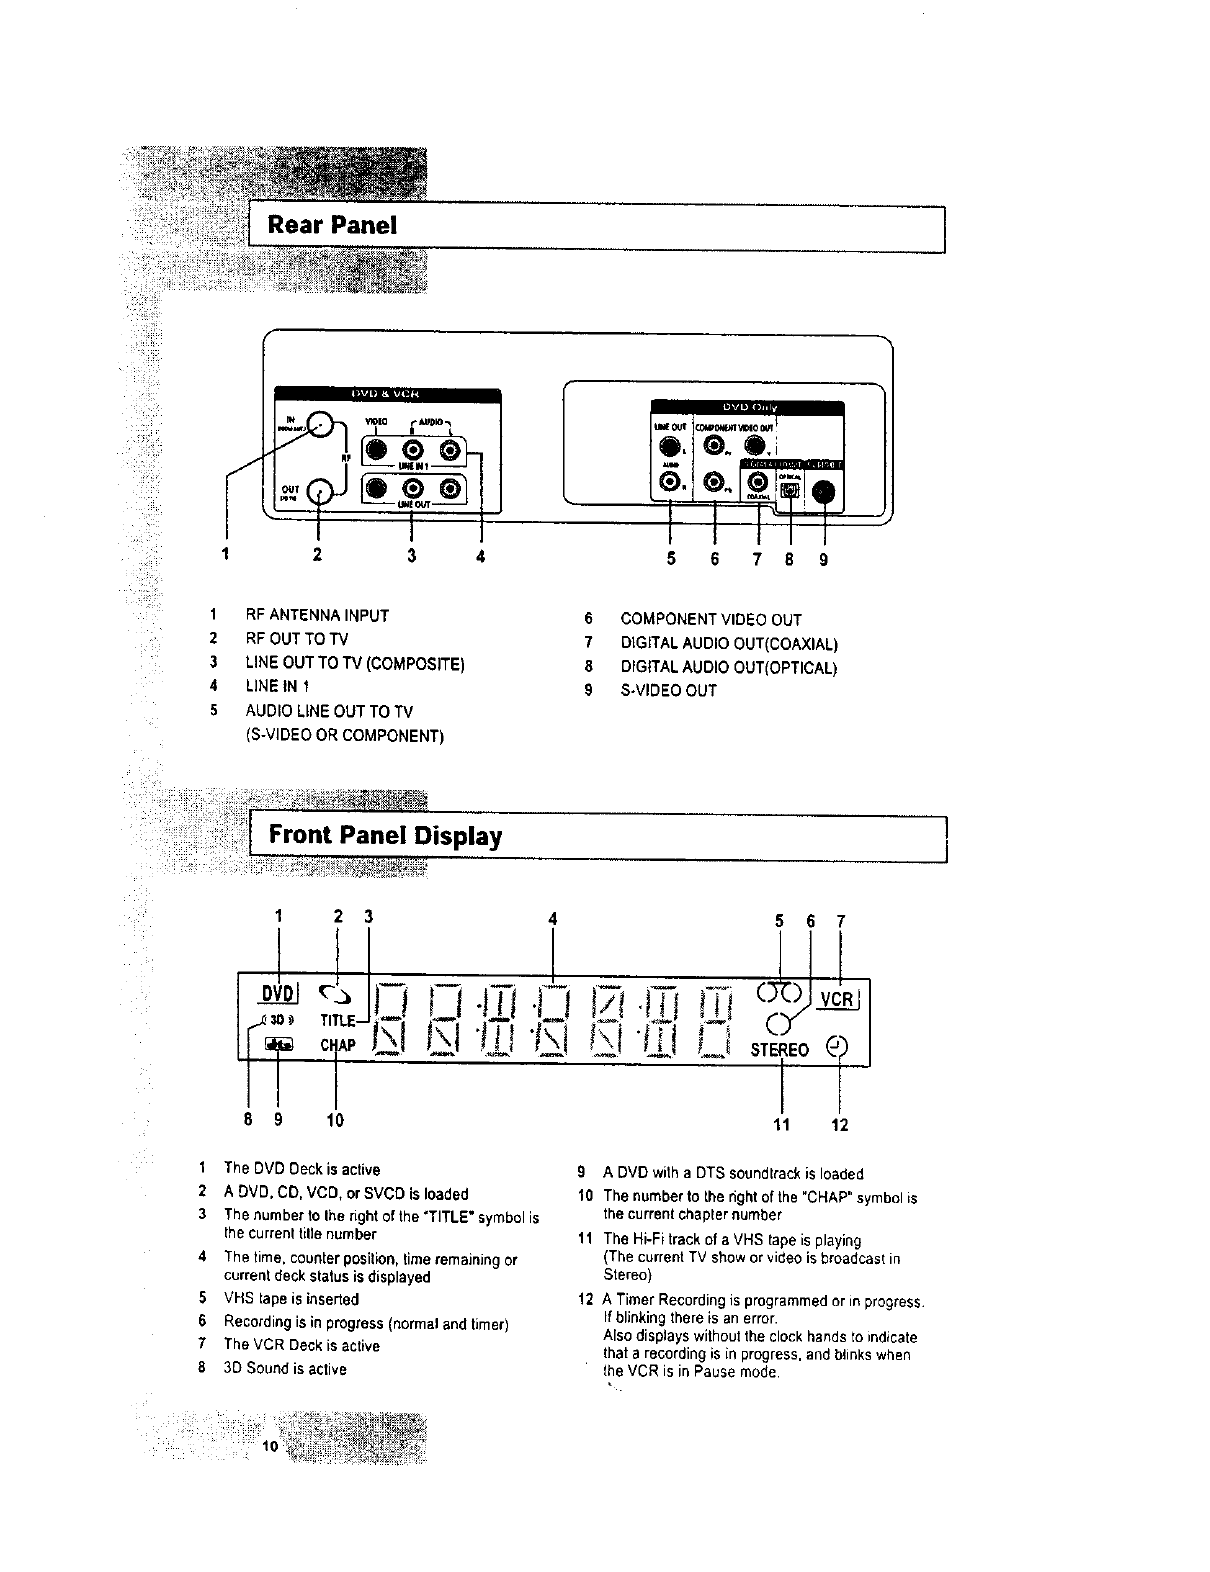
Rear Panel 1
/
VIOEo _AUDbD"_
2 3 4 5 6 7 8
1 RF ANTENNA INPUT 6 COMPONENT VIDEO OUT
2 RF OUT TO TV 7 DIGITAL AUDIO OUT(COAXIAL)
3 LINE OUT TO TV (COMPOSITE) 8 DIG|TAL AUDIO OUT(OPTICAL)
4 LiNE IN 1 9 S-VIDEO OUT
5 AUDIO LiNE OUT TO "iV
-S-VIDEO OR COMPONENT)
IFront Panel Display I
I
1 2 3 4 5 6
8910 11 12
1
2
3
5
6
7
8
The DVD Deck is active
A DVD. CD. VCD, or SVCD is loaded
The number to Ibe right of the "TITLE" symbolis
the currentti,e number
The time. counterposition,time remaining or
currentdeck status is displayed
VHS tape is inserted
Recording is in progress (normal and timer)
The VCR Deck is active
3D Sound is active
9
1o
11
12
A DVD with aDTS soundtrackis loaded
The number to the rightof the "CHAP"symbolis
the current chapter number
The Hi-Fi track of a VHS tape is playing
(The current TV show or _ideo is broadcast in
Stereo)
A Timer Recording is programmed or in progress
If blinking there is an error.
Also displayswithout the clock hands _oindicate
that a recording is in progress, and blinks when
lhe VCR is in Pause mode.
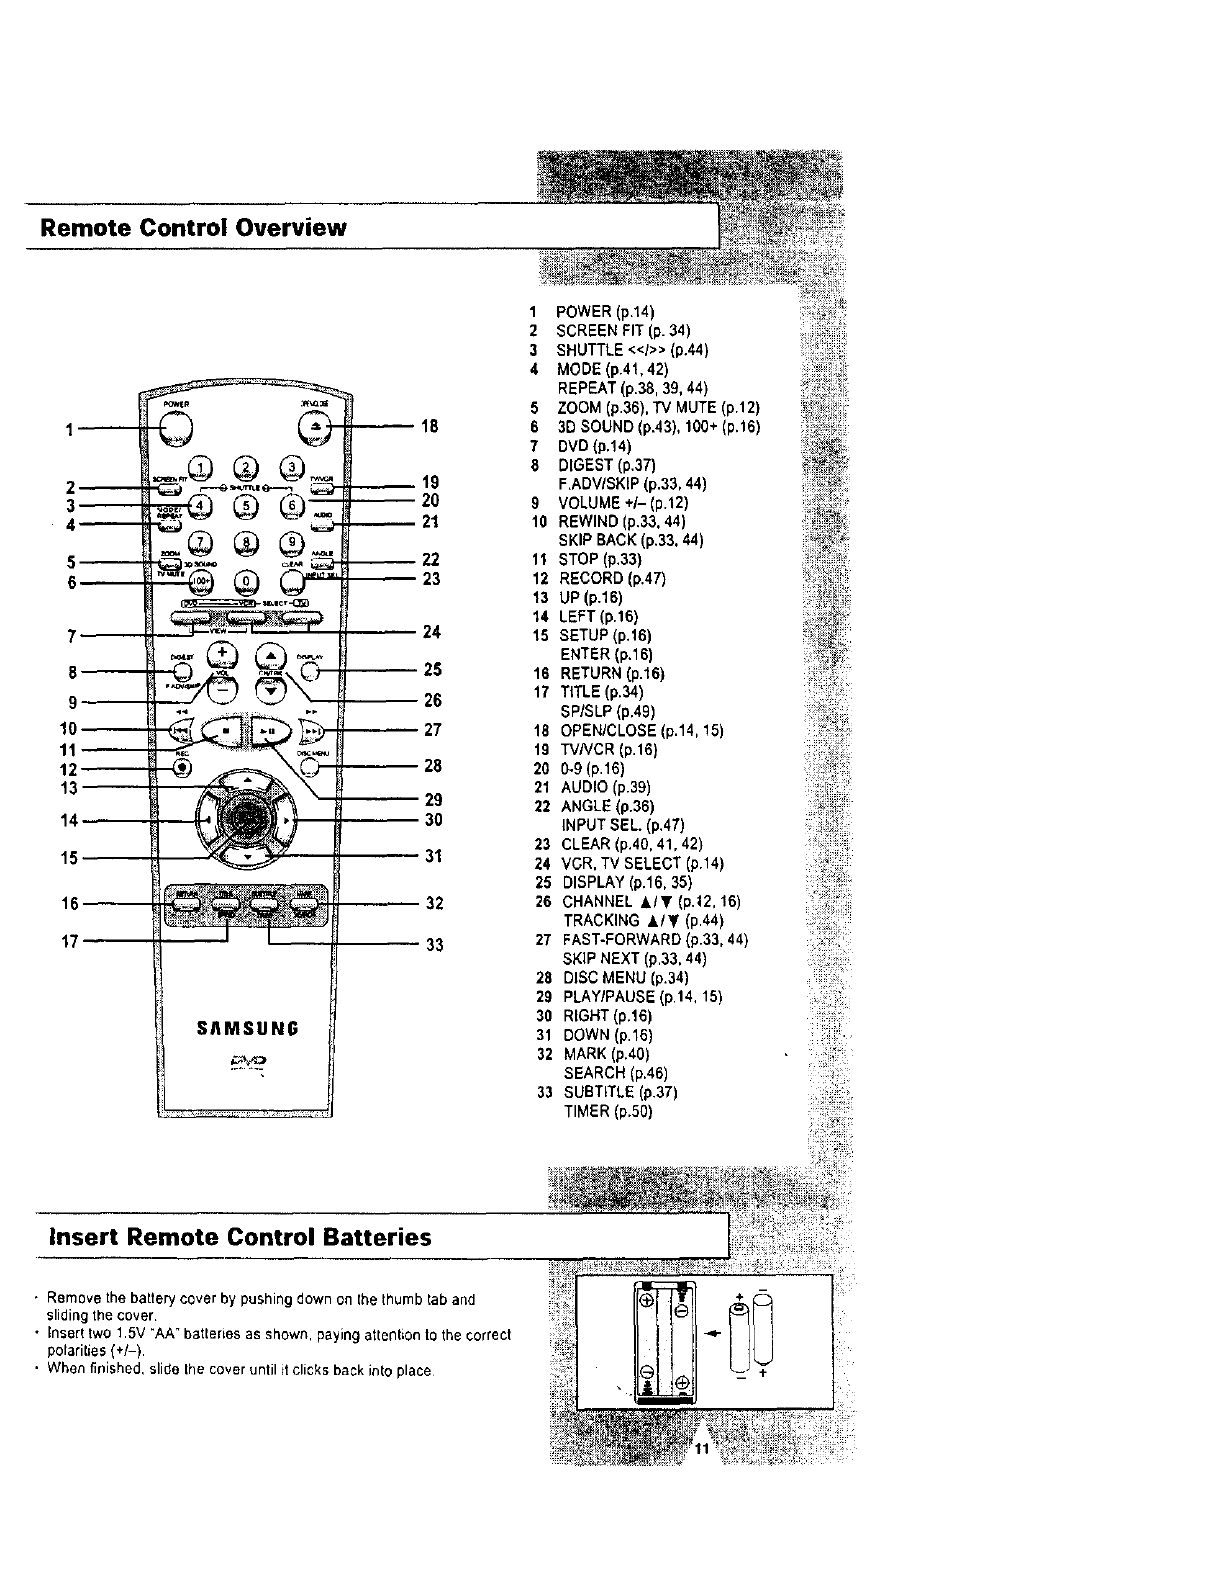
Remote Control Overview
2_
3--
4_
5_
6
7
8--
9
10_
11_
12_
13
14
15
16--
17
© @
®
S/IMSUNG
_18
19
-- 20
21
22
23
24
2S
-- 26
27
-- 28
29
30
31
32
33
1 POWER (p.14)
2SCREEN FIT (p. 34)
3 SHUTTLE <<1>>(p.44)
4 MODE (p.41,42)
REPEAT (p.38, 39, 44)
5 ZOOM (p.36), TV MUTE (p.12)
6 3D SOUND (p.43), 100+ (p.16)
7 DVD(p.14)
8 DIGEST (p.37)
F.ADV/SKIP (p.33, 44)
9 VOLUME +/- (p.12)
10 REWIND (p.33.44)
SKIP BACK (p.33. 44)
11 STOP (p.33)
12 RECORD (p.47)
13 UP (p.16)
14 LEFT (p.16)
15 SETUP (p.16)
ENTER (p.16)
16 RETURN (p.16)
17 TITLE (p.34)
SP/SLP (p.49)
18 OPENICLOSE (p.14, 15)
t9 TVNCR (p.16)
20 0-9 (p.16)
21 AUDIO (p.39)
22 ANGLE (p.36)
INPUT SEL (p.47)
23 CLEAR (p,40, 41,42)
24 VCR, TV SELECT (p.14)
25 DISPLAY (p.16, 35)
26 CHANNEL A/T (p.12, 16)
TRACKING ,&IT (p.44)
27 FAST-FORWARD (p.33,44)
SKIP NEXT (p.33, 44)
28 DISC MENU (p.34)
29 PLAY/PAUSE (p,14, 15)
30 RIGHT (p.16)
31 DOWN (p.16)
32 MARK (p.40)
SEARCH (p,46)
33 SUBTITLE (p.37)
TIMER (p.50)
Insert Remote Control Batteries
•Remove the battery cover by pushing down on the thumbtab and
sliding the cover.
•Inserttwo 1.5V "AA° batteries as shown, paying attention to the correct
polarities(+/-).
• When finished, slide the cover until it clicks back into place
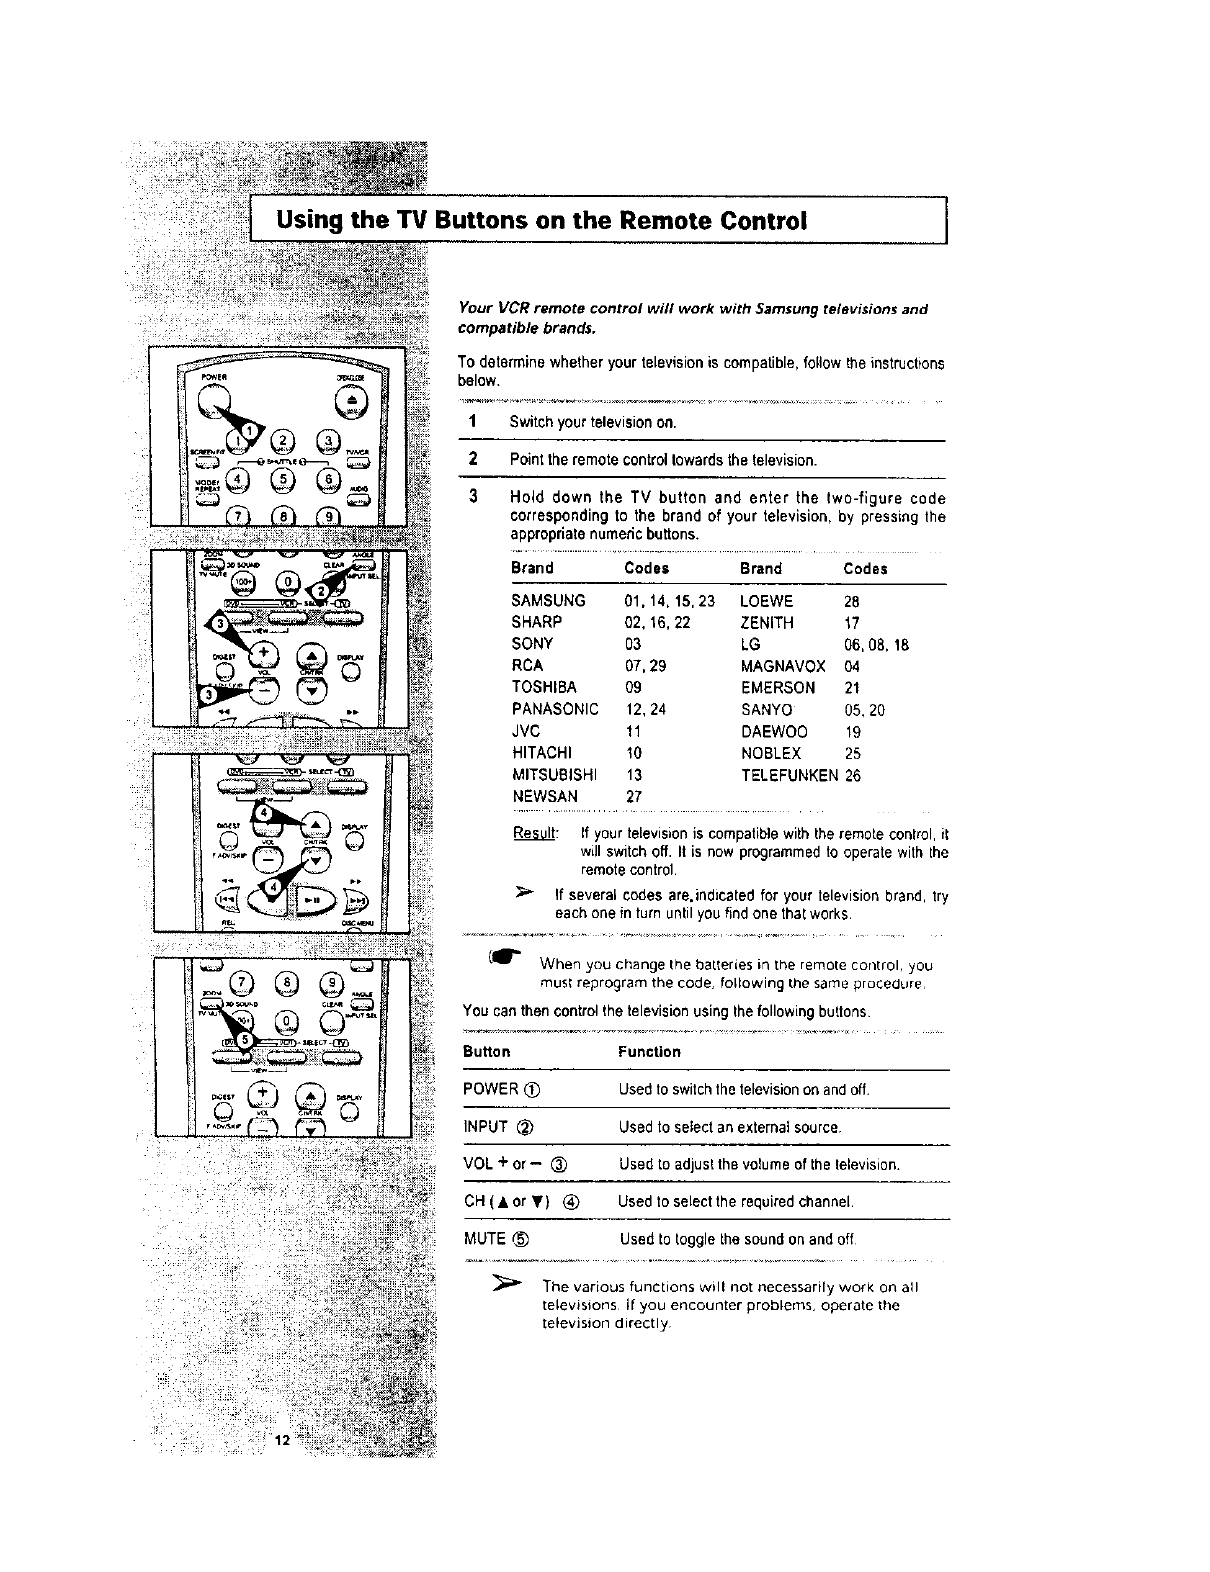
Using the TV Buttons on the Remote Control
Your VCR remote control will work with Samsung televisions and
compatible brands.
To determinewhetheryour televisionis compatible,follow theinstructions
below,
1 Switch your televisionon.
2 Pointthe remote controltowards the television.
3 Hold down the TV button and enter the two-figure cede
corresponding to the brand of your television, by pressing the
appropriatenumeric buttons.
Brand Codes Brand Codes
$AMSUNG 01, 14, 15, 23 LOEWE 28
SHARP 02, 16, 22 ZENITH "_7
SONY 03 LG 06, 08, 18
RCA 07, 29 MAGNAVOX 04
TOSHIBA 09 EMERSON 21
PANASONIC 12, 24 SANYO 05, 20
JVC 11 DAEWOO 19
HITACHI 10 NOBLEX 25
MITSUBISHI 13 TELEFUNKEN 26
NEWSAN 27
Result: If your televisionis compatiblewith the remote control it
will switch Off. It is now programmed to operate with the
remote control.
If several codes are.indicated for your television brand, try
each one in turn until you find one that works•
(_"= When you change the batleries in the remote cor_trol, you
must reprogram the code. following the same procedure
YOUcan then control the television using the following buttons
Button Function
POWER (_ Used to switch the televisionon and off.
INPUT _) Used to select an external source
VOL + or -(_) Used to adjust the volume of the lelevision.
CH (• or T) (_ Used to select the required channel•
MUTE _ Used to toggle the sound on and off
"[he various functions will not necessarily work on all
televisions It you encounter problems, operate the
television directly
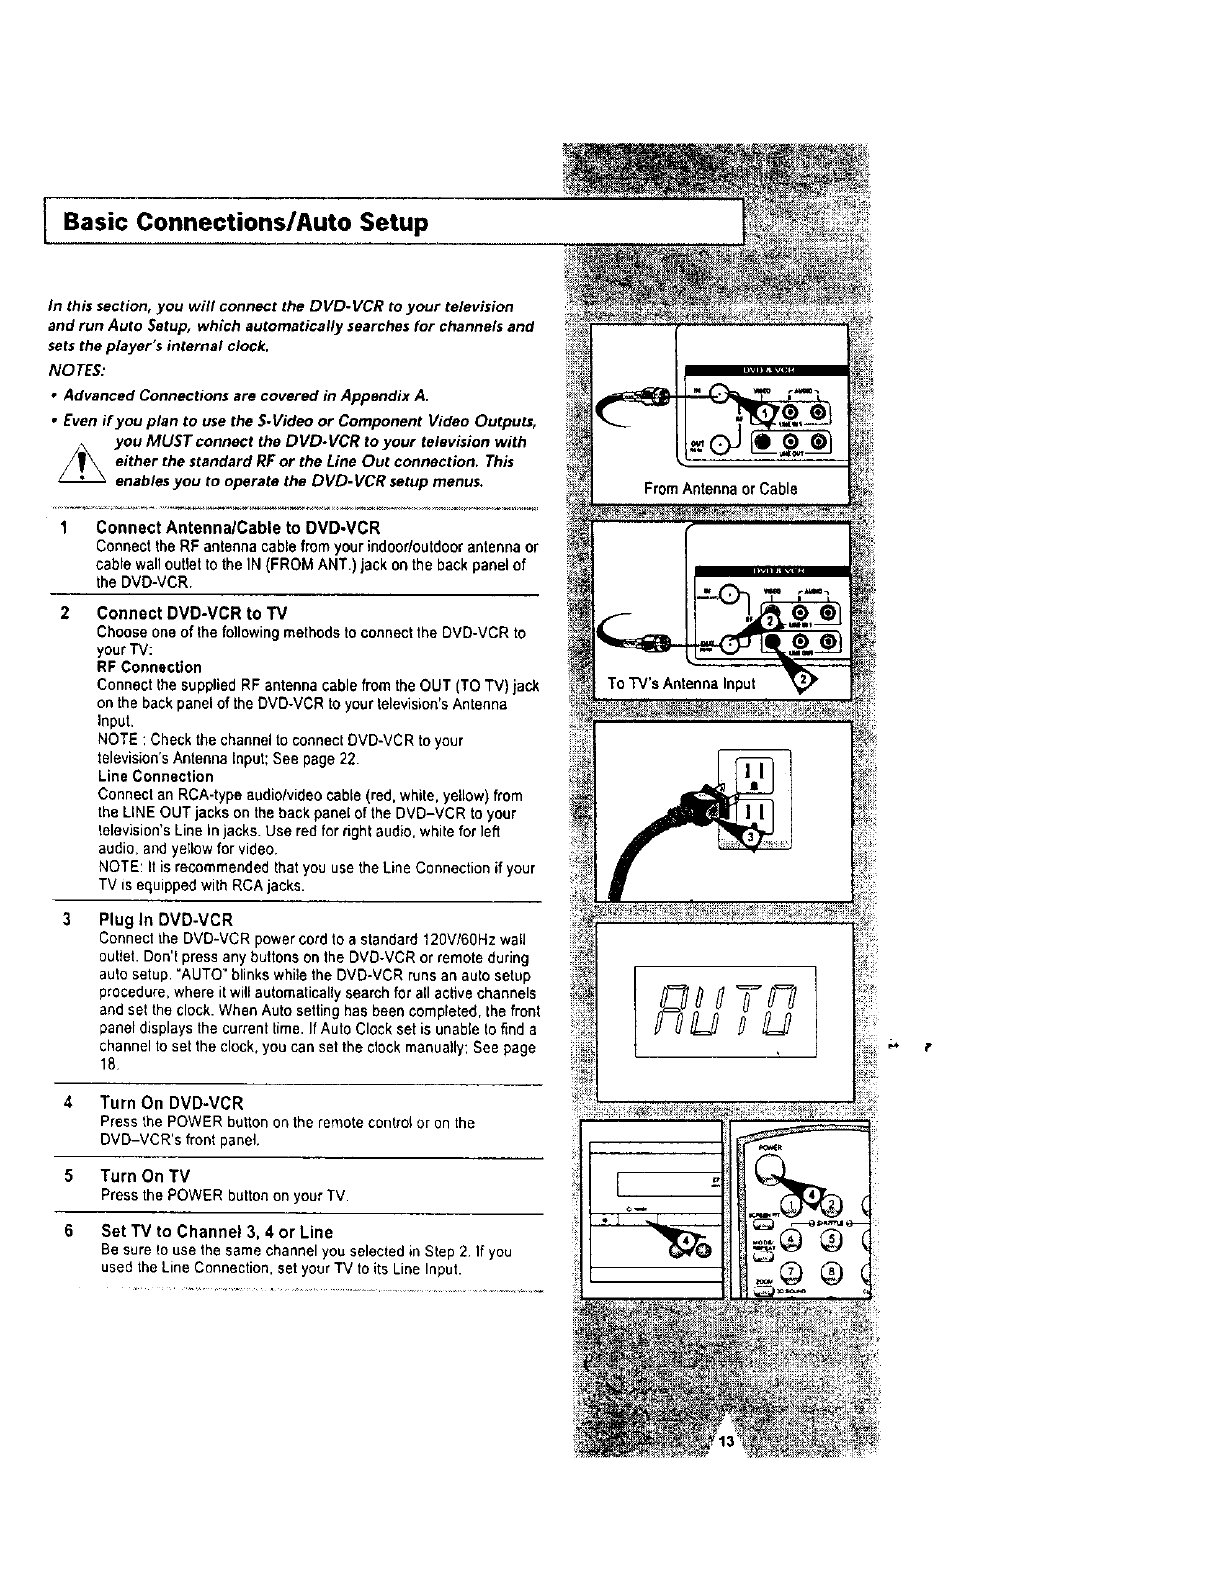
IBasic Connections/Auto Setup
in this section, you will connect the D VD-VCR to your television
and run Auto Setup, which automatically searches for channels and
setsthe player's internal clock.
NOTES:
• Advanced Connections are covered in Appendix A.
•Even if you plan to use the S.Video or Component Video Outputs,
_y_ you MUST connect the DVD.VCR to your television with
either the standard RF or the Line Out connection. This
enables you to operate the DVD-VCR setup menus.
1 Connect Antenna/Cable to DVDoVCR
Connectthe RF antenna cable from yourindoor/outdoorantenna or
cable wall outletto the IN (FROM ANT.) jack on the back panel of
the DVD-VCR.
Connect DVD-VCR to TV
Choose one of the following methods to connect the DVD-VCR to
yourIV:
RF Connection
Connect the supplied RF antenna cable from the OUT (TO TV) jack
on the back panel of the DVD-VCR to yourtelevision'sAntenna
input.
NOTE : Check the channelto connectDVD-VCR to your
television'sAntenna Input; See page 22.
Line Connection
Connect an RCA-type audio/video cable(red. white, yellow) from
the LINE OUT jacks on the back panel of the DVD-VCR to your
_elevision's Line In jacks. Use red for right audio, white for left
audio, and yellow for video.
NOTE: It is recommended that you use the Line Connection if your
TV is equipped with RCA jacks.
3Plug In DVD-VCR
Connect the DVD-VCR power cordto astandard 120V/60Hz wall
ouUet. Don't press any buttons on the DVD-VCR or remote during
auto setup. "AUTO" blinks while the DVD-VCR runs an auto setup
procedure,where it will automatically search for all active channels
and set the clock. When Auto setting has been completed, the front
panel displays the currenttime. If Auto Clock set is unable to find a
channel to set the clock, you can set the clock manually; See page
18
4 Turn On DVD-VCR
PressthePOWERbuttonontheremotecontro_oronthe
DVD-VCR'sfront panel.
5 Turn On TV
PressthePOWERbuttononyour TV.
6Set TV to Channel 3, 4 or Line
Be sure _ouse the same channel you selected in Step 2 If you
used the Line Connection, set your TV to its Line Input.
FromAntennaorCable
To TV's Antenna Input
r
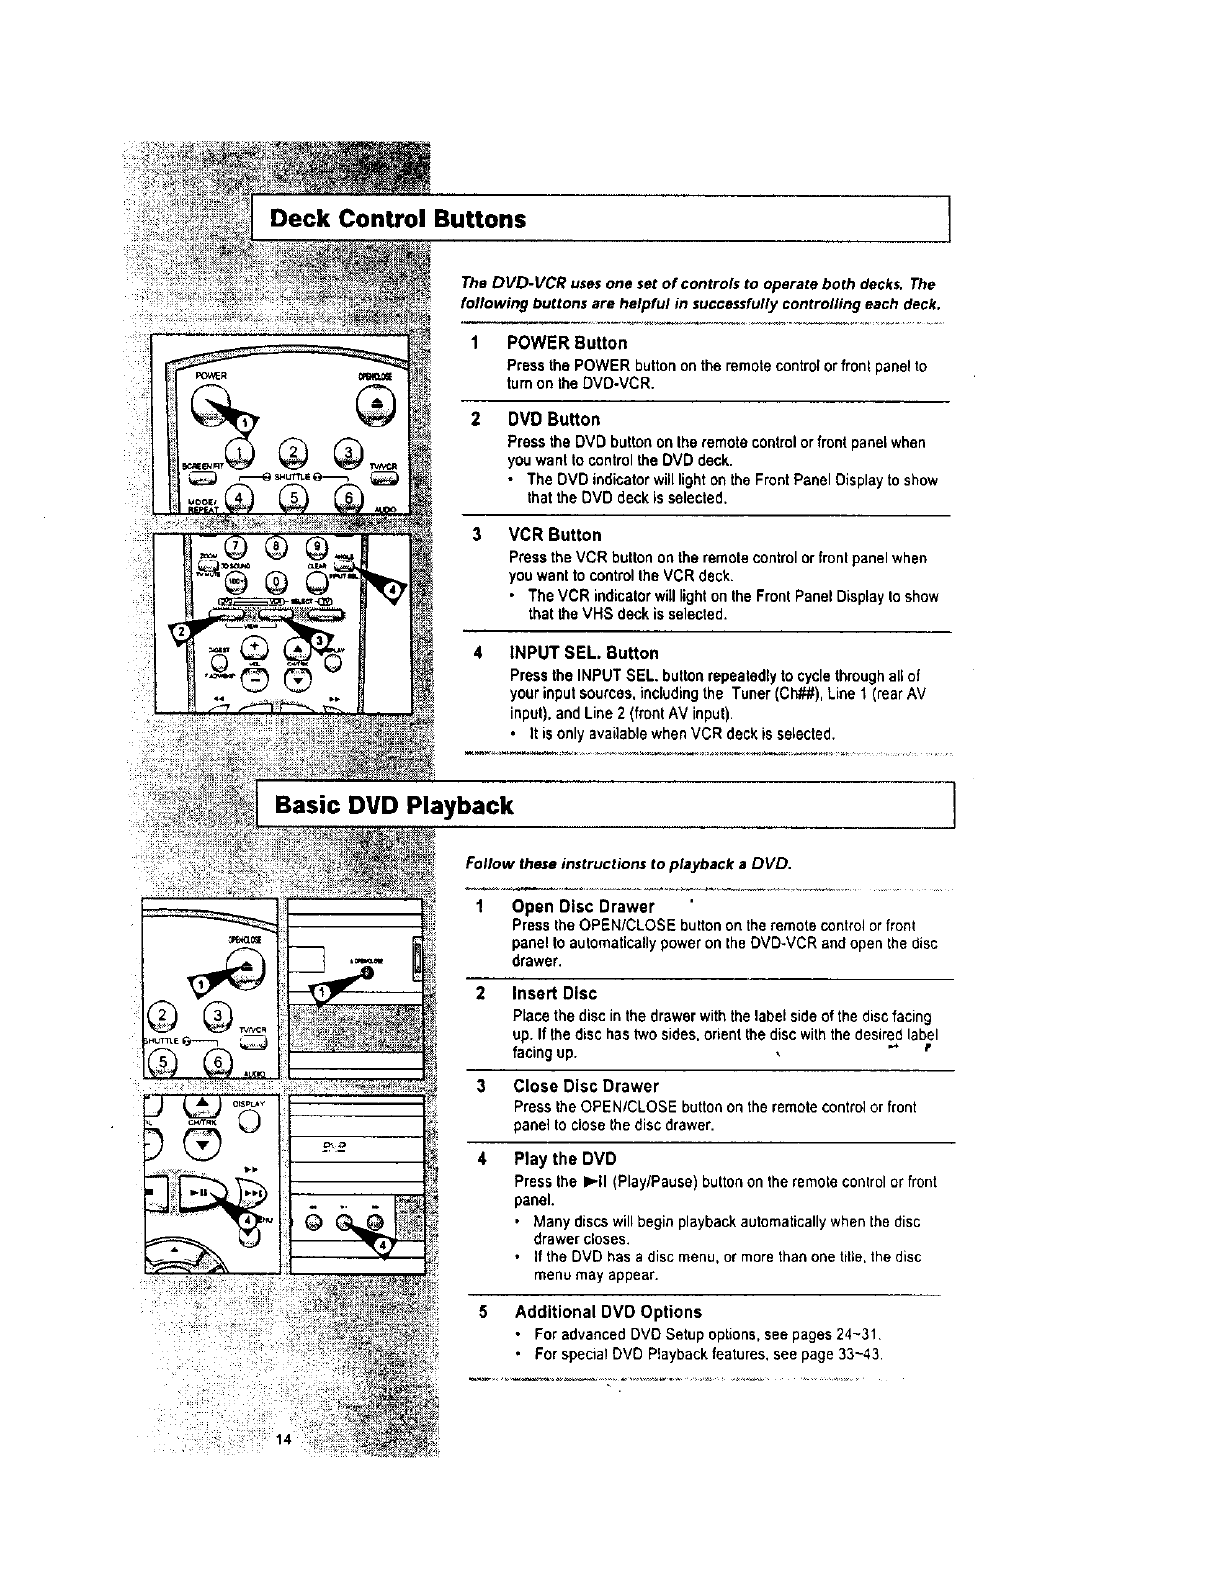
Deck Control Buttons ]
The DVD-VCR usesone set of controls to operate both decks. The
following buttons are helpful in successfully controlling each deck.
1 POWER Button
Press the POWER button on the remote controlor front panel to
turn on the DVD-VCR.
2DVD Button
Press the DVD buttonon Ihe remote controlor frontpanel when
you want to controlthe DVD deck.
• The DVD thdicator will lighton the Front Panel Oisplayto show
that the DVD deck is selected.
VCR Button
Press the VCR button on the remote controlor frontpanel when
you want to controlthe VCR deck.
• The VCR indicatorwilllight on the Front Panel Display to show
that the VHS deck is selected.
INPUT SEL. Button
Pressthe INPUT SEL buttonrepeatedly to cycle throughall of
your inputsources, includingthe Tuner (Oh##), Line 1(rear AV
input),and Line 2(front AV input).
•It is only available when VCR deck is selected.
Basic DVD Playback ]
Follow these instructions to playback a DVD.
1 Open Disc Drawer
Press the OPEN/CLOSE buttonon the remote controlorfront
panel to automatically power on the DVD-VCR and open the disc
drawer,
2 Insert Disc
P_acethe disc in the drawerwith the label side of the disc facing
up. If the disc has two sides, orient the disc with the desired label
facing up. ._- t
3 Close Disc Drawer
Pressthe OPEN/CLOSE button on the remote controlor front
panel to closethe discdrawer.
4 Play the DVD
Press the ),'-II (Play/Pause) button on the remotecontrolor front
panel.
• Many discs willbegin playback automaticallywhen the disc
drawer closes.
•If the DVD has a disc menu, or more than one tit;e, the disc
menu may appear.
5 Additional DVD Options
• For sdvancod DVD Setup options, see pages 24~31
•For specia! DVD Playback features, see page 33~43.
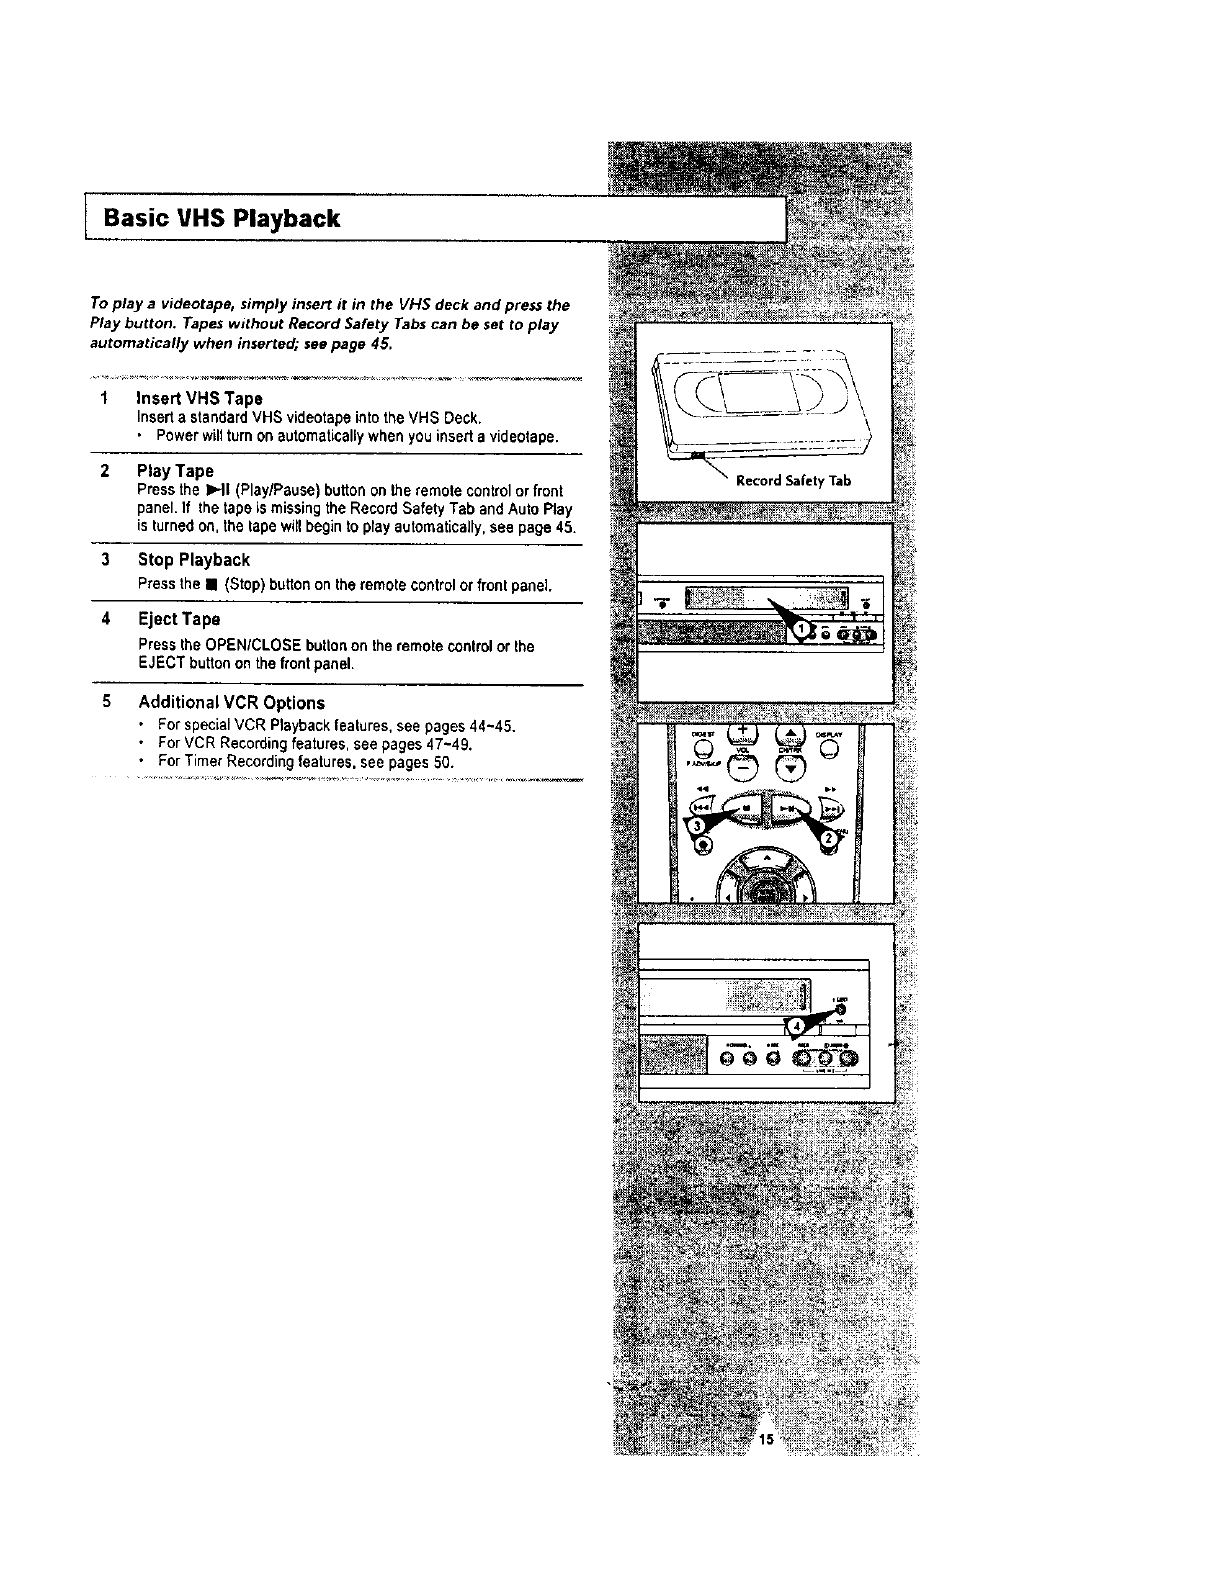
Basic VHS Playback
To play a videotape, simply insert it in the VHS deck and press the
Play button. Tapes without Record Safety Tabs can be set to play
automatically when inserted; see page 45.
1 Insert VHS Tape
Insert a standard VHS videotape into the VHS Deck.
• Power will turn on automatically when you insed a videotape.
2 Play Tape
Press the >..ll (Play/Pause) button on the remote controlor front
panel. ]f the tape is missing the Record Safety Tab and Auto Play
is turned on, the tape witl begin to play automatically, see page 45.
3 Stop Playback
Press the • (Stop) button on the remote controlor front panel•
4Eject Tape
Press the OPENICLOSE button on the remote control or the
EJECT button on the front panel.
5 Additional VCR Options
• For special VCR Playback features, see pages 44~45.
• For VCR Recordingfeatures, see pages 47~49.
•For Timer Recordthg features, see pages 50.
RecordSafetyTab
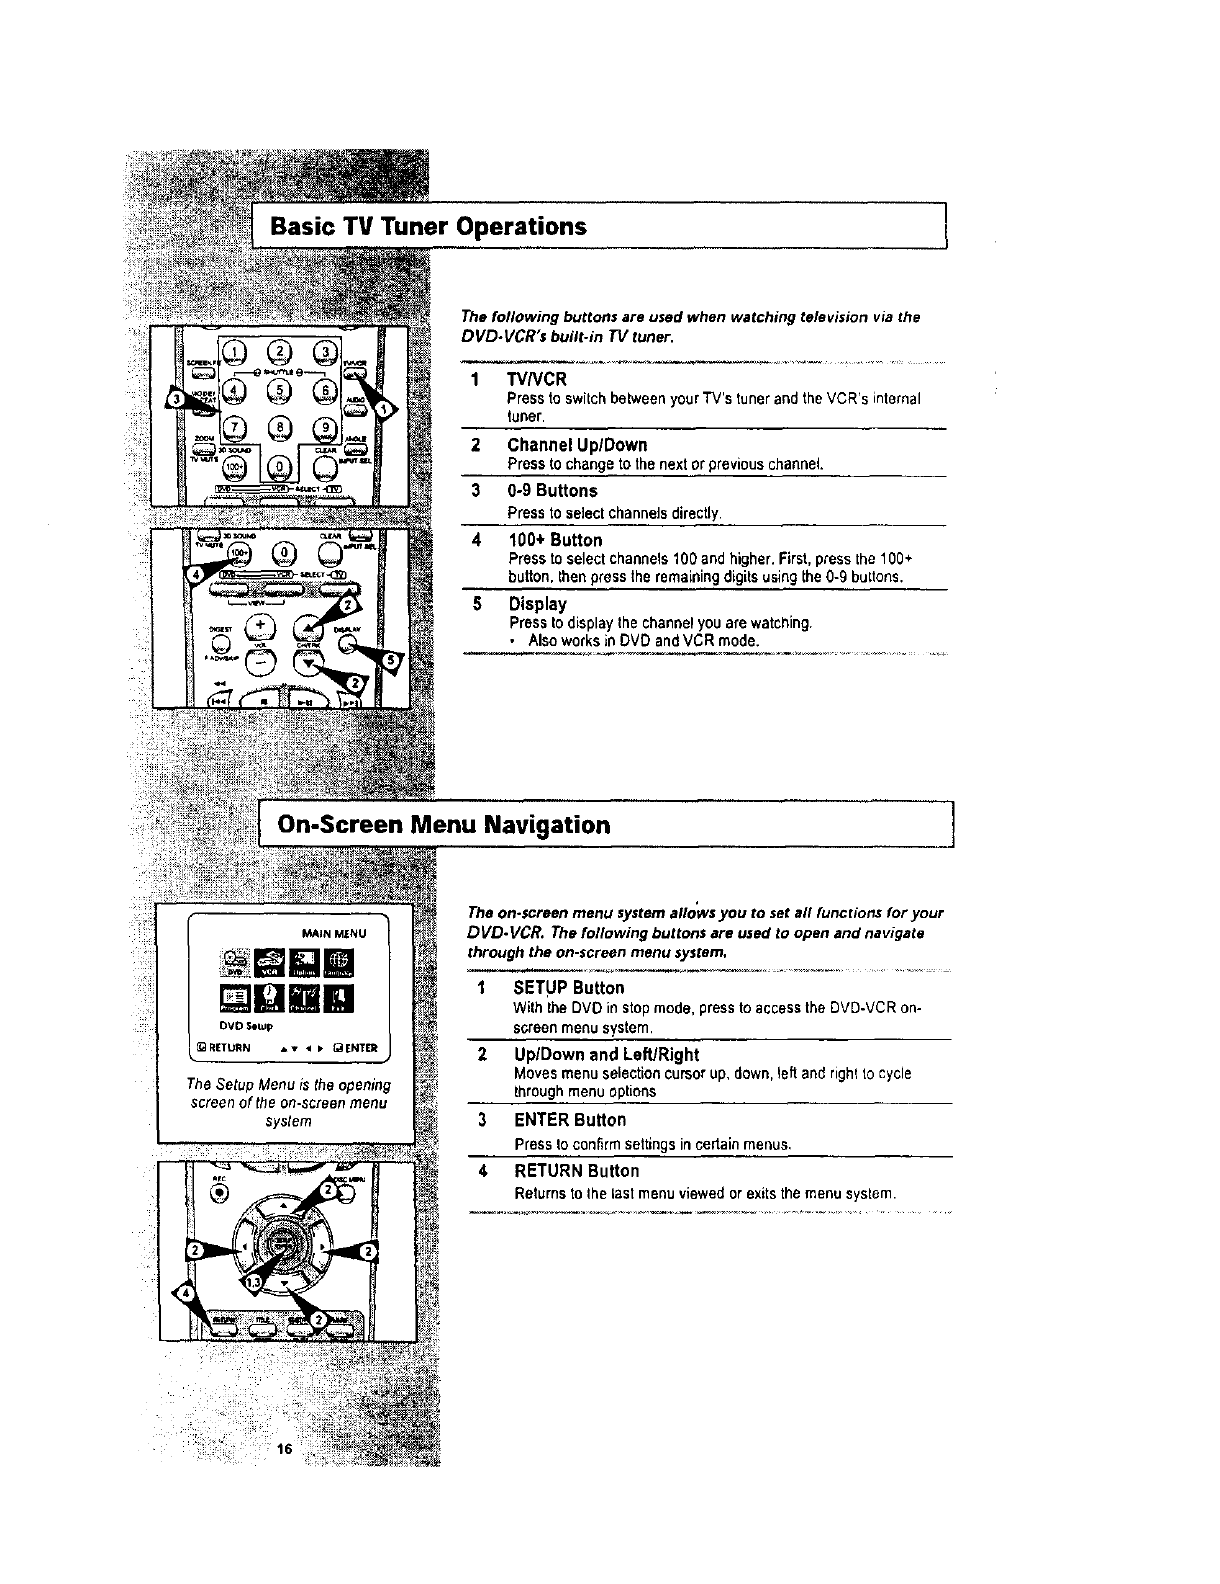
Basic TV Tuner Operations
The following buttons are used when watching television via the
DVD.VCR's built-in TV tuner.
1 TVNCR
Press to switch between your TV's tuner and the VCRIs internal
tuner.
2 Channel Up/Down
Press tochange to the nextor previouschannel.
30-9 Buttons
Press to select channels directly.
4 100+ Button
Press to select channels 100 and higher. First, press the log+
button, then press the remaining digitsusing the 0-g buttons.
5 Display
Press to displaythe channel you are watching.
•Alsoworks in DVD and VCR mode.
On-Screen Menu Navigation ]
MAIN MENU
gBi
OVD $owp
_RETURN _ < I* _ENT_
The Setup Menu is the opening
screen of the on-screen menu
system
The on.screen menu system allo'wsyou to set all functions for your
DVD.VCR, The following buttons are used to open and navigate
through the on-screen menu system,
I SETUP Button
With the DVD in stop mode, press to accessthe DVD-VCR on-
screen menu system.
2 UplDown and LefURight
Moves menu selection cursor up, down, left and right to cycle
throughmenu options
3 ENTER Button
Press to confirmsettings in certain menus,
4 RETURN Button
Returns to the last menu viewed orexits the menu system.
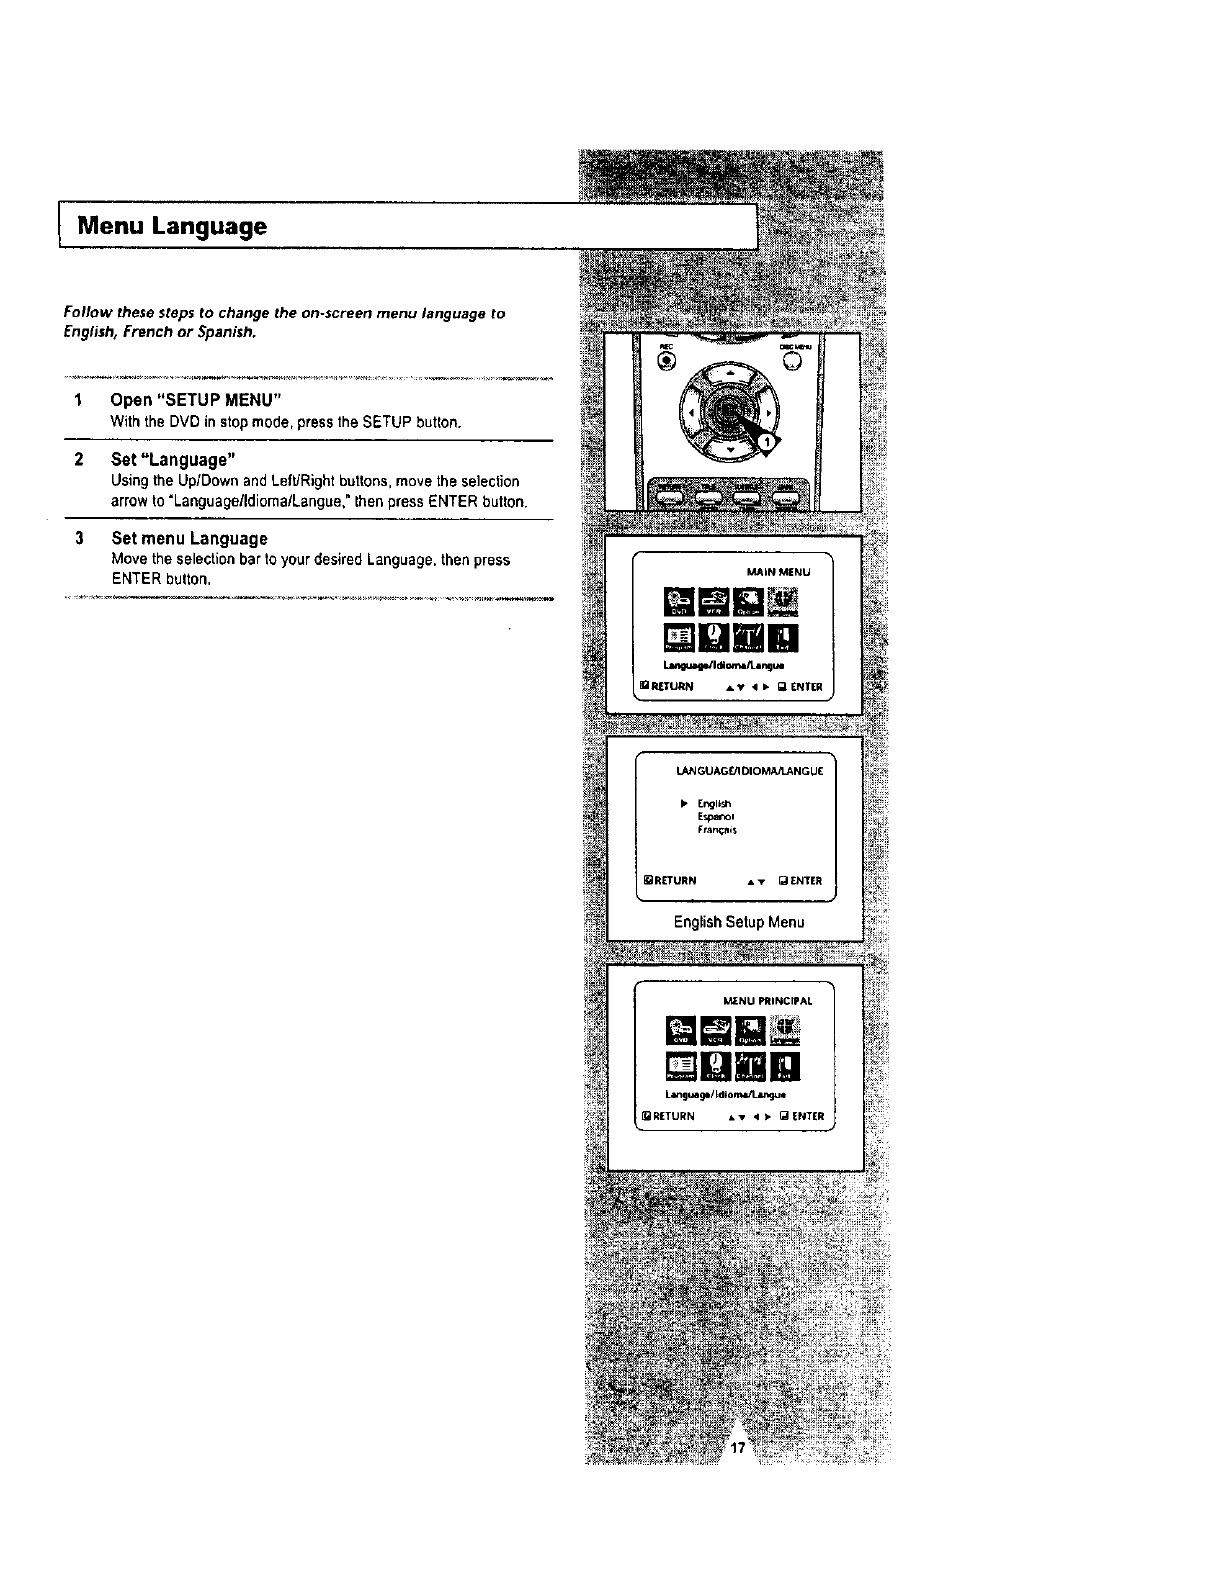
lMenu Language
Follow these steps to change the on-screen menu language to
English, French or Spanish.
1 Open "SETUP MENU"
With the DVD in stop mode, press the SETUP button.
2 Set "Language"
UsingtheUp[DownandLeftJRightbuttons,movetheselection
arrowto "LanguagelldiomalLangue,"thenp,'essENTERbutton.
3 Set menu Language
Move the selectionbar to your desired Language, then press
ENTER button,
gjla
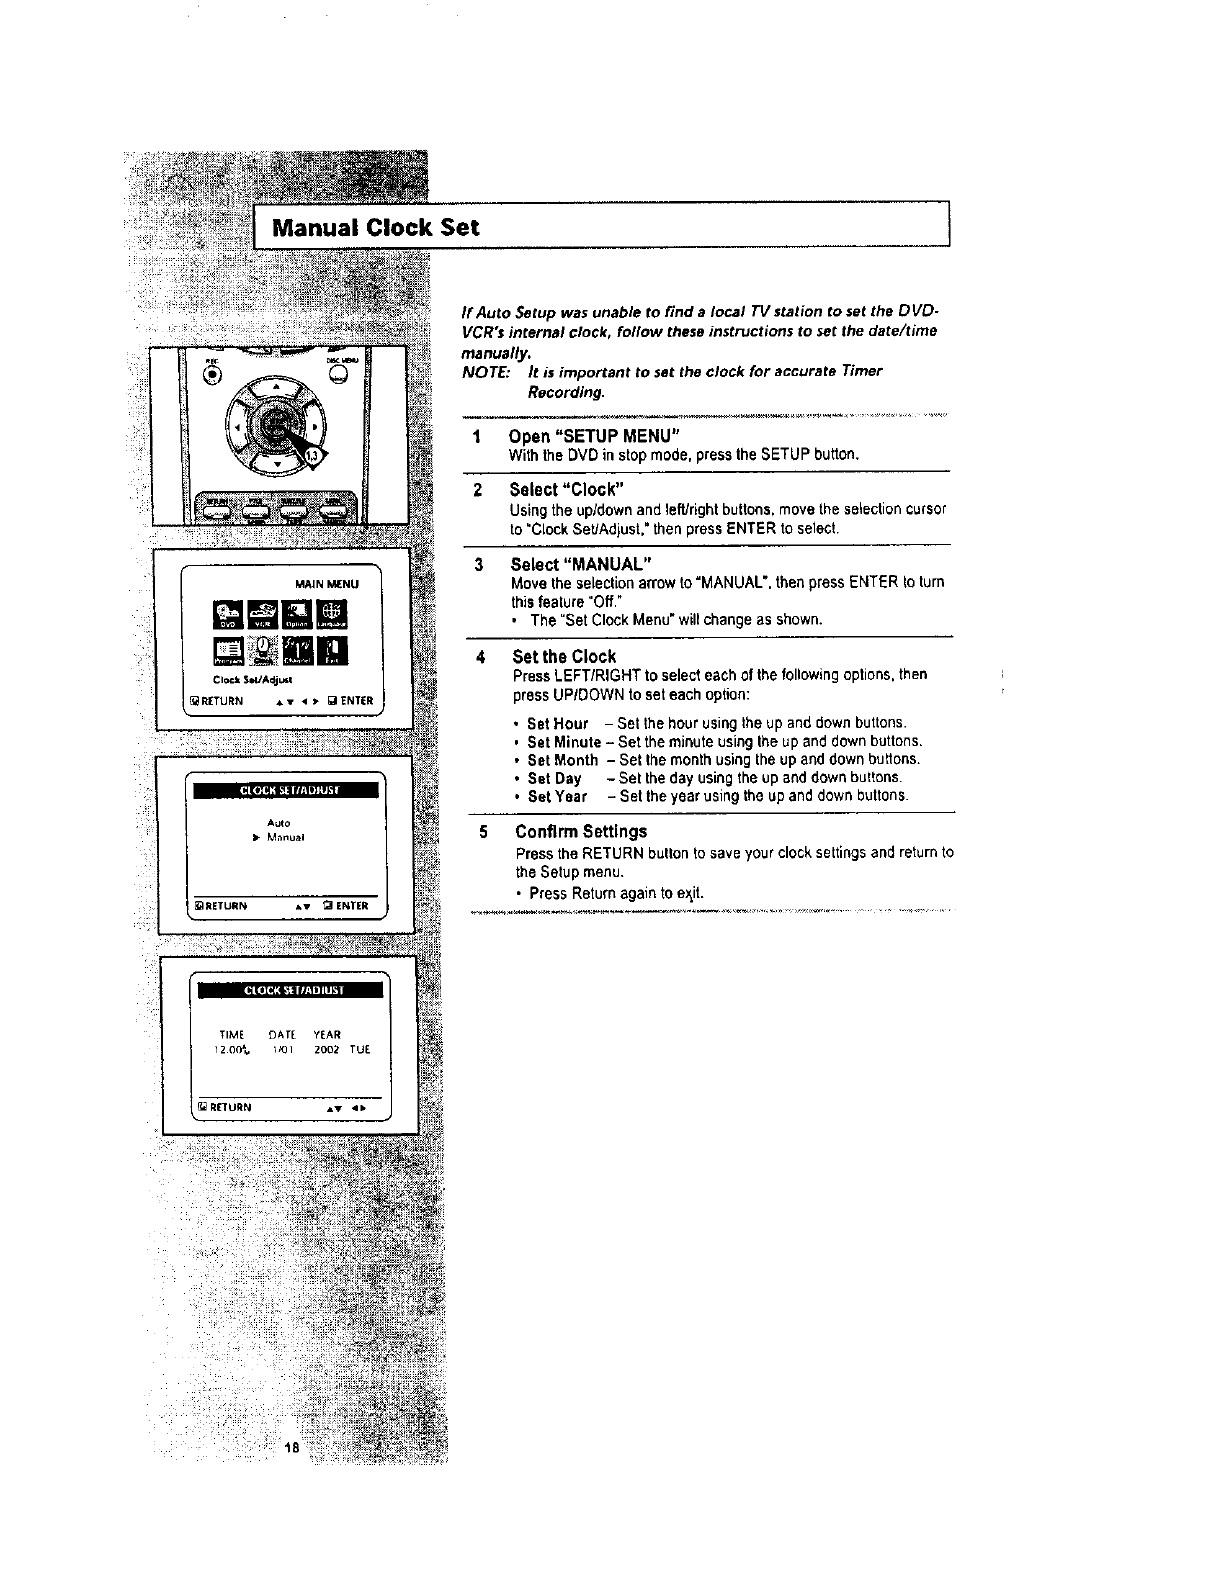
Manual Clock Set
AUtO
•M_nual
If Auto Setup was unable to find a local TV station to set the DVD-
VCR'$ internal clock, follow these instructions to set the date/time
ITlanually.
NOTE: It is important to set the clock for accurate Timer
Recording,
]
1 Open "SETUP MENU"
With the DVD in stop mode. pressthe SETUP button.
2 Select "Clock"
Using the up/down and left/right buttons,move the selectioncursor
to "Clock SeUAdjust,"then press ENTER to select,
3 Select "MANUAL"
Move the selectionarrowto "MANUAL', than press ENTER to turn
thisfeature "Off,"
•The "SetClock Menu" willchange as shown.
4 Set the Clock
Press LEFT/RIGHT to select each of the followingoptions,then
press UP/DOWN to set each option:
• Sat Hour - Set the hour usingthe up and down buttons.
, Set Minute - Set the minute using the up and down buttons.
•Set Month - Set the month using the up and down buttons.
•Set Day - Set the day using the up and down buttons.
•Set Year - Set the year using the up and down buttons.
5 Confirm Settings
Press the RETURN buttonto save your clock settings and return to
the Setup menu.
•Press Return again to e._it.
t8
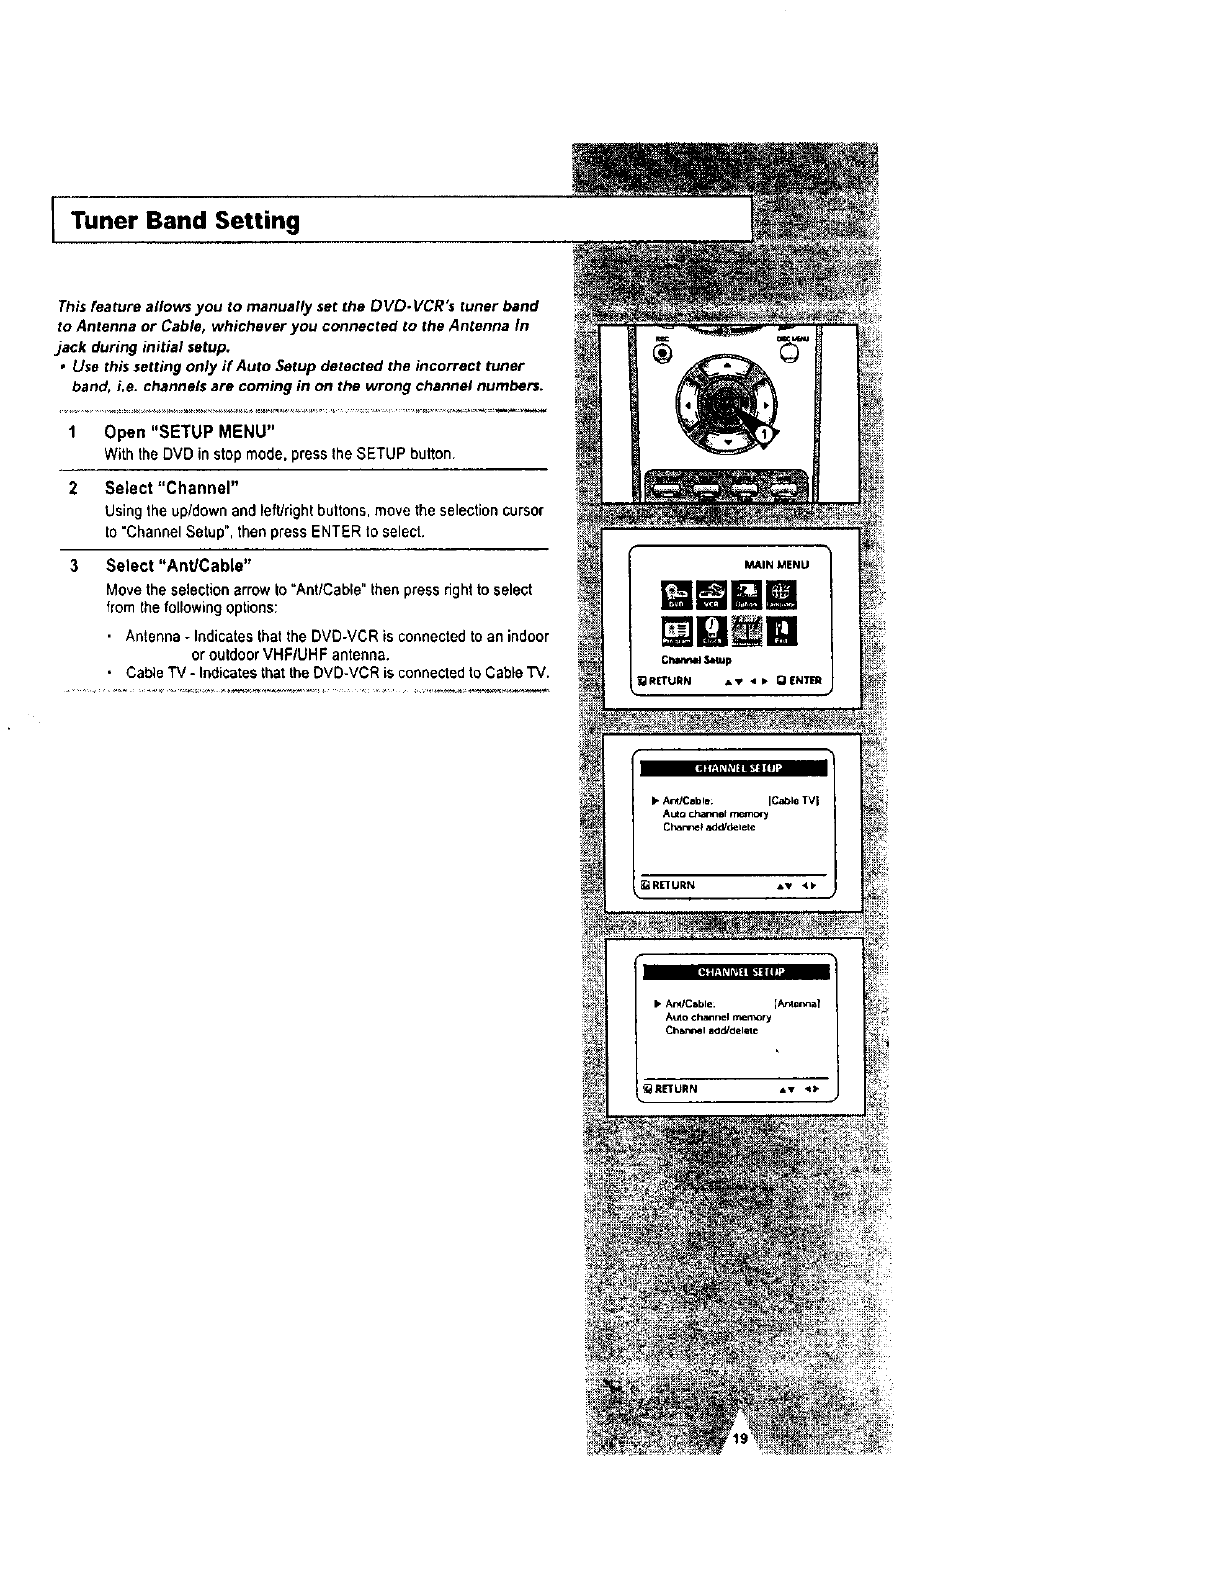
ITuner Band Setting
This feature allows you to manually set the DVD. VCR's tuner band
to Antenna or Cable, whichever you connected to the Antenna In
jack during initial setup.
•Use this setting only if Auto Setup detected the incorrect tuner
band, i,e. channels are coming in on the wrong channel numbers.
1 Open "SETUP MENU"
With the DVD instop mode, press the SETUP button.
2 Select "Channel"
Using the up/down and left/rightbuttons, move the selection cursor
to =Channel Setup", then press ENTER to select.
3 Select "AnUCable"
Move the selectionarrow to "Ant/Cable" then press hght to select
from the following options:
• Antenna - Indicates that the DVO-VCR is connected to an indoor
or outdoor VHFIUHF antenna.
• Cable TV - Indicates that the DVD-VCR is connected to Cable TV.
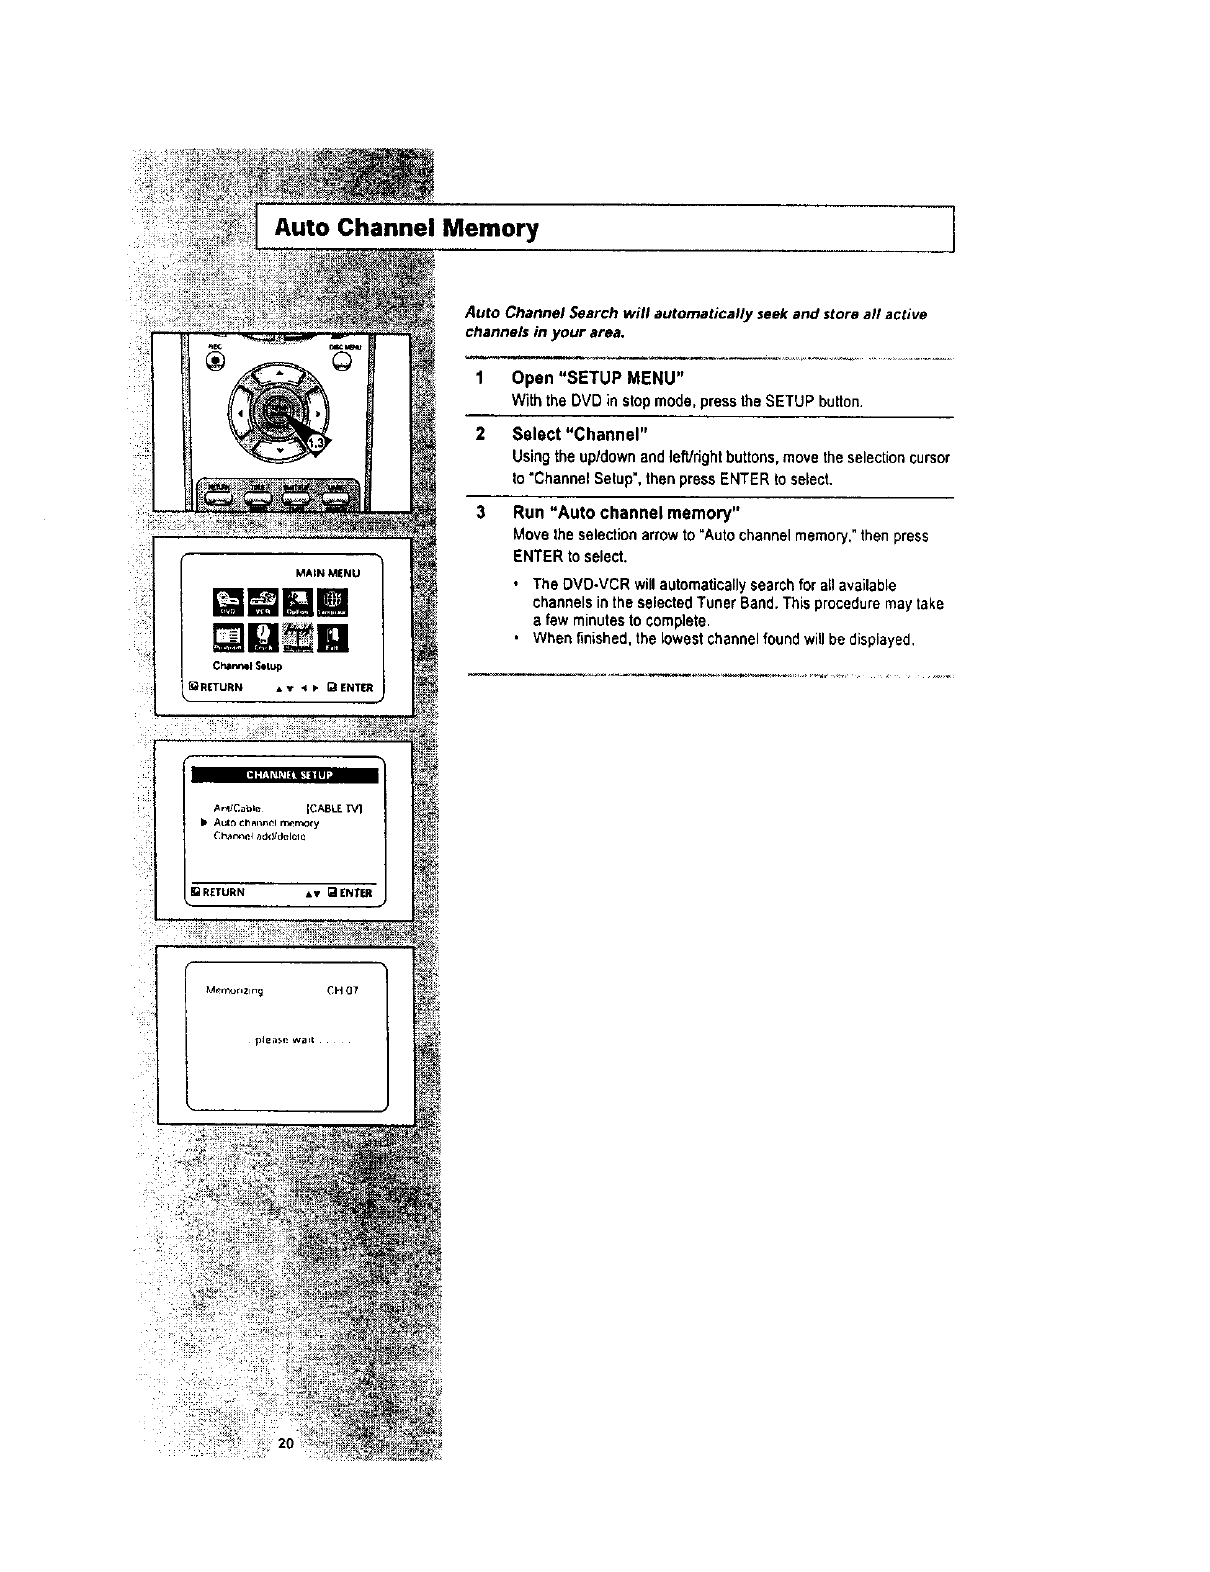
Auto Channel Memory ]
Auto Channel Search will automatically seek and store all active
channels in ),our area.
1 Open "SETUP MENU"
With the DVD in stop mode, press the SETUP button.
2 Select "Channel"
Using the up/down and leWdghtbuttons, move the selectioncursor
to "Channel Setup', then press ENTER to select.
3 Run "Auto channel memory"
Move the selectionarrow to "Auto channel memory."then press
ENTER to select.
• The DVD.VCR willautomatically search for all available
channels in the selected Tuner Band.This proceduremay take
afew minutes to complete.
•When finished,the lowest channel found will be displayed,
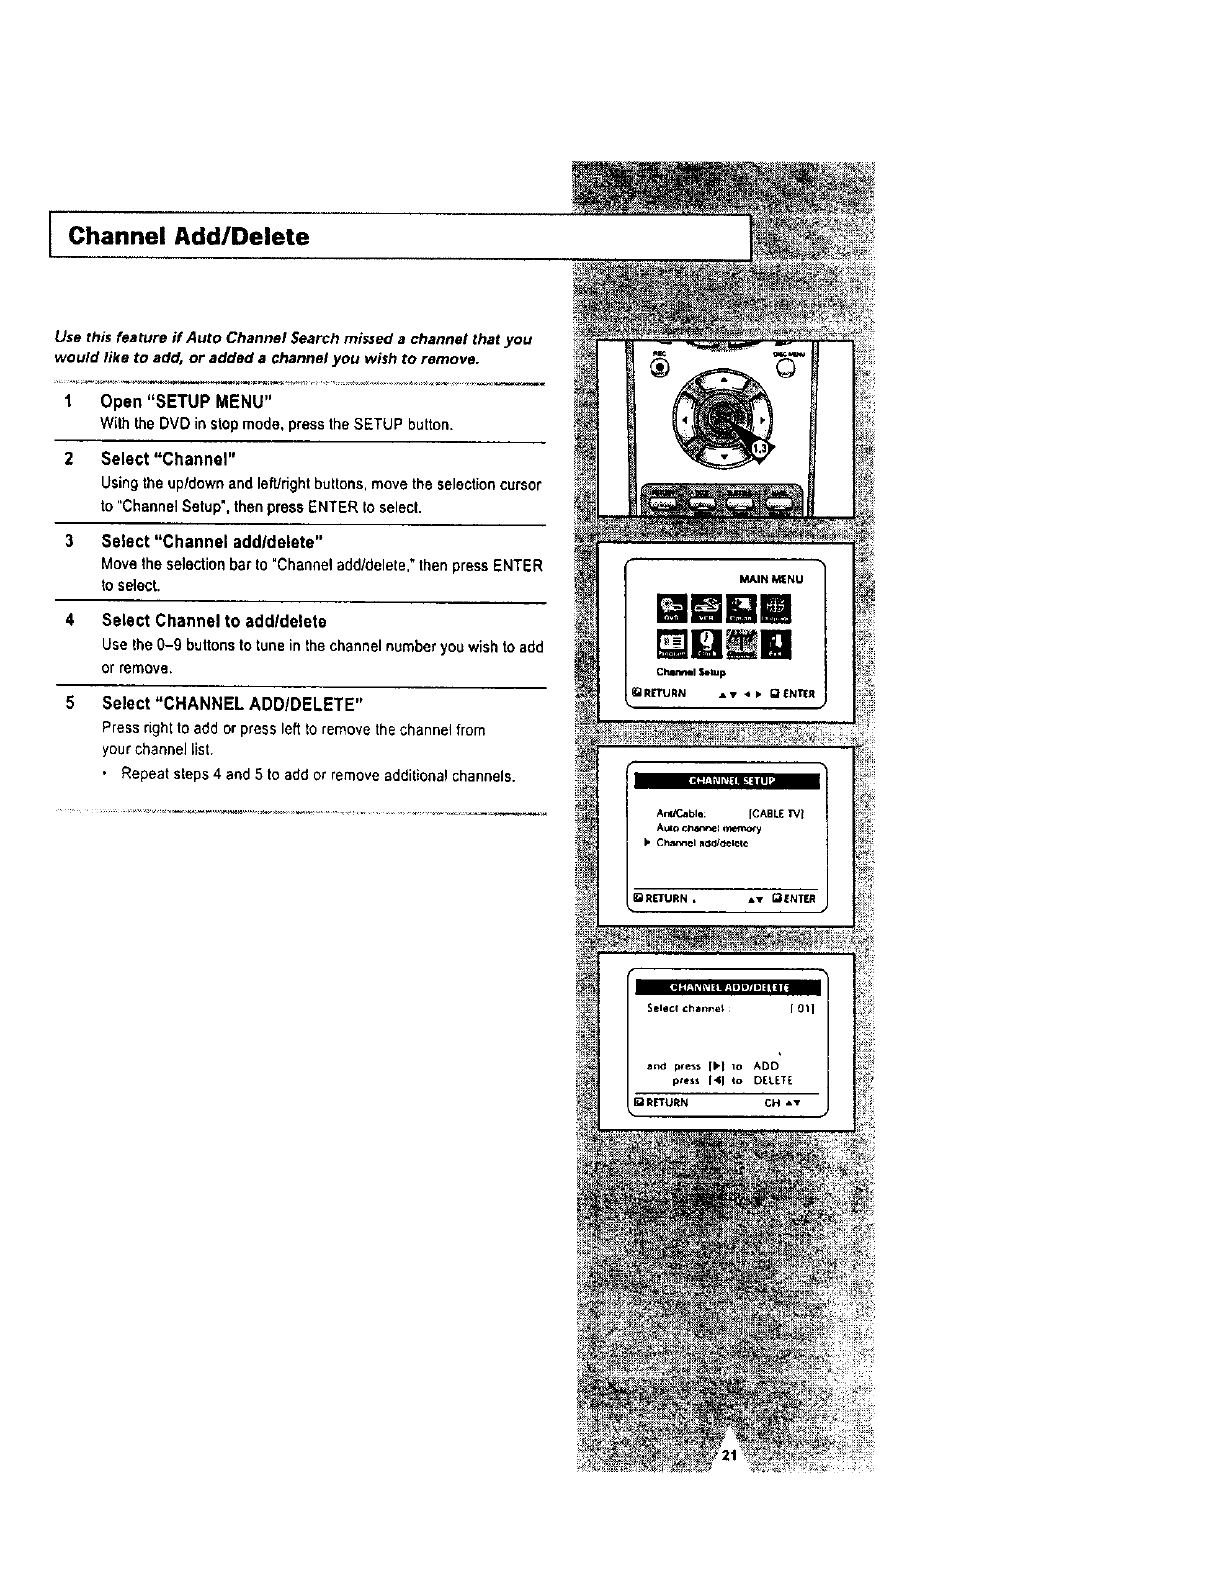
Channel Add/Delete
Use this feature if Auto Channel Search missed a channel that you
would like to add, or added a channel you wish to remove.
1 Open "SETUP MENU"
With the DVD in stop mode, press the SETUP button.
2 Select "Channel"
Using the up/down and left/rightbuttons, move the selectioncursor
to "Channel Setup', then press ENTER to select.
3Select "Channel add/delete"
Move the selectionbar to "Channel add/delete," then press ENTER
to select.
4 Select Channel to addldelete
Use the 0-9 buttonsto tune in the channel number you wish to add
OF remove.
5Select "CHANNEL ADD/DELETE"
Press right to add or press left to remove the channel from
your channel list.
• Repeat steps 4 and 5 to add or remove additional channels.
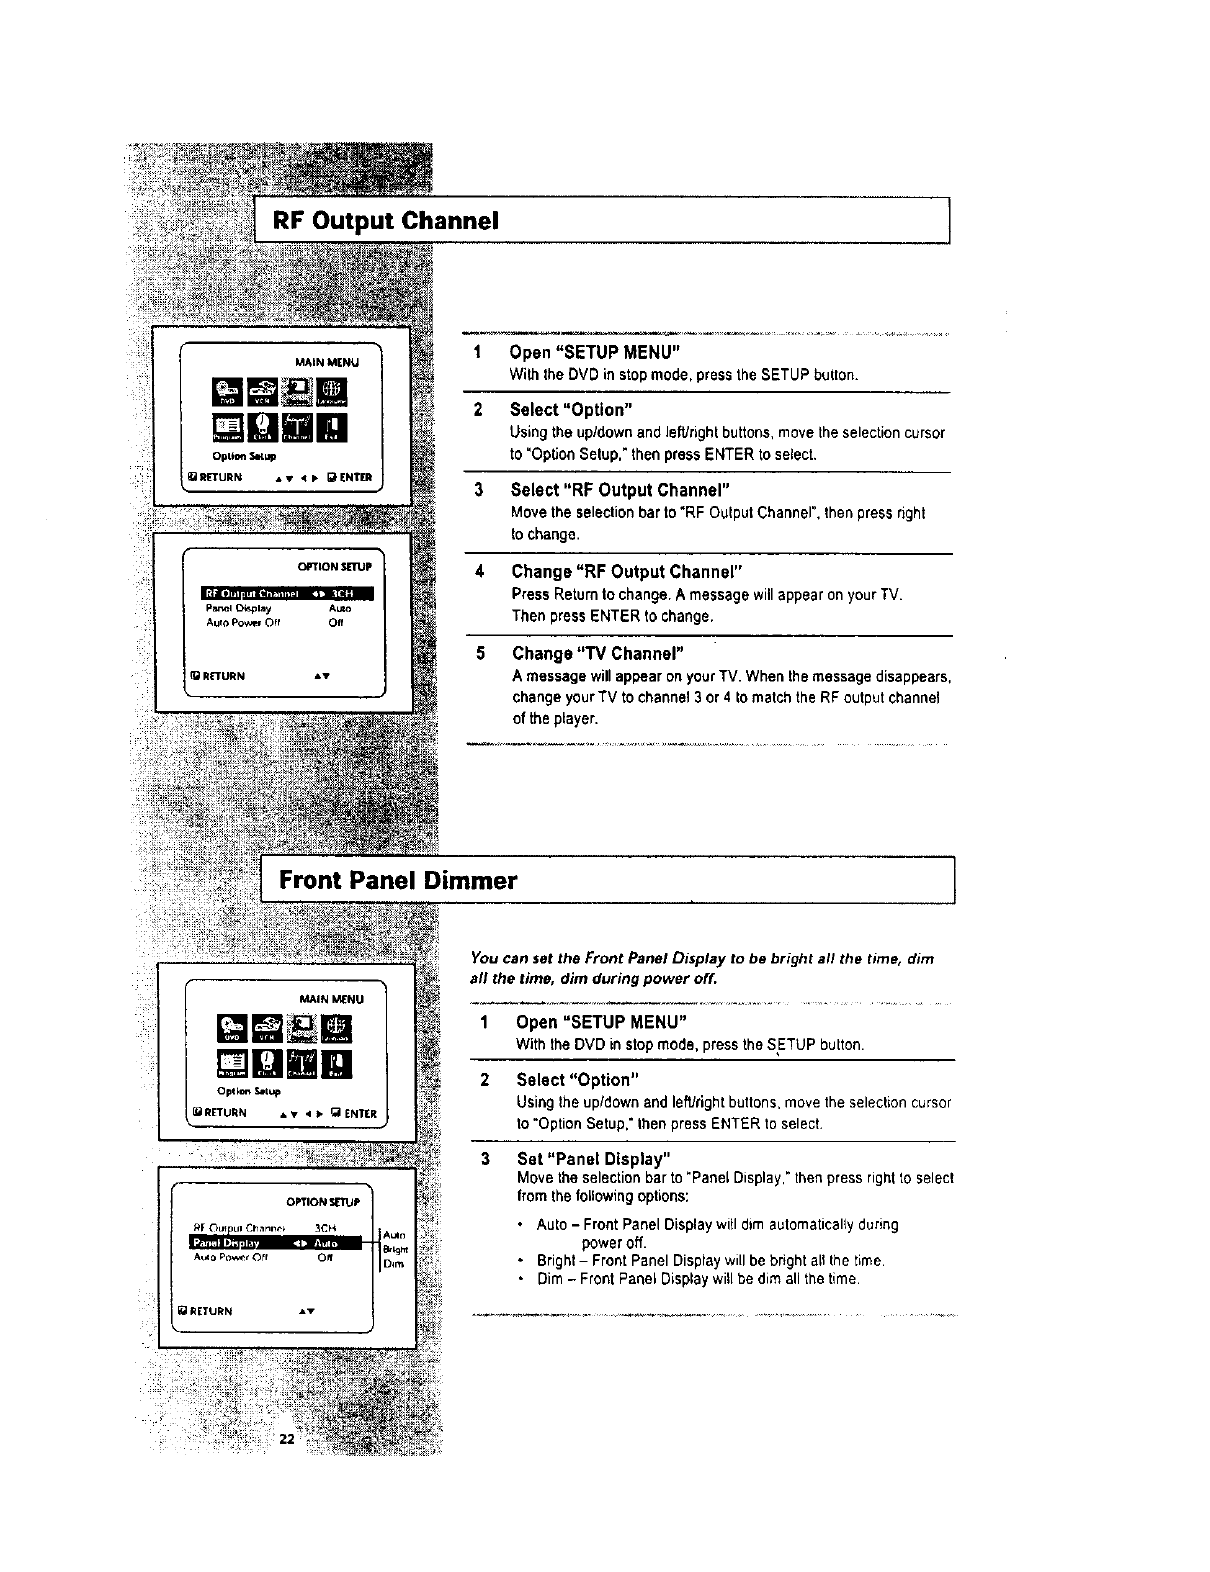
RF Output Channel ]
1 Open "SETUP MENU"
With the DVD in stop mode, press the SETUP button.
2 Select "Option"
Using the up/down and leWrightbuttons, movethe selection cursor
to "OpUoo Setup," then press ENTER to select.
3Select "RF Output Channel"
Move the selectionbar to "RF Output Channel", then press right
to change.
4Change "RF Output Channel"
Press Return to change. A message will appear on your TV.
Then press ENTER to change.
5 Change "TV Channel"
Amessage willappear on your TV. When the message disappears,
change your TV to channel 3 or 4 to match the RF output channel
of the player.
Front Panel Dimmer ]
_IN _NU
[]UBR
Opt ion Setup
_RETURN • • • > (_ ENTER
You can set the Front Panel Display to be bright all the time, dim
all the time, dim during power off.
1Open "SETUP MENU"
With the DVD in stop mode, press the SETUP button.
2 Select "Option"
Using the up/down and leWrightbuttons,move the selection cursor
to "Option Setup." then press ENTER to select.
3 Set "Panel Display"
Move the selection bar to "Panel Display,"then press rightto select
from the following options:
•Auto - Front Panel Display wi(I dim automaticallyduring
power off.
• Bright- Front Panel Display will be bright all the time.
• Dim - Front Panel Display will be dim all the time.
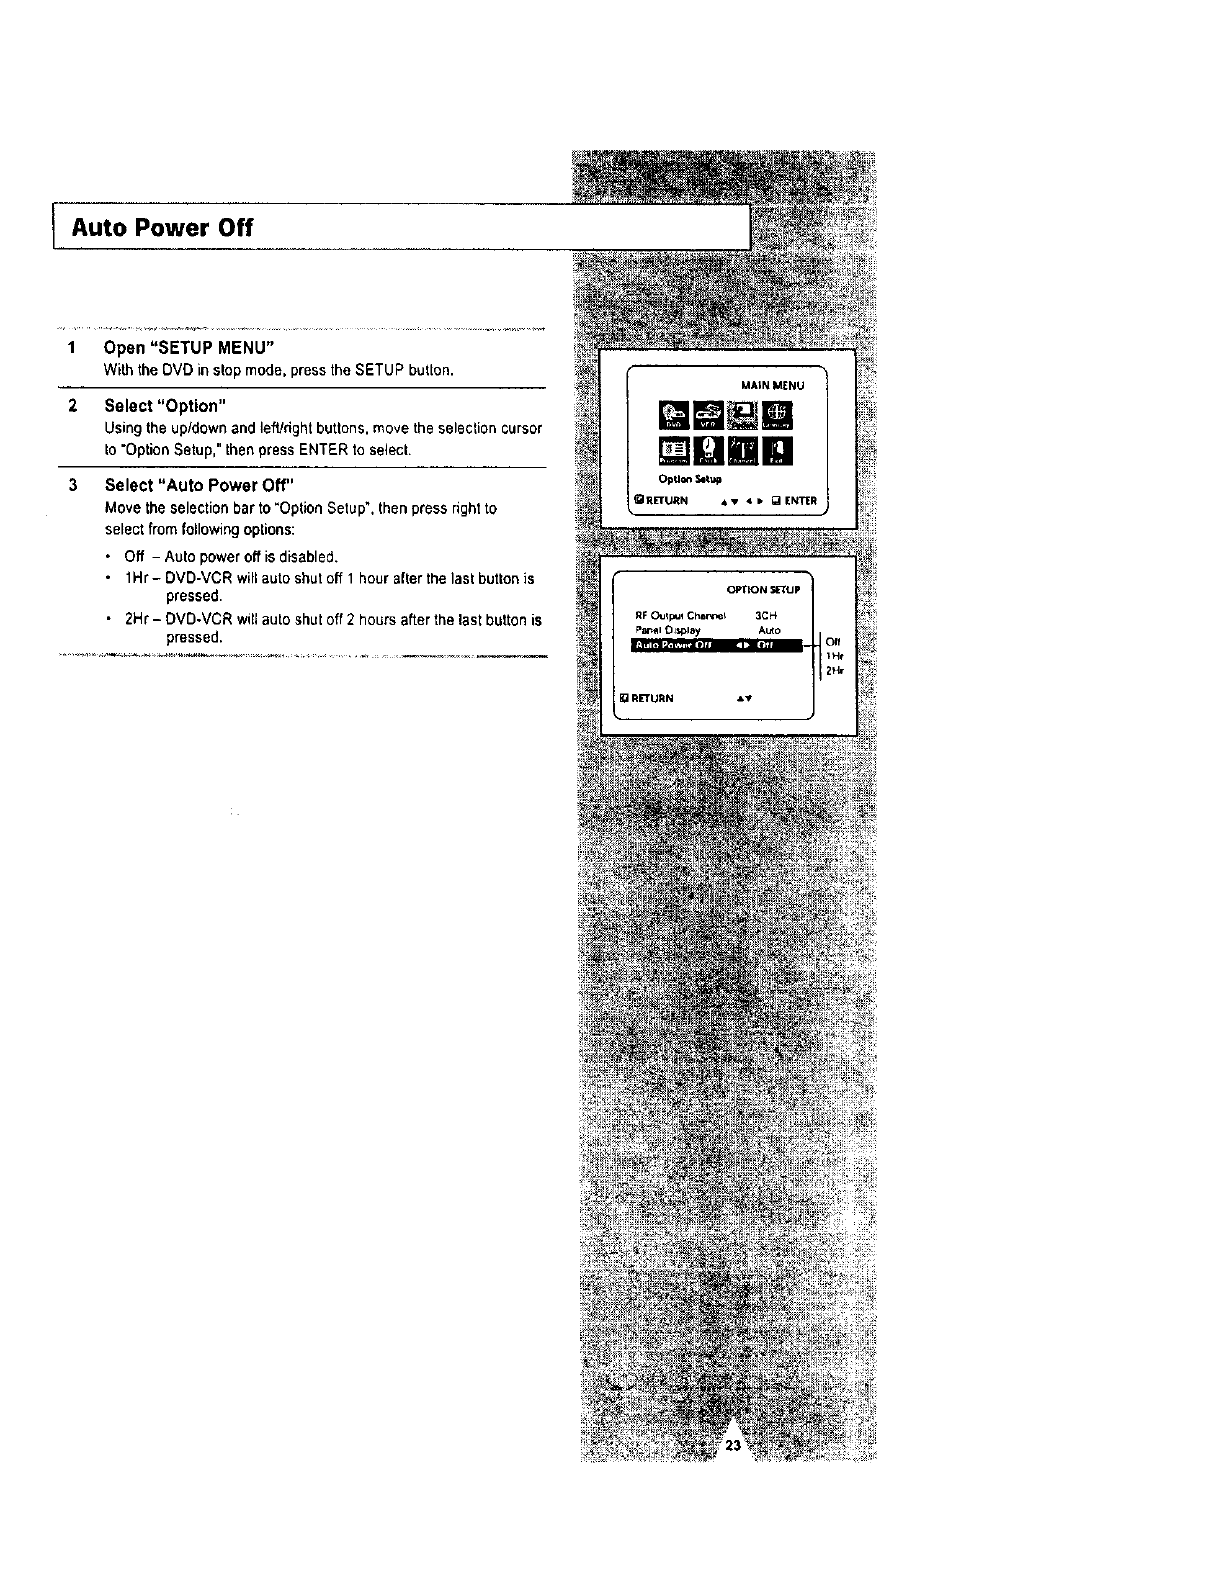
lAuto Power Off
1 Open "SETUP MENU"
With the DVD in stop mode, press the SETUP button.
2 Select "Option"
Using the up/down and leWdght buttons, move the selection cursor
to "Option Setup," then press ENTER to select.
3 Select "Auto Power Off"
Move the selection bar to "Option Setup", then press rightto
select from following options:
•Off - Auto power off is disabled,
•1Hr- DVD-VCR willauto shut off 1 hour after the last buttonis
pressed•
•2Hr- DVD-VCR will auto shut off 2 hours afterthe last button is
pressed.
[][]rid
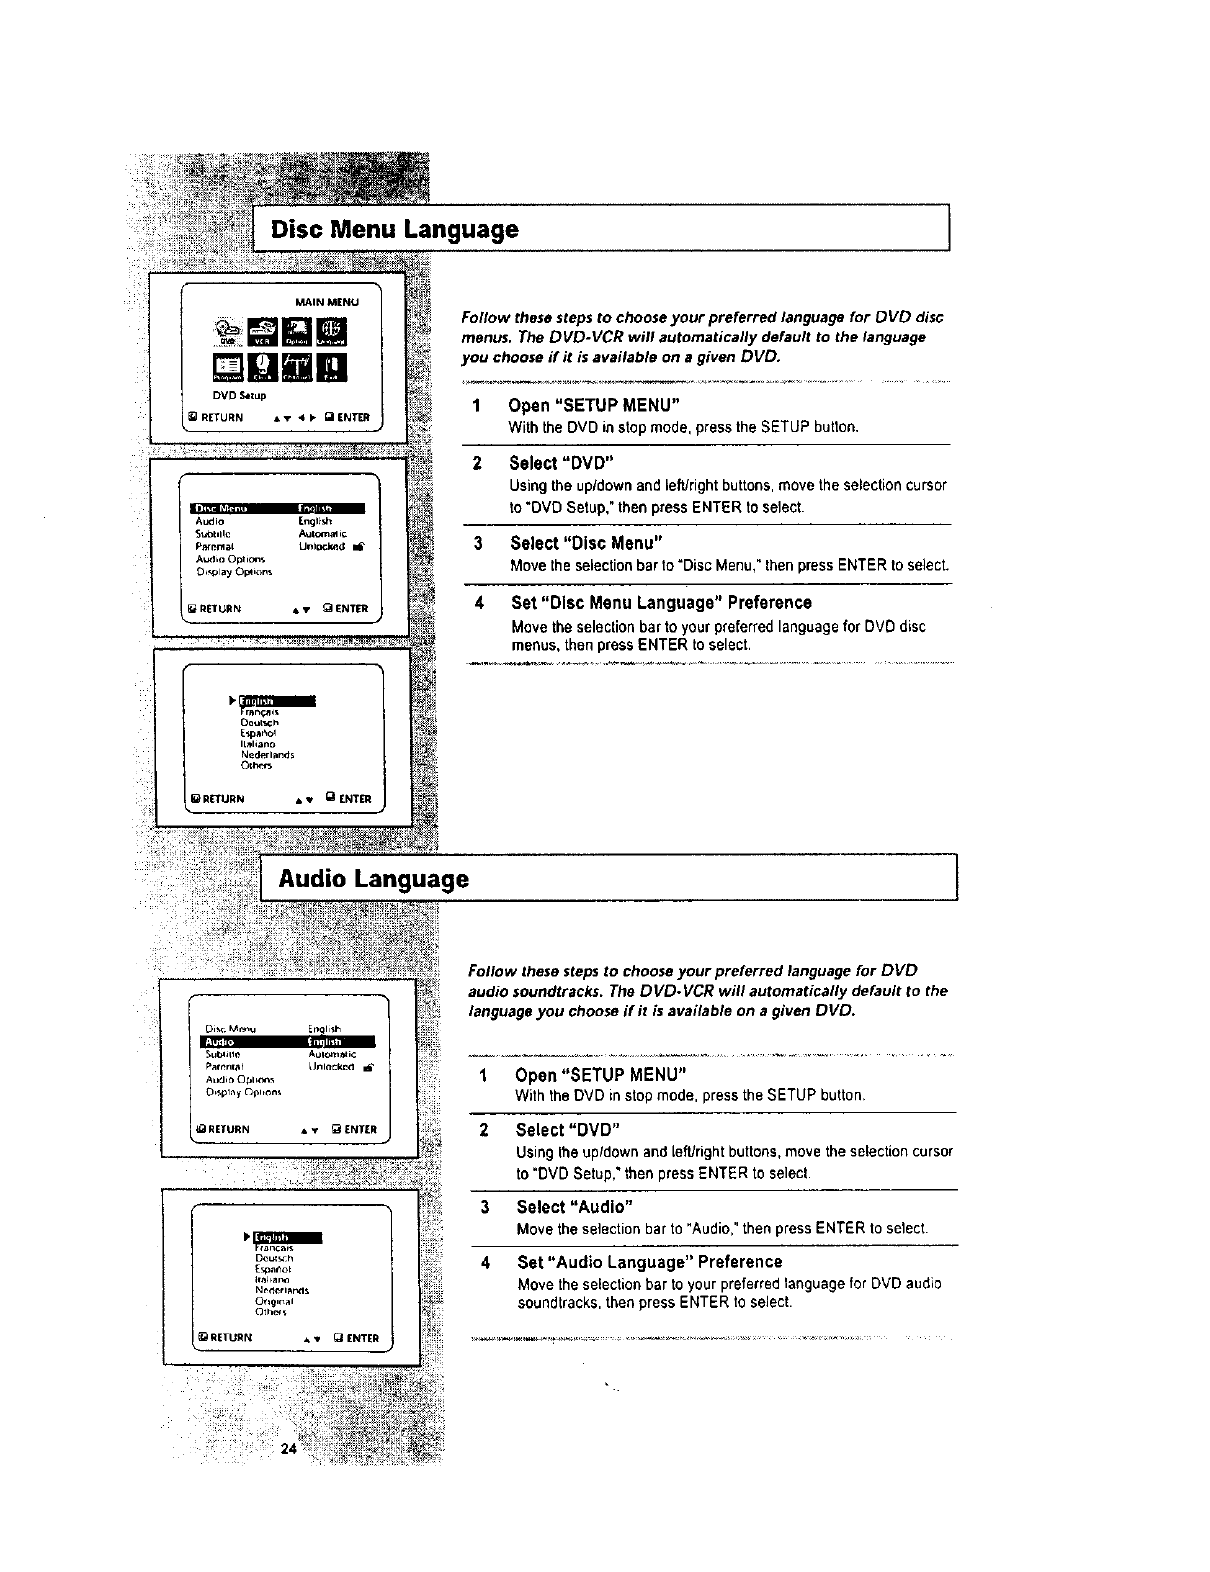
Disc Menu Language 1
HUR
Follow these steps to choose your preferred language for DVD disc
menus. The DVD-VCR will automatically default to the language
you choose if it is available on a given DVD.
1 Open "SETUP MENU"
With the DVD in stop mode, press the SETUP button,
2 Select "DMD"
Using the up/down and left/right buttons, move the selection cursor
to "DVD Setup,"then press ENTER to select.
3 Select "Disc Menu"
Move the selectionbar to "Disc Menu," then press ENTER to select.
4 Set "Disc Menu Language" Preference
Move the selectionbar to your preferred language for DVD disc
menus, then press ENTER to select.
Audio Language
RETURN • • _ ENTER
Follow these steps to choose your preferred language for DVD
audio soundtracks. The DVD.VCR will automatically default to the
language you choose if it is available on a given DVD.
1 Open"SETUP MENU"
With the DVD in stop mode, press the SETUP button.
2 Select "DVD"
Using the up/down and left/right buttons, move the setection cursor
to "DVD Setup," then press ENTER to selecl.
3 Select "Audio"
Move the selection bar to "Audio," then press ENTER to select
4 Set "Audio Language" Preference
Move the selectionbar to your prefeEredlanguage for DVD audio
soundtracks,then press ENTER to select•
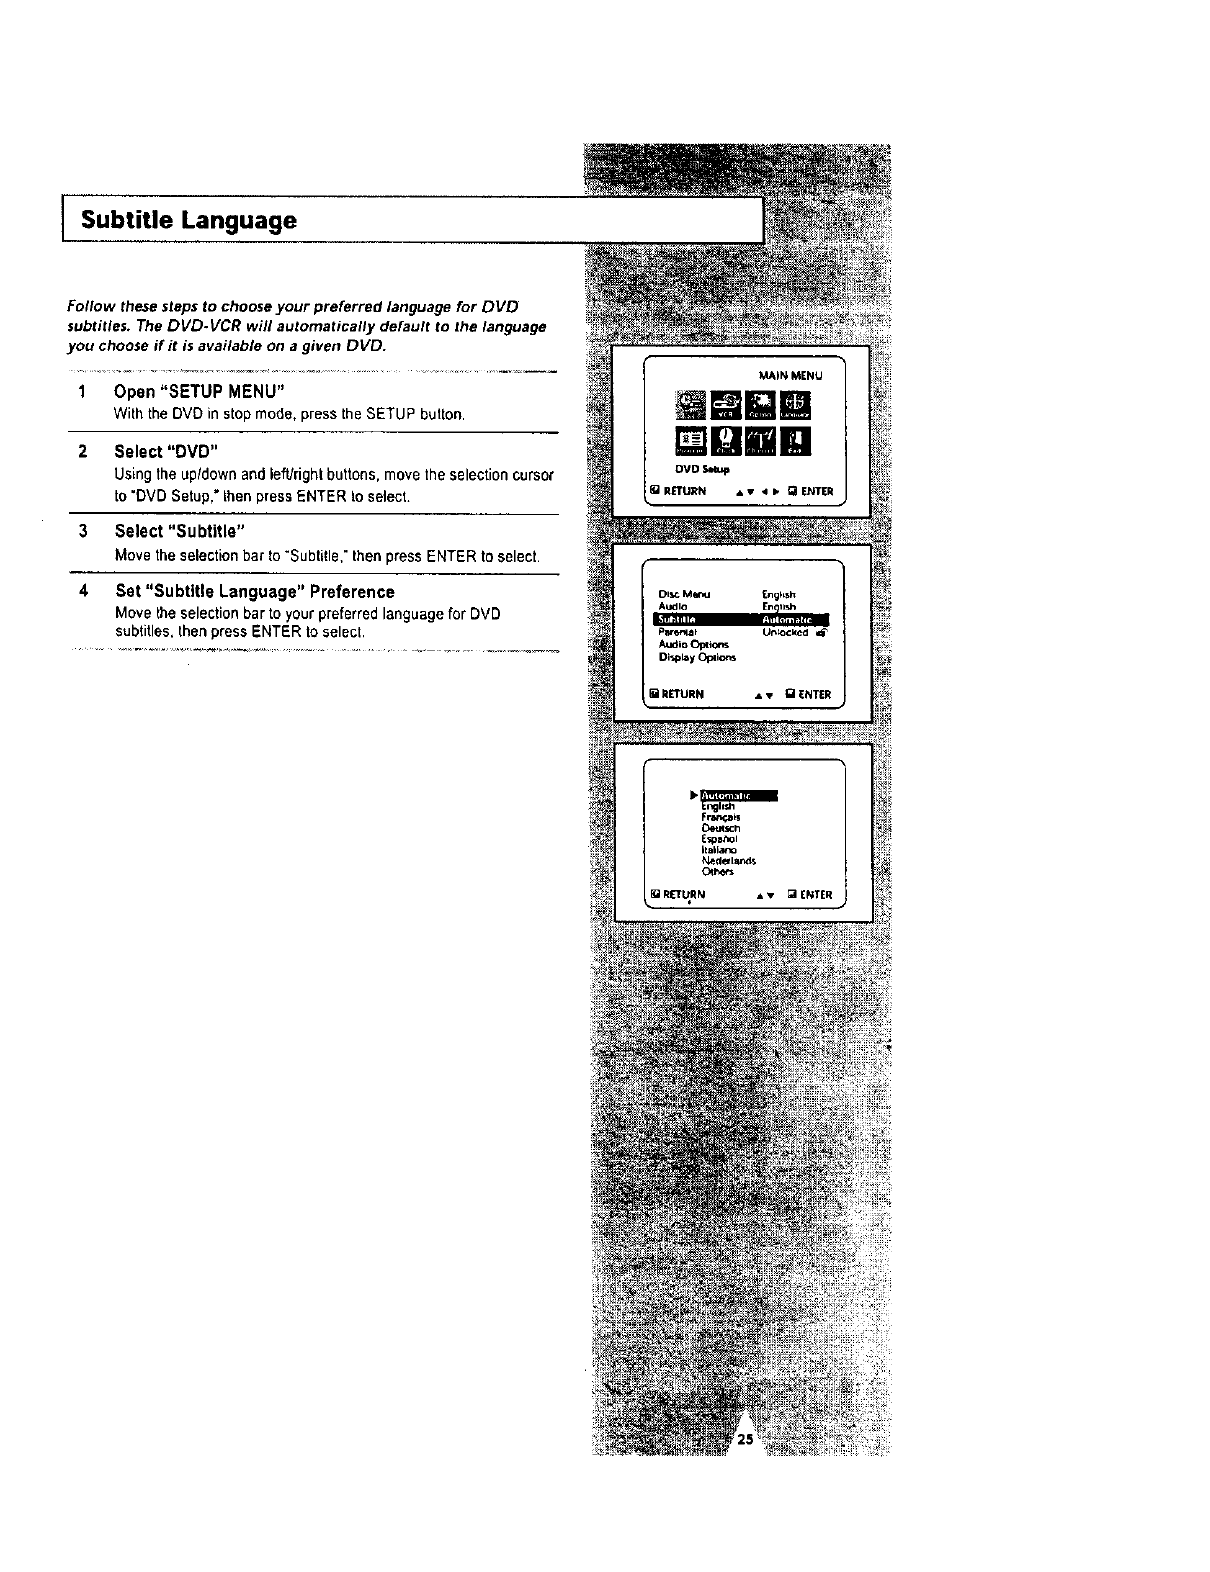
Subtitle Language
Follow these steps to choose your preferred language for DVD
subtitles. The DVD.VCR will automatically default to the language
you choose if it i5 available on a given DVD.
1 Open "SETUP MENU"
With the DVO in stop mode, press the SETUP button.
2 Select "DMD"
Using the upldown and left/right buttons, move the selection cursor
to "DVD Setup," then press ENTER to select.
3Select "Subtitle"
Move the selectionbar to "Subtitle," then press ENTER to select.
4 Set "Subtitle Language" Preference
Move the selectionbar to your preferred language for DVD
subtitles, then press ENTER to select.
[][]mm

Parental ]
MAIN MENU
Qmlll
DVO _tu p
QRETURN AV q • _EN_R
Oq,_ Me, nu EPgli_,h
Audno Engli_
Sublme Aul_n Jm_c
Audio (bpl i¢_,_
Display Opllor'_
RETURN • • _1 ENTE_
_RETURN _ENTER
I]_ R[TURN pR E,TN_0-9
RETURN • • g ENTER
Rating Control is a password protected system that allows you to
block playback of DVDs based on their content, The system usesan
eight level rating system•
•If you try to play a DVD that exceeds the selected rating, an error
message will appear•
•Not all discs are rated.
1 Open "SETUP MENU"
With the OVD in stop mode, press the SETUP button
2 Select "DVD"
Using the up/down and left/rightbuttons, move the selectioncursor
to "DVD Setup,"then press ENTER to select.
3 Select "Parental"
Move the selectionbar to "Parental,"then press ENTER to select•
4 Select "Use Password"
Movetheselectionarrowto"UsePassword,"thenpresstheright
buttontoselectfromthefollowingoptions:
•NO- Indicatesthat no password is required toview any DVD
disc or to change Rating Control options.No additional Rating
Controlsettingsare necessary.
, Yes - Indicates that a password is required to view some DVD
discsand to view Rating Controloptions.The menu wil!change
as shown.
NOTES:
• The firsttime "Require Password"is set to "Yes,"you will be
prompted to enter anew password.
• If the "Enter Password"screen appears, then "Requ=re
Password" has already been set to "Yes," Please skip to Step 5
5 Enter Password
Entera 4-digit password using the 0-9 buttons on the remote
control.
• Write your password down, and keep it in asafe p3ace in case
you need it to change your settings later
6Select "Rating Level"
Move the selection bar to "Rating Level." then press ENTER to
select.
7 Change Rating Level
Use the up/down to select one of the fotlowing ratings:
•Level 8Adult • Level 4
• Level 7 • Level 3
•Level 6 •Level 2
• Level 5 • Level 1Kids Safe
All ratingsabove the level you select will also be blocked, e.g., if
you block Level 6. then Levels 7 and 8 will also be blocked.
Press ENTER to confirm your selection.
• If you forgot your password, press power on from a cold start
with no disc in the unit. Press the REW and F.F buttons
simultaneouslyon the front panel for 5 seconds,The "resel ok'
message will appear. Press the power button and the DVD-VCR
will go to the "Auto Setup" mode. (See page 13)

Digital Output
If your A/V receiver is equipped with a Dolby Digital decoder, your
DVD.VCR can output Dolby Digital 5.1 sound, but you MUST
enable this feature in the menu system to prevent damage to your
speakers.
NOTE: Select "Bitstream " ONLY if you have connected a Dolby
Digital-equipped A/V receiver to the Digital Output
(optical or coaxial) on the DVD-VCR back panel.
1 Open "SETUP MENU"
With the DVD in stop mode, pressthe SETUP button,
2 Select "DVD"
Using the up/down and left/rightbuttons, move the selectioncursor
to "DVD Setup," then press ENTER to select.
3 Select "Audio Options"
Move the selectionbar to *Audio Options,"then press ENTER to
select.
4 Set "Digital Output"
Move the selection bar to "Digita_Output" then press the right
button to select from the following options:
•PCM - To use your DVD/TV with an AN receiver NOT equipped
with a Dolby Digital decoder.
•Bitstream -To use your DVDITV with an A/V receiver equipped
with a Dolby Digital decoder.
[][]mm
[]unm
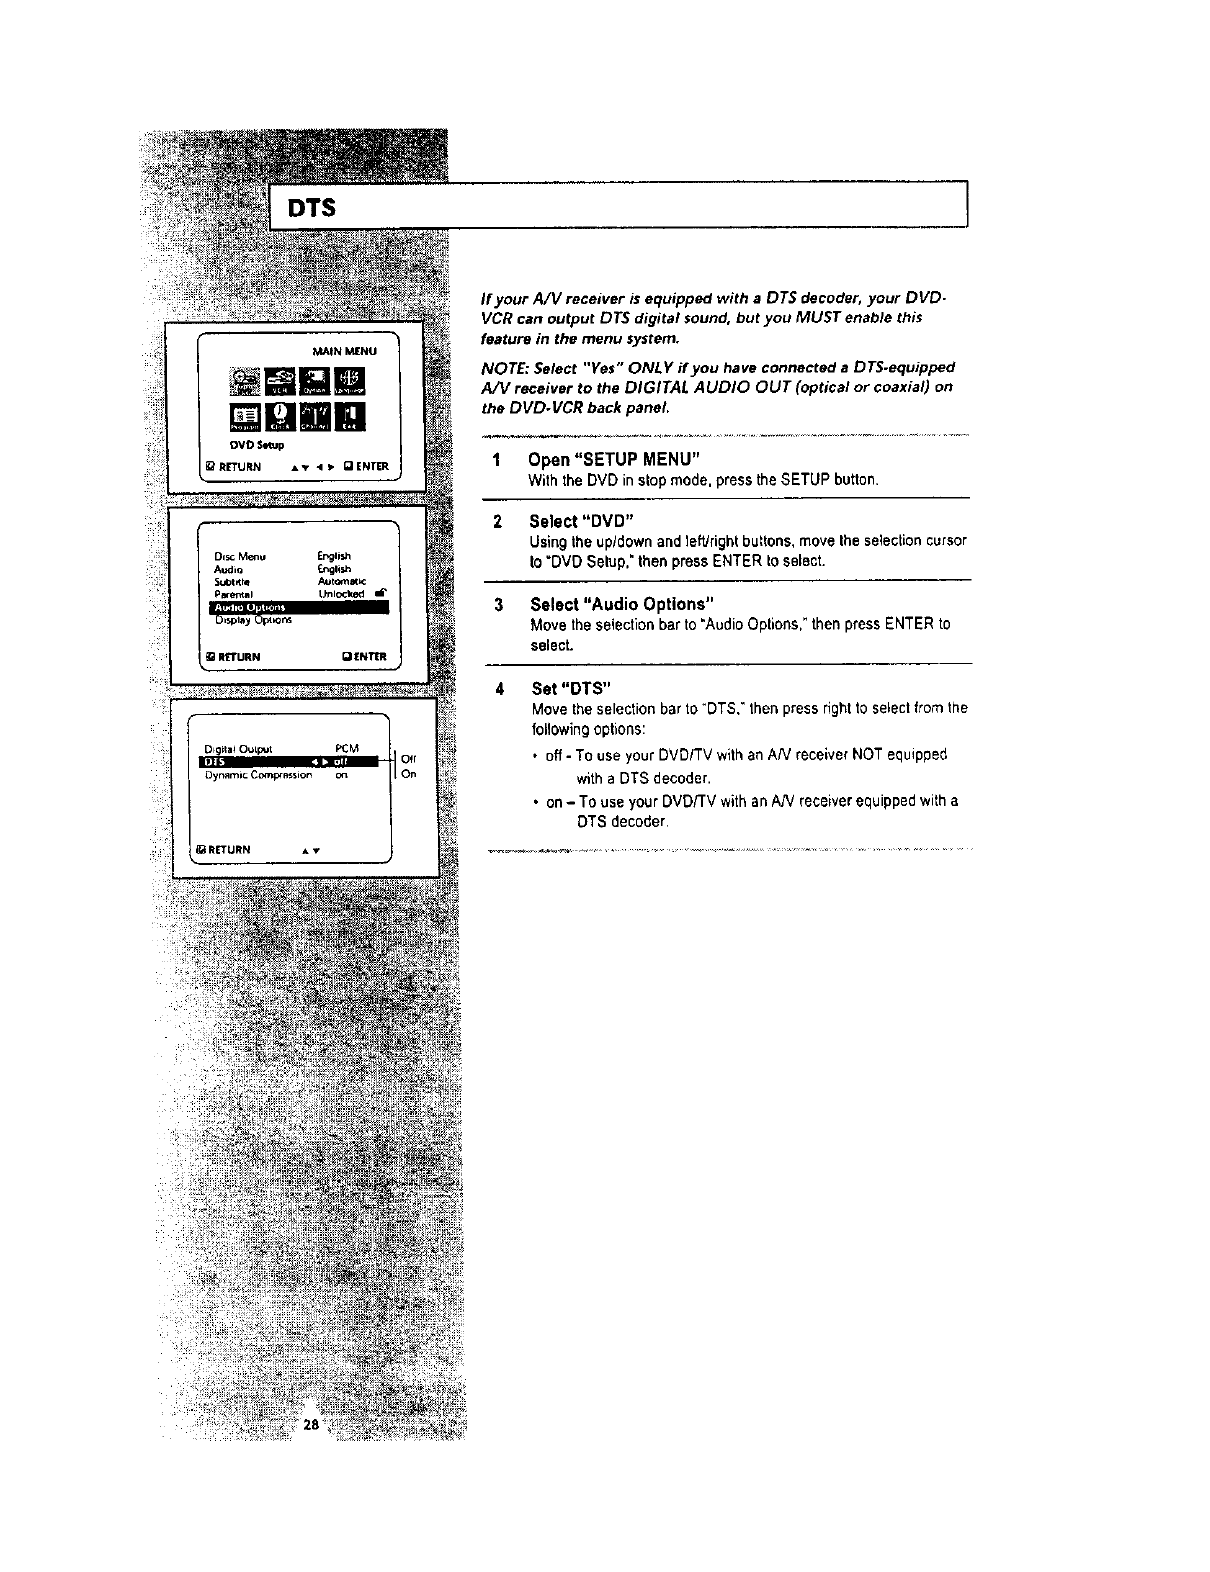
DTS
If your A/V receiver is equipped with a DTS decoder, your DVD-
VCR can output DTS digital sound, but you MUST enable this
feature in the menu system.
NOTE: Select "Yes" ONLY if you have connected a DTS-equipped
A/V receiver to the DIGITAL AUDIO OUT (optical or coaxial) on
the DVD.VCR back panel.
1 Open"SETUPMENU"
With the DVD instop mode, press the SETUP button.
2 Select "DVD"
Using the up/down and le_right buttons,move the selectioncursor
to "DVD Setup." then press ENTER to select.
3 Select "Audio Options"
Move the selection bar to "Audio Options," then press ENTER to
select.
4 Set "DTS"
Movethe selection bar to "DTS," then press rightto select from the
following options:
•off- To use your DVD/TV with an AN receiver NOT equipped
witha DTS decoder.
•on- To use your DVDFrV withan AN receiver equipped with a
DTS decoder,
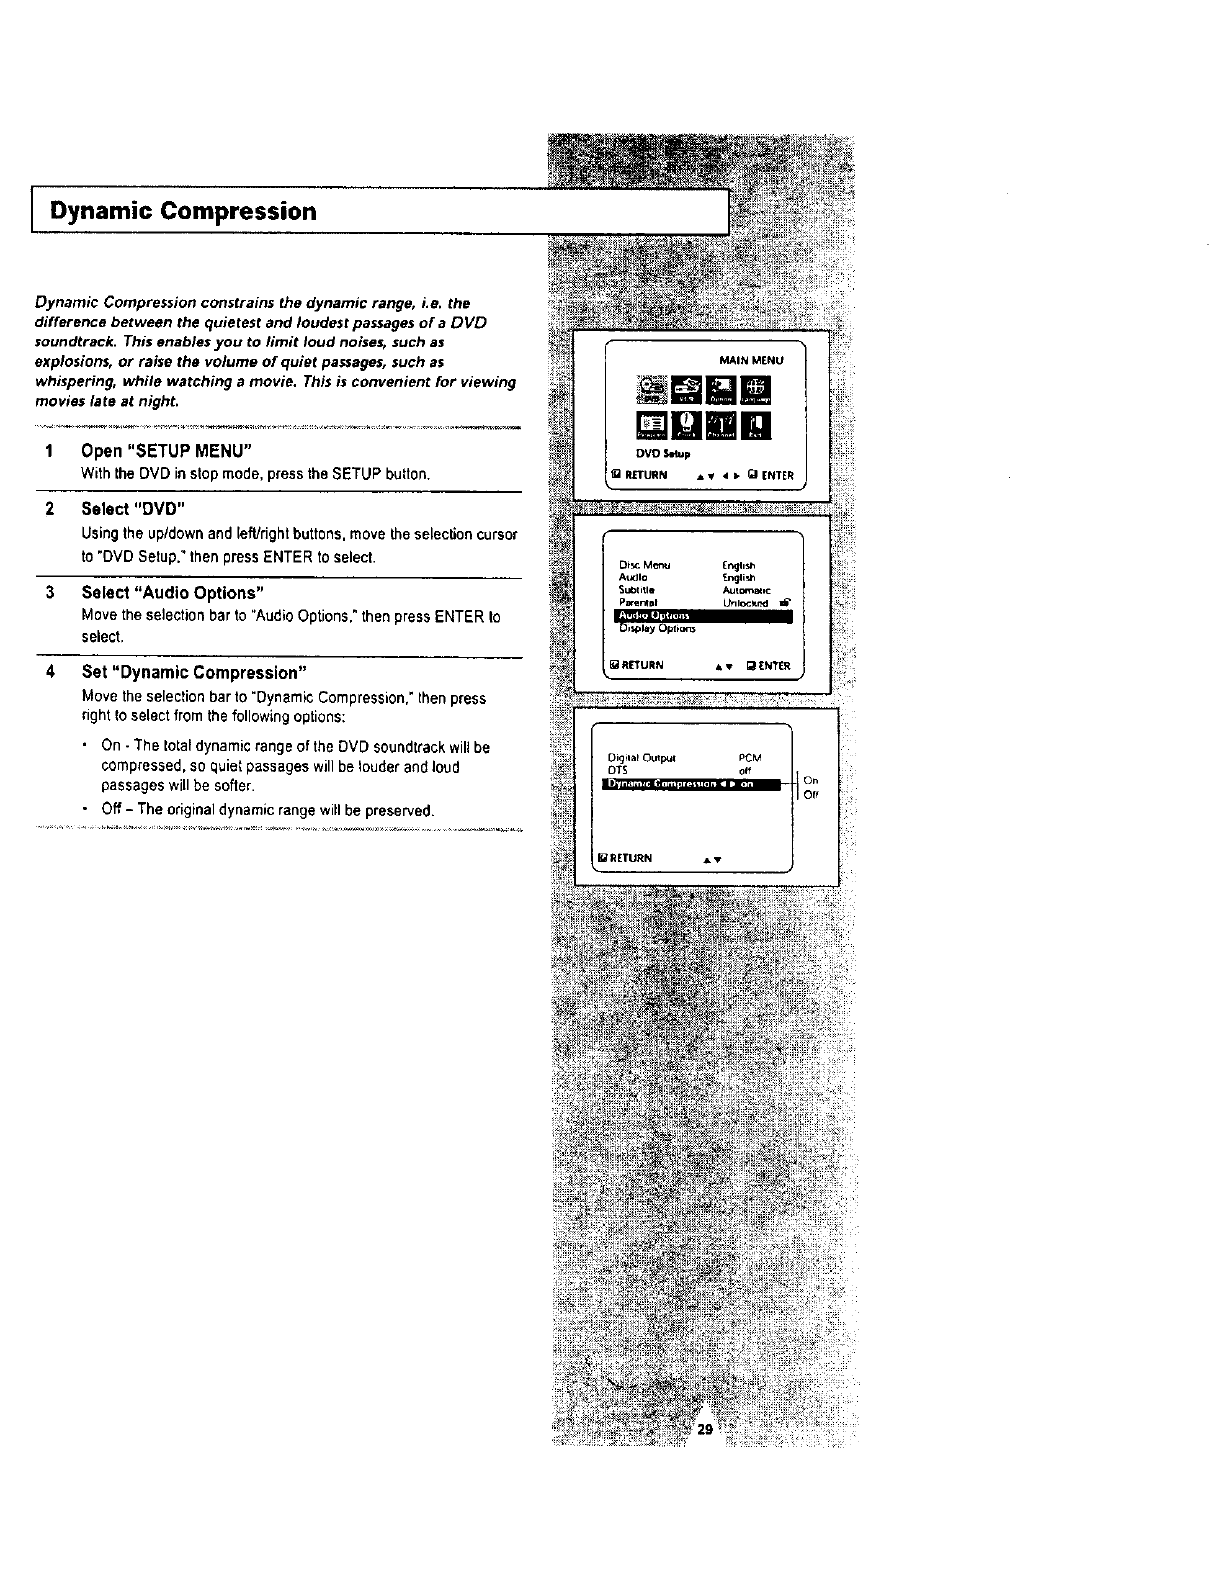
Dynamic Compression
Dynamic Compression constrains the dynamic range, Le, the
difference between the quietest and loudest passages of a DVD
soundtrack, This enables you to limit loud noises, such as
explosions, or raise the volume of quiet passages, such as
whispering, while watching a movie, This is convenient for viewing
movies late at night,
1Open "SETUP MENU"
With the DVD in stop mode, press the SETUP button,
2 Select "DVD"
Usingthe up/down and left/right buttons,move the selectioncursor
to "OVD Setup." then press ENTER to select,
3 Select "Audio Options"
Movethe selection bar to "Audio Options," then press ENTER to
select.
4 Set "Dynamic Compression"
Move the selection bar to "Dynamic Compression," then press
right to select from the following options:
• On - The totaldynamic range of the DVD soundtrack will be
compressed, so quiet passages will be louder and loud
passages will be softer.
•Off- The original dynamic range witl be preserved.
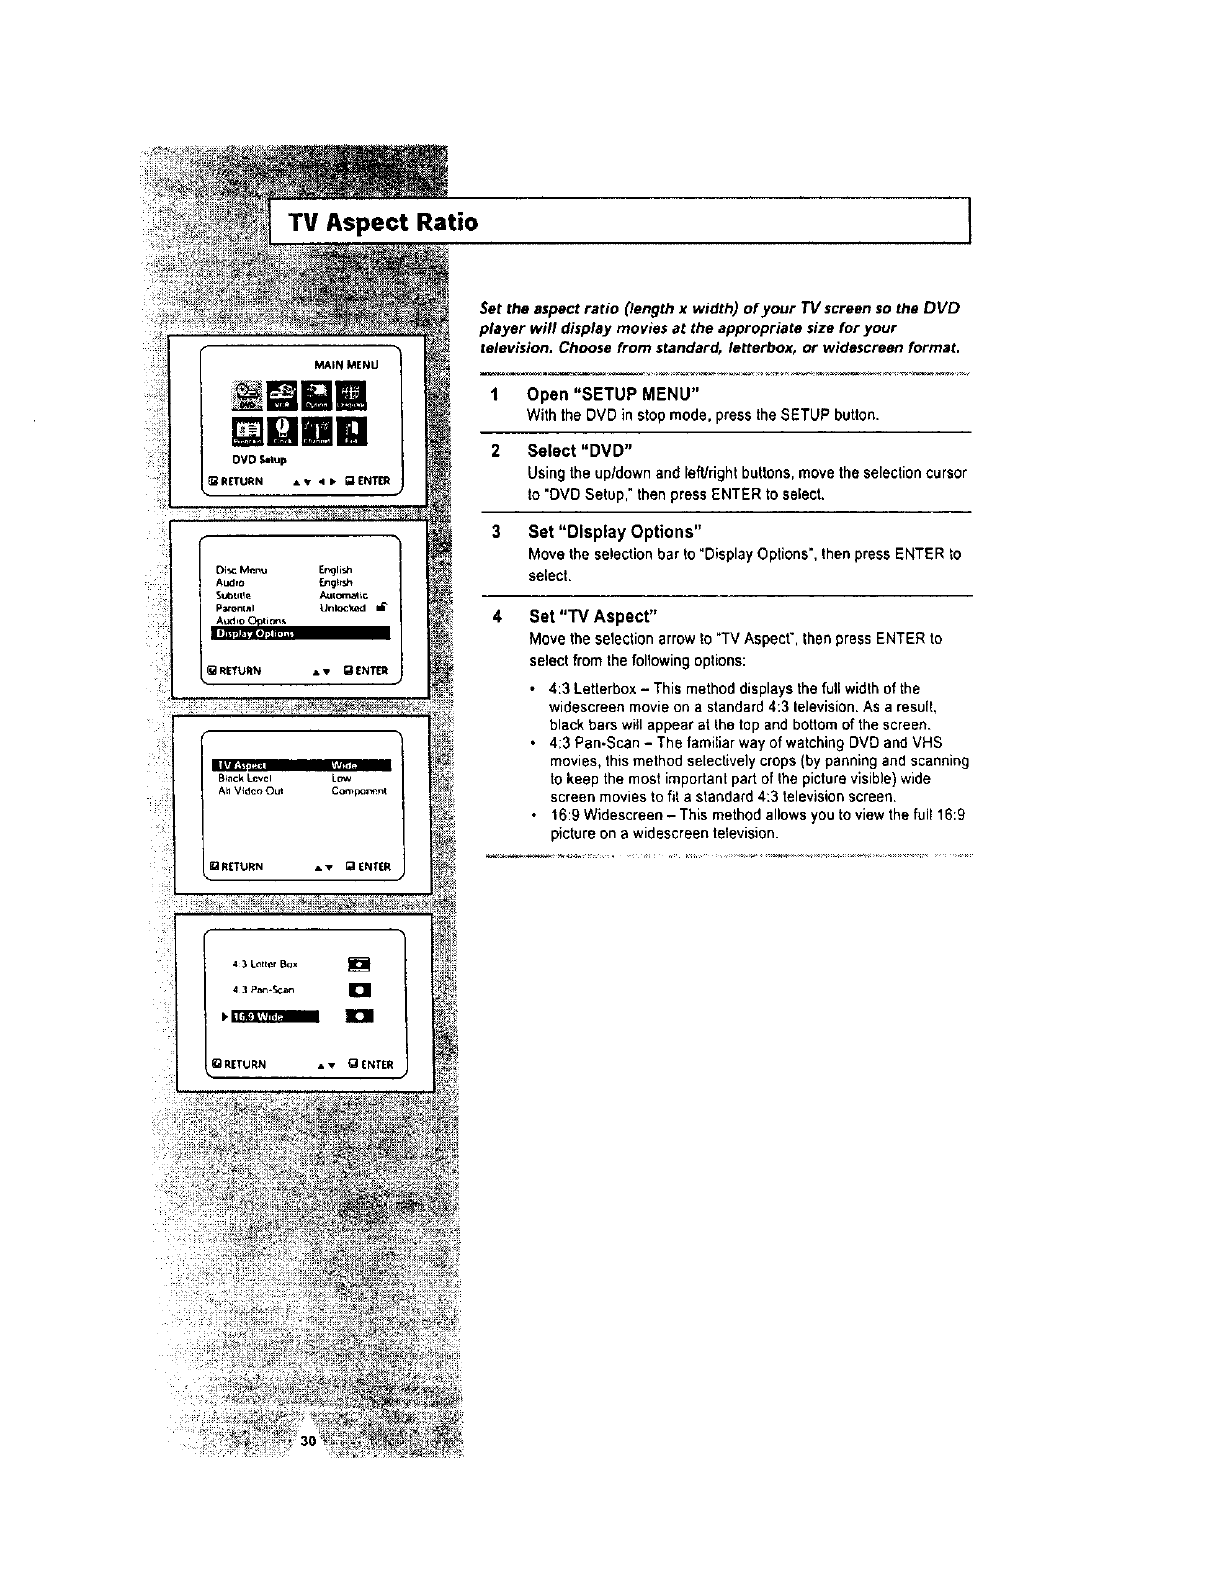
TV Aspect Ratio I
RETURN • • Q ENTER
Set the aspect ratio (length x width) of your TV screen so the DVD
player will display movies at the appropriate size for your
television. Choose from standard, letterbox, or widescreen format.
1 Open "SETUP MENU"
With the DVD in stop mode. press the SETUP button.
2 Select "DVD"
Using the up/down and leftJright buttons, move the selectioncursor
to "DVD Setup," then press ENTER to select,
3 Set "Display Options"
Move the selectionbar to "DisplayOptions", then press ENTER to
select.
4 Set "TV Aspect"
Move the selection arrowto "TV Aspect", then press ENTER to
select from the following options:
•4:3 Letterbox - This method displays the full widthof the
widescreen movie on a standard 4:3 lelevision. As a result,
black bars will appear at the top and bottom of the screen.
• 4;3 Pan-Scan -The familiarway of watching DVD and VHS
movies, this method selectivelycrops(by panningand scanning
to keep the most importantpart of the picturevisible)wide
screen movies to fit a standard 4:3 televisionscreen,
• 16:9 Widescreen- This method allows you to view the full 16:9
pictureon a widescreen tetevision.
la
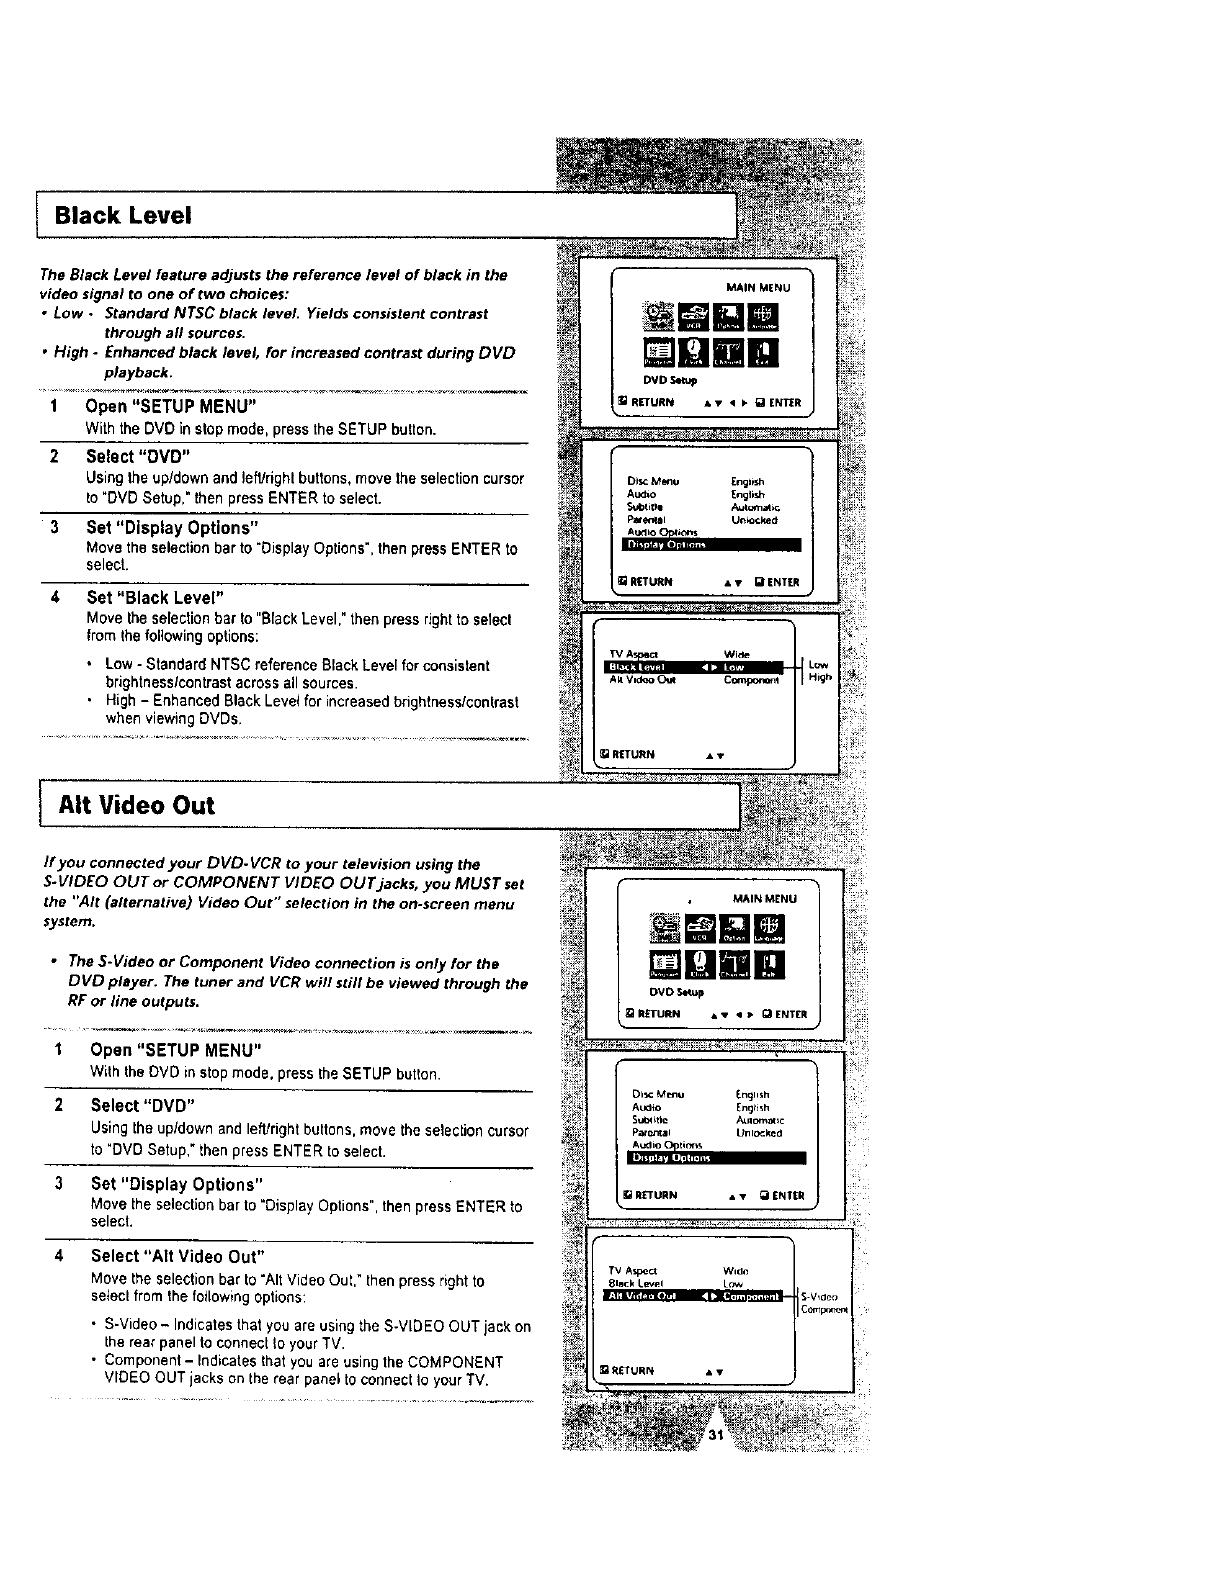
Black Level
The Black Level feature adjusts the reference level of black in the
video signal to one of two choices:
•Low. Standard NTSC black level. Yields consistent contrast
through all sources,
•High. Enhanced black level, for increased contrast during DVD
playback.
1 Open "SETUP MENU"
With the DVD in stop mode, press the SETUP button.
2 Select "DVD"
Usingthe up/down and left/righl buttons,move the selectioncursor
to "DVD Setup," then press ENTER to select.
3 Set "Display Options"
Move the selection bar to "Display Options', then press ENTER to
select.
4 Set "Black Level"
Move the selection bar to "Black Level," then press right to select
from the following options:
• Low - Standard NTSC reference Black Level for consistent
brightness/contrast across all sources.
•High - Enhanced Black Level for increasedbrightness/contrast
when viewing DVDs.
AIt Video Out
If you connected your DVD-VCR to your television using the
S-VIDEO OUT or COMPONENT VIDEO OUT jacks, you MUST set
the "AIt (alternative) Video Out" selection in the on-screen menu
system.
•TheS-VideoorComponent Videoconnectionisonlyforthe
DVD player. The tuner and VCR will still be viewed through the
RE or line outputs.
I Open "SETUP MENU"
With the OVD in stopmode. press the SETUP button.
2 Select "DVD"
Using the up/down and le_right buttons, move the selectioncursor
to "DVD Setup," then press ENTER to select,
3 Set "Display Options"
Move the selectionbar to "DisplayOptions",then press ENTER to
select.
4Select "Alt Video Out"
Move lhe selectionbar to "AItVideo Out," then press right to
se_eclfrom the followingoptions:
• S-Video - Indicatesthat you are using the S-VIDEO OUT jack on
the rear panel to connect Io your TV.
• Component- Indicatesthat you are using the COMPONENT
VIDEO OUT jacks on the rear panel to connect _oyour TV.
Dmm
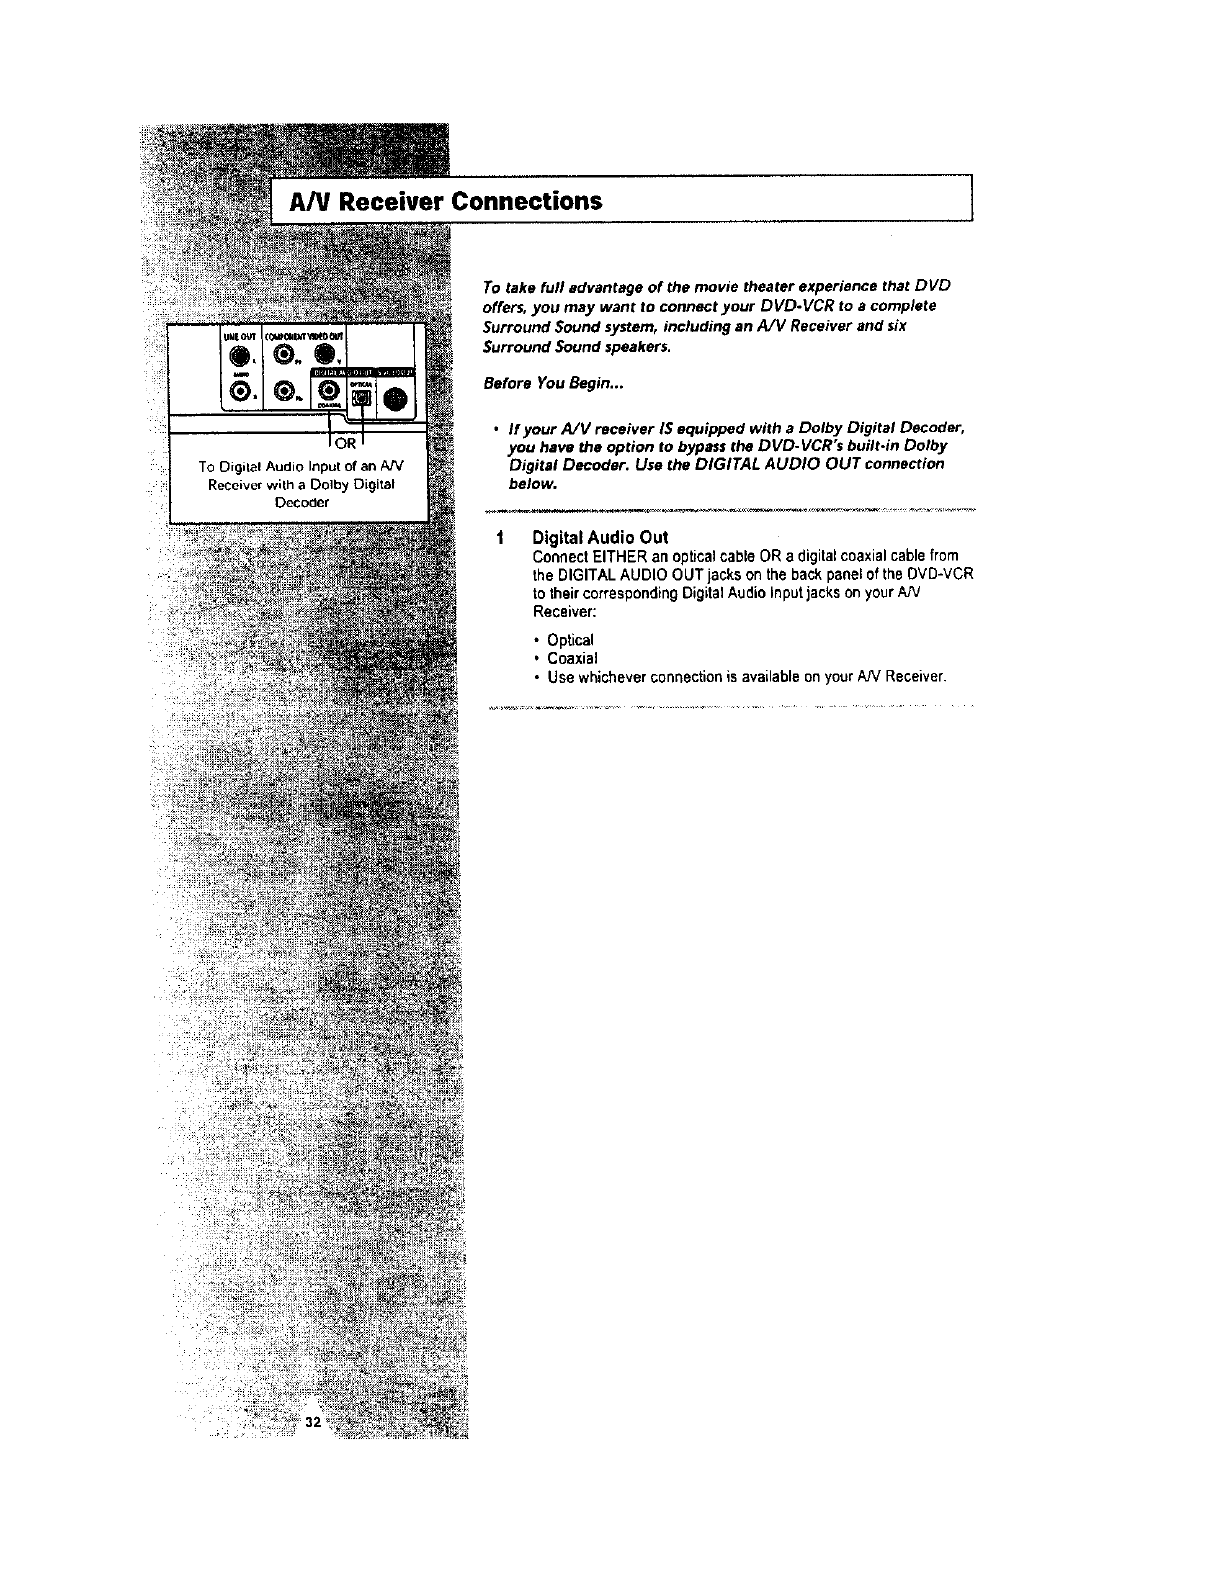
A/V Receiver Connections ]
To Digital Audio Input of an AN
Recoiver with a Do]by Digital
Decoder
To take full advantage of the movie theater experience that DVD
offers, you may want to connect your DVD.VCR to a complete
Surround Sound system, including an A/V Receiver and six
Surround Sound speakers.
Before You Begin...
•If your A/V receiver IS equipped with a Dolby Digital Decoder,
you have the option to bypass the DVD-VCR's built.in Dolby
Digital Decoder. Use the DIGITAL AUDIO OUT connection
below.
Digital Audio Out
ConnectEITHERan opticalcableORa digitalcoaxialcablefrom
theDIGITALAUDIOGUTjacksonthebackpaneloftheDVD-VCR
totheircorrespondingDigitalAudioInputjackson yourAN
Receiver:
• Optical
. Coaxial
•Use whichever connectionis available on your AJVReceiver.
/
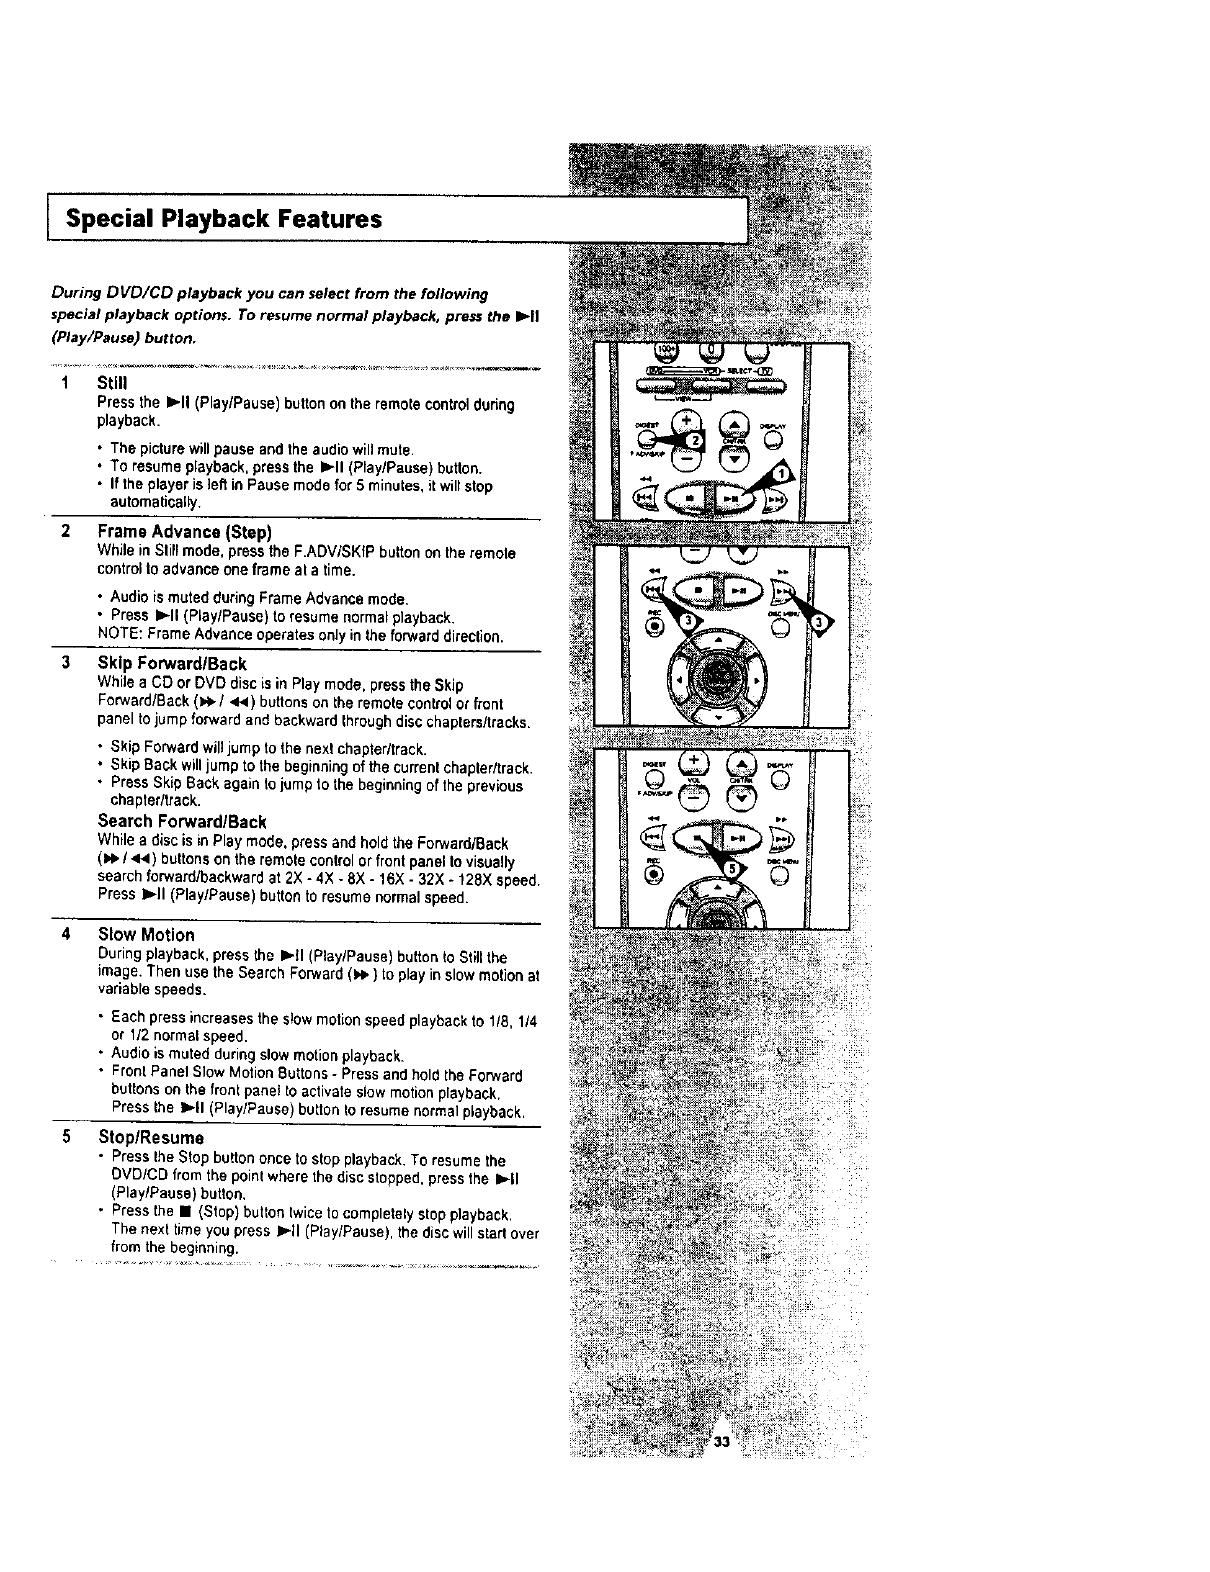
ISpecial Playback Features
During DVD/CD playback you can select from the following
special playb#ck options. To resume normal playback, press the b,-n
(Play/Pause) button,
1 Still
Press the I_11(Play/Pause) button on the remote contr01dottng
playback.
• The picture willpause and the audiowill mute.
•To resume playback, press the I_11 (Play/Pause) button.
• If the player is ]eft in Pause mode for 5 minutes, itwill stop
automatically.
2 Frame Advance {Step)
While in Stiltmode, press the F.ADV/SKfP buttonon the remote
controlto advance one frame at a time.
•Audio is muted during Frame Advance mode.
• Press IP-ll (Play/Pause) to resume normal playback.
NOTE: Frame A_vance operatesonly in the forward _irection.
Skip ForwardlBack
While aCO or OVO diec is in Play mode, press the S;'Jp
Forward/Back (),,_./44 ) buttonson the remote controlor font
panel to jump forward and backward throughdiscchapters/tracks.
• Skip Forward willjump to the next chapter/track.
• Skip Back willjump to the beginningof the currentchapter/track.
•Press Skip Back again tojump to the beginningof the previous
chapter/track.
Search Forward/Back
While a disc is in Play mode, press and hold the Forward/Back
(),e./441) buttonson the remote controlor front panel to visually
search forward/backward at 2X -4X -8X - 16X - 32X - 128X speed.
Press l_tt (PiaylPause) button to resume normalspeed.
4Slow Motion
During playback,press the I_.ll (P_ay/Pause')button _oStill the
image, Then use the Search Forward ()e,) to play inslow motion at
variable speeds.
•Each press increases the slow motion speed playback to 118,1/4
or 1/2 normal speed.
• AL_dieis muted during stowmotion playback.
• Fronl Panel Slow Motion Buttons-Pressand hold the Forward
butlons on the front panel to activate slow motion playback,
Press the I=,.|1{P_ay/Pause) button to resume normalp_ayback.
Stop/Resume
•Press the Stop button once to stop playback. To resume the
OVD/CD from the pointwhere the discstepped, press the I=,-II
(Play/Pause) button.
• Press the I (Stop) button twice to completelystop playback.
The next time you press I=,-II(Play/Pause), the discwillstart over
from the beginning.
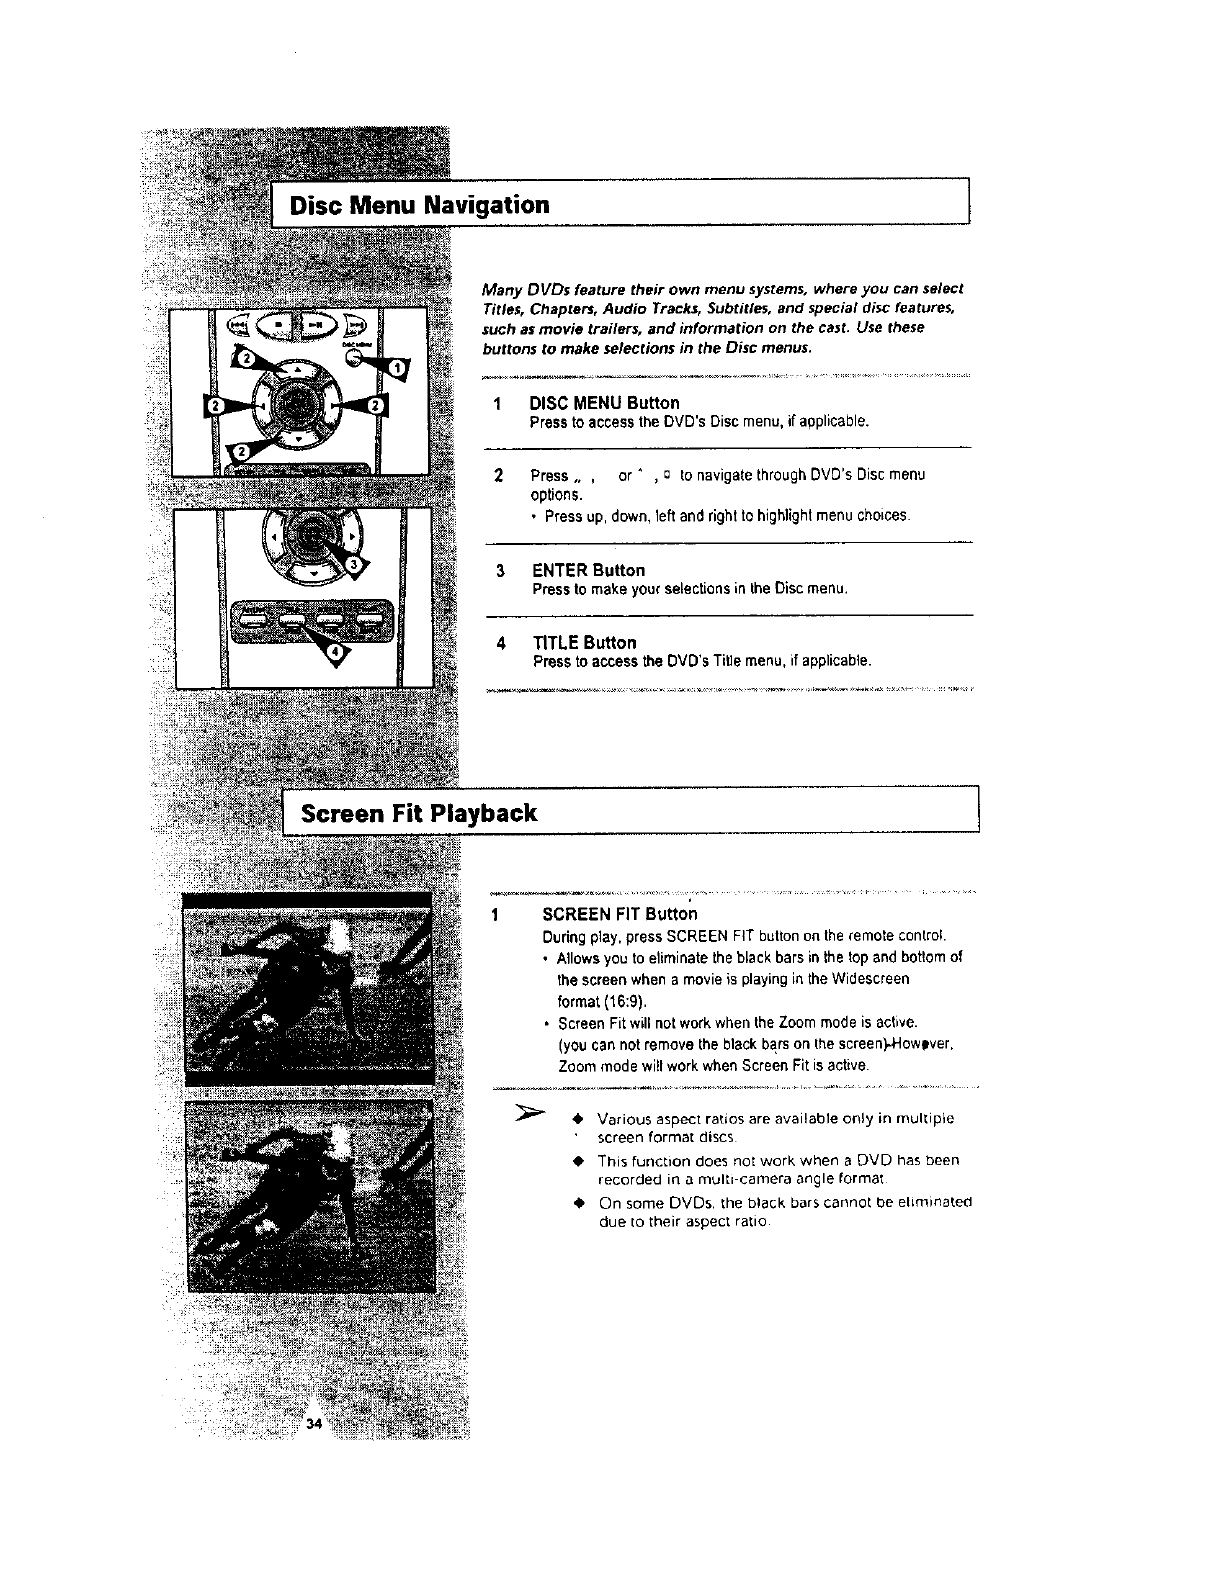
Disc Menu Navigation I
Many DVDs feature their own menu systems, where you can select
Titles, Chapters, Audio Tracks, Subtitles, and special disc features,
such as movie trailers, and information on the cast. Use these
buttons to make selections in the Disc menus.
1 DISC MENU Button
Press to access the DVD's Disc menu, if applicable.
2Press. ,or ", 0 to navigate through DVD's Disc menu
options.
• Press up, down, left and right to highlight menu choices.
3 ENTER Button
Pressto make your selectionsin the Disc menu.
4 TITLE Button
Press to access the DVD's Title menu, if applicable.
Screen Fit Playback !
1 SCREEN FIT Button
During play.press SCREEN FiT button on the remotecontrol
•Allowsyou to eliminate the black bars in the top and bottomof
the screen when amovie is playing inthe Widescreen
format (16:9).
•Screen Fit will not work when the Zoom mode is active.
(you can not remove the black barson the screen)..However,
Zoom mode wi!l work when Screen Fit is active.
• Various aspect ratios are availabte only in multiple
screen format discs
• This function does not work when a DVD has been
recorded in a multi-camera angle format
• On some DVDs, the black bars cannot be etiminated
due 1otheir aspect ratio
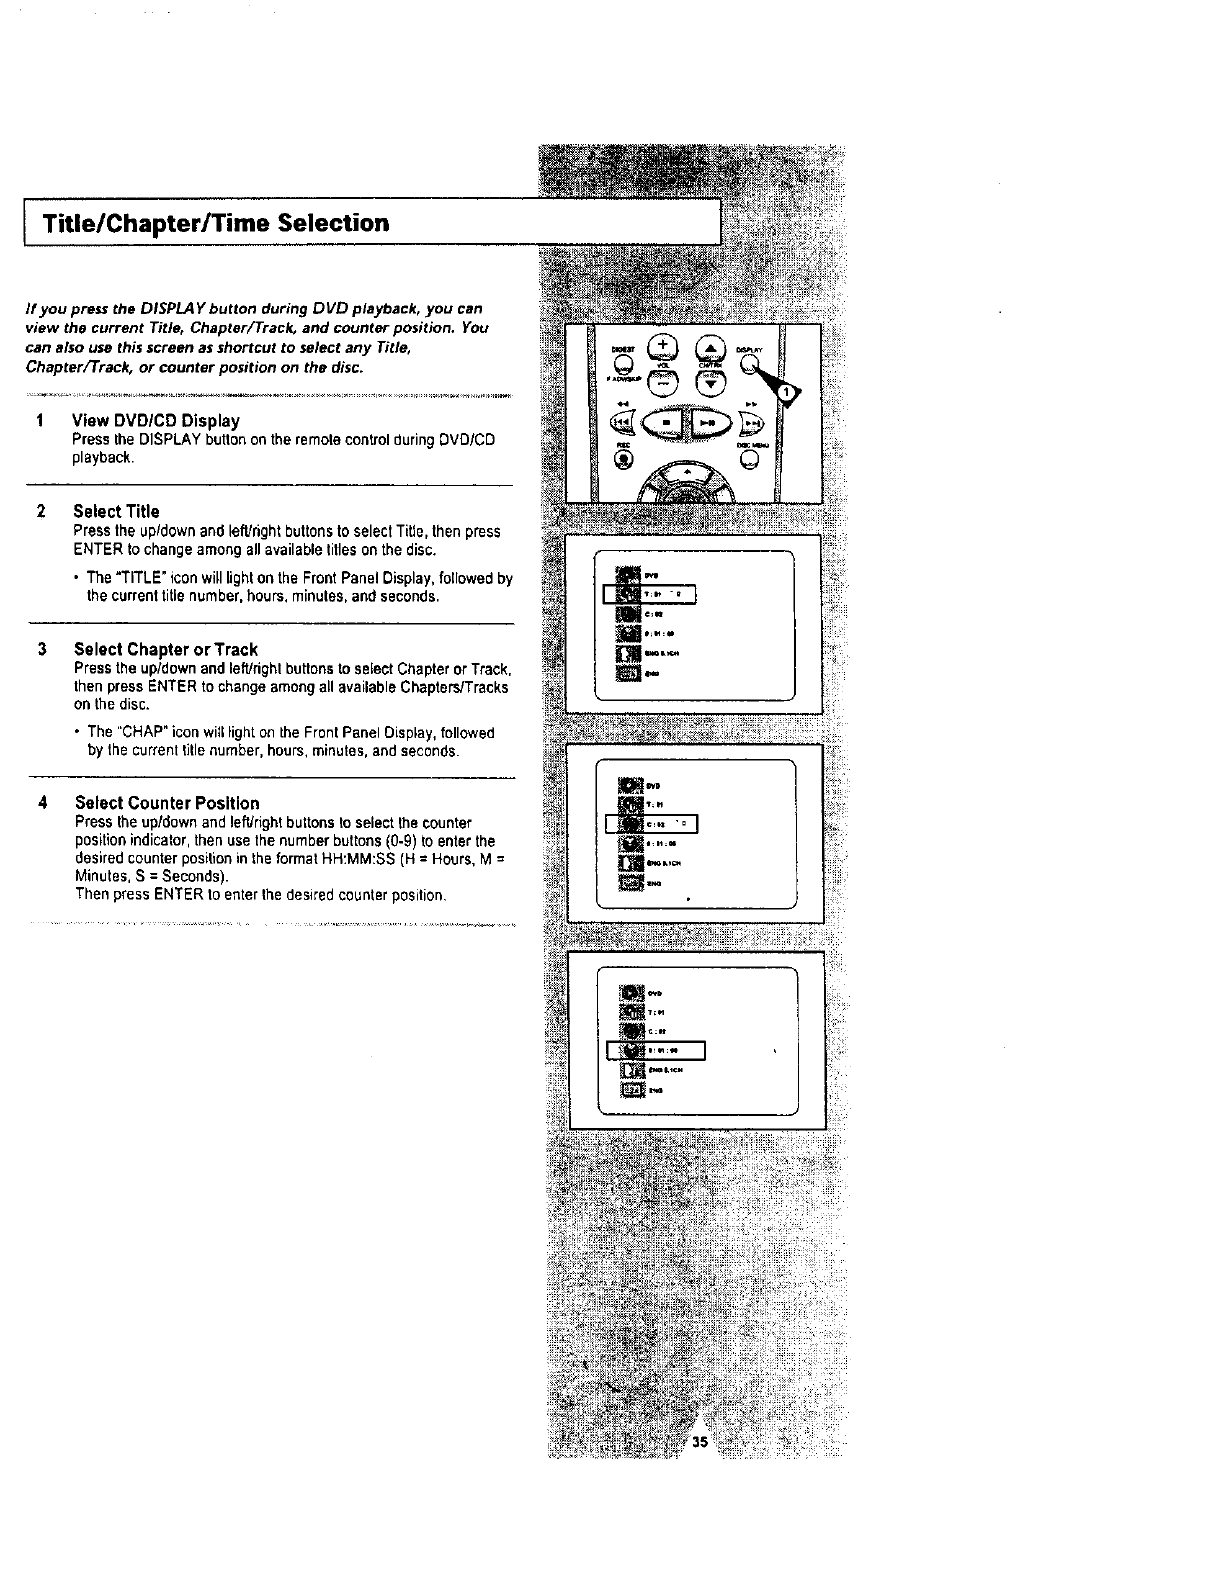
Title/Chapter/Time Selection
If you press the DlSPLA Y button during DVD playback, you can
view the current Title, Chapter/Track, and counter position. You
can also use this screen as shortcut to select any Title,
Chapter[Track, or counter position on the disc.
1 View DVD/CD Display
Press the DISPLAY button on the remote controlduring DVD/CD
playback.
Select Title
Press the up/down and left/right buttons to select Title, then press
ENTER to change among all available titleson the disc.
•The "TITLE" iconwill light on the Front Panel Display, followed by
the current title number, hours, minutes, and seconds.
Select Chapter or Track
Pressthe up/down and left/rightbuttonsto select Chapter or Track,
then press ENTER to change among all available Chapters/Tracks
on the disc.
• The "CHAP" iconwitl light on the Front Panel Display, followed
by the current titlenumber, hours, minutes, and seconds.
4Select Counter PosJtion
Press the up/down and left/right buttonsto select the counter
positionindicator,then use the number buttons(0-9) to enter the
desired counter positionin theformat HH:MM:SS (H = Hours,M =
Minutes, S = Seconds).
Then press ENTER to enter the desired counterposition,
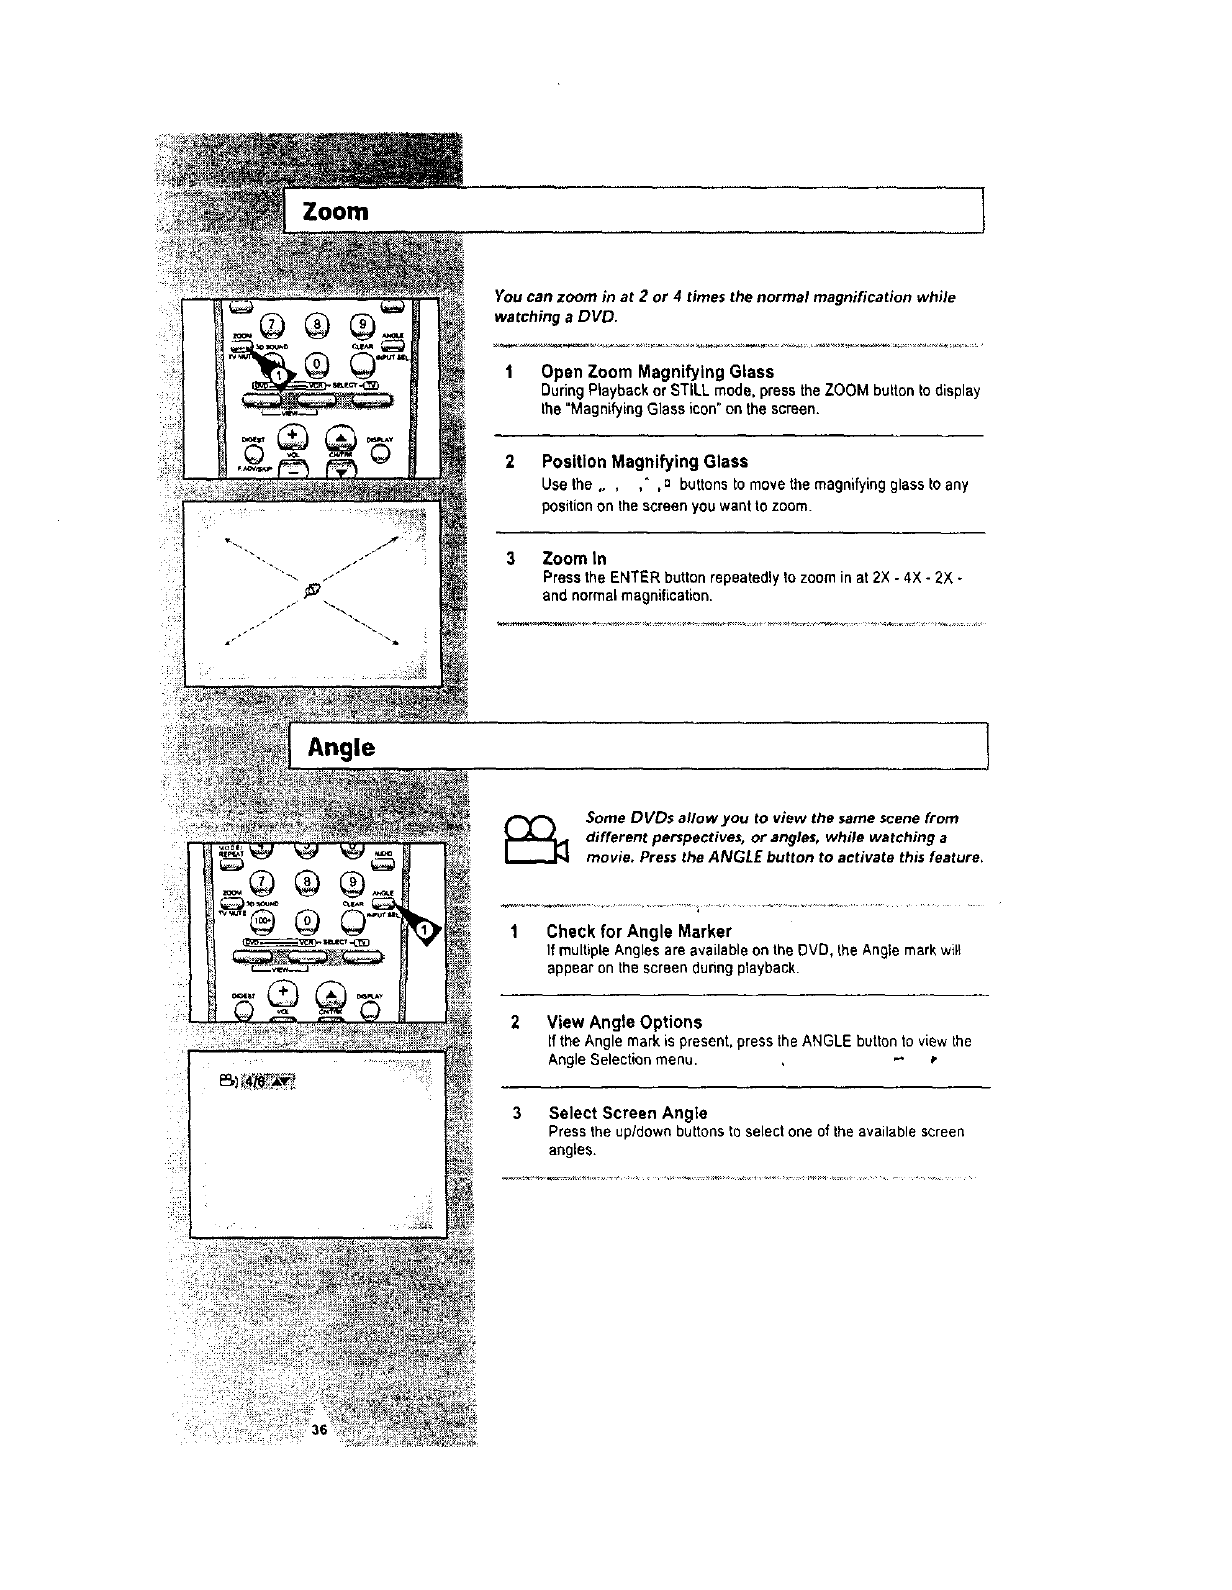
Zoom J
You can zoom in at 2 or 4 times the normal magnification while
watching a DVD.
1 Open Zoom Magnifying Glass
During Playback or STILL mode, press the ZOOM button to display
the "Magnifying Glass icon" on the screen.
2 Position Magnifying Glass
Use the .... " ,a buttons to move the magnifying glass to any
positionon the screen you want to zoom.
3 Zoom In
Press the ENTER button repeatedly to zoom in at 2X - 4X - 2X +
and normal magnification.
Angle !
Some DVDs allow .you to view the same scene from
different perspectives, or angles, while watching a
movie. Press the ANGLE button to activate this feature,
1 Check for Angle Marker
If multiple Angles are available on the DVD, the Angte mark wilt
appear on the screen during playback.
2 View Angte Options
If the Angle mark is present, press the ANGLE button to view the
Angle Selection menu. P
3 Select Screen Angle
Press the up/down buttons to select one of the available screen
angles.
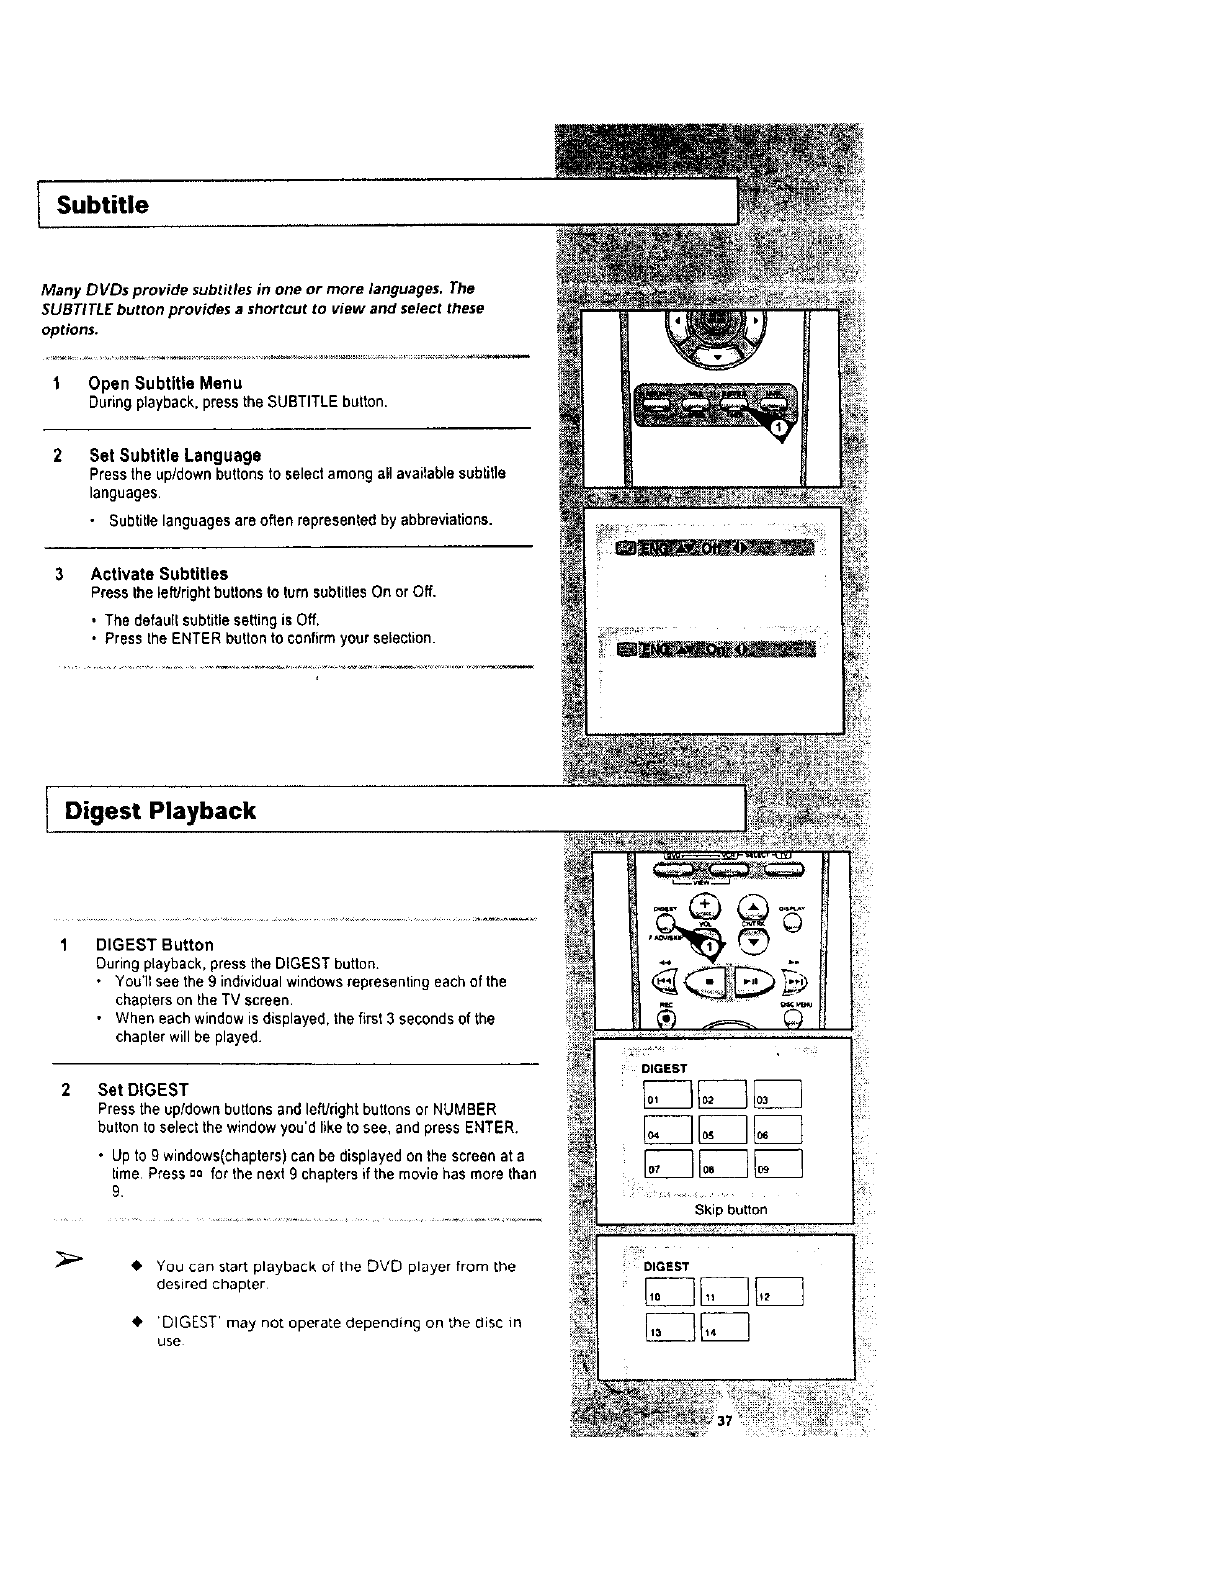
ISubtitle
Many DVDs provide subtitles in one or more languages. The
SUBTITLE button provides a shortcut to view and select these
options.
1 Open Subtitle Menu
During playback, press the SUBTITLE button.
Set Subtitle Language
Press the up/down buttons to select among all available subtitle
languages.
• Subtitle languages are often represented by abbreviations.
Activate Subtitles
PresstheleftJrightbuttonstoturnsubtitlesOnorOff,
•The default subtitlesetting is Off,
•Press the ENTER button to confirmyour selection.
Digest Playback
DIGEST Button
During playback, press the DIGEST button.
• You'll see the 9 individual windows representing each of the
chapters on the TV screen.
• When each window is displayed, thefirst 3 seconds of the
chaplet will be played.
2Set DIGEST
Press the upfdown buttons and left/right buttons or NUMBER
button to select the window you'd like to see, and press ENTER.
• Up to 9 windows(chapters) can be displayed on the screen at a
time Press =o for the next 9 chapters if the movie has more than
9.
_" You can start playback of the DVD player from [he
desired chap[er
•''DIGEST' may not operate depending on the disc in
use
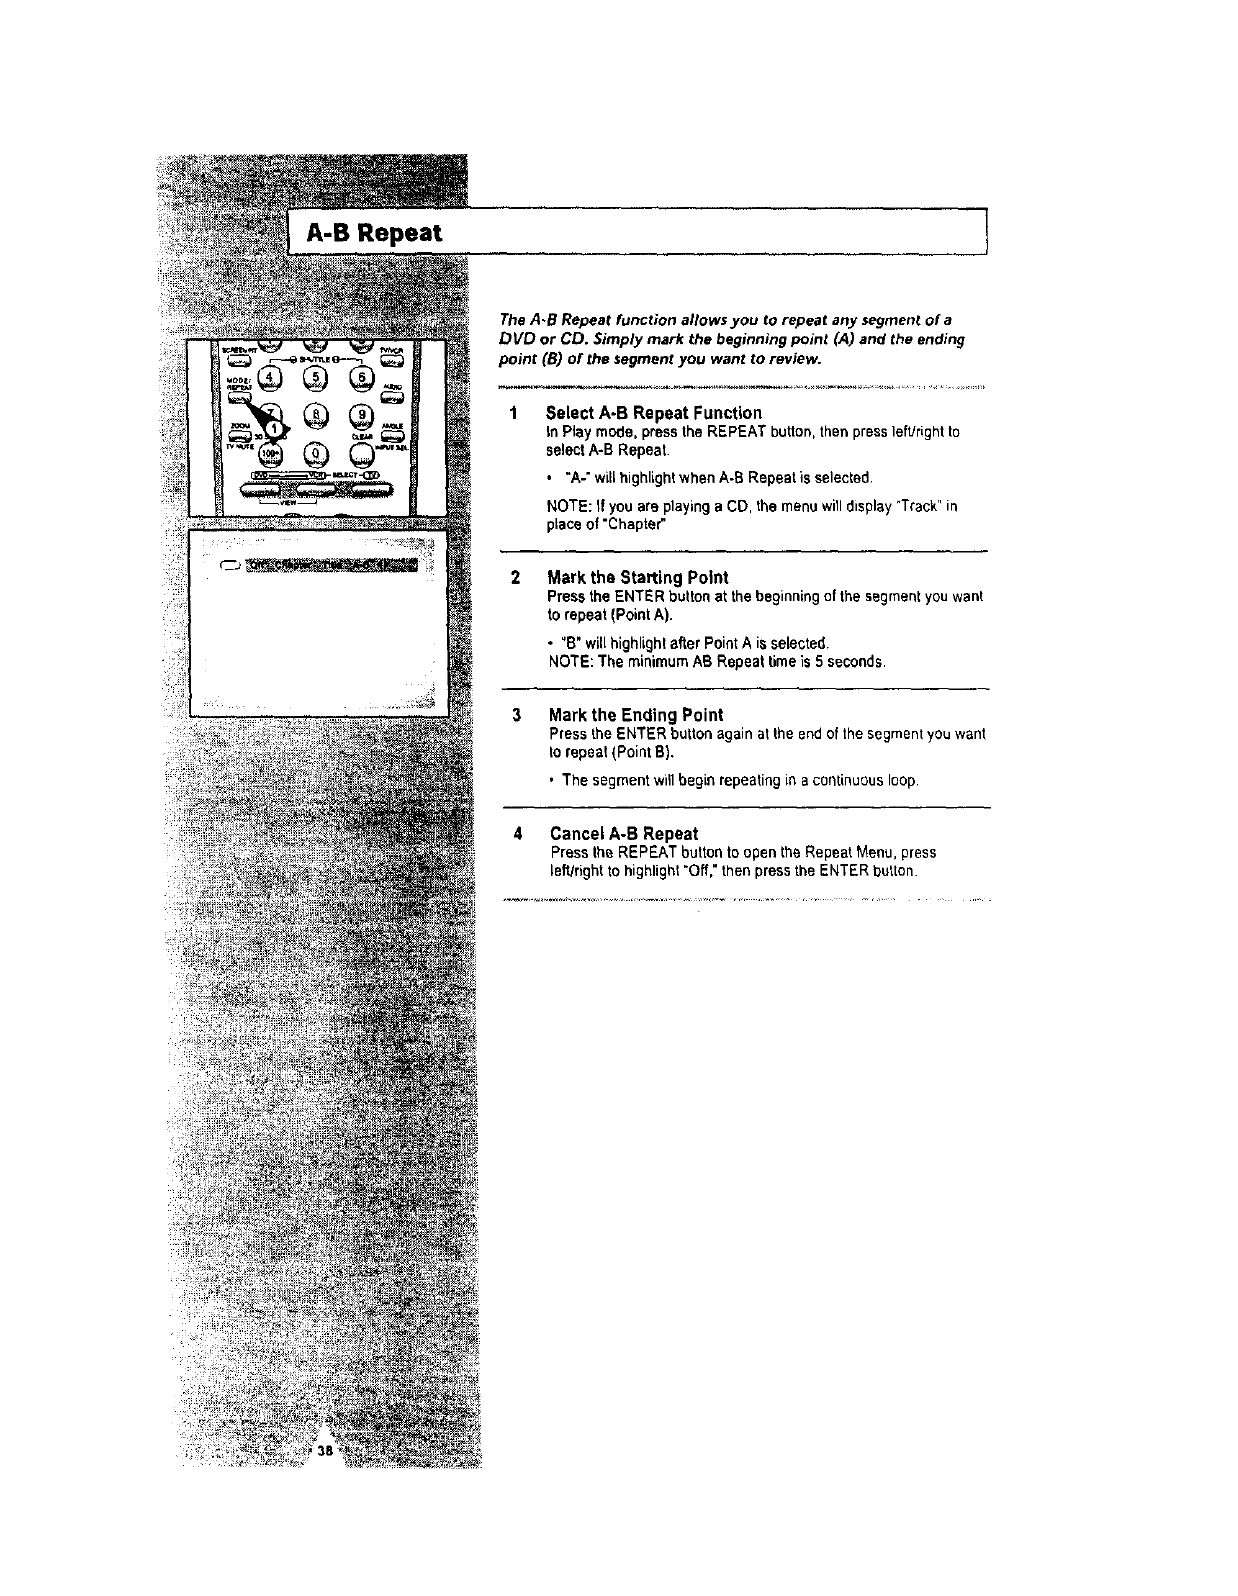
A-B Repeat I
The A.B Repeat function allows you to repeat any segment of a
DVD or CD. Simply mark the beginning point (A) and the ending
point (B) of the segment you want to review.
1 Select A-B Repeat Function
tn Play mode, pressthe REPEAT button, then press left#ightto
select A-B Repeat.
•"A-" willhighlightwhen A-B Repeat is selected.
NOTE: If you are playing a CD, the menu will display "Track" in
place of'Chapter"
2Mark the Starting Point
Press the ENTER button at the beginningof the segment you went
to repeat (Point A).
•"B" will highlightafter Point A is selected,
NOTE: The minimum AB Repeat time is 5 seconds.
Mark the Ending Point
Press the ENTER button again at the end of the segment you want
to repeat (Point B),
• The segment will begin repeatingin a continuous loop.
Cancel A-B Repeat
Press the REPEAT button to open the Repeat Menu, press
left/right to highlight "Off," then press the ENTER button.
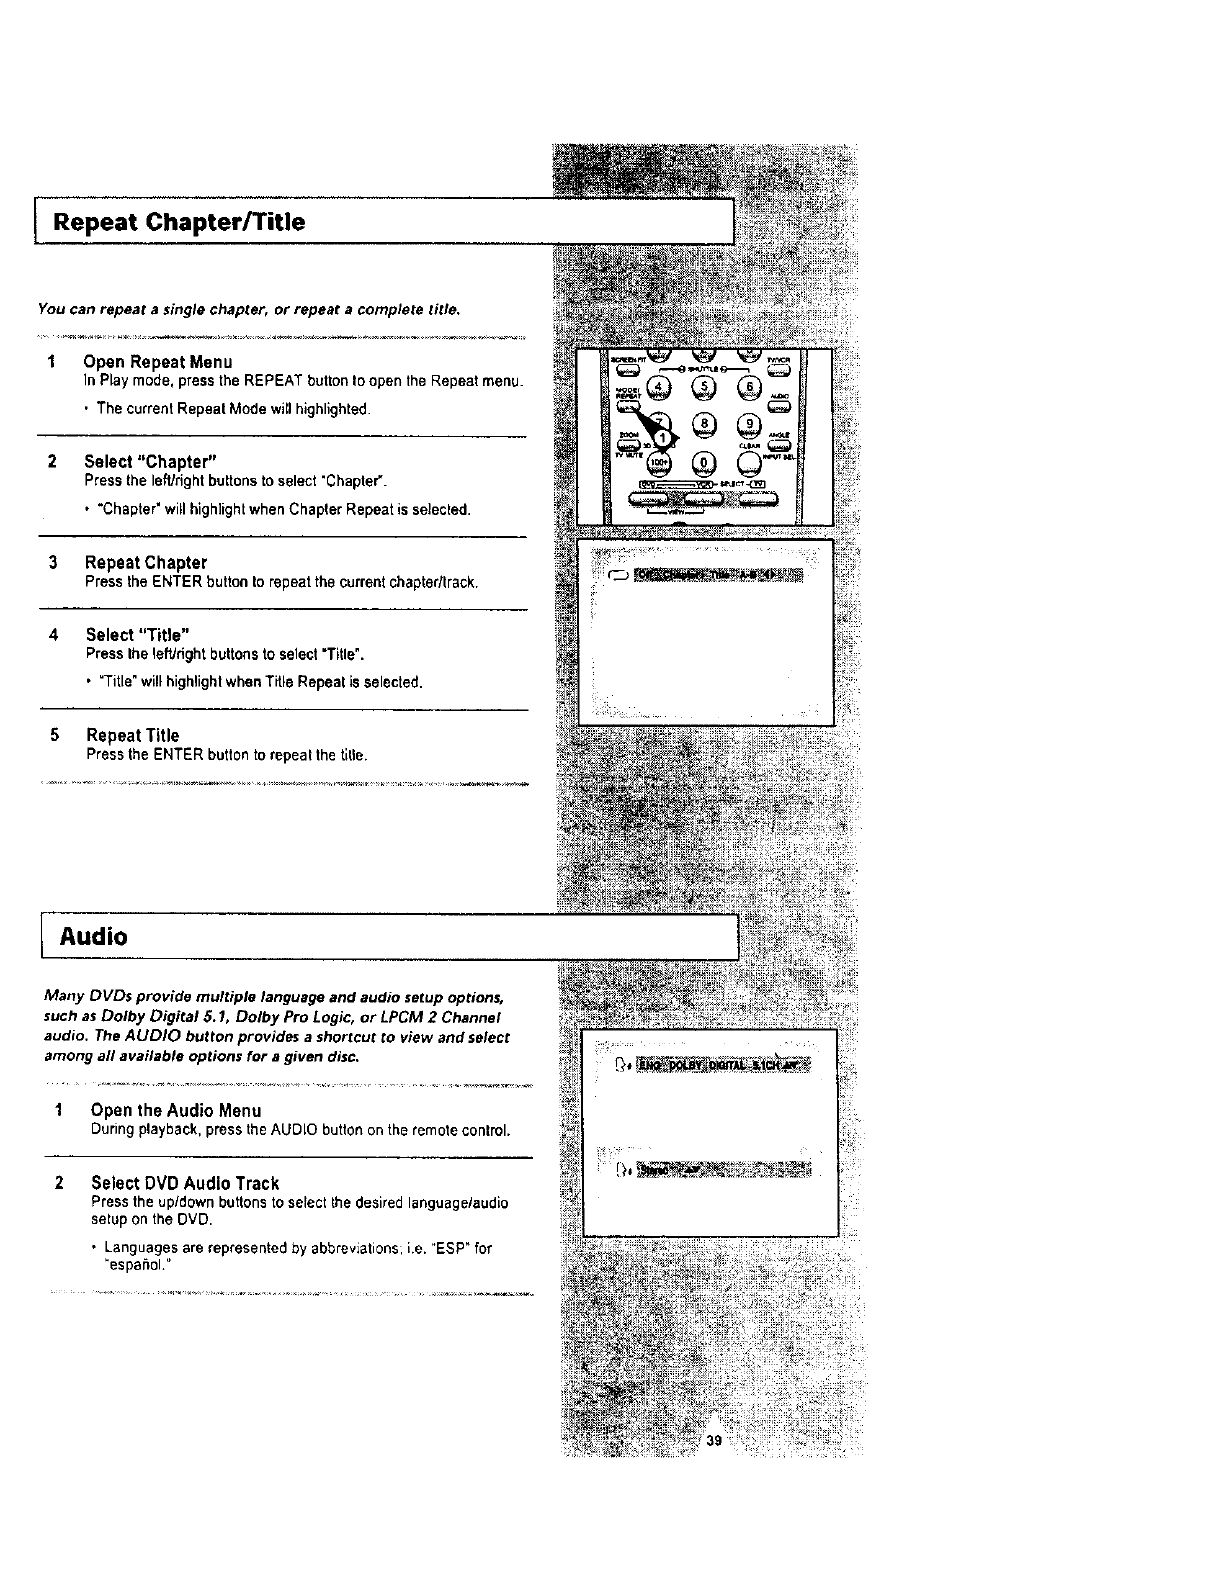
Repeat Chapter/Title
You can repeat a single chapter, or repeat a complete title.
1 Open Repeat Menu
In Play mode, press the REPEAT button to open the Repeat menu.
, The currentRepeat Mode willhighlighted.
2 Select "Chapter"
Press the left/right buttonsto select "Chapter"
• "Chapter" will highlightwhen Chapter Repeat is selected.
3 Repeat Chapter
Press the ENTER button to repeat the currentchaptedtreck.
4 Select "Title"
Press the leftJdght buttons to select "Title".
•"Title"will highlightwhen Title Repeat is selected
5 Repeat Title
Press the ENTER button to repeat the titSe.
L Audio
Many DVDs provide multiple language and audio setup options,
such as Dolby Digital 5.1, Dolby Pro Logic, or LPCM 2 Channel
audio. The AUDIO button provides a shortcut to view and select
among aft available options for a given disc.
1 Open the Audio Menu
During playback, press the AUDIO button on the remote control.
Select DVD Audio Track
Press the up/down buttonsto select the desired language/audio
setup on the DVD.
• Languages are represented by abbreviations;i.e. "ESP" for
"espef_ol."
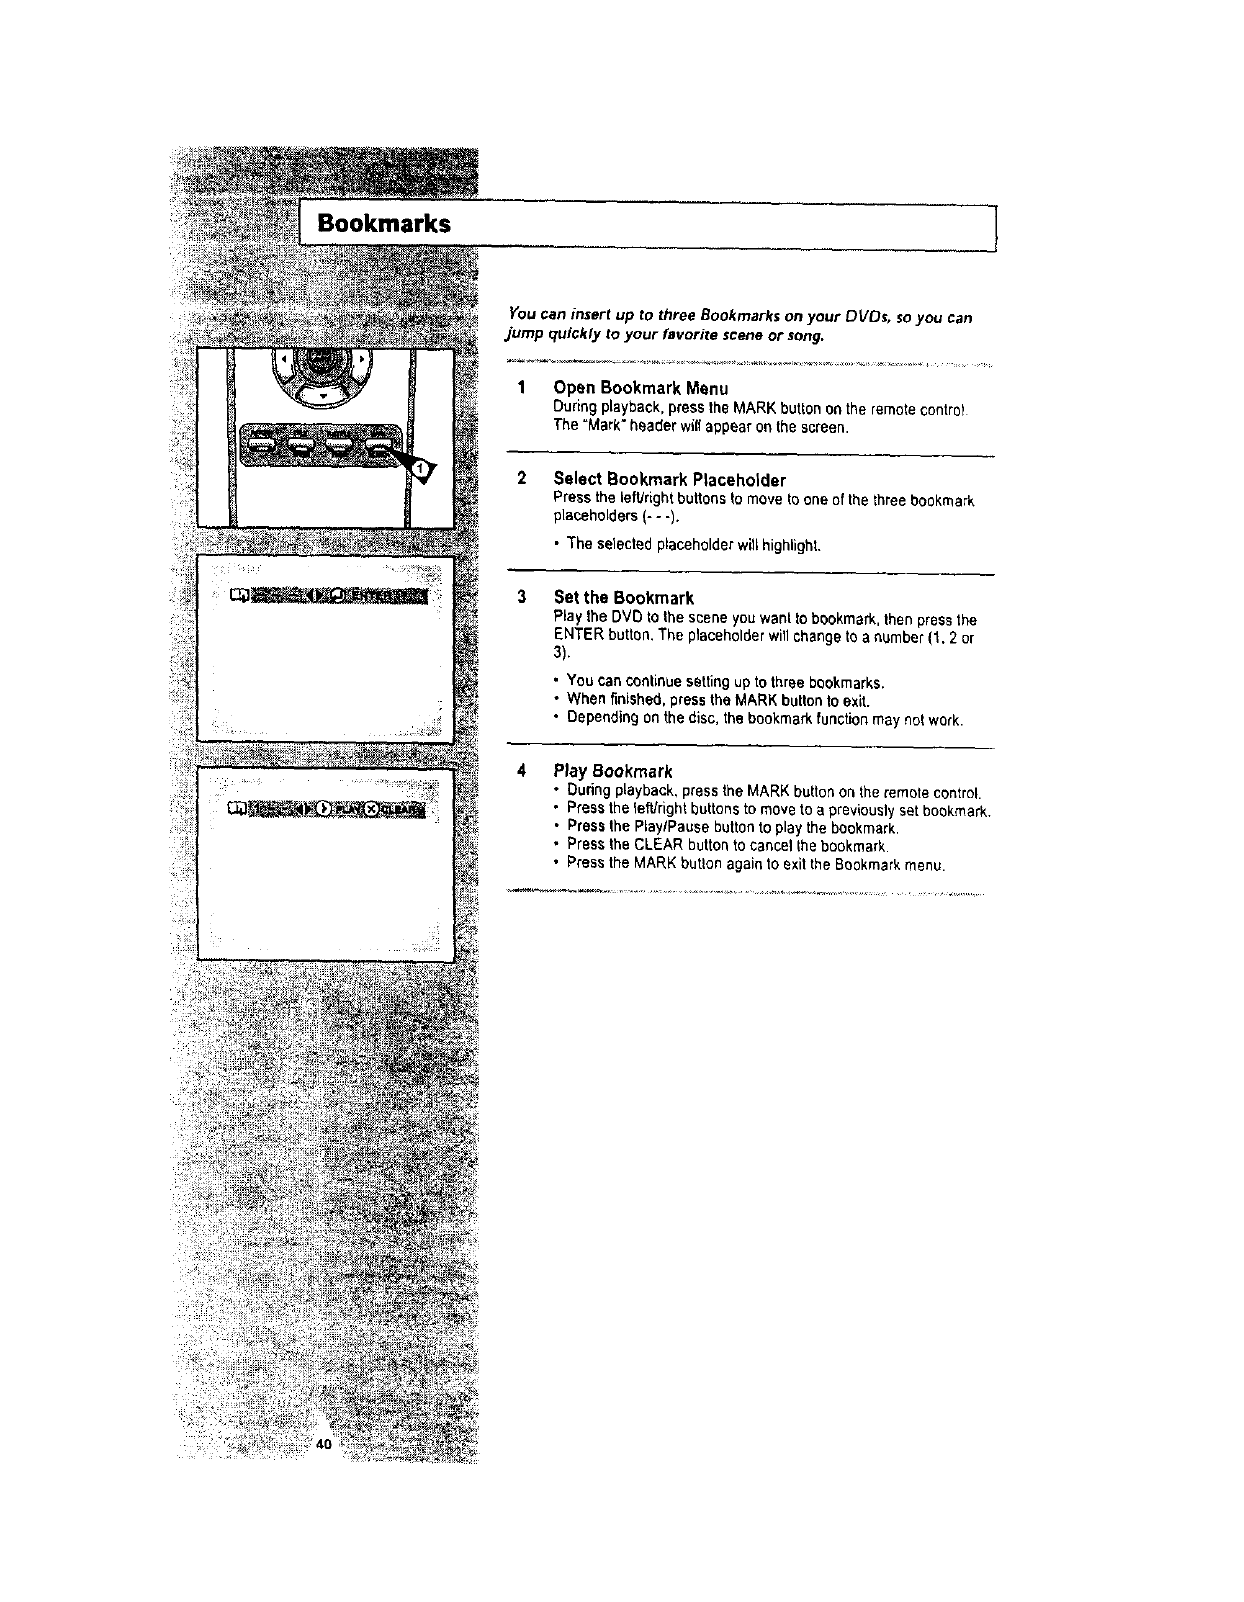
You can insert up to three Bookmarks on your DVDs, so you can
jump quickly to your favorite scene or song,
I Open Bookmark Menu
Ouri_ playback, press the _ARK button _,_ the remote Control
The "Mark" header will appear on the screen.
Bookmarks
2
3
Select Bookmark Placeholder
Press the iefVdghtbuttons to move to one of the three bookmark
placeholders(- - -).
•3"heselected placeholder will highlight.
Set the Bookmark
Ray theDVDto thesceneyouwanttobookmark,thenpressthe
ENTERbutton,Theplacaholderwillchangetoa number(1.2 or
3).
, You can continuesetting up to three bookmarks.
•When finished, press the MARK button to exit.
•Depending on the disc, the bookmark function may not work.
Play Bookmark
•Dudng playback,press the MARK buttonon the remote control.
•Presstheto,rightbuttonstomove toa previouslysetbookmark,
•Press the PlaylPause button to play the bookmark,
•Press the CLEAR button to cancel thebookmark.
•Press the MARK button again to exit the Bookmark menu.
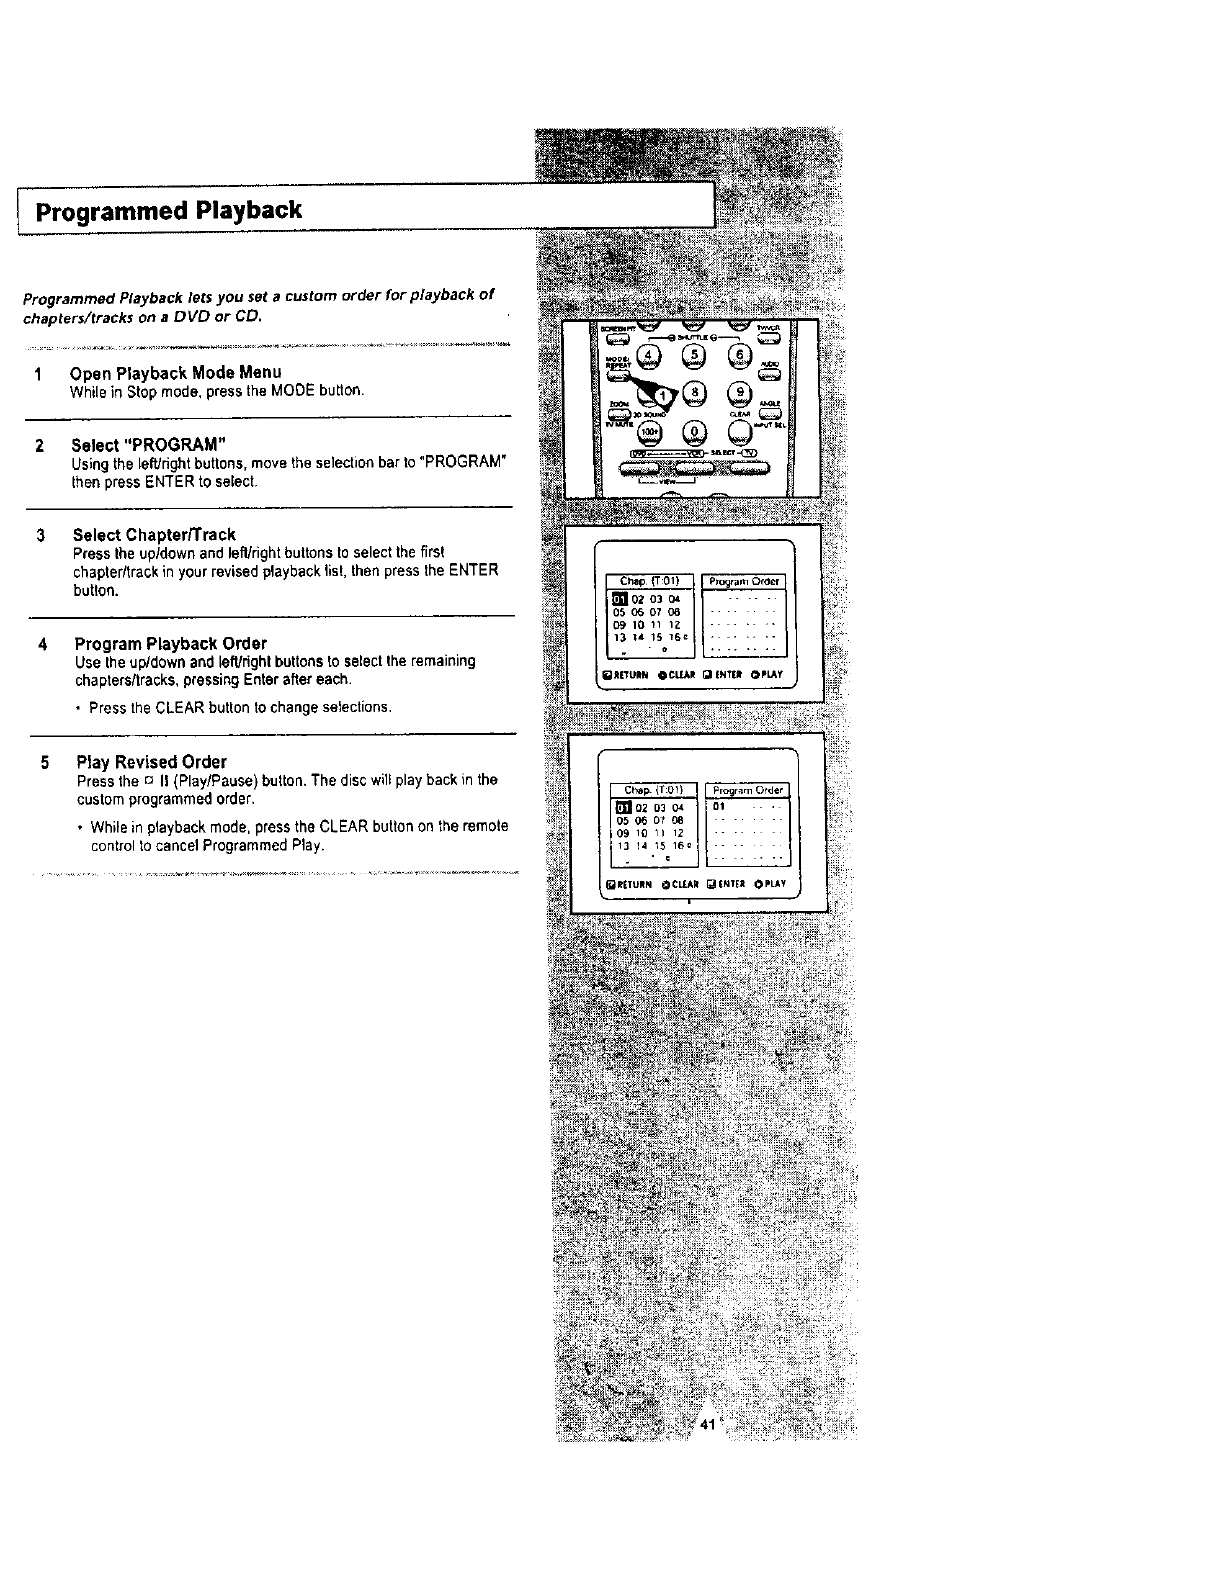
lProgrammed Playback
Programmed Playback lets you set a custom order for playback of
chapters/tracks on a DVD or CD.
1 Open Playback Mode Menu
While in Stop mode, press the MODE button.
2 Select "PROGRAM"
Using the lefUdght buttons, move the selection bar to "PROGRAM"
then press ENTER to select.
3Select Chapter/Track
Press the up/down and left/right buttons to select the first
chapter/track in yourrevised playback Ust.then press the ENTER
button.
4 Program Playback Order
Use the up/down and left/right buttons to select the remaining
chapters/tracks, pressing Enterafter each.
• Press the CLEAR button to change selections,
5 Play Revised Order
Pressthe c_II (Play/Pause) button,The disc will playbackin the
custom programmed order,
• While in playback mode, press the CLEAR button on the remote
control to cancel ProgrammedPlay.
Chep (T:01) p_c_ram Otoer
_102 03 04 ......
_05 07 08
IO 11 1Z
13 t4 1_ 16_
- b
_R[TLIIN QC_R _[NTEI OPLAy
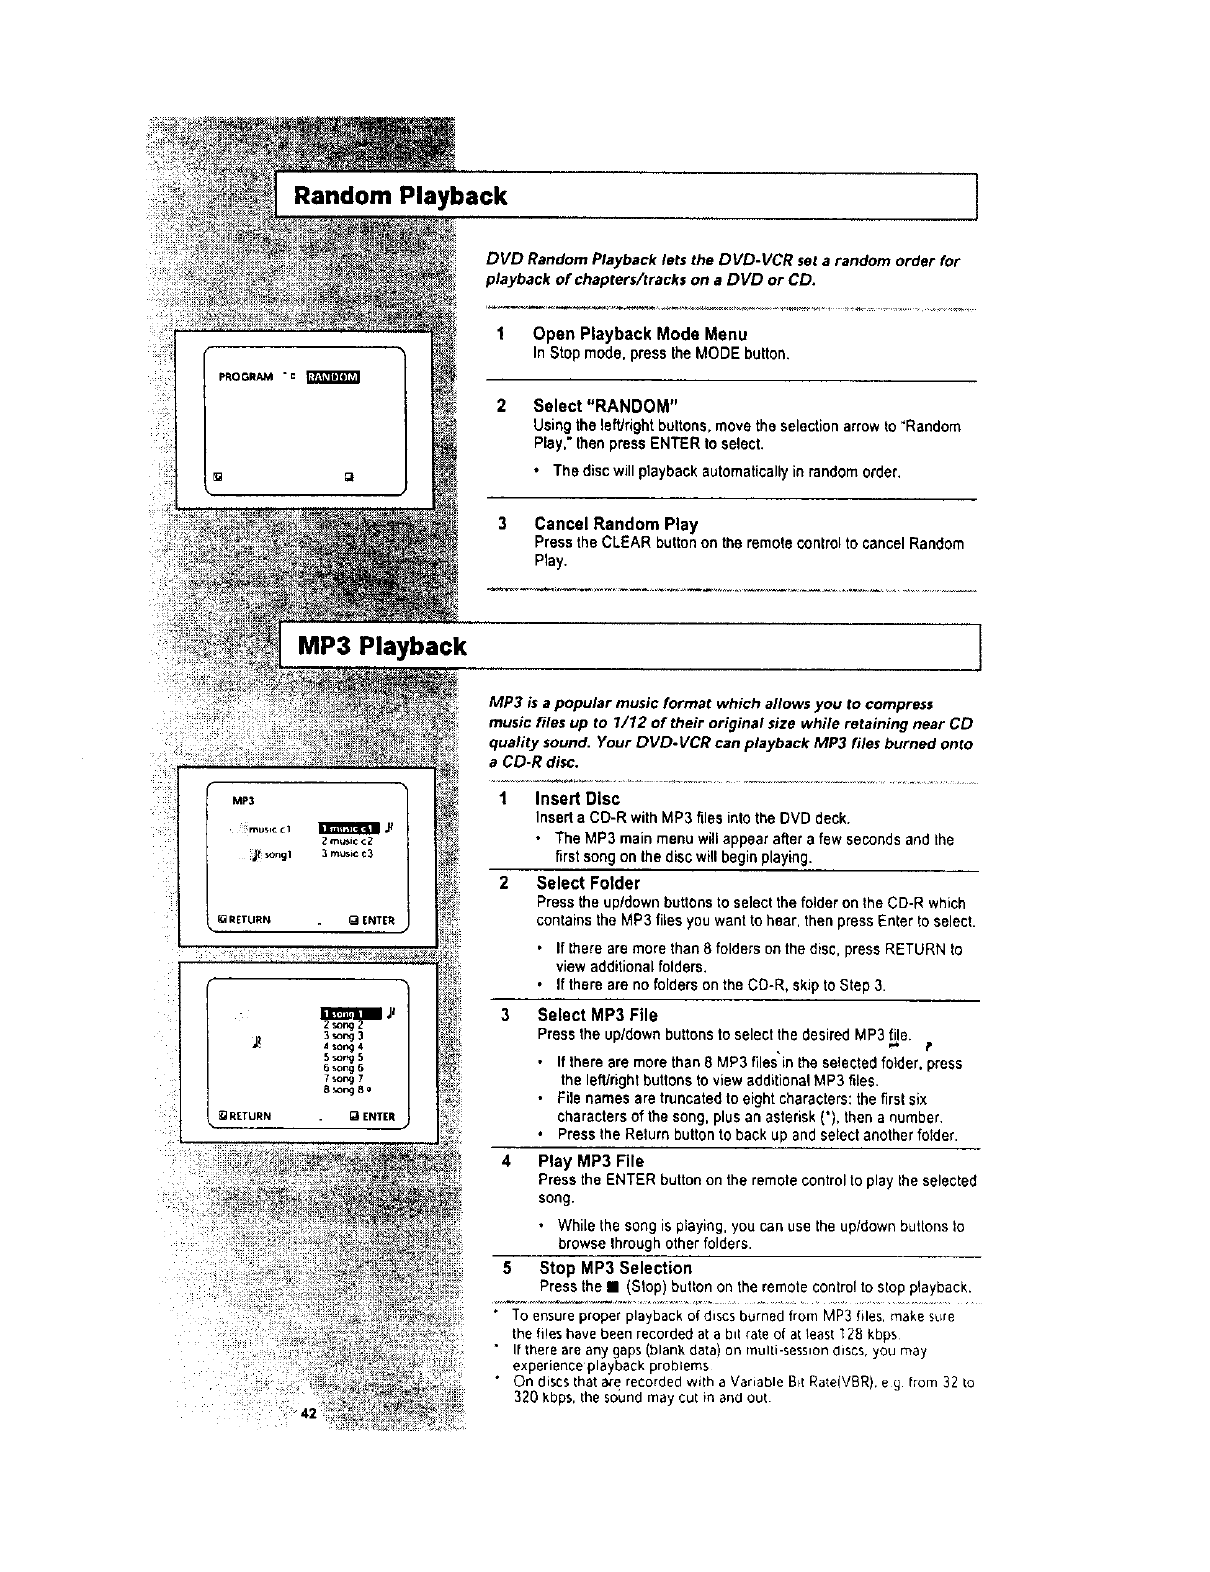
Random Playback ]
DVD Random Playback lets the DVD-VCR set a random order for
playback of chapters/tracks on a DVD or CD.
1 Open Playback Mode Menu
In Stop mode. press the MODE button.
Select "RANDOM"
Using the leftJright buttons,move the selectionarrow to "Random
Play," then press ENTER to select.
• The discwill playback automatically in random order.
3 Cancel Random Play
Press the CLEAR button on the remote controlto cancel Random
Play.
MP3 Playback
MP3 is a popular music format which allows you to compress
music files up to 1/12 of their original size while retaining near CD
quality sound. Your DVD.VCR can playback MP3 files burned onto
a CD-R disc.
1 Insert Disc
Insert a CD-R with MP3 files into the DVD deck.
• The MP3 main menu will appear after afew secondsand the
firstsong on the disc will begin playing.
2 Select Folder
Press the up/down buttons to select the folder on the CD-R which
contains the MP3 files you want to hear, then press Enter to select.
•If there are more than 8 folders on the disc, press RETURN to
view additional folders.
• If there are no folders on the CD-R. skip to Step 3.
3Select MP3 File
Press the up/down buttonsto selectthe desiredMP3 tile. t
•If there are more than 8 MP3 files'inthe selected folder, press
the leWrightbuttons to view additionalMP3 files.
•File names are truncated to eight characters: the first six
characters of the song, plus an asterisk ('), then a number
° Press the Relurn button to back up and select another folder.
4 Play MP3 File
Press the ENTER button on the remote control to play the selected
song.
.While the song is playing, you can use the up/down buttons to
browse throughother folders.
5Stop MP3 Selection
Press the • (Stop) button on the remote control to stop p_ayback.
• To ensure properplayback of discs burned from MP3 tiles, make sl_re
the files have been recorded at a b_trate of at least 128 kbps
• It lhere are an), gaps (blank data) on muni-sess_ondiscs, you may
experience playbackproblems
• On discs that _ff recorded with a Variable B_IRate(VBR).e g from 32 _o
320 kbps, the sound may cut in and out

I3D Sound
30 Audio is an enhanced audio mode that creates the illusion of
Surround 5ound with only two speakers.
Open 3D Sound Menu
During playbackof aDVD, pressthe 3D SOUND buttonon the
remote control.
2 Set 3D Sound
Pressthe up/down buttonsto set "3D Sound"On or Off, then press
the 3D SOUND button to confirmyour selection.
PLAY
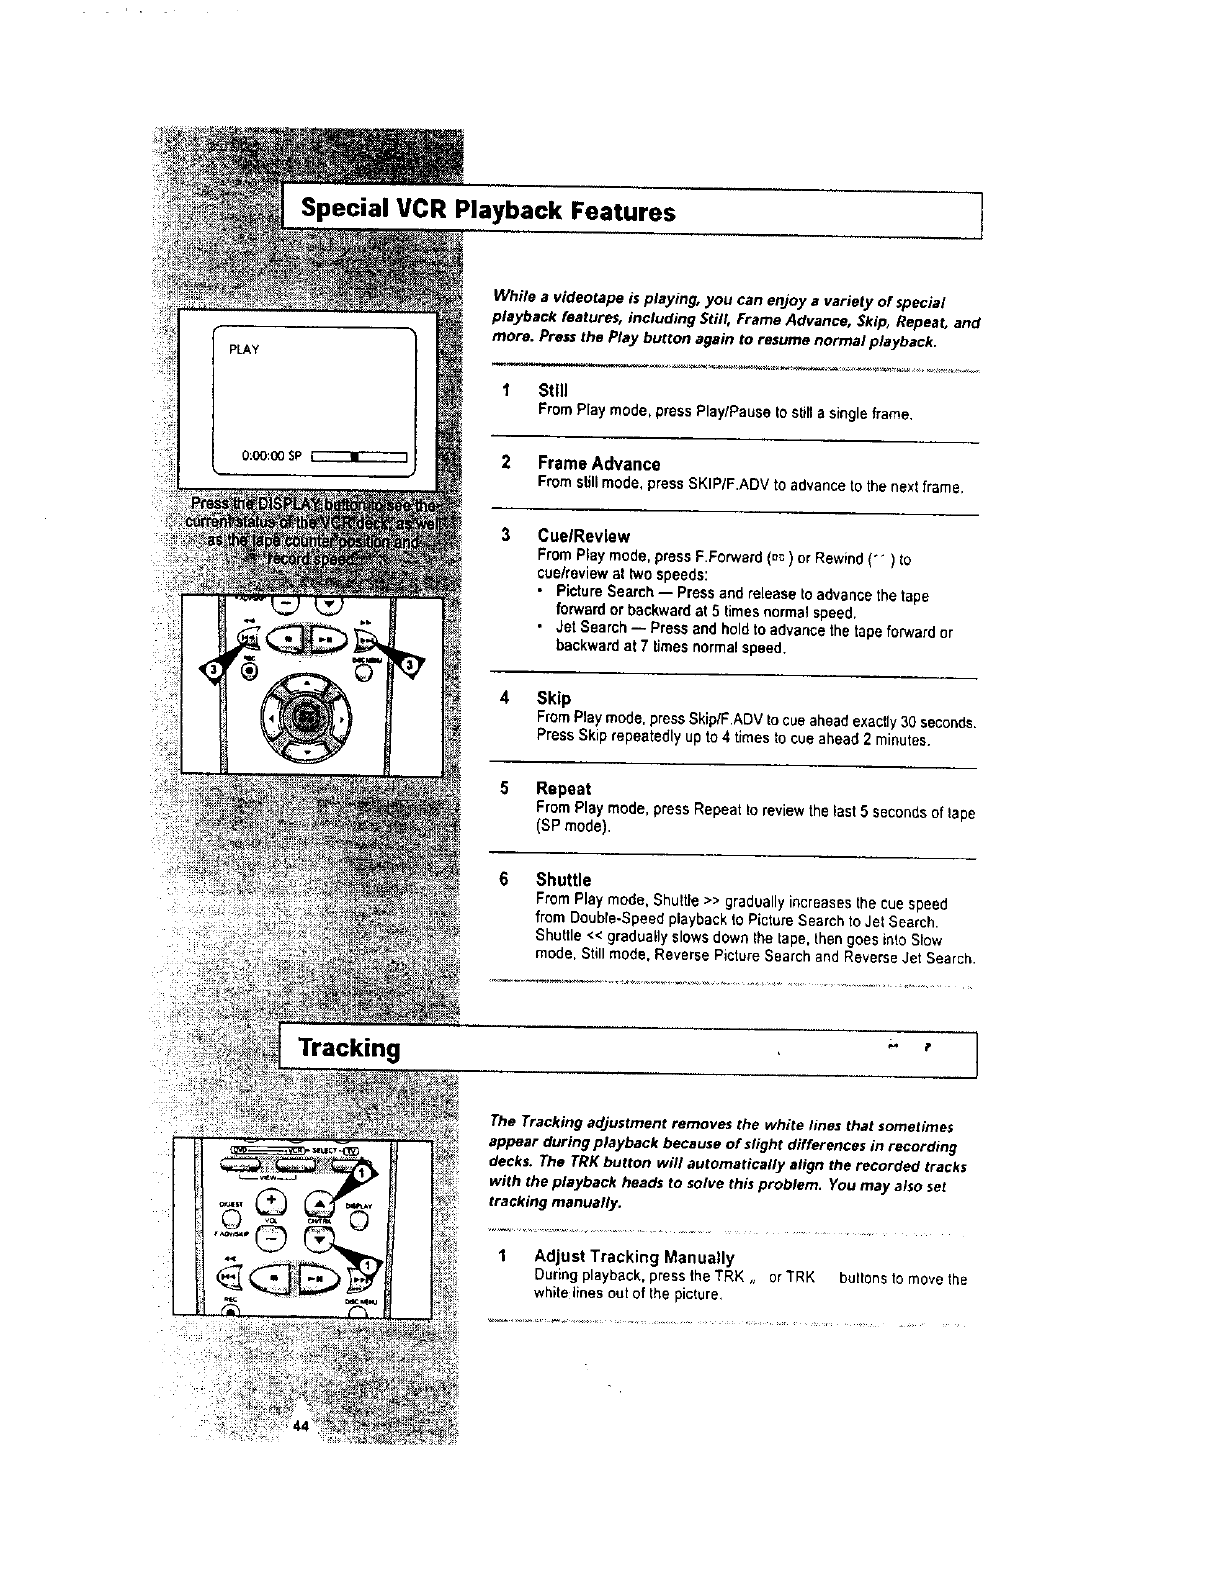
Tracking
,s I
While a videotape is playing, you can enjoy avariety of special
playback features, including Still, Frame Advance, Skip, Repeat, and
more. Press the Play button again to resume normal playback.
1 Still
FromPlaymode,pressPlay/Pauseto stillasingle frame,
2 Frame Advance
From s_t$mode, press SKiP/F.ADV to advance to the next frame.
3 Cue/Revlew
From Ray mode, press F.Forward (=c) or Rewind (-) to
cue/review at twospeeds:
•Picture Search -- Press and release to advance the tape
forward or backward at 5 timesnormal speed.
• Jet Search -- Press and hold to advance the tape forward or
backward at 7 times normal speed.
4Skip
FromPlay mode, press Skip/F.ADV tocue ahead exactly 30 seconds.
Press Skip repeatedly up to 4 times to cue ahead 2 minutes.
5 Repeat
From Play mode, press Repeat to review the last 5 secondsof lape
(SP mode).
6 Shuttle
From Play mode, Shutde >> gradually increases the cue speed
from Double-Speed playback to Picture Search to Jet Search•
Shuttle << gradually slowsdown the tape, then goes into Slow
mode, Stitl mode. Reverse P_ctureSearch and Reverse Jet Search•
The Tracking adjustment removes the white lines that sometimes
appear during playback because of slight differences in recording
decks, The TRK button will automatically align the recorded tracks
with the playback heads to solve this problem. You may also set
tracking manually.
1 Adjust Tracking Manually
During playback, press the TRK ,, or "_RK buttons to move the
whitelines out of the picture,
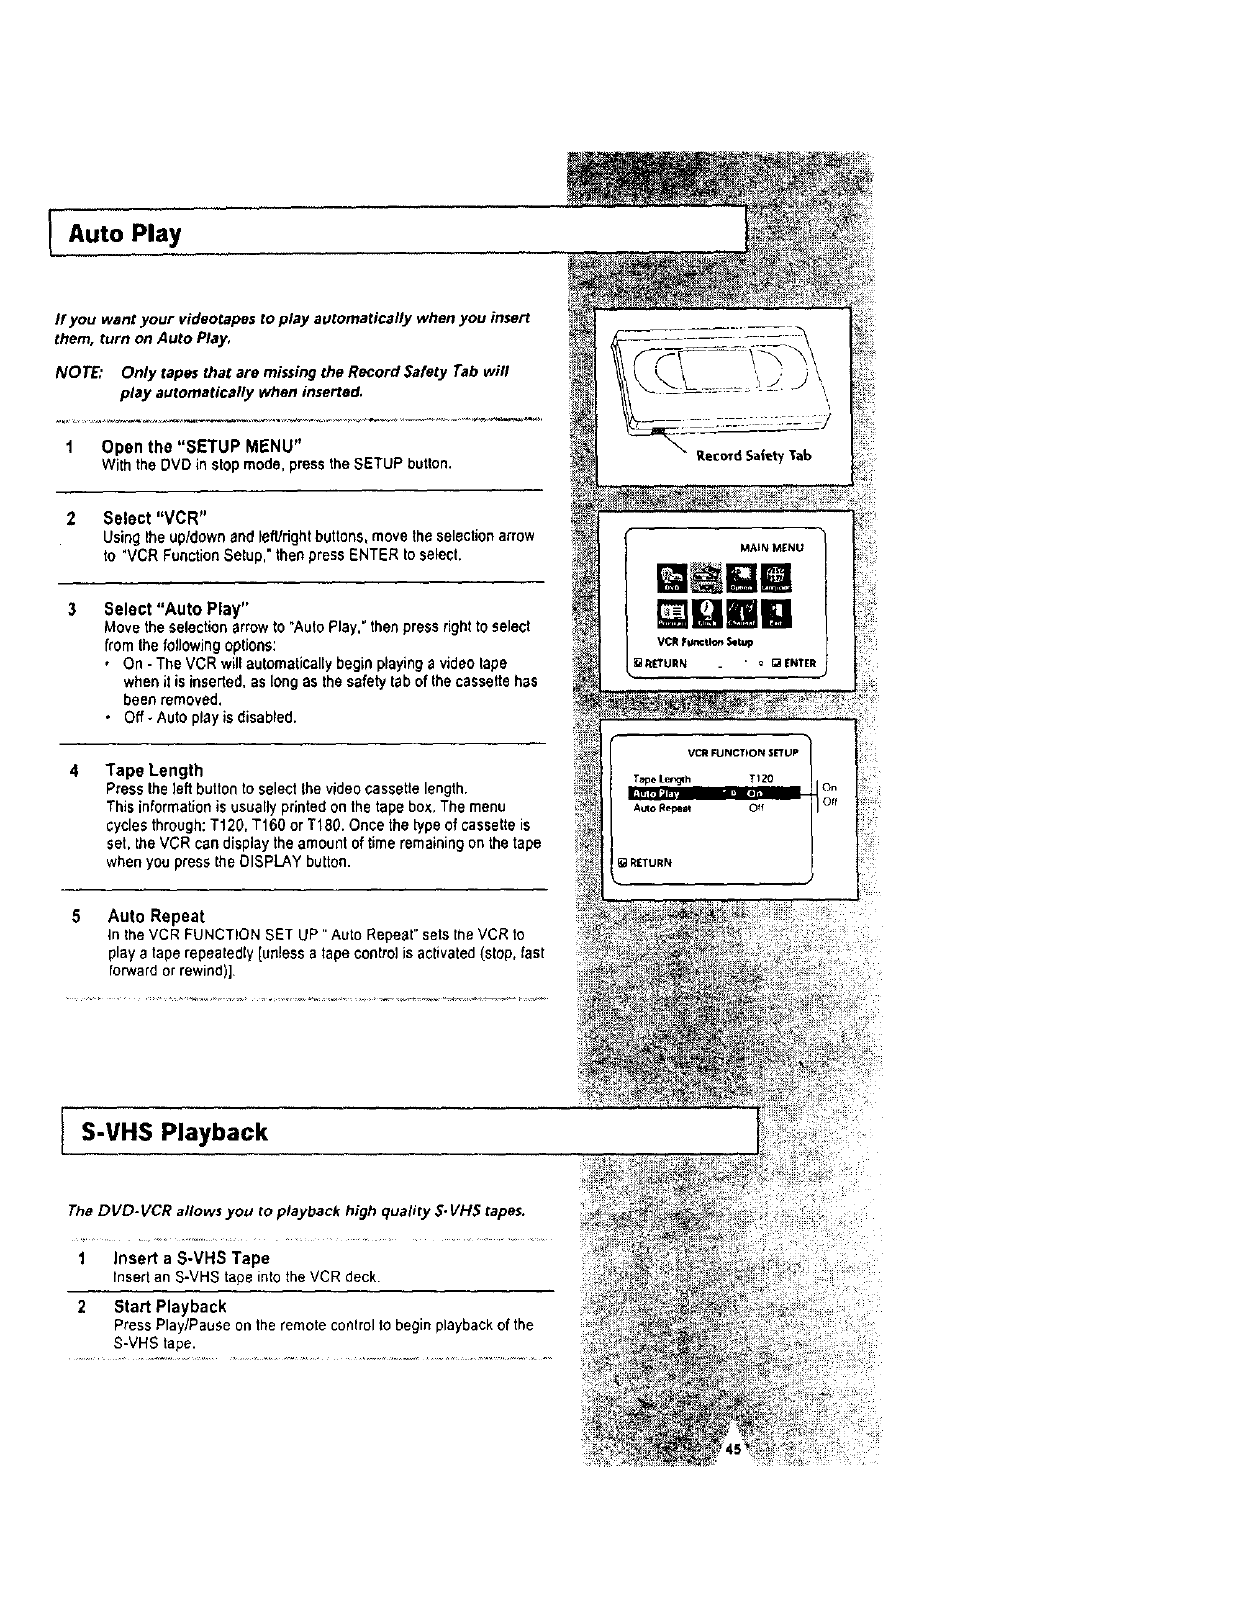
IAutoPlay
If you want your videotapes to play automatically when you insert
them, turn on Auto Play,
NOTE: Only tapes that are missing the Record Safety Tab wifl
play automatically when inserted.
1 Open the "SETUP MENU"
With the DVD in stop mode. press the SETUP button.
2 Select "VCR"
Using the up/down and lefUdghtbuttons, move the selectionarrow
to "VCR FunctionSetup," then press ENTER to select,
3Select "Auto Play"
Move the selection arrow to "AutoPlay." then press rightto select
from the following options:
,On - The VCR will automatically begin playing avideo tape
when it is inserted,as long as the safety tab of thecassette has
been removed.
•Off _ Auto play is disabled.
Tape Length
Press the left button to select the videocassette length.
This informationis usually printed on the tape box, The menu
cyclesthrough: T120, T160 or T18g. Once the type of cassette is
set, the VCR can displaythe amount oftime remaining on the tape
when you press the DISPLAY button.
Auto Repeat
In the VCR FUNCTION SET UP" Auto Repeat" setsthe VCR to
playatape repeatedly [unless a tape controlis activated (stop, fast
forward or rewind)].
S-VHS Playback
The DVD-VCR allows you to playback high quality S. VH5 tapes.
1 Insert a S-VHS Tape
Insert an S-VHS tape into the VCR deck.
2 Start Playback
Press Play/Pause on the remote controlto begin playbackof the
S-VHS tape.
MAIN _NU
QBm
_RETURN "•gaENTER
VC_ FUNCTION srruP
Tape Ler_h TI20
........
Auto Repeal Off
RETURN
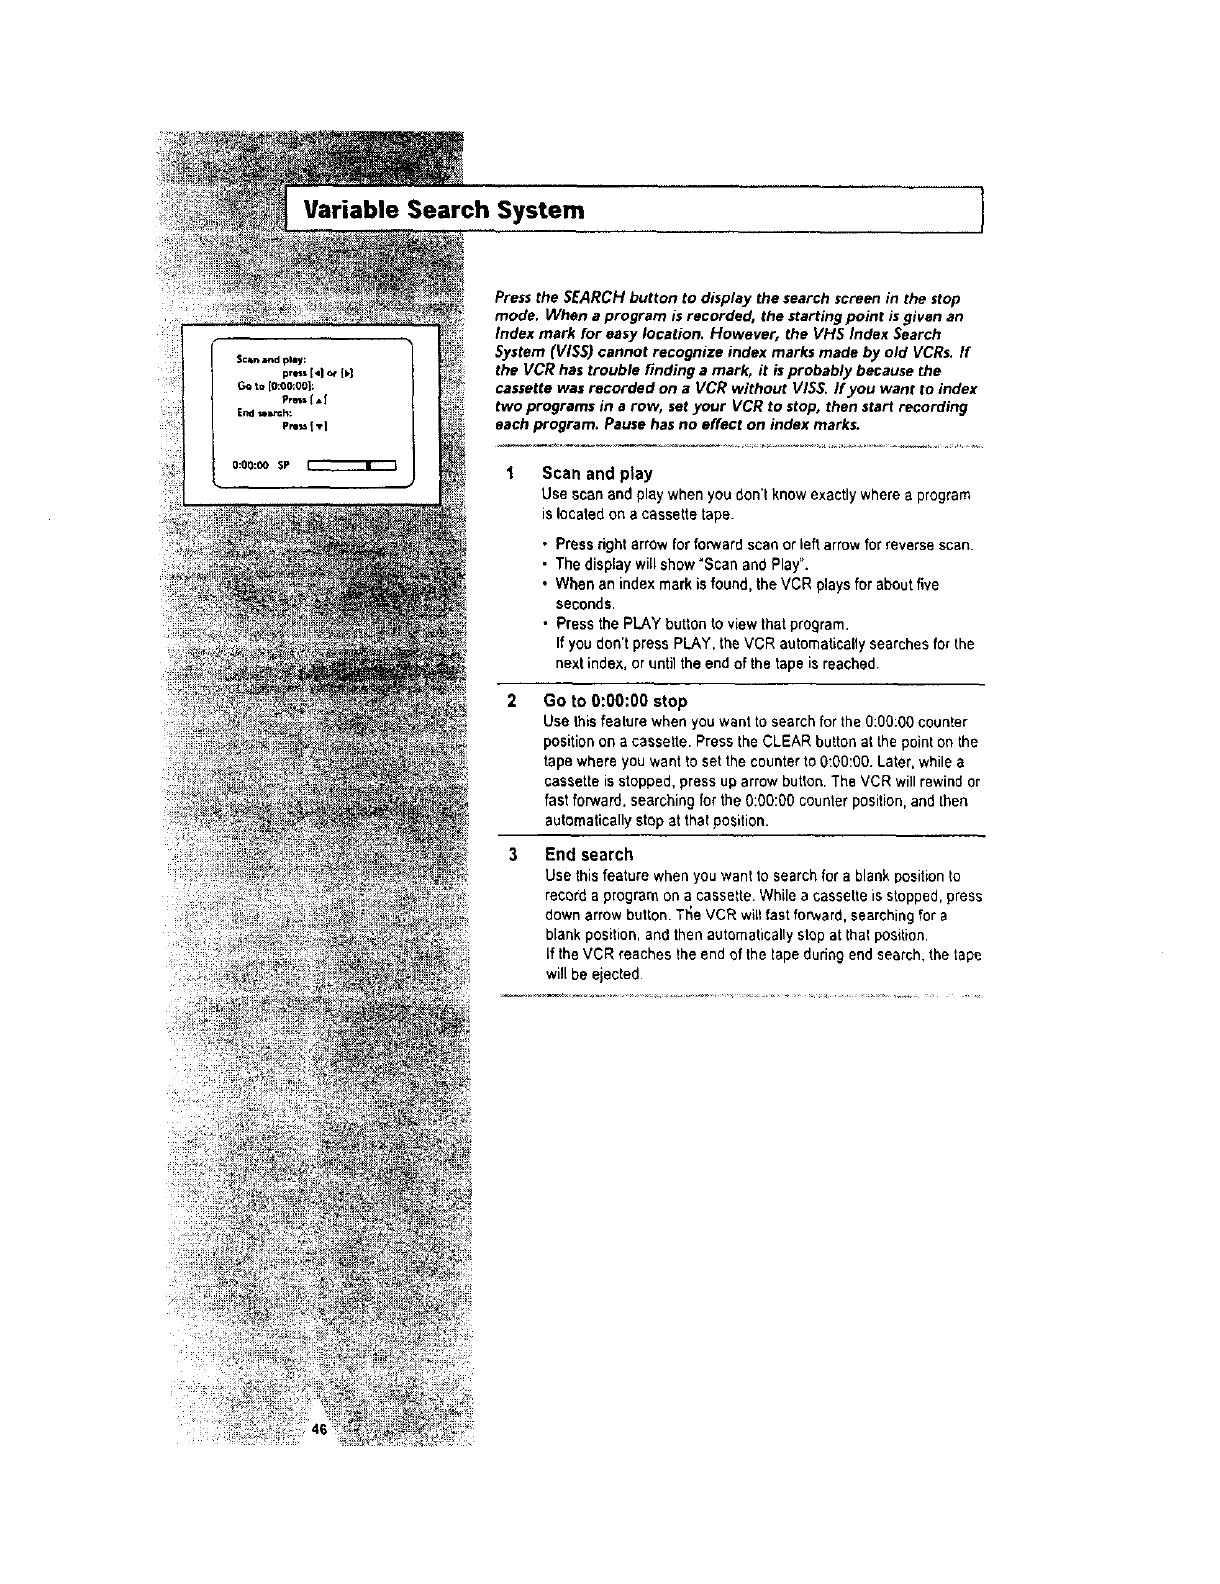
Variable Search System ]
Press the SEARCH button to display the search screen in the stop
mode. When a program is recorded, the starting point is given an
Index mark for easy location. However, the VHS Index Search
System (VISS) cannot recognize index marks made by old VCRs. If
the VCR has trouble finding a mark, it isprobably because the
cassette was recorded on a VCR without VISS. If you want to index
two programs in a row, set your VCR to stop, then start recording
each program. Pause has no effect on index marks.
Scan and play
Usescanandplaywhenyoudon'tknowexactlywherea program
islocatedon a cassettetape.
• Press rightarrow for forward scanor left arrow for reverse scan.
• The displaywill show"Scan and Play".
• When an index mark is found, the VCR playsfor aboutfive
seconds.
• Press the PLAY button to view that program,
If you don't press PLAY, the VCR automaticallysearchesfor the
next index, or until the end of the tape is reached.
GO to 0:00:00 stop
Use thisfeature when you want to search for the O:OO:O0counter
positionon acassette, Press the CLEAR button at the pointon the
tape where you want to set the counter to 0:00:00. Later, while s
cassette is stopped, press up arrow button. The VCR will rewind or
fast forward, searching for the O:OO:O0counter position, and then
automatically stop at that position.
3 End search
Use thisfeature when you want to search for a blank position to
record a programon a cassette. While a cassette is stopped, press
down arrow button. Ti_e VCR will fast forward, searching for a
blank position, antt then automatically stop at that position.
if the VCR reaches the end of the tape dudngend search, the tape
will be ejected
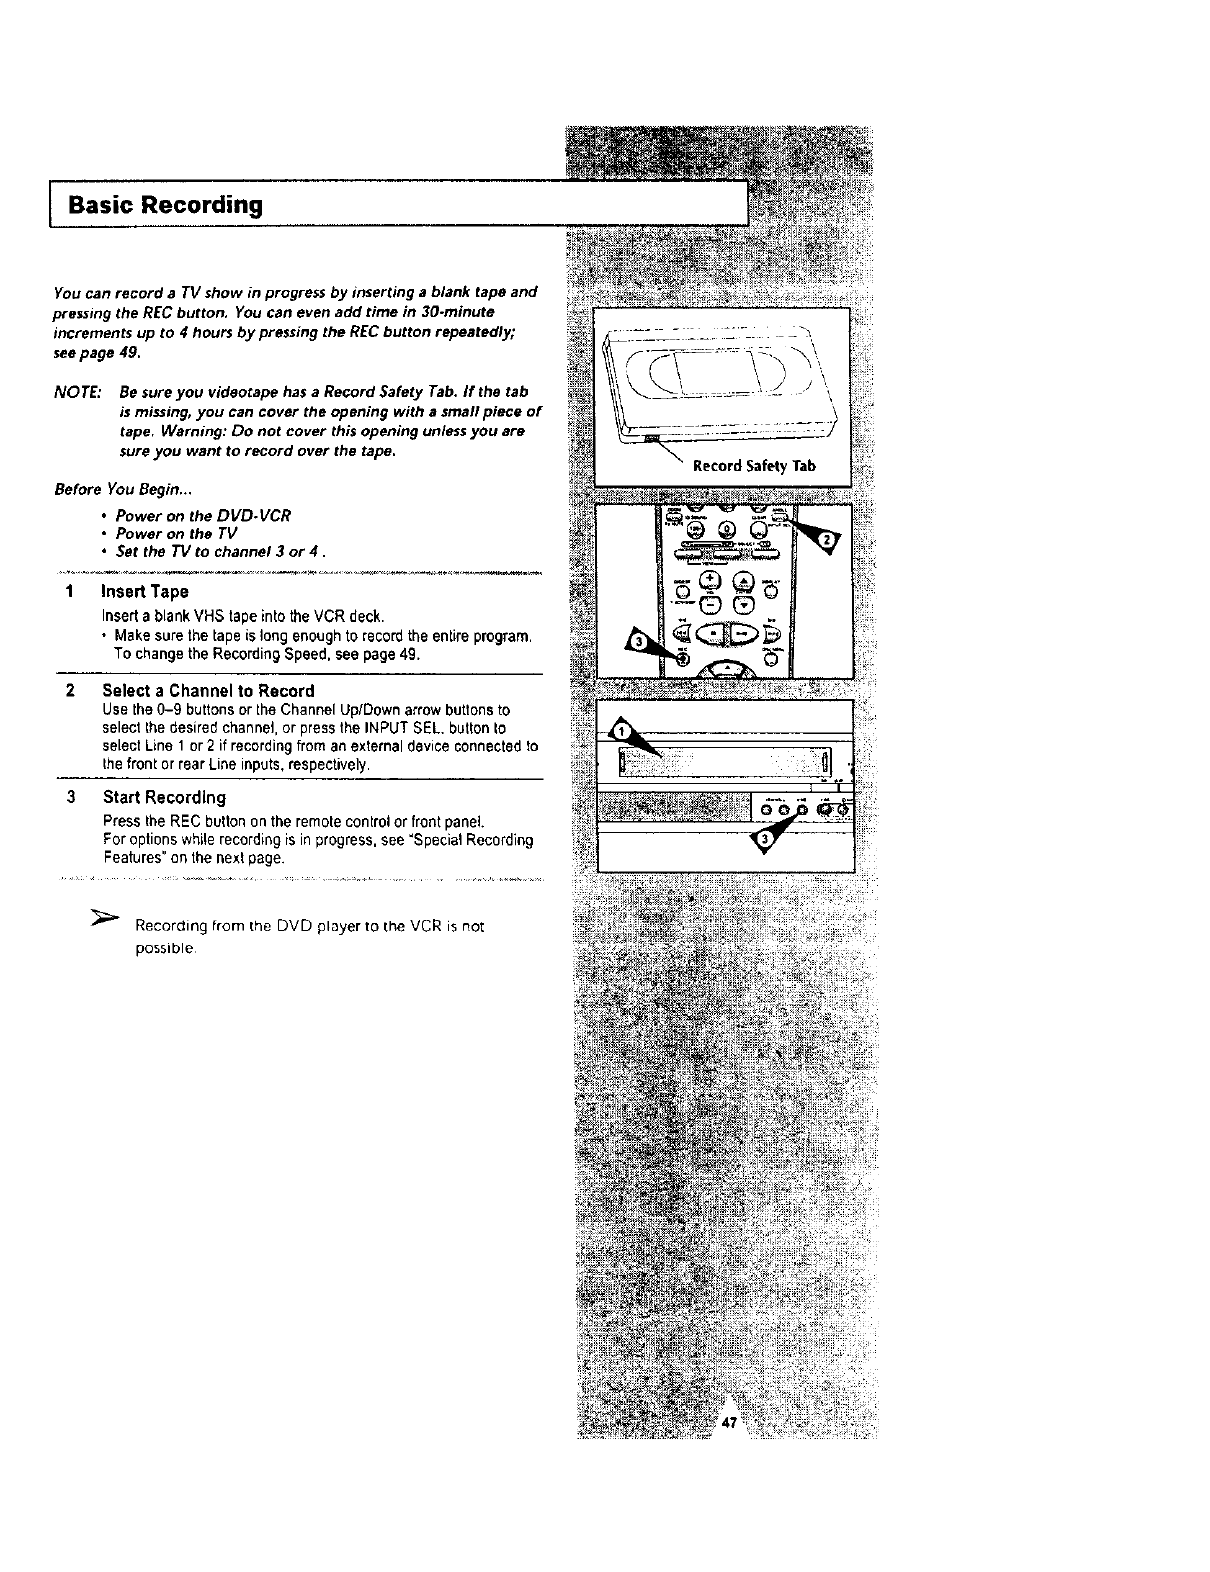
Basic Recording
You can record a TV show in progress by inserting a blank tape and
pressing the REC button. You can even add time in 30ominute
increments up to 4 hours by pressing the REC button repeatedly;
see page 49.
NOTE: Be sure you videotape has a Record Safety Tab. If the tab
is missing, you can cover the opening with a small piece of
tape. Warning: Do not cover this opening unless you are
sure you want to record over the tape.
Before You Begin...
• Power on the DVD.VCR
• Power on the TV
•Set the TV to channel 3 or 4,
1 Insert Tape
Insert a blankVHS tape into the VCR deck
• Make sure the tape is long enough to recordthe entire program.
To change the Recording Speed, see page 49.
2 Select a Channel to Record
Use the 0-g buttons or the Channel Up/Down arrow buttons to
select the desired channel, or press the INPUT SEt button to
select Line 1 or 2 if recording from an external device connected 1o
the front or rear Line inputs, respectively.
3 Start Recording
Press Ihe REC button on the remote controlor front panel.
For optionswhile recording is inprogress, see "Special Recording
Features"on the next page.
_" Recording [rum the DVD player to the VCR is not
possible
!
i
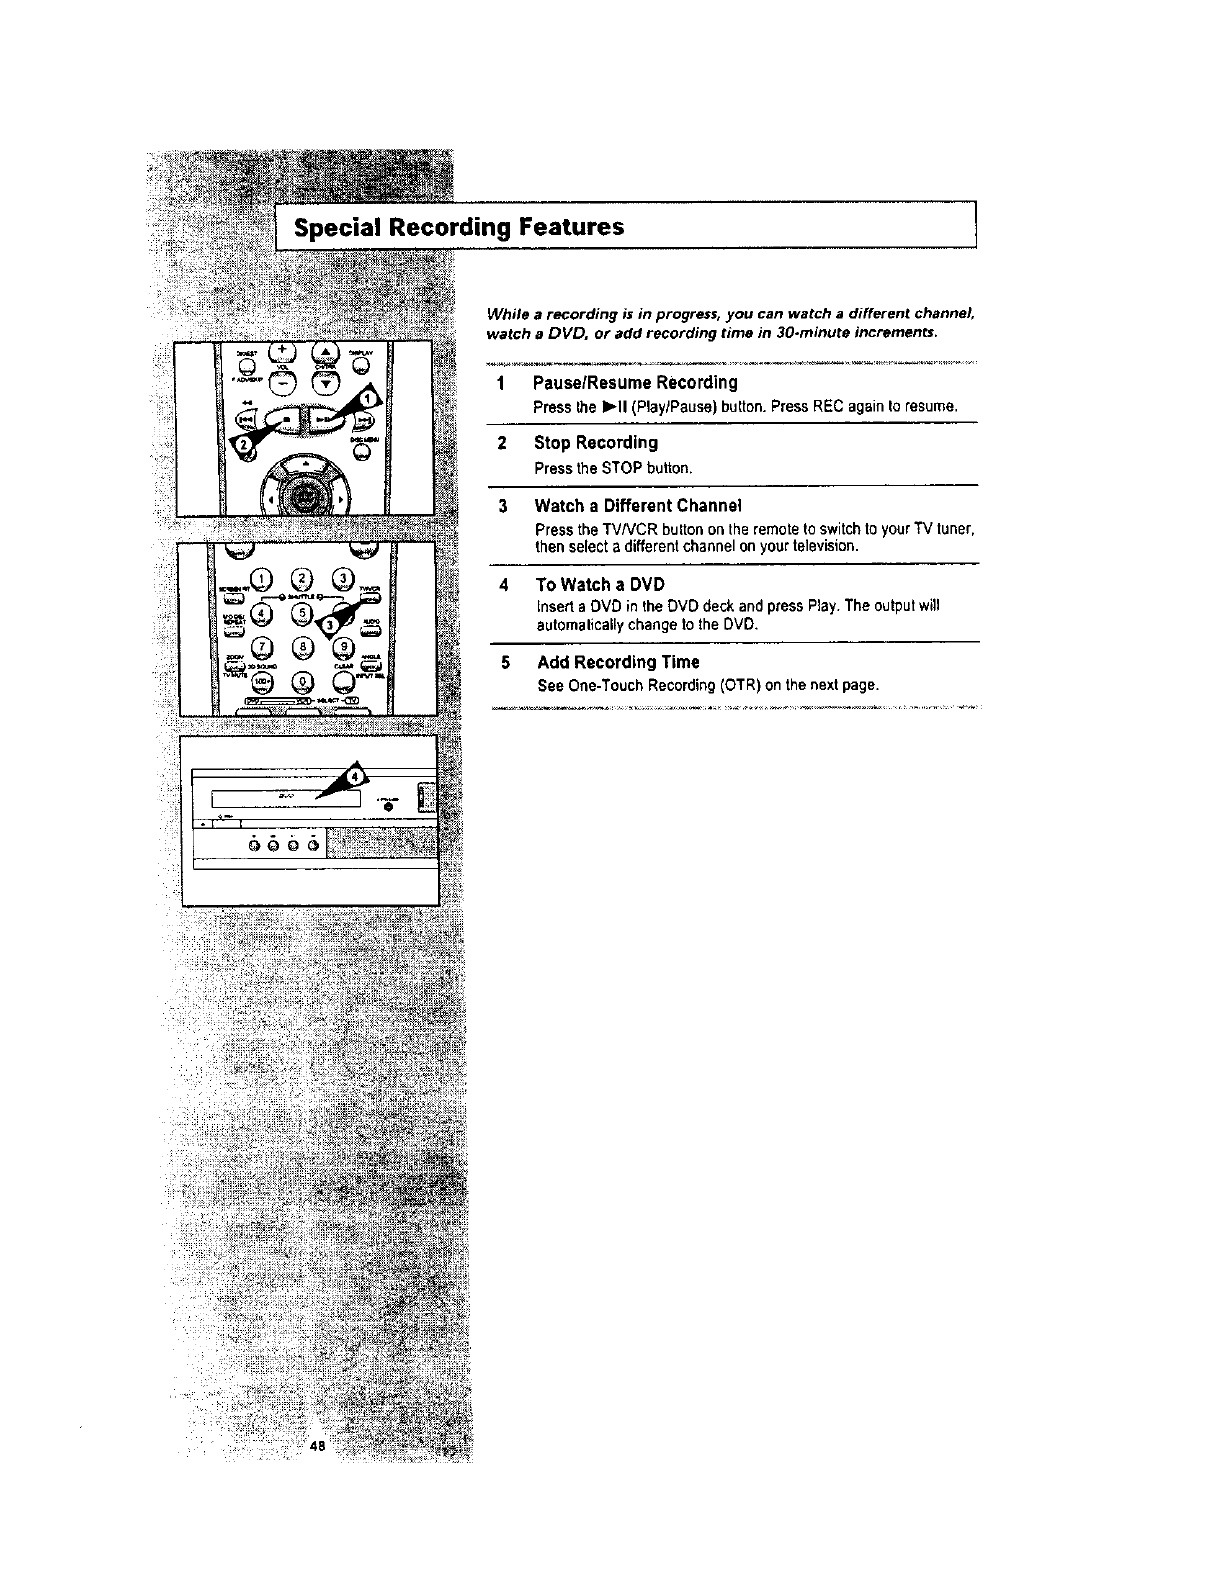
Special Recording Features 1
While a recording is in progress, you can watch a different channel,
watch a DVD, or add recording time in 30.minute increments.
1 PauselResumeRecording
Press _heb,,-II(PlaylPause) button. Press REC again to resume.
2 Stop Recording
PresstheSTOPbutton.
3 Watch a Different Channel
Press the TV/VCR button on the remote to switch to your TV tunel
then select adifferentchannel on your television.
4To Watch a DVD
Insert aDVD in the DVD deck and press Play. The output will
automalicallychange to the DVD.
5 Add Recording Time
See One-Touch Recording (OTR) on the next page.
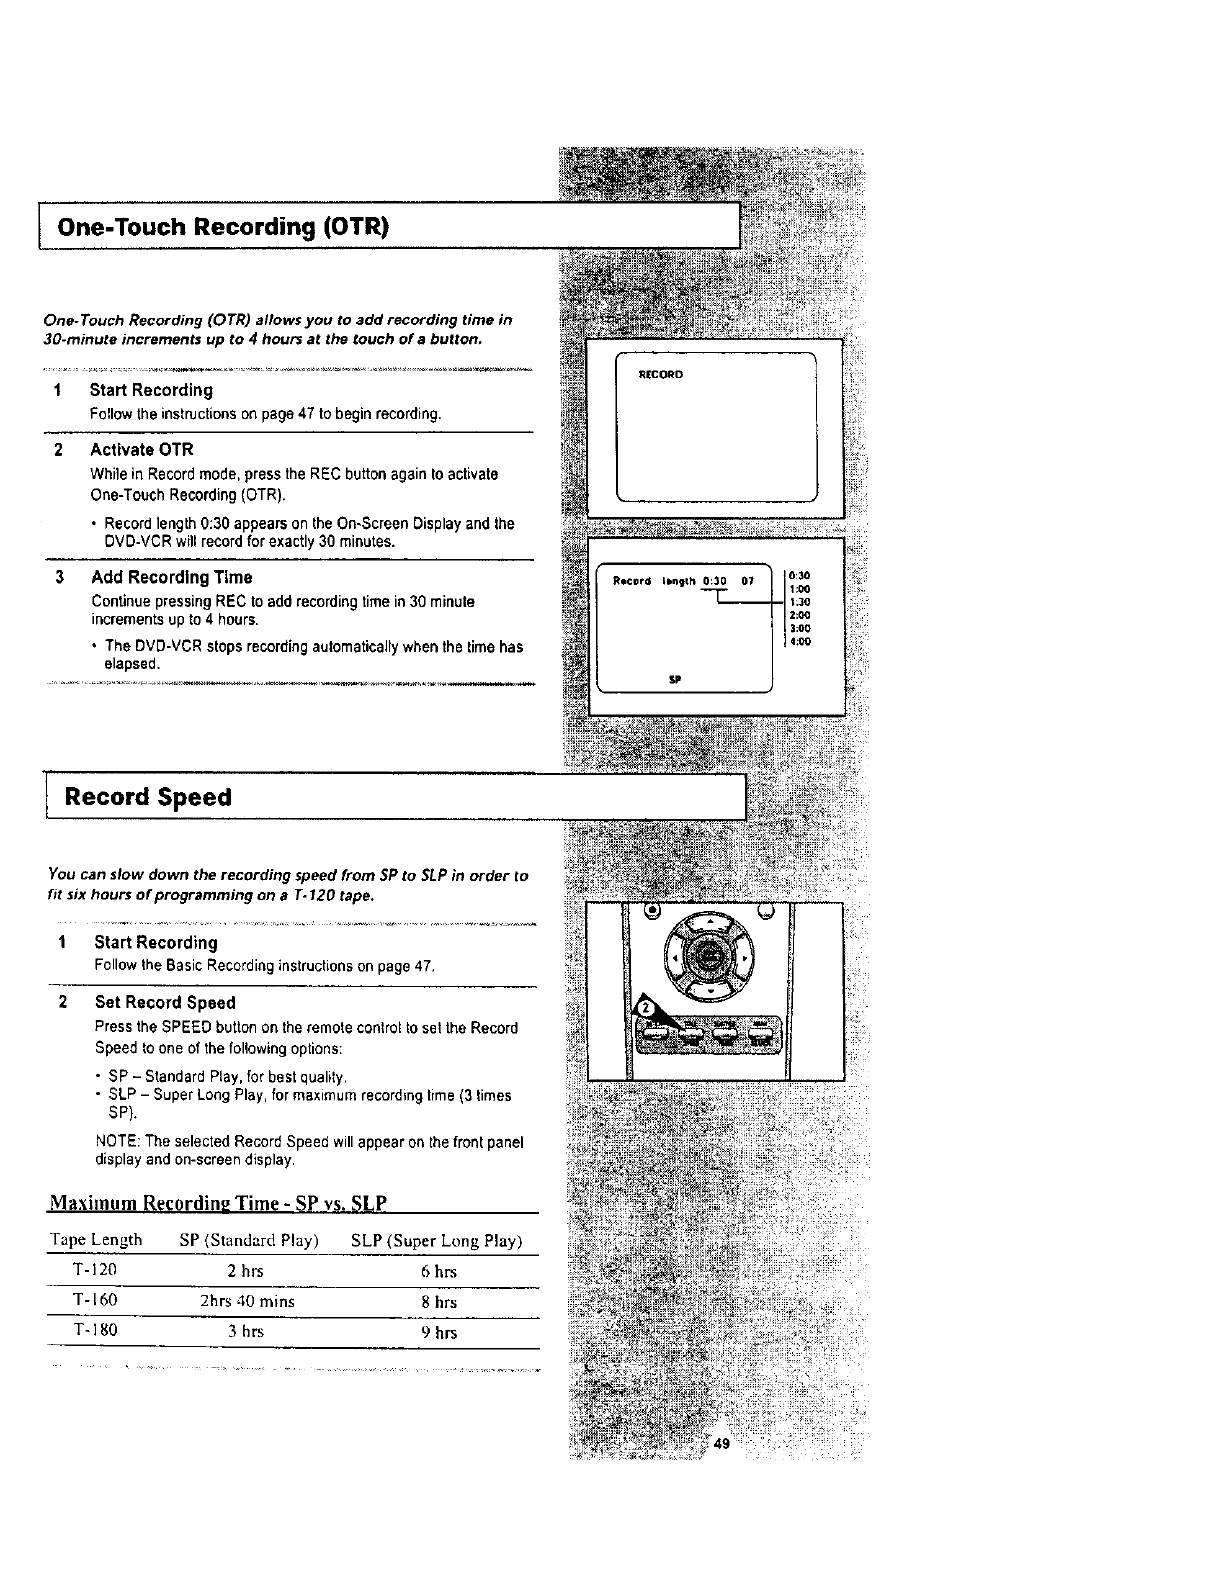
lone-Touch Recording (OTR)
One-Touch Recording (OTR) allows you to add recording time in
30-minute increments up to 4 hours at the touch of a button.
1 Start Recording
Followthe instructionson page 47 to begin recording.
2 Activate OTR
While in Record mode, press the REC button again to activate
One-Touch Recording (OTR)
• Record length 0:30 appears on the On-Screen Displayand the
DVD-VCR will record for exactly 30 minutes.
3 Add Recording Time
Continue pressing REC to add recording time in 30 minute
increments up to 4 hours.
•The DVD-VCR stops recording automatically when the time has
elapsed,
IRecord Speed
You can slow down the recording speed from SP to $LP in order to
fit six hours of programming on a T-120 tape.
1 Start Recording
Follow the Basic Recording instructionson page 47.
Set Record Speed
Press the SPEED button on the remote contro_to set the Record
Speed to one of the following options:
•SP - Standard Play, for best quality.
• SLP - Super Long Play, for maximum recording time (3 times
SP).
NOTE: The selected Record Speed will appear on the front panel
display and on-screen display.
Maximum Recording Time - SP vs. SLP
Tape Length SP (Standard Play) SLP (Super Long Play)
T- 120 2 hrs 6 h_
T-t60 2hrs 40 rnins 8hrs
T- ] 80 3 hrs 9 hrs
RECORD
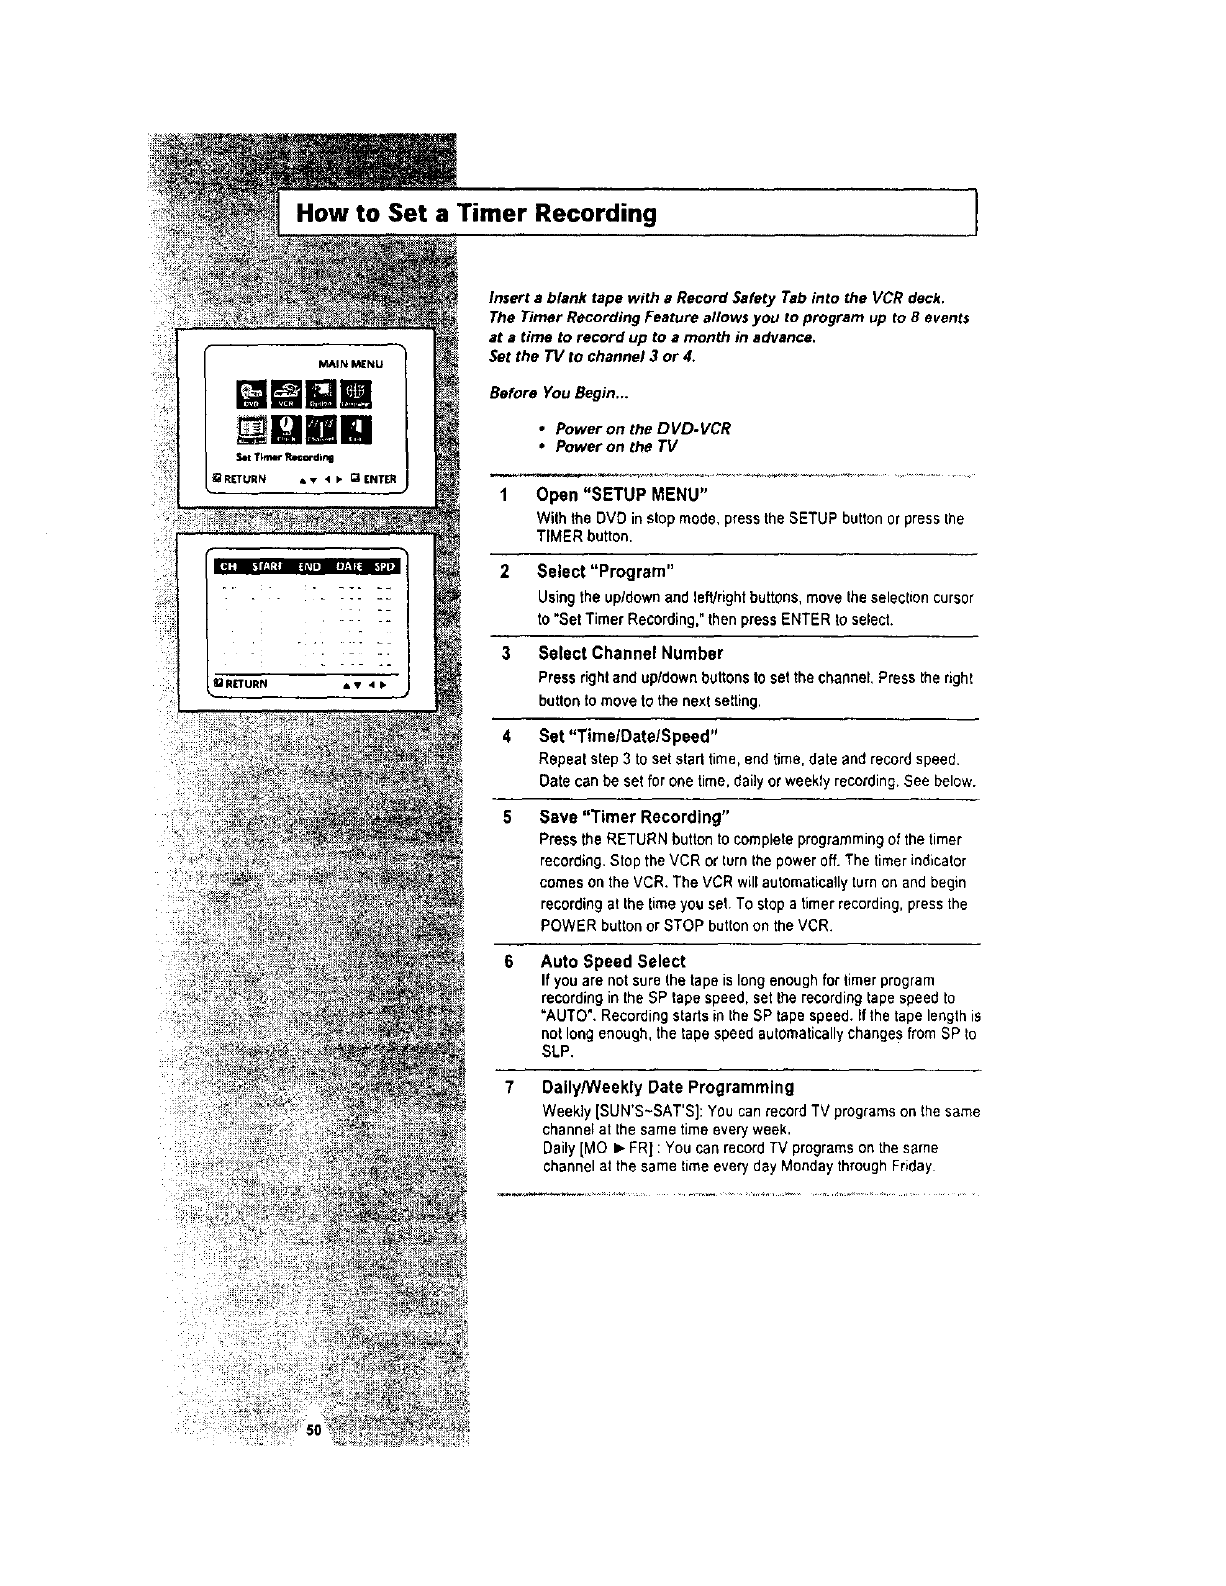
How to Set a Timer Recording 1
Ulil!lil
Insert a blank tape with a Record Safety Tab into the VCR deck.
The Timer Recording Feature allows you to program up to 8 events
at a time to record up to amonth in advance.
Jet the TV to channel 3 or 4.
Before You Begin...
•Power on the DVD.VCR
•Power on the TV
1 Open "SETUP MENU"
With the DVD in stop mode, press the SETUP button or press the
TIMER button.
2 Select "Program"
Using the up/down and left/rightbuttons,move the selectioncursor
to "SetTimer Recording,"then press ENTER to selech
3 Select Channel Number
Press right and up/down buttonsto set the charmer,Press the right
button to move to the next setting,
4 Set "TimelDate/Speed"
Repeat step 3 to set stari time, end time. date and record speed.
Date can be set for one time, daily or weekly recording. See below.
5 Save "Timer Recording"
Press the RETURN button to complete programming of the timer
recording. Stop the VCR or turn the power off. The timer indicator
comes on the VCR. The VCR willautomatically turn on and beg_n
recording at the time you set. To stop a timer recording, press the
POWER button or STOP button on the VCR.
6Auto Speed Select
If you are not sure the tape is long enough for timerprogram
recording in the SP tape speed, set the recording tape speed to
"AUTO". Recording startsin the SP tape speed. If the tape length is
not long enough, the tape speed automatically changes from SP Io
SLP.
7 Daily/Weekly Date Programming
Weekly [SUN'S-SAT'S]: You can record TV programs on the same
channel at the same time every week.
Daily [MO I,,.FR] : You can record TV programs on the same
channel at the same time every day Monday through Friday
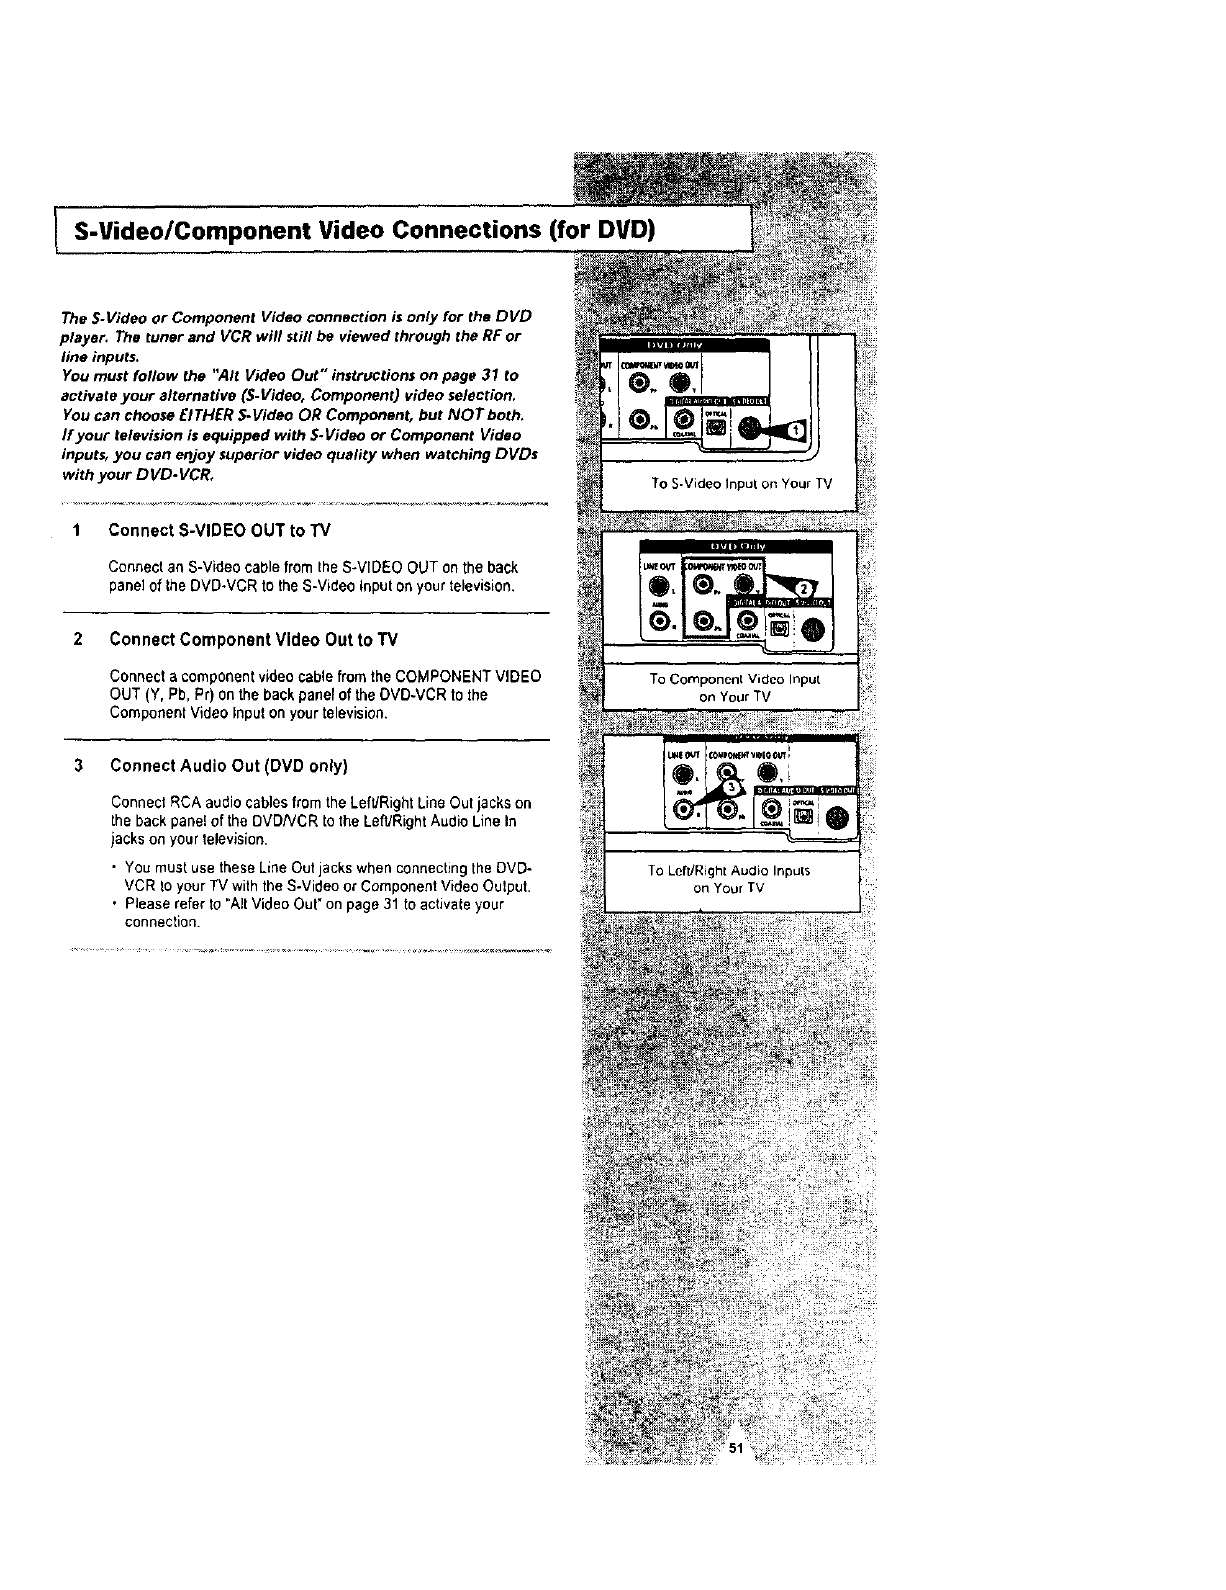
IS-Video/Component Video Connections (for DVD)
The S-Video or Component Video connection is only for the DVD
player. The tuner and VCR will still be viewed through the RF or
line inputs.
You must follow the "Air Video Out" instructions on page 31 to
activate your alternative (S-Video, Component) video selection.
You can choose EITHER S.Video OR Component, but NOT both,
If your television is equipped with 5.Video or Component Video
inputst you can enjoy superior video quality when watching DVDs
with your DVD.VCR,
1 Connect S-VIDEO OUT to "IV
Connect an S-Video cable from the S-VIDEO OUT on the back
panel of the DVD-VCR to the S-Video Input on your television.
2 Connect Component Video Out to TV
Connect a component video cablefrom the COMPONENT VIDEO
OUT (Y, Pb, Pr) on the back panel of the DVD-VCR to the
Component Video Inputon your television,
3Connect Audio Out (DVD only)
Connect RCA audio cables from the Left/Right Line Out jacks on
the back panel of the DVDNCR to the Left/Right Audio Line In
jacks on your television,
•You must use these Line Out jacks when connecting the DVD-
VCR Io your TV with the S-Video or Component Video Output.
. Please refer to "Air Video Out" on page 31 to activate your
connection.

Stereo Connections 1
You can enjoy stereo sound when watching movies and TV shows by
connecting your D VD. VCR to your home stereo system or stereo
TV.
1 Connect DVD.VCR to Stereo
Connect RCA cables from the Line Out Left & Right Audio jacks on
the back panel of the DVD-VCR to lhe Auxiliary Inputs on your
stereo receiver. If you are using a stereo television, connect the
Video Output as well.
2 Set Stereo to Auxiliary Mode
Set your stereoreceiver or television to "Aux" or "Tape," whichever
selects the line input for your particular device.
3 Play a Tape
Inserta DVD or Hi-Fi stereo videotape in your systemand adjust the
volume on your stereo receiver or television. You should hear the
audio throughyour stereo speakers•
•If you stilldo not hear stereo sound after inserting Hi-Fi stereo
video tape, press the Audio button until "Hi-Fi" appears on the
on-screen display•
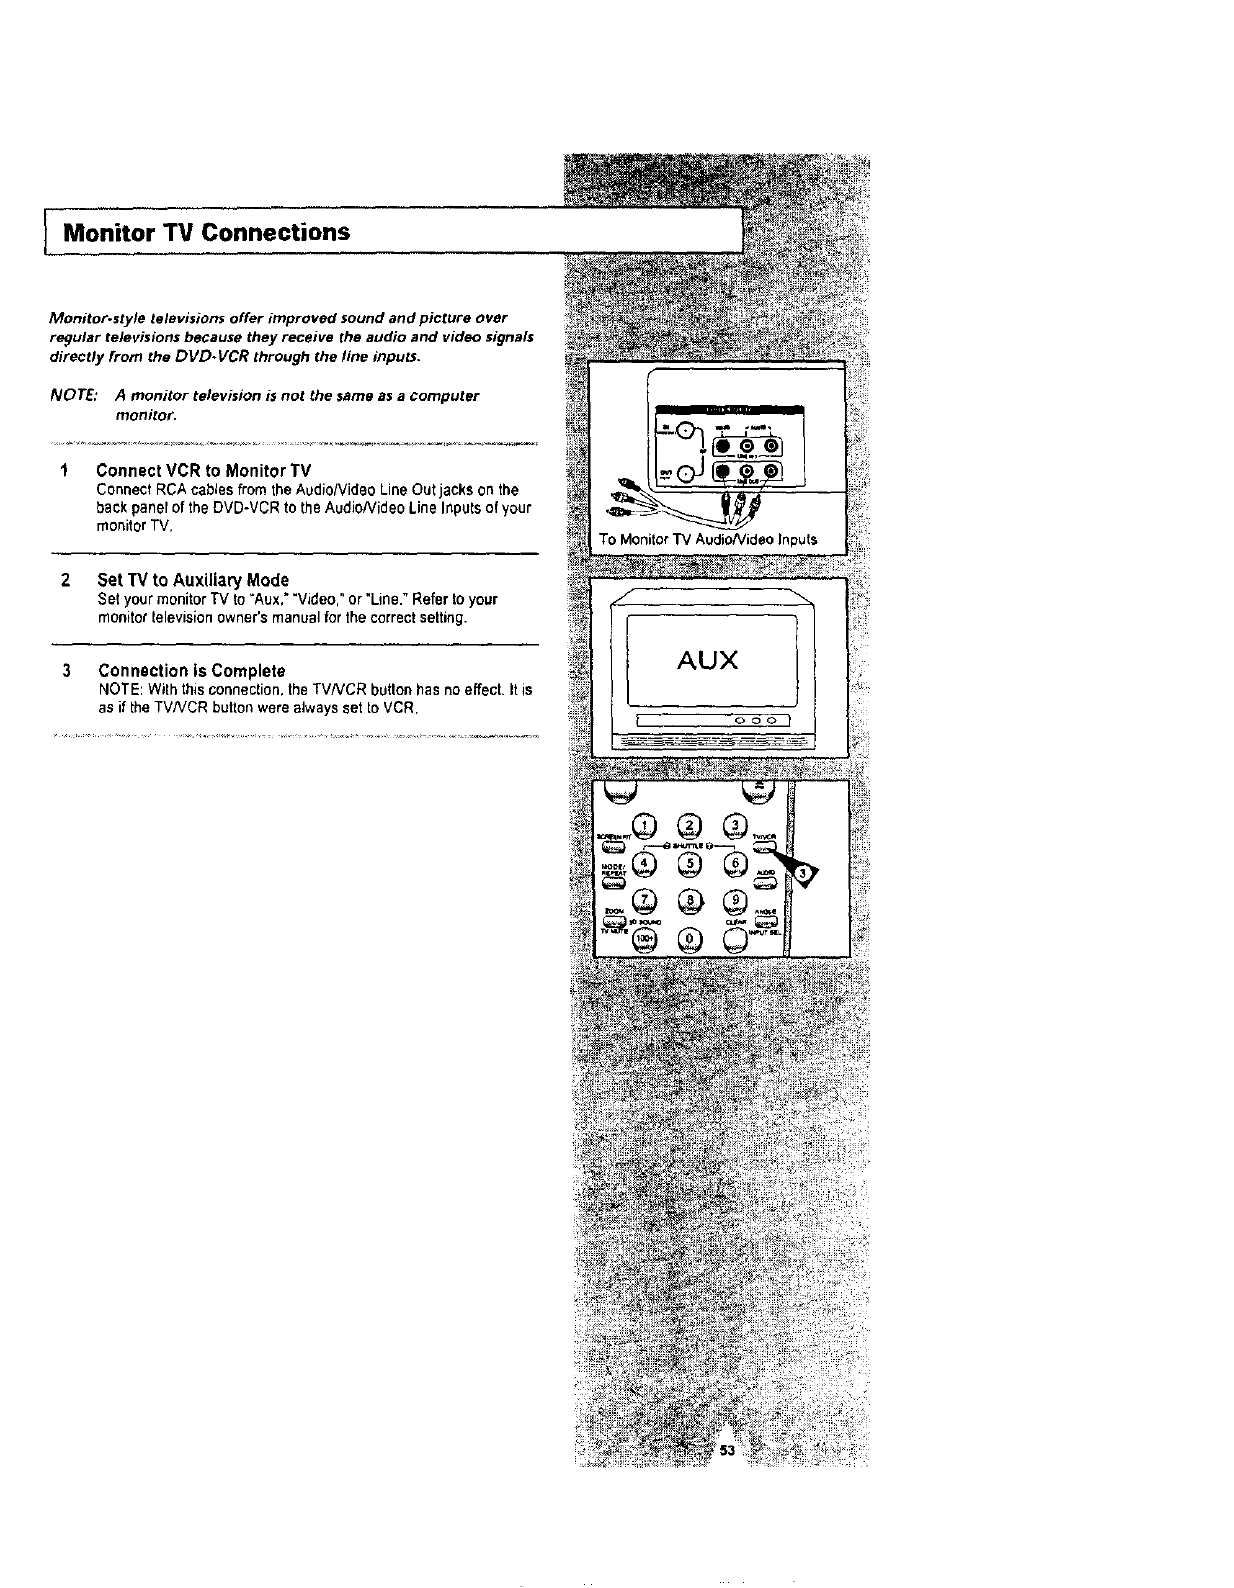
IMonitor TV Connections
Monitor.style televisions offer improved sound and picture over
regular televisions because they receive the audio and video signals
directly from the DVD-VCR through the line inputs,
NOTE: A monitor television is not the same as a computer
monitor.
1Connect VCR to Monitor TV
Connect RCA cables from the Audio/Video Line Out jacks on the
back panel of the DVD-VCR to the AudioNideo Line Inputs of your
monitor TV.
2 Set "IV to Auxiliary Mode
Set your monitorTV to "Aux," "Video,"or"Line,"Refer to your
monitor televisionowner's manual forthe correctsetting.
3 Connection is Complete
NOTE: With this connection, the TVNCR button has no effect. It is
as if the TV/VCR button were always set to VCR.
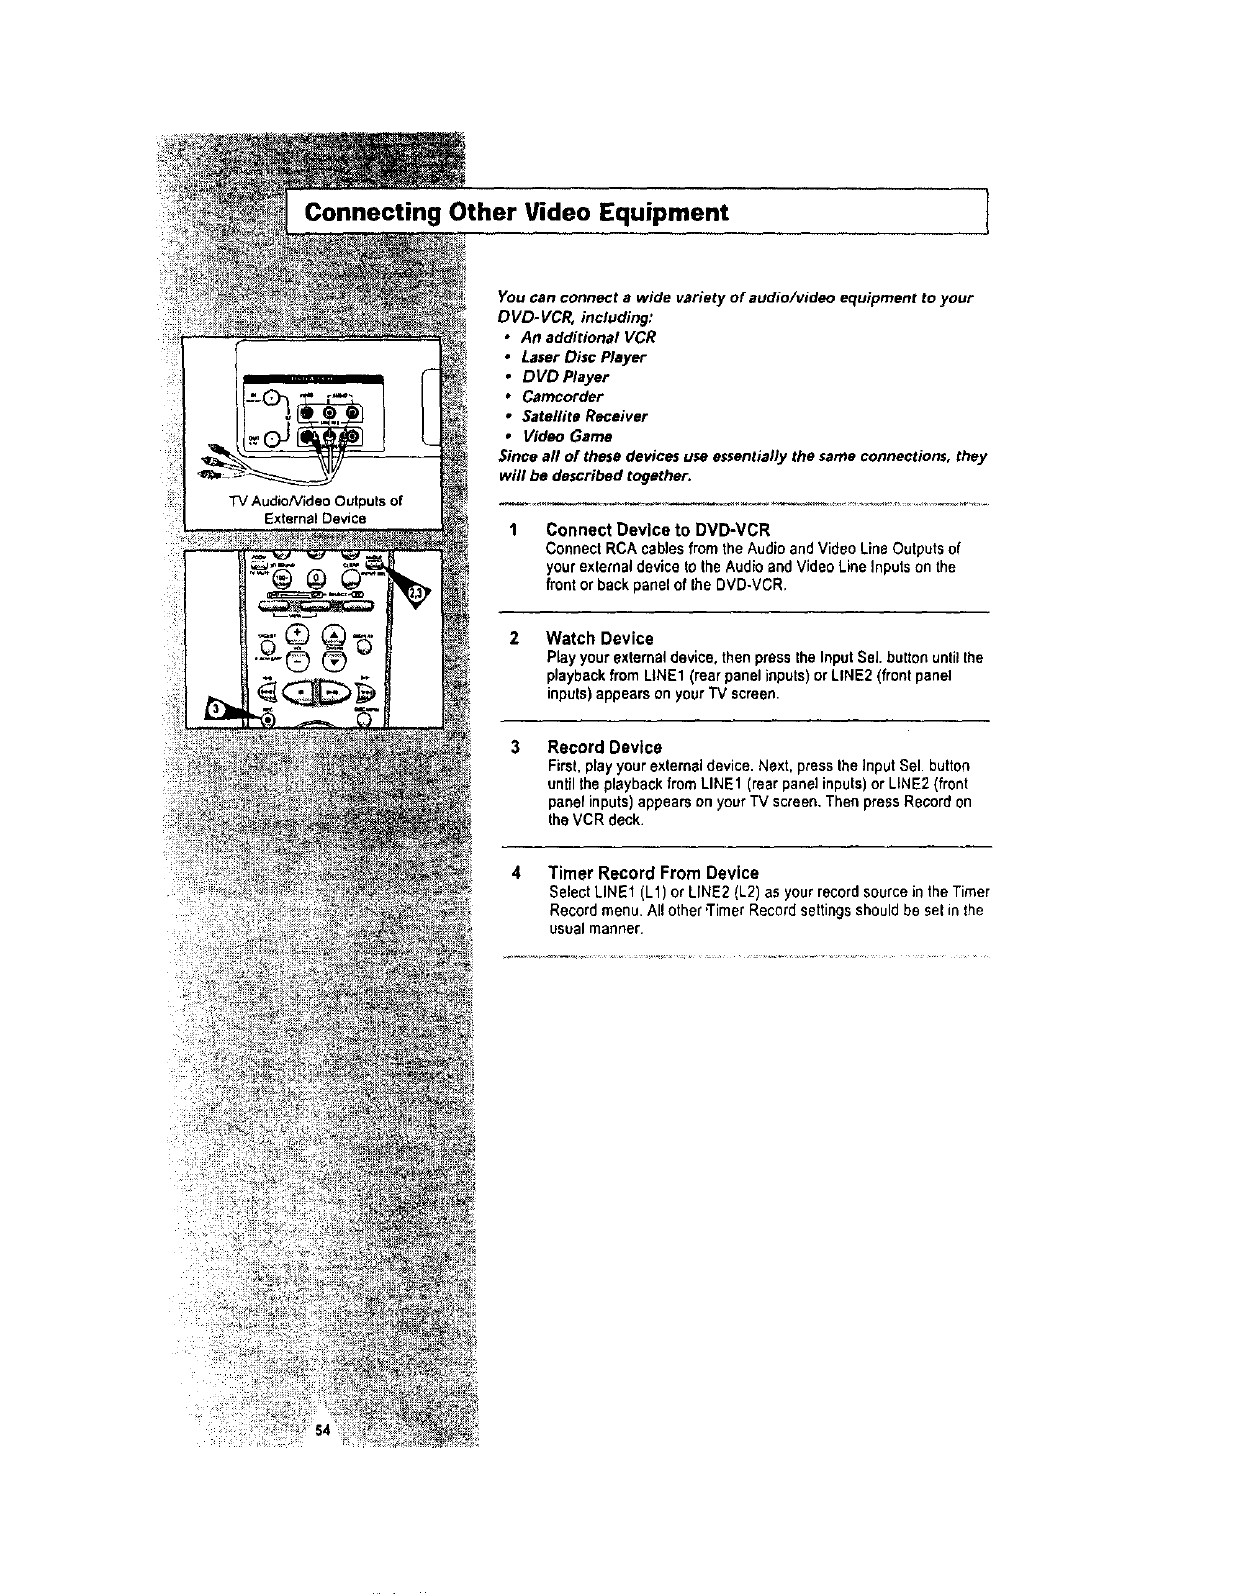
Connecting Other Video Equipment
TV AudioNideo Outputs of
External Device
You can connect a wide variety of audio/video equipment to your
DVD.VCR, including:
An additional VCR
Laser Disc Player
DVD Player
Carncorder
Satellite Receiver
Video Game
Since aft of these devices use essentially the same connections, they
will be described together.
Connect Device to DVD-VCR
Connect RCA cables from the Audio and Video Line Outputs of
yourexternal device to the Audio end Video Line Inputs on the
front orback panel of the DVD*VCR.
Watch Device
PLayyour extemaqdevice, then press the InputSeJ.button until the
playbackfrom LINE1 (rear panel inputs) or LINE2 (frontpanel
inputs) appears on your TV screen•
3Record Device
First, play your external device. Next, press the Input Sel. button
until the playback from LINE1 (rear pane] inputs)or LINE2 (front
panel inputs)appears on your TV screen, Then press Record on
the VCR deck,
4Timer Record From Device
Select LINE1 (L1) or LINE2 (L2) as your record sourcein the Timer
Recordmenu. All other'Timer Record settings shouldbe sel in the
usual manner.
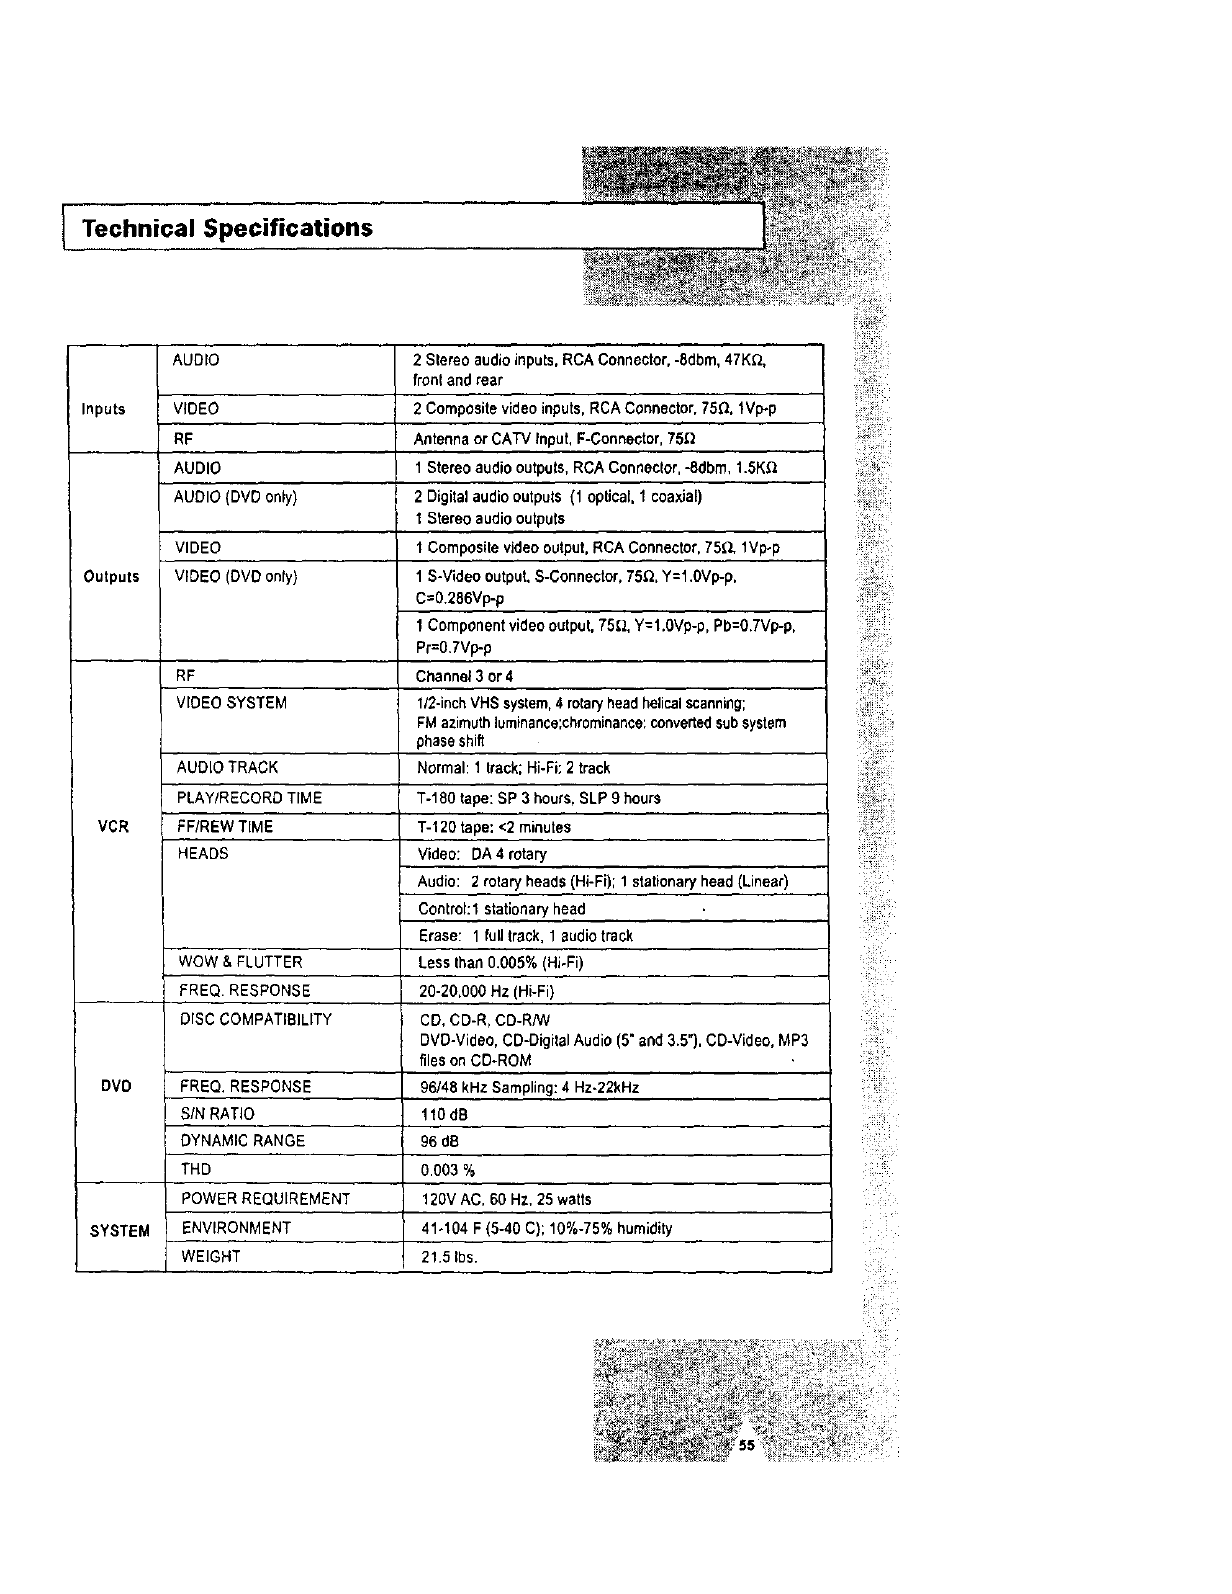
Technical Specifications
AUDIO
Inputs VIDEO
RF
AUDIO
AUDIO (DVD only)
VIDEO
Outputs VIDEO (DVD only)
RF
VIDEO SYSTEM
AUDIO TRACK
I_LAY/RECORD TIME
VCR FF/REW TIME
HEADS
WOW & FLUTTER
FREQ• RESPONSE
DISC COMPATIBILITY
DVD FREQ. RESPONSE
SIN RATIO
DYNAMIC RANGE
THD
POWER REQUIREMENT
SYSTEM ENVIRONMENT
WEIGHT
2 Stereo audio inputs, RCA Connector, -8dbm, 47K0.
front and rear
2 Compositevideo inputs, RCA Connector, 75_, 1VI>p
Antennaor CATV Input, F-Connector, 75_
1Stereo audio outputs,RCA Connector,-8dbm, 1.5K_
2 Digital audio outputs (1 optical 1coaxial)
I Stereo audio outputs
1Composite videooutput, RCA Connector, 750. 1Vp-p
1S-Video output, S-Connector, 75_, Y=l.OVp-p,
C=0.286Vp-p
1 Component video output, 75q, Y=l.0Vp-p, Pb=O.7Vp-p,
Pr=0.7Vp-p
Channel 3 or4
1/2-inchVHS system,4 rotar/head helical scanning;
FM azimuthluminance;chrsminance: convertedsubsystem
phaseshift
Normal: 1Irack; Hi-Fi: 2track
T-180 tape: SP 3hours, SLP 9 hours
T-120 tape: <2 minutes
Video: DA 4 rotary
Audio: 2 rotary heads (Hi-Fi); 1 stationary head (Linear)
Control:t stationaryhead
Erase: 1 full track, 1 audiotrack
Less than 0.005% (Hi-Fi)
20-20,000 Hz (Hi-Fi)
CD, CD-R, CD-R/W
DVD-Video, CD-Digital Audio (5" and 3.5"), CD-Video, MP3
files on CD-ROM
96/48 kHz Sampling: 4 Hz.22kHz
110dB
96 dB
0.003 %
120V AC, 60 HZ, 25 watts
41o104 F (5-40 C); 10%-75% humidity
21.5 Ibs.
!; ii!ii ¸
Warranty (for USA users only)
ThisSAMSUNG brand product, as supplied and distributed by SAMSUNG ELECTRONICS AMERICA, INC.
(SAMSUNG) and delivered new, in the original carton to the original consumer purchaser, is warranted by
SAMSUNG against manufacturing defects in materials and workmanship for the following limited warranty
period:
One (1) Year Parts and Labor
This limited warranty begins on the original date of purchase, and is valid only on products purchased and
used in the United States, and does not include transportation, installation, removaE or reinstallation.
Warranty repairs must be performed by SAMSUNG's authorized service center. To receive warranty
service, the original dated bill of sale must be presented upon request as proof of purchase to SAMSUNG
or SAMSUNG's authorized service center.
Transportation to and from the service center is the responsibility of the purchaser.
SAMSUNG will repair or replace this product, at our option and at no charge with new or reconditioned
parts, if found to be defective during the limited warranty period specified above. The product must be
returned during the warranty period with transportation charges prepaid to SAMSUNG's designated
service center. Prior to returning any product for warranty service, the purchaser must contact SAMSUNG
for problem determination and service procedures. SAMSUNG does not warrant uninterrupted or error-
free operation of the product. All replaced parts and products become the property of SAMSUNG and
must be returned to SAMSUNG. Replacement parts and
products assume the remaining original warranty, or ninety (90) days, whichever is longer.
This limited warranty covers manufacturing defects in materials and workmanship encountered in normal,
noncommercial use of this product and shall not apply to the following, including, but not timited to:
damage which occurs in shipment; applications and uses for which this product was not intended; failures
or problems which are caused by products or equipment not supplied by SAMSUNG; accidents, misuse,
abuse, neglect, misapplication, fire, water, lightning or other acts of nature; incorrect electrical line voltage,
fluctuations or surges; damage caused by improper or faulty installation; improper connection with af_y
peripheral; product alteration or modification; improper
or unauthorized repair; cosmetic damage or exterior finish; product with altered serial numbers; failure to
follow operating instructions, customer adjustments, maintenance and environmental instructions that are
covered and prescribed in the instruction book; use of non-SAMSUNG or unauthorized parts, supplies,
accessories or equipment which damage this product or result in service problems; failures or problems due
to incompatibility with other equipment.
SAMSUNG ELECTRONICS AMERICA, INC.
HEADQUARTERS
105 Challenger Road, Ridgefield Park, N.J.
07660-0511
TEL: 1-800-SAMSUNG
SERVICE DIVISION
400 Valley Road, Suite 201, Mount Arlington, NJ 07856
1-800-SAMSUNG (1-800-726-7864)
ELECTRONICS
AC68-01816A
