Samsung DVD V5500 User Manual DVD/VCR Manuals And Guides L0520893
SAMSUNG DVD/VCR Combo Manual L0520893 SAMSUNG DVD/VCR Combo Owner's Manual, SAMSUNG DVD/VCR Combo installation guides
User Manual: Samsung DVD-V5500 DVD-V5500 SAMSUNG DVD/VCR - Manuals and Guides View the owners manual for your SAMSUNG DVD/VCR #DVDV5500. Home:Electronics Parts:Samsung Parts:Samsung DVD/VCR Manual
Open the PDF directly: View PDF ![]() .
.
Page Count: 85

I SAFETY INSTRUCTIONS 1
Safety Instructions
CAUTION:TO REDU¢5 THE RIME O5 5LMCTMIM
5HOOK, GO MOT_MMOVM ¢OVMR {OF MACK),
GO UMMR MMRVIOMABLMMA_TMJNMIO&
MMFMMMMMV_MINGTO QUALIF_MDMMMVIC5
PMMMONNML,
This symbol is intended to alert the user to the presence of
uninsulated "dangerous voltage" within the product*s
enclosure that may be of sufficient magnitude to constitute a
risk dfire or electric shock to persons
This symbol is intended to alert the user to the presence of
important operating and maintenance (servicing) instructions
in the literature accompanying the appliance.
Note to OATV system installer: This reminder is provided to call OATV system installers attention to Article
820-40 of the Nafional Electrical Code (Section 54 ot Canadian Electrical Code, Part I) that provides guidelines
for proper grounding and in particular, specifies that the cable ground shall be connected to the grounding
system of the building as close to the point of cable entry as practical.
Caution: FOOregulations state that any unauthorized changes or modifications to this equipment may void the
user's authority to operate it.
Caution: To prevent electric shock:,match wide blade of plug to wide slot, fully insert
Attention: Pour eviter les chocs electriques introduire la lame le plus large de la fiche dans la borne
correspondante de la prise et pousser jusqu au fond
mmportant: One Federal Court has held that unauthorized recording of copyrighted TV programs is an
infringement of US copyright laws Certain Canadian programs may be copyrighted and any unauthorized
recording in whole or in part may be a violation of these rights.
To prevent damage which may result in fire or electric shock hazard,
do not expose this appliance to rain or moisture,
important Safety instructions
1 Read these instructions.
2 Keep theseinstructions
3 Heed allwarnings
4. Followall instructions.
5. Do not use this apparatus nearwater
6 Clean only with dry cloth.
7 Do not block any ventilationopenings. Installin accordancewith the manufacturers instructions.
8 Do not install near any heat sourcessuch as radiators,heat registers, stoves or other apparatus(including
amplifiers)that produce heat
9 Do not defeat the safety purposeof the polarizedor grounding-typeplug.A polarizedplug hastwo blades with
one wider than the other A grounding type plug hastwo blades and a third groundingprong. Thewide bladeor
the third prong isprovided for your safety If the provided plugdoes not fit intoyour outlet, consultan electrician
for replacementof the obsoleteoutlet.
10 Protectthe power cord from being walked on or pinchedparticularly at plugs conveniencereceptacles,and the
pointwhere they exit from the apparatus
11 Only use aftachments/accessoriesspecifiedby the manufacturer
12 Use onlywith cart, stand, tripod bracket,or tablespecified by the manufacturer,or sold with the apparatus.
Whena cart is used, usecaution when moving the cart/apparatuscombinationto avoid injury from tip-over.
13 Unplug this apparatus during lightning storms or when unused for longperiods of time
14 Refer allsewicing to qualifiedservicepersonnel Servicing isrequired when the apparatushas been damagedin
anyway, such as power-supply cord or plugis damaged, liquidhas been spilledor objectshave fallen into the
apparatus,the apparatushas been exposed to rain or moisture,does not operate normally,or has been dropped.
ENG-2

BEFORE YOU 8TART
Before you start
Accessories
Remote Control Batteries-2EA Video/Audio Cable Antenna Cable
(AK59-000210) 1.5V(AAA) (AC97-01746A) (AC39-42001J)
(AC43-12002H)
User's Guide Registration Card
InstaJ| Balletic8 in the Remote Control
1
Dpen -meea[[erl cover on
the back of the remote I
3on[roi.
_nsenlwo AAA battenes
'_lakesure _na[_ne
polarities (+ and -/are
allgneo correcw.
3
Replace lee Datter_
cover.
If the remote control doesn't operate properly:
,, Check the polarity +, - of the batteries (Dry-Cell)
B Check if the batteries are drained.
,, Check if remote control sensor is blocked by obstacles.
,, Check if there is any fluorescent lighting nearby.
ENG-3
I TABLE OF CONTENTS 1
Table of Contents
Safety Instructions ........................................................................................................................................ 2
Important Safety Instructions ................................................................................................................ 2
Before you start ............................................................................................................................................ 3
Accessories ........................................................................................................................................... 3
Install Batteries in the Remote Control .................................................................................................. 3
Chapter 1 :Setup
General Features............................................................................................................................................ 6
Disc Type and Characteristics ........................................................................................................................ 7
Description...................................................................................................................................................... 8
Tour of the Remote Control .................................................................................................................. 10
Chapter 2: Connections
Connecting the Antenna Cable ................................................................................................................... 11
Method1: Antenna + DVD-VOR + TV: No Cable box .......................................................................... 11
Method2: Antenna + DVD-VOR + TV: Cable box with many scrambled channels .............................. 12
Method3: Antenna + DVD-VOR + TV: Cable box with a few scrambled channels .............................. 12
Before Connecting the DVD-VCR .............................................................................................................. 13
Connection to a TV ...................................................................................................................................... 13
Connection to a TV (Video) .................................................................................................................. 13
Connection to a TV (S-Video) ............................................................................................................ 14
Connection to a TV (interlace) ............................................................................................................ 15
Connection to a TV (Progressive) ........................................................................................................ 16
Connection to an Audio System ................................................................................................................. 17
Connection to an Audio System (2 Channel Amplifier) ........................................................................ 17
Connection to an Audio System (Dolby digital, MPEG2 or DTS Amplifier) .......................................... 18
Connecting a Power Cord & Auto Setup ...................................................................................................... 19
Chapter 3: Initial Setup
Selecting a Menu Language ........................................................................................................................ 20
Setting the Clock ........................................................................................................................................ 21
Setting the Clock Automatically ............................................................................................................ 21
Setting the Clock Manually ................................................................................................................ 22
Memorizing the Channel .............................................................................................................................. 24
Selecting the Video SignaFsource ...................................................................................................... 24
Storing Channels in Memory (Automatic Method) .............................................................................. 25
Adding and Erasing Channels (Manual Method) ................................................................................ 25
Selecting the RF Output Channel ................................................................................................................ 26
Selecting the Front Panel Display .............................................................................................................. 27
Setting the Power Off Automatically ............................................................................................................ 28
ENG-4
TABLE OF CONTENTS
Chapter 4: DVD Operations
Playing a Disc .............................................................................................................................................. 29
Using the Search and Skip Functions ........................................................................................................ 31
Using the Display Function .......................................................................................................................... 32
Using the Disc and Title Menu (DVD) .......................................................................................................... 34
Using the Function Menu (DVD) .................................................................................................................. 35
Repeat Play ................................................................................................................................................ 36
Slew Repeat Play ........................................................................................................................................ 38
Adjusting the Aspect Ratio (EZ View) .......................................................................................................... 39
Selecting the Audio Language ................................................................................................................... 41
Selecting the Subtitle Language ............................................................................................................... 42
Changing the Oamera Angle ..................................................................................................................... 43
Using the Bookmark Function ................................................................................................................... 43
Using the Zoom Function (DVD) ................................................................................................................. 45
Clips Menu for MP3/WMA/JPEG ............................................................................................................... 46
Folder Selection ......................................................................................................................................... 46
MP3/WMA Playback ................................................................................................................................... 47
Program Play & Random Play..................................................................................................................... 49
Picture OD Playback .................................................................................................................................... 50
Using the Setup Menu ................................................................................................................................ 52
Setting Up the Language Features .............................................................................................................. 53
Setting Up the Audio Options ...................................................................................................................... 55
Setting Up the Display Options .................................................................................................................... 57
Setting Up the Parental Control .................................................................................................................. 59
Chapter 5; VCR Operations
Inserting and Ejecting a Video Cassette Tape ............................................................................................ 62
Playing a Pre-Recorded Video Cassette Tape ............................................................................................ 63
Special VOR Playback Features ................................................................................................................ 64
Using Automatic Tracking ............................................................................................................................ 65
Selecting the Cassette Type ........................................................................................................................ 66
Setting the Auto Play .................................................................................................................................. 67
Setting the Auto Repeat .............................................................................................................................. 68
Using the Tape Oounter .............................................................................................................................. 69
Using the Assemble Edit Function .............................................................................................................. 70
Selecting the Audio Output Mode ................................................................................................................ 71
Searching for a Specific Sequence ............................................................................................................ 72
Basic Recording .......................................................................................................................................... 74
Special Recording Features ........................................................................................................................ 75
Using One-Touch Recording ...................................................................................................................... 76
Selecting the Recording Speed .................................................................................................................. 77
Using a Timer Recording ............................................................................................................................ 78
Chapter 6: Reference
Troubleshooting .......................................................................................................................................... 80
Technical Specifications .............................................................................................................................. 82
ENG-5
SETUP
General Features
DVD-VCR Features
,, Perfect compatibility to play back DVDs, audio
CDs or VHS Tapes.
,, Enjoy a DVD movie while recording a TV show
to the VCR.
,, Auto Setup instantly finds the time and runs
channel search.
,, RF inputs and outputs for all kinds of TVs
available.
,, Composite, S-Video, and Component Video
outputs.
,, On-Screen Program (English/French/Spanish).
DVD Features
,, 10-bit video digital to analog converter and
54MHz advanced digital filter.
,, Playback of 96KRz/24-bit sources.
,, DTS digital output for DTS-enhanced DVDs.
VCR Features
,, Hi-Fi Stereo VCR.
,, Superior slow motion and stop action (with 4
heads).
,, Playback of S-VHS tapes with a better than
standard resolution.
,, INTRO Scan, Zero Return, and END Search.
,, 7-event/l month timer recording.
,, Time remaining counter, real time counter.
Note
,, Discswhich cannot be played with this player.
DVD-ROM/DVD-RAM/VCD
CDI/CDV
SuperAudio CD (CD HD layer)
CDGs play audio only, not graphics
DVD-RW (VR mode)
Non-finalizing DVD-RW, -R, DVD+RW and +R
disc
,, Ability to play back may depend on recording
conditions.
- DVD-RW, -R/CD-RW/DVD+RW +R/CD-ROM
Note
This product incorporates copyright protection
technology that is protected by US patents and
other intellectual property rights. Use of this copyright
protection technology must be authorized by
Macrovisien, and is intended for home and other
limited viewing uses only unless otherwise authorized
by Macrovision. Reverse engineering or disassembly
is prohibited
COPY PROTECTION
Many DVD discs are encoded with copy protection
Because of this, you should only connect your DVD-
VOR directly to your TV, not to a VOR Connecting to
a VOR results in a distorted picture from copy-
protected DVD discs.
This product incorporates copyright protection
technology that is protected by methods claims of
certain U.S patents and other intellectual property
rights owned by Macrovision Corporation and other
rights owners. Use of this copyright protection
technology must be authorized by Macrovision
Corporation and is intended for home and other
limited viewing uses only unless otherwise
authorized by Macrovision Corporation. Reverse
engineering or disassembly is prohibited.
PROGRESSIVE SCAN
OUTPUTS (525p)
'CONSUMERS SHOULD NOTE THAT NOT ALL
HIGH DEFINITI@_ TELEVBi@_ SETS ARE FULL"/
COMPATIBLE WITH THIS PRODUCT AND MAY
CAUSE ARTIFACTS TO BE DISPLAYED INTHE
PBTURE, IF 525 PROGRESSIVE SCAN PICTURE
PROBLEMS OCCUR IT IS RECOMMENDED THAT
THE USER SWITCH THE CONNECTION TO THE
STANDARD DEFINITION' OUTPUT IF THERE ARE
QUESTIONS REGARDING YOUR TV SET
COMPATIBILITY WITH THIS MODEL 525p DVD-
VOR, PLEASE CONTACT SAMSUNG'S
CUSTOMER SERVICE CENTER
ENG-6
SETUP
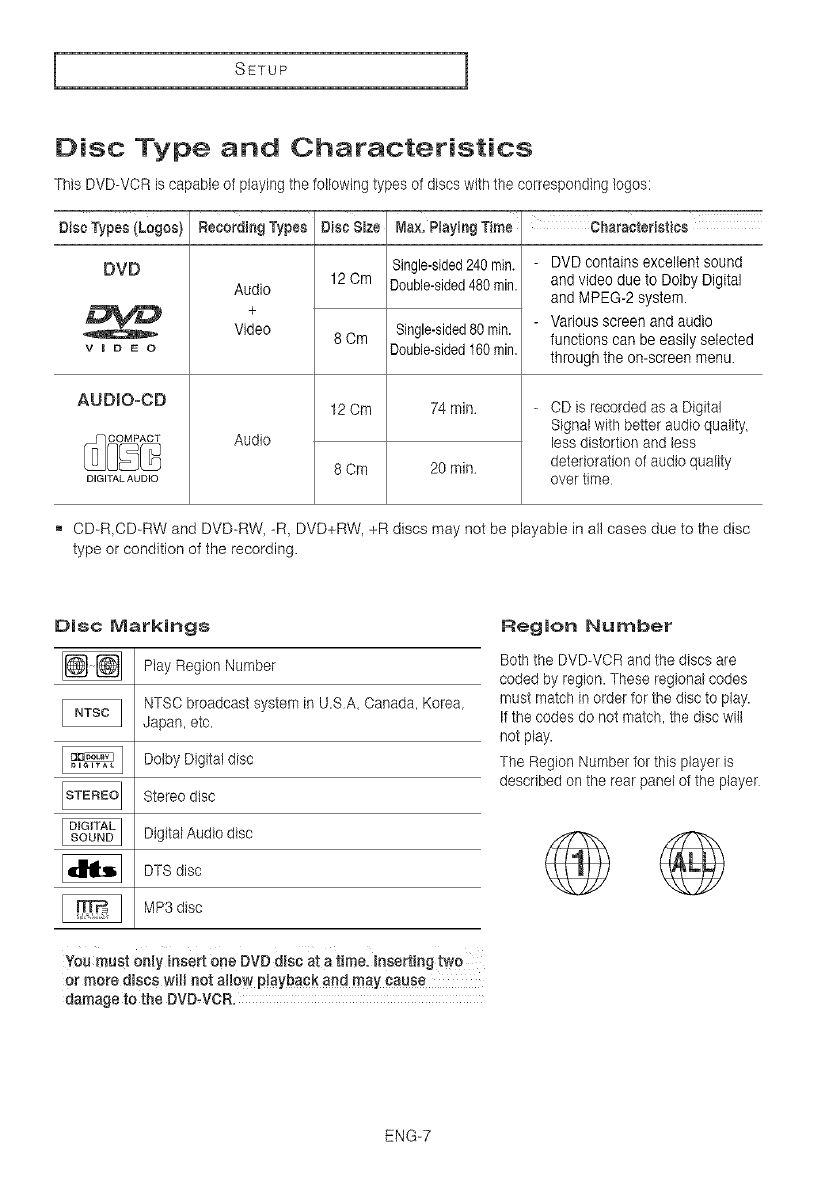
Disc Type and Characteristics
This DVD-VOR is capable of playing the following types of discs with the corresponding Iogos:
Disc Types(Logos)
DVD
V I DE 0
Recording Types Disc Size Max, Playing Time
Single-sided240rein.
Audio 12 Om Double-sided480 rain.
+
Video 8Ore
AUDIO-CD
DIGITAL AUDIO
12 Om
Audio
80m
Single-sided80 rain.
Double-sided160rain.
74 min
20 min
- DVD contains excellent sound
and video due to Dolby Digital
and MPEG-2 system.
-Various screen and audio
functions can be easily selected
through the on-screen menu
-OD is recorded as a Digital
Signal with better audio quality,
less distortion and less
deterioration of audio quality
over time
= CD-R,CD-RW and DVD-RW, -R, DVD+RW, +R discs may not be playable in el! cases due to the disc
type or condition of the recording.
Disc iVlarkinge
Hay Region Number
NTSO broadcast system in U.SA. Oanada, Korea.
Japan, etc.
Dolby Digital disc
Stereo disc
Digital Audio disc
DTS disc
MP3 disc
You must only insert one DVD disc at a time. Inserting tWO
or more discs will not allow PiaYback and may cause
damage to the DVD.VCR.
Region Number
Both the DVD-VCR and the discs are
coded by region. These regional codes
must match in order for the disc to play.
If the codes do not match, the disc will
not play.
The Region Number for this player is
described on the rear panel of the player
ENG-7
I SETUP 1
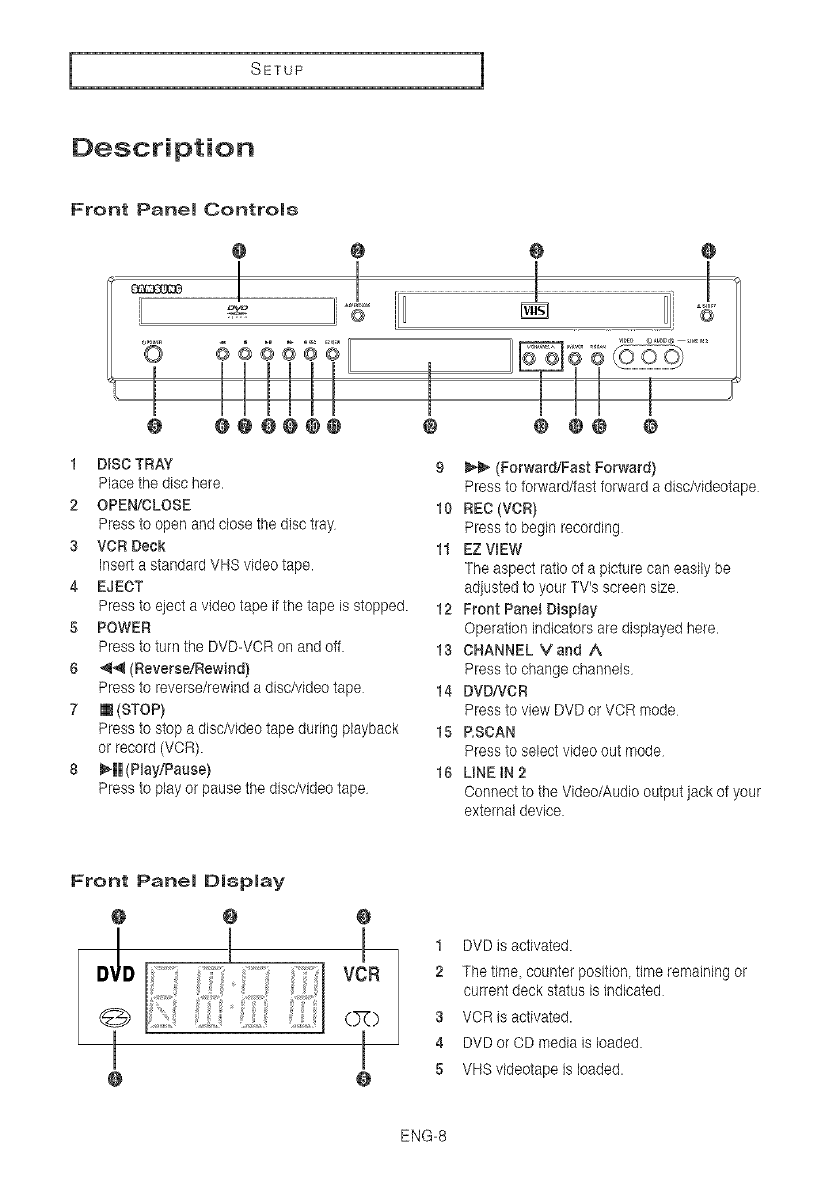
Description
Front Panel Controls
@ @ 0 0
e eee@@@
1 DISC TRAY
Place the disc here.
2 OPEN/CLOSE
Press to open and close the disc tray
3 VOR Deck
Insert a standard VNS video tape.
4 EJECT
Press to eject a video tape if the tape is stopped.
5 POWER
Press to turn the DVD-VCR on and oft
6 _ (Reverse/Rewind)
Press to reverse/rewind a disc/video tape
7 m (STOP)
Press to stop a disc/video tape during playback
or record (VCR).
8 _H (Play/Pause)
Press to play or pause the disc/video tape
N
@ ¢ ¢@ @
9_ (Forward/Fast Forward)
Press to torward/fast forward a disc/videotape
10 REC (VCR)
Press to begin recording
11 EZ ViEW
The aspect ratio of a picture can easily be
adjusted to your TV's screen size
12 Front Panel Display
Operation indicators are displayed here.
13 CHANNEL Vand A
Press to change channels
14 DVC,,'VCR
Press to view DVD or VCR mode
15 P.SCAN
Press to select video out mode
16 UNE IN 2
Connect to the Video/Audio output jack of your
external device
Front Panel Display
@
@
O
lO
O
1 DVD is activated.
2 Thetime counter position time remaining or
current deck status is indicated
3 VCR is activated.
4 DVD or CD media is loaded.
5 VHS videotape is loaded.
ENG-8
SETUP
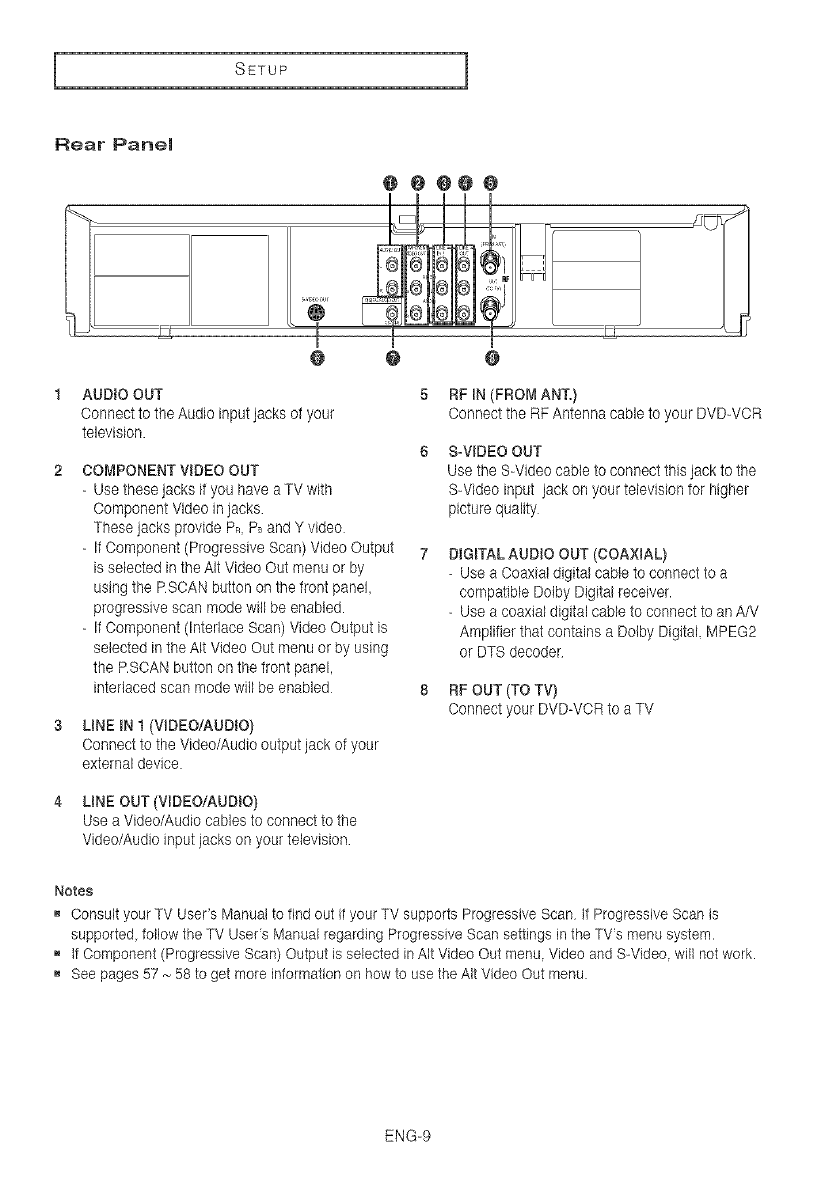
Rear Panel
@@@@@
i I
o o 0
AUDIO OUT
ConnecttotheAudioinputjacksofyour
television.
COMPONENT VIDEO OUT
- Use these jacks if you have a TV with
Component Video in jacks
These jacks provide Pn P_and Y video
-If Component (Progressive Scan) Video Output
is selected in the AIt Video Out menu or by
using the RSCAN button on the front panel,
progressive scan mode will be enabled.
-If Component (Interlace Scan) Video Output is
selected in the AIt Video Out menu or by using
the RSOAN button on the front panel,
interlaced scan mode will be enabled
LiNE iN t (VIDEOIAUDtO)
Connect to the Video/Audio output jack of your
external device.
5 RP mN(FROMANT.)
Connect the RF Antenna cable to your DVD-VOR
S-VIDEO OUT
Use the S-Video cable to connect this jack to the
S-Video input jack on your television for higher
picture quality
DIGITAL AUDIO OUT (COAXIAL)
- Use a Coaxiat digital cable to connect to a
compatible Dolby Digital receiver.
-Use a coaxial digital cable to connect to an A/V
Amplifier that contains a Dolby Digital. MPEG2
or DTSdecoder
8RFOUT(TOTV)
ConnectyourDVD-VOR toaTV
4 LiNE OUT(VIDEO/AUDiO}
Use a Video/Audio cables to connect to the
Video/Audio input jacks on your television
Notes
Consult your TV User's Manualto find out if your TV supports Progressive Scan if Progressive Scan is
supported follow the TV Users Manual regarding Progressive Scan settings in the TV's menu system.
B if Component (Progressive Scan) Output is selected in AIt Video Out menu Video and S-Video will not work.
See pages 57 _ 58 to get more information on how to use the AIt Video Out menu
ENG-9
I SETUP 1
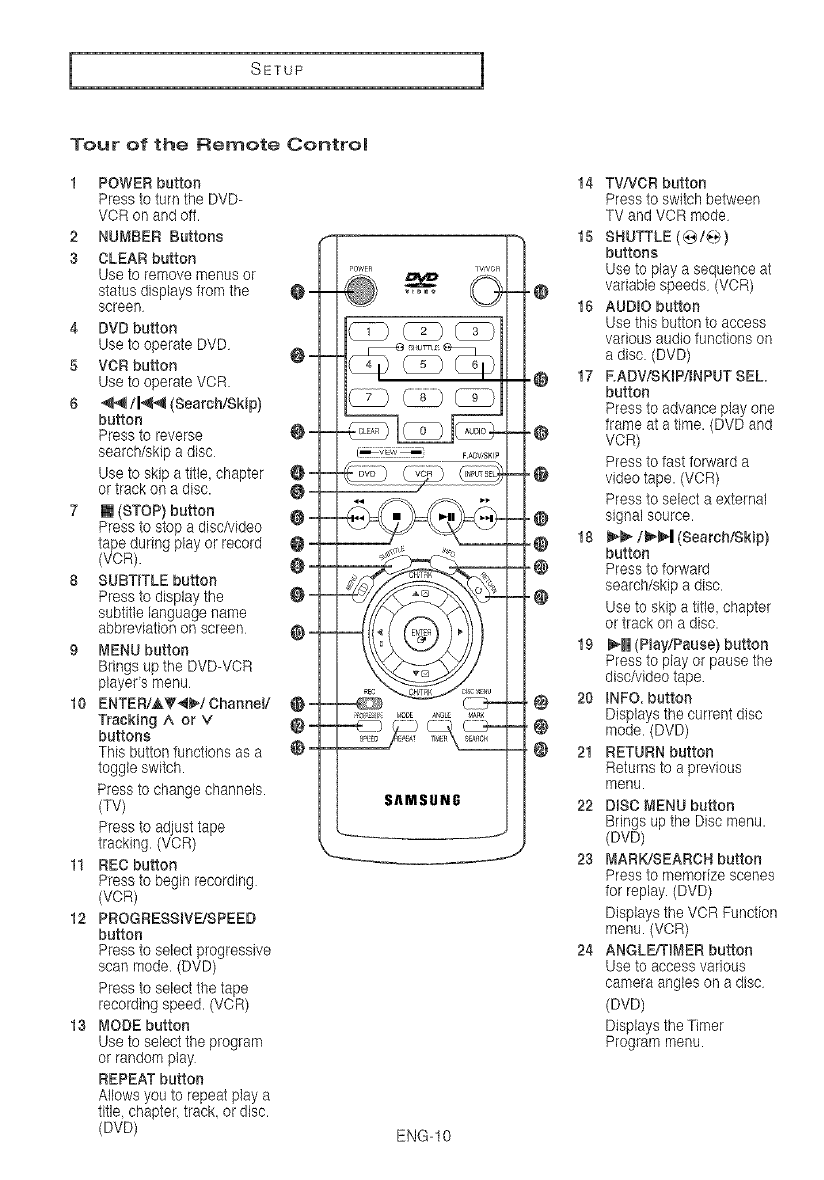
Tour of the Remote Control
1 POWER button
Press to turn the DVD-
VOR on and off.
2 NUMBER Buttons
3 OLEAR button
Use to remove menus or
status displays from the
screen
4 DVDbutton
Use to operate DVD
5 VORbutton
Use to operate VOR
6,,q4/l_l_,_ (Search/Skip)
button
Press to reverse
search/skip a disc
Use to skip a title, chapter
or track on a disc.
7 [] (STOP) button
Press to stop a disc/video
tape during play or record
(VCR).
8 SUBTITLE button
Press to display the
subtitle language name
abbreviation on screen
9 MENU button
Brings up the DVD-VOR
players menu
10 ENTERiAT4_i ChanneV
Trucking A or V
buttons
This button tunctions as a
toggle switch.
Press to change channels.
(TV)
Press to adjust tape
tracking. (VCR)
11 REO button
Press to begin recording
(VCR)
12 PROGRESSWEiSPEED
button
Press to select progressive
scan mode. (DVD)
Press to select the tape
recording speed. (VCR)
13 MODE button
Use to select the program
or random play
REPEAT button
Allows you to repeat play a
titb chapter track or disc.
(DVD)
Om
_m
_m
Om
@=
0
0
@
@=
@=
@=
@=
@=
_OWER _ W_'VC_
_@ ..... ©
=
L_; _ FADVSKIP
REC DISC+_Er_U
8AMSUN6
Y
ENG-t0
14
15
-@ 16
@17
°@
°@
°@
.@ t8
-@
-@
19
. ¢ 20
.¢
-¢ 21
22
23
24
TViVCR button
Press to switch between
TV and VCR mode
SHUTTLE (@/_:_)
buttons
Use to play a sequence at
variable speeds (VOR)
AUDIO button
Use this button to access
various audio functions on
a disc. (DVD)
RADV/SKtPi_NPUT SEL
button
Press to advance play one
frame at a time. (DVD and
VCR)
Press to fast forward a
video tape. (VCR)
Press to select a external
signal source.
_/_,1 (Search/Skip)
button
Press to forward
search/skip a disc.
Use to skip a title, chapter
or track on a disc.
_UH(Hay/Pause) button
Press to play or pause the
discMdeo tape
INFO. button
Displays the current disc
mode. (DVD)
RETURN button
Returns to a previous
menu.
DISC MENU button
Brings up the Disc menu.
(DVD)
MARK/SEARCH button
Press to memorize scenes
for replay. (DVD)
Displays the VOR Function
menu. (VCR)
ANGLE/TIMER button
Use to access various
camera angMs on a disc
(DVD)
Displays the Timer
Program menu.
CONNECTIONS
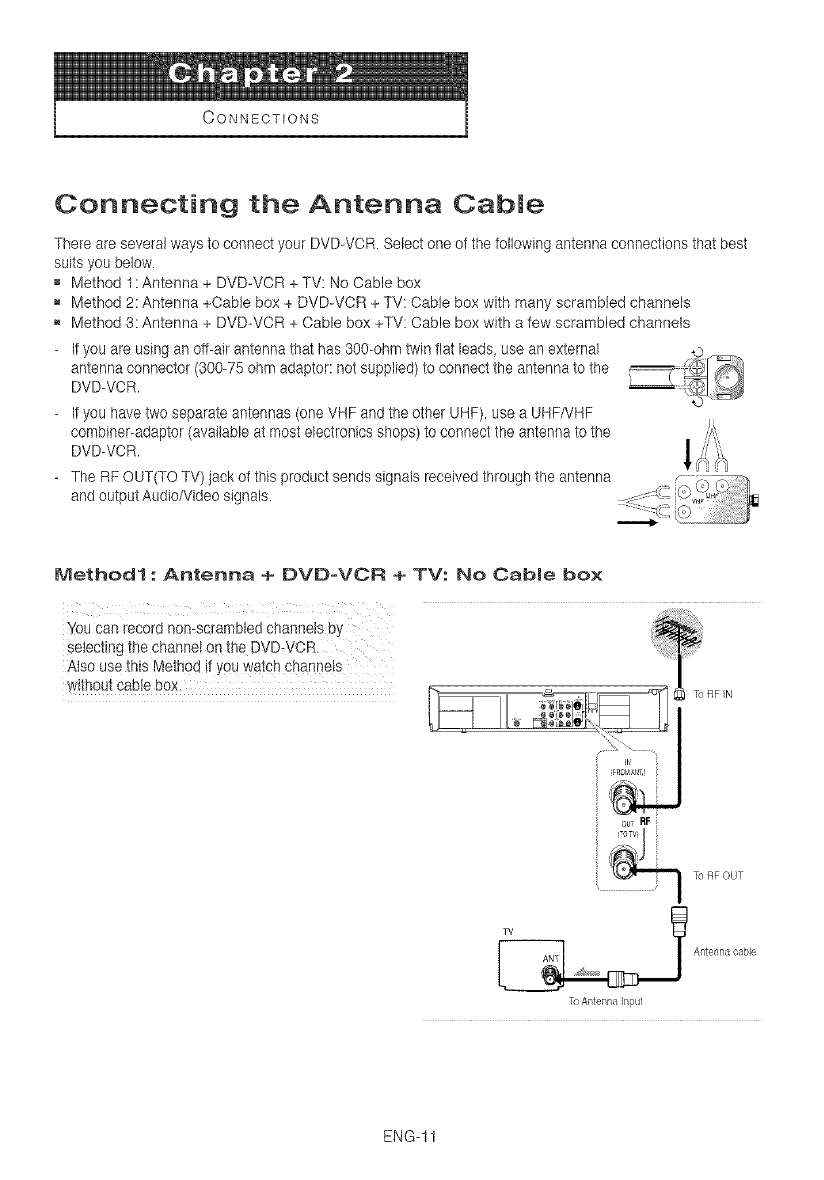
Connecting the Antenna Cable
There are several ways to connect your DVD-VOR. Select one of the following antenna connections that best
suits you below.
B Method 1: Antenna + DVD-VCR + TV: No Cable box
B Method 2: Antenna +Cable box + DVD-VCR + TV: Cable box with many scrambled channels
B Method 3: Antenna + DVD-VCR + Cable box +TV: Cable box with a few scrambled channels
-If you are using an off-air antenna that has 300-ohm twin flat leads, use an external ©
antenna connector (300-75 ohm adaptor: not supplied) to connect ihe antenna to the
DVD-VCR. _,==_ _
-If you have two separate antennas (one VHF and the other UHF), use a UHF/VHF
combiner-adaptor (available at most electronics shops) to connect the antenna to the
DVD-VOR.
-The RF OUT(TO TV) jack of this product sends signals received through the antenna
and output Audio/Video signals.
Method1 :Antenna + DVDoVCR + TV: No Cable box
You Can record non-scrambled Channels by __
selectingthechanne,o0theOVO VCR
Atso use this Method if YOUwatch channels
without cable box. RFIN
out RF
T(_RF CUT
T_ Antennacable
T'_Antepna Input
ENG-11
I 0ONNECTIONS 1
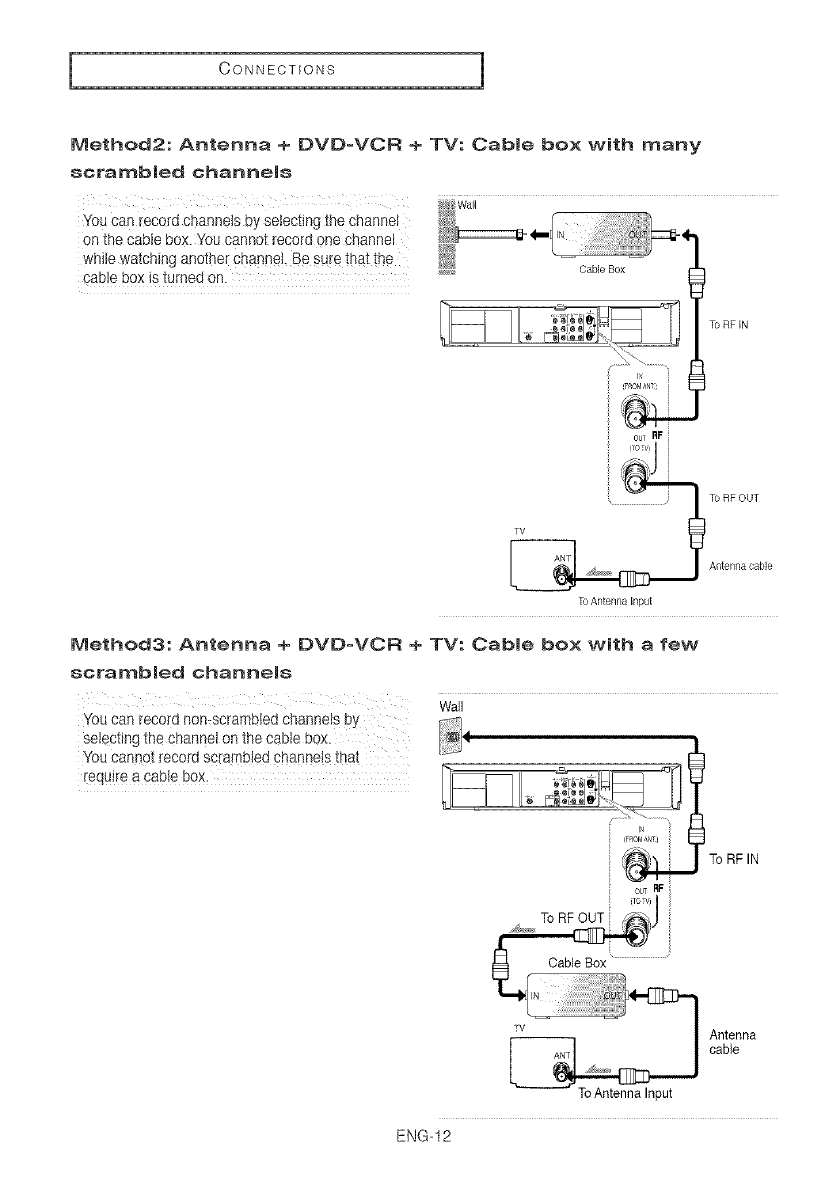
Method2: Antenna + DVD=VCR + TV: Cable box with many
eerantb|ed channels
You can record channels by selecting the channel
on the cable box. You cannot record one channel
while watching another channel. Be sure that the
cable box is turned on. _ CaNe Box
To RF IN
To RF OUT
AMennacabb
ToAntenna Input
Method3: Antenna + DVD-VCR + TV: Cable box with a few
scrambled channels
Wall
YOUcan record nomscrambbd channels by
selecting the channel on the cable box.
You cannot record scrambled channets that
To RF IN
OUTBF
Antenna
cable
ENG-12
OONNECTIONS
Before Connecting the BVB-VCR
-Always turn off the DVD-VOR TV, and other components before you connect or disconnect any cables
-Refer to the users manual of the additional components (such as a TV) you are connecting for more
information on those particular components
Connection to a TV
The following shows examples of connections commonly used to connect the DVD-VOR with a TV and other
components.
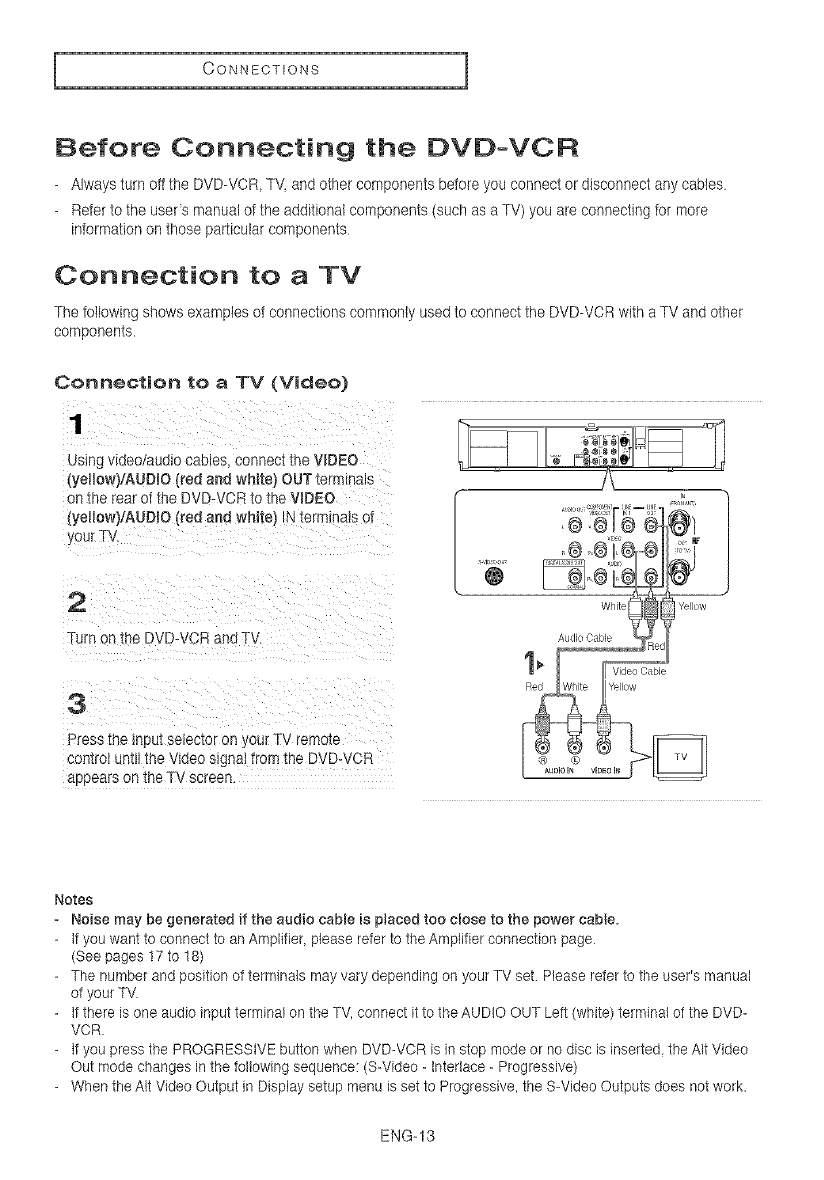
Connection to a TV (Video)
Ustnc video/audio caoles connec[ [he VIDEO
(ye_low)/AUDJO (red and white_ OUT terminals
on the rear ot the DVD-VCR to the VmDEO
(yeliow)/AUDlO (red and white) _Nterm rials of
your TV.
2
Turn on the DVD-VCR and TV.
3
Press the inpu[ selector on jour TV remote
controi un[ll 1hevideo signal from the DVD-VOR
appears on the TV screen.
Notes
-Noise may be generated if the audio cable is placed too close to the power cable.
-if you want to connect to an Amplifier, please refer to the Amplif{er connection page
(See pages 17 to 18)
-The number and position of terminals may vary depending on your TV set Please refer to the user's manual
of your TV
-if there is one audio input terminal on the TV, connect it to the AUDIO OUT Left (white) terminal of the DVD-
VCR
-If you press the PROGRESSIVE button when DVD-VCR is in stop mode or no disc is inserted the AIt Video
Out mode changes in the following sequence: (S-Video - interlace -Progressive)
-When the AIt Video Output in Display setup menu is set to Progressive, the S-Video Outputs does not work.
ENG-f3
I CONNECTIONS 1
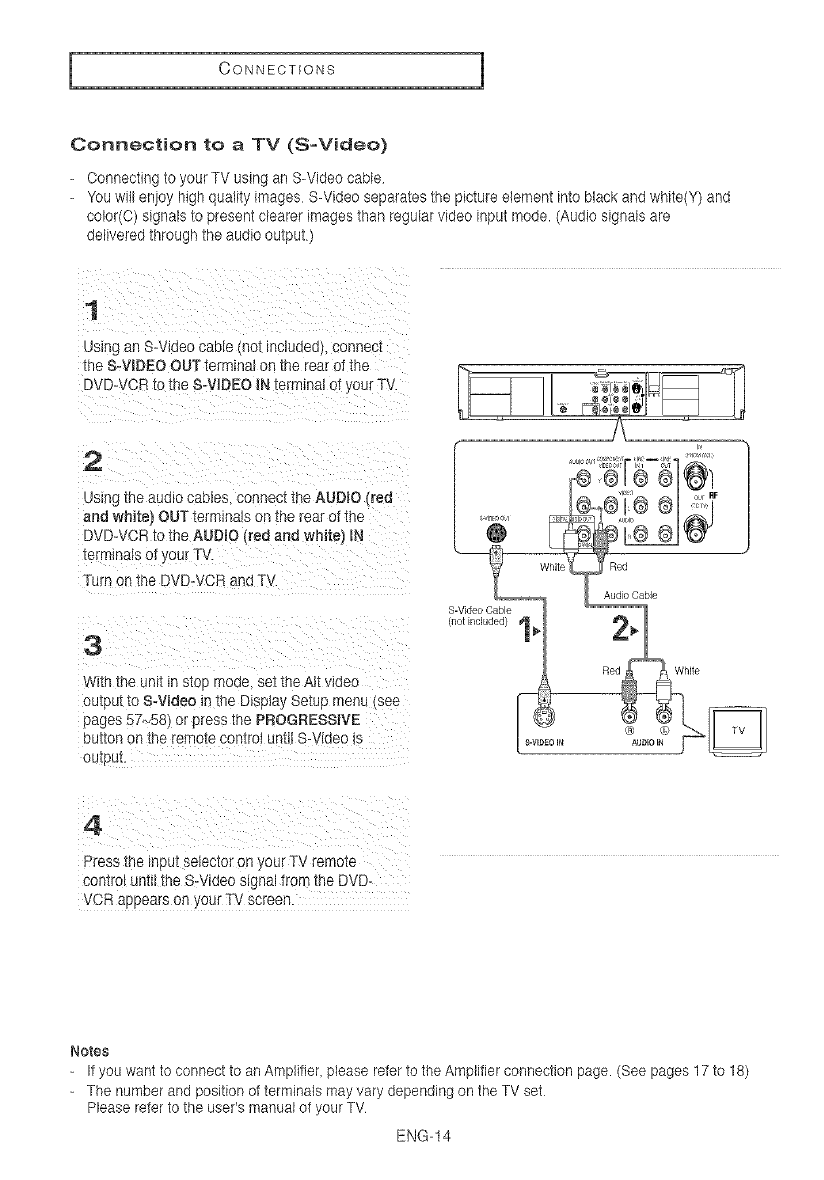
Connection to a TV (S-Video)
Connecting to your TV usingan S-Video cable
You will enjoy high quality images S-Video separates the picture element into black and white(Y) and
color(C) signals to present clearer images than regular video input mode. (Audio signals are
delivered through the audio output.)
using an S-Video cable mo_ mc_uaeo_connec_
the S-VIDEO OUT terminal on the rear )t the
DVD-VCP co_neS-V_DEO iN termina st your TV
2
using the audio cables, connect the AUDIO fred
and whitef OUT termina s on the rear of the
DVD-VCR to the AUDIO [t'ed and white) IN
terminals o!, sur T\/
Turn on the DVD-VCR and TV
3
W_ththe unit _nstoF moae set the Aft video
ou[out to S-Video in the Display Setup menu (see
pages 57_58) or press the PROGRESSIVE
euI'_onon the remo_e control um I S-Video _s
oulpul
4
Press the input selector on ,,our TV remote
conzro_un_ the S-V_deos_gnalfrom the DVD-
OR appears on _sur TV screen.
Notes
If you want to connect to an Amplifier, please refer to the Amplifier connection page. (See pages 17 to 18)
- The number and position of terminals may vary depending on the TV set
Please refer to the user's manual of your TV
ENG-14
OONNECTIONS
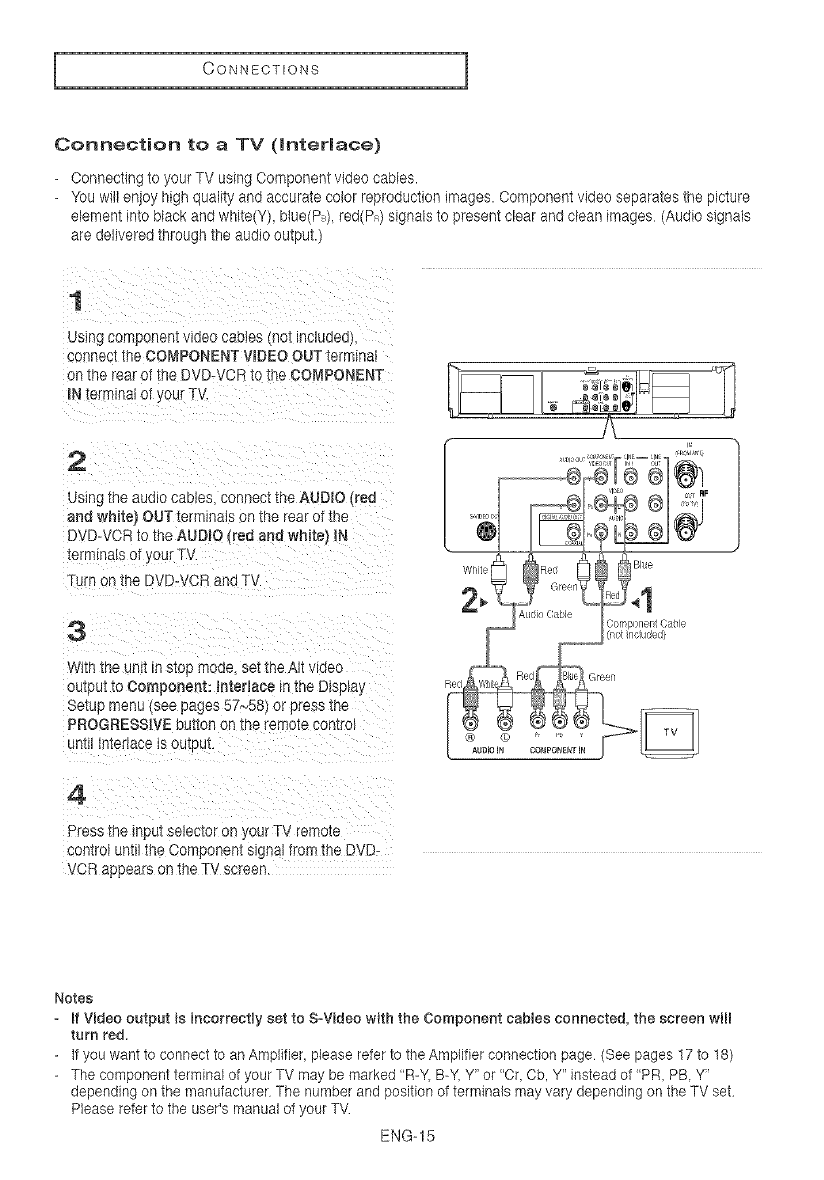
Connection to a TV (Interlace)
-Connecting to your TV using Component video cables.
-You will enjoy high quality and accurate color reproduction images. Component video separates the picture
element into black and white(Y), btue(P_) red(P_) signals to present clear and clean images (Audio signals
are delivered through the audio output.)
1
Using componen[ vleeo cables no[ Incluoeo
connect the COMPONENT VIDEO OUT termlnaI
on the rear ot the DVD-VCR to tt'÷ COMPONENT
mNterminal ot your TV
2
Uslng the audio cab es connect the AUOIO _red
and white) OUT terminals on the rear of the
DVD-VOR to the AUDIO trod and white) iN
terrrllnals of our TV.
/\
Turn o_ the DVD-VCR and TV.
3
With the unit _nstop mode setthe AIt woeo
ou[put to Component: Interlace in the DispBay
Setup menu (see pages 57,_58)or press -_ne
PROGRESSIVE button on the _emu_econtrol
Jnttl I_terlace is cutout.
4
Press the _npu_selec[or o _ your TV remote
con_ro_un_ _neComponen_ signal from the DVD-
VOR appears on the TV screen.
Notee
= if Video output is incorrect{y set to S=Video with the Component cables connected, the screen will
turn red.
-If you want to connect to an Amplifier, phase refer to the Amplifier connection page (See pages 17to 18)
-The component terminal of your TV may be marked "R-Y. B-Y.Y" or "Cr, Cb, Y" instead of "PR. PB, Y"
depending on the manufacturer The number and position of terminals may vary depending on the TV set
Please refer to the useCsmanual of your TV
ENG-15
I OONNECTIONS 1
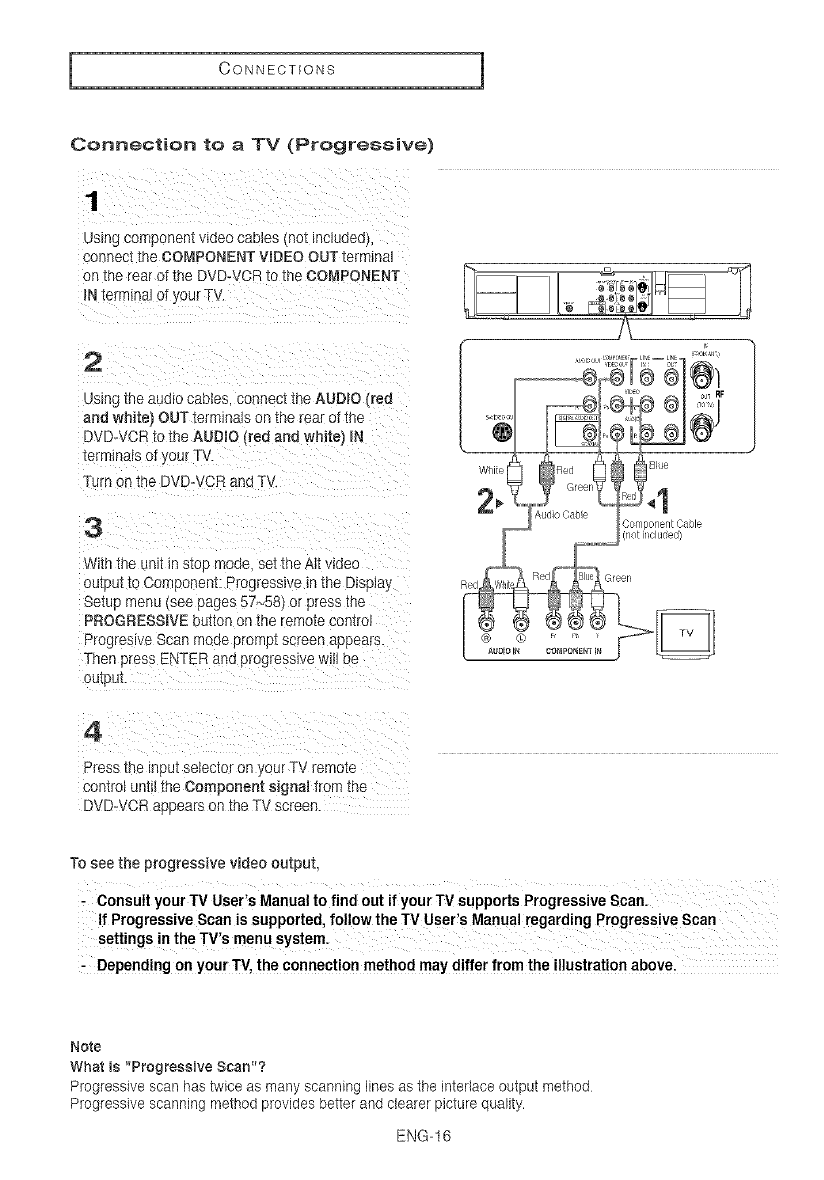
Connection to a TV (Progressive)
using componen_ v_aeocao_es-not _ncluded
connect: [he CO_,_PONENTVIDEO OUT terminal
on the rear ot the DVD-VOR to the COMPONENT
iN [ermlnal of your TV.
2
using the audio cables, connect the AUDIO (red
and white OUT terminals on the rear ot the
DVD-VOR to the AUDIO lred and white] IN
terminals of your TV
Turn on the DVD-VOR an _Tv
3
t_qththe Jnli _nsio_ mooe set the Att video
output to Component: Proc "esswe _nthe Display
Setue menu (see pages 57_58) or press me
PROGRESSIVE EJt_onon tne remo_econtro_
Progreslve Scan mooe promp_ screen appears
Then cress ENTER and prog_esswe wH_oe
output
4
Press the Inpu[ seiec-ioron 'our TV remote
conzro_utah the Component signal from the
DVD-VCR appears on the TV screen.
Vht_
2,
@i ":j
COd Jorlen[ Cabl_
_}[ rio LI_OC
To seethe progressivevideo output,
, Consult yourTV User'sManualto find out if yourTV supportsProgressiveScan.
IfProgressiveScanis supported,follow theTV UseCsManualregardingprogressive Scan
setUngs!n theTV's menusystem.
Dependingon yourTV,theconnectionmethodmaydiffer from theillustration above,
Note
What is "Progressive Scan"?
Progressive scan has twice as many scanning lines as the interlace output method
Progressive scanning method provides better and clearer picture quality.
ENG-16
OONNECT]ONS
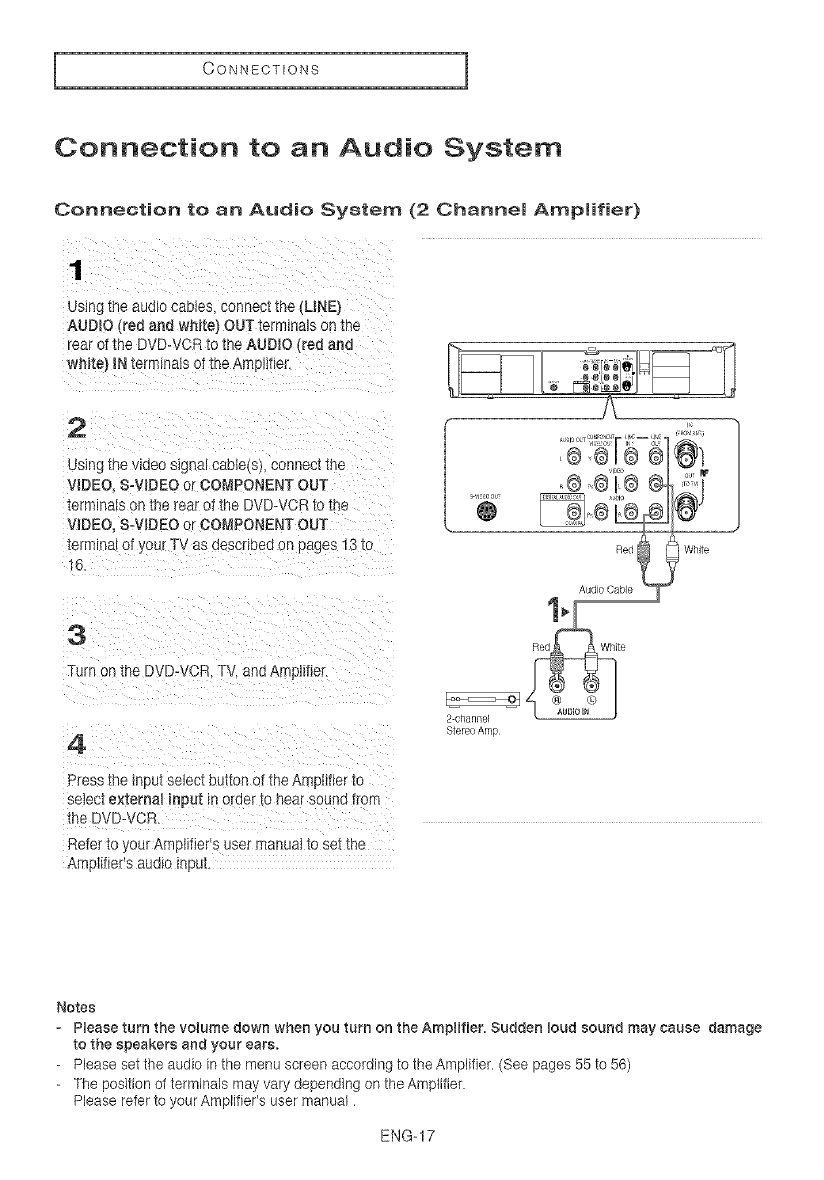
Connection to an Audio System
Connection to an Audio System (2 Channel Amplifier)
Using the audio cables connect -me_'LINE}
AUDIO {led and white] OUT terminals on the
"ear of the DVD-VOR to the AUDIO (red and
white) RNterminals of the Amplifier.
2
Using me video s_gna_cadgers connec_me
VIDEO S-V_DEOor COMPONENT OUT
terminals on the rear at the DVD-VCR to the
VIDEO. S=VIDEOor COMPONENT OUT
termma of your TV as descr_oea on pages 13 to
16.
@
White
3
Turn on the DVD-VOR. TV. and Area _her
4
Red White
2-channel
Stereo Amp
Press the input select button of the Amptif_erto
setect external input _nDrearto hear sound iron_
the DVD- 'OR.
Refertc your Ampl_fier's Jser manual to set the
Amy_er's audio inp JL
Notes
= Please turn the volume down when you turn on the Amplifier. Sudden loud sound may cause damage
to the speakers and your ears.
Please set the audio in the menu screen according to the Amplifier. (See pages 55 to 56)
The position of terminals may vary depending on the Amplifier
Please refer to your Amplifier's user manual.
ENG-17
I OONNECTIONS 1
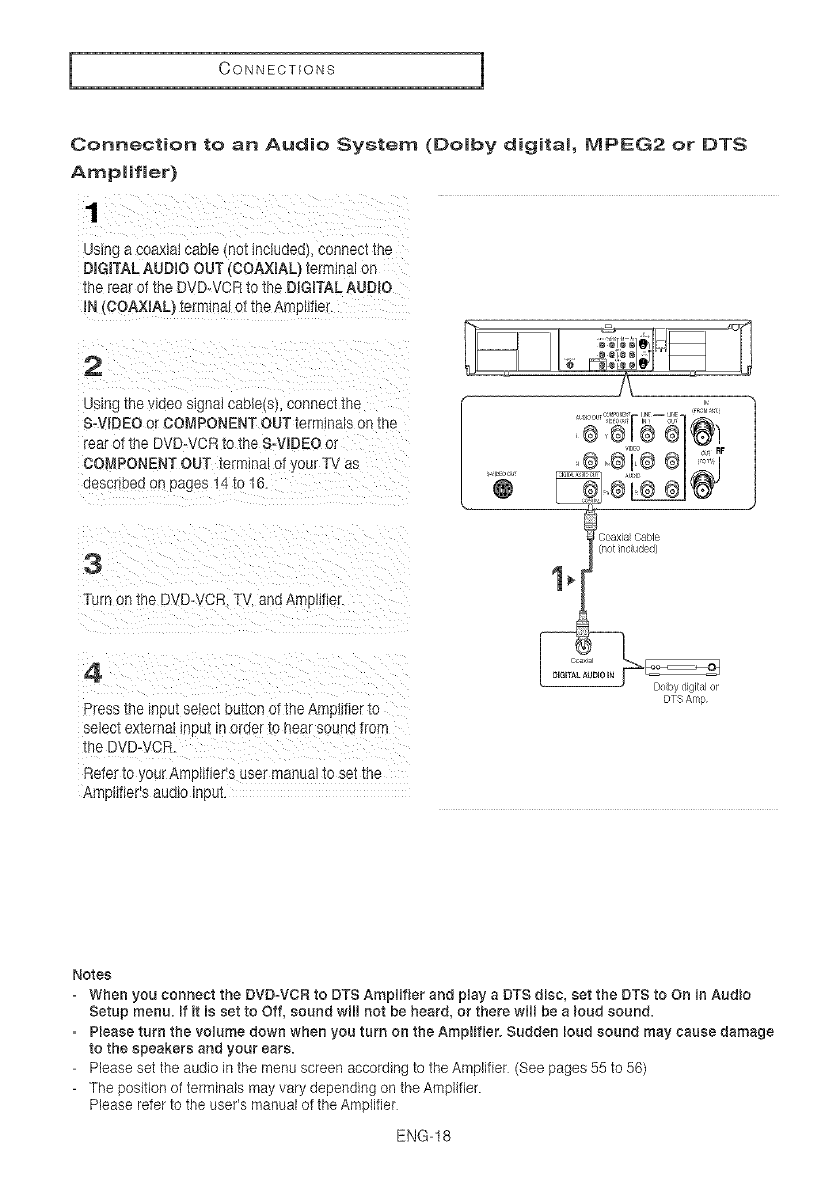
Connection to an Audio System (Doiby digital, iVIPEG2 or DTS
Amplifier)
using a coaxlaI cable nottnciudeo connect me
D_GITALAUDIO OUT (COAXIAL) terminal on
ins _ea_of the DVD-VCR to the DIGITAL AUDIO
iN (COAXIAL) terminal ot the Ampllf_er
2
Using the wdeo signaI cable(s), connect -me
S=WDEO or COMPONENT OUT terminals on the
rear of the DVD-VCR to _ne S=VIDEOor
COMPONENT OUT terminal of 3urTV as
described on pages 14 to 16.
3
Turn on the DVD- ,/CR TV. and Amblifier
'® nL®®/ "1
Coaxia Cable
(not ncuded)
4Doby digital o_
DTS Arrp
Press me input select button of the Amod_ertc
semc[ ex[erns., mpu_m order [o near sol nd from
the DVD-VCR.
Refer to your Amplifier's user manua_to set ire
AF g lfler's audio input.
Notes
When you CoRRect the DVD_VCRto DTS Amplifier and play a DTS disc, set the DTS to On in Audio
Setup menu. If it is set to Off, sound will Rot be heard, or there wH{ be a loud sound.
Please turn the volume down when you turn on the Amplifier_ Sudden loud sound may cause damage
to the speakers and your ears.
- Please set the audio in the menu screen according to the Amplifier (See pages 55 to 56)
-The position of terminals may vary depending on the Amplifier.
Please refer to the user's manual of the Amplifier
ENG-18
CONNECTIONS
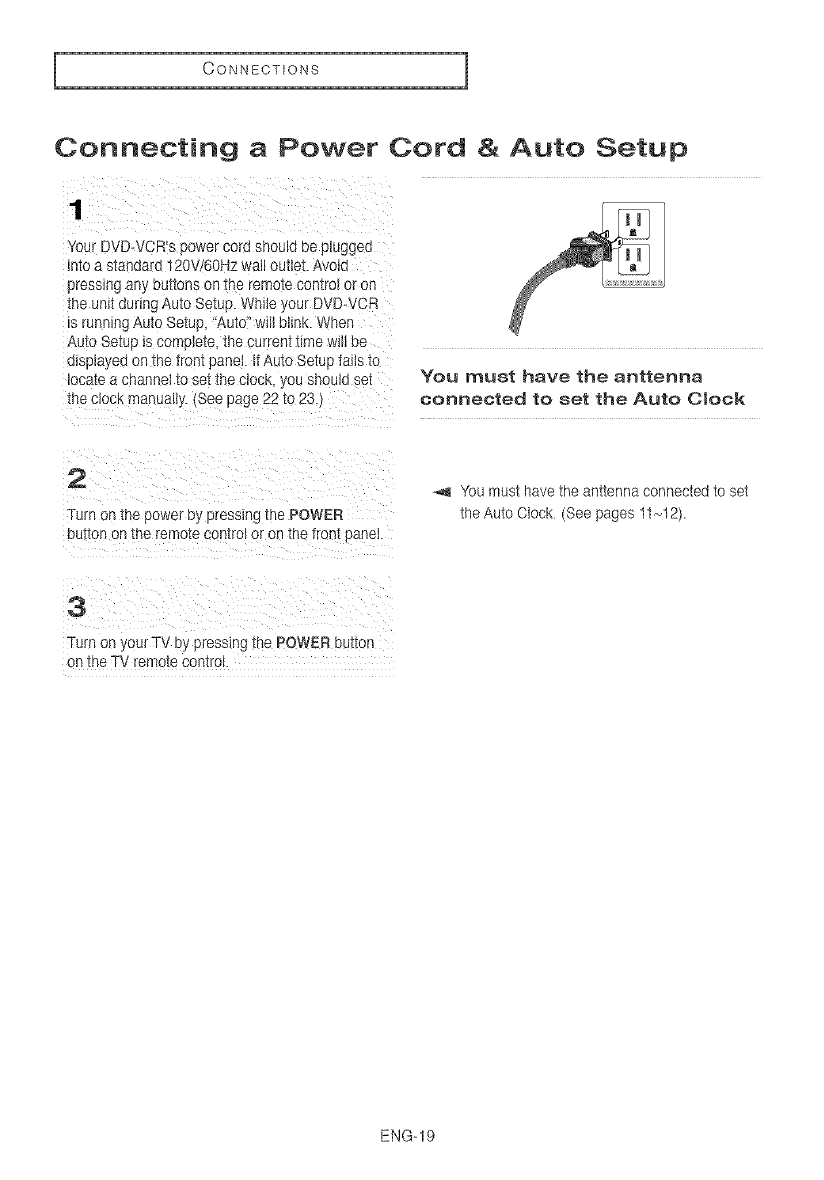
Connecting a Power Cord & Auto Setup
¥OL" DVD-VCR's vower corn snouJaue p_uggea
n_oa sianaard 120V/60Hz wail outlet, i_vo_a
pressing any uu_ons on _ne remc_ecomro_or on
the unit during Auto Setup. While -our DVD-VCR
s running Auto Setup "Auto" will blink. Wqen
Auto Setue Is complete tne current _lmewill be
e_sp_ayedon the front panel. If Auto Setu_ fa_Isto
Ioca_e a cnannet to set tr_eCLOCK_ou ShOUld se{
the CLOCKmanually. (See page 22 to 23.)
You must have the anttenna
connected to set the Auto Clock
2
Turn sn -{hepower uy pressing the POWER
uu_on on _neremo_econ_ro_or on the front DaneI.
You must have the anttenna connected to set
the Auto Clock (See pages II,q 2).
3
Turn on your TV by pressing the POWER button
o _the TV remote control.
ENG-19
INITIAL SETUP
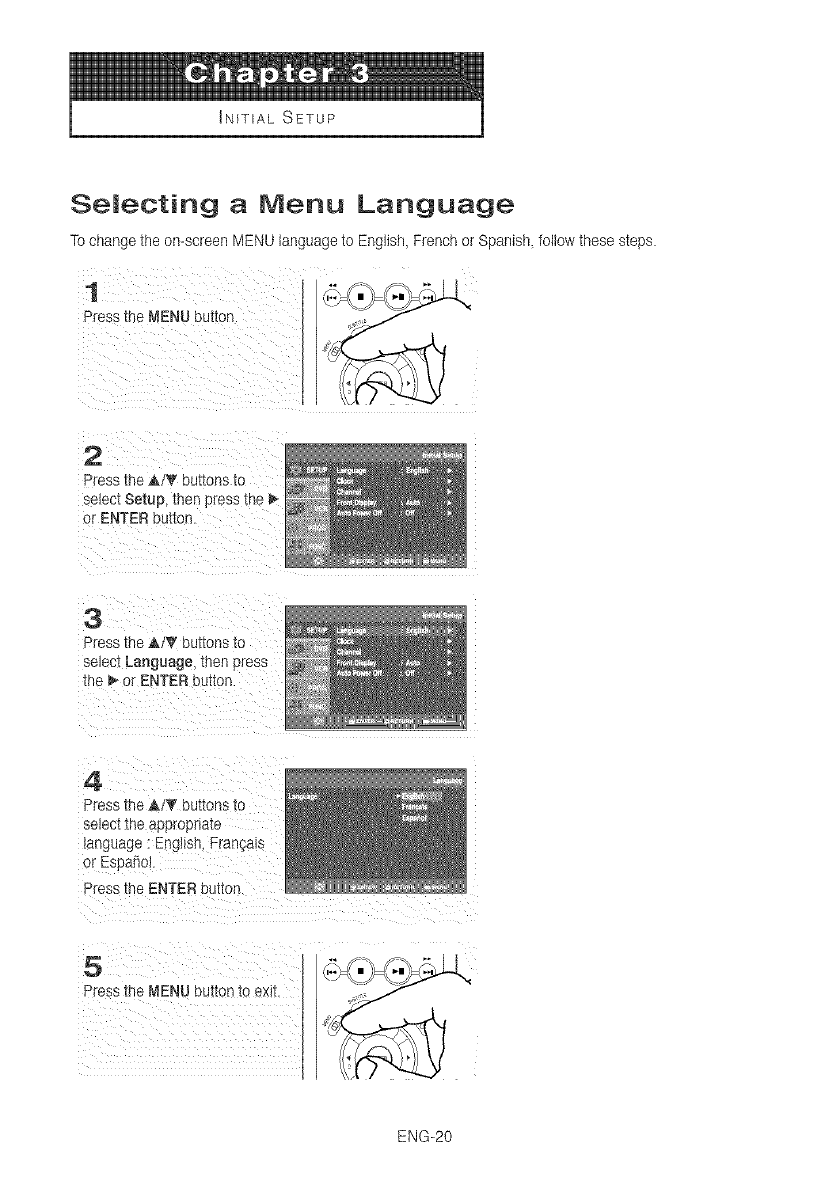
Selecting a Menu Language
Tochange the on-screen MENU language to English French or Spanish follow these steps.
1
Press the MENU button
2
Press the _./_' buttons to
select Setup, then press the _-
or ENTER button.
3
Press the AiT bu[[ons [o
se_ec_Language, _nenpress
"[bem.or ENTER out,on.
4
Press the A.i_' buttons co
selec_-_neaearoenaTe
language. :ngllsn, Frangals
or Espahot.
Press the ENTER button
5
Press the MENU ou_tonto exit J
ENG-20
INITIAL SETUP
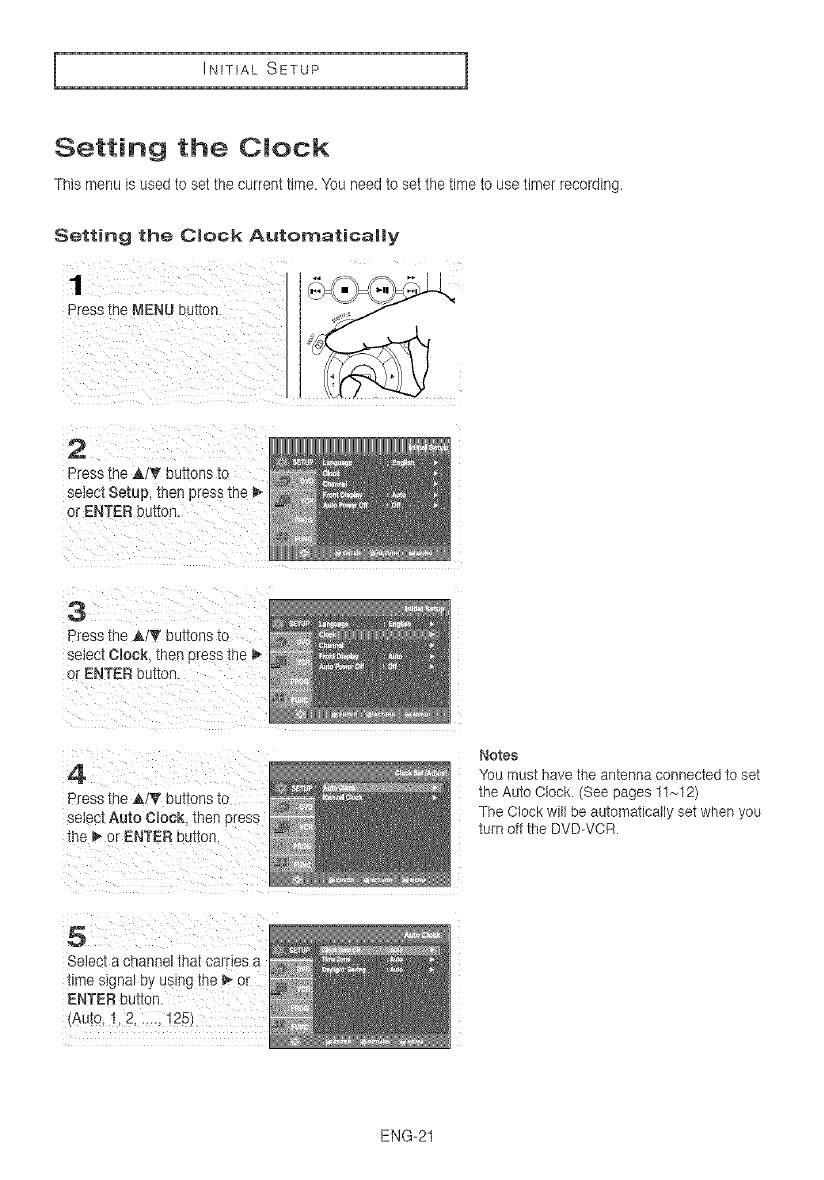
Setting the Clock
This menu isused to set the current time. "Youneed to set the time to use timer recording.
Setting the Clock Automatically
Press the MENU L Jt_on.
2
Press the _,IT buttons to
select Setup, men pres_ the _,,
or ENTER 9u[Ton.
3
Press the j,/V" ou[[ons Io
select C!ock. then press the
or ENTER button.
4
Press the _,/T buttons to
select Auto C!ock. men press
:he _ or ENTER button
Notes
You must have the antenna connected to set
the Auto Clock (See pages 11-12)
The Clock will be automatically set when you
turn off the DVDWCR
5
Select a channel that carries a
time signal oy using [ne _ or
ENTER button
(Auto, 1,2 ...... 125
ENG-21
INITIAL SETUP 1
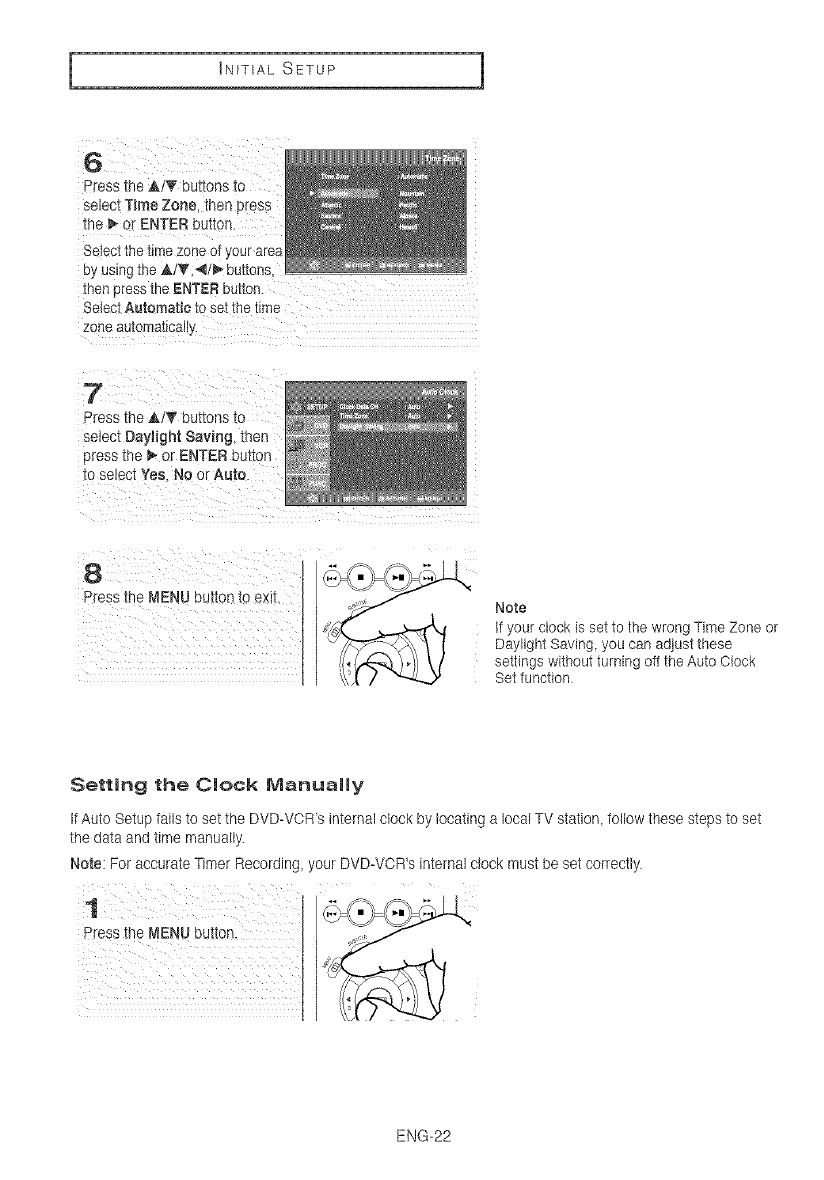
6
Press the A/'_ buttons to
select Time Zone. men press
tile _ c ENTER button.
Select the time zone of your area
#y using the ,a,/T._/_ buttons
men _ress the ENTER Du_on
Selec Automatic to setthe t_rne
zone aul )maiioal_.
7
Dressthe AiT buttons to
select Daylight Saving, then
press the _ or ENTER button
_oselect Yes. No or Auto.
8
Press the MENU eu_tonto exit Note
tf your clock is set to the wrong Time Zone or
Daylight Saving you can adjust these
settings without turning off the Auto Clock
Set function
Setting the Clock Manually
If Auto Setup falls to set the DVD-VOR s internal clock:by locating a local TV station, follow these steps to set
the data and time manually
Note: For accurate Timer Recording, your DVD-VCR's internal clock must be set correctly.
ENG-22
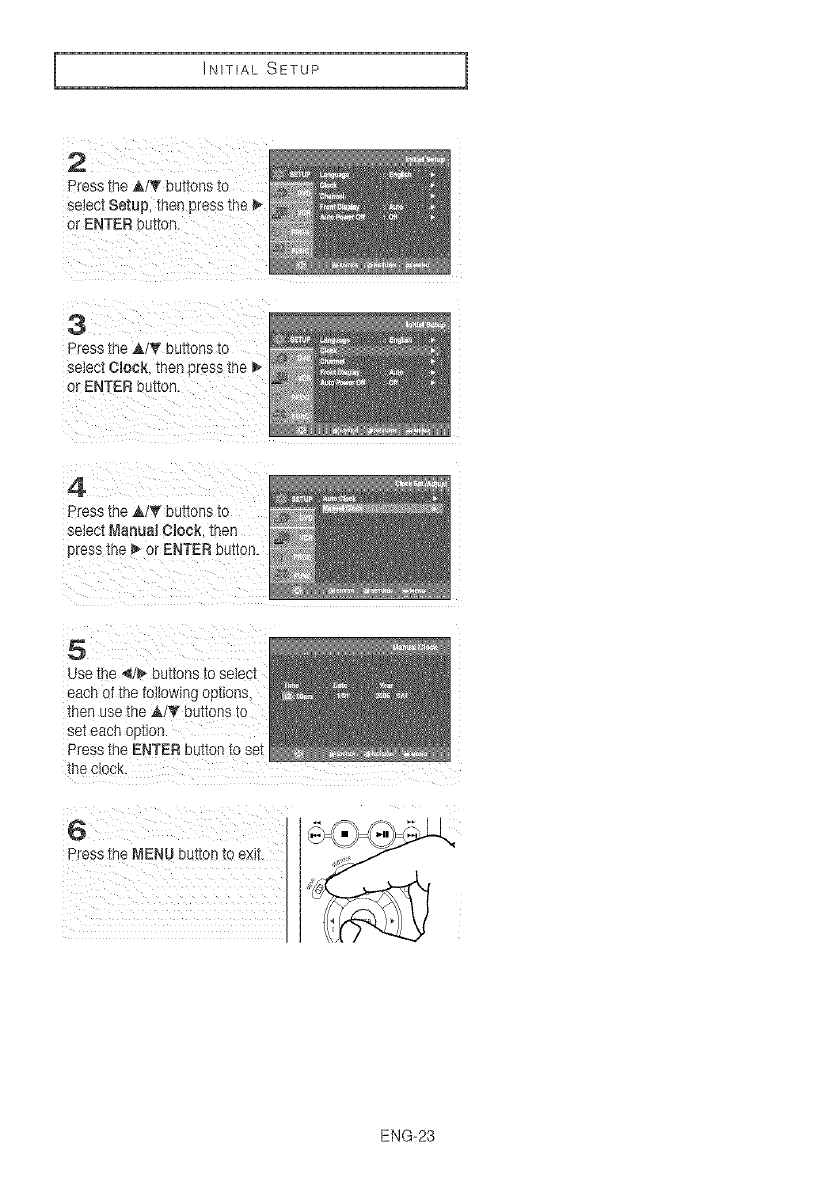
INITIAL SETUP
2
Press the A/_ buttons to
select Setup, 1nunpress the
or ENTER button.
3
Press the ,_,/T buttons to
select 0!ock. _nen Dressthe _,-
or ENTER button.
4
Press the ,&/_' buttons co
select Manua_ Clock. then
_ressthe t_ or ENTER butlon
5
use the 4/_ eUtlOnSt0 sele ;t
_acn of the following options,
then use the ,_1'_ buttons to
sel each option
Press the ENTER uuIton Io set
d_eClock
Press the MENU outton [o exit ,_"_ "
ENG-23
I INITIAL SETUP 1
Memorizing the Channels
Selecting the Video Signal=eource
This feature allows you to manually set the DVD-VOR s tuner band to Antenna or Oable whichever you
connected to the Antenna In jack during initial setup
Use this setting only it Auto Setup detected the incorrect tuner band i.e channels are coming in on the wrong
channel numbers.
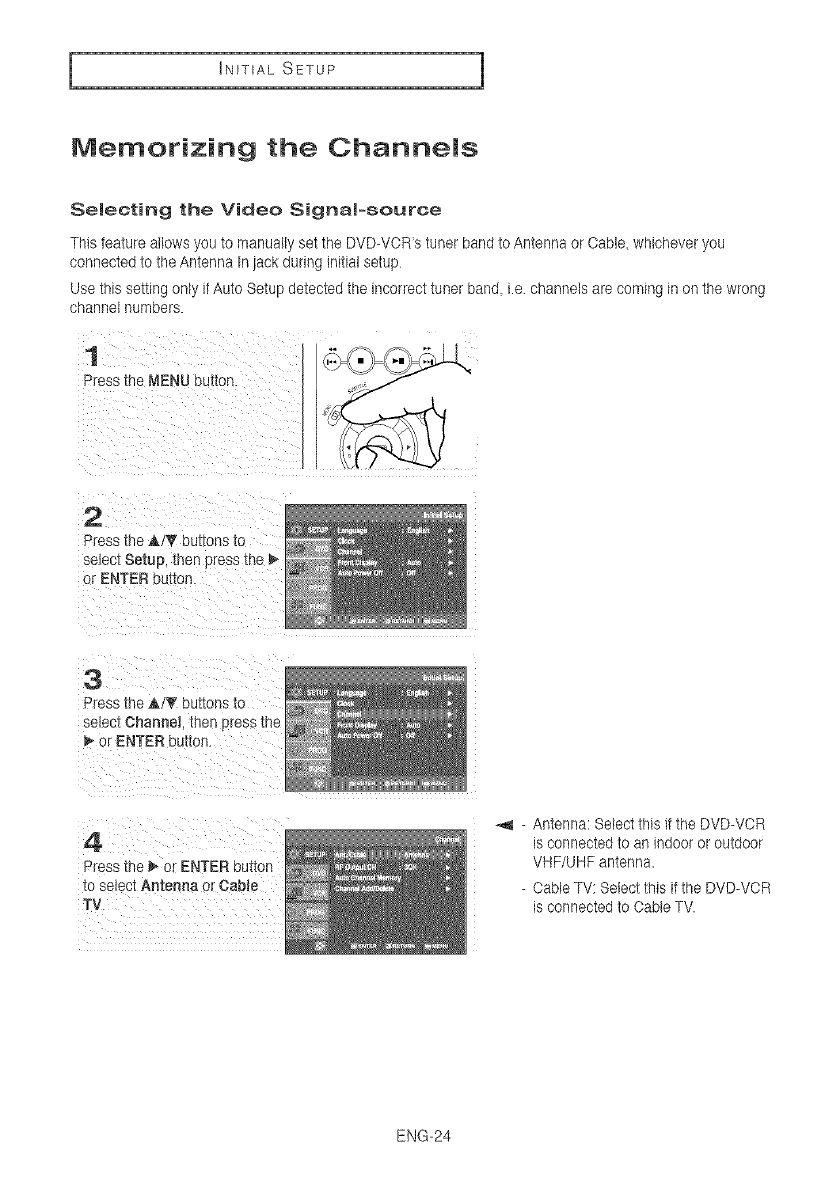
1
Press the MENU Du_on.
2
Press the _,/_' buttons to
select Setup, men press me
or ENTER button.
3
°tess the AIT buttons to
select Channel men press me
or ENTER button.
4
Press the _ or ENTER button
Io select Antenna or Cable
TV.
*,_ - Antenna: Select this it the DVD-VOR
is connected to an indoor or outdoor
VHF/UHF antenna.
- Oable TV: Select this it the DVD-VCR
is connected to Oable TV.
ENG-24
INITIAL SETUP
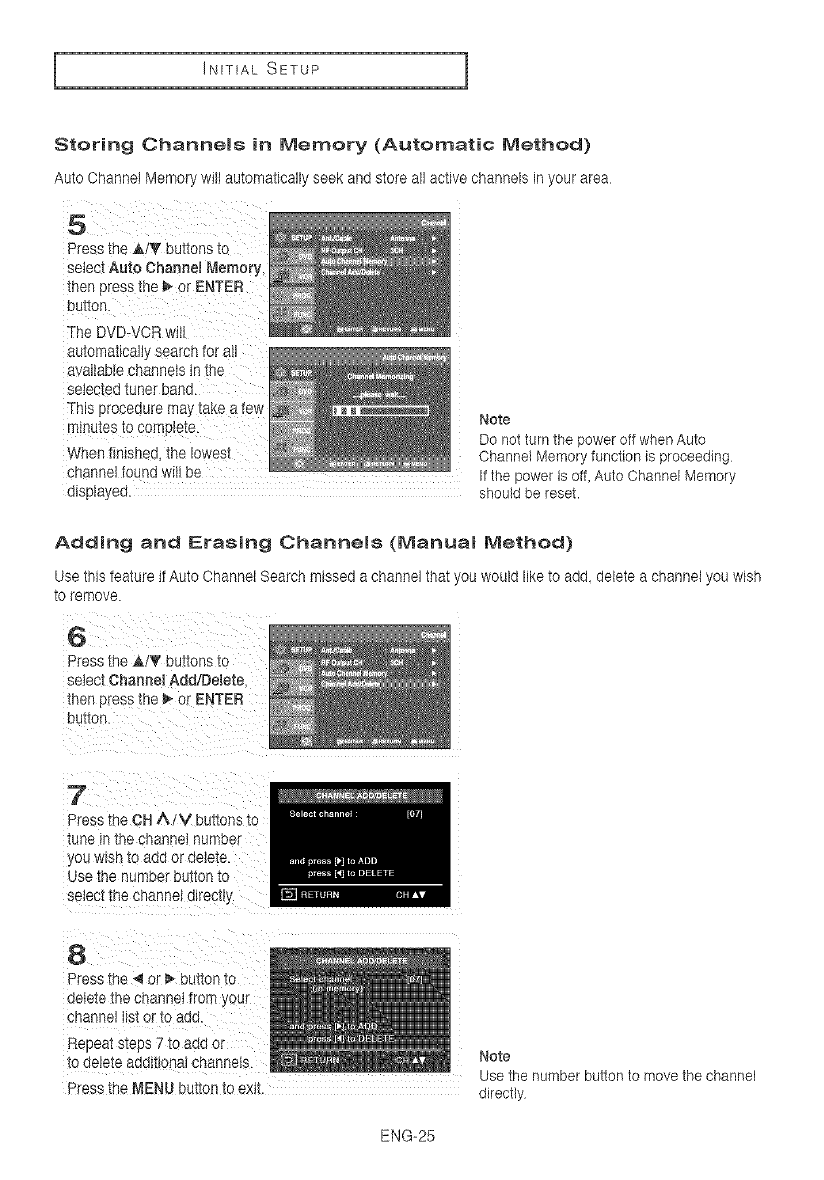
Storing Channels in Memory (Automatic Method)
AutoChannelMemorywillautomaticallyseekandstoreall activechannelsin yourarea
Press the _./_' buttons to
select Auto Channel Memory,
then press the _. or ENTER
The DVD-VOR wit[
automatically search for all
available channels in the
selected tuner band.
This procedure may take a few
minutes tOcomp!ete.
When finished, the lowest
channel t If the power is off, Auto Channel Memory
displayed, should be reset.
Note
Do notturn the power off when Auto
Channel Memory function is proceeding
Adding and Erasing Channels (Manual Method)
Use this feature if Auto Channel Search missed a channel that, ou would like to add. delete a channel you wish
[o _ernove
6
Press the ,_,/_' bL][ons to
select Channel Add/Delete
inert p_ess the _ or ENTER
Dunce.
7
Press theOH A/V buttons to
tune in thoo,,channel number
,ou wine to add or delete.
Jse thenumberBUttOntO
select tee ceannel directly.
8
Press the ,_ or _* but[on "[o
de_etethe channel from your
2cannel tlstor to add.
Repeat steps 7 to aae or
to delete additional channem.
Press the MENU button to exit
Note
Use the number button to move the channel
directly
ENG-25
I INITIAL SETUP 1
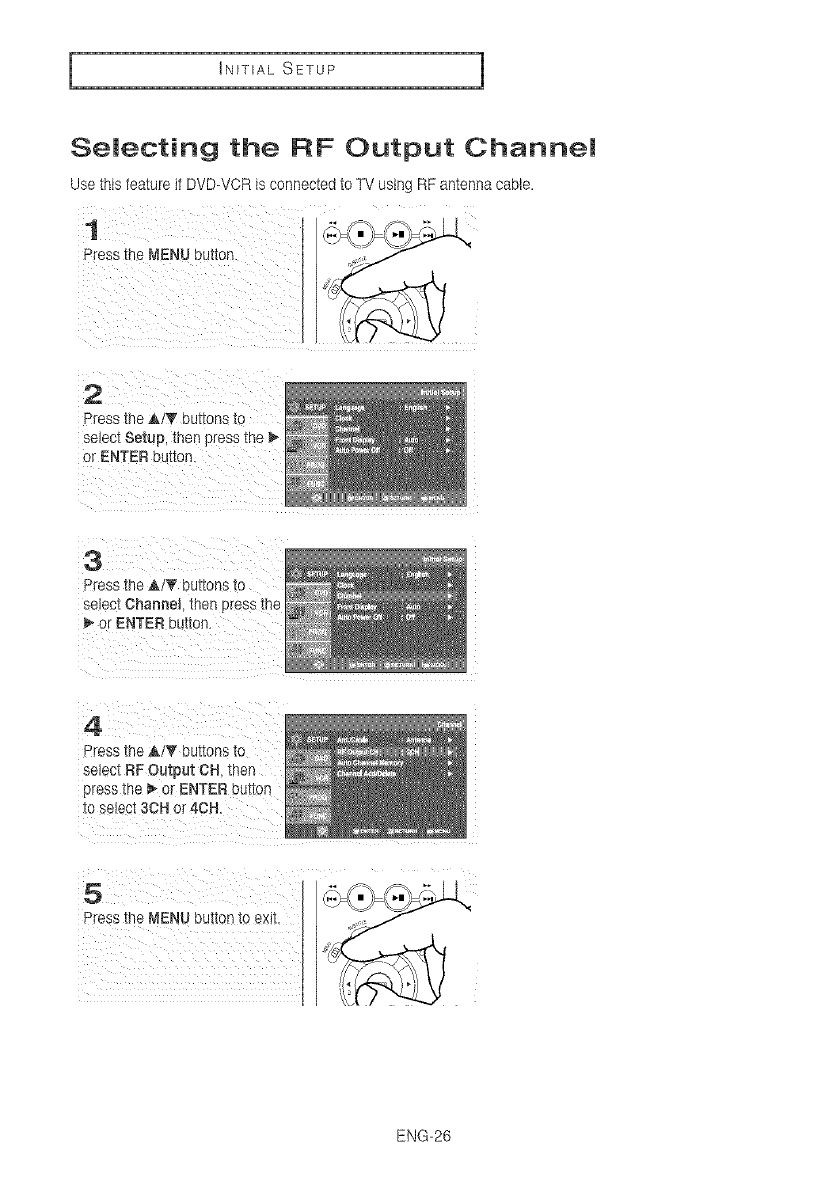
Selecting the RF Output Channel
Use this teature if DVD-VCR is connected toTV using RF antenna cable.
1
Press the MENU bu'cton.
2
Press the ilT buttons Io
select Setup, then press the _-
or ENTER but[on.
3
Press the AiT buttons 1o
se ect Channel _nenpress me
or ENTER DU_[On.
4
Press the ,&!_f buttons to
select RF Output ON. then
press the _ or ENTER button
io selec_3CR or 4OH.
5
Press the MENU _unon to exit:
ENG-26

INITIAL SETUP
Selecting the Front Panel Display
You can set the Front Panel Display to be bright all the time, dim all the time, or to automatically dim during
power off.
1
Pr¢ss me MENU button.
2
Dress the AIT buttons _o
select Setup, men press me
or ENTER button.
3
Press the i!T buttons _o
seie ;t Front Display, then
press the _ or ENTER L JI_on
to select Auto, Bright or D_m.
4
Press me MENU button to exl[
,, Auto: Front Panel Display will dim automatically
during power off
,, Bright: Front Panel Display will be bright all the time
,, Dim: Front Panel Display will be dim all the time.
ENG-27
I INITIAL SETUP 1
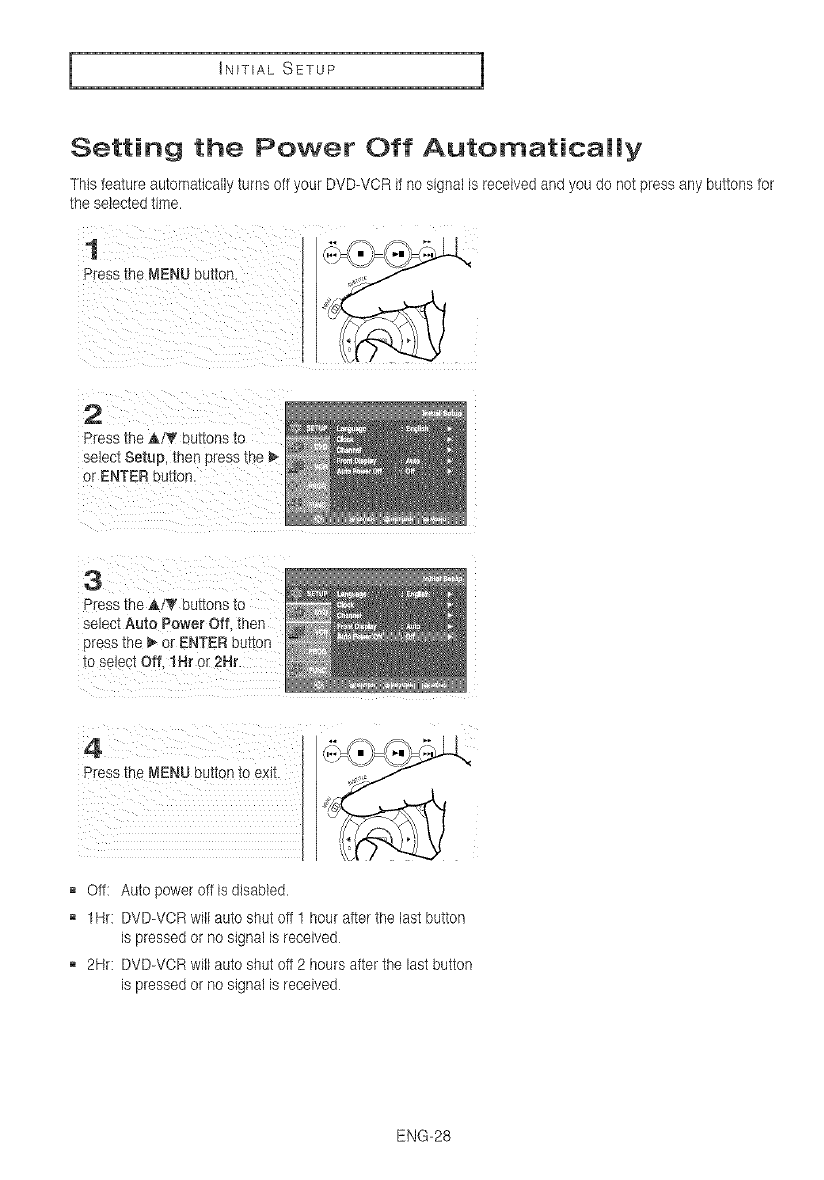
Setting the Power Off Automatically
This feature automatically turns off your DVD-VOR if no signal is received and you do not press any buttons for
the selected time.
1
Press the MENU button.
2
nress the A/V b Jttons to
select Setup, then press the
or ENTER eutton.
3
Press the Ai_ buttons to
select Auto Power Off 1net
ress _ne_ or ENTER button
to select Off. 1Hr or 2Hr.
4
Press _ne MENU button to exit.
,, Off: Auto power off is disabled.
,, 1Hr: DVD-VOR will auto shut off 1 hour after the last button
is pressed or no signal is received
,, 2Hr: DVD-VOR will auto shut oft 2 hours after the last button
is pressed or no signal is received
ENG-28
DVD OPERATIONS
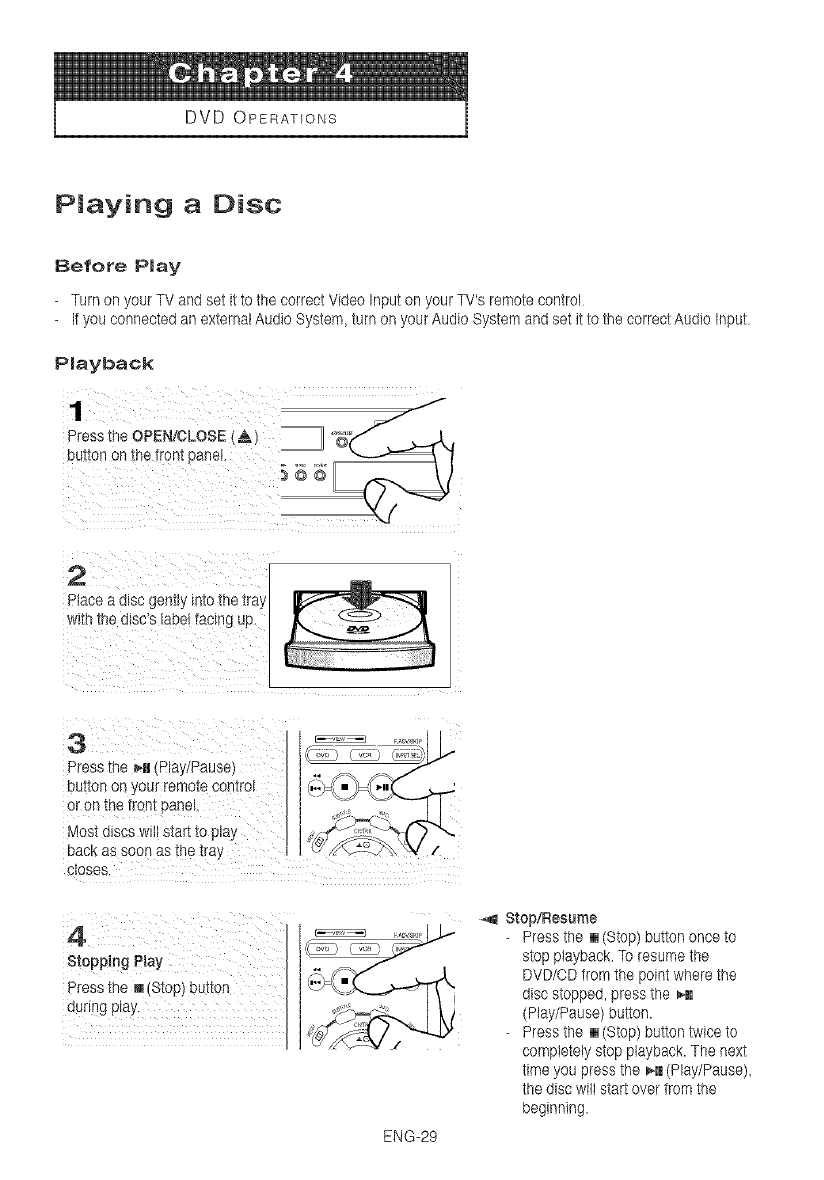
Playing a Disc
Before Play
-Turn on your TV and set it to the correct Video Input on your TV's remote control
-If you connected an external Audio System, turn on your Audio System and set it to the correct Audio Input
Playback
Press the OPEN/CLOSE & _ '_
bUI'_onon the fronI panel
2
Place a disc gen_lyInIo [Retra_
w_ 1hed_SC'Slabel tac_ngup
3
Press tee Hi (Play!Pause)
bUr_Onor jour remo_econtrol
or on Ine Tron_eanel.
'vlost discs w_listart to p_ay
PaCKas soon as lee Ira
closes.
Stopping Play
Press the M Stop_eu_on _
aurlng play ___, .....
ENG-29
.._ Stop/Resume
- Press the [] (Stop) button once to
stop playback To resume the
DVD/OD from the point where the
disc stopped, press the _.||
(Play/Pause) button.
-Press the [] (Stop) button twice to
completely stop playback The next
time you press the _H (Play/Pause),
the disc will start over from the
beginning.
DVD OPERATIONS 1
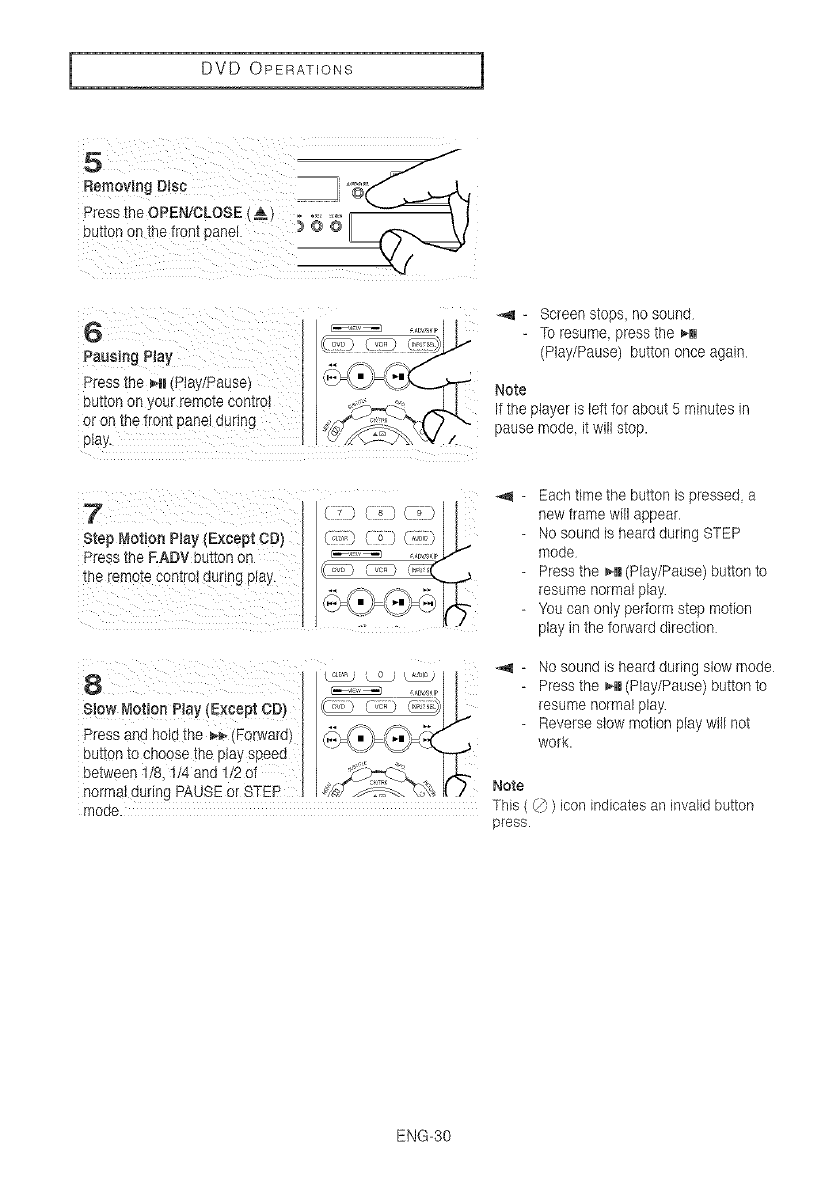
5 -J
Removing Disc _, "__
Press the OPEN/CLOSE _: _,.[ -- \ {A) ..........
Du_on o 1the front cane
6
Pausing Play
Press the _l Ptay/Pause)
DU[IOn On jour remo[e con[rot
o_ on the front panel during
p_a}
- Screen stops, no sound
- Toresume pressthe Hi
(Play/Pause) button once again
Note
If the player is left for about 5 minutes in
pause mode it will stop.
7
Step _lotion Ptay (Except CD)
Pre__the F.ADV button on
the remote control during play.
Each time the button is pressed a
new frame will appear.
No sound is heard during STEP
mode
Press the _H (Play/Pause) button to
resume normal play
You can only pertorm step motion
play in the forward direction
8
Slow _,_otion Play (Except CD)
Press and hole me _- Forward}
button to ChOOSeme play speea
between 1/8 1/4 and !/2 at
-._ - No sound is heard during slow mode
........ - Press the _H (Play/Pause) button to
_ _,:._ _.:_" resume normal play
Reverse stow motion play will not
_¢"s_F'_:F7 wor_.
norma, aur,ng PAUSE or STEP "S_'(S_'_< Note
moae. This ((_)) icon indicates an invalid button
press.
ENG-30
DVD OPERATIONS
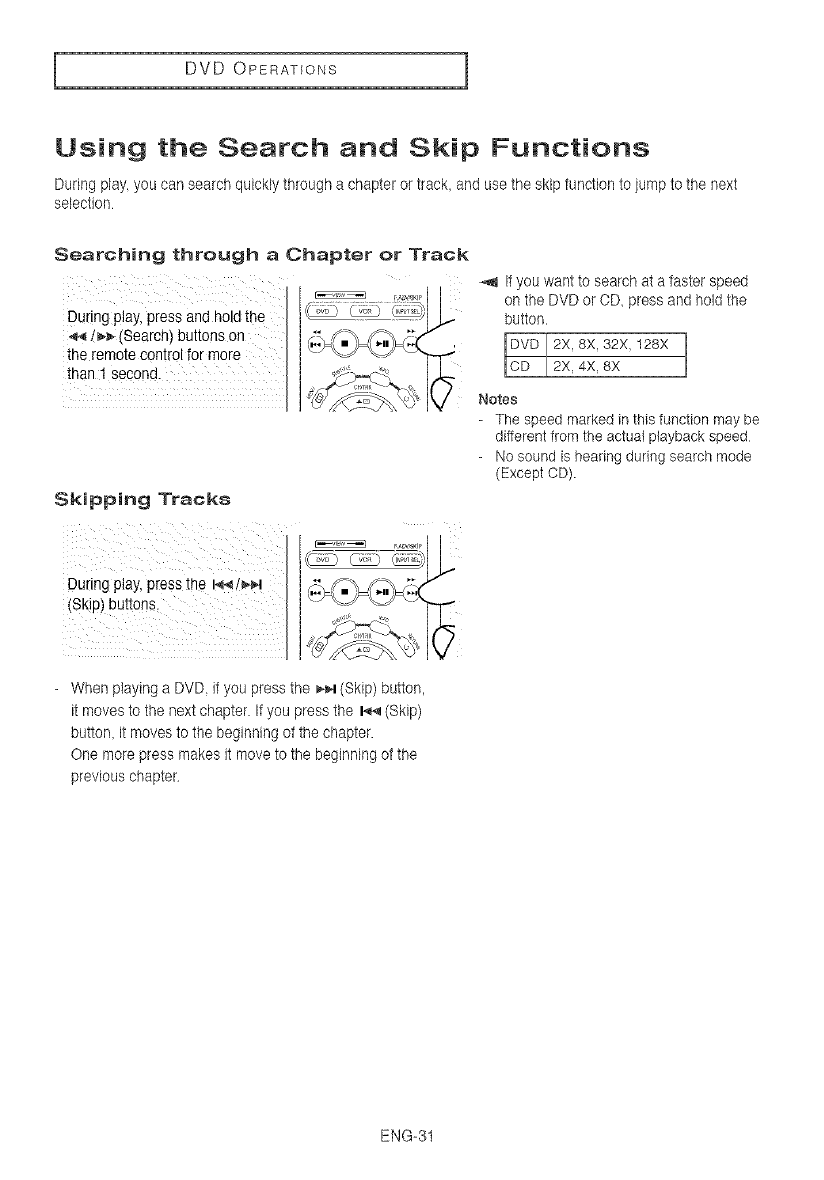
Using the Search and Skip Functions
During play you can search quickly through a chapter or track, and use the skip function to jump to the next
selection
Searching through a Chapter or Track
During;_aylpressandh0_dth_ _'_ _'_i_
-_/_,_(Search) buttonson I r,::_J'_-F,_;_[( f .
the remote contro ! t0r more I
Skipping Tracks
-When playing a DVD if you press the _,_ (Skip) button,
it moves to the next chapter. If you press the _ (Skip)
button, it moves to the beginning of the chapter.
One more press makes it move to the beginning of the
previous chapter
-,_ It you want to search at a faster speed
on the DVD or OD, press and hold the
button.
IDVDI2x8x32x128X12x4X 8X
Notes
- The speed marked in this function may be
different from the actual playback speed
- No sound is hearing during search mode
(Except CD).
ENG-3t
I DVD OPERATIONS 1
Using the Display Function
When Playing a OVD/CD
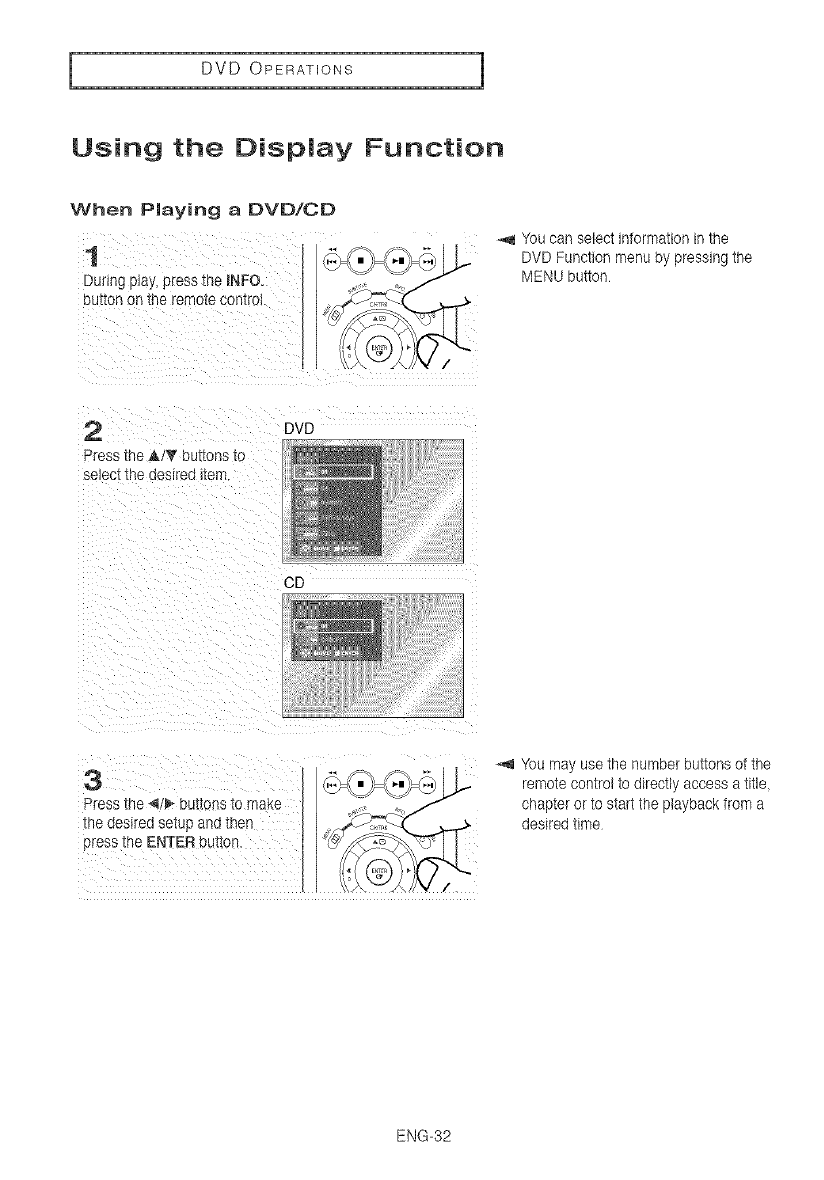
1
During play, press _ne mNFO.
eut_0n on _ee rem0ie c0n[roL
"Youcan select information in the
DVD Function menu by pressing the
MENU button
2
Press the ,al_' buttons TO
elect the desired item.
DVD
CD
3
Press the _, _ bu[tons to make
tee aesirea se_uaand teen
e_ess ErieENTER button.
You may use the number buttons of the
remote control to directly access a title
chapter or to start the playback from a
desired time
ENG-32
DVD OPERATIONS
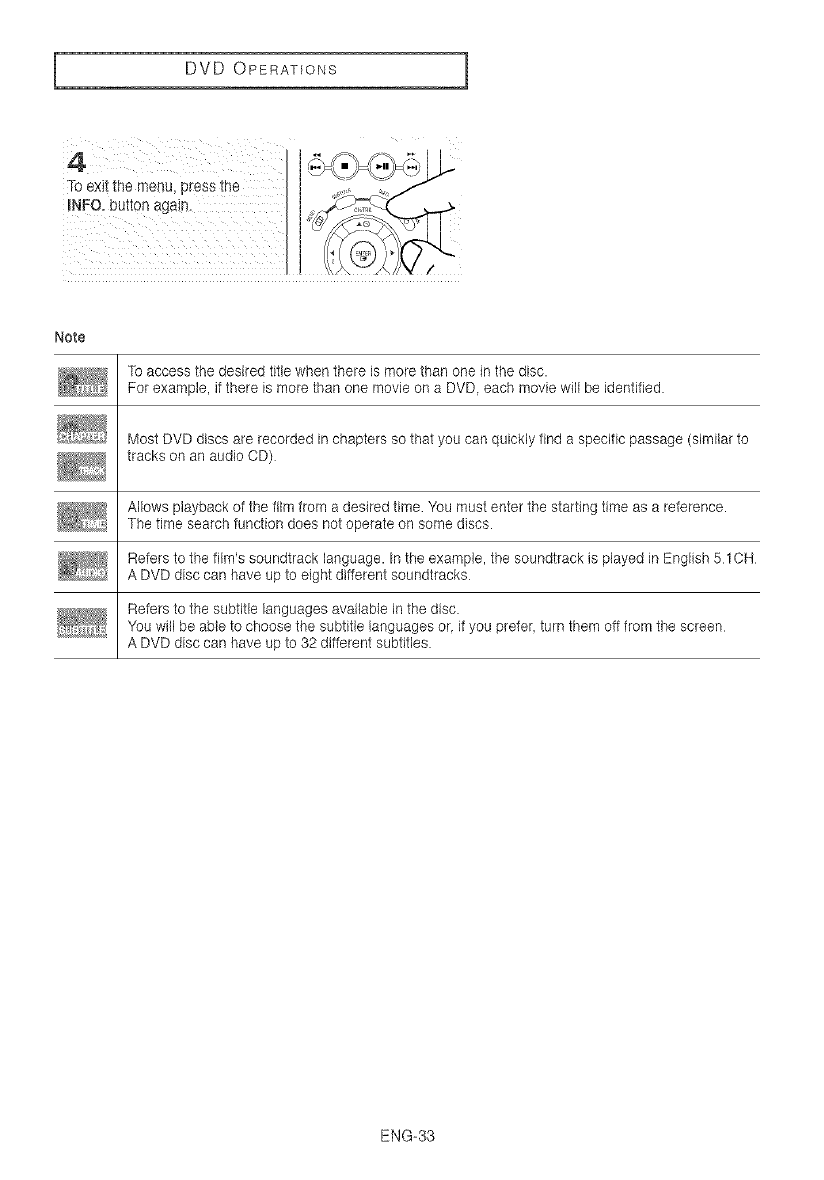
Note
To access the desired title when there is more than one in the disc.
For example, if there is more than one movie on a DVD each movie will be identified.
Most DVD discs are recorded in chapters so that you can quickly find a specific passage (similar to
tracks on an audio CD)
Allows playback of the film from a desired time You must enter the starting time as a reference.
The time search function does not operate on some discs.
Refers to the film's soundtrack language. In the example, the soundtrack is played in English 51CH
A DVD disc can have up to eight different soundtracks
Refers to the subtitle {anguages available in the disc.
You will be able to choose the subtitle languages or if you prefer turn them off from the screen
A DVD disc can have up to 32 different subtitles
ENG-33
I DVD OPERATIONS 1
Using the Disc and Title Menu (DVD)
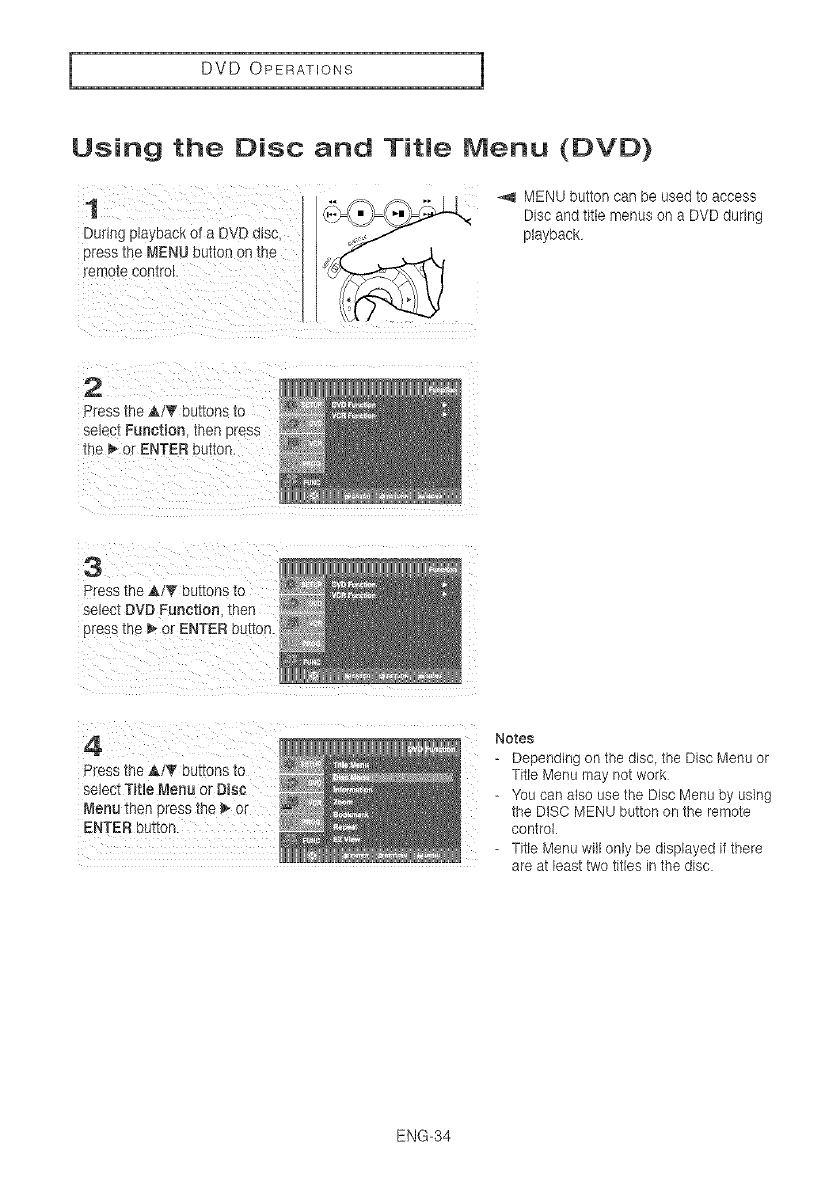
1
Dur ng playback of a DVD disc,
Eress the MENU button on the
remo_econtrol
-,_ MENU button can be used to access
Disc and title menus on a DVD during
playback
2
Press the AtT buttons _o
se_ec_Function _nens_ess
the _ or ENTER button.
Press the _/tr buttons to
select DVD Function, then
press the _ or ENTER bu!ton.
Press the &!T buttons to
select Title [_lenuor Disc
Menu then press the _ or
ENTER button.
Notes
- Depending on the disc, the Disc Menu or
Title Menu may not work
- You can also use the Disc Menu by using
the DISC MENU button on the remote
control
-Title Menu will only be displayed if there
are at least two titles in the disc.
ENG-34
DVD OPERATIONS
Using the Function Menu (DVD)
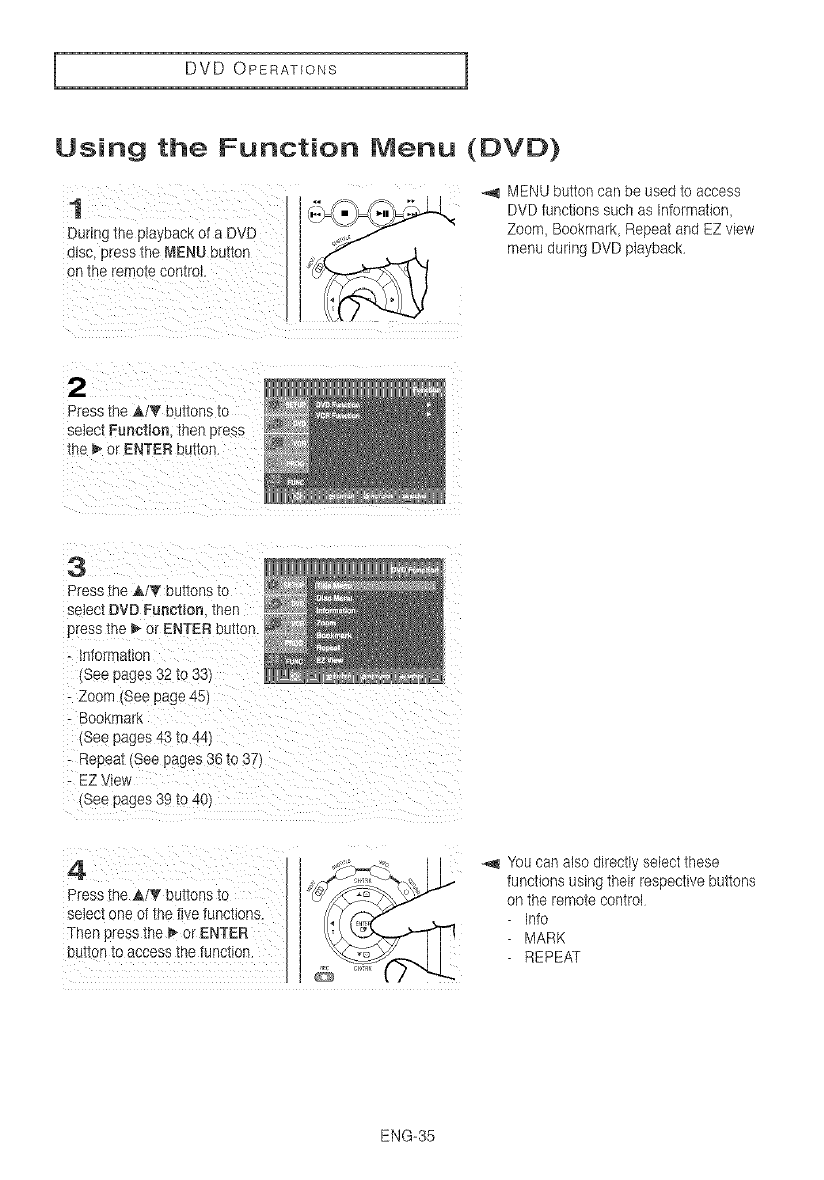
1
Dunng me playback of a DVD
alsc press the MENU buc_on
on me remo_e comroL
_,q MENU button can be used to access
DVD functions such as Information,
Zoom, Bookmark Repeat and EZ view
menu during DVD playback
2
Press the A/_" buttons _o
select Function. then press
me _ or ENTER button.
3
Pres_ the _iT buttons to
select DVD Function men
press the _- or ENTER uunon.
- Informat_or
(See pages 32 to 33
- Zoom _Seepage 45)
- Bookmant
See pages 43 to 44
- Repeat (See pages 36 to 37,
- EZ vie Iv
See pages 39 to 40
4
Pres_ me A!T' buttons to
select J_e of the fwe _unction_
Then p_essthe _, or ENTER
button to access the function.
_,_ You can also directly select these
functions using their respective buttons
on the remote control
into
MARK
REPEAT
ENG-35
I DVD OPERATIONS 1
Repeat Play
Repeat the current track chapter title, a chosen section (A-B), or all of the disc.
When playing & DVD!CD
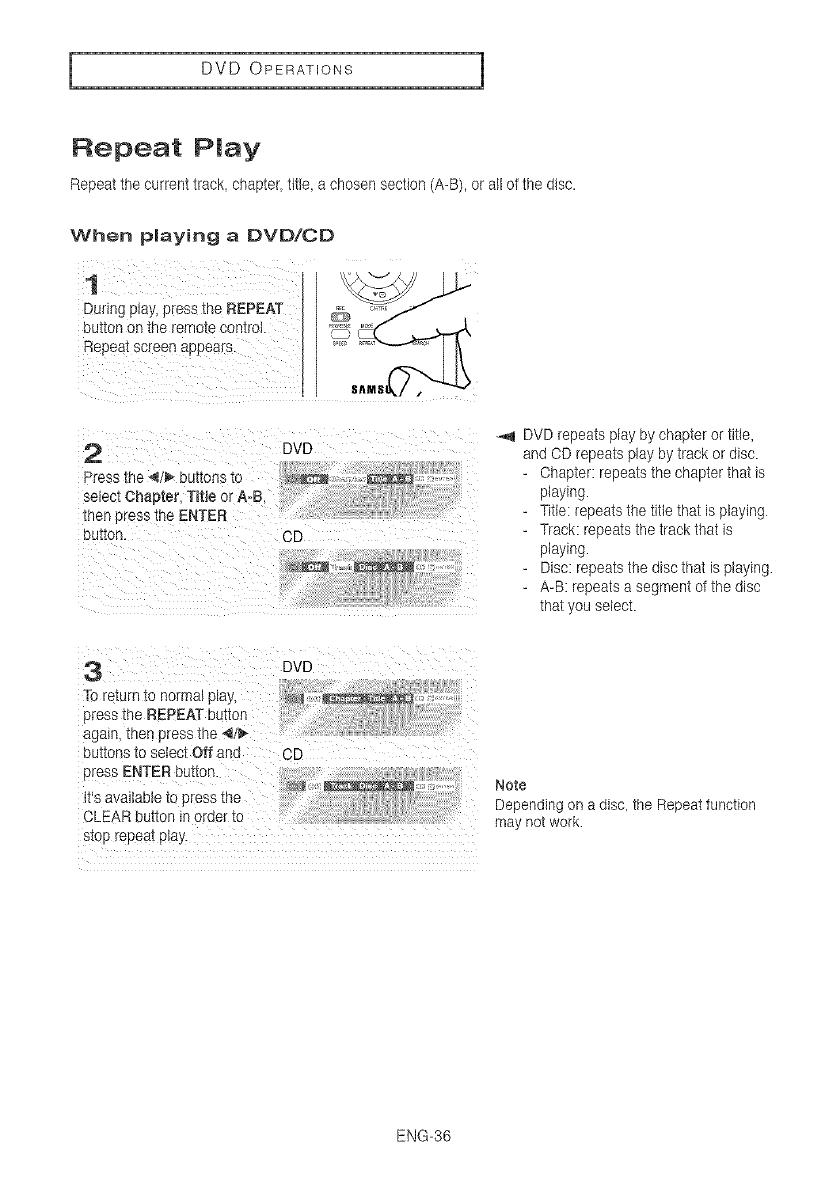
1
During play, press the REPEAT
uui_onon _neremo[e coneoL
ReeeaTscreen appea_s
2 DVD
Press the _/_ buttons to _ .........
select Chapter. Title or A-B
men press the ENTER
eu(_on OD
_,q DVD repeats play by chapter or title,
and CD repeats play by track or disc.
-Ohapter: repeats the chapter that is
playing.
-Title: repeats the title that is playing
-Track: repeats the track that is
playing.
-Disc: repeats the disc that is playing
-A-B: repeats a segment of the disc
that you select.
press ENTER button.
tt's available
OLEAR button
Note
Depending on a disc, the Repeat tunction
may not work
ENG-36
DVD OPERATIONS
Using the AoB Repeat function
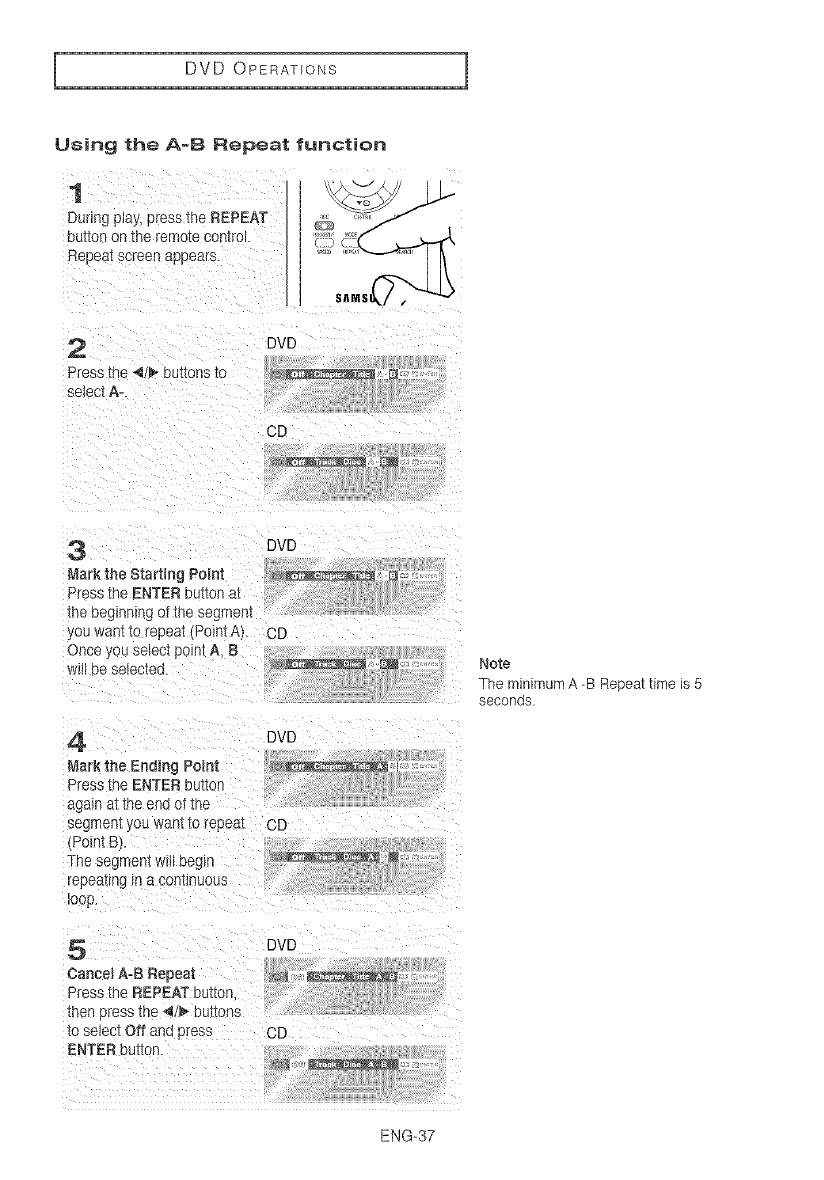
1 j
During ptay,Dress [he REPEAT /"
uu_tol on me remote centre _-_(_ , _,_._,
Repeat screen appears.
SA
2 DVD
Press the ,_/_ Dut[ons to
seaectA-.
CD
3 DVD
Mark the Starting Point , _
Press the ENTER Dut_ona_
me eeglnnlng of the segmen[
,ou want to repeat (Point A). CD
Once you se_ec[pom[ A. 8
w_l Dese_ec[ea. _ _
4 DVD
Mark the Ending Point
Dress the ENTER putter
again a__neend of the
segmemyou wamlo repeal CD
/Point Bt
The segmem wm eeg_n
repeating in a con[tnuous
_oop.
5 DVD
Cancel A-B Repeat
Press the REPEAT butter
teen ]_ess the ,q/_ buttons
to select Off and press CD
ENTER bu_on
Note
The minimum A -B Repeat time is 5
seconds.
ENG-37
I DVD OPERATIONS 1
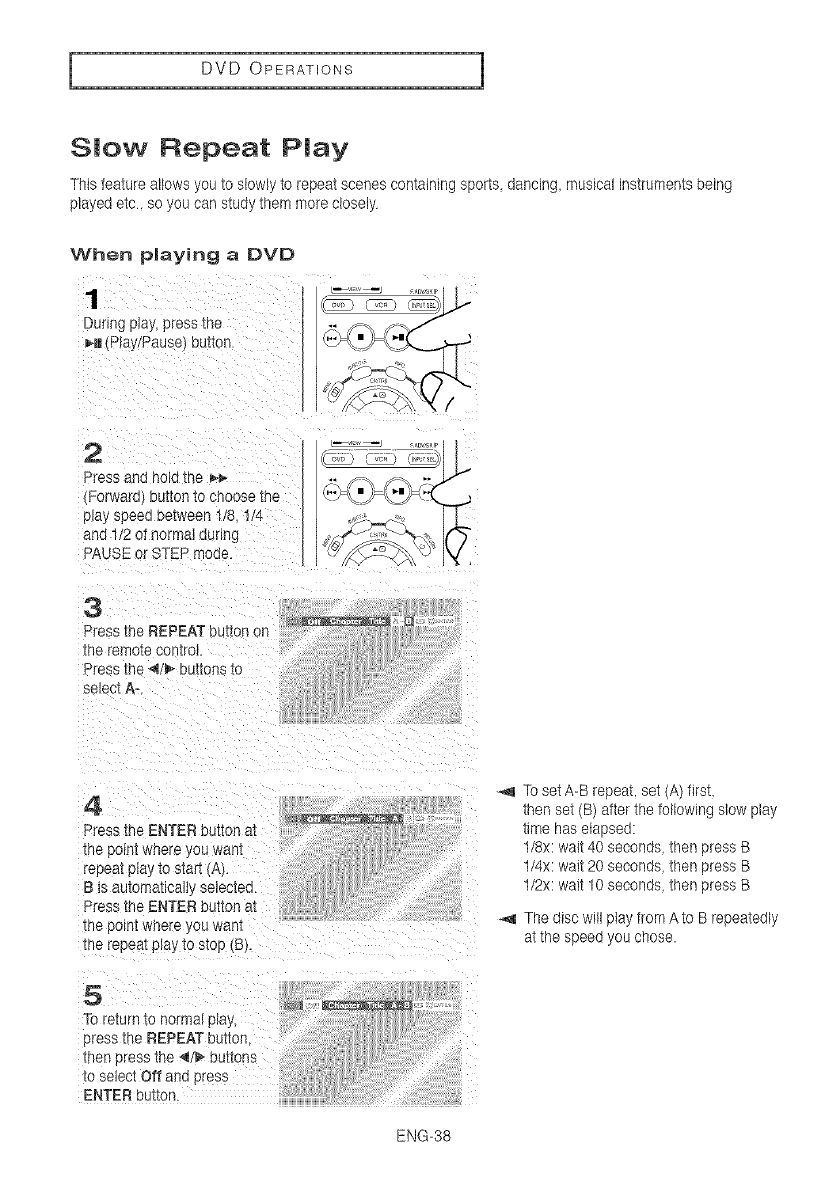
Slow Repeat Play
This feature allows you to slowly to repeat scenes containing sports dancing, musical instruments being
played etc. so you can study them more closely
When playing aDVD
I
During pJay,press me
_H Play/Pause_nutton
2
Press and no_otne
{Forward) nut[on to choose me
play speed between 1/8 !/4
and 1/2 of normaI during
PAUSE or STEP moae
/
3
Press the REPEAT uu_tonon
me remote conlroL
°ross trle 4/_ bu_ons to
select A-.
,Q
4
Press the ENTER button at
me petal wnere you want
repeat pIayto start (A).
B is automatically se_ecleo.
Press the ENTER button at
me point wnere _ou warn
me repeat play to stop (S).
To return _o norma_p_ay
press me REPEAT buttor
me_ [ tess the <l/_ buttons
lo se_ec_Off and Dress
ENTER button.
_.q To set A-B repeat, set (A) first,
then set (B) after the following stow play
time has elapsed:
1/8x: wait 40 seconds then press B
1/4x: wait 20 seconds then press B
1/2x: wait 10 seconds then press B
_,q The disc will ptay from Ato B repeatedly
at the speed you chose.
ENG-38
DVD OPERATIONS
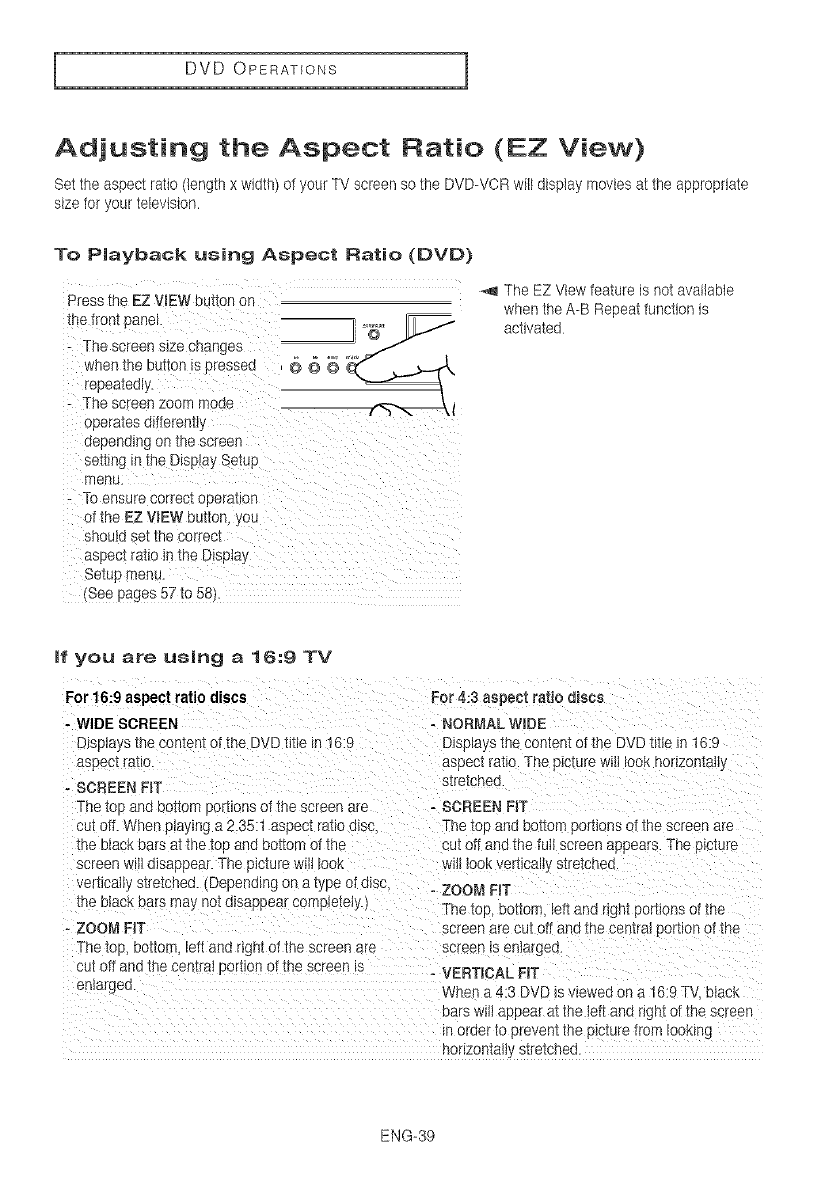
Adjusting the Aspect Ratio (EZ View)
Set the aspect ratio (length x width) of your TV screen so the DVD-VCR will display movies at the appropriate
size for your television.
To Playback using Aspect Ratio (DVO)
Pressthe EZViEWbuttonon -_! The EZ View feature is not available
when the A-B Repeat function is
activated
repeatedly.
- The screenzoom mode /'%"_ _,,I
_ To ensure correct operation
aspec! ratio inthe D!sPiay
Setup menu.
(See pages 57 to 58).
if you are using a 16:9 TV
For 16:9 aspect ratio discs
- WIDE SCREEN
Displays the content ofthe DVD title in !6:9
aspect ratio.
- SCREEN FIT
The too and cottom oonlons of the screen are
cut off. Whet playing a 2.35:1 asoect rauo a_sc.
me Black Bars at tne too aria bottom of the
screen w disappear. The picture Will LOOK
vertically stretched. (Denendmg on a type of disc
the black Bars may net disappear completely.
- ZOOM FIT
For 4:3 aspect ratio discs
o NORMAL WIDE
Displays the content of the DVD tltle m 16:9
asoect ratio. The o_cturewill _OOKnonzontaHy
stretched.
- SCREEN F_T
The t% ane eottom Be[tlens of me screen are
cu_oft and the full screen appears. The Blcture
w_lltook vert_ca_blst e[cneo
- ZOOM FIT
The to[ bottom, left and n Jnt portions of the
screen are cut oft aria me centraJ portion of the
Thetoo uottom, eft and right of the screen are screen is enlargea.
cut off and me central portion of the screen _s - VERTICAL FIT
en_a_gea. When a 4:3 DVB _swewed on a 16:9 T_, black
Bars will appear at the teft and right of the screen
In oreer to prevent me picture from looking
norlzontall_ stretcnea.
ENG-39
I DVD OPERATIONS 1
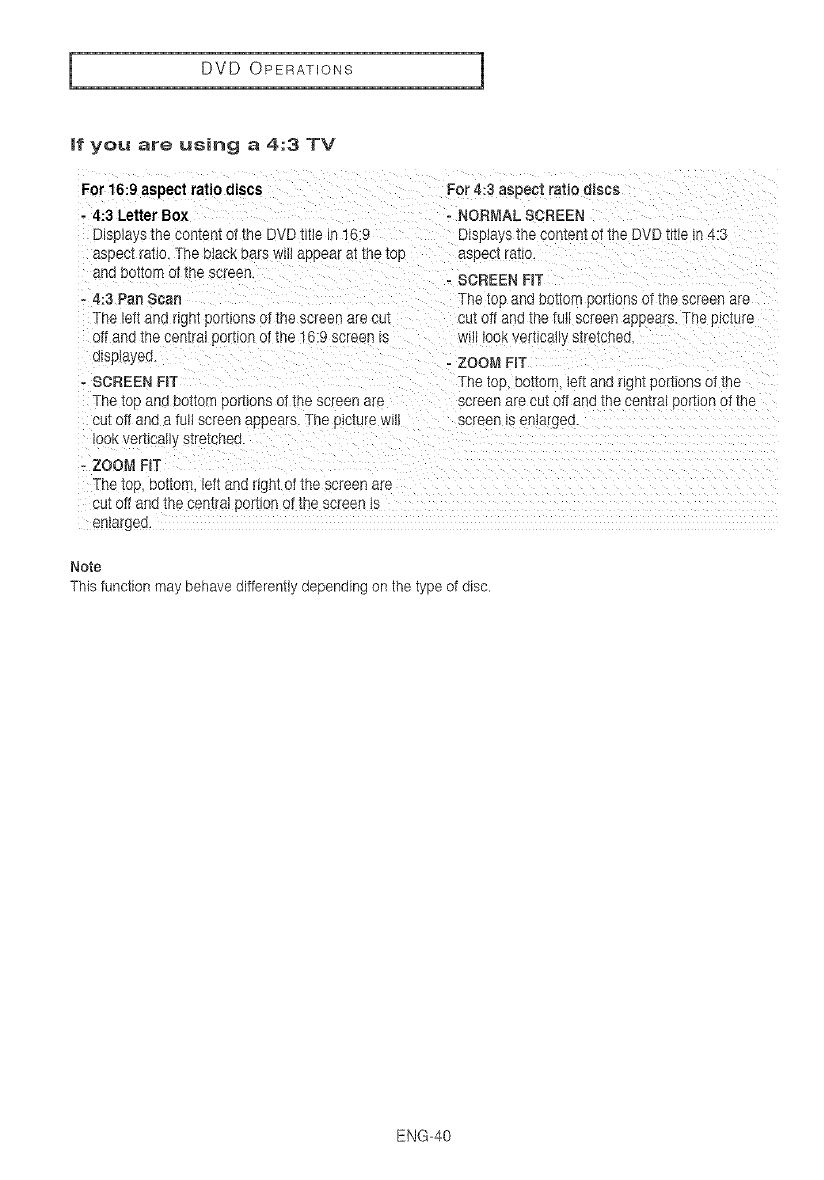
if you are using a 4:3 TV
For 16:9 aspect ratio discs For 4:3 aspect ratio discs
- 4:3 Letter Box -NORMAL SCREEN
DIsp_aysthe content ot the DVD title In 1(-:9 D_spIaystne content of the DVDtitle _n4:3
aspect ratio. The black bass w_l appear a_me top aspec_radio
and bottom of the sc_eer
-4:3 Pan Scan
The eft and r_gnlportions of [ne screen are cu_
df and the cen_ra portion of the 16:9 screen _s
a_splayed.
-SCREEN FiT
-SCREEN FiT
The top and rJonorr _ort_onsof the screen are
cut oft and the futl screen appears. The picture
will took vertically soetcbed
- ZOO_,_FiT
The toe. bottom left and r gn_portions of the
The top and eottom eort_onsof the screen a_e screen are cu_off and _necen_ra _or_on of the
cut oft ano a tuit screen appears. The picture wH screen is enlarged.
_OOKveriical s[re_cnee.
-ZOOM RT
The top, bottom, left and right of the screen ape
( Jt off and the central portion of the screen _s
enlargea.
Note
This function may behave differently depending on the type of disc.
ENG-40
DVD OPERATIONS
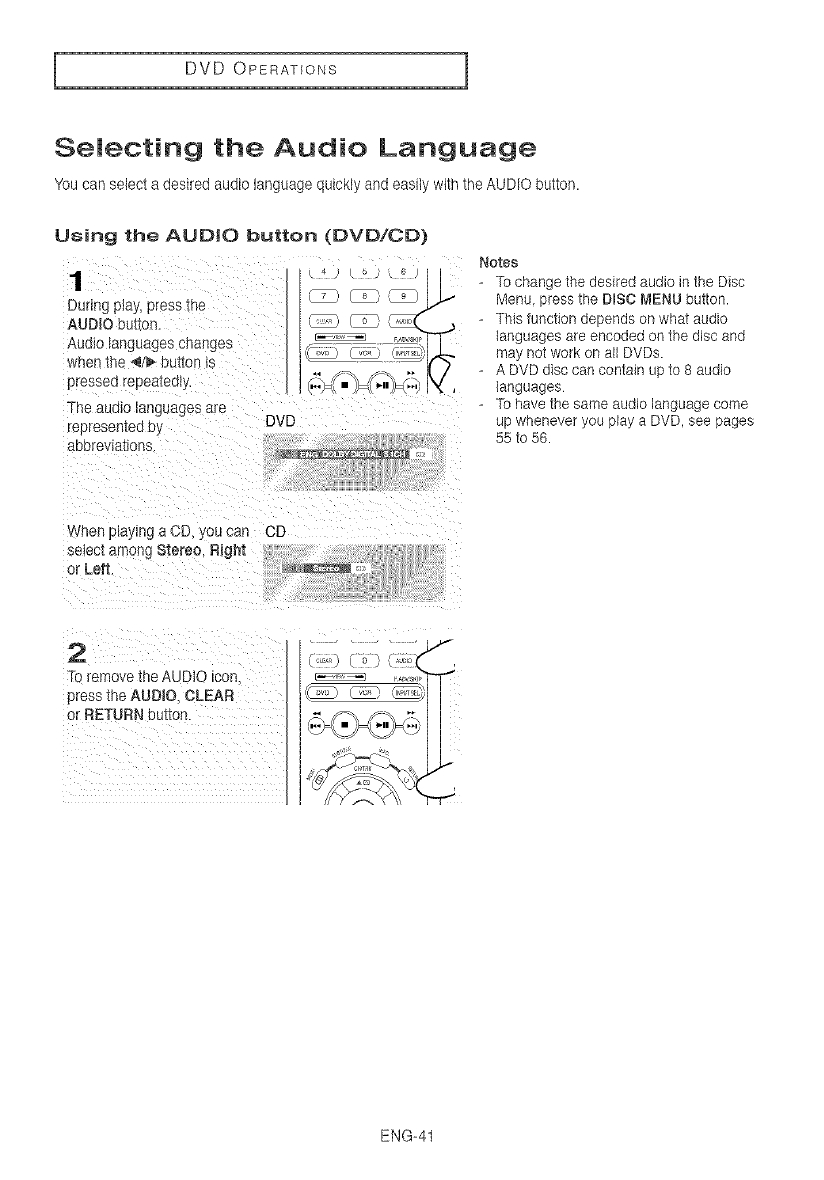
Selecting the Audio Language
You can select a desired audio language quickly and easily with the AUDIO button.
Using the AUDIO button (DVD/CD)
k _ • 6
(7 _
During play, press the
AUDIO buhc 3.
Audio languages cnanges
wnen tne ,_/1_button _s
pressed repeatedly
The auolo _anguagesare
"epresen[ea Dy DVD
aDorevlatlons
f
J
Notes
- To change the desired audio in the Disc
Menu press the DISC MENU button.
- This function depends on what audio
languages are encoded on the disc and
may not work on all DVDs.
- A DVD disc can contain up to 8 audio
languages
- To have the same audio language come
up whenever you play a DVD, see pages
55 to 56.
_/nen playing a CD, } ou can CD
seIec[ amenj Stereo, Right
or Left
To remove the AUDIO son _ ,_,_.o
_t"**T-
press the AUDIO CLEAR _ _ _II
ENG-41
I DVD OPERATIONS 1
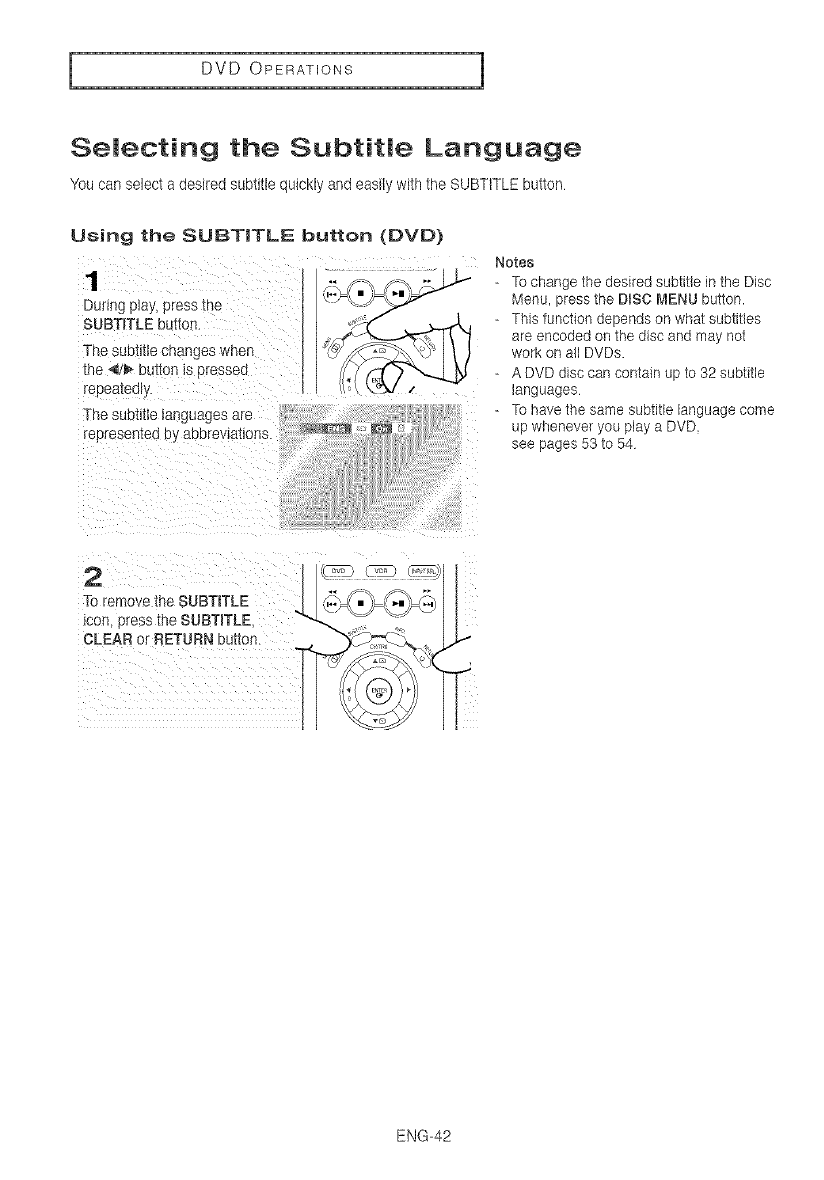
Selecting the Subtitle Language
You can select a desired subtitte quickly and easily with the SUBTITLE button
Using the SUBTITLE button (DVD)
1
During p_ay,press tne
SUBTITLE button.
-he SUDtmechanges when
_ne _/_. button _slsressea
repeatealy.
The sub_e languages are
represented Dy aeorevlatlons.
Notes
- Tochange the desired subtitle in the Disc
Menu, press the DiSC MENU button.
- This function depends on what subtitles
are encoded on the disc and may not
work on all DVDs.
- A DVD disc can contain up to 32 subtitle
languages
- Tohave the same subtitle language come
up whenever you play a DVD,
see pages 53 to 54
2
ENG-42
DVD OPERATIONS
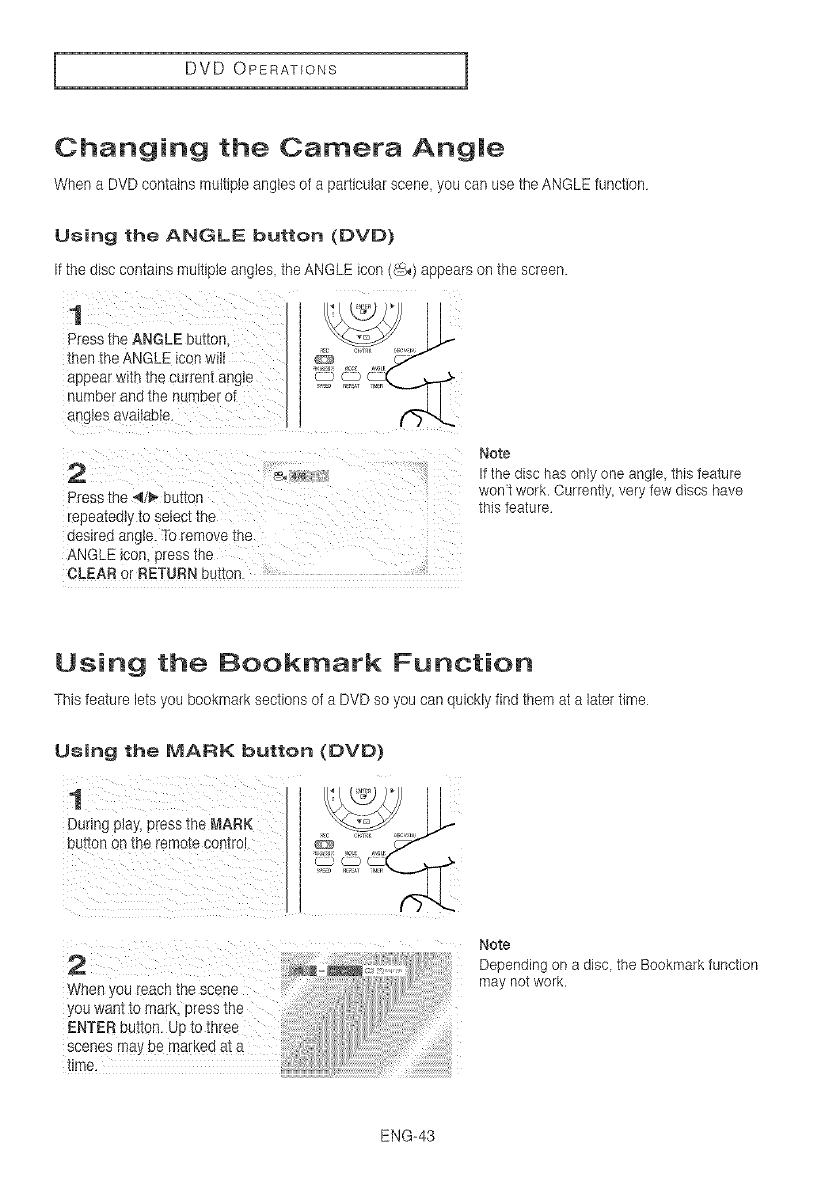
Changing the Camera Angle
When a DVD contains multiple angles of a particular scene you can use the ANGLE function
Using the ANGLE button (DVD)
Ifthedisccontainsmultipleangles theANGLEicon (_) appearson thescreen.
1
Pres.< the ANGLE button /--
men the ANGLE icon wilt _ j/
aDoearwith the curren_angJe _ _ "_'_'L_(...__..._.r_r>
- Jmeer ane tne number ol
angIes avaliabIe.
2 _ 4_
Press the _/_ DUIIOn
repea_eo_yto seiec-(ine
aes_redangIe. To remove the
ANGLE _con 9ressme
CLEAR or RETURN button.
Note
If the disc has only one angle this feature
won't work. Currently, very few discs have
this feature
Using the Bookmark Function
This feature lets you bookmark sections of a DVD so you can quickly find them at a later time
Note
Depending on a disc the Bookmark function
When, may not work.
you want %omark, press the
ENTER button. Up to three
scenes m.aybe marked at a
time.
ENG-43
I DVD OPERATIONS 1
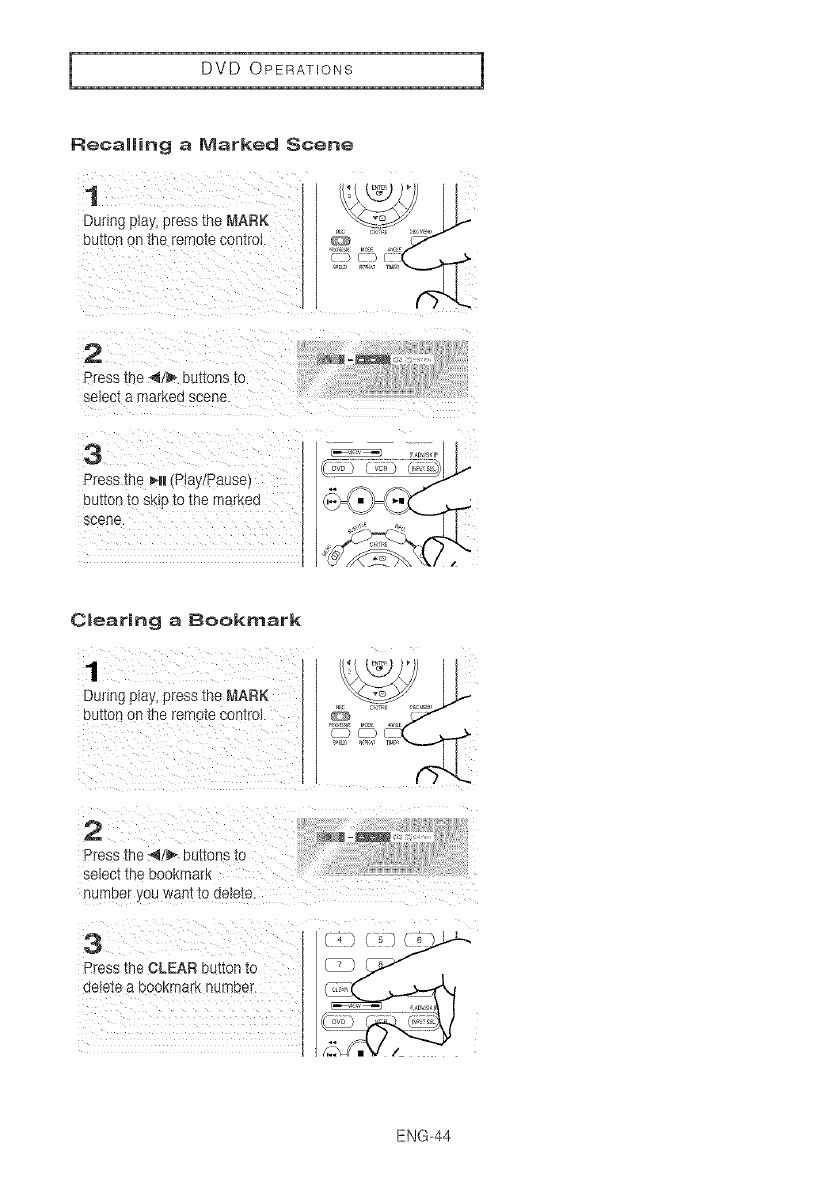
Recalling a Marked Scene
During Play, press the MARK
2
Press the _/_ buttons to
Cmearing a Bookmark
1
During play, press the MARK
Button on the remo_e con_o_.
2
Pres; the ,_1_ buttons to
select Ine becKman
number cOBwan[ to aele_e.
3
Press the CLEAR Du_on_o
oelete a BOOKmarKnurllDeL
ENG-44
DVD OPERATIONS
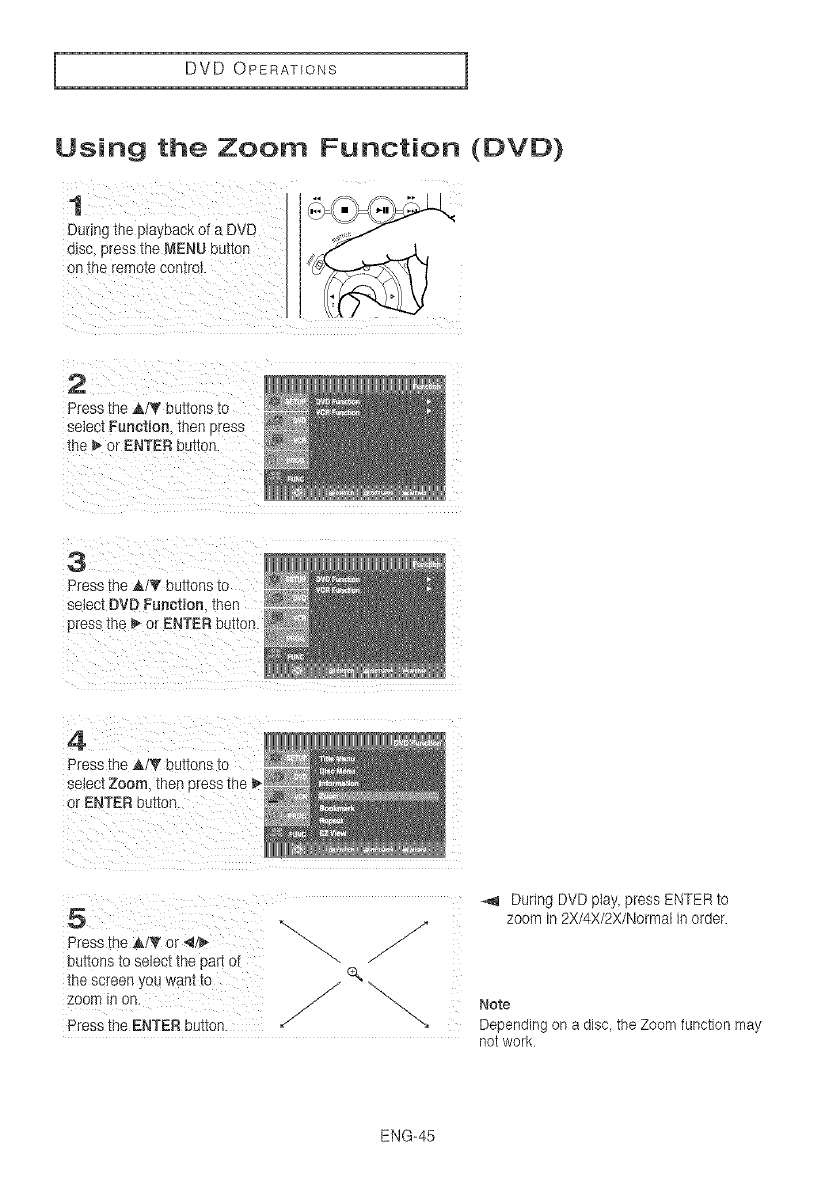
Using the Zoom Function
1
Dunng 1heplayoacK of a DV_
disc press the MENU bunch
on me remo_e comrol.
(DVD)
2
Press the _,/_ buttons co
select Functbn [hen press
the _, or ENTER button.
Z
3
Press the A!_f buttons to
se_ec_DVD Function men
press the _- or ENTER bunch
4
Press the A/T bJ[_ons_o
select Zoom. _nen D_essme
or ENTER burton.
5
Press the _klT or _/_
eunons _ose_ec_-mepan of
me screen you wan1_o
zoom n on.
-,_ During DVD play press ENTER to
zoom in 2X/4X/2X/Normal in order.
%
j Note
Press the ENTER button. / Depending on a disc, the Zoom function may
not work
ENG-45
I DVD OPERATIONS 1
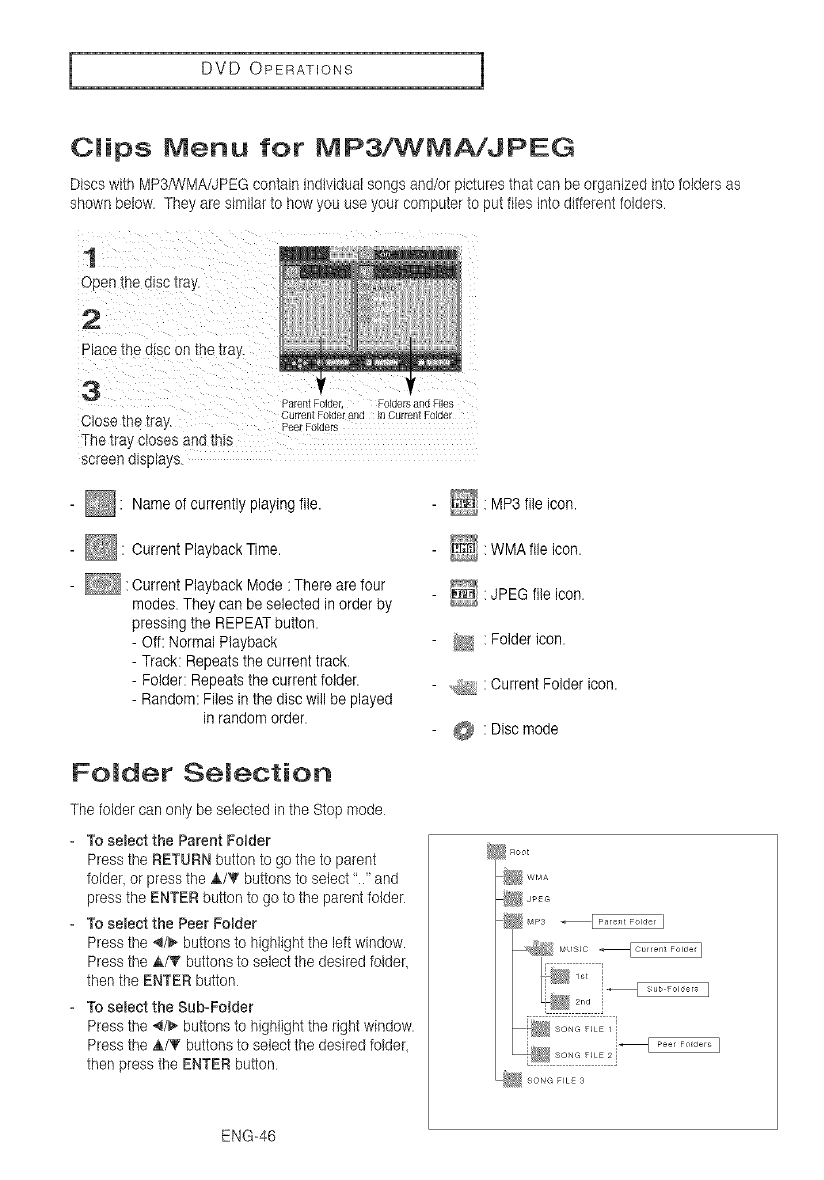
Clips Menu for MP3/WMNJPEG
Discs with MP3/WMA/JPEG contain individualsongs and/or pictures that can be organized into folders as
shown below. They are similar to how you use your computer to put files into different folders
1
Open me a_scIra!
2
Place tt e olsc on Theiraj.
3
Close the tra
The tra; closes aria this
f
ParentFoid_ , Foldersand Files
Current Folder and in CurrentFolder
Pee_Folders
screen alsplays.
- _ Name of currently playing file.
- _ : Ourrent Playback Time.
- : Current Playback Mode :There are four
modes. They can be selected in order by
pressing the REPEAT button.
- Off: Normal Playback
- Track: Repeats the current track.
- Folder: Repeats the current folder.
- Random: Files in the disc will be played
in random order.
Folder Selection
The folder can only be selected in the Stop mode
o To select the Parent Folder
Press the RETURN button to go the to parent
folder, or press the _/'_ buttons to select ' and
press the ENTER button to go to the parent folder
-To select the Peer Folder
Press the ,,_/l_buttons to highlight the left window.
Press the A/T buttons to select the desired folder,
then the ENTER button
- To select the Sub-Folder
Press the 4/_ buttons to highlight the right window.
Press the _/_f buttons to select the desired folder.
then press the ENTER button
_: MP3 file icon.
_: WMA file icon.
_: JPEG file icon.
_ :Folder icon.
..,_ : Current Folder icon.
@ : Disc mode
ENG-46
DVD OPERATIONS
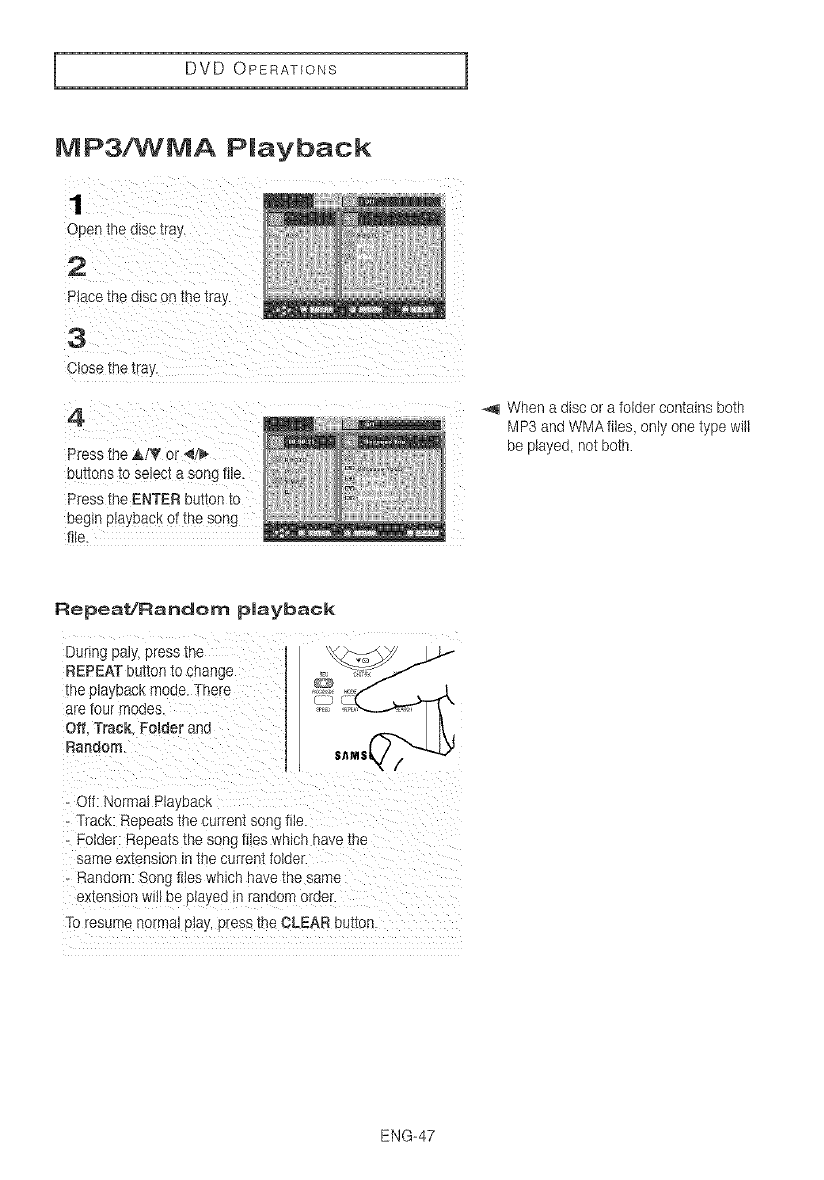
MP3/WMA Playback
1
Open the disc tra_
2
Place the disc on me 1ray.
3
Close me _ra!
4
Press the AI_ or _/_
ounons to se_ec_a song file
r:'ress the ENTER Du_on to
negtn p_aybackof the song
file.
When a disc or a folder contains beth
MP3 and WMA files, only one type will
be played, not both
Repeat/Random playback
During paly_press the II _',t.._-'_f _J_
REPEAT button to change ,,_, _w;_j .f
the playback mode. There [ I ,_ _,/ |
are!oarmodes II
offT_aokFolde_and Jl _ t\,
Random. II S_MS
-Off: Normal Playback
Track: Repeats the current song tile.
Folder: Repeats the song files which have the
Sameextension in the current folder.
Random: Song '_ileswhich have the same
extension will be played in random erda(.
To resume normal play press the CLEAR buttoh.
ENG-47
I DVD OPERATIONS 1
CD=R MP3!VVMA file
When you record MP3 or WMA files on CD-R.
please refer to the following.
- Your MP3 or WMA files should be ISO 9660 or
JOLIET format.
SO 9660 forma_ ant] Joliet MP3 or WMA files _e
compatible with Microsoft's DOS and Windows.
aria wt[h Apple's Mac. Th_sTorma__sme mos_
wl(]e_ JSea.
-When naming your NIP3or WMA files, do not
exceed 8 characters, and enter ".rap3..wma"
as the file extension.
General name format : Title.m _3. or Titte.wma.
- Use a decompression transfer rate of at least
64Kbps when recording WMA flies.
Sound qualr_ywith WMA files basically depenes
on the rate of compressien/aecompression you
ChOOSe.
Getting CD audio sound °eauires an
ant]_og/algl_a]sampling ra_e.that is con_erslon _o
WMA format of at least 64Kb_s ant] up to
192Kbps
Conversely, files wl[n decompression rates below
64KbrJsor over 192Kbps will not be pIayee
propen_
When composing your role _naKesure mat !ou -Do not try recording copyright protected MP3
use 8 cnaracl.ers or tess nave no seaces in me
name ant] avola the use of _peclt]l c(]arac[ers
rlclu(]lng. (.I ,\,=_ +
-Use adecompression transfer rate at at least
128 Kbps when recording MP3 files.
Sound quail1!!with MP3files oas]caHyt]epenas
on -merate of compresslon/t]ecompresston yo_
ChOOSe.Gettm9 CD audio sound requires an
analog/digital sampling ra_e.mt][ _sconversion _o
MP3 format of at least 128 Kbos aria up to 160
Kbos. However. choosing nigher rt]_es t_ke192
Kbos or more. only rarely g_re eerier sauna
quality. Con e_se_ytiles wire decomp_ess_or
files.
Certain "secured" files are encryptet] anu co(]e
projecter] _o prevem H_egalcopying These flies
are of the following _ypes:Windows MediaTM
treglstered trade mark of Microsoft tnc an(]
SDM_TM registered trade mark of The SDM
-oundt]t]om. Youcanno_copy sucn flies
- important:
The aoove recomment]a_ons canno_Detaken as
t] guarantee mar me DVD-VCR wll p_ayMP3
recoreings or as an sssursnce of sound quality.
YOUshoals nora n'_aIceRaln -lecnnoiog_esaria
methods for MP3 f_lerecoramg on CD-Rs
ra_esbelow 128 Kbc_will no_ne player] property, prevem optimal playback of these files on ,ou_
DVD- CR '.degrader]SOUndqua_l[ytin(] m some
case_ nab_lityof the ptayer to read the f_tes
This unit cai pla} a maximum of 3000 files and
300 folders per a_sc
ENG-48

DVD OPERATIONS
Program Play & Random Play
You can listen to songs randomly or in the desired sequence.
Up to 20 tracks can be programmed
This function is available only with Audio CDs.
Program Play
1
With the unit in stop mode,
press the REPEAT button.
- The play mode menu w_H
appear.
2
Press the 4 or _ buttons m
select PROGRAM. thor
dress the ENTER button.
The program play screen
wmappear
Note
Random Play
o With the unit in stop mode, press the
REPEAT button.
- The play mode menu will appear
o Press the ',_or _ buttons to select
Random, then press the ENTER button.
-The disc will be played in random order
3
Press the A T or 4/_,
buttons to semc[ me desired
tracK men press the ENTER
DUI[On.
- The semcted track wil De
aaaec to the Program order.
- _fyou aetete tne track
press the CLEAR but1m
Thetrack added tastwill be
deleted from the Program
order.
Note
If the disc tray is opened during
programming program play will be canceled.
4
To finish programming and
smr_ p_ayoacK,press me _-ll
DUIIOR.
The disc wilI be played In
• To Cancel Programming
- Press the REPEAT button.
The program will not be saved and the
program screen will disappear
, To Cance_Program Play
_Jroc"ammea order. - During playback or in Stop mode, press
the CLEAR button
ENG-49
I DVD OPERATIONS 1
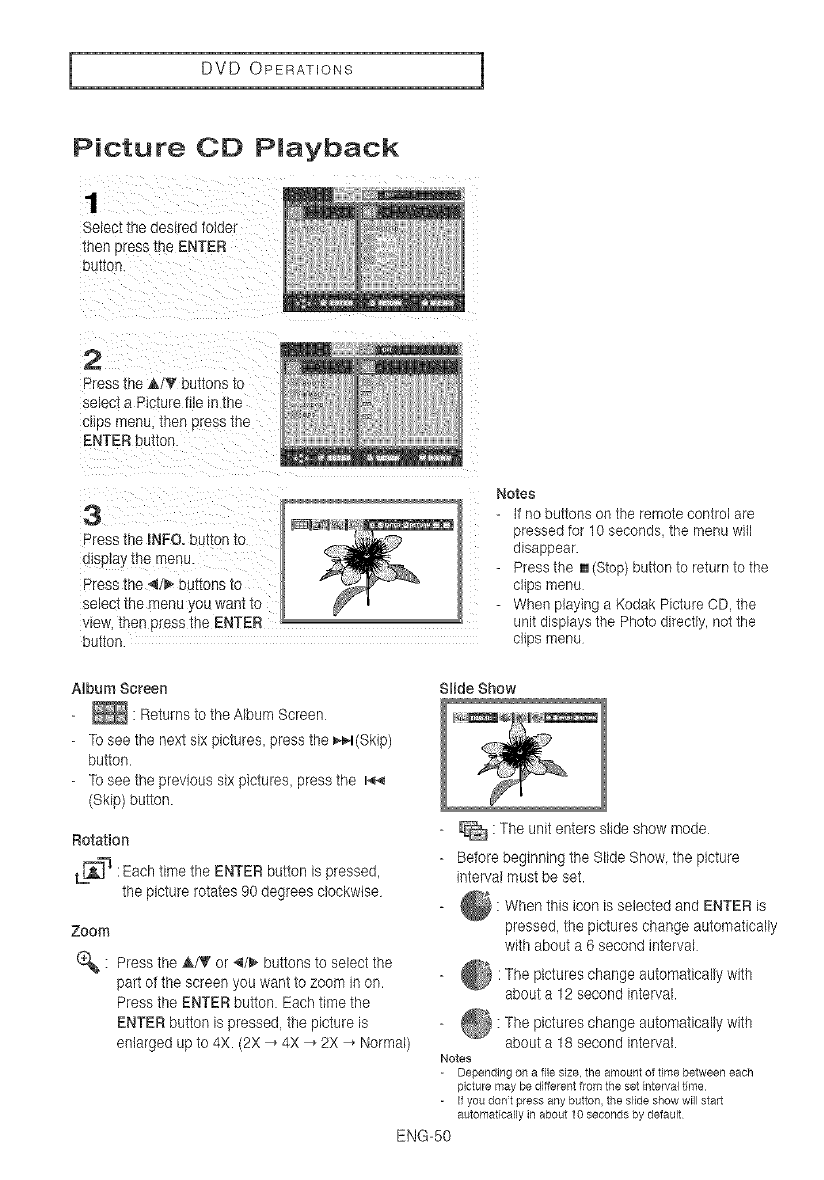
Picture CD Playback
Select the desired bider
[hen press me ENTER
DU[[OF
2
Press me ,&/_ bu_[[onsTo
select a Picture tile m me
ClIDS menu. then oress me
ENTER button.
3
Press the INEO. button to
dtselaj -[nemenu.
Press the _/_ L J{ions To
selec[ me men_ you want to
wew. men press the ENTER
Notes
- If no buttons on the remote control are
pressed for 10 seconds the menu will
disappear.
- Press the [] (Step)button to return to the
clips menu
- When playing a Kodak Picture CD, the
unit displays the Photo directly, not the
ou[[on clips menu
Abum Screen Slide Show
-Tosee the next six pictures, press the _4(Skip)
button.
-Tosee the previous six pictures, press the 144
(Skip) button.
Rotation
LL_: Each time the ENTER button is pressed,
the picture rotates 90 degrees clockwise
Zoom
(_: Press the A/T or _/_ buttons to select the
part ot the screen you want to zoom in on.
Press the ENTER button. Each time the
ENTER button is pressed the picture is
enlarged up to 4X. (2X , 4X , 2X _ Normal)
-_ : The unit enters slide show mode
-Betore beginning the Slide Show. the picture
interval must be set.
@
-: When this icon is selected and ENTER is
pressed the pictures change automatically
with about a 6 second interval
: pictures change automatically
The with
about a 12 second interval,
: pictures change automatically
The with
about a 18 second interval.
Notes
- Depending on a file size, the amount ol time belween each
picture may be different from the set interval time
- II you dont press any button, the slide show will start
automatically in about 10 seconds by default
ENG-50
DVD OPERATIONS
CD-R JPEG Disc8
Onl_ files with the ".]pg" and ".JPG" extensions can De piayea
- If the disc is not closed it w_lltake longer to s[an playing and not all of the recorded f_lesmay be e eyed.
- On CD-R discs with JPEG t _es 1 ISO 9660 or Joliet format can be played.
-The name of the JPEG tile may not De_ongerman 8 characters and should contain no islet Kspaces or
special cnaracters - ÷
- On aconsecutlvel wnttenmum-sesstonalsccanoeplayed. If there ts a elanK segment ln me mum-
session a_sc me d_sccan De stayed only up to me Plank segment
- A maximum of 3OOOimages can Destorec on a slngIe CD
- Kodak Picture COs are recommenoeo
- when playing a Kodak Picture CD, only the JPEG flies in the pictures folder can be played
- Kodak P_ctureCO: The JPEG flies in me o_cturesfolder can be played automa[icalb
- KonJcaPicture CD: It jou want to see me Picture. sebct the JPEG f_lesin the c rapsmenu.
- FU;,Rcture CO: Ityou want to see the Picture select me JPEG t es m me tiles menu.
- QSS Picture CD: The unit may not play QSS Picture CD
!f the - smber of tiles in 1 Disc is over 3000. cab the first 3000 JPEG flies can De playee
fthe number of folders m I Disc is over 300 )n_yJPEG fibs in the first 300 biders can De p_ayea
ENG-51
I DVD OPERATIONS 1
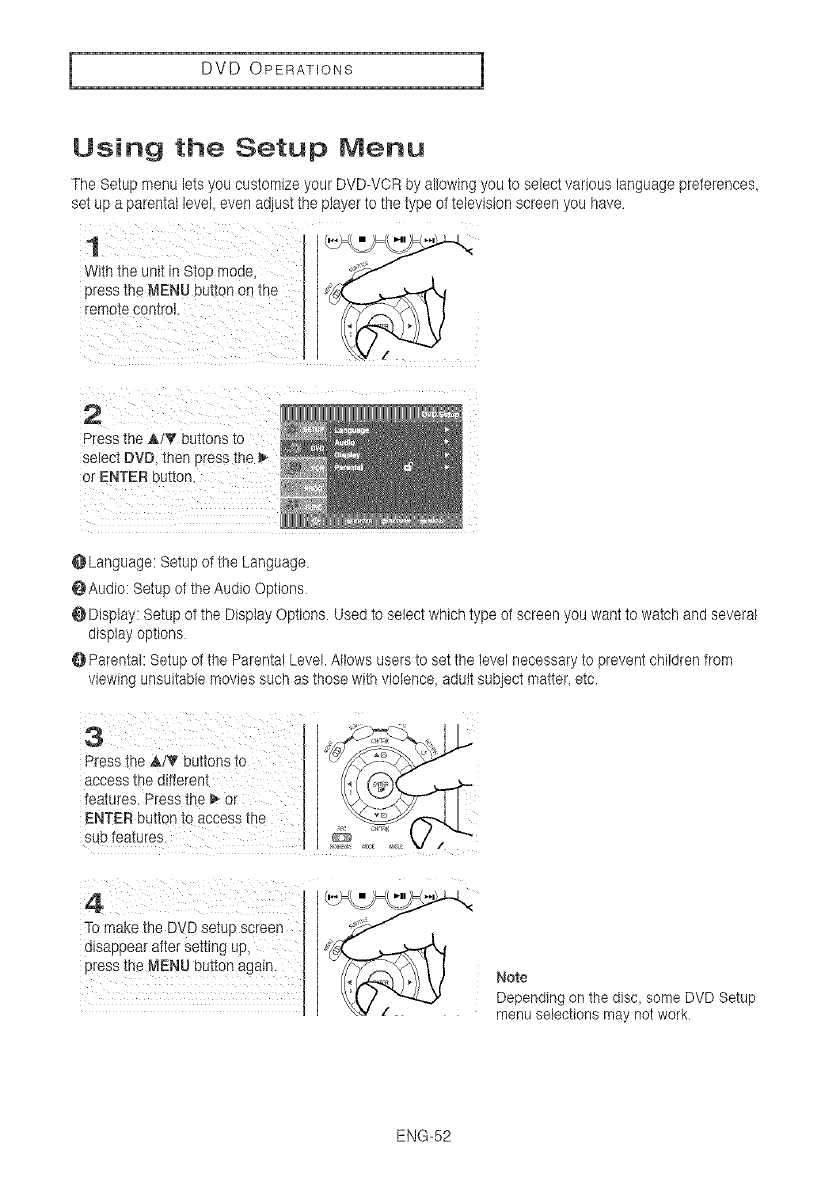
Using the Setup Menu
The Setup menu lets you customize your DVD-VOR by allowing you to select various language preferences,
set up a parental level, even adjust the player to the type of television screen you have
1
w_th the unit in stop meae.
press the MENU button on the
remo[e control
2
Press the a,/_ _utrons to
select DVD. then press the
or ENTER button
@Language: Setup of the Language
OAudio: Setup of the Audio Options
O Display: Setup of the Display Options Used to select which type of screen you want to watch and several
display options
O Parental: Setup of the Parental Level. Allows users to set the level necessary to prevent children from
viewing unsuitable movies such as those with violence adult subject matter, etc
Note
Depending on the disc, some DVD Setup
menu selections may not work
ENG-52
DVD OPERATIONS
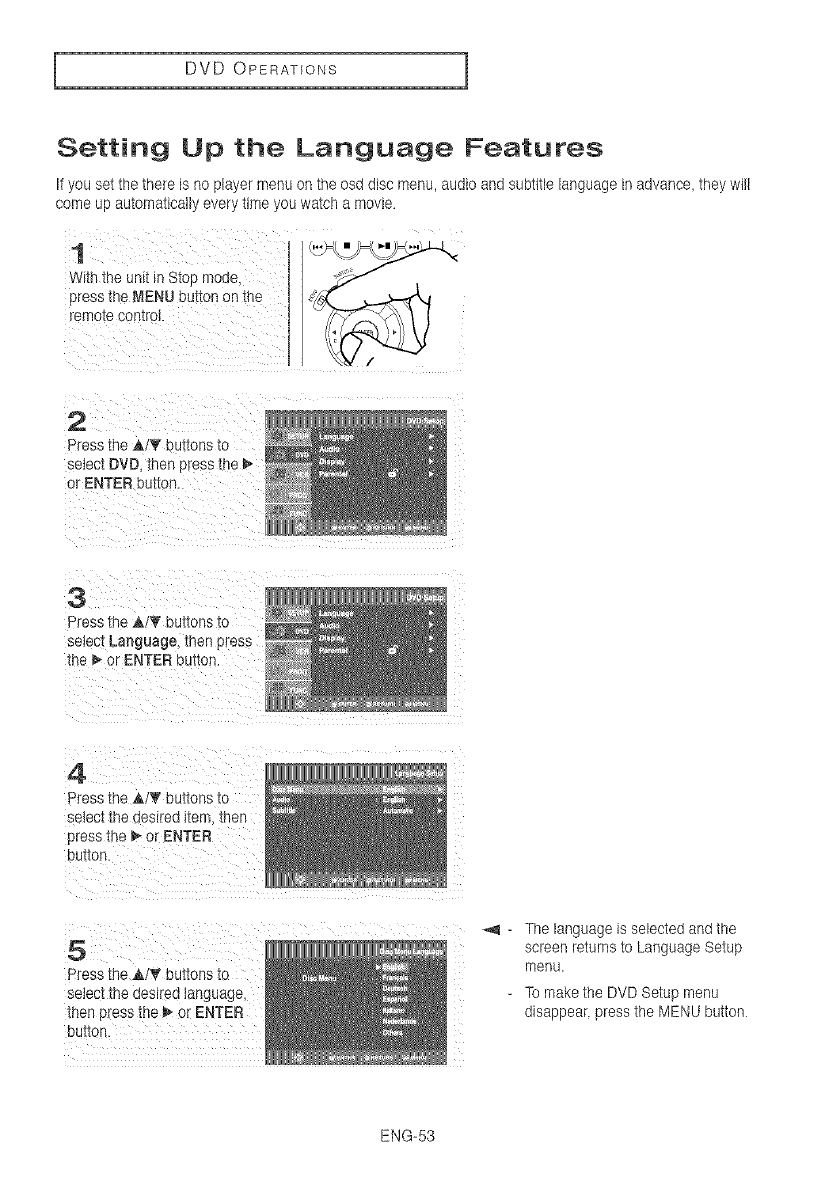
Setting Up the Language Features
If you set the there is no player menu on the osd disc menu, audio and subtitle language in advance, they will
come up automatically every time you watch a movie.
1
With the unit m Stop moae
press 1heMENU button on the
remole 3on1iot.
2
Press the A/T buttons to
select DVD. tnen press the
or ENTER Duiton.
3
Press the _,/_' buttons to
select Language, _nenpress
_ne _ or ENTER bL[ton.
4
Dressthe A!T buttons to
select the des_reo_tem -_ner
press {he _ o_ENTER
buIIon.
5
Press the A!T' buttons to
select the desJrea tanguage
trier oress the _ or ENTER
DUIIOn.
_,_ - The language is selected and the
screen returns to Language Setup
menu.
To make the DVD Setup menu
disappear, press the MENU button
ENG-53
I DVD OPERATIONS 1
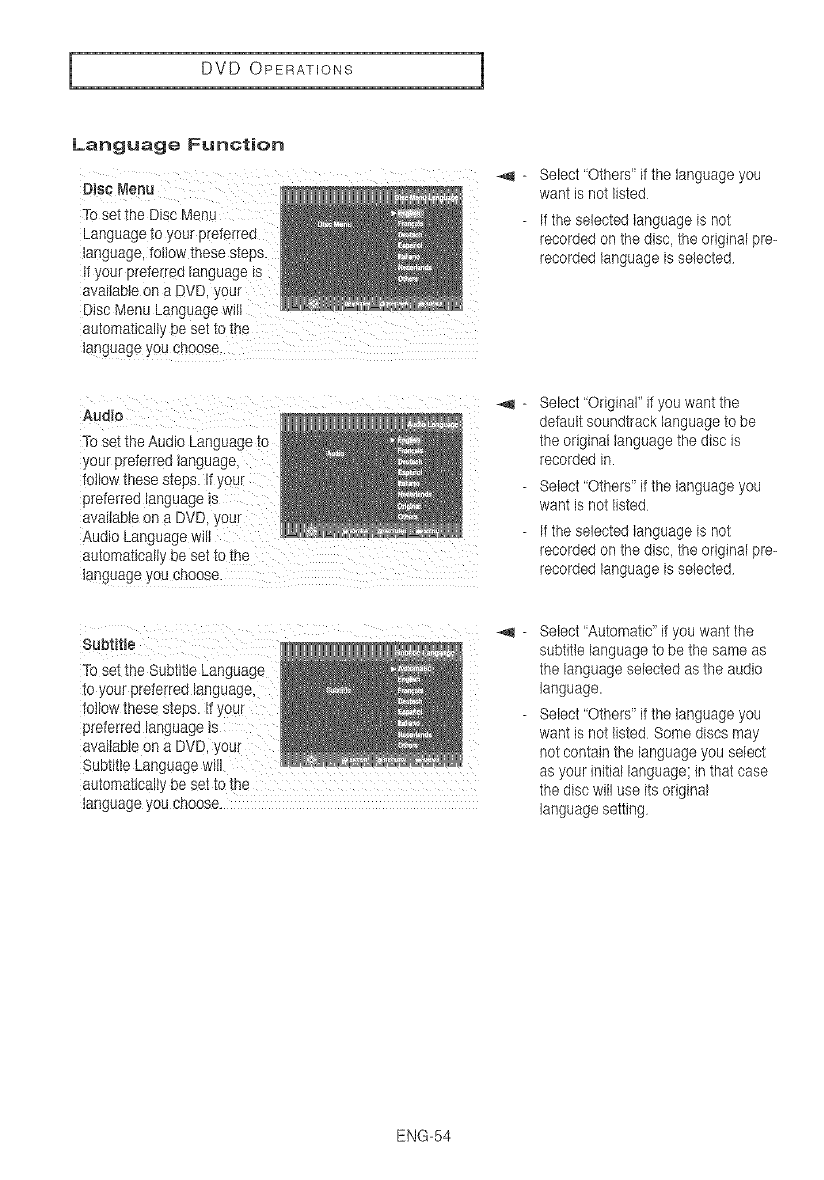
Language Function
_,_ - Select "Others" it the language you
want is not listed
To set the Disc Menu
Language to your preferred
language, follow these steps.
!t your preferred language iS
available on a DVD, your !
Disc Menu Language will i
automatically be set to the
- If the selected language is not
recorded on the disc, the original pre-
recorded language is selected
Aud!0 i
To set the Audio Language Io
your preferred language,
toiiow these steps. If your
preferred languag_
available on a DVD, your
Audio Language
language you choose.
- Select "Original" if you want the
default soundtracK language to be
the original language the disc is
recorded in.
- Select 'Others' if the language you
want is not listed
- If the selected language is not
recorded on the disc the original pre-
recorded language is selected
_,__
To set the Subtitle Language
to your preferred language,
foIIow these steps. If Y0Ur
preferred language is
available on a DVD, your
Subtitle Language will
automatically be set to the
language you choose.
Select "Automatic" if you want the
subtitle language to be the same as
the language selected as the audio
language.
Select 'Others' if the language you
want is not listed Some discs may
not contain the language you select
as your initial language; in that case
the disc will use its original
language setting
ENG-54
DVD OPERATIONS
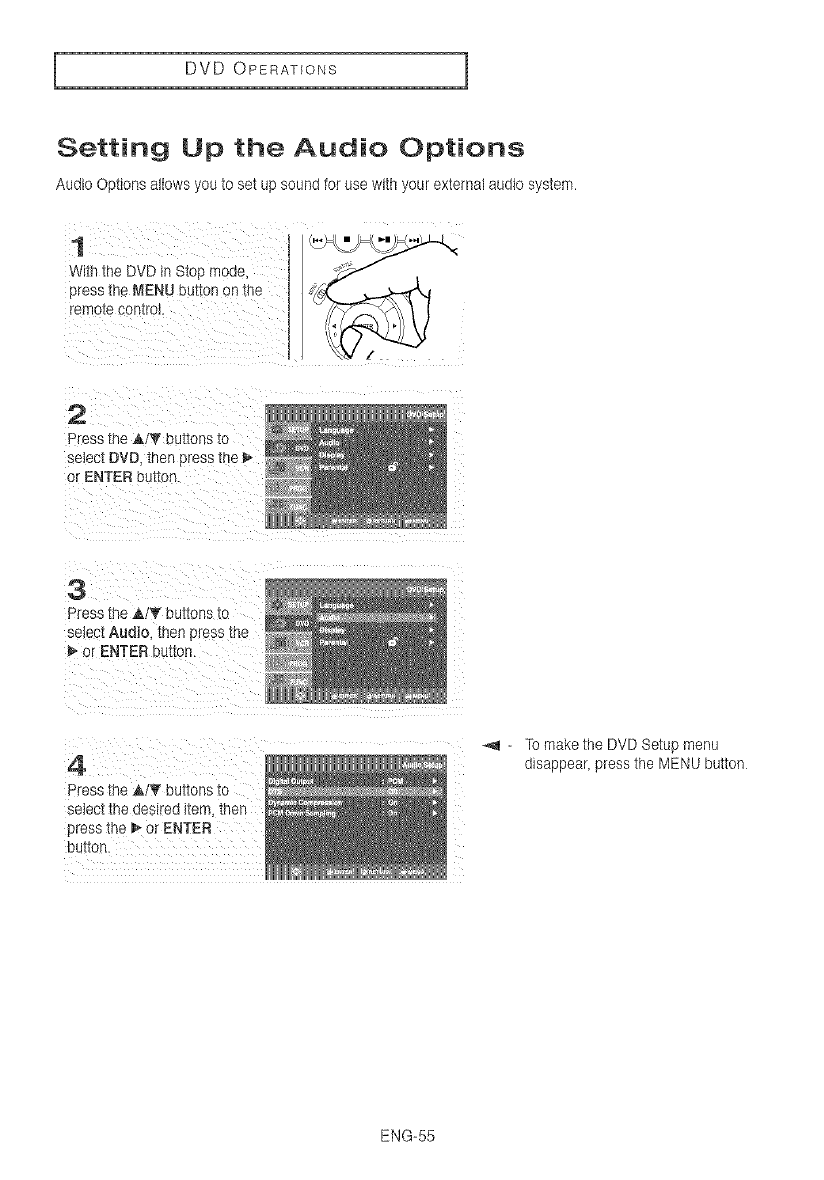
Setting Up the Audio Options
Audio Options allows you to set up sound for use with your external audio system.
1
With the DVD in Sto_:mode.
press the MENU button on -{he
remo_e :ontrot.
2
Press the A/V bJ[rods Io
select DVD. then press the
or ENTER button.
3
Press the A!T buttons _o
_ele_'tAudio. then Dressthe
or ENTER button.
4
Press the _1'_ buttons to
selec[ ine oeslred item. trier
sress the _ or ENTER
button.
- To make the DVD Setup menu
disappear, press the MENU button
ENG-55
I DVD OPERATIONS 1
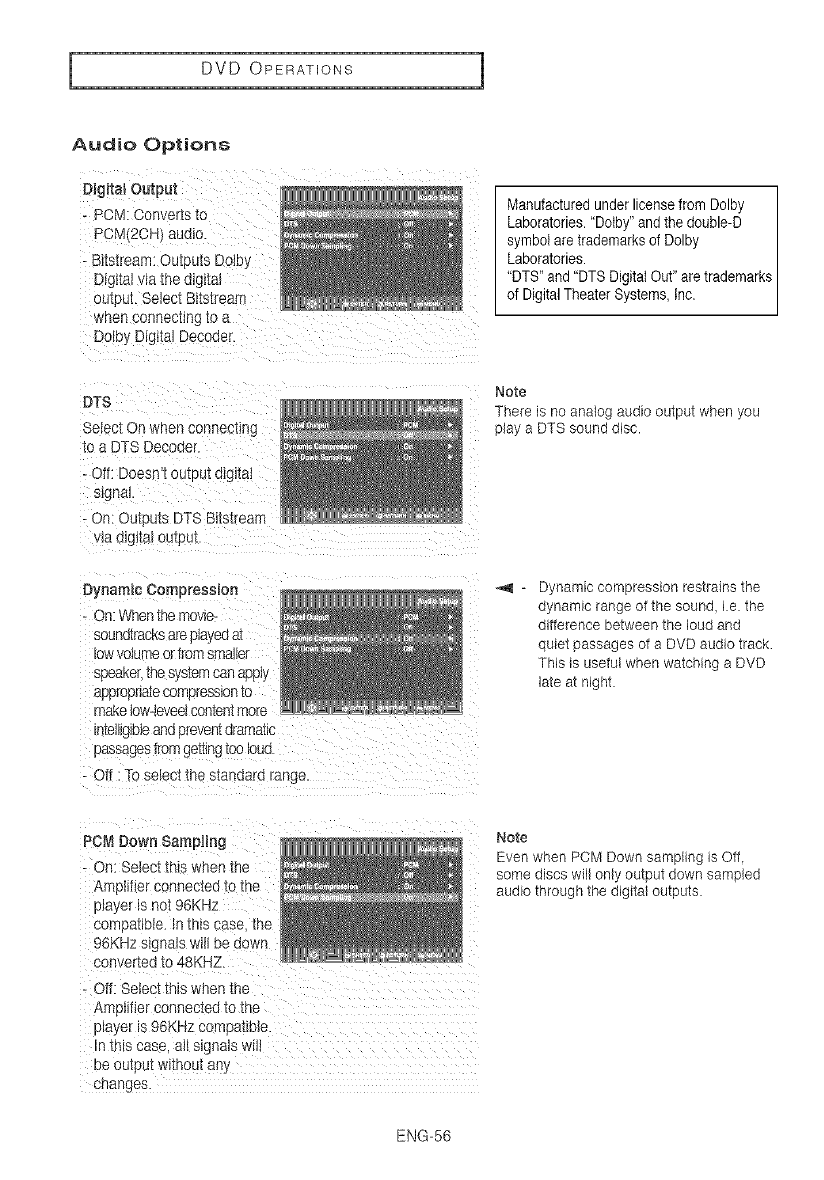
Audio Options
Digital Output
- POM: Converts to
PCM 2CH_ audio.
- Bitstream: Outputs DoJey
DigiTalwa me digital
)utFJt.Select Bltstrearr
t_,nenconnec_ing_o a
Dolby B gita Decoder.
Manufacturedunder license from Dolby
Laboratories."Dotby"and the double-D
symbol aretrademarks of Dolby
Laboratories.
"DTS"and "DTSDigital Out" are trademarks
of DigitalTheater Systems, Inc.
DT8
Select On when connecting
[o a DTS Decoder
- Off: Doesn _omeut ol%al
stgna
- On: Cutouts DTS Bitstream
la alglTa/ou{put
Dynamic Compression
- _n: When t_e mo,,/le-
sounc_racKsareplayeaa_
OW 'volume or from smaller
speaker,ine systemcanapply
appropnaiecompressionto
maketow-eveelcon[entmore
n_eH_Jbleand preventdramatic
passagestrom gettingtoo _ua.
- Off : To select me standard range.
Note
There is no analog audio output when you
play a DTS sound disc.
Dynamic compression restrains the
dynamic range of the sound, ie. the
difference between the loud and
quiet passages of a DVD audio track
This is useful when watching a DVD
late at night.
PCM Down Sampling
- On: Select tn_swhen me
Am_lff erconnec_eo _ome
p_ayer_snot 96KH2
comoa_lble, n mls case me
96KHz signals w_llbe down
converted to 48KHZ.
- Off: Select this when the
AmetffJerconnectea come
b_ayer_s96KHz comoane_e.
n m_scase. all signals w_H
De ou_oucwimou_any
cflan[,les.
Note
Even when PCM Down sampling is Off
some discs will only output down sampled
audio through the digital outputs.
ENG-56
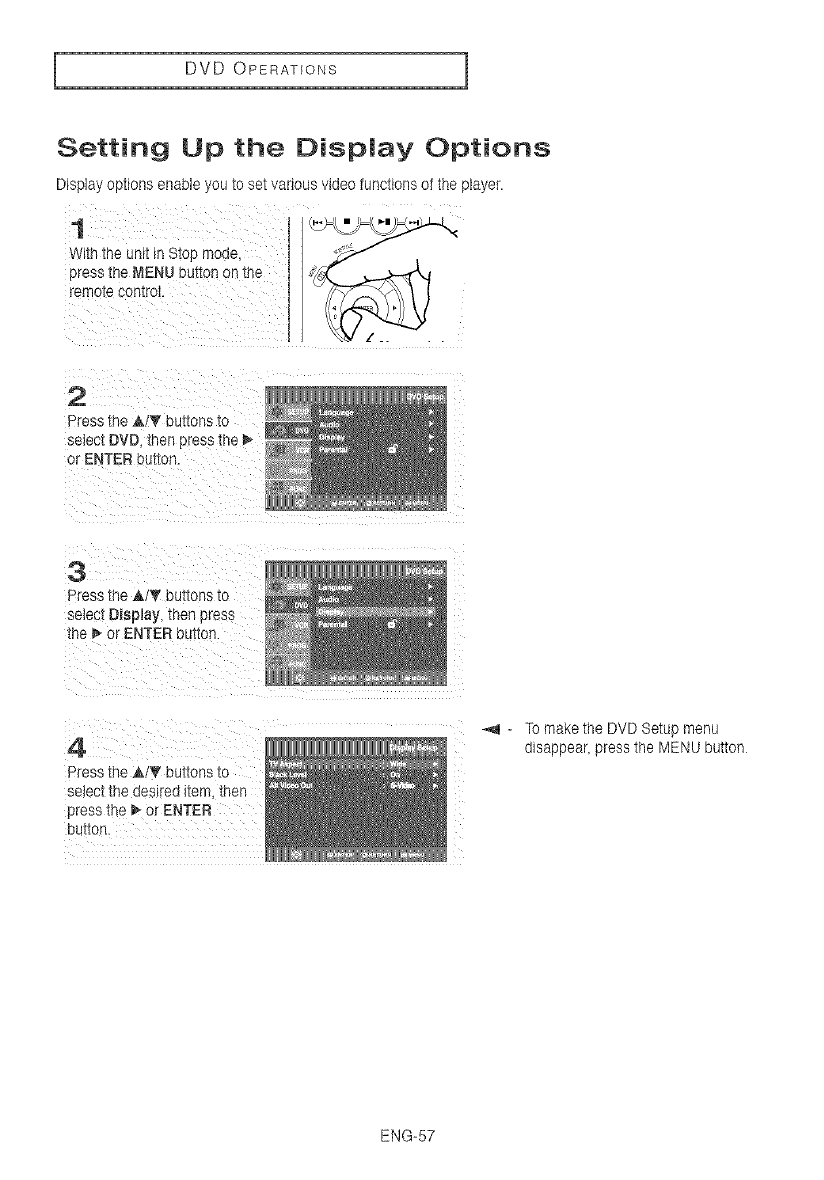
DVD OPERATIONS
Setting Up the Display Options
Display options enable you to set various video functions of the player.
1
With the unit _nStop moae
press the MENU button on _ne
remote control.
2
Press the A!_' bL:_onsIo
select DVD. _nenpress the
or ENTER bu[[on.
3
Press the Al'V puc_onsto
select Display, then press
the _ or ENTER buscon.
4
Press the A!_' buttons to
_elec[ -_neaeslrea _tern.trlen
press the _" or ENTER
DU__On.
_,_ - To make the DVD Setup menu
disappear, press the MENU button
ENG-57
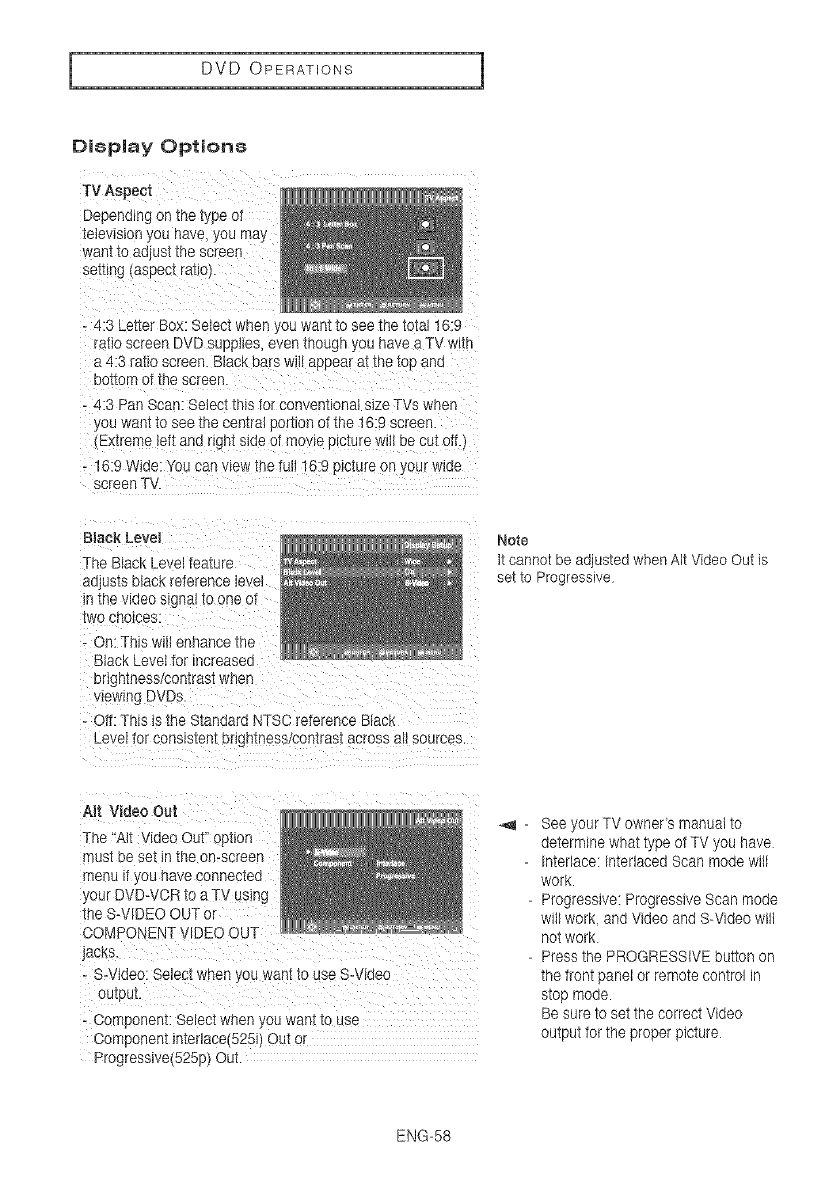
I DVD OPERATIONS 1
Display Options
TV Aspect
Depending on the tl De of
teIevls_onyou nave, you may
wan[ _oaGus_.[ne sc_eer
se_[mg_aseecTrat _.
- 4:3 _etter Box: Select when j ou wan__osee _ne_otal1E:9
ra[lo screen DVD SUbOHes.even _nougnyou nave a TV with
a 4:3 rat_oscreen. BlacK aars will appear a__netoe and
bottom of the screen.
- 4:3 Pan Scan: Select this for conventional size TVs when
ou wan[ to see the centraI poruon of the 16:9 screen.
Extreme iett and ngnt side of movie plcl:urewill De cut ott._
- 16:9 Wide: YOUcan wew tf e full 16:9 picture on your wloe
screen TV.
Black Level
The Black Level feature
aa usts black reference tevel
in the video s_gnalto one of
[we choices:
- On: Tt s wm ennance me
Black LeveI tot _ncreased
urlgn[ness/con[rasi wnen
tew_ngDVDs
- Off: This is the Standard NTSC reference Black
Level for conslsten'i engnelessiconlras[ across a i sources.
Note
It cannot be adjusted when AIt Video Out is
set to Progressive
Alt Video Out
The "Alt Video Out" opIIon
TlUS_De se[ In tne on-screen
menu if _ouhave connected
,'our DVD-VCR to a T\ using
the S-VIDEO OUT or
COMPONENT ViDE D OUT
jacks.
- S-Video: Select wnen you want to use S-Wdeo
OU_DU[.
- Component: Select when .tou wan[ [o use
Comoonent interlace 5251 Out or
Progresswe(525p out.
-,_ - See yourTV owner's manual to
determine what type of TV you have
-Interlace: Interlaced Scan mode will
work.
-Progressive: Progressive Scan mode
will work and Video and S-Video will
not work
-Press the PROGRESSIVE button on
the front panel or remote control in
stop mode.
Be sure to set the correct Video
output for the proper picture
ENG-58
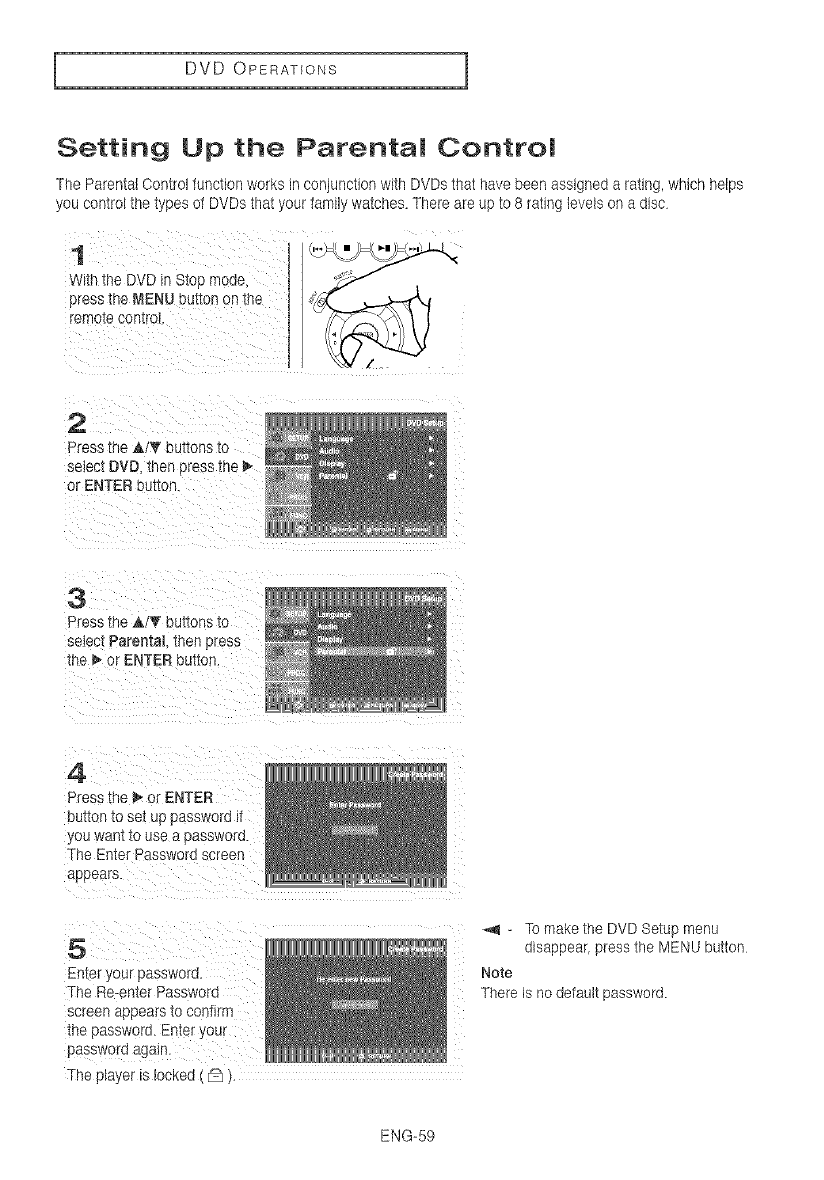
DVD OPERATIONS
Setting Up the Parental Control
The Parental Control function works in conjunction with DVDs that have been assigned a rating, which helps
you control the types of DVDs that your family watches. There are up to 8 rating levels on adisc
1
with the DVD in Stoc mode.
Dress the MENU button on the
remo_e con_ro
2
Press the A!_ buttons "(o
select DVD then press the
or ENTER butte _.
3
Press the AIT buttons to
select Parental met press
the _ or ENTER bu_an.
4
Press the _ or ENTER
button to set ue password if
yOU warn to use a passwerd.
The Enter Password screen
appears.
5
Enter your password.
The Re-enter Password
_creen appears to contlrn
_ne password. Enter your
password agaIr
The player Is locKed
-TOmake the DVD Setup menu
disappear, press the MENU button
Note
There is no default password.
ENG-59
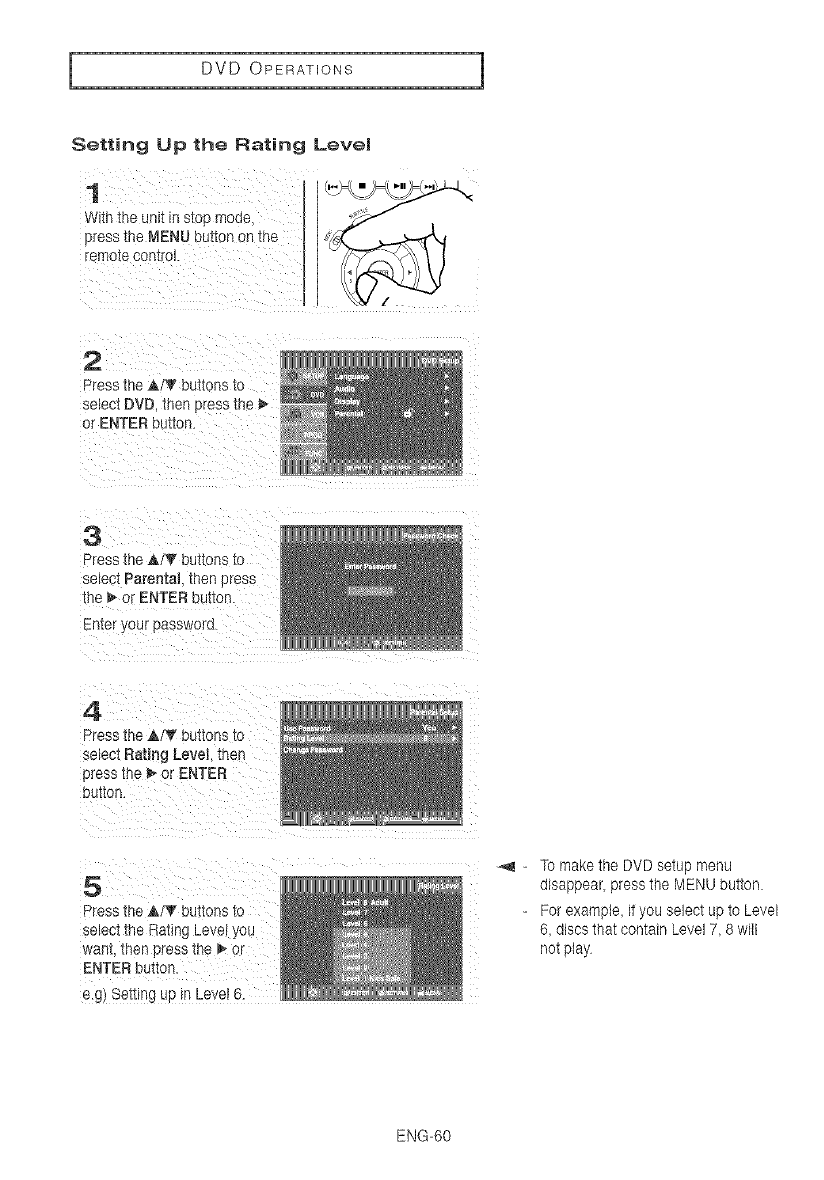
I DVD OPERATIONS 1
Setting Up the Rating Level
1
With the unit _nSlop moae.
press the MENU butl )n on me
remo[e comrc
2
Dress Tee,&/'_' buttons _o
se_ec[DVD. [nen press the _,
or ENTER out[on
3
Press the _./_' buttons co
se_ec_Parental men press
[ne _ o[ ENTER button.
Enter /our password
4
Press the A/_ buttons to
select Rating Level then
press the _-or ENTER
DuI[on
5
Press the A/T bu_,zonsto
select the Ratm _ Leve_you
wan[. men press me _ or
ENTER button.
e.gI Setting up in Level 6.
_,_ -To make the DVD setup menu
disappear press the MENU button.
-For example, it you select up to Level
6, discs that contain Level 7, 8 will
not play
ENG-60
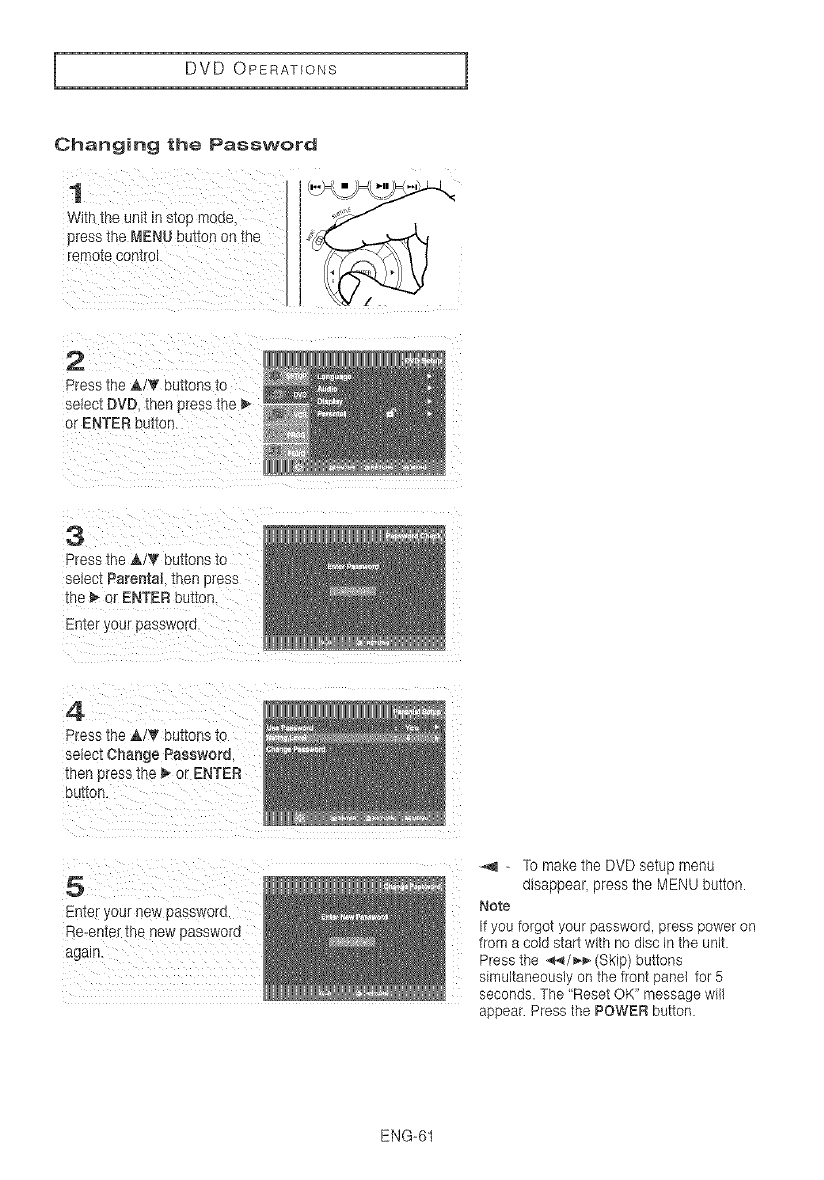
DVD OPERATIONS
Changing the Password
1
w_tn the unit _nere') mode
press the MENU button on the
"emo[econtrol
2
Press the _&/_"buttons to
select DVD men yess the
or ENTER but[on.
3
Press the ,a,/_ buttons to
selecl Parental men press
•no _ or ENTER button
Enter you_passwore
4
Press the ,&/T buttons to
select Change Password
men press the _ or ENTER
OU[_On.
5
Enter your new passworo.
Re-enter me nov passwora
again.
-,_ - To make the DVD setup menu
disappear press the MENU button.
Note
If you forgot your password, press power on
from a cold start with no disc in the unit
Press the _/_ (Skip) buttons
simultaneously on the front panel for 5
seconds. The "Reset OK" message will
appear Press the POWER button.
ENG-61
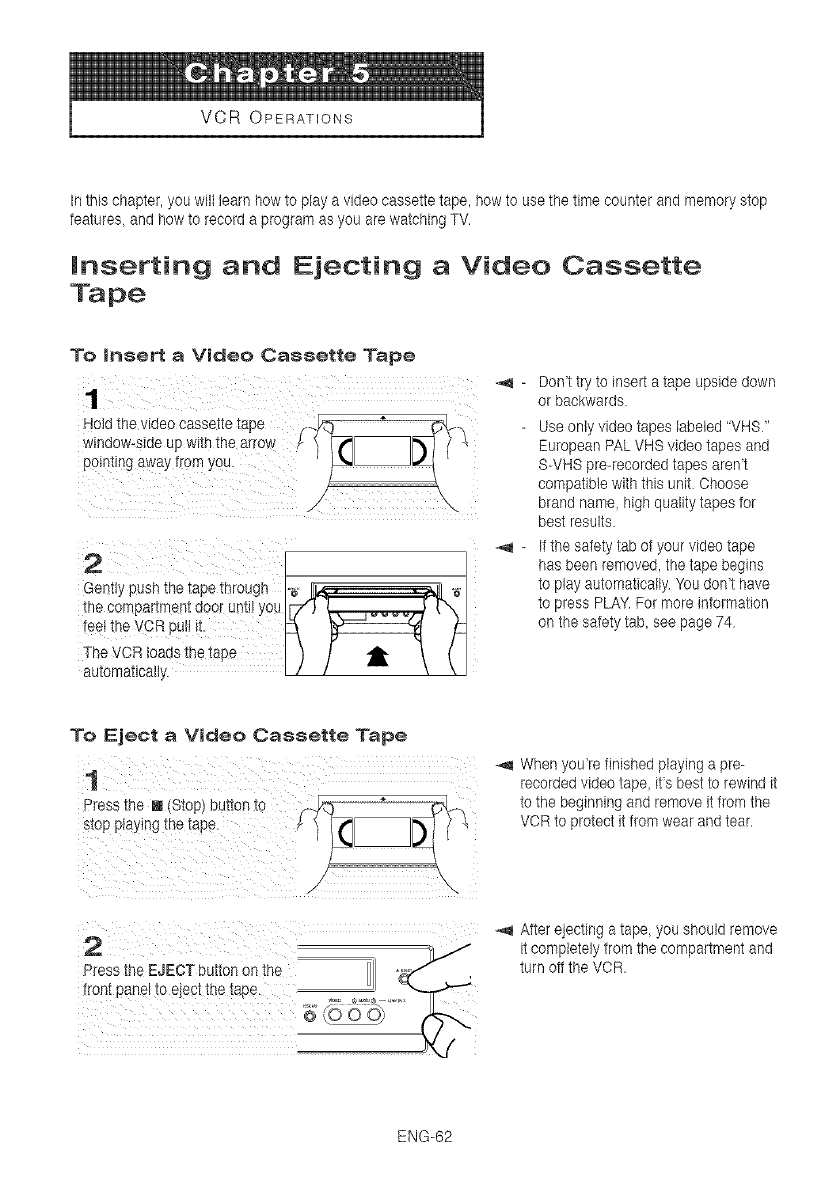
VCR OPERATIONS
In this chapter, you will learn how to play a video cassette tape, how to use the time counter and memory stop
features and how to record a program as you are watching TV.
Inserting and Ejecting a Video Cassette
Tape
To insert a Video Cassette Tape
2:¸¸¸ :: i
Gently push the tape througt_ _-jj_. ._ -_
theoompa_me_tdoorUnti!you[7"1_-_
!ee! the vCR pu!l !!- _ /q
TheVORieadstbetape ) / t \ t
automatically.
Don't try te insert a tape upside down
er backwards.
Use only video tapes labeled "VHS _'
European PAL VHS video tapes and
S-VHS pre-recorded tapes arent
compatible with this unit Ohoose
brand name high quality tapes for
best results.
If the safety tab of your video tape
has been removed, the tape begins
to play autematicalty Youdon't have
to press PLAY. For more infermation
on the safety tab, see page 74
To Eject a VBdeo Cassette Tape
1
Press Ine I iStoD) button tc
stop playing tne tape.
When yeu're finished playing a pre-
recorded video tape, its best te rewind it
to the beginning and remove it from the
VCR to protect it from wear and tear.
2After ejecting a tape you should remove
it completely from the compartment and
turn off the VCR.
ENG-62
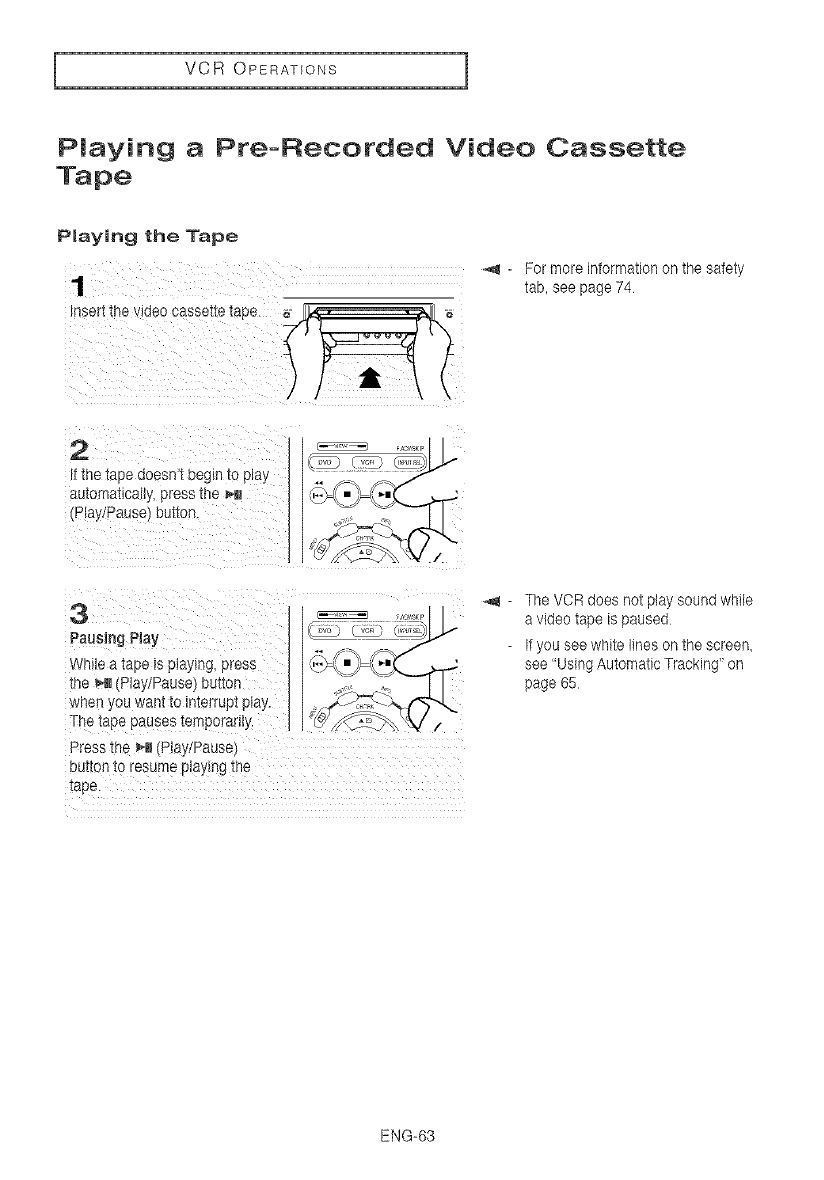
VCR OPERATIONS
Playing a Pre-Recorded Video Cassette
Tape
Pmaying the Tape
-_ =For more information on the safety
1tab, see page 74
2
f the tape doesn _ DegmcoE ay
automatic rely,press me HI
Play/Pause bunion.
svu ¥cH
3
Pausing Play
While a tape _spraying, press
the _41P ay!Pause button
wnen. ou wan__o m_e_ruptpray.
The tape pauses temporamy.
Press the _,H(Play!PauseI
Dut_onto resume p_aymgme
tape.
-_ - The VCR does not play sound while
a video tape is paused
It you see white lines on the screen,
see "Using Automatic Tracking" on
page 65
ENG-63
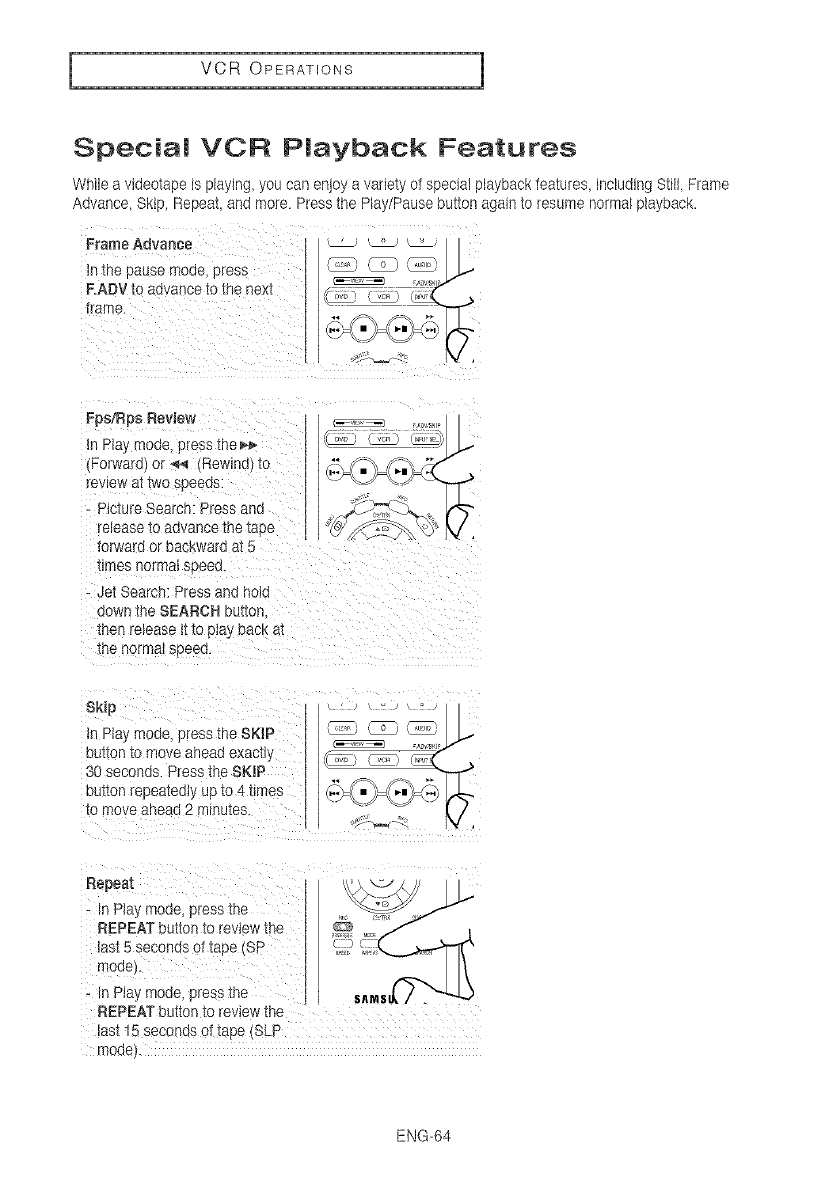
I VCR OPERATIONS 1
SpeciaJ VCR PJayback Features
Whib a videotape is playing, you can enjoy a variety of special playback features, including Still, Frame
Advance, Skip, Repeat and more. Press the Play/Pause button again to resume norma{ playback.
Frame Advance
in _ne .)ause meae. sress
F.ADV to aavar secotoe nex]
frame
J
Fps_ps Review
In Play moae, press toe
Forward or _ /Rewind} to
'ewew a[ iwo soeeus.
-Picture $6 _rch: Press and
re}ease t( _avance toe tape
forwara or rJac4wardat 5
times normal soeea.
-Jet Search: Press and hold
aown the SEARCH buttoP
then release tt to play back a[
toe normal speea.
Sk{p
m Play moae_press the SK{P
uui_onto move ahead exact{y
30 seconds. Press the SKIP
sutton repea[eaiy up to 4 times
_0 move aneaa 2 minutes
Repeat
-{n Play mode, press toe /
REPEAT outran to review the _ i_iils._
_ast5 seconds of taoe/8F ......
moae
- In Play moae_press 1he sn
REPEAT button _oreview toe
}as115 seconds at tape SL°
moae
ENG-64
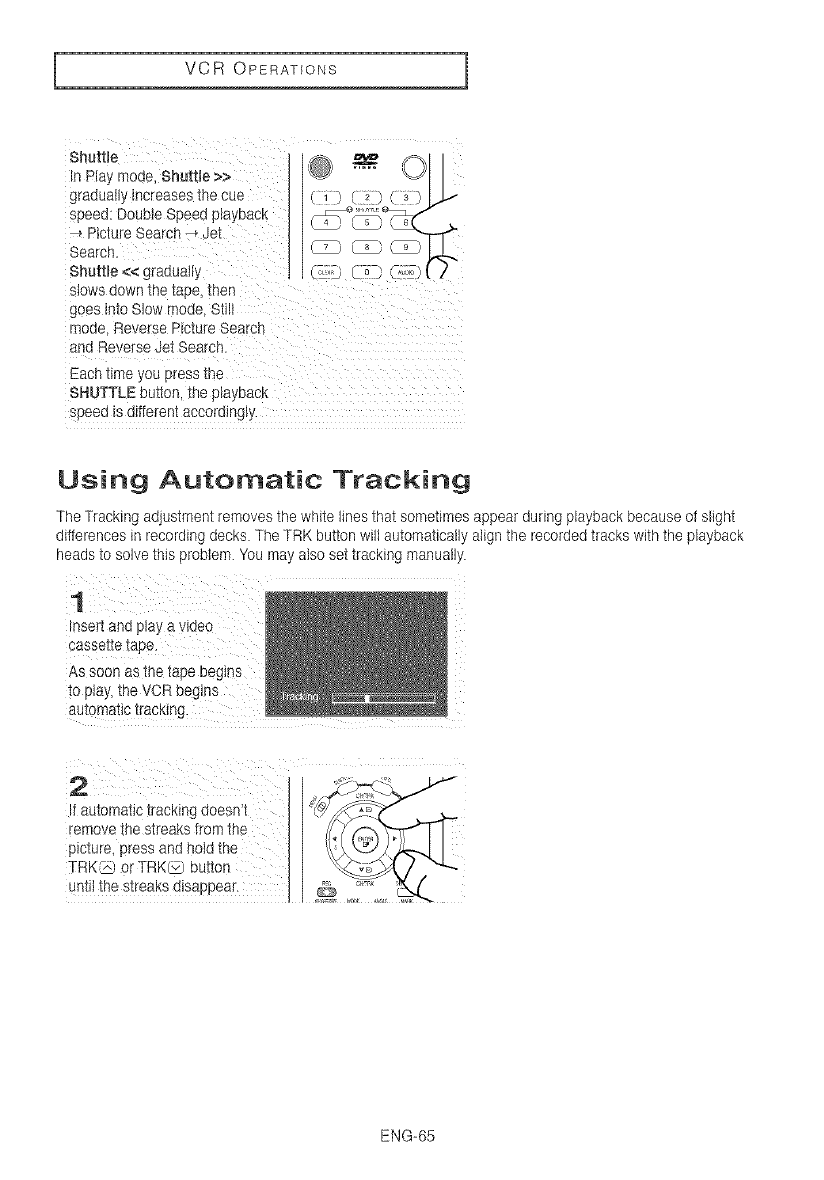
VCR OPERATIONS I
Shottle @ © |
In Play mode, Shuttle >>
gradually increases the cue (1} {2}
speed: Double Seeee play[}acK 4-_7e_"_s__d/
Ptcture Search -_ de[
Search. _
Shuttle << graouaw i ....© o
s_owsdown [ne tape, [nen
goes Into Slow mode Still
moae Reverse P_ctureSearcr
and Reverse Jet Search
EachEimeyou press tne
SHUTTLE button me pBa_Pack
soeed _sdifferent accordingly.
Using Automatic Tracking
The Tracking adjustment removes the white lines that sometimes appear during playback because of slight
differences in recording decks. The TRK button will automatically align the recorded tracks with the playback
heads to solve this problem. You may also set tracking manually.
1
insert and play a video
cassette tape.
As soon as the tape begins
to play, the VCR begins
jf automatic tracking doesn't }
remove the streaks from the
picture, press and hoid the
TRK@ or TRKL_ button
until the streaks disappear.
ENG-65
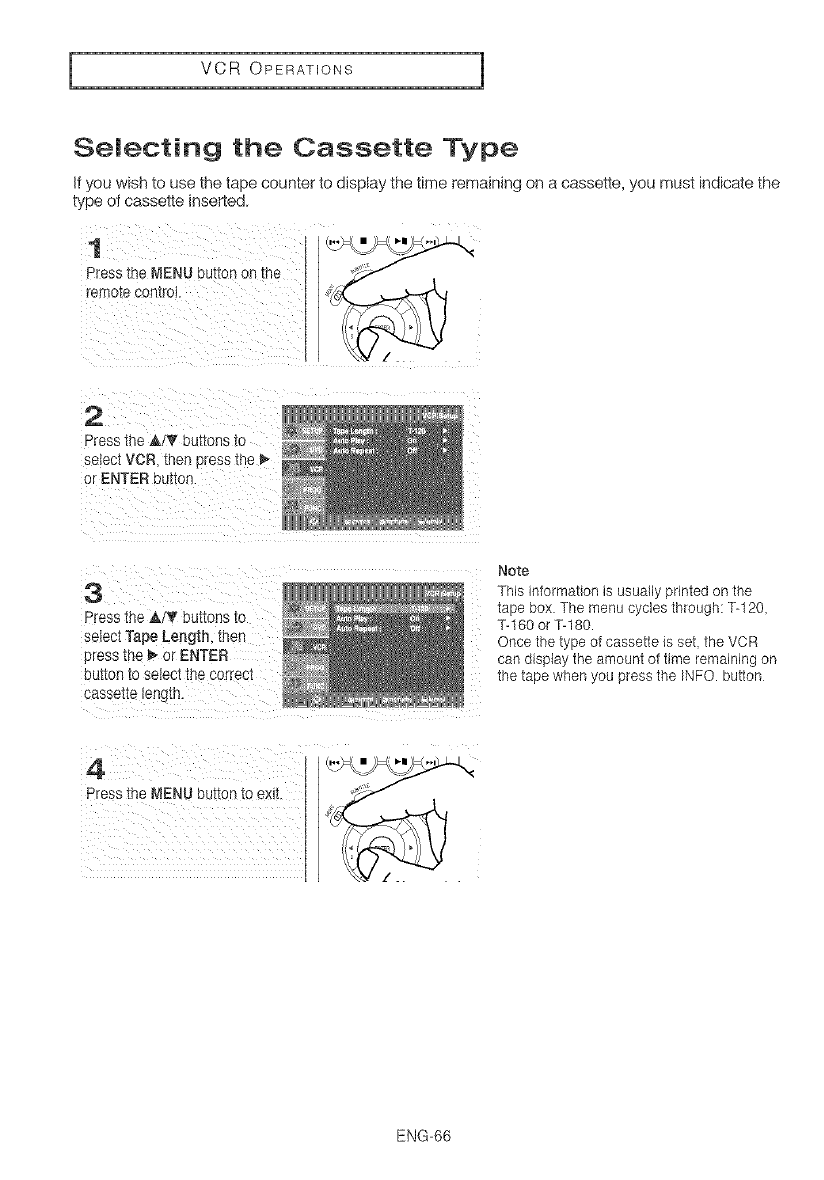
I VCR OPERATIONS 1
Selecting the Cassette Type
If you wish to use the tape counter to display the time remaining on a cassette, you must indicate the
type of cassette inserted.
1
Press the NENU button on lne
temo[e contro_
2
Press ttle i!T burlons to
select VCR ther press the _-
or ENTER button.
3
Press the I/_ buttons to
select Tape Length_ then
press the _ or ENTER
burton io select ine correcl
cassette _eng_n.
4
Press the MENU buttonto exit
Note
This information Js usually printed on the
tape box. The menu cycles through: %120,
%160 or %180.
Once the type of cassette is set the VCR
can display the amount of time remaining on
the tape when you press the INFO. button
ENG-66
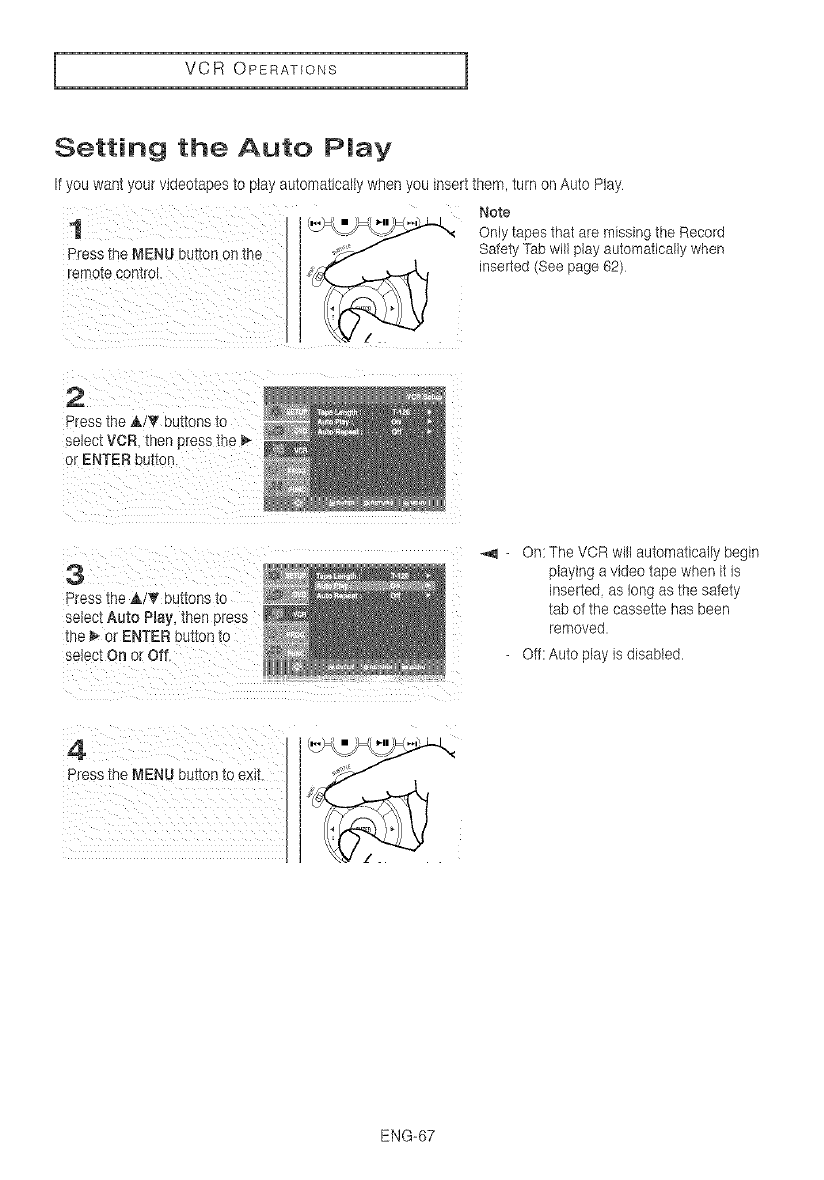
VCR OPERATIONS
Setting the Auto Play
It you want your videotapes to play automatically when you insert them, turn on Auto Play
Note
1Only tapes that are missing the Record
Press the MENU button on the Safety Tab will play automatically when
"emotecontrol, inserted (See page 62)
2
Press trle i _ buttons to
select VCR _henpress the
or ENTER button.
3
Press the A _' buttons to
"[nem or ENTER ouIIon [o
se[ect On or Off.
4
Press the MENU DUI_On[o exit
- On: The VOR will automatically begin
playing a video tape when it is
inserted, as long as the sabty
tab ot the cassette has been
removed.
- Off: Auto play is disabled.
ENG-67
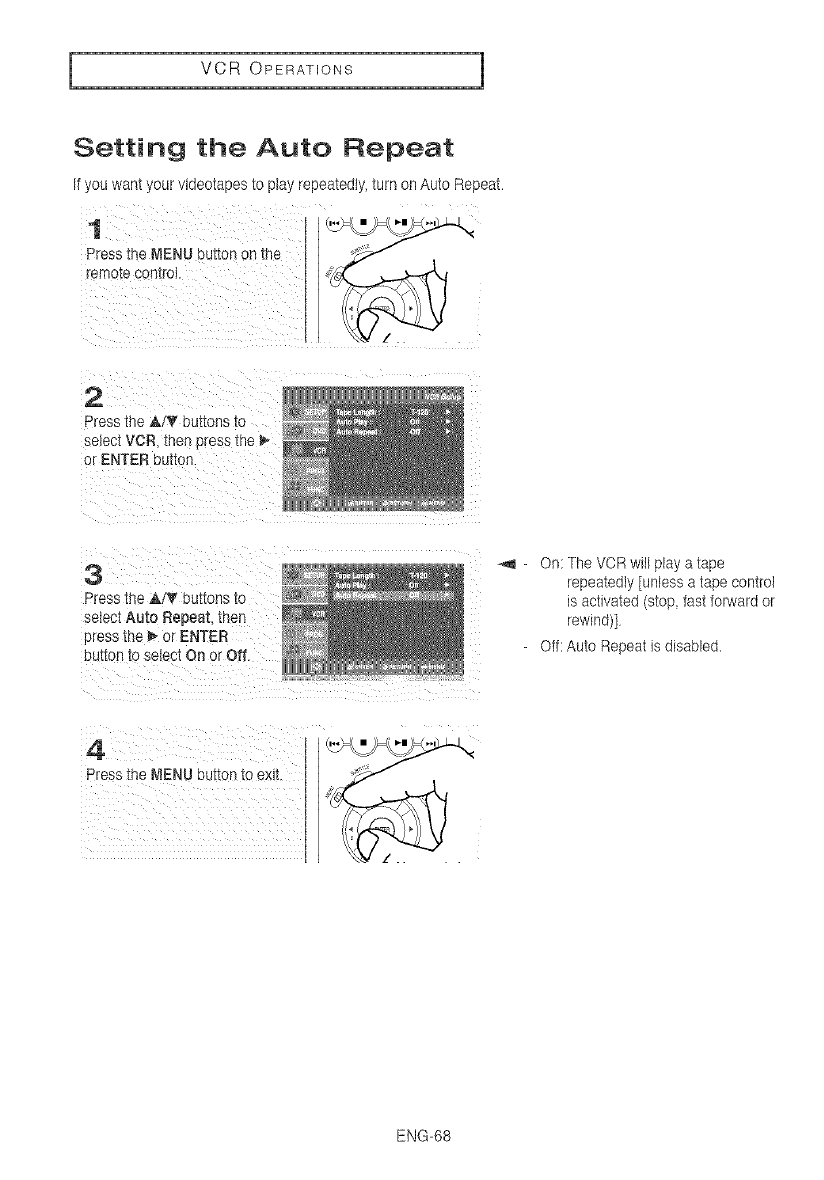
I VCR OPERATIONS 1
Setting the Auto Repeat
If you want your videotapes to play repeatedly, turn on Auto Repeat.
1
Press the MENU button on 1ne
remote coa[roi
2
Press the A/'v buttons to
select VOR _nen press the
or ENTER button.
3
Press the A/V" buttons to
select Auto Repeat. then
press the I_ or ENTER
button to seiect On or Off
4
Press the MENU outton to exl_
_l - On: The VCR will play a tape
repeatedly [unless a tape control
is activated (stop tast forward or
rewind)]
- Off: Auto Repeat is disabled.
ENG-68
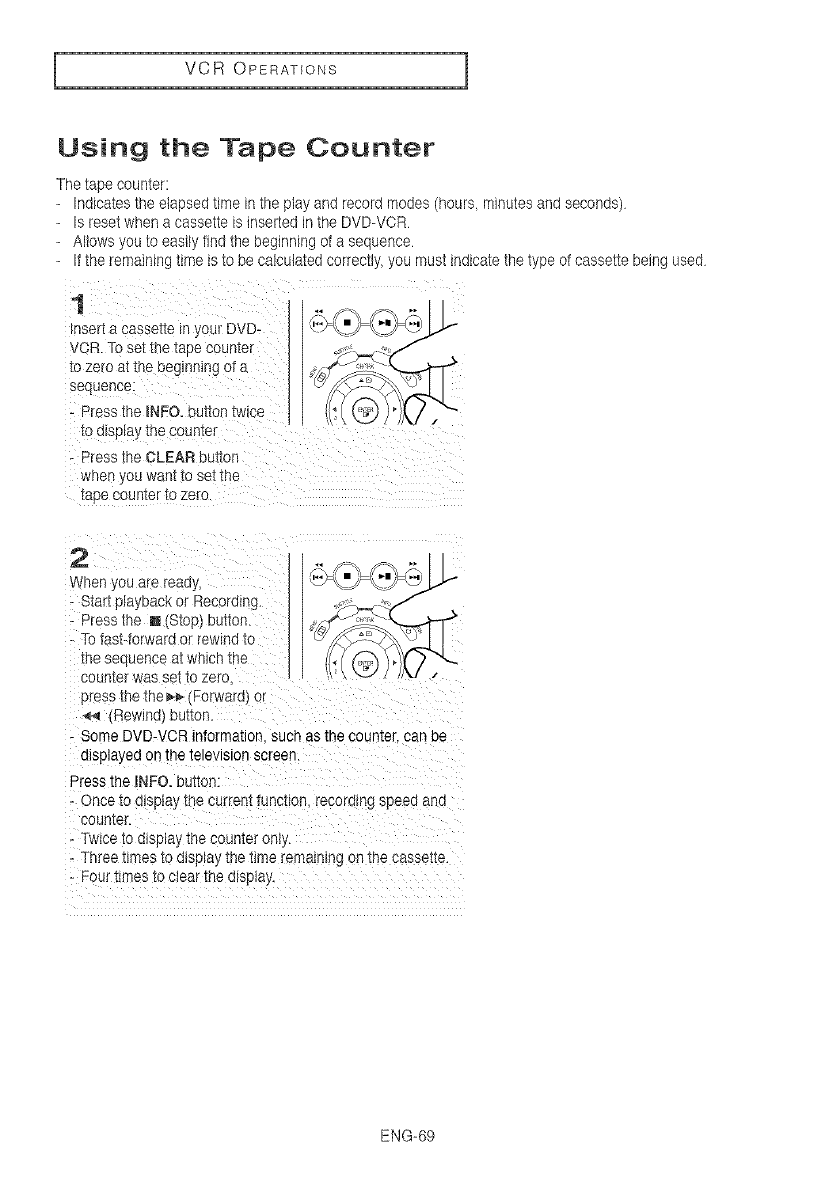
VCR OPERATIONS
Using the Tape Counter
The tape counter:
Indicates the elapsed time in the play and record modes (hours, minutes and seconds)
Is reset when a cassette is inserted in the DVD-VOR
-Allows you to easily find the beginning of a sequence
If the remaining time is to be calculated correctly, you must indicate the type of cassette being used
1
nsert a cassetie [n jour DVD-
VCR. To set the taoe coumer
to zero a[ me oeglnnlng at a
sequence
- °'ass the mNFO.LJi[on twice
[o display the counter
Press the CLEAR button
wrier joe wan[ to se[ the
[ape counter [o zero
2
When you are reaay
- Starl pla} oack or Rec )ruing.
Press the ! [Stoo #uuan.
- Tofast4orward or rewind to
the sec uence at which the
]cuRler was set 1ozero.
presstnetne_ Forward or
44 _Rewlnd_ear[on
- Some 3VD-VCR information sucn as tne counier, can be
displayed on the tele\ s_onscreen.
Press the INFO. button.
Once to display the current function, recora_ngspeea aria
:ounIer.
- Twice to dlspla_ the courtier onIj.
- Three tlm,es to display [rie lEna rematnlno on the casser[e
- Four rimes [o clear [he display.
ENG-69
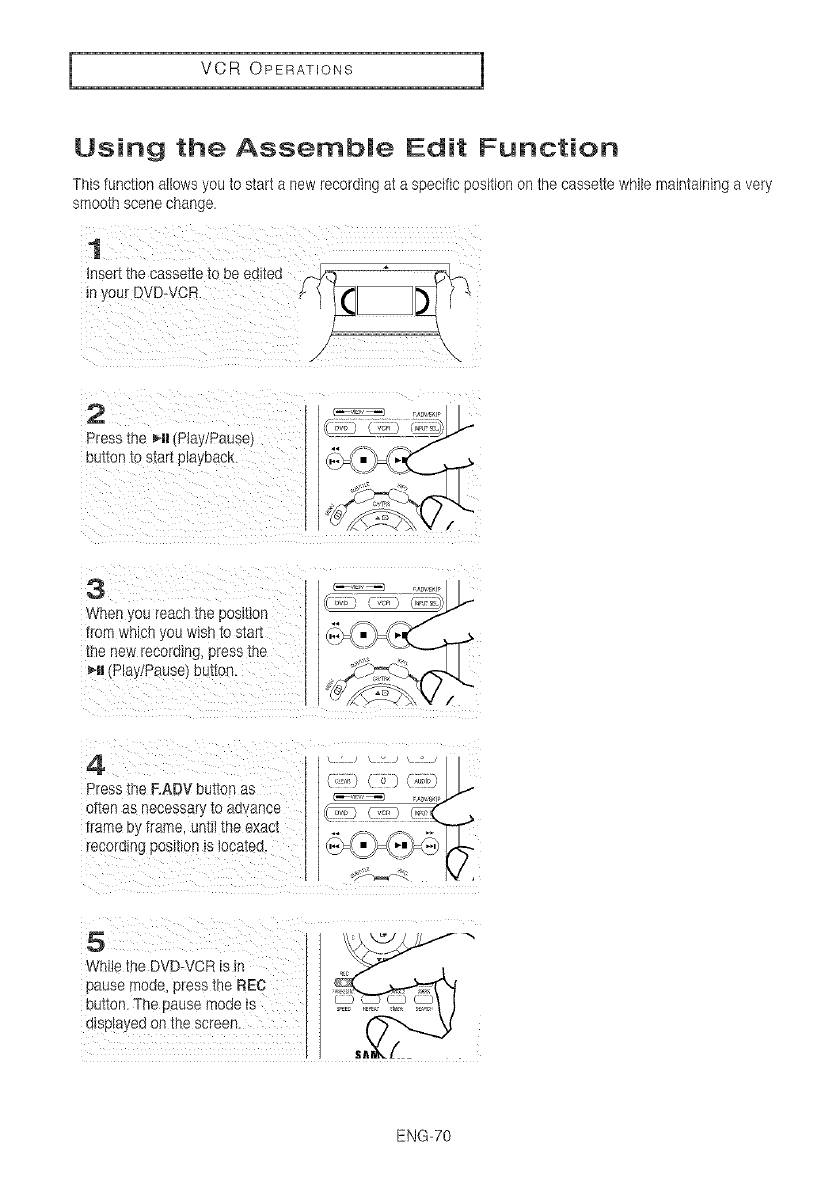
I VCR OPERATIONS 1
Using the Assemble Edit Function
This function atlows you to start e new recording at a specific position on the cassette while maintaining e very
smooth scene change.
1
inser[ 1Decassel_e ToDeeal[ea
Jnyour DiD-VCR.
2
Press the _ll Play/Pause)
nut,on to s_ar[pBayDacK.
3
when you reacn the posliton
frog wRIoll jou wish IO start
[ne new recoroing, press [ne
_l (Play!Pausel eu_on.
4
Press the EADV button as
often as necessa[, [o advance
tame b frame Jntll the exact
recora_ngpos_t_on_sDcatee.
_u_ J
5
wr; te [he DVD-VCR _sin
pause meae. Dresstne REC
button. The pause _nodeis
dispiayea on [ne screer
ENG-70
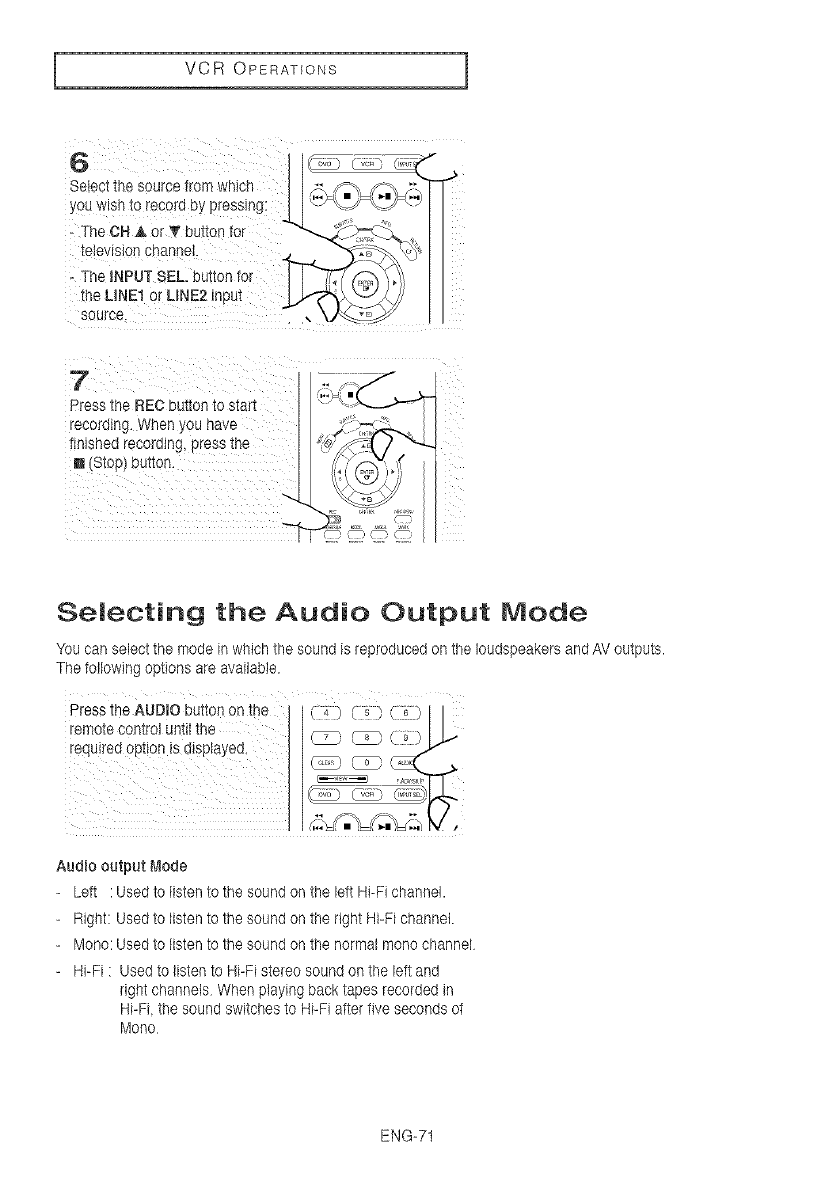
VCR OPERATIONS
television channel.
- The INPUT SEL. button for
the LINE1 or LINE2 input
Selecting the Audio Output Mode
You can select the mode in which the sound is reproduced on the loudspeakers and AV outputs.
The following options are available.
Press the AUDJO button on the I (!) (_ (_:)
remote control until the I_ _ _,,_
Audio output Mode
Left :Used to listen to the sound on the left Hi-Fi channel.
Right: Used to listen to the sound on the right Hi-Fi channel.
Mono: Used to listen to the sound onthe normal mono channel
Hi-Fi : Used to listen to Hi-Fi stereo sound on the left and
right channels When playing back tapes recorded in
Hi-Fi the sound switches to Hi-Fi after five seconds of
Mono
ENG-71
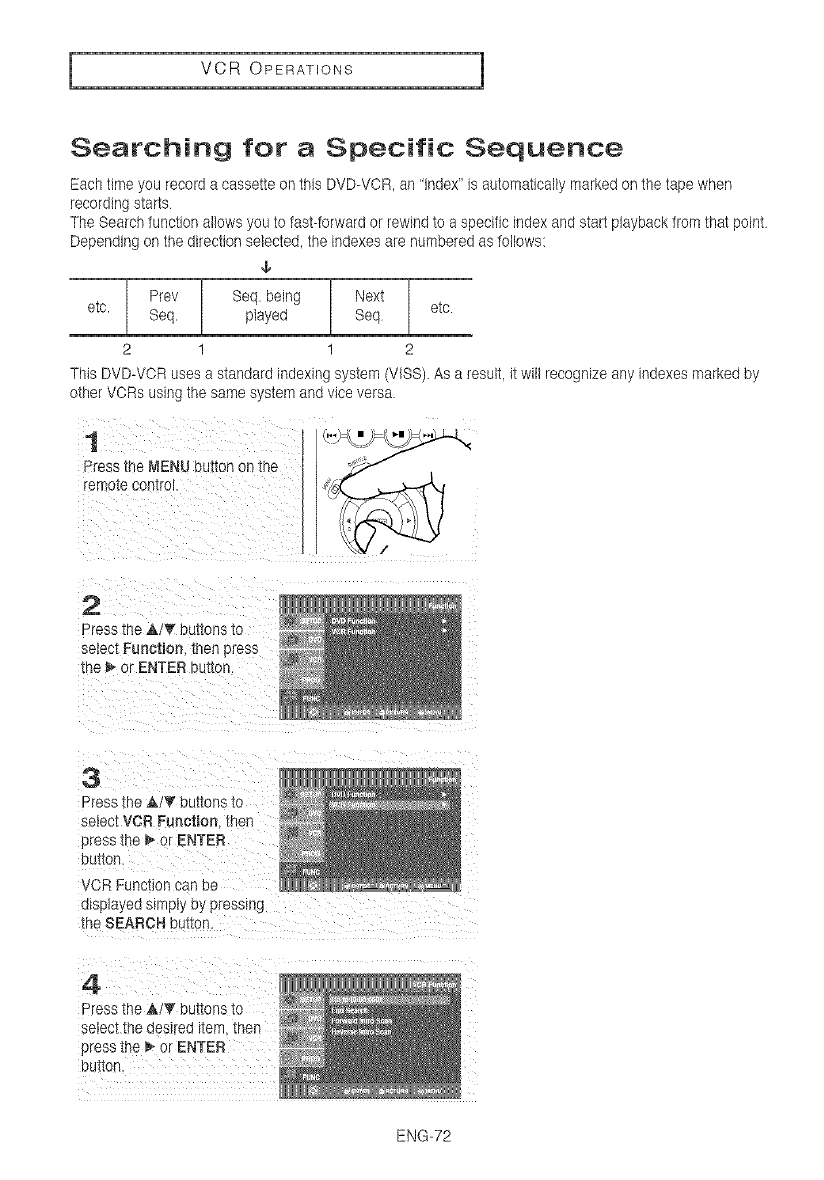
I VCR OPERATIONS 1
Searching for a Specific Sequence
Each time you record a cassette on this DVD-VCR, an "index' is automatically marked on the tape when
recording starts
The Search function allows you to fast-forward or rewind to a specific index and start playback from that point
Depending on the direction selected, the indexes are numbered as fotlows:
¢
_i seq.be,ng_i
etcl seq.I p,ayedI Se_I etc
21 1 2
This DVD-VOR uses a standard indexing system (VlSS). As a result, it witl recognize any indexes marked by
other VORs using the same system and vice versa.
1
Press the MENU b_,i_onon tne
ren.ote con:tel.
2
Press the A/T buttons to
_eiec_Function. tber Dress
the _ or ENTER out,on
3
Press the ,&IT bunons to
_eIectVCR Function men
press the _ or ENTER
bU*[_On.
VCR Function can De
displayed simply by pressing
the SEARCH Dut_on
4
Press the A/T buttons zo
seIecI _nedesired
sress the _ or ENTER
buI[on.
ENG-72
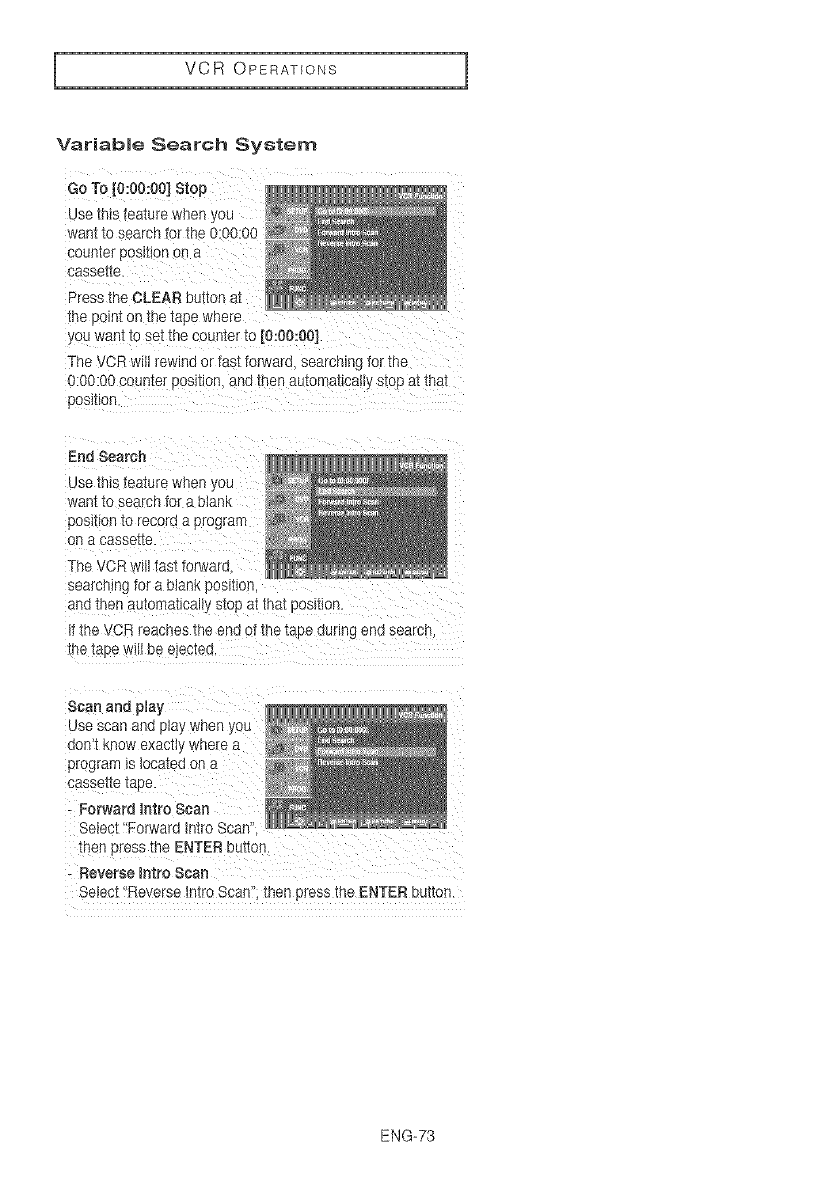
VCR OPERATIONS
Variable Search System
Go To [0:00:00] Stop
use this feature wnen yOt
want to searcn _orthe 0:00:00
eounler oos[[Ion on a
cassette.
Press the CLEAR button at
cne poln_on -_ne1ace where
you warn _ose_me counter _o[0:00:00].
The VCR will rewind or fast forward, searching tot the
0:00:00 coumer posmon, ann men au-_orr_E_caHys_opa,,ma._
pOSElO[1
End Search
use mis feature when
want to search for a blank
9OStTion iO recora a program
on a casse-ae.
The VOR will fast torwara
searching for a blank oosmon
and znenau[oma_cauy slop a( ma,,oosmon.
if the VCR reaches me end of the taDedunng end searcn
me _apewill Be ejec[eo.
Scan and play
Use scan and play when you
aon_ Know exacny wnere a
program is tocated on a
cassette rope
-Forward _ntro Scan
Select "Forward Intro Scan'
men Dressme ENTER button
-Reverse Intro Scan
Select "Reverse Intro Scan'. men press the ENTER button
ENG-73
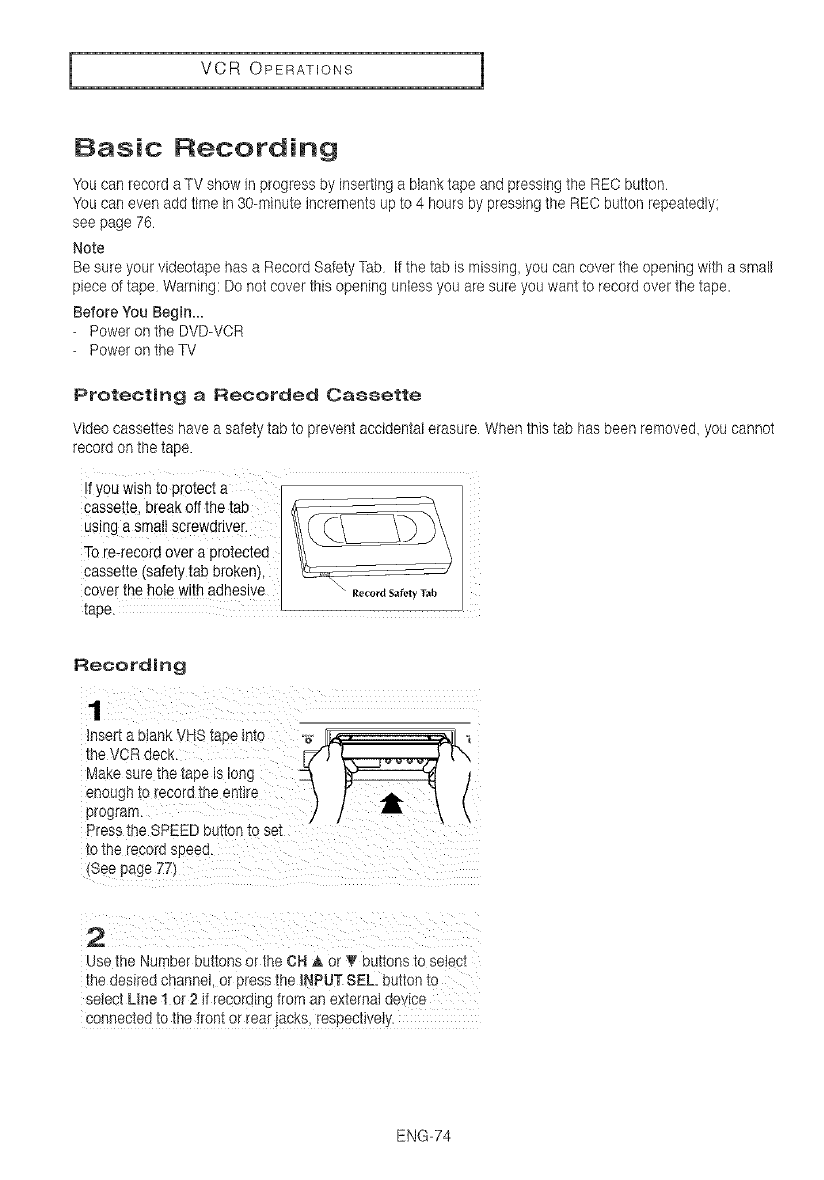
I VCR OPERATIONS 1
Basic Recording
You can record a TV show in progress by inserting a blank tape and pressing the REC button
You can even add time in 30-minute increments up to 4 hours by pressing the REC button repeatedly:
see page 76
Note
Be sure your videotape has a Record Safety Tab It the tab is missing, you can cover the opening with a small
piece of tape Warning: Do not cover this opening unless you are sure you want to record over the tape.
Before You Begin...
-Power on the DVD-VOR
-Power on the TV
Protecting a Recorded Cassette
Video cassettes have a safety tab to prevent accidental erasure. When this tab has been removed, you cannot
record on the tape.
If y0u wish to pf0tect a I I
Cassette,break off the tab I _ _ J
Using a small Screwdriver _(_"} "_D
To re4ec0rd over a protected //_
cassette (safety tab broken),
€over the hole with adhesive I _° '-' -',,._o,as,,f_.t,T.b I
tape.
Recording
rosen a blank VHS [ape n[o "_ _"_" "_]L
the VOR deck. [7" ) _ i \
Make sure the tape is long Z_ _ )
enough to record the entire \ _" _ "_ /
program. ,/ / m, \ \
Press the SPEED button to se]
[o ine recelo speea.
_Seepage 77)
2
use the Number buttons or the CH _. or 'v buttons to setecl
me aeslrea cnanne or )tess the iNPUT 8EL button to
sel6 stUne 1 or 2 if recording from an externat device
connected to the front or rear jacks, respectwety.
ENG-74
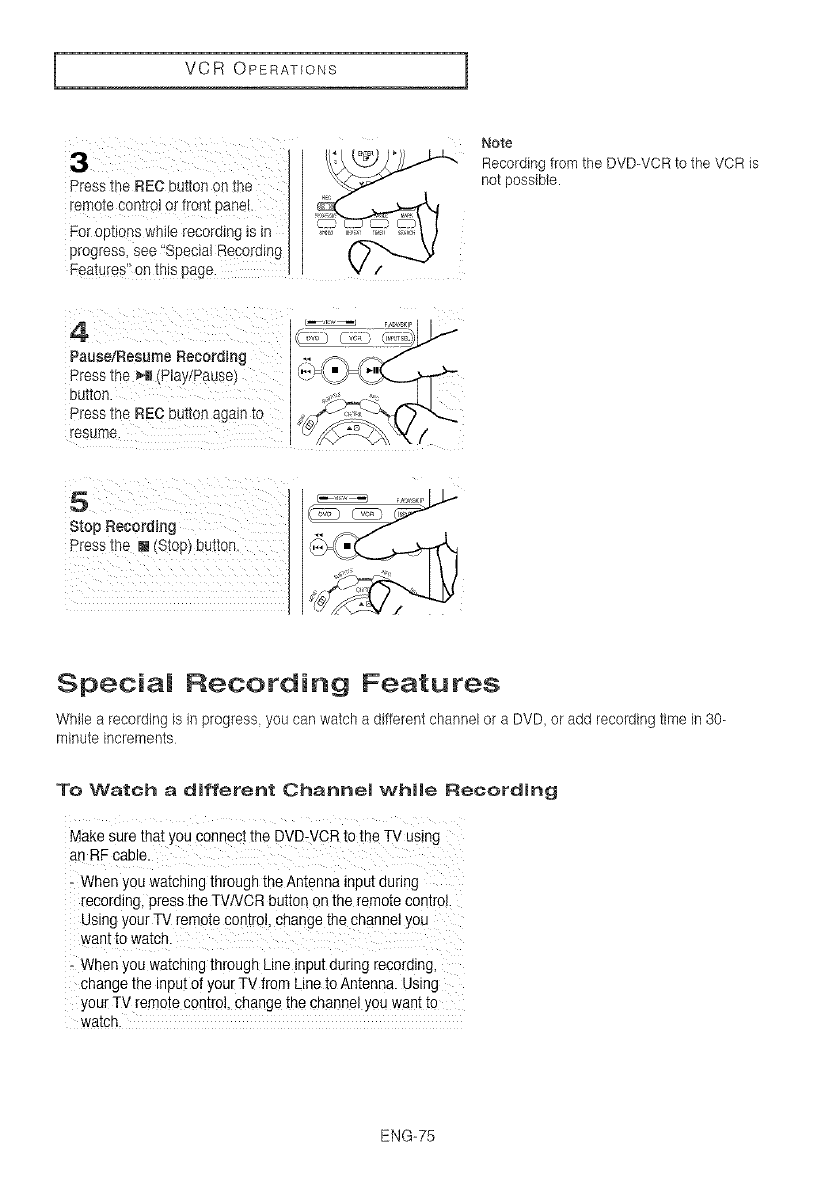
VCR OPERATIONS I
3
Press the REO button on tne
remote control or front panel.
For oo[_enswh_lerecording is tn
prog ess. see "Special Recording
Features on tnls page.
Note
Recording from the DVD-VCR to the VCR is
not possible.
4
Pause/Resume Recording
Press the _H (PlaylPause)
CUr[On
Press the REC button aga n re
resume.
/
Stop Recording
Press the []/StoP) button ,,F_,_-_ . _-,-r'_,
Special Recording Features
While a recording is in progress, you can watch a different channel or a DVD, or add recording time in 30-
minute increments
To Watch a different Channel while Recording
Make sure that you connect the DVD:VCR to the TV using
an RF Cable.
- When you watching through the Antenna input during
recordingl press the TVNCR button on the remote centre!,
Using your TV remote €ontro!_change the channel you
when you watching through Line input during recording,
change the input of yourTV bm Line to Antenna. Using
your TV remote c0ntro!, change the channe! you want to
watch.
ENG-75

I VCR OPERATIONS 1
To Watch a BVD while Recording
Insert a DVD in the DVD tray and press the Hi
(Play/Pause). The output wi!l autQmat!caJ!ychange to the
DVD,
To Add Recording Time
See One-Touch Recording (OTR)below.
Using One-Touch Recording
One-Touch Recording (OTR) allows you to add recording time in 30-minute increments up to 4 hours at the
touch o! a button.
1
,nsertabanKVNStape,n,o
thovcR0ec !
2
Use the Number buttons or the OH A or _' buttons to select
lhe desired cnanne_ or Dressthe iNPUT SEE button to
select Line 1 or 2 it r_:ording from an external device
connected to the fron_ or rea_ _acKs,respectwe_y.
:3
Press the REC button on _ne
remo_econtrol or rron_cartel
ENG-76
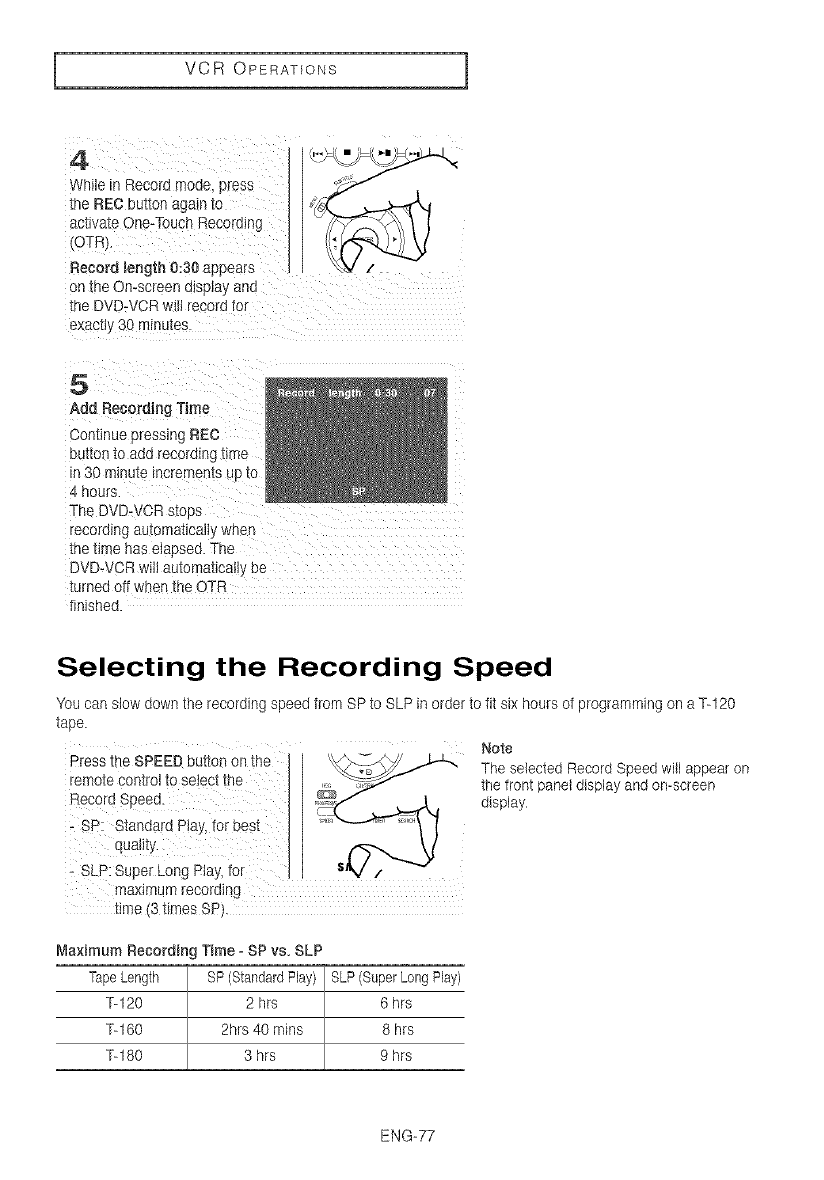
VCR OPERATIONS
4
While m Recor ]moue _3ress
the REC button again to
acwate One-TouchRecoruing
OTR;
Record length 0:30 appears
on Tle On-screen display an{
the DV[ -VCR wili record for
exac[ly 3Ommu[es.
5
Add Recording Time
Continue pressing REC
button Io and recording rime
n 3Om_nu_emcremems uEto
4 flours.
The DVD-VOR stc 3s
recolaing automatlcalt:;,wnen
me rime has elapsed. The
DVD-VCR wilt automaticah_ De
wrneo oft when the OTR
finished.
Selecting the Recording Speed
"Youcan stow down the recording speed from SP to SLP in order to fit six hours of programming on a %120
tape.
Press the SPEED button on the _,_//
remote control to seleCt the ...._
RecordSpeed
S£: StandardP!aY, forbest _'"\ ]
qua!!tY _ V
sLp: Super Long Play, for J s=q /
maximum recording
time (3 times SP).
Note
The selected Record Speed will appear on
the front panel display and on-screen
display.
Maximum Recording Time =SP vs. SLP
TapeLength SP (StandardPlay)
%120 2 hrs
%180 2hrs 40 mins
%180 3 hrs
SLP(SuperLongPlay)
6 hrs
8 hrs
9 hrs
ENG-77
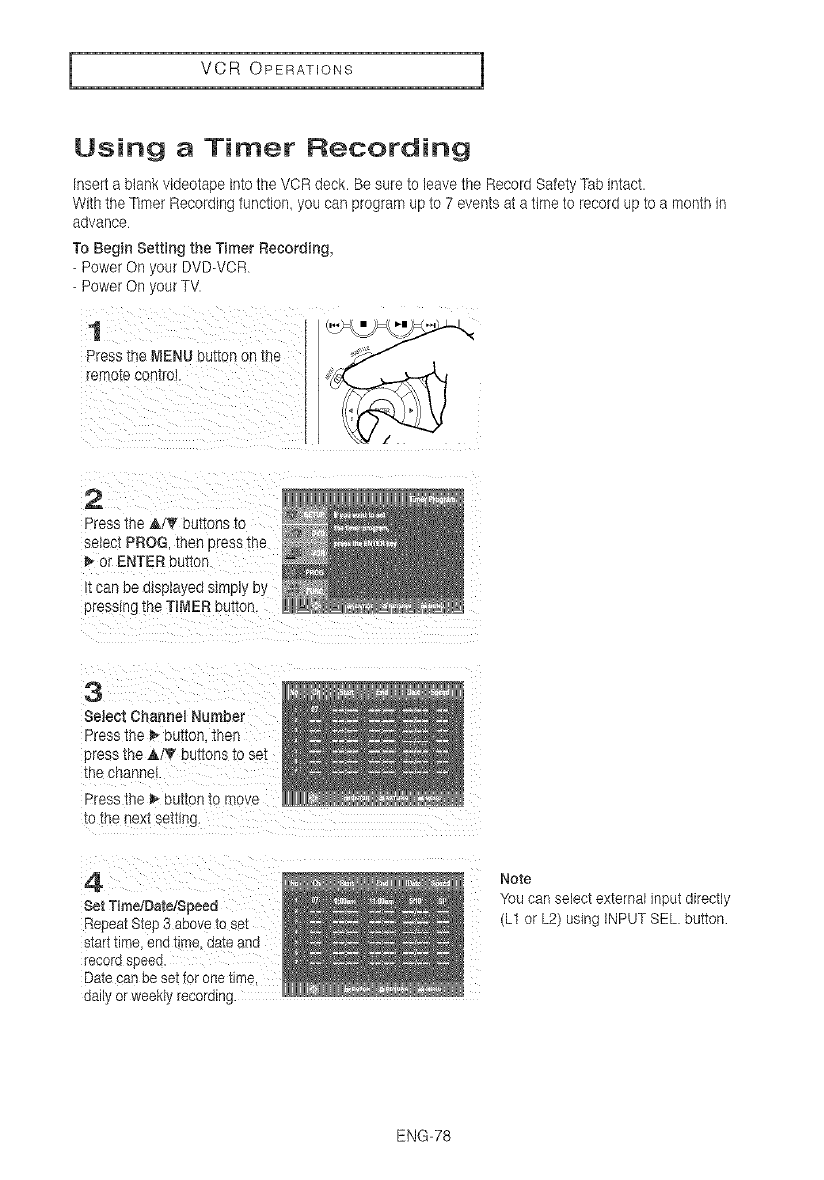
I VCR OPERATIONS 1
Using a Timer Recording
Insert a blank videotape into the VCR decK. Be sure to leave the Record Safety Tab intact.
With the Timer Recording function, you can program up to 7 events at a time to record up to a month in
advance
To Begin Betting the Timer Recording,
-Power On your DVD-VCR.
-Power On your TV.
1
Press the MENU button on me
remote control
2
Press the A! '_ buttons to
setect PROS men pressme
or ENTER button.
t can De a_sp_ayeos_mplyDy
Dress "_gthe TIMER button
3
Select Channel Number
Press the _ button, men
press me A/_' buttons m set
me orlanRel
Press the _ button [o nl _ve
[0 me next sm[im
4
Bet Time/Date/Speed
RepeatBte_ 5 above to set
siarl:l:lme end time. da_eand
_ecola sDeecL
Date can be set for one brae
oa_lyor weekly recording
Note
You can select external input directly
(L1 or L2) using iNPUT SEL. button
ENG-78
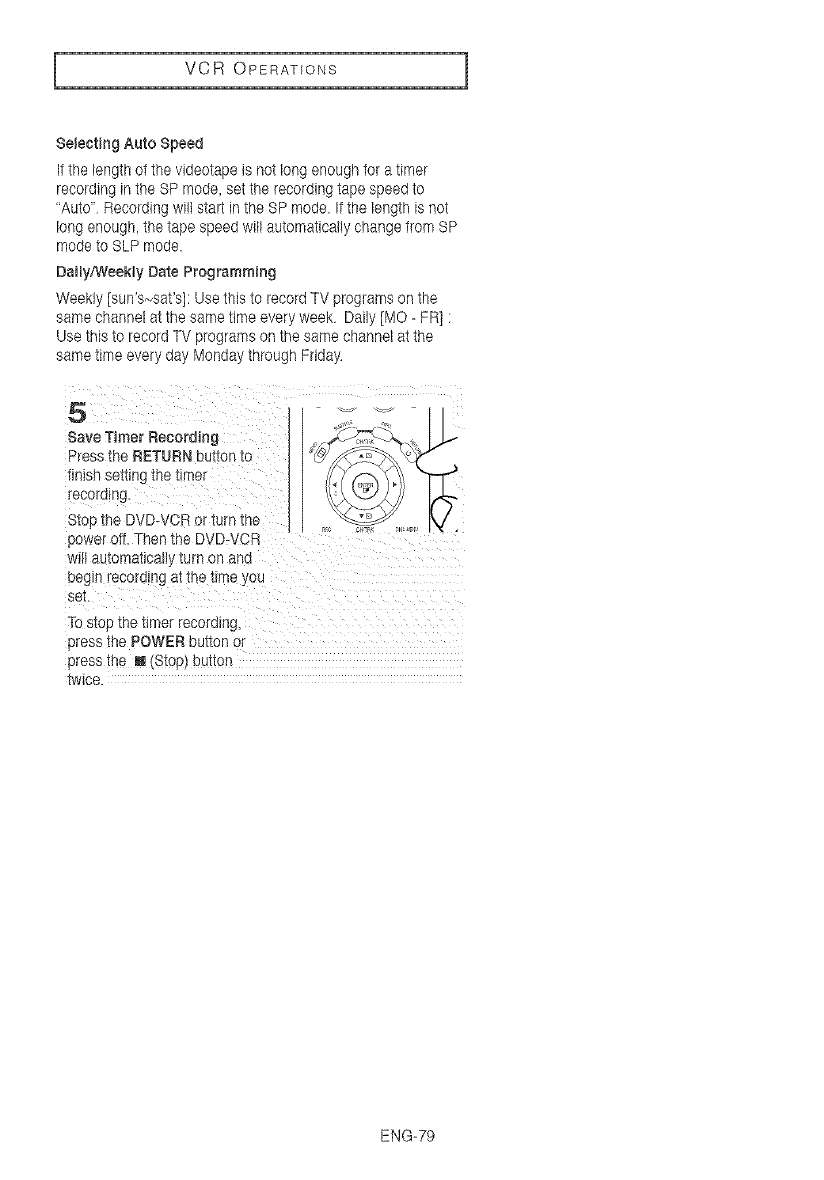
VCR OPERATIONS
Selecting Auto Speed
If the length of the videotape is not long enough for a timer
recording in the SP mode, set the recording tape speed to
"Auto Recording will start in the SP mode. II the length is not
long enough, the tape speed will automatically change trom SP
mode to SLP mode.
Daily/Weekly Date Programming
Weekly [sun'sNsat's]: Use this to record TV programs on the
same channel at the same time every week Daily [NO - FR] :
Use this to record TV programs on the same channel at the
same time every day Monday through Friday.
Save Timer Recording
Press the RETURN bu[ton lo
tlnlsh setting trle m_er
recoralng
Stop the DVD-VC£ or [urn me
3ower ( ft. Then the DVD-VOR
wlJlautomatma., [urn on and
eegm _ecoro_ngat me lime yoL
set.
To stop tr_etimer recoralnc
3ress the POWER outton o[
press the [] Stop button
twice
ENG-79
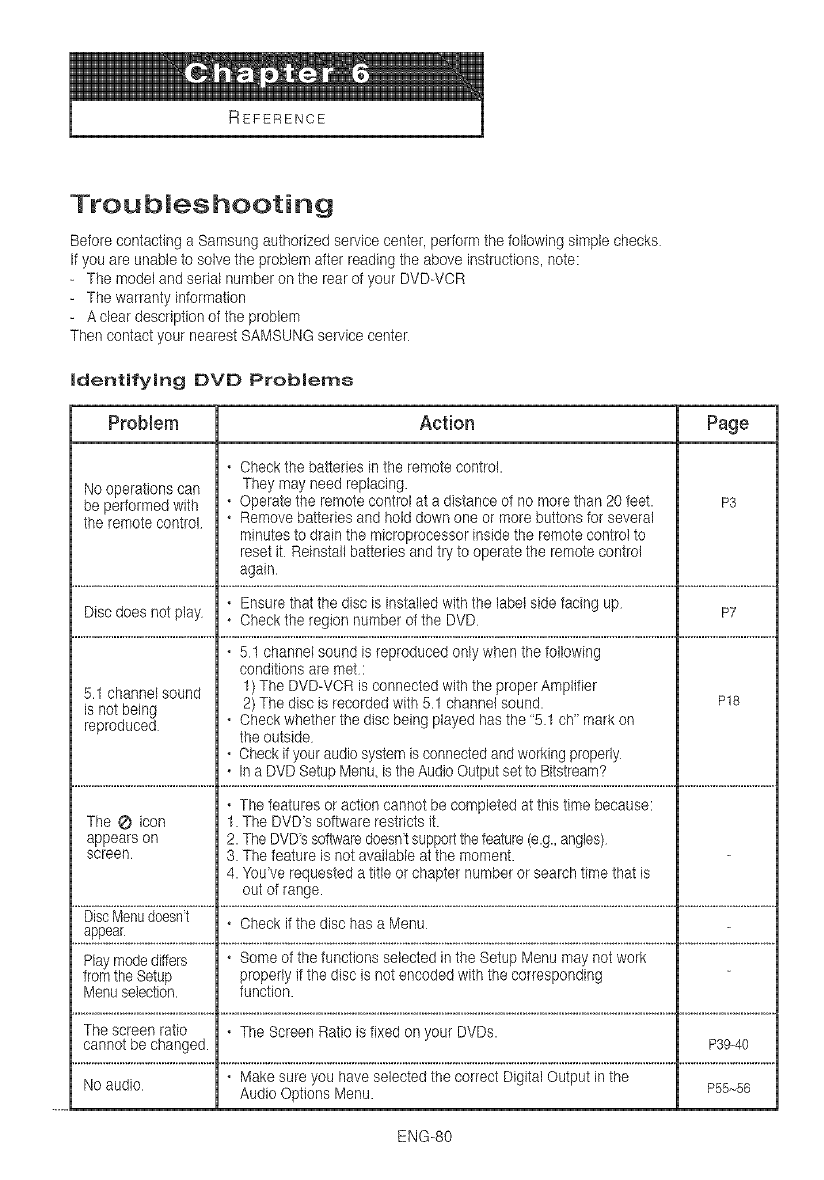
REFERENCE
Troubleshooting
Before contacting a Samsung authorized service center, perform the following simple checks
If you are unable to solve the problem after reading the above instructions, note:
-The model and serial number on the rear of your DVD-VCR
-The warranty information
-A clear description of the problem
Then contact your nearest SAMSUNG service center
identifying DVD Problems
Problem Action Page
.Check the batteries in the remote controt.
Nooperations can They may need replacing.
be performed with .Operate the remote control at a distance of no more than 20 feet. P3
the remote control .Remove batteries and hold down one or more buttons for several
minutes to drain the microprocessor inside the remote control to
reset it Reinstall batteries and try to operate the remote control
again
.Ensure that the disc is installed with the label side facing up P7
Disc does not play .Check the region number of the DVD
.51 channel sound is reproduced only when the following
conditions are met:
5.1 channel sound 1)The DVD-VOR is connected with the proper Amplifier
is not being 2) The disc is recorded with 5.1 channel sound. P18
reproduced .Check whether the disc being played has the "5.1 ch" mark on
the outside
.Check if your audiosystem is connected and working properly
.In a DVD Setup Menu, isthe Audio Output set to Bitstream?
.The features or action cannot be completed at this time because:
The @ icon 1. The DVDs software restricts it.
appears on 2. The DVDs softwaredoesn't supportthe feature (e.g.,angles)
screen 3. The feature is not available at the moment.
4. Youve requested a title or chapter number or search time that is
out of range.
DiscMenudoesnt .Check if the disc has a Menu
appear
Play modediners .Some of the functions selected in the Setup Menu may not work
from the Setup properly if the disc is not encoded with the corresponding
Menuselection, function.
The screen ratio .The Screen Ratio is fixed on your DVDs.
cannot be changed. P39-40
.Make sure you have selected the correct Digital Output in the
Noaudio Audio Options Menu. P55_56
ENG-80
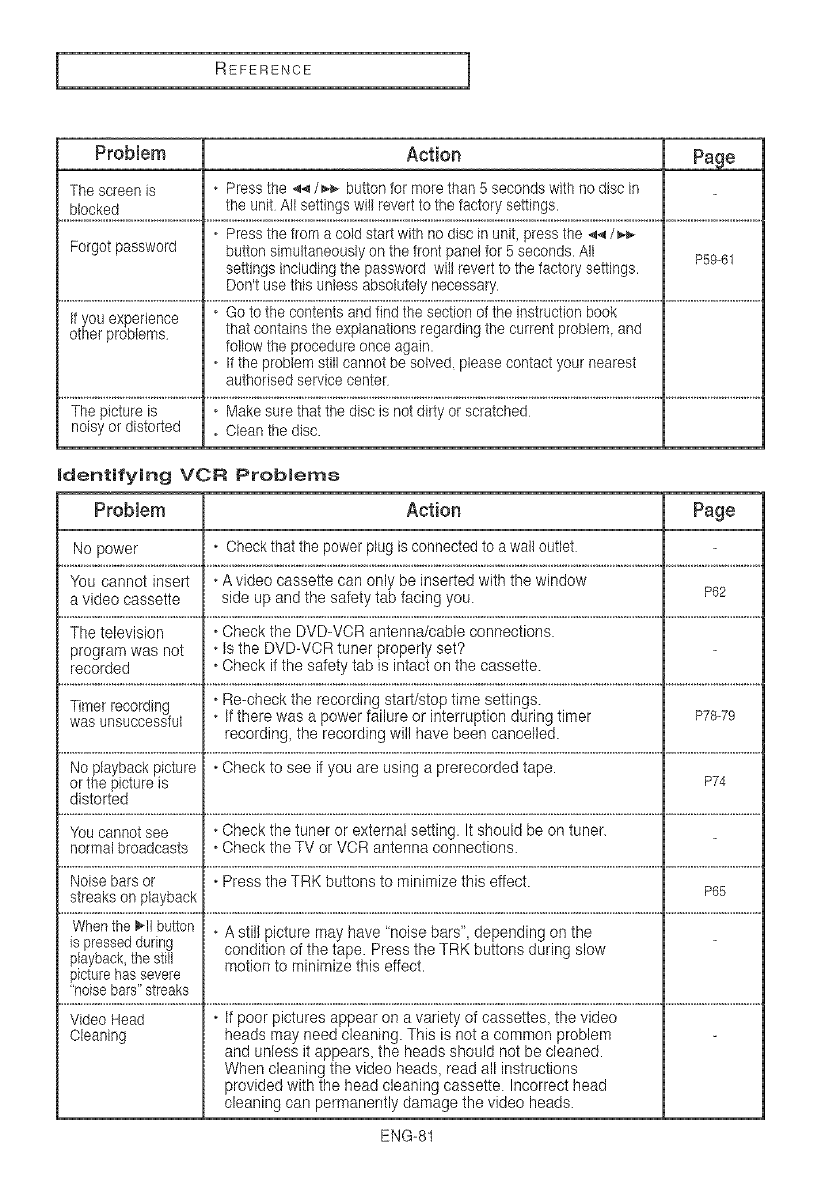
REFERENCE ]
Problem Action Page
The screen is • Press the 4._/_,_,_button for more than 5 seconds with no disc in
blocked the unit All settings will revert to the factory settings.
• Press the from a cold start with no disc in unit press the 44/_¢_
Forgot password button simultaneously on the front panel for 5 seconds. All P59-61
settings including the password will revert to the factory settings.
Don't use this unless absolutely necessary.
If you experience
other problems that contains the explanations regarding the current problem and
follow the procedure once again.
• If the problem still cannot be solved please contact your nearest
authorised service center
noisy or distorted . Clean the disc.
identifying VCR Problems
Problem Action Page
No power • Check that the power plug isconnected to a wall outlet
You cannot insert • A video cassette can only be inserted with the window
a video cassette side up and the safety tab facing you. P62
The television • Check the DVD-VCR antenna/cable connections.
program was not • is the DVD-VCR tuner properly set?
recorded • Check if the safety tab is intact on the cassette.
Timer recording • Re-check the recording start/stop time settings.
was unsuccessful • if there was a power failure or interruptionduring timer P78-79
recording, the recording wil! have been cancelled.
No playback picture • Check to see if you are using a prerecorded tape.
or the picture is P74
distorted
You cannot see • Check the tuner or external setting. It should be on tuner.
normal broadcasts • Check the TV or VCR antenna connections.
Noise bars or • Press the TRK buttons to minimize this effect.
streaks on playback P65
Whenthe _.11button • A still picture may have "noise bars", depending on the
is pressedduring condition of the tape. Press the TRK buttons during slow
playback,the still motion to minimize this effect.
picturehas severe
'noise bars"streaks
Cleaning heads may need cleaning. This is not a common problem
and unless it appears, the heads should not be cleaned.
When cleaning the video heads, read all instructions
provided with the head cleaning cassette. Incorrect head
cleaning can permanently damage the video heads.
ENG-81
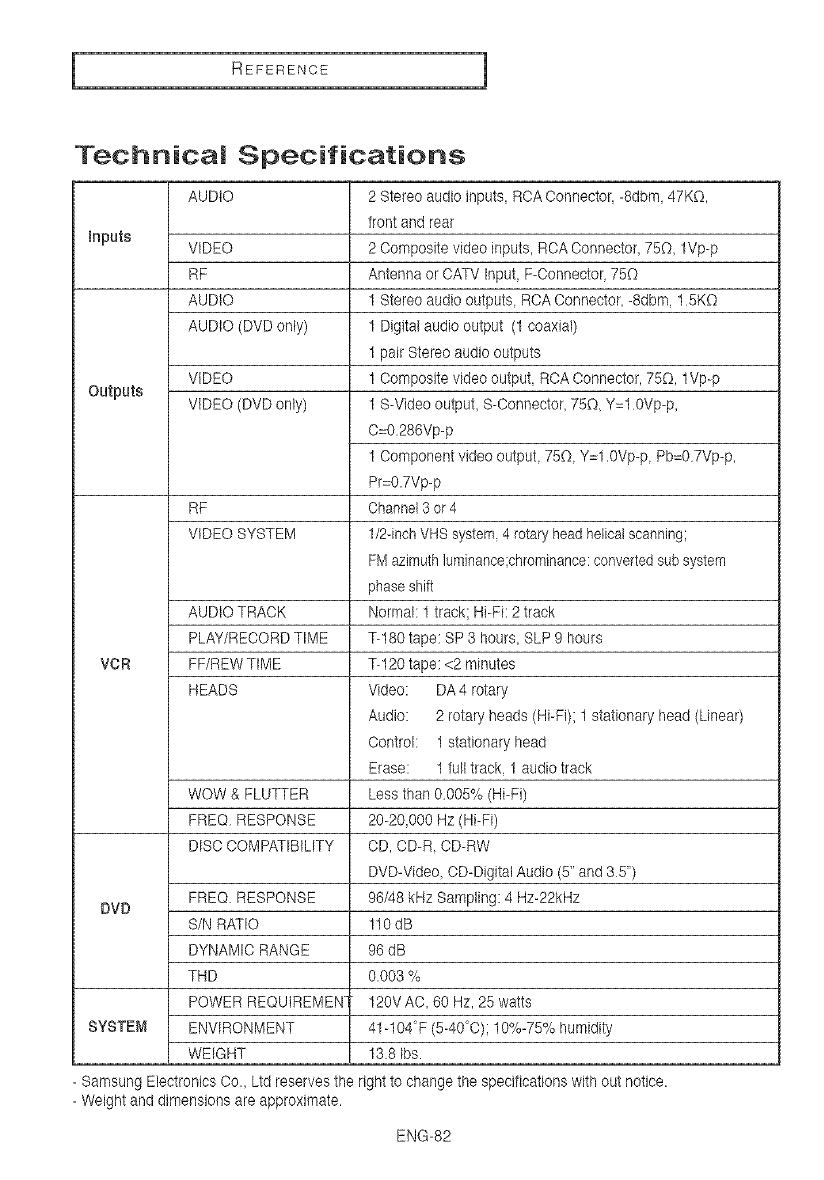
I REFERENCE 1
Technical Specifications
AUDIO 2 Stereo audio inputs ROA Connector -8dbm, 47K0,
front and rear
inputs VIDEO 20omposite video inputs, ROAOonnector, 750, 1Vp-p
RF Antenna or OATV Input, F-Oonnector, 750
AUDIO 1 Stereo audio outputs, ROA Oonnector, -8dbm 1 5KO
AUDIO (DVD only) 1 Digital audio output (1 coaxial)
1 pair Stereo audio outputs
VIDEO 10omposite video output ROAConnector, 750, 1Vp-p
Outputs VIDEO (DVD only) 1 S-Video output, S-Connector, 750 Y=I 0Vp-p,
C=0.286Vp-p
1 Component video output 750 Y=l.0Vp-p Pb=0 7Vp-p,
Pr=0.7Vp-p
RF Channel3 or4
VIDEO SYSTEM 1/2-inch VHS system 4 rotary head helical scanning;
FM azimuthluminance;chrominance:convertedsub system
phaseshift
AUDIO TRAOK Normal: 1 track; Hi-Fi: 2 track
PLAY/REOORD TIME %180 tape: SP 3 hours, SLP 9 hours
VOR FF/REW TIME %120 tape: <2 minutes
HEADS Video: DA 4 rotary
Audio: 2 rotary heads (Hi-Fi); 1 stationary head (Linear)
Control: 1 stationary head
Erase: 1 full track 1 audio track
WOW & FLUTTER Less than 0005% (Hi-Fi)
FREQ RESPONSE 20-20,000 Rz (Hi-Fi)
DISO COMPATIBILITY OD, OD-R OD-RW
DVD-Video, CD-Digital Audio (5" and 35")
FREQ RESPONSE 96/48 kHz Sampling: 4 Rz-22kHz
DVD S/N RATIO 110 dB
DYNAMIC RANGE 96 dB
THD 0.003 %
POWER REQUIREMEN 120V AC, 60 Rz, 25 watts
SYSTEM ENVIRONMENT 41-104'F (5-40°C); 10%-75% humidity
WEIGHT 13.8 Ibs.
-Samsung Electronics Co., Ltd reserves the right to change the specifications with out notice.
-Weight and dimensions are approximate.
ENG-82

I REFERENCE
Warranty
THIS SAMSUNG BRAND PRODUCT AS SUPPLIED AND DISTRIBUTED BY SAMSUNG ELECTRONICS
AMERIDA INO (SAMSUNG) AND DELIVERED NEW IN THE ORIGINAL OARTON TO THE ORIGINAL
CONSUMER PUROHASER IS WARRANTED BY SAMSUNG AGAINST MANUFAOTURING DEFEOTS IN
MATERIALS AND WORKMANSHIP FOR THE FOLLOWING LIMITED WARRANTY PERIOD:
One (1) Year Parts /Ninety (90) days Labor
This limited warranty begins on the original date of purchase and is valid only on products purchased and
used in the United States, and does not include transportation, installation, removal or reinstaltation
WARRANTY REPAIRS MUST BE PERFORMED BY SAMSUNG'S AUTHORIZED SERVlOE OENTER.
TO REDEIVE WARRANTY SERVICE, THE ORIGINAL DATED BILL OF SALE MUST BE PRESENTED UPON
REQUEST AS PROOF OF PUROHASE TO SAMSUNG OR SAMSUNG S AUTHORIZED SERVIOE OENTER
TRANSPORTATION TO AND FROM THE SERVIOE OENTER IS THE RESPONSIBILFY OF THE
PUROHASER.
SAtVlSUNGWILL REPAIR OR REPLADE THIS PRODUOT,AT OUR OPTION AND AT NO OHARGE WITH
NEW OR REOONDmONED PARTS, IF FOUND TO BE DEFECTIVE DURING THE LIMITED WARRANTY
PERIOD SPEOIFED ABOVE The product must be returned during the warranty period with transportation
charges prepaid to SAMSUNG's designated service center. Prior to returning any product for warranty
service, the purchaser must contact SAMSDNG for problem determination and service procedures.
SAMSUNG DOES NOT WARRANT UNINTERRUPTED OR ERROR-FREE OPERATION OF THE PRODUCT.
All replaced parts and products become the property of SAMSUNG and must be returned to SAMSUNG
Replacement parts and products assume the remaining original warranty, or ninety (90) days, whichever is
longer.
This limited warranty covers manufacturing defects in materials and workmanship encountered in normal
noncommercial use of this product and shall not apply to the following including, but not limited to: damage
which occurs in shipment; applications and uses for which this product was not intended; failures or problems
which are caused by products or equipment not supplied by SAMSDNG: accidents, misuse, abuse, neglect
misapplication, fire, water, lightning or other acts of nature: incorrect electrical line voltage fluctuations or
surges; damage caused by improper or faulty installation; improper connection with any peripheral; product
alteration or modification; improper or unauthorized repair; cosmetic damage or exterior finish: product with
altered serial numbers; failure to follow operating instructions, customer adjustments maintenance and
environmental instructions that are covered and prescribed in the instruction book; use of nomSAMSUNG or
unauthorized parts, supplies accessories or equipment which damage this product or result in service
problems; failures or problems due to incompatibility with other equipment.
ELECTRONICS
HEADQUARTERS
105 Chalienger Road
Ridgefield Park, NJ 07660=0511
TEL: I=800-SAMSUNG
SERVICE DiViSION
400 Valley Road, Suite 201
Mount Ariington, NJ 07856
1-800=SAMSUNG (1=800=726o7864)
www.samsung.oom
AK68-00593A=00
