Samsung DW80J7550UG/AA 0000 User Manual DISHWASHER Manuals And Guides 1508064L
User Manual: Samsung DW80J7550UG/AA-0000 DW80J7550UG/AA-0000 SAMSUNG DISHWASHER - Manuals and Guides View the owners manual for your SAMSUNG DISHWASHER #DW80J7550UGAA0000. Home:Kitchen Appliance Parts:Samsung Parts:Samsung DISHWASHER Manual
Open the PDF directly: View PDF ![]() .
.
Page Count: 72
h@F
manua
the possibilities
Thank you for purchasing this Sanqsung product
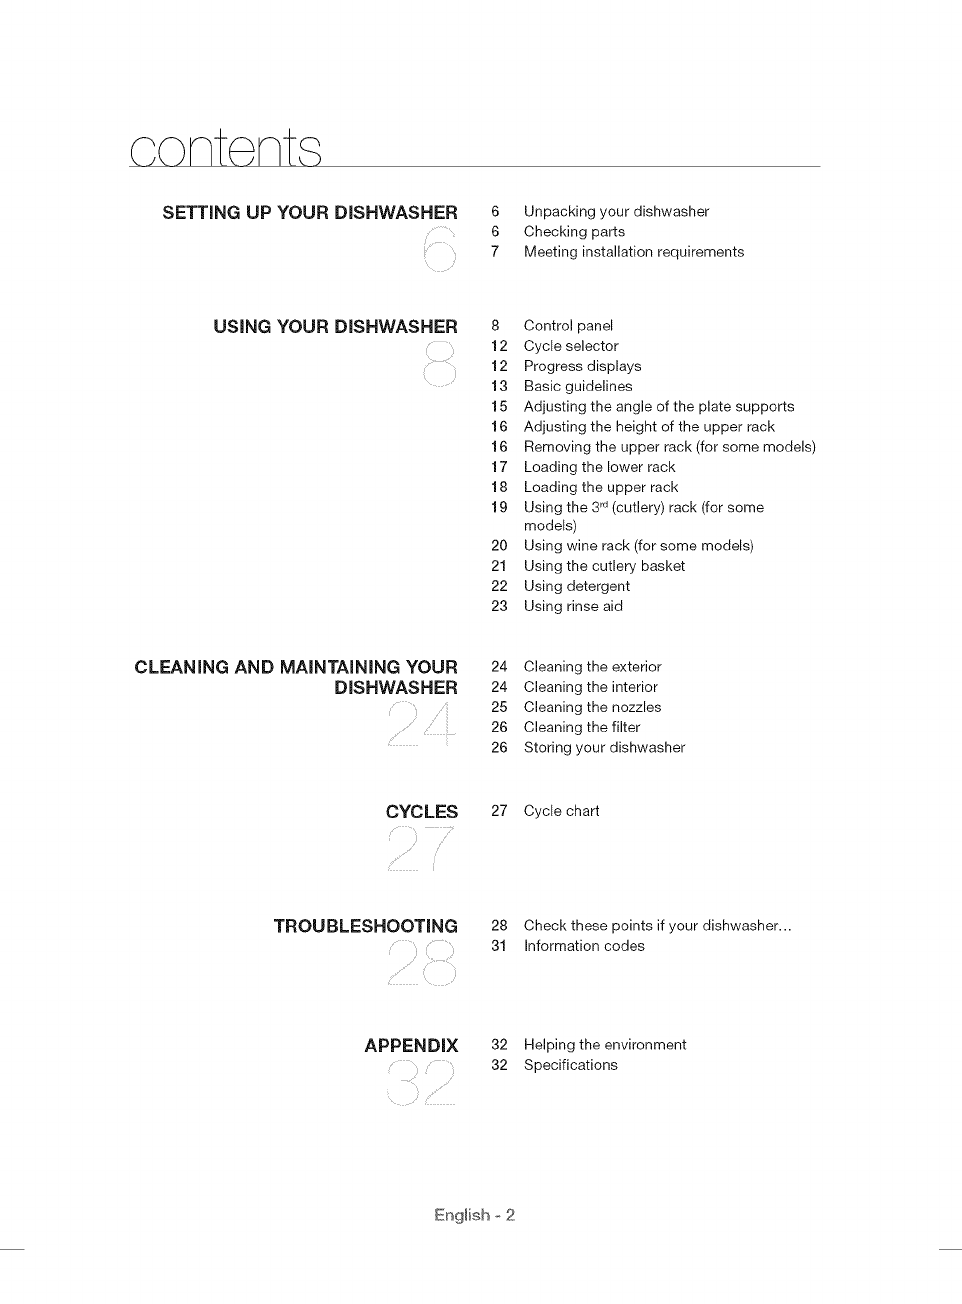
c ont nt,s
SETTING UP YOUR DISHWASHER 6 Unpacking your dishwasher
6 Checking parts
7 Meeting installation requirements
USING YOUR DISHWASHER 8 Control panel
12 Cycle selector
12 Progress displays
13 Basic guidelines
15 Adjusting the angle of the plate supports
16 Adjusting the height of the upper rack
16 Removing the upper rack (for some models)
17 Loading the lower rack
18 Loading the upper rack
19 Using the 3rd(cutlery) rack (for some
models)
20 Using wine rack (for some models)
21 Using the cutlery basket
22 Using detergent
23 Using rinse aid
CLEANING AND MAiNTAINiNG YOUR
DISHWASHER 24 Cleaning the exterior
24 Cleaning the interior
25 Cleaning the nozzles
26 Cleaning the filter
26 Storing your dishwasher
CYCLES 27 Cycle chart
TROUBLESHOOTING
i
28 Check these points if your dishwasher...
31 Information codes
APPENDIX
i
32 Helping the environment
32 Specifications
English ° 2
I I
,s f ty information
Congratulations on your new Samsung Dish washer. This manual contains important
information on the installation, use, and care of your appliance. Please take time to
read this manual to take full advantage of your washer's many benefits and features.
WHAT YOU NEED TO KNOW ABOUT THE SAFETY INSTRUCTIONS
Warnings and Important Safety Instructions in this manual do not cover all
possible conditions and situations that may occur. It is your responsibility to use
common sense, caution, and care when installing, maintaining, and operating
your washer.
IMPORTANT SAFETY INSTRUCTIONS
What the icons and signs in this user manual mean:
H_ards or unsafe practices that may result in severe personal injury or death.
Z_ [o reduce the risk of fire, explosion, electric shock, or personal injury when using
WARNING your washer, follow these basic safety precautions:
Z_ H_ards or unsafe practices that may result in minor personal injury or property
CAUTION damage,
Do NOT attempt.
_} Do NOT disassemble.
{_ Do NOT touch.
Follow directions explicity.
_:} Unplug the power plug from the wall socket.
Make sure the machine is grounded to prevent electric shock.
Call the service center for help.
Note
These warning signs are here to prevent injury to you and others.
Please follow them explicitly.
After reading this section, keep it in a safe place for future reference.
SAVE THESE INSTRUCTIONS
English o 3
,s f ty information
ik WARNING : When using your dishwasher, follow basic precautions, including the following:
WARNNNt_
t. Read all instructions before using the dishwasher.
2. Use the dishwasher only for its intended function.
3. Use only detergents or wetting agents recommended for use in a dishwasher and keep them
out of the reach of children.
4. When loading items to be washed:
locate sharp items so that they are not likely to damage the door seal, and
load sharp knives with the handles up to reduce the risk of cut-type injuries.
5. Do not wash plastic items unless they are marked "dishwasher safe" or the equivalent. For
plastic items not so marked, check the manufacturer's recommendations.
6. Do not touch the HEATING ELEMENT during or immediately after use.
7. Do not operate your dishwasher unless all ENCLOSURE panels are properly in place.
8. Do not tamper with controls.
9. Do not abuse, sit on, or stand on the door or dish rack of the dishwasher.
t0. To reduce the risk of injury, do not allow children to play in or on a dishwasher.
t 1. Under certain conditions, hydrogen gas may be produced in a hot-water system that has
not been used for two weeks or more. HYDROGEN GAS IS EXPLOSIVE. If the hot-water
system has not been used for such a period, before using the dishwasher turn on all hot-
water faucets and let the water flow from each for several minutes. This will release any
accumulated hydrogen gas. As the gas is flammable, do not smoke or use an open flame
during this time.
t2. Remove the door to the washing compartment when removing an old dishwasher from
service or discarding it.
/_ WARNING:
wA,_-'_.,.This product contains chemicals known to the State of California to cause cancer and
reproductive toxicity.
o
oAuTnoN O
O
O
O
O
O
O
After unpacking the dishwasher, keep the packaging out of the reach of children.
The dishwasher is extremely heavy. Do not attempt to move or carry the dishwasher by
yourself. Two or more people are needed to move a dishwasher and avoid potential injuries.
As with any equipment using electricity, water, and moving parts, potential hazards exist.
Do not install the dishwasher near electrical components. Keep the dishwasher away from
open flames.
Install and level your dishwasher on an uncarpeted floor that can support its weight.
Your dishwasher must be properly grounded. Never connect it to an ungrounded outlet. See
page 7 for more information on grounding your dishwasher.
Connect the ground wire to the green ground connector in the terminal box.
After the dishwasher is installed, check that the drain hose is properly connected and
that there is no leakage from the hose connectors. If the drain hose is loose, it may cause
property damage.
The water supply line is susceptible to breakage. As time goes by, it becomes less flexible.
Check the line periodically. If it is swollen, torn, cut, or there is a water leak, replace it
immediately.
To safely operate this appliance, familiarize yourself with its operations and exercise care
when using it.
SAVE THESE INSTRUCTIONS
English o 4
• Do not put gasoline, solvents, or other flammable materials inside the dishwasher. Do not
wash dishes exposed to these materials.
o Keep your dishwasher detergent out of the reach of children. Detergent has an adverse
effect on human organs. It contains elements for polishing and is corrosive. Avoid letting the
detergent come into contact with your skin and eyes.
o Do not push or place pressure on the door when it is open, as this may damage the
dishwasher or cause harm.
Do not allow children to play in or on the dishwasher. They may harm themselves or damage
the dishwasher.
Disconnect the power cable (or set the circuit breaker to off) before servicing your
dishwasher.
o Do not repair, replace, or service any part of your dishwasher yourself. Disassembly, repairs,
and modifications are permitted by authorized service technicians only. Work done by an
unauthorized person may void your warranty.
Before disposing of your dishwasher, remove the door of the washing compartment or the
door latch so that children or small animals cannot get trapped inside.
If the dishwasher is left unused for an extended period of time, turn off the water supply.
This dishwasher is intended for residential use only.
BEFORE USING YOUR DISHWASHER
Z_ WARNING
WARNING
_Tip-Over Hazard
Do not use the dishwasher until it is correctly installed.
Do not push down on an open door.
Do not place excessive weight on the open door.
Electric Shock Hazard
Failure to follow these instructions can result in death, fire, or electric shock:
Electrically ground the dishwasher
Connect the ground wire to the green ground connector in the junction box.
Do not use an extension cord.
SAVE THESE iNSTRUCTiONS
English o 5
Be sure to have your installer follow these instructions closely so that your new
dishwasher works properly and that you're not at risk of injury when washing
dishes.
UNPACKING YOUR DISHWASHER
o Once your new dishwasher has been delivered to you, carefully unpack it and check for any damage.
If the dishwasher has been damaged, make note of it on the waybill and keep a copy.
Do not install the dishwasher, and contact Samsung Customer Service at the number listed below.
• If there is no damage to the product, you can proceed with the installation. If you are going to install it
yourself, make sure to read through the installation guide and follow the directions inside.
• After unpacking your dishwasher, keep the packaging out of the reach of children to ensure their safety.
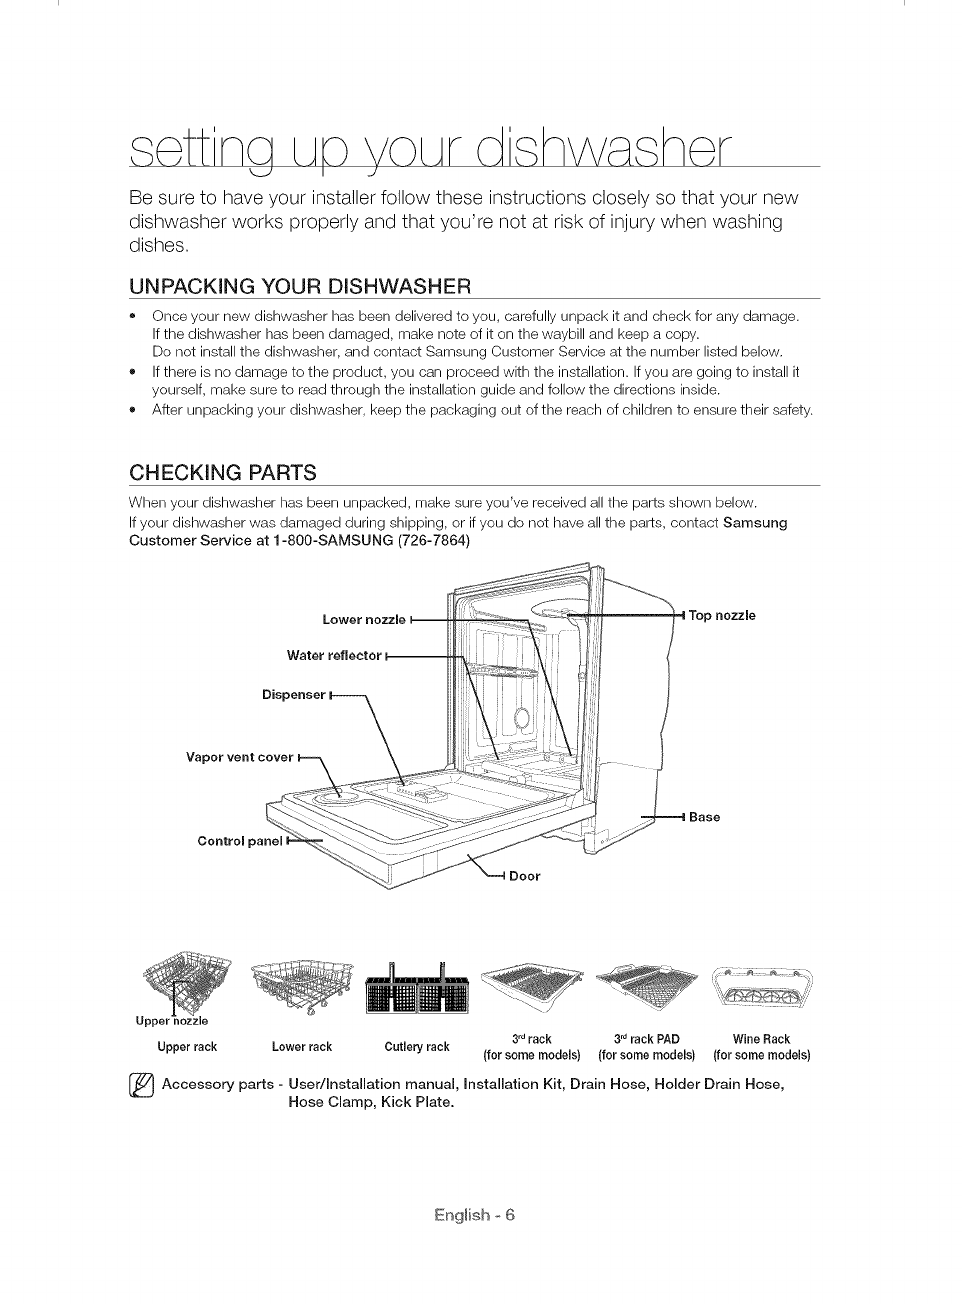
CHECKING PARTS
When your dishwasher has been unpacked, make sure you've received all the parts shown below.
If your dishwasher was damaged during shipping, or if you do not have all the parts, contact Samsung
Customer Service at 1-800-SAMSUNG (726-7864)
Waterrefleetor--
3 nozzle
Control panel I
3rdrack 3rdrack PAD Wine Rack
Upper rack Lower rack Cutlery rack (for some models) (for some models) (for some models)
(_ Accessory User/Installation manual, installation Kit, Drain Hose, Holder Drain Hose,
parts i
Hose Clamp, Kick Plate.
English o 6
MEETING iNSTALLATiON REQUIREMENTS
@
Electrical supply and grounding
To prevent the risk of fire, electric shock, or personal injury, all wiring and grounding must be
done in accordance with the National Electrical Code ANSI/FNPA, No. 70 Latest Revision and
local codes and ordinances. It is the personal responsibility of the appliance owner to provide
adequate electrical service for this appliance.
/_ Never use an extension cord.
....... When preparing for installation, ensure that your power supply provides:
o An individual 120 Volt, 60Hz branch circuit serving only your dishwasher with a 15 AMP fuse
or circuit breaker
Your dishwasher must be grounded. If your dishwasher malfunctions or breaks down, grounding
will reduce the risk of electric shock by providing a path of least resistance for the electric
current.
Never connect the ground wire to plastic plumbing lines, gas lines, or hot water pipes.
WARNINe
GROUNDING INSTRUCTIONS
For a permanently connected appliance:
This appliance must be connected to a grounded metal, permanent wiring system, or an
equipment-grounding conductor must be run with the circuit conductors and then connected to
the equipment-grounding terminal or lead on the appliance.
Water supply
The hot water supply line pressure must be between 20 - 120 psi (140 - 830 kPa).
Adjust the water heater to deliver water between 120 °F (49 °C) _ 149 °F (65 °C).
[_ ost plumbing supply stores sell water supply lines of various lengths up to 10 feet
(305 cm)long.
You can reduce the risk of leaks and water damage by:
o Making water faucets easily accessible.
Turning off faucets when the dishwasher is not in use.
Periodically checking for leaks at water supply line fittings.
A Before using your dishwasher for the first time, check all connections at the water supply valve
......._ and faucets for leaks.
Flooring
For safety, your dishwasher must be installed on a solidly constructed floor.
Never install your dishwasher on a platform or poorly supported structure.
Your dishwasher must be properly installed in accordance with the Installation Guide before you use it.
If you did not receive an Installation Guide with your dishwasher, you can obtain one by visiting our website
at www.samsung.com.
English o 7
/_k WARNING: To reduce the risk of fire, electric shock, or injury to persons, read the IMPORTANT
......._ SAFETY INSTRUCTIONS before operating this appliance.
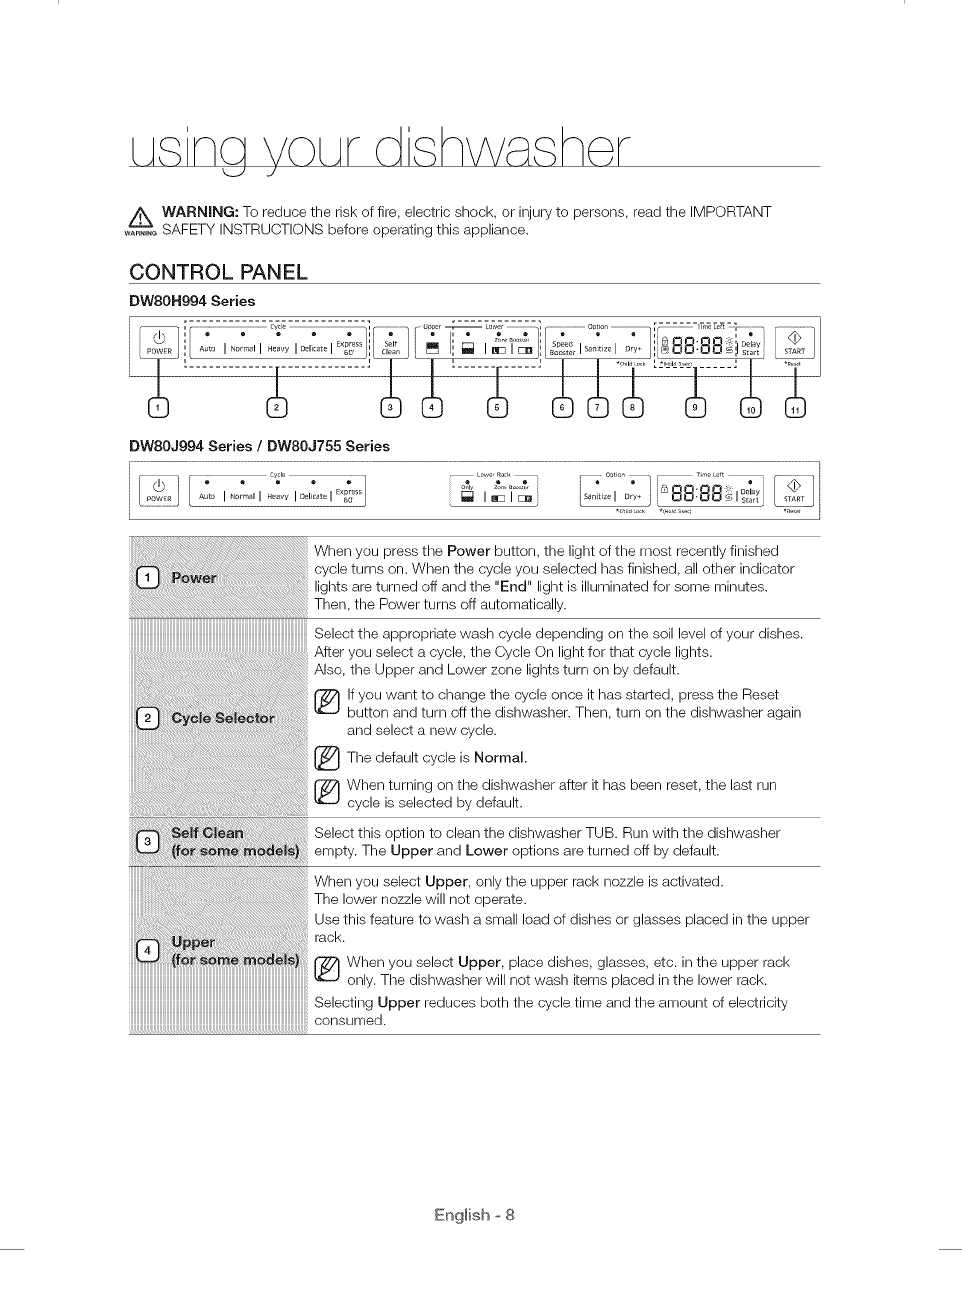
CONTROL PANEL
DW80N994 Series
" ....................................................- -- - - -- _:_ ............ " up_e --[_ Lower ] .......................................o_io_, [ _'_57_..........................
DWSOJ994 Series /DWSOJ755 Series
When you press the Power button, the light of the most recently finished
cycle turns on. When the cycle you selected has finished, all other indicator
turned off and the "End" light is illuminated for some minutes.
the Power turns off automatically.
IIIIIIIIIIIIIIIIIIIIIIIIIIIIIIIIIIIIIIIIIIIIIIIIIIIIIIIIIIIIIIIIIIIIIIIIIIIIIIIIIIIIIIIIIIIIIIIIIIIII_
Select the appropriate wash cycle depending on the soil level of your dishes•
select a cycle, the Cycle On light for that cycle lights.
Also, the Upper and Lower zone lights turn on by default•
r_ if you want to change the cycle once it has started, press the Reset
button and turn off the dishwasher. Then, turn on the dishwasher again
and select a new cycle•
The default is Normal.
cycle
When turning on the dishwasher after it has been reset, the last run
cycle is selected by default•
Select this option to clean the dishwasher TUB. Run with the dishwasher
empty• The Upper and Lower options are turned off by default.
When you select Upper, only the upper rack nozzle is activated•
The lower nozzle will not operate•
Use this feature to wash a small load of dishes or glasses placed in the upper
rack
@ When you select Upper, place dishes, glasses, etc. in the upper rack
only. The dishwasher will not wash items placed in the lower rack.
Selecting Upper reduces both the cycle time and the amount of electricity
consumed•
English o 8
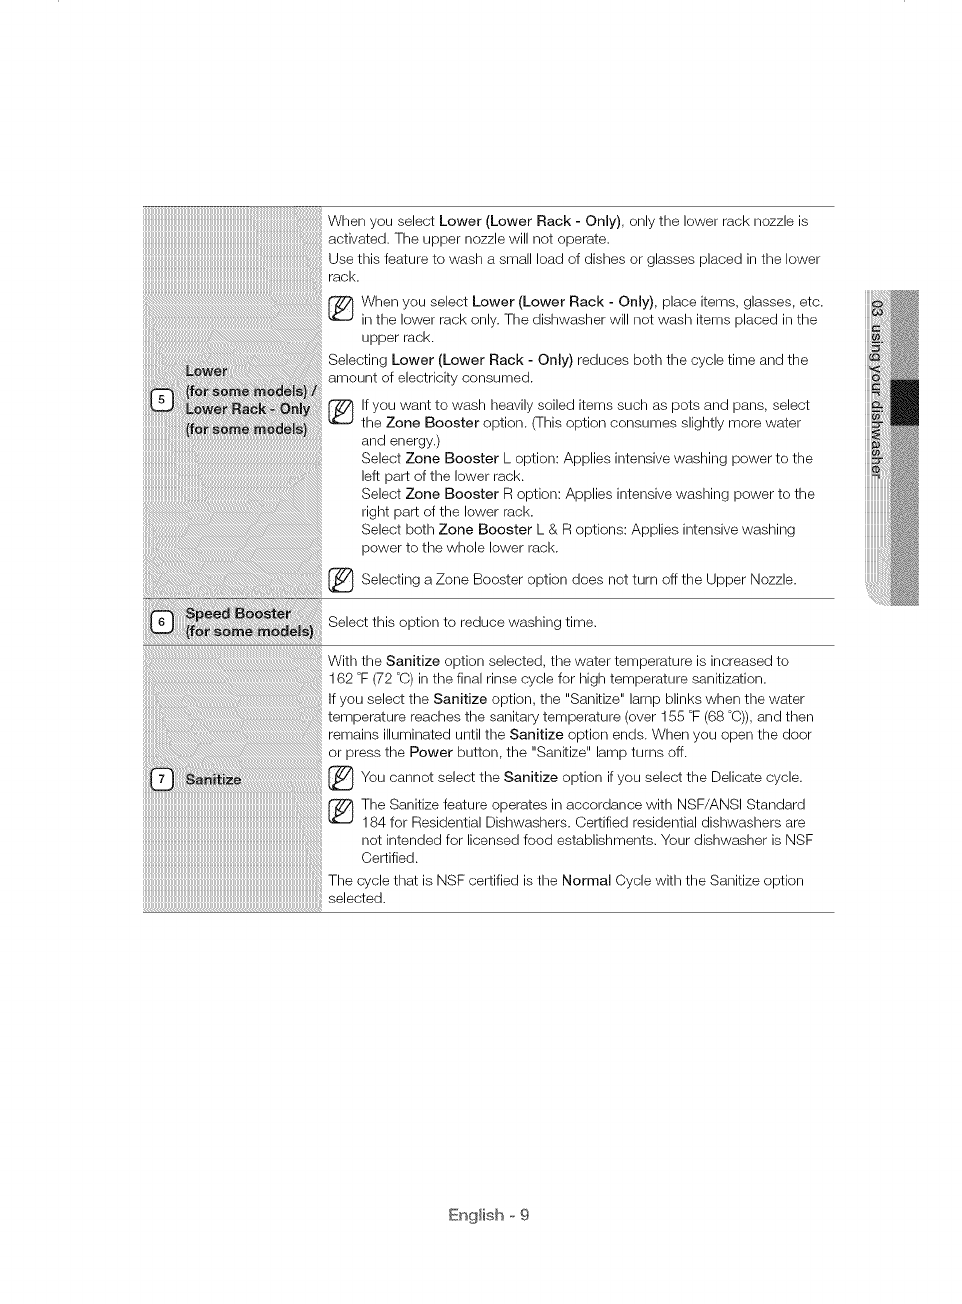
When you select Lower (Lower Rack - Only), only the lower rack nozzle is
activated. The upper nozzle will not operate.
Use this feature to wash a small load of dishes or glasses placed in the lower
rack.
(_ hen you select Lower (Lower Rack - Only), place items, glasses, etc.
in the lower rack only. The dishwasher will not wash items placed in the
upper rack.
Selecting Lower (Lower Rack - Only) reduces both the cycle time and the
amount of electricity consumed.
lf you want to wash heavily soiled items such as pots and pans, select
the Zone Booster option. (This option consumes slightly more water
and energy.)
Select Zone Booster L option: Applies intensive washing power to the
left part of the lower rack.
Select Zone Booster R option: Applies intensive washing power to the
right part of the lower rack.
Select both Zone Booster L & R options: Applies intensive washing
power to the whole lower rack.
_ Selecting a Zone Booster option does not turn off the Upper Nozzle.
Select this option to reduce washing time.
With the Sanitize option selected, the water temperature is increased to
162 °F (72 °C) in the final rinse cycle for high temperature sanitization.
If you select the Sanitize option, the "Sanitize" lamp blinks when the water
temperature reaches the sanitary temperature (over 155 °F (68 °C)), and then
remains illuminated until the Sanitize option ends. When you open the door
or press the Power button, the "Sanitize" lamp turns off.
_You cannot select the Sanitize if select the Delicate
option cycle.you
The Sanitize feature operates in accordance with NSF/ANSI Standard
184 for Residential Dishwashers. Certified residential dishwashers are
not intended for licensed food establishments. Your dishwasher is NSF
Certified.
The cycle that is NSF certified is the Normal Cycle with the Sanitize option
selected.
English o 9
Use this option when you want to dry your dishes more completely.
The temperature rises to 162 °F (72 °C) in the final rinse cycle and dry time is
increased.
If you select the this option, electricity consumption is increased.
The next time you use the dishwasher, the Dry+ option will be selected
automatically and applied to the next cycle. You can turn off the Dry+ option
by pressing the Dry+ button.
I_You cannot select the if select the Delicate
Dry+ option you cycle.
*Child Lock : This option allows you to lock the buttons on the control panel -
except the Power button - so children cannot accidently start the dishwasher
by pressing the buttons on the panel. Only the Power button remains active.
To lock or unlock the buttons on the control panel, press and hold the
Dry+/Child Lock button for three (3) seconds.
When the Power is On : Press and hold the "Dry+/Child Lock" button for
three (3) seconds.
When the Power is Off : Push the Power button first, and then press and
hold the "Dry+/Child Lock" button for three (3) seconds.
Child Lock remains active until you turn it off. You cannot select cycles or
options or start the dishwasher when Child Lock is on.
IIIIIIIIIIIIIIIIIIIIIIIIIIIIIIIIIIIIIIIIIIIIIIIIIIIIIIIIIIIIIIIIIIIIIIIIIIIIIIIIIIIIIIIIIIIIIIIIIIIIIIIIIIIIIIII_
Displays cycle time and remaining hours and minutes, Delay Start hours, and
Information codes.
If a problem occurs during operation, an information code appears with a
............................................................................................................................warning sound.
Refer to the information codes page.
i_ Child Lock indicator
[iJrns on if the Child Lock is set (or the dishwasher is in the standby or
pause modes).
[iJrns off while the dishwasher is operating.
When Child Lock is on, the Child Lock indicator blinks for several
seconds if any button except the Power button is pressed.
(for some models)
Self Clean indicator
[iJrns on when the Self Clean option is enabled (or the dishwasher is
in the standby or pause modes), but turns off while the dishwasher is
operating.
Blinks[or secondsevery20to22cycles,
The cycle counter disappears when the Self Clean operation is complete
or when the dishwasher reaches the 23rd cycle without the Self Clean
cycle being used. ([he Reset or Self Clean operation is not counted by
the cycle counter.)
-:J'-'- Rinse Refill indicator
[iJrns on if the dishwasher runs out of rinse aid (or the dishwasher is in
the standby or pause modes).
[iJrns off while the dishwasher is operating.
English o 10
_Lack of salt indicator models(*applicable only)
Turns on when the water softener runs out of salt. (or the dishwasher is
in the standby or pause modes.)
fi_rns off while the dishwasher is operating.
Delay a cycle for up to 24 hours in one-hour increments. To increase the delay
start time, press or hold the Delay Start button. The hour displayed indicates
the time at which the wash will be started.
After setting the delay time, press the Start button, and then close the
door to start the cycle.
If you want to change the delay time once the dishwasher has started,
press the Reset button and turn off the dishwasher. Then, turn on the
dishwasher again and select a new cycle with a new delay setting.
To start a cycle, press the Start button before closing the door.
*Reset : To cancel a currently running cycle and drain the dishwasher, press
and hold the Start button for three (3)seconds.
Once the dishwasher is reset, select a cycle and option, and then press Start
to restart the dishwasher.
You can select options (Self Clean, Upper, Lower, Speed Booster, Sanitize, Dry+, Delay Start) before
starting a cycle. If you change the cycle after selecting an option, the original cycle is reset.
_To prevent touchpad losing response sensitivity,
the from follow these instructions:
Touch the center of each keypad using one finger. Do not push.
Clean the touch control's surface regularly with a soft, damp cloth.
Be careful not to touch more than one touch key pad at a time, except as directed.
When you pause a cycle by opening the door during operation, press the Start button before closing
the door to continue the cycle.
English o 11
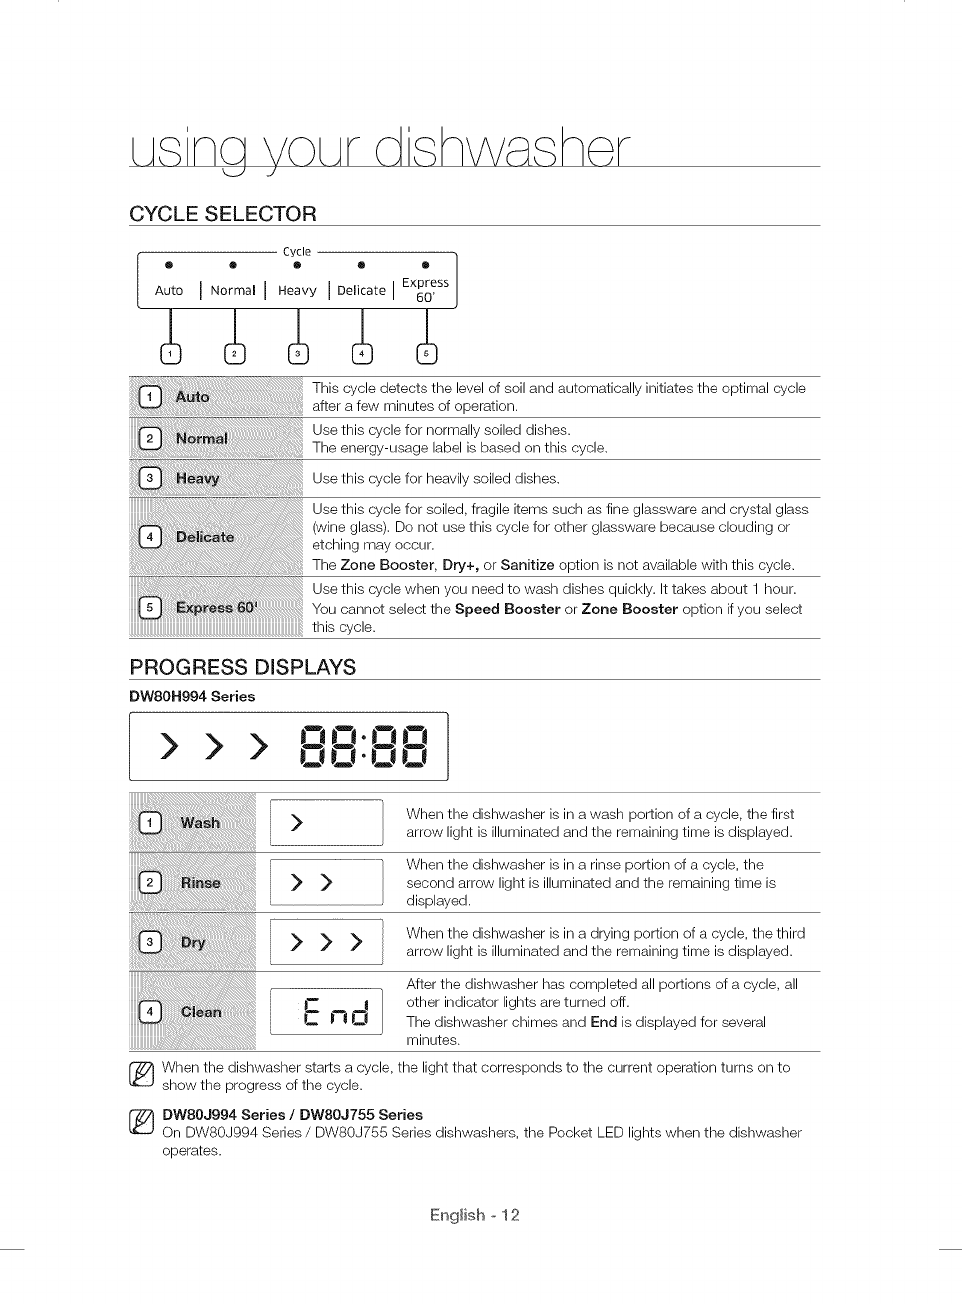
CYCLE SELECTOR
i Cycle ]
® 0 ® Q ®
Auto I N°rmal I Heavy I Delicate I Express
60'
This cycle detects the level of soil and automatically initiates the optimal cycle
after a few minutes of operation.
Use this cycle for normally soiled dishes.
The energy-usage label is based on this cycle.
Use this cycle for heavily soiled dishes.
Use this cycle for soiled, fragile items such as fine glassware and crystal glass
(wine glass). Do not use this cycle for other glassware because clouding or
etching may occur.
The Zone Booster, Dry+, or Sanitize option is not available with this cycle.
Use this cycle when you need to wash dishes quickly. It takes about 1 hour.
You cannot select the Speed Booster or Zone Booster option if you select
this cycle.
PROGRESS DISPLAYS
DW80H994 Series
> > >
>
00-00
>>>
When the dishwasher is in a wash portion of a cycle, the first
arrow light is illuminated and the remaining time is displayed.
When the dishwasher is in a rinse portion of a cycle, the
second arrow light is illuminated and the remaining time is
displayed.
When the dishwasher is in a drying portion of a cycle, the third
arrow light is illuminated and the remaining time is displayed.
After the dishwasher has completed all portions of a cycle, all
other indicator lights are turned off.
The dishwasher chimes and End is displayed for several
minutes.
[_ hen the dishwasher starts a cycle, the light that corresponds to the current operation turns on to
show the progress of the cycle.
[_ BWSOJ994 Series /DW80J755 Series
On DW80J994 Series /DW80J755 Series dishwashers, the Pocket LED lights when the dishwasher
operates.
English o 12
BASIC GUIDELINES
1. Open the door and load your dishes (see page 17 - 21).
Place dishes into the upper and lower racks, unless you have selected the Upper or Lower
(Lower Rack - Only) option.
Remove any food remains from the dishes before placing them in the rack(s).
After placing the dishes into the racks, turn the upper nozzles to make sure none of the dishes will
block nozzle rotation.
Make sure the dishes will not prevent the detergent dispenser from opening.
2o Add detergent to the dispenser (see page 22).
Make sure to use only automatic dishwasher detergent.
Refer to "Using detergent" on how to add detergent.
3. Press the Power button.
When you press the Power button, the cycle light of the most recently finished cycle lights up.
If "Rinse Refill" Indicator is illuminated, you should refill the rinse aid dispenser to improve washing
and drying performance.
4. Select an appropriate cleaning cycle depending on the soil level of the dishes. (see pages 12 and 27).
Press the appropriate Cycle button.
When you press a Cycle button, the cycle indicator light is illuminated.
For information about selecting a cycle according to the soil level of the dishes, see "Cycle
selector".
5. Press the Start button, and then close the door.
Push the racks back so that they are in place, and then press the Start button and close the door.
Make sure to close the door firmly. If the door is slightly ajar, the selected cycle will not start
automatically.
The dishwasher will start draining after a few seconds, and then start the cycle you selected.
6. When the wash cycle is completed.
The "End" light illuminates and the dishwasher sounds a chime.
The power is automatically turned off after a few minutes.
/_ If you want to load more dishes or pause the dishwasher while it is already running, make sure to open
OAO"--_",T,Othe door slowly and carefully as there is a possibility of injury from the hot steam or water inside the
dishwasher.
(If the door is opened while the dishwasher is running, a safety mechanism is activated and stops the
cycle.) To resume operation, press the Start button, and then close the door.
Note that adding dishes several minutes after the dishwasher started operating may affect the
performance.
You should use rinse aids for better drying performance. You can further improve drying performance
by also selecting the Dry+ option.
English o 13
Touch Controls
Touch controls allow you to operate the dishwasher easily.
o They are convenient to operate, requiring only a soft touch.
• Have a simple and stylish design.
• Are easy to clean.
If you have children or you want to clean the Control Interface, we recommend activating
the Child Lock feature to lock the control buttons.
Children will not be able to accidently start the dishwasher by touching the controls with
this option selected.
If a cycle is running, the buttons will not respond. (except the Power button and
Child Lock & Reset options)
If dishwasher is off, only the Power button responds.
Delay Start
When you select the Delay Start option, your dishwasher will begin the selected cycle when the
delay time expires.
The Water Reflector interference Alarm:
• The water reflector interference feature automatically detects obstacles in the tub. If it detects
an obstacle, the display blinks and the dishwasher chimes for several minutes. If an obstacle
is detected at the end a cycle, End blinks for several minutes.
• Remove any obstacles in the bottom of the dishwasher.
Setting Mode
The Setting Mode lets you change the dishwasher's sound setting and LED brightness setting.
To enter the Setting mode, press the Delay Start + Sanitize buttons for 3 seconds while
the dishwasher is on. Press the Sanitize button to select a sub-setting menu and press the
Delay Start button to change a setting.
Sound Setting: Press the Sanitize button until "S on" or "SoFF" is displayed. To change
the setting, press the Delay Start button. "SoFF" means that the sound is off for all cycles.
The dishwasher maintains the Sound Setting you have selected until you change it.
Pocket LED Brightness Setting: Press the Sanitize button until "B0 - BS" is displayed.
The higher the number, the brighter the LEDs. To change the setting on an DW80J994
Series /DW80J755 Series dishwasher, press the Delay Start button.
When using the dishwasher, try to arrange the dishes properly as described on page 16.
WARNING
You should remove food remains such as bones, fruit seeds, etc. and any other waste such
as toothpicks, paper, etc. from the dishes as these may cause damage to the dishes, create
noise, or cause the dishwasher to malfunction.
• Select the appropriate cycle depending on the level of soil and the type of dishes.
• Use only the proper amount of detergent and rinsing agent.
Do not wash the following items
WARNING
Acrylic or Aluminum items: Acrylic and aluminum items can discolor dishes with printed
gold rim decoration and mar other items.
• Dishes treated with adhesive: Treaied plastics can come apart. Wood, ivory, copper, and tin
glued to dishes can come loose.
Plastics with a temperature tolerance less than 194 °F (90 °C): Thin plastics wash and dry
poorly, and may be damaged by elevated wash temperatures.
• Tin: Tin should be washed by hand and dried immediately as it can rust.
• Wooden utensils: Wooden items can crack.
English o 14
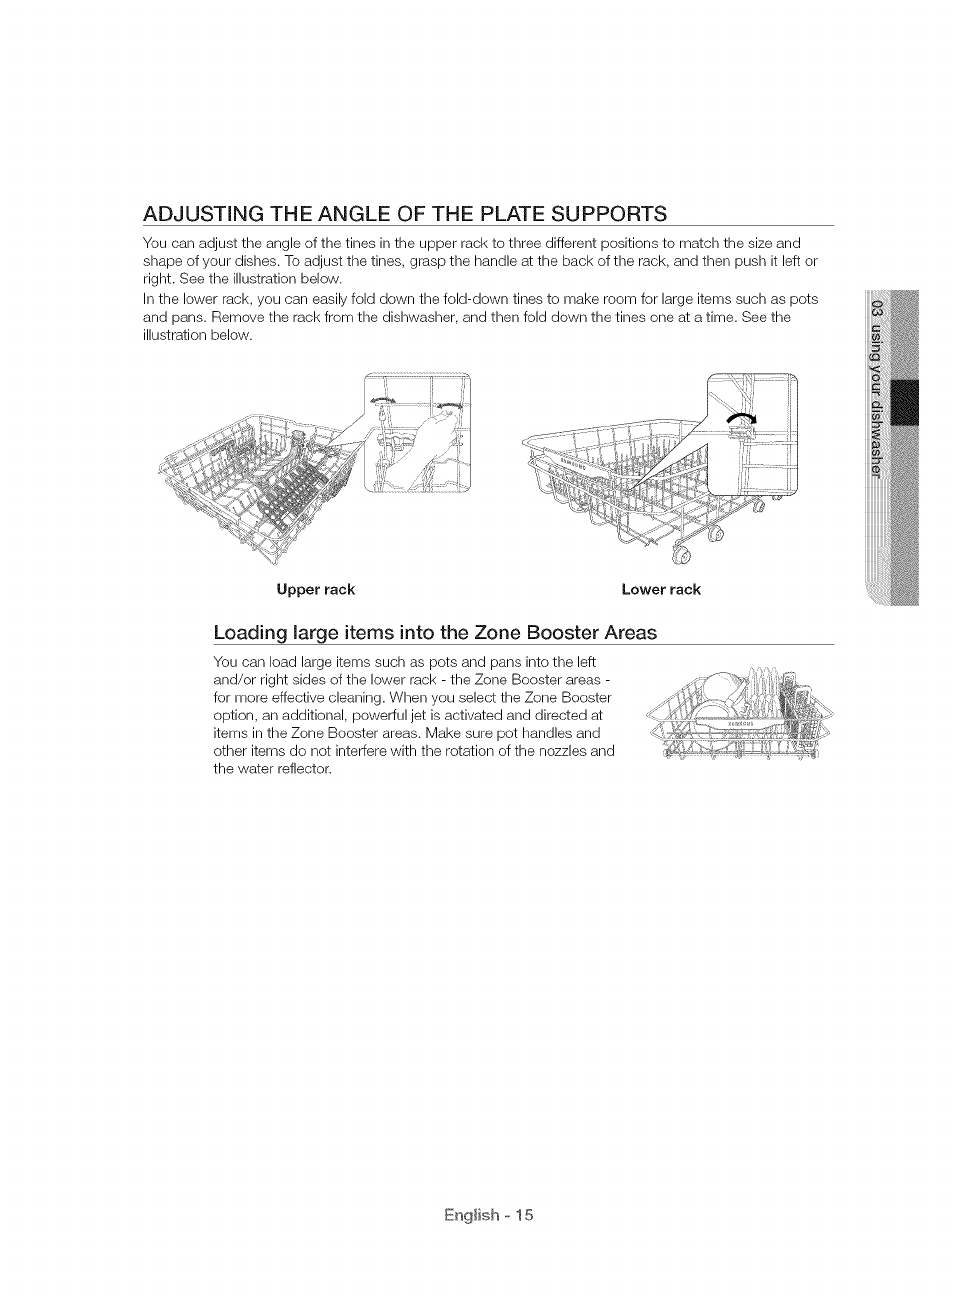
ADJUSTING THE ANGLE OF THE PLATE SUPPORTS
You can adjust the angle of the tines in the upper rack to three different positions to match the size and
shape of your dishes. To adjust the tines, grasp the handle at the back of the rack, and then push it left or
right. See the illustration below.
In the lower rack, you can easily fold down the fold-down tines to make room for large items such as pots
and pans. Remove the rack from the dishwasher, and then fold down the tines one at a time. See the
illustration below.
Upper rack Lower rack
Loading large items into the Zone Booster Areas
You can load large items such as pots and pans into the left
and/or right sides of the lower rack - the Zone Booster areas -
for more effective cleaning. When you select the Zone Booster
option, an additional, powerful jet is activated and directed at
items in the Zone Booster areas. Make sure pot handles and
other items do not interfere with the rotation of the nozzles and
the water reflector.
English o 15
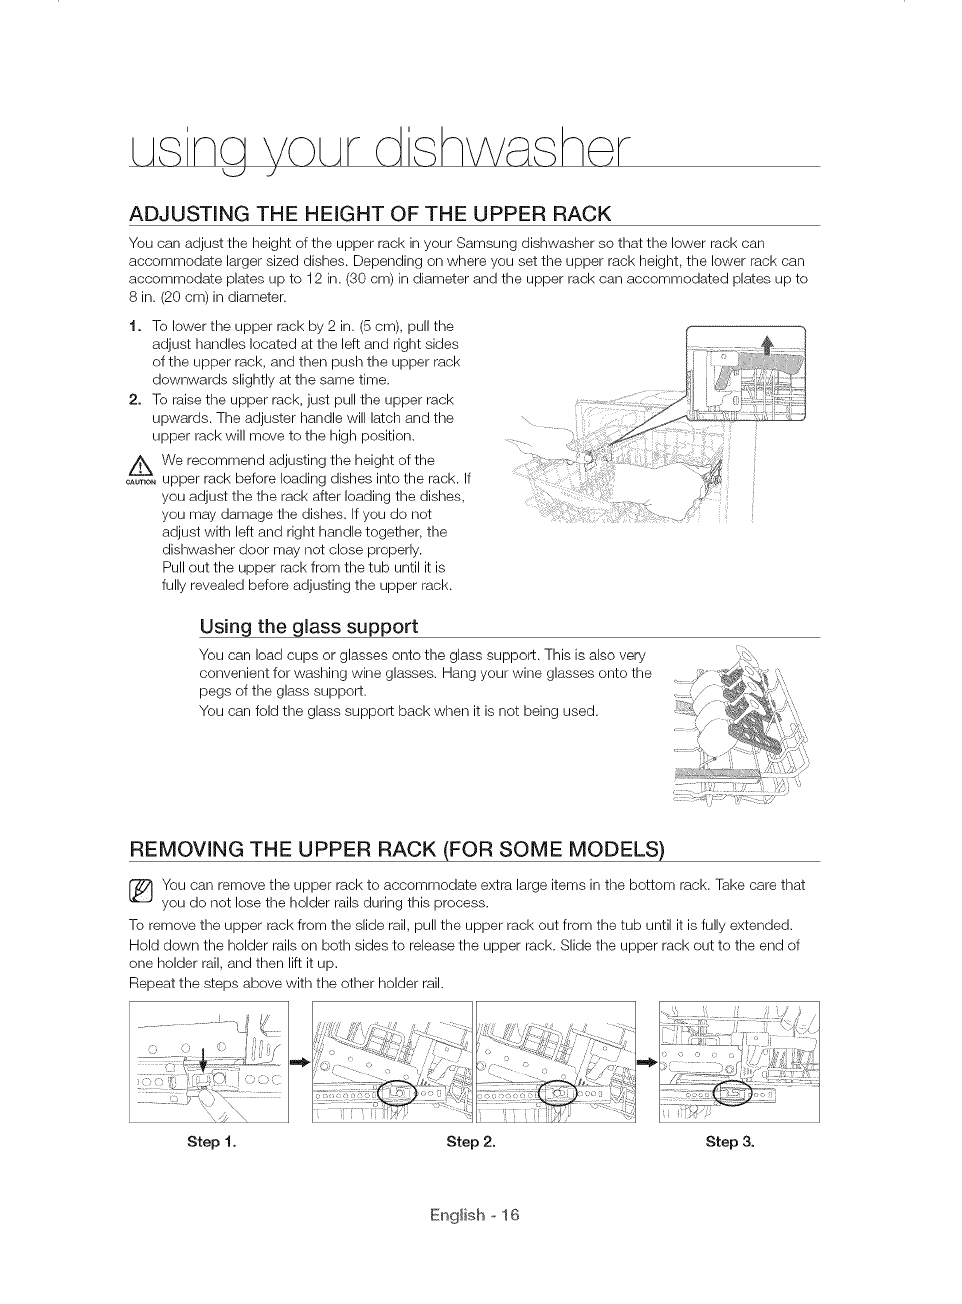
ADJUSTING THE HEIGHT OF THE UPPER RACK
You can adjust the height of the upper rack in your Samsung dishwasher so that the lower rack can
accommodate larger sized dishes. Depending on where you set the upper rack height, the lower rack can
accommodate plates up to 12 in. (30 cm) in diameter and the upper rack can accommodated plates up to
8 in. (20 cm)in diameter.
t. To lower the upper rack by 2 in. (5 cm), pull the
adjust handles located at the left and right sides
of the upper rack, and then push the upper rack
downwards slightly at the same time.
2. To raise the upper rack, just pull the upper rack
upwards. The adjuster handle will latch and the
upper rack will move to the high position.
/_ We recommend adjusting the height of the
......._ upper rack before loading dishes into the rack. If
you adjust the the rack after loading the dishes,
you may damage the dishes. If you do not
adjust with left and right handle together, the
dishwasher door may not close properly.
Pull out the upper rack from the tub until it is
fully revealed before adjusting the upper rack.
Using the glass support
You can load cups or glasses onto the glass support. This is also very
convenient for washing wine glasses. Hang your wine glasses onto the
pegs of the glass support.
You can fold the glass support back when it is not being used.
REMOVING THE UPPER RACK (FOR SOME MODELS)
You can remove the upper rack to accommodate extra large items in the bottom rack. Take care that
you do not lose the holder rails during this process.
To remove the upper rack from the slide rail, pull the upper rack out from the tub until it is fully extended.
Hold down the holder rails on both sides to release the upper rack. Slide the upper rack out to the end of
one holder rail, and then lift it up.
Repeat the steps above with the other holder rail.
.............•_ _, // , ..................................... ...........
?, ,> j Y f
), ..... Y I%,,; _1_ -:
Step t. Step 2. Step 3.
English o 16
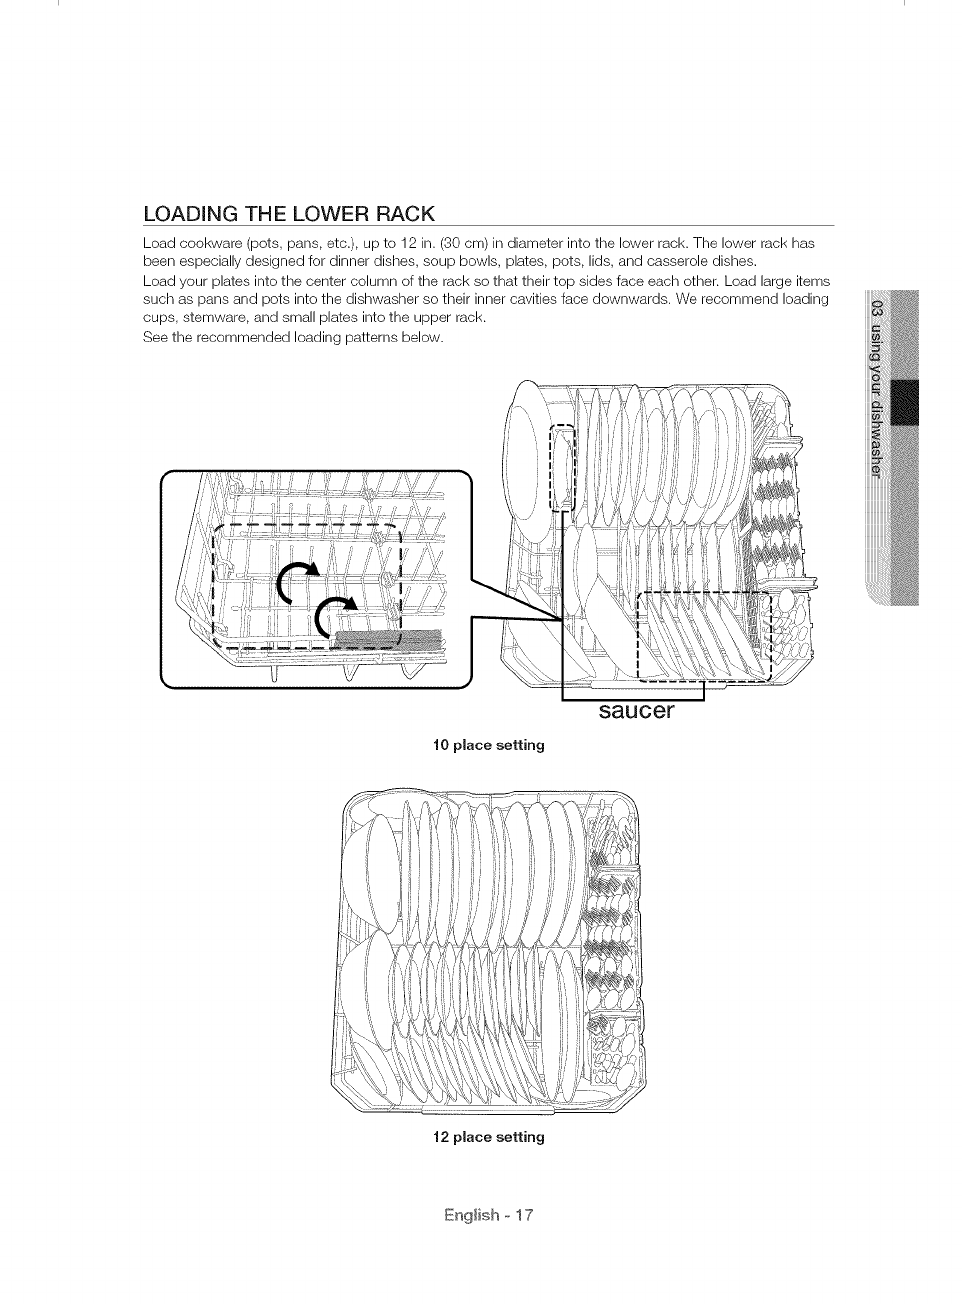
LOADING THE LOWER RACK
Load cookware (pots, pans, etc.), up to 12 in. (30 cm) in diameter into the lower rack. The lower rack has
been especially designed for dinner dishes, soup bowls, plates, pots, lids, and casserole dishes.
Load your plates into the center column of the rack so that their top sides face each other. Load large items
such as pans and pots into the dishwasher so their inner cavities face downwards. We recommend loading
cups, stemware, and small plates into the upper rack.
See the recommended loading patterns below.
t0 place setting
saucer
t2 place setting
English o 17
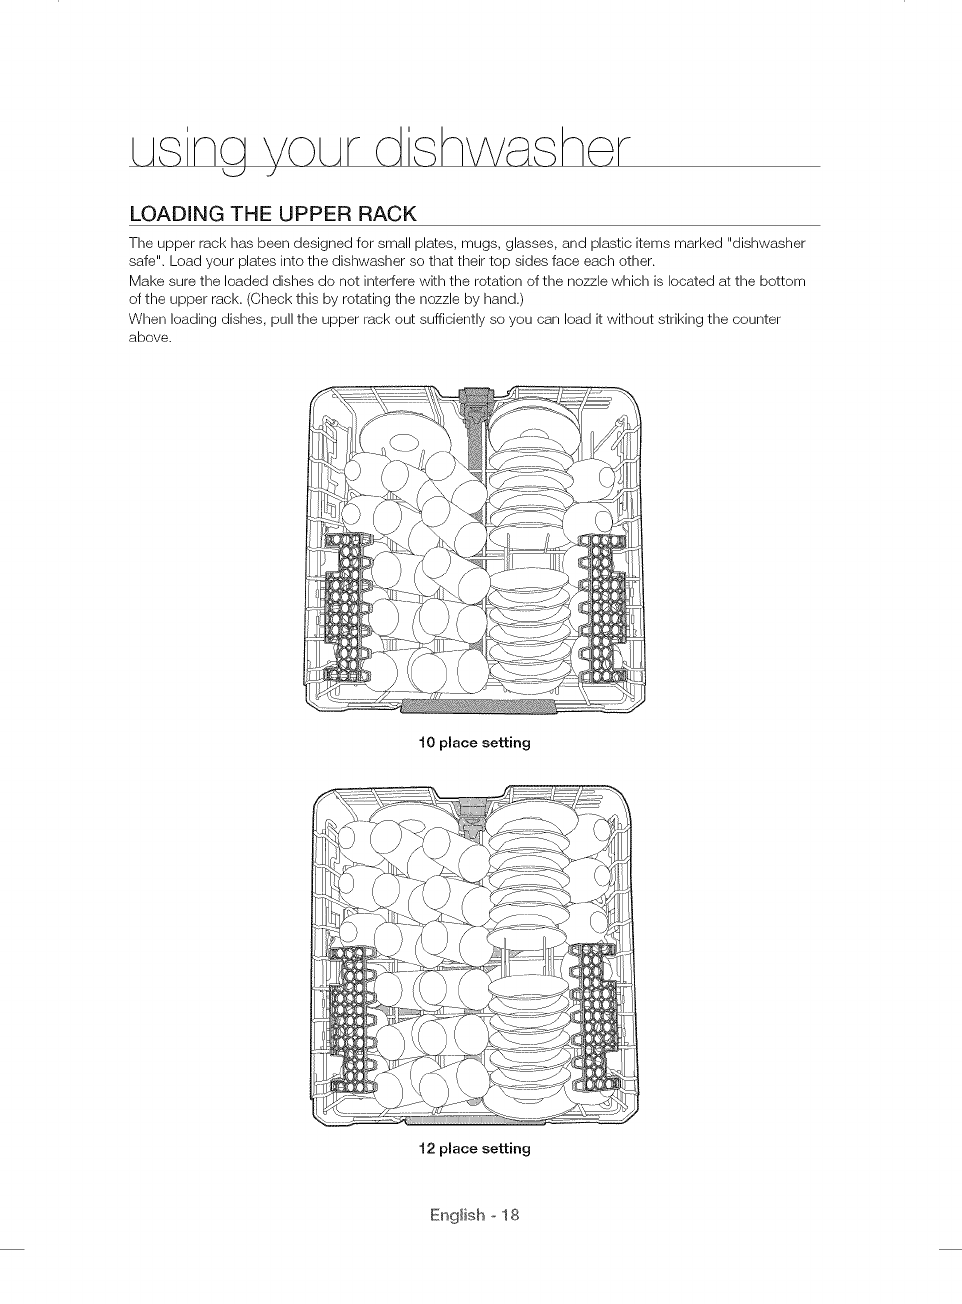
LOADING THE UPPER RACK
The upper rack has been designed for small plates, mugs, glasses, and plastic items marked "dishwasher
safe". Load your plates into the dishwasher so that their top sides face each other.
Make sure the loaded dishes do not interfere with the rotation of the nozzle which is located at the bottom
of the upper rack. (Check this by rotating the nozzle by hand.)
When loading dishes, pull the upper rack out sufficiently so you can load it without striking the counter
above.
10 place setting
12 place setting
English o 18
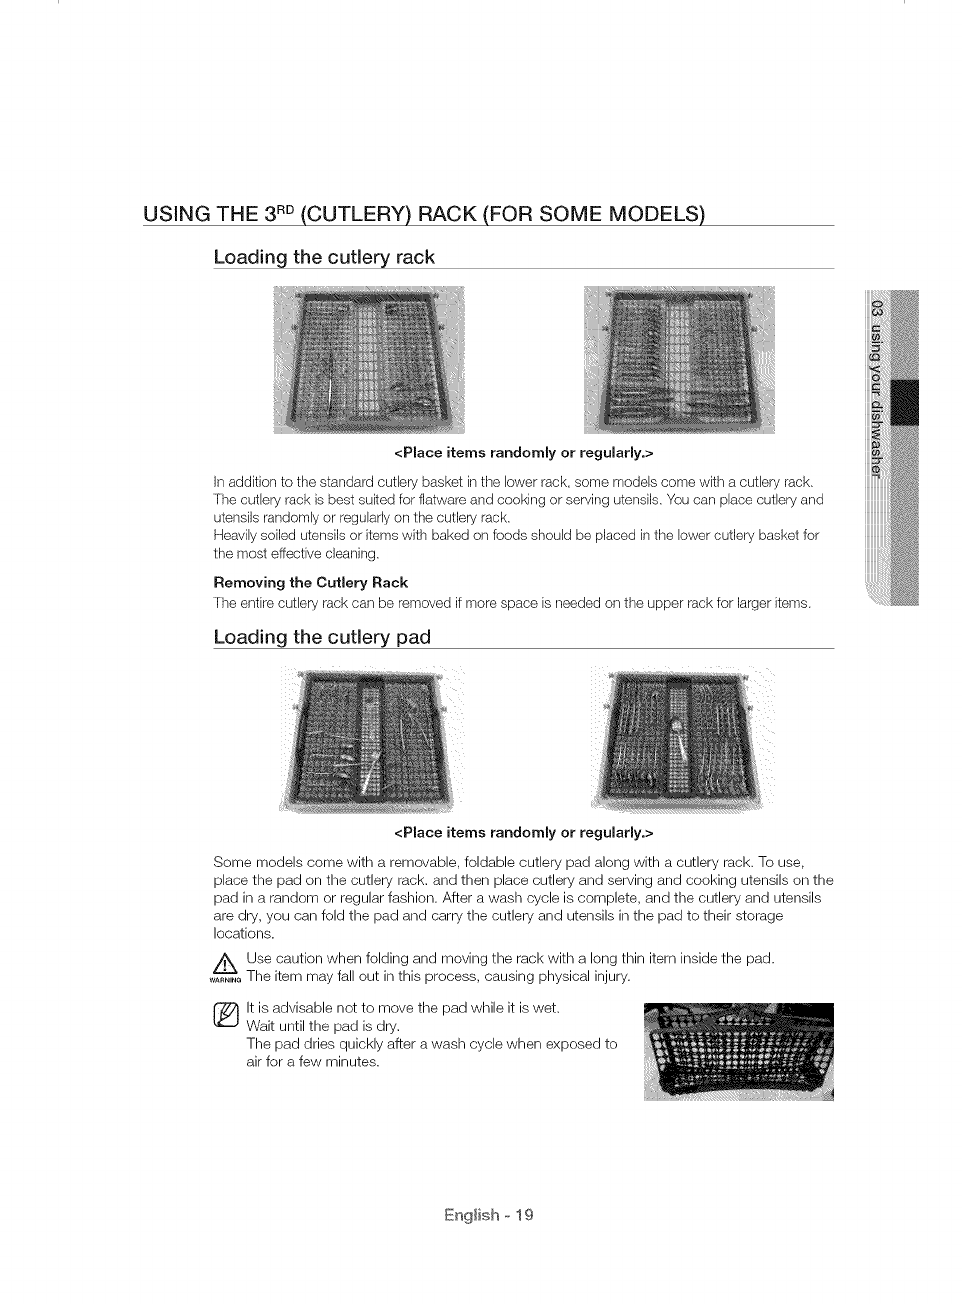
USING THE 3RD(CUTLERY) RACK (FOR SOME MODELS)
Loading the cutlery rack
<Place items randomly or regularly.>
In addition to the standard cutlery basket in the lower rack, some models come with a cutlery rack.
The cutlery rack is best suited for flatware and cooking or serving utensils. You can place cutlery and
utensils randomly or regularly on the cutlery rack.
Heavily soiled utensils or items with baked on foods should be placed in the lower cutlery basket for
the most effective cleaning.
Removing the Cutlery Rack
The entire cutlery rack can be removed if more space is needed on the upper rack for larger items.
Loading the cutlery pad
<Place items randomly or regularly.>
Some models come with a removable, foldable cutlery pad along with a cutlery rack. To use,
place the pad on the cutlery rack. and then place cutlery and serving and cooking utensils on the
pad in a random or regular fashion. After a wash cycle is complete, and the cutlery and utensils
are dry, you can fold the pad and carry the cutlery and utensils in the pad to their storage
locations.
/_ Use caution when folding and moving the rack with a long thin item inside the pad.
......._ The item may fall out in this process, causing physical injury.
lt is advisable not to move the pad while it is wet.
Wait until the pad is dry.
The pad dries quickly after a wash cycle when exposed to
air for a few minutes.
English o 19

USING WNNE RACK (FOR SOME MODELS)
5}
E
E
kO
&
co
®
[ntertek
Conforms to NSF/ANSI STD.2
English o 20
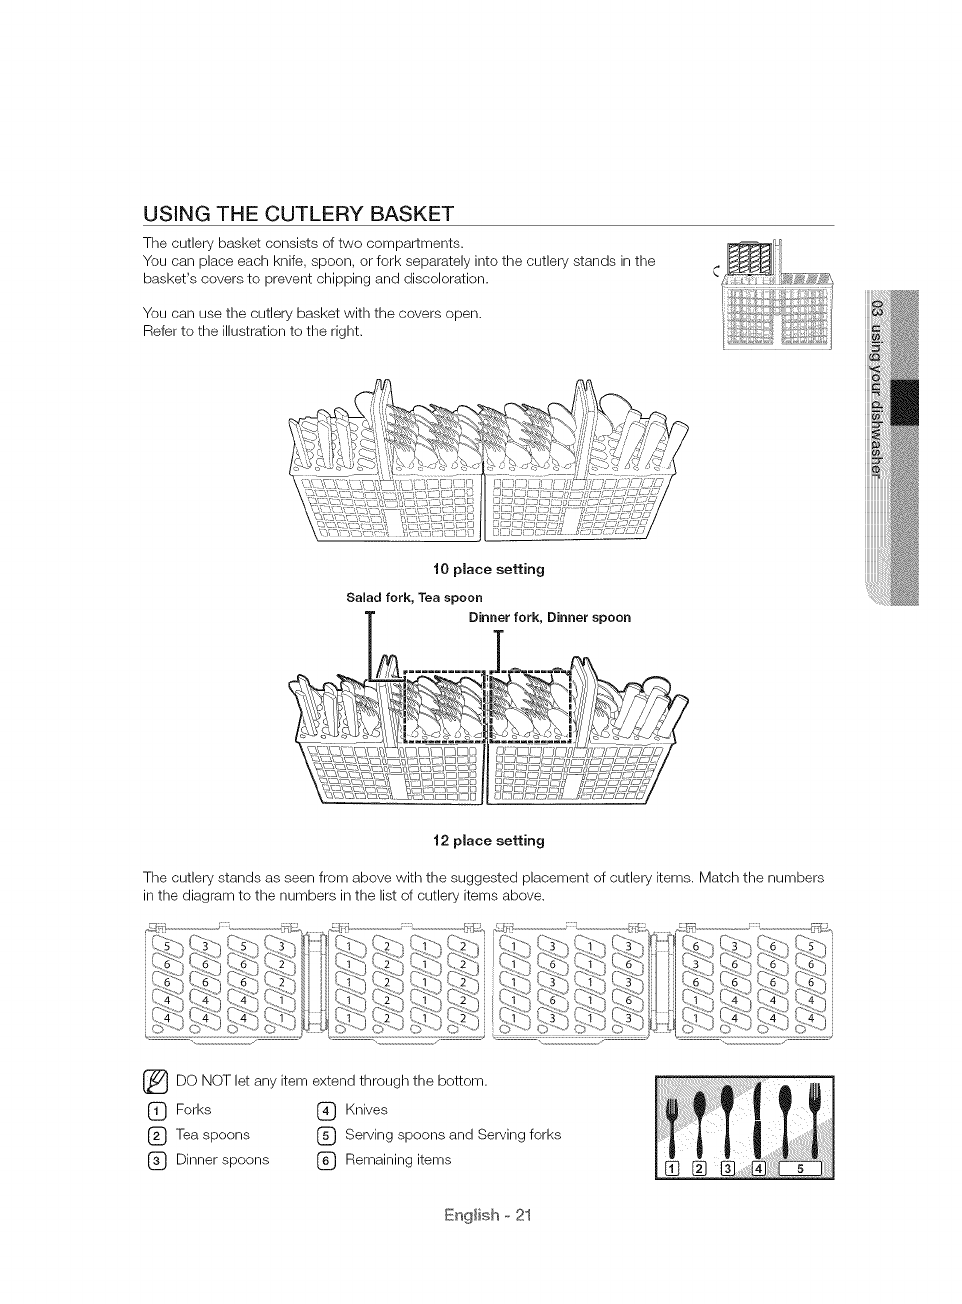
USING THE CUTLERY BASKET
The cutlery basket consists of two compartments.
You can place each knife, spoon, or fork separately into the cutlery stands in the
basket's covers to prevent chipping and discoloration.
You can use the cutlery basket with the covers open.
Refer to the illustration to the right.
t0 place setting
Salad fork, Tea spoon
Dinner fork, Dinner spoon
t2 place setting
The cutlery stands as seen from above with the suggested placement of cutlery items. Match the numbers
in the diagram to the numbers in the list of cutlery items above.
_DO NOT let any item extend through the bottom.
(_) Forks (_ Knives
(_ Tea spoons (_ Serving spoons and Serving forks
(_ Dinner spoons (_ Remaining items
English o 21
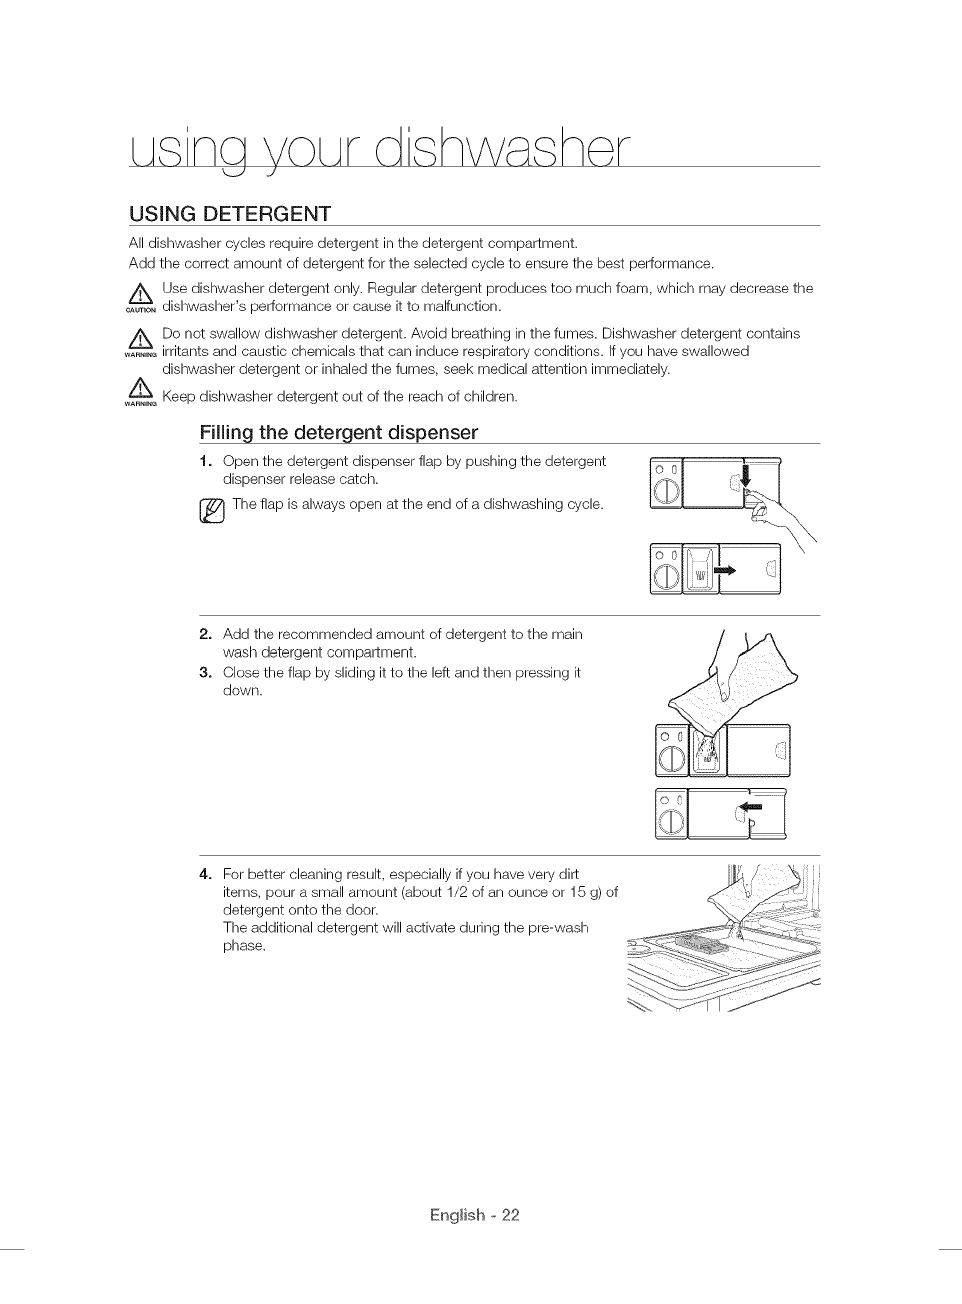
USING DETERGENT
All dishwasher cycles require detergent in the detergent compartment.
Add the correct amount of detergent for the selected cycle to ensure the best performance.
A Use dishwasher detergent only. Regular detergent produces too much foam, which may decrease the
......._ dishwasher's performance or cause it to malfunction.
Do not swallow dishwasher detergent. Avoid breathing in the fumes. Dishwasher detergent contains
......._ irritants and caustic chemicals that can induce respiratory conditions. If you have swallowed
dishwasher detergent or inhaled the fumes, seek medical attention immediately.
Keep dishwasher detergent out of the reach of children.
WARNINe
Filling the detergent dispenser
t. Open the detergent dispenser flap by pushing the detergent
dispenser release catch.
The flap is always open at the end of a dishwashing cycle.
2. Add the recommended amount of detergent to the main
wash detergent compartment.
3. Close the flap by sliding it to the left and then pressing it
down.
For better cleaning result, especially if you have very dirt
items, pour a small amount (about 1/2 of an ounce or 15 g) of
detergent onto the door.
The additional detergent will activate during the pre-wash
phase.
English o 22
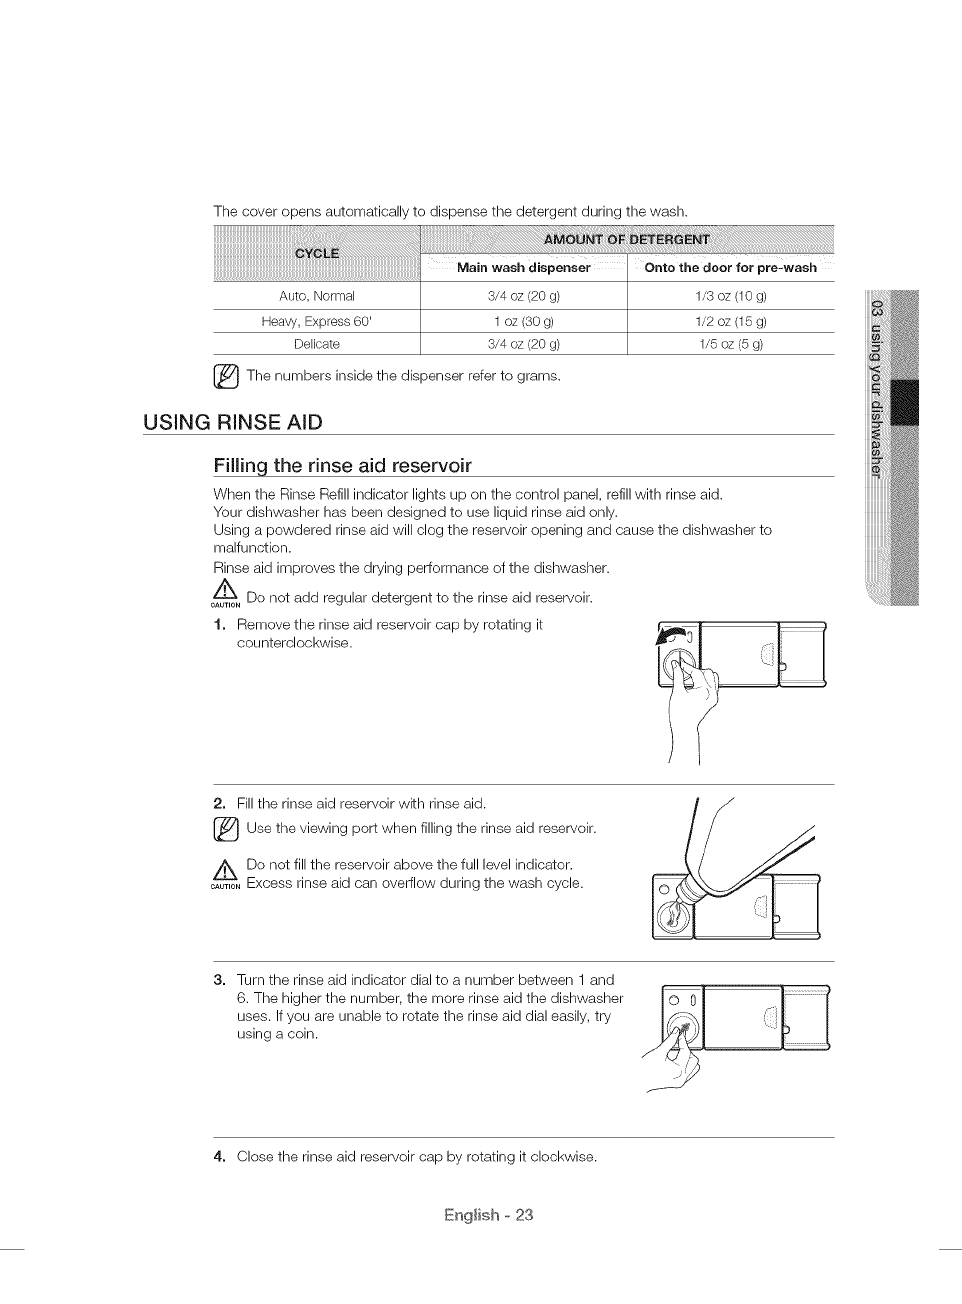
The cover opens automatically to dispense the detergent during the wash.
1/5 oz (5 g)
_The numbers inside the refer to
dispenser grams.
USING RINSE AID
Filling the rinse aid reservoir
When the Rinse Refill indicator lights up on the control panel, refill with rinse aid.
Your dishwasher has been designed to use liquid rinse aid only.
Using a powdered rinse aid will clog the reservoir opening and cause the dishwasher to
malfunction.
Rinse aid improves the drying performance of the dishwasher.
Do not add regular detergent to the rinse aid reservoir.
CAUTION
1. Remove the rinse aid reservoir cap by rotating it
counterclockwise.
2. Fill the rinse aid reservoir with rinse aid.
[_Use the viewing when filling the rinse aid reservoir.
port
z_Do not fill the reservoir above the full level indicator.
....... Excess rinse aid can overflow during the wash cycle.
3. Turn the rinse aid indicator dial to a number between 1 and
6. The higher the number, the more rinse aid the dishwasher
uses. If you are unable to rotate the rinse aid dial easily, tw
using a coin. o0 I(
4. Close the rinse aid reservoir cap by rotating it clockwise.
English o 23
m int ning ©UF
Keeping your dishwasher clean improves its performance, reduces unnecessary
repairs, and lengthens its life.
CLEANING THE EXTERIOR
It's best to clean spills on the outside of your dishwasher as they occur. Use a soft, damp cloth on the
control panel to gently wipe away spills and dust. Do not use benzene, wax, thinner, chlorine bleach, or
alcohol. These materials may discolor the door panel and other outer surfaces and cause stains. Do not
clean the dishwasher by sprinkling water over it and avoid letting water come into contact with any of the
electrical parts.
lf your dishwasher has a stainless steel door panel, you can clean it with a stainless steel cleaner for
Home Appliances or similar product using a clean, soft cloth.
CLEANING THE iNTERiOR
Clean the interior of your dishwasher periodically to remove any dirt or food particles. Wipe the inside of
the dishwasher and the inner part of the door with a wet dishcloth. We recommend filling the detergent
dispenser with dishwasher soap, and then running the dishwasher empty periodically using the Self Clean
option. To keep the cutlery pad clean, turn it over. This will keep your dishwasher clean.
If white spots and odor are still present in your dishwasher, run the Self Clean option with the dishwasher
empty and without detergent until it flushes. Then, interrupt the cycle and put an 8 ounce cup of white
vinegar into the lower basket. Close the dishwasher and let the cycle finish.
A
Do not remove the tub front seal (the long rubber seal enclosing the opening of the dishwasher).
CAUTION
English o 24
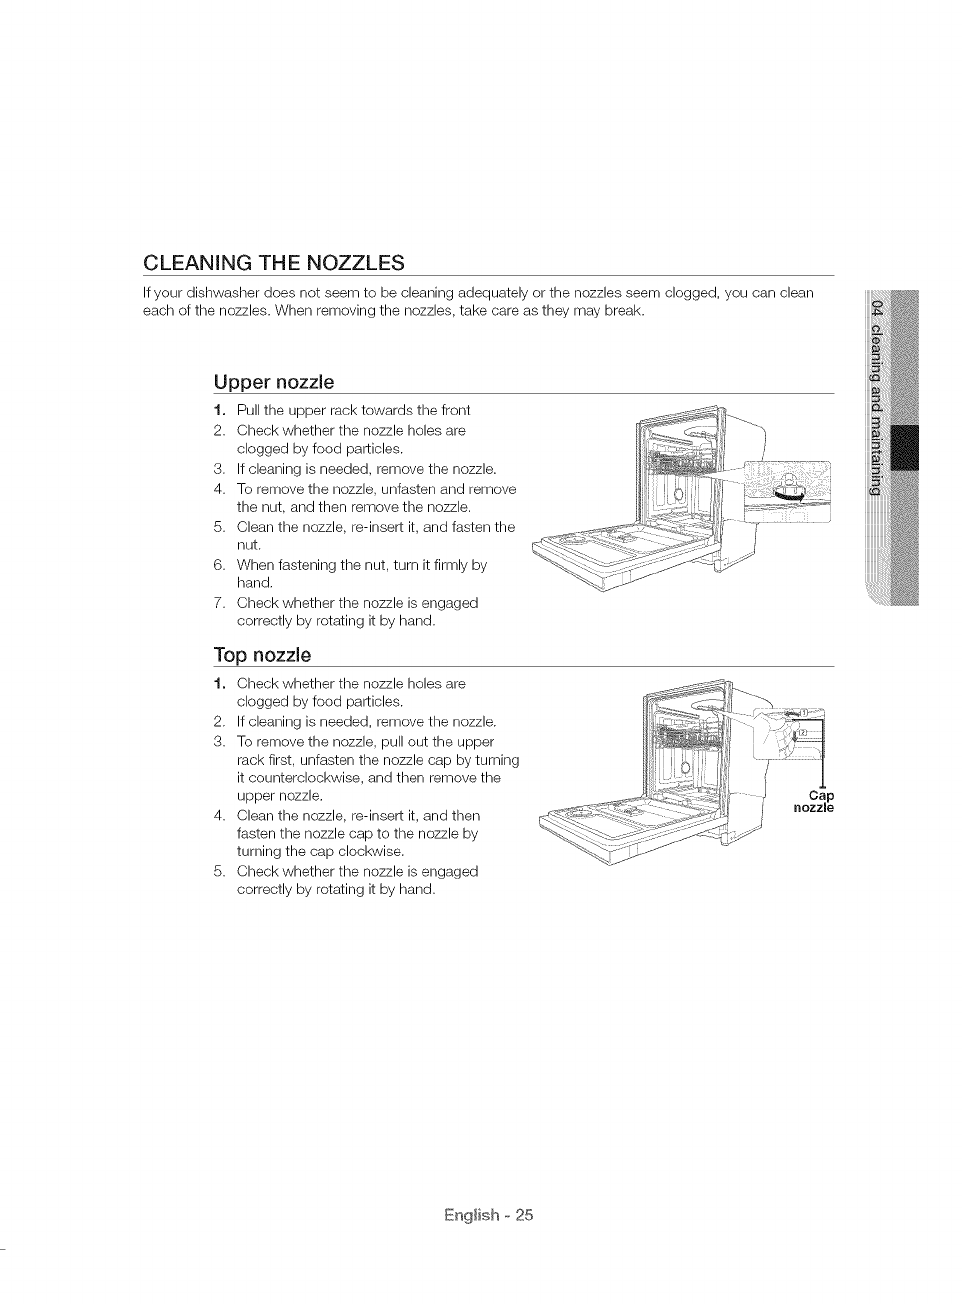
CLEANING THE NOZZLES
If your dishwasher does not seem to be cleaning adequately or the nozzles seem clogged, you can clean
each of the nozzles. When removing the nozzles, take care as they may break.
Upper nozzle
1. Pull the upper rack towards the front
2. Check whether the nozzle holes are
clogged by food particles.
3. If cleaning is needed, remove the nozzle.
4. To remove the nozzle, unfasten and remove
the nut, and then remove the nozzle.
5. Clean the nozzle, re-insert it, and fasten the
nut.
6. When fastening the nut, turn it firmly by
hand.
7. Check whether the nozzle is engaged
correctly by rotating it by hand.
Top nozzle
1. Check whether the nozzle holes are
clogged by food particles.
2. If cleaning is needed, remove the nozzle.
3. To remove the nozzle, pull out the upper
rack first, unfasten the nozzle cap by turning
it counterclockwise, and then remove the
upper nozzle.
4. Clean the nozzle, re-insert it, and then
fasten the nozzle cap to the nozzle by
turning the cap clockwise.
5. Check whether the nozzle is engaged
correctly by rotating it by hand.
Cap
nozzle
English o 25
o ning m int ning
d h\H he, r
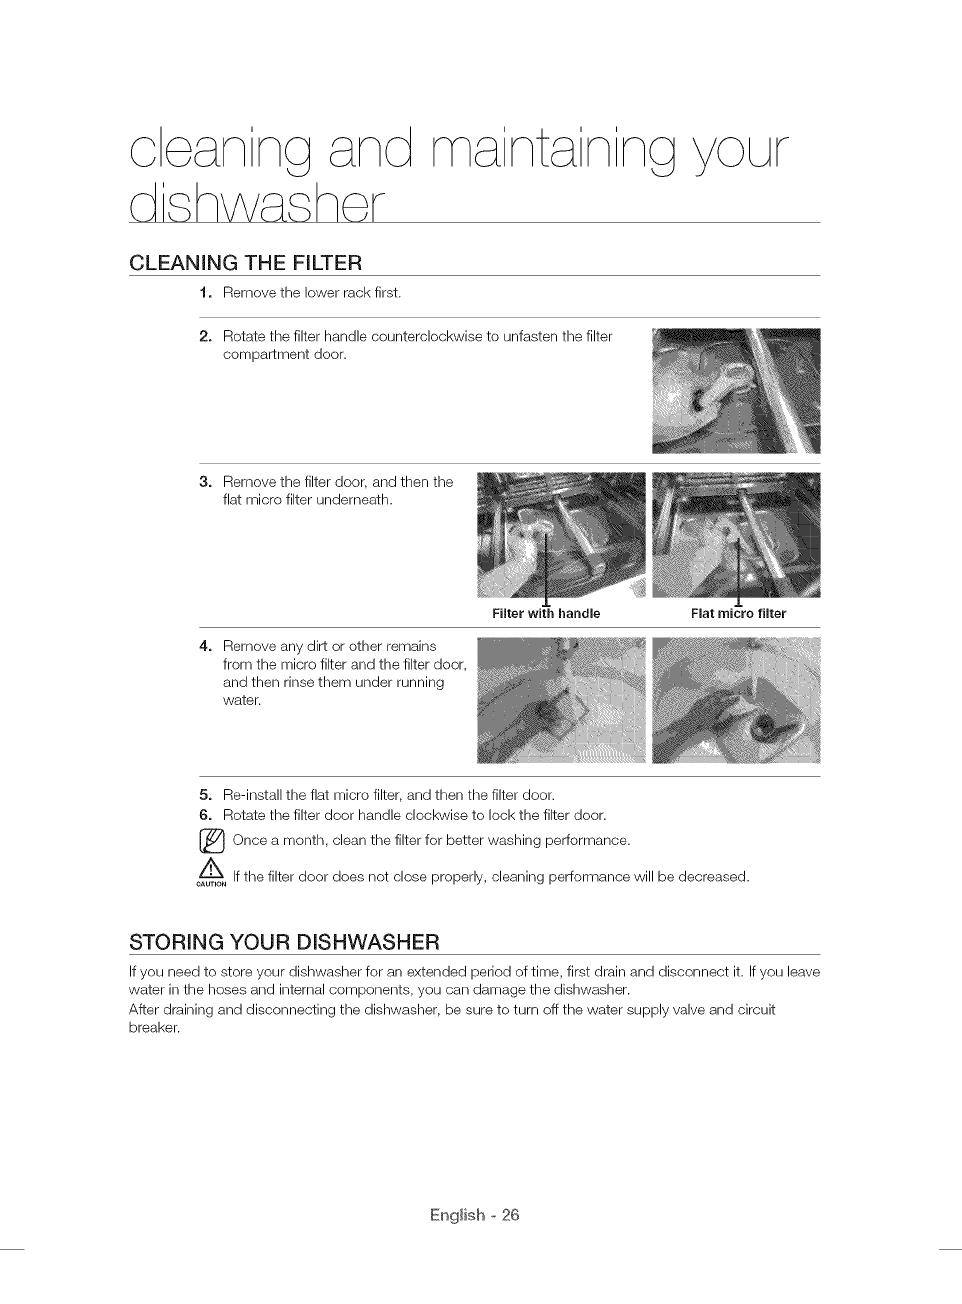
CLEANING THE FILTER
t. Remove the lower rack first.
2. Rotate the filter handle counterclockwise to unfasten the filter
compartment door.
Filter with handle
©UF
3. Remove the filter door, and then the
flat micro filter underneath.
Flat micro filter
Remove any dirt or other remains
from the micro filter and the filter door,
and then rinse them under running
water.
5. Re-install the flat micro filter, and then the filter door.
6. Rotate the filter door handle clockwise to lock the filter door.
[_ Once month, clean the filter for better washing performance.a
If the filter door does not close properly, cleaning performance will be decreased.
CAUTION
STORING YOUR DISHWASHER
If you need to store your dishwasher for an extended period of time, first drain and disconnect it. If you leave
water in the hoses and internal components, you can damage the dishwasher.
After draining and disconnecting the dishwasher, be sure to turn off the water supply valve and circuit
breaker.
English o 26
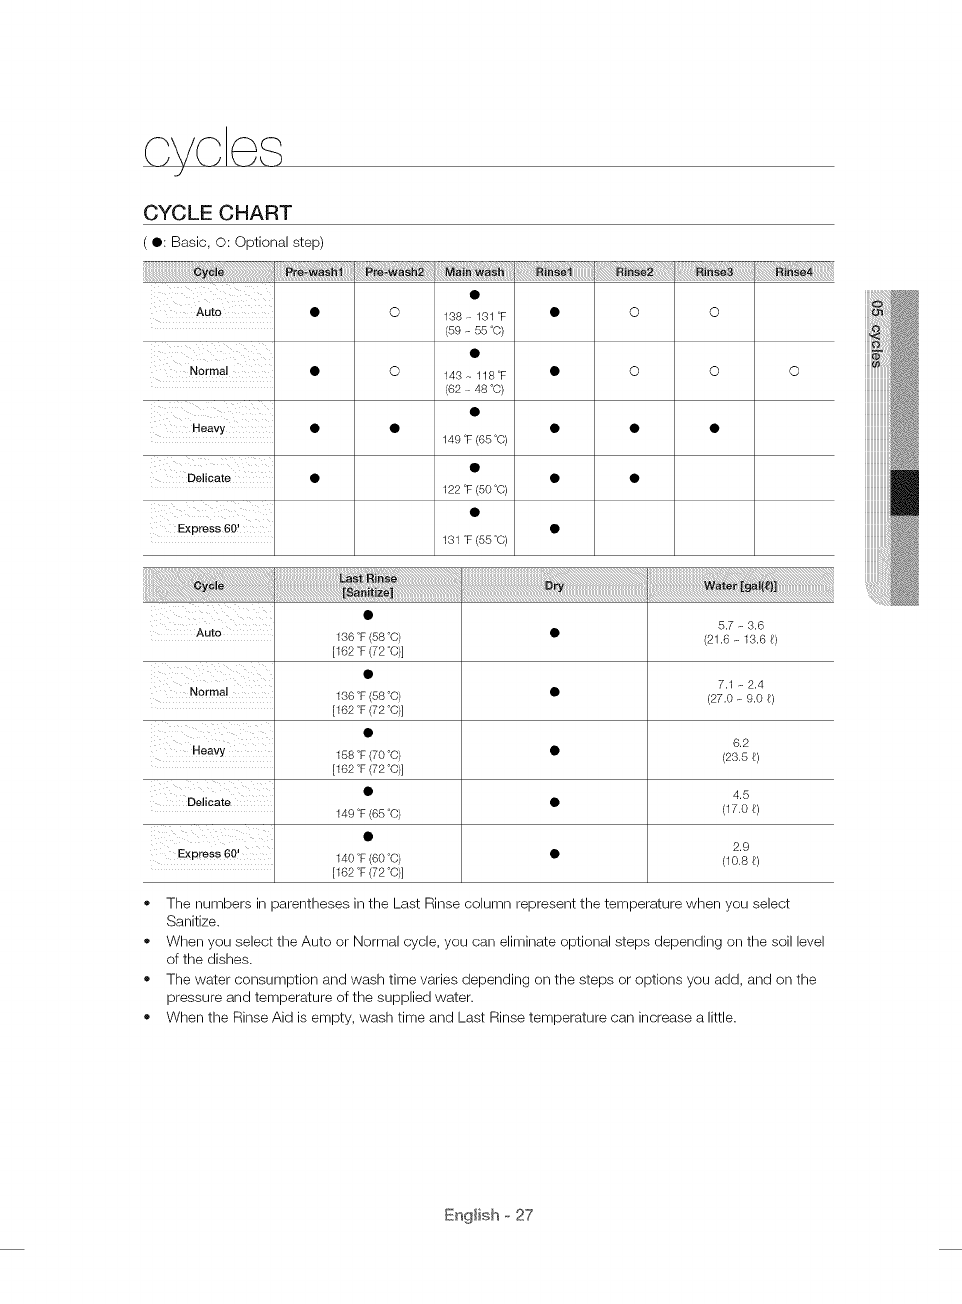
CYCLE CHART
(O: Basic, O: Optional step)
¸¸¸i¸
Heavy
Delicate
Express 60!
•O 138 - 131 °F
(59 - 55 °C)
• O 143 - 118°F
(62 - 48 °C)
149 °F(65°C)
122 °F(50°C)
1Sl °F(55°C)
o
o
!ii!ii!ii!ii!ii!ii!ii!ii!ii!i!ii__i_!_i:i:i:i:i:i:i:i:i:i;!;iii_
o
Auto
7,1 _ 2,4
•(27,0 _ 9.0 _)
6.2
•(23.5 6)
4.5
Delicate •(17.0 6)
2.9
Express 60! • (10.86)
136°F(58°C)
[162°F(72°C)]
136°F(58°C)
[162°F(72°C)]
15S°F(70°C)
[162°F(72°C)]
149°F(65°C)
140°F(60°C)
[162°F(72°C)]
o The numbers in parentheses in the Last Rinse column represent the temperature when you select
Sanitize.
o When you select the Auto or Normal cycle, you can eliminate optional steps depending on the soil level
of the dishes.
o The water consumption and wash time varies depending on the steps or options you add, and on the
pressure and temperature of the supplied water.
o When the Rinse Aid is empty, wash time and Last Rinse temperature can increase a little.
English o 27
tzozAbe,,shootng
CHECK THESE POINTS iF YOUR DISHWASHER...
The door is not closed
completely.
Will not start.
No cycle is selected.
The power cable is not
connected.
The water supply does not
work.
The Control Panel is locked.
A circuit breaker is open.
It's taking too long Cold water is being supplied.
with an operation
or cycle.
Check if the door is latched and closed
completely. Check whether the Upper Rack is
properly joined with Duct Nozzle.
Also, Check imbalance assembly of the Upper
Rack.
Select a proper cycle.
Connect the power cable properly.
Check if the water supply valve is open.
Unlock the child lock, (See page 10.)
Reset the circuit breaker.
Check if the water supply line is connected to a
hot water supply. (Additional time is required to
heat cold water.)
English o 28
There are food
particles [emaining
on dishes.
(Not cleaning
properly,)
i _ i_i ii _ iiiii_
The cycle selected was
unsuitable.
The water temperature is low.
Low water pressure.
The water is too hard.
Dishwasher detergent was not
used.
Detergent remains in the
dispenser.
There is no rinse aid.
A nozzle is clogged.
The dishes are improperly
loaded.
Toe many dishes have been
loaded.
Filter could be clogged.
(Food soils remain on the filter.)
The water supplied is soft and
Leaves glasses too much detergent was used.
with a light filmi Aluminum dishes were
included in the wash load.
Leaves a yel!ow This is caused by coffee and
or brown film on tea soils.
the inside 0f the
dishwasher.
Select a cycle according to the number and soil
level of the dishes, as directed in this manual.
Connect the water supply line to a hot water
supply. For best performance, the temperature of
the supplied water should be 120 °F (49 °C).
The water pressure should be between 20 and
120 psi (140 - 830 kPa).
Use a commercial dishwasher cleaner.
Use high-quality, fresh detergent with rinse aid.
Clean the filter at least once per month. (See
page 26.)
Use a water softener additive designed for
dishwashers.
Use automatic dishwasher detergent.
We recommend a powder or gel type
dishwasher detergent.
Make sure large items such as cookie sheets,
cutting boards, or centaners, etc. are net
blocking the detergent dispenser and preventing
it from opening properly.
Rearrange the dishes so they do not interfere
with detergent dispenser operation.
Check the dispenser and add rinse aid.
Use liquid type rinse aid.
Clean the nozzle. See pages 24 and 26.
Rearrange the dishes so they de not interfere
with nozzle rotation and detergent dispenser
operation.
Load only an appropriate number of dishes.
Load your dishes as recommended.
(See page 17.)
Scrape food from dishes prior to loading. (Do not
prerinse.)
Clean the soils and filters. (See page 26.)
Underlead the dishwasher and use a rinse aid to
minimize this.
Remove the marks on the dishes using a low
sensitivity cleaner.
Remove the soils using a spot cleaner.
English o 29
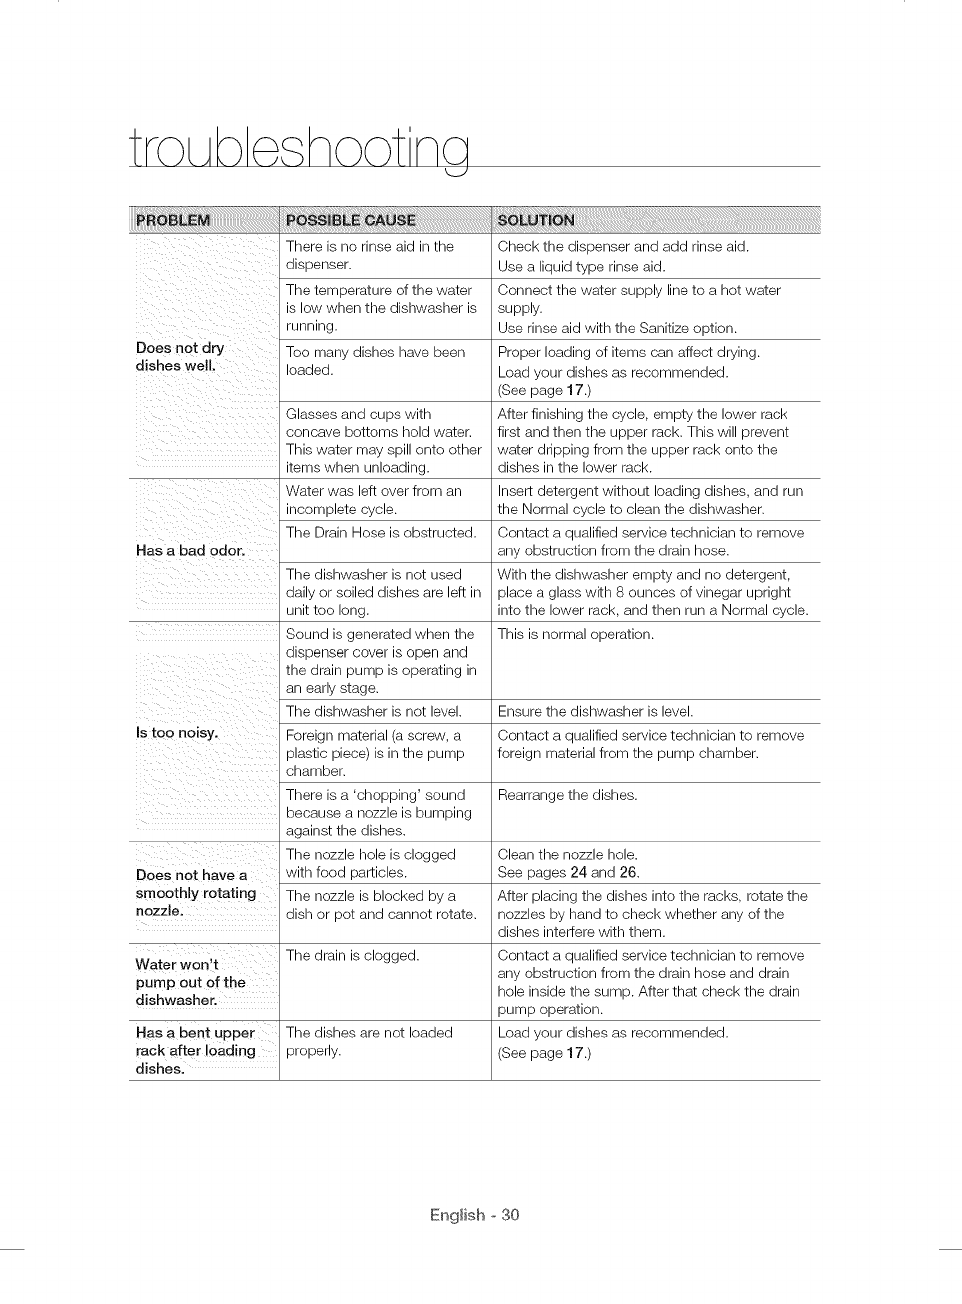
L_J
There is no rinse aid in the Check the dispenser and add rinse aid.
dispenser. Use a liquid type rinse aid.
The temperature of the water Connect the water supply line to a hot water
is low when the dishwasher is supply.
running. Use rinse aid with the Sanitize option.
Doe s not dry Too many dishes have been Proper loading of items can affect drying.
dishes well. loaded. Load your dishes as recommended.
(See page 17.)
Glasses and cups with
concave bottoms hold water.
This water may spill onto other
items when unloading.
Water was left over from an
incomplete cycle.
The Drain Hose is obstructed.
Has a bad odor.
The dishwasher is not used
daily or soiled dishes are left in
unit too long.
Sound is generated when the
dispenser cover is open and
the drain pump is operating in
an early stage.
The dishwasher is not level.
Is too noisy. Foreign material (a screw, a
plastic piece) is in the pump
chamber.
There is a 'chopping' sound
because a nozzle is bumping
against the dishes.
The nozzle hole is clogged
DOes not have a with food particles.
smoothly rotating The nozzle is blocked by a
nozzle: dish or pot and cannot rotate.
Water won,t The drain is clogged.
pump out of the
dishwasher.
Has a bent upper The dishes are not loaded
rack after loading properly.
dishes.
After finishing the cycle, empty the lower rack
first and then the upper rack. This will prevent
water dripping from the upper rack onto the
dishes in the lower rack.
Insert detergent without loading dishes, and run
the Normal cycle to clean the dishwasher.
Contact a qualified service technician to remove
any obstruction from the drain hose.
With the dishwasher empty and no detergent,
place a glass with 8 ounces of vinegar upright
into the lower rack, and then run a Normal cycle.
This is normal operation.
Ensure the dishwasher is level.
Contact a qualified service technician to remove
foreign material from the pump chamber.
Rearrange the dishes.
Clean the nozzle hole.
See pages 24 and 26.
After placing the dishes into the racks, rotate the
nozzles by hand to check whether any of the
dishes interfere with them.
Contact a qualified service technician to remove
any obstruction from the drain hose and drain
hole inside the sump. After that check the drain
pump operation.
Load your dishes as recommended.
(See page 17.)
English ° 30
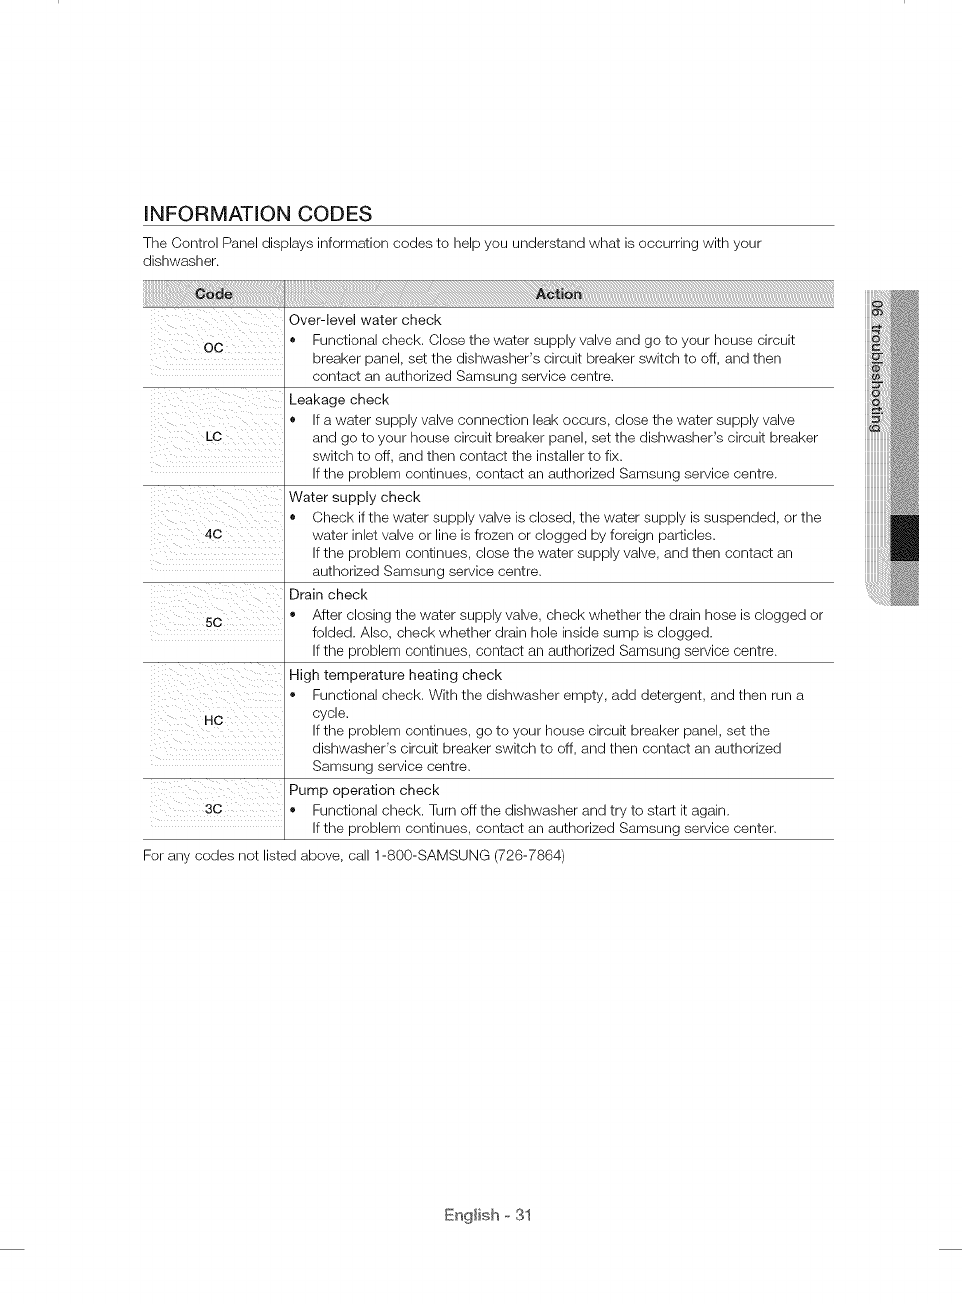
INFORMATION CODES
The Control Panel displays information codes to help you understand what is occurring with your
dishwasher.
0c ........
ii_i_ii_ii!i_iiii__ili__ iii_i_
!i_i_iii i :i i_ ii_ i
50
i _ 7ili iiii
Over-level water check
• Functional check. Close the water supply valve and go to your house circuit
breaker panel, set the dishwasher's circuit breaker switch to off, and then
contact an authorized Samsung service centre.
Leakage check
• If a water supply valve connection leak occurs, close the water supply valve
and go to your house circuit breaker panel, set the dishwasher's circuit breaker
switch to off, and then contact the installer to fix.
If the problem continues, contact an authorized Samsung service centre.
Water supply check
• Check if the water supply valve is closed, the water supply is suspended, or the
water inlet valve or line is frozen or clogged by foreign particles.
If the problem continues, close the water supply valve, and then contact an
authorized Samsung service centre.
Drain check
o After closing the water supply valve, check whether the drain hose is clogged or
folded. Also, check whether drain hole inside sump is clogged.
If the problem continues, contact an authorized Samsung service centre.
High temperature heating check
Functional check. With the dishwasher empty, add detergent, and then run a
cycle.
If the problem continues, go to your house circuit breaker panel, set the
dishwasher's circuit breaker switch to off, and then contact an authorized
Samsung service centre.
Pump operation check
30 o Functional check. Turn off the dishwasher and try to start it again.
If the problem continues, contact an authorized Samsung service center.
For any codes not listed above, call 1-800-SAMSUNG (726-7864)
English o 31
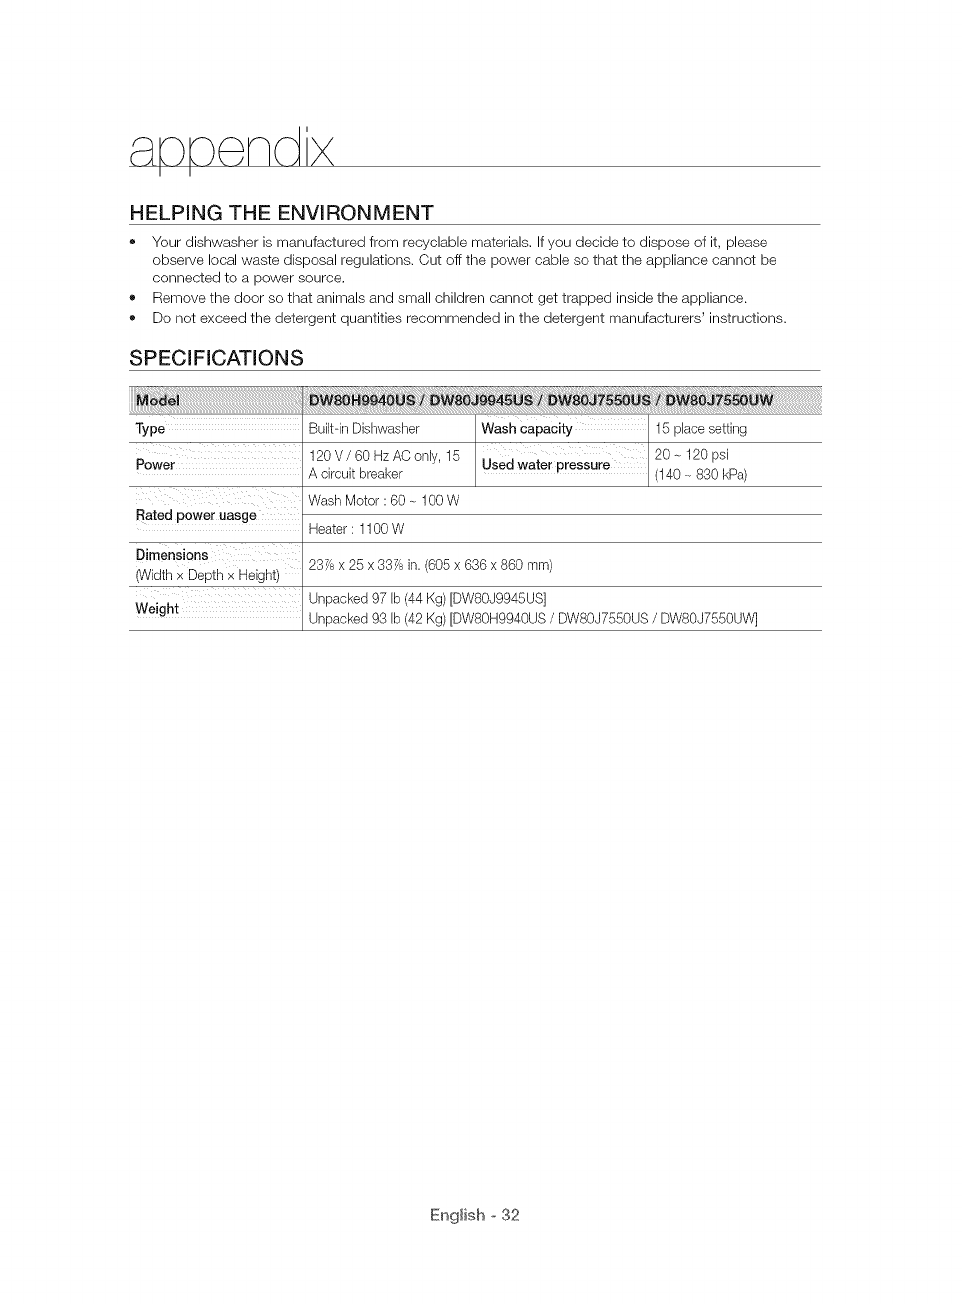
HELPING THE ENVIRONMENT
oYour dishwasher is manufactured from recyclable materials. If you decide to dispose of it, please
observe local waste disposal regulations. Cut off the power cable so that the appliance cannot be
connected to a power source.
Remove the door so that animals and small children cannot get trapped inside the appliance.
Do not exceed the detergent quantities recommended in the detergent manufacturers' instructions.
SPECIFICATIONS
Type Built-in Dishwasher 15 place setting
Power 120 V /60 Hz AO only, 15 20 - 120 psi
A circuit breaker (140 - 830 kPa)
Wash Motor : 60 _ 100 W
Rated power uasge
Dimensions
(Width x Depth _ Height
Weight
Heater : 1100 W
237/6x 25 x 337/6in. (605 x 636 x 860 ram)
Unpacked 97 Ib (44 Kg) [DW80J9945US]
Unpacked 93 Ib (42 Kg) [DW80H9940US /DWSOJ7550US /DW80J7550UW]
English o 32
SAMSUNG DISHWASHER
LIMITED WARRANTY TO ORiGiNAL PURCHASER
This SAMSUNG brand product, as supplied and distributed by USA: SAMSUNG ELECTR©NIOS AMERICA,
INC./CANADA: SAMSUNG ELECTRONICS CANADA, INO. (SAMSUNG) and delivered new, in the original
carton to the original consumer purchaser, is warranted by SAMSUNG against manufacturing defects in
materials and workmanship for a limited warranty period of:
One (1) Year All Parts and Labor, Five (5) Years Linear Motion Parts*, Printed Circuit Board, Racking (Labor
Charges for in-home service starting from the 2nd year is customer's responsibility), and Lifetime Stainless
Door Liner & Tub for leakage. Samsung will replace your unit with same or current model (that is better or
equivalent in functionality) (Labor related to replacement is customer's responsibility).
* Linear Motion Parts: Belt operating AC motor [Motor Geared], Belt V-Timing, Rail, Holder Rail [Front Up,
Front Low].
This limited warranty begins on the original date of purchase, and is valid only on products purchased and
used in the United States/Canada. To receive warranty service, the purchaser must contact SAMSUNG for
problem determination and service procedures. Warranty service can only be performed by a SAMSUNG
authorized service center. The original dated bill of sale must be presented upon request as proof of
purchase to SAMSUNG or SAMSUNG's authorized service center. SAMSUNG will provide in-home service
during the warranty period at no charge, subject to availability within the contiguous United States/Canada.
In home service is not available in all areas.
To receive in-home service, product must be unobstructed and accessible to the service agent. If service
is not available, SAMSUNG may elect to provide transportation of the product to and from an authorized
service center.
SAMSUNG will repair, replace, or refund this product at our option and at no charge as stipulated herein,
with new or reconditioned parts or products if found to be defective during the limited warranty period
specified above. All replaced parts and products become the property of SAMSUNG and must be returned
to SAMSUNG. Replacement parts and products assume the remaining original warranty, or ninety (90)
days, whichever is longer.
This limited warranty covers manufacturing defects in materials and workmanship encountered in normal,
noncommercial use of this product and shall not apply to the following: damage that occurs in shipment;
delivery and installation; applications and uses for which this product was not intended; altered product or
serial numbers; cosmetic damage or exterior finish; accidents, abuse, neglect, fire, water, lightning, or other
acts of nature or God; use of products, equipment, systems, utilities, services, parts, supplies, accessories,
applications, installations, repairs, external wiring or connectors not supplied or authorized by SAMSUNG
that damage this product or result in service problems; incorrect electrical line voltage, fluctuations and
surges; customer adjustments and failure to follow operating instructions, maintenance and environmental
instructions that are covered and prescribed in the instruction book; product removal and reinstallation;
problems caused by pest infestations. This limited warranty does not cover problems resulting from
incorrect electric current, voltage or supply, light bulbs, house fuses, house wiring, cost of a service call for
instructions, or fixing installation errors. SAMSUNG does not warrant uninterrupted or error-free operation of
the product.
English o 33
\/v r nty
EXCEPTAS SET FORTH HEREIN,THERE ARE NO WARRANTIES ON THIS PRODUCT EITHER EXPRESS
OR IMPLIED, AND SAMSUNG DISCLAIMS ALL WARRANTIES INCLUDING, BUT NOT LIMITED TO, ANY
IMPLIEDWARRANTIES OF MERCHANTABILITY, INFRINGEMENT OR FITNESS FOR A PARTICULAR
PURPOSE. NO WARRANTY OR GUARANTEE GIVEN BY ANY PERSON, FIRM, OR CORPORATION WITH
RESPECTTO THIS PRODUCT SHALL BE BINDING ON SAMSUNG. SAMSUNG SHALL NOT BE LIABLE
FOR LOSS OF REVENUE OR PROFITS, FAILURETO REALIZESAVINGS OR OTHER BENEFITS, OR ANY
OTHER SPECIAL, INCIDENTAL OR CONSEQUENTIAL DAMAGES CAUSED BYTHE USE, MISUSE, OR
INABILITYTO USE THIS PRODUCT, REGARDLESS OF THE LEGAL THEORY ON WHICH THE CLAIM IS
BASED, AND EVEN IF SAMSUNG HAS BEEN ADVISED OF THE POSSIBILITY OF SUCH DAMAGES.
NOR SHALL RECOVERYOF ANY KIND AGAINST SAMSUNG BE GREATER IN AMOUNT THAN THE
PURCHASE PRICE OF THE PRODUCT SOLD BY SAMSUNG AND CAUSING THE ALLEGED DAMAGE.
WITHOUT LIMITING THE FOREGOING, PURCHASER ASSUMES ALL RISKAND LIABILITY FOR LOSS,
DAMAGE, OR INJURYTO PURCHASER AND PURCHASER'S PROPERTYAND TO OTHERSAND THEIR
PROPERTYARISING OUT OF THE USE, MISUSE, OR INABILITYTO USE THIS PRODUCT. THIS LIMITED
WARRANTY SHALL NOT EXTENDTO ANYONE OTHERTHAN THE ORIGINAL PURCHASER OF THIS
PRODUCT, IS NONTRANSFERABLE AND STATESYOUR EXCLUSIVEREMEDY.
Some states or provinces do not allow limitations on how long an implied warranty lasts, or the exclusion
or limitation of incidental or consequential damages, so the above limitations or exclusions may not apply
to you. This warranty gives you specific rights, and you may also have other rights, which vary from state to
state or province to province.
To obtain warranty service, please contact SAMSUNG at:
in USA
Samsung Electronics America, Inc.
85 Challenger Road Ridgefield Park, NJ 07660
1-800-SAMSU NG(726-7864)
www.samsung.com/us/support
In CANADA
Samsung Electronics Canada Inc.
2050 Derry Road West, Mississauga, Ontario L5N 0B9 Canada
1-800-SAMSU NG(726-7864)
www.samsung.com/ca/support (English)
www.samsung.com/ca fr/support (French)
English o 34

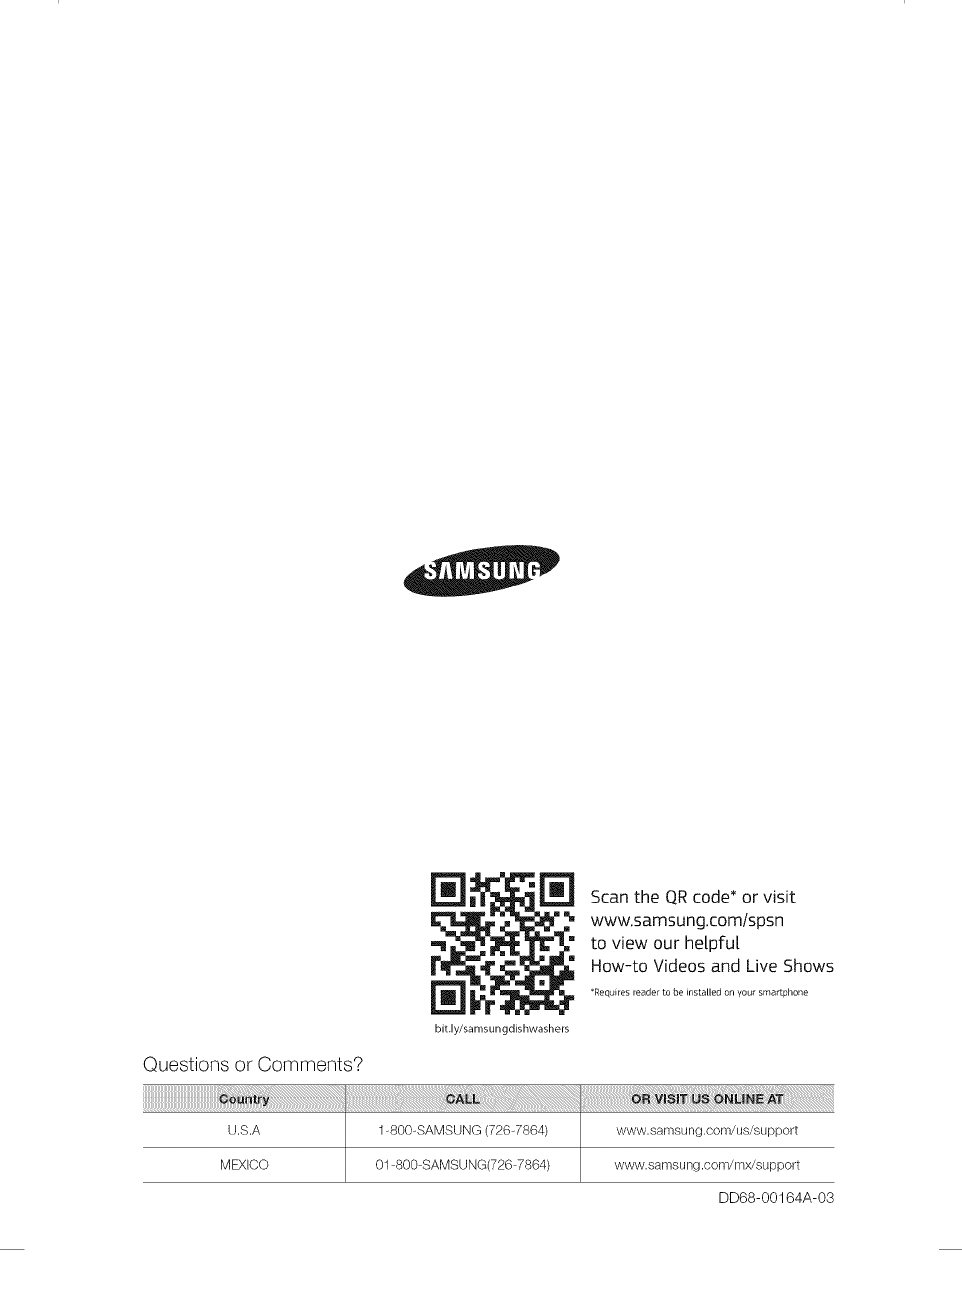
bit.ly/samsun gdishwashers
Scan the QR code* or visit
www.samsung.com/spsn
to view our he[pfu[
How-to Videos and Live Shows
_Requires reader to be installed on your smartphone
Questions or Comments?
U.S.A 1-800-SAMSUNG (726-7864) www.samsung.com/us/support
MEXICO 01-800-SAMSU NG(726-7864) www.samsung.com/mx/support
DD68-00164A-03

las posibilidades
Graclas pot adcluirir este producto Sal]lsung

c ont ni o
CONFIGURACIONDE SU LAVAVAJILLAS
i
6 Desempaque de la lavavajillas
6 Verificaci6n de las piezas
7 Cumplimiento de los requisitos de instalaci6n
USO DE LA LAVAVAJILLAS 8 Panel de control
12 Selector de ciclos
12 Pantallas de progreso
13 Pautas b_sicas
15 Ajuste del _ngulo de los soportes para platos
16 Ajuste de la altura del estante superior
16 C6mo retirar el estante superior (en algunos
modelos)
17 Carga del estante inferior
18 Carga del estante superior
19 Uso del 3_ estante (cubiertos) (en algunos modelos)
20 Uso de la estanterfa para copas (para algunos
modelos)
21 Uso de la canasta para cubiertos
22 Usodeldetergente
23 Uso del producto de enjuague
LIMPIEZAY MANTENIMIENTODELA
LAVAVAJILLAS 24 Limpieza del exterior
24 Limpieza delinterior
25 Limpieza delas boquillas
26 Limpieza delos filtro
26 C6mo guardarlalavavajillas
ClCLOS 27 Tabla deciclos
SOLUCION DE PROBLEMAS 28 Controle estos puntos si su lavavajillas...
31 C6digosdeinformaci6n
APENDJCE 32 Ayudaal medioambiente
32 Especificaciones
EspaSol o2
Felicitacionespor lacompra de su nueva lavavajillasSamsung. Estemanualcontiene
informaciOnimportanteacerca de lainstalaciOn,el uso y elcuidado del electrodomestico.
Leadetenidamenteestas instruccionesa fin de aprovecharal m_tximolos m01tiples
beneficiosy funciones de la lavavajillas.
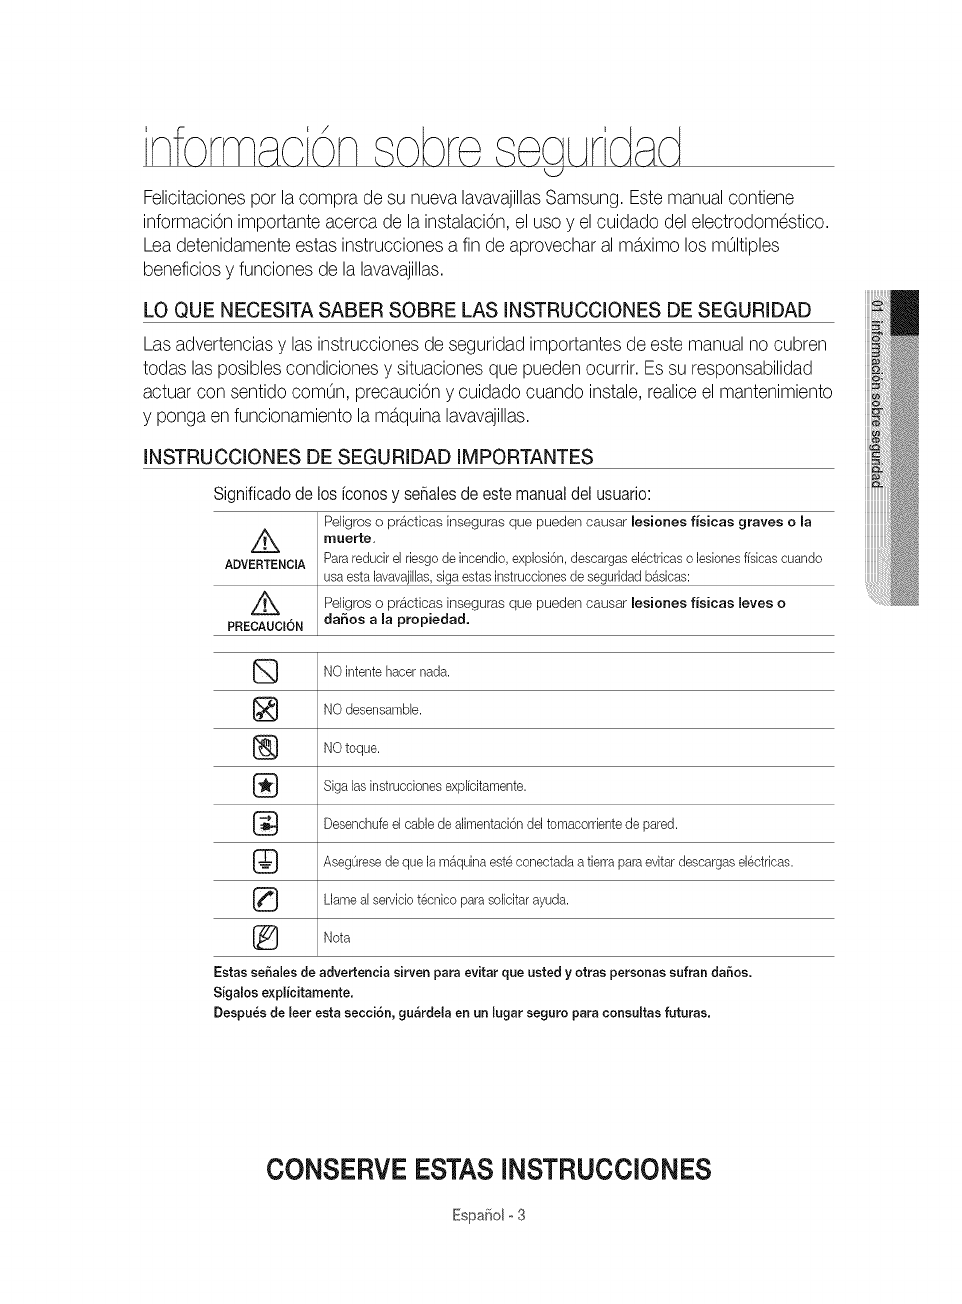
LO QUE NECESITA SABER SOBRE LAS INSTRUCCIONES DE SEGURIDAD
Las advertenciasy las instruccionesde seguridad importantesde este manualno cubren
todas las posiblescondiciones y situacionesque pueden ocurrir.Es su responsabilidad
actuar con sentido com0n, precauciOny cuidado cuando instale,realiceel mantenimiento
y ponga en funcionamientolam_tquinalavavajillas.
INSTRUCCIONES DE SEGURIDAD IMPORTANTES
Significadode los iconos y seSalesde este manualdel usuario:
Peligros o pr_tcticas inseguras que pueden causar lesiones fisicas graves o la
Z_ muerte,
ADVERTENCIA Para reducir el riesgo de incendio, explosi6n, descargas el@tdcas o bsiones ffsbas cuando
usa esta [avavaji[[as,siga estas instrucdones de seguridad b&sicas:
Z_ Peligros o pr4tcticas inseguras que pueden causar lesiones f/sicas leves o
PRECAUClON da_os a [a propiedad.
NO intente hacer nada.
NO desensambb.
J_ NO toque.
Siga [as instrucciones exp[fcitamente.
Desenchufe el cable de alimentaci6n del tomacorriente de pared.
AsegOrese de que la m_quina este conectada a tierra para evitar descargas el@tricas.
Llame a[ servicio t@nico para soiicitar ayuda.
[_ Nota
Estas seSa[es de advertencia sirven para evitar que usted yotras personas sufran da6os.
Sigalos expl_citamente.
Despu_s de leer esta secciSn, gu&rdela en an [ugar seguro para consu[tas futuras.
CONSERVE ESTAS INSTRUCCIONES
EspaSolo3
/k ADVERTENCIA: Cuando utilice la lavavajillas, tome todas las precauciones b_sicas, incluyendo las siguientes:
ADV_tNC_
1. Lea todas las instrucciones antes de usar la hvavajillas.
2. Utilicela lavavajillasOnicamente para la funci6n para la cual est_ dise_ada.
3. UtiliceOnicamente detergentes o productos humectantes recomendados para utilizarse en lavavajiiiasy
mantengalos fuera del alcance de los ni_os.
4.. Cuando cargue los artfculos que se lavar_n:
co]oque los artfcuios cortantes de manera que no da_en las juntas de la puerta y
cargue los cuchillos %sos con el mango hacia arriba para reducir el riesgo de sufrir lesiones pot cortes.
5. No lave articuios de pl_stico a menos que tengan el r6tulo "apto para lavavajiiias"o su equivalente.
Enel caso de los articuios de pi_stico que no tengan tal r6tulo, consulte las recomendaciones de]fabricante.
6. No toque el ELEMENTO CALENTADOR durante el uso o inmediatamente luego de el.
7. No ponga en funcionamiento la lavavajilias a menos que todos los paneles de CIERRE esten correctamente
co]ocados.
8. No manipule indebidamente los controles.
9. ]rate con cuidado la puerta y el estante de la lavavajillas,no se siente o pare sobre elias.
10. Para reducir el riesgo de lesiones, evite que los nihos jueguen dentro o fuera de la lavavajiilas.
11. Enciertas circunstancias, se puede producir gas hidr6geno en un sistema de agua caliente que no se ha
usado durante dos semanas o m_s. EL GAS HIDROGENO ES EXPLOSIVO. Si el sistema de agua caliente no
se ha usado durante dicho periodo, abra todas las Ilaves de agua caliente y deje que el agua fluya durante
varios minutos antes de usar la lavavajilias.Esto disipar_ el gas hidr6geno acumulado. Dado que el gas es
inflamable, no fume ni utilice una llama abierta en ese momento.
12. Cuando deje de utiiizaro descarte una lavavajillas antigua, retire la puerta del compartimiento de lavado.
ADVERTENOIA:
........ Este producto contiene sustancias quimicas que, segOn el Estado de California, provocan c_ncer y toxicidad
reproductiva.
rRE_UCIO_®
Despues de desempacar la lavavajillas, mantenga el empaque fuera del alcance de los ni_os.
La m_quina lavavajillas es muy pesada. No intente mover o trasladarla usted mismo. Se necesitan dos o m_s
personas para mover una lavavajillasy evitar lesiones potenciales.
* AI igual que con cualquier equipo que use electricidad, agua y piezas movibles, existen riesgos potenciales.
* No instale la lavavajillas cerca de componentes electricos. Mantenga la lavavajillas alejadade llamas abiertas.
* Instaley nivele la lavavajillassobre una supefficie no alfombrada que pueda soportar su peso.
* La lavavajillas debe conectarse a tierra correctamente. Nunca la conecte a un tomacorriente sin conexi6n a
tierra. Consulte la p_gina 7 para obtener m_s informaci6n sobre c6mo conectar la lavavajillas a tierra.
* Conecte el cable a tierra a la conexi6n a tierra de color verde de la caja de terminales.
* Despues de instalar la lavavajillas, asegOreseque la manguera de desag{Jeeste correctamente conectada
y que las conexiones de la manguera no tengan perdidas. Si la manguera de desag{Jeest_ floja, puede
ocasionar perdidas materiales.
* Elconducto puede romperse. A medida que transcurre el tiempo, pierde su flexibilidad. Reviseel conducto
peri6dicamente. Si est_ hinchado, rasgado, cortado o si hay perdida de agua, reempl_celo inmediatamente.
,_ Parausar este electrodomestico en forma segura, familiar[cese con su funcionamiento y manejelo con
cuidado cuando Io use.
* No vierta gasolina, solventes ni otros materiales inflamables dentro de la lavavajillas. No lave vajillaque haya
sido expuesta a estos materiales.
CONSERVEESTASINSTRUCCIONES
Espafiol °4
Mantengaeldetergentede[a[avavaji[lasfuerade[a[cancedelosni_os.Eldetergentecausaunef÷cto
adversoenlos6rganosde[cuerpohumano.Contienesustanciasparaotorgarbrilloyescorrosivo.
Evitequee[detergenteentreencontactocon[apie[olosojos.
Noempujenipresionelapuertacuandoesteabierta,yaquealhacerlopodffada_larlalavavajillasohacerse
da_o.
Nopermitaquelosni_osjueguendentrooencimadelam_quinalavavajillas.Puedenhacerseda_ooda_ar
lalavavajillas.
• Desconecteelcabledealimentaci6n(ocorteeldisyuntor)antesderealizarelmantenimiento
delalavavajillas.
• Norepare,reemplacenirealiceelmantenimientodeningunadelaspiezasdesulavavajillas
ustedmismo.$61osepermitequet6cnicoscalificadosautorizadosrealiceneldesensamble,
lasreparacionesylasmodificaciones.Eltrabajoefectuadoporunapersonanoautorizada
puedeinvalidarsugarantfa.
• Antesdedeshacersedesulavavajillas,retirelapuertadelcompartimientodelavadoola
trabadelapuertaparaevitarqueni_osoanimalespeque_ospuedanquedaratrapados
adentro.
• Sinovaautilizarselalavavajillasduranteunpeffodoprolongado,corteelsuministrodeagua.
Estalavavajillashasidodise_adaparausoresidencialOnicamente.
ANTES DE USAR LA LAVAVAJILLAS
ADVERTENC[A
ADVER_
_Riesgo de vueico
- No ufi[be la lavavaji[[ashasta que no este correctamente insta[ada.
No ejerza presi6n sobre una puerta abbrta.
No coloque peso excesivo sobre una puerta abierta.
Riesgo de descarga e[_ctrica
E[ incumplimiento con estas instrucciones puede tenet como resultado [a muerte, incendioso descargas
ei@tricas:
Conecte a tierra la lavavaji[[as.
Conecte e[ cane a tierra a [a conexi6n a tierra de color verde de [a caja de conexiones.
No uti[ice un cabb prolongador.
CONSERVE ESTAS INSTRUCCIONES
EspaSolo5
Aseg0resede que su instaladorsiga estas instruccionesminuciosamenteparaque su
nuevalavavajillasfuncioneadecuadamentey no existan riesgosde sufrirlesionesal lavar
los platos.
DESEMPAQUE DE LA LAVAVAJILLAS
Cuando haya recibido su nueva Eavavajillas,desemp&queh con cuidado y verifique que no este daF_ada.
Si EaDvavajillas est_ daF_ada,tome nota de eHoen la carta de porte y guarde una copia.
No instale la lavavajillasy comunfquese con el Servicio aEdiente de Samsung aEnOmeroque se indica a continuaci6n.
• Si eEproducto no est& da_lado, comience con Eainstalad6n. Siva a instaDrb por su cuenta, asegOresede bet Eagala de
instalaci6n y de seguir sus instrucciones.
• Despues de desempacar la lavavajiHas,mantenga eLempaque fuera deLabance de los niF_ospara garantizar su seguridad.
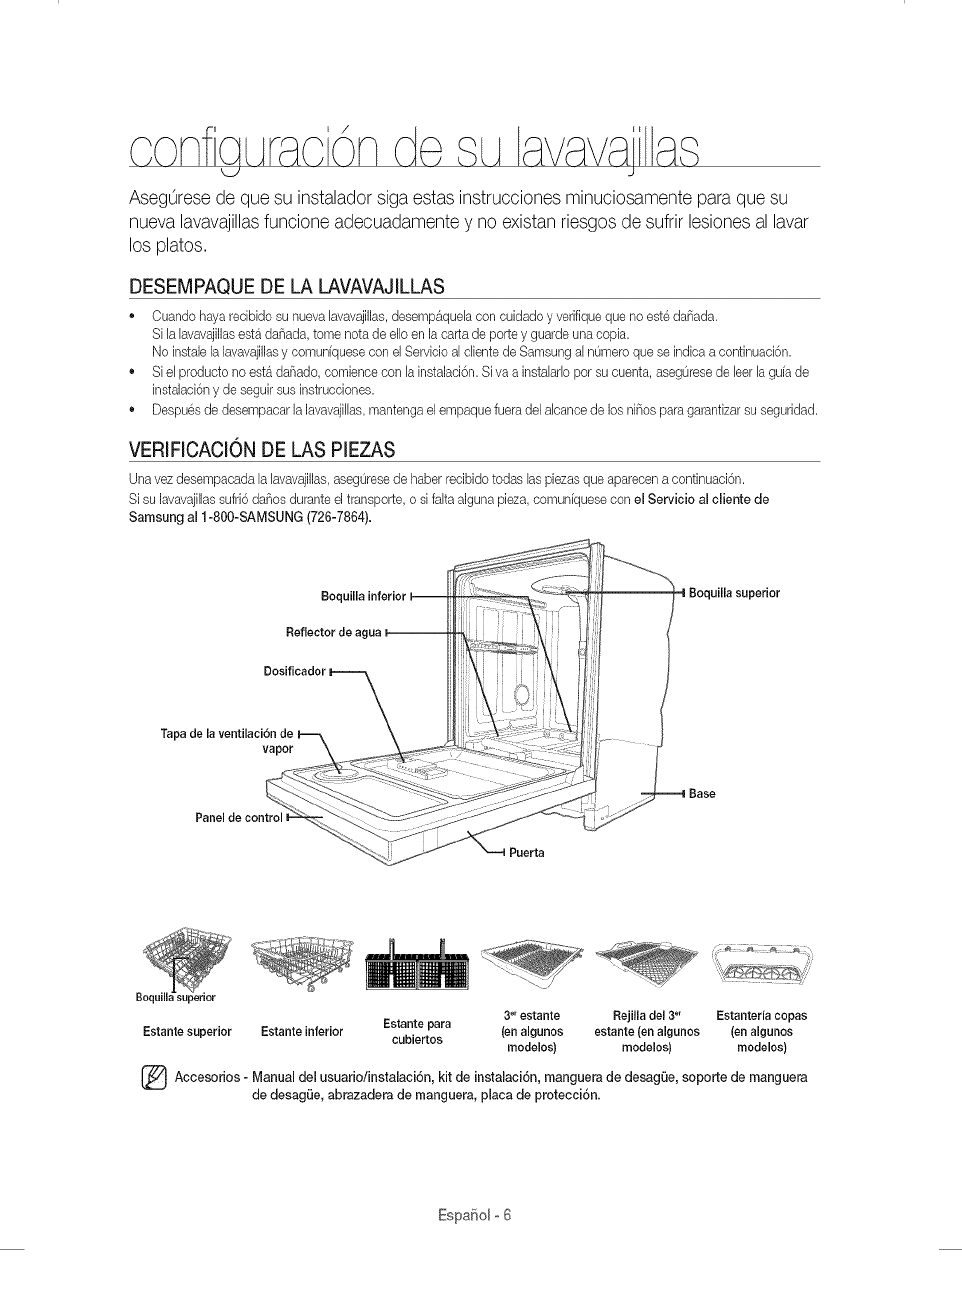
VERIFICACION DE LAS PIEZAS
Una vez desernpacada EaDvavajillas, asegOresede haber recibido todas Ds piezas que aparecen a continuaci6n.
Si su lavavajiElassufri6 daF_osdurante el transporte, o si faka alguna pieza, comun[quese con el Servicio al cliente de
Samsung al 1-800-SAMSUNG (726-7864).
Boquilla
Dosificador
Tapa dela ventilaci6n
vapor
Panel de control I
Boquil
Estante superior Estante inferior
, ¸1!¸;¸
3°r estante Rejilla del 3_' Estanteria copas
Estante para (en algunos estante (en algunos (en algunos
cubiertos modelos) modelos) modelos)
Accesorios Manual del usuario/instalaci6n, kit de instalaci6n, de de
manguera desag0e, soporte manguera
de desagLie, abrazadera de manguera, placa de protecci6n.
EspaSol o6
CUMPL[MIENTO DE LOS REQUIS[TOS DE INSTALACION
Suministroel6ctrico y conexi6na tierra
Paraevkar e[ riesgo de incendio, descarga e[ectrica o [esionesfisicas, todo el cableado y la conexi6n a tierra
deben realizarse de conformidad con la versi6n m&s redente del C6digo Electrico Nacional, ANSI/FNPA,
Nro. 70 y los c6digos y ordenanzas locales. Es exclusiva responsaWidad de[ propietario de[e[ectrodomestico
proveer los servicios e[ectricos adecuados para este electrodomestico.
A Nunca utilice un cable prolongador.
....._u., Cuando prepare la instalaci6n, asegOresede que el suministro electrico ofrezca las siguientes caracteffsticas:
Un circuito derivado individual de 120 voltios, 60 Hz destinado Onicamentea la lavavajillascon un fusible o
disyuntor de 15 amp.
La lavavajillas debe estar conectada a tierra. Encaso de que la lavavajillasfuncione real o se descomponga, la
conexi6n a tierra reducir_ el riesgo de descarga electrica al ofrecer una via de menor resistencia para la corriente
electrica.
Nunca conecte un cable a tierra alas tuber[as de pl_stico, las tuber[as de gas o las caF_effasde agua caliente.
ADVER_
INSTRUCCIONESDECONEXlONA TIERRA
Para un electrodom_stico con conexi6n permanente:
Este electrodomestico debe estar conectado a un metal con conexi6n a tierra, a un sistema de cableado
permanente, o se debe conectar el conductor de conexi6n a fierra del equipo a los conductores del circuito y
luego a la terminal de conexi6n a tierra del equipo.
Suministro de agua
La presi6n del conducto de agua caliente debe estar entre 20 y 120 psi (140 y 830 kPa).
Ajuste el calentador de agua para obtener una temperatura de agua entre 120 °F(49 °C)y 149 °F(65 °C).
La mayoffa de las tiendas de suministros de plomer[avenden conductos de diversas longitudes, de hasta
10 pies (305 cm) de largo.
Para reducir el riesgo de perdidas y daF_osocasionados por el agua puede hacer Io siguiente:
Coloque las Ilaves de agua en un lugar de f_cil acceso.
* Cierre las Ilaves cuando no use la lavavajillas.
Verifique peri6dicamente que no haya perdidas de agua en los accesorios del conducto.
/_ Antes de utilizarla lavavajillaspor primera vez verifique que no haya perdidas en ninguna de las conexiones de la
........_ %lvula de suministro de agua ni en las Ilaves.
Piso
Por razones de seguridad, su lavavajillasdebe estar instalada sobre un piso de construcci6n s61ida.
Nunca instale la lavavajillassobre una plataforma o sobre una estructura con soportes poco resistentes.
La lavavajillasdebe instalarse adecuadamente, conforme a la Guia de instalaci6n, antes de utilizarla. Si no recibi6 una Guia de
instalaci6n junto con la lavavajillas, puede obtener una en nuestro sitio Web www.samsung.com.
Espa_olo7
de a ava\iaia,q
J
/_ ADVERTENCIA: Pare redudr eIriesgo de incendio, descarga el@trice o lesiones personabs, ba los INSTRUCCIONES
........._ DESEGURIDAD IMPORTANTES antes de poner en marcha este ebetrodomestieo.
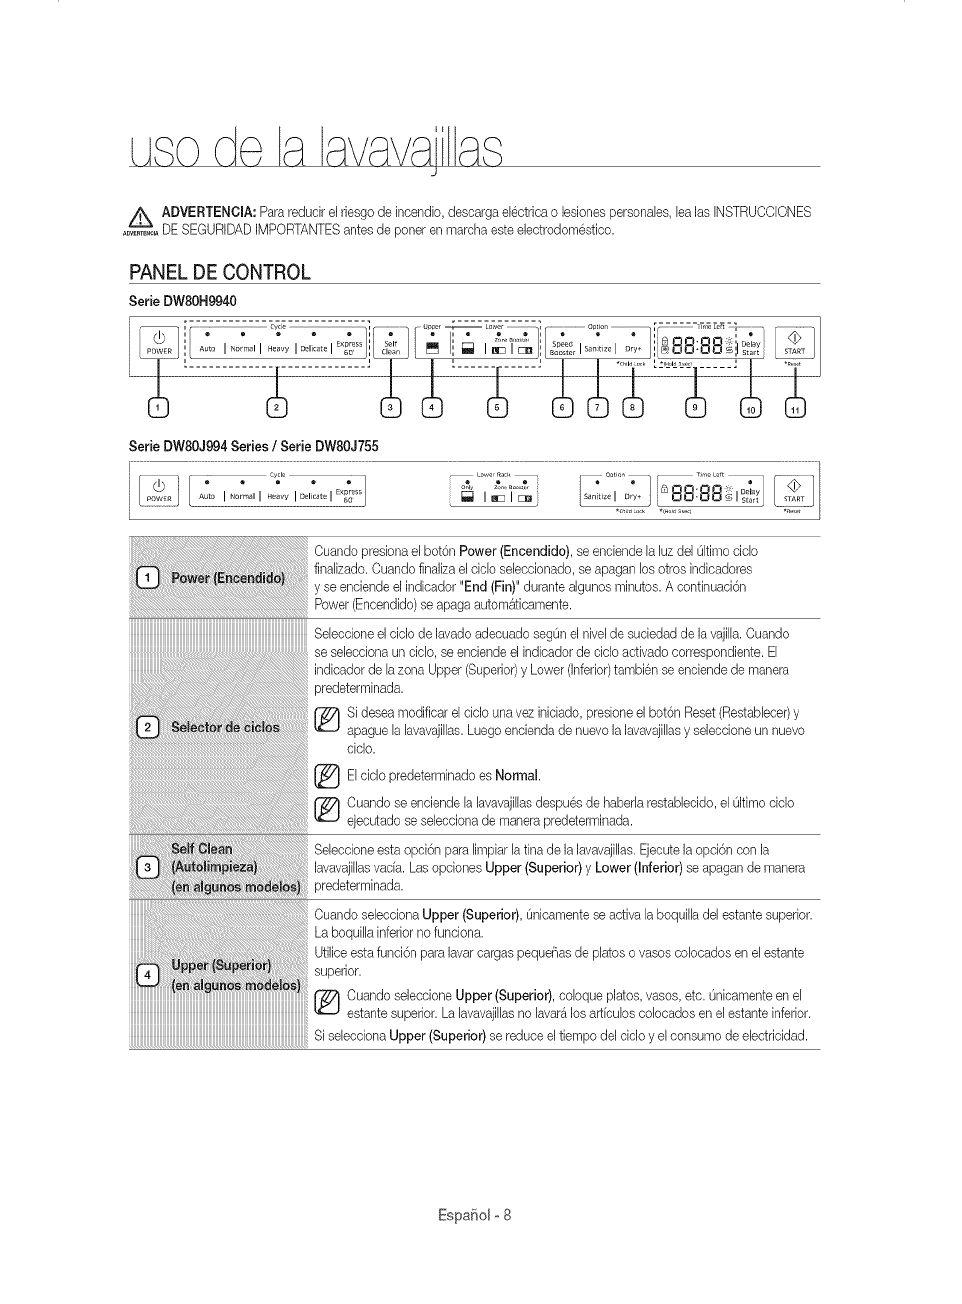
PANEL DE CONTROL
Serb DWSOH9940
....................................................---- --- _ ............ _ Uppe _ Lower / .......................................O#don [ _'_ 7 7 .......................... _" ]
................. =.... ..... ° L2'-_'R"I.....
Serie DW80J994 Series /Serie DW80J755
Cuando presiona el bot6n Power (Encendido), se enebnde la Bz del Okimocido
finaJizado.Cuando finalize eI ddo sebedonado, se apagan Josotros indbadores
y se eneiende el indbador "End (Fin)" durante algunos minutos. A eontinuaei6n
Power (Eneendido) seapaga autom&tieamente.
Sebeeione el oido de lavado adeouado segOn el nivel de sueiedad de la vajilla. Cuando
se sebcciona uncicJo,se enciende el indicador de eiclo aetivado correspondiente. EJ
indieador de lazone Upper (Superior)y Lower (inferior)tambi@nse eneiende de manera
predeterminada.
Si desea modificar el cido una vez iniciado, presione el bot6n Reset (Restabbcer) y
apague la lavavajillas. Luego encienda de nuevo la lavavajillas y sebccione un nuevo
ciclo.
Elcido predeterminado es Normal.
Cuando se eneiende la lavavajillas despu@ de haberla restabbcido, el Oltimoeido
ejecutado se seleeeiona de manera predeterminada.
Sebccione esta opci6n pare limpiar la tina de la lavavajiJlas.Ejecute la opci6n con la
JavavajiJJasvac[a. Los opciones Upper (Superior)y Lower (Inferior)se apagan de manera
predeterminada.
Ouando sebcciona Upper (Superior), Onicamentese active la boquilla del estante superior.
La boquilla inferior no funciona.
Utilice esta funci6n pare laver cargos pequeBas de platos o vasos colocados en el estante
superior.
j_ Cuando selecoione Upper (Superior), caique platos, vasos, etc. Onioamente en el
estante superior. La lavavajillas no laver4los articulos colocados en el estante inferior.
iiiiiiiiiiiiiiiiiiiiiiiiiiiiiiiiiiiiiiiiiiiiiiiiiiiiiiiiiiiiiiiiiiiiiiiiiiiiiiiiiiiiiiiiiiiiiiiiiiiiiiiiiiiiiiiiiiiiiiiiiii_
Si seleeciona Upper (Superior) se reduce el tiempo del cido y el eonsumo de ebetricidad.
EspaBolo8
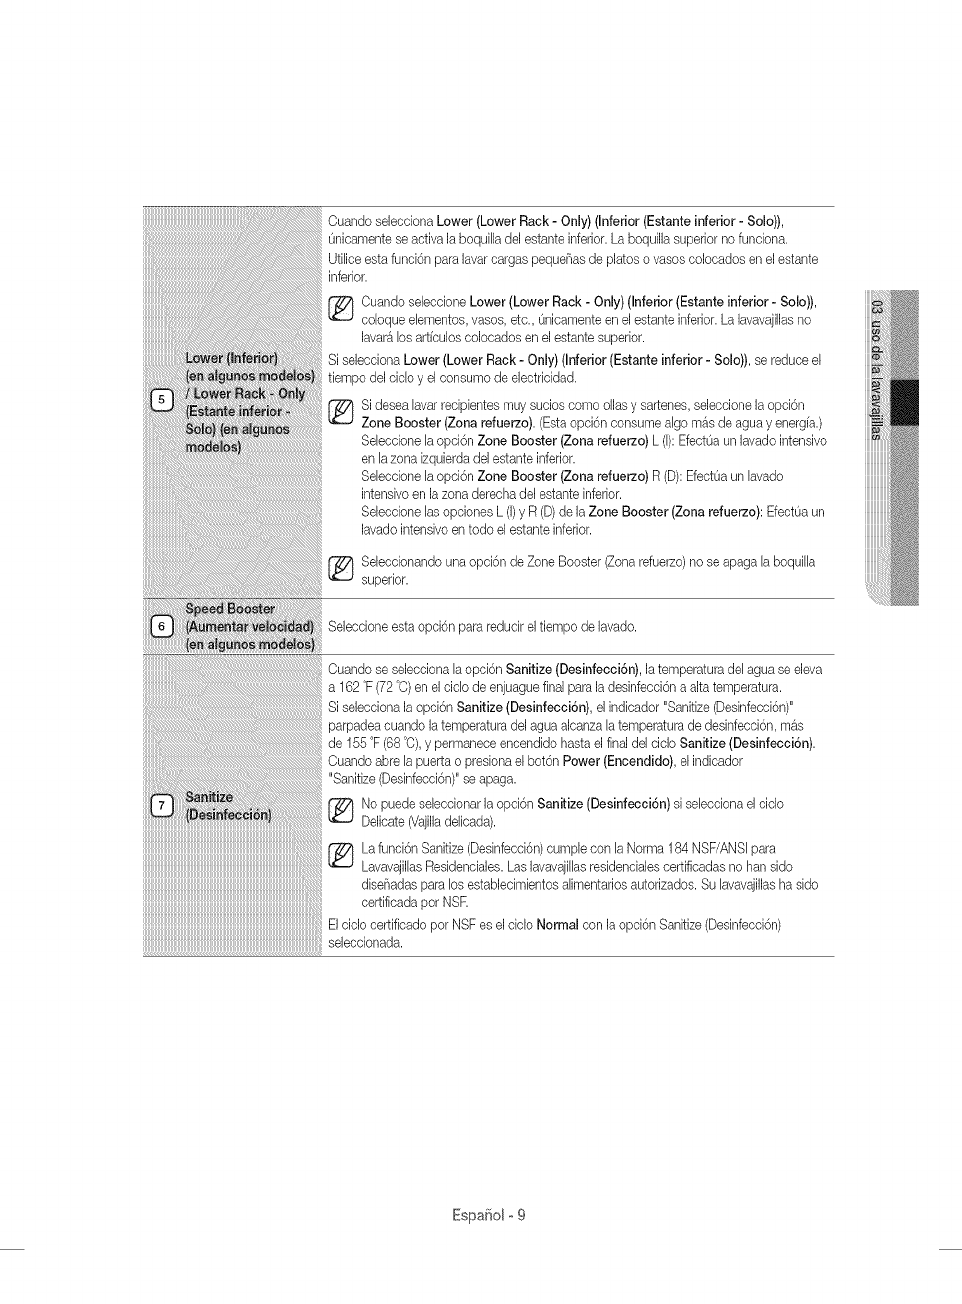
Cuando selecciona Lower (Lower Rack - Only) (Inferior (Estante inferior - Solo)),
Onicamente seactiva la boqui[la del estante inferior. La boquilla superior no fundona.
Ufi[ice esta funci6n para lavar cargas peque_as de platos o vasos colocados en el estante
inferior.
_ uando se[ecdone Lower (Lower Rack - Only) (Inferior (Estante inferior - Solo)),
co[oque e[ementos, vasos, etc., Onicamenteen el estante inferior. La lavavajillas no
lavar_ los artfculos colocados en el estante superior.
Si selecciona Lower (Lower Rack - Only) (Inferior (Estante inferior - Solo)), se reduce e[
tiempo del cic[o y el consumo de electdcidad.
Si desea [avarrecipientes muy sucios como ollas y sartenes, seleccione la opd6n
Zone Booster (Zona refuerzo). (Esta opci6n consume a[go m_s de agua y energfa.)
Se[ecdone [a opci6n Zone Booster (Zona refuerzo) L ([):EfectOa un lavado intensivo
en [a zona izquierda del estante inferior.
Se[ecdone [a opci6n Zone Booster (Zona refuerzo) R (D): EfectOaun [avado
intensivo en la zona derecha de[ estante inferior.
Se[eceione [as opciones L (1)y R (D)de [a Zone Booster (Zona refuerzo): EfectOaun
lavado intensivo en todo el estante inferior.
_ e[eccionando una opci6n de Zone Booster (Zona refuerzo) no se apaga [a boqui[[a
superior.
Seleccione esta opci6n para reducir el tiempo de lavado.
Cuando se selecciona [a opci6n Sanitize (Desinfecci6n), la temperatura del agua se eJeva
a 162 °F (72 °C)en el cic[o de enjuague final para la desinfecci6n a alta temperatura.
Si selecciona la opci6n Sanitize (Desinfecci6n), el indicador "Sanitize (Desinfecci6n)"
parpadea cuando la temperatura del agua alcanza [a temperatura de desinfecci6n, mas
de 155 °F (68 °O),y permanece encendido hasta el final del ciclo Sanitize (Desinfecci6n).
Cuando abre [a puerta o presiona el bot6n Power (Encendido), el indicador
"Sanitize (Desinfecci6n)" se apaga.
No puede seieccionar la opci6n Sanitize (Desinfecci6n) si seiecciona el ciclo
Delicate (Vajilladelicada).
La funci6n Sanitize (Desinfecci6n)cump[e con [a Norma 184 NSF/ANS[ para
Lavavajil[asResidenciales. Las lavavaji[[asresidenciales certificadas no han sido
diseF_adaspara los establecimientos a[imentarios autorizados. Su [avavajillasha sido
certificada pot NSR
El ciclo certificado por NSF es el ciclo Normal con la opci6n Sanitize (Desinfecci6n)
seleccionada.
Espa_olo9
J
iiiiiiiiiiiiiiiiiiiiiiiiiiiiiiiiiiiiiiiiiiiiiiiiiiiiiiiiiiiiiiiiiiiiiiiiiiiiiiiiiiiiiiiiiiiiiiiiiiiiiiiiiiiiiiiiiiiiiiiiiiii-
iiiiiiiiiiiiiiiiiiiiiiiiiiiiiiiiiiiiiiiiiiiiiiiiiiiiiiiiiiiiiiiiiiiiiiiiiiiiiiiiiiiiiiiiiiiiiiiiiiiiiiiiiiiiiiiiiiiiiiiiiiii
iiiiiiiiiiiiiiiiiiiiiiiiiiiiiiiiiiiiiiiiiiiiiiiiiiiiiiiiiiiiiiiiiiiiiiiiiiiiiiiiiiiiiiiiiiiiiiiiiiiiiiiiiiiiiiiiiiiiiiiiiiii
iiiiiiiiiiiiiiiiiiiiiiiiiiiiiiiiiiiiiiiiiiiiiiiiiiiiiiiiiiiiiiiiiiiiiiiiiiiiiiiiiiiiiiiiiiiiiiiiiiiiiiiiiiiiiiiiiiiiiiiiiiii
iiiiiiiiiiiiiiiiiiiiiiiiiiiiiiiiiiiiiiiiiiiiiiiiiiiiiiiiiiiiiiiiiiiiiiiiiiiiiiiiiiiiiiiiiiiiiiiiiiiiiiiiiiiiiiiiiiiiiiiiiiii
iiiiiiiiiiiiiiiiiiiiiiiiiiiiiiiiiiiiiiiiiiiiiiiiiiiiiiiiiiiiiiiiiiiiiiiiiiiiiiiiiiiiiiiiiiiiiiiiiiiiiiiiiiiiiiiiiiiiiiiiiiii
iiiiiiiiiiiiiiiiiiiiiiiiiiiiiiiiiiiiiiiiiiiiiiiiiiiiiiiiiiiiiiiiiiiiiiiiiiiiiiiiiiiiiiiiiiiiiiiiiiiiiiiiiiiiiiiiiiiiiiiiiiii
iiiiiiiiiiiiiiiiiiiiiiiiiiiiiiiiiiiiiiiiiiiiiiiiiiiiiiiiiiiiiiiiiiiiiiiiiiiiiiiiiiiiiiiiiiiiiiiiiiiiiiiiiiiiiiiiiiiiiiiiiiii
iiiiiiiiiiiiiiiiiiiiiiiiiiiiiiiiiiiiiiiiiiiiiiiiiiiiiiiiiiiiiiiiiiiiiiiiiiiiiiiiiiiiiiiiiiiiiiiiiiiiiiiiiiiiiiiiiiiiiiiiiiii
iiiiiiiiiiiiiiiiiiiiiiiiiiiiiiiiiiiiiiiiiiiiiiiiiiiiiiiiiiiiiiiiiiiiiiiiiiiiiiiiiiiiiiiiiiiiiiiiiiiiiiiiiiiiiiiiiiiiiiiiiiii
iiiiiiiiiiiiiiiiiiiiiiiiiiiiiiiiiiiiiiiiiiiiiiiiiiiiiiiiiiiiiiiiiiiiiiiiiiiiiiiiiiiiiiiiiiiiiiiiiiiiiiiiiiiiiiiiiiiiiiiiiiii
iiiiiiiiiiiiiiiiiiiiiiiiiiiiiiiiiiiiiiiiiiiiiiiiiiiiiiiiiiiiiiiiiiiiiiiiiiiiiiiiiiiiiiiiiiii_i_!i_ii:ii:ii:ii:ii:ii:ii:ii:ii:ii:ii:ii:ii:ii:ii:ii:ii:ii:ii:ii:ii:ii:ii:ii:ii:ii:ii:ii:ii:ii:ii:ii:ii:ii:ii:ii:ii:ii:ii:ii:ii:ii:ii:ii:ii:ii:ii:ii:ii:ii:ii:ii:ii:ii:ii:ii:ii:ii:ii:ii:ii:ii:iisiseleeeionaestaopei6n,seaumentaeleons_odeeleetrieidad.
La pr6xima vez que utiliee la lavavajillas, la opei6n Dry+ (Seoado+/se aeleceionar_
autom_ticamente y se aplicar_ al siguiente ciclo. Puede desactivar la opci6n
Dry+ (Seoado+/pulsando el bot6n Dry+ (Seoado+/.
(_ No puede seleccionar la opci6n Dry+ (Secado+)si selecciona el ciclo
Delicate (Vajilladelicada).
*Child Look (Bloqueo para ni_os): Esta opci6n le permite bloquear los botones del panel
de control, excepto el bot6n Power (Encendido), parr que los niF_osno puedan encender
la lavavajillas en forma accidental al presionar los botones del panel de control. Unicamente
el bot6n Power (Encendido) permanece activo.
Para bloquear o desbloquear los botones del panel de control, mantenga presionado el
bot6n Dry+ /Child Look (Seoado+ /Bloqueo parr ni_os) durante tres (3)segundos.
Cuando est_ encendida: Mantenga presionado el bot6n
"Dry+ /Child Look (Secado+ /Bloqueo parr ni_os)" durante tres (3)segundos.
Cuando est_ apagada: Presione primero el bot6n Power (Encendido) y luego
presione el bot6n "Dry+ /Child Lock (Secado+ /Bloqueo parr ni_os)" durante tres
(3)segundos.
Child Lock (Bloqueo parr niF_os)seguir_ activo hasta que Io apague. No
puede seleccionar ciclos ni opciones ni encender la lavavajillascuando
Child Lock (Bloqueo parr niF_os)est_ encendido.
Muestra el tiempo del ciclo y las horas y los minutos restantes, las horas del
Delay Start (Inicio Retardado) y los c6digos de informaci6n.
Si ocurre un problema durante el funcionamiento, aparece un c6digo de informaci6n con
un sonido de advertencia.
...................................Consulte la p_gina de c6digos de informaci6n.
_) (Bloqueo para niF_os)
Indicador Child Lock
Est4 encendido cuando Child Lock (Bloqueo parr niF_os)est4 activado (o la
lavavajillasest4 en el modo de espera o de pausa).
Est4 apagado cuando la lavavajillas est_ en funcionamiento.
Cuando Child Lock (Bloqueo parr niBos) est4 activado, el indicador
Child Lock (Bloqueo para niBos) parpadea durante unos segundos si no se
iiiiiiiiiiiiiiiiiiiiiiiiiiiiiiiiiiiiiiiiiiiiiiiiiiiiiiiiiiiiiiiiiiiiiiiiiiiiiiiiiiiiiiiiiiiiiiiiiiiiiiiiiiiiiiiiiiiiiiiiiii_
presiona ningOnbot6n excepto Power (Encendido).
,ndleadorSelfClean<A tollmpieza> <enalbinosmodeloe>>
Est4 encendido cuando la opci6n Self Clean (Autolimpieza)est_ activada (o la
lavavajillasest4 en el modo de espera o de pausa), pero se apaga cuando la
lavavajillasest4 en funcionamiento.
Parpadea durante 6 segundos erda 20 o 22 ciolos.
Eloontador de chios desapareoe cuando se oompleta el oiclo
Self Clean (Autolimpieza) o cuando la lavavajillasalcanza el ciclo 23 sin que
se utilice el ciclo SelfClean (Autolimpieza). (Elcontador de ciclos no cuenta el
funcionamiento de Reset (Restablecer) o Self Clean (Autolimpieza).)
Espa_iol - 10
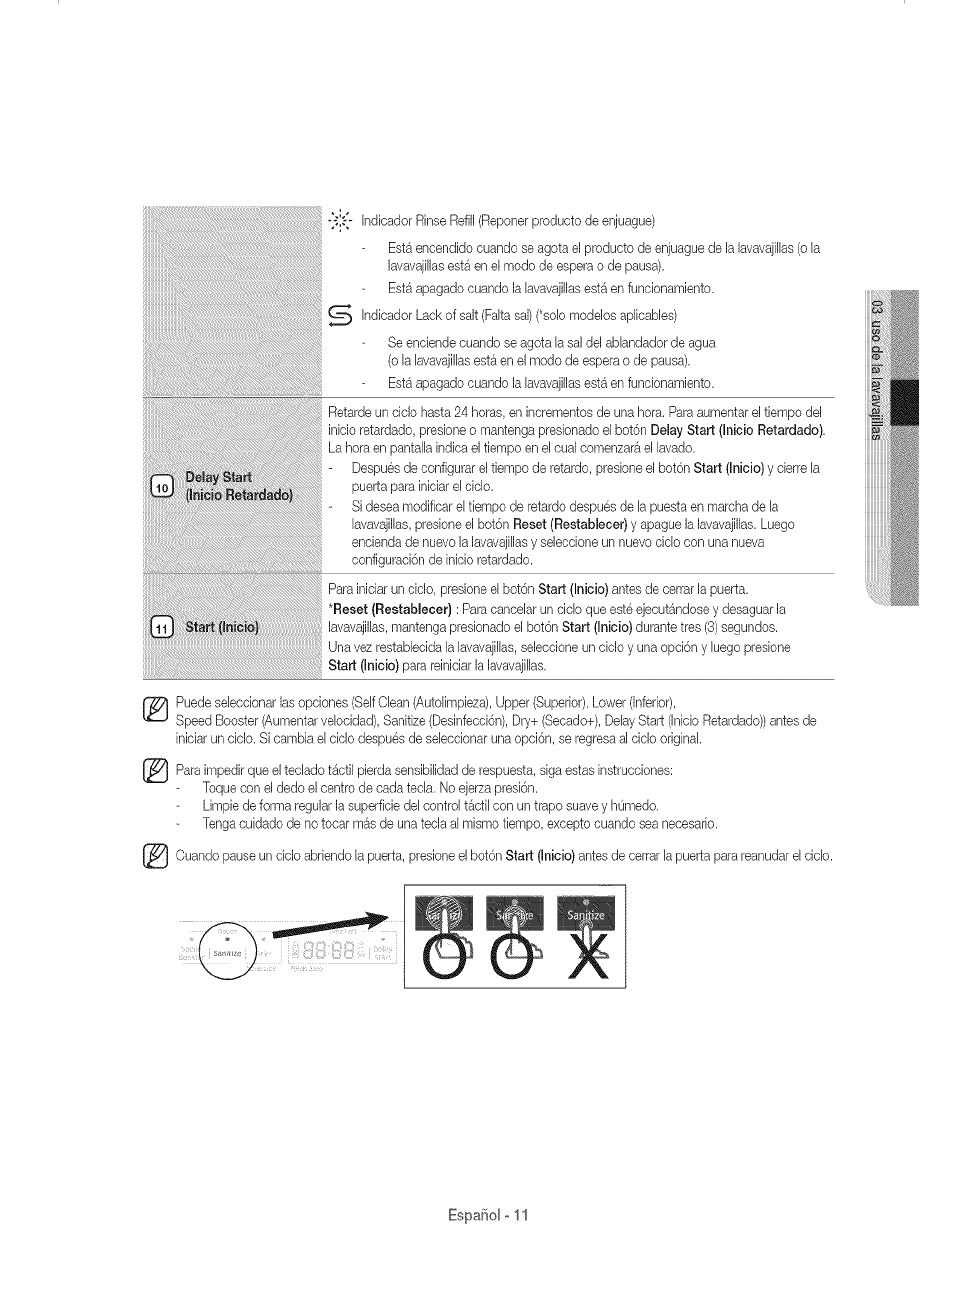
"31:-" Indicador Rinse Refill(Reporter producto de enjuague)
Est_ encendido cuando se agota el producto de enjuague de la lavavajilhs (o la
lavavajillas est_ en el modo de espera o de pausa).
Est_ apagado cuando la lavavajillas est_ en funcionamiento.
_ Indicador (Fakasal) (*solo aplicables)
Lack of salt modeJos
Se enciende cuando se agota la sal del ablandador de agua
(o la lavavajillas est_ en el modo de espera o de pausa).
Est4 apagado cuando la lavavajillas est4 en funcionamiento.
Retarde un ciclo hasta 24 horas, en incrementos de una hora. Paraaumentar el tiempo del
inicio retardado, presione o mantenga presionado el bot6n Delay Start (Inicio Retardado).
La hora en pantalh indica el tiempo en el cual comenzar_ el lavado.
Despues de configurar el tiempo de retardo, presione el bot6n Start (Inioio) y cierre la
puerta para iniciar el ciclo.
- Si desea modificar el tiempo de retardo despues de la puesta en marcha de la
lavavajillas,presione el bot6n Reset (Restablecer) y @ague la lavavajillas.Luego
encienda de nuevo la lavavajillasy seleccione un nuevo ciclo con una nueva
configuraci6n de inicio retardado.
Para iniciar un ciclo, presione el bot6n Start (Inicio) antes de cerrar la puerta.
*Reset (Restablecer} : Para cancelar un ciclo que este ejecut4ndose y desaguar la
lavavajillas, mantenga presionado el bot6n Start (Inicio) durante tres (3)segundos.
Una vez restablecida la lavavajillas,seleccione un ciclo y una opci6n y luego presione
Start(,n o o/parare n c ar avavai EEas.
Puede seleccionar las opciones (SelfOlean (Autolimpieza), Upper (Superior), Lower (Inferior),
Speed Booster (Aumentar velocidad), Sanitize (Desinfecci6n), Dry+ (Secado+), Delay Start (Inicio Retardado)) antes de
inlciar un ciclo. Si cambia el ciclo despues de seleccionar una opci6n, se regresaal ciclo original.
Para el teclado t4ctil sensibilidad de estas instrucciones:
impedir que pierda respuesta, siga
Toque con el dedo el centro de cada tecla. No ejerza presi6n.
Limpie de forma regular la superficie del control t_ctil con un trapo suave y hOmedo.
Tenga cuidado de no tocar m_s de una tecla al mismo tiempo, excepto cuando sea necesario.
Ouando ciclo abriendo la el bot6n Start antes de la reanudarel ciclo.
pause un puerta, presione (Inicio) cerrar puerta para
Espafiolo11
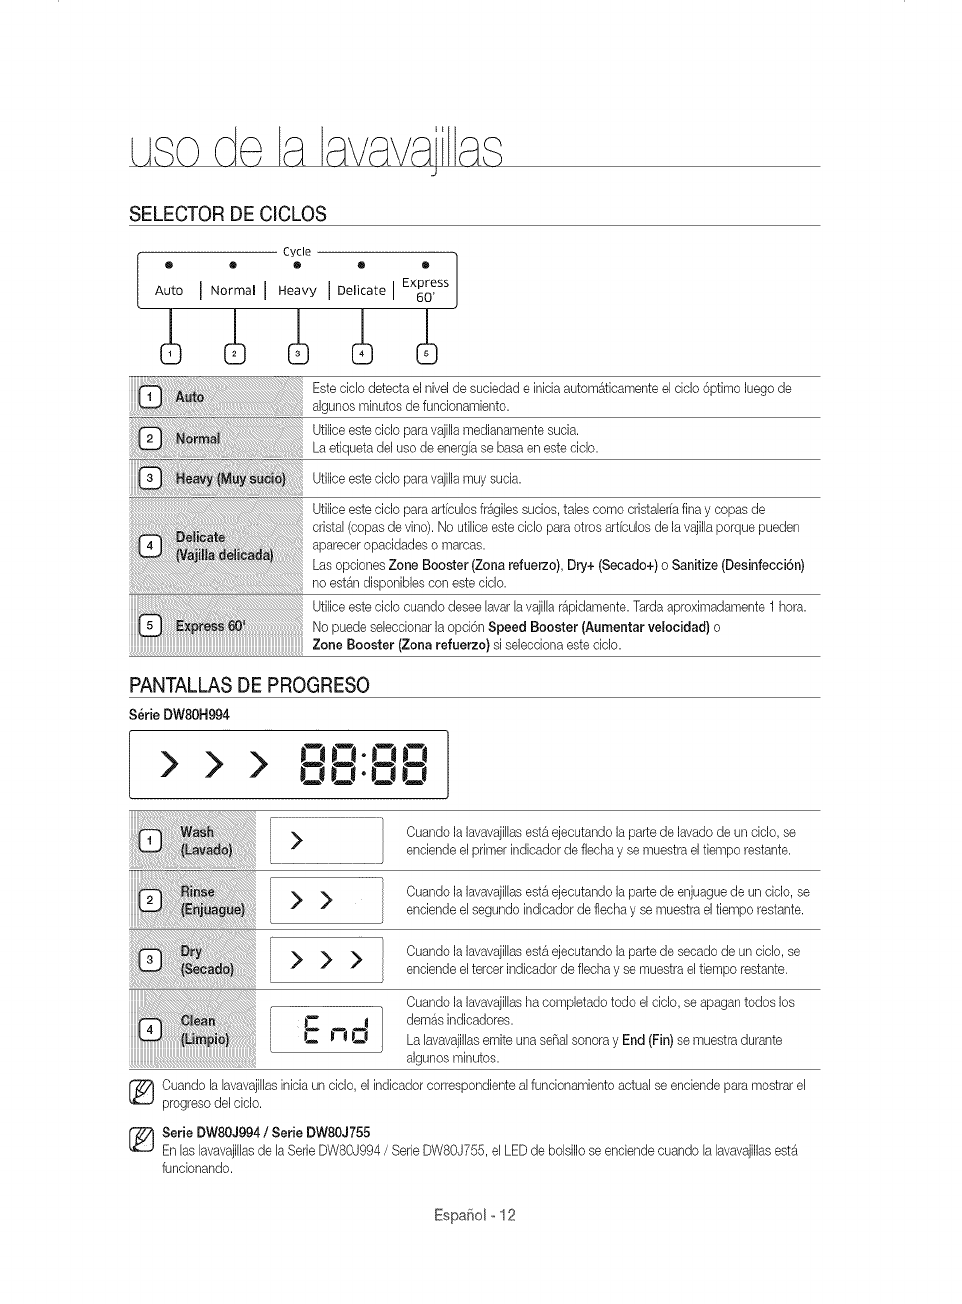
J
SELECTOR DE CICLOS
Cycle ]
® @ ® Q ®
Auto I N°rmal I Heavy I Delicate I Express
60'
Este ciclo detecta el nivel de suciedad e inicia automAticamente el ciclo 6ptimo luego de
algunos minutos de funcionamiento.
Utilice este ciclo para vajilla medianamente sucia.
La etiqueta del uso de energfa se basa en este ciclo.
Utilice este ciclo para vajilla muy sucia.
Utilice este ciclo para arficulos fr&giles suoios, tales como cristalerfa fina y copas de
cristal (copas de vino). No utilice este ciolo para otros arficulos de la vajilla porque pueden
aparecer opacidades o maroas.
Las opoiones Zone Booster (Zona refuerzo), Dry+ (Secado+) o Sanitize (Desinfecci6n)
no est&ndisponibles con este ciclo.
Utilice este ciclo cuando desee lavar la vajilla r_pidamente. Tarda aproximadamente 1 horn.
No puede seleccionar la opci6n Speed Booster IAumentar velocidad} o
Zone Booster (Zona refuerzo} si selecoiona este ciolo.
PANTALLAS DE PROGRESO
Serie DW80H994
I > > > oo-oo
l .Jl j-O 0
> >
>>>
L:no
Cuando la lavavajillas est& ejecutando la parte de lavado de un dclo, se
enciende el pdmer indicador de flecha y se muestra el fiempo restante.
Cuando la lavavajillas est& ejecutando la parte de enjuague de un dclo, se
enciende el segundo indicador de flecha y se muestra el tiempo restante.
Cuando la lavavajillas est& ejecutando la parte de secado de un cMo, se
enciende el tercer indioador de flecha y se muestra el tiempo restante.
Cuando la lavavajillas ha completado todo el dclo, se apagan todos los
demos indicadores.
La lavavajillasemite una se_al sonora y End (Fin) se muestra durante
algunos minutos.
[_ uando la lavavajillasinicia un ciclo, el indicador correspondiente al funcionamiento actual se enciende para mostrar el
progreso del cMo.
[_ Serie DW80J994/Serie DW80J755
En Ins lavavajillas de la Serie DW80J994 /Serie DW80J755, el LED de bolsillo se enciende cuando la lavavajillasest_
funcionando.
EspaSolo12
PAUTAS BASICAS
1. Abra la puerta y cargue lavajilla (consulte la p_gina 17-21).
Coloque la vajllla en los estantes superior e inferior, a menos que haya seleocionado la opoi6n Upper (Superior) o
Lower (Lower Rack - Only) (Inferior (Estante inferior -Solo)).
Retire los restos de comlda de la vajilla antes de colocarla en los estantes.
Despues de cargar la vajllla en los estantes, rote las boqulllas superiores para asegurarse de que ninguno de los
platos bloquee la rotaci6n de las boqulllas.
AsegOresede que los platos no lmpldan que se abra la apertura del doslficador del detergente.
2. Agregue detergente al dosificador (p_gina 22).
AsegOresede utilizar Onicamente detergente para lavavajillas autom_.tica.
Consulte "Uso del detergente" para saber c6mo agregar el detergente.
3. Preslone el bot6n Power (Encendido).
Cuando presiona el bot6n Power (Encendido), se enclende el lndicador del Oltimoclolo finallzado.
Si se enclende el lndicador "Rinse Refill (Reponer producto de enjuague)", debe reponer el producto de enjuague para
mejorar el desempeF_odel lavado y del secado.
4. Selecclone el ciclo de Iimpieza adecuado segOnel nlvelde sucledad de la vajilla. (consulte las p_glnas 12 y 27.)
Presione el bot6n de clclo adecuado.
Cuando presiona un bot6n de ciclo, se enclende el lndicador correspondlente.
Para obtener informacl6n sobre c6mo selecclonar un clolo segOn el nivel de suciedad de lavajllla, consulte "Selector
de ciclos".
5. Pres[one e[ bot6n Start (In[cio) y c[erre la puerta.
Empuje los estantes hacia atr_s para colocarlos en su lugar, pulse el bot6n Start (Inicio) y clerre la puerta.
AsegOrese de cerrar la puerta firmemente. Si la puerta esta levemente entreab[erta, el c[clo selecc[onado no
comenzar_ autom&ticamente.
La lavavajillas comenzar_ a drenar despues de unos segundos y luego [n[oiar_el ciclo selecclonado.
6. Cuando se completa el ciclo de lavado.
Se enc[ende el [ndicador "End (Fin)" y la lavavajillasem[te una seF_alsonora.
La lavavajillas se apaga autom_t[oamente luego de algunos m[nutos.
/_ Para cargar m_s vaj[llao parahacer una pausa durante el funoionam[ento, abra la puerta despac[o y con cuidado, ya
_E,A'_"%0O,que ex[ste la posibilidad de sufr[r les[ones a causa del vapor caliente conten[do en el interior de la lavavaj[llas.
(Sise abre la puerta cuando la lavavajillasest_ funclonando, se activa un mecanlsmo de segurldad y se detiene el clolo.)
Para reanudar el func[onamiento, pres[one el bot6n Start (Inicio) y c[erre la puerta.
Tenga en cuenta que agregar vaj[lla algunos m[nutos despues de que la lavavaj[llascom[ence a funoionar puede afectar
al desempeF_o.
[_ ara Iograr un mejor desempe_o en el secado debe ut[l[zar productos para el enjuague. Puede Iograr un mejor
desempeF_odel secado selecoionando la opci6n Dry+ (Secado+).
EspaSo[o13
J
Controles tactiles
Los controles t_ctiles le permiten operar f_cilmente la m_quina lavavajillas.
• Se actJvanf_cilmente con un toque suave.
Tienen un diseflo sencillo y elegante.
Son f_ciles de limpiar.
Si tiene niSos o desea limpiar la Interfaz de control, recomendamos activar la funci6n
Child Lock (BIoqueo para nJSos)para bloquear los botones de control.
Cuando esta opci6n este selecdonada, los niflos no podr_n encender la lavavajilhs en forma accidental
al tocar los controles.
Si un ciclo se est_ ejecutando, los botones no responder_n. (excepto el bot6n Power (Encendido) y hs
opciones Child Lock (Bloqueo para niflos) y Reset (Restablece0)
Si la lavavajillas est_ apagada, 0nicamente responder_ el bot6n Power (Encendido).
Inicio Retardado
AI seleccionar la opci6n de Delay Start (Inicio Retardado), la lavavajillas inicia el ciclo seleccionado luego de que
se cumpla el tiempo estaUecido.
Alarma de interferencia del reflector de agua:
La funci6n de interferencia del reflector de agua detecta autom_ticamente los obst_culos en la tina. Si detecta
algOn obst&culo, la pantalla parpadea y la lavavajillas emite una seflal sonora durante unos minutos. Si se
detecta algOn obst_culo al final del ciclo, End (Fin) parpadea durante unos minutos.
Retire cualquier obst_culo de la parte inferior de la lavavajillas.
Modo de configuraci6n
Elmodo de configuraci6n permite cambiar el sonido y el brillo del LED de la lavavajillas. Para ingresar en el modo
de configuraci6n, presione los botones Delay Start (InJcio Retardado) + Sanitize (Desinfecci6n) durante
3 segundos con la lavavajillasencendida. Presione el bot6n Sanitize (Desinfecci6n) para seleccionar un
subelemento del menLide configuraci6n y presione el bot6n Delay Start (Inicio Retardado) para cambiar una
configuraci6n.
Configuraci6n del aonido: Presione el bot6n Sanitize (Desinfecci6n) hasta que se muestre "S on"
(Sonido activado) o "SoFF" (Sonido desactivado). Para cambiar la configuraci6n, presione el bot6n
Delay Start (Inicio Retardado). "SoFF" significa que el sonido est_ desactivado durante todos los ciclos.
La lavavajillasconservar_ la configuraci6n del sonido seleccionada hasta que vuelva a cambiarla.
Configuraci6n del brillo del LED de bolsillo: Presione el bot6n Sanitize (Desinfecci6n) hasta que se
muestre "B0- BS". Los nOmeros m_s altos indican m_s brillo.) Cuanto m_s alto es el nOmero, m_s brillan
los LED. Paracambiar la configuraci6n en una lavavajilhs de h Serie DW80J994 /Serie DW80J755,
presione e] bot6n Delay Start (InJcJoRetardado).
Cuando utilice la lavavajillas,trate de acomodar los platos de maneraadecuada, como sedescribe en la p_gina 16.
ADV_ENC_
Debe retirar de lavajilla todos los restos de comida, como huesos, semillas, etc., y cualquier otro tipo de
desecho como los palillos, papel u otros, ya que es posiUe que darien la vajilla, generen ruidos u ocasionen
incluso real funcionamiento.
Presione el bot6n de ciclo adecuado seg0n el nivel de suciedad y el tipo de vajilla.
UtiliceLinicamente la cantidad adecuada de detergente y de producto para el enjuague.
®
®
No
ADV_ENC_
®
deben lavarselos siguientesarticulos
Articulos de acrJlico o aluminio: Los articulos de acnlico o aluminio pueden decolorar los platos con un
horde dorado impreso y daflar otros articulos.
*Platos tratados con adhesivos: Los pl_sllcos tratados se deben lavar aparte. Pueden
despegarse Jos adornos de madera, marfil, cobre y hojalala de Jos plalos.
PI6.sticos con una tolerancia a la temperatura inferior a 194 °F (90 °C):Los pl_sticos delgados no se lavan
ni secan bien yes posible que se darien debido a las altas temperaturas de lavado.
Hojalata: La hojalata debe lavarse a mano y secarse inmediatamente, ya que puede oxidarse.
Utensilios de madera: Los articulos de madera pueden agrietarse.
EspaSol o 14
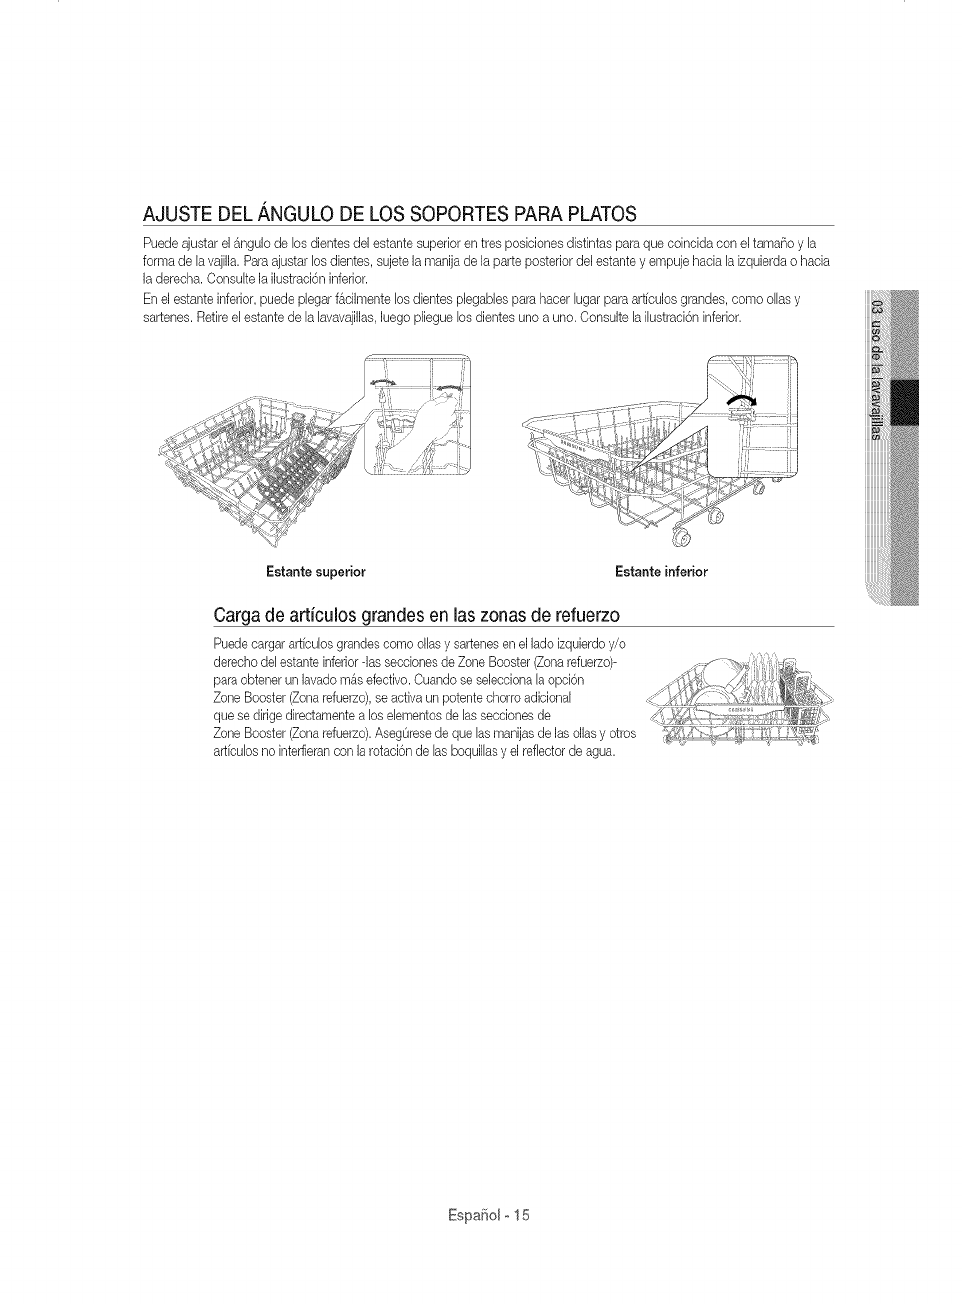
AJUSTE DEL _,NGULO DE LOS SOPORTES PARA PLATOS
Puedeajustar el _ngulo de los dientes deJestante superior en tres posiciones distintas para que coincida con e[ tama_o y [a
forma de [avajilla. Para ajustar los dientes, sujete [a manija de [a parte posterior de[ estante y empuje hada [a izquierda o hacia
[a derecha. Consu[te [a ilustraci6n inferior.
Enel estante inferior, puede plegar f_cilmente los dientes p[egabJespara hacer [ugar para artfcuJosgrandes, como o[[as y
sartenes. Retire e[ estante de [a [avavajillas,[uego pJieguelos dientes uno a uno. Consulte [a i[ustraci6n inferior.
Estante superior Estante inferior
Cargade articulos grandes en [aszonasde refuerzo
Puedecargar artfcu[os grandes como o[[as y sartenes en el [ado izquierdo y/o
derecho de[ estante inferior -Jasseeeionesde Zone Booster (Zonarefuerzo)-
para obtener un [avado m&s efectivo. Ouando se seJecciona[a opci6n
Zone Booster (Zona refuerzo),se activa un potente chorro adiciona[
que se dirige directamente a los e[ementos de [as secciones de
Zone Booster (Zona refuerzo).AsegOresede que [as manijas de [as ollas y otros
articu[os no inteffieran con [a rotaci6n de [as boquil[asy el reflector de agua.
EspaSolo15
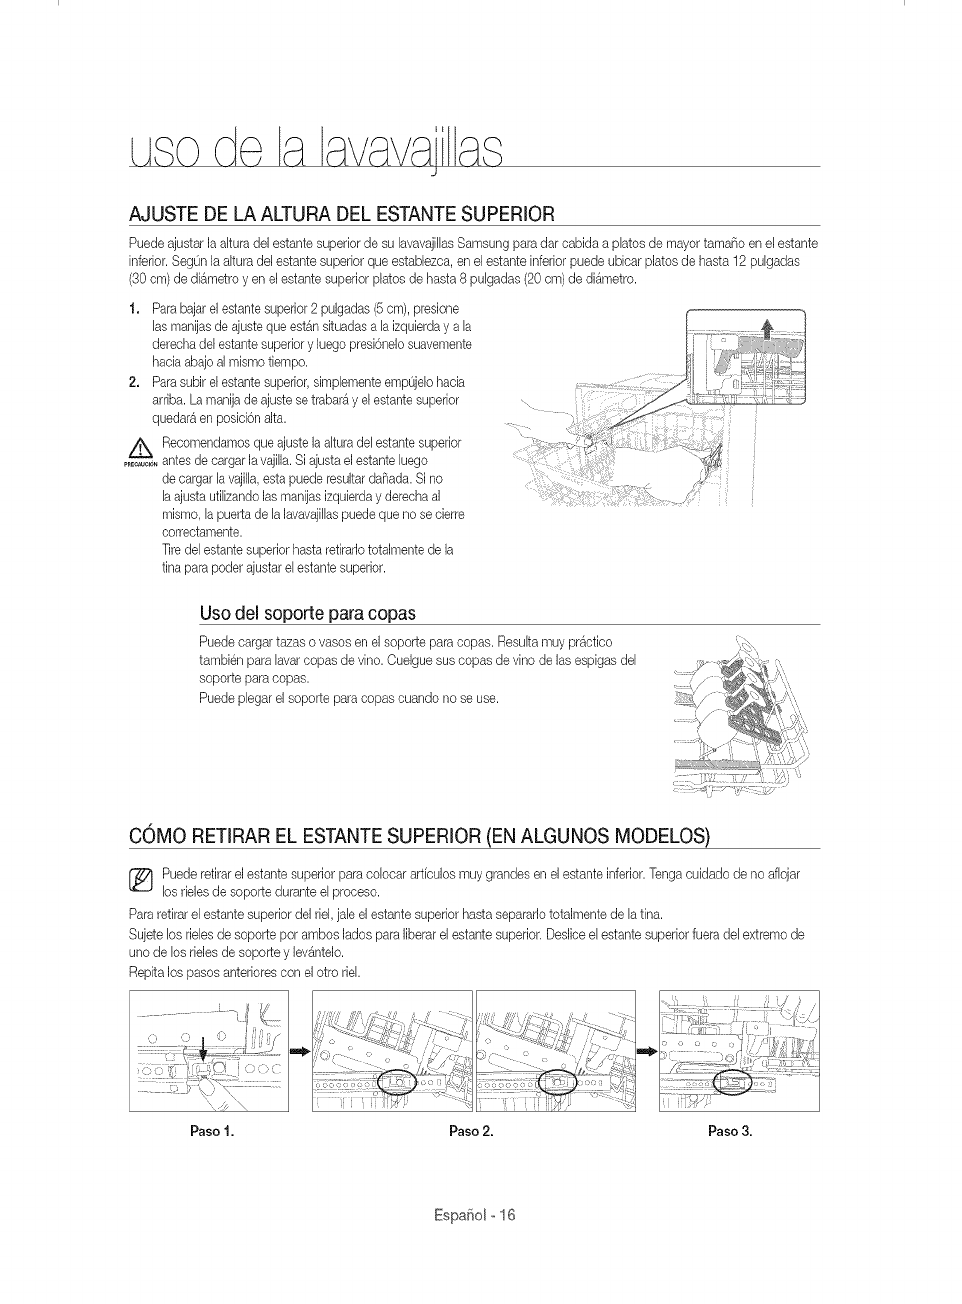
J
AJUSTE DE LA ALTURA DEL ESTANTESUPERIOR
Puede ajustar la akuradel estante superior de su hvavajillas Samsung para dar cabida a phtos de mayor tamaSo en el estante
inferior. SegOnla akura del estante superior que estaUezca, en el estante inferior puede ubicar platos de hasta 12 pulgadas
(30 cm) de di&metro yen el estante superior platos de hasta 8 pulgadas (20 cm) de di_metro.
1. Para bajarel estante superior 2 pulgadas (5cm), presione
hs manias de ajuste que est_n situadas a la izquierday a la
derecha del estante superior y luego presi6nelo suavemente
hacia abajo al mismo tiempo.
2. Para subir el estante superior,simplemente empOjelohacia
arriba. La manija de ajuste setrabar_ y el estante superior
quedar_ en posicbn alta.
/_ Recomendamos que ajuste la akura del estante superior
......_ _, antes de cargar la vajilla.Si ajusta el estante luego
de cargar la vajilh, esta puede resultar da_ada. Si no
h ajusta utilizando las manijas izquierday derecha al
mismo, la puerta de la lavavajillaspuede que no secierre
correctamente.
]]re del estante superior hasta retirarlo totalmente de la
tina para poder ajustar el estante superior.
Usodel soporte para copas
Puede cargar tazas o vasos en el soporte para copas. Resulta muy pr_ctico
tambien para lavar copas de vino. Cuelgue sus copas de vino de las espigas del
soporte para copas.
Puede plegar el soporte para copas cuando no se use.
COMO RETIRAR EL ESTANTESUPERIOR (EN ALGUNOS MODELOS)
_ uede retirar el estante superior para colocar arficulos muy grandes en el estante inferior. Tonga cuidado de no aflojar
los rMes de soporte durante el proceso.
Para retirar el estante superior del riel. jale el estante superior hasta separarlo totalmente de la tin&
Sujete los delesde soporte pot ambos lados para liberar el estante superior. Deslice el estante superior fuera del extremo de
uno de los rielesde soporte y le%ntelo.
Repita los pasos anteriores con el otto riel.
Paso 1. Paso 2. Paso 3.
Espa_iol o16
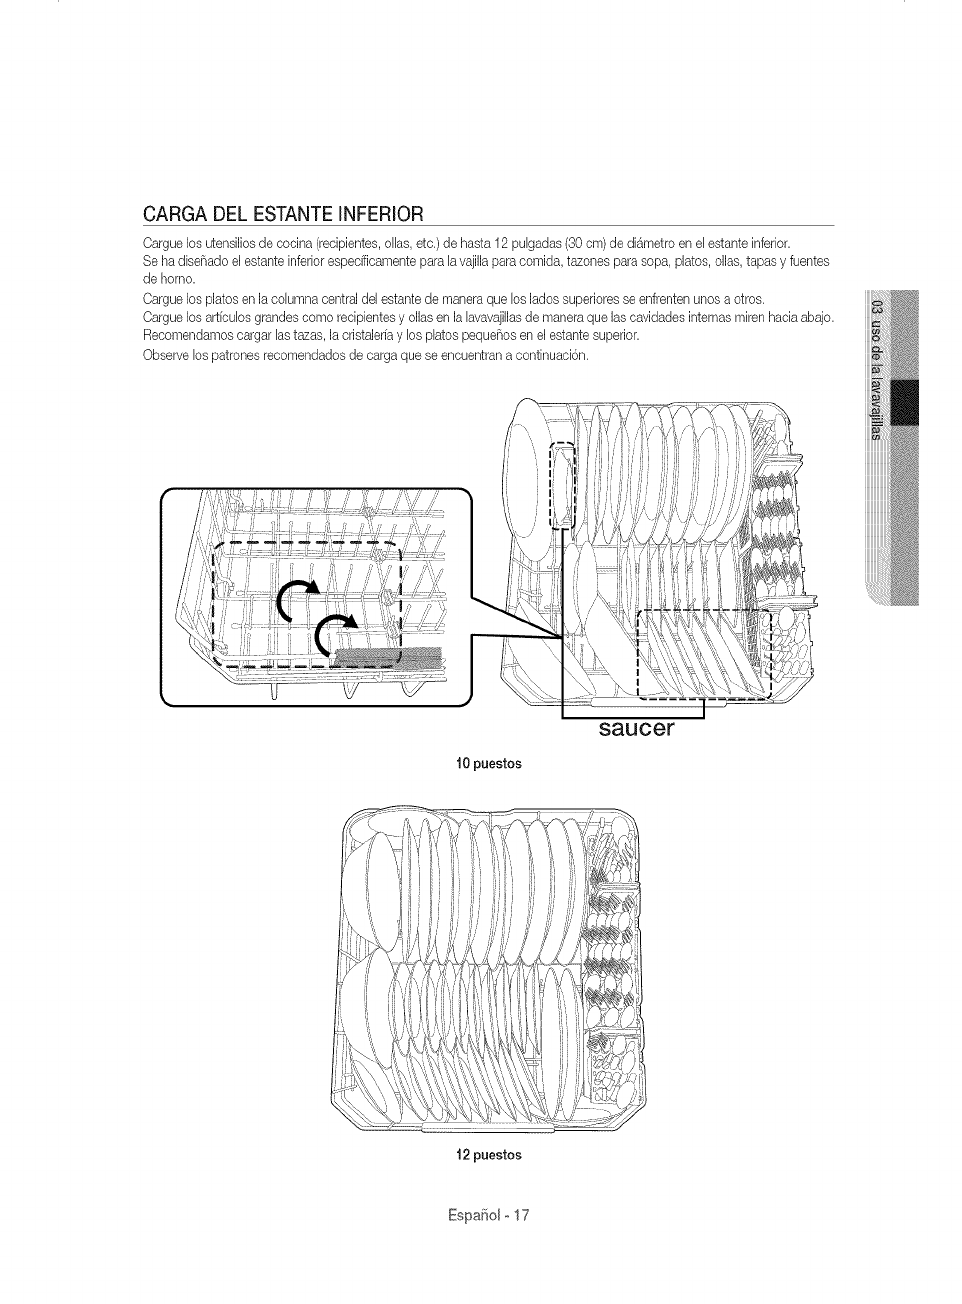
CARGA DEL ESTANTEINFERIOR
Cargue los utensilios de cocina (recipientes, olhs, etc.) de haste 12 pulgadas (30 cm) de di_metro en el estante inferior.
Se ha dise_ado el estante inferior espedficamente pare lavajilla pare comida, tezones pare sopa, platos, ollas, tapes y fuentes
de homo.
Cargue los plates en la columna central del estante de manera que los lades superiores se enfrenten unos a otros.
Cargue los art[culos grandes come redpientes y elias en la lavavajillasde manera que las cavidades internes miren hada abajo.
Recomendamos cargar hs tazas, la cristalerfa y los platos peque_os en el estante superior.
Observe los patrones recomendados de carga que se encuentran a continuaci6n.
10 puestos
saucer
12 puestos
Espa¢_olo 17
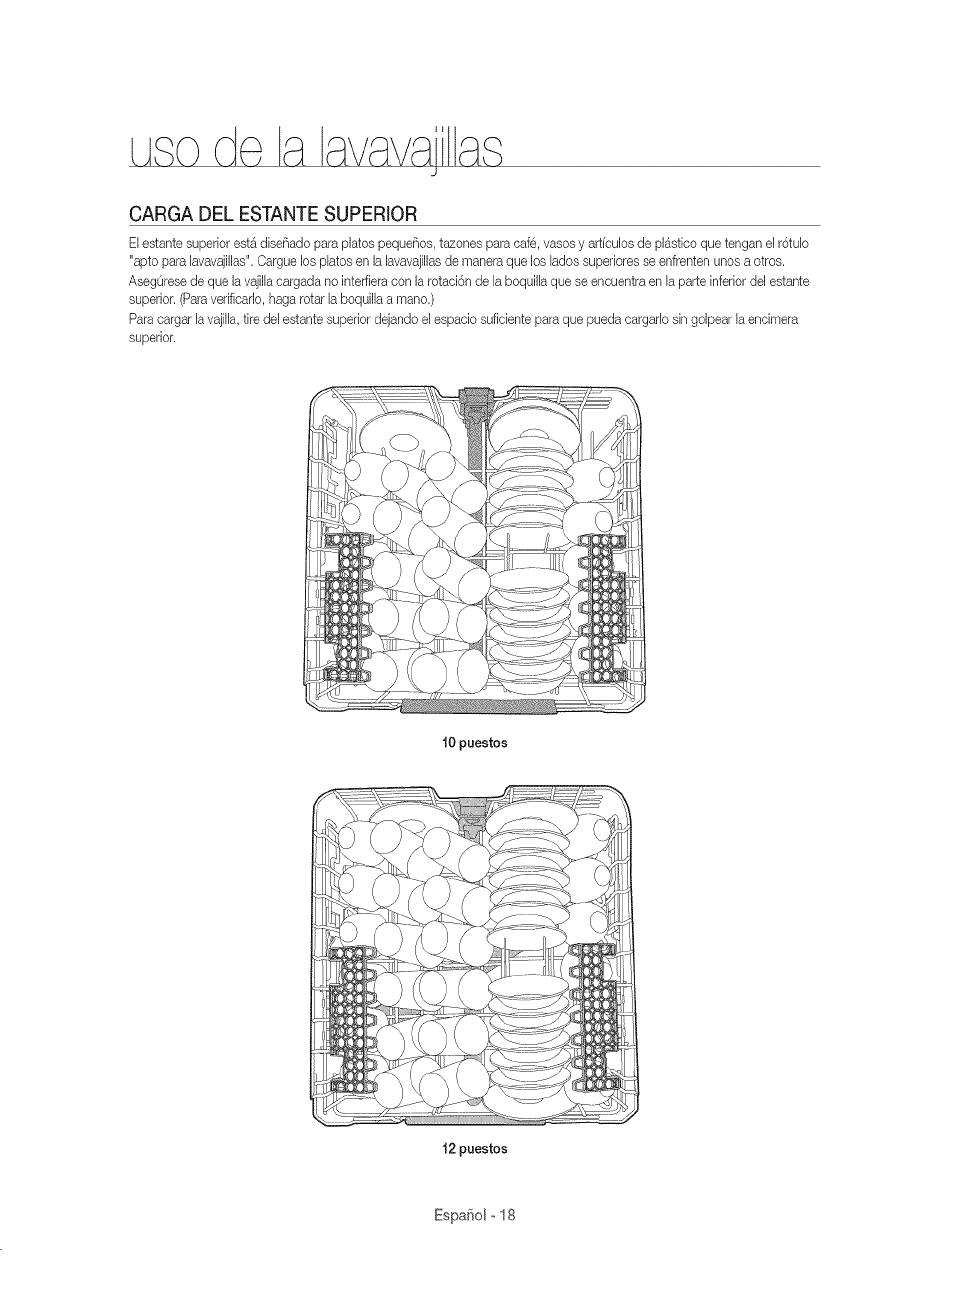
J
CARGA DEL ESTANTESUPERIOR
ELestante superior est_ diseSado para plates pequeSos, tazones para cafe, vases y artfculos de pl_stico que tengan el r6tub
"apto para Eavavajillas".Cargue los plates en la lavavajillasde manera que los Eadossuperiores se enfrenten unos a otros.
AsegOrese de que la vajilEacargada no inteffieracon la rotaci6n de EaboquilEaque se encuentra en Eaparte inferior del estante
superior. (Paraverificarlo, haga rotar la boquilla a mane.)
Para cargar EavajiEh,tire deLestante superior dejando el espacio suficiente para que pueda cargarb sin golpear Eaencimera
superior.
10 puestos
12 puestos
EspaSolo18
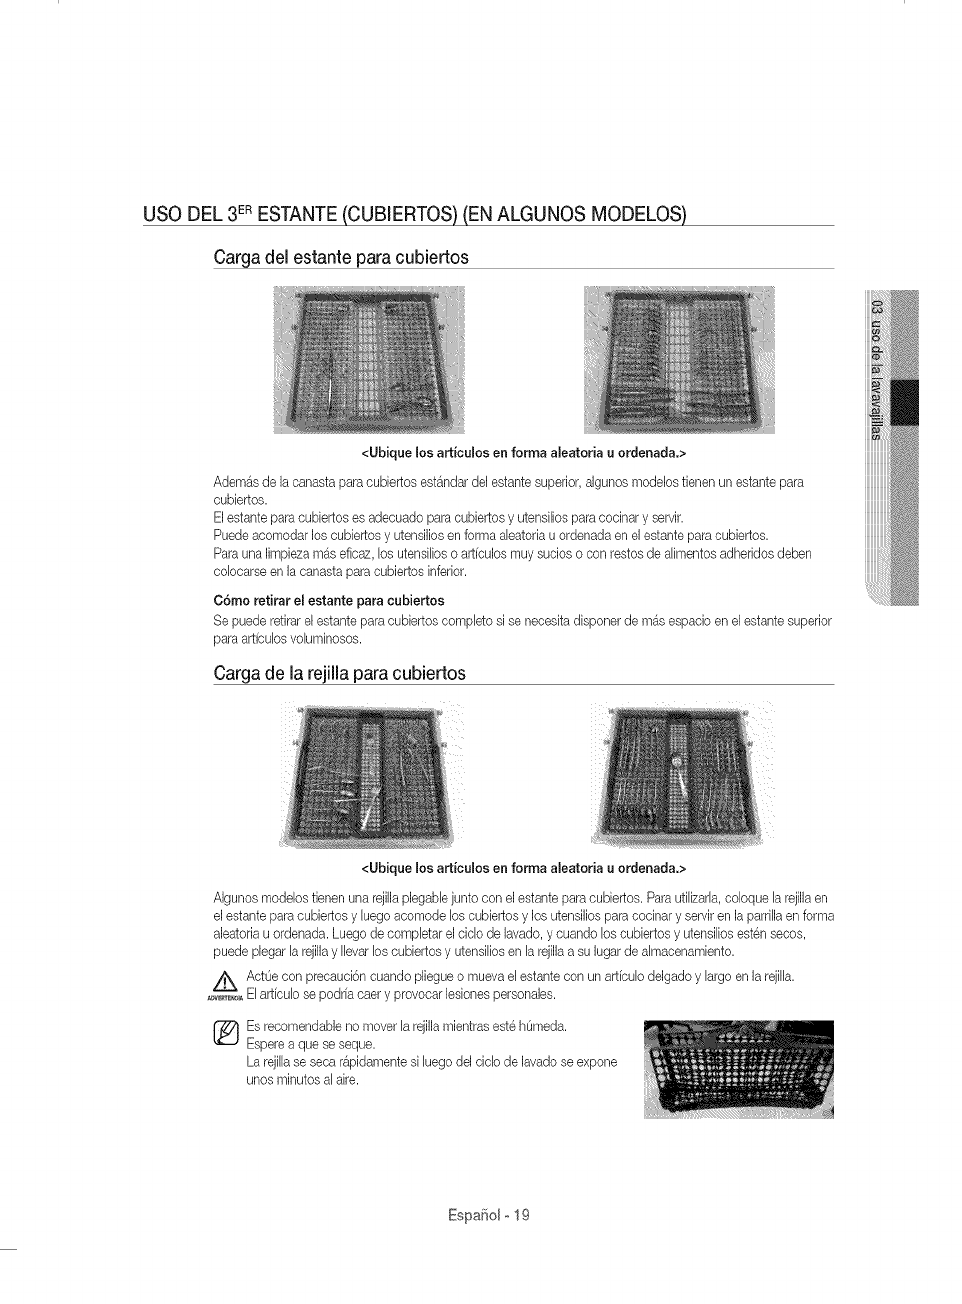
USO DEL 3ERESTANTE(CUB]ERTOS) (EN ALGUNOS MODELOS)
Cargadel estante para cubiertos
<Ubique los art{culos en forma aleatoria u ordenada.>
Adem_s de ]a canasta para cubiertos est_ndar del estante superior, algunos modelos tienen un estante para
cubiertos.
Elestante para cubiertos es adecuado para cubiertos y utensiEiosparacocinar y servir.
Puede acomodar los cubiertos y utensilios en forma aEeatoriau ordenada en el estante para cubiertos.
Para una ]impieza m_s eficaz, bs utensiEioso artfculos muy sucios o con restos de aEimentosadheridos deben
cobcarse en ]a canasta para cubiertos inferior.
C6mo retirar el estante para cubiertos
Se puede retirar el estante para cubiertos compEetosi se neceska disponer de m_s espacio en el estante superior
para artfcubs voluminosos.
Cargade la rejilla paracubiertos
<Ubique los articulos en forma aleatoria u ordenada.>
Algunos modelos tienen una rejilla plegaNe junto con el estante para cubiertos. ParautiEizada,cobque Earejilla en
el estante para cubiertos y Euegoacomode los cubiertos y los utensilios para cocinar y servir en ]a parrilla en forma
aleatoria u ordenada. Luego de completar el ciclo de ]avado, y cuando los cubiertos y utensilios esten secos,
puede plegar la rejillay Ilevar los cubiertos y utensilios en la rejilla a su ]ugar de almacenamiento.
i_k ActOe con precauci6n cuando pliegue o mueva el estante con un art[culo delgado y largo en ]a rejilla.
........_ El art[culo se podr[a caer y provocar ]esionespersonales.
Es recomendable no mover la rejilla mientras este homed&
Espere a que se seque.
La rejillase seca r&pidamente si luego de] ciclo de ]avado se expone
unos minutes al aire.
Espafiol-19

J
USO DE LA ESTANTERiA PARA COPAS (PARA ALGUNOS MODELOS
G ®
0t05 mm
--O6-9mm
E
E
ca
[ntertek
Conforms to NSF/ANSI STD.2
EspaSol o 20
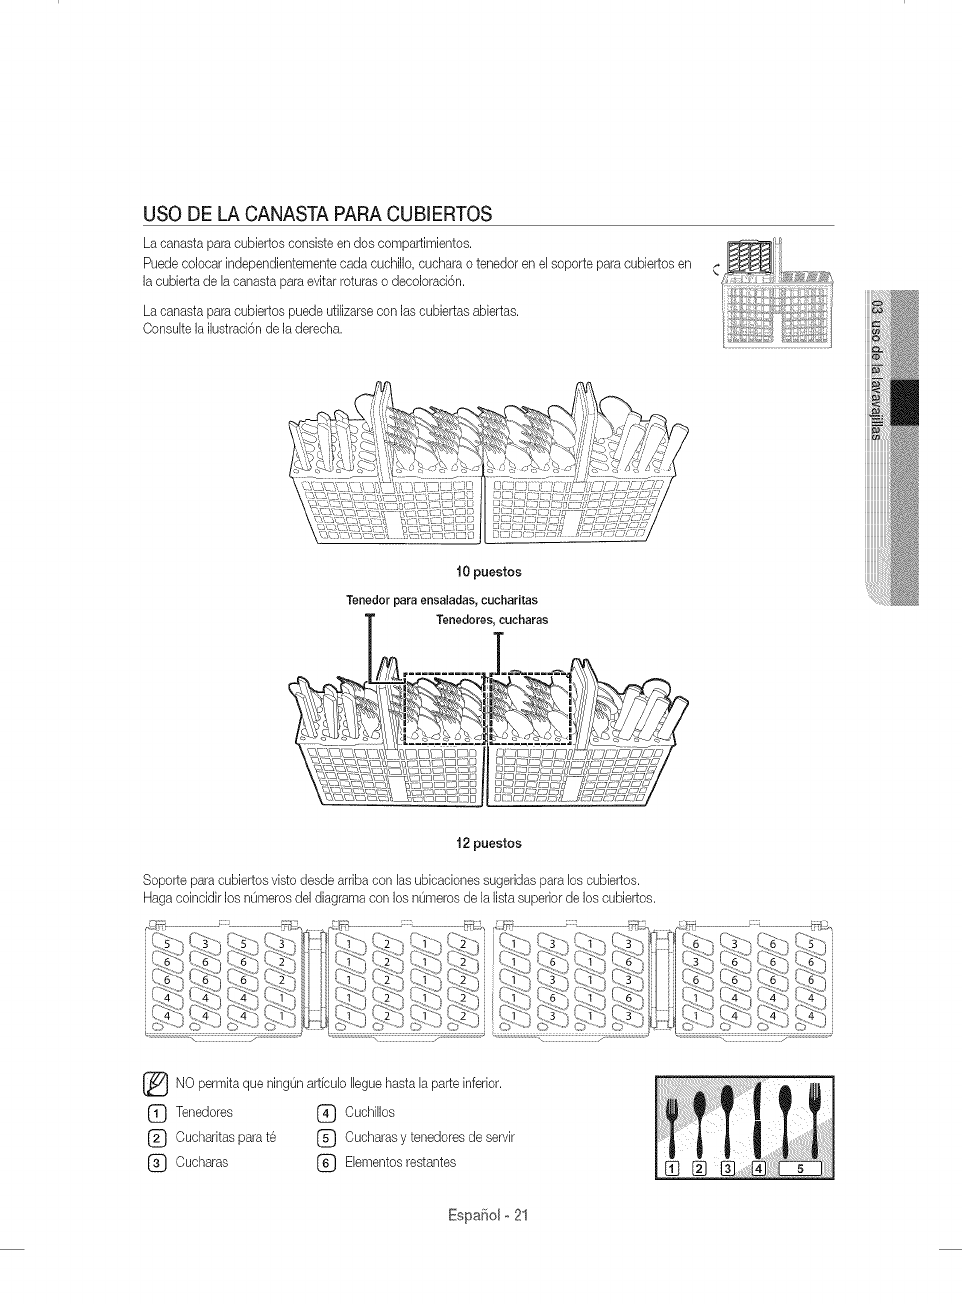
USO DE LA CANASTA PARA CUB[ERTOS
La canasta para cubiertos consiste en dos compartimientos.
Puedecolocar independientemente cada cuchillo, cuchara o tenedor en e[ soporte para cubiertos en
la cubierta de [a canasta para evitar roturas o decoloraci6n.
La canasta para cubiertos puede utilizarse con las cubiertas abiertas.
Consu[te la ilustrad6n de la derecha.
10 puestos
Tenedor para ensaladas, cucharitas
Tenedores_ cuoharas
12 puestos
Soporte para cubiertos visto desde arriba con [as ubicac#nes sugeridas para los cubiertos.
Haga coinddir los nOmerosdel diagrama con los nOmeros de la lista superior de los cubiertos.
[_NO permka que ningOnartfcu[o [[eguehasta [a parte inferior.
(_ Tenedores (_ Cuchi[Ios
(_ Oucharitas para te (_ Oucharas y tenedores de servir
(_ Cucharas (_) E[ementos restantes
Espa_ol-21

de, J
USO DEL DETERGENTE
Todos Ds cicDs de EaEavavajillasrequieren detergente en el compartimiento correspondiente.
Agregue la canfidad adecuada de detergente para eLcMo seLeccionadopara asegurar el mejor desempeflo.
Use soEamentedetergente para lavavajillas. Los detergentes normaJesproducen demasiada espuma, D que puede
......_,_, reducir el desempeflo de EaEavavajillaso causar su malfuncionamiento.
/'_ No ingiera detergente para hvavajiEEas.Evite inhaEarlas emanaciones. Los detergentes para lavavajillascontienen
........._ productos quimicos irritantes y c_usticos que pueden provocar trastornos respiratorios.
Si ingiri6 detergente para lavavajillas o inhal6 sus emanaciones, proc0rese atenci6n medica inmediatamente.
_o_ Mantenga el detergente para lavavajillas fuera del aJcance de los niflos.
Llenadodel dosificador de detergente
1. Abra la tapa deJdosificador de detergente empujando su pestillo de
Jiberaci6n.
[_La est& abierta aJ final del ciclo de lavado.
tapa sJempre
2. Agregue la cantidad recomendada de detergente en el compartimiento
del detergente de Javadoprincipal
3. Cierre la tapa desliz4ndola hacia la izquierda y presion4ndola.
Paraobtener Josmejores resultados, en especial con los articulos muy
sucios, vierta una pequefla cantidad (alrededor de 1/2 de onza u 15 g)
de detergente en la puerta.
Eldetergente adicionaJse utilizara durante la fase de prelavado.
EspaSolo22
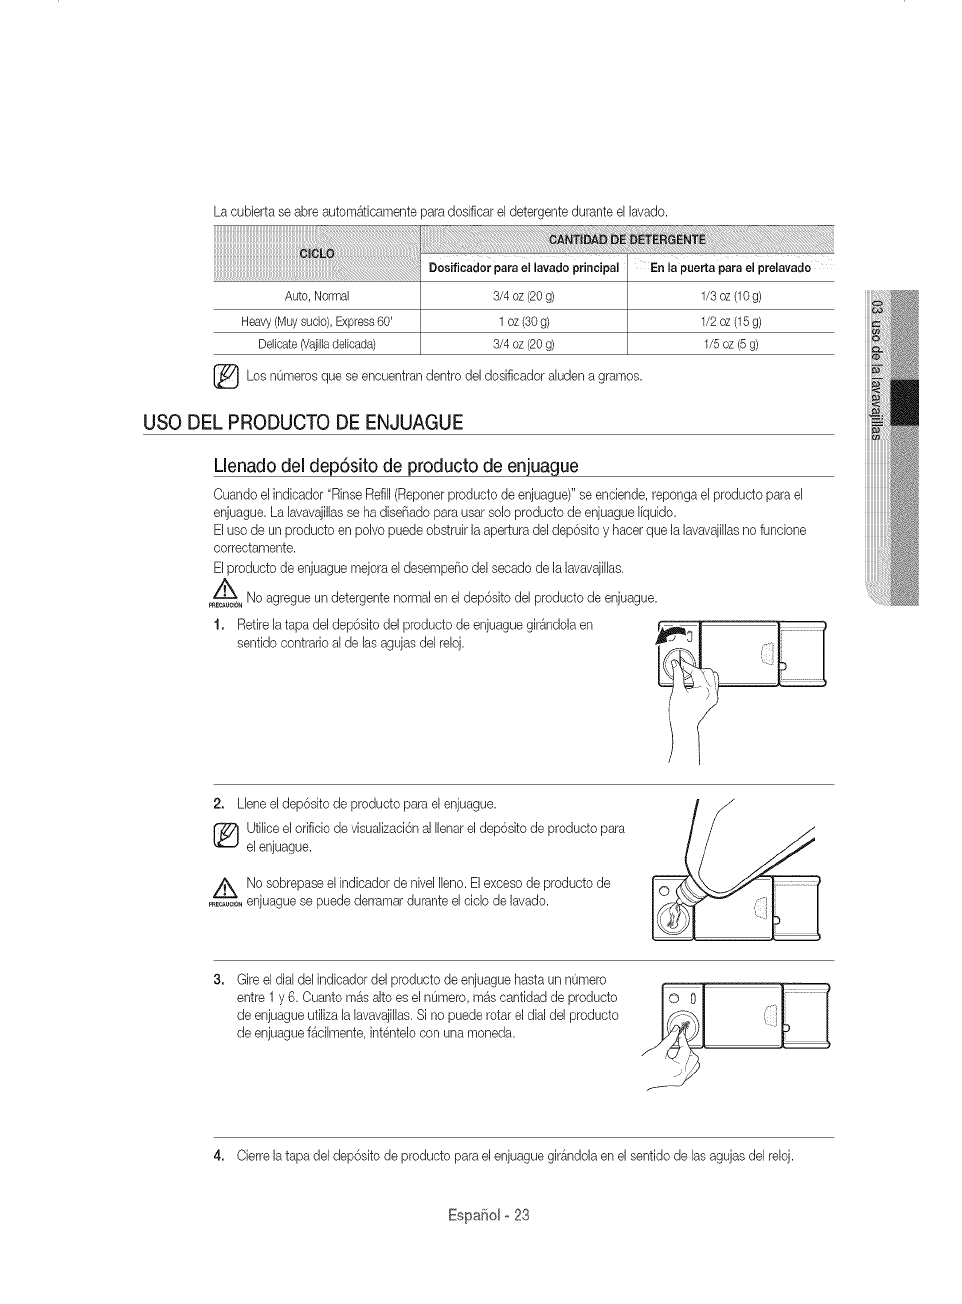
La cubierta se abre autom_ticamente para dosificar el detergente durante el lavado.
[]_ Los nOmeros encuentran dentro del dosificador aludenque se a gramos.
USO DEL PRODUCTO DE ENJUAGUE
Llenadodel dep6sito de producto de enjuague
Cuando el indicador "Rinse Refill(Reponer producto de enjuague)" se enciende, reponga el producto para el
enjuague. La lavavajillasse ha diseF_adopara usar solo producto de enjuague Ifquido.
Eluso de un producto en polvo puede obstruk la apertura del dep6sko y hacer que la lavavajillasno funcione
correctamente.
Elproducto de enjuague mejora el desempeF_odel secado de la lavavajilhs.
No agregue un detergente normal en el dep6sito del producto de enjuague.
rRE_UCION
1, Retire la tapa del dep6sito del producto de enjuague gir_ndola en
sentido contrario al de las agujas del reloj.
2. Llene el dep6sito de producto para el enjuague.
[_ tilice el orificio de visualizaci6n al Ilenar el dep6sito de producto para
el enjuague.
No sobrepaseel indicadordenivellleno.Elexcesode productode
........ enjuaguesepuedederramarduranteelciclode lavado.
3. Gire el dial del indicador del producto de enjuague hasta un nOmero
entre 1 y 6. Cuanto mas alto es el nOmero,m4s cantidad de producto
de enjuague utiliza la lavavajillas.Si no puede rotar el dial del producto
de enjuague f4cilmente, intentelo con una moneda.
4, Cierre la tapa del dep6sito de producto para el enjuague girandola en el sentido de las agujas del reloj.
Espa¢:_olo 23
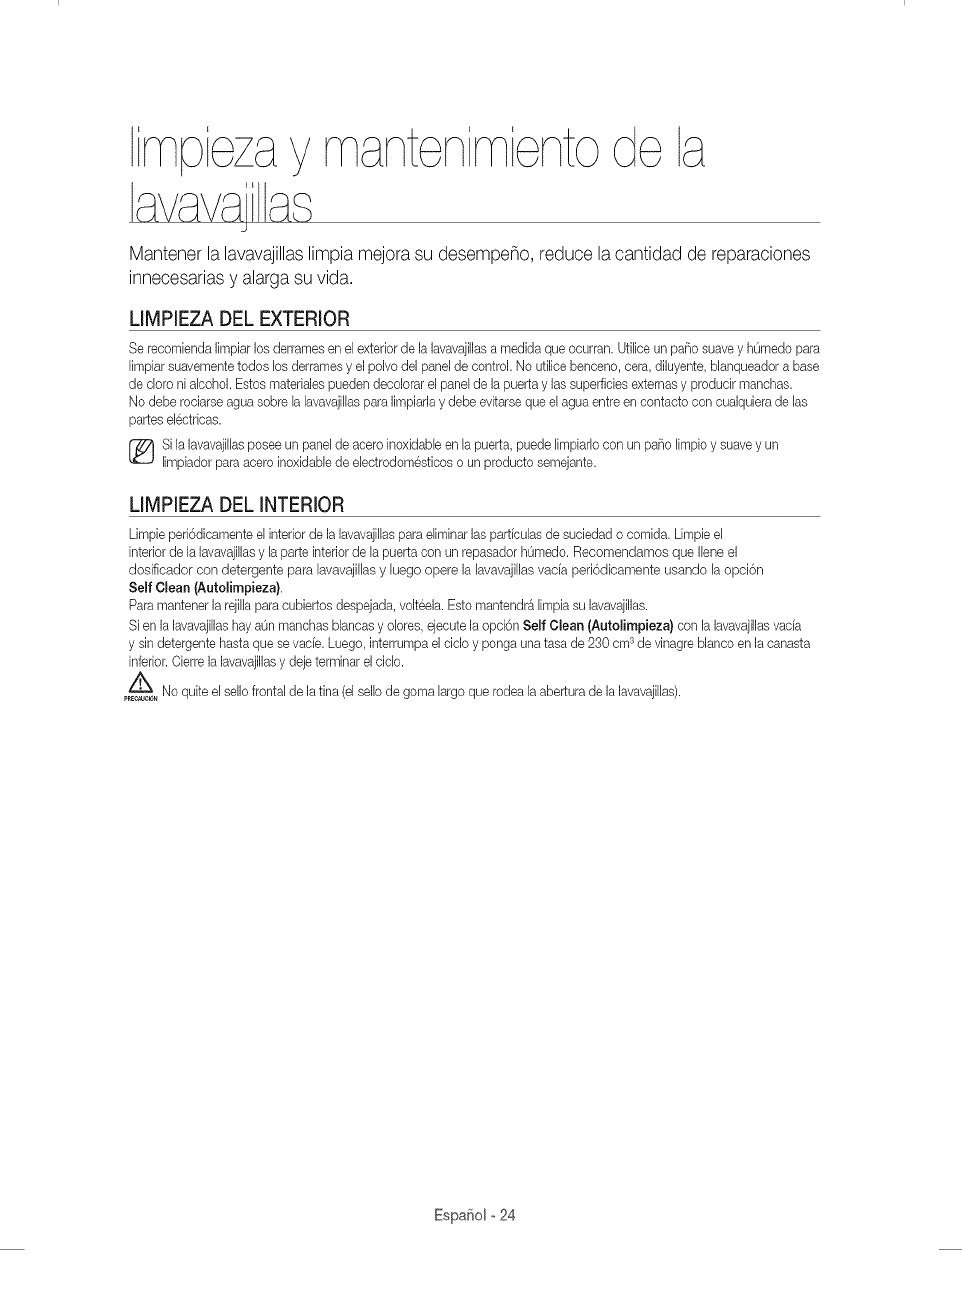
mpezay mantenimientode a
avavajas
Mantenerla lavavajillaslimpia mejorasu desempeho, reduce lacantidad de repasciones
innecesariasy alargasu vida.
LIMPIEZA DEL EXTERIOR
Se recombnda Iimpiar los derrames en el extedor de la lavava.jillasa medida que ocurran. Utilice un paso suave y hOmedo para
Iimpiar suavemente todos los derrames y el polvo del panel de control. No ufiliee beneeno, eera, diluyente, blanqueador a base
de doro ni alcohol. Estos matedabs pueden deeolorar el panel de la puerta y las superfiebs extemas y produqr manchas.
No debe roeiarse agua sobre la lavavajillaspara limpiarla y debe evkarse que el agua entre en eontaeto con eualquiera de las
partes el@trbas.
Si la lavavajillas posee un panel de acero inoxidabb en la puerta, puede Iimpiarlo con un paso Iimpio y suave y un
Iimpiador para aeero inoxidabb de ebetrodomestieos o un produeto semejante.
LIMPIEZA DEL INTERIOR
Limpie peri6dicamente el interior de la lavavajillas para eliminar las part[culas de suciedad o comida. Limpie el
interior de la lavavajillas y la parte interior de la puerta con un repasador hOmedo. Recomendamos que Ilene el
dosificador con detergente para lavavajillas y luego opere la lavavajillas vacia peri6dicamente usando la opci6n
Self Clean (Autolimpieza}.
Para mantener la rejilla para cubiertos despejada, volteela. Esto mantendr{t limpia su lavavajillas.
Si en la lavavajillas hay aOnmanchas blancas y olores, ejecute la opci6n Self Clean (Autolimpieza} con la lavavajillasvacia
y sin detergente hasta que se vacie. Luego, interrumpa el cido y ponga una tasa de 230 cm sde vinagre blanco en la canasta
inferior. Cierre la lavavajillasy deje terminar el cido.
Z_No quite el sello frontal de la tina (el sellode goma largo que rodea la abertura de la lavavajillas).
PREC_JC_N
EspaSol o 24
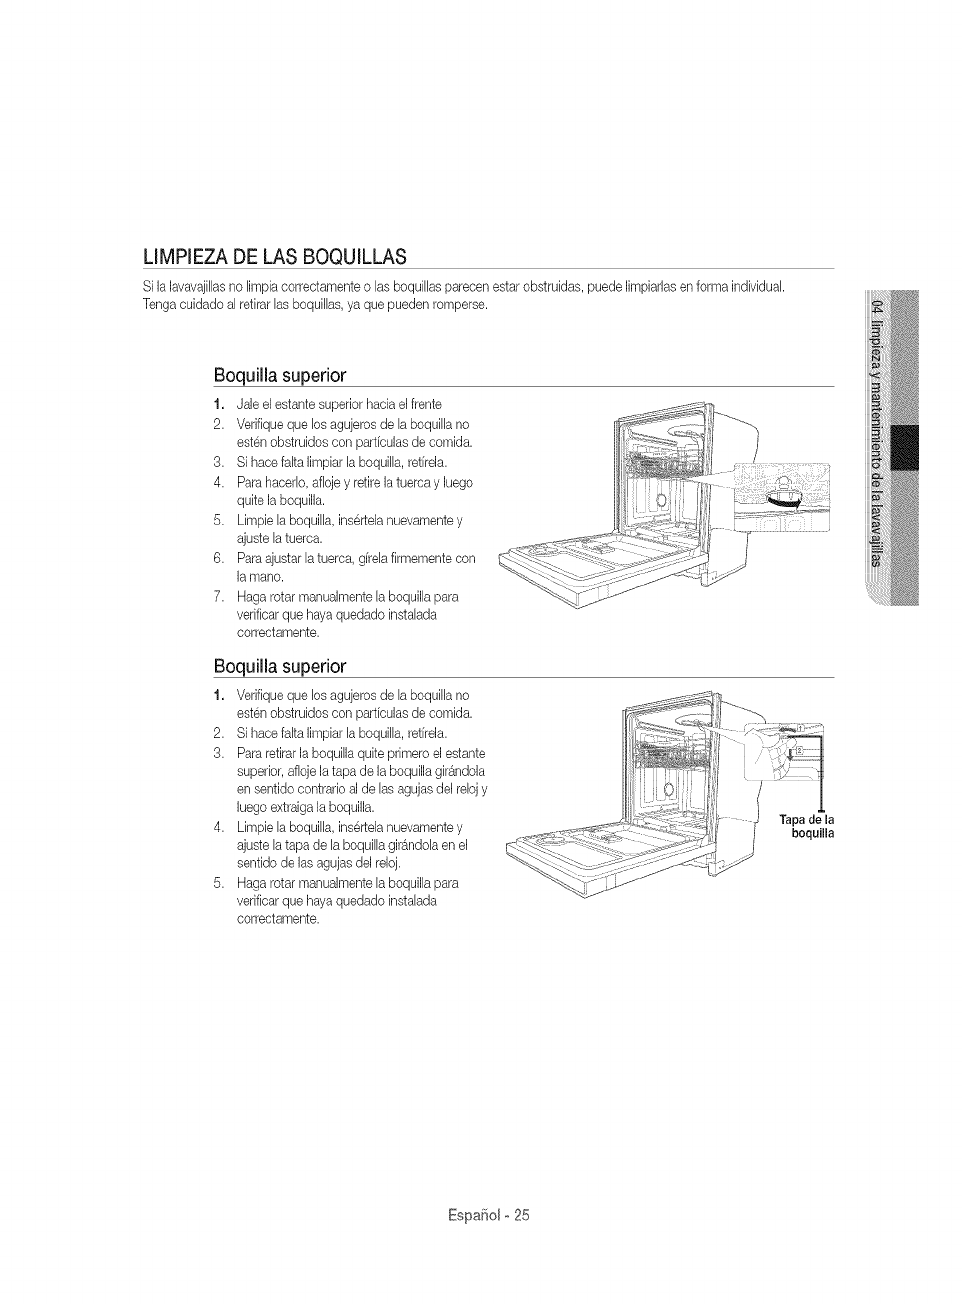
LIMPIEZA DE LAS BOQUILLAS
Si {a{avavaji[hs no [impia correctamente o [as boqui[[asparecen estar obstruidas, puede {impiarias en forma individual
Tenga cuidado a[ retirar [as boqui[[as, ya que pueden romperse.
Boquiiia superior
1, Jale el estante superior hacia el frente
2. Verifique que Ds agujeros de [a boqui[[a no
esten obstruidos con parficulas de comida.
3. Si hace faka {impiar [a boqui[[a, retffela.
4. ParahacerD, afioje y retire {atuerca y {uego
quite {a boquiiia.
5. Limpie [a boqui[[a, insertela nuevamente y
ajuste [a tuerca.
6. Paraajustar [a tuerca, gffe[a firmemente con
la mano.
7. Haga rotar manualmente [a boquiiD para
verificar que haya quedado instaDda
correctamente.
Boquiiia superior
1, Verifique que Ds agujeros de [a boqui[[a no
esten obstruidos con parficuias de comida.
2. Si hace falta {impiar la boquiiia, retffela.
3. Pararetirar {aboquiiia quite primero el estante
superior, afIoje {atapa de {a boquiiia gir_ndola
en sentido contrario a{de las agujas de[ re[ojy
hego extraiga {aboquiiia.
4. Limpie la boquiiia, insertela nuevamente y
ajuste la tapa de la boquiiia girgndoia en el
sentido de {asagujas de{ reioj.
5. Haga rotar manuaimente la boquilia para
verificar que haya quedado instaiada
correctamente.
0iJ ]' ,°
J boquilla
Espafio[ o 25
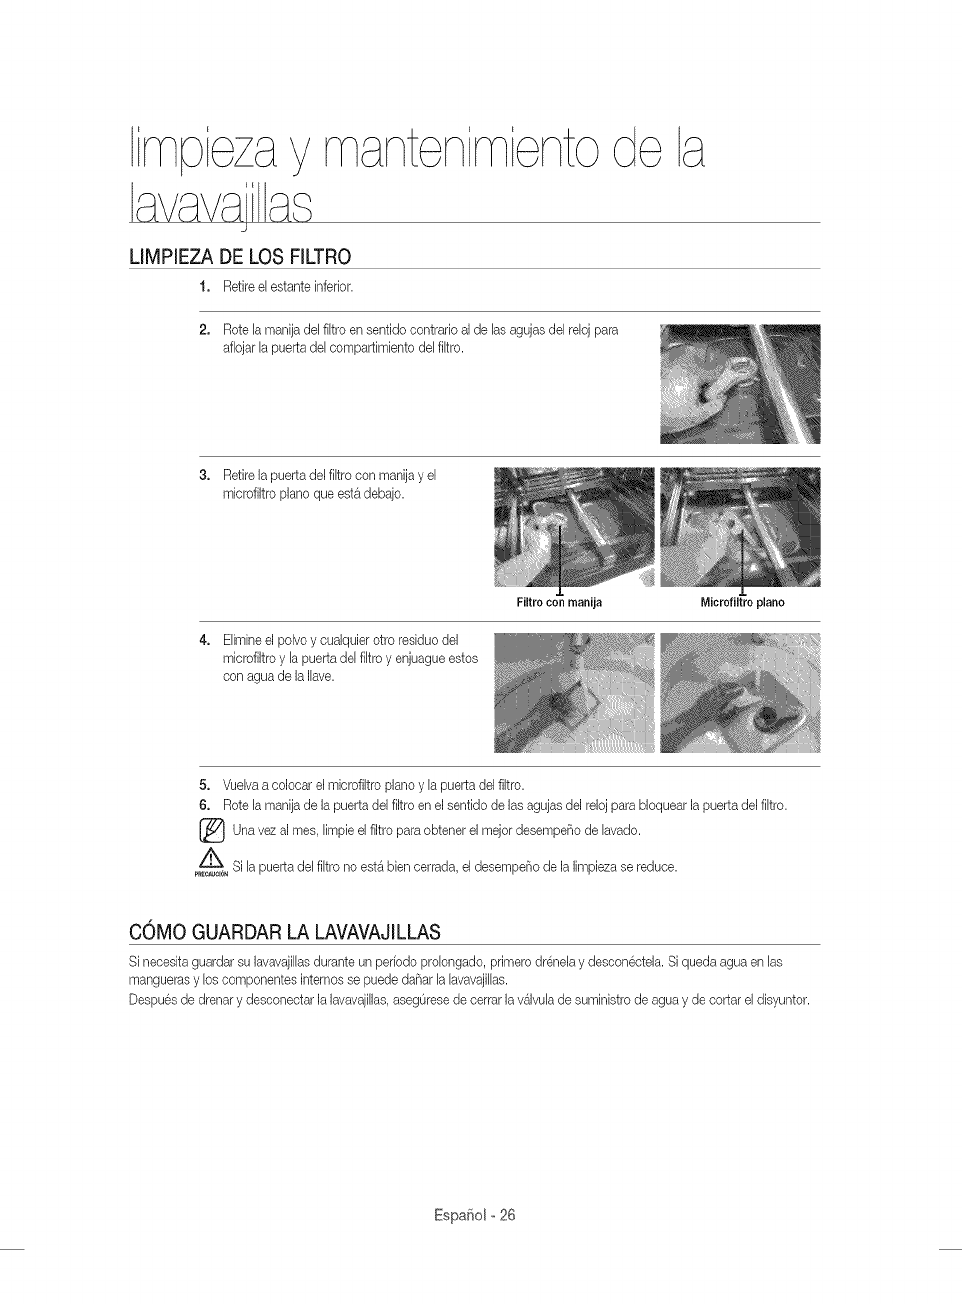
mpezay mantenimienIo
avavajas
LIMPIEZA DE LOS FILTRO
1. Retire e[ estante inferior.
2. Rote la manija del filtro en sentido contrado al de las agujas del reloj para
aflojar la puerta de[ eompartimbnto de[ fJltro.
3. Retire Japuerta de[ filtro con manJjay e[
microfiltro piano que esta debajo.
4. Elimineel polvo y cualquier otro residuo del
mJerofJltroy la puerta del fJltroy enjuague estos
con agua de la Ilave.
Fiitro con manija Microfiitro piano
5. Vuelva a colocar el mJcrofiltropiano y la puerta del filtro.
6. Rote la manija de la puerta del filtro en el sentido de las agujas del reloj para bloquear la puerta del filtro.
Una al el filtro obtener el de lavado.
vez rues, limpb para mejot desempeF_o
Si [a puerta del fJitro no est_ bien cerrada, el desempeF_ode la limpieza se reduce.
pRECAUtION
COMO GUARDAR LA LAVAVAJiLLAS
Si necesita guardar su lavavajillasdurante un peffodo prolongado, primero drenela y descon@tela. Si queda agua en las
mangueras y los eomponentes internos se puede daF_arJaJavavajiJJas.
Despues de drenar y deseoneetar la lavavajiJlas,asegOresede eerrar la valvuJade suministro de agua y de eortar el disyuntor.
Espafiol o 26

TABLA DE CICLOS
( •: B_sbo, O: paso optional)
Auto
Heavy (Muy sucio)
138- 131T
59 55°0)
143-118T
C6248°0)
149°F(65°O)
Delicate (Vajilla delicada) • 122°F (50°C)
Express 60! 131°F (55°C)
o
5,7 3,6
Auto 136OF(58o0) • (21,6 13,6 _)
[162 °F(72 °C)]
7,1 2,4
136 T (58 °C) • (27,0 9,0 _)
[162 °F(72 °C)]
6,2
Heavy (Muy sucio) 158 °F(70 °C) • [23 5 _)
[162 °F(72 °C)]
• 4,5
Delicate (Vajilla delicada) 149 T (65 °C) • C170 _)
2,9
Express@! 140 T (60o0) • C108_)
[162 °F(72 °C)]
Los nOmerosque se encuentran entre parentesis en la columna 0kimo enjuague representan la temperatura cuando est_
sebcdonada la opci6n Sanitize (Desinfecd6n).
Cuando sebcdona el cMo Auto o Normal, puede eliminar los pasos opdonales segOn el nivel de suciedad de la vajilla.
El consumo de agua y el tiempo de hvado @pen@ de los pasos o las opdones que agregue, y de la presi6n y la
temperatura del agua suminbtrada.
Cuando faka producto de enjuague, el tbmpo de lavado y la temperatura del qtimo enjuague se pueden incrementar un
poco.
Espa¢:_olo 27
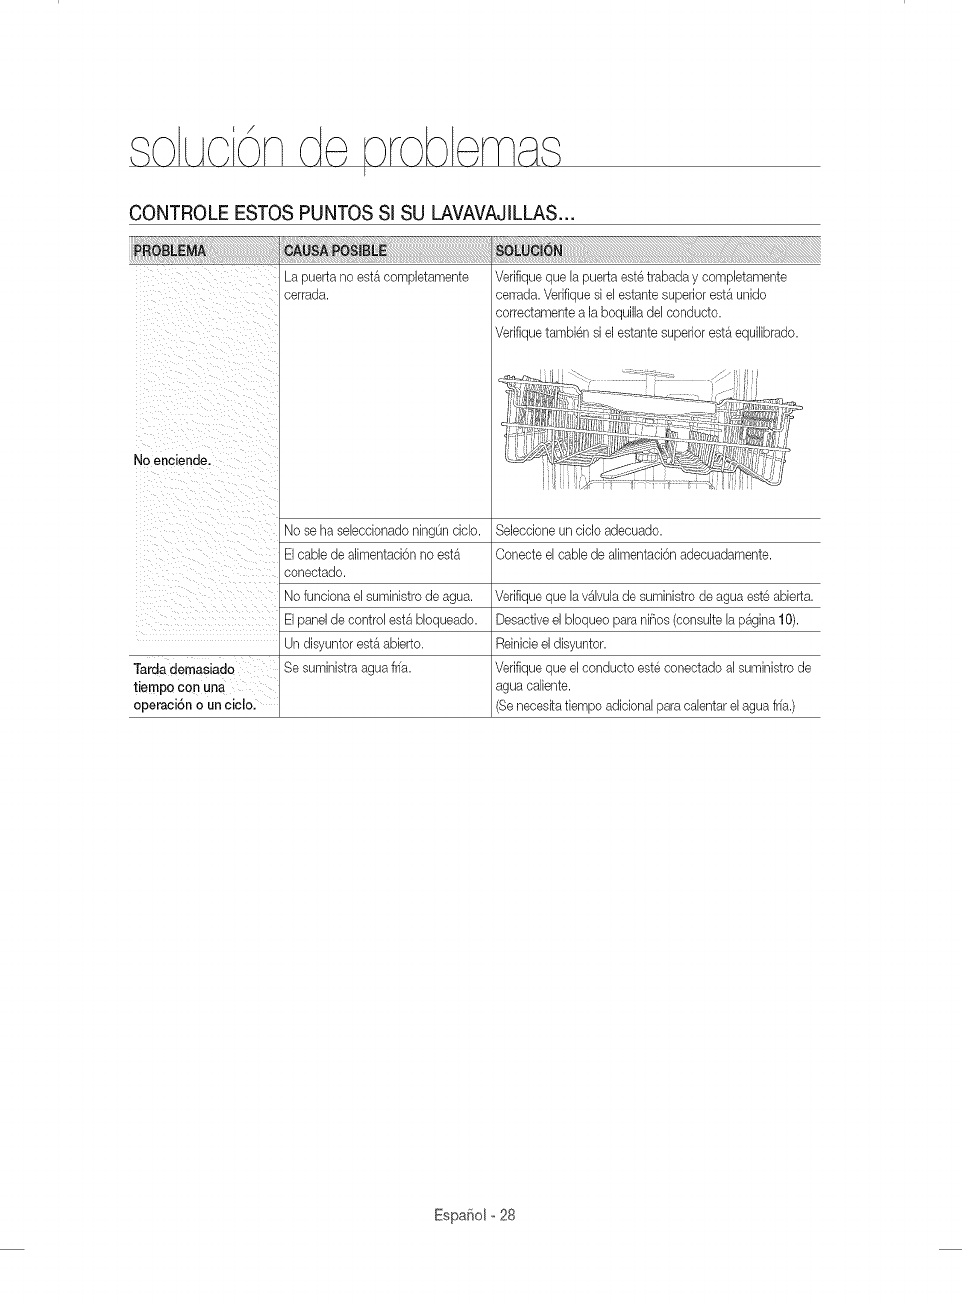
CONTROLE ESTOS PUNTOS Sl SU LAVAVAJILLAS...
/_ii i _! ii iiii ii
ii I _ _ i ii
ii i i ii
Lapuertanoest&compJetamente
cerrada.
No se ha selecdonado ningOnciclo.
Verifique que [a puerta este trabada y comp[etamente
cerrada. Verifique si el estante superior est& unido
correctamente a la boquilla del conducto.
Verifique tambien si el estante superior est& equi[ibrado.
SeJeccioneun cicJoadecuado.
/i : eoneetadoEIcabledeal mentaei6nnoest
No funciona el suministro de agua.
El panel de control est& bloqueado.
Un disyuntor est& abierto.
Tarda demasiada Se suministra agua fffa.
tiempo con una
operaci6n o un eiclo.
Conecte el cable de alimentaci6n adecuadamente.
Verifique que la v4lvula de suministro de agua este abierta.
Desactive el bloqueo para niBos (consulte la p4gina 10).
Reinicieel disyuntor.
Verifique que el conducto este conectado al suministro de
agua caliente.
Se necesita tiempo adicional para calentar el agua fffa.)
Espa_iol o 28
La vaji[la presenta
particulas de comid&
(No limpia
correotamente.)
i!ill _ iiiii_ii _ ii_bi_
! iii iii iiiI
El ciclo seleccionado no es el
adecuado.
La temperatura del agua es baja.
Presi6n de agua baja.
El agua es demasiado dura.
Noseus6detergentepara
lavavajillas.
Quedanrestosdedetergenteenel
dosificador.
No hay producto de enjuague.
Hay una boquilla obstruida.
La vajilla no se carg6 correctamente.
Se carg6 demasiada vajilla.
El fltro puede estar obstruide.
Seleccione un ciclo de acuerdo con la cantidad de vajilla y
su nivel de suciedad, tal come Io indica este manual.
Conecte el conducto al suministro de agua caliente.
Para un mejor desempeP_o,la temperatura del agua
suministrada debe ser de 120 °F(49 °O).
La presi6n del agua debe estar entre 20 y 120 psi (140-
830 kPa).
Use un limpiador para lavavajillascomercial.
Utilice un detergente fresco, de alta calidad, con producto
de enjuague.
Limpie el filtro per Io menos una vez per rues. (Consuke la
p_gina 26.)
Use un aditivo ablandador de agua especial para
lavavajillas.
Utilice detergente para lavavajillas automAtico.
Recomendamos un detergente para lavavajillas en polvo
o en gel.
AsegOresede que los art[culos grandes, come laminas
para hornear galletas, tablas para cortar, recipientes, etc.
no bloqueen el dosificador de detergente o impidan que
se abra adecuadamente.
Reacomode la vajillade manera que no inteffiera con el
funcionamiento del dosificador del detergente.
Revise el dosificador y agregue producto de enjuague.
Use producto I[quido para el enjuague.
Limpie la boquilla. Consulte las pAginas 24 y 26.
Reacomode la vajillade manera que no inteffiera con
la rotaci6n de la boquilh ni con el funcionamiento del
dosificador del detergente.
Cargue Onicamente la cantidad adecuada de vajilla.
Cargue la vajilla segOnlas recomendaciones.
(Consulte la p_gina 17.)
Elimine los restos de comida de los plates antes de
(Quedan restos de alimentos en el
filtre.)
ElaguasuministradaesUandayse
Deja !os vases Con una ha usado demasiado detergente.
ligera pelicula. La carga incluye vajillade aluminio.
Deja una pe!icula Este es debide a testes de cafe o t&
arnarilla o marr6n
en el interior de la
lavavajillas.
cargarlos. (No los enjuague.) Elimine la suciedad y Iimpie
los filtros. (Consulte la pAgina 26.)
No cargue cempletamente la lavavajillasy utilice un
producte de enjuague para minimizar este efecto.
Elimine las marcas de la vajilla con un Iimpiador de baja
sensibilidad.
Elimine esta suciedad con un limpiador de manchas.
EspaSol ° 29
/Nohayproduetodeenjuagueenel
dosificador.
Cuando la lavavajillasest_
funeionando, la temperatura del
agua es baja.
Se carg6 demasiada vajilla.
No seca bien la vajiila.
Los vases y las copas c6ncavos
retienen agua. Elagua puede
derramarse sobre otros objetos al
sacarlos.
Qued6 agua despues de un ciclo
incomplete.
La manguera de desag(Jeest_
Tiene real clot. obstruida.
No usa la lavavajiilas cada d[a o deja
vajilla sucia en la unidad demasiado
tiempo.
Cuando la cubierta del dosificador
laeSt&abierta y el funoionamientodebombade desagOeest& en las
primeras etapas, se genera ruido.
Hace demasiado ruido. La lavavajillas no est_ nivelada.
Hay materiales extraSos (un tornillo,
una pieza de pl_stico) en la c&mara
de la bomb&
Se escucha un "goipeteo" porque
una boquilla golpea contra la vajilla.
El agujero de la boquilla est_
obstruido con part[cubs de comida.
No rotan las boqui!las
con suavidad, Un plato o una ella Uoquean la
boquilh y esta no puede girar.
El drenaje se obstruy6.
No se vac{a eI agua de
la lavavajillas,
Presenta su estante Se carg6 incorrectamente la vajilh.
superior dob!ado luego
de cargar la vajilla,
Reviseel dosiflcador y agregue producto de enjuague.
Use un producto I[quido para el enjuague.
Conecte ei conducto al suministro de agua caliente.
Utilice producto de enjuague con la opci6n
Sanitize (Desinfecci6n).
Las carga inadecuada de los arficulos puede afectar el
secado.
Oargue lavajilla segOnlas recomendaciones.
(Consulte la p_gina 17.)
Luego de finalizar el ciclo, vade primero el estante inferior
y luego el superior. Esto evitar_ que el agua del estante
superior gotee sobre la vajilla del estante inferior.
Coloque detergente, sin cargar vajilla,y haga funcionar ei
ciclo Normal para limpiar la lavavajillas.
Comuniquese con un tecnico calificado para retirar
cualquier obstrucci6n de la manguera de desag_Je.
Con la lavavajillas vacia y sin detergente, coloque un vase
con 8 onzas de vinagre boca arriba en el estante inferior y
ejecute el ciclo Normal.
Este funcionamiento es normal.
AsegOrese de que la lavavajillaseste nivelada.
Oomuniquese con un tecnico calificado para retirar los
materiales extra_os de la c_mara de la bomb&
Reacomode la vajilla.
Limpie el agujero de la boquilla.
Consulte las p_ginas 24 y 26.
Despues de cargar la vajilla en los estantes, rote las
boquillas a mane para controlar si alguno de los plates
inteffiere con elias.
Comuniquese con un tecnico calificado para retirar
cualquier obstrucci6n de la manguera de desag_Jey del
orificio de desagOedel interior del sumidero. Luego revise
el funcionamiento de la bomba de desagOe.
Cargue lavajilla segOnlas recomendaciones.
(Consulte la p_gina 17.)
Espafiol o 30
CODIGOS DE INFORMACION
Elpanel de control muestra c6digos de informaci6n para ayudar[e a comprender mejor que ocurre con ]a ]avavaji[[as.
Control de nivel alto de agua
oC * Control funciona]. Cierre ]a %]vu[a de suministro de agua, vaya a] panel de] disyuntor de su
casa, desconecte el disyuntor de [a [avavajillasy contacte a un centro de servicio tecnico de
Samsung autorizado.
Control de p6rdidas
• Si se produce una fuga en [aconexi6n de [a%[vula de suministro de agua, cierre esta y vaya
LC a] panel de] disyuntor de su casa, desconecte el disyuntor de [a [avavajillas y contacte a[
insta[ador para que efect0e ]a reparaci6n.
Si e[ problema contin0a, contacte a un centro de servicio tecnico de Samsung autorizado.
Control de suministro de agua
• Verifique si la %[vula de suministro de agua est_ cerrada, si se ha suspendido el suministro de
40 agua o si e[ conducto o ]a v&lvu[ade entrada de agua est&n congelados u obstruidos.
Si e[ problema contin0a, derre ]a %]vula de]suministro de agua y contacte a un centro de
servicio tecnico de Samsung autorizado.
Control de desagL)e
• Luego de cerrar ]a %]vu[a de suministro de agua, revise si [a manguera de desagOeest_
5C obstruida o dob[ada. Revisetambien si e[ orificio de desag{Je de]interior de]sumidero est&
obstruido. Si el prob[ema contin0a, contacte a un centro de servicio tecnico de Samsung
autorizado.
Control de calentamiento de temperatura alta
• Control funcional. Con [a [avavajil[asvacfa agregue detergente y ejecute un ciclo.
He
Si e[ problema contin0a, vaya a]panel de[disyuntor de su casa, desconecte el disyuntor de la
lavavaji[[asy contacte a un centro de servicio tecnico de Samsung autorizado.
Control del funcionamiento de la bomba
30 • Control funcional. Apague la lavavaji[[asy enciendala nuevamente.
Si e[ problema contin0a, contacte a un centro de servicio tecnico de Samsung autorizado.
Paralos c6digos que no figuran m&s arriba, [lame a[ 1-800-SAMSUNG (726-7864).
Espa¢:_ol- 31
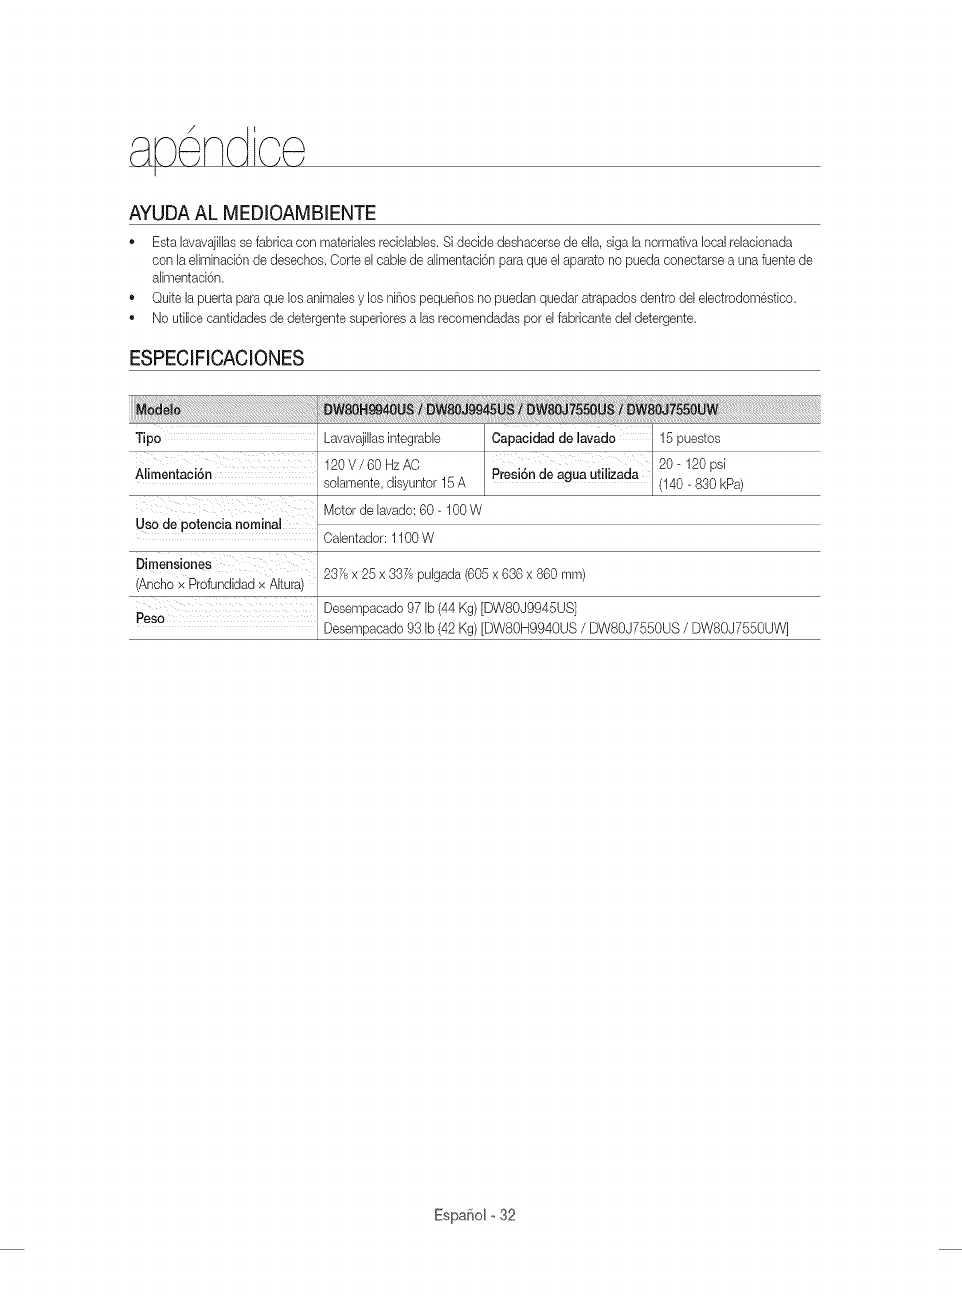
pe cJ'
AYUDA AL MEDIOAMBIENTE
®Esta lavavajilhs sefabrica con materiabs recidabbs. Si decide deshacerse de ella, siga la normativa local reladonada
con la eliminaci6n de desechos. Corte el cable de alimentad6n para que el aparato no pueda conectarse a una fuente de
alimentad6n.
Quite la puerta para que los animabs y los niSos pequeSos no puedan quedar atrapados dentro del ebctrodom@tbo.
No ufilice canfidades de detergente superiores a las recomendadas por el fabricante del detergente.
ESPECIFICACIONES
Tipo
Alimentaci6n
Uso de potencia nominal
Dimensiones
Ancho x Profundidad x Altura
Lavavaji[lasintegrabb Capacidad de lavado 15 puestos
120 V /60 Hz AC 20- 120 psi
soiamente, disyuntor 15A Presi6n de agua utilizada (140- 830 kPa)
Motor de [avado: 60- 100 W
Ca[entador: 1100 W
23Ysx 25 x 337/spu[gada (605 x 636 x 860 ram)
Peso Desempacado 97 [b (44 Kg) [DWSOJ9945US]
Desempacado 93 [b (42 Kg) [DW80H9940US /DWSOJ7550US /DW80J7550UW]
EspaSolo32
LAVAVAJILLA$ SAMSURG
GARART[A LIMITADA PARA EL COMPRADOR ORiGiNAL
Elpresente producto de ]a marca SAMSUNG, tal como ]o provee y distribuye SAMSUNG ELECTRONICSAMERICA, INC. en
EE.UU./SAMSUNG ELECTRONICS CANADA, INC. en CANADA (SAMSUNG)y ]o entrega como nuevo, en su embaIaje de
cart6n original a] comprador o consumidor original, est_ garanfizado pot SAMSUNG contra defectos de fabricaci6n de los
matedales y h mano de obra durante el perfodo ]imitado de ]a garant[a de:
Un (1)aBo para todas las piezas y la mano de obra, cinco (5)aBos para las piezas de movimiento lineal,* la placa de
circuito impreso, los estantes (losgastos de mano de obra del servicio tecnico a domicilio a partir del segundo aBo son
responsabilidad del cliente), y toda la vida para el revestimiento inoxidable de la puerta y la tina de acero inoxidable con
respecto a perdidas. Samsung reemplazar4 la unidad pot el mismo modelo o pot el actual (esdecir, mejor o equivalente en
prestaciones) (La mano de obra necesaria para el reemphzo es responsabilidad del cliente).
* Piezas de movimiento lineal: Motor AC de accionamiento pot correa [motor de engranajes], correa de distribuci6n en V, riel,
riel de soporte [frontal superior, frontal inferior].
La presente garanfia limitada comienza en la fecha original de compra yes %lida 0nicamente para productos comprados y
usados en los Estados Unidos/Canad_. Para recibir el servicio tecnico de la garanth, el comprador debe comunicarse con
SAMSUNG con el fin de que se determine el problema y los procedimientos del servicio. Elservicio tecnico de la garanth
solo puede set prestado pot un centro de servicio tecnico autorizado de SAMSUNG. Se debe presentar la factura de compra
original como prueba de compra a SAMSUNG o al servicio tecnico autorizado de SAMSUNG. SAMSUNG prestar4 servicio
tecnico a domicilio durante el periodo de la garantia sin costo, sujeto a la disponibilidad dentro de los Estados Unidos/Canad_
contiguos.
Elservicio tecnico a domicilio no est_ disponible en todas las 4teas.
Pararecibir el servicio tecnico a domicilio, el producto no debe presentar obstrucciones y debe set accesible para el agente
del servicio tecnico. Si el servicio tecnico no est_ disponible, SAMSUNG puede optar pot transportar el producto hasta y
desde el servicio tecnico autorizado.
SAMSUNG reparar_, reemplazar4 el producto u ofrecer4 un reembolso a nuestra discreci6n y sin cargo adicional, tal como se
establece en la presente garantia, con piezas o productos nuevos o reacondicionados si se comprueba que es defectuoso
durante el periodo limitado de la garanfia especificado anteriormente. Todas las piezasy los productos reemplazados pasan
a set propiedad de SAMSUNG y deben set devueltos a SAMSUNG. Las piezas y los productos reemplazados asumen la
garantia original que testa, o noventa (90) dias, el periodo que sea el m4s prolongado.
La presente garanfia limitada cubre defectos de fabricaci6n de los materiales y la mano de obra encontrados durante el
uso normal y domestico de este producto y no set4 v41idapara Io siguiente: daBos que ocurran durante el envio; entrega
e instalaci6n; aplicaciones y usos para los cuales el presente producto no fue destinado; producto o n0meros de serie
alterados; daF_ocosmetico o acabado exterior; accidentes, abuso, descuido, incendio, inundaci6n, cdda de rayos, u otros
casos fortuitos o de fuerza mayor; uso de productos, equipo, sistemas, utilidades, servicios, piezas, suministros, accesorios,
aplicaciones, instalaciones, reparaciones, cableado externo o conectores no provistos ni autorizados pot SAMSUNG
que daF_eneste producto o que acarreen problemas en el servicio; voltaje de la I[neaelectrica incorrecto, fluctuaciones
y sobretensi6n; ajustes del cliente e incumplimiento de Io establecido en el manual de instrucciones, instrucciones de
mantenimiento y ambientales que est4n cubiertas y recomendadas en el manual de instrucciones; traslado y reinstalaci6n
del producto; problemas causados pot plagas. La presente garanfia limitada no cubre problemas derivados de la corriente,
el voltaje o el suministro electrico incorrectos, las bombillas de luz, los fusibles de la casa, el cableado de la casa, el costo
del servicio tecnico para recibir instrucciones o corregir errores en la instalaci6n. SAMSUNG no garantiza el funcionamiento
ininterrumpido o sin errores del producto.
Espafiol-33
SALVOLOESTABLECIDOENLAPRESENTEGARANT[A,NOEXISTENGARANT[ASSOBREELPRESENTEPRODUCTO,
YASEANEXPRESASOT_,CITAS,YSAMSUNGDESCONOCETODASLASGARANTiASQUEENCLUYEN,AUNQUENO
ENCARACTERTAXATEVO,CUALQUIERGARANT[AT_,CITADEQUEELPRODUOTOSEENCUENTRAENCONDECIONES
APTASPARALAVENTA,DEDEFRAUDAOIONDEDERECHOSODEQUEELPRODUCTOSEADECUAALOSRNES
ESPEC[RCOSPARALOSCUALESSEADQUIERE.NINGONAVALOGARANT[AOTORGADOSPORPERSONA,COMPANiA
OCORPORACIONALGUNACONRESPEOTOALPRESENTEPRODUCTOREVESTIR_,CARACTERVENOULANTEPARA
SAMSUNG.SAMSUNGNOSERARESPONSABLEPORPERDIDADEINGRESOSOLUCROCESANTE,EMPOSEBILIDAD
DEGENERARAHORROSUOBTENEROTROSBENERCIOS,OCUALQUIERDAiqODERIVADODECIROUNSTANCIAS
ESPECEALES,DANOIMPREVESTOODERLVADOOAUSADOPORELUSO,USOINCORRECTO,OENOAPACDADPARA
USARELPRESENTEPRODUCTO,ENDEPENDIENTEMENTEDELATEORiALEGALENQUESEFUNDEELREOLAMOY
AUNCUANDOSELEHAYANOTIFICADOASAMSUNGDELAPOSIBUDADDETALESDANOS.
NINGONRESARCIMIENTODENINGUNA[NDOLECONTRASAMSUNGSUPERARAELMONTODELPRECIODECOMPRA
DELPRODUCTOVENDIDOPORSAMSUNGYCAUSANTEDELPRESUNTODAiqO.
SINLIMITARLOPRECEDENTE,ELCOMPRADORASUMETODOELRIESGOYLARESPONSABILEDADPORPERDEDA,
DAIIOOLESEONALOOMPRADORYALOSBIENESDELCOMPRADORYATERCEROSYASUSBLENESDERLVADOSDEL
USO,USOINCORRECTOOINCAPACIDADPARAUSARELPRESENTEPRODUCTO.LAPRESENTEGARANT[ALEMETADA
NOSEEXTENDERAANENGUNAPERSONADESTINTADELCOMPRADORORIGENALDELPRESENTEPRODUCTO,ES
INTRANSFERLBLEYESTABLECESUEXOLUSEVAREPARACION.
ALgunosestados o provincias no permken limitaciones en cuanto al plazo de una garanfia impl[cita, o la exclusi6n o limitaci6n
de da_os imprevistos o derivados, pot Io tanto las limitaciones o exclusiones antedichas pueden no aplicarse en su caso. Esta
garant[a le otorga derechos especificos, y ademas puede tenet otros derechos que vat[an segOn el estado o la provincia.
Para recibir un servicio t_cnico de garantia, comuniquese con SAMSUNG a:
En EE.UU.
Samsung Electronics America, inc.
85 Challenger Road Ridgefield Park, NJ 07660
1-800-SAMSUNG(726-7864)
www.samsung.com/us/support
En CANADA
Samsung Electronics Canada Inc.
2050 Derry Road West, Mississauga, Ontario L5N 0B9 Canada
1-800-SAMSUNG(726-7864)
www.samsung.com/ca/support (English)
www.samsung.com/cafdsupport (French)
EspaSol o 34

bit.ly/samsun gdishwashers
Scan the QR code* or visit
www.samsung.com/spsn
to view our he[pfu[
How-to Videos and Live Shows
*Requires reader to be installed on your smartphone
sTienealgunapregunta o algOncomentario?
U.S.A 1-800-SAMSUNG(726-7864)
MEXICO 01-800-SAMSUNG(726-7864)
,_Jvw.samsung.com/us/support
www.samsung.com/mx/support
DD68-00164A-03
