Samzuk Technology Development Co FWAN20A 10 channel FRS User Manual Samcom English Manual
Guangdong Samzuk Technology Development Co,Ltd 10 channel FRS Samcom English Manual
User manual
FWAN20A Instruction Manual - English
LCD DISPLAY ICONS
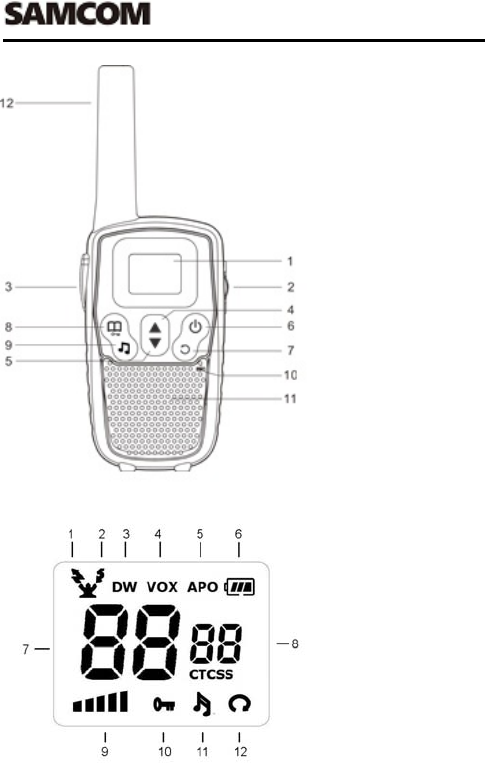
1. LCD display
2. Earphone &
Charger
Jack
3. PTT key
4. Up key
5. Down key
6. Power
On/Off key
7. Scan key
8. Menu / Key
lock key
9. Call Tone
key
10. Microphone
11. Speaker
12. Antenna
1. RX
2. TX
3. Dual Watch
4. VOX
5. APO (Auto
Power Off)
6. Battery
Level
7. Main
Channel
Number
8. CTCSS
Code
9. Speaker
Volume
10. Key Lock
11. Call
ToneScan
MAIN FEATURES
Frequency: 462~467MHz
Power output < 0.5W
10 channels
3 CTCSS code
83 DSC code
10 km optimal range
Dual Watch
3 VOX levels
10 Call tones
5 levels Speaker volume
Scan
Key lock function
Auto Power Off
PRECAUTIONS
Read this manual before use the radio.
Avoid the direct exposure to solar rays and/or in front of heat.
Do not use adaptor and/or batteries diverged from that
specified on instructions manual.
Do not operate the radio in hazardous environments, explosion
or fire may result.
Do not operate the radio in high humidity, dusty or explosive
environment.
Clean by using a cloth slightly dampened. Do not use alcohol,
solvents or abrasives etc.
Do not attempt to modify the radio. The radio is designed to
comply with CE and R&TTE.
The LCD display is made of glass and maybe damaged if
dropped or impacted.
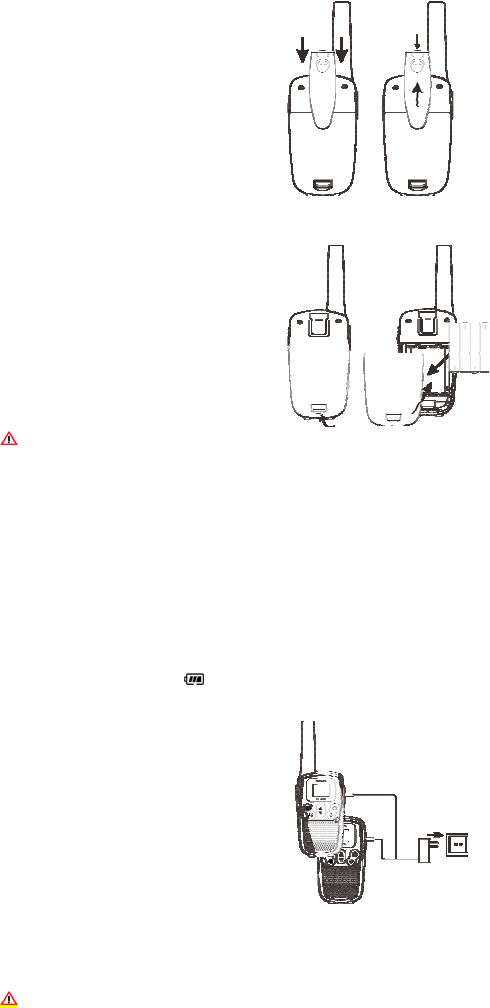
INSTALLING / REMOVING BELT CLIP
Installing Belt Clip
Slide the Belt clip into the
slot as shown in Figure 1. A
“click” indicates the Belt
Clip is locked into position.
Removing Belt Clip
Pull the belt clip latch
forward
While pulling the belt clip
latch, push up the belt clip
as shown in Fi
g
ure 2.
Fi
g
ure 1 Fi
g
ure 2
INSTALLING BATTERIES
Slide down the Battery
compartment cover.
Install the rechargeable
batteries by following the
orientation as shown in
Figure 3.
Replace the Battery
compartment cover.
WARNING
Follow the polar directions and insert 4 x AAA Ni-MH
rechargeable batteries.
Incorrect positioning can damage both the batteries and unit.
Don’t try to recharge non-rechargeable batteries.
Make sure the battery compartment cover is securely locked
in place when you are charging the batteries.
Dispose of used batteries safely and in a way that will not
harm the environment, never try to burn them or put them
anywhere, they could get burnt or punctured.
Don’t leave dead batteries in you unit. They might leak if you
do.
CHARGING BATTERIES
When the “Battery level ’ icon is low, you need to charge the
battery with the enclosed AC/DC adaptor .
Charging with AC/DC adaptor
Plug the adaptor into the wall
socket and the other end into
the earphone jack on the right
side of the radio.
The unit will automatically turn
off and the LCD “Battery” Icon
will flash.
Each adaptor can connect 2
sets of radio for char
g
in
g
.
To charge fully from empty require about 8 ~ 10 hours.
After charged, unplug the adaptor from the socket and the radio
will automatically turn on.
WARNING
To avoid damage to the radio use only original accessories.
Figure 3
Figure 4

The radio will be slightly warm during charging.
GENERAL OPERATIONS
1. TRANSMITTING RANGE
The talk range depends on the environmental and terrain. It
will be reach (up to about 10km) in wide open spaces, without
obstructions such as hills or buildings. Don’t try to use two
PMR units which are less than 1.5m (5feet) apart. If you do,
you may have experience interference.
2. POWER ON/OFF
To power On the radio, press Power On/Off Key for 2
seconds until a beep is heard and the LCD display turn on.
To power Off the radio, press Power On/Off key for 2
seconds until LCD display turns off.
3. MAKING COMMUNICATIONS
The radio has 8 main frequencies and 38 CTCSS codes or 83 DCS
codes effectively giving you 968 channels. You can communicate
with any other user who is using the same combinations, providing
they are within range.
4. SPEAK TO OTHER RADIO
Press & hold the PTT key, LCD TX icon indicating the radio is
transmitting.
Hold the radio in a vertical position with the microphone 3-5 cm
from your mouth and then speak.
When you finish speaking, release the PTT key and a beep
tone will be heard.
5. LISTEN TO OTHER RADIO
The radio will automatically sound received signal from the
other radio with the same channel and LCD shows the icon .
When you press the PTT key, you can’t listen to other radios.
Make sure you do not press PTT key for listening.
Adjust volume control if necessary.
6. ADJUSTING SPEAKER VOLUME (5 LEVELS)
Press the Up key to increase the volume.
Press the Down key to decrease the volume.
7. TALK TIME-OUT FUNCTION
Time-out function can avoid transmitting by chance and prolong
the battery life.
The radio will stop transmitting and sound a warning tone when
PTT is held over 3 minutes. You then need to release PTT
and press again for further transmission.
In VOX mode, the unit will stop transmitting and sound a
warning tone after continuous talk for 3 minutes. You can
re-activate VOX after the time-out. (Please refer to VOX
function for detailed VOX operation).
8. MENU FLOW CHART
Press Menu key once to enter main channel selection, press
again for next function selection etc.
Main Screen → Main Channel → CTCSS → Dual Watch → VOX →
Call Tone → Beep Tone → Roger Beep → Auto Power Off → Main
Screen
9. SELECT CHANNEL
To select the main channel
Press the key once, Main channel number displayed will
flash.
Press or key to select your desired main channel
number.
Press the PTT key to confirm and quit or press to continue
next function setting.
You have 10 seconds to decide before auto-reverting back to
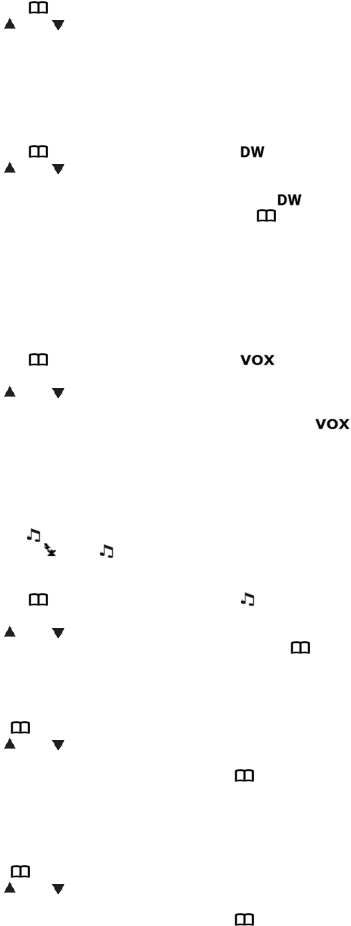
the main screen.
10. CTCSSCODE FUNCTION
This function can help you select your group (3 CTCSS codes) of
users on the same channel. Only the users with the same CTCSS
code can listen and talk to each other. Please note that selecting a
CTCSS code does not assure total privacy. In radio communication,
any FRS radio can listen to all communications on the same channel
when using the default standard setting with CTCSS = 0 (OFF).
Press the key twice, CTCSS code display will flash.
Press or key to select your desired CTCSS code from
1 to 3, 0 is OFF.
Press the PTT key to confirm and quit.
11. DUAL WATCH
The unit has dual watch function. You can monitor two channels, the
current and another (dual watch) channel. If the unit detects a signal
on either channel, it will stop and receive the signal.
Press the key 4 times, LCD display icon.
Press or key to select the dual watch channel (1-8,
except the current channel), LCD display OF is OFF.
After turning on the function, LCD will display icon
Press the PTT key to confirm and quit or press to continue next
function setting.
12. VOX (Hands-Free Function)
The unit has a built-in Voice Activated Circuit (VOX) function. You
can enjoy talking and listening without pressing PTT key. To have
better performance, you can use this function with the external
earphone (optional accessories).
Press the key 5 times, LCD display icon and VOX
sensitivity digit will flash.
Press or key to select sensitivity level from “OF, 1, 2, 3”
for “OFF, Low, Medium and High respectively.
After turning on the VOX function, LCD will display icon.
Press PTT to confirm and quit.
Please speak close to the mic in order to activate VOX function.
13. SENDING CALL TONE
You can use 1 of 10 different “Call Tones” to get attention of other
user on the same channel.
Press the key and the tone will sound, LCD will display the
transmit icon and icon and your call tone will be sent.
14. SELECTING CALL TONE
Press the key 6 times, LCD display icon and call tone
number will flash.
Press or key to select your desired call tone.
Press the PTT key to confirm and quit or press to continue
next function setting.
15 KEY TONE ON/OFF
The unit has the function to turn the beep tone on or off.
Press key 7 times, LCD display “ t o ”.
Press or key to turn on (LCD display ON icon) or turn
off (LCD display OF icon).
Press PTT to confirm and quit or press to continue next
function setting.
16. ROGER BEEP
The roger beep function enables a short tone signal which is
transmitted after releasing the PTT button.
Press key 8 times, LCD display “ r o ”.
Press or key to turn on (LCD display ON icon) or turn
off (LCD display OF icon).
Press PTT to confirm and quit or press to continue next
function setting.
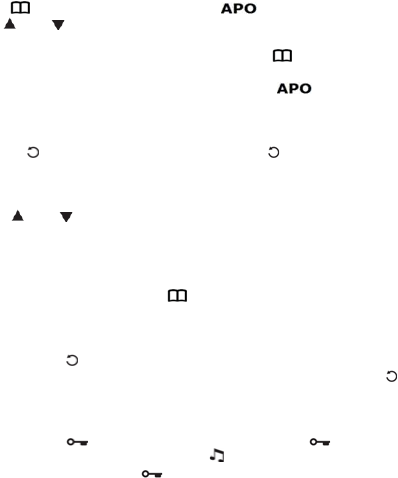
17. AUTO POWER OFF (APO)
Press key 9 times, LCD display icon.
Press or key to select auto power off time from 0 to 6
hours.
Press PTT key to confirm and quit or press to return to
Main screen.
After turning on the function, LCD will display icon and
automatically turn off at designated time.
18. SCANNING CHANNELS
Press the key once and LCD will display and radio will
start scanning.
LCD display shows the scanning channel one by one.
It will stop at those channels with signal for a while.
Press or key to continue scanning.
Or if you want to use this channel, press PTT to confirm and
your radio will change to this channel.
If there is no signal, it will continue to scan. Press the PTT key
and it will stay on the current selected channel and quit the
scanning function. Or press to quit and enter next
function setting.
19. MONITOR
Press and hold key to break the squelch noise and open
(un-squelch) the frequency for monitor function. Release the
key to stop.
20. KEY LOCK
Press and hold key for 3 second, LCD display icon.
All keys are locked except PTT and key.
To unlock, press and hold key for 3 second again.
21. MICROPHONE / EARPHONE JACK
The unit is equipped with a microphone / Earphone jack located at
the right side. You can use an optional earphone (not included) for
handsfree function.

SPECIFICATIONS
Operation Frequency Range : 462 ~ 467MHz
Modulation : FM
RF Output Power : < 500mW e.r.p
Channels : 10
CTCSS sub-code : 3
Power Supply : AAA battery x 4
Channel Frequency Table
Channel Frequency
(MHz) Channel Frequency
(MHz)
1 467.7125 6 467.5875
2 467.6875 7 467.5625
3 467.6625 8 462.7125
4 467.6375 9 462.6875
5 467.6125 0 462.6625
CTCSS Sub-Code Frequency Table
Code Frequency
(Hz)
1 110.9
2 136.5
3 186.2

This radio has been tested and complies with the FCC RF exposure limits for
“General population.” In addition, your SANCON radio complies with the following
Standards and Guidelines with regard to RF energy and electromagnetic energy levels
and evaluation of such levels for exposure to humans:
Guidelines for Human Exposure to Radio Frequency Electromagnetic Fields.
• American National Standards Institute (C95.1–1992), IEEE Standard for Safety Levels
with Respect to Human Exposure to Radio Frequency Electromagnetic Fields, 3 kHz to
300 GHz.
• American National Standards Institute (C95.3–1992), IEEE Recommended Practice for
the Measurement of Potential y Hazardous Electromagnetic Fields— RF and Microwave.
To ensure that your exposure to RF electromagnetic energy is
within the FCC allowable limits for general population use, always adhere
to the following CAUTION guidelines:
• DO NOT operate the radio without a proper antenna attached, as
this may damage the radio and may also cause you to exceed FCC
RF exposure limits. A proper antenna is the antenna supplied with
KDB 865664 D01 SAR Measurement 100 MHz to 6 GHz v01r03, Evaluating Compliance with FCC
this radio by the manufacturer or an antenna specifically authorized by the manufacturer
for use with this radio.
• DO NOT transmit for more than 50% of total radio use time (“50% duty cycle”).
Transmitting more than 50% of the time can cause FCC RF exposure compliance
requirements to be exceeded. The radio is transmitting when the “TX indicator” lights red.
You can cause the radio to transmit by pressing the “PTT” switch.
• ALWAYS use SANCON authorized accessories (antennas, batteries, belt clips,
speaker/mics, etc). Use of unauthorized accessories can cause the FCC RF exposure
compliance requirements to be exceeded. Body-worn operations are restricted to
belt-clips, holsters or similar accessories that have no metallic component in the assembly
and that provide at least 1.5 cm separation between the device, including its antenna, and
the user's body. To provide the recipients of your transmission the best sound quality, hold
the antenna at least 5 cm (2 inches) from mouth, and slightly off to one side. The
information listed above provides the user with the information needed to make him or her
aware of RF exposure, and what to do to assure that this radio operates within the FCC
RF exposure limits of this radio.
Electromagnetic Interference/Compatibility
During transmissions, your SANCON radio generates RF energy that can possibly cause
interference with other devices or systems. To avoid such interference, turn off the radio in
areas where signs are posted to do so. DO NOT operate the transmitter in areas that are
sensitive to electromagnetic radiation such as hospitals, aircraft, and blasting sites.
This device complies with Part 95 of the FCC rules. Operation is subject to the following two
conditions: (1) This device may not cause harmful interference, and
(2) this device must except any interference received, including interference that may cause
undesired operation.
Changesormodificationsnotexpresslyapprovedbythepartyresponsiblefor
compliancecouldvoidtheuser’sauthoritytooperatetheequipment.
Important: Do not hold down CALL for more than 10 seconds. The FCC does not allow you to
send a continuous tone for more than 10 seconds at a time on FRS frequencies.