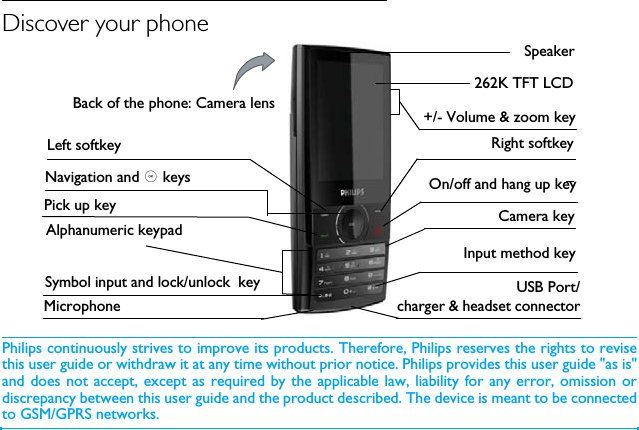
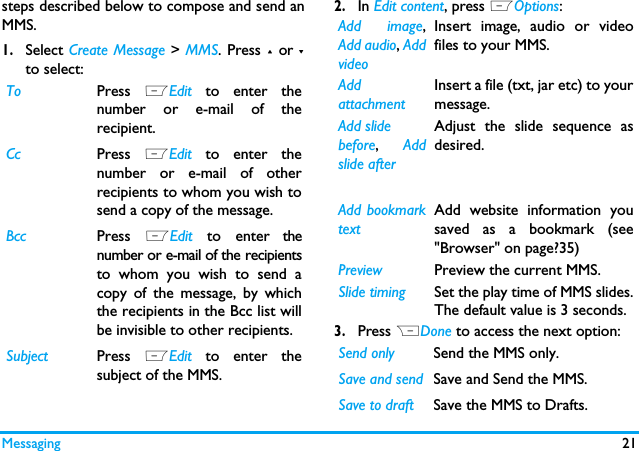
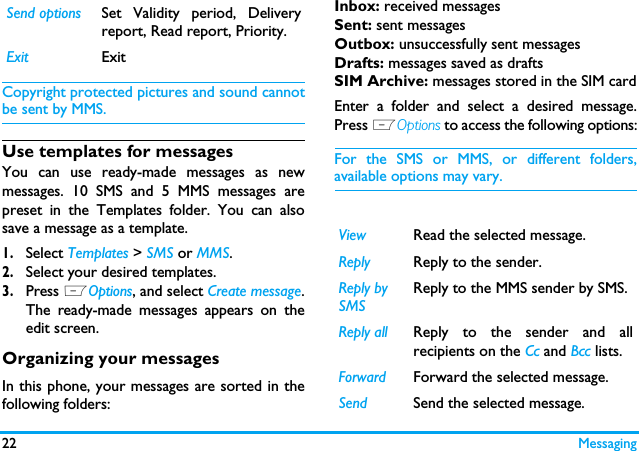
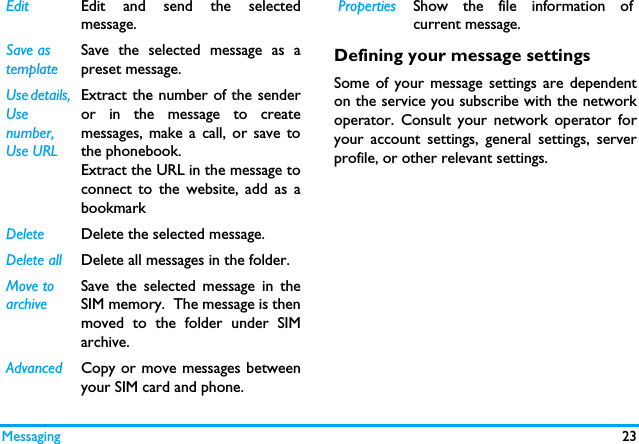
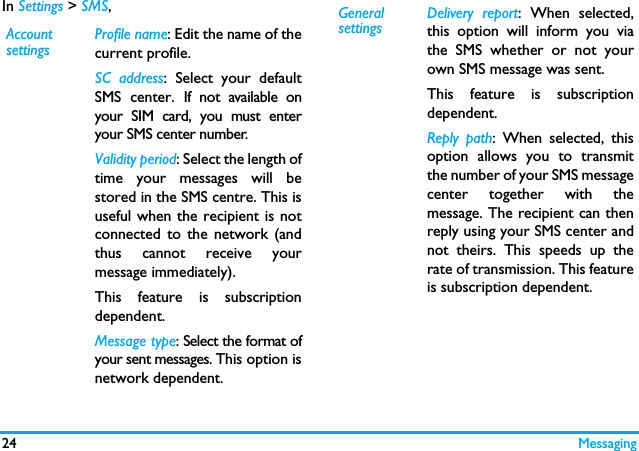
Sang Fei Consumer Communications CTX620 GSM/GPRS/EDGE 850/900/1800/1900 digital mobile Phone with Bluetooth User Manual XKing GB EN

Shenzhen Sang Fei Consumer Communications Co., Ltd. GSM/GPRS/EDGE 850/900/1800/1900 digital mobile Phone with Bluetooth XKing GB EN
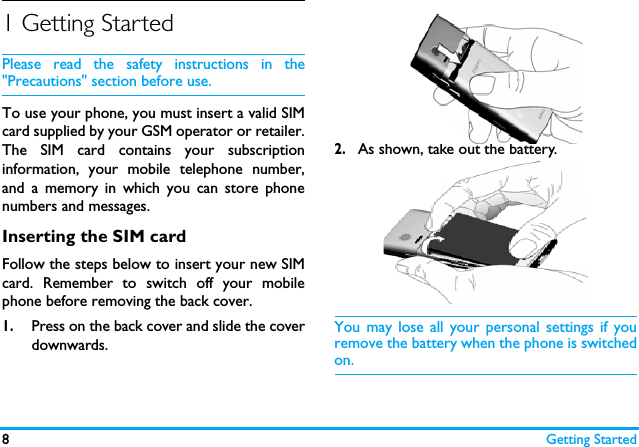
user manual

Discover your phonePhilips continuously strives to improve its products. Therefore, Philips reserves the rights to revisethis user guide or withdraw it at any time without prior notice. Philips provides this user guide "as is"and does not accept, except as required by the applicable law, liability for any error, omission ordiscrepancy between this user guide and the product described. The device is meant to be connectedto GSM/GPRS networks.Input method keyLeft softkeyNavigation and , keysOn/off and hang up keyBack of the phone: Camera lens +/- Volume & zoom keyRight softkeyCamera keyAlphanumeric keypad Symbol input and lock/unlock  keyMicrophonePick up keyUSB Port/charger & headset connector   Speaker262K TFT LCD
1How to...Switch the phone On/Off Long press ).Enter your PIN code Enter your PIN code using the keypad and press , to confirm.Lock/Unlock  the keypad Long press *.Make a call Enter the phone number using the keypad and press (.Answer a call When the phone rings, press (.End a call Press ).Activate/Deactivate handsfree modeDuring a call, press R. Access Contacts Press R Contacts on idle screen. You can add or edit a contact,search for a contact, make a call or send a message to a contact. Select input methods Press #. repeatedly. Long press * to turn T9 input on or off. Access the main menu Press L Menu on idle screen.  Quickly returnto idle when browsing menusPress)..Activate/deactivate  Silent  modefor incoming calls and messagesLong press #on idle screen.
2SoftkeysThe soft keys L and R allow you to selectthe options above them on the screen. Suchoptions are contextual: they vary according tocurrent context.Main menuThe main menu gives you access to all thedifferent features of your mobile phone. Thetable below summarizes the functional icons onthe main menu. To find more information abouttheir functions, refer to the pages. Press L Menu  on idle screen to access the mainmenu and press +, -, < or > to navigate through theicons and lists. Press LOK to access theoptions related to the selected item. Press RBack to return to the previous menu. Press ) toreturn to the idle screen.Fun Browser Musicpage 37 page 35 page 40 Camera Messaging My filespage 36 page 20 page 42Business Contacts Profilespage 31 page 27 page 47Bluetooth Calls Settingspage 45 page 44 page 48
3Hot keysYou can configure the navigation keys +, -, <, > toaccess your favorite features directly. On idlescreen, press the keys to access the features.Go to Settings > General > Fast keys to check thedefault settings of the navigation keys +, -, <, >.To change the default settings,1.Select the item to be changed.2. Press L Edit  to assign a new shortcut to the key.3.Press + or - to select, and LOK toconfirm.ShortcutsWith shortcuts, you can access a functional sub-menu directly. You can set the list of shortcutsas a hot key (see "Hot keys"). Then, list yourdesired shortcuts and rank them in the order ofpreference. Go to Settings > General > Shortcutsto check the list of shortcuts. To add a shortcut, 1.Press LOptions > Add.The list of available shortcuts appears. 2. Select your desired shortcut.3. Press < and > to select its order in the list.To replace one shortcut with another,1.Select the shortcut to be replaced.2. Press LOptions > Edit.3. Select the desired shortcut, and press LOK. The new shortcut is added to the location. The old one is replaced. 1Long press to access the voice mailbox. Long press to select Silent mode for incoming calls and mess . #0Long press to enter “+” whenmaking international calls.ages.
4To remove a shortcut,• Select it, and press LOptions >  Delete, orDisable.
Table of contents 5Table of contents1   Getting Started 8Inserting the SIM card 8Charging the battery 9Setting clock 10Displaying local and international clocks 11Insert the micro-SD card 112   Text Entry 13Selecting text entry methods 13Entering text 133   Calling 16Making a call 16Answering and ending a call 17Options during a call 17Handling multiple calls (Network-dependent) 18Making an emergency call 194   Messaging  20Creating messages 20Organizing your messages 22Defining your message settings 23E-mail 26Broadcast messages  285   Contacts 29Adding and editing contacts 29Searching for a contact  30Managing your contacts 30Special numbers 31Table of contents
6Table of contentsTable of contents6   Business 32Using your business organizer 32Create your to-do list 32Check your calendar 33Using your business assistant 33Alarm 33Business card reader 34Text reader 34Sound recorder 34Change clock display  35Others 357   Browser 36Managing your browser 36Accessing web sites 368   Camera 37Using the camera 37Using the video recorder 379   Fun 38Getting fun from Java applications 38Listening to the FM radio 38Editing your photos 40Editing your ring tones 41STK 4110   Music 42Creating your music library 42Playing music 4211   My files 44Finding your files  44Managing your files 44Sharing your files 45Using photos 45
Table of contents 7Table of contentsSetting audio files as ringtones 4612   Calls 4713   Bluetooth 48About Bluetooth 48Connecting to a Bluetooth device 48Getting connected by a Bluetooth device 49Other Bluetooth connections 4914   Profiles 50Adjust ring settings to different scenes 50Define your profile 50Apply a profile 5015   Settings 51General 51Display 51Call settings 52Network settings 53Security 53Icons & Symbols  54Precautions 56Troubleshooting 63Philips Authentic Accessories  67Trademark Declaration  69Specific Absorption Rate Information  70Limited Warranty  72Declaration of Conformity  76
8Getting Started1 Getting StartedPlease read the safety instructions in the"Precautions" section before use.To use your phone, you must insert a valid SIMcard supplied by your GSM operator or retailer.The SIM card contains your subscriptioninformation, your mobile telephone number,and a memory in which you can store phonenumbers and messages.Inserting the SIM cardFollow the steps below to insert your new SIMcard. Remember to switch off your mobilephone before removing the back cover. 1.Press on the back cover and slide the coverdownwards.2.As shown, take out the battery.You may lose all your personal settings if youremove the battery when the phone is switchedon.
Getting Started 93.As shown, align your SIM card with the SIMcard slot, clipped corner facing you and goldcontact downwards. Insert your SIM cardunder the metal clip holder.4.As shown, align the metallic connectors onthe battery and battery slot. Press thebattery down until it is locked.5.As shown, slide the back cover along theslots until it is locked.Remove the protective film covering the screenand the camera lens before using the phone.Charging the batteryYour phone is powered by a rechargeablebattery. A new battery is partially charged. Thebattery symbol indicates the state of the battery.
10 Getting StartedTo charge the battery, plug in the connector asshown below. Then plug the  other end into apower socket.During charging, the battery symbol scrolls. Ittakes about X hours to fully recharge thebattery. Depending on the network and condition of use,talk time goes up to X hours and stand-by timeup to X month.Keeping the charger plugged to the mobilephone when the battery is fully charged will notdamage the battery. The only way to turn off thecharger is to unplug it, so it is advisable to use aneasily accessible power socket. If you do not intend to use your phone forseveral days, we recommend that you removethe battery.You can use the phone while it is charging. If thebattery is completely flat, the battery symbol willonly reappear after a few minutes of charging.Setting clock1.Check that your phone is switched on.Long press ) if necessary. Enter the PINcode if required. A PIN code is a 4- to 8-digit secret code of your SIM card. It ispreconfigured and communicated to youby your network operator or retailer.If you enter an incorrect PIN code three timesin succession, your SIM card will be blocked. Tounblock it, you must request the PUK code fromyour operator.
Getting Started 112.On idle screen, press L Menu and go toSettings > General > Time & date.Set time/date: Enter the time and date by usingthe numeric keypad. Set format: Select the time (12-hour or 24-hourclock) and date format by pressing thenavigation keys +, -, <, > and LOK.Clock type: To display time and date on the idlescreen, press  + or - show the time in a clock(Analog clock) or digits (Digital clock). Press LOKto confirm.Displaying local and internationalclocksYou can display two clocks on the idle screen,one showing your local time and one the time ofyour destination. 1.Check that you have set your local timeand date.2.On idle screen, press L Menu and go toSettings > General > Time & date>International clock.Clock status: Press>, +, or - to turn on theinternational clock.Local setting/Foreign setting: Press > to enter thetime zone screen. Press < or > repeatedly toselect a time zone. Press LOptions to enter Citylist, and select a city in the time zone.Inserting an micro-SD card (memory card)You can expand the memory of your phone byadding an micro-SD card. Supported format: XXXSupported capacity: XXX1.Follow Step 1 and 2 under “Inserting theSIM card”.2. As shown, push down the card holder andlift it up.
12 Getting Started3.As shown, align your micro-SD card withthe slot. Put it in place.4.Press down the card holder and pull it untilit is locked.
132 Text entryYour mobile phone supports a number of textentry modes, including T9 input, multi-tap input,numeric input and symbol input. Selecting text entry methods1.During text editing, press # repeatedly toselect your desired inputs:/ / : for English entry: for numeric entry: Pinyin input for Simplified                      Chinese/ : Stroke input for Simplified/                         Traditional Chinese       2.Long press * to switch the T9 input on oroff. 3.To enter a symbol and punctuations, press*.The text editor remembers the last inputmethod you have used before you exit theediting screen. When you access the editoragain, it will automatically select the last inputmethod you have used. Entering text1.Select your desired text entry methods.2.Enter text by using the alphanumerickeypad.2 to 9   To input letters (T9 input)                     Press repeatedly to input desired                     letters (multi-tap input).1 to 6    To enter strokes (stroke input)<,>         To browse candidate words (T9 input/              multi-tap input)+, -         To browse the candidate words on the              previous/next page (T9 input/multi-tap              input)LSelect To confirm the selectionor ,0         To input a space
14                                                                                                                        RClear   Short press to clear a letter,                long press to clear all entries.                  If necessary, press R to exit the input              mode first.T9® inputT9® predictive text input is anintelligent editing mode formessages, which includes acomprehensive dictionary. Itallows you to quickly enter text.You need to press only once on the keycorresponding to each letter needed to spell aword: keystrokes input are analyzed and theword suggested by T9® is displayed at the pop-up window. Examples: how to enter the word "home":1. Press 4, 6, 6, 3.  The screendisplays the first word of a list: Good.2. Press - to scroll and select Home.3. Press ,Select to confirm.Multi-tap input (ABC/Abc/abc)Press the keys that are marked with thecorresponding letter you wish to enter. Pressonce to get the first letter on the key, presstwice quickly to get the second letter and so onuntil the letter you want is displayed on thescreen.Example: how to enter the word "home":Press 4, 4 (GHI) 6, 6, 6 (MNO), 6(MNO), 3, 3 (DEF). Press , when themessage is completed.Stroke input The principle of stroke input is to dissect andseparate every stroke of a Chinese characteraccording to sequence. When you wish to inputthe character, press the keys corresponding tothe required strokes according to sequence toget the desired character. The stroke inputmethod in this phone classifies a Chinesecharacter into 5 basic strokes: (horizontal,vertical, left falling stroke, right falling stroke andTegic Euro. Pat. App. 0842463
15over-down) as well as a special stroke. Whenthe stroke you need does not correspond to the5 basic strokes, replace it with the specialstroke.
16 Calling3 CallingMaking a callFrom the idle screen1.Enter the phone number.2.Press (  to dial the number. or press LOptions > Dial.3.Press )  to hang up.For international calls, long press 0 toenter the "+" sign for the international prefix.Use the phonebook (see "Contacts" on page 27)1.On the idle screen, press RContacts toopen the contacts list.2.Select a contact from the list, and press (to dial the selected number. Or press LOptions to enter options menu,then select Dial.For IP calls (China only), select L Options >Dial > IP call. You can preset your IP servicenumber under Settings > Call settings > IP number.3.Press )  to hang up.Speed dialOn the idle screen, you can call a contact in yourphonebook by long pressing a numeric key.To assign a speed dial key to a contact:1.Go to Settings > General > Speed dial.2.If necessary, press L to turn the speeddial on.To make a speed dial, always checkthat the speed dial function is enabled. 3.In Set number, select one of the locations (2 to 9).4.Assign to the location a contact from yourphonebook.
Calling 17Answering and ending a callWhen you receive a call, the number of the callermay be displayed, depending on whether or notthe calling party has chosen to display his or her ID.If the number is stored in the phonebook, then thecorresponding name is displayed.•Answer the call: Press (.•Divert the call: Press LOptions and selectDeflect. You can set your call divert (servicesubscription-dependent) under Settings  > Callsettings > Call divert.•Call background sound: Select thebackground sound for your calls.•Hang up: Press )..The phone will not ring if it is in Silent mode (see"Adjusting ring settings to different scenes" onpage 47 ).Options during a callDuring a call, you can press R  to selectHandsfree or Handheld mode. Press LOptionsto access the following options:-Hold single: Put current call on hold -End single: End current call -New call: Make a new (a second) call-Phonebook: Add or view contacts-Messaging: Send and receive Messages- Sound recorder-Background music: Select the backgroundsound for your calls. You can turn theoption on or off under Settings  >  Callsetting > Call background sound.-Mute: Mute/unmute the call.-Messages: Send and receive messages. - Enabling  DTMF (the touch tone dialingsystem).
18 CallingSound recorderIn most countries, recording of telephoneconversation is subject to legislation. We adviseyou to notify the caller if you intend to recordthe conversation and only do so if they agree.You should also ensure confidentiality of therecordings.To record a conversation during a call, selectOptions and select Sound recorder. Recordedsound is saved in *.amr format and stored in Audioof  My files  menu. (see "Finding your files" onpage 42).Mute or unmute a callDuring a call, select Options and select to set theMute function On/Off. If you select Mute, themicrophone will be deactivated.Adjust the earpiece volumeDuring a call, press + or - side keys to increaseor decrease the volume.Handling multiple calls (Network- dependent)You can handle two or more calls at the sametime, as well as make conference calls with yourphone. The availability of this feature isdependent on your network operator and/oryour subscription.Make a second call You can make a second call when there is anactive call or with a call on hold. While on thephone, dial the number (or select a contact fromthe phonebook) and press (. The first call isput on hold and the second number is dialed.You can then select Options to access thefollowing options:•Swap to toggle between 2 calls.
Calling 19•Conference to introduce the caller into aconference call.•End single to disconnect one party from thecall.•End all to disconnect all party from the call.•Transfer  to connect the two calls. You aredisconnected when the transfer is completed.•New call to make a new call•Phonebook to add or view contacts •Messaging to send or receive messages •Sound recorder to record the phoneconversation.•Mute to deactivate the microphone.Answer a second callWhen you receive a second call while already incommunication, the phone will emit a beep toneand the screen displays information about theincoming call. You can then:Press (  to answer the call (the first one is put               on hold).Press )  to reject the call.PressROptions to access the options list.                  You can select Answer, Hold                     Active, End Active to hold or end                   the current call and answer the               incoming call.To receive a second call, Call Divert for voice calls(see page 49) must be deactivated and Callwaiting (see page 49) must be activated.Making an emergency callWithout a SIM card in phone, you can press RSOS to make the emergency call.With a SIM card in phone, you can enter theemergency number in idle mode, then press)..Note that an emergency call will not be storedin the call record. In Europe, the standard emergency number is112, in the UK, it is 999.
20 Messaging4 MessagingCreating messagesSMSSMS enables you to send text messages to theother party, using Short Messaging Service(SMS). You can use the SMS menu to sendmessages to another handphone or a device thatis capable of receiving SMS. To compose andsend an SMS, follow the steps below:1.Select Create message > SMS, and write yourmessage. 2.Press  LOptions to access the followingoptions:3.Press  ,Send to send the message to thedesired contact or contact group (see"Contacts" on page?27)MMSYour mobile phone can also send and receiveMMS (Multimedia Messaging Service) messages.With MMS, you can send messages that containpictures, sound and text.When sending MMS messages, make sure thatyour recipient also has an MMS-enabled phonein order to view your messages. Follow theUsetemplateSelect to insert a preset message.Then press LOK.InsertphonebookNo., Insertphonebookname,InsertBookmarkSelect to insert contactinformation (name or mobilenumber), or website informationyou saved as a bookmark (see"Browser" on page?35). Thenpress LOK.Save Select Save  as drafts  or Save  totemplates. Then press LOK.
Messaging 21steps described below to compose and send anMMS.1.Select Create Message > MMS. Press + or -to select:2.In Edit content, press LOptions:3.Press RDone to access the next option:To Press  LEdit  to enter thenumber or e-mail of therecipient.Cc Press  LEdit  to enter thenumber or e-mail of otherrecipients to whom you wish tosend a copy of the message.Bcc Press  LEdit  to enter thenumber or e-mail of the recipientsto whom you wish to send acopy of the message, by whichthe recipients in the Bcc list willbe invisible to other recipients.Subject Press  LEdit  to enter thesubject of the MMS.Add image,Add audio, AddvideoInsert image, audio or videofiles to your MMS.AddattachmentInsert a file (txt, jar etc) to yourmessage.Add slidebefore,  Addslide after Adjust the slide sequence asdesired.Add bookmarktextAdd website information yousaved as a bookmark (see"Browser" on page?35)Preview Preview the current MMS.Slide timing Set the play time of MMS slides.The default value is 3 seconds.Send only Send the MMS only.Save and send Save and Send the MMS.Save to draft Save the MMS to Drafts.
22 MessagingCopyright protected pictures and sound cannotbe sent by MMS.Use templates for messagesYou can use ready-made messages as newmessages. 10 SMS and 5 MMS messages arepreset in the Templates folder. You can alsosave a message as a template. 1.Select Templates > SMS or MMS.2.Select your desired templates.3.Press LOptions, and select Create message.The ready-made messages appears on theedit screen.Organizing your messagesIn this phone, your messages are sorted in thefollowing folders:Inbox: received messagesSent: sent messagesOutbox: unsuccessfully sent messagesDrafts: messages saved as draftsSIM Archive: messages stored in the SIM cardEnter a folder and select a desired message.Press LOptions to access the following options:For the SMS or MMS, or different folders,available options may vary.  Send options Set Validity period, Deliveryreport, Read report, Priority.Exit ExitView Read the selected message.Reply Reply to the sender.Reply by SMSReply to the MMS sender by SMS.Reply all Reply to the sender and allrecipients on the Cc and Bcc lists.Forward Forward the selected message.Send Send the selected message.
Messaging 23Defining your message settingsSome of your message settings are dependenton the service you subscribe with the networkoperator. Consult your network operator foryour account settings, general settings, serverprofile, or other relevant settings. Edit Edit and send the selectedmessage.Save as templateSave the selected message as apreset message.Use details, Use number, Use URLExtract the number of the senderor in the message to createmessages, make a call, or save tothe phonebook.Extract the URL in the message toconnect to the website, add as abookmarkDelete Delete the selected message.Delete all Delete all messages in the folder.Move to archiveSave the selected message in theSIM memory.  The message is thenmoved to the folder under SIMarchive. Advanced Copy or move messages betweenyour SIM card and phone.Properties Show the file information ofcurrent message.
24 MessagingIn Settings > SMS,Account settingsProfile name: Edit the name of thecurrent profile.SC address: Select your defaultSMS center. If not available onyour SIM card, you must enteryour SMS center number.Validity period: Select the length oftime your messages will bestored in the SMS centre. This isuseful when the recipient is notconnected to the network (andthus cannot receive yourmessage immediately).This feature is subscriptiondependent.Message type: Select the format ofyour sent messages. This option isnetwork dependent.General settingsDelivery report: When selected,this option will inform you viathe SMS whether or not yourown SMS message was sent. This feature is subscriptiondependent.Reply path: When selected, thisoption allows you to transmitthe number of your SMS messagecenter together with themessage. The recipient can thenreply using your SMS center andnot theirs. This speeds up therate of transmission. This featureis subscription dependent.
Messaging 25In Settings > MMS,Preferred storage location Select where is your messagestored, your SIM card or phone.Before the memory is full, allyour messages will be stored inthe selected location.  To checkthe memory status, selectMemory status.Send and save settings Press Lto select On or Off.On: The mail is sent and save tothe Sent folder. Off: The mail is sent only. Pref. bearer This option allows you to set thepreferred transmission mode.You can select Preferred GPRS,Preferred GSM or GSM only. Forfurther details, please contactyour network operator.Memory statusThis option can display thememory status of the messagessaved in the SIM card and thephone.Compose Set  Creation mode,  Image resizingand  Auto signature. When Autosignature is set to On, press - and, Edit  to enter the content  ofsignature. Send Set  Validity period,  Delivery report,Read report, Priority, Slide timing andDelivery time options for sending anMMS.Retrieve Set  Home network,  Roaming,  Readreport and Delivery report optionsfor receiving an MMS.Filter Set  Anonymous, and Advertisementfrom whom you want to filter MMSor e-mail messages.
26 MessagingE-mailIf not included in your mobile phone contract,you will need to subscribe to an e-mail service inorder to send and receive e-mails. In this case,all parameters are communicated to you by youroperator.This menu allows you to send e-mails to one orseveral recipients at a time, including with anattachment such as a JPEG picture. Oncereceived, your messages can be forwarded andthe attachments can be visualized with theappropriate software.Set up E-mail accountsThis menu allows you to Activate, or Edit one ofthe available email profiles. You can also createa new Email account. Consult the networkoperator and mail service provider for theaccount information.  Write E-mailTo write an E-mail, select E-mail > Write e-mail.Enter the address (To), a copy (Cc),  a blind copy(Bcc),  Subject and Attachment (up to 3 files),and the e-mail content. When you have finishedwriting your e-mail, press Done , and then Yes.You can then select to Send, Send and save, Saveto draft or Quit without Saving.To use a template for your E-mail, select E-mail> Template. Select your desired template, pressLOptions to edit or create your mail.  If you exit the E-mail > Write E-mail menu beforesending your e-mail or if you cancel the sendingServerprofileSet network configuration. Pleasecontact your network provider formore information.MemorystatusView the memory status of yourMMS.
Messaging 27while it takes place, the e-mail content is deletedwithout being stored.Send and receive E-mailThis menu allows you to send E-mails from yourphone to the Internet, and receive e-mails fromthe Internet to the mailbox you have preset onyour phone.You can only attach one file (JPEG, MID, JAR,TXT, MP3) or one sound at a time. If you acceptan incoming call while writing an e-mail, themenu is closed and the phone goes back to idlemode when you hang up.Organize your E-mailIn this phone, your messages are sorted in thefollowing folders:Inbox: received E-mailUnsent: unsuccessfully sent E-mailSent: sent E-mailDrafts: Email saved as draftsEnter a folder and select a desired message.Press LOptions to access the following options::Reply  Reply to the senders. Reply without contentReply to the sender without theemail history.Reply all Reply to all senders. Reply all without contentReply to all senders without theemail history.Forward Forward the downloaded e-mailto someone else. Mark as unreadDisplays the unread messages.Mark as deletedDisplays the messages to bedeleted.
28 MessagingBroadcast messagesBroadcast messages are public messagesbroadcasted to a group of mobile users. Themessages are broadcasted on coded channels.Generally, one broadcast channel can transmitone type of message. Please contact yournetwork operator for a list of channel numbersand their respective broadcast information.Defining settings for broadcast messagesIn Broadcast messages, Delete Mark the E-mail to be deleted(select this option again tounmark it). When you exit thee-mail menu, you will be asked toconfirm deletion of the selecteditem(s) from the e-mail server.Receive mode Press  Lto turn the receivemode on or off.Readmessage Read messages when there arereceived broadcast messages. Languages Set language for the broadcastmessage to be received. Channel settingsDefine the channel for broadcastmessages
Contacts 295 ContactsContacts are stored in one of the two availablephonebooks: SIM phonebook (located on yourSIM card, by which the number of entries youcan store depends on the card capacity) or theSmart Phonebook (located on your phone,which allows you to store up to 1000 names).New contacts will only be added to thephonebook you have selected.Adding or editing contactsAdd a contact to Smart PhonebookFor contacts on the Smart Phonebook, you canadd detailed information, like home number andoffice number, and identifying features, likecontact pictures and ringtones.1.In Contacts > Advanced > Choose contact list,2.Go to Contacts > New contact. Press LOKto add a contact.Name: Press ,Edit to go to the editingscreen. To select input methods, press #repeatedly; long press *to turn T9 inputon or off. Press RBack to exit the inputmode, if necessary. Press LOptions  >Done to finish editing. Mobile number: Enter the mobile number. 3.Go to Contacts > View contact. To add detailsto a contact,Select the desired contact. Press ,View.Press  LOptions > Add details. Selectdesired items, and press ,Edit.Default contacts listPress + or - and LOK to selectPhone contacts.Default contact locationPress + or - and LOK to selectTo Phone.
30 Contacts4.Save the entries when finish editing.Add a contact to SIM phonebook1.In Contacts > Advanced > Choose contact list,2.For information editing, see Step 2 under“Add a contact to Smart Phonebook”.Edit a contact1.Go to Contacts > View contacts. 2.Select your desired contact (see "Searchingfor a contact"). Press ,View.3.Press  LOptions  to go to the editingoptions.For contacts on SIM phonebook, only nameand mobile number are editable. Searching for a contact1.In  Contacts > View contacts, enter thecontact information in full or part.Press  # repeatedly to select an inputmethod. 2.Press , to start searching. Managing your contactsYou can copy or move your contact entriesbetween the two phonebooks. Also, you cangroup your contacts as Family, Friends, Businessand others as you like. For different groups, youcan use different ringtones for identification, andsend messages to a group. Copy or move a certain contact1.Go to Contacts > View contacts.2.On the View contacts screen, select thedesired contact.3.Press  LOptions  to select Copy to phone(SIM) or Move to phone (SIM).Default contacts listPress + or - and LOK to selectSim contacts.Default contact locationPress + or - and LOK to selectTo SIM.
Contacts 31Copy all contacts1.Go to Contacts > Advanced.2.Press + or - and LOK  to select Copy all toSIM  (available if the phone is the defaultcontact location) or  Copy all to phone(available if the SIM card is the defaultcontact location).Delete all contacts1.Go to Contacts > Advanced > Delete all. 2.Press + or - and LOK  to delete all contactfrom your current contact location, the SIMcard or phone. Group your contacts1.Go to Contacts > View groups.2.Press + or - and LOK  to select a group.3.You can rename the group, select aringtone, and add contacts to Members List.Special numbersThis menu allows you to keep a list of usefulnumbers such as own numbers, servicenumbers, voicemail and emergency numbers.Options DescriptionMynumberSelect to Edit or Erase your ownphone number.Voice mail Dial the number of your voicemail service provider.Emergency Dial emergency phone numbers.ServicenumberThis service is provided by yournetwork operator. For moreinformation regarding thecorresponding function, pleasecontact your network operator.
32 Business6 BusinessUsing your business organizerYou can add your to-do work to the phone.Such to-do tasks are marked in your calender.You can  always check your calendar and remindyourself as desired.Create your to-do list1.In Business > To do list, press LOptions >Add to add a kind of task. You can also add a task in Business >Calendar: select a date in the calendar, pressLOptions > Add task.2.When setting a task, specify the date andtime.3.To keep yourself reminded, do thefollowing:Note Add a note about the task. Alarm Press < or > once or more to turnthe alarm on, have it sound 15 or30 minutes before the specifiedtime, or turn the alarm off. Repeat Press  < or >  once or more torepeat the alarm at the specifiedtime once, everyday, weekly ormonthly. To repeat the alarm at certaindays, press < or > to selectCustomize, - and < or > to select aweekday or weekend, and pressL to turn the alarm on or off onthe certain day.
Business 334.For an existing task, you can do thefollowing in the Business > To do list >LOptions:Check your calendarAfter creating your to-do lists, you can checkyour calendar in day, weekly, or monthly views.In  Business > Calendar, press LOptions or,View. You can also create your to-do list in thecalendar of different views.Using your business assistantSuch features provide you with convenience.Alarm You can set up to five alarms. To set an alarm, 1.Check that your clock is correctly set (see"Setting clock" on Page?10)2.Go to Business > Alarm.The screen of alarm list appears.3.Select an alarm, and press LChange toenter the alarm setting screen. Time: Set the alarm time. Repetition: Repeat the alarm on one or some of the weekdays or weekends.Alarm tone: Select an alarm tone.4.PressRBack  repeatedly to return to thescreen of alarm list. Press , to turn thealarm on or off. To use an alarm,On the set alarm time, your alarm sounds. Select Stop: The alarm stops. If you have selectedrepetition mode for the alarm (see “To set analarm”), it will sound again at the set time. Edit Edit an existing task.Send vCalendarSend the task as a message.
34 BusinessSelect  Snooze: The alarm will sound again fiveminutes later. You can select Snooze three times. The alarm clock will ring even if your mobilephone is switched off, but the alarm will not ringor vibrate if the Profiles menu is set to Silent.Business card readerThis menu allows you to collect the businesscards information by directly scanning thebusiness card contents into Contacts.   1.In Business > Business Card Reader, to adjust the focus: press the camera keygently;to capture the business card: press downthe camera key. The recognition result is displayed on thescreen. 2.Edit the information as desired.      A new contact is created in your phonebook.    The captured card is saved to My files >    Picture.  Text readerThis menu allows you to view the text file saved in the phone or micro SD card. To read a text file on your phone, copy and save the file to  My files > Others > Ebook. Press Options to do  the following: CleanUp Bookshelf : Clear the files created by the system during e-book reading.View settings: Select your reading settings.Sound recorderYou can make recording for yourself or send itvia the MMS, E-mail, or bluetooth. Make recording1.Go to Business  >  Sound recorder. pressLOptions > Settings to select the storagelocation, file format, and recording speedfor your recording.
Business 352.Press  LOptions  >  Record to startrecording,  Lto pause/resume recording,and RStop to stop recording.3.Press  LOptions  >  Save to save therecording.Edit or append recording to a file1.Select the desired file.2.Press LOptions to select your options. Send an audio file1.Select the desired file. 2. Press LOptions > Send to send the audio file via the MMS, E-mail, or Bluetooth. Change clock displayAs you travel from one time zone to another,you may need to change your local clocksettings.1.To retain the clock of you home country,switch the clock to a foreign clock ifnecessary:Go to Settings > General > Time and date >Time and date > International clock >  Switchlocal/foreign. Press LOK.2.Go to Business > World clock to select yourlocal settings:Press < or > repeatedly to select a time zoneand city. Press , to confirm. On the idle screen, the local clock is changed.OthersCalculator: Enter figures by using the thenumeric keypad. Press +, -, <, >, or ,Ok to select“+”, “-”, “x”, “/” or “=” for your calculation.Press #to enter a decimal point. Unit converter: Convert betweeninternational and British units.Currency converter: Convert betweendifferent currencies based on exchange rates.
36 Browser7 BrowserYou can use this function to browse theInternet. Consult your network operator forthe service subscription and WAP settings. Managing your browserIn Browser > Settings,Wap profile:Define or select your Internet accesssettings.Browser options: Define the time for an accessattempt, choose whether to show images onweb pages. Clear cache, Clear cookies: Clear the history andcookies of the browser.Accessing web sitesYou can access a web site in different ways:Home: Save a web page as your homepage.Enter address: Enter a web site address.Bookmarks: Save a website as a bookmark. In thisway, you save and quickly access your favoritewebsites, and forward them in your messages(see "Creating messages" page 20).History: Access a web site you visited before.Offline pages:  Access web pages you saved.
Camera 378 CameraYour mobile phone features a digital camera thatallows you to take pictures (up to 3.0 Megapixels) and record short video clips, store themin your phone or transfer them to your PC via adata cable, use them as wallpaper or send themto your friends via the MMS.Using the cameraIn Camera > Camera,• press the camera key gently to focus, andpress down the camer key to take a picture;• press  < or >  to increase or decrease thebrightness;• press + or - to zoom in or out;• to select your desired photo settings, andstorage location, press LOptions; to returnto the default settings, select Restore defaultsettings.After taking a picture, you can press ,  tosend the picture via the MMS. Using the video recorderIn Camera > Video,•press , to start or pause recording;•press RBack to stop recording;• to select your desired video recorder settings,video file settings, and storage location, pressLOptions; to return to the default settings,select Restore default settings.After video recording, you can press ,  tosend the picture via the MMS.
38 Fun9 Fun Getting fun from Java applicationsYour mobile phone features a Java run-timeenvironment, which allows you to run Javaapplications, such as games downloaded fromthe network.Contact your network operator to subscribeservices and set your Java network in Fun > Java> Settings.Java applicationsIn  Java  >  Java application lists, our phone ispreloaded with games, dictionary (available onsome  product versions), MSN.To play the supplied games online, select thedesired game and press LOptions  > Setting todefine your  network settings. Listening to the FM radioTune to a radio stationTo tune to a radio station, always plug thesupplied earphone into your phone.•Auto tune: In Fun >  FM radio, pressLOptions >  Auto presets. The radiofrequency scanning starts automatically. Up tonine available radio stations are saved toChannel list. The first preset radio stationstarts to play. Select your desired station fromChannel list. If necessary, press RBack to goto the playback screen. To listen to a preset station, press + or -, ornumeric keys 1 to 9 (corresponding tothe presets in Location 1 to 9) on radioplayback screen. •Manual tune: Press  LOptions  >  Manual input to enteryour desired radio frequency;On the radio playback screen, press < or >repeatedly to tune to a station; long press < or
Fun 39>  to start auto search for the next availablestation from current frequency.Edit the channel listYou can assign a preset to a certain location.When pressing the numeric key on the radioplayback screen, you tune to the stationimmediately. 1.In  Fun  >  FM radio, press  LOptions  >Channel list to select a location for yourpreset (Location 1 to 9 corresponding tonumeric keys 1 to 9).2.Press LOptions > Edit:Channel name: Name or rename thechannel.Frequency: Enter your desired frequency.The old frequency in the location isreplaced. Or1.Tune to your desired station (see "Tune to aradio station").2.On the radio playback screen, press yourdesired numeric key.Current station is save to the location(corresponding to the numeric key) inChannel list.3.To edit the channel name, press LOptions>  Channel list to select a channel. PressLOptions > Edit to edit the channel name. Listen to a radio station1.Go to Fun > FM radio.The last played station starts to play. 2.Tune to your desired station (see "Tune to aradio station").3.On the radio playback screen, pressLOptions  >  Settings to select yourplayback settings.Background play: Turn it on to play the radio afterexiting Fun > FM radio. The station informationappears on the idle screen. Loudspeaker: Turn it on to listen to the radiothrough the speaker.
40 FunChannel effect: Select sound effects for yourradio.4.On the radio playback screen, press , tostop or resume radio playback. Editing your photosYou can edit your photos before sending themvia the MMS or saving them for other purposes. Add to or clip from photos1.Go to Fun > Photo editor > Photo artist, andselect your desired photo from My files >(Photo or Memory card)  > Picture > Photos.2.To add effects, contents, or changes,select  Auto resize, press LOptions, andselect your desired addition or change;To clip a portion, select Main LCD clip, press +, -, <, > to selectthe desired clip, and press LOK toconfirm.Piecing photos togetherYou can make a photo consisting of 2, 4 or 9photos. 1.In Fun > Photo editor > Image tile, select yourdesired option.2.Press LSelect to select a photo from Myfiles > (Photo  or  Memory card)  >  Picture >Photos.3.To clip the photo, select Clip image.Otherwise, select Auto resize.4.Follow Step 2 and 3 to select desiredphotos.5.Press LOptions  to select Save as:Select your desired storage location, andthenSelect: Use an assigned file name (editable).Open:  Open a folder in a storage location.Create: Create a file name.
Fun 41Editing your ringtonesYou can edit your ringtone files in My files >Audio.1.In  Fun  > Melody  composer, select theringtone to be edited. 2.Press  LOptions to select your playbackoptions, and save the edited ringtone as anew file. STKThe availability of the features in this menudepends on whether or not your SIM cardsupports STK. If your SIM card supports STKfunction, the STK menu will be displayed on thescreen.
42 Music10 MusicSave MP3 music files under the Audio folder ofthe micro-SD card.You can play the music onyour phone.Creating your music library  Edit music files on your PC1.Run Windows Media Player (or other musicmanagement program) on your PC.2.To add music files, click Media Library on theleft menu, and then click Add on the topmenu.3.On the left pane, select All Music.On the right pane, all the music files youadded are displayed. 4.Click  Title,  Artist,  Album to edit them asdesired.Transfer music files from PC to your phone 1.Check that you have installed a memorycard on your phone (see "Inserting anmicro-SD card (memory card)" on Page 11).2.Use the supplied USB data cable to connectyour phone with the PC. Select Mass storageon your phone. 3.Copy the music files from the PC to theAudio folder on the memory card.4.Remove your phone (a USB mass storagedevice) from the PC safely. 5.On your phone, go to Music. PressLOptions > Refresh library on the Musicplayer screen.All the music files are transferred to yourphone.Playing music The music files are organized in three folders.All songs: all the songs on your phone.
Music 43Album: songs sorted by album.Artist: songs sorted by artist.Play music files1.Select your desired song in a folder. Playback starts from the song. On theplayback screen show the file informationand selected playback settings.2.To select your plackback settings, Press LOptions > Settings:Shuffle: Turn it on to play music files in thefolder randomly.Repeat 1: Play current file repeatedly.Repeat All: Play all the files in the folderrepeatedly. Equalizer: Press> repeatedly to select soundsettings suitable to your songs.Background play: Continue to play musicafter you exit the music player. 3.To return to the playback screen, pressRBack. During playback (on the playback or idlescreen)< or >: press repeatedly to select a song< or >: long press to select a section within a          song  +: press repeatedly to select sound settingsVolume side keys: adjust the volume     ,: pause and resume playback      - : stop playback    ): go to the idle screenCreate playlistsYou can create up to 4 playlists for songs thatyou wish to play at this time. Your last playedsongs are saved to Play list > Last played.1.Select your desired songs or albums.2.Press  LOptions  >  Add to playlist to addsongs by file or album. 3.Select a playlist where you add the songs. A playlist is created.
44 My files11 My filesOn the phone, all the files are stored under thefolders of the phone memory or memory card.Finding your files1.Go to My files.2.Select  Phone  or  Memory card, if you haveinstall a memory card on your phone. Audio: for audio files, like sound recording,music files, ringtones, and othersPicture: for photos under Photos, .jpg filesand othersVideo: for video clips, and othersOther: for .txt files under Ebook  (readablethrough  Business > Text reader), and filesreceived via the MMS and  E-mail underReceived on the phone memory.          3.If necessary, press LOptions to select yourview settings:Browse style: Show files as icons or a listSort: Show files in the order of name, type,time or size.Managing your filesCreate sub-folders You can create sub-folders under the Audio,Picture,  Video  and  Other  folders, or an existingsub-folder.1.Select a folder or sub-folder under whichyou wish to create a folder.2.Press LOptions > Create.3.In the Edit screen, enter a file name. Ifnecessary, press #  repeatedly to selectinput methods, and long press *  to turnthe T9 input on or off. 4.Press LOptions > Done.A sub-folder is created.
My files 45Manage your filesYou can copy and move files within a folder,delete, or rename your files. 1.Select a file under a folder.2.Press  LOptions  to select your desiredoption:  Rename,  Copy,  Move,  Delete,  Deleteall files.3.To copy or move a file, select the desiredsub-folder, and press LOptions:Done: Move or copy the file to current sub-folder.Open: Open a sub-folder under current sub-folder, and move or copy the file to it. Create: Create a sub-folder under currentsub-folder, and move or copy the file to it. Sharing your filesYou can share your files with others via theMMS, E-mail, or Bluetooth. 1.Select the desired file, and press LOptions> Send.2.Select the option to send the file via theMMS, E-mail, or bluetooth.If you send your files via the bluetooth,check your Bluetooth connection first. (see "Bluetooth" on page 45 )Using photosEdit a photo1.Select a photo under My files > Picture >Photos.2.Press LOptions  > Edit.3.Follow the steps under "Add to or clip fromphotos" on page 40.Set a photo as wallpaper1.Select a photo under My files > Picture >Photos.2.Press LOptions  > Set as wallpaper.The photo is set as the wallpaper of yourphone.
46 My filesSet a photo as screensaverYou can set a photo as the screensaver of yourphone. After the set time span in idle mode, thescreensaver appears, hiding the information onthe idle screen of your phone. 1.Select a photo under My files > Picture >Photos.2.Press LOptions  > Set as screensaver.Print a photo1.Check that your phone is connected to aPictBridge-enabled printer through thesupplied USB data cable, or a bluetooth-enabled printer.2.Select the desired photo, and pressLOptions  > Print.Setting audio files as ringtone1.Select an audio file under Audio.2.Press LOptions  > Set as incoming call tone.To edit the audio file, see see "Editing yourringtones" on page 41.
47 Calls12 CallsYou are provided with the records about your incoming and outgoing calls, and  received and sent Internet data. Go to Calls to check your call history.Depending on your network, rounding-off forbilling purposes, taxes, and others, the actualtime invoiced for calls and services by yourservice provider may vary.The Call costs function is network-dependent.
48 Bluetooth13 BluetoothAbout BluetoothYour phone supports Bluetooth wirelesstechnology, allowing connection to a compatibleBluetooth device within 10 meters. TheBluetooth connection can be subject tointerference from obstructions such as walls orother electronic devices.Before you can apply Bluetooth, make sure theother device supports Bluetooth function bycontacting the device’s manufacturer or itsaccompanied documentation.Connecting to a Bluetooth device1.Go to Bluetooth > Power. Press L ifnecessary, to turn on the bluetoothfunction. 2.Select  Find devices to start searching foravailable Bluetooth devices. A list of available Bluetooth devices appears.3.Select the device you wish to connect.4.Enter your Bluetooth password (0000 bydefault) to start connecting.The connection is made if your connectionrequest is accepted by the other device. To connect to a device you connectedpreviously, 1.Go to Bluetooth  > My devices.2.Select the device, and press LOptions  >Connect.The connection is made if the device isavailable for a connection.
Bluetooth 49Getting connected by a Bluetooth device1.Go to Bluetooth  > Settings:Visibility: Turn it on to make your phone             visible to other Bluetooth devicesMy name: your phone name to be identified              by other Bluetooth devices. Press              L to edit it.Authentication: Turn it on if a password                    (0000 by default) is required to                   accept the connection request.FTP settings or BIP settings: file folder to receive files             shared with other Bluetooth device.Access right: When sending files via the        Bluetooth, define the access right here.    2.Go to Bluetooth  > Power. Press L ifnecessary, to turn on the bluetoothfunction. The connection is made when you receive andaccept the connection request (enter thepassword 0000 if necessary).    Other Bluetooth connectionsYour phone can also be connected to aBluetooth earphone or the Bluetooth-enabledin-car handfree telephone system. For a Bluetooth earphone, select Bluetooth  >Settings > Audio path > Forward to BT headset.Also, consult the user documentation of theBluetooth earphone. For the in-car handfree telephone system, selectBluetooth  > Settings > Remote SIM mode. Turn onthe mode. When the mode is on, otherBluetooth functions of your phone isdeactivated.  If you do not use the Bluetooth feature for sometime, you should deactivate it in order toconserve battery power.
50 Profiles14 ProfilesAdjusting ring settings to different scenesThe profiles are defined for several scenes. Theyconsist of the settings for ringtones, ring volume,answer mode, and others. With preset profiles,you can easily adjust incoming calls and messagesas desired. Define your profilesThis phone has provide you several presetprofiles. You can use the default settings orchange them as desired. The settings for Flight mode (on a plane) areunchangeable.To change the settings:1.In Profiles, select the profile to be changed.2.Press LOptions > Modify.3.Select your desired option and makechanges as desired.Apply a profile1.In Profiles, select the profile to be applied.2.Press ,Activate to activate the profile.To activate the silent mode, long press #on the idle screen.If you select Flight mode, you disable theconnection between your phone and yourmobile phone network.
Settings 5115 SettingsGeneralTime & date: Set the clock of the phone                   (see "Setting clock" on page 10).                   Auto power On/Off: Set time for                    your phone to be turned on or off                   automatically.Language: Select a language for your phone.Auto keypad lock:  Set an idle time span for the                        keypad to be locked.Speed dial: Set a numeric key as a direct dial to a               contact (see "Speed dial" on page 16).Fast keys: Set a navigation key as a direct access              to a menu.Auto update of date and time: Update the time and date of your phoneaccording to the signals sent by the network.(dependent on the network).DisplayWallpaper: Select an image as the wall paper of                your phone.Screen saver: Settings: Turn the screen saver on                               or off.                  Waiting: Set time span in idle mode                                before a screen saver appears.                  Select: Select an image as the screen                           saver.Backlit setting: Select the brightness and duration                    of backlight.Show own number: Select whether to show your                         phone number to the called party                     (network-dependent)Greeting: Select whether to show greetings when              your phone is turned on.
52 SettingsCall settingsCaller ID: Set how to show your number to the             called party (network-dependent).Call waiting: Get informed of an incoming call                      when on phone               (see "Answer a second call" on page 19).Call divert: Divert incoming calls to your voice                      mailbox or to another phone number               (regardless of whether or not the number            is in your phonebook)           (see "Answer a second call" on page 19).This feature is subscription dependent.Call barring: Set limits to your incoming and                 outgoing calls.                 Select Change barring PW to change                  the call barring password. This feature is network dependent and requiresa specific call barring password supplied by yourservice provider.IP number (network -dependent, available only in              China): Add the preset IP number to              outgoing call numbers.Blacklist: Status: Turn the blacklist mode on or                        off.        Blacklist number: Edit a list of phone        numbers. You can reject all the calls from       such numbers. Auto redial: Keep redialing the call number that                fails to go through.Call time reminder: Get reminded after the                          specified call time span once or                          repeatedly.Call time display: Display the call time on the                       screen. Background music: Play selected music as the              background music during a call.                 (see "Options during a call" on page 17).Closed user group (service subscription-          dependent): Restrict incoming and        outgoing calls within certain groups of        people.
Settings 53Line switching: Swap phones when handling                     multiple calls. (see "Handling multiple calls (Network-dependent)" on page 18).Network settingsSelect network: Select the network for your                      phone.Preferred network: Select your preferred networkGPRS connection: Select GPRS connection mode.Data account: Check or create your data            account.SecuritySIM lock: Set PIN or PIN2 password protection              for your SIM card.             (The PIN or PIN2 are provided by the              network operator. )Phone lock: Set password protection for your                phone. You are required to enter the                password each time you turn on the                phone. (1122 by default)Fixed dial: Restrict your outgoing calls to certain               numbers.Barred dial: Prohibit some outgoing calls. Change password: Change your PIN, PIN2, phone                          passwords as desired. Factory settings: Restore your phone settings to                       the default values. You need to                      enter your phone lock password                      to restore settings.
54 Icons & SymbolsIcons & SymbolsIn idle mode, several symbols can be displayedsimultaneously on the main screen.  Whenpressing some of the status icons, thecorresponding menu will be displayed on thescreen. If the network symbol isn’t displayed, thenetwork is currently not available. You may bein a bad reception area, moving to a differentlocation may help.Silent - Your phone will not ring whenreceiving a call. Vibrate - Your phone will vibrate whenreceiving a call.  SMS message - You have received a newmessage.Battery - The bars indicate the batterylevel (4 bars = full, 1 bar = low).Call divert - Indicates that the call divertfunction is activated.Bluetooth - Feature is activatedAlarm clock is activated.Roaming - Displayed when your phone isregistered to a network other than yourown (especially when you’re abroad).Missed call - You have a missed call.Headset - The headset is plugged into thephone.
Icons & Symbols 55Home zone - A zone designated by yournetwork operator. Subscriptiondependent, contact your serviceprovider for details.GSM network: your phone is connectedto a GSM network.Reception quality: the more bars areshown the better the reception is.Tap on the icon to switch between theflight mode and normal mode.SIM memory full - The SIM memory is full.Delete old items to store new ones.MMS message - You have received a newmultimedia message.GPRS attach - Your phone is connectedto the GPRS network.EDGE attach - Your phone is connectedto the EDGE network.Memory card - Indicates the memorycard is in use.
56PrecautionsRadio WavesYour cellular mobile phone is a lowpower radio transmitter andreceiver. When it is operating, itsends and receives radio waves. Theradio waves carry your voice or datasignal to a base station that is connected to thetelephone network. The network controls thepower at which the phone transmits.• Your phone transmits/receives radio waves inthe GSM frequency (900 / 1800 / 1900 MHz).• The GSM network controls transmissionpower (0.01 to 2 watts).• Your phone complies with all relevant safetystandards.• The CE mark on your phone showscompliancy with European electromagneticcompatibility (Ref. 89/336/EEC) and lowvoltage directives (Ref. 73/23/EEC).Your cellular mobile phone is yourresponsibility. To avoid damage to yourself, toothers or to the phone itself, read and follow allthe safety instructions and make them known toanyone borrowing your phone. Furthermore toprevent unauthorised use of your phone:Keep your phone in a safe place andkeep it out of small children's reach.Avoid writing down your PIN code.Try to remember it instead. Switch off the phone and remove the battery ifyou are going to leave it unused for a long time.Change your PIN code after purchasing thephone and to activate call restriction options.The design of your phone complieswith all applicable laws and regulations.However your phone may causeinterference with other electronicdevices. Consequently you should
57follow all local recommendations andregulations when using your cellular phoneboth at home and when away. Regulations onthe use of cellular phones in vehicles andaircraft are particularly stringent.Public concern has been focused for some time onthe possible health risks for users of cellularphones. The current research on radio wavetechnology, including the GSM technology, hasbeen reviewed and safety standards have beendrawn up to ensure protection from exposure toradio wave energy. Your cellular telephonecomplies with all applicable safety standardsand the Radio Equipment and TelecommunicationsTerminal Equipment Directive 1999/5/EC.Always switch off your phone...Inadequately protected or sensitive electronicequipment  may be affected by radio energy.This interference can lead to accidents.Before boarding an aircraft and/orwhen packing the phone in yourluggage: the use of mobile phones in anaircraft may be dangerous for the operation ofthe aircraft, disrupt the mobile phones networkand may be illegal.In hospitals, clinics, other health carecentres and anywhere else where youmay be in the close vicinity of medicalequipment.In areas with a potentially explosiveatmosphere (e.g. petrol stations andalso areas where the air contains dustparticles, such as metal powders).In a vehicle transporting flammable products(even if the vehicle is parked) or a vehiclepowered by liquefied petroleum gas (LPG),check first that the vehicle complies with theapplicable safety rules.
58In areas where you are requested to turn off radiotransmitting devices, such as quarries or otherareas where blasting operations are in progress.Check with the vehicle manufacturerthat electronic equipment used inyour vehicle will not be affected byradio energy.PacemakersIf you have a pacemaker:• Always keep the phone more than 15 cmfrom your pacemaker when the phone isswitched on, in order to avoid potentialinterference.• Do not carry the phone in a breastpocket.• Use the ear opposite to the pacemaker tominimise the potential interference.• Switch off your phone if you suspect thatinterference is taking place.Hearing aidsIf you are a user of a hearing aid, consult yourphysician and hearing aid manufacturer to learnwhether your particular device is susceptible tocellular phone interference.Improved performanceIn order to improve the performance ofyour phone, reduce radio energy emission,reduce battery consumption and ensuresafe operation adhere to the followingguidelines:For the optimal and satisfactoryoperation of the phone you arerecommended to use the phone in thenormal operating position (when notusing in hands-free mode or with a hands-freeaccessory).• Do not expose your phone to extremetemperatures.
59• Treat the phone with care. Any misuse willvoid the International Guarantee.• Do not immerse the phone in any liquid; ifyour phone is damp, switch it off, remove thebattery and let them dry for 24hrs beforeusing them again.• To clean the phone, wipe it with a soft cloth.• Placing and receiving calls consumes the sameamount of battery energy. However, themobile consumes less energy in idle screenwhen kept in the same place. When in idlescreen and while you are moving, your phoneconsumes energy to transmit updatedlocation information to the network. Settingthe backlight for a shorter period of time aswell as avoiding unnecessary navigating in themenus will also help to save the battery’senergy for longer phoning and stand-byperformances.Battery information• Your phone is powered by a rechargeablebattery.• Use specified charger only.• Do not incinerate.• Do not deform or open the battery.• Do not allow metal objects (such as keys inyour pocket) to short circuit the batterycontacts.• Avoid exposure to excessive heat (>60° C or140° F), moisture or caustic environments.You should only use Philips AuthenticAccessories, as the use of any otheraccessories may damage your phoneand may be dangerous, and will makeall guarantees for your Philips phone null andvoid. The use of an incorrect type of battery mayalso cause an explosion.Make sure damaged parts are replacedimmediately by a qualified technician and that they
60are replaced with genuine Philips replacementparts.Your mobile phone and your carStudies have shown that speaking onthe telephone while driving lowersyour concentration, which can be dangerous. Adhereto the following guidelines:• Give your full attention to driving. Pull off theroad and park before using the phone.• Respect the local regulations in countrieswhere you drive and use your GSM phone.• If you want to use your phone in a vehicle,install the hands-free car kit which is designedfor that purpose.• Ensure that your phone and car kit do notblock any air bags or other security devicesfitted in your car.• The use of an alarm system to operate avehicle's light or horn to indicate incomingphone calls is prohibited on public roads insome countries. Check local regulations.EN 60950 NormIn hot weather or after prolonged exposure tothe sun (e.g., behind a window or a windscreen),the temperature of your phone's casing mightincrease, especially when featuring a metallicfinish. Be very careful in this case when pickingup your phone and also avoid using it with anambient temperature over 40° C.For your phone, the socket-outlet shall beinstalled near the phone and shall be accessible.Environmental careRemember to observe the localregulations regarding the disposal ofthe packaging materials, exhaustedbatteries and old phone and pleasepromote their recycling.
61Philips has marked the battery and packagingwith standard symbols designed to promote therecycling and appropriate disposal of youreventual waste.WEEE Marking in the DFU: “Information to the Consumer”Disposal of your old productYour product is designed and manufactured withhigh quality materials and components, whichcan be recycled and reused. When this crossed-out wheeled binsymbol is attached to a product itmeans the product is covered bythe European Directive 2002/96/ECPlease inform yourself about thelocal separate collection system forelectrical and electronic products.Please act according to your local rules and donot dispose of your old products with yournormal household waste. The correct disposalof your old product will help prevent potentialnegative consequences for the environment andhuman health.The labelled packaging material isrecyclable.A financial contribution has beenmade to the associated nationalpackaging recovery and recyclingsystem.The plastic material is recyclable(also identifies the type ofplastic).
62FCC Compliance StatementThis equipment has been tested and found tocomply with the limits for a Class B digitaldevice, pursuant to Part 15 of the FCC Rules.These limits are designed to provide reasonableprotection against harmful interference in aresidential installation. This equipmentgenerates, uses and can radiate radio frequencyenergy and, if not installed and used inaccordance with the instructions, may causeharmful interference to radio communications.However, there is no guarantee thatinterference will not occur in a particularinstallation. If this equipment does cause harmfulinterference to radio or television reception,which can be determined by turning theequipment off and on, the user is encouraged totry to correct the interference by one or moreof the following measures: -- Reorient or relocate the receiving antenna. -- Increase the separation between theequipment and receiver. -- Connect the equipment into an outlet on acircuit different from that to which the receiveris connected. Any changes or modifications not expresslyapproved by the party responsible forcompliance could void the user’s authority tooperate the equipment.This device complies with part 15 of the FCCRules. Operation is subject to the following twoconditions: (1) This device may not causeharmful interference, and (2) this device mustaccept any interference received, includinginterference that may cause undesiredoperation.
63TroubleshootingThe phone does not switch onRemove/reinstall the battery. Then charge thephone until the battery icon stops scrolling.Unplug the charger and try to switch the mobileon.The display shows BLOCKED when you switch on the phoneSomebody tried to use your phone but didn’tknow the PIN code nor the unblocking code(PUK). Contact your service provider.The display shows IMSI failureThis problem is related to your subscription.Contact your operator.Your phone doesn’t return to idle screenLong press the hang-up key or switch off thephone, check that the SIM card and the batteryare installed correctly and switch it on again.The network symbol is not displayedThe network connection is lost. Either you arein a radio shadow (in a tunnel or between tallbuildings) or you are outside the networkcoverage area. Try from another place, try toreconnect to the network (especially whenabroad), check that the antenna is in place if yourmobile has an external antenna, or contact yournetwork operator for assistance/information.The display doesn’t respond (or the display responds slowly) to key pressesThe display responds more slowly at very lowtemperatures. This is normal and does not affect
64the operation of the phone. Take the phone toa warmer place and try again. In other casesplease contact your phone supplier.Your battery seems to over heatYou might be using a charger that was notintended for use with your phone. Make sureyou always use the Philips authentic accessoryshipped with your phone.Your phone doesn’t display the phone numbers of incoming callsThis feature is network and subscriptiondependent. If the network doesn’t send thecaller’s number, the phone will display Call 1 orWithheld instead. Contact your operator fordetailed information on this subject.You can’t send text messagesSome networks don’t allow message exchangeswith other networks. First check that you haveentered the number of your SMS centre, orcontact your operator for detailed informationon this subject.You can’t receive and/or store JPEG picturesA picture may not be accepted by your mobilephone if it is too large, if its name is too long, orif it doesn’t have the correct file format.You feel that you have missed some callsCheck your call divert options.When charging, the battery icon shows no bar and the outline is flashingOnly charge the battery in an environmentwhere the temperature does not go below 0°C(32°F) or above 50°C (113°F).In other cases please contact your phonesupplier.
65The display shows SIM failureCheck that the SIM card has been insertedcorrectly. If the problem persists, your SIM cardmay be damaged. Contact your operator.When attempting to use a feature in the menu, the display shows NOT ALLOWEDSome features are network dependent. They areonly available, therefore, if the network or yoursubscription supports them. Contact youroperator for detailed information on thissubject.The display shows INSERT YOUR SIM CARDCheck that the SIM card has been insertedcorrectly. If the problem persists, your SIM cardmay be damaged. Contact your operator.The autonomy of your phone seems lower than indicated on the user guideThe autonomy is linked to your settings (e.g.,ringer volume, backlight duration) and thefeatures you use. To increase the autonomy, andwhenever possible, you must deactivate featuresyou do not use.Your phone doesn’t work well in your carA car contains many metallic parts that absorbelectromagnetic waves which can affect thephone’s performance. A car kit is available toprovide you with an external antenna andenables you to make and receive phone callswithout handling the handset.Check with the local authorities whether or notyou are allowed to use the phone while driving.
66Your phone is not chargingIf the battery is completely flat, it might takeseveral minutes of pre-charge (up to 5 minutesin some cases) before the charging icon isdisplayed on the screen.The picture captured with the phone camera is not clearMake sure that the camera lens on both sides isclean.
67Philips Authentic AccessoriesSome accessories, such as a standard battery,headset, USB cable and a charger, are includedas standard accessories in your mobile phonepackage. Additional accessories may also beprovided or sold separately. Package contentsmay therefore vary.To maximise the performance of your Philipsmobile phone and not to void the warranty,always purchase Philips Authentic Accessoriesthat are specially designed for use with yourphone. Philips Consumer Electronics cannot beheld liable for any damages due to use with nonauthorised accessories.ChargerCharges your battery in any AC outlet. Smallenough to carry in a briefcase/handbag.Deluxe headsetThe integrated answer button offers you asimple way to answer your calls. Simply answeran incoming call by pressing the button or longpress to reject the incoming call.Data cableProvides easy data connection to your Philipsmobile phone. The USB cable enables high-speed communication between your phone andyour computer. The provided software allowsyou to download pictures and melodies and tosynchronise your contacts and appointments.When your mobile phone is connected to thePC via a USB data cable, the cable also acts ascharger to charge your phone (X620 USBcharging is compatible with most PCs).
68USBThis feature allows you to connect your phoneto a PC via USB cable. You can carry out thefollowing operations:When the transfer is finished, please make surethat you safely remove your device based on theinstruction of your computer.Using mobile phone toolsMobile phone tools help you make the best useof your mobile phone for data and documenttransmission through the Mobile Phone Toolssoftware. With this software, you can uploadand download files, send and receive SMS andedit your mobile phone contacts. To activatethis feature, you need to install and open theMobile Phone Tools. Then connect the phonevia the USB cable. Select COM port on the phone.On the computer screen, select Settings >Interface settings, then select X620 and press OK.MassStorageActs as a mass storage for yourmobile phone data on thecomputer and recover the datasaved in the computer, uploadand download files, access theinternal memory and micro SDcard (if present) and the size oftransfer is unlimited until yourmemory is full.Webcam Acts as a webcam for your PC.COM port Acts as a modem for your phoneand PC connnection. You can usethe software provided to edityour mobile phone contacts,pictures and melodies.
69Trademark DeclarationT9® is a trademark ofTegic CommunicationsInc.JAVA is a trademark ofSun Microsystems, Inc.In-Fusio and the gamesengine Exen aretrademarks of In-FusioFrance.Tegic Euro. Pat. App. 0842463PHILIPS and PHILIPS’Shield Emblem areregistered trademarks ofKoninklijke PhilipsElectronics N.V. manufactured byShenzhen Sang FeiConsumer Communications Co.,Ltd.  under license fromKoninklijke Philips Electronics N.V.
Specific Absorption Rate Information 70Specific Absorption Rate InformationInternational standardsTHIS MOBILE PHONE MEETS THE INTERNATIONAL RECOMMENDATIONS FOR EXPOSURE TO RADIO WAVESYour mobile phone is a radio transmitter and receiver. It is designed and manufactured not to exceedthe limits for exposure to radio frequency (RF) energy defined by the international standards. Theserecommendations have been established by the International Commission on Non-Ionizing RadiationProtection (ICNIRP) and, the Institute of Electrical and Electronics Engineers (IEEE) that forecast asubstantial safety margin for assuring the protection of all persons, regardless of age and health.The exposure recommendations for mobile phones use a measurement unit known as the SpecificAbsorption Rate (SAR). The SAR limit recommended by the ICNIRP for the mobile phones used bythe general public is 2.0W/kg averaged over ten grams of tissue and, is 1,6W/kg averagedover one gram of tissue by IEEE Std 1528 for the head.Tests for SAR have been conducted using recommended operating positions with the mobile phonetransmitting at its highest certified power level in all tested frequency bands. Although the SAR isdetermined at the highest certified power level, the actual SAR levels of the mobile phone whileoperating are generally below the maximum SAR value. This is because the phone is designed to
71 Specific Absorption Rate Informationoperate at multiple power levels so as to use only the power required to reach the network. Ingeneral, the closer you are to a base station antenna, the lower the power output. While there may be differences between the SAR levels of various phones and at various positions,they all meet the international protection standards for exposure to radio waves. The highest SAR value for this Philips Xenium X620 model phone when tested for compliance againstthe standard was 0.401 W/kg for ICNIRP recommendation and 1.09 W/kg for IEEE Std 1528. For limiting the radio waves exposure, it is recommended to reduce the mobile phone call durationor to use a headset. The purpose of those precautions is to take the mobile phone away from thehead and the body.For body worn operation, this phone has been tested and meets FCC RF exposure guidelines whenused whit an accessory that contains no metal and that positions the handset a minimum of 1.5cmfrom the body. Use of other accessories may not ensure compliance with FCC RF exposureguidelines.
72Limited Warranty1.  What Does This Limited WarrantyCover?Philips warrants to the original retailpurchaser (“Consumer” or “You”) that thisPhilips cellular product and all accessoriesoriginally provided by Philips in the salespackage (“Product”) are free from defectsin materials, design and workmanship undernormal use in accordance with theoperating instructions and pursuant to thefollowing terms and conditions. This limitedwarranty extends only to the Consumer forProducts purchased and used in the originalcountry of purchase. The limited warrantyis valid only in Philips’ intended country ofsales of the product.2.  How Long is The Limited Warranty Period?The limited warranty period for theProduct extends for ONE (1) YEAR fromthe date of purchase of the Product,documented by valid proof of purchase.The limited warranty for original Philipsrechargeable battery extends for six (6)months from the date of purchase.3.  What Will Philips Do if The Product is NotFree From Material Defects in Materials andWorkmanship During The LimitedWarranty Period?During the limited warranty period, Philipsor its authorized service representativewill, at its option either repair or replace,without charge for parts or labour, amaterially defective Product with new orrefurbished parts or Product and returnsuch repaired or replaced Product to theConsumer in working condition. Philips willretain defective parts, modules orequipment.Repaired or replaced Product will becovered by this limited warranty for thebalance of the original limited warrantyperiod or ninety (90) days from the date ofrepair or replacement whichever is longer.
73Repair or replacement of Product, atPhilips’ option is your exclusive remedy.4.  What is Not Covered By This LimitedWarranty?This limited warranty does not cover:a)  Product that has been subjected tomisuse, accident, shipping or otherphysical damage, improper installation,abnormal operation handling, neglect,inundation, fire, water or other liquidintrusion; orb)  Product that has been damaged due torepair, alteration, or modification byanyone not authorized by Philips; orc) Product that has reception oroperation problems caused by signalconditions, network reliability or cableor antenna systems; ord) Product defects or problems caused byuses with non-Philips products oraccessories; or e) Product  which  warranty/qualitystickers, product serial number orelectronic serial number has beenremoved, altered or rendered illegible;or f)  Product purchased, used, serviced, orshipped for repair from outside theoriginal country of purchase, or usedfor commercial or institutionalpurposes (including but not limited toProducts used for rental purposes); or g) Product returned without valid proofof purchase or which proof ofpurchase has been altered or isillegible.h) Normal wear and tear or ForceMajeure.5.  How Do You Get Warranty Service?a)  Return the Product to an authorizedservice center of Philips. You maycontact the local Philips office for thelocation of the nearest authorizedservice center.
74b) The SIM card must be removed fromthe Product before it is given to Philips.Philips assumes no liability for damagedor loss of the SIM card or the datacontained therein.c) If the Product failure is not covered bythis limited warranty, or this limitedwarranty is inapplicable, void or invaliddue to any terms and conditions statedherein, the Consumer will be chargedfor the cost of repair or replacementof the Product and all other relatedcost incurred in repairing or replacingthe Product.d)  IMPORTANT - you are required toreturn the Product together with avalid proof of purchase which mustidentify the point of purchase, date ofpurchase, Product model and Productserial number clearly.6.  Other Limitation: This Warranty is TheEntire Agreement.EXCEPT FOR THE EXPRESSWARRANTIES SET FORTH ABOVE ANDTHOSE IMPLIED BY LAW AND WHICHCANNOT BE EXCLUDED OR MODIFIEDBY AGREEMENT, PHILIPS PROVIDES NOOTHER WARRANTY WHETHEREXPRESS OR IMPLIED (WHETHER BYSTATUTE, UNDER THE OPERATION OFLAW OR OTHERWISE) AND SPECIALLYDISCLAIMS ANY WARRANTY OFSATISFACTORY QUALITYMERCHANTABILITY OR FITNESS FOR APARTICULAR PURPOSE.PHILIPS’ TOTAL LIABILITY FORDAMAGES RELATING TO OR ARISINGOUT OF THE PURCHASE OR USE OFTHE PRODUCT, REGARDLESS OF THETYPE OR CAUSE OF SUCH DAMAGE ORTHE FORM OR CHARACTERISATIONOF THE CLAIM ASSERTED (E.G.CONTRACT OR TOPIT), SHALL NOTEXCEED THE ORIGINAL PURCHASEPRICE PAID FOR THE PRODUCT.
75HOWEVER IN NO EVENT SHALLPHILIPS BE LIABLE FOR ANY PUNITIVE,SPECIAL, INCIDENTAL, INDIRECT ORCONSEQUENTIAL DAMAGES(INCLUDING BUT NOT LIMITED TO THELOSS OF USE, LOSS OF TIME,INCONVENIENCE, COMMERIAL LOSS,LOST PROFITS, LOST BUSINESSOPPORTUNITIES, COST OFSUBSTITUTION OF GOODS ORSERVICES, INVESTMENTS, DAMAGE TOGOODWILL OR REPUTATION, ORLOSS OF DATA AND CLAIMS BY THIRDPARTIES) RESULTING FROM PURCHASEOR USE OF THE PRODUCT, TO THEFULLEST EXTENT ALLOWED BY LAW,WHETHER OR NOT PHILIPS HAS BEENADVISED OF THE POSSIBILTY OF SUCHDAMAGES. THESE LIMITATIONS SHALLAPPLY NOTWITHSTANDING THEFAILURE OF THE ESSENTIAL PURPOSEOF ANY LIMITED REMEDY.This limited warranty represents thecomplete and exclusive agreement betweenthe Consumer and Philips with respect tothis cellular Product and it supercedes allprior agreements between the parties, oralor written, and all other communicationsbetween the parties relating to the subjectmatter of this limited warranty. No carrier,retailer, agent, dealer, employee, thereof,or employee of Philips is authorized tomake modifications to this limited warrantyand you should not rely on any suchrepresentation.This limited warranty does not affect theConsumer’s statutory rights underapplicable national laws in force.
Declaration of ConformityWe, Shenzhen Sang Fei ConsumerCommunications Co., Ltd.11 Science and Technology Road,Shenzhen Hi-tech Industrial Park,Nanshan District, Shenzhen  518057Chinadeclare under our sole responsibility that theproductPhilips X620Philips GSM/GPRS 900/1800/1900TAC number: 35364802to which this declaration relates, is in conformitywith the following Standards:SAFETY : EN 60950-1: 2001+A11:2004HEALTH: EN50360: 2001EMC: ETSI EN301 489-7 v 1.2.1; ETSI EN301 489-17 v1.2.1 SPECTRUM: ETSI EN 301 511 v9.0.2; ETSIEN 300 328 v1.6.1We hereby declare that all essential radio testsuites have been carried out and that the abovenamed product is in conformity to all theessential requirements of Directive 1999/5/EC.The conformity assessment procedure referredto in Article 10 and detailed in Annex IV of Di-rective 1999/5/EC has been followed with theinvolvement of the following Notified Body: CETECOM ICT Services GmbH,Unterturkheimer Strabe6-10, 66117,Saarbrucken, Germany.Identification mark: 0682May 5th, 2008Quality Manager

Navigation menu