Sanyo Electric Co A1303SA Single-Mode Cellular Phone (CDMA) User Manual
Sanyo Electric Co Ltd Single-Mode Cellular Phone (CDMA) Users Manual
UserManual.wiki
>
Sanyo Electric Co
>
A1303SA User Manual
Users Manual
Navigation menu
Upload a User Manual
Namespaces
Wiki Guide
HTML
PDF
Info
Views
User Manual
Discussion / Help
Navigation
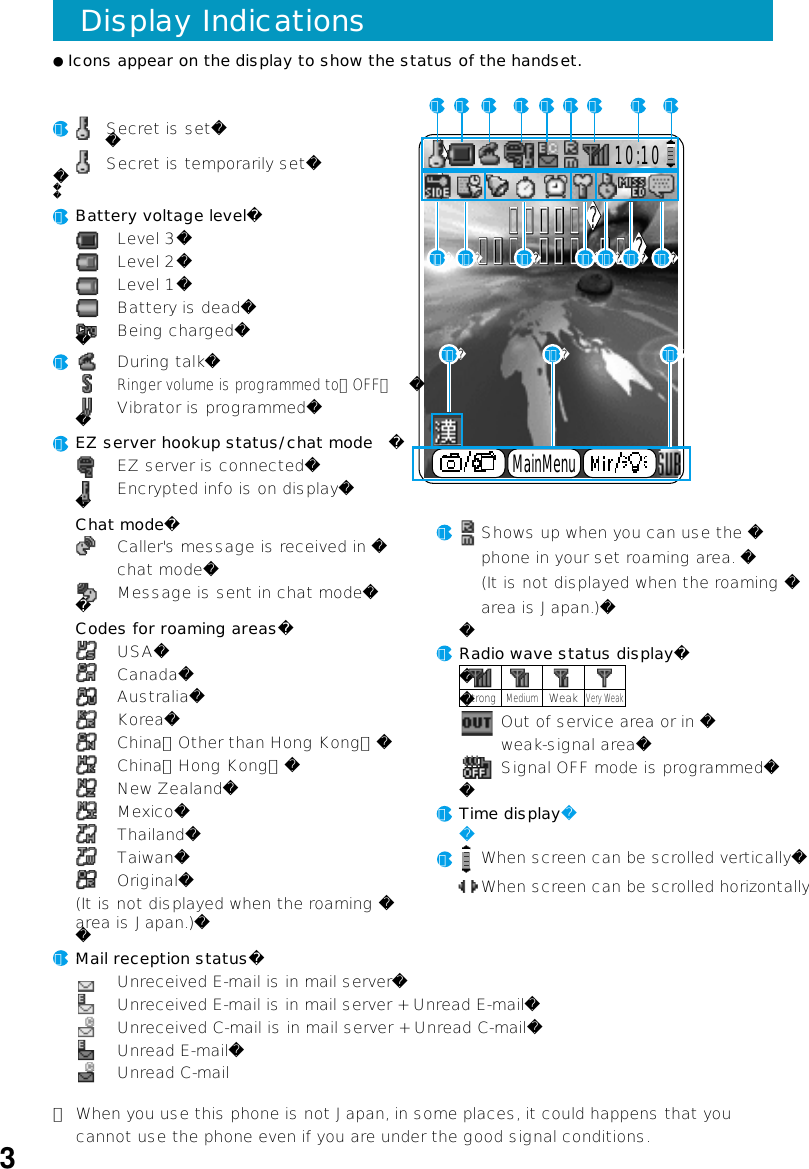
![11EarpieceUsed to hear other party's voice,various messages.12DisplayShows various settings, phonenumbers.13Flexible keysUsed to select items shown in thebottom of the display (refer to "Usingthe flexible keys" on page 5.)Also left side of this key is used in theCamera mode and right side of thiskey is used to use Mirror Display andturn on pocket light.14 Search/Cursor keyUsed for the functions of Search andcursor move. Volume/Conversion keyUsed for the functions of volumesetting and character conversion. Address book ( ) keyUsed to call up the address book, andto enter a new address book entry. Calendar ( ) keyUsed to display the Calendar, and toenter a new Schedule or Task list. Receiving History ( ) keyUsed to call up the history of incomingcalls or E-mail and C-mail. Redial ( ) keyUsed to call up the history of outgoingcalls or E-mail and C-mail.15 keyUsed to delete characters, and toreturn to previous display.Also set/cancel manner mode.16 keyUsed for E-mail and C-mail functionsand entering symbols in text.17 (Start) keyUsed to make or receive a call.18Dial keysUsed to enter phone numbers andcharacters.19MicrophoneUsed to convey your voice during a call.20External connection terminalUsed to connect an optional devicessuch as Sanyo DC adapter 01.21 (End) keyUsed to turn on and off the power, toend a call, or to hold a call.22 keyUsed for the EZweb Service.23 keyUsed to call up the jump menu and tocall the sub-menu while [ ] isdisplayed.24 keyUsed to call up the menu or to enterselected items. Also used to selectitems shown in the bottom center ofthe display.25Optical sensorUsed to detect light.2111215161314 242523222117201819](https://usermanual.wiki/Sanyo-Electric-Co/A1303SA/User-Guide-321034-Page-3.png)
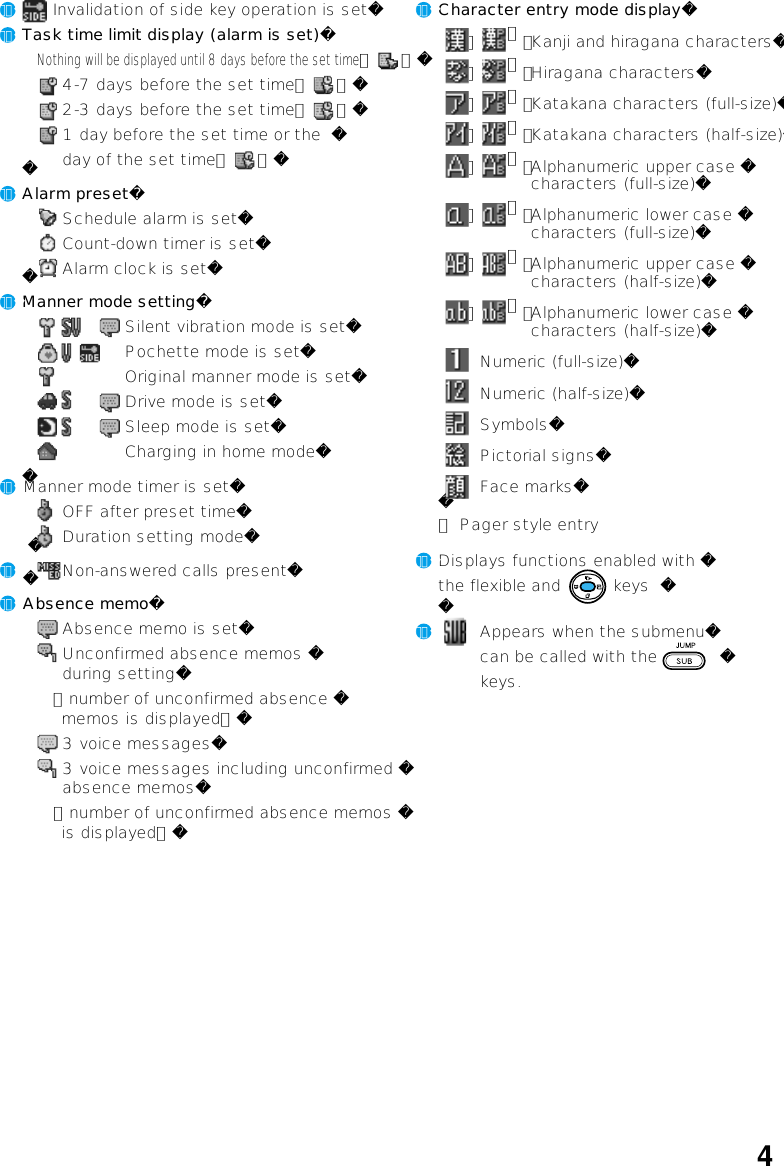

![[Assignment of characters and key functions]Characters are assigned to each key as shown below. Press a keyrepeatedly to cycle through characters assigned to that key.Remarks:■ To enter a Japanese character with (゛) or (゜), enter the desired characterwithout confirming and press in this order. When you enter a capitalcharacter without confirming and press , the character changes to thelowercase, and when you enter a lowercase character and press , thecharacter changes to the capital.(Example: た→だ→た…/は→ば→ぱ→は…/つ→づ→っ→つ…/ A → a→ A…)■ A character is switched into reverse order by pressing after enteringcharacter using the dial keys. (Example: か→こ→け→く→き→か)■ When the pager style entry mode is selected, you can enter a character with a2-digit number.■ Using the JIS dot code (4 digits), you can also enter characters.■ When entering characters for composing E-mail in Katakana mode, characterassignment of is " ワ→ヲ→ン→ヮ→、→。→ー→・→∼→!→?→(space)".keyentry mode(Before confirming letters)Converts to Kanji characters.P/ー12345678901234567890#Reverse toggle of entered characters (before confirm), line change (after confirm).あいうえおぉぇぅぃぁかきくけこさしすせそたちつてとっなにぬねのはひふへほまみむめもやゆよゃゅょらりるれろわをんゎ、。−(space)?!∼・アイウエオォェゥィァカキクケコサシスセソタチツテトッナニヌネノハヒフヘホマミムメモヤユヨャュョラリルレロワヲン 、 。 ー −(space)? ! ~・abcABC2defDEF3ghiGHI4jklJKL5mnoMNO6pqrsPQRS7tuvTUV8wxyzWXYZ90Symbols (half size)(Before confirming letters)Switches between full size and half size characters.Switches lowercase/uppercase"Kanji", "Hiragana"(full size) "Katakana"(half size) "Alphanumeric"(half size) "Number"(half size) "Phonenumber"゛ ゜Switches lowercase/uppercase゛ ゜Switches lowercase/uppercaseSymbols (full size),pictographs.@-_/:~1P/-13](https://usermanual.wiki/Sanyo-Electric-Co/A1303SA/User-Guide-321034-Page-14.png)