Sanyo Electric Co A1303SA Single-Mode Cellular Phone (CDMA) User Manual
Sanyo Electric Co Ltd Single-Mode Cellular Phone (CDMA) Users Manual
Users Manual

For more information about RF exposure, please visit the FCC website at www.fcc.gov
FCC RF EXPOSURE INFORMATION
In August 1996 the Federal Communications Commission (FCC) of the United States
with its action in Report and Order FCC 96-326 adopted an updated safety standard for
human exposure to radio frequency electromagnetic energy emitted by FCC regulated
transmitters. Those guidelines are consistent with the safety standard previously set
by both U.S. and international standards bodies. The design of this phone complies
with the FCC guidelines and these international standards.
Use only the supplied or an approved antenna. Unauthorized antennas, modifications,
or attachments could impair call quality, damage the phone, or result in violation of FCC
regulations.
Do not use the phone with a damaged antenna. If a damaged antenna comes into
contact with the skin, a minor burn may result. Please contact your local dealer for
replacement antenna.
Body-worn Operation
This device was tested for typical body-worn operations with the back of the phone kept
1.5 cm. from the body. To maintain compliance with FCC RF exposure requirements,
use only belt-clips, holsters or similar accessories that maintain a 1.5 cm. separation
distance between the user’s body and the back of the phone, including the antenna,
whether extended or retracted. The use of belt-clips, holsters and similar accessories
should not contain metallic components in its assembly. The use of accessories that
do not satisfy these requirements may not comply with FCC RF exposure
requirements, and should be avoided.
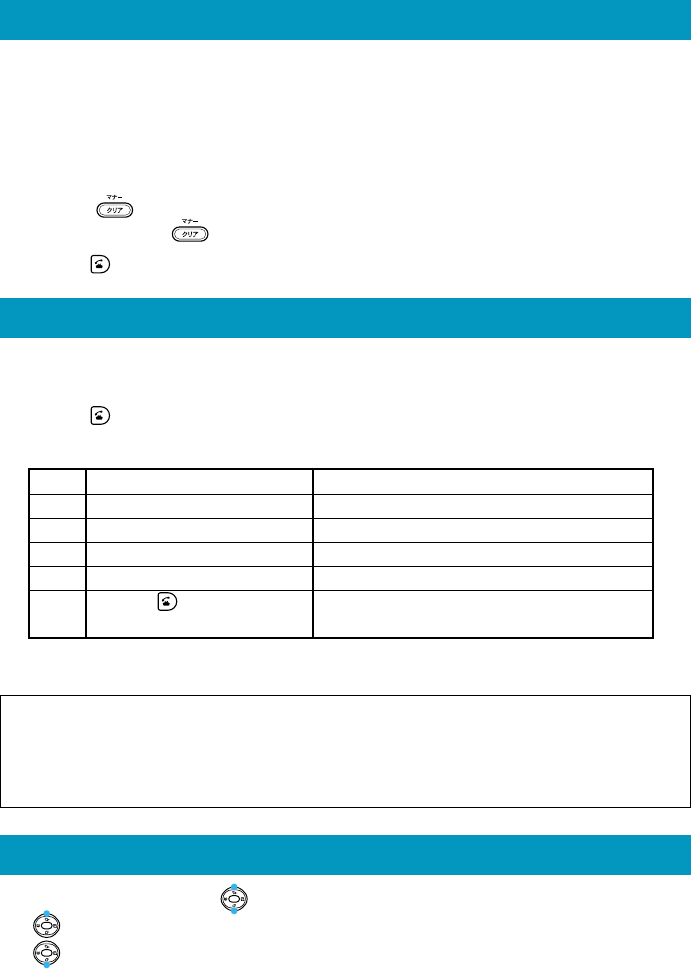
WARNING! Read this information before using your phone
Operating Instructions
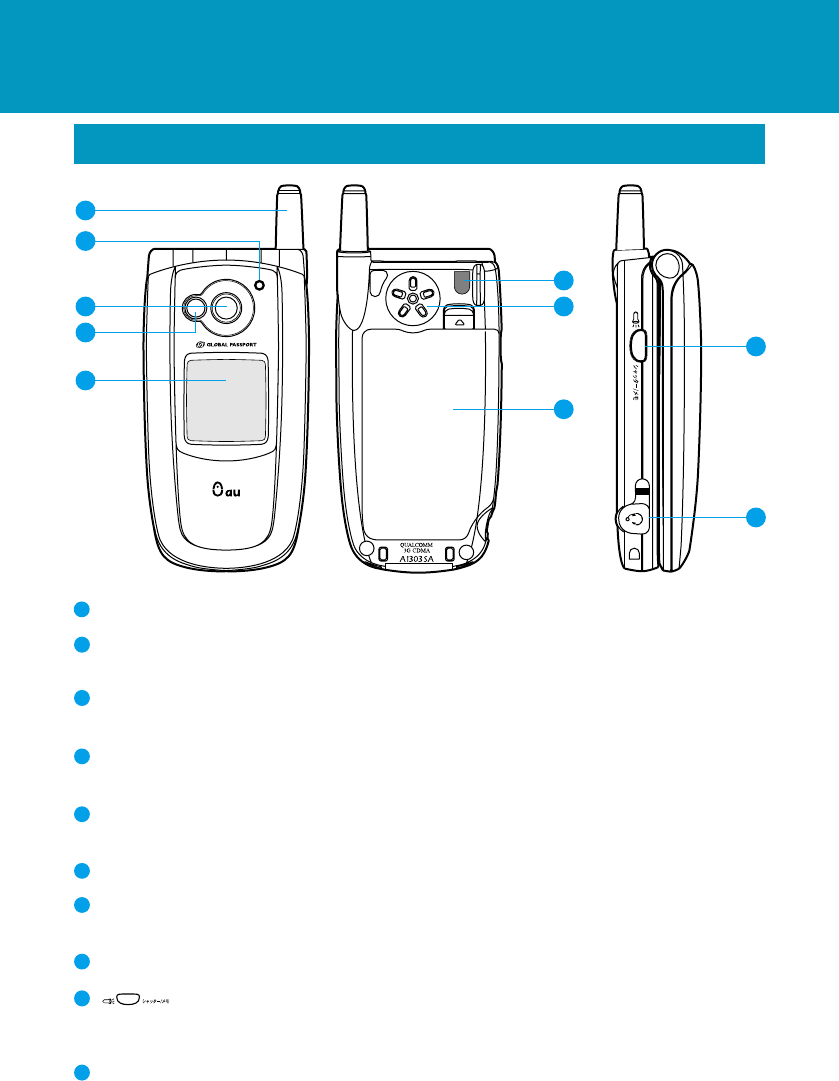
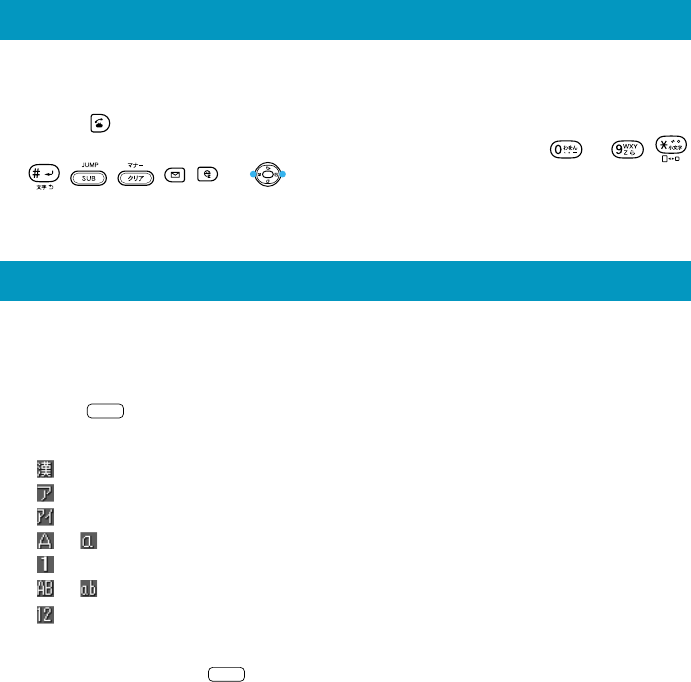
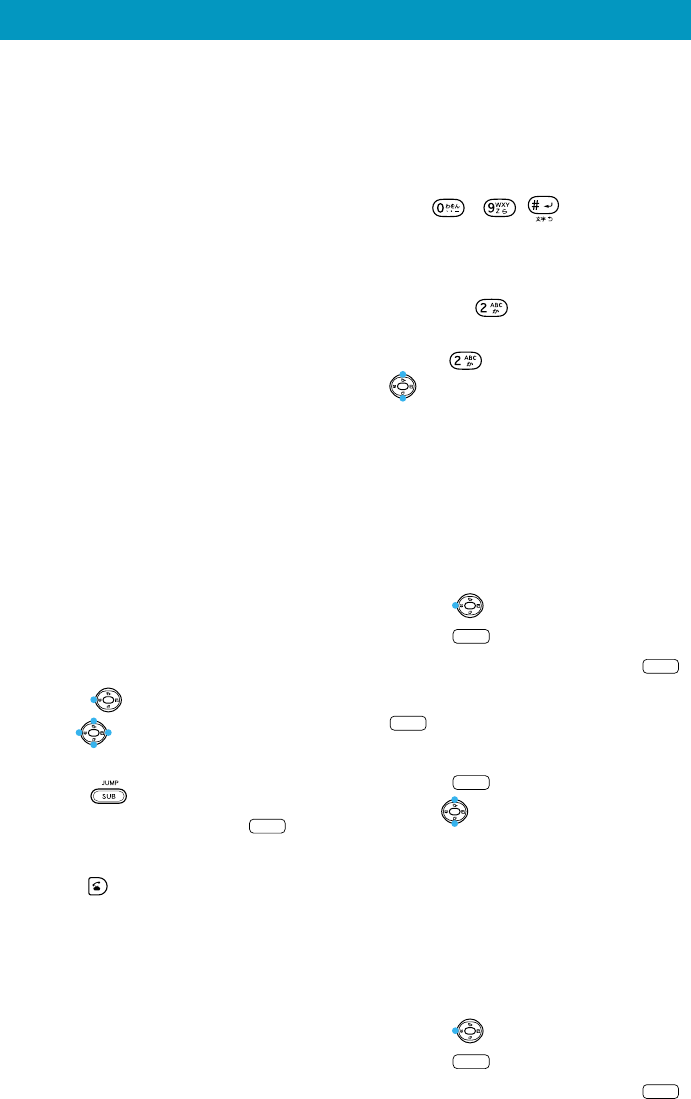
Name & Function of Parts
1
Antenna
2
Incoming call light
Blinks when the phone rings, and lights red during battery charging.
3
Built-in camera (Lens)
Used to take digital images.
4
Built-in flash
Used to take digital images in dark places.
5
Sub-display
Shows standby screen or receiving screen while the handset is closed.
6
Strap hole
7
Speaker
Issues ringer tone and notification tone.
8
Battery pack
9
(side) key
Used to switch the notification of non-answered call on the sub-display and to set
absence memo. Used in the Camera mode and to turn on pocket light.
1
0
Ear-microphone jack
Used to connect an optional switchable ear-microphone.
1
1
2
5
6
7
9
8
1
0
3
4
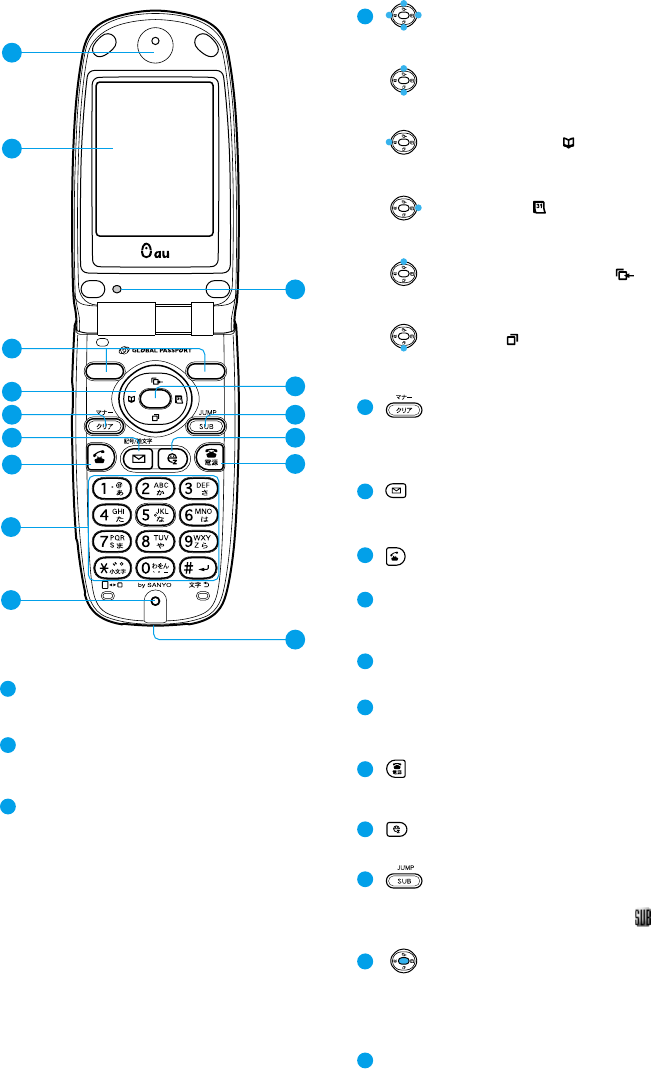
1
1
Earpiece
Used to hear other party's voice,
various messages.
1
2
Display
Shows various settings, phone
numbers.
1
3
Flexible keys
Used to select items shown in the
bottom of the display (refer to "Using
the flexible keys" on page 5.)
Also left side of this key is used in the
Camera mode and right side of this
key is used to use Mirror Display and
turn on pocket light.
1
4
Search/Cursor key
Used for the functions of Search and
cursor move.
Volume/Conversion key
Used for the functions of volume
setting and character conversion.
Address book ( ) key
Used to call up the address book, and
to enter a new address book entry.
Calendar ( ) key
Used to display the Calendar, and to
enter a new Schedule or Task list.
Receiving History ( ) key
Used to call up the history of incoming
calls or E-mail and C-mail.
Redial ( ) key
Used to call up the history of outgoing
calls or E-mail and C-mail.
1
5
key
Used to delete characters, and to
return to previous display.
Also set/cancel manner mode.
1
6
key
Used for E-mail and C-mail functions
and entering symbols in text.
1
7
(Start) key
Used to make or receive a call.
1
8
Dial keys
Used to enter phone numbers and
characters.
1
9
Microphone
Used to convey your voice during a call.
2
0
External connection terminal
Used to connect an optional devices
such as Sanyo DC adapter 01.
2
1
(End) key
Used to turn on and off the power, to
end a call, or to hold a call.
2
2
key
Used for the EZweb Service.
2
3
key
Used to call up the jump menu and to
call the sub-menu while [ ] is
displayed.
2
4
key
Used to call up the menu or to enter
selected items. Also used to select
items shown in the bottom center of
the display.
2
5
Optical sensor
Used to detect light.
2
11
12
15
16
13
14 2
4
2
5
2
3
2
2
2
1
17
2
0
18
19

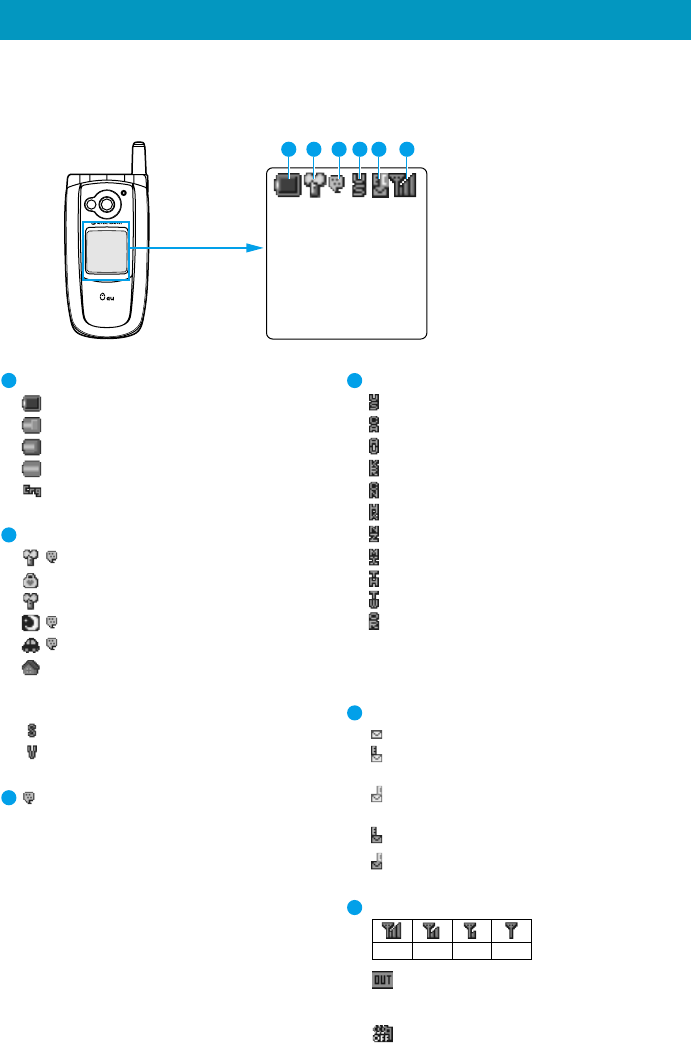
●Icons appear on the display to show the status of the handset.
Display Indications
3
10:10
10:10
10:10
Fri Oct 10
Fri Oct 10
10:10
Fri Oct 10
MainMenu
18 1917
1 2 5 6 7 8 93 4
10 11 12 131415 16
Secret is set
Secret is temporarily set
Battery voltage level
Level 3
Level 2
Level 1
Battery is dead
Being charged
During talk
Ringer volume is programmed to「OFF」
Vibrator is programmed
EZ server hookup status/chat mode
EZ server is connected
Encrypted info is on display
Chat mode
Caller's message is received in
chat mode
Message is sent in chat mode
Codes for roaming areas
USA
Canada
Australia
Korea
China(Other than Hong Kong)
China(Hong Kong)
New Zealand
Mexico
Thailand
Taiwan
Original
(It is not displayed when the roaming
area is Japan.)
Mail reception status
Unreceived E-mail is in mail server
Unreceived E-mail is in mail server + Unread E-mail
Unreceived C-mail is in mail server + Unread C-mail
Unread E-mail
Unread C-mail
Shows up when you can use the
phone in your set roaming area.
(It is not displayed when the roaming
area is Japan.)
Radio wave status display
Out of service area or in
weak-signal area
Signal OFF mode is programmed
Time display
When screen can be scrolled vertically
When screen can be scrolled horizontally
1
2
3
4
5
6
7
8
9
Strong
Medium
Weak
Very Weak
* When you use this phone is not Japan, in some places, it could happens that you
cannot use the phone even if you are under the good signal conditions.
4
10:10
Fri Oct 10
Invalidation of side key operation is set
Task time limit display (alarm is set)
Nothing will be displayed until 8 days before the set time
( )
4-7 days before the set time( )
2-3 days before the set time( )
1 day before the set time or the
day of the set time( )
Alarm preset
Schedule alarm is set
Count-down timer is set
Alarm clock is set
Manner mode setting
Silent vibration mode is set
Pochette mode is set
Original manner mode is set
Drive mode is set
Sleep mode is set
Charging in home mode
Displays functions enabled with
the flexible and keys
Appears when the submenu
can be called with the
keys.
Manner mode timer is set
OFF after preset time
Duration setting mode
Non-answered calls present
Absence memo
Absence memo is set
Unconfirmed absence memos
during setting
(number of unconfirmed absence
memos is displayed)
3 voice messages
3 voice messages including unconfirmed
absence memos
(number of unconfirmed absence memos
is displayed)
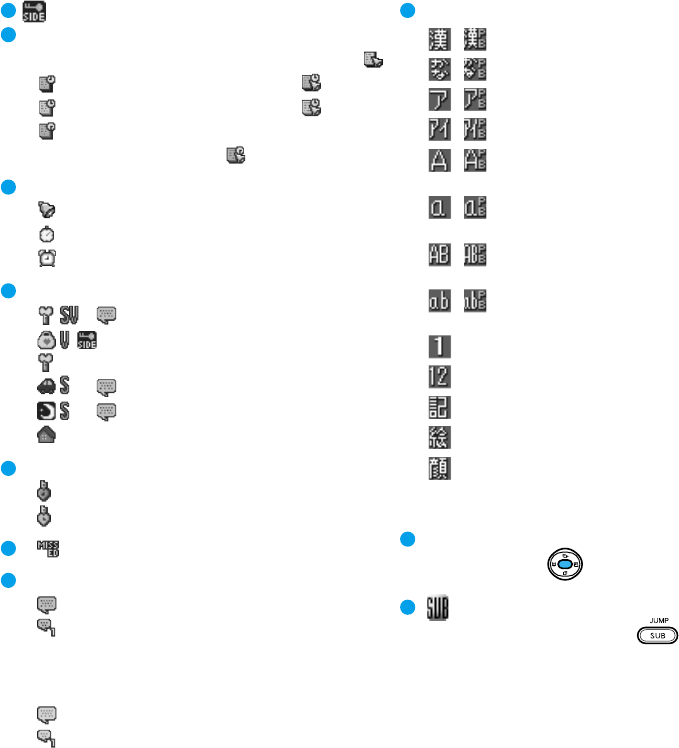
Character entry mode display
( *) Kanji and hiragana characters
( *) Hiragana characters
( *) Katakana characters (full-size
)
( *) Katakana characters (half-siz
e)
( *) Alphanumeric upper case
characters (full-size)
( *) Alphanumeric lower case
characters (full-size)
( *) Alphanumeric upper case
characters (half-size)
( *) Alphanumeric lower case
characters (half-size)
Numeric (full-size)
Numeric (half-size)
Symbols
Pictorial signs
Face marks
* Pager style entry
10
11
12
13
14
15
16
17
19
18

In this manual, the flexible and keys are shown
as ,
MainMenu
and from left to right. See at
right.
Each key is allocated to an item shown in the bottom of the display. Press the
key just below and the key to select the item.
There are several different patterns of indications
shown on the display, and the functions of the flexible
keys vary accordingly.
■Using the flexible keys
※ The illustrations in this manual differ slightly from the actual displays.
〈Example〉
■ key
In this manual, the point at which to press the
key is indicated as shown below.
Example) Press or →
In order to minimize the power consumption, the A1303SA display turns
automatically to power saving mode when key operation is stopped for a while.
The indication restores with key operation.
■Power saving during standby
Indications on
the display
Functions of the
flexible keys
MainMenu
5
●When the handset is closed, the sub-display tells the status of the handset. (The
screens in this manual are somewhat different in fonts and shapes from actual
ones.)
Sub-display Indications
6
Battery voltage level
Level 3
Level 2
Level 1
Battery is dead
Being charged
Manner mode setting
Silent vibration mode is set
Pochette mode is set
Original manner mode is set
Sleep mode is set
Drive mode is set
Charging in home mode
Ringer tone setting
Ringer volume is programmed to「OFF」
Vibrator is programmed
Absence memo is set
Codes for roaming areas
USA
Canada
Australia
Korea
China(Other than Hong Kong)
China(Hong Kong)
New Zealand
Mexico
Thailand
Taiwan
Original
(It is not displayed when the roaming
area is Japan.)
Mail reception status
Unreceived E-mail is in mail serve
r
Unreceived E-mail is in mail serve
r
+ Unread E-mail
Unreceived C-mail is in mail serve
r
+ Unread C-mail
Unread E-mail
Unread C-mail
Radio wave status display
Out of service area or in
weak-signal area
Signal OFF mode is programme
d
1
2
5
6
3
4
* When you use this phone is not Japan, in some places, it could happens that
you cannot use the phone even if you are under the good signal conditions.
Strong
Medium
Weak
Very Weak
10
:
10
10/10Fri
1 2 5 6
34
●You can charge the battery with turning the power ON, but it will take longer.
●If the battery has not been used for a long period or not charged for some time after sounding the alert
tone, it may not start charging. When the battery pack is still usable, the reception lamp lights up in a
couple of minutes and the " " also lights up to start charging.
●When you charge the battery in weak signal areas, it might take time for the light (of incoming /
charging) to light up after you set the phone into the desktop charging holder.
●When installing the phone into the desktop charging holder, do not move the phone around while it is
in the holder. Failure to do so will cause a damage of the phone or poor contact with the holder.
●After charging, pull out the connector by pushing release buttons on the both sides.
●Using the desktop holder, the phone transmits the data even while being charged.
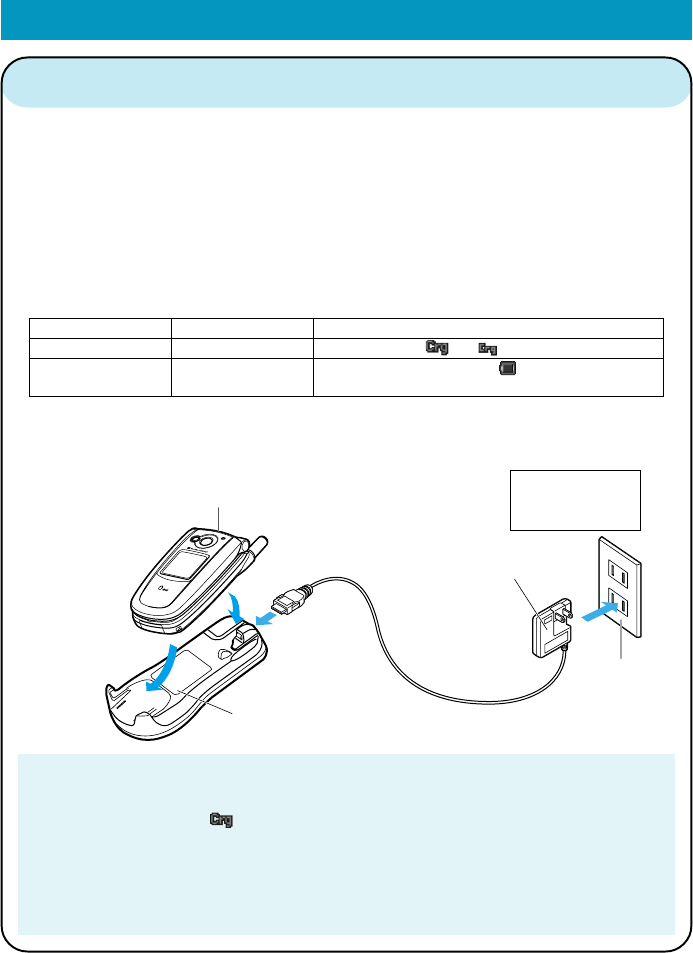
1. Insert the connector of the Sanyo AC adapter 02 firmly into the desktop
charging holder.
2.
Connect the plug of the Sanyo AC adapter 02 into an AC wall outlet.
3. Put the telephone (A1303SA) with battery pack attached into the desktop
charging holder, paying attention to the installing direction.
Install the body securely onto the charging holder and make sure that the
light (of incoming call / charging) lights up in red.
Charging time:
approximately 100
minutes.
1Charging with the Sanyo AC Adapter 02
Getting Ready to Make a Call
While charging
Fully charged
Light
lights up in red
lights up in green
Display / sub-display
"" or " " appears
Phone power is ON → The " " appears
Phone power is OFF → Disappears
4.
When fully charged, remove the phone (A1303SA) from the desktop charging
holder, then disconnect the plug from the AC wall outlet.
④
③
②
①
Light
(lights up in red)
au telephone
(with battery
pack attached)
Desktop charging holder
Sanyo AC adapter 02
AC wall outlet
7
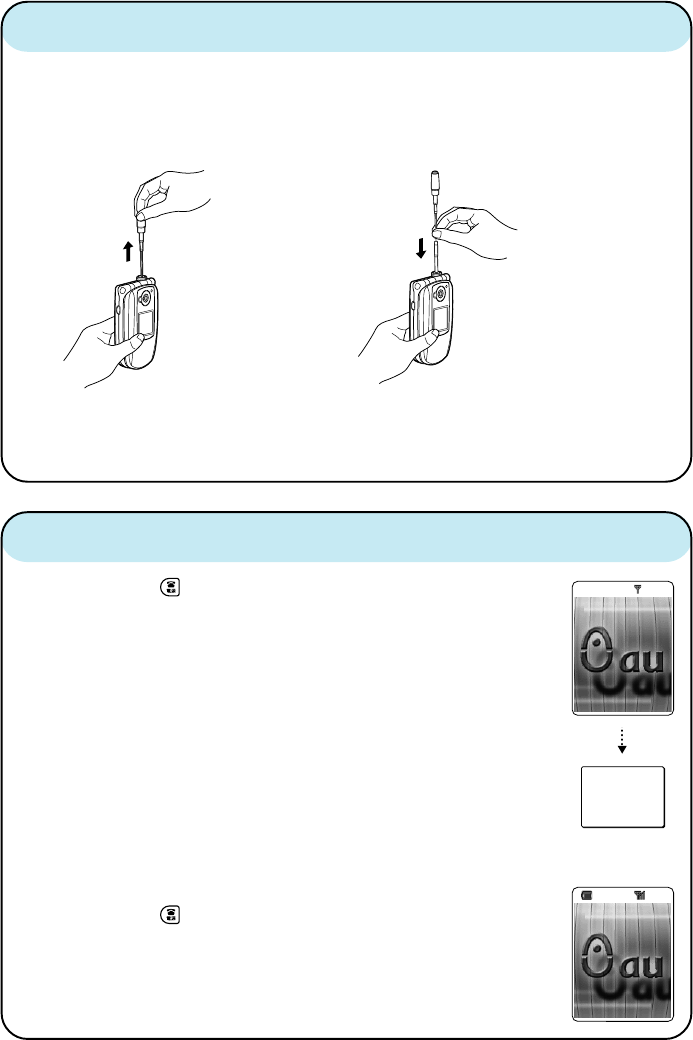
● Extending the antenna
Extend the antenna until it
stops with a click.
● Retracting the antenna
Move it straight down by pulling on a lower
part of the antenna.
To avoid damaging the antenna, never apply
direct pressure to the top part of the antenna.
2
The radio waves cannot be transmitted or received well if the antenna is not
extended. To facilitate transmission and reception of radio waves, use the
phone by positioning the antenna vertically with respect to the ground.
Extending the antenna
3Turning the power on
Press and hold for more than one second.
When the power is turned on, "au" logo appears and the
wake-up tone sounds.
(The display is lit for about 10 seconds.)
◆ Turning the power off
Press and hold for more than one second.
After a while, "au" logo appears and the power is turned off.
After a while, the roaming mode set at present is displayed.
●Pop up window for confirming Roaming Area re-appears
when being in the out of service area.
●Standby display appears even if the keys other than flexible
keys are pressed.
8
現在の
エリア
日本
現在の
エリア
は
ク゛ローハ゛ル
機能
エリア
設定
で変更できます
10:10
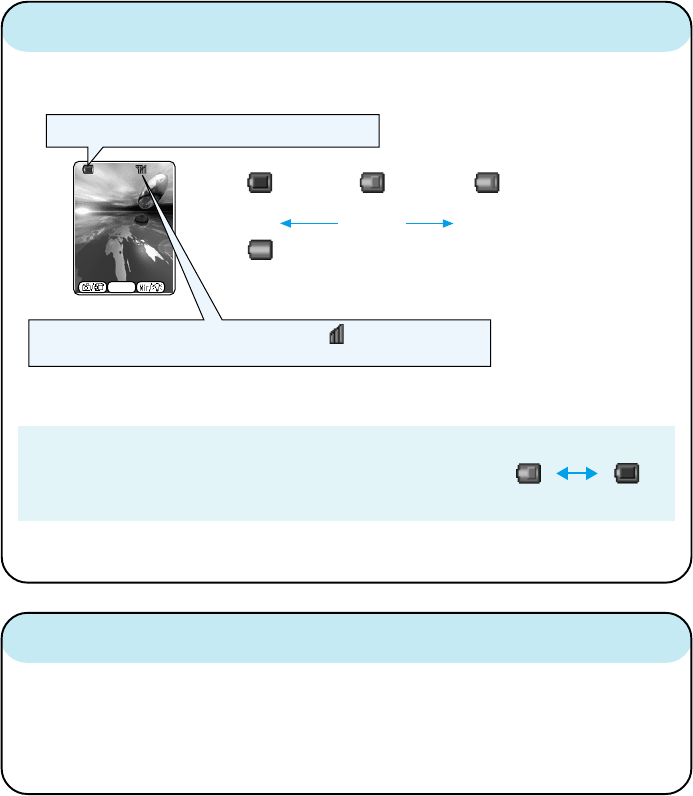
4Checking the display screen
Check the display screen and make sure it is shown in the figure below after
you turn the power on. This will indicate if the phone is in good working order.
The above battery voltage level figures show remaining
battery strength. Certain charges in conditions may cause
the battery level figures to fluctuate. (See example of figure
right.)
5Set up the handset for first use(→Page 10)
This is important to protect your confidential data and to prevent malfunction.
Clock setting, call number log setting and other basic settings are made in
order to make a handset perform its date- and time-related functions. In this
way, lock number change, calling history and receiving history can be
registered correctly.
●Even in main service areas there are places that only receive weak signals. In this
case, you might not hear well or your call may be cut off.
10:10
メインメニュー
10:10
10:10
Fri Oct 10
Fri Oct 10
10:10
Fri Oct 10
The availability of power is indicated in three levels.
Level 3 Level 2 Level
1
full medium low
●
when no power is left,
「充電してください」
appears on the display.
This display shows radio wave status. A display of 3 bars
shows the most ideal condition for telephoning.
*When you use this phone is not Japan, in some places, it could happens that you
cannot use the phone even if you are under the good signal conditions.
9
1. Just after you have bought the handset or you have initialized all func-
tions and memories by performing M453 operation, press .
2. Select "今すぐ設定 " and press
OK
.
3. Press
OK
.
4. Select "YES" and press
選択
.
5. Enter the lock number.
6. Change the lock number and press
設定
.
7. Press
OK
.
8. Select "個別設定 " and press
選択
.
9. Select the font size for input and press
設定
.
10.Press
OK
.
11.Select the font size for C-mail and E-mail and press
設定
.
12.Press
OK
.
13.Select the font size for EZweb and press
設定
.
14.Press
OK
.
15.Select the font size for Address Book List and press
設定
.
16.Press
OK
.
17.Select the font size for phone number input and press
設定
.
18.Press
OK
.
19.Select whether to inform your phone number when you make a call and
press
設定
.
Set up for first use
1. While in standby mode or while making a call, press
MainMenu
and select
"Personal Info".
2. Select "Profile" and press
Selec
t
to display your au telephone number.
Displaying your own phone number
1. Press .
2. Select " 基本設定 " and press
選択
.
3. Press .
4. Select "English" and press
Set
.
Switch to English
10
1. Enter the phone number you want to call using the following pattern.
International dial code - Country code - Area code - Subscriber's number
2. Press to make a call.
For the details of the international call services, contact us. Call numbers are
given below for your reference:
From au phone:157 (toll free)
Example: to call United States, number 212-123-XXXX.
Operation Explanation
1 Pressing "005345" Access code
2 Pressing "1" Country code of United States: 1
3 Pressing "212" Area code※ : 212
4 Pressing "123-XXXX" Subscriber's number: 123-XXXX
5 Press The following operation is the same
as the normal telephone operation.
※ When the first number of the area code is "0", press the area code number
without "0".
Making an International Call
1. During a call, press .
: Volume level raised
: Volume level lowered
Adjusting the receiver volume
Calling to general, mobile and PHS phones
1. Enter the phone number you want to call.
Area code - Local code - Subscriber's number.
Example: 03-0001-XXXX
Always include the area code, even when calling to a number in the same area
you are in.
If you enter a wrong number:
●Press briefly - the last dialed digit will be deleted.
●Press and hold - the entire phone number will be deleted.
2. Press to make a call.
11
This is the method of entering names for registering address book and
writing mail.
1. Press
Char.
.
2. Select the entry mode you want.
「 」: "Kanji", "Hiragana" entry mode (full size)
「 」: "Katakana" entry mode (full size)
「 」: "Katakana" entry mode (half size)
「 」「 」: "Alphanumeric" entry mode (full size)
「 」: "Number" entry mode (full size)
「 」「 」: "Alphanumeric" entry mode (half size)
「 」: "Number" entry mode (half size)
When you press the
Undo
just after the characters are confirmed, the
characters return to the previous state.
Entering characters
1. The ringer tone sounds/vibrator buzzes, and the incoming call lamp
flashes.
2. Press to answer the call.
An incoming call can also be answered by pressing any of the ∼ , ,
, , , , , or keys when M52: AnyKey Answer is set.
If you do not answer the call or the caller disconnects before the call is answered,
"Missed Call X" will be displayed. (A number appears in the "X".)
Answering a call
12
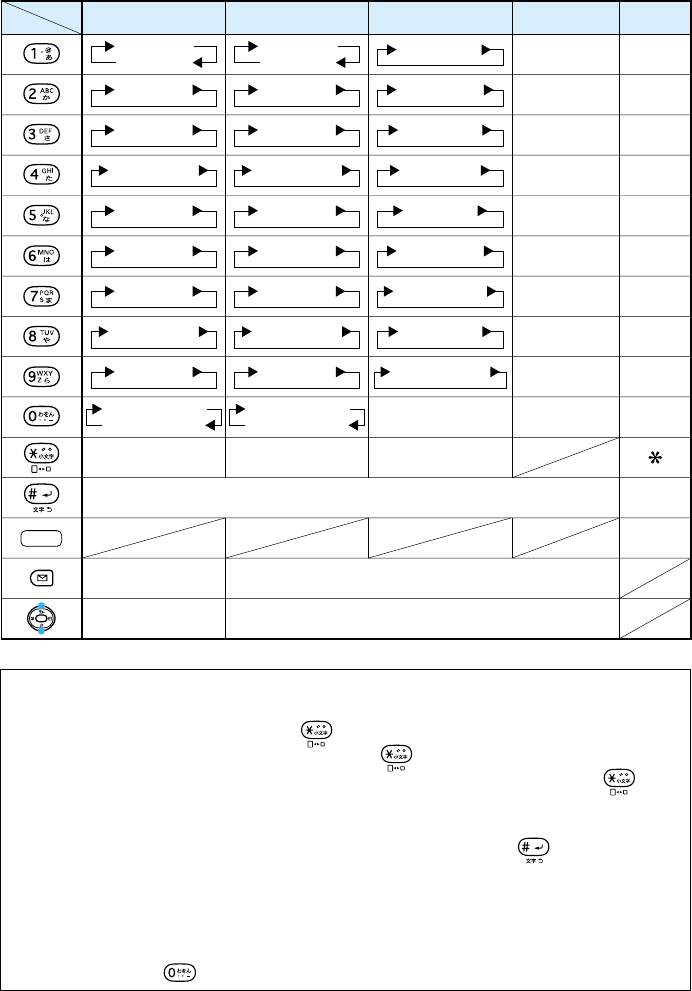
[Assignment of characters and key functions]
Characters are assigned to each key as shown below. Press a key
repeatedly to cycle through characters assigned to that key.
Remarks:
■ To enter a Japanese character with (゛) or (゜), enter the desired character
without confirming and press in this order. When you enter a capital
character without confirming and press , the character changes to the
lowercase, and when you enter a lowercase character and press , the
character changes to the capital.
(Example: た→だ→た…/は→ば→ぱ→は…/つ→づ→っ→つ…/ A → a→ A…)
■ A character is switched into reverse order by pressing after entering
character using the dial keys. (Example: か→こ→け→く→き→か)
■ When the pager style entry mode is selected, you can enter a character with a
2-digit number.
■ Using the JIS dot code (4 digits), you can also enter characters.
■ When entering characters for composing E-mail in Katakana mode, character
assignment of is " ワ→ヲ→ン→ヮ→、→。→ー→・→∼→!→?→(space)".
key
entry mode
(Before confirming letters)
Converts to Kanji characters.
P/ー
1
2
3
4
5
6
7
8
9
0
1
2
3
4
5
6
7
8
9
0
#
Reverse toggle of entered characters (before confirm), line change (after confirm).
あいうえお
ぉぇぅぃぁ
かきくけこ
さしすせそ
たちつてとっ
なにぬねの
はひふへほ
まみむめも
やゆよゃゅょ
らりるれろ
わをんゎ、。−
(space)
?!∼・
アイウエオ
ォェゥィァ
カキクケコ
サシスセソ
タチツテトッ
ナニヌネノ
ハヒフヘホ
マミムメモ
ヤユヨャュョ
ラリルレロ
ワヲン 、 。
ー
−
(space)
? !
~・
abcABC2
defDEF3
ghiGHI4
jklJKL5
mnoMNO6
pqrsPQRS7
tuvTUV8
wxyzWXYZ9
0
Symbols (half size)
(Before confirming letters)
Switches between full size and half size characters.
Switches lowercase/
uppercase
"Kanji", "Hiragana"
(full size) "Katakana"
(half size) "Alphanumeric"
(half size) "Number"
(half size) "Phone
number"
゛ ゜
Switches lowercase/
uppercase
゛ ゜
Switches lowercase/
uppercase
Symbols (full size),
pictographs
.@-_/:~1
P/
-
13
You can register frequently used phone numbers and E-mail addresses.
Up to 500 addresses can be registered in the address book.
■Registering in the address book
1. Press and hold for more than one second.
The address book item list is displayed.
The smallest free memory number (No.000 - No.499) is displayed.
2. Enter the item you want.
Select the icon of the item you want by and press
Selec
t
to enter it.
As for the items you can enter, see "Items to register in the address book".
3. Press
Save
to complete registration.
Registering in the Address Book
■Items to register in the address book
The following data can be put in the address book.
(※1)This item cannot be used now because it is scheduled to be used in the future.
(※2)Up to 100 entries for any optional item can be registered in any memory number.
ー
ー
ー
ー
ー
Memory No.
Name
Pronunciation
Phone No.1
Class of No.1
Phone No.2
Class of No.2
Phone No.3
Class of No.3
E-mail address 1
E-mail address type 1
E-mail address 2
E-mail address type 2
Group
Link image
Secret
GPS information※ 1
Option
Voice reception
E-mail reception
C-mail reception
Chat reception
Message
Blood type
Birthday
Constellation
Postal code
Address
Hobby
URL
Memo
Address Book Items
−
Up to 12 full size (24 half size) characters
Up to 24 half size characters
Up to 36 digits
−
Up to 36 digits
−
Up to 36 digits
−
Up to 64 half size alphanumeric characters
−
Up to 64 half size alphanumeric characters
−
−
−
−
−
−
−
−
−
−
−
−
−
−
Up to 7 half size numbers
Up to 40 full size (80 half size) characters
Up to 10 full size (20 half size) characters
Up to 256 half size alphanumeric characters
Up to 40 full size (80 half size) characters
000 - 499
−
Registered automatically after "Name" is entered.
Used for speed call. (→ Page 16)
You can classify it into 6 classes for managing.
You can register only when "Phone No.1" is entered.
You can register only when "Phone No.1" is entered.
You can register only when "Phone No.2" is entered.
You can register only when "Phone No.2" is entered.
Used for speed mail.
You can classify it into 6 classes for managing.
You can register only when "E-mail address 1" is entered.
You can register only when "E-mail address 1" is entered.
You can classify it into 11 classes for managing.
An image stored in the data folder is selected.
You can prevent disclosing the content of registration to other persons.
You cannot register it.
Optional items ON/OFF to be preset.
Behavior for specified caller to be changed.
Behavior for specified E-mail sender to be changed.
Behavior for specified C-mail sender to be changed.
Behavior for specified chat mailer to be changed.
Message for specified caller to be changed.
−
−
−
−
−
−
−
−
Item
Maximum entry characters
Remarks
Specific Items Optional Items
※
2
14
You can make a call by using phone
numbers saved in the Address Book.
There are 8 ways to search numbers
saved in the Address Book.
① Searching for a phone number
by scrolling
② Searching for a phone number
using the dial keys
③ Searching for
a phone number
by name
④ Searching for a phone number
by Japanese syllabary
⑤ Searching for a phone number
by a part of phone number
⑥ Searching for a phone number
by a part of E-mail address
⑦ Searching the address book
by history
⑧ Calling with speed call
Calling from the Address Book
■Searching for a phone
number by scrolling
1. Press .
2. Use to scroll through and
display the name you want.
3. Press .
4. Select "Dial" and press
OK
.
5. Select the phone number, and
press .
■Searching for a phone
number using the dial keys
You can make a call from a list of the
names whose first character is entered
using the same dial key.
1. Press and hold a desired dial key
from - , for more than
one second.
Example: to find a name beginning with
カ,キ,ク,ケ,コ, A, B, C, a, b, c, 2, press
and hold for more than one
second.
2. Press several times or use
to scroll through and display
the name you want.
3. Perform Steps 3 to 5 described
in "Searching for a phone number
by scrolling".(→Page 15)
■Searching for a phone
number by name
1. Press .
2. Press
Mode
.
3. Select "Search" and press
OK
.
4. Select "Name Search" and press
OK
.
5. Enter a part of name.
6. Press
Searc
h
.
7. Use to scroll through and
display the name you want.
8. Perform Steps 3 to 5 described
in "Searching for a phone number
by scrolling".(→Page 15)
■
Searching for a phone number
by Japanese syllabary
1. Press .
2. Press
Mode
.
3. Select "Search" and press
OK
.
15
■
Searching for a phone number
by a part of phone number
1. Press .
2. Press
Mode
.
3. Select "Search" and press
OK
.
4. Select "Phone # Search" and
press
OK
.
5. Enter the first several digits of
the desired phone number.
6. Press
Searc
h
.
7. Use to scroll through and
display the name you want.
8. Perform Steps 3 to 5 described
in "Searching for a phone number
by scrolling".(→ Page 15)
■
Searching for a phone number
by a part of E-mail address
1. Press .
2. Press
Mode
.
3. Select "Search" and press
OK
.
4. Select "E-Address Search" and
press
OK
.
5. Enter part of the mail address.
6. Press
Searc
h
.
7. Use to scroll through and
display the name you want.
4. Select "Reading Search" and
press
OK
.
5.
Enter the first several characters
of desired name.
6. Press
Searc
h
.
7. Use to scroll through and
display the name you want.
8. Perform Steps 3 to 5 described
in "Searching for a phone number
by scrolling".(→ Page 15)
8. Perform Steps 3 to 5 described
in "Searching for a phone number
by scrolling".(→ Page 15)
■Searching the address book
by history
1. Display the history.
Outgoing call history: press .
Incoming call history: press .
Sending mail history: press and hold
for more than one second.
Receiving mail history: press and hold
for more than one second.
(Use to scroll through and display
the history you want.)
2. Press .
3. Select "Search Adrs. Bk." and
press
OK
.
4. Use to scroll through and
display the name you want.
5. Perform Steps 3 to 5 described
in "Searching for a phone number
by scrolling".(→Page 15)
■Calling with speed call
Calling Memory numbers 000 - 009:
<EX.> To dial the phone number stored at
number 005.
1. Press .
2. Press .
Calling Memory numbers 010 - 099:
<EX.> To dial the phone number stored at
number 015.
1. Press .
2. Press .
16

List of Basic Setup
17
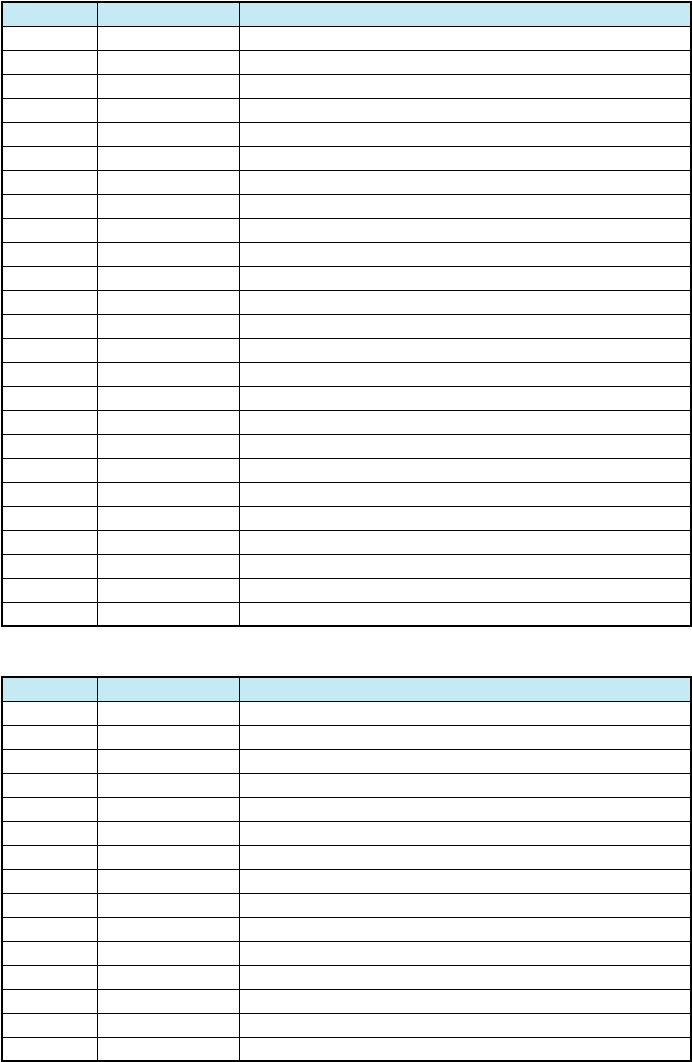
■M2 Sounds/Vibes
M21※
M211※
M212※
M213※
M214※
M215※
M216※
M217※
M218※
M22※
M221※
M222※
M223※
M224※
M225※
M226※
M23※
M231※
M232※
M233※
M234※
M235※
M24※
M25※
M26
M27
M28★
Speaker Vol.
Call Notice
E-Mail Notice
Unreg.E-Mail
Server Notice
C-Mail Notice
Chat Notice
Alarm
Browser
Ringer/Vibes
Call Notice
E-Mail Notice
Unreg.E-Mail
Server Notice
C-Mail Notice
Chat Notice
Sound Effect
Key Beep
OK Tone
NG Tone
Opening Tone
Closing Tone
Wake-Up
Power Off
Quality Alert
Rcvr.Vol.Adj.
Call Vibes
Mode No. Function
Adjusting speaker sound volume
Setting speaker sound volume for voice call reception
Setting speaker sound volume for E-mail reception
Setting speaker sound volume for unspecified E-mail
Setting speaker sound volume for Server Notice reception
Setting speaker sound volume for C-mail reception
Setting speaker sound volume for chat
Setting speaker sound volume for alarm
Setting speaker sound volume for browser
Selecting ringer tone/vibrater
Setting voice reception mode
Setting E-mail reception mode
Setting unspecified E-mail reception mode
Setting Server Notice reception mode
Setting C-mail reception mode
Setting chat reception mode
Setting sound effects
Setting key-in confirm tone
Setting OK sound effects
Setting NG sound effects
Setting sound effects when opening the handset
Setting sound effects when closing the handset
Setting wake-up tone
Setting power-off tone
Announcing in case of talk interruption
Adjusting receiver volume
Setting the call-up vibrator
Description
■M0 Profile
M0 Profile
Mode No. Function
Displaying own phone number and E-mail address
Description
☆ This display is just for your reference and may be different from what you see.
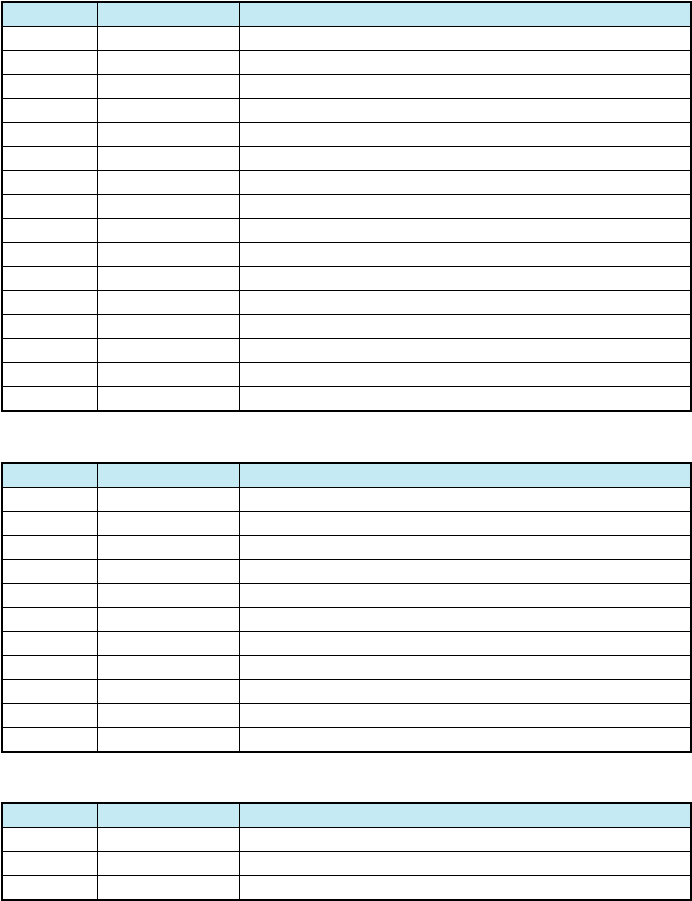
■M1 Call/Toll
M11☆
M12☆
M13☆
M14☆★
M15★
M16
M17
Previous Call
Accum.Display
TalkTimeDisp.
Toll Display
TollRateSetup
TalkTimeReset
Toll Reset
Mode No. Function
Displaying last call's estimated talk time and charge
Displaying estimated total talk time and charge
Displaying estimated talk time during call
Displaying estimated charge after call
Setting the multiplication of charge
Resetting estimated talk time
Resetting estimated charge
Description
18
■M4 Privacy
M41
M42★
M43
M431
M432
M433
M434
M435
M436
M44★
M45★
M46※
M461※
M462※
M463※
ChangeLockNo.
Number Notice
User Restrict
Auto Lock
Dial
Address Book
Mail
EZweb
Secret Mode
Incoming Rej.
OneCallReject
Reset
Func.Reset
Memory Reset
All Reset
Mode No. Function
Changing Lock Number
Announcing your number to the other party
Restricted Setting
Setting Auto Lock
Disabling dial-up calls
Restricting Address Book access
Restricting mail access
Restricting EZweb access
Setting Secret
Rejecting designated unwanted phone numbers
Rejecting nuisance calls
Initializing the memory and functions
Initializing all functions
Initializing the memory
Initializing all functions and memories
Description
■M3 Screen
M31
M311※
M312※
M313※
M314※
M315
M32
M321※
M322
M323
M324
M33
M331
M332
M333
M34
M341
M342
M343
M344
M345
M35
M36
M37
M38
Main Display
Wall Paper
Screen-Saver
Mail Connect
EZ Connect
Power Saving
Sub Display
Screen Setup
Caller Disp.
Notice Disp.
On Call Disp.
Lighting
Usual Screen
Mail Screen
EZweb Screen
Font Size
Entry Size
Mail Display
EZweb Disp.
Adrs.Bk.List
Phone# Entry
Font Type
Coloration
Call Illum.
KeyLight Save
Mode No. Function
Setting Main display
Setting wallpaper on standby screen
Setting screen saver
Setting E-mail, C-mail connection screen
Setting EZweb connection screen
Setting Power save screen
Setting Sub display
Setting wallpaper on Sub display's standby screen
Displaying the caller when receiving voice call
Setting notice screen of Sub display
Setting Sub display during call
Setting lighting of display and keys
Setting lighting for Main display
Setting lighting for mail screen
Setting lighting for EZweb screen
Setting character size
Setting character size for input
Setting character size for mail display
Setting character size for EZweb display
Setting character size for Address Book List
Setting character size for phone number input
Setting character font
Setting the display's colors
Setting illumination during call
Setting key illumination during power save
Description
19
■M5 User Support
M51
M511
M512
M513
M514
M515※
M516
M52
M53★
M54
M55※
M551※★
M552※★
M553※
M56
M57
Char.Entry
Entry Setup
Edit Format
EditFaceMark
EditUsrDict.
D/L Dict.
Learning Clr
AnyKey Answer
Jpn.Area Code
Set OpenClose
Transmission
XMSN Mode
Data Speed
Data Transfer
VibrateCheck
バイリンガル機能
Mode No. Function
Setting character entry method
Setting character entry method/forecast conversion
Editing formatted text
Editing face marks
Registering/Editing User dictionary
Registering the dictionary downloaded from EZweb
Initializing learned information
Answering calls using the digit keys
Registering frequently used area code
Setting actions for incoming calls when opening and closing the handset
Setting transmission mode and speed
Setting transmission mode
Setting transmission speed
Communicating with other devices
Checking unconfirmed notices by vibration
Setting the English display
Description
■M6 AnsPh./Manner
M61
M62※
M63
M631※
M632
M633※
M634※
M64※
M65※
M66
M67
Answer Phone
AnswerMessage
VoiceDataOpr.
Record MyVoice
Rec.Phone Memo
Ans.Ph/Ph.Memo
MyVoice Folder
Manner Setup
Elect.WavesCut
Charging Mode
Side Key Opr.
Mode No. Function
Setting simple absence memo
Selecting simple absence memo message
Playing, deleting and recording Voice data
Recording own voice during standby
Recording other party's voice during call
Playing and deleting the absence memo
Playing My Voice
Setting the manner mode and its styles
Locking in radio wave with power on
Setting the home mode
Setting the side key usage
Description
■M7 Clock
M71★
M72
M73
Auto Correct
Auto Power ON
Auto PowerOFF
Mode No. Function
Setting the date and time
Power on at specified time
Power off at specified time
Description
※ The height and depth are the dimensions when the telephone is folded.
★ Used Japan
●The continuous talk time and continuous standby time are the average values of
when the signals can be received normally while the telephone is in the standstill
status.
The operation time may be reduced to utmost half due to charging conditions,
temperature, and other operation environment conditions, signal condition at the
location of use, function setting, roaming area.
Weight: approximately XX g (including battery pack)
Continuous talk time: approximately XX minutes ★
Continuous standby time: approximately XX hours ★
Dimensions (H/W/D): approximately XX mm x XX mm x XX mm ※
(not including the antenna and protuberances)
Specifications
20
■NetworkService(M8)
M81
M811
M812
M813★
M814
M815★
M816★
M817★
M82
M821
M822
M823
M824★
M825
M826
M83★
M831★
M832★
Voice Mail
Play VoMail
VoMail1 ON
VoMail2 ON
VoMail OFF
Chg.Ans.Msg.
Eng.Guidance
Jpn.Guidance
Call Fwding
Fwd No Ans.
Forward Busy
Forward All
Fwd UsrSlct
Fwding OFF
Reg.Fwd #
CallerID Req.
ID Req.ON
ID Req.OFF
Mode No. Function
Answering message service
Listening to messages
Setting the answering message service 1
Setting the answering message service 2
Stopping the answering message service
Recording/Confirming/Changing response messages
Switching to English language guidance
Switching to Japanese language guidance
Incoming Call forwarding service
Forwarding non-answered calls
Forwarding calls during talk (no response forwarding)
Forwarding all calls (full forwarding)
Forwarding manually (selective forwarding)
Stopping the incoming call forwarding service (forwarding stop)
Registering forwarding phone numbers (forwarding register)
Interrupt talk service
Setting the interrupt call service
Stopping the interrupt call service
Description
※ Unable to operate during the call.
★ Unable to operate when roaming area is a country other than Japan.
■Guidance(M#)
M# Guide Function
Mode No. Function
Displaying the operation instructions for functions other than
M functions
Description