Sanyo Electric Co A5505SA Dual-Band CDMA Phone User Manual
Sanyo Electric Co Ltd Dual-Band CDMA Phone Users Manual
UserManual.wiki
>
Sanyo Electric Co
>
A5505SA User Manual
Users Manual
Navigation menu
Upload a User Manual
Namespaces
Wiki Guide
HTML
PDF
Info
Views
User Manual
Discussion / Help
Navigation


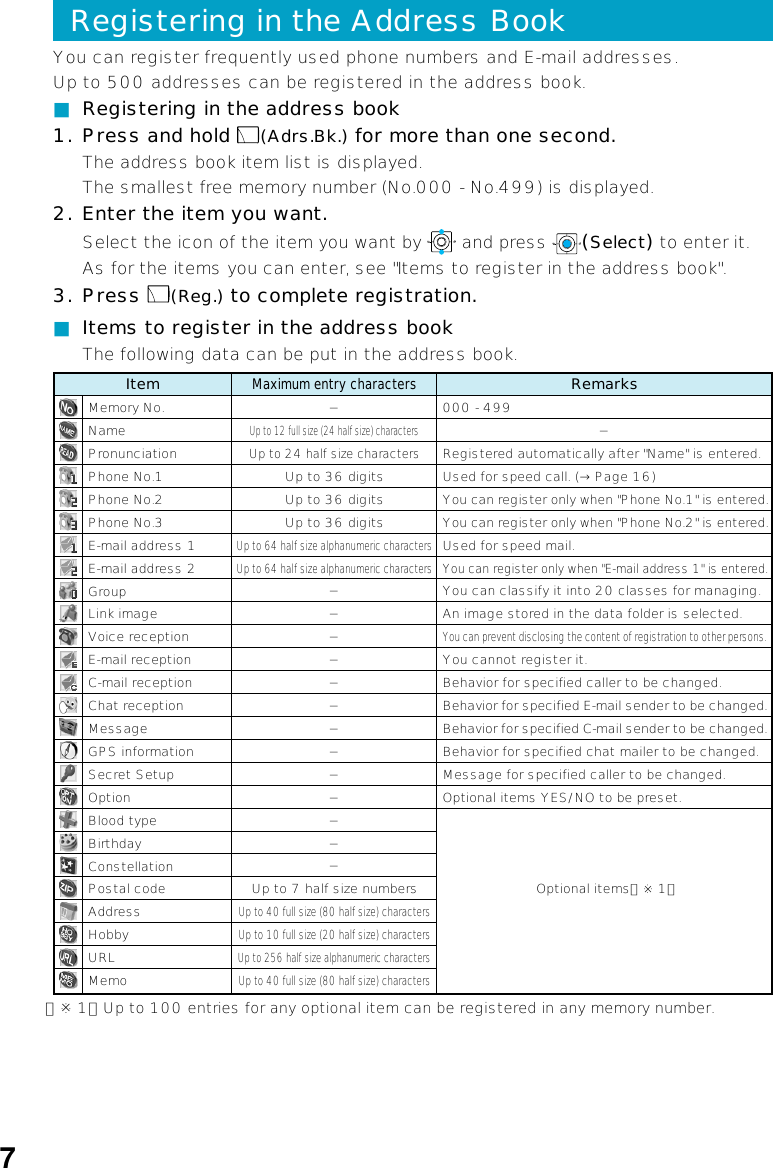
![6[Assignment of characters and key functions]Characters are assigned to each key as shown below. Press a keyrepeatedly to cycle through characters assigned to that key.Remarks:■To enter a Japanese character with (゛) or (゜), enter the desired characterwithout confirming and press in this order. When you enter a capitalcharacter without confirming and press , the character changes to thelowercase, and when you enter a lowercase character and press , thecharacter changes to the capital.(Example: た→だ→た…/は→ば→ぱ→は…/つ→づ→っ→つ…/ A → a→A…)■A character is switched into reverse order by pressing after enteringcharacter using the dial keys. (Example: か→こ→け→く→き→か)Kanji・HiraganaKatakana Alphanumeric Numberkeyentry mode1234567890Reverse toggle of entered characters, line change(after confirm) あいうえお ぉぇぅぃぁ かきくけこ さしすせそ たちつてとっ なにぬねの はひふへほ まみむめも やゆよゃゅょ らりるれろ わをんゎ、。− (space)?!∼・ アイウエオ ォェゥィァ カキクケコ サシスセソ タチツテトッ ナニヌネノ ハヒフヘホ マミムメモ ヤユヨャュョ ラリルレロ ワヲン 、 。 ー− (space)? ! ~・ ABC2DEF3GHI4JKL5MNO6PQRS7TUV8WXYZ90゛ ゜ Switches lowercase/uppercase Switches lowercase/uppercase.@-_/:~1Alphanumericabc2def3ghi4jkl5mno6pqrs7tuv8wxyz90.@-_/:~1Symbol (full size) Symbol (half size) Pictographs Face marks・ ・ ・ ・](https://usermanual.wiki/Sanyo-Electric-Co/A5505SA/User-Guide-407129-Page-7.png)
![8Calling from the Address BookSaved phone number in the Address Book can be loaded and a call is placed to thatnumber.1. Press (Adrs.Bk.).2. Use to scroll through and display the name you want.3. Press (Detail).4. Select the phone number, and press .Creating and Sending E-Mail1. Press in the Standby Screen.2. Use to select “Create New”and press (Select).Icons:”To” to which you send E-Mail:”Title” of E-Mail:”Attachment data” of E-Mail:”Body” which is the mail contents.3. Use to select “ [Address]” and press (Select).4. Use to select “Address Entry” and press (OK).5. Enter the address and press (OK).6. Use to select “ [Title]” and press (Select).7. Enter the title and press (OK).8. Use to select “ [Body]” and press (Select).9. Enter the body sentences and press (OK).10. Press (Send).11. Use to select “Send” and press (“OK”).](https://usermanual.wiki/Sanyo-Electric-Co/A5505SA/User-Guide-407129-Page-9.png)