Sanyo Electric Co C401SA Single-Mode Cellular Phone (CDMA) User Manual F P382 414
Sanyo Electric Co Ltd Single-Mode Cellular Phone (CDMA) F P382 414
Users Manual

389
389
そ
の
他
そ
の
他
■
Operating Instructions
Operating Instructions
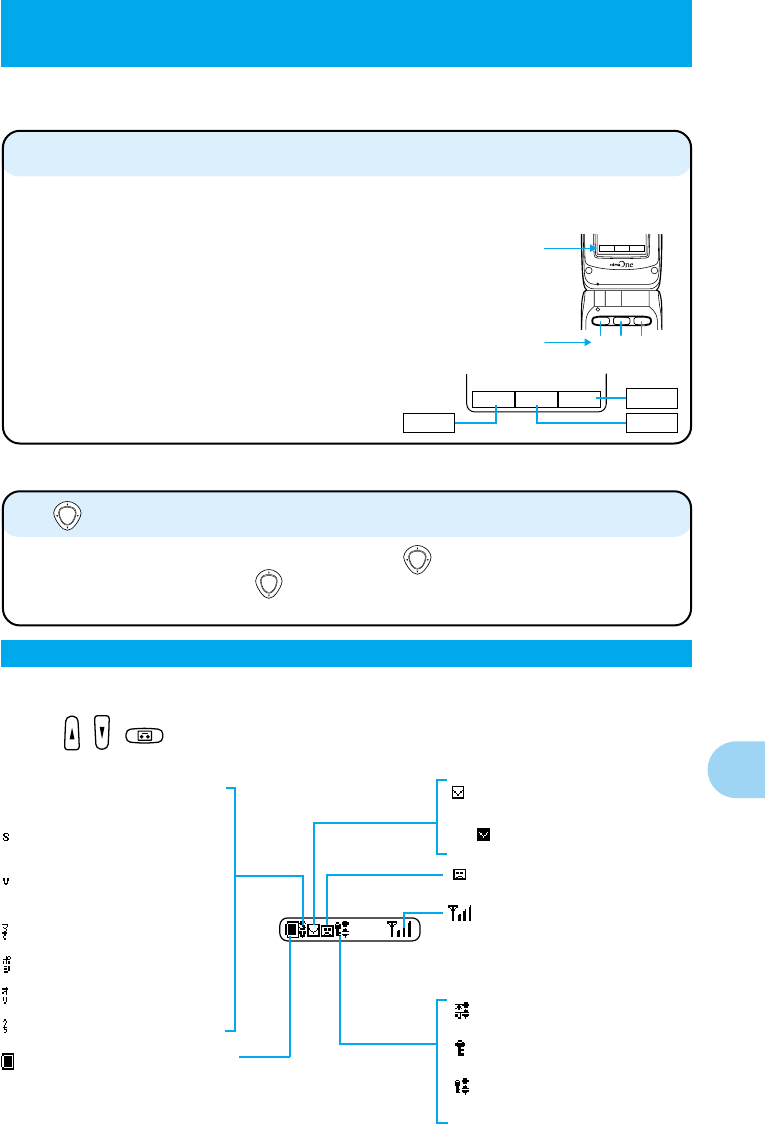
Name & function of parts
q11 Antenna
w Incoming call light
blinks green when the phone rings, and lights red during battery
charging.
e Sub-display
shows wait time, receive time, etc, while the set is closed.
r Speaker
used to
incoming calls
.
t Strap hole
y Ear-microphone jack
used to connect an optional switchable ear microphone.
u key
used to set a message or to enter a selected item (similar func-
tions as the key on top of the set).
i , Up/Down keys
used to adjust the volume, scroll through the Memory Dial con-
tents, convert characters, and to make function settings (similar
functions as the key on top of the set).
o Earpiece
used to hear, other party's voice, various messages, etc.
!0 Display
shows various settings, phone numbers, etc.
!1 Flexible keys
used to select items shown at the bottom of the display (refer to
"Using the flexible keys" on page 391.)
!2 key
used for the EZweb service.
!3 Volume/Retrieve/Convert/Phonebook( )/
Redial( )/Cursor key
used to set the volume, call a memory dial, redial, convert Kanji
characters, and select functions.
!4 (Start) key
used to make or receive a call.
!5 Dial keys
used to enter phone numbers and characters.
!6 Microphone
used to convey your voice during a call.
!7 External connection terminal
used to connect an optional device such as a quick-rechargeable
cigarette lighter adapter.
!8 (End) key
used to turn on and off the power, to end a call, or to hold a re-
sponse.
!9 key
used to call the menu or to enter selected items.
@0 key
used to send and receive E-mail and C-mail service, to delete char-
acters, or to return to the previous display.
MULTI DISPLAY
1
2
3
4
6
7
8
5
11
9
10
12
13
14
15
16
20
19
18
17
390
390
そ
の
他
■
Operating Instructions
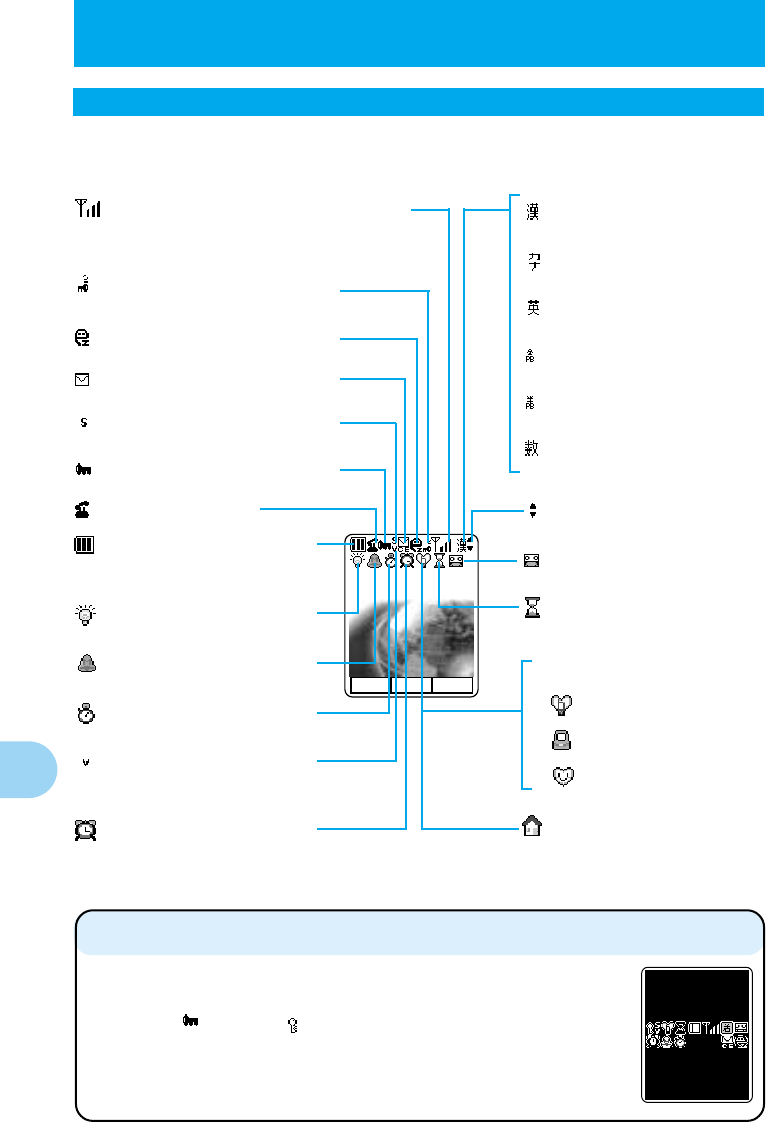
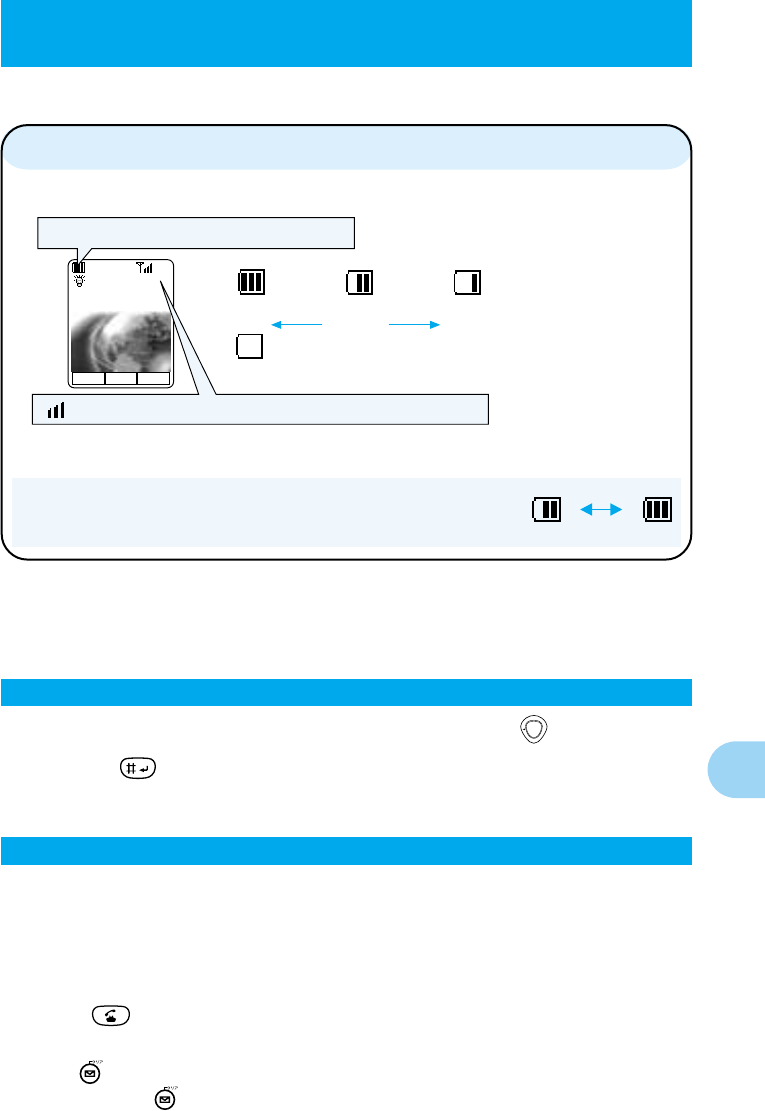
Display indications
●The following illustration is for explanation purpose only. Not all indications will actually
be displayed at the same time.
●When any key is pressed, illumination will turn on for about 10 seconds.
shows up when you set the
vibration function.
shows up when you set the se-
cret mode.
shows up during call.
indicates the battery pack
power in 3 levels. "充電" is
displayed during battery
charge.
shows up when you turn off the
ringer.
shows up when there is an un-
opened mail.
shows up when the phone is
connected the EZ-web server.
Security display
This shows up when the en-
crypted information is displayed.
shows up when the front/
backlight is set.
shows up when the schedule
function alarm is set.
shows up when you set the
easy timer.
shows signal strength. The more seg-
ments, the stronger the signal. "圏外" is
displayed while you are out of the ser-
vice area or in a weak signal field.
shows up when you set the
alarm clock.
あいうえおかき
12
/
24
(
日
)
10:30
メモ
文字/マナー
F
appears when the content
overflows the display.
is displayed during "Kanji/
Hiragana" entry mode.
is displayed during "Katakana"
entry mode.
is displayed during alphanu-
meric entry mode.
is displayed during pager style
entry mode (in em fonts).
is displayed during pager style
entry mode (in en fonts).
is displayed during numeric
entry mode.
shows up when the manner
mode is set.
shows up when the timer
mode is set for the manner
mode.
shows up when a message
memo is set.
shows up during battery
charge after setting the home
mode.
In order to minimize the power consumption, the cdmaOne C401SA dis-
play turns automatically to power saving mode when key operation is
stopped for a while.
Indication " " turns to " " in power saving mode.
The indication restores with key operation.
Power saving during standby for next information
17:01
Silent vibrator mode
Pochette mode
Original manner mode
391
391
そ
の
他
■
Operating Instructions
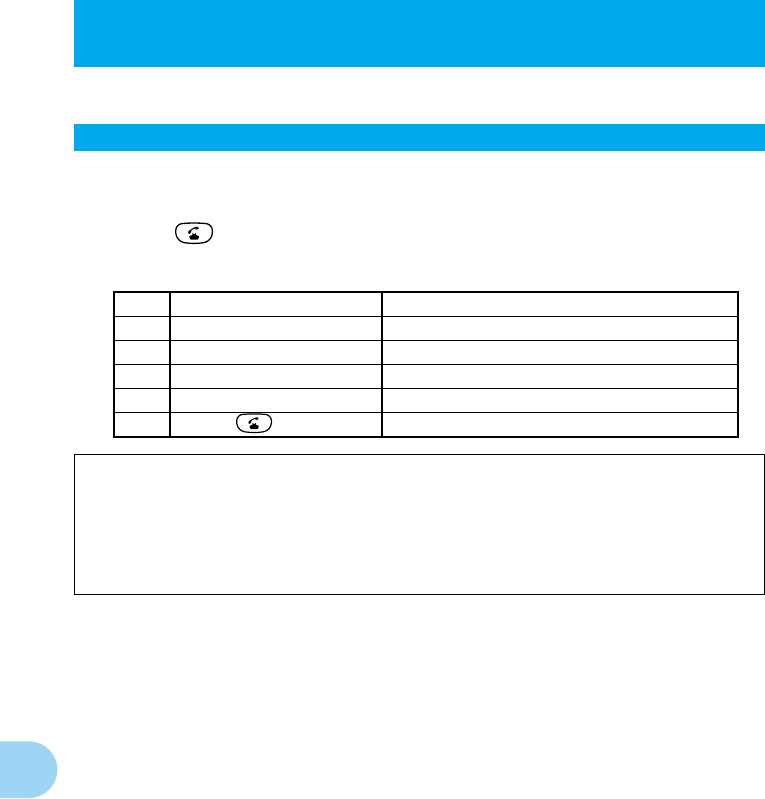
In this instruction manual, the indications for the
flexible keys are expressed as shown below.
The flexible keys correspond to the items shown at the bottom of the display.
Press the key below each indication to select it.
There are several different patterns of indications
shown on the display, and the functions of the flex-
ible keys vary accodingly.
■ Using the flexible keys
※The illustrations in this manual differs slightly from the actual displays.
メモ
文字/マナー
F
Indications on
the display
Functions of the
flexible keys F
メモ
文字/マナー
〈Example〉
メモ
文字/マナー
F
Fメモ
文字/マナー
■ key
In this instruction manual, the point at which to press the
key is indicated as shown below.
Example) Press top or bottom →
● Continuous scrolling can be made by holding down.
●The following illustration is for explanation purpose only. Some indications will not be
displayed depending on circumstances.
●When , , is pressed, illumination will turn on for about 10 seconds.
●The sub-display does not work while the cover is opened.
6:38
indicates the battery pack
power in 3 levels. "充" is dis-
played during battery
charge.
shows up when you set the
vibration function.
shows up when you turn off
the ringer.
Manner mode, ringer and vi-
brator settings are displayed.
Silent vibrator mode
Pochette mode
Original manner mode
shows up when there is an
unopened mail.
shows up when a message
memo is set.
shows up when the side key
guard is set.
shows signal strength. The
more segments, the stronger
the signal. "圏外" is displayed
while you are out of the ser-
vice area or in a weak signal
field.
shows up when the mail
box is full.
Sub-display indications
Home mode shows up when you set the
secret mode.
shows up when you set the
secret mode and the side key
guard at the same time.
392
392
そ
の
他
■
Operating Instructions
Charging with the AC Adapter
●
You can charge the battery with turning the power ON, but it will take longer.
●If the battery has not been used for a long period or not charged for some time after sounding the
alert tone,it may not start charging.
Other than the cases that the battery is broken or its life is over,it starts charging in the normal
way some minutes later.
●When you charge the battery in weak signal areas, it might take time for the light (of incoming/
charging) to light up after you set the phone unit into the desktop charger.
●After charging,pull out the connector with pushinng both side release buttons.
4. When fully charged, remove the phone from the desktop charger,and then
disconnect the plug from the AC wall outlet .
1. Insert the connector of the AC adapter firmly into the desktop charger
(see figure 1).
2. Connect the plug
of the AC adapter
to an AC 100V wall outlet (see figure
2).
3. Place the au telephone unit (with battery pack attached) into the desktop
charger with care of the direction. (see figure 3, 4)
The light (of incoming call / charging) lights up in red,"充電" appears on the
display and then begins to charge the battery.
Light
Display
While charging
lights up in red
「充電」appears
Fully charged
lights up in green
Phone unit's power is ON→The「 」 appears
Phone unit's power is OFF→ disappears
31
42
AC Wall Outle
t
(100V)
AC Adapter
au telephone
unit
(with battery
pack attached)
Light
(lights up in red)
Desktop charger
Charging time:
approximately 115
minutes.
393
393
そ
の
他
■
Operating Instructions
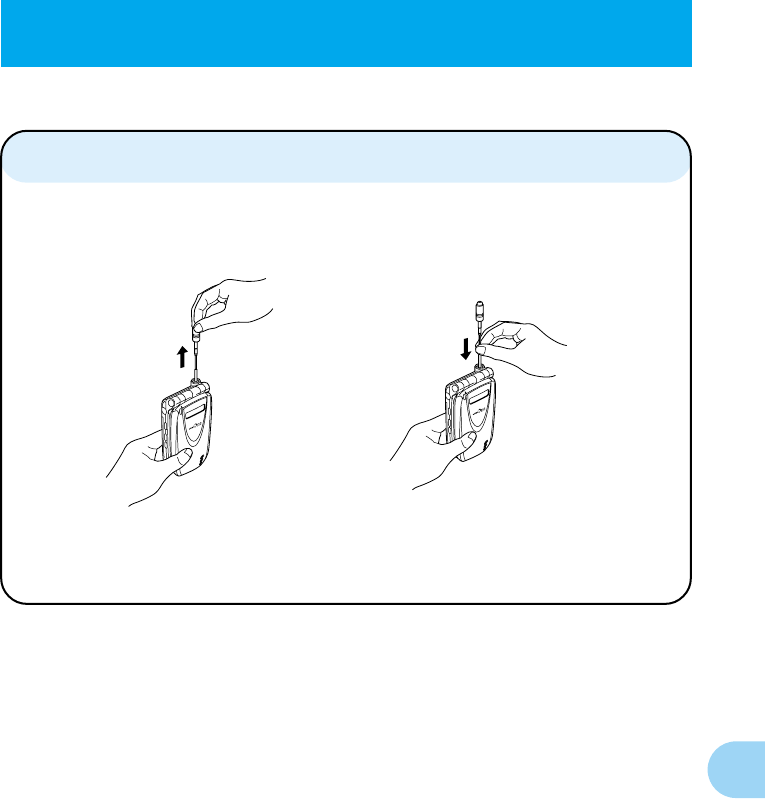
● Extending the antenna.
Extend the antenna until it
stops with a click.
● Retracting the antenna.
Move it straight down by pulling on a lower part
of the antenna.
To avoid damaging the antenna, never apply
direct pressure to the top part of the antenna.
2
The radio waves cannot be transmitted or received well if the antenna is
not extended. To facilitate transmission and reception of radio waves, use
the phone by positioning the antenna vertically with respect to the ground.
Extending the antenna
394
394
そ
の
他
■
Operating Instructions
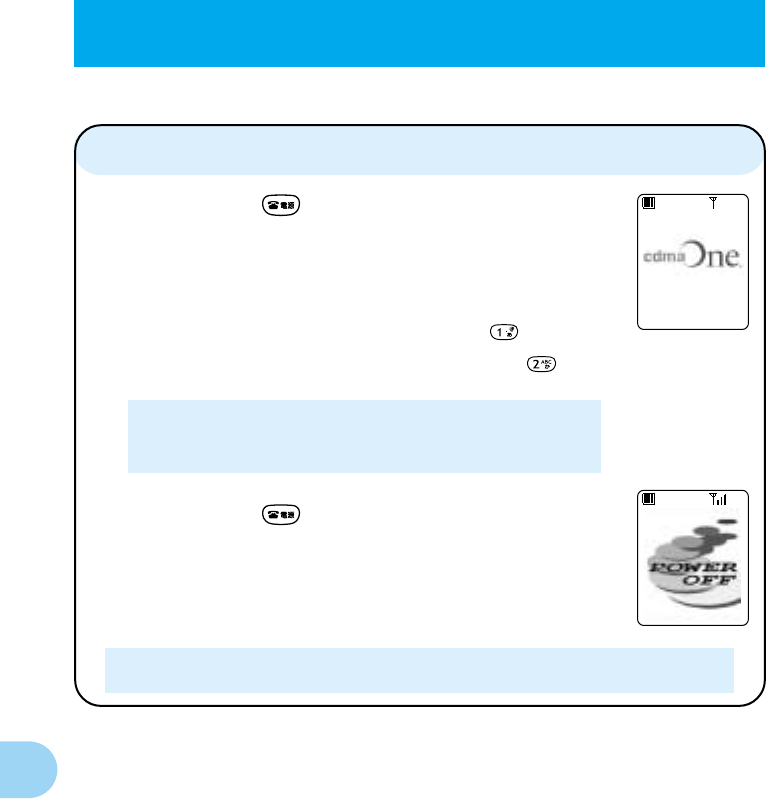
3Turning the power on.
Press and hold or more than one second.
When you turn the power on, you'll hear the wake-up tone.
After a few seconds, the sign will change to standby.
(The display remains lit for about 10 seconds.)
"Charamigo" data is not registered at the time of purchase. The
message "キャラミーゴ用データ未登録です 登録しますか" appears
when you turn the power on. When you press (YES) and
register "Charamigo" data, the character is displayed thereafter.
(see Charamigo Function Guidebook.) If you press (NO),
standby indication will be displayed.
◆Turning the power off
Press and hold for more than one second.
Power is turned off.
In this manual, the display shows the indications for the case when the character
display function is off.
Until you register the user data or cancel the character display
function (see Charamigo Function Guidebook.), the message
"キャラミーゴ用データ未登録です 登録しますか" is displayed when-
ever you turn the power on.
395
395
そ
の
他
■
Operating Instructions
Displaying your own phone number.
1.While in standby mode or while making a call, press .
2.Pressing displays your au telephone number.
1.Enter the phone number you want to call.
Area code - local code - subscriber's number.
example: 03-0001-XXXX
Always include the area code, even when calling to a number in the same area
you are in.
2.Press to place a call.
If you enter a wrong number:
●Press briefly - the last dialed digit will be deleted.
●Press and hold the entire phone number will be deleted.
4 Checking the display screen
Check the display screen and make sure it is shown in the figure below after you
turn the power on. This will indicates if the phone is in good working order.
The above battery level figures show remaining battery strength.
Certain charges in conditions may cause the battery level figures
to fluctuate.(See example of figure right.)
あいうえおかき
__
/
__(
_
)__:__
The availability of power is indicated in three levels.
This display shows telephone signal strength.
A display of 3 bars shows the most ideal condition for telephoning.
Level 3 Level 2 Level 1
full medium low
●
when no power is left
「充電(電池交換)してください」
appears on the display
。
●
Even in main service areas there are places that only receive weak signals.
In this case, you might not hear well or your call may be cut off.
メモ
文字/マナー
F
Calling a landline, a mobile, PHS phone.
396
396
そ
の
他
■
Operating Instructions
Making an International Call
1. Enter the phone number you want to call using the following pattern.
International dial code - Country code - Area code - subscriber's number
2. Press to place the call.
To make international calls, you need to fill out an application from KDDI interna-
tional call services. Call numbers are given below for your reference:
From landline phone or au phone: 0120-786-001 (toll free)
(9:00 to 21:00)
operation explanation
1 Pressing "001" KDDI access code: 001
2 Pressing "1" country code of United States: 1
3 Pressing "212" area code of New York City: 212
4 Pressing "123-XXXX" subscriber's number: 123-XXXX
5 Press
example: to call New York City, number 123-XXXX,
397
397
そ
の
他
■
Operating Instructions
Answering a call
1. The ring tone sounds/vibrator buzzes, and the incoming call lamp
flashes.
2. Press to answer the call.
An incoming call can also be answered by pressing any of the 、 ∼
, , , , or keys.
If you do not answer the call or the caller disconnects before the call is answered,
"着信あり " will be displayed.
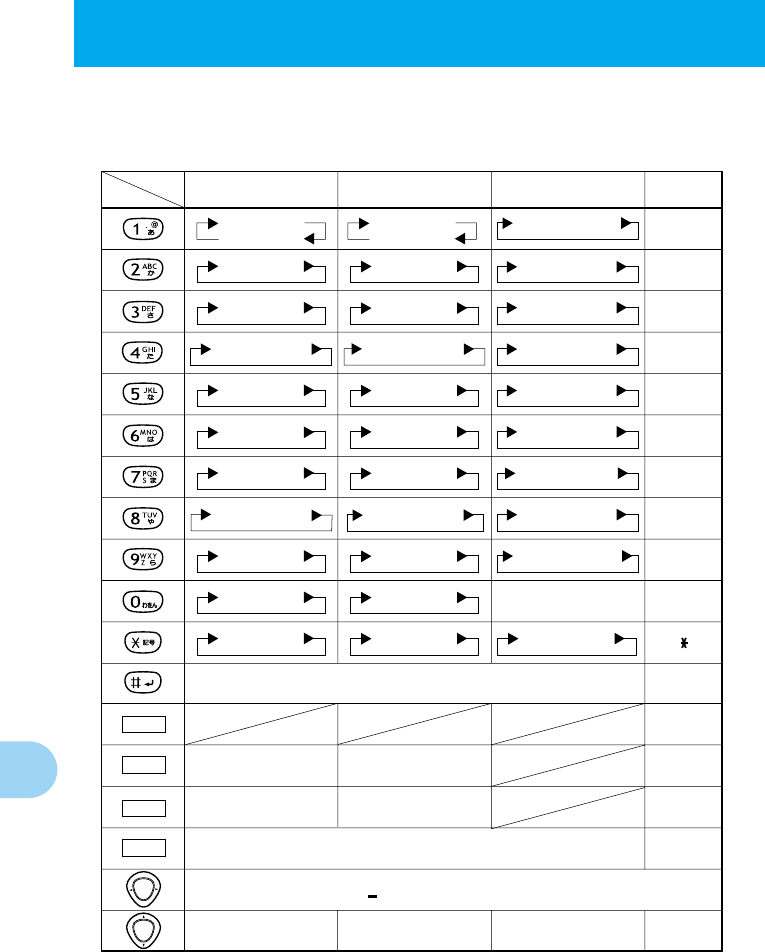
Entering characters:
This is the method of entering names for registering memory dials and
writing mail for "C mail" and "E mail."
Each time you press
文字
,the entry mode will change:
Press
文字
and find the entry mode you want.
"Kanji", "Hiragana" entry mode.
↓
"Katakana" entry mode.
↓
"Alphabetic" entry mode.
↓
"Phone number" entry mode.
398
398
そ
の
他
■
Operating Instructions
Letters are assigned to each key as shown below. Press a key repeatedly
to cycle through letters assigned to that key.
"Kanji","Hiragana"
entry mode
key
"Katakana" "Alphanumeric"
"Phone
number"
かきくけこ カキクケコ
さしすせそ サシスセソ
なにぬねの ナニヌネノ
はひふへほ ハヒフヘホ
まみむめも マミムメモ
らりるれろ
ワヲンー
ラリルレロ
1
2
3
4
5
6
7
8
9
00
#
Move the cursor ( ) to the left and to the right.
Symbols (full size),
pictographs
Symbols (half size)
Line change
P/ー
゛
×
(Impossible)
×
(Impossible)
×
(Impossible)
Converts to Kanji
characters.
Switches between full-size
and half-size characters. Switches between full-size
and half-size characters.
Switches lowercase.
Note 1 Note 1
Symbols (half size)
Note 1
Note 2
P/−
゛
゜
小文字
゜
゛
゜
たちつてとっ
やゆよゃゅょ
わをん
わ
ー
あいうえお
ぉぇぅぃぁ
タチツテトッ
ヤユヨャュョ
アイウエオ
ォェゥィァ
ABCabc2
DEFdef3
GHIghi4
JKLjkl5
MNOmno6
PQRSpqrs7
TUVtuv8
WXYZwxyz9
. @ - _ / : ~1
Note 1: It is possible enter symbols (full size), pictographs and symbols (half size).
Note 2: It is possible to put in the line change mark * in entering characters in the EZweb servic
e.

399
399
そ
の
他
■
Operating Instructions
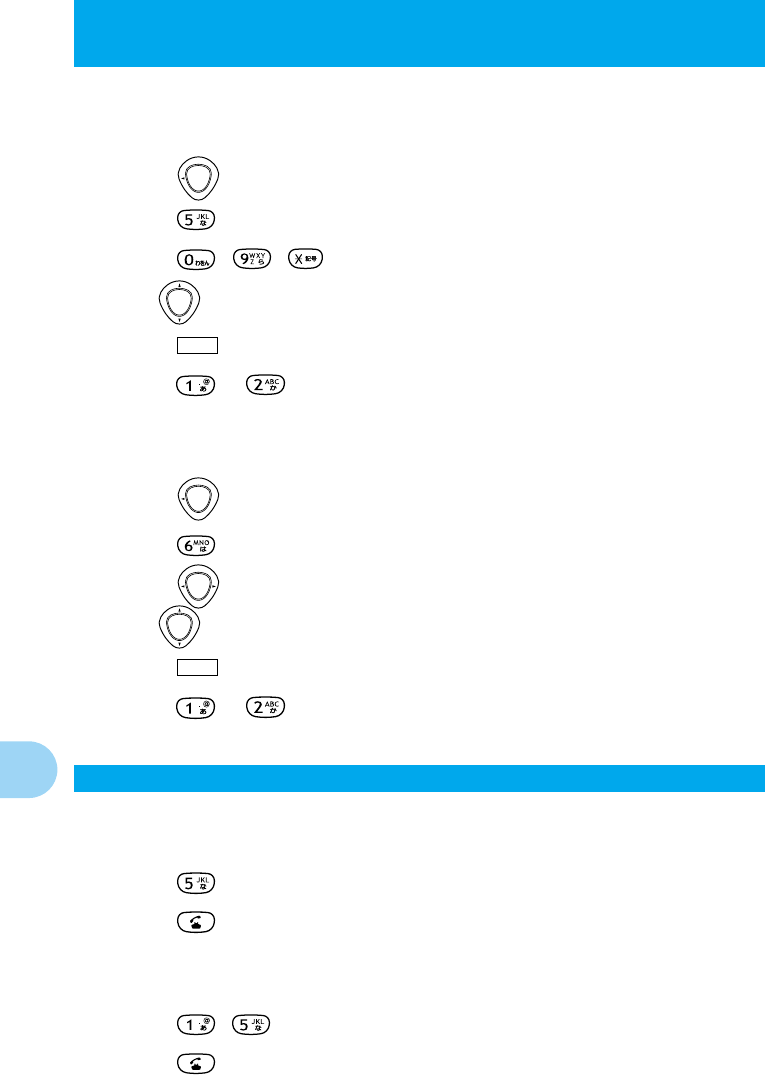
Registering Memory Dials.
You can register frequently used phone numbers and E-mail addresses.
You can store up to 500 phone numbers and E-mail addresses in the memory dials.
■Registering memory dials (Start with the menu.)
To register memory dials, carry out the following basic operation.
1. Press .
The main menu is displayed.
2. Select "電話帳" by and press .
The list of phone directory functions is displayed.
3. Press .
The registration selection of extension item is displayed.
: Extension item is registered.
: Extension item is not registered.
4. Press or .
When is pressed, the smallest vacant number of the memory numbers No.000
- No.099 is indicated.
When is pressed, the smallest vacant number of the memory numbers No.100
- No.499 is indicated.
5. Enter the item you want.
Select the icon of the item you want by and press to enter it.
As for the items you can enter, see "Registration Items of Memory Dials".
6. Press
保存
.
This completes registration.
400
400
そ
の
他
■
Operating Instructions
■Registration Items of Memory Dials
You can register the following items in the memory dials, in addition to the
phone numbers.
000 - 499
―
Names entered in Kanji/Hiragana are regis-
tered automatically.
―
Phone numbers can be classified and con-
trolled in 6 classes.
You can register phone number only when
"Phone No.1" is entered.
You can register phone number only when
"Phone No.1" is entered.
―
You can register E-mail address only when
"E-mail address" is entered.
You can classify and control names into 11
groups.
Message memo can be changed according to
the name you preset.
Melody & Animation can be changed accord-
ing to the name you preset.
Ringer can be changed according to the name
you preset.
Image/color can be changed according to the
name you preset.
You can prevent disclosing the content of reg-
istration to other persons.
―
―
―
Content of registration cannot be changed.
―
Up to 12 em-size charac-
ters (24 en-size characters)
Up to 24 en-size charac-
ters
Up to 36 digits
―
Up to 36 digits
―
Up to 64 en-size alphanu-
meric characters
Up to 64 en-size alphanu-
meric characters
―
―
―
―
―
―
Up to 40 em-size char-
acters
Up to 128 en-size char-
acters
Up to 40 em-size char-
acters
―
Memory No.
Name
Pronunciation
Phone No.1
Class of No.1
Phone No.2
Class of No.2
E-mail address 1
E-mail address 2
Group No. (Group
name)
Special
message memo
Special melody
& animation
Special ringer
Special image/
color
Secret
Address
URL
Memo
Location
information
―
―
Special receptions Extension items
(※1)
(※1) These items can be registered in the memory dials of memory No. 000 - 099 only.
Item
Maximum entry characters
Remarks
Icon

401
401
そ
の
他
■
Operating Instructions
Making a call with Memory Dial.
You can call by using phone numbers saved in Memory Dial.
There are 8 ways to recall numbers saved in Memory Dial.
① Dial Memory Dial numbers by using the number pad.
② Dial by Japanese phonetic symbols, i.e. hiragana or katakana.
③ Dial by telephone book order.
④ Dial by letters.
⑤ Dial by phone number fragment.
⑥ Dial by memory number order.
⑦ Dial by group number.
⑧ Dial by type of phone.
402
402
そ
の
他
■
Operating Instructions
■ Finding a name in the stored telephone book:
1. Press .
2. Press .
3. Press or to access the telephone book.
4. Use to scroll through and display the name you want.
5. Press
メニ
ュー
.
6. Press or access the telephone number.
■ Finding a name using the dial keys:
■ Finding a name in the Japanese alphabetical order:
You can dial from a list of the names whose first letters are entered using a same
dial key.
1. Press a desired dial key from - , and hold it for more
than one second.
example: to find a name that begins with カ , キ, ク ,ケ ,コ , A, B, C, a, b, c, 2, press
2. Press and hold or press several times to scroll through and
display the name you want.
3. Press
メニ
ュー
.
4. Press or access the telephone number.
1. Press
文字
.
2. Use to scroll through and display the name you want.
3. Press
メニ
ュー
.
4. Press or access the telephone number.
403
403
そ
の
他
■
Operating Instructions
■ Finding a name by the phone number:
1. Press .
2. Press .
3. Enter the first several digits of the desired phone number.
4. Press
検索
or .
5. Use to scroll through and display the name you want.
6. Press
メニ
ュー
.
7. Press or access the telephone number.
■ Finding a name in the order of the Memory Dial number:
1. Press .
2. Press .
3. Use to scroll through and display the name you want.
4. Press
メニ
ュー
.
5. Press or access the telephone number.
1. Press .
2. Press .
3. Enter the first letter(s) of the desired name.
4. Press
検索
or .
5. Use to scroll through and display the name you want.
6. Press
メニ
ュー
.
7. Press or access the telephone number.
■ Finding a name using its first letter(s):
404
404
そ
の
他
■
Operating Instructions
Speed Dial:
<EX.> To dial the phone number stored at number 005.
1. Press .
2. Press .
■ Calling Memory Dial numbers 000-009
■ Calling Memory Dial numbers 010-099
<EX.> To dial the phone number stored at number 015.
1. Press , .
2. Press .
■ Finding a name by the phone type:
1. Press .
2. Press .
3. Press to select the desired phone type.
4. Use to scroll through and display the name you want.
5. Press
メニ
ュー
.
6. Press or access the telephone number.
■ Finding a name by the Group number:
1. Press .
2. Press .
3. Press - , to select the desired Group number.
4. Use to scroll through and display the name you want to call.
5. Press
メニ
ュー
.
6. Press or access the telephone number.
405
405
そ
の
他
■
Operating Instructions
List of functions
Mode No.
F11
F12
F13
F14
F15
F16
F17
F18
Auto-lock ON/OFF
Checking the estimated time and charge for the previous call
Checking the estimated total time and charge for calls
Displaying the duration for the current call
Displaying the charge for the current call after ringing off
Setting the remote talk function using an ear microphone
Setting the auto answering function using an ear microphone
Setting the quick call
Group F10
Function Description
Function Description
Function Description
Function Description
Function Description
Mode No.
F0
Instructions of functions besides F functions
Group F0
Mode No.
F21※
F22※
F23
F24
F25※
F26
F27※
F28
F29※
Ringer volume
Selecting ringer pattern
Setting the vibrator with the ringer turned off
Adjusting key response tone volume
Turning off sound effects
Setting the disconnection alert
Composing a melody
Adjusting speaker tone
Setting an original manner
Group F20
Mode No.
F31
F32
F33
F34
F35
F36※
F37
F38※
F39
Turning on the display illumination while a car cigarette lighter adapter is used
Turning off the key illuminations
Changing display color
Adjusting contrast of display
Setting display animation
Selecting the waiting mode display
Setting display image effects
Displaying the characters
Power save mode
Group F30
Mode No.
F40
F41
F42
F43
F44※
F45※
F46
F47
F48
F49※
Displaying the Memory Dial number registration status
Resetting the estimated time for calls
Resetting the estimated charge for calls
Resetting the contents of memory
Resetting the function settings
Resetting the entire memory
Changing the password
Registering the area code
Setting the rate for calls
Registering group names
Group F40

406
406
そ
の
他
■
Operating Instructions
Function Description
Function Description
Function Description
Function Description
Function Description
Mode No.
F51
F52
F53
F54
F55
F56
Setting limits for transmission
Locking Memory Dial function
Setting limits for EZweb service
Rejecting non-shared incoming calls and unwanted calls
Prohibiting E-mail and C-mail service
Setting secret mode
Group
F
50
Mode No.
F60
F61
※
F62
F63
F64
F65
F66
F67
F68
F69
※
Registering profiley
Setting melody & animation
Setting pager style entry mode & registering user dictionary
Setting the message memo, recording/playing/erasing the "absent" message
Setting the answering time for the message memo
Setting the ringer and the vibration
Calculator
Setting "home" mode
Ranking the phone numbers by frequently of reception and transmission
Playing games
Group F60
Mode No.
F71
F72
※
F73
※
F74
F75
F76
※
F77
Entering the date, time or birthdays
Alarm
Registering schedule
Auto Power ON
Auto Power OFF
Setting easy timer
Registering task list
Group F70
Mode No.
F80
F81
F82
F83
F84
F85
F86
F87
F88
F89
Playing message(s) from the answering service
Enabling answering service
Canceling the answering service
Changing the message(s) from the answering service
Forwarding incoming calls without the answering message
Forwarding incoming calls while the phone is used
Forwarding incoming calls unconditionally
Forwarding incoming calls selectively.
Resetting call forwarding service
Registering the destination for forwarding
Mode No.
F91
F92
※
F93
※
Notifying receiving parties of your phone number
Setting the rates for communication
Setting data communications mode
Group F90
Group F80
※:Unable to operate during the cal
l.

407
407
そ
の
他
■
Operating Instructions
Specifications
●The continuous talk time and continuous standby time are the average values of
when the signals can be received normally while the telephone is in the standstill
status.
The operation time may be reduced to almost half due to charging conditions,
temperature, and other operation environment conditions, signal condition at the
location of use, function setting, etc.
Weight: approximately 100 g (including battery pack)
Continuous talk time: approximately 150 minutes
Continuous standby time: approximately 200 hours
Dimensions (H/W/D): approximately 94mm x 49mm x 24mm
(not including the antenna and protuberances)