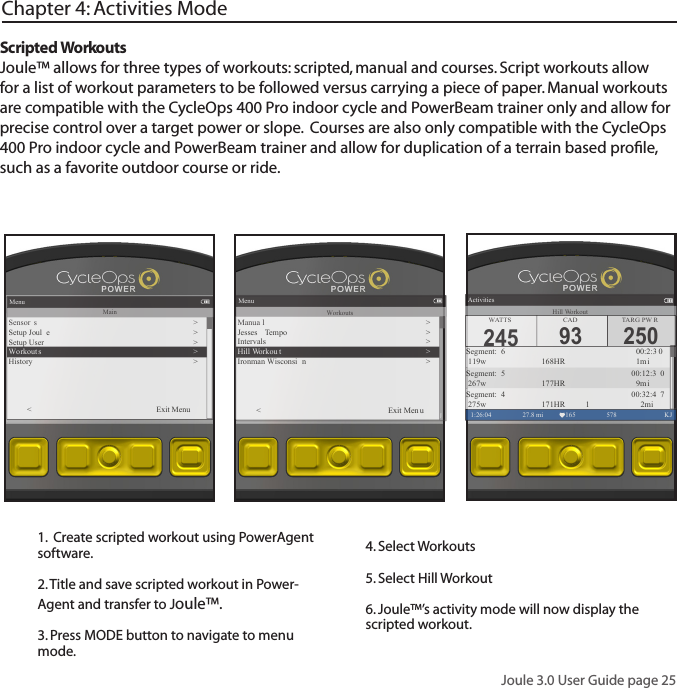
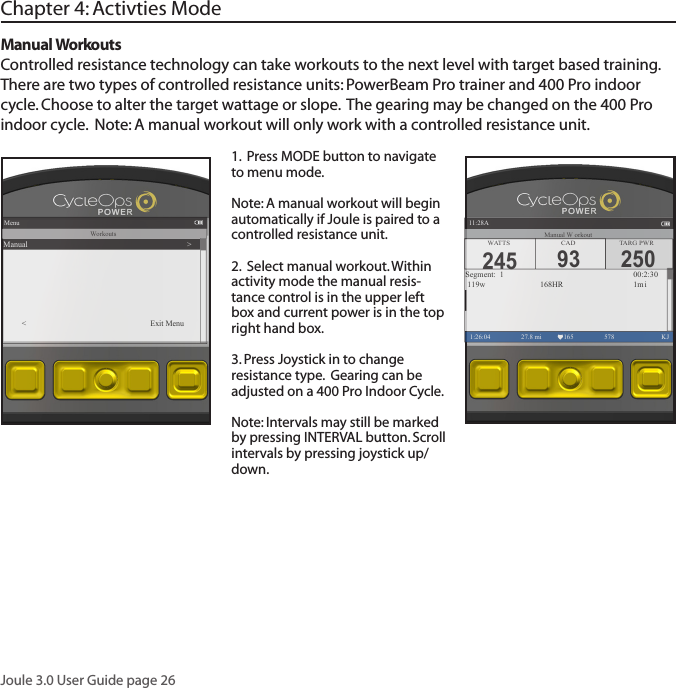
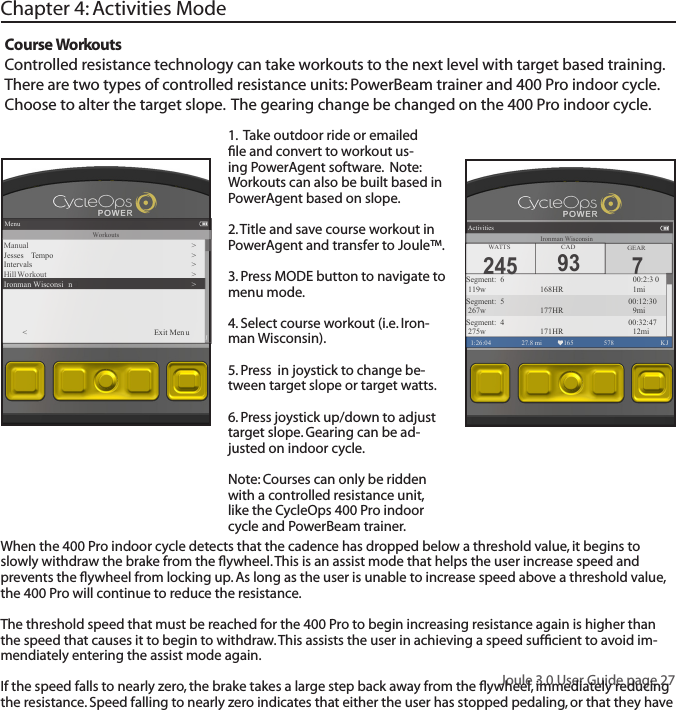
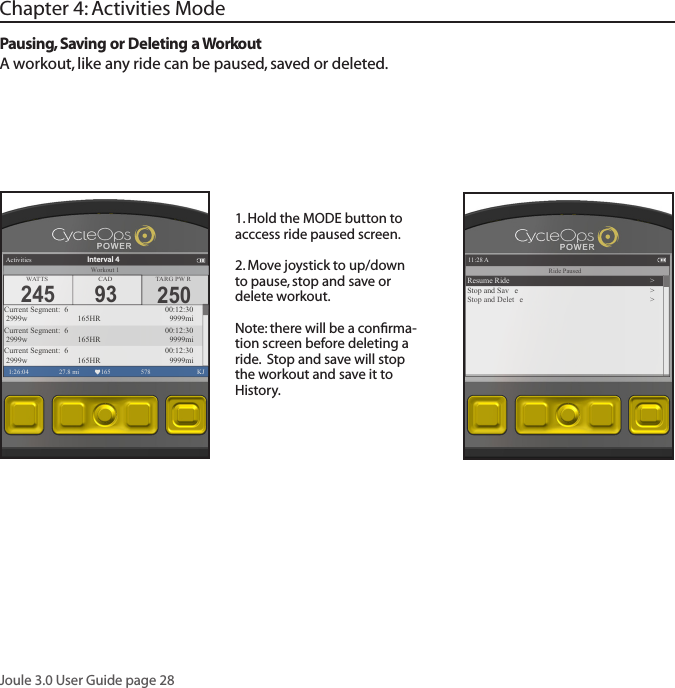
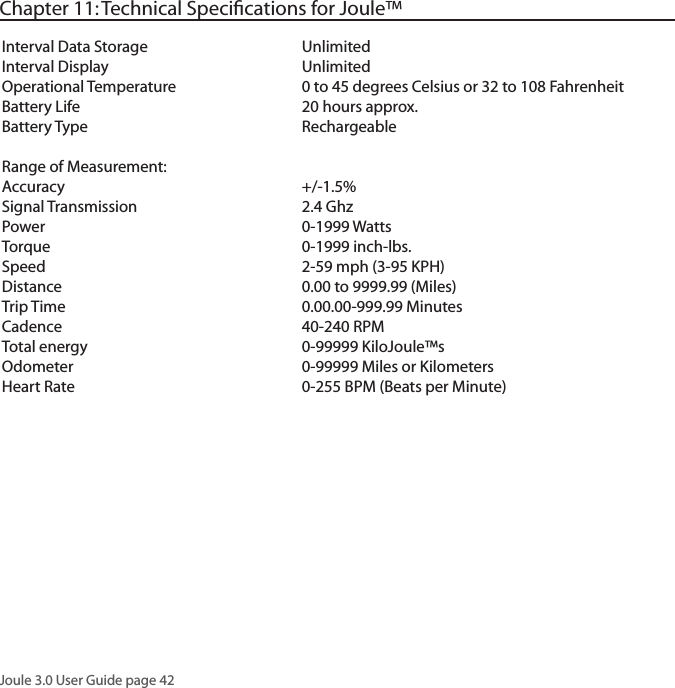
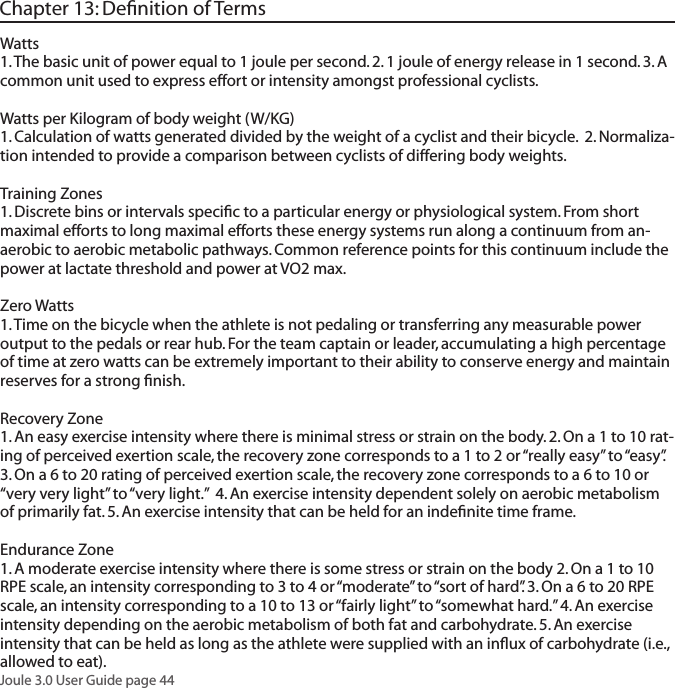
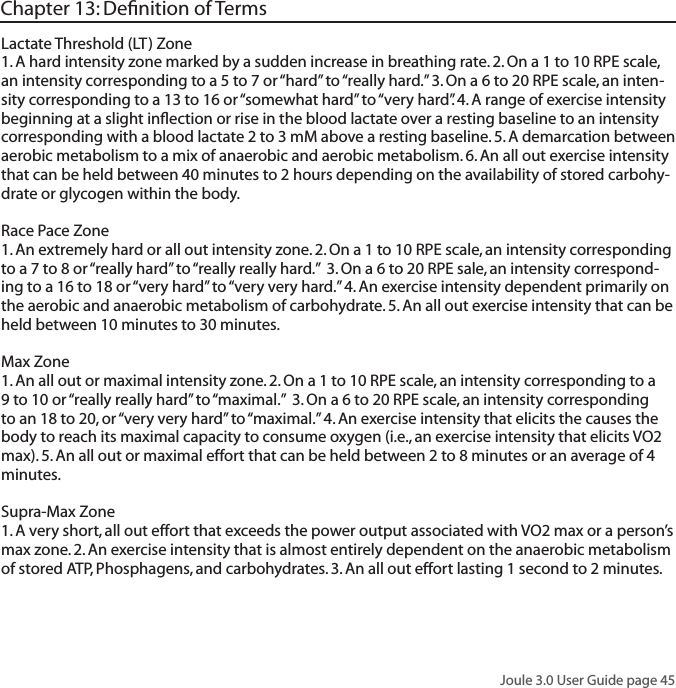
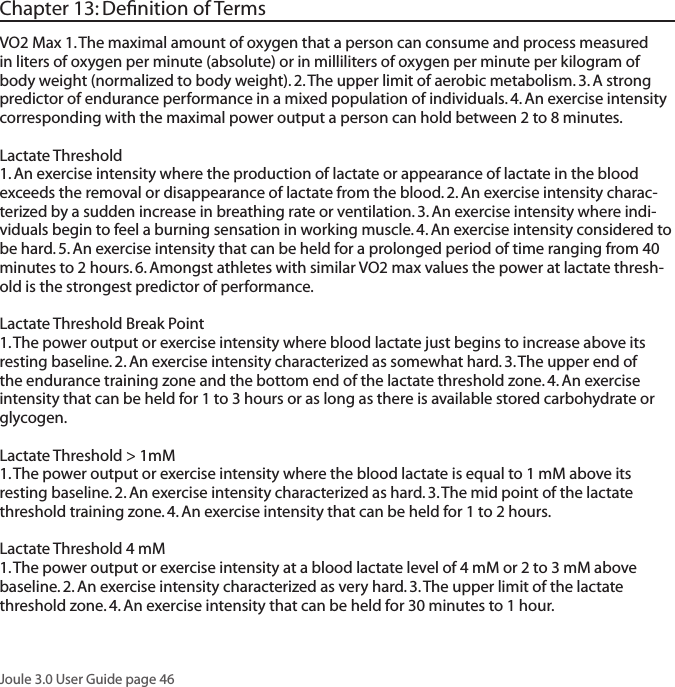
Saris Cycling Group CON2FT3 Bicycle Monitoring Transmitter User Manual manual

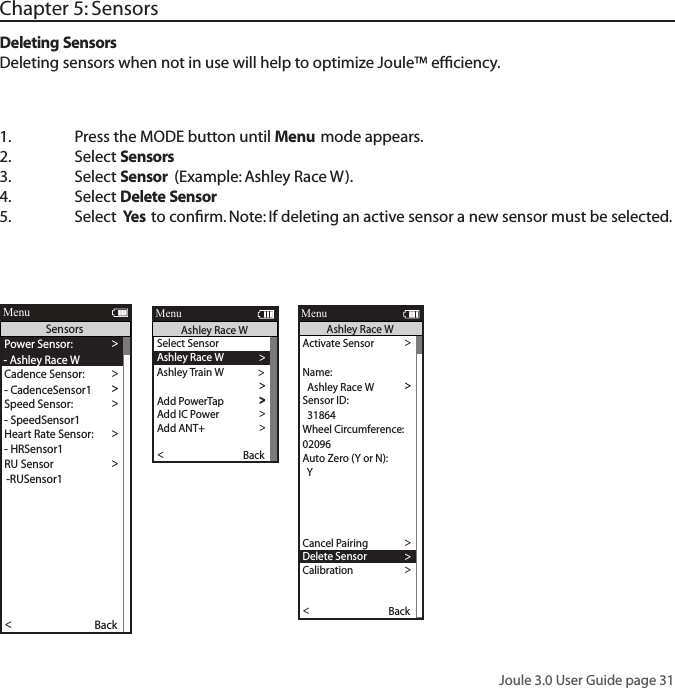
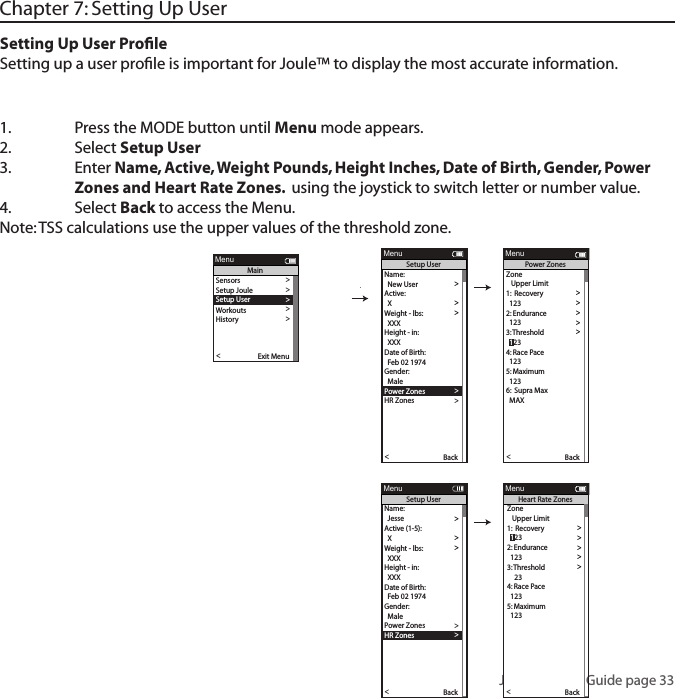
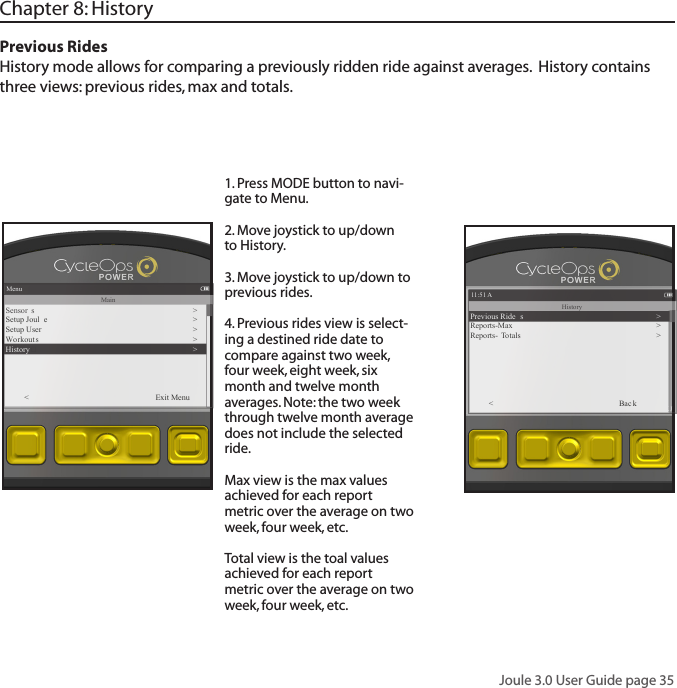
Saris Cycling Group Inc Bicycle Monitoring Transmitter manual

Contents

manual

Joule 3.0 User Guide page 1Header TextThe Leader in P o we r .CycleOps Joule™ 3.0 User Guide
TABLE OF CONTENTS (Chapters)1. Starting Out.....................................................................................................4   Buttons   Mount  Battery  Navigation2. Dashboard Mode.........................................................................................16  Display Actions   Navigation  Dashboard Categories3. Reports Mode...............................................................................................18  Navigation  Report Metrics4. Activities Mode............................................................................................23  Intervals     Scripted Workouts  Manual Workouts  Course Workouts  Pausing, Saving and/or Deleting a Workout5. Sensors............................................................................................................29  Setting Up/Pairing Sensors  Calibrating Devices6. Setup Joule™.................................................................................................317. Setup User......................................................................................................338. History.............................................................................................................35 9. Troubleshooting Joule™..........................................................................3710. Important Precautions...........................................................................3811. Technical Specifications for Joule™...................................................4112. Joule™ Warranty.......................................................................................4313. Definition of Terms...................................................................................44
Joule 3.0 User Guide page 4Chapter 1: Starting OutVisit www.cycleops.com to learn more about Saris Cycling Group and: -Register product and activate warranty-View frequently asked questions-View instructional videos-Sign up for the CycleOps Power newsletter-View product and technical updates from CycleOps PowerWARNING: Always consult a physician before beginning or modifying any exercise program.Unpacking Joule™™ Remove all parts from the box to ensure the following contents are included:PACKAGE CONTENTS:Item Part Description     Qty1. Joule™ 3.0 computer     12. Chest strap     13. Handlebar mount     14. Mount bolts     25.  Training With Power DVD        16.  PowerAgent CD w/Complete User Guides      17. USB Cable      1 Please contact the local dealer or Saris Cycling Group with any questions at 1-800-783-7257.
Joule 3.0 User Guide page 5Chapter 1: Starting Out2. Insert two screws through Joule™ bracket, handlebar bracket, and tighten together.3. Slide the Joule™ down com-pletely down onto the bracket. Ensure to provide the Joule™ and bracket remain clean and free from moisture or debris.Installing MountCycleOps Joule™ 3.0 comes with a  mount designed for the indoor cycle handlebar. The Joule™ 3.0 can also mount onto a more road like profile.  The Joule™ 3.0 mount is only included with the CycleOps Pro Series indoor cycles (200 Pro, 300 Pro and 400 Pro).1. Place bracket onto the handle-bars as shown.
Joule 3.0 User Guide page 6Chapter 1: Starting Out3. Slide Joule™™ forward into mount. 5. To remove Joule™™, press down on the release lever and slide Joule™™ back. MountThe CycleOps Joule™ 3.0 also includes a more road style mount. This can be used for a lower profile. This mount can be oriented in either stem or handlebar orientations.  The mount is preas-sembled for the stem orientation.   1.  For stem orientation insert two zip ties through bottom of mount and secure to stem. 2. Slide Joule™™ down above mount. 4. Be sure to check Joule™™, is secure in mount.
Joule 3.0 User Guide page 7Chapter 1: Starting Out2. Insert screw threw bottom of mount.  3. Insert two zip ties through bottom of mount. Tighten by pulling on the zip ties to secure mount.1.  Remove screw that  holds bot-tom of mount and rotate bottom 90 degrees. MountIf desired, change from the preassembled stem orientation to a handlebar orientation. 4.  Handlebar orientation.
Joule 3.0 User Guide page 8HEART RATE MONITORPosition the heart rate monitor strap above torso as pictured.  The strap should rest just beneath the pectoralis muscles of the chest.  For best results slightly moisten the electrodes where contact is made with skin.  The heart rate strap must be worn to enable the heart rate function.  It should be snug enough to stay in place during the ride.NOTE: The chest strap for Joule™ uses a coded frequency and is not compatible with other manufacturer’s chest straps. If heart rate is not displayed, consult Chapter 5: Sensors.Chapter 1: Starting Out
Joule 3.0 User Guide page 9BatteryCycleOps Joule™ 3.0 is powered by a built-in lithium-ion battery that can be recharged using the included USB cable and a computer. A 5VDC 400mA charger can also be used (not included).  A fully charged battery can run for approximately 20 hours before it must be recharged. Recharging completely will take approximately three hours.  The battery level is indicated in the title bar. WARNING: This product contains a Lithium battery. See Important Precautions section for more information on page %%.Chapter 1: Starting Out1. Press Mode or Interval button to turn on Joule™ 3.0.  Note: Pressing joystick will not turn Joule™ 3.0 on.2. Plug the mini-USB cable into the mini-USB port on the back of Joule™ 3.0 and plug the other end into an available USB port on a computer. 3. A standard AC adapter to wall outlet is available separately. WATTS CAD AV WA T TSMPHTSS MX WA T TSPWR ZONE AV W/KGDashboard Interval 41:26:04 27.8 mi 165 578 KJ245 9322.3 100.94 3.2253785250TARG PW R
Joule 3.0 User Guide page 10WATTS CAD AV WA T TSMPHTSS MX WA T TSPWR ZONE AV W/KGDashboard Interval 41:26:04 27.8 mi 165 578 KJ245 9322.3 100.94 3.2253785250TARG PW RChapter 1: Starting OutMODE buttonJoystickINTERVAL buttonHome buttonDisplay ActionsThere are three buttons and a two joysticks to navigate Joule™ 3.0.Controlled resistance joystick
Joule 3.0 User Guide page 11Chapter 1: Starting Out        Button + Action     Function    Detail Joystick  Press left/right  Move    Move within a screen or change screens  Press up/down   Move    Move within a screen or scroll screen   Press in and release   Switch    Switch metrics in dashboard, change date                ranges in reports or select settings in menu  Hold     Switch    Switch dashboard category settings MODE  Press in and release   Switch    Switch between dashboard, reports, activities,  menu  Press in and release  Back    Navigate “back” in menu mode  Hold for 2 seconds  Pause    Display “Ride Paused” screenINTERVAL  Press in and release   Mark    Stop previous interval and mark next   Hold for 2 seconds  Switch    Switch dashboard to “Interval Mode”                (INT) metrics for that interval (i.e. avg watts) versus      entire ride MODE      Hold for 2 seconds  Find    Initiates finding previously paired sensors+INTERVALControlled    Press up/down  Switch    Move within the resistance to make work harder/eaiser  resistance     Click    Switch    Switch between target watts, target slope and gearningjoystick      HOME  Press in and release  Switch    Return to dashboard mode Display Actions
Joule 3.0 User Guide page 12Chapter 1: Starting OutDashboard mode:To view customizable metrics while riding.Reports mode:To view how a current ride com-pares to previous rides. Menumode: To setup prefer-ences, manage workouts, history  and sensors. W ATTS CAD A V  WA T TSMPHTSS MX WA T TSPWR ZONE A V  W/KGDashboard Interval 41:26:04 27.8 mi 165 578 KJ245 9322.3 100.94 3.2253785250TARG PWRMenu1:26:04 578  KJMainSensor s�>Setup Joul e �>Setup User �>Wo rkout s �>History�>�<�Exit Menu ��2WK MEANReport Interval 41:26:04 27.8 mi 165 578 KJRIDETIME 00:59:45 01:45:33MILES 125 75KJ 376 432TEMP 52 56A V  WATTS 337 311A V  CAD 105 107A V  MPH 20 22A V  HR 167 165Summary2/2/09 2WKReport Interval 41:26:04 27.8 mi 165 578 KJKJ 329 853KJ/HR 289 482IF 2.0 3.1TSS 3.7 1.0Work2/2/092WK Report Interval 41:26:04 27.8 mi 165 578 KJA V  WATTS 29 9 378MX W ATTS 478 641ZEROW ATTS 00:05:12 00:09:06ZEROW ATTS 10% 6%NP 205 258A V  W/KG 3.1 2.2MX W/KG 5.2 7.3Power Detail2/2/09 2WK Report Interval 41:26:04 27.8 mi 165 578 KJ5 SEC 839 91030 SEC 779 7911 MIN 653 7595 MIN 801 74820 MIN 476 53330 MIN 512 41940 MIN 382 34960 MIN 196 29 1Peak Power2/2/09Activities mode: To view what should be done while riding (intervals, courses and workouts). 250TARG PW RActivities1:26:04 27.8 mi 165 578  KJCurrent Segment:  6        00:12:30 2999w   165HR 9999miCurrent Segment:  6        00:12:30 2999w   165HR 9999miCurrent Segment:  6        00:12:30 2999w   165HR 9999miInterval 4W ATTS CAD245 93Workout 1
Joule 3.0 User Guide page 13Chapter 1: Starting Out2WK Report Interval 41:26:04 27.8 mi 165 578 KJ100:15:04 00:12:33200:20:22 00:24:51300:44:16 00:49:23401:01:44 01:00:29500:13:34 00:12:31600:08:03 00:05:01110% 12%214% 15%330% 23%441% 45%512% 1 1 %65% 3%Time in Power Zones2/2/09 2WK Report Interval 41:26:04 27.8 mi 165 578 KJ100:09:51 00:07:31200:05:09 00:09:45300:40:03 00:35:14400:19:58 00:15:32500:03:21 00:05:02110% 1 1 %213% 9%340% 70%421% 18%58% 6%Time in HR Zones2/2/09 2WK Report Interval 41:26:04 27.8 mi 165 578 KJ>4 W/KG 4 5>6 W/KG 7 9>8 W/KG 1 1 10>10 W/KG 15 13Surges2/2/092WK Report Interval 41:26:04 27.8 mi 165 578 KJFT GAIN 958 2156A V  GRADE 15% 10%FT LOST 226 1 1 2V A M349 509Climbing2/2/09
Joule 3.0 User Guide page 14  Chapter 1: Starting OutNavigationJoule™ has four modes of functionality: dashboard, reports, activites and menu indicated by the title bar.1. Press the MODE button once to switch from dashboard mode to report mode.  2. Press the MODE button again to switch from report mode to activities mode. WATTS CAD A V  WA T TSMPHTSS MX WA T TSPWR ZONE A V  W/KGDashboard Interval 41:26:04 27.8 mi 165 578 KJ245 9322.3 100.94 3.2253785250TARG PW R2WK MEANReport1:26:04 27.8 mi 165 578  KJRIDE TIME 99:59:59 99:59:59MILES 9999 9999KJ 9999 9999TEMP 250 250Summary2/2/09Interval 4
Joule 3.0 User Guide page 15Chapter 1: Starting OutNavigationJoule™ has four modes of functionality: dashboard, reports, activites and menu indicated by the title bar.3. Press the MODE button again to switch from activities mode to menu mode. 4. Press the MODE button again to switch from menu mode back to dashboard mode. 250TARG PW RActivities1:26:04 27.8 mi 165 578  KJCurrent Segment:  6        00:12:30 2999w   165HR 9999miCurrent Segment:  6        00:12:30 2999w   165HR 9999miCurrent Segment:  6        00:12:30 2999w   165HR 9999miInterval 4WATTS CAD245 93Workout 1MenuMainSensor s >Setup Joul e >Setup User >Wo rkout s >History >< Exit Menu
Joule 3.0 User Guide page 161. Move joystick to the desired metric. Note: it is shaded. 2.Press joystick to rotate metrics from detailed view to dash-board. (Example: watts, av watts, mx watts).  In order to change detailed view, move joystick to  desired metric.3. Press in and hold joystick to change and switch through available categories.  Note: Press in and hold MODE button to pause a ride or stop, save and/or delete ride. Once a ride is stopped and saved,  it is added to the Reports and History calculation.Chapter 2: Dashboard ModeNavigationThe dashboard shows current ride data.  It displays 6 metrics that can easily be configured to create a customizable dashboard. The detailed view shows additional data from the highlighted group in the dashboard. WATTS CAD A V  WA T TSMPHTSS MX WA T TSPWR ZONE A V  W/KGDashboard Interval 41:26:04 27.8 mi 165 578 KJ245 9322.3 100.94 3.2253785250TARG PW RA V  WA T TS CAD MX WA T TSMPHTSS  WA T TSPWR ZONE A V  W/KGDashboard Interval 41:26:04 27.8 mi 165 578 KJ253 9322.3 100.94 3.2785245250TARG PW R5 SEC CAD 5 MINMPH TSS 20 MINPWR ZONE A V  W/KGDashboard Interval 41:26:04 27.8 mi 165 578 KJ512 9322.3 100.94 3.2435307250TARG PWR
Joule 3.0 User Guide page 17Chapter 2: Dashboard ModeDashboard CategoriesTo customize the dashboard, choose 6 categories from the following12 available categories. Each dashboard category is made up of 3 metrics.WATTS CAD A V  WA T TSMPHTSS MX WA T TSPWR ZONE A V  W/KGDashboard Interval 41:26:04 27.8 mi 165 578 KJ245 9322.3 100.94 3.2253785250TARG PW RCategory Metric 1Metric 2Metric 3Powerwatts average wattsaverage watts/kgcurrent power zone average power zonemaximum watts/kgmaximum wattsWa tts/kg watts/kgZonesPeak PowerScoresWo rkSpeedV A M2999 29992999WA TTSW/KGAV WATTSMXWA T TS20.0PWR ZONE6A V  PWR ZONE4.2heart rate zoneHR ZONE35sec Peak Power 5min Peak Power5 SEC29995 MIN299920 min Peak Power20 MIN2999training stress score normalized powerTSS500.1NORM PWR2999intensity factorIF2.000kilojoules kilojoules / hourKJ9999KJ/HR9999training stress scoreTSS9999Cadence rpmaverage rpmCAD250A V  CAD250maximum rpmMX CAD250current speed average speedMPH99.9A V  MPH99.9maximum speedMX MPH99.9current grade current altitude ft or mcurrent altitude ft or m% GRADE45.0ALTITUDE FT29999total ascent ft or mtotal ascent ft or mFT GAIN9999vertical ascentVA MHeart RateClimbingheart rate average heart rateHR250A V  HR250MX HR250maximum heart rateAV W/KG20.0MX W/KG20.0Ride ride time99:59:59MILEtime of day12:5999.99ride distanceRIDE TIME HR CLOCK PM29999 9999ALTITUDE FTFT GAIN45.0
Joule 3.0 User Guide page 181. Press joystick left/right to page through eight reports.  Press joystick up/down to scroll screen. The left column of data displays the current ride. The right column displays an average of the rides completed over the selected time frame. Note: the highlighted metrics represents the higher of the two metrics. 2. Press in and release joystick to change date ranges. NavigationJoule™ provides eight reports with an easy comparison of the current ride and historical aver-ages  so information can be seen in context. Chapter 3: Reports Mode2WK MEANReport1:26:04 27.8 mi 165 578  KJRIDE TIME 99:59:59 99:59:59MILES 9999 9999KJ 9999 9999TEMP 250 250Summary2/2/09Interval 42WK Report Interval 41:26:04 27.8 mi 165 578 KJ5 SEC 839 91030 SEC 779 7911 MIN 653 759Peak Power2/2/09
Joule 3.0 User Guide page 19Chapter 3: Reports Mode2WK MEANReport Interval 41:26:04 27.8 mi 165 578 KJRIDETIME 00:59:45 01:45:33MILES 125 75KJ 376 432TEMP 52 56A V  WATTS 337 311A V  CAD 105 107A V  MPH 20 22A V  HR 167 165Summary2/2/09 2WK Report Interval 41:26:04 27.8 mi 165 578 KJA V  WATTS 299 378MX WATTS 478 641ZEROWATTS 00:05:12 00:09:06ZEROWATTS 10% 6%NP 205 258A V  W/KG 3.1 2.2MX W/KG 5.2 7.3Power Detail2/2/09Report DetailsJoule™ provides eight reports that provide an easy comparison of the ride and historical aver-ages  so information can be seen in the context.  See Definition of Terms for an explanation of  metrics on page %. In depth view of power specific information for new insight into ride intensity and characterics. Includes normalized power, watter per kilo-gram of body weight and time spent at zero watts. Basic information with minimal ma-nipulation or calculation and how they compare to previous rides. Note: Ride time equals time moving. Av-erage watts is calculated without zeros and is time weighted.
Joule 3.0 User Guide page 202WKReport Inter v al 41:26:04 27.8 mi 165 578 KJKJ 329 853KJ/HR 289 482IF 2.0 3.1TSS 3.7 1.0Work2/2/09 2WK Report Interv al 41:26:04 27.8 mi 165 578 KJ5 SEC 839 91030 SEC 779 79 11 MIN 653 7595 MIN 801 74820 MIN 476 53330 MIN 512 41940 MIN 382 34960 MIN 196 29 1Peak Power2/2/09Chapter 3: Reports ModeReport DetailsJoule™ provides eight reports that provide an easy comparison of the ride and historical aver-ages  so information can be seen in the context.  See Definition of Terms for an explanation of  each metric in reports on page %. Key measures for quantifying work com-pleted, including TrainingPeaks’ Training Stress Score (TSS) and Intensity Factor (IF). Full array of peak power data for indica-tion of ride intensity at key  physiological markers of current fitness compared to previous performances.
Joule 3.0 User Guide page 212WK Report Interval 41:26:04 27.8 mi 165 578 KJ100:15:04 00:12:33200:20:22 00:24:51300:44:16 00:49:23401:01:44 01:00:29500:13:34 00:12:31600:08:03 00:05:01110% 12%214% 15%330% 23%441% 45%512% 11 %65% 3%Time in Power Zones2/2/092WK ReportInterv al 41:26:04 27.8 mi 165 578 KJ100:09:51 00:07:31200:05:09 00:09:45300:40:03 00:35:14400:19:58 00:15:32500:03:21 00:05:02110% 11 %213% 9%340% 70%421% 18%58% 6%Time in HR Zones2/2/09Chapter 3: Reports ModeReport DetailsJoule™ provides eight reports that provide an easy comparison of the ride and historical aver-ages  so information can be seen in the context.  See Definition of Terms for an explanation of  each metric in reports on page %. Time spent in physiological relevant power zones in absolute minutes and as a percent of total time. Time spent in physiological relevant heart rate zones in absolute minutes and as per-cent of total time.
Joule 3.0 User Guide page 222WK Report Inter v al 41:26:04 27.8 mi 165 578 KJ>4 W/KG 4 5>6 W/KG 7 9>8 W/KG 1 1 10>10 W/KG 15 13Surges2/2/092WK Report Interv al 41:26:04 27.8 mi 165 578 KJFT GAIN 958 2156A V  GRADE 15% 10%FT LOST 226 1 1 2V A M349 509Climbing2/2/09Chapter 3: Reports ModeReport DetailsJoule™ provides eight reports that provide an easy comparison of the ride and historical aver-ages  so information can be seen in the context.  See Definition of Terms for an explanation of  each metric in reports on page %. Detailed indication of climbing includ-ing total altitude gained and lost, vertical ascent (VAM) and grade. Quantification of how many accelerations or “matches” were burned during a ride over 4, 6, 8 and 10 watts per kilogram. Note: A surge is counted whenever three consecutive val-ues (someword) w/kg value and recorded.
Joule 3.0 User Guide page 23Activites Overview Joule™ activities mode manages intervals and workouts. Chapter 4: Activities ModeMenu1:26:04 578  KJWorkoutsManua l�>Jesses  Tempo >Intervals >Hill Workou t >Ironman Wisconsi n ><          Exit Men u250TARG PW RActivities1:26:04 27.8 mi 165 578  KJSegment:  6                  00:2:3 0 119w       168HR      1miSegment:  5               00:12:3 0 267w       177HR      9m iSegment:  4               00:32:4 7 275w       171HR     1 2miWATTS CAD245 93Hill Workout250TARG PW RActivities1:26:04 27.8 mi 165 578  KJCurrent Segment:  6        00:12:30 2999w 165HR 9999miCurrent Segment:  6        00:12:30 2999w 165HR 9999miCurrent Segment:  6        00:12:30 2999w 165HR 9999miInterval 4WATTS CAD245 93Workout 1
Joule 3.0 User Guide page 241. Intervals can be marked at any point during the ride and from any mode by pressing INTERVAL button.2. To view intervals from the dash-board hold INTERVAL button until “INT” is displayed in the title bar.Note: All dashboard data now per-tains to the active interval only. 3.  To exit interval mode, hold INTERVAL button again. 4. To view all interval data press MODE button to navigate to activ-ity mode. Note: Activity mode shows all intervals completed with the cur-rent interval at the top of the list.  Average power, heart rate, interval time and distance are displayed for each interval.IntervalsIntervals may be viewed from activity mode or dashboard mode.Chapter 4: Activities ModeWATTS CAD A V  WA T TSMPHTSS MX WA T TSPWR ZONE A V  W/KGDashboard Interval 41:26:04 27.8 mi 165 578 KJ245 9322.3 100.94 3.2253785250TARG PW R250TARG PW RActivities1:26:04 27.8 mi 165 578  KJCurrent Segment:  6        00:12:30 2999w   165HR 9999miCurrent Segment:  6        00:12:30 2999w   165HR 9999miCurrent Segment:  6        00:12:30 2999w   165HR 9999miInterval 4WATTS CAD245 93Workout 1
Joule 3.0 User Guide page 25Scripted WorkoutsJoule™ allows for three types of workouts: scripted, manual and courses. Script workouts allow for a list of workout parameters to be followed versus carrying a piece of paper. Manual workouts are compatible with the CycleOps 400 Pro indoor cycle and PowerBeam trainer only and allow for precise control over a target power or slope.  Courses are also only compatible with the CycleOps 400 Pro indoor cycle and PowerBeam trainer and allow for duplication of a terrain based profile, such as a favorite outdoor course or ride. Chapter 4: Activities Mode1.  Create scripted workout using PowerAgent software. 2. Title and save scripted workout in Power-Agent and transfer to Joule™.3. Press MODE button to navigate to menu mode. 4. Select Workouts5. Select Hill Workout 6. Joule™’s activity mode will now display the scripted workout. Menu1:26:04 578  KJMainSensor s�>Setup Joul e >Setup User >Wo rkout s >History ><          Exit Menu250TARG PW RActivities1:26:04 27.8 mi 165 578  KJSegment:  6                  00:2:3 0 119w       168HR      1miSegment:  5               00:12:3 0 267w       177HR      9m iSegment:  4               00:32:4 7 275w       171HR     1 2miWATTS CAD245 93Hill WorkoutMenu1:26:04 578  KJWorkoutsManua l�>Jesses  Tempo >Intervals >Hill Workou t >Ironman Wisconsi n ><          Exit Men u
Joule 3.0 User Guide page 26Manual Workouts Controlled resistance technology can take workouts to the next level with target based training.  There are two types of controlled resistance units: PowerBeam Pro trainer and 400 Pro indoor cycle. Choose to alter the target wattage or slope.  The gearing may be changed on the 400 Pro indoor cycle.  Note: A manual workout will only work with a controlled resistance unit.Chapter 4: Activties Mode1.  Press MODE button to navigate to menu mode. Note: A manual workout will begin automatically if Joule is paired to a controlled resistance unit. 2.  Select manual workout. Within activity mode the manual resis-tance control is in the upper left box and current power is in the top right hand box.3. Press Joystick in to change resistance type.  Gearing can be adjusted on a 400 Pro Indoor Cycle. Note: Intervals may still be marked by pressing INTERVAL button. Scroll intervals by pressing joystick up/down.Menu1:26:04 578  KJWorkoutsManual >< Exit Menu250TARG PWR1:26:04 27.8 mi 165 578  KJSegment:  1                  00:2:30 119w       168HR      1miWATTS CAD245 93Manual W orkout11:28A
Joule 3.0 User Guide page 27Chapter 4: Activities ModeCourse WorkoutsControlled resistance technology can take workouts to the next level with target based training.  There are two types of controlled resistance units: PowerBeam trainer and 400 Pro indoor cycle. Choose to alter the target slope.  The gearing change be changed on the 400 Pro indoor cycle. 1.  Take outdoor ride or emailed file and convert to workout us-ing PowerAgent software.  Note: Workouts can also be built based in PowerAgent based on slope. 2. Title and save course workout in PowerAgent and transfer to Joule™. 3. Press MODE button to navigate to menu mode. 4. Select course workout (i.e. Iron-man Wisconsin).5. Press  in joystick to change be-tween target slope or target watts.6. Press joystick up/down to adjust target slope. Gearing can be ad-justed on indoor cycle. Note: Courses can only be ridden with a controlled resistance unit, like the CycleOps 400 Pro indoor cycle and PowerBeam trainer.Menu1:26:04 578  KJWorkoutsManual �>Jesses  Tempo >Intervals >Hill W o rkout >Ironman Wisconsi n �><          Exit Men u7GEARActivities1:26:04 27.8 mi 165 578  KJSegment:  6  00:2:3 0 119w  168HR  1miSegment:  5         00:12:30 267w 177HR  9miSegment:  4         00:32:47 275w 171HR  12miWA T TS CAD245 93Ironman WisconsinWhen the 400 Pro indoor cycle detects that the cadence has dropped below a threshold value, it begins to slowly withdraw the brake from the flywheel. This is an assist mode that helps the user increase speed and prevents the flywheel from locking up. As long as the user is unable to increase speed above a threshold value, the 400 Pro will continue to reduce the resistance. The threshold speed that must be reached for the 400 Pro to begin increasing resistance again is higher than the speed that causes it to begin to withdraw. This assists the user in achieving a speed sufficient to avoid im-mendiately entering the assist mode again.  If the speed falls to nearly zero, the brake takes a large step back away from the flywheel, immediately reducing the resistance. Speed falling to nearly zero indicates that either the user has stopped pedaling, or that they have exerted themselves so much that the assist mode is insufficient to get them back up to speed.
Joule 3.0 User Guide page 28Pausing, Saving or Deleting a WorkoutA workout, like any ride can be paused, saved or deleted.1. Hold the MODE button to acccess ride paused screen. 2. Move joystick to up/down to pause, stop and save or delete workout. Note: there will be a confirma-tion screen before deleting a ride.  Stop and save will stop the workout and save it to History.Chapter 4: Activities Mode250TARG PW RActivities1:26:04 27.8 mi 165 578  KJCurrent Segment:  6        00:12:30 2999w   165HR 9999miCurrent Segment:  6        00:12:30 2999w   165HR 9999miCurrent Segment:  6        00:12:30 2999w   165HR 9999miInterval 4WATTS CAD245 93Workout 111:28 A1:26:04 578  KJRide PausedResume Ride >Stop and Sav e >Stop and Delet e >
Joule 3.0 User Guide page 291.  Press the MODE button until Menu mode appears.2.   Select Sensors. 3.  Select the desired sensor type (Power, Cadence, Speed, Heart Rate or RU); make sure    sensor is awake and isolated from other active sensors by 65 feet/20 meters).4.  For Power sensors, select type of power meter. (PowerTap, Indoor Cycle -IC, ANT+, SRM,    Quarq)5.   Select Start Pairing.   Note:  If a heart rate strap was purchased with Joule™ with it    will already be paired to Joule™ .6.  After successful pairing, Joule™ should display a five digit code corresponding to the    sensor. (Pairing may take up to 60 seconds).7.  Select  Name and/or Wheel Circumferance  to edit if desired. 8.  Select Active Sensor to save as the primary sensor and return to sensor list.   9.  Only activate sensors will be found by Joule™.Follow above steps for Setting Up any Power, Cadence, Speed, Heart Rate or Resistance Unit sen-sor.  Note: It is recommended the Auto Zero setting for PowerTap remain selected as yes, unless using a track hub.  Chapter 5: SensorsSetting Up SensorsJoule™ is compatible witn many ANT+ sesnors, each having a unique code.  A sensor is defined as ANT + compatible power meters, cadence sensors, speed sensors, heart rate straps and CycleOps resistance units.  Joule™ needs to be paired to each sensor to ensure proper functionality.Power Sensor: >- NoneCadence Sensor: >>Speed Sensor: >- None >Heart Rate Sensor:>- None >RU Sensor >-None >Y>>Auto Zero (Y or N):Y>Re-Pair Sensor >Re-Pair Sensor >Delete Sensor >PT Data>Pair >Pair New Sensor >Back<ReportMenuSensors- NoneSelect Sensor >-  PowerSensor1 >Sensor ID >Add PowerTap >The Gun Show >Torque O set >Torque O set >Torque O set >>Add IC Power >Add ANT+ >Pair New Sensor >Back<ReportMenuPower SensorActivate Sensor >>>  00000 >Wheel Circumference:>02096 >Auto Zero (Y or N): >Y>Auto Zero (Y or N): >Y>>Auto Zero (Y or N):Y>Re-Pair Sensor >Cancel Pairing >Delete Sensor >Calibration >Pair >Pair New Sensor >Back<ReportMenuPowerSensor1Sensor ID:  PowerSensor1Name: >Start Pairing >Activate Sensor >>>  PAIRING >Wheel Circumference:>02096 >Auto Zero (Y or N): >Y>Auto Zero (Y or N): >Y>>Auto Zero (Y or N):Y>Re-Pair Sensor >Cancel Pairing >Delete Sensor >Calibration >Pair >Pair New Sensor >Back<ReportMenuPowerSensor1Sensor ID:  PowerSensor1Name: >Start Pairing >Activate Sensor >>>  12345 >Wheel Circumference:>02096 >Auto Zero (Y or N): >Y>Auto Zero (Y or N): >Y>>Auto Zero (Y or N):Y>Re-Pair Sensor >Cancel Pairing >Delete Sensor >Calibration >Pair >Pair New Sensor >Back<ReportMenuPowerSensor1Sensor ID:  PowerSensor1Name: >Start Pairing >blink
Joule 3.0 User Guide page 301.  Press the MODE button until Menu mode appears. 2.   Select RU Sensor  3.  Select Calibration4.  After successful pairing, Joule™ should display a five digit code corresponding to the   sensor. (Pairing may take up to 60 seconds). 5.  Select Roll Down, Manual or Restore to Default  to calibrate resistance unit. 6.  Select Back to access the Menu. Chapter 5: SensorsCalibrating SensorsFor accurate PowerTap and indoor cycle readings, it is important to frequently zero the torque. If the current power display is positive or negative while coasting the torque must be zeroed. This operation must be done while stopped with no tension on the chain, pedals and the the trans-mission icon must be illuminated. For calibration of other power sensor please refer to that sensor manufacturer’s calibration recomendations. Activate Sensor >Name: >  12345 > >  12345 >Weight - lbs: >  12.1 >  1234 >Auto Zero (Y or N): >  Y >>   RUSENSOR1 >Sensor ID: >  60054 >>>>>Delete Sensor >>>>Back<ReportMenuRUSensor1Cancel PairingDelete SensorRU DataCalibration>>Start Pairing>Roll Down>Manual >Reset to Defaults >Sensor ID >Sensor ID >The Gun Show >T o rque O set >Manual Calibration >T o rque O set >BackReportMenuCalibrationPo wer Sensor: 9999 w > >Roll Down CalibrationWheel Circumference >Wheel Circumference >The Gun Show >Auto Zero >Auto Zero >Pair >Roll Down>Manual >Reset to Defaults >Sensor ID >Sensor ID >The Gun Show >T o rque O set >Manual Calibration >T o rque O set >Pair New Sensor >Back<ReportMenuCalibrationPedal to 18-22 MPH >  XX >Hold for (sec):  >  XXX >Current Speed: >  XX.X >T o rque O set >Manual Calibration >T o rque O set >Pair >Completed >Back<ReportMenuRoll DownUse up/down to >match ERU to power >sensor number. >T u :>  XXXXX >ERU Power:> T o rque O set >Manual Calibration >T o rque O set >  XXX >Po wer Sensor:  XXX >Back<ReportMenuManual CalibrationPo wer Sensor: 9999 w > >Roll Down CalibrationWheel Circumference >Wheel Circumference >The Gun Show >Auto Zero >Auto Zero >Pair >Roll Down>Manual >Reset to Defaults >Sensor ID >Sensor ID >The Gun Show >T o rque O set >Manual Calibration >T o rque O set >Pair New Sensor >Back<ReportMenuCalibrationRestoring Defaults >match ERU to power >sensor number. >ERU Power >Completed >The Gun Show >T o rque O set >Manual Calibration >T o rque O set >Completed >Pair New Sensor >Back<ReportMenuReset Calibration
Joule 3.0 User Guide page 31Chapter 5: Sensors1.  Press the MODE button until Menu mode appears. 2.   Select Sensors 3.  Select Sensor (Example: Ashley Race W).4.  Select Delete Sensor5.  Select  Yes to confirm. Note: If deleting an active sensor a new sensor must be selected. Deleting SensorsDeleting sensors when not in use will help to optimize Joule™ efficiency.Activate Sensor >>>  31864 >Wheel Circumference:>02096 >Auto Zero (Y or N): >Y>Auto Zero (Y or N): >Y>>Auto Zero (Y or N):Y>Re-Pair Sensor >Cancel Pairing >Delete Sensor>Calibration >Pair >Pair New Sensor >Back<ReportMenuAshley Race WSensor ID:  Ashley Race WName:>Start Pairing >Power Sensor: >- Ashley Race WCadence Sensor: >>Speed Sensor: >- SpeedSensor1 >Heart Rate Sensor: >- HRSensor1 >RU Sensor >-RUSensor1 >Y>>Auto Zero (Y or N):Y>Re-Pair Sensor >Re-Pair Sensor >Delete Sensor >PT Data >Pair >Pair New Sensor >Back<ReportMenuSensors- CadenceSensor1Select Sensor >Ashley Race W >Sensor ID >Add PowerTap >The Gun Show >To rque O set >To rque O set >To rque O set >>Add IC Power >Add ANT+ >Pair New Sensor >Back<ReportMenuAshley Race WAshley Train W >
Joule 3.0 User Guide page 321.  Press the MODE button until Menu mode appears. 2.   Select Setup Joule™ 3.  Select Date and Time, Display, Memory, Joule™ Mode, Joule™ Data, or Test Mode      to edit desired computer setting. 4.  Select Back to access the Menu. Chapter 6: Setting Up Joule™Setting Up Joule™Setting up Joule™ will allow for editing Date and Time, Backlight, Power/Speed/Cadence Smooth-ing with Zeros,  Memory, End Ride Time, Record Control, Sleep Time, Firmware Version, Odometer and Test Mode.  Date:>  Feb 26 2009 >Time:>>Clock Format: >  12 >Automatic DST: >  On >DST E ective:>  On >>P5ower ZonesHR Zones >Pair New Sensor >Back<Report MenuINTDate & Time  04:55 pmFirmware Version: >  01:00 >Odometer >>Reset Odometer >  90  >Power Avg (sec): >Designed in: >Madison, WI by >Saris Cycling Group >800-783-7257 >>  1Speed Avg (sec): >  1 >Language: >  English >Units: >  English >Pair New Sensor >Back<Report MenuINTCPU Data  512356End Ride Time (min): >>  90Clear Memory >>Clear Ride Memory >  90  >Power Avg (sec): >  1 >Power Zeros: >  With >Cadence Av g (sec): >>  1Units: >  English >Pair New Sensor >Back<Report MenuINTMemory  5Backlight Level:>  2 >Backlight Time (sec): >>Contrast: >  5 >Zero averaging: >   With >Power Avg (sec): >  1 >Cadence Av g (sec): >>  1Speed Avg (sec): >  1 >Language: >  English >Units: >  English >Pair New Sensor >Back<Report MenuINTDisplay  10> Record Control >>Sleep Time: >  1 >Power Avg (sec): >  1 >Power Zeros: >  With >Cadence Av g (sec): >>  1Speed Avg (sec): >  1 >Language: >  English >Units: >  English >Pair New Sensor >Back<Report MenuINTCPU Mode  SpeedFrequency > 057 >Power>>End Ride Time (min): >Start Radio Test  >Stop Radio Test >Designed in: >Madison, WI by >Saris Cycling Group >800-783-7257 >Units: >  English >Pair New Sensor >Back<Report MenuINTTest Mode  3Note: Power smoothing adjusts the  rate at which the displayed metric updates. 1=fastest, 30=slowest. Note: End ride time controls how long Joule waits after no speed is measured before the current ride is automatically stopped saved to history. Note: End ride time controls when the current ride automatically is saved to History and Reports.Note: Record control sets how Joule™ manages recording of data. Speed setting starts recording when speed is present. Heart rate setting starts recording any-time heart is present.
Joule 3.0 User Guide page 331.  Press the MODE button until Menu mode appears. 2.   Select Setup User 3.  Enter Name, Active, Weight Pounds, Height Inches, Date of Birth, Gender, Power      Zones and Heart Rate Zones.  using the joystick to switch letter or number value. 4.  Select Back to access the Menu. Note: TSS calculations use the upper values of the threshold zone. Chapter 7: Setting Up UserSetting Up User ProfileSetting up a user profile is important for Joule™ to display the most accurate information.Name:  >  New User > Active: >  X >Weight - lbs: >  XXX >Height - in: >  XXX >Date of Birth: >  Feb 02 1974 >Gender: >>  MalePo wer Zones >HR Zones >The Gun Show >Auto Zero >Po wer Zones >HR Zones >Pair New Sensor >Back<Report MenuSetup User>>XXXX XXXX>The Gun Show >Auto Zero >Po wer Zones >HR Zones >Pair New Sensor >Back<Report MenuPo wer ZonesZone   Upper Limit1:  Recovery >  123 >2: Endurance >  123 >3:  T hreshold >4: Race Pace >  123 >5: Maximum >  123 >>6:  Supra Max  MAX >  123Name:  >  Jesse >Active (1-5): >  X >Weight - lbs: >  XXX >Height - in: >  XXX >Date of Birth: >  Feb 02 1974 >Gender: >>  MalePo wer Zones >HR Zones >The Gun Show >Auto Zero >Po wer Zones >HR Zones >Pair New Sensor >Back<Report MenuSetup User>>>6:  Supra MaxXXXX XXXX>Gender >The Gun Show >Auto Zero >Po wer Zones >HR Zones >Pair New Sensor >Back<Report MenuHeart Rate ZonesSensors >Setup Joule >Setup User >Workouts >History >Sensors >Main >Exit Menu<ReportMenuMainZone   Upper Limit1:  Recovery >>2: Endurance >  123 >3:  T hreshold >4: Race Pace >  123 >5: Maximum >  123 >>6:  Supra Max  MAX >  123  123
Joule 3.0 User Guide page 341.  Press the MODE button until Menu mode appears. 2.   Select Setup User 3.  Edit Name, Active, Weight Pounds, Height Inches, Date of Birth, Gender, Power      Zones and Heart Rate Zones using the joystick to switch letter or number value. 4.  Select Back to access the Menu. Chapter 7: Setting Up UserEditing User ProfileEdit user profile to reflect changes to weight, power zones, heart rate zones and to ensure the most accurate information.Name:  >  New User > Active: >  X >Weight - lbs: >  XXX >Height - in: >  XXX >Date of Birth: >  Feb 02 1974 >Gender: >>  MalePo wer Zones >HR Zones >The Gun Show >Auto Zero >Po wer Zones >HR Zones >Pair New Sensor >Back<Report MenuSetup User>>XXXX XXXX>The Gun Show >Auto Zero >Po wer Zones >HR Zones >Pair New Sensor >Back<Report MenuPo wer ZonesZone   Upper Limit1:  Recovery >  123 >2: Endurance >  123 >3:  T hreshold >4: Race Pace >  123 >5: Maximum >  123 >>6:  Supra Max  MAX >  123Name:  >  Jesse >Active (1-5): >  X >Weight - lbs: >  XXX >Height - in: >  XXX >Date of Birth: >  Feb 02 1974 >Gender: >>  MalePo wer Zones >HR Zones >The Gun Show >Auto Zero >Po wer Zones >HR Zones >Pair New Sensor >Back<Report MenuSetup User>>>6:  Supra MaxXXXX XXXX>Gender >The Gun Show >Auto Zero >Po wer Zones >HR Zones >Pair New Sensor >Back<Report MenuHeart Rate ZonesSensors >Setup Joule >Setup User >Workouts >History >Sensors >Main >Exit Menu<ReportMenuMainZone   Upper Limit1:  Recovery >>2: Endurance >  123 >3:  T hreshold >4: Race Pace >  123 >5: Maximum >  123 >>6:  Supra Max  MAX >  123  123
Joule 3.0 User Guide page 35Chapter 8: History Previous Rides History mode allows for comparing a previously ridden ride against averages.  History contains three views: previous rides, max and totals. 1. Press MODE button to navi-gate to Menu.  2. Move joystick to up/down to History. 3. Move joystick to up/down to previous rides.4. Previous rides view is select-ing a destined ride date to compare against two week, four week, eight week, six month and twelve month averages. Note: the two week through twelve month average does not include the selected ride. Max view is the max values achieved for each report metric over the average on two week, four week, etc.Total view is the toal values achieved for each report metric over the average on two week, four week, etc.Menu1:26:04 578  KJMainSensor s�>Setup Joul e >Setup User >Wo rkout s >History�><          Exit Menu11:51 A1:26:04 578  KJHistoryPrevious Ride s >Reports-Max >Reports- T o tals ><          Bac k
Joule 3.0 User Guide page 36Chapter 8: History Viewing HistoryAccess all reports in History mode.
Joule 3.0 User Guide page 37No display on computer screen· Computer is asleep – Press MODE or INTERVAL on the computer to wake up the computer.· Computer is too cold- operating temp. is 32 to 110 degrees FahrenheitComputer display is on, but there is no transmission of data.· Hub is asleep - spin the wheel to wake up the hub.· Computer has not “found” the hub. Press and hold MODE and INTERVAL button until “Find” ap-pears on Title Bar. Make sure hub is awake by rotating wheel once.· Batteries need replacement - replace the hub batteries as shown in the maintenance section   of the User GuidePower seems incorrect·Torque value is not zeroed.  To manually zero torque, go to Menu, Sensors, Select Sensor, Calibra-tion. Manual Zero the hub.  Torque is now being displayed. If re-zeroing the torque does not recalibrate the unit, call Saris Cycling Group customer service   at 1-800-783-7257.Speed seems incorrect· Wheel size incorrect -refer to Sensors to enter the correct size in corresponding sensor. Chapter 9: Troubleshooting Joule™
Joule 3.0 User Guide page 38© 2009 Saris Cycling Group, Inc.5253 Verona RoadMadison WI 53711 USATelephone: 800.783.7257 or 608.274.6550Fax: 608.274.1702All rights reserved. No part of this publication may be copied, photographed, reproduced, translated, transmitted electronically or placed on digital media without the prior written consent of Saris Cycling Group, Inc.TrademarksSaris Cycling Group, Inc , Joule™ 2.0, PowerTap and the PowerTap logo, are all registered trademarks of Saris Cycling Group, Inc. All other product, brand, or trade names used in this manual may be trademarks or registered trademarks of their respective owners.ModificationsSaris Cycling Group, Inc reserves the right to make improvements and/or updates to the products described herein at any time without notice.FCC Statement of Compliance:Statement of Compliance for FCC and Industry Canada:“This device complies with Industry Canada and Part 15 of the FCC Rules. Operation is subject to the following two conditions: (1) This device may not cause harmful interference, and (2) this device must accept any interference received, including interference that may cause undesired operation.”The term “IC:” before the radio certification number only signifies that Industry Canada technical specifi-cations were met.Changes or modifications to this device not expressly approved by the party responsible for compliance with FCC regulations (the manufacturer) could void the user’s authority to operate the equipment.Chapter 10: Important Precautions
Joule 3.0 User Guide page 39NOTE: This equipment has been tested and found to comply with the limits for a Class B digital device, pursuant to Part 15 of the FCC Rules. These limits are designed to provide reasonable protection against harmful interference in a residential installation. This equipment generates, uses and can radiate radio frequency energy and, if not installed and used in accordance with the instructions, may cause harmful interference to radio communications. However, there is no guarantee that interference will not occur in a particular installation. If this equipment does cause harmful interference to radio or television reception, which can be determined by turning the equipment off and on, the user is encouraged to try to correct the interference by one or more of the following measures:-- Reorient or relocate the receiving antenna.-- Increase the separation between the equipment and receiver.-- Connect the equipment into an outlet on a circuit different from that to which the receiver is connected.-- Consult the dealer or an experienced radio/TV technician for help.WARNING: Always consult a physician before beginning or modifying any exercise program.Precautions:Keep eyes on the road. Do not become overly engaged with CycleOps Joule™ 2.0 •display. We recommend getting familiar with the computer functions while stationary.•The computer and chest strap are water resistant, not water proof.  Avoid sustained •water contact and do not deliberately place CycleOps Joule™ 2.0 or its components in water or under high-pressure sprays. Avoid spraying the unit directly with solvent mixture.  Do not use thinner or other •solvents to clean parts. Failure to adhere to these precautions may cause premature failure or incorrect opera-•tion of the unit and may void the warranty. Chapter 10: Important Precautions
Joule 3.0 User Guide page 40Battery Warnings:Charge battery at temperature range of 0-45 degrees Celcius. engaged with CycleOps •Joule™ 2.0 display. Do not immerse the battery in water or seawater, and keep the battery in a cool dry •environment during stands by period. functions while stationary.Do not connect the battery to an electrical outlet.•Do not strike or throw the battery against hard surfaces. •Do not transportor store the battery together with metal objects such as necklaces, •hairpins, etc. Do not heat or dispose in fire or water. Do not modify or dissassembly the battery. It •will be dangerrous and may cause ignition, heating leakage or explosion. Do not short-circuit positive (+) and negative (-) teminals. Keep away from metal or •other conductive materials. Jumbling the batteries of direct contact with positive (+) and negative (-) terminals or other conductive materials may cause short-circuit. Do not reverse the positive (+) and negative (-) terminals. •Do not solder the battery directly. Excessive heating may cause deformation of the bat-•tery components such as the gasket, which may lead to the battery swelling, leakage, explosion or ignition. Do not use abnormal cell which has damages by shipping stress, drop short or some-•thing else, and which gives off electrolyte odor. Do not use battery in a location where static electricity is rich, otherwise, the safety •devices may be damaged, causing a harmful situation. If the battery gives off an oder, generates heat or becomes discolored, or in any way •appears abnormals during use,  recharging or storage, immediately remove it from the device or battery charger and stop using it. Do not use sharp things to hit the battery. •Chapter 10: Important Precautions
Joule 3.0 User Guide page 41USB STICKInformation to go here.Image HereChapter 11: Technical Specifications for Joule™
Joule 3.0 User Guide page 42Chapter 11: Technical Specifications for Joule™Interval Data Storage     UnlimitedInterval Display      UnlimitedOperational Temperature    0 to 45 degrees Celsius or 32 to 108 FahrenheitBattery Life      20 hours approx. Battery Type      RechargeableRange of Measurement:Accuracy    +/-1.5%  Signal Transmission      2.4 GhzPower        0-1999 WattsTorque        0-1999 inch-lbs.Speed        2-59 mph (3-95 KPH)Distance        0.00 to 9999.99 (Miles)Trip Time       0.00.00-999.99 MinutesCadence        40-240 RPMTotal energy      0-99999 KiloJoule™sOdometer       0-99999 Miles or Kilometers Heart Rate       0-255 BPM (Beats per Minute)
Joule 3.0 User Guide page 43Chapter 12: Joule™ WarrantyCycleOps Joule™ is warranted to the original retail purchaser to be free from defects in materi-als and workmanship. Warranty coverage is valid to the original purchaser only and proof of purchase will be required.Electronics - 1 yearThis warranty does not cover:1.  Normal wear and tear.2.  Any damage, failure or loss caused by accident, misuse, neglect, abuse, improper assembly, improper maintenance, or failure to follow instructions or warnings in User Guide .3. Use of products in a manner or environment for which they were not designed.LimitationsThe foregoing warranties are in lieu of and exclude all other warranties not expressly set forth herein, whether expressed or implied by operation of law or otherwise, including, but not limited to, warranties of merchantability or fitness for a particular purpose. Saris Cycling Group shall in no event be liable for incidental or consequential losses, damages or expenses in connection with its exercise products. Saris Cycling Group’s liability hereunder is expressly limited to the replacement of goods not complying with this warranty or, at Saris Cycling Group election, to the repayment of an amount of the purchase price of the exercise product in question. Some states do not permit the exclusion or limitation of implied warranties or incidental or consequential damages, so the preceding limitations and exclusions may not apply to.ProceduresWarranty service will be performed by Saris Cycling Group or an authorized Saris Cycling Group Dealer. The original purchaser must provide proof of purchase. Service calls and/or tranation to and from the Authorized Saris Cycling Group Dealer are the responsibility of the purchaser.
Joule 3.0 User Guide page 44Chapter 13: Definition of TermsWatts1. The basic unit of power equal to 1 joule per second. 2. 1 joule of energy release in 1 second. 3. A common unit used to express effort or intensity amongst professional cyclists. Watts per Kilogram of body weight (W/KG)  1. Calculation of watts generated divided by the weight of a cyclist and their bicycle.  2. Normaliza-tion intended to provide a comparison between cyclists of differing body weights.  Training Zones 1. Discrete bins or intervals specific to a particular energy or physiological system. From short maximal efforts to long maximal efforts these energy systems run along a continuum from an-aerobic to aerobic metabolic pathways. Common reference points for this continuum include the power at lactate threshold and power at VO2 max. Zero Watts 1. Time on the bicycle when the athlete is not pedaling or transferring any measurable power output to the pedals or rear hub. For the team captain or leader, accumulating a high percentage of time at zero watts can be extremely important to their ability to conserve energy and maintain reserves for a strong finish. Recovery Zone 1. An easy exercise intensity where there is minimal stress or strain on the body. 2. On a 1 to 10 rat-ing of perceived exertion scale, the recovery zone corresponds to a 1 to 2 or “really easy” to “easy”. 3. On a 6 to 20 rating of perceived exertion scale, the recovery zone corresponds to a 6 to 10 or “very very light” to “very light.”  4. An exercise intensity dependent solely on aerobic metabolism of primarily fat. 5. An exercise intensity that can be held for an indefinite time frame.  Endurance Zone 1. A moderate exercise intensity where there is some stress or strain on the body 2. On a 1 to 10 RPE scale, an intensity corresponding to 3 to 4 or “moderate” to “sort of hard”. 3. On a 6 to 20 RPE scale, an intensity corresponding to a 10 to 13 or “fairly light” to “somewhat hard.” 4. An exercise intensity depending on the aerobic metabolism of both fat and carbohydrate. 5. An exercise intensity that can be held as long as the athlete were supplied with an influx of carbohydrate (i.e., allowed to eat).
Joule 3.0 User Guide page 45Chapter 13: Definition of TermsLactate Threshold (LT) Zone 1. A hard intensity zone marked by a sudden increase in breathing rate. 2. On a 1 to 10 RPE scale, an intensity corresponding to a 5 to 7 or “hard” to “really hard.” 3. On a 6 to 20 RPE scale, an inten-sity corresponding to a 13 to 16 or “somewhat hard” to “very hard”. 4. A range of exercise intensity beginning at a slight inflection or rise in the blood lactate over a resting baseline to an intensity corresponding with a blood lactate 2 to 3 mM above a resting baseline. 5. A demarcation between aerobic metabolism to a mix of anaerobic and aerobic metabolism. 6. An all out exercise intensity that can be held between 40 minutes to 2 hours depending on the availability of stored carbohy-drate or glycogen within the body. Race Pace Zone 1. An extremely hard or all out intensity zone. 2. On a 1 to 10 RPE scale, an intensity corresponding to a 7 to 8 or “really hard” to “really really hard.”  3. On a 6 to 20 RPE sale, an intensity correspond-ing to a 16 to 18 or “very hard” to “very very hard.” 4. An exercise intensity dependent primarily on the aerobic and anaerobic metabolism of carbohydrate. 5. An all out exercise intensity that can be held between 10 minutes to 30 minutes. Max Zone 1. An all out or maximal intensity zone. 2. On a 1 to 10 RPE scale, an intensity corresponding to a 9 to 10 or “really really hard” to “maximal.”  3. On a 6 to 20 RPE scale, an intensity corresponding to an 18 to 20, or “very very hard” to “maximal.” 4. An exercise intensity that elicits the causes the body to reach its maximal capacity to consume oxygen (i.e., an exercise intensity that elicits VO2 max). 5. An all out or maximal effort that can be held between 2 to 8 minutes or an average of 4 minutes. Supra-Max Zone 1. A very short, all out effort that exceeds the power output associated with VO2 max or a person’s max zone. 2. An exercise intensity that is almost entirely dependent on the anaerobic metabolism of stored ATP, Phosphagens, and carbohydrates. 3. An all out effort lasting 1 second to 2 minutes.
Joule 3.0 User Guide page 46Chapter 13: Definition of TermsVO2 Max 1. The maximal amount of oxygen that a person can consume and process measured in liters of oxygen per minute (absolute) or in milliliters of oxygen per minute per kilogram of body weight (normalized to body weight). 2. The upper limit of aerobic metabolism. 3. A strong predictor of endurance performance in a mixed population of individuals. 4. An exercise intensity corresponding with the maximal power output a person can hold between 2 to 8 minutes.  Lactate Threshold 1. An exercise intensity where the production of lactate or appearance of lactate in the blood exceeds the removal or disappearance of lactate from the blood. 2. An exercise intensity charac-terized by a sudden increase in breathing rate or ventilation. 3. An exercise intensity where indi-viduals begin to feel a burning sensation in working muscle. 4. An exercise intensity considered to be hard. 5. An exercise intensity that can be held for a prolonged period of time ranging from 40 minutes to 2 hours. 6. Amongst athletes with similar VO2 max values the power at lactate thresh-old is the strongest predictor of performance. Lactate Threshold Break Point 1. The power output or exercise intensity where blood lactate just begins to increase above its resting baseline. 2. An exercise intensity characterized as somewhat hard. 3. The upper end of the endurance training zone and the bottom end of the lactate threshold zone. 4. An exercise intensity that can be held for 1 to 3 hours or as long as there is available stored carbohydrate or glycogen. Lactate Threshold > 1mM 1. The power output or exercise intensity where the blood lactate is equal to 1 mM above its resting baseline. 2. An exercise intensity characterized as hard. 3. The mid point of the lactate threshold training zone. 4. An exercise intensity that can be held for 1 to 2 hours. Lactate Threshold 4 mM1. The power output or exercise intensity at a blood lactate level of 4 mM or 2 to 3 mM above baseline. 2. An exercise intensity characterized as very hard. 3. The upper limit of the lactate threshold zone. 4. An exercise intensity that can be held for 30 minutes to 1 hour.
Joule 3.0 User Guide page 47Chapter 13: Definition of TermsPeak Sustainable Power or Peak Power 1. The highest average power output that can be held for a given duration. 2. For most individuals a peak sustainable power or peak power output lasting 4 to 8 minutes is equivalent to an inten-sity that elicits their VO2 max, or maximal capacity to consume oxygen. 3. For most individuals a peak sustainable power output lasting 20 to 40 minutes is equivalent to an intensity that elicits their lactate threshold or a value of blood lactate 2 to3 mM above their baseline blood lactate. 4. For most individuals a peak sustainable power output lasting 40 minutes to 2 hours is equivalent to an intensity that elicits their lactate threshold, or a value of blood lactate just above to 1 mM above their baseline blood lactate. 5. In cycling, the peak sustainable power for any given dura-tion is analogous to their best performance for a given time. For example, a runner might have a personal best of 5 minutes in a mile run and 35 minutes in a 10 km run, whereas a cyclist might have a personal best or peak sustainable power of 400 watts for 5 minutes and 340 watts for 35 minutes. Normalized Power 1. An estimate of the power that you could have maintained for the same physiological “cost” if your power output had been perfectly constant.  Intensity Factor (IF)  1. Ratio of normalized power to power output at threshold. 2. A convenient way of comparing the relative intensity of a training session or race either within or between riders, taking into account changes or differences in threshold power. Typical IF values for various training sessions or races are as follows:• Lessthan0.75recoveryrides• 0.75-0.85endurance-pacedtrainingrides• 0.85-0.95temporides,aerobicandanaerobicintervalworkouts(workandrestperiodscombined), longer (>2.5 h) road races• 0.95-1.05lactatethresholdintervals(workperiodonly),shorter(<2.5h)roadraces,criteriums, circuit races, longer (e.g., 40 km) TTs• 1.05-1.15shorter(e.g.,15km)TTs,trackpointsrace• Greaterthan1.15prologueTT,trackpursuit,trackmiss-and-out
Joule 3.0 User Guide page 48Chapter 13: Definition of TermsTraining Stress Score (TSS)  1. Modeled after Dr. Eric Bannister’s heart rate-based training impulse (TRIMPS), takes into account both the intensity (i.e., IF) and the duration of each training session.  The following scale can be used as an approximate guide:• Lessthan150-low(recoverygenerallycompletebyfollowingday)• 150-300-medium(someresidualfatiguemaybepresentthenextday,butgoneby2nd day)• 300-450-high(someresidualfatiguemaybepresentevenafter2days)• Greaterthan450-veryhigh(residualfatiguelastingseveraldayslikely)Kilojoule or Kjoule 1. 1000 Joules. 2. A unit of energy equal to the work done by a force of 1000 newtons acting through a distance of 1 meter.  3. A measure of mechanical energy or the energy released when a force is applied to an object or body. 4. A common unit used to express the total volume or work accomplished during a given workout, ride, or exercise bout. 5. A unit or measure used to express the total training load. 6. The average power output in watts multiplied by the time in seconds divided by 1000. Calorie 1. A unit of energy equal to that needed to raise the temperature of 1 gram or ml of water 1 ˚C. 2. A measure of thermal energy or the energy released when a fuel or substrate is burned. Kilocalorie or Kcal 1. 1000 calories. 2. A unit of energy equal to that needed to raise the temperature of 1 kilogram or liter of water 1 ˚C.  3. A measure of the amount of energy in food 4. On U.S. food labels, 1 Calorie, spelled with a capital “C”, rather than a lower case “c” is equal to 1 Kilocalorie or Kcal. 5. 4.186 Kjoules 6. For a given person, the total energy burned in Kcals is equal to the total Kjoules of work performed on a bicycle divided by 4.186 divided by the percent fraction (i.e., 22% = 0.22) of that person’s gross mechanical efficiency. 7. 1 to 1.2 multiplied by the total Kjoules. Cadence 1. The number of pedal revolutions per minute.
Joule 3.0 User Guide page 49Heart Rate  1. The number of time the heart beats each minute or beats per minute or BPM. 2. Although the heart rate response is reflective of the cardiovascular strain it is by no means always indicative of the metabolic strain or external power output. Maximal Heart Rate1. The highest achievable heart rate during an all out 2 minute to 8-minute effort. 2. The highest heart rate recorded during competition or training. 3. The heart rate associated with the power output at VO2 max. 4. Commonly estimated as 220 – Age. 5. Better estimated as 208 – (0.7 x Age). Velocity 1. The distance traveled in a given time frame normally expressed in meters per second, kilome-ters per hour, or miles per hour. 2. Speed. 3. Power divided by the total resistance impeding move-ment. 4. A function of a cyclist’s power output and all of the forces resisting that cyclist’s forward motion. Rate of Ascent 1. The vertical speed traveled or climbed in feet per hour or meters per hour. 2. The VAM or vertical ascent in meters per hour. 3. A reflection of a cyclist’s power output on climbs steeper than 7% in grade. At an 8% grade, a rate of ascent of 1800 meters per hour requires a power output of 6.3 watts per kg and is considered the upper limit for climbing speed in professional cyclists. Chapter 13: Definition of Terms
Joule 3.0 User Guide page 50Chapter 13: Definition of TermsElevation Gain or Rise 1. The total vertical distance in feet or meters traveled or climbed over a given distance ridden. Percent Grade 1. A measure of the steepness of a climb where a 100% grade or 45-degree road angle is equal to a 1-meter vertical increase in elevation (rise) for each 1-meter traveled horizontally (run).  2. The rise or vertical increase in elevation divided by the run or horizontal distance traveled multiplied by 100 (rise ÷ run x 100). 3. 100 x Tangent (slope).  4. The elevation gain divided by the square root of the actual distance traveled squared minus the elevation gain squared (Elevation Gain / [square root (Actual Distance 2 – Elevation Gain2)]) Shallow Grade or Hill 1. A road with a percent grade between 2 to 4%.Moderate Grade or Hill 1. A road with a percent grade between 4 to 6%Steep Grade or Hill 1. A road with a percent grade between 6 to 8%Wicked Steep 1. Any road, trail, path, climb or mountain greater than 8% in grade. Category 1 to 4 Climb 1. A rating system used to rank the difficulty of a climb that is based on a combination of the length, grade, and location of the climb on the course. A category 1 climb is considered the most difficult while a category 4 climb is considered the least difficult. Hors Category Climb 1. A climb that is so difficult that it is beyond categorization. 2. Any climb longer and steeper than a category 1 climb. 3. The most difficult climb in the Tour de France.
Joule 3.0 User Guide page 51Chapter 13: Definition of TermsRide Time 1. The total elapsed time while moving.  Most calculations (averages etc.) are based on this time vs. the total elapsed time since the ride began or the time spent pedaling.  Distance 1. The length from start to finish along ridden roads measured in meters, kilometers, or miles where 1000 meters is equal to 1 kilometer and 1 kilometer is equal to 0.62 miles.

Navigation menu