Sarotech DVP-260 Multi Media Player User Manual DVP 260 FCC
Sarotech Co., Ltd. Multi Media Player DVP 260 FCC
Sarotech >
User Manual

User Manual
DVP-260
- Before using the product, read carefully the user manual first.
- Carefully read the warning notes and use the product properly.
- Pictures in the user manual are for reference and can be different from the actual product.
- This user manual can be revised for upgrade without prior notice.
Sarotech Co., Ltd.
2
---- Contents ----
- Safety Warnings --- 4
- Application Warnings --- 5
1. Introduction --- 6
2. Main Features --- 6
3. Product Components --- 7
4. User Environment --- 7
5. Product Specifications --- 8
6. Name and Title of Each Part --- 9
6-1. Front --- 9
6-2. Rear Terminal --- 10
7. Method of Hard Disk Mountings --- 11
8. Connection to PC --- 14
8-1. Hard Disk FDISK and Format --- 14
8-2. During the use of Windows ME/2000/2003/XP --- 14
■ Connecting
■ Release of Connection
8-3. During the use of Windows 98/98SE --- 15
■ installation of Drive
■ Connecting, Releasing
3
9. Connection to Video/Audio Equipment --- 16
9-1. Connection of Video Cable --- 16
9-2. Connection of Audio Cable --- 18
9-3. Connection to TV in Stationary or Inslide Vehicles --- 19
10. Usage of Remote Control --- 22
11. Viewing MOVIE/MUSIC/PHOTO --- 23
11-1. File Browser --- 23
11-2. File Play (MOVIE/MUSIC/PHOTO) --- 24
11-3. Watching Movie --- 24
■ Menu during Movie Play
■ Convenient features for watching Movie
11-4. Listening Music --- 26
■ Background Image Change
■ Convenient features for Music Listening
11-5. Watching PHOTO --- 28
■ Menu during watching PHOTO
■ Convenient features for watching PHOTO
11-6. Usage of Play List --- 29
■ PLAY LIST
■ ADD/DEL
■ REMOVE
12. System Setup --- 30
12-1. Video Setup --- 30
12-2. Audio Setup --- 31
12-3. Caption Setup --- 31
12-4. System Setup --- 32
13. Before Service Request --- 34
- Guidance for Customer Registration --- 35
- Warranty -
4
※ User Information
B Class Equipment(Equipment for home use) : This apparatus is for home use and has a radio wave
acceptability registration, so it can be used in all areas.
Safety Warnings
Before using the product, read carefully the user manual first and use the product safely.
- Users may not arbitrarily disassemble or rebuild the product. This may damage the product.
- Do not disassemble the product while the power code is on. This may cause electric shock or fire.
- Do not touch the power plug with wet hands or use damaged power codes or loose outlet. This may
cause electric shock or fire.
- Do not move the product while it is activated. This may damage the hard disk. Only move the
product while the power code is off.
- If users drop the product or provide shock to it, the product and its hard disk can be damaged.
- Do not install the product in places with a lot of dust, direct ray of light, rain and wind, wetness or
high humidity because the product can be damaged.
- Do not install the product near products releasing a lot of heat. The product can break down if it is
stored or left alone at high temperature for a long time. Install the product in a well-ventilated area.
5
Application Warnings
Before using the product, read carefully the user manual first and use the product properly.
- Data in the hard disk can be damaged due to static electricity, awkward usage or defective products.
Therefore, please pay close attention in handling the product. Always back up important data.
Especially, be careful of losing the data as manufacturers have no responsibility on such damage.
- Connect to the outside cable only after turning off the power codes of the product and external
video/audio. This product activates by the multimedia player and external storage equipment that
cannot be activated simultaneously.
- The product activates by the external storage equipment if the USB cable is connected. However, the
product activates by the multimedia player equipment if the USB cable is not connected. To activate
the multimedia player in a stable manner after using the external storage equipment, take out the USB
cable and turn on the power code.
- When exchanging the hard disk, fully dissipate the heat and separate the product. Be careful not to
get burnt from the heat generated from the hard disk when the product is activating.
- The data in the hard disk can be damaged if it is close to magnetic materials such as speakers or
magnets.
- It is possible to repair the hard disk for free if the product has defects. However, the manufacturer is
not responsible for restoring or compensating for the damaged data in the hard disk.
- Pictures and titles in the user manual are prepared based on DVP-260.
6
1. Introduction
DVP-260(hereinafter referred to as ‘abigs’) is a new concept of multimedia player equipment that
connects digital contents (movie, music, photo, etc.) files to external display equipment (household TV,
automobile TV, projector (external video supported), etc.) without a PC. Therefore, users with abigs
can enjoy digital contents from video file, music file and picture file.
Users can also conveniently use abigs as an USB 2.0 external storage in connection with the PC.
2. Main Features
- Users can play various movie/music/photo files downloaded from the PC on TV (HDTV).
- Users can easily listen to the audio by supporting the analogue 2ch stereo output or connect to
external audio equipment and enjoy live music by supporting digital audio output (optical/coaxial).
- Users can upgrade the firmware in a simple and convenient way.
- Users can listen to the audio without cable by supporting a FM transmitter.
- Users can use the product without a remote control by embedding the main switch.
- Users can see the operation status by embedding the main LED.
- Users can easily install the hard disk.
- Users can store the data at high-speed by supporting the USB2.0 external storage feature.
7
3. Product Components
1) abigs
2) Remote control (battery included)
3) AV cable (composite video, stereo sound)
4) S-Video cable
5) Component cable
6) DC adapter (DC +5V, 2A)
7) USB cable
8) User manual
9) Fixed bolt
10) CD (driver installation)
11) Coaxial adapter
12) Product stand
* Please check the components after purchasing the product. Components can be changed according
to their features.
* Users should pay extra for the external remote control receiver, vehicle power adapter, vehicle stereo
cable and optical/coaxial cable besides the basic components.
4. User Environment
1) PC or MAC of more than 586 Pentium 2
2) Equipment with USB port availability
- If the user connects the USB 2.0 product to the USB 1.1 Host Adapter, it will run at USB 1.1 speed/
(12Mbps).
- If user wants to use the speed of USB2.0(Max.:480Mbps), you should use a USB2.0 Host Adaptor in
Computer.
3) Using a 2.5” hard disk with a volume of more than 6GB is recommended.

8
5. Product Specifications
Movie AVI(Divx 3.x/4.x/5.x, Xvid), ISO, IFO, DAT, MPG, VOB
Music MP3, OGG Vorbis, WMA, AC3, PCM(WAV)
Picture JPEG
Support file format
Subtitle SMI, SRT, SUB
Main chip set EM8511 (sigma design)
Video output
Composite
S-Video
HD Component (Progressive output support: 480i, 480p, 576i, 720p,
1080i)
Audio output
Analogue 2ch
Digital audio output (Optical/Coaxial) (DTS pass though)
Usable frequency: 88.1/88.5/88.9MHz(400KHz, Number of channels: 3)
FM transmission output Communication method: one-way communication
HDD Type 2.5" IDE HDD (separate)
File format system FAT32, NTFS
Interface USB 2.0
Transmission speed 480Mbps at maximum
Support OS Windows 98/98SE/ME/2000/2003/XP
More than Mac OS 9.0 or more than Linux 2.4
Size 135(W) X 80.3(L) X 22(H)
Weight 130g(HDD excluded)
Material Aluminum, ABS
DVP-260 Basic specifications Model
DVP-260Vx Basic specifications + Wireless AV transmitter
* Reference
The product specifications can differ according to the built-in drive.
9
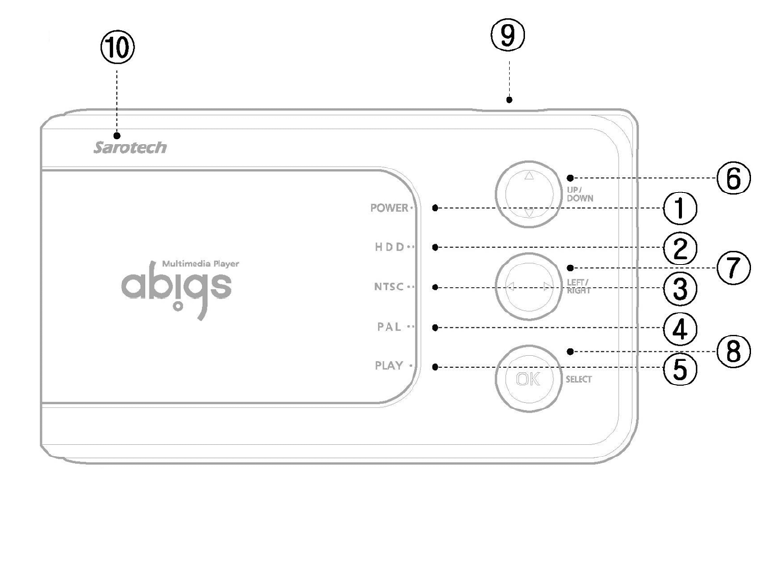
6. Name and Title of Each Part
6-1. Front
1. POWER LED: If users press the “I/O” switch from the main frame, power will be supplied and the
power lamp will be lightened up.
2. HDD LED: The hard disk lamp will lightened up when the hard disk activates.
3. NTSC LED: It will be lightened up when the TV method is set as NTSC state.
4. PAL LED: It will be lightened up when the TV method is set as PAL state.
5. PLAY LED: It will be lightened up when the movie, music or picture is played.
6. UP/DOWN SWITCH: Users can use this switch to move the subtitle location and menu item up and
down.
7. LEFT/RIGHT SWITCH: Users can use this switch to play the screen forward/backward rapidly or
move the menu item right and left.
8. SELECT SWITCH: If users press either the movie play button or the menu selection button, it will be
played. If users press it once again, it will go back to the menu item.
9. I/O SWITCH: This is a power on/off switch.
- ON: If users press the “I/O” switch one time with the switch off, power will be turned on.
- OFF: If users press the “I/O” switch for about two seconds with the switch on, power will be turned
off after about three seconds.
10. REMOTE CONTROL RECEIVER: This is a receiver of remote control signals. Remote control signals
will be received correctly if the remote control activates while facing the front side of abigs main frame.
10
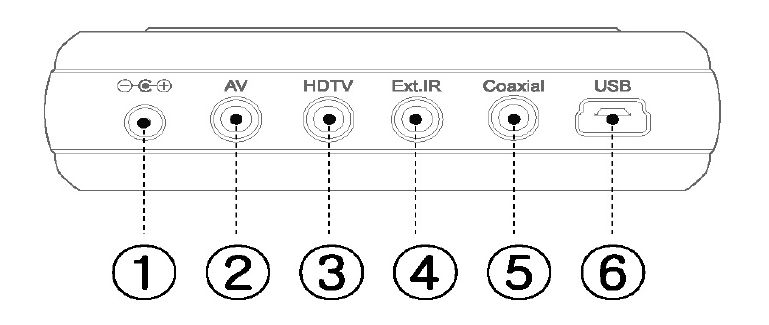
6-2. Rear Terminal
1. POWER TERMINAL: This is a terminal that inputs DC +5V. 2A power. (Dedicated AC power adapter
or dedicated vehicle power adapter is used.)
* Warnings
Press the “I/O” button with the power on. If the remote control doesn’t activate during play time or the
system goes out of service, turn off the power with the “I/O” switch (if users press the switch for two
seconds, the power will be turned off after three seconds.) from the main frame or turn off or remove
the power with the “POWER” button from the remote control and make connection again.
If users cannot solve the problem, please make inquiry to the customer service center.
2. AV TERMINAL: This is a terminal that connects the composite (CVBS) cable. AV terminal outputs the
composite video signal and stereo audio signal.
3. HDTV TERMINAL: This is a terminal that connects the composite video cable or S-Video image
cable. HDTV terminal is a terminal that outputs the composite (YPbPr) video signal or S-Video image
signal.
4. Ext.IR TERMINAL: This is a terminal that is connected to an external remote control receiver.
5. Coaxial TERMINAL: This is a terminal that connects the coaxial/optical cable. Coaxial terminal
outputs digital audio signals.
6. USB TERMINAL: This is used for PC and data transmission and reception.

11
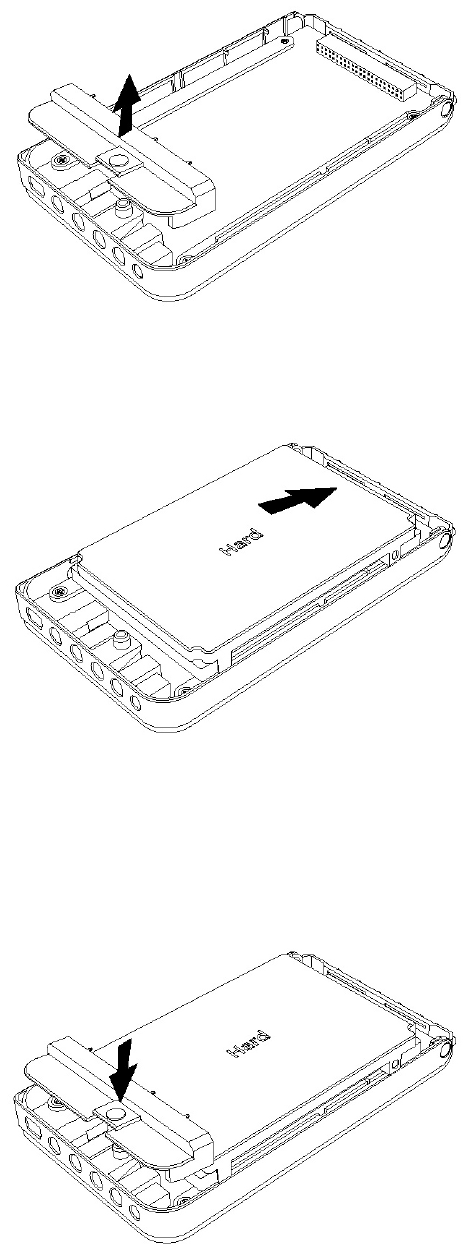
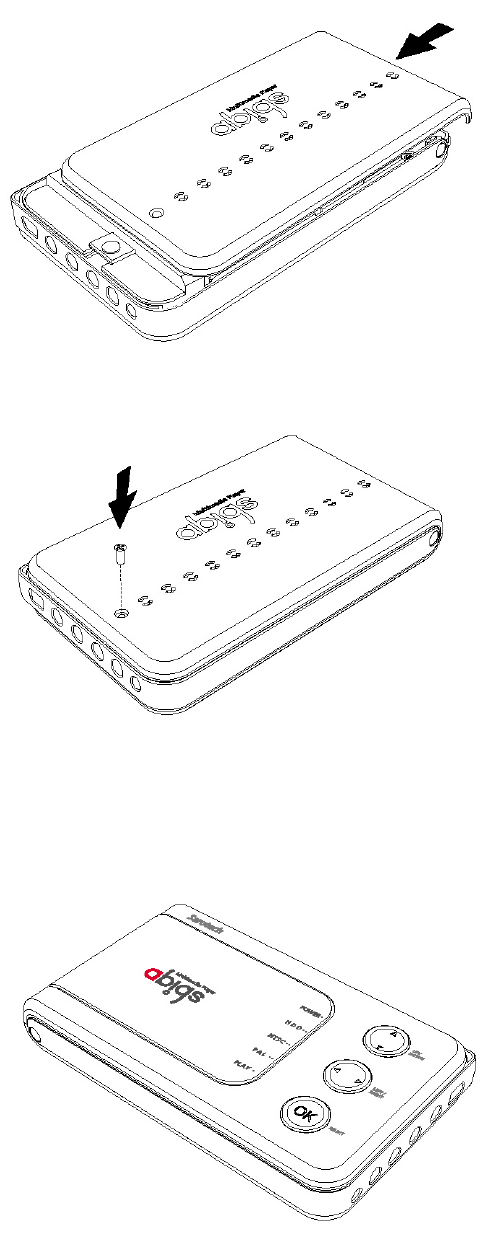
7. Method of Hard Disk Mountings
1. Remove the screw from the bottom in the arrow direction.
2. Push the bottom case to the side in the arrow direction.
3. Separate the bottom case upwards in the arrow direction.
12
4. Separate the hard fixed fixture upwards in the arrow direction.
5. Connect the hard disk to the 44 pin connector in the arrow direction. Assemble the hard disk and
connector based on No. 1 pin.
* Warnings
The 4 remaining pins on the left of the hard disk is for setting Master/Slave. Therefore, these are not
connected to the product.
6. Assemble the hard fixed fixture to the combined hard disk and product as shown.
13
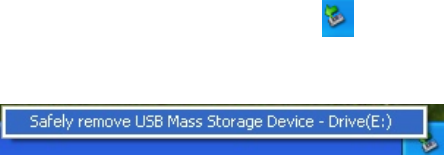
7. Assemble the upper case in the direction as shown.
8. Assemble the separated screw as shown.
9. The mounting of hard disk is completed.
14
8. Connection to PC
The following teaches how to connect abigs to external storage equipment and use it.
Consider watching a movie in connection with the external TV while abigs is activating. If users
connect the USB cable, it will activate as external storage equipment. As a result, users cannot see the
screen from the external TV. If users want to end the use of external storage equipment and watch the
movie again, turn off the power, remove the USB cable and turn on the power again. If abigs doesn’t
activate, connect the USB cable so that abigs can automatically activate as external storage equipment.
If users remove the USB cable, the power will be automatically turned off.
* Warnings
Please turn on the power before using the external storage equipment in connection with the PC.
Sometimes, abigs doesn’t activate with a USB power depending on the hard disk. In this case, the
hard disk can be damaged.
8-1. Hard Disk FDISK and Format
1. A new hard disk, which is assembled on abigs, cannot be automatically recognized. In this case, it
is necessary to conduct FDISK and Format work. Refer to the file,
“/FDISK&FORMAT/fdisk&format(ENG).pdf” in the provided CD. Download is possible from the abigs
website. (http://www.sarotech.com)
2. Set the partition information as “Main Partition(P)”. If users set the partition information as logical
partition or extended partition, the movie cannot be played in connection with the TV.
* Reference
Hard Disk 2 Partition Support
Support two partitions. If there are two partitions, the first one is expressed as /hd1/ and the second
one as /hd2/. If there is one partition, /hd1/ becomes the top level folder.
8-2. During the use of Windows ME/2000/2003/XP
It is automatically recognized in Windows without a separate driver.
■ Connecting
1. Connect power to the product.
15
2. In case of connection PC and abigs with a USB cable, a new driver will automatically be created in
[My Computer].
Now, users can read or use various files or folders in this drive.
■ Release of Connection
Press the USB connection icon ( )at the right side and bottom of the Windows program with the
mouse left button and select “drive removal”.
After the process has successfully taken place, a message allowing the separation pops up. Users can
then separate PC and abigs.
8-3. During the use of Windows 98/98SE
Installation of a dedicated driver is necessary in Windows 98/98SE.
■ Installation of Drive
Run the “/USB Driver₩DVP-260₩Windows 98/Setup.exe” in the provided CD.
Select “Next” in the installation wizard window. Continue to select “Next” that appears in each window.
Select “Complete” in the window that confirms the completion. Now, the driver has successfully been
installed.
1. Connect the power.
2. If users connect the PC and abigs with a USB cable, a new drive will automatically be created in [My
Computer]. Users can then read and use various files and folders in the drive.
■ Connecting, Releasing
The method of connecting and releasing is similar to that in Windows ME/2000/XP. Please refer to the
relevant explanation.
16
9. Connection to Video/Audio Equipment
The following teaches how to use the abigs by connecting it to external video/audio equipment. Users
can watch and listen to both video and sound only after connecting the video cable (refer to 9-1) and
the audio cable (refer to 9-2).
9-1. Connection of Video Cable
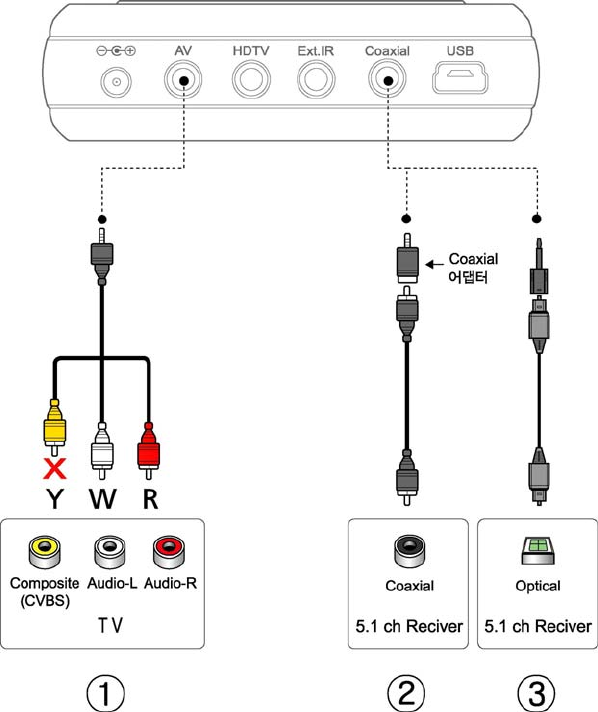
Connect the product to the TV(composite terminal, component terminal, S-Video terminal). If users
want to watch the video, connect the provided video cable as shown in picture 1.
If users should connect the audio cable (refer to 9-2) in order to listen to the sound.
Picture 1
17
1) Connect the power
2) Connect the provided video cable to the abigs and TV.
① Connection of composite video
Connect the product to the composite video terminal of TV. If users want to watch movie, connect the
AV terminal of abigs and the composite terminal (yellow terminal) of TV as shown in ① of picture 1.
② Connection of component video
Connect the product to the component terminal of TV. If users want to watch movie, connect the HDTV
terminal of abigs and the HDTV terminal of TV (green, blue, red terminals) as shown in ② of picture 1.
③ Connection of S-Video
Connect the product to the S-Video terminal of TV. If users want to watch movie, connect the HDTV
terminal of abigs and the S-Video terminal of TV as shown in ③ of picture 1.
3) Turn on the TV power and set the video input of TV as same as the video output of abigs.
4) Press the “I/O”switch at the side of main frame or “Power” button from the remote control.
18
9-2. Connection of Audio Cable
abigs supports the analogue audio output (composite cable audio signal), digital audio output
(Coaxial/Optical) and FM audio output (FM antenna). To watch the video, users should connect the
video cable (refer to 9-1).
Picture 2
1) Connect the power.
2) Connect the audio cable to the TV or audio equipment.
* Reference
Users should pay extra for the optical/coaxial cable besides the basic components.
① Connection of analogue audio cable
Connect the abigs to the analogue audio input terminal of TV or audio equipment. If users want to
listen to the audio, use the composite cable (red, white terminals) to connect the AV terminal of abigs
and the stereo audio terminal of TV as shown in ① of picture 2.
19
② Through FM radio
If users want to listen to the audio through FM radio, basic frequencies for FM sending features are
88.1/88.5/88.9MHz, which are forward as 88.9MHz from the factory.
* Warnings
Raise the abigs sound output properly to the mid level and control the radio volume. If the tone is
distorted, control the abigs sound output value.
③ Connection of digital audio coaxial cable
The following is the method of connecting the abigs to the digital audio coaxial input of external audio
equipment. Connect the coaxial cable to the coaxial input terminal of external audio equipment by
using the coaxial adapter as shown in ② of picture 2.
④ Connection of digital audio optical cable
The following is the method of connecting the abigs to the digital audio optical input of external audio
equipment. Connect the optical cable to the optical input terminal of external audio equipment as
shown in ③ of picture 2.
* Warnings
Users can listen to the audio file, which is recorded in DTS format, by using the audio equipment,
which contains the decoder features. (refer to 5.1)
3) Press the “I/O” switch at the side of main frame or “Power” button from the remote control.
4) To see the screen, please refer to the connection of video cable (refer to 9-1).
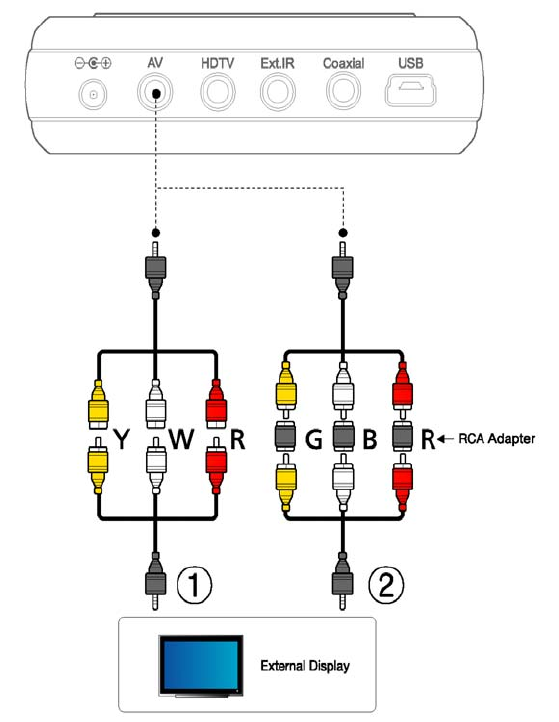
9-3. Connection to TV in Stationary or Inslide Vehicles
To connect the abigs to the TV in stationary or inslide vehicle, users need a dedicated cable for vehicle
TV provided by the vehicle TV manufacturer, main frame of abigs, composite vehicle cable or standard
composite cable, and vehicle adapter. Users also need an extra vehicle operation pack.
20
Picture 3
※ Warnings
1. Users must have the cable provided by the TV manufacturer when connecting to stationary or inslide
vehicle. If the user lost the cable, purchase one from the TV manufacturer or purchasing place.
2. If the user has an external AV terminal for stationary or inslide TV, follow the below procedures.
However, if the user doesn’t have an external AC terminal, purchase one from the TV manufacturer or
purchasing place.
3. Some genuine products don’t have an external AV input terminal. In this case, please make inquiry
to the automobile manufacturer before purchasing the product.
Picture 3 shows how to make connection to the vehicle TV.
1) Connect the dedicated AV cable for TV provided by the TV manufacturer to the vehicle TV.
2) Use a composite vehicle cable on the AV port in abigs main frame as shown in ① of picture 3. To
use the abigs standard composite cable, users need a RCA adapter as shown in ② of picture 3.
3) Connect each cable with the right color.
21
* Reference
Users can listen to the abigs audio signals through the vehicle amp in connection with the car pack.
4) Supply power by connecting the vehicle adapter to the abigs.
5) Press the “I/O”switch from the main frame or “Power” button from the remote control.

22
10. Usage of Remote Control
* Reference
Refer to the 11. Viewing “MOVIE/MUSIC/PHOTO” for convenient use of the remote control
23
11. Viewing MOVIE/MUSIC/PHOTO
* Reference
Part of the features or method of usage can be different according to the firmware version.
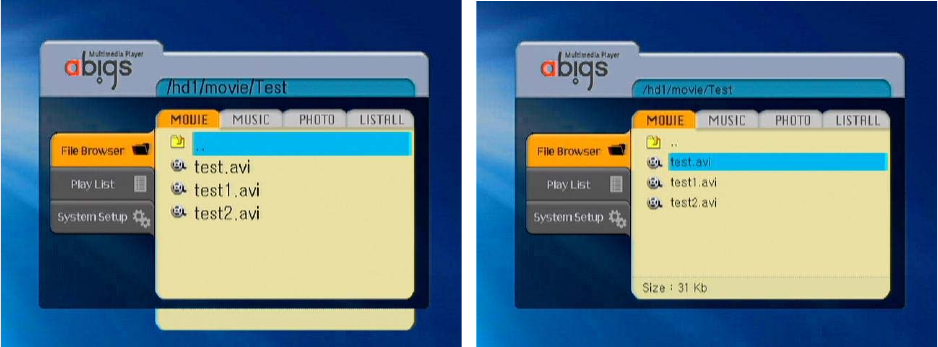
11-1. File Browser
1. The file name is clearly displayed from the [File Browser] and [Play List].
If you press the “ZOOM” button from the remote control on the [File Browser] and [Play List], the
letter size will change as shown.
2. Previous Folder Movement Feature
If the user presses the “STOP” button while moving from the current folder to the upper folder, the
screen moves to the last upper folder.
If the user presses the “STOP” button at the current location of “/hd1/folder1/folder2/”, the screen
moves to the “/hd1/folder1/” folder.
3. Movement of [File Browser] Page Unit
If you click the “▶▶|” button from the [File Browser], the screen moves from the current file item to
the next page.
If you click the “|◀◀” button from the [File Browser], the screen moves from the current file item to
the previous page.
24
11-2. File Play (Movie/Music/Photo)
Press the “▲,▼” button to move to [File Browser]. Press the “OK” button for selection.
Press the “◀,▶” button from the [File Browser] screen to move to the
[Movie]/[Music]/[Photo]/[Listall] items. Only the relevant files of the selected item are displayed on
the screen. If the user selects the [Listall] item, all files are displayed.
Press the “▲,▼” button to select the play file.
Press the “▶▌▌” or “OK” button to play movie, music or picture.
Press the “MENU” button during play time to see the menu screen.
11-3. Watching Movie
■ Menu during Movie Play
Press the “MENU” button to see the menus. Use the “▲,▼” button to select the detailed items.
Select the detailed item.
Press the “OK” button to designate the detailed item. (The letter color of the detailed item changes)
Use the “◀,▶” button to input the value. Press the “OK” button to apply the changed details. (The
letter color of the detailed item returns)
Press the “MENU” button again to close the menu screen.
1. Play Information
Information of the currently played file is displayed. The current play time and total play time are
displayed.
2. Subtitle Change
Select the subtitle location, size, on/off, color and language.
3. Screen Size
Users can expand or reduce the screen size.
4. Screen Setting
Users can change the screen brightness, color and gradation.
25
■ Convenient features for watching Movie
1. BOOKMARK
This feature stores the current location being played. Users can use the bookmark feature when they
are turning off and on the power or working on other menus and returning to the move they were
previously watching.
-Registration: Press the “B/M” button at the required location during file play time. The last registered
location is only remembered.
-Play: Press the “B/M” button when the file is not played. The previously registered movie is
automatically played.
* Warnings
The final play file is recognized only if the power has successfully been turned off. In case of movie file,
the play location is also stored. In case of music file, the play location is not stored.
2. ZOOM
At every one click, the screen is displayed based on the methods of letter box and pan & scan. The
letter box method doesn’t show part of the vertical axis to display the entire video on TV. Pan & scan
method properly cuts and shows both side of the horizontal axis to display the entire vertical screen of
the video on the TV.
If users press the “ZOOM” button from the avi and mpg, the settings of letter box, ZOOM and pan &
scan will change in order. Users can use “▲”,”▼”,”◀”,”▶” buttons under the ZOON state to expand
or reduce the screen size. After setting the required screen size, press the “OK” button.
If users press the “ZOOM” button from the iso and ifo, the screen will expand in order of ZOOM1,
ZOOM2, ZOOM3 and ZOOM OFF.
3. SCROLL
This feature is used to move the entire screen location.
Press the “SCROLL” button once and use the “◀,▶,▲,▼” button to move the screen location.
4. +Skip, -Skip
This feature is used to move the played video 5 minutes forward or 5 minutes backward.
5. Audio Change
If the user press the “Audio” or “0” button from the remote control while playing 2 AVI files, the audio
changes.
26
6. Double Speed Play
Whenever pressing “◀”,“▶” buttons from the remote control while playing AVI files, the double speed
play will take place with the indications of high-speed play 4, high-speed play 8, high-speed play 16,
high-speed play 32, high-speed backward play 4, high-speed backward play 8, high-speed backward
play 16 and high-speed backward play 32”.
7. ISO File Play Features
Users can play the ISO file of DVD format.
Select the file with the iso extension from the [Movie] menu of [File Browser].
* Reference
Users can only play the DVD made in ISO file. Other normal data in ISO format cannot be played.
8. Repeat Play Features
The “REPEAT” button is used to repeatedly play one movie file during play time.
11-4. Listening Music
■ Background Image Change
If there is a jpg file with the name same as that of the music file (extension excluded) in the same
music play folder, use the jpg file for the background screen image.
If there is no jpg file with the same name but only the /mymusic/background.jpg file, use this file for
the background screen image.
If there is neither the jpg file with the same name nor the /mymusic/background.jpg file, use the basic
background screen image.
* Warnings:
Create the background screen in 720 x 480. In case of designating the resolution above that level, the
basic screen will be played.
■ Convenient Features for Music Listening
1. Play Music without TV Image
This feature is used to play the music without a TV.
Press the “I/O” switch from the main frame or the “Power” button from the remote control. If users
27
press the “MUSIC” button after the power lamp is on the main frame and the NTSC(PAL) LED is
lightened up, the entire music file in “/mymusic” folder of the hard disk will be played.
Users can create a “mymusic” folder in the hard disk root folder and store music files.
2. File Search during Music Play
If users press the “MENU” button during play time, the screen for file search appears. Users cannot
use this feature with the “MUSIC” button during play time.
Press the MENU button to close the search window.
3. MP3 ID3Tag Information
The signer name, album name, music explanation and genre are displayed. If users press the “INFO”
button during MP3 play time, the relevant information appears.
This feature is not supported if the file search window appears during music play time.
4. Display of MP3, WMA, OGG Play Information
This feature displays the bitrate, sampling frequency and total play time during music play time. If users
press the “INFO” button during music play time, the relevant information appears.
This feature is not supported if the file search window appears during music play time.
* Warnings
The total play time can be different from the actual time in case of OGG. Information can not be
displayed in case of some music files.
5. Slide Show Support during Music Play
This feature displays the slide show by designating the required picture folder during music play time.
To designate the picture folder, press the “MENU” button during music play time, search the required
folder and press the “Picture” button.
After the required picture folder is designated, press the “MENU” button once again and close the
search window. Then, press the “Picture” button to start the slide show.
To stop the slide show, press the “Picture” button once again. Press the “Picture” button again to
restart the slide show.
The time intervals of the slide show are same as those set in the menu.
6. REPEAT, RANDOM Button Features
The “REPEAT” button is used during music play time to repeatedly play one music file.
The “RANDOM” button is used during music play to randomly play music files in the same folder.
28
7. Movement of Sub-Folder Unit in “mymusic” Folder
Turn the power on. If users press “◀”,“▶” buttons with the “MUSIC” button during music play time,
the music files in the sub-folder of mymusic folder will be played.
Users press the “◀”button to move to the previous folder, and the “▶” button to move to the next
folder. Folders are moved from “mymusic” folder to the next sub-folders in order.
If there is no music file in the sub-folder as a result of pressing “◀”,“▶” buttons during play time, the
screen moves to the next folder.
Users can only move the folder right below “mymusic” folder. (Ex: /mymusic/folder1,
/mymusic/folder2)
Files in subfolder2 cannot be played if the folder is set as /mymusic/folder1/subfolder2/.
11-5. Watching PHOTO
■ Menu during watching PHOTO
If users press the “MENU” button during Photo file play time, menus appear. Use the “▲, ▼” button to
move to the detailed items for setting. Press the “OK” button for selection and change the setting
value with the “◀, ▶” button.
1) Play information
Indicate the information of the currently played file.
2) Screen size
The file size can be expanded or reduced.
3) Screen settings
The screen brightness, color and gradation can be changed.
4) Slide
Set the time intervals between slides as 1, 3, 5, 7, 9 seconds.
5) Screen rotation
The screen can rotate at an angle of 90, 180, 270 degrees and come back.
■ Convenient features for watching PHOTO
* Slide feature on/off
Users can watch the slide show at the prescribed time intervals.
Users can set or release the slide on/off features by pressing the No. button “0” from the remote
control.
29
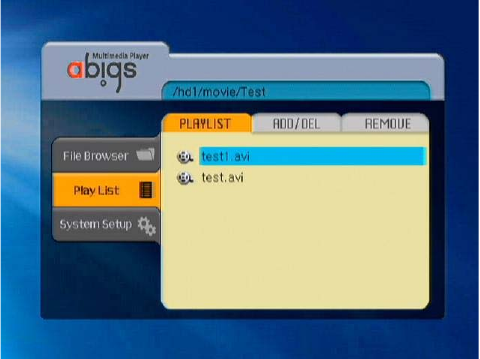
11-6. Usage of Play List
Press the “MENU” button or the “◀, ▶” button. Use the “▲, ▼” button to move to the [Play List].
Press the “OK” button for selection. Press the “◀, ▶” button from the [Play List] screen and select
the [Play Order].
Press the “▲, ▼” button to select the movie file.
Press the “▶▌▌” button to play the movie.
* Reference
Users can only use the play list feature for movie files.
■ PLAY LIST
Press the “◀, ▶” button from the[Play List] screen to select the [Play List ].
Press the “▲, ▼” button to select the movie file that the user wants to play.
Press the “OK” button to select the file that the user wants to move. (The left icon activates)
Press the “▲, ▼” button to select the location that the user wants to move. (The selected file move at
the same time)
Press the “OK” button to apply the current location. (The icon returns to its original state)
■ ADD/DEL
Press the “◀, ▶” button from the [Play List] screen to select the [ADD/DEL].
Press the “▲, ▼” button to select the file that the user wants to add from the play list.
Press the “OK” button to add the file to the play list. (Checking is indicated)
Press the “OK” once again to delete the file from the play list.
30
■ REMOVE
Press the “◀, ▶” button from the [Play List] screen to select the [REMOVE].
Press the “▲, ▼” button to select the file that the user wants to delete from the play list.
Press the “OK” button to delete the file from the play list.
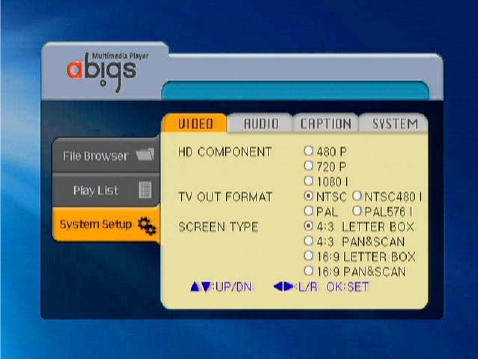
12. System Setup
* Reference
- Some setting items can be different according to the firmware version.
- Support features can be different according to the product model. Please use the product after
checking its specifications.
Press the “MENU” or “◀, ▶” button. Use the “▲, ▼” button to move to the [System Setup] menu.
Press the “OK” button to select the [System Setup].
Press the “◀, ▶” button to select one of the [ViIDEO]/[AUDIO]/[CAPTION]/[SYSTEM] menus.
Press the “▲, ▼” button to select the detailed setting item.
Press the “OK” button to make or cancel the checking.
12-1. Video Setup
1. HDTV, TV out Format
This item selects the TV type.
31
* Warnings
This item doesn’t appear on the screen if it is wrongly set. In this case, slowly press the “T/O(TV
OUT)” button from the remote control for several times until the normal screen appears. The TV out
Format will automatically be changed before output.
2. Screen Type
Users can select the “Screen Type” to see the video in letter box or pan & scan format.
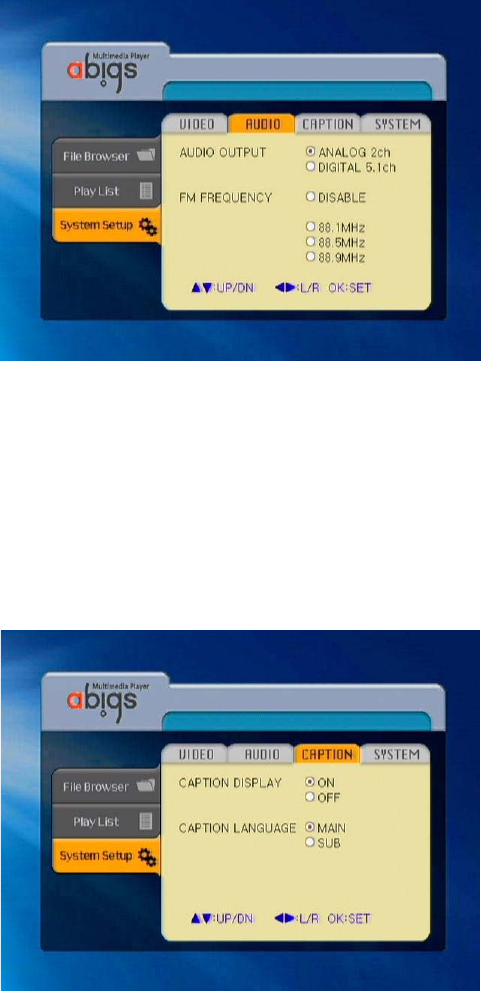
12-2. Audio Setup
1. Audio Output
Users can select one between analogue 2ch (stereo) and digital 5.1ch method.
2. FM Frequency
Users can set the operational frequency of FM transmitter.
12-3. CAPTION Setup
32
1. CAPTION Setup
Users can select Caption on / off
2. Caption language
If there are two Captions, users can select one of them.
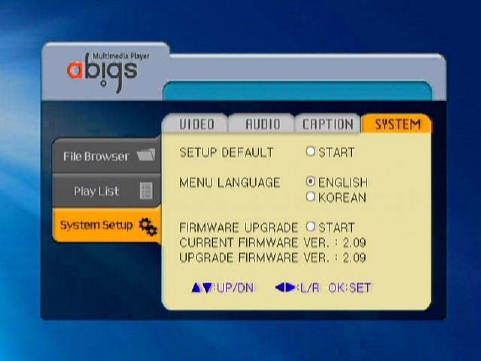
12-4. System Setup
1. SETUP DEFAULT
This feature is used to initialize the system into the factory version.
2. MENU LANGUAGE
This feature is used to select the language from the menu.
3. Firmware Upgrade
This feature is used to upgrade the firmware.
“Upgrade Firmware Version” indicates the “/update/update.bin” file version in the hard disk.
“Current Firmware Version” is a firmware version of the currently operated abigs system.
* Warnings
Do not turn off the power during firmware upgrading. Or else, the product will not activate successfully.
Make sure to turn off the power after the firmware upgrade is completed.
- Firmware Upgrade Method
1) Connect the abigs to the PC.
2) Create the “/update” folder in the abigs hard disk.
3) Download the update.bin file from the abigs homepage and save it in the “/update” folder.
33
4) Remove the abigs from the PC and turn on the power by connecting the abigs to the TV.
5) Move to the [SYSTEM SETUP]/[System] screen and press the “▲, ▼” button and the “OK” button
from the “Start the Firmware Upgrade” item.
6) Press the “▲, ▼” button from the reconfirm message window and move to the “Yes” location. Press
the “OK” button to see the window for upgrade. The firmware upgrade will begin.
If users want to cancel the firmware upgrade, press the “OK” button from the “No” location.
7) After the firmware upgrade is completed, abigs automatically restarts.
* Reference
If the “Upgrade Firmware Version” is higher than the “Current Firmware Version”, start the upgrade.
34
13. Before Service Request
Read the following matters before making a request for service. Please contact the customer service
center if necessary.
1. Hard disk is not being read.
Check the hard disk cable and the jumper (Master, Slave) setting. If the operation system is windows
98, users must install a separate driver. In case of using a new hard disk, users must create a format
with the partition. Please refer to “HARD DISK FDISK and FORMAT” in User Manual, 8-1.
2. Video file is not being played.
Video file with an unsupported CODEC cannot be played. Users can figure out whether the CODEC is
being supported from the test program or use the media conversion program to convert the file.
3. Subtitle is not being displayed during video play time.
Check it the video file and subtitle file have the same name. If the file names are different, users
cannot see the subtitle.
4. Screen is not being shown during TV connection.
Check the cable connection state between the product and TV. The product’s TV output state and the
external equipment’s input state must be equal. After checking the external equipment’s input state,
press the TV OUT button from the remote control and set the external equipment’s input state as same
as the product’s TV output state.
5. Screen is being displayed with no sound.
Check the external TV’s input terminal. The video input terminals of external equipment such as the
composite, component and S-Video have separated audio inputs. Check it the video and sound inputs
are properly connected.
6. The temperature of the main frame is high during use.
This product uses the hard disk and contains aluminum material in the main frame. Therefore, heat
occurs when the product is running. It is a normal operation, so do not worry.
7. The remote control is not working.
If the remote control receiver is covered, the remote control signal cannot be inputted. Therefore, be
careful not to shield the remote control receiver. Remote control signals can be influenced by external
fluorescent, lamp or signals from low frequency equipment.

35
Guidance for Customer Registration
Thank you for using our company’s product.
To fully reflect precious opinions from customers and offer improved products, perfect technical
support and A/S, we have prepared a registration column for online customers.
■ Registration method: Log on the abigs website (http://www.sarotech.com) and click ‘Customer
Registration’ at the upper right side of the main screen. After preparing the online customer registration
card, you will become a member of our company. Previously registered members should key in their E-
main address and password, and make customer suggestions.
■ After the E-mail address and customer name are inputted, you will be registered as our customer
and have the privilege to receive all kinds of information of new products or planned events at all times.
Also, you will able to receive technical support and A/S easier.
- Warranty
Product Name Model Name
Serial No Purchasing Date day/month/year
Customer Name
Tele.
No. Address
Purchasing
Place
Tele.
No. Address
■ Term of Product Guarantee – 1 year
The free guarantee term will be counted from the purchasing date, so make sure that the purchasing
date is mentioned. (If the purchasing date is not identified, the quality guarantee term will be counted
from the date after 3 months from the manufacturing date.)
■ Free Service
You can receive free service for troubles or defects on the product’s performance or function within
one year (product guarantee term) from purchase.
If there is any major quality defect on the product within 14 days from purchase, we will exchange or
refund the product.
■ Paid Service
- If the product was broke down because of the customer’s mistake

36
- If the product was broke down because of the customer’s careless handling, repairing or
reconstructing
- If the product was broke down because of the repair by a third person other than the salesperson or
service center deliveryman
- If the product was broke down or damaged because the customer dropped the installed product
while moving
- If the product was broke down because the power outlet had a problem or the connector were
defective
- If the product was broke down because of natural disaster (fire, damage from salt water, flooding)
If the product is not broken down, customers can pay for the service fee. Therefore, carefully read the
user manual beforehand. (Cases of impossible repair follow a separate standard.)
■ If the product is broken down, contact the customer support center or the purchasing place.
Guidance for Certification Indication
Name of the certified company: Sarotech Co., Ltd.
Equipment name: Multimedia Player (Extremely Low Electric Field Strength Wireless Equipment)
Model name: DVP-260
Manufacturing date:
Manufacturing company: Sarotech Co., Ltd.
Manufacturing country: Korea
Identification code of the certified party: SRT
Sarotech CO.,LTD
http://www.sarotech.com
support@sarotech.com
Rev 1.0(E)