Sarotech NHD-355 Network Storage User Manual Manual
Sarotech Co., Ltd. Network Storage Manual
UserManual.wiki
>
Sarotech
>
NHD-355 User Manual
>
Users Manual 1 of 2
Contents
1.
Users Manual 1 of 2
2.
Users Manual 2 of 2
Users Manual 1 of 2
Navigation menu
Upload a User Manual
Namespaces
Wiki Guide
HTML
PDF
Info
Views
User Manual
Discussion / Help
Navigation
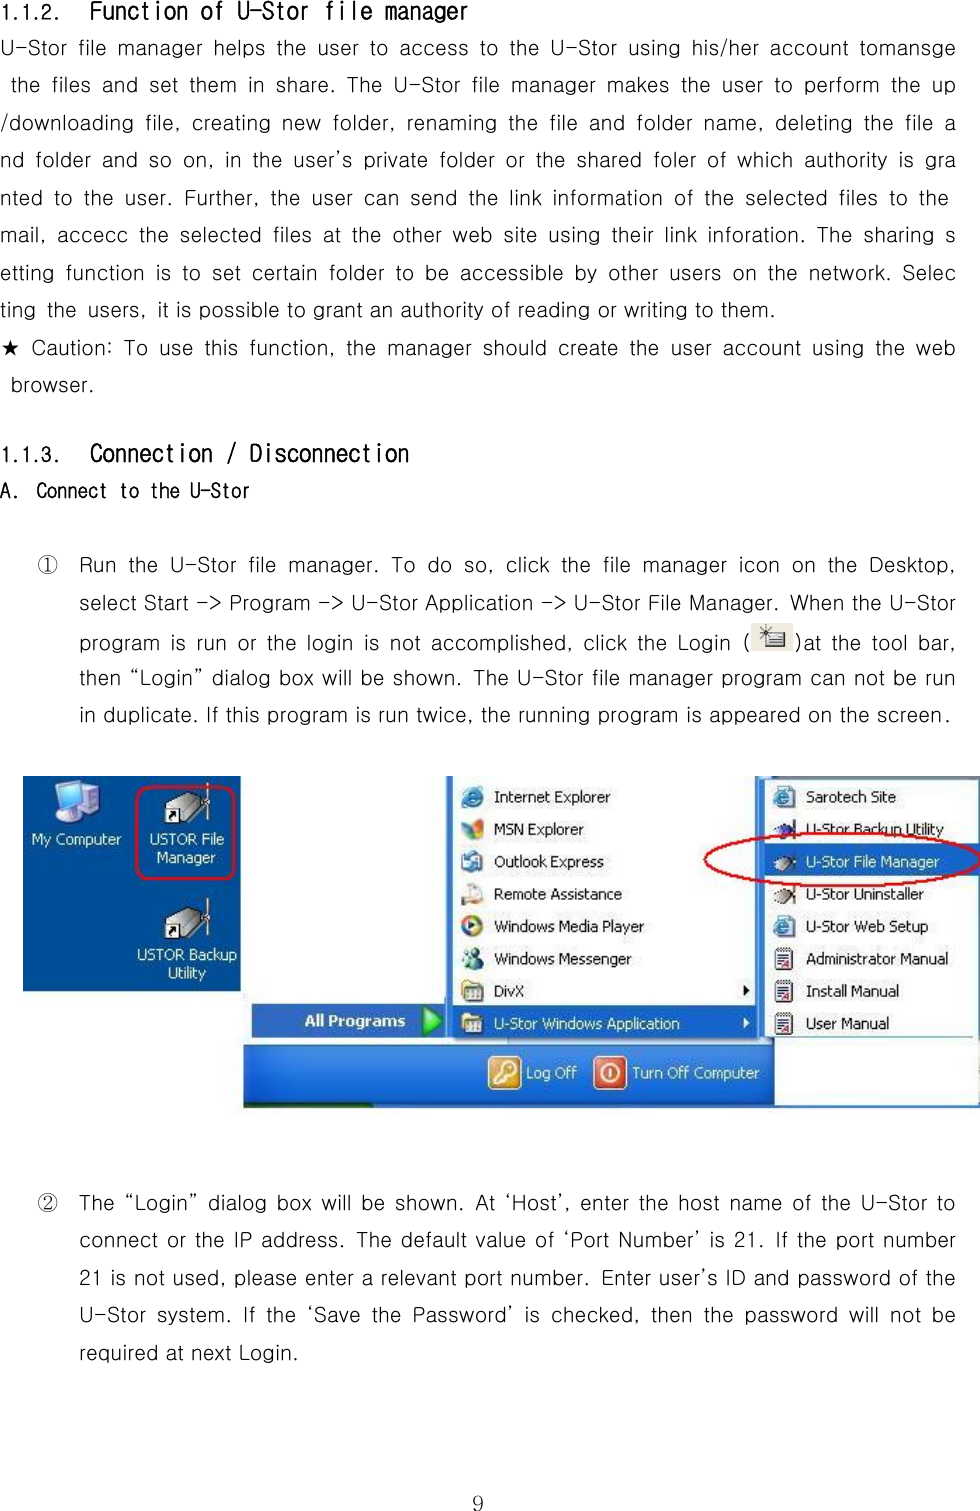
![4 ① Run U-StorSetup.exe the Installation program of the U-Stor Windows Application in the CD-ROM supplied with U-Stor system or downloaded from the web site of U-Stor (http://www.u-stor.net). Then, ‘select a language’ screen will be shown. Select a language to be installed and click the button. ② Press the [OK] button to continue the installation. ③ On the “Choose component” screen, choose the component which you want and then click the [Next] button.](https://usermanual.wiki/Sarotech/NHD-355.Users-Manual-1-of-2/User-Guide-583085-Page-3.png)
![5 ④ Choose the folder in which this program will be installed and then click the [Install] buttom. ⑤ The installing progress status bar will be shown.](https://usermanual.wiki/Sarotech/NHD-355.Users-Manual-1-of-2/User-Guide-583085-Page-4.png)
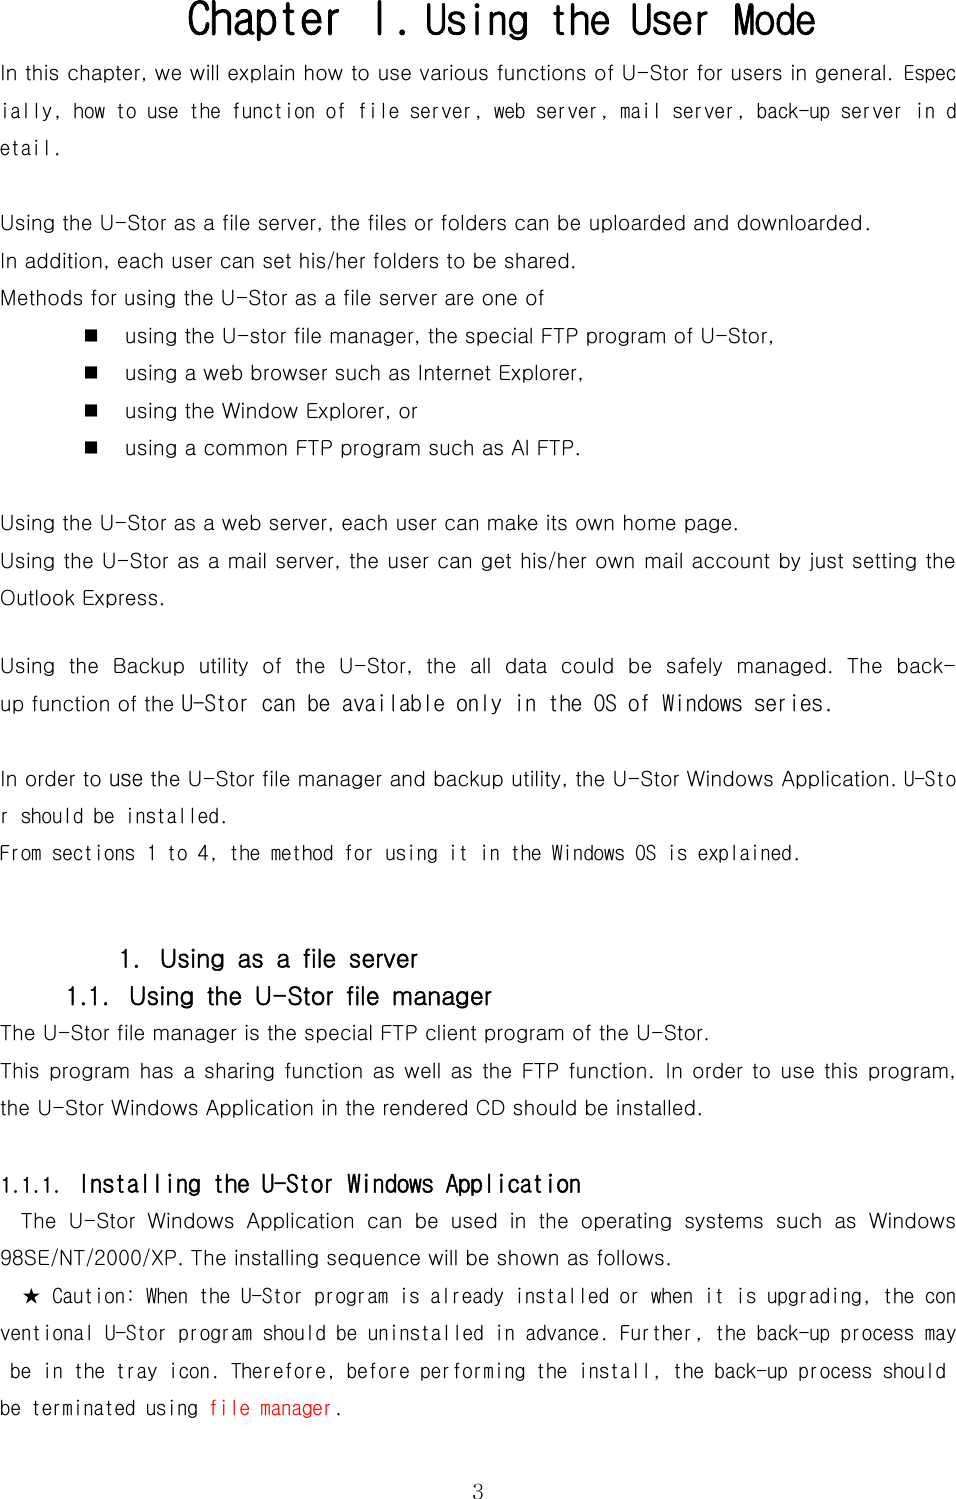
![6 ⑥ Now, the installation of the U-Stor Windows Application is completed. With being checked the check box of “Run the U-Stor Windows Application 1.0” click the [Finish] button to run the U-Stor file manager program.](https://usermanual.wiki/Sarotech/NHD-355.Users-Manual-1-of-2/User-Guide-583085-Page-5.png)
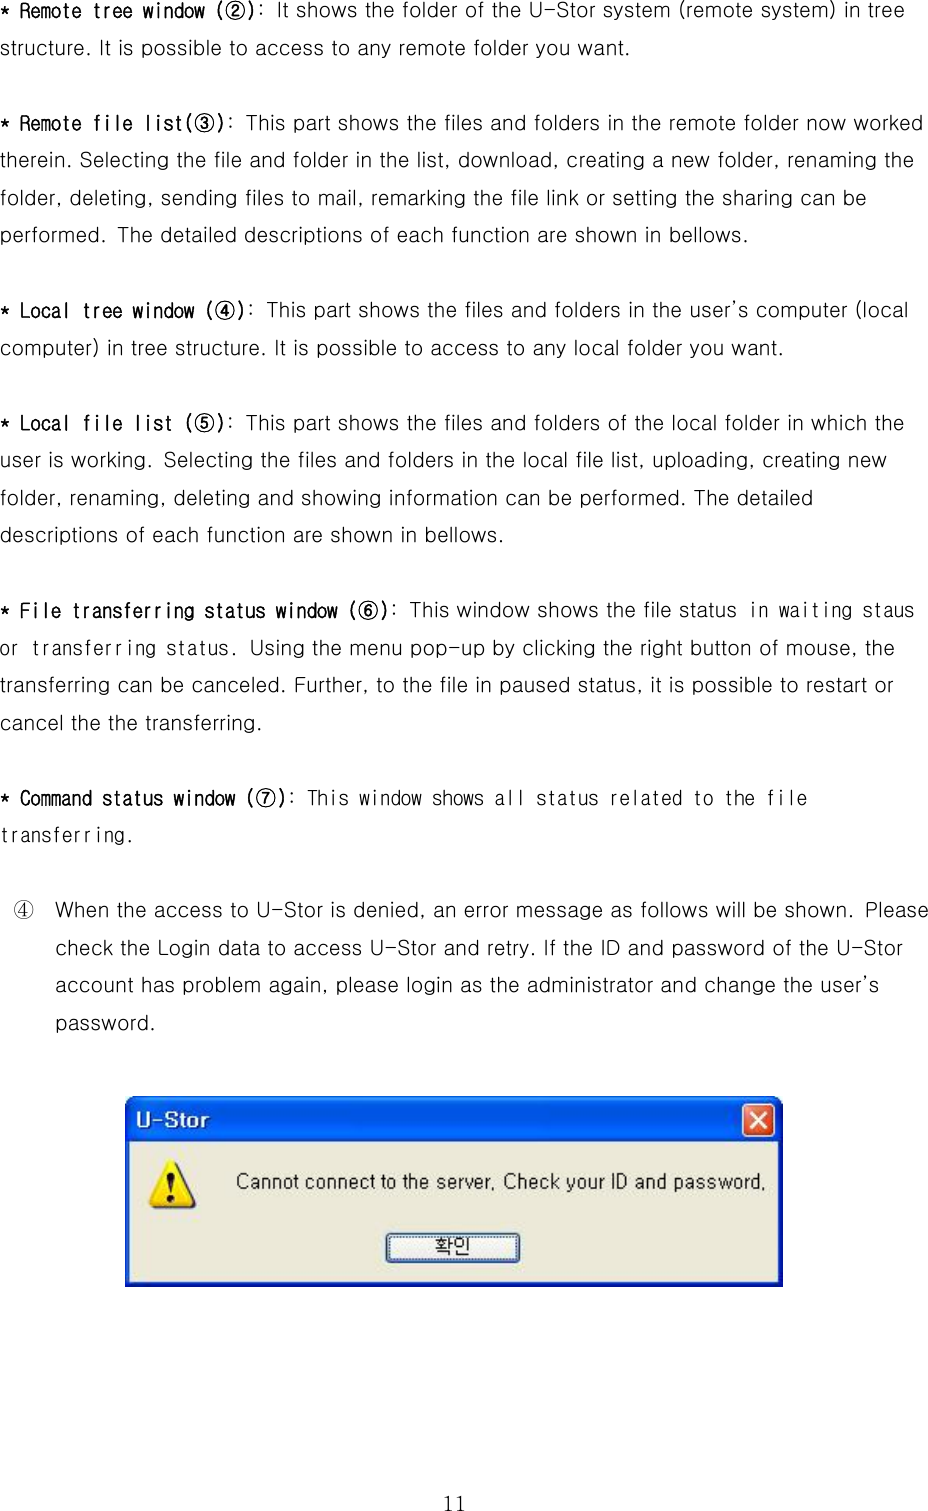
![10 ③ After clicking the [Login] button and connecting to the U-Stor successfully, the following main screen will be shown. This screen comprises of six parts. The names and functions of each part are explained as follows. * Tool bar(①): It includes all menus for U-Stor file management to access quickly to each function.](https://usermanual.wiki/Sarotech/NHD-355.Users-Manual-1-of-2/User-Guide-583085-Page-9.png)
![12 B. Disconnection By selecting the disconnection () at the tool bar, a warning message as follows will be shown. If you select [Yes], then the connection will be disconnected. At that time, if a file is transferring, the file transfer will be canceled and the connection is disconnected. C. Exit the program To exit from the program, click the button at the upper right of the U-Stor file manager. If you select [Yes], the connection will be disconnected and the program will be terminated. 1.1.4. File managing function The most functions of the U-Stor file manager are similar to those of the common FTP programs. Only, the functions will be limited according to the authority of the private and public folders. The private folder under the path of “/home/User’s name/ftproot/private/” can be up/downloading, creating a new folder, deleting and renaming. According to the authority, an unauthorized client can not access to the public folder under the path/home/user’s name/ftproot/public/ and the client having the reading authority only can access to the folder and download files and folders therein. The client having the writing authority can use all functions of file manager including upload.](https://usermanual.wiki/Sarotech/NHD-355.Users-Manual-1-of-2/User-Guide-583085-Page-11.png)
![13A. Upload ( ) ① After connecting to the U-Stor, move to the U-Stor folder you want to upload in the remote file list window. ② Select files and folders to be upload in the local file list window showing the contents of user’s PC. To select multiple of files and folders, select the files with pressing the Shift key or Ctrl key. ③ There are four methods for downloading. * Click the activated upload menu at the tool bar. * Clicking the right button of the mouse and select [Upload] in the pop-up menu. * Holding the selected folder/file by pressing the left button of the mouse, drag and drop to the folder to be uploaded. * Selecting the files to upload at the desktop or window exploer, drag and drop them to the uploading folder of the U-Stor file manager. ④ The uploading file is added in the file transferring status window and the file transferring status is shown. Selecting certain file or multiple files and clicking the right mouse button on the file transferring status window, a pop-up menu will be shown. Selecting [Pause] among the pop-up menu, the transferring of certain file will be paused. Selecting [Cancel all] menu, the transferring of all files is canceled. Selecting [Delete] menu, the selected files are removed from the que. After selecting the paused files, if the [restart] menu is selected, the paused files will be transferred again.](https://usermanual.wiki/Sarotech/NHD-355.Users-Manual-1-of-2/User-Guide-583085-Page-12.png)
![15③ There are possible three methods for downloading. * Click the activated upload menu at the tool bar. * Select the [Download] in the pop-up menu appearing by clicking the right button of the mouse. * Holding the selected folder/file by pressing the left button of the mouse, drag and drop them to the folder to be uploaded. ④ In the file transferring status window, the downloading file will be added and the file transferring status will be shown. Selecting [pause] among the pop-up menu, the transferring of selected file will be paused temporalily. Selecting [Cancel all] menu, the transferring of all files is canceled. Selecting [Delete] menu, the selected files are removed from the que. After selecting the paused files, if the [restart] menu is selected, the paused files will be transferred again.](https://usermanual.wiki/Sarotech/NHD-355.Users-Manual-1-of-2/User-Guide-583085-Page-14.png)
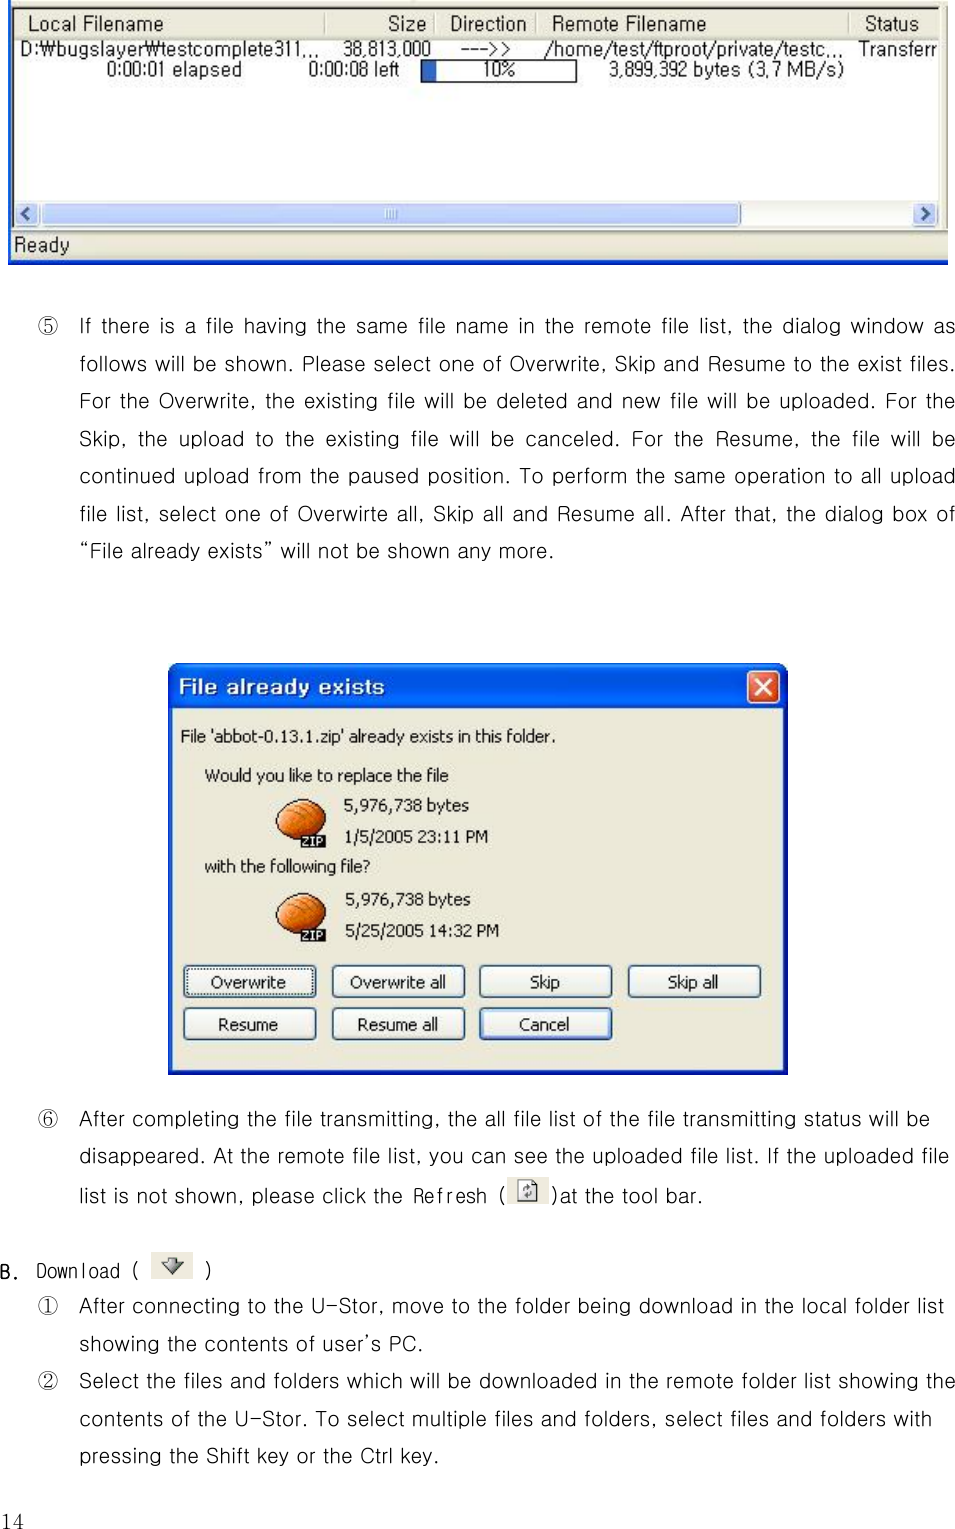
![16 ⑤ If there is a file having the same file name in the remote file list, the dialog window as follows will be shown. Please select one of Overwrite, Skip and Resume to the exist files. For the Overwrite, the existing file will be deleted and new file will be uploaded. For the Skip, the upload to the existing file will be canceled. For the Resume, the file will be continued upload from the paused position. To perform the same operation to all upload file list, select one of Overwirte all, Skip all and Resume all. After that, the dialog box of “File already exists” will not be shown any more. . ⑥ After completing the file transmitting, the all file list of the file transmitting status will be disappeared. At the local file list, you can see the downloaded files. If the downloaded file list is not shown, please click the Refresh ( )at the tool bar. C. New folder ( ) ① Select the local file list window or the remote file list window. (The status bar at the upper side of the selected file list window will be activated.) ② Select the New folder activated at the tool bar or select the [New folder] at the pop-up menu appearing by clicking the right button of the mouse at the selected file list window.](https://usermanual.wiki/Sarotech/NHD-355.Users-Manual-1-of-2/User-Guide-583085-Page-15.png)
![17 ★ Caution: In the U-Stor main folder (/home/user’s name/ftproot/public/) and the public folder (home/user’s name/ftproot/public/), it is impossible to create new folder. All file manager menus are inactivated. ③ Enter a name for the new folder and press the “OK” button. ④ Then you see the new folder in the selected file list window. If the new folder is not shown in the selected folder, please click the Refresh ( ) at the tool bar. ⑤ If a folder having the same name is exist already, the message for indicating the duplicating of name will be shown. D. Rename ( ) ① In the local file list window or the remote file list window, select one file or folder. ★ Caution: If multiple of files or folders are selected, then the rename can not be performed. ① Select the Rename at the tool bar. Alternately, click the right button of the mouse at the selected file or folder name, then a pop-up menu will be appeared. Here, select the [Rename]. ② The background color of the file or folder name will be changed and it is possible to enter new name. You can change the name of the file or folder. ③ If a folder having the same name is exist already, the message for indicating the duplicating of name will be shown.](https://usermanual.wiki/Sarotech/NHD-355.Users-Manual-1-of-2/User-Guide-583085-Page-16.png)
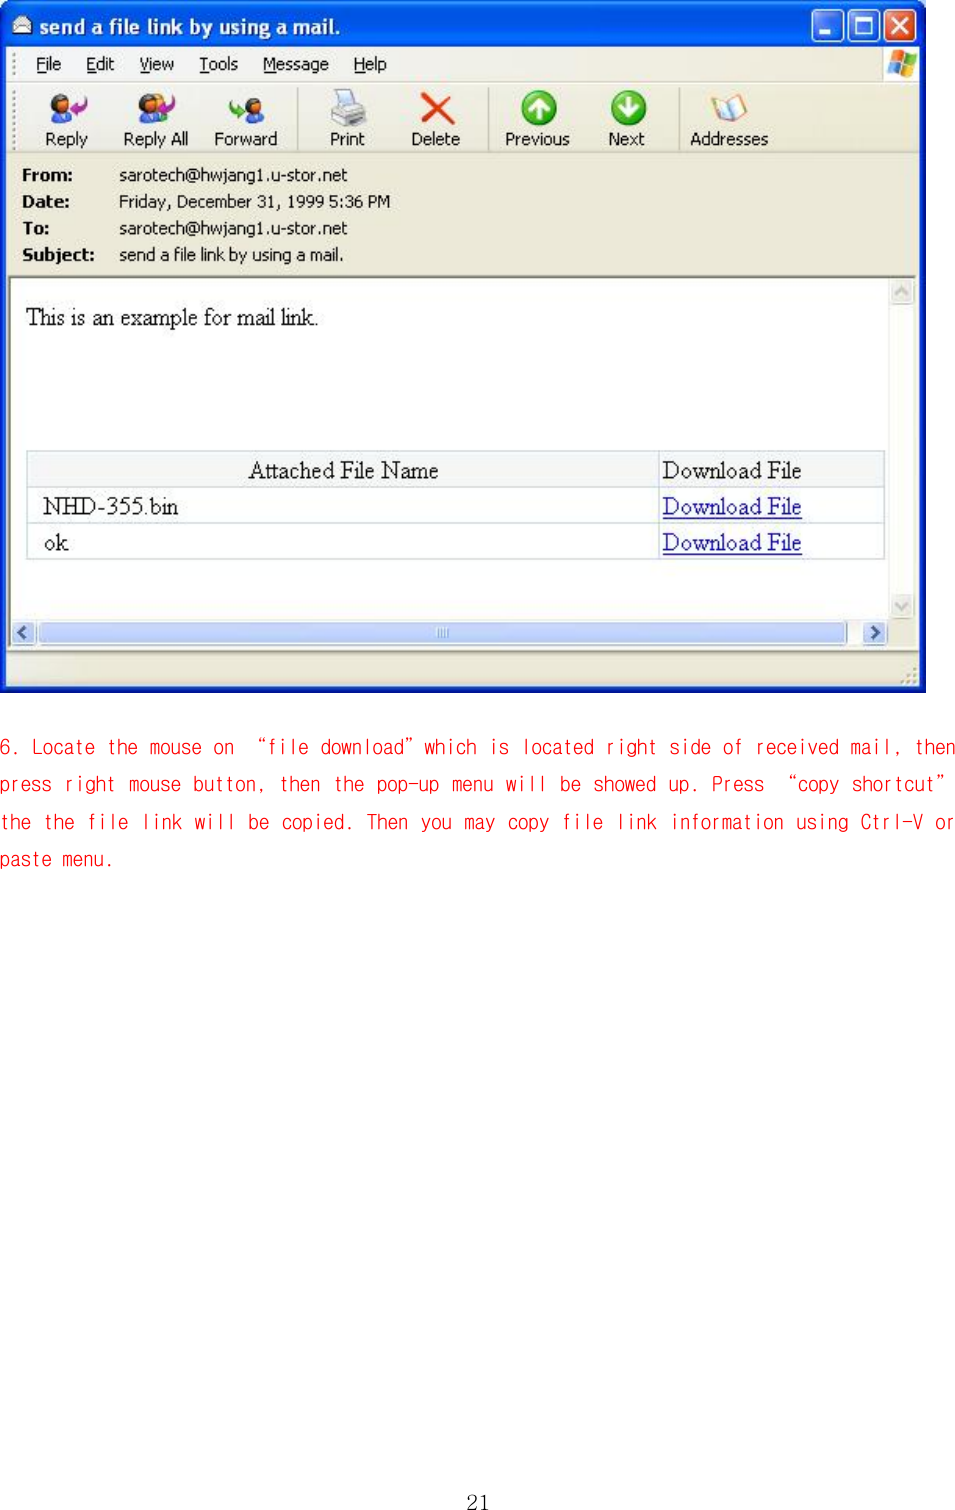
![18 E. Delete ( ) ① Select files or folders in the file list window. To select multiple files and folders, select them with pressing the Shift key or Ctrl key. ② Select the [Delete] at the tool bar or select [Delete] at the pop-up menu appearing by pressing the right button of the mouse. ③ A dialog box confirming the deleting operation will be shown. ④ Press [Yes] to delete the selected files or folders. ★ Caution: When the public folder is deleted, a confirming message as follows will be shown. As the public (shared) folder is shared with other client, please reconfirm before the delete is performed. F. Mail When the file is sent via mail by being attached, it takes much time for sending a file over 1MB, further it is hard to send the large file over 10MB. The U-Stor suggests the function of sending the link information of file in the remote folder in the U-Stor by being attatched in the mail. As the user just inputs the related message in the mail and attatches the link of file in the remote folder of U-Stor, it is very short to send the](https://usermanual.wiki/Sarotech/NHD-355.Users-Manual-1-of-2/User-Guide-583085-Page-17.png)
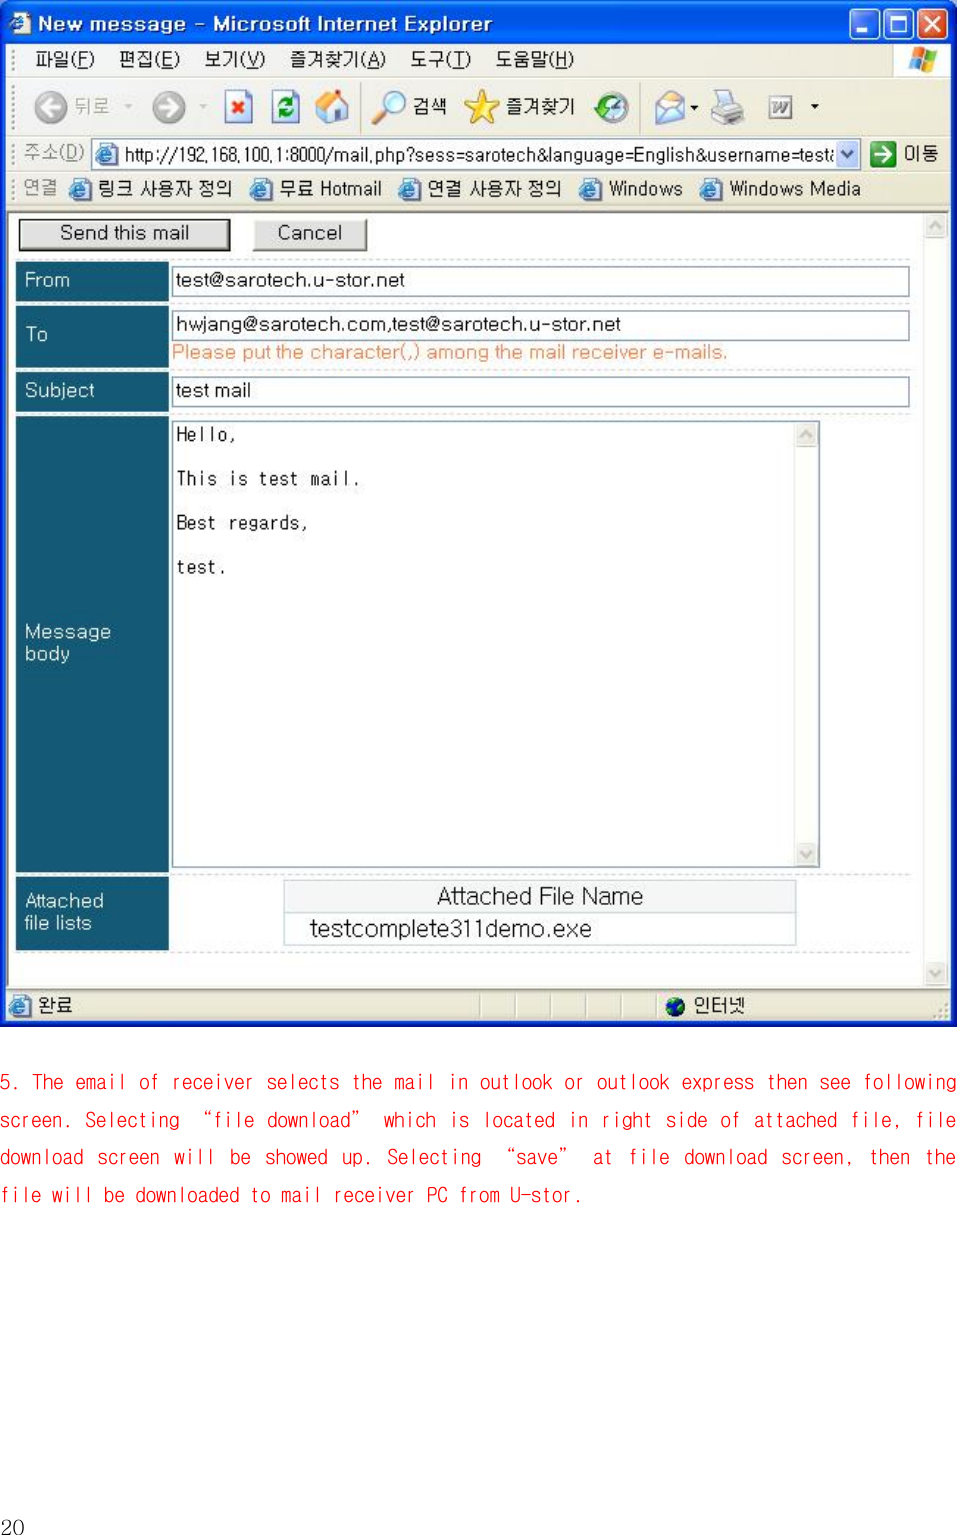
![19mail. The receiver of the mail can download the file just by clicking the file link in the mail. ① Select file which will be sent to a receiver in the file list of the remote folder located under private folder. To select multiple files, select them with pressing the Shift key or Ctrl key. Make sure this folder is located under Private folder. ② After selecting the files, select the [Mail] at the pop-up menu appearing by clicking the right button of the mouse. ③ If this function and the show file link function are used at first, a window screen for entering the position of the brower used in the user’s PC will be shown. Finding the path of the web browser and select it. Generally, the path of the internet explorer file is “C:₩Program Files₩Internet Explorer₩ iexplore.exe”, and for the Firefox, it is “C:₩Program Files₩Mozilla Firefox₩firefox.exe”. After that, this information is saved in the window registry so that the web browser used for sending the mail is automatically shown. ④ After entering the sender, the email of the receiver and the title and contents of the mail, select the “sending mail” button. When the mail is sent to multiple people, the e-mails of the receiver should be follows the commer (,). Be careful that the encording method of the sender and receiver should be the same. That is, the method for mail encording should be set in Korean.](https://usermanual.wiki/Sarotech/NHD-355.Users-Manual-1-of-2/User-Guide-583085-Page-18.png)
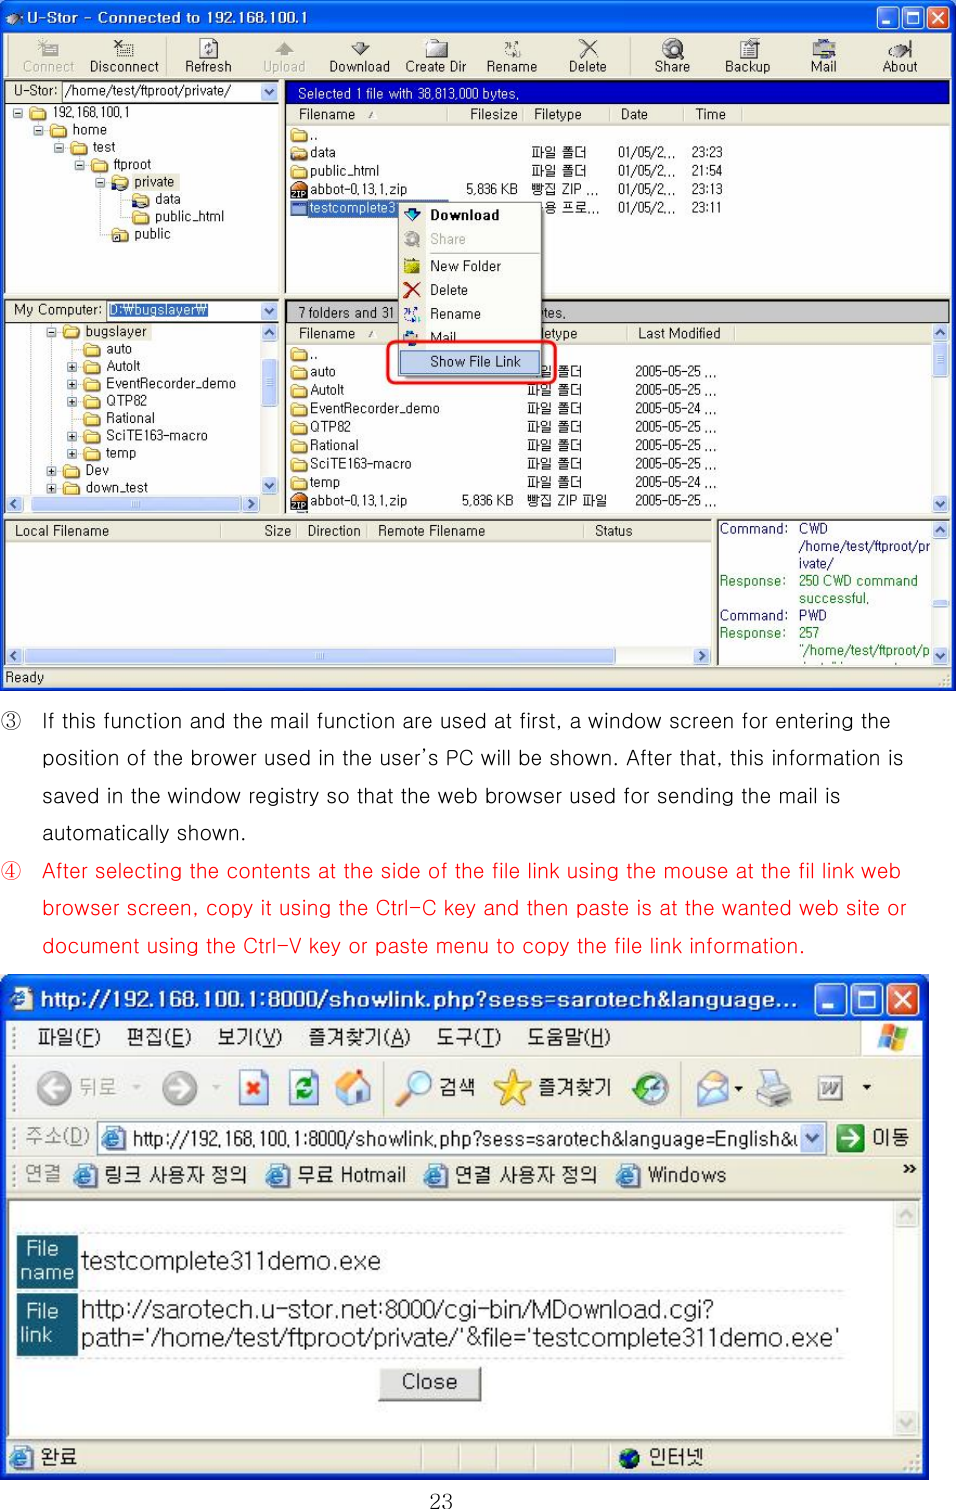
![22 G. Show file link This function is used for showing the stored data in the U-Stor on the blutein board of the other web site using link. ① Select the file showing link in the file list of the remote folder located under private folder. Select only one file. Make sure this folder is located under Private folder. ② After selecting the files, select the [Show File Link] at the pop-up menu appearing by clicking the right button of the mouse.](https://usermanual.wiki/Sarotech/NHD-355.Users-Manual-1-of-2/User-Guide-583085-Page-21.png)
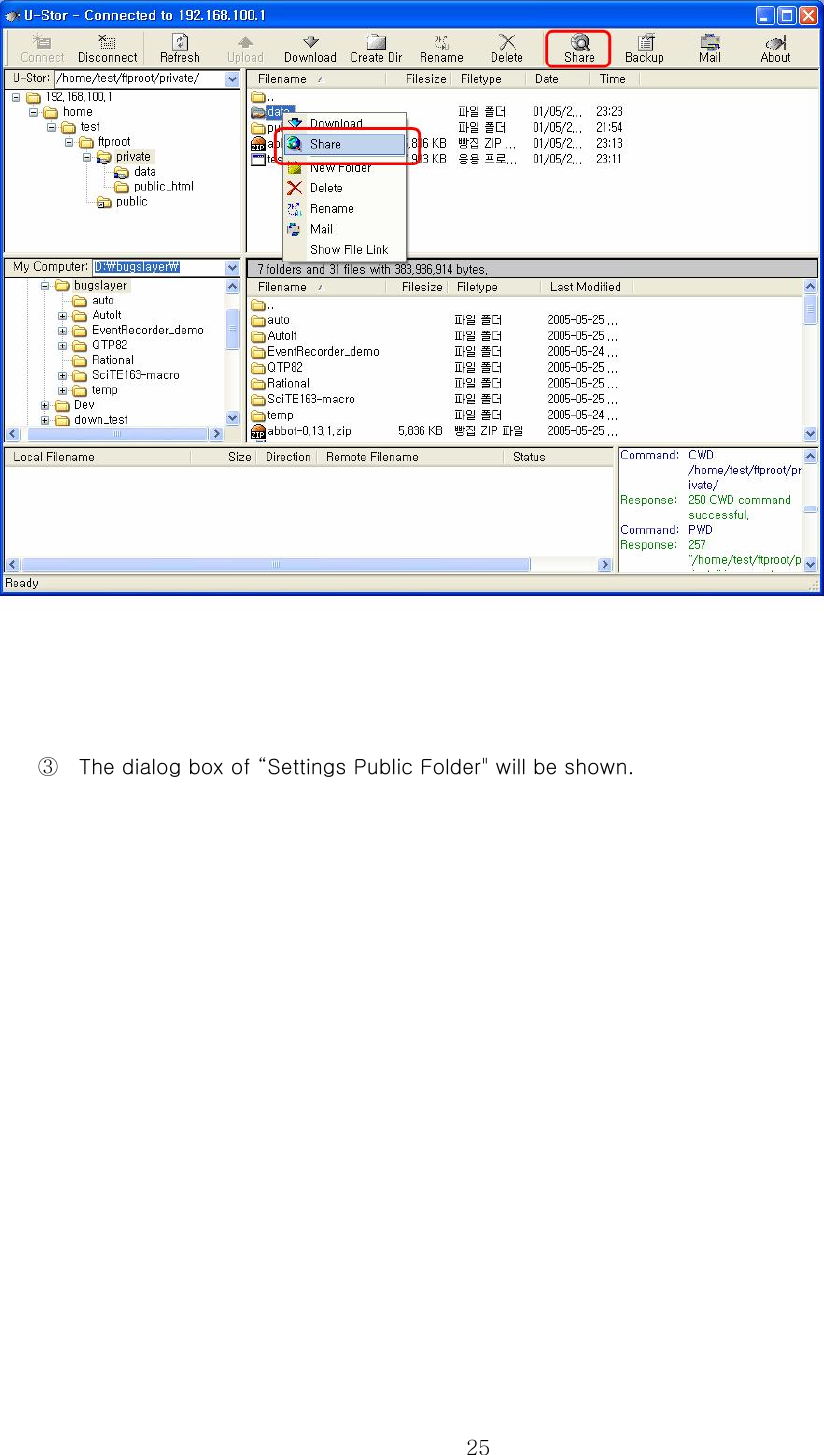
![24 1.1.5. Share function Now we will explain about the share function using the U-Stor file manager. Any folders in the private folder (/home/user’s name/ftproot/private/) can be set to be used with reading or writing authority for other users. The list of folders set as a public folder will be shown under the path of /home/user’s name/ftproot/public/. These folders can be limited the functions of access, download or upload according to the authority of each user. For certain public folder, one who has the writing authority can have the reading and writing authority for all sub folder of the public folder, and one who has the reading authority can have only the reading authority about all sub folder of it. The name of public folder shown under the path of ./home/user’s name/ftproot/public/ has the name of “user’s name_” in front of the folder name. For example, if the user whose name is User1 sets the folder “Temp1” under his private folder as a public folder, then the name of public (shared) folder will be “User1_Temp1”. ★ Caution: In the sub folder or parent folder of the preset private folder, the setting for share can not be performed. ★ Caution: The length of the shared folder is 16 character with alphanumeric. Do not use Korean name for the shared folder name. A. Share ( ) ① Move to the private folder (/home/usder’s name/ftproot/private /) in the remote file list after accessing to the U-Stor. ② Select one folder to be set as public folder and press the (Share) at the tool bar. Alternatively, select the [Share] at the pop-up menu appearing by pressing the right button of the mouse.](https://usermanual.wiki/Sarotech/NHD-355.Users-Manual-1-of-2/User-Guide-583085-Page-23.png)
![26 ④ Enter a public folder name unique in the U-Stor system at the ‘Public name’ under the ‘Public folder’ showing the existing folder names. The public name basically includes the user’s name and the folder name. ⑤ Register the clients who will share the folder. The left ‘Group/User list’ represents the list of all users of the U-Stor system. If a ceratin user is checked, then the authority addition button in below will be activated. If you want to grant the reading authority to the selected user, click the [Add Read] button. If you want to grant the writing authority, click the [Add Write] button. ⑥ The registered users of public folder are shown in each reading or writing authority list according to the kind of authority, separately. Using the [Delete User], [Delete All] button under the public users list, you can remove special user from the user list. The “Delete User” is the function by which one selected user is removed from the public user list. The “Delete All” is the function by which all selected users are removed. Completing the sharing setting, select the [Save Share Info] button. ⑦ When the public setting has any problem, the error message as follows will be shown and the public setting will not performed. According to the message, please modify the setting value carefully.](https://usermanual.wiki/Sarotech/NHD-355.Users-Manual-1-of-2/User-Guide-583085-Page-25.png)
![27 ⑧ You can see the icon of the public folder under the private folder (/home/user’s name/ftproot/private/) is changed to the public icon. If you success in the public setting, then a public folder name (in this example, test_data) will be shown under the public folder(/home/user’s name/ftproot/public/) of the user who grants the share authority. B. Deleting the Public Setting ( ) ① Accessing to the U-Stor, move to the private folder (/home/user’s name/ftproot/private /) in the remote file list. ② Select the public folder and then select the (Share) at the tool bar. Alternatively, select the [Share] at the pop-up menu appearing by pressing the right button of the mouse.](https://usermanual.wiki/Sarotech/NHD-355.Users-Manual-1-of-2/User-Guide-583085-Page-26.png)
![28 ③ Select the [Delete Share Info] button. If the “Delete Share Infor” is succeeded, the share setting of the U-Stor system will be deleted. You can see the icon of the public folder is changed into the normal icon. You can also see tha the public name under the public folder (/home/user’s name/ftproot/public) is deleted. C. Cautions for the public function Followings are the descriptions for the main message concerned with the share setting. ① If the same name is already exist when the public setting is performed, then the public function is not accomplished. ② In the subfolder of the public folder, the share setting can not be performed.](https://usermanual.wiki/Sarotech/NHD-355.Users-Manual-1-of-2/User-Guide-583085-Page-27.png)
![29 ③ In the upper folder of the public folder, the sharing setting can not be performed. ④ When a folder having the sharing setting under the private folder (/home/user’s name/ftproot/private/) is deleted or renamed, a message confirming whether the share setting is deleted or not will be shown. Select [Y] to delete the sharing setting. ⑤ When the commands for moving, uploading, downloading, deleting, renaming or creating new folder are performed in the public folder (/home/user’s name/ftproot/public/), the message of “Permission denied” could be shown according to the user’s authority. In this case, the user does not have writing authority to the public folder. 1.2. Method for usng a Web browser Using most web browser, it is possible to access to the U-Stor. You can use the file managing,](https://usermanual.wiki/Sarotech/NHD-355.Users-Manual-1-of-2/User-Guide-583085-Page-28.png)
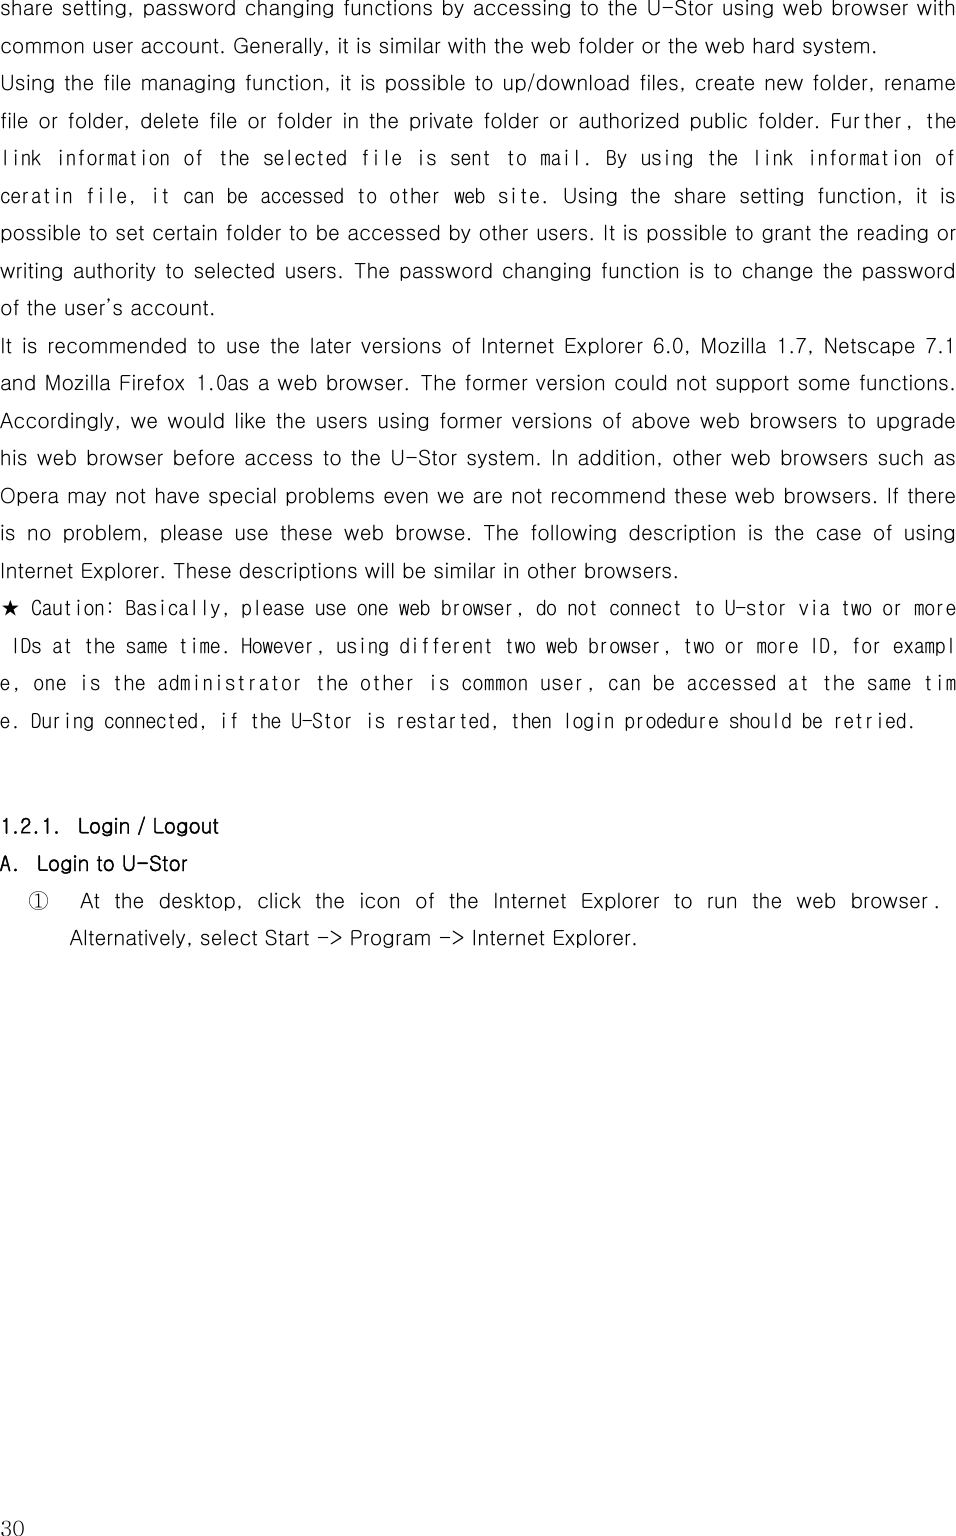

![32 ③ Enter your ID and password of the account, and select language you want. Enter your ID at ‘USERNAME’, your password at ‘PASSWORD’ and, select Korean at ‘LANGUAGE’. Click the [LOGIN] button. The ‘LANGUAGE’ will be selected automatically after it is selected at first login. However, if the IP address of U-Stor is changed, then the ‘LANGUAGE’ is changed into English, the default value. ④ If the login is succeeded, then main screen of the web folder will be shown. The private folder is the user’s folder. There is a folder list showing the public folders in the public folder. ⑤ When the login to the U-Stor is failed, a login failure message will be shown. Retry the Login after confirm the login information of U-Stor. If the ID and password of U-Stor account are not sure, please refer to the user management of the U-Stor administrator mode.](https://usermanual.wiki/Sarotech/NHD-355.Users-Manual-1-of-2/User-Guide-583085-Page-31.png)
![33B. Logout At the left main menu, select [Exit] menu, then a message as follows will be shown on the screen. To exit really, select [OK]. Then, the web browser is teminated for the Internet Explorer, while for the other web browser, it returns to the login screen. C. Exit Program If you click the button at the right upper side of the web browser, then the connection is disconnected and the program will be terminated. 1.2.2. File Managing function The file managing function of the U-Stor web folder includes all function of the FTP and the using method is very similar. In the private folder uner the /U-Stor/private/ path, it is possible to up/download, create new folder, delete, and rename. The possible functions in the public folder under the /U-Stor/public/ path vary according to the user’s authority. The users having no authority can not access any public folder. The user having only reading authority can access to the folder and download files in the public folder. The user having the writing authority can access to the folder, download and upload files. The user always has the writing authority to his/her own public folder. You can not perform any work at the /U-Stor/ folder. At this folder, if any function button is selected, then “Error: Permission Denied” will be shown. If you access to the U-Stor web folder as a private user, following screen will be shown. This screen comprises of 8 parts. The names and functions of each part are as follows.](https://usermanual.wiki/Sarotech/NHD-355.Users-Manual-1-of-2/User-Guide-583085-Page-32.png)
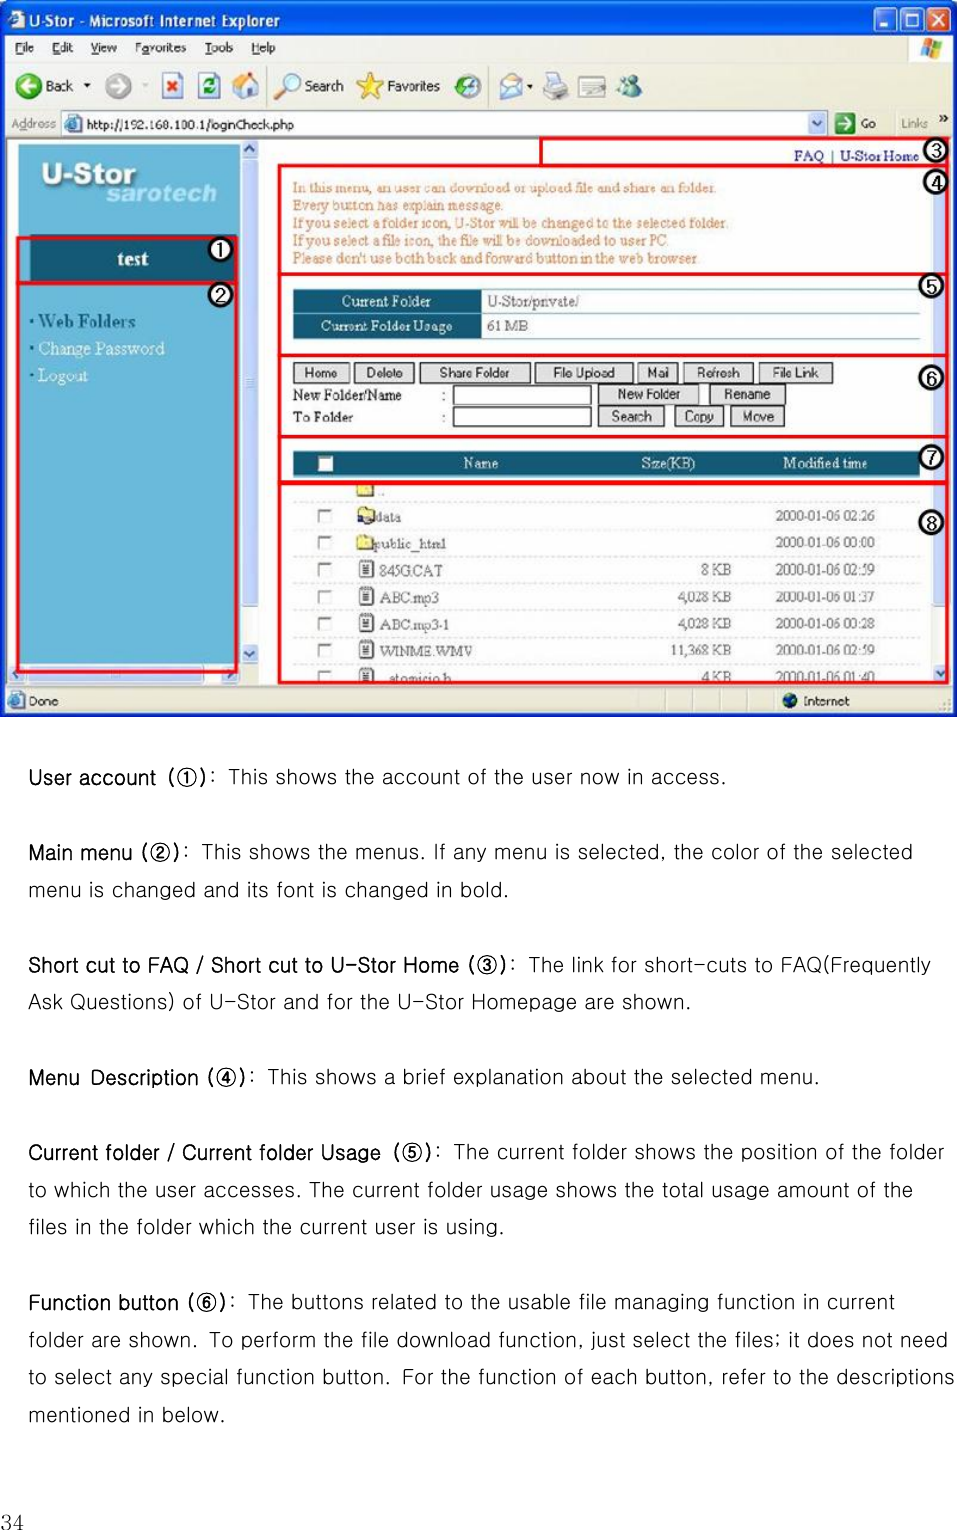
![35Select All, File view option (⑦): If select the check box, then files in the file/folder list of current folder are “select all/unselect all”. If the file view option is chosen, the files in the file/folder list of the current folder will be rearranged in order of name, size or modified date, or reversely. File/Folder list of current folder (⑧): If select the check box, the file/folder in current folder is selected or unselected. When other functions except for download function are used, they can be possible to use after the check box is selected. The followings show the detailed using method of each function. A. Go to Home ( ) Using the Home button, the user can instantly go to the user’s Home (the web folder main screen) from any where he/she is. B. Upload ( ) In the web browser, only one file can be uploaded at one time. ① After connecting to the U-Stor, move to the fold of U-Stor to be uploaded. In order to move to wanted folder in the U-Stor, select “..” at the file/folder list of current folder then you will move to the upper folder. Otherwise, select folder icon or folder name you want then you will move to the sub folder you want to go. ② If you select [File upload] button, then following screen will be shown.](https://usermanual.wiki/Sarotech/NHD-355.Users-Manual-1-of-2/User-Guide-583085-Page-34.png)
![36 ③ If you [Find] button, the file selection screen will be shown. After select files to be uploaded, select the [Open] button.](https://usermanual.wiki/Sarotech/NHD-355.Users-Manual-1-of-2/User-Guide-583085-Page-35.png)
![37 ④ At the file upload screen, if you select [File Upload] button, the file upload will be preceeding with showing the window representing the file upload status. Caution: If you select [Close] button or exit the window during the file uploading, the file upload will not be canceled but continued.](https://usermanual.wiki/Sarotech/NHD-355.Users-Manual-1-of-2/User-Guide-583085-Page-36.png)
![38 After the file upload is completed, if there is no file and folder having the same name in the current folder, then the upload completing screen will be appeared. Please select [OK] button. If there is the file having the same name, a message confirming whether the current file is back-up will be shown. When “OK” button is selected, the name of the current file will be changed into “file name-number” type. For example, if “A.doc” file already exists and a file having the same nameis uploaded, then, the new file name will be “A.doc” and the existed file will be “A.doc-1”. If the “A.doc-1” also exists already, then it will be “A.doc-2”. If the folder having the same name exists, the upload will be canceled with showing the message of “Error: The same folder exists”. ★ Caution: Please select [OK] button at the file upload completing screen. ★ Caution: As the checking for the existing of the same file or same folder is performed after the upload is completed, when the file is large, please check the file/folder name of the current folder before performing the upload.](https://usermanual.wiki/Sarotech/NHD-355.Users-Manual-1-of-2/User-Guide-583085-Page-37.png)
![39 ⑤ At the file/folder list screen, you can see the uploaded file is enclosed. C. Download For download, only one file can be performed at every time. The folder download is not supported in the web browser. ① After accessing to the U-Stor, move to the folder having the files you want to download. In order to move to wanted folder in the U-Stor, select “..” at the file/folder list of current folder to move to the upper folder. Otherwise, select folder icon or folder name you want to move to the sub folder you want to go. ② Select file you want to download. The method for selecting is to select the file icon or file name. ③ Then the dialog window for file download will be shown. To save in PC, press the [Save] button, or to open the file immediately, press the [Open] button.](https://usermanual.wiki/Sarotech/NHD-355.Users-Manual-1-of-2/User-Guide-583085-Page-38.png)
![40 ④ If you select the [Save] button, the dialog box of ‘Save as …’ will be shown. Select the target folder of PC and press the [Save] button. ⑤ The download will be proceeding as following screen and the downloaded file will be saved in the selected folder in the PC.](https://usermanual.wiki/Sarotech/NHD-355.Users-Manual-1-of-2/User-Guide-583085-Page-39.png)
![41 D. New folder ( ) ① After accessing to the U-Stor, move to the folder in which you want to create a new folder. In order to move to wanted folder in the U-Stor, select “..” at the file/folder list of current folder to move to the upper folder. Otherwise, select folder icon or folder name to move to the sub folder you want to go. ② Enter the new name of the folder at the ‘New folder/Name’ on the web folder screen of the user. ③ Select the [New folder] button. ④ If there is no problem, then a new folder will be added in the current folder. If the entered name is the same with the name of file or folder in the current folder already, then the name duplication error message will be shown. ★ Caution: In the /U-Stor/ and the /U-Stor/public/, the new folder can not be created. In these folder, all file managing menu are inactivated.](https://usermanual.wiki/Sarotech/NHD-355.Users-Manual-1-of-2/User-Guide-583085-Page-40.png)