Sarotech NHD-355 Network Storage User Manual Manual
Sarotech Co., Ltd. Network Storage Manual
UserManual.wiki
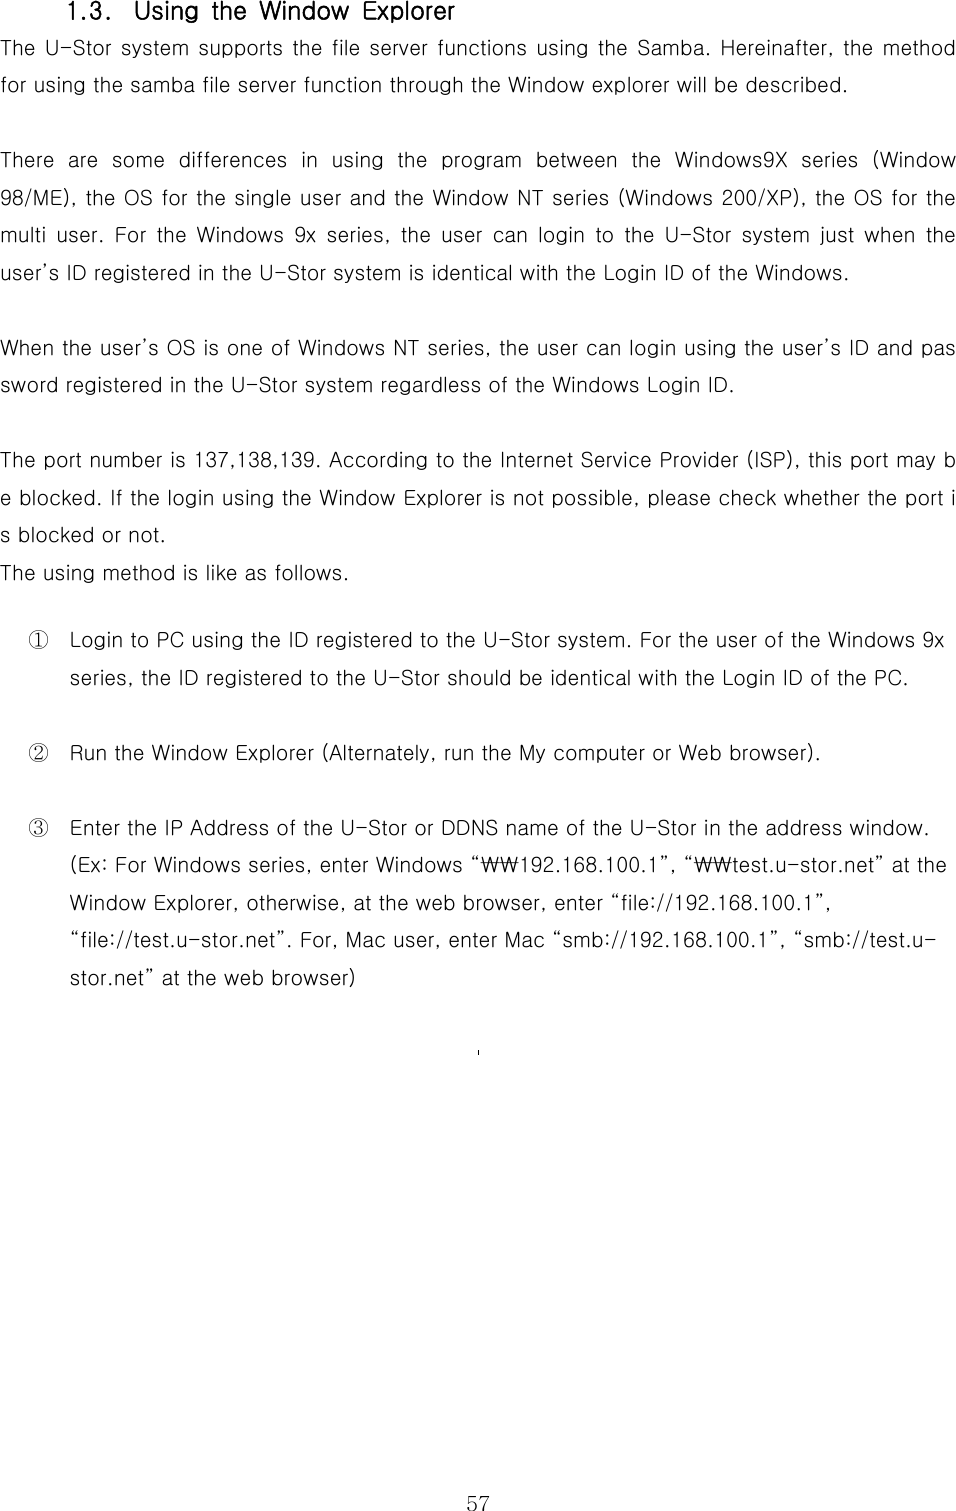
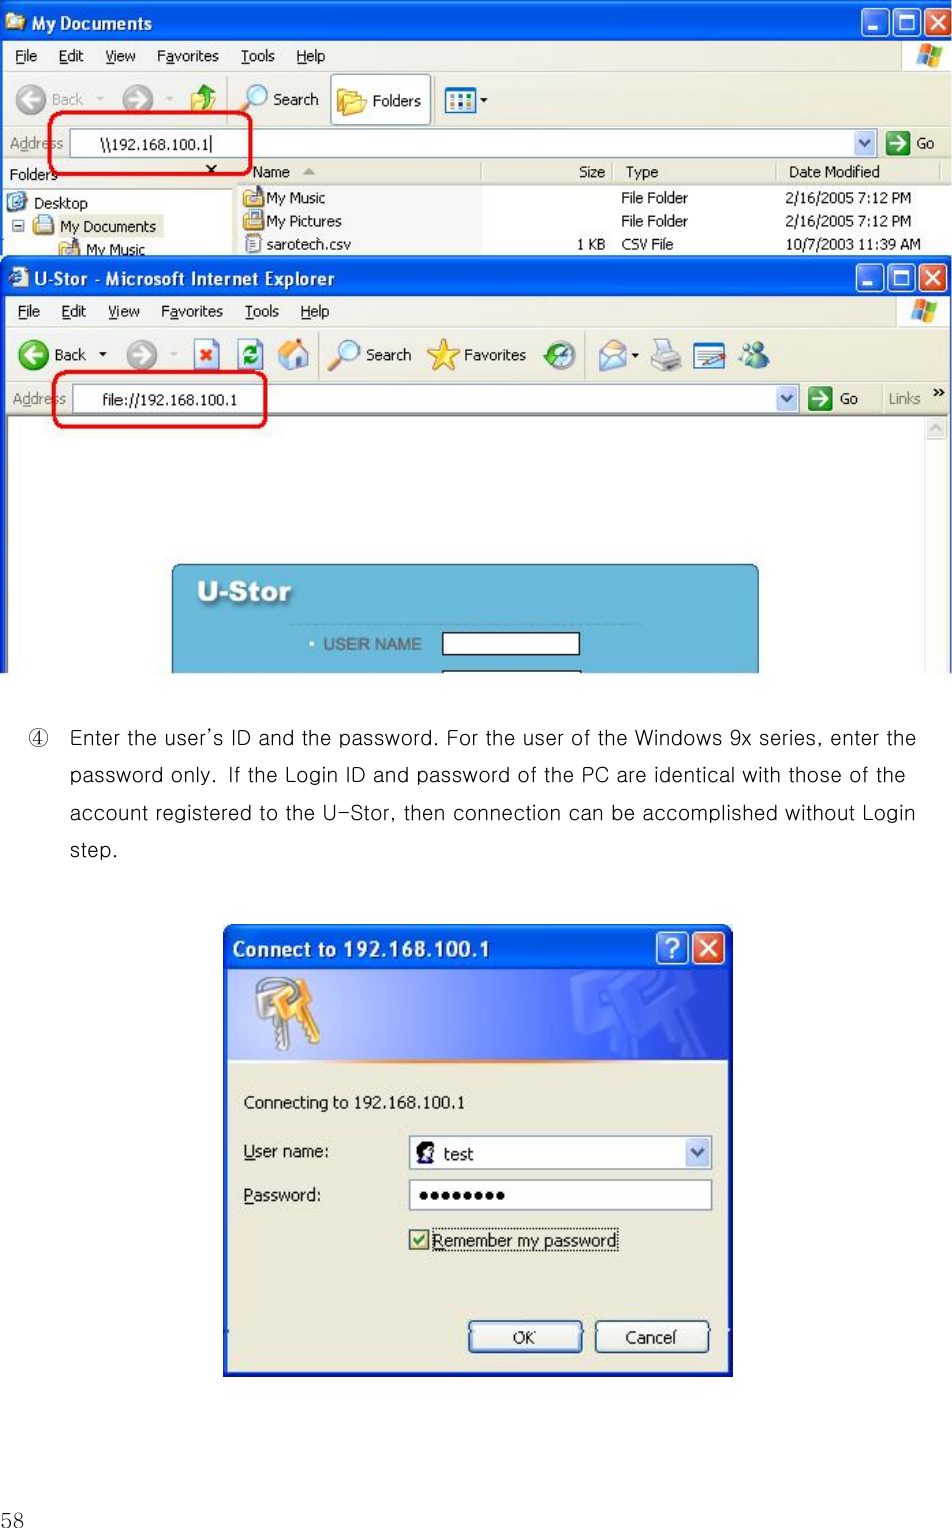
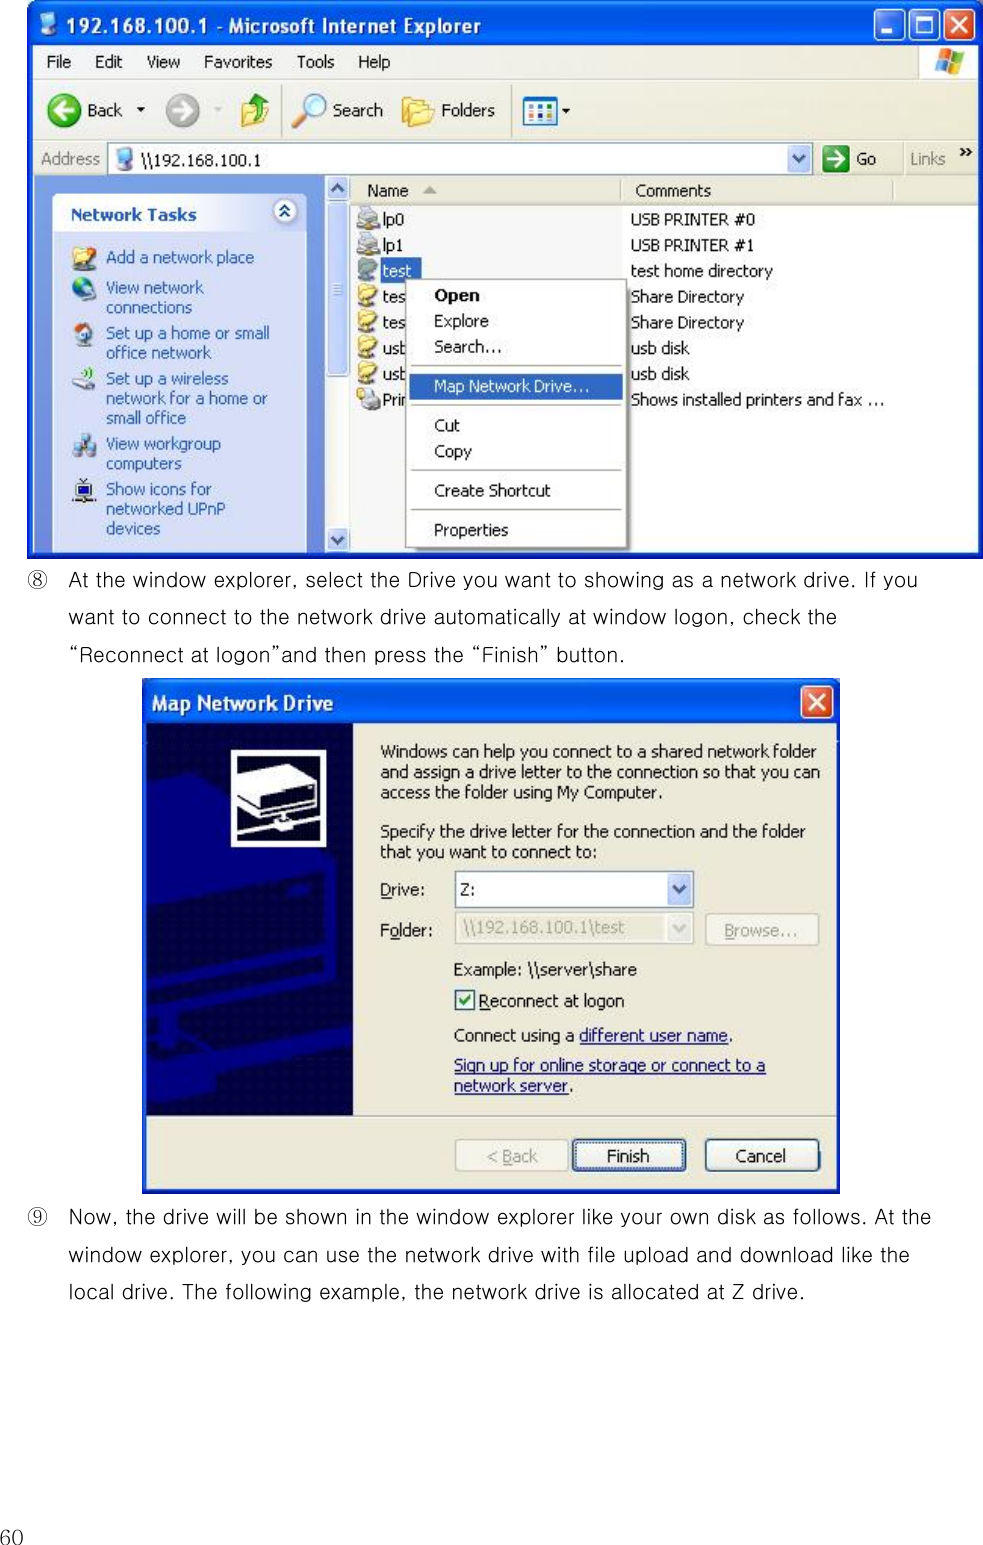
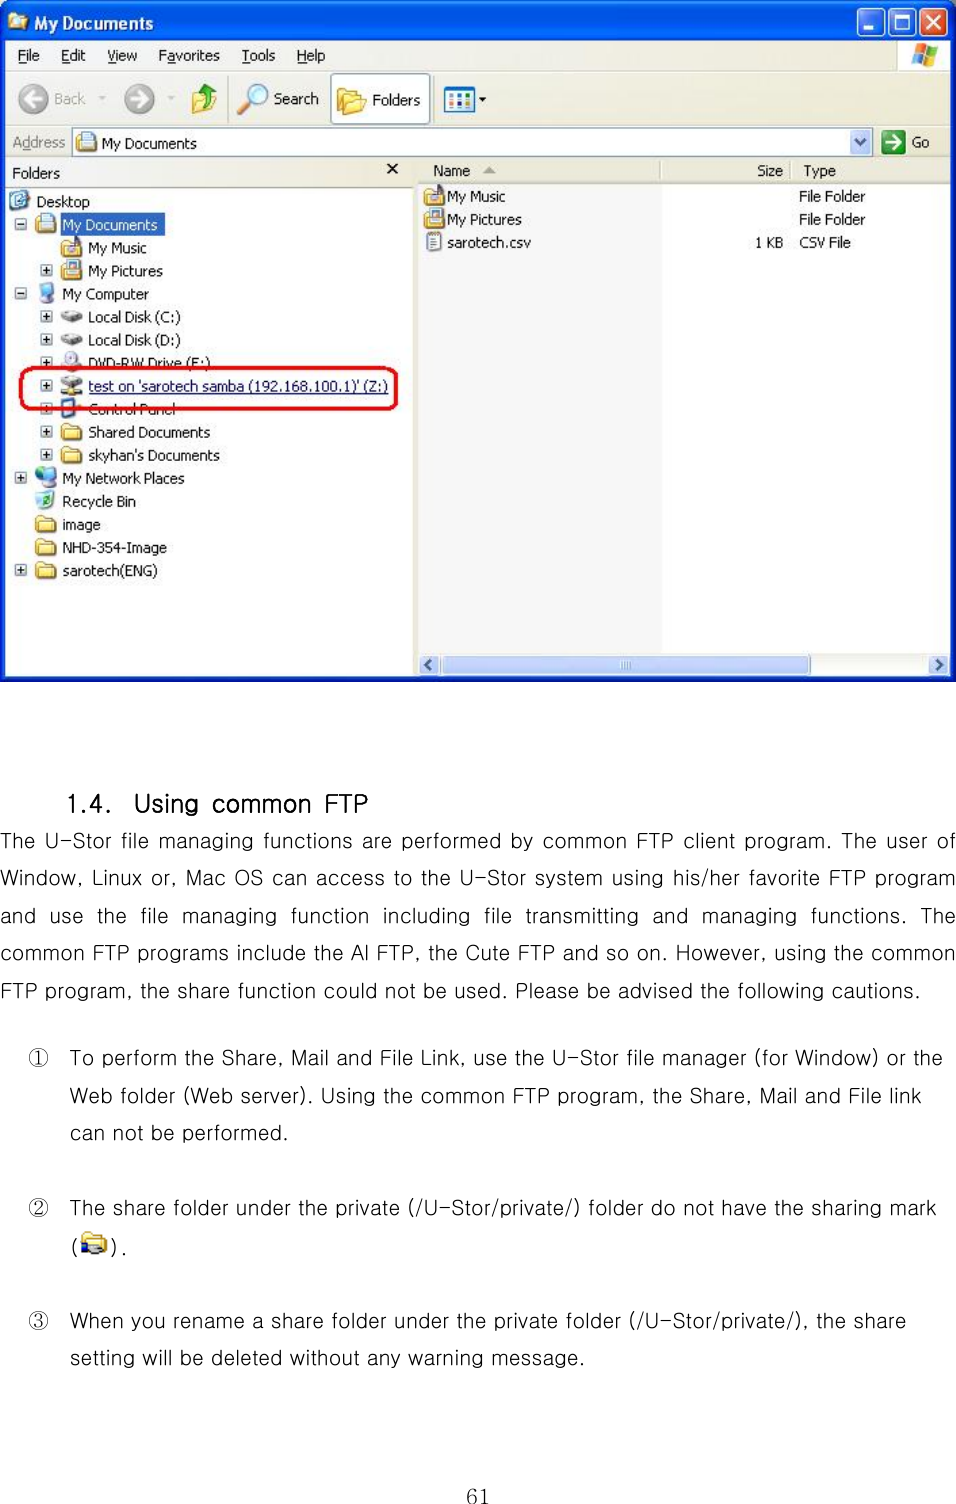
>
Sarotech
>
NHD-355 User Manual
>
Users Manual 2 of 2
Contents
1.
Users Manual 1 of 2
2.
Users Manual 2 of 2
Users Manual 2 of 2
Navigation menu
Upload a User Manual
Namespaces
Wiki Guide
HTML
PDF
Info
Views
User Manual
Discussion / Help
Navigation
![42 E. Rename ( ) This function is for changing the name (rename) of the file or folder you choose. ① After accessing to the U-Stor, move to the folder in which you want to rename file or folder. In order to move to wanted folder in the U-Stor, select “..” at the file/folder list of current folder to move to the upper folder. Otherwise, select folder icon or folder name to move to the sub folder you want to go. ② Click the check box next to the folder or file you want to remane in the file/folder list of the current folder to mark the V using the mouse. ③ On the web folder screen of the user, enter the new name at the ‘New folder/Name’. ④ Select [Rename] button of the function button. ⑤ If the renaming is completed successfully, the changed name will be shown in the current folder. If a file having the same name exists already, an error message of “Same filename or foldername exist” will be shown. If you select multiple of files or folders, an error message of “Select one file or folder” will be shown. If the target of renaming is a public folder in the current folder, then a message of “The sharing folder is canceled. Continue?” will be shown. If the user selects the [OK] button, then the rename function will be performed. If he selects [Cancel] button, the rename function will not be performed. When the renaming target is a folder and it has a sub folder as a share folder, then the message of “There are share folders under the selected folder” and the rename function is not performed.](https://usermanual.wiki/Sarotech/NHD-355.Users-Manual-2-of-2/User-Guide-583087-Page-1.png)
![43 F. Delete () ① After accessing to the U-Stor, move to the folder having the file/folder list you want to delete. In order to move to wanted folder in the U-Stor, select “..” at the file/folder list of current folder to move to the parent folder. Otherwise, select folder icon or folder name to move to the sub folder you want to go. ② Click the check box next to the folder or file which you want to delete in the file/folder list of the current folder to mark the V using the mouse. ③ Press the [Delete] button. ④ When the deleting targets do not have any shared folder in the current folder, a message to confirm the deleting file or folder will be appeared. If the deleting targets have shared folders in the current folder, then a message of “Shared folders exist in the current folder. Do you continue to delete the selected files and folders?” will be appeared.](https://usermanual.wiki/Sarotech/NHD-355.Users-Manual-2-of-2/User-Guide-583087-Page-2.png)
![44 ⑤ If you press the [OK] button, the selected files and folders will be deleted. To cancel the deleting, press the [Cancel] button. ⑥ If there are shared folders under the deleting folders in the folder/file list to delete, then a message of “There are share folders under the selected folders.” will be appeared. The deleting the current folders having the shared folders are canceled, and other files/folders are deleted. If the user has only the read authority to the current folder, then a message “Permission Denied.” Will be shown and all file/folder deletings are canceled. G. Copy ( ) ① After accessing to the U-Stor, move to the folder having the file/folder list to copy. In order to move to wanted folder in the U-Stor, select “..” at the file/folder list of current folder then you will move to the upper folder. Otherwise, select folder icon or folder name to move to the sub folder you want to go.](https://usermanual.wiki/Sarotech/NHD-355.Users-Manual-2-of-2/User-Guide-583087-Page-3.png)
![45② Click the check box next to the folder or file to be copied in the file/folder list of the current folder to mark the V using the mouse. ③ Select the [Find] button next to the ‘Copy/Move folder’. ④ The following dialog box for selecting the folder to Copy/Move will be shown. ⑤ Select target folder to copy using the mouse so to move to the folder. ⑥ Click the [OK] button. ⑦ The selected target folder will be shown next to the ‘Copy/Move folder’. ⑧ Select the [Copy] button. ⑨ If the user has only reading authority about the folder to be copied, an error message will be shown and all file/folder copy will be canceled.](https://usermanual.wiki/Sarotech/NHD-355.Users-Manual-2-of-2/User-Guide-583087-Page-4.png)
![46 H. Move ① After accessing to the U-Stor, move to the folder having the file/folder list you want to move. In order to move to wanted folder in the U-Stor, select “..” at the file/folder list of current folder then you will move to the upper folder. Otherwise, select folder icon or folder name to move to the sub folder you want to go. ② Click the check box next to the folder or file to be moved in the file/folder list of the current folder to mark the V using the mouse. ③ Select the [Find] button next to the ‘Copy/Move folder’. ④ The dialog box for selecting the folder to Copy/Move will be shown. ⑤ Select the target folder to move using the mouse. ⑥ Click the [OK] button. ⑦ The selected target folder will be shown in the ‘Copy/Move folder’. ⑧ Select the [Move] button. ⑨ If there are shared folders under the moving folder/file list, then a message of “Error: You can not move a share folder. At first, delete share function.” will be appeared. If there are shared folcers under the moving folder in the folder/file list to be moved, then a message of “The shared folder does not move." And the current folder having the share folders does not move, while others are moved. If the user has not the write authority to the current folder and moving folder, then an error message is shown and all file/folder movings are canceled.](https://usermanual.wiki/Sarotech/NHD-355.Users-Manual-2-of-2/User-Guide-583087-Page-5.png)
![48 ② Click the check box next to the file to be sent in the file list of the current folder to mark the V using the mouse. ③ Select the [Mail] button. ④ At the web browser screen of sending mail, enter the e-mail of the sender and the receiver, the subject of the mail and the message. Press the “Send this mail” button. When the mail is sending to multiple users, the e-mails of receivers’ should be distinguished by comer (,). Be careful that the mail encording methods of the sender and receiver should be the same. That is, the mail encording method should be set in Korea. K. File Link This function is used for representing the data stroed in the U-Stor to the bulletin board of other](https://usermanual.wiki/Sarotech/NHD-355.Users-Manual-2-of-2/User-Guide-583087-Page-7.png)
![49web site by link. ① After accessing to the U-Stor, move to the folder having the file you want to link. In order to move to wanted folder in the U-Stor, select “..” at the file/folder list of current folder then you will move to the upper folder. Otherwise, select folder icon or folder name to move to the sub folder you want to go. Make sure this folder is located under Private folder. ② Click the check box next to the file to be sent via mail in the file list of the current folder to mark the V using the mouse. ③ Select the [File link] button. ④ At the file link web browser secreen, after selecting the contents next to the file link using the mouse and copying it using the Ctrl-C, paste the file link information at the wanted web site of document using the Ctrl-V or paste menu 1.2.3. Share Here, the share function using the U-Stor file manager will be explained. The folder in the private folder (/U-Stor/private/) can be set to be used by other users with reading or writing authority. The set public folders will be shown under the path of /U-Stor/public/. These folders can be limited to be accessed, downloaded or uploaded according to the user’s authority. A user having the writing authority to certain public folder has the reading and writing authority to all files and folders under the public folder. A user having the reading authority has the reading authority to the files and folders under the public folder.](https://usermanual.wiki/Sarotech/NHD-355.Users-Manual-2-of-2/User-Guide-583087-Page-8.png)
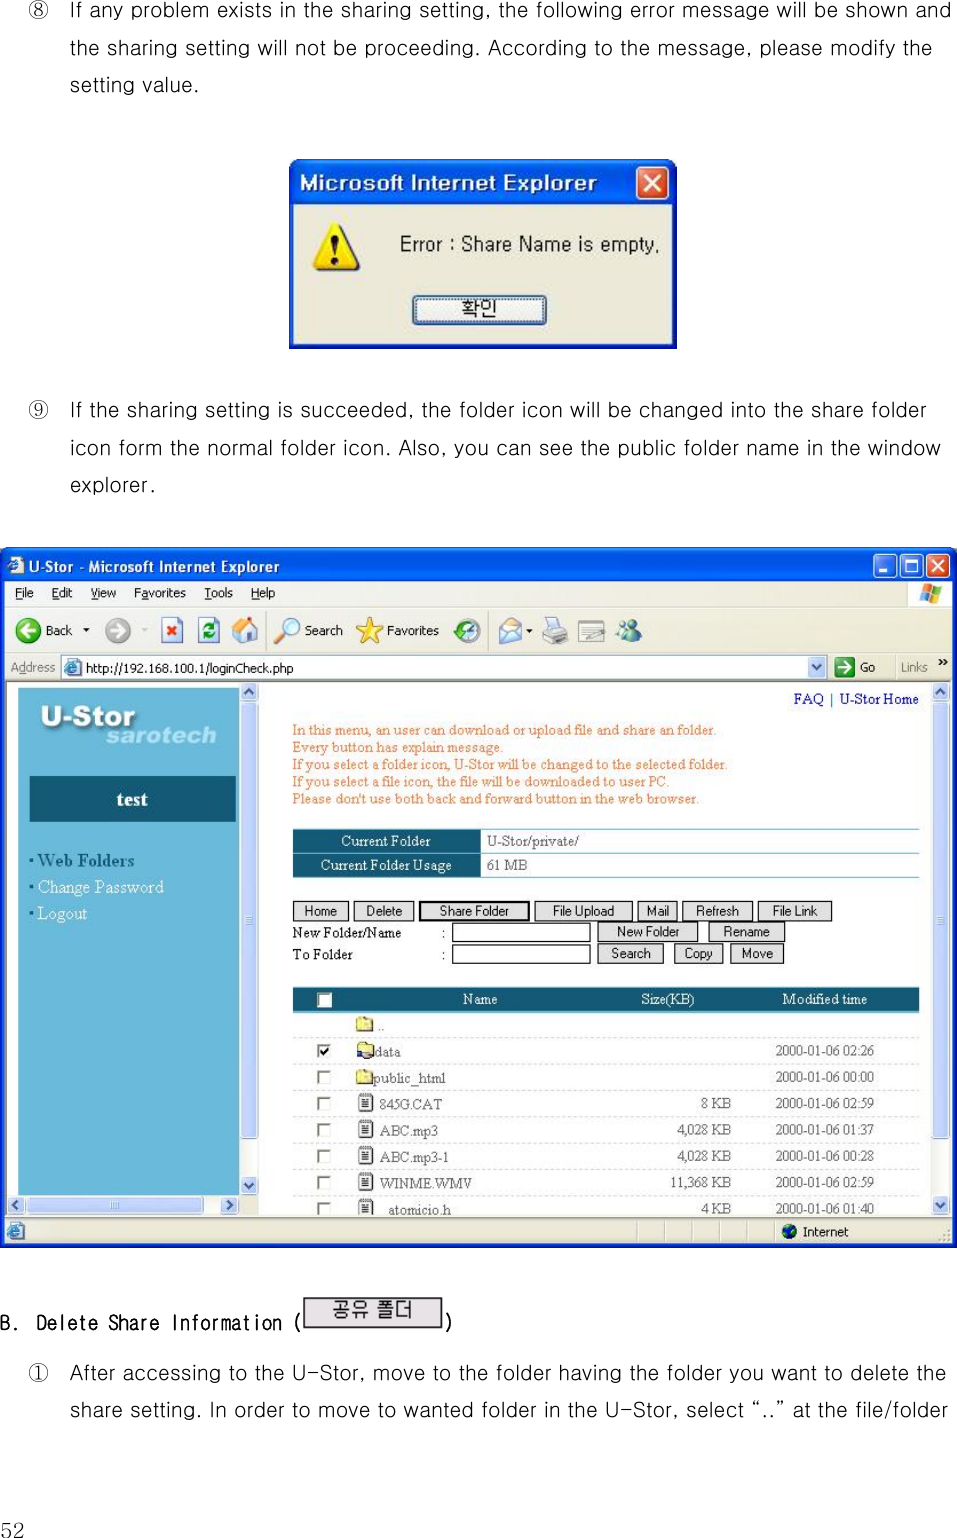
![50 The name of the public folder shown under the path of /U-Stor/public/ has “user’s name_” in front of its name. For example, a user whose name is “User1” set the folder “Temp1” as a public folder under his/her private folder, then the name of the public folder will be “User1_Temp1”. The maximum length of the shared folder name is 16 characters. ★ Caution: To the sub folder or upper folder of the current public folder, the share setting can not be performed. If you want to set the share setting, delete the share info of the shared folder and then set the new share setting. A. Share Folder ( ) ① After accessing to the U-Stor, move to the folder having the folder you want to set a share setting. In order to move to wanted folder in the U-Stor, select “..” at the file/folder list of current folder so as to move to the upper folder. Otherwise, select folder icon or folder name you want to move to the sub folder you want to go. ② Click the check box next to the folder you want to share. ③ Select the [Share Folder] button. ④ The dialog box for setting the Share Folder will be shown.](https://usermanual.wiki/Sarotech/NHD-355.Users-Manual-2-of-2/User-Guide-583087-Page-9.png)
![51 ⑤ Enter a share name unique in the U-Stor system at the ‘Share name’ under the ‘Public folder’ showing the actual folder names. The default of share name includes the user’s name and folder name. If needed, the user can change the folder name. The user’s name can not be changed. The maximum length of the shared folder name is 16 characters. ⑥ Make a register of the share user list. The left ‘Group/User list’ shows all user list of the U-Stor system. If you check users to be public members, then one of add authority buttons there-under will be activated. To grant a reading authority to the selected user, click the [Add Read] button. To grant a writing authority, click the [Add Read-Wirte] button. ⑦ The registered share users are shown in the reading authority list or the writing authority list according to his/her authority. Using the [Delete User] or [Delete All] button under the Share user list, certain user can be deleted from the user list. The “Delete User” is for deleting one user selected in the Share user list. The “Delete All” is for deleting all users in the all users having the relative authority in the Share user list. Completing the share setting, select the [Save Share Info] button.](https://usermanual.wiki/Sarotech/NHD-355.Users-Manual-2-of-2/User-Guide-583087-Page-10.png)
![53list of current folder so as to move to the upper folder. Otherwise, select folder icon or folder name to move to the sub folder you want to go. ② Click the check box next to the public folder to be cancelled its public setting. ③ Select the [Share Folder] button. ④ The dialog box for setting the Share setting will be shown. ⑤ Select the [Delete share info] button. Completing the deleting the share, the share information of the U-Stor system will be deleted. You can see the folder icon is changed to the normal icon. You can also see the share name is deleted under the shared (public) folder (/U-Stor/public). C. Caustions using the Share function The followings are the main message related to the share setting.](https://usermanual.wiki/Sarotech/NHD-355.Users-Manual-2-of-2/User-Guide-583087-Page-12.png)
![54 ① If a same share name exists already, the public setting can not be performed. It causes an error. ② It is impossible to perform the share set to the sub folder of the share folder. ③ It is impossible to perform the share set to the upper folder of the share folder. ④ When the share folder in the private folder (/USotr/private/) is renamed or deleted, a message inquiring whether the share setting will be deleted or not will be shown. To delete the share setting, press the [Y].](https://usermanual.wiki/Sarotech/NHD-355.Users-Manual-2-of-2/User-Guide-583087-Page-13.png)
![55⑤ When the commands of move, upload, download, delete, rename or create new folder are performed in the share folder (/U-Stor/public/), a message of “Permission denied” may be shown according to the authority of the user. The following is the case in which the user has not writing authority to the share folder. 1.2.4. Change the Password of U-Stor account Each user of the U-Stor has his/her own password. It is recommended that the password should be changed periodically for security. The method for changing the password is as follows. ① Select the [Change Password] item on the left main menu. ② On the password changing screen, enter the old password into the ‘Current password’ and the new password into the ‘New password’ and ‘Confirm new password’. The password should be comprises of more than 5 digits and less than 8 digits of alphanumeric characters.](https://usermanual.wiki/Sarotech/NHD-355.Users-Manual-2-of-2/User-Guide-583087-Page-14.png)
![56 ③ Press the [Apply] button to change with the new password. If there are no errors in the current password, new password and confirm password, then the password is changed with the new one. If the current password is incorrect, an error message will be shown. When the password is identical with the user’s name, the new password is not identical with the confirm password or the new password includes less than 5 digits, an error message will be shown.](https://usermanual.wiki/Sarotech/NHD-355.Users-Manual-2-of-2/User-Guide-583087-Page-15.png)

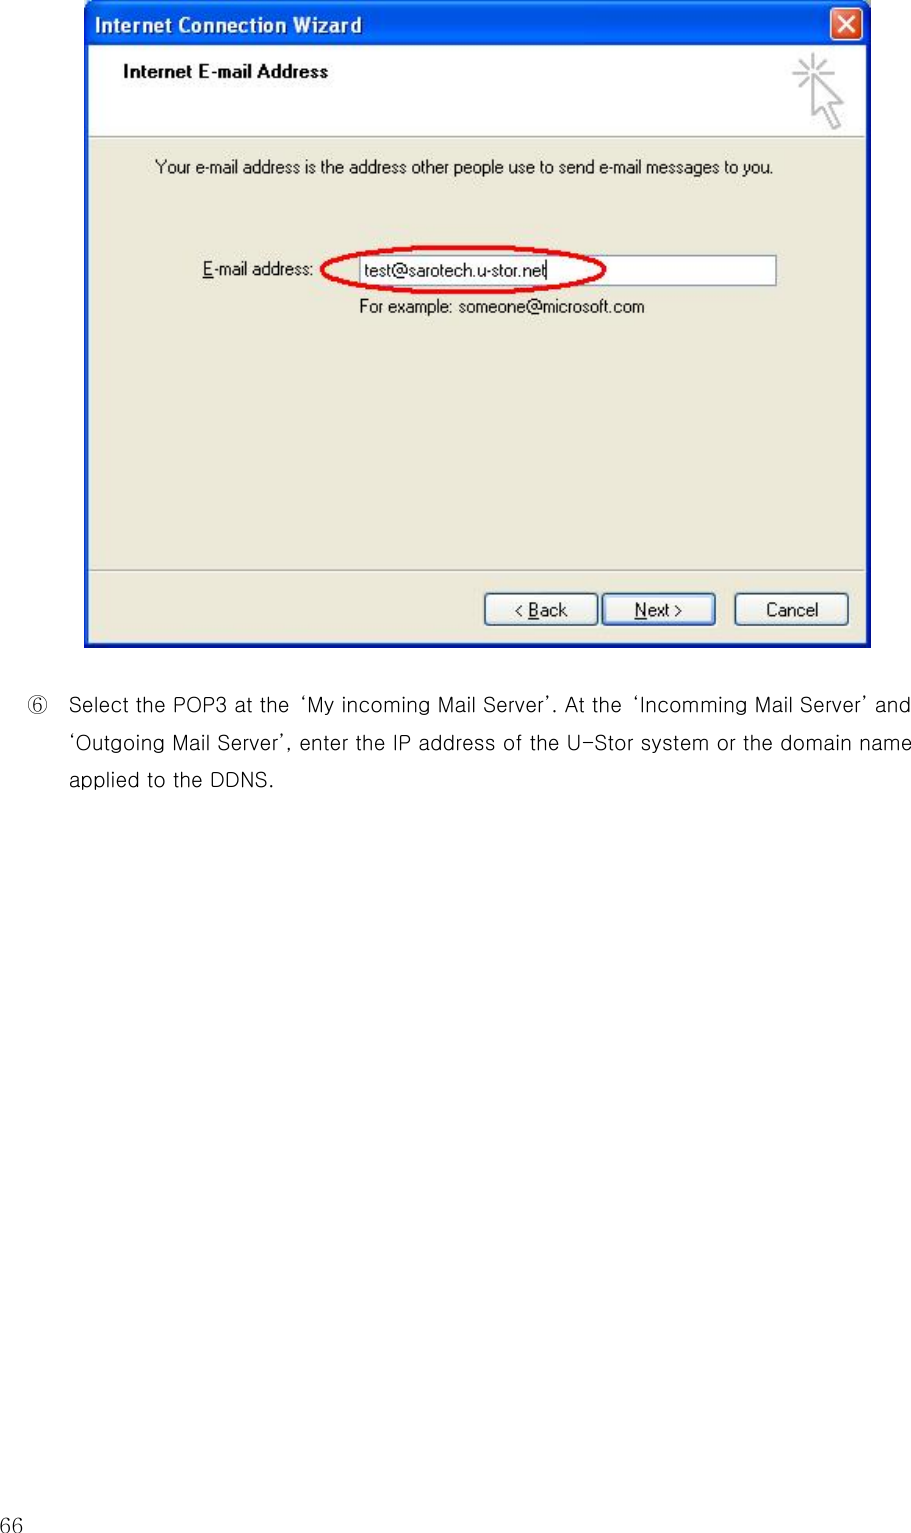
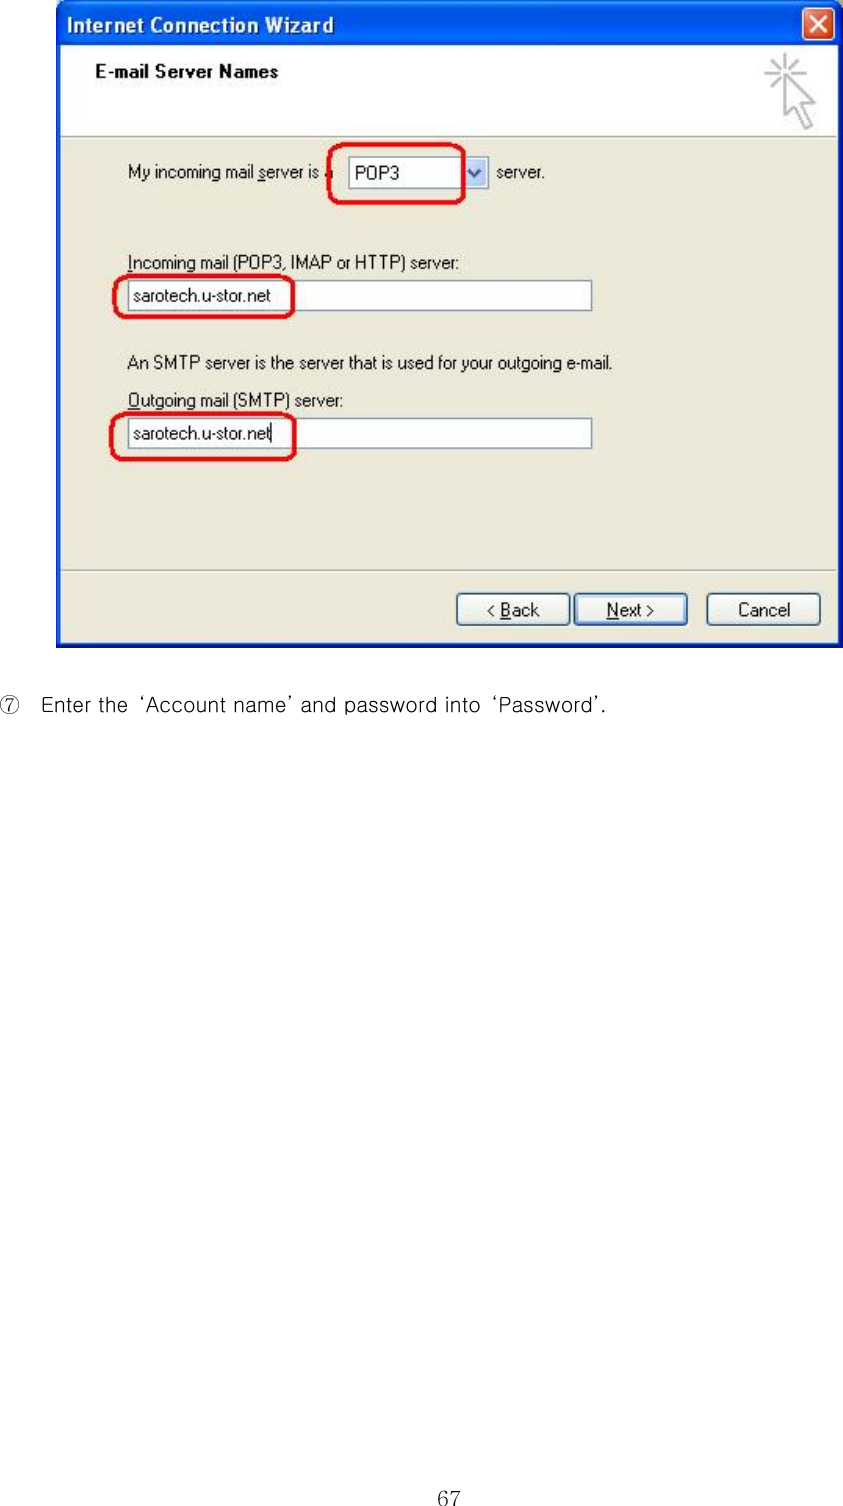
![63 3. Using as a mail server The U-Stor system suggests the mail server function. It suggest POP3 service in order to help you to check your e-mails using the common e-mail program any where, any time. The followings show the method for setting the mail account using the Outlook Express, the typical e-mail program of Windows. For the user using another mail program, refer to the manual of the mail program. ① Run the Outlook Express. ② Click [Tool] -> [Account] in the menu bar.](https://usermanual.wiki/Sarotech/NHD-355.Users-Manual-2-of-2/User-Guide-583087-Page-22.png)
![64 ③ Click the [Add] ->[Mail] among the menu located upper right side.](https://usermanual.wiki/Sarotech/NHD-355.Users-Manual-2-of-2/User-Guide-583087-Page-23.png)
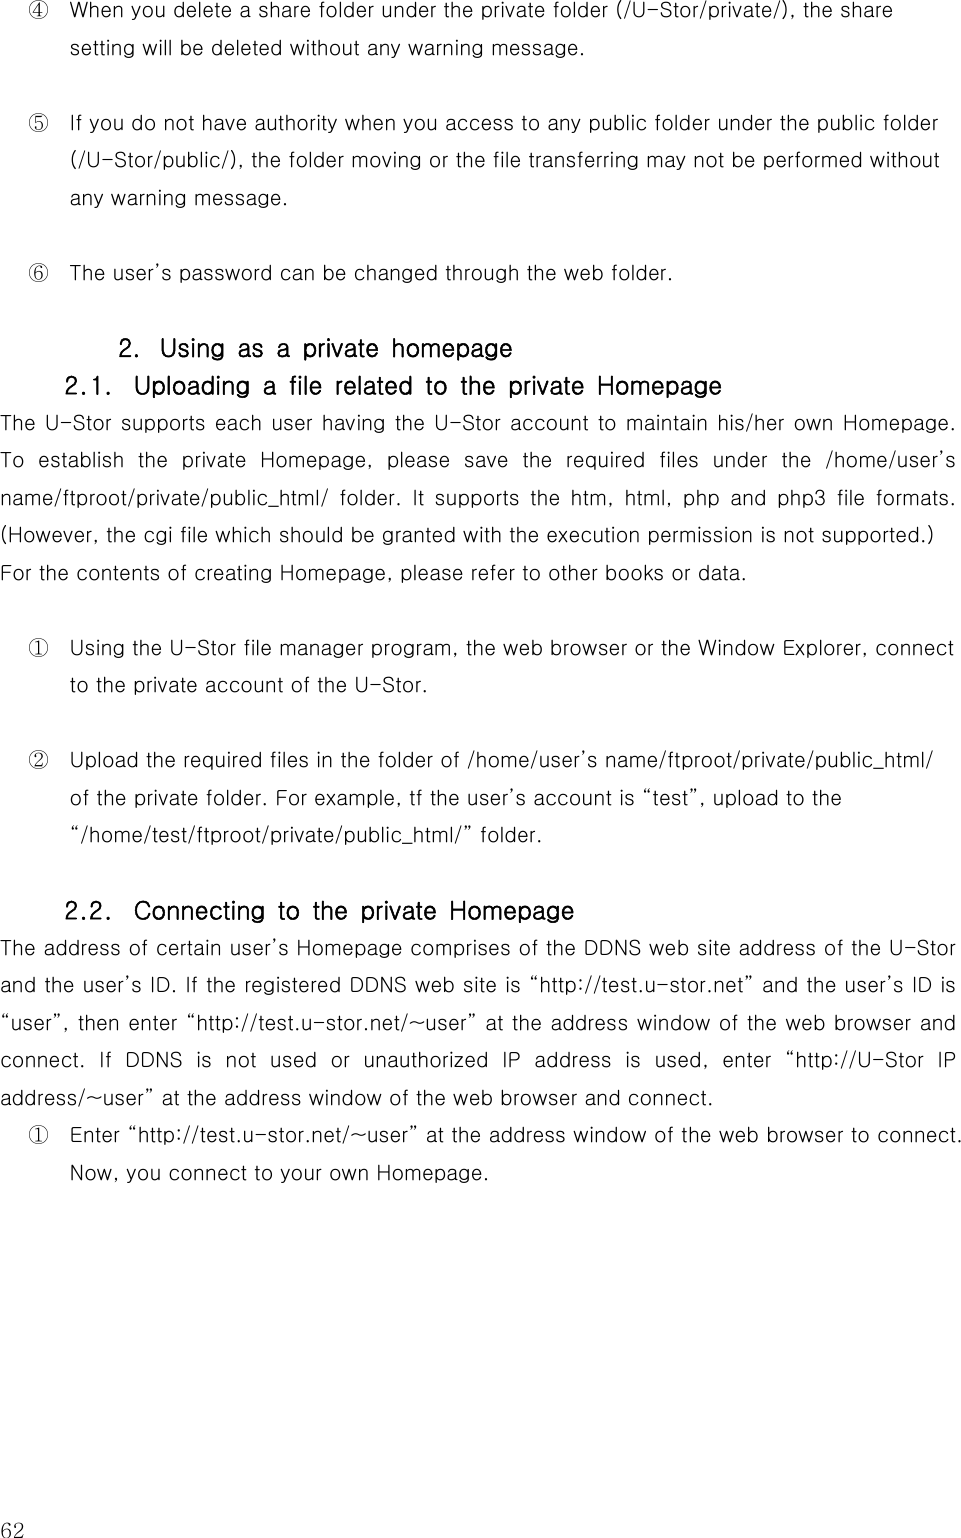
![65④ After enter a name in the ‘Display name’, press the [Next] button ⑤ Enter your E-mail address and then press the [Next] button.](https://usermanual.wiki/Sarotech/NHD-355.Users-Manual-2-of-2/User-Guide-583087-Page-24.png)
![68 ⑧ Now press the [Next] button to complete setting.](https://usermanual.wiki/Sarotech/NHD-355.Users-Manual-2-of-2/User-Guide-583087-Page-27.png)
![694. Using the U-Stor backup utility The U-Stor backup utility is rendered with the U-Stor file manager. It supports the backup from the local computer to the U-Stor system, the backup from the U-Stor system to the local computer and the file synchronizing between the local computer and the U-Stor system. In addition, the periodical backup can be performed by setting and managing the auto backup scheduling. (This function is supported in the Windows OS series only.) ★ Caution: Before using the backup function, synchronize the standard time at the Mainternance -> Time setting menu of the U-Stor with the time of the PC performing the backup. Otherwise, by the synchronizing backup option, the old file may be treated as a upgraded new file. 4.1. Installation of the U-Stor Windows Application After the U-Stor Windows Application is installed, the U-Stor file manager and the U-Stor backup utility are created. Please refer to ‘1.1.1.U-Stor Windows Application Installation’. 4.2. Start the U-Stor backup utility After the U-Stor Windows Application is installed, the U-Stor backup utility will be automatically registered in the Start Program. Accordingly, when a user login to window, the backup program will start and then an icon will be shown on the Tray. When the U-Stor backup program is ended, the scheduling backup program does not work. To start the U-Stor backup utility in manual, click the [Start] -> [Program] -> [U-Stor Application] -> [U-Stor Backup Utility]. Further, during the U-Stor file manager is running the U-Stor backup utility can be started by clicking the backup ( )on the tool bar. Alternately, it can be started by clicking the U-Stor backup utility on the Tray. Running the backup utility, the main screen will be shown as follows.](https://usermanual.wiki/Sarotech/NHD-355.Users-Manual-2-of-2/User-Guide-583087-Page-28.png)
![70 The follows are the descriptions for the functions of each menu. z Backup setting: It is possible to manage the backup scheduling, and add, delete and edit the backup section. z Manual Backup: By selecting the backup section, the manual backup can be started immediately. z Backup Stop: This function is activated during the backup is running. By clicking this button, the running backup will be stopped. z Show Log: This function shows the Log per each backup section. To end the U-Stor utility, select “Exit” in the pop-up menu appearing by clicking the right button of the mouse with the cursor being on the program icon ( ) at the Tray. Press [Y] to exit program then all backup scheduling are cancelled. A message confirming the ending of the program will be shown.](https://usermanual.wiki/Sarotech/NHD-355.Users-Manual-2-of-2/User-Guide-583087-Page-29.png)
![714.2.1. Backup setting Here, explained are the backup setting functions such as the managing the backup scheduling and the adding, deleting and editing the backup section. To perform the auto backup or manual backup, a backup section should be registered using the backup setting. A. Adding the backup section ① Select the backup setting ( ) in the menu. ② If the program is run at first, a backup section should be added. Please select the [New] button. ③ The dialog box for backup setting will be shown. The number of figure is also used as the following explain number.](https://usermanual.wiki/Sarotech/NHD-355.Users-Manual-2-of-2/User-Guide-583087-Page-30.png)
![72 ④ Enter a backup section name in the ‘Input Backup Name’. The backup name should be distinguished from the other backup names. ⑤ Enter the ‘Connection’. Enter the Host, the Port number, the User’s ID and the Password. ⑥ To select the backup folder of the local folder, click the [Browse...] button. A local folder you want and select the OK button.](https://usermanual.wiki/Sarotech/NHD-355.Users-Manual-2-of-2/User-Guide-583087-Page-31.png)
![73 ⑦ To select a backup folder of the remote folder, click the [Browse...] button and then select a remote folder you want and press the OK button. ★ Caution: The backup folder can be selected when it is under the private folder. Using the U-Stor file manager, you should create a folder used as a backup folder under the private folder in advance. At the Brower dialog box for the remote folder, a new folder could not be created.](https://usermanual.wiki/Sarotech/NHD-355.Users-Manual-2-of-2/User-Guide-583087-Page-32.png)
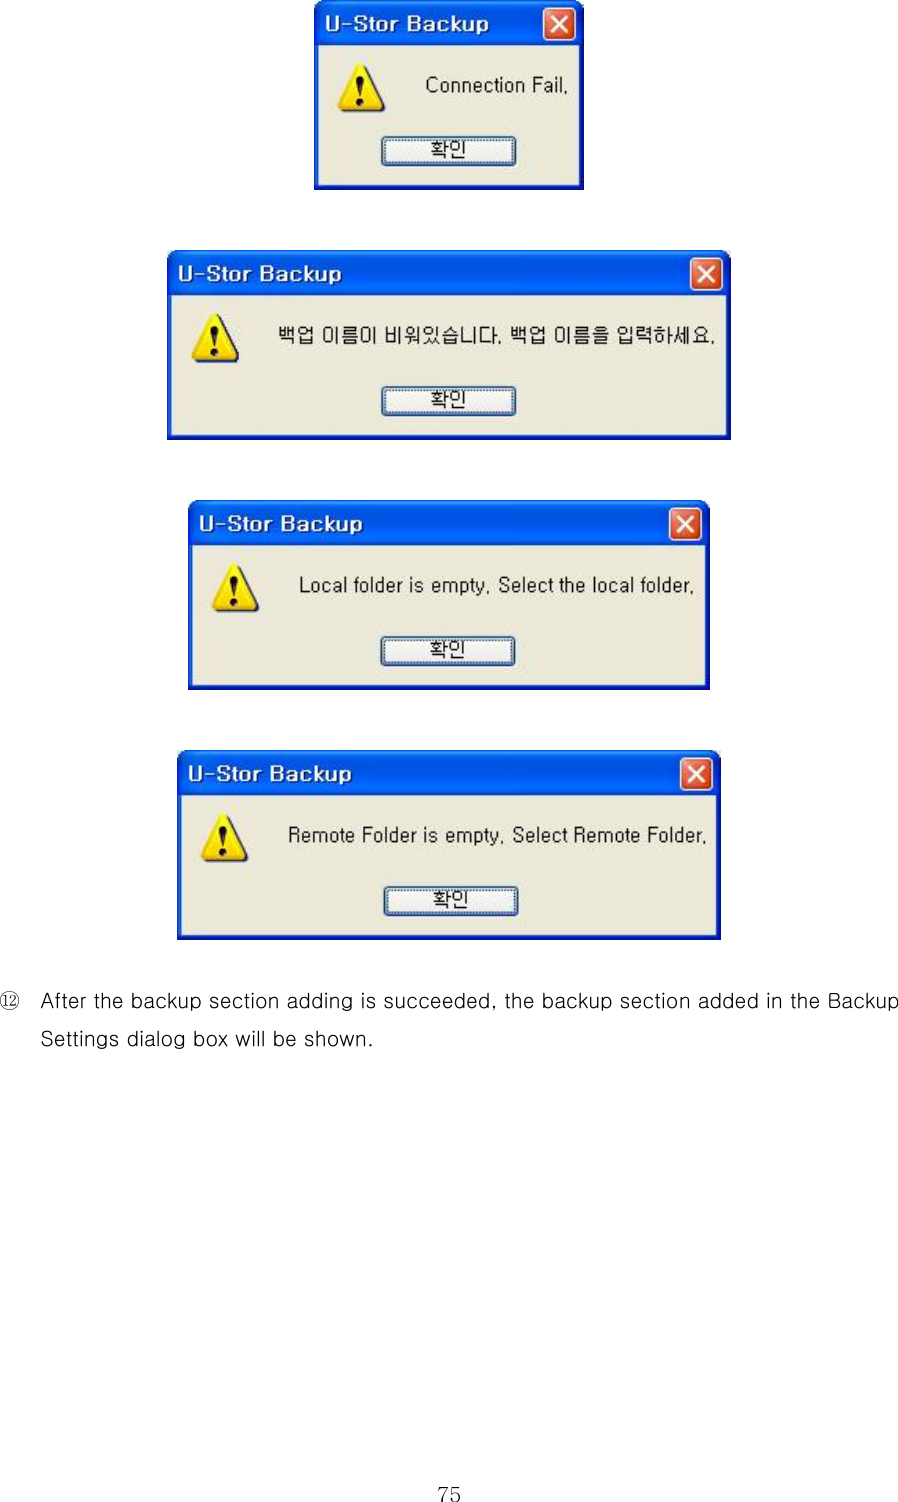
![74 ⑧ Select the backup method. As a backup method, select one method among the ‘From Local Folder to Remote Folder’, ‘From Remote Folder to Local Folder’ and ‘Synchronization’. In the backup method to one direction such as ‘From Local Folder to Remote Folder’ and ‘From Remote Folder to Local Folder’, the option of ‘Remove the deleted file’ can be selected. If the ‘Remove the deleted file’ is selected, the file will be automatically deleted if the removed file from the original folder exists in the target folder. In the ‘Synchronization’ method, the ‘Remove the deleted file’ option will be inactivated. When the same files exist in the source and target folders, these files are synchronized to the latest modified file in the both folders. ★ Caution: If the ‘Remove the deleted file’ or the ‘Synchronization’ is selected, the file will be automatically erased or replaced with new file. Please be aware of the usage before using this function. ⑨ Select the Backup Schedule. The backup schedule has three options, Daily, Weekly and Monthly. Please select one of them and set the backup time in minute unit. ⑩ Select the [OK] button after completing the setting from the backup setting dialog box to save the setting values. ⑪ When the backup setting has any error, the following message will be shown. Please confirm the backup setting and modify it.](https://usermanual.wiki/Sarotech/NHD-355.Users-Manual-2-of-2/User-Guide-583087-Page-33.png)
![76 B. Editing backup section ① Selecting the backup section which you want to edit in the Backup Setting dialog box, click the [Edit] button. ② The Backup Configuration dialog box will be shown. The backup name can not be changed, the changing order is the same as ⑤~⑫ sequences of ‘A. Backup section adding’.](https://usermanual.wiki/Sarotech/NHD-355.Users-Manual-2-of-2/User-Guide-583087-Page-35.png)
![77 C. Deleting backup section ① Selecting the backup section which you want to delete in the Backup Setting dialog box, click the [Delete] button. ② Then the inquiring message to the deleting backup section will be shown. Select the [Y] button to delete the backup section from the backup setting list. Press the [N] button to cancel the backup section deleting. D. Managing the auto backup scheduling ① Select the backup section list of the auto Backup Setting. By checking the check box of the scheduling column, turn ON or OFF the backup scheduling. The backup section having the check at the scheduling column only performs the auto backup.](https://usermanual.wiki/Sarotech/NHD-355.Users-Manual-2-of-2/User-Guide-583087-Page-36.png)
![78 ② Start the backup scheduling by selecting the [OK] button. The following main screen shows the status of the backup scheduling. At the status bar of the U-Stor backup utility program, the current backup scheduling data will be shown. At the backup status bar, the backup status will be shown in LED style for example, with red for during backup scheduling, green for no backup scheduling and blue for during backup. Further, the next backup scheduling data is also shown.](https://usermanual.wiki/Sarotech/NHD-355.Users-Manual-2-of-2/User-Guide-583087-Page-37.png)
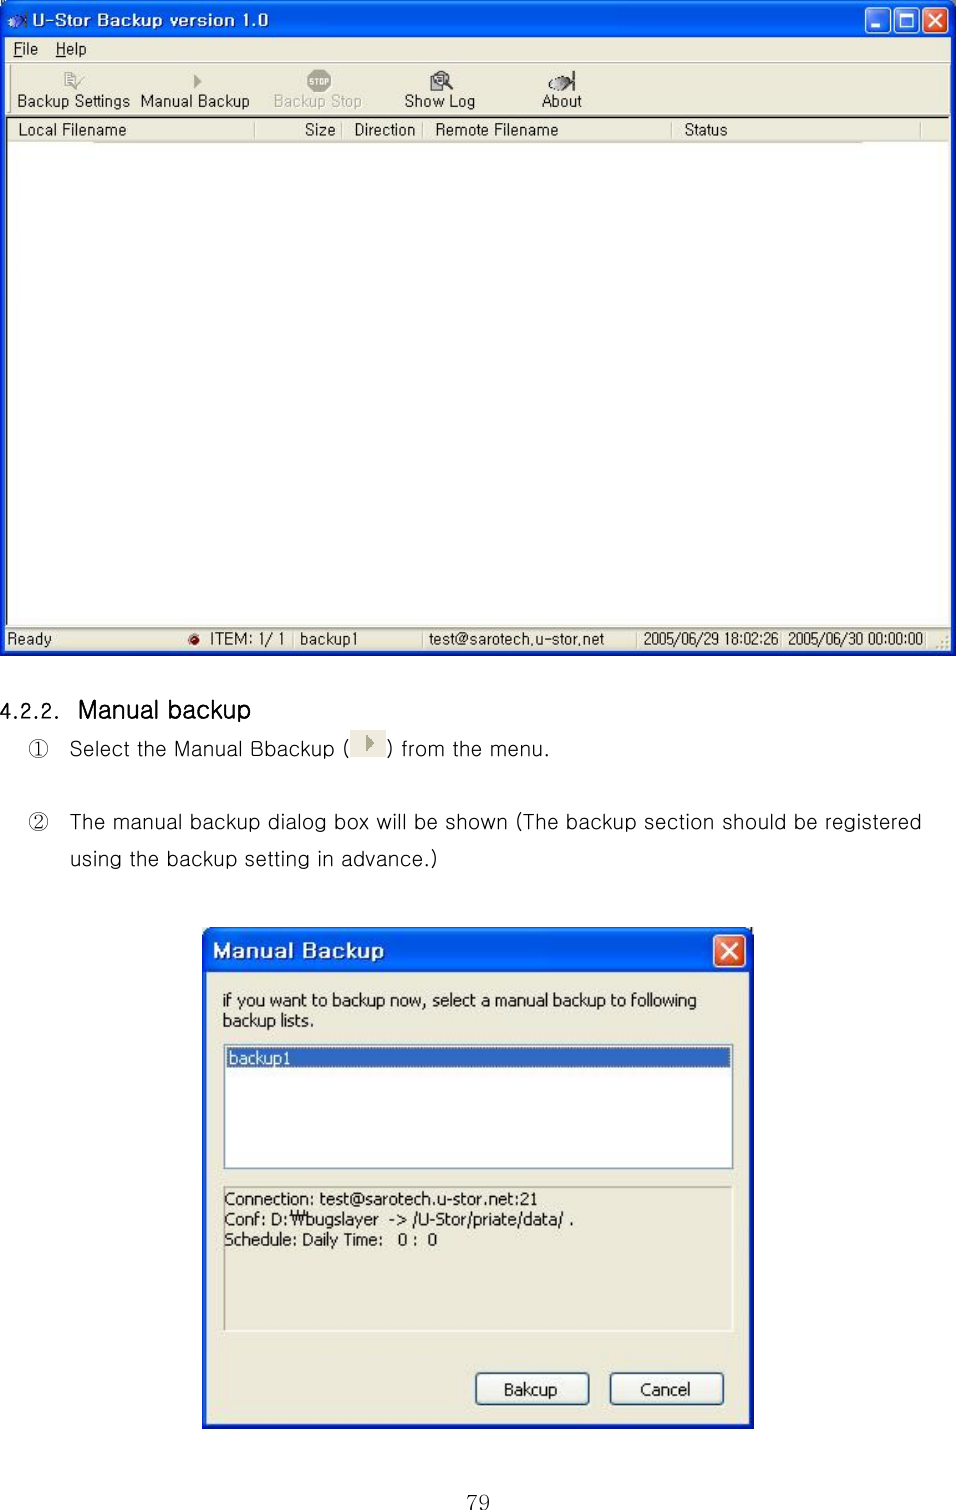
![80 ③ Select the backup name perform the manual backup from the dialog box list. ④ Click the [Backup] button. ⑤ During the backup item list is prepared after accessing to the U-Stor, a progrssing message will be shown. If the [Cancel] button is selected during the waiting, then the backup will be cancelled. ⑥ The backup item will be added to the backup file list and the backup will be proceeding. The file transmitting status will be shown on the screen.](https://usermanual.wiki/Sarotech/NHD-355.Users-Manual-2-of-2/User-Guide-583087-Page-39.png)
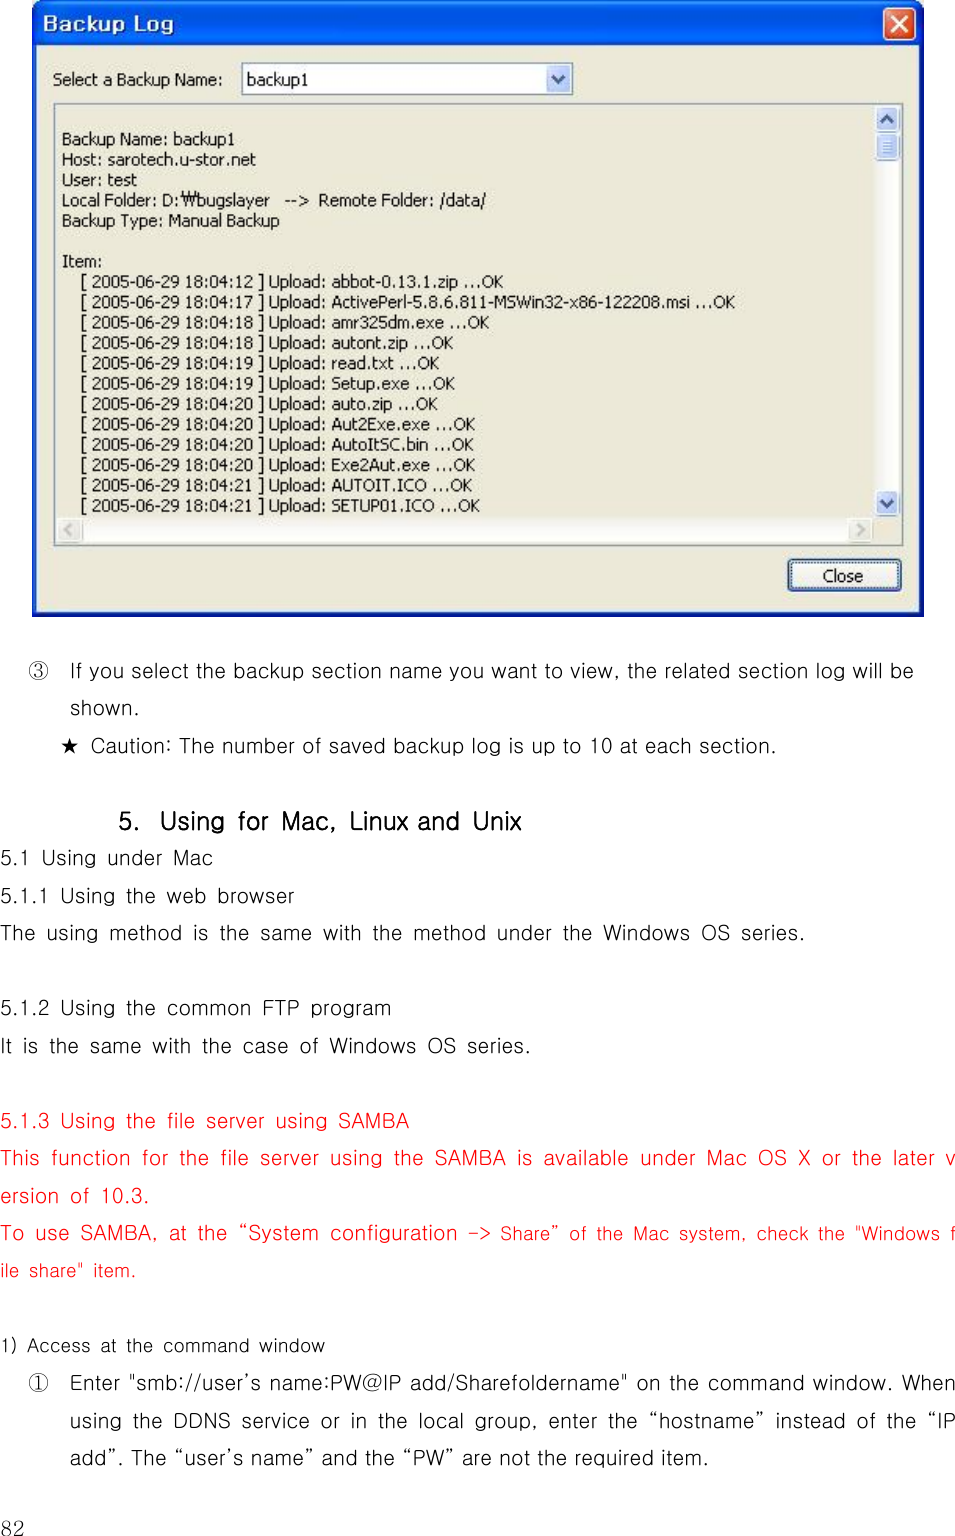
![81 ⑦ During the backup is proceeding, the Stop ( ) button will be activated on the menu. If the backup stop is selected, the backup stop confirming message will be shown. Select [Y] to cancel all backup proceeding. 4.2.3. View the backup log ① Select the Log view ( ) on the menu. ② The Backup Log dialog box will be shown.](https://usermanual.wiki/Sarotech/NHD-355.Users-Manual-2-of-2/User-Guide-583087-Page-40.png)