Schneider Electric Buildings ROAMIO2 HVAC CONTROL TRANSCEIVER User Manual BACnet Service Tool User s Guide
Schneider Electric Buildings LLC HVAC CONTROL TRANSCEIVER BACnet Service Tool User s Guide
users manual

BACnet Service Tool
User’s Guide
© 2005, TAC
All Rights Reserved
No part of this publication may be reproduced, read or stored in a retrieval system, or
transmitted, in any form or by any means, electronic, mechanical, photocopying, recording,
or otherwise, without prior written permission of TAC.
This document is produced in the United States of America.
Product Names are trademarks of TAC. All other trademarks are the property of their
respective owners.
Title: BACnet Service Tool User’s Guide
Revision: A
Date: December, 2005
TAC part number: 30-3001-910
The information in this document is furnished for informational purposes only, is subject
to change without notice, and should not be construed as a commitment by TAC. TAC as-
sumes no liability for any errors or inaccuracies that may appear in this document.
Tour Andover Controls, Inc.
One High Street
North Andover, MA 01845
(978) 470-0555
Fax: (978) 975-9782
http://www.tac.com

December, 2005
BACnet Service Tool User’s Guide
30-3001-910
Revision A

Regulatory Notices
BACnet Service Tool User’s Guide 5
Regulatory Notices
Federal Communications Commission
This device complies with part 15 of the FCC Rules. Operation is
subject to the following two conditions: (1) This device may not cause
harmful interference, and (2) this device must accept any interference
received, including interference that may cause undesired operation.
Caution: the user that changes or makes modifications not expressly
approved by Tour Andover Controls, Inc. for compliance could void the
user's authority to operate the equipment.
FCC ID: DVE - ROAMIO2
Industry Canada Radio Equipment
This digital apparatus does not exceed the wireless requirements for
Industry Canada IC RSS-210 and is listed on the Industry Canada
Radio Equipment List.
IC: 1026A - ROA
C-Tick - Australian Communications Authority (ACA)
This equipment carries the C-Tick label and complies with
EMC and radio communications regulations of the
Australian Communications Authority (ACA), governing
the Australian and New Zealand communities.

Regulatory Notices
6TAC
CE - Compliance to European Union (EU)
This equipment complies with the rules of the Official Journal
of the European Communities specified in the EMC directive
89/336/EEC governing the Self Declaration of the CE Marking
for the European Union..
WEEE - Directive of the European Union (EU)
This equipment and its packaging carry the waste electrical
and electronic equipment (WEEE) label, in compliance with
European Union (EU) Directive 2002/96/EC, governing the
disposal and recycling of electrical and electronic equipment in
the European community.
BACnet Service Tool User’s Guide 7
Regulatory Notices................................................................ 5
Federal Communications Commission ...................................... 5
Industry Canada Radio Equipment ........................................... 5
C-Tick - Australian Communications Authority (ACA) ............ 5
CE - Compliance to European Union (EU) ................................ 6
WEEE - Directive of the European Union (EU) ........................ 6
Chapter 1 The BACnet Service Tool ..................................................... 11
Introducing the BACnet Service Tool ........................................... 12
What Can You Do With This Tool? .............................................. 12
What You Cannot Do With This Tool .......................................... 13
Before You Get Started ................................................................. 14
Compatible Controllers ................................................................... 14
Hardware & Software Requirements ............................................. 15
The RoamIO2 Hardware Adapter .................................................. 16
Connectors and Indicators ............................................................ 16
Batteries and Power ...................................................................... 17
What to do Next .............................................................................. 18
Chapter 2 Getting Started ...................................................................... 19
Installing the BACnet Service Tool ................................................ 20
Bluetooth Installation and Configuration ................................... 21
BACnet Service Tool Laptop or Desktop Installations ............... 23
BACnet Service Tool Pocket PC Installations ............................. 25
Upgrading the RoamIO2 Firmware ............................................... 27
Getting Started with the Service Tool Software ........................... 29
Starting and Logging on to the Application ................................ 29
Configuring the BACnet Service Tool ............................................ 31
Creating Users and User Levels .................................................. 31
What to do Next .............................................................................. 33
Chapter 3 Connecting to a BACnet Controller .................................... 35
Connecting the RoamIO2 to the PC ............................................... 36
Connect the RoamIO2 to the PC Using the RS-232 Serial Cable 36
Activating the RoamIO2 for a Serial Connection ...................... 37
Contents
Table of Contents
8TAC
Connect the RoamIO2 to the PC using Bluetooth ....................... 38
Connect a RoamIO2 Cable to the Controller ................................. 40
Connecting to a Controller using MS/TP (Field Bus) ................... 41
Connecting to a Controller using Ethernet ................................... 43
Generating a License Request with the RoamIO2 Connected ... 44
Generating a License Request without the RoamIO2 Connected 46
Making an Ethernet Connection .................................................. 49
Chapter 4 BACnet Service Tool
Quick-Reference ................................................................... 51
Connecting to a Controller ............................................................. 52
File Menu ........................................................................................ 53
View Menu ....................................................................................... 54
Tools Menu ...................................................................................... 55
About Menu ..................................................................................... 58
Chapter 5 Using the BACnet Service Tool Software .......................... 59
BACnet Service Tool Overview ...................................................... 60
Connecting to Your BACnet Network .......................................... 60
Disconnecting from the Network ................................................. 60
Navigating and Selecting Devices and Objects ........................... 61
Adjusting the Service Tool’s Point of View .................................. 62
Making Changes to Controllers ................................................... 64
Configuring and Maintaining BACnet Devices ............................. 65
Available and Non-available Tool menu options ......................... 65
Preferences .................................................................................... 66
Update OS ..................................................................................... 67
Backup To File .............................................................................. 68
Restore From File ......................................................................... 69
Backup to Flash ............................................................................ 70
Set Offline B3 MAC Id .................................................................. 71
Learn ............................................................................................. 72
Update RoamIO ............................................................................ 73
Warm Start Device ....................................................................... 73
Cold Start Device .......................................................................... 74
Set Device Date and Time ............................................................ 75
Some Typical Use Cases ................................................................. 76
Simple and Complex Properties ................................................... 76
Adjusting a Temperature Setpoint .............................................. 79
Viewing a Trend Log Buffer ......................................................... 81
Viewing a Schedule of Events ...................................................... 83
Table of Contents
BACnet Service Tool User’s Guide 9
Appendix A What Is BACnet? .................................................................. 85
Introduction ..................................................................................... 86
BACnet - Knowing the Terminology .............................................. 88
What Is a BACnet Network? ........................................................ 88
What Are BACnet Devices? .......................................................... 89
How Are Devices Identified? ...................................................... 89
What Are Device Profiles? .......................................................... 90
What Are BACnet Objects? .......................................................... 91
How Are Objects Identified? ....................................................... 92
What Are BACnet Properties? ..................................................... 92
How Are Properties Identified? .................................................. 93
What Are Complex Properties? .................................................. 93
What Are BACnet Services? ......................................................... 93
What Are BIBBs? .......................................................................... 94
What Are BACnet Broadcasts? .................................................... 95
What Is BACnet Command Priority? .......................................... 96
The Command Priority Process .................................................. 96
Command Values and NULLs ................................................... 97
Relinquishing a Command ......................................................... 97
The 16-Element BACnet Command Priority Array .................. 98
What Are BACnet PICS? .............................................................. 99
BACnet and Andover Continuum .................................................. 100
Andover Continuum vs. BACnet Terminology — a Roadmap .... 100
Andover Continuum BACnet Devices .......................................... 101
How BACnet Devices Are Created in Andover Continuum ...... 101
BACnet Objects in Andover Continuum ...................................... 102
How BACnet Objects Are Created in Andover Continuum ...... 103
BACnet Class Object Folders ..................................................... 104
BACnet Properties and Andover Continuum .............................. 104
Routers, Gateways, BBMDs, and Foreign Devices ....................... 106
Routers and Gateways .................................................................. 106
BBMDs and Foreign Devices ........................................................ 107
Table of Contents
10 TAC

BACnet Service Tool User’s Guide 11
Chapter 1
The BACnet Service Tool
This chapter contains the following topics:
zIntroducing the BACnet Service Tool
zWhat Can You Do With This Tool?
zWhat You Cannot Do With This Tool
zBefore You Get Started
zConnectors and Indicators
zBatteries and Power
zCompatible Controllers
zHardware & Software Requirements
zThe RoamIO2 Hardware Adapter
zWhat to do Next
Note: This manual describes the installation and use of the BACnet
Service Tool for BACnet controllers. If your network has
Andover Continuum Infinet controllers, you should refer to the
RoamIO User’s Guide, Revision A, TAC part number: 30-3001-
891.

Chapter 1: The BACnet Service Tool
12 TAC
Introducing the BACnet Service Tool
The BACnet Service Tool is a software application, with a hardware
adapter, that allows you to perform basic administrative functions to
maintain a network of Andover Continuum and third-party BACnet
controllers while being mobile, using a laptop or Pocket PC. The
software can also be used from an ordinary desktop.
Connections If you are connecting your PC (desktop, laptop, or Pocket PC) to the
service port of a controller, you will need the RoamIO2 hardware
adapter to make the physical connection (serial cable or Bluetooth
wireless) between the MS/TP bus and your PC .
Other connections, such as Ethernet, will not require the RoamIO2
hardware adapter, but will require a valid license from TAC to enable
the connection.
What Can You Do With This Tool?
Using the BACnet Service Tool, an administrator can plug into a
Continuum controller on any BACnet subnetwork and perform basic
adminstrative functions to any Continuum or third-party controller
across the BACnet Internetwork.
Administrators can “view” an entire network of devices, and then select
a specific subnetwork or device. The objects and classes defined within
a device can be viewed or changed .
For example, some of the functions you can perform include:
zAdjusting a temperature setpoint
zBacking up and restoring a device
zSetting the date and time of a device
zSetting the MAC IDs for Continuum controllers during startup and
commissioning
zInitiate the automatic “learning” function of Continuum controllers
zUpgrading an Andover Continuum device Operating System (OS)
zRenaming objects

Chapter 1: The BACnet Service Tool
BACnet Service Tool User’s Guide 13
zViewing and editing object properties
zViewing the controller’s trend data log
zViewing a controller’s schedule of events
zStarting and Stopping a program
Note: You can connect the BACnet Service Tool to Ethernet to view the
Andover Continuum proprietary classes and properties of any
device running controller firmware version 4.4, or later.
For MS/TP connections, you can view the proprietary classes
and properties of all connected devices, as long as at least one
controller on the MS/TP network is running firmware version
4.4, or later.
What You Cannot Do With This Tool
The BACnet Service Tool does not allow you to perform all
administrative and maintenance tasks available on Continuum
CyberStation.
For example, you cannot use the BACnet Service Tool to:
zAdd or delete devices
zCreate or delete objects
zView or modify a file within a device, such as a Plain English (PE)
program

Chapter 1: The BACnet Service Tool
14 TAC
Before You Get Started
Before you get started, be sure you have all of the following items:
zRoamIO2 hardware adapter and interface cables
zDesktop PC or Laptop PC
zPocket PC with optional serial cable and docking cradle
zBACnet Service Tool software application
Compatible Controllers
You can use the BACnet Service Tool by connecting to the following
controllers:
zAndover Continuum bCX 40x0
zAndover Continuum b4920
zAndover Continuum b3xxx
zAll third-party BACnet devices

Chapter 1: The BACnet Service Tool
BACnet Service Tool User’s Guide 15
Hardware & Software Requirements
Before installing the BACnet Service Tool application, be sure that
your Pocket PC, desktop or laptop PC meet the following requirements:
Hardware & Software Requirements1
1. You must be able to download from PC to Pocket PC.
Desktop or Laptop PC Hardware Requirements
Minimum Recommended
Any Hardware that is compatible with ActiveSync 3.8 or 4.0
CD ROM Drive or access to installation over a network
Available 9-pin or 25-pin communications port, USB port or BlueTooth wireless
Note: RS-232 cable with appropriate connectors is not supplied by TAC for PC
connection
5 MB available hard drive space space
Desktop or Laptop PC Software Requirements
Minimum Recommended
ActiveSync 3.8 or 4.0
Microsoft Windows XP, Windows 2000
5 MB available hard drive space space
Pocket PC Requirements
Minimum Recommended
Pocket PC2002 Operating System Windows Mobile 2003 or 5.0 for the
Pocket PC
32 MB RAM 64 MB RAM
9-pin RS 232 serial cable to comm port on Pocket PC or BlueTooth wireless
5 MB available hard drive space space
Note: The ActiveSync software is included as part of your Pocket PC package and is
part of the installation and configuration of the Pocket PC itself. The
ActiveSync software can also be downloaded from the Microsoft website. Refer
to the documentation supplied with your Pocket PC for requirements,
installation and operation of the ActiveSync program.
Chapter 1: The BACnet Service Tool
16 TAC
The RoamIO2 Hardware Adapter
The RoamIO2 hardware adapter (RoamIO2 ) is a device that serves as
an interface between the MSTP bus and a PC (desktop, laptop or
Pocket PC). The RoamIO2 is connected to the service port of the
controller and then, using a serial cable or the Bluetooth wireless
protocol, to the PC.
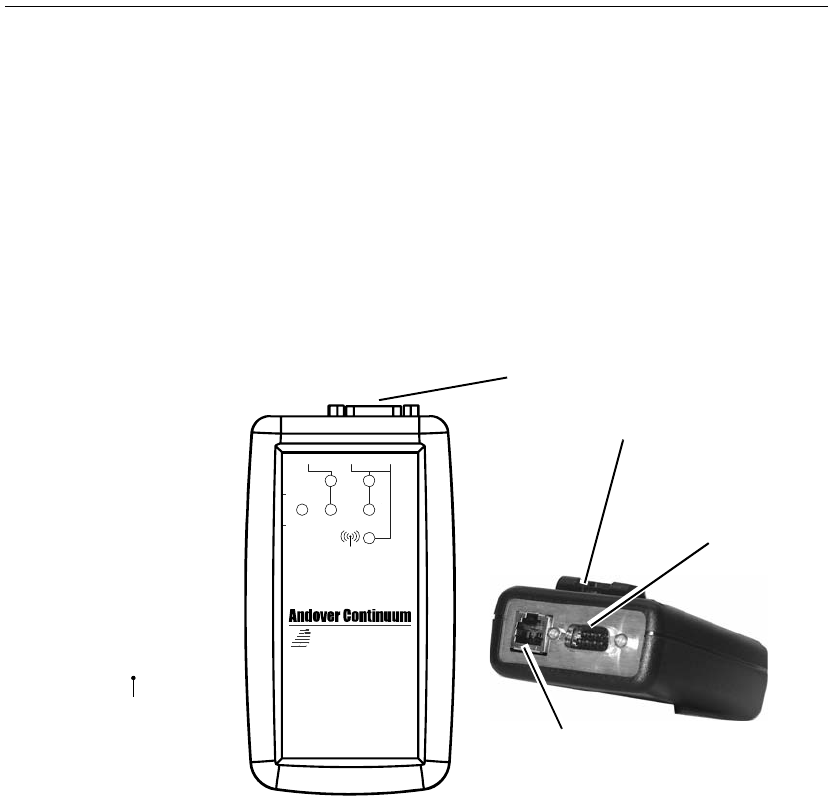
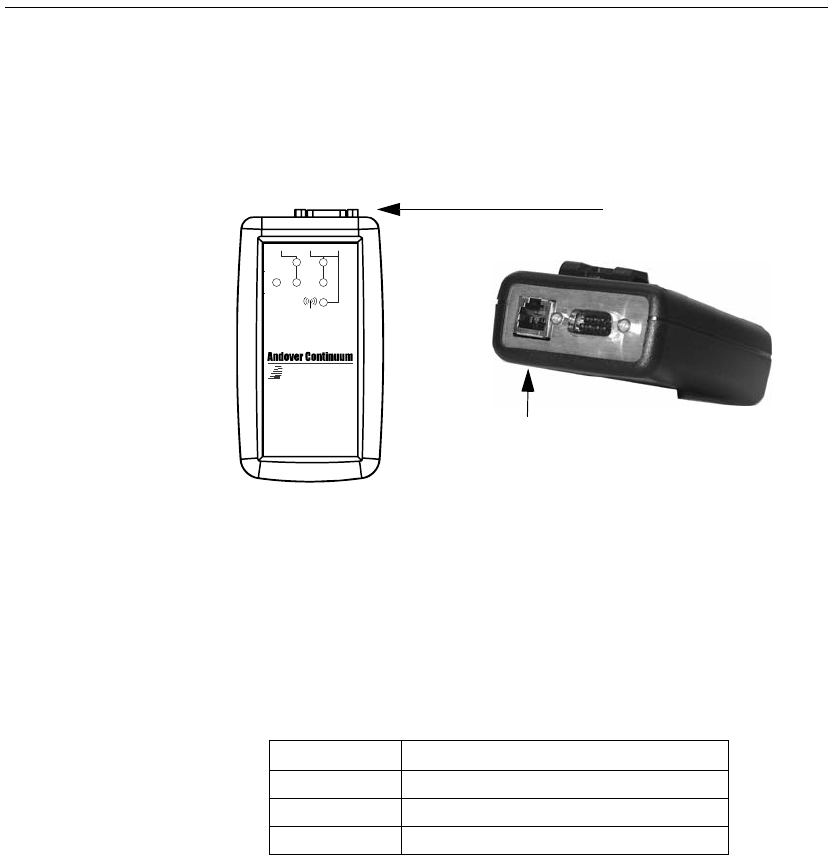
Connectors and Indicators
The following illustration shows the connector and indicator areas of
the interface unit.
TXD
RXD
OFF
ON
PWR
RS-4 85 RS-2 32 /WIRELESS
RoamIO
2
RJ-11 Connector to Controller/
Sensor Service Ports Using
Supplied Adapter Cables
Activity/Status
Indicators
TXD
Transmit data flashes indicating
the appropriate port’s data is
being transmitted
PWR
Power Status
RXD
Received data flashes indicating
the appropriate port’s data is
being received
Connections to PC or
PocketPC and Controller/
Sensor Service Ports
Bluetooth
Bluetooth wireless connection
Bluetooth capability is automatic
when a serial cable is not
attached to the DB-9 Connector
(
(())
)
DB-9 Connector to PC or
Pocket PC Using Adapter
(not supplied)
Dimensions = 2.748” wide x 4.937” long
Chapter 1: The BACnet Service Tool
BACnet Service Tool User’s Guide 17
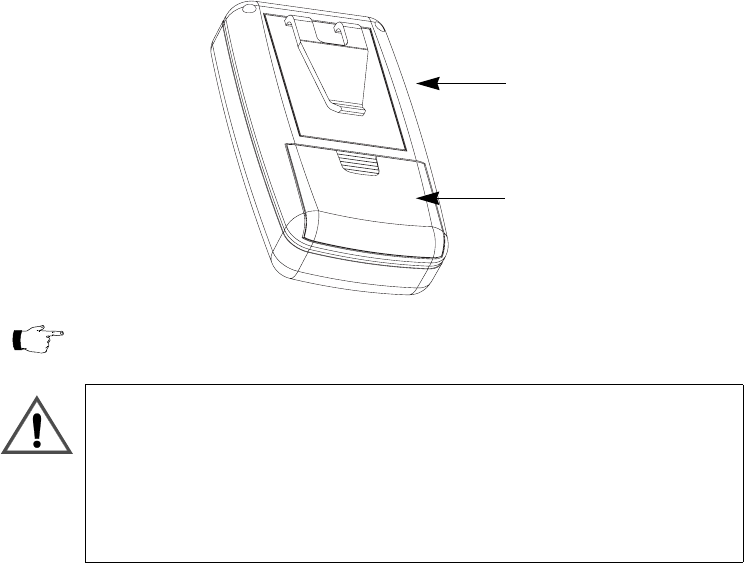
Batteries and Power
When the RoamIO2 is connected to an Andover Continuum controller,
it will draw power from the controller instead of the batteries, to
prolong battery life.
Power is supplied by two AA batteries (included). Recommended
batteries are Eveready type X91 1.5V AA alkaline or equivalent. The
battery compartment is located on the back of the unit.
.
To turn on the unit, slide the power switch to the ON position. The
Power indicator LED will illuminate if the batteries are fully
operational.
Power Switch
Battery Compartment
(side location)
Note: A new set of alkaline batteries provides up to 30 hours of continuous use
depending on the battery manufacturer.
CAUTION
Damage to the unit
To avoid damaging the unit, slide the power switch to the OFF position before installing
or removing batteries. During installation, be sure to observe correct polarity when
inserting batteries. Align the + and - symbols printed on the batteries with the symbols
indicated inside the battery compartment.
Failure to observe this precaution can result in equipment damage.

Chapter 1: The BACnet Service Tool
18 TAC
What to do Next
From this point in the manual you have two options:
zYou can proceed to Appendix A, What Is BACnet?, for an overview
of BACnet terminology and the relationship of BACnet to Andover
Continuum products.
or
zYou can go to Chapter 2, Getting Started, to:
Begin the process of installing the BACnet Service Tool
software on your PC (desktop, laptop, or Pocket PC).
Configure the Service Tool software.
Make the physical connections between your PC and a
controller.
Start the application and connect to the BACnet Internetwork.

Chapter 2: Getting Started
20 TAC
Installing the BACnet Service Tool
The BACnet Service Tool comes with a RoamIO2 hardware adapter,
cables, and a CD that should be installed on a laptop or desktop PC,
and may also be installed on a Pocket PC that is synchronized with the
laptop or desktop.
The CD contains the following software:
The complete installation process involves the following steps:
Step 1:
If you are going to be connecting your PC (desktop, laptop, or
Pocket) to the RoamIO2 hardware adapter, install and
configure your Bluetooth wireless communication software.
Step 2:
Install the BACnet Service Tool application on to your PC
(desktop, laptop, or Pocket)
Step 3:
Start the application and log on using the factory supplied
username and password (acc, acc).
Step 4: Create usernames and passwords for your site
Step 5: Make the physical PC to RoamIO2 connection, using a serial
cable or the Bluetooth wireless protocol, and then RoamIO to
controller.
Step 6: Set the communication options for the MS/TP or Ethernet
network you are connecting to, and then make the connection
Program Description
SetupPC.exe Installation executable for BACnet Service Tool
software for the PC
SetupPPC.exe Installation executable for BACnet Service Tool
software for the Pocket PC
InfinetSetupPC.exe Installation executable for Infinet Service Tool
software
InfinetSetupPPC.exe Installation executable for Infinet Service Tool
software for the Pocket PC
RoamIO2Uprev.exe Executable for upgrading RoamIO2 firmware

Chapter 2: Getting Started
BACnet Service Tool User’s Guide 21
using the BACnet Service Tool to maintain and configure your
BACnet Internetwork of controllers.
Bluetooth Installation and Configuration
If you are going to connect your PC to the RoamIO2 hardware adapter
using Bluetooth wireless communication, you will need specific
Bluetooth security and service configuration settings.
If Bluetooth is already installed on your PC, make sure the following
settings are configured:
zSecurity “Pairing” PIN # = ACC
zSerial Port Service is enabled
Note: When configuring your Bluetooth hardware to work with the
RoamIO2 hardware, you should refer to the manual or the online
help that came with your Bluetooth adapter.
The steps listed below generically describe the configuration process.
You will notice variations depending on whether you are configuring a
laptop or a Pocket PC, the specific operating system and the driver that
is installed.
Step 1: Turn on your RoamIO2 device. (Make sure you have installed
batteries or have the device connected to the service port of a
powered Continuum controller.)
Use the Bluetooth management software on your laptop or
Pocket PC to discover the RoamIO2 device. The RoamIO2 will be
listed as "Serial Port Device: COM1". COM1 donotes the
communication port on the RoamIO2 and is not the
communication port on the laptop or PocketPC. The discovery
tool is often refered to as a "Bluetooth hardware configuration
wizard"
Step 2: After selecting the RoamIO2 device, most drivers will
automatically ask you to assign a PIN code. This process is
called "Pairing" your bluetooth adapter to the bluetooth device.
If the driver does not automatically ask you to pair your
Chapter 2: Getting Started
22 TAC
device, look for a button that allows you to initiate a device
pairing. Enter the Pin Code of ACC.
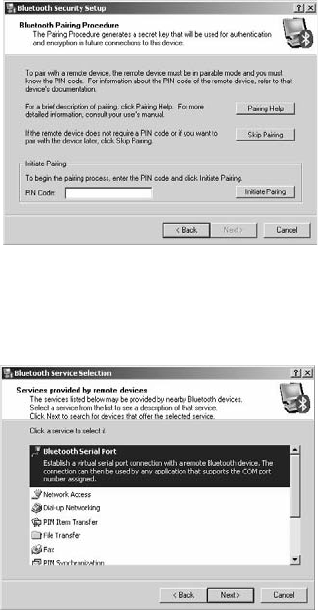
Step 3: The driver will allow you to select a Bluetooth Service. This is
sometimes displayed as a Service Selection window. Select the
Bluetooth Serial Port service.
Step 4: Select the COM port number your PC will use for Bluetooth
communications and record this number. Some drivers assign
the COM port number for you and do not allow you to change
it. It is common for a Pocket PC Bluetooth driver to have two
COM port assignments; one for Incoming and one for Outgoing
connections.
The RoamIO2 will connect to the COM port labeled as
"Outgoing" connections. This COM port will provide the
connection to the RoamIO2 hardware adapter.
Step 5: Complete the Bluetooth installation.
Chapter 2: Getting Started
BACnet Service Tool User’s Guide 23
BACnet Service Tool Laptop or Desktop Installations
To install the BACnet Service Tool application onto your laptop or
desktop PC, perform the following steps:
Step 1: Insert the BACnet Service Tool CD into the CD drive of your
laptop or desktop PC.
Step 2: Double-click the My Computer icon on your desktop
Step 3: Double-click the CD drive icon
Step 4: Locate the SetupPC.exe file and double-click to activate the
installation program.

Chapter 2: Getting Started
24 TAC
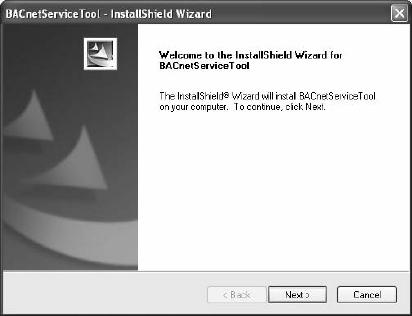
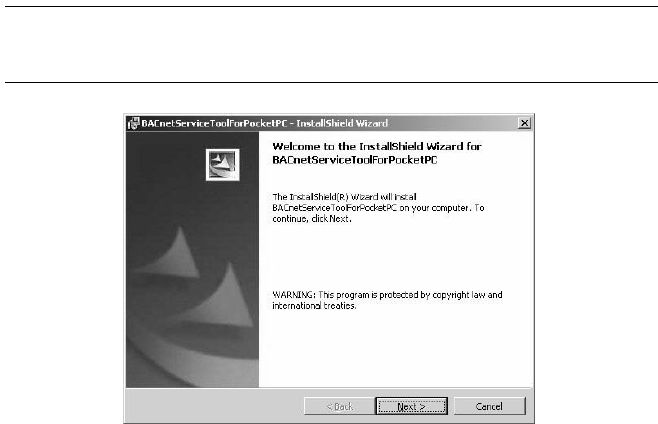
Step 5: Follow the directions of the installation wizard to complete the
installation of the program. At the end of the installation, you
should see the following screen.
Step 6: Select Finish to complete the installation on your desktop or
laptop PC.
Chapter 2: Getting Started
BACnet Service Tool User’s Guide 25
BACnet Service Tool Pocket PC Installations
To install the BACnet Service Tool application onto your Pocket PC,
perform the following steps:
Step 1: Place the Pocket PC in the docking cradle that is connected to
your laptop or desktop PC. Refer to the documentation
supplied with your Pocket PC for operation and detailed
information.
Step 2: Once the laptop or desktop PC and the Pocket PC are properly
synchronized, insert the BACnet Service Tool CD into the CD
drive in your PC.
Step 3: Double-click the My Computer icon on your desktop
Step 4: Double-click the CD drive icon
Step 5: Locate the SetupPPC.exe file and double-click to activate the
installation program.
Note: The install process interacts with the Pocket PC using active
sync to automatically transfer and install the application onto
the Pocket PC.
Chapter 2: Getting Started
26 TAC
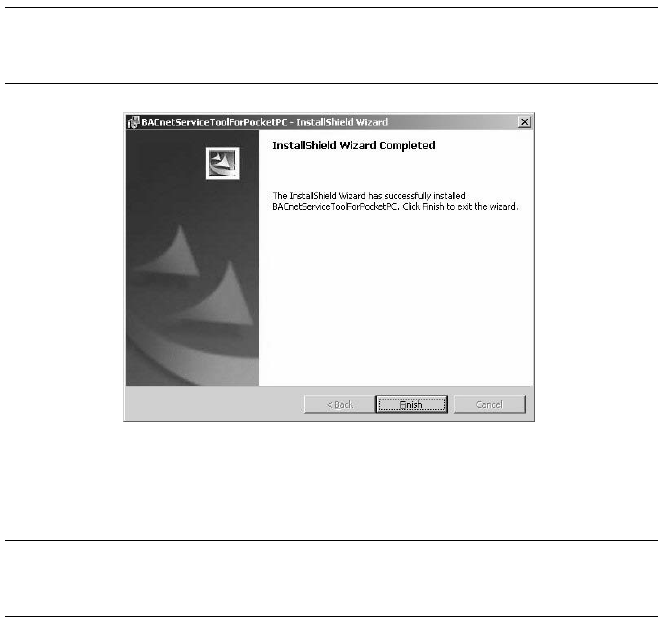
Step 6: Follow the directions of the installation wizard to complete the
installation of the program. At the end of the installation, you
should see the following screen
Note: If you are running the Windows Mobile 5.0 operating system, the
screen may prompt you to look at messages on your Pocket PC
for final instructions.
Step 7: Select Finish to complete the installation of your BACnet
Service Tool for the Pocket PC. Synchronization with your
desktop or laptop PC should be automatic.
Note: If for some reason your Pocket PC does not automatically
syncrhonize with your PC, you will need to synchronize to
complete the installation.
Chapter 2: Getting Started
BACnet Service Tool User’s Guide 27
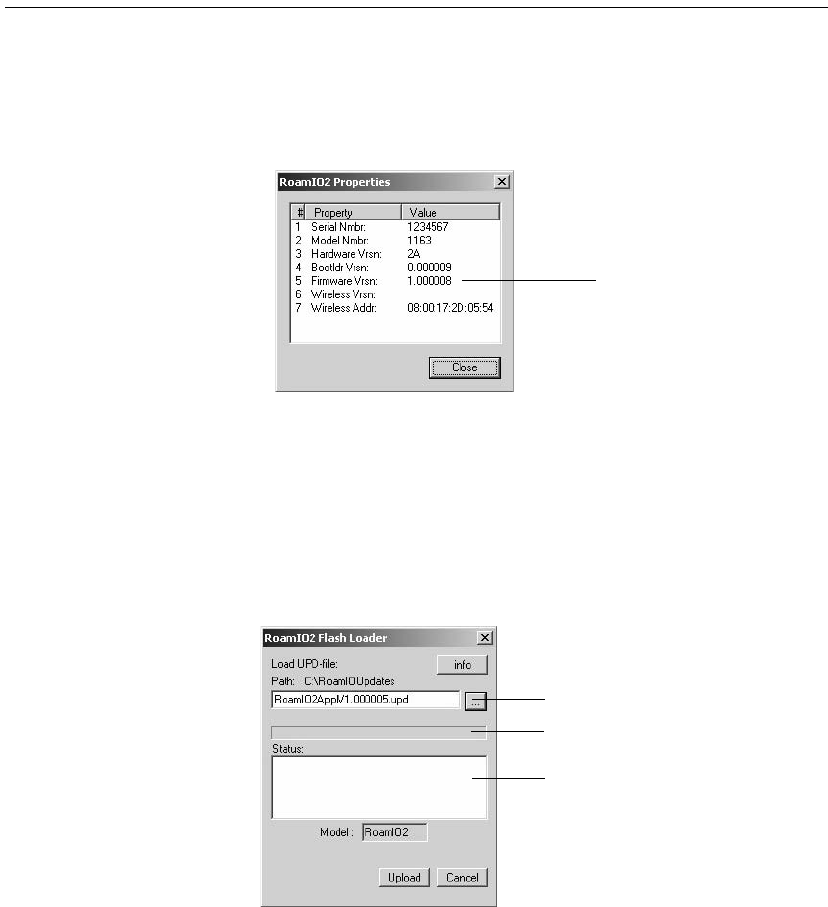
Upgrading the RoamIO2 Firmware
To see what version of firmware is running on your RoamIO2 hardware
adapter, go to the View menu and select RoamIO Properties to
display the following window.
To upgrade the RoamIO2 firmware, perform the following steps:
Step 1: If you are connected to the BACnet network, disconnect from
the network (File -> Disconnect) before beginning the
upgrade procedure.
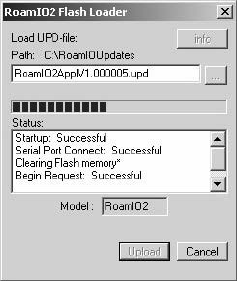
Step 2: From the Tools menu, select Update RoamIO to display the
following dialog.
Step 3: Use the Browse button to find the new UPD file you want to
load into the RoamIO hardware adapter.
Firmware version
Browse button
Progress bar
Status messages
Chapter 2: Getting Started
28 TAC
Step 4: Click on the Upload button to start the upgrade installation.
When the progress bar is completely filled, the installation
should be complete. Scroll down the Status area to confirm
that the process was successful.
Step 5: Click Cancel to close this dialog.
Chapter 2: Getting Started
BACnet Service Tool User’s Guide 29
Getting Started with the Service Tool Software
Once the software is installed, you can start the application, configure
users and set preferences before you begin to connect and work with
controllers.
Starting and Logging on to the Application
To open and log on to the application, perform the following steps:
Step 1: Start the program from the BACnet Service Tool icon on your
desktop, or from the Start menu item.
After the TAC splash screen displays for several seconds, the
logon dialog displays.
Step 2: Enter a username and password.
The default username is acc (lower case) and the default
password is also acc (lower case). You can create additional
usernames and passwords when you configure the BACnet
Service Tool.

Chapter 2: Getting Started
30 TAC
Step 3: Select the OK button to complete the logon or Cancel to close
the application.
Menu tool bar
Connect/Disconnect icon
View area
Switch View icon
Refresh icon
Chapter 2: Getting Started
BACnet Service Tool User’s Guide 31
Configuring the BACnet Service Tool
The BACnet Service Tool provides user management capabilities in the
form of user and user levels in determining what operations a person
can perform. User levels are already defined in the BACnet Service
Tool for each available operation and their assignment to a user
determines the permissions he/she has to perform for administrative
and maintenance operations.
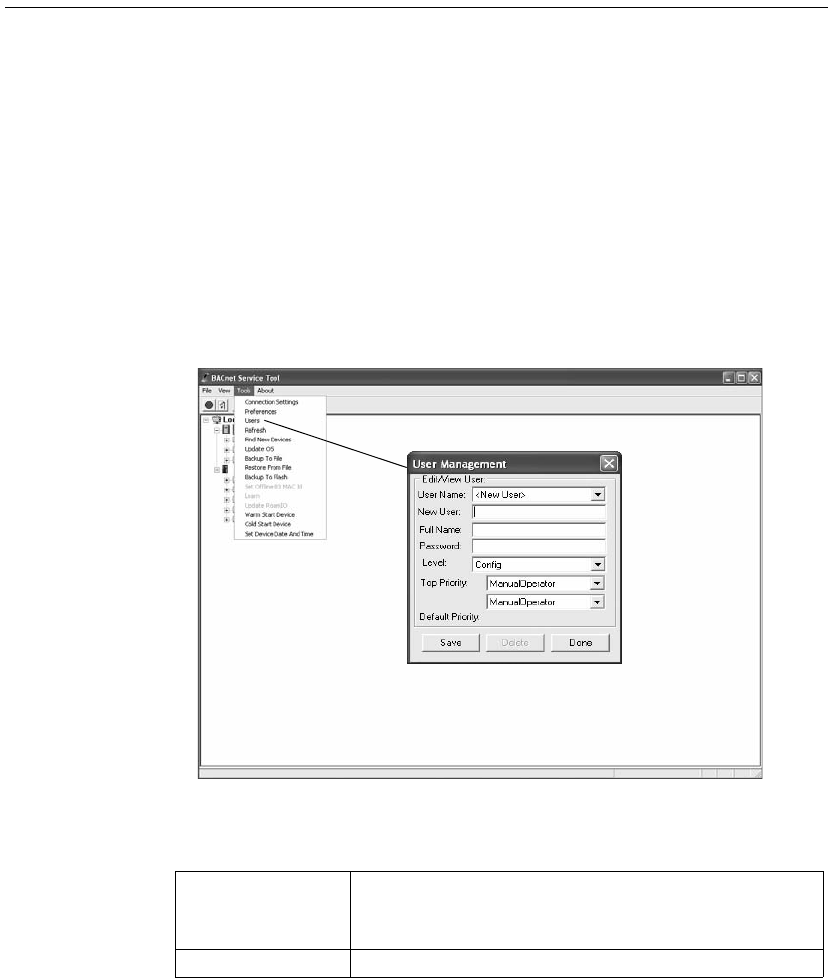
Creating Users and User Levels
Users are added to the Service Tool using the User option from the
Tools dropdown menu.
In addition to User Name, the User Management dialog defines the
following fields:
Field Description
User Name Allows you to bring up an existing name and user profile for
editing
New User Allows you to assign a new user name

Chapter 2: Getting Started
32 TAC
In addition to adding Users, you can also use this dialog to change user
information or levels, and to remove users from the Tool.
Note: When a user logs on using the BACnet Service Tool, the user
name and password are first checked against the security level
tables in the Andover Continuum controller (for example, bCX).
If the username and password is unknown to the controller, the
security levels are determined by the Service Tool .
Full Name Allows you to record a user’s real name
Password Allows you to assign this user a security password
Level Allows you to assign a Continuum security level for this user
that allows him/her to perform pre-defined operations on
specific classes and objects.
Security Levels (from high to low) include:
zAdmin - Unlimited access to all classes and objects
zProgram - Allows user to use objects in Plain English
(PE) programs for altering controller actions
zConfig - Allows user to alter or set the values of pre-
defined classes and objects
zAck Alarms - Allows user to acknowledge alarms based
on some pre-defined specific object values or states
zEnable/Disable - Allows user to enable or disable actions
based on pre-defined object values
zChange Values - Allows user to change the values on
some pre-defined objects
Security at one level, automatically includes the privileges
granted at a lower level. For example, if a user’s security level
is set at Config, he/she automatically has the privileges
assigned to Ack Alarms, Enable/Disable, and Change
Values.
Top Priority Allows you to select one of the 16 BACnet command priority
levels (Priority_Array) for this user to establish his/her ability
to execute a commandable property when in conflict with
other BACnet priorities
Default Priority Sets the default BACnet priority level for this user. The
current default value is 8 - Manual Operator
Field Description

Chapter 2: Getting Started
BACnet Service Tool User’s Guide 33
What to do Next
Now that you have been able to start the application, logon, create
users and set any initial preferences for your site, you can complete the
product installation by making sure your physical connections and
communication settings are correct . Refer to Chapter 4, Connecting to
a BACnet Controller.
Chapter 2: Getting Started
34 TAC
BACnet Service Tool User’s Guide 35
Chapter 3
Connecting to a BACnet
Controller
This chapter contains the following topics:
zConnecting the RoamIO2 to the PC
Connect the RoamIO2 to the PC Using the RS-232 Serial Cable
Connect the RoamIO2 to the PC using Bluetooth
zConnect a RoamIO2 Cable to the Controller
zConnecting to a Controller using MS/TP (Field Bus)
zConnecting to a Controller using Ethernet
Chapter 3: Connecting to a BACnet Controller
36 TAC
Connecting the RoamIO2 to the PC
To connect the RoamIO2 hardware adapter to a PC, you can connect a
serial cable with a DB-9 female connector to the COM1 port (RS-232)
on the PC, or you can take advantage of the internal Bluetooth wireless
capability.
Connect the RoamIO2 to the PC Using the RS-232 Serial Cable
Connect the serial cable (not supplied) from a COM port on your PC to
the RoamIO2 hardware adapter.
The connector on the RoamIO2 is a standard DB-9 male connection
with the following pinout assignments.
This requires a cable that is not included with the BACnet Service Tool
product.
TXD
RXD
OFF
ON
PWR
RS- 48 5 RS -2 32 / WI R EL ESS
RoamIO
2
RJ-11 Connector to Controller/
Sensor Service Ports Using
Supplied Adapter Cables
DB-9 Connector to PC
(serial cable not supplied)
Pin Signal
2 RXD (Received Data)
3 TXD (Transmitted Data)
5 GND (Ground)
Chapter 3: Connecting to a BACnet Controller
BACnet Service Tool User’s Guide 37
Activating the RoamIO2 for a Serial Connection
To activate the RoamIO2, perform these steps:
Step 1: Log on to the BACnet Service Tool.
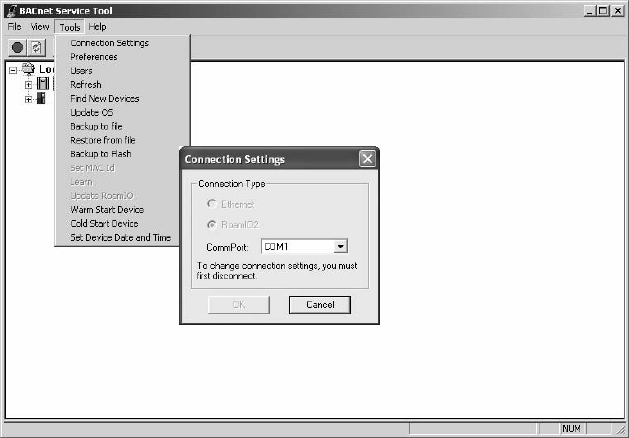
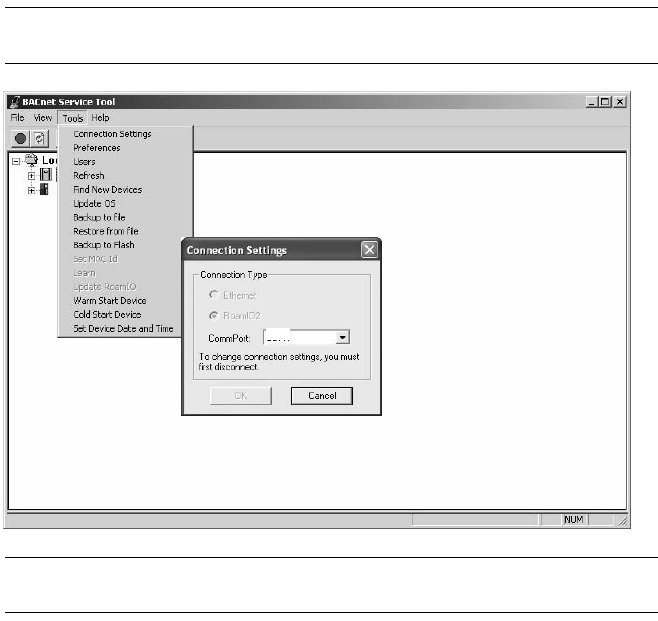
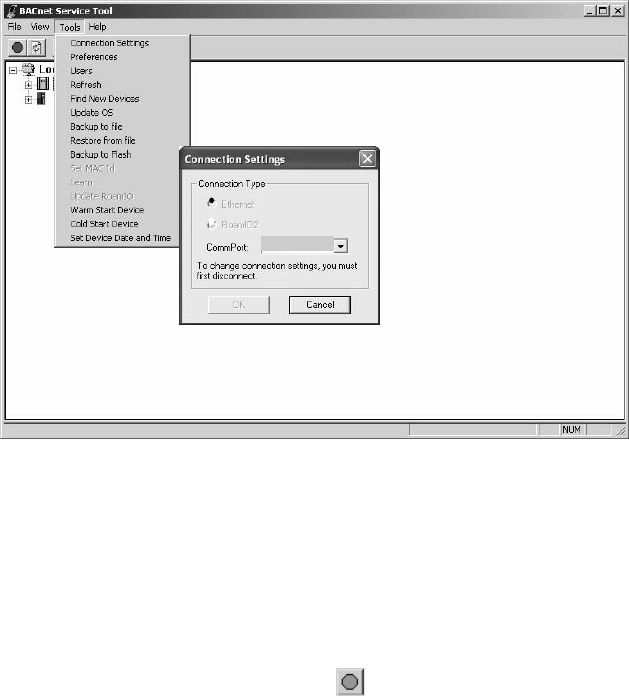
Step 2: From the BACnet Service Tool toolbar, select the Tools menu.
Step 3: Select the Connection Settings option to display the
connections setting dialog.
Step 4: Select the MS/TP option.
Step 5: Select the COM port for your PC’s connection to the RoamIO2
hardware adapter.
Step 6: Select the OK button to complete the setting.
Chapter 3: Connecting to a BACnet Controller
38 TAC
Connect the RoamIO2 to the PC using Bluetooth
Bluetooth wireless capability is built into the RoamIO2 hardware
adapter. When the unit is powered on, and there is no connector in the
DB9 connector, Bluetooth wireless availability is automatic and only
needs to be “discovered” by a Bluetooth-enabled PC, running the
BACnet Service Tool application.
To set up a wireless connection from the PC to the RoamIO2 hardware
adapter, perform the following steps:
Note: To change a connection setting, if you are already connected to
the network, you must first disconnect (File--> Disconnect).
Note: Refer to Chapter 2: Bluetooth Installation and Configuration, for
the correct Bluetooth configuration settings.
Step 1: Log on to the BACnet Service Tool.
Step 2: From the BACnet Service Tool toolbar, select the Tools menu.
COM 6
Chapter 3: Connecting to a BACnet Controller
BACnet Service Tool User’s Guide 39
Step 3: Select the Connection Settings option to display the
connection settings dialog.
Step 4: Select the COM port number for your PC's wireless serial
connection.
Step 5: Select the OK button to begin the wireless “search” for the
RoamIO2 hardware adapter.
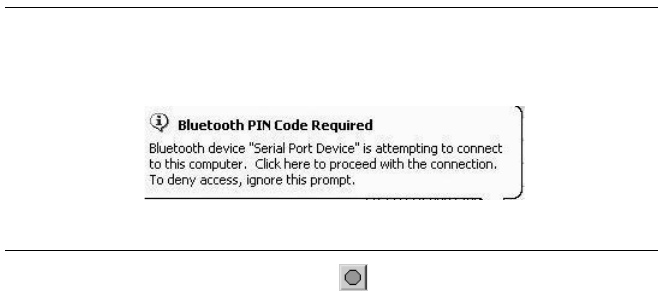
Note: If your Bluetooth configuration does not have the correct
security PIN number (ACC), you will be prompted with the
following message.
Enter the security PIN number for the RoamIO2, which is ACC.
Step 6: Select the Connect Button on the toolbar to make the
connection to the attached controller.
A successful connection will display the network of BACnet
devices. An unsuccessful connection will result in an error
message indicating the cause of the connection problem.
Chapter 3: Connecting to a BACnet Controller
40 TAC
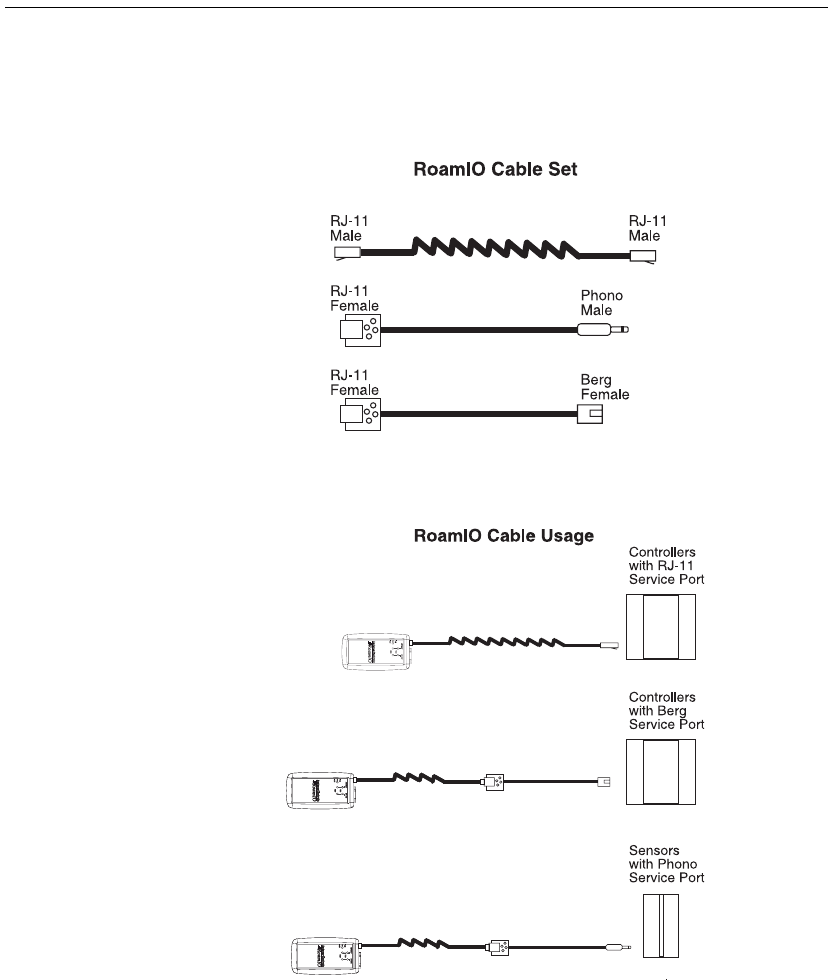
Connect a RoamIO2 Cable to the Controller
To connect the RoamIO2 hardware adapter to an Andover Continuum
controller’s service port, use one or more of the appropriate supplied
cables.
The following illustration shows how to make the cable connections to
controllers with specific styles of service ports.
RJ-11
Male
RJ-II
Female
Berg
Female
Phono
Male
RJ-II
Female
RJ-11
Male
RJ-11
Male
RJ-11
Male
RJ-11
Male
RJ-11
Male

Chapter 3: Connecting to a BACnet Controller
BACnet Service Tool User’s Guide 41
Connecting to a Controller using MS/TP (Field Bus)
When the RoamIO2 hardware adapter is correctly connected between
the PC and a BACnet controller and powered on, the BACnet Service
Tool software can communicate with the BACnet controller.
To set up a connection to a controller on an MS/TP (Field) bus, perform
the following steps:
Note: To change a connection setting, if you are already connected to a
controller, you must first disconnect (File--> Disconnect).
Step 1: Log on to the BACnet Service Tool.
Step 2: From the BACnet Service Tool toolbar, select the Tools menu.
Step 3: Select the Connection Settings option to display the
connections dialog.
Step 4: Select the MS/TP option.

Chapter 3: Connecting to a BACnet Controller
42 TAC
Step 5: Select the COM port for your PC’s RS-232 serial connection
that is connected to the RoamIO2 hardware adapter.
Step 6: Select the OK button to complete the setting.
Step 7: Select the Connect Button icon on the toolbar to make
the connection.
A successful connection will display the network of BACnet
devices. An unsuccessful connection will result in an error
message indicating the cause of the connection problem.
Chapter 3: Connecting to a BACnet Controller
BACnet Service Tool User’s Guide 43
Connecting to a Controller using Ethernet
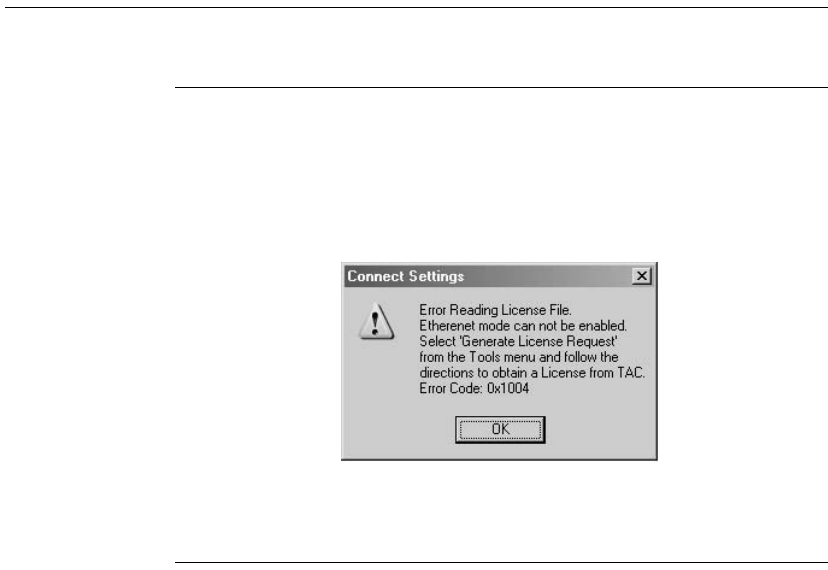
Note: Upon selecting the Ethernet option for the first time, the
BACnet Service Tool will check for a valid license file to enable
an Ethernet connection.
If the license file is not found, the following message will be
displayed and the Ethernet option on the Connection Settings
dialog will be disabled.
Refer to the sections below for the procedure on generating a
license request with or without a RoamIO2 hardware adapter
connected to your PC.
The following sections include:
zGenerating a License Request with the RoamIO2 Connected
zGenerating a License Request without the RoamIO2 Connected
zMaking an Ethernet Connection
Chapter 3: Connecting to a BACnet Controller
44 TAC
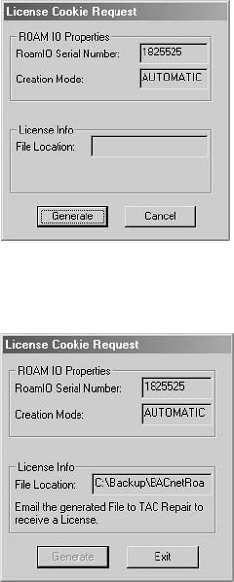
Generating a License Request with the RoamIO2 Connected
With the RoamI02 hardware adapter connected to your PC, you can
perform the following steps to make a license request for an Ethernet
connection.
Step 1: From the Tools menu, select Generate License Request.
If the RoamIO2 hardware adapter is connected, the
BACnet Service Tool will validate the serial number on the
attached RoamIO2 hardware adapter and display the following
dialog with the serial number displayed in a read-only field.
Step 2: Select the Generate button to create a License Request
Cookie file. The file location and name will be displayed in the
dialog as follows:
The file format will be:
<path>\ROAMIO\<serial number>.req
Chapter 3: Connecting to a BACnet Controller
BACnet Service Tool User’s Guide 45
Step 3: To receive a valid license, attach this file to an email and send
it to the TAC address listed in the readme file for this release.
Include the following information:
- Your contact information
- Your PO (purchase order) and RA number for this product.
Step 4: TAC will respond with a valid license file that must be placed
in the same directory as the BACnet Service Tool executable is
installed.
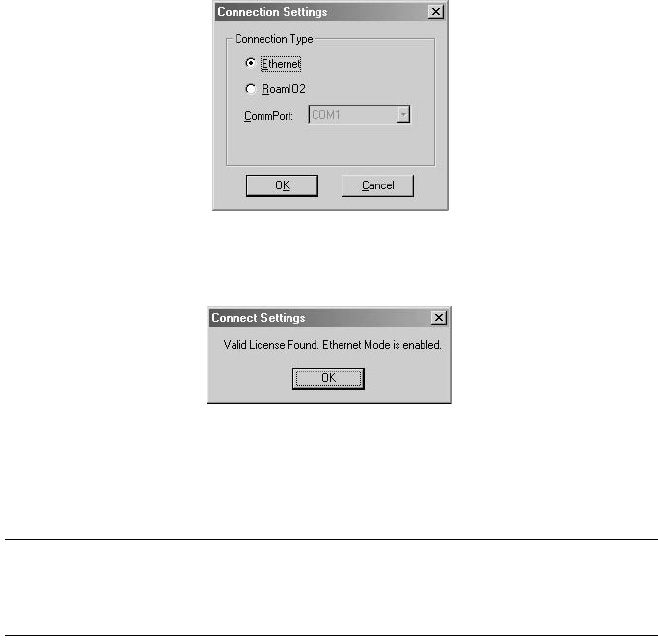
Step 5: Once the license file is placed in the directory, select
Communication Settings from the Tool drop-down menu to
display the following dialog:
Step 6: Select Ethernet and click OK. The BACnet Service Tool
responds with the following message:
Once the Ethernet mode is enabled, you can make an Ethernet
connection. Refer to the section in this chapter, Making an Ethernet
Connection.
Note: To transfer a License to a different PC (deskop, laptop, or
Pocket), the BACnet Service Tool software must be installed and
a valid License Request Cookie must be generated for the new
PC. Refer to the procedure described above.
Chapter 3: Connecting to a BACnet Controller
46 TAC
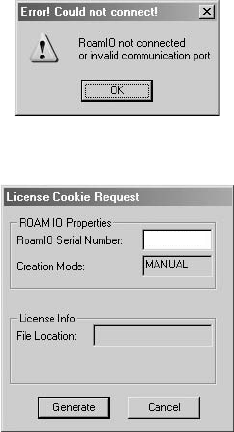
Generating a License Request without the RoamIO2
Connected
If a RoamIO2 hardware adatper is not connected to your PC, you can
perform the following steps to make a license request for an Ethernet
connection.
Step 1: From the Tools menu, select Generate License Request.
If the RoamIO2 hardware adapter is not connected, the
BACnet Service Tool will display the following message.
Step 2: Select the OK button to display the following dialog.
Chapter 3: Connecting to a BACnet Controller
BACnet Service Tool User’s Guide 47
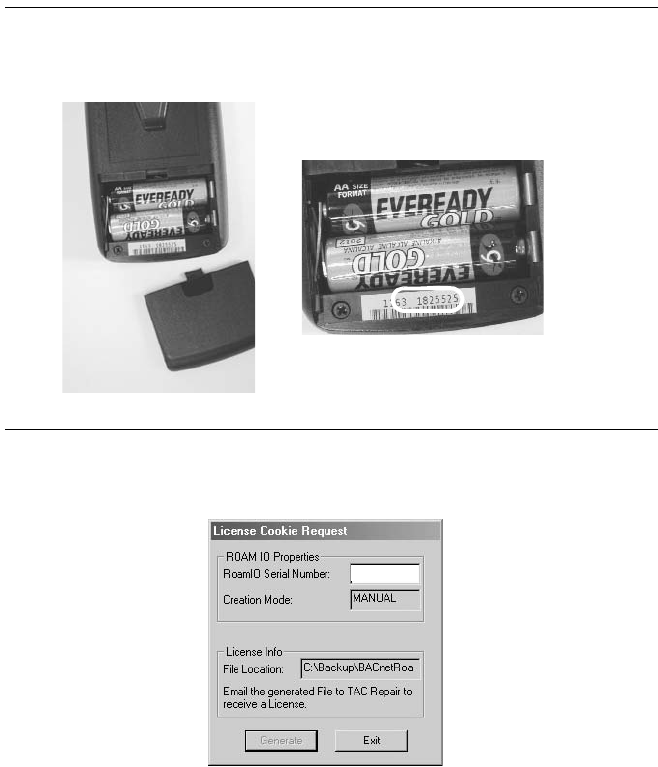
Note: To obtain the RoamIO2 hardware adapter serial number, remove
the battery cover. The serial number is the second group of
numbers (to the right) as shown in the illustration below:
Step 3: Enter the serial number and select the Generate button to
create a License Request Cookie file.
The file location and name will be displayed in the dialog. The
file format is as follows:
<path>\ROAMIO\<serial number>.req
Step 4: To receive a valid license, attach this file to an email and send
it to the TAC address listed in the readme file for this release.
Include the following information:
- Your contact information
- Your PO (purchase order) and RA number for this product.
Serial number is the second
group of numbers
1825525

Chapter 3: Connecting to a BACnet Controller
48 TAC
Step 5: TAC will respond with a valid license file that must be placed
in the same directory as the BACnet Service Tool executable is
installed.
Step 6: Once the license file is placed in the directory, select
Communication Settings from the Tool drop-down menu to
display the following dialog:
Step 7: Select Ethernet and click OK. The BACnet Service Tool
responds with the following message:
Once the Ethernet mode is enabled, you can make an Ethernet
connection. Refer to the following section in this chapter, Making an
Ethernet Connection.
Note: To transfer a License to a different PC (deskop, laptop, or
Pocket), the BACnet Service Tool software must be installed and
a valid License Request Cookie must be generated for the new
PC. Refer to the procedure described above.
Chapter 3: Connecting to a BACnet Controller
BACnet Service Tool User’s Guide 49
Making an Ethernet Connection
To make an Ethernet connection, perform the following steps:.
Step 1: From the BACnet Service Tool toolbar, select the Tools menu.
Step 2: Select theConnection Settings option to display the
connections dialog.
Step 3: Select the Ethernet option.
Step 4: Select the OK button.
Step 5: Select the Connect Button on the toolbar to make the
Ethernet connection to a controller.
A successful connection will display the network of BACnet
devices. An unsuccessful connection will result in an error
message indicating the cause of the connection problem
Chapter 3: Connecting to a BACnet Controller
50 TAC
BACnet Service Tool User’s Guide 51
Chapter 4
BACnet Service Tool
Quick-Reference
This chapter presents a quick-reference of the BACnet Service Tool
graphical user interface and contains the following topics:
zConnecting to a Controller
zFile Menu
zView Menu
zTools Menu
zAbout Menu
For more detailed descriptions of Service Tool functions, refer to
Chatper 6: Using the BACnet Service Tool Software.
Chapter 4: BACnet Service Tool Quick-Reference
52 TAC
Connecting to a Controller
Once you have started the application and completed the logon, you can
connect to the network using the communications configuration you
have set up under the Tools > Connection Setting dialog.
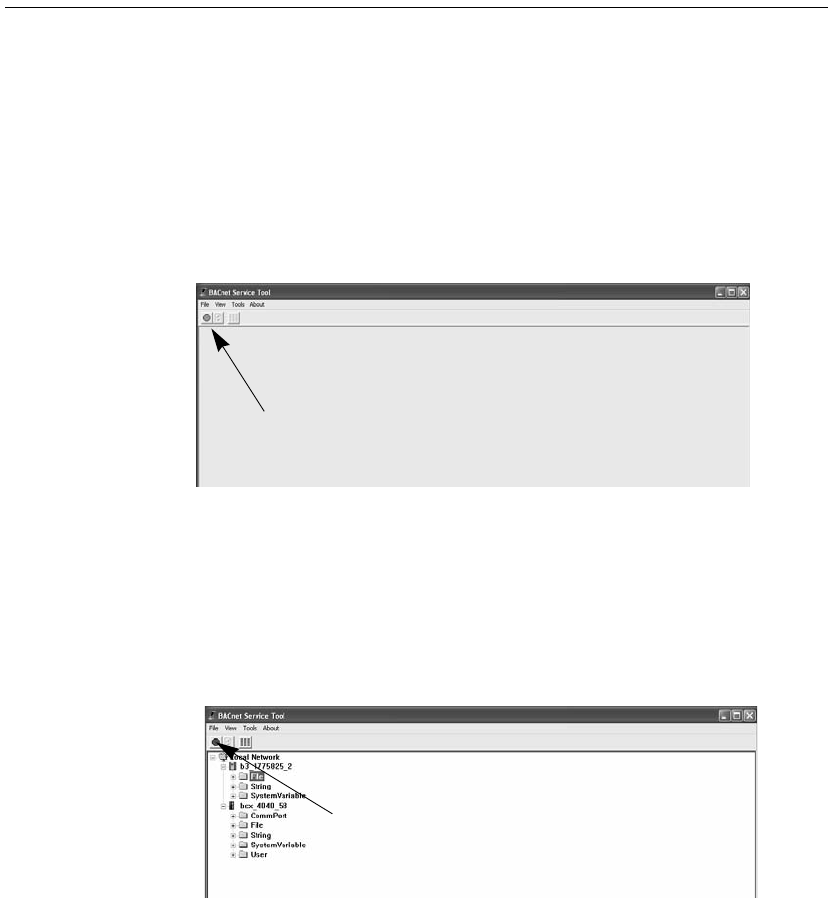
Selecting the Green Connect icon establishes communication with
the controller or network connection and you are presented with a
“view” of the BACnet Internetwork.
You can disconnect from the network using the Red Connect icon.
You also have the option of making the connection from the File drop-
down menu and selecting the Connect or Disconnect option.
Connect
Disconnect
Chapter 4: BACnet Service Tool Quick-Reference
BACnet Service Tool User’s Guide 53
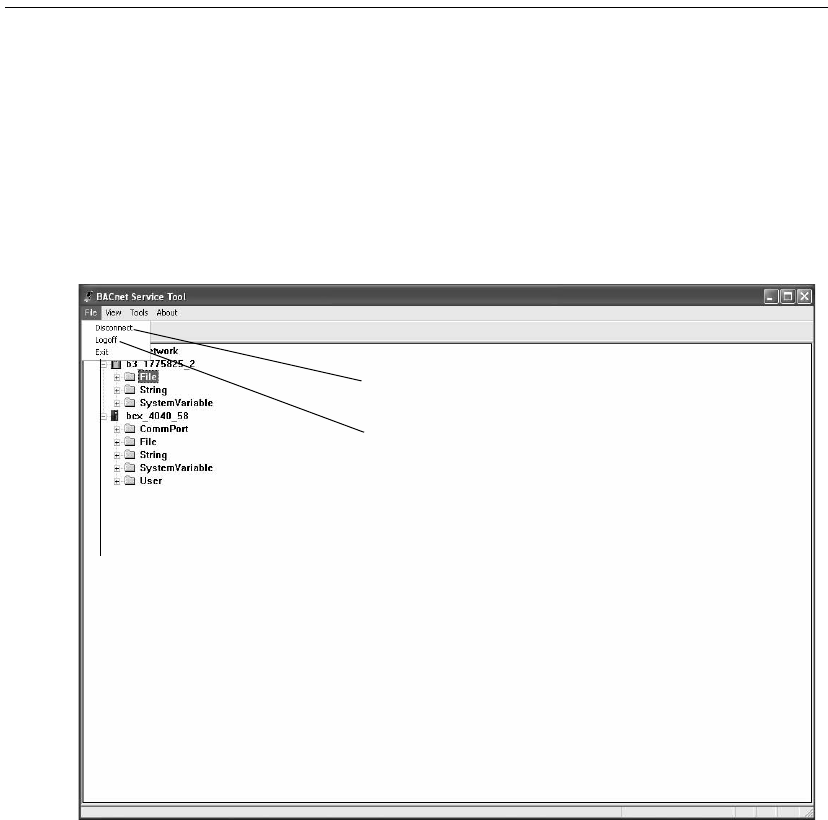
File Menu
The File Menu offers you the following options:
zConnect to the BACnet Internetwork (or Disconnect if you are
already connected) via your physical connection to the controller or
to the network.
zLogoff the application, but keep it open.
zExit the application.
Connect / Disconnect toggle switch
Logoff the application
Exit and Close the application
Chapter 4: BACnet Service Tool Quick-Reference
54 TAC
View Menu
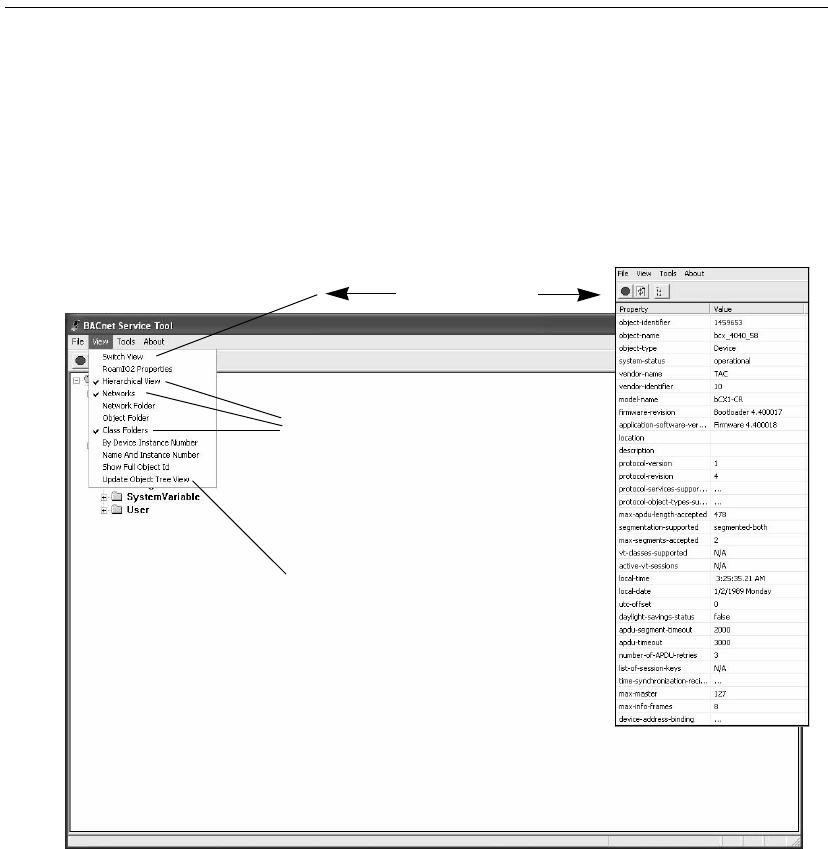
“Views” are a significant concept within the BACnet Service Tool.
Under the View menu, you can select different elements that will
appear in your Object Tree image of the BACnet Internetwork, as
well as perform a Switch View to see a more detailed table of any sub-
network, controller, class, or object that you have selected.
Object Tree / Detail View
Default View settings:
Hiearchical View
Networks
Class Folders
Update Object Tree View command
(You must select this command after you change
any of the setting options in the View menu.)
toggle switch

Chapter 4: BACnet Service Tool Quick-Reference
56 TAC
Management capabilities include:
zSetting communication parameters
zSetting class and object property viewing preferences
zCreating and edting users and user level settings
zRefreshing the viewing image
zFinding new devices on the network
zUpdating the Operating System (OS) of a controller
zBacking up a controller’s configuration information
zRestoring a controller’s configuration information
zBacking up a Continuum controller’s configuration in RAM to Flash
memory
zSetting or changing the MAC ID on Continuum controllers on an
MS/TP network
Warning: Changing the MAC ID of an MS/TP controller should only be
performed during startup and commissioning. Once an MS/
TP controller is “learned” into a CyberStation database,
changing the MAC ID of that controller will cause the
controller to go offline. Since MAC IDs cannot be changed in
CyberStation in either Online or Offline editing modes, you
will not be able to communicate to a controller whose MAC
ID has been changed after it is added to the CyberStation
database.
You can change the BACnet Device ID using the tool, but you
must also use CyberStation in offline mode to duplicate the
change in the CyberStation database.
zSearching for new controllers and “learning” about them
zUpgrading the operating system of the RoamIO2 hardware adapter
zRemotely warm starting a device
zRemotely cold starting a device
zSetting a device’s date and time.
Chapter 4: BACnet Service Tool Quick-Reference
BACnet Service Tool User’s Guide 57
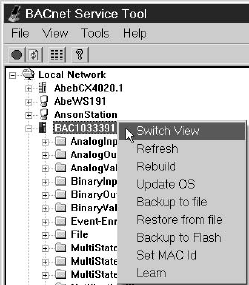
In addition to performing these operations from the Tools menu, you
can also select a controller or other object and Right-Click to display a
pop-up menu with the available Tool operations for that controller or
object.
Chapter 4: BACnet Service Tool Quick-Reference
58 TAC
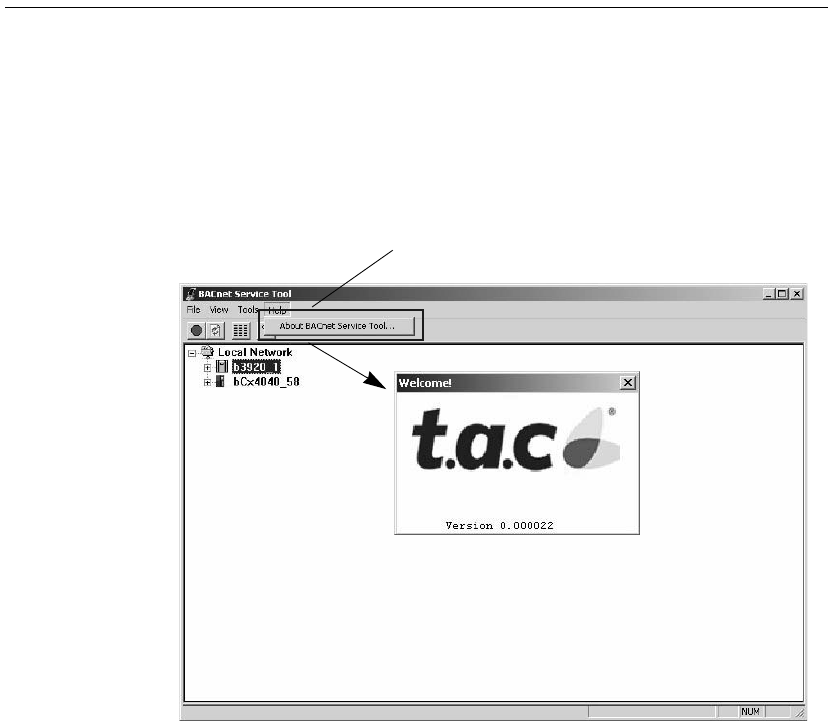
About Menu
Click on the About menu to display the one option that enables you to
view the version number of the current software.
Single option
Chapter 5: Using the BACnet Service Tool Software
60 TAC
BACnet Service Tool Overview
The following section presents an overview on using the BACnet
Service Tool’s grahical user interface.
Connecting to Your BACnet Network
From the BACnet Service Tool graphical interface use the green Access
button to connect to your BACnet network.
You can also connect using the File drop-down menu
(File -> Connect).
Disconnecting from the Network
From the BACnet Service Tool graphical interface, use the red Access
button to disconnect from your BACnet network.
You can also disconnect using the File drop-down menu
(File -> Disconnect).
Click on the Green button to connect
Click on the Red button to disconnect
Chapter 5: Using the BACnet Service Tool Software
BACnet Service Tool User’s Guide 61
Navigating and Selecting Devices and Objects
The Graphical
Interface
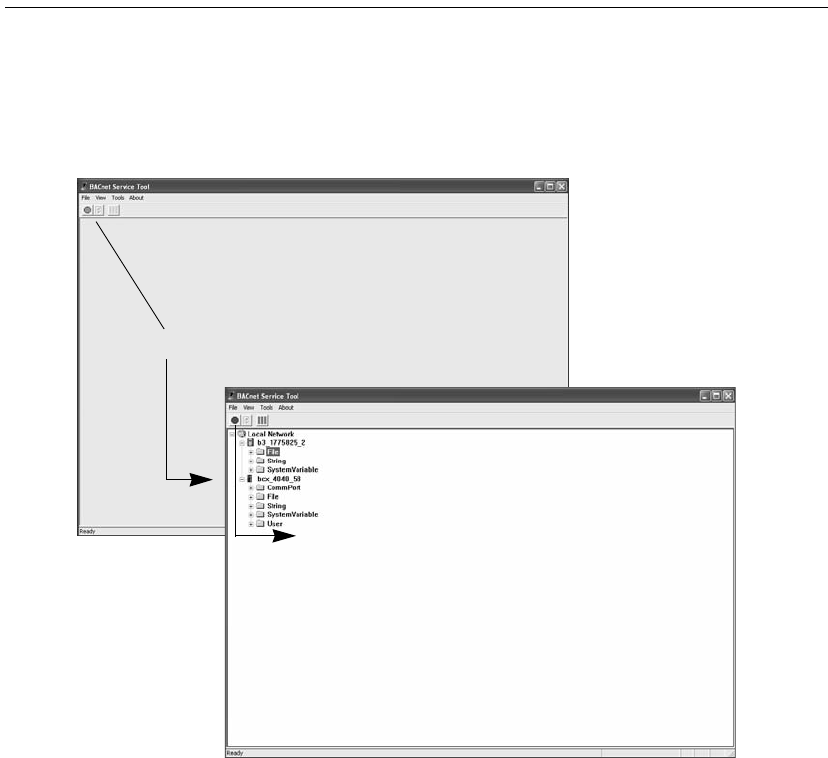
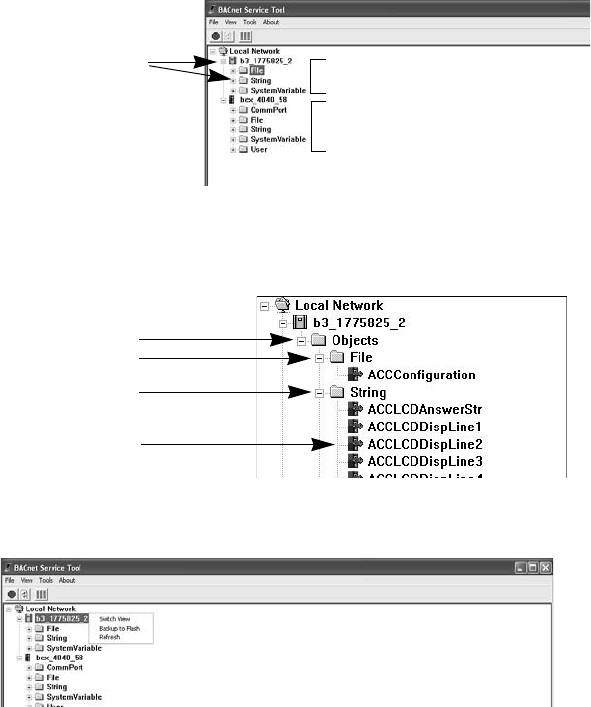
The graphical user interface displays your BACnet network as a
heirarchy of devices, using the standard Windows Explorer-type plus
(+) and minus (-) icons to indicate when folders can be expanded to
reveal additional folders or objects.
Devices may contain a set of object and class folders. You can navigate
to a specific device, and continue to expand folders until you reach the
specific device-related object or class item you want to review or
change.
Pop-up Menus
Once you have selected an item, you can also right-click and display a
pop-up menu that lists the choices you have for that specific controller,
object, class or item.
Or you can make a selection and use the Tool drop-down menu to
perform an action on the controller or object you selected
(Tool -> menu option).
Explorer icons
Expanded controllers
Object folder
Class of object
Class of object
Property
Right-Click to display pop-up menu
Chapter 5: Using the BACnet Service Tool Software
62 TAC
Adjusting the Service Tool’s Point of View
The BACnet Service Tool is capable of displaying the network and
associated controllers and objects using different “view settings” that
you can turn on or off, depending on the level of detail you want to
display.
Selecting a
View
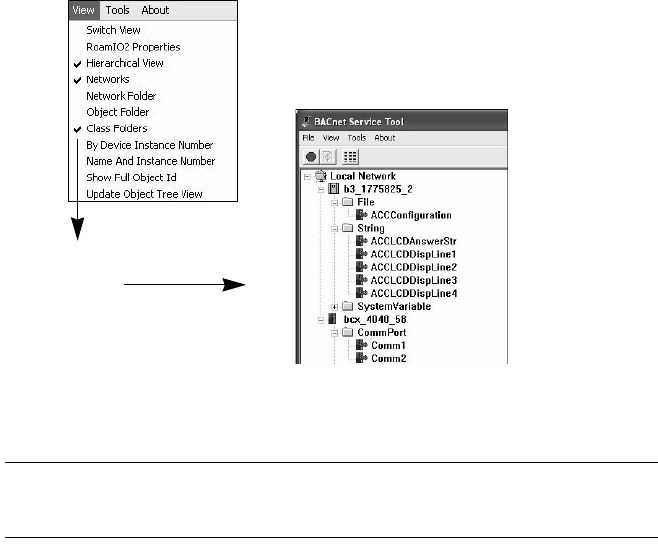
For example, in the illustration below, the selected view is created by
selecting the following options from the View drop-down menu:
zHierarchical
zNetworks
zClass Folders
The result is that the graphical display identifies network segments
and each controller lists only the class folders associated with that
controller.
The above view is the Service Tool’s default view, but you can add
or delete selections according to what “view” you works best for you.
Note: Each time you change a view, making your selections from the
View menu, you will need to open the View menu again and
select Update Object Tree View to execute the new changes.
Selected
View
Chapter 5: Using the BACnet Service Tool Software
BACnet Service Tool User’s Guide 63
Switching to a
Detailed View
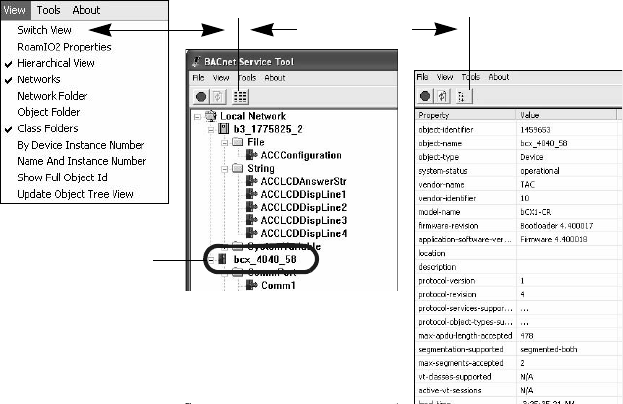
In addition to changing graphical view, you can select a specific
controller or object and use a “Switch View” command to toggle
between the graphical view and a detailed table of information listing
all the information about the device, folder or object you selected.
You can switch a view, from graphic to detailled or reverse, using any
of the following actions:
zAfte selecting a controller or object, use the View drop-down menu,
an select the Switch View option.
zSelect a controller or object and use the Switch View icon
buttons on the toolbar.
zSelect a controller or object from the graphic view and double-click
to display detailled view. (You will need to use one of the methods
above to return to the graphic view.)
Switch View
Buttons
Selected Device
Chapter 5: Using the BACnet Service Tool Software
64 TAC
Making Changes to Controllers
After selecting a controller, Class folder, or object, perform a “Switch
View” to display the detailed table and double-click on an object to
bring up the associated property editor (if available), where you can
make some of the changes or adjustments normally performed from the
CyberStation workstation.
Note: Within a detailed table, some properties are information only,
such as vendor identifer and model name, while others, such as
product-object-types-supported do have editors for changing or
adjusting values.
Double-Click
to display
Property Editors
Chapter 5: Using the BACnet Service Tool Software
BACnet Service Tool User’s Guide 65
Configuring and Maintaining BACnet Devices
Controller configuration and maintenance actions are available from
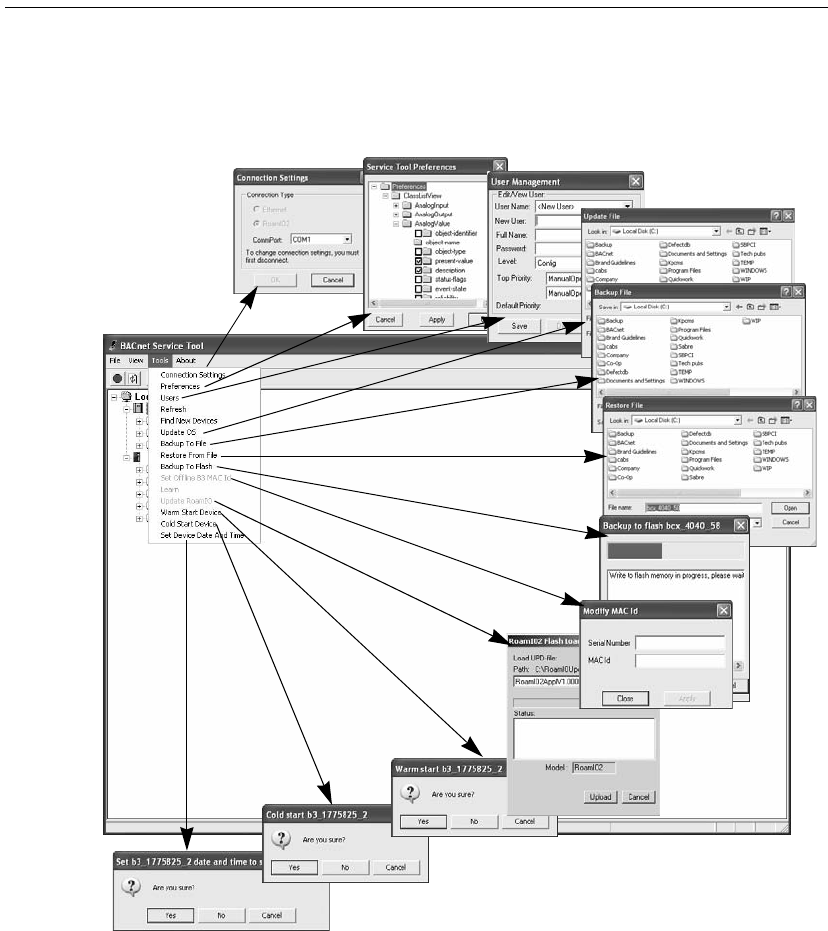
the Tools drop-down menu.
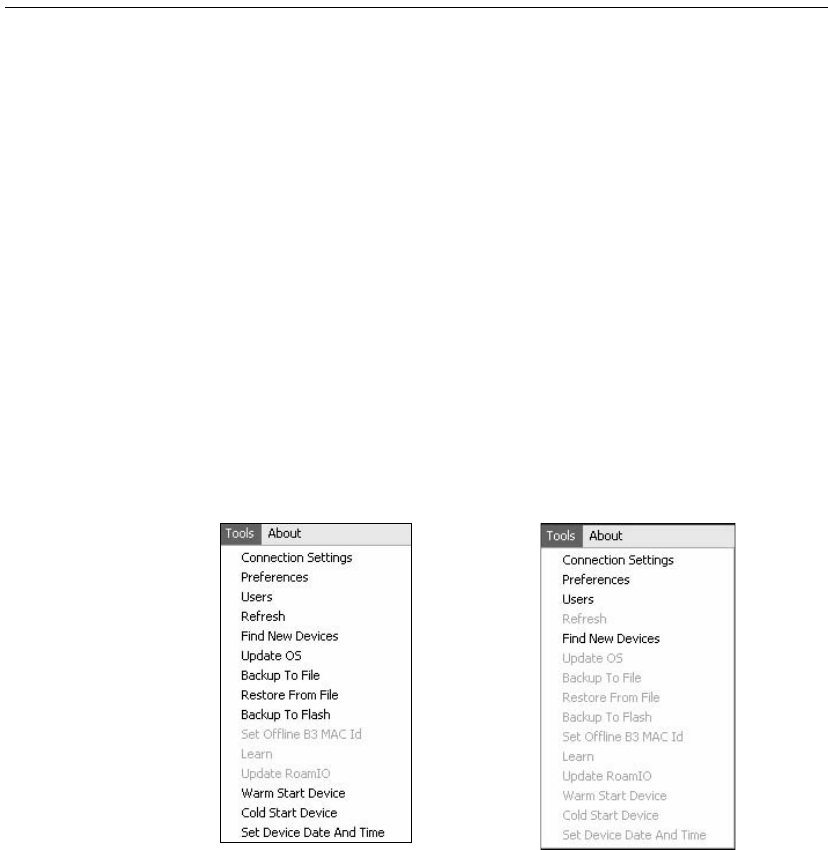
Available and Non-available Tool menu options
When you display the Tools drop-down menu, some options in the
menu may be grayed-out, while others appear in normal black text.
This difference in available menu options is based on which device or
object is selected in the graphical interface.
When a controller is selected, most of the Service Tool options are
available. However, when an object is selected, only several options are
enabled.
For example, in the illustration below, the first Tools menu is
displayed when a controller is selected. The second menu is displayed
when an object, BinaryOutput1, is selected.
Available options when
selecting a controller
Available options when
selecting the object
BinaryOutput1
Chapter 5: Using the BACnet Service Tool Software
66 TAC
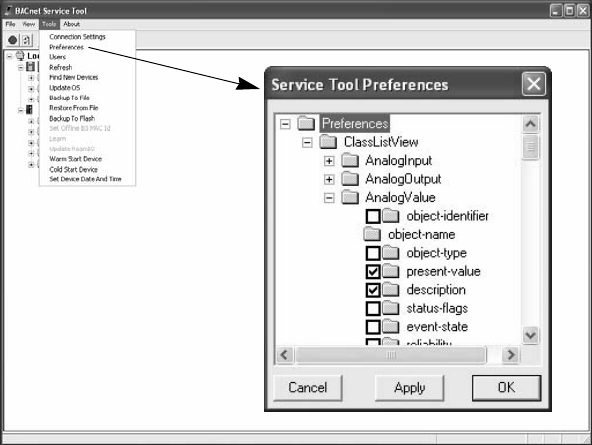
Preferences
The Preferences option is currently limted to a Class List View,
which contains folders listing the properties for all supplied and user-
defined objects.
From the Tools menu, the Preference options allows you to select the
properties that you want to see when you perform a “Switch View”
(refer to “Switching to a Detailed View” on page 63) to display a
detailed table of properties for a specific device or object.
Click on each box in the Service Tool Preferences dialog to place or
remove a check. Properties that have been checked will appear in the
columns of the detailed view of a device.
If you have only selected a specific object and performed a “Switch
View”, only the properties for that object will be shown (Object View),
and your Preference selections will not apply.
Chapter 5: Using the BACnet Service Tool Software
BACnet Service Tool User’s Guide 67
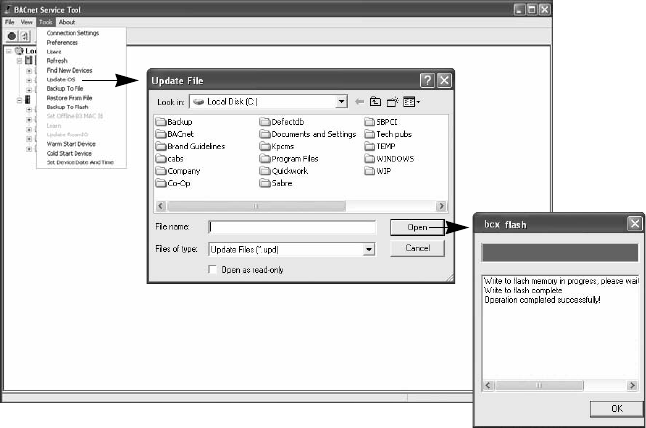
Update OS
To update the Operating System (OS) of a controller, perform the
following steps:
Step 1:
From the graphical display, select the controller you wish to
update.
Step 2:
From the Tools menu, select Update OS.
Step 3:
From the Update File dialog, navigate to the drive and
directory where the new update file (.upd) is stored and select
the appropriate file.
Step 4:
Select Open to execute the Flash Loader dialog. When the
process bar is complete, a message will indicate whether the
restore action is successful or not.
Step 5:
Select OK to close the dialog.
Chapter 5: Using the BACnet Service Tool Software
68 TAC
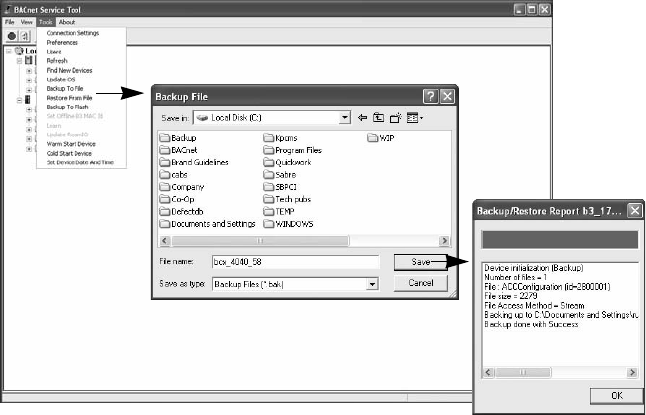
Backup To File
To store the configuration and database information of a controller to a
backup file, perform the following steps:
Step 1:
From the graphical display, select the controller you wish to
backup.
Step 2:
From the Tools menu, select Backup To File.
Step 3:
From the Backup/Restore file dialog, navigate to the drive and
directory where you want to store the backup files (.bak).
You can accept the automatic name of the file provided by the
Service Tool, or you can rename the file.
Step 4:
Select Save to execute the Backup/Restore dialog. When the
process bar is complete, a message will indicate whether the
backup is successful or not.
Step 5:
Select OK to close the dialog.
Chapter 5: Using the BACnet Service Tool Software
BACnet Service Tool User’s Guide 69
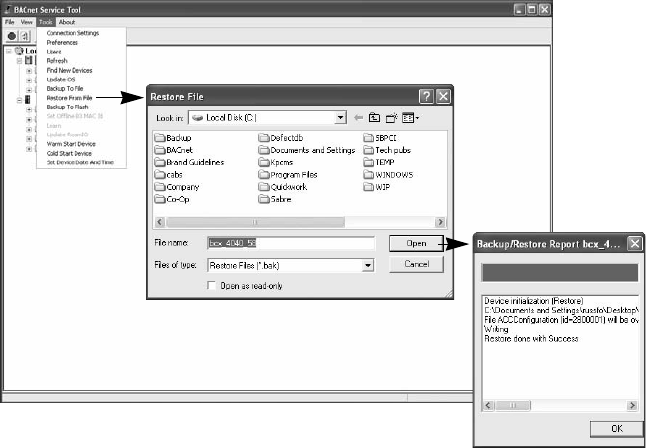
Restore From File
To restore a previously saved configuration file to a controller, perform
the following steps:
Step 1:
From the graphical display, select the controller you wish to
restore.
Step 2:
From the Tools menu, select Restore From File.
Step 3:
From the Backup/Restore file dialog, navigate to the drive and
directory where the backup files (.bak) are stored and select
the appropriate file.
Step 4:
Select Open to execute the Backup/Restore dialog. When
the process bar is complete, a message will indicate whether
the restore action is successful or not.
Step 5:
Select OK to close the dialog.
Chapter 5: Using the BACnet Service Tool Software
70 TAC
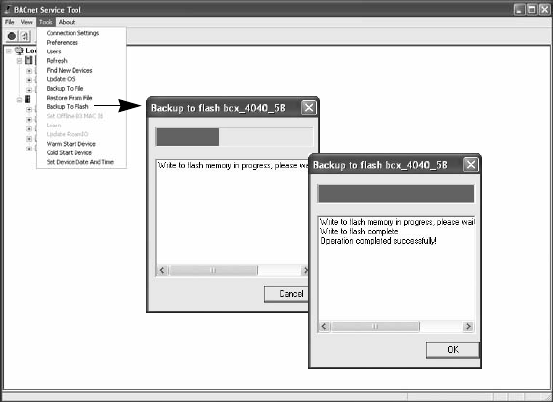
Backup to Flash
In addition to an internal battery for keeping the SDRAM user
configuration and database information active, Andover Continuum
controllers have non-volatile flash memory for storing user
configuration information as a secondary precaution to a power loss, or
as a return to a previous user configuration.
To backup a controller’s memory into flash memory, perform the
following steps:
Step 1:
From the graphical display, select the controller where you
wish to perform a backup to flash memory.
Step 2:
From the Tools menu, select Backup To Flash. (You can also
right-click to display the pop-up menu and select Backup To
Flash).
Step 3:
From the Backup to flash dialog, you can observe the progress
bar of the backup, or select Cancel to stop the backup
operation. When the progress bar is complete a message will
indicate whether or not the operation was successful.
Step 4:
Select OK to close the dialog.
Chapter 5: Using the BACnet Service Tool Software
BACnet Service Tool User’s Guide 71
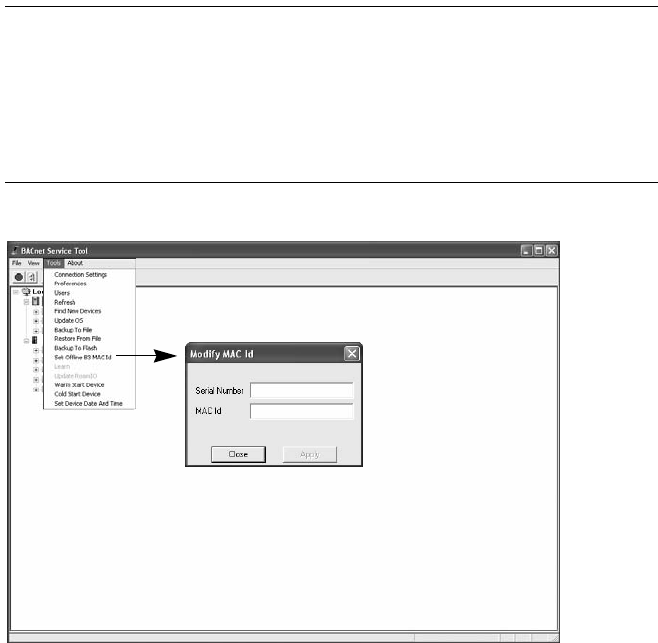
Set Offline B3 MAC Id
The MAC (Media Access Control) ID address of an Andover Continuum
b3 series controller is the networking address used for BACnet (MS/TP)
identification and communication. The address range is from 0 to 127.
Note: Changing the MAC Id of a BACnet controller should only be
performed during startup and commissioning. Once a BACnet
controller is learned into a CyberStation database, changing the
MAC Id of that controller will cause the controller to go offline.
Since MAC Ids cannot be changed in CyberStation, in either
online or offline editing modes, you will not be able to
communicate with a controller whose MAC Id has been changed
after it is added to the CyberStation database.
To set a b3 controller’s MAC ID address, perform the following steps:
Step 1: From the graphical display, select a bCX controller that is
connected to the b3 controller that requires an address change.
Step 2: From the Tools menu, select Set Offline B3 MAC Id.
Step 3: Enter the serial number of the controller and the new MAC ID
Step 4: Select Apply to complete the action or Close to cancel the
request.
Chapter 5: Using the BACnet Service Tool Software
72 TAC
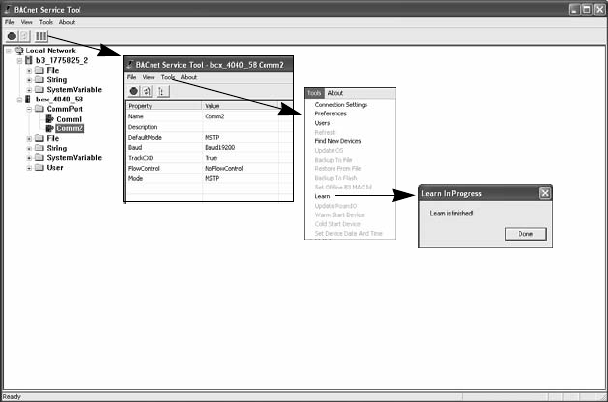
Learn
From the COMM port of a bCX controller, you can execute a “learn”
action that allows the controller to record and recognize the other
controllers on the same network segment.
To execute a “learn” action, perform the following steps:
Step 1: From the graphical display, select the bCX controller where
you want to perform a learn action.
Step 2: Use the Switch View icon to review the details and make
sure the COMM port is set to MSTP.
Step 3: From the Tools menu, select Learn.
The Learning in Process dialog will initially display an
“In-Process” message”, but will change to “Finished”. when the
Learn action is completed.
Step 4: Select Done to close the dialog.
Chapter 5: Using the BACnet Service Tool Software
BACnet Service Tool User’s Guide 73
Update RoamIO
To update the firmware version of the RoamIO2 hardware adatper,
refer to Chapter 2, “Upgrading the RoamIO2 Firmware” on page 27
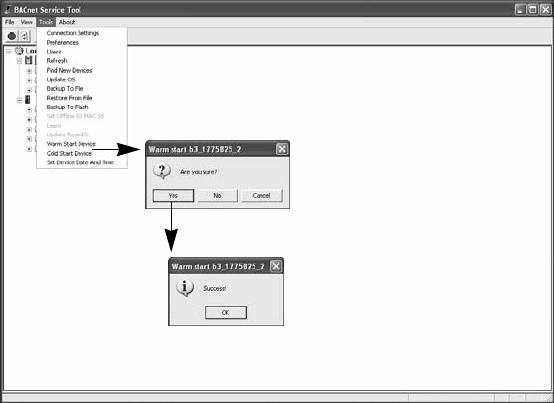
Warm Start Device
A warm start is when a controller powers up from a loss of power with a
user configuration in place. The user configuration was preserved due
to the battery-backed memory when power was lost. Point log data is
preserved, Plain English programs are restarted at the same logical
line that was being interpreted when the controller shut down, and all
user points have their values restored..
To warm start a controller, perform the following steps:
Step 1: From the graphical display, select the controller you wish to
warm start.
Step 2: From the Tools menu, select Warm Start Device.
Step 3: A warm start confirmation dialog is displaye. Select Yes to
perform the warm start, No or Cancel to stop the request.
A Success! message will display to confirm the action.
Step 4: Select OK to close the Warm Start success dialog.
Chapter 5: Using the BACnet Service Tool Software
74 TAC
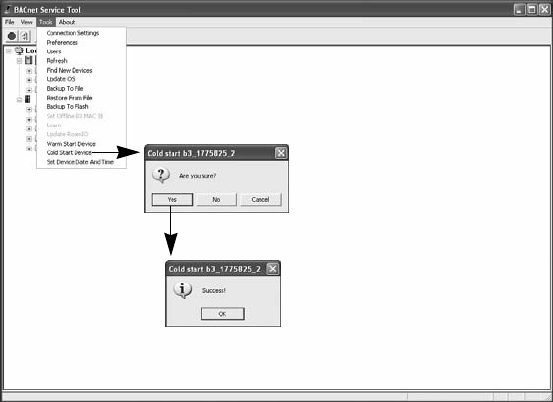
Cold Start Device
A cold start is when the controller powers up from reset with no user
objects or configuration in place.
To cold start a controller, perform the following steps:
Step 1: From the graphical display, select the controller you wish to
cold start.
Step 2: From the Tools menu, select Cold Start Device.
Step 3: A cold start confirmation dialog is displaye. Select Yes to
perform the warm start, No or Cancel to stop the request.
A Success! message will display to confirm the action.
Step 4: Select OK to close the Cold Start success dialog.
Chapter 5: Using the BACnet Service Tool Software
BACnet Service Tool User’s Guide 75
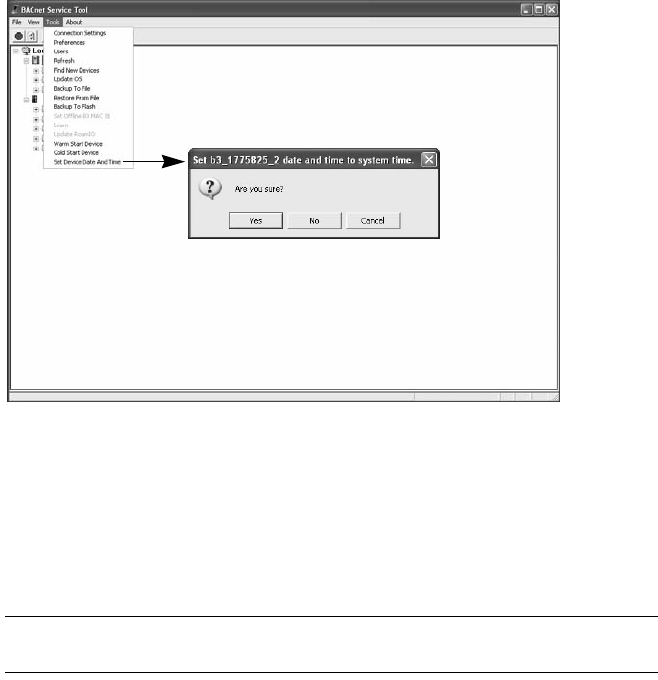
Set Device Date and Time
To set a controller’s date and time to match the system date and time of
your PC, perform the following steps:
Step 1: From the graphical display, select the controller where you
wish to set the date and time.
Step 2: From the Tools menu, select Set Device Date and Time.
Step 3: The Service Tools responds with a confirmation dialog that
asks you to confirm this action (Yes or No button), or gives you
the option to Cancel this request.
Note: After selecting, Yes, No, or Cancel, the action is complete and
no other dialog is displayed.
Chapter 5: Using the BACnet Service Tool Software
76 TAC
Some Typical Use Cases
The BACnet Service Tool allows you to drill-down the heirachy tree of
BACnet devices, view property values of objects and perform some of
the administrative functions available on the Andover Continuum
CyberStation product.
The following sections provide some information and examples on what
you can do with the Service Tool. These examples only represent a
small sampling of the administrative actions you can perform.
Simple and Complex Properties
To help you understand what you can do with the Service Tool, there is
one simple statement to remember:
The BACnet Service Tool allows you to edit simple properties, but not
complex properties.
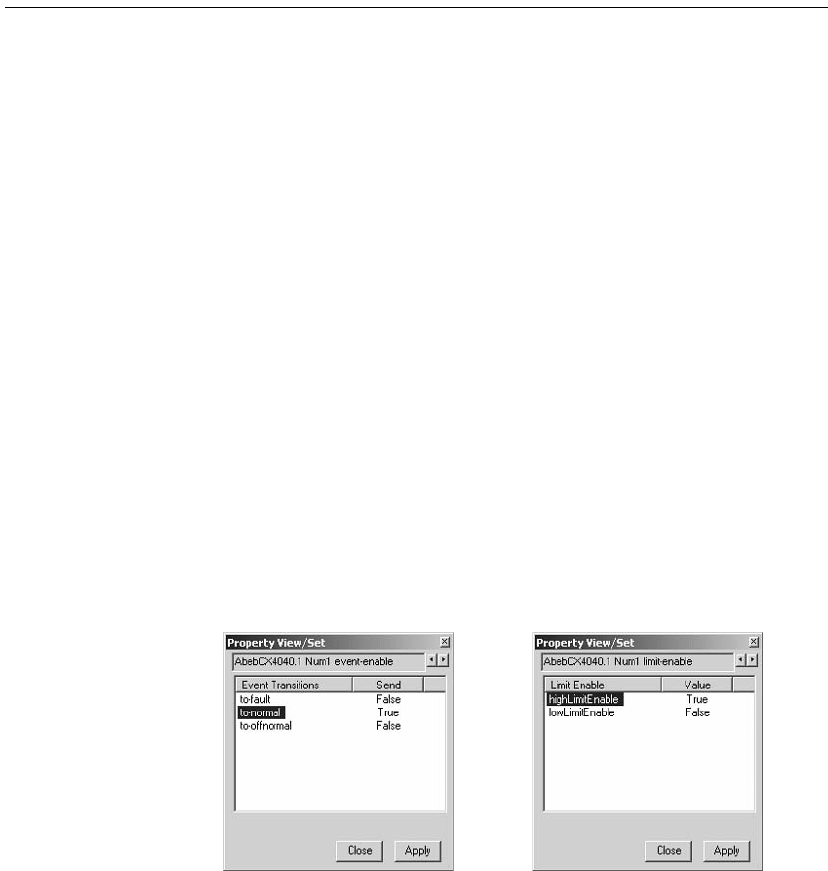
A simple property is one that has a single value, while a complex
property is one that has more than one value that can be changed. Of
course, there are always execeptions to general rules. Within the
Service Tool, there are two complex properties that you can change,
event-enable and limit-enable.
Exception: Two complex properties that can be edited
event-enable limit-enable
Chapter 5: Using the BACnet Service Tool Software
BACnet Service Tool User’s Guide 77
The Event-enable property has two values, Event Transitions and
Send. The limit-enable property also has two values, Limit-Enable and
Value.
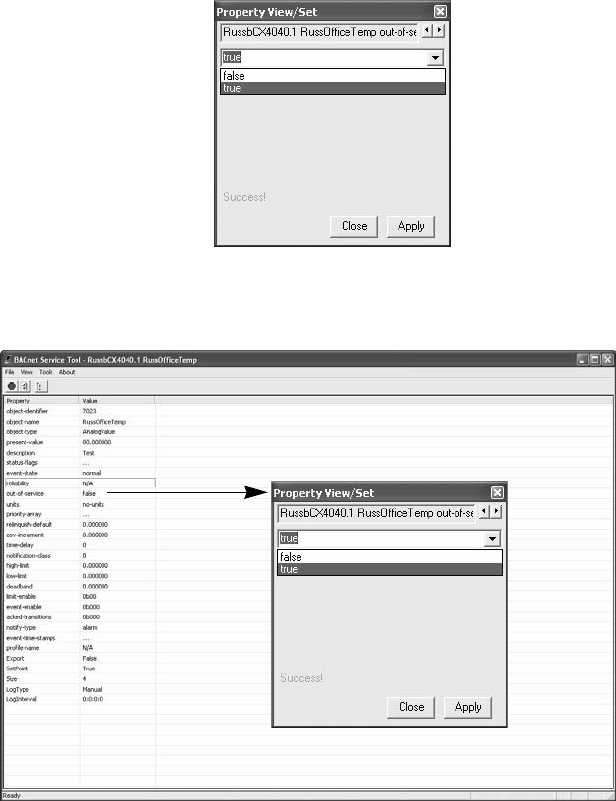
This differs from a simple property, such as the out-of-service property,
that only has one value that can be changed.
Selecting
Properties
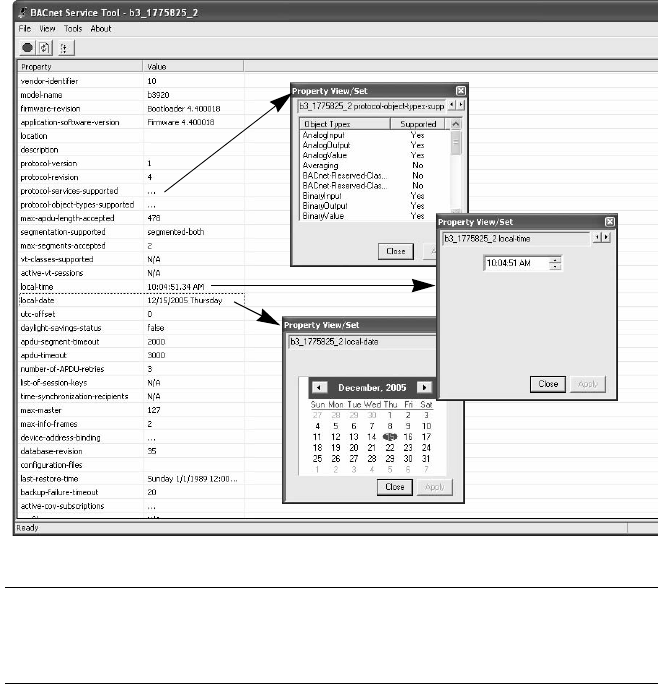
Properties are selected from the detailed view of an object and by
double-clicking on the property, a PropertyView/Set dialog is displayed
where you can change or just view the current setting and options.
Double-Click property to display dialog
Chapter 5: Using the BACnet Service Tool Software
78 TAC
Problems In some cases, property values are displayed in the dialog and even
thought you can change the value and hit the Apply button, the value
does not change in the table. In other cases, you may not be able to
bring up the Property View/Set dialog after double-clicking on the
property.
This can occur for one of two reasons:
zYour access privilege is not set high enough to change this property.
zThe property value is set on the controller from CyberStation and
cannot be changed using the Service Tool.
If you encounter this situation, check your security level to see if you
are authorized to change a property value, or consult with your system
administrator.
Chapter 5: Using the BACnet Service Tool Software
BACnet Service Tool User’s Guide 79
Adjusting a Temperature Setpoint
One very typical example of using the Service Tool is to change or
adjust a temperature setpoint. To adjust a temperature setpoint,
perform the following steps:
Step 1:
From the Service Tool graphical interface, make sure the
View menu setting includes Class folders.
Step 2:
Navigate to the device that controls the area where you want
to change the setpoint, click on the + sign to display the Class
folders
Step 3:
Select the AnalogValue folder and click on the + sign to
display the folder’s objects.
Step 4:
Navigate to the object that represents the office or room you
are attempting to change. In this example it is
SampleOfficeTemp. Double-click on the object to switch to a
detailed table view.
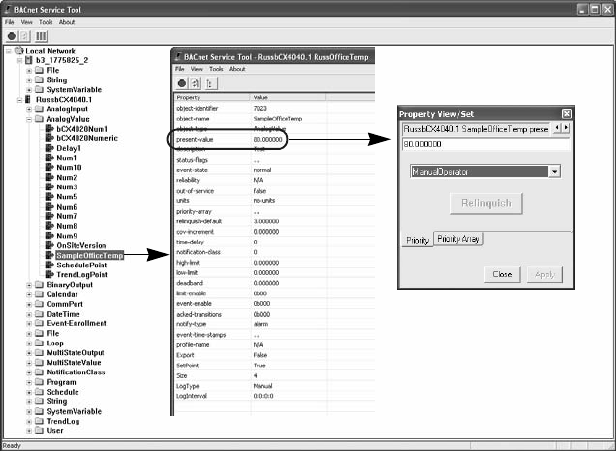
Step 5: From the detailed view table, double-click the present-
value property to display the Property View/Set dialog.
(In this example, this value has a BACnet priority level setting
Chapter 5: Using the BACnet Service Tool Software
80 TAC
of 8 (ManualOperator), which means you should have a level
setting of 8 or higher to perform this change.)
Step 6: Type the new setting into the value display area and click on
the Apply button to make the change.
Step 7: A success message should appear in the dialog and the table
should be updated with the new value. Close the dialog to
complete this task.
In this example, we only changed the setpoint of the current
temperature. We could have changed the high-limit and low-limit
values to adjust the temperature range of operation or we could have
changed other objects that would have adusted how the controller
functions.
Chapter 5: Using the BACnet Service Tool Software
BACnet Service Tool User’s Guide 81
Viewing a Trend Log Buffer
Another common task is to view the history of events in a trend log
buffer. If a system administrator has defined an AnalogValue to
capture changes in a unit of value, such as ohms, relative humidy,
watts, etc., these events can be logged and listed as an object in a Class
folder (TrendLog is the folder name in this example).
To view a trend log buffer, perform the following steps:
Step 1: From the Service Tool graphical interface, make sure the
View menu setting includes Class folders.
Step 2: Navigate to the device where the trend logging is taking place,
click on the + sign to display the Class folders.
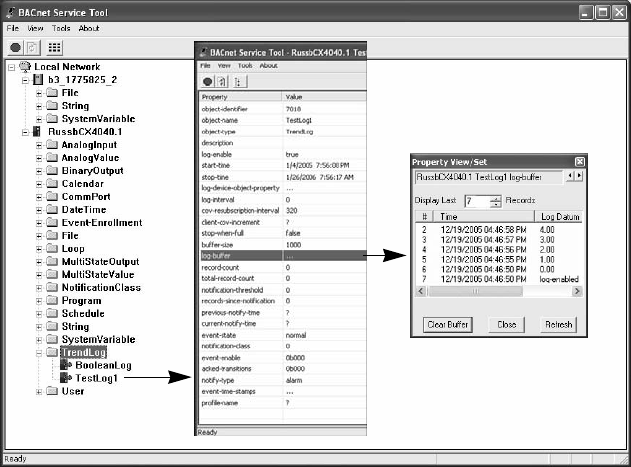
Step 3: Select the TrendLog folder and click on the + sign to display
the folder’s objects.
Step 4: Navigate to the object that represents the trend logging
event you are looking for. In this example it is TestLog1.
Double-click on the object to switch to a detailed table view.
Chapter 5: Using the BACnet Service Tool Software
82 TAC
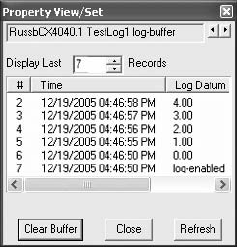
Step 5: From the detailed view table, double-click the log-buffer
property to display the Property View/Set dialog .
Step 6: View the contents. This dialog gives you three options.
zYou can Clear the buffer and erase the contents
zYou can Close the dialog
zYou can Refresh the buffer and possibly display additional
data that may have been captured while this dialog was open.
Step 7: Close the dialog to complete this task.
Chapter 5: Using the BACnet Service Tool Software
BACnet Service Tool User’s Guide 83
Viewing a Schedule of Events
Viewing the particular details of schedule of events is another common
task that you can perform using the Service Tool. An example of a
schedule of events would include automatically changing high and low
temperature setpoints at different times of the day, with some
exceptions for weekends and holidays.
From the Service Tool, you can view the following:
zThe overall time period of the schedule of an event
zThe specific weekly schedule of event occurances
zThe time exceptions for an event
zThe list of object property references that trigger, or are affected by,
an event
To view the schedule details of an event, perform the following steps:
Chapter 5: Using the BACnet Service Tool Software
84 TAC
Step 1: From the Service Tool graphical interface, make sure the
View menu setting includes Class folders.
Step 2: Navigate to the device where the schedule object has been
defined and click on the + sign to display the Class folders.
Step 3: Select the Schedule folder and click on the + sign to display
the folder’s objects.
Step 4: Navigate to the object that represents the event you are
looking for. In this example it is SchTestOne. Double-click on
the object to switch to a detailed table view.
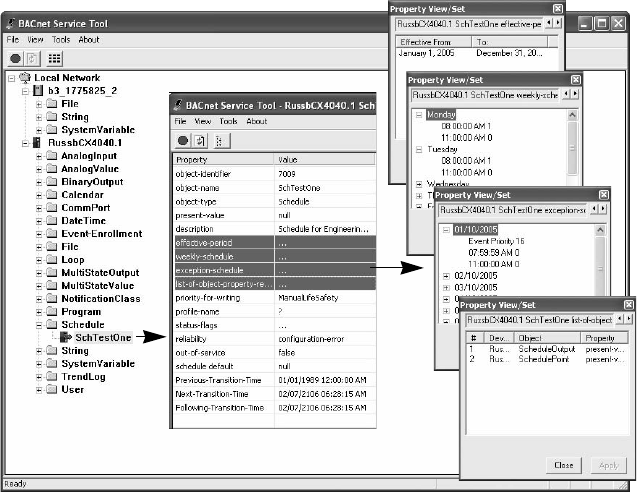
Step 5: From the detailed table, you can view the Property View/Set
dialog on one or more of the following by double-clicking on the
property.
zeffective-period defines the duration of a scheduled event
zweekly-schedule defines the specific dates and times that an
event is triggered
zexception-schedule defines the date and time exceptions to a
schedule
zlist-of-objects-property-references defines what defined
objects and values are associated with an event.

Appendix A: What Is BACnet?
86 TAC
Introduction
BACnet® stands for Building Automation and Control Network. It is a
communication protocol developed by the American Society of Heating,
Refrigerating, and Air-Conditioning Engineers, Inc. (ASHRAE).
BACnet integrates products made by different manufacturers into a
single-building automated control system. This means that, as long as
they meet ANSI/ASHRAE Standard 135-2004, products from different
manufacturers can communicate with each other over a network. These
different products include controllers, workstations, actuators, and
sensors. In the BACnet world, each of these products is known as a
device.
BACnet is a common network technology that facilitiates
communication among many different networked systems.
Note: If you do not already have the ANSI/ASHRAE Standard 1350-
2004 BACnet — A Data Communication Protocol for Building
Automation and Control Networks, you can get it from the web
site, http://www.bacnet.org/.
BACnet support is integrated into Andover Continuum products, such
as the BACnet service tool and Continuum CyberStation, in a way that
ensures transparency and “sameness” in the user experience. Viewing
and configuring networks, controllers, classes, objects, and properties
in BACnet are similar. These BACnet elements are integrated into the
“look and feel” of Andover Continuum products — for exmaple,
application viewers, explorer trees, list views, object/point editors,
graphics editors.
Our proprietary Plain English (PE) programming language is used to
program Andover Continuum BACnet devices. Some BACnet functions
and features have been added to PE, allowing you to query and change
points on other BACnet third-party devices. Through programming and
the user interfaces of Andover Continuum products, Continuum’s
implementation of BACnet allows you to manipulate Continuum/
Infinity points that subsequently operates a BACnet device and vice
versa.

Appendix A: What Is BACnet?
BACnet Service Tool User’s Guide 87
For more information on integration, please see the section, BACnet
and Andover Continuum, later in this appendix.
Note: Andover Continuum’s integration of BACnet is fully documented
in the Continuum online help, the Andover Continuum
CyberStation Configurator’s Guide, 30-3001-781, the
Introducing BACnet for the Continuum User Guide, 30-3001-
863, and the Plain English Language Reference, 30-3001-872.

Appendix A: What Is BACnet?
88 TAC
BACnet - Knowing the Terminology
This section provides brief descriptions of the following fundamental
BACnet components and terms:
Network
Internetwork
Device
Profile
Object
Property
Service
Broadcast
PICS
BIBBs
Command Priority
For routers and BACnet Broadcast Management Devices (BBMDs), see
the section, Routers, Gateways, BBMDs, and Foreign Devices, later in
this appendix.
What Is a BACnet Network?
A BACnet network is a transport (LAN or WAN) that carries data from
device to device, within a network and between networks. A BACnet
network can be a high-speed backbone network:
zEthernet
zBACnet/IP
And it can be a fieldbus network:
zMaster-Slave/Token-Passing (MS/TP)
zARCnet
zLonTalk

Appendix A: What Is BACnet?
BACnet Service Tool User’s Guide 89
Note: Since many BACnet devices are located across the network on
smaller subnetworks, the term Internetwork is often used in
BACnet literature to describe an entire network of BACnet
devices.
What Are BACnet Devices?
A BACnet device conforms to the BACnet standard and can serve as a:
zBuilding controller
zField controller
zRouter
zGateway
zEnd device, such as a sensor or actuator.
Devices are networked together in a building as peer-to-peer devices,
slave devices, or master/slave devices.
How Are Devices Identified?
Every device can be identified by:
zA device identifier, which is an instance number that is unique to
that device across many different networks that comprise a BACnet
system. (See also What Is an Internetwork?.). A device instance
number can be 1 to 4194303.
zA network number that is unique to the network to which the device
belongs. A network can be numbered 1 to 65535.

Appendix A: What Is BACnet?
90 TAC
zA MAC address number that is unique only within its own network.
The following table lists ranges of MAC address numbers for some
BACnet networks:
Note: A MAC address is typically read from a DIP switch or from non-
volatile memory. Some devices auto-assign MAC addresses
when the devices are placed on the network.
BACnet devices can have input/output functionality or no input/output
functionality.
What Are Device Profiles?
The BACnet standard identifies six device types, also known as device
profiles. These are:
zBACnet Operator Workstation (B-OWS)
zBACnet Building Controller (B-BC)
zBACnet Advanced Application Controller (B-AAC)
zBACnet Application Specific Controller (B-ASC)
zBACnet Smart Actuator (B-SA)
zBACnet Smart Sensor (B-SS)
For a list of Andover Continuum BACnet devices, please see the
section, BACnet and Andover Continuum, later in this appendix.
MAC Address Numbers
Network Number Range
MS/TP 1 to 254
ARCNET 1 to 255
Ethernet 1 to 281
474
976
710
655
Appendix A: What Is BACnet?
BACnet Service Tool User’s Guide 91
What Are BACnet Objects?
BACnet objects are the logical representation of system data. Objects
represent data that originates in physical inputs, physical outputs, or
software processes — for example, single physical points or logical
groupings/collections of points, which perform a specific function.
Objects standardize the organization of data to facilitate the exchange
of data between the products of different manufacturers.
Each object possesses a number of properties. The BACnet standard
provides the following standard objects:
Accumulator
Analog_Input
Analog_Output
Analog_Value
Averaging
Binary_Input
Binary_Output
Binary_Value
Calendar
Command
Device
Event_Enrollment
File
Group
Life_Safety_Point
Life_Safety_Zone
Loop
Multi_State_Input
Multi_State_Output
Multi_State_Value
Notification_Class (supported as an EventNotification object)
Program
Pulse Converter
Schedule
Trend Log
Individual manufacturers may implement their own proprietary object
types, as long as they conform to the BACnet standard.
Appendix A: What Is BACnet?
92 TAC
For a list of BACnet objects supported in Andover Continuum products,
please see the section, BACnet and Andover Continuum, later in this
appendix.
How Are Objects Identified?
Each object has a numerical object identifier comprising an object type
and an instance number, as follows:
zObject types 0 to 127 are reserved to identify standard BACnet
objects.
zObject types 128 to 1023 are used to identify proprietary objects.
zBACnet devices support object types up to a limit of 4194303
instances. (As you know from the device section, instance numbers
can be 1 to 4194303.)
What Are BACnet Properties?
Objects are examined and controlled by a set of properties that belong to
each object. A property contains the smallest piece of BACnet
information, and it has a name and a value. For example, a property
named high_limit can hold a value of 78.0. A property can be written
and/or read, and can provide command control.
For every object, the BACnet standard requires some properties, while
others are optional. Still other properties can be proprietary to a
manufacturer. Required properties must be implemented for each
object type. Optional properties need not be implemented, but if they
are, they must conform to the BACnet standard.
Each BACnet Device object contains properties that can be used to
verify communications, identify the vendor, identify software and
firmware revision, and other characteristics of the device. The device
object’s properties represent the externally visible characteristics of a
BACnet device.
Appendix A: What Is BACnet?
BACnet Service Tool User’s Guide 93
How Are Properties Identified?
Each property has a property identifier, which is a number. Properties
0 to 511 are reserved as standard, though only 166 properties are
currently defined in the BACnet standard. Properties 512 and higher
are unique to a manufacturer’s proprietary properties.
For example, TAC (Andover Continuum) has three proprietary
properties:
512 — PreviousTransitionTime
513 — NextTransitionTime
514 — FollowingTransitionTime
The Device object property, Vendor ID, is used to identify the
manufacturer.
What Are Complex Properties?
Information not available for Beta.
What Are BACnet Services?
BACnet services are essentially the messages that BACnet devices
send to each other. Services can:
zRead and write the property values of one or more objects.
zSend notifications of alarms and special events.
zRead and write files.
Services follow a basic client/server model. A BACnet client is a device
that requests a service. A BACnet server is a device that performs a
service. (See also What Are BACnet Broadcasts?)

Appendix A: What Is BACnet?
94 TAC
The following table lists the major categories of BACnet services:
What Are BIBBs?
BACnet Interoperability Building Blocks (BIBBs) are collections of
BACnet services. They represent the next detailed layer of service
components. BIBBs are grouped into the following five five major
categories:
zData Sharing
zAlarm and Event Management
zScheduling
zTrending
zDevice and Network Management
Different combinations of BIBBs apply to each type (profile) of BACnet
device — B-OWS, B-BC, B-AAC, B-ASC, B-SA, B-SS. For example, the
following table summarizes the BIBB services provided for a B-BC type
of device.
BACnet Service Categories
Category Service
Alarm and Event Performs alarm routing and event notification
File Access Accesses and manipulates files contained in devices.
Object Access Reads and writes properties, creates and deletes objects,
and manipulates lists of data
Remote Device
Management
Remotely monitors and controls devices.
Virtual Terminal Esablishes, for a client user, a connection to an
application program server in another BACnet device.
Example: BIBBs for a B-BC Type Device
BIBB Category Capabilities & Services Provided for a B-BC
Data Sharing zProvides values of any of its BACnet objects
zRetrieves values of BACnet objects from other devices.
zModifies some/all of its BACnet objects by another device
zModifies some BACnet objects in other devices.

Appendix A: What Is BACnet?
BACnet Service Tool User’s Guide 95
See also: What Are BACnet Services?
What Are BACnet Broadcasts?
A BACnet broadcast is a User Datagram Protocol (UDP) broadcast that
carries messages (or services) from one device to another. These
broadcasts, for example, can be:
zA query from a device that seeks to discover the existence of other
devices and their objects. In the BACnet world, this is known as a
Who-Is broadcast.
zAn announcement from a device that informs other devices of its
existence, identifying itself and its objects. In the BACnet world,
this is known as an I-Am broadcast.
zBroadcasts that deliver alarm messages to devices.
Alarm and Event
Management
zGenerates alarm/event notifications and directs them to
recipients.
zMaintains a list of unacknowledged alarms/events.
zNotifies other recipients that the acknolwedgement has been
recieved.
zAdjusts alarm/event parameters.
Scheduling zSchedules output actions, both in the local device, and in
other devices, both binary and analog, based on the date
and time.
Trending zCollects and delivers time/value pairs.
Device and Network
Management
zResponds to queries about its status.
zResponds to requests for information about any of its
objects.
zResponds to communication control messages.
zSynchronizes its internal clock upon request.
zUploads its configuration and allows it to be subsequently
restored.
zCommands half-routers to establish and terminate
connections.
Example: BIBBs for a B-BC Type Device
BIBB Category Capabilities & Services Provided for a B-BC
Appendix A: What Is BACnet?
96 TAC
zBroadcasts that inform other devices that the value of one or more
objects/points has changed. In the BACnet world, these are known
as Change Of Value (COV) messages.
Broadcasts are sent and received through a UDP port on each device.
Each device on a network has a unique UDP port number. The default
port number is [0xBAC0]. They are also sent using an IP router and a
BACnet Broadcast Managment Device (BBMD).
For more information on routers and BBMDs, please see the section,
Routers, Gateways, BBMDs, and Foreign Devices, later in this
appendix. See also: What Are BACnet Services?
What Is BACnet Command Priority?
In an Andover Continuum building control system, an object may be
manipulated by a number of different entities. The current value of an
object is set by several applications and other sources.
Each application has a well-defined function that it needs to perform.
When the actions of two or more applications conflict, with regard to
the value of an object property, there is a need to arbitrate between
them.
Arbitration ensures that several program and non-program sources can
properly manipulate the value of the same object. For example, a start/
stop program may command a particular BinaryOutput to turn ON,
while a demand-metering program may command the same
BinaryOutput to turn OFF. In this case, the OFF takes precedence.
However, an operator might override the demand-metering program
and force the BinaryOutput ON, in which case the ON takes
precedence.
The Command Priority Process
In BACnet, arbitration is provided by a process known as command
priority, which assigns varying levels of priorities to commanding
entities throughout the system. Each object that contains a
"commandable" property is responsible for acting on prioritized
commands, in the order of their established priorities.
Appendix A: What Is BACnet?
BACnet Service Tool User’s Guide 97
Implementation of the command priority process in an Andover
Continuum system involves the following command priority properties:
zCommandable Property — Each object that supports command
priorities has one or more properties that are known as
commandable properties. The value of these properties is controlled
by the command priority process.
zPriority_Array — BACnet has established a set of 16 priority
levels, known as the priority array, which consists of commands or
NULLs, in an order of decreasing priority. The highest priority
(lowest array priority level) with a non-NULL value is the active
command. If a priority level holds a value of NULL, then the next
non-NULL is assigned to the object.
zRelinquish_Default — When all priority levels in the priority
array become NULL, the value of Relinquish Default is assigned to
the commandable property. You set the value of Relinquish Default
when you configure the BACnet object.
.
Command Values and NULLs
A priority level in the priority array may have a commanded value or a
NULL value. A NULL value means there is no existing command at
that priority. An object continuously monitors (polls) the entire priority
array to locate the entry with the highest non-NULL value, then sets
the commandable property to this value.
Relinquishing a Command
A commanding entity (application program or operator, for example)
may issue a command to an object's commandable property, or it may
relinquish a command issued earlier. Relinquishing is a write
operation, similar to the command itself, except that the value of NULL
is commanded. That is, relinquishing a command places a NULL value
in the priority array, corresponding to the appropriate priority. (You
may override and relinquish a commanded value.)

Appendix A: What Is BACnet?
98 TAC
The 16-Element BACnet Command Priority Array
In the 16-level BACnet priority array, the top two priorities are related
to personnel safety. Five of the 16 priority levels have been assigned a
priority. However, the remaining 11 levels are designated as
"available" for possible future use. These priorities are:
1 — Manual Life Safety
2 — Automatic Life Safety
3 — Priority 3, available
4 — Priority 4, available
5 — Critical Equipment Control
6 — Minimum On Off
7 — Priority 7, available
8 — Manual Operator
9 — Priority 9, available
10 — Priority 10, available
11 — Priority 11, available
12 — Priority 12, available
13 — Priority 13, available
14 — Priority 14, available
15 — Priority 15, available
16 — Priority 16, available
Note: If an attempt is made to command a property for which a
priority level has not been specified, a default priority level of 16
(the lowest priority) is assumed. If an attempt is made to
command a property that is not commandable with a specified
priority level, the priority shall be ignored.
For more information on Andover Continuum’s implementation of
BACnet comand priority, please see the Continuum online help and the
Andover Continuum CyberStation Configurator’s Guide, 30-3001-781.
Appendix A: What Is BACnet?
BACnet Service Tool User’s Guide 99
What Are BACnet PICS?
BACnet Protocol Implementation Conformance Statements (PICS) are
detailed descriptions of a device’s inherent BACnet capabilities.
PICS can:
zTell a potential user what objects and BACnet services a device
supports.
zDetail the type of communications network, the baud rate, the
range of values each object property expects.
zSpecify whether a property is either writeable or just read-only.
zAssess the level of interoperability between devices.
PICS are available from each BACnet manufacturer.

Appendix A: What Is BACnet?
100 TAC
BACnet and Andover Continuum
As you learned in the Introduction section earlier in this appendix,
BACnet support is integrated into Andover Continuum products —
both software and hardware — in a way that ensures transparency and
“sameness” in the user experience. Creating, viewing, finding, and
configuring BACnet networks, controllers, classes, objects, and
properties is very similar to the ways you would do these things
without BACnet. The BACnet elements are integrated into the “look
and feel” of Andover Continuum products — for example, application
viewers, explorer trees, list views, object/point editors, graphics editors,
and the proprietary Plain English programming language.
Note: Andover Continuum’s integration of BACnet is fully documented
in the Continuum online help, the Andover Continuum
CyberStation Configurator’s Guide, 30-3001-781, the
Introducing BACnet for the Continuum User Guide, 30-3001-
863, and the Plain English Language Reference, 30-3001-872.
Andover Continuum vs. BACnet Terminology — a Roadmap
When working with Andover Continuum’s implementation of BACnet,
the following tips may help you “map” Continuum/Infinity terminology
to BACnet terminology:
zAn attribute in the Continuum/Infinity world is a property in the
BACnet world.
zA point in the Continuum/Infinity world is an object in the
BACnet world.
zA controller in the Continuum/Infinity world is a device in the
BACnet world.
zAn alarm in the Continuum/Infinity world is an event in the
BACnet world.
zThe term digital in the Continuum/Infinity world generally means
binary in the BACnet world.
zThe term class (as in class object) means the same in both worlds.

Appendix A: What Is BACnet?
BACnet Service Tool User’s Guide 101
Andover Continuum BACnet Devices
Andover Continuum BACnet devices are “native” BACnet, meaning
that they can interoperate directly with other manufacturers’ (third-
party) BACnet devices. They inherently represent internal data in
BACnet format and use BACnet messaging to communicate. Andover
Continuum BACnet devices can be connected to a BACnet system
without requiring a gateway device or software driver to translate to
and from proprietary protocols.
The following table lists Andover Continuum BACnet devices and
matches them with their respective BACnet device profile.
How BACnet Devices Are Created in Andover Continuum
An Andover Continuum BACnet device (BACnet class object Device) is
first created as a Continuum InfinityController object or an
InfinityInfinetCtlr object.
For example, when an InfinityController object is created, and it is
designated as a b4920 or bCX1 4040, it automatically becomes a Device
object when it appears in the BACnet section of Continuum’s tree-view
structure, known as the Continuum Explorer. In fact, in Continuum
Explorer you can see the InfinityController object residing in the
Infinity view and its Device object equivalent residing in the BACnet
view.
Third-party BACnet devices are absorbed into a Continuum system
and appear as Device objects only in the BACnet view.
Andover Continuum BACnet Devices
Andover Continuum Device Profile
CyberStation workstation B-OWS
bCX1 (4040) controller B-BC
bCX1 (4000) router Other
b4920 system controller B-AAC
b3xxx equipment controller B-AAC
RoamIO2 hardware adapter Not applicable

Appendix A: What Is BACnet?
102 TAC
Note: For complete information on Continuum Explorer and creating,
finding, and viewing Andover Continuum and third-party
BACnet devices, please see the Continuum online help and the
Andover Continuum CyberStation Configurator’s Guide, 30-
3001-781.
BACnet Objects in Andover Continuum
Andover Continuum supports the following BACnet class objects.
Continuum editors are also available for creating and modifying these
BACnet objects. The Continuum object name appears on the right.
BACnet Objects Suported in Andover Continuum
BACnet Object Name Supported? Continuum Name
Accumulator No N/A
Analog_Input Yes AnalogInput
Analog_Output Yes AnalogOutput
Analog_Value Yes AnalogValue
Averaging No N/A
Binary_Input Yes BinaryInput
Binary_Output Yes BinaryOutput
Binary_Value Yes BinaryValue
Calendar Yes Calendar
Command No N/A
Device Yes Device
Event_Enrollment Yes EventEnrollment
File Yes File
Group Yes Group
Life_Safety_Point No N/A
Life_Safety_Zone No N/A
Loop Yes Loop
Multi_State_Input Yes MultistateInput
Multi_State_Output Yes MultistateOutput
Multi_State_Value Yes MultistateValue
Notification_Class Yes EventNotification
Program Yes Program

Appendix A: What Is BACnet?
BACnet Service Tool User’s Guide 103
How BACnet Objects Are Created in Andover Continuum
You may create and/or modify BACnet objects in an Andover
Continuum system. Most of these objects are first created as
Continuum/Infinity objects, and depending how they are configured,
they are automatically transformed into BACnet objects when they are
created on an Andover Continuum BACnet controller, such as a bCX1
4040.
For example, when a Continuum InfinityInput object is created on an
Andover Continuum BACnet controller, and the input type is “voltage,”
it automatically becomes an AnalogInput object when it appears inthe
BACnet section of Continuum’s tree-view structure, the Continuum
Explorer.
Most BACnet objects are created as Continuum/Infinity objects on an
Andover Continuum BACnet controller, as follows:
AnalogInput (created as an InfinityInput)
AnalogOutput (created as an InfinityOutput)
AnalogValue (created as an InfinityNumeric)
BinaryInput (created as an InfinityInput)
BinaryOutput (created as an InfinityOutput)
BinaryValue (created as an InfinityNumeric)
Device (created as an InfinityController or InfinityInfinetController)
EventEnrollment (created as an AlarmEnrollment)
MultistateInput (created as an InfinityInput)
MultistateOutput (created as an InfinityOutput)
MultistateValue (created as an InfinityNumeric)
Notification_Class (created as an EventNotification)
Third-party BACnet objects are absorbed into a Continuum system and
appear only in the BACnet view.
Pulse Converter No N/A
Schedule Yes Schedule
Trend Log Yes TrendLog
BACnet Objects Suported in Andover Continuum
BACnet Object Name Supported? Continuum Name

Appendix A: What Is BACnet?
104 TAC
Note: For complete information on Continuum Explorer and creating,
finding, and viewing Andover Continuum and third-party
BACnet objects, please see the Continuum online help and the
Andover Continuum CyberStation Configurator’s Guide, 30-
3001-781.
BACnet Class Object Folders
Just as Continuum/Infinity objects appear in class object folders in
Continuum Explorer’s Infinity view, so too do BACnet objects appear in
BACnet class object folders in the BACnet view, regardless of whether
they reside on Andover Continuum or third-party BACnet devices.
A class object folder, typically created for each device, contains all the
objects residing on that device for that class. For example, a class folder
named InfinityNumeric would contain InfinityNumeric objects residing
with its respective Infinity controller. On the BACnet side, the
equivalent class folder, named AnalogValue, would reside with its
respective BACnet device. For example, the Infinity view might have
an InfinityInfinetCtlr class folder, while on the BACnet view the folder
would be named Device.
BACnet Properties and Andover Continuum
As you recall from earlier in this appendix, every BACnet object has
many BACnet standard properties (and sometimes proprietary
properties). The BACnet standard defines the names of standard
properties. Andover Continuum implements these properties (or
subsets of these properties) in its object editors and its Plain English
(PE) programming language, compliant with the BACnet standard.
However, property names used in Andover Continuum and in Plain
English differ slightly, just as Continuum object names differ slightly.
This maintains the same funcitonal “look and feel” in the integration of
BACnet into Andover Continuum products.

Appendix A: What Is BACnet?
BACnet Service Tool User’s Guide 105
The following table shows some examples of how the BACnet standard
property names may differ from the way they appear to Continuum
internally and in Plain English programs, as well as they way they
appear in the Continuum user interface (object editors).
For more information please see Introducing BACnet - A Guide for the
Continuum User, 30-3001-863, and the Plain English Language
Reference, 30-3001-872.
Variations of Property Names in Andover Continuum
BACnet Standard
Property Name
Internal Continuum
and PE Program Name
Continuum User
Interface Name
Event_State EventState Event State
Object_Name ObjectName Name
Out_Of_Service OutOfService Out of Service
Present_Value Value Present Value
Description Description Description

Appendix A: What Is BACnet?
106 TAC
Routers, Gateways, BBMDs, and Foreign Devices
This section describes some other types of BACnet devices:
zRouters
zGateways
zBACnet Broadcast Management Devices (BBMDs)
zForeign devices
Routers and Gateways
A router (or IP router) is a BACnet device, such as the Andover
Continuum bCX1 4000, that facilitates the exchange of data between
different types of BACnet networks — MS/TP, BACnet/IP, Ethernet,
and so on. A router is simply a “pass through” device. It does not
change the data format or the content of the message. This exchange of
broadcast messages between networks, using a router, requires a
BACnet Broadcast Management Device (BBMD) — one BBMD per
network. (For more information on BBMDs, please see the section,
BBMDs and Foreign Devices, below.)
A gateway is a BACnet device that facilitates exchange of data between
devices on a BACnet network and devices on a non-BACnet network so
that BACnet and non-BACnet information can be shared. While a
router simply passes information from one network to another, a
gateway takes the data from one device, analyzes it, translates the data
into another data protocol (BACnet or non-BACnet), then delivers it.
This ensures the recipient device understands the message.
Physically, a gateway can take one of the following forms:
zInternal: This is typically a board or module inside a device.
zExternal hardware/software: This is typically an external hardware
interface box combined with a software translator.
zSoftware: This is typically a software translator on a PC.
Note: These exchanges of data, via routers and gateways, are also
known as internetworking.

Appendix A: What Is BACnet?
BACnet Service Tool User’s Guide 107
BBMDs and Foreign Devices
A BBMD is a workstation (B-OWS) specially designated to ensure that
broadcast messages are delivered, via one or more routers, between
BACnet networks. (See also the sections: Routers and Gateways, and
What Are BACnet Broadcasts?)
Each network must have a BBMD. Each BBMD maintains two internal
tables:
zBroadcast Distribution Table (BDT)
zForeign Device Table (FDT)
These tables essentially allow different networks to know about the
existence of each other and each other’s devices. They must know about
each other before broadcast messages can be routed.
A BDT maintains a list of other BBMDs located on other “foreign”
networks. If a “foreign” BBMD is added to a BDT, then it becomes
registered in the “local” BBMD. During this process, not only does that
“foreign” BBMD get registered, but all the BBMDs listed in its “foreign”
BDT also get registered. This means the local network knows about the
foreign network and all the networks that the foreign network knows
about.
An FDT maintains a list of foreign devices. A foreign device is simply
the identity of a device residing on another BACnet network. When a
foreign device is added to an FDT, then it also becomes registered with
the “local” BBMD.
Note: In Andover Continuum CyberStation, you can designate and
register BBMDs, as well as register foreign devices, so that
broadcast messages are routed among BACnet networks. For
more information, please see the Continuum online help, the
Continuum CyberStation Configurator’s Guide, 30-3001-781,
and Introducing BACnet - A Guide for the Continuum User, 30-
3001-863.
Appendix A: What Is BACnet?
108 TAC

BACnet Service Tool User’s Guide
Document Number 30-3001-910
Revision A