Schneider Electric 33950 Wireless RF Key Fob User Manual C Bus RF Wireless Key Fob and Visor Remote
Schneider Electric (Australia) Pty. Ltd. Wireless RF Key Fob C Bus RF Wireless Key Fob and Visor Remote
User manual
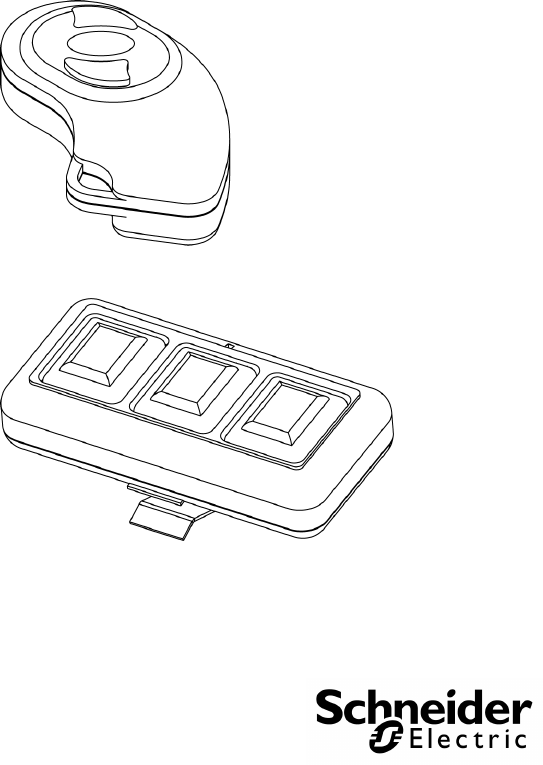
C-Bus™ RF Wireless Key Fob and Visor Remote
SLC5800TXBDKF and SLC5800TXBDVR for use with
RF Wireless Control Systems
Instruction Bulletin
Retain for future use.
C-Bus™ RF Wireless Key Fob and Visor Remote 63249-420-342A1
Instruction Bulletin 06/2010
2 © 2010 Schneider Electric. All Rights Reserved.
HAZARD CATEGORIES AND SPECIAL SYMBOLS
Read these instructions carefully and look at the equipment to become
familiar with the device before trying to install, operate, service, or maintain
it. The following special messages may appear throughout this bulletin or on
the equipment to warn of potential hazards or to call attention to information
that clarifies or simplifies a procedure.
The addition of either symbol to a “Danger” or “Warning” safety label
indicates that an electrical hazard exists which will result in personal injury if
the instructions are not followed.
This is the safety alert symbol. It is used to alert you to potential personal
injury hazards. Obey all safety messages that follow this symbol to avoid
possible injury or death.
Danger indicates an immediately hazardous situation which, if not
avoided, will result in death or serious injury.
Warning indicates a potentially hazardous situation which, if not
avoided, can result in death or serious injury.
Caution indicates a potentially hazardous situation which, if not
avoided, can result in minor or moderate injury.
Caution, used without the safety alert symbol, indicates a potentially
hazardous situation which, if not avoided, can result in property
damage or improper operation.
NOTE: Provides additional information to clarify or simplify a procedure.

63249-420-342A1 C-Bus™ RF Wireless Key Fob and Visor Remote
06/2010 Instruction Bulletin
© 2010 Schneider Electric. All Rights Reserved. 3
PLEASE NOTE
Electrical equipment should be installed, operated, serviced, and maintained
only by qualified personnel. This document is not intended as an instruction
manual for untrained persons. No responsibility is assumed by Schneider
Electric for any consequences arising out of the use of this manual.
FCC CLASS B
This device complies with Part 15 of the FCC Rules. Operation is
subject to the following two conditions: (1) this device may not
cause harmful interference, and (2) this device must accept any
interference received, including interference that may cause
undesired operation.
This equipment has been tested and found to comply with the limits
for a Class B digital device, pursuant to Part 15 of the FCC Rules.
These limits are designed to provide reasonable protection against
harmful interference in a residential installation. This equipment
generates, uses, and can radiate radio frequency energy and, if not
installed and used in accordance with the instructions, may cause
harmful interference to radio communications. However, there is no
guarantee that interference will not occur in a particular installation.
If this equipment does cause harmful interference to radio or
television reception, which can be determined by turning the
equipment off and on, the user is encouraged to try to correct the
interference by one or more of the following measures:
Reorient or relocate the receiving antenna.
Increase the separation between the equipment and receiver.
Connect the equipment into an outlet on a circuit different from
that to which the receiver is connected.
Consult the dealer or an experienced radio/TV technician for
help.
Changes or modifications to this device that are not expressly
approved by Schneider Electric could void the user's authority to
operate this equipment.
C-Bus™ RF Wireless Key Fob and Visor Remote 63249-420-342A1
Instruction Bulletin 06/2010
4 © 2010 Schneider Electric. All Rights Reserved.
ABOUT THE RF KEY FOB AND VISOR REMOTE
The C-Bus™ Wireless RF Key Fob and Visor Remote provides
C-Bus protocol commands to remotely controlled buttons on RF
wireless wall units and plug adapter units.
The two radio frequency (RF) remote controls work up to 50 to 70
feet (15 to 20 meters) from a unit they control. Unlike an infrared
remote, which operates on line-of-sight, an RF remote signal cannot
be blocked by obstructions. The user can control a unit by pointing a
remote in any direction, including away from the unit.
Up to three separate wall units or plug adapter buttons can be
controlled by a remote control unit. The buttons can be on various
units on different wireless networks. A single button on a wall unit or
plug adapter unit can be controlled by up to two RF remote controls.
Before You Begin
Before using the key fob and visor remote, inspect it carefully. Verify
the catalog number on the box label.
Table 1: Contents of the Box
Part Number Description Quantity
SLC5800TXBDVR RF Wireless Visor Remote Control 1
SLC5800TXBDKF RF Wireless Key Fob 1
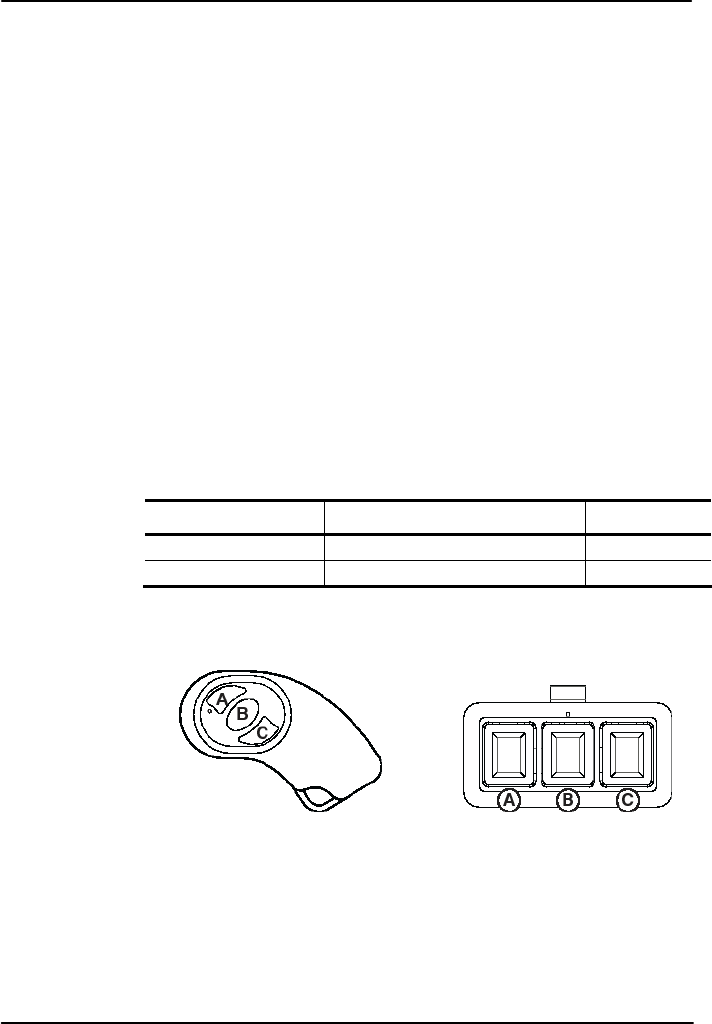
REMOTE CONTROL BUTTONS
KEY:
Buttons A, B, and C
are individual
programmable control
buttons. Each button
controls a wall unit or
a plug adapter button.
63249-420-342A1 C-Bus™ RF Wireless Key Fob and Visor Remote
06/2010 Instruction Bulletin
© 2010 Schneider Electric. All Rights Reserved. 5
INSTALLING THE BATTERIES
Battery Tips and Precautions
Use new CR2032 batteries and verify that all batteries are the
same type.
Keep batteries out of the reach of children.
Verify that the positive (+) and negative (–) battery polarities line
up with the battery-case polarities.
Replace batteries that have been in use two or more years.
Recycle or properly dispose of used batteries.
Try changing the batteries if your remote does not control units.
The remote’s range decreases when the batteries’ power is low.
NOTE: The Short name will not lose programmed data when the
batteries are replaced.
FIRE OR CHEMICAL HAZARD
The batteries used in this unit may present a risk of fire or chemical
burn if not handled properly.
Do not recharge, disassemble, heat above 212 °F (100 °C), or
incinerate.
Recycle or properly dispose of used batteries.
Replace with identical type.
Follow all battery manufacturers' instructions.
Failure to follow these instructions can result in injury or
equipment damage.

C-Bus™ RF Wireless Key Fob and Visor Remote 63249-420-342A1
Instruction Bulletin 06/2010
6 © 2010 Schneider Electric. All Rights Reserved.
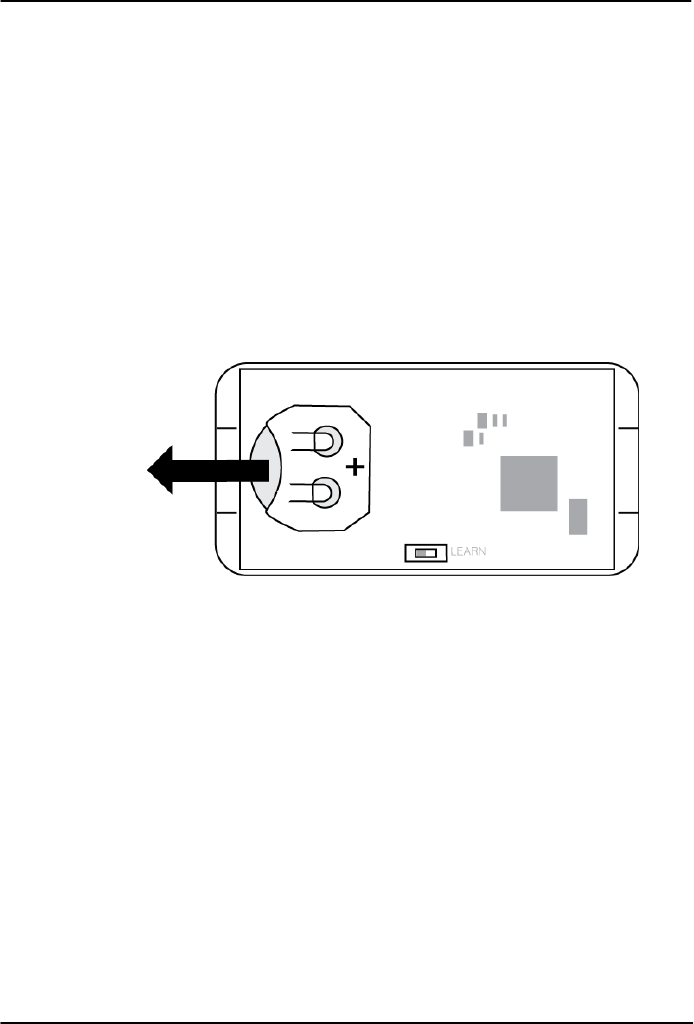
Key Fob Battery Installation
1. Using a small flat-head screw driver, gently pry off the bottom of
the key fob.
2. Remove the old battery from the key fob.
3. Insert the new battery. Verify that the positive and negative
terminals match the symbols inside the battery compartment.
4. Replace the back cover by positioning the cover and snapping it
into place.
Figure 1: Removing the Key Fob Battery
63249-420-342A1 C-Bus™ RF Wireless Key Fob and Visor Remote
06/2010 Instruction Bulletin
© 2010 Schneider Electric. All Rights Reserved. 7
Visor Remote Battery Installation
1. Using a small Phillips screw driver, remove the two screws from
the back of the visor remote.
2. Remove the back of the visor remote.
3. Remove the old battery from the visor remote.
4. Insert the new battery. Verify that the positive and negative
terminals match the symbols inside the battery compartment.
5. Replace the back cover by positioning the cover and snapping it
into place.
6. Tighten the screws on the back of the visor remote.
Figure 2: Removing the Visor Remote Battery
C-Bus™ RF Wireless Key Fob and Visor Remote 63249-420-342A1
Instruction Bulletin 06/2010
8 © 2010 Schneider Electric. All Rights Reserved.
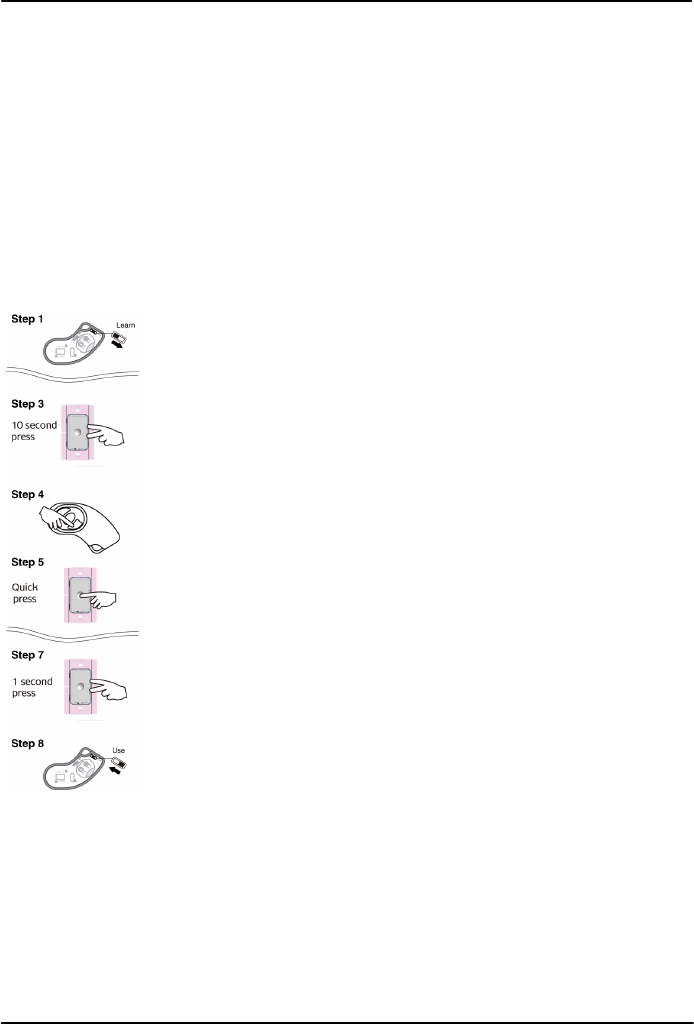
PROGRAMMING THE KEY FOB
Follow the guidelines below to make the Key Fob functional.
Program C-Bus Wireless units to recognize the key fob's
buttons.
Program the key fob, wall units, and plug adapter units using
learn mode.
Learn mode is activated on the remote by removing the back cover
(see the "Installing the Batteries" section to remove the back cover),
and sliding the switch down to the Learn position. Refer to the steps
below to activate learn mode and to program the key fob.
Use the following procedure to assign a button on the key fob to a
button on a C-Bus Wireless wall unit or plug adapter unit:
NOTE: Assigning a button on the key fob to a button on a C-Bus
Wireless unit does not unlearn previous assignments to other units.
To do this, follow the instructions in the "Clearing Remote
Assignments" section.
1. Set the key fob to learn mode by sliding the switch across to
the Learn position.
2. Replace the back cover.
3. On the wall unit, press the Learn button to activate learn mode.
4. On the key fob, press the button you want to assign.
5. Quickly press the button on the wall unit you want the key fob
to control (within 30 seconds of pressing the remote button).
NOTE: All units on the network will enter Learn mode at this
time.
6. Repeat steps 4 and 5 to program additional buttons.
7. When you have finished programming the key fob buttons,
press the learn button on the wall unit to exit learn mode.
8. Remove the back cover on the key fob, slide the learn mode
switch on the back to the Use position, then replace the back
cover.

63249-420-342A1 C-Bus™ RF Wireless Key Fob and Visor Remote
06/2010 Instruction Bulletin
© 2010 Schneider Electric. All Rights Reserved. 9
PROGRAMMING THE VISOR REMOTE
Follow the guidelines below to make the Visor Remote functional.
Program C-Bus Wireless units to recognize the visor remote's
buttons.
Program the visor remote, wall units, and plug adapter units
using learn mode.
Learn mode is activated on the remote by removing the back cover
(see the "Installing the Batteries" section to remove the back cover),
and sliding the switch down to the Learn position. Refer to the steps
below to activate learn mode and to program the visor remote.
Use the following procedure to assign a button on the visor remote
to a button on a C-Bus Wireless wall unit or plug adapter unit:
NOTE: Assigning a button on the visor remote to a button on a
C-Bus Wireless unit does not unlearn previous assignments to
other units. To do this, follow the instructions in the "Clearing
Remote Assignments" section.
1. Set the visor remote to learn mode by sliding the switch across
to the Learn position.
2. Replace the back cover.
3. On the wall unit, press the Learn button to activate learn mode.
4. On the visor remote, press the button you want to assign.
5. Quickly press the button on the wall unit you want the visor
remote to control (within 30 seconds of pressing the remote
button).
NOTE: All units on the network will enter Learn mode at this
time.
6. Repeat steps 4 and 5 to program additional buttons.
7. When you have finished programming the visor remote buttons,
press the learn button on the wall unit to exit learn mode.
8. Remove the back cover on the visor remote, slide the learn
mode switch on the back to the Use position, then replace the
back cover.

C-Bus™ RF Wireless Key Fob and Visor Remote 63249-420-342A1
Instruction Bulletin 06/2010
10 © 2010 Schneider Electric. All Rights Reserved.
CLEARING REMOTE ASSIGNMENTS
To clear an individual remote assignment learned by a specific
button on a wall unit or plug adapter unit, reassign the same remote
button to the wall unit or plug adapter button. Assigning a button
once programs it. Assigning it again clears it.
To clear all remote assignments (from all remote controls) learned
by an individual wall unit or plug adapter unit:
1. Set the remote control to learn mode by sliding the switch across
to the Learn position.
2. On the wall unit or plug adapter unit, press the learn button to
activate learn mode.
3. Press one of the assignable buttons on the remote control.
4. Press twice one of the buttons on the wall unit or plug adapter
unit.
5. Wait until the indicator lights on the wall unit return to a slow
alternating flash. Then press the learn button on the wall unit or
plug adapter to exit learn mode.
6. Slide the learn mode switch on the back to the Use position.

63249-420-342A1 C-Bus™ RF Wireless Key Fob and Visor Remote
06/2010 Instruction Bulletin
© 2010 Schneider Electric. All Rights Reserved. 11
SPECIFICATIONS
Parameter Description
Supply voltage CR2032 batteries
Radio frequency 916 MHz
Transmitting power 10 mW
Typical range (range depends
on building construction and the
proximity to dense or metallic
objects)
Wood frame / brick veneer construction
50 to 70 feet (15 to 20 m)
Brick, stone, or steel frame construction
35 to 50 feet (10 to 15 m)
Steel reinforced concrete construction
20 to 35 feet (5 to 10 m)
Maximum range (open air) 165 feet (50 m)
Operating temperature range 32 to 104 °F (0 to 40 °C)
Operating humidity range 10 to 95% RH
C-Bus™ RF Wireless Key Fob and Visor Remote 63249-420-342A1
Instruction Bulletin 06/2010
12 © 2010 Schneider Electric. All Rights Reserved.
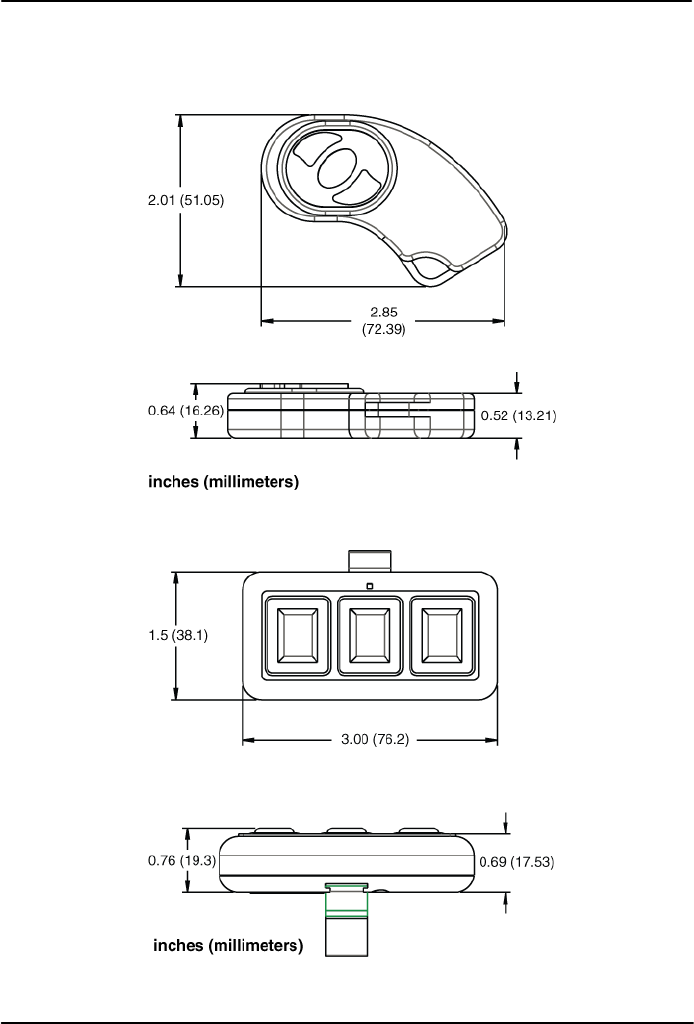
DIMENSIONS
Figure 3: Key Fob Dimensions
Figure 4: Visor Remote Dimensions

63249-420-342A1 C-Bus™ RF Wireless Key Fob and Visor Remote
06/2010 Instruction Bulletin
© 2010 Schneider Electric. All Rights Reserved. 13
STANDARDS
The key fob and visor remote complies with the following Standards:
Table 2: U.S. and Canadian Product Safety Standards and U.S.
FCC Regulations
Standards/Regulations Title
FCC Part 15 Class B Digital Device for Home or Office Use

C-Bus™ RF Wireless Key Fob and Visor Remote 63249-420-342A1
Instruction Bulletin 06/2010
14 © 2010 Schneider Electric. All Rights Reserved.

63249-420-342A1 C-Bus™ RF Wireless Key Fob and Visor Remote
06/2010 Instruction Bulletin
© 2010 Schneider Electric. All Rights Reserved. 15
C-Bus™ RF Wireless Key Fob and Visor Remote
Instruction Bulletin
Schneider Electric, USA
320 Tech Park Drive, Suite 100
La Vergne, TN, 37086
1-888-778-2733
www.schneider-electric.us
C-Bus, Saturn and Neo are trademarks or registered trademarks of
Schneider Electric and/or its affiliates in the United States and/or other
countries.
Electrical equipment should be installed, operated, serviced, and
maintained only by qualified personnel. No responsibility is assumed by
Schneider Electric for any consequences arising out of the use of this
material.
© 2010 Schneider Electric. All Rights Reserved.
63249-420-342A1 06/2010
SUPPORT AND SERVICE
Contact the Customer Information Center for technical support by
phone at 1-888-778-2733 or e-mail at
lightingcontrol.support@us.schneider-electric.com.
Contact your local Schneider Electric service representative or
C-Bus™ system certified installer for repairs or service to your
network.
You may also find helpful information on our web site at
www.Schneider-Electric.us.