Schumacher SC 8010A User Manual To The 0bc54a22 37ff Fd34 6194 086715f71b40
User Manual: Schumacher SC-8010A to the manual
Open the PDF directly: View PDF ![]() .
.
Page Count: 32

Fully Automatic
Microprocessor Controlled
Battery Charger with
Engine Starter plus
Battery Tester and
Alternator Tester
CAUTION:
Read all Safety Rules and Operating Instructions,
and follow them with each use of this product.
00-99-000811/0607
OWNER’S MANUAL
Schumacher Electric Corporation
Mount Prospect, IL 60056 U.S.A.
Model SC-8010A
For 12-Volt Batteries
Send Warranty Product Repairs to:
Customer Service Returns
P.O. Box 280,1025 E. Thompson, Hoopeston, IL 60942-0280
Questions? Call Customer Service: 1-800-621-5485
ELECTRONIC
BATTERY CHARGER
2amp
S L O W
CHARGE
80
10
25amp
F A S T
CHARGE
amp
ENGINE
S T A R T

2
PLEASE SAVE THIS OWNER’S MANUAL AND READ BEFORE EACH USE.
Model SC-8010A Microprocessor Controlled, Fully Automatic Operation Battery Charger
with Engine Starter Plus Battery and Alternator Tester offers features to accommodate
the needs for home or light commercial use. This manual will explain how to use the
battery charger safely and effectively. Please read and follow these instructions and
precautions carefully.
IMPORTANT SAFETY INSTRUCTIONS ................................................................... 3
PERSONAL SAFETY PRECAUTIONS ...................................................................... 4
BEFORE USING YOUR BATTERY CHARGER ........................................................ 4
Plugging It In ......................................................................................................... 4
Assembling Your Charger ..................................................................................... 4
Using An Extension Cord ...................................................................................... 5
PREPARING YOUR BATTERY TO BE CHARGED .................................................. 5
OPERATING INSTRUCTIONS ................................................................................... 5
Charging Battery In The Vehicle ........................................................................... 5
Charging Battery Removed From The Vehicle ..................................................... 6
Using Engine Start ................................................................................................ 7
USING YOUR BATTERY CHARGER ........................................................................ 8
CHARGER CONTROLS ............................................................................................. 9
CONTROL PANEL GUIDE ....................................................................................... 10
USING THE BUILT-IN BATTERY TESTER ..............................................................11
USING THE BUILT-IN ALTERNATOR TESTER ....................................................... 12
BATTERY PERCENT AND CHARGE TIME ............................................................ 13
CHARGING TIPS ...................................................................................................... 14
MAINTENANCE AND CARE ................................................................................... 14
TROUBLESHOOTING .............................................................................................. 15
WARRANTY .............................................................................................................. 16
TABLE OF CONTENTS

3
IMPORTANT SAFETY INSTRUCTIONS
• WARNING: Handling the cord on this
product or cords associated with ac-
cessories sold with this product, may
expose you to lead, a chemical known
to the State of California to cause cancer
and birth defects or other reproductive
harm. Wash hands after handling.
• Read all instructions and cautions printed
on the battery charger, battery, and vehicle
or equipment using battery.
• Use charger only on lead acid type re-
chargeable batteries, such as those used
in cars, trucks, tractors, airplanes, vans,
RVs, trolling motors, etc. This charger
is not intended to supply power to a low
voltage electrical system other than in a
starter-motor application.
• Never use charger for charging dry cell
batteries that are commonly used with
home appliances like radios, stereos,
remote controls, etc. These batteries
may burst and cause personal injury.
• Do not disassemble charger. Take it to a
qualied service professional if service
or repair is required. Incorrect assembly
may result in re or electrical shock.
• To reduce risk of electrical shock, unplug
the charger from the outlet before at-
tempting any maintenance or cleaning.
• Always charge battery in a well-ventilated
area.
WARNING – RISK OF EXPLOSIVE GASES
WORKING IN VICINITY OF A LEAD-ACID BATTERY IS DANGEROUS. BAT-
TERIES GENERATE EXPLOSIVE GASES DURING NORMAL BATTERY
OPERATION. FOR THIS REASON, IT IS OF UTMOST IMPORTANCE THAT
EACH TIME BEFORE USING YOUR CHARGER, YOU READ THIS MANUAL
AND FOLLOW THE INSTRUCTIONS EXACTLY.
SAVE THESE INSTRUCTIONS
• WARNING: Battery chargers get hot
during operation and must have proper
ventilation. Air needs to ow around
entire charger. Do not set charger on
ammable materials like carpeting, up-
holstery, paper, cardboard, etc. Charger
may damage leather and melt plastic and
rubber.
HELP US HELP YOU ——
Remember:
Place charger as far away from the bat-
tery being charged as the charger cables
will permit.
Do not expose charger to rain or snow.
Use of an attachment not recommended
or sold by the battery charger manufacture
may result in a risk of re, electric shock,
or injury to persons.
Never charge a frozen battery. If battery
uid (electrolyte) becomes frozen, bring
battery into a warm area to thaw before
you begin charging.
Never allow battery acid to drip on char-
ger when reading specic gravity or lling
battery.
Never set a battery on top of the charger.
Never place charger directly above battery
being charged. The gases from the battery
will corrode and damage the charger.
To reduce risk of battery explosion, follow these instructions and those published by
battery manufacturer and manufacturer of any equipment you intend to use in vicinity of
battery. Review cautionary markings on these products and on engine.
This manual contains important safety and operating instructions for battery charger
model SC-8010A.

4
Never touch the battery clamps together
when the charger is on. You could cause
a spark.
Never operate charger if it has received
a hard blow, been dropped, or otherwise
damaged. Take it to a qualied professional
for inspection and repair.
Be sure to position the charger power cord
to prevent it from being stepped on, tripped
over, or damaged.
Never pull out the plug by the cord when
unplugging the charger. Pulling on the
cord may cause damage to the cord or
the plug.
Do not operate the charger if it has a
damaged power cord or plug. Have the
cord replaced.
PERSONAL SAFETY PRECAUTIONS
• Wear complete eye and clothing
protection when working with lead-acid
batteries.
• Make sure that someone is within range
of your voice to come to your aid if needed
while you work with or are near a lead-
acid battery.
• Have plenty of fresh water and soap
nearby for use in case battery acid con-
tacts your eyes, skin, or clothing. If this
happens, wash immediately with soap
and water. Then get medical attention.
• Avoid touching your eyes while work-
ing with a battery. Acid particles (corro-
sion) may get into your eyes. If this oc-
curs, ush eyes immediately with running
cold water for at least 10 minutes. Then
immediately get medical attention.
• Remove all personal metal items from
your body such as rings, bracelets, neck-
laces and watches, while working with a
lead-acid battery. A battery can produce a
short circuit current high enough to weld
a ring (or the like) to metal, causing a
severe burn.
• Take care not to drop any metal tool
or metal object onto the battery. This
may spark or short circuit the battery or
another electrical device that may cause
an explosion.
• Always operate the battery charger in
an open, well-ventilated area.
• Never smoke or allow a spark or ame
in the vicinity of the battery or engine.
Batteries generate explosive gases.
• Neutralize any acid spills thoroughly
with baking soda before attempting to
clean up.
BEFORE USING YOUR BATTERY CHARGER
It is important to understand your charger's requirements. This section will tell you about
your charger's electrical requirements and how to prepare a battery for charging.
PLUGGING IT IN
Your charger requires a 120V AC wall
outlet receptacle installed according to all
local codes and ordinances.
ASSEMBLING YOUR CHARGER
Included with your battery charger are two
cord wrap cleats for storage of the clamp
cables.
To install, align the two tabs to correspond
with the two receptacles and push until you
hear a snap.
Wrap clamp cables after unplugging the
power cord from the AC wall outlet and
store your charger in a dry location.

5
PREPARING YOUR BATTERY TO BE CHARGED
It is important that you read and follow these guidelines while you are preparing to charge
the battery.
• Make sure that you have a 12 volt lead-
acid battery. Determine voltage of battery
by referring to vehicle owner’s manual
or the battery markings. Charge battery
initially at charger’s lowest rate.
• Clean the battery terminals. Be careful to
keep corrosion from getting in or around
your eyes or on your hands.
• Wear safety glasses. See additional “Per-
sonal Safety Precautions” on page 4.
• If required, for batteries with removable
vent caps, add distilled water to each cell
until the battery acid reaches the level
recommended by the manufacturer. This
will help purge excessive gases from the
cells. Be careful not to overll. If you have
a sealed battery with non-removable vent
caps, no action is necessary.
• Take time to read all of the battery
manufacturer’s specic precautions,
such as removing or not removing vent
caps while charging, and recommended
rates of charge.
• Be sure that the area around the bat-
tery is well ventilated while it is being
charged. Gas can be forcefully blown
away by using a piece of cardboard or
other nonmetallic material as a fan.
• If it is necessary to remove the battery
from the vehicle to charge it, always
remove the grounded terminal from the
battery rst. Turn off all vehicle acces-
sories to avoid sparks from occurring.
• NOTE: A marine (boat) battery installed
in a boat must be removed and charged
on shore.
USING AN EXTENSION CORD
The use of an extension cord is not rec-
ommended. If you must use an extension
cord, please make sure that you follow
these guidelines:
• Make sure that the pins on charger's
power cord t rmly into the extension
cord, and that the extension cord ts
rmly into the receptacle.
• Check that the extension cord is properly
wired and in good electrical condition.
• Make sure that the wire size is large
enough for its length and for the AC
ampere rating, as specied in the chart
below.
MINIMUM RECOMMENDED EXTENSION CORD
Length of Cord, in Feet 25 50 100 150
AWG* Size of Cord 18 16 12 10
*AWG=American Wire Gauge
OPERATING INSTRUCTIONS
NOTE: A marine (boat) boat battery must be removed and charged on shore. To charge
it on board requires equipment specially designed for marine use.
IMPORTANT: Follow all safety instructions and precautions when charging your battery.
Wear complete eye protection and clothing protection. Charge your battery in a well-
ventilated area.
CHARGING BATTERY IN THE
VEHICLE:
1. Avoid personal injury by keeping clear
of fan blades, belts, pulleys and other
engine parts.
2. Avoid damaging the charger by keep-
ing the power cord and output cords
away from the hood, door or moving
engine parts.
3. Note the polarity of the battery posts
by checking the identication marks
on the battery: POSITIVE (POS, P or
+) and NEGATIVE (NEG, N or -). The
positive post is usually larger than the
negative post.
4. Identify which battery post is grounded
or connected to the chassis. THIS IS
NORMALLY THE NEGATIVE POST.
6
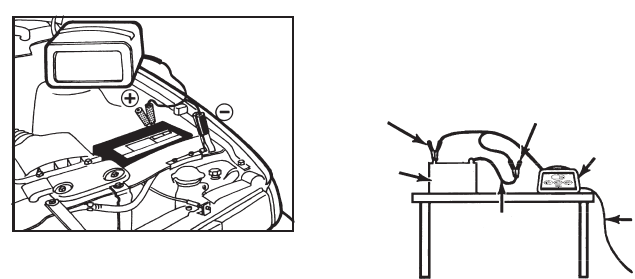
NEGATIVE GROUNDED SYSTEM
5. Connecting to a negative-grounded
system: Connect the red (POSITIVE)
output clamp to the POSITIVE post of
the battery. Rock and twist the clamp
back and forth to be sure a solid
electrical connection is made. Then
connect the black (NEGATIVE) output
clamp to a heavy, unpainted metal
part of the chassis or engine block,
away from the battery (see gure).
DO NOT connect clamp to negative
battery post, carburetor, fuel line or
sheet metal part.
Connecting to a positive-grounded
system: Connect the black (NEGA-
TIVE) output clamp to the NEGATIVE
post of the battery. Rock and twist
the clamp back and forth to be sure
a solid electrical connection is made.
Then connect the red (POSITIVE)
output clamp to a heavy, unpainted
metal part of the chassis or engine
block, away from the battery. DO NOT
connect clamp to positive battery
post, carburetor, fuel line or sheet
metal part.
6. Plug power cord into a 120V AC
wall outlet. The charger will be set to
the default state of 12V REGULAR
battery type, no charge rate (tes-
ter mode). The CONNECTED LED
should be lit. If the CONNECTED LED
is not lit, check for correct cable con-
nections.
7. Press the appropriate control buttons
to select the desired charge rate and
battery type. Within a few seconds, the
CHARGING (yellow) LED should light
and the charging process should start.
8. To disconnect the charger, unplug
its power cord before attempting to
disconnect the output clamps. Then,
standing away from the battery, re-
move the output clamp from the chas-
sis or engine block. Finally, remove
the output clamp from the battery
post.
9. Clean and store the charger in a dry
location.
DIGITAL DISPLAY
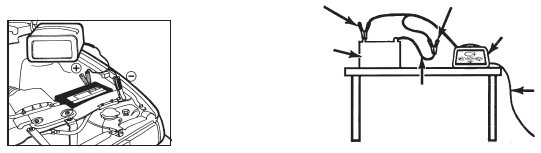
CHARGING BATTERY REMOVED
FROM THE VEHICLE:
NEGATIVE
BATTERY
CHARGER
BATTERY
24", 6 GAUGE CABLE
POWER
CORD
TO
GROUNDED
POWER
OUTLET
POSITIVE
1. Note the polarity of the battery posts by
checking the identication marks on the
battery: POSITIVE (POS, P or +) and
NEGATIVE (NEG, N or -). The positive
post is usually larger than the negative
post.
2. Attach at least a 24-inch-long, 6-gauge
(AWG), insulated battery cable to
NEGATIVE (NEG, N or -) battery post.
Rock and twist the clamp back and forth
to be sure a solid electrical connection
is made.
3. Connect the red (POSITIVE) output
clamp to the POSITIVE battery post.
Rock and twist the clamp back and forth
to be sure a solid electrical connection
is made.
4. Position yourself as far away from the
battery as possible, and then connect
the black (NEGATIVE) output clamp to
the free end of the cable.
5. Plug the power cord into a 120V AC
wall outlet. The charger will be set to the
default state of 12V REGULAR battery
type, no charge rate (tester mode). The
CONNECTED LED should be lit. If the
7
CONNECTED LED is not lit, check for
correct cable connections.
6. Press the appropriate control buttons
to select the desired charge rate and
battery type.
7. To disconnect the charger, unplug its
power cord before attempting to discon-
nect the charger clamps. Then, standing
away from the battery, remove the out-
put clamp from the NEGATIVE battery
post. Finally, remove the output clamp
from the POSITIVE battery post.
8. Clean and store the charger in a dry
location.
USING ENGINE START
Your battery charger can be used to jump
start your car if the battery is low. Fol-
low these instructions on how to use the
ENGINE START feature.
IMPORTANT: Follow all safety instructions
and precautions when charging your bat-
tery. Wear complete eye protection and
clothing protection. Charge your battery
in a well-ventilated area.
IMPORTANT: Using the ENGINE START
feature WITHOUT a battery installed in
the vehicle could cause damage to the
vehicle’s electrical system.
1. For battery connections, see page 5
and follow instructions 1 – 6 of CHARG-
ING BATTERY IN THE VEHICLE. With
the charger plugged in and connected
to the battery of the vehicle, press
the CHARGE START button until the
ENGINE START LED is lit. Only the
ENGINE START, CHARGING, CON-
NECTED, and VOLTAGE LEDs should
be lit.
2. Crank the engine for no more than 5
seconds. If engine does not start, wait
3 minutes before cranking again.
3. After the engine starts, unplug the power
cord before disconnecting the output
clamps from the battery.
4. Clean and store the charger in a dry
location.
NOTE: During the starting sequence listed
above, the charger is set to one of three
states.
1. Wait for cranking - The charger waits
until the engine is actually being cranked
before delivering 80 amps for engine
start. The charger delivers charge at a
rate of up to 10 amps while waiting and
will reset if the engine is not cranked
within 15 minutes. (If the charger resets,
it sets itself for a SMALL BATTERY
charge and REGULAR battery type.)
While waiting for cranking, the digital
display shows the battery voltage (it
can’t be set to percent).
2. Cranking - When cranking is detected,
the charger will automatically deliver up
to its maximum output (at least 80A)
as required by the starting system for
up to 5 seconds or until the engine
cranking stops. The digital display
shows a countdown of the remaining
crank time in seconds. It starts at 5 and
counts down to 0.
3. Cool Down - After cranking, the char-
ger enters a mandatory 3-minute (180
second) cool down state. During this
period, no settings can be changed. The
buttons are ignored. The digital display
indicates the remaining cool down time
in seconds. It starts at 180 and counts
down to 0. The ENGINE START LED
blinks once every second. During the
cool down period, no current is deliv-
ered to the battery. After 3 minutes, the
ENGINE START LED will stop blinking
and will light continuously, indicating that
another crank cycle can be started. The
digital display will change from display-
ing the countdown back to displaying
the battery voltage. The CHARGING
LED will then be lit.
ENGINE STARTING NOTES:
• If the battery is disconnected during
the cool down period, the charger will
reset.

8
OVERVIEW
Using this battery charger is very simple.
First, connect the battery and AC power
following the precautions listed under
“OPERATING INSTRUCTIONS”. Then se-
lect the appropriate BATTERY TYPE and
charge rate for your battery. The charger
will then do everything automatically. This
section explains a few details.
CHARGING: If the charger does not
detect a properly connected battery, the
CONNECTED (yellow) LED will not light.
Charging will not begin while the CON-
NECTED LED is on. When charging be-
gins, the CHARGING LED will be lit.
AUTOMATIC SHUT OFF: When the
SMALL BATTERY or REGULAR BAT-
TERY charge is selected, the charger
is set to perform an automatic charge.
When an automatic charge is performed,
the charger stops charging automatically
after the battery is charged.
ABORTED CHARGE: If charging can’t
be completed normally, charging will be
aborted. When charging is aborted, the
charger’s output is shut off and the digital
display blinks on and off. In that state, the
charger ignores all buttons. To reset from
after an aborted charge, either disconnect
the battery or unplug the charger.
DESULFATION MODE: If a battery is
left discharged for an extended period,
it could become sulfated and not accept
a normal charge. If the charger detects a
sulfated battery, the charger will switch to
a special mode of operation designed for
such batteries. Activation of the special
desulfation mode is indicated by blinking
the CHARGING LED. If successful, nor-
mal charging will resume after the battery
is desulfated. The CHARGING LED will
then stop blinking and light continuously.
Desulfation could take up to 10 hours. If
desulfation fails, charging will be aborted
and the digital display will blink.
C O M PL E T I O N O F C H A R G I N G :
Charge completion is indicated by
the CHARGED (green) LED; when
lit, the charger has stopped charging
and switched to the Maintain Mode of
operation, if the 12V DEEP CYCLE bat-
tery type was selected. For other battery
types the CHARGED LED comes on
when the battery is charged enough for
normal use.
MAINTAIN MODE: When the CHARGED
(green) LED is lit, the charger has started
Maintain Mode. This mode of operation is
also known as Float-Mode Monitoring. In
this mode, the charger keeps the battery
fully charged by delivering a small amount
of current, when necessary. The voltage
is maintained at a level determined by the
BATTERY TYPE selected.
NOTE: For charge types other than 12V
DEEP CYCLE, the CHARGED LED might
be lit before Maintain Mode is started.
GENERAL CHARGING NOTES:
The charger is designed to control its
cooling fan for efcient operation. Con-
sequently, it is normal for the fan to start
and stop when maintaining a fully charged
battery. The fan does not run in Tester
Mode.
If the charge mode is changed after charg-
ing has started (by pressing the CHARGE
START or BATTERY TYPE button), the
charging process will be restarted.
The voltage displayed during charging
will usually be higher than the battery’s
resting voltage.
The voltage displayed during charging is
the battery voltage, not the RMS charg-
ing voltage.
USING YOUR BATTERY CHARGER
9
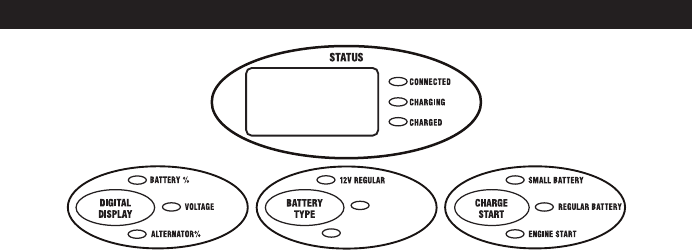
DIGITAL DISPLAY BUTTON
Use this button to set the function of the
digital display to one of the following.
• BATTERY %: The digital display shows
an estimate of the percent of charge of
the battery connected to the charger
battery clamps.
• VOLTAGE: The digital display shows the
voltage at the charger battery clamps in
DC volts.
• ALTERNATOR %: The digital display
shows an estimated percentage of the
output of the vehicle charging system
connected to the charger battery clamps
as compared to a properly functioning
system.
BATTERY TYPE BUTTON
Use this button to set the type of battery to
be charged to one of the following.
• 12V REGULAR: This is the type of
battery usually used in cars, trucks,
and motorcycles. These batteries have
vent caps and are often marked “low
maintenance” or “maintenance-free”.
• 12V DEEP CYCLE: Deep cycle batter-
ies are usually marked as “deep cycle”
or “marine”. Deep cycle batteries are
usually larger than the other types.
• 12V AGM/GEL: AGM and gel cell bat-
teries have sealed cases without vent
caps. Such batteries are often smaller
than the other types.
With the exception of AGM and gel cell
batteries, all other battery types may or
may not have vent caps. Vent caps are
located on top of the battery and provide a
means to add distilled water when needed.
Batteries should be marked with their type.
If charging a battery that is not marked,
check the manual of the item that uses the
battery. If the battery type is unknown, use
the 12V REGULAR setting. Make sure the
battery complies with the safety instructions
on page 3.
CHARGE START BUTTON
Use this button to set the maximum charge
rate to one of the following.
• SMALL BATTERY: Provides a charge
rate of up to 2A. Intended for charging
small batteries such as those commonly
used in garden tractors, snow mobiles
and motorcycles. The 2A rate is not
intended to be used as a trickle charger
for larger batteries.
• REGULAR BATTERY: Automatically
switches between 10 25 amps, or
provides 10 amps continuous depending
on the battery. Use for charging normal or
large batteries. Not intended for industrial
applications.
• ENGINE START: Provides 80 amps for
cranking an engine with a weak or run
down battery. Always use in combination
with a battery.
• OFF: Charger returns to tester mode
and the SMALL BATTERY, REGULAR
BATTERY, and ENGINE START LEDs
all stay OFF.
CHARGER CONTROLS
DIGITAL DISPLAY
2 AMP SMALL BATTERY
10 25 AMP REGULAR BATTERY
80 AMP ENGINE START
12 AGM
12V GEL
10
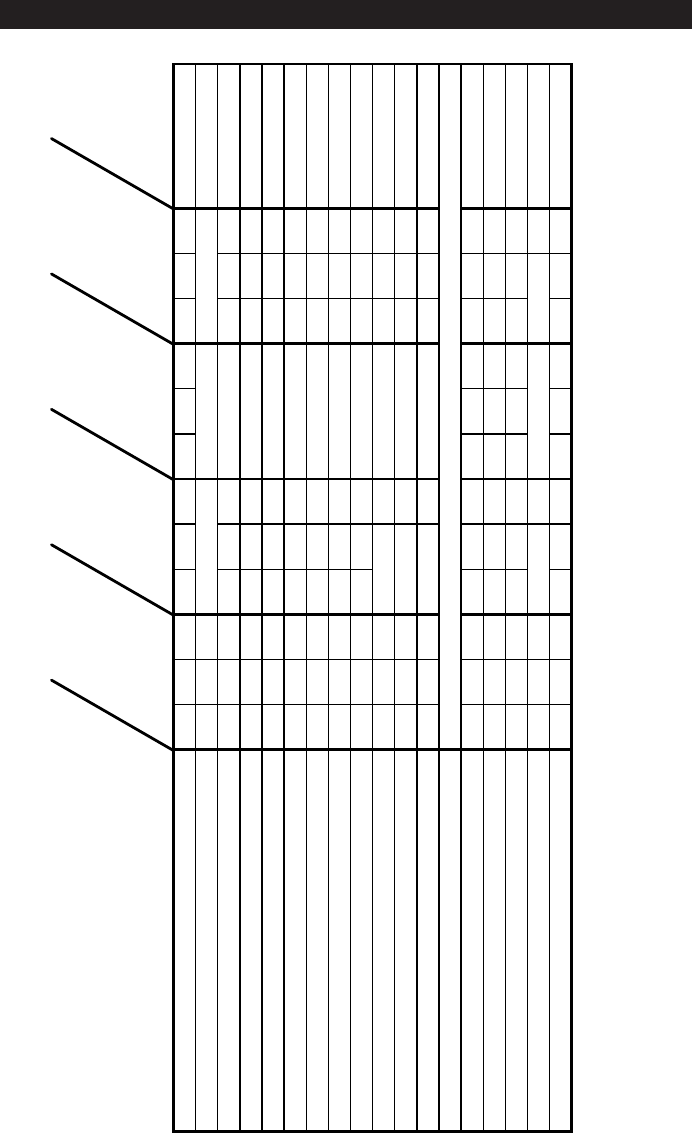
CONTROL PANEL GUIDE
SE-8010A CONTROL PANEL GUIDE
MODE OF OPERATION
Charged
Charging
Connected
Battery%
Voltage
Alternator%
12VRegular
12VDeep-Cycle
12VAGM,Gel
SmallBattery
RegularBattery
EngineStart
Digital
Display
Initial power-up, battery not detected O O 0.0
No battery or reversed battery detected 0(%) or 0.0(V)
Battery tester activated O 0~100
Battery tester with charged battery O O O 100
Battery tester with no battery O 0
Voltage meter activated O 0.0~17.0
Alternator tester activated O 0~199
Alternator tester on good alternator O O O 85~130
Alternator tester on bad alternator O O 0~84,131~199
Small Battery (2A) charge activated O O O xx(%) or xx.x(V)
Regular Battery (10AŻŹ25A) charge activated O O O xx(%) or xx.x(V)
Charge complete - Maintain Mode started O O 100(%) or xx.x(V)
Engine Start
Waiting for engine crank O O O O 1.0~16.0
Cranking engine O O O 5ĺ0
Cool down after cranking O B 180ĺ0
Desulfation mode activated B O 15(%) or 16(V)
Charge aborted O 8.8.8 (B)
Empty spaces indicate LEDs that are off.
O indicates an LED that is on continuously.
B indicates an LED that blinks on and off.
x indicates a digit 0 ~ 9.
User sel. User sel.
User selected
User selected
User selected
User selected
User selected
User selected User selectedUser selected
User selected
User selected
User selected
User selected
User sel.
User selected
User selected
User sel.
User sel.

11
USING THE BUILT-IN BATTERY TESTER
OVERVIEW
This battery charger has a built-in battery
tester that displays either an accurate bat-
tery voltage or an estimate of the battery’s
relative charge based on the battery volt-
age and the Battery Council International
scale.
TESTING SEQUENCE
There are four basic steps required to use
the SC-8010A as a battery tester.
1. Connect the charger battery clamps to
the battery. Be sure to follow all of the
precautions listed under “OPERATING
INSTRUCTIONS”.
2. Connect the charger power cord to a
120V AC wall outlet. Again, be sure to
follow all of the precautions listed under
“OPERATING INSTRUCTIONS”.
3. If necessary, press the BATTERY
TYPE button until the correct type is
indicated.
4. Read the voltage on the digital display
or press the DIGITAL DISPLAY button
to set the tester to BATTERY % and
read the battery percent.
TESTER AND CHARGER
When rst turned on, the SC-8010A oper-
ates only as a tester, not as a charger. To
continue to use it as only a tester, avoid
pressing the CHARGE START button. Se-
lecting a charge rate activates the battery
charger and deactivates the tester. Press-
ing the CHARGE START button when the
ENGINE START LED is lit (except during
the 180 second cool down) will shut off the
charger and activate the tester.
POWER-UP IDLE TIME LIMIT
If no button is pressed within 15 minutes
after the SC-8010A is rst powered up,
it will automatically switch from tester
to charger, if a battery is connected. In
that case, the charger will be set for the
SMALL BATTERY and 12V REGULAR
BATTERY type.
TESTER WITHOUT TIME LIMIT
If either the DIGITAL DISPLAY or BAT-
TERY TYPE button is pressed within the
first 15 minutes after the SC-8010A is
powered up, it will remain a tester (not a
charger) indenitely, unless a charge rate
is selected.
TESTING AFTER CHARGING
After the SC-8010A has been changed
from tester to charger (by selecting a
charge rate), it remains a charger. To
change the SC-8010A back to a tester,
press the CHARGE START button until the
SMALL BATTERY, REGULAR BATTERY,
and ENGINE START LEDs are all off.
TESTER STATUS LEDs
When the SC-8010A is operating as a bat-
tery tester, the status LEDs light under the
following conditions:
• The CHARGED (green) LED will light if
a charged battery is tested.
• The CHARGING (yellow) LED does not
light in the battery test mode.
• The CONNECTED LED lights when a
properly connected battery is detected.
• When the tester digital display is set to
VOLTAGE, the CHARGED and CHARG-
ING LEDs won't light (it could be testing
a battery or an alternator).
INITIAL PERCENT CALCULATION
When a battery % is calculated for the rst
time after connecting a battery, the digital
display will show three dashes (“---”) for a
period as long as several seconds while
the tester analyzes the battery.
NOTES FOR TESTING BATTERY %
A recently charged battery could have a
temporarily high voltage due to what is
known as “surface charge”. The voltage
of such a battery will gradually drop during
the period immediately after the charging
system is disengaged. Consequently, the
tester could display inconsistent values
for such a battery. For a more accurate
reading, the surface charge should be
removed by temporarily creating a load on
the battery, such as by turning on lights or
other accessories.
The battery % ranges from 0 to 100.
The battery tester is only designed to test
batteries. Testing a device with a rapidly
changing voltage could yield unexpected
or inaccurate results.

12
This battery charger has a built-in alterna-
tor tester that displays either an accurate
alternator voltage or an estimate of the
alternator’s relative output compared
to normal alternators. The Alternator %
values displayed should be taken as
general reference, not precise diagnosis.
The alternator tester functions the same
as the battery tester (see previous sec-
tion of this manual for details) with a few
differences.
TESTING SEQUENCE
There are three basic steps required to use
the SC-8010A as an alternator tester.
1. Connect the charger battery clamps to
the battery or charging system. Be sure
to follow all of the precautions listed under
“OPERATING INSTRUCTIONS”.
2. Connect the charger power cord to a 120V
AC 2-prong wall outlet. Again, be sure to
follow all of the precautions listed under
“OPERATING INSTRUCTIONS”.
3. Start the vehicle and turn on the vehicle’s
headlights. Read the voltage on the
digital display or press the DIGITAL
DISPLAY button to set the tester to AL-
TERNATOR % and read the alternator
percent.
USING THE BUILT-IN ALTERNATOR TESTER
TESTER STATUS LEDs
When the SC-8010A is operating as an
alternator tester, the status LEDs light
under the following conditions.
• The CHARGED (green) LED will light if
the output of the charging system is at
the normally desired level.
• The CHARGING (yellow) LED does not
light in the alternator test mode.
• The CONNECTED LED lights if the tester
detects a connection.
• When the tester digital display is set to
VOLTAGE, the CHARGED and CHARG-
ING LEDs won't light (it could be testing
a battery or an alternator).
ALTERNATOR TESTING NOTES
• The alternator percent display can range
from 0 to 199.
• The DIGITAL DISPLAY cannot be set to
ALTERNATOR % during charging.

13
BATTERY PERCENT AND CHARGE TIME
This charger adjusts the charging time in
order to charge the battery completely,
efciently and safely. The microproces-
sor automatically makes the necessary
decisions. However, this section includes
guidelines that can be used to estimate
charging times.
The duration of the charging process de-
pends on three factors:
1. Battery State – If a battery has only been
slightly discharged, it can be charged in
less than a few hours. The same battery
could take up to 10 hours if very weak.
The battery state can be estimated by
using the built-in tester (see page 11).
The lower the reading the longer charg-
ing will take.
2. Battery rating – A higher rated battery
will take longer to charge than a lower
rated battery under the same conditions.
A battery is rated in ampere-hours (AH),
reserve capacity (RC) and cold cranking
amps (CCA). The lower the rating the
quicker the battery will be charged.
3. Charge rate – The charge rate is mea-
sured in amps. This charger provides
charge rates of 2A, 10A, and 25A. The
80A rate is for engine start only. The
2A rate is for charging smaller batteries
such as those used for motorcycles and
garden tractors. Such batteries should
not be charged using the REGULAR
BATTERY setting. The 2A, 10A and 25A
rates are for charging larger batteries.
In the REGULAR BATTERY mode, the
charger begins at the 10A rate and in-
creases the charge rate if it is determined
that the battery can accept the 25A rate.
All charging modes will decrease the
charge rate as the battery approaches
maximum charge.
After the charging process has started, the
digital display can be used to determine
charging progress by selecting the BAT-
TERY % mode.
There are some important facts to keep in
mind when charging a battery.
• When the display indicates 77% charged,
the battery has been charged enough
to start most vehicles and has already
been charged as much as by many other
battery chargers.
• When the display indicates 85% charged,
the battery has already been charged at
least as much as by most other battery
chargers.
• The battery % shown in tester mode is
an estimate based on the battery voltage
and the Battery Council International
scale. The battery % shown in charger
mode is an estimate of the relative charge
in the battery compared to the charge it
should have if the charging process is
allowed to complete.
• The battery % shown in tester mode can
be used to estimate the relative charge
time. The lower the % shown, the longer
the charge time for a given battery.
• The battery % shown in charger mode
is an indication of the relative progress
of the charging process. The higher the
battery % displayed, the less charge time
remains.
• The more a battery is discharged, the
faster it absorbs charge from a charger.
That means that the battery % increases
faster at the beginning of the charging
process than at the end. In other words,
it takes longer for the battery to absorb
the last few percent of charge than the
rst several percent.

14
CHARGING TIPS
Read this entire manual before using your charger. The tips below serve only as a guide
for specic situations.
If your vehicle won’t start: You don’t
need to fully charge the battery to start
your vehicle. If the charger won’t start your
vehicle using the ENGINE START rate, try
charging the battery using the REGULAR
BATTERY setting for 10 or 15 minutes.
That should charge the battery enough to
allow the ENGINE START rate to start the
vehicle. If the vehicle will then be operated
continuously for an extended period (such
as a long drive), the vehicle could charge
the battery back to normal during that
period. If the vehicle will only be operated
for a short period (short drive), the battery
might need to be charged again before it
could start the vehicle again.
Reviving your battery: If you only wish
to charge your battery enough to operate
your vehicle, you don’t need to wait for the
entire charging process to be completed.
When the charger displays a battery %
of 77 or more (see page 13), the battery
has usually been charged enough for the
vehicle to start and operate normally.
Completing an interrupted charge: If
the charging process has been interrupted
and restarted after the charger displays a
battery % of 85 or more, the charger could
go straight to Maintain Mode (see page 8).
However, if the original charge was started
using the REGULAR BATTERY rate, the
charge can often be completed using the
SMALL BATTERY setting.
MAINTENANCE AND CARE
A minimal amount of care can keep your battery charger working properly for years.
1. Clean the clamps each time you are nished charging. Wipe off any battery uid that
may have come in contact with the clamps to prevent corrosion.
2. Coil the input and output cords neatly when storing the charger. This will help prevent
accidental damage to the cords and charger.
3. Occasional cleaning of the case of the charger with a soft cloth will keep the nish
shiny.

15
TROUBLESHOOTING
Performance problems often can be corrected by the user. Please read through this chart
for a possible solution to common problems.
PROBLEM POSSIBLE CAUSE SOLUTION
The battery is connected
and the charger is on,
but isn't charging.
The charger is in tester
mode, not charger mode.
Press the CHARGE
START button to activate
charging and select a
charge rate.
Indicator lights are lit in
an erratic manner not
explained in the “Using
Your Battery Charger”
section.
You might have acciden-
tally activated a special
diagnostic mode.
The charger may be
defective.
Make sure nothing is
touching the control
panel, then unplug the
charger and plug it in
again.
Return to place of pur-
chase for replacement.
The DIGITAL DISPLAY
always ashes before
the battery is completely
charged.
The incorrect BATTERY
TYPE may have been
selected.
This will happen if the
battery did not reach full
charge within 24 hours.
May be due to a very
large battery or a bank of
batteries requiring more
power than a 10A25A
amp charger can deliver
within 24 hours. The bat-
tery may also be faulty.
Reset the charger by
briey unplugging it or
briey disconnecting the
negative battery clip.
Select the desired rate
(SMALL or REGULAR
BATTERY) and BAT-
TERY TYPE again, if
necessary.
Engine crank time is less
than specied.
Starter motor may be
drawing more than 80
amps.
Charge the battery at the
REGULAR BATTERY
rate for 10 to 15 minutes
then crank the engine.
The green CHARGED
LED lights a few minutes
after connecting to the
battery.
The battery may be
fully charged or recently
charged, leaving the bat-
tery voltage high enough
to appear to be fully
charged.
The incorrect BATTERY
TYPE may have been
selected.
If the battery is in a ve-
hicle, turn the headlights
on for a few minutes
to reduce the battery
voltage and try charging
again.
Reset the charger by
briey unplugging it or
briey disconnecting the
negative battery clip.
Select the desired rate
(SMALL or REGULAR
BATTERY) and BAT-
TERY TYPE again, if
necessary.

16
WARRANTY
SCHUMACHER ELECTRIC CORPORATION,
801 BUSINESS CENTER DRIVE,
MOUNT PROSPECT, ILLINOIS 60056-2179
MAKES THIS LIMITED WARRANTY TO THE ORIGINAL PURCHASER AT RETAIL OF
THIS PRODUCT. THIS LIMITED WARRANTY IS NOT TRANSFERABLE.
Schumacher Electric Corporation warrants this battery charger for ve years from date
of purchase at retail against defective material or workmanship. If such should occur, the
unit will be repaired or replaced at the option of the manufacturer. It is the obligation of
the purchaser to forward the unit together with proof of purchase, transportation and/or
mailing charges prepaid to the manufacturer or its authorized representative.
This limited warranty is void if the product is misused, subjected to careless handling, or
repaired by anyone other than the manufacturer or its authorized representative.
The manufacturer makes no warranty other than this limited warranty and expressly
excludes any implied warranty including any warranty for consequential damages.
THIS IS THE ONLY EXPRESS LIMITED WARRANTY AND THE MANUFACTURER NEI-
THER ASSUMES NOR AUTHORIZES ANYONE TO ASSUME OR MAKE ANY OTHER
OBLIGATION TOWARDS THE PRODUCT OTHER THAN THIS EXPRESS LIMITED
WARRANTY. THE MANUFACTURER MAKES NO WARRANTY OF MERCHANTABIL-
ITY OR FITNESS FOR PURPOSE OF THIS PRODUCT AND EXPRESSLY EXCLUDES
SUCH FROM THIS LIMITED WARRANTY.
SOME STATES DO NOT ALLOW THE EXCLUSION OR LIMITATION OF INCIDENTAL
OR CONSEQUENTIAL DAMAGES OR LENGTH OF IMPLIED WARRANTY SO THE
ABOVE LIMITATIONS OR EXCLUSIONS MAY NOT APPLY TO YOU.
THIS WARRANTY GIVES YOU SPECIFIC LEGAL RIGHTS AND YOU MAY ALSO HAVE
OTHER RIGHTS THAT VARY FROM STATE TO STATE.
WARRANTY VALIDATION: The enclosed “Warranty Validation Card” must be completed
and mailed within 10 days of product purchase to activate this limited warranty.

Cargador de Baterías
Totalmente Automático
Controlado por Microprocesador con
Arranque de Motor más
Probador de Baterías y
Probador de Alternadores
PRECAUCIÓN:
Lea todas las Reglas de Seguridad e Instrucciones de Operación y
sígalas en cada uso de este producto.
00-99-000811/0607
MANUAL DEL DUEÑO
Schumacher Electric Corporation
Mount Prospect, IL 60056 U.S.A.
Modelo SC-8010A
Para Baterías 12 voltios
Envíe los productos para Reparación bajo Garantía a:
Customer Service Returns
P.O. Box 280,1025 E. Thompson, Hoopeston, IL 60942-0280
¿Preguntas? Llame a: Customer Service: 1-800-621-5485
2
80
12
30
CARGADOR DE BATERIAS
ELECTRÓNICO
CARGA
RÁPIDA a
amperios
CARGA
LENTA a
a m p e r i o s
ARRANQUE
DE MOTOR a
amperios

2
SÍRVASE GUARDAR ESTE MANUAL DEL DUEÑO Y LEERLO ANTES DE CADA
USO.
El Cargador de Baterías Totalmente Automático Controlado por Microprocesador con
Arranque de Motor más Probador de Baterías y de Alternadores Modelo SC-8010A
provee funciones para llenar las necesidades del hogar o del uso comercial liviano.
Este manual explica la manera de usar el cargador de baterías de modo seguro y ecaz
Sírvase leer y seguir con cuidado estas instrucciones y precauciones.
INSTRUCCIONES IMPORTANTES DE SEGURIDAD .............................................. 2
PRECAUCIONES DE SEGURIDAD PERSONAL ..................................................... 4
ANTES DE USAR SU CARGADOR DE BATERÍAS .................................................. 4
Cómo Enchufarlo .................................................................................................. 4
Cómo ensamblar su cargador .............................................................................. 4
El uso de un cordón de extensión......................................................................... 4
COMO PREPARAR SU BATERÍA PARA CARGARSE ............................................. 5
INSTRUCCIONES DE OPERACIÓN .......................................................................... 5
Para Cargar la Batería dentro del Vehículo .......................................................... 5
Para Cargar la Batería sacada del Vehículo ......................................................... 6
Cómo Usar el Arranque de Motor ......................................................................... 7
CÓMO USAR SU CARGADOR DE BATERÍAS ......................................................... 8
CONTROLES DEL CARGADOR ................................................................................ 9
GUÍA AL PANEL DE CONTROL .............................................................................. 10
EL USO DEL PROBADOR DE BATERÍAS INCORPORADO ..................................11
EL USO DEL PROBADOR DE ALTERNADORES INCORPORADO .................... 12
PORCENTAJE DE LA BATERÍA Y TIEMPO DE CARGAR ..................................... 13
PAUTAS PARA CARGAR ......................................................................................... 14
MANTENIMIENTO Y CUIDADO ............................................................................... 14
SOLUCIÓN DE PROBLEMAS .................................................................................. 15
GARANTÍA ................................................................................................................ 16
ÍNDICE
INSTRUCCIONES DE SEGURIDAD IMPORTANTES
ADVERTENCIA – RIESGO DE GASES EXPLOSIVOS
EL TRABAJAR PRÓXIMO A UNA BATERÍA DE PLOMO-ÁCIDO ES PELI-
GROSO. LAS BATERÍAS GENERAN GASES EXPLOSIVOS DURANTE SU
OPERACIÓN NORMAL POR ESTE MOTIVO, ES DE SUMA IMPORTANCIA
QUE CADA VEZ, ANTES DE USAR SU CARGADOR, USTED LEA ESTE
MANUAL Y SIGA LAS INSTRUCCIONES EXACTAMENTE.
Para reducir el riesgo de explosión de la batería, siga estas instrucciones y aquellas
publicadas por el fabricante de la batería así como por el fabricante de cualquier equipo
que usted piensa usar cerca de la batería. Revise las indicaciones de precaución en
estos productos y en el motor.

3
• ADVERTENCIA: El manejo del cordón
en este producto o de los cordones aso-
ciados con los accesorios vendidos con
este producto, puede exponerle a usted
al plomo, un producto químico conocido
en el Estado de California de causar
cáncer y defectos de nacimiento u otro
daño reproductivo. Lávese las manos
después de manejar los cordones.
• Lea todas las instrucciones y precaucio-
nes impresas en el cargador de baterías,
en la batería y en el vehículo o equipo
utilizando la batería.
• Use el cargador solamente en las bat-
erías recargables de plomo-ácido, tales
como aquellas usadas en automóviles,
camiones, tractores, aviones, furgon-
etas, RV’s, motores de marcha lenta,
etc. Este cargador no se destina para
proveer energía a un sistema eléctrico
de bajo voltaje que no sea aplicación de
motor de arranque.
• Nunca use el cargador para cargar
las baterías de pila seca comúnmente
usadas con los artefactos domésticos
tales como radios, estéreos, controles
remotos, etc. Dichas baterías pueden
reventarse y causar lesiones personales.
• No desarme el cargador. Llévelo a un
profesional de servicio calicado si se
requiere servicio o reparación. El mon-
taje incorrecto puede producir incendio
o choque eléctrico.
• Para reducir el riesgo de choque eléc-
trico, desenchufe el cargador del toma-
corriente antes de intentar cualquier
mantenimiento o limpieza.
• Siempre se debe cargar la batería en
un sitio bien ventilado.
• ADVERTENCIA: Los cargadores de
baterías se ponen calientes durante su
funcionamiento y requieren la debida
ventilación El aire necesita uir alred-
edor del cargador entero. No coloque el
cargador sobre materiales inamables
tales como alfombras, tapizado, papel,
cartón, etc. El cargador puede causar
daños al cuero, al plástico y al caucho.
GUARDE ESTAS INSTRUCCIONES
AYÚDENOS PARA PODERLE
AYUDAR — Acuérdese:
Coloque el cargador y la batería que se
está cargando a la mayor distancia entre sí
que permitan los cables del cargador.
NO exponga el cargador a lluvia o nieve.
El uso de otras conexiones o alteración del
producto, no recomendados o vendidos por
el fabricante de cargadores de baterías,
podría causar daños personales, un corto
circuito o riesgos de incendio.
Nunca cargue una batería congelada. Si el
uido de la batería (electrolito) se congela,
lleve la batería adentro de un sitio abrigado
y permita que la batería se descongele
antes de comenzar a cargarla.
Nunca deje que el ácido de la batería caiga
sobre el cargador mientras usted lee la
gravedad especíca o llena la batería.
Nunca coloque una batería encima del
cargador.
Nunca coloque el cargador directamente
encima de la batería que se está cargando.
Los gases de la batería causarán corrosión
y daño al cargador.
Nunca ponga juntas las pinzas de la bat-
ería cuando el cargador está encendido.
Se podría causar chispa.
Nunca opere el cargador de baterías si ha
recibido golpe fuerte, se ha dejado caer o
de otro modo ha sufrido daño. Llévelo a
un profesional calicado para inspección
y reparación.
Asegúrese de colocar el cordón de po-
tencia del cargador en forma tal que no
sea posible pisarlo, tropezarse con él o
causarle daño.
Nunca utilice el cordón para sacar el en-
chufe al desenchufar el cargador. El tirar
del cordón puede causar daños al cordón
o al enchufe.
No opere el cargador si tiene el cordón de
potencia o el enchufe dañado. Reemplace
el cordón.
Este manual contiene instrucciones de seguridad y operación importantes para el car-
gador de baterías modelo SC-8010A.

4
PRECAUCIONES DE SEGURIDAD PERSONAL
• Lleve puesta protección completa
para los ojos y la ropa al trabajar con
baterías de plomo-ácido.
• Asegúrese que alguien esté a distancia
de poder oír su voz, para venir en su
ayuda si hay necesidad mientras usted
trabaja con o está cerca de una batería
de plomo-ácido.
• Tenga bastante agua fresca y jabón
a mano para uso en caso de que ácido
de la batería haga contacto con los ojos,
la piel o la ropa. Si esto sucede, lávese
inmediatamente con agua y jabón. Luego
consiga atención médica.
• Evite tocar los ojos al trabajar con
una batería. Las partículas de ácido
(corrosión) pueden entrar en los ojos. Si
esto sucede, enjuague los ojos inmedi-
atamente con agua fría corriente durante
por lo menos 10 minutos. Luego consiga
atención médica inmediatamente.
• Quite todo artículo personal metálico
del cuerpo, tales como anillos, pulseras,
collares y relojes, al trabajar con una bat-
ería de plomo-ácido. Una batería puede
producir una corriente de cortocircuito
suciente para soldar un anillo (o algo
parecido) a metal, causando una severa
quemadura.
• Tenga cuidado de no dejar caer en la
batería ninguna herramienta metálica ni
otro objeto de metal. Esto puede producir
chispa o cortocircuito a través de la bat-
ería o de otro dispositivo eléctrico que a
su vez puede causar una explosión.
• Siempre opere el cargador de baterías
en un sector abierto y bien ventilado.
• Nunca fume ni permita que haya chispa o
llama cerca de la batería o del motor. Las
baterías generan gases explosivos.
• Neutralice minuciosamente cualquier
derrame de ácido con bicarbonato de
soda antes de tratar de hacer la limp-
ieza.
ANTES DE USAR SU CARGADOR DE BATERÍAS
Es importante entender los requisitos del cargador. Esta sección explica los requisitos
eléctricos del cargador y la manera de preparar una batería para cargarse.
CÓMO ENCHUFARLO
Su cargador requiere un receptáculo de
pared de 120V CA (corriente alterna, AC
por sus siglas en inglés) instalado de acu-
erdo con todos los códigos y ordenanzas
locales.
CÓMO ENSAMBLAR SU CARGADOR.
Incluidos con su cargadora de baterías hay
dos bitas de envoltura de cordón para al-
macenaje de los cables de abrazadera.
Para instalar, alinee las dos lengüetas para
corresponder con los dos receptáculos y
empuje hasta oír un chasquido.
Envuelva los cables de abrazadera
después de desenchufar el cordón de
potencia del tomacorriente de pared CA y
guarde su cargador en un sitio seco.
EL USO DE UN CORDÓN DE EXTEN-
SIÓN.
No se recomienda el uso de un cordón
de extensión. Si hay que usar cordón
de extensión, sírvase asegurar que siga
estas pautas:
• Asegúrese que las clavijas en el cordón
de potencia del cargador entren rme-
mente en el cordón de extensión, y que
el cordón de extensión entre rmemente
dentro del receptáculo.
• Verique que el cordón de extensión esté
correctamente cableado y en buenas
condiciones eléctricas.

5
• Asegúrese que el tamaño del alambre
es lo sucientemente grande para su
largo y para el amperaje CA, tal como
se especica a continuación:
CÓMO PREPARAR SU BATERÍA PARA CARGARSE
Es importante que usted lea y siga estas pautas al prepararse para cargar la batería.
• Asegúrese de tener una batería de
plomo-ácido de 12 voltios. Se determina
el voltaje de la batería reriéndose al
manual del dueño o a las marcaciones en
la batería. Cargue la batería inicialmente
a la tasa más baja del cargador.
• Limpie los terminales de la batería. Tenga
cuidado de evitar que la corrosión entre
en o cerca de los ojos.
• Lleve puestos anteojos de seguridad.
Véase las “Precauciones de Seguridad
Personal” adicionales en la página 4.
• Si se requiere para las baterías con tapas
de respiradero removibles, añada agua
destilada a cada célula hasta que el ácido
de la batería llegue al nivel recomendado
por el fabricante. Esto ayudará a purgar
los gases excesivos de las células. Tenga
cuidado de no sobrellenar las células. Si
usted tiene batería sellada sin tapas de
respiradero removibles, no se requiere
ninguna acción.
• Tome tiempo para leer todas las pre-
cauciones especícas del fabricante de
la batería, tales como si se debe o no
remover las tapas de los respiraderos
durante la carga y las tasas de carga
recomendadas.
• Asegúrese que el área alrededor de la
batería esté bien ventilada mientras la
batería se carga. Se puede expulsar el
gas fuertemente usando como abanico
un pedazo de cartón u otro material no
metálico.
• Si resulta necesario sacar la batería del
vehículo para poderla cargar, siempre
quite primero el terminal a tierra de la
batería. Apague todos los accesorios del
vehículo para evitar que haya chispas.
NOTA: Una batería marina (de bote) ya
instalada en un bote tiene que removerse
para cargarse en tierra. Para cargarla a
bordo, se requiere equipo especialmente
diseñado para uso marino.
CORDÓN DE EXTENSIÓN MÍNIMO QUE SE RECOMIENDA
Largo del cordón (píes) 25 50 100 150
Tamaño AWG del cordón 18 16 12 10
*AWG=American Wire Gauge
INSTRUCCIONES DE OPERACIÓN
IMPORTANTE: Siga todas las instrucciones y precauciones de seguridad al cargar la
batería. Lleve protección completa para los ojos y para la ropa. Cargue la batería en
un área bien ventilada.
PARA CARGAR LA BATERÍA DEN-
TRO DEL VEHÍCULO
1. Para evitar las lesiones personales,
manténgase alejado de las aspas del
ventilador, las correas, las poleas y otras
piezas del motor.
2. Para evitar daños al cargador, mantenga
los cordones de potencia y de salida
alejados de la capota, la puerta o las
piezas móviles del motor.
3. Note la polaridad de los postes de la
batería al vericar las marcaciones de
identicación en la batería: POSITIVO
(POS, P o +) y NEGATIVO (NEG, N
o -). El poste positivo generalmente es
más grande que el poste negativo.
4. Identique cuál poste de la batería está
puesto a tierra o conectado al chasis.
ESTE NORMALMENTE ES EL POSTE
NEGATIVO.
5. Cómo conectar a un sistema a tierra
negativo: Conecte la pinza roja (POSI-
TIVA) de salida al poste POSITIVO de la
batería. Mueva la pinza para delante y
atrás para asegurar una buena conexión
eléctrica. Luego conecte la pinza negra
6
(NEGATIVA) de salida a una parte de
metal gruesa y sin pintar del chasis o al
bloque del motor, alejada de la batería.
PARA CARGAR LA BATERÍASACADA
DEL VEHÍCULO:
POSITIVO NEGATIVO
BATERÍA
CARGADOR
DE BATERÍAS
CABLE DE
24”, CALIBRE 6
AL
TOMACORRIENTE
DE FUERZA
A TIERRA
CORDÓN DE
FUERZA
DIGITAL DISPLAY
1. Note la polaridad de los postes de la
batería al vericar las marcaciones de
identicación en la batería: POSITIVO
(POS, P o +) y NEGATIVO (NEG, N o
-). El poste positivo generalmente es
más grande que el poste negativo.
2. Asegure un cable de batería aislado
de por lo menos 24 pulgadas de largo
y calibre 6 (AWG) al poste NEGATIVO
(NEG, N o -) de la batería. Mueva la pinza
hacia adelante y atrás para asegurarse
de una buena conexión eléctrica.
3. Conecte la pinza roja (POSITIVA) de
salida al poste POSITIVO de la batería.
Mueva la pinza hacia adelante y atrás
para asegurarse de una buena conexión
eléctrica.
4. Posiciónese lo más lejos posible de la
batería, y luego conecte la pinza negra
(NEGATIVA) de salida al extremo libre
del cable.
5. Enchufe el cordón de potencia en un
tomacorriente de pared de 120V CA.
El cargador quedará puesto en el es-
tado de tasa de 12V y tipo de batería
REGULAR sin tasa de cargar (modo de
probar). EL LED “CONNECTED” (CO-
NECTADO) debe encenderse. Si no se
enciende, verique que las conexiones
de los cables sean correctas.
6. Oprima los botones de control apropia-
dos para seleccionar la tasa de carga
y el tipo de batería deseadas.
7. Para desconectar el cargador, desen-
chufe el cordón de potencia antes de
tratar de desconectar las pinzas del
cargador. Luego, parándose alejado
de la batería, quite la pinza de salida
del poste NEGATIVO de la batería.
Finalmente, quite la pinza de salida del
poste POSITIVO de la batería.
SISTEMA A TIERRA NEGATIVO
NO conecte la pinza al poste negativo
de la batería, ni al carburador, la línea
de combustible o ninguna plancha de
metal.
Cómo conectar a un sistema a tierra
positivo: Conecte la pinza negra (NEG-
ATIVA) de salida al poste NEGATIVO de
la batería. Mueva la pinza para delante y
atrás para asegurar una buena conexión
eléctrica. Luego conecte la pinza roja
(POSITIVA) de salida a una parte de
metal gruesa y sin pintar del chasis o al
bloque del motor, alejada de la batería
NO conecte la pinza al poste positivo
de la batería, ni al carburador, la línea
de combustible o ninguna plancha de
metal.
6. Enchufe el cordón de potencia en un
tomacorriente de pared de 120V CA. El
cargador quedará puesto en el estado de
tasa de 12V y tipo de batería REGULAR
sin tasa de cargar (modo de probar). EL
LED “CONNECTED” (CONECTADO)
debe encenderse. Si no se enciende,
verique que las conexiones de los
cables sean correctas.
7. Oprima los botones de control apropia-
dos para escoger la tasa de carga y tipo
de batería deseadas. Dentro de pocos
segundos, se debe encender el LED
“CHARGING” y el proceso de cargar
comenzar.
8. Para desconectar el cargador, desen-
chufe el cordón de potencia antes de
tratar de desconectar las pinzas de
salida. Luego, parándose alejado de
la batería, quite la pinza de salida del
chasis o bloque del motor. Finalmente,
quite la pinza de salida del poste de la
batería.
9. Limpie el cargador y guárdelo en un
sitio seco.
7
8. Limpie el cargador y guárdelo en un
sitio seco.
CÓMO USAR EL ARRANQUE DE MO-
TOR. (“ENGINE START”)
Su cargador de baterías puede usarse
para puesta en marcha rápida de su ve-
hículo si está baja la batería. Siga estas
instrucciones sobre la manera de usar la
función ENGINE START.
IMPORTANTE: Siga todas las instruc-
ciones y precauciones de seguridad al
estar cargando su batería. Use protección
completa para los ojos y protección para
la ropa. Cargue su batería en un sitio bien
ventilado.
IMPORTANTE: Si se trata de usar la
función ENGINE START SIN tener batería
instalada en el vehículo, hay posibilidad
de causar daño al sistema eléctrico del
vehículo.
1. Para conexiones de la batería, vea la
página 5 y siga las instrucciones 1 – 6
de PARA CARGAR LA BATERÍA DEN-
TRO DEL VEHÍCULO. Con el cargador
enchufado y conectado a la batería del
vehículo, oprima el botón “CHARGE
START” (COMIENZA CARGA) hasta
que se encienda el DEL “ENGINE
START”. Solo deben estar encendidos
los LED’s ENGINE START, CHARG-
ING, CONNECTED y VOLTAGE.
2. Arranque el motor por no más de 5
segundos. Si el motor no enciende,
espere 3 minutos antes de arrancar
otra vez.
3. Después de que el motor esté en mar-
cha, desenchufe el cordón de potencia
antes de desconectar las pinzas de
salida de la batería.
4. Limpie el cargador y guárdelo en un
sitio seco.
NOTA: Durante la secuencia de arranque
indicada arriba, el cargador está puesto en
uno de tres estados.
1. Espere el arranque – El cargador
espera hasta que se comience el ar-
ranque antes de entregar 80 amperios
para poner el motor en marcha. El car-
gador entrega a una tasa hasta por 10
amperios mientras espera y se repone
si no hay arranque de motor dentro de
15 minutos. (Si el cargador se repone,
queda puesto para carga de SMALL
BATTERY y tipo de batería REGULAR.)
Mientras espera el arranque, la pantalla
digital muestra el voltaje de la batería
(no se le puede poner en porcentaje).
2. Arranque – Al detectar arranque, el
cargador automáticamente entrega
hasta su salida máxima (por lo menos
80 amperios) tal como el sistema de
arranque requiere hasta por 5 segun-
dos o hasta que se pare el arranque
de motor. La pantalla digital muestra
el tiempo restante de arranque en se-
gundos. Comienza en 5 y cuenta para
abajo hasta 0.
3. Enfriamiento - Después del arranque,
el cargador entre en un estado ob-
ligatorio de enfriamiento de 3 minutos
(180 segundos). Durante ese período
no se puede cambiar ninguna de las
graduaciones. No se tome en cuenta
los botones. La pantalla digital indica
el tiempo de enfriamiento restante en
segundos. Comienza en 180 y cuenta
para abajo hasta 0. El LED “ENGINE
START” se enciende y se apaga una
vez cada segundo. Durante el período
de enfriamiento, no se entrega corriente
a la batería. Después de 3 minutos,
el LED “ENGINE START” se queda
encendido continuamente, indicando
que se puede comenzar otro ciclo de
arranque. La pantalla digital cambie
de mostrar tiempo restante y muestra
el voltaje de la batería. Entonces se
enciende el LED “CHARGING”.
NOTES SOBRE EL ARRANQUE DE
MOTOR
• Si se desconecta la batería durante el
período de enfriamiento, el cargador se
repone.

8
CÓMO USAR SU CARGADOR DE BATERÍAS
VISTA GENERAL
El modo de usar este cargador de bat-
erías es muy sencillo. Primero, conecte
la batería y la fuerza CA siguiendo las
precauciones detalladas bajo “INSTRUC-
CIONES DE OPERACIÓN”. Luego, je el
BATTERY TYPE y charge rate apropiados
para la batería. El cargador entonces hará
todo automáticamente. Esta sección ex-
plica unos cuantos detalles.
CARGAR: Si el cargador no detecta
una batería debidamente conectada, el
LED “CONNECTED” (amarillo) no se
enciende. El proceso de cargar no co-
mienza mientras está encendido el LED
“CONNECTED”. Al comenzar a cargar, se
enciende el LED “CHARGING”.
CIERRE AUTOMÁTICO: Cuando se
selecciona la carga “SMALL BATTERY”
(BATERÍA PEQUEÑA) o “REGULAR
BATTERY” (BATERÍA REGULAR), el car-
gador está puesto para hacer una carga
automática. Al hacer carga automática, el
cargador deja de cargar automáticamente
después de que la batería esté cargada.
CARGA ABORTADA: Si no se puede
completar el proceso de cargar en forma
normal, queda abortada. Al quedar la
carga abortada, la salida del cargador se
cierre, la pantalla digital se enciende y se
apaga. En ese estado, el cargador pasa
por alto a todos los botones. Para repon-
erlo después de una carga abortada, hay
que desconectar la batería o desenchufar
el cargador.
“DESULFATION MODE” (MODO DE
DESULFATAR):
Si una batería queda descargada por
mucho tiempo, puede sulfatarse y no
aceptar una carga normal. Si el cargador
detecta una batería sulfatada, el cargador
cambia en un modo especial de operación
diseñado para tales baterías. La acti-
vación del modo especial de desulfurar se
indica por el encender y apagar del LED
“CHARGING” (amarillo). Si hay éxito, el
proceso normal de cargar comenzará de
nuevo después de que la batería quede
desulfurada. El LED “CHARGING” en-
tonces dejará de encenderse y apagarse
y estará encendido continuamente. El
proceso de desulfurar puede llevar hasta
10 horas. Si no hay éxito, el proceso de
cargar se aborta y la pantalla digital se
enciende y se apaga.
TERMINACIÓN DE CARGAR: La termi-
nación de la carga se indica por el LED
“CHARGED” (verde); al encenderse, el
cargador ha dejado de cargar y ha cam-
biado a “Maintenance Mode” (Modo de
Mantenimiento) de operación, si se selec-
cionó el tipo de batería “DEEP CYCLE”
(CICLO PROFUNDO). Para otros tipos de
batería el LED “CHARGED” se enciende
cuando la batería se ha cargado lo suci-
ente para uso normal.
MODO DE MANTENIMIENTO: Si el
LED “CARGADA” (verde) se enciende, el
cargador ha iniciado el Maintain Mode.
Este modo de operación también se llama
“Float-Mode Monitoring” (Monitoreo a
Modo Flotante). En este modo, el carga-
dor mantiene la batería a plena carga al
entregar una pequeña cantidad de cor-
riente cuando sea necesario. El voltaje
se mantiene a un nivel determinado por
el BATTERY TYPE seleccionado.
NOTA: Para tipos de carga salvo el DEEP
CYCLE, EL LED “CHARGED” quizás se
encienda antes de comenzar Maintain
Mode.
NOTAS GENERALES RESPECTO AL
PROCESO DE CARGAR:
El cargador está diseñado en forma de
controlar su ventilador de enfriamiento
para operación ecaz. En consecuencia,
es normal que el ventilador se enciende
y se apaga al mantener una batería a
plena carga. El ventilador no funciona en
Tester Mode.
Si al modo de cargar se le hace cambiar
después de comenzar el proceso de car-
gar (oprimiendo el botón de “CHARGE
START” o “BATTERY TYPE” el proceso
de cargar comienza de nuevo.

9
CONTROLES DEL CARGADOR
PANTALLA DIGITAL
CONECTADO
CARGANDO
CARGADA
ESTADO
BATERÍA PEQUEÑA DE 2 AMP
BATERÍA REGULAR DE 10 25 AMP
ARRANQUE DE MOTOR A 80 AMP
% DE BATERÍA
PANTALLA
DIGITAL VOLTAJE
% ALTERNADORES
TIPO DE
BATERÍA
12V AGM
12V CÉLULA DE GAL
12V REGULAR
BATERÍA PEQUEÑA
BATERÍA REGULAR
COMIENZA DE
CARGA
ARRANQUE DE MOTOR
BOTÓN DE DISPLAY MODE (MODO
DE PANTALLA)
Use este botón para jar la función de la
pantalla digital en una de las tres funcio-
nes a continuación:
• “BATTERY %” (% DE BATERÍA): La
pantalla digital muestra un cálculo del
porcentaje de la carga de la batería
conectada a las pinzas de batería del
cargador.
• “VOLTAGE” (VOLTAJE ): La pantalla
digital muestra el voltaje en las pinzas
de batería del cargador en voltios CC
(corriente continua, “DC”).
• “ALTERNATOR %” (% DE ALTERNA-
DOR ): La pantalla digital muestra un
cálculo de la salida del sistema de cargar
del vehículo conectado a las pinzas de
batería del cargador, en comparación
con un sistema que funciona correcta-
mente.
"BATTERY TYPE BUTTON" (BOTÓN
DE TIPO DE BATERÍA)
Use este botón para jar el tipo de batería a
cargar a uno de los tipos a continuación.:
• 12V REGULAR: Este es el tipo de
batería normalmente usada en automó-
viles, comaniones y motocicletas. Estas
baterías tienen tapas de respiradero y
a menudo están marcadas “low main-
tenance” (mantenimiento bajo) o “main-
tenance-free” (sin maintenimiento).
• “12V DEEP CYCLE” (CICLO PRO-
FUNDO): Las baterías de ciclo profundo
normalmente vienen marcadas “deep
cycle” o “marine”. Las baterías de ci-
clo profundo generalmente son más
grandes que los otros tipos.
• “12V AGM, GEL CELL” (AGM, CÉLULA
DE GEL): Las baterías AGM y de célula
de gel tienen cajas selladas sin tapas
en los respiraderos. Tales baterías a
menudo son más pequeñas que los
otros tipos.
Con excepción de las baterías AGM y de
célula de gel, todos los demás tipos de
batería pueden tener o no tener las tapas
de respiradero. Las tapas de los respirade-
ros se encuentran encima de la batería y
proveen un medio de añadir agua destilada
cuando se necesita. Las baterías deben
llevar marcado su tipo. Si se desea cargar
una batería no marcada, vea el manual del
aparato en que se usa la batería. Si el tipo
de batería es desconocido, escoja 12V
REGULAR. Cerciórese de que la batería
cumpla con las instrucciones de seguridad
en la página 3.
“CHARGE START BUTTON” (BOTÓN
DE COMIENZO DE CARGA)
Use este botón para jar la tasa de carga
máxima en una de las siguientes tasas:
• “SMALL BATTERY” (BATERÍA
PEQUEÑA) Provee una tasa de carga
hasta 2A. Se destina para cargar baterías
pequeñas tales como las que común-
mente se usan en los tractores de jardín,
El voltaje que se muestra durante el
proceso de cargar y por lo general será
más alto que el voltaje de descanso de
la batería.
El voltaje que se muestra durante el pro-
ceso de cargar es el voltaje de cargar, no
el voltaje de cargar RMS.

10
nievemóviles y motocicletas. La tasa 2A
no se destina para usar como cargador
a goteo para baterías más grandes.
• “REGULAR BATTERY” (BATERÍA
REGULAR): Automáticamente cam-
bia entre 10 y 25 amperios, o provee
10 amperios continuos, dependiendo
del estado de la batería. Se usa para
cargar las baterías normales o grandes.
NO se destina para las aplicaciones
industriales.
• “ENGINE START” (ARRANQUE DE
MOTOR) Provee 80 amperios para ar-
rancar un motor con una batería débil o
desgastada. Siempre se debe usar en
combinación con una batería.
• “OFF”: El cargador vuelve al modo de
probar y los LED’s SMALL BATTERY,
REGULAR BATTERY y ENGINE START
se apagan.
GUIA AL PANEL DEL CONTROL
GUIA AL PANEL DEL CONTROL DEL SE-8010A
MODO DE OPERACIÓN
Cargada
Cargando
Conectada
%Batería
Voltage
%Alternador
12VRegular
12VCicloProfund
o
12VAGM,Gel
BateríaPequeña
BateríaRegular
Arranquedemoto
r
Pantalla
Digital
Encendido inicial, batería battery no detectada O O 0.0
No batería o batería invertida detectada 0% or 0.0V
Probador de batería activada O 0~100
Probador de batería con batería cargada O O O 100
Probador de batería sin batería O 0
Medidor de voltaje activado, batería detectada O O 0.0~17.0V
Probador de alternador activado O 0~199
Probador de alternador en alternador bueno
O O O 85~130
Probador de alternador en alternador malo
O O 0~84, 131~199
Carga de Batería Pequeña (2A) activada
O O O xx% or xx.xV
Carga de Batería Regular (10AŻŹ25A) activada
O O O xx% or xx.xV
Carga completa - Modo de Mantenimiento iniciado
O O 100% or xx.xV
Arranque de Motor
Esperando arranque de motor O O O O 1.0~16.0V
Arrancando motor O O O 5ĺ0
Enfriamiento después del arranque O B 180ĺ0
Modo de desulfurar activado B O 15% or 16V
Carga Abortada O 8.8.8. (B)
Espacios en blanco indican los LED'S que están apagados
O indica un LED encendido continuamente
B indica un LED que se enciende y se apaga
x indica un dígito entre 0 ~ 9
Escogido por usuario
Escogido por usuario
Escogido por Usuario
Esc. Usuario Esc. Usuario
Escogido por usuario
Escogido por usuario
Escogido por usuario
Escogido por usuario
Escogido por usuario
Escogido por usuario
Escogido por usuario
Esc. Usuario.
Esc. Usuario.
Esc. Usuario.
Escogido por usuario
Escogido por usuario
Escogido por usuario
Escogido por usuario

11
EL USO DEL PROBADOR DE BATERÍAS INCORPORADO
VISTA GENERAL
Este cargador de baterías tiene un proba-
dor de baterías incorporado que muestra
ya sea el voltaje correcto de la batería o
un cálculo de la carga relativa de la bat-
ería basado en el voltaje de la batería y
una escala jada por el "Battery Council
International" (Concejo Internacional de
Baterías).
SECUENCIA DE PROBAR
Hay cuatro pasos básicos requeridos para
usar el SC-8010A en forma de probador
de baterías.
1. Conecte las pinzas de batería del car-
gador a la batería. Asegúrese de seguir
todas las precauciones detalladas bajo
“INSTRUCCIONES DE OPERACIÓN”.
2. Conecte el cordón de potencia del
cargador a un tomacorriente de pared
de 120V CA. Nuevamente, asegúrese
de seguir todas las precauciones de-
talladas bajo “INSTRUCCIONES DE
OPERACIÓN”.
3. Al ser necesario, oprima el botón BAT-
TERY TYPE hasta que se indique el
tipo correcto.
4. Lea el voltaje en la pantalla digital u
oprima el botón DIGITAL DISPLAY para
poner el probador en BATTERY % lea
el porcentaje de la batería.
PROBADOR Y CARGADOR
Al primero encenderse, el SC-8010A
funciona únicamente como probador, no
como cargador. Para seguirlo usando
solo como probador, evite oprimir el botón
CHARGE START. La selección de una
tasa de carga activa el cargador de bat-
erías y desactiva el probador. Si se oprime
el botón CHARGE START mientras está
encendido el LED “ENGINE START”
(salvo durante el período de enfriamiento
de 180 segundos) el cargador se apaga
y se activa el probador.
LÍMITE DE TIEMPO INACTIVO AL
INICIO DE POTENCIA: Si no se oprima
ningún botón dentro de los 15 minutos
después de que se encienda inicialmente
el SC-8010A, automáticamente cambia
de probador en cargador, si hay una
batería conectada. En dicho caso, la
unidad queda jada para tasa de carga
SMALL BATTERY y tipo de batería 12V
REGULAR.
PROBADOR SIN LÍMITE DE TIEMPO
Si se oprime el botón de DIGITAL DIS-
PLAY o BATTERY TYPE dentro de los
primeros 15 minutos después de encender
el SC-8010A, esta seguirá actuando de
probador (no de cargador) indenidam-
ente, a no ser que se seleccione una tasa
de carga.
PARA PROBAR DESPUÉS DE CARGAR
Después de que el SC-8010A se ha cam-
biado de probador en cargador (al selec-
cionar una tasa de carga), sigue siendo
cargador. Para cambiar el SC-8010A
en probador, oprima el botón CHARGE
START hasta que se apaguen todos los
LED”s CHARGE START o CHARGE
RATE.
LOS LED DE ESTADO DEL PROBADOR
Cuando el SC-8010A está funcionando
en forma de probador de baterías, las
luces de estado LED se encienden bajo
las siguientes condiciones:
• El LED “CHARGED” (verde) se enciende
si se prueba una batería cargada.
• El LED “CHARGING” (amarillo) no se
enciende en el modo de probar batería.
• El LED “CONNECTED” se enciende
cuando se detecta una batería debida-
mente conectada.
• Al poner la pantalla digital del probador
en VOLTAGE, los LED”s CHARGED Y
CHARGING no se encienden (el proba-
dor podría estar probando una batería o
un alternador).
CÁLCULO INICIAL DE PORCENTAJE
Al calcular por primera vez el % de batería
después de conectarla, la pantalla digital
muestra tres guiones (“---“) por varios
segundos mientras el probador analiza
la batería.

12
EL USO DEL PROBADOR DE ALTERNADORES INCORPORADO
NOTAS PARA PROBAR EL % DE
BATERÍA
Una batería recién cargada pudiera tener
alto voltaje temporal debido a lo que se
llama “carga supercial”. El voltaje de
una batería tal se bajará gradualmente
durante el período inmediatamente
después de deslizar el sistema de carga.
En consecuencia, el probador pudiera
mostrar valores inconsistentes con tal
batería. Para una lectura más precisa, se
debe eliminar la carga supercial al crear
temporalmente una carga en la batería;
por ejemplo, encendiendo los faros u otros
accesorios.
El % de batería varía entre 0 y 100.
El probador de baterías se destina única-
mente para probar baterías. Si se trata de
probar un aparato con voltaje de cambio
rápido posiblemente produzca resultados
inesperados o incorrectos.
Este cargador de baterías tiene un
probador de alternadores incorporado
que muestra ya sea voltaje correcto del
alternador o un cálculo del porcentaje
de la salida relativa del alternador com-
parada con los alternadores normales.
Los valores de % del Alternador que se
muestran deben tomarse como referencia
general, no como diagnosis precisa. El
probador de alternadores funciona de
la misma manera que el probador de
baterías (vea la sección anterior de este
manual para más detalles), con unas
pocas diferencias.
SECUENCIA DE PROBAR
Hay tres pasos básicos requeridos para
usar el SC-8010A en forma de probador
de alternadores.
1. Conecte las pinzas de batería del carga-
dor de baterías a la batería o al sistema
de cargar. Asegúrese de seguir todas
las precauciones detalladas bajo “IN-
STRUCCIONES DE OPERACIÓN”.
2. Conecte el cordón de potencia del
cargador a un tomacorriente de pared
de 120V CA. Nuevamente, asegúrese
de seguir todas las precauciones de-
talladas bajo “INSTRUCCIONES DE
OPERACIÓN”.
3. Ponga el vehículo en marcha y encienda
los faros. Lea el voltaje en la pan-
talla digital u oprima el botón DIGITAL
DISPLAY para poner el probador en
“ALTERNATOR %” y lea el porcentaje
del alternador.
LOS LED DE ESTADO DE PROBADOR
Cuando el SC-8010A está funcionando
en forma de probador de alternadores, las
luces de estado LED se encienden bajo
las siguientes condiciones:
• El LED “CHARGED” (verde) se enciende
si la salida del sistema de cargar está al
nivel normalmente deseado.
• EL LED “CHARGING” (amarillo) no se
enciende en modo de probar alterna-
dor.
• EL LED “CONNECTED” se enciende si
el probador detecta una conexión.
• Cuando se ja el modo de pantalla
del probador en VOLTAGE, los LED’s
‘CHARGED” y “CHARGING” no se
encienden (podría estar probando una
batería o un alternador).
NOTAS SOBRE LA PRUEBA DE AL-
TERNADORES:
• El porcentaje del alternador que se
muestra puede variar entre 0 y 199.
• El modo de DISPLAY MODE no puede
ponerse en “ALTERNATOR %” durante
el proceso de cargar.

13
PORCENTAJE DE LA BATERÍA Y TIEMPO DE CARGAR
Este cargador regula el tiempo de cargar
para poder cargar la batería de modo com-
pleto, ecaz y seguro. El microprocesador
automáticamente hace las decisiones
necesarias. Sin embargo, esta sección
incluye pautas que se pueden usar para
calcular los tiempos de cargar.
La duración del proceso de cargar de-
pende en tres factores:
1. Estado de la Batería – Si una batería
ha sufrido sola una pequeña descarga,
puede cargarse en menos de unas pocas
horas. La misma batería podría necesi-
tar hasta 10 horas si está bien débil. El
estado de la batería puede calcularse
usando el probador incorporado (véase
la página 11). Entre más baja sea la
lectura, más tiempo requiere el proceso
de cargar.
2. Potencia de Régimen de la Batería
– Una batería con potencia más alta
llevará más tiempo para cargarse que
una batería de menor potencia bajo
las mismas condiciones. La potencia
de una batería se calcula en amperio-
horas (AH), capacidad de reserva (RC)
y amperios de arranque en frío (CCA).
Si la potencia es más baja, la cargada
de la batería será más rápida.
3. Tasa de Carga – La tasa de carga se
mide en amperios. Este cargador provee
tasas de carga de 2A, 10A y 25A. La tasa
de 80A es únicamente para arranque de
motor. La tasa 2A es para cargar baterías
más pequeñas como aquellas que se
usan para motocicletas y tractores de
jardín. Tales baterías no deben ser car-
gadas usando la tasa de 12V REGULAR
BATTERY. Las tasas de 10A y 25A son
para cargar baterías más grandes. En
el modo de 12V REGULAR BATTERY,
el cargador comienza a la tasa de 10A y
aumenta la tasa de carga si se determina
que la batería puede aceptar la tasa de
25A. Todos los modos de cargar harán
disminuir la tasa de carga a medida
que la batería se acerque a la carga
máxima. Después de haber comenzado
el proceso de cargar, la pantalla digital
puede usarse para vericar el proceso
de la carga al seleccionar el modo de
BATTERY %.
Hay algunos hechos que es importante
recordar al estar cargando una batería.
• Cuando la pantalla indica el 77% de
carga, la batería se ha cargado suciente
para poner en marcha la mayoría de
los vehículos y ya se ha cargado hasta
el mismo nivel que por muchos otros
cargadores de baterías.
• Cuando la pantalla indica el 85% de
carga, la batería ya se ha cargado por
lo menos hasta el mismo nivel que por
la mayoría de los demás cargadores de
batería.
• El % de batería que se muestra en el
modo de probar es un cálculo basado
en el voltaje de la batería y una escala
jada por el “Battery Council Interna-
tional”. El % de batería que se muestra
en el modo de cargar es un cálculo de la
carga relativa en la batería comparada
con la carga que debe tener si se permite
completar el proceso de cargar.
• El % de batería que se muestra en el
modo de probar puede usarse para cal-
cular el tiempo relativo de carga. Entre
más bajo el % mostrado, mayor será
el tiempo de cargar para una batería
especíca.
• El % de batería que se muestra en el
modo de cargar indica el progreso rela-
tivo del proceso de cargar. Entre más
alto el % de batería mostrada, menos
es el tiempo de carga que queda.
• Entre mayor la descarga de una bat-
ería, más rápido absorbe la carga de
un cargador. Esto signica que el % de
batería aumenta más rápido al principio
del proceso de cargar que al nal.En
otras palabras, se lleva más tiempo
para que la batería absorba los últimos
pocos porcentajes de carga que para
los primeros porcentajes.

14
PAUTAS PARA CARGAR
Lea este manual entero antes de usar el cargador. Las pautas a continuación sirven
únicamente de guía para situaciones especícas.
Si su vehículo no se pone en mar-
cha. No se necesita cargar la batería
totalmente para poner en marcha a su
vehículo. Si el cargador no puede poner
su vehículo en marcha usando la tasa
de ENGINE START, procure cargar la
batería usando REGULAR BATTERY por
unos 10 o 15 minutos. Eso debe cargar la
batería lo suciente para permitir que la
tasa ENGINE START ponga el vehículo
en marcha. Si el vehículo entonces se va
a operar por un buen tiempo (por ejemplo,
manejar largo), el vehículo quizás cargue
la batería hasta su estado normal durante
ese período. Si el vehículo se va a operar
solamente por poco tiempo (viaje corto),
la batería posiblemente necesite cargarse
otra vez antes de poder poner el vehículo
en marcha nuevamente.
Para restaurar la batería. Si se desea
cargar la batería sólo lo necesario para
operar su vehículo, no se necesita esperar
que se complete el ciclo entero de cargar.
Cuando el cargador muestra un % de
batería de 77 o más (vea la página 13) la
batería por lo general se ha cargado lo
suciente para que el vehículo se ponga
en marcha y opere en forma normal.
Para completar una carga interrum-
pida. Si el proceso de cargar se ha inter-
rumpido, y se ha reiniciado después de
que el cargador muestre un % de batería
de 85 o más, el cargador posiblemente
entre directamente en el “Maintain Mode”
(vea el comienzo de esta página 8). Sin
embargo, si se inició la carga original
usando la tasa de REGULAR BATTERY
la carga a menudo puede completarse
usando la tasa de SMALL BATTERY.
MANTENIMIENTO Y CUIDADO
Con un mínimo de cuidado, su cargador de baterías puede seguir funcionando bien
por años.
1. Limpie las pinzas cada vez que termine la carga. Para evitar corrosión, use un trapo para
quitar cualquier uido de la batería que se haya hecho contacto con las pinzas.
2. Enrolle los cordones de entrada y salida nítidamente para guardar el cargador. Esto
ayuda a evitar daños accidentales a los cordones y al cargador.
3. La limpieza de la caja del cargador de vez en cuando con un trapo suave mantiene
el lustre del acabado y ayude a evitar la corrosión.

15
PROBLEMA POSIBLE CAUSA SOLUCIÓN
La batería está conectada
y el cargador encendido,
pero este no carga.
El cargador está en modo
de probar, no en modo de
cargar.
Oprima el botón CHARGE
START para activar el pro-
ceso de cargar y selecci-
one una tasa de carga.
Las luces indicadoras es-
tán encendidas de una
manera errática no ex-
plicada en la sección “El
Uso de Su Cargador de
Baterías".
Quizás se haya activado
accidentalmente un modo
diagnóstico especial.
El cargador puede ser
defectuoso.
Asegúrese que no haya
nada tocando el panel de
control, luego desenchufe
la unidad y enchúfala de
nuevo.
Regréselo al lugar de com-
pra para reemplazo.
El DIGITAL DISPLAY siem-
pre se destella antes de
que la batería esté
a plena carga.
Puede haberse escogido
el BATTERY TYPE incor-
recto.
Esto sucede si la batería no
llegó a plena carga dentro
de 24 horas. Puede ser a
causa de una batería muy
grande o banco de baterías
que requiere más fuerza
de lo que un cargador de
10A25A amperios pu-
ede proveer en 24 horas.
La Batería también puede
ser defectuosa.
Para reponer el cargador,
desenchúfelo brevemente
y desconecte la pinza neg-
ativa de la batería. Escoja
la tasa de carga deseada
(SMALL o REGULAR BAT-
TERY) y BATTERY TYPE
de nuevo, al ser necesa-
rio.
El tiempo de arranque
del motor es menos que
aquello especicado.
El motor de arranque pu-
ede estar recibiendo más
de 80 Amperios.
Cargue la batería a la tasa
REGULAR BATTERY por
10 a 15 minutos, luego ar-
ranque el motor.
EL LED CHARGED (verde)
se enciende pocos minutos
después de conectar a la
batería.
La batería puede estar a
plena carga o recién car-
gada, dejando su voltaje
lo suficientemente alto
que parece estar a plena
carga.
Puede haberse escogido
el BATTERY TYPE incor-
recto.
Si la batería está en un ve-
hículo, encienda los faros
por unos pocos minutos
para reducir el voltaje de
la batería y trate de cargar
otra vez.
Para reponer el cargador,
desenchúfelo brevemente
y desconecte la pinza neg-
ativa de la batería. Escoja
la tasa de carga deseada
(SMALL o REGULAR BAT-
TERY) y BATTERY TYPE
de nuevo, al ser necesa-
rio.
A menudo el usuario mismo puede corregir los problemas de funcionamiento. Sírvase
leer este cuadro de principio a n para encontrar posibles soluciones a los problemas
comunes.
SOLUCIÓN DE PROBLEMAS

16
GARANTÍA
SCHUMACHER ELECTRIC CORPORATION,
801 BUSINESS CENTER DRIVE,
MOUNT PROSPECT, ILLINOIS 60056-2179
HACE ESTA GARANTÍA LIMITADA AL COMPRADOR ORIGINAL AL POR MENOR DE
ESTE PRODUCTO. ESTA GARANTÍA LIMITADA NO ES TRANSFERIBLE.
Schumacher Electric Corporation garantiza este cargador de baterías por cinco años,
contados a partir de la fecha de compra al por menor, contra defectos de material o
fabricación. Si tal cosa ocurre, la unidad será reparada o reemplazada, según opción
del fabricante. El comprador tiene la obligación de enviar la unidad, acompañada del
recibo original de venta, al fabricante o a su representante autorizado, con el costo del
transporte o de envío por correo ya pagado.
Esta garantía limitada no es válida si el producto ha sido usado incorrectamente,
sometido a manejo negligente, o reparado por cualquier persona o entidad que no sea
el fabricante o su representante autorizado.
El fabricante no hace ninguna otra garantía aparte de la presente garantía limitada, y
expresamente excluye cualquier garantía implícita, inclusive garantía por daños con-
secuentes.
LA PRESENTE GARANTÍA ES LA ÚNICA GARANTÍA EXPRESA Y LIMITADA Y EL
FABRICANTE NO ASUME NI AUTORIZA A NADIE A ASUMIR NI HACER NINGÚN
OTRO COMPROMISO CON RELACIÓN A ESTE PRODUCTO QUE NO SEA ESTA
GARANTÍA EXPRESA Y LIMITADA. EL FABRICANTE NO HACE NINGUNA GARANTÍA
DE CAPACIDAD DE COMERCIALIZACIÓN NI DE ADECUACIÓN A LA FINALIDAD
DE ESTE PRODUCTO Y EXPRESAMENTE LAS EXCLUYE DE ESTA GARANTÍA
LIMITADA.
ALGUNOS ESTADOS NO PERMITEN LA EXCLUSIÓN O LIMITACIÓN DE DAÑOS
INCIDENTALES O CONSECUENTES, O DEL PERÍODO DE LA GARANTÍA IMPLÍCITA,
DE MODO QUE LAS LIMITACIONES O EXCLUSIONES CITADAS ARRIBA PUEDEN
NO SER APLICABLES A USTED.
ESTA GARANTÍA LE CONCEDE A USTED DERECHOS LEGALES ESPECÍFICOS, Y
USTED QUIZÁS TENGA TAMBIÉN OTROS DERECHOS QUE VARÍAN DE ESTADO
EN ESTADO.
VALIDACIÓN DE LA GARANTÍA. La “Warranty Validation Card” (Tarjeta de Validación
de Garantía) adjunta tiene que completarse y ser enviada por correo dentro de los 10
días de la compra del producto para activar esta garantía limitada.
