Scientific Toys 4795-24B2 R/C Car User Manual OI 6126 99100F Mini Flip eng only ai
Scientific Toys Ltd R/C Car OI 6126 99100F Mini Flip eng only ai
User Manual
CAUTION: BUILT-IN BATTERY SAFETY
INFORMATION
1. The Mini Flip Buggy includes a non-replaceable
battery. Do not open, disassemble or alter the
Mini Flip Buggy in any way.
2. Adult supervision is required when charging the
Mini Flip Buggy.
3. Charge battery in an isolated area. Keep away
from flammable materials.
4. Do not expose to direct sunlight.
5. Do not recharge the toy if it is hot. Allow it to cool
before recharging.
6. Do not allow the batteries to get wet.
7. Carefully read the insturction guide and charge
the batteries correctly.
8. Rechargeable batteries are only to be charged
under adult supervision.
9. Routinely examine for damage to the plug,
enclosure and other parts. In the event of any
damage, the toy must not be used with a USB
port until the damage has been repaired.
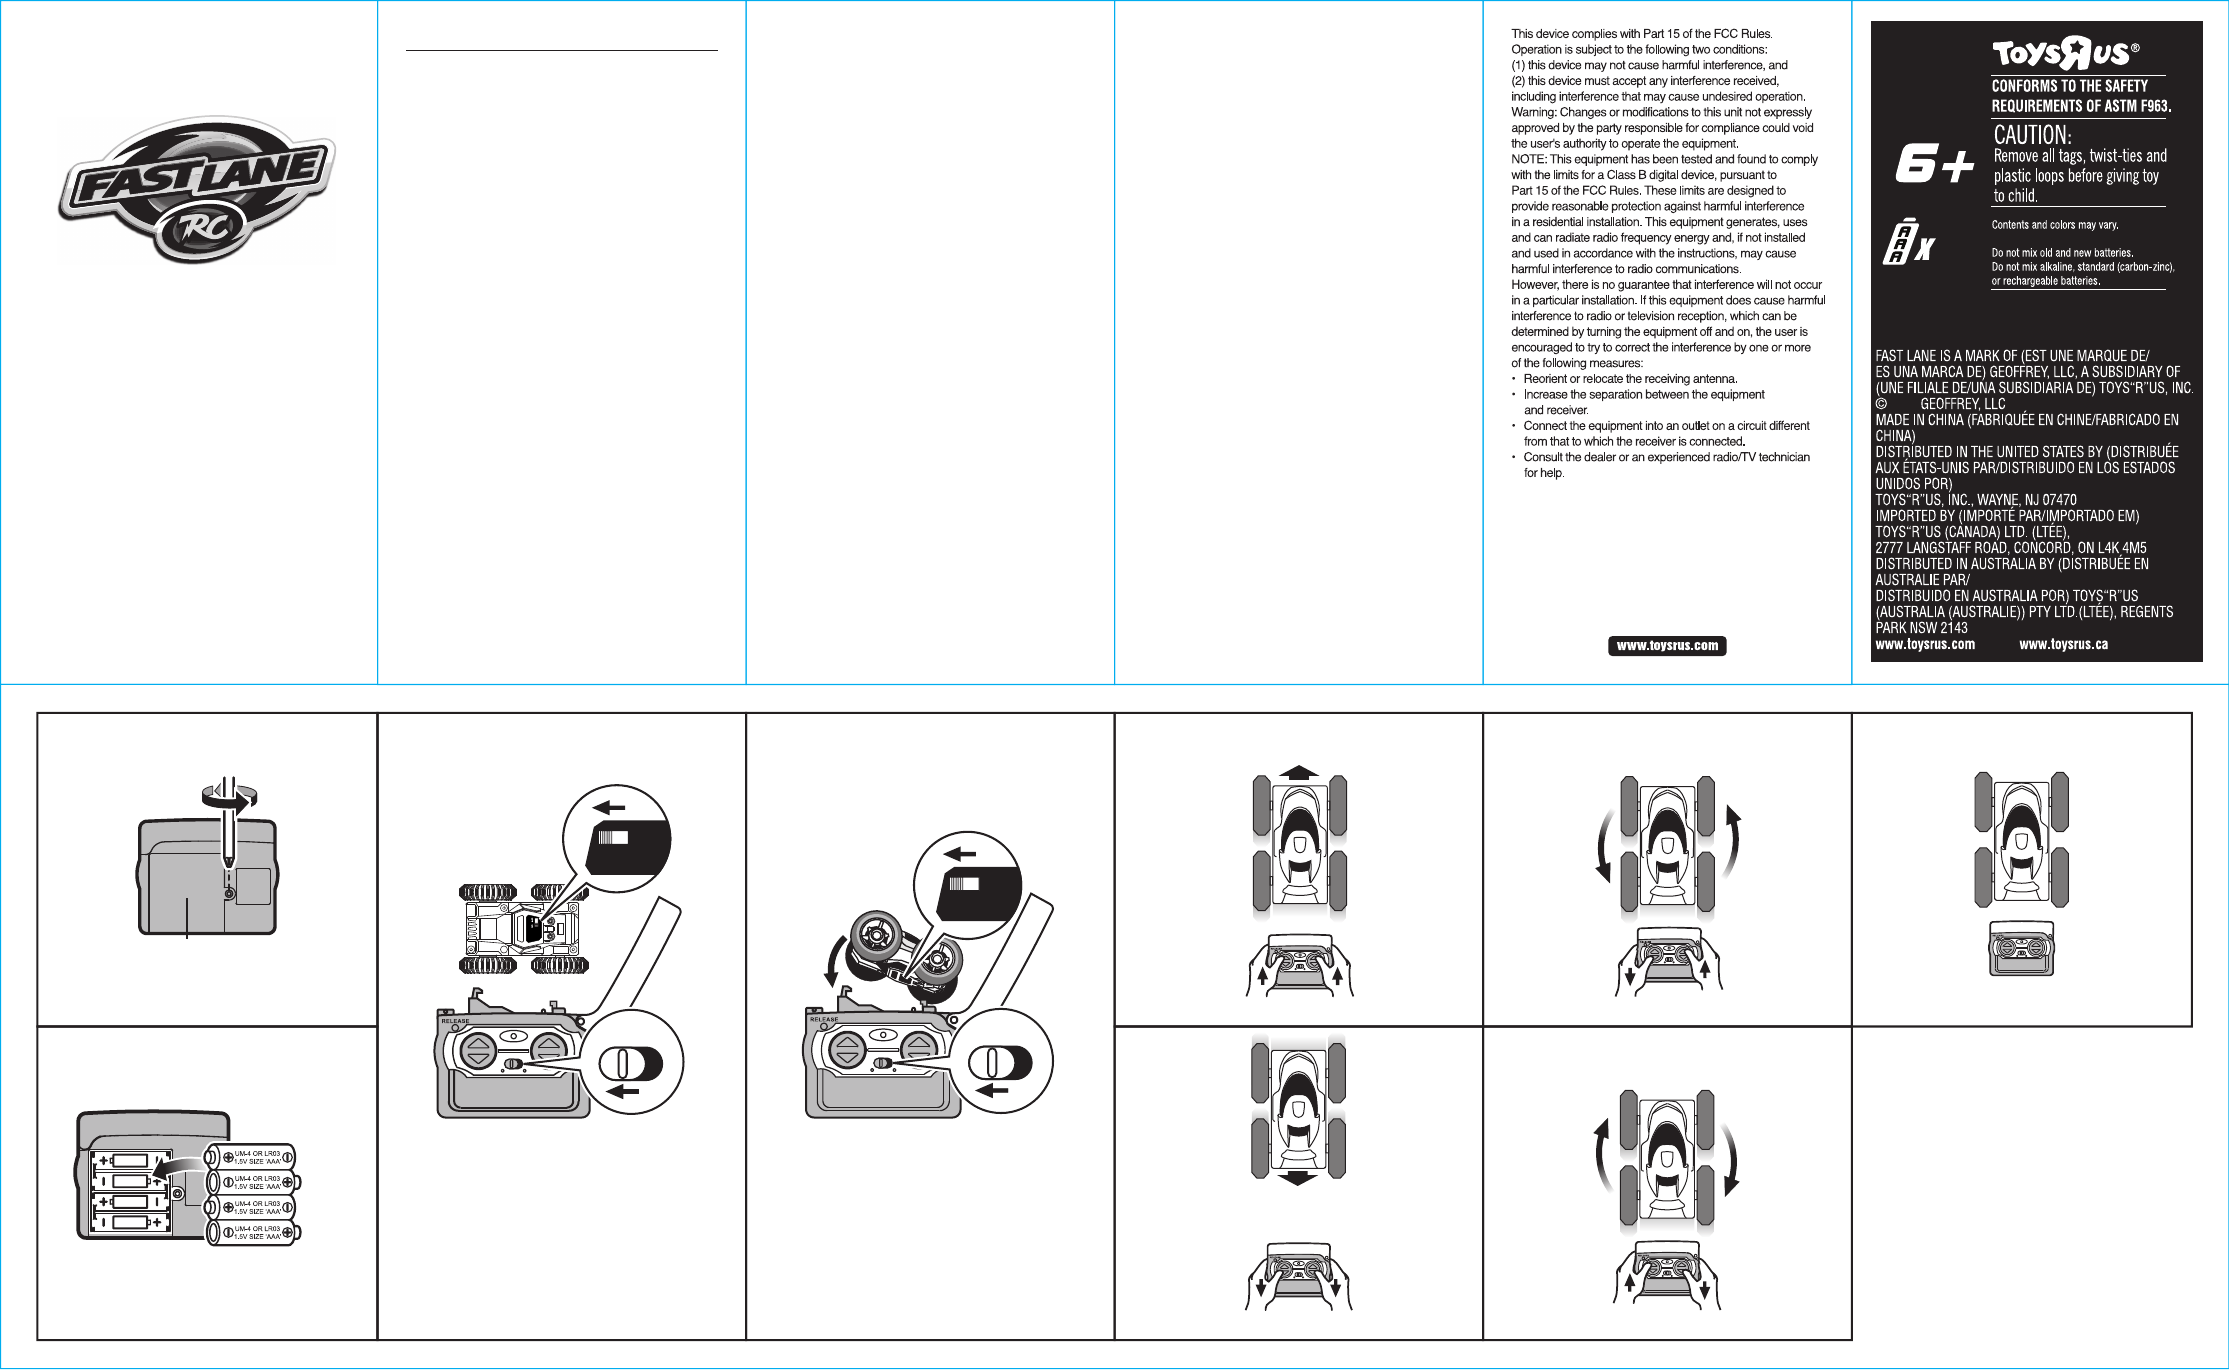
HOW TO PLAY
TO BEGIN
1. Turn “ON” the controller.
2. Turn “ON” the vehicle.
RUNNING FORWARD
1. Press both control buttons forward at the same
time for forward running. (See Diagram #5)
RUNNING REVERSE
1. Press both control buttons backward at the same
time for reverse running. (See Diagram #6)
TURNING
1. Press the right button forward while pressing the
left button backward at the same time to turn left.
(See Diagram #7)
2. Press the left button forward while pressing the
right button backward at the same time to turn right.
(See Diagram #8)
STOP OPERATION
To stop the vehicle, release both control buttons.
(See Diagram #9)
SIZE: 391 X 241mm PN#65-6126-000-0100
BACKWARD
FORWARD TURN LEFT
OPERATING INSTRUCTIONS:
MINI FLIP BUGGY
The Mini Flip Buggy is powered by a built-in non-
replaceable rechargeable battery. The included
rechargeable battery is not charged prior to shipment
and must be charged before the first use.
INSTALL BATTERIES IN THE CONTROLLER
1. Unscrew the battery compartment cover to open.
(See Diagram #1)
2. Insert four AAA/LR3 batteries by matching (+) and
(–) signs as indicated in the battery compartment.
(See Diagram #2)
3. Replace the battery compartment cover, and
screw it closed.
CHARGING THE MINI FLIP BUGGY
1. Make sure the Mini Flip Buggy’s ON/OFF switch
is in the OFF position.
2. Open the controller's top. Push the button to
CHARGE/ON. (See Diagram #3)
3. Align the car's metal contact point (on the bottom)
with the controller and snap the car in place.
(See Diagram #4)
4. The RED light will stay ON to show it is charging.
5. Once the light turns from RED to GREEN, the
Mini Flip Buggy is fully charged. It takes about
30 minutes.
6. Press the RELEASE button on the top of the left
hand corner of the controller to release your car
from the controller.
Caution: After charging the Mini Flip Buggy, take it
out from the controller. Overcharging could damage
the car and the controller.
PERFORMANCE TIPS FOR VEHICLE
• For maximum performance, drive vehicle on
smooth ground.
• Avoid driving on uneven surfaces- this could cause
damage to vehicle.
• Do not drive car on grass, sand or carpet.
• Do not drive car through water.
• Be sure to rest your vehicle for at least 30 minutes
after every 15 minutes of operation.
• Make sure ON/OFF switch on your vehicle is in the
“OFF” position when it is not in use.
• Do not bend the antenna.
• Electrical, CB interference, mobile phones, air
conditioning, elevators and steel girders in
buildings will affect the operation of your vehicle.
• Do not leave the vehicle or transmitter near sources
of heat or in direct sunlight for long periods of time.
• Remove the batteries from the vehicle and
transmitter when they are not in use.
O.I. NO. 6126 #AD15454
2017
ATTENTION PARENTS:
IT IS RECOMMENDED THAT THIS TOY AND
ALL ACCESSORIES BE PERIODICALLY
EXAMINED FOR POTENTIAL HAZARDS AND
THAT ANY POTENTIALLY HAZARDOUS
PARTS BE REPAIRED OR REPLACED.
MINI
FLIP BUGGY
DIAGRAM 1
DIAGRAM 2 DIAGRAM 3 DIAGRAM 4
DIAGRAM 5
DIAGRAM 6
DIAGRAM 7
TURN RIGHT
DIAGRAM 8
CHARGE / ON
/
OFF
CHARGE / ON
/
OFF
OFF ON
STOP
DIAGRAM 9
4 X AAA BATTERIES
BATTERY COVER
UNSCREW TO OPEN
4
NOT INCLUDED
OFF ON