Sears Ez3 917 387023 Users Manual
917387023 917387023 CRAFTSMAN ROTARY MOWER - Manuals and Guides L0904454 View the owners manual for your CRAFTSMAN ROTARY MOWER #917387023. Home:Lawn & Garden Parts:Craftsman Parts:Craftsman ROTARY MOWER Manual
CRAFTSMAN Walk Behind Lawnmower, Gas Manual L0904454 CRAFTSMAN Walk Behind Lawnmower, Gas Owner's Manual, CRAFTSMAN Walk Behind Lawnmower, Gas installation guides
917.387023 to the manual 56fa6f0d-0b0f-41b7-a563-91cf96eef461
2015-02-05
: Sears Sears-Ez3-917-387023-Users-Manual-399109 sears-ez3-917-387023-users-manual-399109 sears pdf
Open the PDF directly: View PDF ![]() .
.
Page Count: 36
Owner's Manual
®
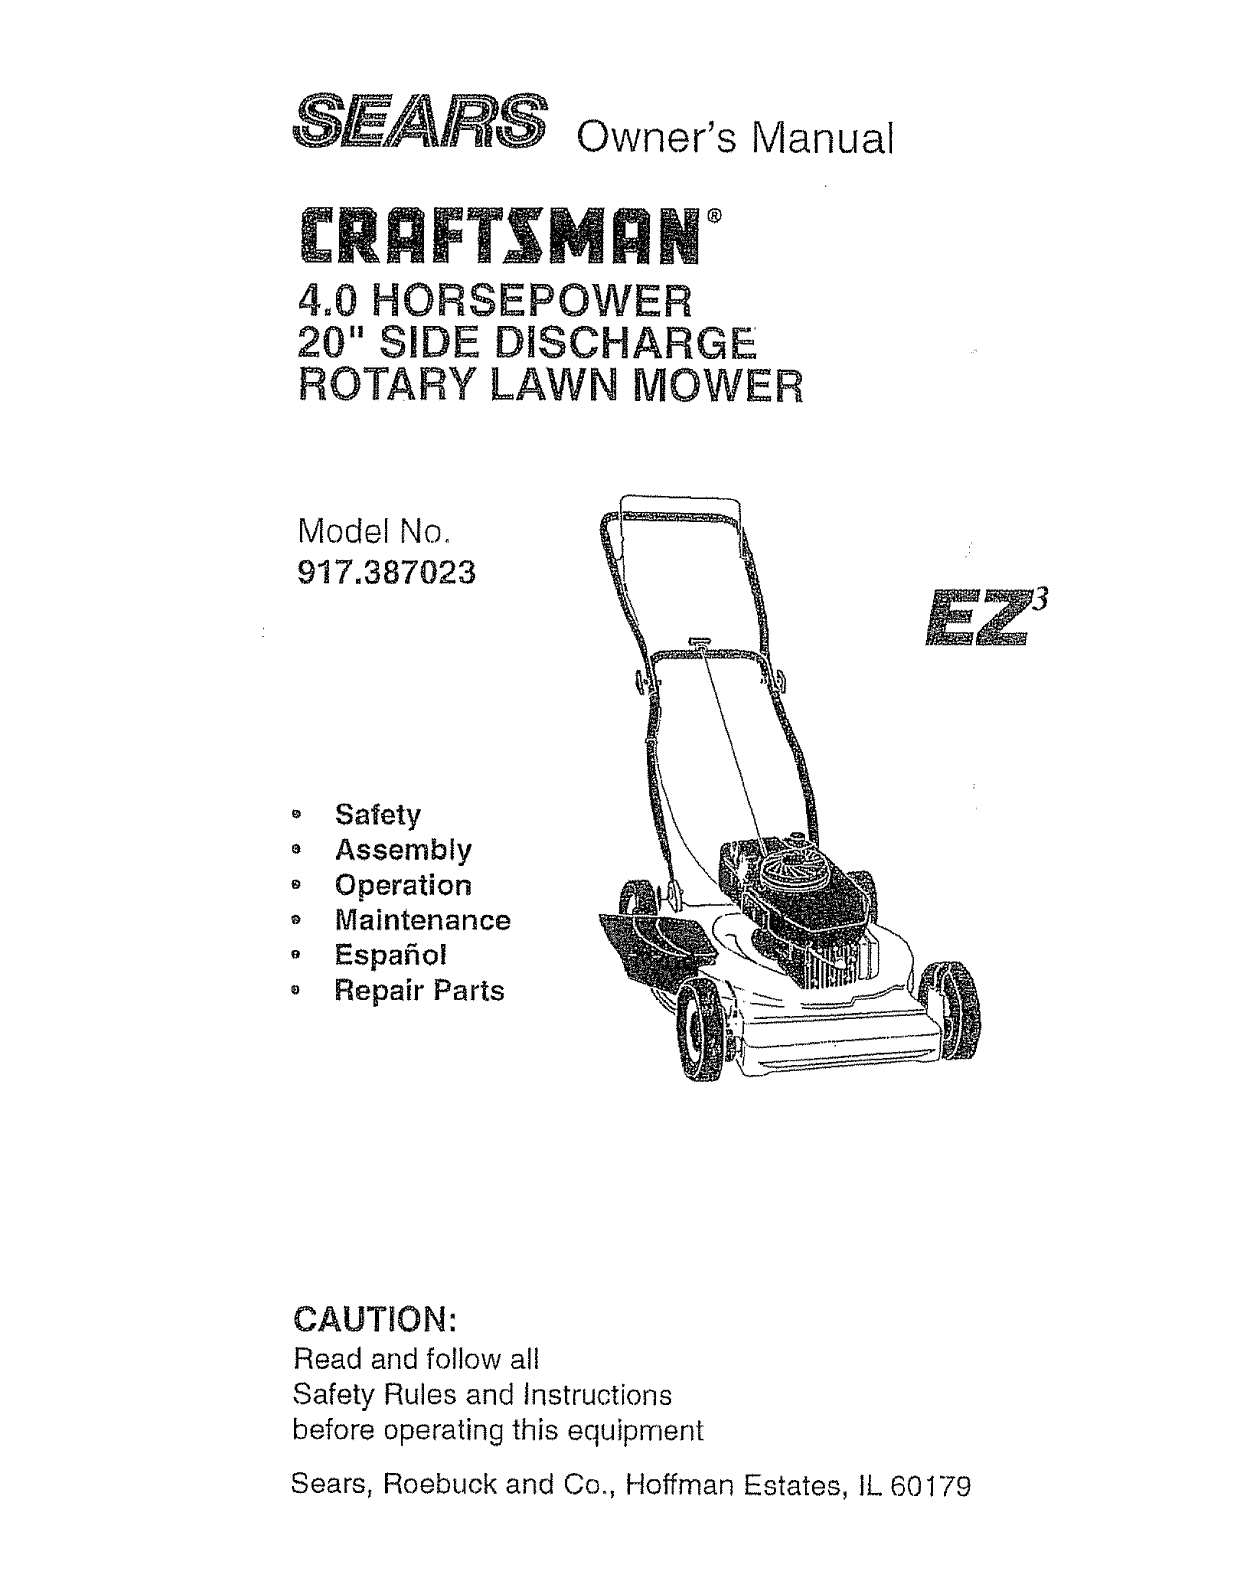
4.0 HORSEPOWER
20" SIDE DISCHARGE
ROTARY LAWN MOWER
Model No.
917.387023
Safety
e Assembly
• Operation
oMaintenance
o Espa5ol
Repair Parts
CAUTION'.
Read and follow all
Safety Rules and Instructions
before operating this equipment
Sears, Roebuck and Co,, Hoffman Estates, IL 60179
Warranty 2 Product Specifications 11
Safety Rules 2 Service and Adjustments t3
Assembly 4 Storage 14
Operation 6 Troubleshooting 15
Maintenance Schedule 10 Repair Parts 32
Maintenance 10 Parts Ordering Back Cover
LIMITED TWO YEAR WARRANTY ON CRAFTSMAN POWER MOWER
For two years from date of purchase, when this Craftsman Lawn Mower is maintained,
lubricated, and tuned up according to the operating and maintenance instructions in the
owner's manual, Sears will repair free of charge any defect in material or workmanship.
if this Craftsman Lawn Mower is used for commercial or rental purposes, this warranty
applies for only 90 days from the date of purchase.
This Warranty does not cover:
• Expendable items which become worn during normal use, such as rotary mower
blades, blade adapters, belts, air cleaners and spark plug.
oRepairs necessary because of operator abuse or negligence, including bent crank,
shafts and the failure to maintain the equipment according to the instructions con-
tained in the owner's manual.
Warranty service is available by returning the craftsman power mower to the nearest
sears service center/department in the united states. This warranty applies only while
this product is in use in the united states.
This Warranty gives you specific legal rights, and you may also have other rights which
vary from state to state,
SEARS, ROEBUCKAND CO,, D/817 WA, HOFFMAN ESTATES, ILLINOIS 60179
TRAINING:
o Read this operator's manual carefully,.
Become familiar with the controls and
know how to operate your mower
properly. Learn how to quickly stop
mower.
,, Do not allow children to use your mower.
Never aIlow adults to use mower without
proper instructions,
o Keep the area of operation clear of all
persons, especially small children and
pets,
o Use mower only as the manufacturer
intended and as described in this manual.
o Do not operate mower if it _has been
dropped or damaged in any manner..
Always have damage repaired before
using your mower,
° Do not use accessory attachments that
are not recommended by the manufac-
turer. Use of such attachments may be
hazardous.
o The blade turns when the engine is
running.
PREPARATION:
o Always thoroughJy check the area to be
mowed and clear it of a]! stones, sticks,
wires, bones, and other foreign objects.
These objects wilt be thrown by the blade
and can cause severe injury.
• Always wear safety glasses or eye
shields when starting and while using
your mower.
• Dress properly. Do not operate mower
when barefoot or wearing open sandals,
Wear only solid shoes with good traction
when mowing.
, Check fuel tank before starting engine..
Do not fil! gas tank indoors, when the
engine is running or when tile engine is
hot..Allowtheenginetocootfor several
minutesbeforefillingthegastank. Clean
offanyspilledgasolinebeforestartingthe
engine..
Alwaysmakewheelheightadjustments
beforestartingyourmower.Never
attemptto dothiswhilethe engineis
running.
Mowonlyindaylightor goodartificial
light.
OPERATION:
o Keep your eyes and mind on your mower
and the area being cut. Do not let other
interests distract you°
o Do not mow wet or slippery grass. Never
run while operating your mower. A!ways
be sure of your footing -- keep a firm
hold on the handles and walk.
o Do not put hands or feet near or under
rotating parts. Keep clear of the discharge
opening at all times,
o Always stop the engine whenever you
leave or are not using your mower, or
before crossing driveways, walk,s, roads,
and anjj gravel--covered areas.
- Never direct discharge of material toward
bystanders nor allow anyone near the
mower while you are operating it.
o Before cleaning, inspecting, or repairing
your mower, stop the engine and make
abso!utely Sure the blade and all moving
parts have stopped. Then disconnect the
spark plug wire and keep it away fromthe
spark plug to prevent accidental starting.
o Do not cOntinue to run your mower if you
hit a foreign object, Follow the procedure
outlined above, then repair any damage
before restart!ng and operating you
mower°
oDo not change the governor settings or
overspeed the engine. Engine damage or
personal injury may result.
o Do not operate your mower if it vibrates
abnormally. Excessive vibration is an
indication of damage; step the engine,
safely check for the cause of vibration
and repair as required°
o Do not run the engine indoors. Exhaust
fumes are dangerous.
. Never cut grass by pulling ttte mower
towards you. Mow across the face of
slopes, never up and down or you might
lose your footing. Do not mow exces-
sively steep slopes.. Use caution when
operating the mower on uneven terrain
or when changing directions -- maintain
good footing,.
o Never operate your mower without
proper guards, plates, grass catcher or
other safety devices in place,
MAINTENANCE AND STORAGE:
o Check the blade and the engine mount-
ing bolts omen to be sure they are
tightened properlyr
o Check all bolts, nuts and screws at
frequent intervals for proper tightness to
be sure mower is in safe working
condition.
o Keep all safety devices in place and
wo,rking,
o To reduce fire hazard, Reep the engine
free of grass, leaves or excessive grease
and oil,
° Check grass catcher often for deteriora-
tion and. wear and replace worn bags.
Use only replacement bags that are
recommended by and comply with
specifications of the manufacturer of your
mower.
• Always keep a sharp blade on your
mower.
,, Allow engine to cool before storing in any
enclosure.
o Never store mower with fuel tn the tank
inside a building where fumes may reach
an open flame or an ignition source such
as a hot water heater, space heater,
clothes dryer, etc
CAUTION: Always disconnect spark plug
wire and place wire where it cannot contact
spark plug in order to prevent accidental
starting when setting up, transporting,
adjusting or making repairs.
WARNING: The engine exhaust from this
product contains chemicals known to the
State of California to cause cancer, birth
defects, or other reproductive harm.
3
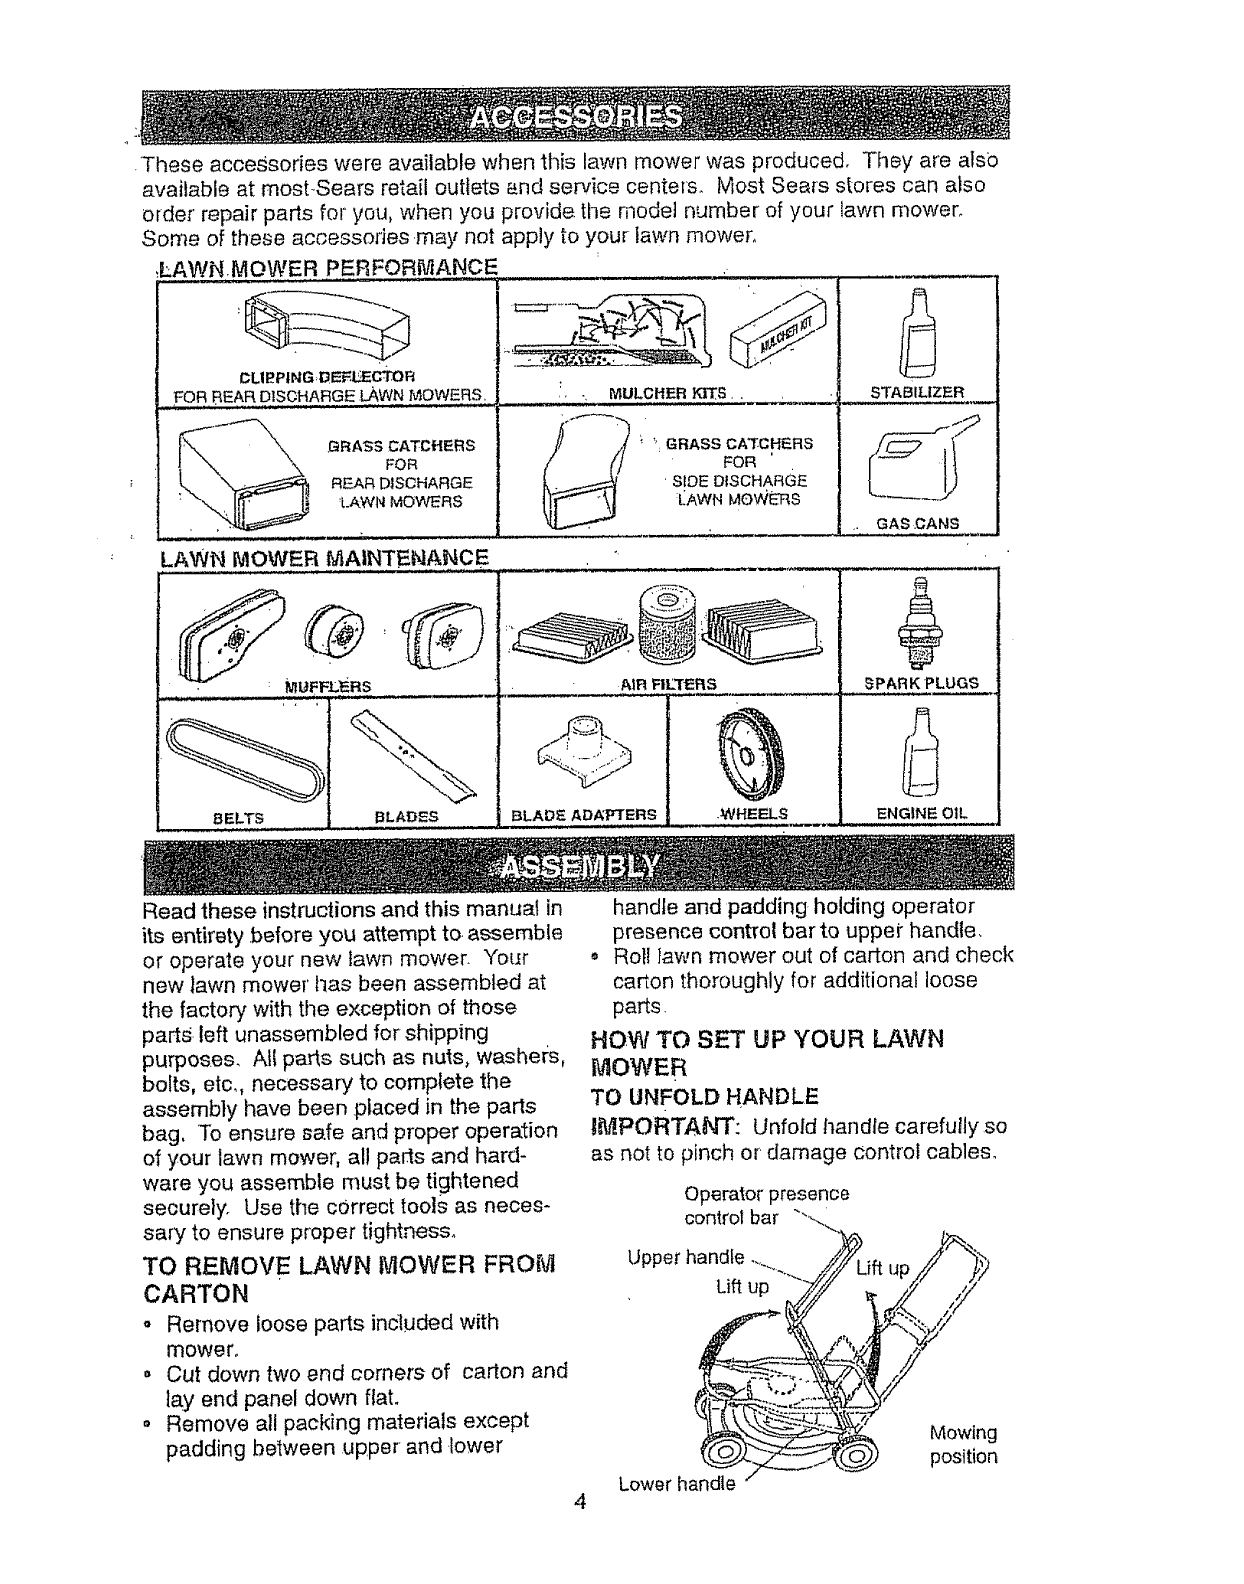
.Theseacces_sorieswereavailablewhenthis lawnmowerwas produced. They are als0
availableat mostSearsretailoutlets_nd servicecenters. MostSearsstorescan also
order repair parts for you, when you provide the model number of your lawn mower.
Some of these accessories,may not apply to your lawn mower,
FOR REAR D1SOHARGE LAWN MOWERS ,, MULCHER KITS, .
GRASS CATCHERS
FOR
REAR DISCHARGE
'[.AWNMOWERS
LAWN MOWER MAINTENANCE
;"_GRASS CATCII'I_RS
FOR
'SIDE DISCHARGE
:I_AWNMQWE'RS
BLADE AZ}A'PTERS ._HEELS
STABIL[ZP-R
GAS .CANS
SPARK PLUGS
E_GIt_E0_. I
Read these instructions and this manual in
its entirety before you attempt to. assemble
or operate your new lawn mower. Yo[_r
new lawn mower' has been assembled at
the factory with the e×ception of those
parts, left unassembled for shipping
purposes. All parts such as nuts, washers,
bolts, etc,, necessary to complete the
assembly have been placed in the parts
bag, To ensure sefe and proper operation
of your lawn mower, al! parts and hard-
ware you assemble must be tightened
securely. Use the correct tools as neces-
sary to ensure proper tightness.
TO REMOVE LAWN MOWER FROM
CARTON
o Remove loose parts included with
mower.
o Cut down two end corners of carton and
lay end panel down flat.
o Remove all packing materials except
padding between upper and .lower
4
handle and padding holding operator
presence control bar to upper handle.
= Rot! lawn mower out of carton and check
carton thoroughly for additional loose
parts.
HOW TO SET UP YOUR LAWN
MOWER
TO UNFOLD HANDLE
B_PORTANT: Unfold handle carefully so
as not to pinch or damage control cables.
Operator presence
control bar "'-..
Upper handle ..... .--..,,,.,_,dft up/_'A_
, Lift up _'./_._____ _r
_. Z,::,,,z
r/ Mowing
position
Lower h
,, Raisehandlesuntillowerhandlesection
locksintoplacein mowingposition.
,, Removeprotectivepadding,raiseupper
handlesectionintoplaceonlower
handleandtightenbothhandleknobs,
• Removehandlepaddingholding
operatorpresencecontrolbarto upper
handle.
Yourlawnmowerhandlecanbe
adjustedfo[.yobrmowingcomfort.
Refer'to "AdjustHandle"in theService
andAdjustmentssectionof this _anuaL
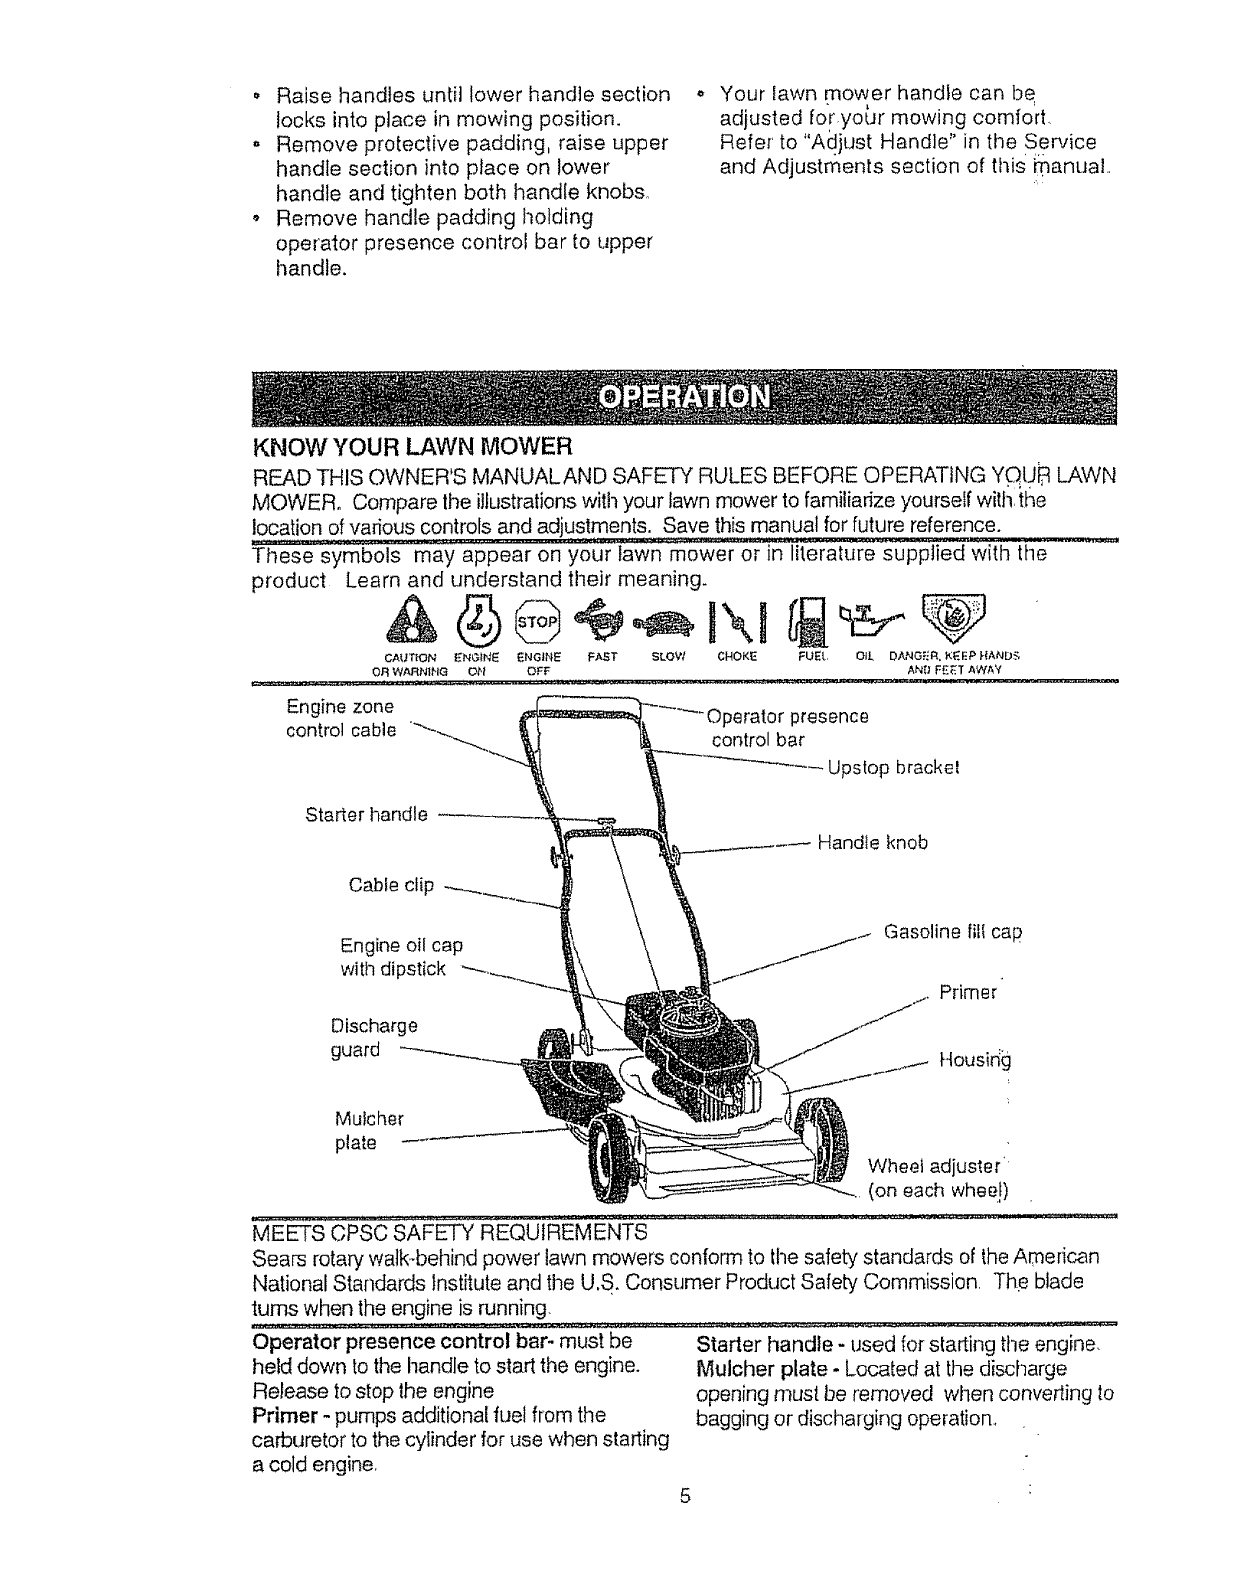
KNOW YOUR LAWN MOWER
READ THIS OWNER'S MANUALAND SAFETY RULES BEFORE OPERATING Y_UB LAWN
MOWER. Compare lhe illustrations with your lawn mower to familiarize yourself with the
location of various controls and adjustments. Save this manual for future reference.
These symbols may appear on your lawn mower or in literature supplied with the
product Learn and understand their meaning.
CAt_IT_ON ENG_N_ _NGINE FA_T SLOW CHOK_ FUEl, OiL DANOFR. K_EP HANDS
OR WARNING Ofl OFF AN[} FEE]" AWAY
Engine zone _erator presence
control cable control bar
- Upstop brackel
Starter handle
Handle knob
Cable clip
Gasoline fill cap
Engine oil cap
with dipstick Primer
Discharge
guard Housir_g
Mutcher
plate Wheel adjuster
(on each whee!)
MEETS CPSC SAFETY REQUIREMENTS
Sears rotary walk-behind power lawn mowers conform to the safety standards of lhe American
National Standards Institute and the U.S. Consumer Product Safety Commission The blade
turns when the engine is running.
Operator presence control bar- must be
held down to the handle to start the engine.
Release to stop the engine
Primer - pumps additional fuel from the
carburetor to the cylinder for use when starting
a cold engine,
Starter handle - used for starting ttle engine.
Mulcher plate -Located at the discharge
opening must be removed when converting to
bagging or discharging operation.,

Theoperationof anylawnmowercan resultin
foreignobjectsthrownintotheeyes,whichcan
resultinsevereeyedamage.Alwayswear
safetyglassesoreyeshieldswhileoperating
yourlawnmower"orperforminganyadjust-
mentsorrepairs Werecommendawide
visionsafetymaskoverthespectaclesor
standardsafetyglasses
ENGINESPEED
Theenginespeedwassetatthefactoryfor
optimumperformanceSpeedisnotadjust-
able.
ENGINEZONECONTROL
CAUTION',Federalregulationsrequirean
enginecontroltobe installedonthisfawn
mowerinorderto minimizetheriskofblade
contactinjuryDonotunderanycircumstances
attempttodefeatthefunctionoftheoperator
control..Thebladeturnswhentheengineis
running.
o Yourlawnmowerisequippedwithan
operatorpresencecontrolbarwhich
requirestheoperatortobepositioned
behindthefawnmowerhandletostartand
operatethelawnmower.
Lower Wheels lor Plate Tab
High Cut
Raise Wheels for
Low Cut
TO ADJUST CUTTING HEIGHT
,, Raise wheels for low cut and lower wheels
for high cut
,, Adjust cutting height to suit your require-
merits Medium position is best for most
lawns.
", To change cutting height, squeeze adjuster
lever toward wheel, Move wheel up or
down to suit your requirements. Be sure all
wheels are in the same setting_
NOTE: Adjuster is properly positioned when
plate tab inserts into hole in lever, Also, g-
position adjusters (if so equipped) allow lever
to be positioned between the plate tabs,
Your lawn mower has been shipped ready for
mulching operation, To convert to discharging
or bagging operation:
TO CONVERT TO DISCHARGING MOWER
Your mower is shipped ready to be used as a
mutcher.. To convertto bagging or discharging:
,, Lift discharge guard and remove mulcher
plate.
o Mower can now be used for side discharg-
ing or optional grass catcher can be
attached
• To return to mulching operation, simply
reinstall mulcher plate as shown.
CAUTION: Do not run your lawn mower
without discharge guard, approved grass
catcher or mulcher plate in place.
Tab
Discharge guard
Mulcher
Piate
(
BEFORE STARTING ENGINE
OIL
Your lawn mower is shipped without oil in
the engine.
,, Be sure mower is level and area around
oil fill is clean..
, Remove engine oil cap w/dipstick and fill
to the full tine on the dipstick,
o Use 20 ozs. of oil.. For type and grade
of oil to use, see "ENGINE" in Customer
Responsibilities section of this manual.
• Pour oi! slowly. Do not over fill.
• Check oil level before each use, Add oil
if neede& Fill to full line on dipstick.
o To read proper level, tighten engine oil
cap each time.
o Reinstall engine oil cap and tighten.
,, Change the oil after every 25 hours of
operation or each season, You may
need to change the oil more often under
dusty, dirty conditions.
GAS
° Fill fuel tank. Use fresh, clean, regular
unleaded gasoline with a minimum of 87
octane. Do not mix oil with gasoline.
Purchase fuel in quantities that can be used
within 30 days to assure fuel freshness.
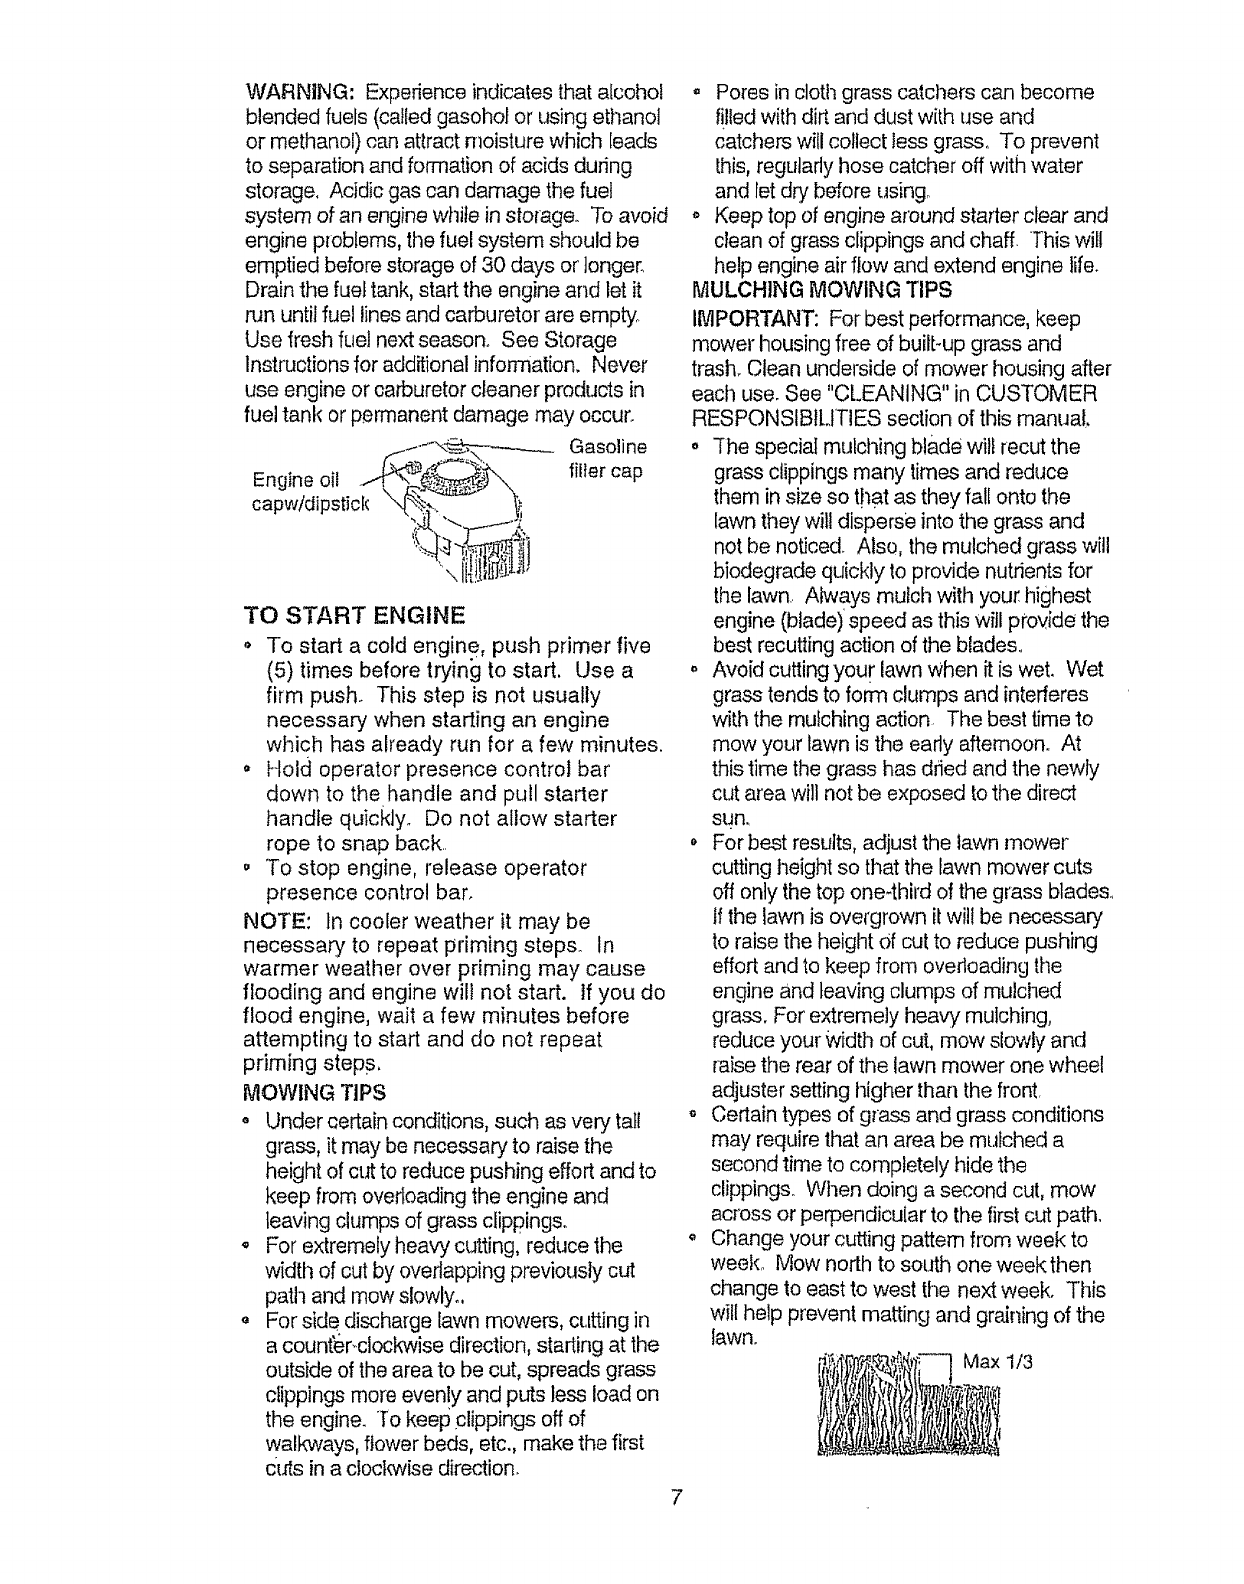
WARNING:Experienceindicatesthatalcohol
blendedfuels(calledgasoholorusingethanol
ormethanol)canattractmoisturewhichleads
to separationandformationofacidsduring
storage,Acidicgascandamagethefuel
systemofanenginewhileinstorage_Toavoid
engineproblems,thefuelsystemshouldbe
emptiedbeforestorageof30 daysorlonger.
Drainthefueltank,starttheengineandletit
rununtilfuellinesandcarburetorareempty..
Usefreshfuelnextseason_SeeStorage
Instructionsforadditionalinfonnation.Never
useengine or carburetor cleaner products in
fuel tank or permanent damage may occur.
....I-_--------_ Gasoline
filler
Engine oil ....q__\-\ cap
capwidipstiok ",._._-- _.;_
TO START ENGINE
o To start a cold engine, push primer five
(5) times before trying to start. Use a
firm push° This step is not usually
necessary when starting an engine
which has already run for a few minutes.
° Hold operator presence control bar
down to the handle and pull starter
handle quickly. Do not allow starter
rope to snap back..
,, "To stop engine, release operator
presence control bar.
NOTE: In cooler weather it may be
necessary to repeat priming step& In
warmer weather over priming may cause
flooding and engine will not start. If you do
flood engine, wait a few minutes before
attempting to start and do not repeat
priming steps.
MOWING TIPS
, Under certain conditions, such as very tall
grass, it may be necessary to raise the
height of cut to reduce pushing effort and to
keep from overloading the engine and
leaving clumps of grass clippings.
• For extremely heavy cutting, reduce the
width of cut by overlapping previously cut
path and mow slowly..
o For side discharge lawn mowers, cutting in
a counf6r-cloc#¢ise direction, starting at the
outside of the area to be cut, spreads grass
clippings more even!y and puts less load on
the engine. fo keep clippings off of
walt{ways, flower beds, etc., make the first
cuts in a clocl_ise direction.
7
. Pores in cloth grass catchers can become
filled with dirt and dust with use and
catchers will collect less grass,. To prevent
[his, regularly hose catcher off with water
and let dry before using_
o Keep top of engine around starter clear and
clean of grass clippings and chaff. This will
help engine air flow and extend engine life.
MULCHING MOWING TIPS
IMPORTANT: For best performance, keep
mower housing free of buibup grass and
trash. Clean underside of mower housing after
each use. See "CLEANING" in CUSTOMER
RESPONSIBILITIES section of this manual,
° The special mulching blade will recut the
grass clippings many times and reduce
them in size so that as they fall onto the
lawn they will disperse into the grass and
not be noticed. Also, the mulched grass will
biodegrade quickly to provide nutnents for
the lawn.. AfwaYs mulch with your_highest
engine (blade) speed as this will provide the
best recutting action of the blades,.
o Avoid cutting your lawn when it is wet. Wet
grass tends to form clumps and interferes
with the mulching action The best time to
mow your lawn is the early aftemoon,. At
this time the grass has dried and the newly
cut area will not be exposed to the direct
sun,
For best results, adjust the lawn mower
cutting height so that the lawn mower cuts
off only the top one4hird of the grass blades,
if the lawn is overgrown it wil! be necessary
to raise the height Of cut to reduce pushing
effort and to keep from overloading the
engine and leaving clumps of mulched
grass. For extremely heavy mulching,
reduce your Width of cut, mow slowly and
raise the rear of the lawn mower one wheel
adjuster setting higher than the front
o Certain types of grass and grass conditions
may require that an area be mulched a
second time to completely hide the
clippings. When doing a second cut, mow
across or perpendicular to the first cut path.
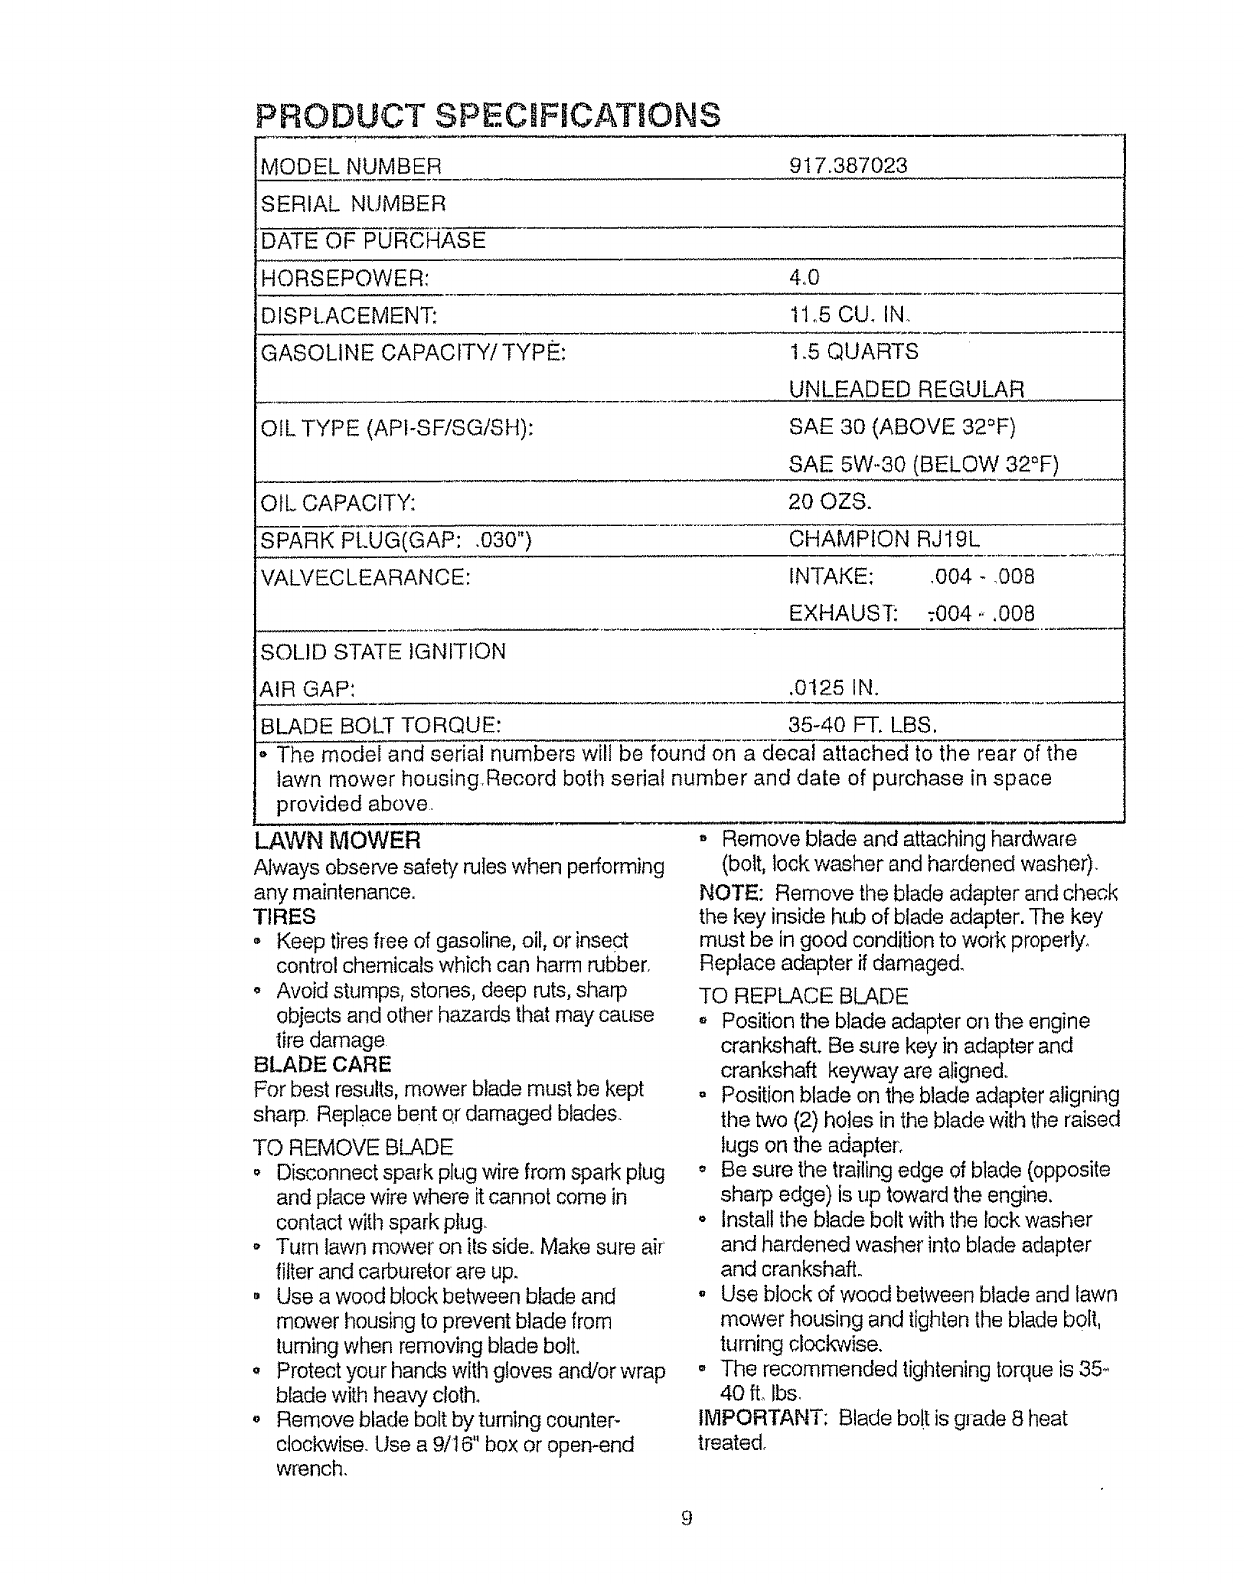
,, Change your cutting pattern from week to
week_ Mow north to south one week then
change to east to west the next week. This
will help prevent matting and graining of the
lawn.
Max 1/3
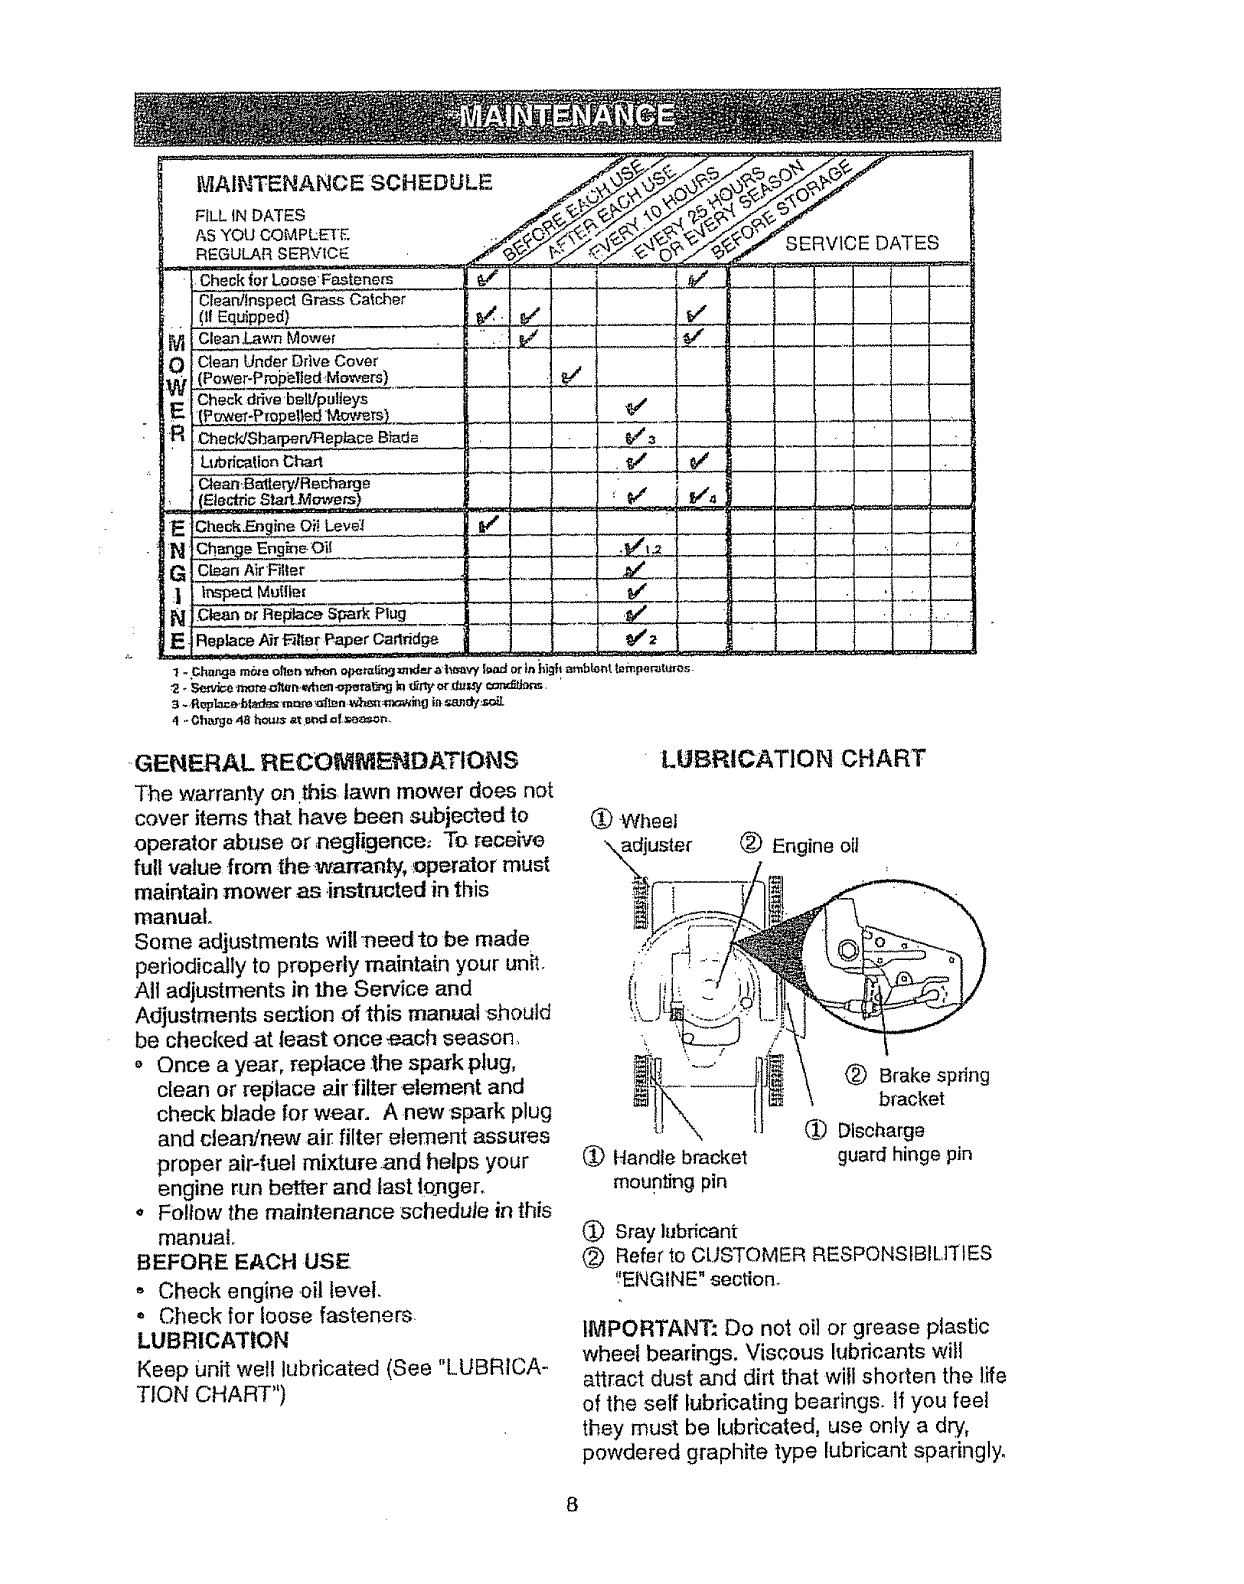
MAINTENANCESCHEDULE
SERVICE DATES
GENERAL RECOMMENDATIONS
T-he warranty on this lawn mower does not
cover items that have been subjected to
operator abuse or ,negligence, To receive
full value from :thewarranty, _operator must
maintain mower as ,instructed in this
manual.
Some adjustments will-need to be made
periodically to properly maintain your unit.
All adjustments in the Service and
Adjustments section of this manual -should
be checked at least once .each season_
o Once a year, replace the spark plug,
clean or replace air filter element and
check blade for wear. A new spark plug
and clean!new air filter element assures
proper aiP(uei mixture and helps your
engine run better and last longer.
o Follow the maintenance schedule in this
manual.
BEFORE EACH USE
,, Check engine oil level.
- Check for loose fasteners
LUBRICATION
Keep Unit well lubricated (See "LUBRICA-
TION CHART")
LUBRIICATION CHART
(_ -Wheel
\adjuster _ Engine oil
/
(_) Handle bracket
mounting pin
Brake spring
bracket
(1__DlschaFge
guard hinge pin
(_ Sray lubricant
(_) Refer to CUSTOMER RESPONSIBILITIES
':ENGINE" section_
IMPORTANT: Do not oil or grease plastic
wheel bearings. Viscous lubricants will
attract dust and dirt that will shorten the life
of the self lubricating bearings. If you feel
they must be lubricated, use only a d_,
powdered graphite type lubricant sparingly_
8
PRODUCT SPECnFICATIONS
MODEL NUMBER 917.387023
SERIAL NUMBER
DATE OF PURCHASE
HORSEPOWER: &0
DISPLACEMENT: 11o5 CUd IN.
GASOLINE CAPACITY/TYPE: 1.5 QUARTS
UNLEADED REGULAR
OIL TYPE (API-SF/SG/SH): SAE 30 (ABOVE 32°F)
SAE 5W.30 (BELOW 32°F)
OIL CAPACITY: 20 OZS.
SPARK PLUG(GAP: .030") CHAMPION RJIgL
VALVECLEARANCE: INTAKE: .004 - _008
EXHAUST _. :004.. ,008
SOLID STATE IGNITION
AIR GAP: ,0125 IN.
BLADE BOLT TORQUE: 35-40 FT. LBS,
" The model and serial numbers will be found on a decal attached to the rear of the
lawn mower housing,Record both serial number and date of purchase in space
provided above
LAWN MOWER
Always observe safety rules when performing
any maintenance.
TIRES
• Keep tires free of gasoline, oil, or insect
control chemicals which can harm rubber.
o Avoid stumps, stones, deep ruts, sharp
° Remove blade and attaching hardware
(bolt, lock washer and hardened washer).
NOTE: Remove the blade adapter and check
the key inside hub of blade adapter. The key
must be in good condition to work properly.
Replace adapter if damaged.
TO REPLACE BLADE
objects and other hazards that may cause
tire damage
BLADE CARE
For best results, mower blade must be kept
sharp. Replace bent qr damaged blades.
TO REMOVE BLADE
o Disconnect spa_rkplug wire from spark plug
and place wire where it cannot come in
contact with spark plug.
o Turn lawn mower on its side. Make sure air
filter and carburetor are up.
,, Use a wood block between blade and
mower housing to prevent blade from
turning when removing blade bolt,
,, Protect your hands with gloves and/or wrap
blade with heavy cloth.
o Position the blade adapter on the engine
crankshaft. Be sure key in adapter and
crankshaft keyway are aligned,
,, Position blade on the blade adapter aligning
the two (2) holes in the blade with the raised
lugs on the adapter.
,, Be sure the trailing edge of blade (opposite
sharp edge) is up toward the engine,
o install the blade bolt with the rock washer
and hardened washer into blade adapter
and crankshaft.
° Use block of wood between blade and lawn
mower housing and tighten the blade bolt,
turning clockwise,
• The recommended tightening torque is 35-
40 f1,,Ibs.
IMPORTANT: Blade bolt is grade 8 heat
treated_
Remove blade bolt by turning counter-
clockwise. Use a 9/I 6" box or open-end
wrench.

NOTE:Wedonotrecommendsharpening
blade- butifyoudo,besurethebladeis
balanced. Crankshaft
Blade .. _ keyway
adapter"_..z/_ ---m--.L
\ V'S <
bolt _ Hardened Trailing "Blade
washer edge adapter
Lock washer
TO SHARPEN BLADE
Care should be taken to keep the blade
balanced, An unbalanced blade will cause
eventual damage to lawn mower or
engine.
. The blade can be sharpened with a file
or on a grinding wheel. Do not attempt
to sharpen while on the mower,
. To check blade balance, drive a nail into
a beam or wall. Leave about one inch of
the straight nail exposed. Place center
hole of blade over the head of the nail.
If Made is balanced, it should remain in
a horizontal position, If either end of the
blade moves downward, sharpen the
heavy end until the blade is balanced.
GRASS CATCHER
(If purchased as an accessory)
o The grass catcher may be hosed with
water, but must be dry when used.
o Check your grass catcher often for
damage or deterioration. Through
normal use it will wear. If catcher needs
replacing, replace only with a manufac-
turer approved replacement catcher.
Give the lawn mower model number
when ordering.
ENGINE
LUBRICATION
Use only high quality detergent oil rated
with API service classification SF, SG or
SH Select the oil's SAE viscosity grade
according to your expected operating
temperature.
NOTE: Although multi-viscosity oils
(5W30, 10W30 etc.) improve starting in
cold weather, these multiwiscosity oils will
result in increased oil consumption when
I SAE V_E_OD_rTY GRADES ]
Check your' engine oil level more fre-
quently to avoid possible engine damage
from running low on oil.
Change the oil after every 25 hours of
operation or at least once a year if the
lawn mower is not used for 25 hours in
one year_
Check the crankcase oil level before
starting the engine and after each five (5)
hours of continuous use. Tighten oi! plug
securely each time you check the oil level,
TO CHANGE ENGINE OIL.
NOTE: Befo[e tipping lawn mower to drain oil,
drain fuel tank by running engine until fuel tank
is empty.
. Disconnect spark plug wire from spark plug
and place wire where it cannot come in
contact w]th spark plug.
o Remove engine oil cap; lay aside on a clean
surface.
o Tip lawn mower on its side as shown and
drain oil into a suitable container. Rock lawn
mower back and forth to remove any oil
trapped inside of engine,
o Wipe off any spilled oil on lawn mower and
on side of engine,
. Fill engine with oil. Fill only to the "FULL"
line on the dipstick. DO NOT OVER FILL
o Replace engine oil cap,
• Reconnect spark plug wire to spark plug.
Container
AIR FILTER
Your engine will not run properly and may be
damaged by using a dirty air filter.
Replace the a!r filter every year, more often if
you mow in very dust/, dirty conditions. Do not
wash air filter.
TO CHANGE AIR FILTER
, Remove the air filter by turning counter-
cloclewise to the stop and pull away from
collar.
o Remove filter from inside of cover.
° Clean the inside of the cover and the collar
to remove any dirt accumulation.
Insert new filter into cover.
4t'_
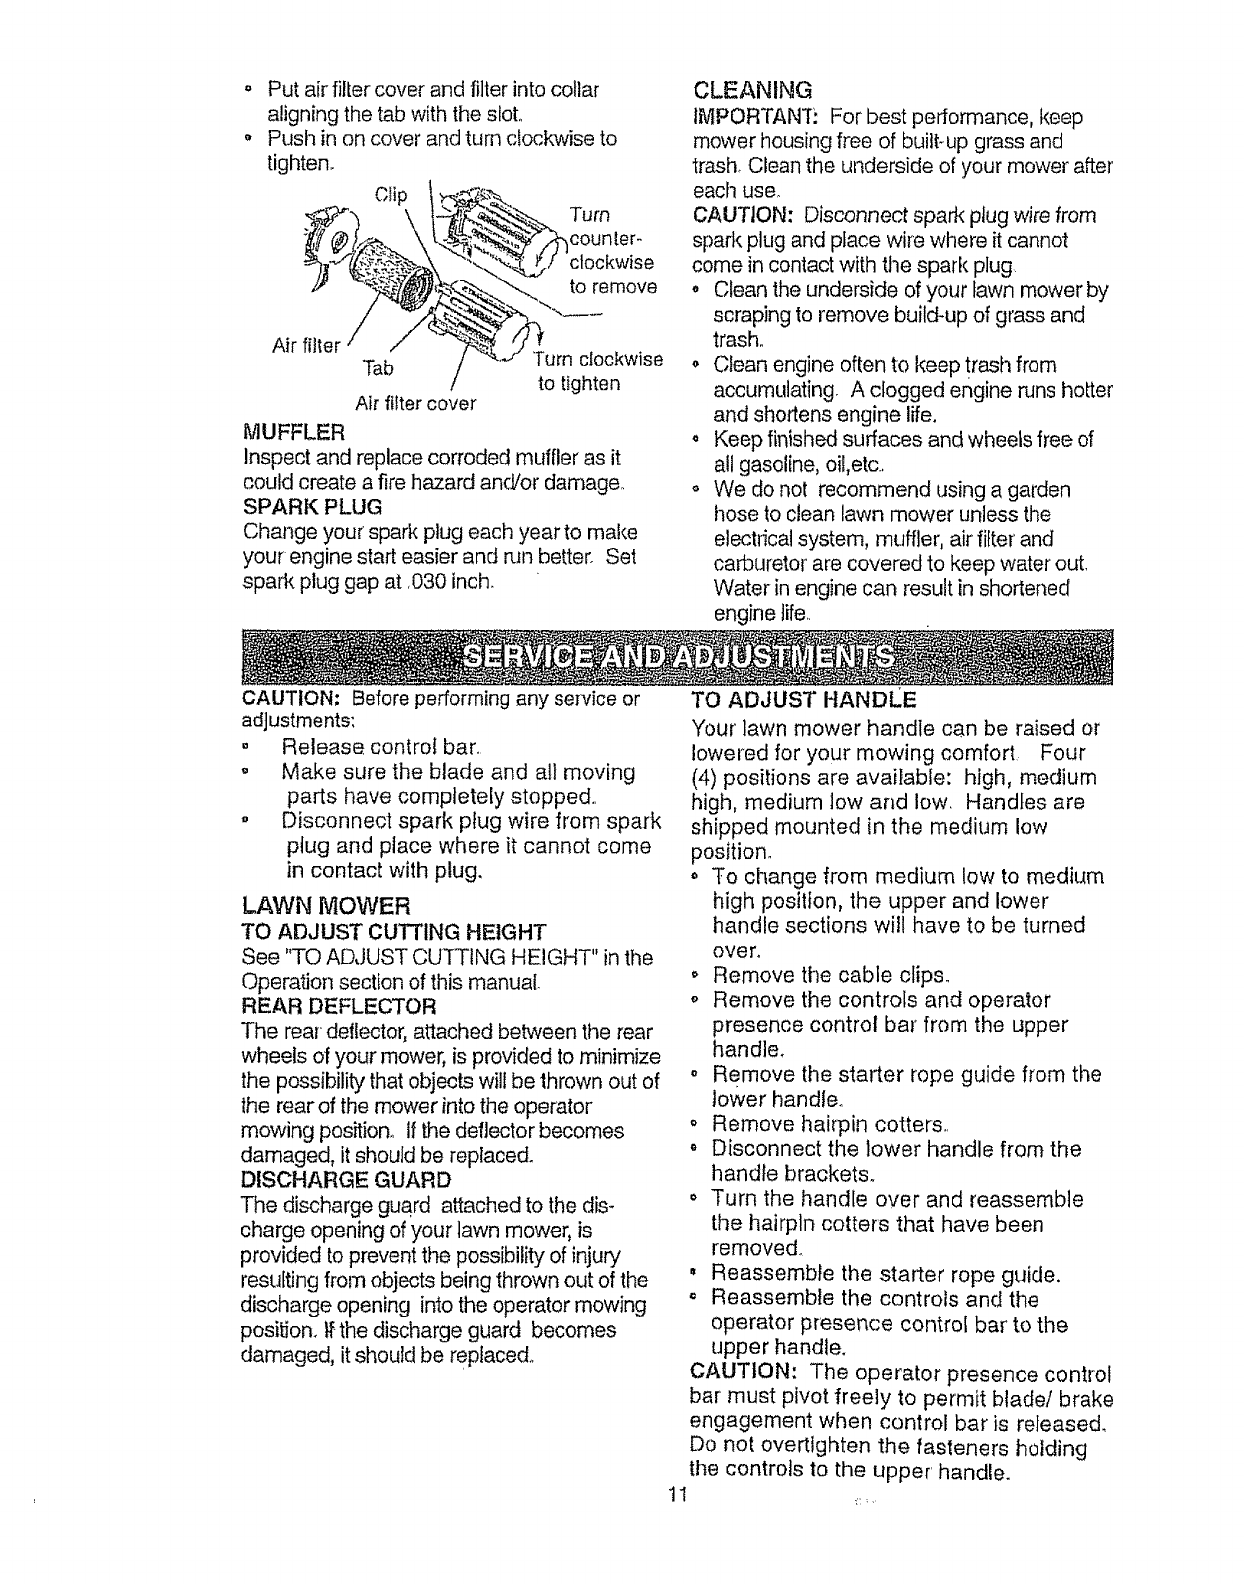
Put air filler cover and filter into collar
aligning the tab with the slot..
Push in on cover and turn clockwise to
tighten.
Clip "rum
counter-
to remove
Air filter Tab 'Turn clockwise
to tighten
Air filter cover
MUFFLER
Inspect and replace corroded muffler as it
could create a fire hazard and!or damage.
SPARK PLUG
Change your spark plug each year to make
your engine start easier and n._nbetter. Set
spark plug gap at ,030 inch.
CLEANING
IMPORTAN'f_ For best performance, keep
mower housing free of built-up grass and
trash. Clean the underside of your mower after
each use.
CAUTION: Disconnect spark plug wire from
spark plug and place wire where it cannot
come in contact with the spark plug
• Clean the underside of your fawn mower by
scraping to remove build-up of grass and
trash..
° Clean engine often to keep trash from
accumulating A clogged engine runs holier
and shodens engine life.
o Keep finished surfaces and wheels free of
all gasoline, oil,etc.
o We do not recommend using a garden
hose to clean lawn mower unless the
electrical system, muffler, air filter and
carburetor are covered to keep water out.
Water in engine can result in shortened
engine life.
CAUTION: Before performing any setvice or
adjustments:
° Release control bar.
,' Make sure the blade and all moving
parts have completely stopped..
° Disconnect spark plug wire from spark
piug and place where it cannot come
in contact with plug,
LAWN MOWER
TO ADJUST CUTTING HEIGHT
See "TO ADJUST CUrTING HEIGHT" in the
Operation section of this manual.
REAR DEFLECTOR
The rear deflector, attached between the rear
wheels of your mower, is provided to minimize
the possibility that objects will be thrown out of
the rear of the mower into the operator
mowing position. If the deflector becomes
damaged, it should be replaced.
DISCHARGE GUARD
The discharge guard attached to the dis-
charge opening of your lawn mower, is
provided to prevent the possibility of injury'
resulting from objects being thrown out of the
discharge opening into the operator mowing
position, if-the discharge guard becomes
damaged, it should be replaced°
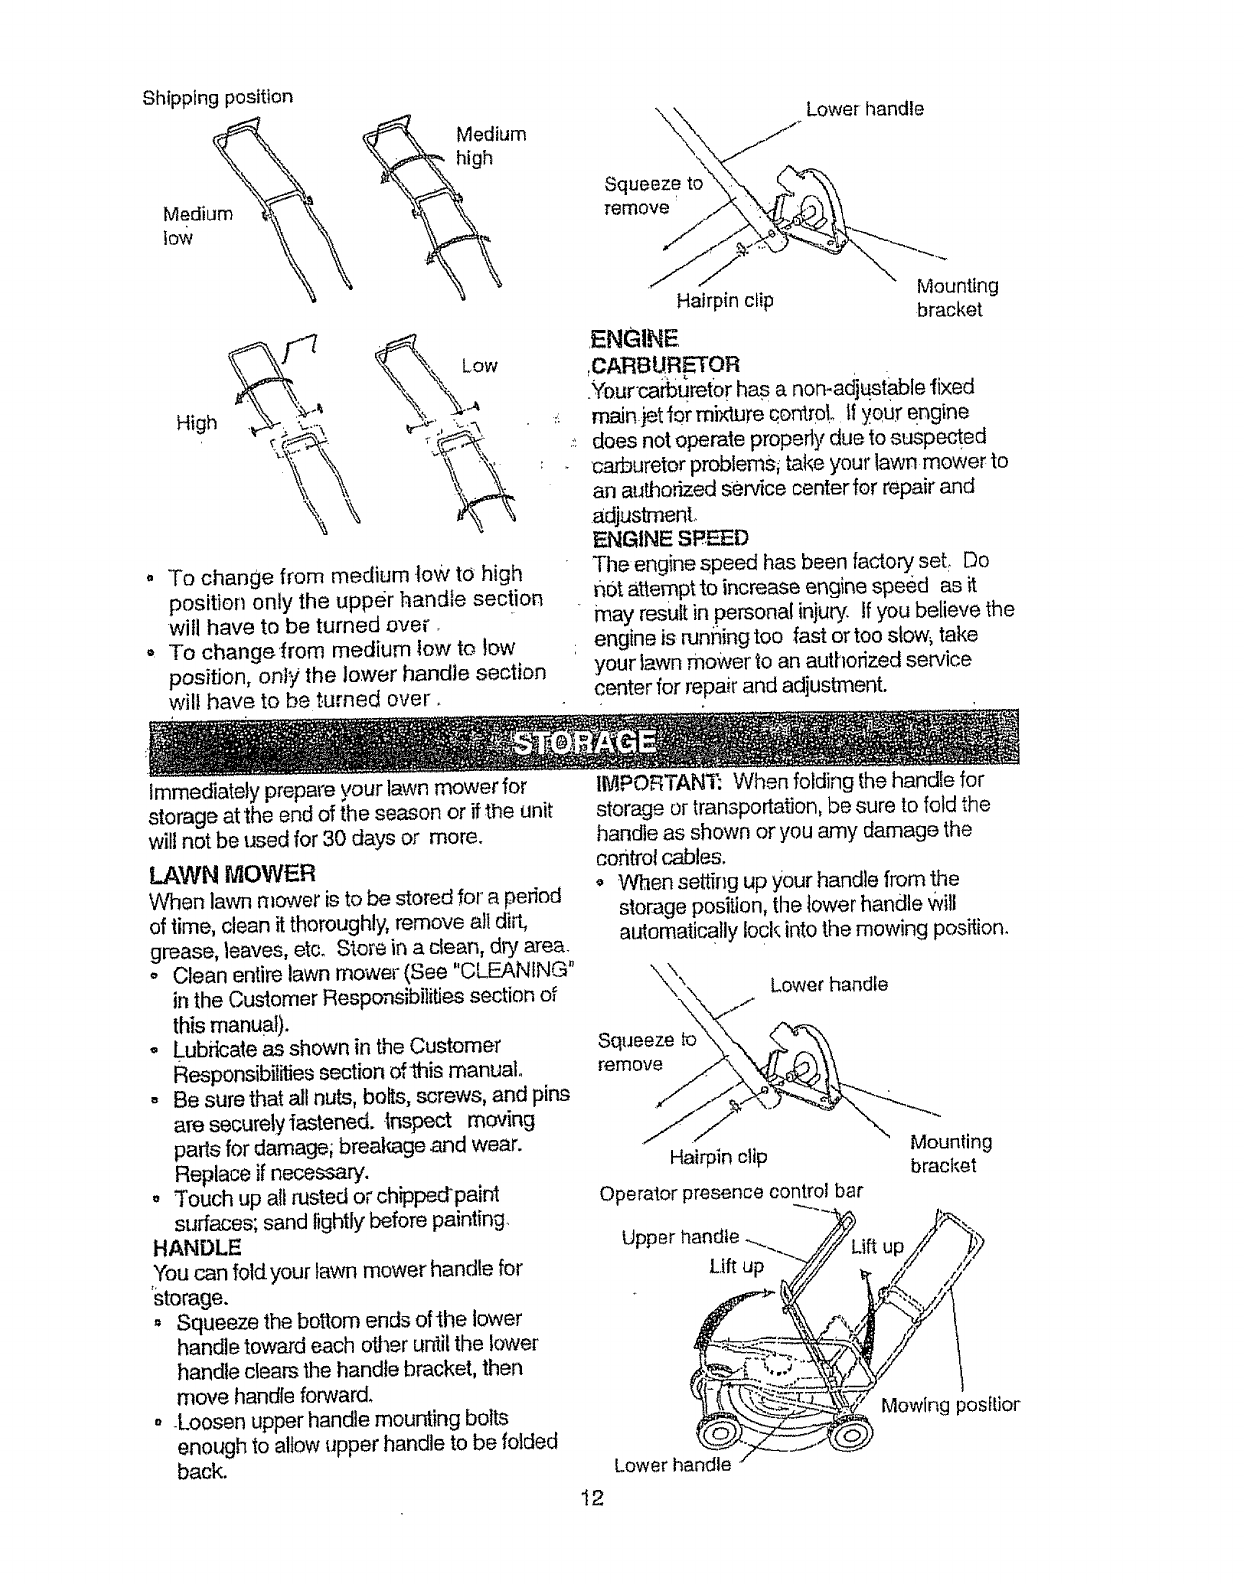
TO ADJUST HANDLE
Your lawn mower handle can be raised or
lowered for your mowing comfort Four
(4) positions are available: high, medium
high, medium low arid low. Handles are
shipped mounted in the medium low
position.
o To change from medium low to medium
high position, the upper and lower
handle sections will have to be turned
over_
o Remove the cable clips.
o Remove the controls and operator
presence control bar from the upper
handle.
,, Remove the starter rope guide from the
lower handle°
o Remove hairpin cotters,.
• Disconnect the lower handle from the
handle brackets_
o Turn the handle over and reassemble
the hairpin cotters that have been
removed..
, Reassemble the starter rope guide.
,, Reassemble the controls and the
operator presence control bar to the
upper handle.
CAUTION: The operator presence control
bar must pivot freely to permit blade/brake
engagement when control bar is released,
Do not overtlghten the fasteners holding
the controts to the upper' handle.
1I <....
Shipping position
_,__i Medium
High
\\
LOW
..,a
" To change from medium low to high
position only the upper handle section
will have to be turned over.
o To change from medium low to tow
position, only the lower handle section
wil! have to be turned over.
Lower handle
\
Squeez e
remove
Hairpin clip Mounting
bracket
ENGINE
,CARBURETOR
.YourcaiStiretor has, a non-adjustable fixed
main_t for mixture c,ontroL Ii your engine
does not operate properly due to suspected
carburetor problems; take your lawn mower to
an au[hofized service center for repair and
adjustment.
ENGINE S_EED
The engine speed has been facto,_ set, Do
not attempt to increase engine speed as it
may result in personal injury. If you believe the
engine is runfling too .fast or too slow_ take
your lawn recover to an authorized service
center for repair and adjustment.
immediately prepare your lawn mower for
storage at the end of the season or if the unit
will not be used for 30 days or more.
LAWN MOWER
When lawn mower is to be stored for a period
of time, clean it thoroughly, remove a}t di&
grease, leaves, etc. Store in a dean, dry area.
o Clean entire lawn mower (See "CLEANING"
in the Customer Responsibilities section of
this manual).
o Lubricate as shown in the Customer
Responsib_ities section ofthis manual.
. Be sure that all nuts, bolts, screws, and pins
aresecuretyiastened..Inspect moving
paris for damage; breakage and wear.
Replace if necessary.
o Touch up alt rusted or chipped'paint
surfaces; sand lightly before painting.
HANDLE
,you can fold your lawn mower handle for
storage.
Squeeze the bottom ends oflhe lower
handle toward each oU_er until the lower
handle clears the handle bracket, then
move handle forward_
°.Loosen upper handle mounting bolts
enough to allow upper handle to be folded
back
IMPORTANT; When folding the handle for
storage or transportation, be sure to fold the
handie as shown or you amy damage the
control cables.
. When setting up your handle from the
storage position, the lower handle Will
automatically lock into the mowing position.
X x Lower handle
N
Squeeze to
remove
Hairpin clip
Operator presence control bar
Upper handle ._.....
Lift up
Mounting
bracket
up
t
Mowing posflJor
Lower handle
12
ENGINE
FUELSYSTEM
IMPORTANT:ttisimportanttopreventgum
depositsfromforminginessentialfuelsystem
parissuchascarburetor,fuelfilter,fuelhose,
ortankduringstorage.Also,experience
indicatesthatalcoholblendedfuels(called
gasoholorusingethanolormethanol)can
attractmoisturewhichleadstoseparationand
formationofacidsduringstorage,.Acidicgas
candamagethefuelsystemof anengine
whileinstorage_
o Drainthefueltank.
o Starttheengineandletit rununtilthefuel
linesandcarburetorareempty,,
o Neveruseengineorcarburetorcleaner
productsinthefueltankorpermanent
damagemayoccur.
* Usefreshfuelnextseason.
NOTE:Fuelstabilizerisanacceptable
alternativeinminimizingtheformationoffuel
gumdepositsduringstorage.Addstabilizerto
gasolineinfueltank or storage container.
Always follow the mix ratio found on stabilizer
container. Run engine at least 10 minutes
after adding stabilizer to allow the stabilizer to
reach the carburetor, Do not drain the gas
tank and carburetor if using fuel stabilizer.
ENGINE OIL
Drain oil (with engine warm) and replace with
clean engine oil. (See "ENGINE" in the
Customer Responsibilities section of this
manual).
CYLINDER
,, Remove spark plug.
• Pour one ounce (29 ml) of oil through spark
plug hole into cylinder.
o Pull starter handle slowly a few times to
distribute oi!.
o Replace with new spark plug.
OTHER
° Do not store gasoline from one season to
another_
o Replace your gasoline can if your can starts
to rusL Rust and!or dirt in your gasoline will
cause problems.
oif possible, store your unit indoors and cover
it to give protection from dust and dirt
° Cover your unit with a suitable protective
cover that does not retain moisture, Do not
use plaslic. Plastic cannot breathe which
allows condensation to form and will cause
your unit to rusL
IMPORTANT: Never cover mower while
engine and exhaust areas are still warm.
CAUTION: Never store the lawn mower with
gasoline in the tank inside a building where
fumes may reach an open flame or spark.
Allow the engine to coot before storing in any
enclosure.
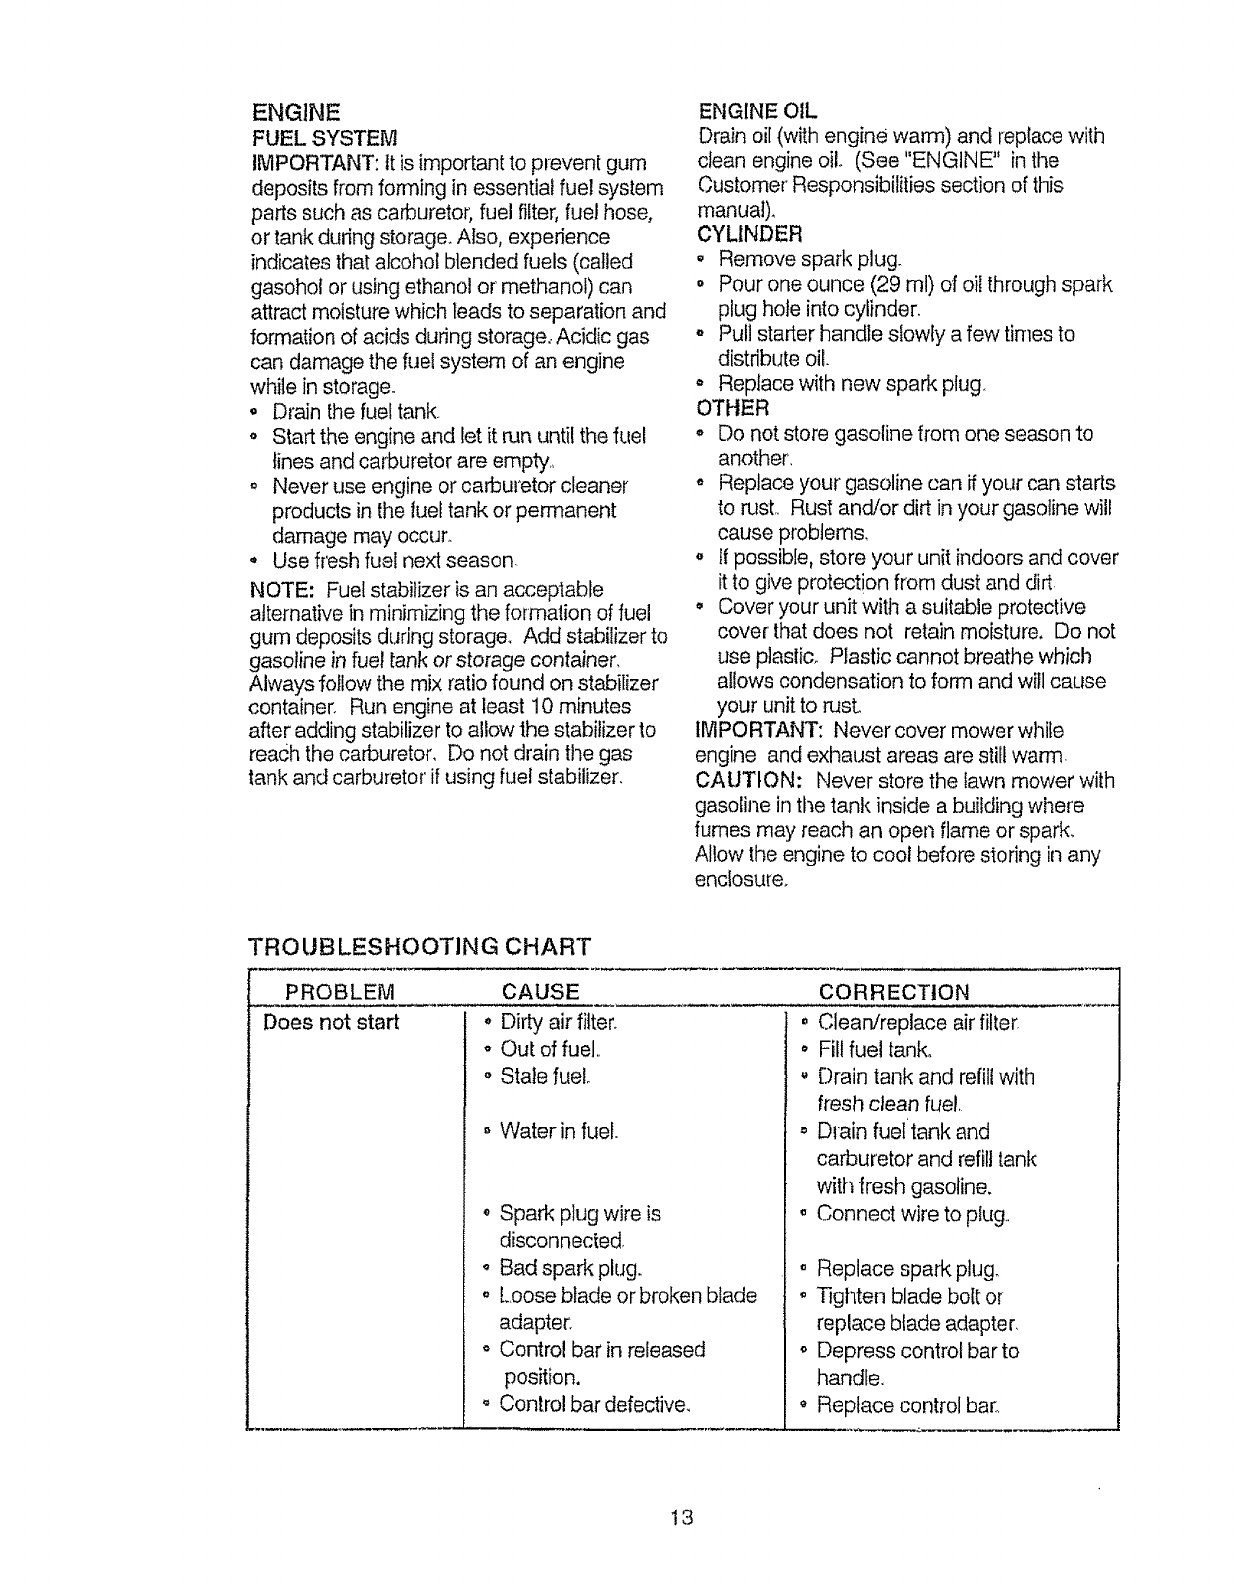
TROUBLESHOOTING CHART
PROBLEM CAUSE
Does not start * Dirty air filter°
o Out of fuel..
o Stale fuelo
Water in fuel.
o Spark plug wire is
disconnected,
,, Bad spark plug.
o Loose blade or broken blade
adapter.
o Control bar in released
position,
o Control bar defective_
CORRECTION
o Clean/replace air filter
• Fill fuel tank°
.Drain tank and refill with
fresh clean fuel,
o Dlain fueltank and
carburetor and refill tank
with _resh gasoline.
,, Connect wire to plug.
o Replace spark plug.
. Tighten blade bolt or
replace blade adapter,
o Depress control bar to
handle.
Replace control bar°
13

TROUBLESHOOTING CHART
PROBLEM
[.o--_ of power
CAUSE
o Rear of lawn mower housing
or cutting blade dragging
in heavy grass.
o Cutting too much grass.
o Dirty air filter.
,, Buildup of grass, leaves,
and trash under mower.
o Too much oii in engine,
,, Walking speed too fast.
_oor cut _ uneven
Excessive
vibration
•3tarter rope hard
:o pu!!
Grass catcher
not filling (if so
...quipped)
Hard to push
o Worn, bent or loose blade,
,, Wheel heights uneven
o Low engine speed
o Buildup of grass, heaves
and trash under mower.
o Worn, bent or loose blade,
,, Bent engine crankshaft.
o Engine flywheel brake is on
when control bar is released.
°Bent engine crankshaft.
,, Blade adapter broken.
o Blade dragging in grass.
o Cutting height too low.
oLift on blade worn off.
,, Catcher not venting air,,
,, Low engine speed.
,, Grass is too high or wheel
height is too low.
o Rear of lawn mower
housing or blade dragging
in grass.
o Grass catcher too full.
,, Handle height position not
right for you.
CORRECTION
-_ Setto "Higher Cut"
position,
• Setto "Higher Cur'
po.citiono
o Clean/replace air fitte[:
o Clean underside of mower
housing.
Check oil level
,_ Cut at slower walking
spee&
•Replace blade. _ghten
blade boll ,
o Set all wheels at same
height
o Set engine speed con{rol
in fast position.
o Clean undelside of
mower housing.
o Replace blade. "tighten
blade bolt.
o Contact an authorized
service center.
.Depress control bar to
upper handle before
pulling starter rope.
,, Contact an authorized
set€ice center.
,, Replace blade adapter'.
o Move lawn mowerto cut
grass or to hard surface
to stalt engine.
, Raise cutting height,,
o Replace blade°
o Clean grass catcher,
o Set engine speed control
in fast position.
o Raise cutting height°
• Raise rear of lawn mower
housing one (I) setting
higher.
° Empty grass catcher.
,, Adjust handle height to
suit.
4 ,4
CRAFTS AN Model No. 917.387023
Garant[a I7 Especificaciones del Producto 25
Reglas de Seguridad I7 Servicio y Adjustes 27
Montaje 19 Aimacenamiento 28
Operaci6n 20 fdenttflcaci6n de problemas 30
Mantenimiento 24 Partes de repuesto Vea el manual
Programa de Mantenimiento 24 ingl6s del dueSo
Orden de Partes Contratapa
GARANT[A LIMITADA DE DOS AltOS PARA LA SEGADORA A MOTOR CRAFTSMAN
Por dos (2) a5os, a partir de la fecha de compra, cuando esta Segadora Craftsman se mantenga, lubrlque
y afine seg,Jnlos instrucciones para ]a operaci6n y el mantenimiento en el manual def due£to,Seats
reparar#, gratistodo defectO en el material y fa mano de obra
Sila Segadora Craftsman se usa pare fines comerciales o de arrfendo, esta garantfa s61ose aplica por
noventa (90) dias a partir de ta fecha de compra.
Esta Garantia no cubre:
,, Artfcutos que se desgastan durante el uso normal tales corno }as cuchitlas segadoras rotatorias, los
adaptadores de la cuchilta, las correas, los filtros de atre y los bujt'as.
, Reparaciones necesarias debido af abuso o ala negligencia dot operadar, induy_ndose a los
clgOe_alesdobladosy a ]a falta de mantenimiento def equipo segL2ntas instrucciones que se incluyen
en el manual del due_o.
EL SERVICIO DE GARANT{A ES'TADISPONIBLE al devofver la segadpra a motor Craftsman al centro/
departmento de servicio Sears mas cercano en los estados unidos Esta gara.ntfase aptica solamente
mientras el producto este en uso en los estados unidos..
Esta Garant[a le otorga derechos legates especfficos, y puede que tambi_n tonga otros derechos que
var[an de estado a estado.
Sears, Roebuck and Co., D/817WA, Hoffman Estates, IL 60179 USA
Los estandrares de seguridad exigen la presencia
del operator en los controles para reducir a un
mlnlmo el rlesgo de lesionarse. Su unldad viene
equipada con dichos contToles.Por ningun molJvo
irate del eliminar lafi.Jnci6nde los controles que
exigen la presencia del operador.
ENTRF_.NAMIENTO:
o Lea este manu_-idel operador
cuidadosamente. Famitiaficese con los
controles y aprenda a operar su segadora en
forma adecuada. Aprenda a parer su segadora
r_pidamente
,, No permita que los niiios usen su segadora,
Nunca pe[mita que los adut_osoperen ta
segadora sin contar con fas instrucctones
adecuadas.
o Mantenga el,_reade operaci6n despejada
de genre, especialmente de niSos pequeSos
y de animales dom6sticos.
o Use la segadora solamente para los fines
propuestos por el fabricante y segen los
e×plicaciones descritas en este manual
, No opere la segadora stse ha cai'doo daSado en
cualqulera form& Stempre repare los da_os
antes de usada,
No use accesor_osque no hayan sido
recomendados por el fabdcante, El uso de dichos
accesorios puede ser peligroso,
o La cucIliIla gira cuando el motor est_
funcionando
PREPARAClON:
° Siempre revise cuidadosarnente el area que se
va a segar y desp6jeIa de todas los piedras,
palos, aJambres,huesos y otros objetos
extra_os. Estos objetos ser_,nlanzados con la
cuchilla y pueden producir lesiones graves,
SIempre use anteoJos de seguridad o protectores
de ojos cuando arranque y durante ef Uempo
que use la segadora.
I5
o Vfstase an forma adecuada; No o#ere la
segadora sin zapatos o con sandalias
mientras que e! motor estA fbncionando_
oSiegue siempre durante el dfa o con buena
luz artificial
OPERACl6N:
• Mantenga sos ,o!os y su monte e.nla
segadora y oR,el Area qua se estb. cortando,
.Nc_permita que otros intereses to distratgan.
o No code c_sped r_ojado 6 resbaloso. Nunca
corra mtentras estr_oparando su segadora.
Siempre asegurese de mantener el equilibrio
,- man_nga f_lmango agarrado tirmarnente y
camine.
. No ponga tas manos o los pies cerca odebajo
de los partes rotatoriaso Mantengase
alejado de ]a abertura de descarga en todo
momento,
o Stempie pare el motor cuando se vaya
ocuando no est, usando su segadora, o
antes de atravesar las en|radas pare autos,
: los senderos, caminos y &teas cubierlas de
ri#b,
o Nuoca dirtja ta descarga dot mateflal hacia
los espectadores ni permlta a nadie cerca de
la segadora mientras la est6 operando.
. Antes de limpfar, inspecciona: o de reparar [
a segadoi'a, pare ,el motor y est§ " '
completamente seguro de que la cuchilla y
que todas los partes que se mue-ven se
hayan detenido, Luego, desconecle el
alambre de la bujfa y mantengato alejado de
{_sla para evitar el arranque por accidente,
. No centtnOe haciendo funcionar su segado_a
si le pega a un Objeto extrafio Siga el
procedimiento descrito anteriormente, luego
repare cualquier dafio antes de vo]ver a
arrancar y de operar su segadora,
•No cambie los ajustes del regulador o
hagaque el motor ande a una velocidad
excesiva. Se pueden productr dafios en e{
motor y I esiones personales,
, No opera su segadora si vibra fuera de ]o
norma!. La vibraeiSn exoesiva es una
fndicact6n de daho; p_,re el motor, revise en
forrna segura la causa de la vibracir_n y haga
las reparaciones segun sea necesario
o No haga funcfonar el motor en
rectntoscerrados Los gases de escape son
peftgrosos.
.Nunca corte el c6sped tirando la segadora
hacla tJsted. Siegue a trav6s de la care de
los pendfentes, nunca hacia arriba o hacia
abajo pues puede perder el equilibrio. No
siegue pendientes demasfado empinadas
Tenoa cuidado cuando ope_'ela segadora en
terren0.disparejo o cuando cambie de
direccidh - mantenga Un b_en equitibri0.
' o Nunca opera la segadora sin las
prolecciones .adecuadasl los planchas, el
recogedor de c_sped y otros dispositivos de
seguridad en su tugar,
iViANTENIMIENTO Y ALMACENA_IEN-
TO:
._ Revise la cuchilla y los pemos de montaje
daf motor a menudo, para asegurarse qua
est_n apietados en la forma adecuad&
Revise todos los pemos, tuercas y torni/Ios a
intervaJos frecuentes, pare veriflcar si esl&n
apretados en forma adecuada, y
asegurarseque la segadora se encuentra en
condiciones de funcionarniento seguro.
• Mantenga todos los dispositivos de seguridad
ea su lugar y Ifstos pare funcionar,
° Pate reductr el peligro de incendio,
mantenga el motor sin cesped, hojas y grasa
o aceite en exceso
- Revise el recogedor de c#,sped a menudo
pare vedficar si hay detetioro y desgasie y
cambie las bolsas desgastadas Use
solamente los IJolsas de repuesto
recomendadas por e! fabficante de su
segadora o qua cdmplen con los
especificaciones de _ste
oSiempre mantenga una cuchilla afilada en su
segadora
o Siempre permita qua el motor se enfrfe
antes de guardafla en cuatquier recinto
cerrado,
° Nonce guarde la segadora con combustible
en el estanque dentro de un edificio endende
los gases pueden alcanzar una llama
expuesta o una fuente de tgnici6n, tal como el
calentador de agua, la estufa de
calefacci6n, ta secadora de rope, etc.
PRECAUC|ON: Siempre desconecte el
atambre ,de la bujla y pbngato donde no pueda
entrar en contacto con [a bujfa, pare eviler el
arranque por accidente, durante la preparaci6n,
el tr'ansporte, el ajuste o cuando se hacen
reparaci_nes
PRECAUCI6N; Es conocido por el Estado de
California qua los gases de escape del motor de
este productor contienen qufmicos los cuales a
ciertos niveles, pueden ocasionar, cancer,
defectos de nactmlento, y otros da[_os al sistema
rep_oductlvo.
16
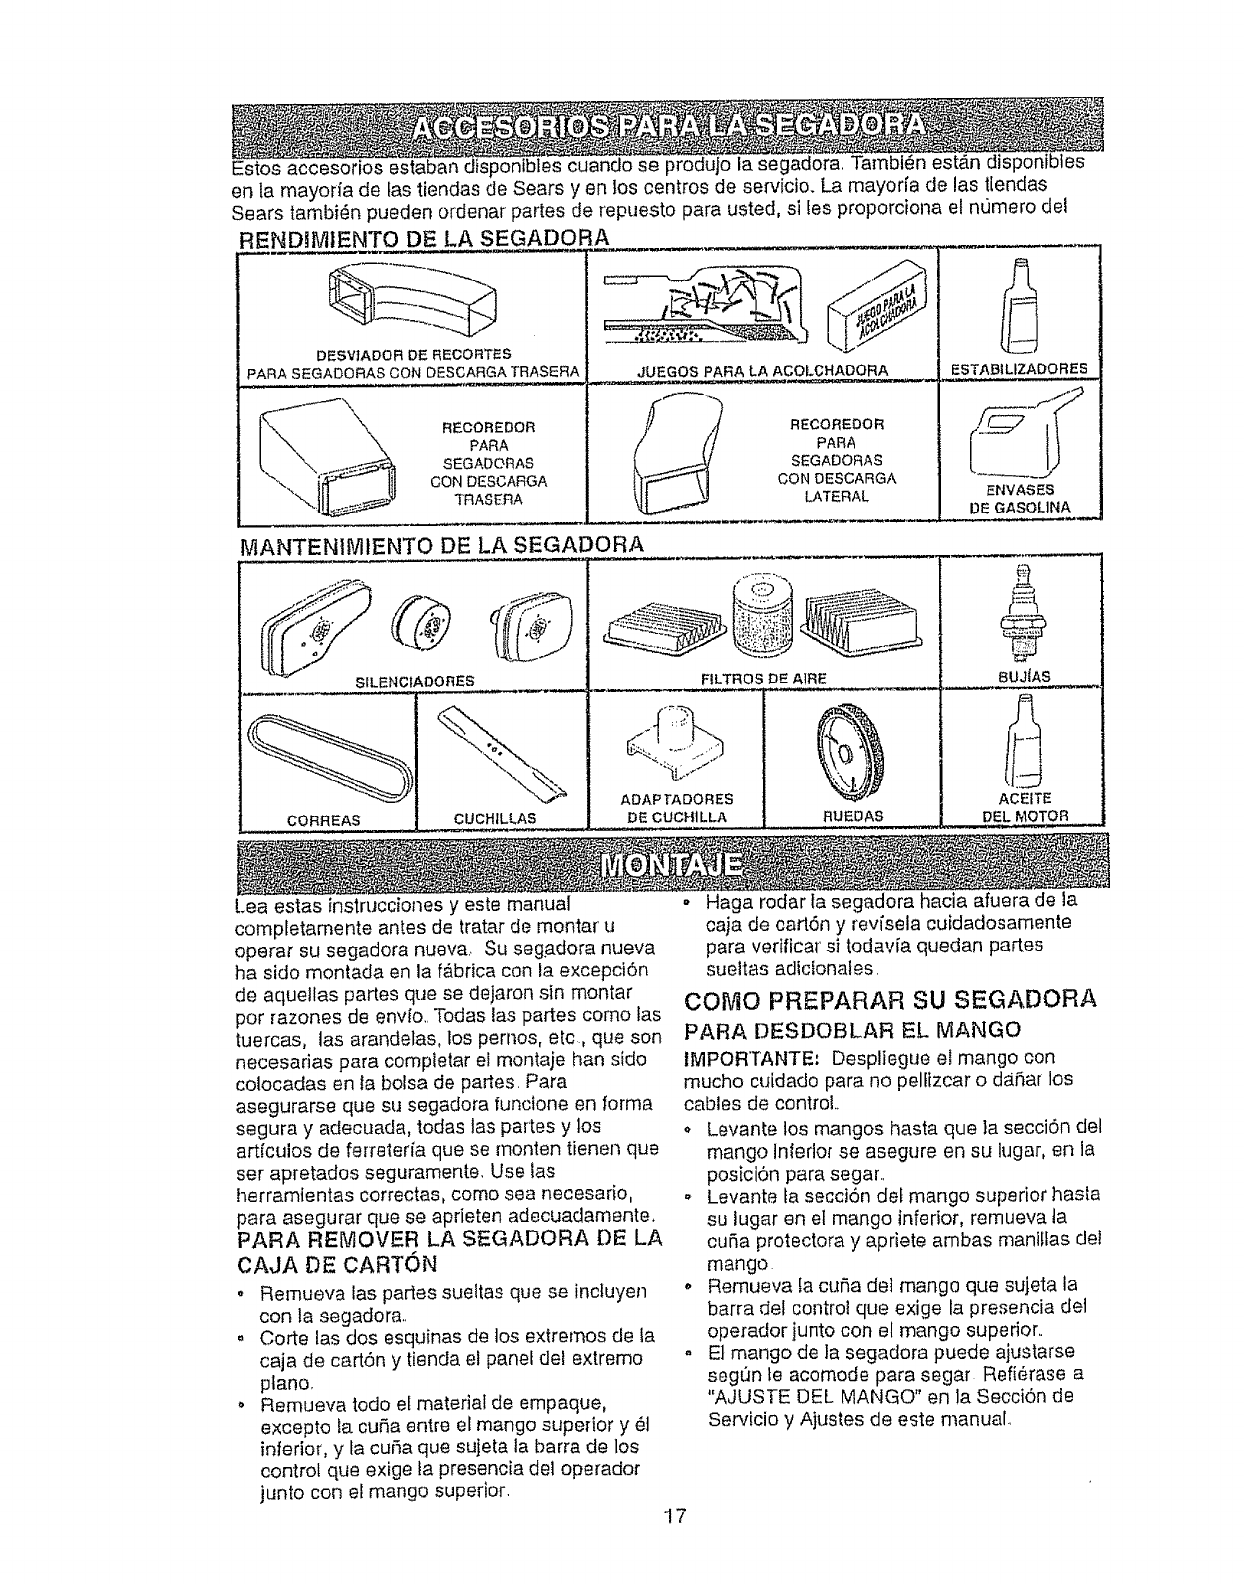
Estos accesorios estaban dispontbles cuando se produjo la segadora, Tambien estAn disponibles
en la mayorfa de fas tiendas de Sears yen los centros de servicio. La mayorfa de las lendas
Sears tambi_n pueden ordenar partes de repuesto para usted, si [es proporciona et numero del
RENDaMtENTO DE LASEGAD. ORA __.
DESV]ADOR DE. RECOITIS
PARA SEGADORAS CON DESCARGA TRASERA JUEGOS PARA LA AGOLCHADQRA ESTABILIZADORES
\ = oo=E°o=pA=A
SEGADORAS
CON DESCARGA
"fRASERA
MANTENIMIENTO DE LA SEGADORA
RECOREDOR
PARA
SEGADORAS
CON OESCARGA
LATERAL
ij
9S
ENVASES
DE GASOLINA
SILENC|AOORES
CORREAS i
CUCHtLLAS
ADAP TADORES
DE CUCHtLLA
W
8UJiAS
ACEITE
DEL MOTOR
........ .:=:::.,
Lea estas instrucciot_es y este manual
comptetamente antes de tratar de montar u
operar su segadora nueva, Su seg+adoranueva
ha sido montada en la fAbrica con la excepci6n
de aquellas partes que se dejaron sin montar
pot razones de envfo,, Todas ins partes como Ins
tuercas, Ins arandelas, los pernos, etc, que son
necesarias para compietar el montaje ban sido
colocadas en la bolsa de partes. Para
asegurarse que su segadora functone en forma
segura y adecuada, todas las partes y los
arlcuios de ferreterfa que se monten tienen que
ser apretados seguramente, Use ins
13erramientascorrectas, como sea necesario,
para asegurar que se aprieten adecuadamente,
PARA REMOVER LA SEGADORA DE LA
CAJA DE CART(SN
.Remueva las partes sueltas que se inctuyen
con ta segadora.
= Corte Ins dos esquinas de los extremos de la
caja de cartSn y tienda et panel del extremo
piano,
Remueva todo e[ material de empaque,
excepto 1_cuSa entre el mango superior y _]
inferior, y fa cuSa que sujeta la barra de los
control que exige fa presencia de1operador
junto con el mango superior.
Haga rodar la segadora hacia afuera de la
cain de cartSn y rev[sela cuidadosamente
para verlicat si todav[a quedan partes
sueltas adicionales
COMO PREPARAR SU SEGADORA
PARA DESDOBLAR EL MANGO
IMPORTANTE; Despliegue el mango con
mucho cuidado para no pellzcar o daSar los
cables de control
. Levante los mangos hasta que la secciSn del
mango Inferior se asegure en su lugar, en la
posiciSn para segar.
. Levante fa secciSn def mango superior has_a
su lugar en et mango inferior, remueva ta
cuRa protectora y apriete ambas mantfas del
mango
o Remueva ta cuSa de] mango que sujeta ia
barra det control que exige la presencla det
operador junto con el mango superior,,
° El mango de la segadora puede ajustarse
seg[]n _eacomode para segar Ref{erase a
"AJUSTE DEL MANGO" en la Secci(_n de
Servicio y Ajustes de este manual
17

Barradecontrolqueexige{a
presenciadeioperador"---.
Mangosuperior
Levantar
Mangoinferior/
Posict6npara
segar
FAMILIARICESE CON SU SEGADORA
LEA ESTE MANUAL DEL DUEllO Y LAS REGLAS DE SEGURIDAD ANTES DE oPARAR Su
SEGADORA Compare las ilusLracionescon su segadora para familiadzarse con la ubicaci6n de los
diversos controfes y ajustes. Guarde este manual para referencia en el futuro.
Estos simbolos pueden apareser sobre su segadora o en la literatura proporcionada con el
productoo Aprenda y comprenda sus significados.
ATTENGt_N O MOTOR MOTOR RAPIDD LENTO ESTR.t-_IGU COM. ACEITE PELIGRO r-4tUARDE LAS
•ADV'ERTENCtA ENCENDJDO APAGADO LAC_H 8USTIgLF-. MANO._ Y LgS PI¢_S LEJO5
CordSn arrancador Barra de control que exige
ta presencia del operador
Manitla det
mango Puntaf de tope
Abrazadera
de] cable
Tapa del deposito de acelte
del motor con varilla
indicadora de nivel
Cable de control de fa
velocidad dei motor
Tapa del deposito
gasotlna
Cebador
Proteccf6n Caja
contra la
descarga Ajustador de ia rueda
(En cada rueda)
P}ace de la
acolchadora
CUMPLE CON t.OS REQUISITOS DE SEGURIDAD DE [A CPSC
Las segadoras a motor; que se conducen desde ]a parte de atr#,s,rotatorias, Sears, cumplen con los
est_ndares de seguddad det American Na{ional Standards insf_tutey de la U.S. Consumer Product Safety
Comm!_tono La cuchfl_ag!ra cuando el motor estAfuncionando.
Bara de ocntrol que exige ta presencia del
operador - tiene que sujetarse abajo, Junto con
e! mango, para hacer arrancar el motor.
Su_ltela para parar el motor.
Cebador - bombea combustible adicional desde
el carburador at cillndro para uso cuando se
necesita hacer arrancar un motor frio,
Oord6n arrancador - se usa para hacer
arrancar el motor.
Ptaca de la acolchadora- situada en la
abedura de la descarga y debe ser quitada
cuando se convlerte la operaccton de
ensadcado a descarg&
18
La operact6n de cualquier segadora puede hacer
qua salten objetos e_raSos dentro de sus ojos, Io
qua puede producir dares graves en 6stos.
Sfempre use anteojos de seguridad o protecci6n
para los ojos mientras opera su segadora o cuando
haga ajustes o reparaciones Recomendamos una
mascara de seguridad de visi6n amplia, pare use
espeJueloso anteojos de seguridad estandarle
COMO LtSAR SU SEGADORA
VELOCtDAD DEL MOTOR
La velocidad del motor se estableci6 en la f;_.qbdca
pare un rendimiento 6primo. La velocidad no se
puede ajustar.
CONTROL DE ZONA DEL I'_OTOR
PRIECAUCION: [..as regulaciones federales
exigen qua se instale un control par a e! motor
en esta segadora para reducir a un mfnimo el
riesgo de lesionarse debido al tentacle con ia
cuchi{t& Per ningL)n motive trate de eliminar
ta funci6n del control del operadoro La cuchilla
gira cuando el motor est6 funcionando.
o Su segadora viene equipada con una barra de
contrc4clue exige la presencia del operador, Io
que requiere que el operador est6 detr&s de_
mango de la segadora pare haceda arrancar y
operada..
PARD, AJUSTAR LA AL'TURA DE CORTE
,, Levante las medas para el corte bajo y baje las
ruedas para el corte alto
o Ajuste la attura de corte pare qua se acomode a
sus requisites La posici6n de! medio es la major
pare la mayor[a de los cespedes..
o Pare cambiar la aJturade core, empuje fa
palanca del ajuslador hacia In nJeda Mueva ta
r,Jedahacia arriba o hacia abajo de mode que
se acomode a sus requisites Asegurese qua
todas las ruedas queden igualmente ajustadas.
ATENCI6N: El ajustador esta correctamente
colocado cuando los orejas de laplaca estb.n
insertadas en el agujero del mango. Tambi6n, !os
ajustes de 9 posiciones (st equipado} pemqitenqua
el mango pueda set movido entre fas orejas de la
place.
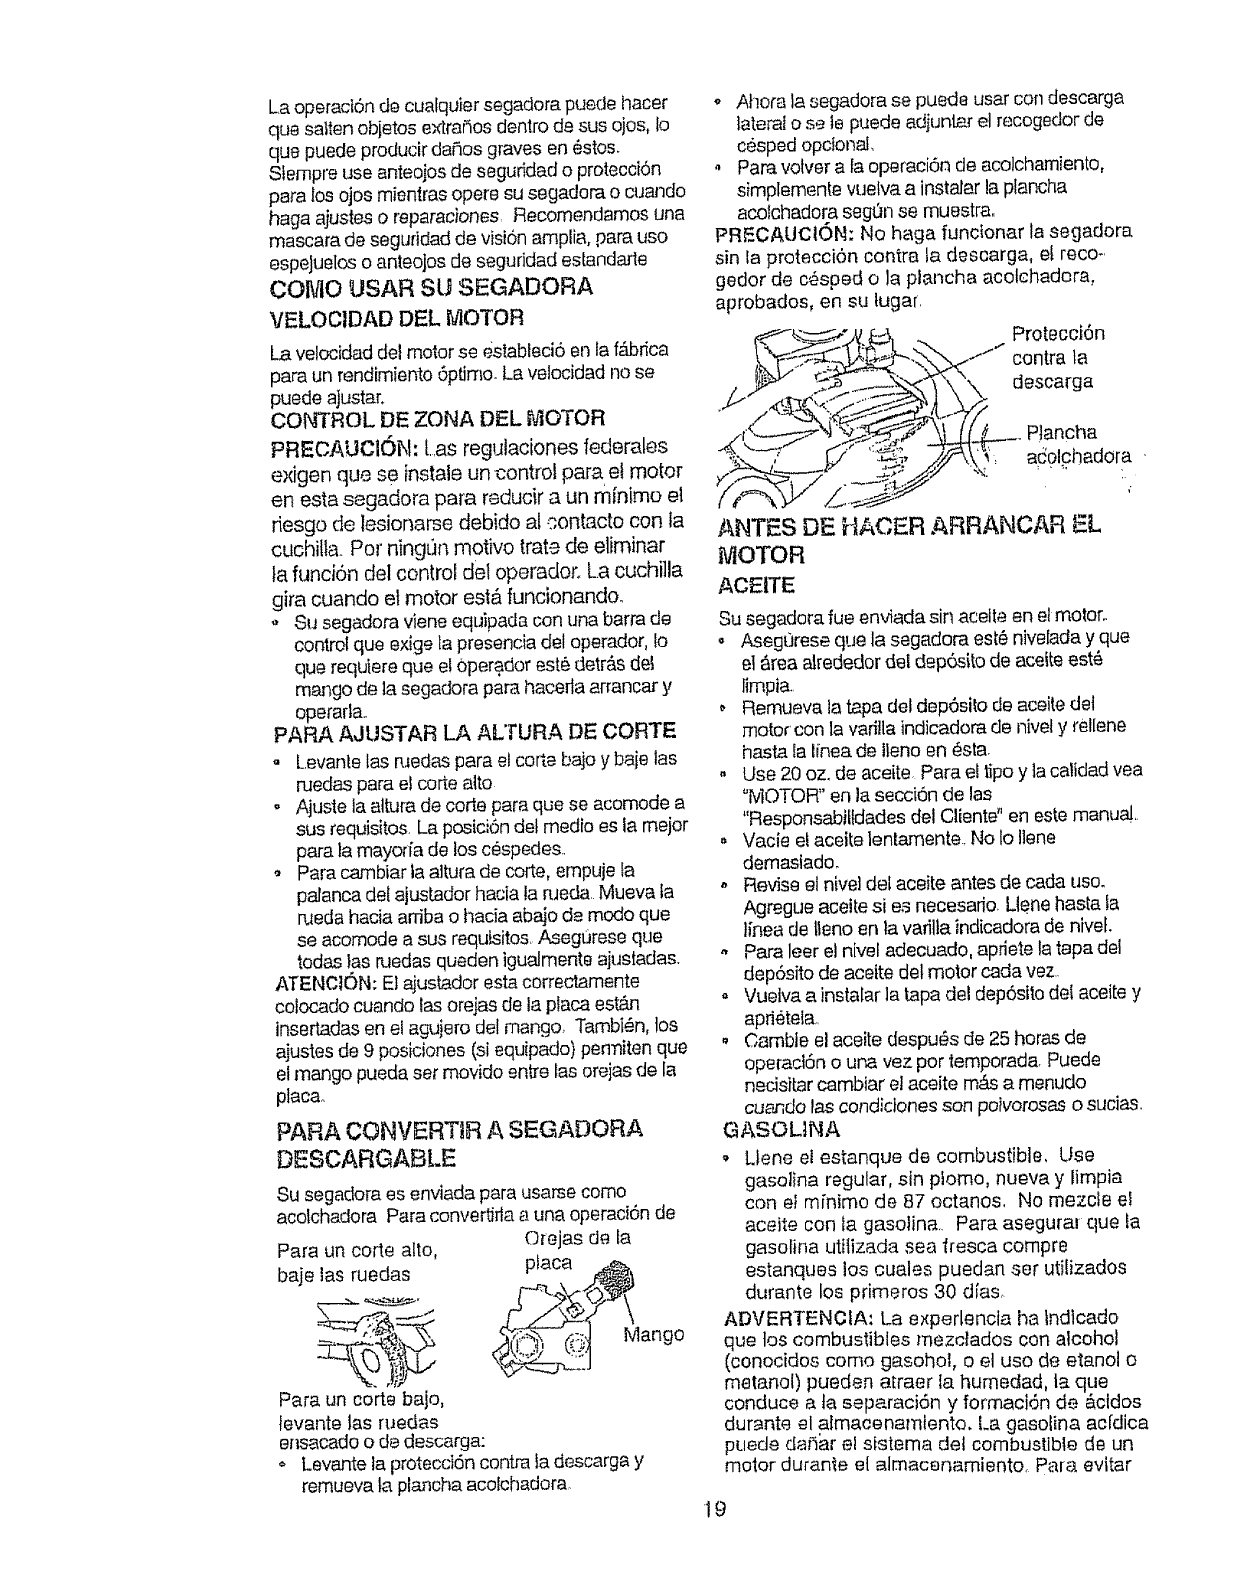
PARA CONVERTtR A SEGADOFtA
DESCARGABLE
Pare un corte alto,
baje los ruedas
Para un torte bajo,
levante las ruedas
ensacado o de descarga:
Su segadora es enviada pare usarse come
acolchadora Para convertifla a una operaci6n de
Orejas de fa
p}aca 2_
i;';);, (I-'_; Mango
Levante la protecd6n centre ia descarga y
remueva la plancha acolchadora
o Ahora la segadora se puede USErcon descnrga
lateral o sete puede adjuntar el recogedor de
cesped opclonal,
• Pare votver ata operaci6n de acolchamiento,
simplemenle vuelva a instalar la plancha
acolchadora seg0n se muestra.
PRECAUCI6N: No haga functonar la segadora
sin la protecci6n centre ta descarga, et race-.
gedor de c,6soed o la plancha acotchadora,
aprobados, en su tugar.
__',v _, . Protecci6n
'.\ ,; _/ ".._._L-,_"/ilk\"*': a_olchadora.
{i'%'y
ANTES DE HACER ARRANCAR _.L
MOTOR
ACEffE
Su segadora rue enviada sin aceile en elmotor.
* AsegOrese que la segadora est6 nivelada y qua
el 6rea aJ_'ededordel dep6sito de aceite est_
limpia..
o Remueva la tapa del dep6sito de aceite dot
motor'con la varilla indicadora de nivety rellene
haste In linea de ileno en _sta
- Use 20 ozode acei[e..Pare el ripe y la calidad yea
"MOTOR" en la secci6n de los
"Responsabif{dades del Cliental' en este manual,.
, Vacie el aceite lentamente. No Io Ilene
demaslado.
-Revise el nive] del aceite antes de coda use.
Ag_gue aceite si es necesario, Uene haste la
tinea de tleno en la varilta indicadora de nivef.
,, Pare leer el nivef adecuado, apriete la tapa del
dep6sito de acette del motor coda vez..
o Vuelva a instalar la tapa del dep6sito del aceite y
apri6tela.
,Camble el aceite despu6s de 25 heros de
operaci6n o ur'a vez per temporada Puede
necisitar cambiar el aceite m&s a menudo
cua_do los condiciones son poRerosas o sucias..
GASOUNA
°Ltene el estanque de combustible, Use
gasotina regular, sin pfomo, nueva y limpia
con el mi'nimo de 87 octanes, No mezcle e!
aceite con fa gasoline.. Para asegura_ que la
gasoline uttlizada sea "tresca compre
estanques los cuales puedan ser utilizados
durante los primeros 30 dias_
ADVERTENOIA: La e×perlencla ha Indtcado
que los combustibles mezc/ados con alcohol
(conocidos come gasohot, o el use de etanol o
metanol) pueden atraer ta humedad, la que
conduce ata separaci6n y formaci6n de &cldos
durante el almacenamlento, La gasolina acldica
puede daiiar el sistema det combustible de un
motor duranle el almacenamiento, Pare evitnr
losproblemasconelmotor,sedeberacierel
sistemadelcombustibleantesdeguardadoper
unperfodode30dfasomb,s Vacleelestanque
defcombustiNe,hagaarrancarel motor y
hAgalo funcionar hasta que las !fneas del
combustible y el carburador queden vacfos, La
pr6xima temporada use combustible nuevo,
Vea tas lnstruccfones Para El Almacenamiento
pare mb,s informaci6n, Nunca use productos de
timpieza pare et motor opara el carburador an
el estanque de] combustible pues se pueden
producir dai'ios permanentes
,- f-r_tpa del
..J---"_z-_. .... rellenador de
Tapa de, ..-_ t-_'t",._,_.'_:_\ gasotina
acoitecon
PARARACERARR,'- NCAnELMOTOR
" Pare hacer arrancar un motor fifo, empuje et
cebador cinco (5) veces antes de tratarto_
Empuje f]rmemente, Este paso normalmente no
es necesario cuando se hace arrancar un motor
que ya ha estado tuncionando per unos cuantos
minute&
• Suje|e la barra de controles que exigen la
presencia del operador abajo an el mango y tire
el mango del arrancador r#.pidamenle_No
permita que el cord6n arrancador se devuelva
abruptamente
•Para parar et motor, suelte la barra de controles
qua exigen fa presencia del operadoro
AVlSO: En dimas m&s fries puede que sea
necesario repegrlos pasos del cebado..En climas
m#,scaturosos el cebar demasiado puede producir
el ahogo y el motor no va a arrancar. Si se ahoga el
motor espere unos cuantos minutes antes de tratar
de hacello a[rancar y no repita los pasos det
cebado,
CONSEJOS PARA SEGAR
•Bajo clertas condiciones, tal come c&sped muy
alto, puede ser necesado el elevar la attura del
torte para reducir el esfuerzo necesario pare
empujar la segadore y para evitar sobrecargar el
motor, dejando montones de recortes de c_sped.
,, Para un c_)demuy pesado, reduzca el ancho del
corte pasando parclalrnente per encima del lugar
anteriormente cortado y siegue lehiamente.
• Sitas segadoras de descarga laterancorten en
una direcci6n contraria a las man!lies del reloj, si
se em-pieza en ta parle de afuera del Area que
se va a cortar, se repaitir&n los recortes del
c#sped en forma m&s pareja y el motor se
cargar,_menos. Para evttar que los recortes
caigan en los senderos, en las flores, etc., haga
los primeros cortes en la direcci6n de tas manillas
del reloj
oLos pores en los !ecogedores de c6sped de tela
pueden llenarse con mugre y polvo con el use y
los recogedores recaudar,Cnmenos c#sped,
2O
Pare evitar 6sto, rocfe el recogedor con la
mangue_ade ague, regularmente, y d6jelo
secarse antes de usar!o
° Mantenga la parte superior del motor, atrededor
del arrancador; despejada y sin recedes de
c6sped y paja. Esto ayudar_ el flujo del aire del
motor y extender#, la duraci6n 6ste,
CONSEJOS PARA SEGAR Y ACOLCHAR
IMPORIAN1-E: Para obtener el meier rendimiento
mantenga ta caja de la segadora sin acumulaci6n
de cesped y basua,.Vea "LIMPIEZA" en taseccDn
"RESPONSABILIDADES DEL CLIENTE" de este
manua!.,
• La cuchifla acolchadora especial vaa vofver a
cedar los recortes de c_sped touches veces, y
los reduce en tamaSo, de mode quesi se caen
en el c_sped se van a dispeser entre 6ste y no
se van a notar,.Tambi_.n,el c_sped acolchado se
va a deshacer r@tdamenle entregando
substancias nutdtivas para el c_sped Siempre
acolche con la velocidad del motor (cuchilia) m_s
ella, pues as[ se obtendr,_la meier acci6n de
recorte de las cuchillas
,, Evite cedar et cc-sped cuando est_ mojado El
c_sped mojado iiende a fon'nar montones e
interfiere con la acciSn de acolchado, La major
hera pare sega_ el cesped es temprano en fa
tarde. A esa hera _ste se ha secado y el area
reci_n coflada no quedar,_expuesta al sol
directo.
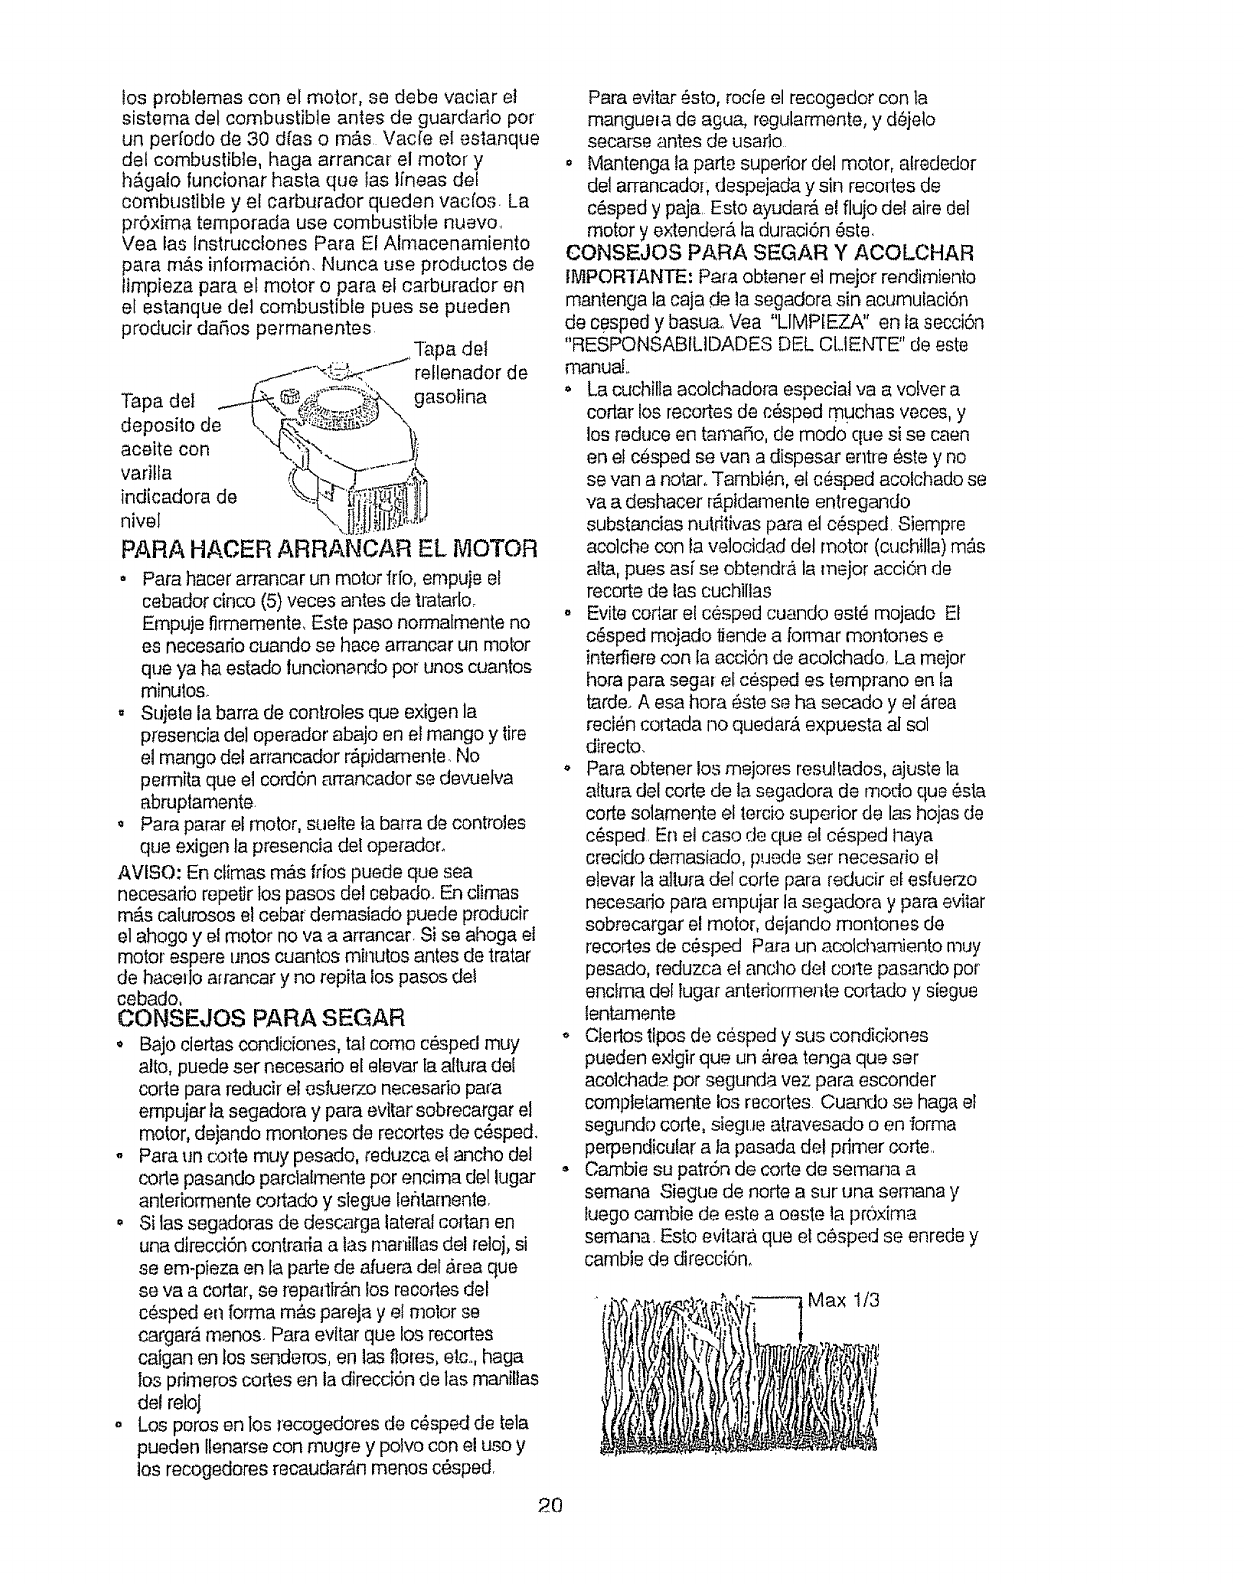
o Pare obtener los mejores resultados, ajuste la
altura del code de la segadora de mode que ¢sta
corte solamente el terciosuperior de las hojas de
c_sped. En el case de que el c_sped haya
crecido demasiado, puede ser necesario et
elevar la altura del code para [educirel esfuerzo
necesado para empujar la segadora y pare evilar
sobrecargar el motor, deiando montones de
recedes de c_specl Para un acolchamiento muy
pesado, reduzca el ancho del co_tepasando per
enclma del tugar anteriorrnente cortado y siegue
lentamente
o Ciedos ttpos de cesped y sus condiciones
pueden exfgir que un .4teatenga que ser
acoichade per segunda vez para esconder
compielamente los recortes Cu&qdo se haga el
segundo code, siegue atravesado o en brma
perpendicular a la pasada del pdrner code..
- Cambie su patr6n de corte de semana a
semana Siegue de norte a sur una semana y
luego cambie de este a oeste ]a pr(*_xima
semana. Esto evitara,que et c6sped se enrede y
cambie de direccbno
Max 1/3
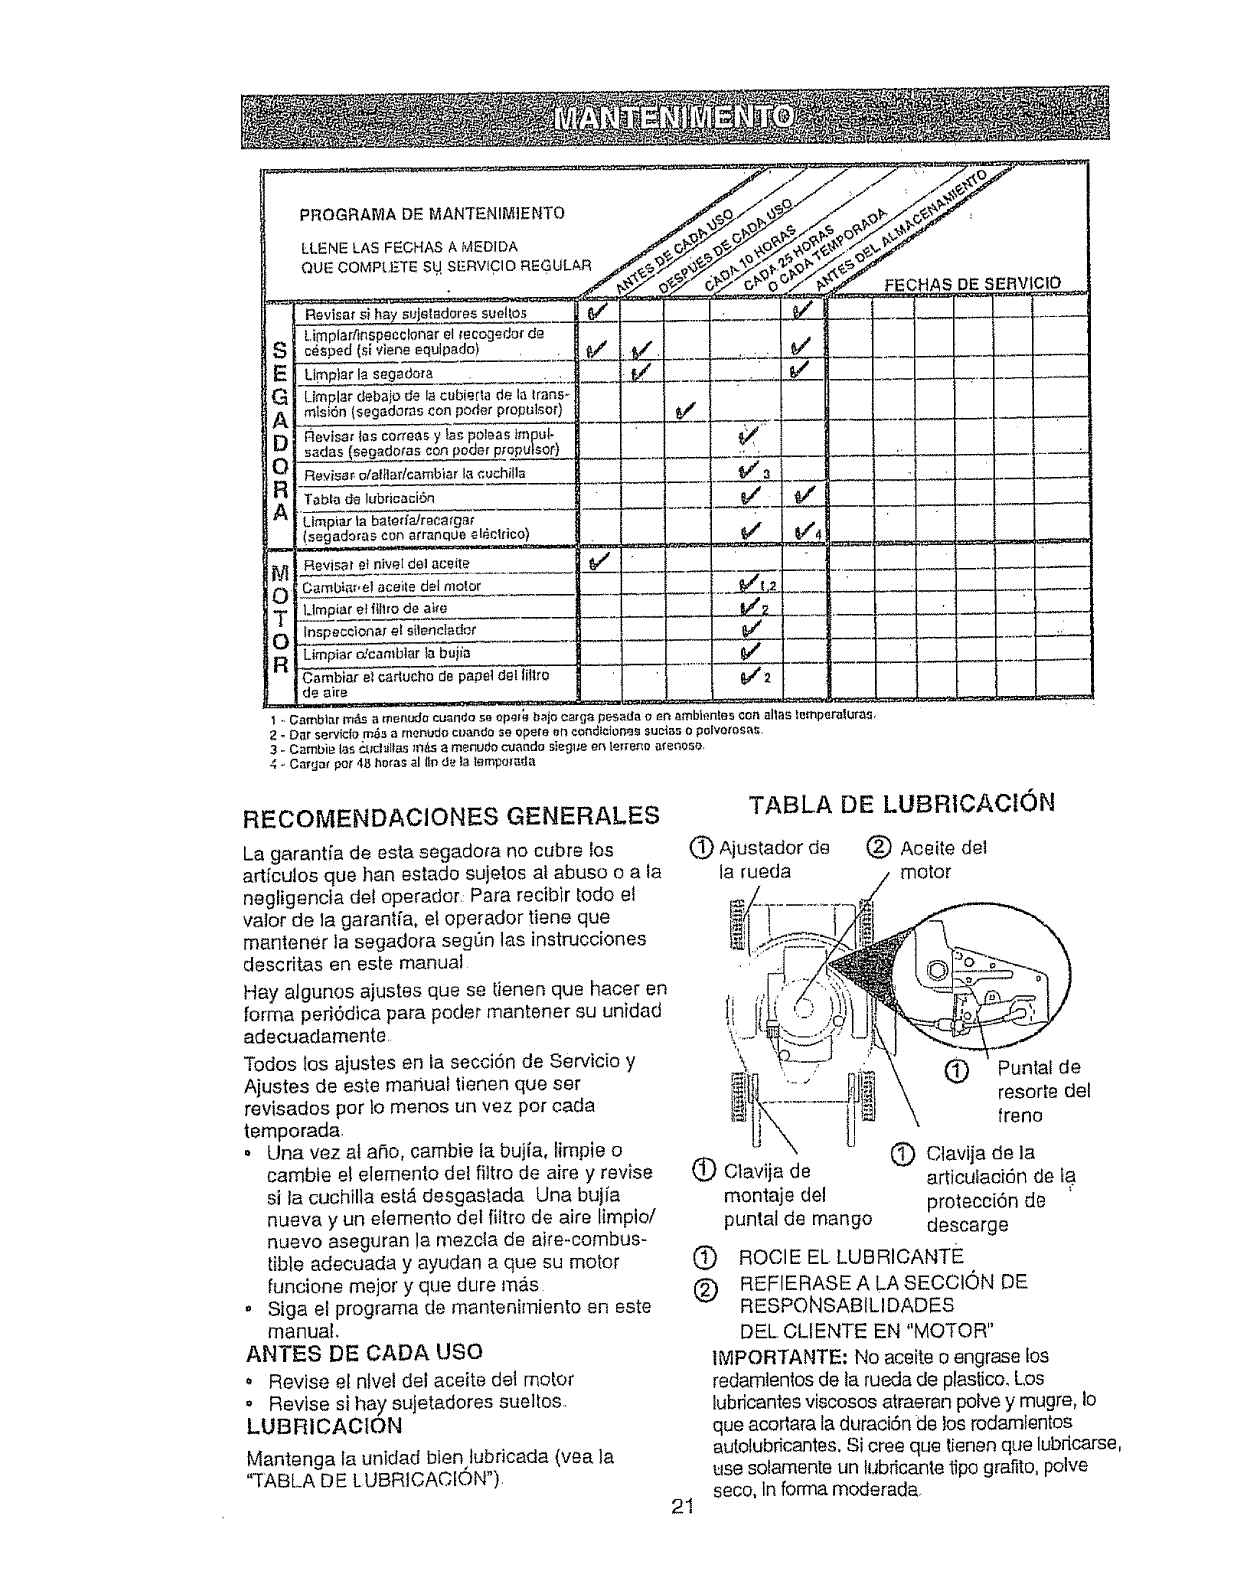
PROGRAIVIA DE I'4ANTENIM]ENTO
£LENE LAS FECHAS A MEOIDA
QUE COMPLETE SU. SERVICIO REGULAR
SI
El
GI
AI
Di
O1
RI
AI
RI
Reviser si hay sujeladores sueltos
Liraplarfinspecclonar el tecogedof de
cesped (si viene equipado)
Limpiar la segaciora
Umplar debajo de la cuDietta de la lrans- :
m|si6n (segadoras con poder propulsor)
Reviser tas coffees y las
sadas (segadoras con
Revis,_r. o/alttar!cambiar la cuchilla
Table de lubricaci6n
)i_r la ba_eda/recatga_
ado[as con atra#qoe el_cltico)
Reviser et niveI del aceile
Cambiat, el aceite deI meier
Llmpiar et filtro de aife
lnspeccionaf el silenctadot
Limpiar o.tcambiar fa bujit_
Cambiar el ¢ar_ucho de paget del lil#o
de ai[e
I- Cambt_r m&._ a men#do cuande se oiPer_balr_eat! ;apesada o en ambienfos con allas lempereluras,
2 - Oa_rservido ra4_,JamenuU# c#ando se o_,ef8 er_cendl¢fene_ 5uciBs o polvotosas
3 - C_mbie {as _cl_iltas m&s a menudo cuando siegue en le_-Tenoafer_ose.
4 - Ca_,ga_per 48 l_orasal ttn de fa tempe_'aata
RECOMENDAClONES GENERALES
La garantia de es{.asegadora no cubre los
artfculos que ban estado sujetos al abuse o a la
negligencia del operador: Para recibir rode el
valor de la garantfa, et operador tiene que
mantener la segadora segQn las instrucciones
descritas en este manual
Hay algunos ajustes que se tienen que hacer en
forma peri6dica para poder mantener su unidad
adecuadamente.
Todos los ajustes en fa secci6n de Servicio y
Ajustes de este matiuaf tienen que ser
revisados per Io menos un vez per cada
temporada.
o Una vez al aSo, cambie la bujia, timpie o
eatable et elemento deI fi]tro de aire y revise
si la cuchilla estA desgastada Una bujfa
nueva y un elemento del fiftro de aire limpto/
nuevo aseguran la mezcla de aire_combus-
tible adecuada y ayudan a que su motor
funcione meier y que dure rnas
o Siga el programa de mantenimiento en este
manual
ANTES DE CADA use
, Revise el ntvel del aceite del motor
• Revise si hay sujetadores sueltos..
LUBRICACION
Mantenga, fa unidad bien tubricada (vea la
"TABLA DE LUBRICACION"),
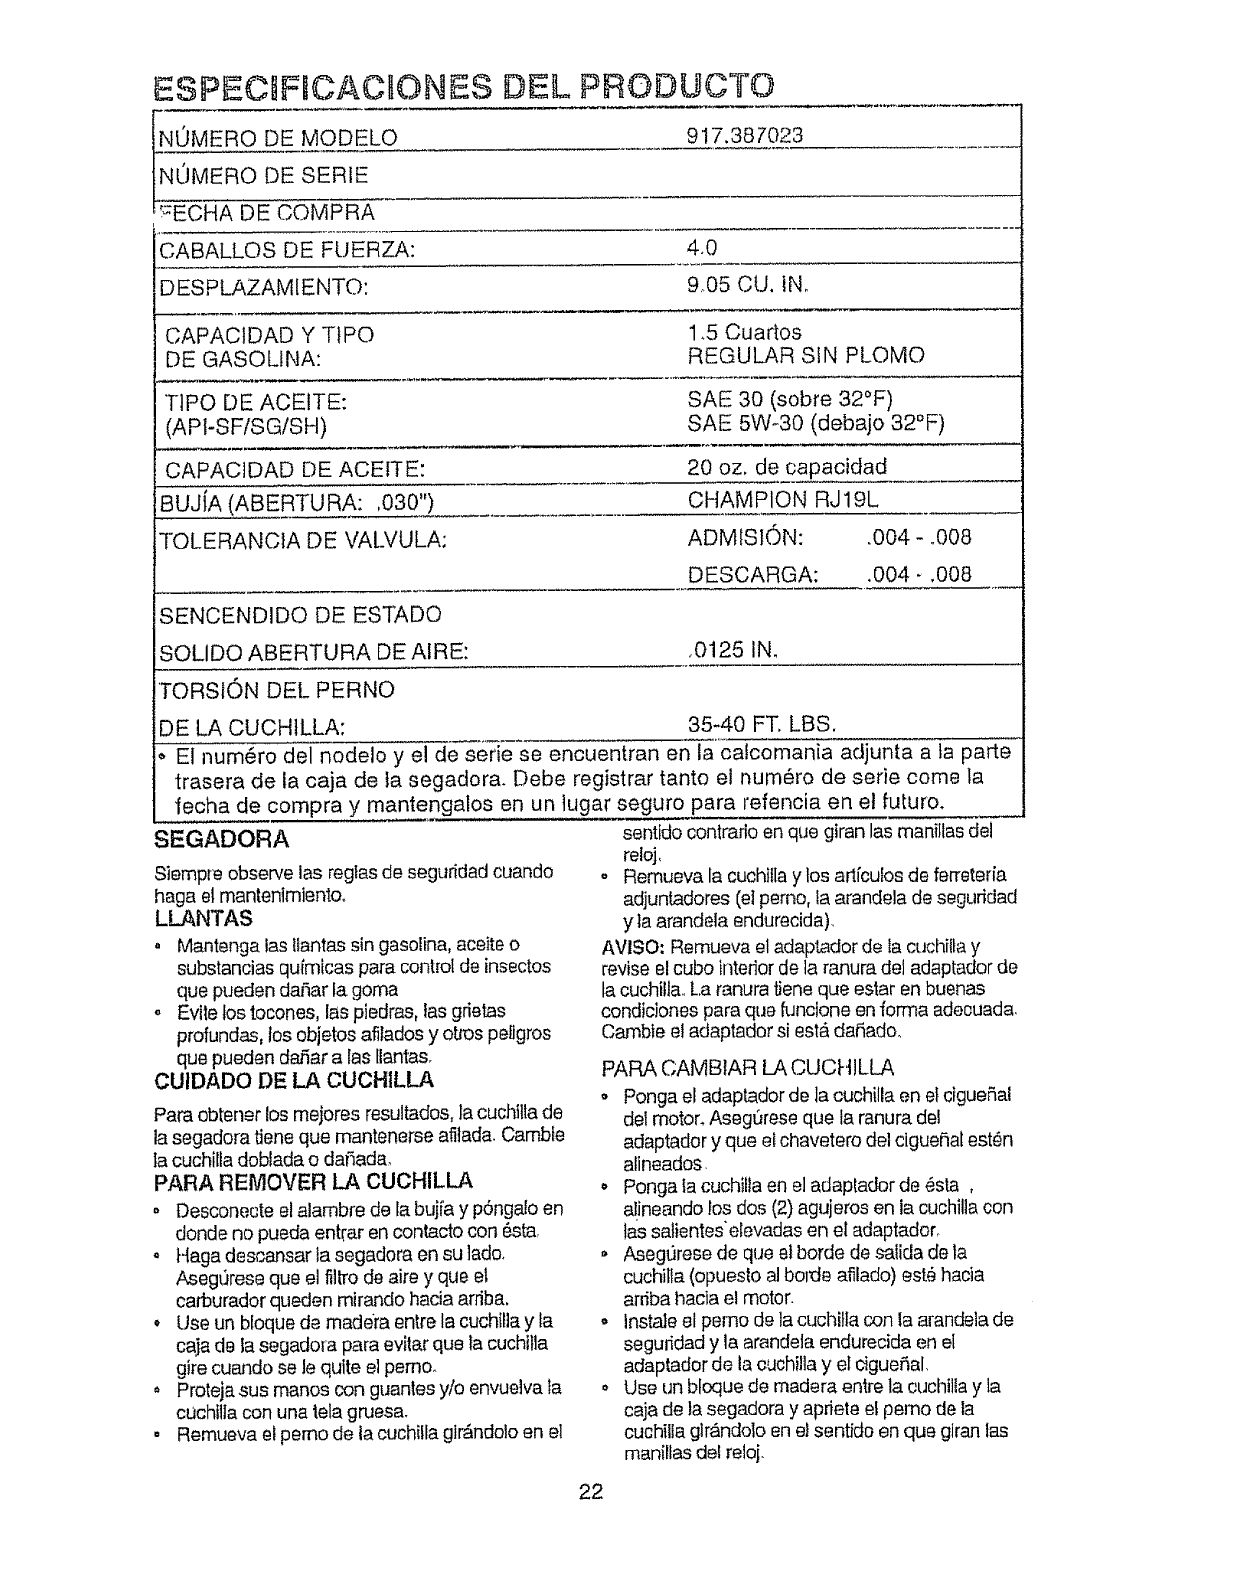
TABLA DE LUBRICAClON
(_ Ajustador de (_ Aceite del
la rueda motor
21
\(_) Puntal de
resorte del
freno
(_ Clavija de
®
®
(_ Ciavija de la
articulaei6n de fa
montaje del protecci6n de
punlal de mango descarge
ROCIE EL.LUBRICANTE
REFIERASE A LA SECClON DE
RESPONSABILIDADES
DEL CLIENTE EN "MOTOR"
IMPORTANTE: No aceite o engrase los
redamlentos de ta rueda de plaslico, Los
tubricantes viscosos atraeran polve y mugre, Io
que acerlara ta duraciSn de los rodamlentos
autolubricantes, Si cree que _ienenque lubdcarse,
_se sotamente un lubricante ripe grafito, polve
seco, In forma moderada.
ESPECUFRCACHONES DEL PRODUCTO
!N MER_ OD!MOD LO
917,38 7023
UMERO DE SERIE-
r_F_CHA DECOMP--R-A
CABALLOS DE FUERZA: 4.0
:)ESPLAZAMIENTO: 9.05 CU. IN.
CAPACIDAD Y TIPO 1.5 Cuartos
DE GASOLINA: REGULAR SIN PLOMO
TIPO DE ACEITE: SAE 30 (sobre 32°F)
(AP1-SFiSGiSH) SAE 5W-30 (debajo 32°F)
CAPACIDAD DE ACEITE: 20 oz. de capacidad
BUJiA (ABERTURA: ,030") CHAMPION RJ 19L
TOLERANCtA DE VALVULA: ADMISION: ,004 - .008
DESCARGA: .004 - .008
SENCENDIDQ DE ESTADO
SOLIDQ ABERTURA DE AIRE: ,0125 IN,
TORSION DEL PERNO
DE LA CUCHILLA: 35-40 FT, LBS,
El num_ro del nodelo y el de serie se encuentran en la calcomania adjunta ata parte
trasera de la caja de fa segadora. Debe registrar tanto el num6ro de serie come la
iecha de compra y mantengalos en un ]ugar seguro para refencia en el futuro.
sentido contrarlo en que gtran las manittas del
_EGADORA reloj,
o Remueva la cuchittay los art[culos de ferreteria
adjuntadores (el pemo, la arandela de seguridad
y la arandela endurecida),
AVlSO: Remueva el adaptador de la cuchilta y
revise el cubo interior de la ranura del adaptador de
la cuchilla, La ranura tiene que estar en buenas
condiciones para qua funcione en forma adecuada,
Cambie et adaptador si est_ dafiado,
Siempre observe ias reglas de seguridad cuando
haga el manlentmiento_
LLANTAS
° Mantenga las !lantas sin gasoline, aceite o
substancias quimicas para control de insectos
que pueden darer la goma
o Evlte los tocones, las piedras, las grietas
profundas, los objetos afilados y otros peligros
que pueden d&fiar a las flantas,
OUIDADO DE LA CUCHILLA
Para obtener los mejores resultados, la cuchitla de
la segadora flene que mantenerse afilada. Cambfe
Ia cuchilla dobladao da_ada_
PARA REMOVER LA CUCHILLA
o Desconecte el alambre de ta buj[a y p6ngab en
donde no pueda entrar en contacto con 6sta_
o Haga descansar la segadora en su lado.
Asegt]rese que el filtro de aire y que el
carburador queden mirando hacia arriba,
•Use un bloque de madere entre la cuchifla y ta
caja de ta segadora pare evitar que la cuchflla
gire cuando se le quite el pemo..
Proteja.sus manos con guantes y/o envuelva ta
cuchtlla con una iela gruesa.
. Remueva el pemo de la cuchilla glr&ndolo en el
PAPA CAMBIAR LA CUCHILLA
Ponga el adaptador de la cuchilla en el ctgue_a!
del motor, Asegerese que la ranura del
adaptador y que el chavetero del ciguefial est_n
alineados.
•Ponga la cuchilla en el adaptador de _sta ,
alineando !os dos (2) agujeros en ia cuchilla con
tas satientes'elevadas en el adaptador_
•AsegOrese de que et borde de salida de la
cuchilla (opueslo alboide afilado) est_ hacia
ardba hacia el motor.
•lnstale et pemo de la cuchiila con la arandeta de
seguridad y la arandeta endurecida en el
adaptador de la cuchilla y el dgueSal,
• Use up,bloque de madera entre la cuchiila y la
caja de la segadora y apriete el pemo de la
cuchilla glrAndolo en e! sentido en que giran las
menillas del reloj.
22
° La torsi6n pare aprelar recomendada es de 35 -
40 pies libra3°
IMPORTANTE; EI perno de la cuchitla es clase
8 tratado a cator.
AVISO: No recomendamos el afilar la cuchiiia-
pero si 1ohace, asegQresede que quede
balanceada
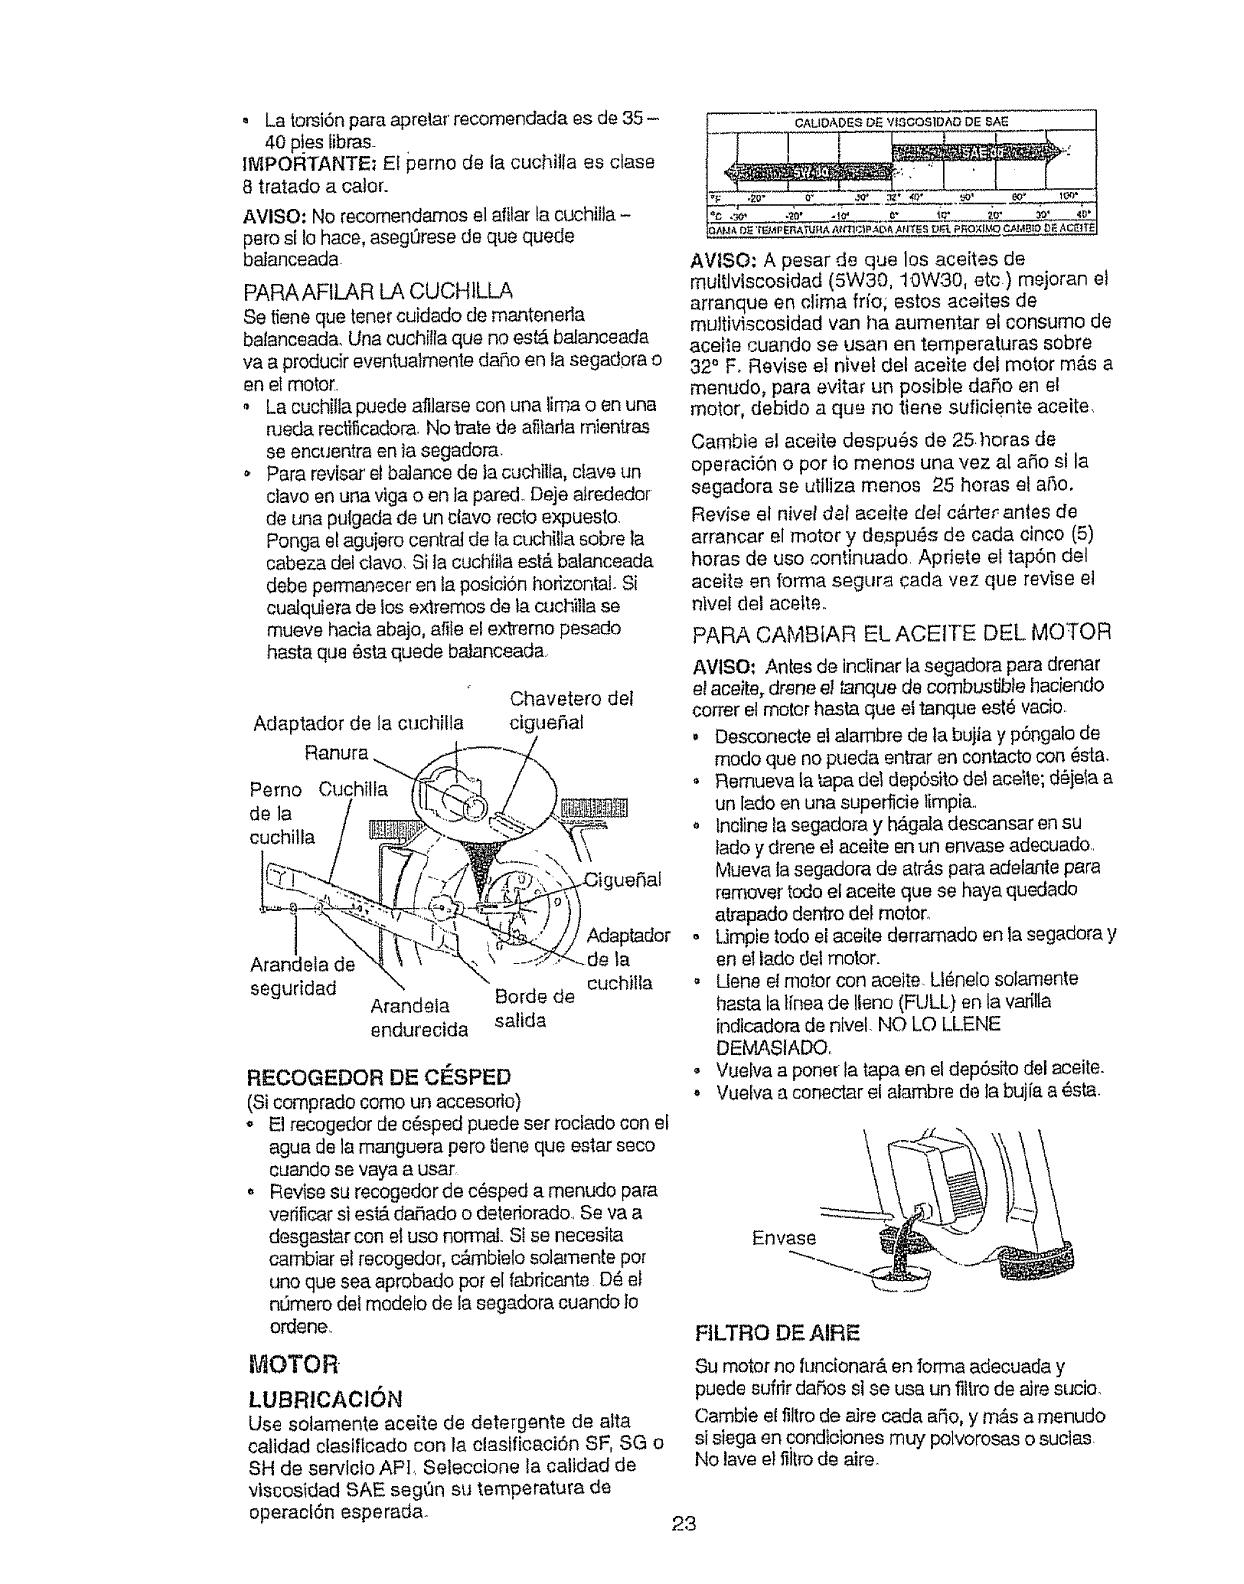
PARAAFILAR LA CUCHtLLA
Se tiene que toner cuidado de manteneda
batanceada. Una cuchilta que no esL4balanceada
va a producir eventualmente daflo en la segad0ra o
en el motor..
- La cuchilla puede afllarse con una lima o en una
rueda recfificadora. No trate de afilafla mientras
se encuentra en ia segadora.
Para revlsar etbalance de la cuclqilla, clav,3[.in
davo en una riga o en ta pared..Deje atrededor
de una puigada de un clavo recto expuesto.
Ponga et aguiero centraJde la cuchiUasobre la
cabeza def ctavo. Si ]a cuchiita estb,balanceada
debe pen'nanecer en la posicbn horizontal. Si
cualquiera de los ex_remos de ta cuchitla se
mueve hacia abajo, afife el extremo pesado
haste que 6sta quede baJanceada.
Adaptador de la cuchilla
Ranura.___%
Perno Cuchilla _4-_---:i_ /
l _"'" .... '_, I!.._XL __Ll_
Arandefa de \ _ "'%_." --<_:
seguridad ", "x
Arandela
endurecida
Chavetero del
ciguefiat
._C_guenal
_)) Adaptador
_-de la
cuchitla
Borde de
salida
RECOGEDOR DE CI_SPED
(St comprado como un accesorto)
o Ei recogedor de c6sped puede ser rocfado con el
agua de la manguera pero ttene que ester seco
cuando se vaya a usar_
, Revise su recogedor de c6sped a menudo para
verit]ear si est&de, ado o deteriorado_ Se va a
desgastar con el uso normal Si se necesita
cambiar el recogedor, c&mbielo solamente pot
uno que sea aprobado pot el fabficante D6 et
n_mero del modefo de la segadora cuando to
ordene.
CALIE)ADE$ OE VI._GOSIDi_D DE SAE -_---I
l_l_,'a ¢._B_o D__c_tE I
AVtSO: A pesar de que los aceites de
multlvtscosidad (5W30, 10W30, etc.) mejoran et
arranque en clima frio; estos aceites de
multMscosidad van ha aumentar el consumo de
aceite cuando se usan en ternperaturas sobre
32° F. Revise et nlvel del aceite del motor m6,s a
menudo, pare evitar un posible daSo en el
motor, debido a qua no tiene suficiente aceite.
Cambia al aceite despu6s de 25.bores de
operaci6n o por 1omenos una vez al afio si la
segadora se utilize menos 25 bores et aho,
Revise el nive/dal aceite def c6rte_ antes de
arrancar el motor y de_pu_s de cada cinco (5)
horas de uso continuado. Apriete el tap6n del
aceite en forma segura cada vez que revise el
ntvel del acette.
PARA CAMBIAR EL ACEITE DEL MOTOR
AVISO: Antes de inclinar la segadora pare drenar
el aceite, (:irenee! tar_quede combuslJbiehaciendo
cotter el motor has_ que el tanque est6 vacio.
, Desconecte et alambre de ta buila y p6ngalo de
modo que no pueda entrar an contacto con 6sta.
• Remueva ta _apadel rJep6sitode1aceite; d6jela a
un lado en una superficie limpia..
oIncline la segadora y hAga]a descansar en su
fado y drone el aceite enun envase adecuado..
Mueva ta segadora de a_-_s pare adelante pare
remover todo el aceite que se haya quedado
a_apado dent_odot motor..
o Limpie todo el aceile derrarnado en la segadora y
en e! lado det motor.
, Uene e!motor con aceite. Ll6nelo solamente
hasta la linea de !leno (FULL) en la varilta
indlcadora de nlvel. NO LO LLENE
DEMASIADO.
- Vuelva a poner la tapa en el dep6sito del aceite.
.Vuelva a conectar el atambre de la buj[a a 6sta.
FtLTRO DE AIREE
_OTOR
LUBRlCACiON
Use sotamente aceite de detergente de alta
calidad cfasificado con la elastficaci6n SF, SG o
SH de servicto APL Selecoione Ia calidad de
viscosidad SAE segQn su temperature de
operacl6n esperada.
Su motor no tuncionar& en forma adecuada y
puede sufrir dafios st se usa un filtro de aire sucio.
Cambie el filtro de aJrecada afio, y m_,sa menudo
si siega en condioiones muy polvorosas o suctas
No lave et _iJtrode aire.
23
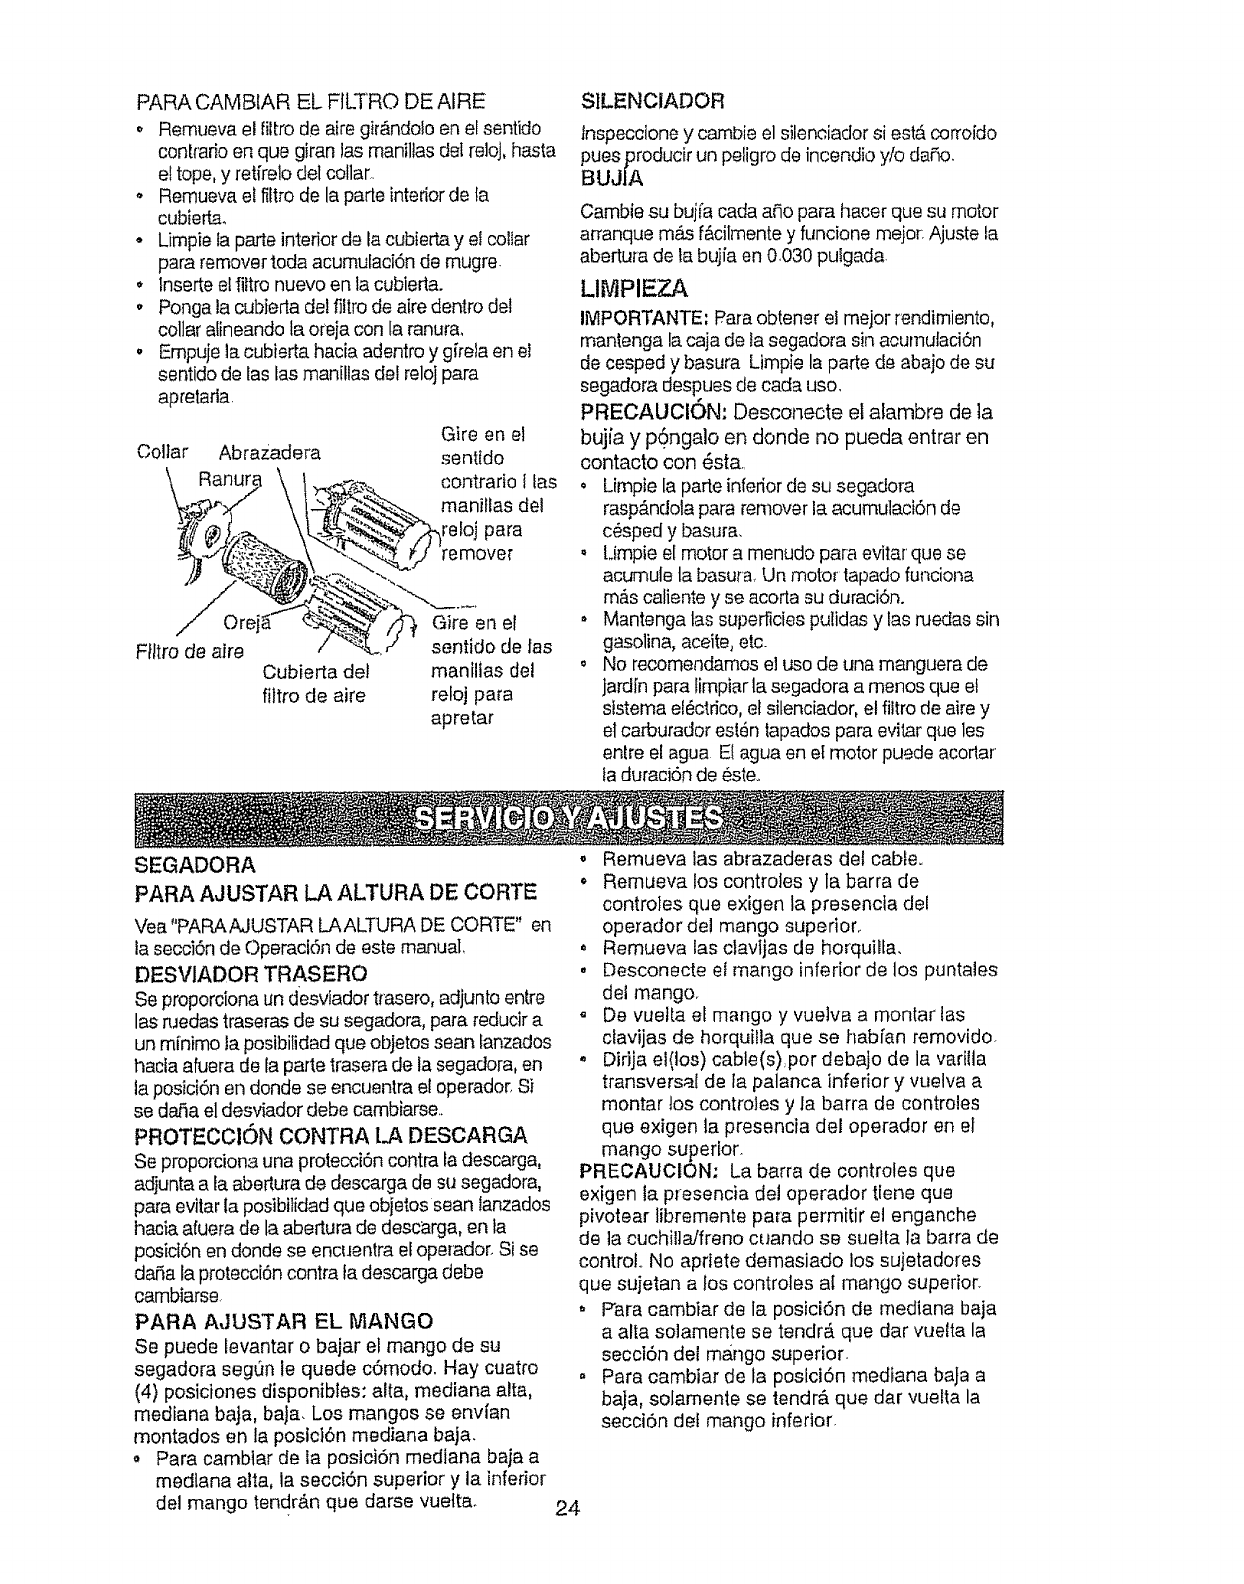
PARACAMBIARELFILTRODEAIRE
o Remuevaelfiltrode sire gir&ndoloen el sentido
cont[ario en que giran las maniltas det re]oj,hasta
el tope, y retfrelo del collar_.
', Remueva et filtro de la parle interior de ta
cubierta,
• Limpie la parte interior de la cubierta y el collar
para removertoda acumulaci6n de mugre
• lnserte el filtronuevo en la cublerta.
• Ponga la cubierta del filtro de aire dentro det
collar alineando la oreja con la ranur&
o Empuje la cubierta hacia adentro y gireta en el
sentido de las las manillas del reloj para
apretarla
Collar Abrazadera
Ranur_
Gire en et
sentido
contrario I las
maniflas del
reloj para
remover
Fittro de aire
Gire en el
sentido de las
Cubierta del maniltas del
filtro de sire reloj pars
apretar
SILENCiADOR
inspeccione y cambie el silenciador siestA corroido
pues producir un peligro de incendio y/o dafio.
BUJIA
Cambie su bujfa cads aSo para hacer que su motor
arranque mAs fb,cilmente y funcione mejor: Ajuste ta
abertu[a de la bujfa en 0,030 putgada
LIMPIEZA
IMPORTANTE; P.araobtener el mejor rendimiento,
mantenga lacaja de la segadora sin acumutaci6n
de cesped y basura Limpie la parte de abajo de su
segadora despues de cads uso,
PRECAUCION: Desconecte el alambre de la
bujfa y pSngalo en donde no pueda entrar en
contacto con _sta..
• Limpie la parte inferior de su segadora
rasp#,ndolapars remover la acumulaci6n de
c#sped y basura,
o Limpie el motor a menudo pars evitar que se
acumute ta basut"a_Un motor tapado funciona
m#_scaliente y se acorta su duraci6n.
, Mantenga tas superficies pulidas y las ruedas sin
gasolina, aceite, etc.
o No recomendamos el uso de una manguera de
jardfn pars limpiar la segadora a menos que el
sistema ef_ctrico, el sitenciador, el filtro de aire y
el carburador est_n tapados pars evitar que les
entre el agua El agua en el motor puede acorlar
fa duraci6n de _ste,,
SEGADORA
PARA AJUSTAR LA ALTURA DE: CORTE
Vea "PARAAJUSTAR LAALTURA DE CORTE" en
ta secci6n de OperaciSn de este manual,
DESVlADOR TRASERO
Se proporciona un desviador trasero, adjunto entre
las ruedas traseras de su segadora, pars reducir a
un m[nimo ]aposibitidad que objetos sean lanzados
hacla afuera de la parte trasera de la segadora, en
la posici6n en donde se encuentra el operador, Si
se da_a el desviador debe cambiarse..
PROTECCION CONTRA LA DESOARGA
Se proporciona una protecciSn contra fa descarga,
adjunta a la abertura de descarga de su segadora,
pars evitar la posibitidad que objetos sean Ianzados
hacia afuera de la abertura de descarga, en ta
posid6n en donde se encuentra el operador, Si se
dafia la protecci6n contra fa descarga debe
cambiarse
PARA AJUSTAR EL MANGO
Se puede ievantar o bajar el mango de su
segadora segun le quede c6modo. Hay cuatro
(4) posiciones disponibles: sits, mediana alta,
mediana baja, baJa. Los mangos se envlan
montados en la posict6n mediana baja.
,, Para camblar de la poslciSn medtana baiaa
medians alta, la secciSn superior y la inferior
del mango tendr&n que darse vue[tao 24
o Remueva las abrazaderas del cable,.
• Remueva los controJes y la barra de
contro]es que exigen la presencia del
operador de! mango superior,.
o Remueva las clavljas de horquilfa.
. Desconecte el mango inferior de los puntales
del rnango_
De vuetta el mango y vue]va a montar las
ctavijas de horqui!la que se hab[an removido.
. Dirija el(los) cabte(s) por debajo de la varilla
transversal de ta palanca inferior y vuelva a
montar los controles y ]a barra de controles
que exigen la presencia del operador en el
mango superior.
PRECAUCION; La barfs de controles que
exigen la presencia del operador tlene que
pivotear libremente pars permitir et enganche
de la cuchil]aJfreno cuando se suelta la barra de
control.. No apriete demasiado los sujetadores
que sujetan a los controles al mango superior.
.P'ara cambiar de la posici6n de medtana baja
a alta solamente se tendrA que dar vuelta la
secci6n del mango superior.
.Para cambiar de la poslcl6n medians baJa a
baja, solamente se tendr& que dar vuelta la
secci6n del mango inferior.
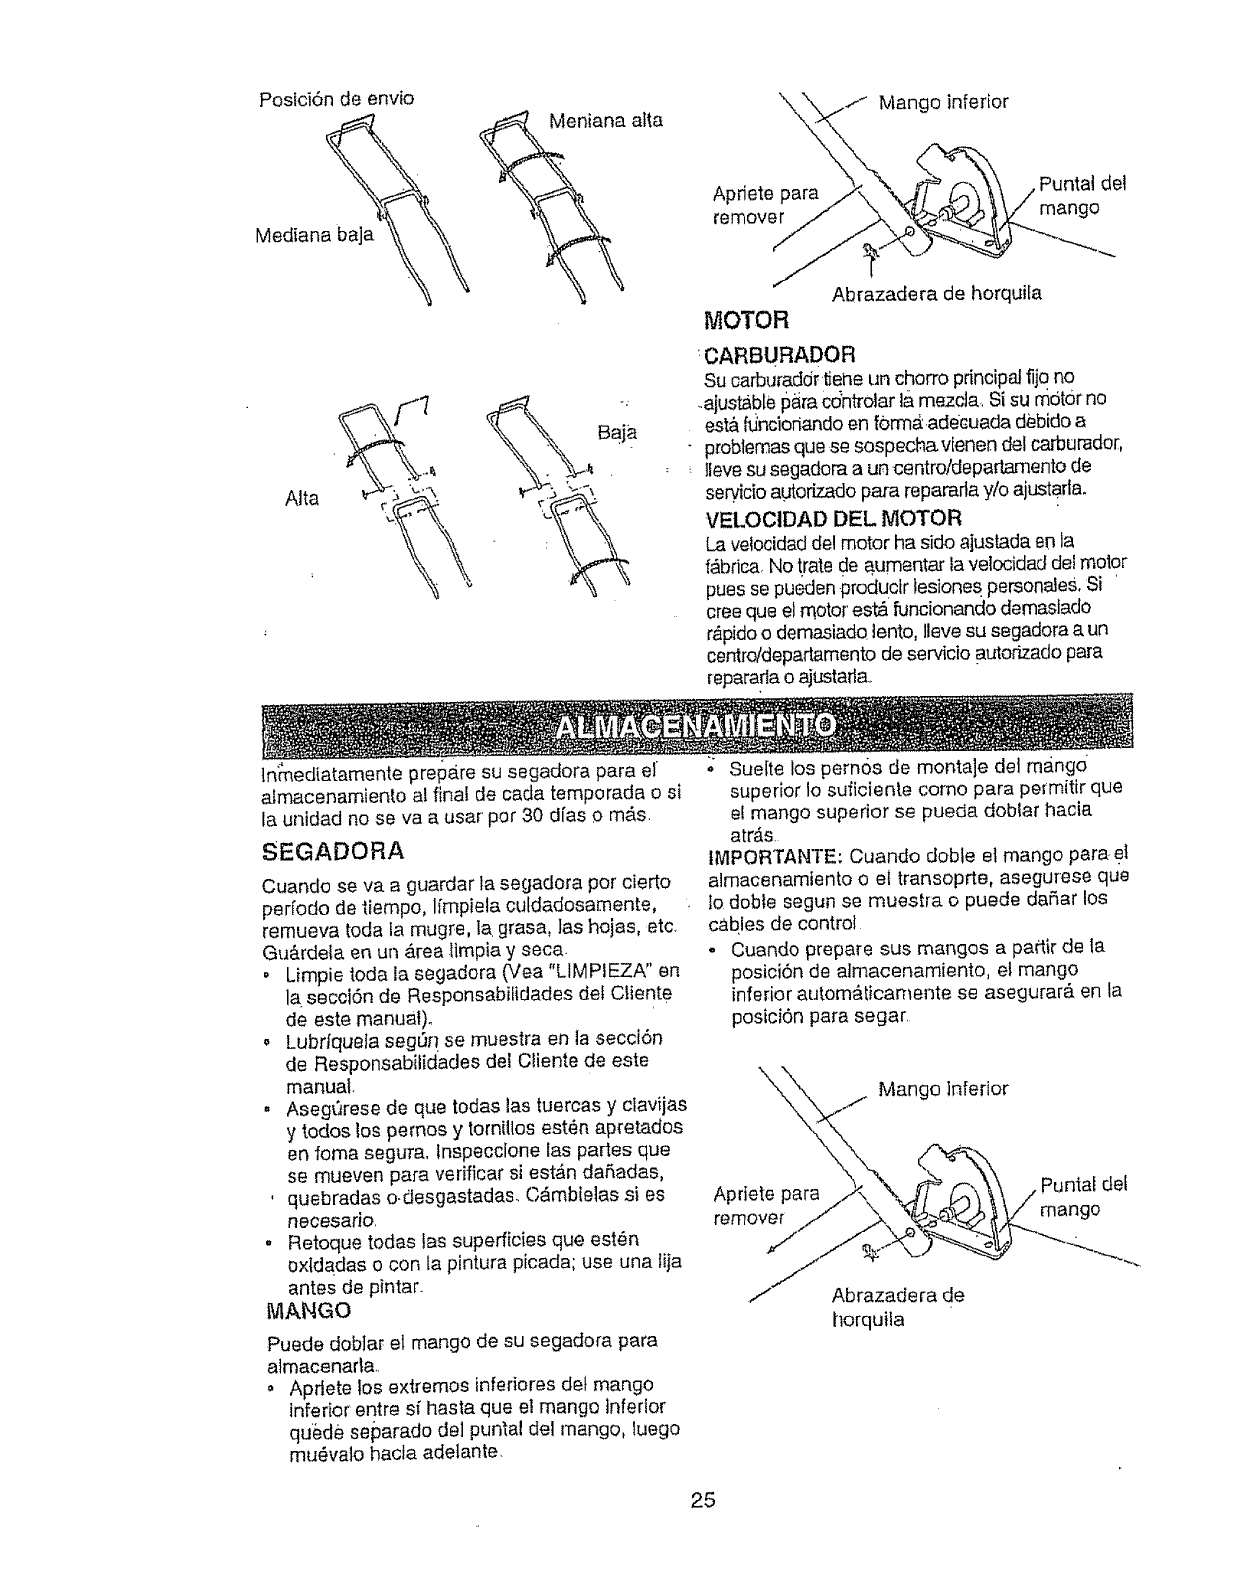
Poslci6n de env{o "X .1 Mango inferior
Meniana alia
Mediana baja
Apdete para
remover
Puntai de!
mango
Alta
Abrazadera de horqui[a
MOTOR
:CARBURADOR
Su aarburaddrtierte un chorro principal fijq no
.ajustable p_irac_ntro]ar l& mezcla, si su mdtor no
est&fl.Jncioriandoen fOrm_adecuada debido a
problemas que se sospecha, vlenen del carburador,
.. ]levesu segadora a un centroldeparlamento de
sewicio autor",zadopara repamfla y/o ajustarla.
VELOCIDAD DEL MOTOR
La velocldad del motor ha sido ajustada en la
f&brica, No trate de aumentar lavelocidad del motor
pues se pueden producir lesiones personales, Si '
cree que el motor est_ funcionando demastado
r,_pidoo demasiado lento, Ileve su segadora a un
centro/departamento de servicio autorizado para
repararlao ajustafla,
tn_ediatamente prepare su segadora para el
almacenamiento al final de cada temporada o si
la unidad no se va a usar por 30 d[as o re&s.
SEGADORA
Cuando se va a guardar la segadora pot cierto
per[odo de tiempo, lfmpiela culdadosamente, .
remueva toda la mugre, ta grasa, tas hojas, etc.
Gu&rdela en un Area {impia y seca.
Limpie toda la segadora (Vea "L1MPIEZA" en
la seccl6n de Responsabilidades det Cliente
de este manual).
Lubrfqueta seg6r} se muestra en la seccl6n
de Responsabilidades deI Cliente de este
manual.
. AsegQrese de que todas las tuercas y clavijas
y todos los pemos y tornillos est_n apretados
en foma seguTa, lnspecclone las partes que
se mueven para verificar si estf_n daSadas,
, quebradas o.desgastadas. CAmbtelas si es
necesario.
.Retoque todas las superficies que est6n
oxtdadas o con la pintura picada; use una lija
antes de pintar_
MANGO
Puede dobiar el mango de su segadora para
almacenafla..
o Apdete los extremos infedores del mango
inferior entre sf hasta que el mango inferior
quede separado del pun_al del mango, luego
mu_va]o hacta adetante.
;; Sue[te los pernos de monta]e det mango
superior Io suficiente como para pe[mitir que
e! mango superior se pueda dobiar hacia
atr_,s.
I!VIPORTANTE- Cuando doble el mango para el
almacenamiento o el transoprte, asegurese que
io doble segun se muesba o puede dafiar los
cables de control
o Cuando prepare sus mangos a pattir de la
posici6n de almacenamiento, el mango
inferior autom_Licamente se asegurar_, en la
posici6n para segar.
\Mango inferior
Puntal del
Apriete para /
/mango
remover
Abrazadera de
horquila
25
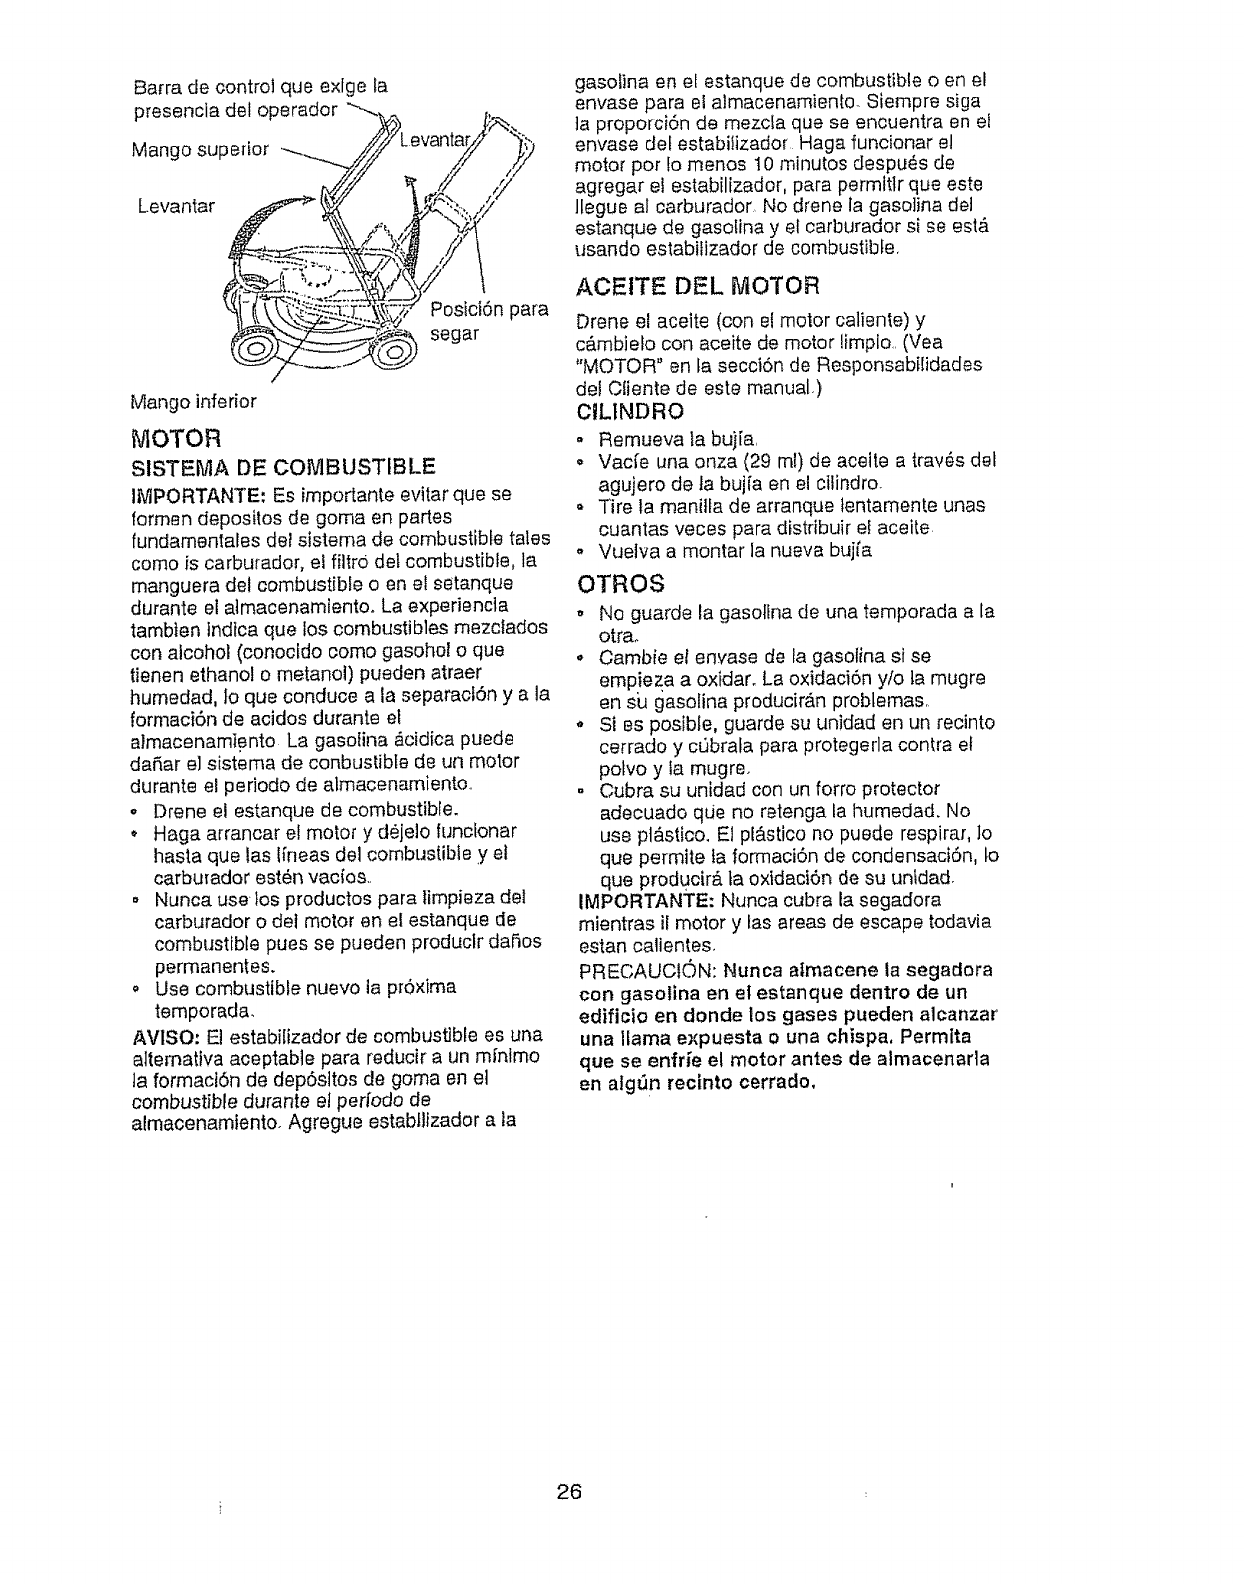
Barra de control que exlge la
presenc/a det operador
Mango superior
Levantar
i 2
Mango inferior
f JIOTOR
Posici6n para
segar
SISTEMA DE COMBUSTIBLE
IMPORTANTE: Es importante evitar que se
formen deposilos de goma en partes
fundamen!_ales del sistema de combustible tales
como is carburador, el filtro dot combustible, la
manguera del combustible oen el setanque
durante el almacenamlento. La experiencta
tambien Indica que los combustibles mezclados
con alcohol (conocido como gasohol o que
tienen ethanol o metanol) pueden atraer
humedad, Io que conduce ala separacl6n y ala
formaci6n de acidos durante el
almacenamiento La gasoline _cidica puede
da_iar el sistema de conbustibte de un motor
durante el periodo de almacenamiento..
o Drene el estanque de combustible.
• Haga arrancar el motor y dejelo funcionar
haste que las l[neas de1combustible y et
carbu_ador est6n vacfos,,
oNunca uselos productos para limpieza del
carburador odei motor en el estanque de
combustible pues se pueden produclr daRos
permanentes.
Use combustible nuevo la pr6xfma
temporada.
AVISO; E! estabilizador de combustible es una
alternattva aceptable pare reducir a un mfnlmo
ta formaci6n de dep6sltos de goma en et
combustible durante e! perlodo de
almacenamiento. Agregue estabtllzador a la
gasotina an et estanque de combustible o en el
envase pare el almacenamiento. Siempre siga
la proporci6n de mezcfa que se encuentra en el
envase def estabilizador Haga funcionar e!
motor por lo menos 10 minutos despu_s de
agregar el estabilizador, pare permltir que este
llegue al carburador, No drone la gaso]ina del
estanque de gasoline y el carburador si se est&
usando estabifizador de combustible,
ACEITE DEL MOTOR
Drone el aceite (con el motor caliente) y
c&mbiefo con aceite de motor limplo.. (Yea
"MOTOR" en fa seccidn de Responsabilidades
del Otiente de este manual.)
CILtNDRO
- Remueva ta bu}[a,
o Vacfe una onza (29 ml) de acelte a tray,s dot
agujero de ta bujfa en el cilindro.
Tire la manilfa de arranque lentamente unas
cuantas veces pare distribuir e! aceite
. Vuelva a montar la nueva bujia
OTROS
o No guarde la gasotlna de una temporada ala
otra_
.Camb/e el envase de la gasofina si se
empieza a oxidar. La oxidaci6n y/o la mugre
en su gasolina producir&n problemas..
° Si es posible, guarde su unidad en un recinto
cerrado y cubrala pare protegerla contra el
potvo y la mugre.
° Cubra su unidad con un forro protector
adecuado que no r_tenga la humedad. No
use pt_stico. El p!&stico no puede respirar, 1o
que permite ta formaci6n de condensact6n, to
que producir& la oxidact6n de su untdad.
IMPORTANTE: Nunca cubra la segadora
mientras il motor y las areas de escape todavia
estan calientes,
PRECAUCION: Nunca atmacene la segadora
con gasolina en el estanque dentro de un
edificio en donde los gases pueden alcanzar
una llama expuesta ouna chispa, Perm[ta
que se enfrie el motor antes de almacenarla
en alg0n recinto cerrado,
i 26
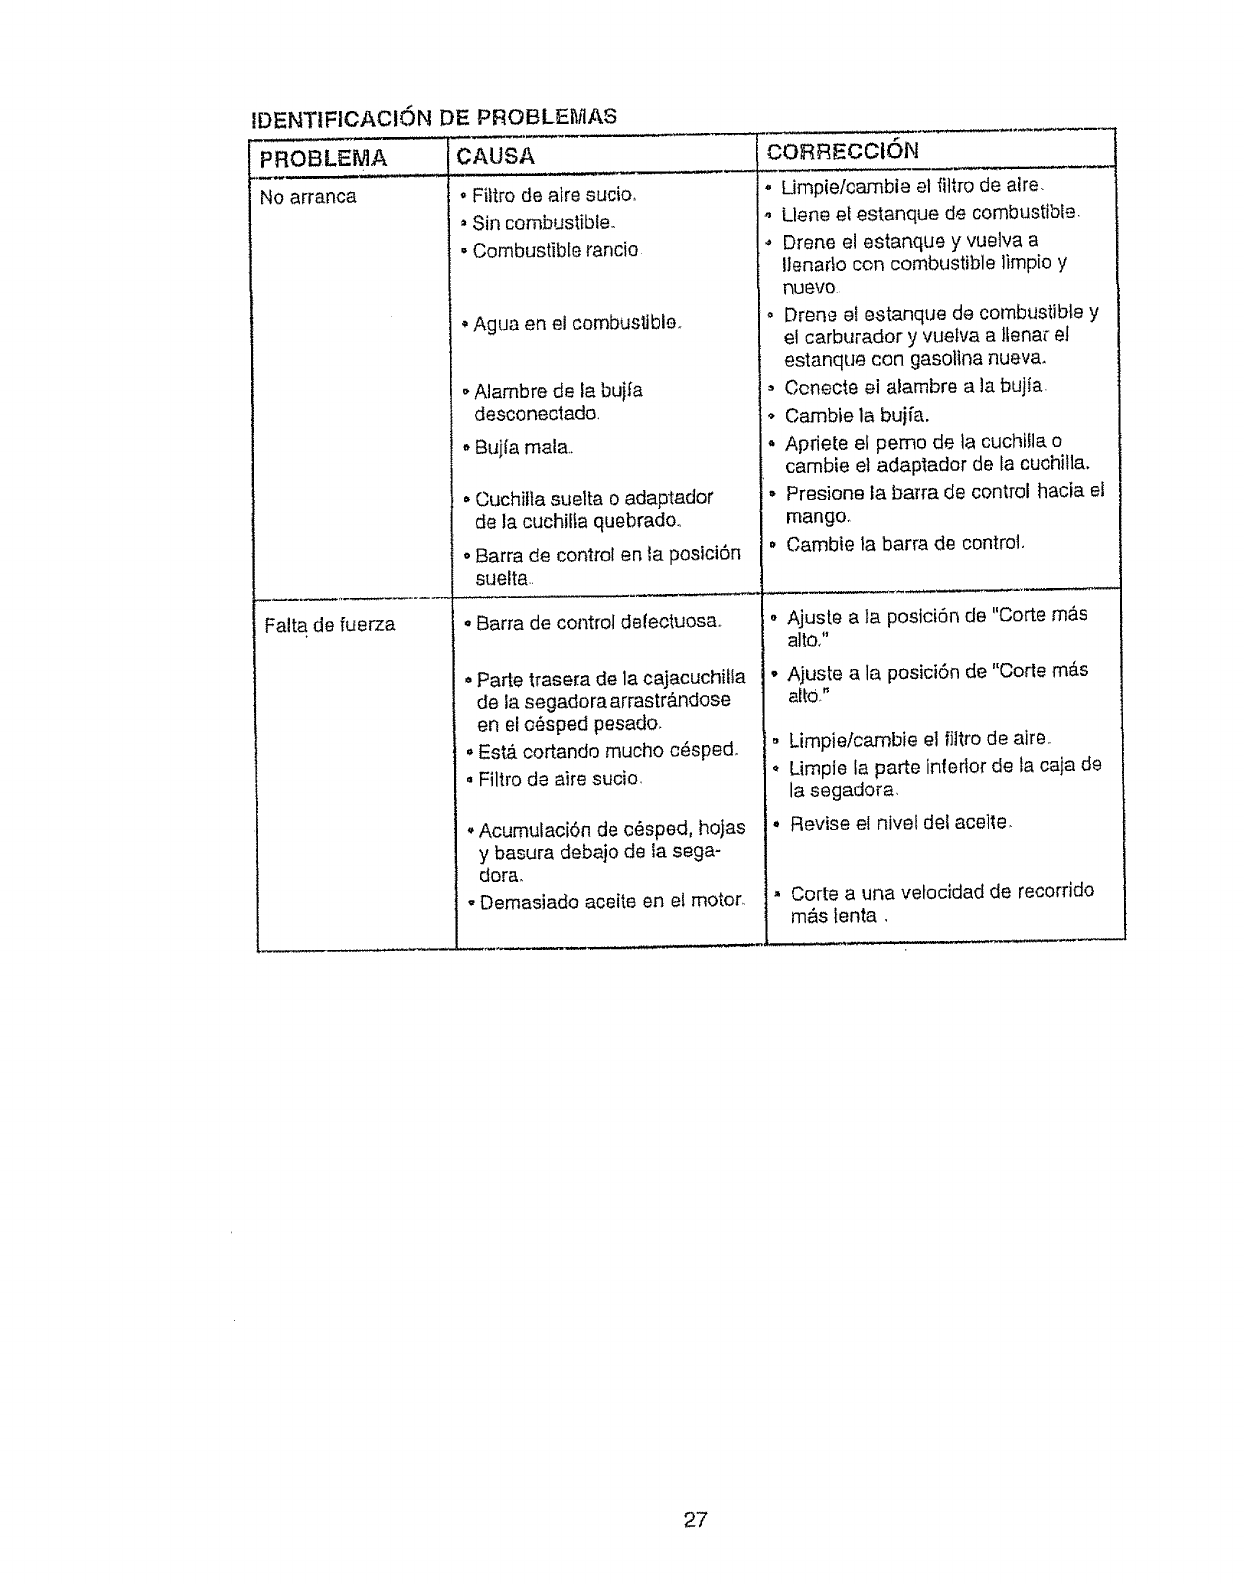
IDENTIFICAClONbE PROBLF-.i_ilAS
_ROBLEMA CAUSA
NOarranca
Falta de fuerza
• Filtro de aire sucio,
Sin combustible..
oCombustible rancio
• Agua en el combusttble_
oAlambre de la bujfa
desconectado,
, Bujfa real&
• Cuchilta suelta o adaptador
de la cuchilta quebradoo
oBarra de control en _aposici6n
suelta
• Barra de control defectuos&
• Parte trasera de la cajacuchilla
de la segadora arrastr&ndose
en el o_sped pesado.
° Est& cortando mucho c_spe&
°Filtro de aire sucio.
° Acumulaci6n de cesped, hojas
y basura debajo de ta saga-
dora.
° Demasiado aceite en el motor.
CORREOCiON
- Limpie/cambie el fittro de atre.
,, Uene et estanque de combustible.
,, Drene el estanque y vuelva a
Ilenar_o con combustible ]impioy
nuevo
o Drene ei estanque de combustible y
el carburador y vuetva a lianas"et
estanque con gasollna nueva.
Conecte ei alambre a la bujta.
o Cambie la bujfa.
° Apriete el pemo de la cuchtlla o
cambie el adaptador de la cuchilla.
° Presione la ba[ra de control hacta el
mango.
o Cambte la barra de control.
AjusLe a la posici6n de "Corte m_.s
alto,"
Ajuste a la posici6n de "Code mAs
altO."
o Limpiefcambie el fiitro de aire.,
°Limple la parte inledor de la caja de
la segadora,
• Revise el nivel del aceite.
• Corte a una velocidad de recorrido
m#,s tenta,
27
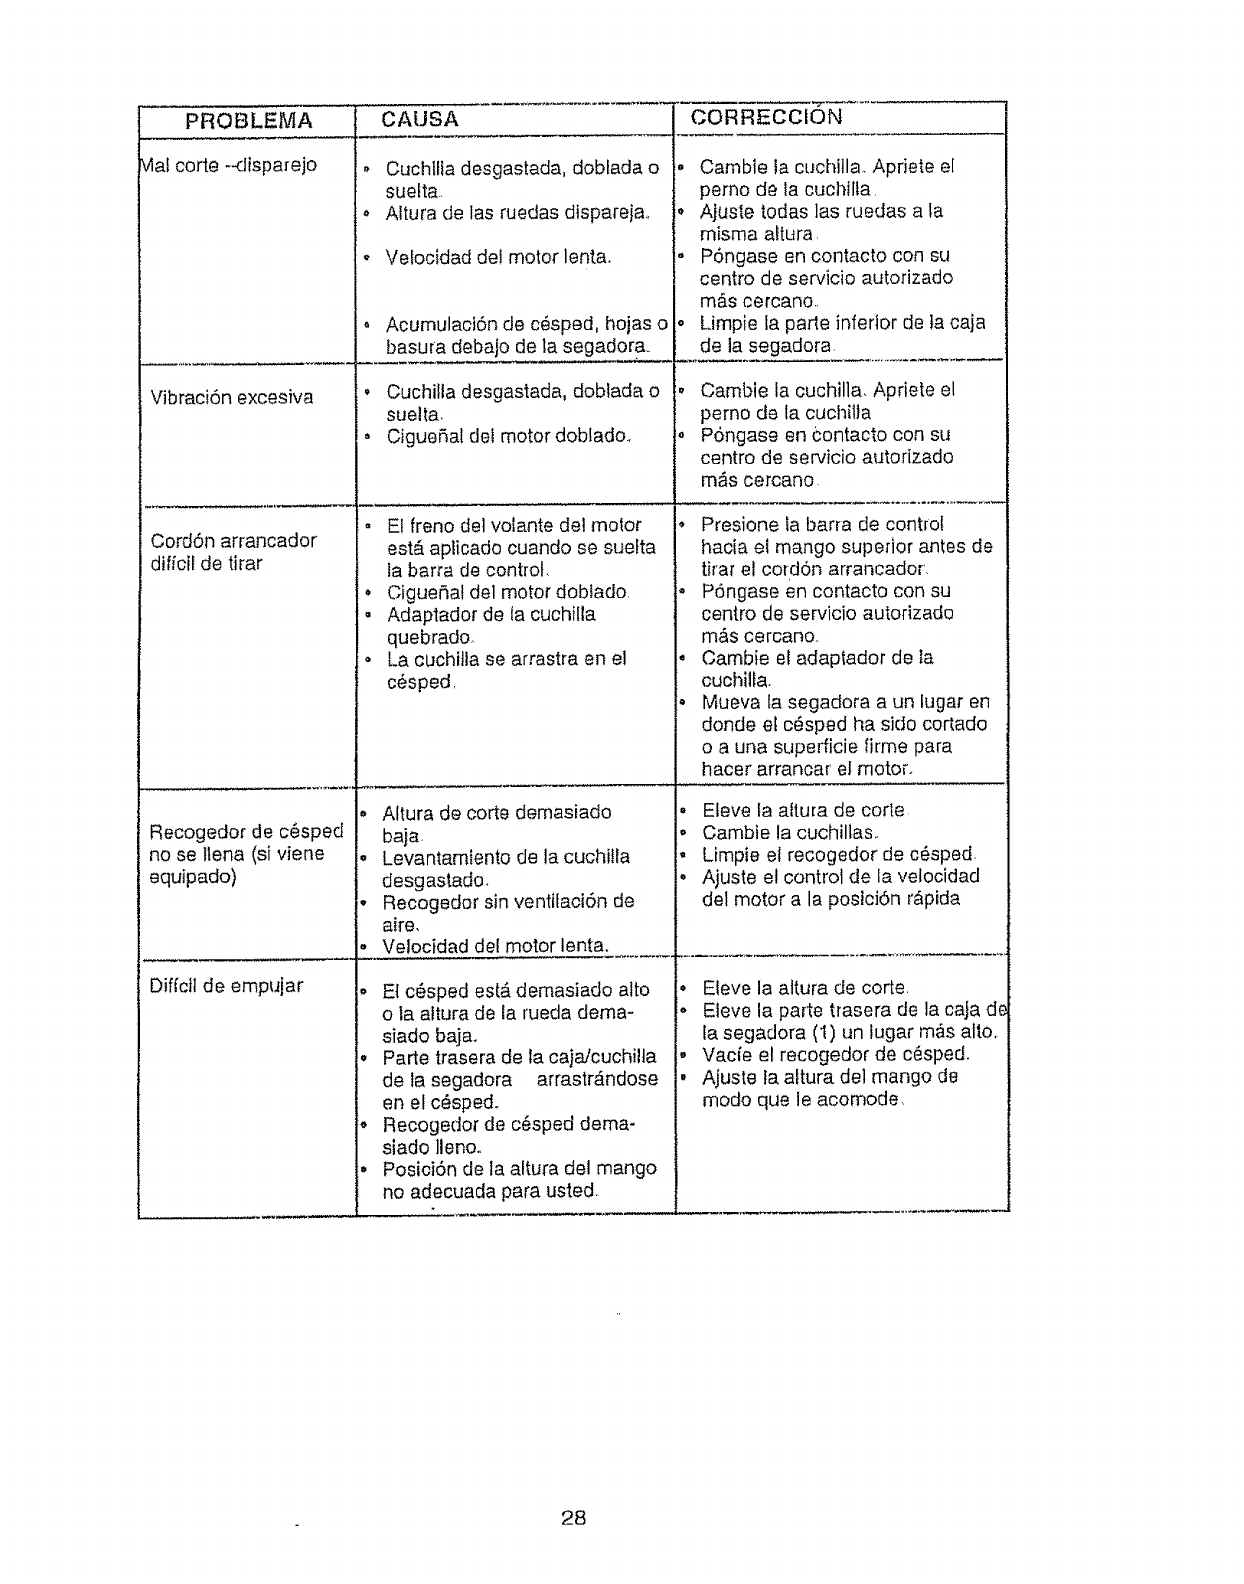
PROBLEMA
Vlafcode+_Jisparejo
Vibraci6n excesiva
Cord6n arrancador
dificil de tirar
Recogedor de c6sped
no se tlena (st viene
equipado)
Diffctt de empujar
CAUSA
o
Q
Cuchllta desgastada, doblada o
suefta,
Altura de las ruedas dispareja+
Velocidad de! motor lenta.
o Acumulaci6n de c#sped, hojas o
basura debajo de la segador a_
o Cuchilla desgastada, dobtada o
suelta,
. Cigue5al dot motordoblado+
. El freno del volante del motor
est& aplicado cuando se suefta
ta barra de control.
+ CigueSat del motor dobtado,
° Adaptador de ta cuchilla
quebrado
. La cuchitla se arrastra en el
c_sped,
• Attura de corte demasiado
baia.
. Levantamiento de la cuchi!la
desgastado+
° Recogedor sin venttlacl6n de
aire.
+ Velocidad del motor lenta.
oEl c6sped est& demasiado alto
o la altura de la rueda dema-
siado baja+
Parte trasera de la caja/cuchilta
de la segadora arrastrAndose
en el c_sped+
Recogedor de c@speddema+
siado llano+
Posici6n de la aftura del mango
no adecuada para usted
Cambie la cuchilla+ Apriete el
perno de la cuchilta,
Ajuste todas las ruedas a la
misma altura,
P6ngase en contacto con su
centro de servicio autorizado
m_.s cercano.,
Limpie la parte inferior de ]a caja
de la segadora
Cambie la cucllilla. Apriete el
perno de la cuchilla
P6ngase en contacto con su
centro de servicio autorizado
m_is cercano,
Presione labarra de control
hacia el mango superior antes de
tirar el cotd6n arrancador.
P6ngase en contacto con su
centro de servicio autorizado
m#,s cercano,
Cambie el adaplador de ta
cuchilla.
Mueva la segadora a un lugar en
donde el c_sped ha sido cortado
o a una superficie firme para
hacer arrancar el motor.
Eleve la aftura de corte
Cambie la cuchillas+
Limpie et recogedor de c6sped.
Ajuste el control de la velocidad
del motor a la poslci6n r&pida
Eleve la attura de corte.
Eleve la parte trasera de la caja de
la segadora (I) un lugar rn@salto,
Vade el recogedor de c_.sped.
Ajuste fa altura del mango de
modo qua le acomode.
28

29
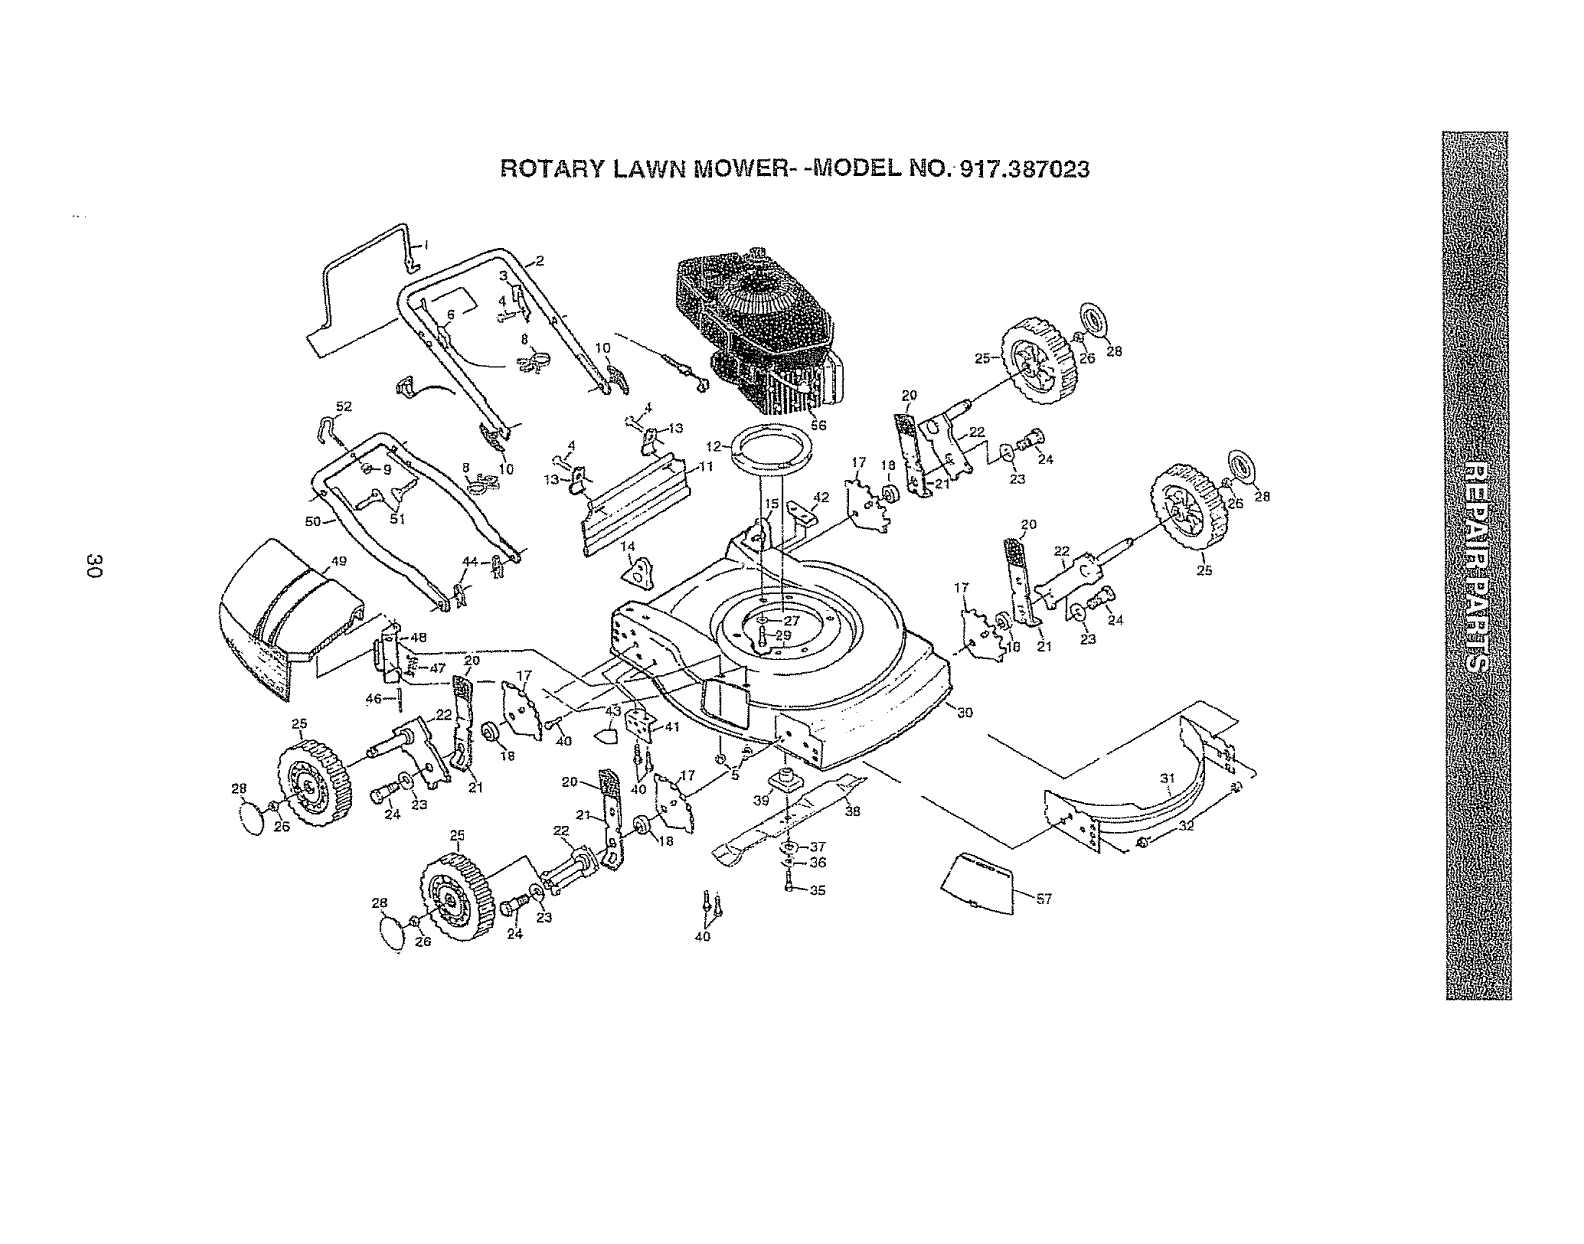
ROTARY LAWN MOWER--MODEL NO.917.387023
o
25
52
23
14
4O
38
28
17
24
23
\
25
31

ROTARY LAWN MOWER- -MODEL NO. 917.387023
KEY PART DESCRIPTION KEY PART
NO, NO. NO. NO.
DESCRIPTION
t 86902 Control Bar 36 850263
2 145646X479 Upper Handle 37 851074
3 850733X004 Up-Slop Bracket 38 145108
4 750097 Hex Wsh. }-lead Screw #10-24 x t12 39 850977
5 STD541425 Locknut 114-20 40 150078
6 156577 Engine Zone Control Cabie 4t 88272X479
8 151517 Cal31e Clip 42 88271 X479
9 63601 Nylon Locknut 43 85463
10 136376 Handle Knob 44 51793
t 1 t 4Q543 Rear Skirt 46 147286
12 701313 Engine Spacer 47 87589
13 87584X004 Skirt Bracket 48 87593
t4 15t665X479 Handle Bracket Assembly (Right) 49 750149
15 151667X479 Handle Bracket Assembly (Left) 50 157081X479
17 750085X007 Wheei Adiusting Bracket 51 131959
!8 146630 Spacer 52 103672X
20 87877 Selector Knob 56 ......
2! 700331X004 Selector Spring
22 145935X004 Axle Arm Assembly 57 751772X479
23 62335 Belleville Washer - -87576X479
24 o 142748 Shoulder Bolt - - 152095
25 146248 Wheel and Tire AssembIy - - 161303
26 83923 Hex Flange Locknut 3/8-16 - - 128415
27 53998 Fiat Washer
28 77400 Hubcap
29 850999 Hex Head Se]f4applng Screw 3/8-16 × 1-1/8
30 48403 Lawn Mower Housing Kit (Incl. Rel, #31, 43'}
31 701706X479 Front Baffle
32 751592 Locknut 318-16
35 851084 Hex Head Machine Screw 3/8-24 x t-3/8
(Gr. 8}
Hellcat Lockwasher 3/8
Hardened Washer
20" Mulching 8tade
Blade Adapter
Self Tapping Screw 5/t6-t8 x 3/4
Handle Support Bracket (Right)
Handle Support 8rackel (Left]
Danger Decal
Hairpin Cotter
Hinge Roa
Torsion Spnng
Housing Bracket Assembly
Discharge Guard
Lower Handle
Handle Bott
Rope Guide
Engine -(See Breakdown) Craftsman
Model I43.974036
Muicher Plate
Rear Baffle (Not Shown)
Dec:a(-EZ.
Owner's Manuai (EnglishtSpantsh)
Pop Rivet .I56 x .415 (Not shoran}
Available accessor{es not included with lawn mower:
71 33072 Grass Catcher
7__33823 Gas Can (2.5 gal.}
ZJ..33500 Fuel Stabilizer
"/'1.._.33300 SAE 30W Oil (20 oz.)
Z.I_I33723 High Wheel Kit
7.1 33316 Mower Cover
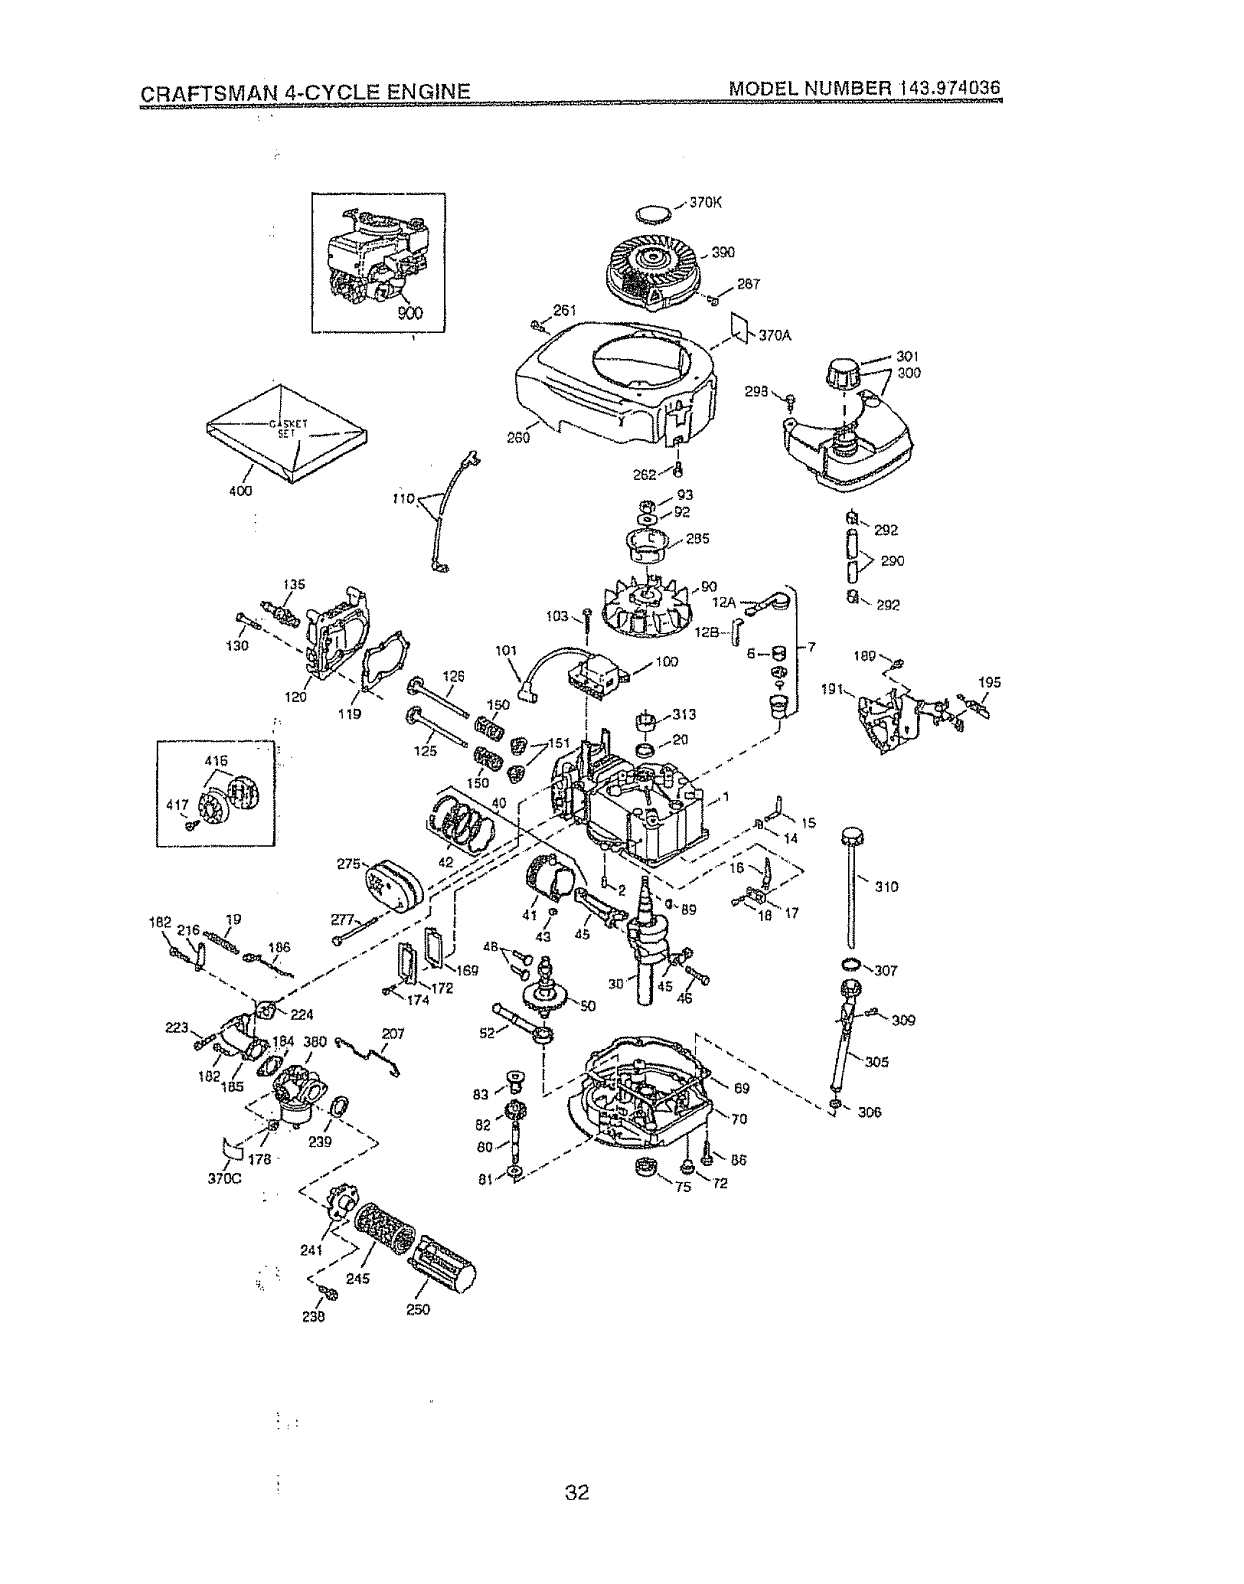
CRAFTSMAN 4-CYCLE ENGINE MODEL NUMBER 143,9/'4036
26t
4OO
195
32
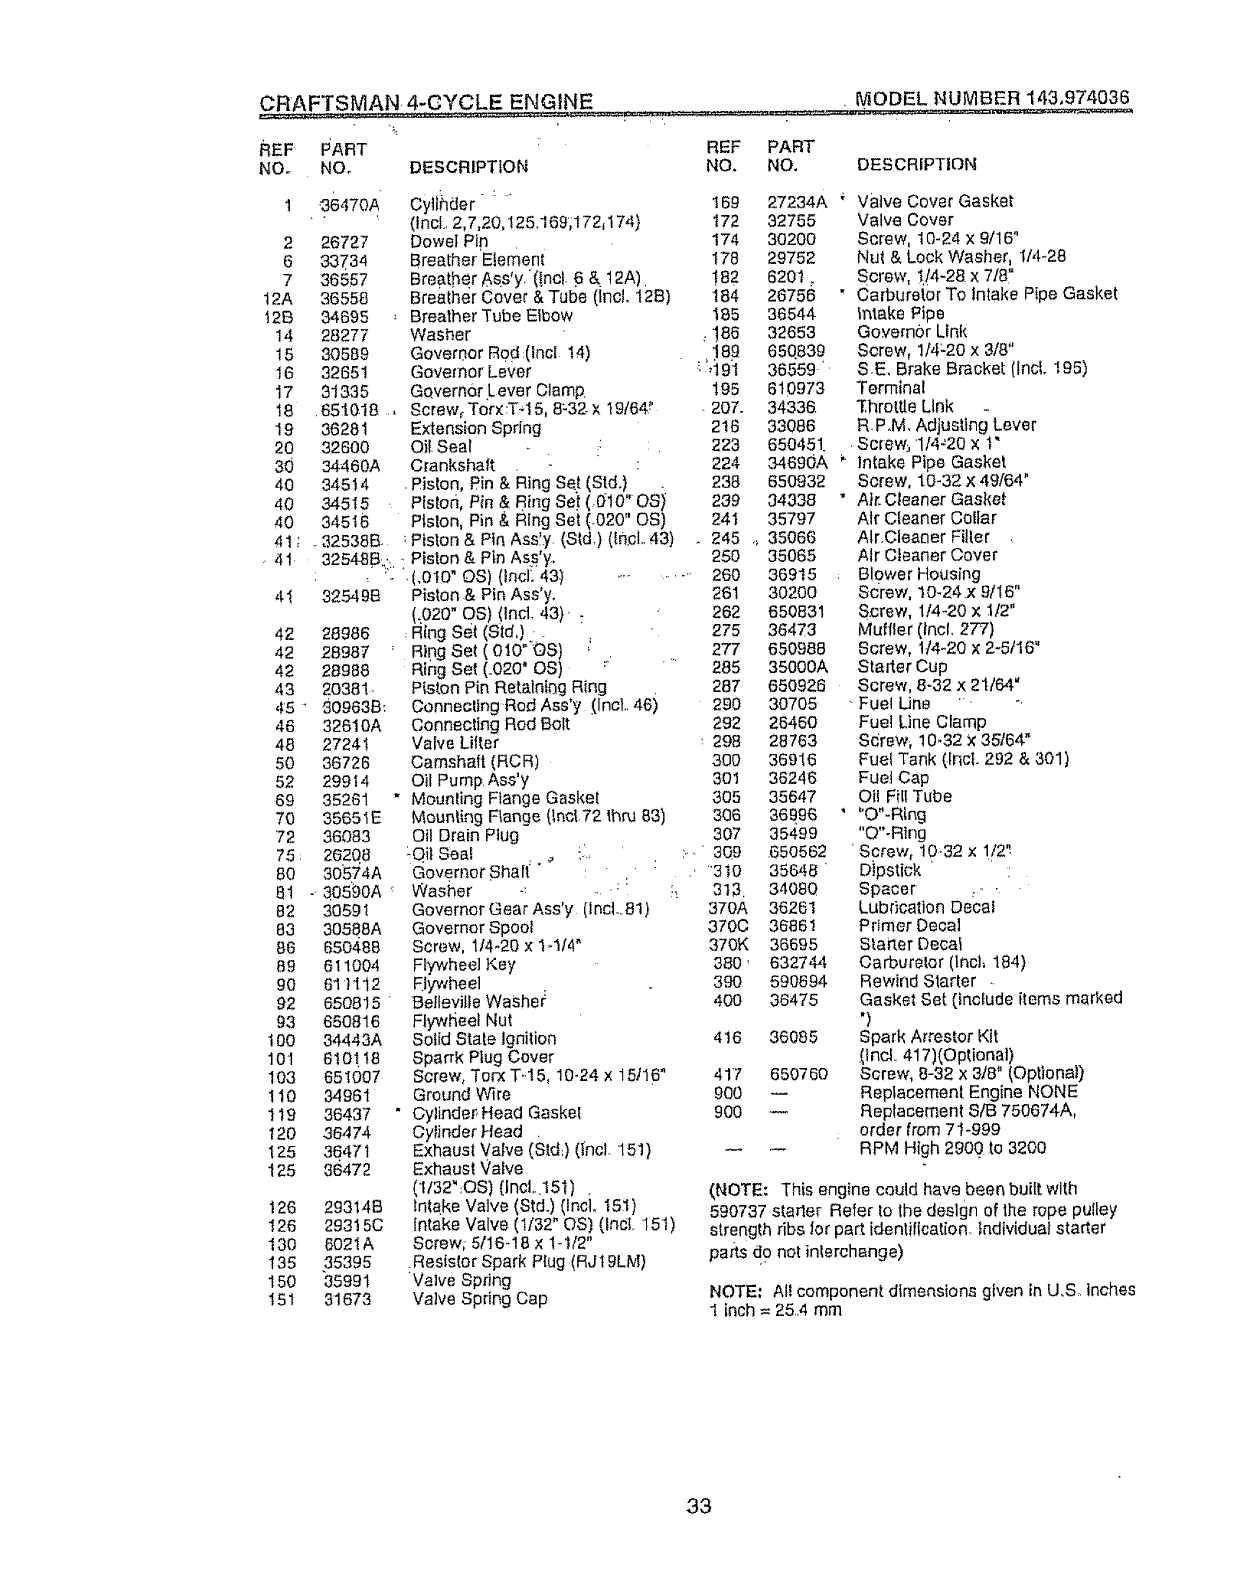
CRAFTSMAN4-CYCLEENGINE • MODEL NUMBER 143,974036
REF PART
NO. NOo DESCRIPTION
36470A
2 26727
6 337,34
7 36557
t 2A 36558
t2B 34695 '-
14 28277
15 30589
16 32651
17 31335
I8 .651018 ....
19 36281
20 32600
30 34460A
40 34514
40 34515 -
40 34516
41 ; . 325388.
.41 3254-88.,.
•'¢i."
41 32549B
42 28986
42 28987
42 28988
43 20381,
45" 309638:
46 32610A
48 27241
50 36726
52 299t4
69 35261 "
70 3565IE
72 36083
75; 262q8
80 30574A
8I -30590A
82 30591
83 305QSA
86 650488
69 611004
9Q 611112
92 650815
93 650816
t00 34443A
101 610118
103 651007
110 34961
1!9 36437 "
t20 36474
I25 36471
125 36472
126 29314B
t26 29315C
130 6021A
135 25395
150 35991
t51 31673
Cylihder .....
(Incl.. 2,7.20, I25.169';172_ 174}
Dowel Pin
Breather Element
Breather &ss'yi(tnct. 5 & t2A).
Breather Cover & Tube (lncl. t28)
Breather Tube Elbow
Washer
Goveroor R0d:(Incl t4)
Governor Lever
Gqvem0r Lever Clamp.
Screwr Tot× :Tq 5, 8:32-x I9t64.!'
Extension Spring
Oil.Seal
Crankshaft
Piston, Pin & Ring set (Std.)
Piston, Pin & Ring Se_(010" OSi
Piston, Pin & Ring Set {.020" OS)
Piston & Pin Ass[y (Std) (Ih.el,.43)
Piston & Pin Ass'y.
.(.010" OS) (lncL 43} ..........
Piston & Pin Ass'y,
(.020" OS) (lncL 43). :
#itng Set (Std,) ..
Ring Set (010""0S) _'
Ring Set (.020" OS) : '"
Piston Pin Retaining Ring
ConnecllngRod Ass'y (IncL 46)
Connecling Rod Bolt
Valve Lifter
Camshalt (RCR)
Oil Pump. Ass'y
Mounling Flange Gasket
Mounting F,ange {lnc172 lhru 83)
Oi1Drain Ptug
:Oil Seal :',.. :,.,'
Governor Sha[_ "" " '
Washer -: . "" .:_
Governor Gear Ass'y (fncL81)
Governor Spool
Screw, 1t4-20 x 1-114"
Flywheel Key
E ywlleel
Belteville Washe_;
Flywheel Nut
Solid State Ignition
Sparrk Plug Cover
Screw, Torx T..15, 10-24 x 15,ti6"
Ground Wire
Cylinde# Head Gaskel
Cylinder' Head
Exhaust Valve (Std_) ({ncl. 151)
Exhaust Valve
(1t32',O8) (IncL.151) .
Intake Valve (Std.) (lncL I5:f)
Intake Valve (1/32" OS) (fnCt I5t)
Screw; 5116-18 x I-t/2"
•Resistor Spark Plug (RJ t 9LM)
Valve Spdng
Valve Spring Cap
REF PART
NO. NO. DESCRIPTION
169 27234A _
172 32755
174 30200
I78 29752
!82 620I,
184 26756 "
I85 36544
,186 32653
,189 650839
_,191 36559 -_
195 610973
.207- 34336
2t6 33086
223 650451.
224 34690A _'
238 650932
239 34338 "
24I 35797
. 245 ,, 35066
250 35065
260 36915
261 30200
262 650831
275 36473
277 650988
285 35000A
287 650926
290 30705
292 26460
298 28763
300 36916
301 36246
305 35647
3436 36£96 *
307 35499
3Q9 .650562
"3t0 35648 _
313. 34080
370A 36261
370C 36861
370K 36695
380' 632744
390 590694
400 36475
4t6 36085
417 650760
900
900 _
valve Cover Gasket
Valve Cover
Screw, t0-24 x 9/16"
Nut & Lock Washer, t/4-28
Screw, t/4-28 x 7/81'
Carburetor To Intake Pipe Gasket
_ntake Pipe
Governor Link
Screw, 1/4:20 x 3/8"
SE, Brake Bracket (Incl. 195)
Terminal
Throttle Link
R P.M. Adjusting Lever
.Screw;, 114:20 x t"
Intake Pipe Gasket
Screw, 10-32 X 49164"
Air. C_eaner Gasket
Atr Cleaner CoIlar
AIrCleaner Filter
Air Cleaner Cover
Blower Housing
Screw, 10-24.x 9/I6"
Screw, 1f4-20 x _1f2"
Muffler (incl, 277)
Screw, 1-/4-20× 2-5/i6"
Starter Cup
Screw, 8-32 x 21/64"
- Fuel Une '
Fuel Line Clamp
Sdrew, 10-32 X 35164"
Fuel Tank gncL 292 & 301)
Fuel Cap
Oil Fill Tube
"O"-Ring
"O"-Rtng
' Screw, 10.32 x !/2 _
Dipstick
Spacer .. •
Lubrication Decal
Primer Decal
Starter Deca_
Carburetor (tnol, 184)
Rewind Starter ..
Gasket Set (include items marked
,)
Spark Arrestor Kit
.(incl..417)(Optional)
Screw, 8-32 x 3/8" {Optional)
Replacement Engine NONE
Replacement S/B 750674A,
order from 71-999
RPM High 2900 to 3200
(NOTE: This engine could have been built with
590737 stader Refer to the design of lhe rope pulley
strength ribs lot part identification, individual starter
parts dO not interchange)
NOTE: All component dimensions given in U.S,. inches
1 inch = 25.4 mm
33
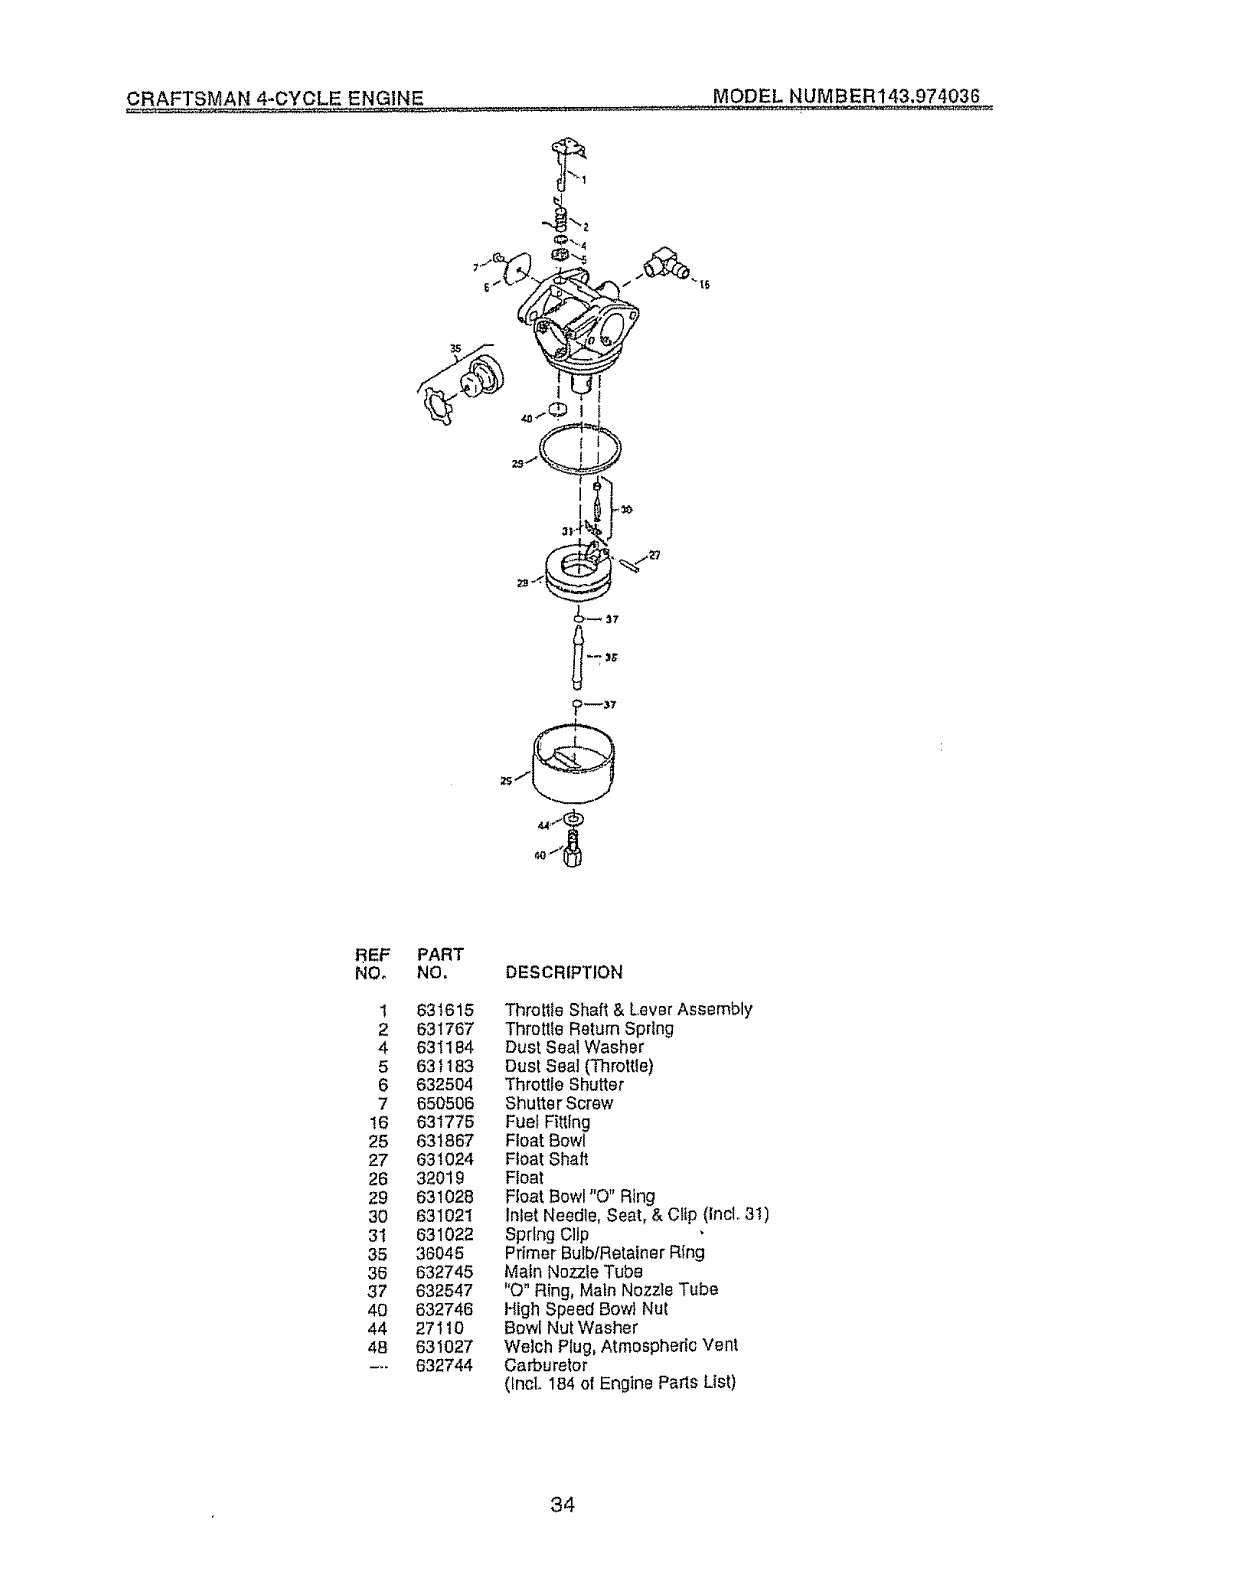
CRAFTSMAN 4-CYCLE ENGINE MODEL NUMBER143,974036
6¸
ILiit
REF
NO,
1
2
4
5
6
7
I6
25
27
26
29
30
31
35
36
37
4O
44
48
PART
NO. DESCRIPTION
631615
631767
631184
631183
632504
650506
631776
631867
631024
32019
631028
631021
631022
36045
632745
632547
632746
27110
631027
632744
Throttle Shaft & Levar Assembly
Throttle Return Spring
Dust Seal Washer
Dust Seal (Throttle)
Throffle Shutter
Shutter Screw
Fuel Fitting
Float Bowl
Float Shaft
Float
Float Bowl "O" Ring
Inter Needle, Seat, &CItp (IncL 3!)
Spring Cllp
Primer Butb/Retainer Ring
Main Nozzle Tube
"O" Ring, Main Nozzle Tube
High Speed Bo_ Nut
Bowl Nut Washer
Welch Plug, Atmospheric Vent
Carburetor
(tncL 184 of Engine Parts List)
34
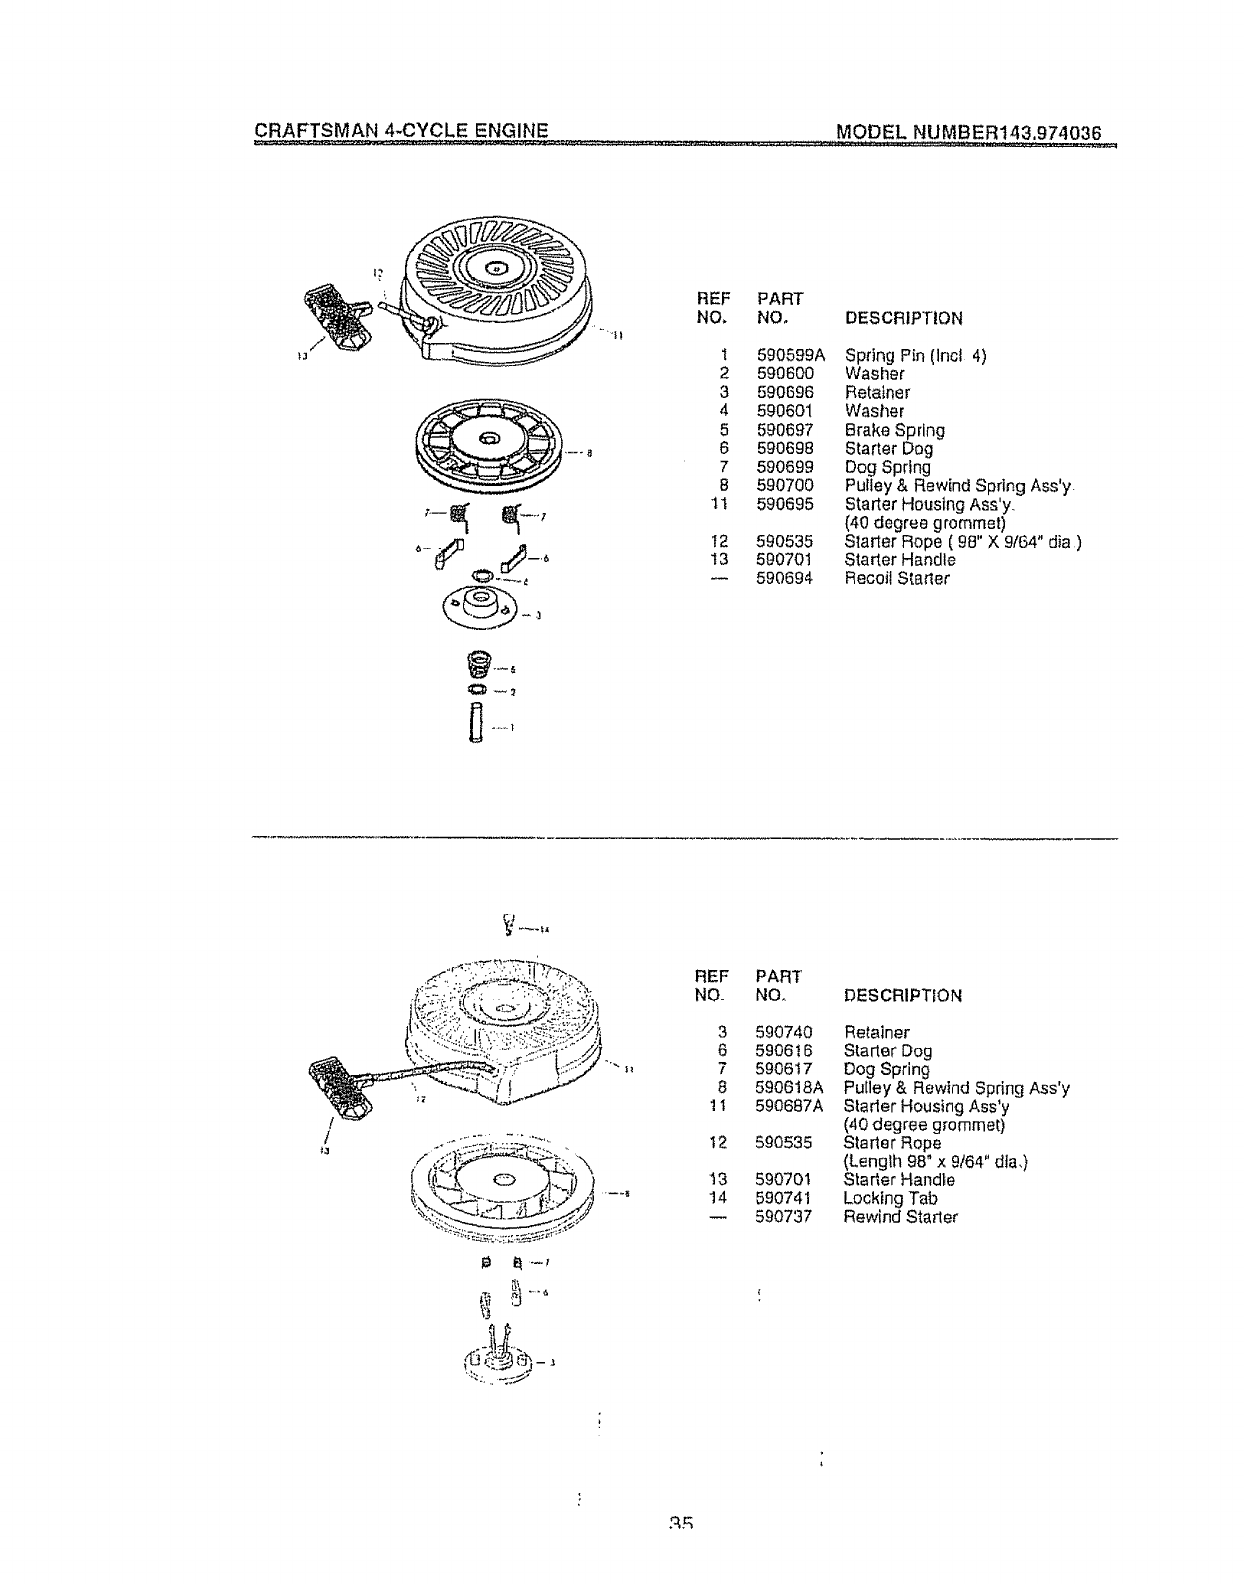
CRAFTSMAN 4-CYCLE ENGINE MODEL NUMBER143,974036
="1 !
REF PART
NO, NO, DESCRIPTION
1 590599A Spring Pin (Inct 4)
2 590600 Washer
3 590696 Retainer
4 590601 Washer
5 590697 Brake Spdng
6 590698 Starter Dog
7 590699 Dog Spring
8 590700 Pulley & Rewind Spring Ass'y.
1! 590695 Starter Housing Ass'y.
(40 degree grommet)
I2 590535 Starter Rope ( 98" X 9/64" dia )
I3 590701 Starter Handle
590694 Recoil Starter
REF PART
NO- NO,, DESCRIPTION
t2
t3
14
.q.£
690740 Retainer
5906 t 6 Starter Dog
590617 Dog Spring
5906t8A Pulley & Rewind Spring Ass'y
590687A Starter Housing Ass'y
(40 degree g_ommet)
590535 Starter Rope
(Leng_,h98" x 9/64" dta,)
590701 Starter Handte
590741 Locking Tab
590737 Rewind Starter
For 1he iepair or replacement parts you need
deliverg,d directly to your home
Call 7 am - 7 pro, 7 days a week
1-800:..366-PART
(1-800-366-7278)
Para ordenar piezas con entrega a
domicili0 .- 1-800-659-7084
i
For" in-h.0,use major brand repair service
Call 24 hours a day, 7 days a week
l o80 ;4..REPAIR
(I-800-4_3:7274)
Para pedi_- servicio de reparacidn a
domicilio - 1-800-676-5811
f
For the focation of a Sears Parts and
Repair Center in your area
Call 24 hours a day, 7 days a week
1-800-488..1222
For' inf6r:niation on purchasing a Sears
Maintenance Agreement or to inquire
about an existing Agreement
Call 9 am - 5 pro, Monday-Saturday
1-.800 .827°6655
When requesting service or ordering
parts, airways provide the following
informat!£_
• Product T.£pe o Part Number
° Model N'ember ° Part Description
Amertcas Repacr .,.qpeclailsts
161303 07.,15o97 REV,1 VB Printed in U,S,A.
