Seiko Epson AP012 sensor solar GPS watch User Manual 05 Short Term Confidential 1
Seiko Epson Corporation sensor solar GPS watch 05 Short Term Confidential 1
Contents
- 1. 05 (Short-Term Confidential) User Manual 1
- 2. 05 (Short-Term Confidential) User Manual 2
05 (Short-Term Confidential) User Manual 1

![Screw lock winding crownCenter hand Minute handBezelDisplays the unit’s and ten’s place during measurementsDial ringGradations used for measurementsDisplays the time zoneHour handDisplays results[Y] Success[N] FailureNumbersUnit for tens of thousands when measuring stepsNumber of satellites used for capture when receiving GPS dataMeasurement value symbolsDST (summer time) settingsBarometric tendency display rangeShort seconds handBasic OperationsCBANames of Each Part and How to Use ThemWatchThe dial plate may vary depending on the model of watch.](https://usermanual.wiki/Seiko-Epson/AP012.05-Short-Term-Confidential-User-Manual-1/User-Guide-3475482-Page-16.png)
![NumbersShort hand: Unit for thousands when performing measurementsLong hand: Unit for hundreds when performing measurementsMeasuring hand (short hand)Measuring hand (long hand)Mode[TIME] Clock mode[ALT] Altimeter mode[COM] Compass mode[BAR] Barometric pressure mode[ACC] Accessory modeFlight ModeCurrently workingCalendarRemaining battery levelMode handIndicator hand](https://usermanual.wiki/Seiko-Epson/AP012.05-Short-Term-Confidential-User-Manual-1/User-Guide-3475482-Page-17.png)
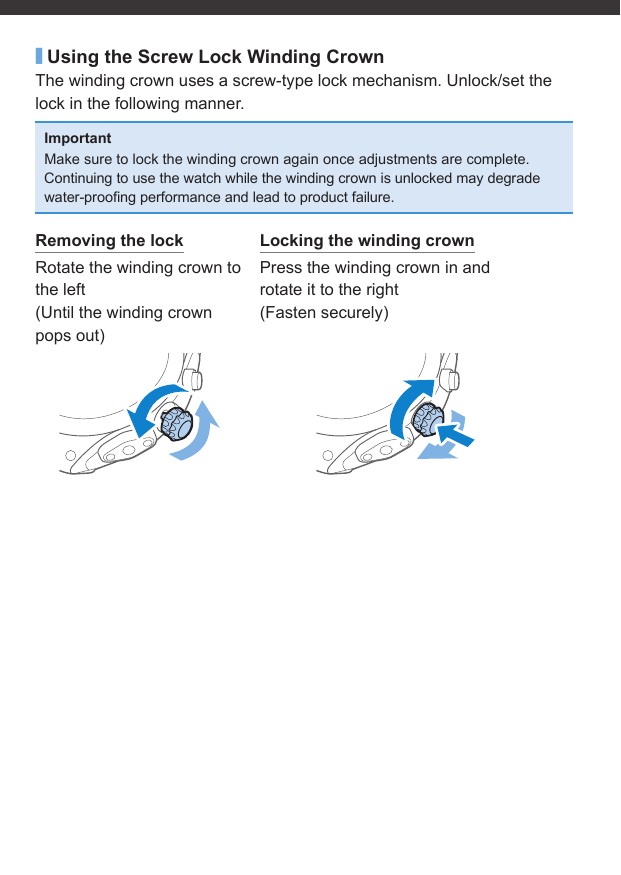
![Removing the lock on the winding crown allows you to pull out and rotate the winding crown.Pulling out The winding crown is pulled out in two stages.Each stage results in a different action.012Rotating Quickly move the hand forwards or backwards by rapidly turning the winding crown.To stop this, either turn the winding crown once more, or rotate it in the opposite direction.Pushing back Push the winding crown into the watch to return it to its original state.Wireless FunctionsPress and release the “C” button while the watch is in [ACC] mode to begin transmission with the accessory.Press and release the “C” button once more to stop transmission.](https://usermanual.wiki/Seiko-Epson/AP012.05-Short-Term-Confidential-User-Manual-1/User-Guide-3475482-Page-19.png)
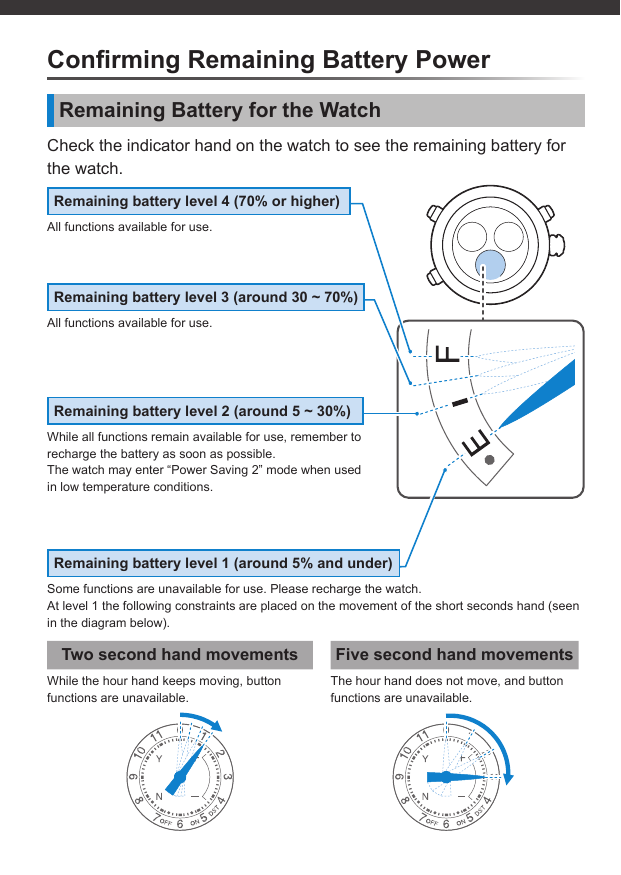
![Watch Power Saving FunctionsThis product is equipped with power saving functions to limit battery power consumption.There are two types of power saving functions, with each used when certain conditions are met.Note that while the hour and minute hands will stop moving, this does not indicate damage to the product. ■Power Saving 1The watch will go into “Power Saving 1” mode when kept away from light for at least 72 hours. In this mode the short seconds hand will stop at the 15 seconds mark. All other displays besides the short seconds hand will also stop.The clock will start again showing the current time after exposing the watch to light for at least fi ve seconds, or by pressing a button. ■Power Saving 2The watch will go into “Power Saving 2” mode when in a poor state of charge. In this mode the short seconds hand will stop at the 45 seconds mark.Provide a suffi cient charge to the watch and then readjust the time as necessary.Remaining Battery Power for the Accessory[Battery] will start fl ashing when the accessory is low on battery charge. We recommend replacing the battery as soon as possible. (User’s Guide)](https://usermanual.wiki/Seiko-Epson/AP012.05-Short-Term-Confidential-User-Manual-1/User-Guide-3475482-Page-22.png)
![3 sec.Setting the TimeSetting the TimeYou can set the time to the time zone set based on GPS satellite waves.ReferenceYou will need to set the correct time zone when adjusting the time to your travel destination.1 Move to an area suitable for receiving GPS information2 Keep pressing the “A” button to set the mode to [TIME]3 Press and hold down the “B” button (around three seconds) and release when the short seconds hand points to the 0 seconds markReferenceIf the short seconds hand points to [Y] or [N] without pointing to the 0 sec-onds mark the device is not receiving data.Press and hold down the “B” button again (around three seconds) and release when the short seconds hand points to the 0 seconds mark.](https://usermanual.wiki/Seiko-Epson/AP012.05-Short-Term-Confidential-User-Manual-1/User-Guide-3475482-Page-26.png)
![4 Point the watch upwards and wait until the data transmission results appear (the short seconds hand points to [Y] or [N])It will take anywhere from 10 seconds to 1 minute for data to be received. ■Receiving dataThe short seconds hand will show the number of GPS data sources acquired.Reference• In general at least one GPS data acquisition site is needed to acquire time information.• Press and release the “B” button during the acquisition process to cancel it. ■Ending data transmissionsData has been successfully received when the short seconds hand points to [Y].The time and date will be adjusted automatically based on the time information acquired.ReferenceThe data transmission has failed if the short seconds hand points to [N].Move to a location more suited to receiving data and try again.Refer to the “User’s Guide” for information on other time setting functions.](https://usermanual.wiki/Seiko-Epson/AP012.05-Short-Term-Confidential-User-Manual-1/User-Guide-3475482-Page-27.png)
![5 sec.Matching Time Zones and Time SettingsReceive GPS data to acquire positional information on your current location. You can use the positional information acquired to identify the time zone and set the time and date for your location.ImportantNote that your watch may be set to a neighboring time zone if you use this function near the boundary between time zones. Avoid being near the boundary between time zones when setting the time zone if possible. Check the time displayed on your watch to see if the correct time zone has been set.Set the time zone and time manually if the time zone has been set incorrectly. (User’s Guide)1 Move to an area suitable for receiving GPS information2 Keep pressing the “A” button to set the mode to [TIME]3 Press and hold down the “B” button (around fi ve seconds) and release when the short seconds hand points to the 30 seconds markThe short seconds hand will point to the 0 seconds mark three seconds after pressing the “B” button. Ignore this and keep holding the button down.](https://usermanual.wiki/Seiko-Epson/AP012.05-Short-Term-Confidential-User-Manual-1/User-Guide-3475482-Page-28.png)
![4 Point the watch upwards and wait until the data transmission results appear (the short seconds hand points to [Y] or [N])It will take anywhere from 30 seconds to 2 minutes for data to be received. ■Receiving dataThe short seconds hand will show the number of GPS data sources acquired.Reference• In general four GPS data acquisition sites are needed to acquire positional information.However, you may not be able to receive data correctly even if four or more sites are displayed.• Press and release the “B” button during the acquisition process to cancel it. ■Ending data transmissionsData has been successfully received when the short seconds hand points to [Y].The time and date will be adjusted automatically based on the positional information acquired.ReferenceThe data transmission has failed if the short seconds hand points to [N].Move to a location more suited to receiving data and try again.• Manually adjust for DST (summer time) as required. (User’s Guide)• Refer to the “User’s Guide” for information on other time setting functions.](https://usermanual.wiki/Seiko-Epson/AP012.05-Short-Term-Confidential-User-Manual-1/User-Guide-3475482-Page-29.png)
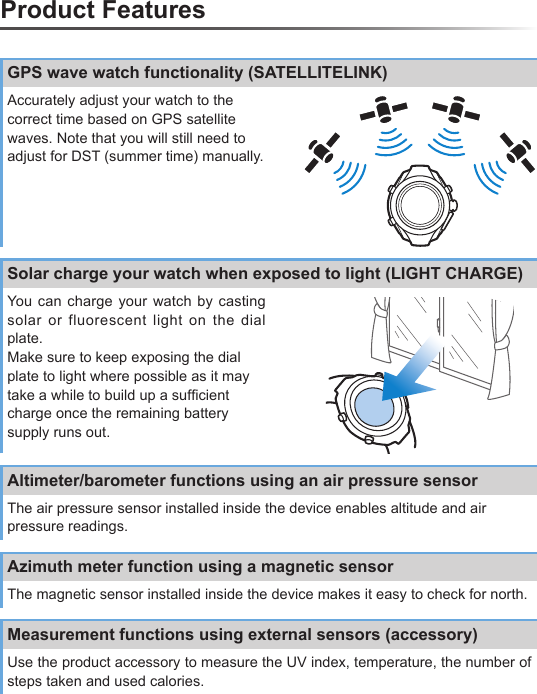
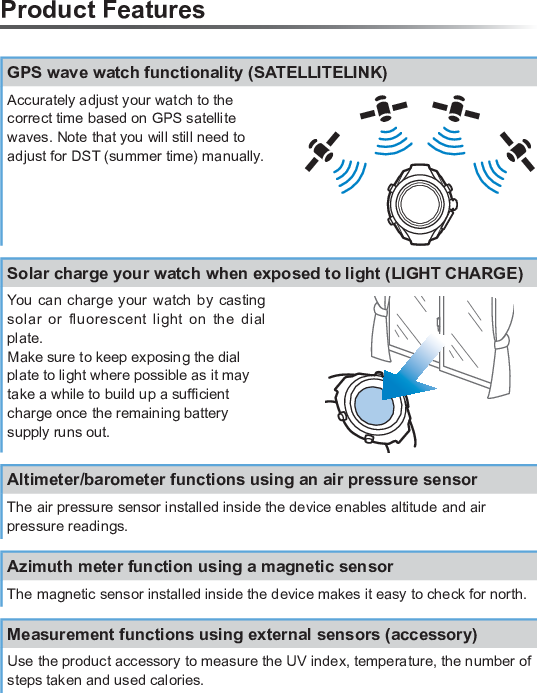
![Using the Watch as a Measuring DeviceMeasuring Altitude/Barometric PressureThe air pressure sensor installed inside the device enables altitude and air pressure readings.Altitude readings are taken when in [ALT] mode, and barometric pressure readings are taken when in [BAR] mode.ImportantThis product uses an air pressure sensor to calculate altitude readings. Note that changes in air pressure will result in different altitude readings even when standing in the same location. This may result in discrepancies in altitude readings from the actual elevation height. Make sure to calibrate altitude readings (set the standard altitude) before use.Measurement1 Keep pressing the “A” button to set the mode to [ALT] or [BAR]ReferenceThis product automatically measures the altitude and barometric pressure in intervals of around 10. Switching between [ALT] and [BAR] modes will display the last measured value. Proceed to step 2 to measure values for your current location in real time.](https://usermanual.wiki/Seiko-Epson/AP012.05-Short-Term-Confidential-User-Manual-1/User-Guide-3475482-Page-30.png)
![2 Press and release the “C” button to perform a measurementWhen measurements are being performed (one minute) the indicator hand will point to [M].After measurements are complete measurement results will be updated around once every 10 minutes.3 Confi rm the measurement results](https://usermanual.wiki/Seiko-Epson/AP012.05-Short-Term-Confidential-User-Manual-1/User-Guide-3475482-Page-31.png)
![Checking DirectionThe magnetic sensor installed inside the device makes it easy to check for north.ImportantMake sure to calibrate the magnetic sensor when fi rst using this product, or whenever you feel that the measured results diverge from true north.1 Keep pressing the “A” button to set the mode to [COM]2 Press and release the “C” button while keeping the watch levelThe center hand will point to north (one minute).ImportantNote that directional readings may be incorrect when using this function near products with a strong magnetic discharge or in strong magnetic fi elds.Avoid the following locations when using this function.• Near magnets• Near electric products• Near metallic products• Near modes of transport or inside motor vehicles• Near high-voltage wires, overhead railway lines, etc.• Indoors, or within buildings built using reinforced concrete structures and steel structures](https://usermanual.wiki/Seiko-Epson/AP012.05-Short-Term-Confidential-User-Manual-1/User-Guide-3475482-Page-32.png)
![1Calibrating the Magnetic SensorPlacing this product in environments with strong magnetic fi elds may prevent it from showing north.Make sure to calibrate the magnetic sensor when fi rst using this product, or whenever you feel that the measured results diverge from true north.Important• Avoid areas close to products with a strong magnetic discharge or strong magnetic fi elds when calibrating the magnetic sensor.• When calibrating the magnetic sensor keep the watch level and make sure that the metal part of the watch band does not come into contact with the clock part of the watch.1 Keep pressing the “A” button to set the mode to [COM]2 Unlock the winding crown and pull it out one level3 Press and release the “C” button while keeping the watch level](https://usermanual.wiki/Seiko-Epson/AP012.05-Short-Term-Confidential-User-Manual-1/User-Guide-3475482-Page-33.png)
![180°When performing the fi rst calibration the short seconds hand will move from the 0 seconds mark to the 30 seconds mark.4 Rotate the watch 180 degrees as accurately as possible while keeping the watch level5 Keep the watch as it is in step 4 and press and release the “C” button once moreWhen performing the second calibration the short seconds hand will point to [Y].ReferenceIf the short seconds hand points to [N] check to see if there any products giving of a strong magnetic discharge nearby, or if you are in an area with a strong magnetic fi eld. Following this, press and release the “C” button again and repeat this process from step 3.If the short seconds hand continues to point to [N] even after repeated calibration attempts, please contact our customer support center.](https://usermanual.wiki/Seiko-Epson/AP012.05-Short-Term-Confidential-User-Manual-1/User-Guide-3475482-Page-34.png)

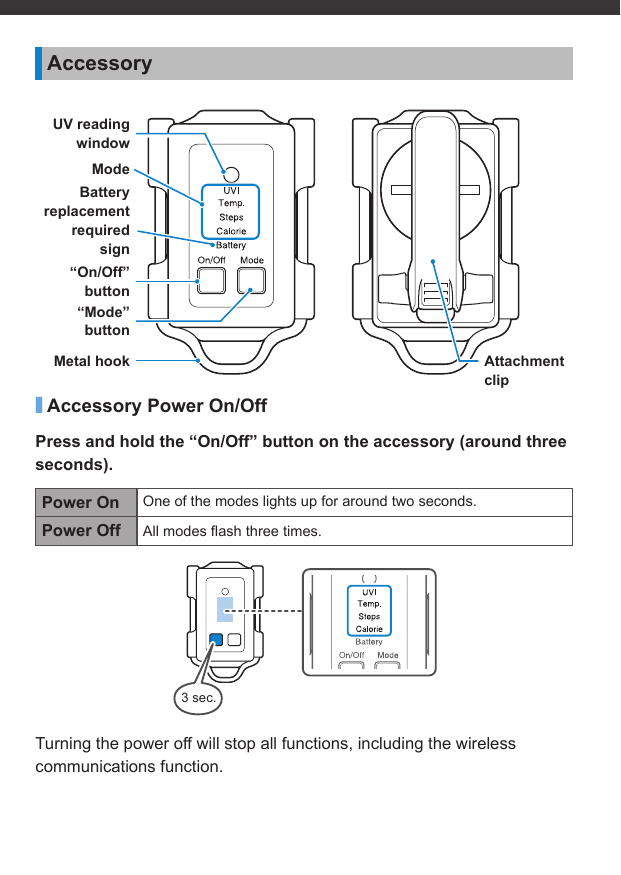
![Using the Watch and Accessory Together for MeasurementsMeasuring the UV IndexYou can use the product accessory to measure the UV index. The UV index indicates the strength of UV light.Measurement results are sent from the accessory to the watch and displayed using the watch hands.Measurement1 Turn the accessory onWhen on, pressing and releasing the “Mode” button will light up a mode for around two seconds.2 Keep pressing the “Mode” button on the accessory to set the mode to [UVI]3 Keep pressing the “A” button to set the mode to [ACC]Switching to the [ACC] mode will display details of the last connection with the accessory.](https://usermanual.wiki/Seiko-Epson/AP012.05-Short-Term-Confidential-User-Manual-1/User-Guide-3475482-Page-36.png)
![4 Press and release the “C” button to start a connection between the watch and the accessoryWhen transmitting (one minute) the indicator hand will point to [M].5 Point the UV reading window on the accessory (the sensor used to measure UV light) directly at the sunlight6 Confi rm the measurement results](https://usermanual.wiki/Seiko-Epson/AP012.05-Short-Term-Confidential-User-Manual-1/User-Guide-3475482-Page-37.png)
![Measuring the TemperatureYou can use the product accessory to measure the temperature.Measurement results are sent from the accessory to the watch and displayed using the watch hands.Important• Temperature readings are affected by direct sunlight, body temperature, humidity and other environmental factors.• While temperature changes are roughly refl ected in the temperature displayed within minutes, it may take around 30 minutes for the temperature displayed to stabilize.Measurement1 Turn the accessory onWhen on, pressing and releasing the “Mode” button will light up a mode for around two seconds.2 Keep pressing the “Mode” button on the accessory to set the mode to [Temp.]3 Keep pressing the “A” button to set the mode to [ACC]Switching to the [ACC] mode will display details of the last connection with the accessory.](https://usermanual.wiki/Seiko-Epson/AP012.05-Short-Term-Confidential-User-Manual-1/User-Guide-3475482-Page-38.png)
![4 Press and release the “C” button to start a connection between the watch and the accessoryWhen transmitting (one minute) the indicator hand will point to [M].5 Confi rm the measurement results](https://usermanual.wiki/Seiko-Epson/AP012.05-Short-Term-Confidential-User-Manual-1/User-Guide-3475482-Page-39.png)
![Measuring Steps Taken and Calories UsedYou can use the product accessory to measure steps taken and calories used.Check the number of steps taken in the [Steps] mode, and the number of calories used in the [Calorie] mode.Measurement results are sent from the accessory to the watch and displayed using the watch hands.Before Measurement1 Turn the accessory onWhen on, pressing and releasing the “Mode” button will light up a mode for around two seconds.2 Attach the accessory to your waistUse the attachment clip for the accessory to attach it to a belt, pocket or elsewhere. Fully insert the accessory to the base of the attachment clip so that it does not fall off.](https://usermanual.wiki/Seiko-Epson/AP012.05-Short-Term-Confidential-User-Manual-1/User-Guide-3475482-Page-40.png)
![3 sec.Reference• The number of steps taken and calories used are always being tracked regardless of the measurement mode used on the watch provided that the accessory is turned on.• Measurement results are cumulative. To begin measurements from 0, reset the measurement results.Set the accessory mode to [Steps] or [Calorie], and then press and hold down the “Mode” button. (Around three seconds)After each mode begins fl ashing in order, all modes will light up for around three seconds to indicate that measurement results for the number of steps taken and calories used are being simultaneously reset.Confi rming Measurement Results1 Keep pressing the “Mode” button on the accessory to set the mode to [Steps] or [Calorie]](https://usermanual.wiki/Seiko-Epson/AP012.05-Short-Term-Confidential-User-Manual-1/User-Guide-3475482-Page-41.png)
![2 Keep pressing the “A” button to set the mode to [ACC]Switching to the [ACC] mode will display details of the last connection with the accessory.3 Press and release the “C” button to start a connection between the watch and the accessoryWhen transmitting (one minute) the indicator hand will point to [M].4 Confi rm the measurement results](https://usermanual.wiki/Seiko-Epson/AP012.05-Short-Term-Confidential-User-Manual-1/User-Guide-3475482-Page-42.png)