Senao Co 2511AP2PLUS Wireless LAN Access Point User Manual SL 2511AP2 User Guide v1 04
Senao International Co Ltd Wireless LAN Access Point SL 2511AP2 User Guide v1 04
UserManual.wiki
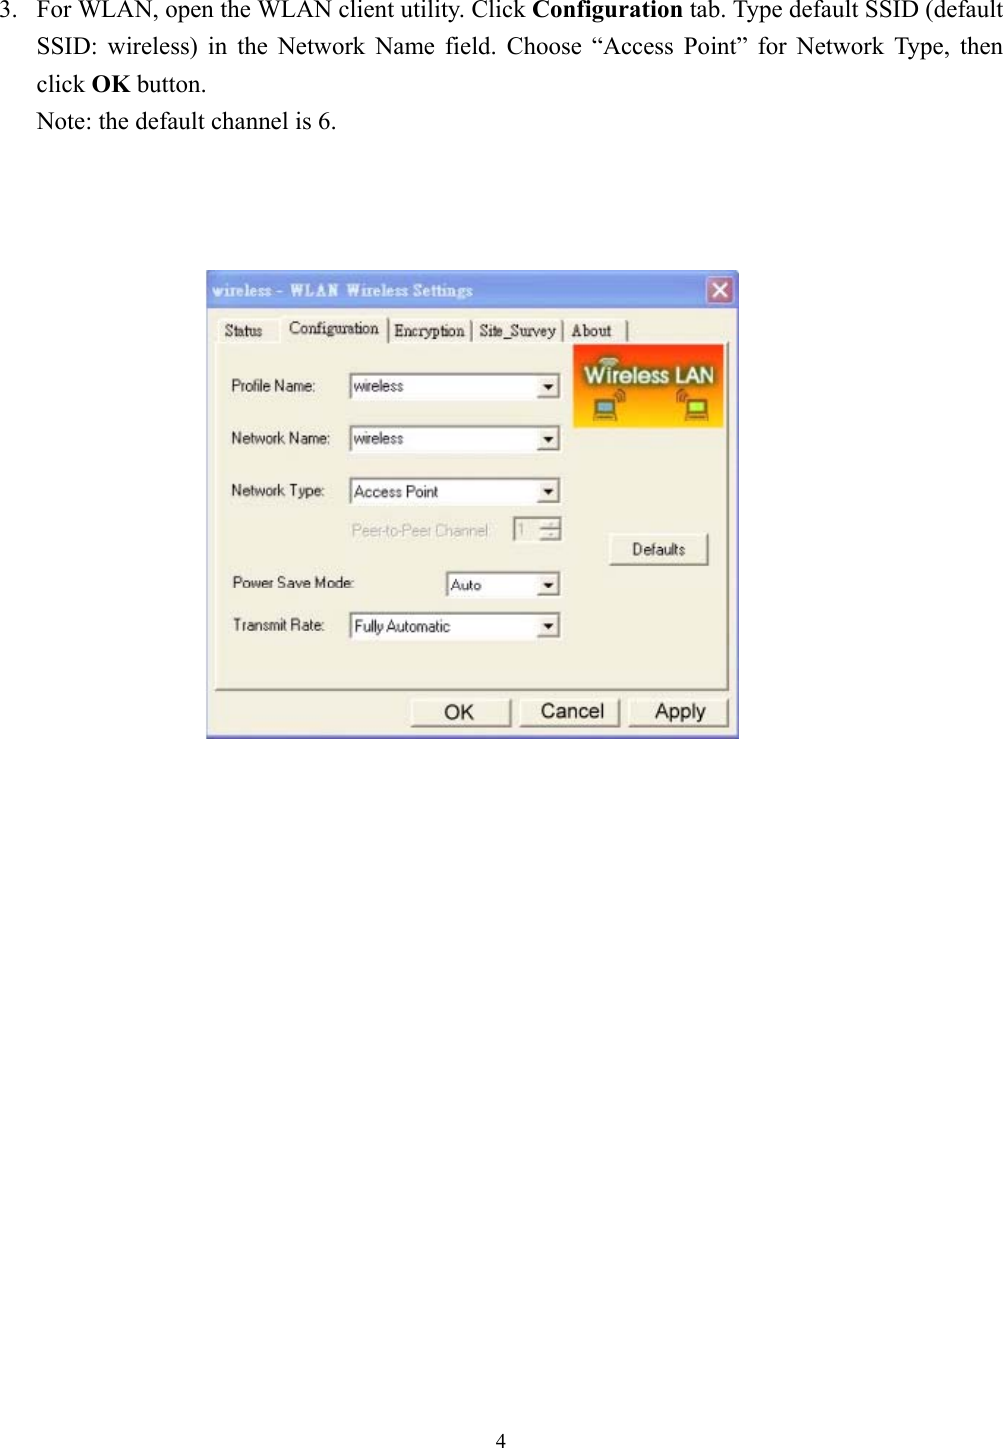
>
Senao Co
>
2511AP2PLUS User Manual
Manual
Navigation menu
Upload a User Manual
Namespaces
Wiki Guide
HTML
PDF
Info
Views
User Manual
Discussion / Help
Navigation


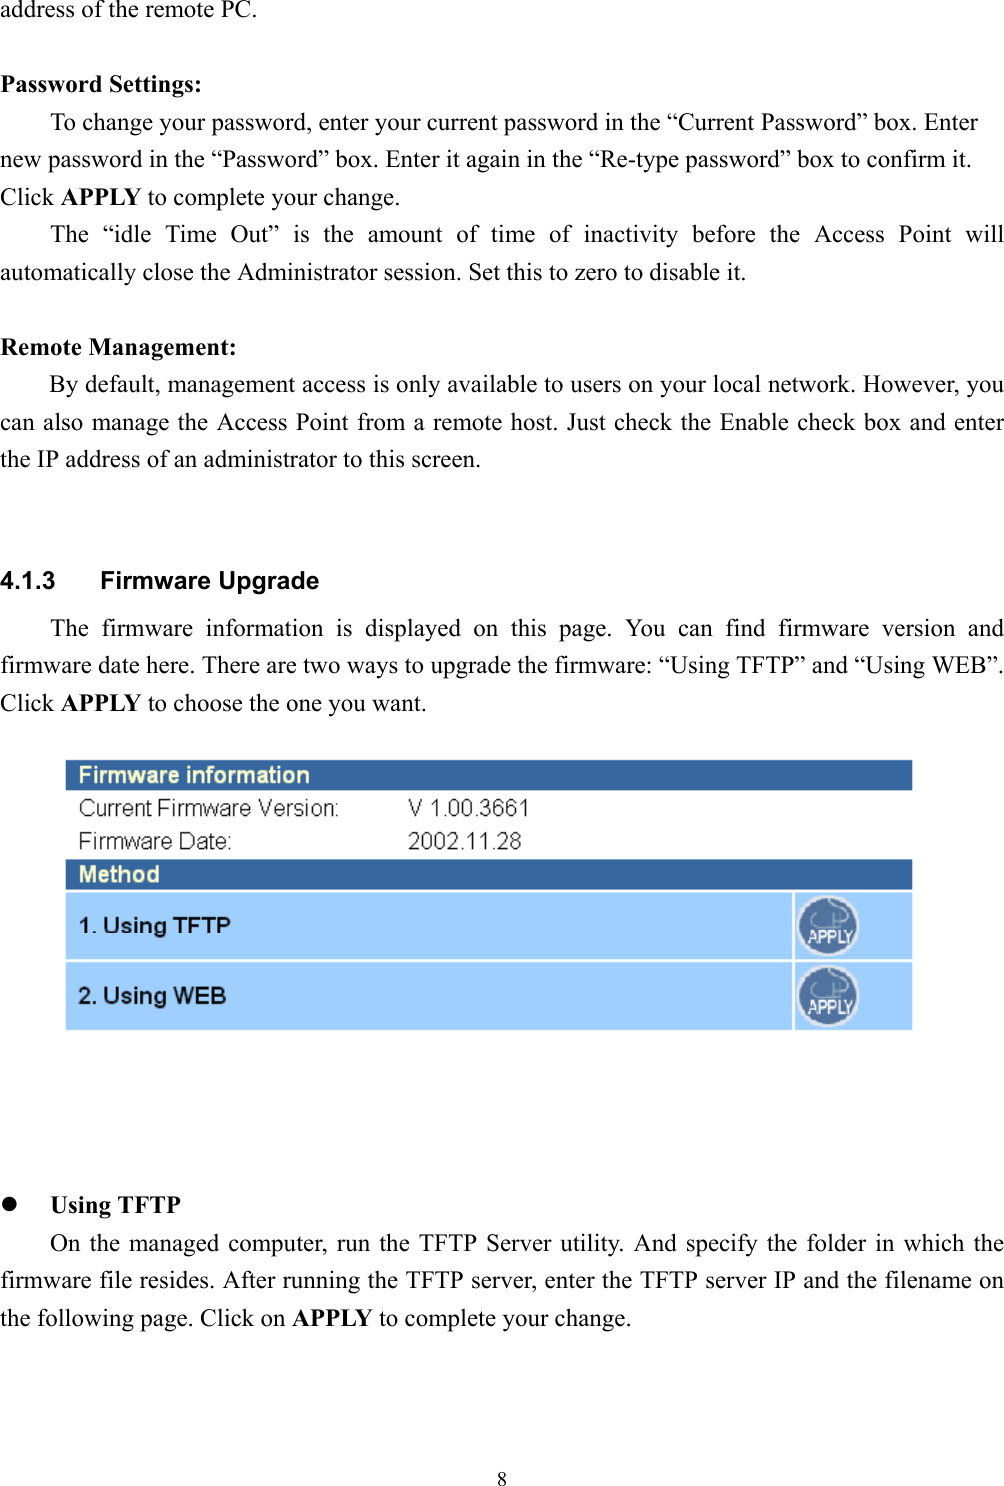


![233. After entering the telnet daemon, you can first type help to see the available commands. Command Line Interface v 1.0======================================================time : Get current system time. Usage: timesettime : Set system time. Usage: settime <hh:mm:ss> [yy/mm/dd] [TZ(GMT +/- hour)]help : List all commands. Usage: helpifShow : Dispaly network interface. Usage: ifShow <ifname>ipConfig : Configure interface address and subnet mask. Usage: ipConfig [ifname] [ip] [subnet mask]ping : Ping a host.. Usage: ping [ip]routeShow : Show Route. Usage: routeShowdhcpsStart: Start DHCP Server.. Usage: dhcpsStartdhcpsStop : Stop DHCP Server.. Usage: dhcpsStopexit : exit this telnet session. Usage: ExitwlanShow : Show the WLAN config. Usage: wlanShowreset : reset the system. Usage: resetwlanSet : configure the wireless part. Usage: wlanset ACTION [arg1], [agr2], ...status : Show the AP status. Usage: statussysSet : Change the System Configuration. Usage: sysSet ACTION [arg1], [agr2], ...lanShow : Show the LAN setting.](https://usermanual.wiki/Senao-Co/2511AP2PLUS/User-Guide-296329-Page-24.png)
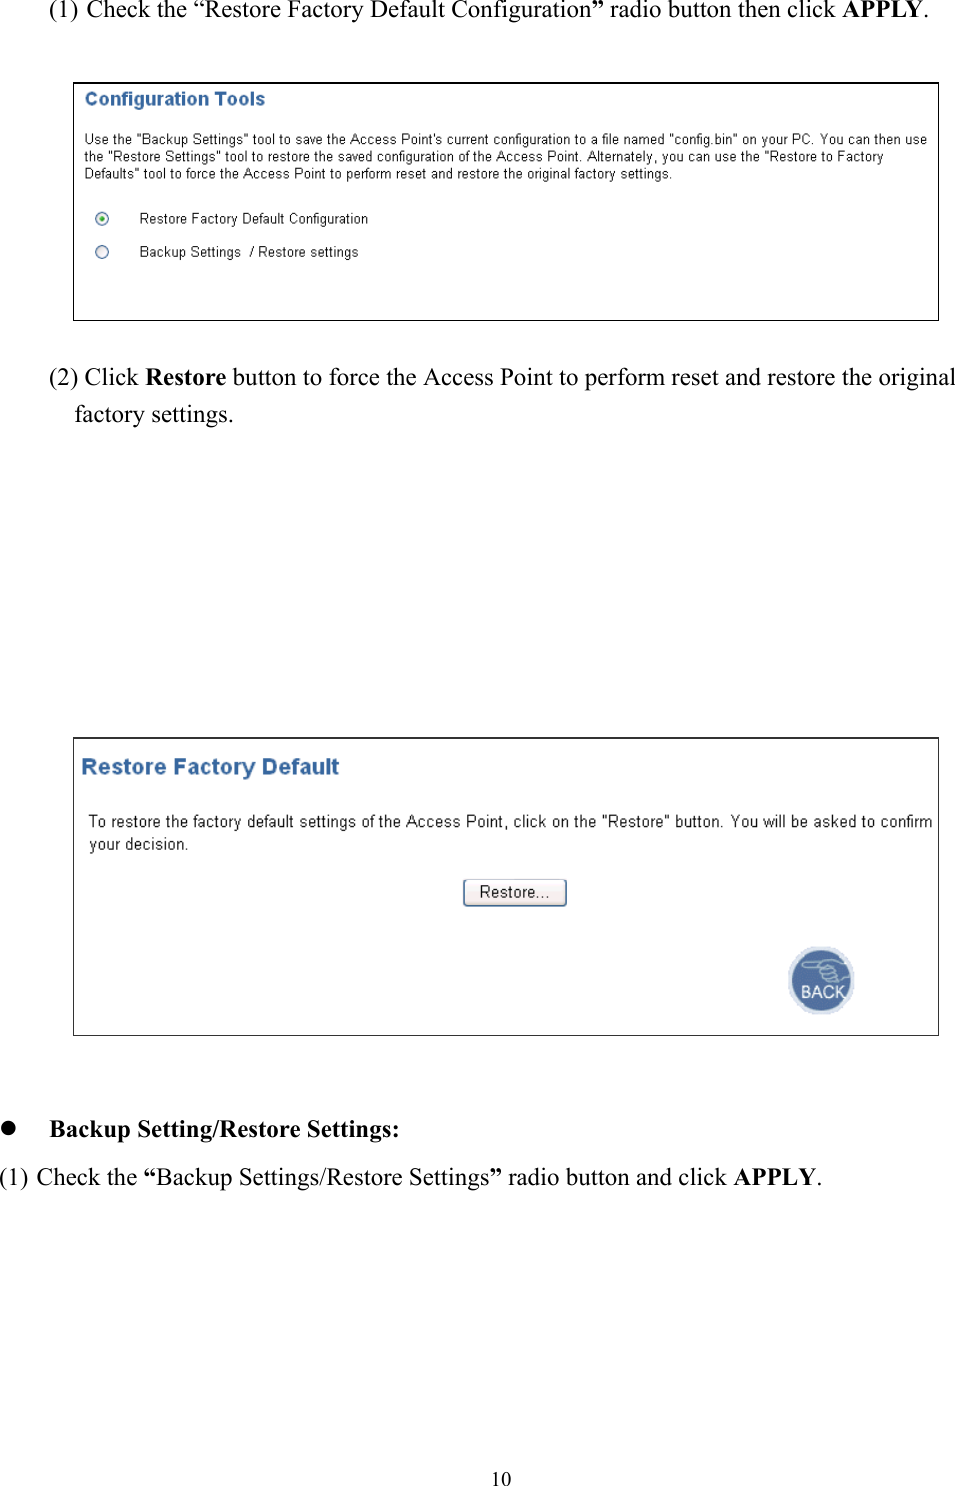
![245.2 Command Line for Telnet daemon1. “time” command shows current system time. Just type “time” at command line prompt.2. Use “settime” to change the current system time.Usage: settime <hh:mm:ss> [yy/mm/dd] [TZ(GMT +/- hour)]cmd>timeTime zone: GMT+6Local time: Thu Jan 1 00:59:10 1970GMT time: Thu Jan 1 06:59:10 1970cmd>](https://usermanual.wiki/Senao-Co/2511AP2PLUS/User-Guide-296329-Page-25.png)
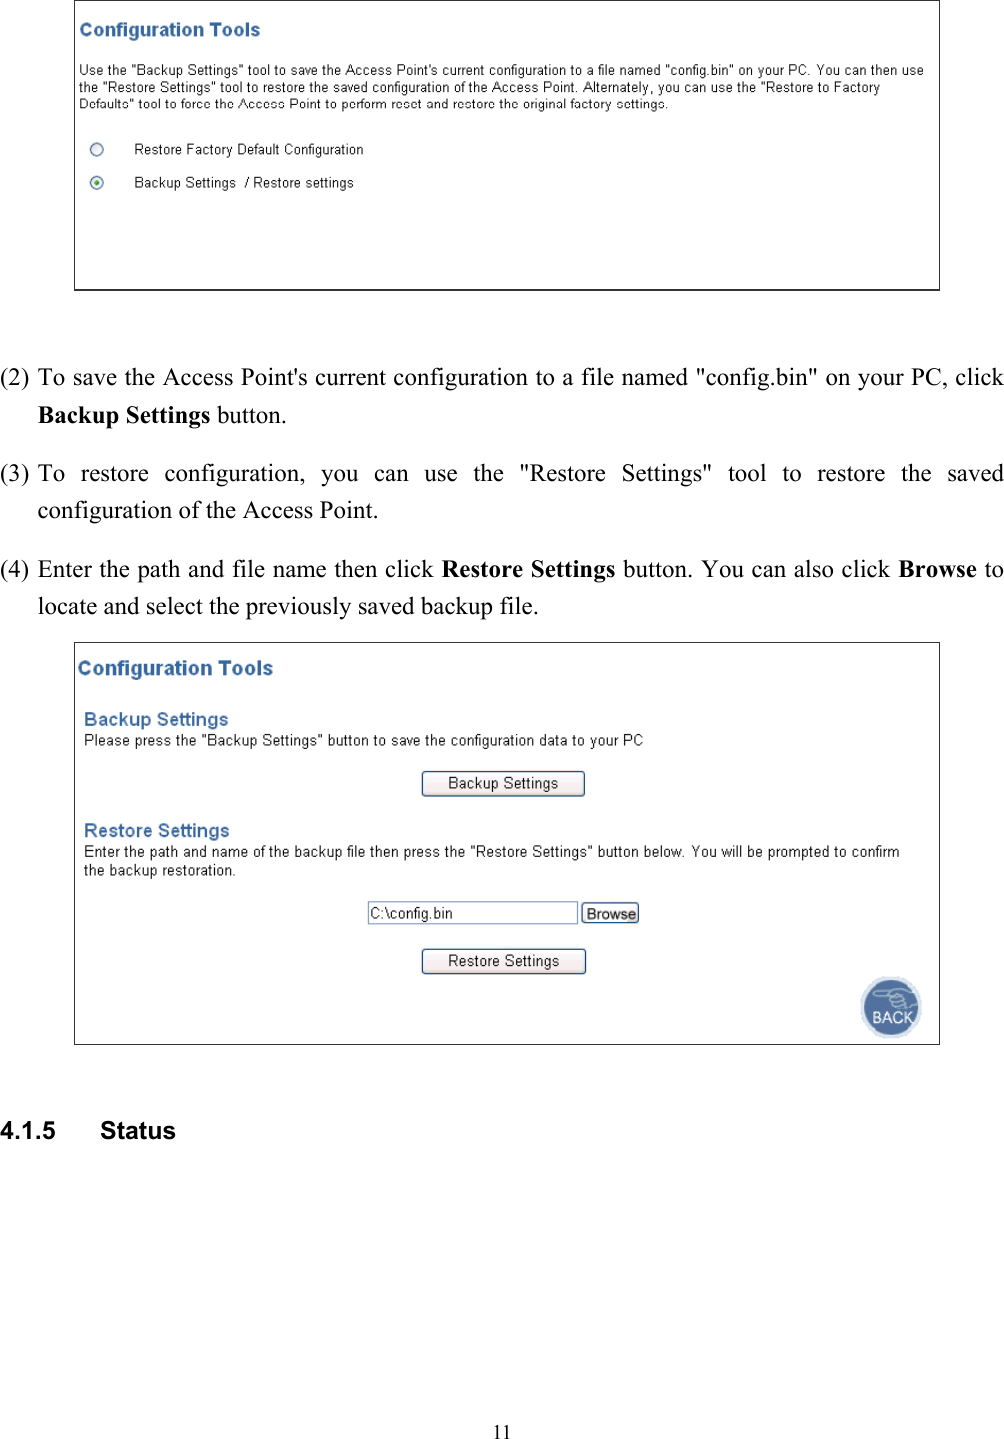
![253. “ifShow” command shows all network interface information, including IP address, subnetmask, and information of packets.Usage: ifShow [ifname]To show all network interface, just type “ifShow” at command line prompt.lo - Loopback interface.adm – LAN interface.wlan – Wireless LAN interface.cmd>settime 15:50:00 2002/12/13cmd>timeTime zone: GMT+6Local time: Fri Dec 13 15:50:02 2002GMT time: Fri Dec 13 21:50:02 2002cmd>cmd>ifShowlo (unit number 0): Type: SOFTWARE_LOOPBACK Internet address: 127.0.0.1 Netmask 0xff000000 Subnetmask 0xff000000 Metric is 0 Maximum Transfer Unit size is 1536 0 packets received; 0 packets sent 0 multicast packets received 0 multicast packets sent 0 input errors; 0 output errors 0 collisions; 0 dropped](https://usermanual.wiki/Senao-Co/2511AP2PLUS/User-Guide-296329-Page-26.png)
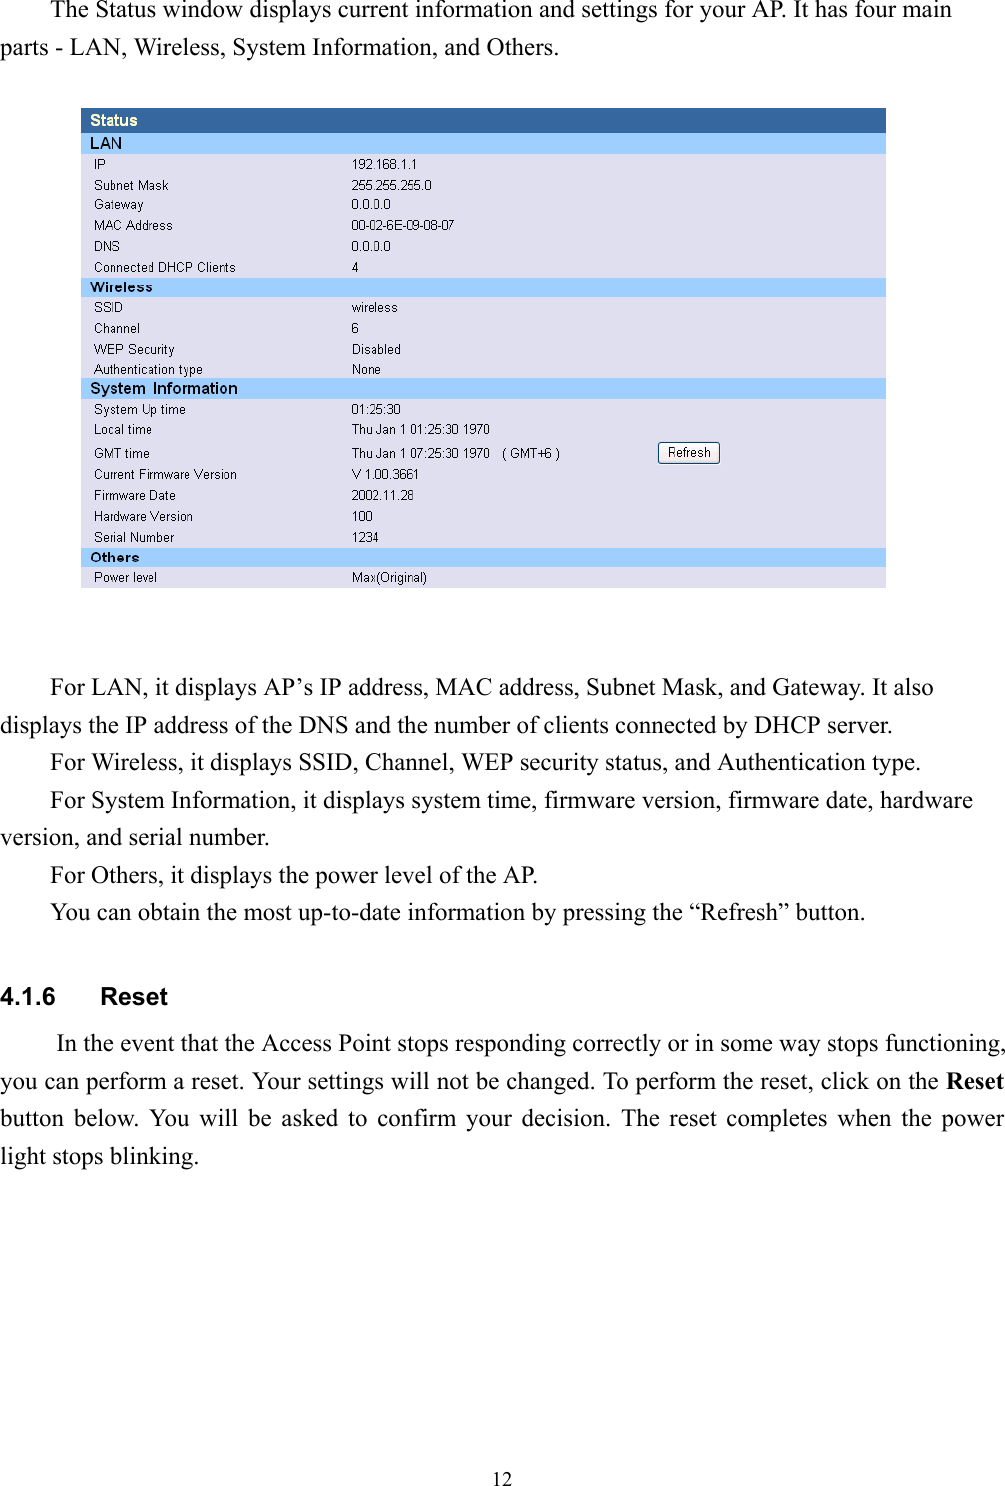
![264. “ipConfig” command is used to configure interface address and subnet mask. Usage: ipConfig [ifname] [ip] [subnetMask]adm (unit number 0): Type: ETHERNET_CSMACD Internet address: 192.168.1.1 Broadcast address: 192.168.1.255 Netmask 0xffffff00 Subnetmask 0xffffff00 Ethernet address is 00:01:02:03:04:05 Metric is 0 Maximum Transfer Unit size is 1500 1016 packets received; 686 packets sent 189 multicast packets received 21 multicast packets sent 0 input errors; 0 output errors 0 collisions; 0 droppedwlan (unit number 0): Type: ETHERNET_CSMACD Netmask 0x1114 Subnetmask 0x111c Ethernet address is 00:02:6f:01:c0:3f Metric is 0 Maximum Transfer Unit size is 1500 0 packets received; 209 packets sent 0 multicast packets received 0 multicast packets sent 0 input errors; 0 output errors 0 collisions; 0 droppedcmd>](https://usermanual.wiki/Senao-Co/2511AP2PLUS/User-Guide-296329-Page-27.png)
![27Iask]5. “ping” command is used to ping a host.Usage: ping [IP address]6. “exit” command exit the telnet session. Type “exit” at command line prompt.7. “wlanShow” command shows the wireless LAN configuration, including SSID, Channel,WEP Encryption information, threshold information, and security information. Just type“wlanShow” at command line prompt.Welcome to Telnet Daemon v1.00cmd>ipConfig adm0 192.168.1.50 255.255.255.0cmd>Interface name IP addressof interface Subnet Maskcmd>ping 192.168.1.20Start time 14671Reply from 192.168.1.20End time 14673Ping statics for 192.168.1.20:Packets: Sent = 1, Received = 1, Lost = 0cmd>exitExit this telnet sessioncmd>wlanShow------- AP configuration ---------MAC address 00:02:6f:01:c0:3dSSID: CandiceChannel: 6WEP: DisableAuthentication algorithm: Open System](https://usermanual.wiki/Senao-Co/2511AP2PLUS/User-Guide-296329-Page-28.png)
![288.“reset” command can reboot the system. Just type ”reset” at command line prompt. 9. “status” shows current information and settings for your AP. Default Wep key Id(1-4): 1WEP key len: 64-bitKey 1: 00000000000000000000000000Key 2: 00000000000000000000000000Key 3: 00000000000000000000000000Key 4: 00000000000000000000000000--- Wireless Enhanced Features ---Power Level: MAX(original)Fragment Threshold: 2346RTS Threshold: 2432Beacon Interval 100 (max: 4095 ms default :100ms)Max associated stations: 250Wireless Client Isolation: DisableHide SSID: DisableBlock Responds to 'Unspecified-SSID': DisableAP Link Completeness: Disablecmd>status--------- LAN -----------------IP: 192.168.1.98Subnet Mask: 255.255.255.0Gateway: 0.20.247.208LAN MAC Address: 00:01:02:03:04:10Connected DHCP Clients: 1--------- Wireless -----------------SSID: [(null)]Channel: 6Authentication type: NoneWireless MAC Address: 00:02:6f:01:c0:3dWireless MAC Address:](https://usermanual.wiki/Senao-Co/2511AP2PLUS/User-Guide-296329-Page-29.png)
![2910. “routeShow” shows the network routing table, host routing table and the ARP table.cmd>routeShowNet Routing Table:Destination Gateway NetMask Flags Used Hops Interface----------------------------------------------------------------------------------------------------------192.168.3.0 192.168.3.1 255.255.255.0 U C 0 0 adm0Host Routing Table:Destination Gateway NetMask Flags Used Hops Interface-------------------------------------------------------------------------------------------------------127.0.0.1 127.0.0.1 U H 0 0 lo0ARP Table:Destination Gateway NetMask Flags Used Hops Interface------------------------------------------------------------------------------------------------------192.168.3.20 00:00:e2:7a:59:3f U H L 3377 0 adm0192.168.3.25 00:02:6f:01:c0:3d U H L 3142 0 adm0cmd>11.“dhcpsStart” command enables the DHCP server function. The AP can function as a DHCPserver and automatically assign an IP address to a client.cmd>dhcpsStartDhcpsStart: successful!12. “dhcpsStop” command can stop the DHCP server function.--------- System Information -----------------System Up time: 01:26:55Local time: Thu Jan 1 01:26:55 1970GMT time: Wed Dec 31 17:26:55 1969Current Firmware Version: [1.00.4455]Firmware Date: [2003.01.06]Hardware Version: [1]Serial Number: [0000011118]cmd>](https://usermanual.wiki/Senao-Co/2511AP2PLUS/User-Guide-296329-Page-30.png)

![325.3 Configuring Wireless LAN through TelnetThe command “wlanSet” can configure the Wireless LAN part. Type “wlanSet” and the actionyou want to perform. You need to know actions for the Wireless LAN setting.Usage: wlanSet [ACTION] [arg1] [arg2] ….ACTION Description Usagessid Change the SSID wlanSet ssid [SSID]channel Change the wirelesschannel[1-14]wlanSet channel [channelnumber]frag Change the fragmentThresholdwlanSet frag [fragmentthreshold]rts Change the RTS Threshold wlanSet rts [RTSThreshold]keyid Change the WEP defaultkey id [1-4]wlanSet keyid [defualt keyid]beacon Change the beacon Period[0-4095ms]wlanSet beacon [beaconperiod]maxass Change the max associatedstations [1-300]wlanSet maxass [number ofstations]wepkey Change the WEP key wlanSet wepkey [keyid][key(hex format)]wep wlanSet wep [0|64|128] wlanSet wep [0|64|128]isolate Change the Wireless ClientIsolation: 0:disable,1:enablewlanSet isloate [0|1]hidessid Change the Hide SSID:0:disable, 1:enablewlanSet hidessid [0|1]block Change the Block Respondsto 'Unspecified-SSID':0:disable, 1:enablewlanSet block [0|1]power Change the Outpower level:0:Original, 1: 100mW, 2:50mW, 3: 20mWwlanSet power [0|1|2|3]aplink Change the AP LinkCompleteness: 0:disable,1:enablewlanSet aplink [0|1]authalgo Change Authentication wlanSet authalgo [1|2|3]](https://usermanual.wiki/Senao-Co/2511AP2PLUS/User-Guide-296329-Page-33.png)
![33ACTION Description Usagealgorithm: 1:Open system,2: Shared key, 3:Auto1. The “ssid” action can change the SSIDUsage: wlanSet ssid [New SSID]2. The “channel” action can change the wireless channel.Usage: wlanSet channel [New channel number]3. The “frag” action can change the frame’s fragment threshold.Fragment Threshold: 256~2346 bytes , default is 2346Usage: wlanSet frag [ New fragment threshold]4. The “rts” action can change the frame’s RTS threshold.RTS Threshold: 0~3000 ms, default is 2432Usage: wlanSet rts [Nes RTS threshold]cmd>wlanSet ssid WirelessLANOld SSID: WirelessNew SSID (after reset): WirelessLAN(Please remember to reset the Access Point if you made any change).cmd>wlanSet channel 5Old Channel: 6New Channel (after reset): 5(Please remember to reset the Access Point if you made any change).cmd>wlanSet frag 2000Old Fragment Threshold: 2346New Fragment Threshold (after reset): 2000(Please remember to reset the Access Point if you made any change).New SSIDcmd>wlanSet rts 2500Old RTS Threshold: 2432New RTS Threshold (after reset): 2500(Please remember to reset the Access Point if you made any change).](https://usermanual.wiki/Senao-Co/2511AP2PLUS/User-Guide-296329-Page-34.png)
![345. The “keyid” action can change the WEP default ID( the default is from 1 to 4).Usage: wlanSet keyid [New key default ID]6. The “beacon” action can change the beacon period.Beacon Period: Default is 100 ms. The maximum is 4095.Usage: wlanSet beacon [New beacon period]7. The “maxass” action can set the maximun number of users that can associate the AP.8. The “wepkey” action can change the WEP key.Usage: wlanSet wepkey [keyid] [key(hex format)]9. The action “wep” is for changing the WEP key length (0:disable/64 bit/128 bit).Usage: wlanSet wep [New key length]cmd>wlanSet keyid 2Old WEP default key id: 0New WEP default key id (after reset): 2(Please remember to reset the Access Point if you made any change).cmd>wlanSet beacon 3000Old Beacon Period: 100New Beacon Period (after reset): 3000(Please remember to reset the Access Point if you made any change).cmd>wlanSet maxass 20Old Maximum Assocated Stations: 250New Maximum Assocated Stations (after reset): 20(Please remember to reset the Access Point if you made any change).cmd>wlanSet wepkey 1 1122334455CmdWlanSetKey() key 1122334455Old Key 1: 0011223344New Key 1: 1122334455(Please remember to reset the Access Point if you made any change).](https://usermanual.wiki/Senao-Co/2511AP2PLUS/User-Guide-296329-Page-35.png)
![35 Example:To disable the WEP key, type following command:10. The “isolate” action can enable/disable the wireless client isolation function.0: Disable1: EnableUsage: wlanSet isolate [0|1]11. The “hidessid” action can enable/disable the “Hide SSID in beacon frame” function.0: Disable1: EnableUsage: wlanSet hidessid [0|1]cmd>wlanSet wep 128Old WEP Encryption: 64-bitNew WEP Encryption (after reset): 128-bit(Please remember to reset the Access Point if you made any change).cmd>wlanSet isolate 1Old Wireless Client Isolation: DisableNew Wireless Client Isolation (after reset): Enable(Please remember to reset the Access Point if you made any change).cmd>wlanSet hidessid 1Old Hide SSID: DisableNew Hide SSID (after reset): Enable(Please remember to reset the Access Point if you made any change).cmd>wlanSet wep 0Old WEP Encryption: 64-bitNew WEP Encryption (after reset): Disabled(Please remember to reset the Access Point if you made any change).](https://usermanual.wiki/Senao-Co/2511AP2PLUS/User-Guide-296329-Page-36.png)
![3612. The “block” action can enable/disable the ”Block responds to Unspecified-SSID” function.0: Disable1: EnableUsage: wlanSet block [0|1]13. The “power” action can change the power level 0:Original, 1: 100mW, 2: 50mW, 3: 20mW0:Original1: 100mW2: 50mW3: 20mWUsage: wlanSet power [0|1|2|3]If plug off the cable of LAN interface,14. The “aplink” action can change the AP Link Completeness. If enable this function, the WLANinterface will be disabled when plug off the cable of LAN interface,0: Disable1: EnableUsage: wlanSet aplink [0|1]cmd>wlanSet block 0Old Block Responds to 'Unspecified-SSID': EnableNew Block Responds to 'Unspecified-SSID' (after reset): Disable(Please remember to reset the Access Point if you made any change).cmd>wlanSet power 2Old Power Level: MAX(original)New Power Level (after reset): 50mW(Please remember to reset the Access Point if you made any change).cmd>wlanSet aplink 1Old AP Link Completeness: DisableNew AP Link Completeness (after reset): Enable(Please remember to reset the Access Point if you made any change).](https://usermanual.wiki/Senao-Co/2511AP2PLUS/User-Guide-296329-Page-37.png)
![3715. The “authalgo” action can change the authentication algorithm.1: Shared key2: Open system3: AutoUsage: wlanSet authalgo [1|2|3]5.4 Configuring LAN through TelnetThe command “lanSet” can configure the LAN part. Type “lanSet” and the action you want toperform. You need to know actions for the LAN setting.Usage: lanSet [ACTION] [arg1] [arg2] ….ACTION Description Usageip Change the LAN’s IP andmaskLanSet ip [IP] [mask]gateway Change the AP IP, mask,Gateway, DHCPlanSet gateway [gateway]dhcp Change the DHCP serversetting.lanSet dhcp ['disable'|startip] [end ip] [lease time][domain name]1. The “ip” action can change the LAN’s IP address and Subnet Mask.Usage: lanSet ip [IP] [mask]Example:Welcome to Telnet Daemon v1.01cmd>wlanSet authalgoCurrent Authentication algorithm: Open Systemcmd>wlanSet authalgo 3Old Authentication algorithm: Open SystemNew Authentication algorithm (after reset): Auto(Please remember to reset the Access Point if you made any change).cmd>](https://usermanual.wiki/Senao-Co/2511AP2PLUS/User-Guide-296329-Page-38.png)
![382. The “gateway” action can set the network’s gateway. Usage: lanSet gateway [gateway IP] Example:3. The “dhcp” action can change the dhcp server setting. Usage: lanSet dhcp ['disable' | start ip] [end ip] [lease time] [domain name]Argument Description Usage'disable'|start ip disable: to disable the DHCP server functionstart ip: the start IP address of the IP poolend ip The ending IP address of the IP poollease time: The period client can have the IPaddress assigned by DHCP server.0: Half hour, 1: One hour, 2: Two hours, 3:Halfday, 4: One day, 5: Two days, 6: One week,7:Two weeks 8: Foreverdomain name: the domain name (needed bysome applications)Usage: To disable the dhcp server, type: lanSet dhcp 'disable' To enable the dhcp server, type:lanSet dhcp ['disable' | start ip] [end ip] [lease time] [domain name]Example: cmd>lanSet gateway 192.168.3.47Change gateway success.(Please remember to reset the Access Point if you made any change).cmd>cmd>lanSet ip 192.168.3.1 255.255.255.0argc 3, ip [192.168.3.1] mask [255.255.255.0](Please remember to reset the Access Point if you made any change).cmd>lanSet dhcp disabledisable the DHCP server(Please remember to reset the Access Point if you made any change).cmd>](https://usermanual.wiki/Senao-Co/2511AP2PLUS/User-Guide-296329-Page-39.png)
![395.5 Configuring System through TelnetThe command “sysSet” can change the settings of system, including time and administratorsettings. Type “sysSet” and the action you want to perform. You need to know actions for filtersetting.Usage: sysSet [ACTION] [arg1][arg2]…..ACTION Description Usagepasswd Change the password. sysSet passwdidletime Change the IdleTimeOut. sysSet idletime [idle time(mins)]remote Change the RemoteManagement statussysSet remote [0|1][IP]fwupgrade firmware upgrade. sysSet fwupgrade [IP] [file]setdefault Set to default systemconfiguration.sysSet setdefaultreset reset the system. sysSet resetsntppoll Change the SNTP pollingtimesysSet sntppollsntp Change the SNTP setting sysSet sntp [0|1] [IP]sntpchangeip Change a SNTP server's IP. sysSet sntpchangeip[INDEX] [IP], index: 1-41. The “passwd” action can change the system password.Usage: sysSet passwdExample:cmd>lanSet dhcp 55 66 1 domainnameLAN set DHCP ok!(Please remember to reset the Access Point if you made any change).cmd>Welcome to Telnet Daemon v1.01cmd>sysSet passwd**** Change password ****Please enter current password:Please enter new password: ****Please re-enter new password:****](https://usermanual.wiki/Senao-Co/2511AP2PLUS/User-Guide-296329-Page-40.png)
![402. The “idletime” action can change the system idle time out.Usage: sysSet idletime [idle time(min)]3. The “remote” action can enable or disable the remote management function. You can enterthe IP address of the remote manager.Usage: sysSet remote [0|1] [IP of remote manager]0: disable1: enable Example: 4. The ”fwupgrade” action can do the firmware upgrade.Usage: sysSet fwupgrade [IP] [file] Example:cmd>sysSet idletime 98New Idle time value out is 98 min(s)(Please remember to reset the Access Point if you made any change).cmd>cmd>sysSet remoteCurrent Remote Management status: Disabledcmd>sysSet remote 1 192.168.3.25New Remote Management status: Enabled(Please remember to reset the Access Point if you made any change).cmd>Welcome to Telnet Daemon v1.01cmd>sysSet fwupgrade 192.168.3.20 application.dlfCurrent Firmware Version: 1.00.4431Firmware Date: 2003.01.02TFTP download startTFTP download successed(Please remember to reset the Access Point if you made any change).](https://usermanual.wiki/Senao-Co/2511AP2PLUS/User-Guide-296329-Page-41.png)
![41 5. The “setdefault” action can reset system to factory default configuration. This command isthe same as the “Restore Factory Default Configuration” function of the Web-Based utility.Usage: sysSet setdefaultExample: Note: You have to reset system to let this change effective.6. The “reset” action can reboot the system and refresh the AP’s connection.Usage: sysSet reset7. The “sntppoll” action can change the SNTP pooling time.Usage: sysSet sntppoll [polling time(sec)] Example:Welcome to Telnet Daemon v1.01cmd>sysSet setdefaultLoad default system configurationLoad default system configuration finishedcmd>sysSet sntppollCurrent SNTP polling time value is 86400 second(s)cmd>Welcome to Telnet Daemon v1.01cmd>sysSet sntppoll 11000New SNTP polling time value is 11000 second(s)(Please remember to reset the Access Point if you made any change).cmd>](https://usermanual.wiki/Senao-Co/2511AP2PLUS/User-Guide-296329-Page-42.png)
![428. The “sntp” action can change SNTP function and set SNTP server.Usage: sntp [0|1] [IP]0: Disable1: EnableExample:9. The “sntpchangeip” action can change SNTP server’s IP. Usage: sntpchangeip [Index] [sntp server’s IP]index: 0-4 Example:cmd>sysSet sntp 0New SNTP status: Disabled(Please remember to reset the Access Point if you made any change).cmd>sysSet sntp 1 192.168.3.20New SNTP configurationUsage: sntp [0|1] [IP], 0:disable, 1:enable---==== SNTP configuration ===---Status: EnablePolling time: 86400 secondsServer #1's IP: 192.168.3.20Server #2's IP: 0.0.0.0Server #3's IP: 0.0.0.0Server #4's IP: 0.0.0.0(Please remember to reset the Access Point if you made any change).cmd>sysSet sntpchangeip 1 192.168.3.25New setting:---==== SNTP configuration ===---Status: EnablePolling time: 86400 secondsServer #1's IP: 192.168.3.25Server #2's IP: 0.0.0.0Server #3'sIP:0000](https://usermanual.wiki/Senao-Co/2511AP2PLUS/User-Guide-296329-Page-43.png)
![435.6 Configuring Filtering through TelnetThe command “filterSet” can change the settings of MAC filtering and IP filtering. Type“filterSet” and the action you want to perform. You need to know actions for filter setting.Usage: filterSet [ACTION] [arg1][arg2]…..ACTION Description Usagemacshow Show the MAC filteringsetting.filterSet macshowmac Change the MAC addressfiltering.filterSet mac ….ip Show the IP filteringsetting.filterSet ip ….ipdaytime Change the daytime part filterSet ipdaytimeipstatus Enable or Disable the IPfiltering function.filterSet ipstatus1. The “macshow” action shows the filtering type and MAC address table of MAC filtering.Usage: filterSet macshowcmd>filterSet macshow---====== MAC control list ---======Filtering type: Disabled (Any station can access)Item MAC Select---------------------------------------------1 00:02:6f:01:c0:3f Unselect2 00:00:00:00:00:00 Unselect3 00:00:00:00:00:00 Unselect4 00:00:00:00:00:00 Unselect………….………….………….](https://usermanual.wiki/Senao-Co/2511AP2PLUS/User-Guide-296329-Page-44.png)
![442. “mac” action can change the settings of MAC address filtering. You can change filteringtype. You can select ,unselect or clear those MAC address item.Description UsageSet filtering type to 'disable' filterSet mac disableSet filtering type to 'include' filterSet mac includeSet filtering type to 'exclude' filterSet mac excludeSet mac address filterSet mac setmac [index] [MAC address]index: 1...1291632,MAC address format : 00-00-01-02-03-04-05Select a mac address filterSet mac select [index]index: 1...64Unselect a mac address filterSet mac unselect [index]index: 1...64Clear a mac address filterSet mac clear [index]index: 1...64Clear all mac addresses filterSet mac clearall3. The “ip” action can set the IP and port to be block. You can set the protocol type to be block.Usage: filterSet ip [Index] [Start IP] [End IP] [Start port] [End port] [Protocol]Argument Descriptionindex: the (index)th item to be modified index : 1 .. 8Start IP the last byte of the Start IPEnd IP the last byte of the End IPStart port the first port being blockedEnd port the last port being blockedProtocol: the protocol type Type “tcp” or “udp”Example:cmd>filterSet ip 2 45 78 21 21 udpSet to index 2 Source IP Start: 45 Source IP end: 78 PortStart 21 PortEnd 21 protocol 2Ok](https://usermanual.wiki/Senao-Co/2511AP2PLUS/User-Guide-296329-Page-45.png)
![454. The “ipdaytime” can set the day and time to block the IP address. Usage: filterSet ipdaytime index [Start day] [End day] [Start hour] [End hour] Example: filterSet ipdaytime 1 MON FRI 9am 6pmArgument Description Usageindex: the (index)th item to be modified index : 1 .. 8Start day: the day start to block SUN, MON, TUE, WED, THU, FRI, SATEnd day: the day stop to block SUN, MON, TUE, WED, THU, FRI, SATStart hour: the time start to block 0am, 1am, 2am, 3am, 4am, 5am, 6am, 7am,8am, 9am, 10am,11am, 12am, 1pm, 2pm, 3pm,4pm, 5pm, 6pm, 7pm, 8pm, 9pm,10pm, 11pmEnd hour: the time stop to block 0am, 1am, 2am, 3am, 4am, 5am, 6am, 7am,8am, 9am, 10am 11am, 12am, 1pm, 2pm, 3pm,4pm, 5pm, 6pm, 7pm, 8pm, 9pm,10pm, 11pm5. The “ipstatus” action can enable and disable the IP filtering function. Usage: filterSet ipstatus [index] [status] Example: filterSet ipstatus 1 2Argument Description Usageindex: the (index)th item to be modified index : 1 .. 8status 0: disable, 1:enable, 2:always block, 3:blockon time Note: If you choose 3 (block on time) for status, you have to indicate the day and time byusing the “ipdaytime” action.5.7 Configuring SNMP through TelnetThe command “snmpSet” can change the settings of SNMP. Type “snmpSet” and the action youwant to perform. You need to know actions for snmp setting.Usage: snmpSet [ACTION] [arg1] [arg2]…..](https://usermanual.wiki/Senao-Co/2511AP2PLUS/User-Guide-296329-Page-46.png)
![461. The “comstatus” action can enable or disable the community status.Usage: snmpSet comstatus [0|1]0: Disable1: Enable2. The “community” action can change the settings of SNMP community.Usage: snmpSet community [item] [Access Right] [Community] [Validity]Argument Description Usageitem item: 1 .. 5Access Right: Select a access right for thecorresponding SNMP communityType “deny”, “read”, “write”, “create” fordifferent access rightValidity: enable or disable the SNMP functionof the corresponding community item.0:disable, 1:enableExample:3. The “trap” action can change the settings of SNMP trap.Usage: snmpSet trap [item] [version] [ip] [community] Argument Description Usageitem item: 1 .. 5Version: the version of SNMP 0:disable, 1: Version 1, 2: Version 2ACTION Description Usagecomstatus Enable or disable theSNMP community functionsnmpSet comstatus [0|1]community Change the SNMPcommunity setting.snmpSet community[index] [access right][community] [validatiy]trap Change the SNMP trapsetting.snmpSet trap [index][version] [IP] [community]Welcome to Telnet Daemon v1.01cmd>snmpSet community 1 read public 1SNMP community set ok.(Please remember to reset the Access Point if you made any change).](https://usermanual.wiki/Senao-Co/2511AP2PLUS/User-Guide-296329-Page-47.png)
![495. Type help to list all command.6. On the managed computer, run the TFTP Server utility. Make sure to specify the folder inwhich the firmware files reside.7. To perform the firmware upgrade, use tftp command.Usage: tftp [IP Address] [ File Name]cmd>help Command Line Interface v 1.0==============================================time : Get current system time. Usage: timehelp : List all commands. Usage: helptftp : tftp download. Usage: tftp [IP] [file]ipConfig : Configure interface address and subnet mask. Usage: ipConfig [ifname] [ip] [subnet mask]ifShow : Dispaly network interface. Usage: ifShow <ifname>reset : reset the system. Usage: resetping : Ping a host.. Usage: ping [ip] [ms]Welcome to Telnet Daemon v1.00cmd>tftp 192.168.1.20 application.dlfIP address of TFTP server Firmware file name](https://usermanual.wiki/Senao-Co/2511AP2PLUS/User-Guide-296329-Page-50.png)