Senao Co CB32106001 11g Wireless Multi-Client Bridge/ Router/AP/WDS User Manual NCB 3220 UsersManual V1 36 A
Senao International Co Ltd 11g Wireless Multi-Client Bridge/ Router/AP/WDS NCB 3220 UsersManual V1 36 A
Senao Co >
Contents
- 1. Manual 1
- 2. Manual 2
Manual 2
11g Wireless Multi-Client Bridge/Bridge Router/AP/WDS Version 1.36
31
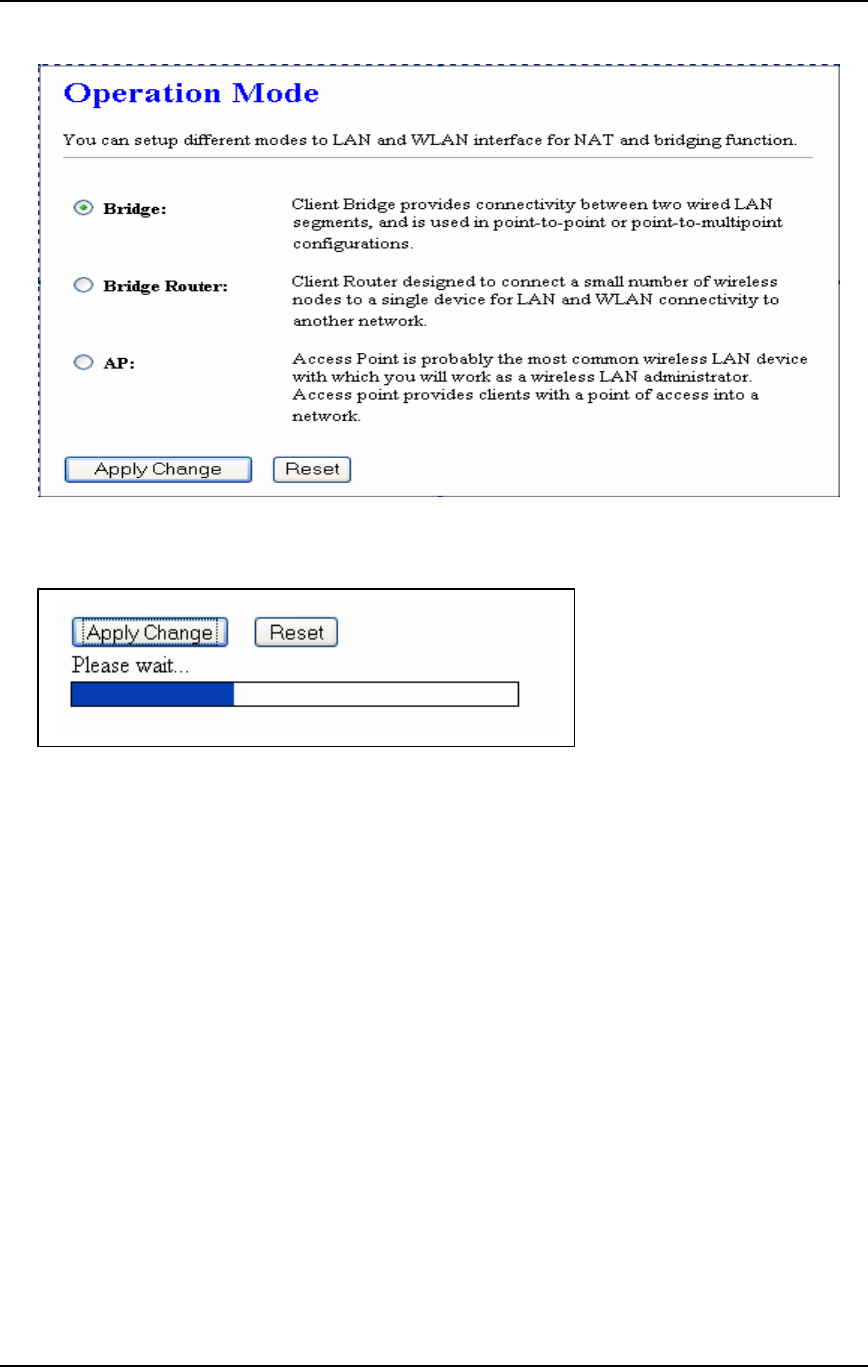
§ Select the AP, Bridge or Bridge Router and then click on the Apply Change button.
§ Wait for about a minute until you see the Pop-Up message.
§ Click on the OK button and then enter the specified IP address into the web-browser.
**Switch to other mode, the configuration settings will continue using.**
§ Switch to other mode, the setting
Refer to Chapter 4 to learn how to configure this device in Bridge/Router mode.
5.2.2 Status
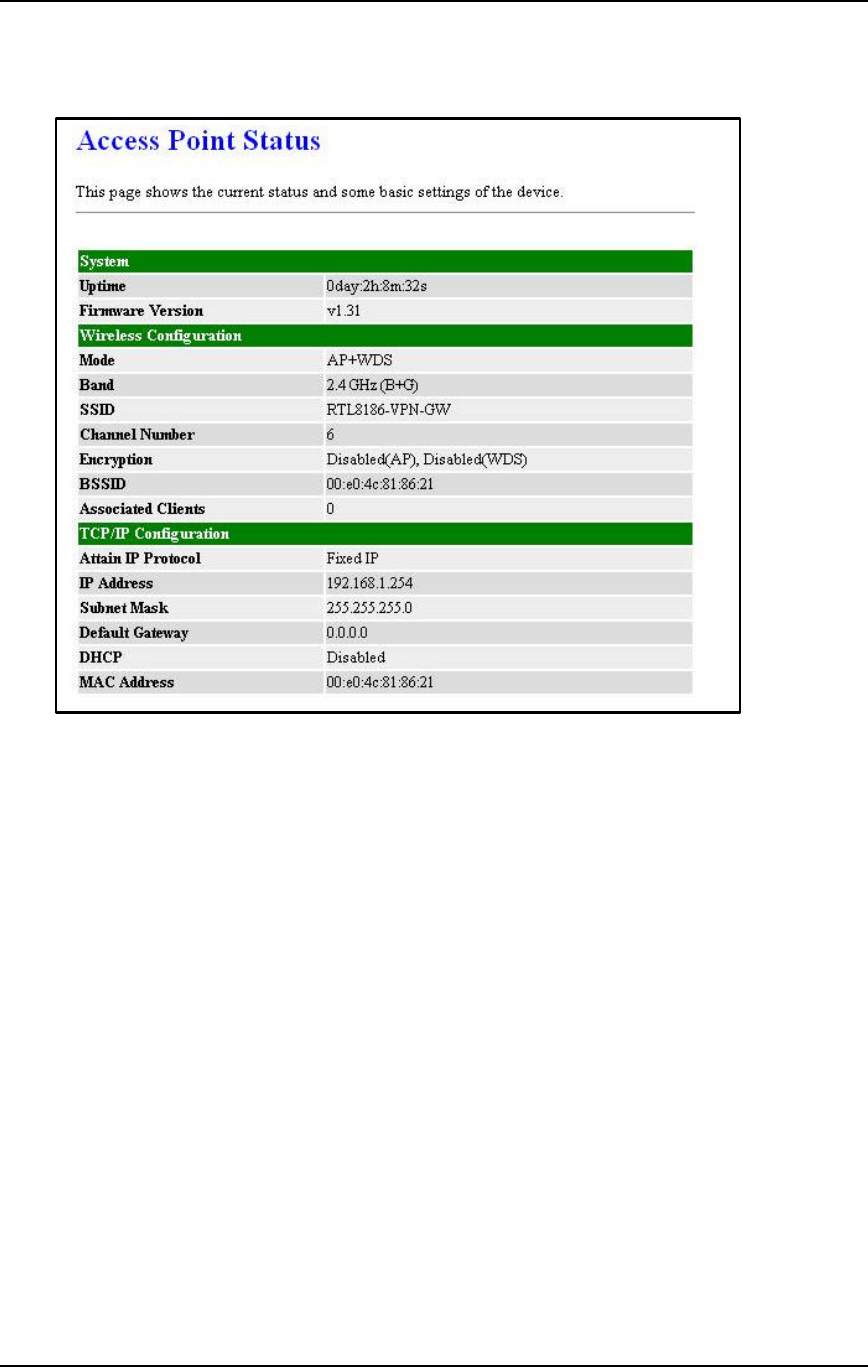
§ Click on the Status link under the Management menu. The Status page is the first
page that is displayed once you have logged in. This includes details about the
system, wireless, and TCP/IP configuration.
11g Wireless Multi-Client Bridge/Bridge Router/AP/WDS Version 1.36
32
§ System
o Uptime: Duration of time since the device was last reset.
o Firmware version: Version of the firmware that is currently loaded on the
device.
§ Wireless Configuration:
o Mode: Wireless configuration mode such as client bridge, AP, or WDS.
o Band: Frequency and IEEE 802.11 operation mode (b-only, g-only, or b+g).
o SSID: The name used to identify the wireless network.
o Channel Number: The channel used to communicate on the wireless
network.
o Encryption: The type of security used on this network. It may be disabled,
WEP, WPA, etc.
o BSSID: The MAC address of the SSID.
o Associated Clients: Displays the number of clients currently associated to
the Access Point.
§ TCP/IP Configuration:
o Attain IP Protocol: The IP address setting may be fixed or static.
o IP Address: Displays the current IP address of the LAN port.
o Subnet Mask: Displays the current subnet mask for the IP address.
o Default Gateway: Displays the default gateway for the device.
o DHCP: Displays the DHCP setting.
o MAC Address: Displays the MAC address of the device.
11g Wireless Multi-Client Bridge/Bridge Router/AP/WDS Version 1.36
33
5.2.3 Statistics
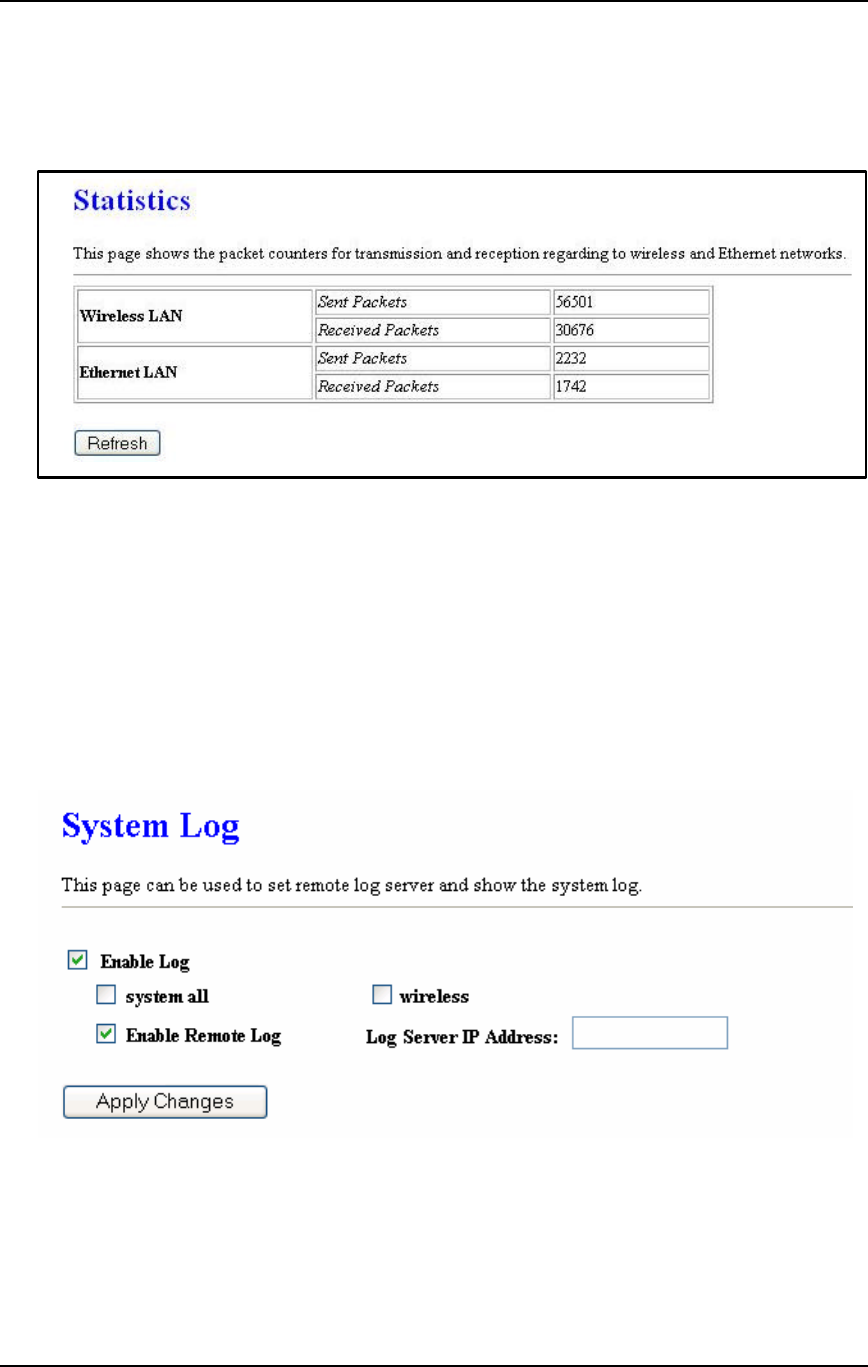
§ Click on the Statistics link under the Management menu. This page displays the
number of sent and received packets on the Ethernet and Wireless interface.
§ Since the packet counter is not dynamic, you must click on the Refresh button for
the most recent statistics.
5.2.4 Log
§ Click on the Log link under the Management menu. The Log page displays a list of
events that are triggered on the Ethernet and Wireless interface. This log can be
referred when an unknown error occurs on the system or when a report needs to be
sent to the technical support department for debugging purposes.
§ In order for the log to record all the events, you must first place a check in the
Enable Log or Enable Remote Log (Log Server required) check box.
§ Select system all or wireless depending on the type of events you want recorded.
§ Since the log is not dynamic, you must click on the Refresh button for the most
recent events, or click on the Clear button to clear the log.
11g Wireless Multi-Client Bridge/Bridge Router/AP/WDS Version 1.36
34
5.2.5 Upgrade Firmware
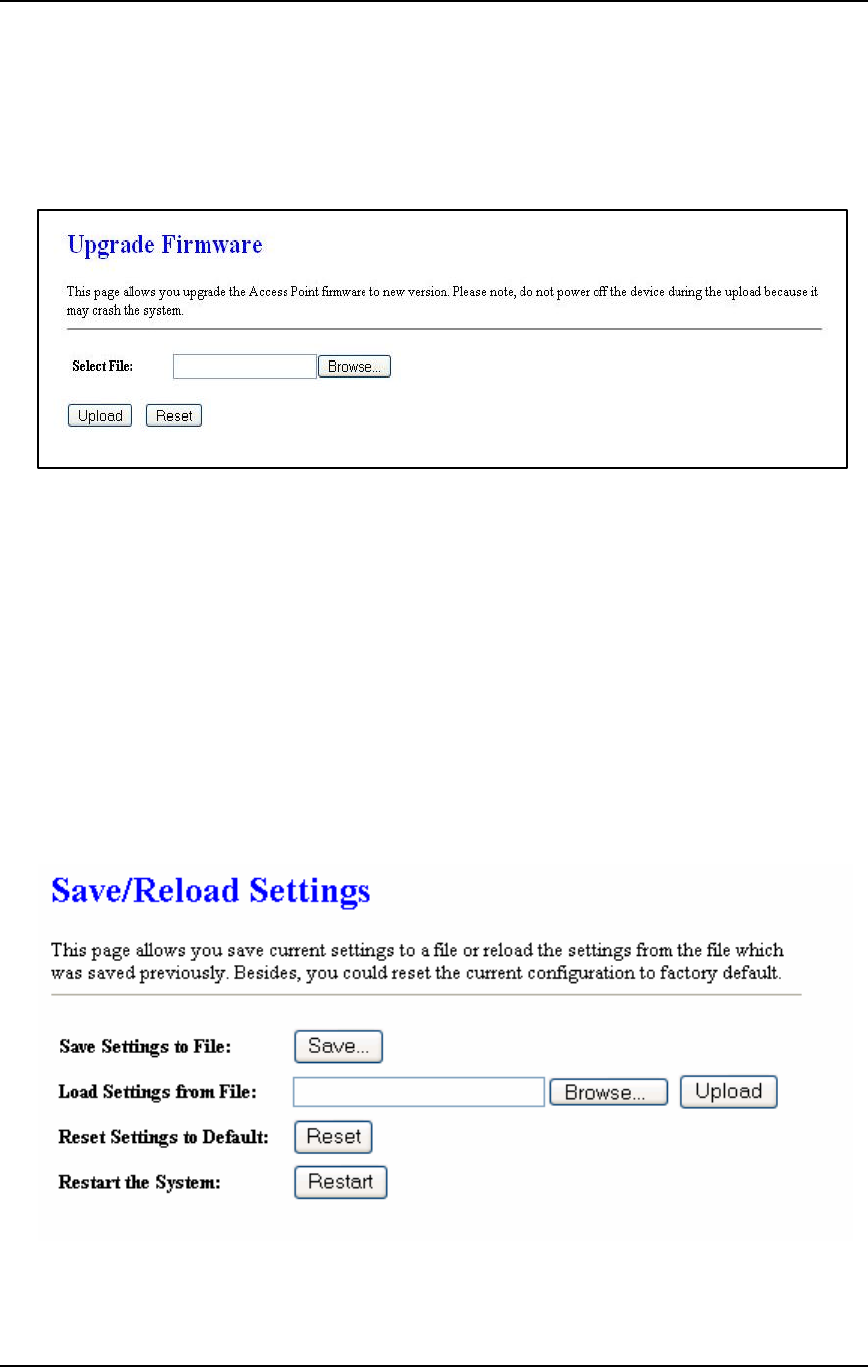
§ Click on the Upgrade Firmware link under the Management menu. This page is
used to upgrade the firmware on the device. Make sure that downloaded the
appropriate firmware from your vendor.
§ Click on the Browse button and then select the appropriate firmware and then click
on the Upload button.
Note: The upgrade process may take about 1 minute to complete. Do not power off
the device during this process as it may crash the device and make it unusable. The
device will restart automatically once the upgrade is complete.
5.2.6 Save / Reload Settings, Reset to Default
§ Click on the Save / Reload Setting link under the Management menu. This option is
used to save the current settings of the device in a file on your local disk or load
settings on to the device from a local disk. This feature is very handy for
administrators who have several devices that need to be configured with the same
settings.
§ This page also allows you to reset the device to its factory default settings.
11g Wireless Multi-Client Bridge/Bridge Router/AP/WDS Version 1.36
35
§ Click on the Save button to save the current settings to a file on the local disk.
§ Click on the Browse button to select the settings file and then click on the Upload
button to load the previously saved settings.
§ Click on the Reset button to reset the device to its factory default settings. Click
Restart to reboot the device.
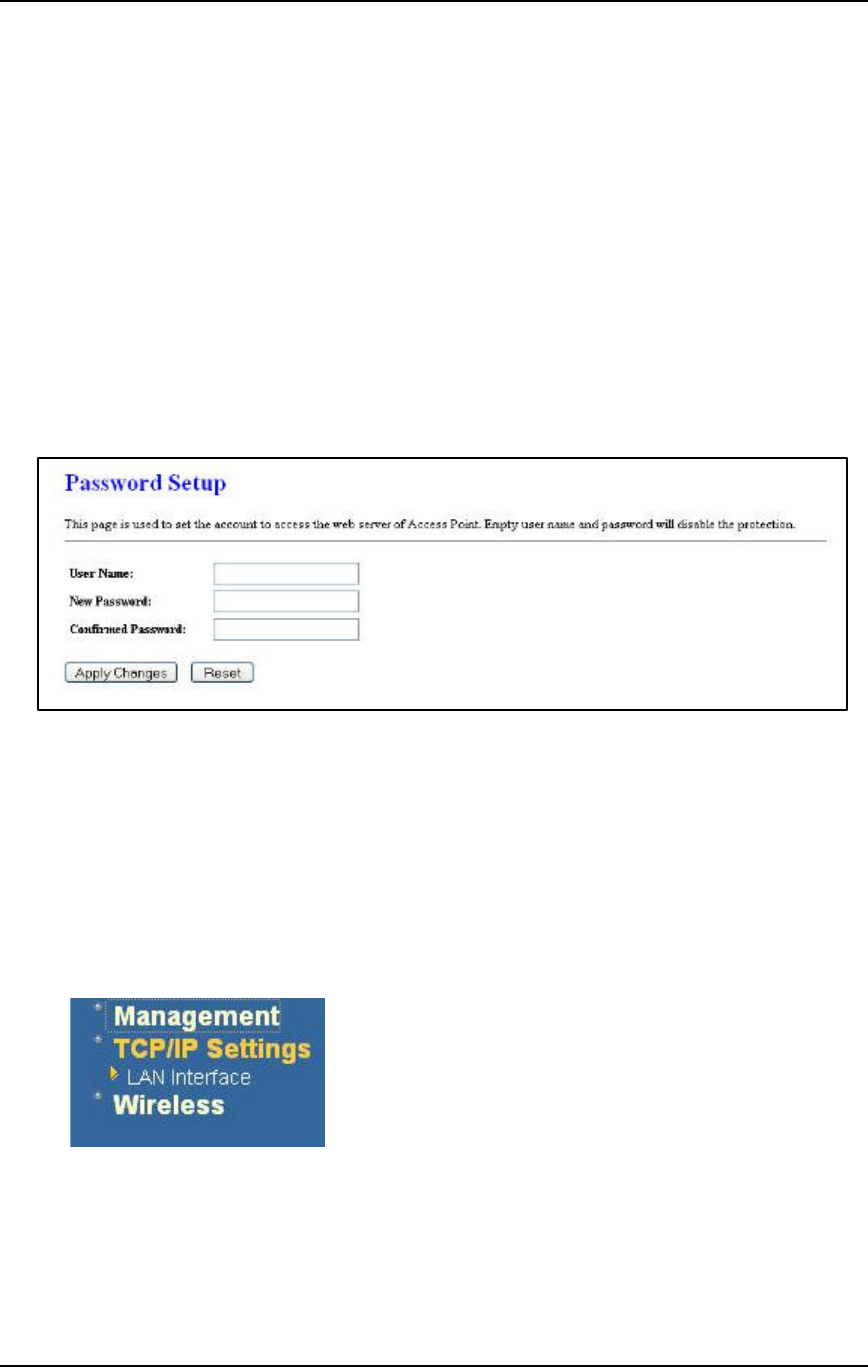
5.2.7 Password
§ Click on the Password link under the Management menu. This option allows you to
create a user name and password for the device. By default, this device is configured
without a user name and password. For security reasons it is highly recommended
that you create a user name and password.
§ Enter a user name into the first field.
§ Enter a password into the New Password field and then re-type the password into
the Confirmed Password field. Then click on the Apply Changes button.
§ By clicking on the Reset button, the user name and password fields will become
blank indicating that the username and password has been disabled.
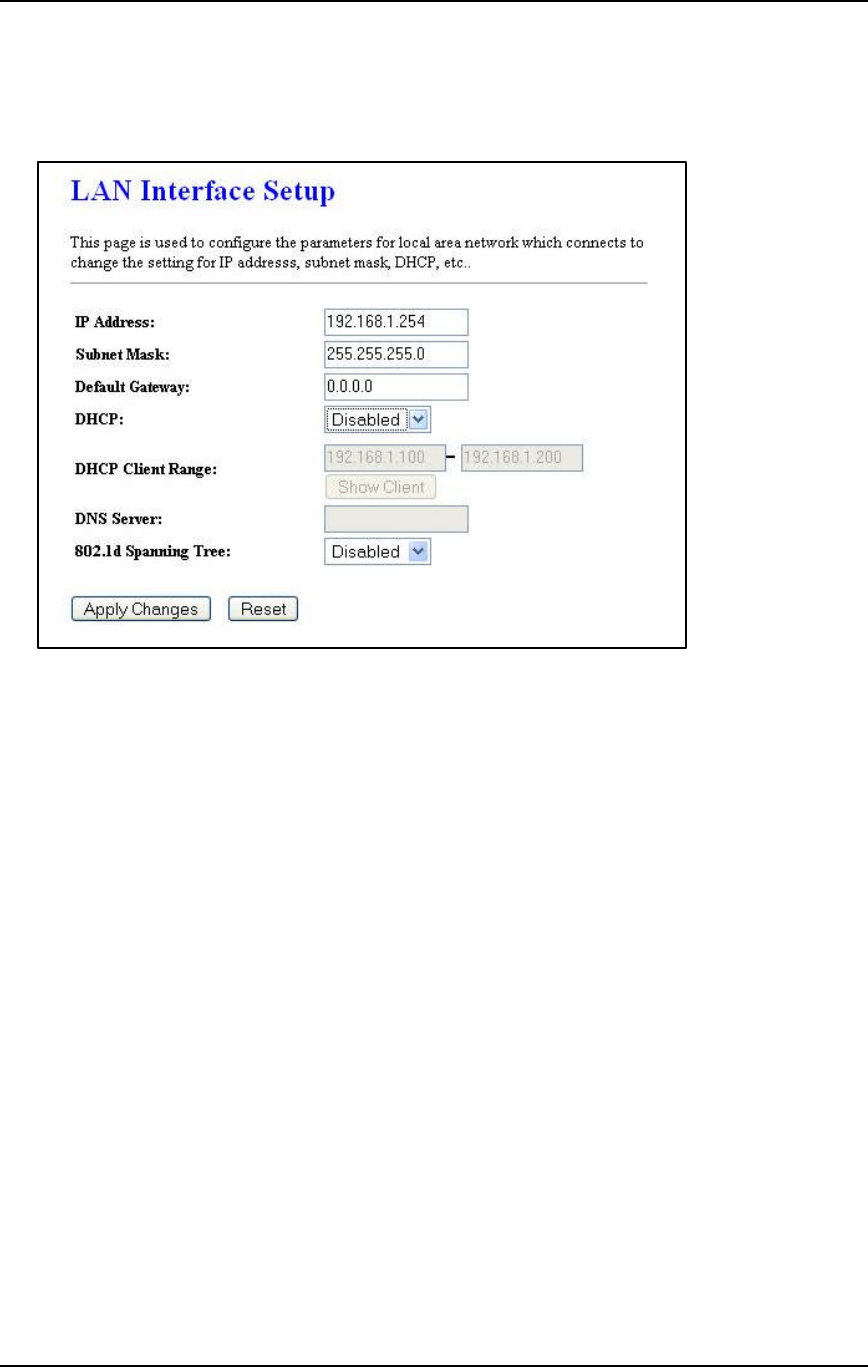
5.3 TCP/IP Settings
§ Click on the TCP/IP Settings link on the
navigation drop-down menu. You will then see
the LAN Interface option. This option is
described in detail below.
5.3.1 LAN Interface
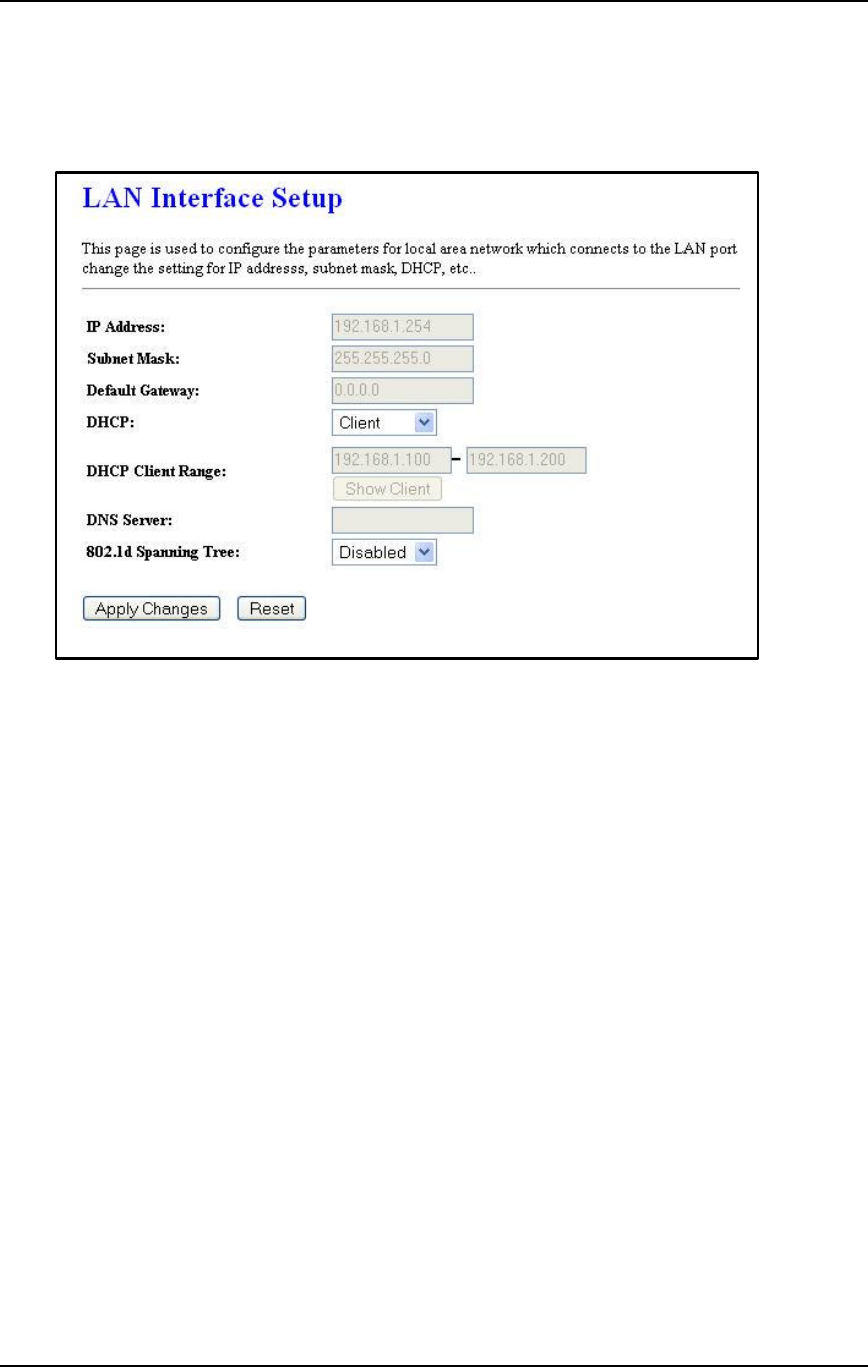
§ Click on the LAN Interface link under the TCP/IP Settings menu. Using this option
you may change the IP address of the device as well as toggle the DHCP and
802.1d spanning tree feature.
11g Wireless Multi-Client Bridge/Bridge Router/AP/WDS Version 1.36
36
5.3.1.1 Static IP Address
.
§ IP Address: Enter the IP address.
§ Subnet Mask: Enter the subnet mask for the IP address.
§ Default Gateway: Enter the IP address for the default gateway.
§ DHCP: Since a static IP address is used, this option must be set to Disabled. If this
device is a DHCP client and will receive its IP settings from a DHCP server, then
select Enabled from the drop-down list. Enabling the DHCP client will disable the IP
address, subnet mask, and default gateway fields. If the DHCP option is Disabled,
then the IP address, subnet mask, and default gateway fields must be filled in.
§ 802.1d Spanning Tree: Select Enabled from the drop-down list if you if you would
like to use the spanning tree feature.
§ Click on the Apply Changes button to confirm the changes. This device will
automatically restart once these changes have been applied.
11g Wireless Multi-Client Bridge/Bridge Router/AP/WDS Version 1.36
37
5.3.1.2 DHCP Client
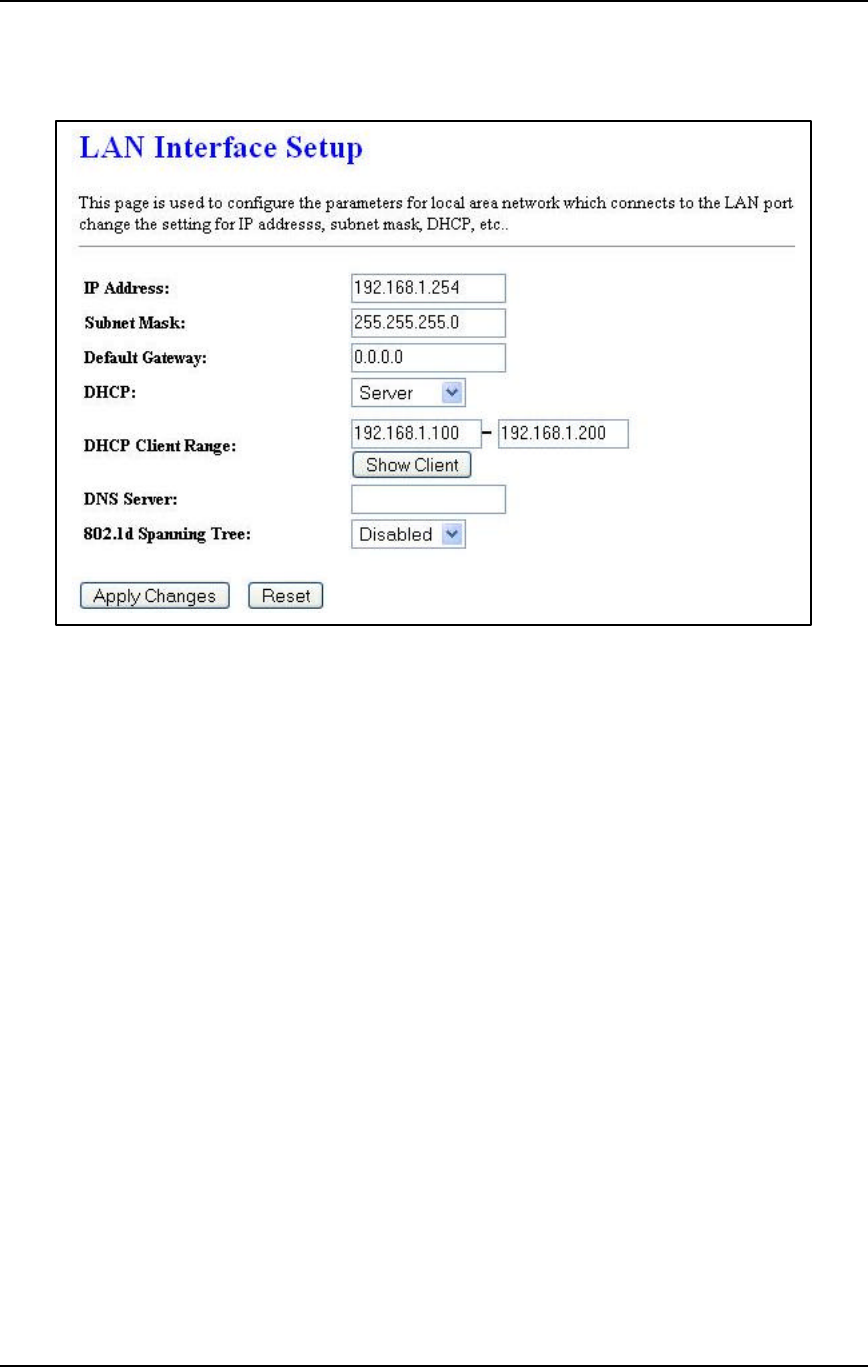
§ DHCP: If this device is a DHCP client and will receive its IP settings from a DHCP
server, then select Client from the drop-down list. Enabling the DHCP client will
disable the IP address, subnet mask, and default gateway fields. If the DHCP option
is Disabled, then the IP address, subnet mask, and default gateway fields must be
filled in.
§ 802.1d Spanning Tree: Select Enabled from the drop-down list if you if you would
like to use the spanning tree feature.
§ Click on the Apply Changes button to confirm the changes. This device will
automatically restart once these changes have been applied.
11g Wireless Multi-Client Bridge/Bridge Router/AP/WDS Version 1.36
38
5.3.1.3 DHCP Server
§ IP Address: Enter the IP address.
§ Subnet Mask: Enter the subnet mask for the IP address.
§ Default Gateway: Enter the IP address for the default gateway.
§ DHCP: Select Server from the drop-down list since this device is the DHCP server.
This device will distribute the IP addresses to the clients associated.
§ DHCP Client Range: Enter the first and last IP address of the range. Make sure that
the range is on the same subnet as the device. You may click on the Show Client
button to view a list of IP addresses that were distributed.
§ DNS Server: Enter the IP address of the DNS server.
§ 802.1d Spanning Tree: Select Enabled from the drop-down list if you if you would
like to use the spanning tree feature.
§ Click on the Apply Changes button to confirm the changes. This device will
automatically restart once these changes have been applied.
11g Wireless Multi-Client Bridge/Bridge Router/AP/WDS Version 1.36
39
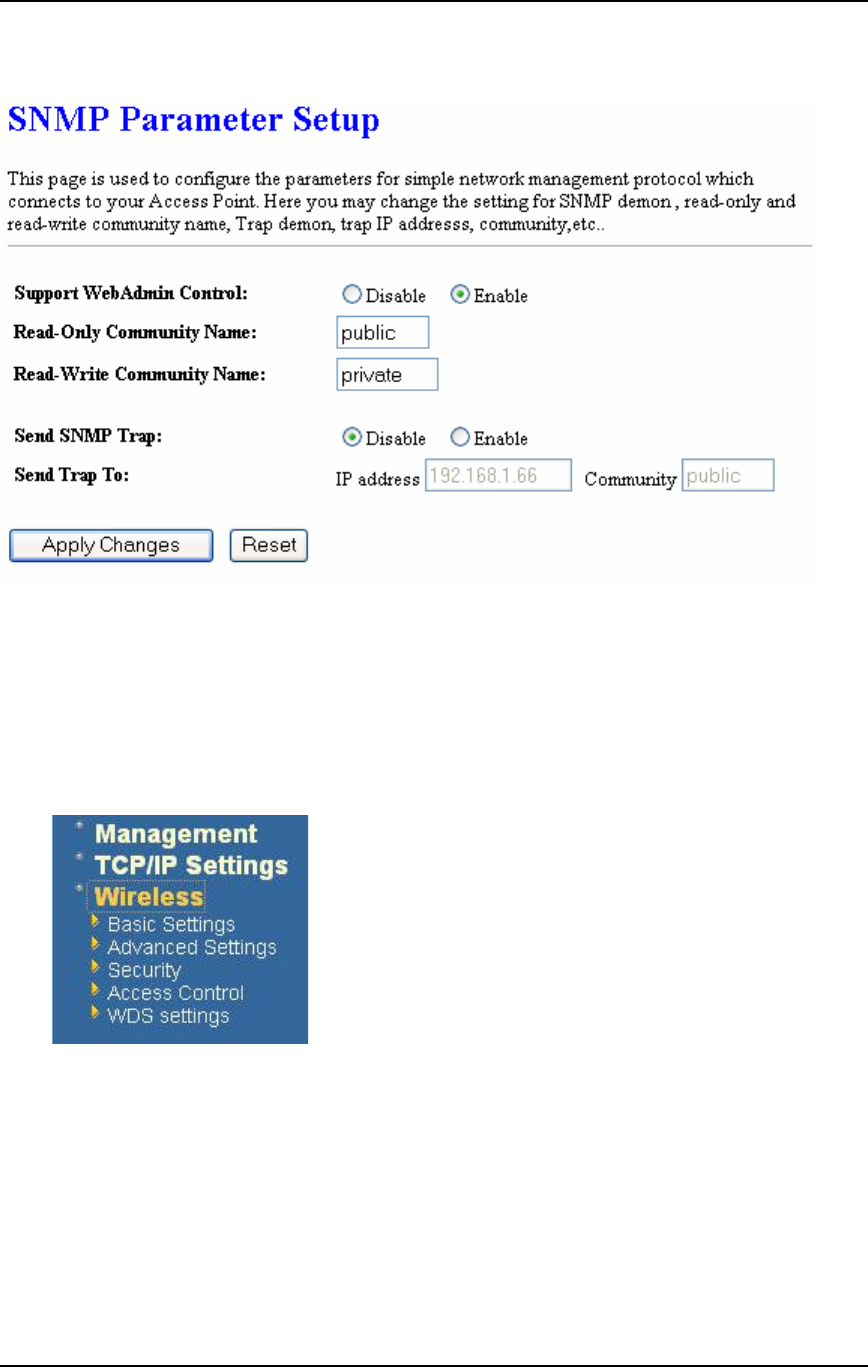
4.3.2 SNMP Settings
n Check Enable to activate the SNMP and then configure the Read/Write Community
Strings.
n Enable Send SNMP Trap to activate the SNMP Trap Agent and input the IP address of
SNMP Trap Host.
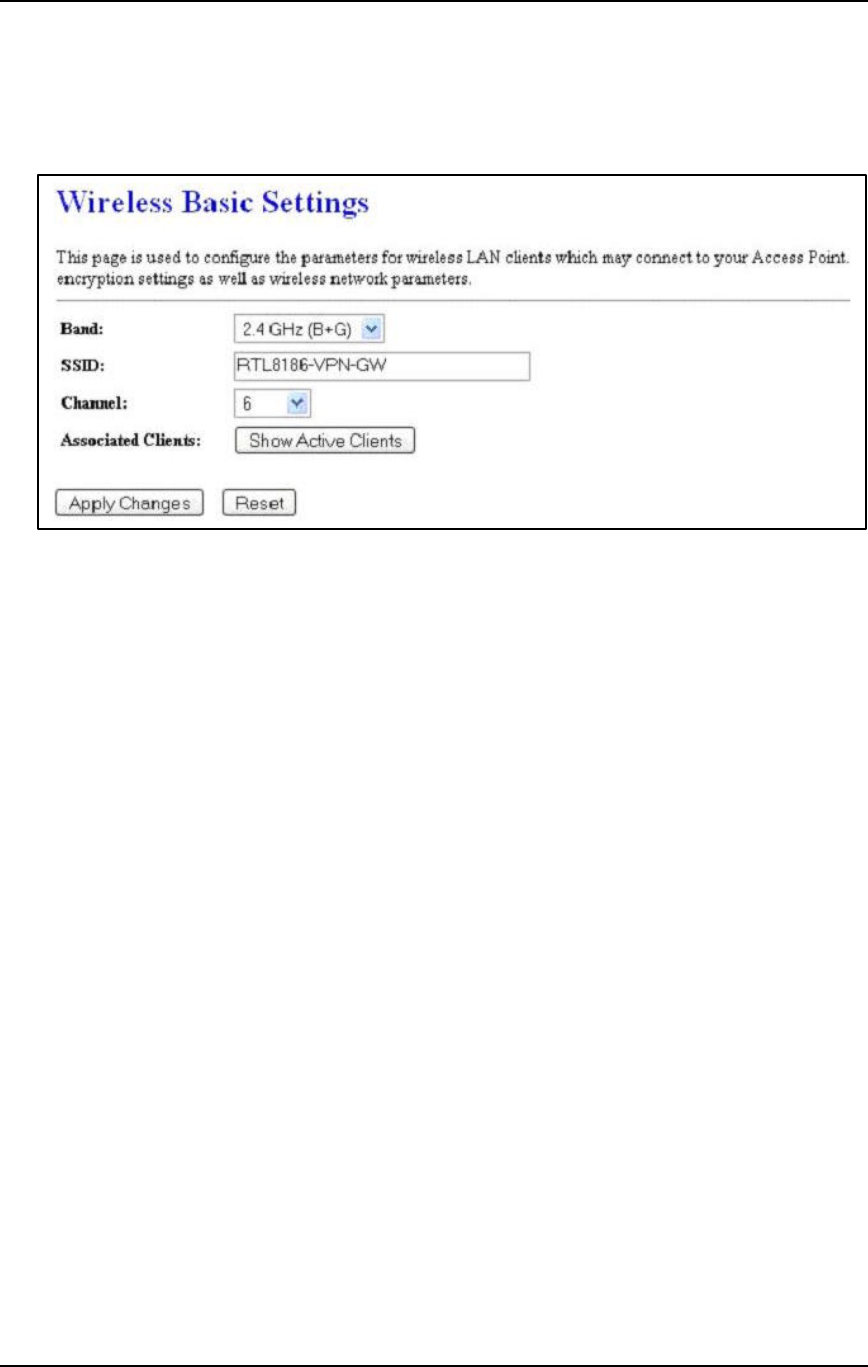
5.4 Wireless
§ Click on the Wireless link on the navigation
drop-down menu. You will then see five options:
basic settings, advanced settings security,
access control and WDS. Each option is
described below.
11g Wireless Multi-Client Bridge/Bridge Router/AP/WDS Version 1.36
40
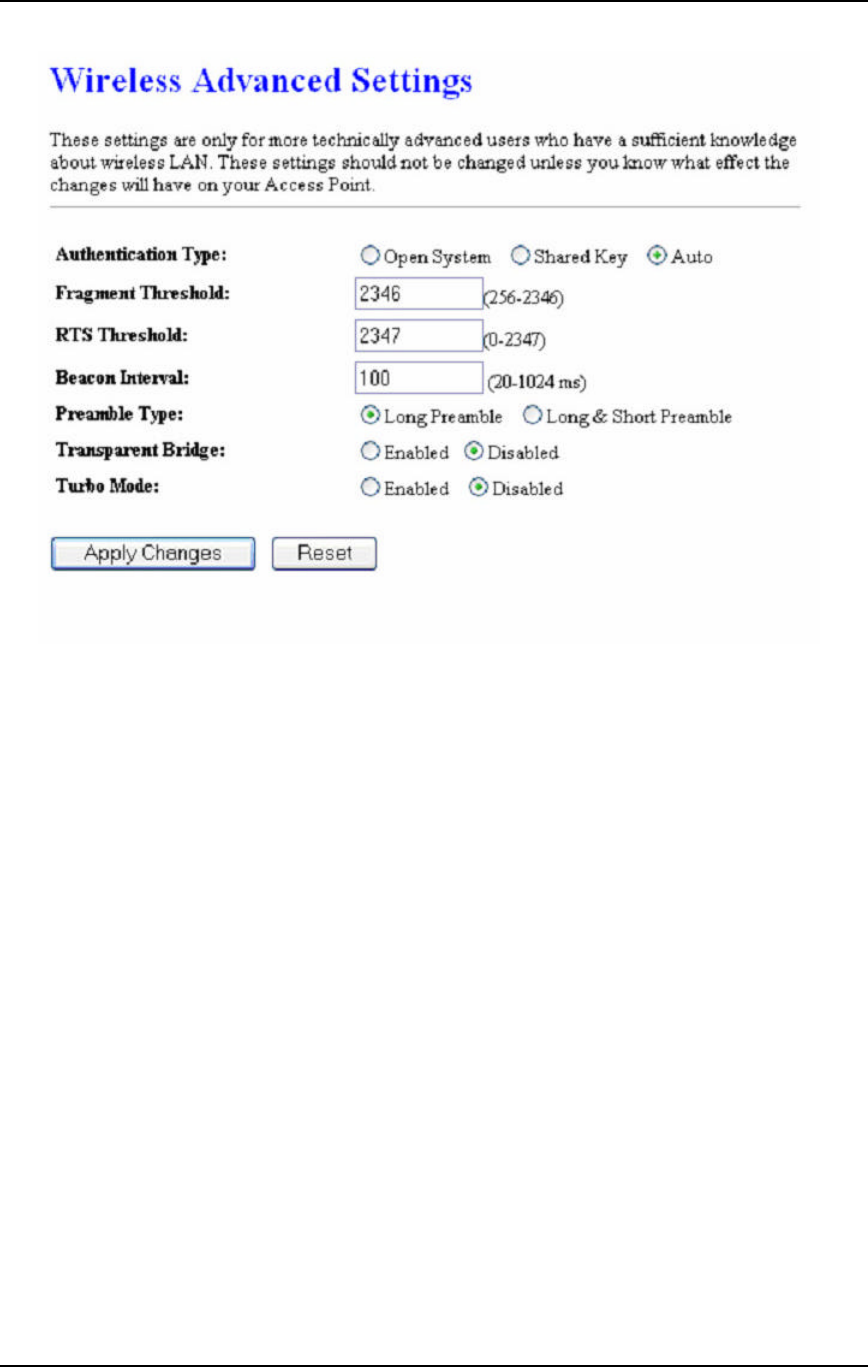
5.4.1 Basic Settings
§ Click on the Basic Settings link under the Wireless menu. Using this option you
may configure the 802.11b/g settings as well as the frequency, channel, and SSID.
§ Band: Select the IEEE 802.11 mode from the drop-down list. Options available are
2.4GHz (B), 2.4GHz (G), or 2.4GHz (B+G). Select the appropriate mode based on
the type of wireless network. For example, if you are sure that the wireless network
will be using only IEEE 802.11g clients, then it is recommended to select 2.4GHz (G)
instead of 2.4GHz (B+G) which will reduce the performance of the wireless network.
§ SSID: The SSID is a unique named shared amongst all the points of the wireless
network. The SSID must be identical on all points of the wireless network and cannot
exceed 32 characters.
§ Channel: Select a channel from the drop-down list. The channels available are
based on the country’s regulation. When selecting Infrastructure mode, a channel is
not required, however, when selecting Adhoc mode, you must select the same
channel on all points.
§ Show Active Clients: Click on this button to view a list of associated clients.
§ Click on the Apply Changes button to confirm the changes. This device will
automatically restart once these changes have been applied.
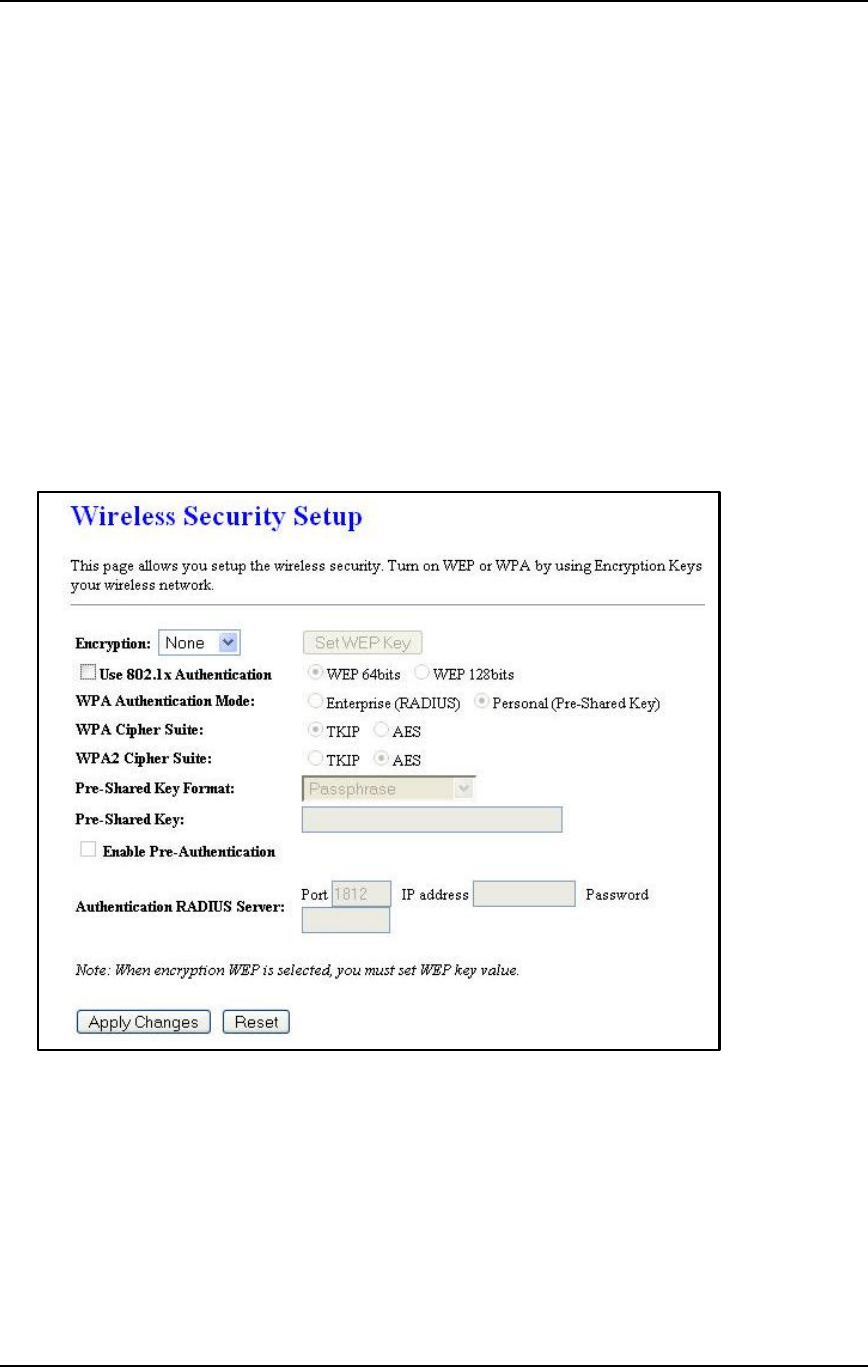
5.4.2 Advanced Settings
§ Click on the Advanced Settings link under the Wireless menu. On this page you
can configure the advanced settings to tweak the performance of your wireless
network. Options available are: fragmentation threshold, RTS threshold, beacon
interval, output power, preamble type, broadcast SSID, IAPP, and 802.11g protection.
11g Wireless Multi-Client Bridge/Bridge Router/AP/WDS Version 1.36
41
§ Authentication Type: select an authentication method. Options available are Open
System, Shared Key or Auto. An open system allows any client to authenticate as
long as it conforms to any MAC address filter policies that may have been set. All
authentication packets are transmitted without encryption. Shared Key sends an
unencrypted challenge text string to any device attempting to communicate with the
AP. The device requesting authentication encrypts the challenge text and sends it
back to the access point. If the challenge text is encrypted correctly, the access point
allows the requesting device to authenticate. It is recommended to select Auto if you
are not sure which authentication type is used.
§ Fragment Threshold: Packets over the specified size will be fragmented in order to
improve performance on noisy networks.
§ RTS Threshold: Packets over the specified size will use the RTS/CTS mechanism to
maintain performance in noisy networks and preventing hidden nodes from
degrading the performance.
§ Beacon Interval: Beacons will be sent out to devices at the specified intervals. This
value is measured in milliseconds (ms).
§ Data Rate: If you would like to force a data rate, you may select one from the drop-
down list. However, for best performance it is recommended to use the Auto setting.
§ Preamble Type: For best performance, all devices on the wireless network should
use the same preamble type. However, the wireless network will still function even
though the wrong preamble type is used.
§ Broadcast SSID: This is a security feature that is enabled by default. This allows
clients on the wireless network to run a site survey and detect this Access Point.
Select Disabled if you do not want this Access Point detected in a site survey.
§ IAPP: It is recommended to Enable the Inter-Access Point Protocol (IAPP) if you
would like the clients on the wireless network to seamlessly roam between Access
Points of the same SSID.
11g Wireless Multi-Client Bridge/Bridge Router/AP/WDS Version 1.36
42
§ 802.11g Protection: If your wireless network is using both 802.11b and 802.g
devices then it is recommended to enable this feature so that the 802.11b devices
will not degrade the performance of 802.11g devices.
§ User Isolation: Click “Enabled” to stop packet transmission between Wireless
Clients.
§ Turbo Mode: Select “Enable” to activate the Turbo mode for better performance.
The Default is disabled.
§ Click on the Apply Changes button to confirm the changes. This device will
automatically restart once these changes have been applied.
5.4.3 Security
§ Click on the Security link under the Wireless menu. On this page you can configure
the authentication and encryption settings such as WEP, WPA, and 802.1x.
5.4.3.1 Encryption Disabled
§ Encryption: Select None from the drop-down list if your wireless network does not
use any type of encryption.
§ Click on the Apply Changes button to confirm the changes. This device will
automatically restart once these changes have been applied.
11g Wireless Multi-Client Bridge/Bridge Router/AP/WDS Version 1.36
43
5.4.3.2 WEP 64-bit / 128-bit
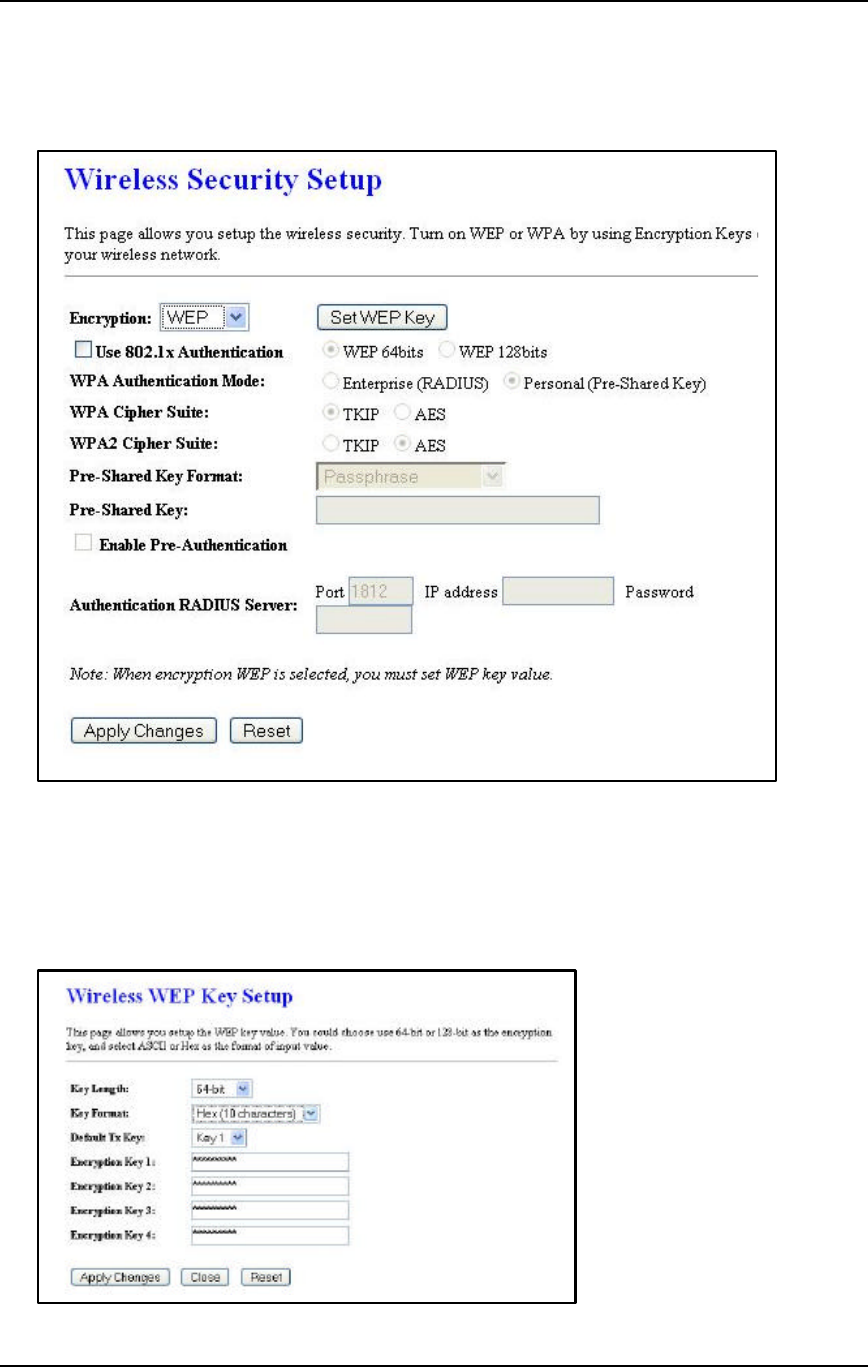
§ Encryption: Select WEP from the drop-down list if your wireless network uses WEP
encryption. WEP is an acronym for Wired Equivalent Privacy, and is a security
protocol that provides the same level of security for wireless networks as for a wired
network.
§ Set WEP Key: Click on this button to configure the WEP Key.
11g Wireless Multi-Client Bridge/Bridge Router/AP/WDS Version 1.36
44
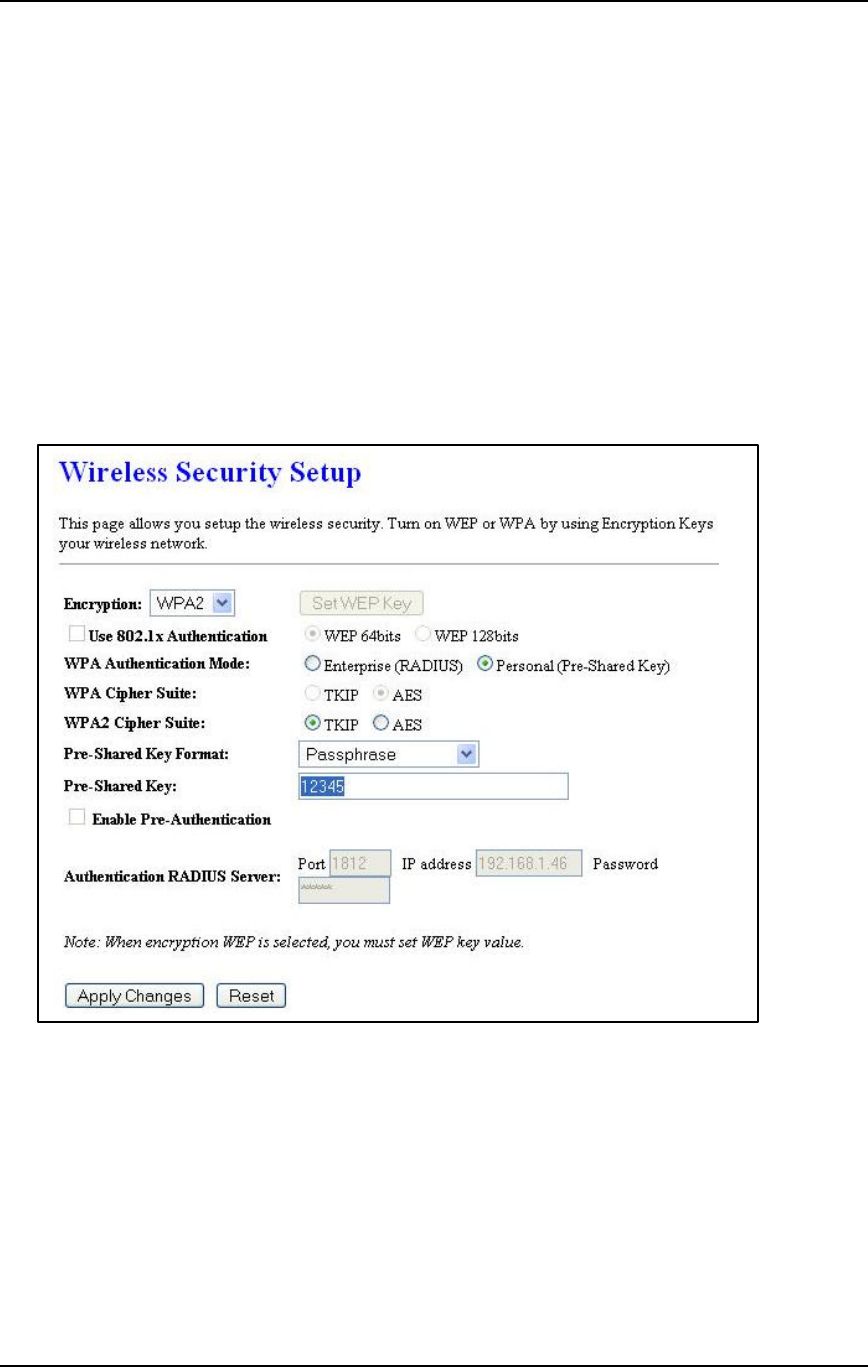
§ Key Length: Select a 64-bit or 128-bit from the drop-down list.
§ Key Format: Select a key format from the drop-down list. 64bit-hex keys require 10
characters, where as 128-bit keys require 26 characters. A hex key is defined as a
number between 0 through 9 and letter between A through F.
§ Default Tx Key: You may use up to four different keys for four different networks.
Select the current key that will be used.
§ Encryption Key 1-4: You may enter four different WEP keys.
§ Click on the Apply Changes button to confirm the changes and then click on the
Close button to return to the pervious window.
5.4.3.3 WPA / WPA2 / WPA2 Mixed Passphrase
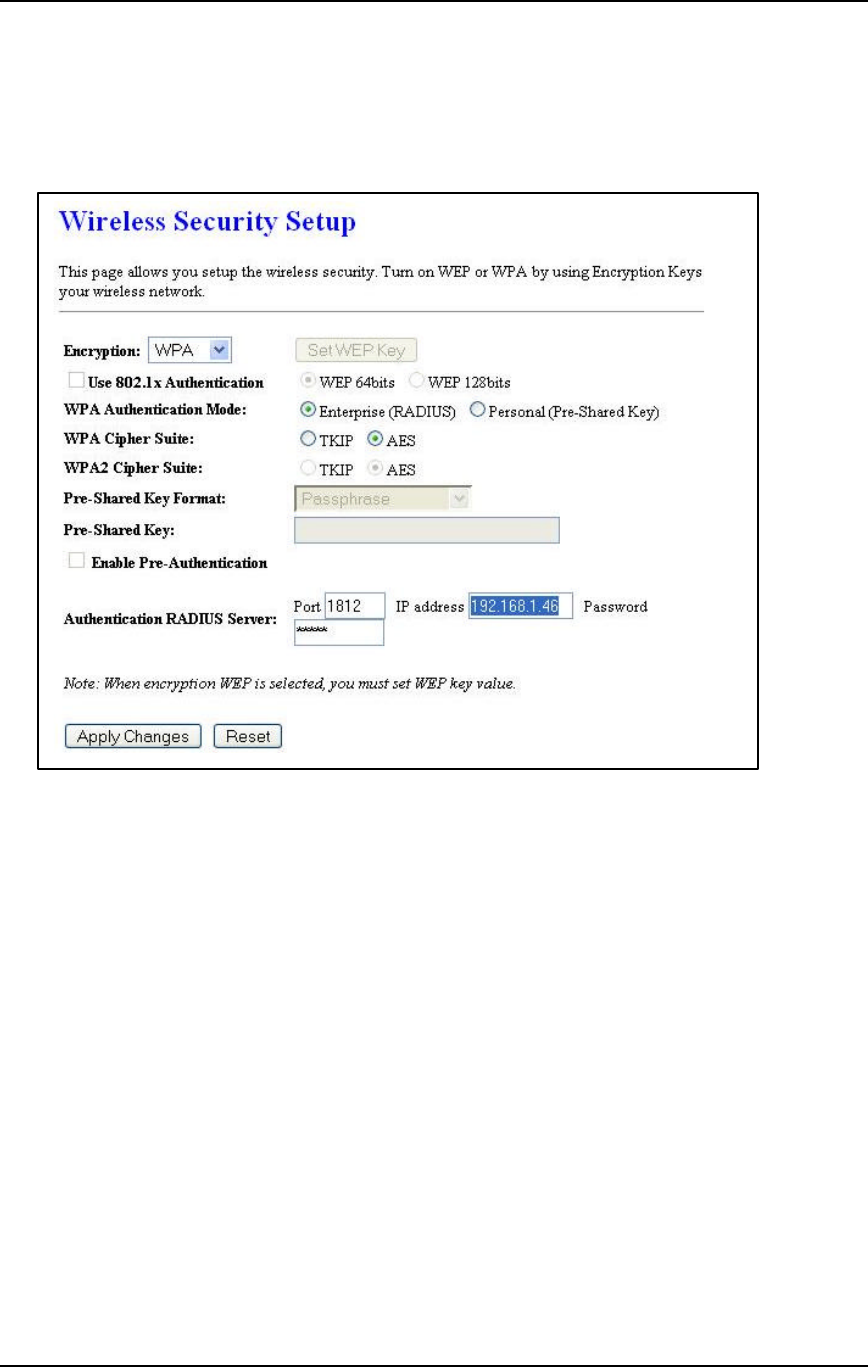
§ Encryption: Select WPA, WPA2 or WPA2_Mixed from the drop-down list if your
wireless network uses this encryption. WPA (Wi-Fi Protected Access) was designed
to improve upon the security features of WEP (Wired Equivalent Privacy). The
technology is designed to work with existing Wi-Fi products that have been enabled
with WEP. WPA provides improved data encryption through the Temporal Integrity
Protocol (TKIP), which scrambles the keys using a hashing algorithm and by adding
an integrity checking feature which makes sure that keys haven’t been tampered with.
§ WPA Authentication Mode: Select the Personal (Pre-Shared Key) radio button.
§ WPA/WPA2: Select TKIP, AES or both as the cipher suite.
§ Pre-Shared Key Format: Select Passphrase from the drop-down list.
§ Pre-Shared Key: Enter the pass phrase; this should be between 8 and 63 characters.
11g Wireless Multi-Client Bridge/Bridge Router/AP/WDS Version 1.36
45
§ Click on the Apply Changes button to confirm the changes. This device will
automatically restart once these changes have been applied.
5.4.3.4 WPA / WPA2 / WPA2 Mixed RADIUS Authentication
§ Encryption: Select WPA, WPA2 or WPA2_Mixed from the drop-down list if your
wireless network uses this encryption. WPA (Wi-Fi Protected Access) was designed
to improve upon the security features of WEP (Wired Equivalent Privacy). The
technology is designed to work with existing Wi-Fi products that have been enabled
with WEP. WPA provides improved data encryption through the Temporal Integrity
Protocol (TKIP), which scrambles the keys using a hashing algorithm and by adding
an integrity checking feature which makes sure that keys haven’t been tampered with.
§ WPA Authentication Mode: Select the Enterprise (RADIUS) radio button.
§ WPA/WPA2: Select TKIP, AES or both as the cipher suite.
§ RADIUS Port: Enter the port number of the RADIUS server. The default is usually
1812.
§ RADIUS IP Address: Enter the IP address of the RADIUS server.
§ RADIUS Password: Enter the shared password of the RADIUS server.
§ Click on the Apply Changes button to confirm the changes. This device will
automatically restart once these changes have been applied.
11g Wireless Multi-Client Bridge/Bridge Router/AP/WDS Version 1.36
46
5.4.4 Access Control
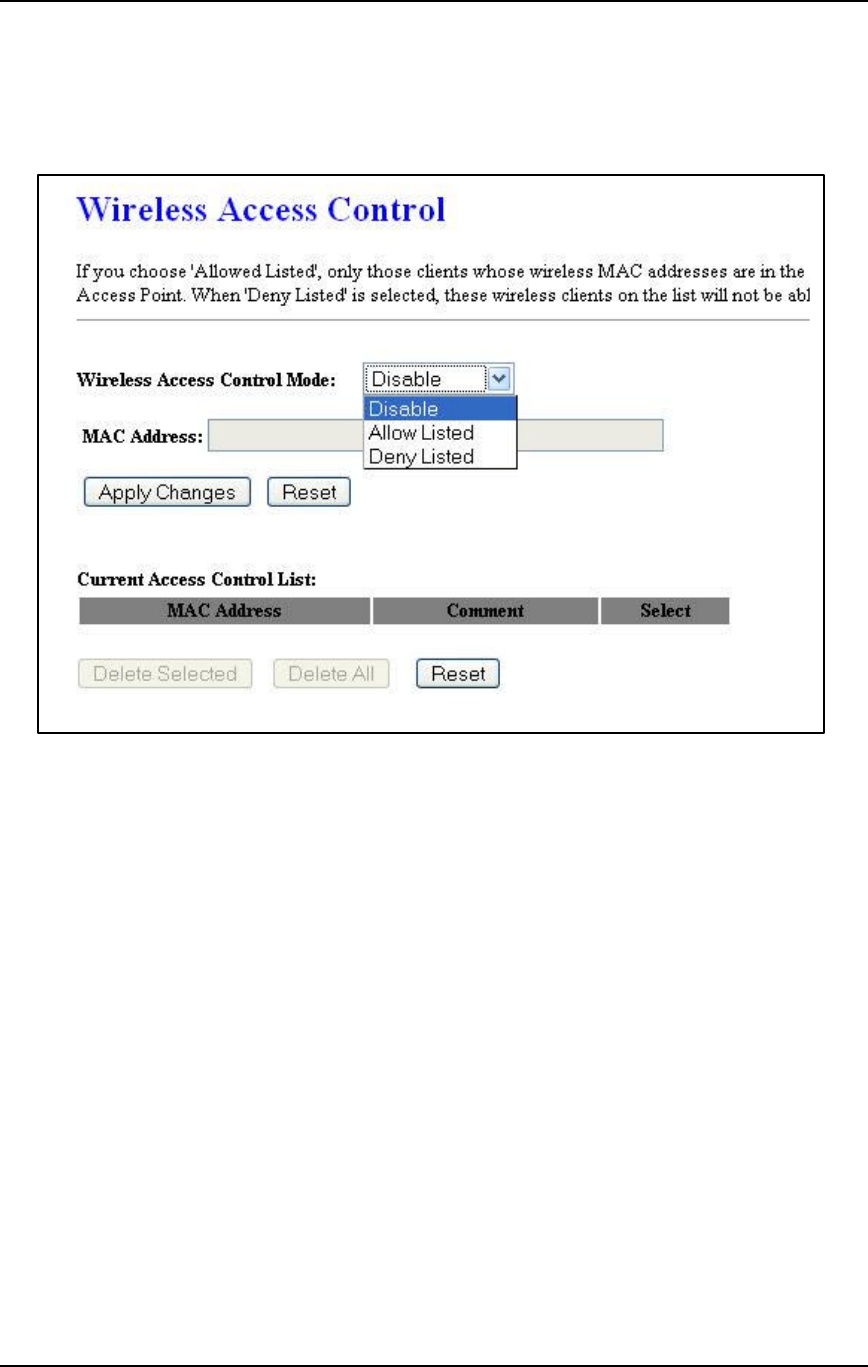
§ Click on the Access Conrol link under the Wireless menu. On this page you can
filter the MAC address by allowing or blocking access the network.
§ Wireless Access Control Mode: You may choose to Disable, Allow Listed, or
Deny Listed MAC address from associating with the network. By selecting Allow
Listed, only the address listed in the table will have access to the network; all other
clients will be blocked. On the other hand, selected Deny Listed, only the listed MAC
address will be blocked from access the network; all other clients will have access to
the network.
§ MAC Address: Enter the MAC address.
§ Current Access Control list: This table lists the blocked or allowed MAC addresses;
you may delete selected MAC address or delete all the addresses from the table by
clicking on the associated buttons.
§ Click on the Apply Changes button to confirm the changes. This device will
automatically restart once these changes have been applied.
11g Wireless Multi-Client Bridge/Bridge Router/AP/WDS Version 1.36
47
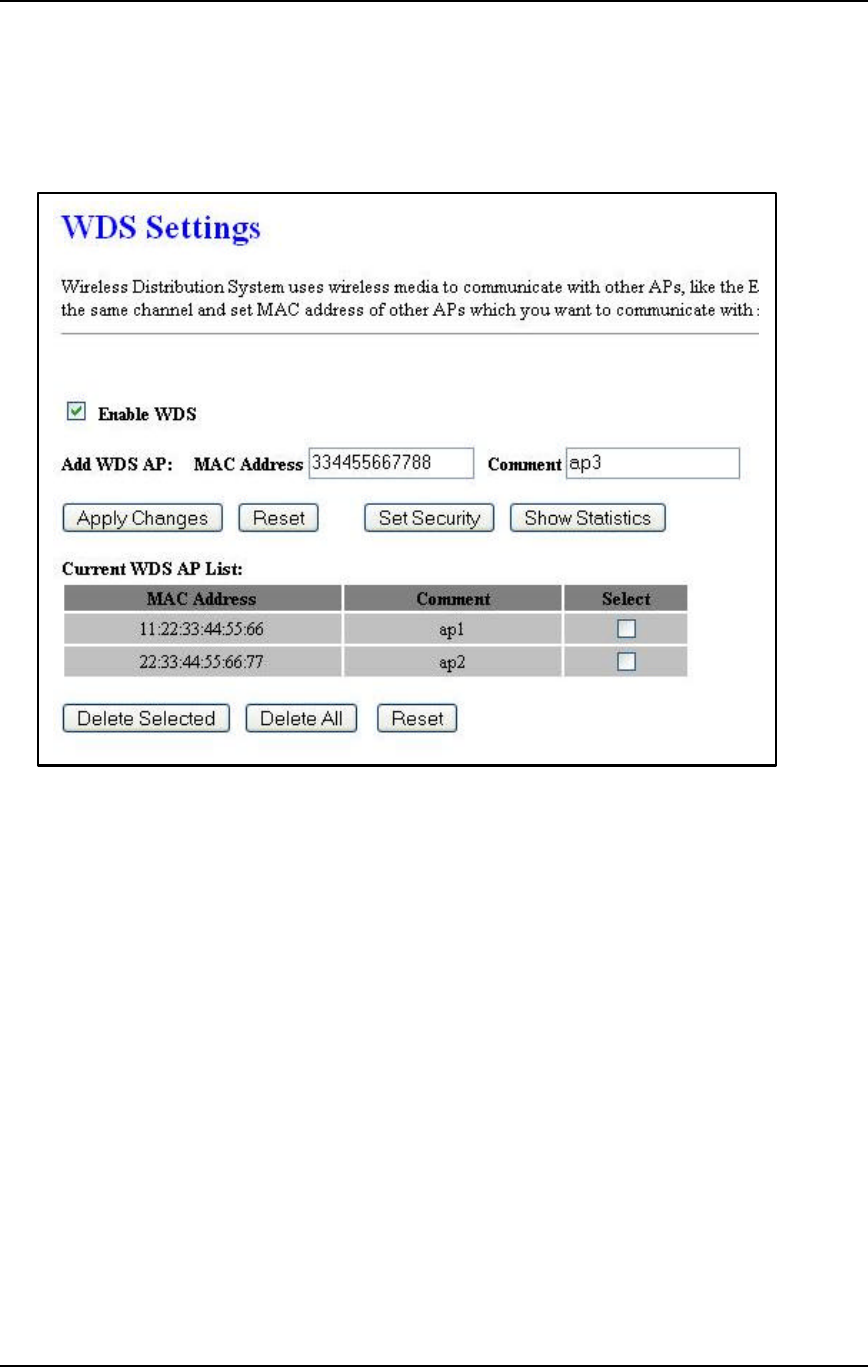
5.4.5 WDS
§ Click on the WDS link under the Wireless menu. On this page you can configure the
WDS (Wireless Distribution System) which allows the Access Point to function as a
repeater.
§ Enable WDS: Place a check in this box to enable this feature.
§ Add WDS AP: Enter the MAC address of the Access Point that will join the WDS
network along with a comment about the AP.
§ Current WDS AP list: This table lists MAC addresses; you may delete selected
MAC address or delete all the addresses from the table by clicking on the associated
buttons.
§ Click on the Apply Changes button to confirm the changes. This device will
automatically restart once these changes have been applied.
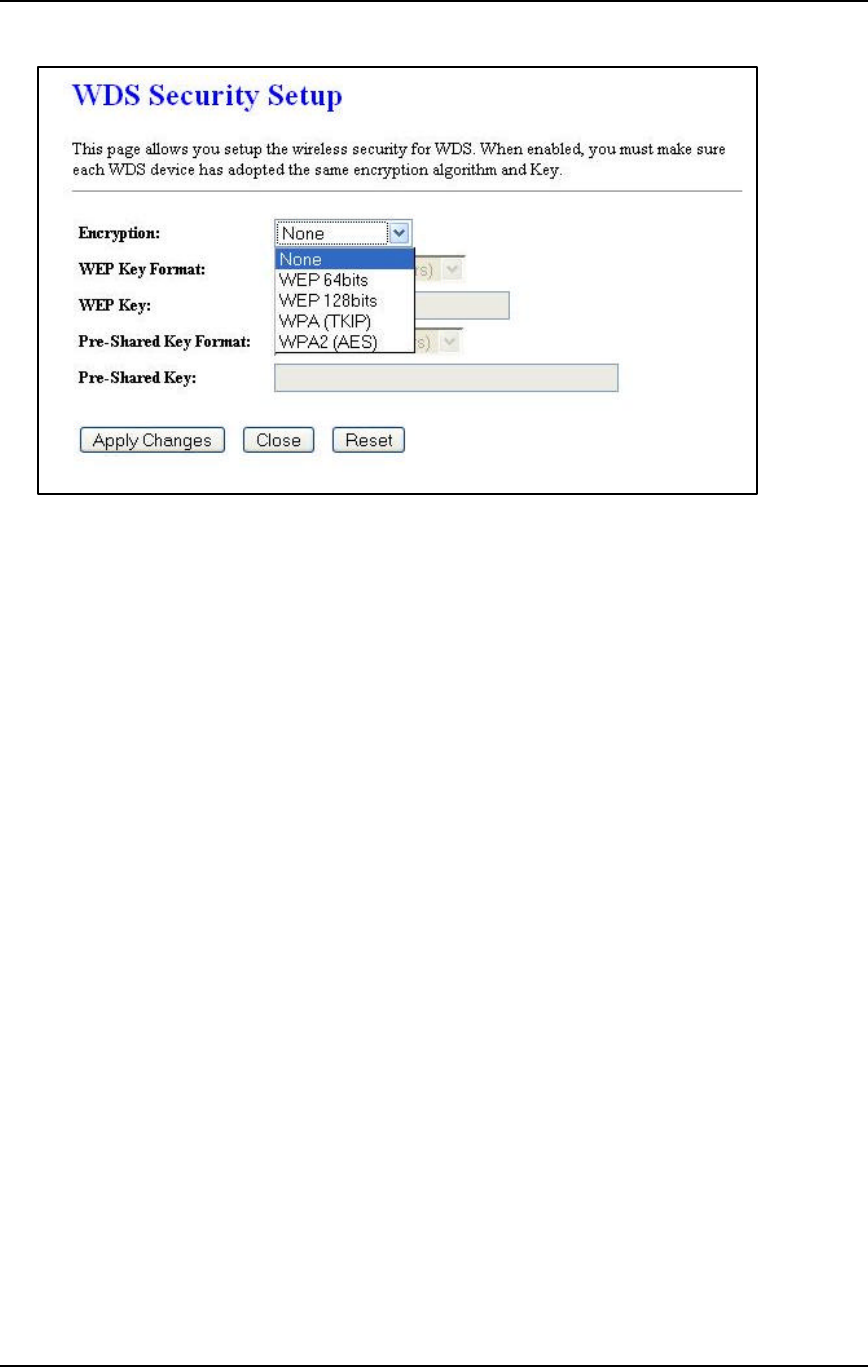
§ Click on the Set Security button to configure the security settings.
11g Wireless Multi-Client Bridge/Bridge Router/AP/WDS Version 1.36
48
§ Encryption: Select WEP 64bits, WEP 128bits, WPA (TKIP) or WPA2 (AES) from the
drop-down list if your wireless network uses a specific encryption.
§ Key Format: Select a key format from the drop-down list. 64bit-hex keys require 10
characters, where as 128-bit keys require 26 characters. A hex key is defined as a
number between 0 through 9 and letter between A through F.
§ Key Length: Select a 64-bit or 128-bit from the drop-down list.
§ Pre-Shared Key Format: Select Passphrase from the drop-down list.
§ Pre-Shared Key: Enter the pass phrase; this should be between 8 and 63 characters.
§ Click on the Apply Changes button to confirm the changes. This device will
automatically restart once these changes have been applied.

11g Wireless Multi-Client Bridge/Bridge Router/AP/WDS Version 1.36
49
Appendix A – Specifications
Data Rates
1, 2, 5.5, 6, 9, 11, 12, 18, 24, 36, 48, 54
Mbps
Standards
IEEE802.11b/g, IEEE802.1x, IEEE802.3,
IEEE802.3u
Compatibility
IEEE 802.11g/ IEEE 802.11b
Power Requirements
Power Supply: 90 to 240 VDC ± 10%
(depends on different countries)
Device: 12 V/ 1A
Status LEDs
LAN: Link, WLAN: Link, Power: on/off
Regulation Certifications
FCC Part 15/UL, ETSI 300/328/CE
RF Information
Frequency Band
2.400∼2.4835 GHz (US, EU)
2.400∼2.484 GHz (JP)
Media Access Protocol
Carrier Sense Multiple Access with
Collision Avoidance (CSMA/CA)
Modulation Technology
Orthogonal Frequency Division
Multiplexing (OFDM)
DBPSK @ 1Mbps
DQPSK @2Mbps
CCK @ 5.5 & 11Mbps
BPSK @ 6 and 9 Mbps
QPSK @ 12 and 18 Mbps
16-QAM @ 24 and 36 Mbps
64-QAM @ 48 and 54 Mbps
Operating Channels
11 for North America, 14 for Japan, 13 for
Europe,
Receive Sensitivity (Typical)
-88dBm @ 6Mbps
-70dBm @ 54Mbps
Available Transmit Power (Max.)
26dBm @ 1~24Mbps
23dBm @ 36Mbps
21dBm @ 48Mbps
20dBm @ 54Mbps
RF Connector
TNC Type (Female Reverse)
Networking
Topology
Ad-Hoc, Infrastructure
Operation Mode
Point-to-Point/ Point-to-Multipoint Bridge/
AP/ Client Bridge/ WDS
Interface
One 10/100Mbps RJ-45 LAN Port
Security
IEEE802.1x Authenticator / RADIUS Client
(EAP-MD5/TLS/TTLS) Support in AP
Mode
WPA2/WPA / Pre-share Key (PSK)/
AES/TKIP
MAC address filtering
Hide SSID in beacons
IP Auto-configuration
DHCP client/server
Management
Configuration
Web-based configuration (HTTP)
Firmware Upgrade
Upgrade firmware via web-browser
Environmental
Temperature Range
Operating: 0°C to 45°C (32°F to 113°F)
Storage: -20°Cto 70°C (-4°F to 158°F)
Humidity (non-condensing)
5%~95% Typical

11g Wireless Multi-Client Bridge/AP/WDS Version 1.0
50
Appendix B – FCC Interference Statement
Federal Communication Commission Interference Statement
This equipment has been tested and found to comply with the limits for a Class B digital device,
pursuant to Part 15 of the FCC Rules. These limits are designed to provide reasonable protection
against harmful interference in a residential installation. This equipment generates, uses and can
radiate radio frequency energy and, if not installed and used in accordance with the instructions, may
cause harmful interference to radio communications. However, there is no guarantee that interference
will not occur in a particular installation. If this equipment does cause harmful interference to radio or
television reception, which can be determined by turning the equipment off and on, the user is
encouraged to try to correct the interference by one of the following measures:
l Reorient or relocate the receiving antenna.
l Increase the separation between the equipment and receiver.
l Connect the equipment into an outlet on a circuit different from that to which the receiver is
connected.
l Consult the dealer or an experienced radio/TV technician for help.
This device complies with Part 15 of the FCC Rules. Operation is subject to the following two conditions:
(1) This device may not cause harmful interference, and (2) this device must accept any interference
received, including interference that may cause undesired operation.
FCC Caution: Any changes or modifications not expressly approved by the party responsible for
compliance could void the user's authority to operate this equipment.
IMPORTANT NOTE:
FCC Radiation Exposure Statement:
This equipment complies with FCC radiation exposure limits set forth for an uncontrolled environment.
This equipment should be installed and operated with minimum distance 20cm between the radiator &
your body.
We declare that the product is limited in CH1~CH11 by specified firmware controlled in the USA.
This transmitter must not be co-located or operating in conjunction with any other antenna or transmitter.
IC statement
Operation is subject to the following two conditions:
This device may not cause interference and
This device must accept any interference, including interference that may cause undesired operation of
the device.
This device has been designed to operate with an antenna having a maximum gain of 9 dBi. Antenna
having a higher gain is strictly prohibited per regulations of Industry Canada. The required antenna
impedance is 50 ohms.
IMPORTANT NOTE:
IC Radiation Exposure Statement:
This equipment complies with IC radiation exposure limits set forth for an uncontrolled environment.
End users must follow the specific operating instructions for satisfying RF exposure compliance. This
equipment should be installed and operated with minimum distance 20cm between the radiator & your
body.
This transmitter must not be co-located or operating in conjunction with any other antenna or transmitter.
Règlement d’Industry Canada
Les conditions de fonctionnement sont sujettes à deux conditions:
Ce périphérique ne doit pas causer d’interférence et.
Ce périphérique doit accepter toute interférence, y compris les interférences pouvant perturber le bon
fonctionnement de ce périphérique.