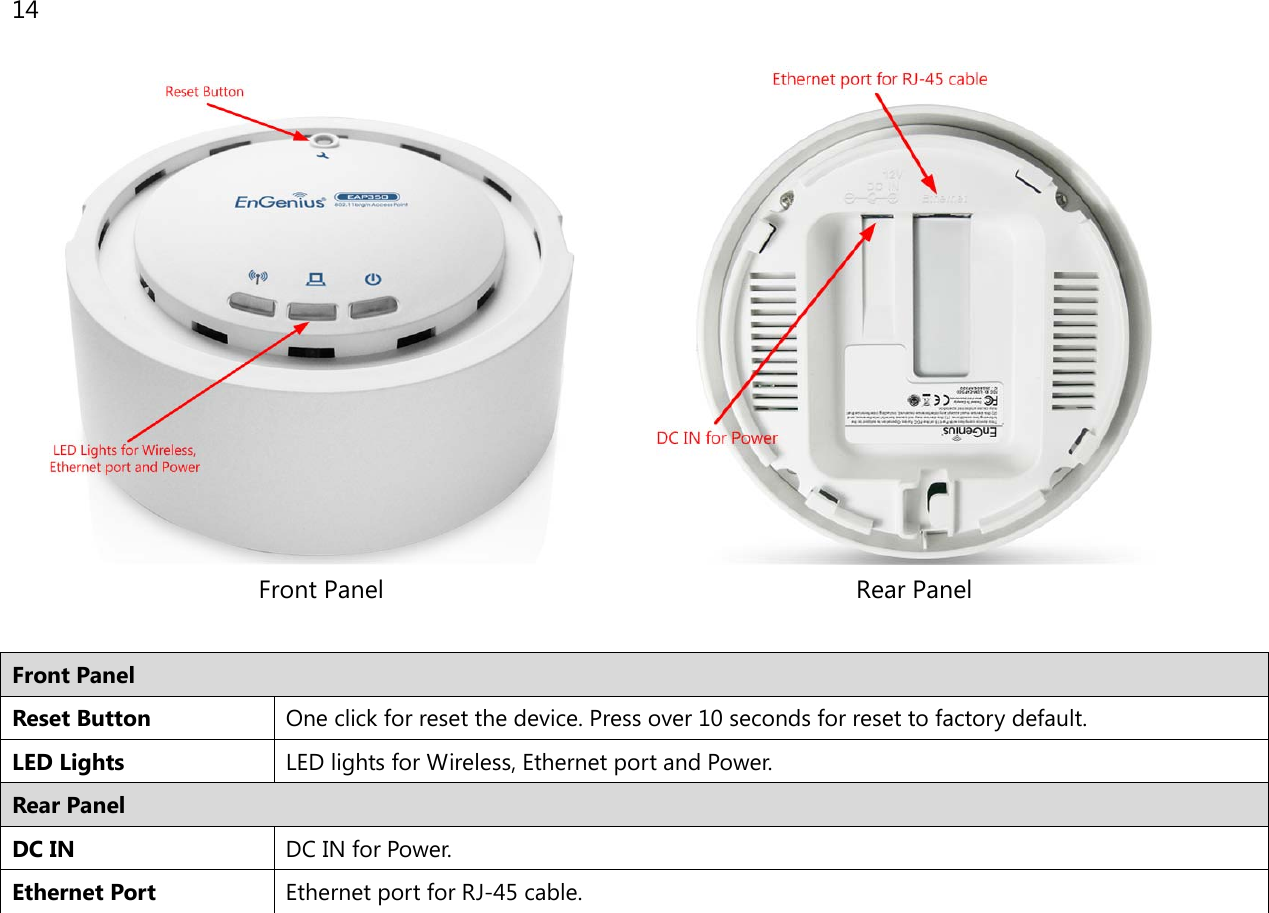
Senao Networks EAP350 11n Long Range Ceiling Mount Access Point User Manual ECB 9750
Senao Networks, Inc. 11n Long Range Ceiling Mount Access Point ECB 9750
UserManual.wiki
>
Senao Networks
>
EAP350 User Manual
User Man_U2M-EAP350_rev. 1
Navigation menu
Upload a User Manual
Namespaces
Wiki Guide
HTML
PDF
Info
Views
User Manual
Discussion / Help
Navigation

![10 • Windows XP, click [Network Connection] • Windows 7, click [View Network Status and Tasks] then [Change adapter settings] • Right click on [Local Area Connection] and select [Properties].](https://usermanual.wiki/Senao-Networks/EAP350/User-Guide-1546426-Page-11.png)
![11 • Select “Internet Protocol (TCP/IP)” and click [Properties] • Select “Use the following IP address” and enter IP address and subnet mask then click [OK]. Note: Ensure that the IP address and subnet mask are on the same subnet as the device. For example: Device IP address: 192.168.1.1 PC IP address: 192.168.1.10 PC subnet mask: 255.255.255.0](https://usermanual.wiki/Senao-Networks/EAP350/User-Guide-1546426-Page-12.png)
![21 4.3 Wireless Client List Clicking the Wireless Client List link under the Status menu displays the list of clients associated to the EAP350, along with the MAC addresses and signal strength for each client. Clicking the [Refresh] button updates (refreshes) the client list. Note: Only in Access Point and WDS AP mode.](https://usermanual.wiki/Senao-Networks/EAP350/User-Guide-1546426-Page-22.png)
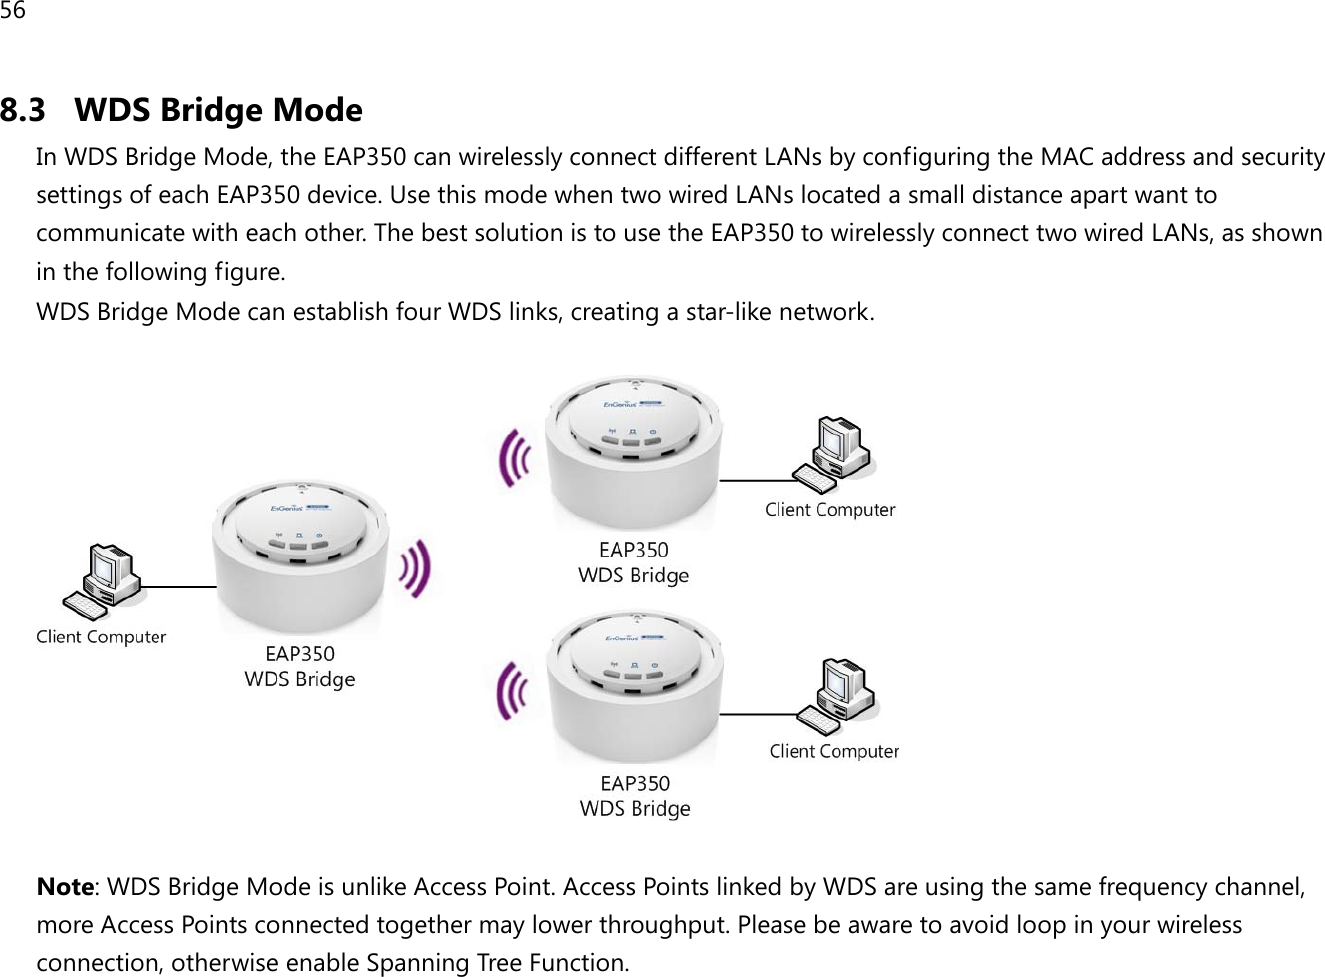
![23 5 System 5.1 Operation Mode The EAP350 supports three operating modes: Access Point, WDS Access Point and WDS Bridge. System Properties Device Name Enter a name for the device. The name you type appears in SNMP management. This name is not the SSID and is not broadcast to other devices. Operation Mode Use the radio button to select an operating mode. Accept / Cancel Click [Accept] to confirm the changes or [Cancel] to cancel and return previous settings.](https://usermanual.wiki/Senao-Networks/EAP350/User-Guide-1546426-Page-24.png)
![25 DNS Accept / Cancel Click [Accept] to confirm the changes or [Cancel] to cancel and return previous settings.](https://usermanual.wiki/Senao-Networks/EAP350/User-Guide-1546426-Page-26.png)

![27 so that when a new bridge comes onto a busy network, it looks at some traffic before participating. Priority Specify the Priority number. Smaller number has greater priority. Accept / Cancel Click [Accept] to confirm the changes or [Cancel] to cancel and return previous settings.](https://usermanual.wiki/Senao-Networks/EAP350/User-Guide-1546426-Page-28.png)
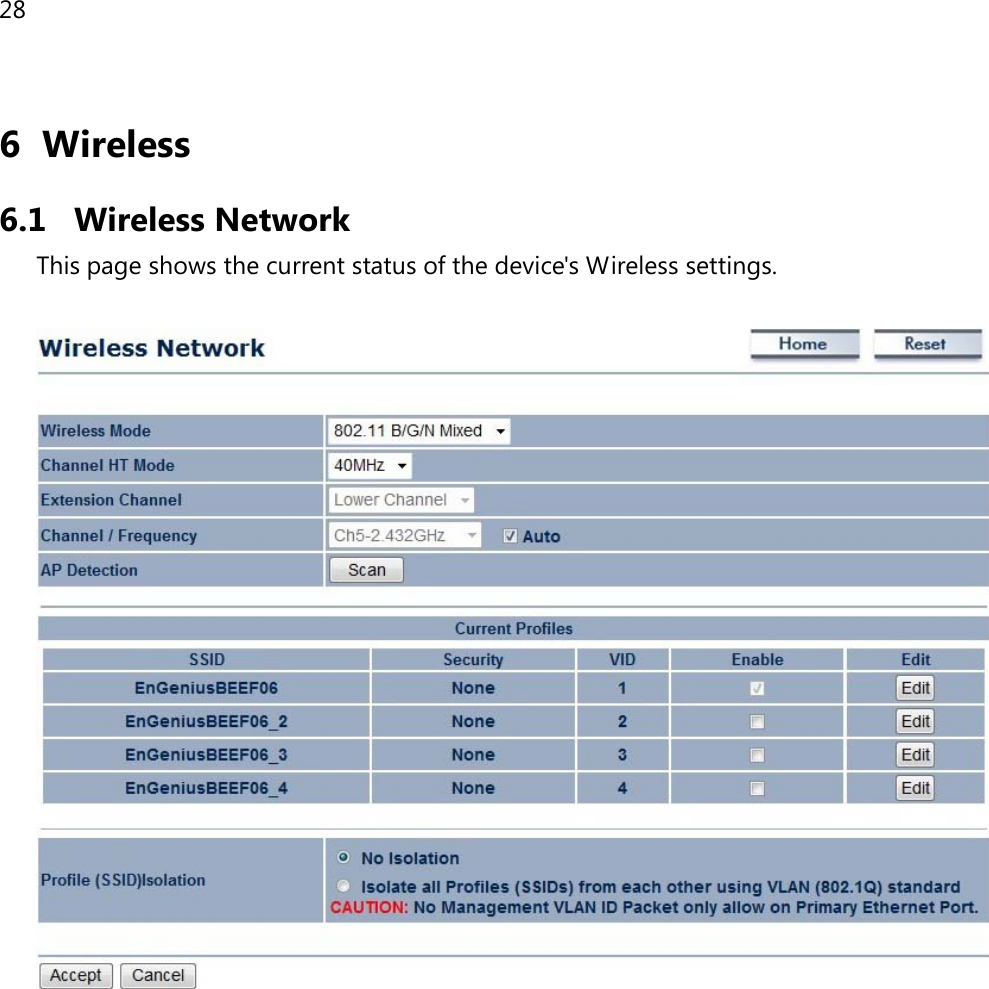
![29 Wireless Network Wireless Mode Wireless mode supports 802.11b/g/n mixed mode. Channel HT Mode The default channel bandwidth is 40 MHz. The larger the channel, the better the transmission quality and speed. Extension Channel Select upper or lower channel. Your selection may affect the Auto channel function. Channel / Frequency Select the channel and frequency appropriate for your country’s regulation. Auto Check this option to enable auto-channel selection. AP Detection AP Detection can select the best channel to use by scanning nearby areas for Access Points. Current Profile Configure up to four different SSIDs. If many client devices will be accessing the network, you can arrange the devices into SSID groups. Click [Edit] to configure the profile and check whether you want to enable extra SSID. Profile Isolation Restricted client to communicate with different VID by selecting the radio button. Accept / Cancel Click [Accept] to confirm the changes or [Cancel] to cancel and return previous settings.](https://usermanual.wiki/Senao-Networks/EAP350/User-Guide-1546426-Page-30.png)
![30 SSID Profile SSID Profile SSID Specify the SSID for the current profile. VLAN ID Specify the VLAN tag for the current profile. Suppressed SSID Check this option to hide the SSID from clients. If checked, the SSID will not appear in the site survey. Station Separation Click the appropriate radio button to allow or prevent communication between client devices. Wireless Security See the Wireless Security section. Save / Cancel Click [Save] to accept the changes or [Cancel] to cancel and return previous settings.](https://usermanual.wiki/Senao-Networks/EAP350/User-Guide-1546426-Page-31.png)
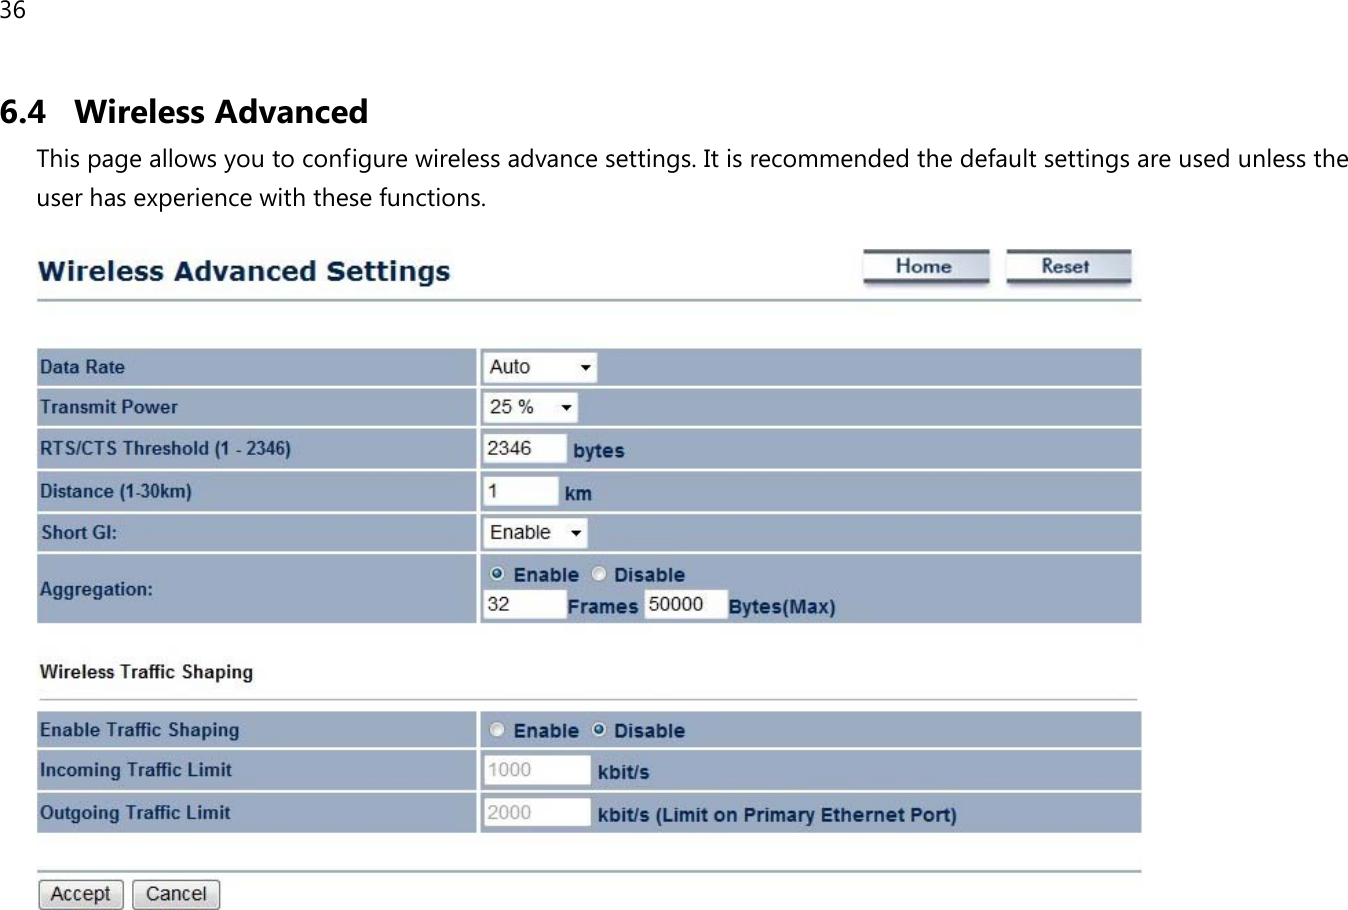
![37 Wireless Advanced Data Rate Select a data rate from the drop-down list. The data rate affects throughput. If you select a low data rate value, for example, the throughput is reduced but the transmission distance increases. Transmit Power Set the power output of the wireless signal. RTS/CTS Threshold Specify the threshold package size for RTC/CTS. A small number causes RTS/CTS packets to be sent more often and consumes more bandwidth. Distance Specify the distance between Access Points and clients. Longer distances may drop high-speed connections. Short GI Sets the time that the receiver waits for RF reflections to settle out before sampling data. Using a short (400ns) guard interval can increase throughput, but can also increase error rate in some installations due to increased sensitivity to radio-frequency reflections. Select the option that works best for your installation. Aggregation Merges data packets into one packet. This option reduces the number of packets, but increases packet sizes. Wireless Traffic Shaping Check this option to enable wireless traffic shaping. Traffic shaping regulates the flow of packets leaving an interface to deliver improved Quality of Service. Incoming Traffic Limit Specify the wireless transmission speed used for downloading. Outgoing Traffic Limit Specify the wireless transmission speed used for uploading. Accept / Cancel Click [Accept] to confirm the changes or [Cancel] to cancel and return previous settings.](https://usermanual.wiki/Senao-Networks/EAP350/User-Guide-1546426-Page-38.png)
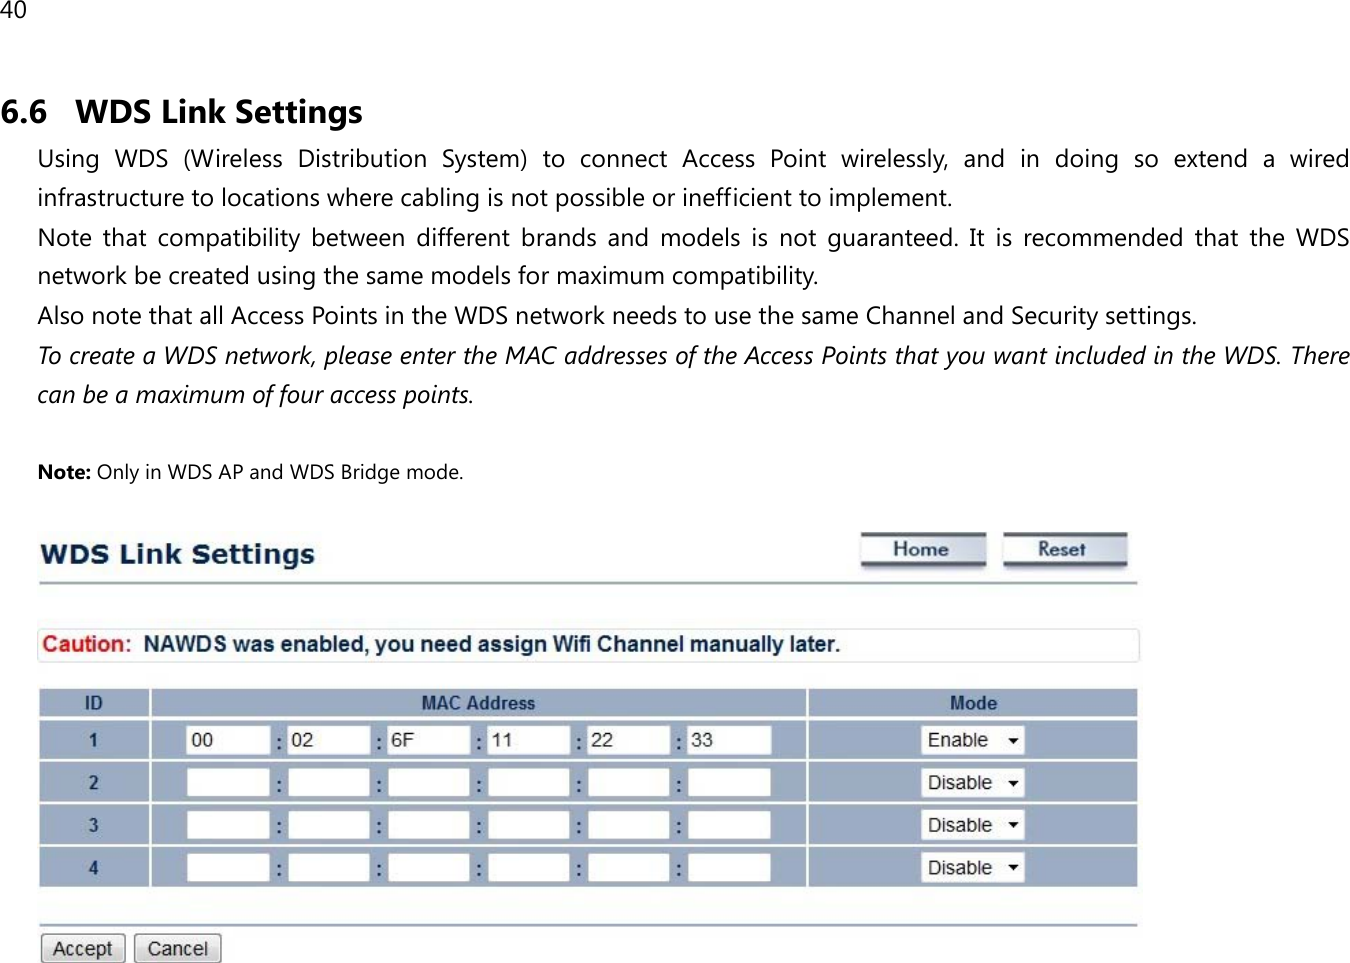
![41 WDS Link Settings MAC Address Enter the Access Point’s MAC address to which you want to extend the wireless area. Mode Select Disable or Enable from the drop-down list. Accept / Cancel Click [Accept] to confirm the changes or [Cancel] to cancel and return previous settings.](https://usermanual.wiki/Senao-Networks/EAP350/User-Guide-1546426-Page-42.png)
![46 7.4 Backup/Restore This page allows you to save the current device configurations. When you save the configurations, you also can re-load the saved configurations into the device through the [Restore Saved Settings from A File]. If extreme problems occur you can use the [Revert to Factory Default Settings] to set all configurations to its original default settings. Backup/Restore Save A Copy of Current Settings Click [Backup] to save the current configured settings. Restore Saved Settings from A File To restore settings that have been previously backed up, click [Browse], select the file, and click [Restore]. Revert to Factory Default Settings Click [Factory Default] button to restore the EAP350 to its factory default settings.](https://usermanual.wiki/Senao-Networks/EAP350/User-Guide-1546426-Page-47.png)
![47 7.5 Firmware Upgrade This page allows you to upgrade the device's firmware. To perform the Firmware Upgrade: 1. Click the [Browse] button and navigate to the location of the upgrade file. 2. Select the upgrade file. Its name will appear in the Upgrade File field. 3. Click the [Upload] button to commence the firmware upgrade. Note: The device is unavailable during the upgrade process, and must restart when the upgrade is completed. Any connections to or through the device will be lost.](https://usermanual.wiki/Senao-Networks/EAP350/User-Guide-1546426-Page-48.png)
![50 7.8 Diagnosis This page allows you to ascertain connection quality and trace the routing table to the target. Diagnosis Target IP Enter the IP address you would like to search. Ping Packet Size Enter the packet size of each ping. Number of Pings Enter the number of times you want to ping. Start Ping Click [Start Ping] to begin pinging. Traceroute Target Enter an IP address or domain name you want to trace. Start Traceroute Click [Start Traceroute] to begin the trace route operation.](https://usermanual.wiki/Senao-Networks/EAP350/User-Guide-1546426-Page-51.png)
![52 7.10 Logout Click [Logout] in Management menu to logout.](https://usermanual.wiki/Senao-Networks/EAP350/User-Guide-1546426-Page-53.png)
![53 7.11 Reset In some circumstances it may be required to force the device to reboot. Click on [Reboot the Device] to reboot.](https://usermanual.wiki/Senao-Networks/EAP350/User-Guide-1546426-Page-54.png)
![Česky [Czech] [Jméno výrobce] tímto prohlašuje, že tento [typ zařízení] je ve shodě se základními požadavky a dalšími příslušnými ustanoveními směrnice 1999/5/ES. Dansk [Danish] Undertegnede [fabrikantens navn] erklærer herved, at følgende udstyr [udstyrets typebetegnelse] overholder de væsentlige krav og øvrige relevante krav i direktiv 1999/5/EF. Deutsch [German] Hiermit erklärt [Name des Herstellers], dass sich das Gerät [Gerätetyp] in Übereinstimmung mit den grundlegenden Anforderungen und den übrigen einschlägigen Bestimmungen der Richtlinie 1999/5/EG befindet. Eesti [Estonian] Käesolevaga kinnitab [tootja nimi = name of manufacturer] seadme [seadme tüüp = type of equipment] vastavust direktiivi 1999/5/EÜ põhinõuetele ja nimetatud direktiivist tulenevatele teistele asjakohastele sätetele. English Hereby, [name of manufacturer], declares that this [type of equipment] is in compliance with the essential requirements and other relevant provisions of Directive 1999/5/EC. Español [Spanish] Por medio de la presente [nombre del fabricante] declara que el [clase de equipo] cumple con los requisitos esenciales y cualesquiera otras disposiciones aplicables o exigibles de la Directiva 1999/5/CE. Ελληνική [Greek] ΜΕ ΤΗΝ ΠΑΡΟΥΣΑ [name of manufacturer] ΔΗΛΩΝΕΙ ΟΤΙ [type of equipment] ΣΥΜΜΟΡΦΩΝΕΤΑΙ ΠΡΟΣ ΤΙΣ ΟΥΣΙΩΔΕΙΣ ΑΠΑΙΤΗΣΕΙΣ ΚΑΙ ΤΙΣ ΛΟΙΠΕΣ ΣΧΕΤΙΚΕΣ ΔΙΑΤΑΞΕΙΣ ΤΗΣ ΟΔΗΓΙΑΣ 1999/5/ΕΚ. Français [French] Par la présente [nom du fabricant] déclare que l'appareil [type d'appareil] est conforme aux exigences essentielles et aux autres dispositions pertinentes de la directive 1999/5/CE. Italiano [Italian] Con la presente [nome del costruttore] dichiara che questo [tipo di apparecchio] è conforme ai requisiti essenziali ed alle altre disposizioni pertinenti stabilite dalla direttiva 1999/5/CE. Latviski [Latvian] Ar šo [name of manufacturer / izgatavotāja nosaukums] deklarē, ka [type of equipment / iekārtas tips] atbilst Direktīvas 1999/5/EK būtiskajām prasībām un citiem ar to saistītajiem noteikumiem. Lietuvių [Lithuanian] Šiuo [manufacturer name] deklaruoja, kad šis [equipment type] atitinka esminius reikalavimus ir kitas 1999/5/EB Direktyvos nuostatas. Nederlands [Dutch] Hierbij verklaart [naam van de fabrikant] dat het toestel [type van toestel] in overeenstemming is met de essentiële eisen en de andere relevante bepalingen van richtlijn 1999/5/EG. Malti [Maltese] Hawnhekk, [isem tal-manifattur], jiddikjara li dan [il-mudel tal-prodott] jikkonforma mal-ħtiġijiet essenzjali u ma provvedimenti oħrajn relevanti li hemm fid-Dirrettiva 1999/5/EC. Magyar [Hungarian] Alulírott, [gyártó neve] nyilatkozom, hogy a [... típus] megfelel a vonatkozó alapvetõ követelményeknek és az 1999/5/EC irányelv egyéb elõírásainak. Polski [Polish] Niniejszym [nazwa producenta] oświadcza, że [nazwa wyrobu] jest zgodny z zasadniczymi wymogami oraz pozostałymi stosownymi postanowieniami Dyrektywy 1999/5/EC. Português [Portuguese] [Nome do fabricante] declara que este [tipo de equipamento] está conforme com os requisitos essenciais e outras disposições da Directiva 1999/5/CE. Slovensko [Slovenian] [Ime proizvajalca] izjavlja, da je ta [tip opreme] v skladu z bistvenimi zahtevami in ostalimi relevantnimi določili direktive 1999/5/ES. Slovensky [Slovak] [Meno výrobcu] týmto vyhlasuje, že [typ zariadenia] spĺňa základné požiadavky a všetky príslušné ustanovenia Smernice 1999/5/ES. Suomi [Finnish] [Valmistaja = manufacturer] vakuuttaa täten että [type of equipment = laitteen tyyppimerkintä] tyyppinen laite on direktiivin 1999/5/EY oleellisten vaatimusten ja sitä koskevien direktiivin muiden ehtojen mukainen. Svenska [Swedish] Härmed intygar [företag] att denna [utrustningstyp] står I överensstämmelse med de väsentliga egenskapskrav och övriga relevanta bestämmelser som framgår av direktiv 1999/5/EG.](https://usermanual.wiki/Senao-Networks/EAP350/User-Guide-1546426-Page-60.png)