Sendo SND100 Z100 User Manual z100
Sendo International Ltd Z100 z100
UserManual.wiki
>
Sendo
>
SND100 User Manual
>
Part 1
Contents
1.
Part 1
2.
Part 2
3.
US SAR Statement pages
Part 1
Navigation menu
Upload a User Manual
Namespaces
Wiki Guide
HTML
PDF
Info
Views
User Manual
Discussion / Help
Navigation


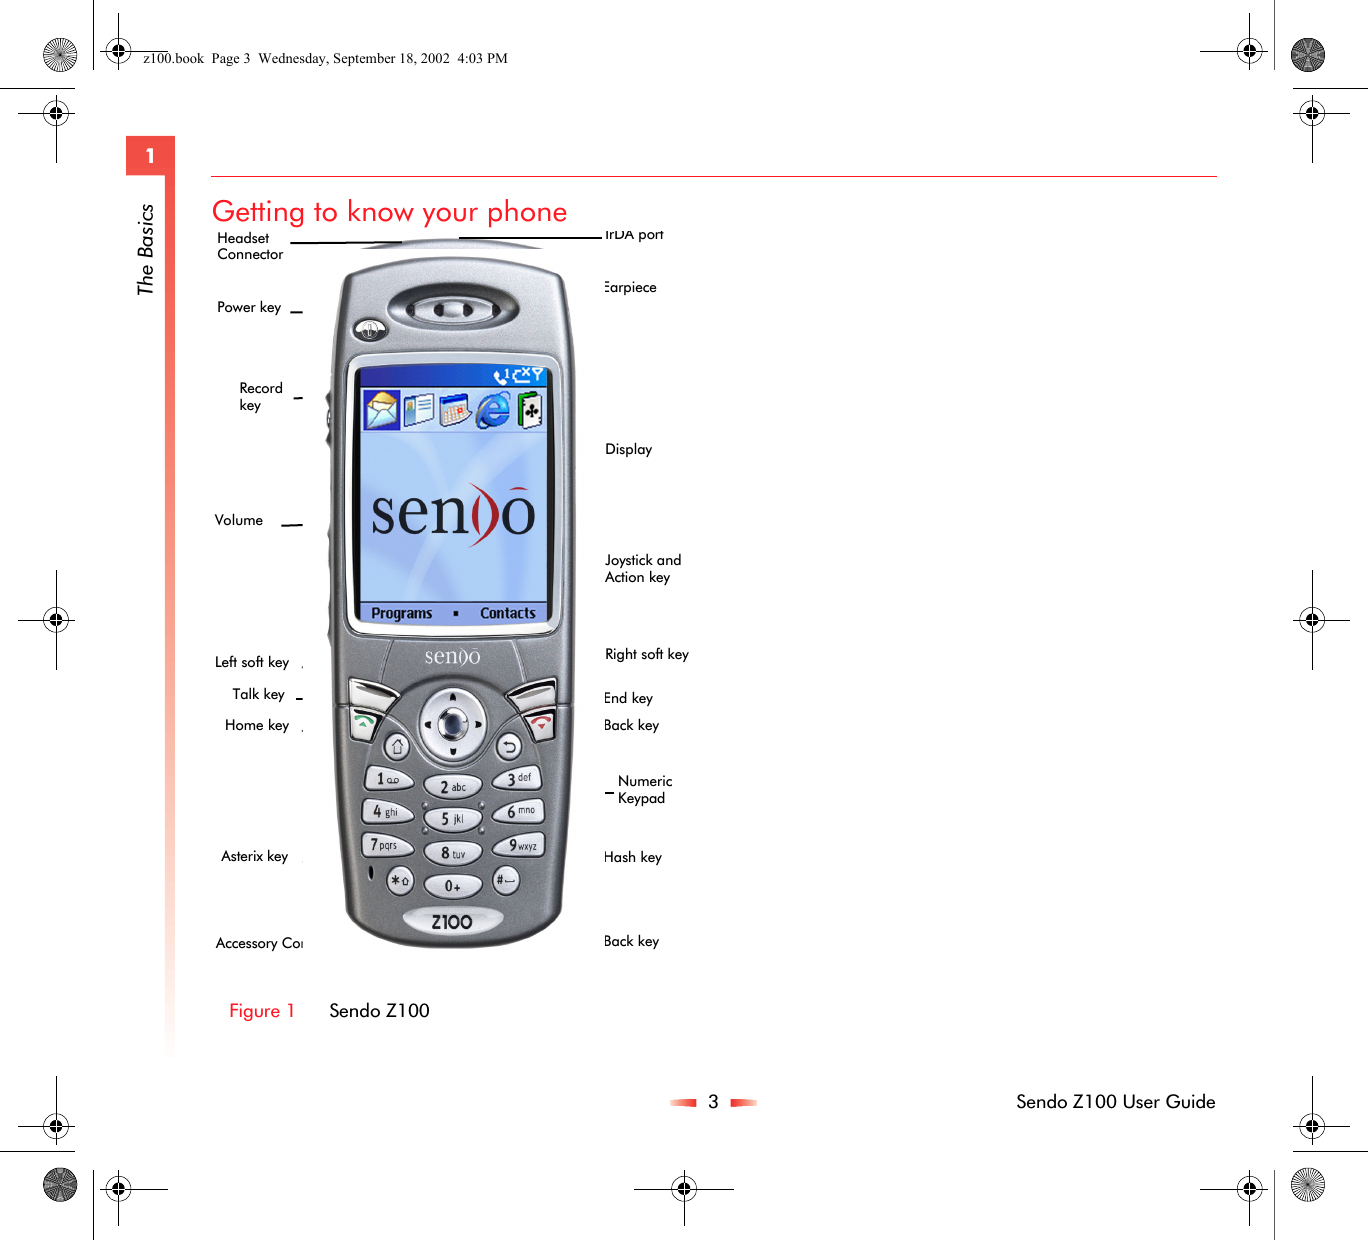
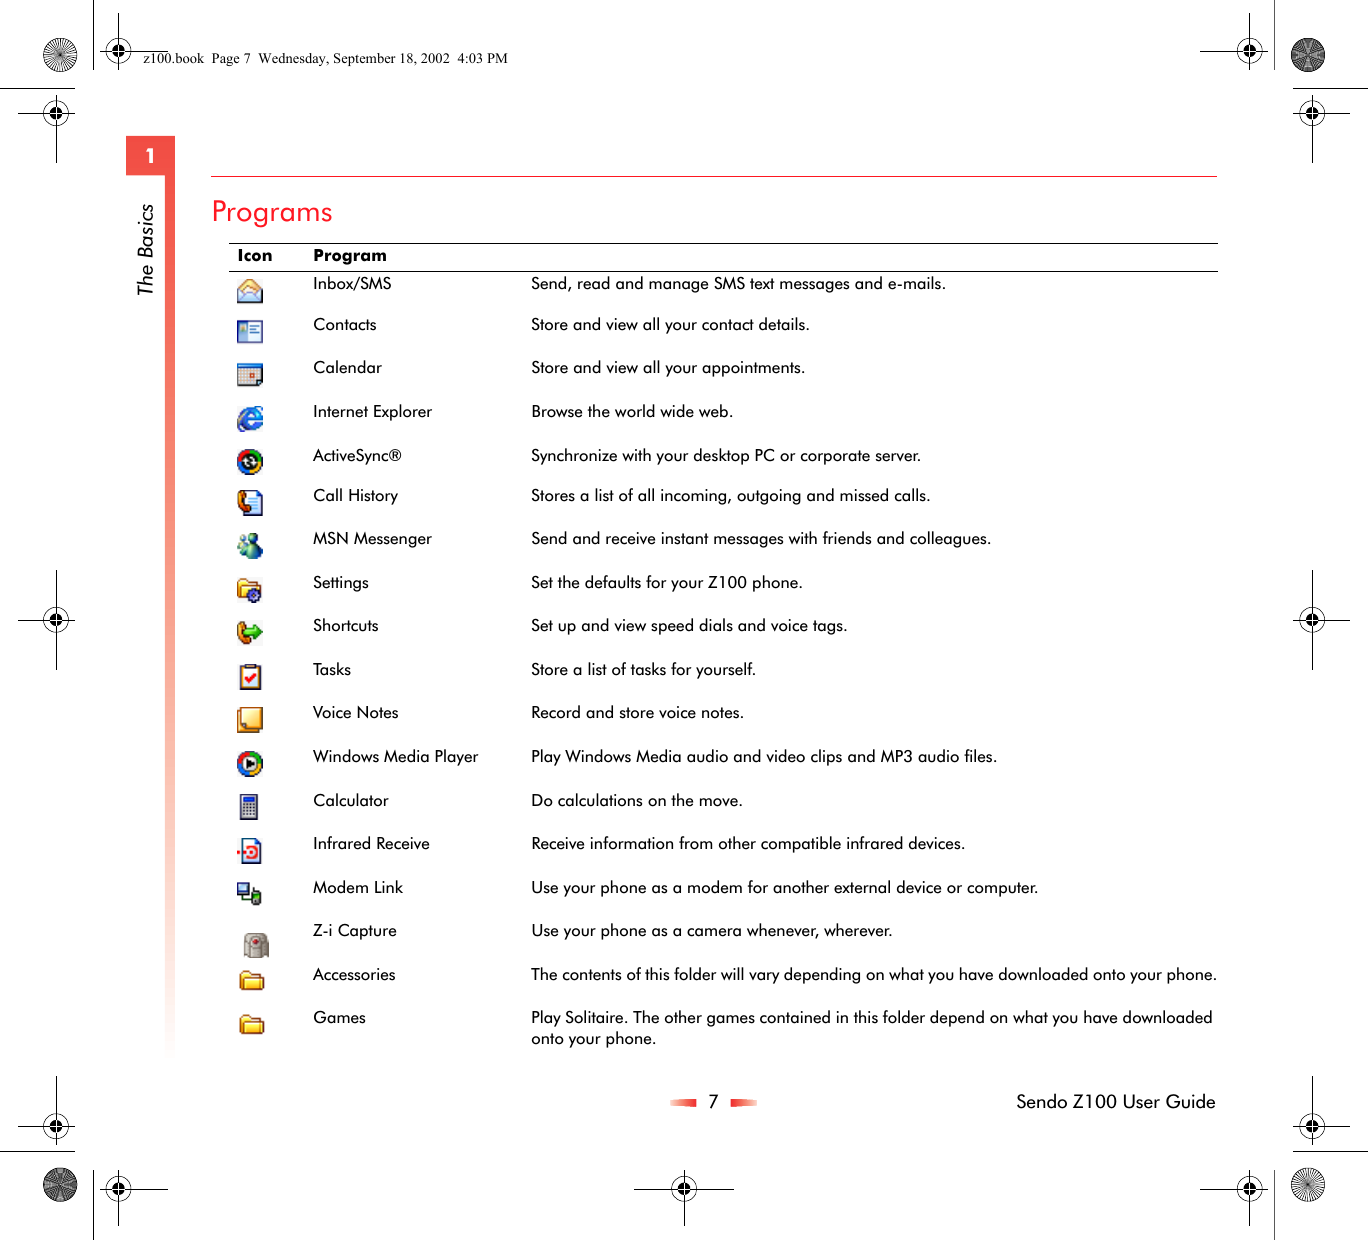
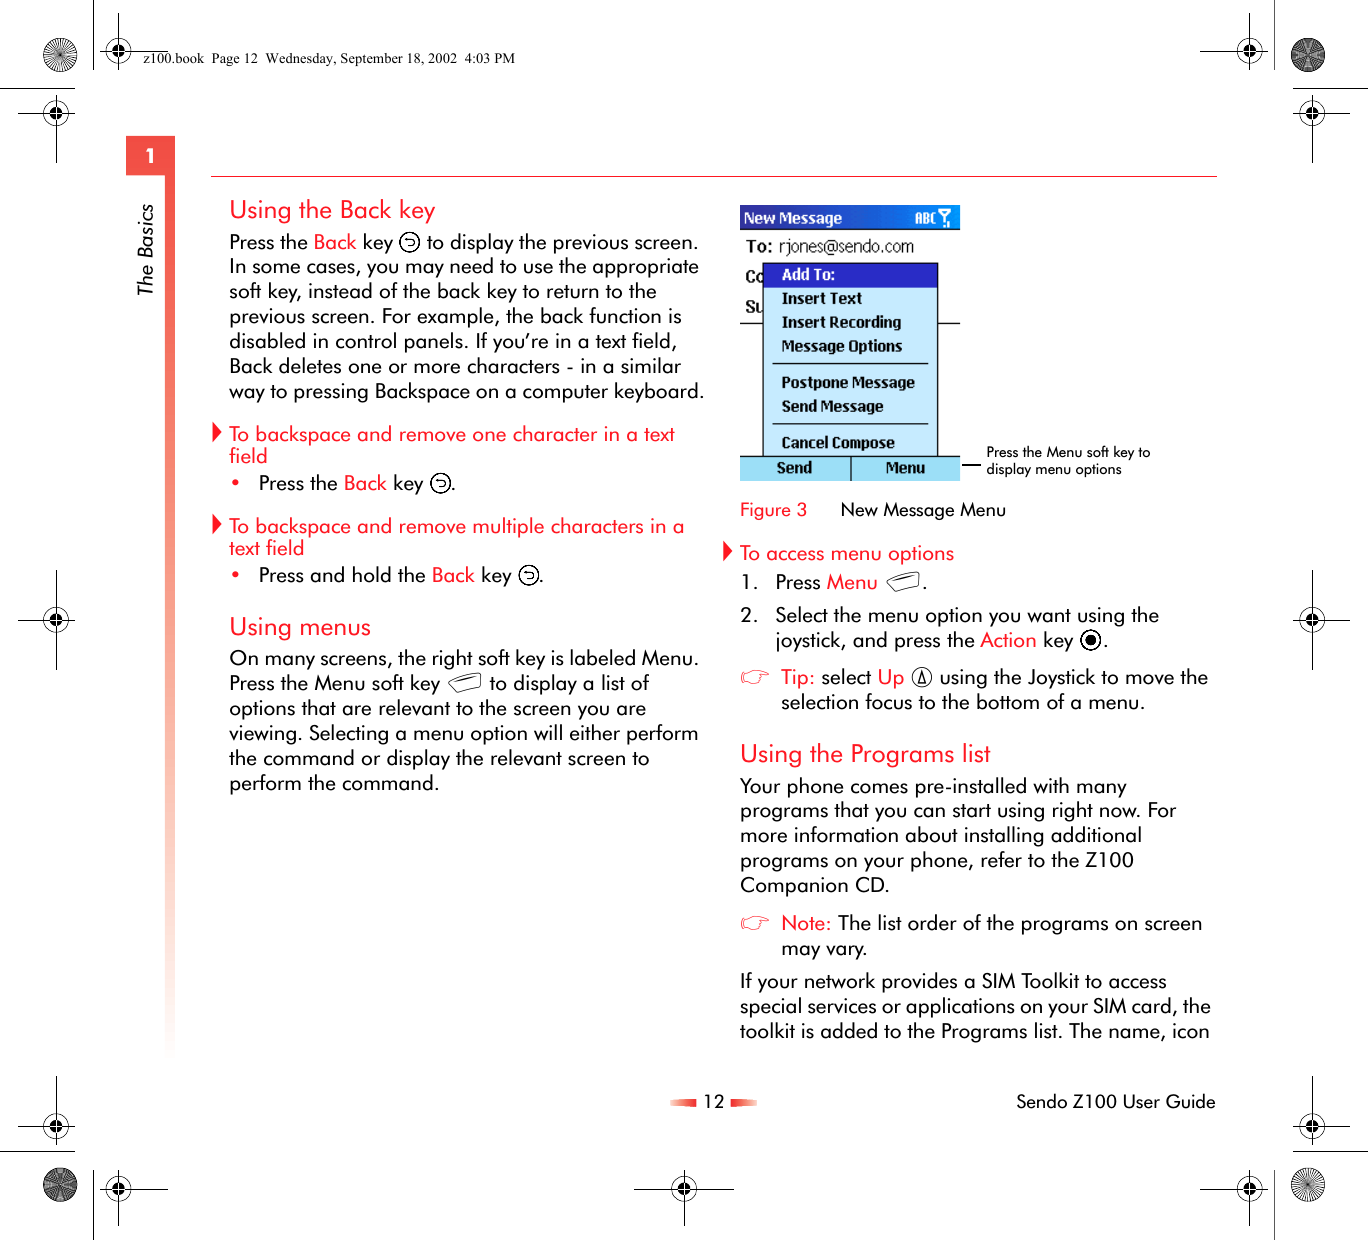
![10 Sendo Z100 User Guide1The BasicsWhere to find more informationThe following table is a guide to finding information to help you use your phone.NavigationThe following sections describe the different ways of navigating around your phone to accomplish tasks quickly and easily.Using the JoystickUse the joystick to navigate horizontally and vertically on the screen and to move the selection focus, so you can select the item you want.The following table shows the four different actions you can perform using the arrows on the Joystick:Using the Action keyPress in on the joystick when it’s centered. Press the Action key A to confirm the selection you’ve made using the Joystick. In some cases pressing Action will take you to a program or setting.Information about SourceMaking a phone call See the Quick Start Guide in the Z100 box, or for more detailed information see Making a callPrograms on the phone Z100 User guide. Additional programs that can be installed on the phoneZ100 CDConnecting to and synchronizing with a desktop computer and/or a Microsoft Exchange ServerSee Chapter 6 - Synchronizing Information in this user guide or ActiveSync™ Help on your desktop computer.Text entry See Entering text and numbers on your phone. Up-to-date information on your Sendo Z100http://www.sendo.com./Support http://www.sendo.com./Accessories http://www.sendo.com/ and the Z100 CD Rom. Direction key actionNavigationPress Up :. Moves the selection focus upward on the screen, or scrolls up in a list.Press Down ;Moves the selection focus downward on the screen or scrolls down in a list.Press Right ] Moves the selection focus forward on the screen, or moves the cursor forward through characters in a text field.Press Left [ Moves the selection focus backward on the screen, or moves the cursor backward through characters in a text field, without deleting characters.z100.book Page 10 Wednesday, September 18, 2002 4:03 PM](https://usermanual.wiki/Sendo/SND100.Part-1/User-Guide-300167-Page-22.png)
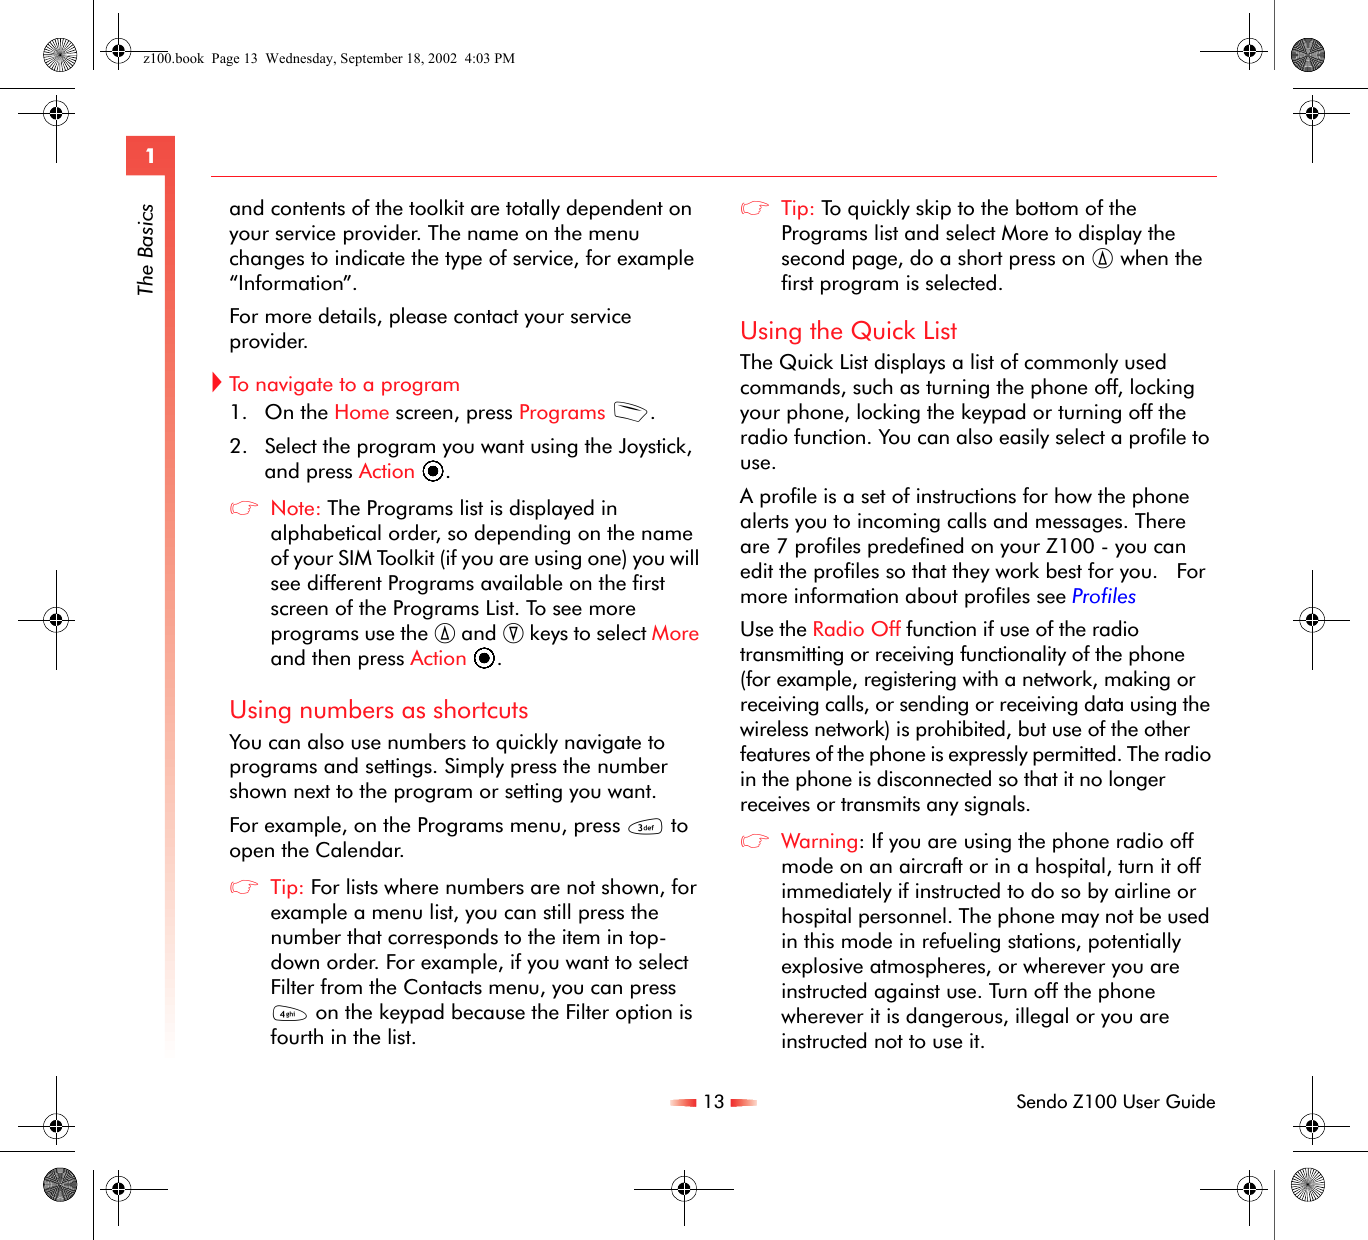
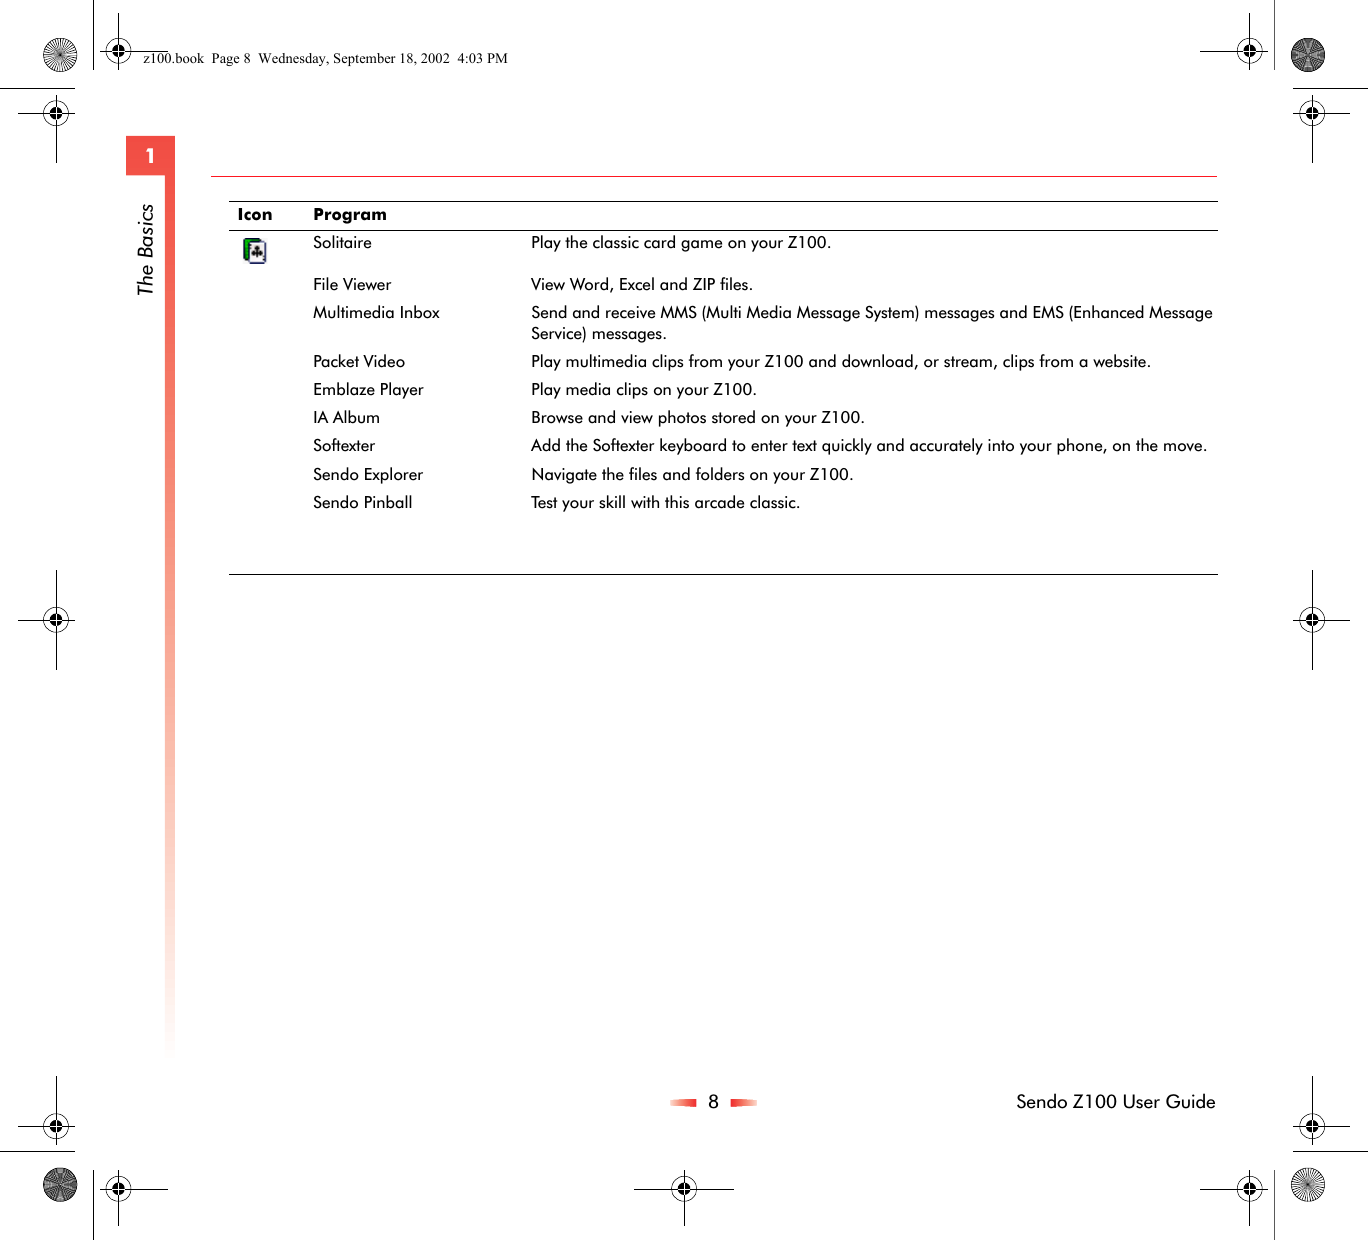
![15 Sendo Z100 User Guide1The Basicsnumber key on which the letter appears. To enter the first letter on the number key, press the key once, to enter the second letter, press the key twice, and so on. The letter entered most recently is underlined until you have completed the key presses for the letter and moved on to the next one.For example:•To enter the letter “i” press 444.•To enter the word “maria,” press 6, 2, 777, 444, 2.If you enter two letters consecutively in a word, which are located on the same key, pause after entering the first letter and wait until the underline disappears before entering the next letter.For example:•To enter the word “anna,” press 2, 66 pause until the underline disappears, press 66 again and then press 2.zTip: This pause is called the multitap time out, and you can adjust the length of the pause between key presses. See below.XTo enter punctuation in Multitap mode•Press 1 repetitively to cycle through common punctuation, or•Do a long press on the Hash key # to display a list of available symbols. Select the symbol you want using the joystick and press Done d.XTo change the Multitap time out1. On the Home screen, press Programs d, select Settings and then press Action A. Now select Accessibility and press Action A.2. Under Multipress time out, use the [ and ] keys to select the time interval you want for the pause between key presses. Press Done d.Entering text in T9 mode To save time when you are writing a message you can use Tegic T9 predictive text entry. This is a built in dictionary feature which guesses words by the sequence of letters you are typing.If you use T9, you only have to press each key once. The letters change as you type, so it is important that you ignore what is displayed on the screen until you have finished typing completely.Key Characters available1. , - ? ! ‘ @ :2a b c 23d e f 3 4g h i 4 5j k l 56m n o 67p q r s 78t u v 89w x y z 900#spacez100.book Page 15 Wednesday, September 18, 2002 4:03 PM](https://usermanual.wiki/Sendo/SND100.Part-1/User-Guide-300167-Page-27.png)
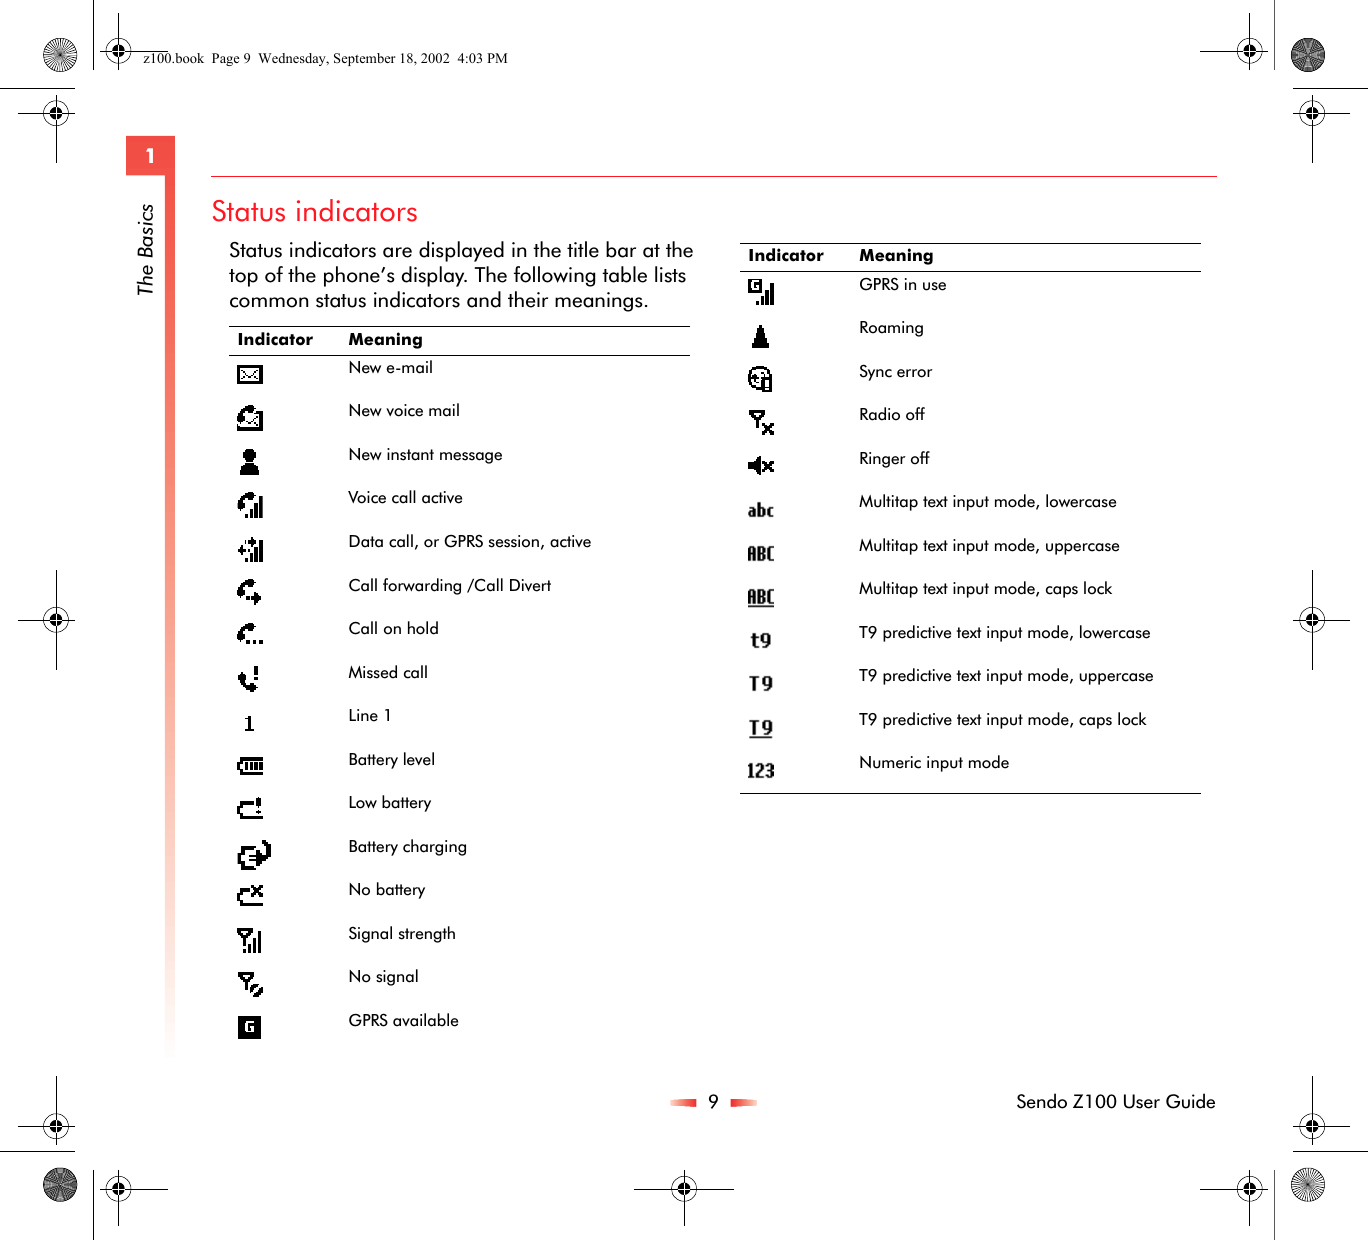
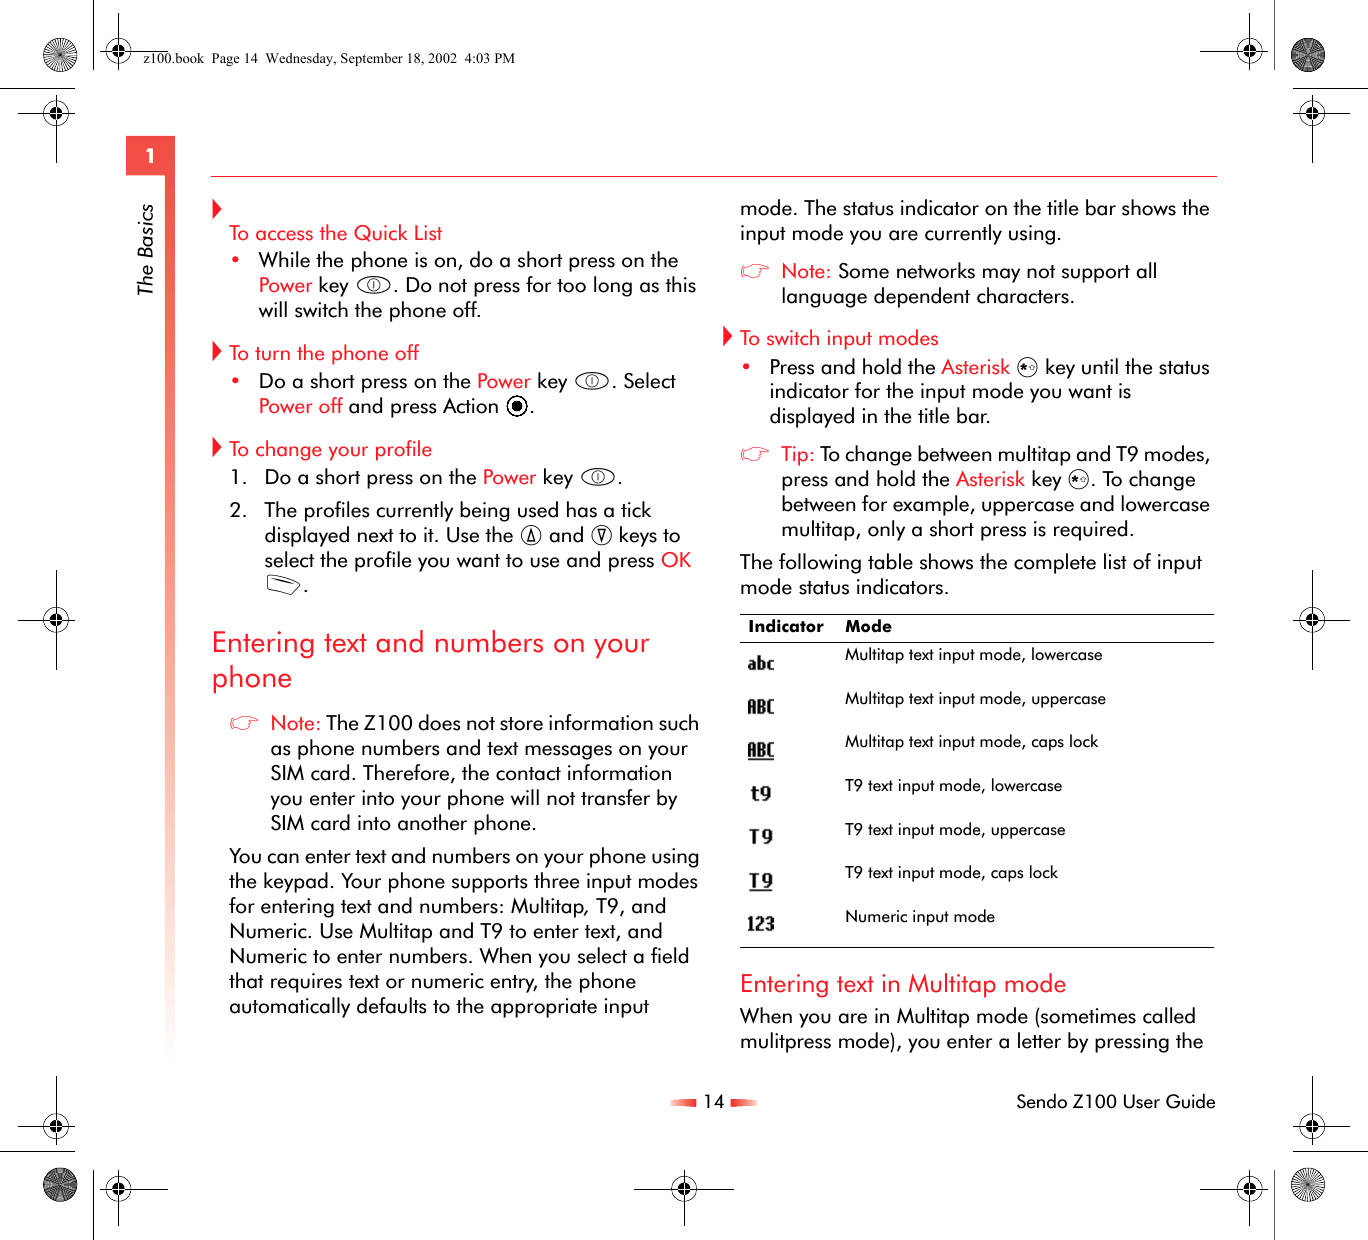
![16 Sendo Z100 User Guide1The BasicsFor example, to enter the word "maria," you can spell out the word with just five key presses, 6 2 7 4 2.T9 Text Input recognizes that the most commonly used word matching that numeric sequence is "maria."If the word which you are typing shares the same sequence of keys as another word then a different word to the one you want may be displayed, you can still select the correct word. Press 0 to scroll through all the words and when you see the correct one, press # to confirm your choice and insert a space.If the word you want is not displayed you can add the word to the T9 dictionary. Press and hold * to move to multitap mode and enter the word again. Now press and hold * again to go back to T9 mode. The word is now stored in the T9 dictionary and you can easily enter it using T9 the next time you need to.XTo enter text using T9 mode1. Press and hold the Asterisk * key until the T9 indicator appears on the title bar.2. Enter the numerical sequence that represents the word you want to write. Remember to ignore what you see on screen until you’ve finished typing.3. When you’ve finished pressing the keys, your word should be on the screen. Press Hash # to accept the word and enter a space after it or press 0 to scroll through other matching words.4. If you don’t see the word you need, erase the word, and enter it using multitap mode.XTo enter punctuation in T9 mode•Press 1, then press 0 repeatedly to cycle through common punctuation.zNote: Do a long press on the Hash key # to display a list of all the available symbols: Entering numbers in Numeric modeDo a long press on * to switch to Numeric mode and then just press the number(s) you want to enter on the keypad. If a field only permits a numerical entry, the input mode automatically defaults to Numeric mode.Miscellaneous input tasksXTo enter a space•In Multitap or T9 mode, press the Hash # key on the keypad.XTo start a new line•Press Action A.'-!"$%&( ) , . /:;?@#*[\]^_`~¡ ´¿+<=> « » £ _z100.book Page 16 Wednesday, September 18, 2002 4:03 PM](https://usermanual.wiki/Sendo/SND100.Part-1/User-Guide-300167-Page-28.png)
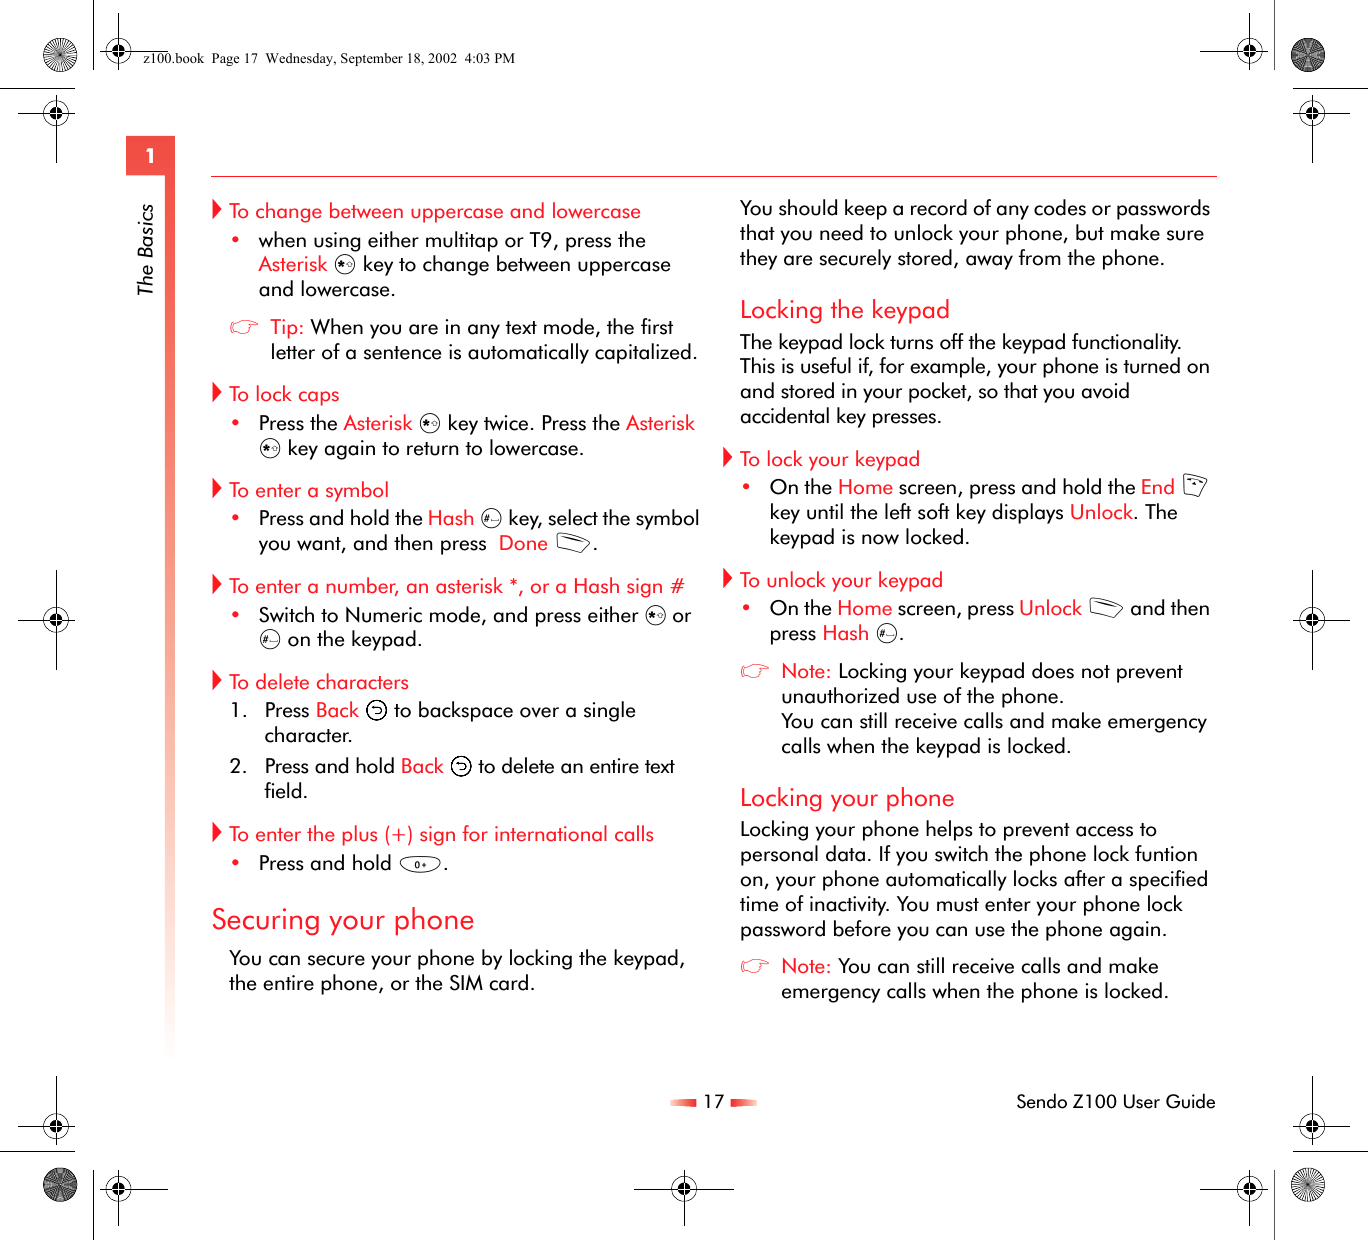
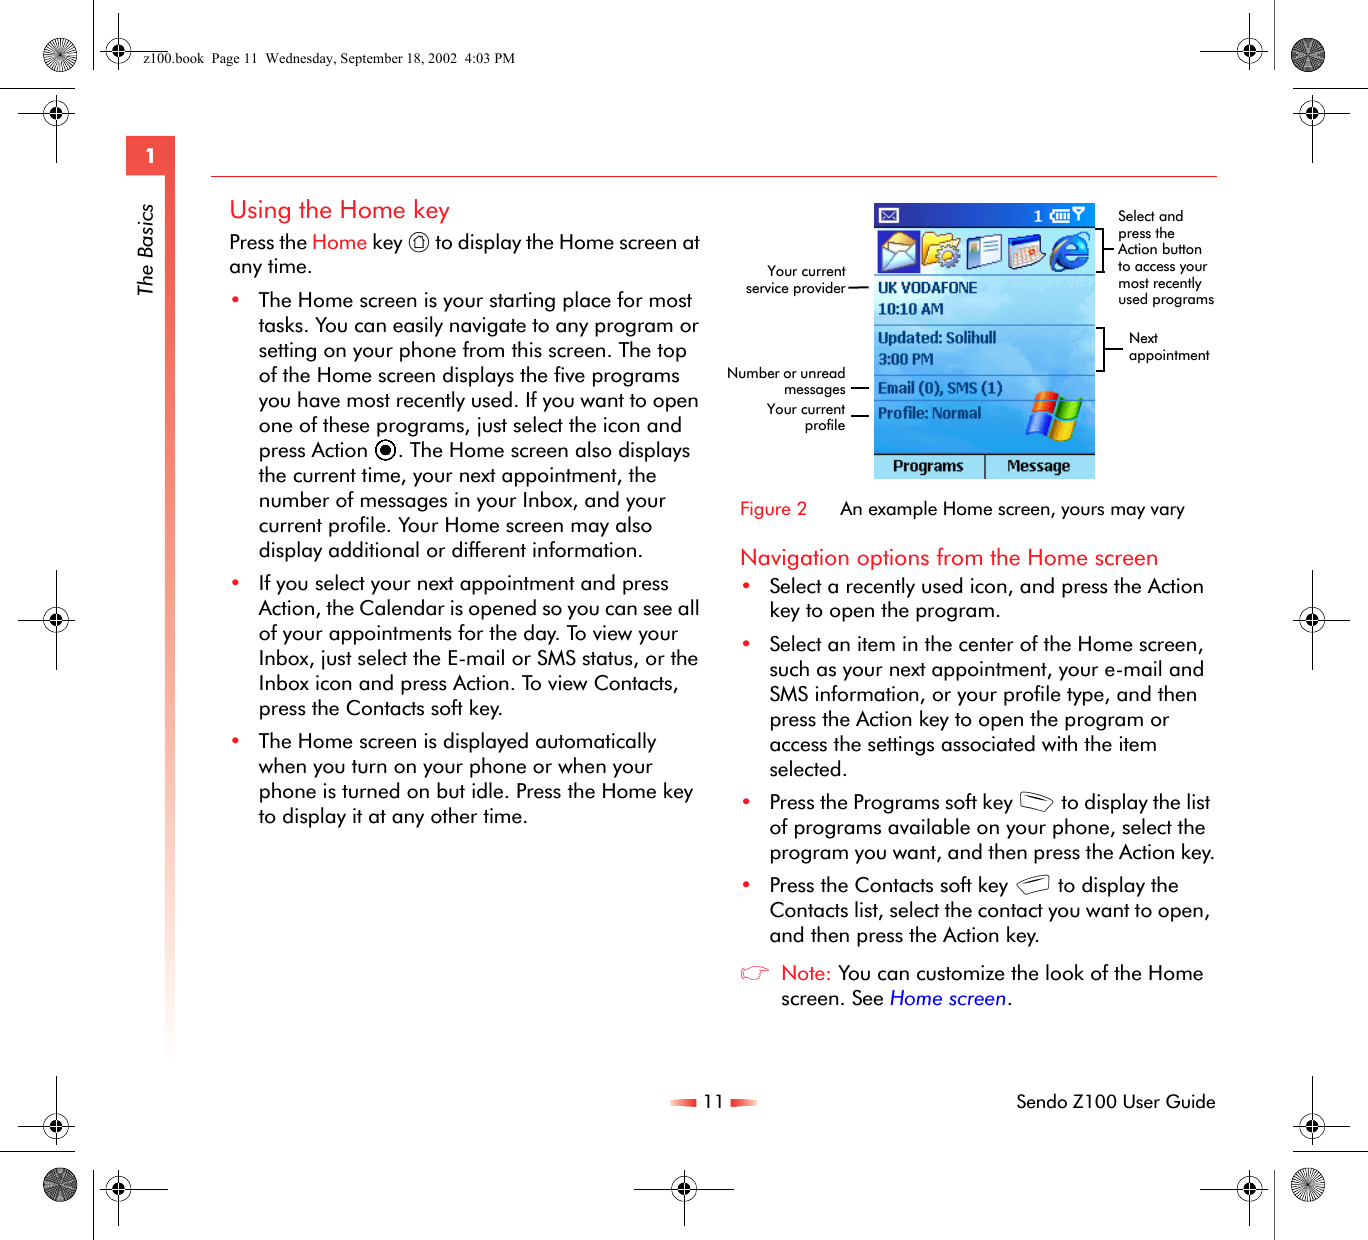
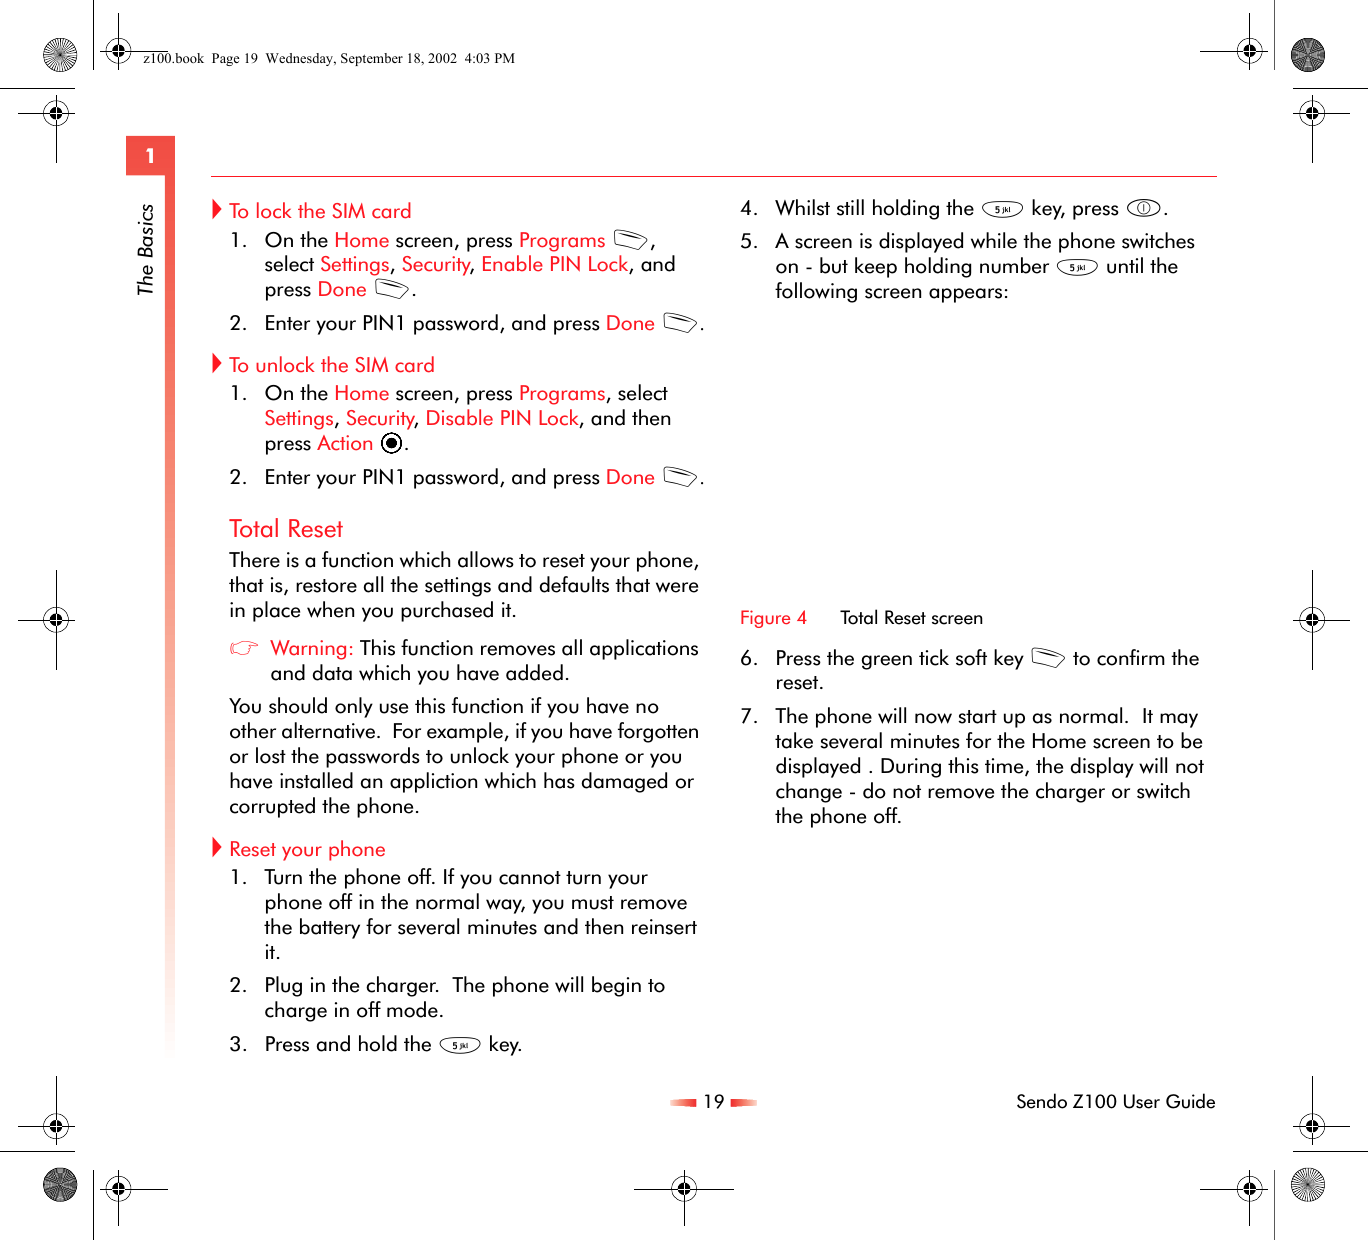
![18 Sendo Z100 User Guide1The BasicszImportant warning: If you forget your passwords, you may not be able to access your phone again without potential data or application loss. This only applies to applications you have added to the phone yourself and not to core applications, for example, Calendar. For instructions on how to reset your phone, see Total ResetX To enable the phone lock 1. Press Programs d, select Settings and then press Action A. 2. Select Security and then select Enable Phone Lock. Press Done d.XTo set up phone lock defaults1. Do a short press on the Power key p to display the Quick List, select Device lock, and press OK d or Action A.2. Under Lock phone after, use the [ and ] keys to select the amount of time your phone is inactive before the phone automatically locks. Choose from 1, 2, 5, 10, 30 or 60 minutes.3. Under Password, enter the password you want to use to access your phone when it is locked.4. Under Confirm password, enter the password again, and press Done d or Action A.zNote: When you have set up the time delay and password, you can quickly lock your phone, at any time, by selecting Device Lock from the Quick List – you do not have to set up the delay and password every time you use the lock.XTo lock your phone1. Do a short press on the Power key p to display the Quick List, select Device lock, and press OK d or Action A.XTo unlock your phone•Press Unlock d, enter your password, and then press Unlock d again.XTo turn off phone lock1. On the Home screen, press Programs d, select Settings and press Action A.2. Select Security, Disable Phone Lock, and press Action A. Enter your password and press Done d.Locking the Subscriber Identity Module (SIM) cardLocking your SIM card should prevent using the phone to make a call, but you can still turn it on and make emergency calls. When you turn your phone on, you may be prompted for your PIN1 password, which you must enter correctly before you can use your phone.If you forget your PIN1 password, you must enter a PUK (Personal Unlock Key). This may be listed in the information that you received with your SIM card or it may only be available from your service provider.zNote: Sendo cannot provide your PUK information.z100.book Page 18 Wednesday, September 18, 2002 4:03 PM](https://usermanual.wiki/Sendo/SND100.Part-1/User-Guide-300167-Page-30.png)
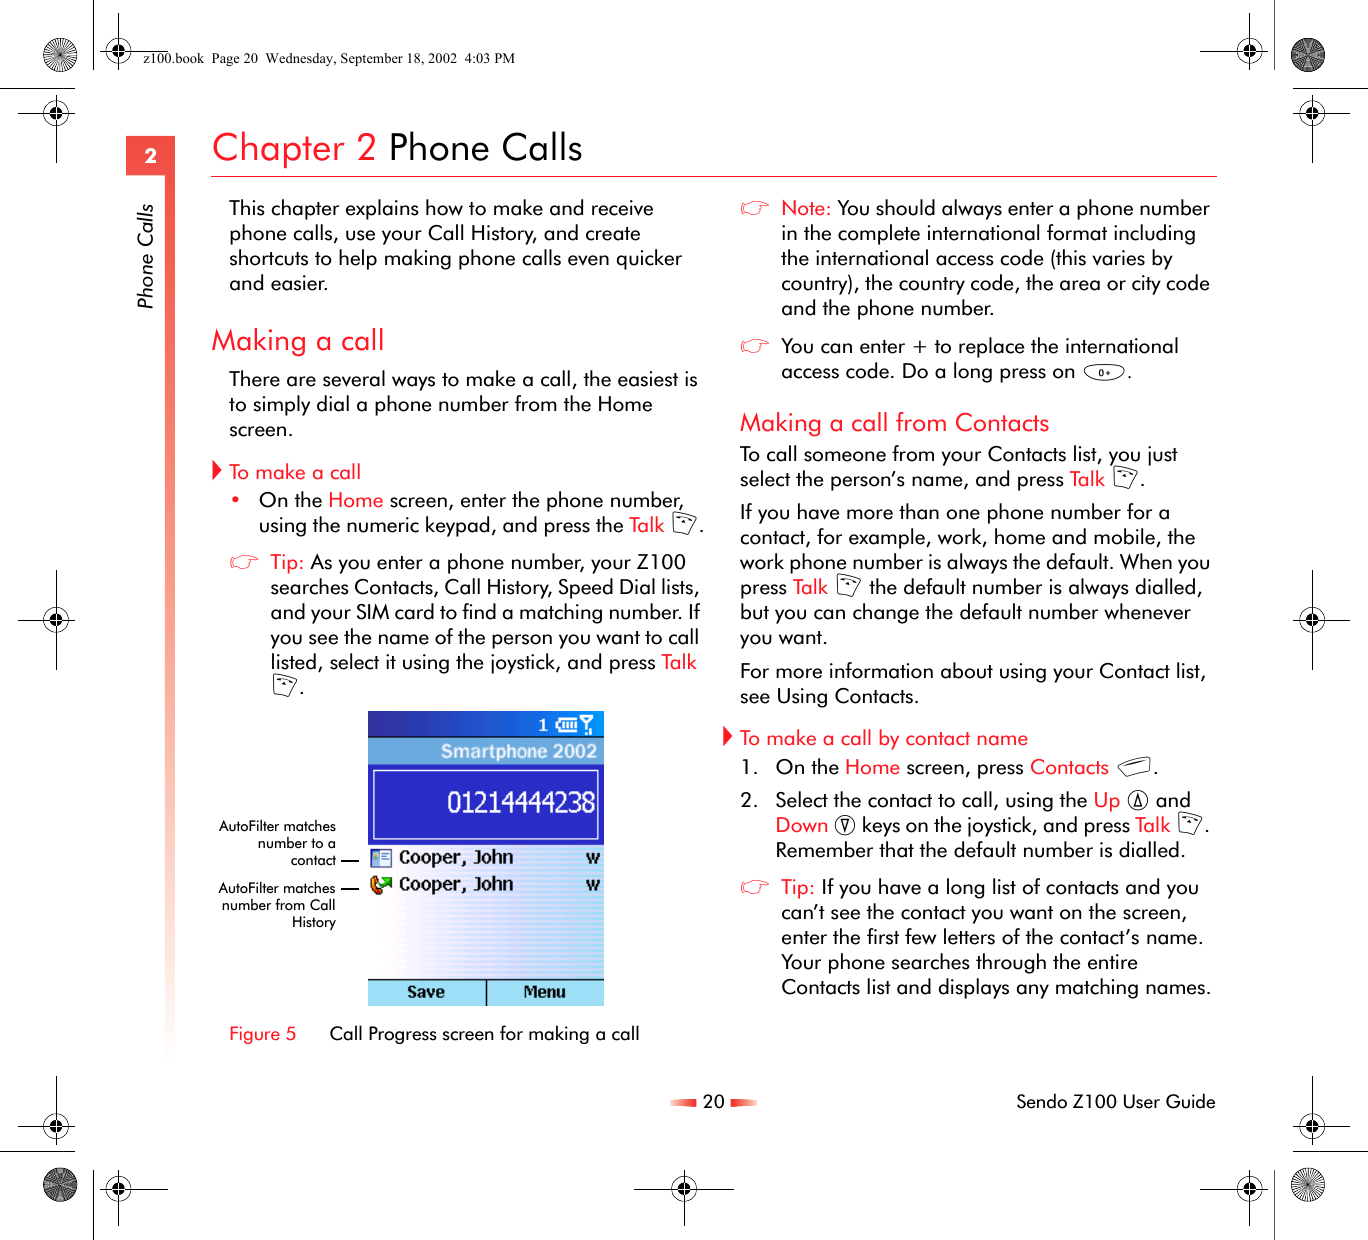
![22 Sendo Z100 User Guide2Phone CallsXTo m ake an emergency call•If the phone is not on, switch it on. Dial the emergency number appropriate to your location, and press Talk f.zNote: Official emergency numbers vary by location (for example 999 in the UK, 911 in the US, or 112 in many other countries). When travelling you should determine the relevant emergency number/s.This phone, like any other wireless phone, operates using radio signals, wireless and landline networks as well as user-programmed functions that cannot guarantee connection in all conditions. Do not rely solely upon your wireless phone for emergency communications, for example, in medical emergencies.Remember that to make or receive calls the phone must be switched on and in a service area with adequate signal strength. Emergency calls may not be possible on all wireless phone networks or when certain network services and/or phone features are in use. Check with local service providers.Having problems making a call?Check to make sure that your phone contains a valid SIM card and that the phone is turned on, unlocked, and in the service area of your service provider’s network.ShortcutsYou can create speed dials and voice tags as shortcuts, to quickly call your frequently used phone numbers.Speed dialsYou can create speed dials to dial frequently used phone numbers, by simply pressing and holding one or two keys. You can set up speed dial entries from 2-99. Speed dial 1 1 is reserved for voice mail access and cannot be changed.zNote: You can only create speed dials for phone numbers which are stored in Contacts.XTo create a speed dial for a phone number1. On the Home screen, press Contacts g.2. Select the contact and press Action A. Use the Up : and Down ; keys to select the phone number to set up a speed dial for.3. Press Menu g, select Add Speed Dial, and press Action A.4. Move Down ; to the Keypad assignment field and enter the speed dial number to associate with the phone number. Press Done d. You can also use the [ and ] keys to scroll to an available number. Press Action A.zTip: You can also create speed dials for Web addresses and e-mail addresses that are stored in Contacts.z100.book Page 22 Wednesday, September 18, 2002 4:03 PM](https://usermanual.wiki/Sendo/SND100.Part-1/User-Guide-300167-Page-34.png)
![25 Sendo Z100 User Guide2Phone CallsAdvanced dialing optionsThe following information covers advanced dialling options that are useful for phone numbers requiring special dialling instructions.For example, International calls require a country code to be included in the phone number. The country code is seperated from the rest of the number sequence by a plus sign (+).XTo insert an international country code•Press and hold 0 until the plus sign (+) appears.zNote: You can insert a plus sign directly into a contacts number or dial it directly from the keyboard.XTo insert a three second pause in a dialling sequenceSome international calls require a three second pause in the dialling sequence for the call to be processed successfully.1. On the Home screen, press Contacts g.2. Select the contact, press Action A and then select the phone number to modify.3. Press Edit d and use the joystick to move the cursor to the point in the phone number where the pause needs to be inserted.4. Press Menu g, select Insert Pause and then press Action A. The letter p appears in the number; this shows where the three second pause will appear in the dialling sequence.5. Press Done d.XTo insert a manual pause in a dialing sequenceSome phone numbers require a pause longer than three seconds in the dialing sequence. You can insert a pause so that the dialing sequence is stopped until you press Talk f.1. On the Home screen, press Contacts g.2. Using the : and ; keys, select the contact, press Action A, and then use the : and ; keys again to select the phone number to modify.3. Press Edit d and move Left [or Right ] to move the cursor to the point in the phone number where the dialing sequence must pause before proceeding.4. Press Menu g, select Insert Wait, and press Action A. The letter w appears in the number, this shows where the pause occurs in the dialing sequence.5. Press Done d.zNote: When you make a call using Insert Wait, the first numbers are dialled and you must press Talk f to continue the dialing sequence.z100.book Page 25 Wednesday, September 18, 2002 4:03 PM](https://usermanual.wiki/Sendo/SND100.Part-1/User-Guide-300167-Page-37.png)

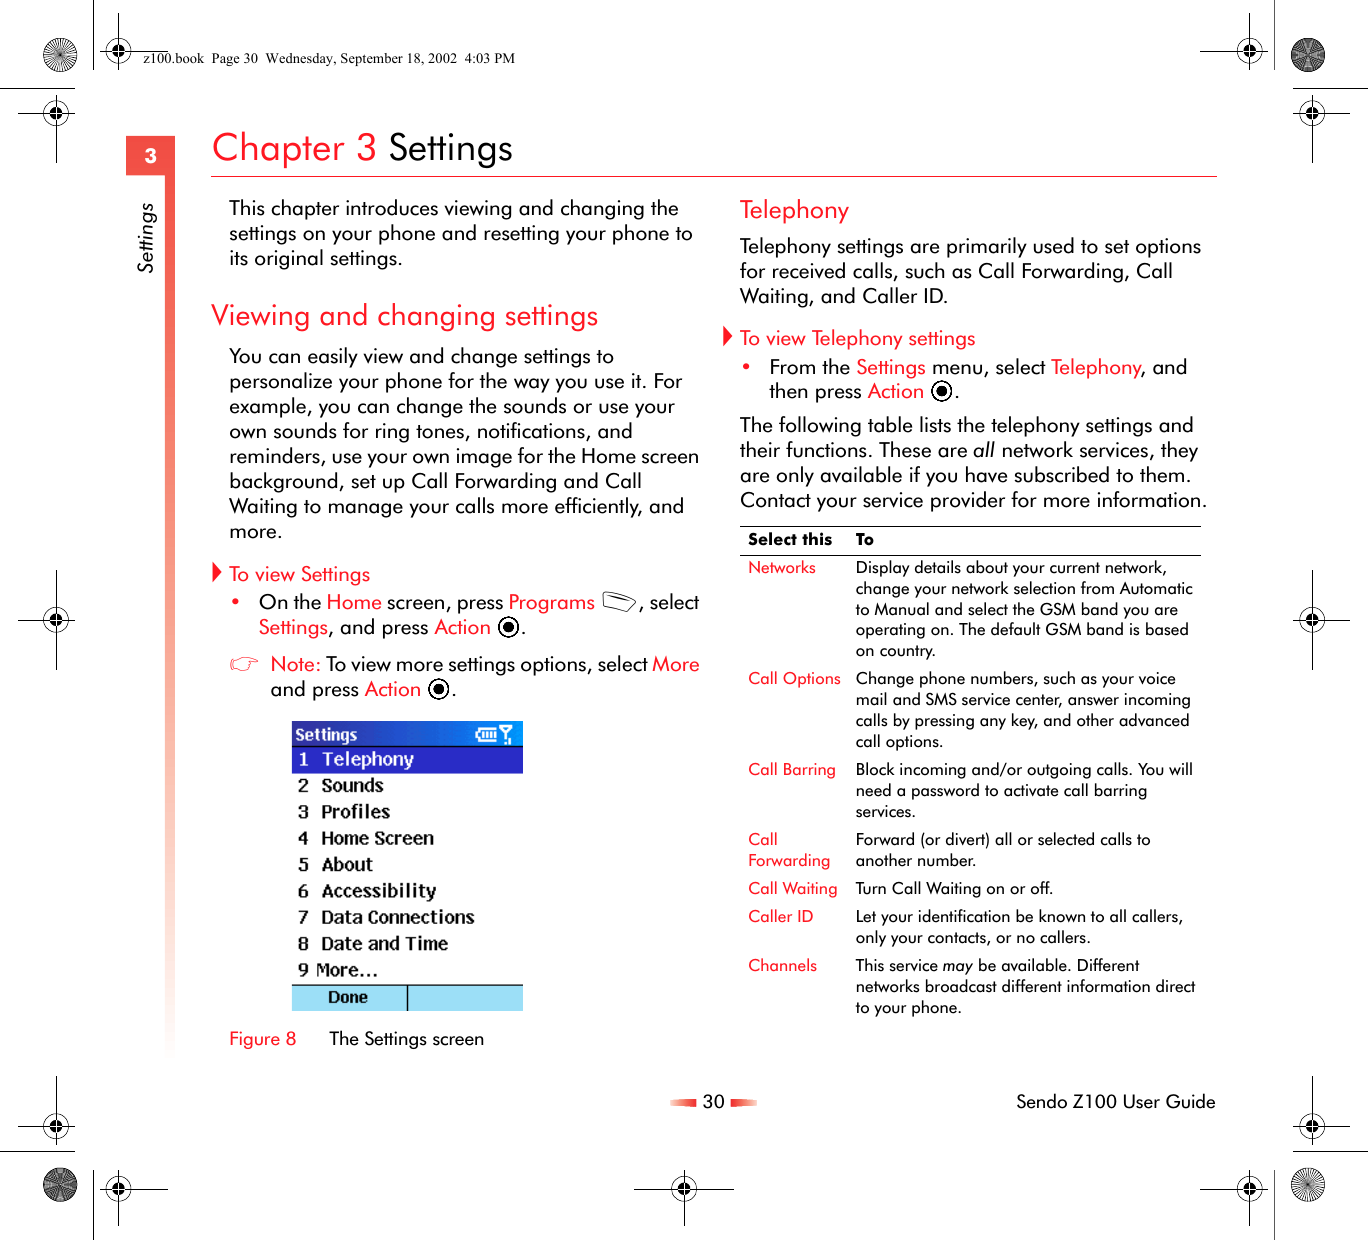
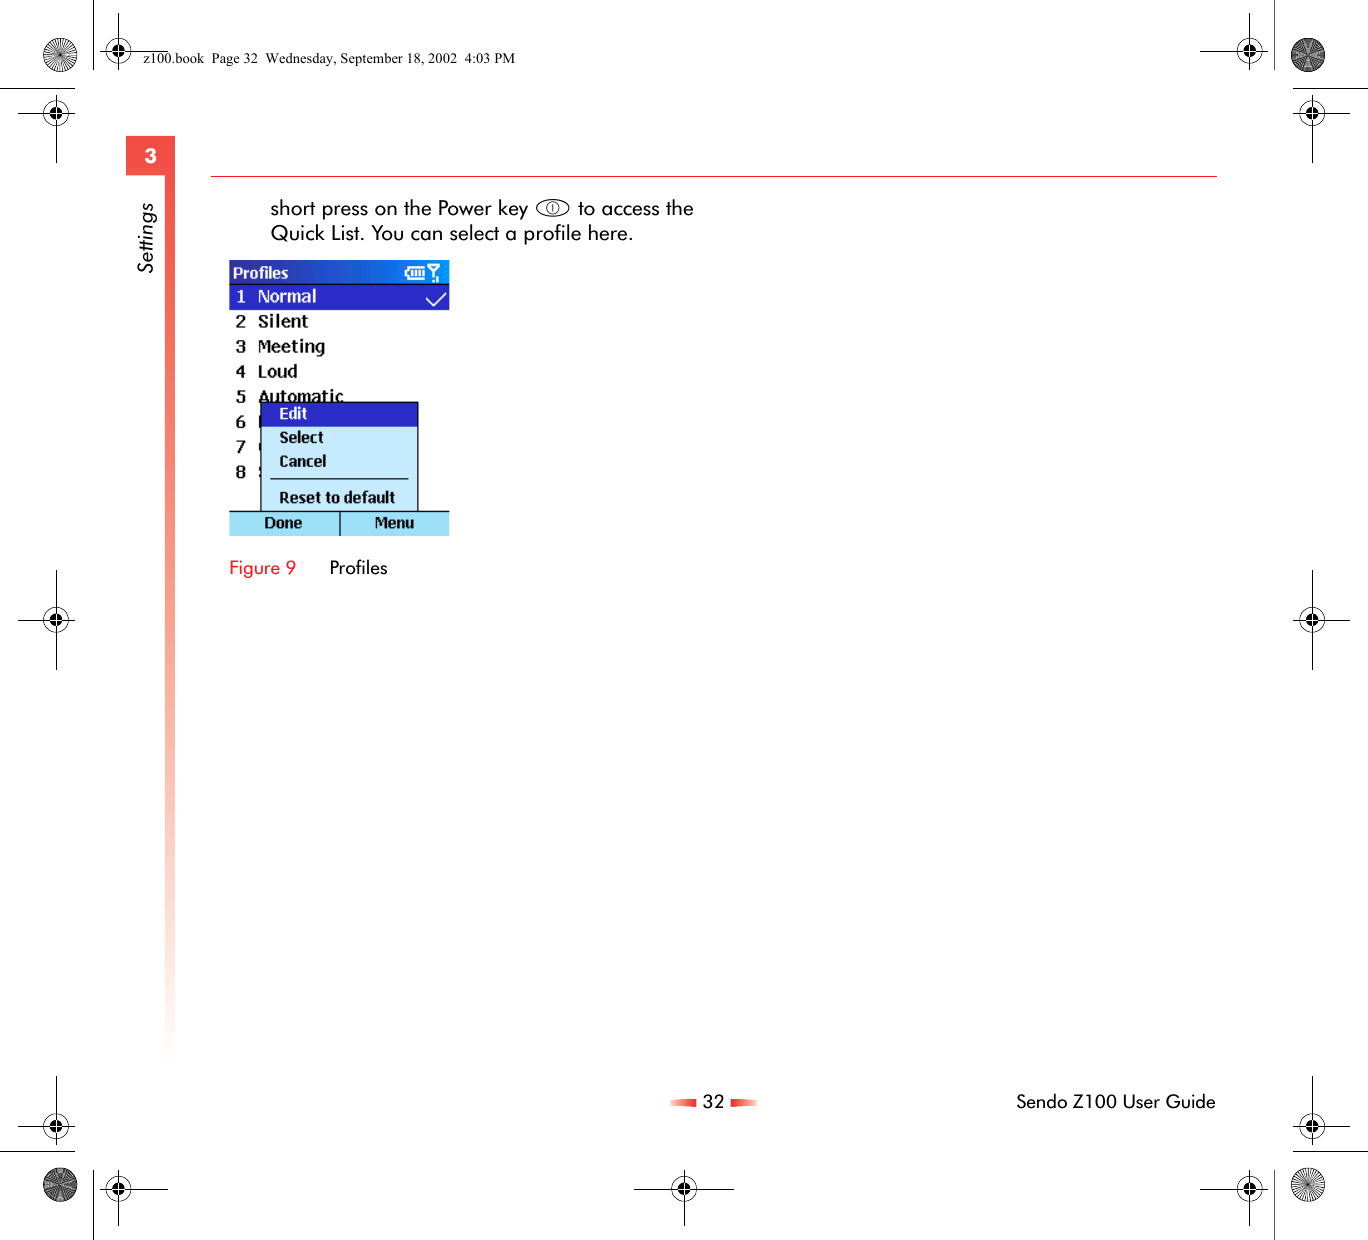
![31 Sendo Z100 User Guide3SettingsSoundsUse Sounds settings to customize all the sounds on your phone. You can select your own sound to ring for incoming calls, keypad sounds, reminders, new e-mails, new SMS, new voice messages, new instant messages, new channel messages, the alarm clock, SIM toolkit messages, exclamations, questions and warnings.XTo display Sounds settings•From the Settings menu, select Sounds, and press Action A.XTo use your own sound1. Copy the file on your desktop computer.2. In ActiveSync™ on your desktop, click Explore, double-click My Smartphone, double-click IPSM, double-click Application Data, double-click Sounds, and then paste the sound file into the Sounds folder.zNote: If a Sounds folder does not exist in this directory, you must create one before you can go any further.3. From the Settings menu, select Sounds, and press Action A.4. Select the item to customize, move Left [ or Right ] to select your sound, and then select Done d.zTip: You can also select the sound to use by selecting the item you want to customize, and pressing Action A. This displays the complete list of sounds to choose from.ProfilesProfiles settings are used to configure how your phone notifies you of all events such as incoming calls, an approaching appointments, or new messages. You can use Profiles to change quickly how you receive all notifications based on your situation. For example, you may want the phone to ring louder if a client is calling, or you may not want the phone to ring at all if you are in a meeting, but still want to hear calendar reminders. The default profile is Normal. The name of the current profile is displayed on the Home screen (You can rename this).The Z100 is supplied with a set of default profiles – you can amend these so they are most suitable for how you use your phone.XTo view Profiles settings•On the Home screen, press Programs d, select Settings, Profiles, then press Action A.zTip: You can access Profiles directly from the Home screen. Either select the current profile, which is displayed at the bottom of the screen, using the joystick and press Action, or do a Fixed Dialing Limit the area the phone can be used to call to one or more specific phone numbers and/or area codes.Select this Toz100.book Page 31 Wednesday, September 18, 2002 4:03 PM](https://usermanual.wiki/Sendo/SND100.Part-1/User-Guide-300167-Page-43.png)

![34 Sendo Z100 User Guide3Settingstype, Notification volume and System sound volume.Home screenUse the Home screen settings to change Home screen layout, Colour scheme, Background image, and Return to home screen after time, that is, the time delay before the Home screen appears when your phone is idle.XTo view Home screen settings•On the Settings menu, select Home Screen and press Action A.XTo customize the Home screen with your own imagezNote: Make sure that your phone is connected to your desktop computer via USB before you open ActiveSync™ to paste the image file.1. Copy the image file from it’s location on your desktop computer. The file format must be .gif, .jpg or .gif.2. Resize the picture to 176 (h) x220 (w) pixels and save the file.3. Open ActiveSync™ on your desktop, click Explore, navigate to Mobile Device, double click My Smartphone, double-click IPSM, double-click Application Data, double click Home and then paste the image file into the Home folder.4. On your Z100, press Programs d, select Settings, Home Screen and press Action A.5. Move Up : and Down ; to select the Background image field. Now use Left [or Right ] to select your image.6. Press Done d.zTip: You can also select the image by selecting the Background image field and pressing Action. This displays the complete list of images to choose from.SecurityUse the Security settings to enable the phone lock or SIM lock and to set the phone lock password.XTo view Security Settings•On the Settings menu, select Security, and then press Action A.XTo enable the phone lock1. On the security screen, select Enable phone lock and press Action A.2. In the Lock phone after field, use the joystick to move left [ and right ] to select the length of time that the phone must be inactive before it locks automatically.zTip: You can also set a password for the phone lock, so that when the phone locks, you must know the password to unlock it. Enter the Password here and enter it again in the Confirm password field for security.z100.book Page 34 Wednesday, September 18, 2002 4:03 PM](https://usermanual.wiki/Sendo/SND100.Part-1/User-Guide-300167-Page-46.png)
![35 Sendo Z100 User Guide3SettingsXTo enable the SIM lock1. On the security screen, select Enable PIN lock and press Action A.2. Enter your SIM1 password. Press Done d.Regional SettingsUse Regional Settings to set the phone’s Language, Locale, Short date style, Long date style, Time format, how Positive and Negative numbers are displayed on the phone and how Positive and Negative currency is displayed. The defaults on your phone are local settings, but you can change these.XTo view Regional Settings•On the Settings menu, select Regional Settings, and then press Action A.Power ManagementUse Power Management settings to check the Main battery level, and set power-saving settings – Backlight time out, Display brightness, Display Blanking after and Display Off.XTo view Power Management settings•On the Settings menu, select Power Management, and then press Action A.XTo set the display off1. On the Settings menu, select Power Management, and then press Action A.2. Move ; to the Display Off field and then use the [ and ] keys to select the length of time you want to pass before the power save screen is displayed.Data ConnectionsYou can visit www.sendo.com/support/config to autoconfigure your GPRS/WAP/e-mail and Internet connection settings. The configurator sends an SMS to your phone (or sends the information to your phone directly if it connected to your PC using ActiveSync) containing the settings you require to start using these services.SelectBacklight time outThe amount of time after the last key press that the backlight, which illuminates the screen, fades.Display brightnessThis is the level of brightness used on the display of your phone. You can change this.Display Blanking afterThe amount of time after the last key press that the phone goes into a power saving mode which fades the screen up and down every few seconds. This is not a problem with your display.Display Off The amount of time after the last key press that the phone goes into a power saving mode which fades the screen to a dark blank display. This is not a problem with your display. Press any key to return to the screen you were viewing previously.Selectz100.book Page 35 Wednesday, September 18, 2002 4:03 PM](https://usermanual.wiki/Sendo/SND100.Part-1/User-Guide-300167-Page-47.png)
![36 Sendo Z100 User Guide3SettingsAuto connectionsUse Data Connections settings to set up Dial-up, Virtual Private Network (VPN), Proxy, and General Packet Radio Service (GPRS) connections so you can connect to the Internet or your corporate network. With a data connection, you can browse the Web, download e-mail, chat using MSN® Messenger, or synchronize wirelessly with the server. Check with your service provider to see if a data connection has already been set up for you, and if over-the-air configuration is supported.Add information about setting up:•Internet connection•Work connection•WAP connection•Secure WAP connectionXTo view Data Connections Settings•On the Settings menu, select Data Connections, and then press Action A.Dial-up connectionYou need to set up a Dial-up connection if you want to connect to the Internet via an ISP (Internet Service Provider) or to your corporate network.XTo create a dial-up connection to the Internet1. On the Settings menu, select Data Connections, and then press Action A.2. Select Menu g, Edit Connections, and then press Action A.3. Select Dial-up Connections, and press Action A.4. Press Menu g, Add, and then press Action A.5. Under Description, enter a name for the connection.6. Under Connects to, move Left [or Right ] to select The Internet.7. Enter the Country code, Dialling code and Phone number for this dial up connection.zNote: Insert a + symbol with a long press on 0 (this replaces the international access code). 8. Enter the User name and Password for this dial up account.9. Enter the Domain name for this dial up account (if required) and press Done d.zNote: Speak to your (ISP) Internet Service Provider for all the required settings.XTo create a dial-up connection to your corporate network1. On the Settings menu, select Data Connections, and press Action A.2. Press Menu g, Edit Connections and press Action A.3. Select Dial-up Connections and press Action A.4. Press Menu g, select Add, and then press Action A.5. Under Description, enter a name for the connection.z100.book Page 36 Wednesday, September 18, 2002 4:03 PM](https://usermanual.wiki/Sendo/SND100.Part-1/User-Guide-300167-Page-48.png)
![37 Sendo Z100 User Guide3Settings6. Under Connects to, move Left [ or Right ] to select My Corporate Network.7. Enter the Country code, Dialling code and Phone number for this corporate connection.zNote: Insert a + symbol with a long press on 0 (this replaces the international access code). 8. Enter the User name and Password for this corporate account.9. Enter the Domain name for this corporate account (if required) and press Done d.zNote: Speak to your corporate IT administrator for all the required settings.VPN connectionA VPN (Virtual Private Network) connection is used to access your corporate network using an existing Internet connection. Speak to your corporate IT administrator to obtain the required information to create a VPN connection. XTo create a VPN connection to your corporate network1. On the Settings menu, select Data Connections, and press Action A.2. Press Menu g, Edit Connections and press Action.3. Select VPN Connections and press Action A.4. Press Menu g, select Add, and then press Action A.5. Under Description, enter a name for the connection.6. Under Server, enter the name of the server to connect to (this information must be supplied by your corporate IT administrator). Press Action A.7. Under Connects from, move Left [ or Right ] to select the field that you require.8. Under Connects to, move Left [ or Right ] to select the field that you require.9. Under User name enter the username that you have been allocated in your corporate network (this information must be supplied by your corporate IT administrator). Press Action A.10. Under Password enter the password that you have been allocated in your corporate network (this information must be supplied by your corporate IT administrator). Press Action A.11. Under Domain enter the domain that you are trying to connect to (this information must be supplied by your corporate IT administrator). Press Action A.12. Press Done d to complete connection.Proxy connectionA proxy connection is used to access the Internet using an existing connection to your corporate network.z100.book Page 37 Wednesday, September 18, 2002 4:03 PM](https://usermanual.wiki/Sendo/SND100.Part-1/User-Guide-300167-Page-49.png)
![38 Sendo Z100 User Guide3SettingsXTo create a proxy connection to your corporate network1. On the Settings menu, select Data Connections and press Action A.2. Press Menu g, select Edit Connections and press Action A.3. Select Proxy Connections and press Action A.4. Press Menu g, select Add and press Action A.5. Under Description enter a name for the connection.6. Under Connects from, use the [and ] keys to select My Corporate Network.7. Under Connects to, use the [and ] keys to select The Internet.8. Under Proxy (name:port) enter the IP address or the proxy name and port number to connect to. Contact your corporate IT administrator for this information.9. Enter the Type - that is the protocol to use when using the internet.10. Enter a User name and Password.11. Press Done d.GPRS connectionIf there is GPRS (General Packet Radio Service) coverage in your area, you can set up a GPRS connection to access the corporate network or the Internet. GPRS is usually faster than a dial up connection.Date and timeUse Date and Time settings to set the Time zone, Date, Time Alarm and Alarm time. When you set the Alarm to on, it will alert you at the appointed time every day until you set it to off. The Time zone is based on country.XTo view Date and Time settings•On the Settings menu, select Date and Time and press Action A.XTo set the Alarm1. On the Settings menu, select Date and Time and press Action A.2. Move Down ; to the Alarm field. Use the [ and ] keys to switch the field to On.3. Move Down ; to the Alarm time field and enter the time you want the Alarm to sound. You must also enter whether this is am or pm. 4. Press Done d.zTip: To set the sound for the alarm, use the Sounds option from the Settings menu and change the Alarm Clock field.AccessibilityUse the Accessibility settings to configure your system font size, multitap time-out (the amount of time between key presses when entering text), confirmation time-out, and in-call alert volume.z100.book Page 38 Wednesday, September 18, 2002 4:03 PM](https://usermanual.wiki/Sendo/SND100.Part-1/User-Guide-300167-Page-50.png)