Contents
- 1. Part 1
- 2. Part 2
- 3. US SAR Statement pages
Part 1

i Sendo Z100 User Guide
Copyright Information
Part No.8E30-16010-90000, Edition 1.
Copyright © Sendo 2002. All rights reserved.
SENDO is a trademark of Sendo International and/or
its affiliates. Reproduction, transfer, distribution or
storage of part or all of the contents in this document
in any form without the prior written permission of
Sendo is prohibited.
T9® Text Input is a registered trademark of Tegic
Communications. All rights reserved. T9 Text input is
licensed under one or more of the following U.S.
Patents: 5,818,437, 5,953,541, 5,945,928,
6,011,554 and additional patents are pending
worldwide. Complying with all applicable copyright
laws is the responsibility of the user.
© 2002 Microsoft Corporation. All rights reserved.
ActiveSync, Hotmail, Microsoft, MS-DOS, MSN,
Outlook, Passport, Windows, Windows NT, Windows
CE, Windows Media are either registered
trademarks or trademarks of Microsoft Corporation
in the United States and/or other countries.
Java and all Java based trademarks and logos are
trademarks are trademarks or registered trademarks
of Sun Microsystems, Inc. in the U.S and other
countries. The names of actual companies and
products mentioned herein may be the trademarks
of their respective owners.
Portions of this User Manual have been authored in
whole of in part by the following entities, and use of
third party text is subject to the following:
© 2002 Emblaze Systems Ltd. All rights reserved.
The Emblaze name and logo is a registered
trademark of Emblaze Systems Ltd. Emblaze
Messaging, Emblaze Video Email Message, Emblaze
Player, Emblaze Personal Video Recorder, Emblaze
Messaging Service, Emblaze Message Player,
Emblaze Mobile Multimedia Platform and Emblaze
Remote Server Management, are product and brand
names of Emblaze Systems Ltd.
Microsoft, Windows, Microsoft Internet Explorer,
Outlook and ActiveX names and logos are
registered trademarks of Microsoft Corporation Inc.
Java, and the Solaris name and logos are
trademarks, and Sun UltraSPARC, Java Virtual
Machine and Sun Solaris 7 are product names, of
Sun Microsystems, Inc. The Pentium name and logo,
MMX and the MMX logo are registered trademarks
of Intel Corporation Inc. Oracle is a registered
trademark of Oracle Corporation Inc.
Important: Please read the Emblaze Systems Ltd. End
User Software License Agreement before using the
accompanying software. Using the software
indicates that you accept the terms of the
Agreement.
Copyright © 2000-2002 PacketVideo Corporation.
All rights reserved. This manual may not be copied,
photocopied, reproduced, translated, or converted
to any electronic or machine-readable form in whole
or in part without prior written approval of
PacketVideo Corporation.
z100.book Page i Wednesday, September 18, 2002 4:03 PM

ii Sendo Z100 User Guide
PacketVideo, the PacketVideo logo pv3, pv3
Mobilemedia System, pvAuthor, pvPlayer, and
pvServer are trademarks of PacketVideo
Corporation. Other product names, logos, designs,
titles, words or phrases mentioned within this user
guide may be trademarks, service marks or trade
names of PacketVideo Corporation or other third
parties and may be registered in the U.S. or other
jurisdictions.
PACKETVIDEO CORPORATION MAKES NO
WARRANTIES, EITHER EXPRESS OR IMPLIED,
REGARDING THE ENCLOSED COMPUTER
SOFTWARE, ITS MERCHANTABILITY OR FITNESS
FOR ANY PARTICULAR PURPOSE. THE EXCLUSION
OF IMPLIED WARRANTIES IS NOT PERMITTED BY
SOME STATES. THE ABOVE EXCLUSION MAY NOT
APPLY TO YOU. THIS WARRANTY PROVIDES YOU
WITH SPECIFIC LEGAL RIGHTS. THERE MAY BE
OTHER RIGHTS THAT YOU MAY HAVE WHICH VARY
FROM STATE TO STATE.
Disclaimer
The information contained in this user guide is
written for the Sendo Z100 phone. Sendo reserves
the right to make changes and improvements to the
products and any of the features of the products
described in this document without prior notice THE
CONTENTS OF THIS DOCUMENT ARE PROVIDED
"AS IS". EXCEPT AS REQUIRED BY APPLICABLE LAW,
NO WARRANTIES OF ANY KIND, EITHER EXPRESS
OR IMPLIED, INCLUDING, BUT NOT LIMITED TO,
THE IMPLIED WARRANTIES OF MERCHANTABILITY
AND FITNESS FOR A PARTICULAR PURPOSE, ARE
MADE IN RELATION TO THE ACCURACY,
RELIABILITY OR CONTENTS OF THIS DOCUMENT.
SENDO RESERVES THE RIGHT TO REVISE THIS
DOCUMENT OR WITHDRAW IT AT ANY TIME
WITHOUT PRIOR NOTICE. UNDER NO
CIRCUMSTANCES SHALL SENDO BE RESPONSIBLE
FOR ANY LOSS OF DATA OR INCOME OR ANY
SPECIAL, INCIDENTAL, CONSEQUENTIAL OR
INDIRECT DAMAGES HOWSOEVER CAUSED.
Using This Guide
The wireless phone described in this guide is
approved for use on the GSM and GPRS networks
operating on the 900, 1800 (DCS/PCN) and 1900
(PCS) bands. It is approved for use in the country
where it was originally sold and may be approved
for use in other countries.
A number of features included in this guide are
called Network Services. They are special services
provided by wireless service providers. Before you
can take advantage of any of these Network
Services, you must subscribe to these service(s) from
your home service provider and obtain instructions
for their use. Some of these network services may
not be available when roaming on a network other
than your home network.
z100.book Page ii Wednesday, September 18, 2002 4:03 PM

i Sendo Z100 User Guide
Table of Contents
Table of Contents
Table of Contents ............................................................................................................ i
For your safety....................................................................................................................................... viii
Chapter 1 The Basics.......................................................................................................................1
Getting Started ..................................................................................................................................... 1
Inserting the SIM card....................................................................................................................... 1
Fitting the battery ............................................................................................................................. 1
Charging the battery........................................................................................................................ 1
Getting to know your phone..................................................................................................................... 3
Earpiece .......................................................................................................................................... 4
Power key........................................................................................................................................ 4
Display............................................................................................................................................ 4
Home screen ......................................................................................................................................... 4
Volume ........................................................................................................................................... 4
Record key....................................................................................................................................... 4
Using soft keys................................................................................................................................. 4
Talk key ................................................................................................................................................ 5
End key ........................................................................................................................................... 5
Home key........................................................................................................................................ 5
Back key ............................................................................................................................................... 5
Joystick............................................................................................................................................ 5
Action (Push in on joystick)................................................................................................................ 5
Antenna ................................................................................................................................................ 6
External Antenna port....................................................................................................................... 6
Microphone..................................................................................................................................... 6
Headset Connector .......................................................................................................................... 6
IrDA port......................................................................................................................................... 6
Accessory connector............................................................................................................................... 6
Charger connector, or in car charger................................................................................................ 6
Numeric Keypad .............................................................................................................................. 6
Asterisk key (*) ................................................................................................................................. 6
Hash key (#).................................................................................................................................... 6
Programs ................................................................................................................................................ 7
Status indicators ...................................................................................................................................... 9
z100.book Page i Wednesday, September 18, 2002 4:03 PM

ii Sendo Z100 User Guide
Table of Contents
Where to find more information ............................................................................................................. 10
Navigation ............................................................................................................................................ 10
Using the Joystick........................................................................................................................... 10
Using the Action key....................................................................................................................... 10
Using the Home key....................................................................................................................... 11
Using the Back key......................................................................................................................... 12
Using menus ................................................................................................................................. 12
Using the Programs list................................................................................................................... 12
Using numbers as shortcuts ............................................................................................................ 13
Using the Quick List ....................................................................................................................... 13
Entering text and numbers on your phone ............................................................................................ 14
Entering text in Multitap mode ........................................................................................................ 14
Entering text in T9 mode ................................................................................................................ 15
Entering numbers in Numeric mode................................................................................................16
Miscellaneous input tasks ............................................................................................................... 16
Securing your phone........................................................................................................................... 17
Locking the keypad........................................................................................................................ 17
Locking your phone ....................................................................................................................... 17
Locking the Subscriber Identity Module (SIM) card............................................................................ 18
Total Reset..................................................................................................................................... 19
Chapter 2 Phone Calls .................................................................................................................. 20
Making a call ..................................................................................................................................... 20
Making a call from Contacts........................................................................................................... 20
Making a call using a recently dialed number.................................................................................. 21
Making a call from the Call History list............................................................................................ 21
Making a call from a hyperlink ....................................................................................................... 21
Making emergency calls................................................................................................................. 21
Having problems making a call? .................................................................................................... 22
Shortcuts ............................................................................................................................................ 22
Speed dials.................................................................................................................................... 22
Voice tags...................................................................................................................................... 23
Viewing and deleting shortcuts........................................................................................................ 24
Advanced dialing options....................................................................................................................... 25
z100.book Page ii Wednesday, September 18, 2002 4:03 PM

iii Sendo Z100 User Guide
Table of Contents
Receiving a call...................................................................................................................................... 26
Multiple Incoming Calls.................................................................................................................. 26
Call tasks ...................................................................................................................................... 27
In-call options..................................................................................................................................... 27
Reviewing your calls............................................................................................................................ 28
Call History ................................................................................................................................... 28
Call Timers.................................................................................................................................... 29
Chapter 3 Settings ........................................................................................................................30
Viewing and changing settings ............................................................................................................ 30
Telephony ..................................................................................................................................... 30
Sounds............................................................................................................................................... 31
Profiles............................................................................................................................................... 31
Preset profiles........................................................................................................................................ 33
Home screen ...................................................................................................................................... 34
Security .............................................................................................................................................. 34
Regional Settings ................................................................................................................................ 35
Power Management............................................................................................................................ 35
Data Connections............................................................................................................................... 35
Dial-up connection......................................................................................................................... 36
VPN connection ............................................................................................................................. 37
Proxy connection............................................................................................................................ 37
GPRS connection............................................................................................................................ 38
Date and time .................................................................................................................................... 38
Accessibility ................................................................................................................................... 38
Remove Programs.......................................................................................................................... 39
Owner Information ........................................................................................................................ 39
About............................................................................................................................................ 39
Chapter 4 Messaging Features ...................................................................................................... 40
SMS messages.................................................................................................................................... 40
Sending e-mail and SMS messages.................................................................................................41
Sending messages from Inbox ........................................................................................................ 41
Sending messages from a Contact card .......................................................................................... 42
z100.book Page iii Wednesday, September 18, 2002 4:03 PM

iv Sendo Z100 User Guide
Table of Contents
Inserting predefined text into messages ........................................................................................... 42
Inserting voice recordings into e-mails............................................................................................. 42
Receiving e-mail and SMS messages.................................................................................................... 43
Message notifications..................................................................................................................... 43
Opening messages ........................................................................................................................ 44
Receiving meeting requests............................................................................................................. 44
Receiving complete messages ......................................................................................................... 44
Receiving message attachments ...................................................................................................... 45
Managing your Inbox.......................................................................................................................... 45
Using Inbox menu options.............................................................................................................. 45
Customizing your Inbox.................................................................................................................. 46
Display.......................................................................................................................................... 46
Sending......................................................................................................................................... 47
Receiving....................................................................................................................................... 47
Pre-defined text.............................................................................................................................. 47
E-mail set up ................................................................................................................................. 47
Automatic Synchronization.............................................................................................................. 48
Import Messages from SIM ............................................................................................................. 49
Transport Options (IMAP only) ........................................................................................................ 49
Managing your message folders.......................................................................................................... 49
Communicating with MSN Messenger.................................................................................................. 50
Getting started with MSN Messenger............................................................................................... 50
......................................................................................................................................................... 52
Chapter 5 Contacts, Calendar, and Tasks ......................................................................................53
Using Contacts ................................................................................................................................... 53
New Contacts ................................................................................................................................ 53
The Contacts list............................................................................................................................. 54
Contact cards ................................................................................................................................ 55
Using contact card menu options.................................................................................................... 56
Using Calendar .................................................................................................................................. 57
Viewing your schedule.................................................................................................................... 58
Receiving reminders....................................................................................................................... 60
Importing Calendar information ..................................................................................................... 60
z100.book Page iv Wednesday, September 18, 2002 4:03 PM

v Sendo Z100 User Guide
Table of Contents
Using Tasks........................................................................................................................................ 61
The task list.................................................................................................................................... 61
Using the task list........................................................................................................................... 61
Sending information via Infrared..................................................................................................... 62
Chapter 6 Synchronizing Information............................................................................................. 64
Using Activesync ................................................................................................................................. 64
Microsoft® ActiveSync® 3.6 System Requirements ........................................................................... 65
Options for Windows XP, Windows 2000, Windows Millennium Edition, Windows NT Workstation 4.0, or
Windows 98 .................................................................................................................................. 65
Getting Started with ActiveSync® ......................................................................................................... 65
Creating a Partnership ................................................................................................................... 66
Setting up Server ActiveSync®.............................................................................................................. 66
Synchronizing Remotely.................................................................................................................. 68
Creating a server synchronization schedule ..................................................................................... 68
Synchronizing information................................................................................................................... 69
Synchronizing Inbox ....................................................................................................................... 69
Synchronizing Calendar ................................................................................................................. 69
Synchronizing Contacts .................................................................................................................. 69
Synchronizing Tasks ....................................................................................................................... 70
ActiveSync® Errors.............................................................................................................................. 70
Chapter 7 Internet, Entertainment and More..................................................................................72
Using Pocket Internet Explorer ............................................................................................................. 72
Navigating in Pocket Internet Explorer ............................................................................................. 72
Using the Favorites list.................................................................................................................... 73
Cached web pages ........................................................................................................................ 74
Pocket Internet Explorer options ...................................................................................................... 74
Media Player ...................................................................................................................................... 74
Playing files ................................................................................................................................... 75
Menu options when playing a file.................................................................................................... 76
Local Content screen menu options................................................................................................. 77
Using Media Player favorites........................................................................................................... 77
Licenses......................................................................................................................................... 77
z100.book Page v Wednesday, September 18, 2002 4:03 PM

vi Sendo Z100 User Guide
Table of Contents
Supported File Formats................................................................................................................... 78
Supported Audio and Video Codecs................................................................................................78
Modem Link ....................................................................................................................................... 78
Voice Notes........................................................................................................................................ 79
Voice Note menu ........................................................................................................................... 80
Solitaire.............................................................................................................................................. 80
Playing Solitaire ............................................................................................................................. 80
Calculator............................................................................................................................................. 81
Z-i Capture ........................................................................................................................................... 82
Getting Started .............................................................................................................................. 82
Using the Viewer............................................................................................................................ 82
Chapter 8 Further Z100 Applications.............................................................................................84
Packet Video....................................................................................................................................... 84
Playing Clips.................................................................................................................................. 84
Managing clips.............................................................................................................................. 85
Managing clips accessed from a web site ........................................................................................ 85
Emblaze Player................................................................................................................................... 85
Using Emblaze menu options .............................................................................................................. 86
Automatic features ......................................................................................................................... 87
IA Album............................................................................................................................................ 87
Viewing Modes .............................................................................................................................. 87
Thumbnail Mode ........................................................................................................................... 87
Thumbnail View menu options........................................................................................................ 88
Image View mode.......................................................................................................................... 89
Image View menu options ............................................................................................................. 90
Slide Show View Mode ........................................................................................................................ 90
Slide Show View menu options........................................................................................................ 90
Sendo Explorer ................................................................................................................................... 90
Soft Texter .......................................................................................................................................... 90
Setting up the Soft Texter ................................................................................................................ 91
Typing and Editing.............................................................................................................................. 91
Selecting Text................................................................................................................................. 92
Cut, Copy and Paste ...................................................................................................................... 93
z100.book Page vi Wednesday, September 18, 2002 4:03 PM

vii Sendo Z100 User Guide
Table of Contents
Special Characters......................................................................................................................... 93
Comfort Guidelines - Important Ergonomic Information........................................................................ 94
Chapter 9 Troubleshooting............................................................................................................ 95
Chapter 10 Safety ......................................................................................................................... 100
Important Safety Information ............................................................................................................. 100
Drive Safely ................................................................................................................................. 100
Operation ................................................................................................................................... 100
Children...................................................................................................................................... 101
Pacemakers................................................................................................................................. 101
Hearing Aids ............................................................................................................................... 101
Medical Equipment ...................................................................................................................... 101
Vehicles....................................................................................................................................... 101
Posted Areas................................................................................................................................ 102
Potentially Explosive Atmospheres ................................................................................................. 102
Blasting Areas.............................................................................................................................. 102
Vehicles....................................................................................................................................... 102
Emergency Calls .......................................................................................................................... 103
Servicing ..................................................................................................................................... 103
Back Up Data .............................................................................................................................. 103
Disposal ...................................................................................................................................... 103
Why the concern? ........................................................................................................................ 106
What kinds of phones are in question?.......................................................................................... 106
How much evidence is there that hand-held mobile phones might be harmful? ............................... 106
What is known about cases of human cancer that have been reported in users of hand-held mobile
phones? ...................................................................................................................................... 108
What is FDA’s role concerning the safety of mobile phones?........................................................... 109
In the absence of conclusive information about any possible risk, what can concerned individuals do? ...
110
Where can I find additional information? ...................................................................................... 110
Chapter 11 Warranty ....................................................................................................................113
Limited Warranty .............................................................................................................................. 113
z100.book Page vii Wednesday, September 18, 2002 4:03 PM

viii Sendo Z100 User Guide
Table of Contents
For your safety
You should observe and follow these guidelines for
the safe and efficient use of your phone. Failure to
comply with these guidelines and requirements may
void your warranty and may invalidate any
approvals given to your phone.
Safe Driving Comes First
Don't use a hand-held phone while driving. Don't
use the stereo headset while driving.
Making Emergency Calls
Your ability to use the phone and all of its features is
subject to availability and coverage of your network
service provided. Ensure the phone is switched on
and in service. Hold clear for several seconds, to
clear the display. Enter the emergency number, then
press Talk f. Give your location. Follow the
instructions of the operator.
Making a Call
Your ability to use the phone and all of its features is
subject to availability and coverage of your network
service provided. Ensure the phone is switched on
and in service. Ensure the phone is switched on and
in service.
Interference
All wireless phones may get interference that could
affect performance. Do not rely on your phone as
your primary contact.
Turn off in hospitals
Follow all hospital regulations or rules. Switch your
phone off near medical equipment.
Turn off on aircraft
Wireless phones may cause interference. On
commercial airlines, follow airline personnel's
instructions, and turn off your phone when advised
to do so. Turn off your phone on all other airplanes.
Turn off when at service stations
Don't use your phone at a gas or petrol station.
Don't use near fuel or chemicals.
Turn off near blasting
Don't use phone where blasting is in progress.
Observe restrictions, and follow any regulations or
rules.
Use in proper position with proper antenna
Do not use your phone if the antenna is damaged.
Replace the antenna only with one approved by the
manufacturer. Unapproved antennas or
modifications may damage your phone, degrade its
performance and violate local regulations. Do not
touch the antenna unnecessarily while a call is in
progress. Contact with the antenna affects call
quality and may cause your phone to transmit at a
higher power level than otherwise needed. Hold
your phone as you would any other phone. The top
of the phone should point up and over your
shoulder.
z100.book Page viii Wednesday, September 18, 2002 4:03 PM

ix Sendo Z100 User Guide
Table of Contents
Use qualified service
Only qualified service personnel must install or
repair your phone, car kits and other accessories.
Accessories and Batteries
Use only Sendo approved accessories and batteries.
Do not connect to incompatible products. All
batteries can cause property damage, injury or
burns if a conductive material such as jewelry or keys
comes into contact with the exposed terminals. The
material may complete an electrical circuit and
become quite hot. Exercise care in handling your
phone battery. For example, avoid carrying your
phone battery loose in a pocket or purse. This
product is designed for use with Sendo-approved
batteries only. Use of unapproved batteries may be
dangerous and may cause damage to the battery or
the phone and may void your warranty
The battery can be charged and discharged
hundreds of times but it will eventually wear out.
When the usage time (talk time and standby time) is
noticeably shorter than normal, it is time to buy a
new battery.
Use only batteries approved by Sendo and recharge
your battery only with the chargers approved by
Sendo for use with this product. When a charger is
not in use, disconnect it from the power source. Do
not leave the battery connected after its battery
indicator shows that the battery is full, or for longer
than a single day, since overcharging may shorten
its life. If left unused, a fully charged battery will
discharge itself over time.
Never use any charger or battery that is damaged or
worn out.
Do not short circuit the battery. All batteries can
cause property damage, injury or burns if a
conductive material such as jewellery or keys comes
into contact with the exposed terminals. The material
may complete an electrical circuit and become quite
hot. Exercise care in handling your phone battery.
For example, avoid carrying your phone battery
loose in a pocket or purse. This product is designed
for use with Sendo approved batteries only. Use of
unapproved batteries may be dangerous and may
cause damage to the battery or the phone and may
void your warranty.
Leaving the battery in hot or cold places, such as a
closed car in summer or winter conditions, may
reduce the capacity and lifetime of the battery.
Always try to keep the battery between 15°C and
25°C (59F and 77F). A phone with a battery that has
been exposed to temperature extremes may
temporarily not work, even when the battery is fully
charged. The performance of Li-Ion batteries is
limited in temperatures below -O°C (32F).
Dispose of your battery properly. Comply with all
local laws or regulations in disposing of your battery.
Do not dispose of batteries in a fire.
Approved Accessories Warning!
Use only batteries, charger and accessories
approved by Sendo for use with this phone model.
The use of any other types may invalidate any
warranty applying to the phone, and may be
dangerous. For availability of approved accessories,
z100.book Page ix Wednesday, September 18, 2002 4:03 PM

x Sendo Z100 User Guide
Table of Contents
please check with your dealer or visit http://
www.sendo.com./
When you disconnect the power cord of any
accessory, grasp and pull the plug, not the cord.
Make Backup copies
Remember to make backup copies of all important
data. Delete security sensitive data before sending
your phone in for repair.
Connecting to other devices
When connecting to any other device, read its user
guide for operation and safety instructions. Do not
connect incompatible products.
Infrared precautions
Do not point the IR beam at anyone's eyes or allow it
to interfere with other IR devices.
zNote: Your phone is NOT water resistant.
The phone is not covered under warranty for
damage by any liquid.
z100.book Page x Wednesday, September 18, 2002 4:03 PM
1 Sendo Z100 User Guide
1
The Basics
Chapter 1 The Basics
This chapter will get you using your Z100 fast. It will
help you set up your phone for use, familiarize
yourself with the different parts of your phone,
explain how to navigate around your phone, enter
text and numbers on your phone and keep your
phone more secure. You can also find out where to
get additional help for using your phone.
Getting Started
Before you can use your phone you must insert the
miniature SIM card supplied by your service provider
and then charge the battery.
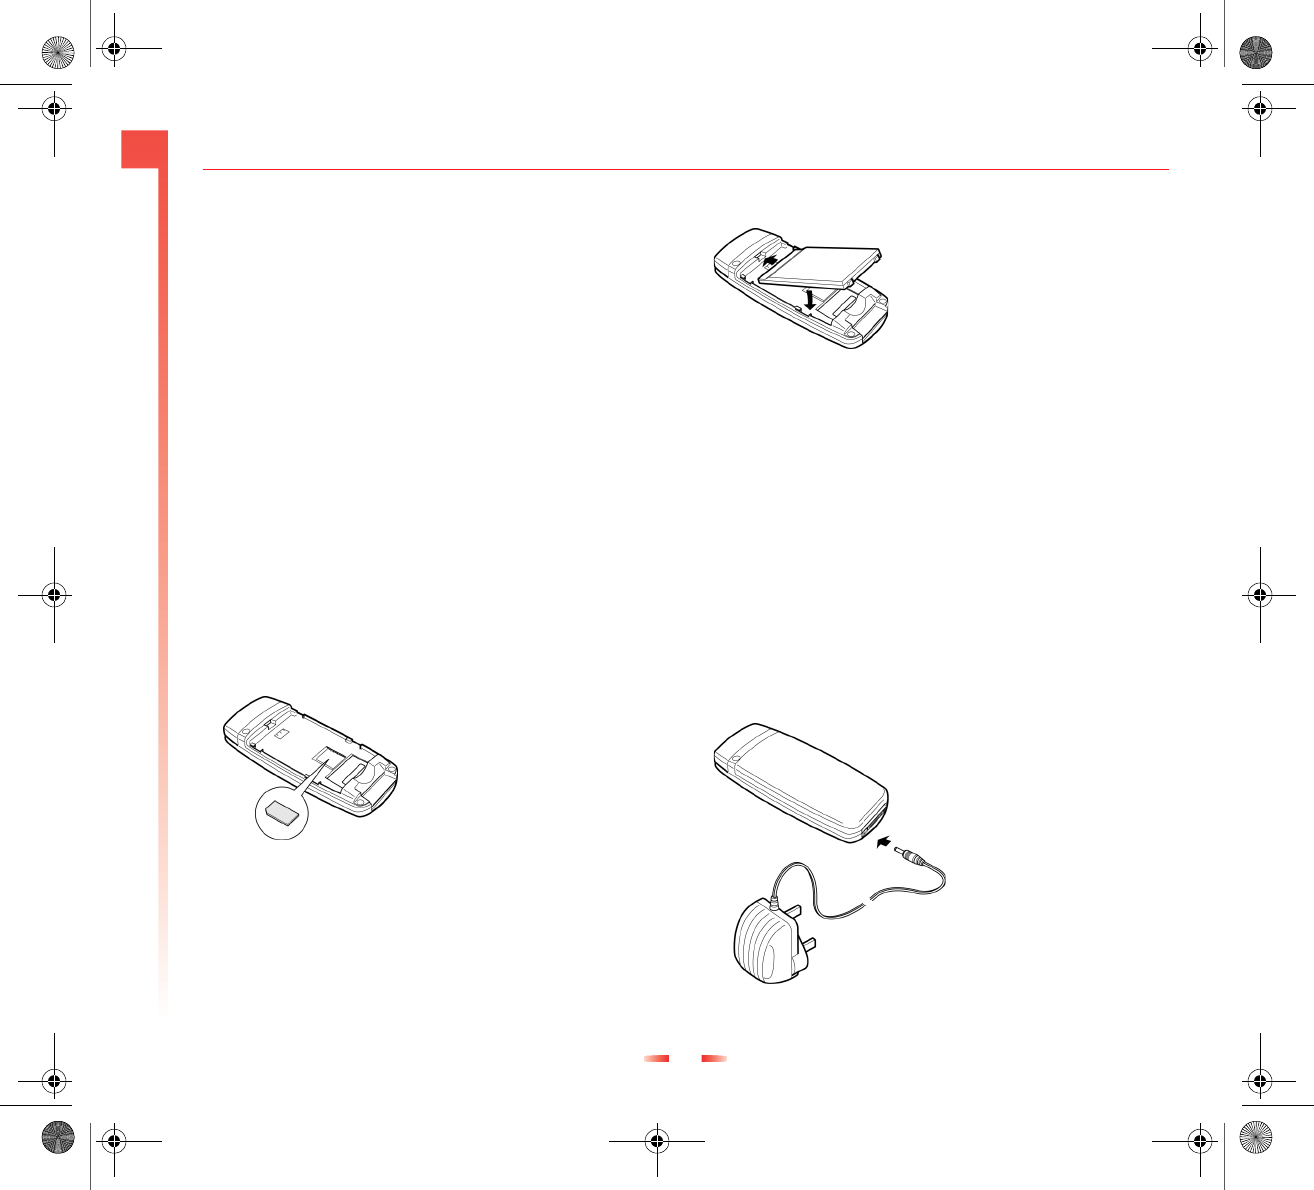
Inserting the SIM card
Firstly you must remove the back cover of the phone
- press down on the ridged area near the top of the
phone and slide the cover down. Lift off.
You must remove the battery. Grasp the battery at
the bottom and push upwards. Lift out.
Place the SIM in the phone,
starting with the right side first,
the logo should be facing you
- make sure that the golden
contacts of the card are
touching the contacts of the
phone.
zNote: Keep all small SIM cards out of the reach
of small children.
Fitting the battery
Insert the battery with the
label facing down. Align the
tabs at the top of the battery
with the tabs on the back of
the phone. Slide into place
and press down. To remove
push upwards on the bottom of the battery and lift
out.
You must charge the battery for at least 12 hours
before you use the phone for the first time.
Allow your battery to fully discharge occasionally
before recharging it.
When the battery is completely discharged it may
take some time for the battery charging icon to
appear after you have connected the charger.
Charging the battery
Insert the connector on the charger lead into the
connector at the base of the phone.
Plug the charger into a
mains AC socket.
When charging
commences, the
battery icon will
change into a charger
cable icon. When the
battery is fully
charged, the battery
icon will reappear and
you can disconnect the
charger.
z100.book Page 1 Wednesday, September 18, 2002 4:03 PM

2 Sendo Z100 User Guide
1
The Basics
The battery will normally take around 2 to 3 hours to
charge.
zNote: A battery’s full performance is achieved
only after two or three complete charge and
discharge cycles. The operations times provided
are reasonable estimates and many be affected
by adverse network conditions, charging and
phone usage.
If the battery is completely empty, it may take a few
minutes before you can make or receive a call once
you plug the phone into a charger.
Use the battery only for its intended purpose.
z100.book Page 2 Wednesday, September 18, 2002 4:03 PM
3 Sendo Z100 User Guide
1
The Basics
Getting to know your phone
Figure 1 Sendo Z100
I
r
DA
por
t
Earpiece
Display
Joystick and
Action key
Right soft key
End key
Back key
Numeric
Keypad
Hash key
Back key
Accessory Connector
Asterix key
Home key
Talk key
Left soft key
Volume
Record
key
Power key
Headset
Connector
z100.book Page 3 Wednesday, September 18, 2002 4:03 PM

4 Sendo Z100 User Guide
1
The Basics
Earpiece
•Use this to listen during calls. It is also used as a
speakerphone – either when the phone is in
speakerphone mode or when you are using the
phone to listen to music or other audio.
zNote: Do not hold the speakerphone to your
ear when using speakerphone or audio modes.
Power key
•Press the Power key p to turn your phone on.
•When your phone is on, do a short press to
access the Quick List.
•Press and hold the Power key p to turn your
phone off.
Display
•The screen on your phone that displays
information.
•The top of the display shows the title bar, where
you can see status indicators about your phone’s
current mode, or the name of the current activity
or active program.
•The center of the display shows the Home screen,
as well as e-mail messages, contacts,
appointments, and other information.
•The bottom of the display shows the functions
assigned to soft keys.
Home screen
•Displays the five programs you have most
recently used, the name of your service provider,
the current time, your next appointment, the
number of messages in Inbox, and your current
profile.
zNote: The home screen is fully configurable;
therefore your home screen may contain
additional or different information to the
examples shown in this guide.
Volume
•Controls the volume of the earpiece.
Record key
•Records notes and voice tags.
Using soft keys
•There are two soft keys on your phone – left and
right. They are located directly below the display
screen. Each soft key performs the command
which is displayed immediately above it on the
screen, these functions change depending on the
screen you are using. For example from the
Home screen, you can select the right soft key
g to display your contacts list, but on the
Contracts screen, you can select the right soft key
g to display the contacts menu.
z100.book Page 4 Wednesday, September 18, 2002 4:03 PM

5 Sendo Z100 User Guide
1
The Basics
Talk key
•Dials a phone number you entered using the
keypad.
•Displays the call history list when pressed from
the home page.
•Dials a phone number you selected from the Call
History list.
•Answers an incoming call.
•Places a call on hold to answer a second
incoming call (call waiting). This feature is
network dependent.
•Switches between an active call and a call that is
on hold.
End key
•Ends active data calls at any time.
•Ends a voice call when one party is on the line,
and ends the active call when multiple parties are
connected.
zNote: Multi party calling is network dependent.
Home key
•Displays the Home screen. Use this key as a
quick way to return to the home screen in any
situation.
Back key
•Displays the previous screen, or backspaces over
one or more characters when you are in a text
field.
zNote: In some case, for example when using
control panels, you may have to press the
appropriate soft key to return to the previous
screen.
Joystick
•Use the joystick to move the selection focus up,
down, left, or right. If you’re in a text field, use the
joystick to move the cursor left or right.
•Many games and other applications use the
joystick- see the instructions for specific
instructions.
Action (Push in on joystick)
•The Action key is at the center of the joystick. It
confirms your selection. The Action key’s
functionality is similar to pressing Enter on a
keyboard. Press in on the joystick when it is
centered.
z100.book Page 5 Wednesday, September 18, 2002 4:03 PM

6 Sendo Z100 User Guide
1
The Basics
Antenna
•The Z100 has an internal antenna which is
located on the rear of the phone, above the
battery compartment.
zWarning: Contact with the antenna affects call
quality and may cause the phone to operate at
a higher power level than otherwise needed.
For best results avoid covering the antenna area
with your hand.
External Antenna port
•This is located on the back of the phone. Use this
to connect to a different antenna, for example, a
car kit could plug into this to use with an antenna
mounted on the outside of your car.
Microphone
•Speak into the microphone during a call or to
record a voice memo or voice tag. You don’t
need to speak directly into the phone when
you’re using speakerphone mode.
Headset Connector
•Use to connect the stereo headset. You can use
the headset to make and receive voice calls or to
listen to music and other audio.
IrDA port
•Align the IrDA (Infrared) port with the IrDA port
on another device to exchange information
between your phone and another device.
Accessory connector
•Use this connector to attach included, or optional
accessories such as the USB or RS232 serial
cable, or a digital camera.
Charger connector, or in car charger
Plug the approved AC (Mains) charger in here.
Numeric Keypad
•Used to enter numbers and characters.
Asterisk key (*)
•Pressing and holding the asterisk key * switches
between text and numeric input modes. In
multitap text or predictive text modes, a short
press switches between caps, caps lock and
lowercase entry.
Hash key (#)
•Press and hold the Hash key# to display a list of
symbols when you are in input mode.
z100.book Page 6 Wednesday, September 18, 2002 4:03 PM
7 Sendo Z100 User Guide
1
The Basics
Programs
Icon Program
Inbox/SMS Send, read and manage SMS text messages and e-mails.
Contacts Store and view all your contact details.
Calendar Store and view all your appointments.
Internet Explorer Browse the world wide web.
ActiveSync® Synchronize with your desktop PC or corporate server.
Call History Stores a list of all incoming, outgoing and missed calls.
MSN Messenger Send and receive instant messages with friends and colleagues.
Settings Set the defaults for your Z100 phone.
Shortcuts Set up and view speed dials and voice tags.
Tasks Store a list of tasks for yourself.
Voice Notes Record and store voice notes.
Windows Media Player Play Windows Media audio and video clips and MP3 audio files.
Calculator Do calculations on the move.
Infrared Receive Receive information from other compatible infrared devices.
Modem Link Use your phone as a modem for another external device or computer.
Z-i Capture Use your phone as a camera whenever, wherever.
Accessories The contents of this folder will vary depending on what you have downloaded onto your phone.
Games Play Solitaire. The other games contained in this folder depend on what you have downloaded
onto your phone.
z100.book Page 7 Wednesday, September 18, 2002 4:03 PM
8 Sendo Z100 User Guide
1
The Basics
Solitaire Play the classic card game on your Z100.
File Viewer View Word, Excel and ZIP files.
Multimedia Inbox Send and receive MMS (Multi Media Message System) messages and EMS (Enhanced Message
Service) messages.
Packet Video Play multimedia clips from your Z100 and download, or stream, clips from a website.
Emblaze Player Play media clips on your Z100.
IA Album Browse and view photos stored on your Z100.
Softexter Add the Softexter keyboard to enter text quickly and accurately into your phone, on the move.
Sendo Explorer Navigate the files and folders on your Z100.
Sendo Pinball Test your skill with this arcade classic.
Icon Program
z100.book Page 8 Wednesday, September 18, 2002 4:03 PM
9 Sendo Z100 User Guide
1
The Basics
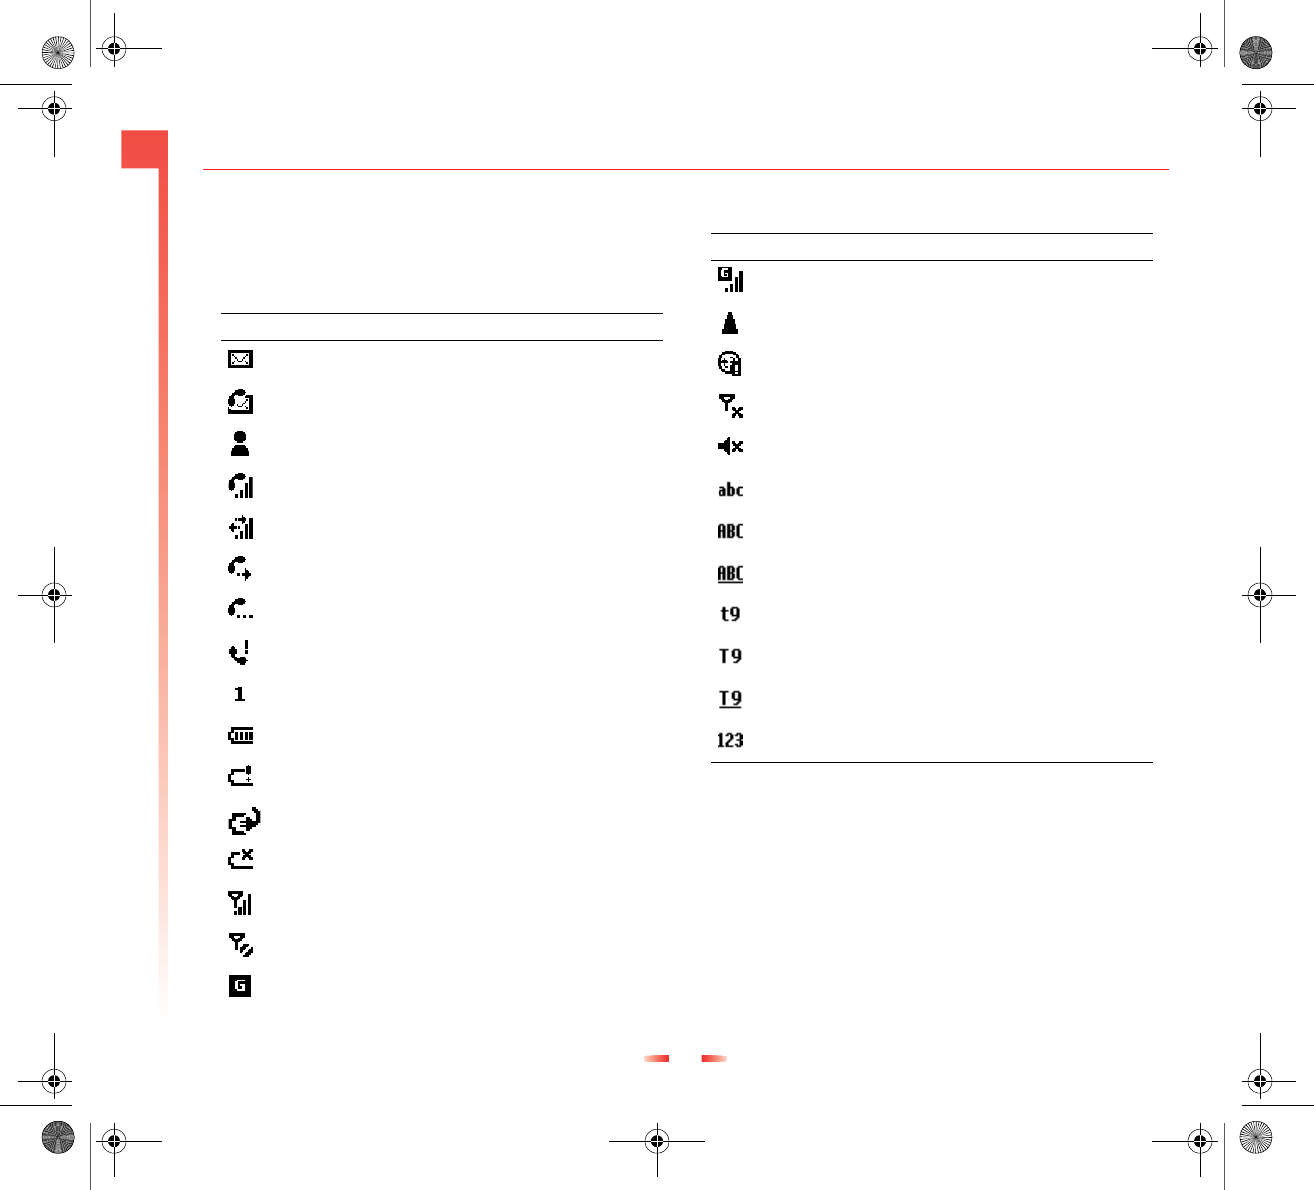
Status indicators
Status indicators are displayed in the title bar at the
top of the phone’s display. The following table lists
common status indicators and their meanings.
Indicator Meaning
New e-mail
New voice mail
New instant message
Voice call active
Data call, or GPRS session, active
Call forwarding /Call Divert
Call on hold
Missed call
Line 1
Battery level
Low battery
Battery charging
No battery
Signal strength
No signal
GPRS available
GPRS in use
Roaming
Sync error
Radio off
Ringer off
Multitap text input mode, lowercase
Multitap text input mode, uppercase
Multitap text input mode, caps lock
T9 predictive text input mode, lowercase
T9 predictive text input mode, uppercase
T9 predictive text input mode, caps lock
Numeric input mode
Indicator Meaning
z100.book Page 9 Wednesday, September 18, 2002 4:03 PM

10 Sendo Z100 User Guide
1
The Basics
Where to find more information
The following table is a guide to finding information
to help you use your phone.
Navigation
The following sections describe the different ways of
navigating around your phone to accomplish tasks
quickly and easily.
Using the Joystick
Use the joystick to navigate horizontally and
vertically on the screen and to move the selection
focus, so you can select the item you want.
The following table shows the four different actions
you can perform using the arrows on the Joystick:
Using the Action key
Press in on the joystick when it’s centered.
Press the Action key A to confirm the selection
you’ve made using the Joystick. In some cases
pressing Action will take you to a program or setting.
Information about Source
Making a phone call See the Quick Start Guide in the
Z100 box, or for more detailed
information see Making a call
Programs on the phone Z100 User guide.
Additional programs that
can be installed on the
phone
Z100 CD
Connecting to and
synchronizing with a
desktop computer and/or a
Microsoft Exchange Server
See Chapter 6 - Synchronizing
Information in this user guide or
ActiveSync™ Help on your
desktop computer.
Text entry See Entering text and numbers on
your phone.
Up-to-date information on
your Sendo Z100
http://www.sendo.com./
Support http://www.sendo.com./
Accessories http://www.sendo.com/ and the
Z100 CD Rom.
Direction key
action
Navigation
Press Up :. Moves the selection focus upward on the
screen, or scrolls up in a list.
Press Down ;Moves the selection focus downward on the
screen or scrolls down in a list.
Press Right ] Moves the selection focus forward on the
screen, or moves the cursor forward through
characters in a text field.
Press Left [ Moves the selection focus backward on the
screen, or moves the cursor backward
through characters in a text field, without
deleting characters.
z100.book Page 10 Wednesday, September 18, 2002 4:03 PM
11 Sendo Z100 User Guide
1
The Basics
Using the Home key
Press the Home key s to display the Home screen at
any time.
•The Home screen is your starting place for most
tasks. You can easily navigate to any program or
setting on your phone from this screen. The top
of the Home screen displays the five programs
you have most recently used. If you want to open
one of these programs, just select the icon and
press Action A. The Home screen also displays
the current time, your next appointment, the
number of messages in your Inbox, and your
current profile. Your Home screen may also
display additional or different information.
•If you select your next appointment and press
Action, the Calendar is opened so you can see all
of your appointments for the day. To view your
Inbox, just select the E-mail or SMS status, or the
Inbox icon and press Action. To view Contacts,
press the Contacts soft key.
•The Home screen is displayed automatically
when you turn on your phone or when your
phone is turned on but idle. Press the Home key
to display it at any other time.
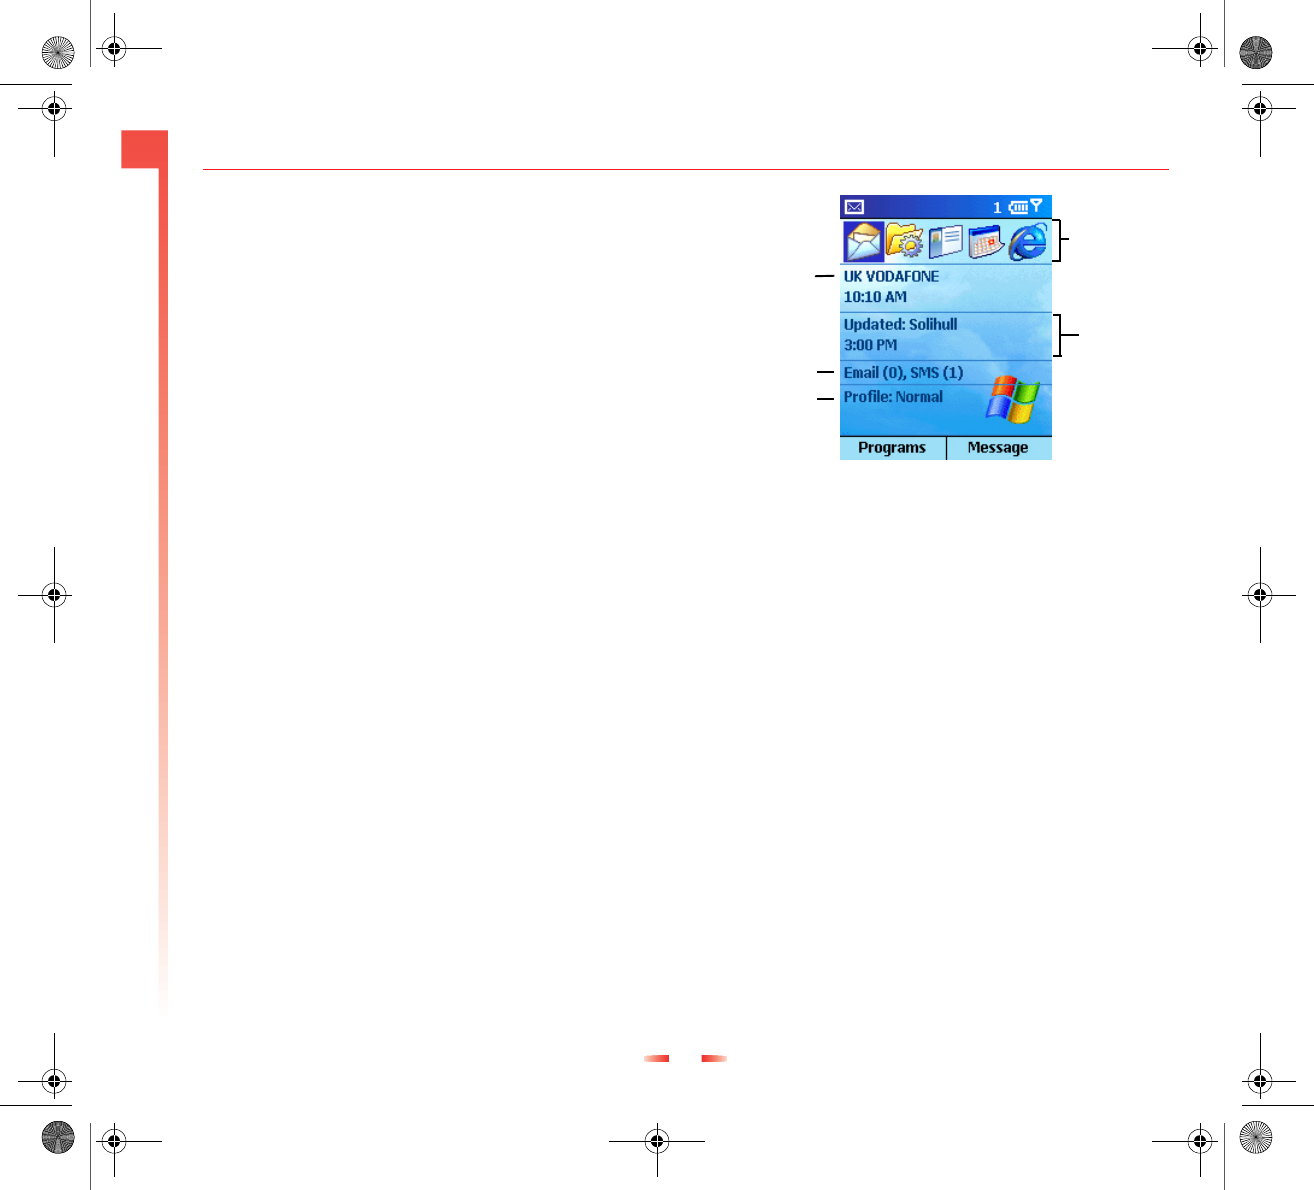
Figure 2 An example Home screen, yours may vary
Navigation options from the Home screen
•Select a recently used icon, and press the Action
key to open the program.
•Select an item in the center of the Home screen,
such as your next appointment, your e-mail and
SMS information, or your profile type, and then
press the Action key to open the program or
access the settings associated with the item
selected.
•Press the Programs soft key d to display the list
of programs available on your phone, select the
program you want, and then press the Action key.
•Press the Contacts soft key g to display the
Contacts list, select the contact you want to open,
and then press the Action key.
zNote: You can customize the look of the Home
screen. See Home screen.
Your current
profile
Number or unread
messages
Your current
service provider
Next
appointment
Select and
press the
Action button
to access your
most recently
used programs
z100.book Page 11 Wednesday, September 18, 2002 4:03 PM
12 Sendo Z100 User Guide
1
The Basics
Using the Back key
Press the Back key r to display the previous screen.
In some cases, you may need to use the appropriate
soft key, instead of the back key to return to the
previous screen. For example, the back function is
disabled in control panels. If you’re in a text field,
Back deletes one or more characters - in a similar
way to pressing Backspace on a computer keyboard.
X
To backspace and remove one character in a text
field
•Press the Back key r.
X
To backspace and remove multiple characters in a
text field
•Press and hold the Back key r.
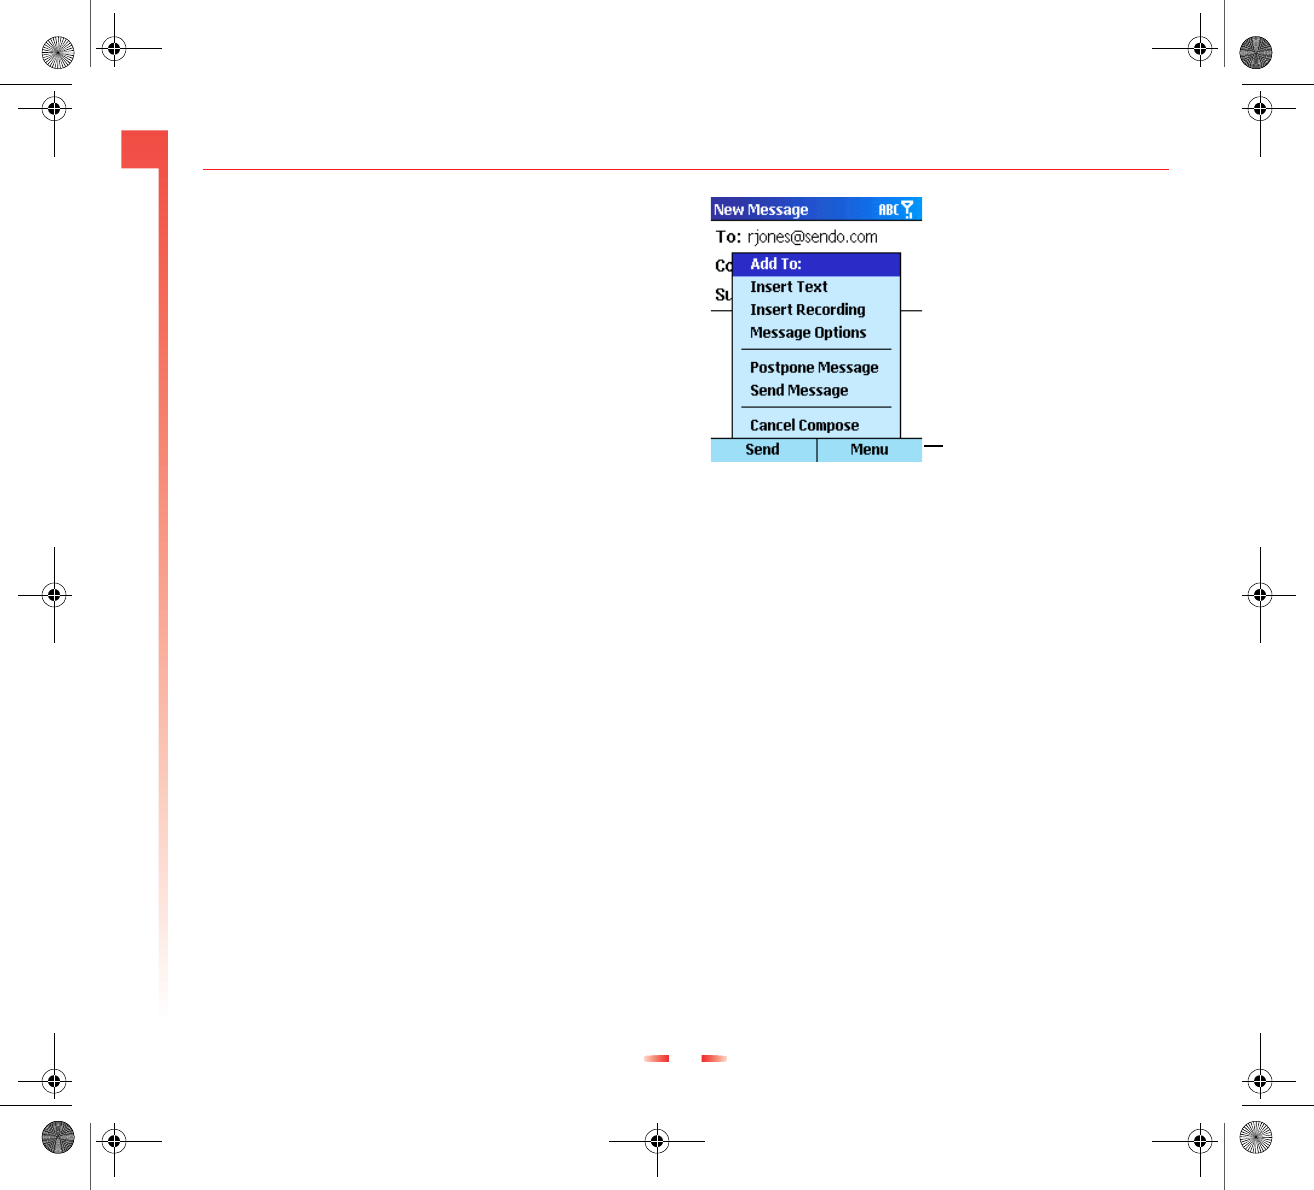
Using menus
On many screens, the right soft key is labeled Menu.
Press the Menu soft key g to display a list of
options that are relevant to the screen you are
viewing. Selecting a menu option will either perform
the command or display the relevant screen to
perform the command.
Figure 3 New Message Menu
X
To access menu options
1. Press Menu g.
2. Select the menu option you want using the
joystick, and press the Action key A.
zTip: select Up : using the Joystick to move the
selection focus to the bottom of a menu.
Using the Programs list
Your phone comes pre-installed with many
programs that you can start using right now. For
more information about installing additional
programs on your phone, refer to the Z100
Companion CD.
zNote: The list order of the programs on screen
may vary.
If your network provides a SIM Toolkit to access
special services or applications on your SIM card, the
toolkit is added to the Programs list. The name, icon
Press the Menu soft key to
display menu options
z100.book Page 12 Wednesday, September 18, 2002 4:03 PM

13 Sendo Z100 User Guide
1
The Basics
and contents of the toolkit are totally dependent on
your service provider. The name on the menu
changes to indicate the type of service, for example
“Information”.
For more details, please contact your service
provider.
X
To navigate to a program
1. On the Home screen, press Programs d.
2. Select the program you want using the Joystick,
and press Action A.
zNote: The Programs list is displayed in
alphabetical order, so depending on the name
of your SIM Toolkit (if you are using one) you will
see different Programs available on the first
screen of the Programs List. To see more
programs use the : and ; keys to select More
and then press Action A.
Using numbers as shortcuts
You can also use numbers to quickly navigate to
programs and settings. Simply press the number
shown next to the program or setting you want.
For example, on the Programs menu, press 3 to
open the Calendar.
zTip: For lists where numbers are not shown, for
example a menu list, you can still press the
number that corresponds to the item in top-
down order. For example, if you want to select
Filter from the Contacts menu, you can press
4 on the keypad because the Filter option is
fourth in the list.
zTip: To quickly skip to the bottom of the
Programs list and select More to display the
second page, do a short press on : when the
first program is selected.
Using the Quick List
The Quick List displays a list of commonly used
commands, such as turning the phone off, locking
your phone, locking the keypad or turning off the
radio function. You can also easily select a profile to
use.
A profile is a set of instructions for how the phone
alerts you to incoming calls and messages. There
are 7 profiles predefined on your Z100 - you can
edit the profiles so that they work best for you. For
more information about profiles see Profiles
Use the Radio Off function if use of the radio
transmitting or receiving functionality of the phone
(for example, registering with a network, making or
receiving calls, or sending or receiving data using the
wireless network) is prohibited, but use of the other
features of the phone is expressly permitted. The radio
in the phone is disconnected so that it no longer
receives or transmits any signals.
zWarning: If you are using the phone radio off
mode on an aircraft or in a hospital, turn it off
immediately if instructed to do so by airline or
hospital personnel. The phone may not be used
in this mode in refueling stations, potentially
explosive atmospheres, or wherever you are
instructed against use. Turn off the phone
wherever it is dangerous, illegal or you are
instructed not to use it.
z100.book Page 13 Wednesday, September 18, 2002 4:03 PM
14 Sendo Z100 User Guide
1
The Basics
X
To access the Quick List
•While the phone is on, do a short press on the
Power key p. Do not press for too long as this
will switch the phone off.
X
To turn the phone off
•Do a short press on the Power key p. Select
Power off and press Action A.
X
To change your profile
1. Do a short press on the Power key p.
2. The profiles currently being used has a tick
displayed next to it. Use the : and ; keys to
select the profile you want to use and press OK
d.
Entering text and numbers on your
phone
zNote: The Z100 does not store information such
as phone numbers and text messages on your
SIM card. Therefore, the contact information
you enter into your phone will not transfer by
SIM card into another phone.
You can enter text and numbers on your phone using
the keypad. Your phone supports three input modes
for entering text and numbers: Multitap, T9, and
Numeric. Use Multitap and T9 to enter text, and
Numeric to enter numbers. When you select a field
that requires text or numeric entry, the phone
automatically defaults to the appropriate input
mode. The status indicator on the title bar shows the
input mode you are currently using.
zNote: Some networks may not support all
language dependent characters.
X
To switch input modes
•Press and hold the Asterisk * key until the status
indicator for the input mode you want is
displayed in the title bar.
zTip: To change between multitap and T9 modes,
press and hold the Asterisk key *. To change
between for example, uppercase and lowercase
multitap, only a short press is required.
The following table shows the complete list of input
mode status indicators.
Entering text in Multitap mode
When you are in Multitap mode (sometimes called
mulitpress mode), you enter a letter by pressing the
Indicator Mode
Multitap text input mode, lowercase
Multitap text input mode, uppercase
Multitap text input mode, caps lock
T9 text input mode, lowercase
T9 text input mode, uppercase
T9 text input mode, caps lock
Numeric input mode
z100.book Page 14 Wednesday, September 18, 2002 4:03 PM
15 Sendo Z100 User Guide
1
The Basics
number key on which the letter appears. To enter the
first letter on the number key, press the key once, to
enter the second letter, press the key twice, and so
on. The letter entered most recently is underlined
until you have completed the key presses for the
letter and moved on to the next one.
For example:
•To enter the letter “i” press 444.
•To enter the word “maria,” press 6, 2,
777, 444, 2.
If you enter two letters consecutively in a word, which
are located on the same key, pause after entering
the first letter and wait until the underline disappears
before entering the next letter.
For example:
•To enter the word “anna,” press 2, 66
pause until the underline disappears, press
66 again and then press 2.
zTip: This pause is called the multitap time out,
and you can adjust the length of the pause
between key presses. See below.
X
To enter punctuation in Multitap mode
•Press 1 repetitively to cycle through common
punctuation, or
•Do a long press on the Hash key # to display a
list of available symbols. Select the symbol you
want using the joystick and press Done d.
X
To change the Multitap time out
1. On the Home screen, press Programs d,
select Settings and then press Action A. Now
select Accessibility and press Action A.
2. Under Multipress time out, use the [ and ]
keys to select the time interval you want for the
pause between key presses. Press Done d.
Entering text in T9 mode
To save time when you are writing a message you
can use Tegic T9 predictive text entry. This is a built in
dictionary feature which guesses words by the
sequence of letters you are typing.
If you use T9, you only have to press each key once.
The letters change as you type, so it is important that
you ignore what is displayed on the screen until you
have finished typing completely.
Key Characters available
1. , - ? ! ‘ @ :
2a b c 2
3d e f 3
4g h i 4
5j k l 5
6m n o 6
7p q r s 7
8t u v 8
9w x y z 9
00
#space
z100.book Page 15 Wednesday, September 18, 2002 4:03 PM
16 Sendo Z100 User Guide
1
The Basics
For example, to enter the word "maria," you can
spell out the word with just five key presses, 6
2 7 4 2.
T9 Text Input recognizes that the most commonly
used word matching that numeric sequence is
"maria."
If the word which you are typing shares the same
sequence of keys as another word then a different
word to the one you want may be displayed, you can
still select the correct word. Press 0 to scroll
through all the words and when you see the correct
one, press # to confirm your choice and insert a
space.
If the word you want is not displayed you can add
the word to the T9 dictionary. Press and hold * to
move to multitap mode and enter the word again.
Now press and hold * again to go back to T9
mode. The word is now stored in the T9 dictionary
and you can easily enter it using T9 the next time you
need to.
X
To enter text using T9 mode
1. Press and hold the Asterisk * key until the T9
indicator appears on the title bar.
2. Enter the numerical sequence that represents the
word you want to write. Remember to ignore
what you see on screen until you’ve finished
typing.
3. When you’ve finished pressing the keys, your
word should be on the screen. Press Hash # to
accept the word and enter a space after it or
press 0 to scroll through other matching
words.
4. If you don’t see the word you need, erase the
word, and enter it using multitap mode.
X
To enter punctuation in T9 mode
•Press 1, then press 0 repeatedly to cycle
through common punctuation.
zNote: Do a long press on the Hash key # to
display a list of all the available symbols:
Entering numbers in Numeric mode
Do a long press on * to switch to Numeric mode
and then just press the number(s) you want to enter
on the keypad. If a field only permits a numerical
entry, the input mode automatically defaults to
Numeric mode.
Miscellaneous input tasks
X
To enter a space
•In Multitap or T9 mode, press the Hash # key on
the keypad.
X
To start a new line
•Press Action A.
'-!"$%
&( ) , . /
:;?@#*
[\]^_`
~¡ ´¿+<
=> « » £ _
z100.book Page 16 Wednesday, September 18, 2002 4:03 PM

17 Sendo Z100 User Guide
1
The Basics
X
To change between uppercase and lowercase
•when using either multitap or T9, press the
Asterisk * key to change between uppercase
and lowercase.
zTip: When you are in any text mode, the first
letter of a sentence is automatically capitalized.
X
To lock caps
•Press the Asterisk * key twice. Press the Asterisk
* key again to return to lowercase.
X
To enter a symbol
•Press and hold the Hash # key, select the symbol
you want, and then press Done d.
X
To enter a number, an asterisk *, or a Hash sign #
•Switch to Numeric mode, and press either * or
# on the keypad.
X
To delete characters
1. Press Back r to backspace over a single
character.
2. Press and hold Back r to delete an entire text
field.
X
To enter the plus (+) sign for international calls
•Press and hold 0.
Securing your phone
You can secure your phone by locking the keypad,
the entire phone, or the SIM card.
You should keep a record of any codes or passwords
that you need to unlock your phone, but make sure
they are securely stored, away from the phone.
Locking the keypad
The keypad lock turns off the keypad functionality.
This is useful if, for example, your phone is turned on
and stored in your pocket, so that you avoid
accidental key presses.
X
To lock your keypad
•On the Home screen, press and hold the End f
key until the left soft key displays Unlock. The
keypad is now locked.
X
To unlock your keypad
•On the Home screen, press Unlock d and then
press Hash #.
zNote: Locking your keypad does not prevent
unauthorized use of the phone.
You can still receive calls and make emergency
calls when the keypad is locked.
Locking your phone
Locking your phone helps to prevent access to
personal data. If you switch the phone lock funtion
on, your phone automatically locks after a specified
time of inactivity. You must enter your phone lock
password before you can use the phone again.
zNote: You can still receive calls and make
emergency calls when the phone is locked.
z100.book Page 17 Wednesday, September 18, 2002 4:03 PM

18 Sendo Z100 User Guide
1
The Basics
zImportant warning: If you forget your
passwords, you may not be able to access your
phone again without potential data or
application loss. This only applies to
applications you have added to the phone
yourself and not to core applications, for
example, Calendar. For instructions on how to
reset your phone, see Total Reset
X
To enable the phone lock
1. Press Programs d, select Settings and then
press Action A.
2. Select Security and then select Enable Phone
Lock. Press Done d.
X
To set up phone lock defaults
1. Do a short press on the Power key p to display
the Quick List, select Device lock, and press OK
d or Action A.
2. Under Lock phone after, use the [ and ] keys
to select the amount of time your phone is
inactive before the phone automatically locks.
Choose from 1, 2, 5, 10, 30 or 60 minutes.
3. Under Password, enter the password you want to
use to access your phone when it is locked.
4. Under Confirm password, enter the password
again, and press Done d or Action A.
zNote: When you have set up the time delay and
password, you can quickly lock your phone, at
any time, by selecting Device Lock from the
Quick List – you do not have to set up the delay
and password every time you use the lock.
X
To lock your phone
1. Do a short press on the Power key p to display
the Quick List, select Device lock, and press OK
d or Action A.
X
To unlock your phone
•Press Unlock d, enter your password, and then
press Unlock d again.
X
To turn off phone lock
1. On the Home screen, press Programs d,
select Settings and press Action A.
2. Select Security, Disable Phone Lock, and press
Action A. Enter your password and press Done
d.
Locking the Subscriber Identity Module
(SIM) card
Locking your SIM card should prevent using the
phone to make a call, but you can still turn it on and
make emergency calls. When you turn your phone
on, you may be prompted for your PIN1 password,
which you must enter correctly before you can use
your phone.
If you forget your PIN1 password, you must enter a
PUK (Personal Unlock Key). This may be listed in the
information that you received with your SIM card or
it may only be available from your service provider.
zNote: Sendo cannot provide your PUK
information.
z100.book Page 18 Wednesday, September 18, 2002 4:03 PM

19 Sendo Z100 User Guide
1
The Basics
X
To lock the SIM card
1. On the Home screen, press Programs d,
select Settings, Security, Enable PIN Lock, and
press Done d.
2. Enter your PIN1 password, and press Done d.
X
To unlock the SIM card
1. On the Home screen, press Programs, select
Settings, Security, Disable PIN Lock, and then
press Action A.
2. Enter your PIN1 password, and press Done d.
Total Reset
There is a function which allows to reset your phone,
that is, restore all the settings and defaults that were
in place when you purchased it.
zWarning: This function removes all applications
and data which you have added.
You should only use this function if you have no
other alternative. For example, if you have forgotten
or lost the passwords to unlock your phone or you
have installed an appliction which has damaged or
corrupted the phone.
X
Reset your phone
1. Turn the phone off. If you cannot turn your
phone off in the normal way, you must remove
the battery for several minutes and then reinsert
it.
2. Plug in the charger. The phone will begin to
charge in off mode.
3. Press and hold the 5 key.
4. Whilst still holding the 5 key, press p.
5. A screen is displayed while the phone switches
on - but keep holding number 5 until the
following screen appears:
Figure 4 Total Reset screen
6. Press the green tick soft key d to confirm the
reset.
7. The phone will now start up as normal. It may
take several minutes for the Home screen to be
displayed . During this time, the display will not
change - do not remove the charger or switch
the phone off.
z100.book Page 19 Wednesday, September 18, 2002 4:03 PM
20 Sendo Z100 User Guide
2
Phone Calls
Chapter 2 Phone Calls
This chapter explains how to make and receive
phone calls, use your Call History, and create
shortcuts to help making phone calls even quicker
and easier.
Making a call
There are several ways to make a call, the easiest is
to simply dial a phone number from the Home
screen.
X
To make a call
•On the Home screen, enter the phone number,
using the numeric keypad, and press the Talk f.
zTip: As you enter a phone number, your Z100
searches Contacts, Call History, Speed Dial lists,
and your SIM card to find a matching number. If
you see the name of the person you want to call
listed, select it using the joystick, and press Talk
f.
Figure 5 Call Progress screen for making a call
zNote: You should always enter a phone number
in the complete international format including
the international access code (this varies by
country), the country code, the area or city code
and the phone number.
zYou can enter + to replace the international
access code. Do a long press on 0.
Making a call from Contacts
To call someone from your Contacts list, you just
select the person’s name, and press Ta lk f.
If you have more than one phone number for a
contact, for example, work, home and mobile, the
work phone number is always the default. When you
press Talk f the default number is always dialled,
but you can change the default number whenever
you want.
For more information about using your Contact list,
see Using Contacts.
X
To make a call by contact name
1. On the Home screen, press Contacts g.
2. Select the contact to call, using the Up : and
Down ; keys on the joystick, and press Tal k f.
Remember that the default number is dialled.
zTip: If you have a long list of contacts and you
can’t see the contact you want on the screen,
enter the first few letters of the contact’s name.
Your phone searches through the entire
Contacts list and displays any matching names.
AutoFilter matches
number from Call
History
AutoFilter matches
number to a
contact
z100.book Page 20 Wednesday, September 18, 2002 4:03 PM

21 Sendo Z100 User Guide
2
Phone Calls
X
To change the default number for a contact
1. On the Home screen, press Contacts g.
2. Using the : and ; keys select the contact and
press Action A. Move Up : and Down ; to
see all the numbers you have saved for this
contact. Select the number to set as the default.
3. Press Menu g and select Set as default. Press
Action A.
4. Now when you view the Contacts list, you’ll see
the default number indicator has changed. For
example, work (w) to mobile (m).
zNote: For more information about contact list
abbreviations, see Using Contacts.
X
To make a call from an open contact
1. On the Home screen, press Contacts g.
2. Using the : and ; keys, select the contact to
call, and press Action A.
3. Using the : and ; keys, select the number to
use, and press Talk f.
Making a call using a recently dialed
number
You can display a list of phone numbers you have
recently dialed and choose a name or number from
the list to call the person again.
X
To make a call using a recently-dialed phone
number
1. On the Home screen, press Talk f to display a
list of recently dialed phone numbers.
2. Using the Up : and Down ; keys on the
joystick, select the number to call and press Talk
f again.
Making a call from the Call History list
The Call History list displays the last 25 calls on the
phone – whether you made, received, or missed
them.
X
To make a call from the Call History list
1. On the Home screen, press Programs d,
select Call History, and press Action A.
2. Select the number or contact to call, and press
Talk f.
Making a call from a hyperlink
You can make a call directly from a hyperlink
(highlighted and underlined), received in an e-mail
message.
X
Make a call from a hyperlink
•Select the hyperlink phone number using the
joystick, and press Action to make the call.
Making emergency calls
Calls to emergency service numbers can be made
under any circumstances, even if you have locked
the SIM card and/or your phone.
zNote: Some networks may require that a valid
SIM card has been properly inserted in the
phone before you can make an emergency call.
z100.book Page 21 Wednesday, September 18, 2002 4:03 PM

22 Sendo Z100 User Guide
2
Phone Calls
X
To m ake an emergency call
•If the phone is not on, switch it on. Dial the
emergency number appropriate to your location,
and press Talk f.
zNote: Official emergency numbers vary by
location (for example 999 in the UK, 911 in the
US, or 112 in many other countries). When
travelling you should determine the relevant
emergency number/s.
This phone, like any other wireless phone,
operates using radio signals, wireless and
landline networks as well as user-programmed
functions that cannot guarantee connection in
all conditions. Do not rely solely upon your
wireless phone for emergency communications,
for example, in medical emergencies.
Remember that to make or receive calls the
phone must be switched on and in a service
area with adequate signal strength. Emergency
calls may not be possible on all wireless phone
networks or when certain network services and/
or phone features are in use. Check with local
service providers.
Having problems making a call?
Check to make sure that your phone contains a valid
SIM card and that the phone is turned on, unlocked,
and in the service area of your service provider’s
network.
Shortcuts
You can create speed dials and voice tags as
shortcuts, to quickly call your frequently used phone
numbers.
Speed dials
You can create speed dials to dial frequently used
phone numbers, by simply pressing and holding one
or two keys. You can set up speed dial entries from
2-99. Speed dial 1 1 is reserved for voice mail
access and cannot be changed.
zNote: You can only create speed dials for phone
numbers which are stored in Contacts.
X
To create a speed dial for a phone number
1. On the Home screen, press Contacts g.
2. Select the contact and press Action A. Use the
Up : and Down ; keys to select the phone
number to set up a speed dial for.
3. Press Menu g, select Add Speed Dial, and
press Action A.
4. Move Down ; to the Keypad assignment field
and enter the speed dial number to associate
with the phone number. Press Done d. You
can also use the [ and ] keys to scroll to an
available number. Press Action A.
zTip: You can also create speed dials for Web
addresses and e-mail addresses that are stored
in Contacts.
z100.book Page 22 Wednesday, September 18, 2002 4:03 PM

23 Sendo Z100 User Guide
2
Phone Calls
X
To make a call using a speed dial
•On the Home screen, press and hold the number
on the keypad that you have assigned as a speed
dial. If the speed dial is two digits, press the first
digit and press and hold the second digit.
X
To edit a speed dial number
•You cannot amend a speed dial. If you want to
change the speed dial you have set for a
particular number, delete it and create a new
speed dial.
zNote: If you delete a contact, the associated
speed dial is also deleted.
X
To delete a speed dial
1. On the Home screen, press Programs d,
select Shortcuts, and press Action A.
2. Select the speed dial to delete, press Menu g,
select Delete and then press Action A. An Alert
message is displayed – you are asked whether
you want to permanently delete the speed dial.
Press Yes g.
Voice tags
You can record voice tags so you can dial a phone
number simply by speaking a word into the phone.
zNote: You can only use the Voice Tag function if
the phone if the Radio On functionality is active.
Voice Tags are not language dependent. Any clearly
spoken word or phrase can be used as a voice tag. It
is easier for the phone to recognize longer voice
tags. For example, you may want to record a
persons first and last name instead of just their first
name, providing that the tag is less than
1.5 seconds.
zNote: Voice Tags are sensitive to background
noise, so record them in a quiet place.
X
To create a voice tag for a phone number
1. On the Home screen, press Contacts g.
2. Use the Up : and Down ; keys to select the
phone number to set up a voice tag for and
press Action A.
3. Press Menu g, select Add Voice Tag and press
Action A.
4. An Alert Message is displayed – “After the Audio
Prompt, please speak the new word”. When you
hear the audio sound pronounce the voice tag
clearly into the microphone.
5. If the voice tag is successful, confirmation is
displayed on screen.
6. The Add Shortcuts screen is displayed, you can
amend contact details here if you wish. Press
Done d.
zNote: You can also create voice tags for Web
and e-mail addresses that are stored in
Contacts. If you delete a contact, the associated
voice tag is also deleted.
X
To make a call using a voice tag
1. On the Home screen, press and hold the Record
key, which is located on the side of the phone.
z100.book Page 23 Wednesday, September 18, 2002 4:03 PM

24 Sendo Z100 User Guide
2
Phone Calls
2. When prompted by the message on screen and
an audio alert, say the voice tag word. The
number is dialled.
3. If the phone misinterprets the word, a message
is displayed: “The system was unable to process
your voice command. Be sure to speak clearly
and reduce the surrounding noise if possible. Try
again?” Press Yes d to try the voice tag again
or No g to display the contacts list and make
the call from there.
zWarning: Do NOT rely on voice tags for dialing
emergency numbers. In emergencies, stress can
cause changes in your voice, which may result
in the phone not recognizing the command.
X
To edit a voice tag
•You cannot amend a voice tag. If you want to
change the voice tag you have recorded for a
particular number, delete the tag and follow the
process to record a voice tag again.
X
To delete a voice tag
1. On the Home screen, press Programs d,
select Shortcuts, and press Action A.
2. Use the : and ; keys to select the shortcut to
delete, press Menu g, select Delete and then
press Action A. An Alert message is displayed –
you are asked whether you want to permanently
delete the voice tag? Press Yes g.
Viewing and deleting shortcuts
Once you have set up speed dials and voice tags,
you can view or delete all of your shortcuts using the
Shortcuts list.
X
To view shortcuts
•On the Home screen, press Programs d, select
Shortcuts, and press Action.
All the shortcuts you have set up are listed. Each
speed dial is listed by the speed dial number, and
each voice tag is indicated by a speech bubble
icon.
zNote: The Voice Mail service is always assigned
to speed dial key 1.
X
To delete shortcuts
1. On the Home screen, press Programs d,
select Shortcuts, and press Action A.
2. Select the shortcut to delete, press Menu g,
select Delete, and then press Action A. An Alert
message is displayed - you are asked whether
you want to permanently delete the shortcut?
Press Yes d.
z100.book Page 24 Wednesday, September 18, 2002 4:03 PM

25 Sendo Z100 User Guide
2
Phone Calls
Advanced dialing options
The following information covers advanced dialling
options that are useful for phone numbers requiring
special dialling instructions.
For example, International calls require a country
code to be included in the phone number. The
country code is seperated from the rest of the
number sequence by a plus sign (+).
X
To insert an international country code
•Press and hold 0 until the plus sign (+)
appears.
zNote: You can insert a plus sign directly into a
contacts number or dial it directly from the
keyboard.
X
To insert a three second pause in a dialling sequence
Some international calls require a three second
pause in the dialling sequence for the call to be
processed successfully.
1. On the Home screen, press Contacts g.
2. Select the contact, press Action A and then
select the phone number to modify.
3. Press Edit d and use the joystick to move the
cursor to the point in the phone number where
the pause needs to be inserted.
4. Press Menu g, select Insert Pause and then
press Action A. The letter p appears in the
number; this shows where the three second
pause will appear in the dialling sequence.
5. Press Done d.
X
To insert a manual pause in a dialing sequence
Some phone numbers require a pause longer than
three seconds in the dialing sequence. You can insert
a pause so that the dialing sequence is stopped until
you press Talk f.
1. On the Home screen, press Contacts g.
2. Using the : and ; keys, select the contact,
press Action A, and then use the : and ;
keys again to select the phone number to
modify.
3. Press Edit d and move Left [or Right ] to
move the cursor to the point in the phone
number where the dialing sequence must pause
before proceeding.
4. Press Menu g, select Insert Wait, and press
Action A. The letter w appears in the number,
this shows where the pause occurs in the dialing
sequence.
5. Press Done d.
zNote: When you make a call using Insert Wait,
the first numbers are dialled and you must press
Talk f to continue the dialing sequence.
z100.book Page 25 Wednesday, September 18, 2002 4:03 PM
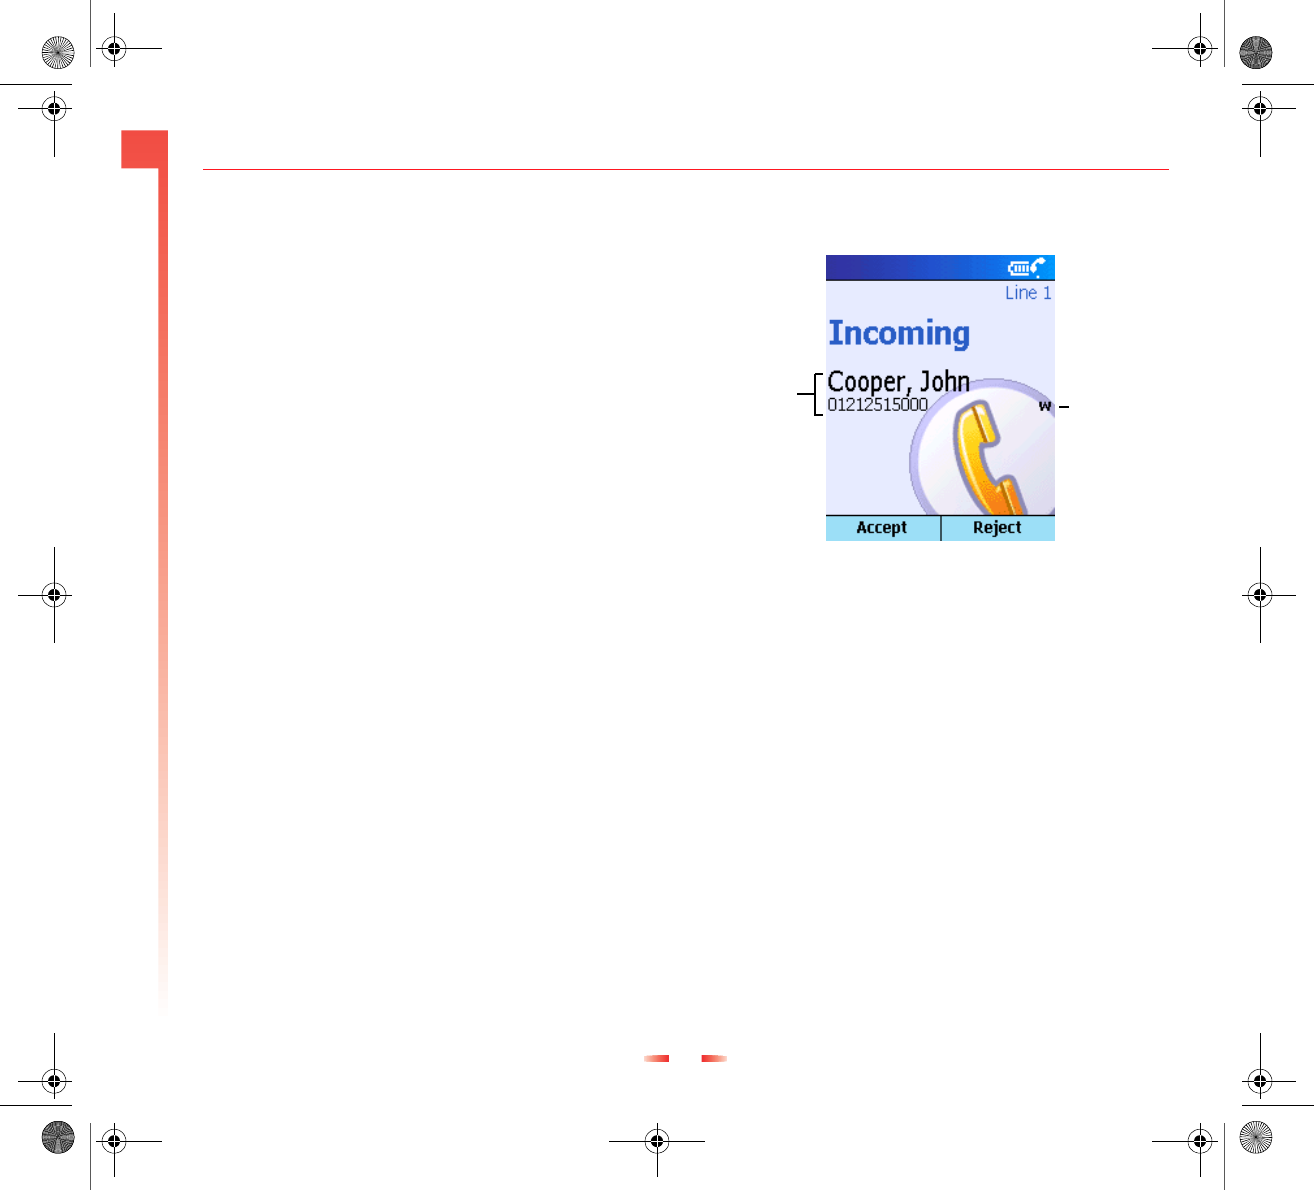
26 Sendo Z100 User Guide
2
Phone Calls
Receiving a call
When you receive a call, an Incoming Call screen is
displayed, which shows the name and number of the
caller. If the caller is not in your Contacts list, only
the caller’s phone number is displayed (unless you
subscribe to caller ID) You can either accept the call
or, if it’s not convenient, you can reject it.
When you reject a call, it is usually forwarded to your
voicemail service. Check with your service provider.
You can change this using the Call Forwarding
option in Telephony settings. See Telephony.
zNote: Caller ID, sometimes called CLI, or
Calling Line Identification, is a network service
that can help identify incoming calls even if the
caller is not in your contact list. Contact your
service provider for further details.
X
To answer an incoming call
•On the Incoming Call screen, press Talk f or
Accept d.
zTip: If you want to silence the incoming call,
press either of the volume keys.
X
To reject an incoming call
•On the Incoming Call screen, press End c or
press Reject g.
zNote: If you reject a call the caller is
automatically connected to your voice mail
service, if you are subscribed to this network
feature.
X
To end a call
•Press End c to disconnect the call.
Figure 6 Call Progress screen for receiving a call
Multiple Incoming Calls
If you are already on a call when a second call is
received, you will remain connected to the first call,
but a second incoming call screen is displayed.
zNote: This is only the case if you subscribe to a
Call Waiting service. Check with your service
provider.
X
To answer a second call using Call Waiting
•If you are already talking on the phone when you
receive another call, press Accept d or Talk
f, to place the first call on hold, and answer the
second call.
•To end the first call before answering the second
incoming call, press End c, then select Accept
Phone number
is identified as
Work number
in Contacts
Caller ID
information is
matched to a
contract
z100.book Page 26 Wednesday, September 18, 2002 4:03 PM

27 Sendo Z100 User Guide
2
Phone Calls
d or press Talk f, to accept the incoming
call.
X
To reject a Call Waiting call
•If you are already talking on the phone when you
receive another call which you don’t want to
answer, select Reject g. This keeps your current
call in progress, but rejects the waiting call.
Call tasks
X
To end a cal l
•Press End c on the relevant call progress screen
to disconnect a call.
X
To place a call on hold
•Select Hold d.
X
To switch between two calls
•Select Swap.
X
To redial the last number called
•On the Home screen, press Talk f twice.
X
To listen to a voice-mail message
1. On the Home screen, press Programs d,
select Inbox/SMS, and press Action.
2. Select the voice-mail message and select the
Voice Mail soft key or press Talk f. Your voice
mail number is dialled.
or,
1. Press and hold 1 on the Home screen.
In-call options
While a call is in progress, you can select Menu g
to list common in call tasks.
The following table shows the menu options
available when a call is in progress. Note that some
of these options are only available when multiple
calls are in progress or during a conference call.
zNote : You can press Home s and then press
Programs d, during a call to access many
other functions.
zTo return to the call progress screen, press
Home s and then select Call Progress.
Select To
End Disconnect the call.
Hold Place the active call on hold.
Unhold Activate the call currently on hold.
Swap Switch between two calls.
Save Contact Create a contact card for the caller.
Conference Join together all existing calls. You must be
subscribed to this service, check with your
service provider for details.
Private Break one call out of a conference call and
make this call active while the rest of the
conference is on hold.
Speaker-
phone
Switch to speakerphone mode.
Mute Mute the microphone for the active call. The
other party cannot hear anything you say, but
you can still hear the other party.
Unmute Turn the microphone back on for the active
call.
z100.book Page 27 Wednesday, September 18, 2002 4:03 PM

28 Sendo Z100 User Guide
2
Phone Calls
Reviewing your calls
Use Call History and Call Timers to view information
about phone calls you have made and received, for
example, you can check who has called you recently,
or the length of calls you’ve made and received.
Call History
Call History displays the last 25 calls you have
made, received, and missed. Each entry in the list
contains the start time of the call, the duration, the
caller’s name (if available) and the caller’s number.
The oldest calls are automatically deleted from the
list to make room for the most recent.
X
o view Call History
•On the Home screen, press Programs d, select
Call History, and press Action A.
zTip: You can change the Call History list so that
it only displays only missed calls, incoming calls
or outgoing calls. On the Call History list
screen, press Menu g, select Filter, press
Action A, and select the filter you want. Press
Action again. Only these types of calls are
displayed in the Call History list until you
change or remove the filter.
X
To view contact information from Call History
•Using the Up : and Down ; keys, select the
entry for the contact, press Menu g, select Find
Contact, and press Action A.
X
To send an e-mail message from Call History
•Select the contact, press Menu g, select E-mail,
and press Action A.
X
To create a new contact from a number in Call
History
•Select the number using the Up : and Down ;
keys and select Save d. Select New Item and
then press Action A. Enter the contacts first
name and surname and then scroll to the
relevant phone number field. Press Insert d to
copy the number from the call history list into the
new contact details. Now press Done d and
then Save d.
z100.book Page 28 Wednesday, September 18, 2002 4:03 PM
29 Sendo Z100 User Guide
2
Phone Calls
X
To remove an item from Call History
•Select the item using the Up : and Down ;
keys. Press Menu g, select Delete, and then
press Action A. An Alert Message is displayed -
you are asked whether you want to permanently
delete the call, select Yes d.
X
To remove all items in Call History
•Press Menu g select Delete List, and then press
Action A. An Alert Message is displayed - you
are asked whether you want to permanently
delete all calls, select Yes d.
Call Timers
Call Timers contains detailed information regarding
the length of your last call, the total number of calls
you’ve made and received, time of calls by type
(incoming, outgoing, roaming, and data), and a
lifetime calls counter.
You can also reset all your call timers at any time.
zNote: The actual time invoiced for calls by your
service provider may vary depending upon for
example, network features, rounding off billing
or taxes.
X
To view Call Timers
•On the Home screen, press Programs d, select
Call History and then press Menu g. Select
View Timers, and press Action A.
Figure 7 Call Timers
X
To reset call timers
•On the Home screen, press Programs d, select
Call History and then Press Menu g, select
Reset Timers and press Action A.
z100.book Page 29 Wednesday, September 18, 2002 4:03 PM
30 Sendo Z100 User Guide
3
Settings
Chapter 3 Settings
This chapter introduces viewing and changing the
settings on your phone and resetting your phone to
its original settings.
Viewing and changing settings
You can easily view and change settings to
personalize your phone for the way you use it. For
example, you can change the sounds or use your
own sounds for ring tones, notifications, and
reminders, use your own image for the Home screen
background, set up Call Forwarding and Call
Waiting to manage your calls more efficiently, and
more.
X
To view Settings
•On the Home screen, press Programs d, select
Settings, and press Action A.
zNote: To view more settings options, select More
and press Action A.
Figure 8 The Settings screen
Telephony
Telephony settings are primarily used to set options
for received calls, such as Call Forwarding, Call
Waiting, and Caller ID.
X
To view Telephony settings
•From the Settings menu, select Telephony, and
then press Action A.
The following table lists the telephony settings and
their functions. These are all network services, they
are only available if you have subscribed to them.
Contact your service provider for more information.
Select this To
Networks Display details about your current network,
change your network selection from Automatic
to Manual and select the GSM band you are
operating on. The default GSM band is based
on country.
Call Options Change phone numbers, such as your voice
mail and SMS service center, answer incoming
calls by pressing any key, and other advanced
call options.
Call Barring Block incoming and/or outgoing calls. You will
need a password to activate call barring
services.
Call
Forwarding
Forward (or divert) all or selected calls to
another number.
Call Waiting Turn Call Waiting on or off.
Caller ID Let your identification be known to all callers,
only your contacts, or no callers.
Channels This service may be available. Different
networks broadcast different information direct
to your phone.
z100.book Page 30 Wednesday, September 18, 2002 4:03 PM

31 Sendo Z100 User Guide
3
Settings
Sounds
Use Sounds settings to customize all the sounds on
your phone. You can select your own sound to ring
for incoming calls, keypad sounds, reminders, new
e-mails, new SMS, new voice messages, new instant
messages, new channel messages, the alarm clock,
SIM toolkit messages, exclamations, questions and
warnings.
X
To display Sounds settings
•From the Settings menu, select Sounds, and press
Action A.
X
To use your own sound
1. Copy the file on your desktop computer.
2. In ActiveSync™ on your desktop, click Explore,
double-click My Smartphone, double-click IPSM,
double-click Application Data, double-click
Sounds, and then paste the sound file into the
Sounds folder.
zNote: If a Sounds folder does not exist in this
directory, you must create one before you can
go any further.
3. From the Settings menu, select Sounds, and
press Action A.
4. Select the item to customize, move Left [ or
Right ] to select your sound, and then select
Done d.
zTip: You can also select the sound to use by
selecting the item you want to customize, and
pressing Action A. This displays the complete
list of sounds to choose from.
Profiles
Profiles settings are used to configure how your
phone notifies you of all events such as incoming
calls, an approaching appointments, or new
messages.
You can use Profiles to change quickly how you
receive all notifications based on your situation. For
example, you may want the phone to ring louder if a
client is calling, or you may not want the phone to
ring at all if you are in a meeting, but still want to
hear calendar reminders. The default profile is
Normal. The name of the current profile is displayed
on the Home screen (You can rename this).
The Z100 is supplied with a set of default profiles –
you can amend these so they are most suitable for
how you use your phone.
X
To view Profiles settings
•On the Home screen, press Programs d, select
Settings, Profiles, then press Action A.
zTip: You can access Profiles directly from the
Home screen. Either select the current profile,
which is displayed at the bottom of the screen,
using the joystick and press Action, or do a
Fixed Dialing Limit the area the phone can be used to call to
one or more specific phone numbers and/or
area codes.
Select this To
z100.book Page 31 Wednesday, September 18, 2002 4:03 PM
32 Sendo Z100 User Guide
3
Settings
short press on the Power key p to access the
Quick List. You can select a profile here.
Figure 9 Profiles
z100.book Page 32 Wednesday, September 18, 2002 4:03 PM
33 Sendo Z100 User Guide
3
Settings
Preset profiles
The following table displays all the profiles that
come with your phone:
zNote: Do not use a stereo headset when its use
may interfere with your ability to hear sirens,
horns or other warning signals, for example,
while driving. Use of stereo headsets while
driving is illegal in some jurisdictions.
X
To choose a profile
1. On the Home screen, use the joystick to move
Down ; and select the current profile, which is
displayed at the bottom of the screen. Press
Action A.
2. Use Up : and Down ; to select the profile you
want to use, press Action A to set the profile,
and then press Done d.
zTip: You can also choose a different profile from
the Quick List. Do a short press on the Power
key p from any screen, select the profile you
want to use and press Action A.
X
To modify a profile
1. From the Settings menu, select Profiles, and
press Action A.
2. Select the profile to modify, press Menu g,
and then select Edit.
3. Modify the settings as required, and press Done
d.
zNote: You can edit the Name, Ring type, Ring
volume, Alarm type, Alarm volume, Notification
Profile Name Normal Silent Meeting Loud Headset Car Speakerphone
Ring type Vibrate and
ring
Vibrate Vibrate Ring Vibrate and Ring Ring Vibrate and ring
Ring volume 4Off1Loud444
Alarm type Vibrate and
ring
Vibrate Vibrate and
sound
Play sound Vibrate and
sound
Vibrate and
sound
Vibrate and
sound
Alarm volume 3Off1Loud333
Notification
Type
Vibrate and
sound
Vibrate Vibrate and
sound
Play sound Vibrate and
sound
Vibrate and
sound
Vibrate and
sound
Notification
Volume
3 Off Loud Loud 3 3 3
System sound
volume
2OffOff3222
Auto answer in Never Never
z100.book Page 33 Wednesday, September 18, 2002 4:03 PM

34 Sendo Z100 User Guide
3
Settings
type, Notification volume and System sound
volume.
Home screen
Use the Home screen settings to change Home
screen layout, Colour scheme, Background image,
and Return to home screen after time, that is, the
time delay before the Home screen appears when
your phone is idle.
X
To view Home screen settings
•On the Settings menu, select Home Screen and
press Action A.
X
To customize the Home screen with your own image
zNote: Make sure that your phone is connected
to your desktop computer via USB before you
open ActiveSync™ to paste the image file.
1. Copy the image file from it’s location on your
desktop computer. The file format must be .gif,
.jpg or .gif.
2. Resize the picture to 176 (h) x220 (w) pixels and
save the file.
3. Open ActiveSync™ on your desktop, click
Explore, navigate to Mobile Device, double click
My Smartphone, double-click IPSM, double-click
Application Data, double click Home and then
paste the image file into the Home folder.
4. On your Z100, press Programs d, select
Settings, Home Screen and press Action A.
5. Move Up : and Down ; to select the
Background image field. Now use Left [or
Right ] to select your image.
6. Press Done d.
zTip: You can also select the image by selecting
the Background image field and pressing
Action. This displays the complete list of images
to choose from.
Security
Use the Security settings to enable the phone lock or
SIM lock and to set the phone lock password.
X
To view Security Settings
•On the Settings menu, select Security, and then
press Action A.
X
To enable the phone lock
1. On the security screen, select Enable phone lock
and press Action A.
2. In the Lock phone after field, use the joystick to
move left [ and right ] to select the length of
time that the phone must be inactive before it
locks automatically.
zTip: You can also set a password for the phone
lock, so that when the phone locks, you must
know the password to unlock it. Enter the
Password here and enter it again in the Confirm
password field for security.
z100.book Page 34 Wednesday, September 18, 2002 4:03 PM

35 Sendo Z100 User Guide
3
Settings
X
To enable the SIM lock
1. On the security screen, select Enable PIN lock
and press Action A.
2. Enter your SIM1 password. Press Done d.
Regional Settings
Use Regional Settings to set the phone’s Language,
Locale, Short date style, Long date style, Time
format, how Positive and Negative numbers are
displayed on the phone and how Positive and
Negative currency is displayed. The defaults on your
phone are local settings, but you can change these.
X
To view Regional Settings
•On the Settings menu, select Regional Settings,
and then press Action A.
Power Management
Use Power Management settings to check the Main
battery level, and set power-saving settings –
Backlight time out, Display brightness, Display
Blanking after and Display Off.
X
To view Power Management settings
•On the Settings menu, select Power
Management, and then press Action A.
X
To set the display off
1. On the Settings menu, select Power
Management, and then press Action A.
2. Move ; to the Display Off field and then use
the [ and ] keys to select the length of time
you want to pass before the power save screen is
displayed.
Data Connections
You can visit www.sendo.com/support/config to
autoconfigure your GPRS/WAP/e-mail and Internet
connection settings. The configurator sends an SMS
to your phone (or sends the information to your
phone directly if it connected to your PC using
ActiveSync) containing the settings you require to
start using these services.
Select
Backlight time
out
The amount of time after the last key press that
the backlight, which illuminates the screen,
fades.
Display
brightness
This is the level of brightness used on the
display of your phone. You can change this.
Display
Blanking after
The amount of time after the last key press that
the phone goes into a power saving mode
which fades the screen up and down every few
seconds. This is not a problem with your
display.
Display Off The amount of time after the last key press that
the phone goes into a power saving mode
which fades the screen to a dark blank display.
This is not a problem with your display. Press
any key to return to the screen you were
viewing previously.
Select
z100.book Page 35 Wednesday, September 18, 2002 4:03 PM

36 Sendo Z100 User Guide
3
Settings
Auto connections
Use Data Connections settings to set up Dial-up,
Virtual Private Network (VPN), Proxy, and General
Packet Radio Service (GPRS) connections so you can
connect to the Internet or your corporate network.
With a data connection, you can browse the Web,
download e-mail, chat using MSN® Messenger, or
synchronize wirelessly with the server. Check with
your service provider to see if a data connection has
already been set up for you, and if over-the-air
configuration is supported.
Add information about setting up:
•Internet connection
•Work connection
•WAP connection
•Secure WAP connection
X
To view Data Connections Settings
•On the Settings menu, select Data Connections,
and then press Action A.
Dial-up connection
You need to set up a Dial-up connection if you want
to connect to the Internet via an ISP (Internet Service
Provider) or to your corporate network.
X
To create a dial-up connection to the Internet
1. On the Settings menu, select Data Connections,
and then press Action A.
2. Select Menu g, Edit Connections, and then
press Action A.
3. Select Dial-up Connections, and press Action A.
4. Press Menu g, Add, and then press Action A.
5. Under Description, enter a name for the
connection.
6. Under Connects to, move Left [or Right ] to
select The Internet.
7. Enter the Country code, Dialling code and
Phone number for this dial up connection.
zNote: Insert a + symbol with a long press on
0 (this replaces the international access
code).
8. Enter the User name and Password for this dial
up account.
9. Enter the Domain name for this dial up account
(if required) and press Done d.
zNote: Speak to your (ISP) Internet Service
Provider for all the required settings.
X
To create a dial-up connection to your corporate
network
1. On the Settings menu, select Data Connections,
and press Action A.
2. Press Menu g, Edit Connections and press
Action A.
3. Select Dial-up Connections and press Action A.
4. Press Menu g, select Add, and then press
Action A.
5. Under Description, enter a name for the
connection.
z100.book Page 36 Wednesday, September 18, 2002 4:03 PM

37 Sendo Z100 User Guide
3
Settings
6. Under Connects to, move Left [ or Right ] to
select My Corporate Network.
7. Enter the Country code, Dialling code and
Phone number for this corporate connection.
zNote: Insert a + symbol with a long press on
0 (this replaces the international access
code).
8. Enter the User name and Password for this
corporate account.
9. Enter the Domain name for this corporate
account (if required) and press Done d.
zNote: Speak to your corporate IT administrator
for all the required settings.
VPN connection
A VPN (Virtual Private Network) connection is used to
access your corporate network using an existing
Internet connection. Speak to your corporate IT
administrator to obtain the required information to
create a VPN connection.
X
To create a VPN connection to your corporate
network
1. On the Settings menu, select Data Connections,
and press Action A.
2. Press Menu g, Edit Connections and press
Action.
3. Select VPN Connections and press Action A.
4. Press Menu g, select Add, and then press
Action A.
5. Under Description, enter a name for the
connection.
6. Under Server, enter the name of the server to
connect to (this information must be supplied by
your corporate IT administrator). Press Action
A.
7. Under Connects from, move Left [ or Right ]
to select the field that you require.
8. Under Connects to, move Left [ or Right ] to
select the field that you require.
9. Under User name enter the username that you
have been allocated in your corporate network
(this information must be supplied by your
corporate IT administrator). Press Action A.
10. Under Password enter the password that you
have been allocated in your corporate network
(this information must be supplied by your
corporate IT administrator). Press Action A.
11. Under Domain enter the domain that you are
trying to connect to (this information must be
supplied by your corporate IT administrator).
Press Action A.
12. Press Done d to complete connection.
Proxy connection
A proxy connection is used to access the Internet
using an existing connection to your corporate
network.
z100.book Page 37 Wednesday, September 18, 2002 4:03 PM

38 Sendo Z100 User Guide
3
Settings
X
To create a proxy connection to your corporate
network
1. On the Settings menu, select Data Connections
and press Action A.
2. Press Menu g, select Edit Connections and
press Action A.
3. Select Proxy Connections and press Action A.
4. Press Menu g, select Add and press Action A.
5. Under Description enter a name for the
connection.
6. Under Connects from, use the [and ] keys to
select My Corporate Network.
7. Under Connects to, use the [and ] keys to
select The Internet.
8. Under Proxy (name:port) enter the IP address or
the proxy name and port number to connect to.
Contact your corporate IT administrator for this
information.
9. Enter the Type - that is the protocol to use when
using the internet.
10. Enter a User name and Password.
11. Press Done d.
GPRS connection
If there is GPRS (General Packet Radio Service)
coverage in your area, you can set up a GPRS
connection to access the corporate network or the
Internet. GPRS is usually faster than a dial up
connection.
Date and time
Use Date and Time settings to set the Time zone,
Date, Time Alarm and Alarm time. When you set the
Alarm to on, it will alert you at the appointed time
every day until you set it to off. The Time zone is
based on country.
X
To view Date and Time settings
•On the Settings menu, select Date and Time and
press Action A.
X
To set the Alarm
1. On the Settings menu, select Date and Time and
press Action A.
2. Move Down ; to the Alarm field. Use the [
and ] keys to switch the field to On.
3. Move Down ; to the Alarm time field and enter
the time you want the Alarm to sound. You must
also enter whether this is am or pm.
4. Press Done d.
zTip: To set the sound for the alarm, use the
Sounds option from the Settings menu and
change the Alarm Clock field.
Accessibility
Use the Accessibility settings to configure your
system font size, multitap time-out (the amount of
time between key presses when entering text),
confirmation time-out, and in-call alert volume.
z100.book Page 38 Wednesday, September 18, 2002 4:03 PM

39 Sendo Z100 User Guide
3
Settings
X
To view Accessibility settings
•On the Settings menu, select Accessibility, and
then press Action A.
Remove Programs
Use the Remove Programs settings to permanently
remove programs which you have installed on your
phone. You cannot remove core programs supplied
with your phone, such as Contacts, Calendar, and
Internet Explorer.
X
To view Remove Programs Settings
•On the Settings menu, select Remove Programs,
and then press Action A.
Owner Information
Use the Owner Information settings to enter and
display personal information, such as your name,
telephone number, and e-mail address. Sendo
recommends that you fill this is as soon as you
purchase your phone. This may be helpful, for
example, if you lose your phone so that you can be
contacted if it is found. The mobile number field is
your phone number as read from your SIM card.
zTip: Enter an alternative phone number to your
Z100 in the Telephone number field, so that you
can be contacted if the phone is found.
X
To view Owner Information settings
•On the Settings menu, select Owner Information,
and then press Action A.
About
The About settings display information about your
phone’s operating system, including version
numbers and copyright information.
X
To view About settings
•On the Settings menu, select About, and then
press Action A.
z100.book Page 39 Wednesday, September 18, 2002 4:03 PM