Senseonics orporated 3401 FG-3300-01-001 User Manual
Senseonics Incorporated FG-3300-01-001
user manual
Mobile App
User Guide
A guide for using the Eversense
Continuous Glucose Monitoring System
Smart TransmitterSensor
LBL-0302-01-101 Rev 1_Eversense User Guide_mmolL_R5.indd 1 11/4/16 2:43 PM

LBL-0302-01-101 Rev 1_Eversense User Guide_mmolL_R5.indd 2 11/4/16 2:43 PM

Eversense Trademark
Eversense, Eversense Continuous Glucose Monitoring, Eversense CGM, Eversense Sensor, Eversense Smart Transmitter,
Eversense App and the Eversense logo are trademarks of Senseonics, Incorporated. Other brands and their products
are trademarks or registered trademarks of their respective holders.
LBL-0302-01-101 Rev 1_Eversense User Guide_mmolL_R5.indd 1 11/4/16 2:43 PM

Contents
Glossary 5
1. Introduction 7
Help and Support 7
Eversense CGM System Components 8
System Requirements 11
End User License Agreement and
Privacy Policy 12
Jailbroken Devices 12
Indications for Use 12
What is Included in this Package 14
How to Use this User Guide 14
2. Benets and Risks 15
Warnings 16
Risks and Side Eects 16
Cautions 18
3. Getting Started 20
Charge your Smart Transmitter 21
Step 1. Download and Install the App 23
Step 2. Set up the App – Account
Creation, Pairing and Settings 24
4. Inserting and Linking the
Sensor 30
5. Using the Smart
Transmitter 33
Daily Use 34
Secure the Smart Transmitter over
Inserted Sensor 35
Turn the Smart Transmitter
ON and OFF 38
Smart Transmitter Care and
Maintenance 39
Battery Indicator 39
LED Status Indicators 40
6. Calibrating the System 41
Calibration Phases 43
How To Calibrate 45
7. Using the App 50
Check Your Mobile Device Settings 50
Get To Know the “My Glucose” Screen 51
Trend Arrows 54
Trend Graph 55
Menu Options 56
LBL-0302-01-101 Rev 1_Eversense User Guide_mmolL_R5.indd 2 11/4/16 2:43 PM

Profile Picture 57
8. Customizing your Settings 58
Setting Glucose Target Levels 60
Setting Glucose Alert Levels 62
Setting Predictive Alerts 64
Setting Rate of Change Alerts 66
Setting Daily Calibration Times 68
Setting System Information 69
Setting Mealtimes Schedule 70
Setting Sounds 71
Setting Temporary Profile 73
Logging out 76
9. Alert Descriptions 77
Alerts and Notifications 77
Alert History 78
Alert Descriptions and Actions 79
10. Event Log 94
Glucose 95
Meals 96
Insulin 97
Health 98
Exercise 99
11. Reports 100
Weekly Modal Summary 101
Glucose Pie Chart 102
Glucose Statistics 102
12. Share My Data 103
Eversense Data Management Software
(DMS) Program 103
Sync 104
My Circle 105
My Reports 105
13. Product and General
Information on the App 106
14. Viewing Eversense Data
on the Apple Watch 108
Glance View 108
15. My Circle 110
Remote Monitoring with Eversense
CGM System and Eversense Now App 110
16. About the Sensor 116
Insertion Steps 117
LBL-0302-01-101 Rev 1_Eversense User Guide_mmolL_R5.indd 3 11/4/16 2:43 PM

Removal Steps 118
17. Travel 119
18. Troubleshooting 120
Smart Transmitter 120
Smart Transmitter Battery and
Charging 122
Connection with Smart Transmitter 123
Calibration 126
Alerts and Notifications 128
Glucose Readings 130
Trend Arrows 131
App 131
Sensor 132
Events 134
Sync 134
19. Device Performance 135
Clinical Study Performance 135
Overall System Performance
Compared to YSI 136
Clarke Error Grid Analysis 137
Consensus (Parkes) Error Grid
Analysis 140
Calibration Performance 142
Sensor Life 143
Smart Transmitter Wear 143
Safety 143
20. Technical Specications 144
Sensor 144
Smart Transmitter 145
Power Supply and Charger 146
USB Cable* for Charging and
Downloading 146
Electrical and Safety Standards 147
Symbols on the Eversense Mobile App 150
Symbols on Packaging and Devices 152
Eversense Smart Transmitter Limited
Warranty 154
Legal Notices 157
Apple Legal Notice 157
Google Legal Notice 157
About Bluetooth® 157
Bluetooth® Trademark 157
FCC Information 158
Index 159
LBL-0302-01-101 Rev 1_Eversense User Guide_mmolL_R5.indd 4 11/4/16 2:43 PM
5
Eversense CGM User Guide
Glossary
Alert An alert warns you that a situation needs
your attention and that you should respond/take
appropriate action.
Blood Glucose Meter A commercially available
device used to measure glucose using a blood sample
from a fingerstick.
Bluetooth® A brand name for a wireless networking
technology that uses short wave radio frequencies
(RF) to connect mobile devices and other wireless
electronic devices.
Calibration Blood glucose reading from a fingerstick
sample entered in the Eversense App to check the
accuracy of the system. With the Eversense System,
there are two phases: Initialization Phase during
which 4 fingerstick tests are required, and the Daily
Calibration Phase, during which 1 fingerstick test is
required twice daily.
CGM Continuous Glucose Monitoring. Continuously
monitoring your glucose levels from interstitial fluid
every few minutes.
Contraindication A condition or circumstance in
which a person should not use the device.
CT Computed Tomography
Do Not Disturb Mode (DND in the Eversense App)
When enabled, the smart transmitter will stop providing
vibratory notifications for non-critical alerts. The Do Not
Disturb feature in the Eversense App only controls the
smart transmitter and will not mute or hide smartphone
notifications. Many mobile devices have a separate
Do Not Disturb Mode. Consult the manufacturer’s
instructions for more information.
Electromagnetic Interference A strong field of energy
generated by electrical or magnetic devices.
EULA End User License Agreement
Eversense App Software program that is installed on a
mobile device and is used to display CGM glucose data
sent from the smart transmitter.
Eversense DMS A web-based application compatible
with the Eversense app where your glucose data is
stored and can be viewed.
Eversense Now A remote monitoring mobile
application that allows you to share your glucose data
with other people.
FAQ Frequently Asked Questions
“HI” Reading Indicates a sensor glucose reading is
> 22.2 mmol/L.
LBL-0302-01-101 Rev 1_Eversense User Guide_mmolL_R5.indd 5 11/4/16 2:43 PM

6
Eversense CGM User Guide
Hyperglycemia An episode of high blood glucose.
Hypoglycemia An episode of low blood glucose.
Interstitial Fluid (ISF) The fluid between cells in
the body. The Eversense CGM measures glucose from
an interstitial fluid sample, versus glucose in a blood
sample obtained from a fingerstick.
Jailbroken Device A device (iPhone or iPod) that has
been modified to remove the controls and limits set by
the original manufacturer.
LED Light Emitting Diode
Linked Sensor A sensor that is connected to a smart
transmitter.
“LO” Reading Indicates sensor glucose reading is
< 2.2 mmol/L.
Mobile Device A handheld device built on a mobile
operating system that runs the Eversense App and
communicates with the smart transmitter.
mg/dL Milligrams per deciliter, a unit of measure that
shows the concentration of a substance in a specific
amount of fluid. In some countries, including the United
States, glucose test results are reported as mg/dL,
indicating how much glucose is in the blood when using
a blood glucose meter, or how much glucose is in the
interstitial fluid when using some CGM systems, like the
Eversense CGM System.
mmol/L Millimoles per liter, a unit of measure that
shows the concentration of a substance in a specific
amount of fluid. In many countries, glucose test results
are reported as mmol/L, indicating how much glucose is
in the blood when using a blood glucose meter, or how
much glucose is in the interstitial fluid when using some
CGM systems, like the Eversense CGM System.
MRI Magnetic Resonance Imaging
Rate of change/trend arrows Indicators of direction
and speed of change of your glucose levels.
Remote Monitoring An optional feature that allows
you to invite others to view your CGM data using
Eversense Now, a separate mobile app they download
to a compatible mobile device.
Sensor A device inserted subcutaneously for
continually measuring interstitial fluid glucose levels.
Snooze Setting Used to set how often an alert repeats.
Subcutaneous Located beneath the skin.
Smart Transmitter A reusable device worn externally
over the inserted sensor that powers the sensor and
sends glucose information to the mobile device for
display in the Eversense App.
Warm-Up Phase The period the sensor requires to
adjust after the sensor has been inserted and before
calibrations.
LBL-0302-01-101 Rev 1_Eversense User Guide_mmolL_R5.indd 6 11/4/16 2:43 PM
7
Eversense CGM User Guide
1
1. Introduction
This section reviews how to use this guide and describes your new Eversense CGM System,
including its components and intended purpose.
Help and Support
Please review this User Guide with your health care provider. For additional Eversense product questions and trouble
shooting issues, contact Customer Support toll free in the US at 844-SENSE4U (844-736-7348). Outside the US, call
your local distributor or visit www.eversensediabetes.com to locate your local distributor.
Congratulations on having the latest technology to assist you in managing your diabetes. Your Eversense CGM System
is intended to continually measure glucose levels for up to 90 days after your sensor is inserted. Glucose information
collected by the system is automatically sent to your mobile device. You must contact your physician’s oce to
schedule the insertion and removal of your sensor.
LBL-0302-01-101 Rev 1_Eversense User Guide_mmolL_R5.indd 7 11/4/16 2:43 PM
8
Eversense CGM User Guide
1
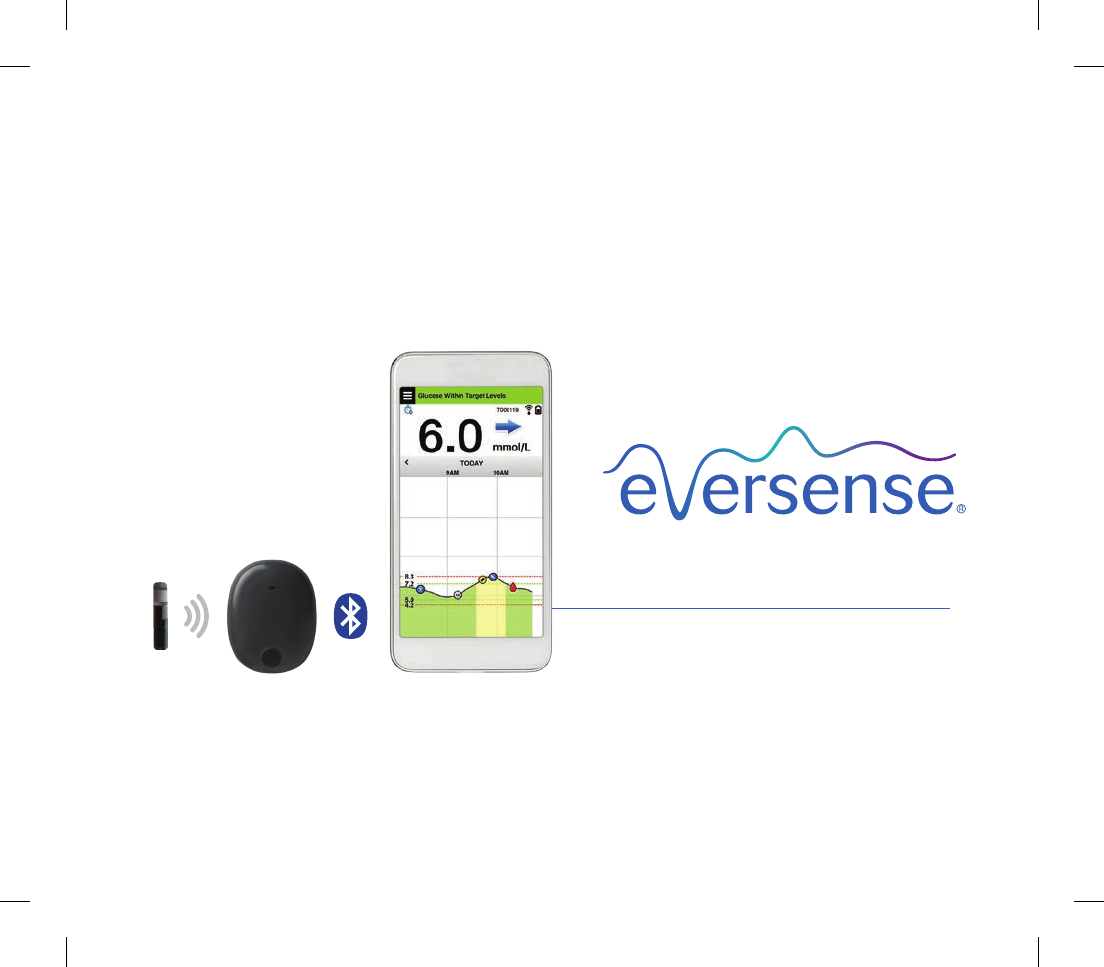
Eversense CGM System Components
The system includes 1) a small sensor inserted subcutaneously by a physician, 2) a removable smart transmitter worn
over the sensor, and 3) a mobile app to display the glucose readings.
Eversense Sensor
The sensor is inserted under the skin (upper arm) and measures glucose in
interstitial fluid for up to 90 days. These glucose levels are then calculated by
the smart transmitter and sent to the app.
Eversense Smart Transmitter
The removable smart transmitter is worn externally over the sensor and
powers the sensor. It wirelessly sends glucose data (via Bluetooth) to the
mobile device app. The smart transmitter also provides on-body vibe alerts
based on the glucose settings you choose. It has a rechargeable battery and
is reusable for up to one year.
Smart Transmitter
Sensor
LBL-0302-01-101 Rev 1_Eversense User Guide_mmolL_R5.indd 8 11/4/16 2:43 PM
9
Eversense CGM User Guide
1
Eversense App
The Eversense App is a software application that runs on a mobile device
(e.g., smartphone or tablet) and displays glucose data in a variety of ways.
It also provides alerts based on the glucose settings you choose.
IMPORTANT: In order to use the Eversense CGM System, you
must have an understanding of downloading and using mobile apps
on your handheld device. Data from the Eversense Smart Transmitter
is sent wirelessly via Bluetooth. Carefully read the instructions in this
User Guide for downloading and installing the Eversense mobile app,
and for pairing your mobile device with the smart transmitter. If there is
anything you do not understand in this User Guide, please contact your
local distributor.
Disposable adhesive patches for daily use are also included as part of the
system, and will be provided to you by your physician after your sensor has
been inserted. The patch has an acrylic adhesive side that attaches to the
back of the smart transmitter, and a silicone adhesive side that attaches to
the skin.
Make sure your mobile
device is using the latest
operating system.
Mobile App
LBL-0302-01-101 Rev 1_Eversense User Guide_mmolL_R5.indd 9 11/4/16 2:43 PM

10
Eversense CGM User Guide
1
Eversense System Overview
A separate blood glucose monitoring system (not provided by Senseonics) is required for calibrating the CGM System,
and to make treatment decisions. When used properly, these components work together to help ensure you get
continuous glucose monitoring for up to 90 days.
To ensure you receive continuous glucose readings and other information, follow these daily use tips:
Wear your smart transmitter all the time except when charging.
The smart transmitter is water-resistant to a depth of 1 meter (3.2 feet) for 30 minutes. Exposing the smart
transmitter to conditions beyond this will result in damage and void your warranty.
Make sure your smart transmitter has enough battery power at all times.
Perform two blood glucose meter calibration tests each day when prompted.
Pay attention to alerts and notifications you receive from your smart transmitter and mobile device.
Replace the adhesive patch on your smart transmitter daily.
You can remove the smart transmitter from the upper arm at any time, except during calibration. Remember that
no data are collected when the smart transmitter is not communicating with the sensor. When you place the smart
transmitter back on the sensor site, it will take 10 minutes for sensor communication to re-start and for glucose
readings to appear in the app.
When the smart transmitter and mobile device are not within range of each other, any data gathered by the smart
transmitter is stored and sent to the app when the mobile device and smart transmitter are back within range.
It is safe for you to wear your sensor and smart transmitter when you go through metal detectors at airports. While
flying, the smart transmitter performs similar to any other Bluetooth device. Be sure to follow the specific safety
guidelines mandated by the airline.
LBL-0302-01-101 Rev 1_Eversense User Guide_mmolL_R5.indd 10 11/4/16 2:43 PM

11
Eversense CGM User Guide
1
Some of the features of the Eversense CGM System:
• Wireless communication with the sensor, smart transmitter and app.
• Long-term sensor wear in the upper arm for up to 90 days.
• Alerts when pre-set Low or High Glucose Alert levels (hypoglycemia or hyperglycemia) are reached.
• Predictive Alerts let you know before reaching pre-set Low or High Glucose Alert levels.
• Use of mobile device (e.g., smartphone) to display glucose readings.
• On-body vibe alerts with the smart transmitter even when mobile device is not nearby.
• Provides readings within 2.2 - 22.2 mmol/L range every 5 minutes.
• Trend arrows that show whether your glucose values are rising or falling and how fast.
• Graphs and statistics that show your glucose results in easy-to-understand formats.
• Removable and rechargeable smart transmitter.
• Event entry capabilities (like meals, exercise and insulin).
• Stores glucose data in the app and on the smart transmitter.
• Provides remote monitoring capability to others using the Eversense Now mobile app.
System Requirements
• The Eversense CGM System.
• A compatible smartphone for Android (version 4.4 or higher) or Apple iPhone® or iPod® or iPad® (iOS version 8.0 or
higher) that has Bluetooth Smart (or Bluetooth Low Energy). The Eversense App also works with the Apple Watch®.
• For a list of compatible devices, please go to www.eversensediabetes.com.
• The Eversense CGM App downloaded to your mobile device from the Apple App Store or on Google Play™.
LBL-0302-01-101 Rev 1_Eversense User Guide_mmolL_R5.indd 11 11/4/16 2:44 PM

12
Eversense CGM User Guide
1
End User License Agreement and Privacy Policy
Use of the Eversense App is subject to the terms and conditions of the most current Eversense App End User License
Agreement and Eversense App Privacy Policy. These documents are updated from time to time and are posted at
www.eversensediabetes.com.
Jailbroken Devices
DO NOT use the Eversense apps on jailbroken iPhones or iPods. Jailbroken devices do not provide an acceptable level
of security and accuracy for the user and are not approved for use by Senseonics.
Indications for Use
The Eversense CGM System is indicated for continually measuring interstitial fluid glucose levels in adults (18 years
and older) with diabetes for the operating life of the sensor.
The system is intended to:
• Aid in the management of diabetes.
• Provide real-time glucose readings.
• Provide glucose trend information.
• Provide alerts for the detection and prediction of episodes of low blood glucose (hypoglycemia) and high blood
glucose (hyperglycemia).
Historical data from the system can be interpreted to aid in providing therapy adjustments. These adjustments should
be based on patterns and trends seen over time.
The system is indicated for use as an adjunctive device to complement, not replace, information obtained from
standard home blood glucose monitoring devices.
LBL-0302-01-101 Rev 1_Eversense User Guide_mmolL_R5.indd 12 11/4/16 2:44 PM

13
Eversense CGM User Guide
1
Contraindications
The sensor and smart transmitter are incompatible with magnetic resonance imaging (MRI) procedures. Patients
should not undergo an MRI procedure while the sensor is inserted or when wearing the smart transmitter. Should an
MRI be required the sensor must be removed before the procedure.
• The system is contraindicated in people for whom dexamethasone or dexamethasone acetate may be
contraindicated.
• Therapeutics products such as mannitol intravenous and irrigation solutions may increase blood mannitol
concentrations and cause falsely elevated readings of sensor glucose results.
LBL-0302-01-101 Rev 1_Eversense User Guide_mmolL_R5.indd 13 11/4/16 2:44 PM
14
Eversense CGM User Guide
1
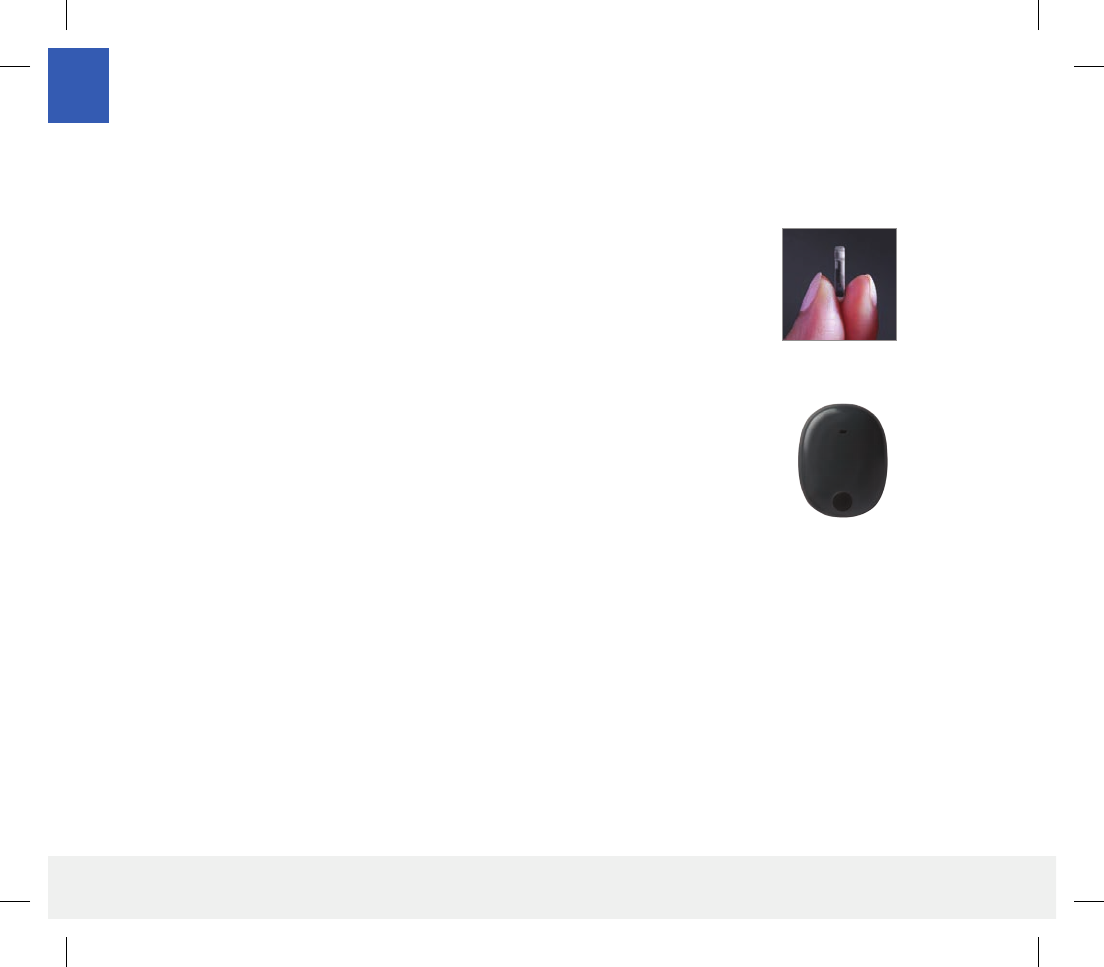
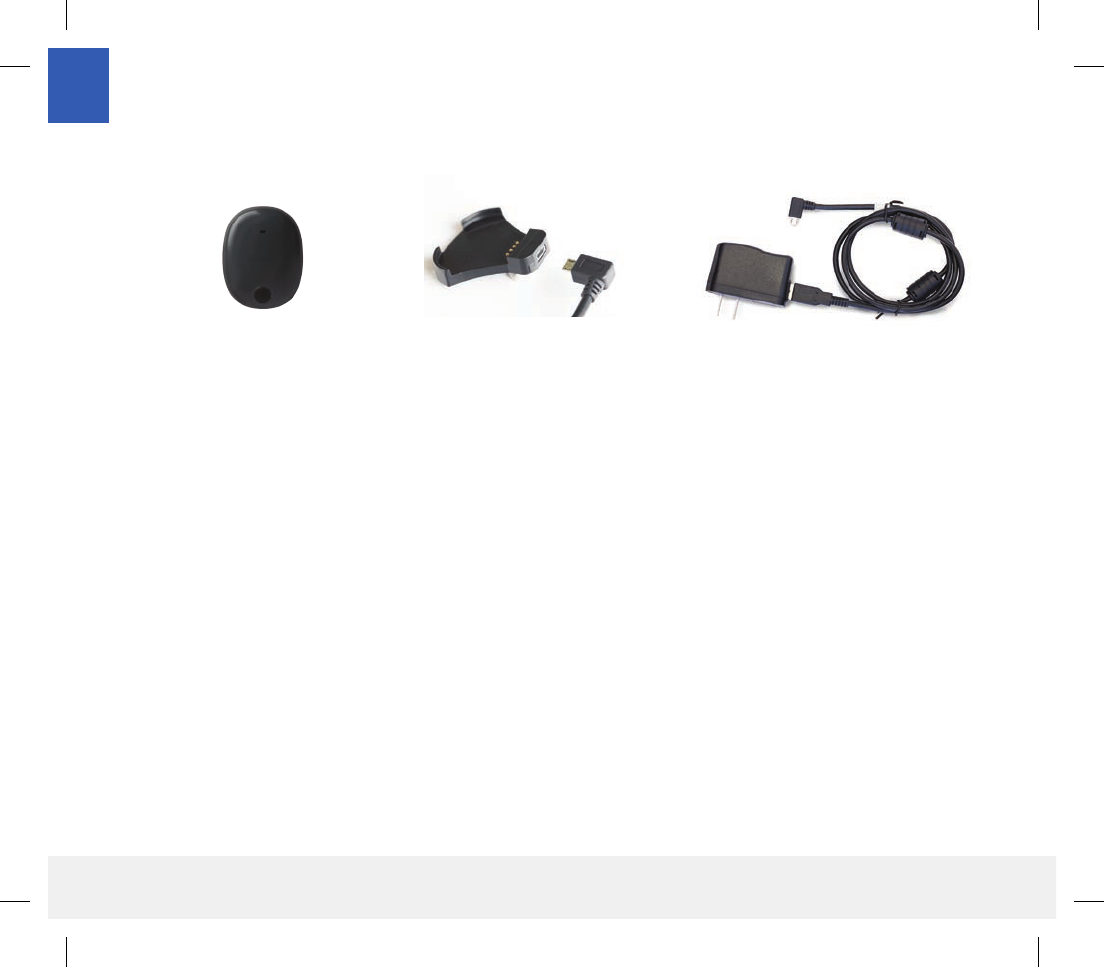
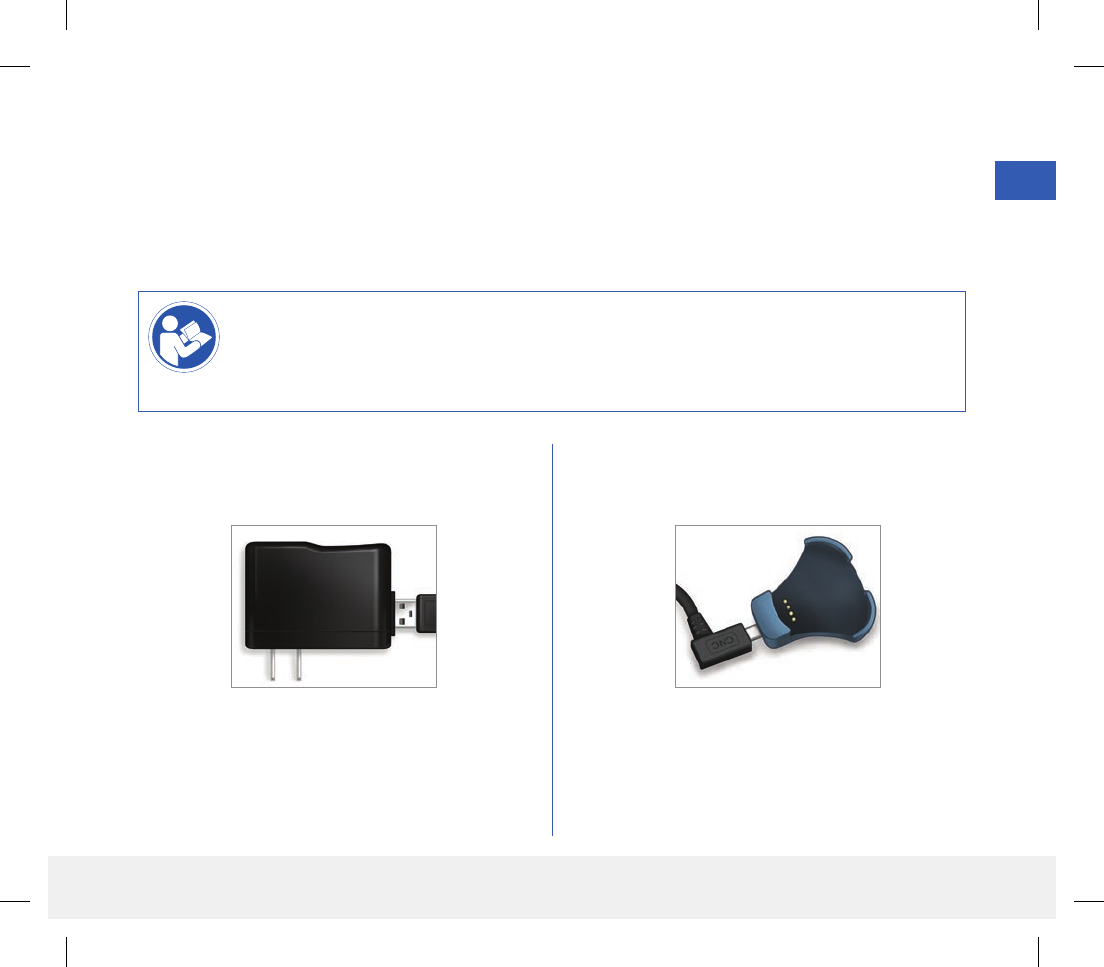
What is Included in this Package
This Eversense Smart Transmitter Pack contains the following:
Also included in this package is this User Guide and a Quick Reference Guide (not shown).
Eversense Smart Transmitter Charging Cradle Power Supply
(USB cable and AC power adapter)
How to Use this User Guide
This guide describes how to use your CGM System. Read the entire guide before using the system.
• Any warnings or cautions are highlighted in a box.
• User tips are preceded by the symbol.
LBL-0302-01-101 Rev 1_Eversense User Guide_mmolL_R5.indd 14 11/4/16 2:44 PM
15
Eversense CGM User Guide
2
2. Benets and Risks
This section describes the benets, expectations and risks associated with using the Eversense
CGM System.
Continuous glucose monitoring aids in the management of diabetes and glucose control, which can improve your
quality of life. Best results are achieved when you are fully informed about the risks and benefits, insertion procedure,
follow-up requirements, and self-care responsibilities. You should not have the sensor inserted if you cannot properly
operate the CGM System.
The CGM System measures glucose in interstitial fluid (ISF) between the body’s cells. Physiologic dierences between
ISF and blood from a fingerstick may result in dierences in glucose measurements. These dierences are especially
evident during times of rapid change in blood glucose (e.g., after eating, dosing insulin, or exercising). Glucose levels
in ISF lag behind glucose levels in blood by several minutes.
The sensor has a silicone ring that contains a small amount of an anti-inflammatory drug (dexamethasone acetate).
It has not been determined whether the risks associated with injectable dexamethasone acetate apply to the
dexamethasone acetate elution ring inside the sensor. The elution ring releases a small amount of dexamethasone
acetate when the sensor comes in contact with body fluids and serves to minimize the body’s inflammatory response
to the inserted sensor. Dexamethasone acetate in the ring may also cause other adverse events not previously seen
with the injectable form. For a listing of potentially adverse eects related to dexamethasone acetate, contact your
physician.
Unauthorized modifications of the equipment, improperly accessing information within it or “jailbreaking” your
system, and taking any other unauthorized actions may cause the CGM system to malfunction and may put you at
risk. Unauthorized modification of the equipment is not permitted and voids your warranty.
LBL-0302-01-101 Rev 1_Eversense User Guide_mmolL_R5.indd 15 11/4/16 2:44 PM
16
Eversense CGM User Guide
2
Risks and Side Eects
The glucose alerts and notifications will not audibly notify the user when the sound on your mobile device is turned
o. If the system cannot display a glucose value, it also cannot provide glucose alerts. If you are unable to feel the
vibration of the smart transmitter you may not notice the alerts. The system’s calculated glucose can be slightly
dierent from your blood glucose meter. This may cause an alert to activate at a dierent time than it would have if
the system’s values always matched the blood glucose meter values.
If you do not take frequent blood glucose measurements and miss an alert, you may not be aware of high or low
glucose levels. You may need medical attention in the event that you have high or low glucose and are unaware of it.
If you do not test your glucose with a blood glucose meter when you have symptoms of a low or high blood glucose
level OR when your symptoms are not consistent with the sensor glucose readings, you may miss a high or low
glucose event. Treatment decisions made without confirming with a blood glucose meter check may result in a high
or low glucose event, since blood glucose values can be slightly dierent than your sensor glucose values measured in
interstitial fluid.
The sensor is inserted by making a small incision and placing it under the skin. This process may cause infection, pain
or skin irritation. Additionally, the adhesive may cause a reaction or skin irritation.
Warnings
• If at any time you have symptoms of a low or high blood glucose level OR if your symptoms are not consistent
with the sensor glucose readings, you should test your glucose with a blood glucose meter.
• Always test your glucose with your blood glucose meter before making a treatment decision.
• If your smart transmitter is damaged or cracked, DO NOT use, as this could create an electrical safety hazard
or malfunction, and could result in electrical shock.
• Close contact with direct EMI may interfere with the smart transmitter’s ability to send data to your mobile
device. Move away from the source of EMI and check that your mobile device is connected to your smart
transmitter.
LBL-0302-01-101 Rev 1_Eversense User Guide_mmolL_R5.indd 16 11/4/16 2:44 PM

17
Eversense CGM User Guide
2
Warnings (continued)
• High doses of aspirin (over 2000 mg), such as for chronic treatment of inflammatory conditions
(e.g., rheumatoid arthritis), may falsely lower Sensor glucose readings.
• Until it has healed, always cover the insertion site with a sterile bandage before placing the smart transmitter
adhesive over the sensor. Failure to do so could result in infection at the insertion site.
• Please review this User Guide with your health care provider. For additional Eversense product questions
and troubleshooting issues, contact Customer Support toll free in the US at 844-SENSE4U (844-736-7348).
Outside the US, call your local distributor or visit www.eversensediabetes.com to locate your local distributor.
• Always calibrate the system using only a fingerstick blood sample. DO NOT use an alternative site (such as
forearm or palm) blood glucose reading to calibrate the system.
• DO NOT insert your infusion set within 10.16 cm (4 in) of the sensor site. If the insulin delivery site is within
10.16 cm (4 in) of the sensor site, it may interfere with sensor glucose readings and can cause inaccurate
glucose readings.
Always follow your physician’s instructions for care after the sensor insertion or removal. Contact your physician
if any of the following events occur:
• You have pain, redness, or swelling at the incision site(s) later than 5 days after the sensor insertion or
removal.
LBL-0302-01-101 Rev 1_Eversense User Guide_mmolL_R5.indd 17 11/4/16 2:44 PM
18
Eversense CGM User Guide
2
Cautions
• DO NOT exchange smart transmitters with another person. Each smart transmitter can be linked to only one
sensor at a time.
• The following medical therapies or procedures may cause permanent damage to the sensor particularly if
used in close proximity to the device:
– Lithotripsy – The use of lithotripsy is not recommended for people who have an inserted sensor because
the eects are unknown.
– Diathermy – DO NOT use diathermy on people who have an inserted sensor. Energy from the diathermy can
transfer through the sensor and cause tissue damage in the insertion area.
– Electrocautery – The use of electrocautery near the inserted sensor may damage the device. DO NOT use
electrocautery near the sensor.
• DO NOT wear the smart transmitter during medical x-rays or computed tomography (CT) scans. To avoid
interference with results, remove the smart transmitter before undergoing medical x-ray or CT scans. Make
sure your physician knows about your smart transmitter.
• The sensor and smart transmitter should be linked the day of insertion. Failure to link the sensor and smart
transmitter could result in a delay in receiving glucose readings.
• Steroid use – It has not been determined whether the risks usually associated with injectable dexamethasone
acetate apply to the use of this dexamethasone acetate elution ring, a highly localized, controlled-release
device. The dexamethasone acetate ring could cause other adverse events not listed or previously seen.
• If the sensor or smart transmitter feels warm, remove the smart transmitter immediately and contact your
physician for further advice. A warm sensor could mean there is an infection or a sensor malfunction.
• Remove the smart transmitter from your arm before charging the smart transmitter battery. Failure to remove
the smart transmitter while it is charging could result in electrical shock.
LBL-0302-01-101 Rev 1_Eversense User Guide_mmolL_R5.indd 18 11/4/16 2:44 PM
19
Eversense CGM User Guide
2
Cautions (continued)
• DO NOT attempt to use the Eversense App while operating a motor vehicle.
• You should not receive massage therapy near the inserted sensor site. Massage therapy near the sensor site
could cause discomfort or skin irritation.
• Use only the AC power adapter and USB cable provided with the smart transmitter when charging the smart
transmitter battery. Use of another power supply could damage the smart transmitter, not allowing glucose
readings to be received properly, and could result in voiding your warranty.
• If you have any concerns about allergic reaction to silicones, contact your physician prior to use.
• Discard the patch after 24 hours of use.
• The Eversense Now Remote Monitoring App does not replace the monitoring regimen as directed by your
health care provider.
• The Eversense CGM System has not been tested in the following populations: women who are
pregnant or nursing, people under the age of 18, critically ill or hospitalized patients, people receiving
immunosuppressant therapy, chemotherapy or anti-coagulant therapy, those with another active implantable
device, e.g., an implantable defibrillator (passive implants are allowed, e.g., cardiac stents), those with known
allergies to or using systemic glucocorticoids (excluding topical, optical or nasal, but including inhaled).
LBL-0302-01-101 Rev 1_Eversense User Guide_mmolL_R5.indd 19 11/4/16 2:44 PM
20
Eversense CGM User Guide
3
3. Getting Started
This section describes the initial start-up steps required before you can begin using your new
Eversense CGM System on a daily basis. You may perform these steps before your physician inserts
the sensor.
To get started you need:
• Your mobile device to download the Eversense App.
• Wireless internet connection.
• This Eversense Smart Transmitter Pack that includes your smart transmitter and power supply.
Note: If you have not received your Smart Transmitter Pack skip to instructions on downloading and installing
the Eversense App to your mobile device later in this section.
You may complete the following start-up steps before your sensor is inserted so that you can familiarize yourself
with the system.
Note: Your smart transmitter is set to “sleep” status for shipping. When you charge the smart transmitter for the
first time, the status changes to active.
2 easy start-up steps:
1. Download the Eversense App to your mobile device.
2. Set up the app – Create an Account, Pairing and Settings.
After you receive your smart transmitter it must be fully charged before pairing with the app.
LBL-0302-01-101 Rev 1_Eversense User Guide_mmolL_R5.indd 20 11/4/16 2:44 PM
21
Eversense CGM User Guide
3
1. Plug the standard end of the USB cable into the
adapter on the USB port.
2. Plug the micro end of the USB cable into the
charging cradle on the USB port.
It is important to charge the smart transmitter battery daily to ensure data is collected from the sensor and
sent to the app. The smart transmitter does not collect information from the sensor or send it to the app while
charging. You may also charge your smart transmitter by connecting the USB cable to a computer USB port
instead of the AC power adapter. Using a computer may take longer to fully charge the smart transmitter battery.
Caution: Use only the AC power adapter and USB cable provided with the smart transmitter
when charging the smart transmitter battery. Use of another power supply could damage the
smart transmitter, not allowing glucose readings to be received properly, and could result in voiding
your warranty.
Charge your Smart Transmitter
LBL-0302-01-101 Rev 1_Eversense User Guide_mmolL_R5.indd 21 11/4/16 2:44 PM
22
Eversense CGM User Guide
3
3. Line up the four gold pins on the bottom of the
smart transmitter with the four gold pins on the
charging cradle.
• Slide the smart transmitter into place in the
charging cradle.
• Once positioned, push down on the smart
transmitter until it snaps into place.
4. Plug the adapter into an AC power outlet.
LED Indicator
(lights green
or orange)
LBL-0302-01-101 Rev 1_Eversense User Guide_mmolL_R5.indd 22 11/4/16 2:44 PM
23
Eversense CGM User Guide
3
Step 1. Download and Install the App
2. Download the free Eversense
App from the Apple App Store
or on Google Play.
The prompts to install the app
will vary between iOS and
Android operating systems.
3. On the install screen, tap
Install application
and follow the installation
instructions.
After 1 - 2 minutes, check your
mobile device display for the
Eversense App icon (as shown
to the left).
The app is designed to work with the smart transmitter to automatically receive and display sensor glucose data.
Eversense App Icon
Note: Make sure your mobile
device is using the latest
operating system.
1. Select the mobile device you
would like to use to display
your glucose readings. In
most cases, this would be a
smartphone.
IMPORTANT: Make sure that you have a wireless internet connection
and that Bluetooth is turned ON before continuing.
LBL-0302-01-101 Rev 1_Eversense User Guide_mmolL_R5.indd 23 11/4/16 2:44 PM
24
Eversense CGM User Guide
3
Step 2. Set up the App – Account Creation, Pairing and Settings
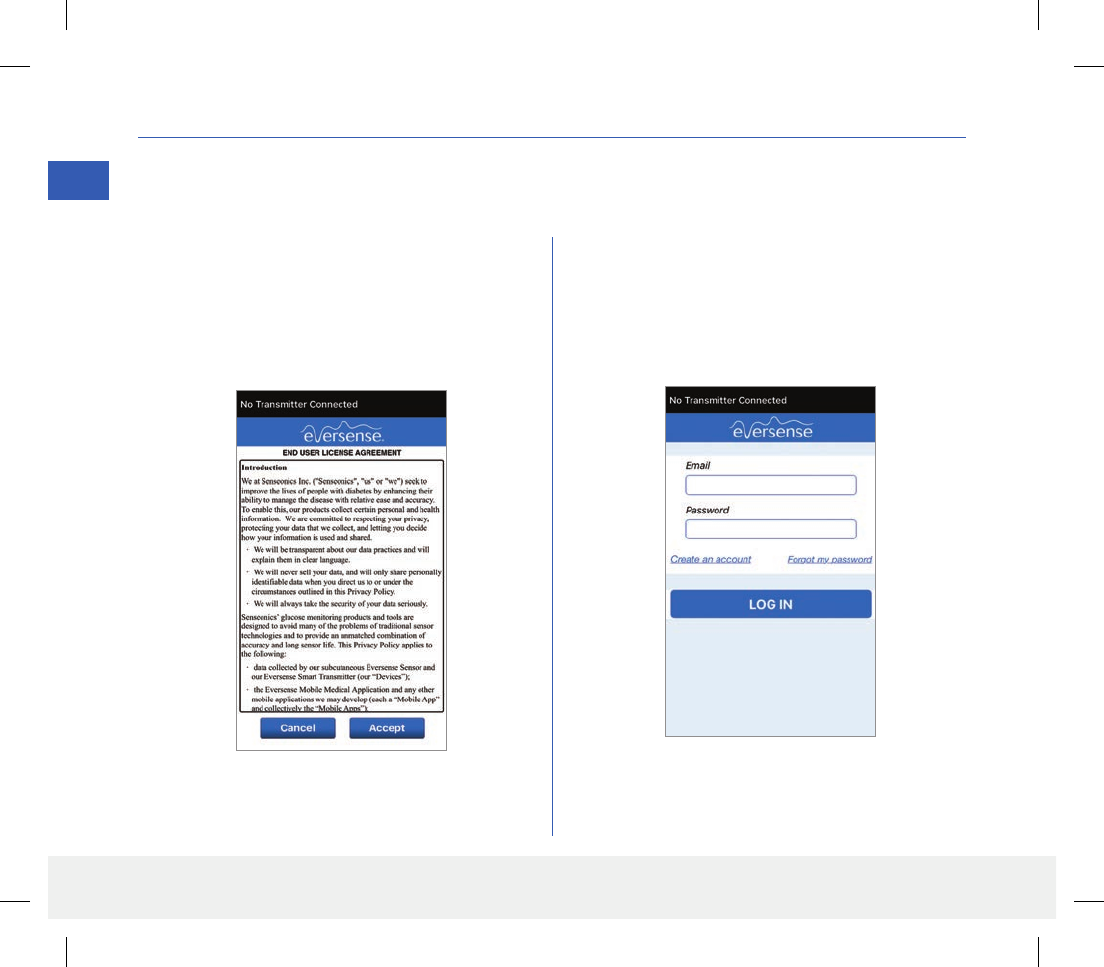
1. Launch the app by tapping the Eversense App
icon on your mobile device. The END USER
LICENSE AGREEMENT will appear.
• Review the Agreement and tap Accept to
agree to the terms of the License Agreement.
2. After you accept the Agreement, you will be
prompted to create and register an account with
an Email and Password.
• You must register an account before you are able
to log in. Tap Create an Account.
Once the app is downloaded, connect the app and smart transmitter by pairing the smart transmitter with your
mobile device.
Note: If you forget your password, you can reset it
via the app. If you forget your email associated with
your account, contact Customer Support.
LBL-0302-01-101 Rev 1_Eversense User Guide_mmolL_R5.indd 24 11/4/16 2:44 PM
25
Eversense CGM User Guide
3
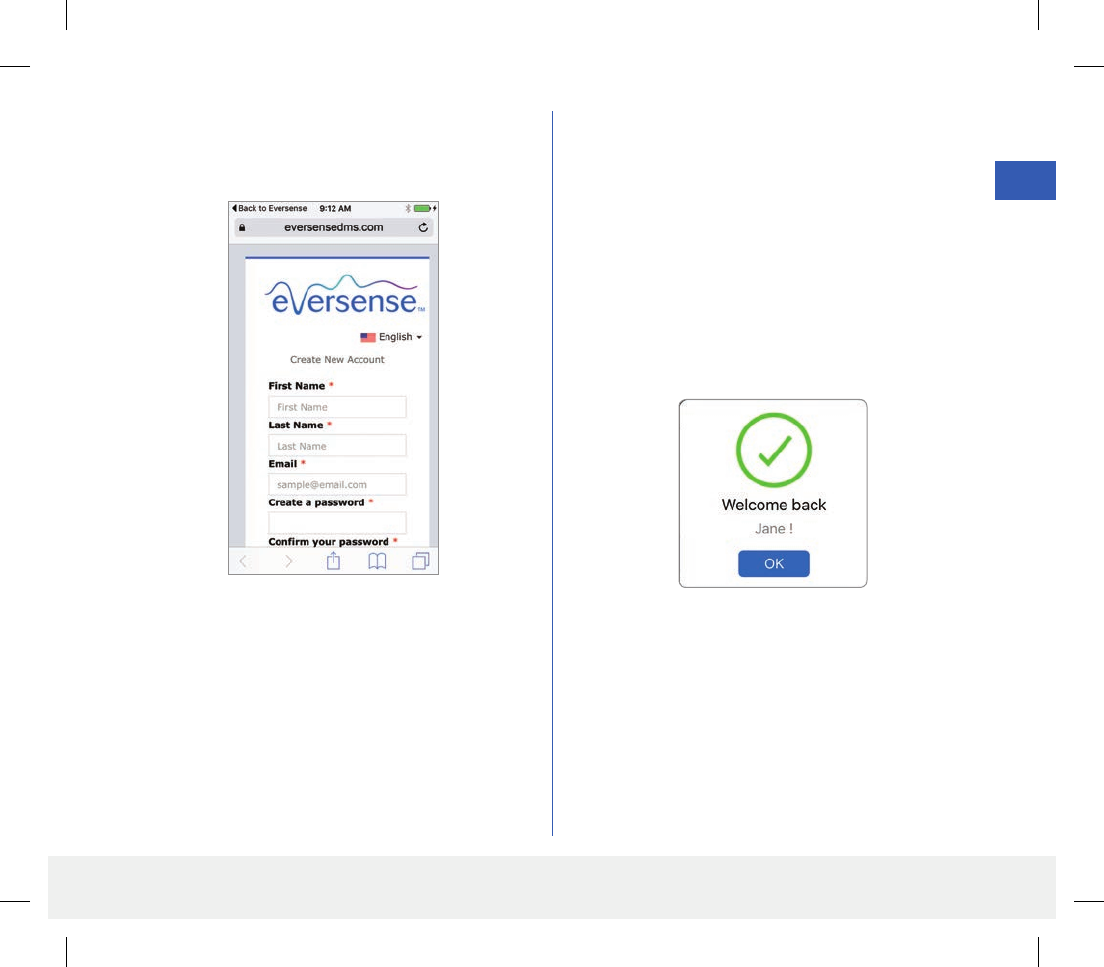
3. Enter your account information and then tap
Register.
4. Enter your email address and password and tap
LOG IN. You will see a confirmation screen.
Tap OK.
Note: The password is case sensitive.
To complete registration check the email address you
provided and click the link in the email.
• Tap Done to return to the Eversense
LOGIN screen.
LBL-0302-01-101 Rev 1_Eversense User Guide_mmolL_R5.indd 25 11/4/16 2:44 PM
26
Eversense CGM User Guide
3
5. When you complete
registration and log in, a
WELCOME screen appears.
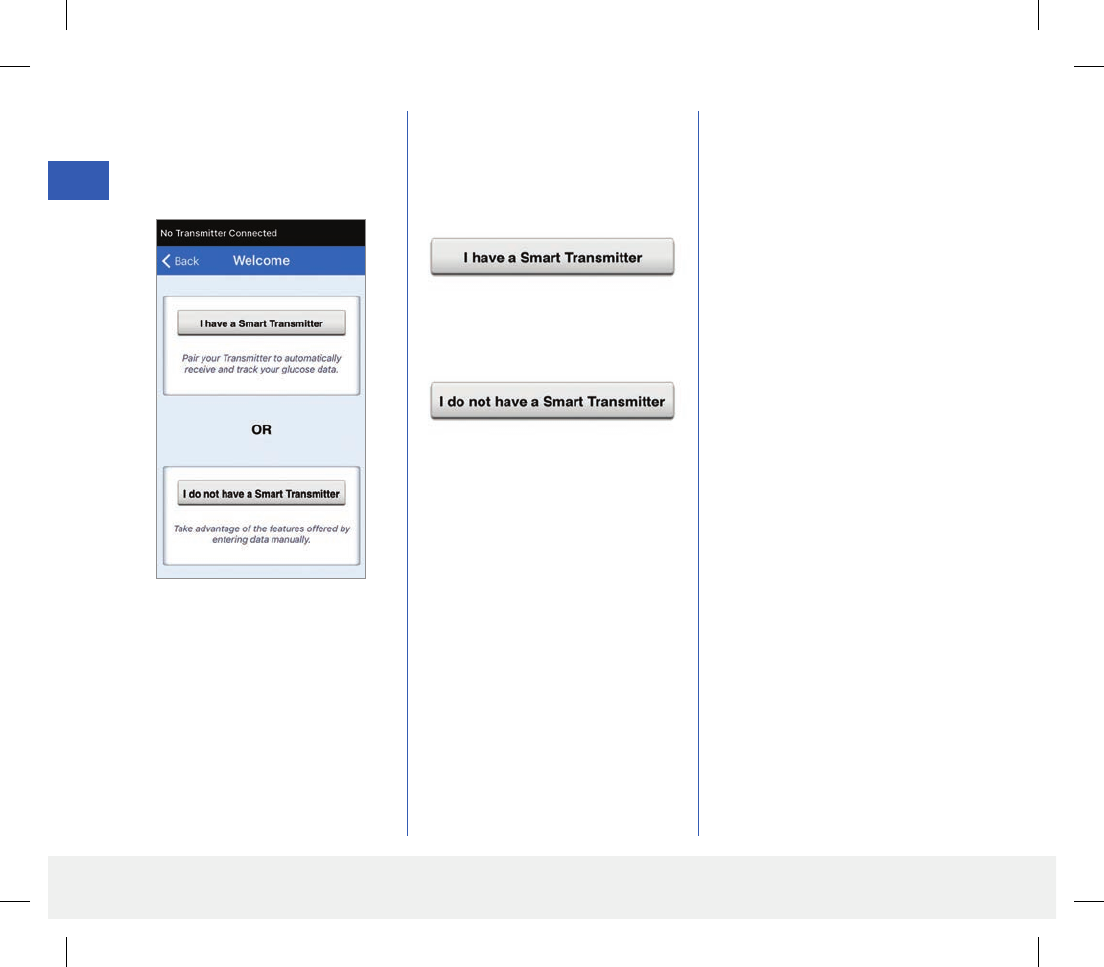
6. Choose one of the two options
depending on whether you
already have your smart
transmitter or not:
(skip to step 7).
(skip to step 12).
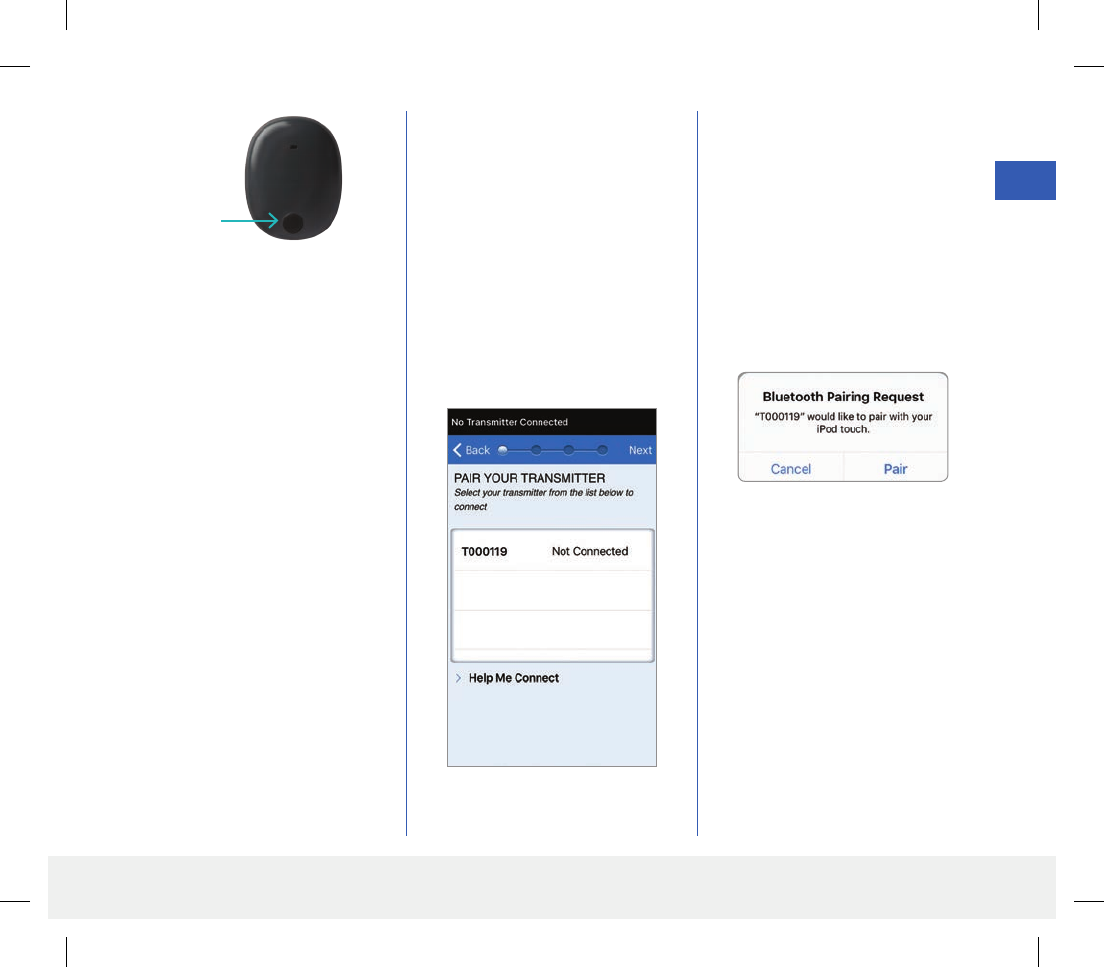
7. With the smart transmitter
turned on, and when
the PAIR YOUR
TRANSMITTER screen
appears on your mobile
device, set your smart
transmitter to “Discoverable”
mode for the mobile device to
find the smart transmitter:
• Press the smart transmitter
power button three times.
Make sure your smart
transmitter is not plugged
into the power supply.
• The LED will blink green
and orange to indicate
the smart transmitter is in
Discoverable mode.
LBL-0302-01-101 Rev 1_Eversense User Guide_mmolL_R5.indd 26 11/4/16 2:44 PM
27
Eversense CGM User Guide
3
8. On the PAIR YOUR
TRANSMITTER screen,
the smart transmitter ID
detected by the app is listed
as “Not Connected”. (Your
smart transmitter ID matches
the serial number found on the
back of the smart transmitter.)
Tap Not Connected to
begin pairing process.
9. A BLUETOOTH
PAIRING REQUEST
pop-up screen appears.
Tap Pair to complete the
pairing process.
Note: The smart transmitter
can only be paired with one
mobile device at a time.
Power button
Note: If you press the power
button on the smart transmitter
and no LED appears, press and
hold the power button for about
5 seconds to turn it on.
LBL-0302-01-101 Rev 1_Eversense User Guide_mmolL_R5.indd 27 11/4/16 2:44 PM
28
Eversense CGM User Guide
3
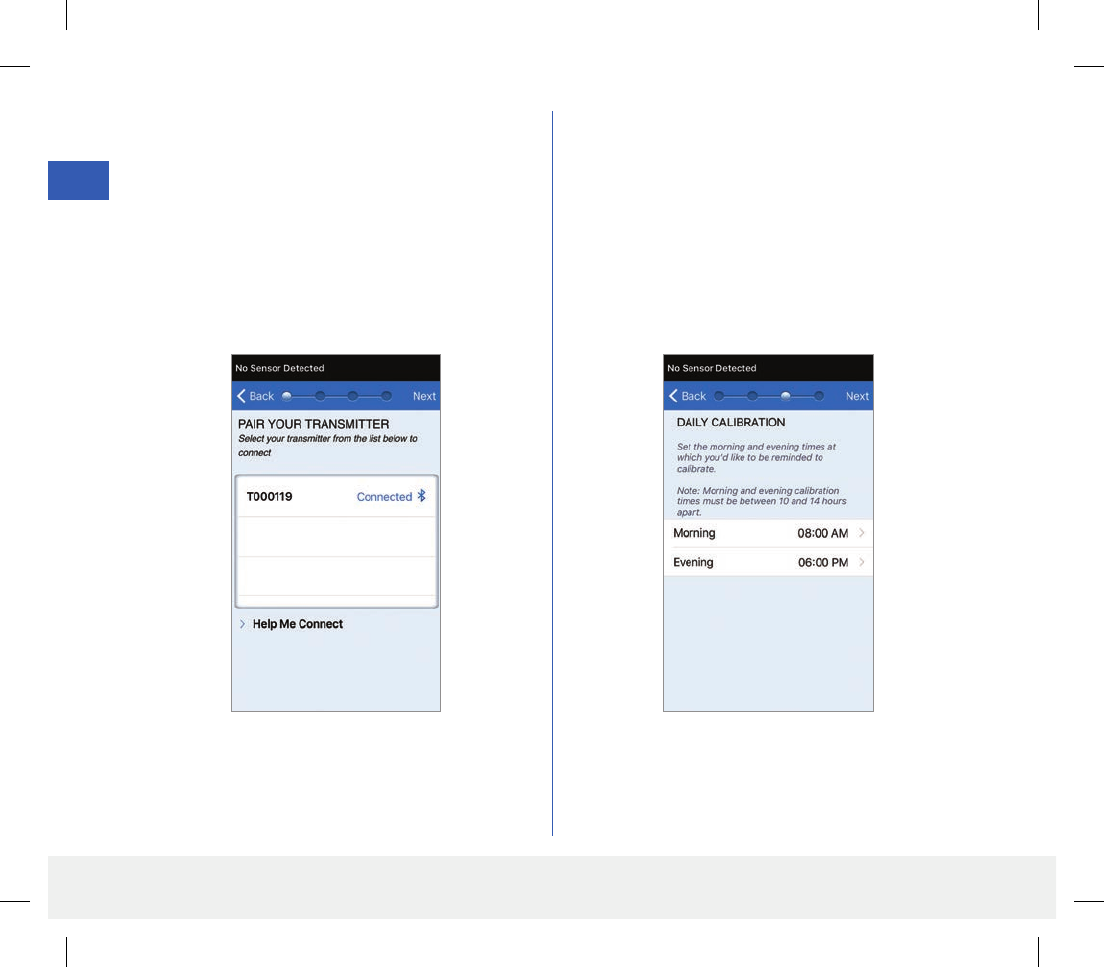
10. “Connected” appears next to the smart
transmitter ID once the pairing is complete.
The smart transmitter will provide intermittent
vibrations until the smart transmitter is linked
with the inserted sensor (see Inserting and
Linking the Sensor).
• Tap Next.
11. The DAILY CALIBRATION screen appears
for you to set your morning and evening reminder
times for your twice-a-day calibrations. You will
automatically receive a notification when it is
time to make a calibration entry.
• Tap Morning to change the time and repeat for
Evening.
• Tap Next when done.
LBL-0302-01-101 Rev 1_Eversense User Guide_mmolL_R5.indd 28 11/4/16 2:44 PM
29
Eversense CGM User Guide
3
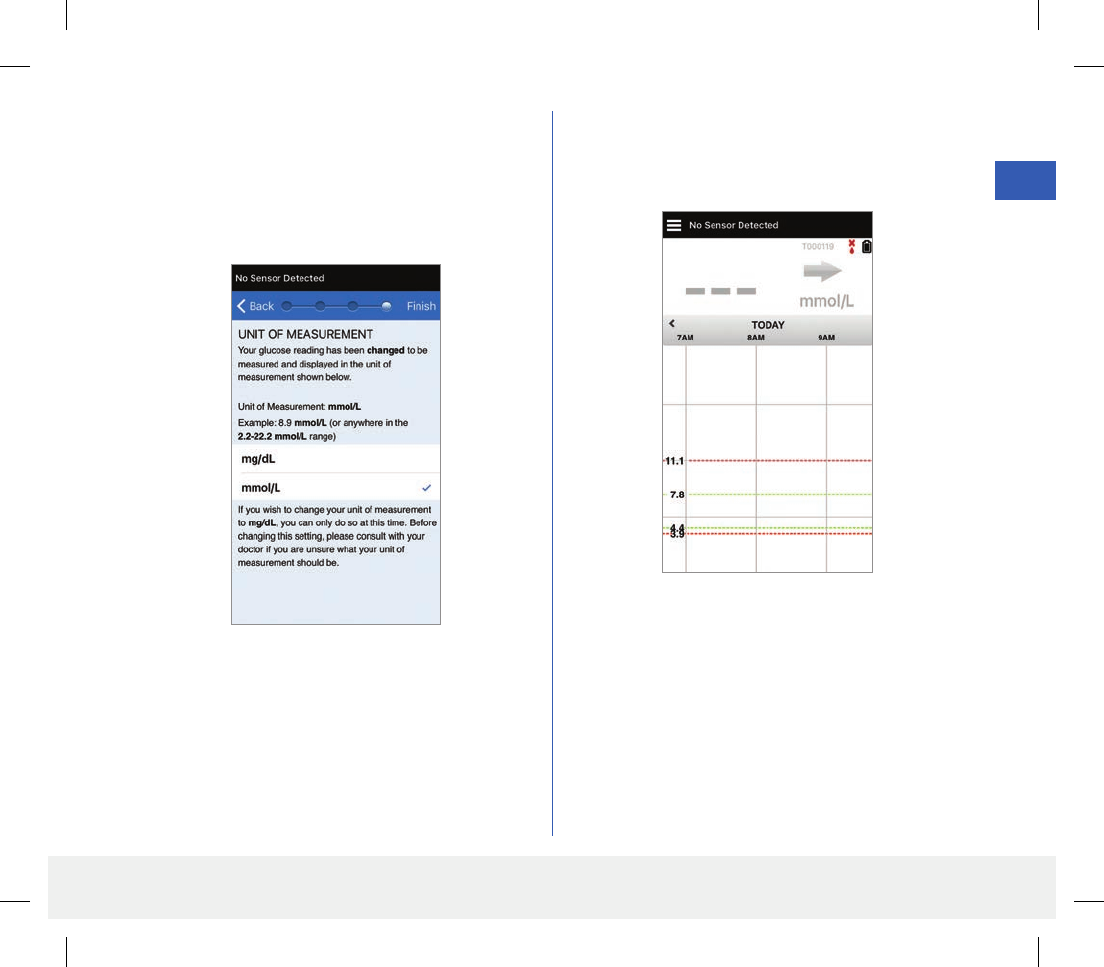
12. The UNIT OF MEASUREMENT screen
appears and indicates the standard unit of
measurement for your region. Your glucose
readings will always be displayed in this unit of
measurement.
Note: DO NOT change the unit of measurement
unless you have discussed it with your physician.
When the unit of measurement is confirmed,
tap Finish.
13. Next, the MY GLUCOSE screen appears. The
screen will not have any glucose data to display
at this time.
Note: Once the sensor is linked to the smart
transmitter, the red blood drop with the X will no
longer appear and a black blood drop with signal
bars will be displayed.
Once the sensor is inserted by your physician and
the 24-hour Warm-Up Phase is completed, you
can begin calibration. If you have not yet had your
sensor inserted, you can review this User Guide to
become familiar with the app and its features.
LBL-0302-01-101 Rev 1_Eversense User Guide_mmolL_R5.indd 29 11/4/16 2:44 PM
30
Eversense CGM User Guide
4
1. Make sure your smart transmitter is turned ON
(see Using the Smart Transmitter) and that your
mobile device has access to the internet.
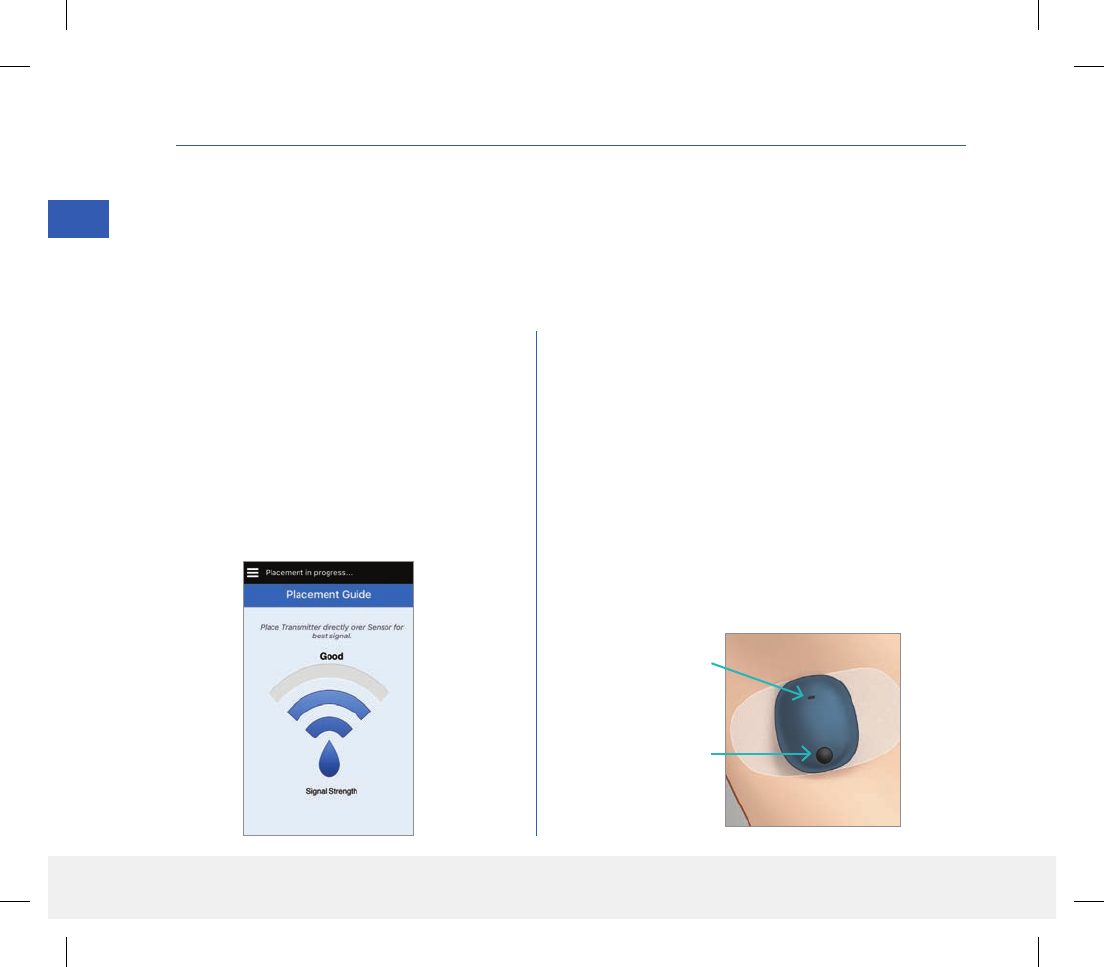
• Position the smart transmitter directly over the
inserted sensor until the Placement Guide
in the app shows some connection. The
Placement Guide page is located in Menu >
Placement Guide.
This section describes how to link the sensor and smart transmitter after your physician has
inserted the sensor. Only your physician can insert the sensor. See “About the Sensor” to learn more.
If the smart transmitter was sent directly to you, be sure to bring it and your mobile device to your insertion
appointment. Once your physician has inserted your sensor, the smart transmitter and the sensor must be linked in
order to start the Warm-Up Phase. Your smart transmitter can only be linked to one sensor at a time.
4. Inserting and Linking the Sensor
2. Navigate away from the Placement Guide page to
the Main Menu screen once you have confirmed there
is a signal.
Note: The connection between the sensor and the
smart transmitter is sensitive to the orientation of the
transmitter. If the smart transmitter is directly over the
sensor and the Placement Guide indicates there is no
connection, try rotating the smart transmitter slightly
to the left or right so the power icon and LED are
parallel to the sensor.
LED indicator
(lights green
or orange)
Power button
LBL-0302-01-101 Rev 1_Eversense User Guide_mmolL_R5.indd 30 11/4/16 2:44 PM
31
Eversense CGM User Guide
4
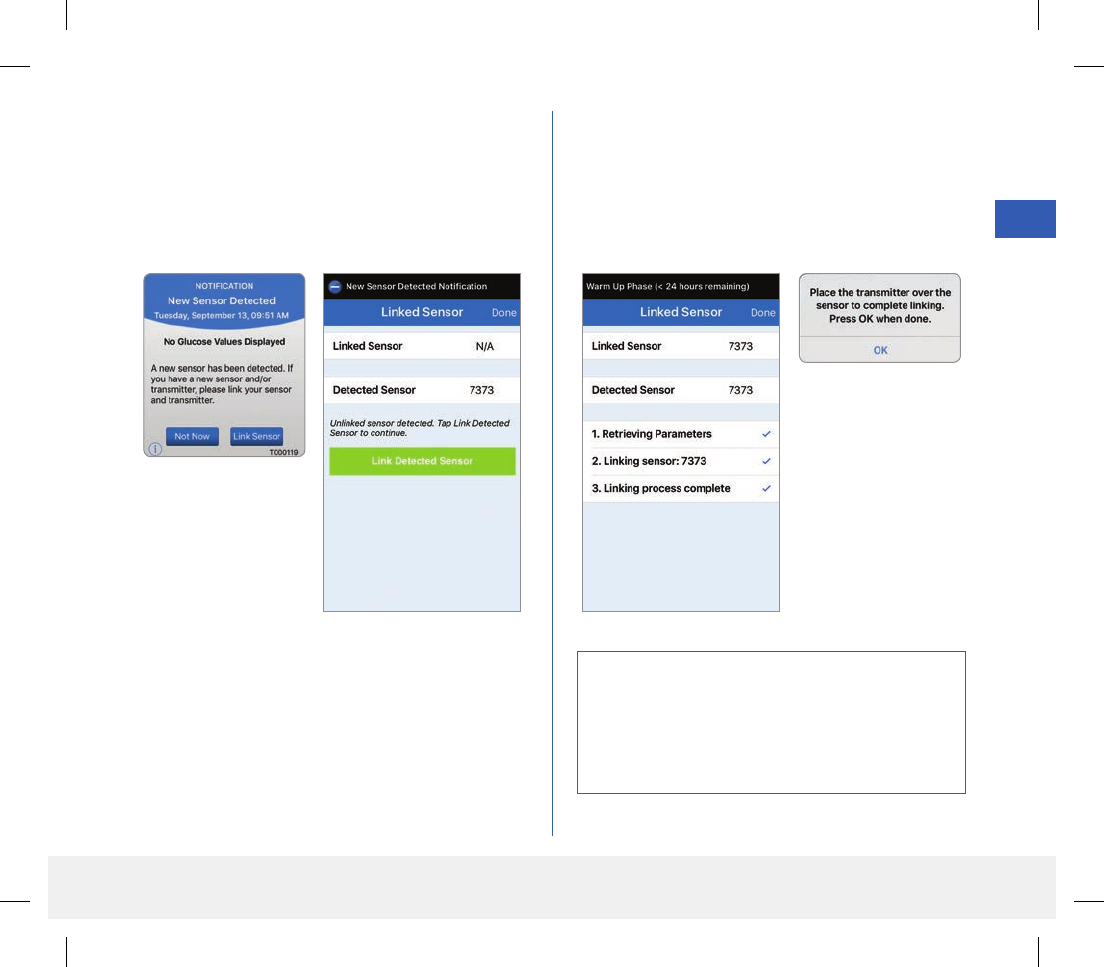
3. To link the smart transmitter and sensor, tap
Link Sensor on either the New Sensor
Detected pop-up screen or by tapping Menu >
Settings > System> Linked Sensor and
then tap Link Detected Sensor.
Note: It may take
up to 5 minutes for the
New Sensor Detected
notification to be
displayed.
If the smart transmitter
is removed from
the sensor site, the
system will display a
notification.
4. The linking process will begin. Each step will show
a check mark when finished. It may take up to
10 minutes for the process to complete. DO NOT
remove the smart transmitter from your insertion
site until the third check mark is displayed.
Caution: The sensor and smart transmitter
should be linked the day of the sensor insertion.
Failure to link the sensor and smart transmitter
could result in a delay in receiving glucose
readings.
LBL-0302-01-101 Rev 1_Eversense User Guide_mmolL_R5.indd 31 11/4/16 2:44 PM
32
Eversense CGM User Guide
4
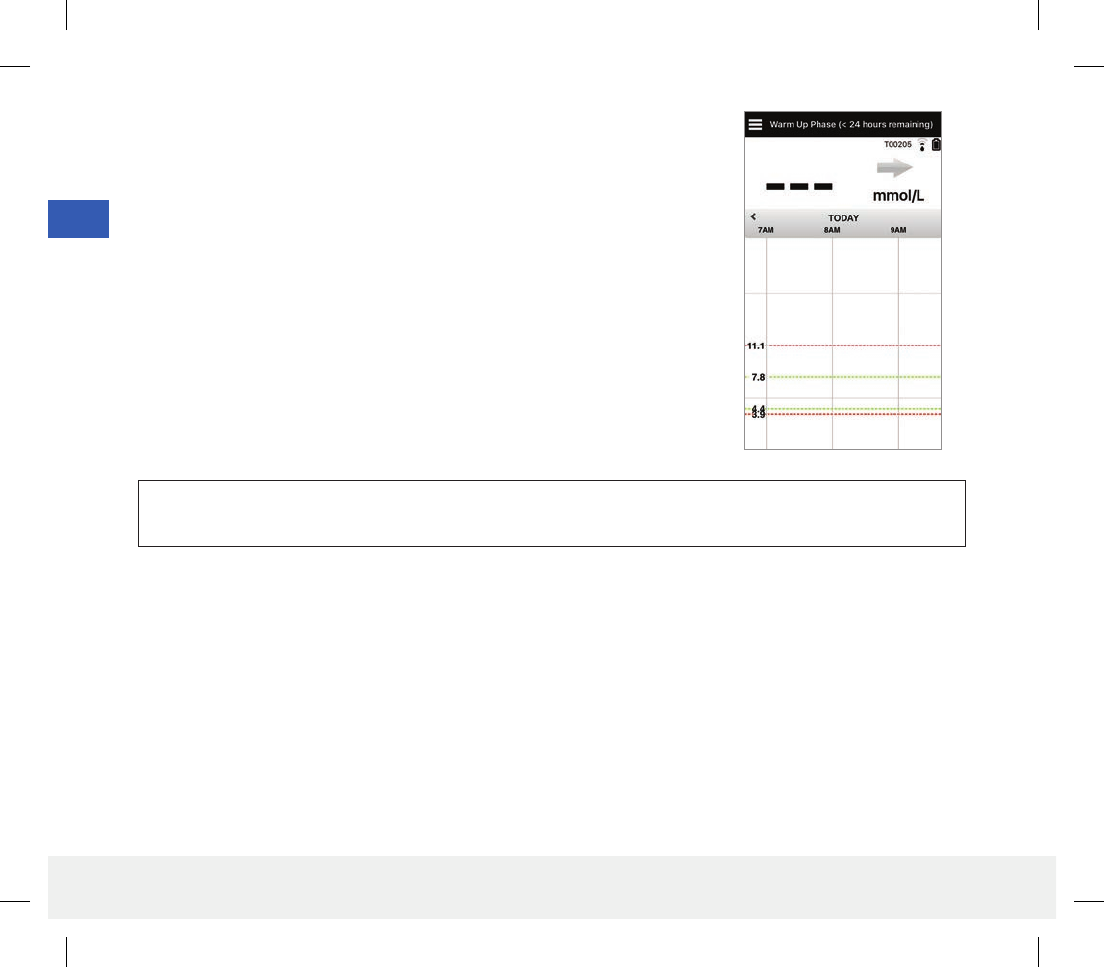
Note: The sensor requires a 24-hour Warm-Up Phase to stabilize in
your body before glucose values will be collected by the smart transmitter.
During the Warm-Up Phase, you do not need to wear the smart transmitter.
If you decide to wear the smart transmitter over the sensor during this
time, you will receive a message on the app indicating the Warm-Up Phase
is in progress. Once the Warm-Up Phase is complete, turn ON the smart
transmitter and place it over the sensor with the Eversense adhesive patch.
The system will prompt you to calibrate using the app.
IMPORTANT: If your smart transmitter is not turned on and paired with the Eversense App and linked to the
sensor, the system is not able to prompt you to calibrate.
LBL-0302-01-101 Rev 1_Eversense User Guide_mmolL_R5.indd 32 11/4/16 2:44 PM
33
Eversense CGM User Guide
5
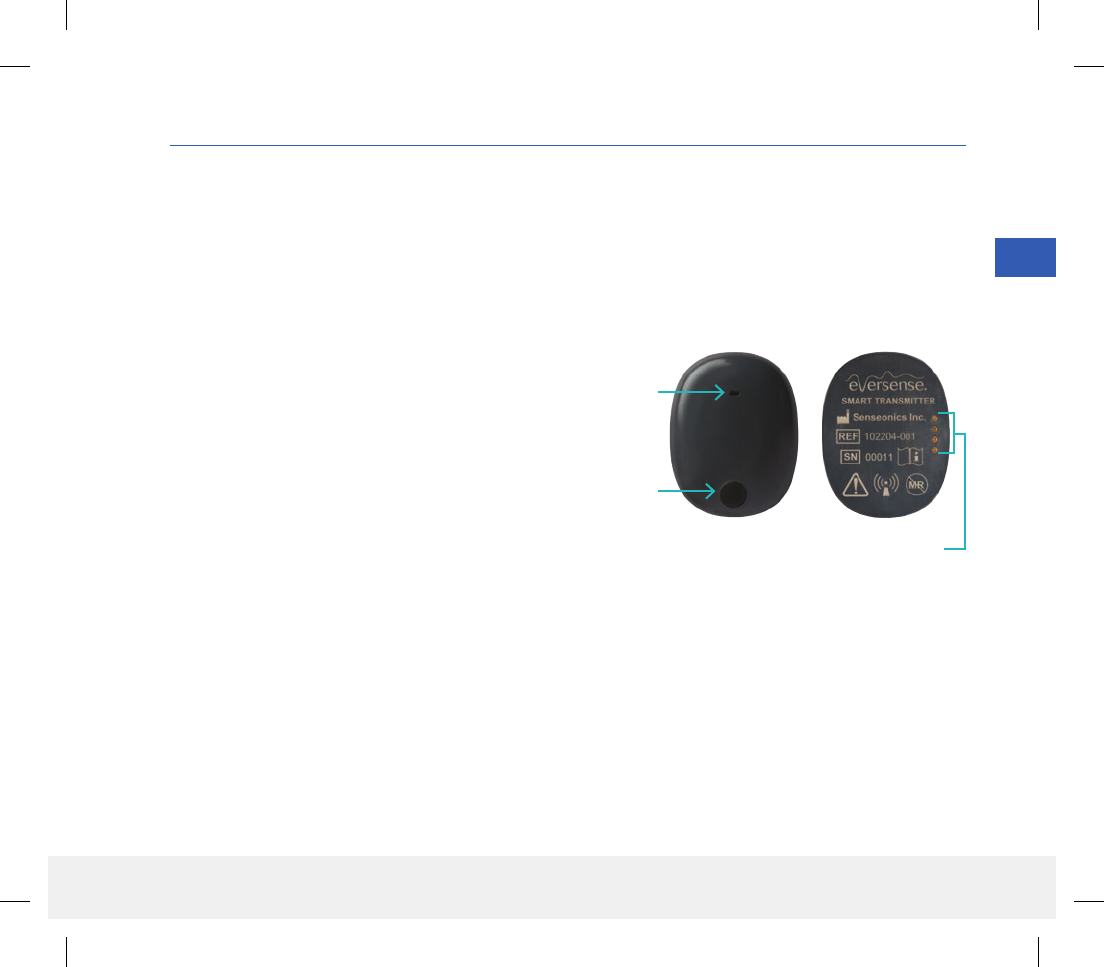
5. Using the Smart Transmitter
This section describes the many features of the smart transmitter and how to get uninterrupted
and continuous monitoring of your glucose levels.
Your smart transmitter communicates with both the sensor and the app to provide CGM information.
Your Eversense Smart Transmitter does the following:
• Powers the sensor.
• Calculates and stores up to 90 days of glucose data.
• Provides on-body vibe alerts when you have
reached the glucose alert levels you set.
• Sends glucose data to the app via Bluetooth.
• Can be recharged using the charging cradle.
• USB port to download data to compatible external
applications.
• Multi-color LED to indicate various modes of the
smart transmitter.
• Communicates with mobile device.
• Can be powered ON or OFF.
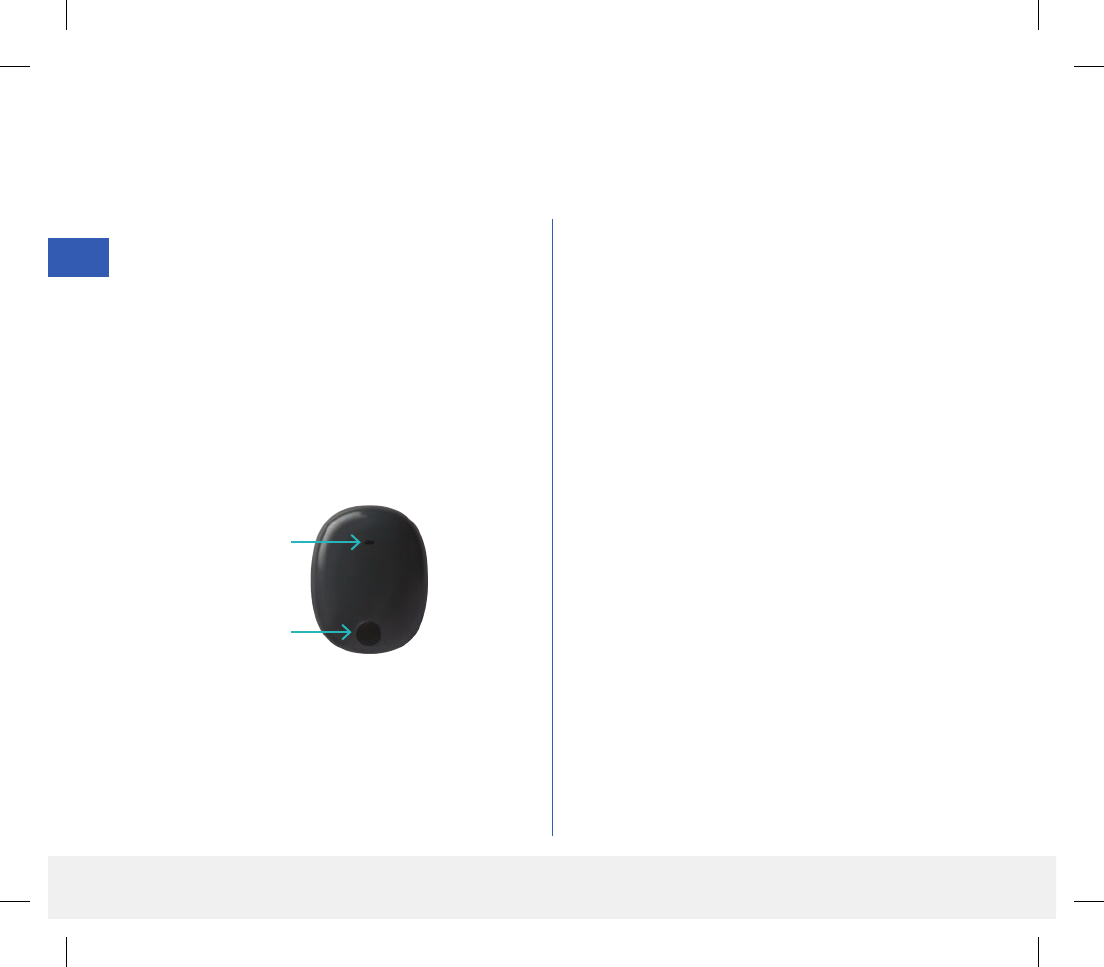
Power button
LED indicator
(lights green
or orange)
Top
Charging contact pins
Back
LBL-0302-01-101 Rev 1_Eversense User Guide_mmolL_R5.indd 33 11/4/16 2:44 PM
34
Eversense CGM User Guide
5
Daily Use
To receive continuous glucose readings and information, keep the following in mind when using your smart transmitter:
Wear your smart transmitter at all times except when charging.
The smart transmitter is water-resistant to a depth of 1 meter (3.2 feet) for 30 minutes. Exposing the smart
transmitter to conditions beyond this will result in damage and void your warranty.
Make sure your smart transmitter has enough battery power at all times.
Perform two blood glucose meter calibration tests each day when prompted.
Pay attention to alerts and notifications you receive from your smart transmitter and mobile device.
Replace the smart transmitter with a new adhesive patch on a daily basis.
You can remove the smart transmitter from the upper arm at any time, except during calibration. Remember that
no data are collected when the smart transmitter is not communicating with the sensor. When you place the smart
transmitter back on the sensor site, it will take about 10 minutes for sensor communication to re-start and for
glucose readings to appear in the app.
When the smart transmitter and mobile device are not within range of each other, any data gathered by the smart
transmitter is stored and sent to the app when the mobile device and smart transmitter are back within range.
It is safe for you to wear your sensor and smart transmitter when you go through metal detectors at airports. While
flying, the smart transmitter performs similar to any other Bluetooth device. Be sure to follow the specific safety
guidelines mandated by the airline.
Caution: Always remove the smart transmitter from your body before charging the battery.
Warning: If your smart transmitter is damaged or cracked, DO NOT use, as this could create an electrical
safety hazard or malfunction, and could result in electrical shock.
LBL-0302-01-101 Rev 1_Eversense User Guide_mmolL_R5.indd 34 11/4/16 2:44 PM
35
Eversense CGM User Guide
5
Caution: If you have any concerns about allergic reaction to silicones, contact your physician prior to use.
Discard the patch after 24 hours of use.
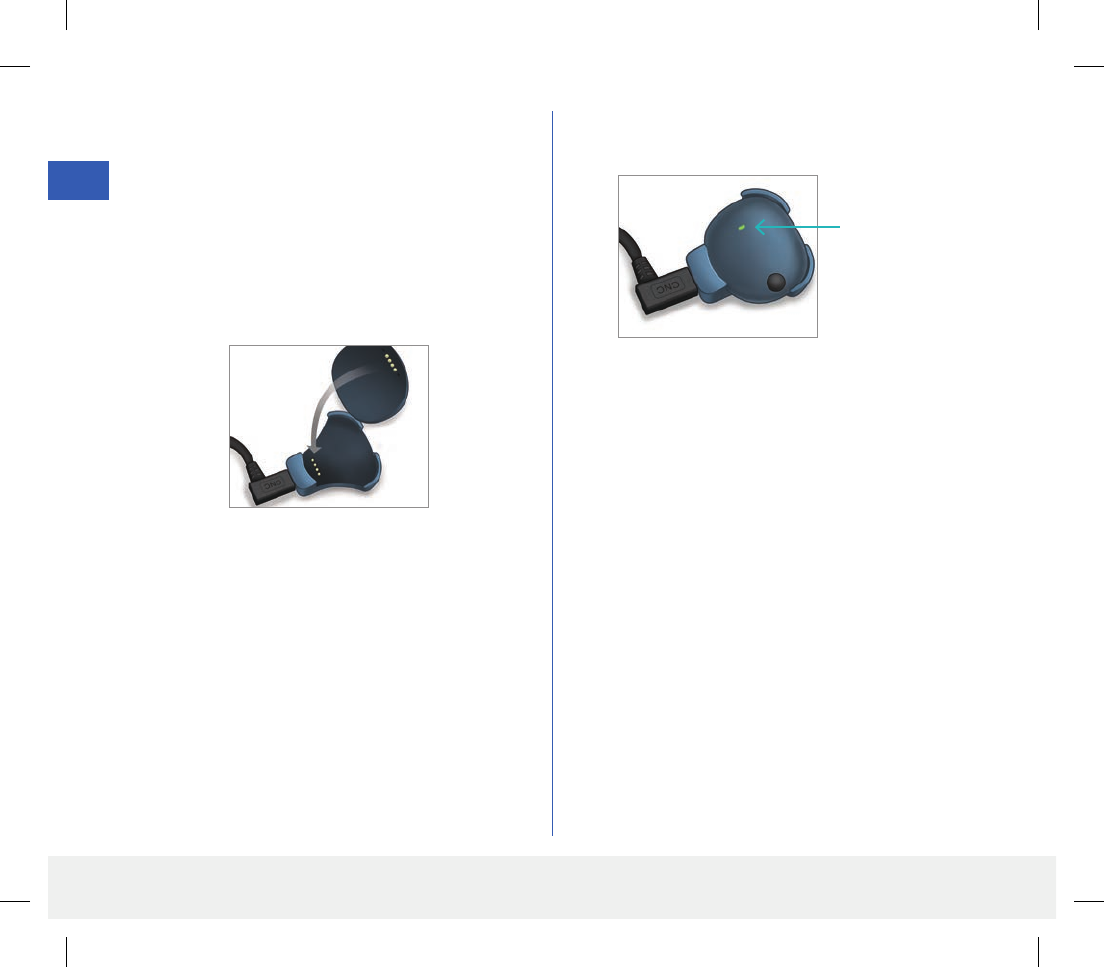
Secure the Smart Transmitter over Inserted Sensor
The smart transmitter must be secured on the skin directly over the sensor with the disposable adhesive patch. Each
adhesive patch is designed to be replaced daily and has an adhesive side that attaches to the back of the smart
transmitter and a silicone adhesive side that attaches to the skin. Both the skin and smart transmitter surfaces should
be clean and dry to secure the adhesive surfaces of the patch.
1. Peel o the paper backing with the Eversense
Smart Transmitter outline on it. Try not to touch the
sticky portion of the adhesive in the center.
2. Align the smart transmitter over the sticky side
(center) of patch and press firmly to secure.
• The smart transmitter should be placed so that its
sides face the wings of the patch (as shown).
Note: You will receive adhesive patches from your physician.
LBL-0302-01-101 Rev 1_Eversense User Guide_mmolL_R5.indd 35 11/4/16 2:44 PM
36
Eversense CGM User Guide
5
4. Check the connection between the smart
transmitter and the sensor.
• Tap Menu > Placement Guide.
• Refer to the Placement Guide when
attaching your smart transmitter to ensure there
is some connection between the sensor and
smart transmitter.
3. Remove the larger clear backing and position the
smart transmitter directly over the sensor.
• For the optimal signal strength, the smart
transmitter must be placed directly over the
sensor. Signal strength can also be improved by
rotating the smart transmitter over the sensor
such that the sensor aligns with the smart
transmitter.
LBL-0302-01-101 Rev 1_Eversense User Guide_mmolL_R5.indd 36 11/4/16 2:44 PM
37
Eversense CGM User Guide
5
5. Press the adhesive patch firmly on skin surface over
the sensor.
• The smart transmitter should be positioned so
that the patch wings lay horizontally on the arm.
6. Use the tab to pull o the remaining clear liner.
• Smooth the adhesive onto the skin. Make sure the
patch is flat on the skin surface.
LBL-0302-01-101 Rev 1_Eversense User Guide_mmolL_R5.indd 37 11/4/16 2:44 PM
38
Eversense CGM User Guide
5
Turn the Smart Transmitter ON and OFF
The smart transmitter has a power button to turn the device on and o. The power button and two light emitting
diodes (LED) lights are also used to indicate the remaining battery power.
1. To turn the smart transmitter ON, press and hold
the power button for about five seconds.
• The smart transmitter will vibrate once.
• Release the power button and the LED will blink
once indicating the power is ON.
At any time, you can press the power button once to
see if the smart transmitter is ON. If the LED appears,
the smart transmitter is ON. If no LED appears, the
smart transmitter is OFF.
2. To turn the smart transmitter OFF, press and hold
the power button for about five seconds.
• The smart transmitter will vibrate once.
• Release the power button and an orange light
will blink once, indicating the power is OFF.
Power button
LED indicator
LBL-0302-01-101 Rev 1_Eversense User Guide_mmolL_R5.indd 38 11/4/16 2:44 PM

39
Eversense CGM User Guide
5
Smart Transmitter Care and Maintenance
• Keep the smart transmitter and charging cradle clean (free of visible dirt) and protected when not in use. Wipe the
outside with a cloth between uses to keep clean.
• Charge the smart transmitter when the battery power is low.
• Use only the power supply supplied with your system to charge the smart transmitter battery. Using a power
supply other than one provided by Senseonics may void your smart transmitter warranty. DO NOT use the power
supply if it is damaged in any way.
To clean your smart transmitter, wipe it down with a water dampened cloth; dispose of the cloth according to your
local regulations. Dispose of the smart transmitter and all other system components according to local regulations.
Battery Indicator
The smart transmitter battery power can be checked using the app, or on the smart transmitter itself.
With the app:
• Tap Menu > About > My Transmitter. Scroll down to the Battery Level line that indicates amount of
battery left.
Or
• Check the battery icon on the upper right corner on the MY GLUCOSE screen. A red battery icon indicates
the smart transmitter battery is empty.
With the smart transmitter:
• With the smart transmitter ON, press and release the power button. The LED will blink green once if the battery
is charged. The LED will blink orange once if the battery is low. See the next page for more information on the
LED indicators.
LBL-0302-01-101 Rev 1_Eversense User Guide_mmolL_R5.indd 39 11/4/16 2:44 PM
40
Eversense CGM User Guide
5
• During smart transmitter charging:
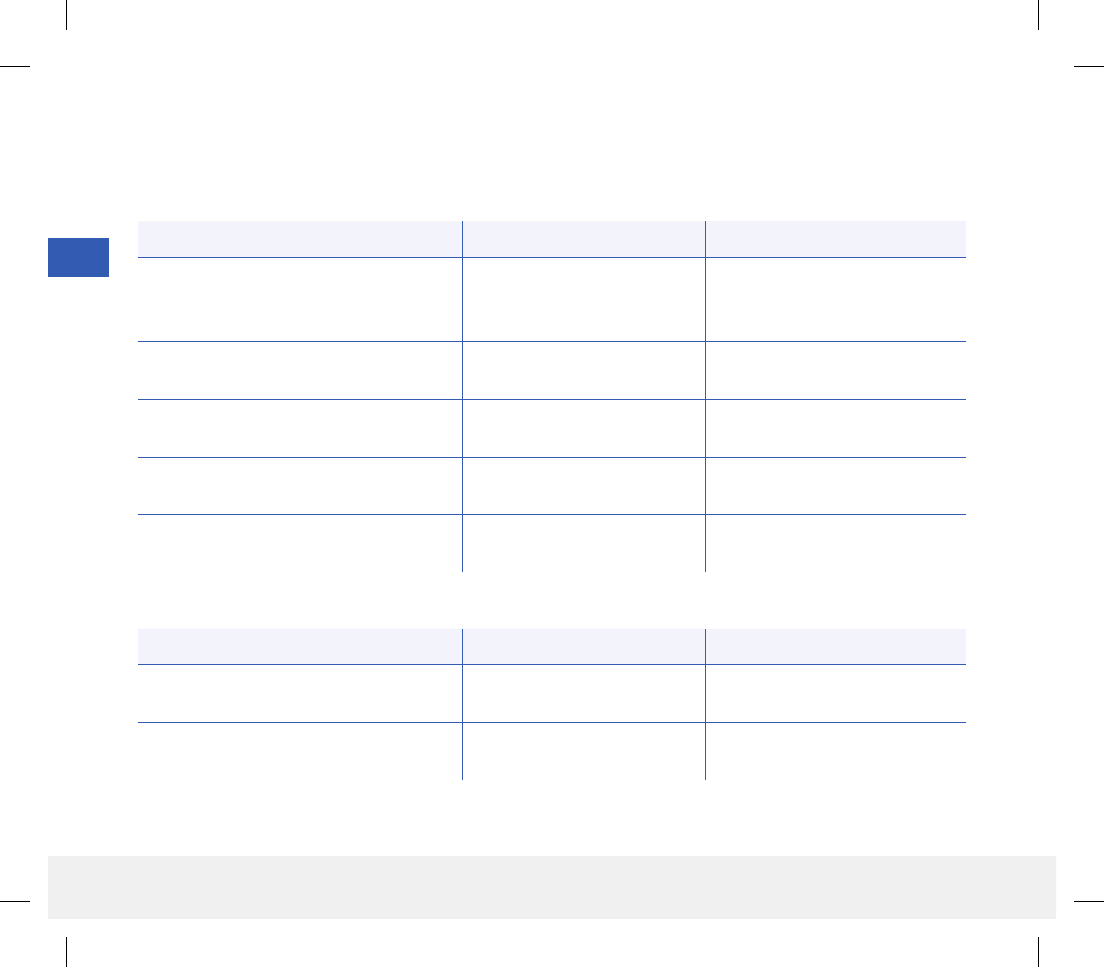
LED Status Battery Status Action
Solid orange when connected to the
USB cable Not yet fully charged Continue charging until complete
Solid green when connected to the
USB cable 100% charged Disconnect from power supply
LED Status Status Action
Alternating green and orange when
power button is pressed 3 times in
5seconds
Discoverable mode Pair smart transmitter with
mobile device
Does not blink when power button
is pressed Smart transmitter o Hold down power button for
5seconds to turn on
Blinks green (once) when power button
is pressed 10% - 90% battery power No immediate action required
Blinks orange (once) when power button
is pressed
Low battery, less than 10%
battery power remaining Charge battery soon
LED is orange for one minute An alert has been triggered Check the app on your mobile
device to understand the alert
• During smart transmitter use:
LED Status Indicators
The smart transmitter communicates several dierent states based upon the color of the LED.
LBL-0302-01-101 Rev 1_Eversense User Guide_mmolL_R5.indd 40 11/4/16 2:44 PM
41
Eversense CGM User Guide
6
6. Calibrating the System
This section describes the calibration procedure and schedule of your Eversense CGM System.
To ensure best performance, routine calibration is required using fingerstick readings from a blood glucose meter.
DO NOT use alternative test sites such as your forearm when entering BG values for calibration. Any commercially
available meter may be used for calibration. Once your sensor has been inserted and linked to your smart transmitter,
the system begins a 24-hour Warm-Up Phase. No calibration is required during this phase.
There are two calibration phases:
Initialization Phase – After the 24 Warm-Up Phase, you must complete 4 fingerstick calibration tests, spaced 2 to 12
hours apart.
Daily Calibration Phase – After the Initialization Phase, you must complete 2 fingerstick calibration tests per day,
spaced 10 to 14 hours apart.
LBL-0302-01-101 Rev 1_Eversense User Guide_mmolL_R5.indd 41 11/4/16 2:44 PM
42
Eversense CGM User Guide
6
Routine calibration is critically important to ensuring the best performance of the Eversense CGM System.
The following tips can help you improve your calibration measurements:
Tips for ensuring good calibration:
Calibrate at times when glucose is NOT changing rapidly (e.g., before meals, before dosing insulin).
Calibrate when you know you will not be removing the smart transmitter during the next 15 minutes.
Wash your hands with warm, soapy water and dry thoroughly before taking a blood glucose meter reading.
It is very important to have clean, dry hands when you test your blood glucose.
Always follow the blood glucose meter manufacturer’s instructions to get accurate blood glucose readings
for calibration.
Be sure the code on test strip vial matches the code on your blood glucose meter (if coding is required).
Calibration will NOT be complete or results NOT accepted if:
Blood glucose meter reading is less than 2.2 mmol/L.
Blood glucose meter reading is greater than 22.2 mmol/L.
Blood glucose meter reading was taken more than 10 minutes before entering the result in the Eversense App.
Sensor glucose reading is significantly dierent than the blood glucose meter reading.
Your smart transmitter was being charged during the 15 minutes after you entered your calibration value.
LBL-0302-01-101 Rev 1_Eversense User Guide_mmolL_R5.indd 42 11/4/16 2:44 PM
43
Eversense CGM User Guide
6
Calibration Phases
A. Initialization Phase (after 24-hour Warm-Up Phase)
During this phase, 4 fingerstick blood glucose meter tests are required.
• The 4 calibration tests must be spaced 2 to 12 hours apart, and all 4tests must be completed within a 36 hour
period.
– 1st calibration = 24 hours after sensor insertion.
– 2nd calibration = 2 to 12 hours after 1st successful calibration.
– 3rd calibration = 2 to 12 hours after 2nd successful calibration.
– 4th calibration = 2 to 12 hours after 3rd successful calibration.
• Glucose readings will start displaying in the app a few minutes after the 2nd calibration is successfully completed.
IMPORTANT: If your smart transmitter is not turned on and paired with the Eversense App and sensor, the
system is not able to prompt you to calibrate.
Re-Entering Initialization Phase
The following will cause the system to re-enter Initialization Phase.
• Not completing a calibration test within a 12-hour period during the Initialization Phase.
• Not completing all 4 calibration tests within 36 hours during the Initialization Phase.
• Not completing 2 calibration tests within a 24-hour period during the Daily Calibration Phase
(see B. Daily Calibration Phase).
• When the last several blood glucose meter measurements are significantly dierent than the sensor glucose values.
• If the smart transmitter is out of battery power for more than 16 hours.
• When you receive a Sensor Check Alert.
• Six hours after you receive a Sensor Suspend Alert.
LBL-0302-01-101 Rev 1_Eversense User Guide_mmolL_R5.indd 43 11/4/16 2:44 PM

44
Eversense CGM User Guide
6
B. Daily Calibration Phase
The Daily Calibration Phase requires 2 blood glucose meter tests at the scheduled morning and evening calibration
times. The first Daily Calibration Phase will begin after successful completion of the Initialization Phase.
• Y our system will automatically tell you when it is time to perform the twice-daily calibration test.
• Daily Calibration times must be spaced 10 to 14 hours apart.
• The system allows the calibration test to be taken up to 2 hours before the scheduled time. If you miss your
scheduled calibration time, the system will prompt you hourly.
• The CALIBRATE screen provides the next allowable calibration time.
Note: If a Daily Calibration test is missed, no additional CGM readings will be displayed after 16 hours have elapsed
since the last accepted calibration result. If a calibration test result is not entered within 24hours from the last
accepted calibration, the system will re-enter the Initialization Phase.
LBL-0302-01-101 Rev 1_Eversense User Guide_mmolL_R5.indd 44 11/4/16 2:44 PM
45
Eversense CGM User Guide
6
Warning: Always calibrate the system using only a fingerstick blood sample. DO NOT use an alternative site
(such as forearm or palm) blood glucose reading to calibrate the system.
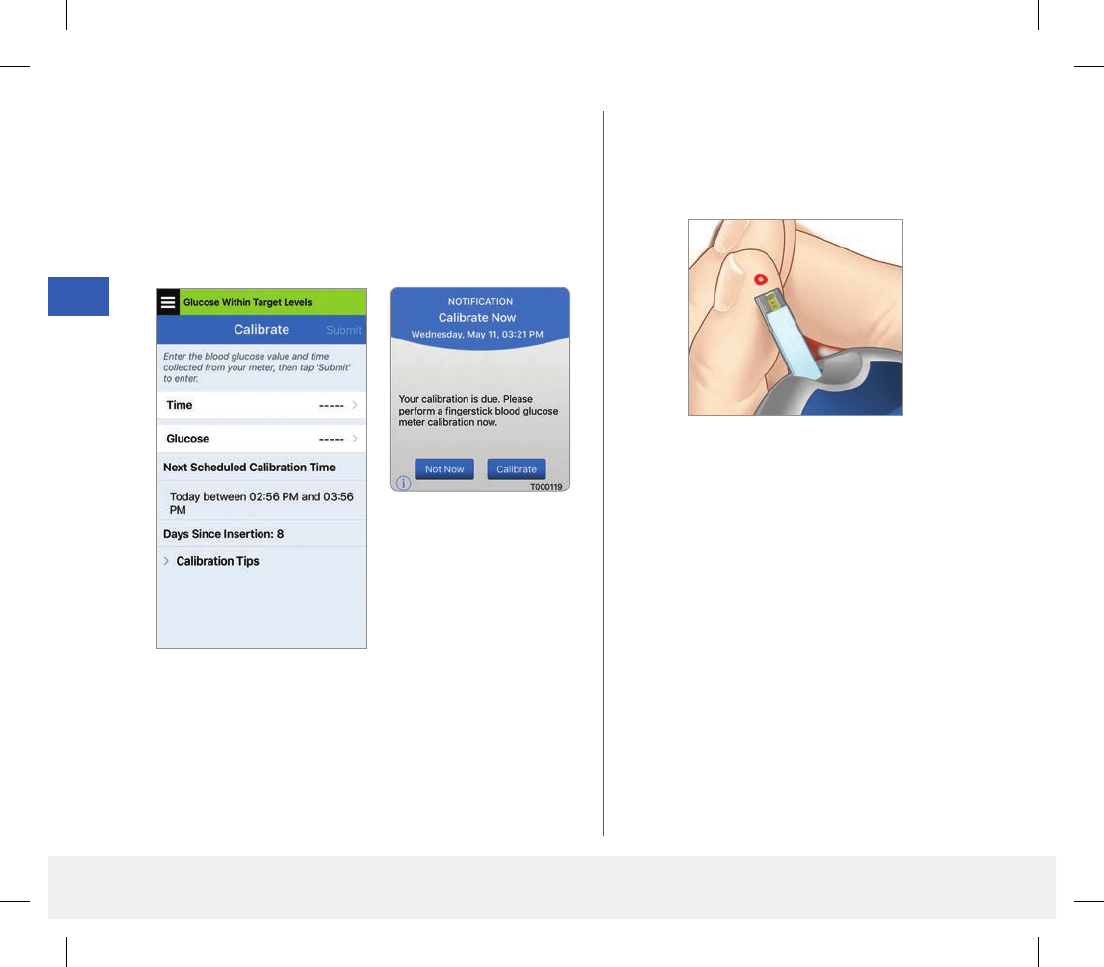
How To Calibrate
Note:
• For daily calibrations your CGM System will alert you when it is time to calibrate based on your scheduled
calibration times.
• You can change your scheduled calibration times to better fit your schedule. Tap Menu > Settings >
Daily Calibration.
• You can calibrate up to 2 hours before your scheduled calibration time. If you miss your scheduled calibration time,
the system will prompt you hourly.
• You can enter additional calibration readings as long as each calibration is at least one hour apart. Tap Menu >
Calibrate.
• If the time chosen is not within the calibration time frame, the CALIBRATE screen will indicate that it is not yet
time for a calibration test.
LBL-0302-01-101 Rev 1_Eversense User Guide_mmolL_R5.indd 45 11/4/16 2:44 PM
46
Eversense CGM User Guide
6
1. When it is time for calibration, the app displays the
CALIBRATE NOW screen.
• Tap Calibrate.
• The CALIBRATE screen appears.
• Tap Not Now if you want to wait until later.
2. Obtain a fingerstick reading from your
blood glucose meter.
LBL-0302-01-101 Rev 1_Eversense User Guide_mmolL_R5.indd 46 11/4/16 2:44 PM
47
Eversense CGM User Guide
6
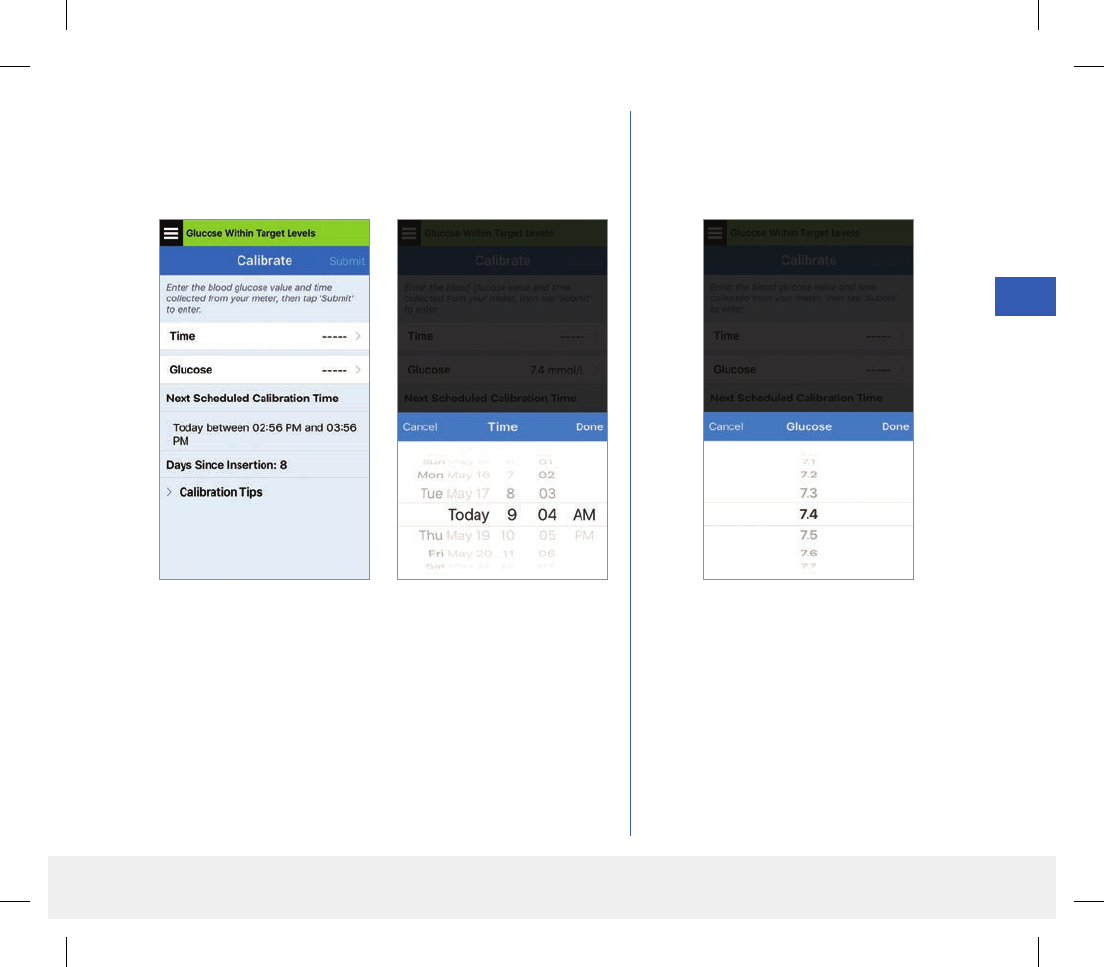
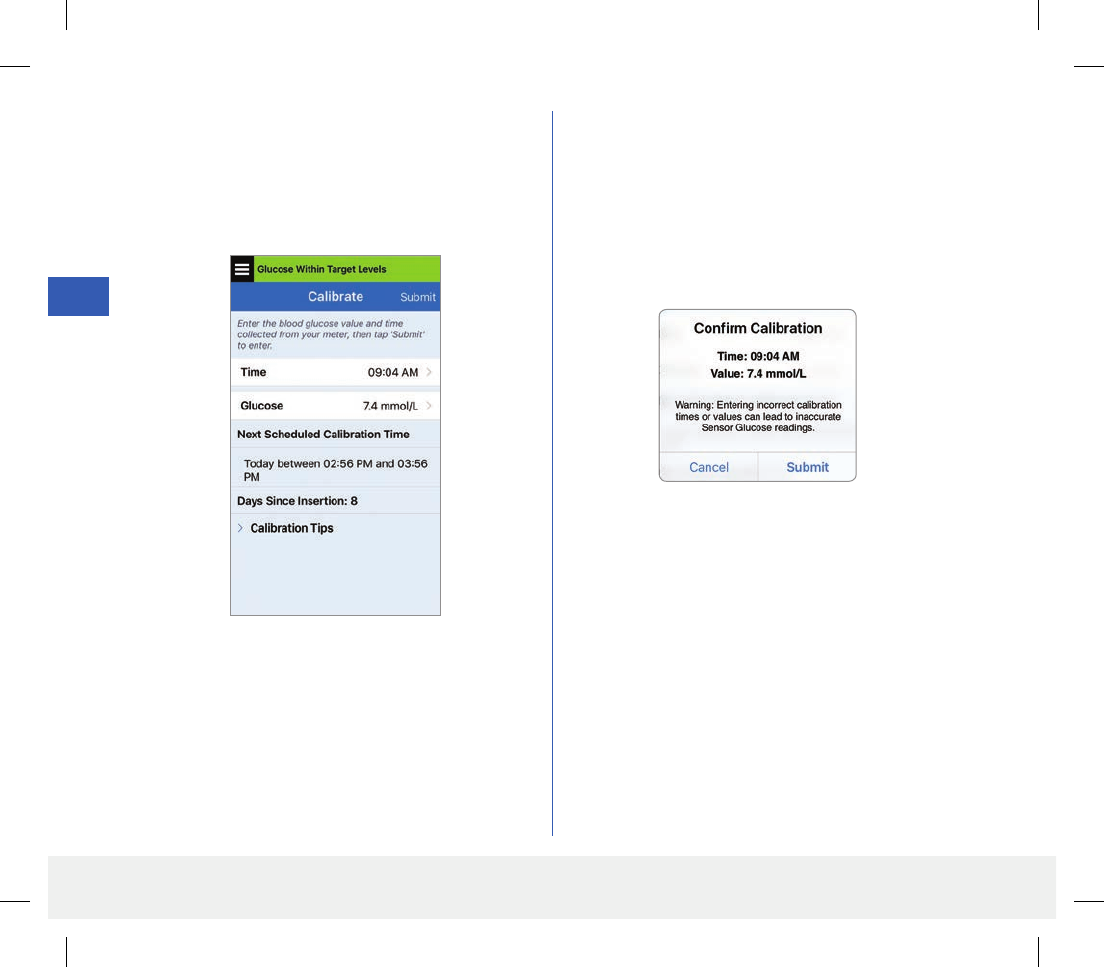
3. Tap Time and enter the time of day when the fingerstick
blood glucose test was taken.
• Tap Done.
4. Tap Glucose and enter the value from
your fingerstick blood glucose test.
• Tap Done.
LBL-0302-01-101 Rev 1_Eversense User Guide_mmolL_R5.indd 47 11/4/16 2:44 PM
48
Eversense CGM User Guide
6
6. A CONFIRM CALIBRATION screen appears.
Make sure that the fingerstick blood glucose test
result you entered is correct.
• Tap Cancel to go back and re-enter the correct
time or glucose test result.
• When correct, tap Submit.
5. The CALIBRATE screen now shows the time
and glucose reading you entered. If not correct,
repeat steps 3 and 4.
• When correct, tap Submit.
LBL-0302-01-101 Rev 1_Eversense User Guide_mmolL_R5.indd 48 11/4/16 2:44 PM
49
Eversense CGM User Guide
6
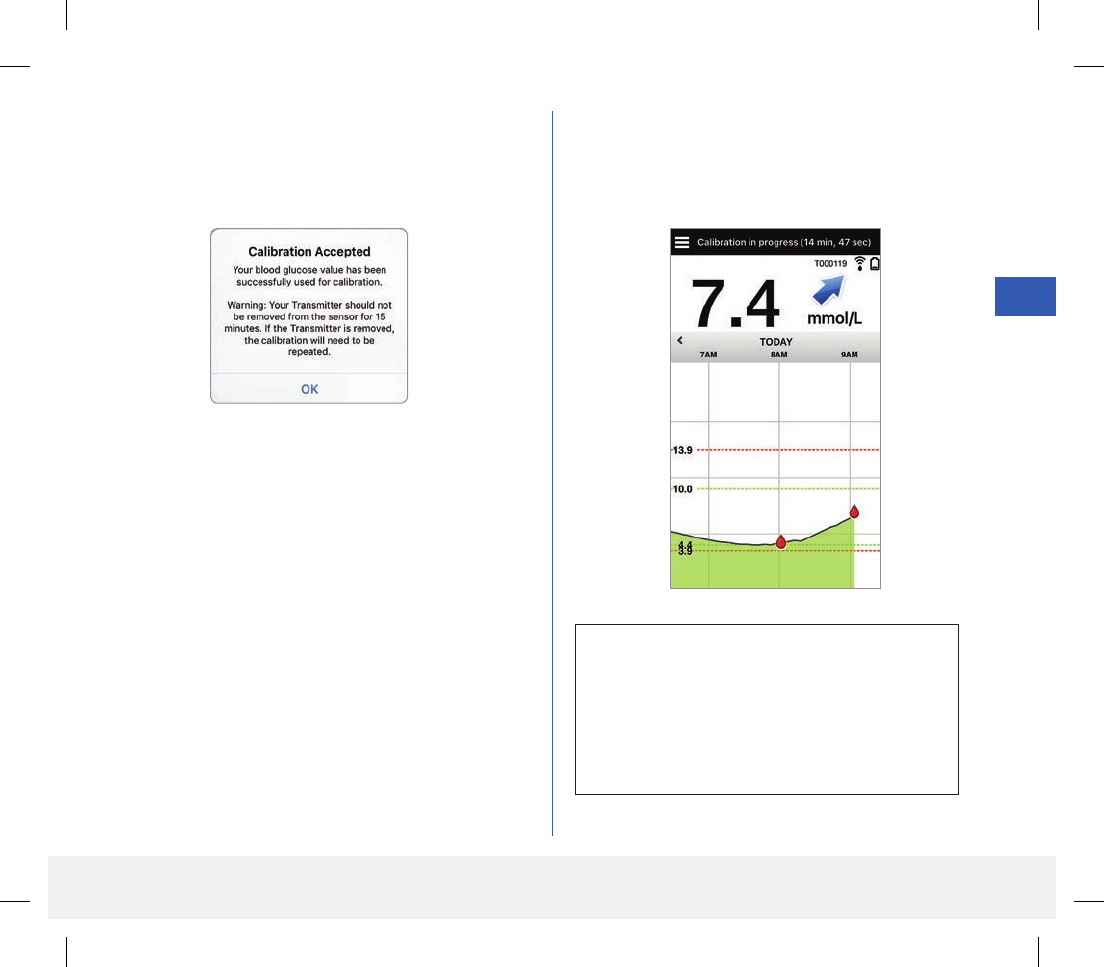
7. The CALIBRATION ACCEPTED screen
appears.
• Tap OK.
8. The MY GLUCOSE screen appears with a
red blood drop icon to identify your fingerstick
calibration.
IMPORTANT: The smart transmitter should
not be removed from over the sensor for at least
5 minutes before the test to 15 minutes after the
test while calibration is in progress. The Status
Bar at the top of the screen lets you know when
calibration will be complete.
Note: There may be conditions when your
calibration result is NOT accepted. See Calibrating
the System for more information.
LBL-0302-01-101 Rev 1_Eversense User Guide_mmolL_R5.indd 49 11/4/16 2:44 PM
50
Eversense CGM User Guide
7
7. Using the App
This section describes the Eversense App including the main screen, trend graph, trend arrows, and
the menu screen.
The app communicates with the smart transmitter to receive and then display glucose data, trends, graphs and alerts.
The app also stores your glucose history with up to 90 days of stored data.
Note: When you log out of the Eversense App, your smart transmitter will not send glucose data to the app until
you log back in.
On the MY GLUCOSE screen, you have easy access to:
• Real-time sensor glucose measurements.
• Rate and direction of your changing glucose levels.
• Graphical trends of your glucose levels.
• Alerts (hypoglycemia or hyperglycemia).
• Events such as meals, exercise, and medications.
Note: A wireless internet connection is required to download or update the Eversense App.
Check Your Mobile Device Settings
You will need a mobile device (such as your smartphone) to use the Eversense CGM System. It is very important
that your mobile device is set up properly to ensure accurate display of your glucose data in the app. Follow the
manufacturer’s instructions for your mobile device to set up the following:
• Time and date.
• Bluetooth turned ON (enabled).
• Notifications turned on.
• Battery is charged.
• Geographic zone.
• Language.
• Mobile device sound should not be on vibrate.
• Do Not Disturb should be OFF.
If you have your mobile device set to Do No Disturb, you will not hear
any notifications from the Eversense App.
LBL-0302-01-101 Rev 1_Eversense User Guide_mmolL_R5.indd 50 11/4/16 2:44 PM
51
Eversense CGM User Guide
7
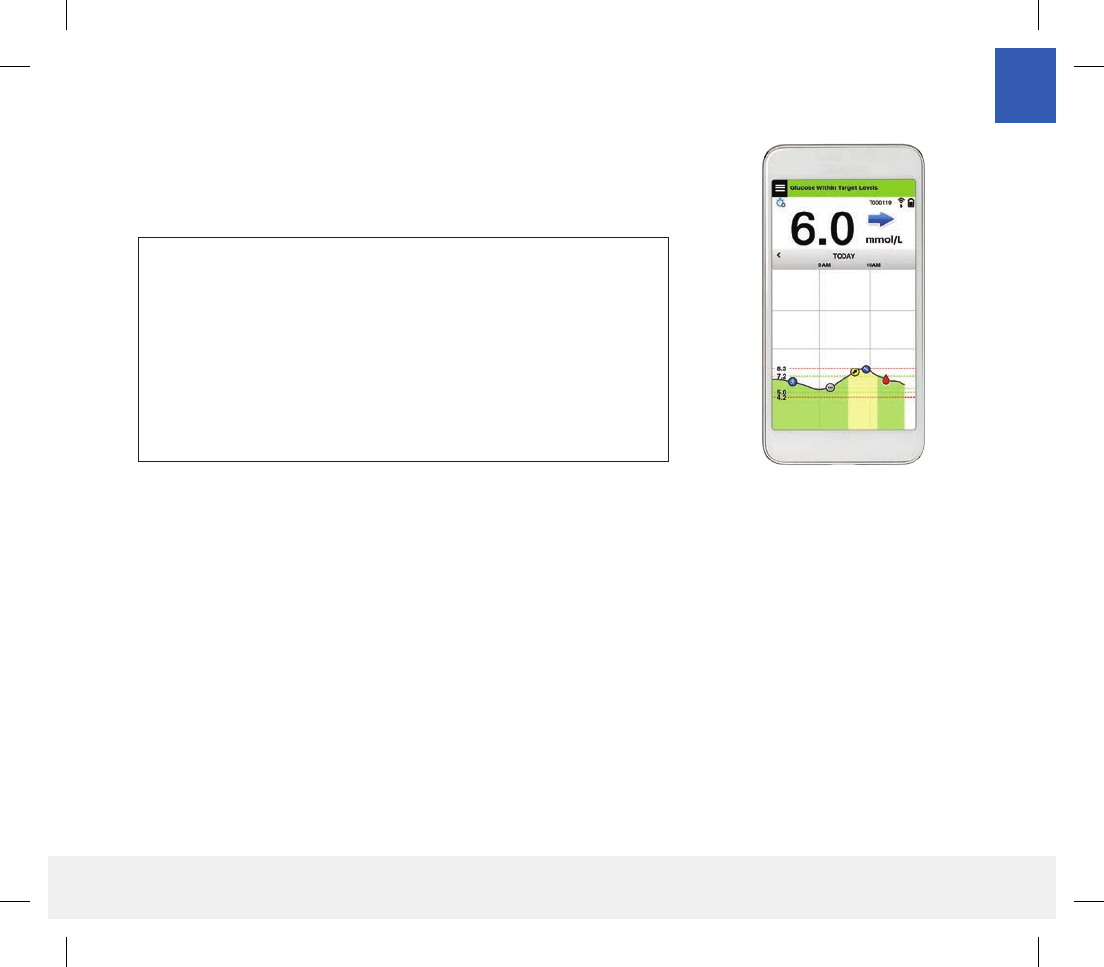
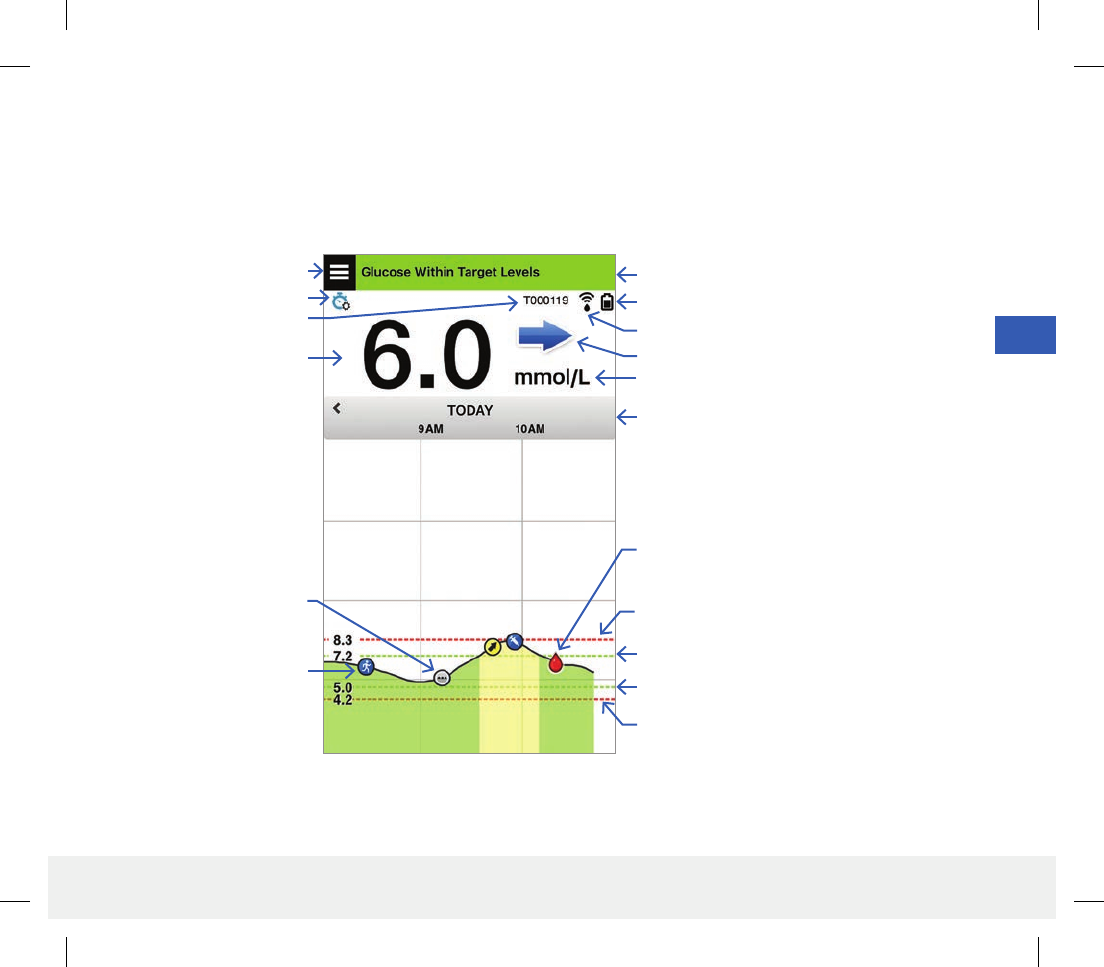
Get To Know the “My Glucose” Screen
The MY GLUCOSE screen is the main display screen for the app. It displays a variety of data, including sensor
glucose readings, direction and rate of change arrow, trend graph, events, calibrations, alerts and notifications.
Menu icon
Temp Profile icon
Date and time
Smart Transmitter battery power
Current glucose reading
Status bar
Multiple events mark
Trend arrow
Smart Transmitter connection to sensor
Unit of measurement
Low Glucose Alert level (Bottom red dashed line)
High Glucose Target level (Top green dashed line)
High Glucose Alert level (Top red dashed line)
Low Glucose Target level (Bottom green dashed line)
Calibration mark
Event mark
Smart Transmitter ID
LBL-0302-01-101 Rev 1_Eversense User Guide_mmolL_R5.indd 51 11/4/16 2:44 PM

52
Eversense CGM User Guide
7
Note:
• If your sensor is not linked to a smart transmitter the smart transmitter connection to sensor icon will appear as a
red blood drop with a red X.
• You can view a snapshot of the Home screen on your iOS device if you add the Eversense App widget to your
widget page. For information on managing widgets, consult your iOS device user guide.
• You can view the MY GLUCOSE screen in landscape orientation to access short cut buttons to view the last
7, 14, 30 or 90 days and you can email this view with a single tap.
Status bar Provides important information about your current glucose and system status.
Smart Transmitter ID This is the smart transmitter you are now using. You can change the name by
tapping Settings > System.
Current glucose reading Current real-time glucose level. This is updated every 5 minutes.
Date and time Current date and time. You can scroll left or right to see dierent dates and
times.
Smart Transmitter battery
power Indicates battery power left in the smart transmitter.
Smart Transmitter connection
to sensor Indicates the strength of your smart transmitter connection with the sensor.
Trend arrow Shows the direction your glucose levels are moving.
Unit of measurement This is the unit of measurement used to display all glucose data.
High/Low Glucose alert level The levels set for the high and low glucose alerts.
High/Low Glucose target level The levels set for the high and low glucose targets (target range).
LBL-0302-01-101 Rev 1_Eversense User Guide_mmolL_R5.indd 52 11/4/16 2:44 PM
53
Eversense CGM User Guide
7
Multiple events mark Indicates multiple events have occurred at the same time.
Event mark Indicates manually entered events (e.g., exercise). See Logging Events for more
information.
Calibration mark Indicates a blood glucose calibration entry.
Glucose trend graph Glucose levels over time. You can scroll back and forth to see trends or zoom
in to display as few as 3hours of data, or zoom out to see up to 3 days.
Menu Provides easy navigation to various sections of the Eversense App:
My Glucose Reports Settings
Calibrate Share My Data About
Alert History Placement Guide
Event Log Connect
LBL-0302-01-101 Rev 1_Eversense User Guide_mmolL_R5.indd 53 11/4/16 2:44 PM
54
Eversense CGM User Guide
7
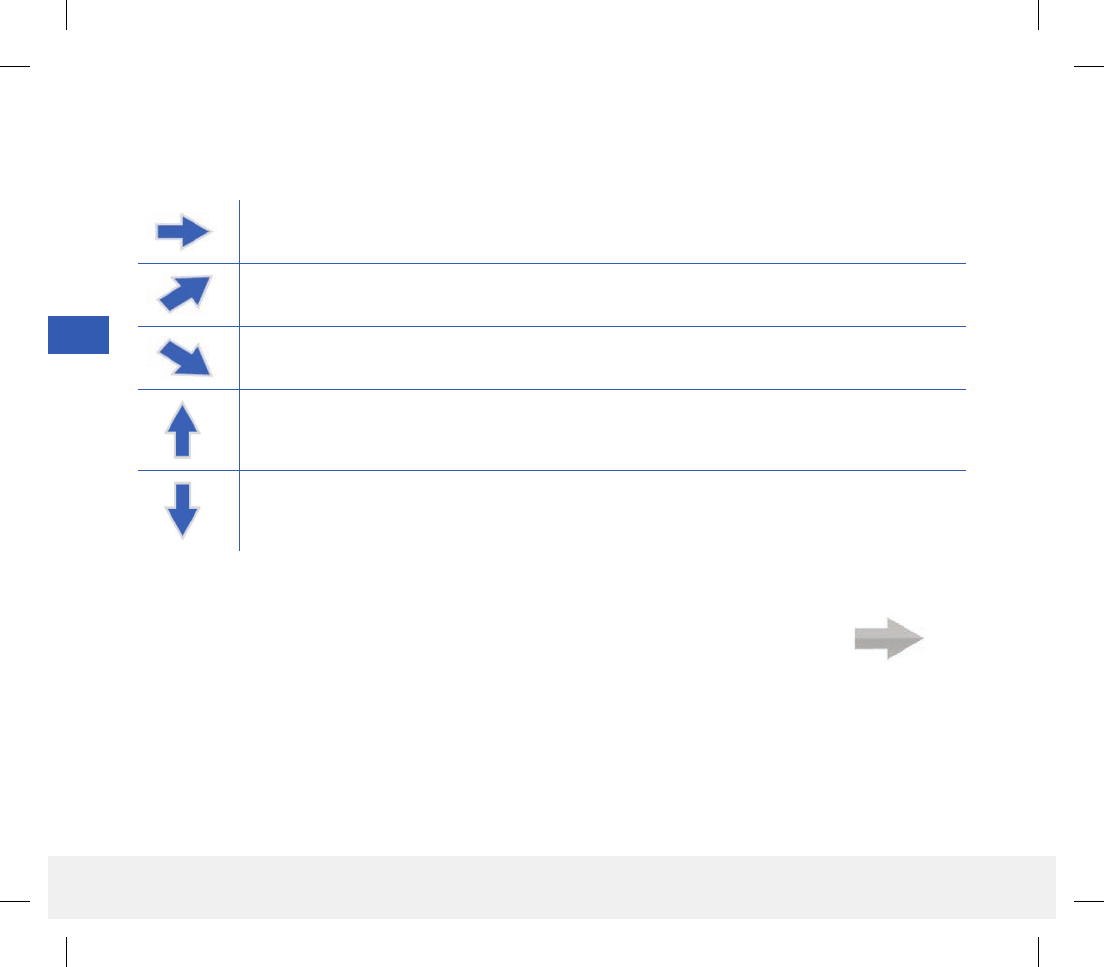
Gradually rising or falling glucose levels, falling or rising at a rate between 0.00 mmol/L and
0.06 mmol/L per minute.
Moderately rising glucose level, rising at a rate between 0.06 mmol/L and 0.11 mmol/L per minute.
Moderately falling glucose levels, falling at a rate between 0.06 mmol/L and 0.11 mmol/L per minute.
Very rapidly rising glucose levels, rising at a rate more than 0.11 mmol/L per minute.
Very rapidly falling glucose levels, falling at a rate more than 0.11 mmol/L per minute.
Trend Arrows
There are 5 dierent trend arrows that show the current direction of your glucose levels, and how fast they are
changing.
The app uses the last 20 minutes of continuous glucose data for calculating glucose trends.
When there are not enough sensor values available for the calculation, the arrow is displayed in gray.
LBL-0302-01-101 Rev 1_Eversense User Guide_mmolL_R5.indd 54 11/4/16 2:44 PM
55
Eversense CGM User Guide
7
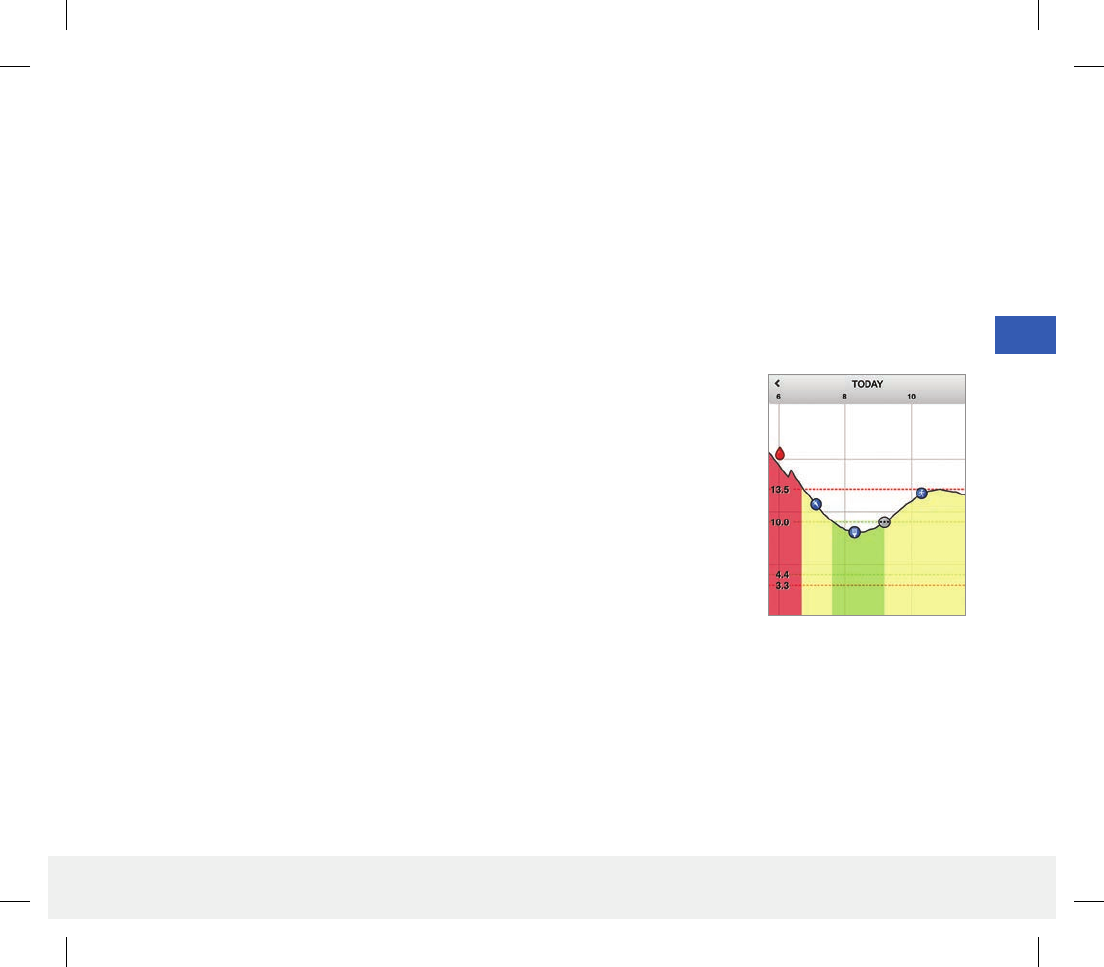
Trend Graph
The trend graph is used to review and analyze historical data and trends in your glucose values over time. It also
displays marks for events you have manually logged in the app (e.g., calibration tests and exercise).
There are several ways you can use the trend graph:
• Quickly review how well you are doing when compared to the glucose targets and alert levels you set. The red
dashed lines indicate your High and Low Glucose Alert levels, and the green dashed lines indicate your high and low
glucose target levels (your target range).
• Shaded areas of the graph are color coded as follows depending on the glucose settings you enter:
– Glucose values that are outside of your glucose alert levels will be red.
– Glucose values that are within your glucose target levels will be green.
– Glucose values that are between your glucose target and alert levels
will be yellow.
• Press and hold any point in the line graph to view a specific glucose reading for
that point in time.
• Tap any of the marks on the app screen to get more information about the event or
alert.
• Pinch in and out on the screen to display dierent day/time ranges on the
trendgraph. You can zoom in and out to display as few as 3 hours or up to 3 days
of information.
• To view trend graph data for a dierent date, tap the date on the screen and enter the desired date.
• You can view the trend graph in either portrait or landscape mode. In landscape mode, there are shortcut buttons to
see 7, 14, 30 and 90 day views.
Note: All of your glucose data will be stored in the app as long as you have memory available on your mobile device.
LBL-0302-01-101 Rev 1_Eversense User Guide_mmolL_R5.indd 55 11/4/16 2:44 PM
56
Eversense CGM User Guide
7
Menu Options Description
My Glucose Main app screen that displays current CGM reading, direction and rate of change, trend
graph, events and alerts.
Calibrate Enter calibration test values. The CALIBRATION screen automatically appears when it is
time to calibrate but you can also enter additional calibration values using this menu option.
Alert History Review past alerts and notifications. See Alert Descriptions for more information.
Event Log Enter information about activities such as blood glucose tests, meals, insulin, health and
exercise. See Event Log for more information.
Reports Review a variety of reports about your CGM data. See Glucose Reports and Sharing for more
information.
Share My
Data
Download or export your CGM data via a .csv file, or allow others to view your glucose data
through the Eversense Now mobile app.
Note: The Eversense Now App is only available for iOS devices.
Placement
Guide
Check the communication between the smart transmitter and sensor. Use this screen
whenever you are attaching the smart transmitter to be sure communication is established.
Connect Check the connection between the smart transmitter and mobile device. A Bluetooth
connection is required to send data to the app.
Settings Customize settings such as glucose target levels, alert levels, sounds, temporary profile and
calibration reminder times. See Customizing your Settings for more information.
About View information about your CGM System, including sensor and smart transmitter ID
numbers.
Menu Options
The Menu icon ( ) appears at the top left corner of all app screens and provides easy navigation to other app
features. The following menu items are available:
LBL-0302-01-101 Rev 1_Eversense User Guide_mmolL_R5.indd 56 11/4/16 2:44 PM
57
Eversense CGM User Guide
7
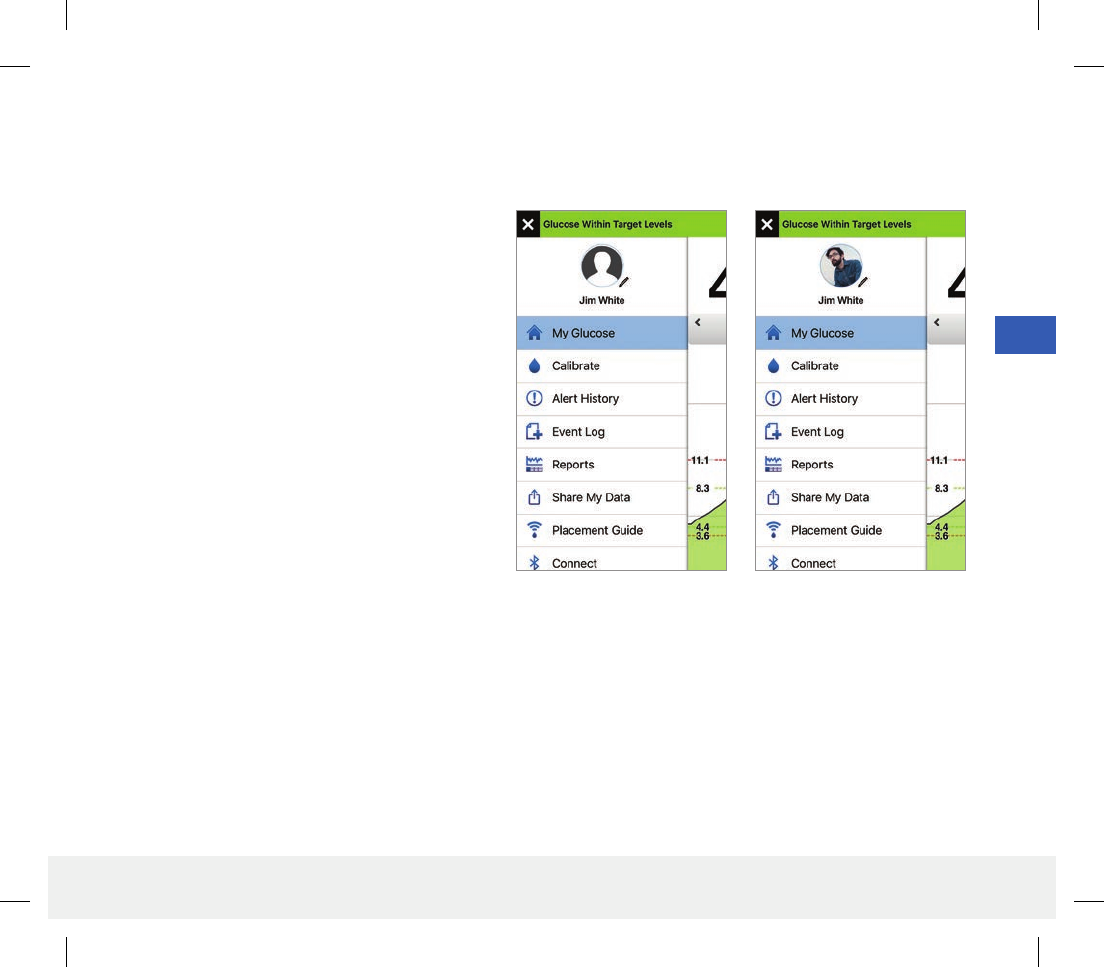
Profile Picture
You can add or change the profile picture in your Eversense account, which will be displayed in your Eversense CGM
mobile app and in your Eversense DMS account.
• Go to the Main Menu and tap on the picture
of the silhouette.
• Follow the prompt to either take a new photo
or choose an existing photo that is saved on
your device.
• The photo you select will be displayed on the
Main Menu screen.
Note: You can also change your profile picture
from your Eversense DMS account. See the
Eversense DMS User Guide for more information.
LBL-0302-01-101 Rev 1_Eversense User Guide_mmolL_R5.indd 57 11/4/16 2:44 PM
58
Eversense CGM User Guide
8
8. Customizing your Settings
This section describes how to customize settings in your Eversense CGM System.
Areas where you can customize app settings include:
• Glucose – glucose levels and change rates that will trigger an alert.
• Daily Calibration – your morning and evening calibration reminders.
• System – identifies or lets you enter personalized information about your system.
• Mealtimes – your times for each meal so that glucose reports can help show how meals may aect readings.
• Sound Settings – change the sounds for some glucose alerts, set snooze times and Do No Disturb for the
Eversense App.
• Temp Profile – set a temporary glucose profile.
• Log Out – log out of your Eversense Account.
Glucose Levels
The Eversense CGM System is designed to provide alerts on your smart transmitter and mobile device when your
glucose level has reached the alert levels you set. You will decide the settings for your glucose alerts, targets, and
rates of change based on input from your health care provider.
LBL-0302-01-101 Rev 1_Eversense User Guide_mmolL_R5.indd 58 11/4/16 2:44 PM
59
Eversense CGM User Guide
8
Warning:
• Before making a dosing decision, perform a fingerstick blood glucose test to confirm the sensor glucose
result.
• The Low and High Glucose Alerts are designed to assist you in managing your diabetes and should not be
exclusively used to detect hypoglycemia or hyperglycemia. The alerts should always be used in conjunction
with other indications of glycemic state such as your glucose level, trend, line graph etc.
IMPORTANT:
• Low and High Glucose Alerts are dierent from your Low and High Glucose Targets.
– Low and High Glucose Alerts notify you on your mobile device and smart transmitter when you have
crossed a certain low or high value.
– Glucose Targets are used in the reports and line graphs to show how your glucose levels have been
performing compared to the targets you set. You will not receive an alert when you have reached your
Glucose Target levels.
LBL-0302-01-101 Rev 1_Eversense User Guide_mmolL_R5.indd 59 11/4/16 2:44 PM
60
Eversense CGM User Guide
8
Setting Glucose Target Levels
Glucose Targets are the low and high levels of the range you are aiming for throughout the day. These settings are
used in the app to indicate when glucose values are in your target range.
Default setting Low: 4.4 mmol/L
High: 7.8 mmol/L
You can change this target range based on what you and your physician agree
are the right target levels for you.
Allowable setting Low: 3.6 - 6.7 mmol/L
High: 6.7 - 19.3 mmol/L
On/O setting Always ON (cannot be turned OFF)
Notes Used in graphs and charts on the app to show time spent in target range.
LBL-0302-01-101 Rev 1_Eversense User Guide_mmolL_R5.indd 60 11/4/16 2:44 PM
61
Eversense CGM User Guide
8
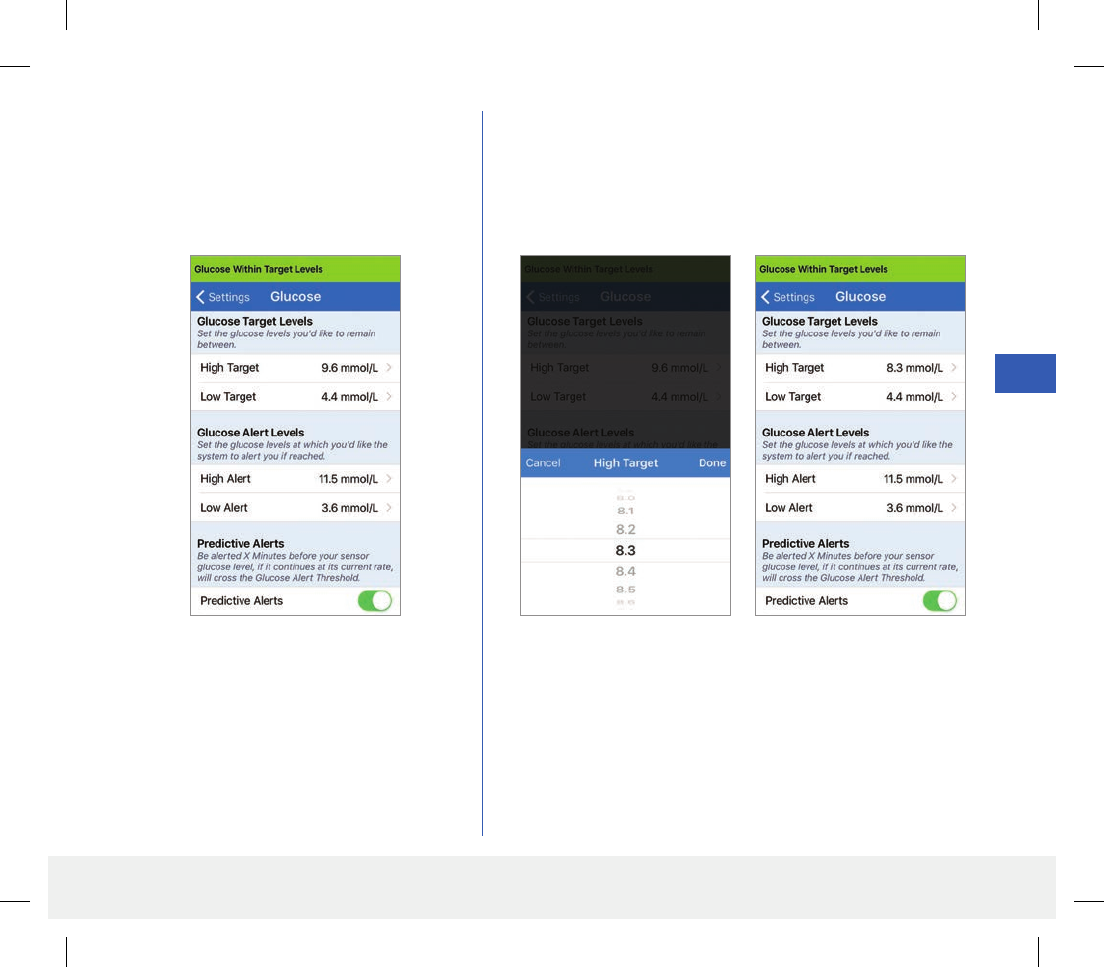
1. Tap Menu > Settings > Glucose to
display the GLUCOSE SETTINGS
screen.
2. Under Glucose Target Levels, tap High Target
and select the appropriate High Glucose Target level.
• Tap Done when complete.
• Repeat step to make your Low Target selection.
LBL-0302-01-101 Rev 1_Eversense User Guide_mmolL_R5.indd 61 11/4/16 2:44 PM
62
Eversense CGM User Guide
8
Default setting Low: 3.9 mmol/L
High: 11.1 mmol/L
You can change these alert levels based on what you and your physician agree are the right
levels for you. Your Low Glucose Alert cannot be set above your Low Glucose Target, and
your High Glucose Alert cannot be set below your High Glucose Target.
Allowable setting Low: 3.3 - 6.4 mmol/L
High: 6.9 - 19.4 mmol/L
On/O setting Always ON (cannot be turned OFF)
Notes Audio notification and visual alerts on your mobile device and smart transmitter on-body
vibe alerts.
Setting Glucose Alert Levels
Your Eversense CGM System will alert you when your glucose levels are outside the alert settings you choose. When
you have reached your low and high glucose alert levels, the smart transmitter vibrates, and the mobile app gives an
audible alert as well as displays a message on the screen. You should immediately perform a fingerstick blood glucose
test before making a treatment decision.
LBL-0302-01-101 Rev 1_Eversense User Guide_mmolL_R5.indd 62 11/4/16 2:44 PM
63
Eversense CGM User Guide
8
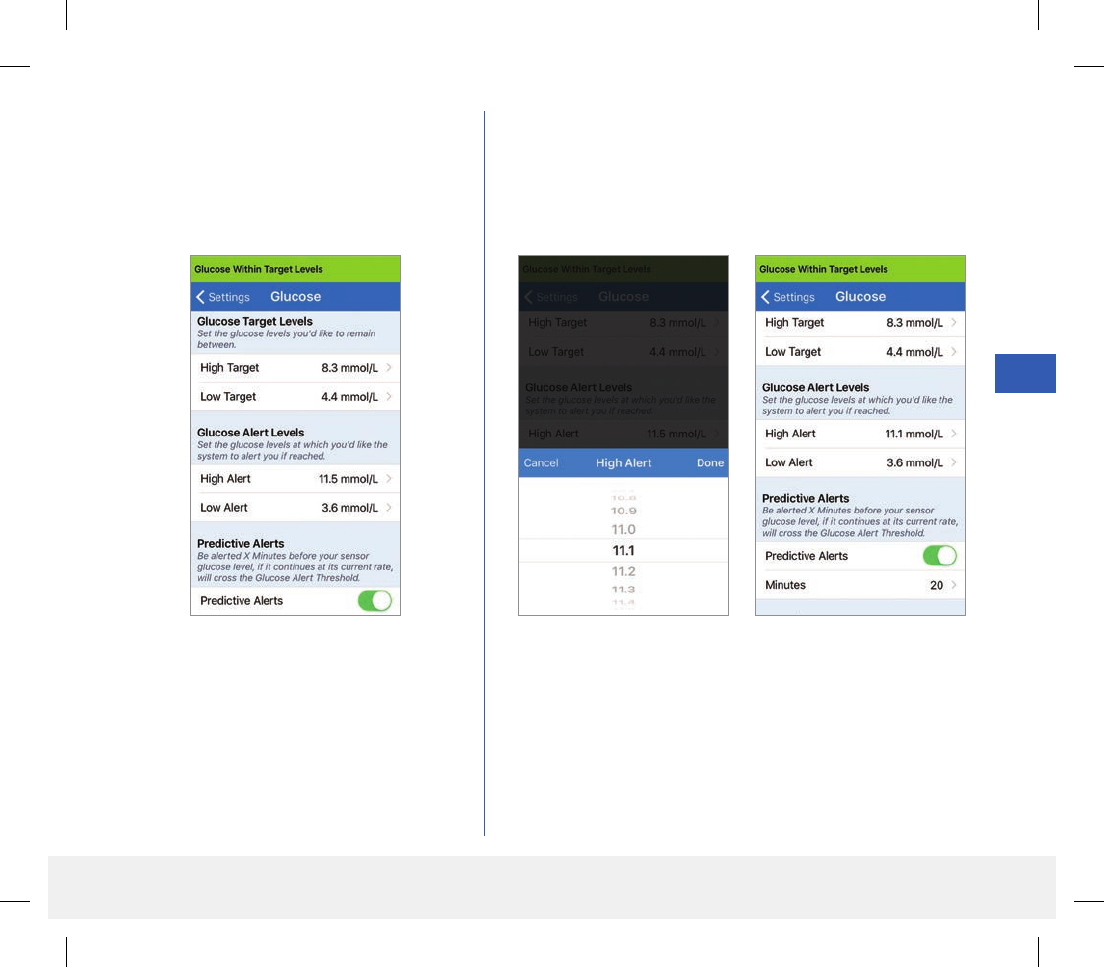
1. Tap Menu > Settings > Glucose to
display the GLUCOSE SETTINGS
screen.
2. Under Glucose Alert Levels, tap High Alert and
select the appropriate High Glucose Alert level.
• Tap Done when complete.
• Repeat step to make your Low Alert selection.
LBL-0302-01-101 Rev 1_Eversense User Guide_mmolL_R5.indd 63 11/4/16 2:44 PM
64
Eversense CGM User Guide
8
Setting Predictive Alerts
Predictive Alerts let you know in advance that a high or low glucose event is likely to occur if current trends continue.
Predictive Alerts use the Low and High Glucose Alert levels to provide an “early” warning. When you have reached
the early warning time, the smart transmitter vibrates, and the mobile app gives an audible alert as well as displays a
message on the screen. You should immediately perform a fingerstick blood glucose test before making a treatment
decision.
Default setting OFF
Allowable setting 10, 20, or 30 minutes prior
On/O setting
You can turn this feature ON.
No predictive alerts will occur until this feature is turned ON. The default is
20 minutes.
Notes Audio notification and visual alerts on your mobile device and smart transmitter
on-body vibe alerts.
LBL-0302-01-101 Rev 1_Eversense User Guide_mmolL_R5.indd 64 11/4/16 2:44 PM
65
Eversense CGM User Guide
8
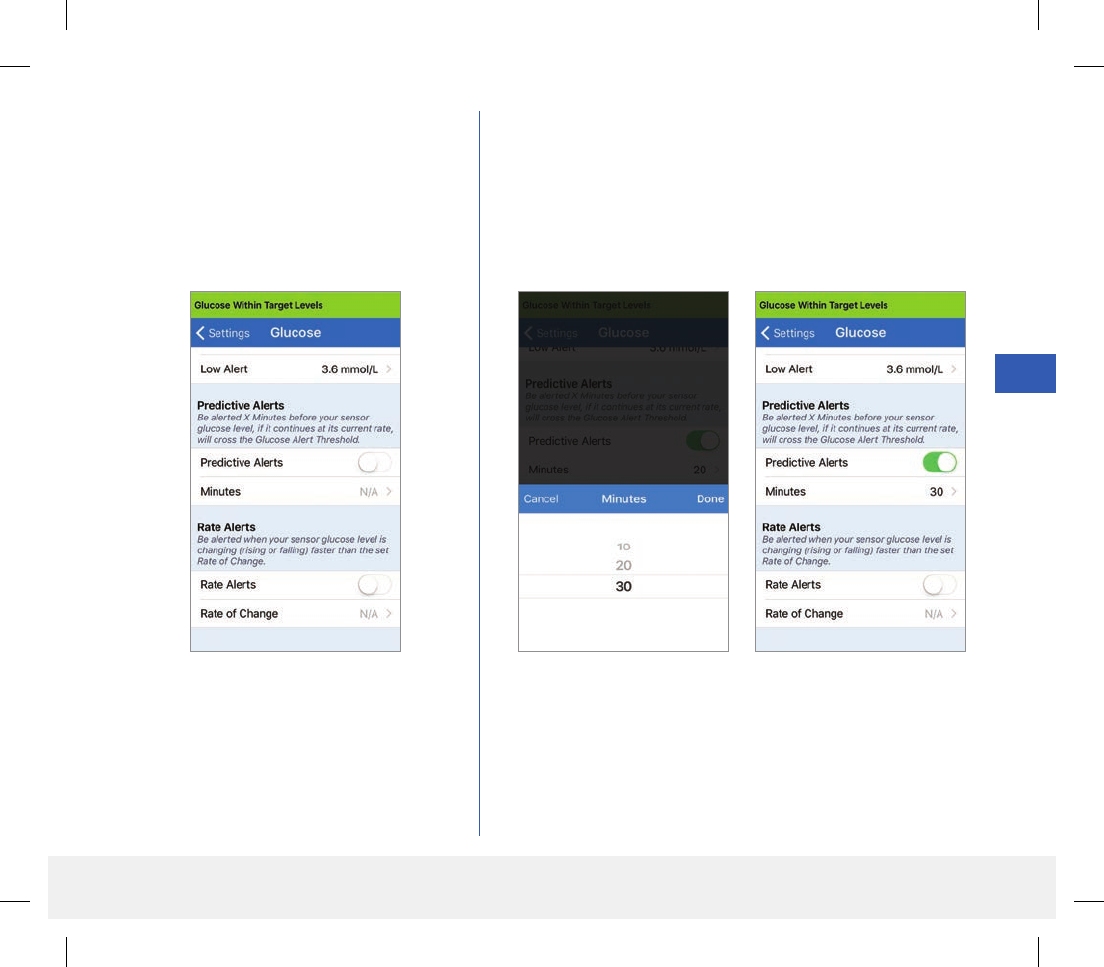
2. Next to Predictive Alerts, slide the OFF button right
to ON.
3. Tap Minutes to select the amount of advance warning
• Tap Done when complete.
1. To turn this feature ON, tap Menu >
Settings > Glucose to display the
GLUCOSE SETTINGS screen.
LBL-0302-01-101 Rev 1_Eversense User Guide_mmolL_R5.indd 65 11/4/16 2:44 PM
66
Eversense CGM User Guide
8
Setting Rate of Change Alerts
The Rate of Change Alerts let you know when your glucose level is falling or rising faster than the Rate Alert setting
you choose.
Default setting OFF
Allowable setting 0.08 - 0.28 mmol/L per minute.
On/O setting You can turn this feature ON. No rate of change alerts will occur until this feature
is turned ON.
Notes Audio notification and visual alerts on your mobile device and transmitter
vibration alerts.
LBL-0302-01-101 Rev 1_Eversense User Guide_mmolL_R5.indd 66 11/4/16 2:44 PM
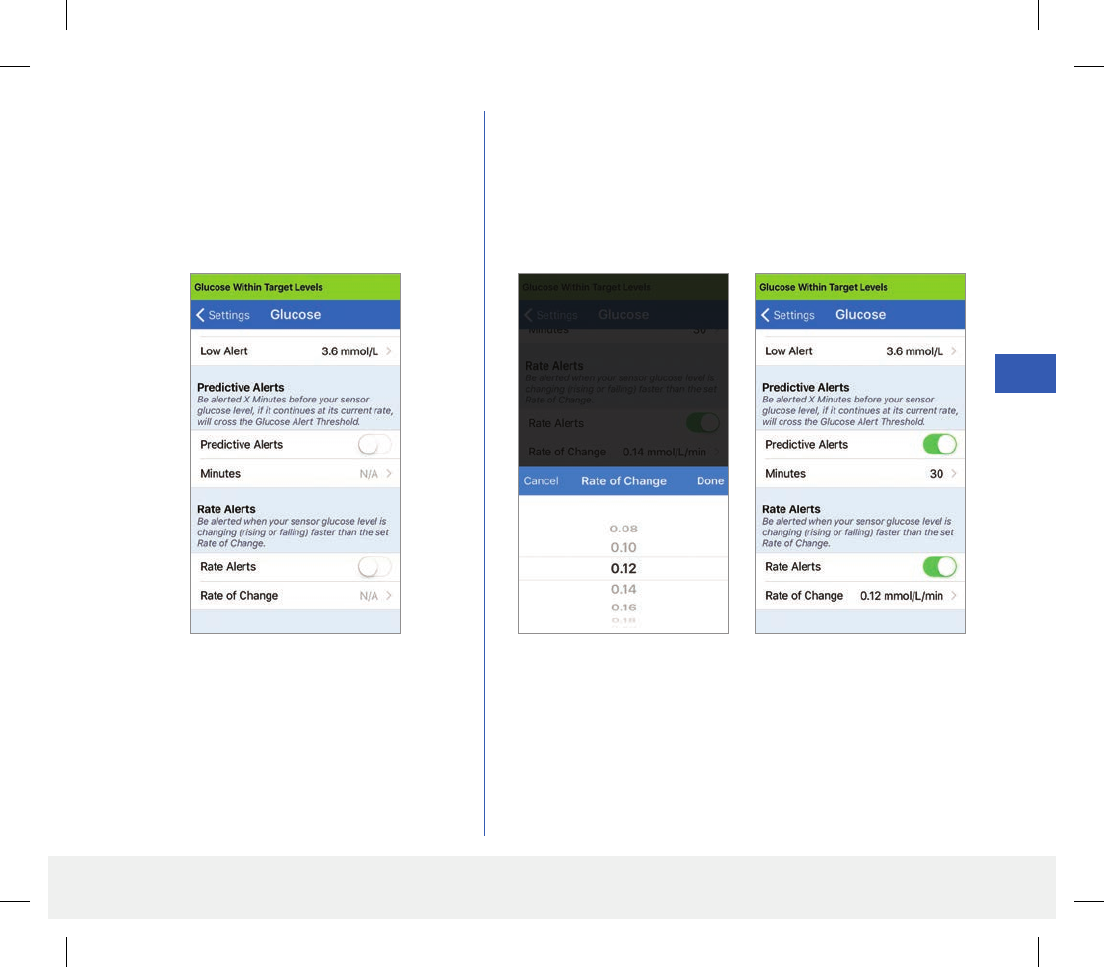
67
Eversense CGM User Guide
8
2. Next to Rate Alerts, slide the OFF button right to ON.
3. Tap Rate of Change to select the rate.
• Tap Done when complete.
1. To turn this feature ON, tap Menu >
Settings > Glucose to display the
GLUCOSE SETTINGS screen.
LBL-0302-01-101 Rev 1_Eversense User Guide_mmolL_R5.indd 67 11/4/16 2:44 PM
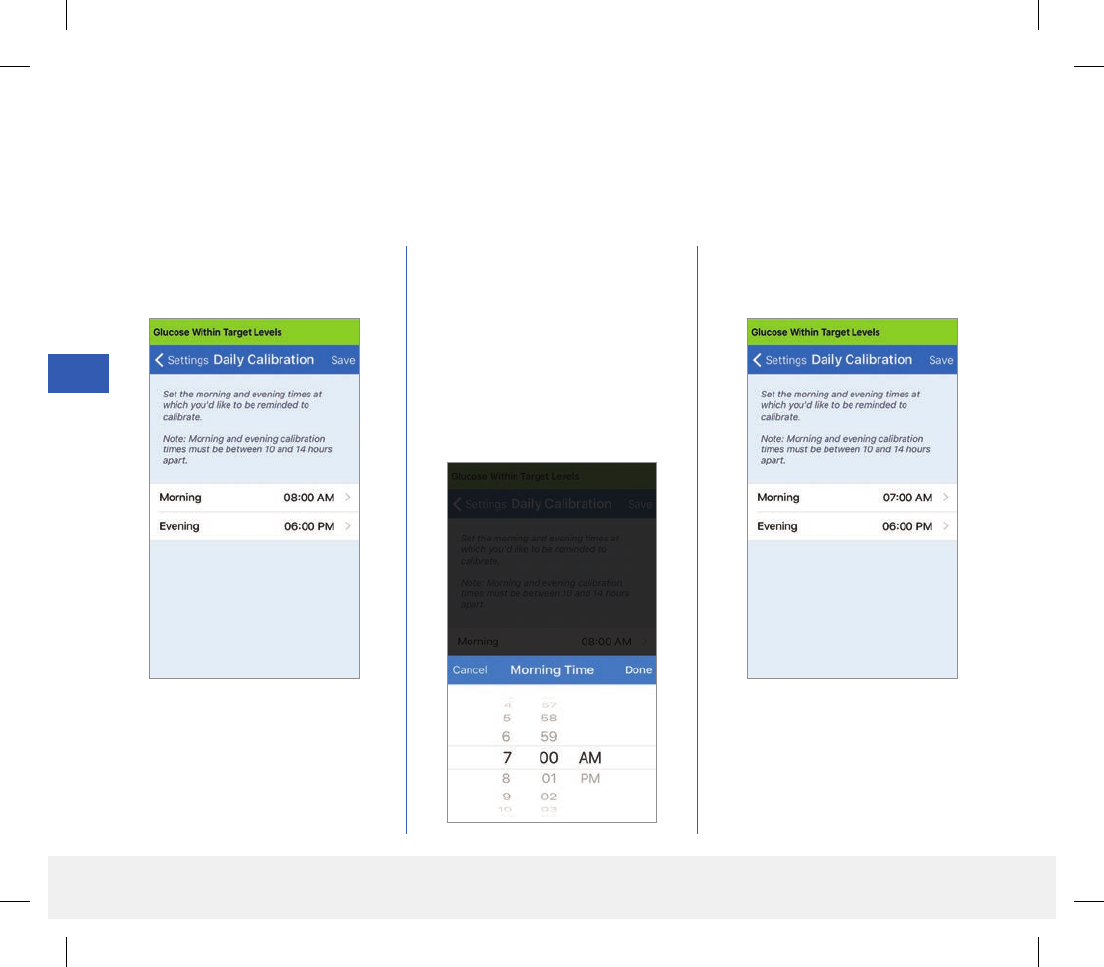
68
Eversense CGM User Guide
8
Setting Daily Calibration Times
The morning and evening calibration times are set to remind you when to calibrate. You can calibrate up to 2 hours
before your scheduled calibration time. Your morning and evening calibration times must be between 10 and 14 hours
apart.
1. Tap Menu > Settings >
Daily Calibration.
2. Tap Morning to set your
morning calibration time.
• Tap Done when complete.
3. Tap Evening to set your
evening calibration time.
• Tap Done when complete.
4. When both times are correct,
tap Save.
LBL-0302-01-101 Rev 1_Eversense User Guide_mmolL_R5.indd 68 11/4/16 2:44 PM
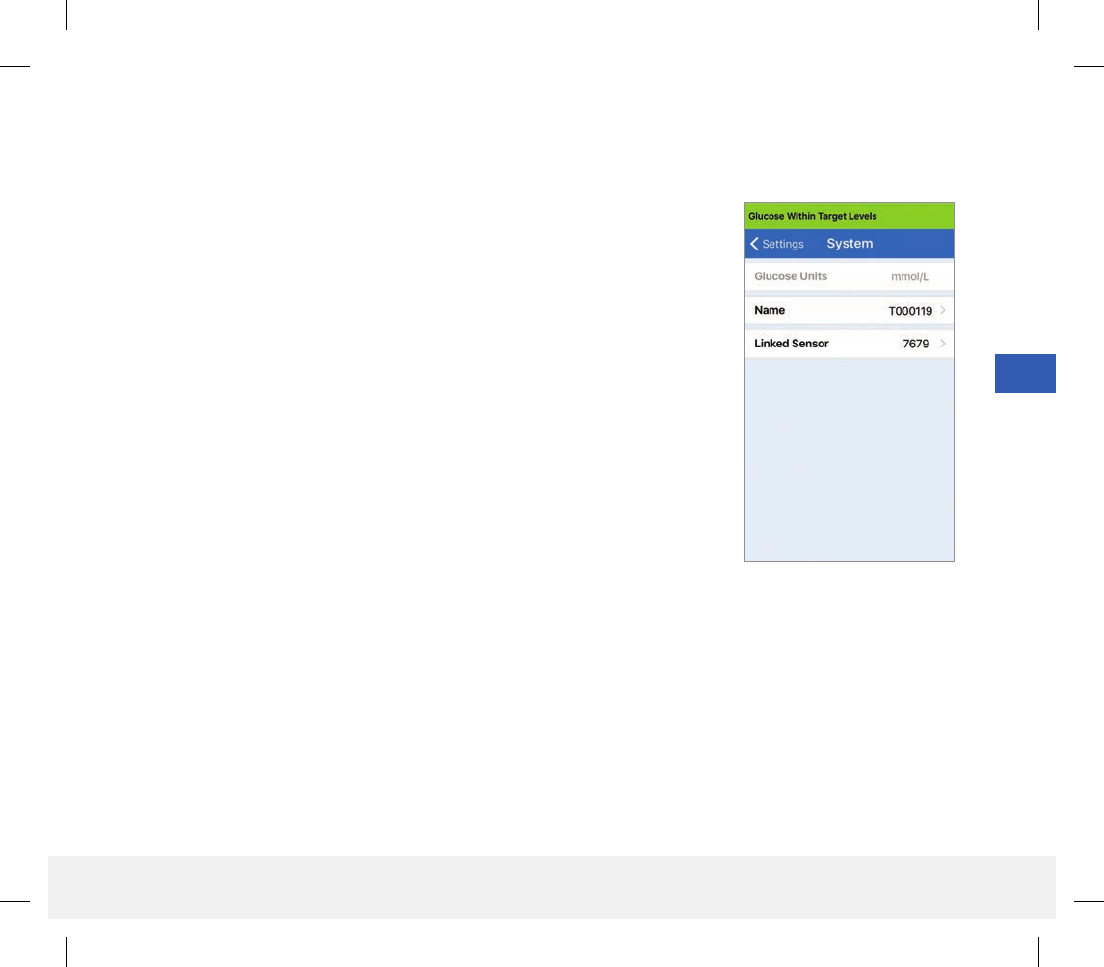
69
Eversense CGM User Guide
8
Setting System Information
The SYSTEM screen lets you view and edit other settings in your Eversense CGM System.
1. Tap Menu > Settings > System to display the SYSTEMS screen.
2. On the SYSTEMS screen, you can tap each of the following to set:
• Glucose Units. The unit of measurement for your glucose readings.
The app must be reinstalled to edit this setting.
• Name. The serial number of your smart transmitter. You can also tap
on the serial number displayed here and give your smart transmitter a
custom name.
• Linked Sensor. The serial number of the sensor currently linked with
the smart transmitter. Tap this feature to access the ability to link or
re-link a sensor.
LBL-0302-01-101 Rev 1_Eversense User Guide_mmolL_R5.indd 69 11/4/16 2:44 PM

70
Eversense CGM User Guide
8
Setting Mealtimes Schedule
The MEAL TIMES screen displays the time slots for your Breakfast, Lunch, Snack, Dinner and Sleep times. The
time intervals set in the MEAL TIMES screen are used on the Reports graph view to indicate the high, low and
average CGM values during each mealtime interval.
1. Tap Menu > Settings > Meal Times to display the MEAL TIMES
screen.
2. Tap each meal time listed, then tap Start and End to set a beginning
and end mealtime.
LBL-0302-01-101 Rev 1_Eversense User Guide_mmolL_R5.indd 70 11/4/16 2:44 PM
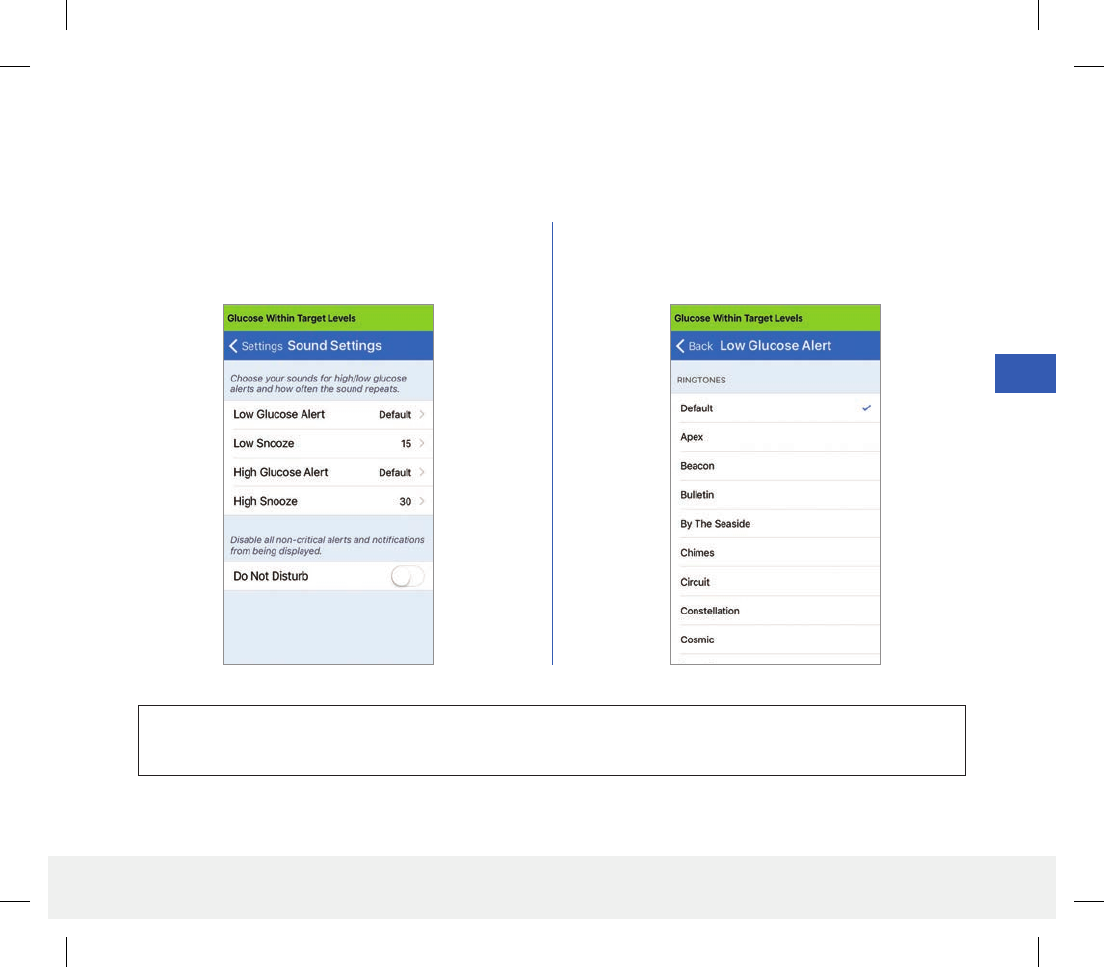
71
Eversense CGM User Guide
8
Setting Sounds
The SOUND SETTINGS screen displays the alert sound settings for Low Glucose and High Glucose. This screen
also allows you to enter a snooze setting for the alerts listed.
2. Tap each alert to select the alert sound. Tap Back
to get back to the SOUND SETTINGS screen.
1. Tap Menu > Settings > Sound Settings to
display the SOUND SETTINGS screen.
IMPORTANT: Be sure the sound on your mobile device is turned on. If you turn the sound on your mobile
device o, you will not hear any sounds from the app.
LBL-0302-01-101 Rev 1_Eversense User Guide_mmolL_R5.indd 71 11/4/16 2:44 PM
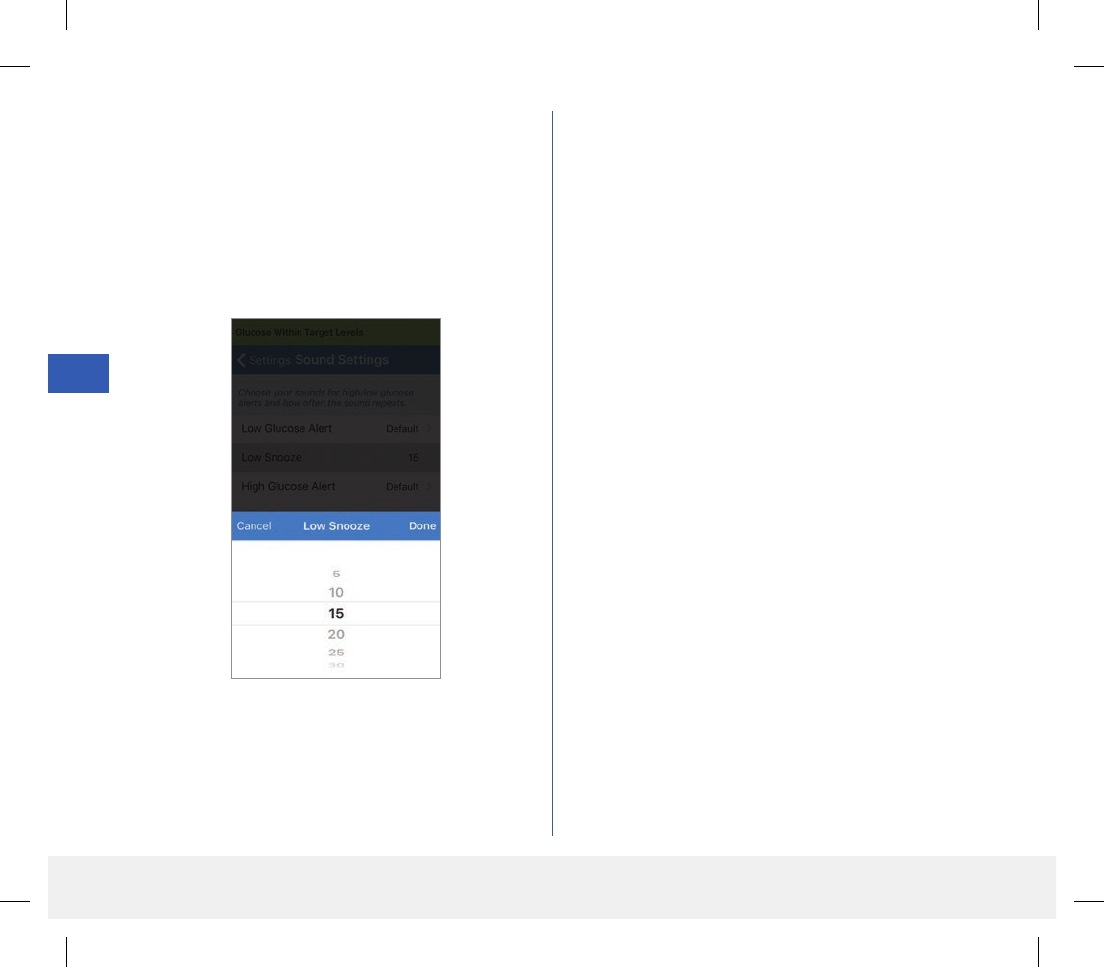
72
Eversense CGM User Guide
8
The SOUND SETTINGS screen also allows you to
enable and disable the Do Not Disturb mode.
3. Tap each snooze alert to set how often the alert
repeats.
Tap Done when complete.
• Do Not Disturb. Places the smart transmitter in a
“Do Not Disturb” mode.
• OFF – ALL notifications – alerts and notifications –
regardless of critical nature will be provided
by the smart transmitter and app.
• ON – ONLY critical alerts will be provided by the
smart transmitter’s on-body vibe alerts. All
alerts will continue to be provided on the
mobile app.
Note: When you enable Do Not Disturb mode on
your mobile device you will not receive any alerts or
notifications from the Eversense App. For a list of alerts,
please see Alert Descriptions.
By setting the snooze alert, you can set how often an
alert repeats after you have received a Low Glucose and
High Glucose alert.
LBL-0302-01-101 Rev 1_Eversense User Guide_mmolL_R5.indd 72 11/4/16 2:44 PM
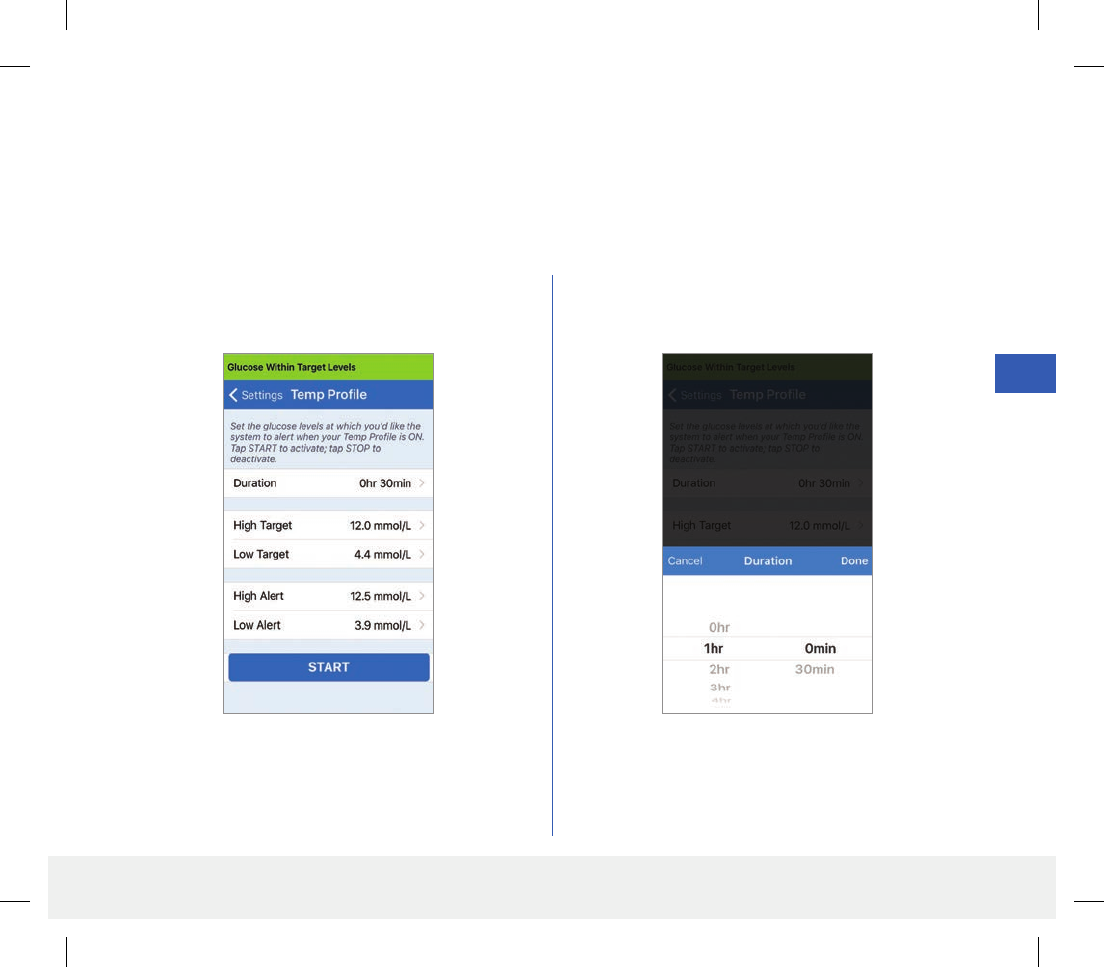
73
Eversense CGM User Guide
8
Setting Temporary Profile
During activities or conditions outside your normal routine, you may wish to temporarily use glucose settings that
are dierent from the standard glucose settings you have entered. The TEMP PROFILE screen allows you to
temporarily change glucose target and alert settings for the duration you choose. When the Temp Profile duration is
over, the standard glucose settings you entered in Settings > Glucose will automatically resume.
1. Tap Menu > Settings > Temp Prole to
display the TEMP PROFILE screen.
2. Select the duration. You can set a Temp Profile for
up to 36 hours in 30 minute increments.
LBL-0302-01-101 Rev 1_Eversense User Guide_mmolL_R5.indd 73 11/4/16 2:44 PM
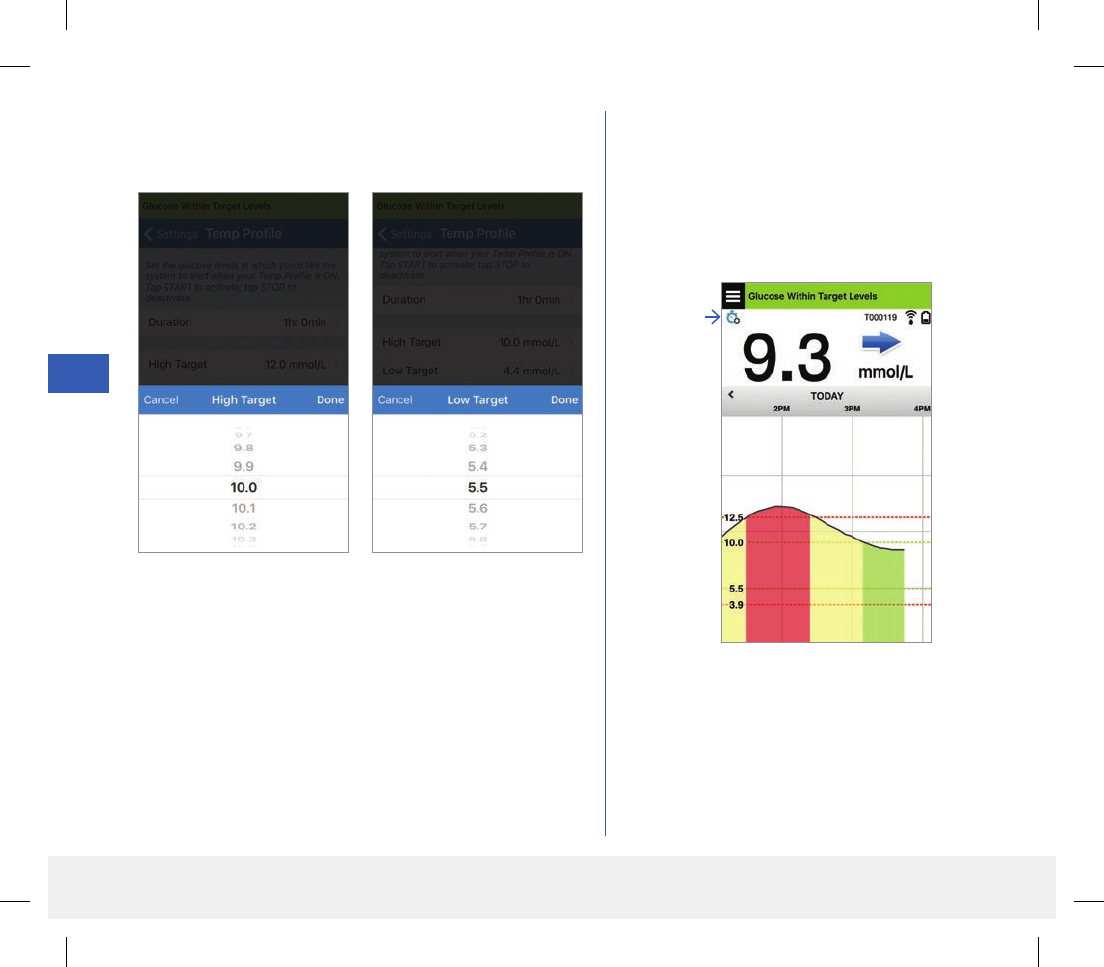
74
Eversense CGM User Guide
8
The Temp Profile selections cannot be
changed when the duration has been started.
While a Temp Profile is active, the Temp Profile
icon will be displayed on the MY GLUCOSE
screen.
Temp
Profile
icon
3. Set the High and Low Targets and High and Low Alert
levels desired. Tap START.
LBL-0302-01-101 Rev 1_Eversense User Guide_mmolL_R5.indd 74 11/4/16 2:44 PM
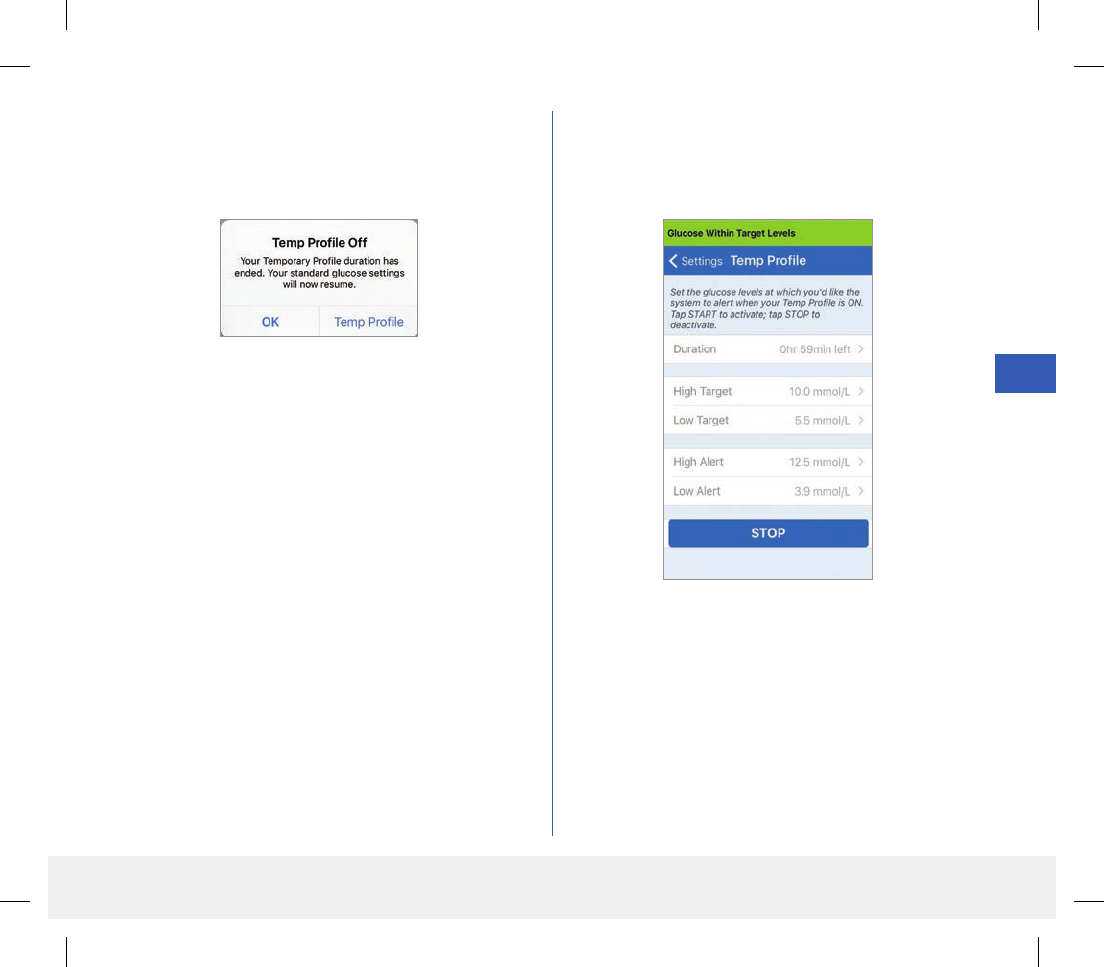
75
Eversense CGM User Guide
8
When the Temp Profile duration is finished, the app
displays a notice and the Temp Profile icon is no
longer displayed on the MY GLUCOSE screen.
To end the Temp Profile earlier than the time you set,
go to Settings > Temp Prole and tap STOP.
LBL-0302-01-101 Rev 1_Eversense User Guide_mmolL_R5.indd 75 11/4/16 2:44 PM
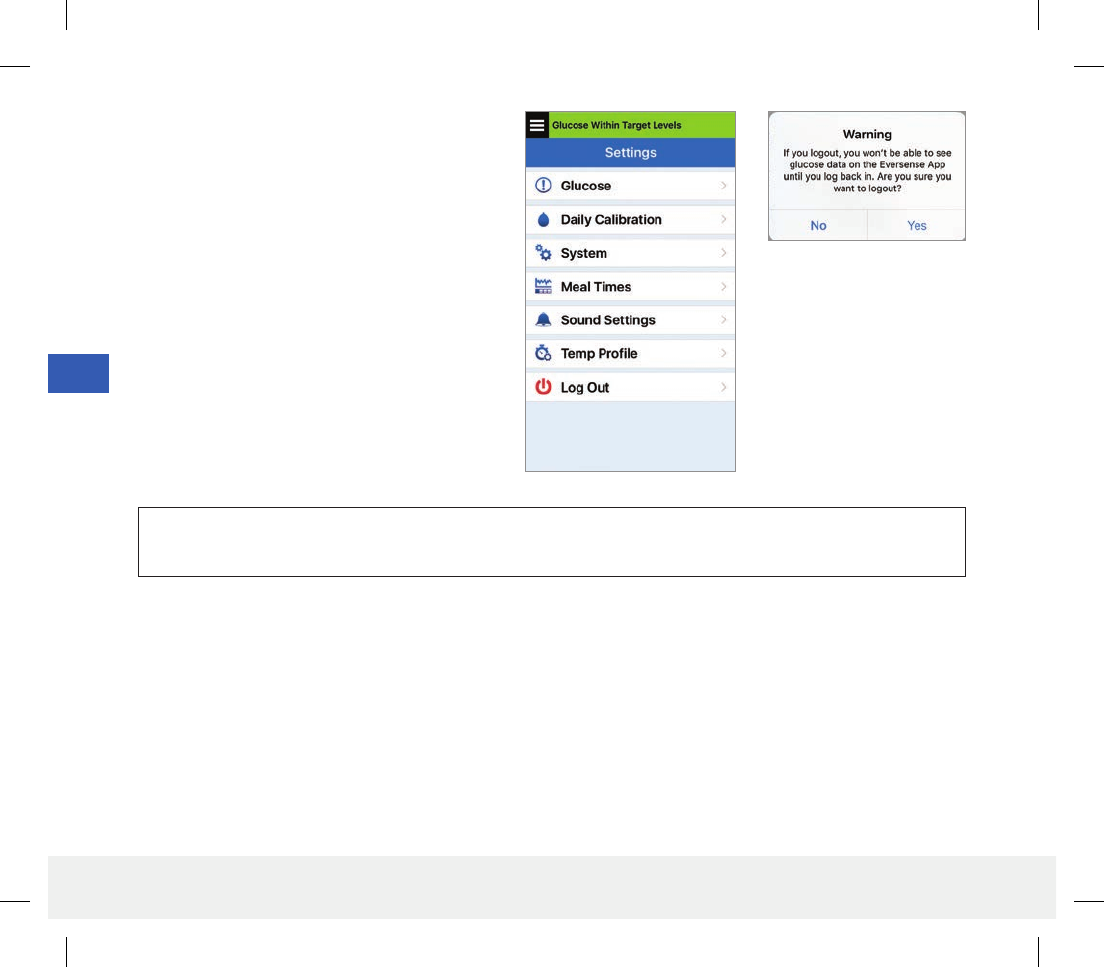
76
Eversense CGM User Guide
8
Logging out
To log out of your Eversense account,
tap Settings > Log Out.
IMPORTANT: If you log out, no glucose data will be displayed on the app until you log back in using the
email and password you entered when you set up your account for the first time.
LBL-0302-01-101 Rev 1_Eversense User Guide_mmolL_R5.indd 76 11/4/16 2:44 PM
77
Eversense CGM User Guide
9
9. Alert Descriptions
This section describes the various alerts and notication messages you may see on the Eversense
App screens and actions you may need to take.
Your CGM System provides you with alerts and notifications related to glucose readings and system status on both
your smart transmitter and mobile device. The smart transmitter provides on-body vibe alerts when an alert level has
been reached. The mobile device app sounds an alert and displays messages on the MY GLUCOSE screen.
The table below describes the vibration patterns on the smart transmitter and the indicators on your app.
Alerts and Notifications Smart Transmitter
Vibration Pattern App Alert Indicators
Alerts where no glucose values can be displayed
Requires immediate and appropriate action. 3 long vibes MESSAGE APPEARS IN YELLOW
Alerts related to Low readings
Low Glucose Alert and Out-of-Range Low.
Requires immediate and appropriate action.
3 short vibes x 3 MESSAGE APPEARS IN YELLOW
Alerts related to High readings
High Glucose Alert and Out-of-Range High.
Requires immediate and appropriate action.
1 long vibe then 2 short
vibes MESSAGE APPEARS IN YELLOW
Alerts related to less critical issues
Requires some action but may not be as critical in
nature. See following section for examples.
1 short vibe MESSAGE APPEARS IN YELLOW
Notifications
Requires some action but not critical in nature.
See following section for examples.
1 short vibe MESSAGE APPEARS IN BLUE
LBL-0302-01-101 Rev 1_Eversense User Guide_mmolL_R5.indd 77 11/4/16 2:44 PM
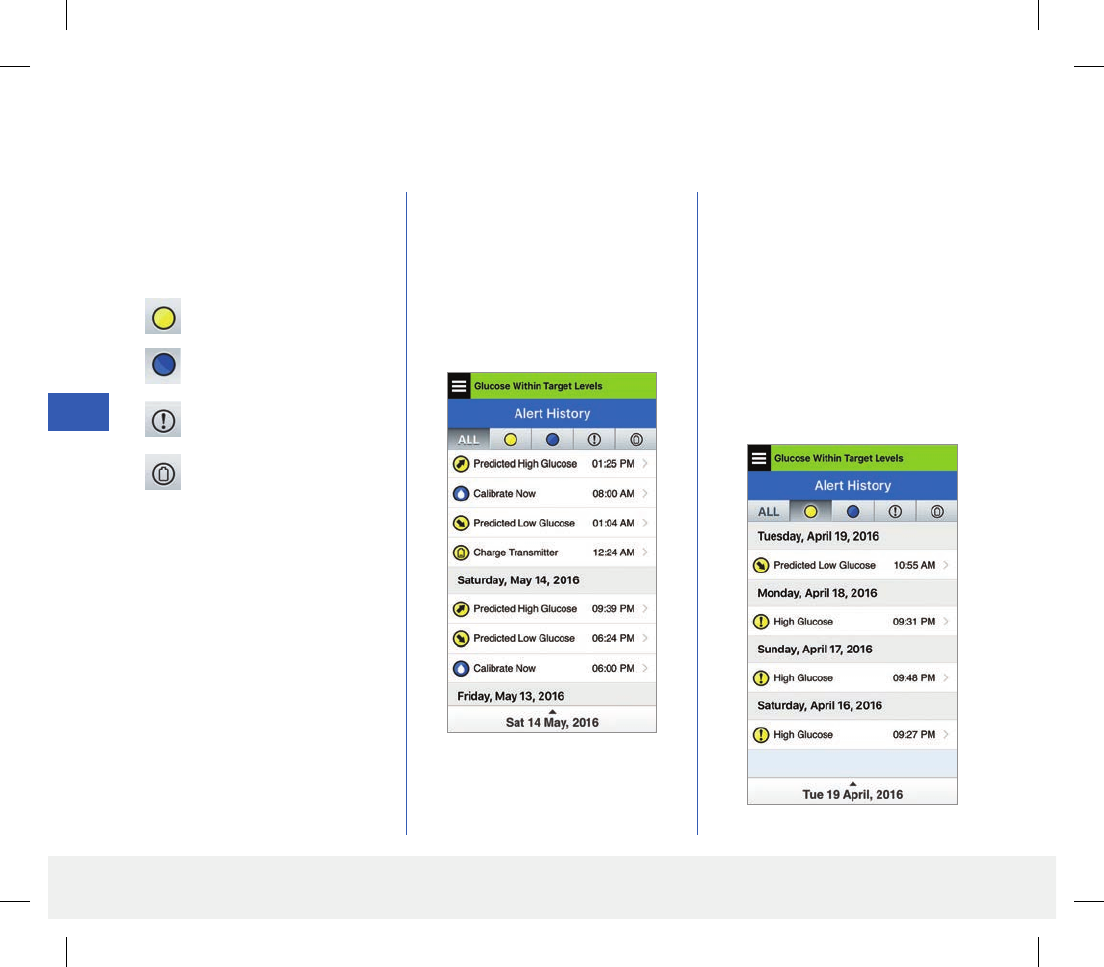
78
Eversense CGM User Guide
9
Alert History
The ALERT HISTORY screen lists alerts and notifications you have received.
1. Tap Menu > Alert History.
• The ALERT HISTORY
screen will list ALL alerts and
notifications for that day.
• Tap on any message to get
more information.
The following icons are used
to indicate the severity level of
messages.
2. You can choose to include only
certain messages (alerts and
notifications, etc.) for review
by tapping selected alert icons.
• Tap ALL, then tap icons on
top of the screen to select
only the types of alerts you
want displayed.
• Tap Menu when done.
Alerts
Notifications
More than 1 Alert in Same
Period
Battery Alerts
Example of ALL
Example of alerts only
Note: When you receive 2 or
more alerts that have not been
acknowledged, the app will
display an option to Dismiss All.
This can happen when your mobile
device has been out of range of
your smart transmitter and then
re-syncs. You can review each alert
in Alert History.
LBL-0302-01-101 Rev 1_Eversense User Guide_mmolL_R5.indd 78 11/4/16 2:44 PM
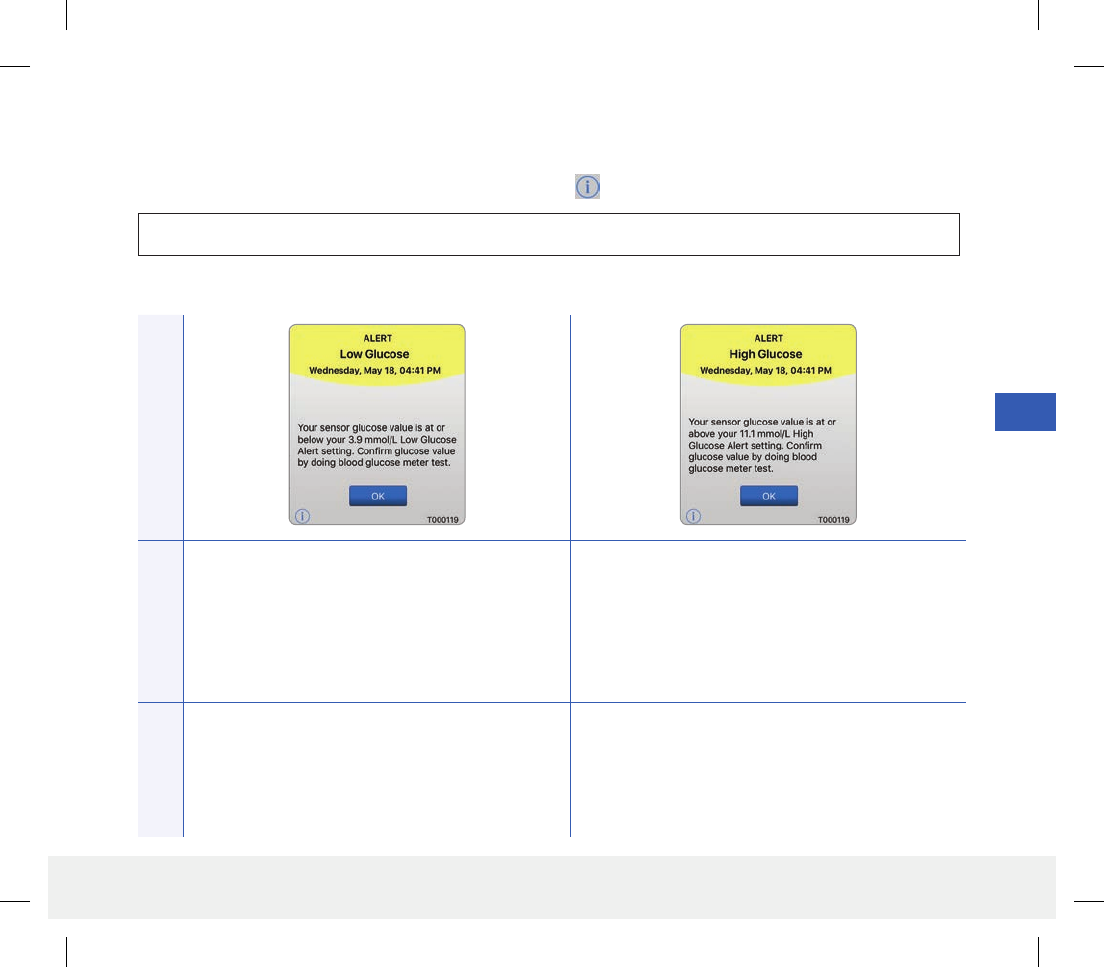
79
Eversense CGM User Guide
9
Alert Descriptions and Actions
The following table lists the alerts and notifications you may receive on the Eversense App.
Note: For each message, you can also tap the information icon to receive additional details about the message.
App DisplayDescription
Low Glucose*
Appears at the interval you enter in sound settings
when your sensor glucose reading is at or below the
low glucose alert level you set. The default repeat
interval is 15 minutes.
High Glucose*
Appears at the interval you enter in sound settings
when your sensor glucose reading is at or above the
high glucose alert level you set. The default repeat
interval is 30 minutes.
Actions
Pay close attention to your glucose values,
symptoms, and trends. Confirm your glucose value
with a blood glucose meter test before making a
treatment decision.
Pay close attention to your glucose values,
symptoms, and trends. Confirm your glucose value
with a blood glucose meter test before making a
treatment decision.
Alerts
IMPORTANT: On-body vibe alerts for the alerts marked with a * cannot be turned o using DND in the app.
LBL-0302-01-101 Rev 1_Eversense User Guide_mmolL_R5.indd 79 11/4/16 2:44 PM
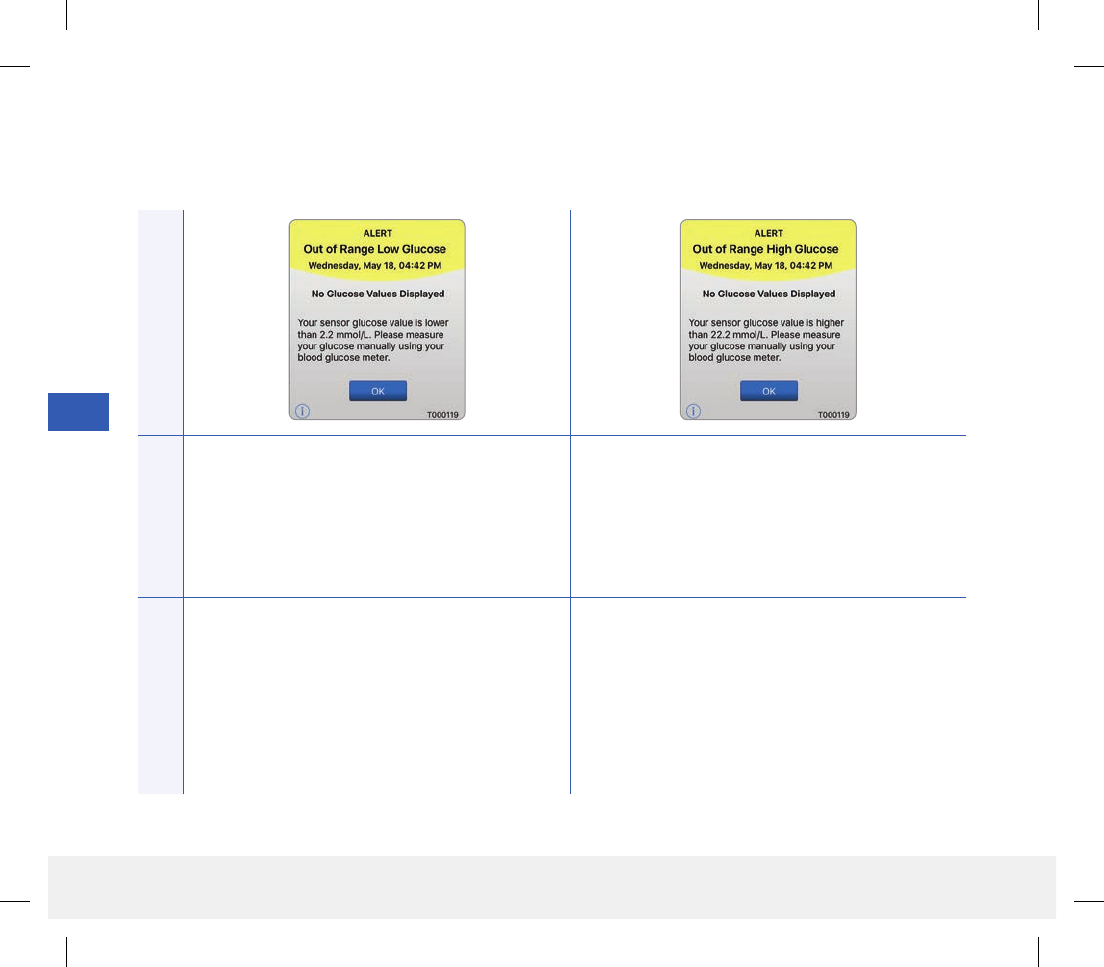
80
Eversense CGM User Guide
9
App DisplayDescription
Out of Range Low Glucose*
Appears when your glucose reading is lower than
2.2 mmol/L.
No glucose reading can be displayed (only LO is
displayed on the MY GLUCOSE screen).
Out of Range High Glucose*
Appears when your glucose value is higher than
22.2 mmol/L.
No glucose reading can be displayed (only HI is
displayed on the MY GLUCOSE screen).
Actions
Confirm your glucose value with a blood glucose
meter test before making a treatment decision.
Once the sensor glucose value is at or higher than
2.2 mmol/L, glucose readings will resume on the
display.
Measure your glucose manually by using your blood
glucose meter. Always confirm your glucose value
with a blood glucose meter test before making a
treatment decision.
Once the sensor glucose value is at or lower than
22.2 mmol/L, glucose readings will resume on the
display.
Alert Descriptions and Actions (continued)
Alerts
LBL-0302-01-101 Rev 1_Eversense User Guide_mmolL_R5.indd 80 11/4/16 2:44 PM
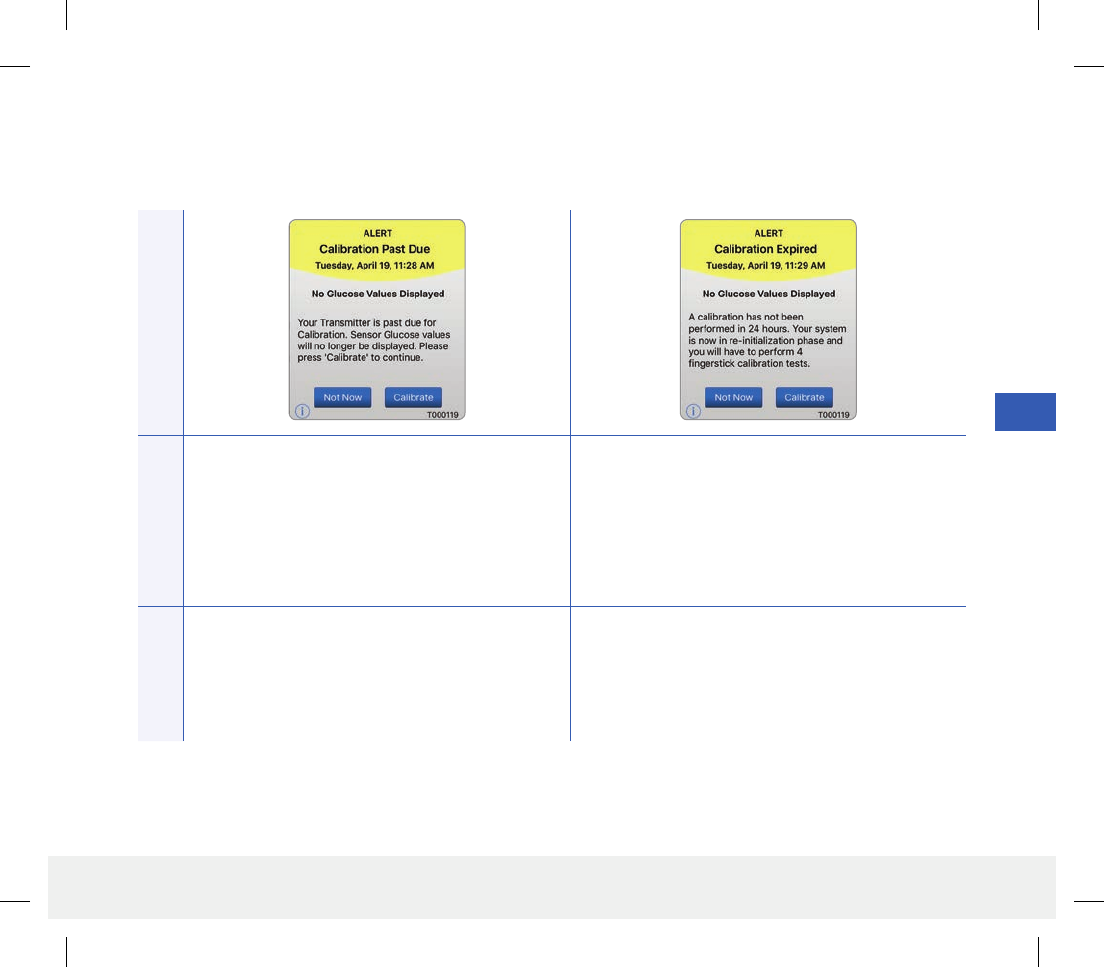
81
Eversense CGM User Guide
9
App DisplayDescription
Calibration Past Due
Appears when your system is past due for
calibration.
No glucose readings can be displayed until
calibration is performed.
Calibration Expired
Appears when a calibration has not been performed
in 24 hours. The system returns to the Initialization
Phase.
No glucose reading can be displayed until calibration
is performed.
Actions
Perform a fingerstick calibration in order to resume
displaying glucose values.
In the Initialization Phase, you must perform
4 fingerstick calibration tests spaced 2 - 12 hours
apart. Display of glucose readings will resume after
the 2nd successful fingerstick calibration test.
Alert Descriptions and Actions (continued)
Alerts
LBL-0302-01-101 Rev 1_Eversense User Guide_mmolL_R5.indd 81 11/4/16 2:44 PM
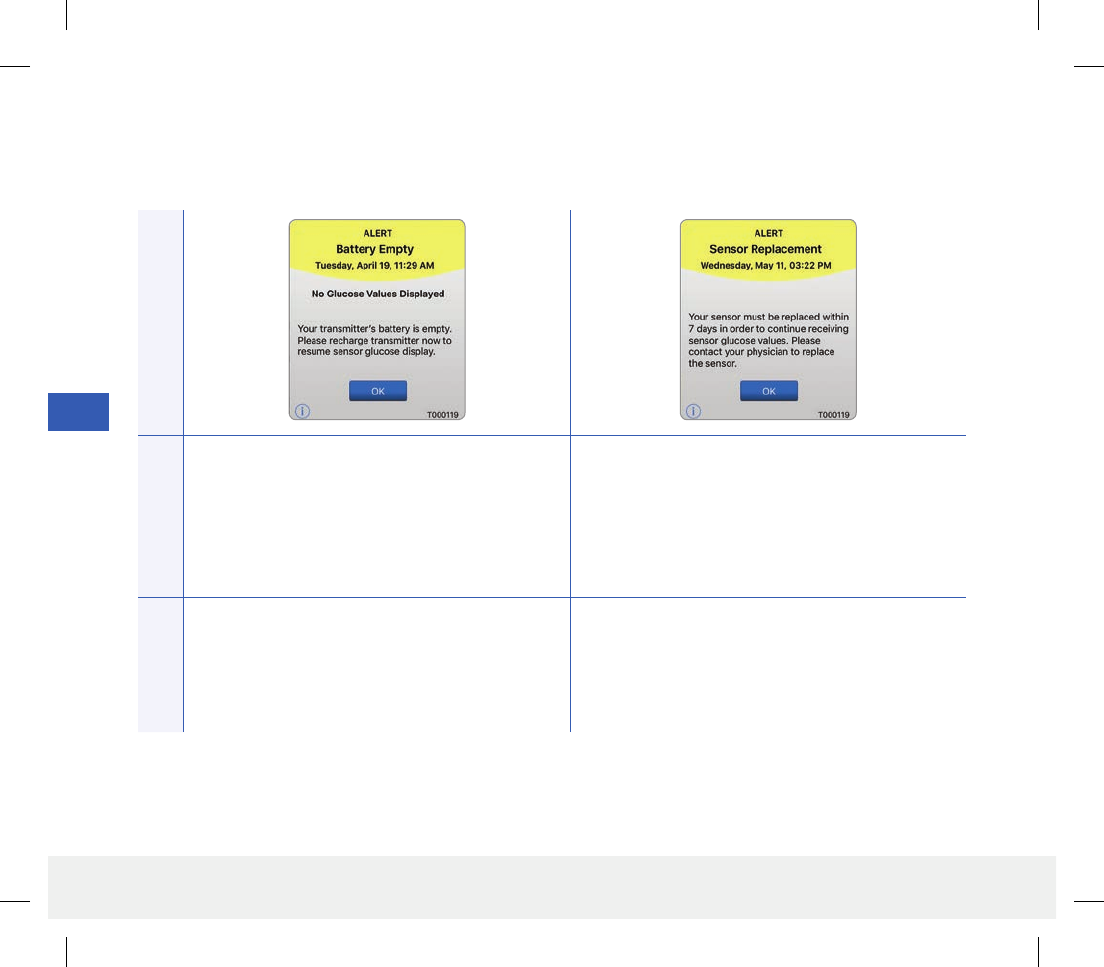
82
Eversense CGM User Guide
9
App DisplayDescription
Battery Empty*
Appears once when your smart transmitter battery
is empty and needs to be charged.
No glucose reading can be displayed until the smart
transmitter is charged.
Sensor Replacement (7 days)
Appears when your sensor will stop collecting
glucose data in 7 days.
Actions
Charge the smart transmitter immediately. Remove
the smart transmitter from your body before
connecting it to the power supply.
Contact your physician to schedule your sensor
removal and insertion of new sensor.
Alert Descriptions and Actions (continued)
Alerts
LBL-0302-01-101 Rev 1_Eversense User Guide_mmolL_R5.indd 82 11/4/16 2:44 PM
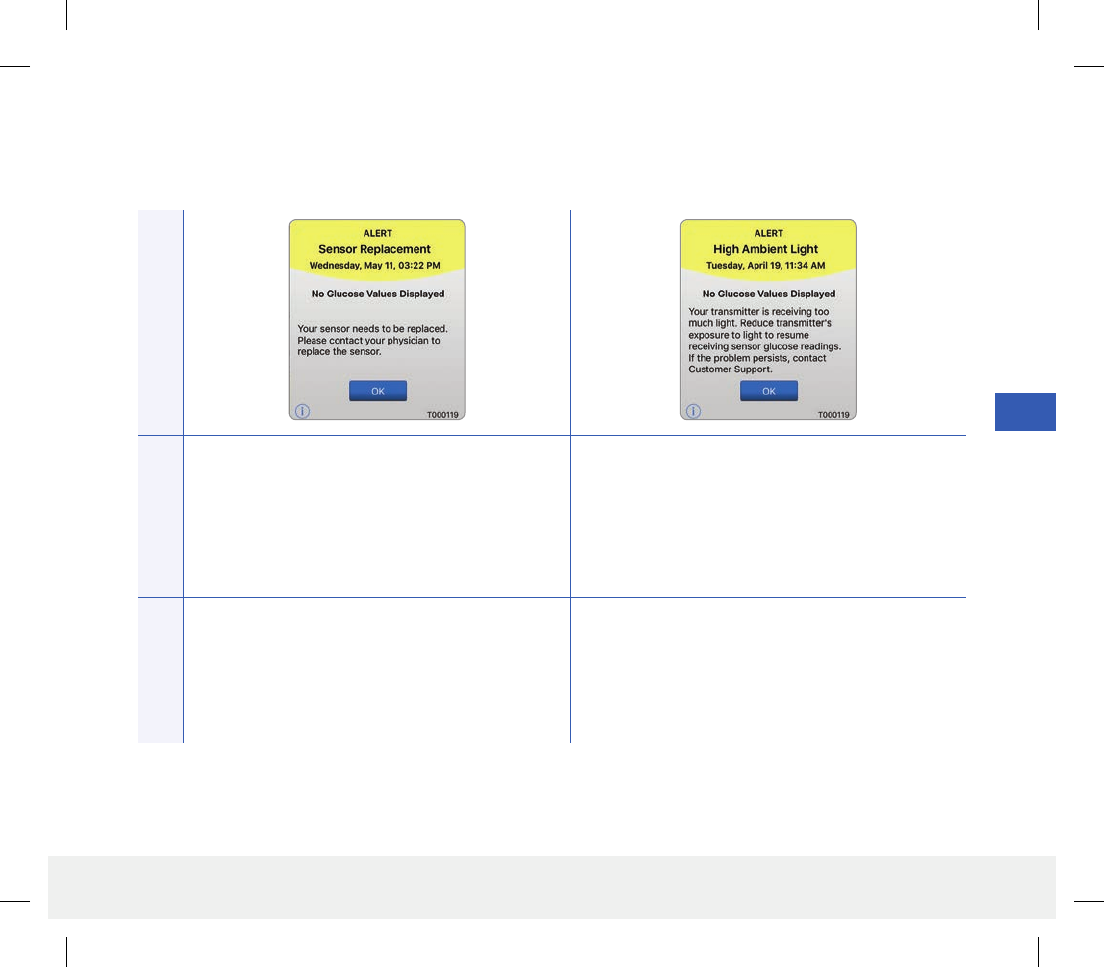
83
Eversense CGM User Guide
9
App DisplayDescription
Sensor Replacement*
Appears once when your sensor needs to be
replaced.
No glucose reading can be displayed until the
sensor is replaced.
High Ambient Light
Appears every 20 minutes when your smart
transmitter is receiving too much ambient light,
aecting its ability to communicate with the sensor.
No glucose reading can be displayed until ambient
light is reduced.
Actions
Contact your physician to have your sensor replaced. Reduce ambient light by doing one or more of the
following:
• Move to an area where there is less light exposure.
• Place a dark material over the smart transmitter.
• Wear the smart transmitter under clothing.
Alert Descriptions and Actions (continued)
Alerts
LBL-0302-01-101 Rev 1_Eversense User Guide_mmolL_R5.indd 83 11/4/16 2:44 PM
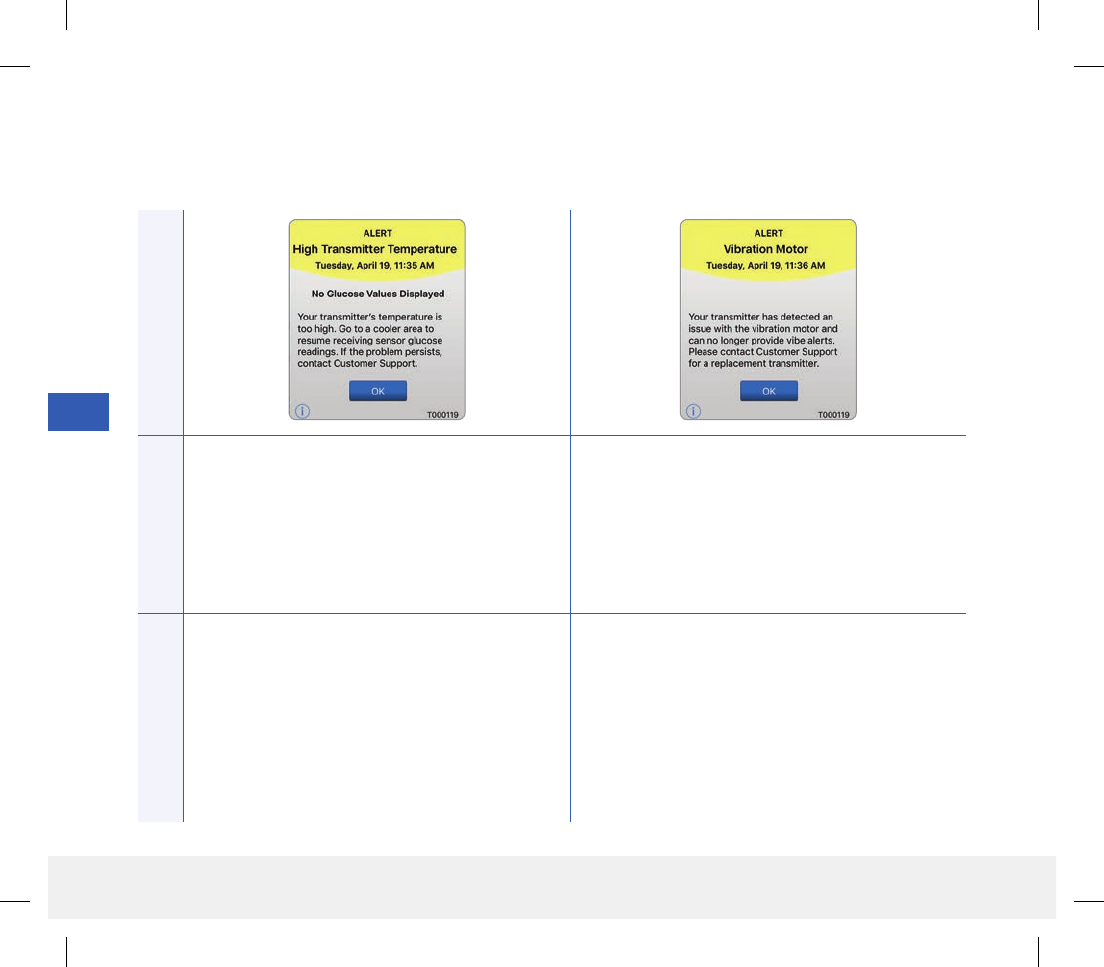
84
Eversense CGM User Guide
9
Alert Descriptions and Actions (continued)
Alerts
App DisplayDescription
High Smart Transmitter Temperature*
Appears every 20 minutes when your smart
transmitter temperature is too high.
No glucose reading is displayed until the smart
transmitter temperature is within normal operating
conditions.
Vibration Motor
Appears every 20 minutes when the vibration motor on
your smart transmitter can no longer provide on-body
vibe alerts. You will continue to get glucose readings up
to 72 hours after receiving the alert message. After
72 hours, you will receive a Transmitter Error Alert every
20 minutes until you replace the smart transmitter.
Actions
Reduce the smart transmitter temperature by moving
to a cooler environment. Once the smart transmitter
temperature is below 42 °C (108 °F), it will resume
displaying glucose values.
You may temporarily remove the smart transmitter
to cool it down. Once the smart transmitter is back
to a lower temperature, be sure to replace it over the
sensor.
Contact Customer Support to have your smart
transmitter replaced immediately.
LBL-0302-01-101 Rev 1_Eversense User Guide_mmolL_R5.indd 84 11/4/16 2:44 PM
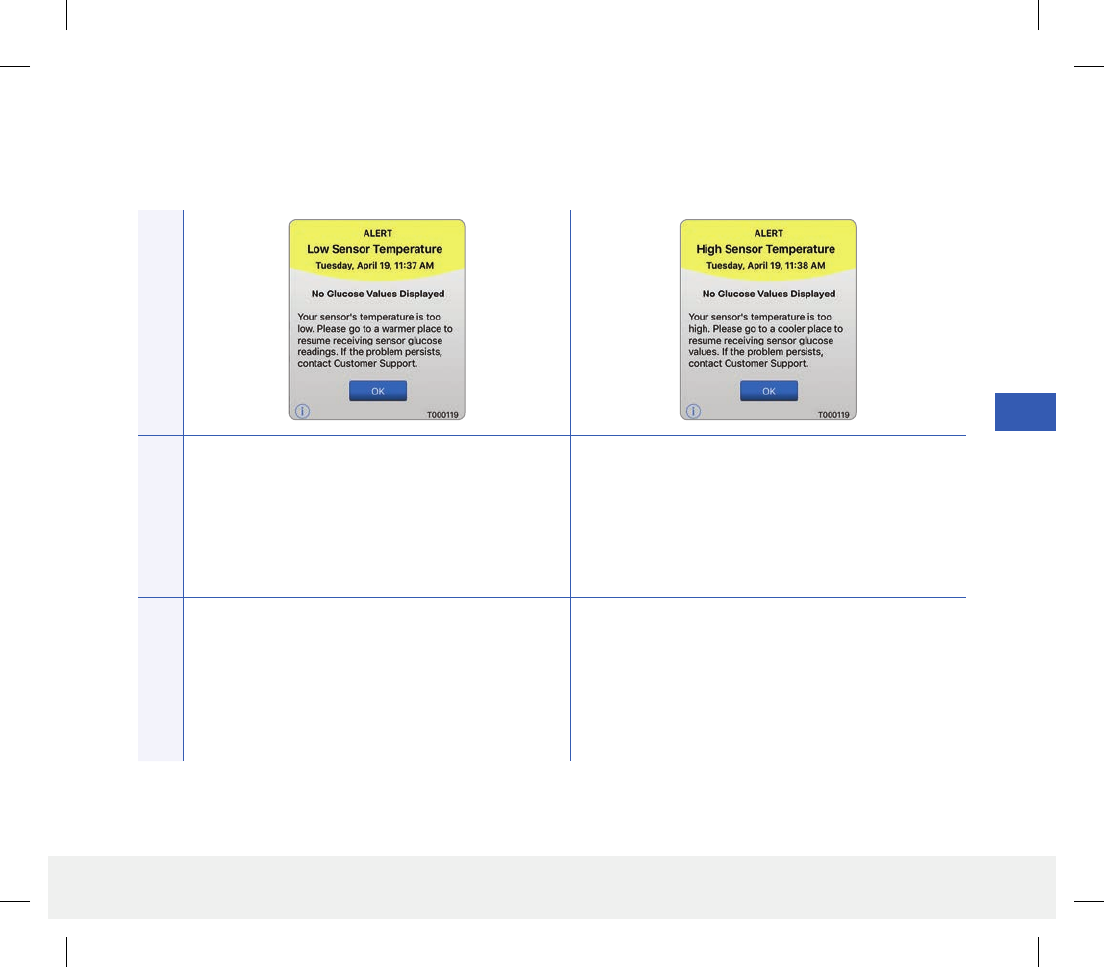
85
Eversense CGM User Guide
9
Alert Descriptions and Actions (continued)
Alerts
App DisplayDescription
Low Sensor Temperature*
Appears every 20 minutes when the sensor
temperature is too low.
No glucose reading is displayed until the sensor
temperature is within normal operating conditions.
High Sensor Temperature*
Appears every 20 minutes when the sensor
temperature is too high. No glucose reading is
displayed until the sensor temperature is within
normal operating conditions.
Actions
Go to a warmer environment to increase the sensor
temperature. Keep your smart transmitter turned
on so you will start receiving glucose values when
the sensor temperature is between 26 - 40 °C
(81 - 104 °F).
Go to a cooler environment to reduce the sensor
temperature. Briefly remove the smart transmitter
while the sensor temperature cools to between
26 - 40° C (81 - 104 °F). Then put the smart
transmitter back on to start receiving glucose values
again from the sensor.
LBL-0302-01-101 Rev 1_Eversense User Guide_mmolL_R5.indd 85 11/4/16 2:44 PM
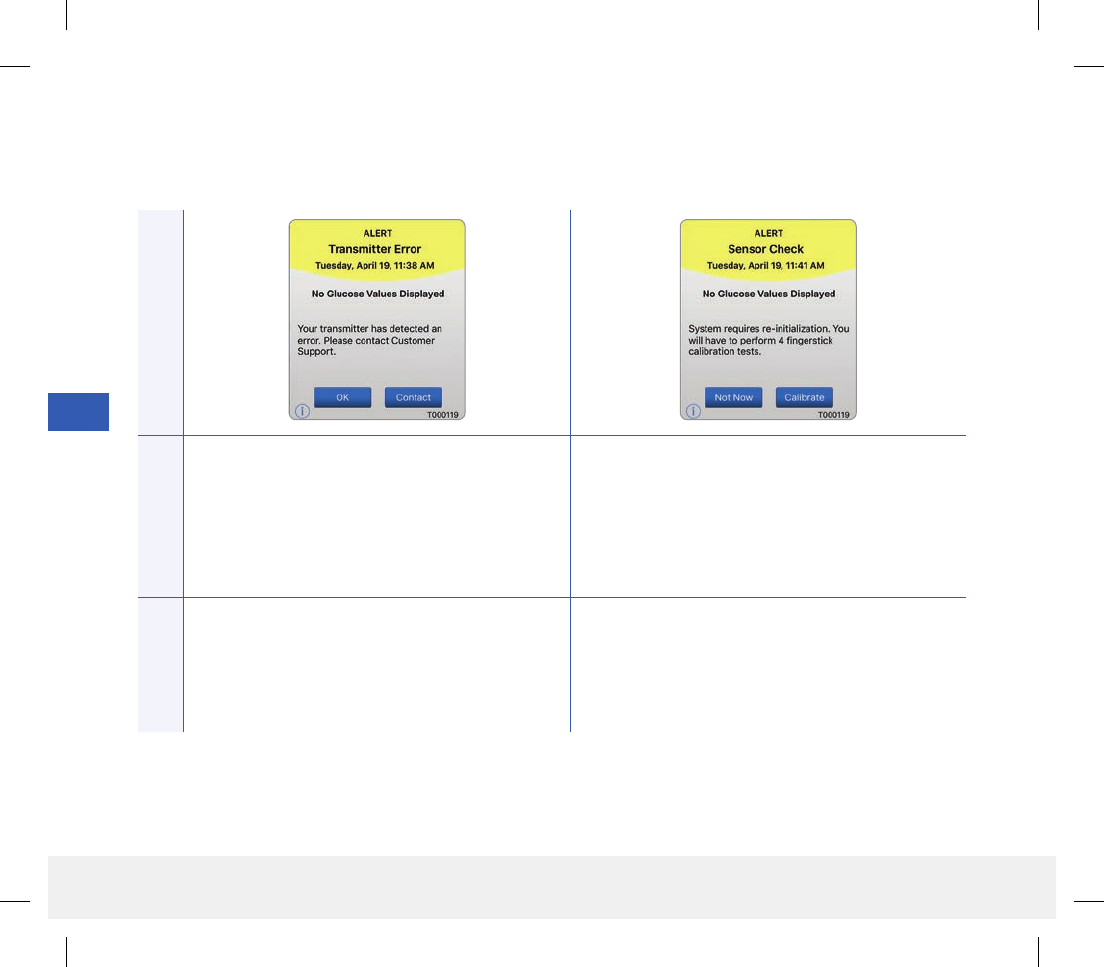
86
Eversense CGM User Guide
9
Alert Descriptions and Actions (continued)
Alerts
App DisplayDescription
Smart Transmitter Error*
Appears when the system’s internal checks detect a
smart transmitter error.
No glucose reading is displayed until the error is
corrected.
Sensor Check
Appears once when the system’s internal checks
detect instability with the sensor which requires a
return to calibration Initialization Phase.
Actions
Follow the steps shown in the Troubleshooting
section to reset your smart transmitter. If you are
unable to complete the reset, contact Customer
Support.
In the Initialization Phase, you must perform 4
fingerstick calibration tests spaced 2 - 12 hours apart.
Display of glucose readings will resume after the 2nd
successful fingerstick calibration test.
LBL-0302-01-101 Rev 1_Eversense User Guide_mmolL_R5.indd 86 11/4/16 2:44 PM

87
Eversense CGM User Guide
9
Alert Descriptions and Actions (continued)
Alerts
App DisplayDescription
Predicted Low Glucose
Appears every 60 minutes when your glucose
values are trending low and will reach your Low
Glucose Alert level within the time you entered in
Settings.
Predicted High Glucose
Appears every 60 minutes when your glucose values
are trending high and will reach your High Glucose
Alert level within the time you entered in Settings.
Actions
Pay close attention to your glucose values,
symptoms, and trends. Confirm your glucose value
with a blood glucose meter test before making a
treatment decision.
Pay close attention to your glucose values,
symptoms, and trends. Confirm your glucose value
with a blood glucose meter test before making a
treatment decision.
LBL-0302-01-101 Rev 1_Eversense User Guide_mmolL_R5.indd 87 11/4/16 2:44 PM

88
Eversense CGM User Guide
9
Alert Descriptions and Actions (continued)
Alerts
App DisplayDescription
Rate Falling
Appears every 60 minutes when your glucose
values are falling at a rate equal to or faster than the
rate of change you entered in Settings.
Rate Rising
Appears every 60 minutes when your glucose value
is rising at a rate equal to or faster than the rate of
change you entered in Settings.
Actions
Pay close attention to your glucose values,
symptoms, and trends. Confirm your glucose value
with a blood glucose meter test before making a
treatment decision.
Pay close attention to your glucose values, symptoms
and trends. Confirm your glucose value with a blood
glucose meter test before making a treatment
decision.
LBL-0302-01-101 Rev 1_Eversense User Guide_mmolL_R5.indd 88 11/4/16 2:44 PM
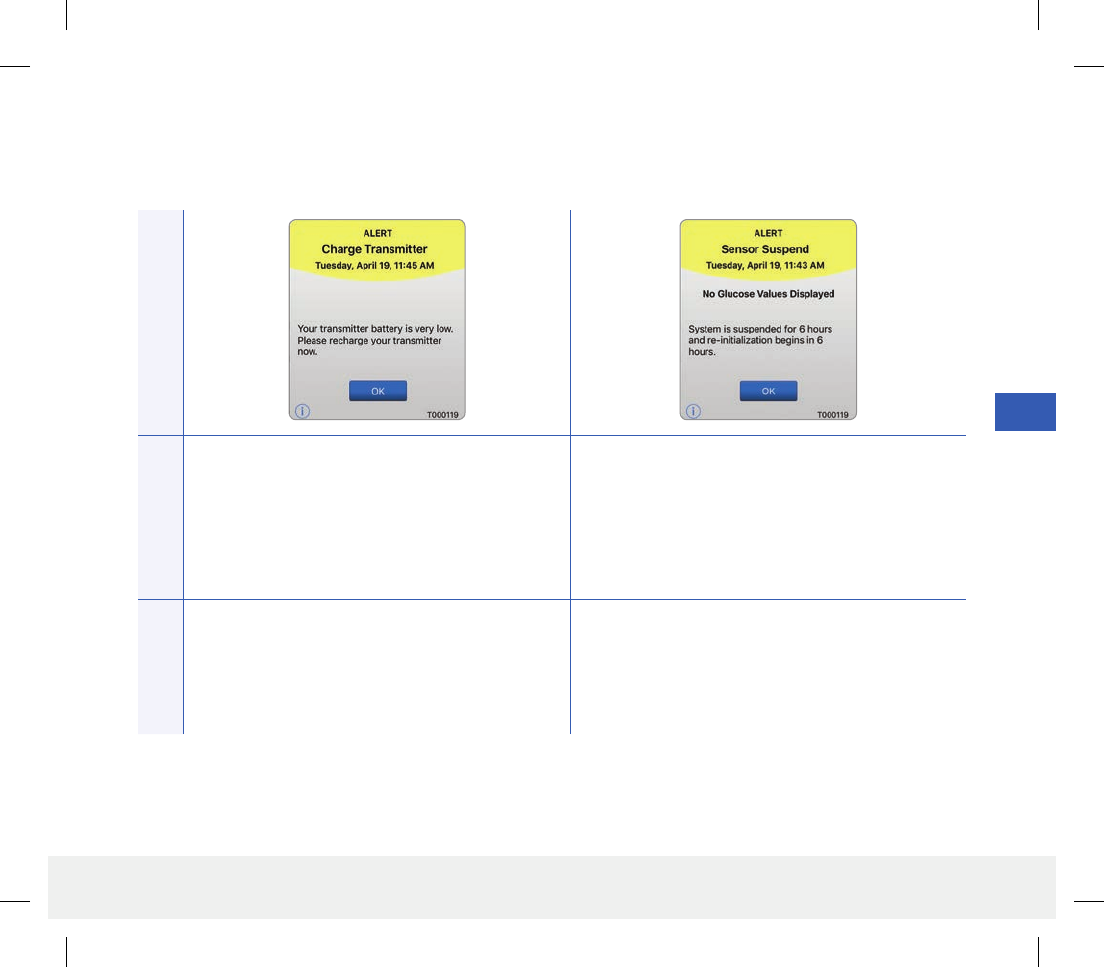
89
Eversense CGM User Guide
9
Alert Descriptions and Actions (continued)
Alerts
App DisplayDescription
Charge Smart Transmitter
Appears when smart transmitter battery power is
very low and you need to charge your battery very
soon.
Sensor Suspend
Appears when the system’s internal checks detect a
need to restart the Initialization Phase for additional
calibrations. Glucose values will be displayed a few
minutes after the second successful calibration during
the Initialization Phase.
Actions
Charge your smart transmitter as soon as possible. Re-initialization of the system begins in 6hours.
LBL-0302-01-101 Rev 1_Eversense User Guide_mmolL_R5.indd 89 11/4/16 2:44 PM
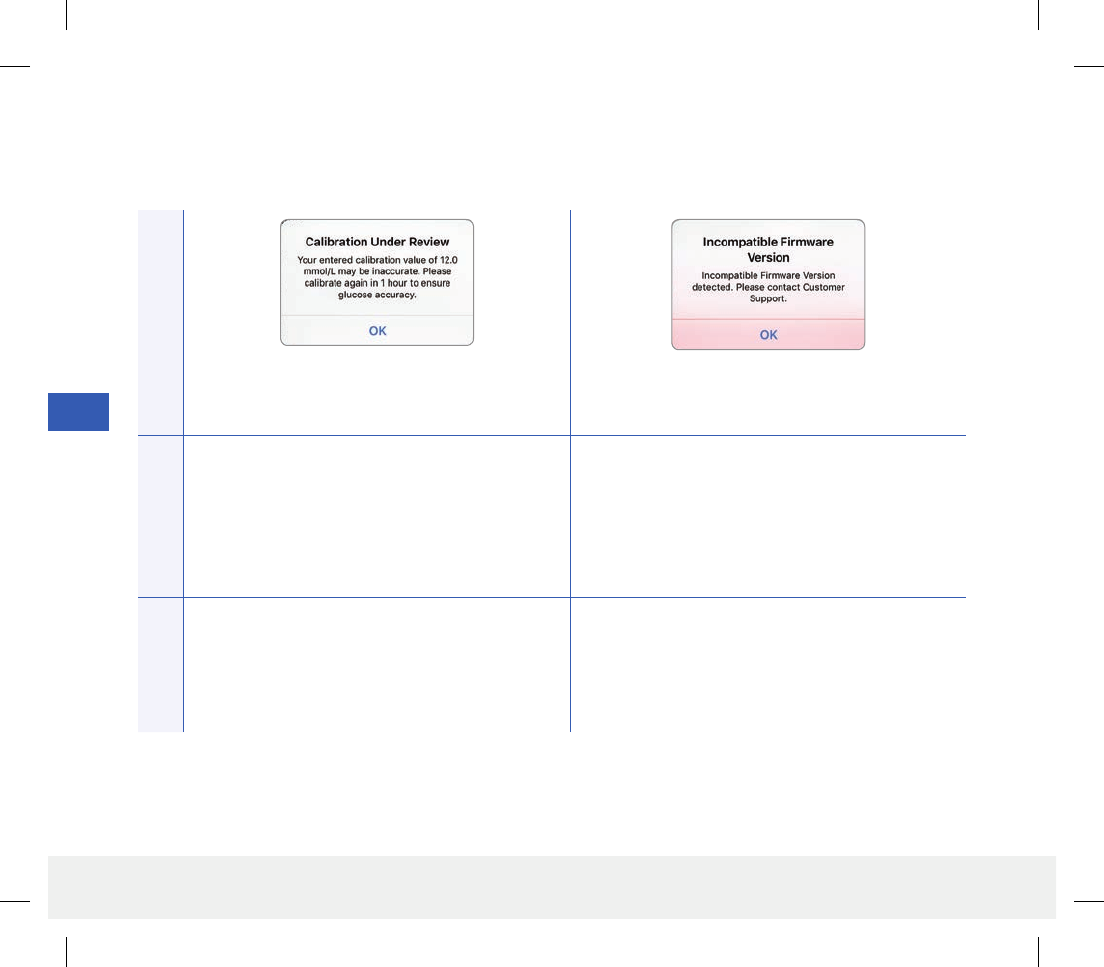
90
Eversense CGM User Guide
9
Alert Descriptions and Actions (continued)
Alerts
App DisplayDescription
Calibration Under Review
Appears when your calibration value is significantly
dierent from your sensor glucose value.
Incompatible Firmware Version
Appears when the firmware in your smart transmitter
is incompatible with the Eversense mobile app
version on your mobile device.
Actions
Re-calibrate when prompted. Contact Customer Support.
LBL-0302-01-101 Rev 1_Eversense User Guide_mmolL_R5.indd 90 11/4/16 2:44 PM
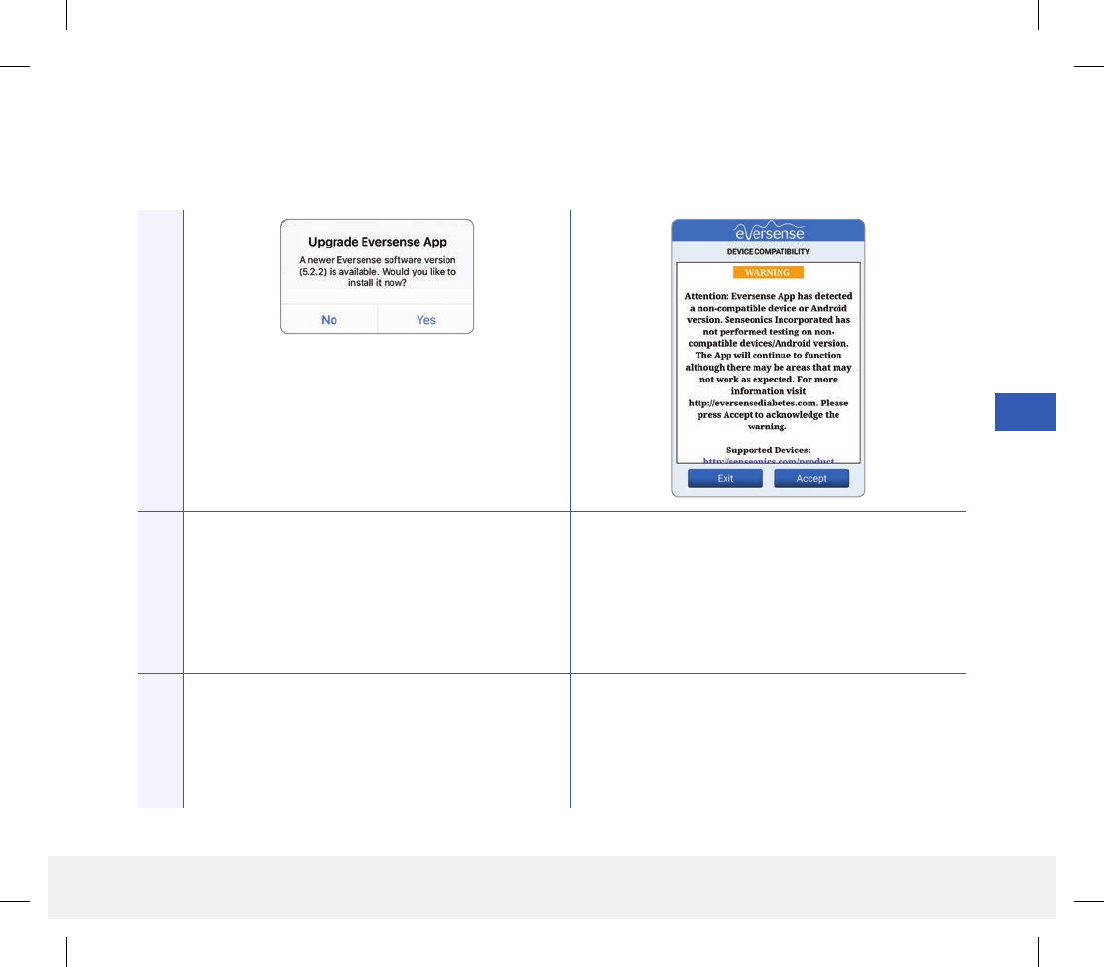
91
Eversense CGM User Guide
9
Alert Descriptions and Actions (continued)
Alerts
App DisplayDescription
Upgrade Eversense App
Appears when a newer version of the Eversense
App is available to download.
Incompatible Device/Operating System
Appears when an incompatible device/operating
system is being used with the app.
Actions
Tap Yes to install the update. For a list of compatible devices/operating systems
visit eversensediabetes.com.
LBL-0302-01-101 Rev 1_Eversense User Guide_mmolL_R5.indd 91 11/4/16 2:44 PM

92
Eversense CGM User Guide
9
Alert Descriptions and Actions (continued)
Notifications
App DisplayDescription
Calibrate Now
Appears when it is time for you to calibrate.
New Sensor Detected
Appears when the smart transmitter detects a new
sensor. The inserted sensor and the smart transmitter
must be linked to begin communication.
Actions
Do a fingerstick blood glucose test and enter the
reading as your calibration value. DO NOT use an
alternative site (such as forearm) to obtain your
blood glucose reading.
Tap Link Sensor to complete the linking process
and begin the 24-hour Warm-Up Phase. You do not
need to wear your smart transmitter over the sensor
until the Warm-Up Phase is complete.
LBL-0302-01-101 Rev 1_Eversense User Guide_mmolL_R5.indd 92 11/4/16 2:44 PM
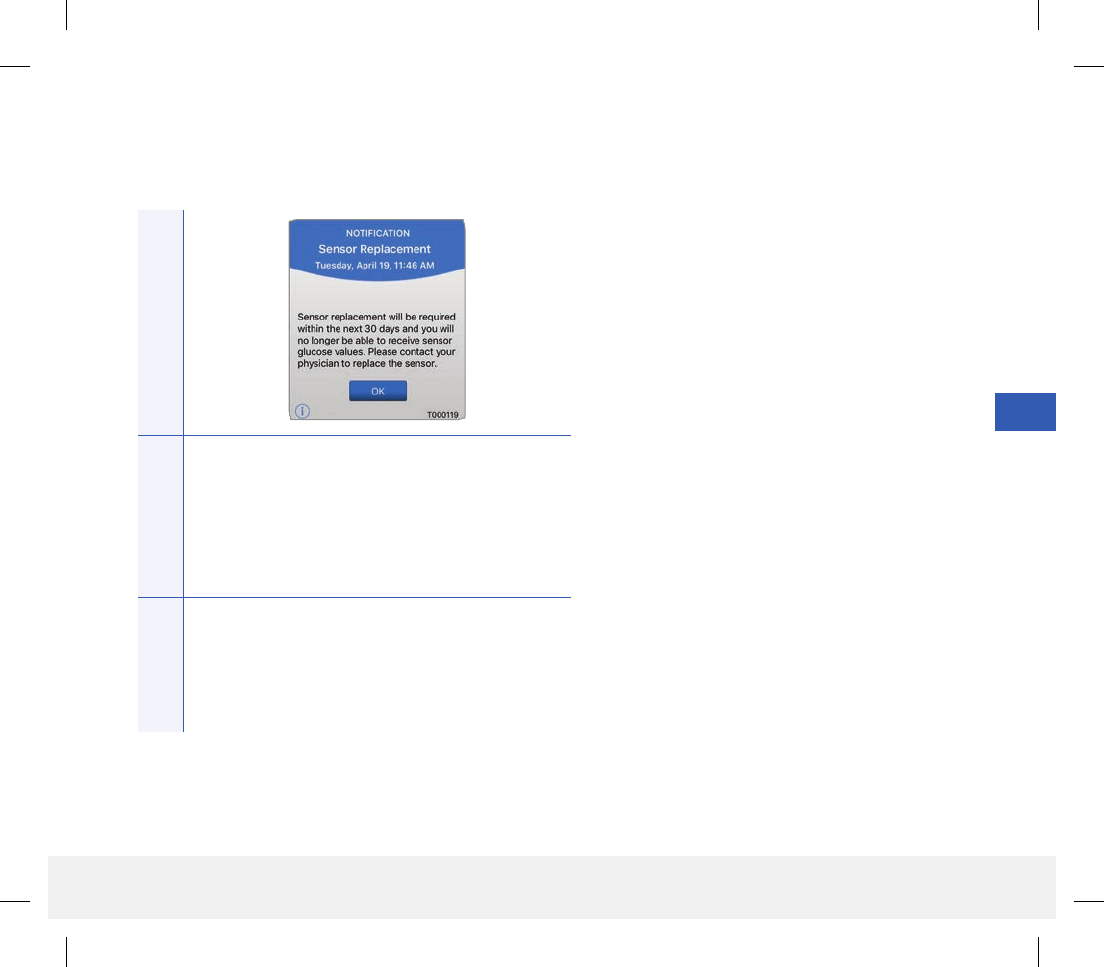
93
Eversense CGM User Guide
9
Alert Descriptions and Actions (continued)
Notifications
App DisplayDescription
Sensor Replacement
Appears 30, 14, 7, 3, 2, and 1 day before your sensor
has completed its 90-day wear period as a reminder
to replace your sensor.
Actions
Contact your physician to schedule the removal and
replacement of your sensor.
LBL-0302-01-101 Rev 1_Eversense User Guide_mmolL_R5.indd 93 11/4/16 2:44 PM
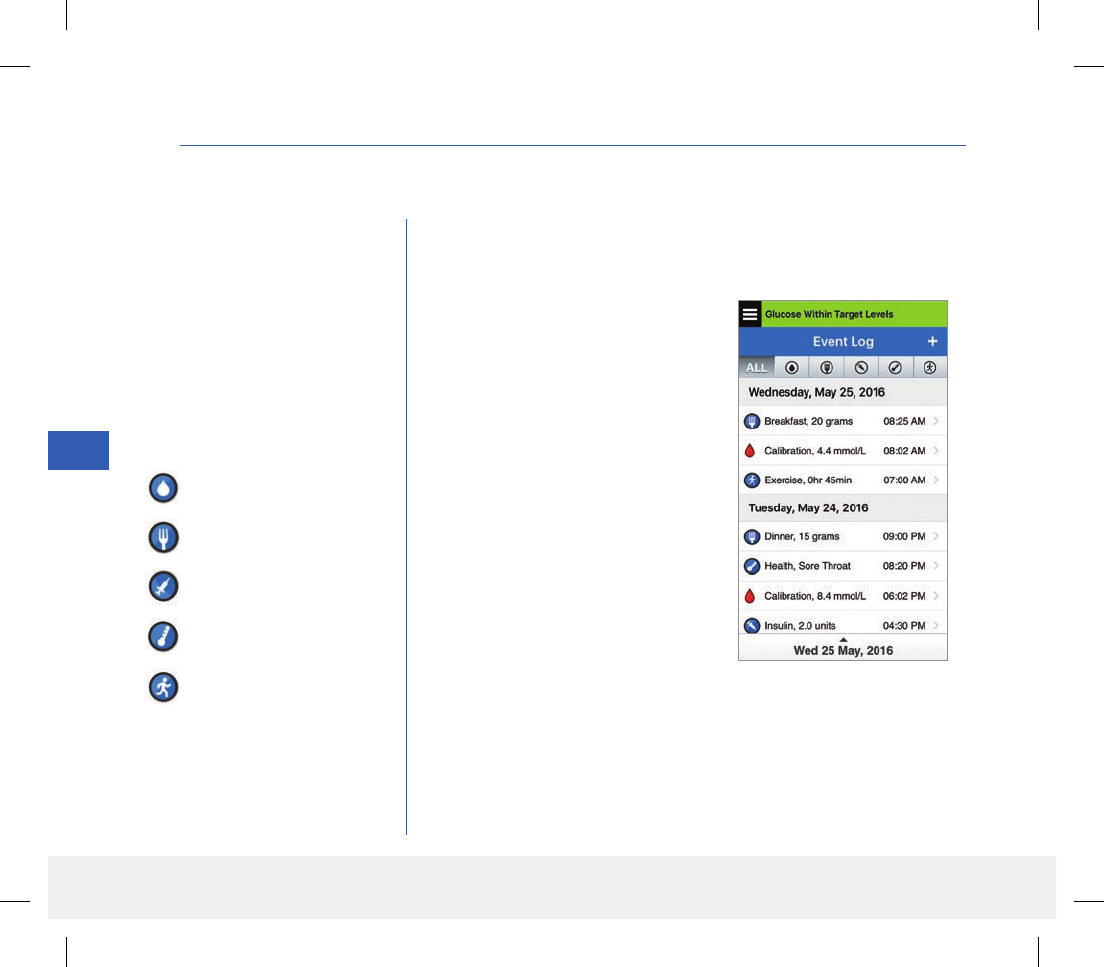
94
Eversense CGM User Guide
10
10. Event Log
This section describes how to review and log events to help better track glucose patterns.
The Eversense CGM System allows
you to log and track events in
addition to continually monitoring
glucose levels. You can manually
enter events that will appear
on the trend graph and glucose
reports to help you find patterns in
your glucose profile.
Types of Events:
View Events
You can view past events entered from the EVENT LOG screen.
Glucose
Meals
Insulin
Health
Exercise
1. Tap Menu > Event Log.
The EVENT LOG screen
will appear.
2. All your entered events will be
listed.
You can also select specific
event types to view by tapping
a selected event type.
• Tap ALL, then tap icons on
top of the screen to select only
the types of events you want
displayed.
Note: You can also access the
ADD EVENT screen directly
from the MY GLUCOSE
screen with a single tap anywhere
on the graph area.
LBL-0302-01-101 Rev 1_Eversense User Guide_mmolL_R5.indd 94 11/4/16 2:44 PM
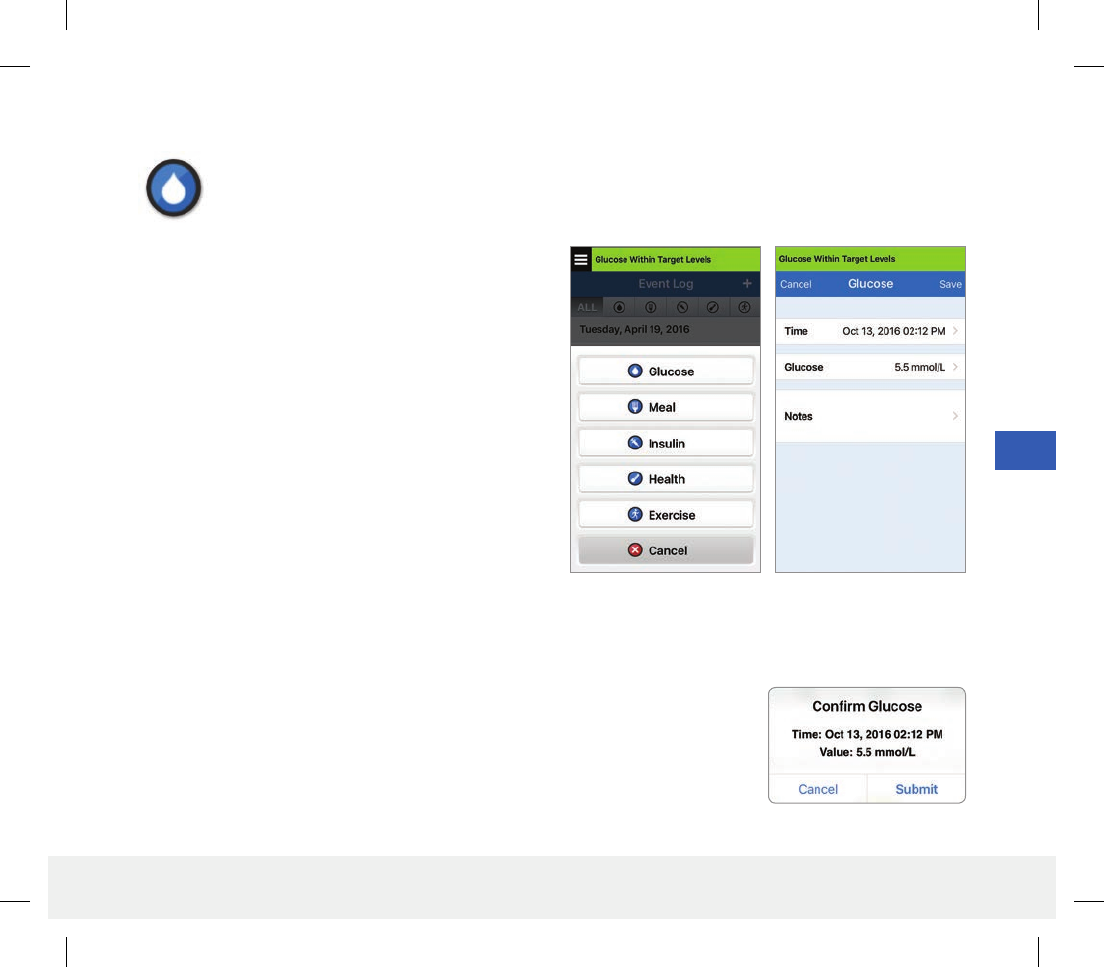
95
Eversense CGM User Guide
10
10. Event Log
Glucose
Enter and track blood glucose meter tests (test results other than calibrations).
1. Tap Menu > Event Log.
2. Add an event using the event icon “+” > Glucose.
3. Tap Time to enter the correct date and time.
Tap Done.
4. Tap Glucose to enter the correct blood glucose
value.
Tap Done.
Note: You can enter a BG value between 1.1 and
33.3 mmol/L. Entries < 1.1 mmol/L will be converted to
1.1, and entries above 33.3 mmol/L will be converted to
33.3 for calculation and display purposes.
5. Tap Save.
6. On the Confirm Glucose pop up box, tap Submit to confirm the glucose event
and return to the EVENT LOG screen, or tap Cancel to exit without saving
changes or to edit the information before saving.
Note: Glucose Events do not replace calibration measurements. You will still
have to enter calibration readings.
Log Specific Events
LBL-0302-01-101 Rev 1_Eversense User Guide_mmolL_R5.indd 95 11/4/16 2:44 PM
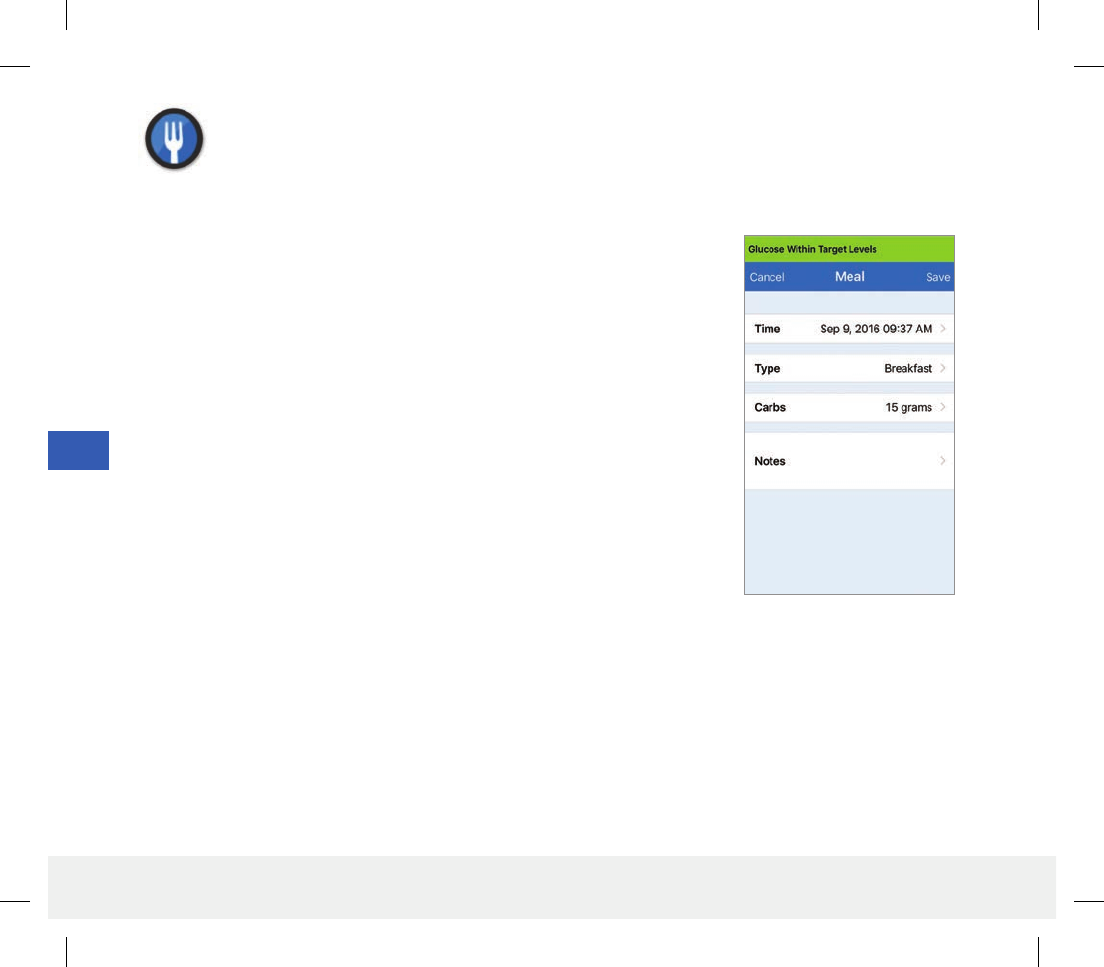
96
Eversense CGM User Guide
10
Meals
Enter the type of meal, date and time and carbohydrate count.
1. Tap Menu > Event Log.
2. Add an event using the event icon “+” > Meals.
3. Tap Time to enter the correct date and time.
Tap Done.
4. Tap Type to enter the type of meal.
Tap Done.
5. Tap Carbs to enter correct number of carbohydrates.
Tap Done.
6. Tap Notes to enter any notes.
Tap Done.
7. Tap Save to save entry and return to EVENT LOG screen. Tap
Cancel to exit without saving changes.
LBL-0302-01-101 Rev 1_Eversense User Guide_mmolL_R5.indd 96 11/4/16 2:44 PM
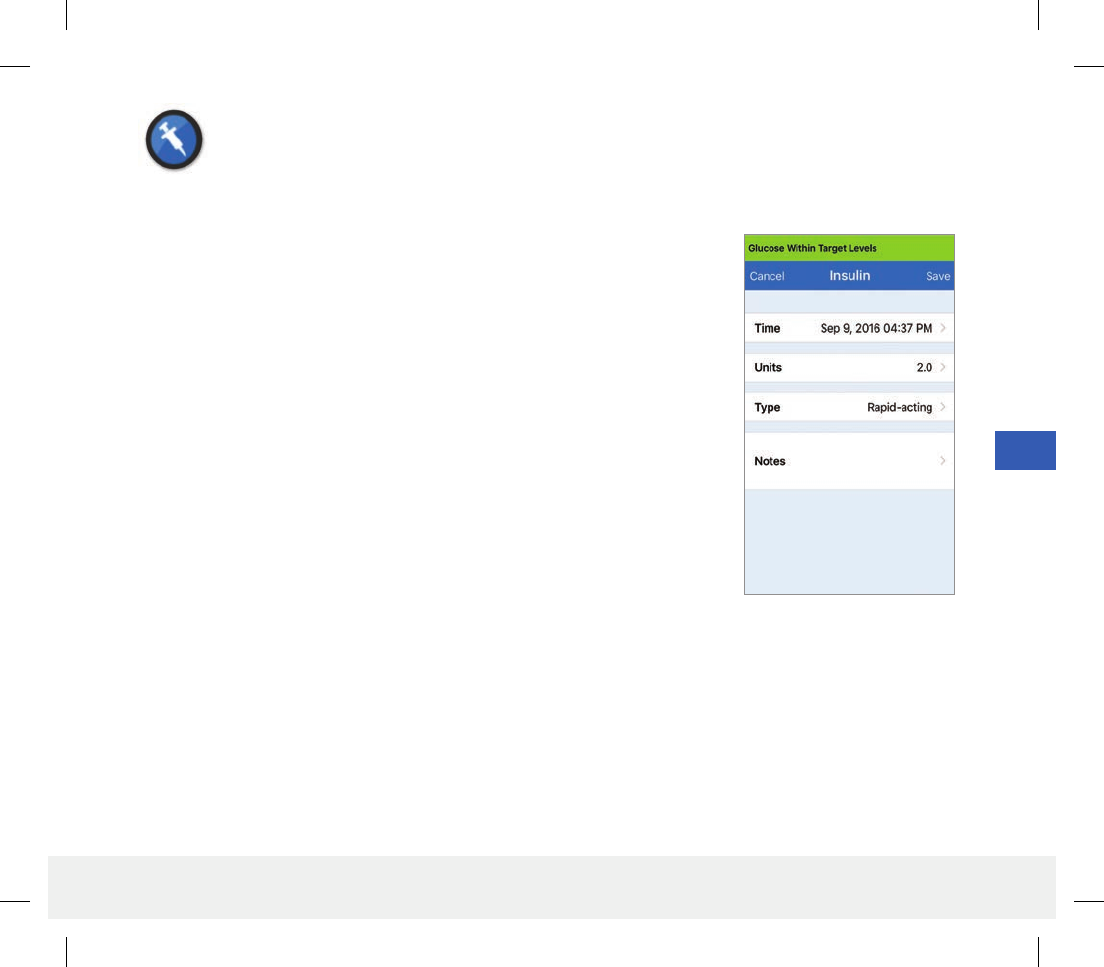
97
Eversense CGM User Guide
10
Insulin
Enter the units of insulin according to Time and Insulin type.
1. Tap Menu > Event Log.
2. Add an event using the event icon “+” > Insulin.
3. Tap Time to enter the correct date and time.
Tap Done.
4. Tap Units to enter the correct number of Units.
Tap Done.
Note: The maximum insulin units that can be entered is 200U.
5. Tap Type to enter the correct Type of Insulin.
Tap Done.
6. Tap Notes to enter any notes.
Tap Done.
7. Tap Save to save entry and return to EVENT LOG screen. Tap
Cancel to exit without saving changes.
LBL-0302-01-101 Rev 1_Eversense User Guide_mmolL_R5.indd 97 11/4/16 2:44 PM
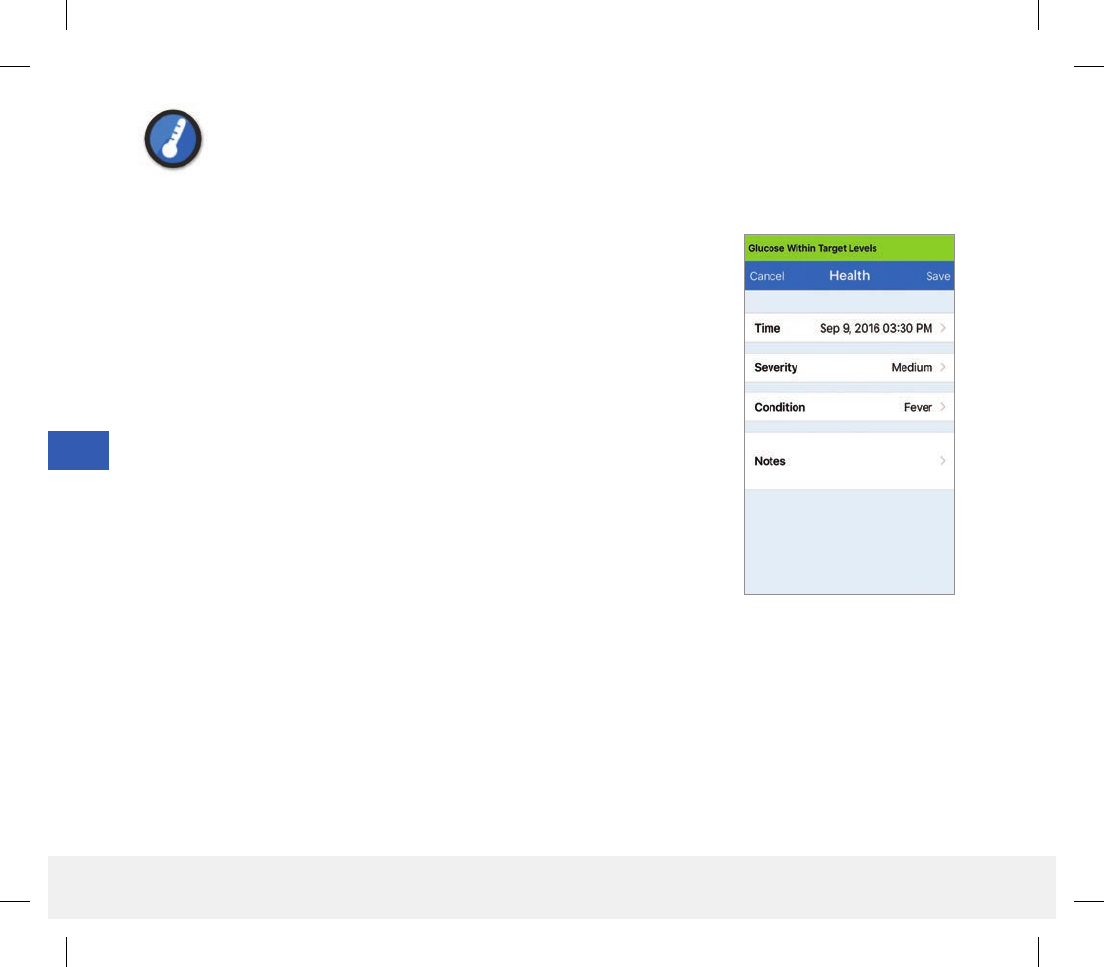
98
Eversense CGM User Guide
10
Health
Enter the type of health condition, severity, and date and time.
1. Tap Menu > Event Log.
2. Add an event using the event icon “+” > Health.
3. Tap Time to enter the correct date and time.
Tap Done.
4. Tap Severity to enter Low, Medium or High.
Tap Done.
5. Tap Condition to enter the health condition.
Tap Done.
6. Tap Notes to enter any notes.
Tap Done.
7. Tap Save to save entry and return to EVENT LOG screen. Tap
Cancel to exit without saving changes.
LBL-0302-01-101 Rev 1_Eversense User Guide_mmolL_R5.indd 98 11/4/16 2:44 PM

99
Eversense CGM User Guide
10
Exercise
Enter exercise type, duration, and intensity.
1. Tap Menu > Event Log.
2. Add an event using the event icon “+” > Exercise.
3. Tap Time to enter the correct date and time.
Tap Done.
4. Tap Intensity to enter Low, Medium or High.
Tap Done.
5. Tap Duration to enter the duration.
Tap Done.
6. Tap Notes to enter any notes.
Tap Done.
7. Tap Save to save entry and return to EVENT LOG screen. Tap
Cancel to exit without saving changes.
LBL-0302-01-101 Rev 1_Eversense User Guide_mmolL_R5.indd 99 11/4/16 2:44 PM
100
Eversense CGM User Guide
11
11. Reports
This section describes the dierent glucose reports available for a summary of your glucose prole.
You may choose specic dates or select pre-selected time ranges.
Types of reports
• Weekly Modal Summary.
• Glucose Pie Chart.
• Glucose Statistics.
Note: Be sure to set the mobile device date and time correctly. The accuracy of the graphs and reports depends
upon the date and time being correct.
To view the glucose reports tap Menu > Reports and swipe to move across the three dierent reports. You can
also email each report as a pdf file by tapping the email icon in the top right hand corner.
LBL-0302-01-101 Rev 1_Eversense User Guide_mmolL_R5.indd 100 11/4/16 2:44 PM
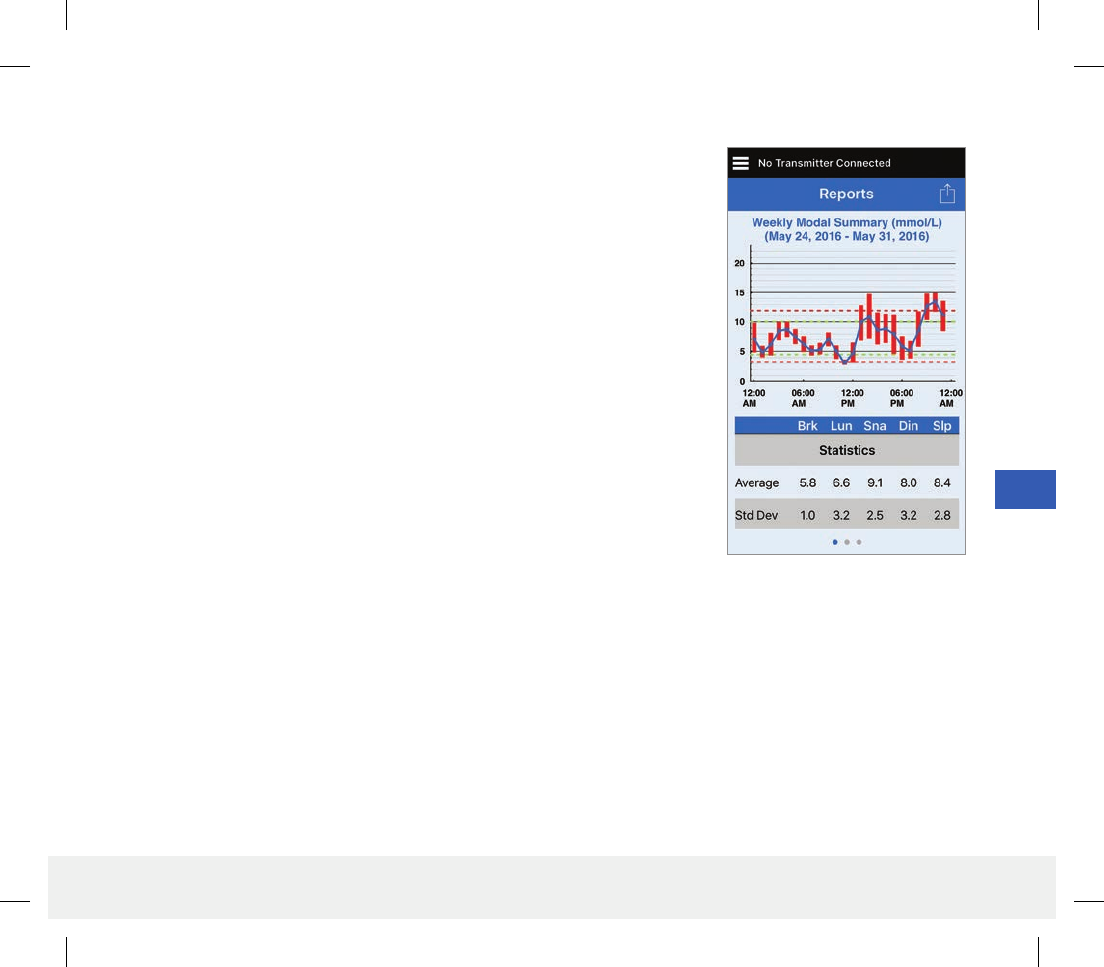
101
Eversense CGM User Guide
11
Weekly Modal Summary
This report shows your last seven days of glucose readings summarized in a
24-hour line graph format to help find patterns during the day.
• The blue line is the average of the last seven days of your readings in an
hour time block.
• The red bars show the highest and lowest actual readings in the same
hour time block.
• The red horizontal dotted lines are your pre-set High and Low Glucose
Alert levels.
• The green horizontal dotted lines are your pre-set High and Low Glucose
Target levels.
This report also provides summary statistics (average readings, standard
deviation of readings), glucose target performance (percent within, above
and below glucose target levels), and glucose reading highs and lows
(percent of readings that fall within the low and high glucose target levels).
The information is shown based on mealtime slots.
Note: To review or change the mealtime slots, please see Setting
Mealtimes Schedule.
LBL-0302-01-101 Rev 1_Eversense User Guide_mmolL_R5.indd 101 11/4/16 2:44 PM
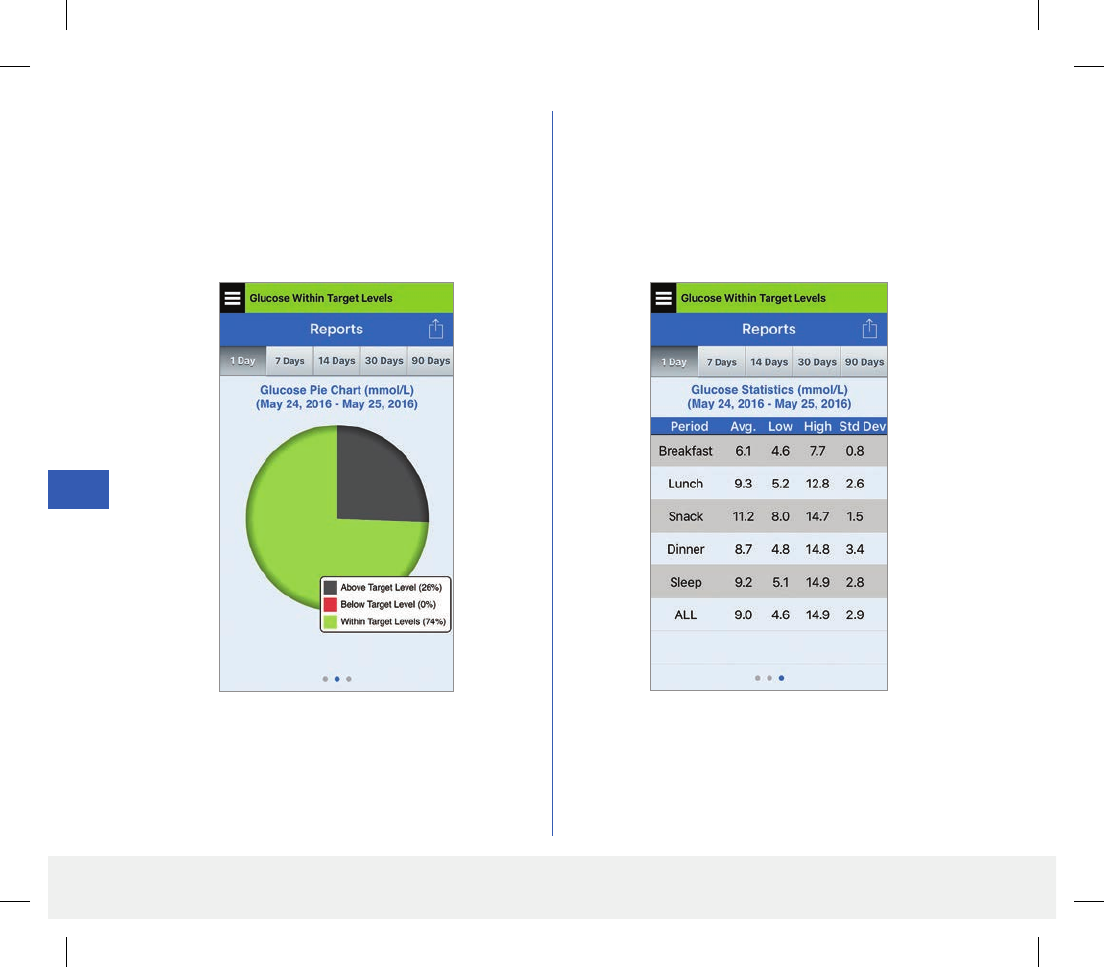
102
Eversense CGM User Guide
11
Glucose Pie Chart
This report shows in graphical format what percent of
your readings within a given time period are within,
below or above your Glucose Target levels. You can
choose the last 1, 7, 14, 30 or 90 days.
Glucose Statistics
This report shows your average, low and high glucose
readings, along with standard deviation within a
mealtime slot period. You can choose the last 1, 7, 14, 30
or 90 days.
LBL-0302-01-101 Rev 1_Eversense User Guide_mmolL_R5.indd 102 11/4/16 2:44 PM
103
Eversense CGM User Guide
12
Eversense Data Management Software (DMS) Program
The Eversense DMS Program is a web-based application that enables patients, caregivers, and health care
professionals to view and analyze glucose data that has been transmitted from the Eversense Smart Transmitter
or the Eversense CGM System mobile app.
This program is oered at no cost to users of the Eversense CGM System. To learn about the Eversense DMS Program,
go to www.eversensediabetes.com. When you create and register your account during the installation of the
Eversense mobile app, an Eversense DMS account is automatically created for you.
IMPORTANT: THE EVERSENSE DATA MANAGEMENT SYSTEM DOES NOT PROVIDE MEDICAL ADVICE.
CHANGES TO YOUR TREATMENT PLAN SHOULD ONLY BE MADE BY YOUR HEALTH CARE TEAM.
12. Share My Data
LBL-0302-01-101 Rev 1_Eversense User Guide_mmolL_R5.indd 103 11/4/16 2:44 PM
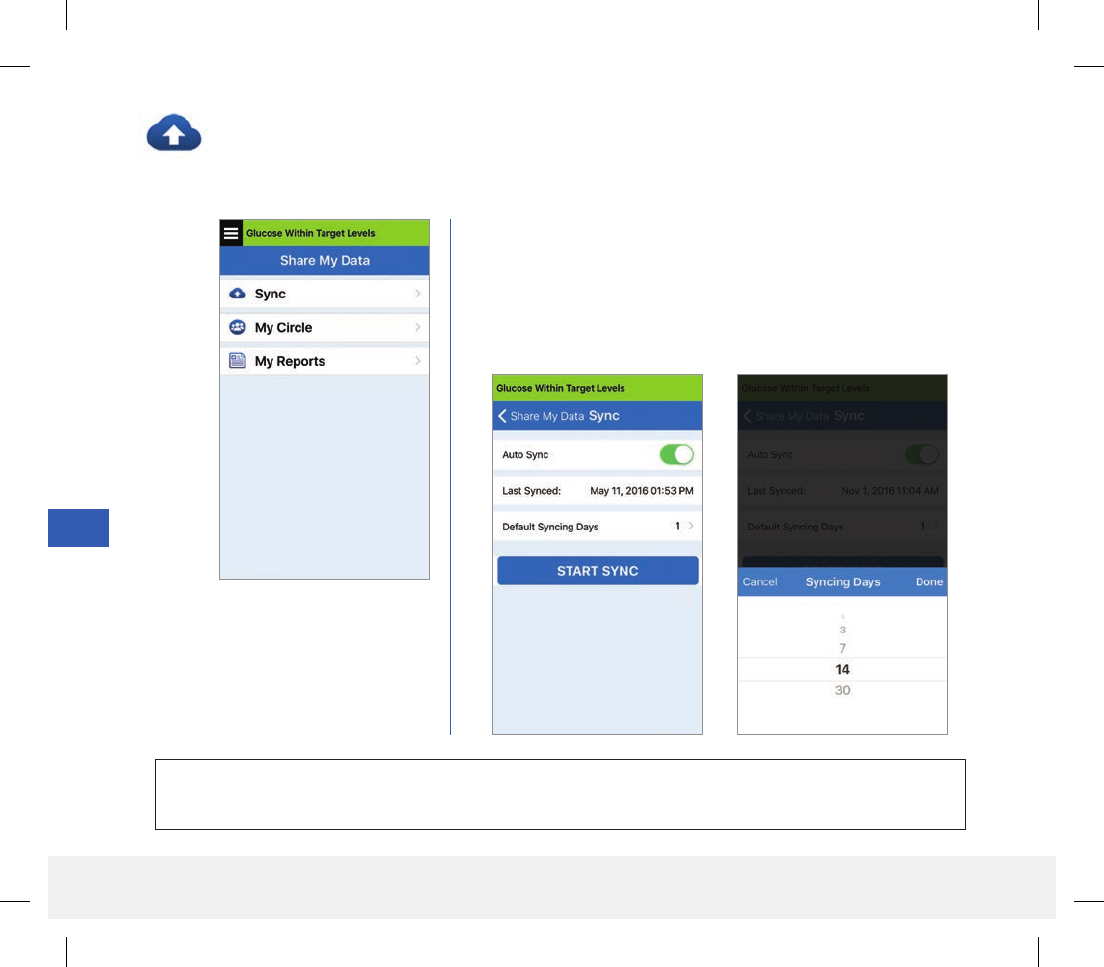
104
Eversense CGM User Guide
12
Sync
As long as you have an internet connection, Auto Sync is turned on, and you are logged into the app, your
glucose readings sync to your Eversense DMS account about every 5 minutes. You can turn o Auto Sync.
IMPORTANT: If you turn o Auto Sync, your data will not be sent to anyone using the Eversense Now App
to remotely monitor your glucose data, and your historical glucose data will not be stored in your DMS account.
To turn o Auto Sync, tap Sync on the SHARE MY DATA screen.
Tap the Auto Sync button to o.
To manually sync your data, tap the Start Sync button. Data for the
number of days set as your default will be synced. You can set the
Default Syncing Days to 1, 3, 7, 14 or 30 days.
LBL-0302-01-101 Rev 1_Eversense User Guide_mmolL_R5.indd 104 11/4/16 2:44 PM
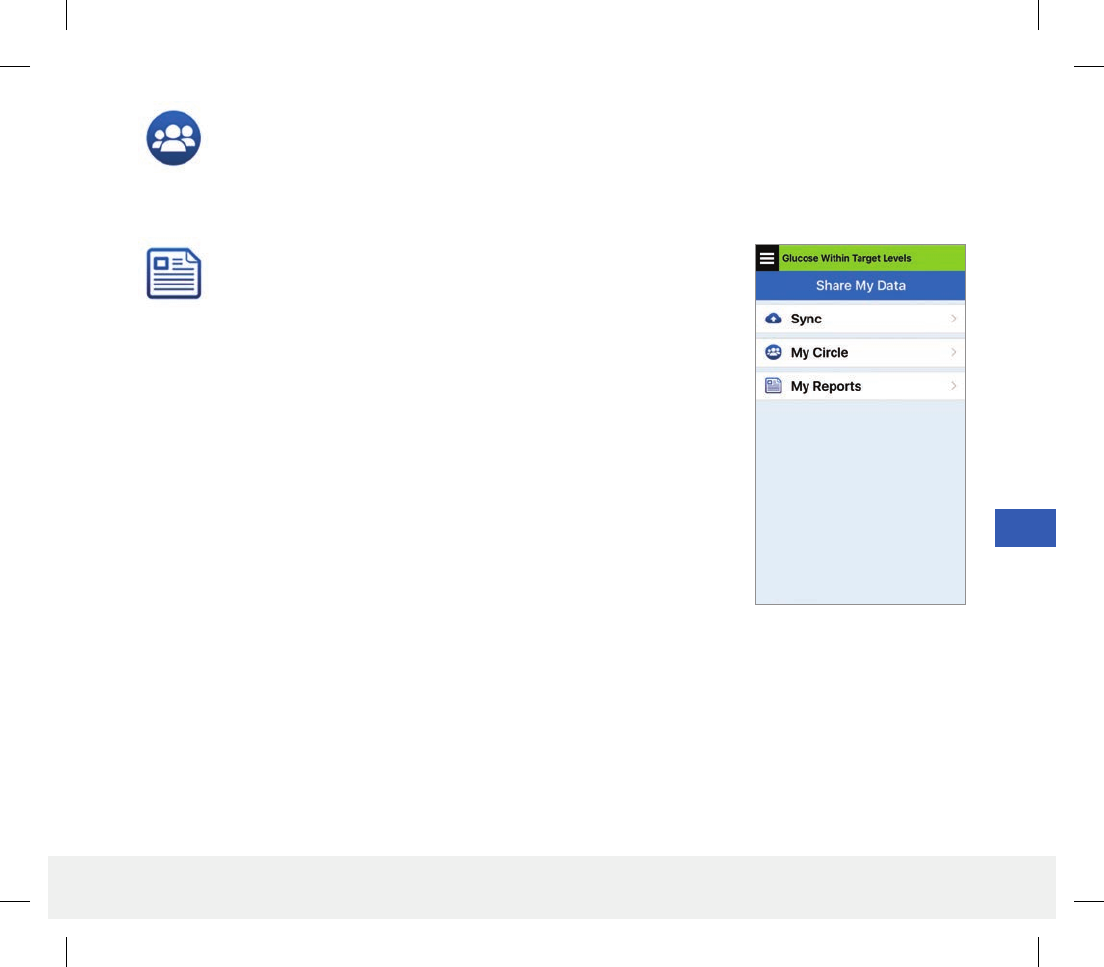
105
Eversense CGM User Guide
12
My Reports
You may also choose to export your glucose readings in a
CSV-file format.
Tap Menu > Share My Data > My Reports
• Select the number of days of your glucose readings
you want to export then tap Done.
• Tap Export.
• Email the CSV-file format by tapping the email icon on
the top right hand corner.
My Circle
My Circle is an optional feature that allows you to activate remote monitoring of your Eversense CGM data.
For more information on this feature, see My Circle - Remote Monitoring.
LBL-0302-01-101 Rev 1_Eversense User Guide_mmolL_R5.indd 105 11/4/16 2:44 PM
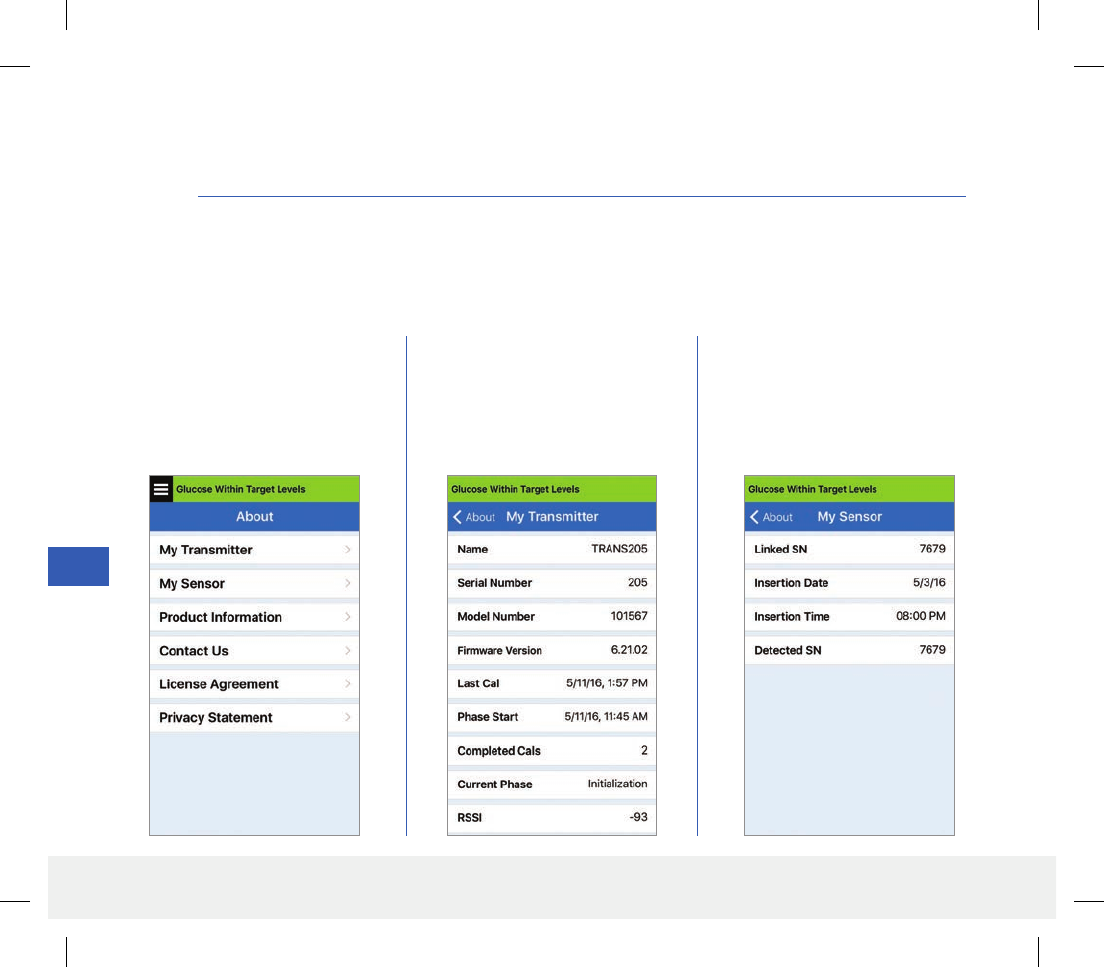
106
Eversense CGM User Guide
13
13. Product and General Information
This section describes the information available from the About section of the Main Menu.
You can view product information about your smart transmitter, your sensor and your Eversense
mobile app.
1. Tap Menu > About and
then tap My Transmitter,
My Sensor or Product
Information.
On the MY TRANSMITTER
screen, you can find information
that includes the serial number,
calibration information and
battery level.
On the MY SENSOR screen,
you can view the sensor serial
number and insertion details.
on the App
LBL-0302-01-101 Rev 1_Eversense User Guide_mmolL_R5.indd 106 11/4/16 2:44 PM
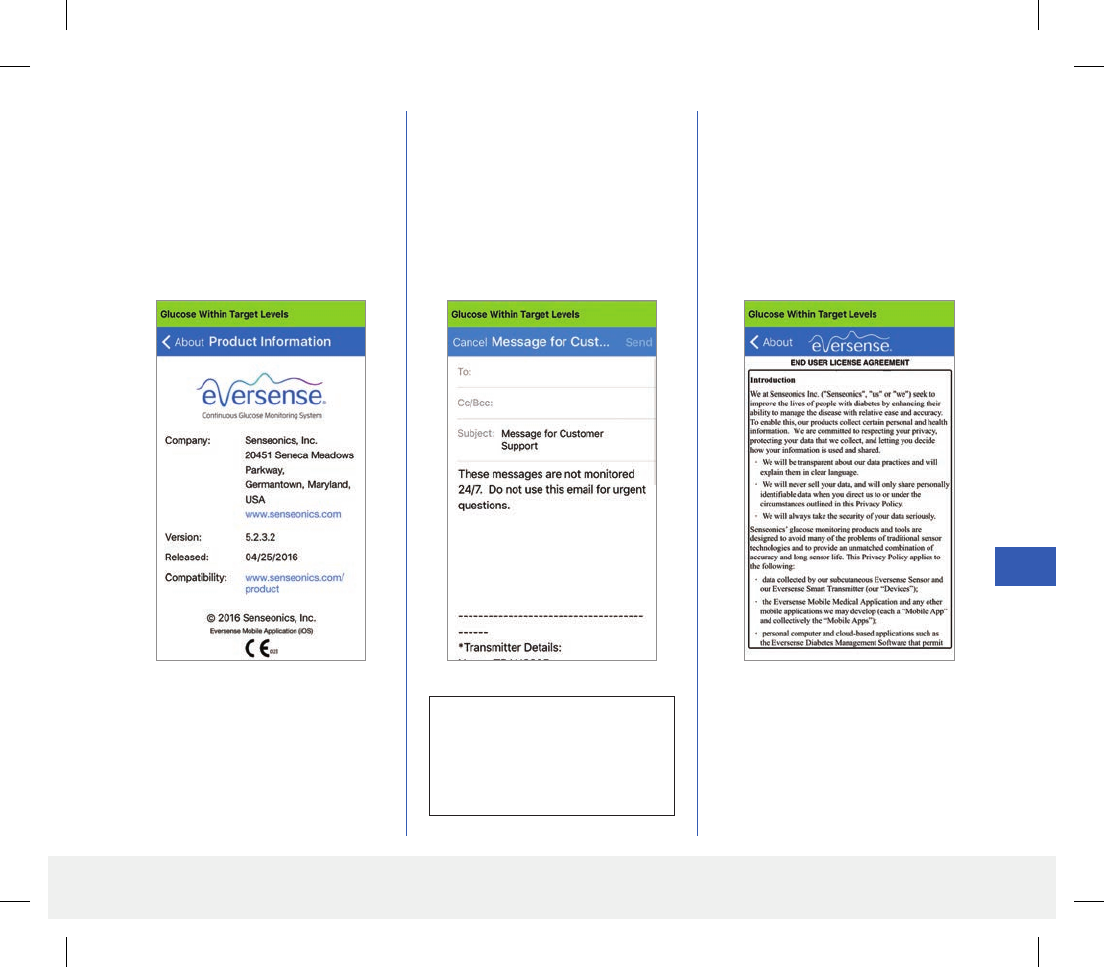
107
Eversense CGM User Guide
13
On the PRODUCT
INFORMATION screen, you
can view information about the
mobile app software version and
Senseonics, Inc., the manufacturer
of the Eversense CGM System.
You can also send feedback
or view the End User License
Agreement and Privacy Policy
from the About menu.
• Tap Contact Us to send an
email to Senseonics, Inc.
To read the End User License
Agreement and the Privacy Policy,
tap either option.
IMPORTANT: This email
is not monitored 24/7. DO NOT
use this email for health-related
or any urgent issues.
LBL-0302-01-101 Rev 1_Eversense User Guide_mmolL_R5.indd 107 11/4/16 2:44 PM
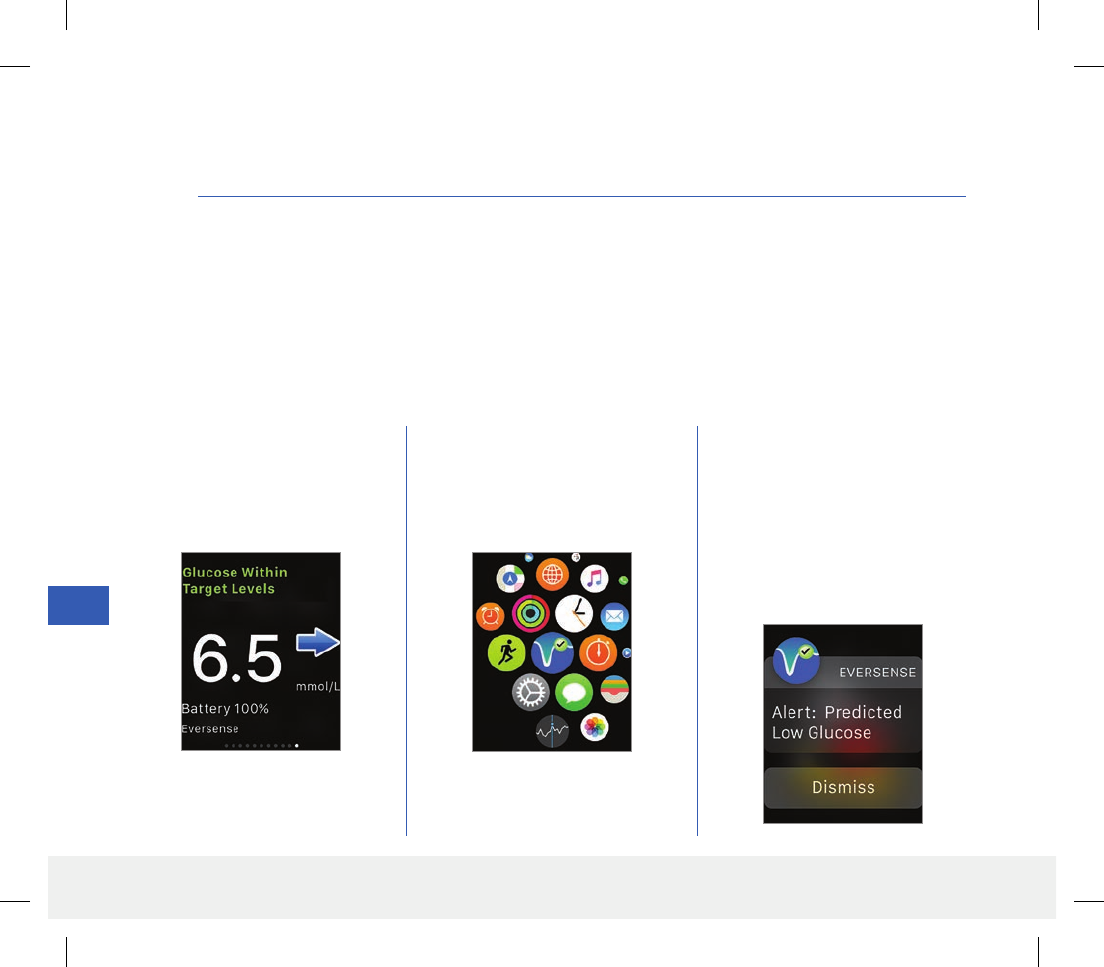
108
Eversense CGM User Guide
14
14. Viewing Eversense Data on the
You can view a snapshot of your Eversense CGM data on your Apple Watch. Once you’ve downloaded and installed the
Eversense mobile app on your mobile device, follow the Apple Watch instructions for adding the app to your watch.
Glance View
If your Apple Watch operating system supports the Glance view, and you have already set the Eversense App on your
mobile device to Show in Glances under the Apple Watch settings, simply swipe up on the watch HOME screen to
display the Eversense App Glance View.
Status bar information, your current
glucose value with trend arrow, and
the battery life remaining in your
smart transmitter appear.
To access additional app features,
tap the Eversense icon on
your watch HOME screen to
open the app.
You can also access the MY
GLUCOSE screen if you turn
on notifications from Eversense in
your Apple Watch settings. When
you receive a notification, you can
also tap on the message to see the
MY GLUCOSE screen.
Apple Watch
LBL-0302-01-101 Rev 1_Eversense User Guide_mmolL_R5.indd 108 11/4/16 2:44 PM
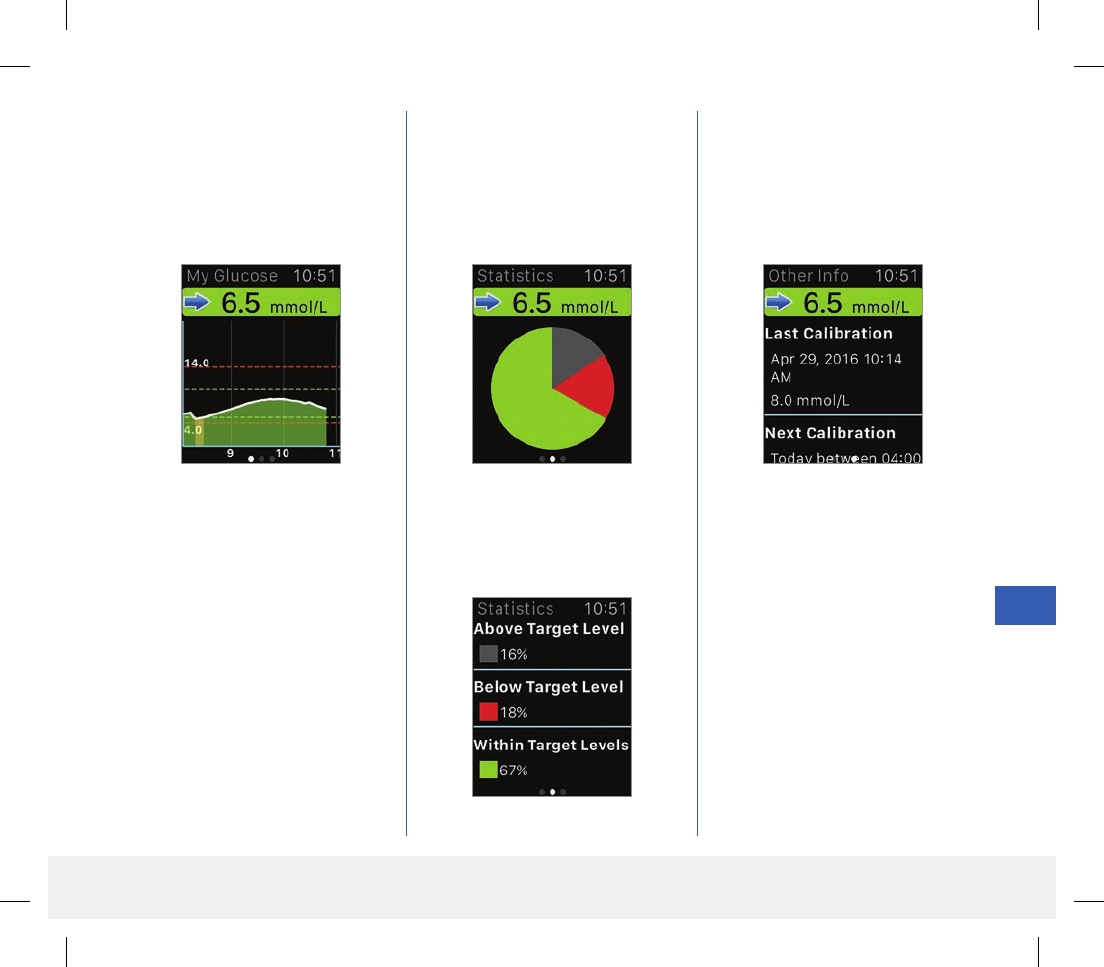
109
Eversense CGM User Guide
14
Swipe left to the next screen
showing a pie chart of your total
time within and outside your target
range for the past 24 hours.
Swipe up to display the same data
shown as percentages.
Swipe left to the next screen
showing your current glucose with
trend arrow, your next scheduled
calibration time, and the current
system calibration phase.
The My Glucose screen shows
your current glucose with trend
arrow, and a trend graph of your
last three hours of CGM data.
LBL-0302-01-101 Rev 1_Eversense User Guide_mmolL_R5.indd 109 11/4/16 2:44 PM
110
Eversense CGM User Guide
15
15. My Circle
The Eversense CGM App includes an optional remote monitoring feature. The Eversense CGM App interacts with the
Eversense Now Remote Glucose Monitoring App to allow other people to view your data.
Note: The Eversense Now Remote Monitoring App is only available for iOS. If you invite a member to your
Circle who does not use an iOS mobile device, they will not be able to use the Eversense Now App to view
your glucose data.
Risks
There may be times when glucose data cannot be sent to the Eversense Now App. lf a member of your Circle is not
receiving glucose data from your Eversense CGM System, they cannot assist you in the event of a high or low glucose
value. The secondary display and notifications on the Eversense NOW mobile app are not a replacement for the
primary display on your Eversense CGM System mobile app.
Members of your Circle may not always have a connection to support data transfer such as internet/wifi or 3G/4G/LTE.
If you or a member of your Circle does not have an internet connection, your glucose data will not be available for
viewing on a secondary display. Any problems with mobile devices, wireless internet, data connection, the Eversense
Data Management System (DMS) System, having your smart transmitter out of range of your mobile device, or
charging your smart transmitter may prevent data from being displayed to members of your Circle. You should not
rely on people remotely monitoring your glucose data to assist you in the event of a high or low glucose event.
The remote monitoring feature provides a secondary display of notifications and data to those in your Circle. It is not
a real-time remote monitoring system.
Benefits
The Eversense CGM System used with the Eversense Now Remote Monitoring App may provide CGM users with
additional confidence, knowing that others can also view their CGM data.
Remote Monitoring with Eversense CGM System and
Eversense Now App
LBL-0302-01-101 Rev 1_Eversense User Guide_mmolL_R5.indd 110 11/4/16 2:44 PM
111
Eversense CGM User Guide
15
Warnings
• Glucose information displayed on the Eversense Now App should not be used to make treatment decisions.
Always use blood glucose values from your meter to make treatment decisions. Using a sensor glucose value to
make a treatment decision could result in a high or low blood glucose. The Eversense Now App is a secondary
display of Eversense CGM data and should not be used in place of the primary Eversense CGM display.
• You should not rely on those who are remotely monitoring your glucose to notify you about high or low
glucose events.
Cautions
• The Eversense Now Remote Mobile App does not replace the monitoring regimen as directed by your health
care provider.
• If you do not have Auto Sync (the feature that enables data to automatically be sent to your Eversense Now
app) turned on, you cannot share data with those in your Circle and they will not see high or low glucose
trends and events.
• If you and the members of your Circle do not have an internet connection, or the mobile device has shut down
due low or empty battery, your Eversense CGM data cannot be displayed on the Eversense Now App.
• If the members of your Circle turn o the sounds on their mobile device, they will not receive audible alerts
about your CGM data on their Eversense Now App.
• If you set your status to oine with any of the members of your Circle, they will not receive any of your CGM
data on their Eversense Now App. DO NOT set your status to oine if you want members of your Circle to see
your CGM data.
• The Eversense Now app does not communicate directly with the Eversense Sensor and/or with the Eversense
Smart Transmitter.
• The Eversense Now app cannot change the settings on the Eversense CGM App.
• If you do not Allow notifications from the Eversense Now app, you will not receive glucose related alerts from
Eversense CGM users.
LBL-0302-01-101 Rev 1_Eversense User Guide_mmolL_R5.indd 111 11/4/16 2:44 PM
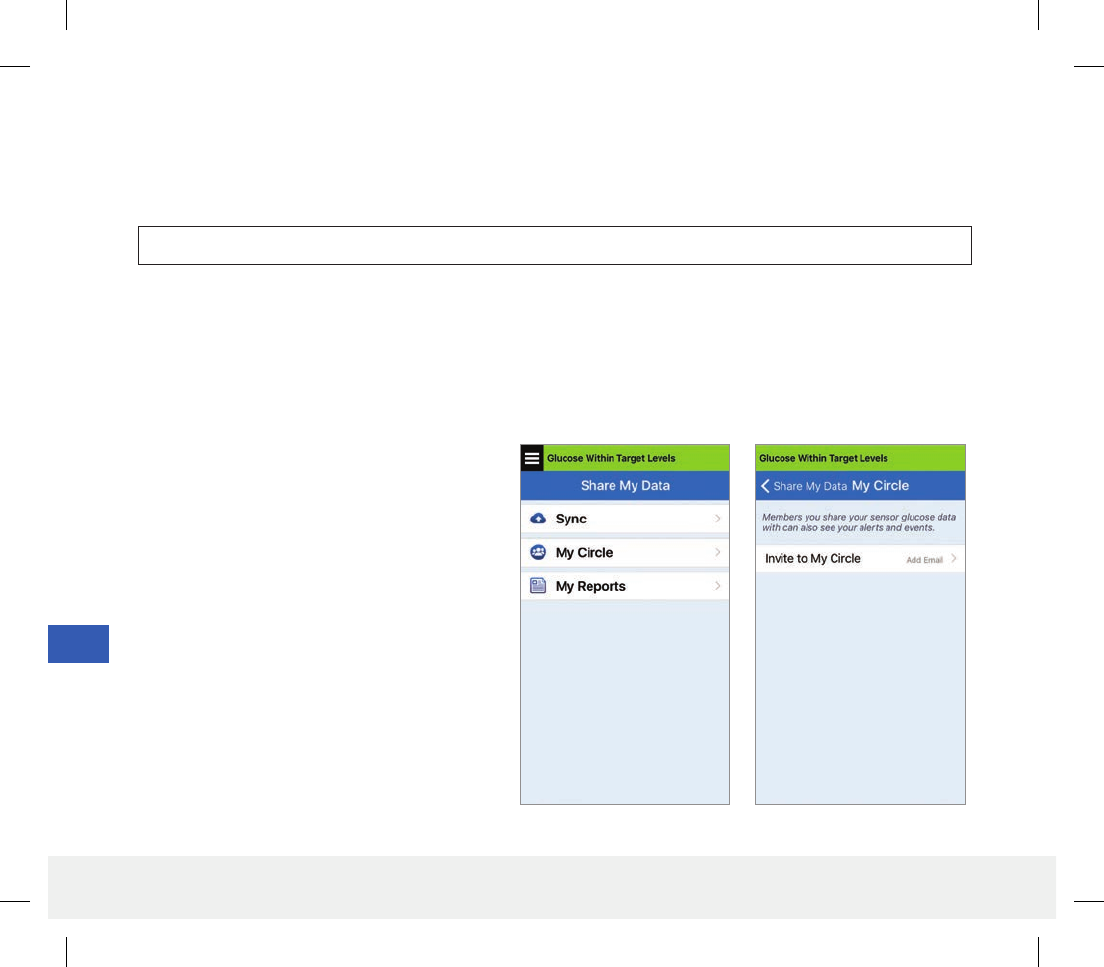
112
Eversense CGM User Guide
15
Through the MY CIRCLE screen on your Eversense mobile app, you can invite up to five people to view your data.
When you invite someone to join your Circle, an invitation will be sent to the email address you entered. Once the
invitation is accepted, and the Eversense Now App is downloaded, members of your Circle can view your recent
glucose data, events and alerts.
IMPORTANT: Members of your Circle who do not have the Eversense Now App will not be able to see your data.
As long as your Eversense CGM System App and the Eversense Now App have an internet connection, your glucose
data is synced to the Eversense Now App approximately every 5 minutes. Calibration values may take longer to sync
to the Eversense Now App.
Note: If you have turned o Auto Sync, your glucose data will NOT be available on the Eversense Now Remote
Monitoring App.
2. To invite a new member to view your
glucose data, tap Invite to My Circle.
1. From the Main Menu, tap Share My Data >
My Circle to display the MY CIRCLE
screen.
LBL-0302-01-101 Rev 1_Eversense User Guide_mmolL_R5.indd 112 11/4/16 2:44 PM
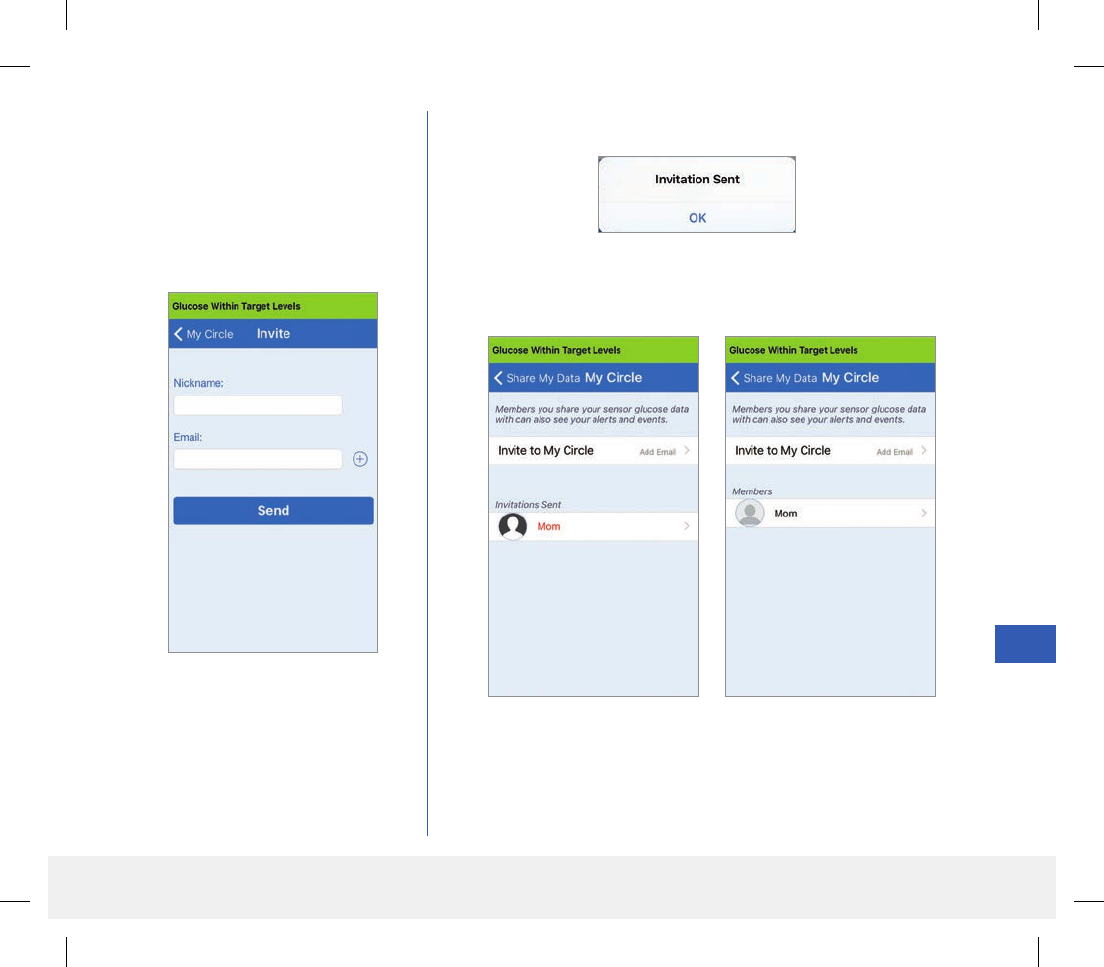
113
Eversense CGM User Guide
15
3. Enter the email for the person you
would like to invite to your Circle,
and tap Send when complete.
Note: You can tap the “+” next
to the email field to select an email
address from your Contact list.
4. An Invitation Sent screen appears. Tap OK.
When the invitation has been accepted, the member’s name will
appear in your Members List on the MY CIRCLE screen in your app.
Tip: Nicknames are optional, and
are used to help you easily manage
your Circle Members. If you choose
not to give a nickname to a Circle
Member, their email address will show
in place of a nickname.
Note: Profile pictures of those remotely viewing your glucose
data are set up in the DMS account by the account owner. You cannot
change profile pictures of those you have invited to your Circle.
LBL-0302-01-101 Rev 1_Eversense User Guide_mmolL_R5.indd 113 11/4/16 2:44 PM
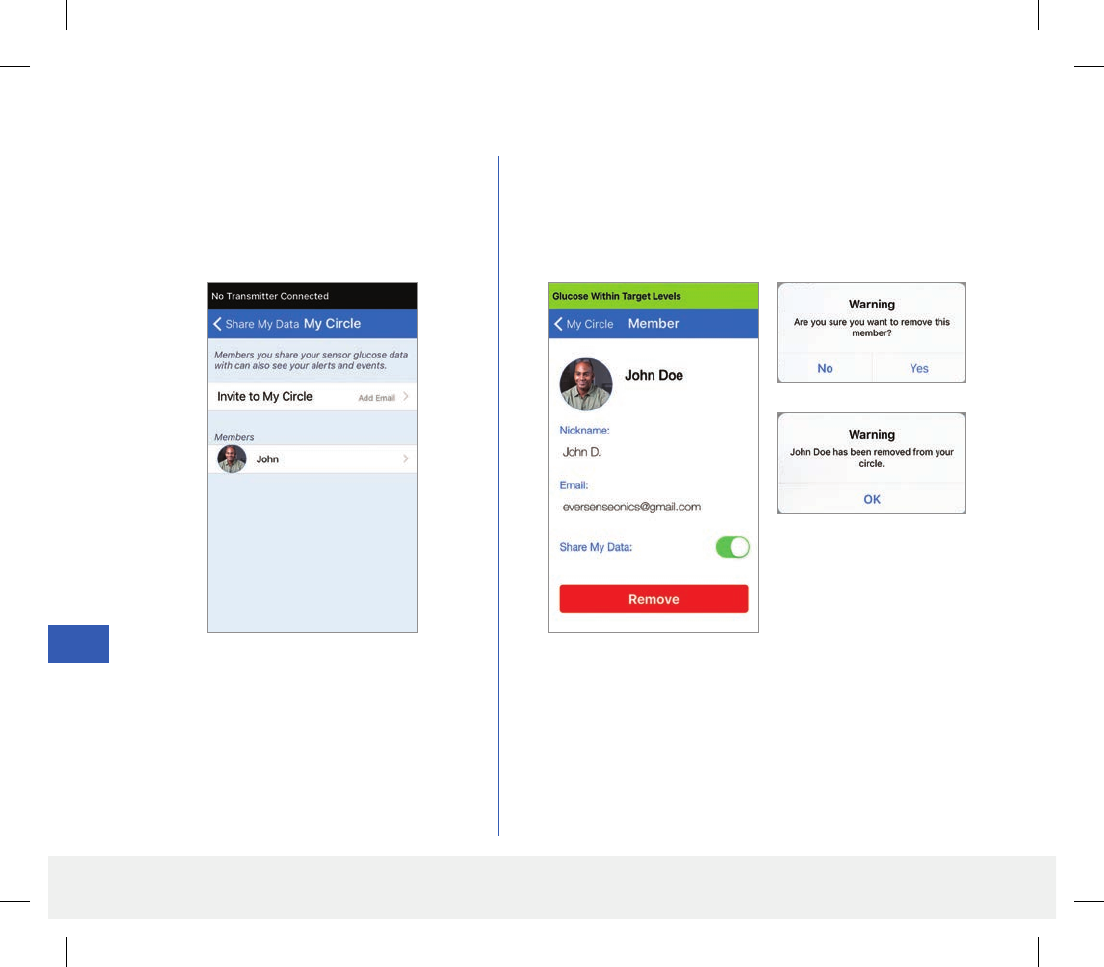
114
Eversense CGM User Guide
15
2. Tap Remove to remove the member from your circle.
Tap Yes when prompted.
1. To remove a member or an invitation,
tap the person’s name in the Members List
or the Invitations Sent List on the
MY CIRCLE screen.
Remove a Member from Your Circle
The member you remove will be notified on their Eversense
Now App if they have already accepted.
LBL-0302-01-101 Rev 1_Eversense User Guide_mmolL_R5.indd 114 11/4/16 2:44 PM
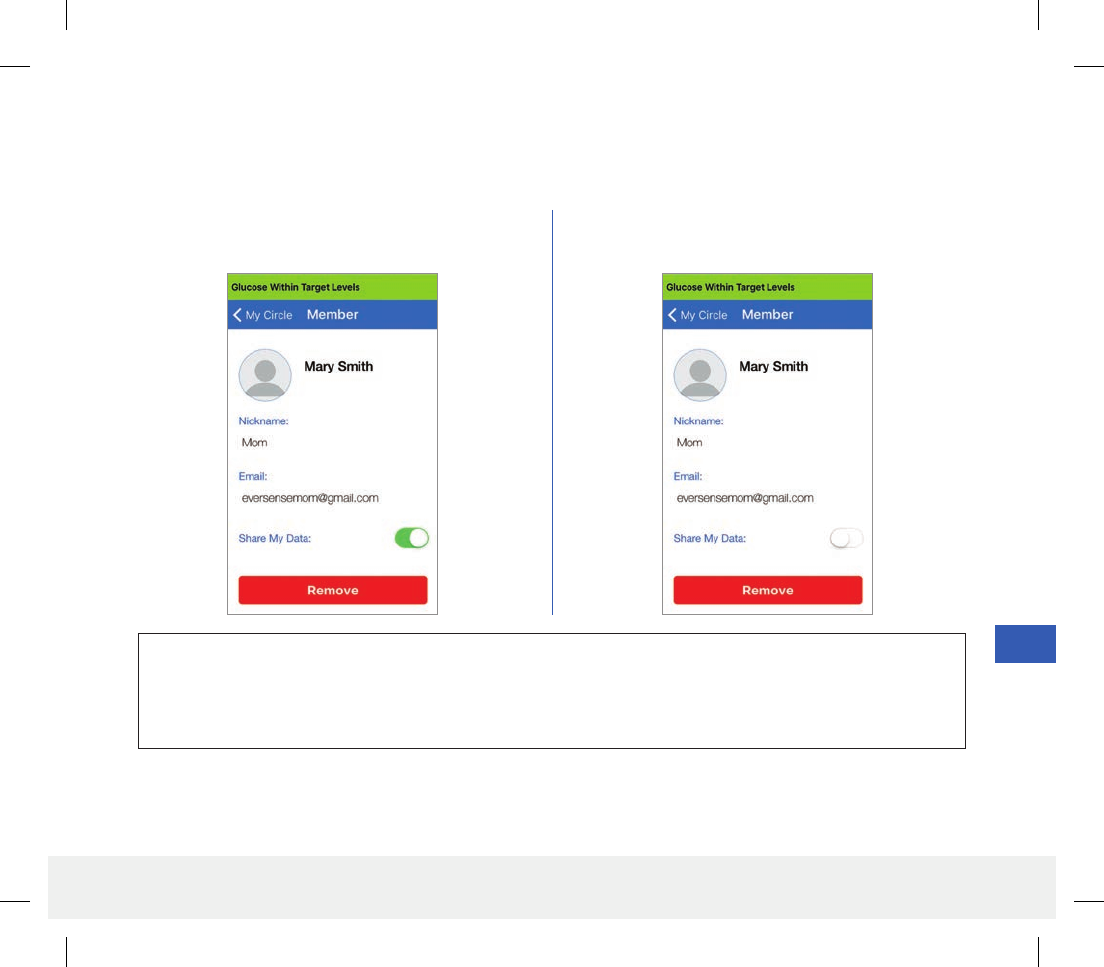
115
Eversense CGM User Guide
15
2. Tap the Share My Data button to turn on/o
data share with this member.
1. Tap the member’s name in the My Circle list to
open the MEMBER screen.
Note: The Eversense Now user can also remove you from their app. It can take up to 2 hours for these changes to
display on your Eversense CGM App.
For more information about the Eversense Now App, please visit eversensediabetes.com or contact your local distributor.
IMPORTANT: If you have disabled the Share My Data feature for a member, that member will not see any
of your Eversense CGM System glucose data, alerts or event history. Members will see your status as Oine on
their Eversense Now App when you have disabled the Share my Data feature. It can take up to 10 minutes for the
change to display on the Eversense Now user’s app.
Temporarily Stop Sharing Data
There may be times when you wish to temporarily stop sharing data with a member, but not remove them from
your Circle.
LBL-0302-01-101 Rev 1_Eversense User Guide_mmolL_R5.indd 115 11/4/16 2:44 PM
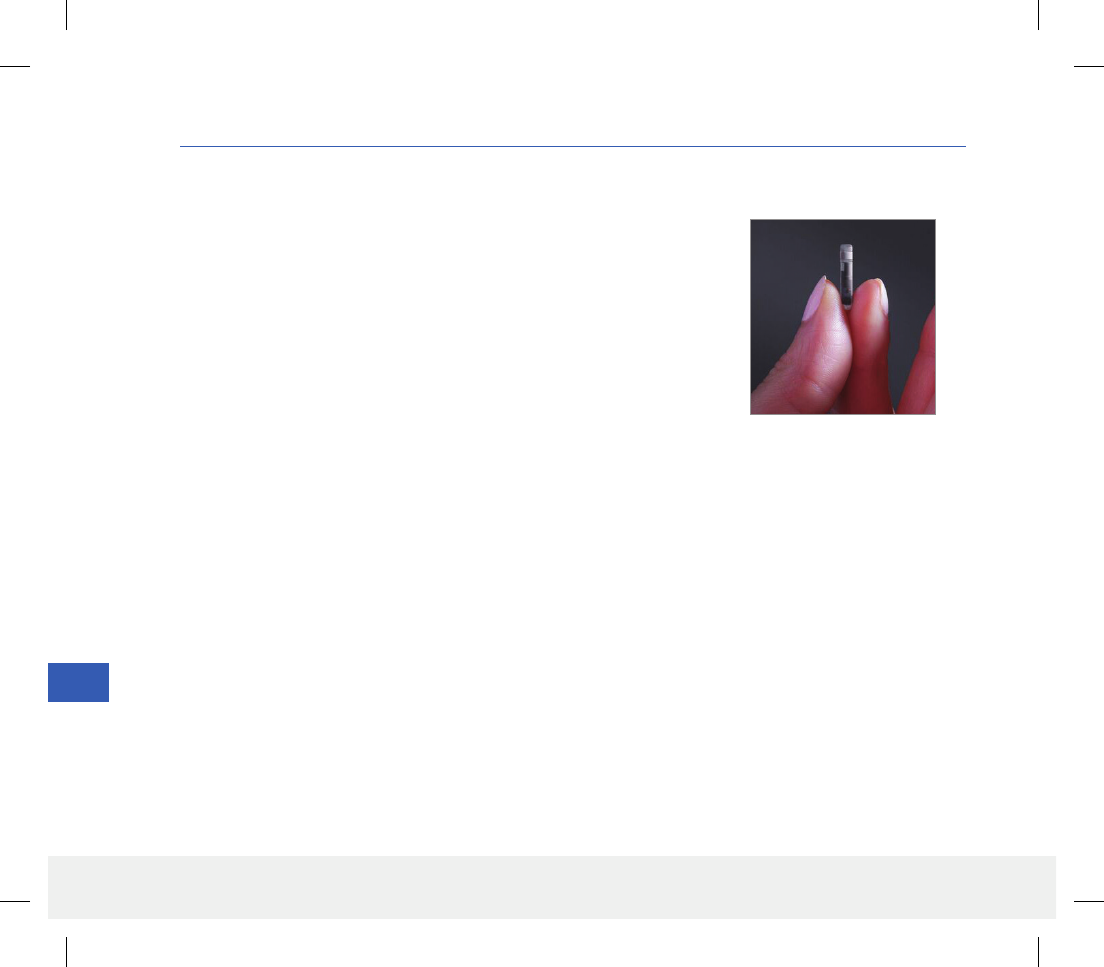
116
Eversense CGM User Guide
16
16. About the Sensor
This section describes the Eversense Sensor and how it is inserted by your physician.
The Eversense Sensor is a miniaturized fluorometer that uses fluorescent
intensity to measure glucose in interstitial fluid. The sensor is implanted
subcutaneously (under the skin) on the upper arm, leaving no part of the
sensor protruding from the skin. The sensor remains in place and provides
CGM measurements for up to 90 days.
The sensor is encased in a biocompatible material and utilizes a unique
fluorescent, glucose indicating polymer. A light emitting diode embedded
in the sensor excites the polymer, and the polymer then rapidly signals
changes in glucose concentration via a change in light output. The
measurement is then relayed to the smart transmitter. Measurements are
completed automatically and require no action by the user.
The sensor is approximately 3.5 mm x 18.3 mm and has a silicone ring that
contains a small amount of dexamethasone acetate, an anti-inflammatory
steroid drug. The dexamethasone acetate minimizes inflammatory
responses, very similar to common medical devices, such as pacemakers.
Eversense Sensor
LBL-0302-01-101 Rev 1_Eversense User Guide_mmolL_R5.indd 116 11/4/16 2:44 PM

117
Eversense CGM User Guide
16
Insertion Steps
Your physician will explain and perform the simple and quick steps to insert the sensor. You will be fully awake during
the approximately 5-minute insertion procedure.
Insertion site:
It is important to choose a site that is comfortable for you to wear the sensor and smart transmitter for the entire
90 day period. It is recommended to have the sensor inserted toward the back of the upper arm. Placement in this
area minimizes the chance of the sensor and smart transmitter being bumped by doorways, walls or other narrow
passages. If possible, avoid areas with loose skin, scars, tattoos, nevus, or blood vessels that could be incised during
the procedure.
Step 1: Site preparation – the insertion site will be cleaned, disinfected, then anesthetized using lidocaine.
Step 2: Incision – a small (less than 1 centimeter) incision will be made at the insertion site.
Step 3: Sensor insertion – a subcutaneous pocket will be created under the skin and the sensor will be inserted in
this pocket.
Step 4: Site closure – the incision will be closed with an adhesive bandage. Sutures are not usually required.
Step 5: Sensor and smart transmitter linking – link the sensor and smart transmitter to begin the 24-hour
Warm-Up Phase.
Note: After insertion, link the smart transmitter and the sensor and then allow the incision site to heal 24 hours
before replacing the transmitter.
The sensor requires 24 hours to stabilize within the insertion site, this period is known as the Warm-up Phase. After
the first 24 hours of sensor insertion, position and secure the smart transmitter over the sensor and ensure you have a
connection. (See Secure the Smart Transmitter over Inserted Sensor.) Then you can perform your Initialization Phase
calibration of 4 fingerstick blood glucose tests to start getting glucose readings.
LBL-0302-01-101 Rev 1_Eversense User Guide_mmolL_R5.indd 117 11/4/16 2:44 PM

118
Eversense CGM User Guide
16
Removal Steps
Similarly to the insertion steps, your physician will explain the simple and quick steps for the sensor removal and you
will be fully awake during the 5-minute (approximate) removal process.
Step 1: Site preparation – the sensor site will be cleaned, disinfected, then anesthetized using lidocaine.
Step 2: Incision – a small (less than 1 centimeter) incision will be made at the sensor site.
Step 3: Sensor removal – the sensor will be removed and discarded.
Step 4: Site closure – once removed, the incision will be closed with a steri-stip (sutures may be used depending
on provider’s preference).
16
LBL-0302-01-101 Rev 1_Eversense User Guide_mmolL_R5.indd 118 11/4/16 2:44 PM
119
Eversense CGM User Guide
17
17. Travel
When traveling, your smart transmitter and sensor are safe to go through airport security without removing them.
You may inform security that you have an implanted medical device.
Your smart transmitter will automatically sync to your smartphone’s current time and date when time zones are
changed.
The Eversense CGM System is safe for use on U.S. commercial airlines. The Eversense Smart Transmitter is a Medical
Portable Electronic Device (M-PED) with emission levels that meet FAA mandates for use in all modes while in flight.
(Reference FAA Advisory, Circular #21-16G, dated 6.22.2011.) To use, turn your mobile device’s Bluetooth feature on
after you have put your mobile device in airplane mode. For flights outside the US, follow local security regulations for
use of medical devices in flight.
This section describes the safety issues when traveling with your Eversense smart transmitter
and sensor.
IMPORTANT: When traveling to dierent time zones, check your calibration reminder settings to ensure the
times are convenient for you in the local time zone.
LBL-0302-01-101 Rev 1_Eversense User Guide_mmolL_R5.indd 119 11/4/16 2:44 PM
120
Eversense CGM User Guide
18
18. Troubleshooting
This section lists information about troubleshooting your Eversense CGM System and includes a list
of frequently asked questions (FAQs).
Smart Transmitter
Q: How do I turn my smart transmitter OFF?
A: Press and hold the smart transmitter power button
for 5 seconds. Release the button when the smart
transmitter begins to vibrate.
Q: How do I turn my smart transmitter ON?
A: Press and hold the smart transmitter power button
for 5 seconds. Release the button when the smart
transmitter begins to vibrate.
Q: How do I properly position the smart transmitter
over the sensor?
A: There are two ways to ensure proper positioning:
1. When using the adhesive patch to secure the
smart transmitter, make sure the power button
symbol and the LED are lined up in parallel with
your arm.
2. Use the PLACEMENT GUIDE screen on the
app to confirm connection between the sensor and
the transmitter.
• Tap Placement Guide.
• Position the smart transmitter over the sensor so
that a connection is confirmed.
Q: My smart transmitter will not vibrate. Why?
A: If the smart transmitter does not vibrate, try the
following steps:
• Check that the smart transmitter is connected to
your mobile device.
• Check that the Do Not Disturb is disabled
by tapping Menu > Settings > Sound
Settings.
• Check that your smart transmitter has enough
battery power and charge if necessary.
If the smart transmitter still will not vibrate, contact
Customer Support or your local distributor for further
troubleshooting.
LBL-0302-01-101 Rev 1_Eversense User Guide_mmolL_R5.indd 120 11/4/16 2:44 PM

121
Eversense CGM User Guide
18
Q: Can I use the same adhesive patch more than once
a day?
A: The individual adhesive patch is intended to be used
for a 24-hour period.
Q: What is the serial number and model number of my
smart transmitter?
A: You can find the serial number and model on the
back of your smart transmitter. Once you have paired
your smart transmitter and mobile device, you can
also find the serial number and model by tapping
Menu > About > My Transmitter.
Q: How do I customize the name of my smart
transmitter?
A: Tap Menu > Settings > System >
Transmitter Name. Type in the name you desire.
The updated name of the smart transmitter will
appear in your connection status screen.
Q: Why does my smart transmitter show a continuous
solid orange LED?
A: Follow the steps below to troubleshoot the smart
transmitter:
1. Make sure the smart transmitter is paired with your
mobile device.
2. Make sure the smart transmitter is charged.
3. Check your app for any alerts or notifications.
4. Remove the smart transmitter from your arm
and wait for a few minutes. A No Sensor
Detected message will appear and the smart
transmitter should vibrate more frequently as it
searches for a sensor. If the smart transmitter
does not vibrate or if the app does not show
No Sensor Detected, contact Customer
Support in the US. Outside the US, contact your
local distributor. Place the smart transmitter back
over the sensor to see if the orange LED disappears
and observe any notifications on the app.
If the orange LED continues to stay lit, contact
Customer Support.
LBL-0302-01-101 Rev 1_Eversense User Guide_mmolL_R5.indd 121 11/4/16 2:44 PM

122
Eversense CGM User Guide
18
Smart Transmitter Battery and
Charging
Q: How long does a fully charged smart transmitter
battery last?
A: A fully charged smart transmitter battery typically
lasts about a day and half.
Q: How long does it take to charge a smart
transmitter?
A: It takes approximately 15 minutes to fully charge a
smart transmitter when plugged into a wall outlet. It
may take longer if charging via a computer USB port.
Q: What happens if my smart transmitter battery is
completely drained?
A: No glucose readings will be displayed. Always charge
immediately when the smart transmitter battery is
completely drained.
Q: How do I check the smart transmitter battery
status?
A: There are three ways to check battery status:
1. Tap Menu > About > My Transmitter.
Scroll down to the Battery Level line that indicates
amount of battery power left.
2. Check the battery symbol in the upper right corner
on the MY GLUCOSE screen. A red battery
icon indicates the smart transmitter battery is
empty.
3. Power ON the smart transmitter. Press and release
the smart transmitter power button. An orange
LED on the smart transmitter indicates low battery.
A green LED indicates the battery is at least 10%
charged.
LBL-0302-01-101 Rev 1_Eversense User Guide_mmolL_R5.indd 122 11/4/16 2:44 PM

123
Eversense CGM User Guide
18
Connection with Smart
Transmitter
Q: How do I pair my mobile device and smart transmitter
for the first time?
A: Follow the steps below to pair your mobile device
and smart transmitter. Please read this User Guide for
more detailed information.
1. Launch the Eversense App.
2. Press the smart transmitter power button three
times to get it into “Discoverable” mode.
3. When the smart transmitter blinks green and
orange, tap the smart transmitter ID on the
CONNECT screen. The app will then begin the
searching process.
• Your smart transmitter ID is the same as the
serial number listed on the back of the smart
transmitter.
4. When the app finds your smart transmitter, a
BLUETOOTH PAIRING REQUEST
pop-up screen appears.
5. Tap Pair to confirm the pairing.
6. The app will display Connected next to the
smart transmitter ID once the pairing is completed.
Q: My smart transmitter and mobile device do not
appear to be connected.
A: There may be several reasons why you do not have a
connection.
• Make sure the Bluetooth setting on your mobile
device is ON and the smart transmitter’s name or
serial number appears on the device list.
• The condition may only be temporary. Tap
Menu > Connect. If your smart transmitter
name indicates Disconnected, tap the smart
transmitter name to connect manually.
• Your smart transmitter and mobile device may be
out of wireless range. Move your mobile device
closer to the smart transmitter.
• Your smart transmitter may be turned o, out of
battery power or is currently being charged. You
may need to restart the Bluetooth (BLE) function
on the smart transmitter by following the steps
below.
1. Power o the smart transmitter – Press and hold
the power button for 5 seconds and wait for the
vibration to confirm it is powered o.
2. Wait 2 seconds and press the power button three
times to restart BLE. (Note: When doing a BLE
restart, do not remove/forget the paired device
via your mobile device’s Bluetooth Settings.)
LBL-0302-01-101 Rev 1_Eversense User Guide_mmolL_R5.indd 123 11/4/16 2:44 PM

124
Eversense CGM User Guide
18
3. Press the power button 3 times again to place the
smart transmitter in discoverable mode and pair
with your mobile device. Tap Menu > Connect
to see if your smart transmitter is connected. If not
connected, tap to select your smart transmitter
from the list.
If these steps do not resolve the problem, you may
need to go to the Bluetooth Settings feature on
your mobile device and unpair or forget the smart
transmitter and then press the smart transmitter
power button 3 times to re-pair. If the problem still
exists, you may need to reset your smart transmitter.
Q: How do I reset my smart transmitter?
A: Follow the steps below.
1. Connect the smart transmitter to the USB cable
and adapter that came with your smart transmitter.
Plug the cable into the wall outlet. (You can also
plug the standard USB end of the cable directly
into a USB port on your computer.)
2. Press and hold the smart transmitter’s power
button for about 10 seconds until it begins to
vibrate. Do not release the power button until the
vibration stops.
3. Once the vibration stops, release the power button.
The orange LED should be on. Quickly (within
about 2 seconds) unplug the smart transmitter
from the USB cable. The LED should be o.
4. To verify the first part of the reset is complete,
press the power button multiple times. The LED
should not light up. If the LED lights up, repeat
steps 1 through 4.
5. After 30 seconds, reconnect the transmitter to the
USB cable. The smart transmitter will complete
a series of self-tests that lasts about 90 seconds.
During this time, the LED will blink green and
orange. When the self-test is complete, the
transmitter will vibrate and the LED (either green
or orange) will stay on. If the self-test doesn’t
complete, repeat steps 1 through 5.
6. Disconnect the smart transmitter from the USB
cable and proceed with pairing. Once paired, the
system will be in the Initialization Phase. If you are
unable to complete the reset, contact Customer
Support.
Q: Can other people connect to my smart transmitter?
A: The Eversense CGM System utilizes a secure
Bluetooth connection and will not allow others to
connect.
LBL-0302-01-101 Rev 1_Eversense User Guide_mmolL_R5.indd 124 11/4/16 2:44 PM

125
Eversense CGM User Guide
18
Q: What happens if my smart transmitter is
disconnected from my mobile device or app?
A: The smart transmitter will vibrate and the app will
provide a “Transmitter Disconnected” notification
every 30 minutes until the app is launched or
the smart transmitter is reconnected. Once the
connection is re-established, the data collected will
sync with the mobile app.
Q: Why am I unable to connect my mobile device
to my smart transmitter (No Transmitter
Connected is displayed in the app status bar)?
A: The smart transmitter may fail to connect with your
mobile device for any of the following reasons:
• The smart transmitter is currently charging.
• The smart transmitter is turned OFF.
• The smart transmitter battery is completely
drained.
• Bluetooth on your mobile device is turned OFF.
• Smart transmitter pairing to your mobile device
has not been established or has been “un-paired”.
You must re-establish pairing. See Troubleshooting
for more information.
Q: Why do I see Searching on the CONNECT
screen?
A: The app will continue to show Searching for any
of the following reasons:
• The smart transmitter is currently charging.
• The smart transmitter is turned OFF.
• The smart transmitter battery is completely
drained.
• Bluetooth on your mobile device is turned OFF.
• Smart transmitter pairing to your mobile device
has not been established or has been “un-paired”.
You must re-establish pairing.
Q: What is “Discoverable” (Pairing) mode?
A: Discoverable mode is the smart transmitter state that
enables it to be located by your mobile device for
pairing. See Getting Started for more information.
Q: Why do I see other smart transmitters listed on the
CONNECT screen?
A: The app may find other Bluetooth enabled devices
in the vicinity. However, the app connects only to the
smart transmitter that was paired with your mobile
device. DO NOT attempt to pair your mobile device to
other smart transmitters that are not yours.
LBL-0302-01-101 Rev 1_Eversense User Guide_mmolL_R5.indd 125 11/4/16 2:44 PM

126
Eversense CGM User Guide
18
Q: My smart transmitter is not listed on the
CONNECT screen?
A: The smart transmitter will not be listed on the
CONNECT screen for any of the following reasons:
• The smart transmitter is currently charging
via USB.
• The smart transmitter is turned OFF.
• The smart transmitter battery is completely
drained.
• Bluetooth on your mobile device is turned OFF.
• Smart transmitter pairing to your mobile device
has not been established or has been “un-paired”.
You must re-establish pairing.
Q : I just received a new smart transmitter. How do
I unlink the old one and link the new one to my
sensor?
A: On the Main Menu, tap Connect. Tap and hold the
name of your old smart transmitter. Tap OK to stop
the app from automatically connecting with the old
smart transmitter. Follow the steps in this User Guide
for pairing the new smart transmitter with the app
and linking it to your sensor.
Calibration
Q: Will doing more than 2 fingerstick calibrations
per day aect the accuracy of the system?
A: The accuracy will not be negatively impacted if you
do more than the required 2 calibrations per day.
Q: When should I do a fingerstick test with a blood
glucose meter?
A: You should perform a blood glucose test on a meter:
• When it is time to calibrate.
• When you cannot get sensor glucose readings.
• Any time you have reached your low or high
glucose alert thresholds.
• Any time you have symptoms of low or high blood
glucose.
• Any time your symptoms are not consistent with
the sensor glucose readings.
• Prior to making treatment decisions, such as
dosing insulin or consuming carbohydrates.
LBL-0302-01-101 Rev 1_Eversense User Guide_mmolL_R5.indd 126 11/4/16 2:44 PM

127
Eversense CGM User Guide
18
Q: Why am I unable to calibrate?
A: You may not be able to calibrate for any of the
following reasons:
• Not enough sensor glucose data has been
collected, which may take up to 5 minutes.
• Sensor glucose values are changing rapidly, such as
after eating or taking insulin.
• The blood glucose reading is less than 2.2 mmol/L.
• The blood glucose reading is greater than
22.2 mmol/L
• The blood glucose reading was taken more
than 10 minutes prior to entering it in the
Eversense App.
• The last sensor glucose value is significantly
dierent than the blood glucose reading entered.
• It is not time for your calibration.
Q: How do I change my scheduled morning and
evening Daily Calibration times?
A: Tap Menu > Settings > Daily Calibration.
Select the morning or evening time to change.
Morning and evening times must be set a minimum
of 10 hours apart and maximum of 14 hours apart.
Q: Why was my calibration rejected?
A: The system will reject the calibration for the any of
the following reasons:
• The blood glucose reading entered is less than
2.2 mmol/L.
• The blood glucose reading entered is greater than
22.2 mmol/L.
• The blood glucose reading entered is significantly
dierent from the last sensor glucose reading.
If the calibration is rejected, you must re-calibrate.
You may need to wait up to 60 minutes before
re-calibrating.
Q: Can I calibrate earlier than my scheduled time?
A: You can calibrate up to 2 hours before the scheduled
time. If you miss your scheduled time, the system will
send an hourly calibration prompt. To view the next
available calibration time, tap Menu > Calibrate.
The next scheduled calibration time is displayed.
Q: What time should I enter on the CALIBRATE
screen when I am notified to calibrate?
A: Enter the time you tested your blood glucose with
your meter. You must enter the blood glucose reading
within 10 minutes of doing the test.
LBL-0302-01-101 Rev 1_Eversense User Guide_mmolL_R5.indd 127 11/4/16 2:44 PM

128
Eversense CGM User Guide
18
Q: Where can I find details for Calibration Phase,
number of calibrations and last calibration date
and time?
A: You can view calibration details by tapping Menu >
About > My Transmitter.
Q: What are the dierent types of calibration phases?
A: The Eversense CGM System has two types of
Calibration Phases, the Initialization Phase and the
Daily Calibration Phase. Initialization Phase begins
24 hours after sensor insertion and requires
4 fingerstick blood glucose tests for calibration. The
Daily Calibration Phase occurs after the Initialization
Phase and requires 2 daily calibrations (morning and
evening) for the life of the sensor.
Alerts and Notifications
Q: Can I change the vibration alert pattern on my
smart transmitter?
A: Smart transmitter vibe patterns are fixed and cannot
be changed. The repeat interval can be changed for
some alerts in Settings > Sound Settings.
Q: Can I increase the volume of the app sounds
coming from my mobile device?
A: You may increase the volume of the app sounds by
connecting your mobile device to an external device
to amplify the sound.
Q: How do I silence glucose alerts?
A: Glucose alerts can be silenced by confirming the alert
on your mobile device and taking the appropriate
action if necessary.
Q: Can I change the number of alerts I receive?
A: If you feel that you are getting too many alerts, you
should first discuss the alert settings best suited for
you with your physician. If you need to change your
glucose alert settings, tap Menu > Settings >
Glucose.
LBL-0302-01-101 Rev 1_Eversense User Guide_mmolL_R5.indd 128 11/4/16 2:44 PM

129
Eversense CGM User Guide
18
Q: What is the dierence between a notification and
alert?
A: A Notification is a non-critical, low priority message
(e.g., calibration reminder).
An Alert is an important message that needs your
attention and may require you to respond/take
action.
Q: What are rate of change alerts?
A: Rate of Change Alerts notify you when your glucose
level is falling or rising faster than the setting you
entered in Settings > Glucose. You should
immediately perform a fingerstick blood glucose test
to confirm your glucose value.
Q: What happens to the notifications if my app is
disconnected from my smart transmitter?
A: If the app is disconnected from your smart
transmitter, but you have been wearing your smart
transmitter over your sensor, the alerts received
during that time will be sent to the app once it is
reconnected and synced with the smart transmitter.
Q: Why am I unable to see notifications when the app
is in the background?
A: Refer to your mobile device instructions to enable the
notifications in the background.
Q: How can I sort the notifications on the ALERT
HISTORY screen?
A: The ALERT HISTORY screen has a sort filter
at the top. You can sort based on the severity levels
(yellow and blue), and alert type. Tap the desired sort
filter icon.
Q: What are predictive alerts?
A: Predictive Alerts notify you in advance of an event
that is likely to occur if current trends continue.
Predictive Alerts use High and Low Glucose Alert
levels you set to determine when the Predictive Alerts
occur. You can set the alerts to notify you at 10, 20,
or 30 minutes in advance of when the CGM System
anticipates you reaching the alert levels you set.
Your smart transmitter will vibrate, and your app will
sound an alert and display a message on the
MY GLUCOSE screen to notify you of a predicted
high or low glucose. You should immediately perform
a fingerstick blood glucose test to confirm your
glucose value.
LBL-0302-01-101 Rev 1_Eversense User Guide_mmolL_R5.indd 129 11/4/16 2:44 PM

130
Eversense CGM User Guide
18
Glucose Readings
Q. Why is my sensor reading dierent from my blood
glucose meter reading?
A: The Eversense CGM System measures glucose in
interstitial fluid (ISF) between the body’s cells.
Physiologic dierences between ISF and blood from
a fingerstick may result in dierences in glucose
measurements. These dierences are especially
evident during times of rapid change in blood glucose
(e.g., after eating, dosing insulin, or exercising). On
average, glucose levels in ISF lag behind glucose
levels in blood by several minutes.
Q: I am getting “-- -- --” in place of sensor glucose
readings on the app.
A: You may not get any sensor glucose readings
when there is no connection between your smart
transmitter and your sensor or smart transmitter and
mobile device.
You may also not get any readings when one of the
alerts below is activated:
• No sensor detected.
• Out of Range High or Out of Range Low Glucose
Sensor reading.
• Low Sensor Temperature.
• High Ambient Light.
• Sensor Check.
• High Smart Transmitter Temperature.
• High Sensor Temperature.
• Empty Battery.
• Calibration Past Due.
• New Sensor Detected.
• Sensor Replacement.
• Calibration Expired.
• Smart Transmitter Error.
• Sensor Suspend Alert.
Please follow the instructions provided in the
notification message to clear the Alert.
LBL-0302-01-101 Rev 1_Eversense User Guide_mmolL_R5.indd 130 11/4/16 2:44 PM

131
Eversense CGM User Guide
18
Trend Arrows
Q: My trend arrows and glucose alerts do not match.
A: Trend arrows indicate the rate and direction of
change in glucose levels. For example, you may have
a trend arrow that points up or down (indicating slow
or rapid changes). Glucose alerts notify you when
your current glucose level reaches the alert level you
set, regardless of the rate or direction of change.
Q: My trend arrow is gray instead of blue.
A: The CGM System uses the last 20 minutes of
continuous glucose data for calculating and
displaying the trend arrow. When there are not
enough sensor values available for the calculation,
the arrow is displayed in gray.
App
Q: What will happen if I re-install the app?
A: Upon re-installing the app, the app will download
historical data only from the last 3 days.
Q: What version of the app is installed on my mobile
device?
A: You can find the app software version by tapping
Menu > About > Product Information.
Q: How will my app be updated?
A: Visit www.eversensediabetes.com for instructions on
updating the app software.
Q: What devices are compatible with the Eversense
App?
A: Visit www.eversensediabetes.com for a list of
compatible devices.
LBL-0302-01-101 Rev 1_Eversense User Guide_mmolL_R5.indd 131 11/4/16 2:44 PM
132
Eversense CGM User Guide
18
Sensor
Q: Can the sensor be inserted in another body part
besides my upper arm?
A: The Eversense CGM System was only tested in the
upper arm during clinical studies.
Q: When do I need to replace my sensor?
A: Your sensor lasts up to 90 days. You will receive
periodic notices (30, 14, 7, 3, 2, and 1 day prior) to
remind you when the sensor needs to be replaced.
Contact your physician to schedule a sensor
replacement.
Q: Can I extend the 90 day life of the sensor?
A: The sensor will no longer provide glucose readings
after 90 days of wear and must be replaced.
Q: Where can I find the sensor serial number?
A: You can view the sensor serial number by tapping
Menu > About > My Sensor.
Q: Can I still use the same smart transmitter if I switch
to a new mobile device?
A: You will need to install the app on your new mobile
device and pair it with your smart transmitter. The
last 3 days of historical data will be synced to the app
on the new mobile device.
Q: What is the Do Not Disturb option?
A: When Do Not Disturb is enabled in the Eversense
App Settings, the smart transmitter will stop
providing vibratory notifications for non-critical
alerts. Critical alerts will still be provided via on-body
vibe alerts. All alerts and notifications will continue
to be provided on the mobile app.
Note that the Do Not Disturb feature on your
smartphone overrides the Do Not Disturb option in
the app. So if the Do Not Disturb feature on your
smartphone is turned on, you will not receive the
alerts on the smart transmitter or in the app.
Q: Why does my status bar say “syncing”?
A: “Syncing” will appear in the status bar when the app
on your mobile device is connecting to your smart
transmitter.
LBL-0302-01-101 Rev 1_Eversense User Guide_mmolL_R5.indd 132 11/4/16 2:44 PM
133
Eversense CGM User Guide
18
Q: Why do I see a “New Sensor Detected”
notification?
A: This message appears when your smart transmitter
detects a new sensor so you may link the smart
transmitter and sensor. The smart transmitter can
only be linked to one sensor at a time. If you see
a New Sensor Detected message and you
already have a sensor inserted and linked to your
smart transmitter, tap Not Now. If unsure, contact
Customer Support for more information.
Q: I have just linked a sensor and smart transmitter for
the first time, but the insertion date and/or time
do not show when I tap About > My Sensor.
A: It may take up to 10 minutes for the linking process
to complete. Be sure the smart transmitter is on top
of the sensor. Confirm the LINKED SENSOR
screen shows a check mark for Linking Process
Complete. Navigate to the MY GLUCOSE
screen and wait about 2 minutes. Return to the MY
SENSOR screen. If the correct insertion date and
time are still not displayed, follow these steps:
1. Remove the smart transmitter from the insertion
site. Connect it with the charging cable and power
supply. Plug the power supply into the wall outlet
and then unplug it and disconnect it from charging
cable.
2. Replace smart transmitter over sensor. Navigate
to About > My Sensor and confirm correct
insertion date and time. If problem persists, contact
Customer Support.
Q: I have just linked a sensor and smart transmitter but
the About > My Transmitter does not show the
correct Current Phase.
A: It may take up to 10 minutes for the linking process to
complete. Be sure the smart transmitter is on top of
the sensor. Confirm the LINKED SENSOR screen
shows a check mark for Linking Process Complete.
Navigate to the MY GLUCOSE screen and wait
about 2 minutes. Return to the MY SENSOR
screen. If the correct insertion date and time are still
not displayed, follow these steps:
1. Remove the smart transmitter from the insertion
site.
2. Connect it with the charging cable and power
supply.
3. Plug the power supply into the wall outlet and then
unplug it and disconnect it from charging cable.
4. Replace the smart transmitter over the sensor.
5. Navigate to About > My Transmitter and
confirm Current Phase is correct. If the problem
continues, contact Customer Support.
LBL-0302-01-101 Rev 1_Eversense User Guide_mmolL_R5.indd 133 11/4/16 2:44 PM

134
Eversense CGM User Guide
18
Events
Q: How can I sort my events on the EVENT LOG
screen?
A: The EVENT LOG screen has a sort filter at the
top of the screen. Tap the desired sort filter icon to
include and exclude events from the list. The default
sort option is to show ALL events.
Sync
Q: Why do I sometimes see a blue and white progress
bar across the top of my screen?
A: You will see this syncing progress bar for several
reasons.
• Your smart transmitter was out of range of your
sensor for a while and it is re-syncing.
• You closed the Eversense App completely and
re-launched it.
• Your mobile device lost battery power and was
recharged.
• Your data is being uploaded to your Eversense
DMS account.
Q: Why did my CGM System re-enter Initialization
Phase?
A: You will re-enter Initialization Phase for any one of
the following reasons:
• Calibration period has expired without you having
entered a fingerstick test value.
• 3 or more blood glucose readings are significantly
dierent than the current sensor glucose readings.
• Your smart transmitter has not been charged
within 16 hours of the empty battery alert.
• If you manually change the time on your mobile
device your smart transmitter will sync and
reinitialize to your mobile device.
18
LBL-0302-01-101 Rev 1_Eversense User Guide_mmolL_R5.indd 134 11/4/16 2:44 PM
135
Eversense CGM User Guide
19
19. Device Performance
This section lists Device Performance Characteristics.
Clinical Study Performance
The performance of the Eversense CGM System was evaluated in a multi-site, non-randomized clinical study.
Adult (older than 17 years old) subjects with diabetes were enrolled at 7 dierent sites in 3 dierent countries.
Each subject had 2 separate sensors inserted, one in each upper arm. One sensor was used to display glucose
data on the subject’s mobile device and the other sensor was used to collect glucose data but was not displayed
to the subject. Forty-four (44) subjects were followed for 90 days following the insertion of the sensor. Accuracy
assessments were made at various points during the study, and subjects were asked to report any adverse events
throughout the study. The Mean Absolute Relative Dierence (MARD) measured throughout the 90 days was 11.4%
for glucose values over 4.2 mmol/L.
LBL-0302-01-101 Rev 1_Eversense User Guide_mmolL_R5.indd 135 11/4/16 2:44 PM
136
Eversense CGM User Guide
19
Overall System Performance Compared to YSI
The study demonstrated that 83.8% of overall CGM System readings were within ± 20% of YSI values, 93.9% were
within ± 30% of YSI values, and 97.5% were within ± 40% of YSI values. The chart below provides a percentage
breakdown by glucose range.
Dierence between CGM System readings and YSI Measurements by Glucose Level
YSI Glucose
Range
(mmol/L)
Number of paired
CGM-YSI
Readings
Percent
within
20% of YSI
Percent
within
30% of YSI
Percent
within
40% of YSI
≤ 3.9* 422 80.6% 93.4% 96.7%
3.9 - 10.0 6633 80.6% 92.2% 96.7%
> 10.0 3387 90.4% 97.3% 99.1%
Overall 10442 83.8% 93.9% 97.5%
*The absolute dierence from the YSI reading is measured in mmol/L if the YSI reading is ≤ 3.9 mmol/L.
Although device measurement errors may have been present in either YSI or sensor readings, and interstitial values
(sensor) are known to have time lags in responses to changing blood glucose levels compared to blood values (YSI),
it was demonstrated that 80% or greater of dierences were within 20%/1.1 mmol/L (20% for YSI values greater
than 3.9 mmol/L, within 1.1 mmol/L for YSI values ≤ 3.9 mmol/L). The level of agreement increased to above 92% for
dierences within 30%/1.7 mmol/L and above 96% for dierences within 40%/2.2 mmol/L.
LBL-0302-01-101 Rev 1_Eversense User Guide_mmolL_R5.indd 136 11/4/16 2:44 PM

137
Eversense CGM User Guide
19
Clarke Error Grid Analysis
The Clarke Error Grid Analysis (EGA) is one of the standards for quantifying the accuracy of CGM systems.
Clarke EGA measures accuracy by comparing subject glucose values taken from their CGM system to reference
values taken in a lab.
Clarke EGA calculates accuracy by looking at the number and percentage of data points that fell into 5 “clinical risk”
zones. Data is presented in both graph and chart formats.
• Zone A (no risk) contains CGM values that fell within ±20% of the reference values.
– Zone A values are considered to be within the acceptable accuracy range of CGM systems.
• Zone B (no risk) contains CGM values that fell outside ±20% of the reference values.
– Zone B values are not considered to be within the acceptable accuracy range, but their dierence from
the reference values would not lead a subject to making an inappropriate treatment decision.
• Zone C (low risk) contains CGM values that diered enough from the reference values that a subject might make
an unnecessary treatment decision based on the CGM information.
• Zone D (medium risk) contains CGM values that were correctly identified as hypoglycemic or hyperglycemic by
the reference system but not the CGMsystem.
– Not correctly identifying a CGM value as hypoglycemic or hyperglycemic is a potentially dangerous
situation.
• Zone E (high risk) contains CGM values that were incorrectly identified as hypoglycemic when the reference
system correctly identified them as hyperglycemic (and vice versa).
– Mistakenly identifying a CGM value as hypoglycemic when it is actually hyperglycemic (or vice versa) is
a potentially dangerous situation.
LBL-0302-01-101 Rev 1_Eversense User Guide_mmolL_R5.indd 137 11/4/16 2:44 PM
138
Eversense CGM User Guide
19
Clarke Error Grid percentages were calculated by glucose range, and at certain “wear duration” points in the study.
Clarke Error Grid Scatterplot
Eversense CGM (mmol/L)
YSI (mmol/L)
22.2
19.4
16.7
13.9
11.1
8.3
5.6
2.8
0
0 2.8 5.6 8.3 11.1 13.9 16.7 19.4 22.2
LBL-0302-01-101 Rev 1_Eversense User Guide_mmolL_R5.indd 138 11/4/16 2:44 PM
139
Eversense CGM User Guide
19
Overall, 83.6% of CGM readings fell within zone A. This indicates CGM readings were in close agreement with
reference values for the great majority of readings.
Clarke Error Grid Accuracy by Glucose Level
YSI Glucose
Range (mmol/L)
Number of paired
CGM-YSI Readings
Clarke Score
A B C D E
≤ 3.9 422 77.2% 2.4% 0.0% 20.4% 0.0%
3.9 - 10.0 6633 80.6% 19.4% 0.0% 0.0% 0.0%
> 10.0 3387 90.4% 9.4% 0.1% 0.1% 0.0%
Overall 10442 83.6% 15.4% 0.1% 0.9% 0.0%
Overall, 83.6% of CGM readings fell within zone A. This indicates CGM readings were in close agreement with
reference values for the great majority of readings. Also, there were no real dierences in zone A percentages as the
duration of wear increased.
Clarke Error Grid Accuracy by Duration of Wear
Percent values are reported to single precision.
Period of Wear
Number of paired
CGM-YSI
Readings
Clarke Score
A B C D E
Days 1-30 6784 82.9% 16.0% 0.1% 1.1% 0.0%
Days 1-60 9529 83.5% 15.6% 0.1% 0.9% 0.0%
Days 1-90 10442 83.6% 15.4% 0.1% 0.9% 0.0%
LBL-0302-01-101 Rev 1_Eversense User Guide_mmolL_R5.indd 139 11/4/16 2:44 PM
140
Eversense CGM User Guide
19
Consensus (Parkes) Error Grid Analysis
The Consensus Error Grid Analysis (CEG) is another standard for quantifying the accuracy of CGM systems. CEG is
similar to the Clarke EGA in that it assigns the dierences (errors) between the CGM system values and reference
values to one of 5 “clinical risk” regions. But the CEG diers from the Clarke EGA in that the risk regions are
continuous (A through E), whereas with the Clarke EGA they are not continuous (e.g., A is next to D).
CEG percentages were calculated for the total number of CGM readings.
Test Device Glucose (mmol/L)
Reference Glucose (mmol/L)
27.8
22.2
16.7
11.1
5.6
0
05.6 11.1 16.7 22.2 27.8
LBL-0302-01-101 Rev 1_Eversense User Guide_mmolL_R5.indd 140 11/4/16 2:44 PM
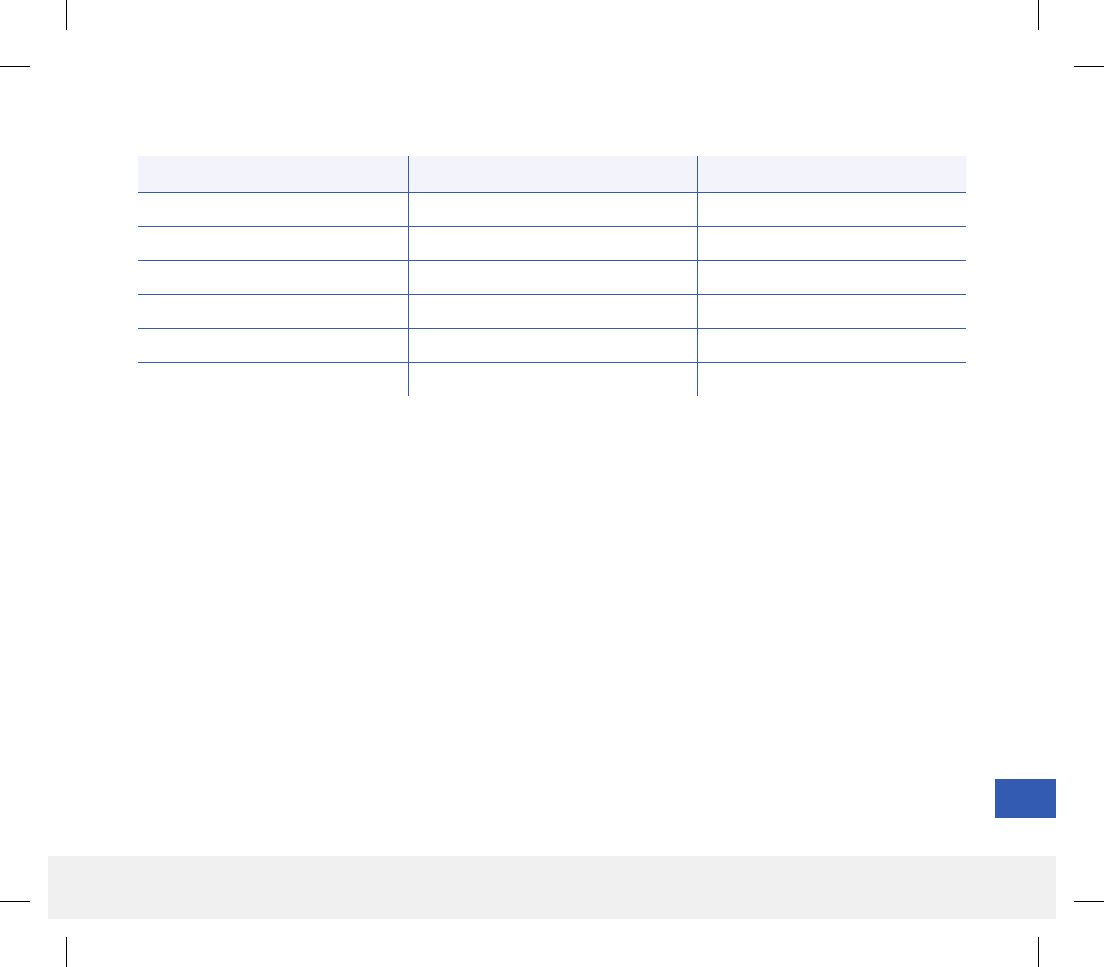
141
Eversense CGM User Guide
19
Overall, 85.4% of CGM readings fell within zone A. This indicates CGM readings were in close agreement with
reference values for the great majority of readings.
Consensus Error Grid Accuracy by Glucose Level
Zone Frequency Percent
A8922 85.4%
B1481 14.2%
C39 0.4%
D00.0%
E00.0%
Total 10442 100.0%
LBL-0302-01-101 Rev 1_Eversense User Guide_mmolL_R5.indd 141 11/4/16 2:44 PM
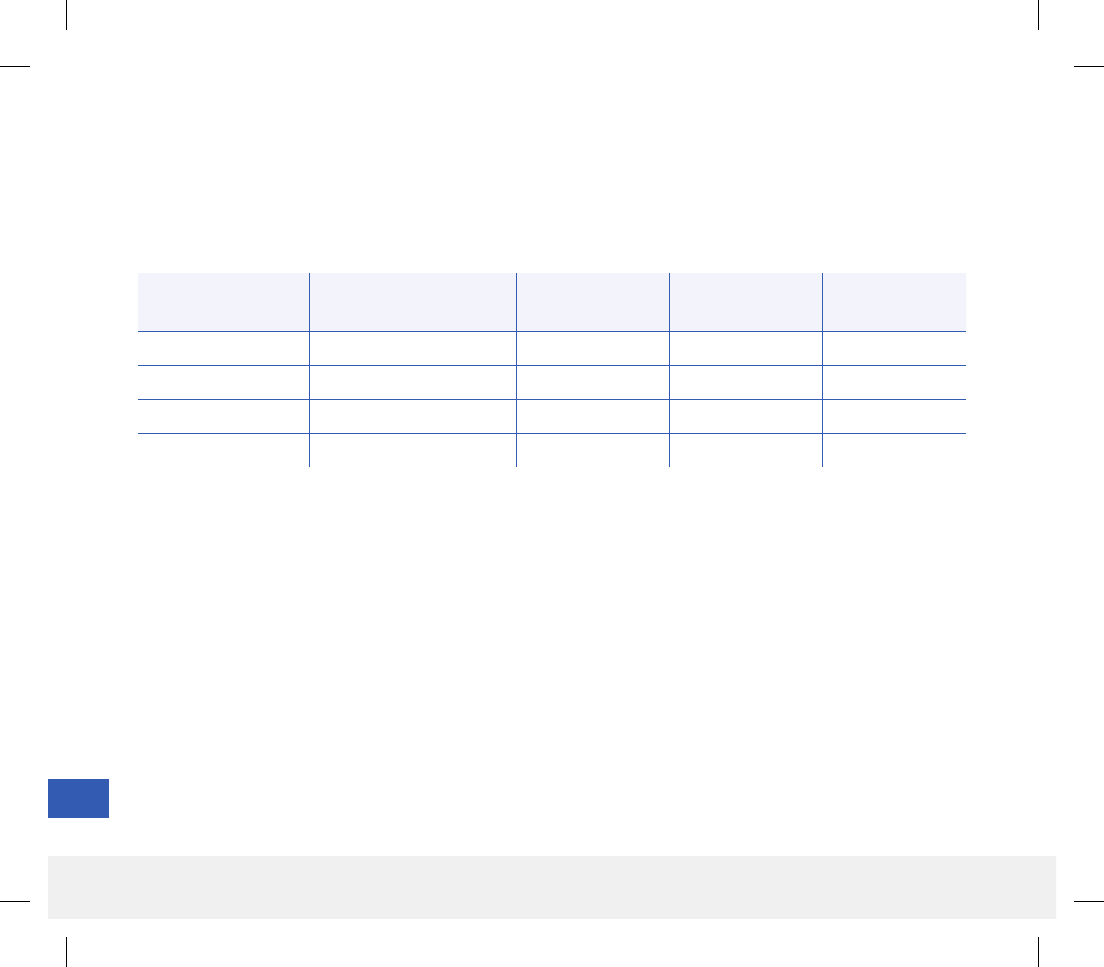
142
Eversense CGM User Guide
19
Overall, there is no real dierence in accuracy based on how long after the last blood glucose calibration the CGM
readings were recorded.
CGM System Performance by Time Since Last Calibration
Time from
Calibration
Number of paired
CGM-YSI Readings
Percent
within 20%
Percent
within 30%
Percent
within 40%
0-4 hrs 6043 83.1% 93.1% 97.0%
4-8 hrs 2479 85.0% 94.5% 97.7%
8-12 hrs 1663 83.6% 95.6% 98.6%
Total 10185 83.6% 93.8% 97.4%
Calibration Performance
Calibration performance looks at whether accuracy is aected by how much time has elapsed since the last system
calibration with a blood glucose value.
LBL-0302-01-101 Rev 1_Eversense User Guide_mmolL_R5.indd 142 11/4/16 2:44 PM

143
Eversense CGM User Guide
19
Sensor Life
Sensor life measured how many days out of the intended 90-day duration period subjects were able to continue
using the sensor to record CGM readings.
Overall, the analysis estimated that 87.5% of sensors remained functioning through 90 days.
Smart Transmitter Wear
Smart transmitter wear measured how many hours of the day subjects wore the smart transmitter. Overall, subjects
wore their smart transmitters an average of 22.3 hours per day, with a median of 23.5 hours.
Safety
The number of adverse events were recorded over the first 90 days of the study period.
The CGM system was extremely well tolerated in the study. There were no serious adverse events reported that were
related to use of the system or the insertion procedure. A total of 37 adverse events were reported in 26 subjects, all
recorded as mild. Twelve (12) of these were related to the sensor insertion procedure. None of the adverse events
resulted in hospitalization due to hypoglycemia, hyperglycemia, or ketoacidosis.
LBL-0302-01-101 Rev 1_Eversense User Guide_mmolL_R5.indd 143 11/4/16 2:44 PM
144
Eversense CGM User Guide
20
20. Technical Specications
Characteristic Description
Dimensions Length: 18.3 mm
Diameter: 3.5 mm
Materials Homopolymer polymethylmethacrylate (PMMA), Hydroxyethylmethacrylate
(HEMA) based Hydrogel, Platinum, Silicone, Dexamethasone Acetate, epoxy 301-2
Glucose Range 2.2 - 22.2 mmol/L
Sensor Life Up to 90 days
Calibration Commercially available self-monitoring blood glucose meter
Calibration Range 2.2 - 22.2 mmol/L
Sterilization Sterile by Ethylene Oxide
Sensor
LBL-0302-01-101 Rev 1_Eversense User Guide_mmolL_R5.indd 144 11/4/16 2:44 PM
145
Eversense CGM User Guide
20
Characteristic Description
Dimensions Length: 37.6 mm
Width: 48.0 mm
Thickness: 8.8 mm
Materials Body: polycarbonate
Weight 11.3 g
Power Supply Rechargeable lithium polymer batteries (not replaceable)
Operational Conditions 5 - 40 °C (41 - 104 °F)
Operational Life 12 months
Storage Conditions 0 - 35 °C (32 - 95 °F)
Moisture Protection IP67: submerged up to 1 meter of water for up to 30 minutes
Protection Against Electrical
Shock
Type BF applied part
Charge time using AC adapter about 15 minutes
Communication Distance Between app and smart transmitter is up to 7.6 meters (25 feet)
Cabin Pressure 700hPa to 1060hPa
Relative Humidity Range
(non-condensing)
15% to 90%
Smart Transmitter
LBL-0302-01-101 Rev 1_Eversense User Guide_mmolL_R5.indd 145 11/4/16 2:44 PM
146
Eversense CGM User Guide
20
Characteristic Description
Class II
Input AC Input, 100-240Vac, 50/60Hx, 0.3-0.15A
DC Output 5V DC, 1A (5.0 watts)
Moisture Protection
(charging cradle)
IP22
Characteristic Description
Input/Output 5V DC, 1A
Type USB-A to USB micro-B
Length 36 inches (91 cm)
Power Supply and Charger
USB Cable* for Charging and Downloading
*If misused, the USB cable can pose a strangulation risk. The USB cable can be connected to the power supply/charger
and charged using an AC power outlet. To isolate the system, unplug the charger/power supply from the outlet. If you
charge the smart transmitter using a USB port on your personal computer, ensure the personal computer complies the
IEC 60950-1 (or equivalent) safety standard.
LBL-0302-01-101 Rev 1_Eversense User Guide_mmolL_R5.indd 146 11/4/16 2:44 PM
147
Eversense CGM User Guide
20
Electrical and Safety Standards
Guidance and Manufacturer’s Declaration – Electromagnetic Immunity
The transmitter is intended for use in the electromagnetic environment specified in the next table. The customer or
the user of the transmitter should ensure that it is used in such an environment.
Immunity
Test
Immunity
Test
Transmitter
Compliance
Level
Electromagnetic
Environment
Guidance
Electrostatic Discharge
(ESD) IEC 61000-4-2 ± 8 kV Contact
± 15 kV Air
± 8 kV Contact
± 15 kV Air
Floors should be wood, concrete
or ceramic tile. If floors are covered
with synthetic material, the relative
humidity should be at least 30%.
Power Frequency
(110VAC/60Hz, 230VAC/50 Hz)
Magnetic Field IEC 61000-4-8 30 A/m 30 A/m
Power frequency magnetic fields
should be at levels characteristic
of a typical location in a typical
commercial or hospital environment.
Transmitter Electromagnetic Immunity Specifications
LBL-0302-01-101 Rev 1_Eversense User Guide_mmolL_R5.indd 147 11/4/16 2:44 PM
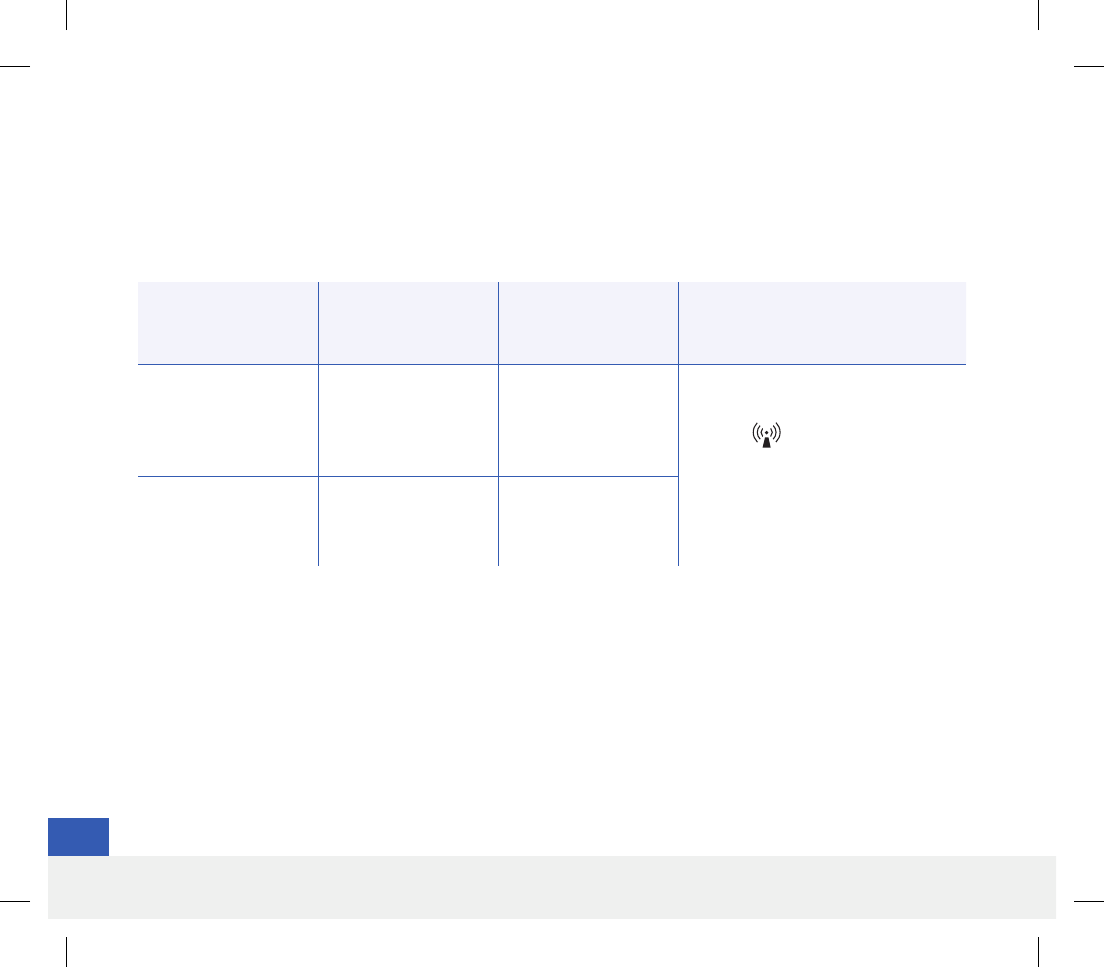
148
Eversense CGM User Guide
20
Electrical and Safety Standards (continued)
The Eversense CGM System is intended to be used in the electromagnetic environment detailed in the table below.
Users of the System should ensure it is used according to these specifications.
System Electromagnetic Immunity Specifications
Immunity
Test
IEC 60601
Test Level
Transmitter
Compliance
Level
Electromagnetic
Environment
Guidance
Conducted RF
IEC 61000-4-6
(Smartphone only
(Receiving Device))
≥ 3 Vrms
(150 kHz to
80 MHz)
3 Vrms Interference may occur in the vicinity
of equipment marked with following
symbol:
Radiated RF
IEC 61000-4-3
≥ 10 V/m at 80 MHz to
2700 MHz
(AM Modulation)
3 Vrms
Note 1: At 80 MHz and 800 MHz, the higher frequency range applies.
Note 2: These guidelines may not apply in all situations. Electromagnetic propagation is aected by absorption and reflection from structures,
objects and people.
a. Field strengths from fixed transmitters, such as base stations for radio (cellular/cordless) telephones and land mobile radios, amateur radio, AM
and FM radio broadcast, and TV broadcast cannot be predicted theoretically with accuracy. To assess the electromagnetic environment due to
fixed RF transmitters, an electromagnetic site survey should be considered. If the measured field strength in the location in which the Eversense
CGM System is used exceeds the applicable RF compliance level above, the Eversense CGM System should be observed to verify normal operation.
If abnormal performance is observed, additional measures may be necessary, such as reorienting or relocating the Eversense CGM System.
b. Over the frequency range 150 kHz to 80 MHz, field strengths should be less than 10 V/m.
LBL-0302-01-101 Rev 1_Eversense User Guide_mmolL_R5.indd 148 11/4/16 2:44 PM
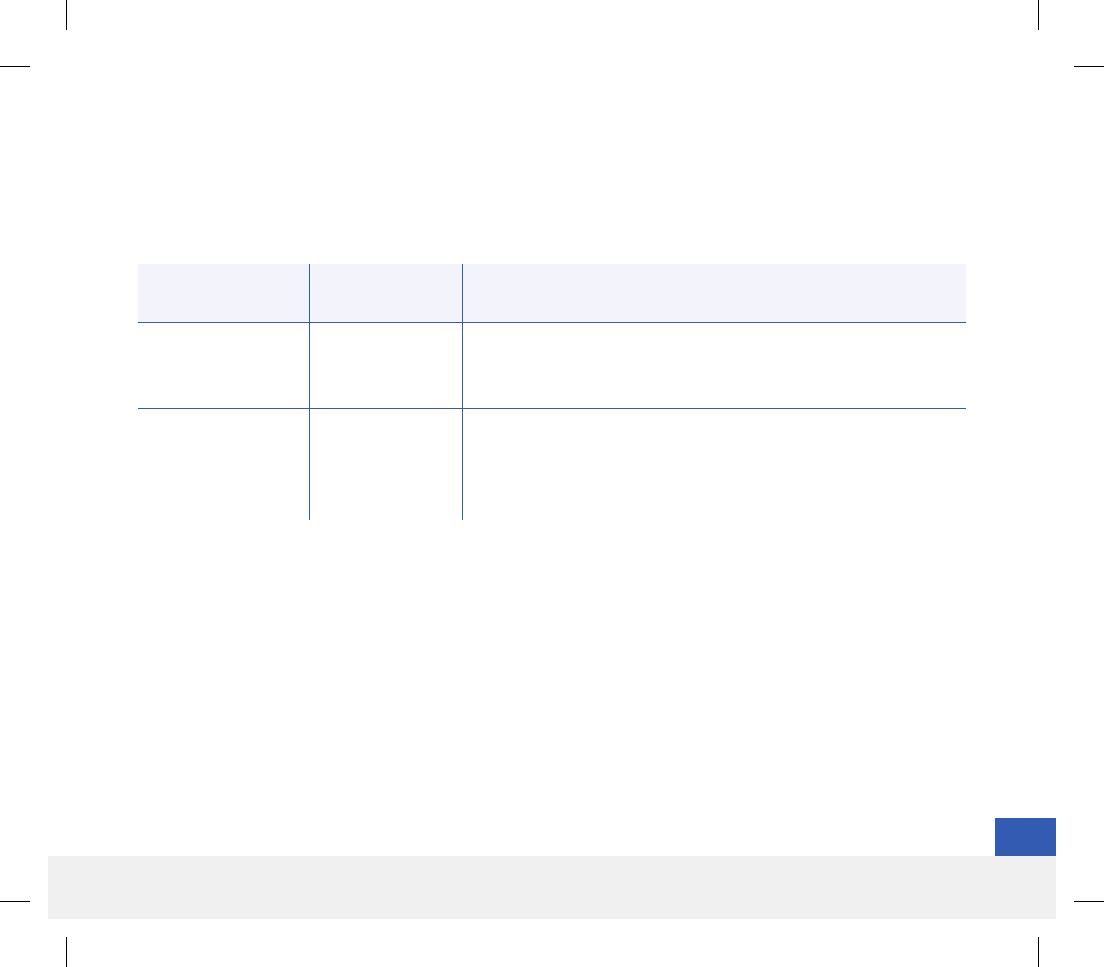
149
Eversense CGM User Guide
20
Electrical and Safety Standards (continued)
Guidance and Manufacturer’s Declaration – Electromagnetic Emissions
The Eversense CGM Mobile System is intended for use in the electromagnetic environment specified in the next table.
The customer or the user of the System should ensure that it is used in such an environment.
Emissions Test Compliance Electromagnetic Environment
Guidance
RF Emissions
CISPR 11 Group 1
The Eversense CGM System uses RF energy only for its internal
function. Therefore, its RF emissions are very low and are not likely
to cause any interference in nearby electronic equipment.
RF Emissions
CISPR 11 Class B
The Eversense CGM System is suitable for use in all establishments
including domestic and those directly connected to the public
low-voltage power supply network that supplies buildings used for
domestic purposes.
Recommended Separation Distances Between Other Portable/Mobile RF Communications Equipment
and the Smartphone (Receiving Device)
Follow the smartphone (or other receiving device) manufacturer’s instructions for separation distances. The
customer or the user of the smartphone (or other receiving device) can help prevent electromagnetic interference by
maintaining a minimum distance between other portable/mobile RF communications equipment (transmitters) and
the smartphone of at least 30 cm (about 12 inches). Portable/mobile RF equipment include: baby monitors, Bluetooth
wireless headsets, wireless routers, microwave ovens, laptops with internal Wi-Fi adapters, GSM cell phones, RFID
scanners and hand-held security metal detector often used by security screeners.
LBL-0302-01-101 Rev 1_Eversense User Guide_mmolL_R5.indd 149 11/4/16 2:44 PM
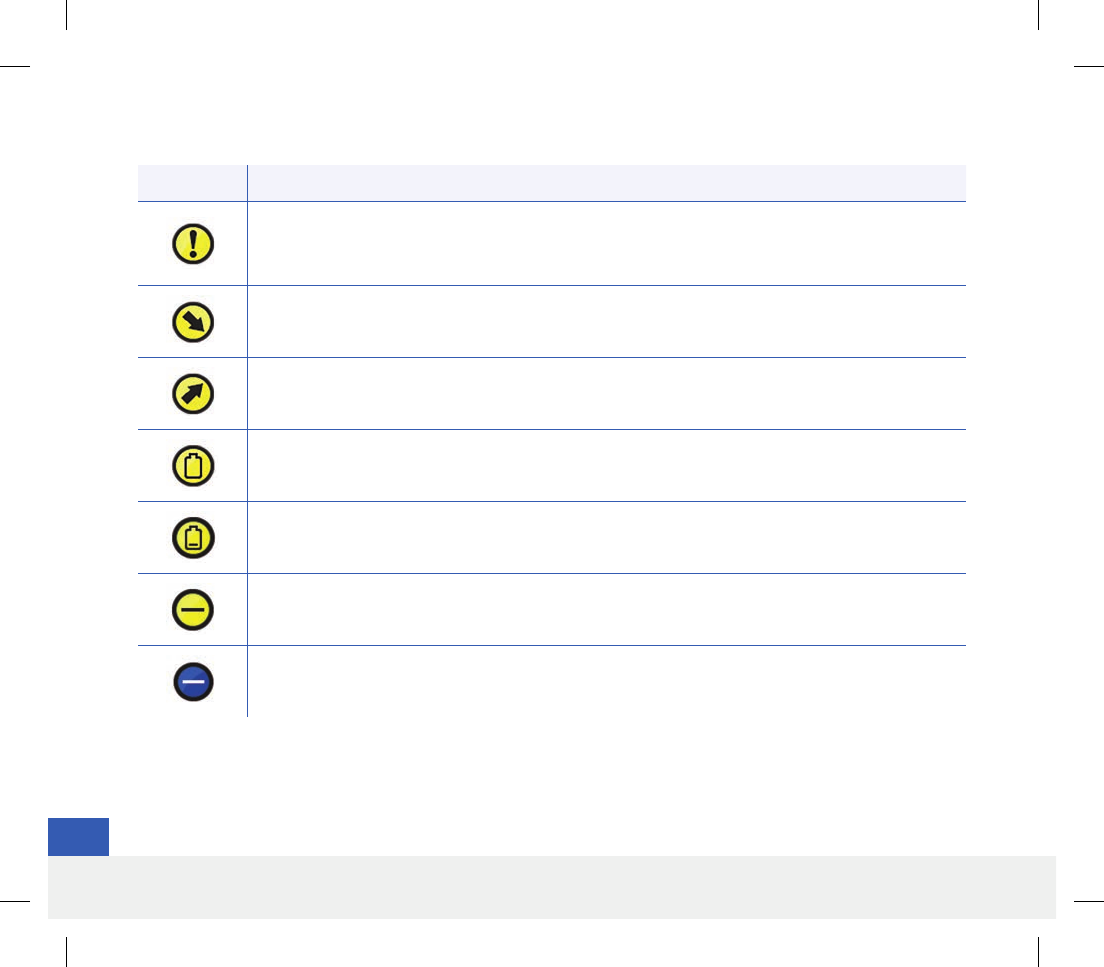
150
Eversense CGM User Guide
20
Symbols on the Eversense Mobile App
Symbol Explanation
Glucose Alert
Appears when the glucose is above the high glucose alert range and below the low glucose alert
range. The icon appears in the ALERT HISTORY screen.
Falling Rate Alert
Appears when the glucose value is falling beyond a defined rate.
Rising Rate Alert
Appears when the glucose value is rising beyond a defined rate.
Empty Battery Alert
Appears when the smart transmitter battery is empty.
Low Battery Alert
Appears when the smart transmitter battery is less than 10% charged.
Smart Transmitter/Sensor Alert
The icon appears only in the ALERT HISTORY screen.
Smart Transmitter/Sensor Notifications
Appears when there are notifications related to the smart transmitter or sensor.
LBL-0302-01-101 Rev 1_Eversense User Guide_mmolL_R5.indd 150 11/4/16 2:44 PM
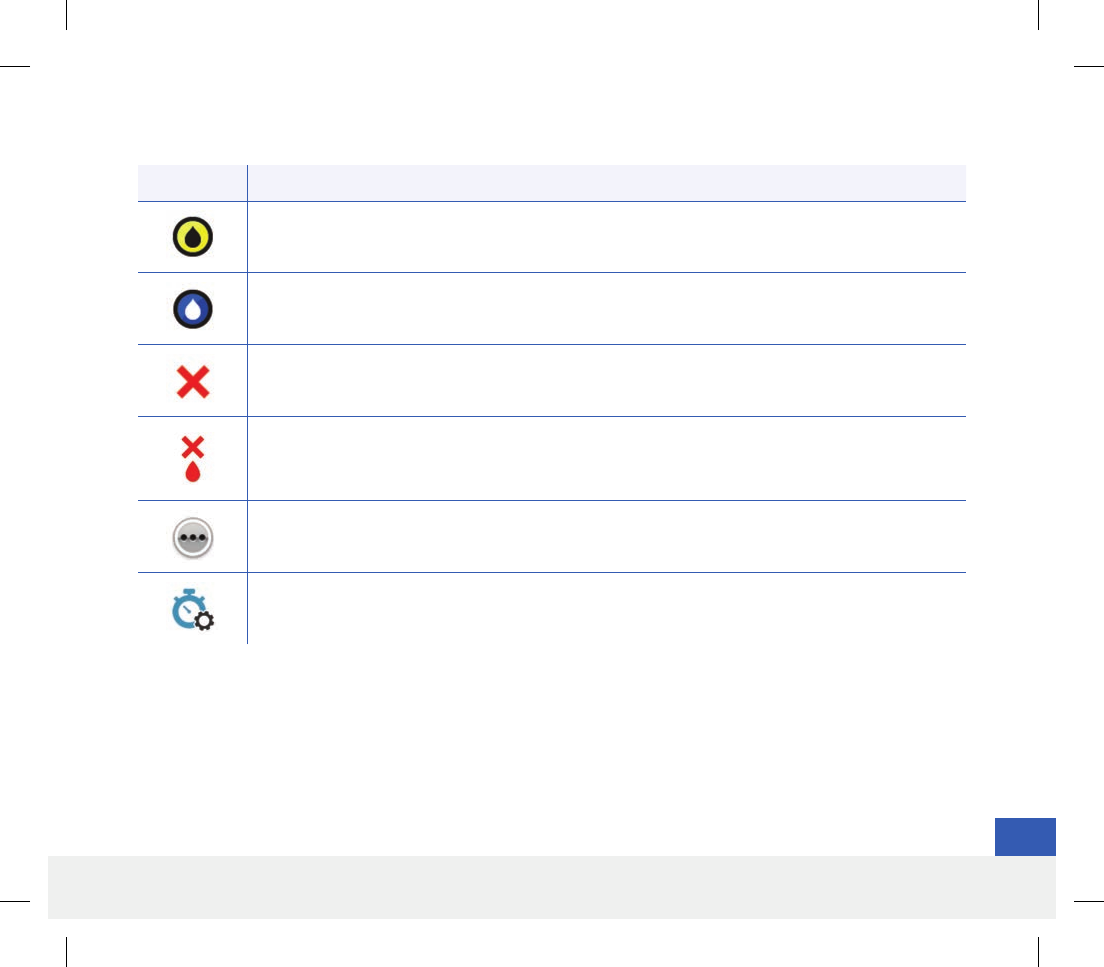
151
Eversense CGM User Guide
20
Symbol Explanation
Calibration Alert
Appears when there are calibration-related alerts.
Calibration Notification
Appears when there are calibration-related notifications.
Calibration Failure
Appears when the smart transmitter rejects the user-entered calibration value.
Connection Failure
Appears when the smart transmitter is disconnected from the smartphone or when the sensor is
not linked to the smart transmitter.
Multiple alerts (more than one alert or event)
Appears when there are two or more alerts or events in a short interval.
Temp Profile
Appears when the Temp Profile is active.
Symbols on the Eversense Mobile App (continued)
LBL-0302-01-101 Rev 1_Eversense User Guide_mmolL_R5.indd 151 11/4/16 2:44 PM
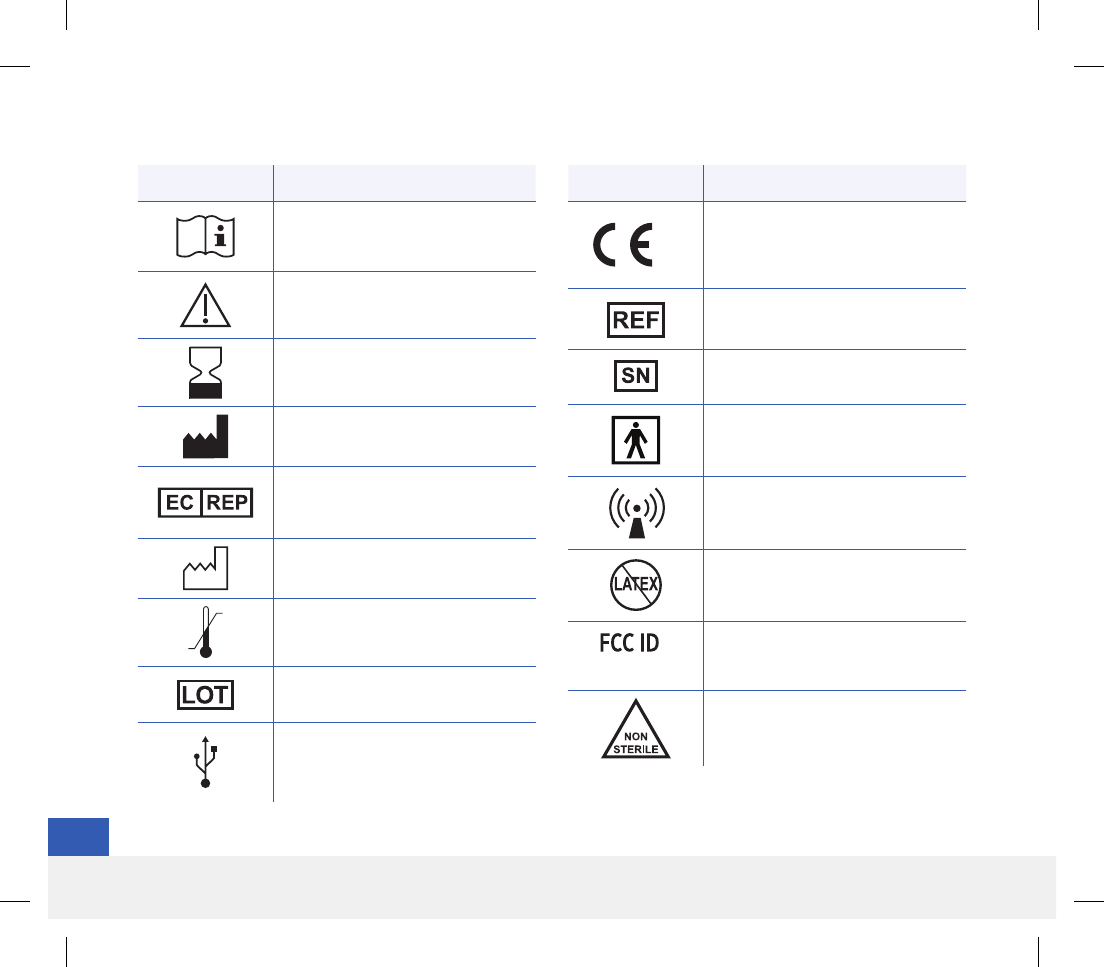
152
Eversense CGM User Guide
20
Symbols on Packaging and Devices
Symbol Explanation
Consult accompanying documents
Caution, consult accompanying
documents
Use by
Manufacturer
Authorized representative in the
European Community
Date of manufacture
Storage temperature limits
Lot number
Universal Serial Bus (USB)
Symbol Explanation
0086
Marking certifies that the device
meets the European Council
Directive 90/385/EEC
Part number
Serial number
Type BF Applied Part
Non-ionizing electromagnetic
radiation
Not made with natural rubber
latex
#
2AHYA-3401
FCC ID is assigned to all devices
subject to certification
Non-sterile
LBL-0302-01-101 Rev 1_Eversense User Guide_mmolL_R5.indd 152 11/4/16 2:44 PM
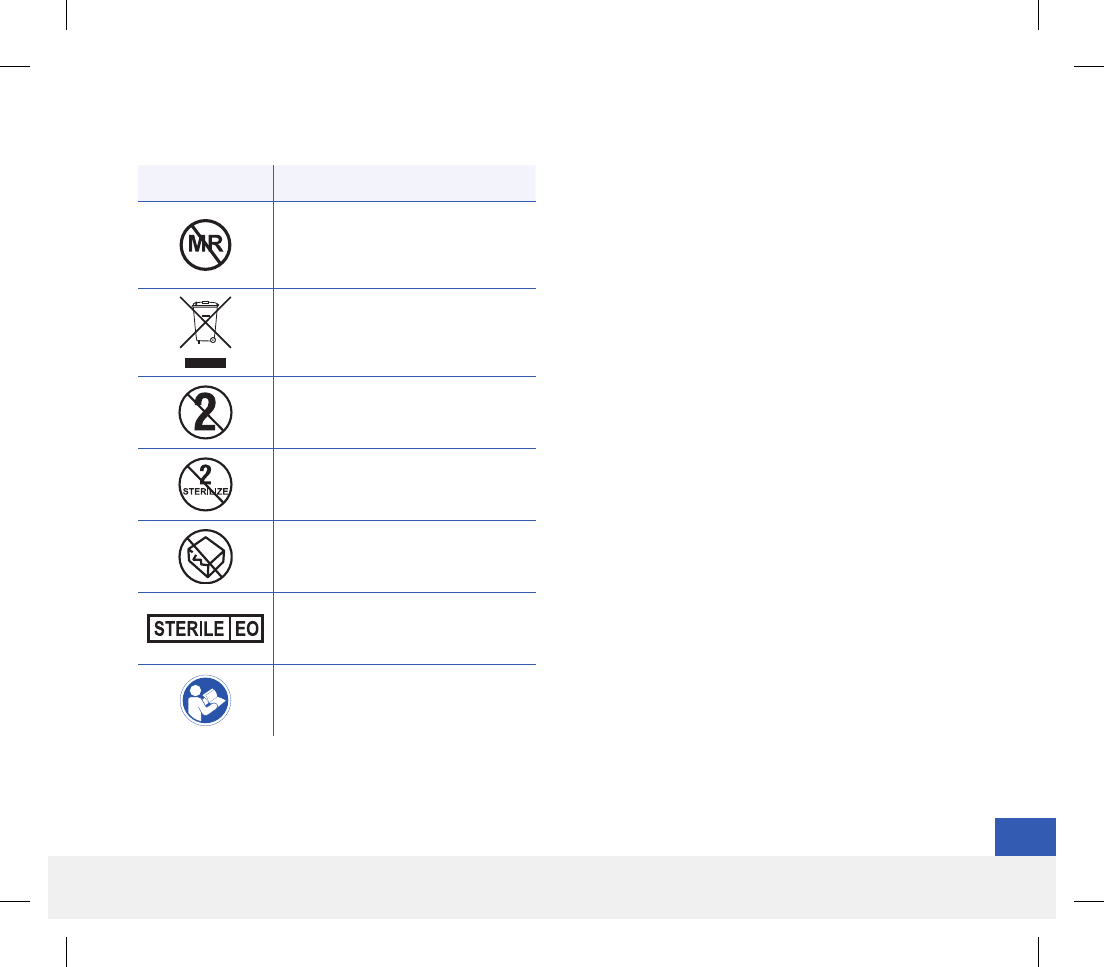
153
Eversense CGM User Guide
20
Symbol Explanation
Magnetic Resonance Imaging
(MRI) procedures are
contraindicated for this device.
European Union WEEE Directive
2012/19/EU
Single use only
Do not re-sterilize
Do not use if package is damaged
Sterilized using Ethylene Oxide
Follow instructions for use
Symbols on Packaging and Devices (continued)
LBL-0302-01-101 Rev 1_Eversense User Guide_mmolL_R5.indd 153 11/4/16 2:44 PM

154
Eversense CGM User Guide
20
Eversense Smart Transmitter Limited Warranty
1. Coverage and duration of limited warranty.
Senseonics, Incorporated (“Senseonics”) warrants to the original patient end user (“you”) of the Eversense
Smart Transmitter (the “Smart Transmitter”) that the Smart Transmitter shall be free from defects in material and
workmanship under normal use for a period of one year (365 days) commencing on the date that you first received
the Smart Transmitter from your physician (“Limited Warranty Period”). This warranty gives you specific legal
rights, and you may also have other rights which vary from jurisdiction to jurisdiction. This limited warranty is made
on the condition that you provide Senseonics with written notice of any defects in material and/or workmanship
immediately upon discovery, and provided that Senseonics determines that your claim is due to defects in original
material and/or workmanship. If Senseonics provides you with a replacement Smart Transmitter pursuant to
the terms of this limited warranty, any remaining warranty on the original Smart Transmitter will transfer to the
replacement Smart Transmitter, the warranty period for the replacement Smart Transmitter shall end on the one year
anniversary of the date that you first received the Smart Transmitter from your physician, and this warranty will be
void with respect to the original Smart Transmitter.
2. Exclusions to the limited warranty.
The limited warranty applies only to the Smart Transmitter manufactured by Senseonics, and is conditioned upon
proper use of the product by you. The limited warranty does not cover a) cosmetic damage, scratching or other
damage to surfaces and exposed parts due to normal use; b) damage resulting from accident, neglect and other
negligence, misuse, unusual physical, electrical or electromechanical stress, or modification of any part of the product;
c) equipment that has been altered to remove, alter or otherwise make illegible the ID number; d) malfunctions
resulting from use with products, accessories or peripheral equipment not furnished or approved in writing by
Senseonics; e)consumables (batteries), f) equipment that has been dissembled; and g) damage caused by improper
operation, testing, maintenance, installation or adjustment.
The Smart Transmitter is water-resistant to the specification listed in the User Guide. This limited warranty does not
cover water damage if the Smart Transmitter housing is cracked, or otherwise damaged. This limited warranty does
not apply to collateral services, equipment or software that may be used with the Smart Transmitter.
LBL-0302-01-101 Rev 1_Eversense User Guide_mmolL_R5.indd 154 11/4/16 2:44 PM

155
Eversense CGM User Guide
20
3. Senseonics’ obligations under the limited warranty.
Your sole and exclusive remedy, and the sole and exclusive obligation of Senseonics under this limited warranty is
to repair or replace, at its sole discretion, without charge to you, any defective Smart Transmitter, provided that the
defect arises and a valid claim is received by Senseonics within the Limited Warranty Period. You must return the
defective Smart Transmitter to an authorized Senseonics Customer Service Department in an appropriate shipping
container that will adequately protect the Smart Transmitter from further damage, accompanied by your name and
address, the name and address of the physician from whom you obtained the Smart Transmitter, and the date and
the ID number of the Smart Transmitter. To find out where to send the Smart Transmitter, please visit our website
www.eversensediabetes.com. Upon receipt, if Senseonics determines that the Smart Transmitter is covered by
the limited warranty and that coverage is not excluded, Senseonics will promptly replace the Smart Transmitter.
If Senseonics determines that the Smart Transmitter is not covered by the limited warranty, you may purchase a
replacement or if you want the original Smart Transmitter returned, you must prepay all shipping charges.
A repaired or replacement Smart Transmitter assumes the remaining warranty of the original Smart Transmitter, or
[30] days from the date of replacement or repair, whichever is longer.
4. Limits of Senseonics’ obligations under the limited warranty.
THE LIMITED WARRANTY OF SENSEONICS DESCRIBED ABOVE IS EXCLUSIVE AND IN LIEU OF ALL OTHER
WARRANTIES, EXPRESS OR IMPLIED, EITHER IN FACT OR BY OPERATION OF LAW, STATUTORY OR OTHERWISE,
AND SENSEONICS EXPRESSLY EXCLUDES AND DISCLAIMS ALL SUCH OTHER WARRANTIES, INCLUDING WITHOUT
LIMITATION, ANY IMPLIED WARRANTY OR CONDITION OF MERCHANTABILITY, FITNESS FOR A PARTICULAR
PURPOSE, NON-INFRINGEMENT, SATISFACTORY QUALITY, NON-INTERFERENCE, ACCURACY OF INFORMATIONAL
CONTENT, OR ARISING FROM A COURSE OF DEALING, LAW, USAGE, OR TRADE PRACTICE.. EXCEPT TO THE
EXTENT PROHIBITED BY APPLICABLE LAW, SENSEONICS SHALL NOT BE LIABLE FOR ANY SPECIAL, INCIDENTAL,
CONSEQUENTIAL, OR INDIRECT DAMAGES, HOWEVER CAUSED AND ON ANY THEORY OF LIABILITY, ARISING IN
ANY WAY OUT OF THE SALE, USE, MISUSE OR INABILITY TO USE THE SMART TRANSMITTERS OR ANY SENSEONICS
EVERSENSE SYSTEM. THIS LIMITATION SHALL APPLY EVEN IF SENSEONICS OR ITS AGENT HAS BEEN ADVISED
OF SUCH DAMAGES AND NOTWITHSTANDING ANY FAILURE OF ESSENTIAL PURPOSE OF THIS LIMITED REMEDY.
LBL-0302-01-101 Rev 1_Eversense User Guide_mmolL_R5.indd 155 11/4/16 2:44 PM
156
Eversense CGM User Guide
20
System component Part Number
Eversense Smart Transmitter Kit FG-3300-01-001
Charging cable FG-6100-00-301
Charging Adapter FG-6301-93-301 (PSM03E-050Q)
Charging Cradle FG-6500-00-301
Eversense Adhesive Patches FG-6400-00-301
Eversense Quick Reference Guide LBL-0303-01-001
Eversense CGM User Guide LBL-0302-01-001
Eversense Data Management Software Application FG-5200-01-300
Eversense Mobile Application iOS FG-5100-01-300
Eversense Mobile Application Android FG-5300-01-300
THIS LIMITED WARRANTY SHALL NOT EXTEND TO ANYONE OTHER THAN YOU, THE ORIGINAL END USER OF THIS
PRODUCT AND IT STATES YOUR EXCLUSIVE REMEDY. IF ANY PORTION OF THIS LIMITED WARRANTY IS ILLEGAL
OR UNENFORCEABLE BY REASON OF ANY LAW, TO THE EXTENT THAT SENSEONICS MAY NOT, AS A MATTER OF
APPLICABLE LAW, DISCLAIM ANY IMPLIED WARRANTY OR LIMIT ITS LIABILITIES, THE SCOPE AND DURATION OF
SUCH WARRANTY AND THE EXTENT OF LIABILITY OF SENSEONICS SHALL BE THE MINIMUM PERMITTED UNDER SUCH
APPLICABLE LAW.
LBL-0302-01-101 Rev 1_Eversense User Guide_mmolL_R5.indd 156 11/4/16 2:44 PM
157
Eversense CGM User Guide
Apple Legal Notice
“Made for iPod touch”, “Made for iPhone” and “Made for iPad” mean that an electronic accessory has been designed
to connect specifically to iPod touch, iPhone or iPad, respectively, and has been certified by the developer to meet
Apple performance standards. Apple is not responsible for the operation of this device or its compliance with safety
and regulatory standards. Please note that the use of this accessory with iPod touch, iPhone or iPad may aect
wireless performance.
Apple, iPad, iPhone, iPod, and iPod touch are trademarks of Apple Inc., registered in the U.S. and other countries.
Legal Notices
Google Legal Notice
The “Android” name, the Android logo, and Google Play are trademarks of Google Inc.
About Bluetooth®
Bluetooth® is a type of wireless (RF) communication. Mobile devices like smartphones use Bluetooth® technology
as do many other devices. Your smart transmitter uses Bluetooth® Smart to pair with the mobile device and to send
results to the app.
Bluetooth® Trademark
The Bluetooth® word mark and logos are owned by the Bluetooth® SIG, Inc. and any use of such marks by
Senseonics, Inc. is under license.
LBL-0302-01-101 Rev 1_Eversense User Guide_mmolL_R5.indd 157 11/4/16 2:44 PM

158158
Eversense CGM User Guide
FCC Information
Your smart transmitter complies with Part 15 of the FCC Rules. Operation is subject to the following two conditions:
(1) This device may not cause harmful interference.
(2) This device must accept any interference received, including interference that may cause undesired operation.
Changes or modifications not expressly approved by Senseonics, Inc., could void the user’s authority to operate the
equipment.
These guidelines help ensure that your smart transmitter will not aect the operation of other nearby electronic
devices. Additionally, other electronic devices should not aect the use of your smart transmitter.
With the exception of your mobile device, other electronic wireless devices that are in use nearby, such as a cell
phone, microwave or a wireless network, may prevent or delay the transmission of data from your smart transmitter
to the app. Moving away from or turning o these electronic devices may allow communication.
The smart transmitter has been tested and found to be appropriate for use at home. In most cases, it should not
interfere with other home electronic devices if used as instructed. However, this smart transmitter gives o RF energy.
If not used correctly, your smart transmitter may interfere with your TV, radio or other electronic devices that receive
or transmit RF signals.
If you experience smart transmitter interference problems, try moving away from the source of the interference. You
can also move the electronic device or its antenna to another location to solve the problem.
If you continue to experience interference, contact customer service for the manufacturer of the electronic device
causing the interference.
LBL-0302-01-101 Rev 1_Eversense User Guide_mmolL_R5.indd 158 11/4/16 2:44 PM
159159
Eversense CGM User Guide
Index
Adhesive patch 35, 37
Alerts 56, 62, 64, 66, 71, 77, 78,
79, 80, 81, 82, 83, 84, 85, 86, 87, 88,
89, 90, 91
App, about 9, 57
App, download 23
App, Glance View 108
App, launch 24
App, log out 76
App, product information 106, 107
App, using 50
Battery, charging 21
Battery power, indicator 39
Bluetooth 57, 157
Bluetooth, restart 123
Button on smart transmitter 27,
33, 38
Calibration, Daily Phase 41, 44
Calibration, Initiation Phase 41, 43
Calibration, procedure 41, 45, 56
Calibration, reminders 28, 68
Charging cradle 14
Discoverable mode 26, 123, 125
Do Not Disturb mode 72
Events 56, 94
Eversense DMS 103
FCC Information 158
LED indicator 22, 33, 38, 40
Link, smart transmitter
with sensor 30
Mealtime schedule 70
Menu 56
Mobile device 23, 50
Mobile device, Apple Watch 108
My Circle 105, 110
MY GLUCOSE screen 29, 50, 51, 56
Notifications 77, 92, 93
Pairing, smart transmitter and
mobile device 24, 27, 123
Placement guide,
signal strength 36, 56
Power adapter 22
Reports 56, 100
Reset smart transmitter 86, 124
Restart Bluetooth 123
RF, radio frequency
communication 157
Sensor, about 8, 116
Sensor, insertion and removal 30,
117, 118
Settings, app 24, 57, 58, 69
Share my data 103
Smart transmitter, about 8, 14
Smart transmitter, attaching 35
Smart transmitter, maintenance 39
Smart transmitter, on/o 38
Smart transmitter, reset 86, 124
Smart transmitter, using 33, 34
Symbols, alerts, notifications 150,
151
Symbols, packaging and
device 152, 153
System components 8, 14
Target levels 60
Temp Profile 73
Travel 119
Trend arrows 54
Trend graph 55
Troubleshooting, FAQs 120
Unit of measurement 29
USB, cable 21
USB, port 21
Wireless 11, 20, 23, 50, 157
LBL-0302-01-101 Rev 1_Eversense User Guide_mmolL_R5.indd 159 11/4/16 2:44 PM
Notes
LBL-0302-01-101 Rev 1_Eversense User Guide_mmolL_R5.indd 160 11/4/16 2:44 PM

LBL-0302-01-101 Rev 1_Eversense User Guide_mmolL_R5.indd 3 11/4/16 2:44 PM
© Senseonics, Inc. 2016 PN: 0302-01-101_Rev 1 11/2016
Emergo Europe
Molenstraat 15
2513 BH, The Hague
The Netherlands
Manufactured by Senseonics, Inc.
20451 Seneca Meadows Parkway
Germantown, MD 20876-7005 USA
844.SENSE4U 301.515.7260
(844.736.7348)
eversensediabetes.com
Distributed by:
For
Placement
Only
0086
Authorized 2016
FPO
LBL-0302-01-101 Rev 1_Eversense User Guide_mmolL_R5.indd 4 11/4/16 2:44 PM
Date: 11/4/16
File name: LBL-0302-01-101 Rev 1_Eversense User Guide_mmolL_R5
Job description: Eversense User Guide
Project Manager: Tom Paradiso Art Director: Ivy Tsang
Dimensions:
Trim: 6.75” w X 5.8” h Bleed: .125”
Folded (Include folded dimensions if applicable):
Colors: 4/color
Spot (Name PMS colors if applicable):
LBL-0302-01-101 Rev 1_Eversense User Guide_mmolL_R5.indd 5 11/4/16 2:44 PM