Sensys Networks FLEXRPS FLEX-RPT3-SLR-E User Manual Quick Start Guide FLEX Repeater
Sensys Networks, Inc. FLEX-RPT3-SLR-E Quick Start Guide FLEX Repeater
Quick Start Guide
1608 4th Street Suite 200 Berkeley CA 94710 | www.sensysnetworks.com/resources| P 510.548.4620 F 510.548.8264
Assemble
1
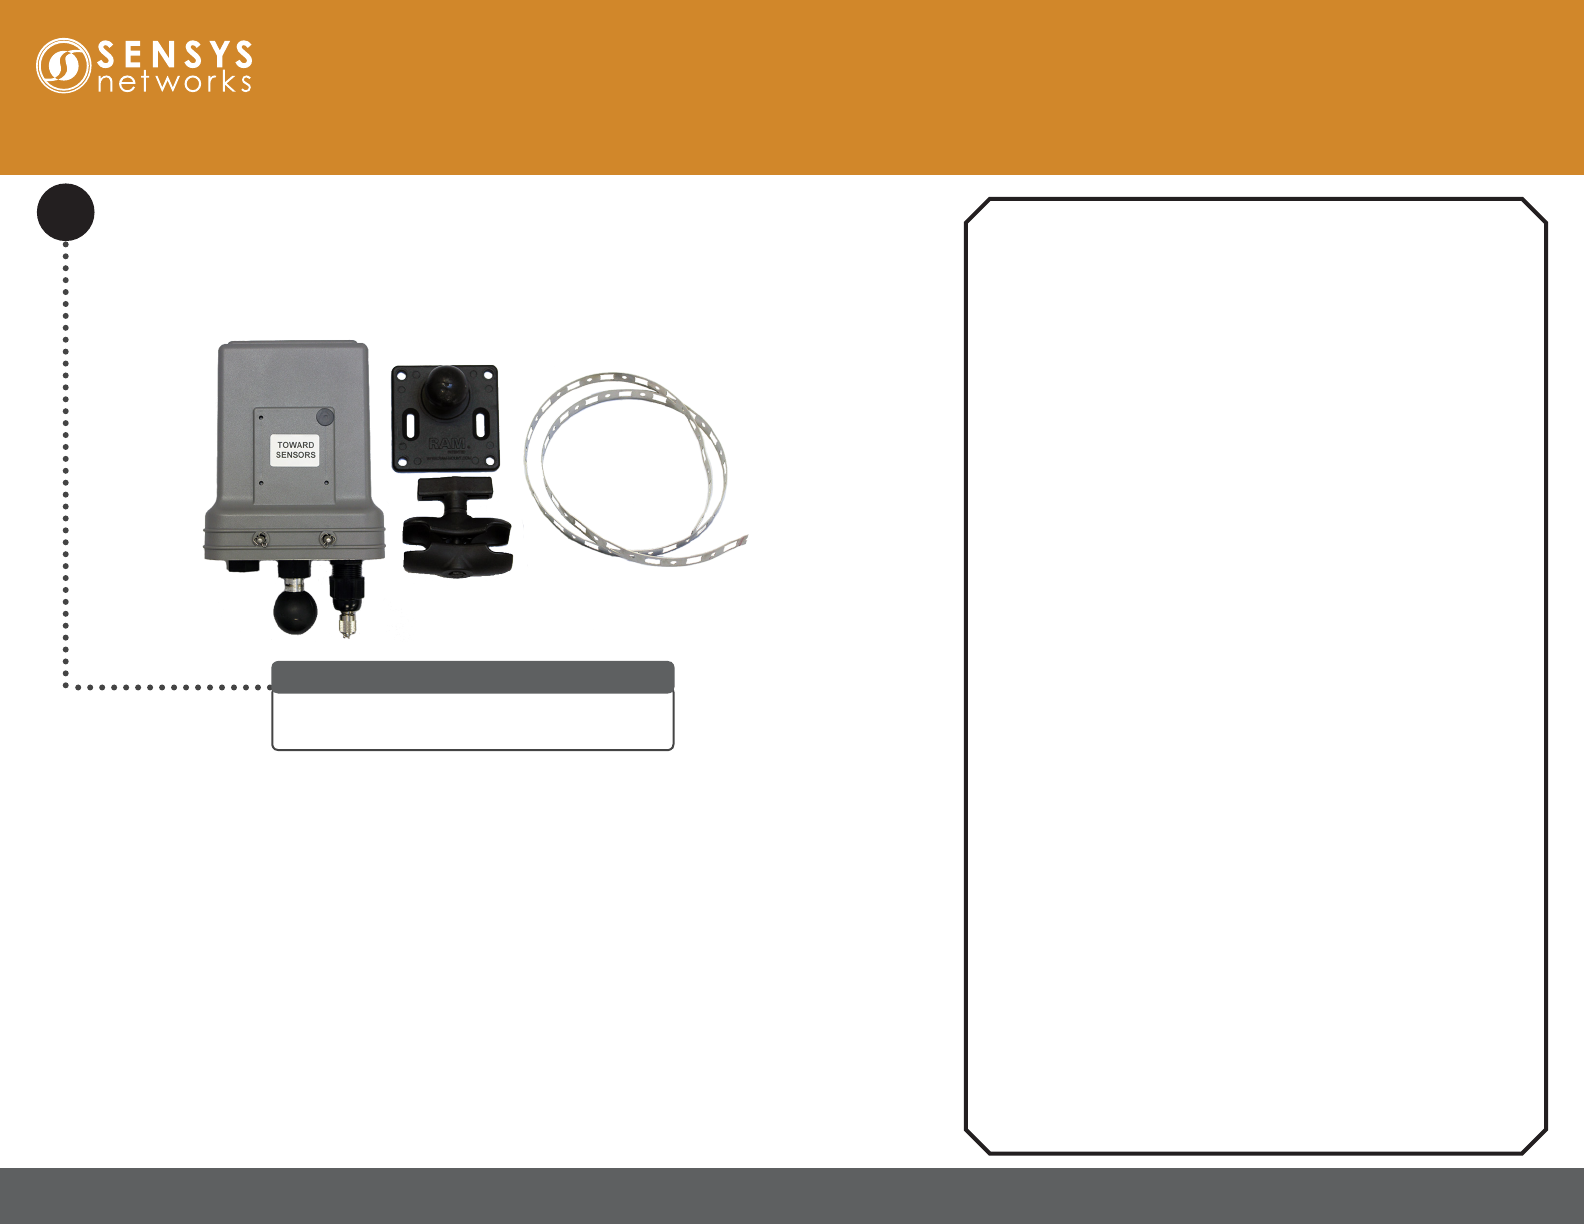
A FlexRepeat3 Solar assembly requires a single
FlexRepeat3 Solar and the mounting kit.
FlexRepeat3 Solar Installation Parts
Quick Start Guide: FlexRepeat3 Solar Repeater
Warnings
Lithium Batteries
Sensys Networks uses Lithium Thionyl Chloride batteries in the
following products:
• SENSORS (VSN240-F-2/M-2/MP-2/T-2 series)
• REPEATERS (RP240, FLEX-RP, and FLEX-RPT3 series
(contains additional 18650 Li-Ion batteries))
Lithium batteries are widely used in electronic products because they
contain more energy per unit-weight than conventional batteries.
However, the same properties that deliver high energy density
also contribute to potential hazards if the batteries are damaged.
Improper use or handling of the batteries may result in leakage or
release of battery contents, explosion, or re.
Following are the recommendations of the battery manufacturer for
proper use and handling of batteries in the Sensys Networks devices
mentioned above:
• DO NOT CHARGE OR ATTEMPT TO RECHARGE THE
BATTERIES
• DO NOT CRUSH OR PUNCTURE BATTERIES
• DO NOT SHORT-CIRCUIT THE BATTERIES
• DO NOT FORCE OVER-DISCHARGE OF THE BATTERIES
• DO NOT INCINERATE OR EXPOSE BATTERIES TO
EXCESSIVE HEATING
• DO NOT EXPOSE BATTERY CONTENTS TO WATER
• DO DISPOSE OF BATTERIES AND DEVICES CONTAINING
BATTERIES IN ACCORDANCE WITH LOCAL REGULATIONS
Sensys Networks sensors contain no serviceable parts and should
never be disassembled. Installation and removal of sensors from
pavement should only be done by trained personnel and care should
be taken to insure that the sensor casing is not punctured or crushed.
Additional safety information is available from the battery’s
manufacturer:
• Sensor battery cell: http://sensysnetworks.com/sensorbattery
• Repeater battery cell: http://sensysnetworks.com/
repeaterbattery
1608 4th Street Suite 200 Berkeley CA 94710 | www.sensysnetworks.com/resources| P 510.548.4620 F 510.548.8264
Quick Start Guide: FlexRepeat3 Solar Repeater
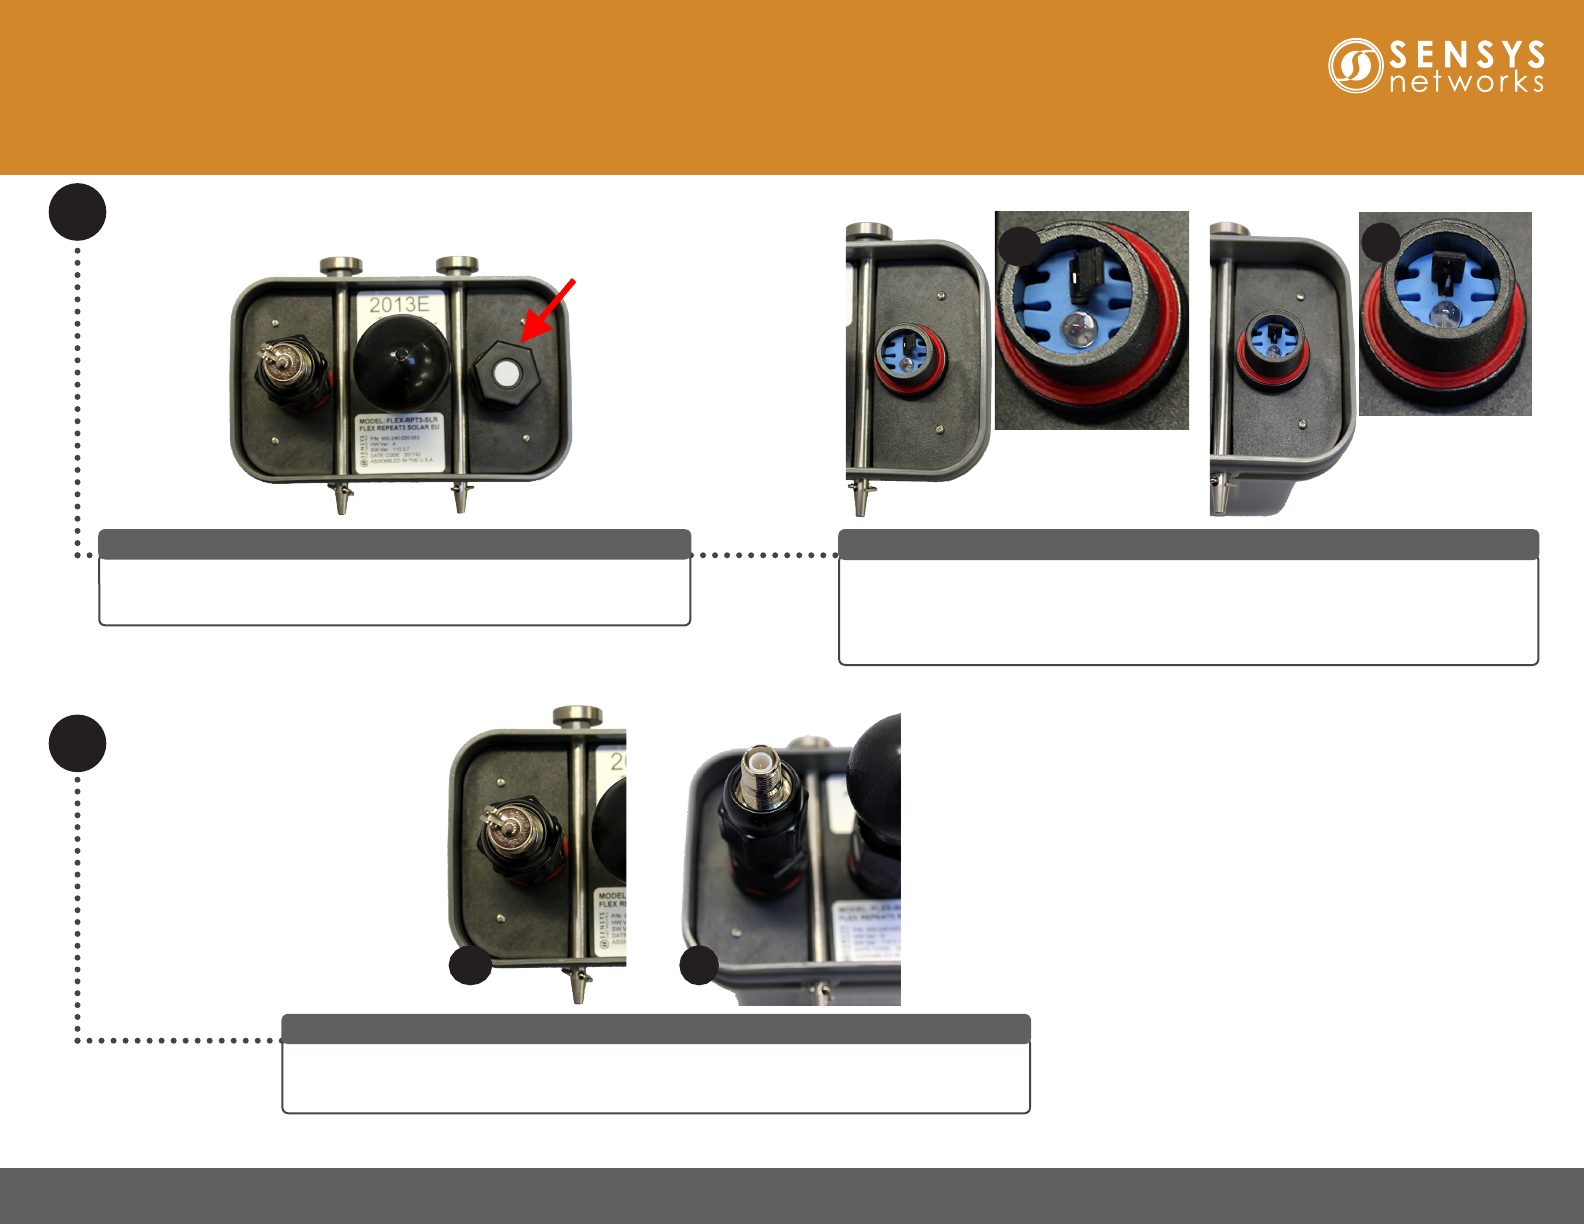
Turn On Repeater
Unscrew the metal cap for the external antenna cable outlet (a) and discard (b).
Note: If the FlexRepeat3 Solar is not used with a external antenna then do not remove cap.
For Use of External Antenna Only
Unscrew the black cap to expose the red jumper and LED indicator.
WARNING: DO NOT open repeater. Removing top could damage unit.
Unscrew Power Jumper Cap
Remove the red jumper (a) and place the jumper on one pin (b). Wait approximately
ve seconds for LED light to blink red to ensure unit is turned on. After ensuring the
unit is properly turned on, screw on the black cap.
Note: To turn o, return jumper to original position.
Remove Red Jumper
2
b
a b
a
1608 4th Street Suite 200 Berkeley CA 94710 | www.sensysnetworks.com/resources| P 510.548.4620 F 510.548.8264
Quick Start Guide: FlexRepeat3 Solar Repeater
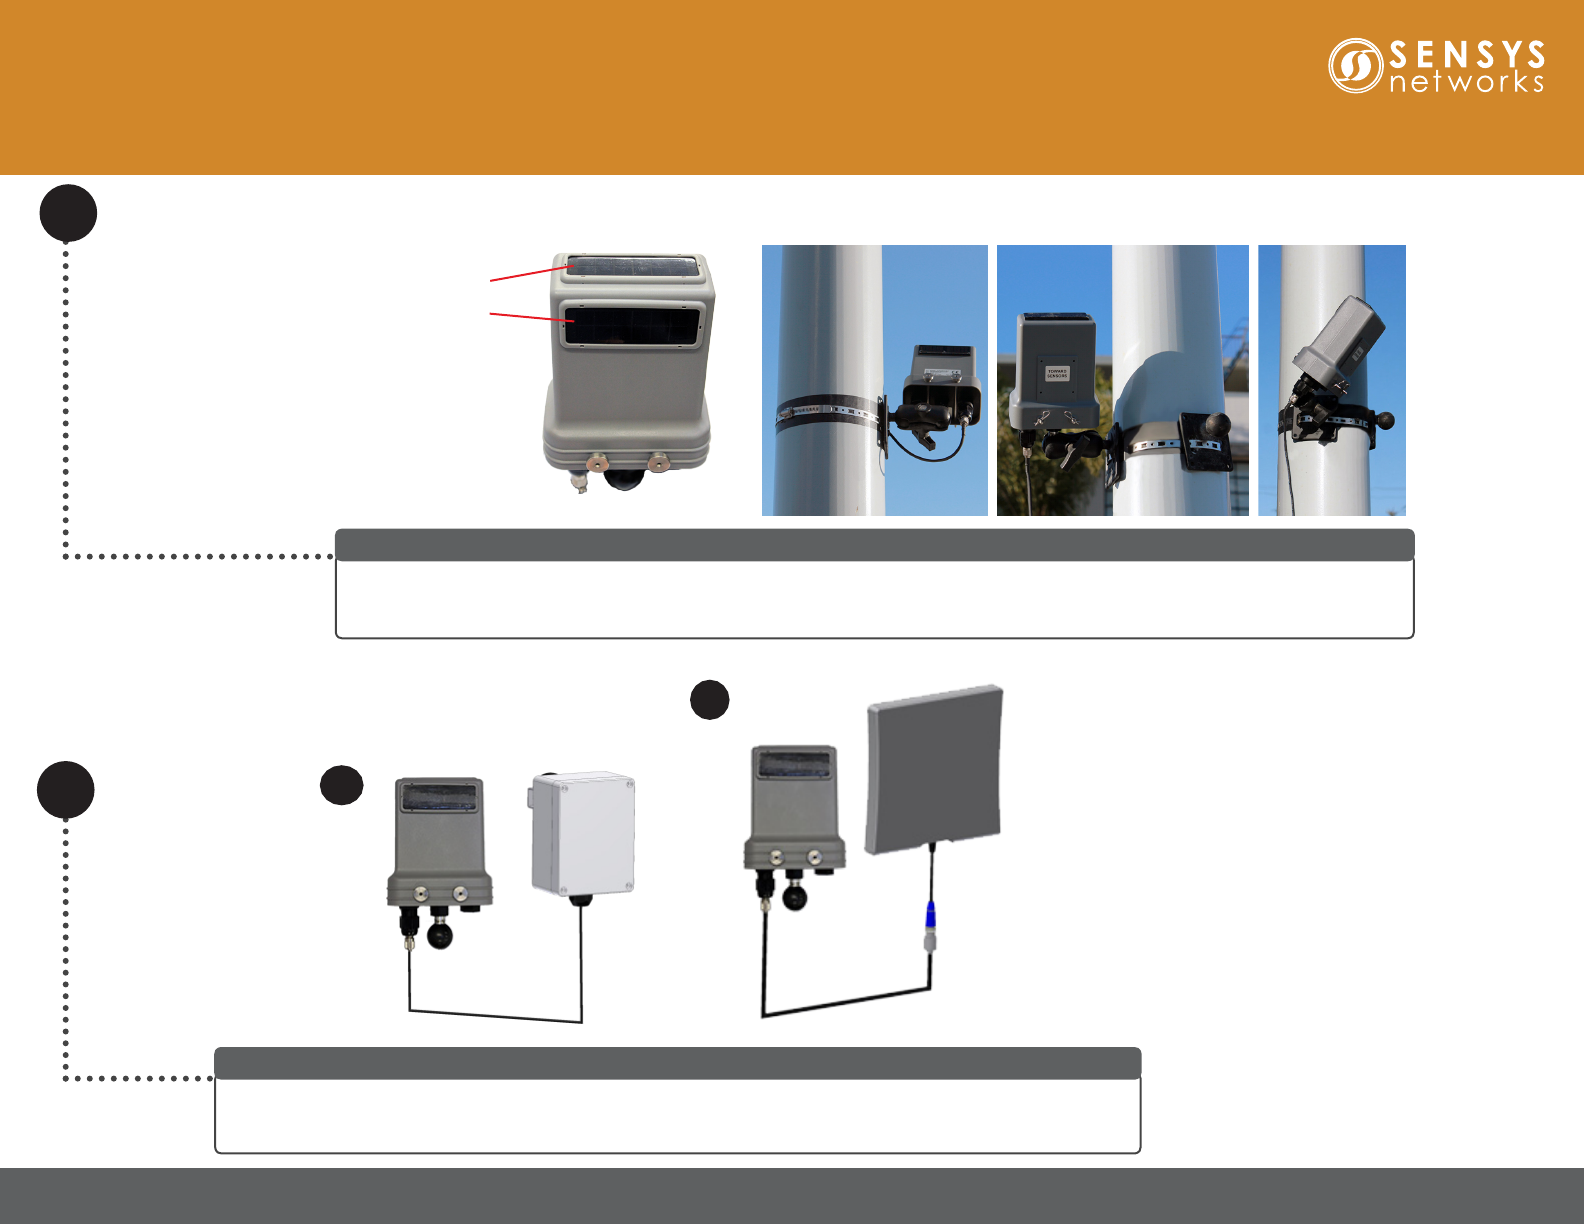
3Mount FlexRepeat3 Solar on Pole
Assemble the mounting kit onto the pole. Attach mounting arm to the mounting plate. Attach the FlexRepeat3 Solar to the mounting
arm with the Towards Sensors side facing the sensors and access point or supporting repeater. Ensure the mounting arm is
tightened so the repeater cannot move. Note that the mounting arm can be oriented to adjust the location of the FlexRepeat3 Solar.
Mount The FlexRepeat3 Solar
Connect to one of the external antenna options with a coax cable. Two options are supported: (a) the FLEX-ANT-1
with the same RF range as the internal antenna and (b) the FLEX-ANT-2 with Long Range RF range. Point the
external antenna towards the sensors. The roles of the internal and external antenna can also be switched.
Connect External Antenna (Optional)
a
b
Ensure at least one
solar panel has
access to the optimal
available sunlight.
1608 4th Street Suite 200 Berkeley CA 94710 | www.sensysnetworks.com/resources| P 510.548.4620 F 510.548.8264
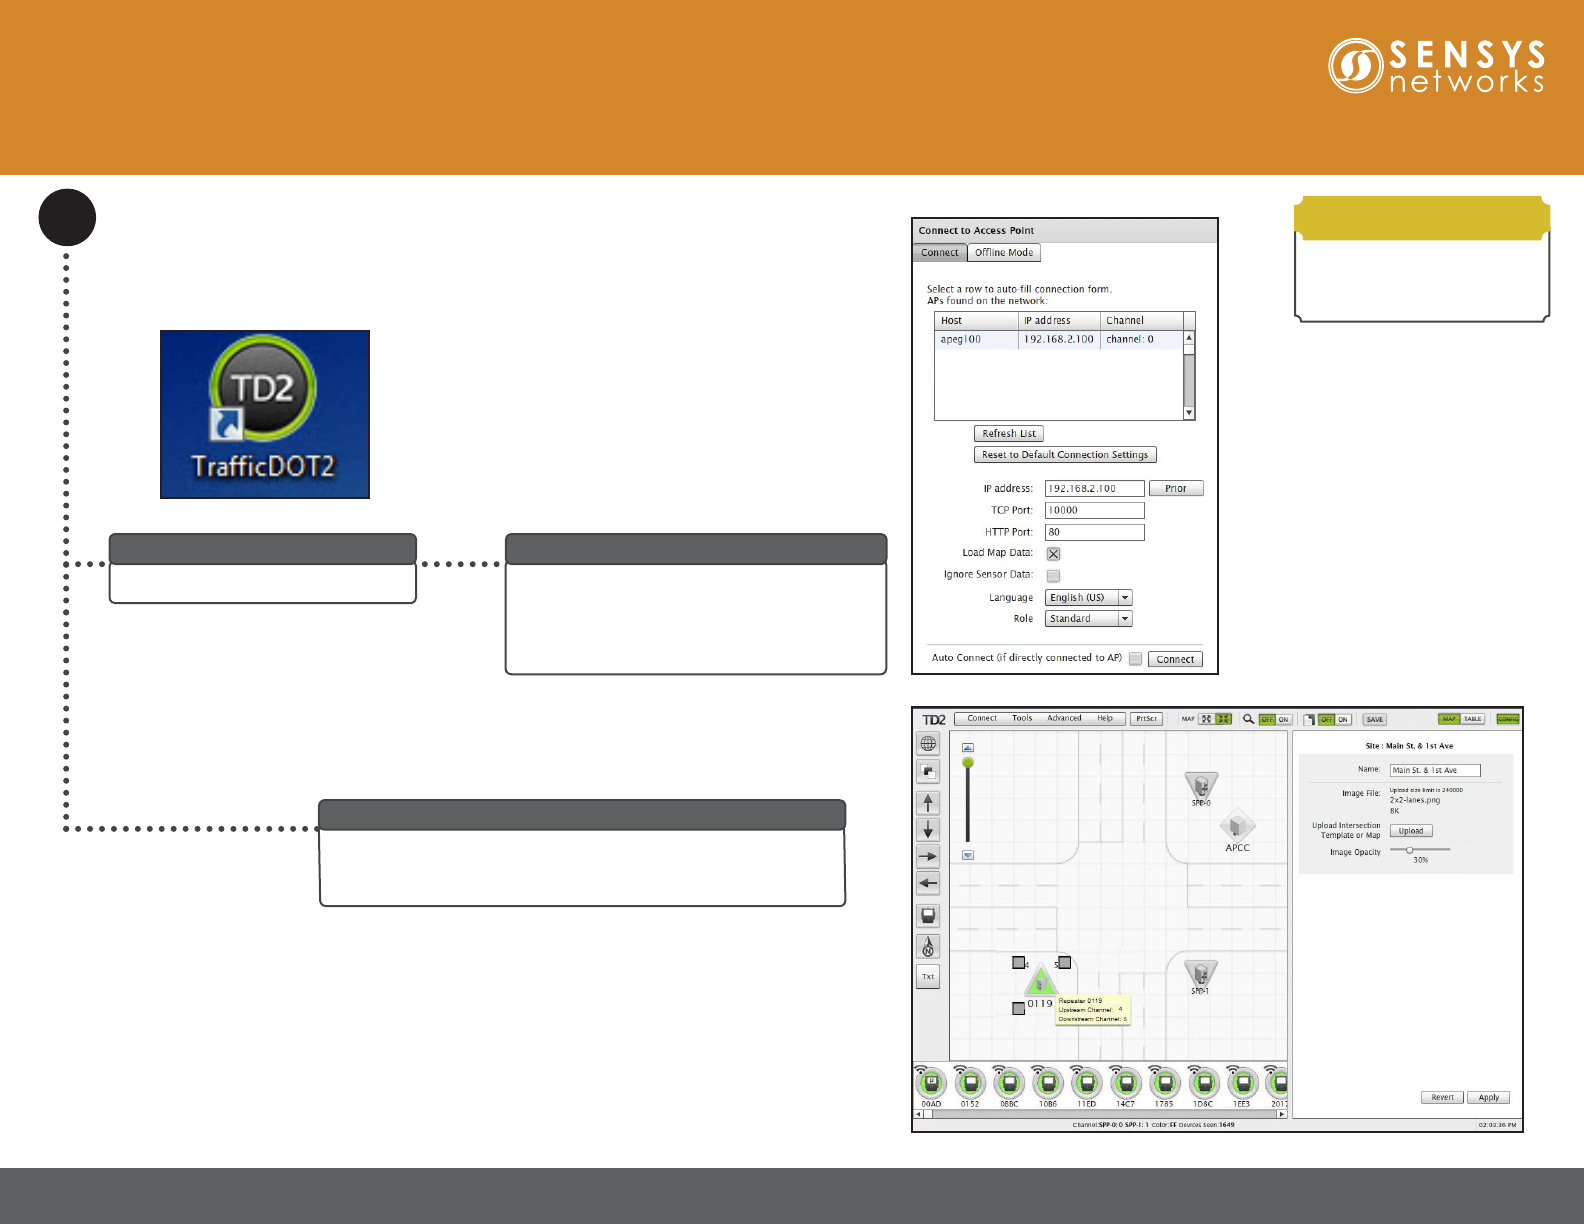
Connect to Access Point
Select an access point from the list of APCCs
and Access Points and click Connect.
Note: Ensure the box for Load map data is
checked before clicking Connect.
Select IP address
Click the icon to start TracDOT2.
Run TrafcDOT
4
The Main window displays. The map on the Main window
populates and congured equipment appears on the map and
in the sensor tray at the bottom of the window.
Main Window
FlexRepeat3 Solar requires
TracDOT2 software 2.12.12
or later.
Requirements
Quick Start Guide: FlexRepeat3 Solar Repeater
1608 4th Street Suite 200 Berkeley CA 94710 | www.sensysnetworks.com/resources| P 510.548.4620 F 510.548.8264
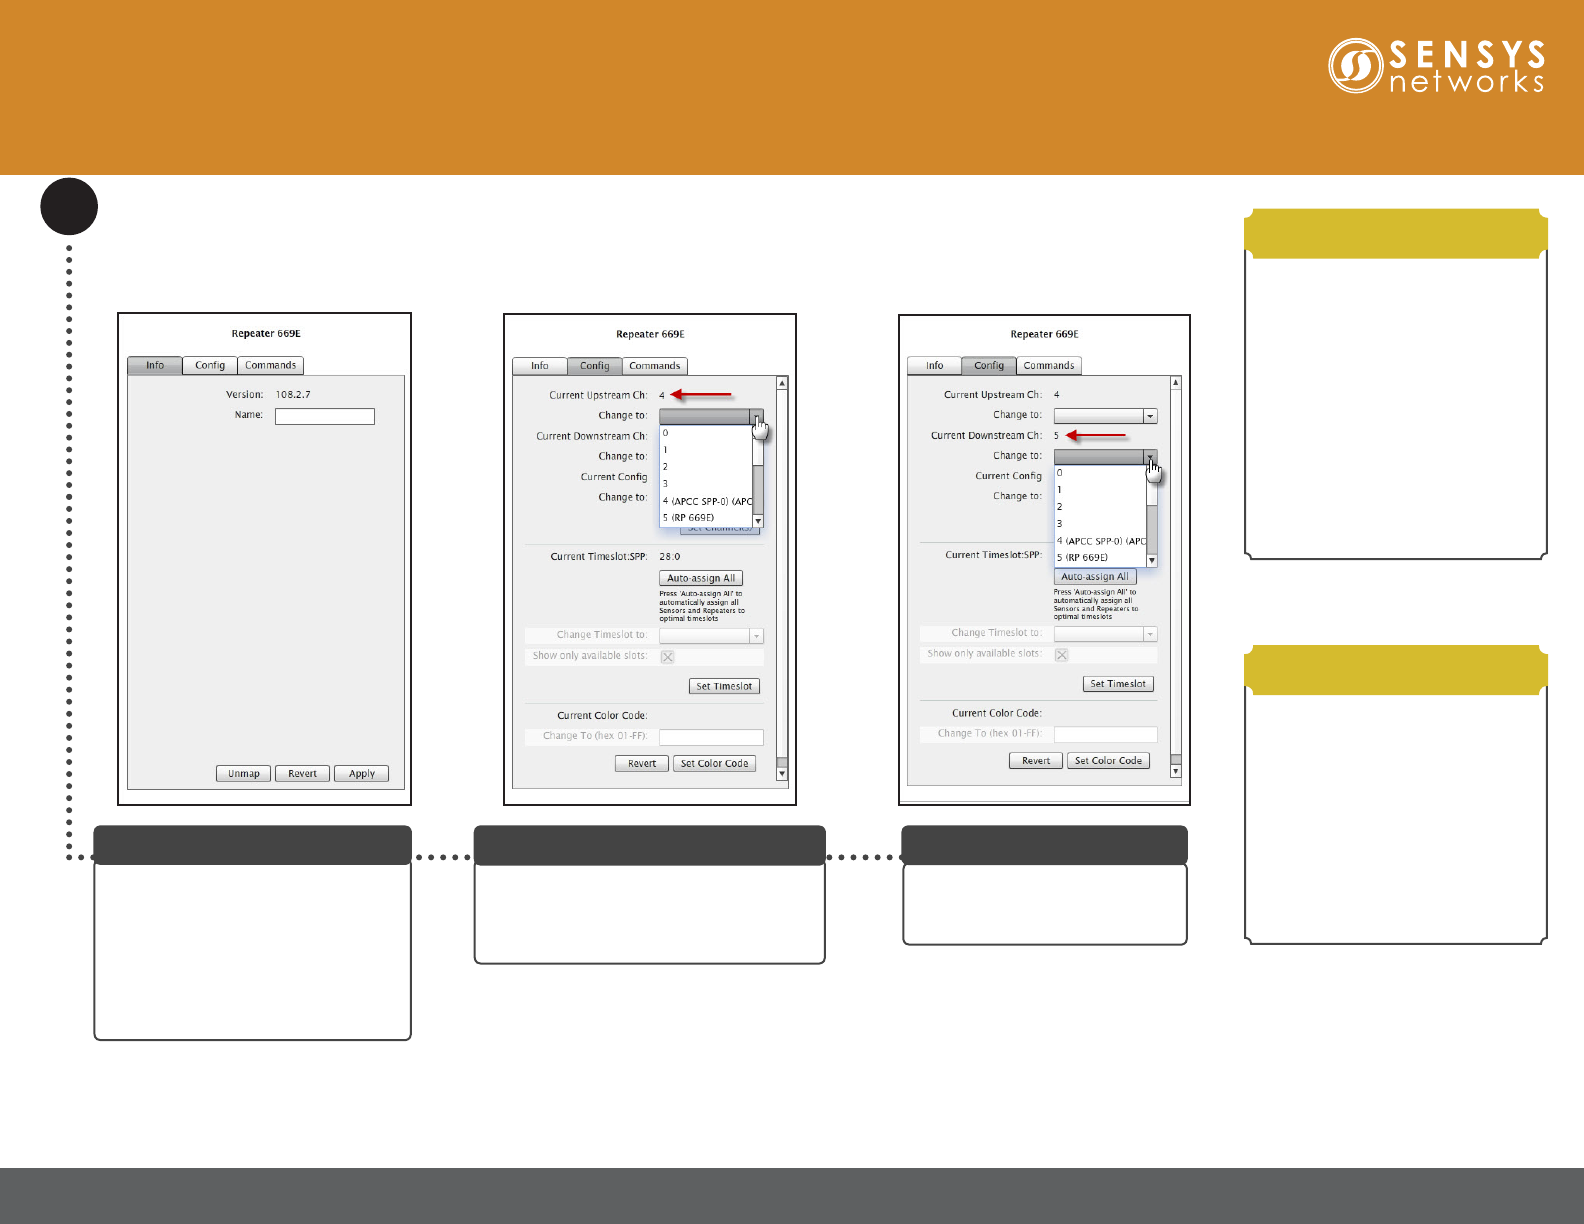
Congure Repeater
Select a repeater from the image
map or tray to access the Repeater
Conguration window with the Info
tab open. The Name eld allows the
repeater’s name to be user-dened.
Note: Repeater’s rmware version is
displayed for reference only.
Repeater Conguration Window
5
Select an upstream channel by clicking
the Cong tab. Select an entry for the
Current Upstream Ch eld by clicking on
the Change to drop-down list.
Specifying Upstream Channel
Select a entry for the Current
Downstream Ch eld by clicking
the Change to drop-down list.
Specifying Downstream Channel
• The default radio channel
for access point to repeater
communications is 4.
• The default radio channel for
repeater to sensor communications
is 5.
• Never use the same channel for
both access point and sensor
communications.
Refer to Sensys Network VDS240
Wireless Vehicle Detection System
TracDOT Set Up and Operating
Guide for more information.
Channel Notes
• When an installation contains
multiple repeaters with more than
20 sensors, changing one or more
repeaters from Current Cong 0 to
Current Cong 1 allows the access
point to communicate with up to
40 sensors through the repeaters.
Refer to Sensys Network VDS240
Wireless Vehicle Detection System
TracDOT Set Up and Operating
Guide for more information.
Cong Notes
Quick Start Guide: FlexRepeat3 Solar Repeater
1608 4th Street Suite 200 Berkeley CA 94710 | www.sensysnetworks.com/resources| P 510.548.4620 F 510.548.8264
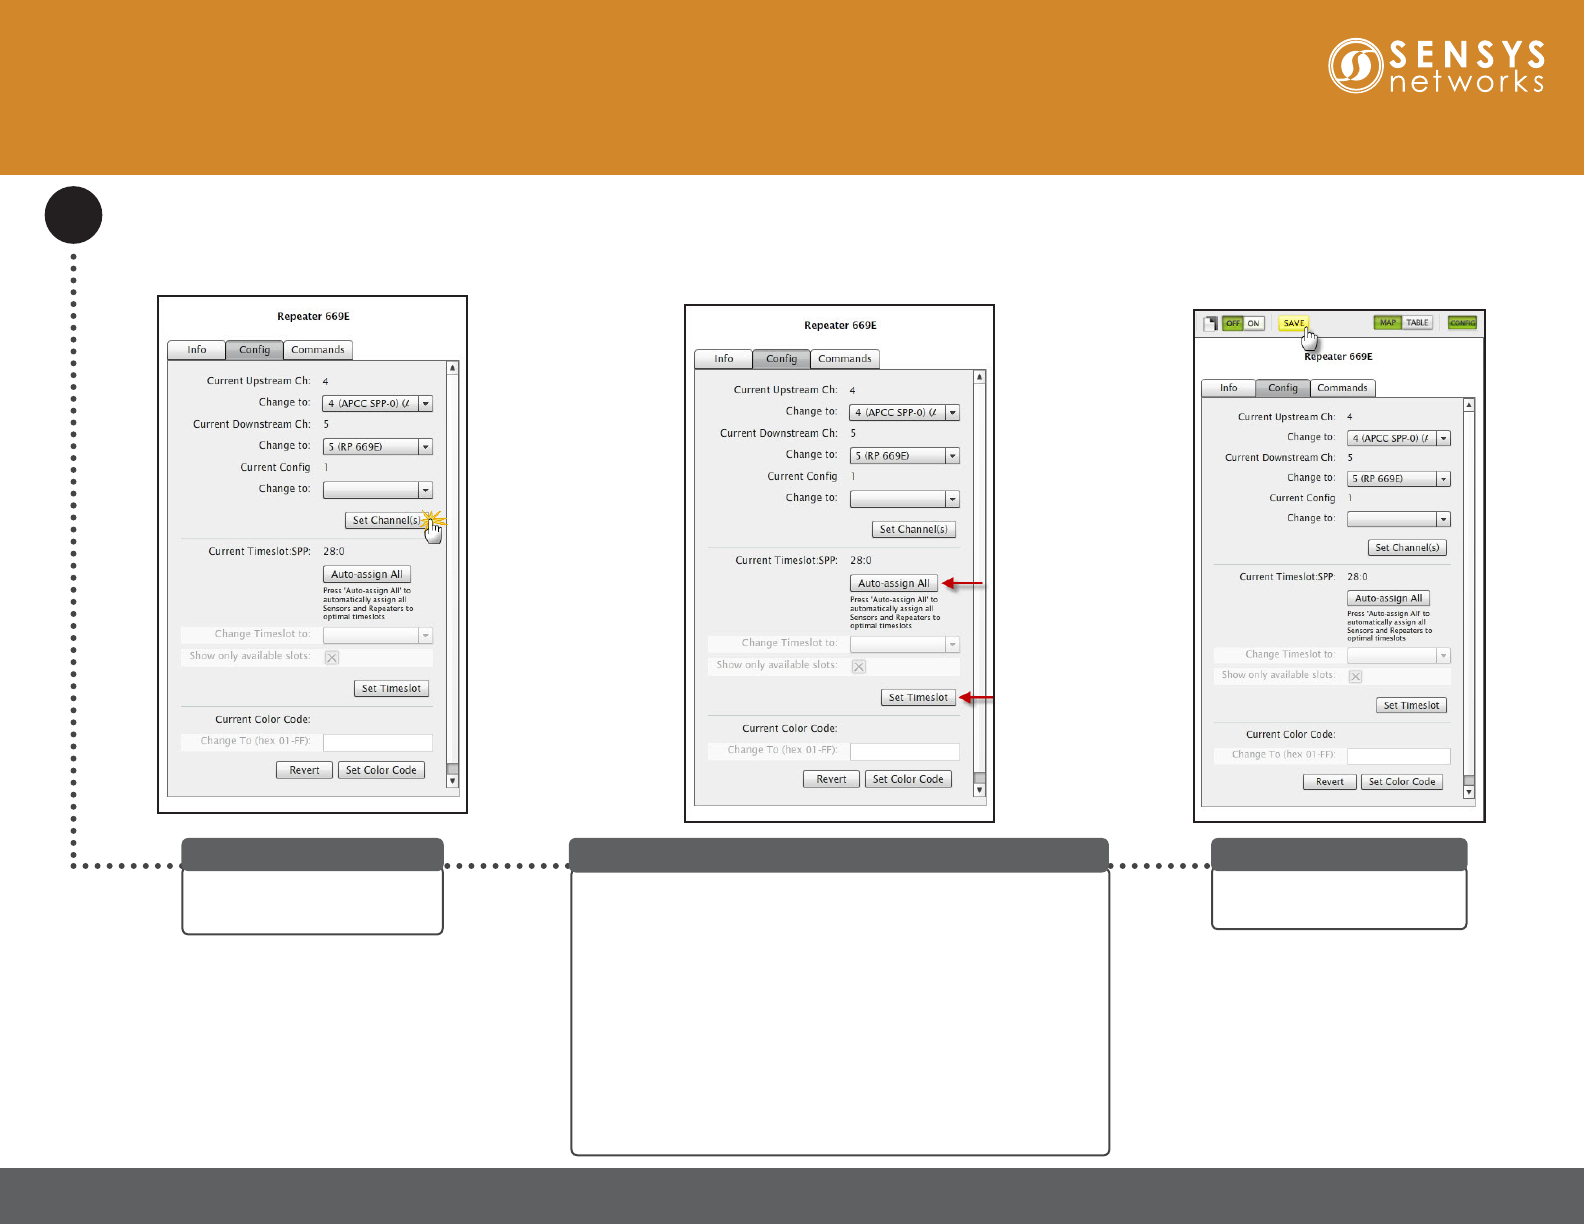
Congure Repeater (cont.)
Click the Auto-assign All button to automatically assign all
Sensors and Repeaters to optimal timeslots.
Note: The grayed out options can be made accessible by enabling
Advanced Mode using the Advanced drop-down menu.
To manually set the time slot, TracDOT lters the contents of
the drop-down list so that only available time slots are displayed.
Click an entry from the Change Timeslot to drop-down list and
then click Set Timeslot to accept changes.
To change the drop-down list to include all time slots in the
network (both assigned and unassigned), remove the check in
the Show only available slots.
Specifying Time Slot
Click SAVE to save changes
made to the access point.
Save Conguration
Quick Start Guide: FlexRepeat3 Solar Repeater
Click Set Channel(s) to
accept conguration changes.
Save Conguration
Sensys Networks and the Sensys Networks logo are trademarks of Sensys Networks, Inc. All other trademarks are the property of their respective owners.
Information contained herein is believed to be reliable, but Sensys Networks makes no warranties as to its accuracy or completeness.
Copyright © 2017 Sensys Networks, Inc. • ALL RIGHTS RESERVED • CONTENTS SUBJECT TO CHANGE
Local Distributor
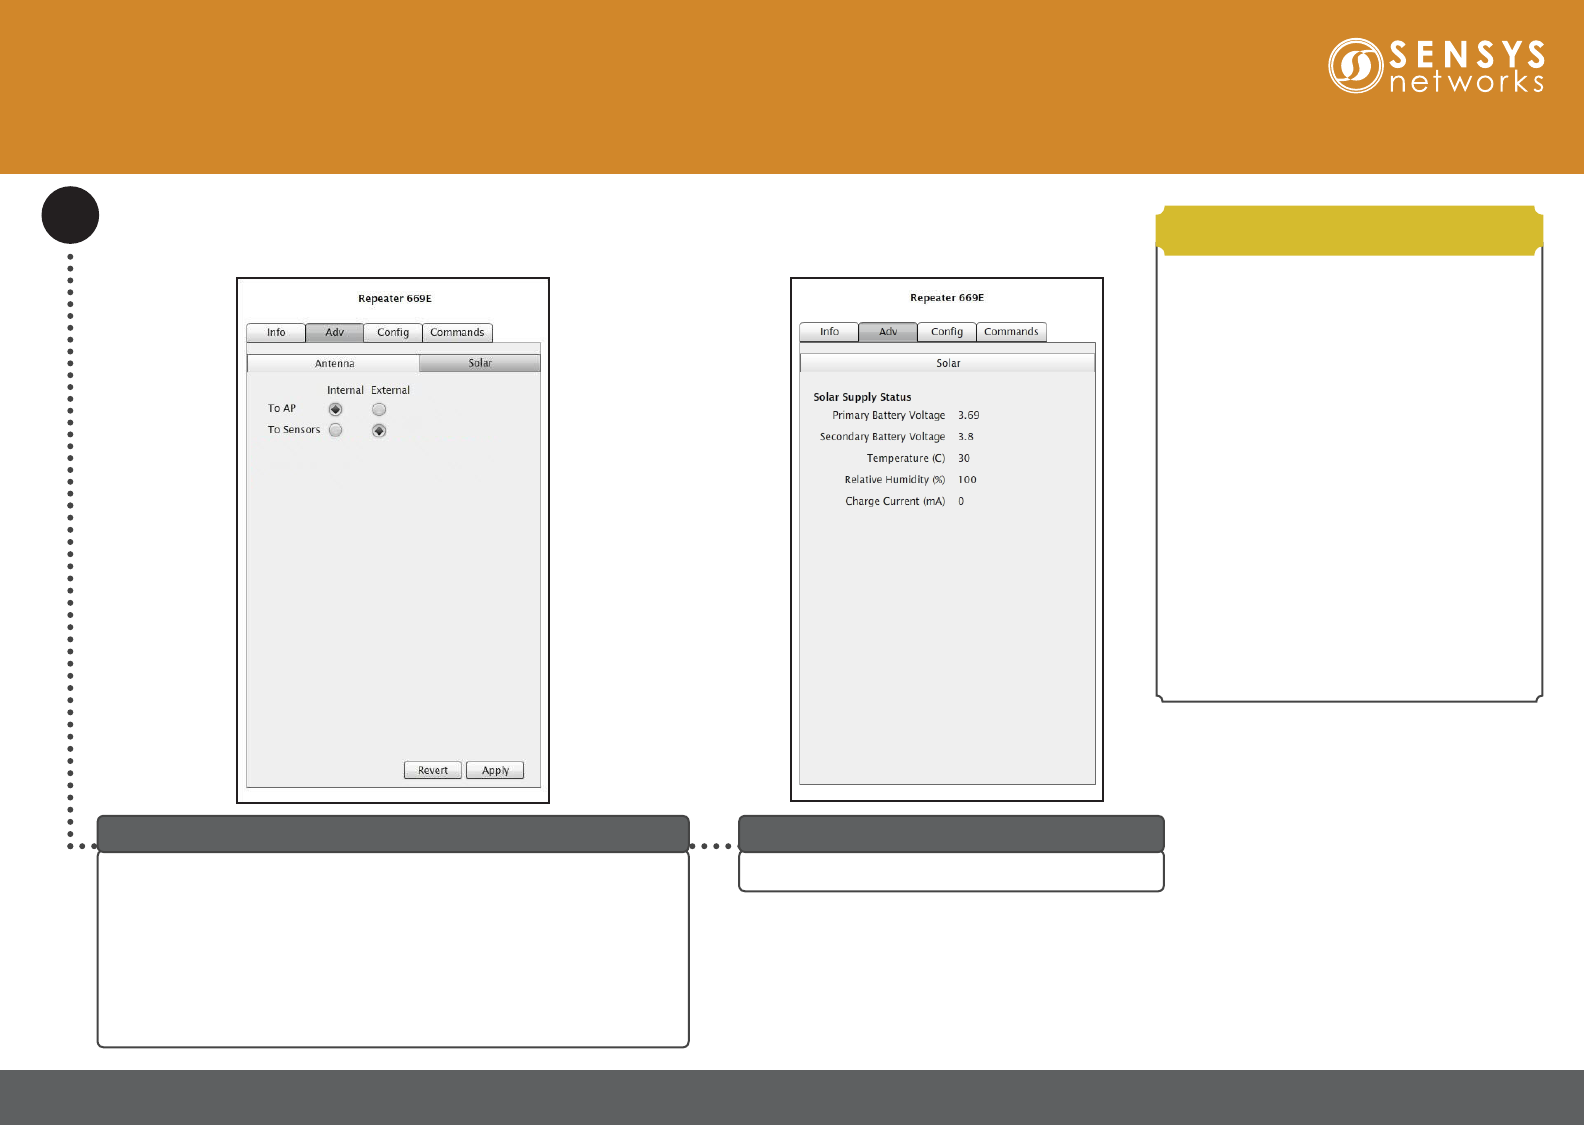
Congure Repeater (cont.)
If the repeater is connected to an external antenna, then it can be
congured via the Adv tab. From the Antenna panel, select either To
AP or To Sensors to congure an internal/external antenna.
Click Apply to accept conguration changes.
Click SAVE at the top of the screen to save changes made to the access
point.
Note: Recommended setting for external antenna is To Sensors.
Adv Tab
• A failsafe error message occurs should you
choose the external antenna option when there
is no external antenna installed.
• If FlexRepeat3 Solar is installed with or
without the external antenna, and the Antenna
panel options are left unchecked, the internal
antenna is used for both To AP and To Sensors
channels.
• If Discover Mode is not ON the following
warning will display: Advanced setting values
shown are either not set or last known current
value because discover not on. Value(s) will
not be updated until discover turned on.
• If Discover Mode is OFF at connection time
for TracDOT the Adv tab displays Not Set
values. Turn Discover Mode ON for true values
to display.
Refer to Sensys Network VDS240 Wireless
Vehicle Detection System TracDOT Set Up and
Operating Guide for more information.
Adv Tab Notes
Quick Start Guide: FlexRepeat3 Solar Repeater
Click the Solar tab to view the solar supply status.
Solar Tab