User Manual
Smart Gateway
User Guide
ADC-SG130
ADC-SG130_Installation_15.indd 1 2/18/19 3:12 PM

ADC-SG130_Installation_15.indd 2 2/18/19 3:12 PM
1
Smart Gateway
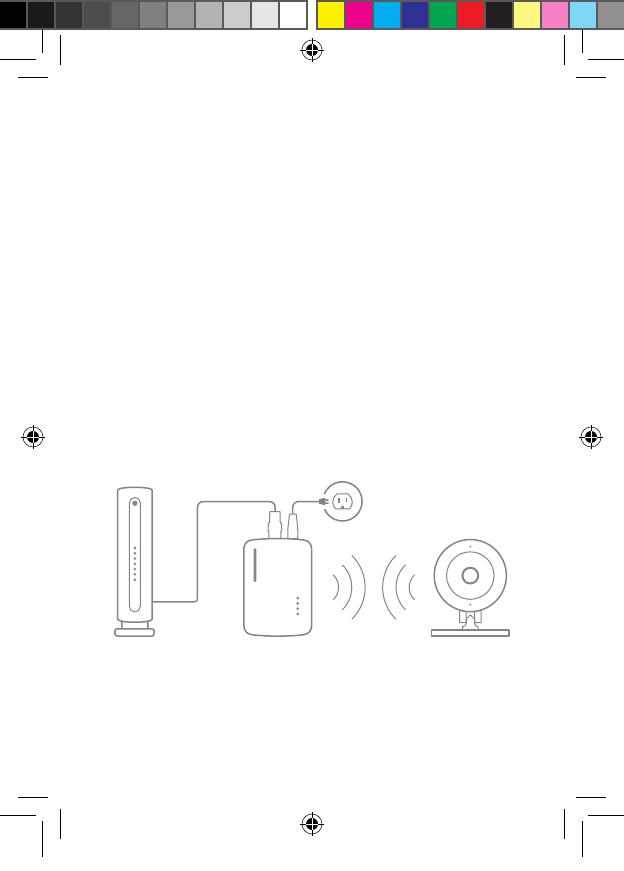
The Alarm.com Smart Gateway (ADC-SG130)
provides a dedicated Wi-Fi network for Alarm.com
Wi-Fi video cameras. Featuring WPS, you no longer
need to update cameras with complicated router
passwords. Simply add to an Alarm.com account,
plug into any wall outlet, connect to the existing
router, and pair with a Wi-Fi camera for instant,
secure Wi-Fi connectivity.
ADC-SG130_Installation_15.indd 1 2/18/19 3:12 PM
2
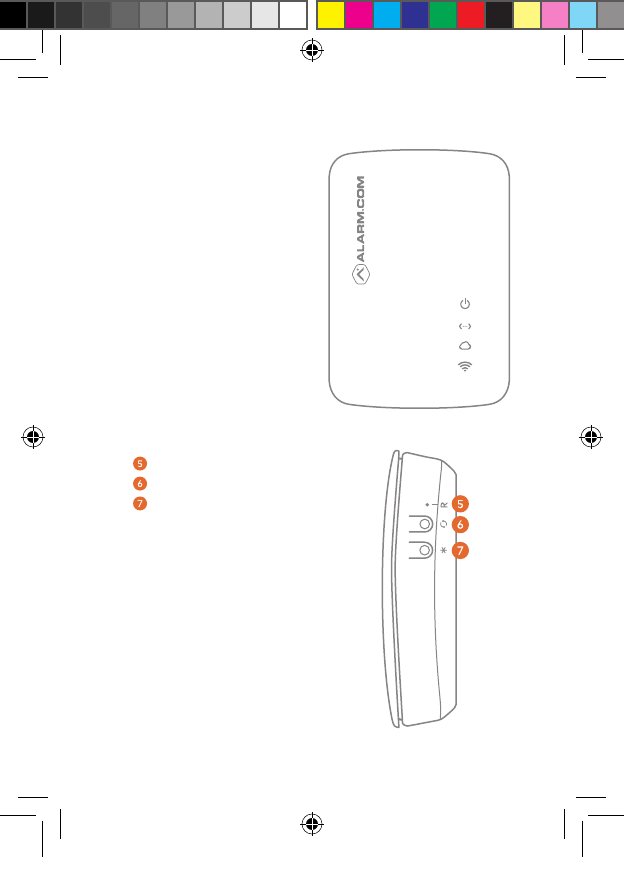
❶ Power LED
❷ Data LED
❸ Communication LED
❹ Wi-Fi LED
Reset Button (Pinhole)
WPS Button
Function Button
❶
❹
❷
❸
ADC-SG130_Installation_15.indd 2 2/18/19 3:12 PM
3
Pre-installation checklist
• ADC-SG130 Smart Gateway (included)
• Ethernet cable (included)
• 12 VDC power adapter (included)
• Router with broadband (Cable, DSL,
or Fiber Optic) Internet connection
and an open Ethernet port
• A computer, tablet, or smartphone
with an Internet connection
• MobileTech or the Login and Password
for the Alarm.com account to which
you will add the Smart Gateway
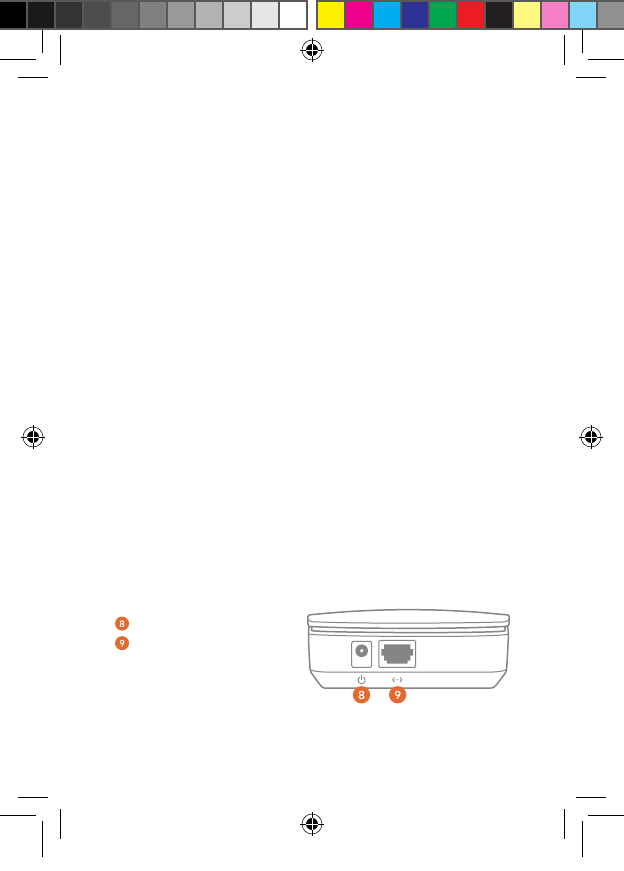
Power Input
Ethernet Port (RJ-45)
ADC-SG130_Installation_15.indd 3 2/18/19 3:12 PM

4
1. Use an Ethernet cable to connect the
Smart Gateway to an open Ethernet
(RJ-45) port on the existing router.
2. Connect the Smart Gateway’s DC power
adapter and plug it in to a non-switched outlet.
NOTE: For optimal Wi-Fi performance, place the
Smart Gateway on top of a table or in another
location free from physical obstructions.
3. Add the device to the account by either
selecting the account in MobileTech or
by using a web browser and entering the
following URL: www.alarm.com/addcamera.
Type in the Smart Gateway’s MAC address
to begin. The MAC address is included
on the label on the back of the device.
Add the Smart Gateway to
an Alarm.com account
ADC-SG130_Installation_15.indd 4 2/18/19 3:12 PM

5
Wi-Fi Protected Setup (WPS) mode
• WPS mode is the preferred way to add
an Alarm.com Wi-Fi camera to the
Smart Gateway’s Wi-Fi network.
• Be sure to add the Smart Gateway to an
Alarm.com account before using WPS mode
to add video cameras to the Wi-Fi network.
• To enter WPS mode, use either the Trigger
WPS feature in MobileTech or press and hold
the WPS button for approximately 1 to 3
seconds. The Wi-Fi LED will slowly flash to
indicate that the device is in WPS mode.
Add the Smart Gateway to
an Alarm.com account
ADC-SG130_Installation_15.indd 5 2/18/19 3:12 PM
6
LED reference guide
Power
On
Device powered on
Off
Device powered off
Flashing
Device booting
Data
On/Flashing
Device transferring/receiving data
over Ethernet.
Off
No data is being transferred over Ethernet.
Please check the Ethernet connection between
the Smart Gateway and the router.
ADC-SG130_Installation_15.indd 6 2/18/19 3:12 PM

7
LED reference guide
Power
On
Device powered on
Off
Device powered off
Flashing
Device booting
Data
On/Flashing
Device transferring/receiving data
over Ethernet.
Off
No data is being transferred over Ethernet.
Please check the Ethernet connection between
the Smart Gateway and the router.
Communication
On
Connected to Internet
Off
No local or Internet connection.
See troubleshooting section
Flashing (slowly)
Local connection, no Internet
Flashing (5 quick blinks)
Communication test initiated
Wi-Fi
On
Active
Off
Inactive
Flashing
WPS mode
ADC-SG130_Installation_15.indd 7 2/18/19 3:12 PM

8
Additional States
All LEDs Flashing (escalating)
Firmware Upgrade in progress
All LEDs Flashing (simultaneously)
Reset in progress
ADC-SG130_Installation_15.indd 8 2/18/19 3:12 PM

9
Troubleshooting
If you are still having issues using the
Smart Gateway, please try the following
troubleshooting options:
Check your router’s connection to the Internet
If you cannot access the Internet using
your router, please contact your Internet
Service Provider to restore Internet access.
Try adding the device again.
Perform a communication test
Press the Reset button (pinhole) for 1 to
3 seconds (use a paper clip or tool if necessary).
The Communication LED will quickly flash
five times to indicate that the test was sent.
Please wait two minutes before trying to
use the device again.
Power cycle
Unplug the device from power for 10 seconds
and plug it back in. Wait for the Power and
Communication LEDs to become solid before
trying to use the device again.
ADC-SG130_Installation_15.indd 9 2/18/19 3:12 PM

10
Reset
Press and hold the Reset button (pinhole) for
15 to 20 seconds (use a paper clip or tool if
necessary). All LEDs will flash simultaneously
to indicate that the device will reset. Wait for
the Power and Communication LEDs to become
solid before trying to use the device again.
Questions?
Visit: www.alarm.com/supportcenter
ADC-SG130_Installation_15.indd 10 2/18/19 3:12 PM

11
FCC STATEMENT
This equipment complies with FCC radiation exposure limits set
forth for an uncontrolled environment. This equipment should be
installed and operated with minimum distance 20cm between
the radiator & your body.
This equipment has been tested and found to comply with the limits
for a Class B digital device, pursuant to Part 15 of the FCC Rules.
These limits are designed to provide reasonable protection against
harmful interference in a residential installation. This equipment
generates, uses and can radiate radio frequency energy and, if not
installed and used in accordance with the instructions, may cause
harmful interference to radio communications. However, there
is no guarantee that interference will not occur in a particular
installation. If this equipment does cause harmful interference
to radio or television reception, which can be determined by
turning the equipment off and on, the user is encouraged to try
to correct the interference by one of the following measures:
• Reorient or relocate the receiving antenna.
• Increase the separation between the equipment and receiver.
• Connect the equipment into an outlet on a circuit different from
that to which the receiver is connected.
• Consult the dealer or an experienced radio/TV technician for help.
Any changes or modifications not expressly approved by the party
responsible for compliance could void the user’s authority to
operate this equipment.
Notices
ADC-SG130_Installation_15.indd 11 2/18/19 3:12 PM

12
IC STATEMENT
This device complies with Industry Canada’s licence-exempt RSSs.
Operation is subject to the following two conditions:
(1) This device may not cause interference; and
(2) This device must accept any interference, including interference
that may cause undesired operation of the device.
Le présent appareil est conforme aux CNR d’Industrie
Canada applicables aux appareils radio exempts de licence.
L’exploitation est autorisée aux deux conditions suivantes:
1) l’appareil ne doit pas produire de brouillage;
2) l’utilisateur de l’appareil doit accepter tout brouillage
radioélectrique subi, même si le brouillage est
susceptible d’en compromettre le fonctionnement.
ADC-SG130_Installation_15.indd 12 2/18/19 3:12 PM

ADC-SG130_Installation_15.indd 13 2/18/19 3:12 PM
8281 Greensboro Drive
Suite 100
Tysons, VA 22102 190218
© 2019 Alarm.com. All rights reserved.
ADC-SG130_Installation_15.indd 14 2/18/19 3:12 PM