Sharp Cdrw5000 Quick Guide CD RW5000 Start
2014-07-06
: Sharp Cdrw5000-Quick-Guide cdrw5000-quick-guide sharp pdf
Open the PDF directly: View PDF ![]() .
.
Page Count: 8

– 1 –
Accessories
Accesorios
Speaker wire for
MAIN terminals × 2
Cable del altavoz para
los terminales MAIN
×
2
AM loop antenna × 1
Antena de cuadro de AM
×
1
Remote control × 1
Controlador remoto
×
1
Blue
Azul
Black
Negro
CD-R × 1
CD-R
×
1
1
1
Speaker wire for
SUBWOOFER terminals × 2
Cable del altavoz para los
terminales SUBWOOFER
×
2
Black
Negro
Red
Rojo
FM antenna × 1
Antena de FM
×
1
CD-RW5000
AUDIO TOWER SYSTEM
AUDIO TOWER SYSTEM
This Quick Guide will help you to correctly
install and operate your system.
Esta guía rápida le ayudará a instalar y operar
correctamente su sistema.
1 2 3
Battery Installation of the Remote Control
Instalación de las pilas del controlador remoto
Use 2 “AA” size batteries (UM/SUM-3, R6, HP-7 or similar). Batteries are not included.
Use dos pilas del tamaño“AA” (UM/SUM-3, R6, HP-7 o equivalentes). Las pilas no están incluidas.
Open the
Insert the batteries
Close the cover.
battery cover.
as shown.
Abra la cubierta Inserte las pilas Cierre la cubierta
de las pilas. como se muestra. de las pilas.
2
2
TINSZ0596AWZZ Printed in Malaysia A0007.YT
Impreso en Malaysia
*RW5000_QG 00.7.13, 7:55 PM1
– 2 –
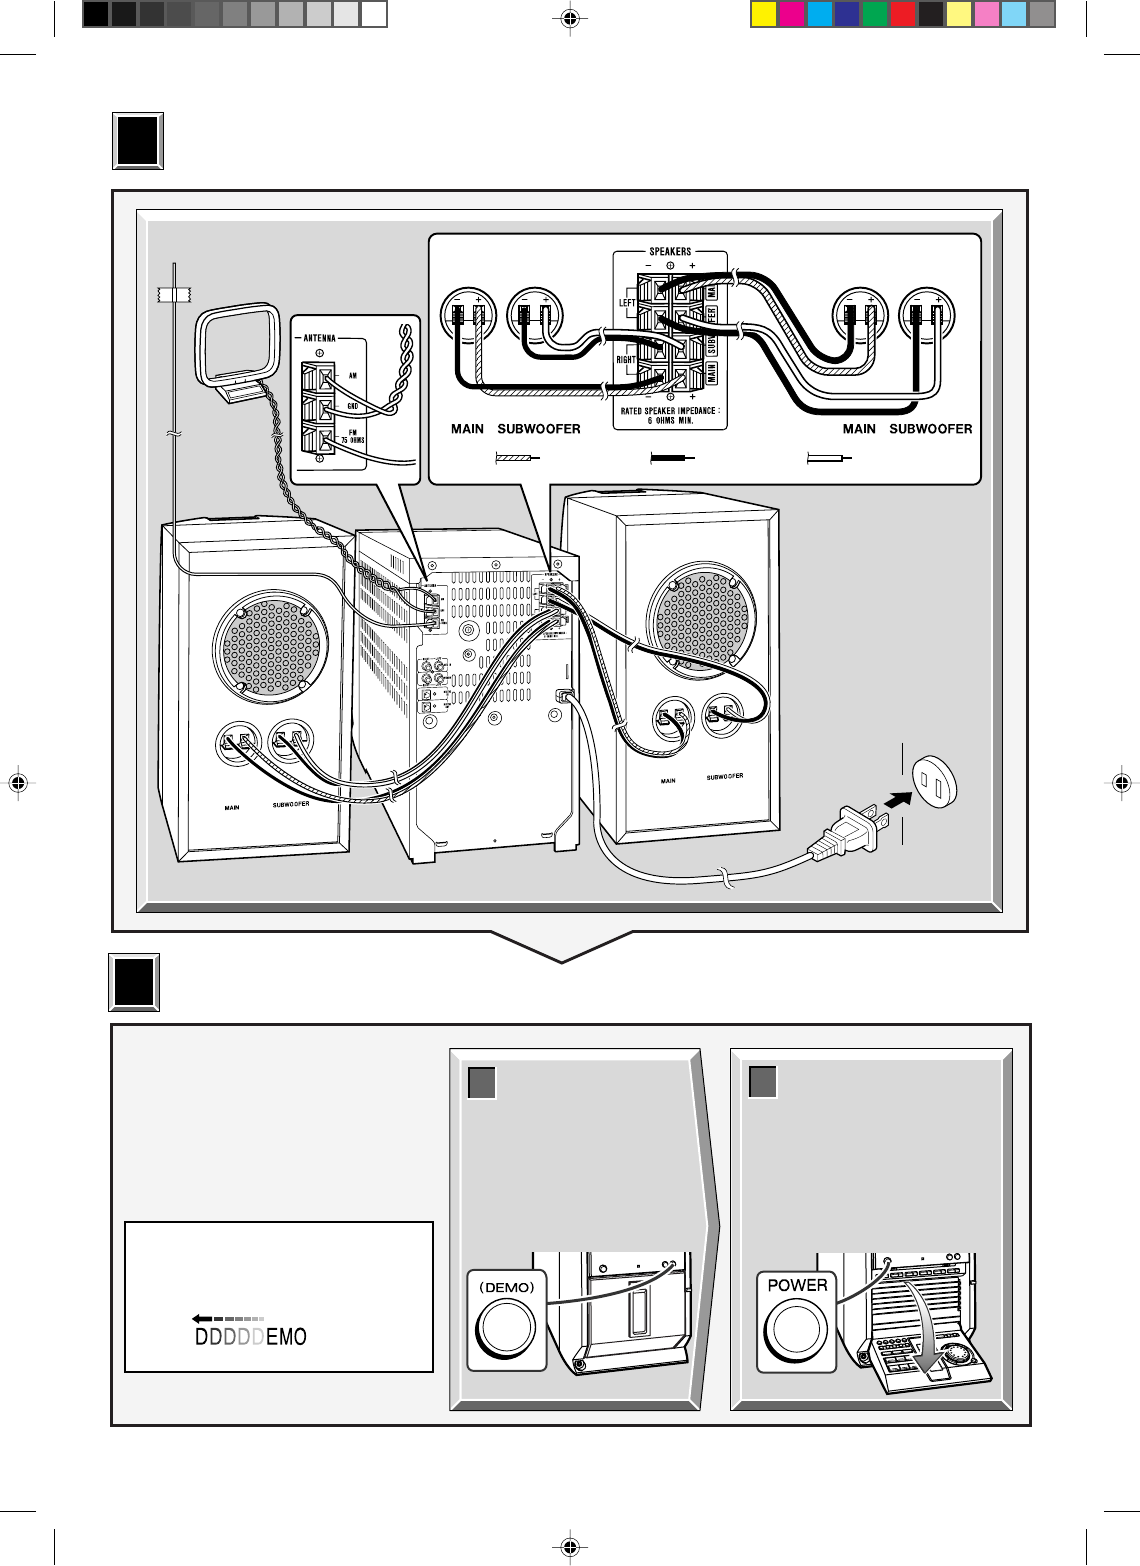
System Connections
Conexiones del sistema
3
3
Turning on Your System
Conexión de la alimentación de su sistema
4
4
The first time the unit is plugged, the
unit will enter the demonstration
mode. You will see words scroll.
Cuando se enchufe por primera vez el
aparato, se establecerá en el modo de
demostración. Verá un desplazamiento
de palabras.
12
Press the DEMO
button to cancel
the demonstra-
tion mode.
Pulse el botón
DEMO para
cancelar el modo
de demostración.
Press the POWER
button to turn the
power on.
Pulse el botón POWER
para conectar la
alimentación.
FM antenna
Antena de FM
AM loop antenna
Antena de cuadro de AM
Right speaker
Altavoz derecho
Left speaker
Altavoz izquierdo
Blue
Azul
Red
Rojo
Black
Negro
Right speaker
Altavoz derecho
Left speaker
Altavoz izquierdo
AC outlet
(AC 120 V, 60 Hz)
A un tomacorriente de
CA (120 V de CA, 60 Hz)
*RW5000_QG 00.7.13, 7:55 PM2
– 3 –
Listening to a CD (CDs)
Audición de un disco CD (CDs)
1Press the CD button.
Pulse el botón CD.
2Press the DISC 1 7 7
7 7
7 button to open the disc tray 1.
Pulse el botón DISC 1
7
para abrir la bandeja del disco 1.
3Place the CD on the disc tray 1, label side up.
Coloque el disco compacto en la bandeja del disco 1, con el lado de la etiqueta
hacia arriba.
4Press the DISC 1 7 7
7 7
7 button to close the disc tray 1.
Pulse el botón DISC 1
7
para cerrar la bandeja del disco 1.
5You can place discs on the trays 2 - 6 by following the steps 2 - 4.
Podrá colocar discos en las bandejas 2 - 6 según los pasos 2 - 4.
6Press the 0606
0606
06 button to start playback.
Pulse el botón
06
para iniciar la reproducción.
Total playing time
Tiempo total de reproducción
Means “disc inside”
Significa “disco dentro”
DISC 1
5” (12 cm)
5” (12 cm)
3” (8 cm)
3” (8 cm)
Total number of tracks
Número total de pistas
DISC 1
DISC 1
*RW5000_QG 00.7.13, 7:55 PM3
– 4 –
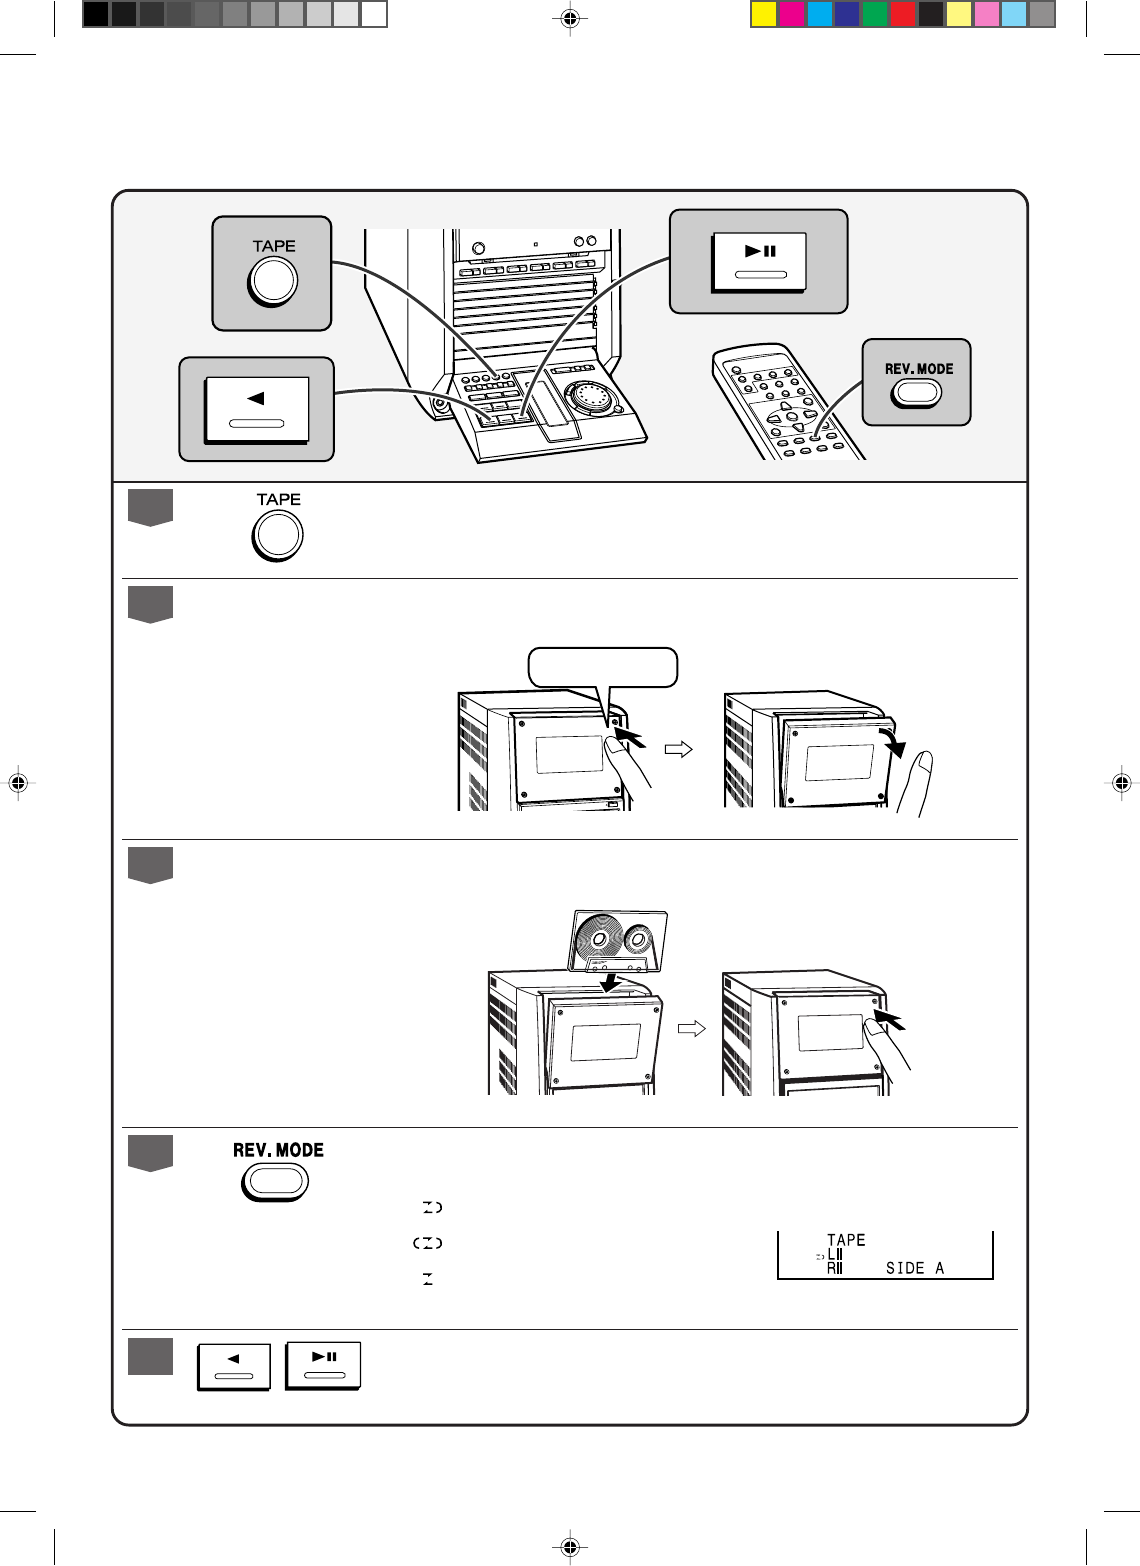
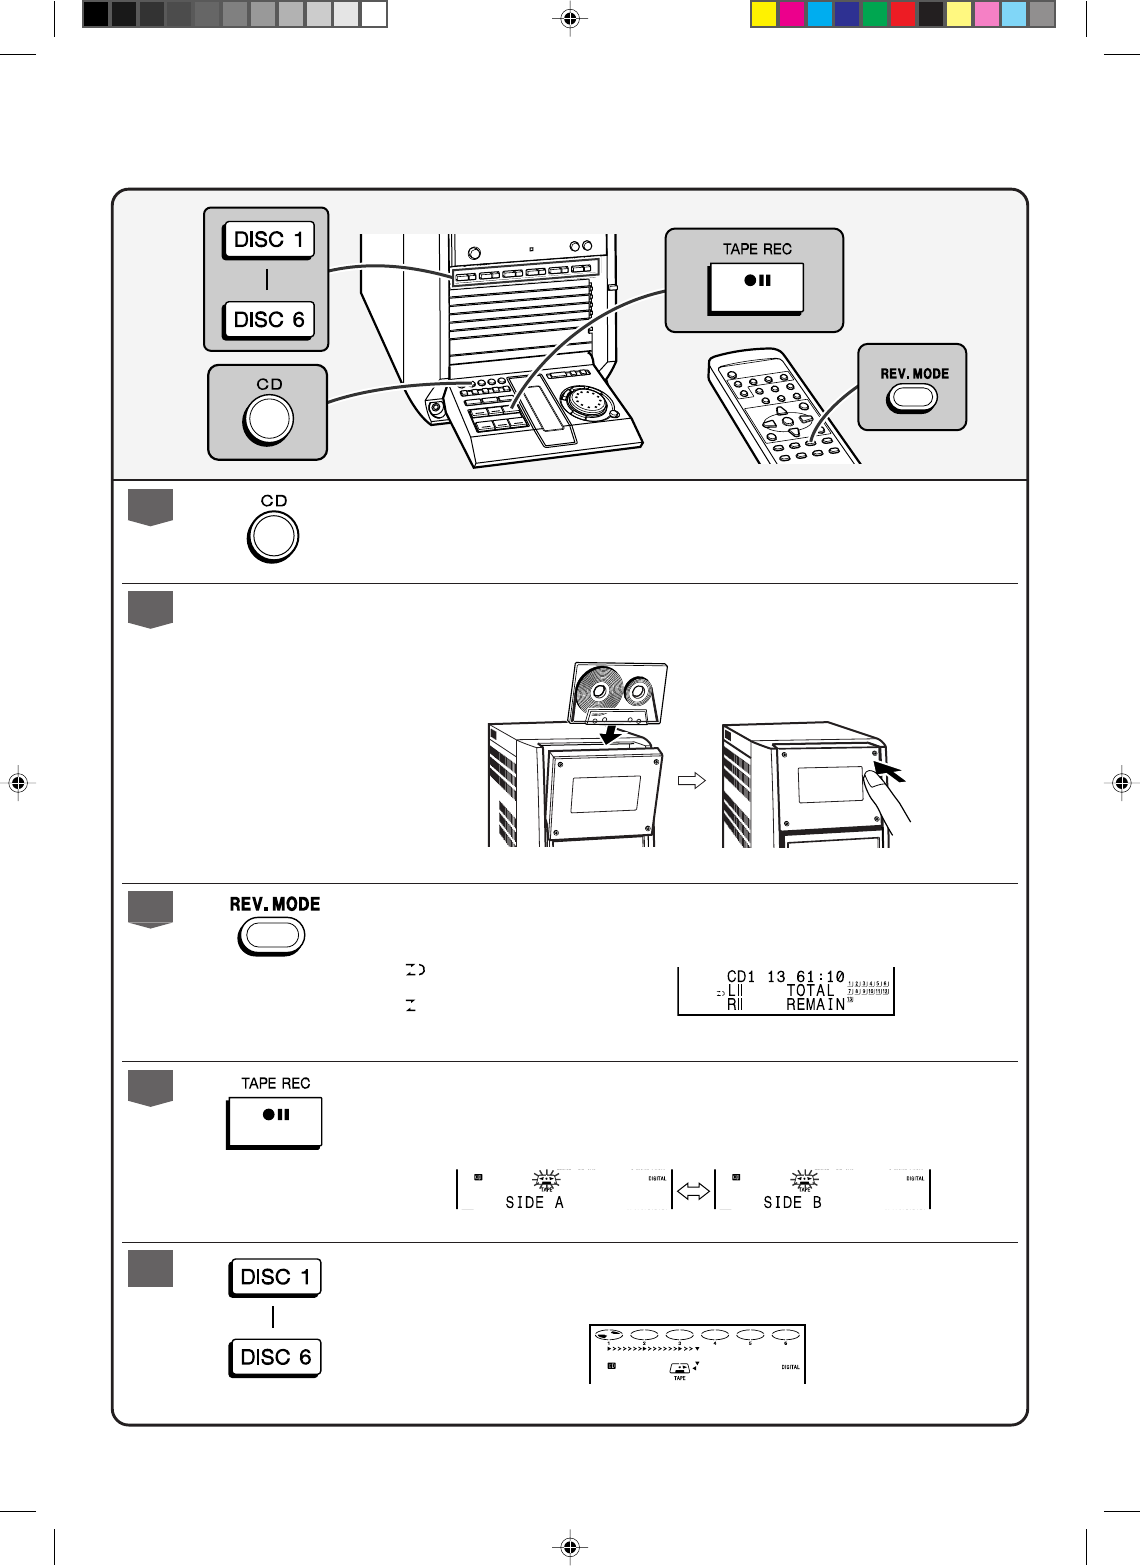
Listening to a Cassette Tape
Audición de una cinta cassette
1Press the TAPE button.
Pulse el botón TAPE.
2Open the cassette door by pushing the area marked “PUSH EJECT 77
77
7”.
Abra la puerta del cassette pulsando la parte marcada “PUSH EJECT
7
”.
PUSH EJECT 7
3Load the cassette into the compartment with side A facing you.
Cargue el cassette en el compartimiento con la cara A encarada hacia usted.
4Press the REV. MODE button to choose one side or both side.
Pulse el botón REV. MODE para seleccionar una cara o ambas caras.
5Press the 0606
0606
06 button to listen to side A, or the 11
11
1 button for side B.
Pulse el botón
06
para escuchar la cara A, o el botón
1
para la cara B.
... To listen to both sides.
Para escuchar ambas caras.
...
For endless repeat play of both sides.
Para repetir indefinidamente ambas caras.
... To listen to one side.
Para escuchar una cara.
*RW5000_QG 00.7.13, 7:55 PM4
– 5 –
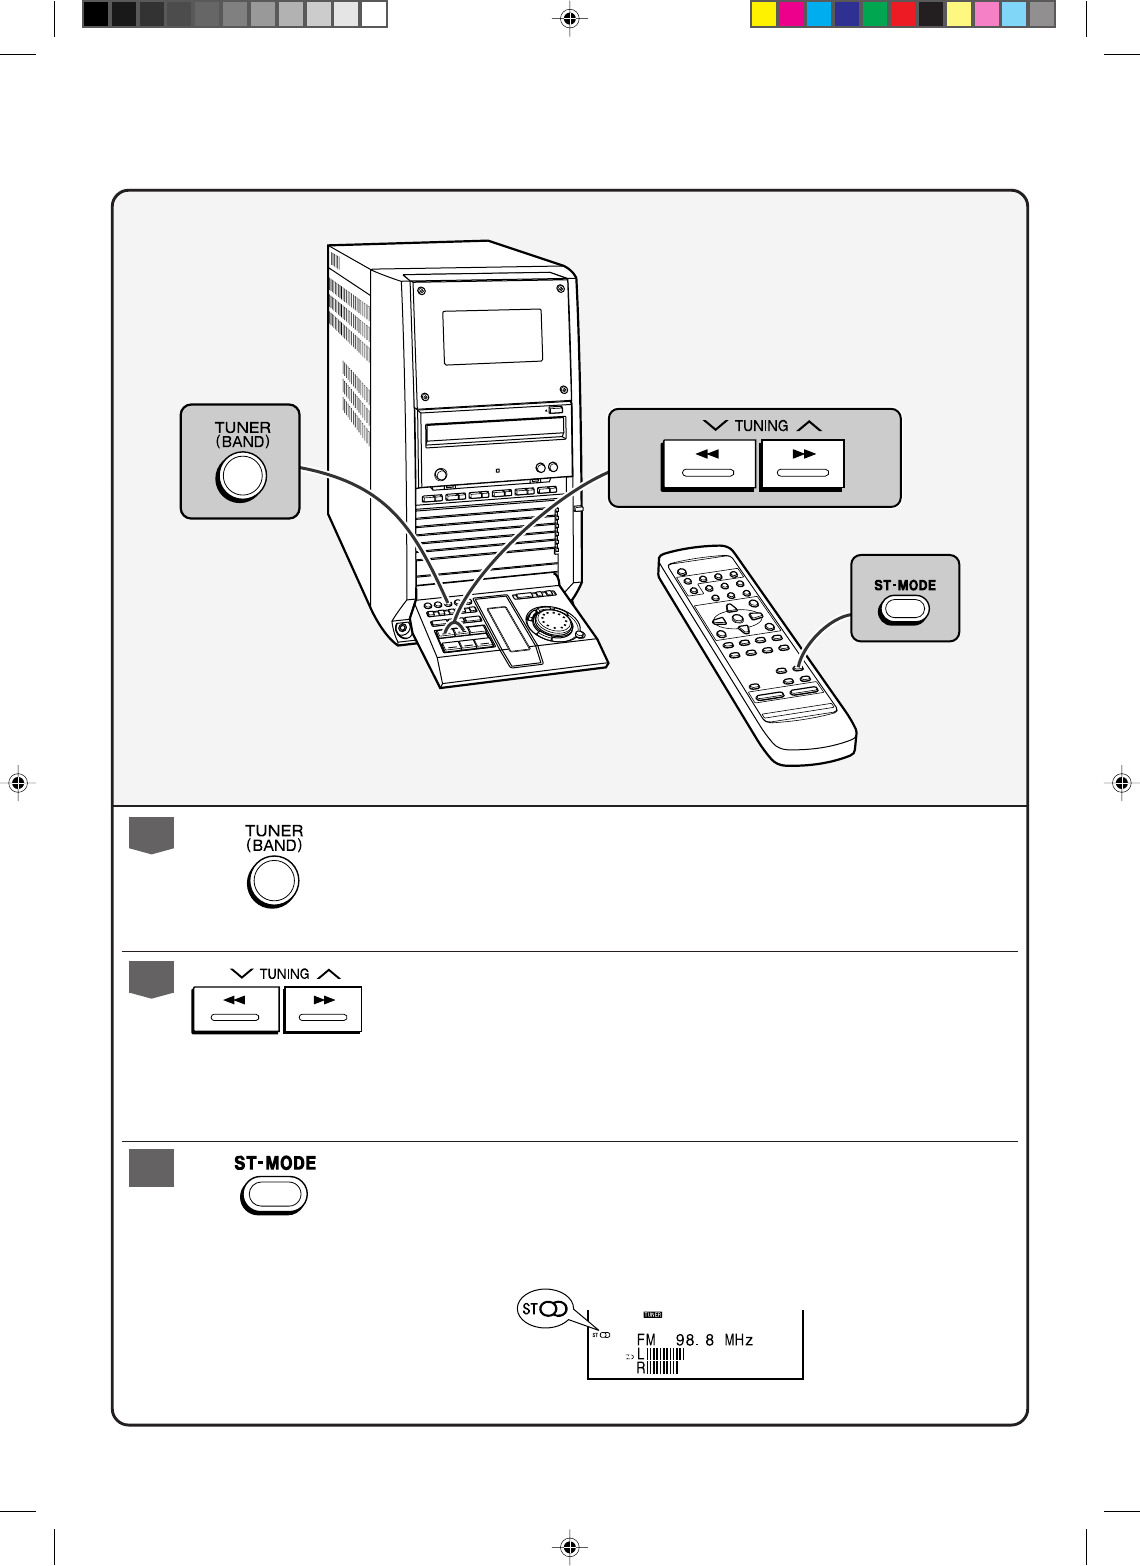
Listening to the Radio
Audición de la radio
1Press the TUNER (BAND) button to select the desired frequency band (FM
or AM).
Pulse el botón TUNER (BAND) para seleccionar la banda de frecuencia deseada
(FM o AM).
2Press the TUNING (XX
XX
X or WW
WW
W) button to tune into the desired station.
●When the TUNING button is pressed for more than 0.5 seconds, scanning will start
automatically and the tuner will stop at the first receivable broadcast station.
Pulse el botón TUNING (
X
o
W
) para sintonizar la emisora deseada.
●
Cuando se pulse el botón TUNING durante más de 0,5 segundos, la exploración se
iniciará automáticamente y el sintonizador se parará en la primera emisora difusora que
pueda recibirse.
3To receive an FM stereo transmission, press the ST-MODE button on the
remote control. The “ST” indicator lights up.
●“jj
jj
j” will appear when an FM broadcast is in stereo.
Para recibir la transmisión de FM en estéreo, pulse el botón ST-MODE del
controlador remoto. Se enciende el indicador “ST”.
●
“
j
” aparecerá cuando una difusión de FM sea en estéreo.
*RW5000_QG 00.7.13, 7:55 PM5
– 6 –
Recording to a Cassette Tape
Grabación en una cinta cassette
1Press the CD button and load the desired disc.
Pulse el botón CD y cargue el disco deseado.
2Load a cassette into the compartment with side A facing you.
Cargue un cassette en el compartimiento con la cara A encarada hacia usted.
3Press the REV. MODE button to choose one side or both side.
Pulse el botón REV. MODE para seleccionar de una cara o ambas caras.
4Press the TAPE REC button repeatedly to switch to the side you record
on.
Pulse repetidamente el botón TAPE REC para cambiar a la cara que grabe.
5Press one of the DISC 1 - DISC 6 buttons to start recording.
Pulse uno de los botones DISC-1 a DISC 6 para iniciar la grabación.
... To record on both sides.
Para grabar en ambas caras.
... To record on only one side.
Para grabar sólo en una cara.
*RW5000_QG 00.7.13, 7:55 PM6
– 7 –
■Playable discs
Discos que pueden reproducirse
This player is compatible with CD-R discs, CD-RW discs, and audio CDs with either mark below.
Este reproductor es compatible con discos CD-R, discos CD-RW, y discos compactos de audio con
cualquiera de las dos marcas de abajo.
■Differences between the CD-R disc and the CD-RW disc
Diferencias entre el disco CD-R y el disco CD-RW
What is CD-R or CD-RW?
¿Qué es CD-R o CD-RW?
Playback
Reproducción
Erasing
Borrado
CD-R
Can be played on a standard CD player
when it is finalized after recording.
Se puede reproducir en un reproductor de
CD estándar cuando se finaliza después
de la grabación.
Erasing is impossible.
El borrado es imposible.
CD-RW
Cannot be played on a standard CD
player.
If it is finalized after recording, it can
be played only on a CD-RW compatible
player.
No se puede reproducir en un reproductor
de CD estándar. Si se finaliza después de
la grabación, se puede reproducir sólo en
un reproductor compatible con discos CD-
RW.
Recorded tracks can be deleted.
A finalized disc can be restored.
Se pueden borrar pistas grabadas.
Se puede restaurar un disco finalizado.
CD-R: Compact Disc-Recordable
CD-R: Disco compacto grabable
CD-RW: Compact Disc-ReWritable
CD-RW: Disco compacto regrabable
*RW5000_QG 00.7.13, 7:55 PM7
– 8 –
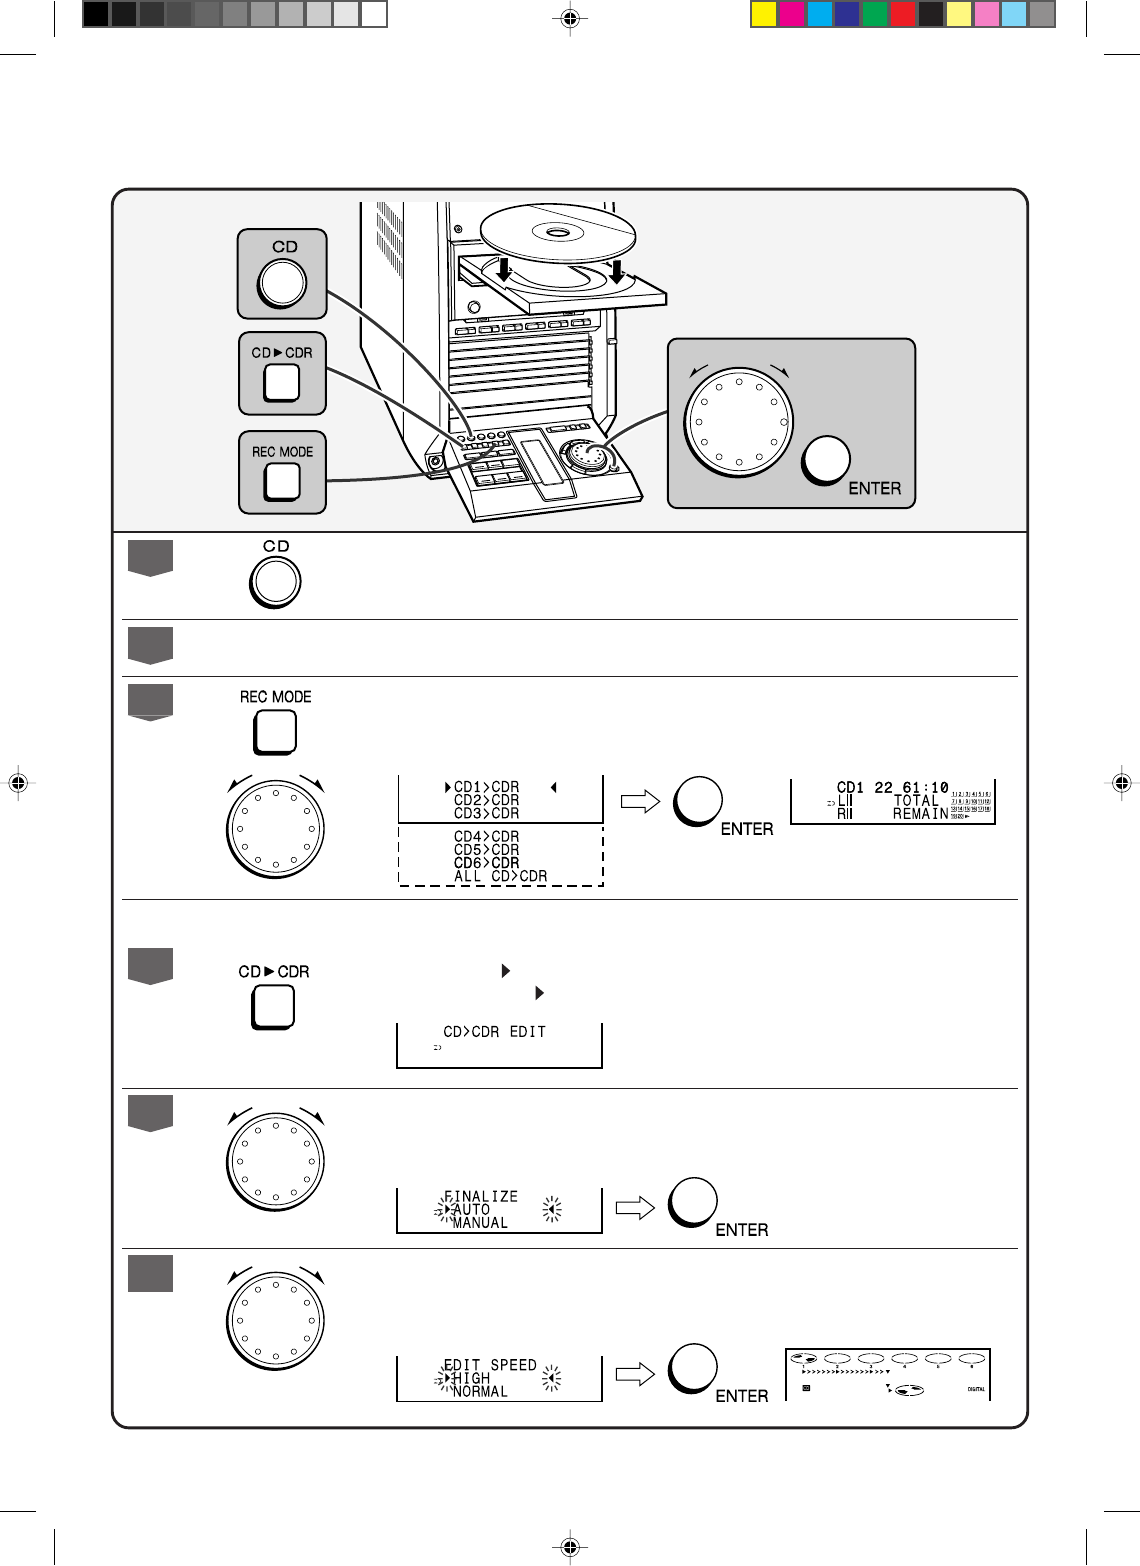
Recording to a CD-R or a CD-RW
Grabación en un CD-R o en un CD-RW
1Press the CD button and load the desired CD(s).
Pulse el botón CD y cargue el disco deseado (los discos deseados).
2Load the CD-R or CD-RW disc.
Cargue el disco CD-R o CD-RW.
3Press the REC MODE button and select the desired CD using the jog dial.
Within 10 seconds, press the ENTER button.
Pulse el botón REC MODE y seleccione el disco compacto deseado empleando el
mando de lanzadera. Antes de transcurrir 10 segundos, pulse el botón ENTER.
In steps 4 - 6, operate within 5 seconds. Otherwise, the system will go to the next step automatically.
En los pasos 4 – 6, opere antes de 5 segundos. De lo contrario, el sistema pasará al paso siguiente automáticamente.
4Press the CD CDR button.
Pulse el botón CD CDR.
5Select “AUTO” using the jog dial to finalize the disc. Then press the EN-
TER button.
Seleccione “AUTO” empleando el mando de lanzadera para finalizar el disco.
Entonces, pulse el botón ENTER.
6Select “HIGH” using the jog dial to record at high speed. Then press the
ENTER button to start recording.
Seleccione “HIGH” empleando el mando de lanzadera para grabar a alta
velocidad. Luego, pulse el botón ENTER para iniciar la grabación.
*RW5000_QG 00.7.13, 7:55 PM8
