Sharp DMR0122 Household Microwave Oven User Manual 1 B200
Sharp Corporation Household Microwave Oven 1 B200
UserManual.wiki
>
Sharp
>
DMR0122 User Manual
Operation manual
Navigation menu
Upload a User Manual
Namespaces
Wiki Guide
HTML
PDF
Info
Views
User Manual
Discussion / Help
Navigation


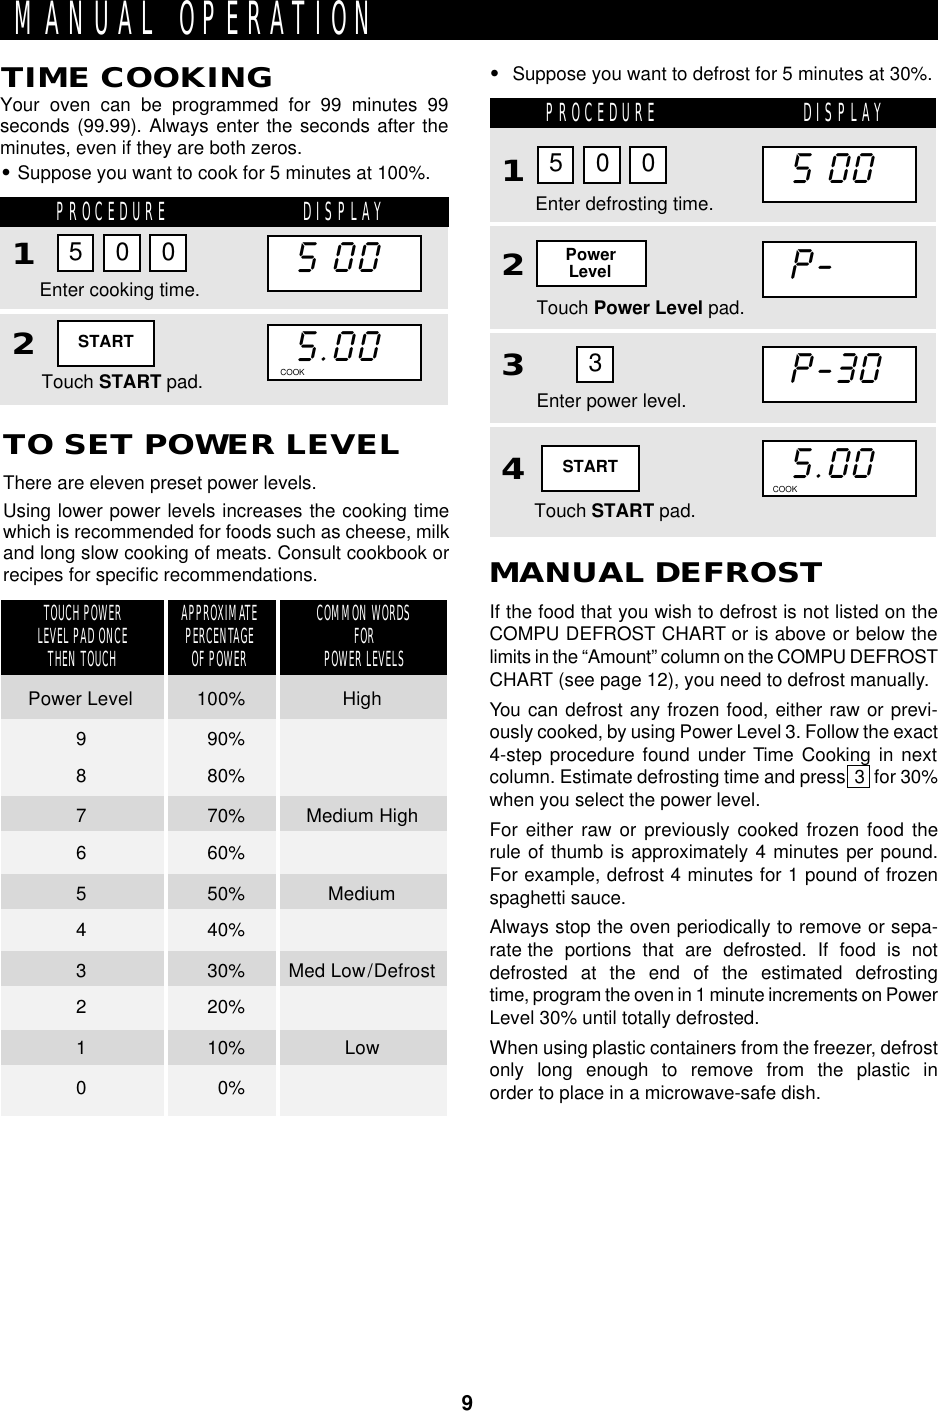
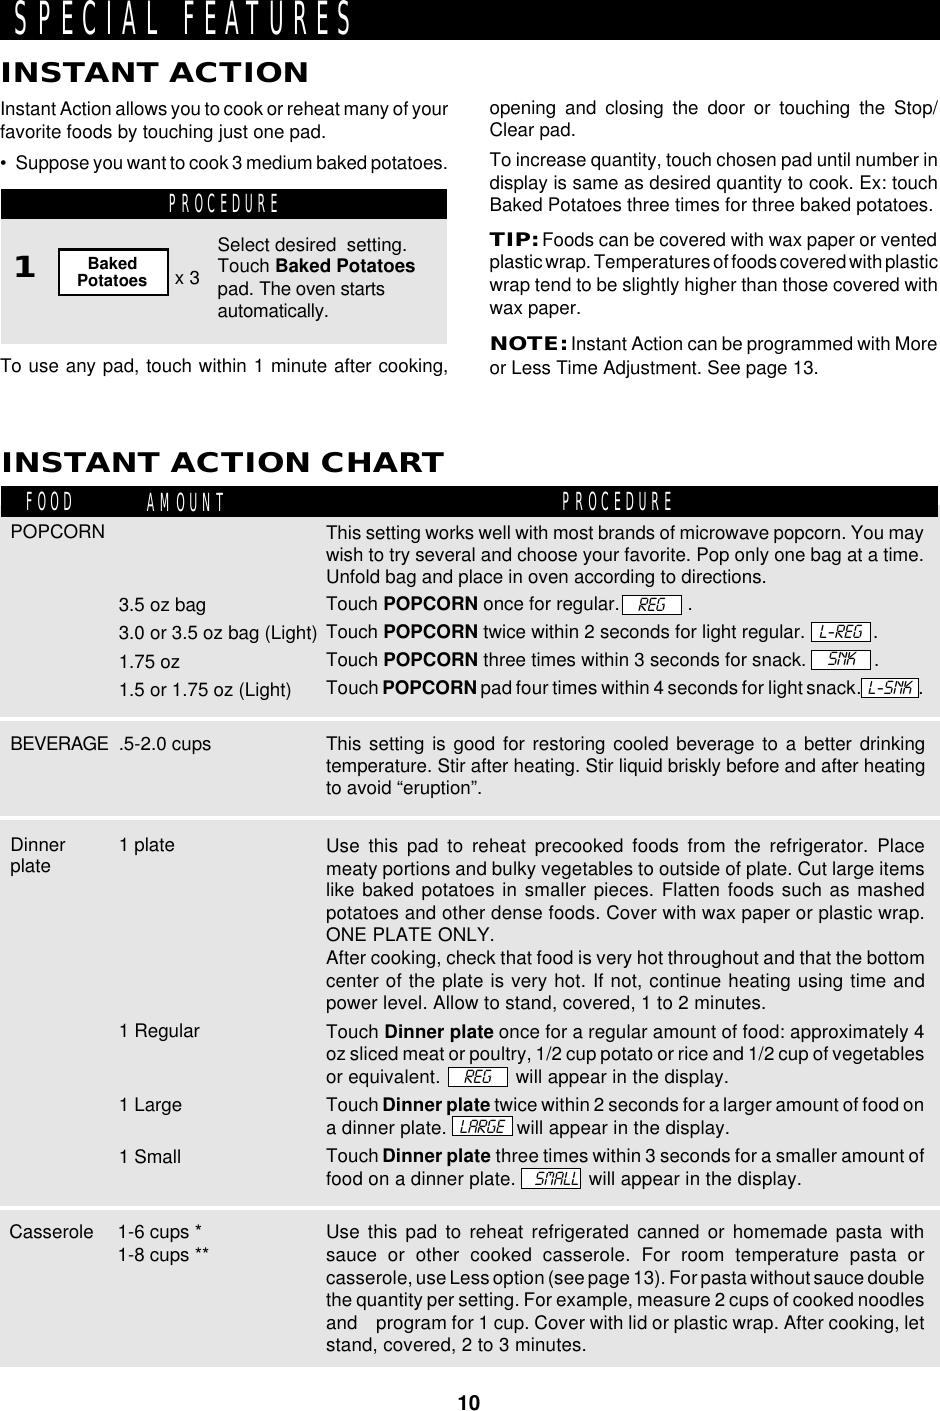
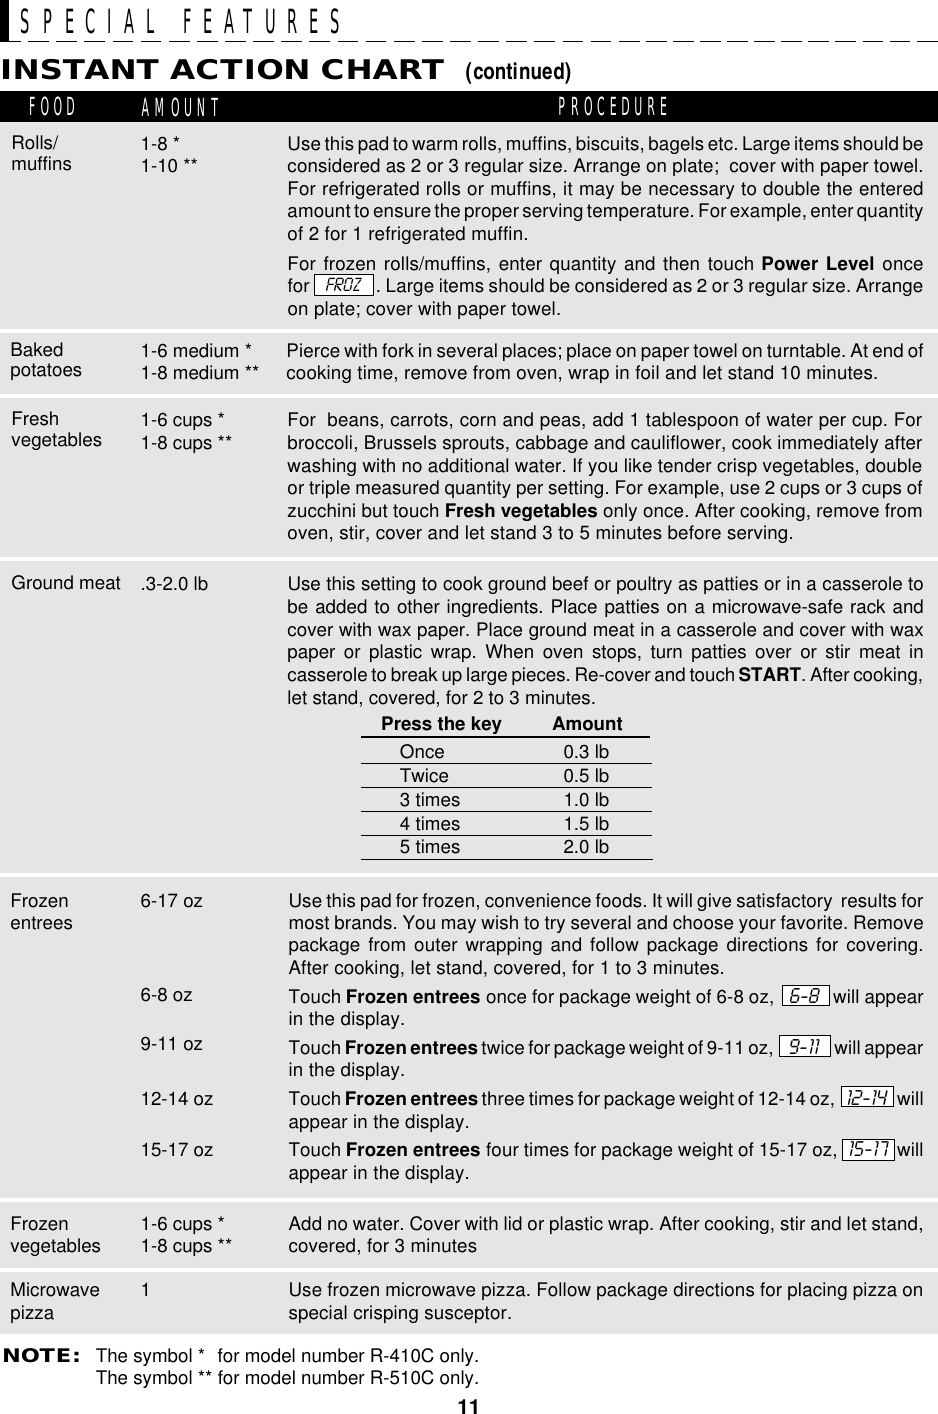
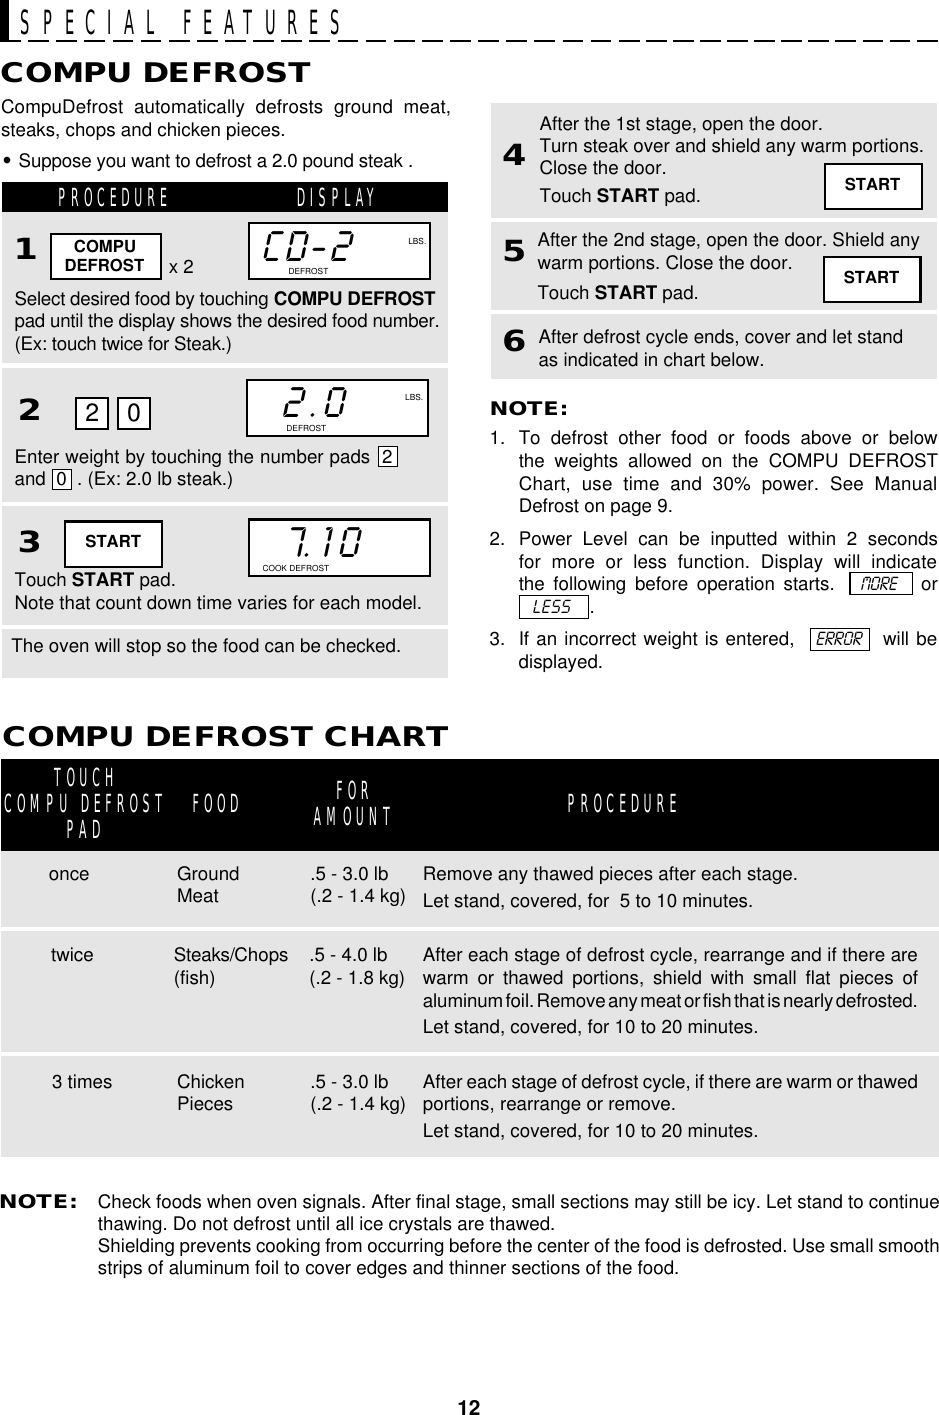


![Carousel® y Auto-Touch® son marcas registradas de Sharp Corporation.Para mayor informacion y precauciones de seguridad, consulte el Manual de OperacionesGUIA AUTO-TOUCHMDR-510CTABLA COMPU DEFROSTOPERACION MANUALCocimiento con Alta Energia.1. Marque el tiempo de cocimiento al oprimir los numeros. (Ej: 1 min. 30 sec.)2. Oprima el START.1. Después de realizar el primer paso (Num. 1 arriba), oprima el Power Level.2. Elija el grado de energia. (Ejemplo: 50%).3. Oprima el START.Energia de CocimientoVariable.Tipo de Comida Cantidad3. Trozos de Pollo ,5 a 3,0 libras2. Filete/Chuleta ,5 a 4,0 libras1. Carne Molida ,5 a 3,0 librasR-410COprima MINUTE PLUS paraobtener un minuto al 100% deenergia o para agregar otrominuto durante el cocimientomanual. Vuelva a oprimirlo paraobtener minutos adicionales.PONER LA HORASi aparece 88:88 en lapantalla, primero oprima “Stop/Clear”.1. Oprima Timer/Clock .2. Ponga la hors correcta del dia oprimiendo los numeros en secuencia (Ej: 12:30).3. Oprima Timer/Clock otra vez.FUNCION INSTANTANEAACTION1.Oprima “POPCORN” una vez parael tamaño normal de palomitas.2 Veces para el tamaño normal “light”.3 Veces para el tamaños botana.4 Veces para el tamaños botana “light”.Tipo de Comida CantidadPOPCORNMINUTO EXTRACOMPU DEFROSTTimerClockTimerClock1 2 3 0,5 a 2,0 tazas1 plato: Normal,Grande oPequeño1 a 8 tazas1 a 101 a 8 tam. Nor.1 a 8 tazas,3-2,0 libras6 a 17 onzas1 a 8 tazas1,5 a 2,0 tazas1 plato: Normal,Grande oPequeño1 a 6 tazas1 a 81 a 6 tam. Nor.1 a 6 tazas,3 a 2,0 libras6 a 17 onzas1 a 6 tazas1BabidaPlato de comidaCacerolaPanPapa asadaVerdura frescaCarne molidaPlatos congeladoVerdura congeladoPizza congeladoPowerLevel51 3 0MINUTEPLUSSTARTSTART1. Seleccione el alimentodeseado, tocando el COMPUDEFROST hasta que lapantalla presente el númerodel alimento deseado. (Ex:toque dos veces para bistec)2. Oprima los numeroscorrespondientes 2 y 0 .(Ej: 2,0 libras [0,900 kg])3. Oprima START. Aldescongelar, el horno sedetiene y revisa la comida.Oprima START para sequirdescongelando.COMPUDEFROST2 0START](https://usermanual.wiki/Sharp/DMR0122/User-Guide-17069-Page-23.png)