Sharp HRO00030 1900MHz GSM/GPRS Cellular Phone User Manual
Sharp Corporation 1900MHz GSM/GPRS Cellular Phone
UserManual.wiki
>
Sharp
>
HRO00030 User Manual
USER MANUAL
Navigation menu
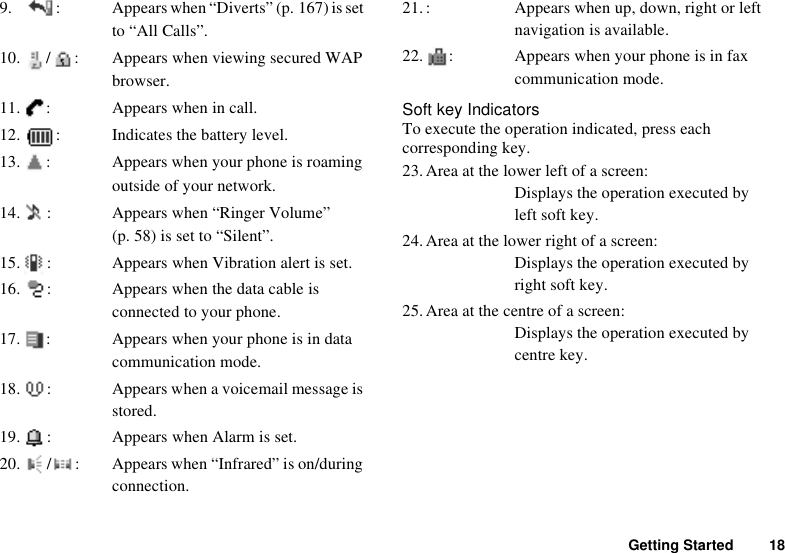
Upload a User Manual
Namespaces
Wiki Guide
HTML
PDF
Info
Views
User Manual
Discussion / Help
Navigation
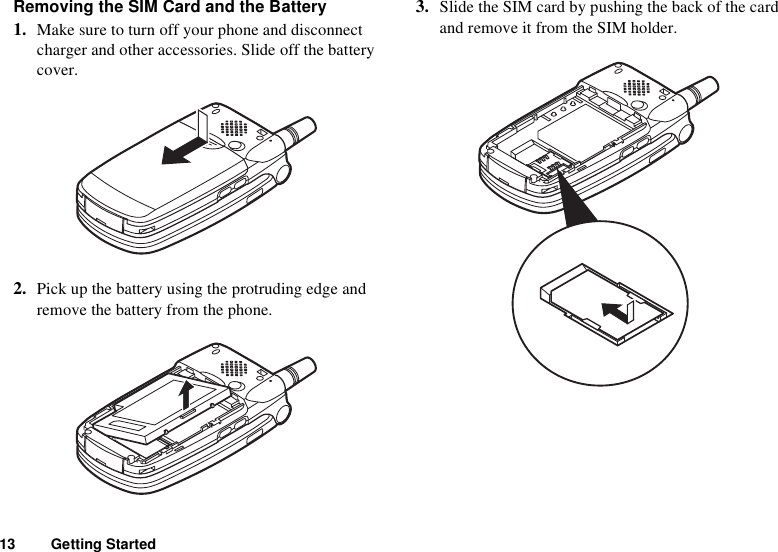
![Getting Started 16Turning Your Phone On and OffTo turn the power on, press and hold F for approximately 2 seconds.The stand-by screen appears.To turn the power off, press and hold F for approximately 2 seconds.Entering the PIN CodeIf activated you will be asked to enter a PIN (Personal Identification Number) code after turning on your phone.1. Enter your PIN code.2. Press .Note• If your PIN code is entered incorrectly three times in a row, the SIM card is locked. See “Enabling/Disabling the PIN Code” on page 142.When you insert the SIM card to your phone for the first time, you are asked whether you want to copy phonebook entries on the SIM card. Follow the on-screen instructions, or you can do it later using the Phonebook menu as follows:1. Press to display the Main menu.2. Press , , or to select “Call Manager”, then press .3. Press or to select “Phonebook”, then press .4. Press A [Options] to display Options Menu.5. Press or to select “Copy All from SIM”, then press .6. Press A [Yes] to start copying.When the process is complete, you see the message, “???”.7. Press <?> to return to the stand-by mode.](https://usermanual.wiki/Sharp/HRO00030/User-Guide-323099-Page-10.png)
![21 Call FunctionsCall FunctionsMaking a Call1. Enter the area code and the phone number you wish to dial.If you enter the wrong number, press C [Clear] to delete the number to the left of the cursor.2. Press D to dial.Emergency Calls1. Enter 112 (international emergency number) using the keypad.2. Press D to dial.Note• Emergency calls may not be available on all mobile phone networks when certain network services and/or phone features are in use. Contact your network operator for more information.• This Emergency number can normally be used to make an emergency call in any country, with or without a SIM card inserted, if a GSM network is within range.International Calls1. Press and hold P until a “+” (international dialling prefix) sign appears.2. Enter the country code, followed by the area code and the number.3. Press D to dial.Note• Enter the area code omitting the first 0 when making international calls, in most cases. (It differs for some countries.)Speed DiallingUp to 9 phone numbers from the phonebook or SIM memory can be assigned to speed dials. You can call the numbers using the digit keys (H to O and Q).For details on setting the Speed Dial List, see “Speed Dial List” on page 43.1. Press and hold any of the digit keys (H to O and Q).The phone number stored in the Speed Dial List is displayed, then dialled.](https://usermanual.wiki/Sharp/HRO00030/User-Guide-323099-Page-15.png)
![Call Functions 22RediallingYou can redial the numbers in the call log list that you may have missed, received or dialled. Each list can contain up to 10 numbers.1. Press D during stand-by.2. Press or to select a category between “Dialled Numbers”, “Missed Calls” and “Received Calls”.3. Press or to select the number you wish to call.4. Press D to redial the call.Automatic RediallingThis setting allows you to automatically redial the number if the first attempt was unsuccessful.If you wish to stop redialling, press F or C [End].To Set the Auto Redial Function1. Press to display the Main Menu. 2. Press , , or to select “Settings”, then press .3. Press or to select “Call Settings”, then press .4. Press or to select “Auto Redial”, then press .5. Select “On” to enable the Auto Redial function or “Off” to disable it, then press .Note• When you receive an incoming call, the Auto Redial function will be interrupted.• Automatic redialling is not available for fax and data calls.Ending a Call1. Press F to end the call.Answering a CallWhen an incoming call is detected, the phone rings and the flash light flashes green.1. Open your phone.2. Press D to answer the call.or](https://usermanual.wiki/Sharp/HRO00030/User-Guide-323099-Page-16.png)
![23 Call FunctionsPress any key except F,C [Reject], and when the “Any Key Answer” function is enabled.Set the Any Key Answer function in the profile in each mode. (p. 63)Tip• When the hands free kit is connected to the phone, you can answer calls by pressing the side-up or side-down key. • If you have subscribed to the Calling Line Identification (CLI) service and the caller’s network sends the number, the caller’s number will appear on the screen. If the caller’s name and number are stored in the Phonebook, the caller’s name will appear on the screen.• If the number is a restricted number, the display shows “Withheld”.• When receiving a call from the person whose picture is registered in the Phonebook, receiving display and the picture are displayed alternately.Rejecting an Incoming CallYou can reject a call you do not wish to answer.1. Press For C[Reject] or press and hold the side-up or down key whilst the phone is ringing.Incall MenusYour phone has additional functions available whilst a call is in progress.Adjusting the Earpiece VolumeYou can adjust the earpiece volume during a call.1. During a call, press V or W.Each press of or adjusts the earpiece volume by one of 5 levels.](https://usermanual.wiki/Sharp/HRO00030/User-Guide-323099-Page-17.png)
![Call Functions 24Putting a Call on HoldThis function allows you to manage two calls at the same time. If you wish to make another call whilst you are talking to someone, you can put the current call on hold to call someone else.To make another call during a call1. During a call, press A [Options] to display the Options Menu.2. Select “Hold”, then press .The current call is put on hold.To retrieve a call, press A [Options] and select “Retrieve”, then press .3. Enter the phone number you wish to make another call to, then press D.Tip• You can also make another call by entering the phone number during a call instead of steps 1 and 2. The current call is automatically put on hold.• To end the current call, then talk again with the person whose call is put on hold, press A[Options] and select “End & Next”, then press .Call WaitingThis service notifies you of another incoming call whilst you have a call in progress.1. During a call, press A [Answer] to answer the second call.The first call is put on hold and you can now talk to the second caller.2. Press A [Options] and select “Swap” to switch between the two calls.3. Press A [Options] and select “End Call”, then press to end the current call and return to the held call.Note• You need to set “Call Waiting” to “On” if you use Call Waiting service (p. 130).• Call Waiting service may not be available on all networks. Contact your network operator for more information.• If you do not wish to answer the second call, press C[Reject] in step 1. The call log of the second call will be saved as a missed call.](https://usermanual.wiki/Sharp/HRO00030/User-Guide-323099-Page-18.png)
![25 Call FunctionsAccessing SMS Menu During a Call1. During a call, press A[Options] and select “SMS”, then press .The following options are available: “Compose” to make an SMS, or “Inbox”, “Sent”, “Draft”, or “Outbox” to access these folders. For details on SMS, see “SMS (Short Message Service)” on page 108.Conference CallConference call is a call with more than 2 participants. You may include up to 5 participants in a conference call.Making a Conference CallTo make a conference call, you must have one active call and one held call.1. Press A [Options] to display the Options Menu.2. Press or to select “Multiparty”, then press .3. Press or to select “Join All”, then press to join the conference call.4. Press F to end the conference call.Note• Conference call service may not be available on all networks. Contact your network operator for more information.• You have more options for the Conference call in step 3:• To put all participants on hold, select “Hold All” instead.• To put all participants except the current call on hold, select “Private” instead.• To end the call with all participants, select “End All” instead.• To xxxxxxxxxx, select “Transfer” instead.• To xxxxxxxxxx, select “Exclude” instead.• To reject adding more participants to the current party, select “Reject” instead, or you can send the busy tone by selecting “I am busy”.](https://usermanual.wiki/Sharp/HRO00030/User-Guide-323099-Page-19.png)
![Call Functions 26Adding New Participants to the Conference Call1. Press A [Options] to display the Options Menu.2. Press or to select “Dial”, then press .3. Enter the number you wish to include in the conference call.4. Press D to dial.5. Press A [Options] to display the Options Menu.6. Press or to select “Multiparty”, then press .7. Press or to select “Join All”, then press to join the conference call.If you wish to add other participants, repeat steps 1 to 7.To End the Call with a Conference Call Participant1. During a conference call, press or to select the person who you wish to disconnect the call.2. Press A [Options] to display the Options Menu.3. Press or to select “End Call”, then press .To Have a Private Conversation with one of the participantsIf you wish to have a private conversation with one of the participants, you may select the participant from the conference list and put the other participants on hold.1. During the conference call, press or to select the person that you wish to talk to.2. Press A [Options] to display the Options Menu.3. Press or to select “Multiparty”, then press .4. Press or to select “Private”, then press .5. Once you have finished the private conversation, press A [Options] and select “Multiparty”, then press .6. Press or to select “Join All”, then press to return to the conference call.](https://usermanual.wiki/Sharp/HRO00030/User-Guide-323099-Page-20.png)
![27 Call FunctionsMuting the Dial Tone (DTMF Tone)1. During a call, press A [Options] and select “DTMF Tones”, then press .2. Press or to select “Off”, then press .To unmute the dial tone, repeat step 1 and then select “On” in step 2.Muting the Microphone1. During a call, press C [Mute] to mute the microphone.To unmute the microphone, press C [Unmute].](https://usermanual.wiki/Sharp/HRO00030/User-Guide-323099-Page-21.png)
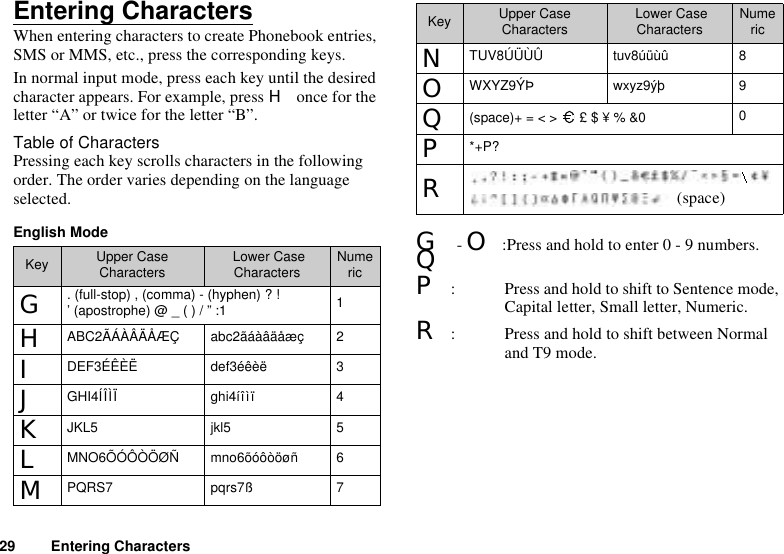
![Entering Characters 30Changing the Input Languages1. On the text entry screen, press A [Options] to display the Options Menu.2. Press or to select “Input Language”, then press .3. Select the desired language, then press .Changing the Input ModeT9 Text InputT9 text input method is a shortcut to enter text easily and quickly. 1. On the text entry screen, press A [Options] to display the Options menu.2. Press or to select the desired T9 mode (T9 Abc, T9 ABC, T9 abc), then press . “ ” will be displayed on the Main Display.3. Press each key once for any letter you require on that key.To enter the word “How”, press J L O.4. Press or until the correct word is shown if the character combination, that was initially displayed, is not correct.5. Press to select the word.Note• If the correct word is not shown in step 3, enter the correct word again after switching to the normal input mode.Tip• If you press Q instead of step 4, a space is inserted next to the selected word.Symbols and PunctuationTo enter symbols or punctuation, press R.Using Text TemplateYou can use the sentences registered in My Text Templates when entering characters.For details on creating the text template, see “Adding Phrases to My Text Templates” on page 80.1. On the text entry screen, press A [Options] to display the Options Menu.2. Press or to select “Insert Template”, then press .3. Select a desired text template, then press .The selected text template will be inserted.4. Put the cursor to the position where the selected text template should be inserted, then press .The selected text template will be inserted.](https://usermanual.wiki/Sharp/HRO00030/User-Guide-323099-Page-24.png)
![31 Entering CharactersCopying, Cutting and Pasting TextUsing these options, you can complete editing smoothly.To copy and cutting text1. On the text entry screen, press A [Options] to display the Options Menu.2. Press or to select "Copy" or "Cut", then press .3. Move the cursor to the first letter to be copied or to be cut, then press .4. Move the cursor to the last letter to highlight the area, then press .The highlighted area will be saved temporarily in the memory.To paste text1. On the text entry screen, press A [Options] to display the Options Menu.2. Press or to select "Paste", then press .3. Move the cursor to the point where you want to paste the letters.](https://usermanual.wiki/Sharp/HRO00030/User-Guide-323099-Page-25.png)
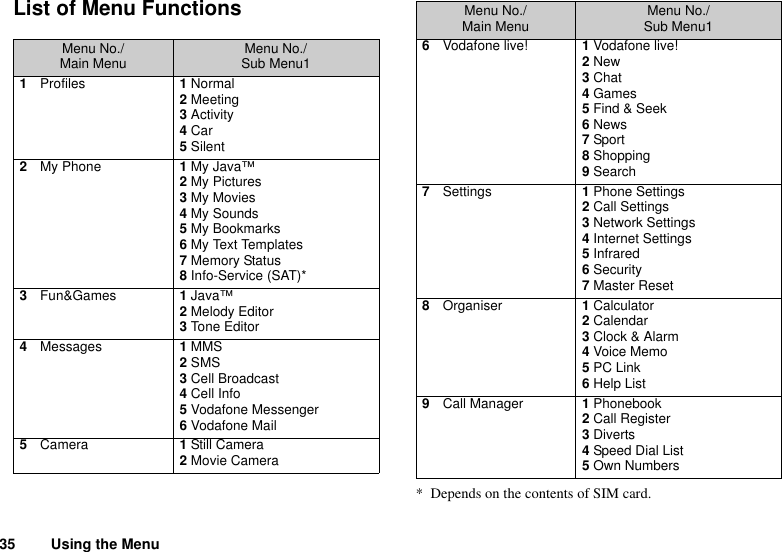
![33 Using the MenuUsing the MenuUsing the Main Menu1. Press during stand-by mode.2. Press , , or to navigate to required location.3. Press to access function.Pressing digit keys for the menu’s corresponding number also accesses function. In this manual, the operation to access function is described by the navigation keys operation.To return to the previous screen, press C [Back] if the right soft key displays [Back]. To close the Main Menu,press C [Exit].Operation GuidanceYour phone uses soft keys to help you to navigate the phone (A and C). These keys change usage depending on the situation. The function of each soft key at any given time is highlighted at the bottom left and bottom right of the screen.Shortcut KeysWhen pressing several key combinations during stand-by mode, you can shortcut to the specified menus. To access the desired menu directly, press and digit keys for the menu’s corresponding number during stand-by mode. See the following table as reference.](https://usermanual.wiki/Sharp/HRO00030/User-Guide-323099-Page-27.png)

![37 PhonebookPhonebookYou can store the phone numbers and E-mail addresses of your friends, family and colleagues in the Phonebook.Your phone can store up to 500 entries. In a Phonebook, you can store the following items.Items stored on handset memoryName: Up to ## characters, ## numbers / entryPhone number: ## digit, 3 phone numbers / entryE-mail Address: Up to ## characters, 2 addresses / entryGroup: ###########Home Address: Up to ## charactersNote:###Items stored on SIM memoryName: Up to ## characters, ## numbers / entryPhone number: ##, 1 phone number / entryChanging the Memory to be Referred ToPhonebook entries are managed respectively for handset memory or SIM memory to store new entries and view them.1. Press to display the Main menu.2. Press , , or to select “Call Manager”, then press .3. Press or to select “Phonebook”, then press .4. Press A [Options] to display the Options Menu.5. Press or to select “Advanced”, then press .](https://usermanual.wiki/Sharp/HRO00030/User-Guide-323099-Page-31.png)
![39 Phonebook6. Enter the phone number, then press .Up to 40 digits can be entered.7. Press or to select a desired number type, then press .8. Press or to move the cursor to the E-mail field, then press .The E-mail entry screen appears.9. Enter an E-mail address, then press .10.Press or to move the cursor to the group field, then press .The group selection screen appears.11.Press or to select the desired group, then press .12.Press or to move the cursor to the address field, then press .The address entry screen appears.13.Enter an address, then press .14.Press or to move the cursor to the note field, then press .15.Enter a note, then press .16.Press C [Save].Adding a Thumbnail Image to EntriesYou can add a thumbnail image to entries on handset memory.1. Perform step1 to 3 in “Changing the Memory to be Referred To” on page 37.2. Press or to select the desired entry to which you want to add a thumbnail picture, then press .3. Press A [Options] to display the Options Menu.4. Press or to select “Thumbnail”, then press .5. Press or to select the desired picture, then press .6. Press C [Save] to save the entry.To change the picture embedded, select “Change” instead in step 4, then press or to select the desired picture and press .Press A [Save].To remove the picture embedded, select “Remove” instead instep 4.On the confirmation screen that appears, press A[Yes].](https://usermanual.wiki/Sharp/HRO00030/User-Guide-323099-Page-33.png)
![Phonebook 40Note• When an image from the Saved Pictures gallery has been allocated as a thumbnail it is protected, and cannot be deleted from Saved Pictures gallery. In order to delete the image you will first need to remove the thumbnail in the Phonebook, then delete the image in Saved Pictures.Adding the Phone Number from the Call Log Entries1. Display the call log entry you wish to store (p. 161).2. Press . 3. Press or to select “Save to Phonebook”, then press .4. Follow the procedure in “Creating a New Entry” on page 38.Storing after Inputting a Phone Number1. Enter the phone number, then press A [Save].2. Follow the procedure from steps 3 to 16 in “Creating a New Entry” on page 38.Copying Entries from Handset to SIM CardYou can copy entries from the handset memory to SIM card one by one.1. Perform steps 1 to 3 in “Changing the Memory to be Referred To” on page 37.2. Press or to select the desired entry you want to copy to SIM card.3. Press A [Options] to display the Options Menu.4. Press or to select “Copy to SIM”, then press .5. Press A [Yes].Copying All Entries from SIM Card to HandsetYou can copy all entries from SIM card to the handset memory at a time.1. Perform 1 to 3 in “Changing the Memory to be Referred To” on page 37.2. Press A [Options] to display the Options Menu.3. Press or to select “Advanced”, then press .4. Press or to select “Copy All from SIM”, then press .5. Press A [Yes].](https://usermanual.wiki/Sharp/HRO00030/User-Guide-323099-Page-34.png)
![41 PhonebookFinding a Name and NumberTwo methods of searching through the Phonebook are available:1. Perform steps 1 to 4 in “Changing the Memory to be Referred To” on page 37.2. Select “Search”, then press .3. Enter a name or the first character(s) of the name.Matched results will be displayed alphabetically.If there is no entry in the Phonebook that satisfies the exact search criteria, the name that is nearest alphabetically matching will be displayed.4. Press or to scroll through list for selecting the desired name, then press .The detailed screen of the Phonebook appears.5. Press D.6. Press or to select the desired phone number, then press to dial.Tip• You can also dial the desired phone number by pressing the digit key corresponding to the list number instead of step 6.• If you select “SIM Entry” for “Refer to” option in Phonebook menu (p. 37), only one phone number entry will be displayed.• If no entries are found in the list, you can create an entry from the list. Press A [Options]. Then follow the procedures as described on page 38.• To view the address of the entry, press A [Options] in step 5, then select “View”. Press C [Back] to go back the detailed screen.Editing Phonebook EntriesYou can edit Phonebook entries searching from the Phonebook list or from each Phonebook entry.1. Search for the desired Phonebook entry.For details on searching through Phonebook entries, see “Finding a Name and Number”.2. Press A [Options] to display the Options Menu.3. Press or to select “Edit”, then press .4. Edit entry as required.5. Press .If you wish to edit another item, repeat steps 1 to 5.6. Press C [Save] to save the change(s).](https://usermanual.wiki/Sharp/HRO00030/User-Guide-323099-Page-35.png)
![Phonebook 42Deleting a single Phonebook Entry1. Search for a desired Phonebook entry.For details on searching through Phonebook entries, see “Finding a Name and Number” on page 41.2. Press A [Options] to display the Options Menu.3. Press or to select “Delete”, then press .4. Press A [Yes], then press .The selected entry will be deleted.To cancel deletion, press C [No] in step 4.Deleting All Phonebook Entries1. Perform steps 1 to 5 in “Changing the Memory to be Referred To” on page 37.2. Press or to select “Delete All Entries”, then press .3. Enter your handset code, then press .4. Press or to select “Handset Entries” or “SIM Entries”, then press .5. Press A [Yes], then press . To cancel deletion, press C [No] in step 5.Viewing GroupsYou can set the available group names when you store/edit the Phonebook.1. Perform steps 1 to 4 in “Changing the Memory to be Referred To” on page 37. 2. Press or to select “View Groups”, then press .3. Select “Select Current” to view the current group, or “Select All” to view all groups.“ ” indicates that the group has been selected. To cancel the selected group, press again.The checkbox becomes blank again.](https://usermanual.wiki/Sharp/HRO00030/User-Guide-323099-Page-36.png)
![43 PhonebookMemory StatusThis function helps you to check the number of entries stored in the Phonebook.1. Perform steps 1 to 4 in “Changing the Memory to be Referred To” on page 37. 2. Press or to select “Memory Status”, then press .You can check the memory status of SIM card and handset.Note• The number of locations available on the SIM is dependant on its capacity.Speed Dial ListYou can set a maximum of 9 phone numbers to the Speed Dial List.Adding Phonebook entries to the Speed Dial List1. Search for the desired Phonebook entry.For details on searching through Phonebook entries, see steps 1 to 4 in “Finding a Name and Number” on page 41.2. Press A [Options].3. Press or to select “Speed Dial”, then press .4. Press or to select the number you wish to add, then press .Viewing the Speed Dial List (?)1. Perform steps 1 and 2 in “Changing the Memory to be Referred To” on page 37.2. Press or to select “Speed Dial List”, then press .The stored names and phone numbers in the selected entry are displayed in order.](https://usermanual.wiki/Sharp/HRO00030/User-Guide-323099-Page-37.png)
![Phonebook 44Sending Messages1. Search for the desired Phonebook entry.For details on searching through Phonebook entries, see “Finding a Name and Number” on page 41.2. Press A [Options] to display the Options Menu.3. Press or to select “Message”, then press .4. Press or to select “MMS” or “SMS”, then press .5. Press or to select the desired number, then press .Or press the corresponding digit keys.6. Enter your message.For details on creating a message, see “Creating a New MMS” on page 99 or “Creating a New SMS” on page 110.](https://usermanual.wiki/Sharp/HRO00030/User-Guide-323099-Page-38.png)
![45 CameraCameraYour phone incorporates an integrated digital camera. This allows you to take and send pictures or movies wherever you are. Still Camera Put the phone into the still camera mode to take a picture.You can send the pictures registered in the Saved Pictures with your message.Picture format to be saved is in JPEG in the following three picture sizes.Small: 120 × 160 dotsMedium: 240 × 320 dotsLarge: 480 × 640 dotsTaking Pictures1. Press to display the Main Menu.2. Confirm that “Camera” is selected, then press .3. Press or to select “Still Camera”, then press .The preview is displayed through the main display.4. Press or side-down key to take the picture.The shutter sound occurs and the static image of the taken picture is displayed.5. Press A [Save].“Save to My Phone” is displayed, then the picture is registered.If you send a picture by MMS after taking the picture, press in step 6.6. Press F to return to stand-by.Note• The Large size images to be recorded may limit communication functions.Tip• Pressing A during stand-by also launches “Still Camera”.• To leave Still Camera Mode without registering the taken picture after step 4 in “Taking Pictures”: Press F and Press A [Yes].• When the distance to the subject is about 5 cm, set the Macro Dial to .When the distance to the subject is about 40 cm or more, set the Macro Dial to .• To take a picture of yourself, set the Macro Dial to the position to preview the image through the external display, then press or side-down key.(M 5)(M 5-1)](https://usermanual.wiki/Sharp/HRO00030/User-Guide-323099-Page-39.png)
![Camera 46To switch the finderPress P when the preview is displayed.Each time you press P, the finder switches between the external display and the main display. When you use the external display as the finder, the taken pictures are saved automatically.Taking Macro Pictures1. In still camera mode, set the Macro Dial to the position.2. Press or side-down key to take the picture.To cancel macro mode, set the Macro Dial to the normal position .Using the Zoom FunctionZooming ratio can be altered between “Wide”, “×2”, and “×4”. Press A or C to change the zooming ratio.Note• When “Select Picture Size” is set to “Small”, you can use the zoom function in three magnifications (×1, ×2, ×4).• When “Select Picture Size” is set to “Medium”, you can use the zoom function in two magnifications (×1, ×2).• When “Select Picture Size” is set to “Large”, you cannot use the zoom function.To select the picture size1. Press A [Options] before step 5 in “Still Camera” to display the Options Menu.2. Press or to select “Select Picture Size”, then press .3. Press or to select the picture size, then press .Selecting the Picture Quality1. In still camera mode, press A [Options].The Options Menu is displayed.2. Press or to select “Picture Quality”, then press .3. Press or to select “Normal” or “Fine”, then press .](https://usermanual.wiki/Sharp/HRO00030/User-Guide-323099-Page-40.png)
![47 CameraRetaking PicturesAfter steps 1 to 4 in “Taking Pictures” on page 45, press C [Cancel].Further shooting is available.Note• The Digital Camera Uses a CCD Sensor. Although this camera has been manufactured to the highest specification, some pictures may still appear too bright or too dark.• If the phone has been left in a warm place for a long time before taking or registering a picture, the picture quality may be poor.In the Case of No Available MemoryWhen the number of pictures that can be taken becomes 4 or less, or when the remaining capacity becomes 27.5 Kbytes (when “Medium” is selected as the picture size) or less, the remaining shots indicator in the upper left of the screen turns in red. (The number of pictures that can be taken is approximate.)When the number of pictures that can be taken becomes 0, and when you try to take a picture again, “Can not take a picture. Maximum Capacity” is displayed.Meanings of Indicators in Still Camera ModeRemaining shots indicator000: Indicates the remaining number of pictures that can be taken.Flash light indicatorIndicates when the flash light is turned on.: Normal mode: Macro modeDelay timer indicator (p. 49): Indicates when Timer is set.Continuous shooting indicatorsIndicates the shooting mode.: Single shot: Double shot: Triple shot: Quadplex shotPicture size indicators (p. 46)Large: 480 × 640 dotsMedium (default): 240 × 320 dotsSmall: 120 × 160 dots](https://usermanual.wiki/Sharp/HRO00030/User-Guide-323099-Page-41.png)
![Camera 48Picture quality indicatorsIndicates the quality (normal or fine) of the picture to be taken.:Fine:NormalPicture brightness (exposure level) indicators:Bright: :Normal: :DarkZooming ratio indicatorsIndicates the magnification (×1, ×2, ×4).: Original size: Double size:Quadplex sizeMaking Adjustments According to Lighting ConditionsAdjusting the Brightness of the PicturePress or to adjust the brightness of the picture.Once the phone has returned to the stand-by screen the brightness settings return to default.Viewing the Taken PicturesThe taken pictures can be viewed in the Saved Pictures.1. In still camera mode, press A [Options].The Options Menu is displayed.2. Select “Existing Pictures”, then press .The list of Saved Pictures is displayed.3. Press or to select the file name you wish to view, then press .The selected picture is displayed.4. Once you have finished, press C [Back] to return to the list.Tip• Your pictures are given file names which is “pic_nnn.jpg” (nnn is a three-digit consecutive number).The file name, date and size of your pictures are displayed in the list of Saved Pictures.](https://usermanual.wiki/Sharp/HRO00030/User-Guide-323099-Page-42.png)
![49 CameraUsing the TimerTaking a Picture with the Timer1. In still camera mode, press A [Options].The Options Menu is displayed.2. Press or to select “Delay Timer”, then press .3. Press or to select “On”, then press .“ ” appears on the screen and the phone returns to still camera mode.4. Press or side-down key to start the delay timer.10 seconds after the timer sound occurs, the camera takes a picture, and the shutter sound occurs.Note• Whilst the delay timer is operating, the flash light and the indicator flash.• If is pressed whilst the delay timer is operating, the picture is taken instantly.• If there is an incoming call or alarm functioning, or F is pressed, whilst the delay timer is operating, the camera operation is cancelled. In this case, the timer setting is cancelled.• The zooming function with A or C, the adjustment of brightness of the picture with or , or selecting the frame, is unavailable whilst the delay timer is operating.• If you wish to stop taking pictures with the timer, press C [Cancel] whilst the delay timer is operating.](https://usermanual.wiki/Sharp/HRO00030/User-Guide-323099-Page-43.png)
![Camera 50Cancelling the Delay TimerFour pictures are taken continuously. There is Auto Shooting and Manual Shooting available.Auto Shooting: Four pictures are taken in a row by pressing .Manual Shooting: Pictures are taken one by one by pressing .1. Press A [Options] whilst the delay timer setting is on.The Options Menu is displayed.2. Press or to select “Delay Timer”, then press .3. Press or to select “Off”, then press .“ ” goes off.Continuous ShootingFour pictures are taken continuously. There is Auto Shooting and Manual Shooting available.Auto Shooting: Four pictures are taken in a row by pressing .Manual Shooting: Pictures are taken one by one by pressing .1. In still camera mode, press A [Options].The Options Menu is displayed.2. Press or to select “Continuous Shooting”, then press .3. Select “Auto Shooting” or “Manual Shooting”, then press .To cancel Continuous Shooting, select “Off”.4. Press or side-down key to start continuousshooting.When the continuous shooting is completed, the taken pictures are saved automatically.To stop Continuous Shooting, press C [Cancel].Note• When “Select Picture Size” is set to “Large”, you cannot use the Continuous Shooting function.Selecting the FrameYou can select the frame from 10 preset patterns. You can also select a frame in the Saved Pictures as the frame.1. In still camera mode, press A [Options].The Options Menu is displayed.2. Press or to select “Select Frame”, then press .3. Press or to select “Preset Frames” or “My Pictures”, then press .](https://usermanual.wiki/Sharp/HRO00030/User-Guide-323099-Page-44.png)
![51 Camera4. Press or to select the frame you wish to use, then press .Note• When “Select Picture Size” is set to “Large”, you cannot use the Frame function.• Only the images of PNG format can be selected as the frame if you select “My Pictures” in step 3.Selecting the Light Colour1. In still camera mode, press A [Options].The Options Menu is displayed.2. Press or to select “Light Colour”, then press .3. Press or to select the desired colour, then press .To turn off the flash light, select “Off”.Tip•EachtimeRor side-up key is pressed, the status ofthe flash light changes as follows.Off o On (brightness for normal mode) o On (brightness for macro mode) o OffSelecting the Shutter SoundYou can select the shutter sound from 3 preset patterns.1. In still camera mode, press A [Options].The Options Menu is displayed.2. Press or to select “Shutter Sound”, then press .To play back the shutter sound, press A [Play].3. Press or to select the desired sound, then press .Sending PicturesSee “Sending Messages” on page 72 for instructions.Deleting PicturesSee “Deleting Pictures” on page 72 for instructions.Movie Camera Put the phone into the movie camera mode to record a movie.You can send the movies registered in the Saved Movies with your message.Movie format to be saved is in “.3gp” or “.mp4”.Recording MoviesThe maximum length of recording is about 5 secords. Sound can be recorded with the movie.1. Press to display the Main Menu.2. Press , , or to select “Camera”, then press .(M 5-2)](https://usermanual.wiki/Sharp/HRO00030/User-Guide-323099-Page-45.png)
![Camera 523. Press or to select “Movie Camera”, then press .The preview is displayed through the main display.4. Press or side-down key to start recording themovie.The sound for recording movie occurs.If you press or side-down key again, or whenthe recording is completed, the sound for ending movie recording occurs and the display transits to step 5.5. Press or to select “Save”, then press .“Save to My Phone” is displayed, then the movie is registered.If you preview a movie before saving, select “Preview” in step 6.If you send a movie by MMS after recording the movie, select “Send Message” in step 6.To switch the finderPress P when the preview is displayed.Each time you press P, the finder switches between the external display and the main display.Recording Macro Movies1. In movie camera mode, set the Macro Dial to the position.2. Press or side-down key to start recording themovie.To cancel macro mode, set the Macro Dial to the normal position.Using the Zoom FunctionZooming ratio can be altered between “Wide”, “×2”, and “×4”. Press A or C to change the zooming ratio.To select the movie format1. Press A [Options] before step 4 in “Recording Movies” to display the Options Menu.2. Press or to select “Movie Format”, then press .3. Press or to select “.3gp” or “.mp4”, then press .To select the movie quality1. Press A [Options] before step 4 in “Recording Movies” to display the Options Menu.2. Press or to select “Movie Quality”, then press .3. Press or to select the “Normal” or “Fine”, then press .](https://usermanual.wiki/Sharp/HRO00030/User-Guide-323099-Page-46.png)
![Camera 54Making Adjustments According to Lighting ConditionsAdjust the Brightness of the MoviePress or to adjust the brightness of the movie.Once the phone has returned to the stand-by screen, the brightness settings return to default.Viewing the Recorded MoviesThe recorded movies can be viewed in the Saved Movies.1. In movie camera mode, press A [Options].2. Press or to select “Existing Movies” then press .The list of Saved Movies is displayed.3. Press or to select the file name you wish to view, then press .4. Press .The selected movie is played back.To pause playing back, press .To resume playing back, press again.To stop playing back, press C [Back].To enlarge the movie, press A [×2].5. Once you have finished, press C [Back] to return to the list.Tip• Your movies are given file names which is “mov_nnn.3gp” (nnn is a three digit consecutive number) or “mov_nnn.mp4” (nnn is a three digit consecutive number).• If the movie has been recorded with sound, the sound volume can be adjusted.• The sound volume depends on the settings of Ringer Volume (p. 58). The sound volume becomes 0 when “Ringer Volume” is set to “Silent” or “Step Tone”.Using the TimerRecording a movie with the Timer1. In movie camera mode, press A [Options].The Options Menu is displayed.2. Press or to select “Delay Timer”, then press .3. Press or to select “On”, then press .“ ” appears on the screen and the phone returns to movie camera mode.4. Press or side-down key to start the delay timer.10 seconds after the timer sound occurs, the camera starts recording a movie.](https://usermanual.wiki/Sharp/HRO00030/User-Guide-323099-Page-48.png)
![55 CameraNote• Whilst the delay timer is operating, the flash light and the indicator flash.• If is pressed whilst the delay timer is operating, the movie is recorded instantly.• If there is an incoming call or alarm functioning, or F is pressed, whilst the delay timer is operating, the camera operation is cancelled. In this case, the timer setting is cancelled.• The zooming function with A or C, or the adjustment of brightness of the movie with or , is unavailable whilst the delay timer is operating.• If you wish to stop recording movies with the timer, press C [Cancel] whilst the delay timer is operating.Cancelling the Delay Timer1. Press A [Options] whilst the delay timer setting is on.The Options Menu is displayed.2. Press or to select “Delay Timer”, then press .3. Press or to select “Off”, then press .“ ” goes off.Recording Movies with Sound1. In movie camera mode, press A [Options].The Options Menu is displayed.2. Press or to select “Voice Record”, then press .3. Press or to select “On”, then press .To cancel recording movies with sound, select “Off” in step 3.](https://usermanual.wiki/Sharp/HRO00030/User-Guide-323099-Page-49.png)
![Camera 56Selecting the Light Colour1. In movie camera mode, press A [Options].The Options Menu is displayed.2. Press or to select “Light Colour”, then press .3. Press or to select the desired colour, then press .To turn off the flash light, select “Off”.Tip• Each time Ror side-up key is pressed, the status ofthe flash light changes as follows.Off o On (brightness for normal mode) o On (brightness for macro mode) o OffSending MoviesSee “Sending Messages” on page 74 for instructions.Deleting MoviesSee “Deleting Movie files” on page 75 for instructions.](https://usermanual.wiki/Sharp/HRO00030/User-Guide-323099-Page-50.png)
![57 ProfilesProfilesYou can easily alter the phone tone (e.g. the ringer volume, keypad tones, etc.) according to your environment.Tone sound and vibration set can be customised for each profile.There are 5 profiles including one user definable profile:• Normal•Meeting• Activity•Car•SilentActivating a Profile1. Press to display the Main Menu.2. Press , , or to select “Profiles”, then press .3. Press or to select the profile you wish to activate, then press .Note• When a profile is set, the icon which corresponds to the profile name appears in the stand-by screen:Normal: Is the default setup. (not displayed in the stand-by screen) Meeting: For use when discretion is needed. Activity: For use in busy environments. Car: For use in the car. (connected to a hands free kit) Silent: For use when silence is needed. All sounds are muted and you arealerted to calls with the vibrator.Tip• You can also activate a profile by pressing and holding R for approximately 2 seconds instead of steps 1and 2.Customising Profiles1. Perform steps 1 and 2 in “Activating a Profile”.2. Press or to select the profile you wish to customise, then press A [Options].(M 1)](https://usermanual.wiki/Sharp/HRO00030/User-Guide-323099-Page-51.png)
![Profiles 583. Press or to select “Personalise”, then press .4. Press or to select the setting you wish to customise, then press .5. Change the setting you want.For details about settings, see pages 58 to 63.Resetting Profile Settings1. Perform steps 1 and 2 in “Activating a Profile” on page 57.2. Press or to select the profile you wish to reset, then press A [Options].3. Press or to select “Set to Default”, then press .4. Enter your handset code, then press .5. Press A [Yes].To cancel the resetting, press C [No].Note• If you enter a wrong handset code in step 4, the screen returns to step 3.Ringer VolumeYou can adjust the ringer volume to one of 5 levels.When it is set to “Silent”, the volume of Java™applications is muted.1. Perform steps 1 to 3 in “Customising Profiles” on page 57.2. Press or to select “Ringer Volume”, then press .The current volume level is displayed.3. Press to increase the ringer volume or press to decrease the ringer volume and then press .To select “Step Tone”, press at level 5.To select “Silent”, press at level 1.](https://usermanual.wiki/Sharp/HRO00030/User-Guide-323099-Page-52.png)
![59 ProfilesRinger TypeYou can select the ring tone from 28 tones including 5 patterns, 13 sound effects and 10 melodies. You can also select a sound in the Saved Sounds as the default ring tone excluding the WAVE format. 1. Perform steps 1 to 3 in “Customising Profiles” on page 57.2. Press or to select “Assign Melody”, then press .3. Press or to select “Preset Melody” or “My Sounds”, followed by .4. Press or to select the ring tone you wish to use.If you wish to hear the demo, press A [Play].To stop playing, press A [Stop].5. When selection is complete, press .VibrationWhen the vibrator option is set to on, the phone will vibrate for incoming calls regardless of the ringer volume and tone settings.1. Perform steps 1 to 3 in “Customising Profiles” on page 57.2. Press or to select “Vibration”, then press .3. Press or to select “Enable”, “Disable” or “Link to Sound”, then press .Tip• When “Link to Sound” is selected in step 3, melodies are synchronised with the vibrator for the ring tone. However, this function may not work depending on data.• When you select “Enable” or “Link to Sound” in step 3, “ ” appears on the stand-by screen.](https://usermanual.wiki/Sharp/HRO00030/User-Guide-323099-Page-53.png)


![My Phone 66Download 1. Press to display the Main Menu. 2. Press , , or to select “My Phone”, then press .3. Press or to select “My Java™”, then press .4. Press or to select “Download More”, then press .The Java™ application download site is displayed.5. Press or to select the Java™ application you wish to download.After a WAP browser is displayed variously, the confirmation screen will appear after a whilst.6. Press A [Get].Downloading starts.7. Press A [OK] even if it carries out complete.Executing Java™ Applications 1. Press to display the Main Menu. 2. Press , , or to select “My Phone”, then press .3. Press or to select “My Java™”, then press .4. Press or to select “Saved Java™”, then press .The list of Saved Java™ is displayed. The downloaded Java™ applications are sequentially displayed from the latest one.5. Press or to select the title of the Java™ application you wish to execute, then press .The selected Java™ application is executed.When using network connection type Java™ applications, connection to the network can be selected.When selecting the Java™ Wallpaper application, you will be asked whether to select it for Java™ Wallpaper. Select “Yes” or “No”.(M 2-1-2) (M 2-1-1)](https://usermanual.wiki/Sharp/HRO00030/User-Guide-323099-Page-60.png)
![67 My PhoneTo end the Java™ application1. Press F.2. Press or to select “End”, then press .The screen returns to stand-by screen.To suspend the Java™ application1. Press F.2. Press or to select “Suspend”, then press .To resume the Java™ application, press during stand-by screen and select “Resume”, then press .Checking the Information of the Java™ Application1. Perform steps 1 to 4 in “Executing Java™ Applications” on page 66.2. Press or to select the Java™ application you wish to check, then press A [Options].The Options Menu is displayed.3. Press or to select “Property”, then press .The detailed information screen is displayed. 4. Press or to scroll through the screen.5. When you have finished, press C [Back] twice.The screen returns to the list.Deleting Java™ Applications1. Perform steps 1 to 4 in “Executing Java™ Applications” on page 66.2. Press or to select the Java™ application you wish to delete, then press A [Options].The Options Menu is displayed.3. Press or to select “Delete”, then press .4. Press A [Yes].The selected application is deleted.To cancel deletion, press C [No] in step 4.Note• You cannot delete preloaded Java™ applications.](https://usermanual.wiki/Sharp/HRO00030/User-Guide-323099-Page-61.png)
![My Phone 68My Pictures Pictures that are taken by a digital camera or images that are downloaded from mobile Internet sites can be managed.: Images in PNG format: Pictures in JPEG format: e-Animation file (NEVA): Images in GIF format: Images in BMP format: Images in WBMP format: Images in WPNG formatUsing as Wallpaper1. Press to display the Main Menu.2. Press , , or to select “My Phone”, then press .3. Press or to select “My Pictures”, then press .4. Press or to select “Saved Pictures”, then press .The list of Saved Pictures is displayed.5. Press or to select the file name you wish to use as wallpaper, then press A [Options].The Options Menu is displayed.6. Press or to select “Wallpaper”, then press .7. Press or to select “Main Display” or “External Display”, then press . Adding to Phonebook1. Perform steps 1 to 4 in “Using as Wallpaper”.2. Press or to select the file name you wish to add to Phonebook, then press A [Options].The Options Menu is displayed.3. Press or to select “Add to Phonebook”, then press .4. Press or to select “Edit Name” or “New Name”, then press .(M 2-2)](https://usermanual.wiki/Sharp/HRO00030/User-Guide-323099-Page-62.png)
![69 My PhoneIf you select “Edit Name”, the list of Phonebook is displayed for selecting the entry to which you wish to add picture. Select the desired entry, then press . The detailed screen of the selected entry is displayed with the picture added to it.If you select “New Name”, a new Phonebook entry is displayed with the picture added to it.Editing PicturesRetouching Pictures1. Perform steps 1 to 4 in “Using as Wallpaper” on page 68.2. Press or to select the file name you wish to retouch, then press A [Options].The Options Menu is displayed.3. Press or to select “Edit Picture”, then press .4. Press or to select “Retouch”, then press .5. Press or to select the retouching option you wish to use, then press .The selected option is confirmed on the display.6. Press .Note• Pictures in jpeg format and larger than QVGA in size (240 [W] × 320 [H]) can only be retouched.Adding Frame to Pictures1. Perform steps 1 to 4 in “Using as Wallpaper” on page 68.2. Press or to select the file name you wish to add frame to, then press A [Options].The Options Menu is displayed.3. Press or to select “Edit Picture”, then press .4. Press or to select “Add Frame”, then press .5. Press or to select the frame pattern you wish to use, then press .You can select a frame from 10 patterns.The selected frame is confirmed on the display.6. Press .Note• No frames can be added to pictures in jpeg format and larger than QVGA in size (240 [W] × 320 [H]).](https://usermanual.wiki/Sharp/HRO00030/User-Guide-323099-Page-63.png)
![My Phone 70Adding Stamp to Pictures1. Perform steps 1 to 4 in “Using as Wallpaper” on page 68.2. Press or to select the file name you wish to add stamp to, then press A [Options].The Options Menu is displayed.3. Press or to select “Edit Picture”, then press .4. Press or to select “Add Stamp”, then press .5. Press or to select the stamp pattern you wish to use, then press .You can select a stamp from 10 patterns.Note• No stamps can be added to pictures in jpeg format and larger than QVGA in size (240 [W] × 320 [H]).Rotating Pictures1. Perform steps 1 to 4 in “Using as Wallpaper” on page 68.2. Press or to select the file name you wish to rotate, then press A [Options].The Options Menu is displayed.3. Press or to select “Edit Picture”, then press .4. Press or to select “Rotate”, then press .The picture is rotated 90º anticlockwise.Press A to rotate 90º clockwise.5. Press .Note• Rotating pictures in jpeg format and larger than QVGA in size (240 [W] × 320 [H]) can not be performed.Downloading Picture File 1. Perform steps 1 to 3 in “Using as Wallpaper” on page 68.2. Press or to select “Download More”, then press .The picture file download site is displayed.(M 2-2-2)](https://usermanual.wiki/Sharp/HRO00030/User-Guide-323099-Page-64.png)
![71 My PhoneViewing Pictures1. Perform steps 1 to 4 in “Using as Wallpaper” on page 68.2. Press or to select the file name you wish to view, then press .The selected picture is displayed.3. Once you have confirmed the picture, press C[Back] to return to the list.Changing the File Name1. Perform steps 1 to 4 in “Using as Wallpaper” on page 68.2. Press or to select the file name you wish to change, then press A [Options].The Options Menu is displayed.3. Press or to select “Rename”, then press .4. Enter a new file name.To correct the last character, press C [Clear] briefly. Press and hold C [Clear] to clear all characters.5. Press .Note• Following characters cannot be used for a file name:/,\,:,*,?,",<,> and .(full-stop).Adjusting the Size of the PictureThe pictures that are registered in the Saved Pictures can be adjusted for use as main or external display as well as incoming call, alarm or power on/off display.When the picture size is modified, the data size is updated.1. Perform steps 1 to 4 in “Using as Wallpaper” on page 68.2. Press or to select the file name you wish to adjust, then press A [Options].The Options Menu is displayed.3. Press or to select “Adjust Size”, then press .4. Press or to select “Main Display”, “External Display”, “Power On/Off”, “Incoming” or “Alarm”, then press .To cancel registration, press C [Back] in step 4. Note• “Adjust Size” may not be available depending on the picture original and copyright issued.](https://usermanual.wiki/Sharp/HRO00030/User-Guide-323099-Page-65.png)
![My Phone 72Sending Messages1. Perform steps 1 to 4 in “Using as Wallpaper” on page 68.2. Press or to select the file name you wish to send, then press A [Options].The Options Menu is displayed.3. Press or to select “Send Message”, then press .4. Enter your message.For details on creating a message, see “Creating a New MMS” on page 99.Note• Pictures with a red icon cannot be sent attached to a message.Deleting Pictures1. Perform steps 1 to 4 in “Using as Wallpaper” on page 68.2. Press or to select the file name you wish to delete, then press A [Options].The Options Menu is displayed.3. Press or to select “Delete”, then press .4. Press or to select “One Data” or “All Data”, then press .5. Press A [Yes].To cancel deletion, Press C [No] in step 5.Checking the Information of the Pictures1. Perform steps 1 to 4 in “Using as Wallpaper” on page 68.2. Press or to select the file name you wish to check, then press A [Options].The Options Menu is displayed.3. Press or to select “Property”, then press .The detailed information screen is displayed.4. Press or to scroll through the screen.5. When you have finished, press C [Back].The screen returns to the list.](https://usermanual.wiki/Sharp/HRO00030/User-Guide-323099-Page-66.png)
![73 My PhoneMy Movies Movies that are recorded by a movie camera or movies that are downloaded from mobile Internet sites can be managed.Downloading Movie Files 1. Press to display the Main Menu.2. Press , , or to select “My Phone”, then press .3. Press or to select “My Movies”, then press .4. Press or to select “Download More”, then press .The movie file download site is displayed.Playing Back Movie Files1. Press to display the Main Menu.2. Press , , or to select “My Phone”, then press .3. Press or to select “My Movies”, then press .4. Press or to select “Saved Movies”, then press .The list of Saved Movies is displayed.5. Press or to select the movie you wish to play back, then press .6. Press .The selected movie is played back.To pause playing back, press .To resume playing back, press again.To stop playing back, press C [Back].To enlarge movie, press A [×2].(M 2-3)(M 2-3-2)](https://usermanual.wiki/Sharp/HRO00030/User-Guide-323099-Page-67.png)
![My Phone 74Checking the Information of the Movie Files1. Perform steps 1 to 4 in “Using as Wallpaper” on page 68.2. Press or to select the file name you wish to check, then press A [Options].The Options Menu is displayed.3. Press or to select “Property”, then press .The detailed information screen is displayed.4. Press or to scroll through the screen.5. When you have finished, press C [Back].The screen returns to the list.Changing the File Name1. Perform steps 1 to 4 in “Playing Back Movie Files” on page 73.2. Press or to select the file name you wish to change, then press A [Options].The Options Menu is displayed.3. Press or to select “Rename”, then press .4. Enter a new file name.To delete the last character, press C [Clear] briefly.Press and hold C [Clear] to clear all characters.5. Press .Note• Following characters cannot be used for a file name:/,\,:,*,?,",<,> and .(full-stop).Sending Messages1. Perform steps 1 to 4 in “Playing Back Movie Files” on page 73.2. Press or to select the file you wish to send, then press A [Options].The Options Menu is displayed.3. Press or to select “Send Message”, then press .4. Enter your message.For details on creating a message, see “Creating a New MMS” on page 99.](https://usermanual.wiki/Sharp/HRO00030/User-Guide-323099-Page-68.png)
![75 My PhoneDeleting Movie files1. Perform steps 1 to 4 in “Playing Back Movie Files” on page 73.2. Press or to select the file you wish to delete, then press A [Options].The Options Menu is displayed.3. Press or to select “Delete”, then press .4. Press or to select “One Data” or “All Data”, then press .5. Press A [Yes].To cancel deletion, press C [No] in step 5.My Sounds The ring tones instead created by Melody Editor and the WAVE data recorded by Voice Memo are managed in the Saved Sounds. Default ring tones are not contained.: Sound file in SMAF format: Original ring tone (composed in Melody Editor): Sound file in Standard MIDI format: Sound file in i Melody format: Sound file in WAVE format#: Sound file in AMR formatNote• SMAF (Synthetic music Mobile Application Format) is a format of music data for mobile phones.Downloading Sound Files 1. Press to display the Main Menu. 2. Press , , or to select “My Phone”, then press .3. Press or to select “My Sounds”, then press .4. Press , , or to select “Download More”, then press .The sound file download site is displayed.(M 2-4)(M 2-4-2)](https://usermanual.wiki/Sharp/HRO00030/User-Guide-323099-Page-69.png)
![My Phone 76Playing Back Sounds1. Press to display the Main Menu. 2. Press , , or to select “My Phone”, then press .3. Press or to select “My Sounds”, then press .4. Press or to select “Saved Sounds”, then press .The Saved Sounds is displayed.5. Press or to select the sound you wish to play back, then press .The selected sound is played.To stop playing, press .Checking the Information of the Sound Files1. Perform steps 1 to 4 in “Using as Wallpaper” on page 68.2. Press or to select the file name you wish to check, then press A [Options].The Options Menu is displayed.3. Press or to select “Property”, then press .The detailed information screen is displayed.4. Press or to scroll through the screen.5. When you have finished, press C [Back].The screen returns to the list.Changing the File Name1. Perform steps 1 to 4 in “Playing Back Sounds” on page 76.2. Press or to select the file name you wish to change, then press A [Options].The Options Menu is displayed.3. Press or to select “Rename”, then press .4. Enter a new file name.To delete the last character, press C [Clear] briefly. Press and hold C [Clear] to clear all characters.5. Press .](https://usermanual.wiki/Sharp/HRO00030/User-Guide-323099-Page-70.png)
![77 My PhoneNote• Following characters cannot be used for a file name:/,\,:,*,?,",<,> and .(full-stop).Tip• When “Edit Data” is displayed in the menu in step 2, you are able to edit the sound (p. 92). Once you have completed editing the newly saved file overwrites the old file. This new file then becomes the original ring tone.Setting the Tone and Strength1. Perform steps 1 to 4 in “Playing Back Sounds” on page 76.2. Press or to select the file name you wish to edit, then press A [Options].The Options Menu is displayed.3. Press or to select “Tone Set” or “Strength Set”, then press .For full details, see pages 90 to 92.Note• If “Tone Set” and “Strength Set” are not displayed in the menu in step 2, you cannot change the settings.Sending Messages1. Perform steps 1 to 4 in “Playing Back Sounds” on page 76.2. Press or to select the file name you wish to send, then press A [Options].The Options Menu is displayed.3. Press or to select “Send Message”, then press .If you select your original ring tone in step 2;4. Press or to select the file format “SMAF”, “MIDI” or “i Melody”, then press .5. Enter your message.For details on creating a message, see “Creating a New MMS” on page 99.Note• Sounds with a red icon cannot be sent attached to a message.• Only the first part of the data will be converted if you select “i Melody” in step 4.](https://usermanual.wiki/Sharp/HRO00030/User-Guide-323099-Page-71.png)
![My Phone 78Deleting Sounds1. Perform steps 1 to 4 in “Playing Back Sounds” on page 76.2. Press or to select the file name you wish to delete, then press A [Options].The Options Menu is displayed.3. Press or to select “Delete”, then press .4. Press or to select “One Data” or “All Data”, then press .5. press A [Yes].To cancel deletion, press C [No] in step 5.My Bookmarks You can store desired (or frequently used) pages (addresses) in My Bookmarks. It can save your time in accessing WAP pages sites. For further details, see “Vodafone live!” on page 117.Adding a Bookmark1. Press to display the Main Menu.2. Press , , or to select “My Phone”, then press .3. Press or to select “My Bookmarks”, then press .The list of My Bookmarks is displayed.4. Press A [Options] to display the Options Menu.When you add a bookmark for the first time, press A [Add] instead, then skip to step 6.5. Press or to select “Add”, then press .6. Enter the bookmark title, then press .7. Enter the URL address, then press .(M 2-5)](https://usermanual.wiki/Sharp/HRO00030/User-Guide-323099-Page-72.png)
![79 My PhoneAccessing Bookmarked Pages1. Perform steps 1 to 3 in “Adding a Bookmark”.2. Press or to select a bookmarked page you wish to access, then press .Editing Bookmarks1. Perform steps 1 to 3 in “Adding a Bookmark” on page 78.2. Press or to select the desired bookmark to edit, then press A [Options].The Options Menu is displayed.3. Press or to select “Edit”, then press .4. Edit the bookmark title.For details on entering characters, see “Entering Characters” on page 29.5. Press .6. Edit the URL address.7. Press .Deleting Bookmarks1. Perform steps 1 to 3 in “Adding a Bookmark” on page 78.2. Press or to select the desired bookmark to delete, then press A [Options].The Options Menu is displayed.3. Press or to select “Delete”, then press .4. Press A [Yes].The selected bookmark has been deleted.To cancel deletion, press C [No] in step 4, then press .](https://usermanual.wiki/Sharp/HRO00030/User-Guide-323099-Page-73.png)
![My Phone 80My Text Templates You can register up to 20 text templates for use in SMS and MMS.You can input messages or others more easily by registering frequently used text.128 characters may be registered in any text template.Adding Phrases to My Text Templates1. Press to display the Main Menu. 2. Press , , or to select “My Phone”, then press .3. Press or to select “My Text Templates”, then press .The list of My Text Templates is displayed.4. Press or to select the number you wish to register, then press .5. Enter the text, then press .For details on entering characters, see “Entering Characters” on page 29.Editing Text Templates1. Perform steps 1 to 3 in “Adding Phrases to My Text Templates”.2. Press or to select the number you wish to edit, then press .3. Enter new text.To correct the last character, press C [Clear] briefly. Press and hold C [Clear] to clear all characters.4. Press .(M 2-6)](https://usermanual.wiki/Sharp/HRO00030/User-Guide-323099-Page-74.png)
![81 My PhoneViewing Text Templates1. Perform steps 1 to 3 in “Adding Phrases to My Text Templates” on page 80.2. Press or to select the number you wish to view, then press A [Options].The Options Menu is displayed.3. Press or to select “Confirm”, then press .The selected text template is displayed.4. After confirmation, press C [Back] to return to template list.Deleting Text Templates1. Perform steps 1 to 3 in “Adding Phrases to My Text Templates” on page 80.2. Press or to select the text template you wish to delete, then press A [Options].3. Press or to select “Delete”, then press .4. Press A [Yes].The selected text template is deleted.To cancel deletion, press C [No] in step 4.Memory Status This function helps you to check the memory status of the My Phone.1. Press to display the Main Menu. 2. Press , , or to select “My Phone”, then press .3. Press or to select “Memory Status”, then press .Info-Service You can refer to the information on the SIM. Contact your service provider for further details.(M 2-7)(M 2-8)](https://usermanual.wiki/Sharp/HRO00030/User-Guide-323099-Page-75.png)
![Fun & Games 86Online ConfirmaionYou can adjust the display settings of the confirmation screen when a Java™ application attempts to connect to the network.1. Perform steps 1 to 4 in “Operation Priority” on page 84.2. Press or to select “Online Confirmation”, then press .3. Press or to select “On”, then press .To cancel confirmation, select “Off”, then press .Java™ ResetTo reset all items in Settings menu1. Perform steps 1 to 4 in “Operation Priority” on page 84.2. Press or to select “Java™ Reset”, then press .3. Enter your handset code, then press .If you enter a wrong handset code, the screen will return to step 4 in “Operation Priority” on page 84.4. Select “Settings Reset”, then press .5. Press A [Yes].All items in Settings menu will be reset.To cancel resetting, select C [No] in step 5.To clear all Java™ applicationsAll Java™ applications stored in Saved Games are cleared. The preloaded Java™ application cannot be deleted.1. Perform steps 1 to 4 in “Operation Priority” on page 84.2. Press or to select “Java™ Reset”, then press .3. Enter your handset code, then press .If you enter a wrong handset code, the screen will return to step 4 in “Operation Priority” on page 84.4. Press or to select “All Clear”, then press .5. Press A [Yes].All Java™ applications are cleared.To cancel clearing, press C [No] in step 5.Java™ Information (M 3-1-4)The information about the license of Java™ can be displayed.Download More (M 3-1-5)See “Download” on page 66 for instructions.](https://usermanual.wiki/Sharp/HRO00030/User-Guide-323099-Page-80.png)
![Fun & Games 88When you press A [Options] and select “Play before Cursor” whilst entering notes, the melody, that is displayed on the screen, is played back up to the cursor position.When you press A [Options] and select “Select Chord”, you can select another chord. Repeat steps 9 to 11 to input notes for the new chord. 13.When you finish inputting, press A [Options] to display the Options Menu.14.Press or to select “Save”, then press .15.Press or to select “Save to My Phone”, then press .Your original ring tone is registered in the Saved Sounds.Note• If the capacity or memory in the Saved Sounds becomes insufficient, the message of “Maximum Capacity : 100 Not registered” or “Not registered. Memory Full” is displayed respectively. At that time, the display returns to the screen of step 15. Try again after deleting unnecessary data (p. 78).Specify the Musical Scale and RestUsing the key shown below, specify the musical scale and rest.When you press the key shown above once, a crotchet is specified in the middle scale (no mark).When you press the same key repeatedly, the note will shift cycle through the available octave ranges.When you press or whilst a note is selected, the note will raise one semitone higher or lower.When entering rest: Crotchet rest is entered.Do Re Mi Fa Sol La Ti RestGHIJKLMQLLLL](https://usermanual.wiki/Sharp/HRO00030/User-Guide-323099-Page-82.png)
![Fun & Games 90Set the ToneThe phone can play notes using different instruments.1. Perform steps 1 to 13 in “Creating Your Original Ring Tone” on page 87.2. Press or to select “Tone Set”, then press .3. Press or to select a category of the tone.4. Press or to select a tone.When you press A [Options] and select “Play Current Chord”, the melody entered is played back in the selected tone.When you press A [Options] and select “Confirm Tones”, the syllable names are played back in the selected tone.5. Press .Now you can create a melody.You can select from the following 128 tones.Category Tone Category TonePianosPianoBright PianoE. Grand PianoHonky-TonkElectric Piano 1Electric Piano 2HarpsichordClaviChimesCelestaGlockenspielMusic BoxVibraphoneMarimbaXylophoneTubular BellsDulcimerOrgansDrawbar OrganPerc. OrganRock OrganChurch OrganReed OrganAccordionHarmonicaTango Accor-dionGuitarsNylon GuitarSteel GuitarJazz GuitarClean GuitarMuted GuitarOverdriven Gtr.Distortion Gtr.Gtr. HarmonicsBassesAcoustic BassFinger BassPick BassFretless BassSlap Bass 1Slap Bass 2Synth Bass 1Synth Bass 2Strings 1ViolinViolaCelloContrabassTremolo StringsPizz. StringsHarpTimpani](https://usermanual.wiki/Sharp/HRO00030/User-Guide-323099-Page-84.png)
![Fun & Games 92Setting the Strength of the Original Ring ToneThe strength of the original ring tone can be set in 3 levels for each melody.When you purchase this phone, the strength of the original ring tone is set to “Loud”.1. Perform steps 1 to 13 in “Creating Your Original Ring Tone” on page 87.2. Press or to select “Strength Set”, then press .3. Press or to select a strength of the tone, then press .When A [Play] is pressed, the original ring tone entered is played back in the selected strength of the tone.4. Press .Now you can create an original ring tone.Deleting an Original Ring TonePerform steps 1 to 4 in “Deleting Sounds” on page 78.Editing Original Ring Tones1. Perform steps 1 to 3 in “Creating Your Original Ring Tone” on page 87.2. Press or to select “Existing Melodies”, then press .3. Press or to select an original ring tone you wish to edit, then press A [Options].The Options Menu is displayed.4. Press or to select “Edit Data”, then press .5. Edit the title and press .6. Press or to select a tempo, then press .7. Press or to select the number of chords, then press .8. Press or to select a note you wish to change, then edit notes.When you add notes, enter the note correctly on the cursor.](https://usermanual.wiki/Sharp/HRO00030/User-Guide-323099-Page-86.png)
![93 Fun & GamesTo delete a note, press C [Clear] briefly. Press and hold C [Clear] to clear all tones.9. When you finish editing, press A [Options] to display the Options Menu.10.Press or to select “Save”, then press .11.Press or to select “Save to My Phone”, then press .12.Press or to select “Overwrite”, then press .The original ring tone is changed.If you select “New”, the melody before the correction is not modified. The original ring tone is registered as a new original ring tone.Note• When the number of chords is modified in step 7, the confirmation screen may be displayed. When you press A [Yes], a section of the melody may be deleted.• When you are going to add notes in step 8, you cannot add any notes if you have already entered 380 notes (for 8 chords melodies) or 190 notes (for 16 chords melodies).Tip• To delete the continuous melody, press A [Options]and then press after selecting “Delete after Cursor” or “Delete before Cursor”. You can delete the melody after the cursor or before the Cursor.Copying and Pasting NotesYou can copy and move a part of a melody to another position.Only original ring tones or editable melodies can be copied or moved.1. Perform steps 1 to 7 in “Editing Original Ring Tones” on page 92.2. Press A [Options] to display the Options Menu.3. Press or to select “Copy” or “Cut”, then press .4. Move the cursor to the first note to be copied or to be cut and press .](https://usermanual.wiki/Sharp/HRO00030/User-Guide-323099-Page-87.png)
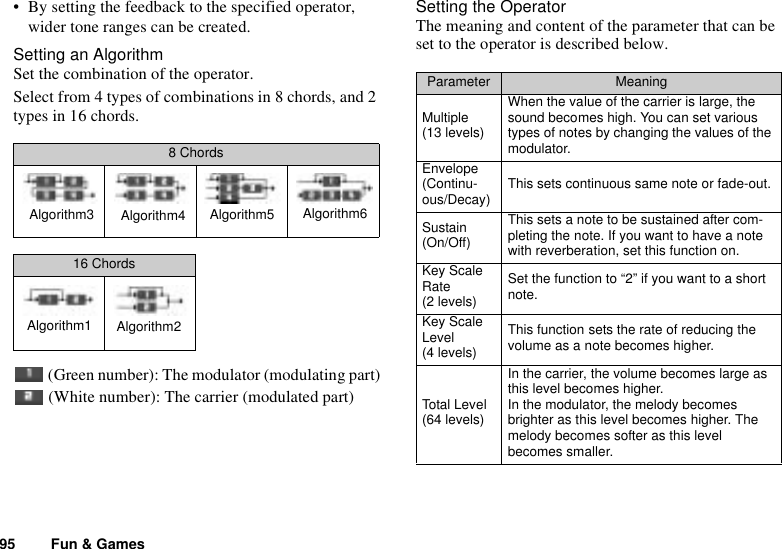
![Fun & Games 945. Move the cursor to the last note to highlight the area and press .The highlighted area will be saved temporarily in the memory. If you select “Cut” in step 3, the highlighted area will be cut.6. Press A [Options] to display the Options Menu.7. Press or to select “Paste”, then press .8. Move the cursor to the point you wish to paste the notes, then press .Saved notes are pasted.Tone Editor You can make a tone and use it for the original ring tone.Up to five types of tones can be registered respectively for 8 chords and 16 chords.FM Sound SourceVarious types of tones can be composed by combining the functions that generate one sine wave called an “Operator”. The combination of the operator is called an algorithm.The operator acts as the modulator (modulating part) or the carrier (modulated part) depending on the algorithm.• In each operator, various parameters such as multiple or envelope can be set.(M 3-3)](https://usermanual.wiki/Sharp/HRO00030/User-Guide-323099-Page-88.png)
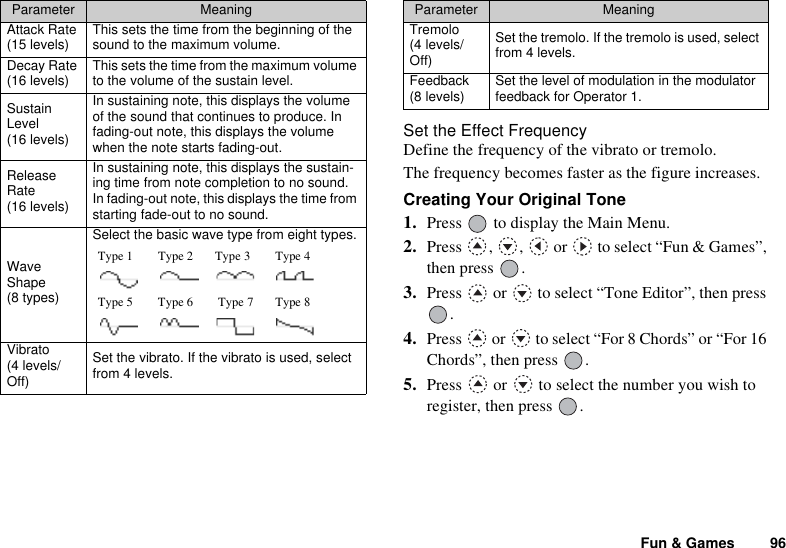
![97 Fun & Games6. Press or to select “Rename”, then press .7. Enter the title.Up to 16 characters can be entered.For details on entering characters, see “Entering Characters” on page 29.8. Press .9. Press or to select “Base Tone Set”, then press .10.Press or to select a category of the tone.11.Press or to select a base tone, then press .When A [Play] is pressed, the syllable names are played back in the selected tone.12.Press .13.Press or to select “Details Editor”, then press .14.Press or to select “Algorithm n” (n: 1, 2, 3, 4, 5 or 6), then press .15.Press or to select an algorithm you wish to set, then press .If you do not wish to change the operator, skip to step 20.16.Press or to select an operator you wish to change, then press .The basic note parameter is set in advance.17.Press or to select a parameter you wish to change.18.Press or to change the content of the parameter.For details of parameter, see pages 95 to 96.When you press , the syllable names are played back in the selected content of the parameter.Repeat steps 17 and 18 to change another content of the parameter.](https://usermanual.wiki/Sharp/HRO00030/User-Guide-323099-Page-91.png)
![Fun & Games 9819.Press A [Save].If you do not wish to change the effect frequency, skip to step 22.20.Press or to select “Effect Frequency”, then press .21.Press or to select the effect frequency you wish to set, then press .22.Press A [Save].23.Press A [Save].Your original tone is registered.](https://usermanual.wiki/Sharp/HRO00030/User-Guide-323099-Page-92.png)
![99 MessagesMessagesYour phone allows you to send and receive short messages, MMS and WAP mails.MMS (Multimedia Messaging Service) About MMSMMS allows you to further personalise your messages with pictures, movies, sounds and animations.Note• Some MMS functions may not always be available depending on your network. Contact your network operator for more information.Setting up MMS (M 4-1-6)1. Press A [ ] during stand-by.2. Press or to select “MMS”, then press .3. Press or to select “Settings”, then press .4. Select the desired item to set, then press .The items available are:• Download Msg.• Delivery Rep. Allow• Anonymous Reject• Auto Delete• Sending Message default5. Edit the each item.6. When you finish setting, press C [Back].Creating a New MMS 1. Press A [ ] during stand-by.2. Select “MMS”, then press .3. Select “Compose”, then press .4. Select “Free Format”, then press .5. Enter your message, then press .6. Enter phone number or E-mail address of the recipient, then press .If you wish to select the phone number or E-mail address in the Phonebook, search for the desired Phonebook entry. (M 4)(M 4-1)(M 4-1-1)](https://usermanual.wiki/Sharp/HRO00030/User-Guide-323099-Page-93.png)
![Messages 100Press or A [Search] to search the number by name or press or to search in alphabetical order, then press . For details on searching the Phonebook entries, see “Finding a Name and Number” on page 41.7. Select “Send”, then press .The confirmation screen of file size is displayed.8. Press A [Yes].After the message has been sent, the message is added to the Sent box.Note• This phone allows you to enter up to 256 characters as a subject, and enter up to 10 addresses of the recipients for sending MMS.However, these may be limited depending on your network. In this case, you may be failed to send MMS.Contact your network operator for more information.To Enter the Subject of the Message1. Perform steps 1 to 6 in “Creating a New MMS” on page 99.2. Select “Subject”, then press .3. Enter the subject of your message, then press .Sending Greeting CardsYou can select and send a template message from the Template List as your Greeting Cards message.1. Perform steps 1 to 3 in “Creating a New MMS” on page 99.2. Select “Greeting Cards”, then press .3. Select a template you wish to send, then press .4. Perform steps 5 to 8 in “Creating a New MMS” on page 99.](https://usermanual.wiki/Sharp/HRO00030/User-Guide-323099-Page-94.png)
![101 MessagesTo Add Recipients1. Perform steps 1 to 8 in “Creating a New MMS” on page 99.2. Press or to select “Add address”, then press .3. Select “To” to add recipients or “Cc” to send a copy of this MMS to other recipients, then press .4. Select a desired number from the list, then press .5. Enter the phone number or E-mail address of the other recipients, then press .6. Press C [Back] twice.To Use the Text Template1. Perform steps 1 to 4 in “Creating a New MMS” on page 99.2. Press A [Options] to display the Options Menu.3. Press or to select “Insert Template”, then press .4. Select the desired template from the list, then press .To Save a Message in the Drafts Box You can save a message in the Drafts box temporarily and send it later, without sending it immediately.1. Perform steps 1 to 6 in “Creating a New MMS” on page 99.2. Press or to select “Save”, then press to save the message in the Drafts box.Note• You can send it later following the instructions in “Sending a Message in the Drafts Box” on page 103.(M 4-1-5)](https://usermanual.wiki/Sharp/HRO00030/User-Guide-323099-Page-95.png)
![Messages 102Turning the Slide Show Setting On or Off1. Perform steps 1 to 4 in “Creating a New MMS” on page 99.2. Press A [Options] to display the Options Menu.3. Press or to select “Slide Show”, then press .4. Press or to select “On” or “Off”, then press .If You Select “On”• You can create messages which have up to 3 slides. Each slide can contain one picture, one sound file and up to 512 characters of text (up to the message total 100Kbyte limit).• The slide options available are:Add Slide: To add a new slide.Delete Slide: To delete the active slide.Previous Slide: To navigate to the previous slide.Next Slide: To navigate to the next slide.• EVA data cannot be attached as a slide data to a message.If You Select “Off”• You can attach a maximum of 6 pictures or sounds and up to 100 Kbyte.• EVA data cannot be attached as a slide data to a message.Inserting Attached DataYou can send pictures and sounds saved in the Saved Pictures or Saved Sounds attached to MMS.1. Perform steps 1 to 4 in “Creating a New MMS” on page 99.2. Press A [Options] to display the Options Menu.3. Press or to select “Picture”, “Movie” or “Sound”, then press .4. Select the file name you wish to attach, then press .The selected picture/movie/sound is attached.5. Press .](https://usermanual.wiki/Sharp/HRO00030/User-Guide-323099-Page-96.png)
![103 MessagesTo Add Attached Data1. Perform step 1 to 3 in “Inserting Attached Data” on page 102. The list of attached data is displayed.2. Select the file name you wish to add, then press A[Options].3. Press or to select “Add Picture”, “Add Movie” or “Add Sound”, then press .4. Perform steps 4 and 5 in “Inserting Attached Data” on page 102.To Delete Attached Data1. Perform steps 1 to 3 in “Inserting Attached Data” on page 102.The list of attached data is displayed.2. Select the file name you wish to delete, then press A [Options].3. Press or to select “Remove”, then press .4. Press A [Yes].Sending a Message in the Drafts Box 1. Perform steps 1 and 2 in “Creating a New MMS” on page 99.2. Press or to select “Drafts”, then press .3. Select the desired message to send in the Drafts box, then press A [Options].The Options Menu is displayed.4. Press or to select “Send”, then press .The confirmation screen of file size is displayed.5. Press A [Yes].The phone begins the sending process and the MMS is sent.(M 4-1-3)](https://usermanual.wiki/Sharp/HRO00030/User-Guide-323099-Page-97.png)
![Messages 104Reading MMS (M 4-1-2)Messages you receive are stored in the Inbox, and outgoing messages are stored in the Drafts box until you send them, after which they move to the Sent box.Incoming MessagesThe MMS indicator ( ) will appear when you are receiving an incoming message.1. Perform steps 1 and 2 in “Creating a New MMS” on page 99.2. Press or to select “Inbox”, then press .Messages are marked with “ ” denote mails with attachments.3. Press or to select the desired message, then press .The message is displayed.4. Scroll the screen to read the message.5. When you finish viewing, press A [Done].To Check the Sender and Receiver Phone Number or E-mail Address1. Perform steps 1 to 2 in “Incoming Messages” on page 104.2. Press or to select the desired message, then press A [Options] to display the Options Menu.3. Press or to select “Details”, then press .The sender’s phone number or E-mail address, time and date stamp, subject, attachment and size are displayed.Replying to a Message to the Sender from Inbox1. Perform steps 1 and 2 in “Creating a New MMS” on page 99.2. Press or to select “Inbox”, then press .3. Press A [Options] to display the Options Menu.4. Press or to select “Reply”, then press .](https://usermanual.wiki/Sharp/HRO00030/User-Guide-323099-Page-98.png)
![105 Messages5. Enter your message.For details on entering characters, see “Entering Characters” on page 29.6. Press .The phone number or E-mail address of the recipient is automatically filled in the sender’s phone number or E-mail address. 7. Press .The subject field is automatically filled in with the original subject preceded by “Re:”.8. Select “Send”, then press .The confirmation screen of file size is displayed.9. Press A [Yes].Tip• You can reply to a message to all addresses of selected messages by selecting “Reply All” in step 4.Forwarding a Message1. Perform steps 1 to 3 in “Replying to a Message to the Sender from Inbox” on page 104.2. Press or to select “Forward”, then press .3. Enter phone number or E-mail address of the recipient, then press .If you wish to select the phone number or E-mail address in the Phonebook, search for the desired Phonebook entry. Press or A [Search] to search the number by name or press or to search in alphabetical order, then press . For details on searching the Phonebook entries, see “Finding a Name and Number” on page 41.4. Select “Send”, then press .The confirmation screen of the file size is displayed.5. Press A [Yes].Note• When the message with attached data is forwarded the data is also sent. However, if there is any material which the phone recognises as having copyright, it will not be sent.• “Subject” field is automatically filled in with the original subject preceded by “Fw:”.The original message and subject cannot be changed.](https://usermanual.wiki/Sharp/HRO00030/User-Guide-323099-Page-99.png)
![Messages 106Modifying a Message1. Perform steps 1 to 3 in “Replying to a Message to the Sender from Inbox” on page 104.2. Select “Edit”, then press .3. Modify the message.4. Press .5. Select “Send”, then press .The confirmation screen of the file size is displayed.6. Press A [Yes].Note• Messages cannot be edited if they contain particular data such as Slide Show, XHTML, copyrights or unknown format.Storing the Phone Number or E-mail Address of a Sender in the Phonebook1. Perform steps 1 to 3 in “Replying to a Message to the Sender from Inbox” on page 104.2. Press or to select “Save to Phonebook”, then press .For details on entering a name, see “Creating a New Entry” on page 38.Retrieving MMSWhen “ ” is in the Inbox, the following can be done.1. Perform steps 1 and 2 in “Creating a New MMS” on page 99.2. Press or to select “Inbox”, then press .3. Press or to select a desired alert to download.4. Press A [Options] to display the Options Menu.5. Press or to select “Download”, then press .](https://usermanual.wiki/Sharp/HRO00030/User-Guide-323099-Page-100.png)
![107 MessagesDeleting Messages1. Perform steps 1 and 2 in “Creating a New MMS” on page 99.2. Press or to select “Inbox”, “Sent”, “Drafts” or “Outbox”, then press .3. Select the message you wish to delete, then press A[Options].The Options Menu is displayed.4. Press or to select “Delete”, then press .The confirmation screen is displayed.5. Press or to select “One Message” or “All Messages”, then press .6. Press A [Yes].To cancel deletion, press C [No].Note• You cannot delete locked messages.To Lock Message1. Perform steps 1 and 2 in “Creating a New MMS” on page 99.2. Press or to select “Inbox” or “Sent”, then press .3. Select the message you wish to lock, then press A[Options].The Options Menu is displayed.4. Press or to select “Lock/Unlock”, then press .Making a Call to the Sender of a MessageYou can make a call to the sender of a message in Inbox whose address (From) is the phone number.1. Perform steps 1 and 2 in “Replying to a Message to the Sender from Inbox” on page 104.2. Press A [Options] to display the Options Menu.3. Press or to select “Call”, then press .](https://usermanual.wiki/Sharp/HRO00030/User-Guide-323099-Page-101.png)
![Messages 108SMS (Short Message Service) About SMSThe Short Message Service (SMS) allows you to send text messages of up to 1024 characters to other GSM users.Using SMS with Your PhoneMessages longer than 160 characters may be composed. During sending, the messages will be split. If the receiver has a suitable phone the messages will recombine during reception, if not your message will appear as a number of separate 152 characters messages.You can send or receive SMS even if you are talking on the phone.You can also use My Text Templates to help you compose SMS.Setting up SMS Before you can use SMS to send and receive messages, you have to set up some personal and system information.To set up the Service Centre Address1. Press A [ ] during stand-by to display the Message menu.2. Press or to select “SMS”, then press .3. Press or to select “Settings”, then press .4. Select “Message Centre”, then press .5. Enter the centre number.If you wish to enter a country code for a message to an international number, press and hold P until a “+” sign appears.6. Press .(M 4-2)(M 4-2-6)](https://usermanual.wiki/Sharp/HRO00030/User-Guide-323099-Page-102.png)
![Messages 110Creating a New SMS 1. Press A [ ] during stand-by.2. Press or to select “SMS”, then press .3. Select “Compose”, then press .4. Enter your message.For details on entering characters, see “Entering Characters” on page 29.5. Press .To Use the Text Template1. Perform steps 1 to 3 in “Creating a New SMS”.2. Press A [Options] to display the Options Menu.3. Press or to select “Insert Template”, then press .4. Select the desired template from the list, then press .To Save the Message in the Draftbox1. Perform steps 1 to 5 in “Creating a New SMS”.2. Enter the SMS phone number of the recipient, then press .3. Press or to select “Save”, then press .Sending a Message 1. Perform steps 1 to 5 in “Creating a New SMS”.2. Enter the SMS phone number of the recipient, then press .3. If you wish to select the SMS phone number in the Phonebook, search for the desired Phonebook entry. Press A [Search] to search the number by name or press or to search in alphabetical order, then press . For details on searching the Phonebook entries, see “Finding a Name and Number” on page 41.4. Press or to select “Send”, then press .The confirmation screen is displayed.5. Press A [Yes].The phone begins the sending process and the SMS is sent. After the message has been sent, the message is added to the Outbox.To Add Recipients1. Perform steps 1 to 3 in “Sending a Message” on page 110.2. Press or to select “Add address”, then press .(M 4-2-1) (M 4-2-3)](https://usermanual.wiki/Sharp/HRO00030/User-Guide-323099-Page-104.png)
![111 Messages3. Select an item number to add recipients phone number, then press .4. Enter the phone number to add, then press .Follow the procedure from step 4 in “Sending a Message” on page 110.Reading SMS Incoming MessagesThe SMS indicator ( ) will appear when an incoming message arrives.1. When you receive a SMS, press during stand-by.2. Press or to select the desired message.The sender’s phone number and a part of the message are displayed. When the sender’s phone number is stored in the Phonebook, the sender’s name is displayed instead of the phone number.Messages are marked with “ ” denote unread messages. If the Inbox, Outbox or Draftbox is full, “ ” flashes. Delete unnecessary messages.3. Press .4. Scroll the screen to read the message.5. When you have finished viewing, press F.Replying to the Sender1. Perform steps 1 to 3 in “Reading SMS”.2. Press A [Options] to display the Options Menu.3. Press or to select “Reply”, then press .4. Enter your message.For details on entering characters, see “Entering Characters” on page 29.5. Press .Follow the procedure from step 2 in “Sending a Message” on page 110.Calling the Message Sender1. Perform steps 1 to 3 “Reading SMS”.2. Press A [Options] to display the Options Menu.3. Press or to select “Call Sender”, then press .Forwarding a Message1. Perform steps 1 to 3 in “Reading SMS”.2. Press A [Options] to display the Options Menu.3. Press or to select “Forward”, then press .(M 4-2-2)](https://usermanual.wiki/Sharp/HRO00030/User-Guide-323099-Page-105.png)
![Messages 1124. Enter the SMS phone number of the recipient, then press .For details on searching the Phonebook entries, see “Finding a Name and Number” on page 41.5. Press or to select “Send”, then press . The confirmation screen is displayed.6. Press A [Yes].The phone begins the sending process and the SMS is sent.Modifying a Message1. Perform steps 1 and 2 in “Creating a New SMS” on page 110.2. Press or to select “Outbox” or “Draftbox”, then press .3. Select the desired message to modify, then press .4. Press A [Options] to display the Options Menu.5. Select “Edit”, then press .6. Modify the message, then press .Follow the procedure from step 2 in “Sending a Message” on page 110.Deleting Messages1. Perform steps 1 and 2 in “Creating a New SMS” on page 110.2. Press or to select “Inbox”, “Outbox” or “Draftbox”, then press .3. Select the message you wish to delete, then press .4. Press A [Options] to display the Options Menu.5. Press or to select “Delete”, then press .6. Press A [Yes] to select “Yes”, then press .The selected message is deleted.To cancel deletion, press C [No].](https://usermanual.wiki/Sharp/HRO00030/User-Guide-323099-Page-106.png)
![113 MessagesExtracting Phone Numbers from the Received Messages and making a callYou can make a call using a telephone number embedded in the received SMS message.1. Perform steps 1 and 2 in “Reading SMS” on page 111.2. Press A [Options] to display the Options Menu.3. Press or to select “Extract Numbers”, then press .Any kinds of numbers are listed.4. Press or to select the telephone number, then press .5. To make a call, press D.To save this telephone number in the phonebook, press A [Save].For details on entering a name, see “Creating a New Entry” on page 38.Tip• Selecting “Save to phonebook” in step 3 instead allows you to go to the phone number entry prompt with the sender’s number entered.For details on entering a name, see “Creating a New Entry” on page 38.](https://usermanual.wiki/Sharp/HRO00030/User-Guide-323099-Page-107.png)
![Messages 114Cell Broadcast You can receive Cell Broadcast messages or general messages like weather reports, traffic reports, etc. broadcast to all subscribers in a certain network area. This function may not be available on all mobile phone networks. Contact your network operator for more information.Enabling/Disabling Cell Broadcast (M 4-3-1)1. Press A [ ] during stand-by.2. Press or to select “Cell Broadcast”, then press .3. Press or to select “On/Off”, then press .4. Select “On” to set Cell Broadcast on or “Off” to set it off, then press .Reading Cell Broadcast Messages (M 4-3-2)1. When you receive a Cell Broadcast message, press .2. Scroll the screen to read the message.3. When you finish viewing, press F.Subscribing to Cell Broadcasts (M 4-3-3)Select the page of the cell broadcast message that you want.1. Press A [ ] during stand-by.2. Press or to select “Cell Broadcast”, then press .3. Press or to select “Settings”, then press .4. Press or to select “Set Info Subjects”, then press .5. Press or to select “Create Subject”, then press .6. Press to add the channel.7. Enter the appropriate channel code obtained from your service provider, and a title for the channel.(M 4-3)](https://usermanual.wiki/Sharp/HRO00030/User-Guide-323099-Page-108.png)
![115 MessagesSetting LanguagesAllows you to select your preferred language for the cell broadcast message display.Cell Information The Cell Information is the message information that operators sent to subscribers in certain areas.When you receive Cell Information, the message will be displayed on the stand-by screen.Note• This function may not be available on all mobile phone networks. Contact your network operator for more information.Enabling/Disabling Cell Information1. Press A [ ] during stand-by.2. Press or to select “Cell Info”, then press .3. Press or to select “On” or “Off”, then press .Note• If Cell Information is set to “On”, the Stand-by Time will decrease.(M 4-4)](https://usermanual.wiki/Sharp/HRO00030/User-Guide-323099-Page-109.png)
![Vodafone live! 118Browser MenuWhen you have started browsing, you can reach browsing options by pressing D.The Browser Menu contains the following:Back: Go to the previous screen.Home: Go to the homepage you set in the WAP Settings.Bookmarks: Add the site you are currently browsing to your list of bookmarks, or see the list of bookmarks.Go to URL: Input the URL of the site you wish to go, and go to the site.Show URL: Display the URL you are currently browsing.SnapShots: Save the page you are currently browsing to your list of Snap Shots, or see the list of Snap Shots.Save Items: Save images or sounds to the My Pictures or My Sounds.Alert Inbox: See the list of WAP push messages. You can receive push messages via WAP Services. This means that a service provider sends WAP content to your phone, without any set up.Reload: Refresh the contents of the WAP page.Settings: Includes “Restart Browser”, some settings, etc.BookmarksAdding a Bookmark1. Press A when you are browsing to display the Option Menu.When you add a bookmark for the first time, press C [Add] instead, then skip to step 3.2. Press or to select “Add”, then press .3. Enter the bookmark title, then press .4. Enter the URL address, then press .](https://usermanual.wiki/Sharp/HRO00030/User-Guide-323099-Page-112.png)

![Settings 130Call SettingsSet various types of functions and services.Call Waiting If you wish to be able to receive another incoming call whilst you have a call in progress, you must activate the Call Waiting service. 1. Press to display the Main Menu. 2. Press , , or to select “Settings”, then press .3. Press or to select “Call Settings”, then press .4. Select “Call Waiting”, then press .5. Select “On” to activate the Call Waiting service or “Off” to deactivate it, then press .6. Press A [OK].Note• Call Waiting service may not be available on all mobile phone networks. Contact your network operator for more information.To Check the Call Waiting Service Status1. Perform steps 1 to 4 in “Call Waiting” on page 130.2. Press or to select “Status”, then press .Now you can check the status of the Call Waiting service. 3. Press C [Back].Displaying Call Timers (M 7-2-2)1. Perform steps 1 to 3 in “Call Waiting” on page 130.2. Press or to select “Display Call Timers”, then press .3. Select “On” or “Off”, then press .Showing Your Phone Number This lets you control whether to show your phone number when calling another party.Display Caller No. is not supported on all networks. Please check with your service provider for availability.1. Perform steps 1 to 3 in “Call Waiting” on page 130.2. Press or to select “Showing Your Phone Number”, then press .3. Select “On” to show your phone number or “Off” not to show your phone number, then press .(M 7-2-1)(M 7-2-3)](https://usermanual.wiki/Sharp/HRO00030/User-Guide-323099-Page-124.png)
![131 SettingsTo Check the Caller No. Status1. Perform steps 1 to 2 in “Showing Your Phone Number”.2. Press or to select “Status”, then press .Now you can check the status of the Display Caller No.3. Press A [OK].Adjusting Earpiece Volume You can adjust the earpiece volume.1. Perform steps 1 to 3 in “Call Waiting” on page 130.2. Press or to select “Earpiece Volume”, then press .3. Press to increase the earpiece volume or press to decrease the earpiece volume, then press .Each press of or adjusts the earpiece volume by one of 5 levels.Personal Call (M 7-2-5)A specified ring tone or vibrator setting can be associated to a pre-registered phone number.Up to 20 phone numbers can be registered.1. Perform steps 1 to 3 in “Call Waiting” on page 130.2. Press or to select “Personal Call”, then press .3. Select the number you wish to set, then press .4. Enter the phone number, then press .If you wish to select the phone number in the Phonebook, search for the desired Phonebook entry.Press or A [Search] to search the number by name or press or to search in alphabetical order, then press . For details on searching the Phonebook entries, see “Finding a Name and Number” on page 41.5. Press or to select “Assign Melody”, then press .6. Select a ring tone.For details on selecting a ring tone, see “Ringer Type” on page 59.7. Press or to select “Vibration”, then press .(M 7-2-4)](https://usermanual.wiki/Sharp/HRO00030/User-Guide-323099-Page-125.png)

![Settings 134Network SettingsSelecting a Network Automatically Each time the power is turned on, your phone will always try to connect first to the most recently available network, then to the subscribed network, and lastly to the preferred network.If none of these are found, it will then search for any other available GSM networks.1. Press to display the Main Menu. 2. Press , , or to select “Settings”, then press .3. Press or to select “Network Settings”, then press .4. Select “Select Network”, then press .5. Select “Automatic”, then press .To Set the Network Manually1. As in step 5 in “Selecting a Network Automatically”, press or to select “Manual”, then press .2. Select the network from the list, then press .Adding a New Network1. Perform steps 1 to 4 in “Selecting a Network Automatically”. 2. Press or to select “Add New Network”, then press .3. Press or to select “Add”, then press .4. Enter the country code.5. Press .6. Enter the network code.7. Press .8. Enter a new network name.9. Press A [OK].Editing the Preferred ListTo Change the Position of a Network in the Preferred List1. Perform steps 1 to 4 in “Selecting a Network Automatically”.2. Press or to select “Set Preferred”, then press .3. Select the name of the network to change the position from the list, then press .(M 7-3-1)](https://usermanual.wiki/Sharp/HRO00030/User-Guide-323099-Page-128.png)
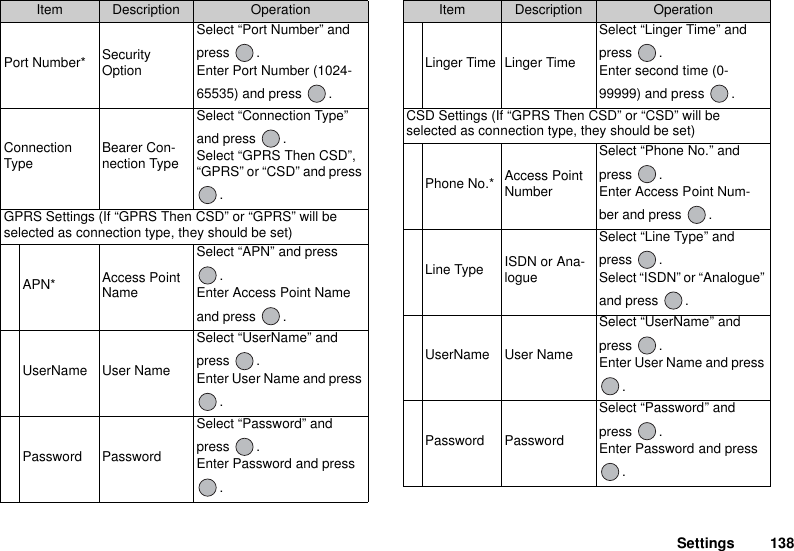
![Settings 144Call Barring This function lets you place restrictions on incoming and outgoing calls. To activate Call Barring you will need the call barring password, which will be available from your service provider.1. Perform steps 1 to 3 in “Enabling/Disabling the PIN Code” on page 142.2. Press or to select “Call Barring”, then press .3. Press or to select call barring option, then press .The call barring functions available are:• “Bar Foreign Calls”: Restricts all outgoing international calls.• “Only Local & Home”:Restricts all outgoing international calls except toyour home country.• “Bar Incoming Calls”: Restricts all incoming calls.• “Bar Inc. if Abroad”: Restricts all incoming calls when you are outside of the coverage from your registered network operator.• “Bar Outgoing Calls”: Restricts all outgoing calls except emergency calls.4. Select one of the call barring options, then press .The call barring options available are:• “All Services”: Restricts all services.• “Voice Calls”: Restricts all voice calls.• “Data”: Restricts all data calls.• “Fax”: Restricts all fax calls.• “Messages”: Restricts all messages.• “All except Msgs.”: Restricts all services except messages.5. Select “On”, then press .If you select “Off”, the selected call barring setting is cancelled.6. Enter the network password, then press .To change the network password, see “Changing the Network Password” on page 135.7. Press A [OK].The selected call barring function is activated.If you enter a wrong network password, the entered password is cleared. Enter the correct the password.(M 7-6-4)](https://usermanual.wiki/Sharp/HRO00030/User-Guide-323099-Page-138.png)
![145 SettingsChecking Call Barring Status1. Perform steps 1 to 4 in “Call Barring” on page 144.2. Press or to select “Status”, then press .Now you can check the status of the selected call barring option. 3. When you finish the confirmation, press C [Back].Cancel All Call Barring Settings1. Perform steps 1 to 2 in “Call Barring” on page 144.2. Press or to select “Cancel All”, then press .3. Enter the network password, then press .4. Press A [OK].All call barring settings are cancelled.To Cancel the Call Barring Setting Individually1. Perform steps 1 to 3 in “Call Barring” on page 144.2. Select the call barring option you wish to cancel, then press .3. Press or to select “Off”, then press .4. Enter the Barring password, then press .The selected call barring setting is cancelled.Fixed Dialling No. (M 7-6-5)When the Fixed Dialling No. is enabled, you can call to only predefined numbers.Enabling Fixed Dialling No.1. Perform steps 1 to 3 in “Enabling/Disabling the PIN Code” on page 142.2. Press or to select “Fixed Dialling No.”, then press .3. Enter a PIN2 code, then press .4. Select “Settings”, then press .5. Select “On”, then press .If you select “Off”, Fixed Dialling No. is disabled.](https://usermanual.wiki/Sharp/HRO00030/User-Guide-323099-Page-139.png)
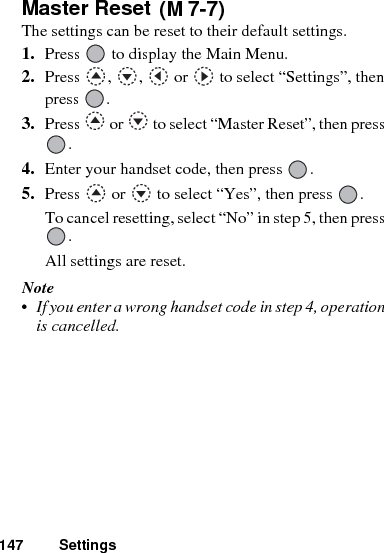
![149 OrganiserOrganiserCalculator The calculator function performs the 4 arithmetic calculations using up to 12 digits.1. Press to display the Main Menu.2. Press , , or to select “Organiser”, then press .3. Select “Calculator”, then press .4. Select “Calculator”, then press .The calculator appears on the display.5. Key operations for calculation are as follows.To enter a decimal point, press R.To clear the entered number or operand, press C[C].To do the calculations, press D.6. If you wish to start a new calculation, press C [C].When calculation is complete, press F.Rate ConversionYou can also use the calculator as a currency calculator to convert from/to a home currency using a conversion rate that you enter.To Set a Currency Conversion Rate (M 8-1-2)1. Perform steps 1 to 3 in “Calculator”.2. Press or to select “Exchange Rate”, then press .3. Press or to select “Foreign Domestic” or “Domestic Foreign”, then press .To delete all digits, press C [Clear]. 4. Enter the currency conversion rate, then press .(M 8)(M 8-1-1)=](https://usermanual.wiki/Sharp/HRO00030/User-Guide-323099-Page-143.png)
![Organiser 150To Convert a Value1. Perform steps 1 to 4 in “Calculator”.2. Press A [Options] to display the Option Menu.3. Enter the value to be converted, then press .4. Press or to select “In Domestic” or “In Foreign”, then press .The result is displayed.If you select “Exchange Rate” in step 4, you can set a currency conversion rate. 5. When calculation is complete, press F.Note• You cannot perform step 3 when a sign of the four fundamental processes of arithmetic is displayed.Calendar The Calendar function helps you organise and manage your busy schedule. You can view the stored schedule on a monthly basis.1. Press to display the Main Menu. 2. Press , , or to select “Organiser”, then press .3. Press or to select “Calendar”, then press .The current month will be displayed and current date will be highlighted.4. Select the day for the schedule by pressing , , or , then press .5. Press or and select the note number, then press .6. Enter the schedule content, press .Up to 3 schedule items can be stored.For details on entering characters, see “Entering Characters” on page 29.If you wish to add another item, repeat steps 5 and 6.(M 8-2)](https://usermanual.wiki/Sharp/HRO00030/User-Guide-323099-Page-144.png)
![151 Organiser7. When you have finished entering, press C [Back].The screen returns to the calendar. Dates with scheduled tasks/meetings are underlined.Note• The calendar can be displayed for dates from January 2000 through to December 2099.Find a Particular DateYou can move the view to a specified date in the calendar.1. Press A [Options] to display the Option Menu.2. Select “Go to Date”, then press .3. Enter the date of the calendar to be displayed, then press .The specified date is displayed.Changing to Weekly FormatYou can change the Calendar to weekly format.1. Perform steps 1 to 3 in “Calendar” on page 150.The current month will be displayed and current date will be highlighted.2. Press A [Options] to display the Option Menu.3. Press or to select “Weekly Format”, then press .4. Select “Monday-Sunday” to display weekly format from Monday or “Sunday-Saturday” to display weekly format from Sunday, then press .Deleting SchedulesTo Delete Schedule Items1. Perform steps 1 to 3 in “Calendar” on page 150.2. Select the day by pressing , , or , then press .](https://usermanual.wiki/Sharp/HRO00030/User-Guide-323099-Page-145.png)
![Organiser 1523. Select the item you wish to delete, then press A[Options].The Options Menu is displayed.4. Press or to select “Delete”, then press .5. Select “1 Data”, then press .6. Select “Yes”, then press .To cancel deleting, select “No” in step 6, then press .To Delete All Scheduled Tasks/Meetings for a Specific Day1. Perform steps 1 to 3 in “Calendar” on page 150.2. Select the day you wish to delete by pressing , , or , then press A [Options].The Options Menu is displayed.3. Press or to select “Delete”, then press .4. Select “1 Day” to delete all contents for a day, then press .5. Select “Yes”, then press .To cancel deleting, select “No” in step 5, then press .To Delete All Scheduled Entries1. Perform steps 1 to 3 in “Calendar” on page 150.2. Press A [Options] to display the Options Menu.3. Press or to select “Delete” to delete all scheduled entries, then press .4. Press or to select “All Data” to delete all scheduled entries, then press .5. Select “Yes”, then press .To cancel deleting, select “No” in step 5, then press .](https://usermanual.wiki/Sharp/HRO00030/User-Guide-323099-Page-146.png)
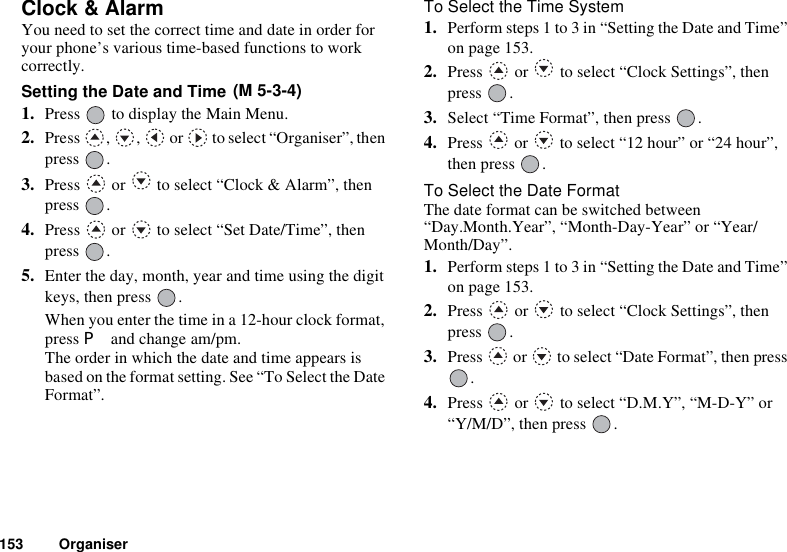
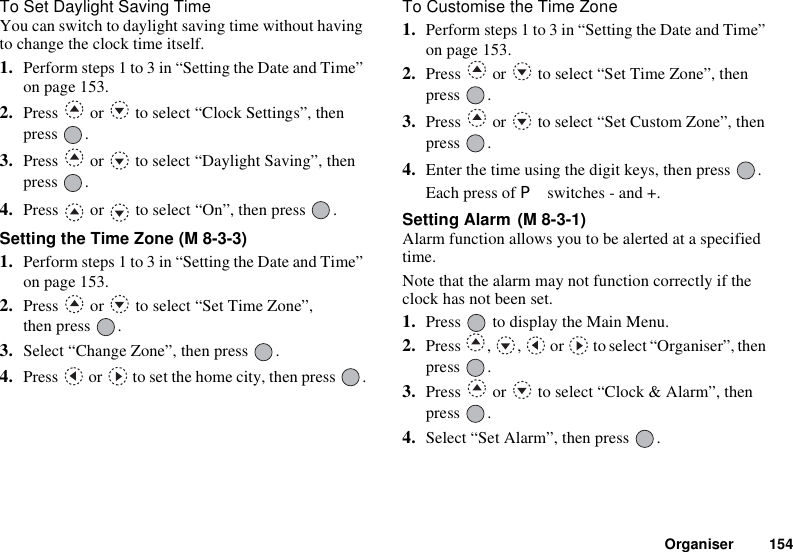
![155 Organiser5. Select “List Alarm”, then press .6. Press or to select the desired alarm number, then press .Up to 5 alarm times can be specified.7. Select “Set Time”, then press .8. Enter the alarm time using the digit keys, then press .When you enter the alarm time in a 12-hour clock format, press P and change am/pm.9. Press or to select “Repeat Daily”, then press .10.Press or to select “On” or “Off”, then press .11.Press or to select “Alarm Status”, then press .12.Press or to select “On”, then press .13.Press C [Save].To Change the Type of Alarm Tone1. Perform steps 1 to 6 in “Setting Alarm” on page 154.2. Press or to select “Alarm Tone”, then press .3. Select “Melody”, then press .4. Press or to select “Preset Melody” or “My Sounds”, then press .5. Select the alarm tone.If you wish to hear the demo play, press A [Play].To stop playing, press C [Stop].6. When selection is complete, press .](https://usermanual.wiki/Sharp/HRO00030/User-Guide-323099-Page-149.png)
![Organiser 156To Change the Vibration of Alarm1. Perform steps 1 to 6 in “Setting Alarm” on page 154.2. Press or to select “Alarm Tone”, then press .3. Press or to select “Vibration”, then press .4. Press or to select “Enable”, “Disable” or “Link to Sound”, then press .To Change the Duration of Alarm1. Perform steps 1 to 6 in “Setting Alarm” on page 154.2. Press or to select “Alarm Tone”, then press .3. Press or to select “Duration”, then press .The current duration is displayed.4. Enter the length of the duration in 2 digits (02 to 59 seconds) using the digit keys, then press .Changing Alarm Settings1. Perform steps 1 to 5 in “Setting Alarm” on page 154.2. Select the number you wish to change, then press .3. Change Alarm settings.For details on changing Alarm settings, see “To Change the Type of Alarm Tone” on page 155.Disabling Alarm Function1. Perform steps 1 and 2 in “Changing Alarm Settings”.2. Press or to select “Alarm Status”, then press .3. Press or to select “Off”, then press .4. Press C [Save].“ ” disappears from the screen.](https://usermanual.wiki/Sharp/HRO00030/User-Guide-323099-Page-150.png)
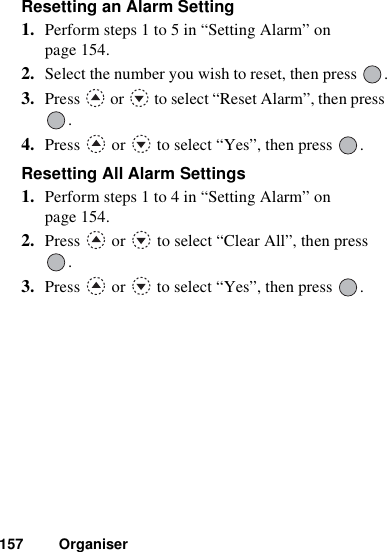
![Organiser 158Voice Memo This allows you to record a voice message of up to 10 seconds, which can be used to remind you of schedule entries or be sent within an MMS. The recorded voice memo is registered in the My Sounds.Recording a Voice Memo1. Press to display the Main Menu.2. Press , , or to select “Organiser”, then press .3. Press or to select “Voice Memo”, then press .4. Press to start recording.To stop recording before the recording time is over, press .5. Select “Save” to save the voice memo, then press .If you wish to exit the voice memo, press C [Exit], then select “Yes”.Tip• You can also record a voice memo by pressing and R instead of steps 1 to 3.• If you wish to record a voice memo again, select “Record Again” in step 6. The screen will return to step 5.To Play Back the Saved Voice Memo1. Perform steps 1 to 5 in “Recording a Voice Memo” on page 158.2. Press or to select “Playback”, then press .3. Press .The recorded voice memo is played back.To stop playback, press .(M 8-4)](https://usermanual.wiki/Sharp/HRO00030/User-Guide-323099-Page-152.png)
![159 OrganiserPC Connection You can select a method to contact between your phone and a PC from infrared link or cable connection.1. Press to display the Main Menu.2. Press , , or to select “Organiser”, then .3. Press or to select “PC Link”, then press .4. Select “Infrared” for infrared link or “Data Cable” for cable connection, then press .Help List You can view the help list and use it to guide you in the phone’s functions.1. Press to display the Main Menu.2. Press , , or to select “Organiser”, then press .3. Press or to select “Help List”, then press .The help list is displayed.4. Check the key operation by pressing and .5. When you have finished, press C [Back].(M 8-5) (M 8-6)](https://usermanual.wiki/Sharp/HRO00030/User-Guide-323099-Page-153.png)
![161 Call ManagerCall ManagerCall LogThe phone will record the last 10 missed calls, received calls and dialled numbers.Viewing Call Log1. Press to display the Main Menu. 2. Press , , or to select “Call Manager”, then press .3. Press or to select “Call Register”, then press .4. Press or to select “Missed Calls”, “Received Calls” or “Dialled Numbers”, then press .The selected call log list is displayed.5. Select the number you wish to view.6. Press .Call record “1” is the most recent.When you press , call record “2” will be displayed.If you wish to dial the number, press D.7. When you have finished, press C [Back] to return to step 4.Tip• You can also confirm call records by pressing D in stand-by mode.• You can switch between histories by pressing or in step 5 only when you enter by D in stand-by mode.Sending Messages1. Perform steps 1 to 5 in “Viewing Call Log”.2. Select the file name you wish to send, then press . Selected call record will be displayed in detail.3. Press A [Options] to display the Options Menu.4. Press or to select “Send Message”, then press .5. Press or to select “MMS” or “SMS”, then press .6. Enter your message.For details on creating a message, see “Creating a New MMS” on page 99 or “Creating a New SMS” on page 110.(M 9)](https://usermanual.wiki/Sharp/HRO00030/User-Guide-323099-Page-155.png)
![Call Manager 162Deleting Call LogDeleting Single Call Record1. Perform steps 1 to 5 in “Viewing Call Log”.2. Select the file name you wish to delete, then press .Selected call record will be displayed in detail. 3. Press A [Options] to display the Options Menu.4. Press or to select “Delete”, then press .5. Press or to select “Yes”, then press .The selected call record will be deleted.To cancel deletion, select “No” in step 5, then press .To Delete All Call Log (M 9-2-4)1. Perform steps 1 to 3 in “Viewing Call Log” on page 161.2. Press or to select “Clear Logs”, then press .3. Select “All Calls”, then press .4. Press or to select “Yes”, then press .All call log records will be deleted.To cancel deleting, select “No” in step 4, then press .Tip• If you select “Missed Calls”, “Received Calls” or “Dialled Numbers” in step 3, the call log in the selected category will be deleted.Call Timers This function lets you check the duration of your calls.Checking the Duration of the Last Call1. Press to display the Main Menu. 2. Press , , or to select “Call Manager”, then press .3. Press or to select “Call Register”, then press .4. Press or to select “Call Timers”, then press .5. Select “Last Call”, then press .The duration of the last call is now displayed.(M 9-2-5)](https://usermanual.wiki/Sharp/HRO00030/User-Guide-323099-Page-156.png)
![163 Call Manager6. When you have finished, press C [Back] to return to call timers menu.Checking the Total Call Time1. Press or to select “All Calls”, then press in step 5 in “Checking the Duration of the Last Call”.2. When you have finished, press C [Back].Resetting All Call Timers1. Perform steps 1 to 4 in “Checking the Duration of the Last Call”.2. Press or to select “Clear Timers”, then press .3. Press or to select “Yes”, then press .To cancel resetting, select “No”, then press .4. Enter your handset code, then press .The Call Timers are reset to zero.Call Costs This function lets you check the charges for your calls. Charging Advice is not supported on all networks. Please check with your service provider for availability.Checking the Cost of the Last Call1. Press to display the Main Menu. 2. Press , , or to select “Call Manager”, then press .3. Press or to select “Call Register”, then press .4. Press or to select “Call Costs”, then press .5. Select “Last Call”, then press .The cost of the last call is now displayed.6. When you have finished, press C [Back] to return to call costs menu.(M 9-2-6)](https://usermanual.wiki/Sharp/HRO00030/User-Guide-323099-Page-157.png)
![Call Manager 164Checking the Total Call Cost1. Press or to select “All Calls”, then press in step 5 in “Checking the Cost of the Last Call”.2. When you have finished, press C [Back].Setting the Charge RateSet the charge rate to calculate the call cost and set the maximum limit for call cost.1. Perform steps 1 to 4 in “Checking the Cost of the Last Call” on page 163.2. Press or to select “Cost Units”, then press .3. Press or to select “Set Units”, then press .4. Enter your PIN2 code, then press .5. Enter a cost per unit, then press .To enter a decimal point, press R.6. Enter a currency unit (up to 3 characters), then press .Checking the Charge Rate1. Select “Read Units”, then press in step 3 in “Setting the Charge Rate”.The charge rate is now displayed.2. When you have finished, press C [Back].Setting the Charge LimitThis function is useful if you wish to make sure you do not exceed a certain charge limit.1. Perform steps 1 to 4 in “Checking the Cost of the Last Call” on page 163.2. Press or to select “Max Cost”, then press .3. Press or to select “Set Limit”, then press .4. Enter your PIN2 code, then press .5. Enter a value, then press .To enter a decimal point, press R.](https://usermanual.wiki/Sharp/HRO00030/User-Guide-323099-Page-158.png)
![165 Call ManagerChecking the Charge Limit1. Select “Read Limit”, then press in step 3 in “Setting the Charge Limit”.The value of the charge limit is now displayed.2. When you have finished, press C [Back].Resetting All Call Costs 1. Perform steps 1 to 4 in “Checking the Cost of the Last Call” on page 163.2. Press or to select “Clear Costs”, then press .3. Press or to select “Yes”, then press .To cancel resetting, select “No”, then press .4. Enter your PIN2 code, then press .The Call Costs are reset to zero.Checking the Residual Credit1. Perform steps 1 to 4 in “Checking the Cost of the Last Call” on page 163.2. Press or to select “Residual Credit”, then press .3. When you have finished, press C [Back].](https://usermanual.wiki/Sharp/HRO00030/User-Guide-323099-Page-159.png)
![Call Manager 166Data Counter You can confirm the amount of bytes which you used in the GPRS transmission.1. Press to display the Main Menu. 2. Press , , or to select “Call Manager”, then press .3. Press or to select “Call Register”, then press .4. Press or to select “Data Counter”, then press .5. Press or to select “Last Data” or “All Data”, then press .You can now check the amount of bytes.6. When you have finished, press C [Back].Resetting All Data Counter1. Perform steps 1 to 4 in “Data Counter”. 2. Press or to select “Clear Counter”, then press .3. Press or to select “Yes”, then press .The Data Counter is reset to zero. To cancel resetting, select “No” in step 3, then press .(M 9-2-7)](https://usermanual.wiki/Sharp/HRO00030/User-Guide-323099-Page-160.png)
![167 Call ManagerDiverts This service is used to divert incoming calls to your voice mail system or to another number depending on certain conditions in which you cannot answer a call.Divert Calls1. Press to display the Main Menu. 2. Press , , or to select “Call Manager”, then press .3. Press or to select “Diverts”, then press .4. Select one of the divert options, then press .The divert options available are:• “All Calls”: Diverts all voice calls without ringing.• “When Busy”: Diverts incoming calls when you are on a call.• “No Answer”: Diverts incoming calls if you do not answer a call within a certain period of time.• “Not Reachable”: Diverts incoming calls when your phone is out of network service or switched off.5. Select “On”, then press .6. If you wish to divert calls to a number which is located in the Phonebook, search for the desired Phonebook entry.Press or A [Search] to search the number by name or press or to search in alphabetical order, then press . For details on searching the Phonebook entries, see “Finding a Name and Number” on page 41.7. If you wish to divert calls to a number which you can enter manually, enter the phone number.8. Press .If you select “No Answer” in step 4:9. Select the period of time from 6 levels (05 to 30 seconds), then press .(M 9-3)](https://usermanual.wiki/Sharp/HRO00030/User-Guide-323099-Page-161.png)
![Call Manager 168Note• When a divert is set to “All Calls”, “ ” appears on the stand-by screen.Tip• If you select “By Service” in step 5, you can select the divert option further in the selected option in step 4.Checking the Divert Status1. Perform steps 1 to 3 in “Divert Calls” on page 167.2. Select the divert option you wish to check, then press .3. Press or to select “Status”, then press .You can now check the status of the selected divert option. 4. When you have finished, press C [Back].Cancelling All Divert Settings1. Perform steps 1 to 3 in “Divert Calls” on page 167.2. Press or to select “Cancel All”, then press .3. Press or to select “Yes”, then press .To cancel the resetting, select “No” in step 3, then press . 4. Press A [OK].All divert settings are cancelled.To cancel the Divert Settings Individually1. Perform steps 1 to 3 in “Divert Calls” on page 167.2. Select the divert option you wish to cancel, then press .3. Press or to select “Off”, then press .4. Press A [OK].The selected divert has been cancelled.](https://usermanual.wiki/Sharp/HRO00030/User-Guide-323099-Page-162.png)