Sharp HRO00060 Cellular Transceiver User Manual
Sharp Corporation Cellular Transceiver
UserManual.wiki
>
Sharp
>
HRO00060 User Manual
>
User Manual
Contents
1.
User Manual
2.
User Manual logo
User Manual
Navigation menu
Upload a User Manual
Namespaces
Wiki Guide
HTML
PDF
Info
Views
User Manual
Discussion / Help
Navigation


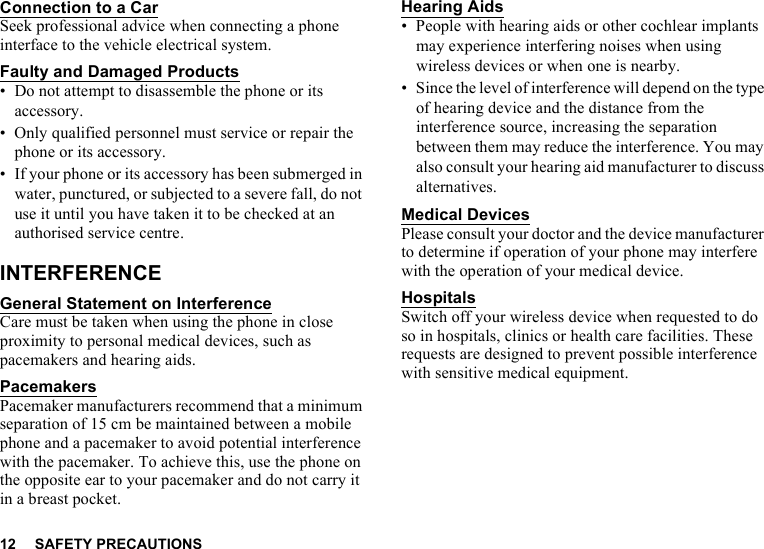


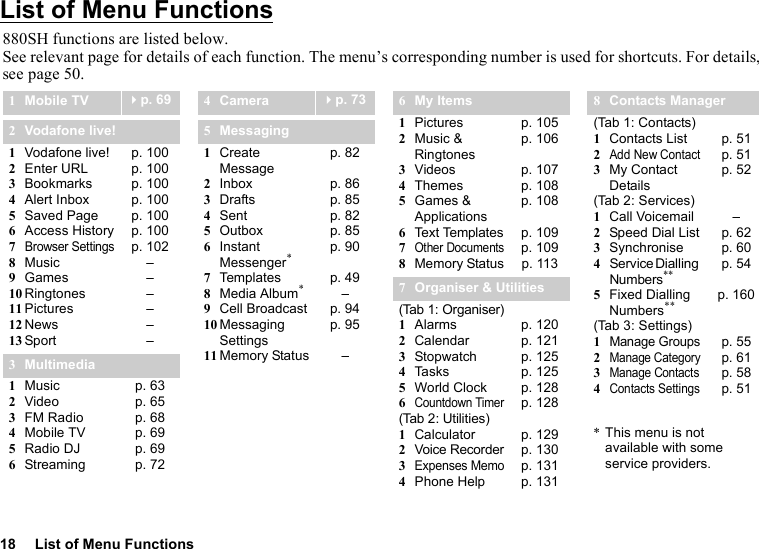

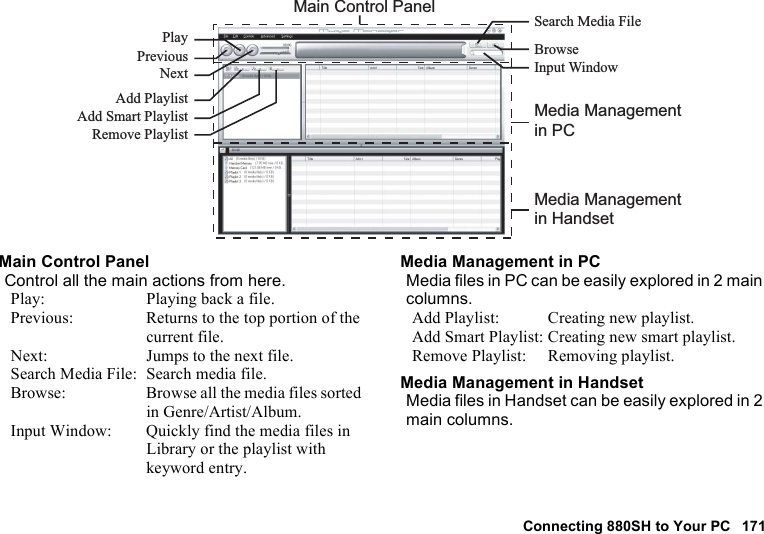
![32 Getting StartedDisplay Indicators1. / : Strength of received signal/Service out of range: 3G (UMTS)/GPRS/ : GPRS enabled/GPRS disabled: Roaming outside network2. : Flight mode3. : Data exchange with external device4. / : Connection to the server [established/communicating]5. / : Voice call [incoming/in progress]6. / / : Video call communication mode enabled [voice/video/voice and video]7. / / : Alerts [text message and multimedia message/Email/Instant Messenger]8. / / : Mailbox full [SIM card only/handset only/both SIM card and handset]9. : Logging in the Instant Messenger10. : “Voice Calls” diverts set to “Always”11. ////: Connection status [USB cable/Bluetooth wireless setting [enabled (in standby)/exchanging information/talking with the Bluetooth headset/Hide my phone]]12. ///: Java™ application [executed (colour)/suspended (grey)]/Music player/FM Radio13. : Secure WAP page displayedRight soft keyCentre keyLeft soft keyIndicator area](https://usermanual.wiki/Sharp/HRO00060.User-Manual/User-Guide-824512-Page-33.png)
![Getting Started 3314. / / / : Silent/vibration setting [silent/increasing volume/vibration enabled/silent and vibration enabled]15. / / : Speaker mode [speaker phone/speaker activated/microphone muted]16. : Memory card inserted17. : Battery level18. : Daily alarm enabled19. / : Schedule entry enabled [with/without reminder alarm]20. : Outbox contains unsent messages [text message/multimedia/Email]21. / / : WAP/OTA provisioning alerts [WAP alert/OTA provisioning alert/WAP and OTA provisioning alerts]22. : Voicemail message alert23. : “Show Secret Data” set to “On”24. : Function Lock enabled25. : Keypad Lock enabled26.(No display)/////: Current profile [Normal/Meeting/Activity/Car/Headset/Silent]](https://usermanual.wiki/Sharp/HRO00060.User-Manual/User-Guide-824512-Page-34.png)
![Voice Call/Video Call Functions 35Voice Call/Video Call FunctionsFor details on setting call functions, see “Telephony” on page 157.Making a Voice Call1. Enter the area code and the phone number you wish to dial and press D to dial.If you enter the wrong number, press [Clear] to delete the number to the left of the cursor.Emergency Calls1. Enter 112 (international emergency number) using the keypad and press D to dial.Note•Emergency calls may not be able to be made on all mobile phone networks when certain network services and/or phone features are in use. Contact your service provider for more information.•This emergency number can normally be used to make an emergency call in any country, with or without a SIM card inserted, if a 3G (UMTS)/GSM network is within range.International Calls1. Press and hold Q until a + (international dialling prefix) sign is displayed.2. Enter the country code, followed by the area code (without the leading zero) and the phone number, and press D to dial.](https://usermanual.wiki/Sharp/HRO00060.User-Manual/User-Guide-824512-Page-36.png)
![36 Voice Call/Video Call FunctionsAdding an Entered Phone Number to the Contacts List1. After entering a phone number, press [Options] and select “Save Number”.For details on creating a new entry, see “Adding a New Contact” on page 51.Showing or Hiding My Phone Number on the Display of the Called Party1. After entering a phone number, press [Options], select “Show My ID” or “Hide My ID” and press D to dial.Speed DiallingUp to 8 phone numbers from the Contacts List memory (Handset and SIM) can be assigned to speed dials. You can call the numbers using the digit keys (G to O). The phone number of the Voicemail centre is assigned to G.For details on setting the speed dial list, see “Speed Dial List” on page 62.1. To dial a number using the speed dial, press and hold any of the digit keys (G to O).The phone number saved in the speed dial list is dialled.RediallingYou can redial numbers in the call log. Select from specific categories or “All Calls”. Specific categories contain up to 30 numbers and the “All Calls” list contains up to 90.1. Press D in standby.2. Select the category from “All Calls”, “Dialled Numbers”, “Missed Calls” or “Received Calls”.To switch logs, press c or d.3. Highlight the phone number you wish to call.4. Press D to redial a voice call or S to redial a video call.](https://usermanual.wiki/Sharp/HRO00060.User-Manual/User-Guide-824512-Page-37.png)
![Voice Call/Video Call Functions 37Answering a Voice CallWhen an incoming call is detected, the phone rings.1. Press D, B or press [Options] and select “Answer” to answer the call.Or press any key except F, [Options] or [Busy] when the “Any Key Answer” function is enabled. Set the Any Key Answer function in the profile of each mode (p. 137).You can answer an incoming call by sliding open your phone if “Calls on Open” is set to “Accept Call” in Slider Settings (p. 141). Tip•If you have subscribed to the Calling Line Identification (CLI) service and the caller’s network sends the number, the caller’s number is displayed on the screen. If the caller’s name and number are saved in the Contacts List, the caller’s name is displayed on the screen.•If the number is a restricted number, the display shows “Withheld”.•When you receive a call from the person whose picture is registered in the Contacts List, the picture and name are displayed.Rejecting an Incoming Call1. Press F while the phone is ringing to reject a call you do not wish to answer.Letting the Caller Know You are Unavailable1. Press [Busy] while the phone is ringing to send a busy tone to the caller.In Call Menu (Voice Call)Your phone has additional functions available while a call is in progress.](https://usermanual.wiki/Sharp/HRO00060.User-Manual/User-Guide-824512-Page-38.png)
![38 Voice Call/Video Call FunctionsAdjusting the Earpiece VolumeYou can adjust the earpiece volume (and handsfree kit volume, if connected) to five levels.1.Press V or W to display the Earpiece Volume screen.2. Press V (or a/d) to increase the volume of the call or press W (or b/c) to decrease the volume.3. Press B when the volume is set to the desired level.Turning the Speaker On and OffYou can talk via the loudspeaker on the phone when it is on.1. During a call, press [Options] and select “Loudspeaker On”.Putting a Call on HoldThis function allows you to manage two calls at the same time. If you wish to make another call while you are talking to someone, you can put the current call on hold to call someone else.To Make Another Call during a Call1. During a call, press [Options] and select “Hold”.The current call is put on hold.2. Press [Options] and select “Dial New Number”.3. Enter the phone number you wish to make another call to, then press D.Tip•You can also make another call by entering the phone number during a call instead of step 1. The current call is automatically put on hold.Accessing SMS/MMS Menu during a Call1. During a call, press [Options] and select “Messaging”.The following options are available: “Create Message” to make an SMS and MMS, or “Inbox”, “Sent” or “Drafts” to access these folders. For details on SMS and MMS, see “SMS” and “MMS” on page 81.](https://usermanual.wiki/Sharp/HRO00060.User-Manual/User-Guide-824512-Page-39.png)
![Voice Call/Video Call Functions 39Call WaitingThis service notifies you of another incoming call while you have a call in progress.1. During a call, press [Options] and select “Hold & Answer” to answer the second call.The first call is put on hold and you can now talk to the second caller.Note•You need to set “Call Waiting” to “On” if you wish to use the Call Waiting service (p. 166).•Call Waiting service may not be available on all networks. Contact your service provider for more information.•If you do not wish to answer the second call, press [Options] and select “Busy” in step 1. If “Reject” is selected, the log of the second call is saved as a missed call.Conference CallConference call is a call with more than 2 participants. You may include up to 5 participants in a conference call.To Make a Conference CallYou must have one active call and one held call.1. During a call, press [Options] and select “Join All Calls” to join the conference call.2. Press F to end the conference call.Note•The conference call service may not be available on all networks. Contact your service provider for more information.•To end the call with all participants, press [Options] and select “End All Calls”.•To reject adding more participants to the current party, press [Options] and select “Reject”, or you can send the busy tone by selecting “Busy”.•You have more options for the Conference call after selecting “Join All Calls” in step 1:•To put all participants on hold, select “Hold All”.•To put all participants except the current call on hold, select “Private Conversation”.](https://usermanual.wiki/Sharp/HRO00060.User-Manual/User-Guide-824512-Page-40.png)
![40 Voice Call/Video Call FunctionsTo Add New Participants to the Conference Call1. Press [Options] and select “Dial New Number”.2. Enter the number you wish to include in the conference call and press D to dial.3. Press [Options] and select “Join All Calls” to join the conference call.If you wish to add other participants, repeat steps 1 to 3.To End the Call with a Conference Call Participant1. During a conference call, highlight the person that you wish to disconnect from the conference call.2. Press [Options] and select “End This Call”.To Have a Private Conversation with One of the ParticipantsIf you wish to have a private conversation with one of the participants, you may select the participant from the conference list and put the other participants on hold.1. During a conference call, select the person that you wish to talk to.2. Press [Options] and select “Private Conversation”.3. Once you have finished the private conversation, press [Options] and select “Join All Calls” to return to the conference call.Muting the Microphone1. During a call, press [Mute].To use the microphone again, press [Unmute].](https://usermanual.wiki/Sharp/HRO00060.User-Manual/User-Guide-824512-Page-41.png)

![42 Voice Call/Video Call FunctionsMaking a Video CallTo Make a Video Call by Entering the Phone Number First1. Enter the area code and the phone number you wish to dial.2. Press [Options] and select “Video Call” or press S to dial.If you enter the wrong number, press [Clear] to delete the number to the left of the cursor.When connected, the image of the called party is displayed in the upper part of the screen and yours in the lower left.Tip•If the called party’s phone is not video call enabled, you can press F and enter the phone number again to make a voice call.To Make a Video Call with the Video Telephony Key1. Press S.Your image is displayed in the upper part of the screen.2. Enter the phone number or press [Options] and select “Call Log”, “Contacts” or “Enter Number”.3. Once the desired number has been selected, press S. To Make a Video Call Using Speed Dial1. Press S.Your image is displayed in the upper part of the screen.2. Press and hold any of the digit keys (G to O).The phone number saved in the speed dial list is dialled. When connected, the image of the called party is displayed in the upper part of the screen and yours in the lower left.](https://usermanual.wiki/Sharp/HRO00060.User-Manual/User-Guide-824512-Page-43.png)
![Voice Call/Video Call Functions 43Answering a Video CallWhen an incoming call is detected, the phone rings.1. Press D to answer the call with video or press [Options] and select “Hide Picture” to answer with voice only.If the slider is closed, you can answer the call (with video) by sliding open the phone when the “Calls on Open” function is enabled.Tip•If you have subscribed to the Calling Line Identification (CLI) service and the caller’s network sends the number, the caller’s number is displayed on the screen. If the caller’s name and number are saved in the Contacts List, the caller’s name is displayed on the screen.Rejecting an Incoming Call1. Press F while the phone is ringing to reject a call you do not wish to answer.You can reject an incoming call by sliding close your phone if “Calls on Close” is set to “End Call” in Slider Settings (p. 141).Letting the Caller Know You are Unavailable1. Press [Busy] while the phone is ringing to send a busy tone to the caller of an incoming call letting them know that you cannot answer the call.In Call Menu (Video Call)Muting the Microphone1. During a video call, press [Mute].To use the microphone again, press [Unmute].Swapping ImagesYou can swap images between the main and sub screens.1. During a video call, press [Options] and select “Switch Images”.](https://usermanual.wiki/Sharp/HRO00060.User-Manual/User-Guide-824512-Page-44.png)
![44 Voice Call/Video Call FunctionsChanging the Image of Yourself1. During a video call, press [Options] and select “Camera Picture”.2. Select “Internal Camera”, “External Camera” or “Alternative Image”.“Internal Camera”: The image through the sub camera is displayed and sent to the receiver.“External Camera”: The image through the camera is displayed and sent to the receiver.“Alternative Image”: The camera is turned off and the image selected in “Alternative Image” of “Video Call Settings” is used.Turning the Speaker On and OffYou can talk via the loudspeaker on the phone when it is on.1. During a video call, press [Options] and select “Loudspeaker On”.Note•In a high-noise environment, you may not be able to continue a call, or make a clear call. We recommend that you use the handsfree kit. •With this option, there may be interruption if you increase the earpiece volume. We recommend that you decrease the earpiece volume or use the handsfree kit.](https://usermanual.wiki/Sharp/HRO00060.User-Manual/User-Guide-824512-Page-45.png)
![Voice Call/Video Call Functions 45Video Call SettingsTo Adjust the Quality of the Incoming or Outgoing ImageYou can adjust the quality of the called party’s or caller’s image.1. During a video call, press [Options] and select “Video Call Settings”.2. Select “Incoming Picture Quality” or “Outgoing Picture Quality”.3. Select “Normal”, “Quality Priority” or “Frame Rate Priority”.“Normal”: The standard quality is used.“Quality Priority”: The quality of the picture takes precedence over the frame rate.“Frame Rate Priority”: The frame rate takes precedence over the quality.To Turn the Backlight On or OffYou can turn on the backlight of your screen.1. During a video call, press [Options] and select “Video Call Settings”.2. Select “Backlight”.3. Select “Always On”, “Always Off” or “As Normal Setting”.When “Always On” is selected, the backlight will always be on during a video call.When “As Normal Setting” is selected, the backlight will time out depending on the Backlight setting (p. 140).To Adjust the Video Exposure1. During a video call, press [Options] and select “Video Call Settings”.2. Select “Exposure”.3. Press a (Light) or b (Dark).](https://usermanual.wiki/Sharp/HRO00060.User-Manual/User-Guide-824512-Page-46.png)
![46 Voice Call/Video Call FunctionsMirror ImageDuring a video call, you can reverse your image on the sub screen.1. During a video call, press [Options] and select “Video Call Settings”.2. Select “Mirror Image”.3. Select “On” or “Off”.To Change the Sub Camera Image to the Alternative ImageDuring a video call, you can switch the image shown to the caller between the sub camera image and an alternative image or display an image while putting a call on hold from the saved picture files.1. During a video call, press [Options] and select “Video Call Settings”.2. Select “Camera Picture” and then select “Default Image” or “Alternative Image”.3. Select the desired option.If “Default Image” is selected, select “Internal Camera”, “External Camera” or “Alternative Image”.If “Alternative Image” is selected, select “Preset Picture” or “My Pictures”.](https://usermanual.wiki/Sharp/HRO00060.User-Manual/User-Guide-824512-Page-47.png)
![48 Entering CharactersChanging the Input Language1. On the text entry screen, press [Options] and select “Input Language”.2. Select the desired language.Changing the Input ModeT9 Text InputT9 text input method is a shortcut to enter text easily and quickly.1. On the text entry screen, press and hold P to enter T9 mode.2. Press [Options] and select “Input Mode”.3. Select the input mode (Abc, ABC, 123, abc).4. Press each key once for any letter you require on that key.To enter the word “How”, press JLO.5. If the word shown is not the one you want, press a or b until you highlight the correct one.6. Press B to select the word.Note•If the correct word is not shown in step 5, enter the correct word again after switching to the multi-tap input method.Tip•If you press Q instead of step 6, a space is inserted next to the selected word.Symbols and Punctuation1. On the text entry screen, press [Options] and select “Add Symbol”.2. Select the desired symbol.](https://usermanual.wiki/Sharp/HRO00060.User-Manual/User-Guide-824512-Page-49.png)
![Entering Characters 49My DictionaryYou can create your own word list for T9 text input.1. On the text entry screen in T9 mode, press [Options] and select “My Dictionary”.2. Select “Add New Word” and enter a new word.Editing a Word in the List1. On the text entry screen in T9 mode, press [Options] and select “My Dictionary”.2. Highlight the desired word.3. Press [Options] and select “Edit”.4. Modify the word.Using TemplatesYou can use the phrases registered in Text Templates when entering characters.For details on creating the text template, see “Adding Phrases to Text Templates” on page 109.1. On the text entry screen, move the cursor to the point you wish to insert the template.2. Press [Options] and select “Advanced”.3. Select “Insert Template”.4. Select the desired text template.Copying, Cutting and Pasting Text1. On the text entry screen, press [Options] and select “Advanced”.2. Select “Copy” or “Cut”.3. Move the cursor to the first letter to be copied or to be cut, then press B.4. Move the cursor to the last letter to highlight the area, then press B.5. Move the cursor to the point you wish to paste the letters.6. Press [Options] and select “Advanced”.7. Select “Paste”.](https://usermanual.wiki/Sharp/HRO00060.User-Manual/User-Guide-824512-Page-50.png)

![Contacts Manager 51Contacts ManagerYou can store the phone numbers and Email addresses of your friends, family and colleagues in the Contacts List.Your phone can store up to 500 entries. For each entry, you can enter information including up to 3 phone numbers and 3 Email addresses. There is a limit to the number of characters that can be entered for each item. The character limit differs for the handset memory and SIM card memory.Adding a New ContactThe amount of phone numbers that you can store to the SIM card is dependent on its capacity. Contact your service provider for details.Selecting the Storage MemoryYou can choose either the phone or SIM card memory locations to store the new entry.“Contacts Manager” → “Settings” tab → “Contacts Settings” → “Save New Contact to”1. Select from “Handset”, “SIM” or “Choose before Saving”.If the selected location is different from the list displayed, a confirmation message is displayed.Tip•“Choose before Saving” prompts you to choose the memory every time you save a new entry.Registering a New Entry“Contacts Manager” → “Contacts” tab → “Add New Contact”If you select the “Choose before Saving” option for the memory to be used, the selection is between “To Handset” and “To SIM”.1. Select the field you wish to fill in, and enter the relevant information.2. Press [Save], when finished.Tip•To create an entry, at least one field must be filled (“First Name”, “Last Name”, “Phone Number” or “Email Address” for the handset memory; “Name” or “Phone Number” for the SIM memory). (M 8)(M 8-d-d-4-3) (M 8-2)](https://usermanual.wiki/Sharp/HRO00060.User-Manual/User-Guide-824512-Page-52.png)
![54 Contacts ManagerDialling a Service Phone NumberCertain SIM cards contain service phone numbers that can be dialled. Contact your SIM card vendor for more information. On the Contacts screen, “Service Dialling No.” is displayed at the bottom of the list.“Contacts Manager” → “Services” tab → “Service Dialling Numbers”1. Select the desired service phone number.Tip•You can also display service phone numbers in the following procedure: “Telephony” → “Call” tab → “Service Dialling Numbers”•If the SIM card contains only one service phone number, you can dial it in step 1 by pressing B.•If no service phone number is stored in the SIM card, this menu is not displayed.Sending a Message from the Contacts List“Contacts Manager” → “Contacts” tab → “Contacts List”Tip•You can also display the Contacts List in the following procedure: “Telephony” → “Call” tab → “Contacts List”1. Select the desired entry including the phone number or Email address you wish to use.2. Highlight the desired phone number or Email address.3. Press [Options] and select “Create Message”.4. Select the desired type of messaging.For further procedures, see “Creating a New Message” on page 82. (M 8-d-4)](https://usermanual.wiki/Sharp/HRO00060.User-Manual/User-Guide-824512-Page-55.png)
![Contacts Manager 55Sending a Voice Clip Message or Video Clip Message Using an Address from the Contacts List“Contacts Manager” → “Contacts” tab → “Contacts List”1. Select the desired entry including the phone number or Email address you wish to use.2. Highlight the desired phone number or Email address.3. Press [Options] and select “Create Message”.4. Select “Voice Message” or “Video Message”.For further procedures, see “Creating a New Message” on page 82.Using Mailing ListsYou can create a mailing list to send the same message to a group of recipients at once. Up to 5 groups can be registered.To Create a New Mailing List“Contacts Manager” → “Settings” tab → “Manage Groups” → “Add New Group”1. Enter the group name.The new group name is displayed following the last group on the Group List screen.To Add Recipients to a GroupUp to 20 recipients can be registered in each list.“Contacts Manager” → “Settings” tab → “Manage Groups”1. Highlight the desired group name.2. Press [Options] and select “View”.3. Select “Assign New Entry”.4. Select the desired entry.The detailed screen is displayed.5. Select the desired phone number or Email address. (M 8-d-d-1)](https://usermanual.wiki/Sharp/HRO00060.User-Manual/User-Guide-824512-Page-56.png)
![56 Contacts ManagerTip•If you modify the entry assigned in the group, you need to re-assign it to the group. Highlight the entry, press [Options], then select “Re-assign Entry” in step 3.•To remove an entry from the group, highlight the entry, press [Options], then select “Remove Entry” in step 3.•To remove a group, highlight a group name and press [Options] and then select “Delete” in step 2.To Send a Message Using a Mailing List“Contacts Manager” → “Settings” tab → “Manage Groups”1. Highlight the desired group name.2. Press [Options] and select “Create Message”.3. Select the desired type of messaging.For further procedures, see “Creating a New Message” on page 82.Editing Contacts List Entries“Contacts Manager” → “Contacts” tab → “Contacts List”1. Highlight the entry you wish to edit.2. Press [Options] and select “Edit”.3. Modify the information.4. Press [Save] when finished.](https://usermanual.wiki/Sharp/HRO00060.User-Manual/User-Guide-824512-Page-57.png)
![Contacts Manager 57Adding a Thumbnail to EntriesOnly Contacts saved to the handset can have Thumbnails attached to them.“Contacts Manager” → “Contacts” tab → “Contacts List”1. Highlight the desired entry.2. Press [Options] and select “Edit”.3. Select “Picture”.4. Select “Assign Picture”.5. Select the desired picture.6. Press [Save] when finished.Note•If you delete a picture in the handset memory, the corresponding thumbnail is also deleted.•To store a picture right after it was taken, select “Take Picture” in step 4.Assigning a Ringtone or a Ring Video Clip to Each Entry“Contacts Manager” → “Contacts” tab → “Contacts List”1. Highlight the desired entry.2. Press [Options] and select “Edit”.3. Select “Assign Tone/Video”.4. Select “For Voice Call”, “For Video Call” or “For New Message”.5. Select “Assign Tone” or “Assign Video”.When selecting “Assign Video”, go to step 7.6. Select “Preset Sounds” or “My Sounds”.7. Select the desired tone or video clip.For details on selecting a ringtone or a ring video clip, see “Assigning a Ringtone for an Incoming Call” on page 134 or “Assigning a Ring Video Clip for an Incoming Call” on page 135.8. Press [Save] when finished.](https://usermanual.wiki/Sharp/HRO00060.User-Manual/User-Guide-824512-Page-58.png)
![58 Contacts ManagerRegistering Birthday Item to CalendarA birthday entered in a contacts list entry can be registered to the calendar.“Contacts Manager” → “Contacts” tab → “Contacts List”1. Highlight the desired entry.2. Press [Options] and select “View”.3. Press d to display the second tab.4. Press b to highlight the birthday entry.5. Press [Options] and select “Set Reminder”.6. Press B. Tip•After registration, the data in Calendar can be customised. For details on customising a schedule entry, see “To Change the Settings” and etc. on page 121.•If the Calendar memory is full, “Set Reminder” is not displayed in step 5.Deleting Contacts List EntriesDeleting All Contact Entries“Contacts Manager” → “Settings” tab → “Manage Contacts” → “Delete All Entries”1. Select from “Handset Entries”, “SIM Entries” or “Both Entries”.2. Enter your handset code.For details on the handset code, see “Changing the Handset Code” on page 146.Deleting a Contact Entry“Contacts Manager” → “Contacts” tab → “Contacts List”1. Highlight the desired entry.2. Press [Options] and select “Delete”. (M 8-d-d-3-3)](https://usermanual.wiki/Sharp/HRO00060.User-Manual/User-Guide-824512-Page-59.png)
![Contacts Manager 59Managing Contacts ListCopying Contacts List Entries between SIM Card and Handset“Contacts Manager” → “Settings” tab → “Manage Contacts” → “Copy All Entries”1. Select “From SIM to Handset” or “From Handset to SIM”.Note•When you insert the SIM card into your phone for the first time and start the Contacts List application, the confirmation screen is displayed automatically, asking you if you wish to copy or not. The number of Contacts List entries to be copied varies depending on the SIM capacity.•If the memory space is not enough to save all entries, you cannot complete copying.Sending a Contacts List Entry“Contacts Manager” → “Contacts” tab → “Contacts List”1. Highlight the desired entry.2. Press [Options] and select “Send Contact”.3. Select “As Message” or “Via Bluetooth”.For “As Message”For details, see “MMS” on page 81.For “Via Bluetooth”For details, see “Using the Bluetooth Function” on page 147.Receiving a Contacts List EntryWhen the phone receives a Contacts List entry, a confirmation message is displayed in standby.1. Press [Yes].The received entry is saved in the Contacts List. Press [No] to reject.Tip•For details on entering Bluetooth wireless settings, see “Connectivity” on page 147. (M 8-d-d-3-1)](https://usermanual.wiki/Sharp/HRO00060.User-Manual/User-Guide-824512-Page-60.png)
![Contacts Manager 61Synchronisation Settings“Contacts Manager” → “Services” tab → “Synchronise” → “Sync Settings”1. Select the desired account or “Create New” to enter the following settings.“Profile Name”: Synchronisation profile name (Unique name)“Server Name”: Server address“User ID”: User ID for authentication“Password”: Password for authentication “Proxy”: Selects Proxy setting for synchronisation.“Contacts DB Name”: Contacts List database name on the serverNote•Synchronisation settings may have already been entered in your phone depending on your service provider. You may have restrictions on viewing, deleting, copying or modifying the settings. Contact your service provider for details.Manage CategoryDifferent ringtones can be set for each category. If you do not change a category ringtone, the ringtone assigned in the Profiles menu is used.“Contacts Manager” → “Settings” tab → “Manage Category”1. Highlight the desired category.2. Press [Options] and select “Assign Tone/Video”.3. Select “For Voice Call”, “For Video Call” or “For New Message”.4. Select “Assign Tone” or “Assign Video”.When selecting “Assign Video”, go to step 6.5. Select “Preset Sounds” or “My Sounds”.6. Select the desired tone or video clip.For details on selecting a ringtone or a ring video clip, see “Assigning a Ringtone for an Incoming Call” on page 134 or “Assigning a Ring Video Clip for an Incoming Call” on page 135. (M 8-d-3-5) (M 8-d-d-2)](https://usermanual.wiki/Sharp/HRO00060.User-Manual/User-Guide-824512-Page-62.png)
![62 Contacts ManagerEditing the Category NameYou can edit category names to be assigned to the Contacts List entries.“Contacts Manager” → “Settings” tab → “Manage Category”1. Highlight the desired category name.2. Press [Options] and select “Edit Name”.3. Modify the name.Speed Dial ListYou can set a maximum of 8 phone numbers in the Speed Dial list (p. 36).Setting Contacts List Entries in the Speed Dial List“Contacts Manager” → “Services” tab → “Speed Dial List”1. Select the desired entry.2. Highlight the desired phone number.3. Press [Options] and select “Assign”.4. Select the desired location.Tip•The nine digit keys (G - O) correspond to Speed Dial list numbers.•When the list is empty, select “Assign” in step 1.To Edit the Speed Dial List“Contacts Manager” → “Services” tab → “Speed Dial List”1. Highlight the entry you wish to edit.2. Press [Options] and select “Re-Assign” (or “Assign”).Memory StatusThis function helps you to check the memory used in the Contacts List.“Contacts Manager” → “Settings” tab → “Manage Contacts” → “Memory Status” (M 8-d-2) (M 8-d-2) (M 8-d-d-3-2)](https://usermanual.wiki/Sharp/HRO00060.User-Manual/User-Guide-824512-Page-63.png)
![Multimedia 63MultimediaMusic PlayerMusic Player supports MP3, MPEG-4 and 3GPP format sound files. You can access other menus while listening to sound files.Creating a New PlaylistYou can create your own playlist, storing and managing your favourite tracks and the order of tracks. T → “Music” → “My Music” → “Playlists”1. Press [Options] and select “Add New Playlist”.2. Enter the desired playlist name.Note•To delete the playlist, highlight the playlist and press [Options]. Then select “Delete Playlist”.•You can create up to 99 playlists.Playing Back Sound FilesT → “Music” → “My Music”1. Select the item you wish to play back.•“All Music”: All sound files are displayed.• “Artists”: The names of all artists are displayed. When an artist is selected, all of his or her albums are displayed. When an album is selected, all of the sound files in the selected album are displayed.• “Albums”: The names of all albums are displayed. When an album is selected, all of the sound files in the selected album are displayed.• “Playlists”: All playlists are displayed. When any playlist is selected, all of the sound files in the selected playlist are displayed.2. Select the desired sound file.To pause playback, press B. (M 3)(M 3-1)](https://usermanual.wiki/Sharp/HRO00060.User-Manual/User-Guide-824512-Page-64.png)
![64 MultimediaNote•Select “My Music” to update the list of available music tracks. •You are asked whether or not to play sounds when the Silent mode is activated.•To play the last played file, select “Last Played Music”. “Currently Playing” is displayed when a file is being played back.•When you receive a call, playback of the current file is paused, and you can receive the call. After the call ends, the paused playback resumes automatically in the background.Tip•You can return to the Main menu screen while playing back the file in the background.•You can create your playlist by listing only the desired files (p. 63).•Sound files in both the handset and the memory card are displayed in a single view.•You can select the playback pattern in step 2. Press [Options] and select “Playback Pattern”.“Normal”: Plays back all files in the selected folder once and stops playback.“Repeat”: Continues playback of selected file in the selected folder. “Repeat All”: Plays back all files in the selected folder.“Random”: Plays back files in the selected folder at random.•While in the Music Player, the player can be controlled by using the following keys:a/b: Increases or decreases the volume.b (press and hold): Mutes.d: Jumps to the next file.c: Returns to the start of the current file.d (press and hold): Fast-forwards.c (press and hold): Rewinds.F: Plays back the file in the background.The side keys are always available to change the volume level.Sorting FilesT → “Music” → “My Music” → “All Music”1. Press [Options] and select “Sort”.2. Select “By Title”, “By Artist”, “By Album” or “By Genre”.Sort results are displayed.](https://usermanual.wiki/Sharp/HRO00060.User-Manual/User-Guide-824512-Page-65.png)
![Multimedia 65Adding a File to the PlaylistYou can add files to a playlist by doing the following.T → “Music” → “My Music” → “All Music”1. Highlight the file you wish to add to the playlist.2. Press [Options] and select “Add to Playlist”.The playlists are displayed. For details on adding a playlist, see “Creating a New Playlist” on page 63.3. Select the desired folder.The file highlighted in step 1 is saved.To delete files from the playlist, highlight the file in the playlist and press [Options]. Then select “Delete from Playlist”.Note•You can store up to 99 files in one playlist. However, the total number of files stored on your phone cannot exceed 350 files.Downloading Music FilesT → “Music” → “Music Store”The music file download site is displayed.Note•This service is not available with some service providers. Please contact your service provider for more information.My WishlistYou can purchase music. Tracks purchased on either your mobile phone or PC will be available for download on both devices. Selecting “My Wishlist” will launch the browser, access the Wishlist page and display the tracks you have added to the Wishlist. You can purchase desired tracks from the list.Video PlayerPlaying Back Video Clip FilesT → “Video” → “My Videos”1. Select “All Videos” or the desired playlist.2. Select the desired file.To pause playback, press B.To stop playback, press [Back].Tip•You can control the Video Player by using the following keys:a/b: Increases or decreases the volume.b (press and hold): Mutes.d: Jumps to the next file.c: Returns to the start of the current file.d (press and hold): Fast-forwards.c (press and hold): Rewinds.The side keys are always available to change the volume level. (M 3-1-3) (M 3-1-4) (M 3-2) (M 3-2-2)](https://usermanual.wiki/Sharp/HRO00060.User-Manual/User-Guide-824512-Page-66.png)
![66 MultimediaSearching a File to Be Played BackT → “Video” → “My Videos”1. Select “All Videos” or the desired playlist.2. Press [Options] and select “Search”.3. Enter a few letters of the title.Search results are displayed in alphabetical order and the matching file is highlighted. The search will match the entered text with any part of the title.Adding a File to the PlaylistYou can add files to a playlist by doing the following.T → “Video” → “My Videos”1. Select “All Videos” or the desired playlist.2. Highlight the file you wish to add to the playlist.3. Press [Options] and select “Add to Playlist”.The playlists are displayed. For details on creating a playlist, see “Adding a New Playlist” on page 66.4. Select the desired playlist.The file highlighted in step 3 is saved.To delete files from the playlist, highlight the file in the playlist and press [Options]. Then select “Delete from Playlist”.Adding a New PlaylistYou can create a playlist and register desired files in it.T → “Video” → “My Videos”1. Press [Options] and select “Add New Playlist”.2. Enter the desired playlist name.3. Press B.Note•To delete the playlist, highlight the playlist and press [Options]. Then select “Delete Playlist”.](https://usermanual.wiki/Sharp/HRO00060.User-Manual/User-Guide-824512-Page-67.png)
![68 MultimediaDownloading Video Clip FilesT → “Video” → “Get Video”The video clip file download site is displayed.Playing Back the Video Clip FilesTo Play Back the Last FileT → “Video” → “Last Played Video”FM RadioYou can connect to the FM Radio service.Selecting a Radio StationT → “FM Radio”1. Press [Options] and select “Select Station”.2. Highlight the desired radio station and press B.Tip•You can play back the program in the background. Press [Options] and select “Play in Background” while the program is played back.•A headset radio antenna is necessary to use this service.Saving a Radio StationT → “FM Radio”1. Press [Options] and select “Save Station”.2. Press [Options] and select “Assign”.Searching for StationsT → “FM Radio”1. Press [Options] and select “Search”.2. Select “Auto Search”.3. Select “Search Upwards” or “Search Downwards”.Tip•You can scan and save the stations automatically by selecting “Auto Scan & Save” in step 2.•You can also select the desired station by entering the frequency directly. Select “Enter Frequency” in step 2.Setting FM Radio PlaybackT → “FM Radio”To Switch the Output1. Press [Options] and select “Settings”.2. Select “Sound Output”.3. Select “Headset”, “Loudspeaker” or “Bluetooth”. (M 3-2-3) (M 3-2-1) (M 3-3)](https://usermanual.wiki/Sharp/HRO00060.User-Manual/User-Guide-824512-Page-69.png)
![Multimedia 69To Activate the Auto Switch Off1. Press [Options] and select “Settings”.2. Select “Auto switch off”.3. Select the desired option.To Switch between Stereo and Monaural1. Press [Options] and select “Settings”.2. Select “Switch to Stereo”.To Switch the Station List1. Press [Options] and select “Settings”.2. Select “Switch List to”.3. Select the desired list.Mobile TVYou can connect to the Mobile TV service.Note•This service is not available with some service providers. Please contact your service provider for more information.•To use Mobile TV on your phone, you need to be in an area of 3G coverage.•To use Mobile TV on your phone, you need to purchase a subscription package from your operator.Radio DJRadio DJ is an interactive, personalised music service available on your mobile phone subject to your service provider. Listen to your favourite music, discover new music and create personal channels. You can also personalise what you hear by rating tracks based on your musical tastes. When you hear a track you want to keep, you can purchase and download it. Tracks can be downloaded and played on your mobile phone.Note•This service is not available with some service providers. Please contact your service provider for more information.•To use Radio DJ on your mobile phone, you need to be in an area with 3G coverage.• To use Radio DJ on your mobile phone, you need to purchase stream time from your service provider. (M 1/M 3-4)(M 3-5)](https://usermanual.wiki/Sharp/HRO00060.User-Manual/User-Guide-824512-Page-70.png)
![70 MultimediaPlaying Pre-defined ChannelsYou can play the pre-defined channels.When trying to access Radio DJ for the first time, you need to purchase stream time.T → “Radio DJ” → “Radio DJ Channels”1. Select the desired channel.The playlist will be downloaded from the mobile network.2. Select the desired track you wish to play.To stop, press [Options] and select “Stop”.To pause, press [Options] and select “Pause”.Tip•The current track will always be in position 2 of the list followed by the next track and the track after in positions 3 and 4. The previous track will always be in position 1 of the track listing.•You can control the Radio DJ by using the following keys:d: Jumps to the next trackc: Jumps to the previous trackF: Plays the track in the backgroundThe side keys are always available to change the volume level.You can return to the Main menu screen while playing the track in the background. To access the play screen again, press T.•You can train your mobile phone to your own personal tastes for radio channels. While you are listening to a track, press [Options] and select “Like Track” or “Dislike Track”. Selecting “Dislike Track” skips to the next track and all tracks with similar properties will be removed from the playlist. Selecting “Like Track” adds more tracks with similar properties to the playlist.•You can add a track to your Wishlist (p. 65) for later download/purchase. Press [Options] and select “Add to Wish List”.](https://usermanual.wiki/Sharp/HRO00060.User-Manual/User-Guide-824512-Page-71.png)
![Multimedia 71Creating a New ChannelYou can create your own personal tastes channels. T → “Radio DJ” → “My Radio DJ Channels” → “Create New Channel”1. Select “Choose a genre”, “Choose a mood” or “Choose a decade”.2. Select the desired genre, mood or decade.Selecting ALL will generate a playlist with all the available genres, moods and decades.Repeat steps 1 and 2 as necessary.3. Press [Create].4. Enter the channel name.The channel name you enter is displayed in the “My Radio DJ Channels” menu. You can play the music in the same way as pre-defined channels (p. 70) by selecting the channel you have created. Tip•You can also train your mobile phone to your own personal tastes for personal radio channels in the same way as pre-defined channels (p. 70).•You can also add a track to your Wishlist for later download/purchase in the same way as pre-defined channels (p. 70).Radio DJ CompilationsSubject to your service provider, Radio DJ presents programmed collections of tracks to the customer on mobile phone or PC. These collections will be created by local music experts around a theme (e.g. Christmas Hits, or the Best New Hip-Hop), be updated regularly, and will comprise about 15 tracks (varied by country).T → “Radio DJ” → “Radio DJ Compilations”1. Select the desired compilation from the list.2. Select the track you wish to play.Tip•You cannot train your mobile phone for Compilation channels.•You can also add a track to your Wishlist for later download/purchase in the same way as pre-defined channels (p. 70).](https://usermanual.wiki/Sharp/HRO00060.User-Manual/User-Guide-824512-Page-72.png)

![Camera 73CameraYour phone has a built-in digital camera that allows you to take pictures and record video clips wherever you are. This section starts with basic functions and operational procedures to take, save and send pictures and video clips, followed by common and unique functions to camera and video modes.Taking Pictures“Camera”1. Press B to take the picture.The shutter sounds and the still image of the taken picture is displayed.2. Press [Save].The taken picture is saved in My Items.To cancel, press [Cancel].To send the taken picture, press B in step 2 and select “As Message”, “As Postcard” or “To Media Album” from the send option. (The Postcard and Media Album service is not available with some service providers. Contact your service provider for more information.)Note•When the video camera is launched, press [Options] and select “Go to Photo Camera”, or press c.•When you try to send a picture that has too large a file size, the picture size is resized for the message. The original sized picture is saved in My Items.Tip•You can activate the camera by pressing and holding X in standby. Simply press X to take pictures, and start and stop recording.•You can lock the focus by pressing F or pressing X halfway before taking a picture or recording a video clip. (M 4)](https://usermanual.wiki/Sharp/HRO00060.User-Manual/User-Guide-824512-Page-74.png)
![74 CameraRecording Video ClipsYou can record a video clip with your phone.“Camera”The preview is displayed on the screen.When in photo camera mode, press d to switch to video camera mode.1. Press B.2. To stop recording, press B.3. Select “Save”.The video clip is saved in My Items.To view the preview before saving, select “Preview”.To send the video clip, select “Save and Send”. Then select “As Message” or “To Media Album”. (The Media Album service is not available with some service providers. Contact your service provider for more information.) For further procedures, see “Creating a New Message” on page 82.Note•You can only send video clips when “For Message” is selected for the recording time. For details, see “Selecting the Recording Time and Picture Size” on page 80.Common Functions in the Photo and Video Camera ModesUsing the Digital Zoom FunctionTo Adjust the Zooming Ratio1. Press a or b.Once the phone has returned to standby, the zoom settings return to default.Adjusting the Exposure“Camera” → [Options] → “Exposure”1. Press a (Bright) or b (Dark).: (Bright → Normal → Dark)Once the phone has returned to standby, the brightness settings return to default.](https://usermanual.wiki/Sharp/HRO00060.User-Manual/User-Guide-824512-Page-75.png)
![Camera 75Selecting the Picture or Video QualitySelect the appropriate option.“Camera” → [Options] → “Picture Quality”“Camera” → [Options] → “Video Quality”1. Select the desired picture or video quality.: Super Fine:Fine: NormalNote•The better quality you select, the larger the file size becomes.Using the Self-TimerSelect the appropriate option.“Camera” → [Options] → “Modes” → “Self-timer”1. Select “2 sec”, “5 sec” or “10 sec”. “ ” is displayed on the screen when you select one of these options.Select “Off” to cancel the self-timer.Switching the Focus Mode“Camera” → [Options] → “Modes” → “Focus”1. Select the desired option.:Auto Focus:Manual Focus:MacroSwitching the Display DirectionYou can switch the display direction between portrait and landscape.“Camera” → [Options] → “Settings” → “Portrait / Landscape”](https://usermanual.wiki/Sharp/HRO00060.User-Manual/User-Guide-824512-Page-76.png)
![76 CameraSelecting the Storage MemorySelect the appropriate option.“Camera” → [Options] → “Settings” → “Save New Pictures”“Camera” → [Options] → “Settings” → “Save New Videos”1. Select the desired location from “To Handset Memory”, “To Memory Card” or “Choose bef. Saving”.Note•If you select “Choose bef. Saving”, select the desired location every time you save.Auto SaveYou can set the phone to save pictures and video clips automatically.“Camera” → [Options] → “Settings” → “Auto Save”1. Select “On” or “Off”.Selecting the Anti-flicker Mode“Camera” → [Options] → “Settings” → “Anti-flicker”1. Select “Mode 1: 50Hz” or “Mode 2: 60Hz”.Note•Vertical stripes may occur on the picture due to the light source. Change the anti-flicker mode to rectify.Switching between the Photo and Video Camera ModesYou can switch between the photo and video camera modes by pressing c or d.Select the appropriate option.“Camera” → [Options] → “Go to Video Camera”“Camera” → [Options] → “Go to Photo Camera”Using the Help Function“Camera” → [Options] → “Help”](https://usermanual.wiki/Sharp/HRO00060.User-Manual/User-Guide-824512-Page-77.png)
![Camera 77Common Shortcut KeysIf multiple options exist, they switch each time you press each following key.Note•The “Switches the display modes” option is available in “Preview” before you save a video clip. See “Recording Video Clips” on page 74.Functions in Photo Camera ModeSelecting the Picture SizeYou can select the size of pictures. All taken pictures are saved in the JPEG format.“Camera” → [Options] → “Picture Size”1. Select the desired size.(External Camera) 1200 × 1600 dots/960 × 1280 dots/768 × 1024 dots/480 × 640 dots/240 × 320 dots/120 × 160 dots(Internal Camera) 240 × 320 dots/120 × 160 dotsPhoto Camera Video CameraDFocus LockGZoom Max/MinHExposureIFocusJSave New Pictures Save New VideosKPicture Size Picture SizeLMPicture Quality Video QualityNSelf-timerOQSwitches Viewfinder between with and without indicatorsSwitches the display modes in the Preview screenPSwitches between internal and external cameras](https://usermanual.wiki/Sharp/HRO00060.User-Manual/User-Guide-824512-Page-78.png)
![78 CameraContinuous ShootThere are various modes for taking continuous shots.“Camera” → [Options] → “Modes” → “Continuous Shoot”1. Select the desired mode.The following continuous shoot modes are available:“Off”: The continuous shoots are cancelled.“4 Pictures”/“9 Pictures” ( / ): Takes 4 or 9 pictures continuously. After selecting this mode, select from “Fast”, “Normal”, “Slow” or “Manual”.“Overlapped” ( ): Overlaps continuous pictures into one picture and makes an afterimage. After selecting this mode, select “Fast” or “Normal”.Note•When you select “Manual” to take continuous pictures, press B manually at the desired speed.•When the Timer and Continuous Shoot functions are simultaneously set, “ ” and “ ” (for “4 Pictures”, for example) are alternately displayed.•You cannot use the Continuous Shoot function for picture sizes larger than 480 × 640 dots. “9 Pictures” and “Overlapped” are not available for picture sizes larger than 240 × 320 dots.](https://usermanual.wiki/Sharp/HRO00060.User-Manual/User-Guide-824512-Page-79.png)
![Camera 79Selecting a FrameYou can select the frame from preset patterns or My Pictures.“Camera” → [Options] → “Modes” → “Add Frame”1. Select “Preset Frames” or “My Pictures”.2. Select the desired frame.The selected frame is confirmed on the display.3. Press B.Note•Images larger than 240 dots [W] × 320 dots [H] cannot be used.Using the Full ScreenYou can display the preview on the full screen without the soft key area and indicator area.“Camera” → [Options] → “Settings”1. Select “Full Viewfinder”.To return to the normal viewfinder, select “Normal Viewfinder”.Selecting the Shutter Sound“Camera” → [Options] → “Settings” → “Shutter Sound”1. Select the desired shutter sound from 3 preset patterns.To play back the shutter sound, press [Play] in step 1.Note•Continuous Shoot uses the specialised shutter sound that cannot be changed using the above settings.•The shutter sound remains active even when “General Volume” (p. 133) is set to “Silent” to prevent unauthorised use.](https://usermanual.wiki/Sharp/HRO00060.User-Manual/User-Guide-824512-Page-80.png)
![80 CameraFunctions in Video Camera ModeSelecting the Recording Time and Picture Size“Camera” → [Options] → “Record Time/Size”1. Select “For Message” or “Extended Video”.For Message ( ): Limits the size to send a message depending on service providers.Extended Video ( ): Less than 30 minutes (depending on the memory).2. Select the desired picture size.If “For Message” is selected, select “Large (QCIF)” or “Small (SubQCIF)”.If “Extended Video” is selected, select “Large (QCIF)” or “Small (SubQCIF)”. When using the external camera, “QVGA (3gp)” is also available.Note•If you select “For Message” for the recording time, the file size is limited depending on the service provider. Therefore, the quality is also limited for the setting.•“Save and Send” is not displayed after recording in the Extended Video mode.Recording Video Clips with SoundTo record a video clip with sound, the microphone needs to be activated.“Camera” → [Options] → “Settings” → “Microphone”1. Select “On” or “Off”.Note•The microphone is already turned on in the default setting. Select “Off” to record a video clip without the sound.•The file size of a video clip can be reduced if the sound is not recorded.Video Encoding“Camera” → [Options] → “Settings” → “Video Encode”1. Select the appropriate format.](https://usermanual.wiki/Sharp/HRO00060.User-Manual/User-Guide-824512-Page-81.png)
![82 MessagingCreating a New Message(SMS/MMS)“Messaging” → “Create Message” → “Message”(Email)“Messaging” → “Create Message” → “Email”1. Select the recipient field.2. Select the desired method to enter the recipient’s details.3. For MMS, enter or select the Email address or phone number from the Contacts List. For SMS, enter or select a phone number. For Email, enter or select an Email address.• To add multiple Email addresses or phone numbers, highlight the recipient field, press [Options], select “Edit Recipient”, and then select “Add Contact”. Enter or select the Email address or phone number from the existing Contacts List.• To change the recipient types, press [Options], select “Edit Recipients” and highlight the desired recipient. Press [Options] and select “Change to To”, “Change to Cc” or “Change to Bcc”.• To add a subject, highlight the subject field and press B. Then enter the subject in the subject entry screen and press B.4. Place the cursor in the message field.5. Press B to display the message entry screen.Enter the message and press B.6. Press [Options] and select “Send”.“Send” is not available when no recipients are set.After the message is sent, the message is moved to the Sent box.Note•When you create an SMS/MMS message, the mode is automatically switched to MMS in the following cases:•When “Enter Email Address” in [Options] is selected for recipient fields.•When a subject is entered.•When the size of entered text has exceeded the SMS size limit.Tip•To send the same message to a group of recipients, select “Select Group” in step 2, then select the desired group name. For details on creating a mailing list, see “To Create a New Mailing List” on page 55. (M 5-1)](https://usermanual.wiki/Sharp/HRO00060.User-Manual/User-Guide-824512-Page-83.png)
![Messaging 83To Add a Slide Show1. Perform steps 1 to 5 in “Creating a New Message” on page 82.2. Press a to highlight your message or other inserted item such as a picture or sound file.3. Press [Options] and select “Add Slide”.4. Select “Add Slide After” or “Add Slide Before”.5. Enter another message.If you wish to set the duration of each slide, highlight the space between the slides. Press [Options] and select “Slide Duration”, then select the desired duration. Repeat steps 2 to 4 to add more slides.Tip•You can create messages up to 300 KB. Each slide can contain one picture and/or one sound file or video clip.To Attach Data1. In step 6 in “Creating a New Message” on page 82, press [Options] and select “Insert Item”.2. Select “Picture”, “Sound”, “Video”, “Attach Contact”, “Attach Appointment” or “Others”.When selecting “Attach Contact” or “Attach Appointment”, go to step 4.3. Select the desired option and then select the desired file.If you wish to attach pictures, sounds or video clips that are saved, select “Saved Picture”, “Saved Sound” or “Saved Video”.If you wish to take new pictures, record sounds or video clips, select “Take Picture”, “Record Voice” or “Record Video”.](https://usermanual.wiki/Sharp/HRO00060.User-Manual/User-Guide-824512-Page-84.png)
![84 Messaging4. Select the desired data.If you wish to select your own Contacts List entry, select “My Contact Details”.When attaching an appointment, select the desired day including a schedule entry you wish to add and select the desired schedule entry.Note•When attaching JPEG files, select the appropriate resize option, as the maximum message size for sending varies depending on the service provider.To Remove or Replace Attachments1. In step 6 in “Creating a New Message” on page 82, press [Options] and select the corresponding remove option for each attachment.Using the Sending OptionsYou can use the message sending options for each type of message.1. Highlight “Send” in the lower left of the screen, then press B and select “Messaging Settings”.• “Read Report” (“On”, “Off”) (MMS): Confirms whether or not a report is sent notifying the sender that the message has been read.• “Delivery Report” (“On”, “Off”) (SMS/MMS): Enables or disables Delivery Report when the message is successfully sent to the recipient.• “Expiry Time” (“Maximum”, “30 minutes”, “1 hour”, “6 hours”, “1 day”, “1 week”) (SMS/MMS): Sets Expiry Time for a message to be saved in the server.• “Priority” (“High”, “Normal”, “Low”): Prioritises composed messages.• “Delivery Time” (“No delay”, “30 minutes”, “1 hour”, “6 hours”, “1 day”, “1 week”) (SMS/MMS): Sets the time the message is delivered after the Send key is pressed.](https://usermanual.wiki/Sharp/HRO00060.User-Manual/User-Guide-824512-Page-85.png)
![Messaging 852. Highlight “Send” in the lower left of the screen. Press B and select “Send Message”.After the message is sent, the message is moved to the Sent box.Note•The current message size displayed while you are creating the message is an approximation.•If a message cannot be sent for some reason, the message stays in the Outbox and the “ ” is displayed in standby.Tip•To save the message without sending, press [Options] and select “Save to Drafts” in step 4 in “Creating a New Message” on page 82.•You can send the following items attached to multimedia messages. Details are given in the following sections.•My Items data•Contacts List entry•Schedule entry created by Calendar, etc.•You can use the template option to help you compose messages. For details on using this option, see “Using Templates” on page 49.Sending a Message in the Drafts Box“Messaging” → “Drafts”1. Select the desired tab, SMS/MMS or Email.2. Press [Options] and select “Edit & Send”.3. Modify the message, if necessary.4. Press [Options] and select “Send”.“Send” is not available when no recipients are set. (M 5-3)](https://usermanual.wiki/Sharp/HRO00060.User-Manual/User-Guide-824512-Page-86.png)
![86 MessagingSending a Voice Clip Message or Video Clip MessageYou can record a new voice or video clip when creating a new message.Select the appropriate option.“Messaging” → “Create Message” → “Voice Message”“Messaging” → “Create Message” → “Video Message”1. Press B to start recording.2. Press B to stop recording.3. Select “Accept” to attach to the new message.4. Select “To Handset Memory” or “To Memory Card” as the destination to save.For further procedures, see “Creating a New Message” on page 82.Tip•You can play back voice or video clips from My Items.Reading a MessageMessages you receive are saved in the Inbox.“Messaging” → “Inbox”1. Select the desired tab, SMS/MMS or Email.2. Select the message you wish to view.Storing the Phone Number of a Sender in the Contacts List“Messaging” → “Inbox”1. Select the desired tab, SMS/MMS or Email.2. Highlight the message from which you wish to store the phone number or Email address.3. Press [Options] and select “Save Address”.The new Contacts List entry screen including the phone number is displayed. For details on creating a new Contacts List entry, see “Adding a New Contact” on page 51.Calling the Phone Number of a Sender Embedded in the Message“Messaging” → “Inbox”1. Select the desired tab, SMS/MMS or Email.2. Highlight the message containing the phone number you wish to dial.3. Press [Options] and select “Call”.](https://usermanual.wiki/Sharp/HRO00060.User-Manual/User-Guide-824512-Page-87.png)
![Messaging 87Downloading a Single MMS“Messaging” → “Inbox”1. Select the SMS/MMS tab.2. Highlight the message alert ( ) you wish to download.3. Press [Options] and select “Download”.Tip•You can download multiple messages at the same time. See “Downloading Multiple MMS”.Downloading Multiple MMS“Messaging” → “Inbox”1. Press [Options] and select “Advanced”.2. Select “Multiple Select”.3. Select the desired message alerts, press [Options] and select “Select” or “Select All”.4. Press [Options] and select “Download”.The selected messages are downloaded at the same time.Replying to a Message or to All Addresses“Messaging” → “Inbox”1. Select the desired tab, SMS/MMS or Email.2. Highlight the message the sender of which you wish to reply to.3. Press [Options] and select “Reply” (to sender only) or “Reply All” (to all other recipients listed in the original To or Cc lists).4. Select “Reply” or “Reply with History”.5. Enter the message.6. Press [Options] and select “Send”.“Send” is not available when no recipients are set.Forwarding a Message“Messaging” → “Inbox”1. Select the desired tab, SMS/MMS or Email.2. Highlight the message you wish to forward.3. Press [Options] and select “Forward”.4. Perform steps 1 to 5 in “Creating a New Message” on page 82.](https://usermanual.wiki/Sharp/HRO00060.User-Manual/User-Guide-824512-Page-88.png)
![88 MessagingSorting the Messages in the List“Messaging” → “Inbox”1. Select the desired tab, SMS/MMS or Email.2. Press [Options] and select “View Settings”.3. Select “Sort”.4. Select the desired sort option.Locking or Unlocking the Messages“Messaging” → “Inbox”1. Select the desired tab, SMS/MMS or Email.2. Highlight the message you wish to lock or unlock.3. Press [Options] and select “Lock/Unlock”.Sending a Picture File with PostcardYour phone allows you to send multimedia messages to a Vodafone specific Postcard service centre that prints the picture and mails it to the recipient’s home address specified in the MMS message. (Your phone is provided with the address of a Vodafone specific Postcard service centre, and its address cannot be changed.)Note•This service is not available with some service providers. Please contact your service provider for more information.To Create a New PostcardSee the note on page 20 for menu indications.“Messaging” → “Create Message” → “Postcard” → “Saved Pictures”1. Select a picture you wish to send.If you wish to take new pictures, select “Take Pictures”.If the file size of selected JPEG format pictures or taken pictures is too large to send, select the appropriate resize option.2. Enter your message.You can enter messages of up to 200 bytes. (M 5-1-4)](https://usermanual.wiki/Sharp/HRO00060.User-Manual/User-Guide-824512-Page-89.png)
![Messaging 893. Enter or select the recipient.See the note below for details.• “Name” (mandatory): Name of the recipient for a postcard up to 50 bytes• “Additional Information” (optional): Additional information of the recipient up to 50 bytes• “Street & Number” (mandatory): Street and number up to 50 bytes• “City” (mandatory): City up to 50 bytes• “Postal Code” (optional): Postal code up to 20 bytes• “State/Province” (optional): State, province, and region up to 50 bytes• “Country” (optional): Country up to 20 bytes4. Press [Options] and select “Send Postcard”.Note•The items “Name”, “Street & Number” and “City” are necessary to complete sending Postcards.•The items displayed differ according to the service. Please contact your service provider for more information. The item “Country” may not be displayed, in which case you cannot send Postcards overseas from your phone.•Asterisks entered in the address become invalid when the message is sent, and spaces cannot be entered in the Postal Code.•Only files in JPEG format can be used for the Postcard service.•The picture quality of Postcards varies depending on the picture size.](https://usermanual.wiki/Sharp/HRO00060.User-Manual/User-Guide-824512-Page-90.png)
![Messaging 91Starting a Conversation“Messaging” → “Instant Messenger” → “Online Contacts” tab or “Group Conversations” tab1. Select the display name or the group name you wish to send the message to.The conversation dialogue opens.2. Enter the message in the lower window and press B.When the message is sent, the message moves to the upper window.3. When you receive a message, it is displayed in the upper window.4. To continue the conversation, repeat steps 2 and 3.Note•You can enter up to 160 characters in each message that is sent.•You can send messages even if the recipient is not connected.Tip•You can move the cursor by a/b. When the cursor is at the top of the lower window, a moves control to the upper window then a/ b scrolls the text in the upper window. To return to the lower window, press [Back].•The number of lines in the upper and lower windows changes to suit the circumstances.Adding a New Contact“Messaging” → “Instant Messenger” → “Registered Contacts” tab or “Online Contacts” tab1. Press [Options] and select “Add New Contact”.2. Enter the new Contacts List member by steps 2 and 3 in “1st Sign in” on page 90.Adding a Group of Contacts“Messaging” → “Instant Messenger” → “Group Conversations” tab1. Press [Options] and select “Add New Group”.2. Enter the group name and press B.The Online Contacts list opens.3. Highlight each member you wish to add to the group and press B to check.To uncheck, press B once.4. Press [Save].](https://usermanual.wiki/Sharp/HRO00060.User-Manual/User-Guide-824512-Page-92.png)
![92 MessagingAdding Members to a Group of Contacts“Messaging” → “Instant Messenger” → “Group Conversations” tab1. Highlight the group you wish to add the members to.2. Press [Options] and select “Invite Contacts”.The Online Contacts list opens.3. Select the members by steps 3 and 4 in “Adding a Group of Contacts” on page 91.Reading a Message“Messaging” → “Instant Messenger” → “Conversations” tab1. Select the desired message you wish to read.Tip•You can continue a conversation after you have received a message by entering a message in the lower window.Saving a Conversation“Messaging” → “Instant Messenger” → “Conversations” tab1. Highlight the conversation you wish to save.2. Press [Options] and select “Save Conversation”.Note•You can save up to 3900 bytes (approx. 100 lines) in a conversation. When this limit is exceeded, messages are automatically deleted starting from the oldest message.•You can save up to ten conversations. When this limit is exceeded, you will be asked to delete old conversations starting from the oldest message.•You can view saved conversations as follows:Reading a Saved Conversation“Messaging” → “Instant Messenger” → “Conversations” tab1. Press [Options] and select “Saved Conversations”.2. Select the conversation you wish to read.](https://usermanual.wiki/Sharp/HRO00060.User-Manual/User-Guide-824512-Page-93.png)
![Messaging 93Watchers ListThe watchers list allows you to see who is viewing your status.To Add Contacts from the Watchers ListYou can add the watchers to the Contacts List using any tab.“Messaging” → “Instant Messenger”1. Press [Options] and select “Settings”.2. Select “Watchers List”.The Watchers List opens.3. Press [Options] and select “Add to Contacts”.Tip•To block a member from viewing your status, highlight the member you wish to block, press [Options] and select “Block User”.Client SettingsYou can set these options using any tab.“Messaging” → “Instant Messenger”1. Press [Options] and select “Settings”.2. Select one of the following items.“My Status”: Changes your connection status to “Online” or “Busy”.“Screen Name”: Changes your screen name.“Automatic Sign In”: Sets whether or not to sign in when you turn your phone on. “Block List”: Views and removes contacts from the Block List.Sign OutYou can log out using any tab.1. Press [Options] and select “Sign Out”.Note•Be sure to disconnect when signing out. Otherwise, you will be charged for data.](https://usermanual.wiki/Sharp/HRO00060.User-Manual/User-Guide-824512-Page-94.png)
![94 MessagingCell BroadcastsYou can receive cell broadcast messages or general messages such as weather forecasts and traffic reports. This information is broadcast to subscribers in certain network areas.This function may not be available on all mobile phone networks. Contact your service provider for more information.Enabling/Disabling Cell Broadcasts“Settings” → “Other Settings” tab → “Network Settings” → “Cell Broadcasts” → “Switch On/Off”1. Select “On” or “Off”.Reading Cell Broadcast Messages“Settings” → “Other Settings” tab → “Network Settings” → “Cell Broadcasts” → “Read Messages”1. Select the desired subject.2. Scroll the screen to read the message.3. Press [Back].Setting Languages for Cell Broadcast Messages“Settings” → “Other Settings” tab → “Network Settings” → “Cell Broadcasts” → “Settings” → “Language”The current language is displayed.1. Press B to check.2. Press [Save].Subscribing to Cell BroadcastsSelect the page of the cell broadcast message that you want.“Settings” → “Other Settings” tab → “Network Settings” → “Cell Broadcasts” → “Settings” → “Set Info Subjects”1. Press [Options] and select “Add/Remove”.2. Select the desired subject.3. Press [Save].Tip•If the desired subject is not in the list that appears in step 2, select “Create Subject” in step 1, then enter the subject code to add a page. For details on the subject code, contact your service provider. (M 12-d-d-d-5-4)](https://usermanual.wiki/Sharp/HRO00060.User-Manual/User-Guide-824512-Page-95.png)
![98 Messaging• “Max Message Size”:Sets the maximum message size for sending and disables sending MMS messages exceeding that size.• “Creation Mode”:When set to “Free”, you can attach files of any format to the mail. When set to “Restricted”, only certain formats and message sizes can be attached. The “Restricted” setting has priority over “Max Message Size”.• “Emoticons”:Enables or disables the Emoticons when entering text.• “Hide Number”:Sets whether to show or hide the sender’s address.• “Delivery Time” (“Immediate”, “1 hour”, “12 hours”, “1 day”, “1 week”): Sets the time the message is delivered after the Send key is pressed.• “Automatic Rejection”:Enables or disables the Automatic Rejection of messages from anonymous senders.Email Settings“Messaging” → “Messaging Settings” → “Email Settings”To Set an Email Account1. Select “Email Accounts” and highlight the preset Email account.You can also create a new account.2. Press [Options] and select “Edit”.3. Select the item you wish to set up.“Account Name”: Email account name (Unique name)“Incoming Server”: Server name, user ID, password, port number, APOP authentication and encryption for the incoming server (M 5-10-4)](https://usermanual.wiki/Sharp/HRO00060.User-Manual/User-Guide-824512-Page-99.png)

![Vodafone live! 101Navigating a WAP Page•a b c d: Moves the highlight around in the screen.•A: Launches the option menu if it has not been launched. Used to select an option from the option menu.•B: Executes the highlighted item in the screen.•C: Launches “Vodafone live!” by opening the browser when in standby. Moves to previous page when the browser is active.•F(short press): Exits the browser.(press and hold): Turns off the phone.Editing Bookmarks“Vodafone live!” → “Bookmarks”1. Select the desired URL, and press [Options].You can edit the list of Bookmarks by the following options:(When a bookmark is focused)“Open”: Selects a bookmark.“Edit”: Edits URL address of the bookmark.“Add New Bookmark”:Creates new bookmarks.“Create Folder”: Creates new folders.“Send via MMS”: Sends the URL address to recipients.“Move”: Moves bookmarks to another location.“Details”: Displays detailed information of the WAP page.“Delete”: Deletes bookmarks.“Delete All”: Deletes all bookmarks. (M 2-3)](https://usermanual.wiki/Sharp/HRO00060.User-Manual/User-Guide-824512-Page-102.png)
![Vodafone live! 103The Browser OptionsYou can use the various options of the browser.C → [Options]“Select”: Selects a WAP page.“Open This Frame”: Opens the selected frame. (This option is displayed only when a frame page is displayed.)“Home”: Goes to the homepage.“Forward”: Goes to the next page of the pages displayed.“Reload Page”: Reloads the WAP page again to get new information.“Bookmarks”: See page 101.“Save This Page”: Allows you to save the currently viewed browser screenshots to the handset memory.“Save Items”: Saves items from the browser pages.“Enter URL”: Allows you to type in the URL of a site directly. Handset browser will go to the web/WAP page that you entered.“Access History”: Shows the history where you have browsed.“Complete Page Display”:Allows the browser to display in complete page mode or Virtual Screen mode.“Advanced”: Displays the advanced option menu of the browser.“Help”: Displays the browser help.“Exit”: Exits the browser.Tip•You can also display browser options in the following procedure: “Settings” → “Other Settings” tab → “Browser Settings”](https://usermanual.wiki/Sharp/HRO00060.User-Manual/User-Guide-824512-Page-104.png)
![104 Vodafone live!The Advanced OptionsC → [Options] → “Advanced”“Zoom In/Out”: Zooms in on or out from the WAP page. This option is available only when “Complete Page Display” is set to “ON”.“Send This Page via MMS”:Sends the WAP/web page via MMS.“Details”: Shows detailed information of the WAP/web page.“Delete Browser Data”:Deletes the browser data. You can clear the cache/cookies/history/authentication information.“Search This Page”: Searches for specific words in the WAP/web page.“Jump to Top”: Jumps to the top of the WAP/web page.“Jump to Bottom”: Jumps to the bottom of the WAP/web page.“Copy Text”: Copies the text on the WAP/web page.“Browser Settings”: Displays the settings menus (p. 102).](https://usermanual.wiki/Sharp/HRO00060.User-Manual/User-Guide-824512-Page-105.png)
![My Items 105My ItemsMy Items contains all your pictures, music and videos. Also included in My Items are Text Templates and recently viewed WAP page addresses. You can also transmit pictures, sounds and video clips via Bluetooth wireless technology to other Bluetooth-enabled devices.PicturesPictures that are taken by your phone’s camera or images that are downloaded from mobile Internet sites can be viewed, edited and organised.Viewing Pictures“My Items” → “Pictures”1. Select the file you wish to view.The selected picture is displayed.Note•To switch between viewing handset or memory card content, select the first item in the options menu.Tip•You can scroll through your pictures with P and R.•To change the default view of pictures (list or grid), press [Options], select “Manage Items” and then select “Change List View”.Using Images as Wallpaper“My Items” → “Pictures”1. Highlight the file you wish to use as wallpaper.2. Press [Options] and select “Set as Wallpaper”.Editing Pictures“My Items” → “Pictures”1. Highlight the file you wish to edit.2. Press [Options] and select “Edit”.3. Select “Picture Editor” or “Composite”.4. Select the desired option.Note•“Picture Editor” may not be available depending on the original picture and copyright issued. (M 6)(M 6-1)](https://usermanual.wiki/Sharp/HRO00060.User-Manual/User-Guide-824512-Page-106.png)
![106 My ItemsSaving an Image to Contacts List EntriesYou can use this option only for pictures saved in the handset memory.“My Items” → “Pictures”1. Highlight the file you wish to add to Contacts List.2. Press [Options] and select “Add to Contacts”.To overwrite, select the data you wish to save.To save as a new entry, select “As New Contact”.For details on entering a name, see “Adding a New Contact” on page 51.Downloading Picture Files“My Items” → “Pictures” → “More Pictures”The picture file download site is displayed.Music & RingtonesThe downloaded sound files and the AMR data recorded by Voice Recorder are managed in Music & Ringtones. The default ringtones are not contained within Music & Ringtones. Only the sound files that can be played back on the phone are stored in Music & Ringtones.Playing Back Sound Files“My Items” → “Music & Ringtones”1. Select the file you wish to play back.To stop playback, press [Back].Note•Playback may not be available for some sound files.•To switch between viewing handset or memory card content, select the first item in the options menu.Using the Sound Files as a Ringtone“My Items” → “Music & Ringtones”1. Highlight the file you wish to use as a ringtone.2. Press [Options] and select “Set as Ringtone”.Tip•For other option menus, see “Common Option Menus” on page 110. (M 6-2)](https://usermanual.wiki/Sharp/HRO00060.User-Manual/User-Guide-824512-Page-107.png)
![My Items 107Downloading Sound Files“My Items” → “Music & Ringtones” → “More Ringtones”The sound file download site is displayed.VideosVideo clips that are recorded by your phone’s video camera or video clips that are downloaded from mobile Internet sites can be viewed and organised.Playing Back Video Clip Files“My Items” → “Videos”1. Select the file you wish to play back.To pause playback, press B.To resume, press B again.To stop playback, press [Back].Note•To switch between viewing handset or memory card content, select the first item in the options menu.Using a Video Clip as a Ring Video ClipYou can set your video clip to play back when the phone rings.“My Items” → “Videos”1. Highlight the desired video clip.2. Press [Options] and select “Set as Ring Video”.Tip•For other option menus, see “Common Option Menus” on page 110.Downloading Video Clip Files“My Items” → “Videos” → “More Videos”The video clip file download site is displayed.(M 6-3)](https://usermanual.wiki/Sharp/HRO00060.User-Manual/User-Guide-824512-Page-108.png)
![My Items 109Text TemplatesYou can register up to 50 text templates for use in text messages and multimedia messages. A maximum of 256 characters can be used for a single text template.Adding Phrases to Text Templates“My Items” → “Text Templates” → “Add New Template”1. Enter the text and press B.Editing Text Templates“My Items” → “Text Templates”1. Highlight the text template you wish to edit.2. Press [Options] and select “Edit”.To view the text template, press [Options] and select “View”.To delete the text template, press [Options] and select “Delete”.3. Modify the text and press B.Sending Text Templates“My Items” → “Text Templates”1. Highlight the text template you wish to send.2. Press [Options] and select “Send Template”.Other DocumentsSome types of files are stored in the Other Documents folder of the phone. You can edit and use these files as My Items data.Opening a Document File“My Items” → “Other Documents”1. Select the desired file.Note•To switch between viewing handset or memory card content, select the first item in the options menu.Tip•For other option menus, see “Common Option Menus” on page 110. (M 6-6) (M 6-7)](https://usermanual.wiki/Sharp/HRO00060.User-Manual/User-Guide-824512-Page-110.png)
![110 My ItemsCommon Option MenusFor using the desired file type, first select the appropriate folder in the My Items menu. My Items contains the following folders.“My Items” → “Pictures”“My Items” → “Music & Ringtones”“My Items” → “Videos”“My Items” → “Themes”“My Items” → “Games & Applications”“My Items” → “Text Templates”“My Items” → “Other Documents”Activating Files with Copyright Protection (DRM)Some pictures, sound files, video clips and theme files have a digital copy protection program, which is called DRM (Digital Rights Management). You need to activate the digital licence permission to open the files. Files protected with DRM are displayed with .1. Select the appropriate folder for the desired file type.2. Highlight the file you wish to activate.3. Press [Options] and select “Activate”.Note•Some pictures with DRM may not open even when an attempt is made to activate it.Sending My Items DataFor details on Bluetooth wireless technology, see “Connectivity” on page 147.1. Select the appropriate folder for the desired file type.2. Highlight the desired file.3. Press [Options] and select “Send”.4. Select “As Message” or “Via Bluetooth”.Tip•For details on creating a message, see “Creating a New Message” on page 82.•For details on Bluetooth settings, see “Using the Bluetooth Function” on page 147.](https://usermanual.wiki/Sharp/HRO00060.User-Manual/User-Guide-824512-Page-111.png)
![My Items 111Note•Pictures/Sounds/Video clips protected by copyright cannot be sent attached to a message, with the exception of Separate Delivery files.•Theme files can only be sent via Bluetooth. Select “Bluetooth” in step 4.•When pairing, you need to enter your passcode when establishing contact with a Bluetooth wireless technology enabled device for the first time.•When you send a picture file, select “As Postcard” in step 4. The Postcard service is not available with some providers. Contact your service provider for more information.Receiving My Items DataWhen the phone receives My Items data, a confirmation message is displayed in standby.1. Press [Yes].The received data is saved in the corresponding My Items folder.Tip•For details on Bluetooth wireless settings, see “Connectivity” on page 147.Using My Items DataYou can copy, move, sort, rename, and delete the saved My Items data.1. Select the appropriate folder for the desired file type (page 110).2. Highlight the desired file.3. Press [Options] and select “Manage Items”.4. Select the desired option.“Sort”: Sorts files. Select the desired files to sort.“Rename”: Renames the file or folder. Select the desired file or folder to rename.“Create Folder”: Creates a new folder.“Change List View”:Changes the list view.“Delete All”: Deletes files. Select the desired files to delete.](https://usermanual.wiki/Sharp/HRO00060.User-Manual/User-Guide-824512-Page-112.png)
![112 My ItemsNote•“Manage Items” is not available for “Games & Applications” and “Text Templates”.To Delete the File1. Select the appropriate folder for the desired file type (page 110).2. Highlight the desired file.3. Press [Options] and select “Delete”.To See the My Items Details1. Select the appropriate folder for the desired file type (page 110).2. Highlight the file you wish to view the details of.3. Press [Options] and select “Details”.Uploading My Items DataYou can upload your picture, sound or video clip files to the Media Album.1. Select the appropriate folder for the desired file type (page 110).2. Highlight the file you wish to upload.3. Press [Options] and select “Send”.4. Select “To Media Album”.Note•This service is not available with some service providers. Please contact your service provider for more information.•Picture, sound and video clip files protected with a copyright cannot be uploaded.](https://usermanual.wiki/Sharp/HRO00060.User-Manual/User-Guide-824512-Page-113.png)
![My Items 113Selecting Multiple FilesYou can select more than one item from My Items for moving, copying, managing and deleting.Note•The following procedure applies when entries other than “More Pictures”/“More Ringtones”/“More Videos”/“More Themes” are highlighted.1. Select the appropriate folder for the desired file type (p. 110).2. Highlight the file you wish to select.3. Press [Options] and select “Check”.4. Repeat steps 2 and 3 until you select all the desired files.Tip•To remove the check, highlight the file again and select “Uncheck” in step 3.•If you wish to unselect all, select “Manage Items” in step 3 and select “Uncheck All”.Memory StatusThis function helps you to check the memory status of the handset memory or memory card. Memory status covers the following.Phone Memory: Applications, Pictures, Videos, Sounds, Themes, Others, Total and FreeMemory Card: Pictures, Videos, Sounds, Themes, Others, Total and Free“My Items” → “Memory Status”1. Select “Phone Memory” or “Memory Card”. (M 6-8)](https://usermanual.wiki/Sharp/HRO00060.User-Manual/User-Guide-824512-Page-114.png)
![Games & Applications 115Executing Applications“Games & Applications” → “Games & Applications”1. Select the title of the application you wish to execute.The selected application is executed. When using network connection type applications, connection to the network can be selected.2. To end the application, press F and select “End”.Setting as a Screensaver for the Display“Games & Applications” → “Games & Applications”1. Highlight the file you wish to use as a screensaver.2. Press [Options] and select “Set as Screensaver”.Setting PermissionYou can set permission for selected Java™ applications.“Games & Applications” → “Games & Applications”1. Highlight the desired Java™ application.2. Press [Options] and select “Permission”.3. Select one of the following options:“Phone Call”: Sets permission to make voice calls.“Network Access”: Sets permission to access the network.“Messaging”: Sets permission to perform MMS and SMS messaging.“Autorun”: Sets permission to perform the Autorun function.“Local Connection”: Sets permission to connect to local devices.“Read User Data”: Sets permission to read user data, such as Contacts List entries, mailbox (Inbox) and My Items data.“Write User Data”: Sets permission to write entries in your phone, such as Contacts List entries, mailbox (Inbox) and My Items data.“Use Multimedia”: Sets permission to use the multimedia recording.](https://usermanual.wiki/Sharp/HRO00060.User-Manual/User-Guide-824512-Page-116.png)
![116 Games & Applications4. Select one of the following options:“Session”: The confirmation message is not displayed until you exit the application, while execution of the API of the specified function group is authorised.“Ask Once”: The confirmation message is displayed every time the API of the specified function group is executed.“Blanket”: The confirmation message is not displayed until the application is deleted or you change the settings, while execution of the API of the specified function group is authorised.“No”: Execution of the API of the specified function group is not authorised.Note•To clear all the permission settings, select “Reset” in step 3.•Some permissions are not available for some Java™ applications.Viewing Application InformationYou can check the information of Java™ applications.“Games & Applications” → “Games & Applications”1. Highlight the desired Java™ application.2. Press [Options] and select “Information”.Moving or Deleting an ApplicationYou can move an application between Games folders and Application folders, and also delete applications in folders.“Games & Applications” → “Games & Applications”1. Highlight the desired Java™ application.2. Press [Options] and select “Move” or “Delete”.](https://usermanual.wiki/Sharp/HRO00060.User-Manual/User-Guide-824512-Page-117.png)
![120 Organiser & UtilitiesOrganiser & UtilitiesAlarmsSetting the AlarmsThe alarm function allows you to be alerted at a specified time.Note that you need to set the current date and time before setting the alarm function if it has not been done already.“Organiser & Utilities” → “Organiser” tab → “Alarms”1.Select the blank line (--:--) you wish to set an alarm to.2. Enter the desired time.3. Press [Save].To Change the Settings1. Select the item you wish to change in the Set Alarm screen.• “Repeat”:Sets the number of times the alarm sounds.• “Assign Tone/Video”:Assigns a tone or video clip file to the alarm.• “Snooze”:Sets the snooze option.• “Alarm Volume”:Sets the desired volume.The alarm will not sound when “Alarm Volume” is set to “Silent”. When the profile is set to “Silent”, the “General Volume” setting (p. 133) has priority.• “Vibration”:Sets the vibration pattern of the alarm.For details on selecting a vibration, see “Vibration” on page 137.•“Duration”:Sets the duration of the alarm.Resetting an Alarm“Organiser & Utilities” → “Organiser” tab → “Alarms”1. Highlight the alarm you wish to reset.2. Press [Options] and select “Reset Alarm”.Resetting All Alarms“Organiser & Utilities” → “Organiser” tab → “Alarms”1. Select “Clear All”. (M 7) (M 7-1)](https://usermanual.wiki/Sharp/HRO00060.User-Manual/User-Guide-824512-Page-121.png)
![Organiser & Utilities 121CalendarThe calendar allows you to easily schedule appointments.These entries can also be sent via Bluetooth wireless technology to a PC to share the same schedules. When you exchange entries with other devices, the date and time displayed may be different to that of the original data depending on the data format of the receiving device.Creating a New Entry“Organiser & Utilities” → “Organiser” tab → “Calendar”1. Select the desired day to which you want to add an event.2. Select “Add New Entry”.3. Enter the subject.4. Select the desired category.5. Enter the start date and time.6. Select the duration.When selecting “Other”, enter the desired end date and time.7. Select the reminder time.When selecting “Other”, enter the desired reminder date and time.8. Press [Save].Note•If the date and time settings have not been entered, the date and time entry screen is displayed (p. 142).•The reminder will not sound when “General Volume” (p. 133) is set to “Silent”.To Change the Settings1. Select the item you wish to change in the New Entry screen.• “Reminder”: Sets options including “Reminder Time”, “Assign Tone/Video” and “Duration” for the reminder.• “Repeat”: Sets the number of times the reminder sounds.• “Location”: Sets the location for the schedule entry.• “Description”: Enables entering a memo for the schedule entry. (M 7-2)](https://usermanual.wiki/Sharp/HRO00060.User-Manual/User-Guide-824512-Page-122.png)
![122 Organiser & Utilities• “Secret”: Sets to show or hide the schedule entry. Set to “On” to make the data secret or select “Off” to leave it as it is.Viewing a Schedule Entry“Organiser & Utilities” → “Organiser” tab → “Calendar”1. Select the day you wish to view.2. Select the desired entry.To Search by Date1. In any view, press [Options] and select “Go to”.2. Select “Today” to display today or “Enter Date” to enter the desired date.Tip•In the monthly or weekly view, you can control the view by using the following:Monthly viewP: Displays the previous month.R: Displays the next month.Q: Displays the weekly view.K: Moves the cursor to today.c/d: Moves the cursor to left (the previous day) or to right (the next day).a/b: Moves the cursor upward (last week) or downward (next week).Weekly viewP: Displays the previous week.R: Displays the next week.Q: Displays the monthly view.K: Moves the cursor to today.c/d: Moves the cursor to left (the previous day) or to right (the next day).a/b: Moves the weekly view up or down (the previous hour or next hour).Setting a HolidayIn the weekly or monthly view, you can highlight a date or days of the week with seven colour options.“Organiser & Utilities” → “Organiser” tab → “Calendar”](https://usermanual.wiki/Sharp/HRO00060.User-Manual/User-Guide-824512-Page-123.png)
![Organiser & Utilities 123For Date Colour1. Highlight the day you wish to set.2. Press [Options] and select “Set Holiday”.3. Select “By Date” and then select the desired colour.For Days of the Week Colour1. Press [Options] and select “Set Holiday”.2. Select “By Week” and then select days of the week you wish to colour.3. Select the desired colour.Tip•The selected date/days are also highlighted on the calendar on the standby screen.Note•If the same date is set with both a date colour and a day of the week colour, the date is highlighted in the date colour.•Up to 100 days can be set for the highlights.Finding a Schedule Entry“Organiser & Utilities” → “Organiser” tab → “Calendar”1. In any view, press [Options] and select “Find”.2. Enter a few letters of the subject.Search results are displayed in time order.Editing a Schedule Entry“Organiser & Utilities” → “Organiser” tab → “Calendar”1. Select the day you wish to edit.2. Highlight the entry you wish to edit, press [Options], then select “Edit”.3. Select the desired item and modify the entry.4. Press [Save].](https://usermanual.wiki/Sharp/HRO00060.User-Manual/User-Guide-824512-Page-124.png)
![124 Organiser & UtilitiesDeleting Schedule Entries1. In any view, press [Options] and select “Delete”.2. Select the desired option.“All This Week” (weekly view): Deletes all entries for the selected week.“All This Month” (monthly view): Deletes all entries for the selected month.“Up to Last Month” (monthly view): Deletes all entries before the selected month.“All Appointments” (weekly, monthly and 2-month view): Deletes all entries in this application.Sending a Schedule Entry“Organiser & Utilities” → “Organiser” tab → “Calendar”1. Select the day including schedule entries you wish to send.2. Highlight the entry you wish to send, press [Options], then select “Send”.3. Select “As Message” or “Via Bluetooth”.For “Via Bluetooth”For details, see “Using the Bluetooth Function” on page 147.Note•When pairing, you need to enter your passcode when establishing contact with a Bluetooth wireless technology enabled device for the first time.Receiving a Schedule EntryWhen the phone receives a schedule entry, a confirmation message is displayed in standby.1. Press [Yes].The received entry is saved in the Calendar.Press [No] to reject.Tip•For details on entering Bluetooth wireless settings, see “Connectivity” on page 147.Viewing the Memory Status1. In any view, press [Options] and select “Memory Status”.](https://usermanual.wiki/Sharp/HRO00060.User-Manual/User-Guide-824512-Page-125.png)
![Organiser & Utilities 125StopwatchYou can store 4 lap times when using the stopwatch function.“Organiser & Utilities” → “Organiser” tab → “Stopwatch”1. Press B to start.Press [LAP] to view the lap time before the stopwatch stops. Last 4 lap times are saved.2. Press B to stop.Tip•You can save a record of lap times and the stop time by pressing [Options] and selecting “Save to Templates”.Resetting Time1. After stopping the stopwatch, press [Options] and select “Reset”.TasksYou can register your schedule as task entries for a given date or time.Creating a New Entry“Organiser & Utilities” → “Organiser” tab → “Tasks”1. Select “Add New Entry”.2. Enter the subject.3. Enter the due date and time.4. Press [Save].Note•If the date and time settings have not been entered, the date and time entry screen is displayed (p. 142).To Select the Reminder Time1. On the New Entry screen, select “Reminder”.2. Select “Reminder Time”.3. Select the reminder time.When selecting “Other”, enter the desired reminder date and time. (M 7-3) (M 7-4)](https://usermanual.wiki/Sharp/HRO00060.User-Manual/User-Guide-824512-Page-126.png)
![126 Organiser & UtilitiesTo Change the Type of Alarm Tone or Video Clip File1. On the New Entry screen, select “Reminder”.2. Select “Assign Tone/Video”.3. Select “Assign Tone” and then select “Preset Sounds” or “My Sounds”, or select “Assign Video”.4. Select the desired tone or video clip file.For details on selecting a tone, see “Assigning a Ringtone for an Incoming Call” on page 134.To Change the Duration of Alarm Tone or Video1. On the New Entry screen, select “Reminder”.2. Select “Duration”.3. Select the desired duration.To Change the Description1. On the New Entry screen, select “Description”.2. Enter a memo for the task entry.To Make the Entry Secret1. On the New Entry screen, select “Secret”.2. Select “On” to make the data secret or select “Off” to leave it as it is.Making the Entry Completed or Incomplete“Organiser & Utilities” → “Organiser” tab → “Tasks”1. Highlight the desired entry.2. Press B.3. On the view screen, press [Options] and select “Check”.To make the entry incomplete, select “Uncheck”.](https://usermanual.wiki/Sharp/HRO00060.User-Manual/User-Guide-824512-Page-127.png)
![Organiser & Utilities 127Finding a Task Entry“Organiser & Utilities” → “Organiser” tab → “Tasks”1. Press [Options] and select “Find”.2. Enter a few letters of the subject and press B.Search results are displayed in time order.Sending a Task Entry“Organiser & Utilities” → “Organiser” tab → “Tasks”1. Highlight the task entry you wish to send.2. Press [Options] and select “Send”.3. Select “As Message” or “Via Bluetooth”.For “Via Bluetooth”For details, see “Using the Bluetooth Function” on page 147.Note•When pairing, you need to enter your passcode when establishing contact with a Bluetooth wireless technology enabled device for the first time.Viewing the Memory Status“Organiser & Utilities” → “Organiser” tab → “Tasks”1. Press [Options] and select “Memory Status”.Deleting Entries“Organiser & Utilities” → “Organiser” tab → “Tasks” → [Options] → “Delete”1. Select the desired option.“This Task”: Deletes the selected entry.“All Completed Tasks”: Deletes all checked entries.“All Tasks”: Deletes all entries.](https://usermanual.wiki/Sharp/HRO00060.User-Manual/User-Guide-824512-Page-128.png)
![128 Organiser & UtilitiesWorld ClockSetting the Time Zone“Organiser & Utilities” → “Organiser” tab → “World Clock”1. Press [Edit] and select “Set Time Zone”.The current time zone is indicated by red line on the world map.2. Press c or d to change the time zone.3. Press B.To Set the Custom Time Zone“Organiser & Utilities” → “Organiser” tab → “World Clock”1. Press [Edit] and select “Set Time Zone”.2. Press [Options] and select “Set Custom Zone”.3. Enter the desired city name and time.Setting Daylight Saving“Organiser & Utilities” → “Organiser” tab → “World Clock”1. Press [Edit] and select “Daylight Saving”.2. Select “On” or “Off”.Countdown Timer“Organiser & Utilities” → “Organiser” tab → “Countdown Timer”1. Enter the time to count.You can set the time from 1 second to 60 minutes.2. Press B to start counting.3. Press B to pause.Press B again to continue counting.4. If the countdown has finished, press [Cancel] and then press B to start the countdown again.Editing the Countdown Time1. In the countdown start screen, press [Options] and select “Edit”.2. Modify the desired time. (M 7-5) (M 7-6)](https://usermanual.wiki/Sharp/HRO00060.User-Manual/User-Guide-824512-Page-129.png)
![Organiser & Utilities 129CalculatorThe calculator function performs the 4 arithmetic calculations using up to 12 digits.“Organiser & Utilities” → “Utilities” tab → “Calculator”Key operations for calculation are as follows:To enter a decimal point, press P.To clear the entered number or function, press [Clear].To do the calculations, press B.To start a new calculation, press [Clear].Rate ConversionYou can also use the calculator as a currency calculator to convert from/to a home currency using a conversion rate that you enter.To Set a Currency Conversion Rate“Organiser & Utilities” → “Utilities” tab → “Calculator” → [Options] → “Currency Converter” → “Exchange Rate”1. Select “Domestic” or “Foreign”.2. Enter the currency conversion rate.To Convert a Value“Organiser & Utilities” → “Utilities” tab → “Calculator”1. Enter the value to be converted.2. Press [Options] and select “Currency Converter”.3. Select “Convert to Domestic” or “Convert to Foreign”. (M 7-d-1)](https://usermanual.wiki/Sharp/HRO00060.User-Manual/User-Guide-824512-Page-130.png)
![130 Organiser & UtilitiesVoice RecorderThis allows you to record a voice clip, which can be used to remind you of schedule entries or be sent within a multimedia message. The recorded voice clip is saved in My Items (Music & Ringtones). Voice clips are saved in .amr format.Recording a Voice Clip“Organiser & Utilities” → “Utilities” tab → “Voice Recorder”1. Press B to start recording.To stop recording before the recording time is over, press B.2. Select “Save” to save the voice clip.Note•Press a (or V) or b (or W) to adjust the sound volume when playing back the recorded file.Sending Voice Clips“Organiser & Utilities” → “Utilities” tab → “Voice Recorder”1. Press B to start recording.To stop recording before the recording time is over, press B.2. Select “Save and Send”.3. Select “As Message” or “To Media Album”.For details on creating a message, see “Creating a New Message” on page 82.(The Media Album service is not available with some service providers. Please contact your service provider for more information.)Selecting the Record Time“Organiser & Utilities” → “Utilities” tab → “Voice Recorder” → [Options] → “Record Time”1. Select “For Message” or “Extended Voice”.When selecting “Extended Voice”, voice clips are automatically saved to a memory card.Selecting Storage Memory“Organiser & Utilities” → “Utilities” tab → “Voice Recorder” → [Options] → “Save New Sounds”1. Select the desired location.When selecting “Choose bef. Saving”, you can select the location when saving a voice clip. (M 7-d-2)](https://usermanual.wiki/Sharp/HRO00060.User-Manual/User-Guide-824512-Page-131.png)
![Organiser & Utilities 131Expenses MemoYou can record an expenses memo with pre-defined or edited categories.Recording in the Expenses Memo“Organiser & Utilities” → “Utilities” tab → “Expenses Memo” → “Add New Expense”1. Enter the expenses using the digit keys.2. Select the desired category.Expenses memo is registered.Viewing Totals“Organiser & Utilities” → “Utilities” tab → “Expenses Memo” → “Totals”Recorded expenses are displayed on the screen.To Change Category1. In the total view, highlight the desired item.2. Press [Options] and select “Change Category”.3. Select the desired category.To Change Amount1. In the total view, highlight the desired item.2. Press [Options] and select “Change Amount”.3. Enter the desired amount using the digit keys.To Delete a Recorded Item or All Items1. In the total view, highlight the desired item.2. Press [Options] and select “Delete Item” or “Delete All”.Editing the Category Name“Organiser & Utilities” → “Utilities” tab → “Expenses Memo” → “Edit Category”1. Select the desired category name.2. Modify the name.Phone HelpYou can view the help list and use it to guide you in the phone’s functions.“Organiser & Utilities” → “Utilities” tab → “Phone Help”1. Press a or b. (M 7-d-3) (M 7-d-3-1) (M 7-d-3-2) (M 7-d-3-3) (M 7-d-4)](https://usermanual.wiki/Sharp/HRO00060.User-Manual/User-Guide-824512-Page-132.png)
![Settings 133SettingsProfilesThe ringtone, sound, vibration and light settings can be customised for each profile according to your environment.There are 6 profiles: “Normal”, “Meeting”, “Activity”, “Car”, “Headset” and “Silent”.Activating a Profile“Settings” → “Profiles” tab1. Select the desired profile.Note•When a profile is set, the corresponding indicator described on page 33 is displayed in standby.Tip•In standby, press and hold R to switch Profiles between Silent mode and the profile most recently activated.Resetting Profile Settings“Settings” → “Profiles” tab1. Highlight the profile you wish to reset.2. Press [Options] and select “Set to Default”.3. Enter your handset code.For details on the handset code, see “Changing the Handset Code” on page 146.VolumeYou can adjust the volume for incoming voice calls, SMS/MMS/Email messages and other sounds (“General Volume”) to one of six levels, or set an increasing volume for all of these except “General Volume”. “Settings” → “Profiles” tab1. Highlight the profile you wish to customise.2. Press [Options] and select “Personalise”.3. Select “Volume”.4. Select “For Incoming Call”, “For New Message” or “General Volume”. (M 12)](https://usermanual.wiki/Sharp/HRO00060.User-Manual/User-Guide-824512-Page-134.png)
![134 Settings5. Press a (or d) to increase the ringer volume or press b (or c) to decrease the ringer volume and then press B.To select “Increasing Volume”, press a (or d) at level 5.To select “Silent”, press b (or c) at level 1.Tip•You can select from two levels or an increasing volume, when selecting the “Silent” profile.Assigning a Ringtone for an Incoming CallYou can set a ringtone for incoming voice and video calls. You can select from different tones including patterns, sound effects and melodies or set a sound in Saved Sounds as the default ringtone.“Settings” → “Profiles” tab1. Highlight the profile you wish to customise.2. Press [Options] and select “Personalise”.3. Select “Ringtone/Ringvideos”.4. Select “For Voice Call” or “For Video Call”.5. Select “Assign Tone”.6. Select “Preset Sounds” or “My Sounds”.7. Highlight the ringtone you wish to use.To hear the demo play, press [Options] and select “Play”.8. Press [Options] and select “Assign” for “Preset Sounds” or “Select” for “My Sounds”.Note•Even if you delete a sound that is being used as a ringtone, the setting remains the same and the default ringtone sounds.•Melodies can be selected from “My Sounds” and “Preset Sounds”.](https://usermanual.wiki/Sharp/HRO00060.User-Manual/User-Guide-824512-Page-135.png)
![Settings 135Assigning a Ring Video Clip for an Incoming CallYou can set a ring video clip for incoming voice and video calls. You can set a video clip in Saved Videos as the default ring video clip.“Settings” → “Profiles” tab1. Highlight the profile you wish to customise.2. Press [Options] and select “Personalise”.3. Select “Ringtone/Ringvideos”.4. Select “For Voice Call” or “For Video Call”.5. Select “Assign Video”.6. Highlight the ring video clip file you wish to use.To preview the file, press [Options] and select “Play”.7. Press [Options] and select “Select”.Message NotificationWhen receiving messages, your phone will notify you of their arrival with the ringtone or ring video clip you specify.“Settings” → “Profiles” tab1. Highlight the profile you wish to customise.2. Press [Options] and select “Personalise”.3. Select “Ringtone/Ringvideos”.4. Select “For New Message”.5. Select “Assign Tone” or “Assign Video”.If “Assign Tone” is selected, select “Preset Sounds” or “My Sounds”.6. Highlight the desired ringtone or ring video clip.For details on selecting a ringtone or a ring video clip, see “Assigning a Ringtone for an Incoming Call” on page 134 or “Assigning a Ring Video Clip for an Incoming Call”.7. Press [Options] and select “Assign” for “Preset Sounds” or “Select”.8. Select “For New Message” and select “Duration”.9. Enter the desired duration of message notification in 2 digits using the digit keys.](https://usermanual.wiki/Sharp/HRO00060.User-Manual/User-Guide-824512-Page-136.png)
![136 SettingsKeypad TonesWhen the keypad tone is set on, you will hear a confirmation tone each time you press any key.“Settings” → “Profiles” tab1. Highlight the profile you wish to customise.2. Press [Options] and select “Personalise”.3. Select “System Sounds”.4. Select “Keypad Tones”.5. Highlight the desired tone pattern.6. Press [Options] and select “Assign”.Warning ToneYour phone can be set to emit a warning tone when an error occurs.“Settings” → “Profiles” tab1. Highlight the profile you wish to customise.2. Press [Options] and select “Personalise”.3. Select “System Sounds”.4. Select “Warning Tone”.5. Select “Tone” or “Duration”.For “Tone”, select “Off”, “Preset Sounds” or “My Sounds”.For “Duration”, select the desired time between 0.5 and 2 seconds.Power On/Off SoundYour phone can be set to emit a sound when it is switched on or off.“Settings” → “Profiles” tab1. Highlight the profile you wish to customise.2. Press [Options] and select “Personalise”.3. Select “System Sounds”.4. Select “Power On Sound” or “Power Off Sound”.5. Select “Sound” or “Duration”.For “Sound”, select “Off”, “Preset Sounds” or “My Sounds”.For “Duration”, enter the desired duration of sound in 2 digits using the digit keys.](https://usermanual.wiki/Sharp/HRO00060.User-Manual/User-Guide-824512-Page-137.png)
![Settings 137Vibration“Settings” → “Profiles” tab1. Highlight the profile you wish to customise.2. Press [Options] and select “Personalise”.3. Select “Vibration”.4. Select “For Incoming Call” or “For New Message”.5. Select “Switch On/Off” and then select “On” to activate.If you wish to change the vibration pattern, select “Vibration Pattern” and then select the desired option.Tip•When you select “On” in step 5, “ ” is displayed in standby.Any Key AnswerYou can answer a call by pressing any key except F or [Busy]. For details, see page 37.“Settings” → “Profiles” tab1. Highlight the profile you wish to customise.2. Press [Options] and select “Personalise”.3. Select “Any Key Answer”.4. Select “On” or “Off”.Phone SettingsSetting the DisplayYou can change the display settings. (M 12-d-1)](https://usermanual.wiki/Sharp/HRO00060.User-Manual/User-Guide-824512-Page-138.png)
![138 SettingsSetting the WallpaperYour phone includes preset pictures to be used as wallpaper in standby. Pictures taken with the phone’s digital camera or images downloaded from a WAP site can also be used as wallpaper.“Settings” → “Phone Settings” tab → “Display” → “Wallpaper”1. Select the folder in which the picture you wish to set is contained.Pictures can be selected from “My Pictures”, “Preset Pictures” or “Other Documents”.2. Select the desired picture.3. After displaying the picture, press B.Note•Some pictures cannot be used because of their picture and data types.•If the picture in My Pictures is already set, it is displayed in step 1. Press [Change] and select the desired picture.•Wallpaper can be linked to a theme. Select “Link to Theme” in step 1.ThemesYou can easily customise the display by using the theme files.The theme files downloaded from a WAP site can be used.“Settings” → “Phone Settings” tab → “Display” → “Themes”1. Select “Preset Themes” or “My Themes”.2. Select the desired theme file.Tip•Even after a theme is set, you can set a wallpaper regardless of the set theme. In this case, the other items follow the set theme. (M 12-d-1-1) (M 12-d-1-2)](https://usermanual.wiki/Sharp/HRO00060.User-Manual/User-Guide-824512-Page-139.png)
![Settings 139System GraphicsPictures can be displayed when turning the power on or off, when receiving an incoming call, or when operating the alarm.Pictures taken with the phone’s digital camera or images downloaded from a WAP site can be used.To Use Preset Animation/Pattern“Settings” → “Phone Settings” tab → “Display” → “System Graphics”1. Select the desired function to set the picture to.2. Select “Preset Animation” when you select “Power On” or select “Power Off” in step 1.Select “Pattern 1”, “Pattern 2” or “Pattern 3” when you select “Incoming Call” or “Incoming Video Call” in step 1.To Set My Pictures“Settings” → “Phone Settings” tab → “Display” → “System Graphics”1. Select the desired function to set the picture to.2. Select “My Pictures”.3. Select the desired picture.4. After displaying the picture, press B.5. Specify the area you wish to display using the navigation keys, then press B.Note•Some pictures cannot be used because of their picture and data types.•If the picture in My Pictures is already set, it is displayed in step 2. Press [Change] and select the desired picture.Setting the Standby DisplayYou can set the standby screen display.“Settings” → “Phone Settings” tab → “Display” → “Standby Display” 1. Select “Clock/Calendar” or “Show Indicators”. (M 12-d-1-3) (M 12-d-1-4)](https://usermanual.wiki/Sharp/HRO00060.User-Manual/User-Guide-824512-Page-140.png)
![Settings 143To Set Daylight Saving“Settings” → “Phone Settings” tab → “Date & Time” → “Daylight Saving”1. Select “On” or “Off”.To Set the Time Zone“Settings” → “Phone Settings” tab → “Date & Time” → “Set Time Zone”1. Press c or d to select the home city to set.2. Press B.To Customise the Time Zone“Settings” → “Phone Settings” tab → “Date & Time” → “Set Time Zone” → [Options] → “Set Custom Zone”1. Enter the city name.2. Enter the time-zone differences using the digit keys.Press a or b to switch between − and +.3. Press B.World ClockFor details, see page 128.To Select the Time Format“Settings” → “Phone Settings” tab → “Date & Time” → “Time Format”1. Select “24 Hour” or “12 Hour”.To Select the Date Format“Settings” → “Phone Settings” tab → “Date & Time” → “Date Format”1. Select from “D.M.Y”, “M-D-Y” or “Y/M/D”.To Select the Calendar Format“Settings” → “Phone Settings” tab → “Date & Time” → “Calendar Format”1. Select “Sunday-Saturday” or “Monday-Sunday”. (M 12-d-4-2) (M 12-d-4-3) (M 12-d-4-4) (M 12-d-4-5) (M 12-d-4-6) (M 12-d-4-7)](https://usermanual.wiki/Sharp/HRO00060.User-Manual/User-Guide-824512-Page-144.png)
![144 SettingsLanguage SettingYou can change the language displayed on the phone.“Settings” → “Phone Settings” tab → “Language”1. Select the desired language.Tip•You can also change the input language on the text entry screen (p. 48).Note•If you select “Automatic” in step 1, the language preset on the SIM card is selected.•If the language preset on the SIM card is not supported, then the default language of the phone is selected.ShortcutsYou can change the default shortcut action/assignment of the a, b, c, d, A and C soft keys and the U key itself with the Shortcuts menu.The menu shows the current assignment of each of the above keys.“Settings” → “Phone Settings” tab → “Shortcuts”1. Highlight the key you wish to change.2. Press [Assign].3. Press a and b to scroll by item.Press c and d to scroll by group.4. Press [Select] to update the key for the highlighted item.Note•If you are outside of your network area, the network-related items are not available.Tip•You can clear the settings by selecting “Set to Default” in step 1.LocksYou can set various locks on your phone such as PIN Entry and Handset Lock.“Settings” → “Phone Settings” tab → “Security” → “Locks” (M 12-d-5) (M 12-d-7) (M 12-d-8-1)](https://usermanual.wiki/Sharp/HRO00060.User-Manual/User-Guide-824512-Page-145.png)
![148 SettingsNote•You can search for devices even when the Bluetooth wireless function is off. Once pairing is started, the phone turns the Bluetooth wireless function on automatically.•You can only select one device for pairing. To change the paired device, see “To Activate the Paired Device”.•Pairing means authentication has been established between the two devices.•In order to pair two devices with Bluetooth wireless technology, the users should agree on the same passcode for both devices.•The passcode is used only once, so there is no need to remember it. The passcode can be different each time the devices are connected.•Devices that do not have a user interface (i.e., headsets and car kits) have a factory-set passcode. See the user guide for the device.Tip•You can save battery power by turning the Bluetooth wireless function off while it is not in use. Turn the Bluetooth wireless function off in “To Turn On or Off the Bluetooth Wireless Function” on page 147 or in “To Turn Off Automatically” on page 150.•During a call, you can divert voice calls to the paired handsfree device. Press [Options], select “Transfer Audio” and then “To Handset” or “To Bluetooth”.To Activate the Paired DevicePaired devices are listed by tabs for all devices and for handsfree devices.“Settings” → “Connectivity” tab → “Bluetooth” → “Paired Devices”1. Press d to switch to the list for handsfree devices. 2. Select the desired device you wish to activate.To Check and Uncheck the Paired Handsfree Devices“Settings” → “Connectivity” tab → “Bluetooth” → “Paired Devices”1. Press d to switch to the list for handsfree devices. 2. Highlight the desired handsfree device.3. Press [Options] and select “Check” or “Uncheck”. (M 12-d-d-1-4)](https://usermanual.wiki/Sharp/HRO00060.User-Manual/User-Guide-824512-Page-149.png)
![Settings 149To Rename or Delete the Paired Devices “Settings” → “Connectivity” tab → “Bluetooth” → “Paired Devices”1. Press c or d to switch between all paired devices and handsfree devices. 2. Highlight the desired device.3. Press [Options].4. Select “Change Name” or “Delete”.You can rename or delete by pressing B after selecting desired device.To Send All Data to Other DevicesYou can send all the data for applications such as Contacts List, Calendar, Tasks to selected devices.“Settings” → “Connectivity” tab → “Bluetooth” → “Send All”1. Select the desired device.If a device is not specified, searching starts automatically.2. Enter your handset code.For details on the handset code, see “Changing the Handset Code” on page 146.3. Select the desired data to send.4. Enter the device passcode for unpaired devices.Note•If the handsfree device is connected, the confirmation screen to deactivate the handsfree function is displayed. Press [Yes] to deactivate.Bluetooth Wireless SettingsWith this setting you can rename your phone, prevent other devices from recognising your phone and turn the Bluetooth wireless function off automatically to save battery power, etc.(M 12-d-d-1-5) (M 12-d-d-1-6)](https://usermanual.wiki/Sharp/HRO00060.User-Manual/User-Guide-824512-Page-150.png)
![Settings 151To See Your Phone Details“Settings” → “Connectivity” tab → “Bluetooth” → “Bluetooth Settings” → “My Phone Details”Mass StorageYou can set the phone to connect to a PC via Mass Storage mode.“Settings” → “Connectivity” tab → “Mass Storage”1. Press [Yes].Note•Activating Mass Storage mode also activates offline mode.•Mass Storage is not available when the battery is low, a Java™ application is paused, or Music Player is active.USB ChargeYou can set the phone to charge via USB, connected to a PC.“Settings” → “Connectivity” tab → “USB Charge”1. Select “On” or “Off”.Making and Restoring a Backup File to the Memory CardWith a memory card inserted in your phone, you can make backup files of Bookmarks, Text, Contacts, Calendar and Tasks in the handset memory to the memory card. You can also restore the backup data from the memory card.To Make a Backup File“Settings” → “Connectivity” tab → “Memory Card” → “Backup/Restore” → “Backup”1. Enter your handset code.For details on the handset code, see “Changing the Handset Code” on page 146.2. Select the desired item to back up or “Select All” to back up all files.To Restore a Backup File“Settings” → “Connectivity” tab → “Memory Card” → “Backup/Restore” → “Restore”1. Enter your handset code.For details on the handset code, see “Changing the Handset Code” on page 146.2. Select the desired item to restore or “Select All” to restore all files. (M 12-d-d-2) (M 12-d-d-3) (M 12-d-d-4-1)](https://usermanual.wiki/Sharp/HRO00060.User-Manual/User-Guide-824512-Page-152.png)
![152 Settings3. Select the desired file to restore.A confirmation message indicating deletion from the handset memory is displayed.4. Press [Yes] to start restoring.Note•To delete a backup file, highlight the desired item, press [Options] and select “Delete” after performing steps 1 to 3.Formatting Memory Card“Settings” → “Connectivity” tab → “Memory Card” → “Format Card”1. Enter your handset code.For details on the handset code, see “Changing the Handset Code” on page 146.2. Press [Yes] to start formatting.Other SettingsNetwork SettingsTo Select a Service AutomaticallyEach time the power is turned on, your phone selects a service automatically.“Settings” → “Other Settings” tab → “Network Settings” → “Select Service”1. Select “Auto”.To Select a Service Manually“Settings” → “Other Settings” tab → “Network Settings” → “Select Service”1. Select “GSM”.Note•If the handset is set to GSM, it will not be able to use any 3G only services (e.g. video calls or high speed data access). (M 12-d-d-4-3) (M 12-d-d-d-5)(M 12-d-d-d-5-1)](https://usermanual.wiki/Sharp/HRO00060.User-Manual/User-Guide-824512-Page-153.png)
![156 SettingsRe-provisioning Settings“Settings” → “Other Settings” tab → “Internet Settings” → “Re-provisioning Settings” → “Execute Pending”Clearing DNS Cache“Settings” → “Other Settings” tab → “Internet Settings” → “Clear DNS Cache”White List“Settings” → “Other Settings” tab → “Internet Settings” → “White List” → “Create New”“SMSC Address”: SMSC address“SM Orig. Address”: SM originating addressTo Activate the Browser/Streaming Profile“Settings” → “Other Settings” tab → “Internet Settings”1. Select “Browser Settings” or “Streaming Settings”.2. Select the desired profile you wish to activate.To Edit/Copy/Delete the Browser/Proxy/Streaming/Access Point Profile“Settings” → “Other Settings” tab → “Internet Settings”1. Select “Browser Settings”, “Streaming Settings”, “Proxy Settings” or “Access Point Settings”.2. Highlight the desired profile.3. Press [Options] and select the desired option.“Edit”: Modify the desired item“Copy”: Enter the new file name“Delete”: Press [Yes] to delete (M 12-d-d-d-6-5) (M 12-d-d-d-6-6) (M 12-d-d-d-6-7)](https://usermanual.wiki/Sharp/HRO00060.User-Manual/User-Guide-824512-Page-157.png)
![Telephony 157TelephonyCall LogThe phone will record the last 30 missed calls, received calls and dialled numbers.Viewing Call Log“Telephony” → “Call Log” tab1. Select from “All Calls”, “Dialled Numbers”, “Missed Calls” or “Received Calls”.The selected call log list is displayed.To switch logs, press c or d.2. Select the phone number you wish to view.If you wish to dial the number, press D to make a voice call or S to make a video call.Tip•You can also confirm call logs by pressing D in standby.Sending Messages1. In the call log list, highlight the phone number or name you wish to send a message to.2. Press [Options] and select “Create Message”.For details on creating a message, see “Creating a New Message” on page 82.Deleting a Call Log1. In the call log list, press [Options] and select “Delete” or “Delete All”.Call TimersThis function lets you check the duration of your calls.Checking the Duration of the Last Call and All Calls“Telephony” → “Call Log” tab → “Call Timers”1. Select “Dialled Calls” or “Received Calls”. (M 9) (M 9-5)](https://usermanual.wiki/Sharp/HRO00060.User-Manual/User-Guide-824512-Page-158.png)

![Telephony 161To Add a New Name“Telephony” → “Call Restrictions” tab → “Fixed Dialling Numbers” 1. Enter your PIN2 code.2. Select “Edit Dial List”.3. Highlight a blank entry, press [Options], then select “Add New Dial”.4. Add a name and a phone number.For details on adding a name and phone number, see “Adding a New Contact” on page 51.5. Press [Save].Rejecting an Incoming CallYou can register phone numbers you do not wish to answer.To Reject the Registered Number“Telephony” → “Call Restrictions” tab → “Rejected Numbers” → “Switch On/Off”1. Select “On” or “Off”.To Register the Rejected Number“Telephony” → “Call Restrictions” tab → “Rejected Numbers” → “Set Rejecting Number”1. Select a blank field.2. Enter the desired number.Rejecting a Call when the Caller’s Number is Withheld“Telephony” → “Call Restrictions” tab → “Withheld Call” 1. Select “On” or “Off”.](https://usermanual.wiki/Sharp/HRO00060.User-Manual/User-Guide-824512-Page-162.png)


![Connecting 880SH to Your PC 167Connecting 880SH to Your PCYou can use the following functions by connecting the 880SH to your PC using a USB port or Bluetooth wireless technology port:• 3G/GSM modem• Handset Manager for 880SH• Music Manager for 880SH• Sync Manager for 880SHSystem RequirementsOperating System:Windows 2000*, Windows XP**, WindowsVista* Service Pack 4 or later** Service Pack 2 or laterSupported Software:Microsoft Outlook/Outlook ExpressInterface:USB port or Bluetooth wireless portCD-ROM driveTo use Music Manager, DirectX9 and Windows Media Player 9 or later are required.3G/GSM ModemYou can use 880SH as a 3G/GSM modem to access the Internet from your PC. Connect your phone to your PC via Bluetooth wireless technology or USB interface. Software installation on your PC is required. Modem via the USB Data Cable1. Insert the supplied CD-ROM into your PC’s CD-ROM drive.The 880SH CD-ROM screen is displayed.If the 880SH CD-ROM screen is not displayed, double-click [Launcher.exe] in your CD-ROM.2. Select the USB driver from the on-screen instructions of your CD-ROM, and start installation of USB driver software following the on-screen instructions of your CD-ROM.•You can also download USB driver software from our web-site, http://www.sharp-mobile.com.•During installation, the on-screen instructions ask you to connect your phone to your PC. Power on your phone and attach the phone to the USB port of your PC using the USB data cable (optional accessory).](https://usermanual.wiki/Sharp/HRO00060.User-Manual/User-Guide-824512-Page-168.png)
![168 Connecting 880SH to Your PC3. Follow the on-screen instructions to complete installation.4. Select the modem driver from the on-screen instructions of your CD-ROM, and install modem driver software following the on-screen instructions of your CD-ROM.•You can also download modem driver software from our web-site, http://www.sharp-mobile.com.5. Follow the on-screen instructions to use your phone as a modem driver.• When the on-screen instructions ask modem driver type, select the cable as a modem driver.Modem via Bluetooth Connection1. Turn on the Bluetooth wireless function of your phone.For details, see “To Turn On or Off the Bluetooth Wireless Function” on page 147.2. Pair your PC with your phone.For details on pairing your PC with your phone, see “To Search for Devices to be Paired” on page 147.3. Insert the supplied CD-ROM into your PC’s CD-ROM drive.The 880SH CD-ROM screen is displayed.If the 880SH CD-ROM screen is not displayed, double-click [Launcher.exe] in your CD-ROM.4. Select the modem driver from the on-screen instructions of your CD-ROM, and install modem driver software following the on-screen instructions of your CD-ROM.5. Follow the on-screen instructions to use your phone as a modem driver.• When the on-screen instructions ask modem driver type, select Bluetooth as a modem driver.Note•Modem communication is not possible while communicating with the Handset Manager via Bluetooth wireless technology or USB interface.•It is not recommended that you make or answer calls when you are using 880SH as a GSM/GPRS modem. The operation may be interrupted.•Your phone exhausts the battery when connected to a PC, even when not communicating.](https://usermanual.wiki/Sharp/HRO00060.User-Manual/User-Guide-824512-Page-169.png)
![Connecting 880SH to Your PC 169Handset ManagerYou can transmit the following items between your phone and your PC, and can use Contacts List entries on your PC:• My Items files (Pictures/Music & Ringtones/Videos/Other Documents data)• Contacts List entries• Short messages• Schedule entriesVia USB Data Cable1. Insert the supplied CD-ROM into your PC’s CD-ROM drive.The 880SH CD-ROM screen is displayed.If the 880SH CD-ROM screen is not displayed, double-click [Launcher.exe] in your CD-ROM.2. Select Handset Manager from the on-screen instructions of your CD-ROM, and start installation of Handset Manager software following the on-screen instructions of your CD-ROM.•You can also download Handset Manager software from our web-site, http://www.sharp-mobile.com.• If you have not installed the USB driver, follow steps 2 and 3 on page 167.3. Follow the on-screen instructions to complete installation.• During installation, the on-screen instructions ask you to select an interface. Select the USB data cable as an interface.4. Connect your phone to your PC. Power on your phone and attach the phone to the USB port of your PC using the USB data cable (optional accessory).5. Select [Yes] for Mass Storage mode.For details on activating this mode, see “Mass Storage” on page 151.6. Launch Handset Manager from the relevant folder.7. Follow the on-screen instructions of Handset Manager.For details, see the User Guide Software which was installed with Handset Manager.](https://usermanual.wiki/Sharp/HRO00060.User-Manual/User-Guide-824512-Page-170.png)
![170 Connecting 880SH to Your PCVia Bluetooth1. Insert the supplied CD-ROM into your PC’s CD-ROM drive.The 880SH CD-ROM screen is displayed.If the 880SH CD-ROM screen is not displayed, double-click [Launcher.exe] in your CD-ROM.2. Select Handset Manager from the on-screen instructions of your CD-ROM, and start installation of Handset Manager software following the on-screen instructions of your CD-ROM.•You can also download Handset Manager software from our web-site, http://www.sharp-mobile.com.3. Follow the on-screen instructions to complete installation.• During installation, the on-screen instructions ask you to select an interface. Select Bluetooth as an interface.4. Select [Yes] for Mass Storage mode.For details on activating this mode, see “Mass Storage” on page 151.5. Launch Handset Manager from the relevant folder.6. Follow the on-screen instructions of Handset Manager.For details, see the User Guide Software which was installed with Handset Manager.Note•Some large files may not be able to be transmitted from the PC to the phone.•Applications (Camera, My Items, etc.) do not run when the phone is connected to the PC via Bluetooth wireless technology interface or USB data cable.•If you have already installed Sharp Handset Manager, you need to uninstall the previous one.•If you have trouble with installation, uninstall Handset Manager, restart your PC, reinstall Handset Manager and restart.Music ManagerYou can exchange the playlist and the sound files between your phone and your PC, and can manage them on your PC. Available files are the sound files in the following formats: MP3, AAC, 3GPP.](https://usermanual.wiki/Sharp/HRO00060.User-Manual/User-Guide-824512-Page-171.png)