Sharp HRO00106 Cellular Phone User Manual
Sharp Corporation Cellular Phone Users Manual
UserManual.wiki
>
Sharp
>
HRO00106 User Manual
Users Manual
Navigation menu
Upload a User Manual
Namespaces
Wiki Guide
HTML
PDF
Info
Views
User Manual
Discussion / Help
Navigation

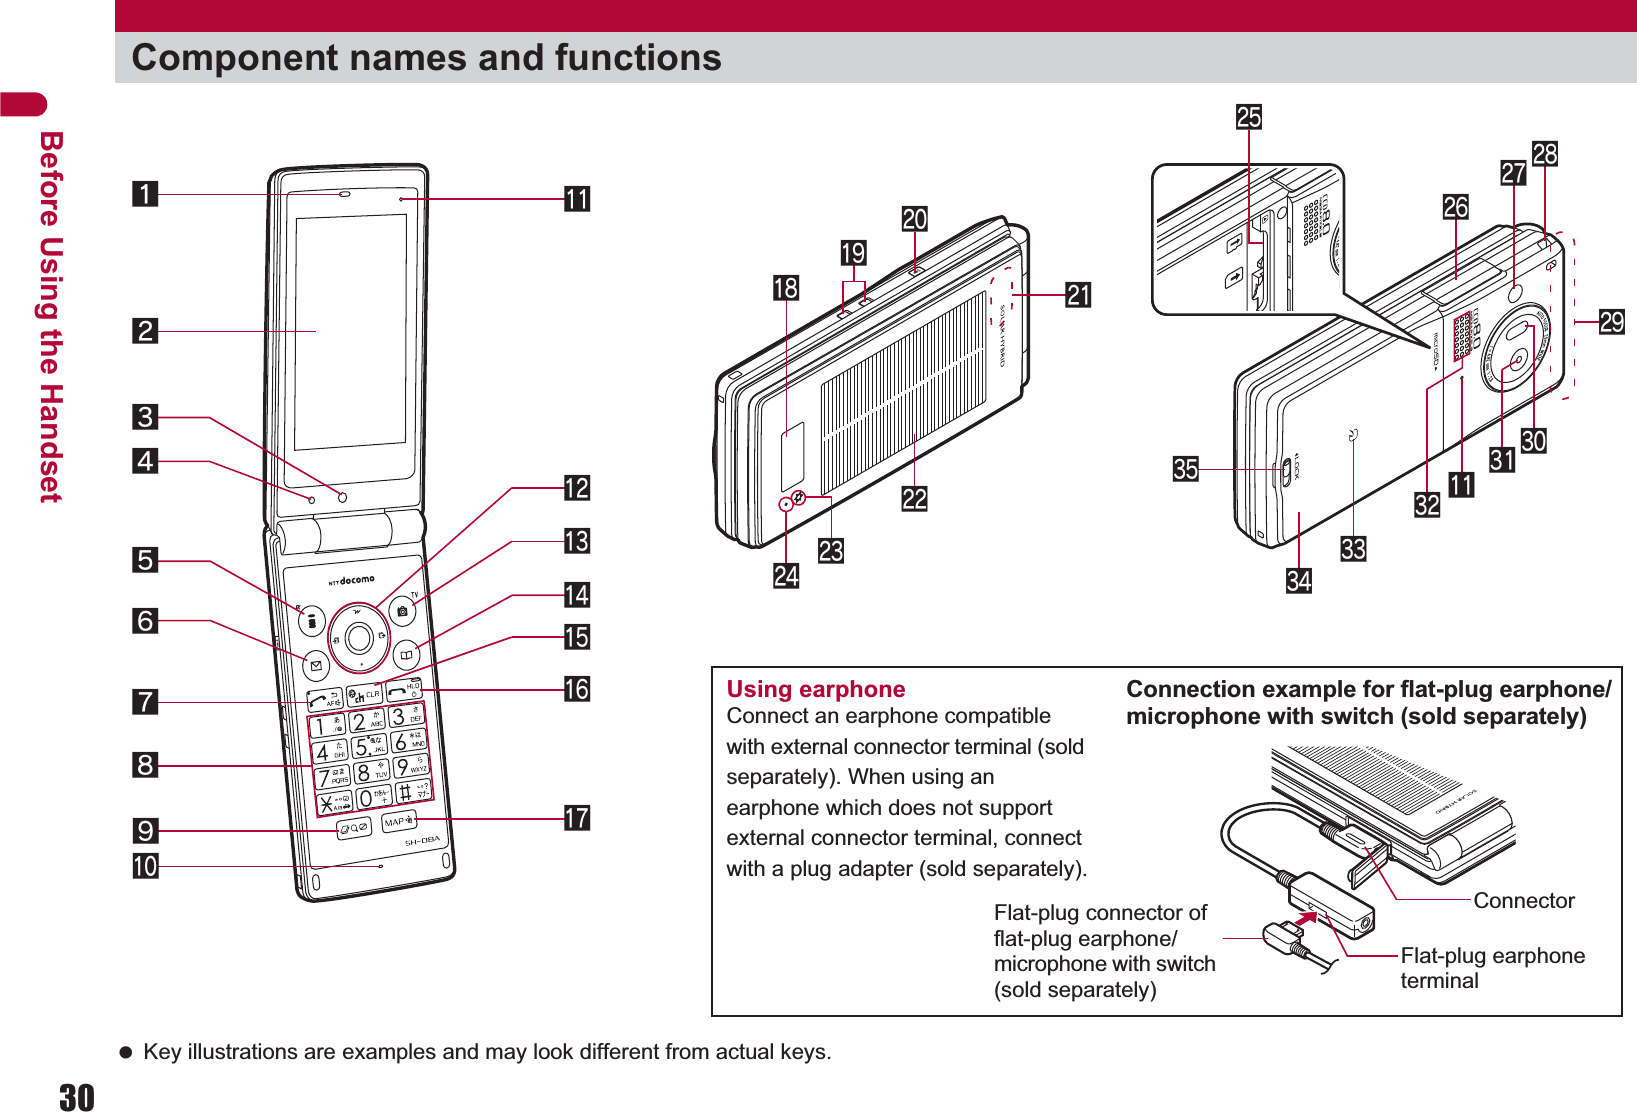
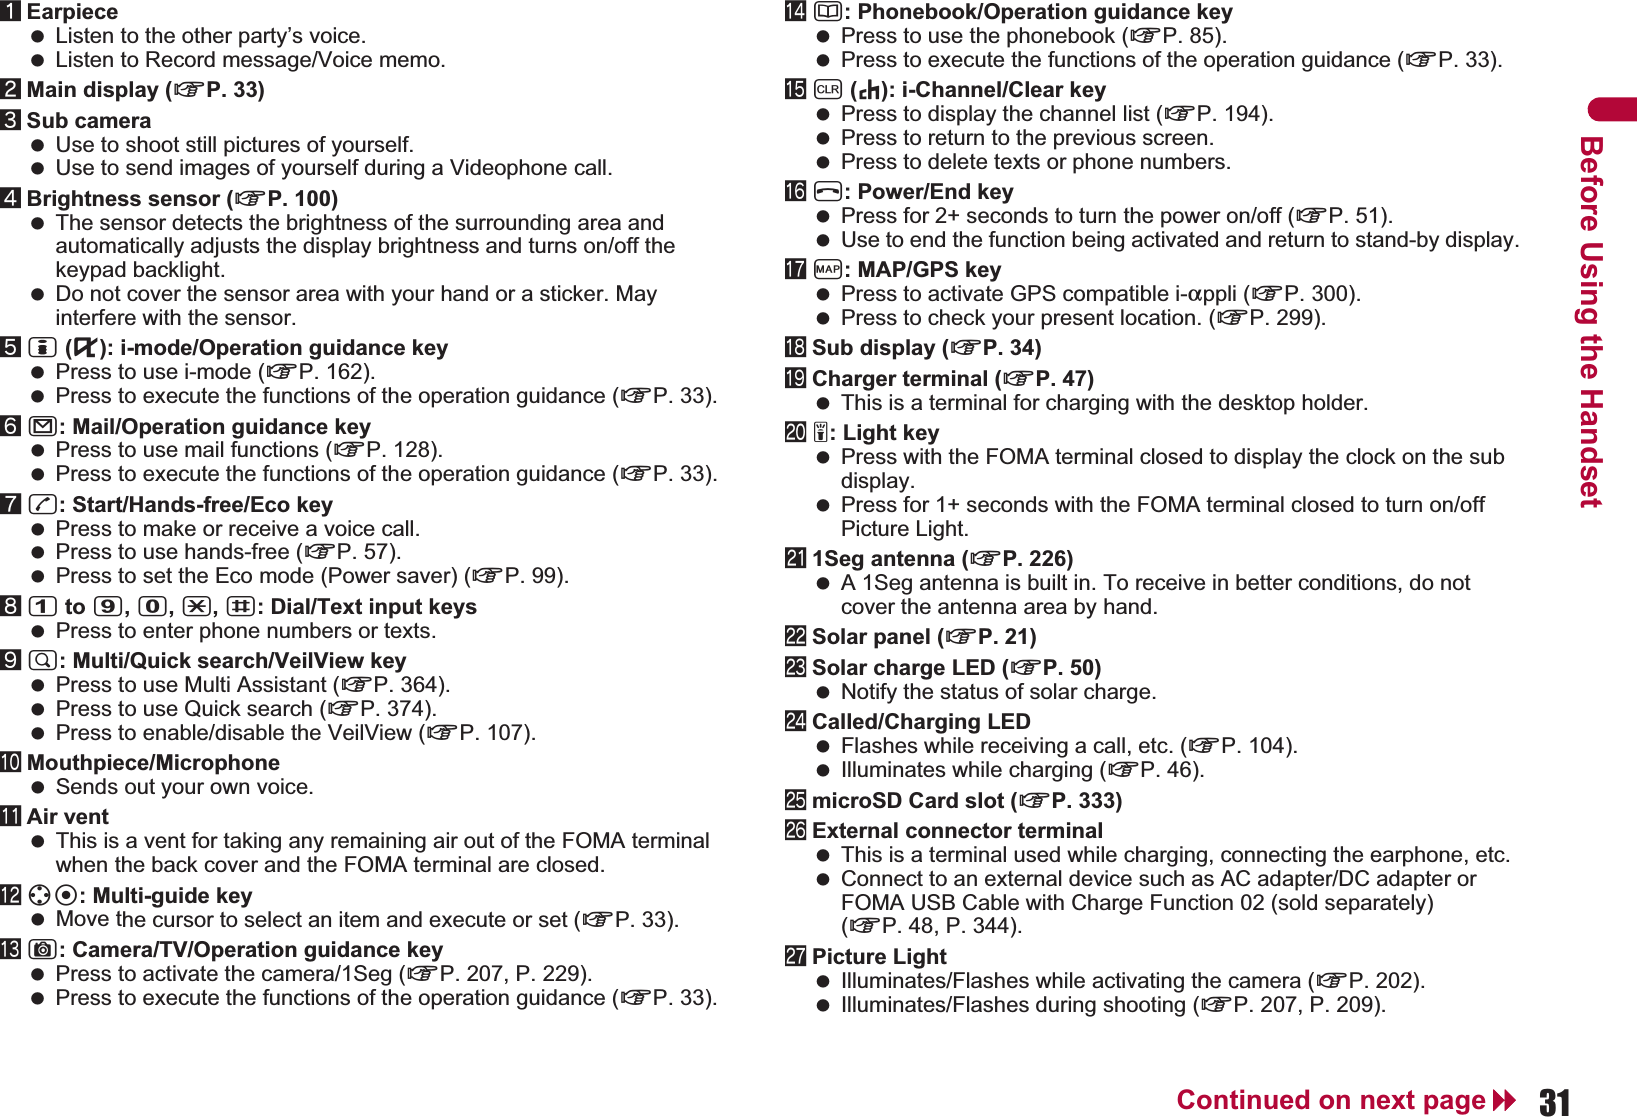
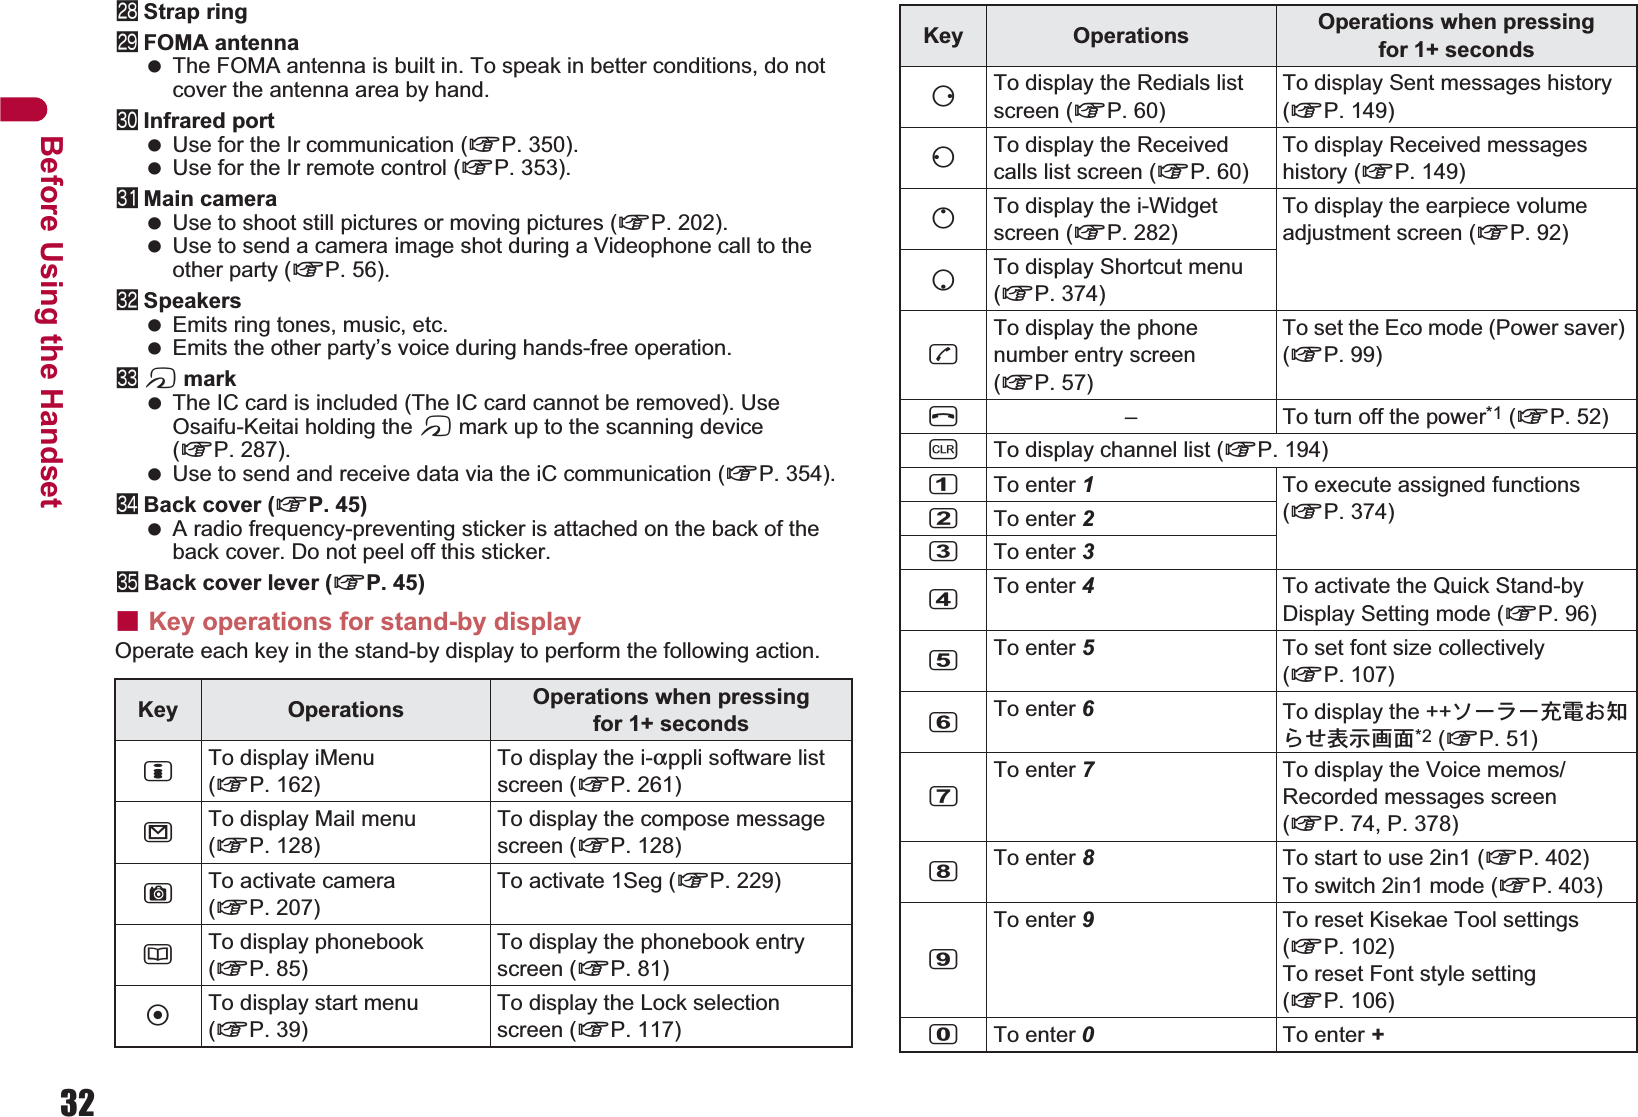
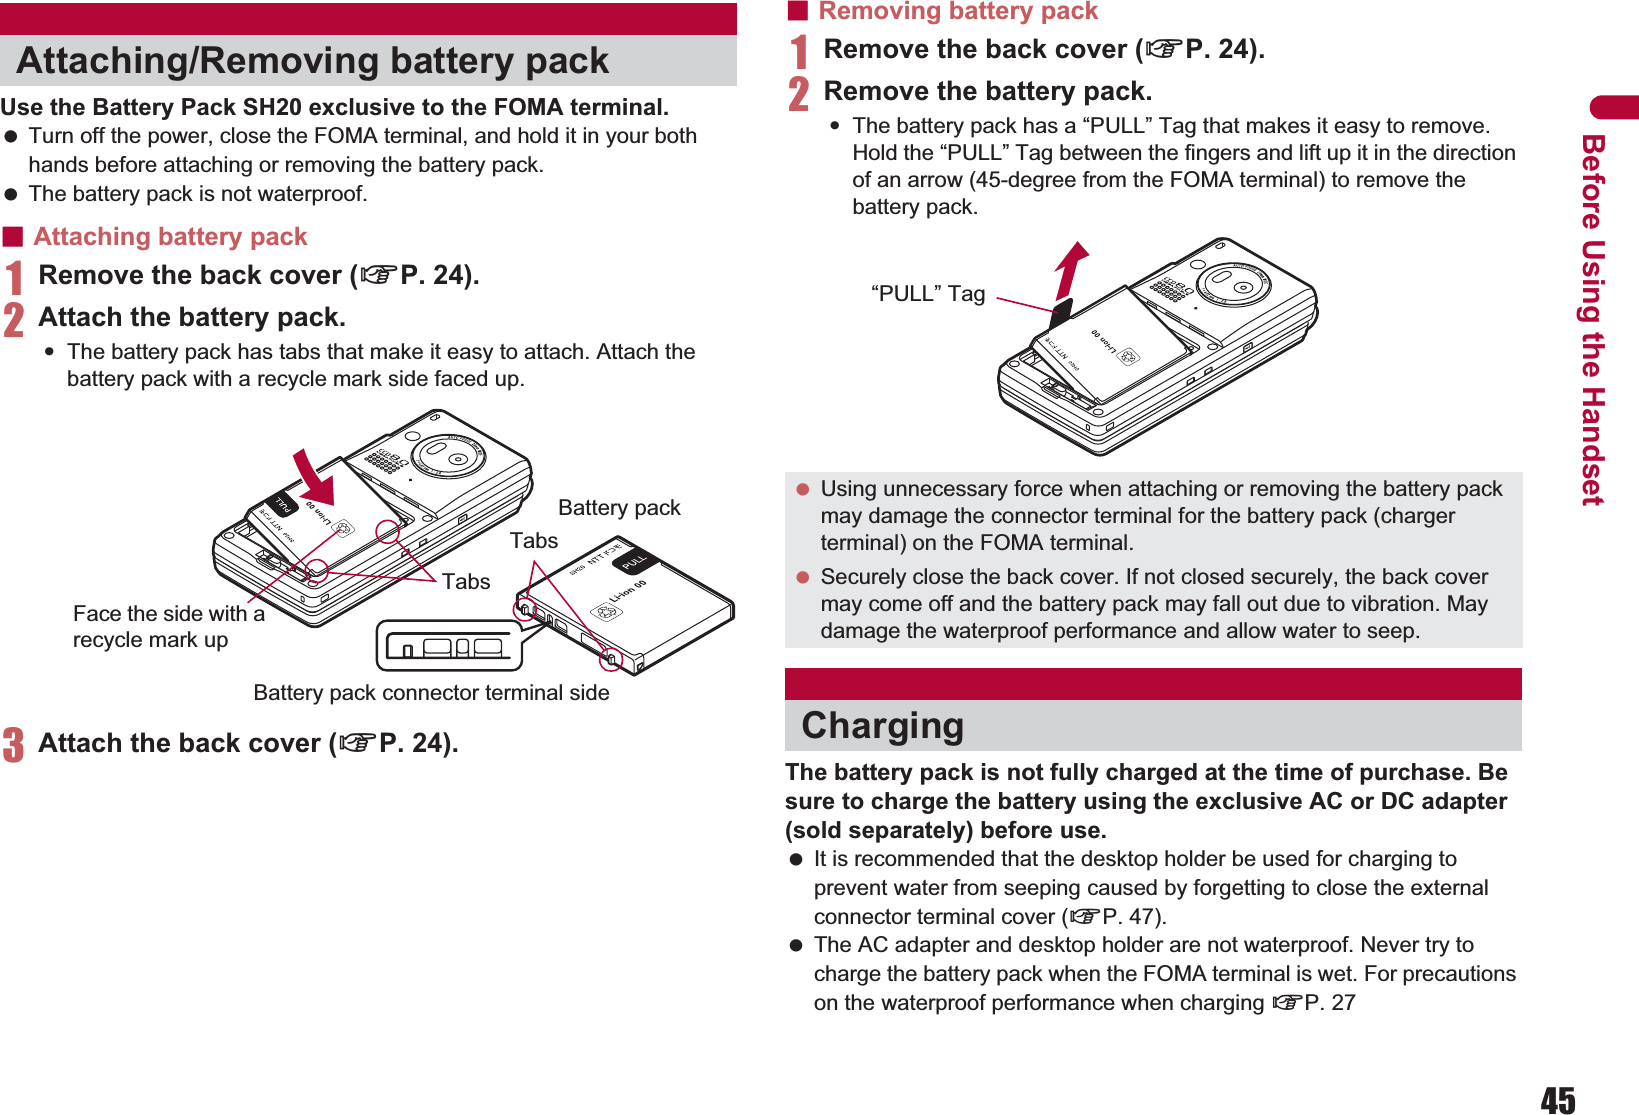
![47Continued on next pageBefore Using the Handset If i-appli, Videophone, or 1Seg is used while charging for a long time, the service life of the battery pack may become shorter than estimated. To prevent damage to the environment, bring used battery packs to a docomo service counter, a docomo agent or a recycle center.ɡAbout charging batteries Refer to user’s guide of FOMA AC Adapter 01/02 (sold separately), FOMA AC Adapter 01 for Global use (sold separately), or FOMA DC Adapter 01/02 (sold separately). FOMA AC Adapter 01 covers only 100V AC. FOMA AC Adapter 02/FOMA AC Adapter 01 for Global use covers from 100 to 240V AC. The shape of the plug for the AC adapter is for 100V AC (for domestic use). To use the AC adapter of 100 to 240V AC overseas, a conversion plug adapter that is compatible with the voltage of your country of stay is required. Do not use a transformer for use overseas to charge the battery.[Read “Desktop Holder SH25 (sold separately) user’s guide” carefully.] Battery pack cannot be charged with the FOMA terminal opened.1Face the side with the arrows of the AC adapter connector up and insert it into the connector terminal of the desktop holder (1).:Keeping the connector parallel with the desktop holder, securely push it all the way in until it clicks.2Insert the AC adapter power plug into an outlet (2).3When placing the FOMA terminal in the desktop holder, Charge start sound is heard, charging LED illuminates, and charging starts.:Place the FOMA terminal as the figure shows (3) and push it in the direction of the arrow (4) until it clicks.:Do not open the FOMA terminal while it is placed in the desktop holder.4When Charge end sound is heard and charging LED turns off, charging is complete.:Hold the desktop holder and lift the FOMA terminal out.Charging by using desktop holder Pull the AC adapter out of the outlet when left unused for a long period of time.Connector(Face the side with the arrows up)FOMA AC Adapter 01/02100V AC outlet312Charging LED4](https://usermanual.wiki/Sharp/HRO00106/User-Guide-1152442-Page-28.png)
![48Before Using the Handset[Read “FOMA AC Adapter 01/02 (sold separately) and FOMA DC Adapter 01/02 (sold separately) user’s guide” carefully.] Battery pack can be charged even with the FOMA terminal opened.1Open the external connector terminal cover and insert the AC or DC adapter connector horizontally into the external connector terminal (1).:Check the direction (See diagram) of the connector, keep it parallel with the FOMA terminal and securely push all the way in until it clicks.2When inserting the AC adapter power plug into an outlet or inserting the DC adapter power plug into a car cigarette lighter socket, Charge start sound is heard, charging LED illuminates, and charging starts.3When Charge end sound is heard and charging LED turns off, charging is complete.:When removing the connector, always hold the release buttons on both sides (1) and unplug it horizontally (2). When Charge start sound is not heard or when charging LED does not illuminate, check that the FOMA terminal is placed securely in the desktop holder (except when terminal is turned off, Manner mode is set or Charge start sound is Silent). When placing the FOMA terminal in the desktop holder, be careful that the strap is not caught in between the handset and the desktop holder.Charging by using AC adapter/DC adapterConnector (Face the side with the arrows up)1External connector terminal coverExternal connector terminalCharging LED Do not forcibly insert or remove. May cause damage to the external connector terminal and the connector. Pull the adapter out of the outlet or cigarette lighter socket if it will not be used for a long time. Do not forcefully pull the external connector terminal cover. May damage the cover. Do not place objects near the FOMA terminal when charging. May damage the FOMA terminal.100V AC outletFor AC adapter For DC adapterCigarette lighter socket121Release buttons](https://usermanual.wiki/Sharp/HRO00106/User-Guide-1152442-Page-29.png)
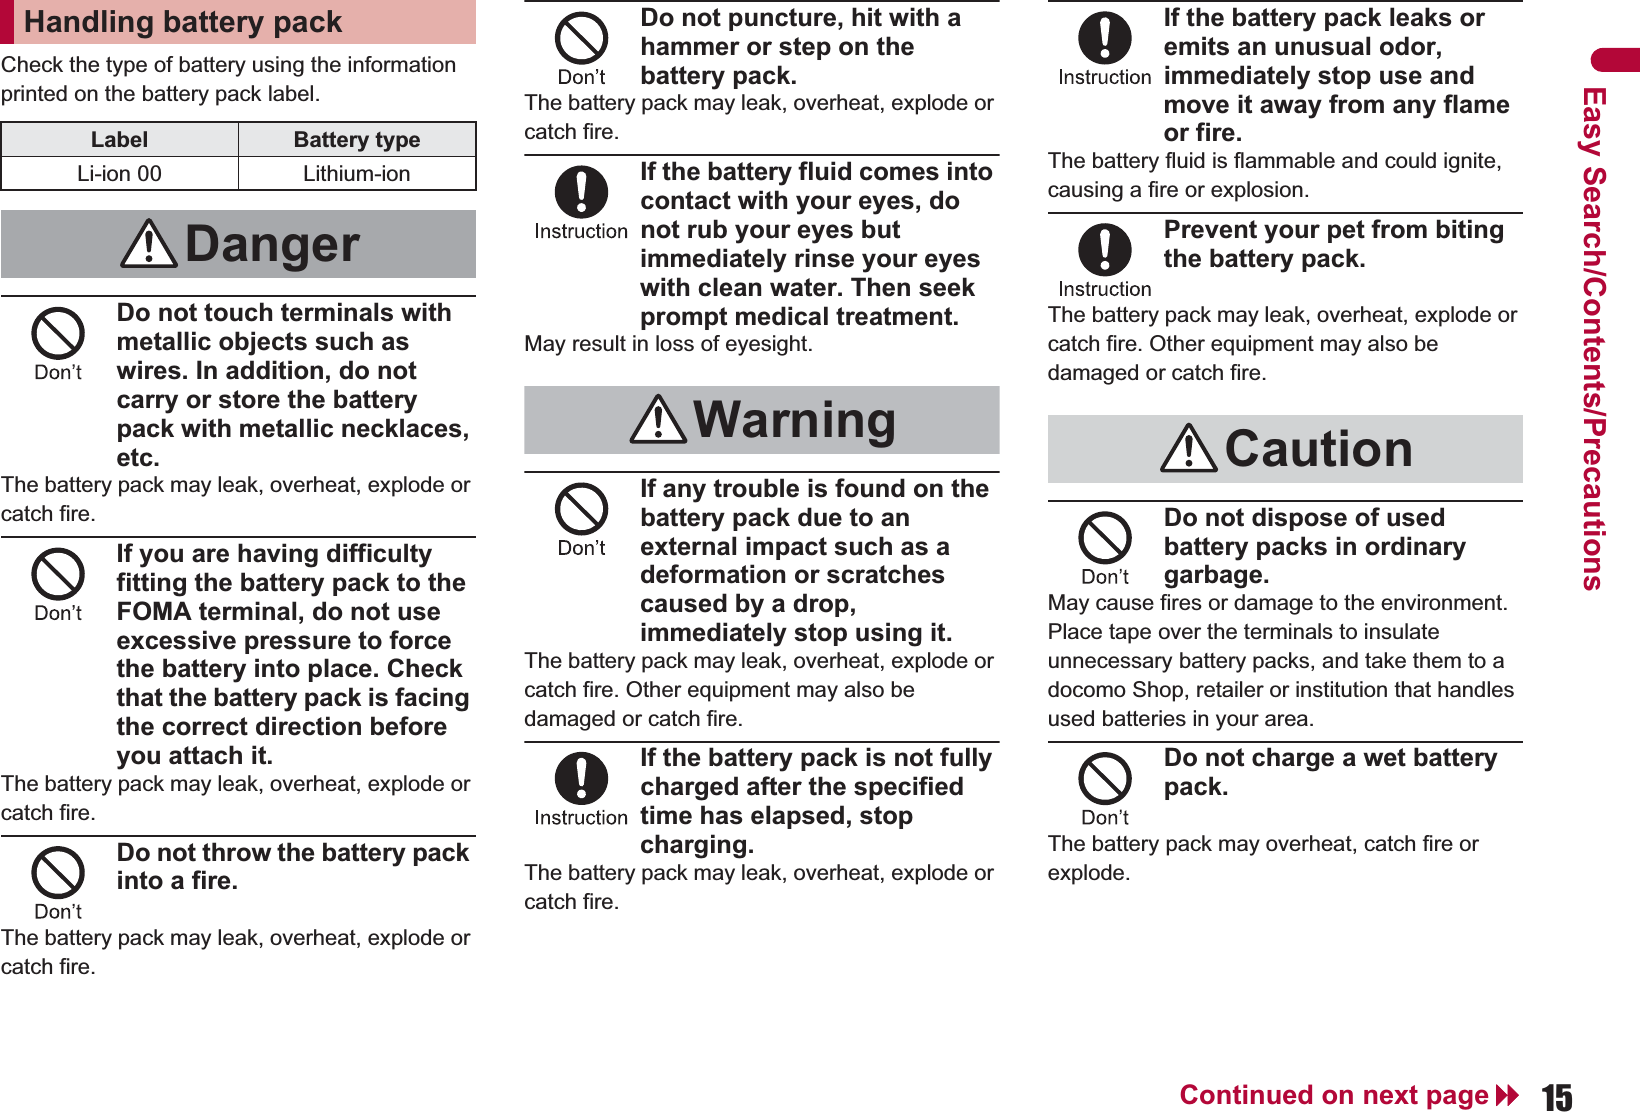
![49Continued on next pageBefore Using the Handset If the battery icon is changed to [ഩ౻ζȜ·%ນা], battery level is displayed in percentage. However, [&] appears when battery level is 100% while [(] appears when battery level is 4% or less. The battery icon and Percentage are rough indications. The battery level may change a lot depending on the conditions of use. If the FOMA terminal is left for a long period or without turning off the power, the battery level may decrease even after the charging is completed.ɡChanging design of battery icon <Battery icon>1In the Custom menu, select [Settings]/[Battery]/[Battery icon]/i.2Select an image/i.ɡDisplaying battery icon in percentage temporarily <Icon% temp display>When the battery icon is set to other than [ഩ౻ζȜ·%ນা], if the display is shown again with the display off, the battery icon in percentage is displayed for approximately 3 seconds.1In the Custom menu, select [Settings]/[Battery]/[Icon% temp display]/[ON].1In the Custom menu, select [Settings]/[Battery]/[Battery level].:Battery level is displayed in percentage and graphic. In addition, it is notified by the number of the battery level sound according to its remaining amount.:Wait approximately 5 seconds and the display disappears.:The battery level sound is heard at the volume set in Key sound (nP. 92).:If the Manner mode is set, the battery level sound follows the setting of the Manner mode.[Battery empty. Unsaved data will be lost. Ending current operation] appears if battery starts to run out (Press t to clear the message). After a while, an alert tone sounds. The warning screen stating that the battery runs out appears, handset operations are disabled and power turns off after approximately 60 seconds.When using a DC adapter The DC adapter should only be used in negative grounded vehicles (12 and 24V DC). Do not use with the car engine shut off. May drain the car battery. The DC adapter fuse (2A) is a consumable. For replacement, purchase a new fuse at a local automobile supply shop. Refer to the FOMA DC Adapter 01/02 user’s guide for details.Battery levelChecking battery level"81 to 100% Battery is sufficiently remaining.061 to 80% Battery is remaining.!41 to 60% Battery level is low.#21 to 40% Battery level is very low.$1 to 20% Battery is almost empty. Charge the battery.%0% Battery is empty (Power will turn off soon).Checking battery level with sound and displayGraphic Number of beep soundFive timesFour timesThree timesTwiceOnceIf battery runs out](https://usermanual.wiki/Sharp/HRO00106/User-Guide-1152442-Page-30.png)
![298Map/GPS Function Note that DOCOMO shall not be liable for the pure economic loss if you cannot confirm the positioning (communication) result with FOMA terminal failure, malfunction, error or external factors such as power failure (including battery exhaustion). FOMA terminals cannot be used as navigation system for professional use of aircrafts, vehicles, person, etc. Therefore, note that DOCOMO shall not be liable for the loss caused by the navigation system to use location information. FOMA terminals cannot be used as surveying GPS of high accuracy. Therefore, note that DOCOMO shall not be liable for the loss caused by the error of location information. GPS is the service in charge of Department of Defense of USA, therefore, GPS radio wave condition may be controlled (accuracy degradation, radio wave abort, etc.) for the US national security reason. For the use of Location provision or Location notification, check the information of an information provider and DOCOMO website. Charges may be incurred for these functions. Position location and Location notification are not available when Function lock is applied to GPS. Location provision, Position location and Location notification are not available in the following cases.When a FOMA card is not insertedDuring the Self mode During software update Note that GPS is using the radio wave from satellites, and following conditions may cause the radio wave abort or difficulty to receive.In or under buildingsIn basement, tunnel, ground or waterIn bags or boxesIn density area with buildings or residenceIn or under densely trees Near high-tension lineInside cars or trains In bad weather with heavy rain/snowWhen people or objects are blocking mobile phonesWhen hands are covering screen/keypad/microphone/speaker of mobile phonesIn these cases, the error of retrieved location information may be 300 m or more. GPS function of the FOMA terminal is not available outside the service area. Note the following when using a map and GPS function overseas.• Location notification and Location provision function are not available.• When attempting to connect to the GPS service setting site from [Service settings] in [Loc. request menu], an error message appears and the functions cannot be used. However, packet transmission charges are incurred in such cases.• The displayed map based on the acquired location information (latitude and longitude information) may not be accurate because of the legal system in each country and the area. Note the following when using each function.ɡViewing map The selection screen for viewing a map either on the i-mode site or i-appli appears when selecting Map in the Map/GPS menu or selecting [Read Map] after checking the present location, etc. Select the view mode. Even if a map is displayed on the i-mode site or i-appli, the map may not be provided or the present location may not appear properly. In those cases, packet transmission charges apply.ɡPosition location Set the correct date and time in advance. i-mode services Settings is required in advance (nP. 412). GPS positioning is available in the 3G network service area. When GPS positioning is failed due to signal status, etc., the message asking whether to select a city name may appear. If [Select city name] is selected, the list of world cities appears. GPS positioning may succeed if the city around the present location is selected.ɡUsing GPS compatible i-appli Even if GPS compatible i-appli is set for Select Map, a map may not appear properly when location information that GPS compatible i-appli does not support is provided. In this case, packet transmission charges apply.Using Map/GPS functionUsing map and GPS function overseas](https://usermanual.wiki/Sharp/HRO00106/User-Guide-1152442-Page-32.png)
![299Map/GPS FunctionɡLocation history [_], the icon indicating that location is positioned overseas, appears for positioned location history in the location history list screen/location history details screen. [.] appears in the location history list screen when the time difference is adjusted. If [Read Map] is selected from the location history positioned overseas, the selection screen for viewing a map either on the i-mode site or i-appli appears. Select the view mode.Check the present location and check your place. Use this function for more convenient use such as showing a map from positioning location information, changing the location information to a URL, sending mail with the URL pasted, etc. Transmission charges are not incurred when the present location is positioned. However, packet transmission charges are applied when a map is displayed based on the location information. Change sound/volume/LED color for Position location (nP. 91, P. 104).1In the Custom menu, select [LifeKit]/[Map/GPS]/[Position location].:In stand-by: Press y (for 1+ seconds).• It is activated following the GPS button setting after positioning.:[B] flashes while GPS positioning is being performed.Accuracy level ɚɚɚ : Almost accurate location information Error is less than 50 mAccuracy level ɚɚə : Relatively accurate location information Error is less than 300 mAccuracy level ɚəə : Rough location information Error is 300 m or more:Accuracy level is a rough indication. It may differ depending on the radio wave condition of the surroundings.:To use the location information as a result of location positioning at the displayed accuracy level while the present location is being positioned: Press C.:To cancel position location: Press i/t.2Select a usage.;Select [Read Map].• GPS compatible i-appli set in Map setting is activated.;Select [Map/GPS appli]/select i-appli/t.;Select [Paste to mail]/[OK]/compose and send a mail.• The Location URL to be sent appears only on the i-mode supported terminal.;Select [Add to phonebook]/add to the phonebook.;Select [Attach to image]/select an image/t/C/select the saving method/t.:To check the location information: Press i.:To retry position location: Press C.Set the operation that is automatically launched after positioning the present location by pressing y for 1+ seconds.1In the Custom menu, select [LifeKit]/[Map/GPS]/[Set position loc.]/[GPS button setting].2Select the action/t/[OK].Position locationChecking your locationSet position loc.Setting position locationSetting GPS button <GPS button setting>](https://usermanual.wiki/Sharp/HRO00106/User-Guide-1152442-Page-33.png)
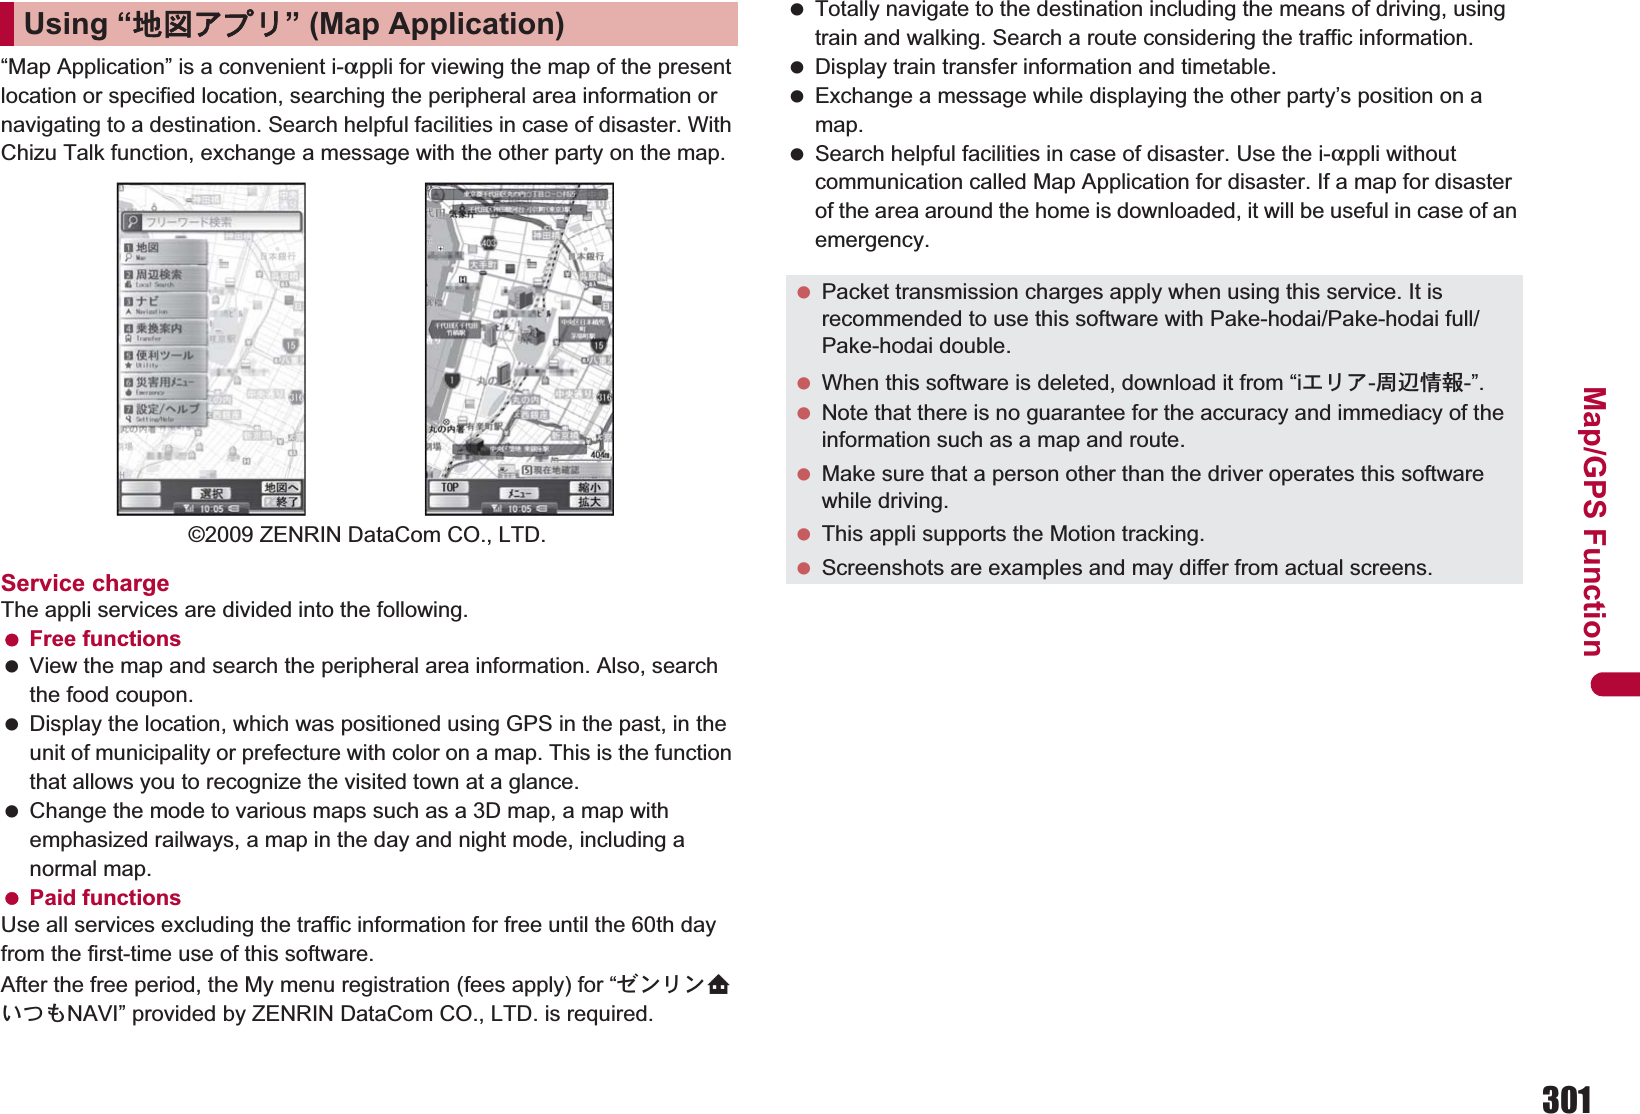
![300Map/GPS Function This setting is valid only when the positioning is performed in Japan.1In the Custom menu, select [LifeKit]/[Map/GPS]/[Set position loc.]/[Positioning mode].2Select the Positioning mode/t/[OK].:When [Quality mode] is selected, the positioning is performed with longer time. As a result, more accurate positioning is performed than in the Standard mode.Activate GPS compatible i-appli and view the present location or specified location. Make the Map setting in advance, and set GPS compatible i-appli to activate. By default, the FOMA terminal is set to activate “Map Application”. For details on operating “Map Application” nP. 3011In the Custom menu, select [LifeKit]/[Map/GPS]/[Map].:GPS compatible i-appli is activated after positioning the present location.ɡSetting i-appli to activate as a map <Select Map>Set GPS compatible i-appli to activate when selecting Map in the Map/GPS menu or [Read Map] from the location information of each function.1In the Custom menu, select [LifeKit]/[Map/GPS]/[Map setting]/[Select Map].2Select the GPS compatible i-appli/t.ɡSetting whether to position present location when activating a map <Map activate setting>Set whether to position the present location when Map in the Map/GPS menu is selected and GPS compatible i-appli is activated.1In the Custom menu, select [LifeKit]/[Map/GPS]/[Map]/[Map activate setting].2Select the setting/t.Start i-appli compatible with Map/GPS function. When GPS compatible i-appli is used, location information is sent to the information provider of the software used. When GPS function is used on GPS compatible i-appli, set Location usage setting of the software used to [Send].1In the Custom menu, select [LifeKit]/[Map/GPS]/[Map/GPS appli].2Select software/t.1In stand-by, press y.:GPS compatible i-appli is started according to Select Map. By default, the FOMA terminal is set to activate “Map Application”.Setting Positioning mode for positioning location <Positioning mode>MapViewing MapSetting map <Map setting>Using GPS compatible i-appliStarting GPS compatible i-appli by one-touch operation](https://usermanual.wiki/Sharp/HRO00106/User-Guide-1152442-Page-34.png)
![302Map/GPS FunctionSet whether to provide the present location on the request from the other party. Location provision may require the subscription to an information provider supporting the service and the service usage fee. To use a service supporting location provision, set Location provision ON/OFF to [Loc. provision:ON] or [Reject No. unset]. In addition, usage settings for each service (GPS Service settings) may be required. To use “imadoco-search”, settings accessed by [iMenu]/[̤ݖအεȜΠ]/[ڎਅ୭(ږ Ȇ་ ࢵȆ၌ ဥ )]/[̷͈ఈȜΫΑ୭Ȇږ]/[պ౾ૂ༭၌ဥ୭]/[ͼζΡȜΙ୭] is required. Sent location information may not reach an information provider depending on the signal strength. Location information may be sent to an information provider without any operation when Location provision ON/OFF is set to [Loc. provision:ON] or [Reject No. unset]. Under [Loc. provision:OFF], even if the location information from the other party is received, it is automatically rejected, and the history of location provision does not remain. [A] (blue) appears when Location provision ON/OFF is set to [Loc. provision:ON] or [Reject No. unset]. Until a location provision permission schedule ends if it is set, [A] (blue) is displayed while permitted and [A] (gray) while rejected. If Location provision ON/OFF is set to [Reject No. unset], calls are automatically rejected when the location information from callers not saved in the phonebook are received. However, a request for Location provision may be received depending on the operating condition of other functions. Change sound/volume/LED color for Location provision (nP. 91, P. 104). Location information is provided free of charge. For the use of location information, check the information of an information provider and DOCOMO website. Charges may apply for these functions.1In the Custom menu, select [LifeKit]/[Map/GPS]/[Loc. request menu]/[Loc. prov. ON/OFF].2Enter the terminal security code/t.3Select the setting/t.ɡSetting permission schedule onto Location provision1In the Location provision ON/OFF setting screen, select [Permission sched.].2Select [Start]/enter the start time (24-hour format)/t.3Select [End]/enter the end time (24-hour format)/t.4Select [Repeat]/select the repeat method.;Select [Daily].;Select [Set day of week]/select a day of the week/t/C.;Select [Not set]/proceed to step 6.5Select [From]/[Start date setting]/enter the start date/t/[End date setting]/enter the end date/t.:To not set valid period: Select [End date]/[Not set].6Press i/select the setting of Reject No. unset/t.ɡSetting Positioning mode of Location provision <Positioning mode>1In the Custom menu, select [LifeKit]/[Map/GPS]/[Loc. request menu]/[Positioning mode].2Select the Positioning mode/t/[OK].Loc. request menuProviding location information on request Location provision can also be set from initial settings (nP. 52). If an end time is set to the time before the scheduled time, location information is not provided for the day.](https://usermanual.wiki/Sharp/HRO00106/User-Guide-1152442-Page-36.png)
![304Map/GPS FunctionStart: 09:00 End: 09:00Set the host for the GPS service setting site.ɦSetting does not normally need to be changed.1In the Custom menu, select [LifeKit]/[Map/GPS]/[Loc. request menu]/[Host setting].2Enter the terminal security code/t.3Select [User specified host]/C.:To return to the default host: Select [Default].:To change to the preset user-defined host: Select [User specified host].:To delete the set user-defined host: Select [User specified host]/C/C/[Yes].4Select [Host name]/enter the host name/t.:Enter up to 99 single-byte alphanumeric characters and symbols.5Select [Host URL]/enter the host URL/t.:Enter up to 100 single-byte alphanumeric characters and symbols.6Press i.Configure the setting required for Location provision.1In the Custom menu, select [LifeKit]/[Map/GPS]/[Loc. request menu]/[Service settings].:Connected to the GPS service setting site.2Configure the settings.:Please contact GPS information providers for the setting details.Location provision starts when the request to provide the location information is received. When each service usage setting is set to [ݺخ], the location information is automatically provided upon request. When each service usage setting is set to [ྀٝږ], a confirmation screen asking whether to provide appears at every request. Select [Yes] to start providing the location information. If no operation is performed when the location is requested, return to stand-by display after providing location information is end, and the stock icon [@] (Send loc - Resp/Send loc - No resp/Send loc - Failed) appears. Select the stock icon and location histories appear. To cancel Location provision, press i and press t. However, the location information may be sent depending on timing. Sent location information may not reach a requestor of the location information depending on the signal strength. Host ID for Location provision may not be displayed on the screen.Setting details Schedule when location provision is performedRepeat Valid periodNot set – 11/24/2009, 14:00 to 11/25/2009, 09:00Everyday From 11/29/2009End date 12/29/2009Everyday from 11/29/2009, 09:00 to 12/30/2009, 09:00 (between 09:00 and 09:00 on the next day)From 11/19/2009End date 12/29/2009Everyday from 11/24/2009, 14:00 to 12/30/2009, 09:00 (between 09:00 and 09:00 on the next day)Not set Everyday after 11/24/2009, 14:00 (between 09:00 and 09:00 on the next day)Set day of weekFrom 11/29/2009End date 12/29/2009Set day of week from 11/29/2009, 09:00 to 12/30/2009, 09:00 (between 09:00 and 09:00 on the next day)From 11/19/2009End date 12/29/2009Set day of week from 11/24/2009, 14:00 to 12/30/2009, 09:00 (between 09:00 and 09:00 on the next day)Not set Set day of week after 11/24/2009, 14:00 (between 09:00 and 09:00 on the next day)Setting host <Host setting>GPS service settings <Service settings>When location information is requested](https://usermanual.wiki/Sharp/HRO00106/User-Guide-1152442-Page-38.png)
![305Continued on next pageMap/GPS FunctionNotify the positioned Location information of the present location to specified service clients (information provider supporting Location notification). For Location notification function, subscription to an information provider supporting Location notification and a service usage fee may be required. Sent location information may not reach an information provider depending on the signal strength. Using Location notification is charged.1In the Custom menu, select [LifeKit]/[Map/GPS]/[Loc.notification/set]/[Location notification].2Select the service client.;Select [Select from list]/select a service client/t.;Select [Direct input]/enter the service client ID/t.:To cancel positioning location: Press i/t.• Positioning may not be canceled or the location information may be sent depending on timing.ɡSetting Positioning mode of Location notification <Positioning mode>1In the Custom menu, select [LifeKit]/[Map/GPS]/[Loc.notification/set]/[Positioning mode].2Select the Positioning mode/t/[OK].Save up to five service clients to notify the present location.1In the Custom menu, select [LifeKit]/[Map/GPS]/[Loc.notification/set]/[Notification clients].2Press C/[Save new].:Alternatively, press i.3Select [Name]/enter a service client name/t.:Enter up to 32 single-byte (16 double-byte) characters.4Select [ID]/enter the service client ID/t.:Enter ID specified by a GPS information provider.:Enter up to 12 single-byte numeric characters. b and # are also available to enter. When the 2in1 service is used, only Number A is available regardless of the mode. If the location information provision is requested with Number B, the location information is not provided, and the failure of search is notified to the other party.When the location information is requested from the other party who used imadocokantan search A confirmation screen for location provision appears at every request. Select [Yes] to immediately notify to a rough positioning result to the other party.After [Yes] is selected, the GPS positioning screen appears, and a high-accuracy positioning result is notified. If the location provision is canceled after [Yes] is selected on a confirmation screen for location provision, a rough positioning result is notified to the other party. In this case, the location history is recorded, but the location information does not appear.When the location information is requested while in Public mode (Drive mode) If Location provision is set to [ݺخ] for usage settings of each service, a confirmation screen for location provision is displayed, the GPS positioning screen appears, and the location is provided after GPS positioning. However, Location provision/accept, Location provision/notify, vibrator or called LED does not operate. When Location provision is set to [ྀٝږ] for usage settings of each service, location information is not provided.Location notificationNotifying present location information Change sound/volume/LED color for Location notification (nP. 91, P. 104). When the 2in1 service is used, the location information is notified with Number A regardless of the mode.Saving service clients <Notification clients>](https://usermanual.wiki/Sharp/HRO00106/User-Guide-1152442-Page-39.png)
![306Map/GPS Function5Select [Phone number]/enter a phone number.;Select [Search phonebook]/select a recipient/t.;Select [Direct input]/enter a phone number/t.:The phone number already saved as location service client cannot be added.6Select [Auto]/select the setting/t.:If automatic notice is set to [Yes], automatically notifies the present location to the recipient when a voice/Videophone call is made to a saved phone number.7Press i.ɡSubmenu operations for notification clients screen[Save new] nP. 305[Copy to microSD] nP. 338[Send data]/[Send Ir data] nP. 352/[iC transmission] nP. 355[Add to phonebook]/add to the phonebook[Delete]/[Delete one]/[Yes]/[Delete selected]/select a service client/t/C/[Yes]/[Delete all]/enter the terminal security code/t/[Yes]ɡEditing saved contents of location service clients1In the notification clients screen, select a location service client/t.2Select an item/t.3Edit/i.Up to 50 entries of location information positioned by GPS function are saved in Location history. Use location information on the history to display a map or for other operations. When 50 entries are exceeded, entries are overwritten starting with the oldest. Even if latitude and longitude are indicated on the Location history screen, sent location information may not reach the service clients or provider.1In the Custom menu, select [LifeKit]/[Map/GPS]/[Location history].:Location history types and dates are listed starting with the most recent.Location history type:[j] appears when the location history contains location information.:To show a map: Select a location history/i.2Select the location history/t.Location historyDisplaying history of checked location informationVPosition location TLocation notificationULocation provision1Positioning date2History type[Position location]/[Location notification]/[Location provision] appears. For [Location notification]/[Location provision], the icon and the information of the service client or service client for provision appear.Location history listLocation history details screen231](https://usermanual.wiki/Sharp/HRO00106/User-Guide-1152442-Page-40.png)
![307Continued on next pageMap/GPS FunctionFor Location notificationFor Location provisionɦWhen the requestor ID for Location provision is a phone number or mail address, Phone To (AV Phone To) (nP. 176) and Mail To (nP. 176) can be used.Latitude : Degrees, Minutes, SecondsLongitude : Degrees, Minutes, SecondsDatum*: wgs84 (World Datum)Accuracy : Error range of accuracy (nP. 299)* Datum is a standard for expressing the position on the earth as latitude and longitude.ɡSubmenu operations for location history list screen[Read Map][Map/GPS appli]/select i-appli/t[Paste to mail]/[OK]/compose and send a mail[Add to phonebook]/add to the phonebook[Attach to image]/select an image/t/C/select the saving method/t[Delete]/[Delete one]/[Yes]/[Delete selected]/select a location history/t/C/[Yes]/[Delete all]/enter the terminal security code/t/[Yes]ɡSubmenu operations for location history details screen Refer to submenu operations for location history list screen (nP. 307) for the following functions.Read Map Map/GPS appli Paste to mail Add to phonebook Attach to image[Delete one]/[Yes]Use location information with each function by adding location information to data such as phonebook and still pictures or displaying a map based on the added location information.Example: Phonebook1In the phonebook entry screen, select [j].2Select a location information to add.;Select [From position loc.]/t/[Yes].• The present location is positioned by GPS function.;Select [From loc. history]/select a location history/i/[Yes].;Select [From image]/select an image/i.;Select [Loc. info details].GService client name HService client IDGService client name for Location provisionHService client ID for Location provisionIRequestor name for Location provisionJRequestor ID for Location provision3Location information Accuracy is a rough indication. It may differ depending on the radio wave condition of the surroundings. The entry that has failed or interrupted to position for Position location is not saved as Location history. If the location information is provided when the 2in1 service is used, the requestor name for Location provision appears in each 2in1 mode according to the Phonebook 2in1 setting. The location information and accuracy recorded in Location history may differ from those sent to a location provider and a location service client due to the signal strength, etc.Using location information from each functionAdding location information](https://usermanual.wiki/Sharp/HRO00106/User-Guide-1152442-Page-41.png)
![308Map/GPS Function;Select [Del. location info].:For images saved in My picture of Data box or i-mode mail, location information added to the phonebook can be selected. The location information added to an image cannot be selected.:For My picture of Data box, when the operation is made from the image list screen, multiple images to which location information is added can be selected.ɡUsing location information in the FOMA terminal handset phonebook or in images saved in My picture of Data boxExample: Phonebook1In the phonebook entry details screen, select [j].:To show a map based on the address saved in the phonebook: In the phonebook entry details screen, select [O]/t.2Select a usage.;Select [Read Map].;Select [Map/GPS appli]/select i-appli/t.;Select [Paste to mail]/[OK]/compose and send a mail.;Select [Attach to image]/select an image/t/C/select the saving method/t.;Select [Loc. info details].ɡUsing location information of sites, data broadcasting, ToruCa or Message R/FExample: Sites1While viewing sites, select location information/t.2Select a usage.;Select [Read Map].;Select [Map/GPS appli]/[Yes]/select i-appli/t.;Select [Paste to mail]/[Yes]/compose and send a mail.Using added location information](https://usermanual.wiki/Sharp/HRO00106/User-Guide-1152442-Page-42.png)
![410Overseas UseInternational roaming (WORLD WING) is a service that enables you, using overseas telecommunications carrier’s networks, to make calls and use i-mode.Use this FOMA terminal for voice/Videophone calls, i-mode and SMS with the phone number and mail address used in Japan. Network services such as Voice Mail and Call Forwarding Services can also be used. This service is available in the 3G network service area. In addition, this service is available in countries and regions supporting 3G850MHz. This FOMA terminal cannot be used in the GSM/GPRS network service area. By default, the FOMA terminal is set to automatically switch networks (nP. 415). Refer to the following before using the FOMA terminal overseas.“Mobile Phone User’s Guide [International Services]”“Mobile Phone User’s Guide [Network Services]”PDF file “٬ٸ̮၌ဥ΄ͼΡ” pre-installed in [My Documents] of Data boxDOCOMO “International Services website”Country codes of major countriesThe following shows “Country code” used when making international calls (nP. 64) or setting International dial assist (nP. 65). For other country codes and details, refer to “Mobile Phone User’s Guide [International Services]” or the DOCOMO “International Services website”.Outline of international roaming (WORLD WING)Country/Region Code Country/Region CodeAustralia 61 Maldives 960Austria 43 Netherlands 31Belgium 32 New Caledonia 687Brazil 55 New Zealand 64Canada 1 Norway 47China 86 Peru 51Czech 420 Philippines 63Egypt 20 Russia 7Fiji 679 Singapore 65Finland 358 South Korea 82France 33 Spain 34Germany 49 Sweden 46Greece 30 Switzerland 41Hong Kong 852 Tahiti(French Polynesia)689Hungary 36India 91 Taiwan 886Indonesia 62 Thailand 66Italy 39 Turkey 90Japan 81 U.K. 44Macau 853 U.S.A. 1Malaysia 60 Vietnam 84](https://usermanual.wiki/Sharp/HRO00106/User-Guide-1152442-Page-45.png)
![411Continued on next pageOverseas UseThe available communication services overseas are as follows.*1 When the 2in1 is used, calling from Number B is not available overseas.*2 When Multi Number is used, calling from Additional Number is not available overseas.*3 Overseas use settings for i-mode is required (nP. 412).*4 i-Channel setting is required. Packet transmission charges are incurred for each i-Channel reception (including Basic channel).*5 Overseas use settings for i-concier is required. Packet transmission charges are incurred for each information reception.Overseas use settings for i-concier can be changed in the following way.In the Custom menu, select [i-concier]/i/[୭]/[̷͈ఈވ୭]/[٬ٸ၌ဥ୭].*6 Setting for i-Widget roaming is required (nP. 283). Multiple Widget Appli may attempt transmission when i-Widget screen appears. In such case, packet transmission charges are incurred for each transmission.*7 Set the correct date and time in advance. Transmission charges are not incurred when the present location is positioned. However, packet transmission charges are incurred when a map is displayed based on the location information.*8 Unable to use 64K data communication by connecting a PC, etc.The following items must be checked before departure, at your country of stay, and after homecoming.Prepare below in Japan before using the FOMA terminal overseas.ɡAbout contract If subscribed to the FOMA service after September 1, 2005, a subscription for “WORLD WING” is not required. However, if a subscription for “WORLD WING” is canceled at or after a subscription for the FOMA service, a subscription for “WORLD WING” is required again.Available services overseasCommunication service Explanation 3GVoice call*1, 2 Make or receive calls in your country of stay or make international calls to Japan or to other countries with the same phone number as used in Japan while abroad.AVideophone*1, 2 Make international Videophone calls to users of the specified 3G telecommunications carriers overseas and FOMA users in Japan.Ai-mode mail Send or receive i-mode mail overseas with the same address as used in Japan. Ai-mode*3 Use i-mode overseas. Ai-Channel*3, 4 Use i-Channel overseas. Ai-concier*5 Use i-concier overseas. Ai-Widget*6 Use i-Widget overseas. ASMS Send or receive SMS overseas with the same phone number as used in Japan. AGPS position location*7Use the GPS function to check the present location overseas. APacket transmission by connecting a PC, etc.*8Use packet transmission overseas.A Some services are not available depending on the telecommunications carrier or network. Refer to “Mobile Phone User’s Guide [International Services]” or the DOCOMO “International Services website” for information on available countries and regions, and telecommunications carriers. Overseas packet transmission charges differ from those in Japan. םๅཱུ̱͓̽̀͝ for SH (J-E Speech Translation for SH) is available overseas (nP. 266).Before use overseasPreparation before departure](https://usermanual.wiki/Sharp/HRO00106/User-Guide-1152442-Page-46.png)
![412Overseas Use If subscribed to the FOMA service before August 31, 2005 but not subscribed to “WORLD WING”, a subscription for “WORLD WING” is required. Some payment plans are not available. Insert the WORLD WING compatible FOMA card (green/white) to the FOMA terminal (nP. 44).ɡAbout charging batteries Precautions for handling the AC adapter nP. 16 Methods for charging the AC adapter nP. 45ɡAbout browsing i-mode sitesTo browse i-mode site overseas, the settings for overseas use must be made from iMenu in advance.i-mode site: Select [iMenu]/[English]/[Options]/[International Settings]/[i-mode services Settings]. iMenu cannot be displayed by pressing i in the stand-by display overseas. If Set i-mode button is set to [iMenu/Search], the message stating that i-mode menu is displayed appears when i is pressed for the first time overseas. i-mode menu appears from the next time.ɡAbout setting network serviceIf subscribed to network services, Voice Mail Service, Call Forwarding Service or other services can be used overseas. Some network services may not be set or checked depending on overseas telecommunications carrier. In addition, some network services are available only in Japan. To use network services overseas, set Remote Control (nP. 401, P. 418) to “Activate” in advance.ɡAbout inquiries overseasFor lost, stolen, and cost settlement, or malfunction of the FOMA terminal overseas, refer to “Loss or theft FOMA terminal or payment of cumulative cost overseas” or “Failures encountered overseas” on the back of this manual. Note that any call or transmission charges incurred after the FOMA terminal is lost or stolen are charged to the subscriber. Add the “International call access codes for major countries (table 1)” or “International prefix numbers for the universal number (table 2)” that is assigned to your country of stay, to the head of your phone number for inquiries.International call access codes for major countries (table 1)The following shows the International call access codes for major countries. Communication charges to Japan will apply.Country/Region Code Country/Region CodeAustralia 0011 Monaco 00Belgium 00 Netherlands 00Brazil 0021/0014New Zealand 00Norway 00Canada 011 Philippines 00China 00 Poland 00Czech 00 Portugal 00Denmark 00 Russia 810Finland 00 Singapore 001France 00 South Korea 001Germany 00 Spain 00Greece 00 Sweden 00Hong Kong 001 Switzerland 00Hungary 00 Taiwan 002India 00 Thailand 001Indonesia 001 Turkey 00Ireland 00 U.A.E. 00Italy 00 U.K. 00Luxemburg 00 U.S.A. 011Macau 00 Vietnam 00Malaysia 00](https://usermanual.wiki/Sharp/HRO00106/User-Guide-1152442-Page-47.png)
![413Overseas UseInternational prefix numbers for the universal number (table 2)The following shows the International prefix number for the universal number of each country. Communication charges or other charges to your country of stay will apply. Communication charges to your country of stay will apply when calling from the mobile phone. Some codes may not be used. Note that the universal number may not be used for calls from a mobile phone, payphone or hotel. The universal number can be used only for countries listed on table 2. Calling from a hotel may cost you extra call charges requested by the hotel (You are responsible for the call charges). Confirm with the hotel before making calls.The service is available in the 3G network service area.The FOMA terminal automatically searches for the network when the power is turned on, and connects to the available telecommunications carrier in your country of stay. When Auto time correction (nP. 52) is set to [ON], if information with time and time differences is received from overseas telecommunications carrier which is being connected, time and time differences on the FOMA terminal clock are corrected. The correction timing differs depending on the telecommunications carrier. Auto time correction may not be available overseas. In such case, correct the time manually (nP. 52). If the connected telecommunications carrier is changed when Auto time correction is set to [ON], a screen notifying that time difference is adjusted may appear. When Operator name display (nP. 416) is set to [Display on], the telecommunications carrier connected appears in stand-by. When Clock display (nP. 97) is set to [ON(Large)], the local time and Japan time appear (excluding regions keeping the same standard time as Japan time). If selecting Down for Set display position, Japan time appears above the local time. If selecting Up for Set display position, Japan time appears under the local time. The local time appears on the sub display. Talk time or stand-by time may be reduced to half the normal time depending on the network condition of your country of stay.By default, the FOMA terminal is set to automatically search for the network and to be connected to the FOMA network when the power is turned on after homecoming. If the Network search mode is set to [Manual], switch to the FOMA network (DOCOMO) manually or change to [Auto].Country/Region Code Country/Region CodeArgentina 00 Luxemburg 00Australia 0011 Malaysia 00Austria 00 Netherlands 00Belgium 00 New Zealand 00Brazil 0021 Norway 00Bulgaria 00 Peru 00Canada 011 Philippines 00China 00 Portugal 00Columbia 009 Singapore 001Denmark 00 South Africa 09Finland 990 South Korea 001France 00 Spain 00Germany 00 Sweden 00Hong Kong 001 Switzerland 00Hungary 00 Taiwan 00Ireland 00 Thailand 001Israel 014 U.K. 00Italy 00 U.S.A. 011Using at your country of staySetting after homecoming](https://usermanual.wiki/Sharp/HRO00106/User-Guide-1152442-Page-48.png)
![414Overseas UseMake a call from overseas using the international roaming service. Even when Notify caller ID of the network service (nP. 53) is set to “Send ID”, [Unavailable] or [User unset] appears depending on the telecommunications carrier, and the caller ID may not be displayed correctly.Make a call from your country of stay to Japan or other countries.1In stand-by, enter + (press 0 for 1+ seconds), country code, area code (city code) and other party’s phone number.:When the area code (city code) begins with 0, omit the 0 when dialing (Include 0 when making a call to some countries or regions such as Italy).2Press s (Phone)/i (V.phone).ɡMaking an international call outside your country of stay using Country code conversionSet Country code conversion (nP. 65) to [ON] and set the country code frequently called to easily make an international call. 0 at the beginning of a phone number is automatically converted to the country code set in Country code conversion.Example: Make a call from phonebook1In stand-by, press a/select the other party.2Press s (Phone)/i (V.phone).3Select [Call].:To dial a phone number as stored in the phonebook: Select [Original number].ɡMaking a call to the phone in country saved in Set country codeSave a country code using Set country code (nP. 66) to select a country code before making an international call. The following operation is available overseas only.1In stand-by, enter a phone number/C/[Add prefix setting]/[International Call].2Select the country code/t.3Press s (Phone)/i (V.phone).Make a domestic call at your country of stay in the same way as you do in Japan.1In stand-by, enter a phone number.2Press s (Phone)/i (V.phone).:Always dial the area code (city code), even when the number is in the same area.:When making a domestic call at your country of stay using the phonebook, select [Original number] in step 3 of “Making an international call outside your country of stay using Country code conversion” on P. 414.When making a call to a “WORLD WING” subscriber overseas, make an international call to Japan regardless of your country of stay.1In stand-by, enter + (press 0 for 1+ seconds), country code 81 (Japan), the other party’s mobile phone number excluding 0.2Press s (Phone)/i (V.phone).Making a call at your country of stayMaking a call outside your country of stay (including Japan) Making a call in your country of stayMaking a call to a WORLD WING subscriber overseas](https://usermanual.wiki/Sharp/HRO00106/User-Guide-1152442-Page-49.png)
![415Overseas UseReceive a call overseas in the same way as you do in Japan.1Press s to receive an incoming call.:Speak to the caller.ɡHaving calls made to your FOMA terminal from JapanTo receive an international call from Japan, have your phone number dialed just as a domestic call in Japan.090 (or 080)-XXXX-XXXX Calling from Received calls may not be available since the phone number may not be displayed correctly.ɡHaving calls made to your FOMA terminal from countries other than JapanHave the international call access code and 81 (Japan) added to the beginning of your phone number, and 0 excluded as an international call to Japan regardless of your country of stay.International call access code of the country of the caller-81-90 (or 80)-XXXX-XXXX Set to manually select a telecommunications carrier. Re-search a network to set another telecommunications carrier. Check that the Network search mode is set to [Auto] when [A] appears even after homecoming. If telecommunications carrier is selected with [Manual] set overseas, manually set to the FOMA network (DOCOMO) again or change to [Auto] after homecoming.1In the Custom menu, select [Settings]/[Phone settings]/[Other settings]/[International Roam.]/[Network search mode].2Select the setting.;Select [Auto]/[Yes].• When [Auto] is set: Select [Auto].;Select [Manual]/select a telecommunications carrier/t.• The telecommunications carrier is changed.;Select [Network re-search].• The host network is changed automatically if the Network search mode is set to [Auto]. If set to [Manual], select a telecommunications carrier and press t.Check the status whether making a call, data transmission or packet transmission is available.1In the Custom menu, select [Settings]/[Phone settings]/[Other settings]/[In-area status]/[Agree].Receiving a call overseas Even when a caller tried to notify of caller ID, it might not be notified depending on the used telecommunications carrier. When a call is received during international roaming, the call is forwarded from Japan. Call charges to Japan are incurred by the caller and receiving charges by the receiver.Having calls to your FOMA terminalNetwork search modeSetting a search method of telecommunications carrierChecking available communication services <In-area status>](https://usermanual.wiki/Sharp/HRO00106/User-Guide-1152442-Page-50.png)
![416Overseas UseSpecify the priority order of telecommunications carriers connected to when the Network search mode is set to [Auto]. Save up to 20.1In the Custom menu, select [Settings]/[Phone settings]/[Other settings]/[International Roam.]/[Network search mode]/[PLMN setting].:To check the saved telecommunications carrier’s detailed information, select the telecommunications carrier.2Select the number of the priority order/C.3Select the saving method.;Select [PLMN manual select]/enter a country code (MCC)/t/enter a network code (MNC)/t.;Select [UPLMN by list]/select a telecommunications carrier/t.• To search a telecommunications carrier from country name: Select [UPLMN by list]/C/select a country name/t/select a telecommunications carrier/t.• To check the detailed information of the telecommunications carrier: Select [UPLMN by list]/select the telecommunications carrier/i.;Select [Set VPLMN to PLMN].• Save the telecommunications carrier currently connected to.;Select [Change priority]/select a destination/t.;Select [Delete]/[Delete one].;Select [Delete]/[Delete all]/enter the terminal security code/t.4Select [Yes].Set whether to display a telecommunications carrier name currently connected to in stand-by during international roaming.1In the Custom menu, select [Settings]/[Phone settings]/[Other settings]/[International Roam.]/[Operator name disp].2Select the setting/t/[Yes].ɡWhen displaying a telecommunications carrierSet whether to play the guidance stating that international roaming is activated when a call is received during international roaming. Make this setting while still in Japan.1In the Custom menu, select [Settings]/[Other NW Services]/[Roaming guidance].2Select an item/t.3Select [Yes].PLMN settingSetting a telecommunications carrier to preferentially connect toOperator name dispDisplaying a telecommunications carrier during roamingRoaming guidanceActivating roaming guidanceTelecommunications carrier name](https://usermanual.wiki/Sharp/HRO00106/User-Guide-1152442-Page-51.png)
![417Overseas UseSet the FOMA terminal to reject calls during roaming. Select whether to bar all incoming calls or only the Videophone calls. Depending on the overseas telecommunications carrier, the setting cannot be made. Unable to use 64K data communication overseas.1In the Custom menu, select [Settings]/[Phone settings]/[Other settings]/[International Roam.]/[Call barring].2Select an item.;Select [Activate]/[Yes]/select the barring method/t/enter the network security code/t.;Select [Deactivate]/[Yes]/enter the network security code/t.;Select [Check setting].When the FOMA terminal is outside the service area, turned off, or a received call cannot be answered during international roaming, the information of the call (received date and time or caller ID) is notified with SMS. For details on setting at your country of stay nP. 4181In the Custom menu, select [Settings]/[Phone settings]/[Other settings]/[International Roam.]/[Missed Call Notice].2Select an item.;Select [Activate]/[Yes].;Select [Deactivate]/[Yes].;Select [Check setting].Use network services such as Voice Mail and Call Forwarding Services from overseas. Depending on the overseas telecommunications carrier, the setting cannot be made. Voice Mail and Call Forwarding Services subscription are required to use Voice Mail (Int.) and Call Forward (Int.). To use network services overseas, set Remote Control (nP. 401, P. 418) to “Activate” in advance. If operated from overseas, international call charges for your country of stay are incurred.Call barringSetting incoming call to reject during roamingBar all incoming All incoming calls are barred.Bar V.phone/64K Only the Videophone calls are barred.Missed Call NoticeUsing Missed Call Notice function during roamingInt’l servicesUsing network services during roaming](https://usermanual.wiki/Sharp/HRO00106/User-Guide-1152442-Page-52.png)
![418Overseas Use1In the Custom menu, select [Settings]/[Phone settings]/[Other settings]/[International Roam.].2Select [Voice Mail(Int.)]/select an item of Voice Mail Service/t.3Select [Yes]/operate according to the voice guidance.1In the Custom menu, select [Settings]/[Phone settings]/[Other settings]/[International Roam.].2Select [Call Forward (Int.)]/select an item of Call Forwarding Service/t.3Select [Yes]/operate according to the voice guidance.1In the Custom menu, select [Settings]/[Phone settings]/[Other settings]/[International Roam.].2Select [Roam. guidance(Int.)].3Select [Yes]/operate according to the voice guidance.1In the Custom menu, select [Settings]/[Phone settings]/[Other settings]/[International Roam.].2Select [Remote access (Int.)].3Select [Yes]/operate according to the voice guidance.1In the Custom menu, select [Settings]/[Phone settings]/[Other settings]/[International Roam.].2Select [Caller ID req (Int.)].3Select [Yes]/operate according to the voice guidance.1In the Custom menu, select [Settings]/[Phone settings]/[Other settings]/[International Roam.].2Select [MissedCallNoticeInt.].3Select [Yes]/operate according to the voice guidance.Operating Voice Mail Service in country you stay <Voice Mail(Int.)>Operating Call Forwarding Service in country you stay <Call Forward (Int.)>Operating roaming guidance in country you stay <Roam. guidance(Int.)>Setting remote control in country you stay <Remote access (Int.)>Operating Caller ID Request Service in country you stay <Caller ID req (Int.)>Setting Missed Call Notice setting in country you stay <MissedCallNoticeInt.>](https://usermanual.wiki/Sharp/HRO00106/User-Guide-1152442-Page-53.png)

![<Cut here>General Inquiries <docomo Information Center>ɦService available in: English, Portuguese, Chinese, Spanish, Korean.ɦAvailable from mobile phones and PHSs.From DOCOMO mobile phones(In Japanese only)ɦUnavailable from land-line phones, etc.From land-line phones(In Japanese only)ɦAvailable from mobile phones and PHSs. Please confirm the phone number before you dial.From DOCOMO mobile phones(In Japanese only)ɦUnavailable from land-line phones, etc.From land-line phones(In Japanese only)ɦAvailable from mobile phones and PHSs. Please confirm the phone number before you dial.1In stand-by, press a (for 1+ seconds)/[Phone].2Enter a name/t/[9]/enter a phone number/t/select a phone type icon/t/[S]/enter a mail address/t/select a mail address type icon/t/i/t.ɡOther save itemsQ: Group ;: Secreta: Company/school F: Secret codeJ: Company/school (Reading) <: Select ring toneq: Department V: Mail ring toner: Title q: Called LED colorN: Postal code -: Called LED patternO: Postal address :: Mail/Message LED colorj: Location info +: Mail LED patternP: Birthday 8: Picture call setG: Memo 1: Substitute image1In stand-by, press r (I)/q (M)/select a phone number/C/[Add to phonebook]/[Save new to phone]/add to the phonebook.1In stand-by, press a/select a name/C/[Edit data]/[Edit]/select an item/t/edit.Quick ManualRegistration/Contactss0120-005-250 (toll free)r(No prefix) 151 (toll free)s0120-800-000 (toll free)SH-08A If you have problems with your FOMAr(No prefix) 113 (toll free)s0120-800-000 (toll free)Adding entries to phonebook (FOMA terminal handset) Adding entries to phonebook from Redials/Received callsEditing phonebook entries1In the text input screen, press a/select the input mode.1Enter a character/*.1Move the cursor to the text and press c.:To delete all text: At the end of the message, press c (for 1+ seconds).1In the text input screen, press a (for 1+ seconds)/select a phrase/t/confirm the phrase/t.1In the text input screen, press i.:To switch between pictogram and Deco-mail pictogram: Press i.:To switch between single- and double-byte symbols: Press C.2Select a pictogram/symbol/t.1In the text input screen, press m (for 1+ seconds)/select an emoticon/t.1In the text input screen, move the cursor to the start position/C/[Copy]/[Cut(HoldS)]/t.2Move the cursor to the end position/t.3Move the cursor to the paste position/* (for 1+ seconds).Ex.) ͈ࣽΞΣΑ3শt1In the text input screen, press 2 (twice)/p/[ࣽ].:As each hiragana character is entered, conversion candidates appear and they can be selected.Text inputChanging input modeSwitching upper/lower caseDeleting textUsing phrasesEntering pictograms/symbolsEntering emoticonsCutting/Copying/Pasting textText input example–1– –2––4––3– –5–](https://usermanual.wiki/Sharp/HRO00106/User-Guide-1152442-Page-67.png)
![<Cut here>2Press p/[͈].3Press 453/o/[ΞΣΑ].:Use o for One-touch conversion.4Press a (five times)/3.:Press a (five times) for single-byte numeric mode.5Press a (twice)/3 (twice)/*/p/[শ].:Use * for dakuten mark.6Press i/[t].1In the Custom menu, select [Settings]/[Disp/LED/Power saver]/[Font style]/[Font style setting]/select the font/t.1In the Custom menu, select [Settings]/[Disp/LED/Power saver]/[Font style]/[Font size setting]/[Individual setting]/select the [Input] field/t/select the font size/t/[Yes].:To change collectively: In stand-by, press 5 (for 1+ seconds).1In stand-by, press C/t/t.1In the Custom menu, select [Camera]/[Shoot movie]/t/t/[Save].1In the Custom menu, select [Data box]/[My picture]/select a still picture/t.1In the Custom menu, select [Data box]/[i-motion/Movie]/select a moving picture/t.Changing font (font style)Changing font sizeCameraShooting still picturesShooting moving picturesDisplaying still picturesPlaying moving pictures1In the Custom menu, select [1Seg]/[Channel setting].2Select the number to save/C/[Auto channel set]/[Yes].3Select an area/t/select a prefecture/district/t/t/[Yes]/[Yes].1In the Custom menu, select [1Seg]/[Channel setting]/select a channel list/t.1In stand-by, press C (for 1+ seconds).:To record a video of 1Seg programs: While watching 1Seg, press i (for 1+ seconds)/(record)/i.:To record 1Seg programs as a still picture: While watching 1Seg, press i.1In the Custom menu, select [Data box]/[1Seg].2Select the [Video] folder/select a video/t.1In the Custom menu, select [Data box]/[MUSIC]/select music data/t.1In stand-by, press m (for 1+ seconds)/select the [To] field/t/select the input method.;Select [Search phonebook]/select a recipient/t.;Select [Sent messages]/select a recipient/t.;Select [Rcvd messages]/select a recipient/t.;Select [Mail members]/select a mail member/t.;Select [Blog/SNS]/select a posting site/i.;Select [Direct input]/enter an address/t.2Select the [Sub] field/t/enter a subject/t/[Msg]/enter the message/t/i.Watching 1SegPerforming Automatic channel settingSelecting a channel listWatching 1SegWatching videosMusic playbackUsing MUSIC PlayerKey operations for MUSIC PlayerTo pause/play tTo stop mTo adjust the volume uTo play previous song/return to the beginning of songqTo play next song rTo end MUSIC Player H/[Yes]MailComposing and sending i-mode mail–7––10––6– –8––11––9–](https://usermanual.wiki/Sharp/HRO00106/User-Guide-1152442-Page-68.png)
![<Cut here>1In the text input screen, press C/[Decorate mail]/select a decoration type/t/specify decoration/t/input text/t/i.1In the compose message screen, select the attachment field (No attachment)/t/select the file to attach.;Select [Image]/select an image/i.;Select [Melody]/select a melody/i.;Select [i-motion]/select i-motion/i.;Select [ToruCa]/select a ToruCa/i.;Select [PDF]/select a PDF/i.;Select [Phonebook]/select a save destination/t/select a name/t.;Select [Schedule]/select a save destination/t (/select a day/i)*/select a schedule/t.* No operation is needed if [microSD] is selected as the save destination.;Select [Bookmark]/select a save destination/t/select a bookmark/t.;Select [Other]/select a file/t.;Select [Start cam (still)]/t/t.;Select [Start cam (movie)]/t/t/[Save].1In stand-by, press m/[Compose SMS]/select the [To] field/t/[Direct input]/enter an address/t/[Msg]/enter the message/t/i.1Mail is automatically received.2Select [Mail]/select the mail/t.1In stand-by, press m/[Check new messages].:SMS: Press m/[Check new SMS].1In the received mail details screen, press C/[Reply/Forward].2Select the reply method/t.3Compose and send a mail.1In the received mail details screen, press C/[Reply/Forward]/[Forward].2Enter an address and send a mail.Sending Deco-mailAttaching a file Composing and sending SMSReceiving mail automaticallyChecking new i-mode mailReplying to i-mode mailForwarding i-mode mail1In the Custom menu/Basic menu, press a.1In the Basic menu, enter a function number.Menu listSwitching between the Custom menu/Basic menuRecalling a function numberUSnd/Vibrator/MannerUSelect volume Received call volume, phone ring vol, Mail ring vol, Key sound, Standby i-motion, Charge start sound, Charge end sound, Timer sound, GPS volumeVSelect sound Select ring tone, Select mail tone, Shutter sound, Timer sound, GPS toneWVibrator Vibration mode, Mail vibration, GPS vibratorXManner mode ON (Normal, Silent, Original), OFFYHeadset settingZRing time settingMail ring time set, GPS ring time set[Set mute ring time\Hold/On hold toneSet on hold tone, Set hold tone]Sound playbackMelody stereo fx, Melody equalizer, Pref playback soundUSnd/Vibrator/Manner VDisp/LED/Power saverUSet screen Stand-by display, Clock display, Calendar display, Stand-by memo disp, Sub Caller ID disp, Sub Clock display, Sub while chargingVFont style Font style setting, Font size settingWThemes Kisekae Tool, Call/Rcv display, Send/Rcv display, Dial image set, Animate notices, Signal/batt/s clock, Machi-chara, Color theme settingXLED settings Called LED, Mail LED, Notice LED, In-call LED, Alarm/Timer LED, IC card LED, Open/close LED, GPS LEDYDisplay img qualityVibrant image mode, Control by scene–13– –14––16––15– –17––12–](https://usermanual.wiki/Sharp/HRO00106/User-Guide-1152442-Page-69.png)
![<Cut here>ZLight/Power saverNorm (auto bright), Norm (fixed bright), Eco mode (Pwr saver), Original Eco mode[VeilView Linked manner, Display pattern, Density\Menu priorityWGeneral settingsU++ΕȜρȜਰഩ̵̤ͣ୭++ΕȜρȜਰഩ̵̤ͣ, ++ΕȜρȜ႑ୟਰഩၾςΓΛΠVCheck status Own number, Check memory, Check settingsWText input settingUser dictionary, Dwnld dictionary, Edit phrase, Clear memory terms, Input methodXAuto power ON/OFFAuto power ON, Auto power OFF, Link alarm/power ONYDate settingsVDisp/LED/Power saverZSelect language[USB mode setting\Scanning functionUpdate, Set auto-update, Set scan, Version]Software updateTReset settingsXNW ServicesUVoice Mail Check messages, Play Messages, Activate VoiceMail, Set ring time, Deactivate VoiceMail, Check setting, Voice Mail setting, Notification setting, Notification, V.phone Voice MailVCall waiting Activate, Deactivate, Check settingWGeneral settingsWCall ForwardingActivate, Deactivate, Register number, If FWD number busy, Check settingXNuis. call blockingRegister caller, Register selected No, Delete all entries, Delete last entry, Check No of entriesYNotify caller ID Check setting, Activate/DeactivateZCaller ID requestActivate, Deactivate, Check setting[Talk time/cost\2in1 setting Mode switching, Phonebook 2in1 set, Stand-by display, Set call/receive No., 2in1 function OFF, Receive avoidance]In-call arrival actSet arrival act, Arrival Call ActXNW ServicesYOther NW ServicesURemote ControlActivate, Deactivate, Check settingVDual network Switching, Check settingWEnglish guidanceGuidance setting, Check settingXService NumbersΡκવ࿚̵ࣣ, ΡκࣣմඤȆັ, ٬ٸȆൔඳ൝, ٬ٸવYAdditional serviceUSSD, Reply messageZMulti number Set multi number, Check setting, Number setting[Chaku-moji Create message, Message display\Roaming guidanceActivate, Deactivate, Check settingZPhone settingsUIn-call settings Noise reduction, Reconnect signal, Quality alarmVHeadset sw to callWIncoming settingsAny key answer, Auto answer setting, Melody Call settingXVideophone set Redial voice call, Set sending image, Display setting, Subscreen position, Visual preference, Notify switch mode, Hands-free V.phone, V.phone while packetYRecord messageRecord message, Answering duration, Reply message, V.phone reply imageZSet when folded[Self mode\Other settings Int’l prefix, Sub address, Int’l dial assist, International Roam., In-area statusZPhone settings–19––22––18– –20––23––21–](https://usermanual.wiki/Sharp/HRO00106/User-Guide-1152442-Page-70.png)
![<Cut here>[SecurityUSecret modeVUIM Settings PIN1 code input set, Change PIN1 code, Change PIN2 codeWAccept/Reject callsAccept calls, Reject calls, Reject unknown, User unset, Reject payphone, Reject not supportXShow call/receivedShow rcvd calls, Show redialYShow sent/receivedShow sent messages, Show rcvd messagesZLock settings All lock, Keypad dial lock,Function lock, Multi lock set, IC card lock, Multi lock auto-set[Change security code\Delete all data Delete user data, Del secret data\i-concier settingsUIncoming settingsSelect volume, Select sound, Vibrator, Ring time setting, LED settingVInformation display]BatteryUBattery levelVBattery iconWIcon% temp displayOther settingsTOwn numberRInitial settingOther functionsManner mode enable/disable # (for 1+ seconds)Public mode (Drive mode) activate/deactivate* (for 1+ seconds)Display the Lock selection t (for 1+ seconds)Show i-Channel list c (J)Show iMenu iShow i-appli software list screen i (,) (for 1+ seconds)Activate Quick search $Activate Multi Assistant (Multitask)$ while using a functionDisplay Shortcut menu pDisplay i-Widget screen oDisplay Received messages historyq (for 1+ seconds)Display Sent massages history r (for 1+ seconds)VeilView ON/OFF $ (for 1+ seconds) Position location y (for 1+ seconds)ɦWhen the confirmation screen appears, select [Yes].Voice Mail Service is a paid option (monthly fees apply) that requires subscription.1In the Custom menu, select [Settings]/[NW Services]/[Voice Mail].2Select [Activate VoiceMail]/[Activate VoiceMail].:To deactivate: Select [Deactivate VoiceMail].:To play messages: Select [Play Messages]/[Play(voice call)]/[Play(videophone)].:To check messages: Select [Check messages].Call Waiting is a paid option (monthly fees apply) that requires subscription.1In the Custom menu, select [Settings]/[NW Services]/[Call waiting].2Select [Activate].:To deactivate: Select [Deactivate].:To check settings: Select [Check setting].Call Forwarding Service is a free option (no monthly fees) that requires subscription.1In the Custom menu, select [Settings]/[NW Services]/[Call Forwarding].2Select [Activate]/[Activate].:To deactivate: Select [Deactivate].:To check settings: Select [Check setting].Subscription is not required (no monthly fees).1In the Custom menu, select [Settings]/[NW Services]/[Caller ID request].2Select [Activate].:To deactivate: Select [Deactivate].:To check settings: Select [Check setting].Network servicesVoice Mail ServiceCall WaitingCall Forwarding ServiceCaller ID Request Service–25– –26––28––27– –29––24–](https://usermanual.wiki/Sharp/HRO00106/User-Guide-1152442-Page-71.png)
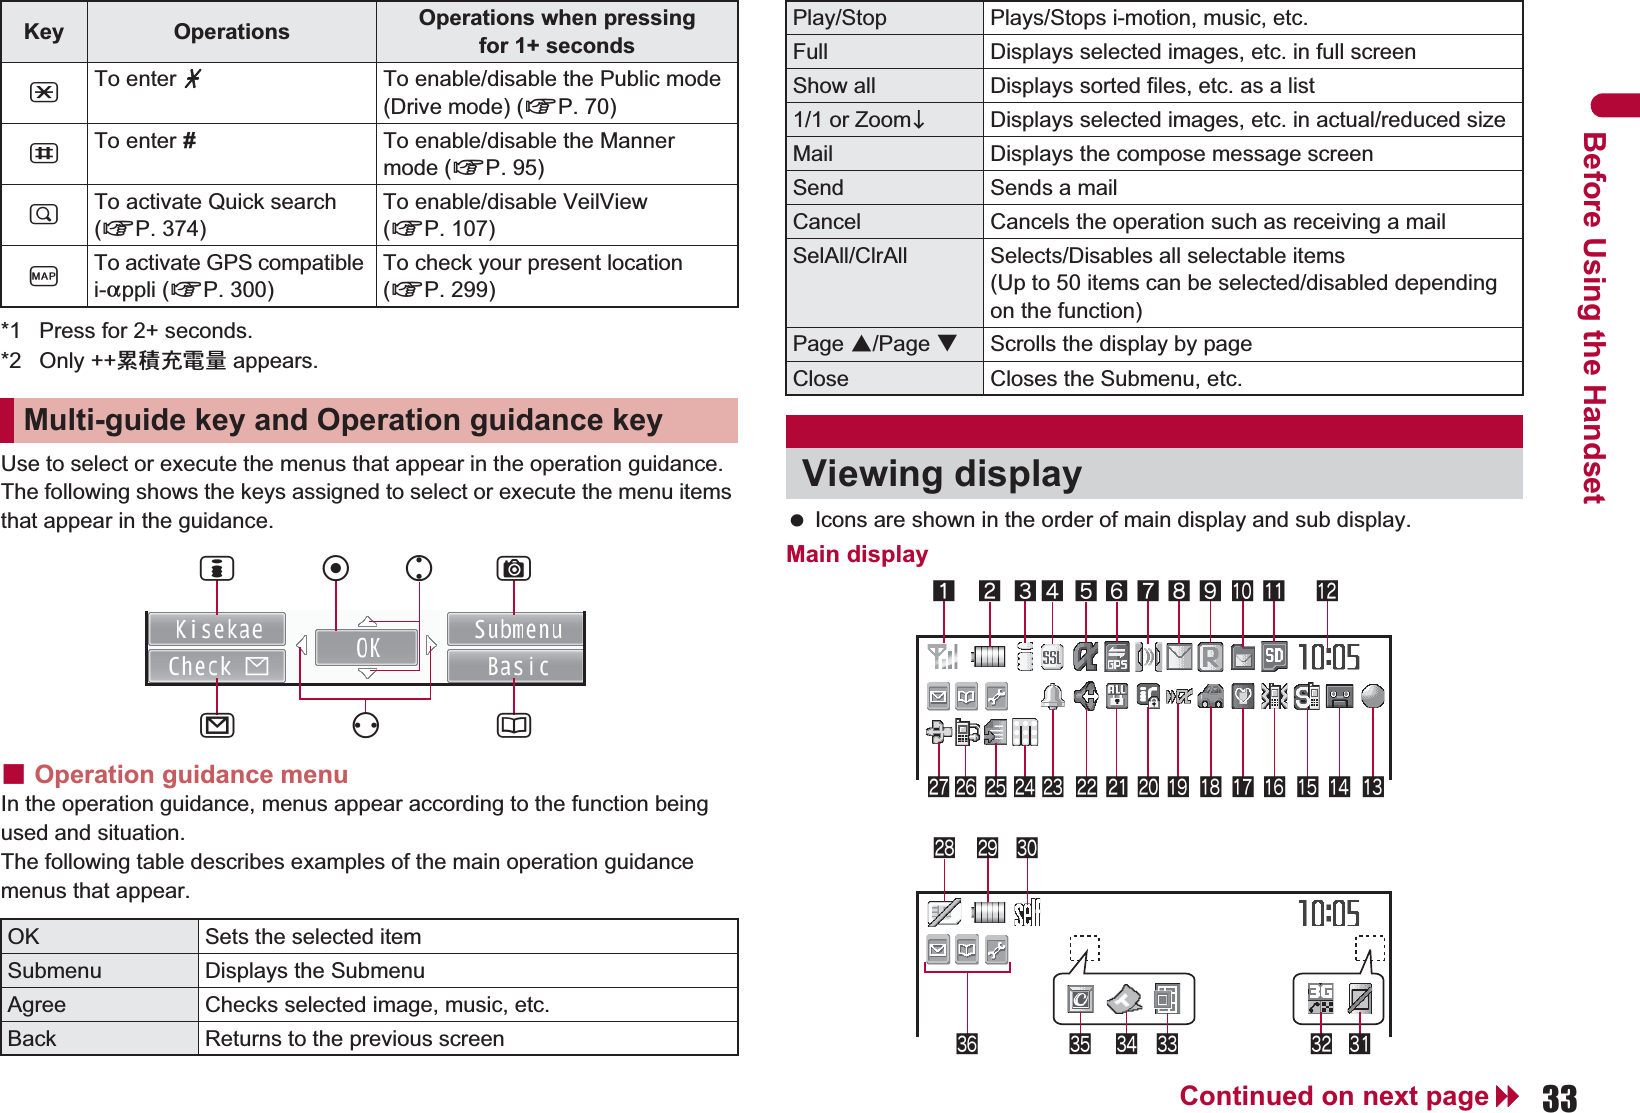
![<Cut here> Icons are shown in the order of main display and sub display.Icon listMain display2345 7 b cpmlkjihgnq or fe d6 a981us<zy vwxtSub display1s hi 82 b 2kl > 2 <cu z 21]/aSignal status2"/bBattery level37=IJAABNO i-mode/Full Browser4oSSL/TLS5GNIQ i-appli6AB GPS7Jtu Ir communication/External device8UhHv[/xi-mode mail/SMS/Area Mail received 9ABJMessage R/F receivedaWGIXSTKL Storage status of i-mode centerb^ (gray)/mmicroSD Card is inserted^ (pink)/lmicroSD Card is being useda/rmicroSD Card cannot be recognizedcClock displayda1Seg being recordedɦRefer to P. 33 to P. 37 of the manual for detailed explanations of displayed icons.e]D to PkRecord messagef[SilentgbVibratorhZ/fManner modei_/dPublic mode (Drive mode)jai-appli callkH/cIC card lock lRSTUVWKX/ie Restrictionm;Hands-free in progressn\Alarmo0Music&Video Channel program reservationp=; i-mode mail send reservationqsEarphone/Microphone connectionrxUSB modesR/jFOMA card is malfunctioning or not insertedB/hNon-FOMA card is insertedt)High temperature warningug/gSelf modevPVeilVieww SQR 3GxIH Status of Comics settingyQToruCazC/zReceiving information <Multitask>wOperation in progress<Emergency contacts in case of loss or other accidents>Omakase LockɦOmakase Lock is a paid service. However, if Omakase Lock is subscribed while or at the same time as when the use of FOMA terminal is suspended, or if the user is a member of docomo Premier Club, the usage fee of Omakase Lock is not charged. Additionally, if Keitai Anshin Pack (Mobile Phone Security Package) is subscribed, Omakase Lock is available for a flat-rate.Enable/Disable Omakase Locks0120-524-360 Office hours: 24hoursOther contacts<Contacts: ><Contacts: ><Contacts: >ɦPlease confirm the phone number before you dial.–31––34––30– –32––35––33–](https://usermanual.wiki/Sharp/HRO00106/User-Guide-1152442-Page-72.png)
![<Cut here>From DOCOMO mobile phonesɦIf you use SH-08A, you should dial the number +81-3-5366-3114 (to enter “+”, press the “0” key for 1+ seconds).From land-line phones<Universal number>ɦSee P.19 to P.22 for international call access codes for major countries (table 1) and international prefix numbers for the universal number (table 2).From DOCOMO mobile phonesɦIf you use SH-08A, you should dial the number +81-3-6718-1414 (to enter “+”, press the “0” key for 1+ seconds).From land-line phones<Universal number>ɦSee P.19 to P.22 for international call access codes for major countries (table 1) and international prefix numbers for the universal number (table 2).Refer to the following before using the FOMA terminal overseas.“Mobile Phone User’s Guide [International Services]”“Mobile Phone User’s Guide [Network Services]”PDF file “٬ٸ̮၌ဥ΄ͼΡ” (Guide for overseas use) pre-installed in [My Documents] of Data boxDOCOMO “International Services website”ɡSetting in Japan1In the Custom menu, select [i-mode]/[iMenu/Search]/[English]/[Options]/[International Settings]/[i-mode services Settings]/[Yes]/select the [Enter i-mode Password] field/t/enter the i-mode password/t/[OK].Quick Manual “Overseas Use”Loss or theft FOMA terminal or payment of cumulative cost overseas <docomo Information Center> (available 24 hours a day)International call access code for the country you stay (table 1)-81-3-5366-3114* (toll free)*You are charged a call fee to Japan when calling from a land-line phone, etc.International prefix number for the universal number (table 2)-800-0120-0151** You might be charged a domestic call fee according to the call rate for the country you stay.SH-08A Failures encountered overseas <Network Technical Operation Center> (available 24 hours a day)International call access code for the country you stay (table 1)-81-3-6718-1414* (toll free)*You are charged a call fee to Japan when calling from a land-line phone, etc.International prefix number for the universal number (table 2)-800-5931-8600** You might be charged a domestic call fee according to the call rate for the country you stay.Preparing for overseas useSetting i-modeɡSetting in overseas1In the Custom menu, select [i-mode]/[iMenu/Search]/[English]/[International Settings]/[i-mode services Settings]/[Yes]/select the [Enter i-mode Password] field/t/enter the i-mode password/t/[OK].ɡSetting in Japan1In the Custom menu, select [Settings]/[Other NW Services]/[Remote Control]/[Activate]/[Yes].ɡSetting in overseas1In the Custom menu, select [Settings]/[Phone settings]/[Other settings]/[International Roam.]/[Remote access (Int.)]/[Yes]/operate according to the voice guidance.1In the Custom menu, select [Settings]/[General settings]/[Date settings]/select the [Auto time correction] field/t/[ON]/i.1In the Custom menu, select [Settings]/[General settings]/[Date settings]/select the [Auto time correction] field/t/[OFF]/C.2Select a time zone/t/select a city/t/i.Setting remote accessCorrecting date and time automaticallySetting time zone manuallyAvailable network3G network AvailableGSM network Not availableGPRS network Not available–1– –2––4––3– –5–](https://usermanual.wiki/Sharp/HRO00106/User-Guide-1152442-Page-73.png)
![<Cut here> Unable to use 64K data communication by connecting a PC, etc. overseas.Default setting: Auto (Automatically switches telecommunications carriers)1In the Custom menu, select [Settings]/[Phone settings]/[Other settings]/[International Roam.]/[Network search mode].2Select [Auto]/[Yes].:To manually switch telecommunications carriers: Select [Manual]/select a telecommunications carrier/t.:To re-search for the host network: Select [Network re-search].1In the Custom menu, select [Settings]/[Phone settings]/[Other settings]/[International Roam.]/[Network search mode]/[PLMN setting]/select the number of the priority order/C.2Select [PLMN manual select]/enter a country code (MCC)/t/enter a network code (MNC)/t/[Yes].:To save from a telecommunications carrier list: Select [UPLMN by list]/select a telecommunications carrier/t/[Yes].:To save the telecommunications carrier currently connected to: Select [Set VPLMN to PLMN]/[Yes].:To change the priority: Select [Change priority]/select a destination/t/[Yes].Available services overseasCommunication service 3GVoice call AVideophone Ai-mode mail Ai-mode Ai-Channel Ai-concier Ai-Widget ASMS AGPS position location APacket transmission by connecting a PC, etc. ASetting a search method of telecommunications carrierNetwork search modeSetting a telecommunications carrier to preferentially connect to1In the Custom menu, select [Settings]/[Phone settings]/[Other settings]/[International Roam.]/[Operator name disp]/[Display on]/[Yes].If Network search mode is set to [Auto], reset Network search mode to the FOMA network (DOCOMO) automatically when the power is turned on after homecoming.ɡSetting to FOMA network (DOCOMO) manually1In the Custom menu, select [Settings]/[Phone settings]/[Other settings]/[International Roam.]/[Network search mode]/[Manual]/[DOCOMO].ɡUsing + to make an international call1In stand-by, press 0 (for 1+ seconds)/enter the country code, area code (city code) and other party’s phone number/s (Phone)/i (V.phone).:When the area code (city code) begins with 0, omit the 0 when dialing (Include 0 when making a call to some countries or regions such as Italy).ɡMaking a call outside your country of stay using country code conversion0 at the beginning of a phone number is automatically converted to the country code set in Country code conversion.Example: Make a call from the phonebook1In stand-by, press a/select the other party/s (Phone)/i (V.phone)/[Call].ɡMaking an international callSave a country number using Set country code to select a country code before making an international call.The following operation is available overseas only.1In stand-by, enter a phone number/C/[Add prefix setting]/[International Call]/select the country code/t/s (Phone)/i (V.phone).Displaying a telecommunications carrier name in stand-bySetting after homecomingTelecommu-nications carrier nameMaking a callMaking a call outside your country of stay (including Japan)–7––10––6– –8––11––9–](https://usermanual.wiki/Sharp/HRO00106/User-Guide-1152442-Page-74.png)
![<Cut here>1In stand-by, enter a phone number/s (Phone)/i (V.phone).ɡMaking a call to the phone in your country of stay using phonebook1In stand-by, press a/select the other party/s (Phone)/i (V.phone)/[Original number].ɡMaking a call to a WORLD WING subscriber overseasEven when making a call to the phone in your country of stay, make an international call to Japan if the call recipient is a “WORLD WING” subscriber overseas.1In stand-by, press 0 (for 1+ seconds)/81/enter the other party’s mobile phone number excluding the first 0/s (Phone)/i (V.phone).1Press s to answer an incoming call.ɡHaving calls made to your FOMA terminal from JapanEnter the phone number in the same way as it is entered in Japan and make a call.ɡHaving calls made to your FOMA terminal from countries other than JapanEnter international call access code of the country of the caller-81-user’s phone number excluding the first 0 and make a call. Make this setting while still in Japan.ɦWhen the confirmation screen appears, select [Yes].1In the Custom menu, select [Settings]/[Other NW Services]/[Roaming guidance].2Select [Activate].:To deactivate: Select [Deactivate].:To check settings: Select [Check setting]. Depending on the overseas telecommunications carrier, the setting cannot be made.1In the Custom menu, select [Settings]/[Phone settings]/[Other settings]/[International Roam.]/[Call barring].2Select [Activate]/[Yes]/select the barring method/t/enter the network security code/t.:To deactivate: Select [Deactivate]/[Yes]/enter the network security code/t.:To check settings: Select [Check setting]. For details on setting at your country of stay nP. 161In the Custom menu, select [Settings]/[Phone settings]/[Other settings]/[International Roam.]/[Missed Call Notice].2Select [Activate]/[Yes].Making a call in your country of stayReceiving callsSetting roaming guidanceCall barringMissed Call Notice:To deactivate: Select [Deactivate]/[Yes].:To check settings: Select [Check setting]. Depending on the overseas telecommunications carrier, the setting cannot be made. To use network service overseas, set Remote Control to “Activate” in advance.ɦWhen the confirmation screen appears, select [Yes].ɦOperate according to the voice guidance.1In the Custom menu, select [Settings]/[Phone settings]/[Other settings]/[International Roam.]/[Voice Mail(Int.)].2Select [Activate Voice Mail].:To deactivate: Select [Deactivate].:To play messages: Select [Play Messages].:To set the service: Select [Voice Mail settings].1In the Custom menu, select [Settings]/[Phone settings]/[Other settings]/[International Roam.]/[Call Forward (Int.)].2Select [Activate].:To deactivate: Select [Deactivate].:To set the service: Select [Settings].1In the Custom menu, select [Settings]/[Phone settings]/[Other settings]/[International Roam.]/[Roam. guidance(Int.)].1In the Custom menu, select [Settings]/[Phone settings]/[Other settings]/[International Roam.]/[MissedCallNoticeInt.].The following shows “Country code” used when making international calls or setting International dial assist.Using network serviceVoice Mail (Int.)Call Forward (Int.)Roaming guidance (Int.)Missed Call Notice (Int.)Country codes of major countriesCountry/Region Code Country/Region CodeAustralia 61 Hong Kong 852Austria 43 Hungary 36Belgium 32 India 91Brazil 55 Indonesia 62Canada 1 Italy 39China 86 Japan 81Czech 420 Macau 853Egypt 20 Malaysia 60Fiji 679 Maldives 960Finland 358 Netherlands 31France 33 New Caledonia 687Germany 49 New Zealand 64Greece 30 Norway 47–13– –14––16––15– –17––12–](https://usermanual.wiki/Sharp/HRO00106/User-Guide-1152442-Page-75.png)
![<Cut here> For other country codes and details, refer to “Mobile Phone User’s Guide [International Services]” or the DOCOMO “International Services website”.The following shows the International call access codes for major countries.Peru 51 Tahiti (French Polynesia)689Philippines 63Russia 7 Taiwan 886Singapore 65 Thailand 66South Korea 82 Turkey 90Spain 34 U.K. 44Sweden 46 U.S.A. 1Switzerland 41 Vietnam 84Country/Region Code Country/Region Code International call access codes for major countries (table 1)Country/Region Code Country/Region CodeAustralia 0011 Hungary 00Belgium 00 India 00Brazil 0021/0014Indonesia 001Ireland 00Canada 011 Italy 00China 00 Luxemburg 00Czech 00 Macau 00Denmark 00 Malaysia 00Finland 00 Monaco 00France 00 Netherlands 00Germany 00 New Zealand 00Greece 00 Norway 00Hong Kong 001 Philippines 00Poland 00 Taiwan 002Portugal 00 Thailand 001Russia 810 Turkey 00Singapore 001 U.A.E. 00South Korea 001 U.K. 00Spain 00 U.S.A. 011Sweden 00 Vietnam 00Switzerland 00Country/Region Code Country/Region CodeThe following shows the International prefix number for the universal number of each country.For lost, stolen, and cost settlement, or malfunction of the FOMA terminal overseas, refer to “Loss or theft FOMA terminal or payment of cumulative cost overseas” on the cover of Quick Manual “Overseas Use” or “Failures encountered overseas” on P.1. Note that transmission/calling charges after the FOMA terminal is lost or stolen are incurred to the subscriber. When the FOMA terminal is lost or stolen overseas, promptly contact DOCOMO and conduct a procedure for canceling the use of service. Add the “International call access codes for major countries (table 1)” or “International prefix numbers for the universal number (table 2)” that is assigned to your country of stay, to the head of your phone number for inquiries.International prefix numbers for the universal number (table 2)Country/Region Code Country/Region CodeArgentina 00 Hong Kong 001Australia 0011 Hungary 00Austria 00 Ireland 00Belgium 00 Israel 014Brazil 0021 Italy 00Bulgaria 00 Luxemburg 00Canada 011 Malaysia 00China 00 Netherlands 00Columbia 009 New Zealand 00Denmark 00 Norway 00Finland 990 Peru 00France 00 Philippines 00Germany 00 Portugal 00Singapore 001 Switzerland 00South Africa 09 Taiwan 00South Korea 001 Thailand 001Spain 00 U.K. 00Sweden 00 U.S.A. 011Country/Region Code Country/Region Code About inquiries overseas–19––22––18– –20––23––21–](https://usermanual.wiki/Sharp/HRO00106/User-Guide-1152442-Page-76.png)