Sharp HRO00153 Cellular Phone User Manual
Sharp Corporation Cellular Phone Users Manual
UserManual.wiki
>
Sharp
>
HRO00153 User Manual
User manual
Navigation menu
Upload a User Manual
Namespaces
Wiki Guide
HTML
PDF
Info
Views
User Manual
Discussion / Help
Navigation
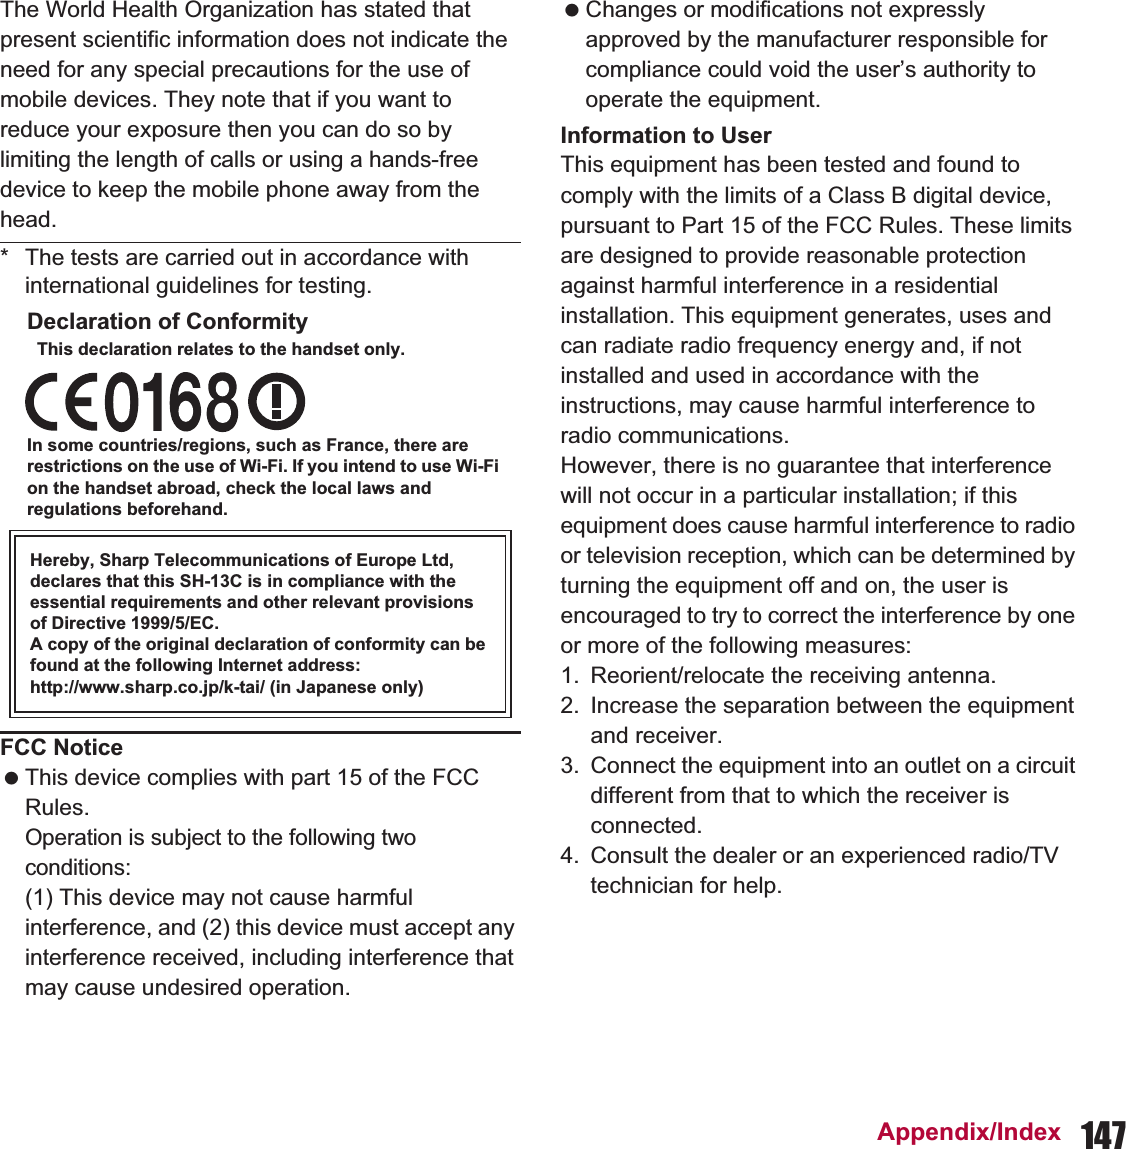
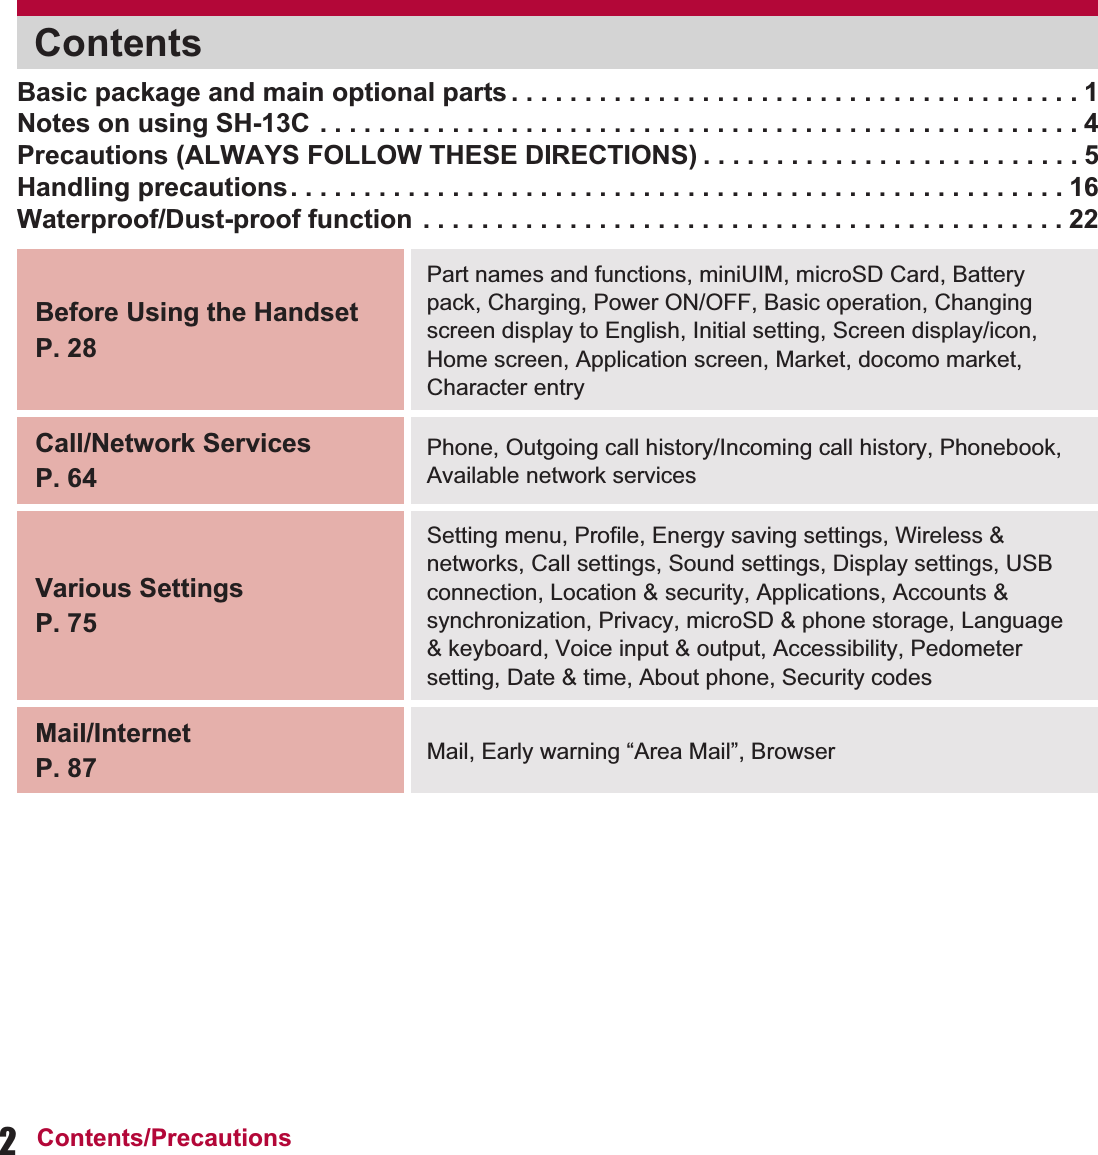
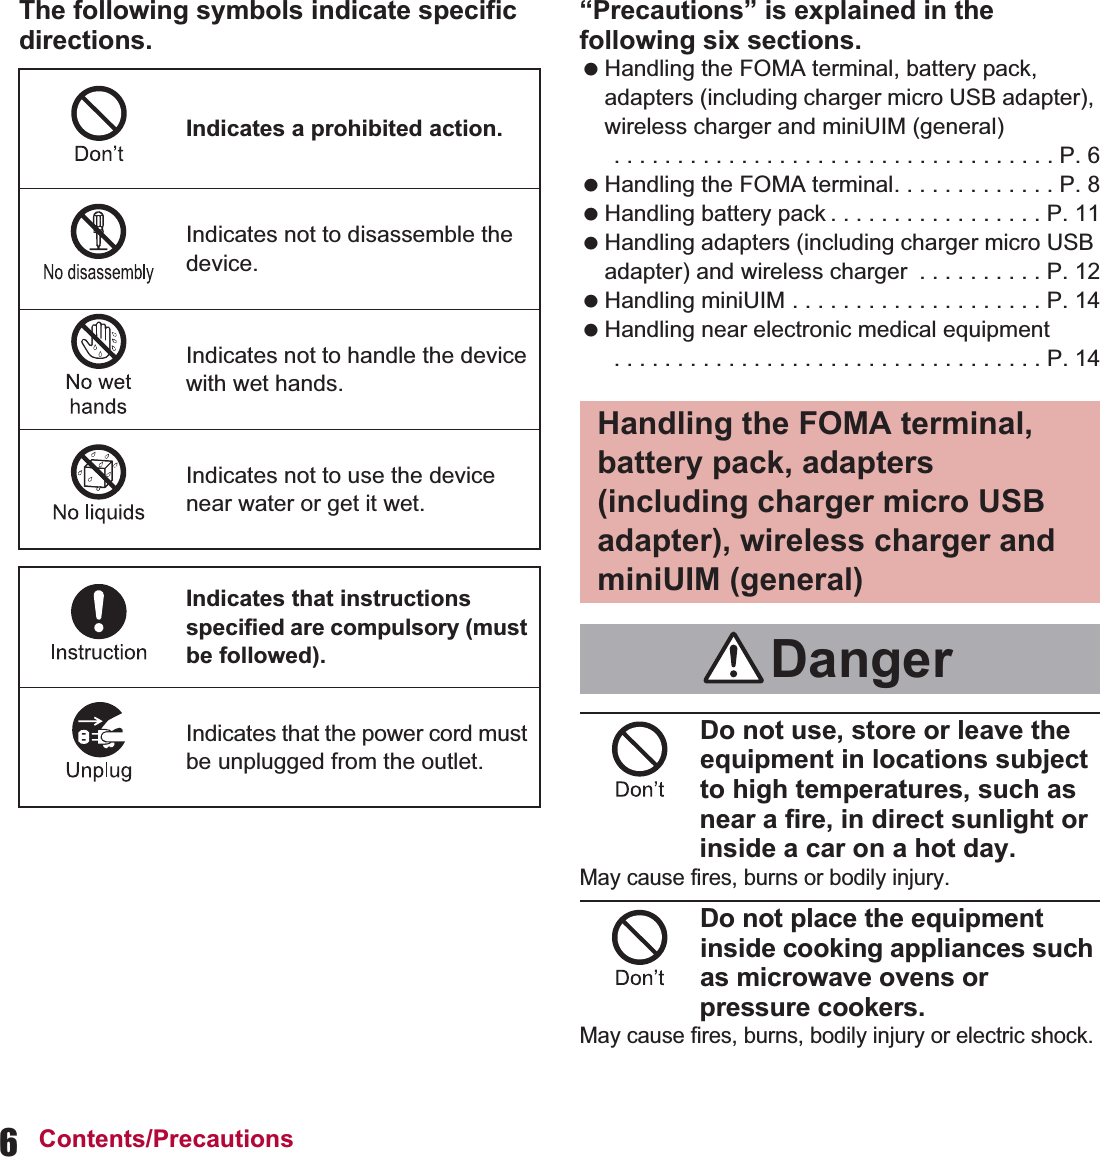
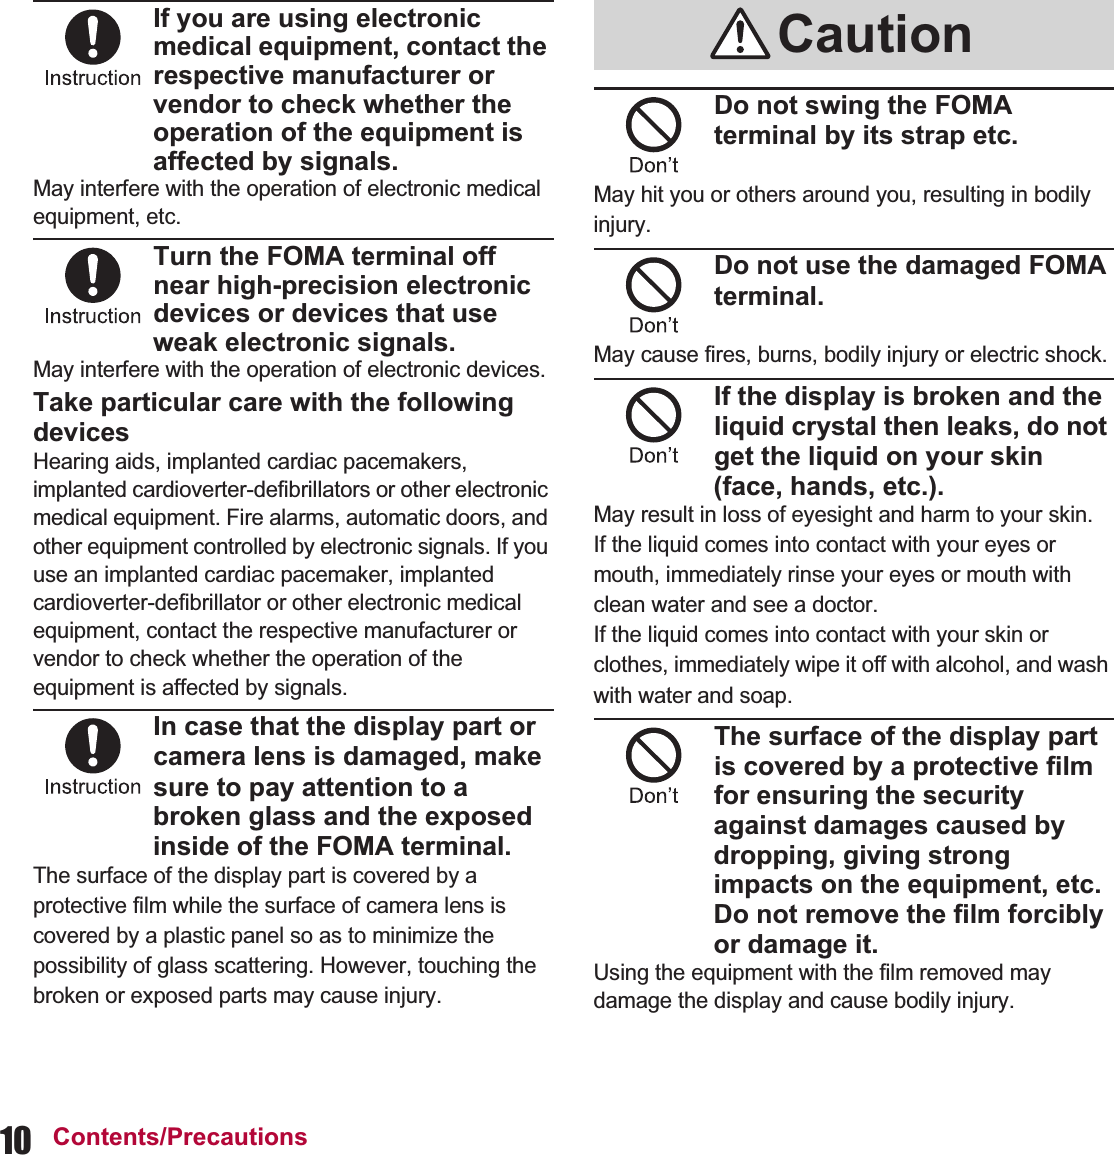
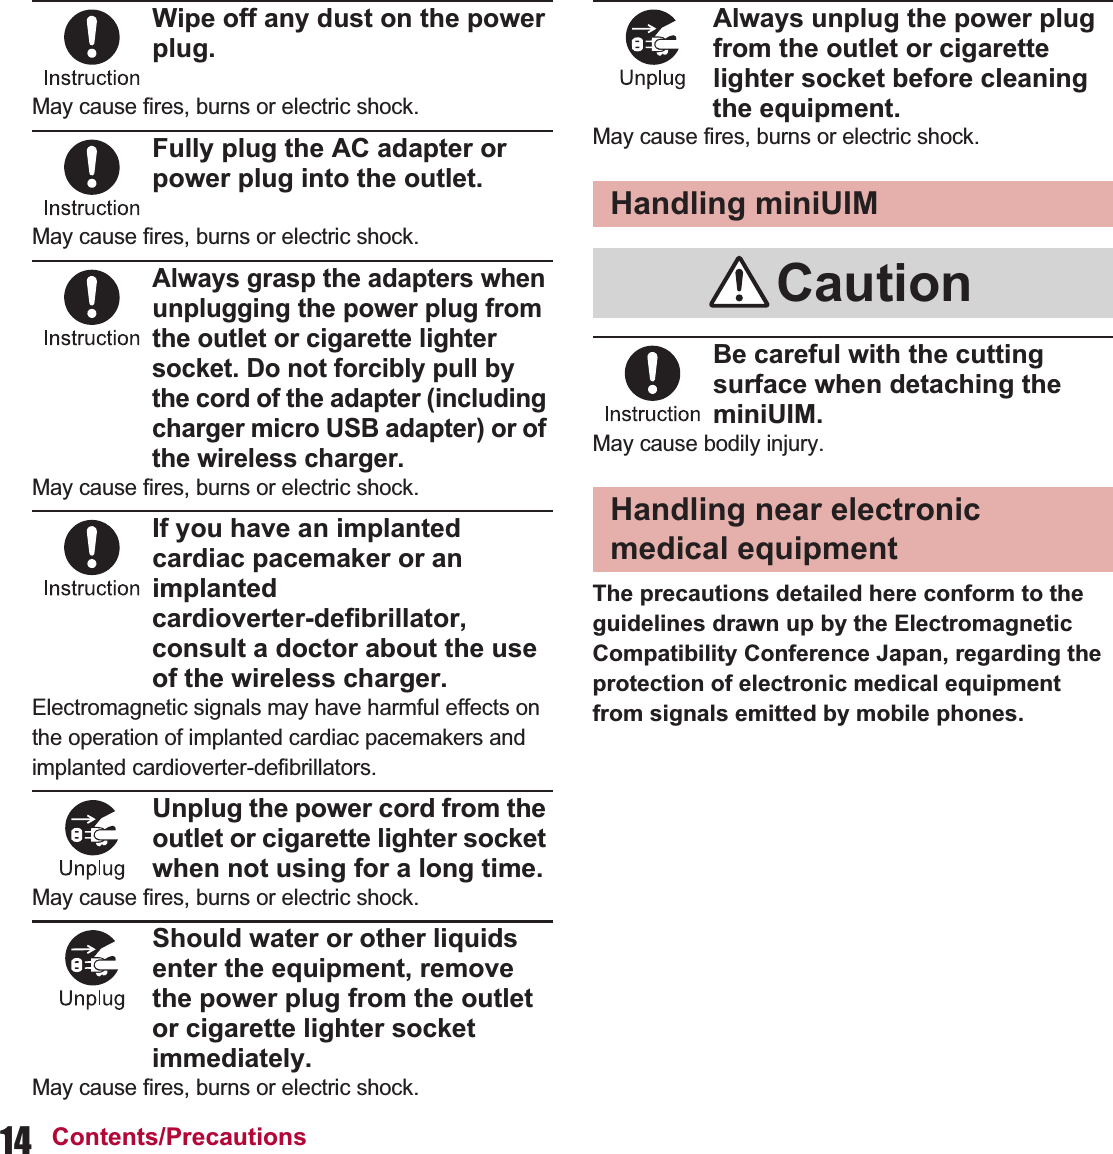
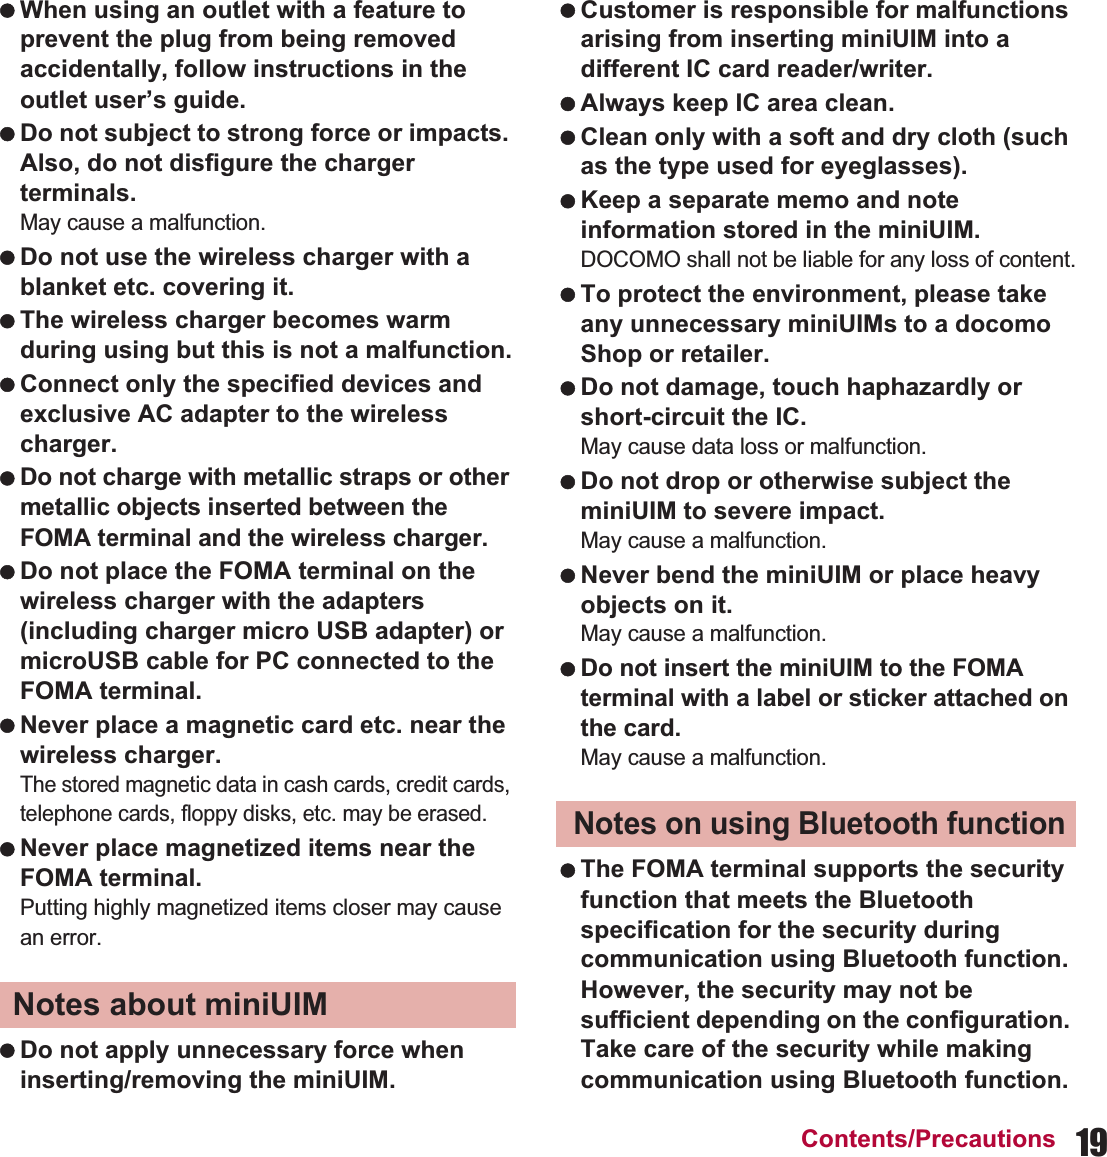
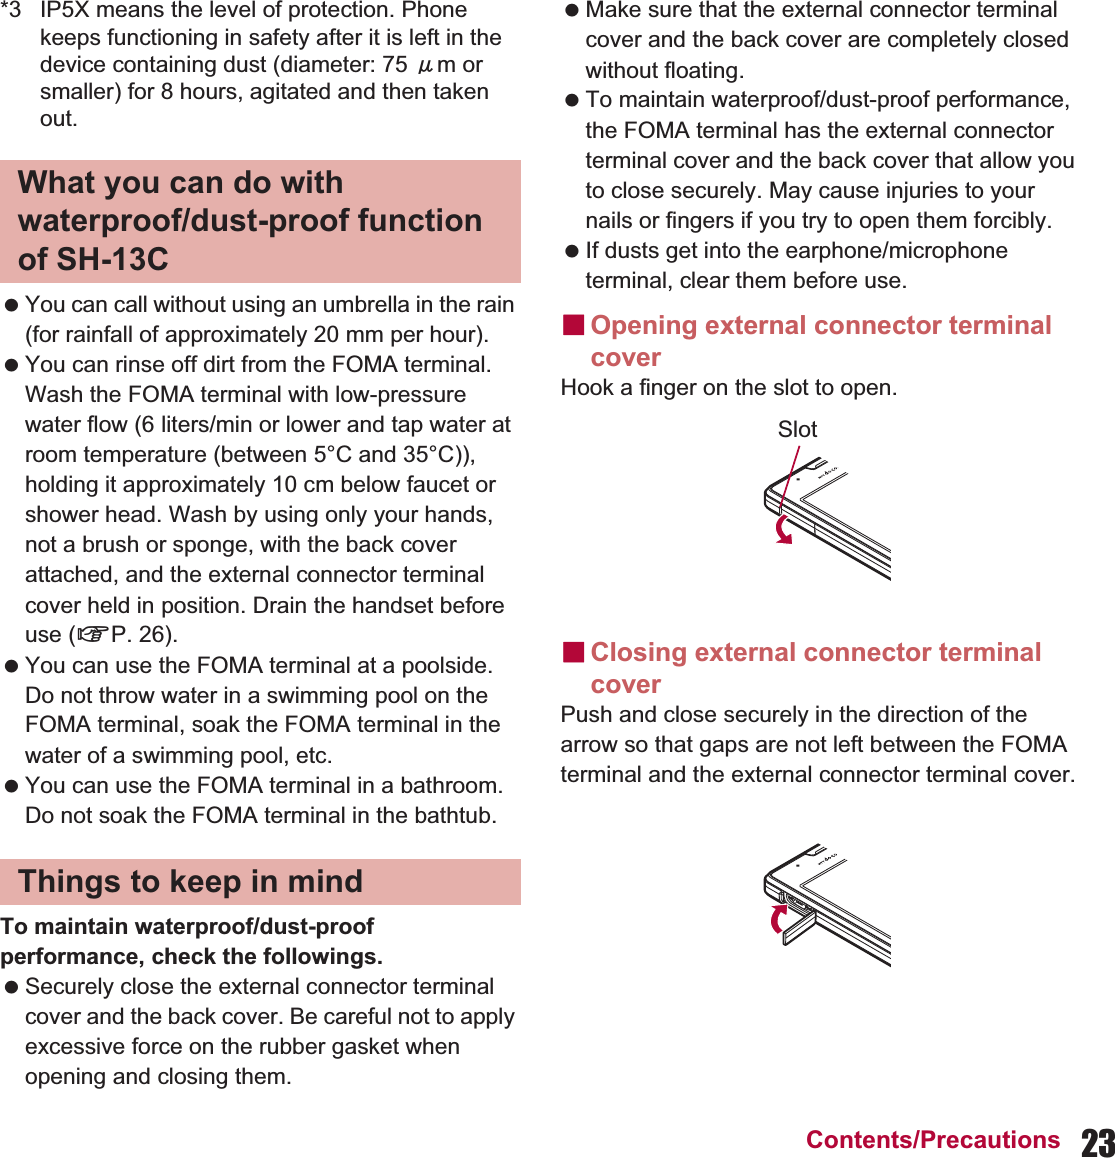
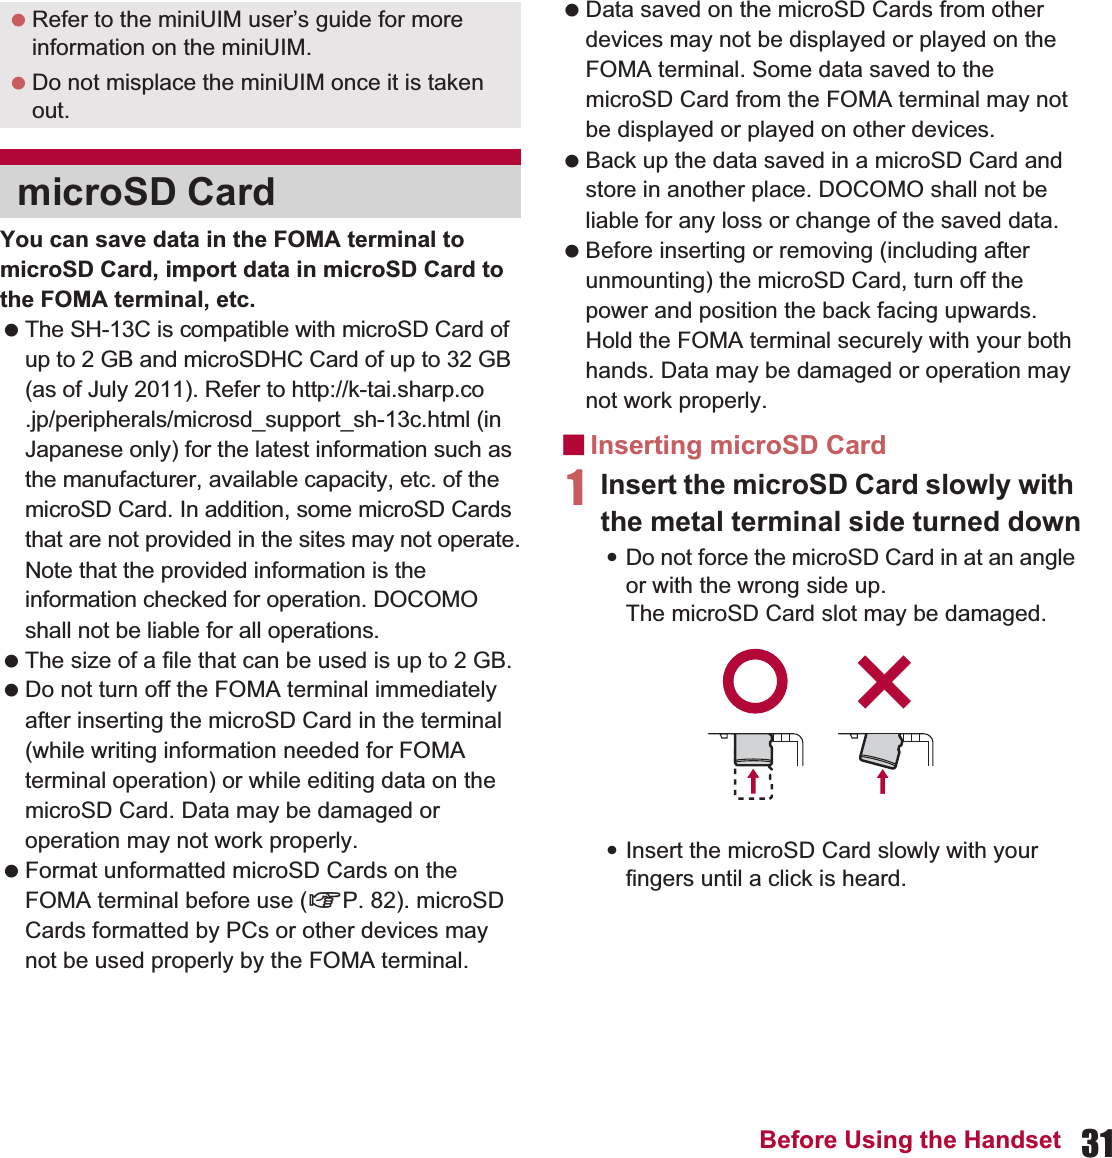
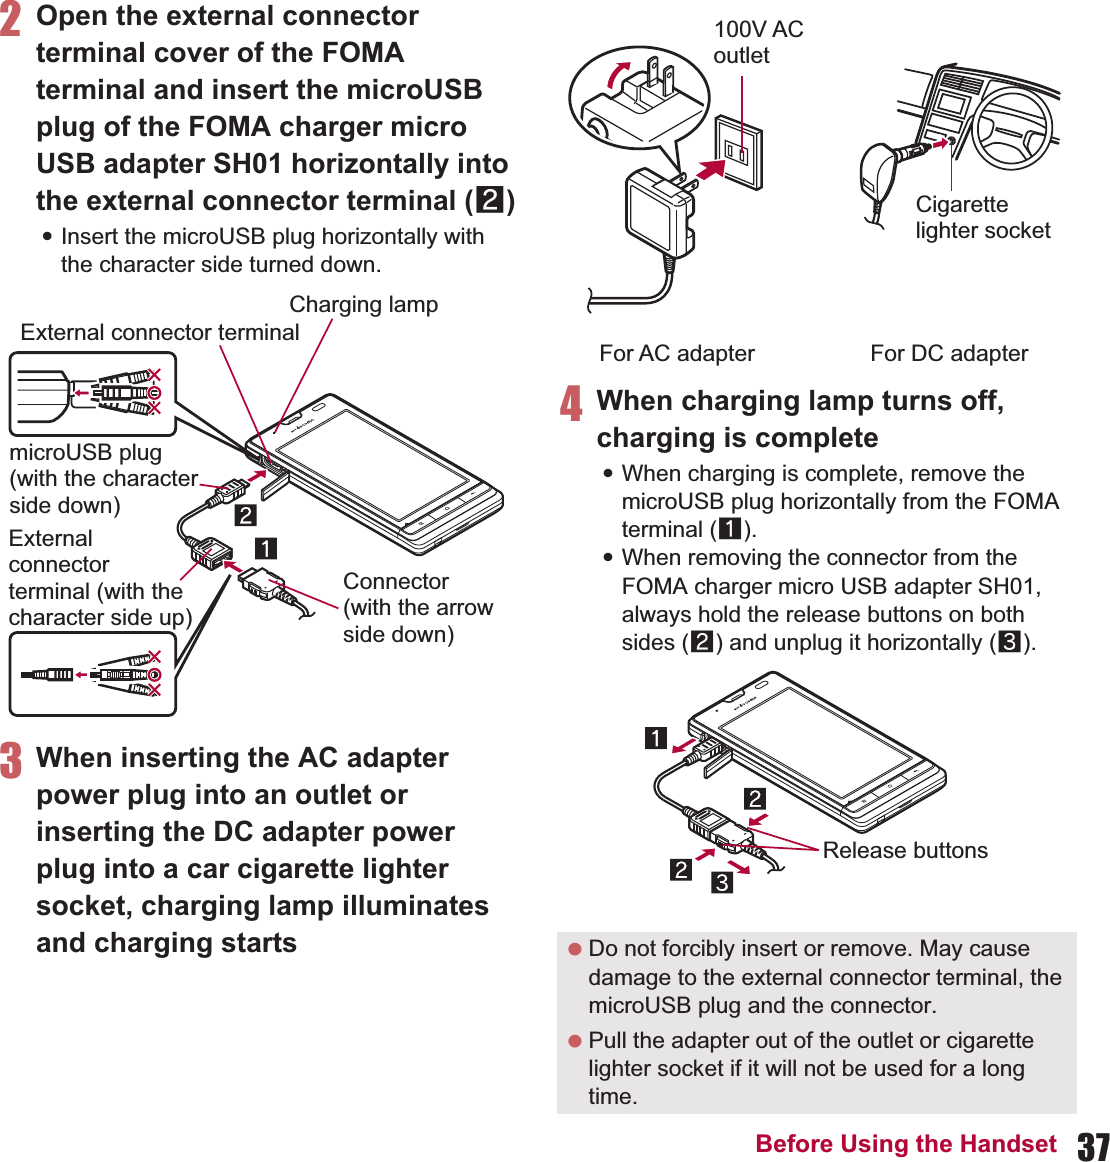
![1ɡBasic packageɡMain optional parts For details on other optional parts nP. 127Basic package and main optional partsSH-13C terminal(includes warranty andBack Cover SH55)microSD Card (2 GB)(sample)(includes user’s guide) microSD Card isinserted to the FOMAterminal by default.Wireless Charger SH01(includes warranty)Battery Pack SH29microUSB cable forPC (sample)(includes user’s guide)Quick Start Guide(in Japanese only) The screens and illustrations in this manual are shown as examples. The actual screens and illustrations may differ. The explanations in this manual are based on default settings. The actual screens may differ depending on settings changed after purchase. Note that “SH-13C” is referred to as “FOMA terminal” in this manual. This manual refers to microSD Card as “microSD Card” or “microSD”. Reproduction of this manual in part or in whole is prohibited. The contents of this manual are subject to change without prior notice.Checking operation method on the FOMA terminalSelect [R]/[Instruction Manual] in the home screen. Main contents described in the manual can be referred (in Japanese only). Also, you can find a description of the function you want to use using table of contents, index and searching. The latest information on the manual is described.FOMA AC Adapter 01/02(includes warranty and user’s guide)FOMA charger microUSB adapter SH01(includes warranty and user’s guide)](https://usermanual.wiki/Sharp/HRO00153/User-Guide-1504731-Page-3.png)
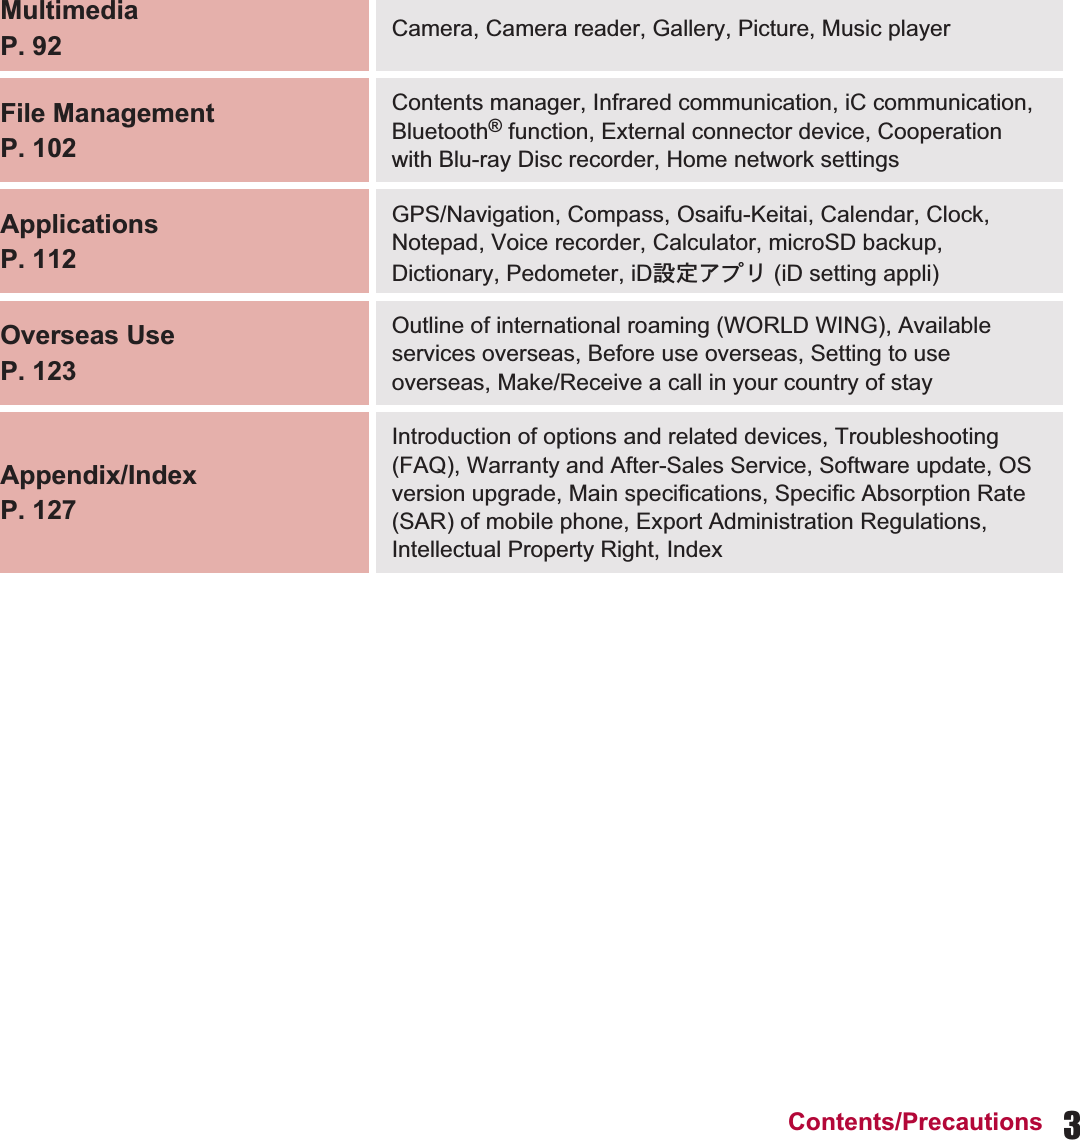
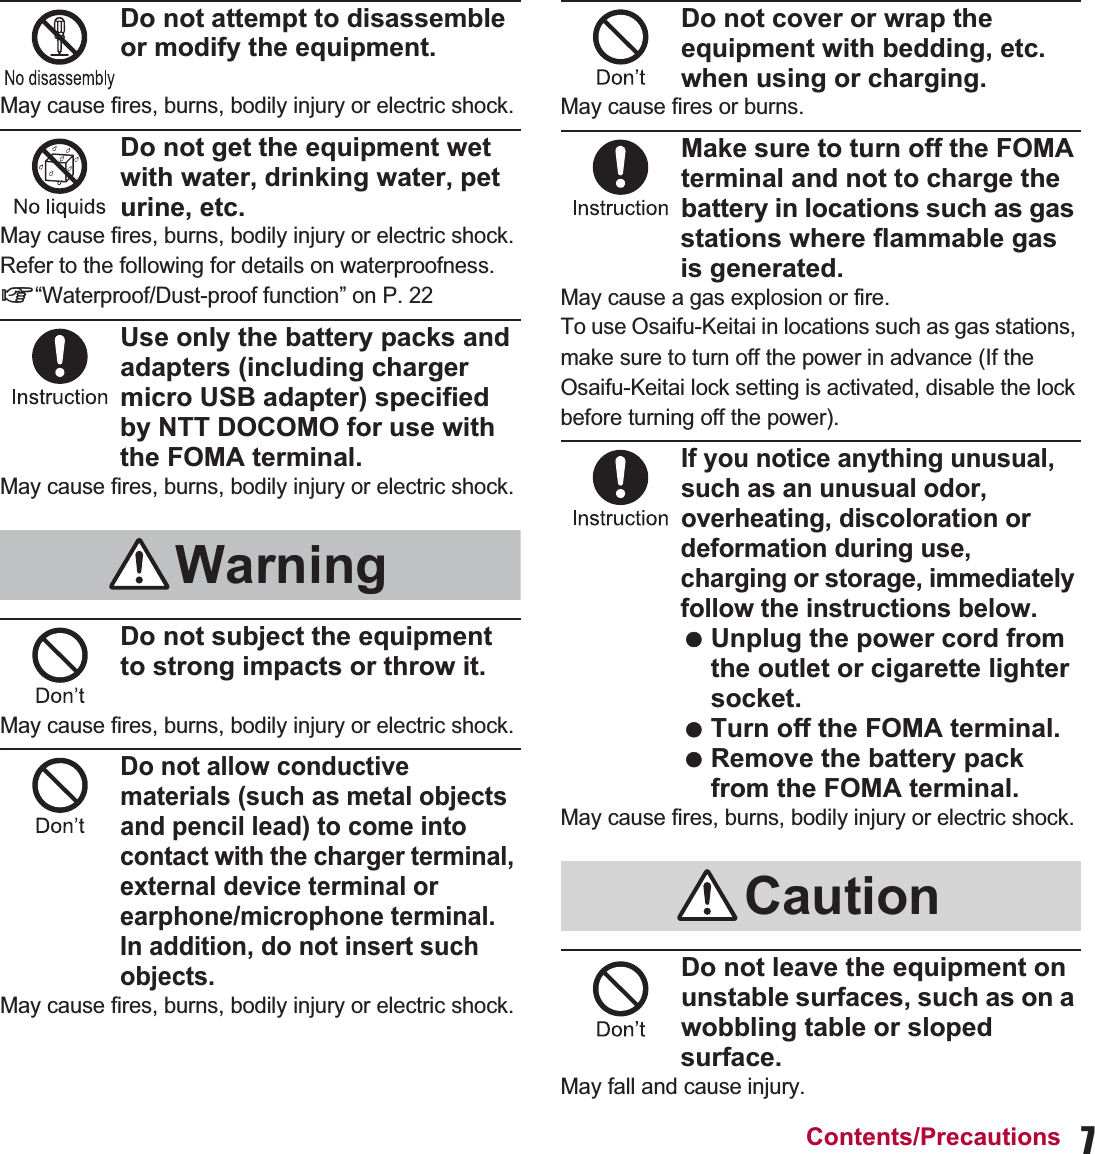
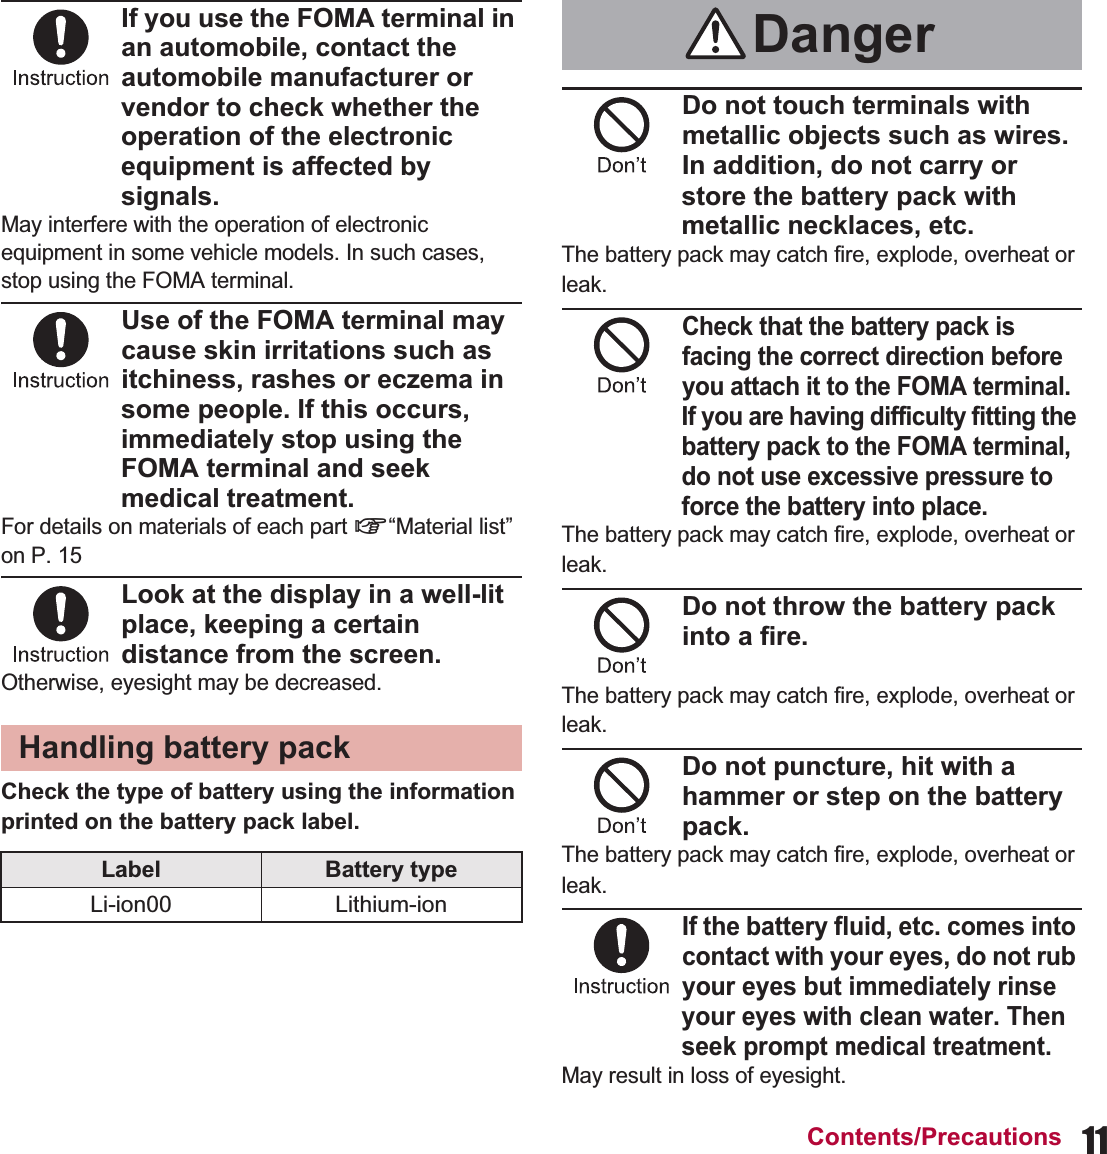
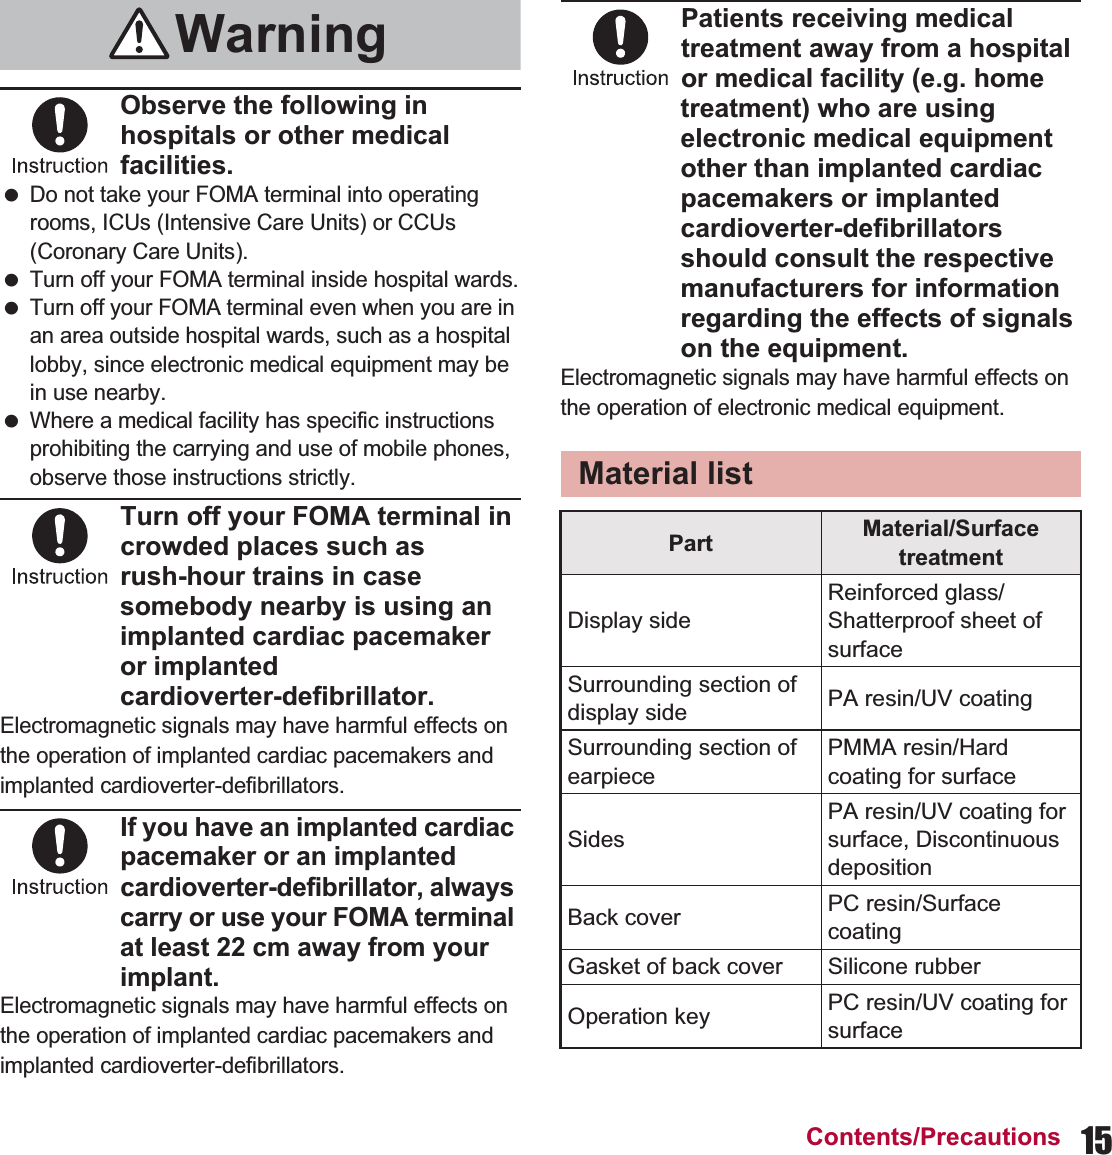

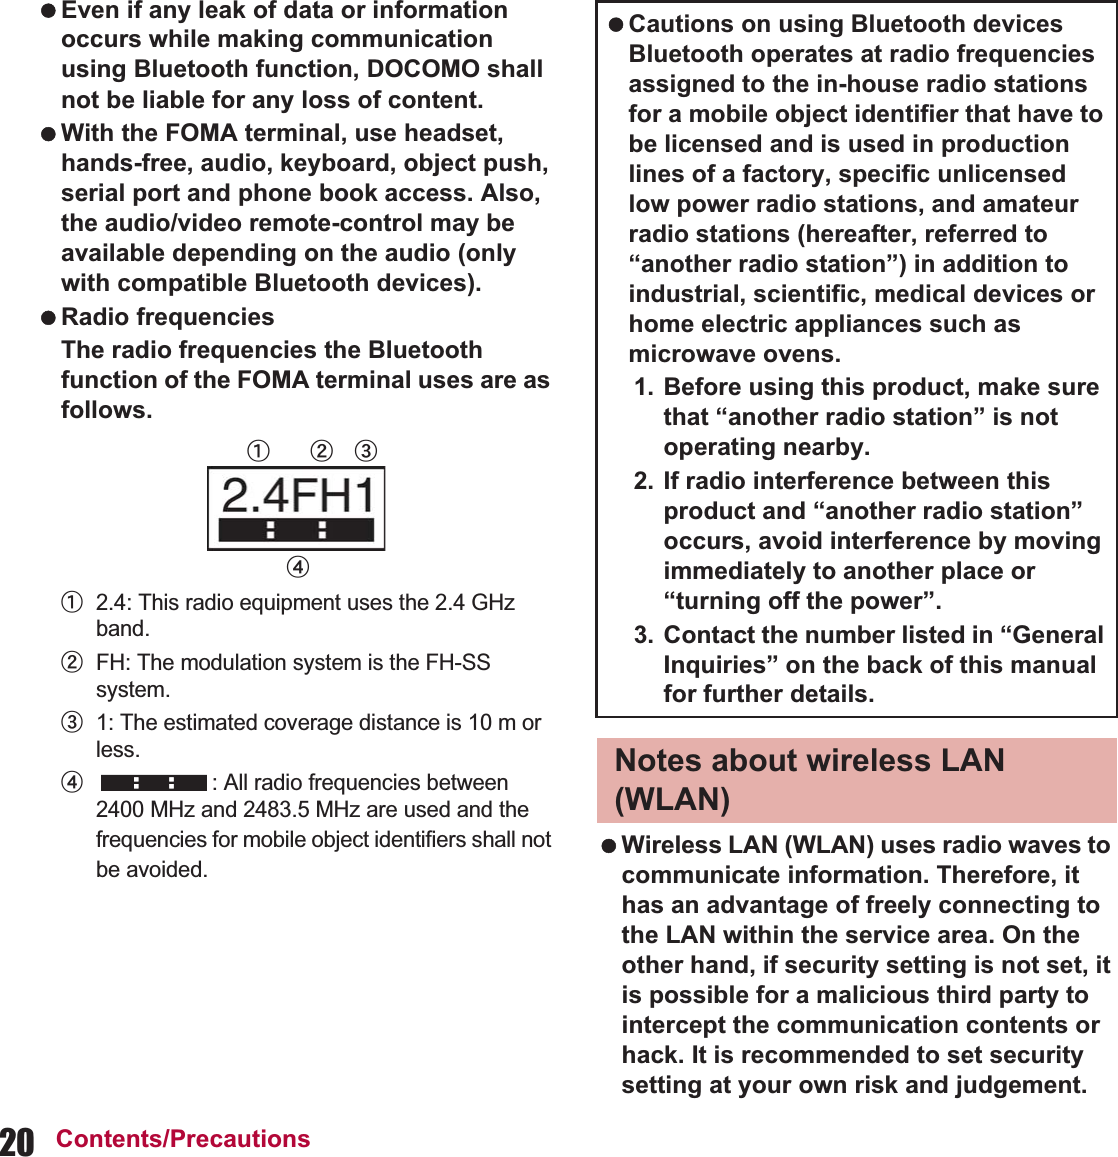
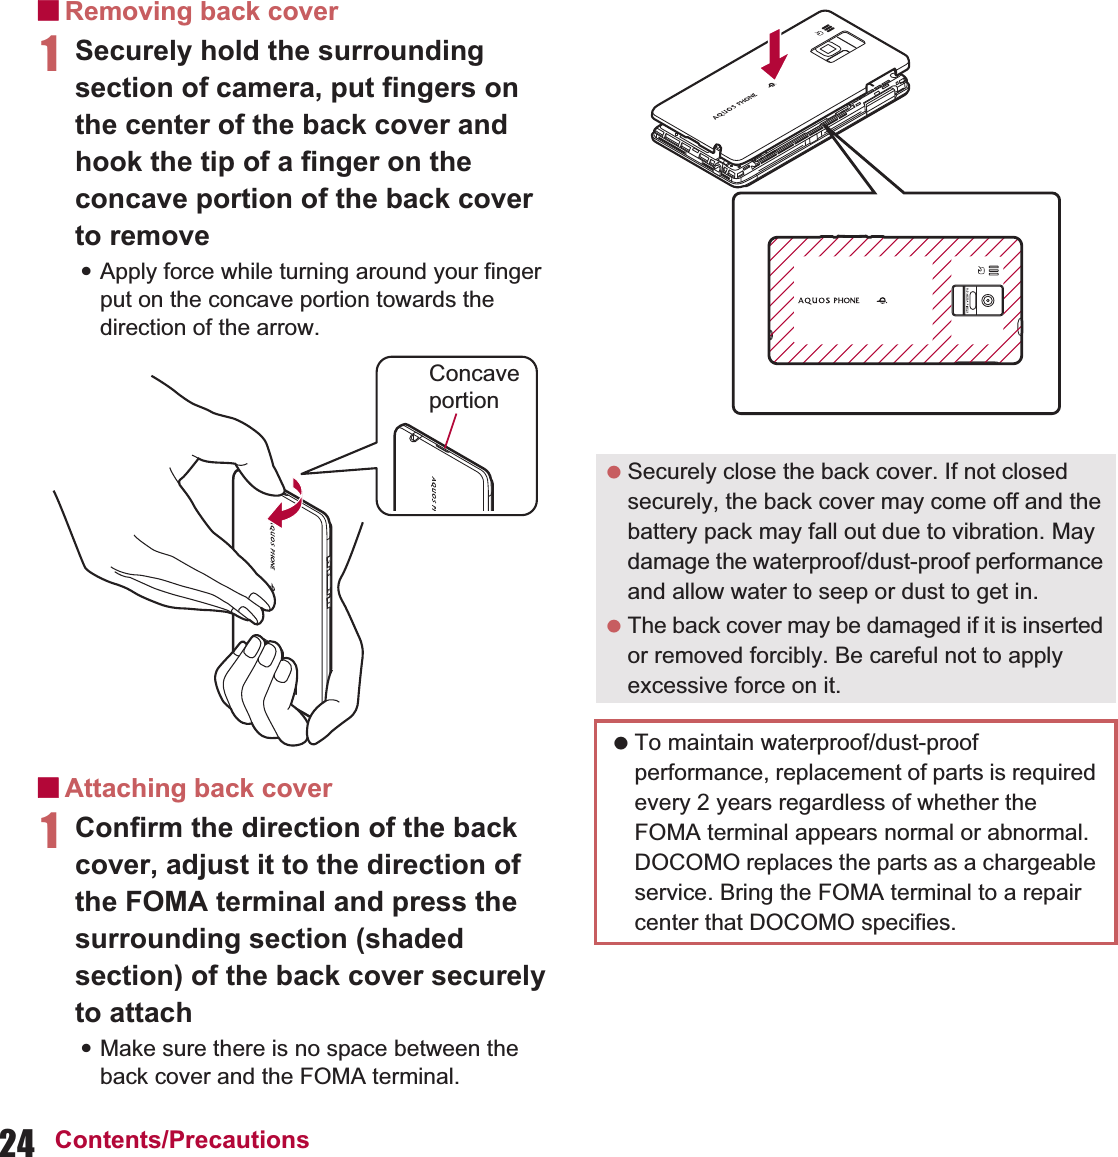
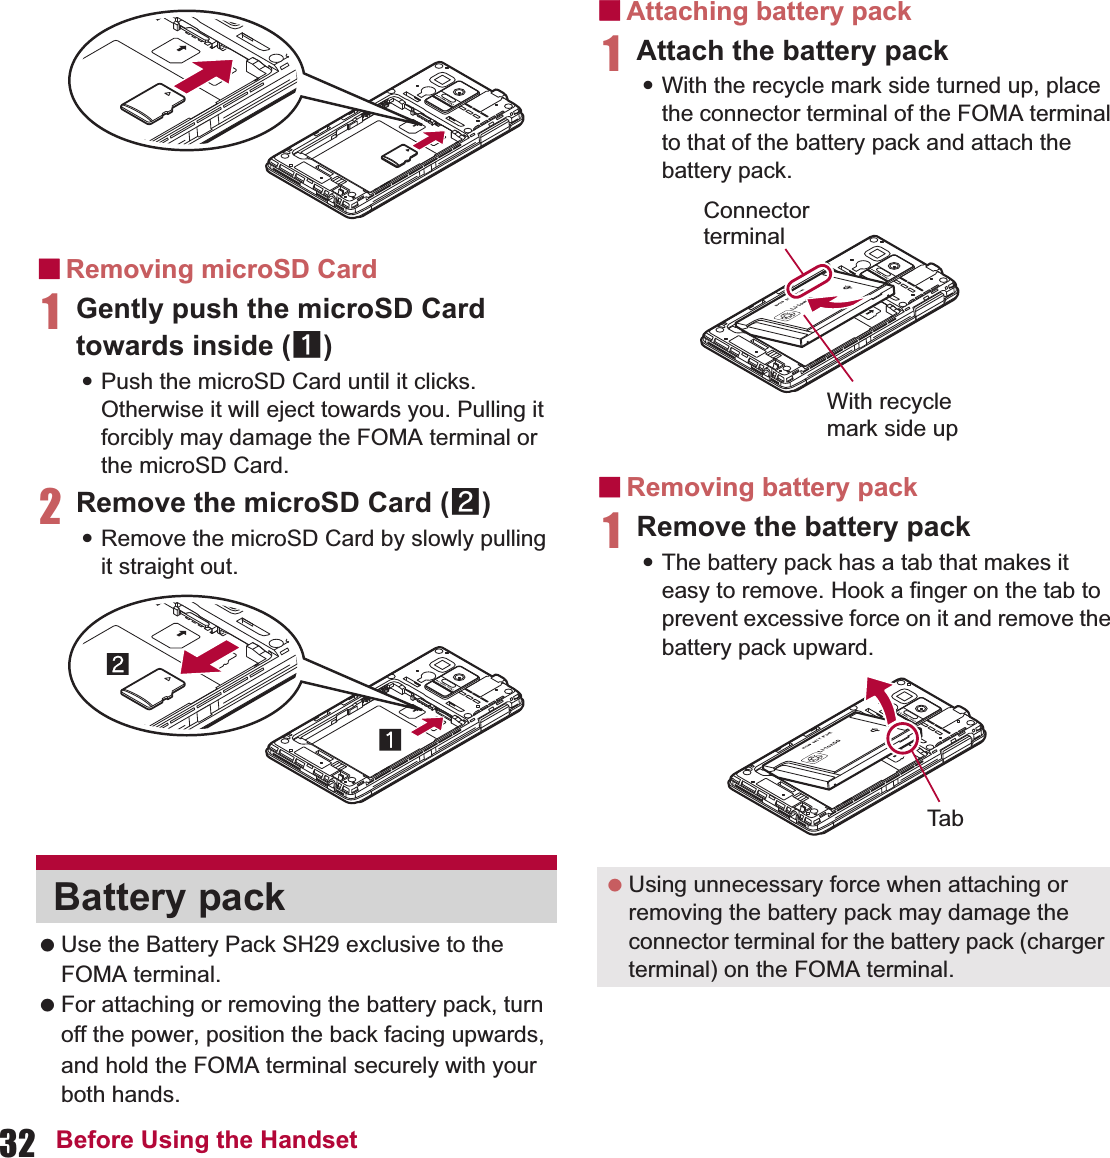
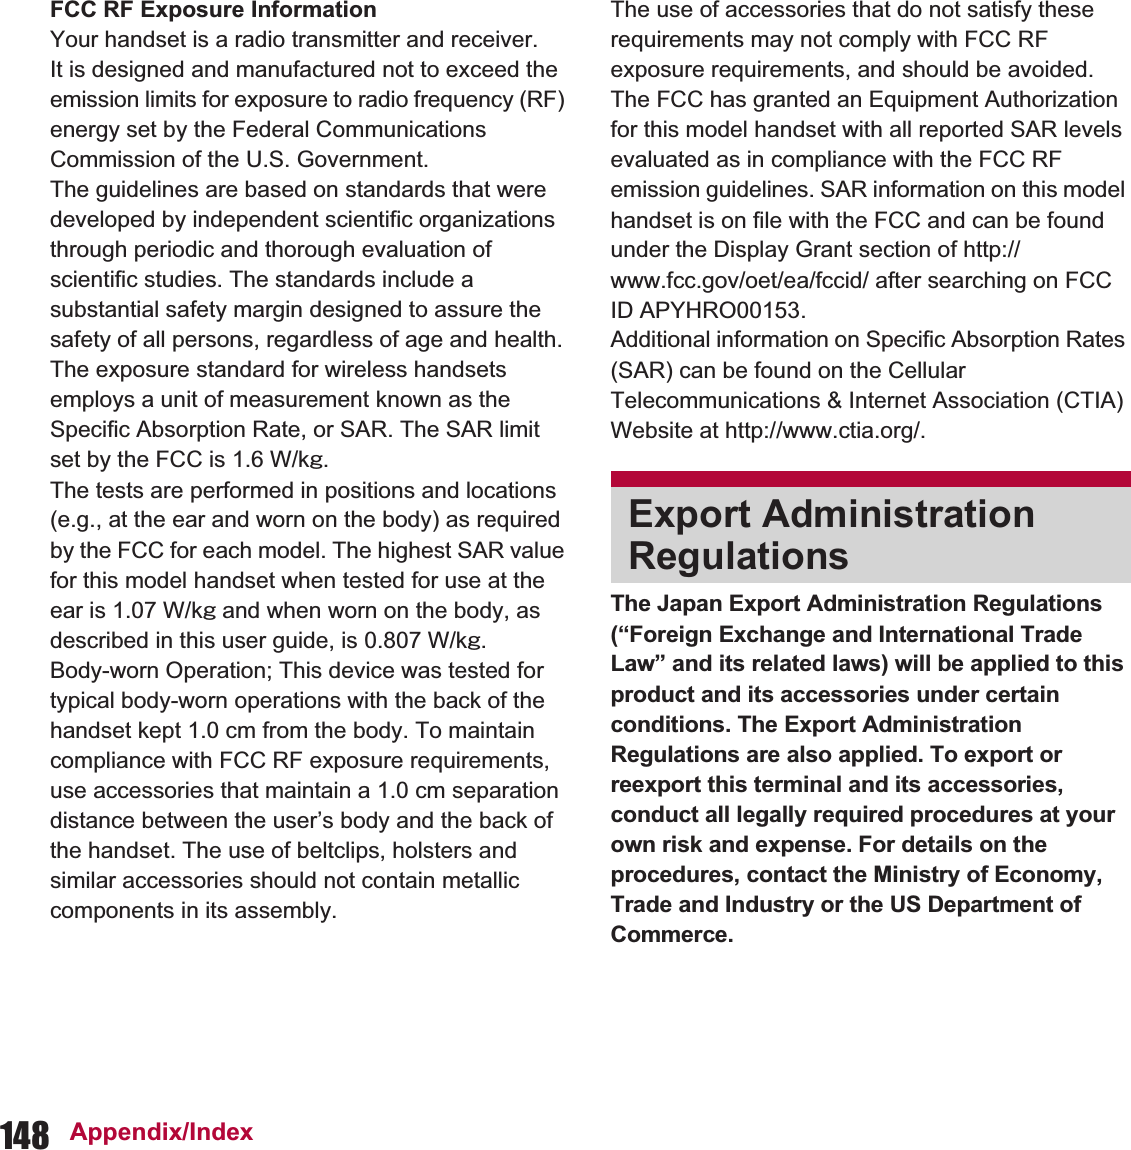
![33Before Using the HandsetThe battery pack is not fully charged at the time of purchase. Be sure to charge the battery before use. It is recommended that the accompanying Wireless Charger SH01 be used for charging to prevent water from seeping or dust from getting in caused by forgetting to close the external connector terminal cover (nP. 35).ɡCautions while charging Do not charge for a long time with the power left on. If the FOMA terminal is left on after charging is complete, the battery pack charge decreases. In that case, the AC or DC adapter (sold separately) or the wireless charger charges the battery again. However, depending on the time when the FOMA terminal is disconnected from the AC or DC adapter or the wireless charger, the battery charge level may be low or the battery may only be usable for a short time. If the FOMA terminal is left for a long time even after the charging is completed, the battery level may decrease. When the battery is empty and terminal is recharging, charging lamp may not illuminate immediately. If the battery empty alert is displayed and the power cannot be turned on, charge the battery for a while. While charging, terminal may not turn on even when charging lamp is illuminated in red. Charge longer and try turning power on again. Frequently recharging the battery when its power is still remaining enough may shorten the life of the battery pack. It is recommended to use the battery to a certain level before recharging.ɡEstimated charge time and lamp displayThe following figures are estimated times for charging an empty battery pack with the FOMA terminal turned off. Charging lamp illuminates in red while charging, and it turns off when charging is completed. If the power of the FOMA terminal is off during the use of the wireless charger, charging lamp flashes red on starting or finishing charging. Check that the battery pack has been properly attached when charging lamp flashes red during the use of the AC or DC adapter. The lamp also flashes red when the battery pack has reached the end of its service life. If the charging information flashes blue (with approximately 0.25 second intervals) during the use of the wireless charger, remove and place the FOMA terminal on it again properly after confirming that there is no foreign object between the wireless charger and the FOMA terminal, remove and insert the power plug into the outlet again, etc. The battery pack can also be charged with the FOMA terminal turned on (While charging, the battery icon appears with [w] superimposed).ChargingFOMA AC Adapter 01/02 Approx. 220 minFOMA DC Adapter 01/02 Approx. 220 min](https://usermanual.wiki/Sharp/HRO00153/User-Guide-1504731-Page-35.png)
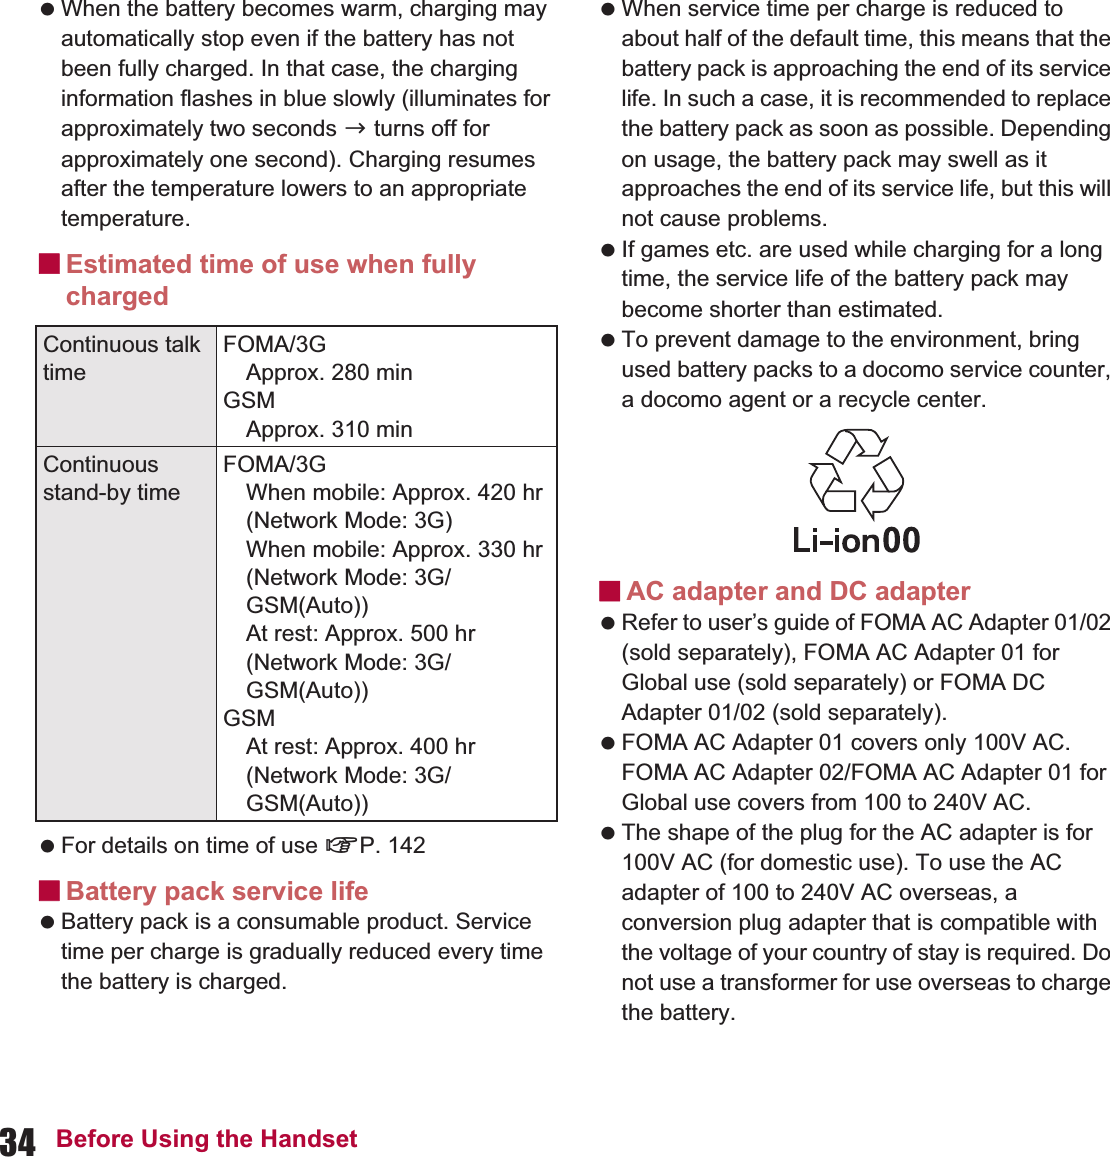
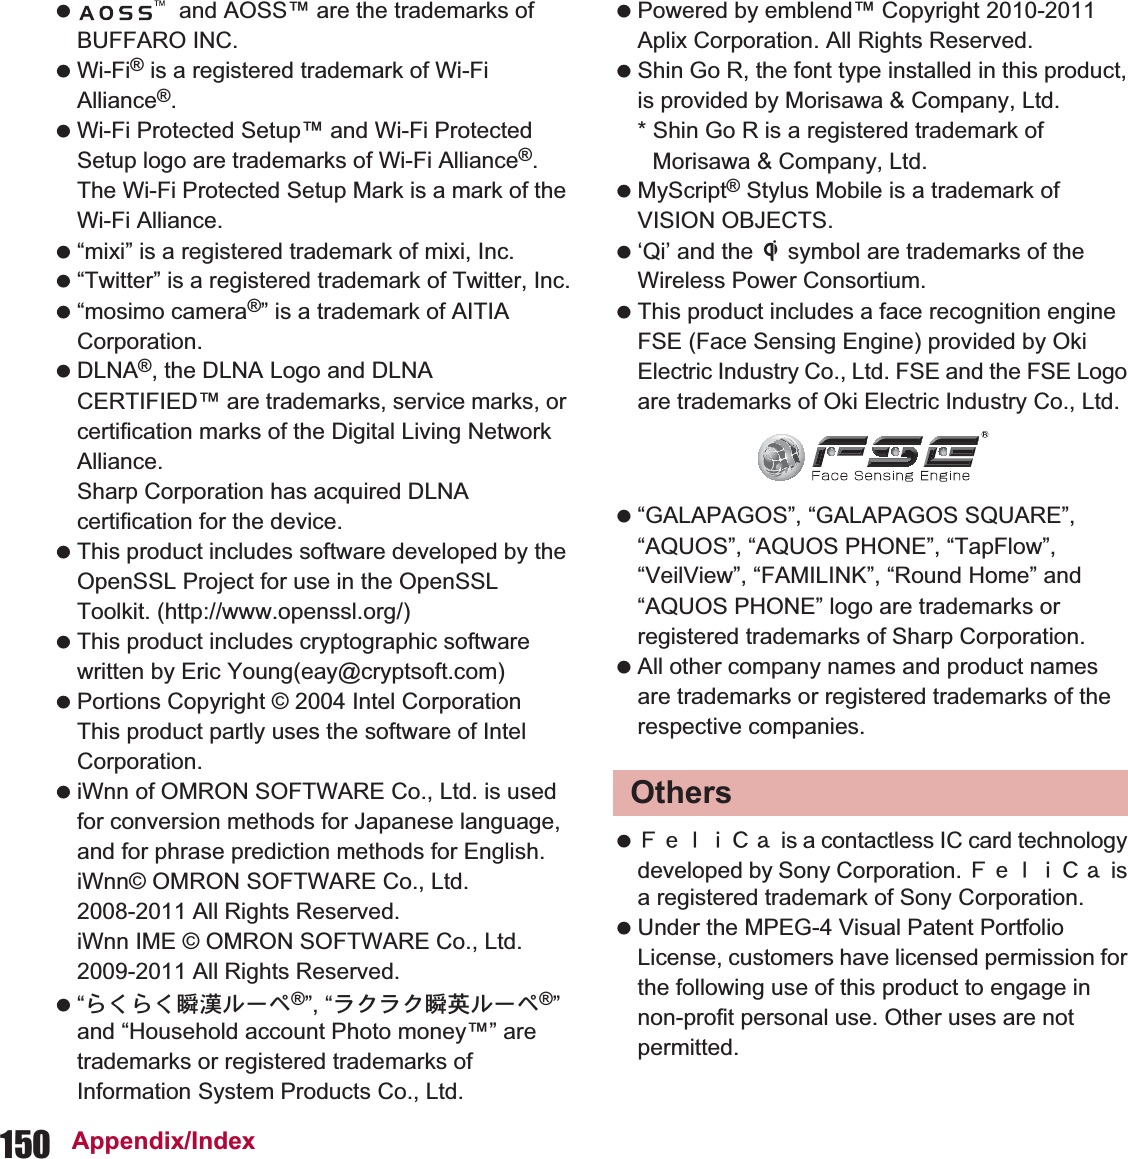
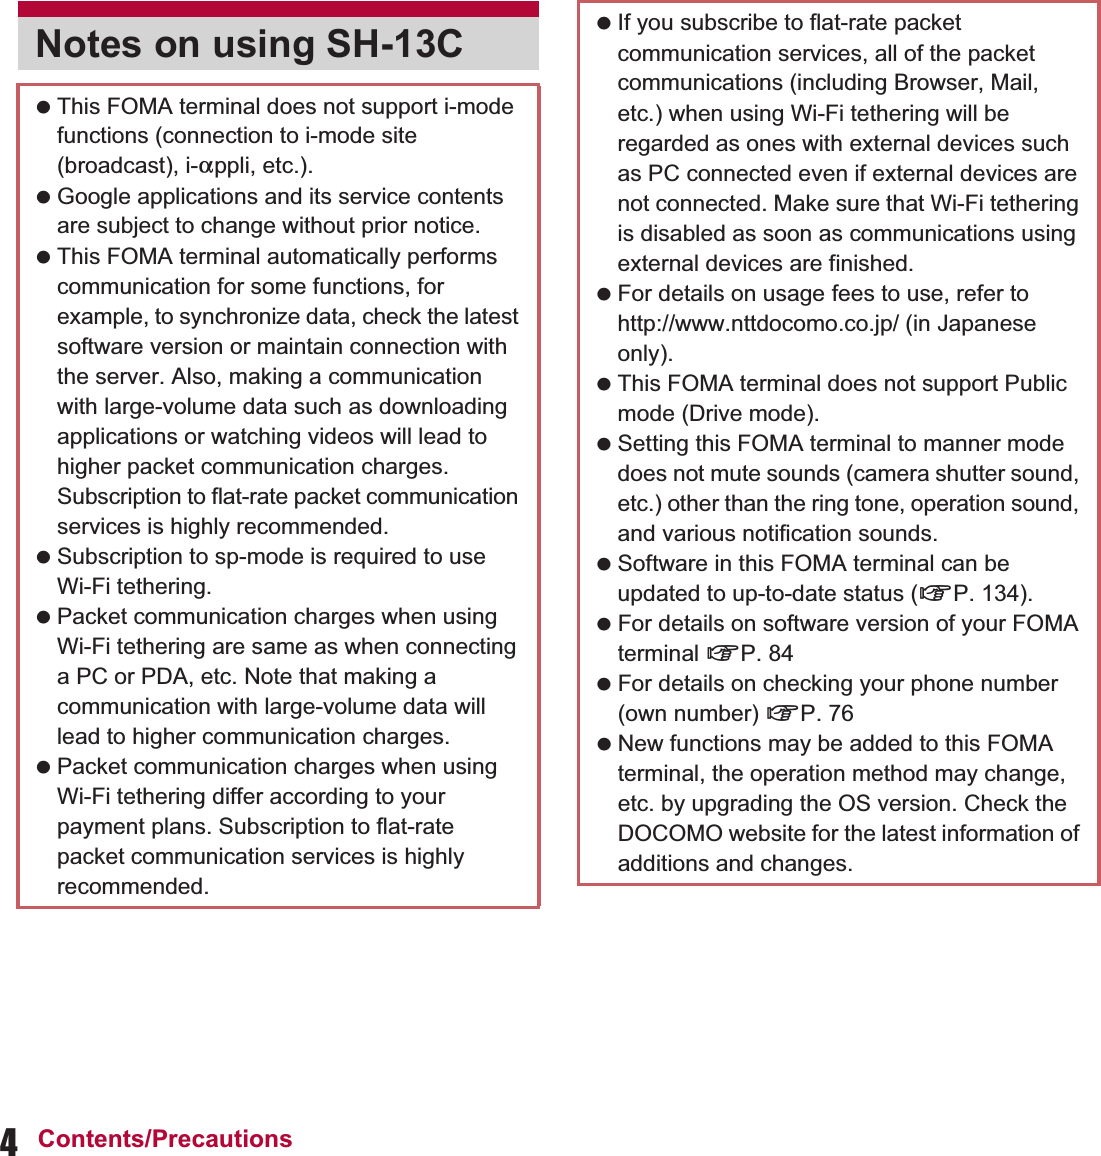
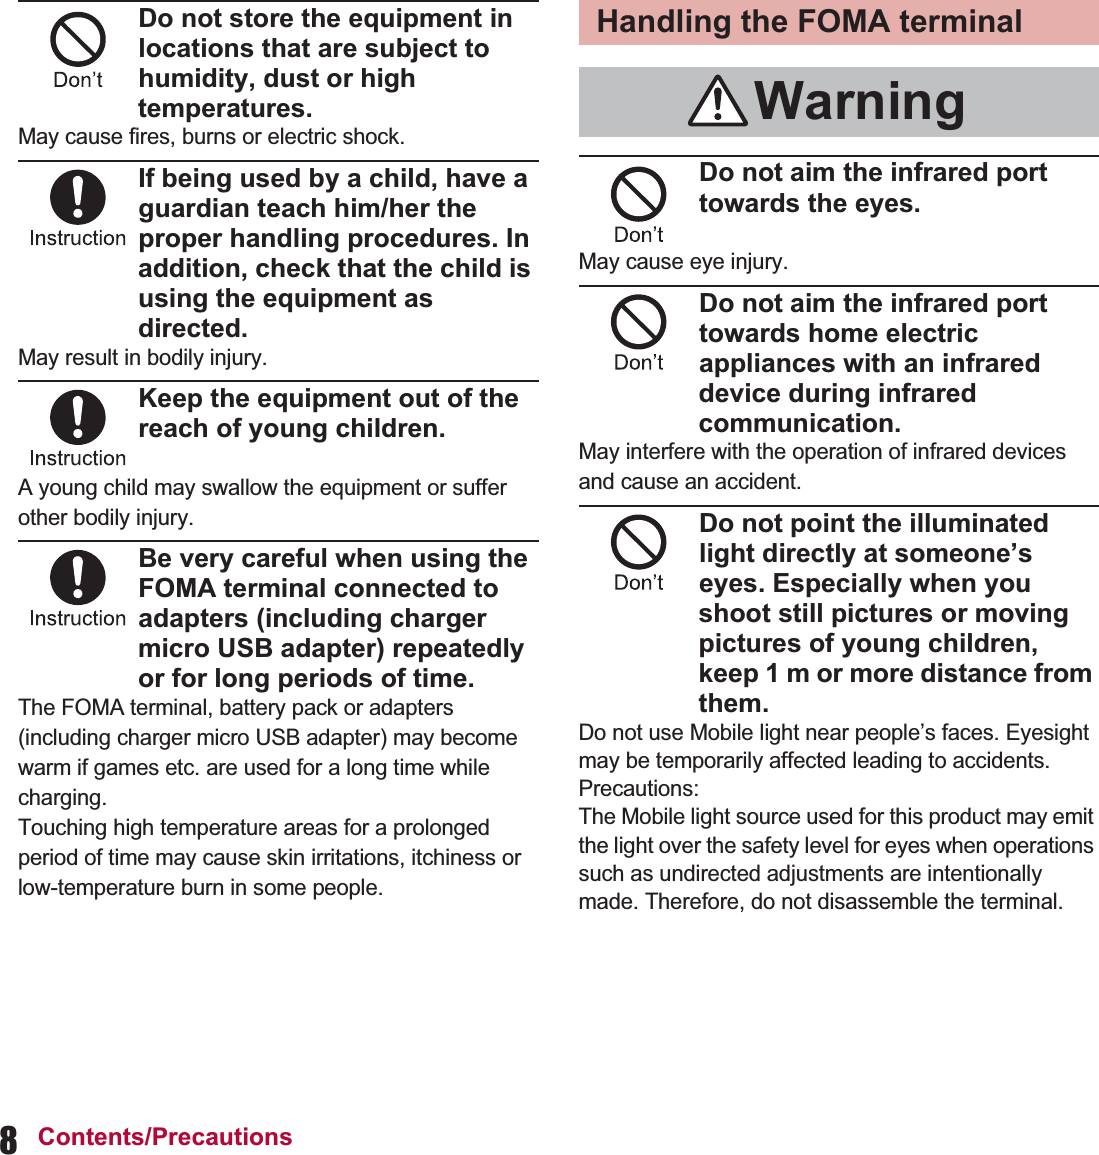
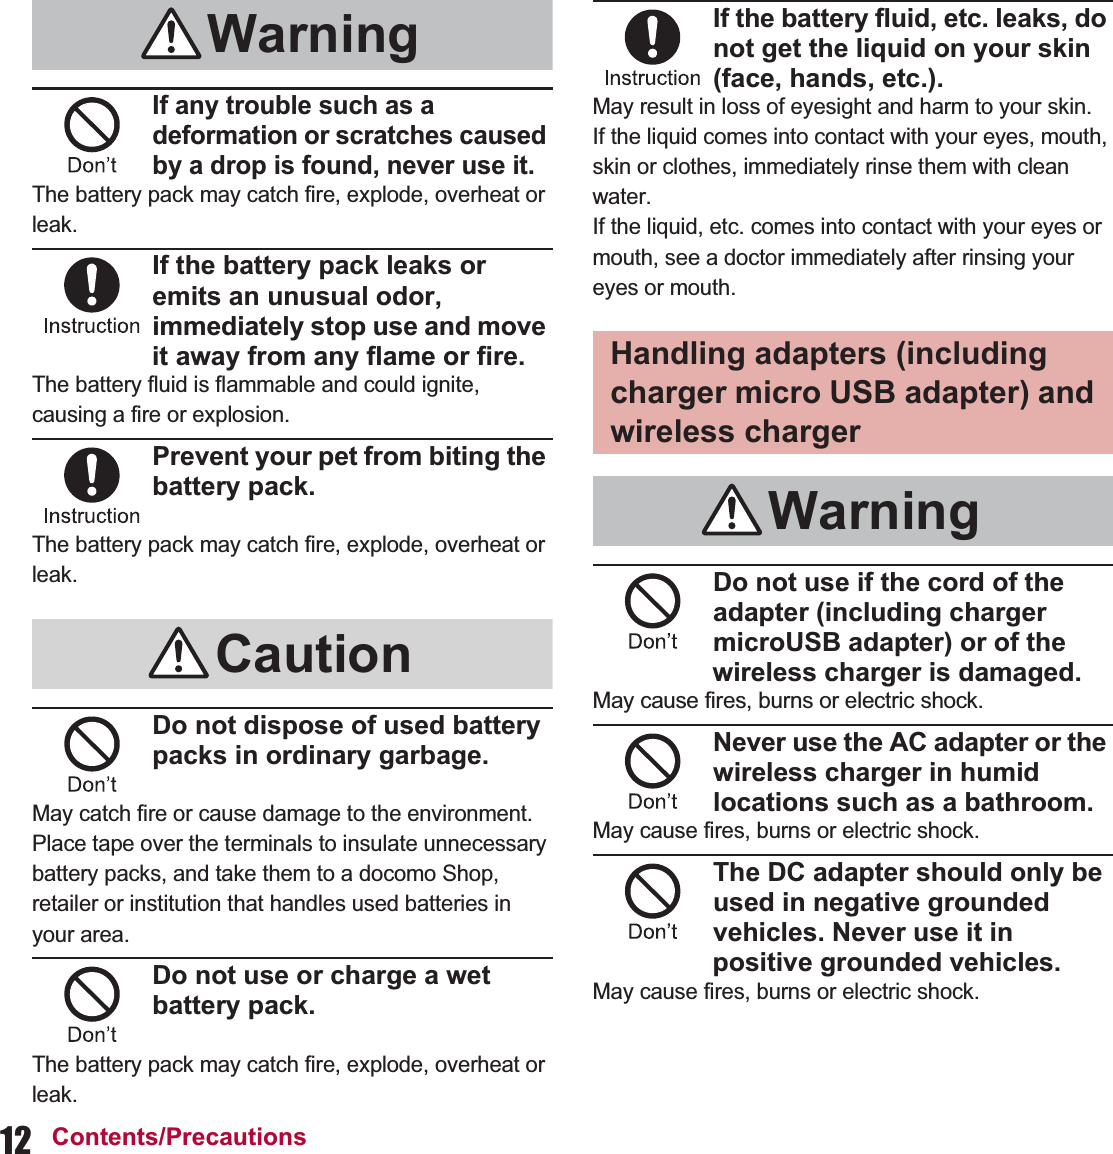
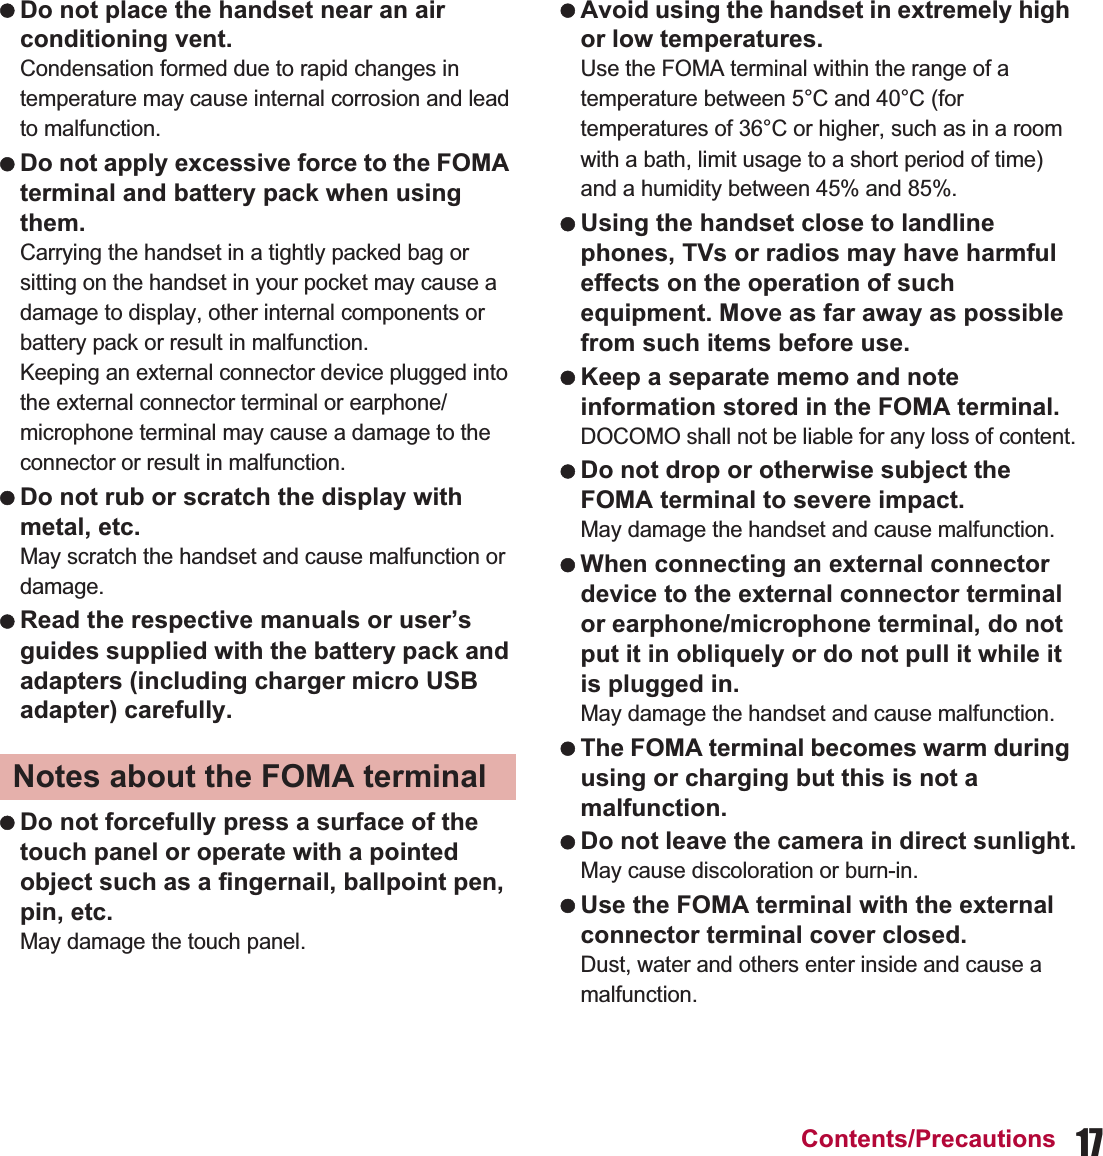
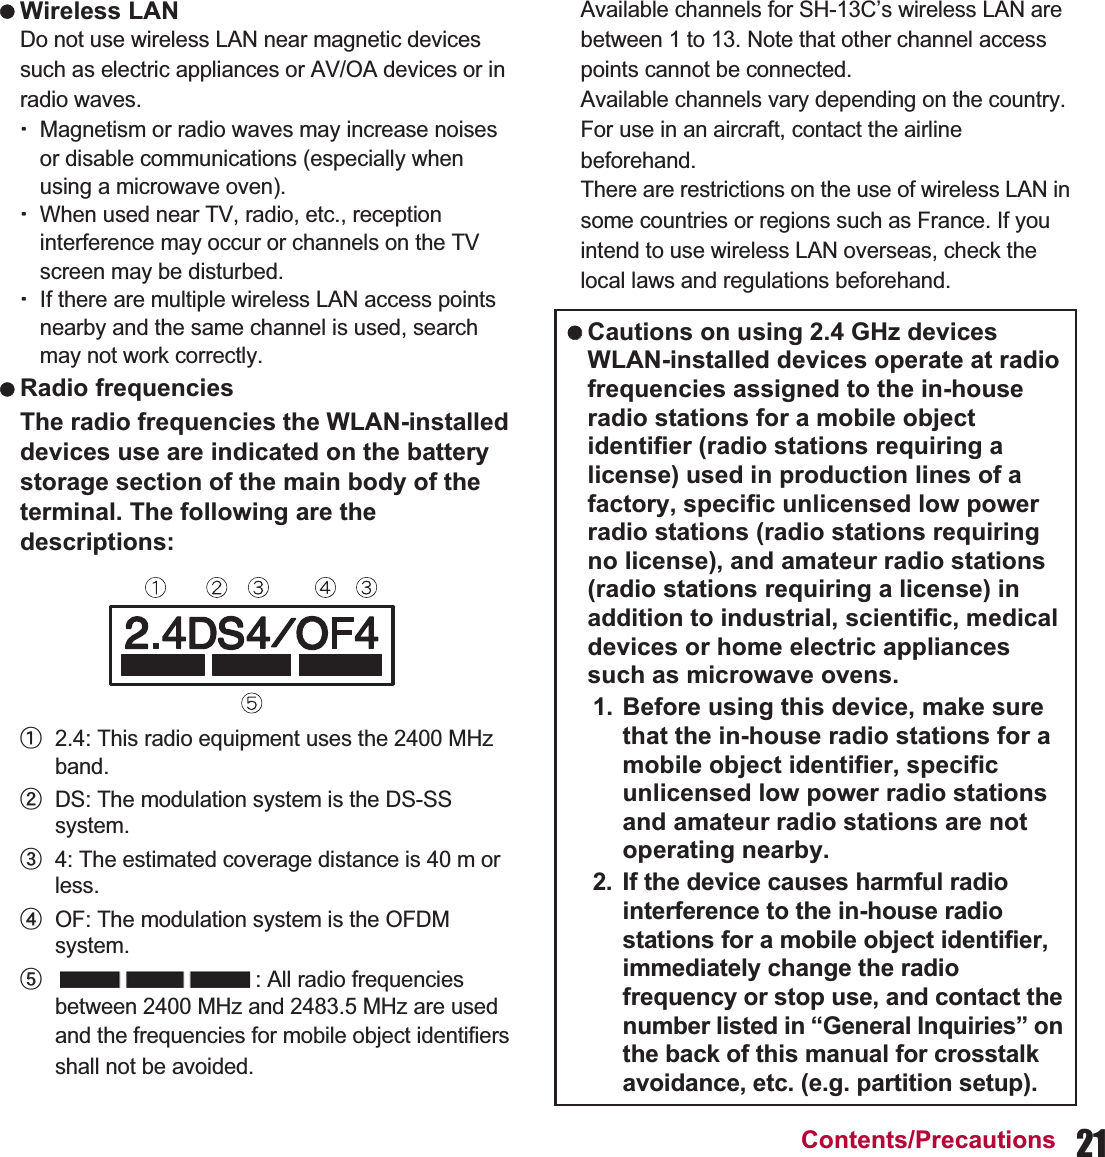
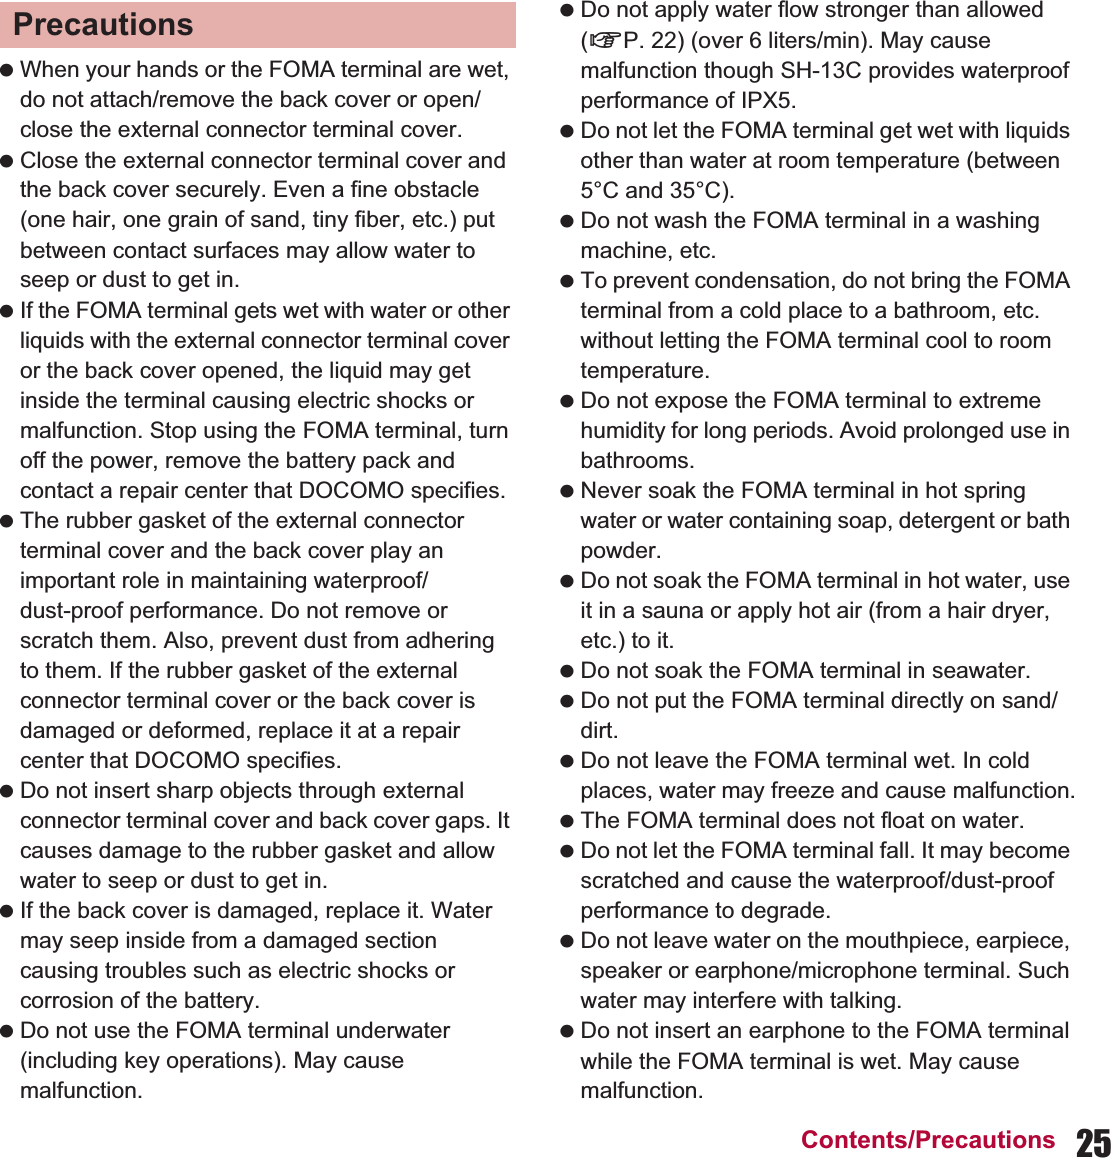
![36 Before Using the HandsetCharging battery packYou can charge the battery pack by placing only the battery pack on the wireless charger. Place the battery pack on the wireless charger with the b mark side turned down.[Read the user’s guides of FOMA AC Adapter 01/02 (sold separately) and FOMA DC Adapter 01/02 (sold separately)]1Insert the AC or DC adapter connector horizontally into the external connector terminal of the FOMA charger micro USB adapter SH01 (1):Check the direction (front or rear) of the connector, keep it parallel with the FOMA charger micro USB adapter SH01 and securely push all the way in until it clicks. Place the wireless charger on a stable and horizontal surface to charge. Pull the exclusive AC adapter out of the outlet if it is not used for a long time. When the power plug is inserted into an outlet or the FOMA terminal/battery pack is placed on the wireless charger or removed, there may be some cases in which sounds are emitted from the wireless charger. This is not a malfunction. Multiple FOMA terminals/battery packs cannot be charged at the same time. If charging does not start, remove and place the FOMA terminal/battery pack on the center of the charging area again, and then press the charging assist button. If the FOMA terminal is equipped with a cover etc., it may not be charged depending on material, thickness, etc. of the cover etc. Remove the FOMA terminal out of the cover etc. to securely charge it.Charginginformation When noises interfere on a TV, radio set, etc. during its use, use the wireless charger after distancing it as far away from a TV, radio set, etc. as possible. If electronic devices are used near the wireless charger, the FOMA terminal may not be charged. When you use electronic devices, keep them at least 30 cm away from the wireless charger to use them. Do not move the wireless charger and the FOMA terminal/battery pack while charging. Do not let the vibrator activated while charging the FOMA terminal. It may move or fall due to vibrations. If you charge the FOMA terminal with a commercially available product with b mark, the handset may not receive calls during charging. Charge with the accompanying Wireless Charger SH01.Charging with AC adapter/DC adapter](https://usermanual.wiki/Sharp/HRO00153/User-Guide-1504731-Page-38.png)
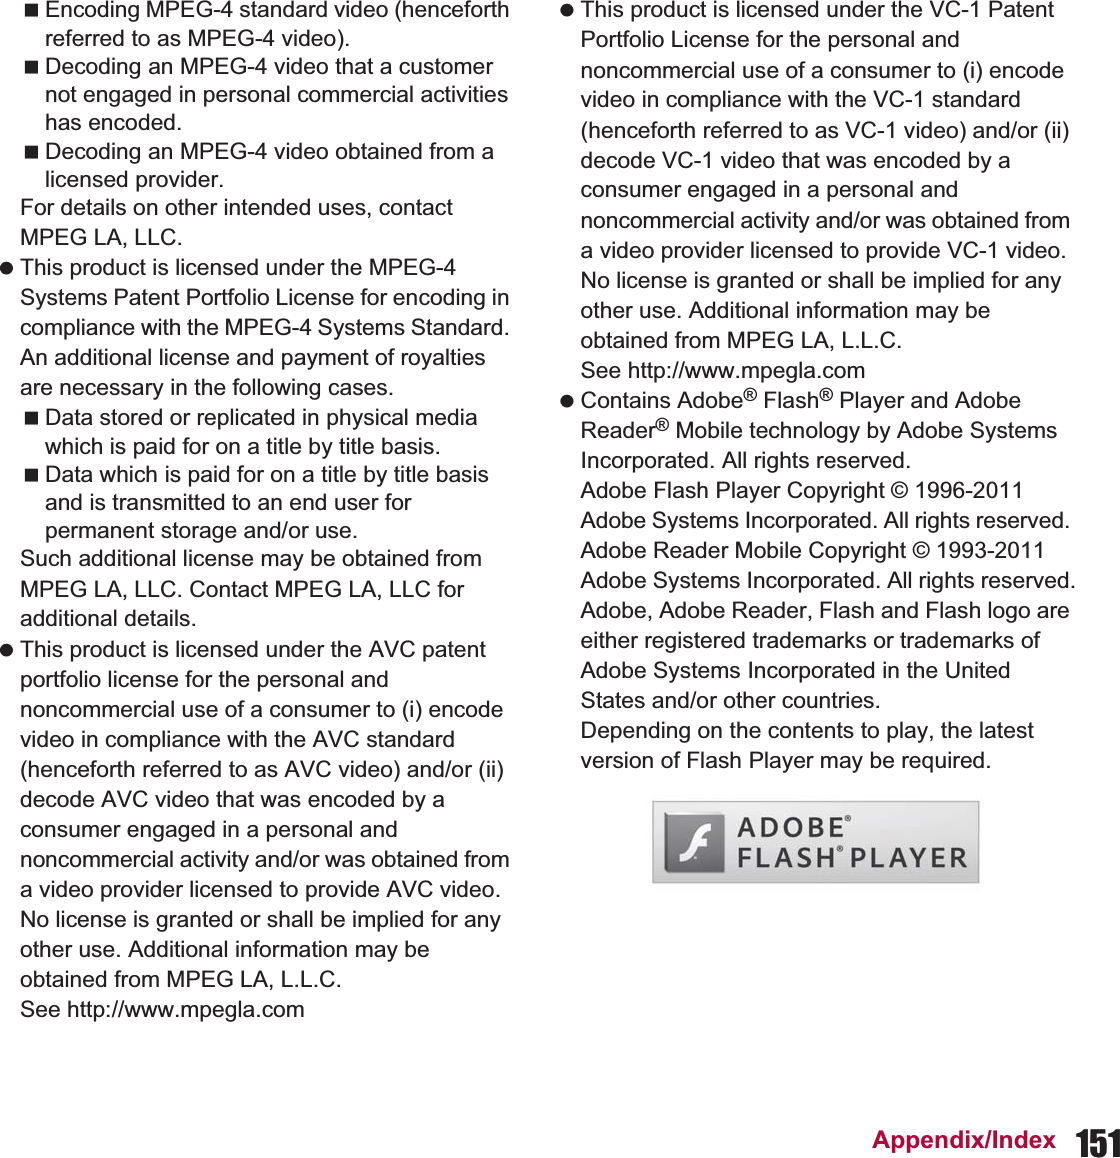
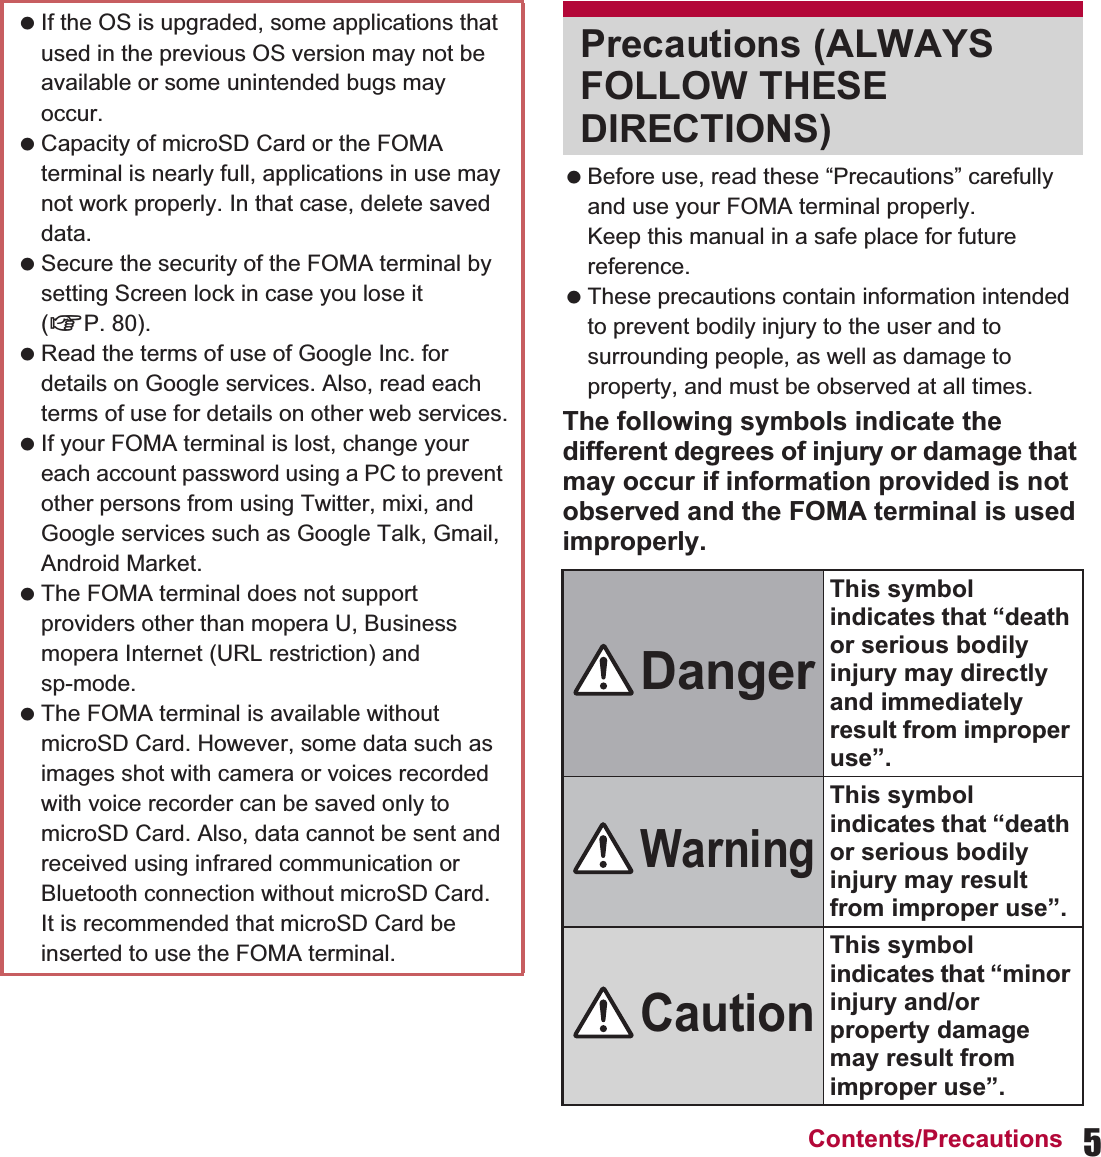
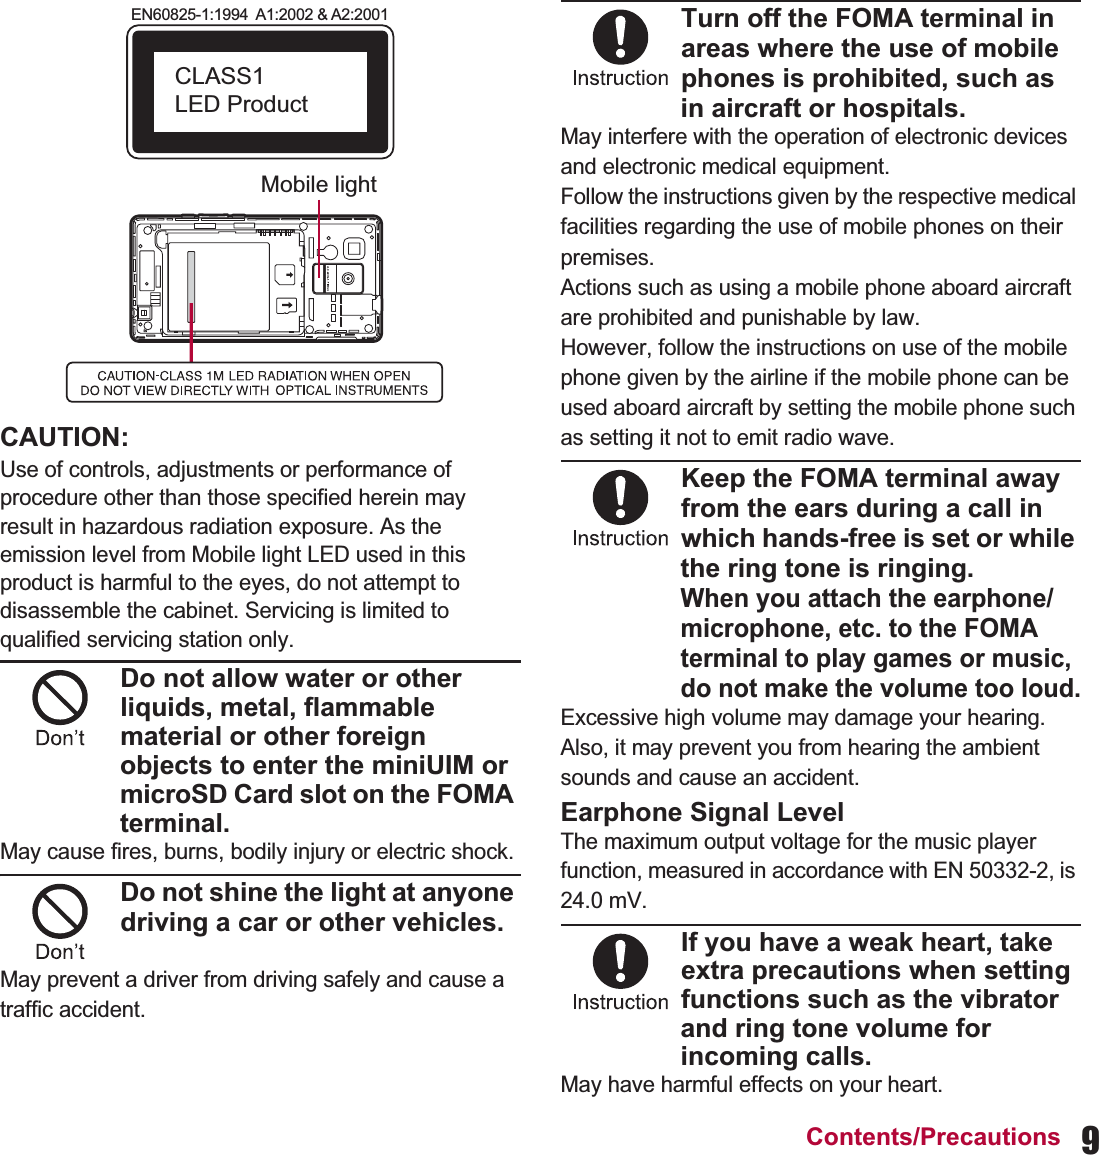
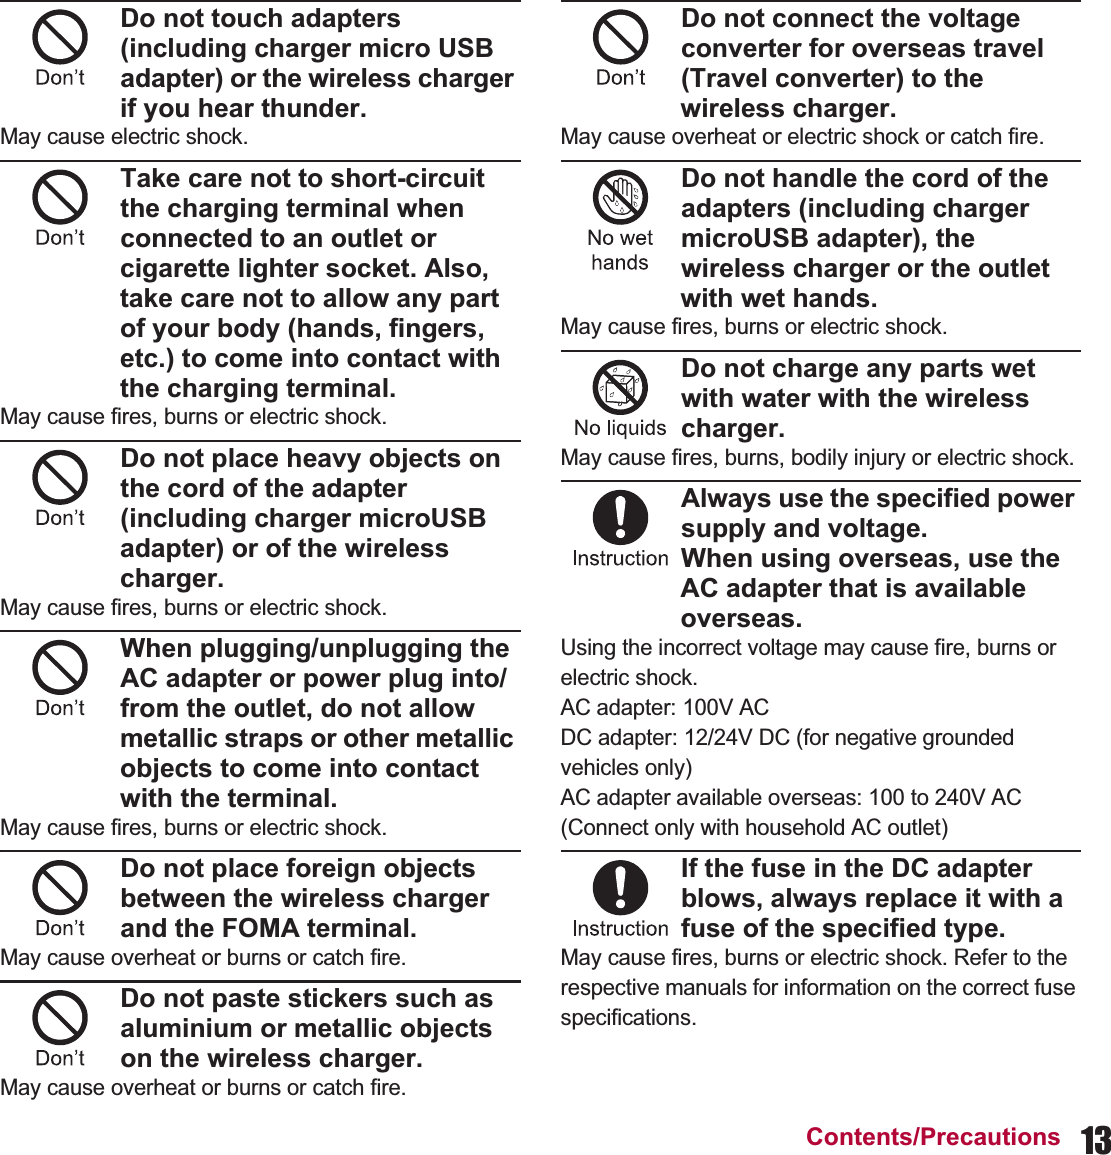
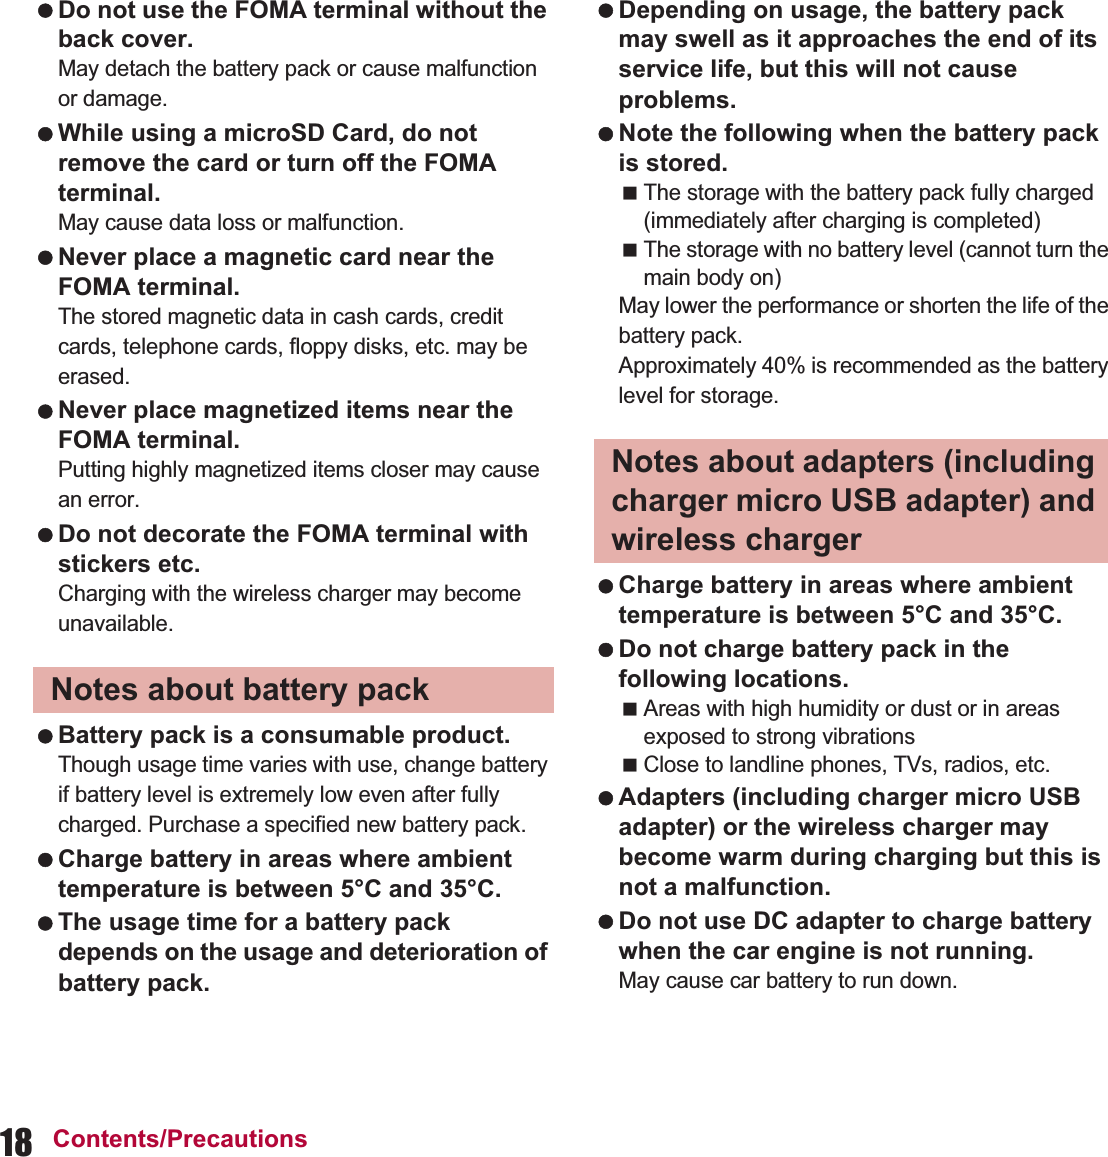
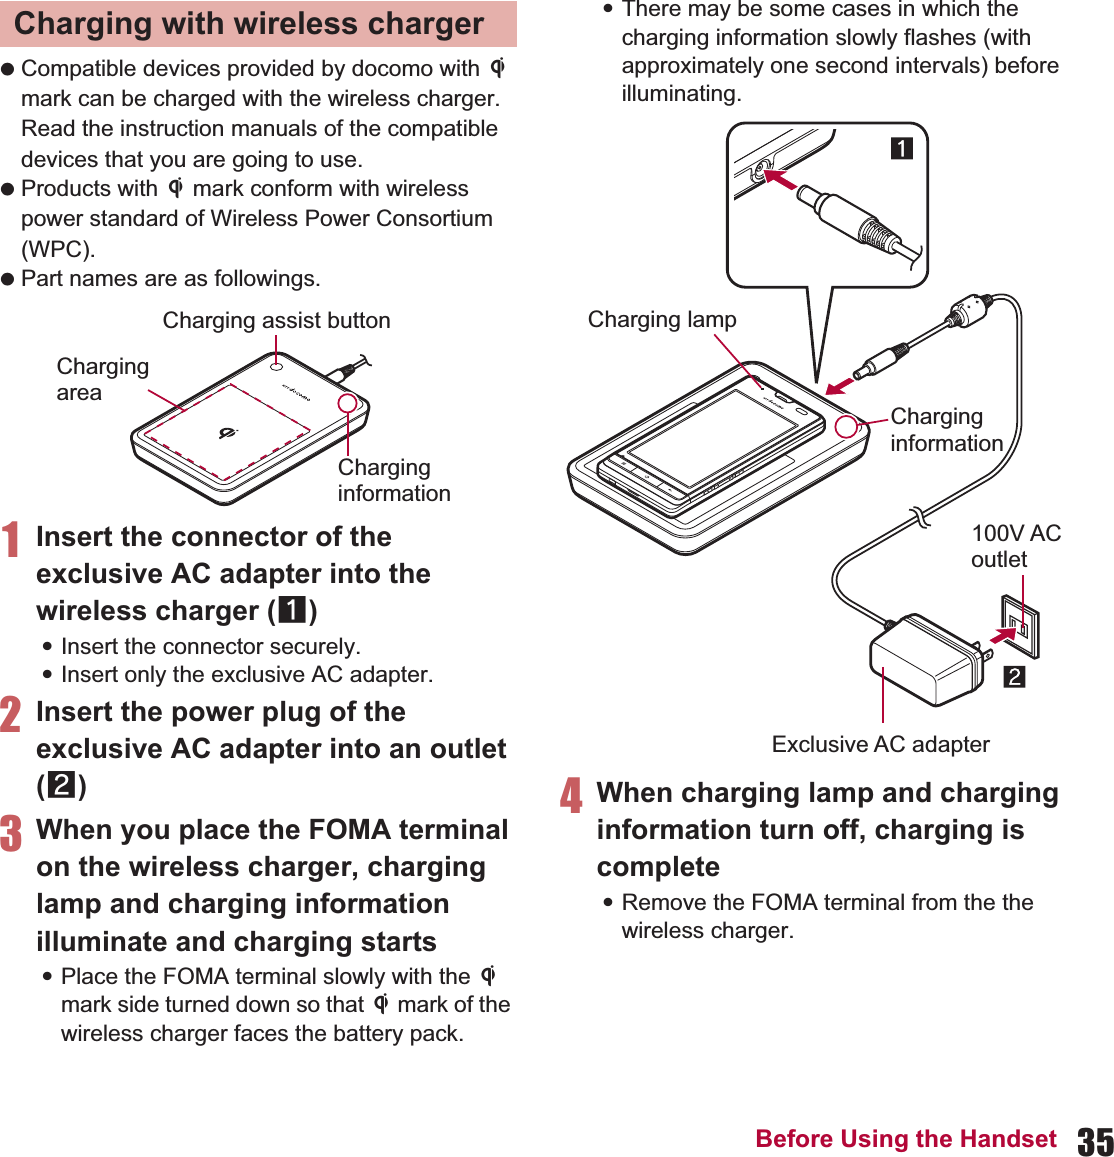
![38 Before Using the HandsetWhen the FOMA terminal is turned on, you can charge the FOMA terminal by connecting the FOMA terminal to a PC with the microUSB cable for PC (sample). Install the USB driver to the PC in advance. And also enable USB battery charge (nP. 79).ƦRefer to “Manual for USB Driver Installation” in PDF format in http://k-tai.sharp.co.jp/support/d/sh-13c/download/usb/index.html (in Japanese only) for details on installing USB driver. For details on connecting to a PC nP. 108ɡTurning power ON1H (for at least 2 seconds)ɡTurning power OFF1H (for at least 1 second)/[Power off]/[OK]ɡSleep modeThe screen is off and the sleep mode is activated when H is pressed or the FOMA terminal is not in use for a set length of time.Press H in the sleep mode to deactivate the sleep mode.ɡTouch panel lockWhen the power is turned on or the sleep mode is deactivated, the touch panel is locked.Keep touching [J] and slide it up into [K] to unlock.Key operation in touch panel unlock screen To set/disable manner mode: y (for at least 1 second) To turn off power: H (for at least 2 seconds) Do not forcibly pull the external connector terminal cover. May damage the cover. Do not place objects near the FOMA terminal when charging. May damage the FOMA terminal.When using a DC adapter The DC adapter should only be used in negative grounded vehicles (12 and 24V DC). Do not use with the car engine shut off. May drain the car battery. The DC adapter fuse (2A) is a consumable. For replacement, purchase a new fuse at a local automobile supply shop. Refer to the user’s guide of FOMA DC Adapter 01/02 for details.Charging with microUSB cable for PCTurning power ON/OFF If there is an unchecked missed call etc., an icon is displayed on the unlock screen. If you touch the icon before unlocking the touch panel, the corresponding screen is displayed.](https://usermanual.wiki/Sharp/HRO00153/User-Guide-1504731-Page-40.png)
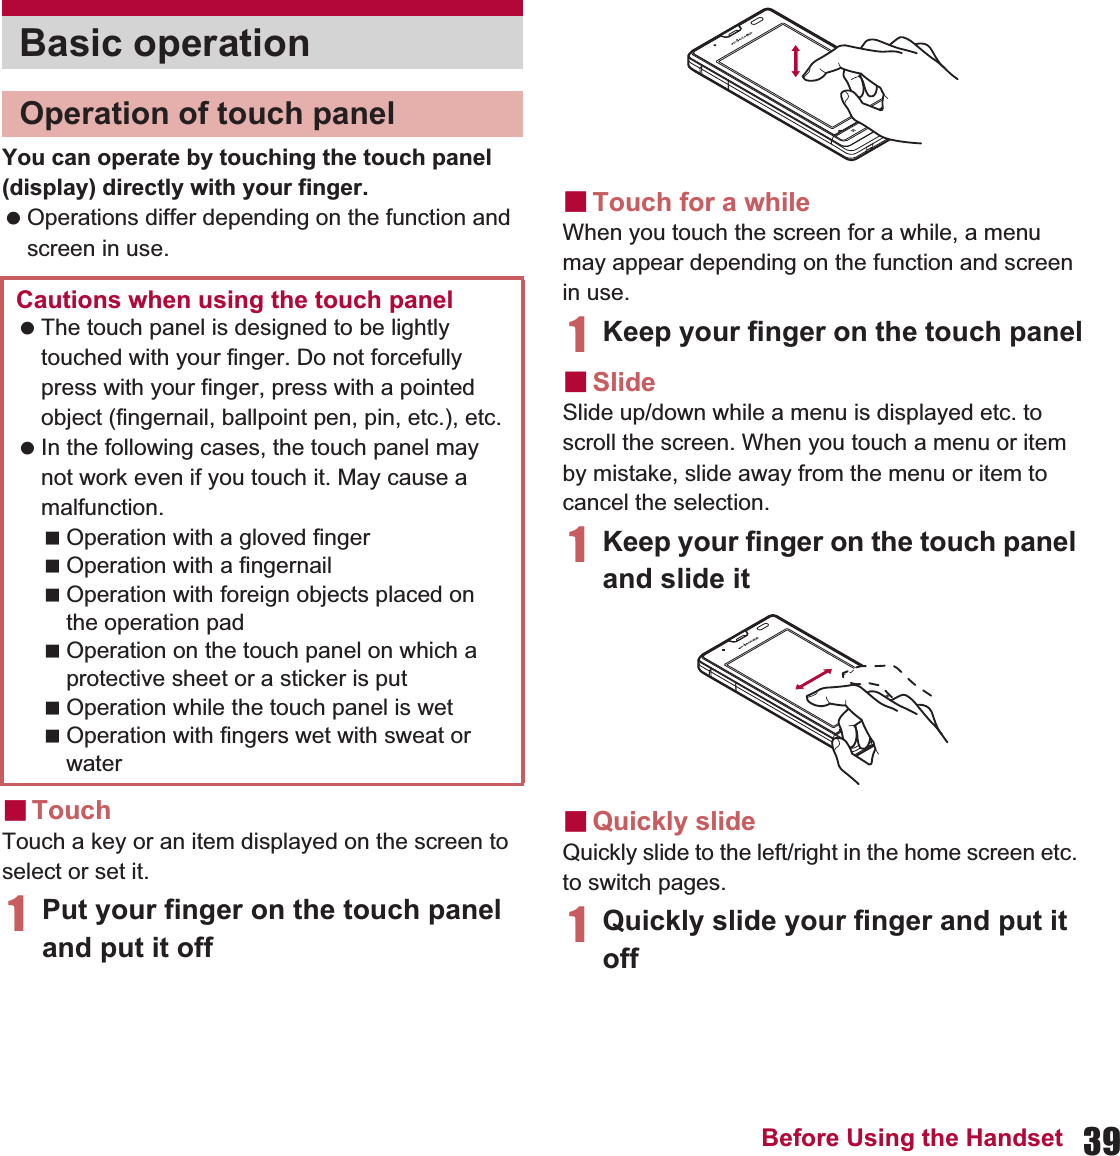
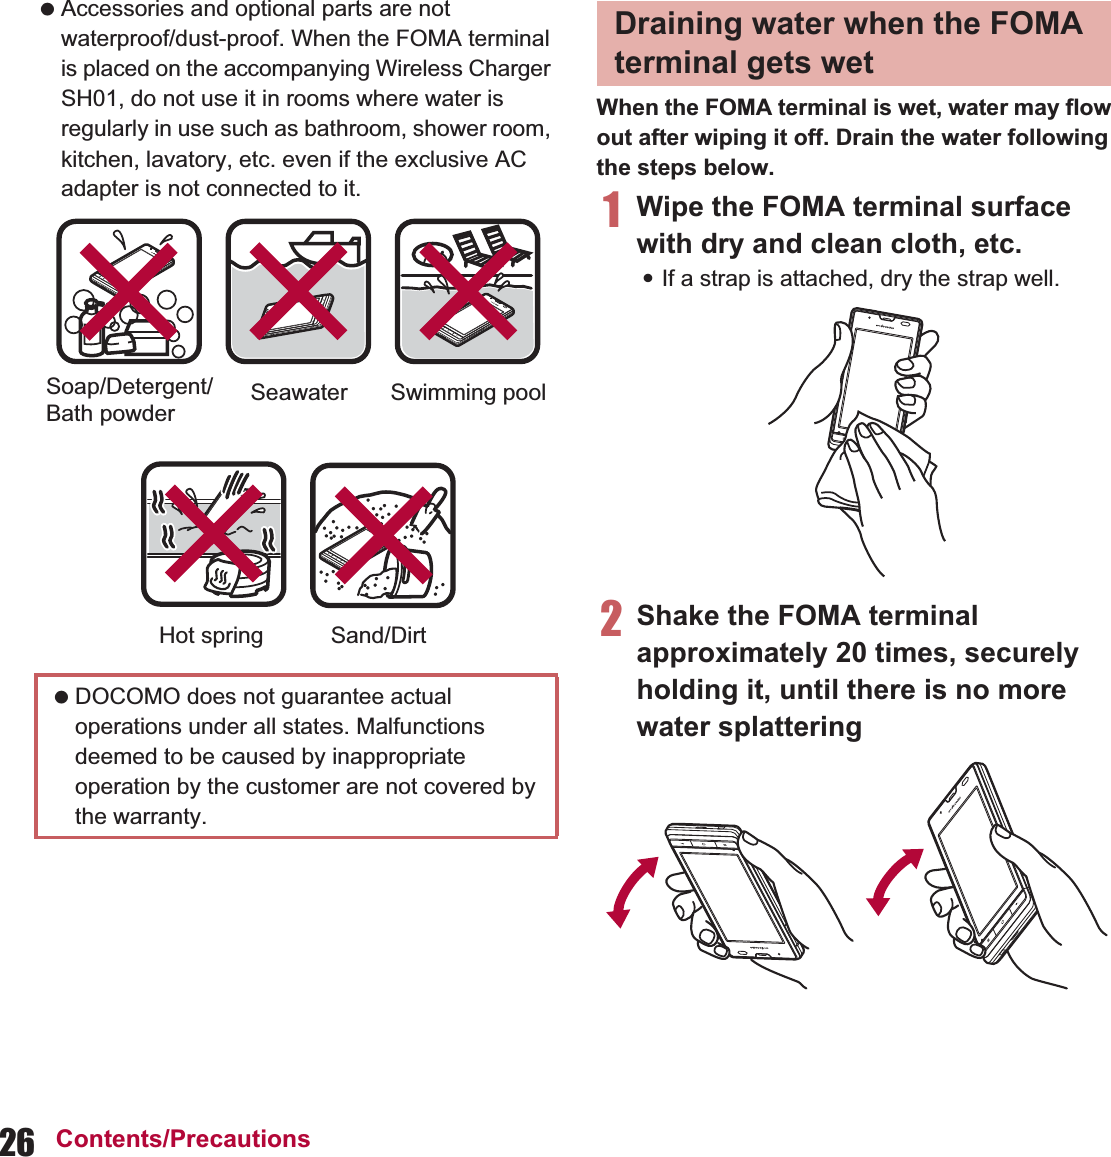
![40 Before Using the HandsetɡPut a distance between two fingers apart/closerPut a distance between two fingers apart/closer while displaying an image etc. to zoom in/out.1Put two fingers on the touch panel and slide them with putting a distance between two fingers apart/closerɡSwitching the settingsWhen a check box is displayed beside the setting item, you can set it enabled/disabled or [ON]/[OFF] by touching it.Example: Energy saving settings screen, Alarm setting contents screen [0]: Enabled, [1]: DisabledɡRetrieving menuWhen you press z or touch the screen for a while, functions (menus) available in that screen appear.Example: Notepad screenɡTapFlow UITapFlow UI is a menu to be displayed by touching [T] when using phonebook, camera and picture.The kinds, position and size of the displayed menu differ depending on the frequency of using menu.Operation while using functionSet item list](https://usermanual.wiki/Sharp/HRO00153/User-Guide-1504731-Page-42.png)
![41Before Using the HandsetExample: Phonebook list screenɡVertical/Horizontal display The screen display is switched when you tilt the FOMA terminal. Vertical/Horizontal display is not switched if the FOMA terminal is turned in the place parallel to the ground. The screen display may not be switched depending on the application being used. The screen display may not be switched properly when a sound or a vibration is activated. Vertical/Horizontal display may not appear properly right after the screen or power is turned on. You can set the display not to automatically switch (nP. 79). Screens may be displayed in the full screen depending on the application when switching the vertical display to the horizontal display.ɡMulti Assistant (Multitask)If you cancel the use of function by pressing | etc., the function does not end and remains activated in background.Display running functions as a list and switch functions to use by using Multi Assistant (Multitask).1| (for at least 1 second)2Select a function to be used:To terminate a function: [Y]:To terminate all functions: [Quit all]/[Yes]ɡShooting screenshotPress Hȼ| to save the screen being displayed to the microSD Card.1In the home screen, }:Alternatively, [R]/[Google Search] in the home screen.:Quick search box appears.2Enter the keyword:Search applications and data that start with the entered character and display a list of them.3Select the search result:When a search result is an application, the corresponding application is activated. The functions being activated in background may end depending on the memory usage or application. Also, the display of running function on the Multi Assistant (Multitask) screen may change depending on the memory usage. Data cannot be saved while using home network or displaying e-books. In addition, image part cannot be saved while playing video such as YouTube. Data may not be saved completely or partially depending on the application.Searching information in the FOMA terminal and sites](https://usermanual.wiki/Sharp/HRO00153/User-Guide-1504731-Page-43.png)
![42 Before Using the HandsetɡSearching sites by voice1In the quick search box, [!]:Alternatively, } (for at least 1 second) in the home screen.:Or, [R]/[Voice Search] in the home screen.2Enter the keyword by voice3Select the keyword1In the home screen, [R]/[୭] (Settings)/[࡞ࢊ͂΅ȜδȜΡ] (Language & keyboard)/[࡞ࢊ(Language)఼ͬ] (Select language)/[English]1In the home screen, [R]/[Settings]/[Default settings]2Set the date and time (nP. 84)/[Next]3Set the location information (nP. 80)/[Next]4Set each itemWi-Fi settings: For details nP. 43Google account: For details nP. 45Profile settings: For details nP. 765[Done] The access point (sp-mode and mopera U) for Internet connection is registered by default. You can add or change it if necessary.At the time of purchase, an access point of sp-mode is set for usual connection.ɡChecking access point in use1In the home screen, [R]/[Settings]/[Wireless & networks]/[Mobile networks]/[Access Point Names]ɡSetting access point additionally Never set the MCC to other than 440 and the MNC to other than 10. They do not appear on the screen.1In the home screen, [R]/[Settings]/[Wireless & networks]/[Mobile networks]/[Access Point Names]/z/[New APN]2[Name]/enter the name of the network profile to create/[OK]3[APN]/enter the access point name/[OK]4Enter other items required by telecommunications carriers/z/[Save]Changing screen display to EnglishInitial settingSetting access point](https://usermanual.wiki/Sharp/HRO00153/User-Guide-1504731-Page-44.png)
![43Before Using the HandsetReset an access point to default setting.1In the home screen, [R]/[Settings]/[Wireless & networks]/[Mobile networks]/[Access Point Names]/z/[Reset to default]sp-mode is an ISP owned by NTT DOCOMO for the Smartphone. In addition to the Internet connection, mail service with the same address you use on i-mode (@docomo.ne.jp) is available. sp-mode is a paid service that requires subscription. For details on sp-mode, refer to DOCOMO website.mopera U is an ISP owned by NTT DOCOMO. If you subscribe to mopera U, you can use Internet with easy setting. mopera U is a paid service that requires subscription. ɡSetting mopera U1In the home screen, [R]/[Settings]/[Wireless & networks]/[Mobile networks]/[Access Point Names]/[mopera U(ΑζȜΠέϋڣ)] (mopera U(Smartphone flat-rate))/[mopera U ୭] (mopera U settings)If you use Wi-Fi function of the FOMA terminal, you can use mail or internet by connecting to your home, corporate network or access points of public wireless LAN service. If the settings of MCC and MNC are changed and they do not appear on the screen, reset the settings or set the access point manually.Resetting access point When sp-mode is not subscribed or if you failed to perform automatic setting of access point due to signal status such as outside the service area etc., you are required to set the access point again manually.sp-modemopera U mopera U ୭ (mopera U settings) is an access point for mopera U settings. When you use the access point for setting mopera U, packet communication charges are not incurred. Note that you can connect to only the initial setting screen or the change setting screen. For details on mopera U settings, refer to the mopera U website. To use mopera U(ΑζȜΠέϋڣ) (mopera U(Smartphone flat-rate)), subscription to flat-rate packet communication services is required. For details on mopera U (Smartphone flat-rate), refer to DOCOMO website.Wi-Fi settings](https://usermanual.wiki/Sharp/HRO00153/User-Guide-1504731-Page-45.png)
![44 Before Using the Handset Packet communication is also available while Wi-Fi function is enabled. Wi-Fi connection is prioritized while Wi-Fi connection is set, but the connection will be automatically switched to that of 3G/GPRS network once Wi-Fi connection is terminated. Note that packet communication charges will be incurred in such case. Refer to the manual of your wireless LAN base unit when using the access point at home. Operate access point registration near the access point. Enable Wi-Fi function in advance (nP. 76).1In the home screen, [R]/[Settings]/[Wireless & networks]/[Wi-Fi settings]2Select an itemWi-Fi: Enable Wi-Fi function.Network notification: You get notified by the notification icon when open Wi-Fi network is detected.Wi-Fi sleep policy: Set the timing to switch Wi-Fi sleep.Easy Wi-Fi registration: Register AOSS/WPS-compatible access point with each method.Auto login settings: You can set the handset to log in DOCOMO Public Wireless LAN Service automatically when you come within its service area.Add Wi-Fi network: Register access points which are not compatible with AOSS/WPS manually.:Available access points are displayed as items in “Wi-Fi networks”. To connect, select an access point to be used/[Connect].ƦIf you select an access point protected by security, enter the password (security key).The radio interference with Bluetooth devices Wireless LANs (IEEE 802.11b/g/n) use the same frequency band (2.4 GHz) as the Bluetooth device. Therefore, using the wireless LAN device near a Bluetooth device may cause the radio interference, lowering of communication speed, noise or connection fail. In this case, turn off the Bluetooth device or keep the FOMA terminal and the wireless LAN device at least approximately 10 m away from the Bluetooth device.[Easy Wi-Fi registration] The registration process takes a few minutes. After completion of the registration of the access point, check that the proper connection to the access point is acquired.[Auto login settings] Separate subscription is required to use DOCOMO Public Wireless LAN Service. In some service areas, automatic login function may be unavailable. If you set the automatic login to [ON], the handset logs in automatically when coming within the service area. Note that high charges may be incurred if your subscription is Mzone daily plan and you set the automatic login to [ON]. This function may become unavailable according to change of the log-in page contents of DOCOMO Public Wireless LAN Service. In this case, log in via the browser.[Add Wi-Fi network] This function supports WEP, WPA/WPA2 PSK, 802.1xEAP as for the security setting.](https://usermanual.wiki/Sharp/HRO00153/User-Guide-1504731-Page-46.png)
![45Before Using the HandsetɡDisconnecting1In the home screen, [R]/[Settings]/[Wireless & networks]/[Wi-Fi settings]2Select the connected access point/[Forget]:Disconnect retaining the password.1In the home screen, [R]/[Email]:Only when an account is not set, the account setting screen appears.2Enter mail address and password/[Next]:Provider information is preset for some mail accounts, and a receiving mail server and a sending mail server are automatically set.:When you use an account whose provider information is not preset, it is necessary to set a receiving mail server and a sending mail server manually. For details on those settings, contact the Internet service provider you use.3Enter an account name and your name/[Done]1In the home screen, [R]/[Settings]/[Accounts & sync]/[Add account]2Select the account type3Set up an accountɡRetrieving your Google account passwordIf you forget your Google account password, retrieve it.1In the home screen, [R]/[Browser]2Enter “http://www.google.com/” in the URL entry field/[I]/[Sign in]/[Can’t access your account?]/follow the instructions on the screen When you terminated the connection with Wi-Fi function disabled, enable Wi-Fi function to connect automatically if the previously connected access point is available.Setting up mail account The account which is registered first is automatically given priority to normal use. To change the priority, enable Default account of the account to be given priority. When you delete an account, all mails delivered to that account are deleted. When there is any protected mail, the account cannot be deleted. When the account type is Exchange, entering “¥UsernameDomain” in the “Domain¥Username” area is required to set a receiving mail server manually depending on the provider to use. Contact the administrator of the server for details.Setting up Google account, etc. When activating the application that requires an account without setting the account, the account setup screen appears. Keep a separate memo of the set account and password.](https://usermanual.wiki/Sharp/HRO00153/User-Guide-1504731-Page-47.png)
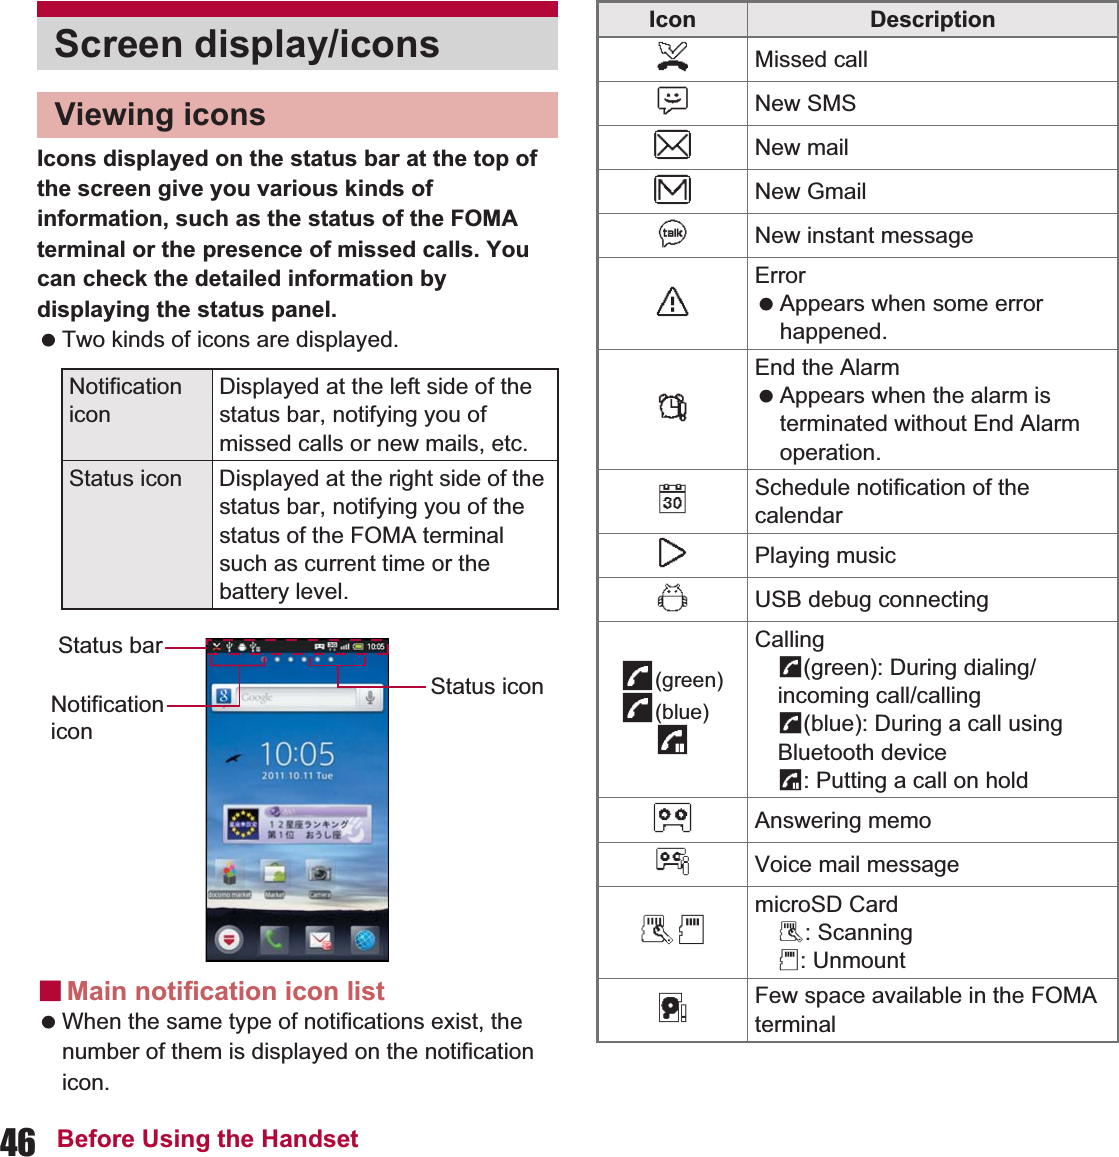
![47Before Using the HandsetɡMain status icon list#:6879Bluetooth#: Receiving registration/Connection request from Bluetooth device:: Receiving data request6: Bluetooth sending8: Bluetooth receiving7: Sent history9: Received history%45USB connection%: USB connection (in Card reader mode connecting)4: Card reader mode5: Fast transfer mode789HData upload/download7: Uploading8: Finished uploading9: DownloadingH: Finished downloading:Finished installing applicationEFGWi-FiE: Open networkF: Wi-Fi information notificationG: Wi-Fi connection notificationɔWi-Fi tethering enabled;< VPN;: Connecting<: Unconnected=Application update available AOS version upgrade availableab Software updatea: Software update availableb: Software update finishedIcon Description>Notification icon (not appeared)Icon Description.Alarm set8 to =>?Battery level8 to =: Approx. 100 to 5%>: Approx. 0%?: Unknown battery level While charging, the battery icon appears with [w] superimposed.!#$%&(Signal strength!: Level 4#: Level 3$: Level 2%: Level 1&: Level 0(: Out of service area While international roaming, [R] appears on the upper left of the signal icon.)Offline mode set01233G data communication status0: 3G available1: Receiving 3G data2: Sending 3G data3: Sending and receiving 3G dataPQRSGSM data communication statusP: GSM availableQ: Receiving GSM dataR: Sending GSM dataS: Sending and receiving GSM data*miniUIM not insertedIcon Description](https://usermanual.wiki/Sharp/HRO00153/User-Guide-1504731-Page-49.png)
![50 Before Using the HandsetɡAdding pages You can add a maximum of 12 pages.1In the home screen, z/[Home screen list]/[+]ɡSorting pages1In the home screen, z/[Home screen list]/touch a thumbnail for a while 2Keep touching the thumbnail and slide it to the destinationɡDeleting pages1In the home screen, z/[Home screen list]/touch a thumbnail for a while2[Delete]:Alternatively, keep touching thumbnail and slide it to [X].ɡCreating quick menu You can create up to three quick menus.1In the home screen, touch a shortcut for a while2Keep touching the shortcut and slide it to the quick menuɡMove quick menu1Touch quick menu for a while 2Keep touching quick menu and slide it to the destinationɡDelete quick menu1Touch quick menu for a while 2[Delete]:Alternatively, keep touching quick menu and slide it to [X].1In the home screen, z/[Add]2Select an item to addShortcut: Paste a shortcut to an application.Widget: Paste a widget.Folder: Paste a folder.Wallpaper: Set an image on the home screen.Group: Paste a shortcut to a group.Web page: Paste a web page widget.ɡMoving shortcut etc.1In the home screen, touch shortcut etc. for a while2Keep touching shortcut etc. and slide it to the destination:If you slide it to the end of the page and stop, the previous/next page is displayed and you can move to the previous/next page.ɡDeleting shortcut etc.1In the home screen, touch shortcut etc. for a while2[Delete]Managing pagesManaging quick menuManaging home screen](https://usermanual.wiki/Sharp/HRO00153/User-Guide-1504731-Page-52.png)
![51Before Using the Handset:Alternatively, keep touching shortcut etc. and slide it to [X].ɡRenaming folder1In the home screen, touch a folder for a while2[Edit name]3Enter a folder name/[OK]Loaded applications are displayed as icons in the application screen by group. Select an icon to activate an application. If you install a new application, an icon is added to the application screen. If you uninstall an application, an icon is deleted. 1Group name2Application icon3Number of applications Touch a group to display/hide an application icon in the group. Also, you can display/hide all the application icons in a group collectively by putting distance between two fingers apart/closer on the application screen.Applications are classified into groups by their function or type.docomo serviceApplication screenApplication screen layoutApplication listIcon Application Descriptiondocomo market*1Access to docomo market where you can search both applications and movies (nP. 60).iΙλΥσ (i-Channel)*1Distribute various information on weather, news, etc. The latest information received automatically are displayed on the widgets of the stand-by display.i-Channel is a paid service that requires a subscription.melodycall*1 Let the other party who has made a call to you listen to your favorite melody. You can listen to, purchase and set music saved as the melody call.Melody call is a paid service that requires a subscription.](https://usermanual.wiki/Sharp/HRO00153/User-Guide-1504731-Page-53.png)
![52 Before Using the HandsetBasic functionIcon Application DescriptionPhone Use Phone (nP. 64).Address Book Use Address Book (nP. 67).Phonebook backup*2Phonebook backup is a service to backup phonebook data automatically to the backup center on regular basis and restore it when you lost the FOMA terminal, deleted data, etc. For details on Phonebook backup, refer to “̮၌ဥ΄ͼΡήΛ· (spκȜΡ<ΑζȜΠέϋ>༎)” (Mobile Phone User’s Guide [sp-mode <Smartphone>]) (in Japanese only).PhoneBookCopy*1The phonebook data can be copied into another FOMA terminal by using the microSD Card. Also, the phonebook data registered in a Google account can be copied into a docomo account (nP. 69).Koe no Takuhaibin*1, 2Koe no Takuhaibin is a service for recording messages by voice call and notifying the other party of the recorded messages.This application enables you to record and play voice messages easily.spκȜΡιȜσ (sp-mode mail)*1, 2Send and receive mail using mail address of i-mode (@docomo.ne.jp) (nP. 88).Email Use Email (nP. 87).Gmail Use Gmail (nP. 88).Area Mail Receive earthquake early warning etc. provided from the Japan Meteorological Agency (nP. 89).Messaging Use SMS (nP. 88).Talk Use Google Talk. Google Talk is an instant message service provided by Google.You can communicate with other users in real time with FOMA terminal or on the website by using Google Talk.Icon Application Description](https://usermanual.wiki/Sharp/HRO00153/User-Guide-1504731-Page-54.png)

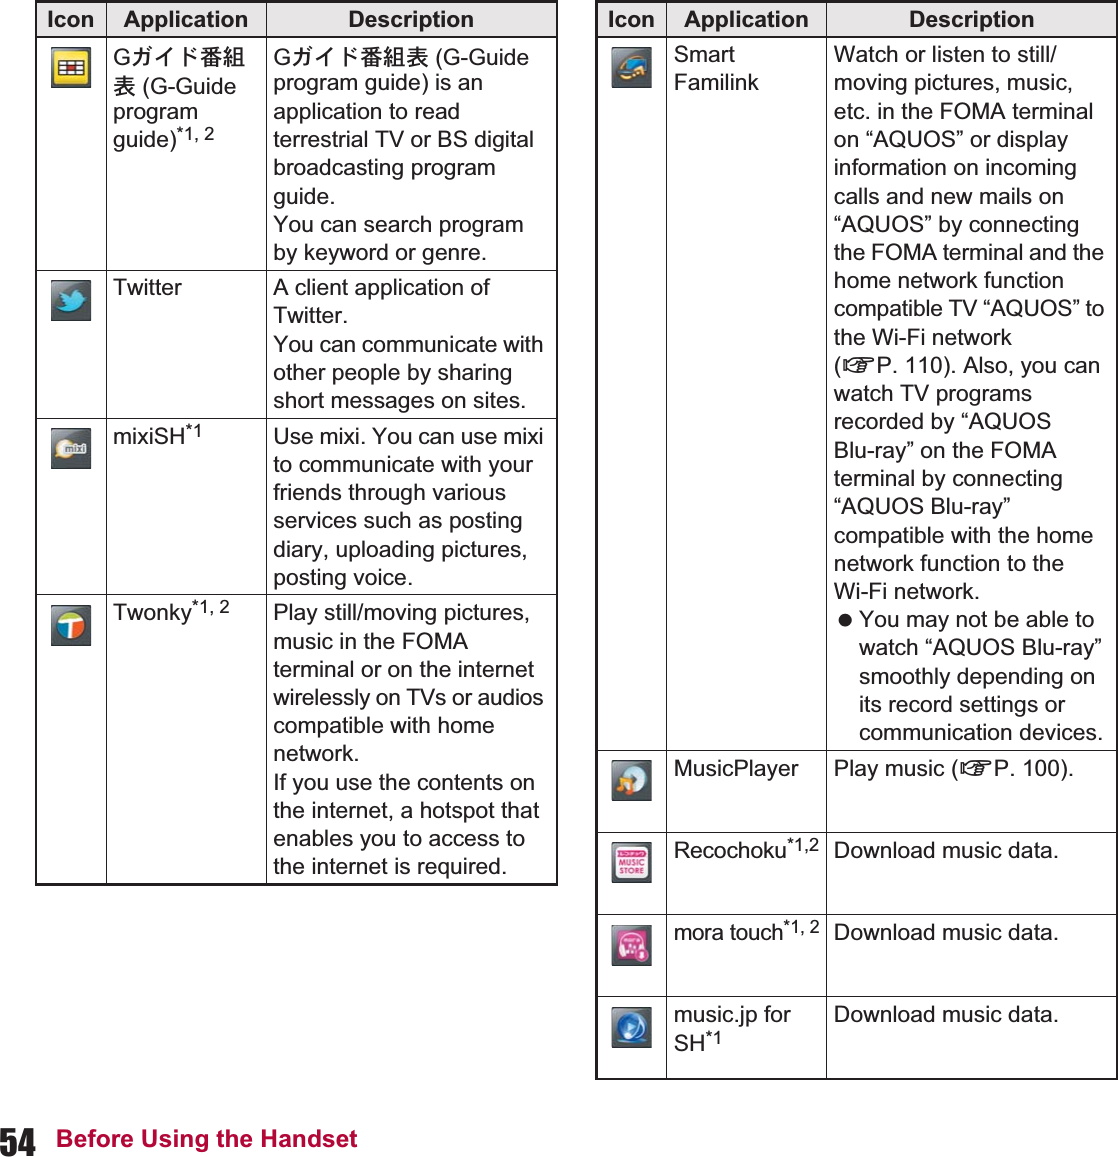
![57Before Using the HandsetOsaifu-Keitai/ShoppingSettingDocuments To GoDisplay files such as Microsoft Word, Microsoft Excel, Microsoft PowerPoint.Adobe ReaderDisplay PDF files.Contents ManagerManage data stored to the microSD Card (nP. 102).ιȜȜͺίς (Maker appli)*1Connect to SHARP website.Icon Application DescriptionOsaifu-Keitai*1Osaifu-Keitai can be used (nP. 115).iD୭ͺίς (iD setting appli)*1iD is the electronic money that enables you to pay by simply holding the FOMA terminal over the scanning device at stores.You can use iD after carrying out simple settings (nP. 122).ToruCa*1, 2 Display, search or update ToruCa such as store information or a coupon (nP. 116).ڢഛȜ·Ώοϋ*1, 2Search popular fashion items etc. that are listed on Rakuten Auction easily.ڢഛ gateway*1Use various services such as Rakuten Ichiba.Icon Application DescriptionͼΥΑΏȜ·τΛΠ*2ͼΥΑΏȜ·τΛΠ is an application directed by Ines Ligron for letting the exterior and interior beauty of women shine.It supports “beauty” with the lessen videos, workbooks, diet diary and body weight management function.ζ·ΡσΡLauncher (McDonald Launcher)*1, 2ζ·ΡσΡ Launcher (McDonald) is an application to allow you to use coupons for McDonald’s members and store locator.Amazon JP*1 Access to the Amazon site and purchase various goods such as books and home electric appliances.Icon Application DescriptionSettings Set each item of the FOMA terminal. The same operation can be performed as z/[Setting] in the home screen.Ρκ٬ٸ၌ဥ (DOCOMO Roaming Utility)*1, 2Support the use of packet communication overseas or the setting/checking of the flat-rate packet communication service overseas.HomeSwitcherSwitch the homeapplication to use.Icon Application Description](https://usermanual.wiki/Sharp/HRO00153/User-Guide-1504731-Page-59.png)
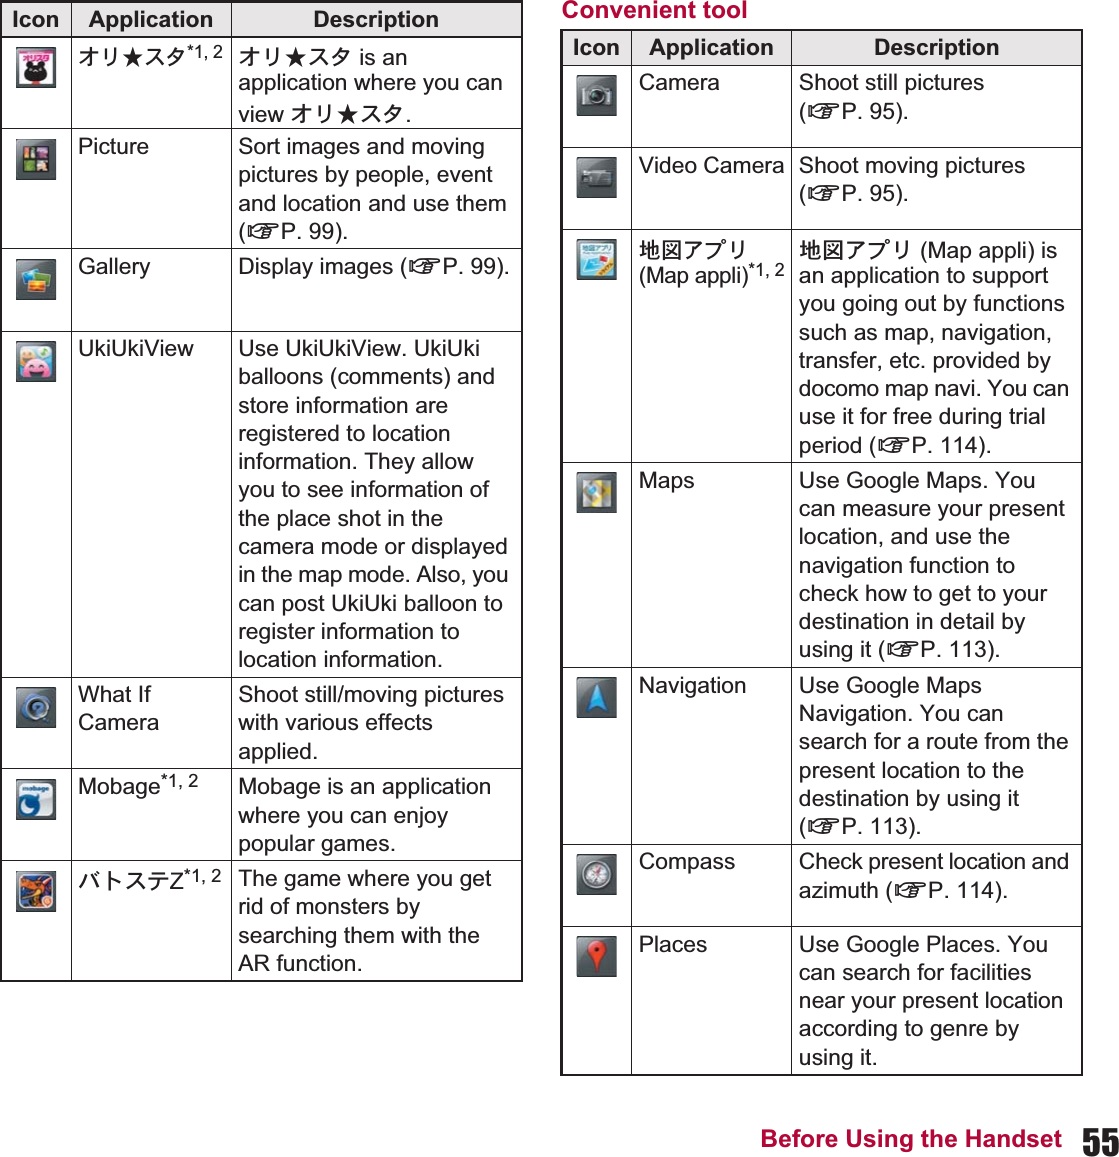
![58 Before Using the Handset*1 This is provided in Japanese.*2 When you use this application for the first time, you need to download it. Packet communication charge is incurred separately for downloading applications.ɡAdding groups You can add a maximum of 50 groups in the application screen.1In the home screen, [R]/z/[Add group]2Enter a group name/[OK]ɡSorting groups1In the home screen, [R]/touch a group for a while2Keep touching the group and slide it to the destinationɡEditing title of groups1In the home screen, [R]/touch a group for a while2[Edit name]/enter a group name/[OK]ɡChanging group color1In the home screen, [R]/touch a group for a while2[Change color]/select a colorɡPasting group1In the home screen, [R]/touch a group for a while2[Add to home]ɡDeleting group1In the home screen, [R]/touch a group for a while2[Delete]/[OK]ɡMoving application icons1In the home screen, [R]/touch an application icon for a while2[Move]/Select a group:Alternatively, keep touching an application icon and slide it to the destination.ɡPasting shortcut1In the home screen, [R]/touch an application icon for a while2[Add to home]ɡUninstalling application1In the home screen, [R]/touch an application icon for a while2[Uninstall]/[OK]Managing groupsManaging application icons](https://usermanual.wiki/Sharp/HRO00153/User-Guide-1504731-Page-60.png)
![59Before Using the Handset1In the home screen, [R]/z/[List view]/[Tile view]By using Android Market, you can access to useful applications or fun games directly, that can be downloaded and installed to the FOMA terminal. Enable Background data (nP. 81) in advance.1In the home screen, [R]/[Market]1In the Android Market screen, select an application to download/[FREE]/[OK] When downloading a charged application, you need to create a Google Checkout account to purchase the application.1In the Android Market screen, select an application to purchase/touch the price/[OK]:If you make a purchase for the first time, sign in Google Checkout payment and billing service.Switching display of application screenMarket Be sure to check the security of application, then install it at your own risk. The FOMA terminal may be infected with a virus or data may be damaged. Note that DOCOMO shall not be liable for malfunctions caused by the application you installed. Note that DOCOMO shall not be liable for any disadvantage brought to you or any third party due to the application you installed.Installing application Once you accept the installation of application, you are responsible for the results of using the application. Be very cautious about installation of applications that have access to many functions or a significant amount of data.Purchasing application You pay for the application only once. Re-downloading applications which you previously uninstalled after first downloading it is not charged. If you have multiple Android devices that use the same Google account, you can download the purchased application to all of them at no additional cost. DOCOMO holds no responsibility for responding to purchase applications and get refund from the Android Market.](https://usermanual.wiki/Sharp/HRO00153/User-Guide-1504731-Page-61.png)
![60 Before Using the HandsetɡUninstalling applicationsYou can ask for a refund within a specified time after of the purchase of application. The application is deleted and you are not charged. In addition, note that a refund request is available for each application only once. If you requested a refund for the purchased application in the past and purchase the same application again, a second refund request is not available. 1In the Android Market screen, [My apps]:In the Android Market screen, z/[Help]/[Android Apps]/each item of [Buying apps] for details on the payment method when purchasing an application, the terms on the refund request, etc.2Select an application to uninstall/[Uninstall]/[OK]3Answer the survey form/[OK]In docomo market, you can quickly access DOCOMO recommended sites and useful applications.ɦdocomo market is provided in Japanese.1In the home screen, [R]/[docomo market]docomo market Packet communication (3G/GPRS) or Internet connection via Wi-Fi is required to use docomo market. Packet communication charge is incurred separately for connecting to docomo market and downloading applications introduced on docomo market. Some downloaded applications automatically perform packet communication. Applications introduced on docomo market include charged ones. DOCOMO shall not be liable for any disadvantage caused by sites introduced on docomo market or the information acquired from the sites. DOCOMO shall not be liable for contents, adequateness to purpose of use, reliability, etc. of applications introduced on docomo market. Some applications that you perform installation may give your FOMA terminal instability of the operation or may send your location information or personal information registered in the FOMA terminal to outside via the Internet and the information may be used improperly. Please thoroughly check a provider and operation condition of the application, etc. before using it. The copyrights of materials (documents, photographs, illustrations, animations, sounds, software, etc.) on this site are owned by DOCOMO or other third parties and are protected by the Copyright Act as well as other laws and agreements. Excluding the extent of quotation and reproduction for private use that is approved in the Copyright Act, the reproduction, adapting or public transmission of copyrighted material is prohibited without the consent of the party owing the copyright.](https://usermanual.wiki/Sharp/HRO00153/User-Guide-1504731-Page-62.png)
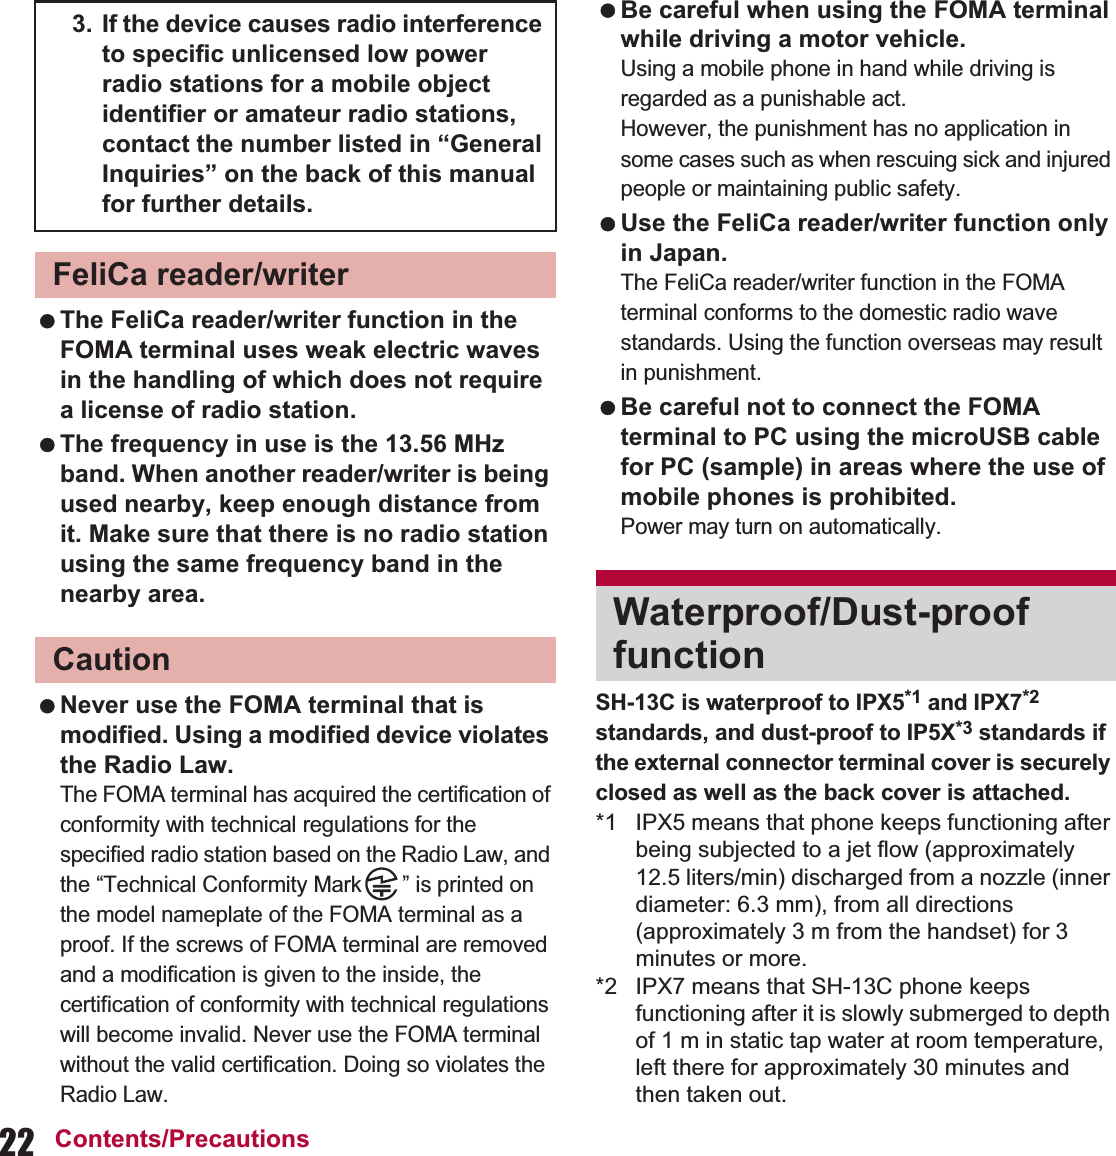
![61Before Using the Handset You can use the following two types of the keyboards.1In the character entry screen, [T]/[Change keyboard(Portrait)]/[Change keyboard(Landscape)]1Character entry keys Use to enter characters or numbers. The display of character entry keys changes according to the input mode or the setting of upper/lower case.2Alphabet/Shift key Touch to enter half-width alphabet in Hiragana-Kanji entry mode. Touch to switch between upper/lower case letters. Symbols that can be entered changes when you switch the upper/lower case letters.3Character key Touch to change input modes.4Delete key Use to delete a character on the left side of the cursor. When the cursor is on the beginning, delete a character on the right side of the cursor. When the cursor is on a character, delete the character.5Enter key Use to confirm the entered characters or insert a line break.6Symbol key Use to display the pictogram/symbol/emoticon list.7Setting/Conversion key Display setting menu. Convert input characters.8Cursor keys Use to move the cursor or to change the range of characters to be converted.Character entrySwitching keyboardsQWERTY keyboardYou can enter a displayed character by touching the character entry key. Use romaji for entry.12 keyboard Several characters are assigned to one character entry key. Characters are switched every time the key is pressed. You can enter characters quickly by keeping touching a character entry key and slide up/down or to the left/right.Keyboard layoutsQWERTY keyboard12 keyboard](https://usermanual.wiki/Sharp/HRO00153/User-Guide-1504731-Page-63.png)
![62 Before Using the Handset9Riverse toggle/Undo key Use to display characters assigned to the same key in the inverse order. Use to undo previous operation.Example: When entering “ল”1In the character entry screen, enter “̲͜”:To enter a displayed conversion candidate: Touch the conversion candidate:To confirm characters in hiragana: [OK]2[་۟] (conversion):To broaden/restore the conversion candidates field: [P]/[Q]3Select “ল”ɡWildcard PredictionConversion candidates are predicted by the number of the entered characters and appear. Enable Wildcard Prediction of iWnn IME - SH edition in advance (nP. 82). This function is available in the Hiragana-Kanji entry mode and the Half-width alphabet entry mode.Example: When entering “ͺ;ϋΑ”1In the character entry screen, enter “̜̈́”2[S]/[S]/[S]:Each time you touch [S], [ī] is entered and the predictive conversion candidates appear according to the number of characters.3In the conversion candidates field, select “ͺ;ϋΑ”ɡSwitching input modesSwitch input modes according to types of characters to enter.1In the character entry screen, touch character key for a while:Touch character key to switch input modes in the order of Hiragana-Kanji b Half-width alphabet b Half-width numeric.2Select input modeɡEntering pictograms/symbols/emoticons Unavailable characters cannot be entered depending on applications.1In the character entry screen, symbol key2Select a pictogram/symbol/emoticonEntering charactersConversion candidates field](https://usermanual.wiki/Sharp/HRO00153/User-Guide-1504731-Page-64.png)
![63Before Using the HandsetɡInputting kuten codesYou can use four-digit kuten codes assigned to each character for entering kanji, hiragana, katakana, symbol or alphanumeric characters.1In the character entry screen, touch character key for a while/[Character Code]2Input a kuten code:After the fourth digit is entered, the corresponding character appears.:After the fourth digit is entered, the entry mode is switched to the previous entry mode.ɡInputting with voiceYou can enter characters with voice. Enable voice input of iWnn IME - SH edition in advance (nP. 82).1In the character entry screen, [T]/[Voice Input]/[OK]2Speak to the mouthpieceɡEntering by handwritingYou can enter characters by handwriting.1In the character entry screen, [T]/[Handwriting Input]2Enter characters or symbols in the character entry area by handwriting:To enter a displayed conversion candidate: Touch the conversion candidateɡConvenient functions in character entryYou can cut, copy or paste the entered characters.1Touch the character entry field for a while2Select a function to be used In the following cases, Voice input may not work properly.When the voice is too loudWhen the surrounding noise is bigWhen the phonation is not clearWhen the phonation is not naturalWhen the pronunciation is too fastWhen any key is pressed, the mouthpiece is touched, etc. When entering characters by handwriting, enter slowly and legibly.](https://usermanual.wiki/Sharp/HRO00153/User-Guide-1504731-Page-65.png)
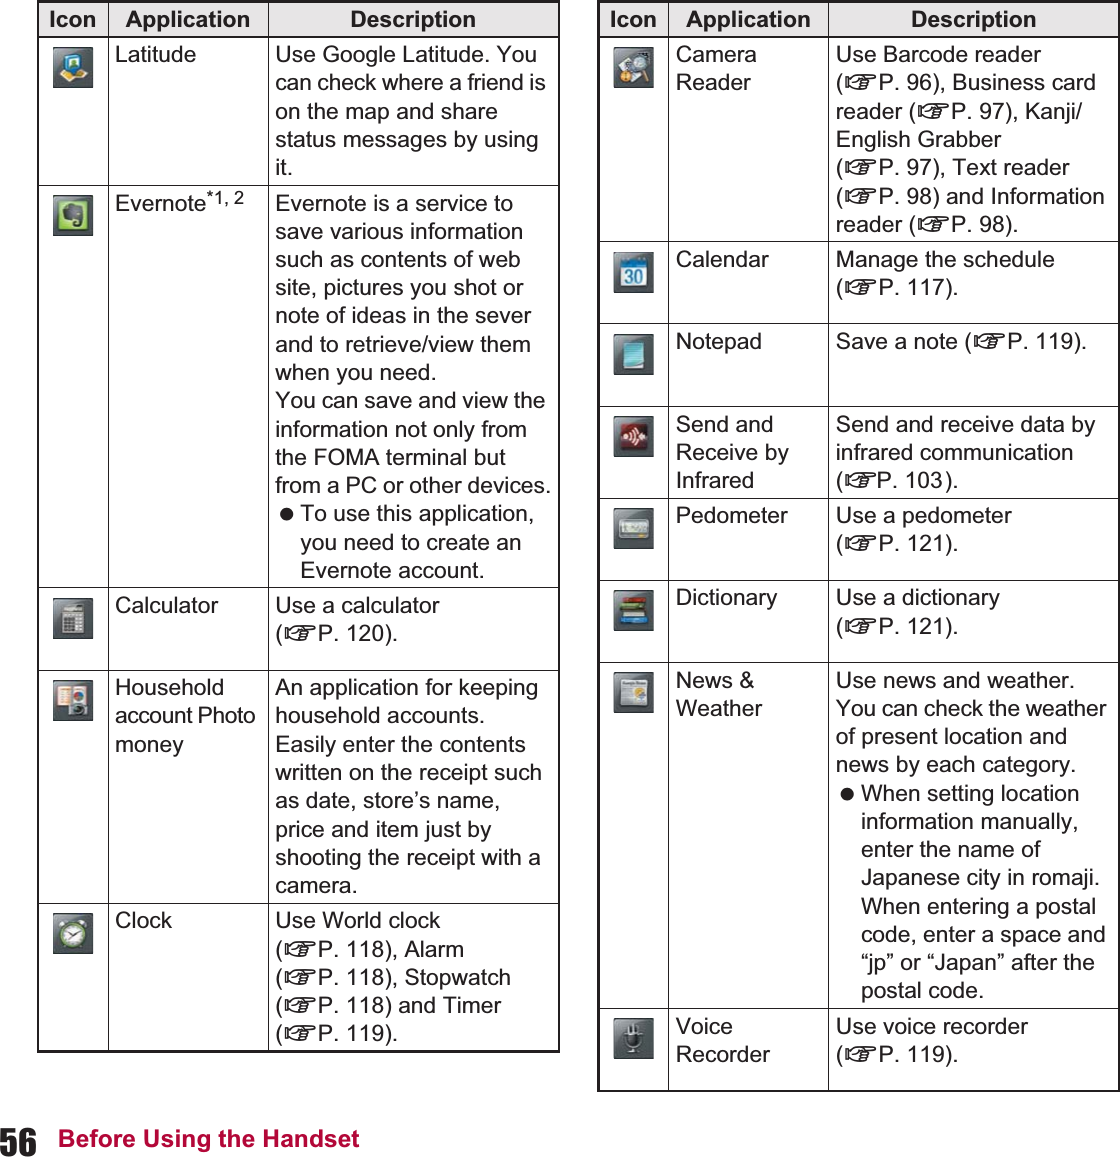
![64 Call/Network Services1In the home screen, [R]/[Phone]2Enter a phone number:Always dial the area code, even when the number is of the same area.:You can set to notify/not to notify the other party of your phone number for each call by adding “186”/“184” to the head of the phone number.3[Call]4[End call] to end the callCall/Network ServicesPhoneMaking a callEmergency callEmergency calls Phone numberEmergency call to police 110Emergency call to fire station/medical assistance 119Emergency call at sea 118 This FOMA terminal supports “Location notification of emergency call”.When dialing an emergency number such as 110, 119, and 118, the information of your location (location information) is automatically notified to the agency that received the emergency call (e.g. the police station). Depending on your location and the reception status of the signal, the agency that received the emergency call may not be able to confirm the exact location.If you are not sending your caller ID by calling with “184” added or other means, your location information and phone number are not notified. However, if the agency that received the emergency call considers your location information and phone number necessary for important purposes, such as life saving, the agency can retrieve them regardless of your settings.In addition, the area/timing to introduce “Location notification of emergency call” depends on the state of preparation in each agency that receives emergency calls. In Japan, you cannot call to the emergency number (110, 119 or 118) from the PIN code entry screen and PUK (PIN Unlock Key) entry screen, with a miniUIM locked.](https://usermanual.wiki/Sharp/HRO00153/User-Guide-1504731-Page-66.png)
![65Call/Network ServicesWORLD CALL is an international calling service available from DOCOMO FOMA terminal in Japan.WORLD CALL is registered when FOMA services are registered (excluding users who did not apply for WORLD CALL). You can call to about 240 countries and regions worldwide. Calling to a fixed-phone and mobile phone overseas is available. For information on available countries and telecommunications carriers, refer to “Mobile Phone User’s Guide [International Services]” or the DOCOMO International Services website. WORLD CALL charges are billed with the monthly FOMA service charges. Commission and monthly usage fees are free. Contact “General Inquiries” on the back of this manual for details on WORLD CALL. To make an international call through a company other than DOCOMO, contact the representative companies for instructions. The caller ID may not be notified or displayed correctly depending on some overseas telecommunications carriers. In this case, making a call with incoming call history is not available.1When a call is received, the ring tone sounds and the incoming lamp flashes2Keep touching [2] and slide to the right:When call is received while the backlight is illuminated (except while the touch panel unlock screen is displayed), touch [Answer].:To place a call on hold: Keep touching [4] and slide to the left3[End call] to end the call When calling 110, 119, and 118 from your FOMA terminal, the police or fire stations may return your call for verification purposes. State that you are calling from a mobile phone, and give your phone number and exact location.Remain stationary to ensure that you are not disconnected while making an emergency call, and keep handset turned on to receive calls for approximately 10 minutes afterwards. Depending on the region, calls to the police or fire station may not be connected.International call (WORLD CALL)[Calling Method] When calling to a fixed-line phone: 010/country code/area code (city code)/the other party’s phone number/[Call] When calling to a mobile phone: 010/country code/the other party’s phone number/[Call]ƦFor the other parties’ phone numbers and area codes (city codes) that begin with “0”, omit the “0” when entering (except some countries or regions such as Italy).ƦAlternatively, enter “009130-010” as usual or “+” instead of “010”.Receiving a call](https://usermanual.wiki/Sharp/HRO00153/User-Guide-1504731-Page-67.png)
![66 Call/Network ServicesɡRejecting calls1When call is received, the ring tone sounds and the incoming LED flashes2z/[Reject]You can carry out operations such as using a hands-free call and adjusting the in-call volume depending on the using condition during a call.1Mute/Disable mute Enables or disables mute setting on a current call.2Activate memo3Activate voice memo4Call by number key5Display phonebook6Speaker/Speaker off You can talk with hands-free.ɡAdjusting the in-call volume1x/y during a callThe FOMA terminal keeps a record of the 100 most recent phone numbers to which calls were made.1In the home screen, [R]/[Phone]/[Outgoing History]/[Incoming History]:To register an entry to the phonebook: Touch a history for a while/[Add to Address Book]/register it to the phonebook:To delete all entries in the outgoing call history/incoming call history: z/[Delete All]/ Enter the Lock No./[OK]/[OK]ƦYou can also delete the outgoing call history/incoming call history in the phonebook by enabling [With Address Book’s call history].:To delete one entry in the outgoing call history/incoming call history: Touch a history for a while/[Delete]/[OK]Operation during a call Note the following when using hands-free.ƦSpeak approximately 20 to 40 cm away from the mouthpiece. When the surroundings are noisy, the sound may break up and the call may not be satisfactory.ƦWhen calling outdoors, in a location where surroundings are noisy and where the sound echoes loudly, use the earphone.ƦIf the sound breaks up during a hands-free call, lower the in-call volume.Outgoing call history/Incoming call historyOutgoing history list Incoming history list](https://usermanual.wiki/Sharp/HRO00153/User-Guide-1504731-Page-68.png)
![67Call/Network Services1Image Appears when the other party’s image is added to phonebook.2Called/Received date and time3The other party’s name/phone number4Outgoing call icon Touch to make a call.5Group icon Touch to display Collected histories. The histories will be collected as the same group even when “186” or “184” is added to the phone numbers.6Incoming call status icon7Talk time/Incoming call ring time2Select a history1In the home screen, [R]/[Address Book]/z/[Add new entry]:When a confirmation screen for linking mixi and Twitter appears, follow the instructions on the screen and operate.2Select the account to register3Set each item/[Save]/[Yes]Image (face), Image (full body): Save an image to display when making and receiving a call or confirming the phonebook. Family name, Given name: Enter a name. You can edit a reading.Phone number: Save phone numbers.Mail: Save mail addresses.mixi: Register my mixi information.Twitter: Register information of following person on twitter.Chat: Save chat addresses.Group setting: Save a group.Other: Save other information. Information which can be saved differs depending on the account type.:Select [#] to specify a phone number/mail address that is usually displayed.You can retrieve phone numbers from the phonebook to make calls and send mail.H(green)Calls that were answeredFCalls that were not answered within 3 seconds ring timeDIncoming calls that were rejectedE(red)Calls that were not answered, calls that were forwarded or calls with an Answering memo leftPhonebookAdding entries to phonebook Checking phonebook](https://usermanual.wiki/Sharp/HRO00153/User-Guide-1504731-Page-69.png)
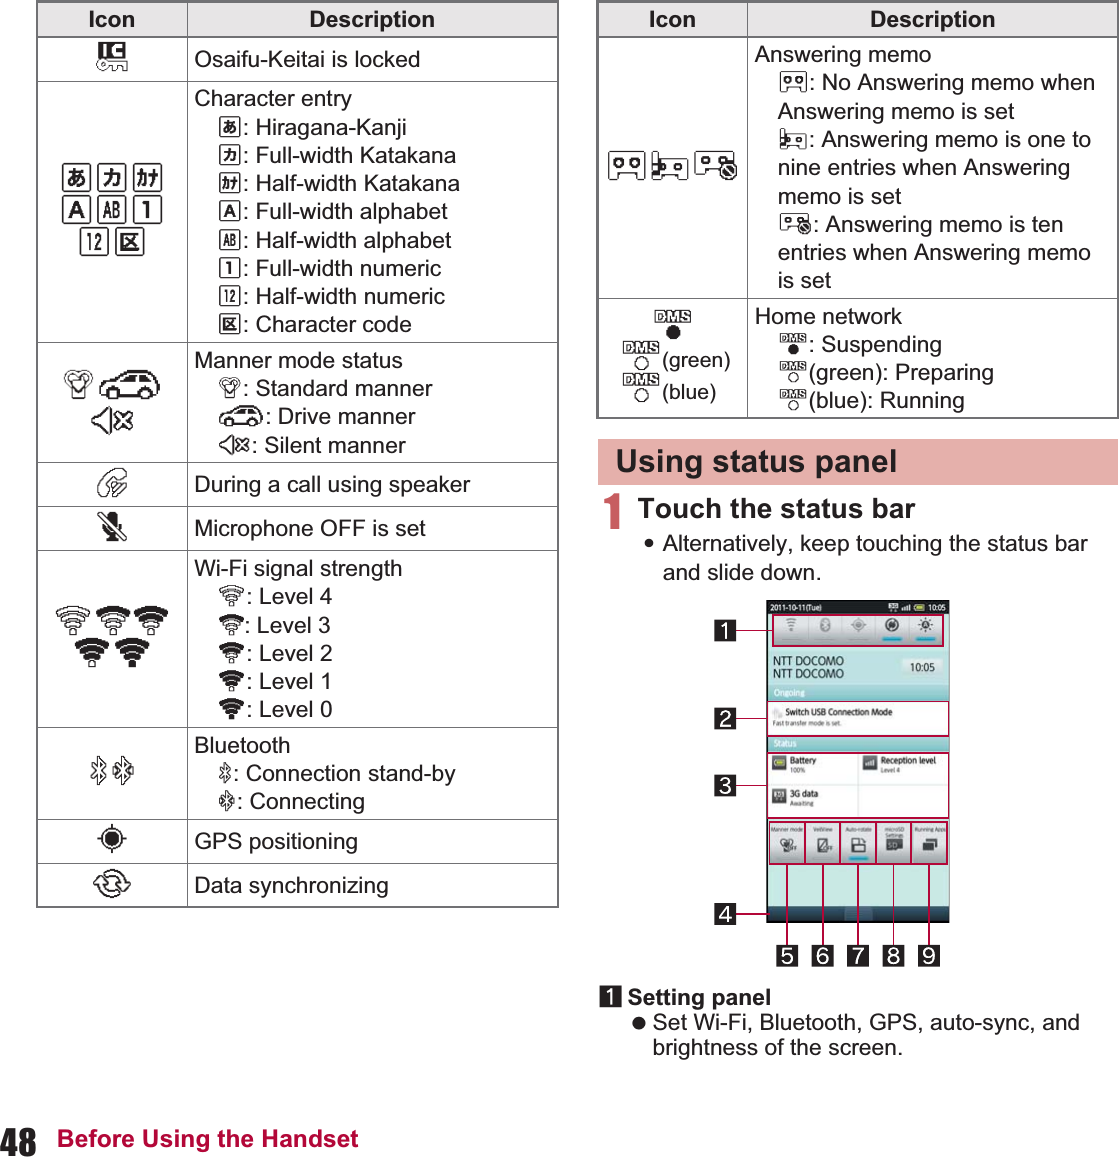
![68 Call/Network Services1In the home screen, [R]/[Address Book]:To switch account: z/[Setting]/[Switch account]/select an account:To delete a phonebook: Touch a phonebook for a while/[Delete]/[Yes]1Account Display the account of retrieved phonebook.2Icon for searching Enter characters one by one to display the closest entries each time.3Tab The tabs of Japanese syllabary row, alphabet and the others are displayed.4Integrated icon The integrated multiple phonebook is displayed.5Image (face)6Speech bubble Speech bubble icon appears when the call, message of mixi/Twitter, etc. is received within 24 hours. Touch it to display the details of the notice in the speech bubble. Touch the speech bubble to check communications.7TapFlow UI activation Display TapFlow UI (nP. 40).2Select a name1Image (full body)2Picture field The data classified by people category from Picture is displayed.3Registered contents Check or use all the registered contents.4Speech bubble Displays messages such as incoming call and mixi/Twitter. Touch to check communications.5Priority icon Displayed in a phone number/mail address that is usually displayed.6Action icons Use to make a call or compose a mail.Phonebook list screenPhonebook detail screen](https://usermanual.wiki/Sharp/HRO00153/User-Guide-1504731-Page-70.png)
![69Call/Network Services7TapFlow activation Displays TapFlow UI (nP. 40).You can copy phonebook data to/from other FOMA terminals using microSD Card. Also, you can copy phonebook data stored in Google account to docomo account.1In the home screen, [R]/[PhoneBookCopy]:When you use this for the first time, you must agree with “license agreement”.ɡExporting phonebook to microSD Card Insert microSD Card in advance.1In the PhoneBookCopy screen, [·ΑεȜΠ] (Export)/[ٳই] (Start)/[OK]:Phonebook data stored in docomo account are saved to microSD Card.ɡImporting phonebook from microSD Card Insert microSD Card with phonebook data in advance.1In the PhoneBookCopy screen, [ͼϋεȜΠ] (Import)2Select a phonebook to import/[ષ̧] (Overwrite)/[ح] (Add)/[OK]:Imported phonebook data are saved in docomo account.ɡCopying contact information stored in Google account to docomo account1In the PhoneBookCopy screen, [docomoͺ;ϋΠ͒άȜ] (Copy to docomo account)2Select a Google account to copy/[ષ̧] (Overwrite)/[ح] (Add)/[OK]:Copied phonebook data are saved in docomo account.:You can copy phonebook data stored in the main body to docomo account in the same way as Google account.Integrated icon When the same name, mail address, etc. as the contact to import are saved in the phonebook, they may be automatically integrated.Speech bubble The outgoing call history/incoming call history can be deleted in the “Phone” application (nP. 66).Using PhoneBookCopy When phonebook item names (phone number etc.) stored in other FOMA terminals are different from those of this FOMA terminal, the item names may be changed or deleted. Also, the characters that can be registered in contact information are different in each FOMA terminal, so they may be deleted in copy destination. When you export phonebook to microSD Card, you cannot copy phonebook data without name. When you import phonebook from microSD Card, you cannot read file which backed up collectively.](https://usermanual.wiki/Sharp/HRO00153/User-Guide-1504731-Page-71.png)
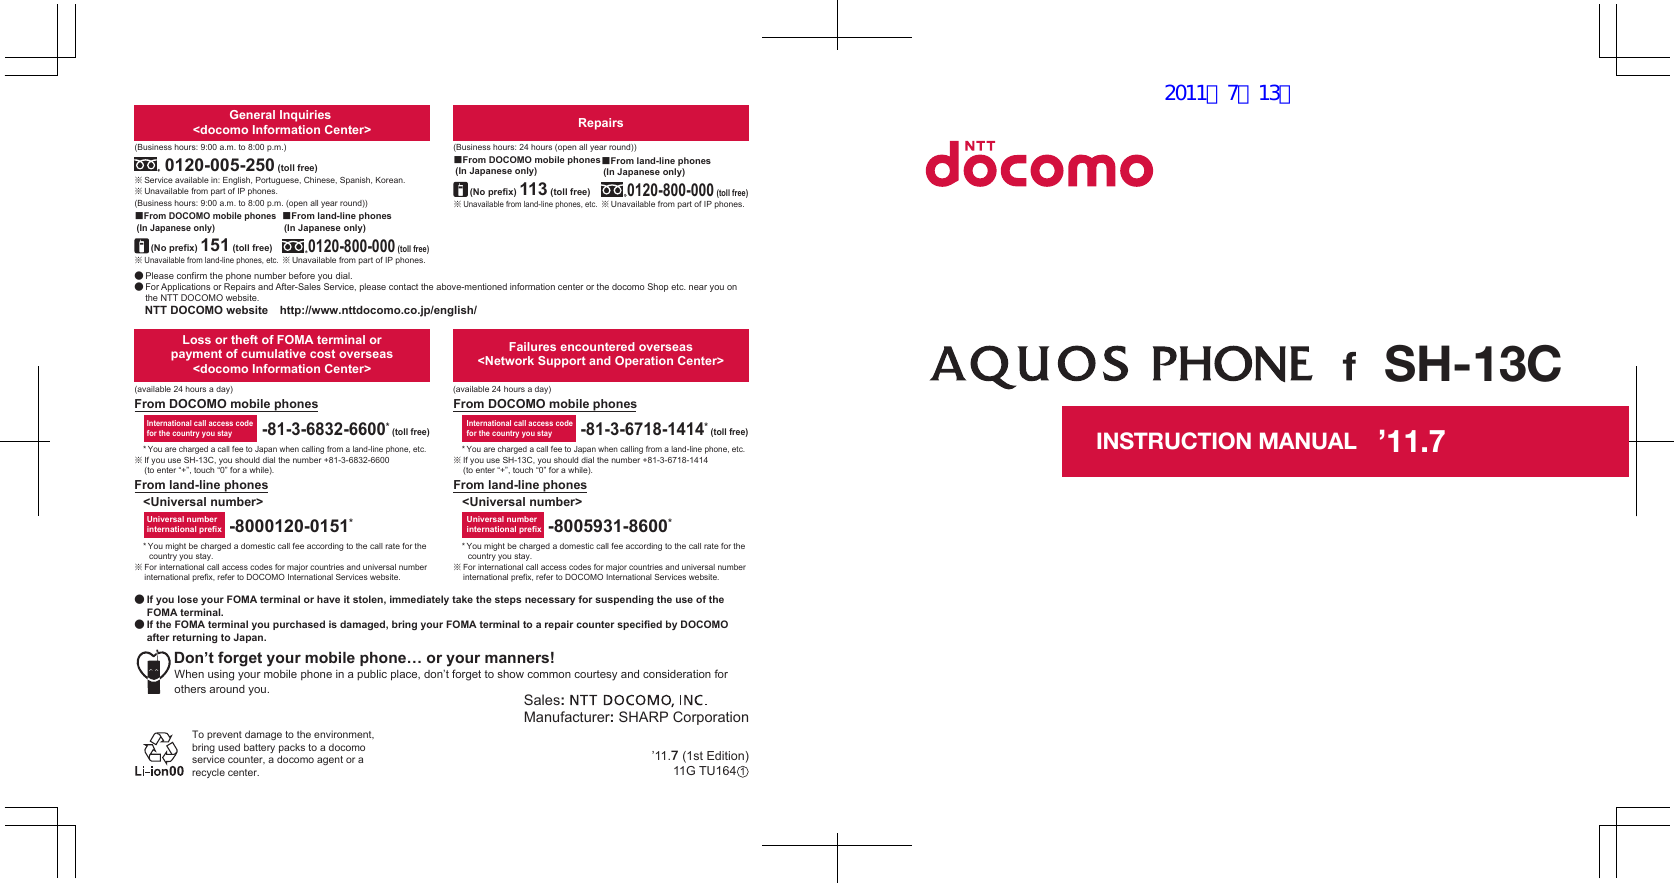
![70 Call/Network Services You can use the following DOCOMO network services on the FOMA terminal. “Deactivate” does not mean that the Voice Mail Service, Call Forwarding Service or other subscriptions are canceled. Network services are not available outside the service area or in a place with no signal. This manual explains the outline of each network service based on the operation using the FOMA terminal menu. Refer to “Mobile Phone User’s Guide [Network Services]” for details. For subscription and inquiries, contact “General Inquiries” on the back of this manual.Voice Mail Service is a service for answering calls with a reply message and recording callers’ messages when the handset is outside the service area or turned off or when you cannot answer calls. This FOMA terminal does not support Voice Mail Service of videophone call. Call “1412” to disable it. To prioritize Voice Mail Service when Answering Memo (nP. 77) is also set, set the ringing time for Voice Mail Service shorter than the answering duration for Answering Memo. If a call is not answered when Voice Mail Service is set to “Activate”, the call is saved as “Missed Call” in “Incoming History” and the notification icon [+] appears.Basic flowSTEP 1 Activate Voice Mail Service.STEP 2 Call is received.STEP 3 Call is connected to Voice Mail Service center if not answered.STEP 4 Caller records a message. To record a message immediately without hearing a reply message when you are in a hurry, press “#” when a reply message is played.STEP 5 Play message.1In the home screen, [R]/[Settings]/[Call settings]/[NWService]/[Voice mail service]2Select the serviceActivate: Start Voice Mail Service.Available network servicesService nameSubscriptionMonthly feeVoice Mail Service Necessary Fees applyCall Waiting Service Necessary Fees applyCall Forwarding Service Necessary FreeNuisance Call BlockingServiceNot necessary FreeCaller ID Notification ServiceNot necessary FreePublic mode (Power off)Not necessary FreeVoice Mail Service](https://usermanual.wiki/Sharp/HRO00153/User-Guide-1504731-Page-72.png)
![71Call/Network ServicesRing time: Set time to connect to Voice Mail Service.Deactivate: Stop Voice Mail Service.Check setting: Check current settings.Play messages: Play new message.Setting: Set Voice Mail Service.Check messages: Check new message.Notification setting: Set to notify when a message is stored.Missed call notification: If a call is received while the handset is outside the service area or turned off, SMS notifies the missed calls received after the handset is turned on again or returns to the service area.Call Waiting Service is a service for placing the current call on hold and answering a new incoming call when the handset beeps during a call to notify you of another call. In addition, place the current call on hold and make a new call. When receiving another call during a call, a beeping is heard.1In the home screen, [R]/[Settings]/[Call settings]/[NWService]/[Call waiting]2Select the serviceActivate: Start Call Waiting Service.Deactivate: Stop Call Waiting Service.Check setting: Check current settings.ɡPlacing the current voice call on hold and answering an incoming call1When a beeping tone is heard during a call, keep touching [2] and slide to the right:Alternatively, z/[Hold current call & answer].:The original call is automatically placed on hold and an incoming call is connected.:To switch between callers: [Swap calls]ɡDisconnecting the current voice call to answer an incoming call1When a beeping tone is heard during a call, keep touching [4] and slide to the left/[Answer]:Alternatively, z/[End current call & answer].:The voice call to the first person is disconnected, and you can answer the new incoming call. You can record up to 20 messages with the recording time per message up to approximately 3 minutes. Messages are saved for up to approximately 72 hours. When Call Forwarding Service is set to “Activate”, Voice Mail Service is stopped automatically.Ring time If you set Ring time to “0 sec.”, an incoming call is directly connected to Voice Mail Service center without being registered in the incoming call history.Call Waiting Service Charges are incurred by a caller even when the call is on hold. Placing the current call on hold and making a call to another party are possible even when Call Waiting Service is deactivated.](https://usermanual.wiki/Sharp/HRO00153/User-Guide-1504731-Page-73.png)
![72 Call/Network ServicesɡPlacing the current voice call on hold and making a separate call1During a call, z/[Add Call]/enter a phone number/[Call]:The original call is automatically placed on hold.:To switch between callers: [Swap calls]ɡRejecting an incoming call during a call1When a beeping tone is heard during a call, z/[Reject]Call Forwarding Service is a service for forwarding calls when the handset is outside the service area or turned off or when calls are not answered within set ringing time. To prioritize Call Forwarding Service when Answering Memo (nP. 77) is also set, set the ringing time for Call Forwarding Service shorter than the answering duration for Answering Memo. If a call is not answered when Call Forwarding Service is set to “Activate”, the call is saved as “Missed Call” in “Incoming History” and the notification icon [+] appears.Basic flowSTEP 1 Register forwarding destination.STEP 2 Activate Call Forwarding Service.STEP 3 Call is received.STEP 4 Call is automatically forwarded to the registered destination if not answered.Call Forwarding Service fees1In the home screen, [R]/[Settings]/[Call settings]/[NWService]/[Call Forwarding]2Select the serviceActivate: Start Call Forwarding Service. Also, the ringing time can be set and a phone number to forward to can be entered.Deactivate: Stop Call Forwarding Service.Register number: Change phone number to forward to.Forwarding number busy: Set whether to connect to Voice Mail Service center when the forwarding destination is busy.Check setting: Check current settings.ɡSetting Call Forwarding guidance1In the home screen, [R]/[Phone]/enter “1429”/[Call]:Set according to the voice guidance.Call Forwarding ServiceCallerCharged to caller.Call Forwarding Service subscriberCharged to Call Forwarding Service subscriber.Forwarding destination When Voice Mail Service is set to “Activate”, Call Forwarding Service is stopped automatically.](https://usermanual.wiki/Sharp/HRO00153/User-Guide-1504731-Page-74.png)
![73Call/Network ServicesYou can register phone numbers for “nuisance calls” such as prank calls. When numbers are registered for the Nuisance Call Blocking Service, calls are automatically rejected and a guidance answers them. A ring tone does not sound when calls are received from registered numbers. In addition, the calls are not saved in the incoming call history. You can reject callers with no caller ID. International calls may not be rejected.1In the home screen, [R]/[Settings]/[Call settings]/[NWService]/[Nuisance call blocking service]2Select the serviceRegister nuisance caller: Register the last caller.Register selected No.: Register specified caller.Delete all entries: Delete all registered numbers.Delete last entry: Delete the last registered number.Check the number of entries: Check the number of registered entries.You can display your number (caller ID) on the other party’s phone (display) when you make a call. Caller ID is important personal information. Be very careful about your caller ID setting. The caller ID notification function is available only on compatible phone devices. If you hear a message asking you to notify caller ID, enable the caller ID notification function or add “186” and call again.1In the home screen, [R]/[Settings]/[Call settings]/[NWService]/[Caller ID notification]2Select the serviceCheck setting: Check current settings.Setting: Activate/Deactivate Caller ID Notification Service.Save and use new DOCOMO network services when they are added. You can save command of new services to the FOMA terminal. When there is a command, it is saved as a “USSD” to the FOMA terminal. Enter the “special number” or “service code” notified from DOCOMO to use the service. “Spacial number” is a number to connect to the service center. “Service code” (USSD) is a code number to notify the service center.Nuisance Call Blocking Service Caller ID Notification ServiceAdditional service](https://usermanual.wiki/Sharp/HRO00153/User-Guide-1504731-Page-75.png)
![74 Call/Network Services1In the home screen, [R]/[Settings]/[Call settings]/[NWService]/[Additional service]2Select the serviceUSSD: Register additional services.ƦYou can register up to ten new network services.Reply message: Register reply message.ƦYou can register up to ten reply messages.Public mode (Power off) is an automatic answering service used to ensure the proper manners in public places. Set Public mode (Power off) to play a message for the caller stating that the power is off and you are unable to answer because you are in a place that does not allow the use of mobile phone (in a hospital, on the airplane, near the priority seats on the train, etc.), and the call is disconnected automatically. When Public mode and network services are set simultaneously, Voice Mail Service*1, Call Forwarding Service*1 and Caller ID Display Request Service*2 are activated in priority to Public mode (Power off).*1 For calls whose ringing time is other than 0 seconds, the service is activated after the Public mode (Power off) guidance.*2 Public mode (Power off) is activated when the caller notifies the ID. For calls from callers rejected by Nuisance Call Blocking Service, Public mode (Power off) is not activated. When a “User unset” call is received while Caller ID Display Request Service is set to “Activate”, Caller ID Display Request message is played (Public mode (Power off) message is not played).1In the home screen, [R]/[Phone]2Enter “b25251”/[Call]:Public mode (Power off) is set (Nothing changes in the home screen).Disabling Public mode (Power off):In the home screen, [R]/[Phone]/enter “b25250”/[Call]Checking Public mode (Power off) setting:In the home screen, [R]/[Phone]/enter “b25259”/[Call]ɡWhen Public mode (Power off) is setPublic mode (Power off) remains set until disabled. The setting is not canceled just by turning on the power. When a call is received, a message stating that you are in a place that does not allow the use of mobile phone is played and the call is disconnected automatically. Public mode (Power off) message is played when the handset is outside the service area or in a place with no signal.Public mode (Power off)](https://usermanual.wiki/Sharp/HRO00153/User-Guide-1504731-Page-76.png)
![75Various SettingsIn the home screen, [R]/[Settings] to display the menu and set various settings of the FOMA terminal.Various SettingsSetting menuSetting DescriptionProfile You can display the phone number registered in the miniUIM and register a name, mail address, etc.Energy saving settingsSet to conserve the battery power.Wireless & networksSet communication such as Wi-Fi, Bluetooth function and Wi-Fi tethering.Call settings Set call such as voice mail, reject calls, etc.Sound settings Set manner mode, ring tone, etc.Display settings Set screen display etc.USB connection Change the setting in connecting the FOMA terminal to PC using the microUSB cable for PC (sample).Location & securitySet the security lock or the way to retrieve information of the present location.Applications Manage applications.Accounts & syncYou can synchronize data between the FOMA terminal and online services. You can access personal information stored in online services from the FOMA terminal and PC, and you can use and update data by synchronizing them.Privacy Delete all of the data in the FOMA terminal.microSD & phone storageYou can check the available space in the microSD Card and manage back up.Language & keyboardSet the language displayed in the screen or character entry.Voice input & outputSet Voice input & output and text-to-speech.Accessibility Set accessibility option.Pedometer settingSet pedometer setting such as User Information.Date & time Set the date and time and the date format.About phone Check the information about phone.Default settings Change the initial setting.Setting Description](https://usermanual.wiki/Sharp/HRO00153/User-Guide-1504731-Page-77.png)
![76 Various SettingsYou can display the phone number registered in the miniUIM and register a name, mail address, etc.1In the home screen, [R]/[Settings]/[Profile]2z/[Edit]/set each item/z/[Save]/[Yes]:For details on each item which can be set nP. 67Set to conserve the battery power.1In the home screen, [R]/[Settings]/[Energy saving settings]2Select an itemQuick energy saving: Set all the items displayed in Energy saving settings to conserve the battery power.Energy saving rest mode: Set time and level to conserve the battery power.Wi-Fi, Bluetooth: For details nP. 76Audible touch tones, Audible selection, Screen lock sounds, Pulse notification light: For details nP. 78Auto-rotate screen, Brightness, Screen timeout: For details nP. 79Use GPS satellites: For details nP. 80Background data: For details nP. 81Set communication such as Wi-Fi, Bluetooth function and Wi-Fi tethering.1In the home screen, [R]/[Settings]/[Wireless & networks]2Select an itemOffline mode: Restrict the use of all functions using communication such as call/mail function.Wi-Fi: Enable Wi-Fi function.Wi-Fi settings: For details nP. 43Home network settings: For details nP. 110Bluetooth: Activate Bluetooth function.Bluetooth settings: For details nP. 107Portable hotspot: For details nP. 77VPN settings: Set and manage VPN.Mobile networks: For details nP. 125ProfileEnergy saving settingsWireless & networks[Offline mode] When the SIM card lock setting is enabled, you cannot call to the emergency number (110, 119 or 118). When the SIM card lock setting is disabled, you can call to the emergency number (110, 119 or 118) in Offline mode. If you call to the emergency number, Offline mode is disabled and the call is made.[VPN settings] VPN (Virtual Private Network) is a connection method to prepare for and connect safely to a virtual dedicated line on the network at home or in the office from outside the home, office, etc.ƦPPTP is not available when ISP is set to sp-mode.](https://usermanual.wiki/Sharp/HRO00153/User-Guide-1504731-Page-78.png)
![77Various SettingsTethering function that connects Wi-Fi compatible devices to the Internet via networks of this FOMA terminal by using the FOMA terminal as a Wi-Fi access point is available. You can connect to up to five Wi-Fi compatible devices simultaneously. This function is available inside the FOMA service area. However, this function may be interrupted depending on the conditions on communications or on network congestion. This function is not available when miniUIM is not inserted or in cases in which the FOMA service is canceled or stopped.1In the home screen, [R]/[Settings]/[Wireless &ȁnetworks]/[Portable hotspot]2Select an itemPortable Wi-Fi hotspot: Enable the Wi-Fi tethering.Portable Wi-Fi hotspot settings: Set the Wi-Fi tethering settings such as network SSID and security.Ʀ[Configure Wi-Fi hotspot]/set each item/[Save] to set Wi-Fi hotspot. Set security setting if necessary. The security setting supports WPA2 PSK.Help: Display Help information.Set call such as voice mail, reject calls, etc.1In the home screen, [R]/[Settings]/[Call settings]2Select an itemAny key answer settings: Set an action when you press | on receiving a call. Auto answer: Set to answer a call automatically when an earphone is connected.Calling display setting: Set the display in the screen during a call.Call/Ans Memo: Play or set Call/Answer Memo. If you set Answering Memo, the FOMA terminal answers a call and records the caller’s message when you cannot answer.Int’l call settings: Check country codes.Call blocking: Set Call blocking.Ʀ[Specified numbers]/z/[Edit] to save the specified phone number.NWService: For details nP. 70Accounts: Set an account of Internet call.Use Internet calling: Set whether to use Internet call.Wi-Fi tethering Call settings[Any key answer settings] Following items can be set.Answer: Press | on receiving a call to answer it.Quick silent: Press | on receiving a call to temporarily stop the ring tone or vibration.OFF: Operation is not available by pressing | on receiving a call.](https://usermanual.wiki/Sharp/HRO00153/User-Guide-1504731-Page-79.png)
![78 Various SettingsSet manner mode, ring tone, etc.1In the home screen, [R]/[Settings]/[Sound settings]2Select an itemManner mode: Set to avoid disturbing others when in public.Phone vibe: Set whether to enable the vibrator for receiving a call.Volume: Set the volume of ring tone, media play sound, etc.ƦAlternatively, press x/y to change the volume.Earphone type: Set the type of earphone connected.Melody: Set the ring tone.Vibrator Pattern: Set the vibrator pattern.Incoming lamp: Set the pattern of lamp when receiving a call.Notification sound: Set the sound for receiving notification.Ring duration: Set the ring duration.Pulse notification light: Set whether to flash a lamp for receiving a notification.Audible touch tones: Set whether to enable dial sound.Audible selection: Set whether to enable operation sound for selecting items.Screen lock sounds: Set whether to enable operation sound for locking or unlocking screen.Haptic feedback: Set whether to enable the vibrator for specific key operation.Sound settings Note that if the vibrator is set to be enabled and the FOMA terminal is left on a table, it may fall due to vibration.[Manner mode] The following is not silenced even while Manner mode is set.Shutter sound of cameraRecord start/end sound of video cameraRecord start/end sound of voice recorder The following manner mode can be set.Standard manner mode: The ring tone and operation sound are silenced, and the vibrator is activated when receiving a call or others. When Answering Memo setting is set to [Mannermode], Answering Memo is enabled and operated according to its setting.Drive manner mode: The ring tone and operation sound are silenced, and the vibrator is not activated even when receiving a call or others. Answering Memo is enabled and operated with the Answering message setting of [Drive].Silent manner mode: The ring tone and operation sound are silenced, and the vibrator is not activated even when receiving a call or others. When Answering Memo setting is set to [Mannermode], Answering Memo is enabled and operated according to its setting. While manner mode is set, incoming call volume cannot be changed by pressing x/y.[Pulse notification light] If no operations are performed for approximately 24 hours after notification lamp starts flashing, notification lamp will be turned off.](https://usermanual.wiki/Sharp/HRO00153/User-Guide-1504731-Page-80.png)
![79Various SettingsSet screen display etc.1In the home screen, [R]/[Settings]/[Display settings]2Select an itemBrightness: Set the brightness of backlight.Auto-rotate screen: Set whether to switch the screen to horizontal/vertical display when rotating the FOMA terminal 90° to the left/right.Animation: Express screen switch with animation.Screen timeout: Set the light duration of backlight.VeilView: Prevent others from seeing display.Text font: Set the text font.Wallpaper: Set an image of home screen.Change the setting in connecting the FOMA terminal to PC using the microUSB cable for PC (sample).1In the home screen, [R]/[Settings]/[USB connection]2Select an itemUSB battery charge: Charge the FOMA terminal while it is connected to a PC via the microUSB cable for PC.USB connection mode: Change the mode set when connecting the FOMA terminal to a PC.ƦConnect the FOMA terminal to a PC via the microUSB cable for PC in advance.Display settings[Brightness], [Screen timeout] Note that increasing the brightness level or the light duration shortens the continuous stand-by time.[VeilView] The effect of preventing others from seeing differs depending on the selected patterns. The intensity is more effective to prevent others from seeing the display in order of [Dark],ȁ[Medium], and [Light]. VeilView is disabled if the power is turned off.[Text font] Font may not appear correctly when activating an application downloaded from Android Market etc. depending on the selected font.USB connection[USB battery charge] USB battery charge setting is enabled when a USB is connected next time or the USB connection mode is changed.[USB connection mode] The following modes can be set.Card reader mode: Mode for using microSD Card inserted to the FOMA terminal as an external memory for a PC.Fast transfer mode: Mode for upgrading OS version.MTP mode: Mode for transferring music/video/still picture data to microSD Card using Windows Media® Player 11/12. While transferring data, Offline mode may be enabled.](https://usermanual.wiki/Sharp/HRO00153/User-Guide-1504731-Page-81.png)
![80 Various SettingsSet the security lock or the way to retrieve information of the present location.1In the home screen, [R]/[Settings]/[Location & security]2Select an itemUse wireless networks: Position location information using wireless network. Use GPS satellites: Position location information with higher accuracy.Lock Setting: Set the various locks.Unlock method: Change the unlock method. finger list, Lock No. or password can be used.Change unlock pattern: Change the finger list pattern, Lock No. or password set for unlock method.Use visible pattern: Display track for entering finger list pattern with line.Use tactile feedback: Activate vibration on entering Lock No., finger list pattern and password.Set up SIM card lock: Set for the PIN code.Visible passwords: When you enter the PIN code etc., you can display the entered characters before displaying [Ȇ].Select device administrators: Set the device administrators when the device administrators is certificated.Use secure credentials: Allow to access secure certificates and other credentials.ƦSet the credential storage password in advance. Install from microSD: Install encrypted certificates from microSD.Set password: Set the credential storage password.Clear storage: Delete all credentials and reset the credential storage password.Location & security It is necessary to enable location information services ([Use wireless networks] or [Use GPS satellites]) to measure the present location.[Use GPS satellites] Power consumption of the FOMA terminal increases.[Lock Setting] If you failed to enter finger list pattern five times when disabling Screen lock, you cannot enter it for 30 seconds. Disable the lock by signing in with your Google account and enter new finger list pattern. You can call to the emergency number (110, 119 or 118) even when you set Restrict calls. To use a function while it is restricted, enter the Lock No. to temporarily disable the restriction.[Set up SIM card lock] In Japan, you cannot call to the emergency number (110, 119 or 118) from the PIN code entry screen and PUK (PIN Unlock Key) entry screen, with a miniUIM locked. The setting is saved in the miniUIM.](https://usermanual.wiki/Sharp/HRO00153/User-Guide-1504731-Page-82.png)
![81Various SettingsManage applications. If you delete the applications or widgets installed by default, you can download them from the manufacture’s site (http://galapagossquare.com/) (in Japanese only).1In the home screen, [R]/[Settings]/[Applications]2Select an itemUnknown sources: Allow installation of application received via mail or site other than Android Market.Preferred install location: Set the preferred location for installed applications.File transfer mail software: Set a mail software to be activated by attaching to mail from another application.Home applications: Switch the home application to use.Manage applications: Check application names, their versions, the memory usage, etc.Running services: Display and control the running services.Storage use: Check storage usage per application.Battery use: Check battery usage per application.Development: Use application development functions.You can synchronize data between the FOMA terminal and online services. You can access personal information stored in online services from the FOMA terminal and PC, and you can use and update data by synchronizing them.1In the home screen, [R]/[Settings]/[Accounts & sync]2Select an itemBackground data: Allow all applications to automatically perform data communication.Auto-sync: Allow all applications to automatically perform data synchronization.:Accounts to be synchronized are displayed as items in “Manage accounts”.:For details on adding an account nP. 45Applications [Unknown sources] Applications you download from the sites may be of unknown origin. To protect your FOMA terminal and personal data, download applications only from trusted sources such as Android Market.[Development] Refer to http://developer.android.com/ for details on development function.Accounts & synchronization Register Google account in advance when you synchronize phonebook of your FOMA terminal with contacts on the online services even if you synchronize with other than Google account.](https://usermanual.wiki/Sharp/HRO00153/User-Guide-1504731-Page-83.png)
![82 Various SettingsDelete all data in the FOMA terminal.1In the home screen, [R]/[Settings]/[Privacy]/[Reset all]/[Reset phone]2Enter the Lock No./[OK]/[Erase everything]You can check the available space in the microSD Card, manage the backup, etc.1In the home screen, [R]/[Settings]/[microSD & phone storage]2Select an itemTotal space: Check the microSD Card space.Available space: Check the available space in the microSD Card.microSD backup: For details nP. 120Mount microSD/Unmount microSD: Mount/Unmount microSD Card.Erase microSD: Format the microSD Card.ƦUnmount the microSD Card in advance.Available space: Check the available space in the FOMA terminal.Set the language displayed in the screen or character entry.1In the home screen, [R]/[Settings]/[Language & keyboard]2Select an itemSelect language: Select Japanese/English.User dictionary: Register any words in the dictionary and display them as conversion candidates when you enter the characters with the Android keyboard.iWnn IME - SH edition: Set iWnn IME - SH edition.Android keyboard: Set the Android keyboard.PrivacymicroSD & phone storage[Mount microSD]/[Unmount microSD] Turn off the power before mounting or unmounting the microSD Card.[Erase microSD] Note that all the data on the microSD Card will be deleted when formatted.Language & keyboard](https://usermanual.wiki/Sharp/HRO00153/User-Guide-1504731-Page-84.png)
![83Various SettingsSet Voice input & output and text-to-speech.1In the home screen, [R]/[Settings]/[Voice input & output]2Select an itemVoice recognizer settings: Set the voice input method.Text-to-speech settings: Set the voice for text-to-speech.Set accessibility option.1In the home screen, [R]/[Settings]/[Accessibility]2Select an itemAccessibility: Set accessibility option which responds to user’s operation with sound and vibration is available.Power key ends call: Set whether to end the call by pressing H.Set pedometer setting such as User Information.1In the home screen, [R]/[Settings]/[Pedometer setting]2Select an itemPedometer On: Enable the pedometer.User Information: Register height, weight and stride.Pedometer Reset Time: Set time to reset the pedometer.Walking Sensitivity: Set the sensitivity of the pedometer.Voice input & output[Text-to-speech settings] Text-to-speech settings is available only when the screen of the FOMA terminal is set to the English display (nP. 82).Accessibility[Accessibility] By default, accessibility option is not registered. Settings will be available by downloading accessibility options such as “SoundBack”, “KickBack” and “TalkBack” from Android Market.Pedometer setting Pedometer On cannot be enabled without inputting User Information. When Pedometer On is enabled, the number of steps is always counted while the power is turned on. The display of the pedometer is reset once a day on the time set in the Pedometer Reset Time.](https://usermanual.wiki/Sharp/HRO00153/User-Guide-1504731-Page-85.png)
![84 Various SettingsSet the date and time and the date format.1In the home screen, [R]/[Settings]/[Date & time]2Select an itemAutomatic: Set whether to adjust the date and time automatically.Set date: Set the date manually.Select time zone: Set the time zone manually.Set time: Set the time manually.Use 24-hour format: Switch 12-hour format/24-hour format.Select date format: Set the date format to display.Check the information about phone.1In the home screen, [R]/[Settings]/[About phone]2Select an itemStatus: You can check the battery level, network in use, etc.Battery use: You can check the battery usage per application.Adjust sensitivity of sensor: Adjust accuracy of motion sensor and geomagnetic sensor.Software Update: For details nP. 134Major Update: Upgrade OS version of the FOMA terminal by connecting the FOMA terminal to your PC.ƦFor details on upgrade nP. 141Legal information: You can check copyright notice, terms of service, etc.Technical Regulations Conformity Certification: You can check the certification of conformity with technical regulations.Model number: You can check the model number.Android version: You can check the Android version.Baseband version: You can check the baseband version.Kernel version: You can check the kernel version.Build number: You can check the build number.Date & timeWhen [Automatic] is enabled If the FOMA terminal does not adjust the time for a while after the power is turned on, turn off the power and restart it. Time may not be adjusted depending on the signal status. Time may be off by a few seconds.About phone[Adjust sensitivity of sensor] Perform the adjustment approximately 10 seconds after the adjustment screen appears.](https://usermanual.wiki/Sharp/HRO00153/User-Guide-1504731-Page-86.png)
![85Various SettingsSome functions for convenient use of the FOMA terminal require security codes. In addition to the Lock No. used for various handset operations, use security codes such as the network security code when using network services. Use security codes with various functions to fully utilize the FOMA terminal. Entered Lock No. (security code for each function) and PIN code are marked with [Ȇ].ɡLock No. (for various functions)Lock No. is set to [0000] by default but you can change the number (nP. 80). If you enter the wrong Lock No. five times continuously, you cannot enter it for 30 seconds. Adjustment may be failed depending on surroundings or other simultaneously running applications. Change the place where you make adjustment, end running applications, etc.Security codesSecurity codes used on the FOMA terminalPrecautions for various security codes Do not use easily estimated numbers for security codes to be set such as “birthday”, “part of a phone number”, “address or room number”, “1111” or “1234”. Keep a separate memo of security codes. Keep security codes private. If the security codes are found and improperly used by others, DOCOMO shall not be liable for any loss of the users. If you forget your security codes, you are required to bring your identification (a driver’s license etc.), your FOMA terminal and your miniUIM to a docomo Shop. For details, contact “General Inquiries” on the back of this manual. PUK (PIN Unlock Key) is described in the agreement form (customer copy) you received at the time of subscription at a docomo Shop. If you made a subscription outside a docomo Shop, bring your identification (a driver’s license etc.) and your miniUIM to a docomo Shop or contact “General Inquiries” on the back of this manual.](https://usermanual.wiki/Sharp/HRO00153/User-Guide-1504731-Page-87.png)
![86 Various SettingsɡNetwork security codeNetwork security code is a four-digit code required for confirming the subscriber’s identity when an order is received at a docomo Shop or docomo Information center or used for accessing various network services. You set arbitrary code at the time of subscription but you can change the code.For those with “docomo ID/password” of the general support site “My docomo” designed for PC (in Japanese only), the registration procedure for a new network security code is available from PC. Refer to the inside back cover of this manual for details on “My docomo”.ɡPIN codeA miniUIM has a security code called PIN code. This security code is set to [0000] by default but you can change the code (nP. 80).The PIN code is a four- to eight-digit security code that is entered when a miniUIM is inserted or when the FOMA terminal is turned on to prevent unauthorized use by a third party. Making/Receiving a call and the terminal operation are enabled by entering PIN code. Use the previously set PIN code when inserting a miniUIM that has been used in another FOMA terminal. It is [0000] if the setting has not been changed. If you enter the wrong PIN code three times continuously, it is locked. In this case, unlock with “PUK” (PIN Unlock Key).ɡPUK (PIN Unlock Key)PUK (PIN Unlock Key) is an eight-digit number used to disable the PIN code lock. You cannot change the code. If you enter the wrong code ten times continuously, the miniUIM is completely locked. In this case, contact a docomo Shop.1In the PIN locking screen, enter PUK (PIN Unlock Key)/[OK]2Enter the new PIN code/[OK]3Enter the new PIN code again/[OK]Disabling PIN lock](https://usermanual.wiki/Sharp/HRO00153/User-Guide-1504731-Page-88.png)
![87Mail/InternetYou can send and receive mail by setting a mail account provided by service provider such as mopera U. Set the account in advance (nP. 45).1In the home screen, [R]/[Email]:The Inbox screen appears when an account is registered.ƦTo display the mail main screen: z/[Accounts]ƦTo display the mailbox screen: z/[Folders]:The mail main screen appears when multiple accounts are registered.2z/[Compose]3Enter a destination, a subject, and a message/[Send]:To attach a file: z/[Add attachment]/select a fileɡDisplaying mail1In the home screen, [R]/[Email]:To update Inbox: In the Inbox screen, z/[Refresh]ƦIncoming new mails are received and displayed in the Inbox screen.2Select a mailɡReplying mail1In the home screen, [R]/[Email]2Select a mail3[Reply]/[Reply all]/compose and send the mailɡForwarding mail1In the home screen, [R]/[Email]2Select a mail3z/[Forward]/enter the destination and sendɡDeleting mail1In the home screen, [R]/[Email]2Select a mail:In the mail list screen, touch check boxes and [Delete] to delete multiple mails.Mail/InternetMail Some receiving models may not be able to receive the subject completely. Mail sent from a Gmail account are treated as one from a PC. When receiving models set PC-mail rejection, mails cannot be sent. Mail that could not be sent by some reason is saved as unsent mail. Text for recipient may not appear correctly depending on signal status.Attaching file You can attach up to 5 MB by each file. There are no limits for number of attaching data. Depending on the receiving side terminal, files may not be received, correctly displayed/played etc. Also, the quality of videos may deteriorate, videos may be converted to continuous still pictures, etc.](https://usermanual.wiki/Sharp/HRO00153/User-Guide-1504731-Page-89.png)
![88 Mail/Internet3[Delete]You can send and receive mail using i-mode mail address (@docomo.ne.jp).Pictograms and Deco-mail are available. Automatic reception is also supported. For details on sp-mode mail, refer to “̮၌ဥ΄ͼΡήΛ· (spκȜΡ<ΑζȜΠέϋ>༎)” (Mobile Phone User’s Guide [sp-mode <Smartphone>]) (in Japanese only).1In the home screen, [R]/[spκȜΡιȜσ] (sp-mode mail)Gmail is a mail service provided by Google. Refer to Gmail website for details on Gmail.1In the home screen, [R]/[Gmail]2z/[Compose]3Enter a destination, a subject, and a message/[#]ɡDisplaying mail1In the home screen, [R]/[Gmail]:To update Inbox: z/[Refresh]ƦIncoming new mails are received and displayed in the Inbox screen.2Select a mailɡReplying mail1In the home screen, [R]/[Gmail]2Select a mail3[$]/compose and send the mail:To reply to all: In the mail composition screen, [%]/[Reply All]/compose and send the mailɡForwarding mail1In the home screen, [R]/[Gmail]2Select a mail3[$]/[%]/[Forward]/enter the destination and sendɡDeleting mail1In the home screen, [R]/[Gmail]2Select a mail:In the mail list screen, touch check boxes and [Delete] to delete multiple mails.3[Delete]You can send and receive text messages that include up to 70 double-byte characters (160 characters for single-byte characters only) to/from other terminal using phone numbers. You can also exchange messages with users of non-DOCOMO overseas telecommunications carriers. Refer to “Mobile Phone User’s Guide [International Services]” or the DOCOMO International Services website for information on available countries and overseas telecommunications carriers.sp-mode mailGmailSMS](https://usermanual.wiki/Sharp/HRO00153/User-Guide-1504731-Page-90.png)
![89Mail/Internet1In the home screen, [R]/[Messaging]:The thread list screen appears.2[New message]/enter a destination and a message/[Send]ɡDisplaying message1In the home screen, [R]/[Messaging]2Select a threadɡDeleting message1In the home screen, [R]/[Messaging]2Select a thread3Touch a message for a while/[Delete message]/[Delete]ɡDeleting thread1In the home screen, [R]/[Messaging]2Touch a thread for a while/[Delete thread]/[Delete]Area Mail is a service to receive the earthquake early warning, etc. provided from the Japan Meteorological Agency. When an area mail is sent to you, it is automatically received and the contents of it is displayed whether or not sleep mode is set or whether or not screen lock is set. Area Mail may not be received or displayed automatically depending on the condition of the FOMA terminal.ƦIn the following cases, you cannot receive Area Mail.While power is offWhile out of service areaDuring international roamingIn Offline modeƦIn the following cases, you may not receive Area Mail.During packet communication (data communication)During Wi-Fi tetheringDuring software updateDuring OS version upgradeƦIn the following cases, you can receive Area Mail but it may not be displayed automatically.During a callDuring packet communication (playing data by streaming, data communication)During software updateDuring OS version upgrade Area Mail is a free service that does not require a subscription. For destinations of non-DOCOMO overseas telecommunications carriers, enter “+”, the country code, and the recipient’s mobile phone number. If the phone number begins with “0”, omit the “0”. Alternatively, enter “010”, the country code and the phone number. Add “010” to reply to SMS received from abroad. Single-byte katakana and special symbols in SMS text may not appear correctly for recipient. SMS cannot be sent when “186” or “184” is added.Early warning “Area Mail”](https://usermanual.wiki/Sharp/HRO00153/User-Guide-1504731-Page-91.png)
![90 Mail/Internet1Receive Area Mail automatically2When Area Mail is received, the Area Mail dedicated ring tone sounds and the incoming lamp flashesɡChecking received Area Mail later1Touch the status bar/select received Area Mail:Alternatively, [R]/[Area Mail] in the home screen.Whether to receive Area Mail, operations on receiving Area Mail, etc. is set.1In the home screen, [R]/[Area Mail]2z/[Early warning “Area Mail” setting]/select an itemReceive setting: Set whether to receive Area Mail.Beep time: Set the ring duration.Manner mode setting: Set the operations activated during manner mode.Check display image and beep tone: Set the incoming screen and ring tones.This FOMA terminal can display sites over packet communication or Wi-Fi connection.1In the home screen, [R]/[Browser]ɡSearching sites1In the browser screen, touch a search box2Enter the URL/keyword:Display a list of URLs that start with the entered characters or sites that include the entered characters.3Select the search result:Alternatively, [I] after entering whole URL/keyword. You can receive Area Mail without subscription to mopera U, Business mopera Internet (URL restriction) and sp-mode. You cannot receive the Area Mail that failed to be received again. You can save up to 50 Area Mails. If the number of Area Mails saved in the FOMA terminal exceeds the maximum number to be saved, Area Mail is deleted from the oldest one.Setting of early warning “Area Mail” Settings of the earthquake early warning alarm, ring tone sounds dedicated to disaster and evacuation information, ring tone volume, vibrator cannot be changed.BrowserDisplaying sites Some sites may not appear properly.](https://usermanual.wiki/Sharp/HRO00153/User-Guide-1504731-Page-92.png)
![91Mail/InternetɡOpening new window1In the browser screen, z/[New window]:When multiple windows are opened: z/[Windows]/[Open new window]ɡSwitching windows1In the browser screen, z/[Windows]2Select a windowɡSearching characters in the page1In the browser screen, z/[Find on page]2Enter the keyword3[a]/[b]:To end searching: [c]ɡCopying characters1In the browser screen, z/[More]/[Copy text]2Keep touching the start position and slide it to the end position:To change the copy range: Keep touching [d]/[e] and slide it3Touch the copy rangeɡConvenient functionsYou can display a link with a new window, download data such as images, etc.1In the browser screen, touch a link/an image for a while2Select a function to useɡSetting website1In the browser screen, z/[More]/[Settings]/[Home page setting]2Enter the URL:To enter the URL of displaying site: [Use current page]3[OK]ɡSaving bookmarks1In the browser screen, z/[Bookmarks]2[Add]/[OK]:When display is set to List view: [Bookmark current page]/[OK]ɡDisplaying sites from bookmarks1In the browser screen, z/[Bookmarks]2Select a bookmarkɡDisplaying sites from frequently used sites/histories1In the browser screen, z/[Bookmarks]/[Most visited]/[History]2Select a frequently used site/historyUsing bookmark and history](https://usermanual.wiki/Sharp/HRO00153/User-Guide-1504731-Page-93.png)
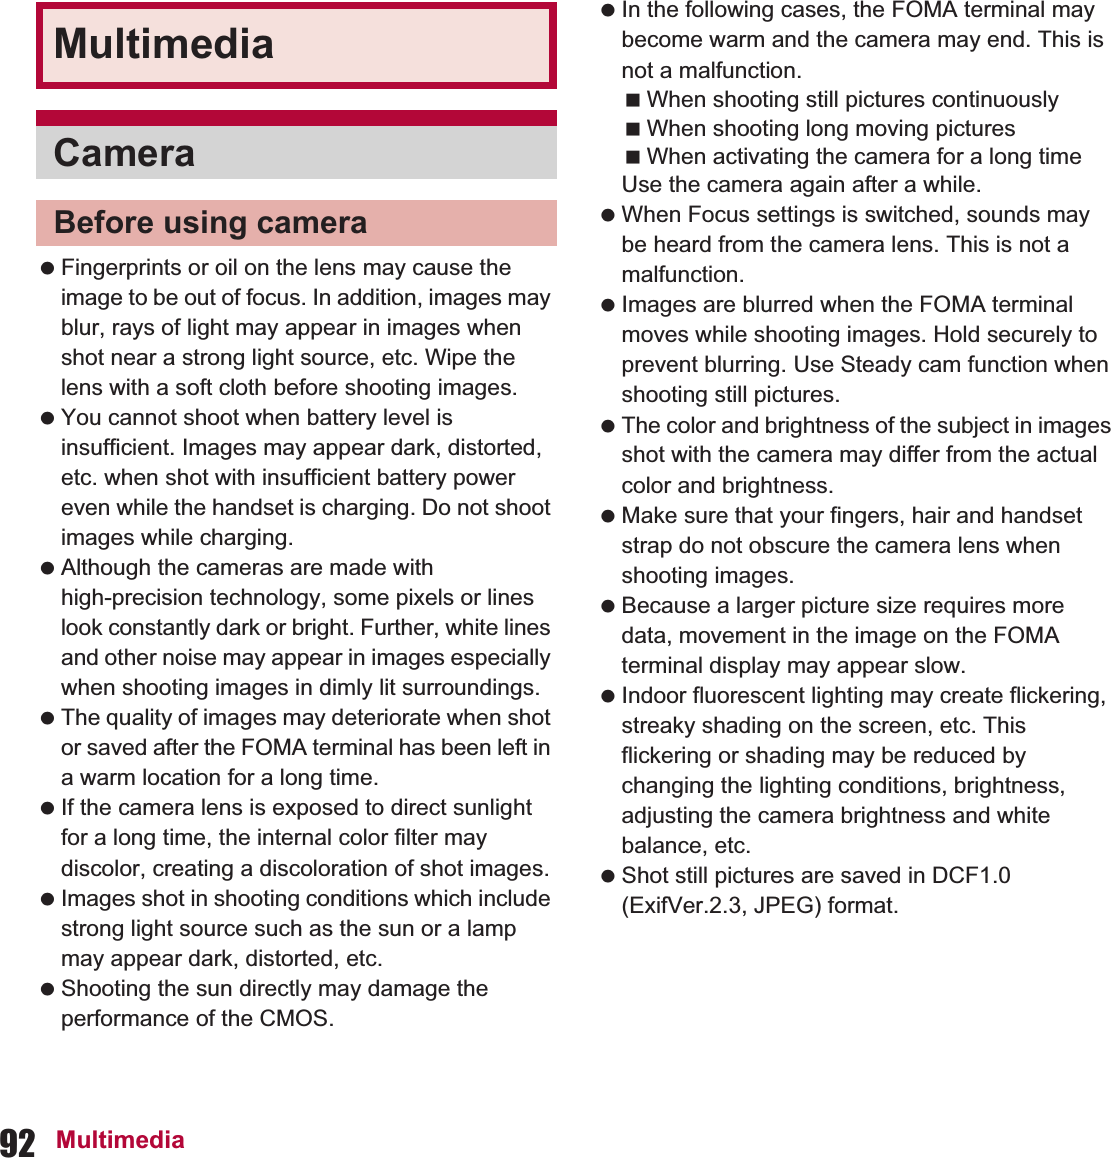
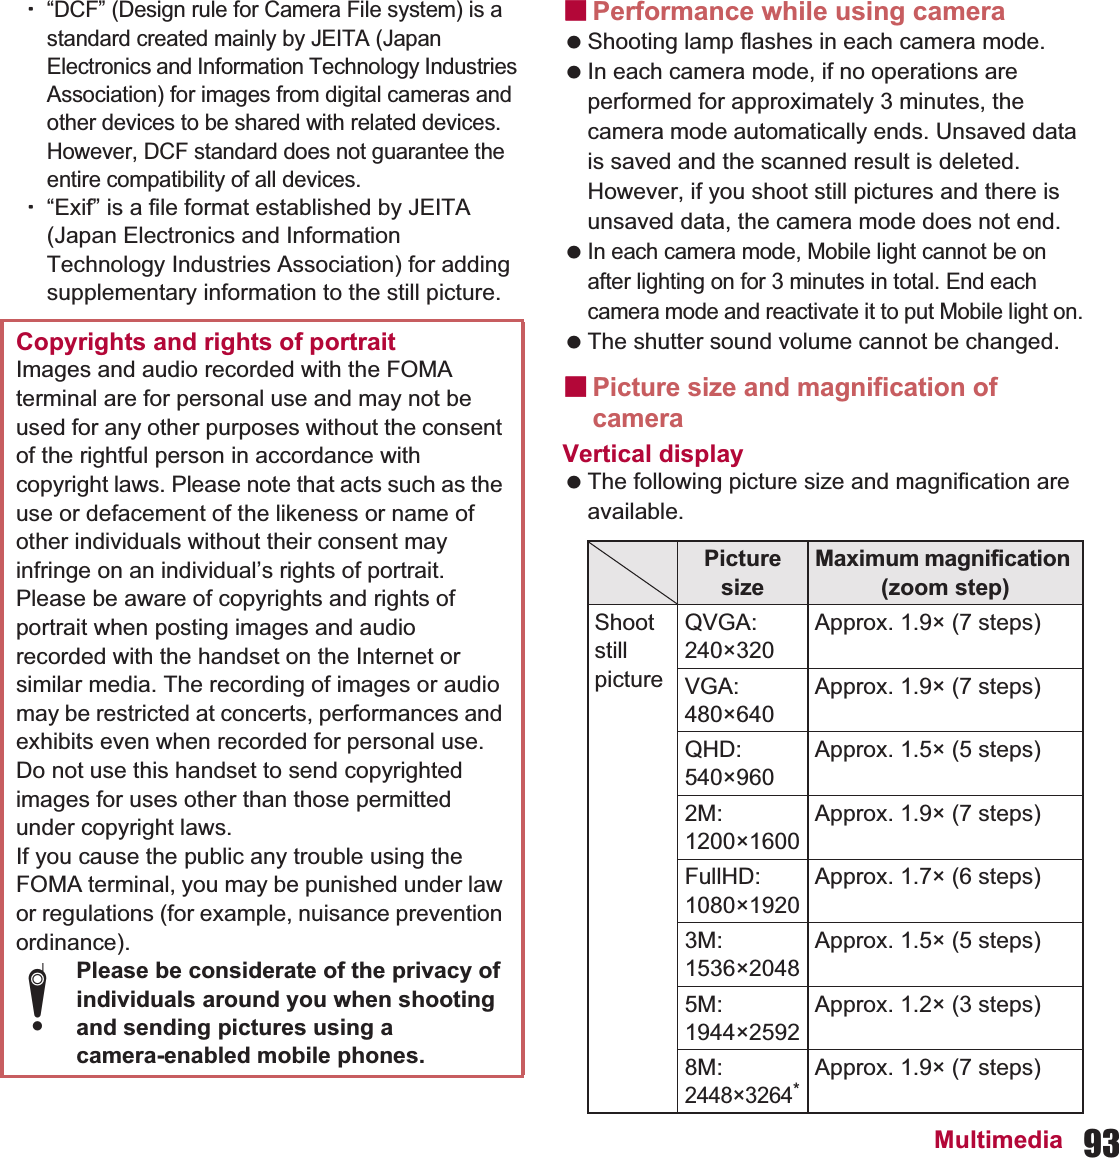
![94 Multimedia* If you use zoom, the suitable picture size is automatically selected.Horizontal display The following picture size and magnification are available.* If you use zoom, the suitable picture size is automatically selected.ɡShooting screen layoutStill picture shooting screenMoving picture shooting screen1Remaining number of pictures/time which can be shot Even after shooting a still picture, remaining number of pictures/time which can be shot may not be changed.2Focus settings3Blog mode An application is activated by touching it when the upload destination setting of the blog mode setting is set to [Twitter] or [mixiSH].4TapFlow activation Displays TapFlow UI (nP. 40).5ISO sensitivityPicture sizeMaximum magnification (zoom step)Shoot still pictureQVGA: 240×320Approx. 1.9× (7 steps)VGA: 480×640Approx. 1.9× (7 steps)QHD: 540×960Approx. 1.5× (5 steps)2M: 1200×1600Approx. 1.9× (7 steps)FullHD: 1080×1920Approx. 1.7× (6 steps)3M: 1536×2048Approx. 1.5× (5 steps)5M: 1944×2592Approx. 1.2× (3 steps)8M: 2448×3264*Approx. 1.9× (7 steps)Shoot moving pictureHD: 1280×720Actual size (–)QHD: 960×544Approx. 1.5× (5 steps)VGA: 640×480Approx. 5.1× (14 steps)QVGA: 320×240Approx. 6.4× (15 steps)](https://usermanual.wiki/Sharp/HRO00153/User-Guide-1504731-Page-96.png)
![95Multimedia6Thumbnail Shoot when Auto Save is set to [ON]. Thumbnail appears. Touch to display the shot still picture/moving picture.7White balance8Picture size9Save settingsaScene settingsbImage qualitycCamera modedFix camera shakeeSelf-timerfShuttergMobile light Switch ON/OFF of Mobile light.hAuto save settingsShoot a still picture.1In the home screen, [R]/[Camera]:To adjust the brightness: Slide up/down:Zoom: Slide to the left/right:Focus lock: Touch the subjectƦTouch anywhere other than focus frame to cancel the focus lock.:To display All Menu: zSwitch camera: Switch camera mode.Blog mode Settings: Set the blog mode.Detect Personal: Set personal detection.Self-timer: Set the use of self-timer.Picture Size: Set the picture size.Focus settings: Set the type of focus.Shutter settings: Set the shutter.ISO Sensitivity: Set ISO sensitivity.Settings: Set each item of settings for shooting.Picture: Activate Picture.D-Range: Set whether to use dynamic range adjustment.Save settings: Set saving method.Scene: Set shooting mode.Mobile light: Set the use of Mobile light.Help: Display Help.Reset usage history: Reset the TapFlow UI history.2[!]:The shutter sounds.:If Auto Save of Save settings is set to [ON], this operation is completed.3[Save]Shoot a moving picture.1In the home screen, [R]/[Video Camera]:To adjust the brightness: Slide up/down:Zoom: Slide to the left/right:To display All Menu: zSwitch camera: Switch camera mode.Self-timer: Set the use of self-timer.Picture Size: Set the picture size.Focus settings: Set the type of focus.Settings: Set each item of settings for shooting.Picture: Activate Picture.Auto Save: For details nP. 96Scene: Set shooting mode.Mobile light: Set the use of Mobile light.Help: Display Help. Touch icon display area to switch display range.CameraVideo camera](https://usermanual.wiki/Sharp/HRO00153/User-Guide-1504731-Page-97.png)
![96 MultimediaReset usage history: Reset the TapFlow UI history.2[(]:Shooting starts after the shooting start sound is heard.3[)] to end shooting:After the shooting end sound, the shooting stops.:When Auto Save is set to [ON], this operation is completed.4[Save]Set whether you save a shot still picture or a shot moving picture automatically.1In the still picture shooting screen, z/[Save settings]/[Auto Save]:When the video camera is on: In the moving picture shooting screen, z/[Auto Save].2Select the settingYou can use the camera to scan bar codes (JAN/QR codes), and perform various operations according to the contents of scanned item.JAN code JAN code is a type of bar code using vertical bars of varying width to express numbers. The following code is read as [4942857119022]. JAN8 and JAN13 can be read.QR code QR code is a type of two-dimensional code expressing data vertically and horizontally. The following code is read as [ڼٛ২NTTΡκ].1In the home screen, [R]/[Camera Reader]/[Switch reader]/[Barcode]:To adjust the brightness: Slide up/down2Scan the bar code The remaining time indicator is an approximation. Shooting may continue longer than the remaining time indicated before the start of shooting or may automatically stop even when there is remaining time. The remaining time indicator changes according to the available space in the microSD Card and battery level.Auto save settingsCamera readerBarcode reader](https://usermanual.wiki/Sharp/HRO00153/User-Guide-1504731-Page-98.png)
![97Multimedia:The Barcode reader screen appears and scanning starts. Display bar code to be scanned in the center of the screen.:Position the camera approximately 10 cm right away from the bar code. Keep aligned and do not move the FOMA terminal or code while scanning.:When scanning is complete, an end tone sounds and the scan result screen appears.Split data:Some QR codes are consisted of single data by scanning split multiple data (up to 16). If split data is scanned, a message appears. Select [Yes] to proceed to the next QR code scanning screen. When the next QR code is displayed in the center of the screen, scanning starts automatically. Repeat until all split data is scanned and the scan results appear.3Use the scan resultYou can scan information such as name or phone number from a business card (Japanese/English) with the camera and save it to the phonebook.1In the home screen, [R]/[Camera Reader]/[Switch reader]/[Card]:To adjust the brightness: Slide up/down2Display a business card in the center of the screen/[Read]:The shutter sounds.:Hold the FOMA terminal securely to fit the entire business card with the frame displayed on the screen. Make sure that no other objects, especially text-written objects, are displayed on the screen.:Keep the camera approximately 10 cm away from the business card.:For scanning, the direction of the business card can be either vertical or horizontal on the screen. Do not place the card obliquely.3[Recognition]4[Register]:The shot card images are automatically saved.5Select an account to register6Specify the register range of the image/[Save]:The specified range of the image is added to the phonebook as an image.7Add to the phonebook:Scanned items are entered in the phonebook editing screen.You can scan kanji and English words with camera and display readings or meanings. You can also search the scanned characters in dictionaries. Some bar codes cannot be scanned depending on types or sizes. Bar codes may not be scanned due to scratches, dirt, damage, poor print quality, lighting conditions or QR code version.Business card reader Some business cards cannot be scanned or recognized properly.Kanji/English Grabber](https://usermanual.wiki/Sharp/HRO00153/User-Guide-1504731-Page-99.png)
![98 Multimedia The readings or meanings displayed in Kanji/English Grabber is based on “ྶޢ࣭ࢊৃങMX” ©KITAHARA Yasuo & Taishukan, 2009, “ΐȜΣͺΑםგৃങMX” ©KONISHI Tomoshichi, MINAMIDE Kosei & Taishukan, 2009.1In the home screen, [R]/[Camera Reader]/[Switch reader]/[Kanji/English]2Display the characters to scan in the loupe frame of the screen:The scanned results and readings or meanings appear in a speech bubble.ƦUp to two readings or meanings appear. [̷͈ఈetc] appears when three or more.:To search the scanned characters in dictionaries: While displaying the scanned results, [Select]/[Search]/search in dictionariesYou can scan an article of newspaper, magazines, etc. by using the camera, and compose mail, notepad, etc.1In the home screen, [R]/[Camera Reader]/[Switch reader]/[Text]:To adjust the brightness: Slide up/down2Display the text to scan in the screen/[Shoot]:The shutter sounds.3Point the cursor to the line to scan with [#]/[$]/[Read]:When letters written in vertical direction are recognized: [%]/[&]:The line to which the cursor is pointed is displayed in light blue frame.4[OK]:To change scanning mode: z/select a mode5Use the scan result:To register to notepad: [Register to Notepad]/[Register]:Touch the scan result to use after scanning phone numbers, URLs and mail addresses.:To display menu: zYou can scan information such as store name or phone number from a magazine, etc. by using the camera, and save it to the phonebook.1In the home screen, [R]/[Camera Reader]/[Switch reader]/[Info.]:To adjust the brightness: Slide up/down2Display information in the center of the screen/[Read]:The shutter sounds.:Hold the FOMA terminal securely to fit necessary information in the screen. However, if the text gets too small, display a phone number or address largely enough to be scanned. The scanned results are not saved. The characters may not be scanned correctly due to scratches, dirt, lighting conditions or text size.Text reader Text may not be scanned correctly due to scratches, dirt, damage, poor print quality, lighting conditions or text size.Information reader](https://usermanual.wiki/Sharp/HRO00153/User-Guide-1504731-Page-100.png)
![99Multimedia:Keep the camera approximately 10 cm away from necessary information.3[Recognition]4[Register]:The shot card images are automatically saved.5Select an account to register6Specify the register range of the image/[Save]:The specified range of the image is saved to the phonebook as an image.7Add to the phonebook:Scanned items are entered in the phonebook editing screen.Display still pictures or moving pictures.1In the home screen, [R]/[Gallery]2Select data:To activate camera: In the album list screen, [@]:To switch data list display/date display: In the data list screen, [A]:To start slideshow: In the image display screen, [Slideshow]:To display menu: In the image display screen, [Menu]ƦSend, delete or edit data.:If there are multiple players to play the data, a player selection screen may appear. Select a player to play the data.You can sort images and moving pictures by people, event and location and use them.1In the home screen, [R]/[Picture]:When a category at the top of the screen is selected, images and moving pictures are sorted and displayed by the selected category.2Select category/data Some information cannot be scanned or recognized properly depending on the description of magazine, etc.GalleryPicture If the file is not displayed, the file may be displayed correctly by deleting a database file of Picture. Connect the FOMA terminal with a microSD card inserted to a PC using microUSB cable for PC (sample) and delete ¥PRIVATE¥SHARP¥PM¥DATABASE folder in the microSD card to use. If you delete the database file, created information of people etc. are also deleted. Take extra precautions and check when deleting. If you have any database file of previously created Picture, a confirmation screen for converting the database file appears. If you convert the database file, the database file created with SH-13C will be deleted.](https://usermanual.wiki/Sharp/HRO00153/User-Guide-1504731-Page-101.png)
![100 MultimediaYou can sort images and moving pictures by created category.ɡSorting by people1In the picture screen, [Portrait]2[Create new portrait]/select data to create a category3Select the cutout range/[OK]:Slide the orange frame border to enlarge/narrow the frame.4[Input new portrait.]/enter person’s name/[OK]:Select [Set from address book] to select and enter the person’s name from the phonebook.5Touch the data to classify for a while/keep touching the data and slide to the category6[Quit to register person.]ɡSorting by event1In the picture screen, [Event]2z/[Create new event]/select data to create a category3[Input new event.]/enter an event name/[OK]:Select [Enter date] to enter the date in the event name.4Touch the data to classify for a while/keep touching the data and slide to the category5[Quit to register event setting.]ɡSorting by locationThe data with location information attached is sorted on a map automatically.1In the picture screen, [Map]2z/[No location list]3z/[Location settings]4Touch the data to classify for a while/keep touching the data and slide to the point to register/[OK]5[Quit location settings]Play music data and playlist saved in a microSD Card. In addition, playing music in the background is available while using mail, browser, etc. The following file formats of music data can be played.AAC LC/LTP (.3gp, .mp4, .m4a, .isma), HE-AACv1 (AAC+), HE-AACv2 (enhanced AAC+), AMR-NB (.3gp), AMR-WB (.3gp), MP3 (.mp3), MIDI (.mid, .imy, .rtttl, .rtx, .ota), Ogg Vorbis (.ogg), PCM/WAVE (.wav), WMA (.wma, .pya)Sorting dataMusic player](https://usermanual.wiki/Sharp/HRO00153/User-Guide-1504731-Page-102.png)
![101Multimedia1In the home screen, [R]/[MusicPlayer]:Select the category on the bottom of the screen to display the data of selected category.2Select data:To adjust the volume of play sound: x/yɡMusic playback screen layout1Album title/Title/Artist’s name/Genre2Jacket image3Play time/Total time4Seek bar5Volume barɡMain touch panel operation in music playback screen The following operations are available with displayed keys.* Return to beginning of the song if the playback time is 1 second or more. The following touch operations are available.ɡCreating playlist1In the home screen, [R]/[MusicPlayer]2[&]/[New playlist]3Enter the playlist name/[OK]4Select the created playlist5[Add]/select the music data/[Apply]Icon Displayed data!Display all music list#Display music by album$Display music by artist%Display music by genre&Display playlist[9]*/[<] Play previous/next data[:]/[;] Play/Pause[8] Display music list screen[6] Repeat[7] ShuffleTo switch display Quickly slide up/downTo change playback positionTouch seek bar](https://usermanual.wiki/Sharp/HRO00153/User-Guide-1504731-Page-103.png)
![102 File ManagementYou can manage the data saved in the microSD Card, classify the data by types and display it.1In the home screen, [R]/[Contents Manager]:Select the category on the bottom of the screen to display the data of selected category. When a corresponding application has already been downloaded, select the data to display it.:When there are multiple corresponding applications, an application selection screen may appear. Select an application to display the data.1In the Contents Manager screen, [2]/select search criteriaUse infrared communication to send and receive data to and from other FOMA terminals which also support infrared communication. Send and receive phonebook entries, profile, notepad, bookmark, data shot by camera, data in Gallery, data recorded with voice recorder, etc. The FOMA terminal infrared communication function complies with IrMC™ 1.1 standard. However, depending on the data, some data may not be sent or received even when the other party’s terminal complies with IrMC™ 1.1 standard. The FOMA terminal Ir send and receive functions comply with IrSimple™ standard. Infrared communication is not available in Offline mode. To enter Lock No. and authentication code are required for sending and receiving all data items. The authentication code is a password exclusively for infrared communication. Before starting data communication, the sender and receiver must enter the same user-specified four-digit code.File ManagementContents managerCategory Displayed dataPhoto Still pictures shot with the FOMA terminal or downloaded imagesMovie Moving pictures shot with the FOMA terminal or downloaded videosMusic Data recorded with the FOMA terminal, melodies or WMA filesTV/SD-VideoRecorder link dataDoc. Office type data (.doc, .xls, .ppt, .docx, .xlsx, .pptx, .csv), PDF data or Text fileOthers Other dataSearching dataInfrared communicationUsing infrared communication](https://usermanual.wiki/Sharp/HRO00153/User-Guide-1504731-Page-104.png)
![103File ManagementɡWhen using infrared communication Face the Infrared ports of the receiver’s and sender’s FOMA terminal each other and set the distance between them to approximately 20 cm or less as shown. While doing infrared communication, keep the Infrared ports facing each other and do not move them. Infrared communication may not function properly in areas of direct sunlight, directly under fluorescent lights or near other equipment using infrared signals. If either of the Infrared ports is dirty, infrared communication will become difficult. Take care not to scratch the ports, and wipe off any dirt with a soft cloth. Insert a microSD Card in advance. However, sending and receiving just single data may not require the microSD Card. When sending memos, bookmarks, etc., operate from each function (menu).1In the home screen, [R]/[Send and Receive by]2Select an itemReceive: Receive single data.Receive all: Receive all data.ƦData receiving begins if the entered authentication code matches an authentication code entered by the sender.Send: Select data and send.ƦSet the receiving FOMA terminal to receive data.:As you operate the handset for receiving, set the sender’s FOMA terminal to send data.:After the operation for receiving, the FOMA terminal waits to receive data. Infrared communication automatically begins when data is sent from sender’s FOMA terminal within 30 seconds.Sending and receiving by InfraredApprox. 20 cmor lessInfrared port15°15° Note that if you select [Delete all before registration] at receiving all data, all data registered to the target function are deleted. Receiving all data is not available depending on the data type. When available memory space in the save destination becomes insufficient, the data being received to that point are saved and receiving ends. IrSS™ communication performs communication without confirming the response of the receiver side, since it uses a simplex communication. For this reason, the sender side completes the communication normally even if the receiver side does not.](https://usermanual.wiki/Sharp/HRO00153/User-Guide-1504731-Page-105.png)
![104 File ManagementYou can send and receive data with other FOMA terminals equipped with iC communication function. Make initial setting of Osaifu-Keitai in advance. (nP. 115). In the following cases, you cannot perform iC communication.During Offline modeDuring Osaifu-Keitai lock In the following cases, data may not be sent via iC communication.During a call During chargingDuring earphone connectionDuring USB connection For details on other data that can be sent and received or various locked operations, refer to “Infrared communication” (nP. 102).ɡWhen using iC communication Use while placing the a mark of receiver’s FOMA terminal on that of sender’s FOMA terminal as shown. Do not move the FOMA terminal until sending and receiving of data is completed. There may be some cases in which data are poorly sent and received or the screen is off by positioning FOMA terminal near depending on the other party’s terminal. In that case, put a distance between the a marks apart/closer or slide them up/down or to the left/right.To enter authentication code is required for sending and receiving all data items. The authentication code is a password exclusively for iC communication. Before starting data communication, the sender and receiver must enter the same user-specified four-digit code. In addition, to enter Lock No. is required for sending and receiving all data items. Insert a microSD Card in advance. However, sending and receiving just single data may not require the microSD Card.ɡSending dataExample: Phonebook1In the home screen, [R]/[Address Book]2Touch a phonebook for a while/[Send IC]/[Yes]3Place the a mark on that of the other party’s FOMA terminal4[OK]ɡReceiving data1Place the a mark on that of the other party’s FOMA terminaliC communicationUsing iC communicationmarkSending and receiving by iC](https://usermanual.wiki/Sharp/HRO00153/User-Guide-1504731-Page-106.png)
![105File Management2[Accept]3Touch the status bar/select received dataYou can connect the FOMA terminal to Bluetooth devices wirelessly. Wireless communications with all the Bluetooth devices are not completely guaranteed. Bluetooth function is not available in Offline mode.ɡSupported version and supported profilesSupported versionBluetooth Specification Ver.3.0+EDR*1Supported profiles*2 (Supported services)HSP: Headset Profile*3HFP: Hands Free Profile*4A2DP: Advanced Audio Distribution Profile*5AVRCP: Audio/Video Remote Control Profile*5HID: Human Interface Device Profile*6OPP: Object Push Profile*7SPP: Serial Port Profile*8PBAP: Phone Book Access Profile*9*1 The FOMA terminal and all Bluetooth function-installed devices have ensured that they conform to the Bluetooth specification according to the rules that the Bluetooth SIG defines, and are all authenticated. However, operating methods might differ or data might not be exchanged even when they are connected wirelessly, depending on the features or specifications of connecting devices.*2 Standardizes the communication procedures of Bluetooth device per feature of a device.*3 Connect commercially available Bluetooth compatible Headset to the FOMA terminal to talk wirelessly.*4 Connect a commercially available Bluetooth compatible hands-free device such as a car navigation system to the FOMA terminal to talk during hands-free operation using the car navigation system.*5 Connect Wireless Earphone Set 02 (sold separately) or commercially available Bluetooth compatible audio device to the FOMA terminal to play music wirelessly. Also, remote control operation may be available from Bluetooth devices. However, compatible devices are limited depending on the data type.*6 Connect commercially available Bluetooth compatible keyboard to Bluetooth devices to enable you to enter characters with a keyboard.*7 Connect a Bluetooth device to the FOMA terminal with the File transfer service to send and receive data between them.*8 Set the virtual connection with a serial cable and interconnect between devices.*9 Transfer phonebook data in the FOMA terminal to a Bluetooth device. Data is not displayed correctly on the other party’s device depending on the contents of the transferred phonebook data.Bluetooth function Refer to the manual for the Bluetooth device as well. When connecting the Wireless Earphone Set 02, connect it from the FOMA terminal.](https://usermanual.wiki/Sharp/HRO00153/User-Guide-1504731-Page-107.png)
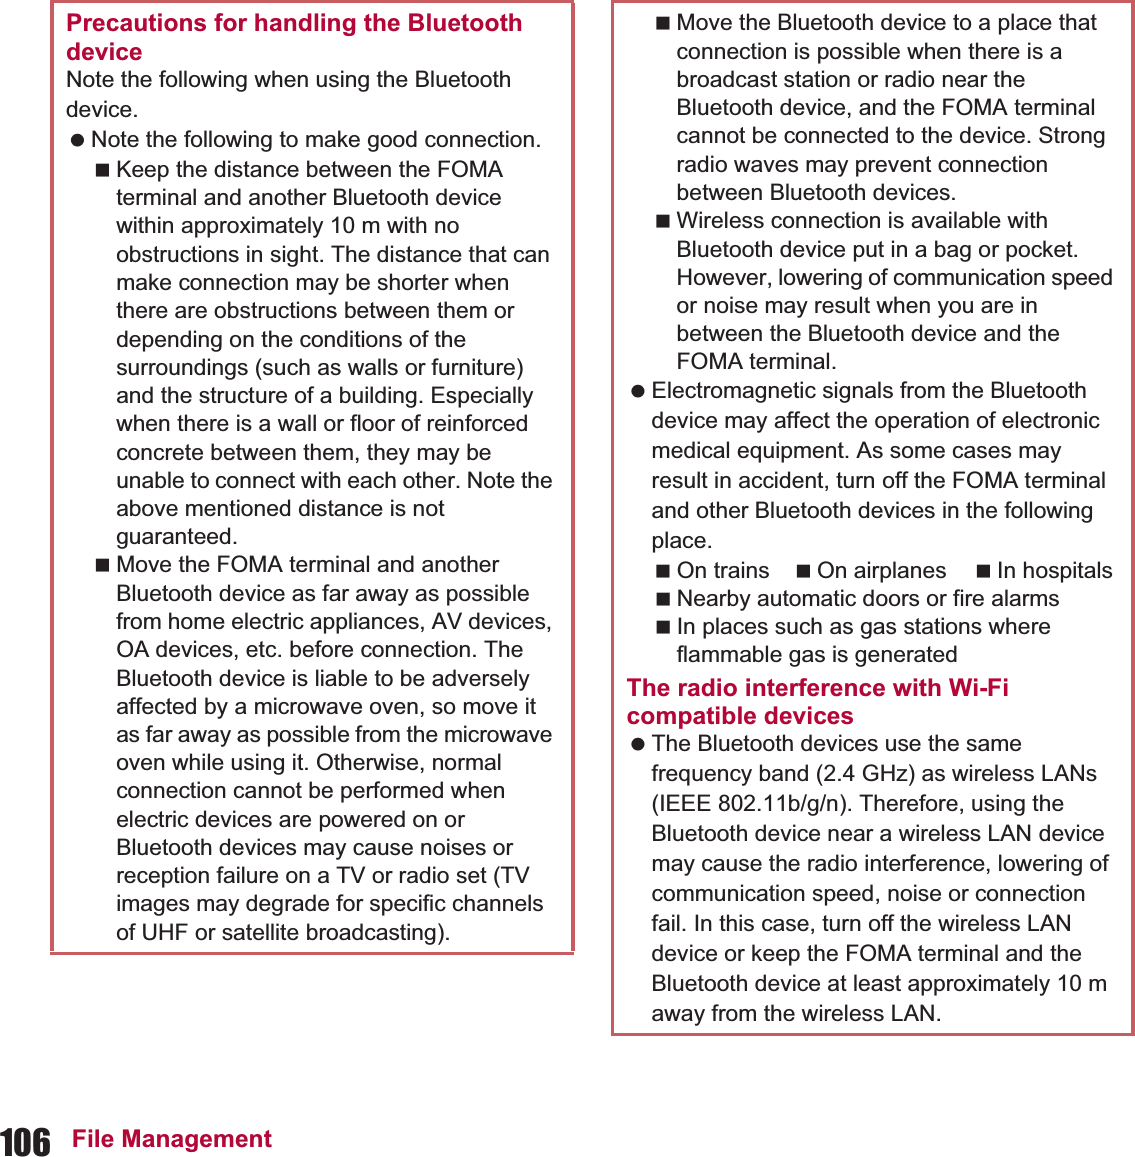
![107File Management Enable Bluetooth function in advance (nP. 76). To register/connect a Bluetooth device, the Bluetooth passkey may need to be entered. Before starting the registration, decide the 1- to 16-digit number. Enter the same number on the FOMA terminal and the other party’s Bluetooth device.1In the home screen, [R]/[Settings]/[Wireless & networks]/[Bluetooth settings]2Select an itemBluetooth: Enable Bluetooth function.Device name: Change the FOMA terminal’s name.Discoverable: Set whether to receive a search request from other Bluetooth devices.Detailed Bluetooth Settings: Set Bluetooth function.Scan for devices: Search for the Bluetooth devices around the FOMA terminal and register them in it.ƦSet the other party’s Bluetooth device to the registration stand-by status in advance.ɡWhen receiving registration request from Bluetooth device or connection request from unregistered Bluetooth device1Registration request/Connection request from Bluetooth device2[Pair]:Entering the Bluetooth passkey may be necessary depending on the other party’s Bluetooth device.Bluetooth settings You can connect more than two devices simultaneously. However, when hands-free (headset) and audio are connected with each other, you cannot hear the audio sound during a hands-free call. If you fail to connect, connection may become available after re-registration of Bluetooth devices.[Bluetooth] When the Bluetooth function is enabled, the FOMA terminal is set to receive a registration request/connection request from other Bluetooth devices. Enable Discoverable in advance to allow the FOMA terminal to be searched for by other Bluetooth devices. While in connection stand-by, even if a connection request from a Bluetooth device is received, connection may not be made depending on the signal strength etc.[Discoverable] Setting is disabled automatically when a certain period of time passed after enabling.[Scan for devices] For details on the operations of the other party’s Bluetooth device, refer to the manuals of the Bluetooth device to be used.](https://usermanual.wiki/Sharp/HRO00153/User-Guide-1504731-Page-109.png)
![108 File Management Insert a microSD Card in advance. However, sending and receiving just single data may not require the microSD Card.ɡSending dataExample: Still picture1In the home screen, [R]/[Contents Manager]2Touch a still picture for a while/[Share]/[Bluetooth]:Set the receiving Bluetooth device to receive data.3Select a Bluetooth device to connect toɡReceiving data1Send data from the sender’s Bluetooth device2Touch the status bar/select data to receive/[Accept]3Touch the status bar/select data to receive1Insert the FOMA terminal side connector of the microUSB cable for PC (sample) horizontally into the external connector terminal on the FOMA terminal (1)2Insert the PC side connector of the microUSB cable for PC horizontally into the USB connector on the PC (2):For details on setting USB connection mode nP. 79Sending and receiving by Bluetooth Note that if you select [Delete all before registration] at receiving all data, all data registered to the target function are deleted. Some data cannot be received all. When available memory space in the save destination becomes insufficient, the data being received to that point are saved and receiving ends.External connector deviceConnecting the FOMA terminal and PCKeep sidewith thecharactersdownmicroUSB cable for PC(sample) Open externalconnectorterminal cover](https://usermanual.wiki/Sharp/HRO00153/User-Guide-1504731-Page-110.png)
![109File Management Insert a microSD Card in advance.1Connect the FOMA terminal to a PC via the microUSB cable for PC (sample)2Touch the status bar/[USB connected]3[Turn on USB storage.]/[OK]4Use as a microSD reader/writer5Perform secure hardware removal after use6[Turn off USB storage.]7Disconnect the microUSB cable for PC from the FOMA terminalTransfer music data, video data, and still picture data from a PC to a microSD Card. Playing copyrighted data is only possible with the FOMA terminal used for transfer from a PC. Some data may not be played due to copyright. Data saved on devices other than SH-13C cannot be played even if they are data without copyright.1Activate Windows Media Player 11/12 on a PC2Connect the FOMA terminal to a PC via the microUSB cable for PC3Set the USB connection mode (nP. 79) to [MTP mode] and activate MTP application4Add data to be saved to the synchronization list in Windows Media Player 11/12 and start synchronization5Exit the MTP application after transfer6Disconnect the microUSB cable for PC from the FOMA terminal Use a USB cable “microUSB cable for PC”. USB cables for PC are not available, since the connector shape is different. The use of a USB HUB may not work correctly. Do not remove the microUSB cable for PC while exchanging data with PC. Data may be damaged. Windows XP, Windows Vista and Windows 7 all of which are Japanese version are available OS for the connection.microSD reader/writer While using as a microSD reader/writer, Offline mode is enabled. While using as a microSD reader/writer, microSD Card cannot be used from other applications. In addition, microSD Card may not be used as a microSD reader/writer while it is used from other applications.Transferring data](https://usermanual.wiki/Sharp/HRO00153/User-Guide-1504731-Page-111.png)
![110 File ManagementTransfer the videos that are recorded on Blu-ray Disc recorder to a microSD Card and play them. Connect Blu-ray Disc recorder to the FOMA terminal using the microUSB cable for PC (sample) to transfer videos. Connect to Blu-ray Disc recorder and set the USB connection mode (nP. 79) to [Card reader mode]. Connection method is the same as for connecting the FOMA terminal with PC or other devices (nP. 108). For details on transferring videos, refer to the manuals of the Blu-ray Disc recorder. Refer to DOCOMO website for compatible models.Using Wi-Fi connection, you can watch the still picture data and listen to the music data of the FOMA terminal or microSD Card with TV compliant to the home network. You can make public the following data managed by Contents Manager.*1 Still picture data whose image size is larger than “4096×4096” cannot be displayed.*2 WAV files can be played only when their data format is LPCM. Also, LPCM is not displayed on the FOMA terminal.ƦYou may not make data public when the number of each data exceeds 1,000. Store the data to make public in the following folders on a microSD Card in advance. Set the Wi-Fi connection before using home network server. For details on Wi-Fi nP. 43 While activating MTP application, Offline mode is enabled. The old data is overwritten if the new data, whose name is the same as old one in its first to 64th characters (including extensions), is transferred. The license information of copyrighted data is saved in the microSD Card. If you perform removing the microSD Card, deleting a license information data or Reset all, the transferred data cannot be played.Cooperating with Blu-ray Disc recorder Display the home screen when connecting Blu-ray Disc recorder to the FOMA terminal using microUSB cable for PC.Home network settingsData type File formatStill picture data*1JPEGMoving picture dataMP4, 3GP (Video codecs: H.264, Audio codecs: aac)Music data*2 MP3, LPCM (44.1 kHz/2ch), WAV (44.1 kHz/2ch)Data type Folder locationStill picture data¥DCIM,¥PRIVATE¥SHARP¥CM¥PICTUREMoving picture data¥DCIM,¥PRIVATE¥SHARP¥CM¥MOVIEMusic data ¥PRIVATE¥SHARP¥CM¥MUSIC,¥PRIVATE¥SHARP¥CM¥SOUND](https://usermanual.wiki/Sharp/HRO00153/User-Guide-1504731-Page-112.png)
![111File Management Refer to the website (http://k-tai.sharp.co.jp/peripherals/dlna/sh-13c.html) (in Japanese only) for types of TV compliant to connection with this FOMA terminal. For the operation method of connecting to the FOMA terminal from TV compliant to the home network, refer to the manual of TV compliant to the home network. Connection may not be made properly or be canceled while using depending on wireless LAN access points or using condition. In this case, disable home network server and then enable it once again. Check the following when you cannot connect properly.Access point settingWi-Fi connecting conditionNetwork setting of the home network compatible device to connectSecurity software/Firewall setting of the home network compatible deviceHome network settings of the FOMA terminal1In the home screen, [R]/[Settings]/[Wireless & networks]/[Home network settings]2Select an itemHome network server: Enable home network server.Wi-Fi for home NW server: Set the network to be used from the access points set for Wi-Fi connection.Home network server name: Register the home network server name to be displayed on TV compliant to the home network.](https://usermanual.wiki/Sharp/HRO00153/User-Guide-1504731-Page-113.png)
![112 Applications GPS is a function to retrieve location information of the FOMA terminal by receiving radio wave from GPS satellites. Enable location information services ([Use wireless networks] or [Use GPS satellites]) to measure the present location (nP. 80). You cannot use the FOMA terminal as navigation system for professional use of aircrafts, vehicles, person, etc. or surveying GPS of high accuracy. Note that DOCOMO shall not be liable for the pure economic loss caused by using for these purposes or other purposes such as you cannot confirm the positioning (communication) result with the FOMA terminal failure, malfunction or external factors such as power failure (including battery exhaustion). GPS is the service administered by Department of Defense of USA. Therefore, GPS radio wave condition may be controlled (accuracy degradation, radio wave abort, etc.) for the US national security reason. In addition, the same results may not be retrieved even when positioned in the same location and environment, since the radio wave condition differs depending on the location of satellites. Note that GPS is using the radio wave from satellites, and following conditions may cause the radio wave abort or difficulty to receive resulting in 300 m or more of the error of retrieved location information.In or under densely trees, in density area with buildings or residenceIn or under buildingsIn basement, tunnel, ground or waterNear high-tension lineInside cars or trainsIn bad weather with heavy rain/snowIn bags or boxesWhen people or objects are blocking the FOMA terminalWhen hands are covering camera, earpiece or proximity sensor of the FOMA terminal When using a map and GPS function overseas, the displayed map based on the acquired location information (latitude and longitude information) may not be accurate because of the legal system in each country and the area. Packet communication charges may be incurred, since assist data such as satellite information is automatically retrieved when you position present location. Packet communication charges are incurred when you display a map based on the location information.ApplicationsGPS/NavigationUsing GPS function](https://usermanual.wiki/Sharp/HRO00153/User-Guide-1504731-Page-114.png)
![113ApplicationsUse Google Maps. You can measure your present location, and use the navigation function to check how to get to your destination in detail by using it. It is necessary to enable location information services ([Use wireless networks] or [Use GPS satellites]) to measure the present location (nP. 80).1In the home screen, [R]/[Maps]ɡMeasuring present location1In the map screen, [0]ɡStreet view1In the map screen, touch any part of which Street view you want to display for a while2Touch the speech bubble/[1]:To change a displayed direction: Keep touching the screen and slide:To move a displayed place: Keep touching [3] and slide:Compass mode: z/[Compass mode]ɡSearching place1In the map screen, z/[Search]2Enter a name of place to be searched:You can search by entering an address, a name of place or facility, etc.3[Go]/[4]:A search results are displayed on the map by a marker.:If there are more than two search results, touch [5] to display the search results as a list.4Touch a marker/touch the speech bubble Use Google Maps Navigation. You can search for a route from the present location to the destination by using it. It is necessary to enable location information services ([Use wireless networks] or [Use GPS satellites]) to measure the present location (nP. 80).1In the home screen, [R]/[Navigation]2Select an itemSpeak Destination: Search for the destination by voice.Type Destination: Search for the destination by entering characters.Contacts: Search for an address registered in phonebook.Maps Some areas are not supported by Street view. If not supported, [2 (grey)] is displayed. When Compass mode is used, the geomagnetic compass of the FOMA terminal and the direction displayed by Street view are associated with each other.Navigation](https://usermanual.wiki/Sharp/HRO00153/User-Guide-1504731-Page-115.png)
![114 ApplicationsStarred Places: Search for a starred location on the map.“౷ͺίς” (Map appli) is an application of docomo map navi service. You can use the location information and view present location or specified location, search for surrounding information, navigate to the destination, etc. It is necessary to enable location information services ([Use wireless networks] or [Use GPS satellites]) to measure the present location (nP. 80).1In the home screen, [R]/[౷ͺίς] (Map appli)Display a map or compass to check your location or the direction that the FOMA terminal is headed to. There are two modes for checking: a compass mode which shows the direction of the FOMA terminal with a compass and a map mode which shows the direction of the FOMA terminal with an azimuth icon on map. To display maps, enable data connection or connect to Wi-Fi. Enable location information services ([Use wireless networks] or [Use GPS satellites]) in advance to measure the present location (nP. 80).1In the home screen, [R]/[Compass]ɡCompass screen layoutCompass mode1Azimuth2Compass Needle rotates in accordance with the direction of the FOMA terminal. In accordance with the tilt of the FOMA terminal, flat display and birds-eye display are switched.3Map window The way of reading the map is the same as in the map mode screen. Touch the map to switch to the map mode.4Angle Display the angle from North to the front of the FOMA terminal.Map mode౷ͺίς (Map appli)Compass](https://usermanual.wiki/Sharp/HRO00153/User-Guide-1504731-Page-116.png)
![115Applications1Map2Present location call-out Display the address or street name of the point on which a human icon is displayed.3Compass window The way of reading the compass is the same as in the compass mode screen. Touch the compass to switch to the compass mode.4Human icon It is displayed on the present location.5Azimuth icon Display the direction of the FOMA terminal on the map.Osaifu-Keitai is a function which has built-in IC card and allows you to pay, use as coupons or collect stamps by simply holding the FOMA terminal over the scanning device at stores.Moreover, you can access sites and web pages by holding the FOMA terminal over the scanning device, and get the latest coupon, deposit electronic money and check your usage by using communication. In addition, for your secure use, you can lock functions of Osaifu-Keitai when you lost the FOMA terminal.For details on Osaifu-Keitai, refer to “̮၌ဥ΄ͼΡήΛ· (spκȜΡ<ΑζȜΠέϋ>༎)” (Mobile Phone User’s Guide [sp-mode <Smartphone>]) (in Japanese only) or docomo market.ɦTo use Osaifu-Keitai compatible service, settings are necessary on a website or an application. FOMA terminal malfunctions may cause data (including electronic money, points, etc.) saved in the IC card to be lost or changed (Note that as a rule, you will be asked to delete data when leaving your FOMA terminal for repairs, etc., since we cannot keep your FOMA terminal with such data still remaining in it). For the service such as a reissue, restoration, temporary keeping or transfer of the data, contact your provider of Osaifu-Keitai compatible service. Be sure to use the Osaifu-Keitai compatible service including a backup service for important data. DOCOMO shall not be liable for any loss or change of data in the IC card or other damages of Osaifu-Keitai service caused by any reason such as malfunctions and upgrading. When the FOMA terminal is stolen or lost, immediately contact your provider of Osaifu-Keitai compatible service for handling methods. To use Osaifu-Keitai compatible services, download the Osaifu-Keitai compatible application from Osaifu-Keitai compatible sites and make the setting. Some services do not need to download the Osaifu-Keitai compatible application.1In the home screen, [R]/[Osaifu-Keitai]:If the initial setting is not completed, the initial setting screen appears.2Select a serviceOsaifu-KeitaiUsing Osaifu-Keitai](https://usermanual.wiki/Sharp/HRO00153/User-Guide-1504731-Page-117.png)
![116 ApplicationsHold the a mark of the FOMA terminal over the scanning device to use as electronic money or railway tickets, to retrieve ToruCa, etc. Pay attention to the following points when holding the a mark over the scanning device. Pay attention to the position to hold over since a mark is on near the camera, not the center of the FOMA terminal.Do not contact between the FOMA terminal and the scanning deviceHold the a mark directly above the scanning deviceSlowly hold the a mark over the center of the scanning deviceIf the scanning device does not recognize the built-in IC card, hold the a mark over the scanning device and move the handset aroundDo not attach a metallic substance on the a mark side1Hold the a mark over the scanning device2Confirm that the data is scannedLock the function of Osaifu-Keitai. Perform the same operation to disable the lock.1In the service list screen, z/[̤ͼέΉȜΗͼ υΛ·୭] (Osaifu-Keitai lock setting)/[Next]2Enter the Lock No./[OK]/[Next]ToruCa is an electronic card that can be imported to the FOMA terminal. You can retrieve it as store information or a coupon from a scanning device or sites. Retrieved ToruCa is saved in the “ToruCa” application and you can display/search/update it using the application.For details on ToruCa, refer to “̮၌ဥ΄ͼΡήΛ· (spκȜΡ<ΑζȜΠέϋ>༎)” (Mobile Phone User’s Guide [sp-mode <Smartphone>]) (in Japanese only) or docomo market.1In the home screen, [R]/[ToruCa] You cannot use Osaifu-Keitai in the following situations. However, you can pay by holding the FOMA terminal over a scanning device.In Offline modeWhen you are charging the FOMA terminal, connecting a microUSB cable for PC (sample) to it or connecting an earphone to it while the miniUIM is not inserted/When the FOMA terminal has never received radio waveHolding over scanning deviceOsaifu-Keitai lock settingToruCamark](https://usermanual.wiki/Sharp/HRO00153/User-Guide-1504731-Page-118.png)
![117ApplicationsManage schedules by using the calendar. Also, synchronize calendar and that of Google account by registering accounts such as Google account. Set the account in advance (nP. 45).1In the home screen, [R]/[Calendar]2Select the date for which you register a schedule 3Select the time for which you register a schedule 4Set each item/[Done]What: Enter the title.From: Set the start date and time.To: Set the end date and time.Time zone: Set the time zone.All day: Switching All day setting.Where: Enter the place.Description: Enter the details.Calendar: Set the calendar sheet.Guests: Enter the mail address of the guests you invite.Repetition: Set the repetition.Reminders: Set how early the reminder notifies you of the schedule before the set start date and time. Packet communication charges may be incurred for retrieving, displaying or updating ToruCa. ToruCa provided for i-mode terminals may not be retrieved/displayed/updated. The following functions may not be used depending on the settings of IP (Information Provider).Retrieving from a scanning deviceUpdatingSending through mailMoving or copying to a microSD CardDisplaying a map A map may not be displayed from the ToruCa list although it can be from ToruCa (details) depending on the settings of IP. When Osaifu-Keitai is locked, you cannot retrieve ToruCa from a scanning device. When duple check is set to “ON”, you cannot retrieve the duplicate ToruCa. If you want to retrieve it, set to “OFF” duple check. When you send ToruCa through mail, it is sent in the status that the ToruCa (details) has not been retrieved. ToruCa received through mail may not be saved depending on the mail application. ToruCa may not be retrieved depending on the browser you use. When you move or copy ToruCa to microSD Card, it is sent in the status that the ToruCa (details) has not been retrieved. If the initial setting of Osaifu-Keitai has not made, ToruCa may not be retrieved from a scanning device.Calendar](https://usermanual.wiki/Sharp/HRO00153/User-Guide-1504731-Page-119.png)
![118 ApplicationsDisplay city time around the world. World clock can be displayed up to ten city time.1In the home screen, [R]/[Clock]/[WorldClock]2[Add]/select a cityActivate an alarm tone or vibrator at the specified time/day of week. You can save up to ten alarms.1In the home screen, [R]/[Clock]/[Alarm]:To adjust alarm volume: z/[Setting]/[Alarm volume]2Select a register destination3Set each itemName: Enter the name.Enable/disable alarm: Enable/Disable the alarm settings.Time: Set the time when the alarm rings.Ring duration: Set the alarm duration.Repeat: Set the repetition of the alarm.Alarm sound: Set the alarm sound.Enable/disable snooze: Enable/Disable the snooze setting.Snooze interval: Set the snooze interval.Snooze repeat: Set the number of snooze repeat.Vibrator Setting: Enable/Disable the vibrator setting.ɡTouch panel operation when an alarm sounds The following touch operations are available.1In the home screen, [R]/[Clock]/[StopWatch]2[Start]:To record the lap time and split time: [Lap]3[Stop]:To reset measured time and history: [Reset]ClockWorld clock [E] appears for cities displaying daylight saving time.Alarm The alarm is not activated when the handset is turned off at the alarm setting time. The alarm is not activated when the set time arrives during a call. Upon the end of the call, the previously displayed screen or the home screen is displayed, and the alarm is activated. When a set time arrives during another alarm sounding, the alarm is delayed. When the former alarm stops or the alarm duration has elapsed, the delayed alarm restarts.End the alarm Keep touching [2] and slide to the right along the arrow on the screenStop the alarm (Snooze works)Keep touching [3] and slide to the left along the arrow on the screenStopwatch](https://usermanual.wiki/Sharp/HRO00153/User-Guide-1504731-Page-120.png)
![119ApplicationsActivate an alarm tone or vibration after the specified length of time passes.1In the home screen, [R]/[Clock]/[Timer]2Touch the set time/enter the time/[OK]:Touch [10sec]/[1min]/[5min]/[10min] to plus 10 seconds/1 minute/5 minutes/10 minutes to the set time.:To reset the set time to 00 minute 00 second: [Reset]3[Start]:To cancel the countdown: [Reset]4[Stop]Register frequently used phrases and use them.1In the home screen, [R]/[Notepad]/[Create]2Enter the body text/[Save] You cannot record when the available space of the microSD Card is less than 300 KB.1In the home screen, [R]/[Voice Recorder]:To switch recording mode: [Mode]ƦWhen [Attach to Mail mode] is set, the limit of the recording time is set to the size that can be attached to mail. When [Long time mode] is set, you can record up to 6 hours per recording.2[p]:Recording start sound is heard and recording starts. Incoming lamp flashes during recording.3[q]:Recording stop sound is heard and recorded data is saved.ɡPlaying recorded data1In the Voice Recorder screen, [Play]:Previously recorded data is played by operating after recording. You can record up to 99 histories of lap time and split time. When the number exceeds 99, they are deleted starting with the oldest. Measured time and history are reset by ending the Clock.TimerNotepadVoice recorder Recording start/stop sounds are activated regardless of the setting of the FOMA terminal. Recording stops automatically when recording time reaches the maximum or when the microSD Card has no available space. When a call is received during recording, recording automatically stops, recorded data is saved, and the call can be answered. After the call ends, the save completion notification screen appears.](https://usermanual.wiki/Sharp/HRO00153/User-Guide-1504731-Page-121.png)
![120 Applications2Select recorded data1In the home screen, [R]/[Calculator]2CalculateYou can collectively backup data, such as phonebook or mail, and each setting information. While backing up microSD, Offline mode is enabled. When the available memory space of the FOMA terminal is less than 11 MB, microSD backup is not available. Insert microSD Card in advance.1In the home screen, [R]/[Settings]/[microSD & phone storage]/[microSD backup]2[Backup]/enter the Lock No./[OK]3Select a data category to save4[Start]/[Yes]5[Complete]1In the home screen, [R]/[Settings]/[microSD & phone storage]/[microSD backup]2[Restore]/enter the Lock No./[OK]3Select a backup file to read4[Start additional]/[Start overwrite]5[Yes]/[Yes]6[Complete]1In the home screen, [R]/[Settings]/[microSD & phone storage]/[microSD backup]/[Management/Settings]2Select an item When a call is received during playing, playing is automatically paused and the call can be answered. After the call ends, the play screen appears while pausing data.Calculator When the calculator is ended, memories are deleted. Results or history information may be deleted while it is active in the background.microSD backupSaving backup file You cannot save the data when battery level is insufficient.Reading backup data You cannot read the data when battery level is insufficient.Setting/Managing backup file](https://usermanual.wiki/Sharp/HRO00153/User-Guide-1504731-Page-122.png)
![121ApplicationsOrganize backup files: You can delete saved backup data.Set image for address book: You can set images to/not to be included when you backup phonebook data.View result screen: Display the latest result of saving/reading the backup file.Auto-backup recommended: You can set to/not to automatically backup application display order, status of TapFlow, communication data, etc. when available space in the FOMA terminal has run out.Link to address book: Associate communication data and phonebook.Enter the keyword and search for it in the Built-in or Net Dictionary. The following e-dictionaries are preset on the FOMA terminal (Part of the dictionary may differ from printed version due to computerization).ྶޢ࣭ࢊৃങMXContaining approximately 58,000 words centered around frequently used modern language.ΐȜΣͺΑםგৃങMXAn English-Japanese dictionary, which is convenient for English conversation, reading newspapers and novels. Containing approximately 89,000 words.ΐȜΣͺΑგםৃങMXA full-fledged words Japanese-English dictionary contains approximately 69,000 words centered around modern language.(“ྶޢ࣭ࢊৃങMX” ©KITAHARA Yasuo & Taishukan, 2009, “ΐȜΣͺΑםგৃങMX”, “ΐȜΣͺΑგםৃങMX” ©KONISHI Tomoshichi, MINAMIDE Kosei & Taishukan, 2009) Net Dictionary “ຐشমങ” (encyclopedia) is available by default.1In the home screen, [R]/[Dictionary]:To switch dictionaries: [Switch dictionary]/select a dictionary to use2Enter the keyword:In the Built-in Dictionary, the search result appears every time text is entered.:In the Net Dictionary, the search result appears after entering the keyword/[Search].3Select a search resultSupport everyday walking and jogging with pedometer.The number of steps, calories burnt, etc. are saved as history. You can check them as graph. Input User Information and enable Pedometer On of Pedometer setting in advance (nP. 83). If vibration or shake was applied to the FOMA terminal by the vibration of the FOMA terminal or azimuth adjustment, the number of steps may not be counted correctly. Counted number of steps may not be displayed correctly depending on how to put on, measure or walk.DictionaryPedometer](https://usermanual.wiki/Sharp/HRO00153/User-Guide-1504731-Page-123.png)
![122 Applications When carrying the FOMA terminal in Carry Case 02 (sold separately), put the Carry Case 02 on a belt etc. When carrying the FOMA terminal in a bag or pouch, place it in a stable space such as in a pocket or compartment.1In the home screen, [R]/[Pedometer]“iD” is convenient electric money using credit-card transactions. You can pay easily and conveniently by simply holding an Osaifu-Keitai which credit card information is set or an iD compatible card over the scanning device at stores etc. Osaifu-Keitai can register two types of credit card information, and can be used depending on the benefits. Some credit card companies also provide cash advance. For using iD with Osaifu-Keitai, subscription to credit card company compatible with iD and setting of iD setting appli are required. Expense (annual fee etc.) for using iD service varies depending on the credit card company. For use overseas, packet communication charges differ from those in Japan. For information on iD, refer to iD website (http://id-credit.com/) (in Japanese only). The first number of steps for approximately 4 seconds is counted, but they will not be displayed as counted steps. Keep walking, and then the total number of steps including them will be displayed as counted steps.Cautions when counting the number of stepsIn the following cases, the number of steps may not be counted correctly. When the FOMA terminal shakes irregularlyWhen the bag which the FOMA terminal is in shakes irregularly by hitting legs or hipWhen dangling the FOMA terminal from your waist, bag, etc. When walked irregularlyWhen walked irregularly wearing sandals, geta, slippers, etc.When disarray of walk occurred such as walking in the crowded place When used in a place with up-and-down movement or frequent vibrationWhen stood up or sit downWhen played sports except walkingWhen walked up/down stairs or steep slopeWhen being wobbled in the vehicles (bicycle, car, train, bus, etc.) When walked extremely slowlyiD୭ͺίς (iD setting appli)](https://usermanual.wiki/Sharp/HRO00153/User-Guide-1504731-Page-124.png)
![123Overseas UseInternational roaming (WORLD WING) is a service that enables you to use the same FOMA terminal as you use in Japan in the service area of DOCOMO affiliated overseas telecommunications carriers without changing your phone number and mail address. You can use calls and SMS without any changes in settings.Available areaYou can use the FOMA terminal in the 3G network and GSM/GPRS network service area. In addition, this service is available in countries and regions supporting 3G 850 MHz. Check the available area.Refer to the following before using the FOMA terminal overseas.“Mobile Phone User’s Guide [International Services]”DOCOMO International Services websiteHelp by the application “Ρκ٬ٸ၌ဥ (DOCOMO Roaming Utility)”*1 Enable Data roaming to use data communication when roaming (nP. 125).*2 Packet communication charges are incurred for GPS positioning (position location).Overseas UseOutline of international roaming (WORLD WING) For country codes, international call access number, universal number international prefix and information on available countries, regions, and telecommunications carriers, refer to “Mobile Phone User’s Guide [International Services]” or the DOCOMO International Services website.Available services overseasMain communication service 3G GSM/GPRS GSMCall AAASMS AAAMail*1 AABBrowser*1 AABGPS position location*2 AAB Some services are not available depending on the telecommunications carrier or network.](https://usermanual.wiki/Sharp/HRO00153/User-Guide-1504731-Page-125.png)
![124 Overseas UseɡCheck before departureCheck followings in Japan before using the FOMA terminal overseas.Subscription Check the status of a subscription for WORLD WING. For details, contact “General Inquiries” on the back of this manual.Charging battery Use FOMA AC Adapter 01 for Global use (sold separately) or FOMA AC Adapter 02 (sold separately) as an AC adapter for charging while traveling overseas.Charge Overseas charges (call charges, packet communication charges) differ from those in Japan. Some FOMA terminal or applications automatically perform packet communication. Since packet communication charges may be higher, contact an application provider for operation of each application.ɡSet before departureNetwork service settingsIf you subscribed to network services, network services such as Voice Mail Service and Call Forwarding Service are available from overseas. However, some network services are not available. To use network services overseas, setting Remote operations to “Activate” is required. Remote operations can be set in your country of stay. Some network services that can be set/disabled etc. may not be available depending on overseas telecommunications carriers.ɡCheck in your country of stayThe FOMA terminal automatically connects to the available telecommunications carrier when you turn the power on in your country of stay.ConnectionIf the FOMA terminal is outsides the service area when telecommunications carriers (nP. 125) is set to [Select automatically], the suitable network is automatically selected.Overseas packet communication charges are available with a fixed amount of charges as an upper limit per day by connecting to a compatible operator for telecommunications carriers manually. To use this service, subscription to flat-rate packet communication services is required. For details, refer to “Mobile Phone User’s Guide [International Services]” or the DOCOMO International Services website.Viewing the display The type of network in use appears in the status bar.Before use overseas01233G data communication status0: 3G available1: Receiving 3G data2: Sending 3G data3: Sending and receiving 3G dataPQRSGSM data communication statusP: GSM availableQ: Receiving GSM dataR: Sending GSM dataS: Sending and receiving GSM data](https://usermanual.wiki/Sharp/HRO00153/User-Guide-1504731-Page-126.png)
![125Overseas UseƦWhile international roaming, [R] appears on the upper left of the signal icon. Connected operator can be checked in the status panel. Date & timeIf [Automatic] of Date & time is enabled, the FOMA terminal receives information with time and time differences from overseas telecommunications carrier, then time and time differences are corrected. Time differences may not be adjusted correctly depending on overseas telecommunications carrier. In such a case, set time zone manually. The correction timing differs depending on the telecommunications carrier. For details on the Date & time nP. 84Inquiries When the FOMA terminal or the miniUIM is lost or stolen overseas, promptly contact DOCOMO and conduct a procedure for canceling the use of service from your country of stay. Refer to the back of this manual for inquiries. Note that communication/calling charges after the FOMA terminal or the miniUIM is lost or stolen are incurred to the subscriber. For land-line phone, etc., “International call access number” of your country of stay or “Universal number international prefix” is required.ɡCheck after homecomingThe FOMA terminal automatically connects to the FOMA network after homecoming. If it fails, perform the following setting. Set Network Mode to [3G/GSM(Auto)] (nP. 125). Set telecommunications carriers (nP. 125) to [Select automatically].1In the home screen, [R]/[Settings]/[Wireless & networks]/[Mobile networks]2Select an itemData transmission: Enable data communication.Data roaming: Set to use packet communication overseas.Network Mode: Set transmission method to use.Access Point Names: Set an access point.Network operators: Search an available network and set.Settings to use overseas](https://usermanual.wiki/Sharp/HRO00153/User-Guide-1504731-Page-127.png)
![126 Overseas Use1In the home screen, [R]/[Phone]2“+” (touch “0” for a while)/enter country code, area code (city code) and the other party’s phone number/[Call]:Alternatively, in the phone number entering screen, z/[Add Prefix]/[International call]/select a country code to enter a country code.ƦThe first “0” of the area code (city code) will be omitted if you operate the phone after entering a phone number.:When the area code (city code) begins with “0”, omit the “0” when dialing (Include the “0” when making a call to some countries or regions such as Italy).You can make a domestic call in your country of stay in the same way as you do in Japan. Always dial the area code (city code), even when the number is in the same area.When you make a call to a “WORLD WING” subscriber overseas, the call is made as an international call to Japan regardless of your country of stay.1In the home screen, [R]/[Phone]2“+” (touch “0” for a while)/enter country code “81” (Japan), the other party’s mobile phone number excluding the first “0”/[Call]You can receive a call overseas in the same way as you do in Japan.ɡHaving calls to your FOMA terminalWhen having calls made to your FOMA terminal from Japan, have your phone number dialed just as a domestic call in Japan.When having calls made to your FOMA terminal from countries other than Japan, have the international call access number and “81” (Japan) added to the beginning of your phone number with the first “0” excluded as an international call to Japan regardless of your country of stay.International call access number of the country of the caller-81-90 (or 80)-XXXX-XXXXMaking/Receiving a call in your country of stayMaking a call outside your country of stay (including Japan) Even if you notify the caller ID, [Unknown] or [ID Unsent] appears depending on the telecommunications carrier, and the caller ID may not be displayed correctly.Making a call in your country of stayMaking a call to a WORLD WING subscriber overseasReceiving a call When a call is received during international roaming, the call is forwarded from Japan. Call charges to Japan are incurred by the caller and receiving charges by the receiver.](https://usermanual.wiki/Sharp/HRO00153/User-Guide-1504731-Page-128.png)
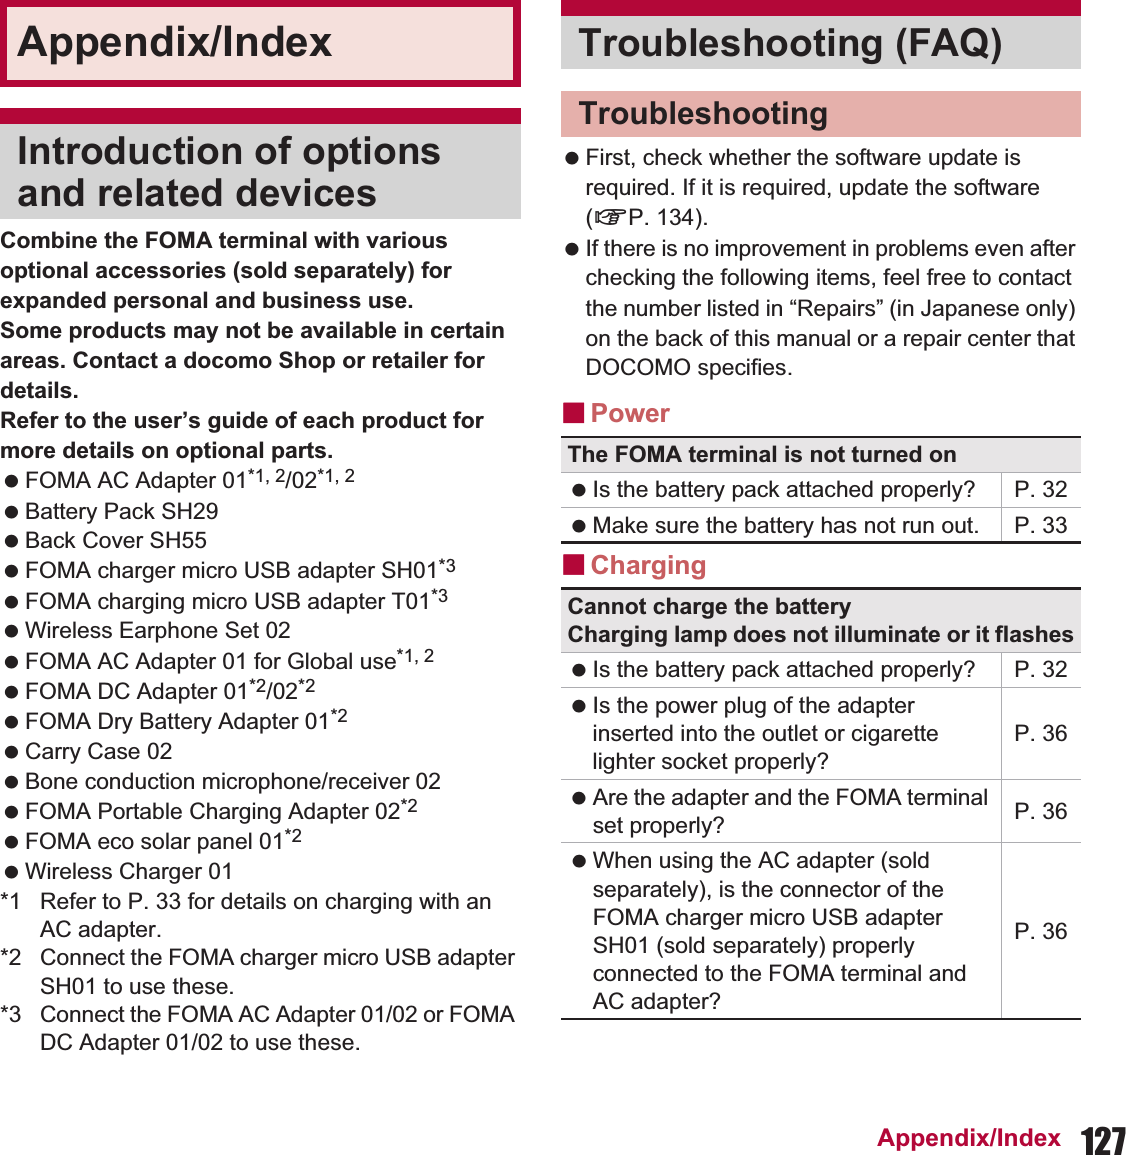
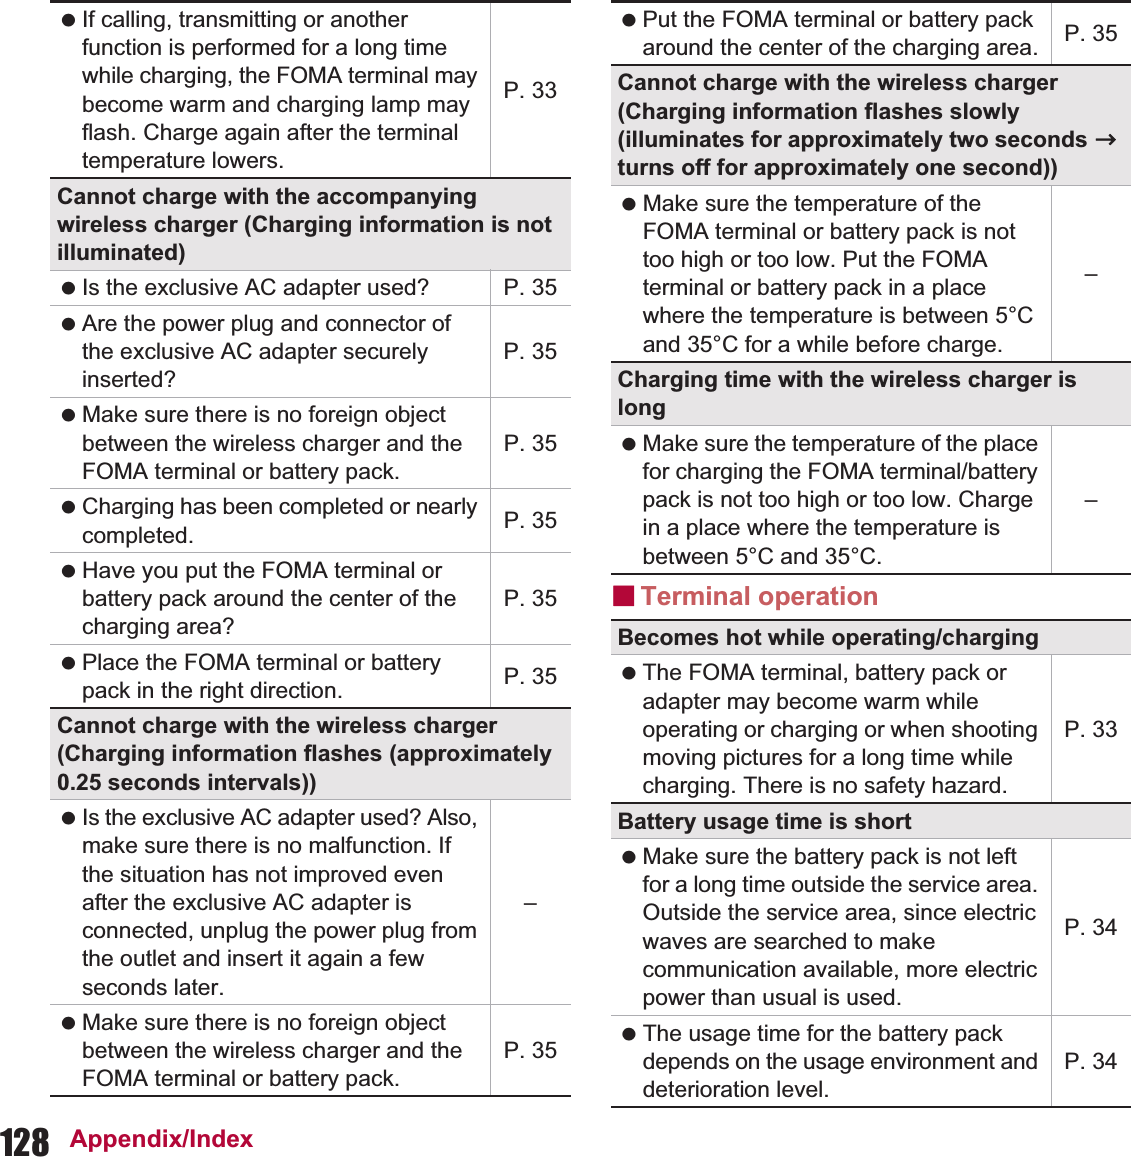
![129Appendix/IndexɡCalling Battery pack is a consumable product. Service time per charge is gradually reduced every time the battery is charged. Purchase a specified new battery pack if the usage time becomes extremely shorter than when the battery was purchased even after fully charged.P. 34Power turns off/The FOMA terminal restarts Unclean terminals for the battery pack may result in poor connections and loss of power. Wipe with a dry cloth or a cotton swab.–Not activated by touching, pressing keys, etc. Make sure the FOMA terminal is not turned off. P. 38Screen response is slow when touching, pressing keys, etc. This may happen when a great deal of data is saved in the FOMA terminal or when a large amount of data is transferred between the FOMA terminal and the microSD Card.P. 82miniUIM does not recognize Is a miniUIM inserted facing right direction? P. 30Clock is incorrect Clock may become incorrect if the power is turned on for a long time. Make sure the setting is set to adjust time automatically and turn the power on again in a location with good signal conditions.P. 84Calls cannot be made by touching, pressing keys, etc. Make sure Restrict calls of Lock Setting is not set. P. 80 Make sure Offline mode is not set. P. 76Ring tone does not sound Make sure phone ring volume is not set to [0]. P. 78 Make sure Public mode, Manner mode or Offline mode is not activated.P. 74P. 76P. 78 Make sure Call blocking is not set. P. 77 Make sure ringing time for Voice Mail Service or Call Forwarding Service is not set to “0 seconds”.P. 70P. 72Connection cannot be made ([(] does not disappear even after moving to another place or calls cannot be made/received even though signal status is not bad) Turn the power on again or attach the battery pack or miniUIM again.P. 30P. 32P. 38 Depending on the signal type, even though status is “inside the service area” or “[!] (indicating signal status) appears”, making/receiving a call may not be available. Move to another place and call again.– Make sure the call restriction such as Call blocking, etc. is not set. P. 77](https://usermanual.wiki/Sharp/HRO00153/User-Guide-1504731-Page-131.png)
![130 Appendix/IndexɡScreenɡSoundɡMailɡCameraɡOsaifu-KeitaiɡOverseas use In crowded place, heavy telephone/mail traffic may be caused and makes it difficult to get a connection. In such case, a busy signal is played. Move to another place or call again later.–Display is dark Make sure Screen timeout is not set short. P. 79 Make sure the setting of Brightness is not changed. P. 79 Make sure Automatic brightness of Brightness is not enabled. Brightness of the screen varies depending on the surrounding light if the setting is enabled.P. 79 Make sure VeilView is not set. P. 79The other party’s voice is not heard well or is too loud during phone call Make sure you did not change the in-call volume. P. 64A mail is not automatically received Make sure Inbox check frequency in Account settings of Email is not set to [Never].P. 87Still picture or moving picture shot by the camera is blurred Switch Focus settings to [Macro AF] or [Macro Fixed] when shooting nearby subject.P. 95 Make sure the camera lens is neither misted up nor exposed to dirt. P. 92Cannot use Osaifu-Keitai If the battery pack is removed, IC card functions are not available regardless of the Osaifu-Keitai lock setting.P. 115 Make sure the Osaifu-Keitai lock setting is not activated.P. 116 Is the a mark of the FOMA terminal held over the scanning device?P. 116Cannot use the FOMA terminal overseas (The signal icon appears) Make sure to subscribe to “International roaming service (WORLD WING)”. Check the status of a subscription for “International roaming service (WORLD WING)”.P. 123Cannot use the FOMA terminal overseas ([(] appears) Make sure the handset is not outside the service area or in a place with weak signal. Refer to “Mobile Phone User’s Guide [International Services]” or the DOCOMO International Services website to check if the service area or telecommunications carrier is available.P. 123 Change the network setting or telecommunications carrier setting.Set Network Mode to [3G/GSM(Auto)].Set telecommunications carriers to [Select automatically].P. 125](https://usermanual.wiki/Sharp/HRO00153/User-Guide-1504731-Page-132.png)
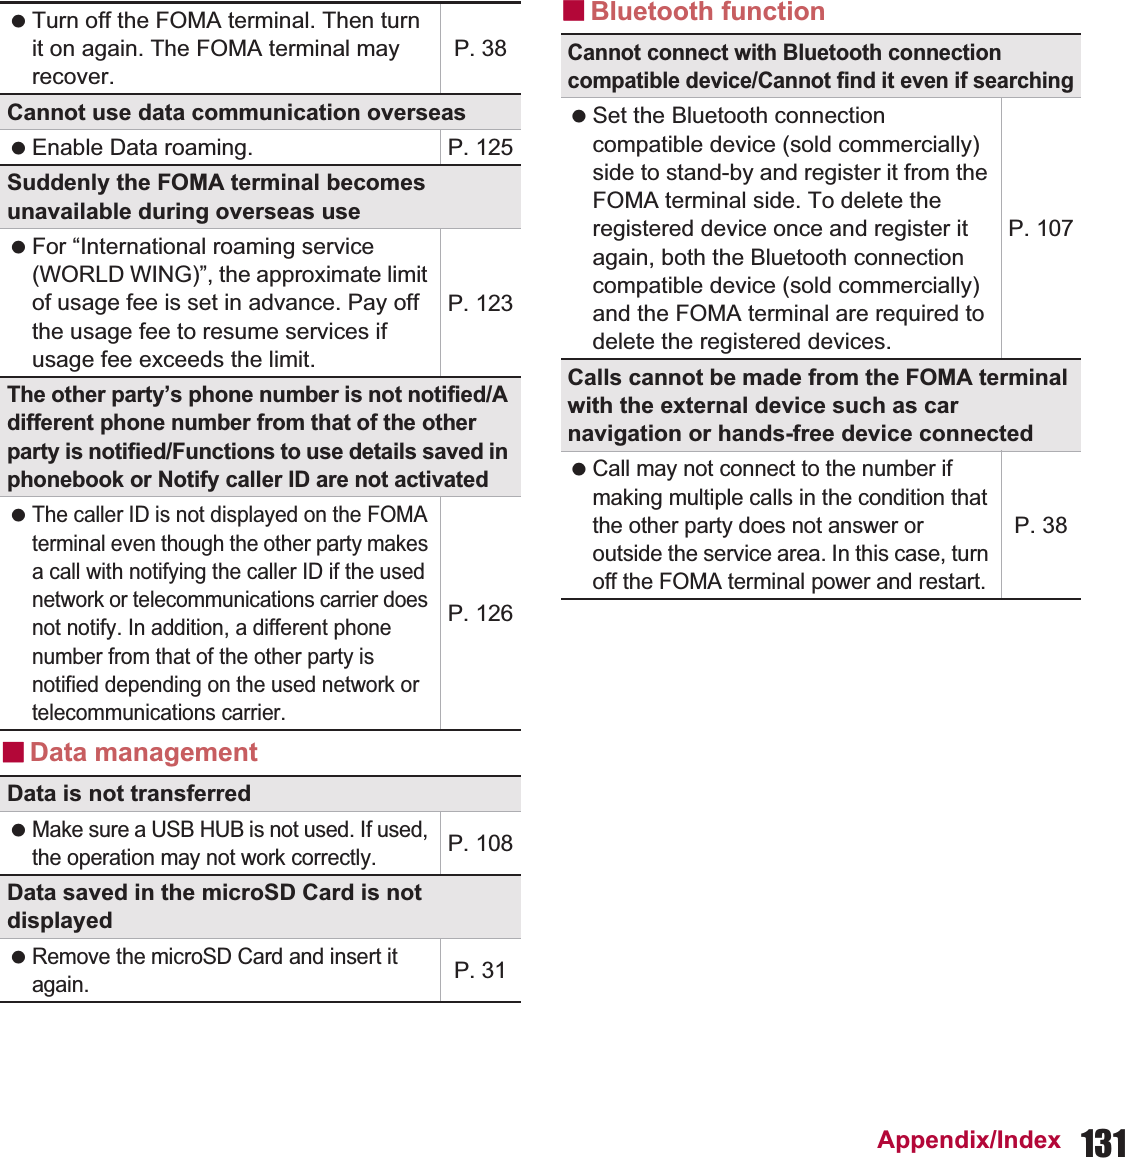
![132 Appendix/IndexMajor error messages displayed on the FOMA terminal are shown in alphanumeric order. Make sure that the warranty card is included with your FOMA terminal at the time of purchase. Check that the name of the retailer, the date of purchase, and the necessary details have been filled in on the warranty card. Be sure to keep it in a safe place. Contact the retailer if any necessary details on the warranty card are not completed. The warranty period without charge is 1 year from the date of purchase. For the purpose of improvement, the specifications for this product and its accessories are subject to complete or partial change without prior notice. Information registered in your FOMA terminal, such as phonebook entries, may be lost or damaged if your FOMA terminal is damaged, repaired or mishandled. It is recommended that a memo be kept of information such as phonebook entries, etc.ɦThis FOMA terminal allows you to save phonebook data to the microSD Card.Error messages[Connection error; failed to send][Connection has been interrupted due to no answer][Server error; failed to send][The destination server is not supporting it.][Transmission error; try again in a while] Appears when attempting to use mail or SMS with the line system not in service or extremely congested. Try again later.[Enter lock no.] Appears when an operation for the restricted function was attempted while the FOMA terminal lock is set. Enter the Lock No. to temporarily disable FOMA terminal lock and continue operation. Appears when attempting to use a function that requires the Lock No. to be entered.[Failed to get license. Cannot play.] Appears when failed to update a license of copyrighted contents that has reached the expiration date.[Failed to send] Appears when SMS was not sent properly. Appears when mail was not sent properly. Try again from a location with a strong signal.[Insert/recheck SIM card.] Make sure miniUIM is properly inserted. nP. 30[Mobile network not available.] Make sure a valid network mode is set. nP. 125[No permissions to play this content.] Appears when there is no available license or when attempting to play copyrighted contents whose playable period or limit has expired.[xx mails have been received, but some have not been received.] Appears when not all mail can be received for an unspecified reason.Warranty and After-Sales ServiceWarranty](https://usermanual.wiki/Sharp/HRO00153/User-Guide-1504731-Page-134.png)

![135Appendix/Index Do not remove the battery pack while updating software. Failure to update software may occur. Fully recharge battery before updating software. Software cannot be updated in the following cases.During a call/Outside the service areaDuring International roamingIn Offline modeWhile connecting to Wi-Fi networkWhile mounting with USB connectionDuring OS version upgradeDuring MTP connectionWhen date and time are set incorrectlyWhen battery level is insufficient for software updateWhen free space is insufficient for software update Updating (downloading and rewriting) software may take time. Making or receiving calls, each communication function and other functions cannot be used while updating software (Receiving voice calls is possible during download). During software update, the handset makes an SSL/TLS connection with the server (DOCOMO site). It is recommended to update software at a location with a strong signal (four bars for the antenna icon) while you are not moving.ɦIf signal status becomes weak and download is interrupted when downloading software, update software again in a location with good signal conditions. If software has already been updated, [No update is needed.] appears when software update is checked. [Failed to start update. Due to no network or roaming.] appears during International roaming or outside the service area. When the battery is not enough to update software, [Failed to start update. Due to low battery. Please recharge and retry later.] appears. While updating software, received SMS is held at SMS center.ɦWhile downloading software, receiving SMS is available. However, if you activate the mail application, download is interrupted. When updating software, the information unique to SH-13C (model, serial number, etc.) is automatically sent to the server (DOCOMO software update server). Sent information is only used for software update. If software update fails, [Rewrite failed] appears and all operations may not be available. In this case, visit a repair center that DOCOMO specifies. When PIN code is set, the PIN code entry screen appears during restart after rewriting and you are required to enter PIN code. While updating software, do not activate other applications. You can update software even if SH-13C contains phonebook, camera image, mail or downloaded data. However, DOCOMO cannot protect data that could be lost due to malfunction, damage, water exposure and so on. It is recommended that important data be backed up before software update. Note that some data, such as downloaded data, cannot be backed up.Using software update](https://usermanual.wiki/Sharp/HRO00153/User-Guide-1504731-Page-137.png)
![136 Appendix/IndexYou can download new software automatically and rewrite the software at the time set in advance.Automatic update setting is set to [Automatic Update] by default.When the rewrite is ready, the notification icon [a] (Software update is available) appears. Then you can confirm the time when the rewrite starts, change the time, and select whether to rewrite software now.If the time when the rewrite starts arrives with the notification icon [a] (Software update is available) displayed, the software is automatically rewritten and the notification icon [a] (Software update is available) disappears.If the time when the rewrite starts arrives with the insufficient battery or during a voice call, software update does not start and is performed at the same time of the following day.Software cannot be updated automatically when Automatic update setting is set to [Manual Update] or while updating software by Now update.ɡSetting auto-update1In the home screen, [R]/[Settings]/[About phone]/[Software Update]/[Configure the software update]2Select the operation performed when update software notification is received:To update the software automatically: [Automatic Update]:To update the software not automatically: [Manual Update]Auto-update](https://usermanual.wiki/Sharp/HRO00153/User-Guide-1504731-Page-138.png)
![137Appendix/IndexɡActions when software update is requiredWhen the software is automatically downloaded, the notification icon [a] (Software update is available) appears in the home screen.1In the home screen, the notification icon [a] (Software update is available)2Select the rewrite methodOK: The rewrite starts when the set time arrives.Sets Time: For subsequent operations nstep 1 of “Reserve update” on P. 140ƦSet a time to install update package.Starts update: For subsequent operations nstep 1 of “Updating software immediately” on P. 139ƦThe rewrite starts.ƦWhen the rewrite is complete, the notification icon [b] (Update completed) appears.:The notification icon disappears when you check it once.1In the home screen, [R]/[Settings]/[About phone]/[Software Update]/[Start the software update]/[Yes]:Once the download starts, software is automatically updated.:If you cancel downloading during the download, data downloaded up to that point is deleted. If software update cannot be activated at the auto-update time, the notification icon [a] (Software update is available) appears in the home screen.Now update](https://usermanual.wiki/Sharp/HRO00153/User-Guide-1504731-Page-139.png)
![138 Appendix/Index:When software update is not necessary, [No update is needed.] appears.2[OK]:The FOMA terminal restarts and the update starts.:During update, all key operations are not available. It is not possible to cancel downloading.:During update, the FOMA terminal restarts automatically twice.3The home screen appears:[b] appears in the status bar. [b] disappears if you check it once.](https://usermanual.wiki/Sharp/HRO00153/User-Guide-1504731-Page-140.png)
![139Appendix/Index1[Starts update]2[Ready for update.]/[OK]:Approximately 3 seconds after [Ready for update.] appears, rewriting starts automatically.:During rewriting, all of the keys are disabled. It is not possible to cancel rewriting.:The FOMA terminal restarts automatically.3After restarting, software update starts automatically:During update, all of the keys are disabled. It is not possible to cancel update.:When update ends, the FOMA terminal restarts automatically after approximately 5 seconds.4The notification icon [b] (Update completed):Software update ends and the home screen appears.:The notification icon [b] (Update completed) that indicates updating is finished appears in the home screen. Once the notification icon [b] (Update completed) is confirmed, it disappears.Updating software immediately](https://usermanual.wiki/Sharp/HRO00153/User-Guide-1504731-Page-141.png)
![140 Appendix/IndexɡPost-update display[b] appears in the status bar. Touch [b] to display the message stating that the software update is complete.You can change a time for software update if you want to set a different time for update package installation.1[Sets Time]:The sets time screen appears.:The time is the same as the time of SH-13C.2Enter the preferred time/[OK]:Set a time.Reserve update](https://usermanual.wiki/Sharp/HRO00153/User-Guide-1504731-Page-142.png)
![141Appendix/IndexɡWhen reserved time arrives1[Ready for update.]/[OK]:Approximately 3 seconds after [Ready for update.] appears, software update automatically starts.:Before software updates, make sure that the home screen is displayed and the handset is in a place with a strong signal.:Software update is performed at the same time of the following day if the battery level is below the necessary level to update software at the reserved time.:If the alarm or another function takes place at the same time when the reserved time arrives, software update is prioritized.:When SH-13C is turned off at the reserved time for software update, software update is performed at the same time as reserved time after turning on the power. For the flow of OS version upgrade, refer to “Manual for USB Driver Installation” in PDF format on http://k-tai.sharp.co.jp/support/d/sh-13c/download/usb/index.html (in Japanese only). Download the major update software and the USB driver to a PC and connect up PC to the FOMA terminal using the microUSB cable for PC (sample) in advance. Also, set the USB connection mode (nP. 79) to [Fast transfer mode].1Start [ιΐλȜͺΛίΟȜΠΜȜσܳ൲] (Activate major update tool) on a PC and click [ষ͒] (Next)2Select [NTT DOCOMO] and [SH-13C], and click [ষ͒] (Next):Download the latest major update file to a PC as needed.3When the latest version is downloaded on the PC, click [ΨȜΐοϋͺΛί] (version upgrade)/[ষ͒] (Next)4Check the time for update on the PC and click [ষ͒] (Next)5When the confirmation screen of disclaimer appears on the PC, check the content and click [ষ͒] (Next) to agreeOS version upgrade](https://usermanual.wiki/Sharp/HRO00153/User-Guide-1504731-Page-143.png)
![142 Appendix/Index6In the home screen of the FOMA terminal, [R]/[Settings]/[About phone]/[Major Update]/[Start update]/[Update via PC]:When you update via Wi-Fi, select [Update via Wi-Fi] and follow the instructions on the screen.ƦInsert the microSD Card and enable the Wi-Fi function in advance. (nP. 76)7Enter the Lock No. on the FOMA terminal/[OK]8Check the precautions on the FOMA terminal and [Yes]:The FOMA terminal restarts.9When the update start screen appears on the FOMA terminal, click [ষ͒] (Next) on the PC:Major update starts.10Click [ਞၭ] (Exit) on the PC11Perform Safely Remove Hardware on the PC12Disconnect the microUSB cable for PC from the FOMA terminalɡPackageMain specificationsProduct nameSH-13CSizeApprox. 119 (H) × Approx. 60 (W) × Approx. 10.9 (D) mm (Approx. 11.5 mm at thickest point)Weight Approx. $$ Ũ (with battery pack attached)Continuous talk time*1, 2, 3FOMA/3GApprox. 280 minGSMApprox. 310 minContinuous stand-by time*2, 3, 4FOMA/3GWhen mobile: Approx. 420 hr (Network Mode: 3G)*5When mobile: Approx. 330 hr (Network Mode: 3G/GSM(Auto))*5At rest: Approx. 500 hr (Network Mode: 3G/GSM(Auto))*6GSMAt rest: Approx. 400 hr (Network Mode: 3G/GSM(Auto))*6Charge time AC adapter: Approx. 220 minDC adapter: Approx. 220 minDisplayTypeNew Mobile ASV LCD 262,144 colorsSizeApprox. 3.7 inchesPixels518,400 pixels (540 × 960 dots)Image pickup deviceTypeCMOS*7Size1/3.2 inches](https://usermanual.wiki/Sharp/HRO00153/User-Guide-1504731-Page-144.png)