Sharp HRO00163 Cellular Phone with Bluetooth, WLAN and Felica User Manual English part1
Sharp Corporation Cellular Phone with Bluetooth, WLAN and Felica English part1
Sharp >
Contents
- 1. FCC statements
- 2. English version part 1
- 3. English version part 2
- 4. User manual English part1
- 5. User manual English part2
- 6. User manual part1
- 7. User manual part2
- 8. User manual English part1
User manual English part1
Getting Ready
Contents
Introduction
Learning the Basics
Phone
Address Book
Mail
Internet
Multimedia
Applications
1Seg
Settings of IS14SH
Global Function
Appendix/Index
Basic Manual
For inquiries, call: Customer Service Center
For general information and charges (toll free)
From fixed-line phones: From au cell phones:
From fixed-line phones: From au cell phones:
In case above numbers are not available,
0120-977-033 (except Okinawa)
0120-977-699 (Okinawa)
For loss, theft or damage and operation information
(toll free)
PRESSING ZERO WILL CONNECT YOU TO AN OPERATOR
AFTER CALLING 157 ON YOUR au CELLPHONE.
area code not required
area code not required
Sales: KDDI CORPORATION・
OKINAWA CELLULAR TELEPHONE COMPANY
Manufactured by: SHARP CORPORATION
Cell phone and PHS operators collect and recycle unused
telephones, batteries and battery chargers at stores
bearing the logo regardless of brand and manufacturer
to protect the environment and reuse valuable resources.
November 2011 Edition

ii
Thank you for purchasing the IS14SH.
Before using your IS14SH, be sure to read the Basic Manual (this PDF
manual) to ensure correct usage.
After you have finished reading this manual, store this PDF manual
and the printed manuals (Accessories) in safe places so you can
retrieve them whenever you need them. If the printed manuals
(Accessories) are lost, please contact an au shop or Customer
Service Center.
■Instruction Manual (Accessory)
This manual describes basic operations of major functions of the
IS14SH.
For detailed descriptions on various functions, refer to the Instruction
Manual application (Japanese) available on the IS14SH or full
Instruction Manual (Japanese) available on the au homepage.
■Instruction Manual Application
You can use the Instruction Manual application (Japanese)
pre-installed in the IS14SH with which you can check detailed
operation methods on this au phone terminal.
Also, you can activate intended functions from an explanation screen
depending on the functions.
On the home screen, tap [Instruction Manual
•To use the application for the first time, you need to download and
install it by following on-screen instructions.
■Downloading Manuals
You can download the Basic Manual (this manual) and the Instruction
Manual (Accessory) (Japanese) or full Instruction Manual (Japanese)
in PDF format from the au homepage.
http://www.au.kddi.com/torisetsu/index.html
•To display the Basic Manual (this manual), the Instruction Manual
(Accessory) (Japanese) or full Instruction Manual (Japanese) in PDF
format on the IS14SH, purchase the full version of Documents To Go
or install an application which allows you to display PDF files.
Be sure to read the Safety Precautions “安全上のご注意” in the
Instruction Manual (Japanese) to ensure proper usage of the IS14SH.
For troubleshooting, check the symptom of your IS14SH in
auお客さまサポート (au Customer Support) on the au homepage.
http://www.kddi.com/customer/service/au/trouble/kosho/
index.html
Preface
For Learning Operations of the IS14SH Safety Precautions
KUUJAWGDQQMKKࡍࠫ㧞㧜㧝㧝ᐕ㧝㧞㧝ᣣޓᧁᦐᣣޓඦᓟ㧡ᤨ㧝㧥ಽ

1
•You cannot receive or make calls in a location where the signal
cannot be received, even within the service area. Calling may not be
available in a location where the signal is weak. If you move to a
location where the signal is weak during a call, the call may be
interrupted.
•The au phone is a digital cell phone and can maintain a high call
quality until the signal weakness reaches its limit. Therefore, once
the limit has been reached, the call may be disconnected suddenly.
•Note that the au phone uses signals which may be intercepted by a
third party. (However, the CDMA system enables highly confidential
call communications.)
•The au phone is a wireless station which is compliant with the Radio
Act, and may be subject to inspections regulated by the Radio Act.
•When you insert the au IC-Card, the product number information of
your au phone is sent to the au server for the security and operation
status notification of the au phone.
•Always be considerate of others around you when using your au
phone in public places.
•For a child’s use, read the Basic Manual and give your child
instructions on proper use.
•The IS14SH is a cell phone compatible with the international
roaming service. Each network service which is described in the
Basic Manual varies depending on the area or service. For details,
refer to Global Passport Owner’s Guide (Japanese).
Before Using an au Phone
KUUJAWGDQQMࡍࠫ㧞㧜㧝㧝ᐕ㧝㧞㧝ᣣޓᧁᦐᣣޓඦᓟ㧡ᤨ㧝㧥ಽ
2
Introduction
Cell phones always emit weak radio waves when power is on. Use cell
phones in an enjoyable and safe manner without forgetting to be
considerate of others around you.
■Use of cell phones is not allowed in some places.
•Using a cell phone while driving a car/motorcycle is dangerous and
is prohibited by law. Also, using a cell phone while riding a bicycle
may be punished by law.
•Using a cell phone in an aircraft is prohibited.
■Be considerate of where you use the cell phone and
how loudly you talk.
Do not make calls in theaters, museums, libraries, and other similar
places. Turn power off or turn on Manner mode so as not to disturb
others around you by ring tones.
•Do not use the cell phone on a street where you might interrupt the
flow of pedestrians.
•Move to areas where you will not inconvenience others on trains or in
hotel lobbies.
•Refrain from talking in a loud voice.
•Obtain the permission of other people before you take their photos
with the cell phone’s camera.
■Be considerate of people around you.
•Some people close to you in crowded places such as packed trains
may be using a cardiac pacemaker. Turn the cell phone off in such
places.
•Abide by the rules of hospitals and other medical institutions where
it is forbidden to use or carry cell phones.
Check whether all the contents are included.
ƔInstruction Manual (Japanese)
ƔSafety Precautions (Japanese)
ƔNotice Sheet (Japanese)
ƔSetting Guide (Japanese)
ƔJIBUN BANK・au Insurance Service Guide (Japanese)
ƔGlobal Passport Owner’s Guide (Japanese)
Ɣau International Call Guide (Japanese)
The following items are not included.
•Purchase a specified charger (sold separately).
•The illustrations in this manual may look different from the actual
product.
Cell Phone Etiquette Accessories
•AC adapter
•Earphone
•microUSB cable
Warranty
(Japanese)
IS14SH microSD memory card
(2 GB) (Sample)
* This is inserted in the
IS14SH at the time of
purchase.
Battery pack
(SHI11UAA)
KUUJAWGDQQMࡍࠫ㧞㧜㧝㧝ᐕ㧝㧞㧝ᣣޓᧁᦐᣣޓඦᓟ㧡ᤨ㧝㧥ಽ
3
Introduction
■Note on Key Illustrations
In this manual, the key illustrations are simplified as shown below. ■Description of Operations for Selecting Item/Icon/
Key etc.
In this manual, operation steps are described as below.
Illustrations and Descriptions in This
Manual
When pressing or ................
When pressing or ................
When pressing , , , ...
Description Explanation
On the character entry
screen, [Input mode.
Tap on the character entry
screen. Then tap Input mode.
On the character entry
screen, A.
Press A on the character entry
screen.
•Explanations of this manual are based on the case when the color of the
IS14SH is “Champagne Pink” as an example.
•Explanations of this manual are based on the case when the IS14SH is held
vertically. If you hold it horizontally, menu items/icons/on-screen keys etc.
may be different.
•Explanations of this manual are based on touch panel operations when you
can operate with either touch panel or keys.
•Explanations of this manual are based on the case when the IS14SH is
closed. If it is opened, menu items/icons/on-screen keys etc. may be
different.
•Menu items, layers and icons described in this manual may be different
according to functions being used and conditions.
•In this manual, entering Lock No. is mentioned as one of the unlock
methods.
•“microSD™ memory card” and “microSDHC™ memory card” are
abbreviated as “microSD memory card” or “microSD”.
KUUJAWGDQQMࡍࠫ㧞㧜㧝㧝ᐕ㧝㧞㧝ᣣޓᧁᦐᣣޓඦᓟ㧡ᤨ㧝㧥ಽ

4
Introduction
■Note on Screenshots
The screenshots in this manual are simplified and may look different
from the actual screens. Also, part of the screen may be abbreviated.
You have to use each security code for using the IS14SH.
You can use a security code and other passwords described below.
Take care not to forget your security code and passwords because
they are required for performing various operations and using
subscription services.
●Security Code
●Lock No.
●PIN Code
Actual screen
In this manual,
part of the screen
such as icons are
abbreviated.
In this manual
Security Code and PIN Code
Security Code and Passwords
Usage
Example
AUsing the Answering Service (Voice Mail) and Call Transfer
remotely from a fixed-line phone
BMaking inquiries, applications, and changes while using
Customer Service Center voice guidance, and au homepage
Initial
Setting
The four-digit number you wrote on your subscription form
Usage
Example
Setting/Canceling Screen lock, Restrict address book, etc.
Initial
Setting
1234
Usage
Example
Preventing unauthorized use of the au IC-Card by a third party
Initial
Setting
1234
KUUJAWGDQQMࡍࠫ㧞㧜㧝㧝ᐕ㧝㧞㧝ᣣޓᧁᦐᣣޓඦᓟ㧡ᤨ㧝㧥ಽ

5
Introduction
If the PIN code is incorrectly entered three times consecutively, the
PIN code will be locked. Use the PUK code to unlock the PIN code.
■PIN Code
You can set the IS14SH to require PIN code entry every time the
power is turned on, to prevent unauthorized use of the au IC-Card by
a third party.
•At the time of purchase, the PIN code is not to be required to use
phone. On the home screen, tap [Settings [Location &
security [Set up UIM card lock [Mark Lock UIM card to set the PIN
code to be required.
The PIN code is also required when setting Lock UIM card.
•The initial setting of the PIN code is “1234”. On the home screen, tap
[Settings [Location & security [Set up UIM card lock
[Change UIM PIN to change the PIN code to a four- to eight- digit
number.
■PUK Code
Enter the PUK code when the PIN code is locked.
•PUK code is an eight-digit number given at the time of purchase,
and is printed on the back side of the plastic card where your au
IC-Card is attached.
•When you enter the PUK code, on the home screen, tap
[Settings [Location & security [Set up UIM card lock [Change
UIM PIN to set the new PIN code.
•If the PUK code is incorrectly entered ten times consecutively,
contact an au shop, PiPit or the Customer Service Center.
PIN Code
•When the PIN code is locked, the IS14SH may be restarted for the security
reasons.
•PIN code cannot be reset even if you carry out the operation (on the home
screen, tap [Settings [Privacy [Reset all).
<Back up notes on the memory contents of the IS14SH>
●Please back up* notes on the important information whose contents are
saved on the IS14SH by yourself or are received/downloaded to the
IS14SH from external devices.
The memory contents of the IS14SH may be deleted or changed because
of unexpected elements such as static electricity and malfunction or
modifications, improper operations, etc.
* Methods for the backup
It is recommended that text information such as the address book or downloaded
dictionaries be backed up in the microSD memory card. You can forward each data to
a PC by attaching one on mails.
However, some data such as data protected by copyright cannot be backed up even
with the above mentioned methods.
KUUJAWGDQQMࡍࠫ㧞㧜㧝㧝ᐕ㧝㧞㧝ᣣޓᧁᦐᣣޓඦᓟ㧡ᤨ㧝㧥ಽ

6
Contents
Preface............................................................ ii
For Learning Operations of the IS14SH.......... ii
Safety Precautions.......................................... ii
Before Using an au Phone.............................. 1
Cell Phone Etiquette ...............................................2
Accessories.............................................................2
Illustrations and Descriptions in This Manual..........3
Security Code and PIN Code ..................................4
Security Code and Passwords................................4
PIN Code.................................................................5
Names and Functions of Parts................................8
Opening the IS14SH .............................................11
Removing/Attaching the Battery Pack...................11
Removing the Battery Pack...................................11
Attaching the Battery Pack ...................................12
Using au IC-Card ..................................................12
au IC-Card ............................................................12
Removing au IC-Card ...........................................12
Inserting au IC-Card .............................................13
Using microSD Memory Card ...............................13
microSD Memory Card .........................................13
Removing microSD Memory Card ........................14
Inserting microSD Memory Card ..........................15
Charging the Battery Pack ....................................16
Turning the Power On/Off .....................................18
Turning the Power On ...........................................18
Turning the Power Off ...........................................18
Restarting the IS14SH...........................................18
Sleep Mode ...........................................................18
Unlock Screen ...................................................... 19
Switching the Display Language to English.......... 19
Initial Setup ........................................................... 19
Setting Up a Google Account ............................... 20
Setting an au one-ID............................................. 20
Operating the Touch Panel................................... 21
Using the Home Screen........................................ 22
Viewing the Home Screen .................................... 22
Using Menu in the Home Screen.......................... 23
Moving/Removing Shortcuts/Widgets/Folders ..... 24
Switching the Home Screen ................................. 24
Using the Launcher............................................... 24
Using the Status Bar............................................. 28
Indicators.............................................................. 28
Using Notification/Status Panel ............................ 30
Switching Orientation............................................ 31
Displaying Available Menu.................................... 32
Character Input (Software Keyboard) ................... 33
Switching Software Keyboards............................. 33
Viewing the Character Entry Screen..................... 33
Switching Character Entry Modes ........................ 35
Entering Emoji/Decoration-emoji/Symbol/Facemark
.............................................................................. 35
Switching Input Software ...................................... 36
Character Input (Hardware Keyboard).................. 36
Switching Character Entry Modes ........................ 37
Entering Emoji/Decoration-emoji/Symbol/Facemark
.............................................................................. 37
Making a Call ........................................................ 38
Making an International Call (au International Call
Service)................................................................. 39
Answering a Call................................................... 40
Answering an Incoming Call................................. 40
Putting the Call on Hold........................................ 40
Answering with the Message of Answering Memo
..............................................................................40
Returning a Call (Outgoing History/Incoming
History) ..................................................................40
Turning On Manner Mode .....................................41
Turning On the Answering Memo..........................41
Playing a Message in Answering Memo................42
Adding an Address Book Entry .............................43
Using an Address Book.........................................44
Viewing the Address Book Details Screen............44
Using Phone Number............................................45
Using Mail Address ...............................................45
Using E-mail/C-mail...............................................46
Sending E-mail Messages.....................................46
Sending C-mail Messages ....................................47
Receiving E-mail/C-mail Messages.......................49
Reading Received E-mail/C-mail Messages .........49
Setting Mail Filters.................................................52
Rejecting Spam C-mail Messages ........................55
Setting Account for PC-mail ..................................55
Sending PC-mail Messages ..................................57
Receiving PC-mail Messages................................57
Using Gmail...........................................................57
Sending Gmail.......................................................58
Receiving Gmail ....................................................58
Viewing Sites with Browser ...................................59
Using Bookmarks/History ......................................59
Displaying a Site from Bookmarks/History ............59
Bookmarking a Web Page ....................................60
Contents
Introduction
Getting Ready
Learning the Basics
Phone
Address Book
Mail
Internet
KUUJAWGDQQMࡍࠫ㧞㧜㧝㧝ᐕ㧝㧞㧝ᣣޓᧁᦐᣣޓඦᓟ㧡ᤨ㧝㧥ಽ

7
Contents
Using the Camera................................................. 61
Cautions for Using the Camera ............................ 61
Taking Photos....................................................... 62
Recording Movies ................................................. 64
Using Gallery ........................................................ 65
Using Contents Manager ...................................... 65
Displaying/Playing Data ....................................... 65
Using Menu in the Contents Screen..................... 66
Cautions for Using 1Seg....................................... 67
TV antenna ........................................................... 67
Initial Setup of 1Seg.............................................. 67
Watching 1Seg ..................................................... 68
Using au Disaster Countermeasure Application ... 70
Using Android Market ........................................... 72
Using au one Market............................................. 72
Using GREE Market ............................................. 72
Using Anshin Security Pack.................................. 72
Anshin Security Pack............................................ 72
Using 3LM Security .............................................. 73
Using Remote Support ......................................... 73
Using VirusBuster™ mobile for au........................ 74
Managing Applications.......................................... 74
Checking Your Profile ........................................... 75
Changing the Incoming Ring Tone ....................... 75
Changing the Wallpaper ....................................... 75
Initializing microSD Memory Card ........................ 76
Using Global Passport CDMA ...............................77
For Overseas Use without Anxiety ........................77
Configuring the Overseas Settings .......................77
Making a Call at Your Travel Destination ..............78
Receiving a Call at Your Travel Destination ..........79
Troubleshooting.....................................................80
Index......................................................................82
Multimedia
1Seg
Applications
Settings of IS14SH
Global Function
Appendix/Index
KUUJAWGDQQMࡍࠫ㧞㧜㧝㧝ᐕ㧝㧞㧝ᣣޓᧁᦐᣣޓඦᓟ㧡ᤨ㧝㧥ಽ

8
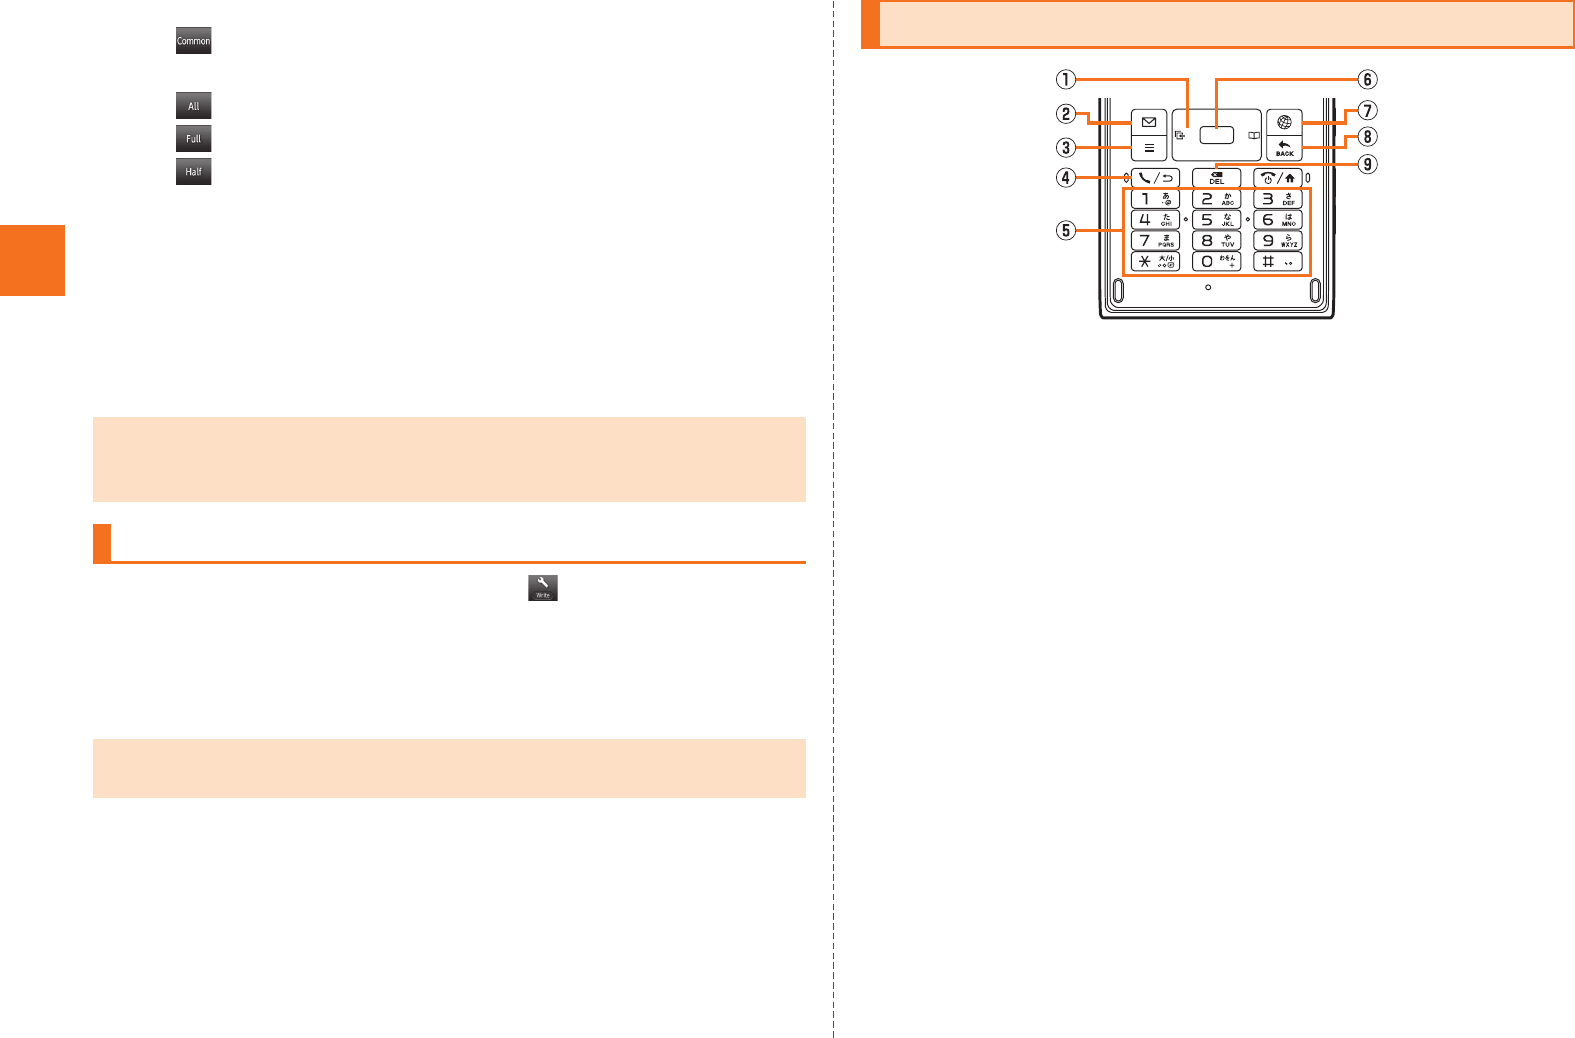
Getting Ready
■Front
AEarpiece (Receiver)
Emits voice of other party during a call, messages in Answering
memo, etc.
BCharging/Incoming indicator
Illuminates in red while charging.
Flashes according to the settings when receiving a call or mail
message.
CDisplay
De Menu key
Displays the option menu.
E# Home key
Use it to display the home screen etc.
FHardware keyboard
GMouthpiece (Microphone)
Transmits your voice to the other party during a call. It is also used
for recording sounds. Take care not to cover the microphone with
your fingers etc.
HProximity sensor/Light sensor
Proximity sensor prevents operating the touch panel incorrectly
during a call.
Light sensor detects the ambient brightness and adjusts the
brightness of display.
Im Search key
Use it to display the Quick Search Box etc.
J^ Return key
Returns to the previous page.
KK Power key
Turns on/off the power.
Names and Functions of Parts
KUUJAWGDQQMࡍࠫ㧞㧜㧝㧝ᐕ㧝㧞㧝ᣣޓᧁᦐᣣޓඦᓟ㧡ᤨ㧝㧥ಽ
9
Getting Ready
■Left Side/Right Side
LExternal connection jack cover
MExternal connection jack
Use it to connect the IS14SH to the common AC adapter 03 (sold
separately), the microUSB cable 01 (sold separately), SHARP
microUSB-18-pin (charger) conversion cable 01 (sold separately),
the microUSB stereo earphone conversion adapter 01 (sold
separately), etc.
NStrap eyelet
Of Lock key
Use it to move/disable sleep mode, and turn off the power.
Pud Volume up/down key
Adjusts the volume.
Hold u down on the unlock screen to turn on the mobile light.
Hold d down on the unlock screen to enable/disable Manner
mode.
■Back
QTV antenna
Extend and use it to watch 1Seg. It has no influence on calls or
data communication if you extend the TV antenna when calling or
using browser.
RCamera lens
SInfrared port
Sends and receives data via infrared communication.
KUUJAWGDQQMࡍࠫ㧞㧜㧝㧝ᐕ㧝㧞㧝ᣣޓᧁᦐᣣޓඦᓟ㧡ᤨ㧝㧥ಽ
10
Getting Ready
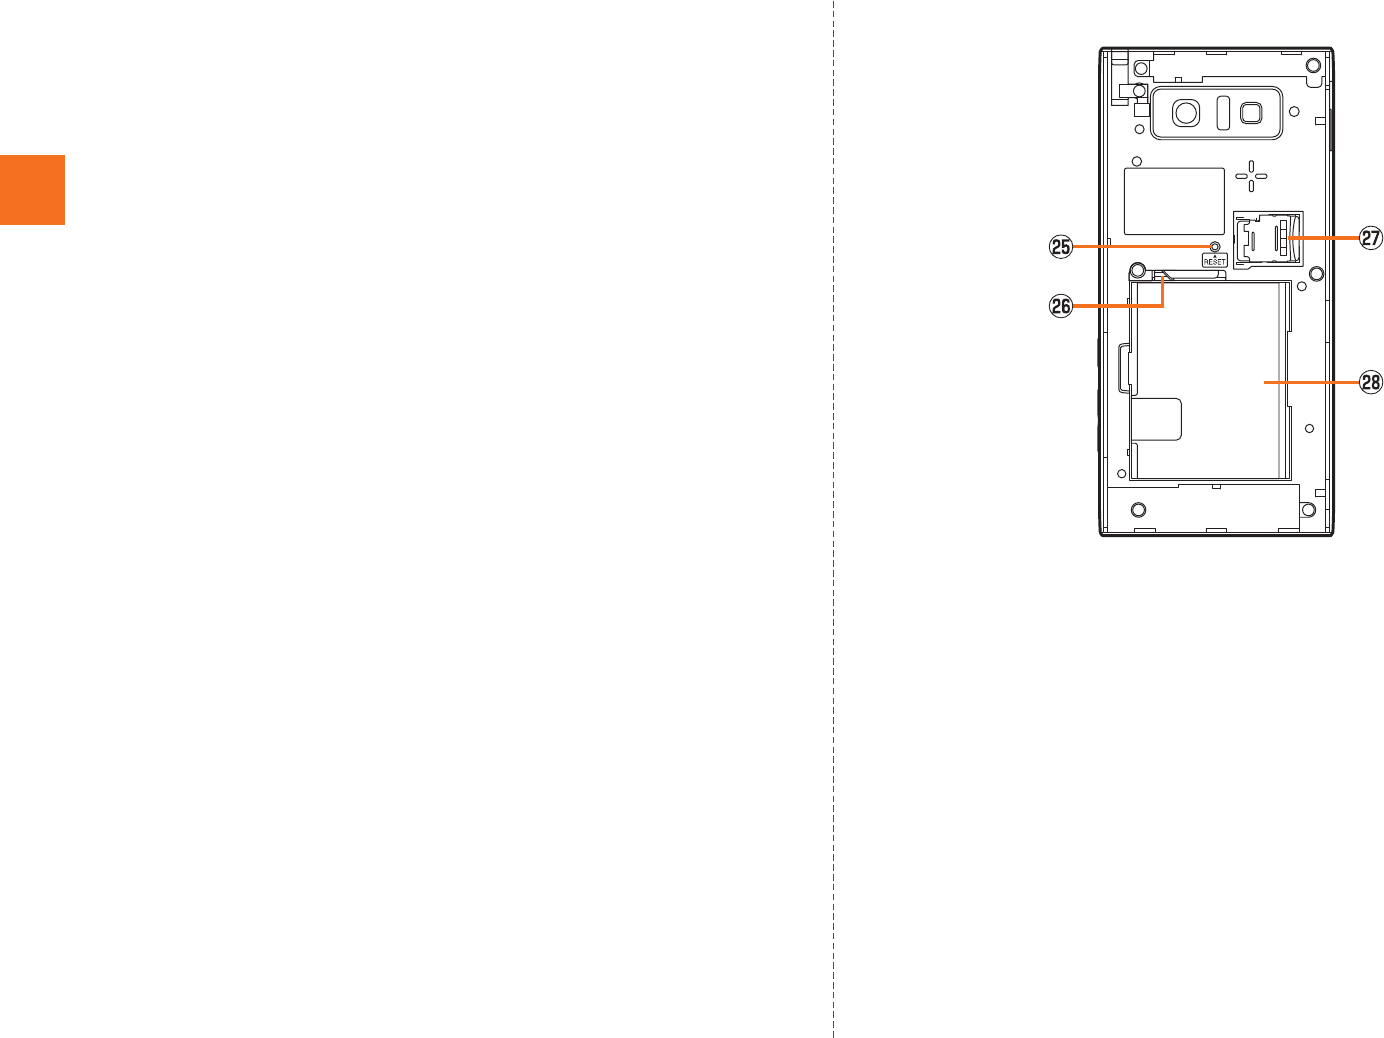
TFeliCa mark
Hold it over a reader/writer when using Osaifu-Keitai®.
Sends and receives data via IC communication.
UBattery pack cover
VInternal antennas
Do not cover the internal antennas area with your hand when you
call, use the Internet, Wi-Fi® or Bluetooth® function or retrieve GPS
information (only the upper part on the back of the cell phone is
responsible for Wi-Fi®, Bluetooth® and GPS functions). Also, do not
paste stickers around the internal antennas area. Otherwise, the
quality of calls/communications will deteriorate.
WMobile light
Flashes in red while activating Camera.
XSpeaker
Emits ring tones, alarm tones, etc.
■Back (Inside the Battery Pack Cover)
YReset button
If operations become unstable or unavailable, press the reset
button with a pointed end of an object for at least two seconds to
restart the IS14SH. Restarting with the reset button does not delete
any saved data or application.
ZTray
Use it when inserting an au IC-card.
amicroSD memory card slot
bBattery pack
KUUJAWGDQQMࡍࠫ㧞㧜㧝㧝ᐕ㧝㧞㧝ᣣޓᧁᦐᣣޓඦᓟ㧡ᤨ㧝㧥ಽ
11
Getting Ready
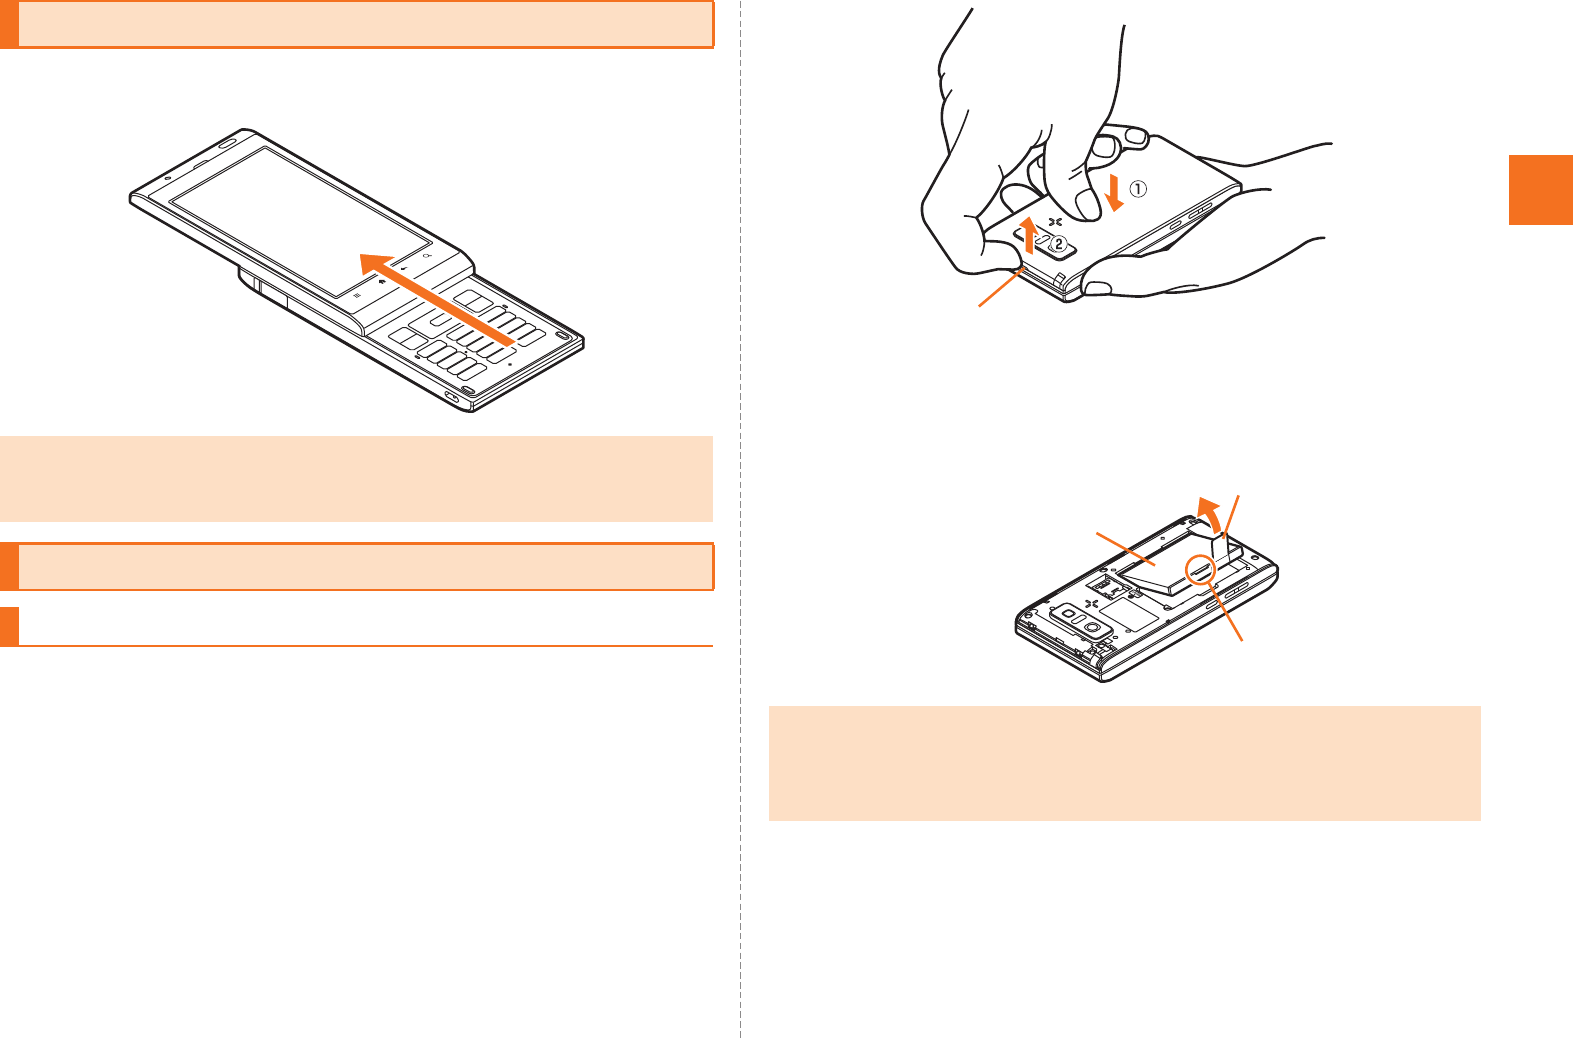
Slide the display part of the IS14SH to the direction of the arrow to
open it.
When removing the battery pack, turn off the IS14SH.
ARemove the battery pack cover on the back of the
IS14SH.
Hook a fingertip (nail) on the concave portion with the center of the
battery pack cover pressed (A), and then remove the battery pack
cover by pulling up in the direction of the arrow (B).
BRemove the battery pack.
Remove the battery pack by pulling up on the PULL tab in the direction
of the arrow.
Opening the IS14SH
•Note that touching the display/e/#/^/m may be recognized as an
operation when you open or close the IS14SH while the backlight
illuminates.
Removing/Attaching the Battery Pack
Removing the Battery Pack
•When removing the battery pack cover, do not warp it too much.
•When removing the battery pack, always pull up on the PULL tab.
Or use the protruding edge of the battery pack. Doing otherwise may result
in damage to the IS14SH or the battery contacts.
Concave portion
PULL tab
Protruding edge
Battery pack
KUUJAWGDQQMࡍࠫ㧞㧜㧝㧝ᐕ㧝㧞㧝ᣣޓᧁᦐᣣޓඦᓟ㧡ᤨ㧝㧥ಽ

12
Getting Ready
Use the specified battery pack for the IS14SH and attach it properly.
AAfter making sure that the PULL tab is closely
attached to the battery pack, align the contacts on the
battery pack with those of the IS14SH and then insert
the battery pack securely.
BAfter attaching the battery pack cover, press the
battery pack cover securely, and make sure that it is
closed properly.
An au IC-Card records your personal information
such as phone numbers.
Turn off the power and remove the battery pack before removing the
au IC-Card.
APull the tab of the tray straight out and remove the au
IC-Card.
BAttach the battery pack and battery pack cover.
Attaching the Battery Pack
•Before attaching the battery pack, make sure that the au IC-Card is inserted
properly.
•Failure to follow the correct procedure when attaching the battery pack may
result in damage to the battery pack or the battery pack cover.
PULL tab
Contacts on IS14SH
Using au IC-Card
au IC-Card
•Confirm the correct direction when you insert the au IC-Card.
•Note that inserting or removing the au IC-Card forcibly may result in
malfunction or damage.
•Make sure to unplug microUSB plugs such as AC adapter 03 (sold
separately) from the IS14SH when inserting or removing the au IC-Card.
Removing au IC-Card
au IC-Card
IC (metal
surface) part
Tab
KUUJAWGDQQMࡍࠫ㧞㧜㧝㧝ᐕ㧝㧞㧝ᣣޓᧁᦐᣣޓඦᓟ㧡ᤨ㧝㧥ಽ

13
Getting Ready
Turn off the power and remove the battery pack before inserting the
au IC-Card.
APull the tab of the tray straight out.
BPlace the au IC-Card on the tray with the IC (metal
surface) side up and insert it securely.
Insert the au IC-Card according to the orientation of its cutout.
CAttach the battery pack and battery pack cover.
You can set microSD memory card (including microSDHC memory
card) to the IS14SH, and save data. And also you can save address
book, mail messages, bookmarks, etc. in microSD memory card.
■Handling Precautions
•Do not remove the microSD memory card or the battery pack and do
not turn off the IS14SH and other equipments while reading, writing,
playing, saving or moving/copying data. It may result in damage to
data in the IS14SH or microSD memory card or data loss.
•Do not drop or subject the IS14SH to vibration or impact with a
microSD memory card inserted. It may result in damage to recorded
data or data loss.
•Do not insert objects other than microSD memory card such as
liquid, metals or flammable items into the microSD memory card
slot. It may result in a fire, electric shock or malfunction.
•Do not apply excessive force to open or close the guide of the
microSD memory card slot.
Inserting au IC-Card
•Inserting the tray not deeply enough may prevent the IS14SH from
functioning properly.
•When the tray comes off, insert the tray straightly.
Cutout
Using microSD Memory Card
microSD Memory Card
•The maximum file size available on a microSD memory card is 2 GB per file
when saving data to microSD memory card.
•A microSD memory card initialized on other devices may not be used on the
IS14SH properly. On the home screen, tap [Settings [microSD &
phone storage [Unmount microSD [OK [Erase microSD [Erase microSD
[Enter Lock No. [OK [Erase everything to initialize the microSD
memory card.
•For operations to play/display data in the microSD memory card, on the
home screen, tap [Contents Manager to use Contents Manager.
•Some files such as copyright protected data may not be played on the
IS14SH even if they are moved/copied from the PC etc. to a microSD
memory card successfully.
KUUJAWGDQQMࡍࠫ㧞㧜㧝㧝ᐕ㧝㧞㧝ᣣޓᧁᦐᣣޓඦᓟ㧡ᤨ㧝㧥ಽ
14
Getting Ready
•The following microSD memory cards have been confirmed for
operation based on the criteria by au. For operation confirmation
results of other microSD memory cards, contact each microSD
memory card manufacturer.
<microSD/microSDHC Memory Card>
○: Confirmed operation
−: Unconfirmed operation or not for sale
As of November 2011
* 4 GB or more are for microSDHC memory card.
* Operation is confirmed for microSD memory cards that are sold as of November 2011. For
the latest information on operation confirmation, visit the au homepage or contact the
Customer Service Center.
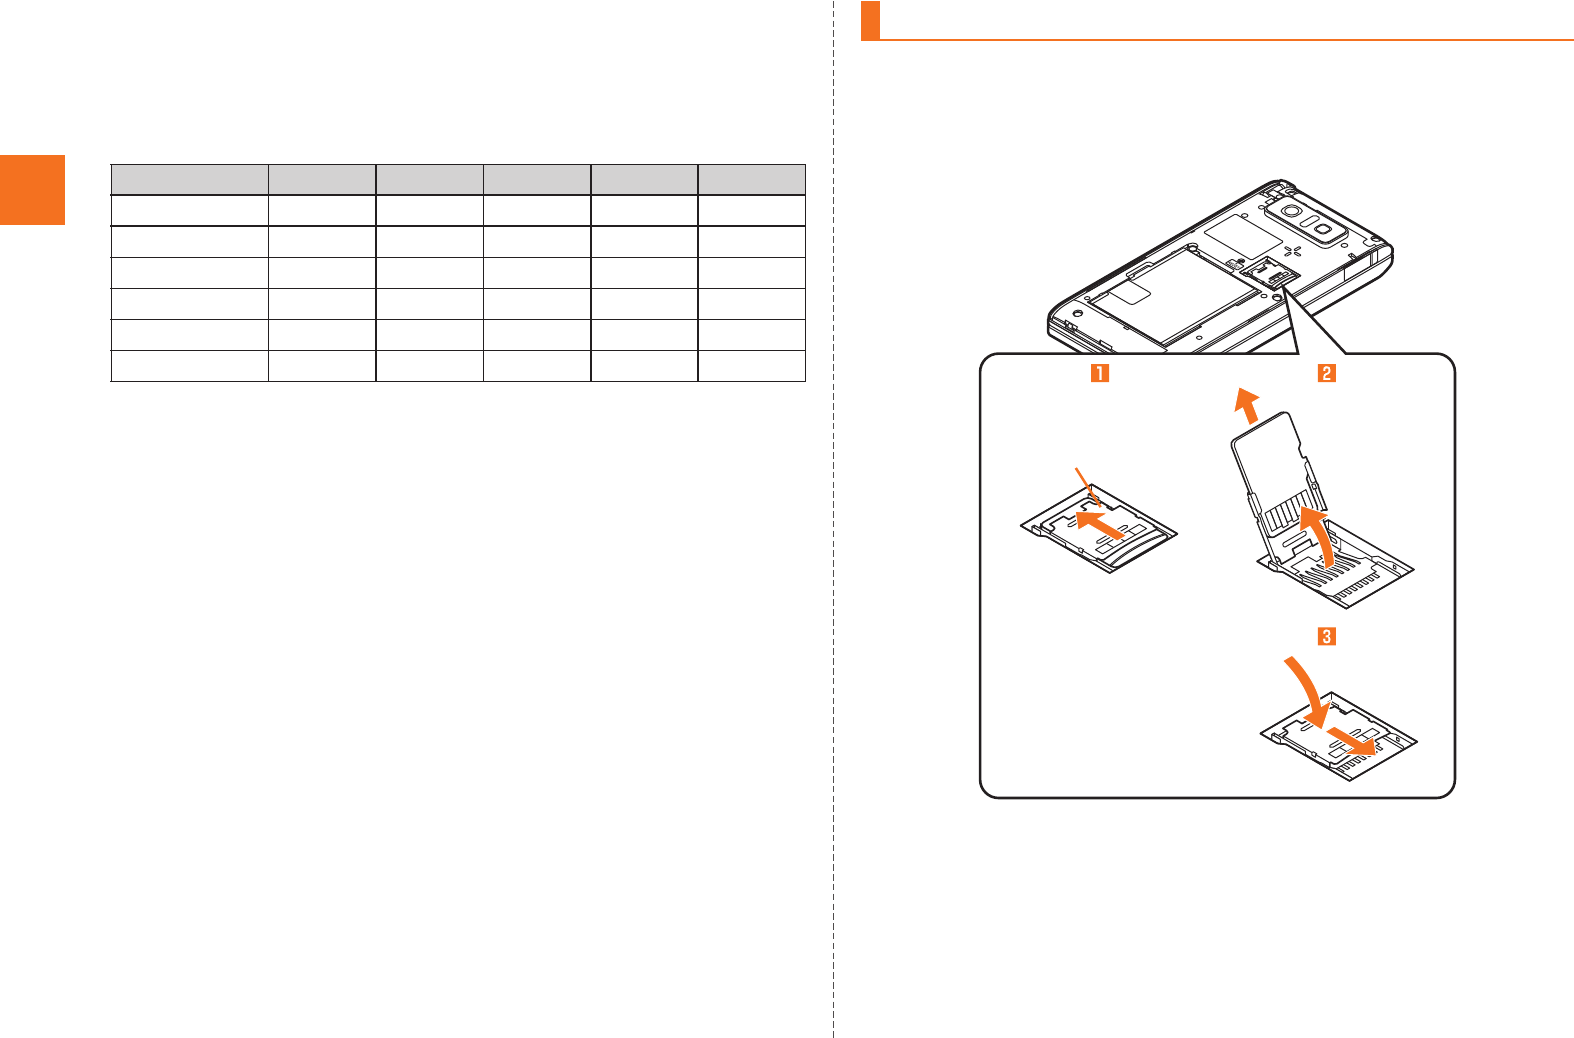
Turn off the power and remove the battery pack cover before
removing the microSD memory card.
AUnlock the guide of the microSD memory card slot.
BRaise the guide of the microSD memory card slot and
remove slowly the microSD memory card straight.
CPut back slowly the guide of the microSD memory
card slot and lock it.
Manufacturer 2 GB 4 GB 8 GB 16 GB 32 GB
Toshiba ○ ○ ○ ○ ○
Panasonic ○ ○ ○ ○ ○
SanDisk ○ ○ ○ ○ ○
ADTEC ○ ○ ○ ○ −
Buffalo ○ ○ ○ ○ ○
Sony ○ ○ ○ − −
Removing microSD Memory Card
Guide
KUUJAWGDQQMࡍࠫ㧞㧜㧝㧝ᐕ㧝㧞㧝ᣣޓᧁᦐᣣޓඦᓟ㧡ᤨ㧝㧥ಽ
15
Getting Ready
DAttach the battery pack cover.
Turn off the power and remove the battery pack cover before inserting
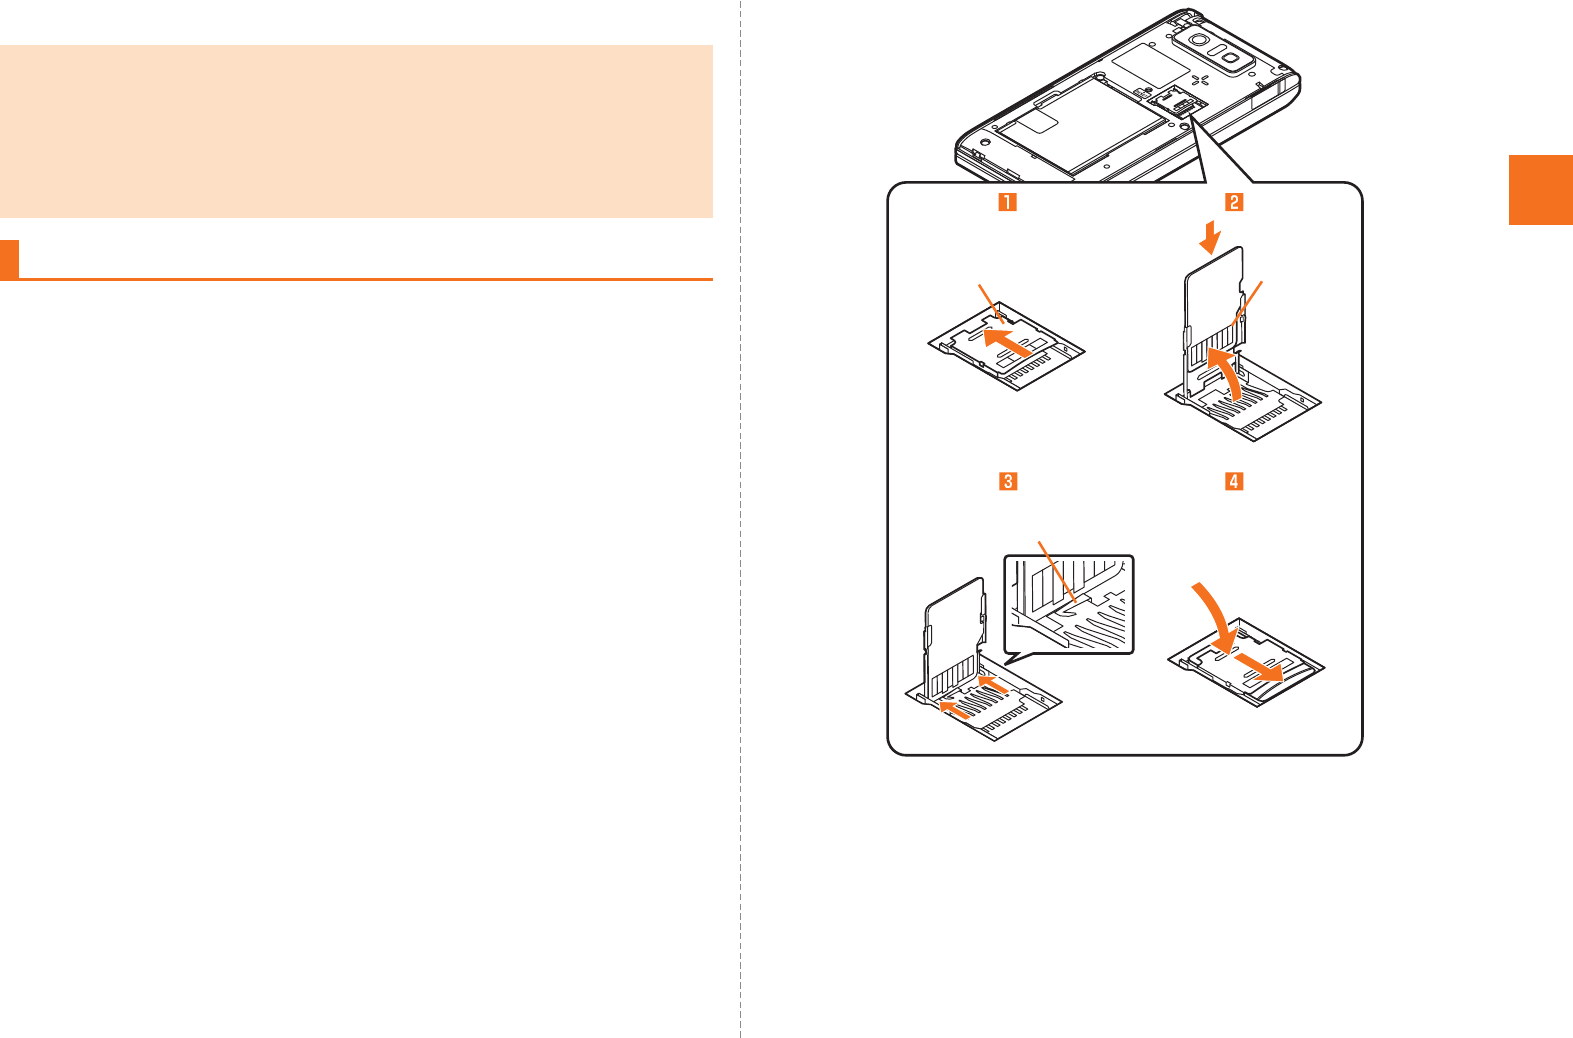
the microSD memory card.
•Follow the steps below to insert a microSD memory card. If you
insert it forcefully, the terminal at the back of it may be damaged and
the IS14SH may not recognize the microSD memory card.
AUnlock the guide of the microSD memory card slot.
BRaise the guide of the microSD memory card slot for
approximately 90 degrees, confirm the direction of
the terminal side of the microSD memory card and
insert it slowly.
CSlide the guide of the microSD memory card slot until
you can see the terminal at the back of it.
•Do not touch the terminal part of microSD memory card.
•Do not remove the microSD memory card forcefully. It may result in damage
to the microSD memory card or the IS14SH or data loss.
•Application installed to microSD memory card cannot be used once you
removed microSD memory card.
•The microSD memory card may be warm after a long time use. It is normal.
Inserting microSD Memory Card Guide
With the terminal
at the back in sight.
Terminal
side
KUUJAWGDQQMࡍࠫ㧞㧜㧝㧝ᐕ㧝㧞㧝ᣣޓᧁᦐᣣޓඦᓟ㧡ᤨ㧝㧥ಽ

16
Getting Ready
DPut back slowly the guide of the microSD memory
card slot and lock it.
EAttach the battery pack cover.
The battery pack is not fully charged at the time of purchase. Charge
the battery pack when you use the IS14SH for the first time or the
battery level becomes low. Charging is finished when the red
charging/incoming indicator goes out.
The usage times are as follows.
* These times are based on the case when the IS14SH is used in Japan.
•Insert a microSD memory card with the right side up in the appropriate
direction.
Inserting a microSD memory card forcefully into the slot could result in
failure to remove the microSD memory card or damage to the microSD
memory card or the IS14SH.
•Do not insert the microSD memory card too deeply when attaching it.
Charging the Battery Pack
Continuous stand-by
time
Approx. 310 hours (while Wi-Fi® is not
used)
Approx. 160 hours (while Wi-Fi® is used)
Continuous talk time Approx. 400 min
•The IS14SH and battery pack may become warm during charging but this is
not a malfunction.
•Charging the IS14SH while using the camera function etc. may lengthen the
charging time.
•If you perform various operations with a specified charger (sold separately)
connected to the IS14SH, charging/battery level consumptions may take
place in a short time. Frequently charging the battery pack shortens its
service life.
•If the charging/incoming indicator of the IS14SH flashes in red, check
whether the battery pack is properly attached, an external device is
properly connected to the cell phone, etc. If the cell phone flashes even
after you have checked that, stop recharging the cell phone and please
contact an au shop or Customer Service Center.
•Properly close the external connection jack cover. Also, do not pull it
forcibly or twist it.
•Each of the continuous talk time and continuous stand-by time is an
average usage time combining the time during which a cell phone is carried
around by a user and properly receives radio waves plus the time during
which a cell phone is stationary and properly receives radio waves.
According to usage conditions such as battery level status and
temperature, the signal strength in a place where the cell phone is used,
settings of functions, etc., the usage times may be reduced to less than half
under the following cases.
•A cell phone is frequently used in a place where (out of service area
indicator) appears on it.
•The Wi-Fi® function, Bluetooth® function, mail function, camera function,
1Seg function, location information, etc. is used.
•A cell phone is set not to enable the sleep mode because of an
application etc.
•Applications which remain activated in the background are used.
•If you stop charging while the charging/incoming indicator still illuminates
during charging, the cell phone may be left not fully charged even if
appears on it. In such case, the average usage times shorten.
KUUJAWGDQQMࡍࠫ㧞㧜㧝㧝ᐕ㧝㧞㧝ᣣޓᧁᦐᣣޓඦᓟ㧡ᤨ㧝㧥ಽ
17
Getting Ready
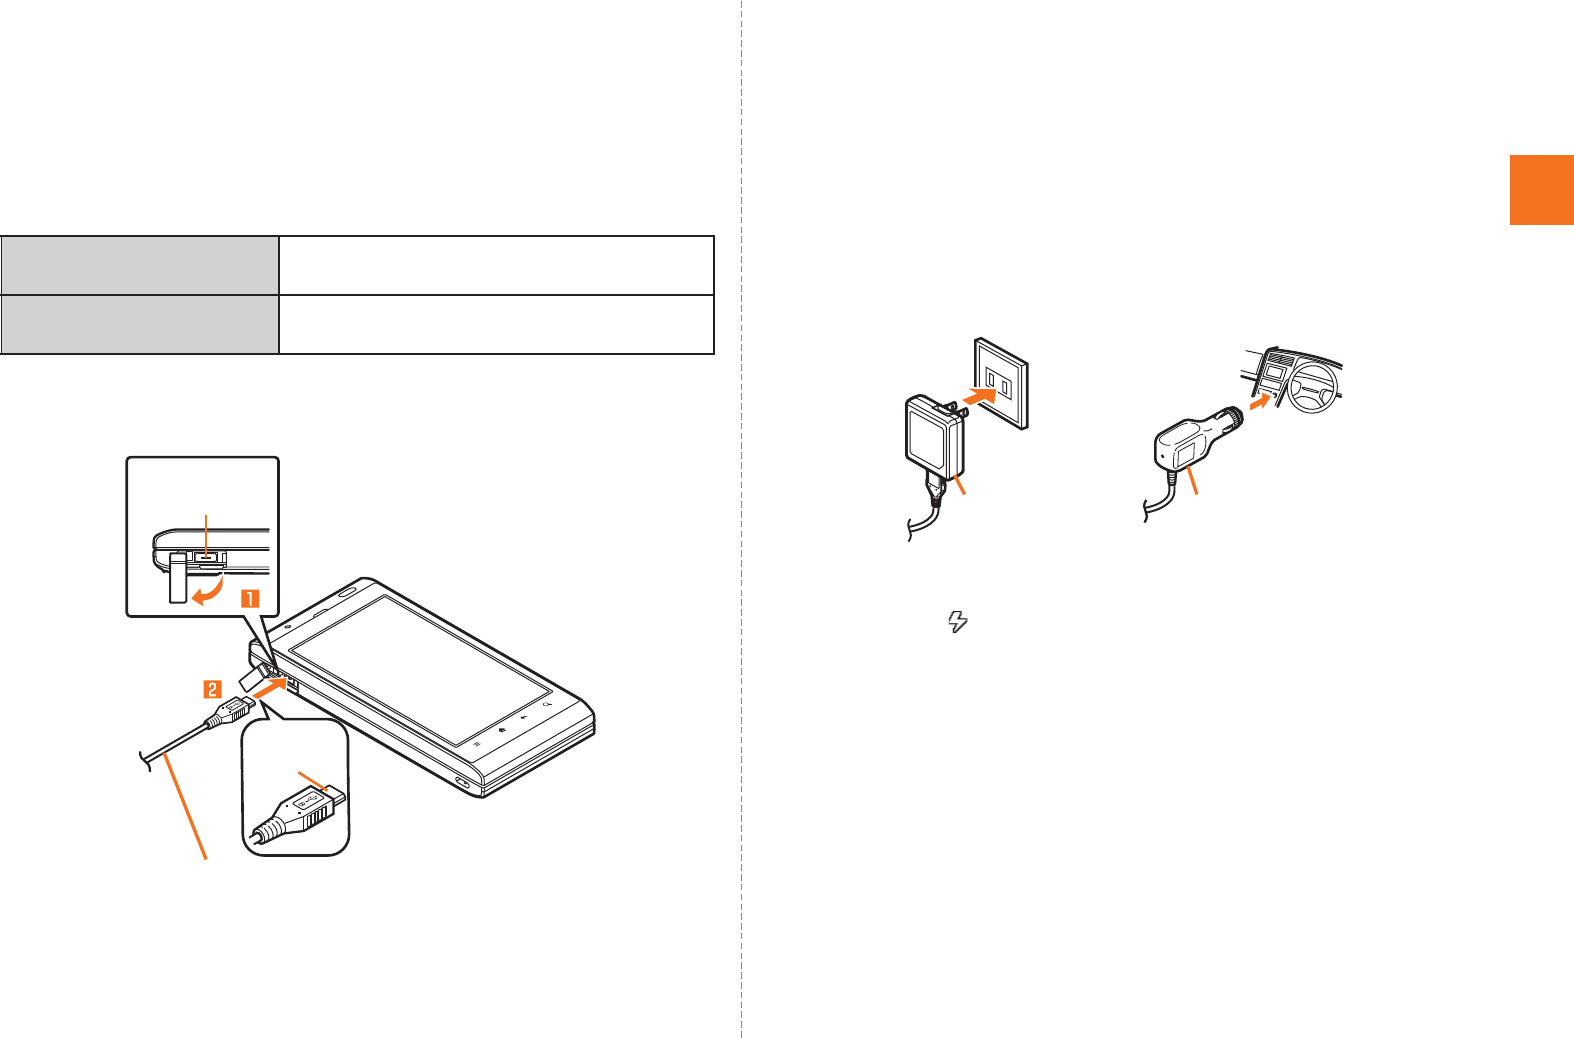
■Charging the Battery Pack with the Specified AC
Adapter (sold separately)/DC Adapter (sold
separately)
The followings are the explanation of how to connect the common AC
adapter 03 (sold separately)/the common DC adapter 03 (sold
separately) to charge.
Charging time is as shown below.
AOpen the external connection jack cover of the
IS14SH.
BInsert the microUSB plug of the common AC adapter
03 (sold separately)/the common DC adapter 03 (sold
separately) to the external connection jack of the
IS14SH.
CPlug the common AC adapter 03 (sold separately)
power plug into a 100 V AC power outlet/Plug the
common DC adapter 03 (sold separately) plug into a
cigarette lighter socket.
Charging/incoming indicator illuminates in red, and the battery icon
appears with superimposed. When charging is finished, the
charging/incoming indicator goes out.
DWhen charging is finished, pull the microUSB plug of
the common AC adapter 03 (sold separately)/common
DC adapter 03 (sold separately) straight out from the
external connection jack of the IS14SH.
EClose the external connection jack cover of the
IS14SH.
Specified AC adapter
(sold separately)
Approx. 150 min
Specified DC adapter
(sold separately)
Approx. 210 min
External
connection jack
Common AC adapter 03 (sold separately)/
Common DC adapter 03 (sold separately)
Check the
orientation
Common DC
adapter 03
(sold separately)
Common AC
adapter 03
(sold separately)
KUUJAWGDQQMࡍࠫ㧞㧜㧝㧝ᐕ㧝㧞㧝ᣣޓᧁᦐᣣޓඦᓟ㧡ᤨ㧝㧥ಽ

18
Getting Ready
FUnplug the common AC adapter 03 (sold separately)
power plug from the power outlet/Unplug the
common DC adapter 03 (sold separately) plug from
the cigarette lighter socket.
■Charging with a PC
When you connect the IS14SH to a USB port of a PC through which
the IS14SH can be charged, the charging/incoming indicator
illuminates in red and charging starts. When charging is finished, the
charging/incoming indicator goes out.
AHold down K for at least two seconds.
AHold down K for at least two seconds.
Alternatively, hold down f for at least two seconds.
BPower off [OK.
Turn off the IS14SH once and restart.
AHold down K for at least two seconds.
Alternatively, hold down f for at least two seconds.
BReboot [OK.
If you press f or no operation is made for a while, the screen is
turned off temporarily, and then sleep mode is set.
■Disabling Sleep Mode
■When the IS14SH is closed
Af while sleep mode is set.
Alternatively, open the IS14SH while sleep mode is set to disable sleep
mode.
■When the IS14SH is opened
APress any key (other than e, #, ^ and m) while
sleep mode is set.
•Although you can charge the IS14SH while the power is turned on, charging
time lengthens.
•If you charge the IS14SH when the battery has run out, the charging/
incoming indicator may not illuminate soon. However, charging is in
progress.
•If you use the microUSB cable to charge the IS14SH, it may take the IS14SH
longer to be fully charged than if you use the specified AC adapter (sold
separately).
Turning the Power On/Off
Turning the Power On
•The initial setting of the touch panel is executed while the logo
Android™ au with Google™ is displayed after the power is turned on. Do not
touch the screen, otherwise touch panel operations may not be performed
properly.
Turning the Power Off
Restarting the IS14SH
Sleep Mode
•In some applications in use, the screen which was displayed before sleep
mode is set may be displayed when sleep mode is disabled.
KUUJAWGDQQMࡍࠫ㧞㧜㧝㧝ᐕ㧝㧞㧝ᣣޓᧁᦐᣣޓඦᓟ㧡ᤨ㧝㧥ಽ

19
Getting Ready
The unlock screen is displayed when you disable sleep mode while
the IS14SH is closed.
Slide to or open the IS14SH to unlock.
Icons and their number appear on the unlock screen when a call is
missed, a new mail is received or Answering memo is recorded. Slide
an icon upward to unlock the screen and activate the corresponding
application.
You can switch the display language for function names and other
items to English.
AOn the home screen, .
B (Settings).
C (Language & keyboard).
D (Select language).
EEnglish.
After you purchase the IS14SH, the initial setup screen is displayed
automatically when turning on the power or inserting another’s au
IC-Card.
For detailed operations on the initial setup, refer to the Setting Guide
(Japanese).
ASet Date & time [Next.
BSet Location [Next.
CSet Vivid display mode [Next.
DSet Other.
Set Wi-Fi settings, au one-ID setting, Lost device protection Settings, Google
account, Text font or Profile settings.
ENext [Done.
•Do not touch the screen when you disable sleep mode. Otherwise touch
panel operations may not be performed properly.
Unlock Screen
《Unlock screen (When a call is missed,
a new mail is received,
Answering memo is recorded)》
Switching the Display Language to English
Initial Setup
設定
言語とキーボード
言語(Language)を選択
KUUJAWGDQQMࡍࠫ㧞㧜㧝㧝ᐕ㧝㧞㧝ᣣޓᧁᦐᣣޓඦᓟ㧡ᤨ㧝㧥ಽ
20
Getting Ready
FYes/No.
If you tap No, the initial setup screen is not displayed from the next
startup.
If you set up a Google account, you can use online services provided
by Google.
When you activate an application which requires a Google account
before setting one up, the Google account adding screen is
displayed.
AOn the Google account adding screen, Next.
BCreate/Sign in.
If you have already had a Google account, tap Sign in, enter the user
name and password and tap Sign in.
If you have not had a Google account, tap Create and follow the
on-screen instructions to register one.
AOn the home screen, [au one-ID setting.
Alternatively, on the home screen, tap [Settings
[au one-ID Setting.
BOK.
The authentication starts.
Cau one-ID (Set/Save au one-ID).
Tap au one-ID (What is au one-ID?) to activate the browser and
and display the explanation of au one-ID.
DFollow the instructions of the screen and set an au
one-ID.
If you have already acquired an au one-ID, set the au one-ID you have.
If you have not acquired an au one-ID, register a new ID.
•Alternatively, on the home screen, tap [Settings [Default settings to
set up.
Setting Up a Google Account
Setting an au one-ID
の設定・保存
とは?
KUUJAWGDQQMࡍࠫ㧞㧜㧝㧝ᐕ㧝㧞㧝ᣣޓᧁᦐᣣޓඦᓟ㧡ᤨ㧝㧥ಽ
21
Learning the Basics
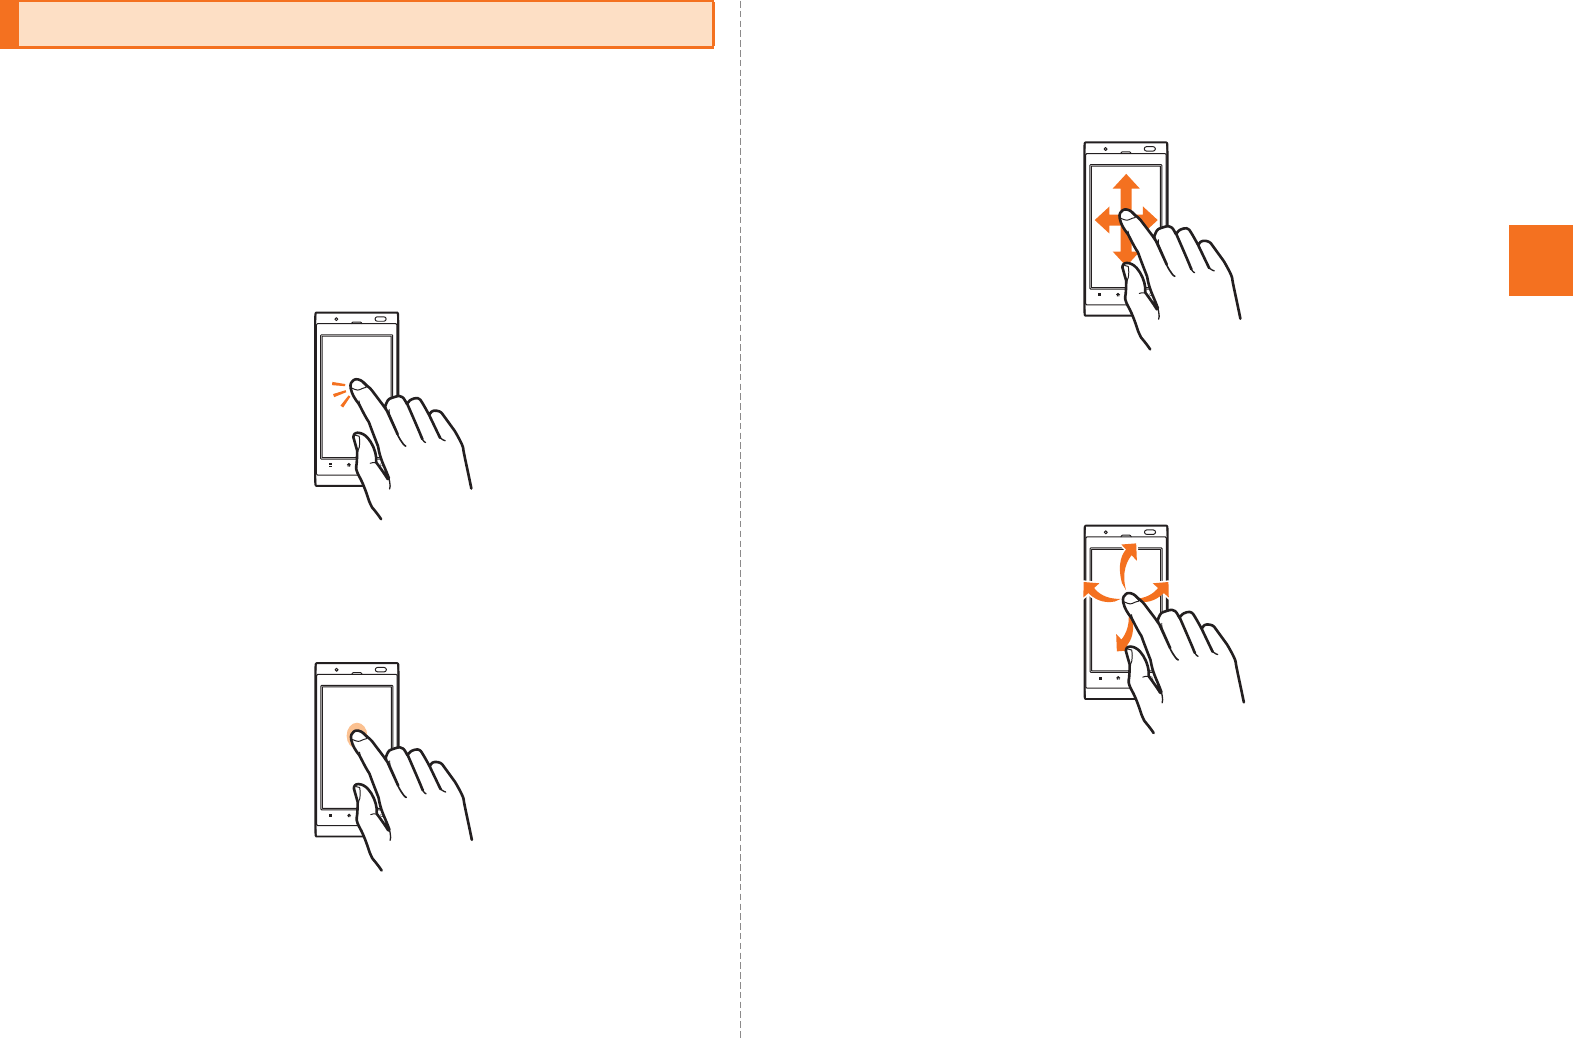
The display of the IS14SH is a touch panel. You can operate the
IS14SH by directly touching the screen.
■Tap/Double-Tap
Tap: Gently touch a screen and then immediately release your finger.
Double-tap: Tap quickly twice on the same position.
•Select an item or icon displayed on the screen. Double-tap to
enlarge/reduce the screen.
■Long-Touch
Keep touching an item, key, etc.
•Display context menu etc.
■Slide
Gently touch a screen and then trace it to the desired direction.
•Scroll screen or switch pages. In addition, operate gauge and bar
when adjusting volume and brightness.
■Flick
Touch a screen and then quickly flick your finger up, down, left or
right.
•Switch pages, enter characters by flick input, etc.
Operating the Touch Panel
KUUJAWGDQQMࡍࠫ㧞㧜㧝㧝ᐕ㧝㧞㧝ᣣޓᧁᦐᣣޓඦᓟ㧡ᤨ㧝㧥ಽ
22
Learning the Basics
■Pinch
Touch a screen with two of your fingers and then move them apart or
closer together.
•Enlarge/Reduce the screen.
■Drag
Gently touch a screen and then trace it to the desired position.
•Move an icon on the screen to the desired position.
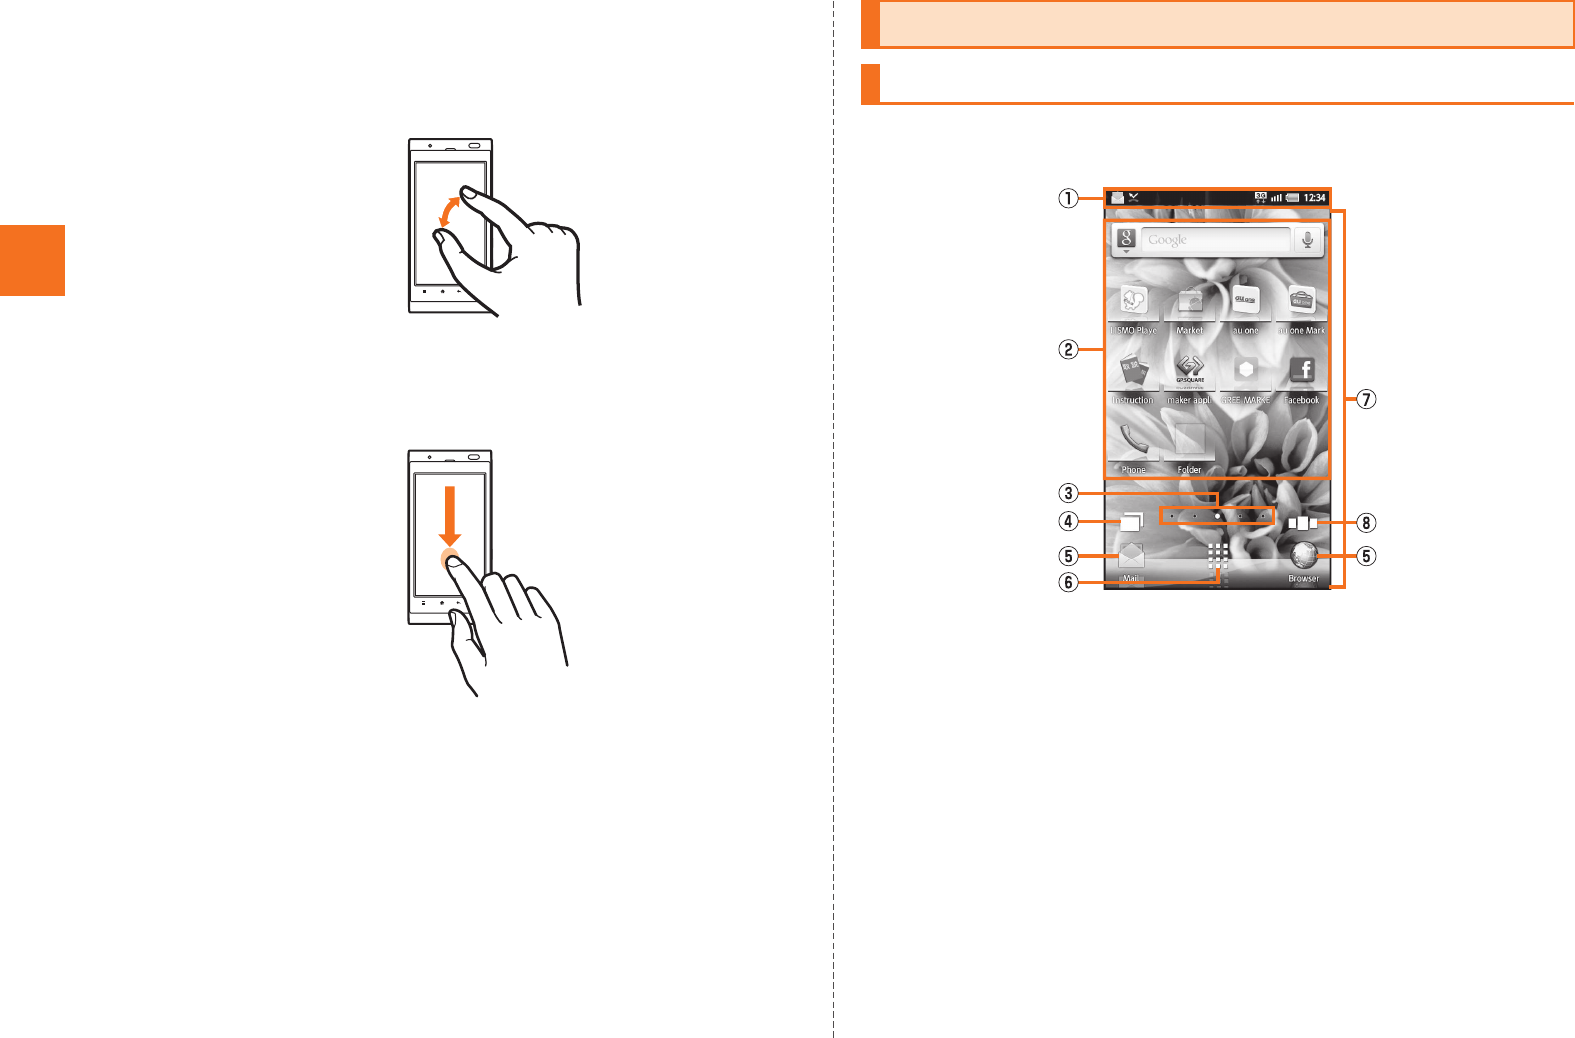
The home screen consists of multiple desktops, and you can add
shortcuts, widgets and folders on each desktop.
AStatus bar
BShortcuts/Widgets/Folders
CIndicator
Shows the current desktop position.
DList running applications
EQuick Menu
If you move frequently used shortcuts to the Quick Menu, you can
use them, whichever desktop is displayed.
FLauncher display
GDesktop
HList of desktops/launchers
Using the Home Screen
Viewing the Home Screen
《Home screen》
KUUJAWGDQQMࡍࠫ㧞㧜㧝㧝ᐕ㧝㧞㧝ᣣޓᧁᦐᣣޓඦᓟ㧡ᤨ㧝㧥ಽ

23
Learning the Basics
■Switching Desktops
You can switch desktops by sliding or flicking the home screen to the
left or right.
AOn the home screen, e.
B
•A shortcut/widget/folder cannot be added when the displayed desktop has
no space enough for one.
•Long-touch a shortcut and drag it to a folder to store the shortcut in the
folder.
•Select a folder [Long-touch the folder name at the upper part of the folder
[Enter a folder name [OK to change the folder name.
•While a live wallpaper is set, the battery level is reduced faster than usual.
•A total of five desktops, two for each side, are set by default. Up to ten
desktops, including the five desktops set by default, can be added.
《Switching desktop screens》
Using Menu in the Home Screen
Home settings Add shortcut
Add shortcuts of an application, a
bookmark, etc.
Add widgets
Add widgets.
Add folders
Add folders.
Wallpapers
Set a wallpaper of when the IS14SH is
opened or closed.
Add contact info
Create shortcuts of any contact and make
voice calls, create mails, etc from the
home screen.
Add sheet
Add desktops.
Delete sheet
Delete the displayed desktop.
Delete all invalid icon
Delete all icons ( ) which cannot be
activated.
Switch home
Switch home applications to use.
Wallpapers Wallpaper(Standby home screen)
Set a wallpaper of when the IS14SH is
opened.
Wallpaper(Home screen)
Set a wallpaper of when the IS14SH is
closed.
Wallpaper(Common)
Set a common wallpaper of when the
IS14SH is opened or closed.
KUUJAWGDQQMࡍࠫ㧞㧜㧝㧝ᐕ㧝㧞㧝ᣣޓᧁᦐᣣޓඦᓟ㧡ᤨ㧝㧥ಽ

24
Learning the Basics
AOn the home screen, long-touch a shortcut/widget/
folder to move/remove.
■When moving the shortcut/widget/folder
BDrag it to the position to move to and release your
finger.
■When removing the shortcut/widget/folder
BDrag it to at the bottom of the screen and release
your finger.
You can switch home applications to use.
AOn the home screen, [Home Switcher.
BSelect a home application to use.
Installed applications are displayed as icons. You can tap an icon to
activate the application.
AOn the home screen, .
Display settings Theme settings
Set themes of the home screen.
Scroll unit
Set whether to change the number of
desktops/launchers to be scrolled
depending on how strong you slide/flick
the screen.
Indicator setting
Set whether to display the thumbnail when
you tap the indicator of desktops/
launchers.
Settings Perform various settings for the IS14SH.
Search Displays the quick search box screen.
Notifications Displays the notifications and status panel.
Undo Return to the previous screen when you sort
or delete shortcuts/widgets/folders or quick
menus.
Moving/Removing Shortcuts/Widgets/Folders
•You can switch desktops by dragging an icon to the left or right edge of the
desktop.
Switching the Home Screen
Using the Launcher
《Launcher》
Applications
KUUJAWGDQQMࡍࠫ㧞㧜㧝㧝ᐕ㧝㧞㧝ᣣޓᧁᦐᣣޓඦᓟ㧡ᤨ㧝㧥ಽ
25
Learning the Basics
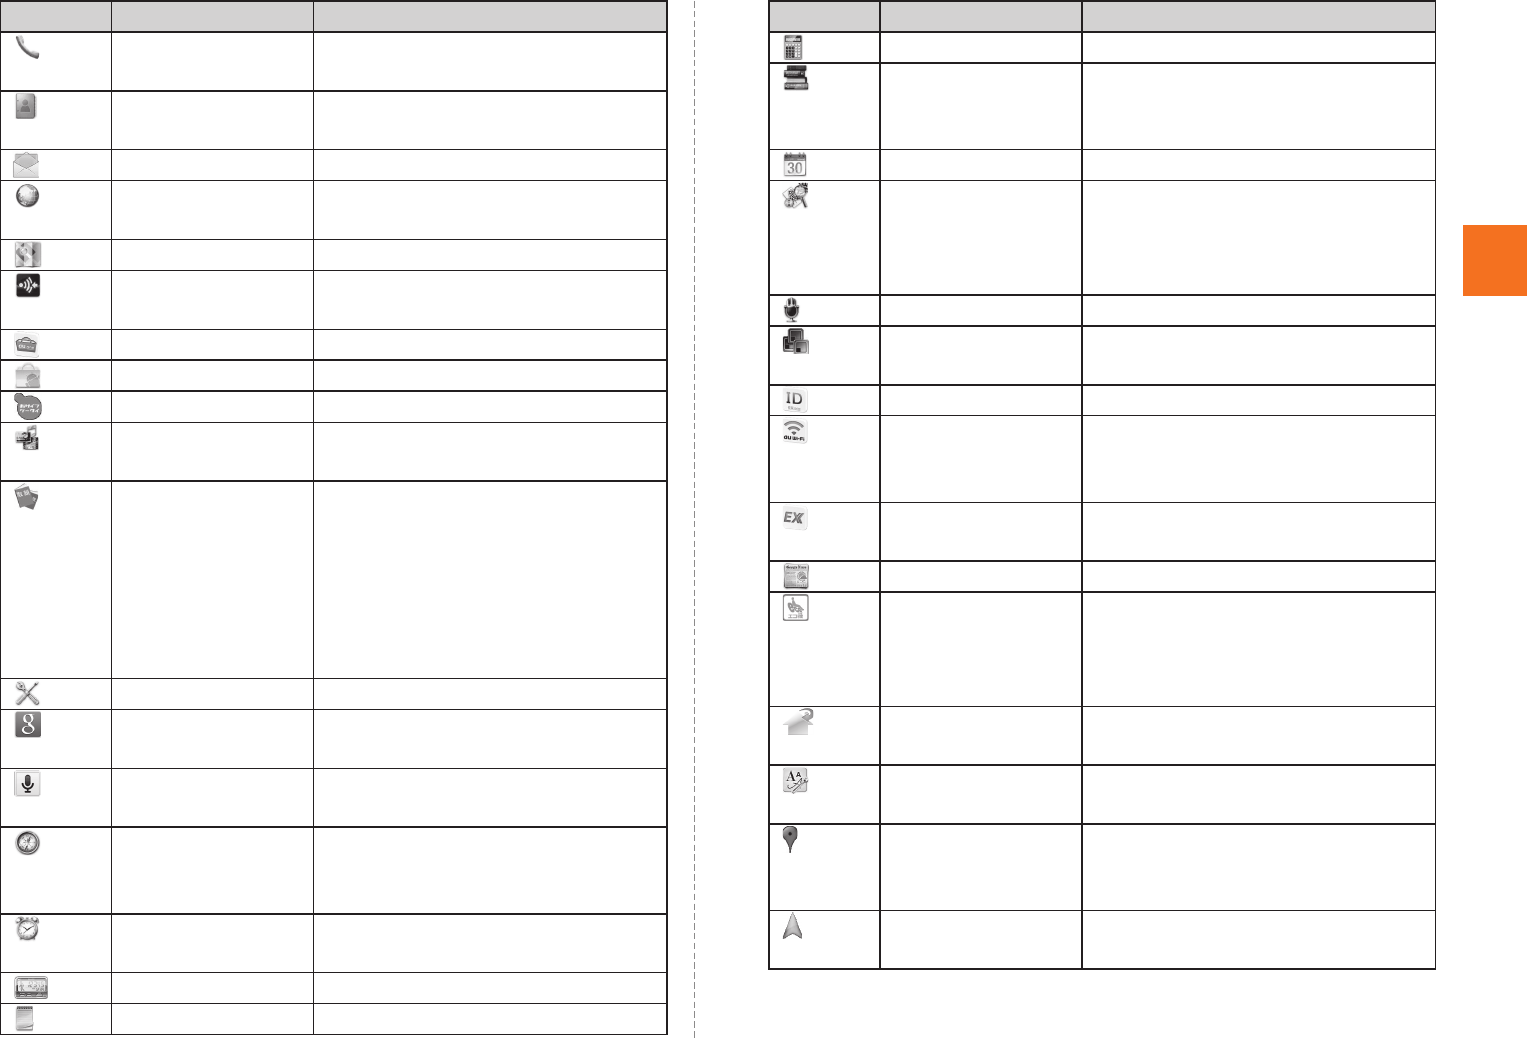
Icon Name of icon Description
Phone Make a call and use outgoing
history/incoming history.
Address Book Manage phone numbers or mail
addresses.
Mail Use e-mail or C-mail.
Browser Browse web sites on the
Internet.
Maps Use Google Maps.
Send and Receive
by Infrared
Send and receive data via
infrared communication.
au one Market Use au one Market.
Market Use Android Market.
Osaifu-Keitai Use Osaifu-Keitai®.
Contents
Manager
Displays and manage data on a
microSD memory card.
*Instruction
Manual
Check the contents written in the
full Instruction Manual
(Japanese). You can search
explanations of a function that
you want to use by using the
table of contents, index and
search engine.
Settings Check settings or information.
Google Search Search for information in the
IS14SH or on web sites.
Voice Search Enter a keyword for Google
search with your voice.
Compass Displays the compass and your
current location on the Google
Maps.
Clock Use world clock, alarm,
stopwatch, and timer.
Pedometer Use pedometer.
Notepad Create memos.
Calculator Use calculator.
Dictionary Search for information in the
built-in dictionary of the IS14SH
or dictionaries on the Internet.
Calendar Save and manage schedules.
Camera Reader Switch Barcode reader,
Business card reader, Kanji/
English grabber, Text reader,
Information reader to use.
Voice Recorder Record a voice.
Documents To
Go
Displays Microsoft Office
documents.
au one-ID Setting Set up an au one-ID.
au Wi-Fi接続ツー
ル (au Wi-Fi
connection tool)
Use Wi-Fi® easily in the spot that
is available for au Wi-Fi SPOT.
*ニュースEX
(News EX)
Check latest news, weather,
fortune-telling, etc.
News & Weather Displays news and weather.
Energy save Switch energy saving modes
and reduce consumption in
battery depending on usage
scenes.
Home Switcher Switch a home application to
use.
Font Manager Change the fonts displayed on
the screen.
Places Search for facilities around your
current location and display
them on the Google Maps.
Navigation Search for routes to the
destination on Google Maps.
Icon Name of icon Description
KUUJAWGDQQMࡍࠫ㧞㧜㧝㧝ᐕ㧝㧞㧝ᣣޓᧁᦐᣣޓඦᓟ㧡ᤨ㧝㧥ಽ

26
Learning the Basics
Download Displays the list of data
downloaded from the browser
and manage them.
3LM Delete data in the IS14SH and
microSD memory card or lock its
operations in case of loss of your
IS14SH.
安心アプリ制限
(Restrict
Applications)
Restrict inappropriate
applications, Wi-Fi
communication, etc. for children.
Facebook Use Facebook.
Twitter Use Twitter.
Skype Make a call or send and receive
messages using Skype™|au.
Friends Note An au one-ID or mail address is
required to use this application.
Gmail Use Gmail.
PC-mail Use PC-mail.
Talk Use Google Talk.
Latitude Google Maps to check the
location of your friends.
*らぶぺ! (Love
pets!)
This is a game in which you can
touch and play with lovely pets.
You can enjoy communications
with your friend’s pets, dressing
up your pets and gathering
items.
One Seg Watch 1Seg.
テレビ.Gガイド
(TV. G-Guide)
Displays
au one テレビ.Gガイ
ド
.
Smart Familink Play data released by DLNA
compatible devices on the
IS14SH using Wi-Fi®.
Camera Take photos (still images).
Icon Name of icon Description
mosimo camera Detects the movement and the
face of the subject and add
effects such as musical notes
and stars.
Video Camera Record movies.
Movie Edit Clip images shot with IS14SH in
the specified range and save.
Picture Sort images and movies by
people, event and location and
use them.
Gallery Displays images and movies as
a list.
LISMO Player Enjoy playing music such as
music downloaded via LISMO
and data imported from music
CDs.
YouTube Use YouTube.
リモートサポート
(Remote Support)
Call for technical supports on the
phone operations by sharing the
screen that you are watching
with au operators.
ウイルスバスター
(VirusBuster)
Blocks improper applications
and sites in order to protect
young people.
au one Displays au one homepage.
ショッピング
(Shopping)
Enjoy shopping on the online
shopping mall directly managed
by KDDI.
オークション
(Auction)
Use the auction site anytime,
anywhere and safely.
GREE_MARKET Use GREE Market.
LISMO Book
Store
Enjoy many e-books such as
comics, novels and photo
albums.
Icon Name of icon Description
KUUJAWGDQQMࡍࠫ㧞㧜㧝㧝ᐕ㧝㧞㧝ᣣޓᧁᦐᣣޓඦᓟ㧡ᤨ㧝㧥ಽ
27
Learning the Basics
maker appli Use various services such as
downloading and viewing
applications.
GALAPAGOS
App for
Smartphone
Purchase and view e-books
such as newspapers, magazines
and books.
au災害対策 (au
Disaster
Countermeasure)
This is an application in which
you can use Disaster Message
Board and Early warning mail
(earthquake early warnings and
disaster/evacuation information).
auお客さまサ
ポート (au
Customer
Support)
Check the subscription contents
or monthly usage of your au
phone etc. easily and it supports
the carefree and secure state of
Android Smartphones
comprehensively.
GLOBAL
PASSPORT PLUS
Check whether the connected
carrier applies to Overseas
Double-Teigaku or confirm the
method of making international
calls and the call fees.
*ファッション通販
(Internet
Shopping Site)
Get the latest items of famous
fashion brands, jackets of the IS
series collaborated with the
brands, and many kind of items
on the internet shopping site.
*Edy|au Pay monthly charge of Edy and
au at the same time.
© bitWallet,Inc.
*Photo Air Backs up your photos that have
been taken with your
Smartphone to your computer
automatically.
© KDDI / Powered by Eye-Fi
Icon Name of icon Description
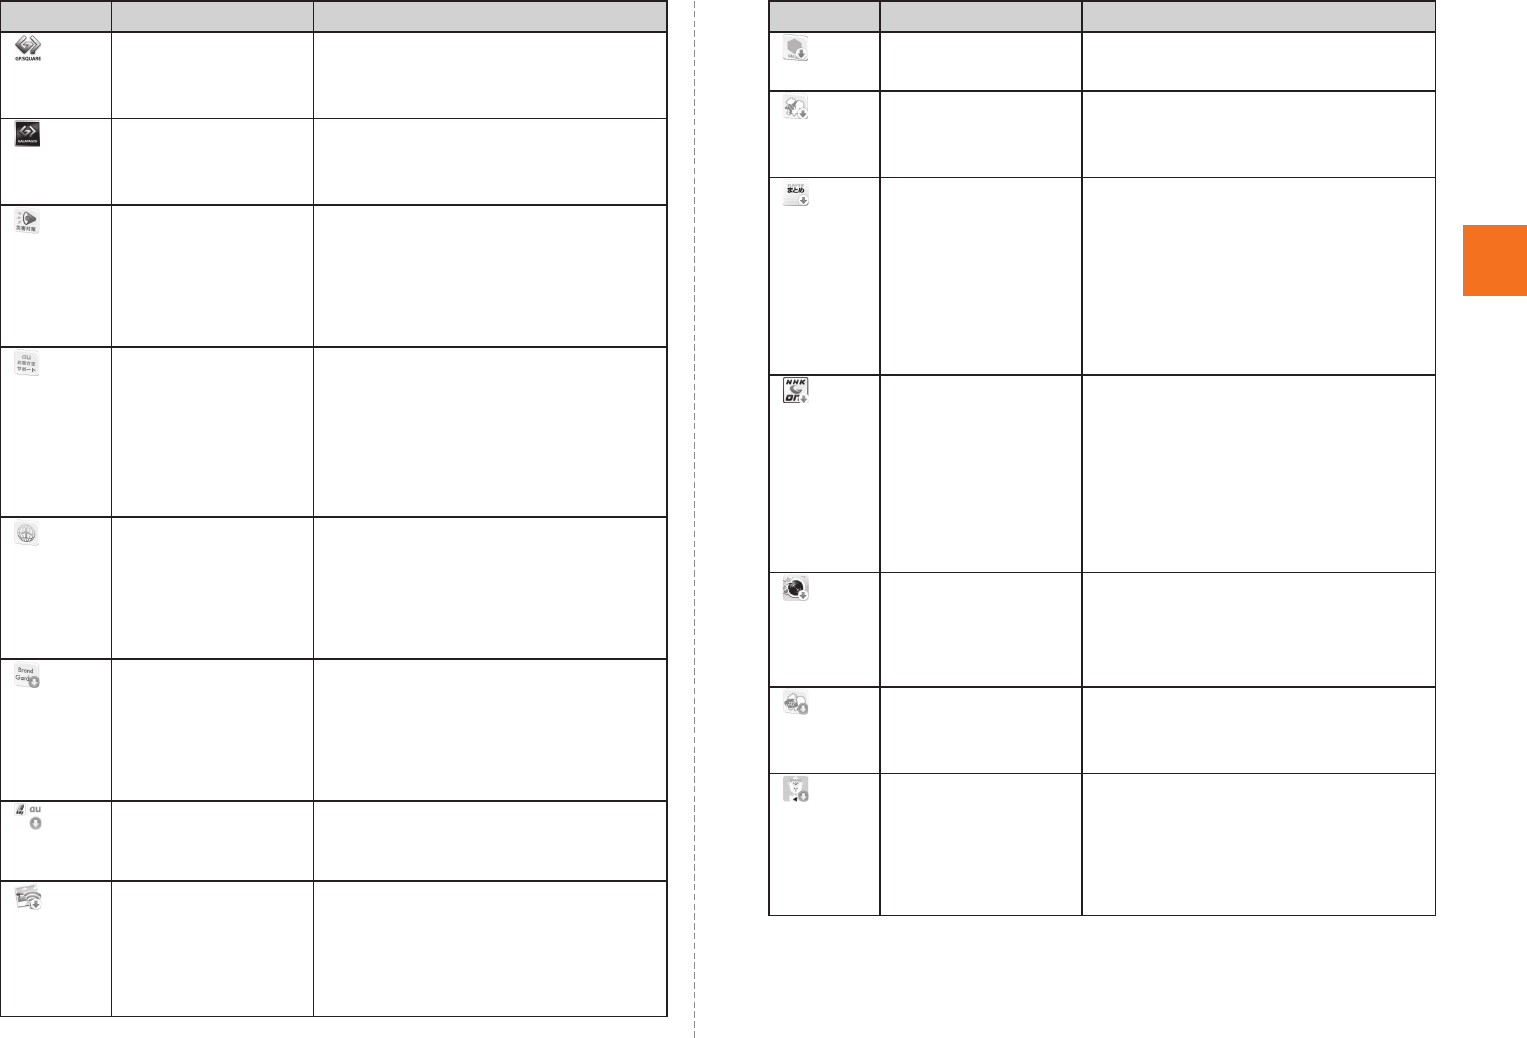
GREE Use games and contents
provided by au one GREE.
*LISMO WAVE Enjoy FM radio all over Japan,
music clips, and live channel
etc.
*まとめ (Matome) “Check topics and news in five
minutes”
NAVERまとめ (NAVER Matome)
enables you to confirm
interesting informations easily in
the same way as browsing them
when you are moving or waiting.
*動画on! (DOGA
on!)
NHK G-Media動画on! (NHK
G-Media DOGA on!) enables
you to watch latest news and
various categories of NHK
movies such as report, sports,
documentary, education, hobby,
etc.
*Snapeee Edit images shot with a
Smartphone using stamps and
frames and share them with
other people.
*unlimited Use monthly paid music service
that enables you to listen to a
lineup of over 1 million musics.
*きせかえ touch
<ブクブクアワー
.ver> (kisekae
touch <BukuBuku
Hour. ver>)
This is a kisekae service of the
Smartphone version for changing
themes of the home screen with
one of your favorite designs.
Icon Name of icon Description
KUUJAWGDQQMࡍࠫ㧞㧜㧝㧝ᐕ㧝㧞㧝ᣣޓᧁᦐᣣޓඦᓟ㧡ᤨ㧝㧥ಽ

28
Learning the Basics
* Requires download and installation to use.
The notification indicators to notify you of a missed call, a new mail
message or a running operation are displayed on the left side of the
status bar, while the status indicators to show the status of the IS14SH
are on the right side.
*じぶん銀行
(JIBUN BANK)
Check the statement of your
account balance, search for
nearest available ATMs, and so
on through the screen optimized
for Smartphones.
*Sockets LIVE Watch videos about various
news of the world or Japan.
*トレンド(ついっ
ぷるトレンド)
(Trend (twipple
trend))
Displays issues which have
stolen the headlines in Twitter
(words, images, celebrities,
tweets, etc.) in ranking style.
*Disneyカレン
ダー (Disney
calendar)
This is a calendar application
with cute Disney characters.
Additional purchases of calendar
backgrounds are also available.
© Disney
*Disneyメール
(Disney mail)
This is a mail application for
sending decoration mail
massages with cute Disney.
Additional decoration items and
more applications are also
available (315 yen per month for
10 applications ※As of
November, 2011).
© Disney
*Disneyきせかえ
(Disney kisekae)
This is an application for
changing the home screen,
launcher and indicators to
Disney characters.
Additional Kisekae tools and
more applications are also
available (315 yen per month for
10 applications).
© Disney
Icon Name of icon Description
*デコとも★DX
(DecoTomo★DX)
This is an email decoration
application a.k.a. decome
application full of cute emoji
(pictograms) and decorated mail
for your Smartphone☆
You’ll be able to stay up to date
with the latest decome as we’ll
be updating brand new
decorations everyday♪
*ナビウォーク
(Navi Walk)
This is an application for
navigating you to the best suited
routes both for on foot and by
vehicle.
•Long-touch an icon and drag it to “Go App Info” at the bottom of the screen
to display the information of the application.
•Call fees may apply depending on the function of applications.
If you have not subscribed to IS NET, au.NET charges (525 yen including
tax for the used month) and communication charges apply.
•Icon designs may be changed without prior notice.
Using the Status Bar
Indicators
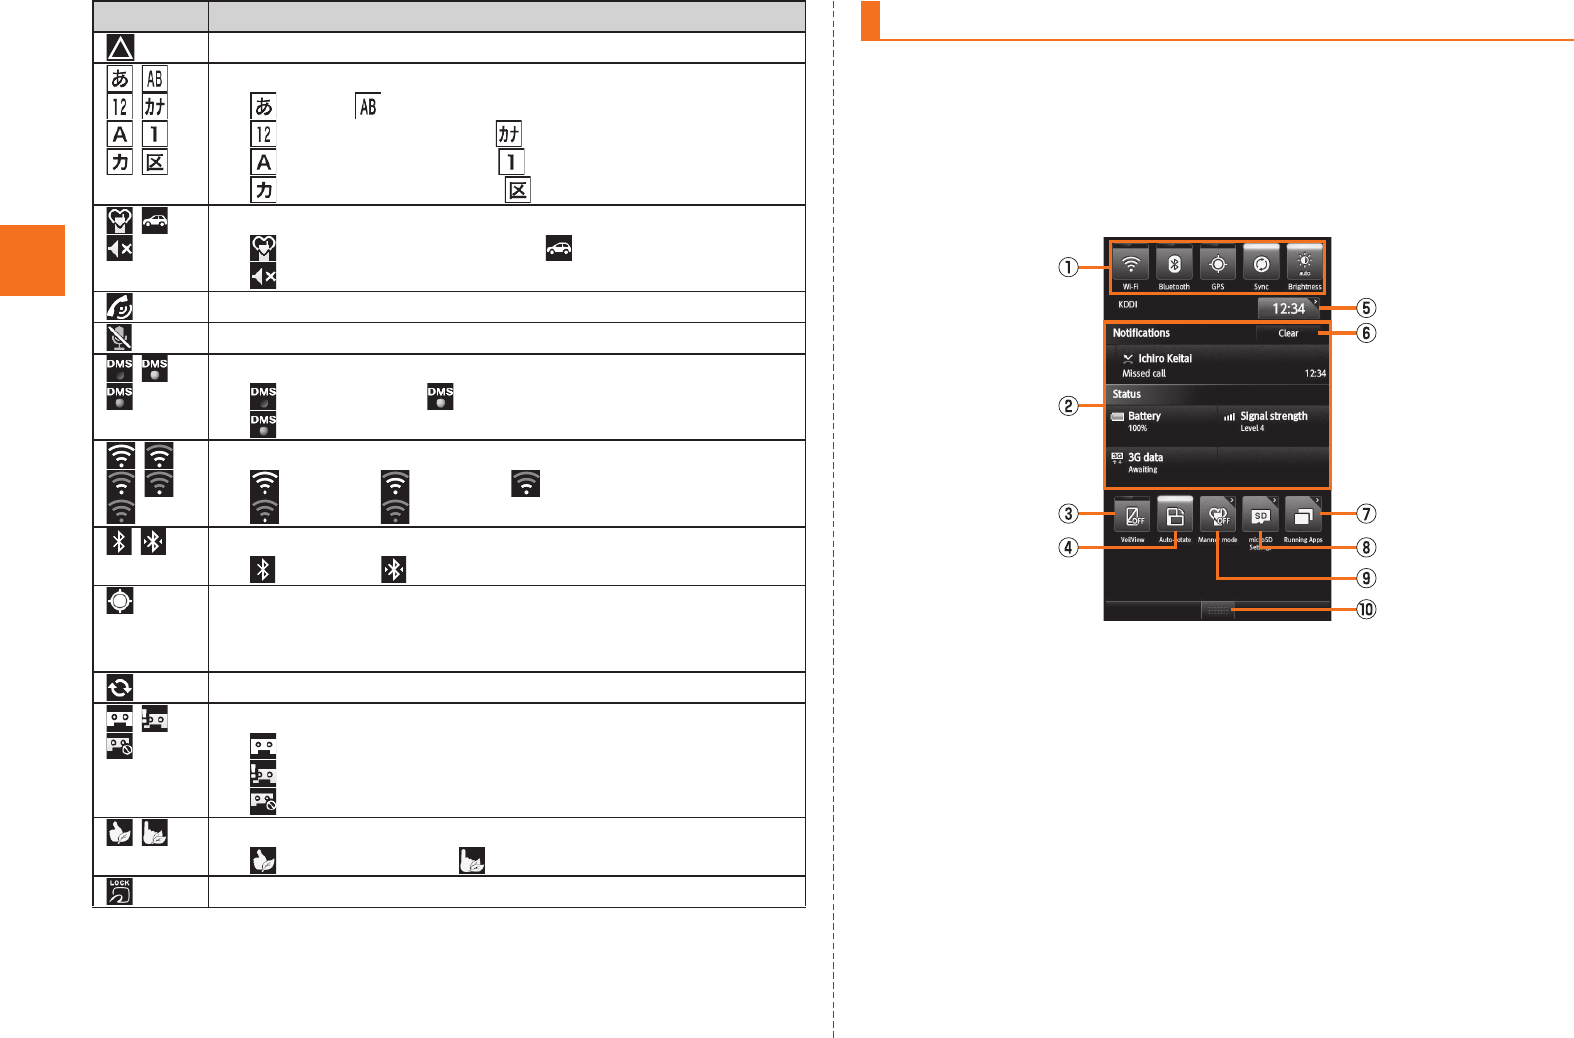
Icon Name of icon Description
KUUJAWGDQQMࡍࠫ㧞㧜㧝㧝ᐕ㧝㧞㧝ᣣޓᧁᦐᣣޓඦᓟ㧡ᤨ㧝㧥ಽ

29
Learning the Basics
■Examples of notification indicator
■Examples of status indicator
Indicator Description
Missed call
New mail message (Mail)
New mail message (PC-mail)
New mail message (Gmail)
Alarm terminated
•Appears when the alarm is terminated without the
operation for terminating the alarm.
Schedule notification of the calendar
1Seg information
: Watching information, Recording reservation
information : Recording information
Playing music
USB debug connecting
Dialing, Calling, During an incoming call
Putting a call on hold
Answering memo
Skype™|au status
: Signed in : New event
Space available less than approx. 10 %
Bluetooth® file receiving request
USB connecting
: Card reader mode : Fast transfer mode
: USB connecting (in Card reader mode
connecting)
Data upload, File sending
: Uploading data, Sending file, Finished sending
file, Failed to send file : Finished uploading data
: Waiting to upload data
•The Uploading data indicator and Sending file
indicator are displayed as animations.
Downloading, Finished downloading, Installing data or
application, Receiving, Finished receiving file, Failed to
receive file
•The Downloading indicator and Receiving file indicator
are displayed as animations.
Finished installing
Connected, Unconnected to VPN
Update available
Major Update (OS Update) available
Indicators collected
•When multiple notifications of the same type exist, the number of them is
displayed on the lower right of some indicators.
Indicator Description
Time
Alarm set
~ Battery level
~ : Battery level display : No battery
: Battery level unknown
•While charging, the battery icon appears with
superimposed. The charge indicator other than is
displayed as an animation.
Offline mode set
Signal strength (Receiving electric field)*
: Level 4 : Level 3 : Level 2
: Level 1 : Level 0 : Out of service area
3G data communication status*
: Waiting : Receiving : Sending
: Sending and Receiving
CDMA 1X data communication status*
: Waiting : Receiving : Sending
: Sending and Receiving
Indicator Description
KUUJAWGDQQMࡍࠫ㧞㧜㧝㧝ᐕ㧝㧞㧝ᣣޓᧁᦐᣣޓඦᓟ㧡ᤨ㧝㧥ಽ
30
Learning the Basics
* Displayed in green when you login using your Google account.
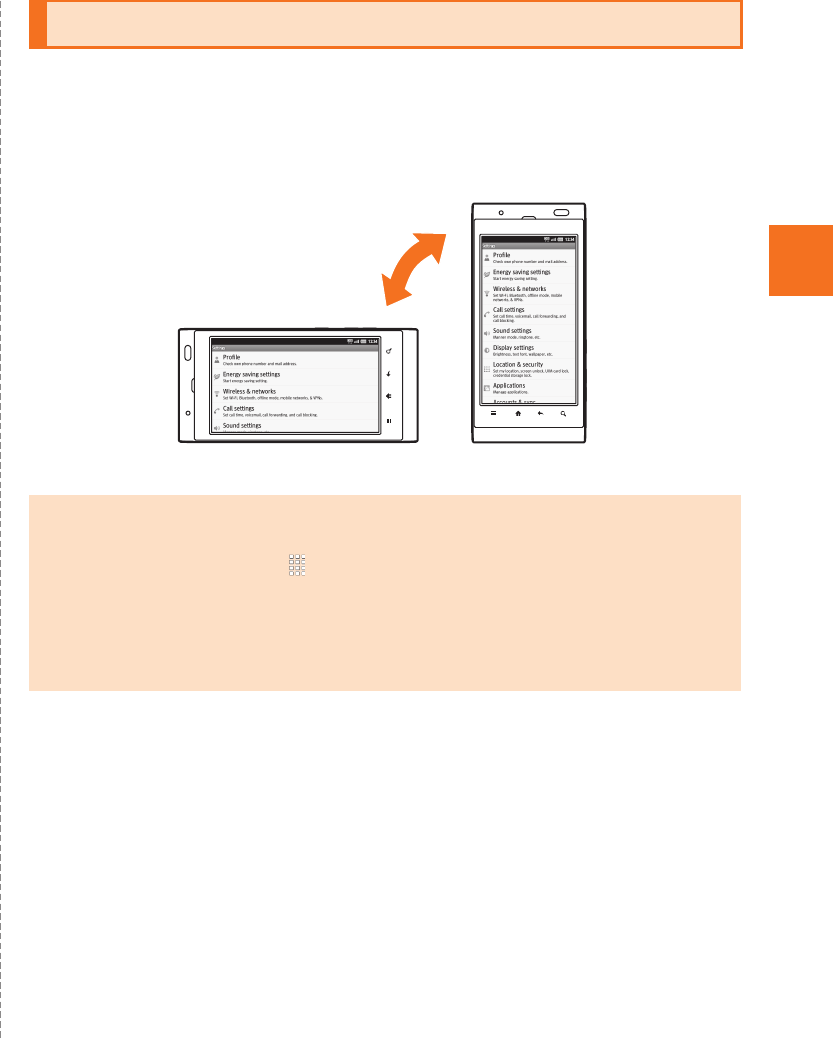
In the notification/status panel, you can check the details on
notification indicators and status indicators or activate an application
corresponding to the indicator.
You can also set Manner mode, VeilView, etc.
ATap the status bar.
APower control
You can set Wi-Fi®, Bluetooth®, GPS, auto-sync, and
brightness of screen.
You can save power by switching the settings frequently when
you do not use functions.
BNotification area
You can check the status of the IS14SH and contents of
notifications. You can tap to activate a corresponding
application depending on the information.
CVeilView
You can set VeilView.
In roaming
Character type
: Kanji : Half-width alphabet
: Half-width numeric : Half-width Katakana
: Full-width alphabet : Full-width numeric
: Full-width Katakana : Character code
Manner mode status
: Standard manner mode : Drive manner mode
: Silent manner mode
During a call using hands-free
Microphone set to off during a call
Home Network status
: Suspending (Green): Preparing
(Blue): Running
Wi-Fi® signal strength*
: Level 4 : Level 3 : Level 2
: Level 1 : Level 0
Bluetooth® in use
: Waiting : Connecting
GPS in use
•The GPS information positioning indicator is displayed
as an animation.
Data synchronizing
Answering memo set
: No Answering memo
: Answering memo (one to nine entries)
: Answering memo (ten entries)
Energy saving setting
: Waza-ari mode : Emergency mode
Osaifu-Keitai® function locked
Indicator Description Using Notification/Status Panel
《Notification/Status panel》
KUUJAWGDQQMࡍࠫ㧞㧜㧝㧝ᐕ㧝㧞㧝ᣣޓᧁᦐᣣޓඦᓟ㧡ᤨ㧝㧥ಽ
31
Learning the Basics
DAuto-rotate
You can set the automatic rotation of the display when the
IS14SH is opened/closed.
ETime
Displays the current time. You can tap to set the alarm.
FClear
You can clear all the notifications by tapping the key.
GRunning Apps
Displays the running applications list screen.
HmicroSD Settings
You can set the microSD memory card and phone space.
IManner mode
You can set Manner mode.
JClose bar
You can hide the notification/status panel by tapping the tab.
Portrait and landscape display are switched according to the
orientation of the IS14SH.
Example: When rotating the IS14SH 90 degrees from Portrait
(Landscape) display to the left (right).
Switching Orientation
•Operate the IS14SH in the upright position. The screen display may not be
changed if the IS14SH is laid in parallel to the ground.
•On the home screen, tap [Settings [Display settings [Auto turn when
opened/Auto turn when closed to set whether to switch portrait display and
landscape display.
•In some applications such as Video Camera, the screen display may not be
switched regardless of the orientation or setting of the IS14SH.
《Landscape display》 《Portrait display》
KUUJAWGDQQMࡍࠫ㧞㧜㧝㧝ᐕ㧝㧞㧝ᣣޓᧁᦐᣣޓඦᓟ㧡ᤨ㧝㧥ಽ

32
Learning the Basics
■Option Menu
The option menu is displayed by tapping e on the screen where the
menu is available.
Example: In the inbox screen
■Context Menu
The context menu is displayed by long-touching an item or a display
where the menu is available.
Example: In the character entry screen (Notepad)
Displaying Available Menu
More
•When the number of available option menus exceeds the number that can
be displayed on the screen as icon, More is displayed. Option menus that
cannot be displayed as icon are collected into More, and tap More to
display them.
•Even on the same screen, the number of items collected into More differs
depending on the setting and condition since the number of option menus
displayed differs depending on the setting and condition.
•In this manual, operation to tap More is not described for tables listing
option menu.
Option menu
Context menu
KUUJAWGDQQMࡍࠫ㧞㧜㧝㧝ᐕ㧝㧞㧝ᣣޓᧁᦐᣣޓඦᓟ㧡ᤨ㧝㧥ಽ

33
Learning the Basics
Tap the character entry field while the IS14SH is closed to display
software keyboard and enter characters by tapping keys on the
screen.
The following software keyboards are available for the IS14SH.
AOn the character entry screen, [Set QWERTY
keyboard[Portrait]/Set 12 keyboard[Portrait] [OK.
■Flick input
When the software keyboard is “12 Key”, you can enter a desired
character by flicking the key up, down, left or right without tapping the
key repeatedly.
By tapping a key, the candidates that can be entered by flick input are
displayed. By flicking the key in the direction of a desired character
being displayed, the character is entered in the character entry area.
For example, you can enter “A” by only tapping , and you can
enter “B” by flicking left.
ACharacter entry area
BPrediction candidates list/Relational prediction candidates list/
Normal conversion candidates list
If the word prediction function is enabled, the prediction
candidates list is displayed when characters are entered. If the
relational prediction function is enabled, the relational prediction
candidates list is displayed when an entry is selected from the
prediction candidates list.
Enter characters and tap to display the normal conversion
candidates list.
•You can enlarge the candidates list area by tapping . Tap
to return it to the original display.
CReverse toggle key/Undo key
: Displays the characters assigned to the same key in the
reverse rotation.
Character Input (Software Keyboard)
Switching Software Keyboards
12Key You can enter a character, changing characters by
repeatedly tapping the character entry key.
QWERTY You can enter a displayed character by tapping the
character entry key. Use romaji for entry.
Keep
touching
Flick left
Viewing the Character Entry Screen
《Character entry screen (12 Key)》 《Character entry screen (QWERTY)》
KUUJAWGDQQMࡍࠫ㧞㧜㧝㧝ᐕ㧝㧞㧝ᣣޓᧁᦐᣣޓඦᓟ㧡ᤨ㧝㧥ಽ

34
Learning the Basics
: You can cancel the last operation such as returning the
determined characters to the undetermined state by tapping
the key.
DSoftware keyboard
You can enter a character assigned to each key.
ECursor key
Moves the cursor to the left and right. Change the range of the
characters for character input and conversion.
FEmoji, Symbol, and Facemark key/Kana, Alphanumeric key
: Displays the emoji/decoration-emoji/symbol/facemark list.
: Displays katakana, alphabet, number and predicted date and
time assigned to the entered key as conversion candidates.
・Tap to return to the previous screen.
GCharacter entry mode key
When you switch the character types, the display changes as
follows.
: Kanji
: Half-width alphabet
: Half-width numeric
: Half-width Katakana
: Full-width alphabet
: Full-width numeric
: Full-width Katakana
: Character code
•Long-touch the character entry mode key to switch the keyboard.
“QWERTY” at the bottom of the character entry mode key is a
keyboard to switch when you long-touch the key. While using the
QWERTY keyboard, “12Key” appears.
HDelete key
Deletes the selected character or the character on the left of the
cursor. When the cursor is at the beginning, the character on the
right of the cursor is deleted.
ISettings key/Conversion key/Space key
: Displays iWnn IME menu.
: Displays the normal conversion candidates list.
: Enters the space.
・Appears in alphabet and katakana entry.
JOK key/Line feed key
: Determines the entering characters.
: Inserts a line feed at the cursor position.
•The display is changed depending on the application or entering
item.
KUppercase/Lowercase characters switch key/Space key
: You can switch the entered alphabet to the uppercase/
lowercase one.
: You can switch the entered character to the uppercase/
lowercase one, add dakuten/handakuten to the character, etc.
: Enters the space.
LAlphabet entry key/Shift key
: Switches the entering characters to the alphabet.
・Appears in kanji entry.
By tapping the shift key, you can switch uppercase characters
entry and lowercase characters entry. The display changes as
follows each time you tap it.
: Lowercase character entry
: Uppercase character entry
: Uppercase character entry lock
You can switch the symbols to enter by tapping the key in numeric
entry.
MSetting key
The iWnn IME menu is displayed.
NSpace key/Conversion key
: Enters space.
: Displays the normal conversion candidates list.
KUUJAWGDQQMࡍࠫ㧞㧜㧝㧝ᐕ㧝㧞㧝ᣣޓᧁᦐᣣޓඦᓟ㧡ᤨ㧝㧥ಽ
35
Learning the Basics
AOn the character entry screen, [Input mode.
BSelect the character type.
AOn the character entry screen, .
Tap when there is no conversion target on the character entry screen.
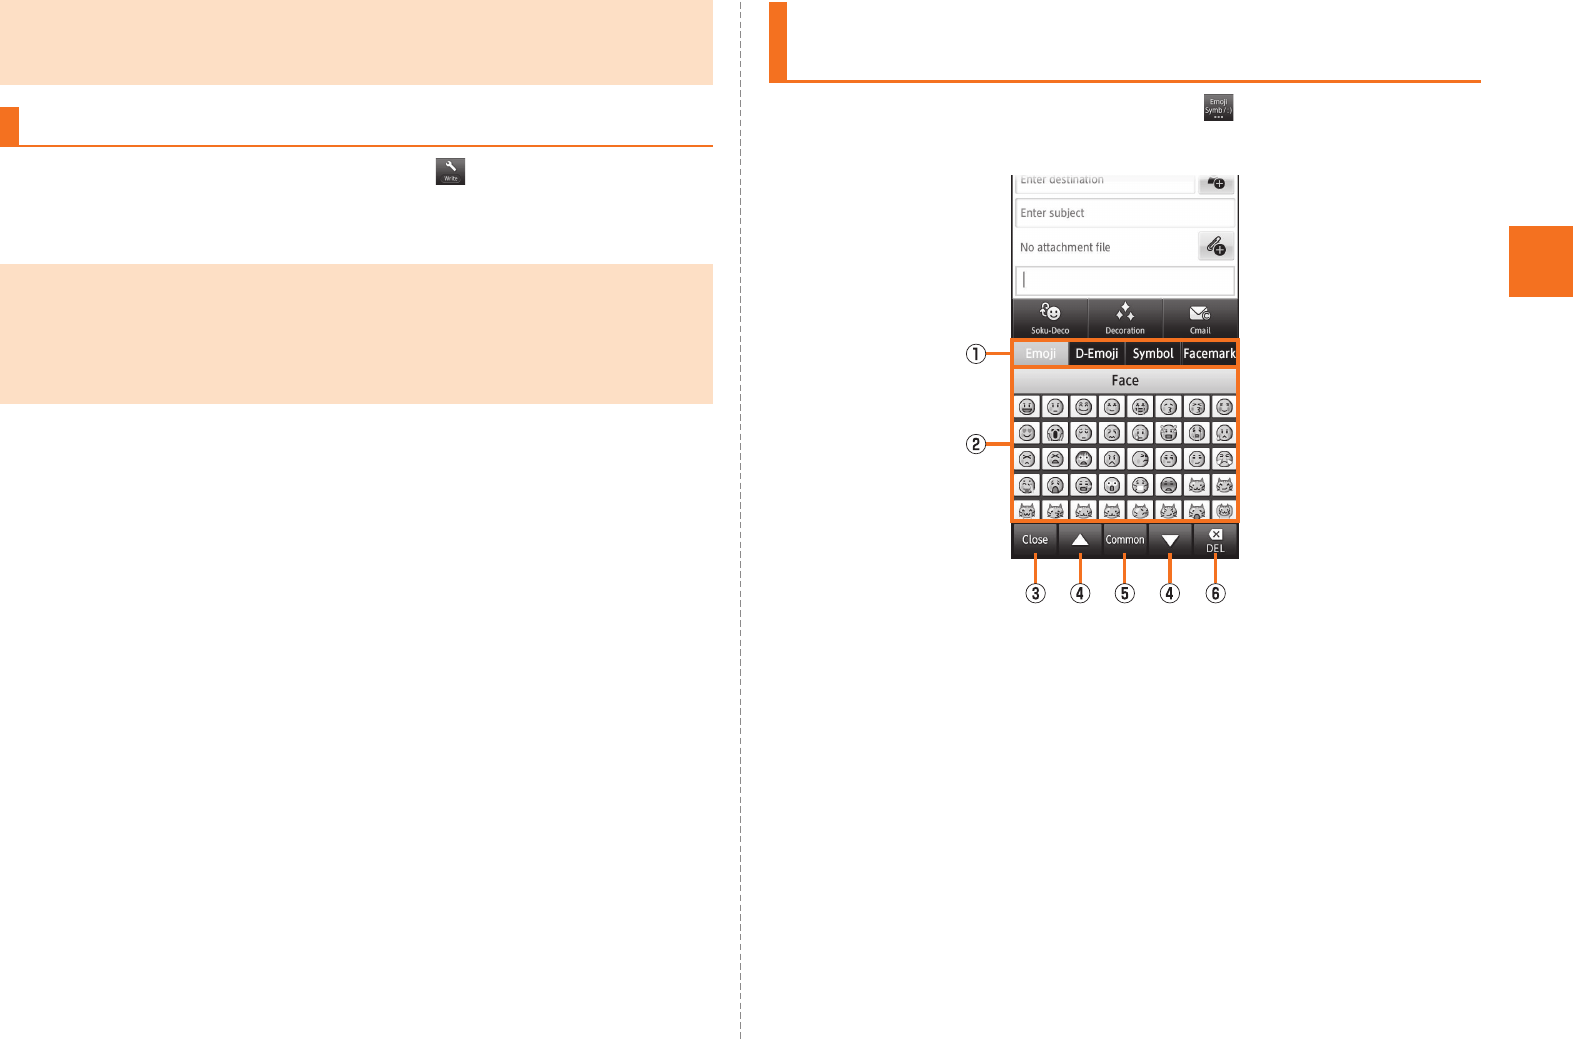
ACharacter switch tab
Switches the emoji/decoration-emoji/symbol/facemark.
BEmoji/Decoration-emoji/Symbol/Facemark list
Displays the emoji/decoration-emoji/symbol/facemark list
screen for each category.
•Long-touch a facemark to edit it. However, facemarks in
History cannot be edited.
CClose key
Returns to the character entry screen.
DPage switch key
Displays the previous/next categories or pages.
•While the prediction candidates list/relational prediction candidates list/
normal conversion candidates list is not displayed, tap ^ to hide the
keyboard.
Switching Character Entry Modes
•The character type is switched in order of “Half-width alphabet”
[“Half-width numeric” [“Kanji” each time you tap the character entry
mode key.
•Some character modes cannot be used depending on the screen or the
application.
Entering Emoji/Decoration-emoji/Symbol/
Facemark
《Emoji/Decoration-emoji/Symbol/
Facemark list screen》
KUUJAWGDQQMࡍࠫ㧞㧜㧝㧝ᐕ㧝㧞㧝ᣣޓᧁᦐᣣޓඦᓟ㧡ᤨ㧝㧥ಽ
36
Learning the Basics
ECharacter entry mode switch key
: Displays emojis converted automatically when sent to a
cell phone of other carrier.
: Displays normal emojis.
: Displays full-width symbols.
: Displays half-width symbols.
FDelete key
Deletes the selected character or the character on the left of
the cursor. When the cursor is at the beginning, the character
on the right of the cursor is deleted.
BSelect an emoji/a decoration-emoji/symbol/facemark
AOn the character entry screen, [Input method.
Alternatively, long-touch the character entry area [Input method to
switch input software.
BSelect an input software.
ACursor key
Moves the cursor.
j: While entering characters, moves the cursor to prediction
candidates list.
s: While entering characters, changes the range of the
characters.
BLeft guidance key
Selects/Performs the function displayed on the lower left of the
character input screen.
CMenu key
Displays the option menu.
DReverse toggle key
Displays the characters assigned to the same key in the reverse
rotation. You can return the determined characters to the
undetermined state.
ENumber key
0 to 9, /: Switches the character each time you press the
key, and enter the character.
.: Inserts a line feed at the cursor position. For conversion, you
can switch the entered character to the uppercase/
lowercase one, or for entering Hiragana/Katakana, add
dakuten/handakuten to the character.
•There are some lists that cannot be displayed and some emojis/
decoration-emojis/symbols/facemarks that cannot be entered depending
on the screen you operate.
Switching Input Software
•When using an installed application, enable it in Language & keyboard in
advance. Refer to “Using Android Market” to install an application.
Character Input (Hardware Keyboard)
KUUJAWGDQQMࡍࠫ㧞㧜㧝㧝ᐕ㧝㧞㧝ᣣޓᧁᦐᣣޓඦᓟ㧡ᤨ㧝㧥ಽ

37
Learning the Basics
FDetermination key
Determines the entering characters.
GRight guidance key
Selects/Performs the function displayed on the lower right of the
character input screen.
HBack key
Returns to the previous state.
While entering characters, deletes the character on the left of the
cursor. When the cursor is at the beginning, the character on the
right of the cursor is deleted.
IDEL key
Deletes the selected character or the character on the left of the
cursor. When the cursor is at the beginning, the character on the
right of the cursor is deleted.
AOn the character entry screen, hold down C
[Input mode.
BSelect the character type [c.
AOn the character entry screen, A.
The emoji/decoration-emoji/symbol/facemark list screen is displayed.
Press when there is no conversion candidate on the character entry
screen.
The character type is switched in order of Emoji [D-Emoji [Symbol
[Facemark each time you press A.
BSelect an emoji/a decoration-emoji/symbol/facemark
[c.
■Operations on the Emoji/Decoration-emoji/Symbol/
Facemark list screen
C: While displaying the emoji list, switches between the emoji list
converted automatically when sent to a cell phone of other
carrier and the normal emoji list.
While displaying the symbol list, switches between the list of
full-width symbols and half-width symbols.
While displaying the facemark list, edits the facemark to which
the cursor is pointed.
.//: Displays the previous/next category or page.
Switching Character Entry Modes
•Some character modes cannot be used depending on the screen or the
application.
Entering Emoji/Decoration-emoji/Symbol/
Facemark
•There are some lists that cannot be displayed and some emojis/
decoration-emojis/symbols/facemarks that cannot be entered depending
on the screen you operate.
KUUJAWGDQQMࡍࠫ㧞㧜㧝㧝ᐕ㧝㧞㧝ᣣޓᧁᦐᣣޓඦᓟ㧡ᤨ㧝㧥ಽ
38
Phone
AOn the home screen, [Phone.
APhone number entry field
Enter numbers of up to 32-digit.
BNumber key
CAddress book key
Make a call by selecting a contact information from the
address book. Or you can register the entered phone number
to the address book.
DCall key
Make a call. Also, if there is an outgoing history, the latest
outgoing history is entered by tapping when the phone
number has not been entered.
EScreen switching tab
Switches the phone number entry screen/incoming history list
screen/outgoing history list screen.
FDelete key
Deletes a single-digit on the left side of the cursor. If you
long-touch it, all the numbers on the left side of the cursor are
deleted and all the numbers are deleted when there is no
number on the left side of the cursor.
BEnter a phone number.
When calling to a fixed-line phone, enter the phone number starting
with the area code even if you are in the same area.
CCall [Talk.
Press u or d during a call to adjust the other party’s voice.
DEnd call
Making a Call
《Phone number entry screen》
•If you cover the screen while dialing or calling, it may be turned off
depending on the orientation of the IS14SH.
•The call fees when calling with “1401” will be subtracted from the balance
registered by purchasing the au prepaid card.
•Note that even if you cover the mouthpiece, the sound can be conveyed to
the other party.
•Even if, on the home screen, tap [Settings [Wireless & networks
[Mark Offline mode, you can call to the emergency number (110, 119, 118)
and the Customer Service Center (157).
•If you want to return to the calling screen after activating another application
during a call, execute the following operations.
•Tap # to return to the home screen, activate Phone and tap Return to call
in progress.
•Tap the status bar and tap Current call.
KUUJAWGDQQMࡍࠫ㧞㧜㧝㧝ᐕ㧝㧞㧝ᣣޓᧁᦐᣣޓඦᓟ㧡ᤨ㧝㧥ಽ

39
Phone
Available without any additional application from IS14SH.
Example: To call 212-123-XXXX in the USA from IS14SH
AOn the home screen, [Phone.
BEnter the international access code “001010” or
“010”.
Long-touch the “0” to enter “+” and “001010” is automatically added
when calling.
CEnter the country code of America “1”.
DEnter the city code “212”.
If the area code starts with “0”, dial it without including the “0” (There
are some exceptions such as fixed-line phones in some countries or
regions including Italy and Moscow).
EEnter the phone number of the other party “123XXXX”
[Call.
Dial services available from au phones
•The following dial services are available.
•Call with fixed-line phones all over Japan
•Call with cell phones, PHS, and car phones all over Japan
•001 (au international call service: Subscription is unnecessary)
•171 (Disaster emergency message dial)
•177 (Weather forecast: The area code is necessary)
•117 (Time signal)
•104 (Directory assistance)
•115 (Sending telegram)
•110 (Emergency call to Police)*
•119 (Emergency call to Fire and Ambulance)*
•118 (Emergency call to Regional Coast Guard)*
•157 (Customer Service Center)
•Maritime telephone
* The numbers are emergency call numbers. The IS14SH notifies your present location to
the emergency call destination with a signal from a base station when you call to the
agency that received the emergency call.
•The following NTT services are unavailable.
•Collect call
•Message service
•Dial Q2
•116 (NTT business information)
Making an International Call
(au International Call Service)
•The monthly limit fee is set for the au International Call Service. The au
International Call Service is unavailable from when the limit fee is confirmed
to be exceeded until the end of the same month.
•Even if you cannot use the service by exceeding the limit fee, you can use
from the first day of the next month. Also, you can use the domestic call as
usual while the service is stopped.
•The international call fee is charged together with other monthly fees from
au.
•If you do not wish to use the service, you can set not to use the au
International Call Service.
For au International Call Service:
From au phones 157 (area code not required) (toll free)
From fixed-line phones 0077-7-111 (toll free)
Open 9:00 to 20:00 (everyday)
KUUJAWGDQQMࡍࠫ㧞㧜㧝㧝ᐕ㧝㧞㧝ᣣޓᧁᦐᣣޓඦᓟ㧡ᤨ㧝㧥ಽ
40
Phone
ASlide to the right during an incoming call.
When you get an incoming call while the backlight illuminates (except
for when the unlock screen is displayed), tap Answer.
BTalk [End call.
ASlide to the left during an incoming call.
When you get an incoming call while the backlight illuminates (except
when the unlock screen is displayed), tap Answer Holding.
The call is put on hold. The other party will hear voice guidance
indicating that the call is put on hold.
BAnswer while the call is put on hold.
The hold state is released.
You can answer a call with the message of the Answering memo and
record the other party’s message.
Ae [Absence Memo during an incoming call.
Tap e while recording an Answering memo [Rcv. ON/Rcv. OFF to
turn ON/OFF the other party’s voice.
AOn the home screen, [Phone [Outgoing History/
Incoming History.
ACalled/Received date and time
BContents of the phone number/name/reason of user unset call/
network service
CImage (Face) registered in address book
DOutgoing call icon
Tap to make a call.
EGroup icon
The histories are collected in a group when the outgoing call
histories/incoming call histories from the same party are
continued. Tap a group icon to switch displaying/hiding of the
history in the group.
Answering a Call
Answering an Incoming Call
Putting the Call on Hold
•The call fee is charged on the other party who has made a call to you while
the call is put on hold as well.
•If you disable the hold state once, you cannot put the call on hold again.
•You can put the call on hold only when Area settings is set to Japan.
Answering with the Message of Answering
Memo
Returning a Call (Outgoing History/
Incoming History)
《Outgoing call history list screen》 《Incoming call history list screen》
KUUJAWGDQQMࡍࠫ㧞㧜㧝㧝ᐕ㧝㧞㧝ᣣޓᧁᦐᣣޓඦᓟ㧡ᤨ㧝㧥ಽ

41
Phone
FTalk time
GIncoming call status icon
: Normal incoming call
: Missed call
: Missed call (One-ring call*)
: Rejecting call
HCalling time
* The missed call cut off in approximately 3 seconds is considered as one-ring call. Note
that it may make customers call back to connect to malicious paid programs.
BSelect the entry to call back.
The outgoing history/incoming history detail screen is displayed.
CCall.
You can tap Mail to create C-mail.
Set not to disturb others around you in public places.
AOn the home screen, [Settings [Sound settings
[
Manner mode.
BSelect Manner mode.
The ring tone/receiving tone/operation sound does not sound when the
Manner mode is set. Also, the vibrator when an incoming call or a mail
message is received does not operate when Drive manner mode or
Silent manner mode is set.
The answering message is fixed to Drive, the answering time is fixed to
3secs and the Answering memo is fixed to ON when the Drive manner
mode is set.
When you cannot answer calls, this function automatically plays a
message and allows callers to record messages.
AOn the home screen, [Settings [Call settings
[Call/Ans Memo [Answering memo setting.
•The IS14SH can store up to 100 entries in each of the outgoing and
incoming call histories. If the history exceeds 100 entries, Exceeded entries
are automatically deleted from the oldest one. The number of the saved
entries may be reduced depending on the amount of free space.
Turning On Manner Mode
•The use of cell phones while driving a car/motorcycle is dangerous and is
prohibited by law. Set Manner mode to Drive manner mode while driving or
riding.
•Hold down K for at least two seconds [Manner mode or hold down
d on the unlock screen to enable/disable Manner mode.
•Even in Manner mode, a shutter sound, recording start/end tone of the
camera or recording start/end tone of the voice recorder are operated.
•When playing the data in Contents Manager or checking the function setting
by playing the data in Manner mode, the data is played on mute.
Depending on the function, you can adjust the volume by pressing u/
d while playing the data.
Turning On the Answering Memo
•When you set the same length of answering time for Answering memo and
Auto Answer, Answering memo takes priority.
•The IS14SH can record a maximum of ten messages of up to approximately
60 seconds per message. When ten messages have already been
recorded, the messages that are already played but not protected are
deleted from the oldest one. When all of them have not been played or are
protected, the Answering memo does not answer the call.
KUUJAWGDQQMࡍࠫ㧞㧜㧝㧝ᐕ㧝㧞㧝ᣣޓᧁᦐᣣޓඦᓟ㧡ᤨ㧝㧥ಽ
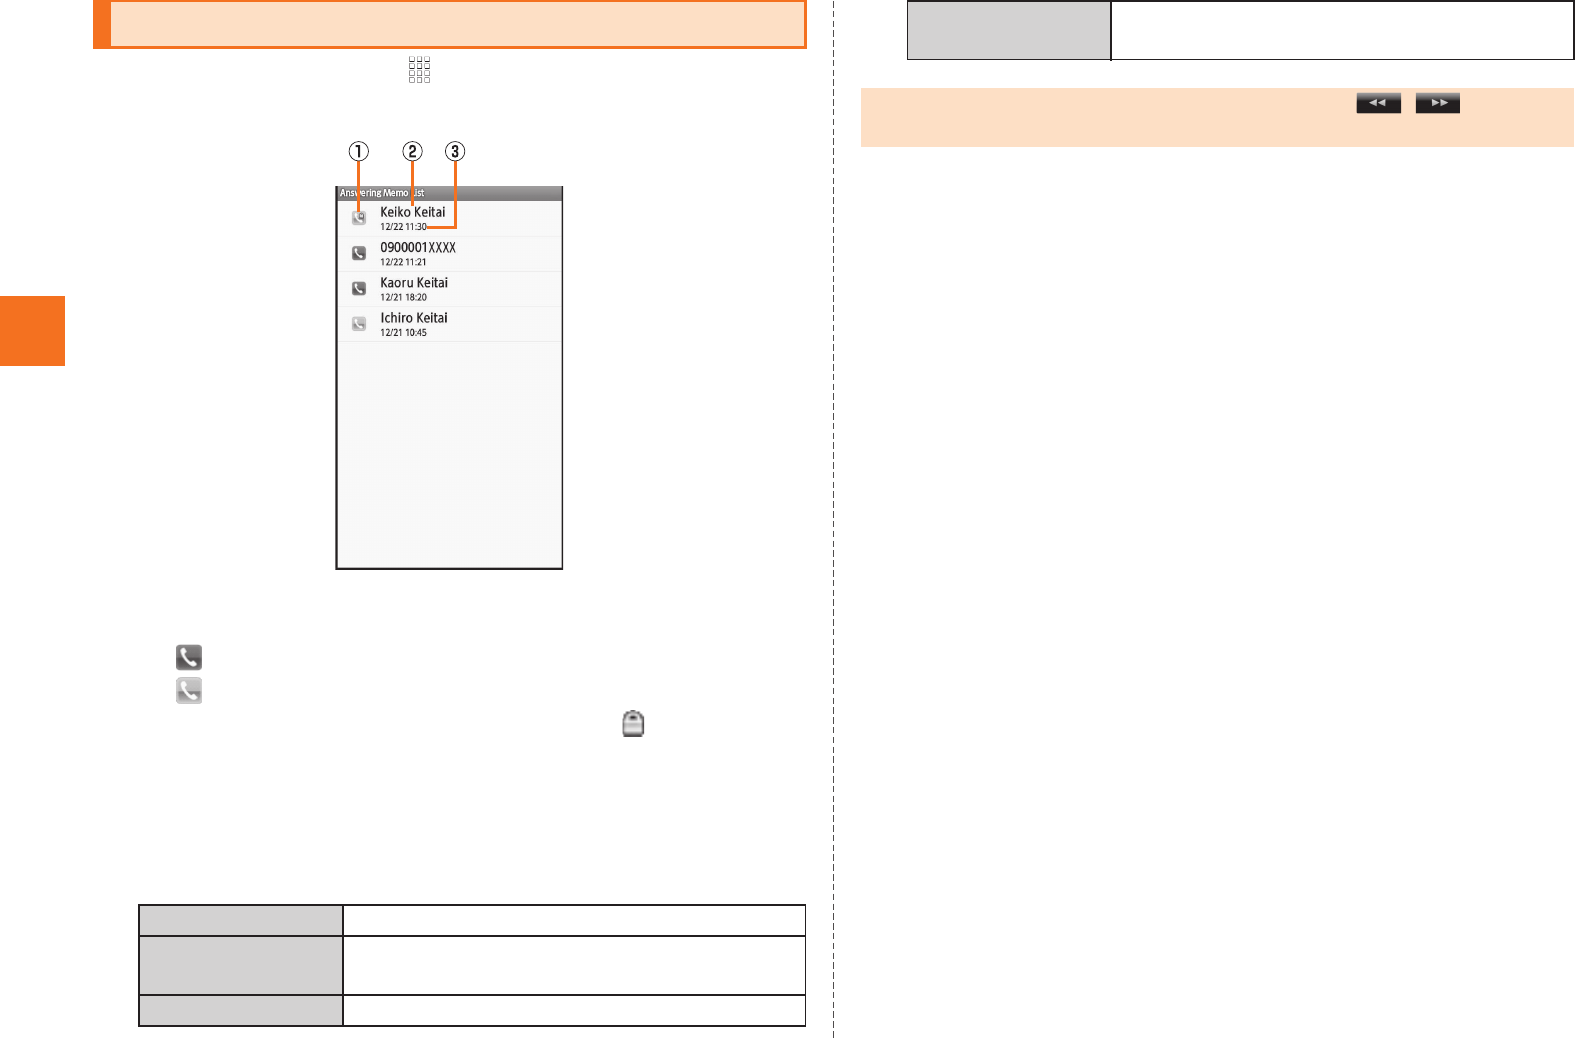
42
Phone
AOn the home screen, [ Settings [Call settings
[Call/Ans Memo [Answering Memo List.
AIcons to indicate the playing status of the Answering memo
: Answering memo which has not been played (red)
: Answering memo which has already been played (green)
Icon of the protected Answering memo has .
BOther party’s name/phone number/reason of user unset call
CDate and time when the Answering memo is recorded
BSelect the Answering memo to play.
The Answering memo is played.
Playing a Message in Answering Memo
Stop Stop playing the Answering memo.
On/Off Protect/Unprotect the Answering memo not
to be automatically deleted.
Delete Delete the Answering memo being played.
《Answering memo list screen》
Speaker on/
Speaker off
The Answering memo can be heard on the
speaker/earpiece.
•When multiple Answering memos are recorded, tap / while
playing a message to play the previous/next Answering memo.
KUUJAWGDQQMࡍࠫ㧞㧜㧝㧝ᐕ㧝㧞㧝ᣣޓᧁᦐᣣޓඦᓟ㧡ᤨ㧝㧥ಽ
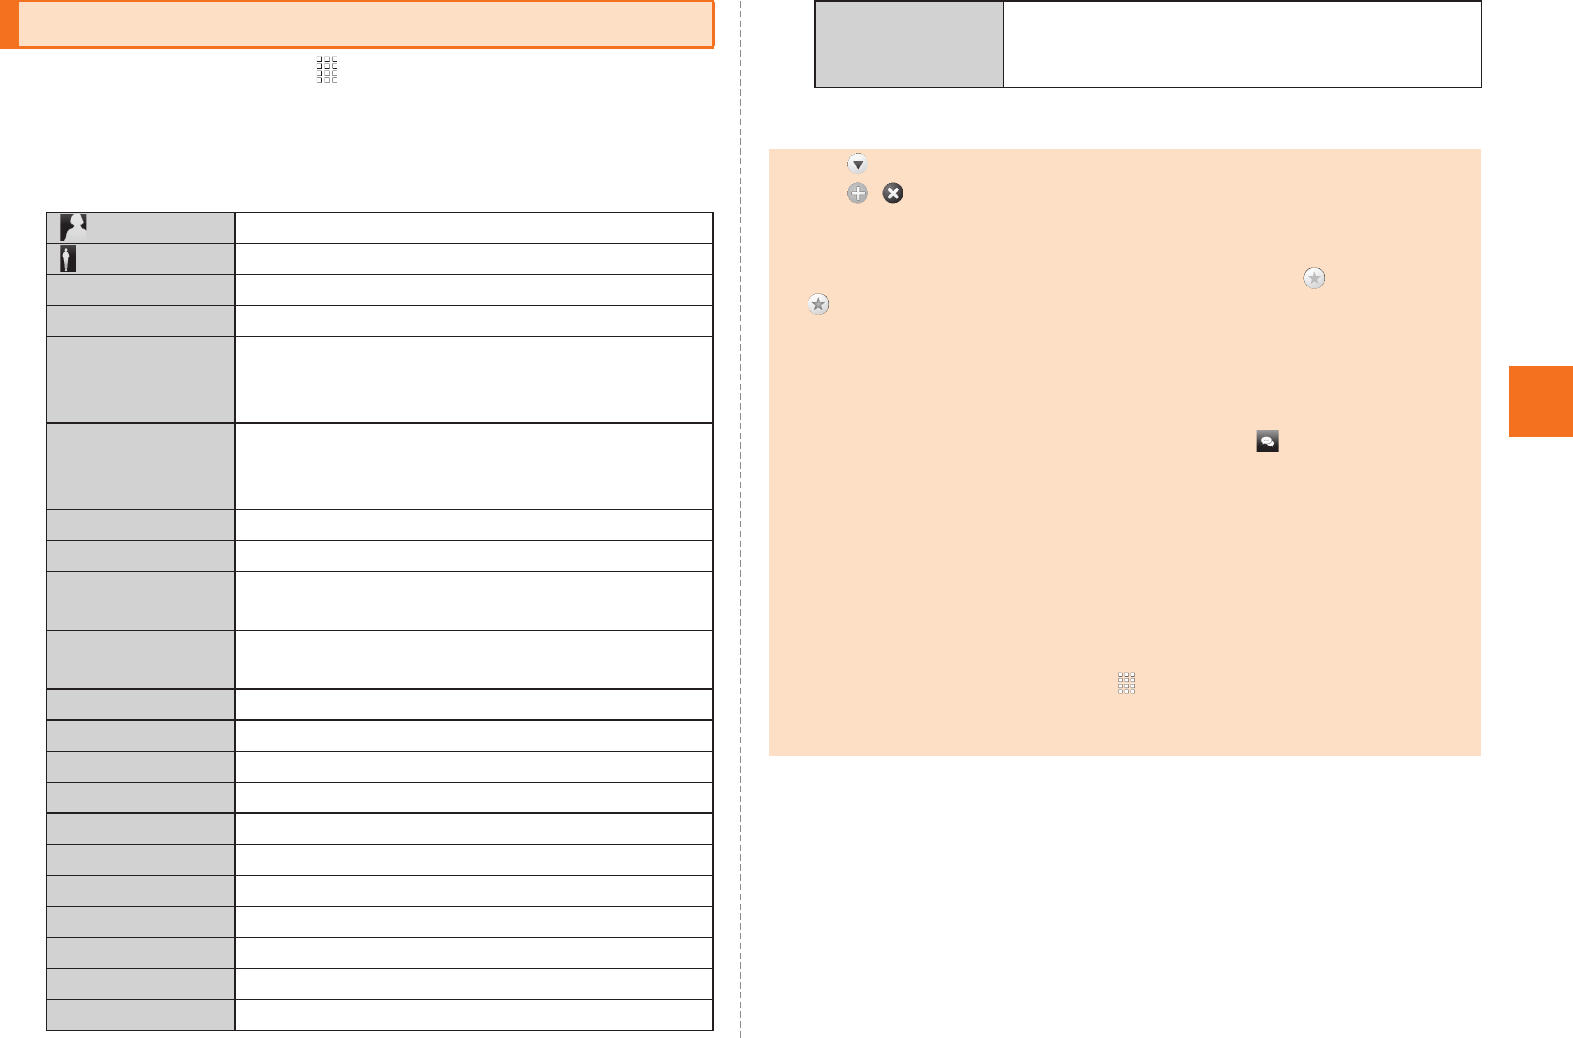
43
Address Book
AOn the home screen, [Address Book [e
[Add new entry.
If you have set an account, select the destination to register a contact
to.
B
CSave [Yes.
Adding an Address Book Entry
(Face) Register the image of the face.
(Whole body) Register the image of the whole body.
Family name Register the family name.
Given name Register the given name.
Read last Register “reading” of the family name.
•The “reading” is automatically entered
when the family name is entered.
Read first Register “reading” of the given name.
•The “reading” is automatically entered
when the given name is entered.
Phone number Register the phone number.
Mail Register the mail address.
mixi Register the information of a person
registered in the friend list of mixi.
Twitter Register the information of a person who you
follow on Twitter.
Chat Resister the chat address.
Group setting Set the group.
Birthday Register the birthday.
Nickname Register the nickname.
Postal Register the address.
GPS Register the GPS information.
Organization Register the company/part/post.
Website Register the URL.
Memo Register the memo.
Event Register the date.
Internet call Register the address for the internet calling.
Ring Set Set the sound, the lamp and the vibration
when an incoming call and a mail message is
received.
•Tap to display the entry items which are not displayed.
•Tap / to add/delete the item.
•If the phone number is for a fixed-line phone, enter the phone number
starting with the area code.
•If you save multiple phone numbers/mail addresses, tap to change it to
so that you can set a phone number/mail address for usual use.
•Depending on an item, you can change its type. Tap the icon displayed on
the left of the item and select a type. By tapping Custom when you change
the type, you can save the entered string as a type.
•For the chat address type, set the application which is activated when the
operation (on the address book details screen, tap ) is executed.
•If you save the name in the following characters, it is displayed in order of
given name, and family name on the address book.
•Half-width alphabet only or half-width alphabet and half-width numeric for
given name and family name
•Half-width alphabet only or half-width alphabet and half-width numeric for
family name/Kanji only or Kanji and half-width alphanumeric for given
name
•To register GPS information, enable Use wireless networks/Use GPS satellites in
advance. On the home screen, tap [Settings [Location & security
[Check Use wireless networks/Use GPS satellites to enable it.
•If the other party’s phone number is not notified, Ring Set is not enabled.
KUUJAWGDQQMࡍࠫ㧞㧜㧝㧝ᐕ㧝㧞㧝ᣣޓᧁᦐᣣޓඦᓟ㧡ᤨ㧝㧥ಽ
User manual English part1

Getting Ready
Contents
Introduction
Learning the Basics
Phone
Address Book
Mail
Internet
Multimedia
Applications
1Seg
Settings of IS14SH
Global Function
Appendix/Index
Basic Manual
For inquiries, call: Customer Service Center
For general information and charges (toll free)
From fixed-line phones: From au cell phones:
From fixed-line phones: From au cell phones:
In case above numbers are not available,
0120-977-033 (except Okinawa)
0120-977-699 (Okinawa)
For loss, theft or damage and operation information
(toll free)
PRESSING ZERO WILL CONNECT YOU TO AN OPERATOR
AFTER CALLING 157 ON YOUR au CELLPHONE.
area code not required
area code not required
Sales: KDDI CORPORATION・
OKINAWA CELLULAR TELEPHONE COMPANY
Manufactured by: SHARP CORPORATION
Cell phone and PHS operators collect and recycle unused
telephones, batteries and battery chargers at stores
bearing the logo regardless of brand and manufacturer
to protect the environment and reuse valuable resources.
November 2011 Edition

ii
Thank you for purchasing the IS14SH.
Before using your IS14SH, be sure to read the Basic Manual (this PDF
manual) to ensure correct usage.
After you have finished reading this manual, store this PDF manual
and the printed manuals (Accessories) in safe places so you can
retrieve them whenever you need them. If the printed manuals
(Accessories) are lost, please contact an au shop or Customer
Service Center.
■Instruction Manual (Accessory)
This manual describes basic operations of major functions of the
IS14SH.
For detailed descriptions on various functions, refer to the Instruction
Manual application (Japanese) available on the IS14SH or full
Instruction Manual (Japanese) available on the au homepage.
■Instruction Manual Application
You can use the Instruction Manual application (Japanese)
pre-installed in the IS14SH with which you can check detailed
operation methods on this au phone terminal.
Also, you can activate intended functions from an explanation screen
depending on the functions.
On the home screen, tap [Instruction Manual
•To use the application for the first time, you need to download and
install it by following on-screen instructions.
■Downloading Manuals
You can download the Basic Manual (this manual) and the Instruction
Manual (Accessory) (Japanese) or full Instruction Manual (Japanese)
in PDF format from the au homepage.
http://www.au.kddi.com/torisetsu/index.html
•To display the Basic Manual (this manual), the Instruction Manual
(Accessory) (Japanese) or full Instruction Manual (Japanese) in PDF
format on the IS14SH, purchase the full version of Documents To Go
or install an application which allows you to display PDF files.
Be sure to read the Safety Precautions “安全上のご注意” in the
Instruction Manual (Japanese) to ensure proper usage of the IS14SH.
For troubleshooting, check the symptom of your IS14SH in
auお客さまサポート (au Customer Support) on the au homepage.
http://www.kddi.com/customer/service/au/trouble/kosho/
index.html
Preface
For Learning Operations of the IS14SH Safety Precautions
KUUJAWGDQQMKKࡍࠫ㧞㧜㧝㧝ᐕ㧝㧞㧝ᣣޓᧁᦐᣣޓඦᓟ㧡ᤨ㧝㧥ಽ

1
•You cannot receive or make calls in a location where the signal
cannot be received, even within the service area. Calling may not be
available in a location where the signal is weak. If you move to a
location where the signal is weak during a call, the call may be
interrupted.
•The au phone is a digital cell phone and can maintain a high call
quality until the signal weakness reaches its limit. Therefore, once
the limit has been reached, the call may be disconnected suddenly.
•Note that the au phone uses signals which may be intercepted by a
third party. (However, the CDMA system enables highly confidential
call communications.)
•The au phone is a wireless station which is compliant with the Radio
Act, and may be subject to inspections regulated by the Radio Act.
•When you insert the au IC-Card, the product number information of
your au phone is sent to the au server for the security and operation
status notification of the au phone.
•Always be considerate of others around you when using your au
phone in public places.
•For a child’s use, read the Basic Manual and give your child
instructions on proper use.
•The IS14SH is a cell phone compatible with the international
roaming service. Each network service which is described in the
Basic Manual varies depending on the area or service. For details,
refer to Global Passport Owner’s Guide (Japanese).
Before Using an au Phone
KUUJAWGDQQMࡍࠫ㧞㧜㧝㧝ᐕ㧝㧞㧝ᣣޓᧁᦐᣣޓඦᓟ㧡ᤨ㧝㧥ಽ

2
Introduction
Cell phones always emit weak radio waves when power is on. Use cell
phones in an enjoyable and safe manner without forgetting to be
considerate of others around you.
■Use of cell phones is not allowed in some places.
•Using a cell phone while driving a car/motorcycle is dangerous and
is prohibited by law. Also, using a cell phone while riding a bicycle
may be punished by law.
•Using a cell phone in an aircraft is prohibited.
■Be considerate of where you use the cell phone and
how loudly you talk.
Do not make calls in theaters, museums, libraries, and other similar
places. Turn power off or turn on Manner mode so as not to disturb
others around you by ring tones.
•Do not use the cell phone on a street where you might interrupt the
flow of pedestrians.
•Move to areas where you will not inconvenience others on trains or in
hotel lobbies.
•Refrain from talking in a loud voice.
•Obtain the permission of other people before you take their photos
with the cell phone’s camera.
■Be considerate of people around you.
•Some people close to you in crowded places such as packed trains
may be using a cardiac pacemaker. Turn the cell phone off in such
places.
•Abide by the rules of hospitals and other medical institutions where
it is forbidden to use or carry cell phones.
Check whether all the contents are included.
ƔInstruction Manual (Japanese)
ƔSafety Precautions (Japanese)
ƔNotice Sheet (Japanese)
ƔSetting Guide (Japanese)
ƔJIBUN BANK・au Insurance Service Guide (Japanese)
ƔGlobal Passport Owner’s Guide (Japanese)
Ɣau International Call Guide (Japanese)
The following items are not included.
•Purchase a specified charger (sold separately).
•The illustrations in this manual may look different from the actual
product.
Cell Phone Etiquette Accessories
•AC adapter
•Earphone
•microUSB cable
Warranty
(Japanese)
IS14SH microSD memory card
(2 GB) (Sample)
* This is inserted in the
IS14SH at the time of
purchase.
Battery pack
(SHI11UAA)
KUUJAWGDQQMࡍࠫ㧞㧜㧝㧝ᐕ㧝㧞㧝ᣣޓᧁᦐᣣޓඦᓟ㧡ᤨ㧝㧥ಽ

3
Introduction
■Note on Key Illustrations
In this manual, the key illustrations are simplified as shown below. ■Description of Operations for Selecting Item/Icon/
Key etc.
In this manual, operation steps are described as below.
Illustrations and Descriptions in This
Manual
When pressing or ................
When pressing or ................
When pressing , , , ...
Description Explanation
On the character entry
screen, [Input mode.
Tap on the character entry
screen. Then tap Input mode.
On the character entry
screen, A.
Press A on the character entry
screen.
•Explanations of this manual are based on the case when the color of the
IS14SH is “Champagne Pink” as an example.
•Explanations of this manual are based on the case when the IS14SH is held
vertically. If you hold it horizontally, menu items/icons/on-screen keys etc.
may be different.
•Explanations of this manual are based on touch panel operations when you
can operate with either touch panel or keys.
•Explanations of this manual are based on the case when the IS14SH is
closed. If it is opened, menu items/icons/on-screen keys etc. may be
different.
•Menu items, layers and icons described in this manual may be different
according to functions being used and conditions.
•In this manual, entering Lock No. is mentioned as one of the unlock
methods.
•“microSD™ memory card” and “microSDHC™ memory card” are
abbreviated as “microSD memory card” or “microSD”.
KUUJAWGDQQMࡍࠫ㧞㧜㧝㧝ᐕ㧝㧞㧝ᣣޓᧁᦐᣣޓඦᓟ㧡ᤨ㧝㧥ಽ
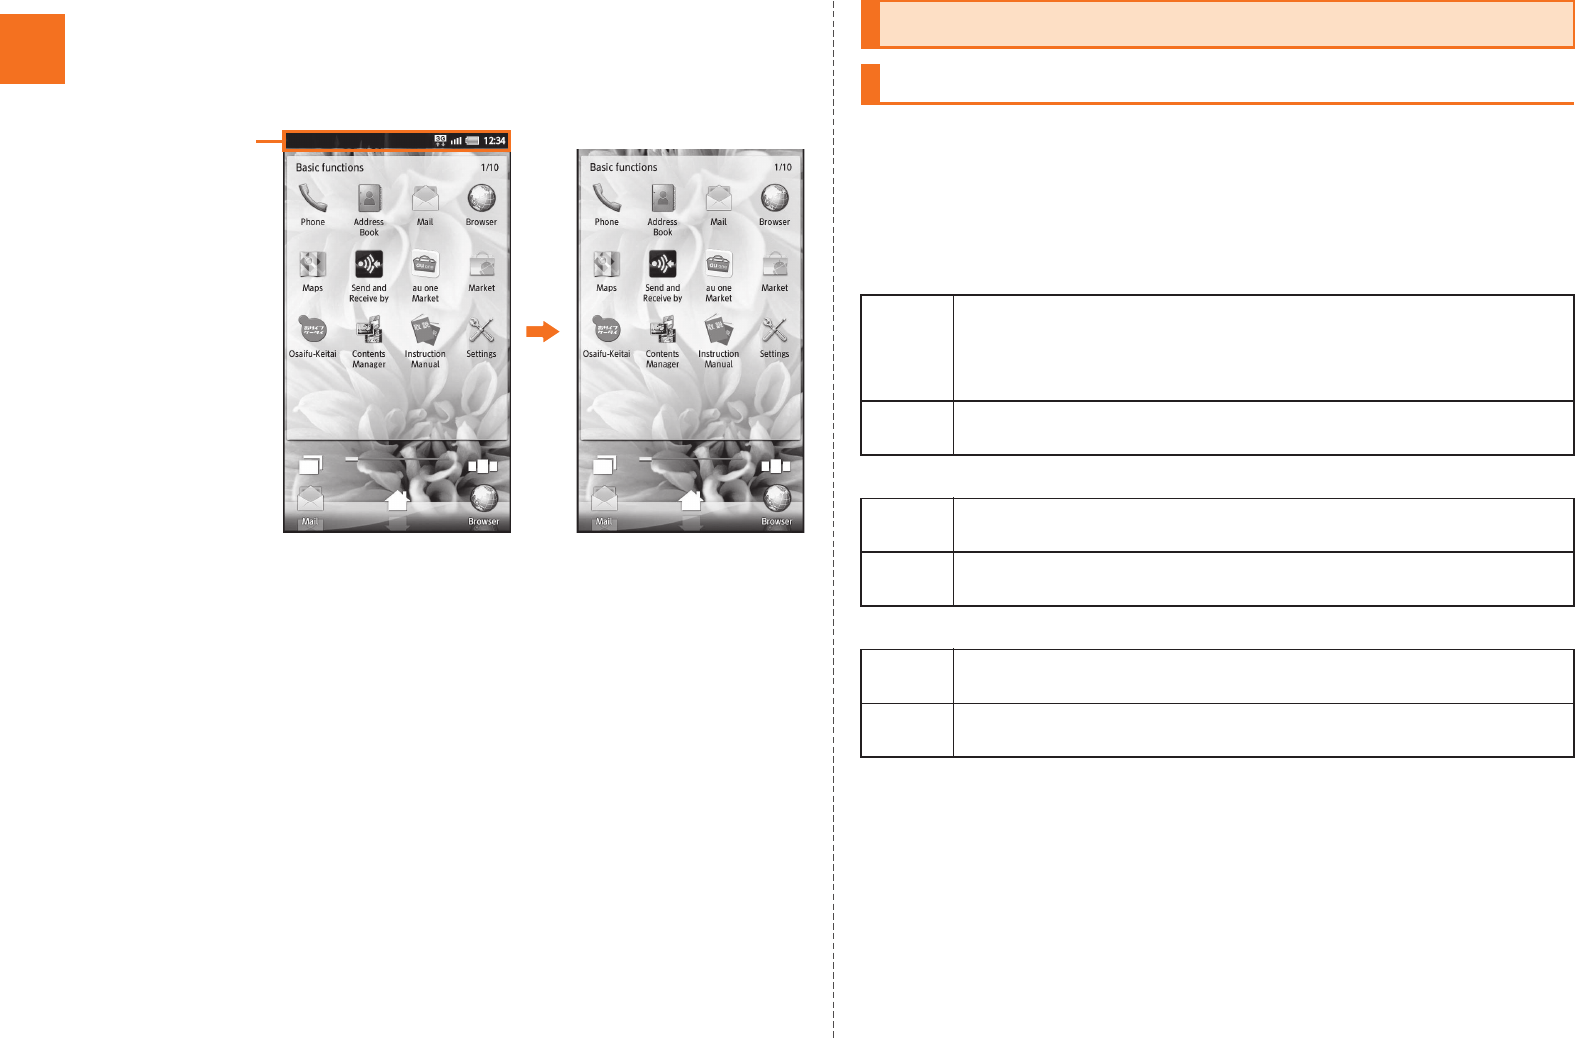
4
Introduction
■Note on Screenshots
The screenshots in this manual are simplified and may look different
from the actual screens. Also, part of the screen may be abbreviated.
You have to use each security code for using the IS14SH.
You can use a security code and other passwords described below.
Take care not to forget your security code and passwords because
they are required for performing various operations and using
subscription services.
●Security Code
●Lock No.
●PIN Code
Actual screen
In this manual,
part of the screen
such as icons are
abbreviated.
In this manual
Security Code and PIN Code
Security Code and Passwords
Usage
Example
AUsing the Answering Service (Voice Mail) and Call Transfer
remotely from a fixed-line phone
BMaking inquiries, applications, and changes while using
Customer Service Center voice guidance, and au homepage
Initial
Setting
The four-digit number you wrote on your subscription form
Usage
Example
Setting/Canceling Screen lock, Restrict address book, etc.
Initial
Setting
1234
Usage
Example
Preventing unauthorized use of the au IC-Card by a third party
Initial
Setting
1234
KUUJAWGDQQMࡍࠫ㧞㧜㧝㧝ᐕ㧝㧞㧝ᣣޓᧁᦐᣣޓඦᓟ㧡ᤨ㧝㧥ಽ

5
Introduction
If the PIN code is incorrectly entered three times consecutively, the
PIN code will be locked. Use the PUK code to unlock the PIN code.
■PIN Code
You can set the IS14SH to require PIN code entry every time the
power is turned on, to prevent unauthorized use of the au IC-Card by
a third party.
•At the time of purchase, the PIN code is not to be required to use
phone. On the home screen, tap [Settings [Location &
security [Set up UIM card lock [Mark Lock UIM card to set the PIN
code to be required.
The PIN code is also required when setting Lock UIM card.
•The initial setting of the PIN code is “1234”. On the home screen, tap
[Settings [Location & security [Set up UIM card lock
[Change UIM PIN to change the PIN code to a four- to eight- digit
number.
■PUK Code
Enter the PUK code when the PIN code is locked.
•PUK code is an eight-digit number given at the time of purchase,
and is printed on the back side of the plastic card where your au
IC-Card is attached.
•When you enter the PUK code, on the home screen, tap
[Settings [Location & security [Set up UIM card lock [Change
UIM PIN to set the new PIN code.
•If the PUK code is incorrectly entered ten times consecutively,
contact an au shop, PiPit or the Customer Service Center.
PIN Code
•When the PIN code is locked, the IS14SH may be restarted for the security
reasons.
•PIN code cannot be reset even if you carry out the operation (on the home
screen, tap [Settings [Privacy [Reset all).
<Back up notes on the memory contents of the IS14SH>
●Please back up* notes on the important information whose contents are
saved on the IS14SH by yourself or are received/downloaded to the
IS14SH from external devices.
The memory contents of the IS14SH may be deleted or changed because
of unexpected elements such as static electricity and malfunction or
modifications, improper operations, etc.
* Methods for the backup
It is recommended that text information such as the address book or downloaded
dictionaries be backed up in the microSD memory card. You can forward each data to
a PC by attaching one on mails.
However, some data such as data protected by copyright cannot be backed up even
with the above mentioned methods.
KUUJAWGDQQMࡍࠫ㧞㧜㧝㧝ᐕ㧝㧞㧝ᣣޓᧁᦐᣣޓඦᓟ㧡ᤨ㧝㧥ಽ

6
Contents
Preface............................................................ ii
For Learning Operations of the IS14SH.......... ii
Safety Precautions.......................................... ii
Before Using an au Phone.............................. 1
Cell Phone Etiquette ...............................................2
Accessories.............................................................2
Illustrations and Descriptions in This Manual..........3
Security Code and PIN Code ..................................4
Security Code and Passwords................................4
PIN Code.................................................................5
Names and Functions of Parts................................8
Opening the IS14SH .............................................11
Removing/Attaching the Battery Pack...................11
Removing the Battery Pack...................................11
Attaching the Battery Pack ...................................12
Using au IC-Card ..................................................12
au IC-Card ............................................................12
Removing au IC-Card ...........................................12
Inserting au IC-Card .............................................13
Using microSD Memory Card ...............................13
microSD Memory Card .........................................13
Removing microSD Memory Card ........................14
Inserting microSD Memory Card ..........................15
Charging the Battery Pack ....................................16
Turning the Power On/Off .....................................18
Turning the Power On ...........................................18
Turning the Power Off ...........................................18
Restarting the IS14SH...........................................18
Sleep Mode ...........................................................18
Unlock Screen ...................................................... 19
Switching the Display Language to English.......... 19
Initial Setup ........................................................... 19
Setting Up a Google Account ............................... 20
Setting an au one-ID............................................. 20
Operating the Touch Panel................................... 21
Using the Home Screen........................................ 22
Viewing the Home Screen .................................... 22
Using Menu in the Home Screen.......................... 23
Moving/Removing Shortcuts/Widgets/Folders ..... 24
Switching the Home Screen ................................. 24
Using the Launcher............................................... 24
Using the Status Bar............................................. 28
Indicators.............................................................. 28
Using Notification/Status Panel ............................ 30
Switching Orientation............................................ 31
Displaying Available Menu.................................... 32
Character Input (Software Keyboard) ................... 33
Switching Software Keyboards............................. 33
Viewing the Character Entry Screen..................... 33
Switching Character Entry Modes ........................ 35
Entering Emoji/Decoration-emoji/Symbol/Facemark
.............................................................................. 35
Switching Input Software ...................................... 36
Character Input (Hardware Keyboard).................. 36
Switching Character Entry Modes ........................ 37
Entering Emoji/Decoration-emoji/Symbol/Facemark
.............................................................................. 37
Making a Call ........................................................ 38
Making an International Call (au International Call
Service)................................................................. 39
Answering a Call................................................... 40
Answering an Incoming Call................................. 40
Putting the Call on Hold........................................ 40
Answering with the Message of Answering Memo
..............................................................................40
Returning a Call (Outgoing History/Incoming
History) ..................................................................40
Turning On Manner Mode .....................................41
Turning On the Answering Memo..........................41
Playing a Message in Answering Memo................42
Adding an Address Book Entry .............................43
Using an Address Book.........................................44
Viewing the Address Book Details Screen............44
Using Phone Number............................................45
Using Mail Address ...............................................45
Using E-mail/C-mail...............................................46
Sending E-mail Messages.....................................46
Sending C-mail Messages ....................................47
Receiving E-mail/C-mail Messages.......................49
Reading Received E-mail/C-mail Messages .........49
Setting Mail Filters.................................................52
Rejecting Spam C-mail Messages ........................55
Setting Account for PC-mail ..................................55
Sending PC-mail Messages ..................................57
Receiving PC-mail Messages................................57
Using Gmail...........................................................57
Sending Gmail.......................................................58
Receiving Gmail ....................................................58
Viewing Sites with Browser ...................................59
Using Bookmarks/History ......................................59
Displaying a Site from Bookmarks/History ............59
Bookmarking a Web Page ....................................60
Contents
Introduction
Getting Ready
Learning the Basics
Phone
Address Book
Mail
Internet
KUUJAWGDQQMࡍࠫ㧞㧜㧝㧝ᐕ㧝㧞㧝ᣣޓᧁᦐᣣޓඦᓟ㧡ᤨ㧝㧥ಽ

7
Contents
Using the Camera................................................. 61
Cautions for Using the Camera ............................ 61
Taking Photos....................................................... 62
Recording Movies ................................................. 64
Using Gallery ........................................................ 65
Using Contents Manager ...................................... 65
Displaying/Playing Data ....................................... 65
Using Menu in the Contents Screen..................... 66
Cautions for Using 1Seg....................................... 67
TV antenna ........................................................... 67
Initial Setup of 1Seg.............................................. 67
Watching 1Seg ..................................................... 68
Using au Disaster Countermeasure Application ... 70
Using Android Market ........................................... 72
Using au one Market............................................. 72
Using GREE Market ............................................. 72
Using Anshin Security Pack.................................. 72
Anshin Security Pack............................................ 72
Using 3LM Security .............................................. 73
Using Remote Support ......................................... 73
Using VirusBuster™ mobile for au........................ 74
Managing Applications.......................................... 74
Checking Your Profile ........................................... 75
Changing the Incoming Ring Tone ....................... 75
Changing the Wallpaper ....................................... 75
Initializing microSD Memory Card ........................ 76
Using Global Passport CDMA ...............................77
For Overseas Use without Anxiety ........................77
Configuring the Overseas Settings .......................77
Making a Call at Your Travel Destination ..............78
Receiving a Call at Your Travel Destination ..........79
Troubleshooting.....................................................80
Index......................................................................82
Multimedia
1Seg
Applications
Settings of IS14SH
Global Function
Appendix/Index
KUUJAWGDQQMࡍࠫ㧞㧜㧝㧝ᐕ㧝㧞㧝ᣣޓᧁᦐᣣޓඦᓟ㧡ᤨ㧝㧥ಽ
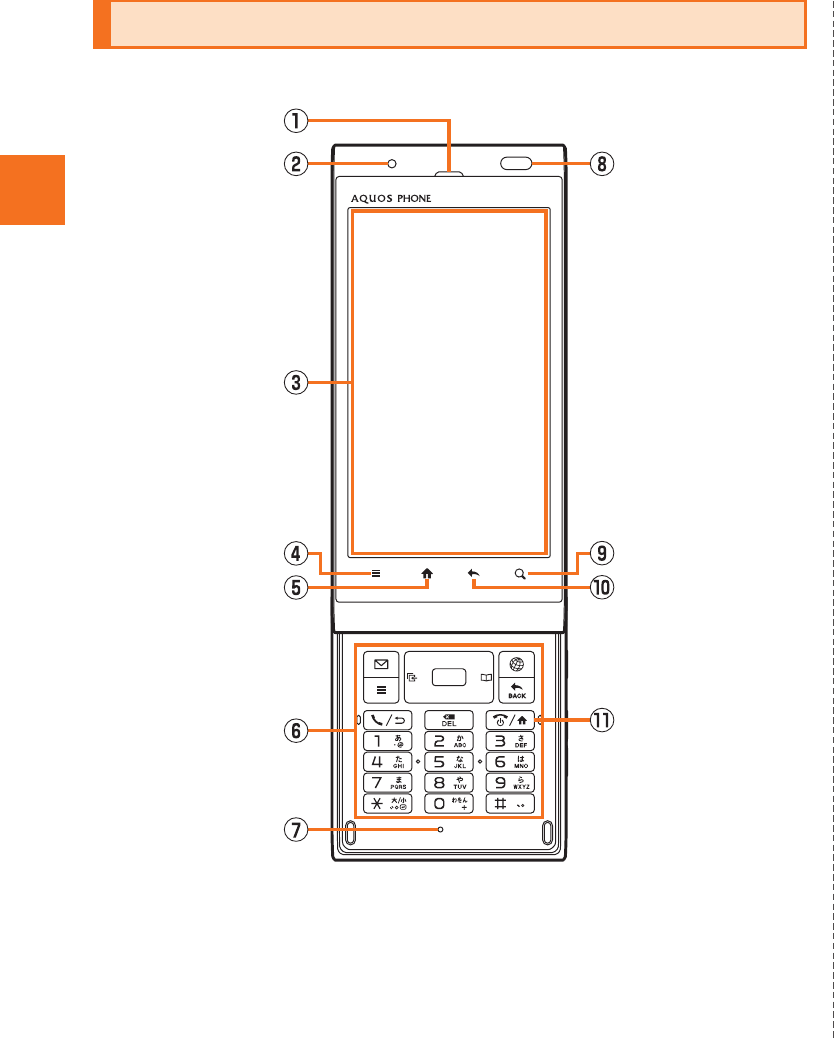
8
Getting Ready
■Front
AEarpiece (Receiver)
Emits voice of other party during a call, messages in Answering
memo, etc.
BCharging/Incoming indicator
Illuminates in red while charging.
Flashes according to the settings when receiving a call or mail
message.
CDisplay
De Menu key
Displays the option menu.
E# Home key
Use it to display the home screen etc.
FHardware keyboard
GMouthpiece (Microphone)
Transmits your voice to the other party during a call. It is also used
for recording sounds. Take care not to cover the microphone with
your fingers etc.
HProximity sensor/Light sensor
Proximity sensor prevents operating the touch panel incorrectly
during a call.
Light sensor detects the ambient brightness and adjusts the
brightness of display.
Im Search key
Use it to display the Quick Search Box etc.
J^ Return key
Returns to the previous page.
KK Power key
Turns on/off the power.
Names and Functions of Parts
KUUJAWGDQQMࡍࠫ㧞㧜㧝㧝ᐕ㧝㧞㧝ᣣޓᧁᦐᣣޓඦᓟ㧡ᤨ㧝㧥ಽ

9
Getting Ready
■Left Side/Right Side
LExternal connection jack cover
MExternal connection jack
Use it to connect the IS14SH to the common AC adapter 03 (sold
separately), the microUSB cable 01 (sold separately), SHARP
microUSB-18-pin (charger) conversion cable 01 (sold separately),
the microUSB stereo earphone conversion adapter 01 (sold
separately), etc.
NStrap eyelet
Of Lock key
Use it to move/disable sleep mode, and turn off the power.
Pud Volume up/down key
Adjusts the volume.
Hold u down on the unlock screen to turn on the mobile light.
Hold d down on the unlock screen to enable/disable Manner
mode.
■Back
QTV antenna
Extend and use it to watch 1Seg. It has no influence on calls or
data communication if you extend the TV antenna when calling or
using browser.
RCamera lens
SInfrared port
Sends and receives data via infrared communication.
KUUJAWGDQQMࡍࠫ㧞㧜㧝㧝ᐕ㧝㧞㧝ᣣޓᧁᦐᣣޓඦᓟ㧡ᤨ㧝㧥ಽ

10
Getting Ready
TFeliCa mark
Hold it over a reader/writer when using Osaifu-Keitai®.
Sends and receives data via IC communication.
UBattery pack cover
VInternal antennas
Do not cover the internal antennas area with your hand when you
call, use the Internet, Wi-Fi® or Bluetooth® function or retrieve GPS
information (only the upper part on the back of the cell phone is
responsible for Wi-Fi®, Bluetooth® and GPS functions). Also, do not
paste stickers around the internal antennas area. Otherwise, the
quality of calls/communications will deteriorate.
WMobile light
Flashes in red while activating Camera.
XSpeaker
Emits ring tones, alarm tones, etc.
■Back (Inside the Battery Pack Cover)
YReset button
If operations become unstable or unavailable, press the reset
button with a pointed end of an object for at least two seconds to
restart the IS14SH. Restarting with the reset button does not delete
any saved data or application.
ZTray
Use it when inserting an au IC-card.
amicroSD memory card slot
bBattery pack
KUUJAWGDQQMࡍࠫ㧞㧜㧝㧝ᐕ㧝㧞㧝ᣣޓᧁᦐᣣޓඦᓟ㧡ᤨ㧝㧥ಽ

11
Getting Ready
Slide the display part of the IS14SH to the direction of the arrow to
open it.
When removing the battery pack, turn off the IS14SH.
ARemove the battery pack cover on the back of the
IS14SH.
Hook a fingertip (nail) on the concave portion with the center of the
battery pack cover pressed (A), and then remove the battery pack
cover by pulling up in the direction of the arrow (B).
BRemove the battery pack.
Remove the battery pack by pulling up on the PULL tab in the direction
of the arrow.
Opening the IS14SH
•Note that touching the display/e/#/^/m may be recognized as an
operation when you open or close the IS14SH while the backlight
illuminates.
Removing/Attaching the Battery Pack
Removing the Battery Pack
•When removing the battery pack cover, do not warp it too much.
•When removing the battery pack, always pull up on the PULL tab.
Or use the protruding edge of the battery pack. Doing otherwise may result
in damage to the IS14SH or the battery contacts.
Concave portion
PULL tab
Protruding edge
Battery pack
KUUJAWGDQQMࡍࠫ㧞㧜㧝㧝ᐕ㧝㧞㧝ᣣޓᧁᦐᣣޓඦᓟ㧡ᤨ㧝㧥ಽ
12
Getting Ready
Use the specified battery pack for the IS14SH and attach it properly.
AAfter making sure that the PULL tab is closely
attached to the battery pack, align the contacts on the
battery pack with those of the IS14SH and then insert
the battery pack securely.
BAfter attaching the battery pack cover, press the
battery pack cover securely, and make sure that it is
closed properly.
An au IC-Card records your personal information
such as phone numbers.
Turn off the power and remove the battery pack before removing the
au IC-Card.
APull the tab of the tray straight out and remove the au
IC-Card.
BAttach the battery pack and battery pack cover.
Attaching the Battery Pack
•Before attaching the battery pack, make sure that the au IC-Card is inserted
properly.
•Failure to follow the correct procedure when attaching the battery pack may
result in damage to the battery pack or the battery pack cover.
PULL tab
Contacts on IS14SH
Using au IC-Card
au IC-Card
•Confirm the correct direction when you insert the au IC-Card.
•Note that inserting or removing the au IC-Card forcibly may result in
malfunction or damage.
•Make sure to unplug microUSB plugs such as AC adapter 03 (sold
separately) from the IS14SH when inserting or removing the au IC-Card.
Removing au IC-Card
au IC-Card
IC (metal
surface) part
Tab
KUUJAWGDQQMࡍࠫ㧞㧜㧝㧝ᐕ㧝㧞㧝ᣣޓᧁᦐᣣޓඦᓟ㧡ᤨ㧝㧥ಽ
13
Getting Ready
Turn off the power and remove the battery pack before inserting the
au IC-Card.
APull the tab of the tray straight out.
BPlace the au IC-Card on the tray with the IC (metal
surface) side up and insert it securely.
Insert the au IC-Card according to the orientation of its cutout.
CAttach the battery pack and battery pack cover.
You can set microSD memory card (including microSDHC memory
card) to the IS14SH, and save data. And also you can save address
book, mail messages, bookmarks, etc. in microSD memory card.
■Handling Precautions
•Do not remove the microSD memory card or the battery pack and do
not turn off the IS14SH and other equipments while reading, writing,
playing, saving or moving/copying data. It may result in damage to
data in the IS14SH or microSD memory card or data loss.
•Do not drop or subject the IS14SH to vibration or impact with a
microSD memory card inserted. It may result in damage to recorded
data or data loss.
•Do not insert objects other than microSD memory card such as
liquid, metals or flammable items into the microSD memory card
slot. It may result in a fire, electric shock or malfunction.
•Do not apply excessive force to open or close the guide of the
microSD memory card slot.
Inserting au IC-Card
•Inserting the tray not deeply enough may prevent the IS14SH from
functioning properly.
•When the tray comes off, insert the tray straightly.
Cutout
Using microSD Memory Card
microSD Memory Card
•The maximum file size available on a microSD memory card is 2 GB per file
when saving data to microSD memory card.
•A microSD memory card initialized on other devices may not be used on the
IS14SH properly. On the home screen, tap [Settings [microSD &
phone storage [Unmount microSD [OK [Erase microSD [Erase microSD
[Enter Lock No. [OK [Erase everything to initialize the microSD
memory card.
•For operations to play/display data in the microSD memory card, on the
home screen, tap [Contents Manager to use Contents Manager.
•Some files such as copyright protected data may not be played on the
IS14SH even if they are moved/copied from the PC etc. to a microSD
memory card successfully.
KUUJAWGDQQMࡍࠫ㧞㧜㧝㧝ᐕ㧝㧞㧝ᣣޓᧁᦐᣣޓඦᓟ㧡ᤨ㧝㧥ಽ

14
Getting Ready
•The following microSD memory cards have been confirmed for
operation based on the criteria by au. For operation confirmation
results of other microSD memory cards, contact each microSD
memory card manufacturer.
<microSD/microSDHC Memory Card>
○: Confirmed operation
−: Unconfirmed operation or not for sale
As of November 2011
* 4 GB or more are for microSDHC memory card.
* Operation is confirmed for microSD memory cards that are sold as of November 2011. For
the latest information on operation confirmation, visit the au homepage or contact the
Customer Service Center.
Turn off the power and remove the battery pack cover before
removing the microSD memory card.
AUnlock the guide of the microSD memory card slot.
BRaise the guide of the microSD memory card slot and
remove slowly the microSD memory card straight.
CPut back slowly the guide of the microSD memory
card slot and lock it.
Manufacturer 2 GB 4 GB 8 GB 16 GB 32 GB
Toshiba ○ ○ ○ ○ ○
Panasonic ○ ○ ○ ○ ○
SanDisk ○ ○ ○ ○ ○
ADTEC ○ ○ ○ ○ −
Buffalo ○ ○ ○ ○ ○
Sony ○ ○ ○ − −
Removing microSD Memory Card
Guide
KUUJAWGDQQMࡍࠫ㧞㧜㧝㧝ᐕ㧝㧞㧝ᣣޓᧁᦐᣣޓඦᓟ㧡ᤨ㧝㧥ಽ

15
Getting Ready
DAttach the battery pack cover.
Turn off the power and remove the battery pack cover before inserting
the microSD memory card.
•Follow the steps below to insert a microSD memory card. If you
insert it forcefully, the terminal at the back of it may be damaged and
the IS14SH may not recognize the microSD memory card.
AUnlock the guide of the microSD memory card slot.
BRaise the guide of the microSD memory card slot for
approximately 90 degrees, confirm the direction of
the terminal side of the microSD memory card and
insert it slowly.
CSlide the guide of the microSD memory card slot until
you can see the terminal at the back of it.
•Do not touch the terminal part of microSD memory card.
•Do not remove the microSD memory card forcefully. It may result in damage
to the microSD memory card or the IS14SH or data loss.
•Application installed to microSD memory card cannot be used once you
removed microSD memory card.
•The microSD memory card may be warm after a long time use. It is normal.
Inserting microSD Memory Card Guide
With the terminal
at the back in sight.
Terminal
side
KUUJAWGDQQMࡍࠫ㧞㧜㧝㧝ᐕ㧝㧞㧝ᣣޓᧁᦐᣣޓඦᓟ㧡ᤨ㧝㧥ಽ
16
Getting Ready
DPut back slowly the guide of the microSD memory
card slot and lock it.
EAttach the battery pack cover.
The battery pack is not fully charged at the time of purchase. Charge
the battery pack when you use the IS14SH for the first time or the
battery level becomes low. Charging is finished when the red
charging/incoming indicator goes out.
The usage times are as follows.
* These times are based on the case when the IS14SH is used in Japan.
•Insert a microSD memory card with the right side up in the appropriate
direction.
Inserting a microSD memory card forcefully into the slot could result in
failure to remove the microSD memory card or damage to the microSD
memory card or the IS14SH.
•Do not insert the microSD memory card too deeply when attaching it.
Charging the Battery Pack
Continuous stand-by
time
Approx. 310 hours (while Wi-Fi® is not
used)
Approx. 160 hours (while Wi-Fi® is used)
Continuous talk time Approx. 400 min
•The IS14SH and battery pack may become warm during charging but this is
not a malfunction.
•Charging the IS14SH while using the camera function etc. may lengthen the
charging time.
•If you perform various operations with a specified charger (sold separately)
connected to the IS14SH, charging/battery level consumptions may take
place in a short time. Frequently charging the battery pack shortens its
service life.
•If the charging/incoming indicator of the IS14SH flashes in red, check
whether the battery pack is properly attached, an external device is
properly connected to the cell phone, etc. If the cell phone flashes even
after you have checked that, stop recharging the cell phone and please
contact an au shop or Customer Service Center.
•Properly close the external connection jack cover. Also, do not pull it
forcibly or twist it.
•Each of the continuous talk time and continuous stand-by time is an
average usage time combining the time during which a cell phone is carried
around by a user and properly receives radio waves plus the time during
which a cell phone is stationary and properly receives radio waves.
According to usage conditions such as battery level status and
temperature, the signal strength in a place where the cell phone is used,
settings of functions, etc., the usage times may be reduced to less than half
under the following cases.
•A cell phone is frequently used in a place where (out of service area
indicator) appears on it.
•The Wi-Fi® function, Bluetooth® function, mail function, camera function,
1Seg function, location information, etc. is used.
•A cell phone is set not to enable the sleep mode because of an
application etc.
•Applications which remain activated in the background are used.
•If you stop charging while the charging/incoming indicator still illuminates
during charging, the cell phone may be left not fully charged even if
appears on it. In such case, the average usage times shorten.
KUUJAWGDQQMࡍࠫ㧞㧜㧝㧝ᐕ㧝㧞㧝ᣣޓᧁᦐᣣޓඦᓟ㧡ᤨ㧝㧥ಽ

17
Getting Ready
■Charging the Battery Pack with the Specified AC
Adapter (sold separately)/DC Adapter (sold
separately)
The followings are the explanation of how to connect the common AC
adapter 03 (sold separately)/the common DC adapter 03 (sold
separately) to charge.
Charging time is as shown below.
AOpen the external connection jack cover of the
IS14SH.
BInsert the microUSB plug of the common AC adapter
03 (sold separately)/the common DC adapter 03 (sold
separately) to the external connection jack of the
IS14SH.
CPlug the common AC adapter 03 (sold separately)
power plug into a 100 V AC power outlet/Plug the
common DC adapter 03 (sold separately) plug into a
cigarette lighter socket.
Charging/incoming indicator illuminates in red, and the battery icon
appears with superimposed. When charging is finished, the
charging/incoming indicator goes out.
DWhen charging is finished, pull the microUSB plug of
the common AC adapter 03 (sold separately)/common
DC adapter 03 (sold separately) straight out from the
external connection jack of the IS14SH.
EClose the external connection jack cover of the
IS14SH.
Specified AC adapter
(sold separately)
Approx. 150 min
Specified DC adapter
(sold separately)
Approx. 210 min
External
connection jack
Common AC adapter 03 (sold separately)/
Common DC adapter 03 (sold separately)
Check the
orientation
Common DC
adapter 03
(sold separately)
Common AC
adapter 03
(sold separately)
KUUJAWGDQQMࡍࠫ㧞㧜㧝㧝ᐕ㧝㧞㧝ᣣޓᧁᦐᣣޓඦᓟ㧡ᤨ㧝㧥ಽ

18
Getting Ready
FUnplug the common AC adapter 03 (sold separately)
power plug from the power outlet/Unplug the
common DC adapter 03 (sold separately) plug from
the cigarette lighter socket.
■Charging with a PC
When you connect the IS14SH to a USB port of a PC through which
the IS14SH can be charged, the charging/incoming indicator
illuminates in red and charging starts. When charging is finished, the
charging/incoming indicator goes out.
AHold down K for at least two seconds.
AHold down K for at least two seconds.
Alternatively, hold down f for at least two seconds.
BPower off [OK.
Turn off the IS14SH once and restart.
AHold down K for at least two seconds.
Alternatively, hold down f for at least two seconds.
BReboot [OK.
If you press f or no operation is made for a while, the screen is
turned off temporarily, and then sleep mode is set.
■Disabling Sleep Mode
■When the IS14SH is closed
Af while sleep mode is set.
Alternatively, open the IS14SH while sleep mode is set to disable sleep
mode.
■When the IS14SH is opened
APress any key (other than e, #, ^ and m) while
sleep mode is set.
•Although you can charge the IS14SH while the power is turned on, charging
time lengthens.
•If you charge the IS14SH when the battery has run out, the charging/
incoming indicator may not illuminate soon. However, charging is in
progress.
•If you use the microUSB cable to charge the IS14SH, it may take the IS14SH
longer to be fully charged than if you use the specified AC adapter (sold
separately).
Turning the Power On/Off
Turning the Power On
•The initial setting of the touch panel is executed while the logo
Android™ au with Google™ is displayed after the power is turned on. Do not
touch the screen, otherwise touch panel operations may not be performed
properly.
Turning the Power Off
Restarting the IS14SH
Sleep Mode
•In some applications in use, the screen which was displayed before sleep
mode is set may be displayed when sleep mode is disabled.
KUUJAWGDQQMࡍࠫ㧞㧜㧝㧝ᐕ㧝㧞㧝ᣣޓᧁᦐᣣޓඦᓟ㧡ᤨ㧝㧥ಽ

19
Getting Ready
The unlock screen is displayed when you disable sleep mode while
the IS14SH is closed.
Slide to or open the IS14SH to unlock.
Icons and their number appear on the unlock screen when a call is
missed, a new mail is received or Answering memo is recorded. Slide
an icon upward to unlock the screen and activate the corresponding
application.
You can switch the display language for function names and other
items to English.
AOn the home screen, .
B (Settings).
C (Language & keyboard).
D (Select language).
EEnglish.
After you purchase the IS14SH, the initial setup screen is displayed
automatically when turning on the power or inserting another’s au
IC-Card.
For detailed operations on the initial setup, refer to the Setting Guide
(Japanese).
ASet Date & time [Next.
BSet Location [Next.
CSet Vivid display mode [Next.
DSet Other.
Set Wi-Fi settings, au one-ID setting, Lost device protection Settings, Google
account, Text font or Profile settings.
ENext [Done.
•Do not touch the screen when you disable sleep mode. Otherwise touch
panel operations may not be performed properly.
Unlock Screen
《Unlock screen (When a call is missed,
a new mail is received,
Answering memo is recorded)》
Switching the Display Language to English
Initial Setup
設定
言語とキーボード
言語(Language)を選択
KUUJAWGDQQMࡍࠫ㧞㧜㧝㧝ᐕ㧝㧞㧝ᣣޓᧁᦐᣣޓඦᓟ㧡ᤨ㧝㧥ಽ

20
Getting Ready
FYes/No.
If you tap No, the initial setup screen is not displayed from the next
startup.
If you set up a Google account, you can use online services provided
by Google.
When you activate an application which requires a Google account
before setting one up, the Google account adding screen is
displayed.
AOn the Google account adding screen, Next.
BCreate/Sign in.
If you have already had a Google account, tap Sign in, enter the user
name and password and tap Sign in.
If you have not had a Google account, tap Create and follow the
on-screen instructions to register one.
AOn the home screen, [au one-ID setting.
Alternatively, on the home screen, tap [Settings
[au one-ID Setting.
BOK.
The authentication starts.
Cau one-ID (Set/Save au one-ID).
Tap au one-ID (What is au one-ID?) to activate the browser and
and display the explanation of au one-ID.
DFollow the instructions of the screen and set an au
one-ID.
If you have already acquired an au one-ID, set the au one-ID you have.
If you have not acquired an au one-ID, register a new ID.
•Alternatively, on the home screen, tap [Settings [Default settings to
set up.
Setting Up a Google Account
Setting an au one-ID
の設定・保存
とは?
KUUJAWGDQQMࡍࠫ㧞㧜㧝㧝ᐕ㧝㧞㧝ᣣޓᧁᦐᣣޓඦᓟ㧡ᤨ㧝㧥ಽ

21
Learning the Basics
The display of the IS14SH is a touch panel. You can operate the
IS14SH by directly touching the screen.
■Tap/Double-Tap
Tap: Gently touch a screen and then immediately release your finger.
Double-tap: Tap quickly twice on the same position.
•Select an item or icon displayed on the screen. Double-tap to
enlarge/reduce the screen.
■Long-Touch
Keep touching an item, key, etc.
•Display context menu etc.
■Slide
Gently touch a screen and then trace it to the desired direction.
•Scroll screen or switch pages. In addition, operate gauge and bar
when adjusting volume and brightness.
■Flick
Touch a screen and then quickly flick your finger up, down, left or
right.
•Switch pages, enter characters by flick input, etc.
Operating the Touch Panel
KUUJAWGDQQMࡍࠫ㧞㧜㧝㧝ᐕ㧝㧞㧝ᣣޓᧁᦐᣣޓඦᓟ㧡ᤨ㧝㧥ಽ

22
Learning the Basics
■Pinch
Touch a screen with two of your fingers and then move them apart or
closer together.
•Enlarge/Reduce the screen.
■Drag
Gently touch a screen and then trace it to the desired position.
•Move an icon on the screen to the desired position.
The home screen consists of multiple desktops, and you can add
shortcuts, widgets and folders on each desktop.
AStatus bar
BShortcuts/Widgets/Folders
CIndicator
Shows the current desktop position.
DList running applications
EQuick Menu
If you move frequently used shortcuts to the Quick Menu, you can
use them, whichever desktop is displayed.
FLauncher display
GDesktop
HList of desktops/launchers
Using the Home Screen
Viewing the Home Screen
《Home screen》
KUUJAWGDQQMࡍࠫ㧞㧜㧝㧝ᐕ㧝㧞㧝ᣣޓᧁᦐᣣޓඦᓟ㧡ᤨ㧝㧥ಽ
23
Learning the Basics
■Switching Desktops
You can switch desktops by sliding or flicking the home screen to the
left or right.
AOn the home screen, e.
B
•A shortcut/widget/folder cannot be added when the displayed desktop has
no space enough for one.
•Long-touch a shortcut and drag it to a folder to store the shortcut in the
folder.
•Select a folder [Long-touch the folder name at the upper part of the folder
[Enter a folder name [OK to change the folder name.
•While a live wallpaper is set, the battery level is reduced faster than usual.
•A total of five desktops, two for each side, are set by default. Up to ten
desktops, including the five desktops set by default, can be added.
《Switching desktop screens》
Using Menu in the Home Screen
Home settings Add shortcut
Add shortcuts of an application, a
bookmark, etc.
Add widgets
Add widgets.
Add folders
Add folders.
Wallpapers
Set a wallpaper of when the IS14SH is
opened or closed.
Add contact info
Create shortcuts of any contact and make
voice calls, create mails, etc from the
home screen.
Add sheet
Add desktops.
Delete sheet
Delete the displayed desktop.
Delete all invalid icon
Delete all icons ( ) which cannot be
activated.
Switch home
Switch home applications to use.
Wallpapers Wallpaper(Standby home screen)
Set a wallpaper of when the IS14SH is
opened.
Wallpaper(Home screen)
Set a wallpaper of when the IS14SH is
closed.
Wallpaper(Common)
Set a common wallpaper of when the
IS14SH is opened or closed.
KUUJAWGDQQMࡍࠫ㧞㧜㧝㧝ᐕ㧝㧞㧝ᣣޓᧁᦐᣣޓඦᓟ㧡ᤨ㧝㧥ಽ
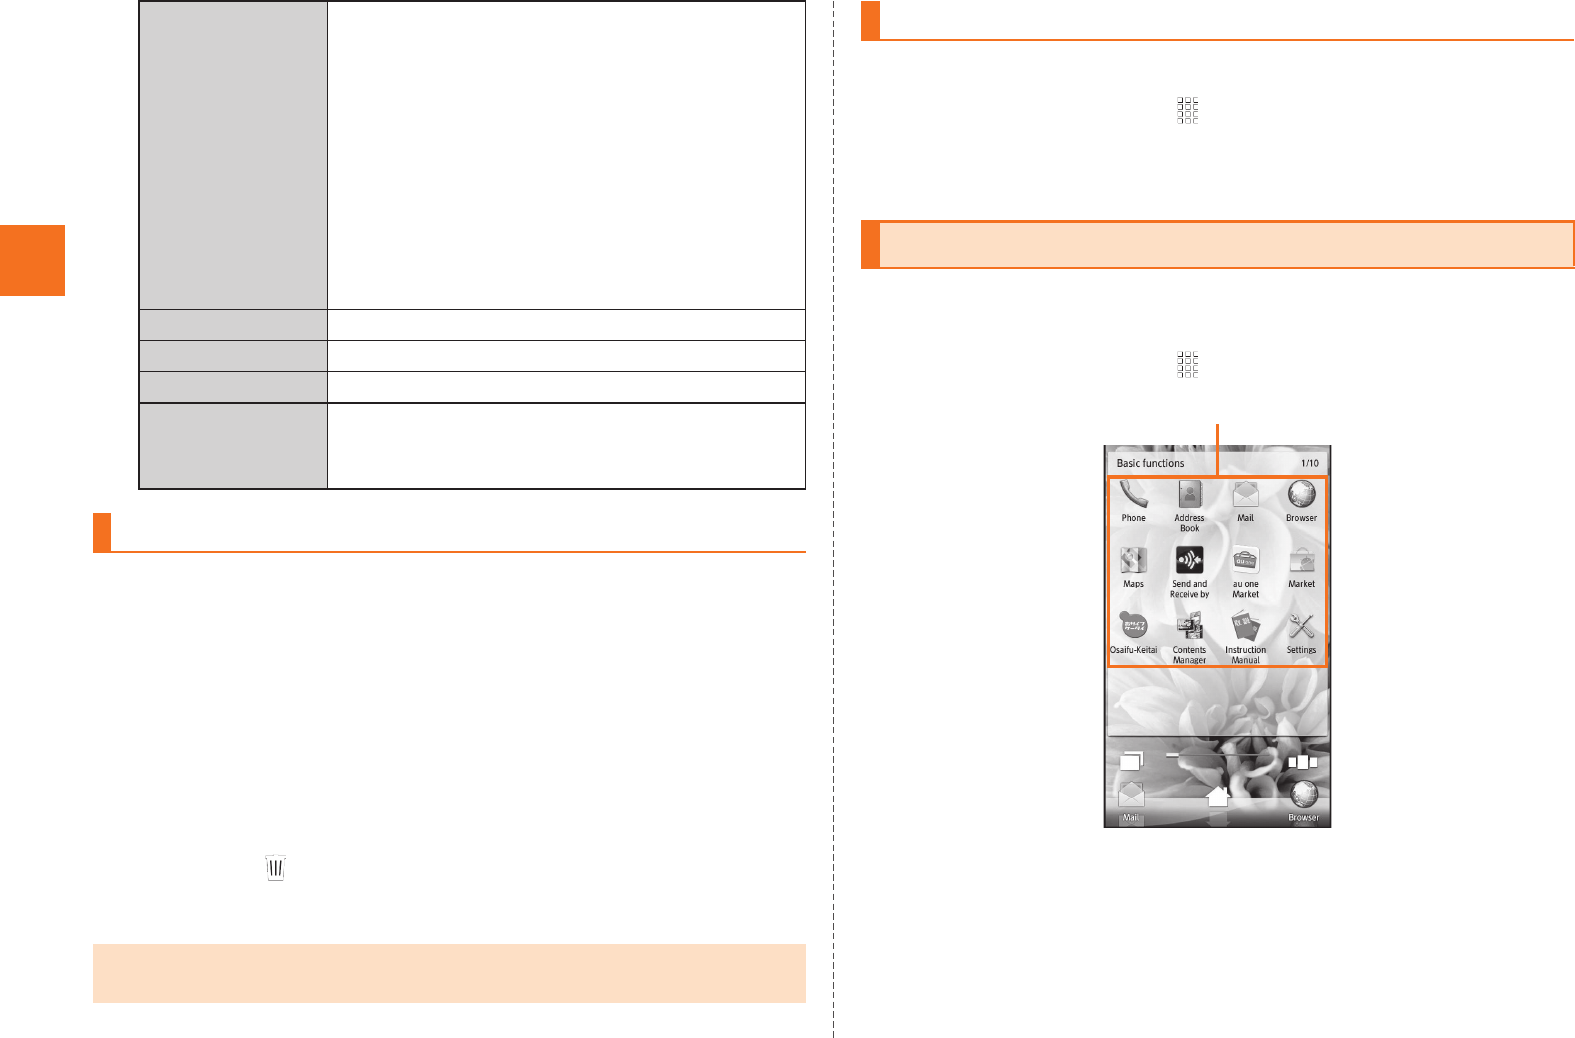
24
Learning the Basics
AOn the home screen, long-touch a shortcut/widget/
folder to move/remove.
■When moving the shortcut/widget/folder
BDrag it to the position to move to and release your
finger.
■When removing the shortcut/widget/folder
BDrag it to at the bottom of the screen and release
your finger.
You can switch home applications to use.
AOn the home screen, [Home Switcher.
BSelect a home application to use.
Installed applications are displayed as icons. You can tap an icon to
activate the application.
AOn the home screen, .
Display settings Theme settings
Set themes of the home screen.
Scroll unit
Set whether to change the number of
desktops/launchers to be scrolled
depending on how strong you slide/flick
the screen.
Indicator setting
Set whether to display the thumbnail when
you tap the indicator of desktops/
launchers.
Settings Perform various settings for the IS14SH.
Search Displays the quick search box screen.
Notifications Displays the notifications and status panel.
Undo Return to the previous screen when you sort
or delete shortcuts/widgets/folders or quick
menus.
Moving/Removing Shortcuts/Widgets/Folders
•You can switch desktops by dragging an icon to the left or right edge of the
desktop.
Switching the Home Screen
Using the Launcher
《Launcher》
Applications
KUUJAWGDQQMࡍࠫ㧞㧜㧝㧝ᐕ㧝㧞㧝ᣣޓᧁᦐᣣޓඦᓟ㧡ᤨ㧝㧥ಽ

25
Learning the Basics
Icon Name of icon Description
Phone Make a call and use outgoing
history/incoming history.
Address Book Manage phone numbers or mail
addresses.
Mail Use e-mail or C-mail.
Browser Browse web sites on the
Internet.
Maps Use Google Maps.
Send and Receive
by Infrared
Send and receive data via
infrared communication.
au one Market Use au one Market.
Market Use Android Market.
Osaifu-Keitai Use Osaifu-Keitai®.
Contents
Manager
Displays and manage data on a
microSD memory card.
*Instruction
Manual
Check the contents written in the
full Instruction Manual
(Japanese). You can search
explanations of a function that
you want to use by using the
table of contents, index and
search engine.
Settings Check settings or information.
Google Search Search for information in the
IS14SH or on web sites.
Voice Search Enter a keyword for Google
search with your voice.
Compass Displays the compass and your
current location on the Google
Maps.
Clock Use world clock, alarm,
stopwatch, and timer.
Pedometer Use pedometer.
Notepad Create memos.
Calculator Use calculator.
Dictionary Search for information in the
built-in dictionary of the IS14SH
or dictionaries on the Internet.
Calendar Save and manage schedules.
Camera Reader Switch Barcode reader,
Business card reader, Kanji/
English grabber, Text reader,
Information reader to use.
Voice Recorder Record a voice.
Documents To
Go
Displays Microsoft Office
documents.
au one-ID Setting Set up an au one-ID.
au Wi-Fi接続ツー
ル (au Wi-Fi
connection tool)
Use Wi-Fi® easily in the spot that
is available for au Wi-Fi SPOT.
*ニュースEX
(News EX)
Check latest news, weather,
fortune-telling, etc.
News & Weather Displays news and weather.
Energy save Switch energy saving modes
and reduce consumption in
battery depending on usage
scenes.
Home Switcher Switch a home application to
use.
Font Manager Change the fonts displayed on
the screen.
Places Search for facilities around your
current location and display
them on the Google Maps.
Navigation Search for routes to the
destination on Google Maps.
Icon Name of icon Description
KUUJAWGDQQMࡍࠫ㧞㧜㧝㧝ᐕ㧝㧞㧝ᣣޓᧁᦐᣣޓඦᓟ㧡ᤨ㧝㧥ಽ
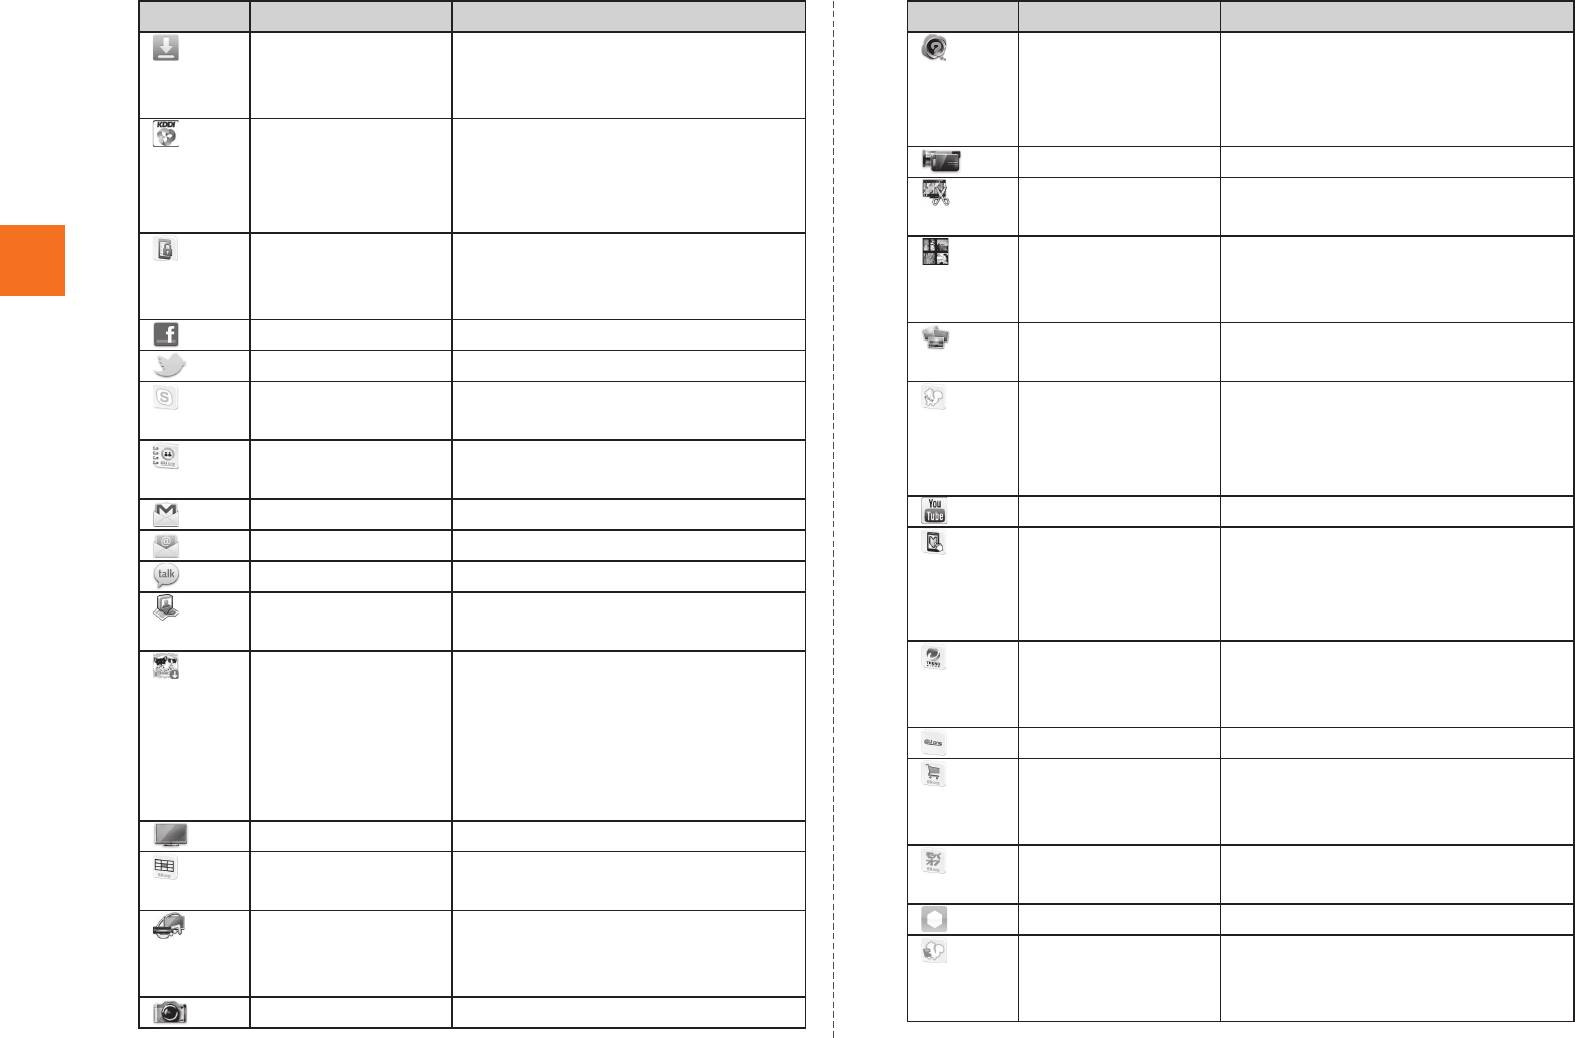
26
Learning the Basics
Download Displays the list of data
downloaded from the browser
and manage them.
3LM Delete data in the IS14SH and
microSD memory card or lock its
operations in case of loss of your
IS14SH.
安心アプリ制限
(Restrict
Applications)
Restrict inappropriate
applications, Wi-Fi
communication, etc. for children.
Facebook Use Facebook.
Twitter Use Twitter.
Skype Make a call or send and receive
messages using Skype™|au.
Friends Note An au one-ID or mail address is
required to use this application.
Gmail Use Gmail.
PC-mail Use PC-mail.
Talk Use Google Talk.
Latitude Google Maps to check the
location of your friends.
*らぶぺ! (Love
pets!)
This is a game in which you can
touch and play with lovely pets.
You can enjoy communications
with your friend’s pets, dressing
up your pets and gathering
items.
One Seg Watch 1Seg.
テレビ.Gガイド
(TV. G-Guide)
Displays
au one テレビ.Gガイ
ド
.
Smart Familink Play data released by DLNA
compatible devices on the
IS14SH using Wi-Fi®.
Camera Take photos (still images).
Icon Name of icon Description
mosimo camera Detects the movement and the
face of the subject and add
effects such as musical notes
and stars.
Video Camera Record movies.
Movie Edit Clip images shot with IS14SH in
the specified range and save.
Picture Sort images and movies by
people, event and location and
use them.
Gallery Displays images and movies as
a list.
LISMO Player Enjoy playing music such as
music downloaded via LISMO
and data imported from music
CDs.
YouTube Use YouTube.
リモートサポート
(Remote Support)
Call for technical supports on the
phone operations by sharing the
screen that you are watching
with au operators.
ウイルスバスター
(VirusBuster)
Blocks improper applications
and sites in order to protect
young people.
au one Displays au one homepage.
ショッピング
(Shopping)
Enjoy shopping on the online
shopping mall directly managed
by KDDI.
オークション
(Auction)
Use the auction site anytime,
anywhere and safely.
GREE_MARKET Use GREE Market.
LISMO Book
Store
Enjoy many e-books such as
comics, novels and photo
albums.
Icon Name of icon Description
KUUJAWGDQQMࡍࠫ㧞㧜㧝㧝ᐕ㧝㧞㧝ᣣޓᧁᦐᣣޓඦᓟ㧡ᤨ㧝㧥ಽ

27
Learning the Basics
maker appli Use various services such as
downloading and viewing
applications.
GALAPAGOS
App for
Smartphone
Purchase and view e-books
such as newspapers, magazines
and books.
au災害対策 (au
Disaster
Countermeasure)
This is an application in which
you can use Disaster Message
Board and Early warning mail
(earthquake early warnings and
disaster/evacuation information).
auお客さまサ
ポート (au
Customer
Support)
Check the subscription contents
or monthly usage of your au
phone etc. easily and it supports
the carefree and secure state of
Android Smartphones
comprehensively.
GLOBAL
PASSPORT PLUS
Check whether the connected
carrier applies to Overseas
Double-Teigaku or confirm the
method of making international
calls and the call fees.
*ファッション通販
(Internet
Shopping Site)
Get the latest items of famous
fashion brands, jackets of the IS
series collaborated with the
brands, and many kind of items
on the internet shopping site.
*Edy|au Pay monthly charge of Edy and
au at the same time.
© bitWallet,Inc.
*Photo Air Backs up your photos that have
been taken with your
Smartphone to your computer
automatically.
© KDDI / Powered by Eye-Fi
Icon Name of icon Description
GREE Use games and contents
provided by au one GREE.
*LISMO WAVE Enjoy FM radio all over Japan,
music clips, and live channel
etc.
*まとめ (Matome) “Check topics and news in five
minutes”
NAVERまとめ (NAVER Matome)
enables you to confirm
interesting informations easily in
the same way as browsing them
when you are moving or waiting.
*動画on! (DOGA
on!)
NHK G-Media動画on! (NHK
G-Media DOGA on!) enables
you to watch latest news and
various categories of NHK
movies such as report, sports,
documentary, education, hobby,
etc.
*Snapeee Edit images shot with a
Smartphone using stamps and
frames and share them with
other people.
*unlimited Use monthly paid music service
that enables you to listen to a
lineup of over 1 million musics.
*きせかえ touch
<ブクブクアワー
.ver> (kisekae
touch <BukuBuku
Hour. ver>)
This is a kisekae service of the
Smartphone version for changing
themes of the home screen with
one of your favorite designs.
Icon Name of icon Description
KUUJAWGDQQMࡍࠫ㧞㧜㧝㧝ᐕ㧝㧞㧝ᣣޓᧁᦐᣣޓඦᓟ㧡ᤨ㧝㧥ಽ
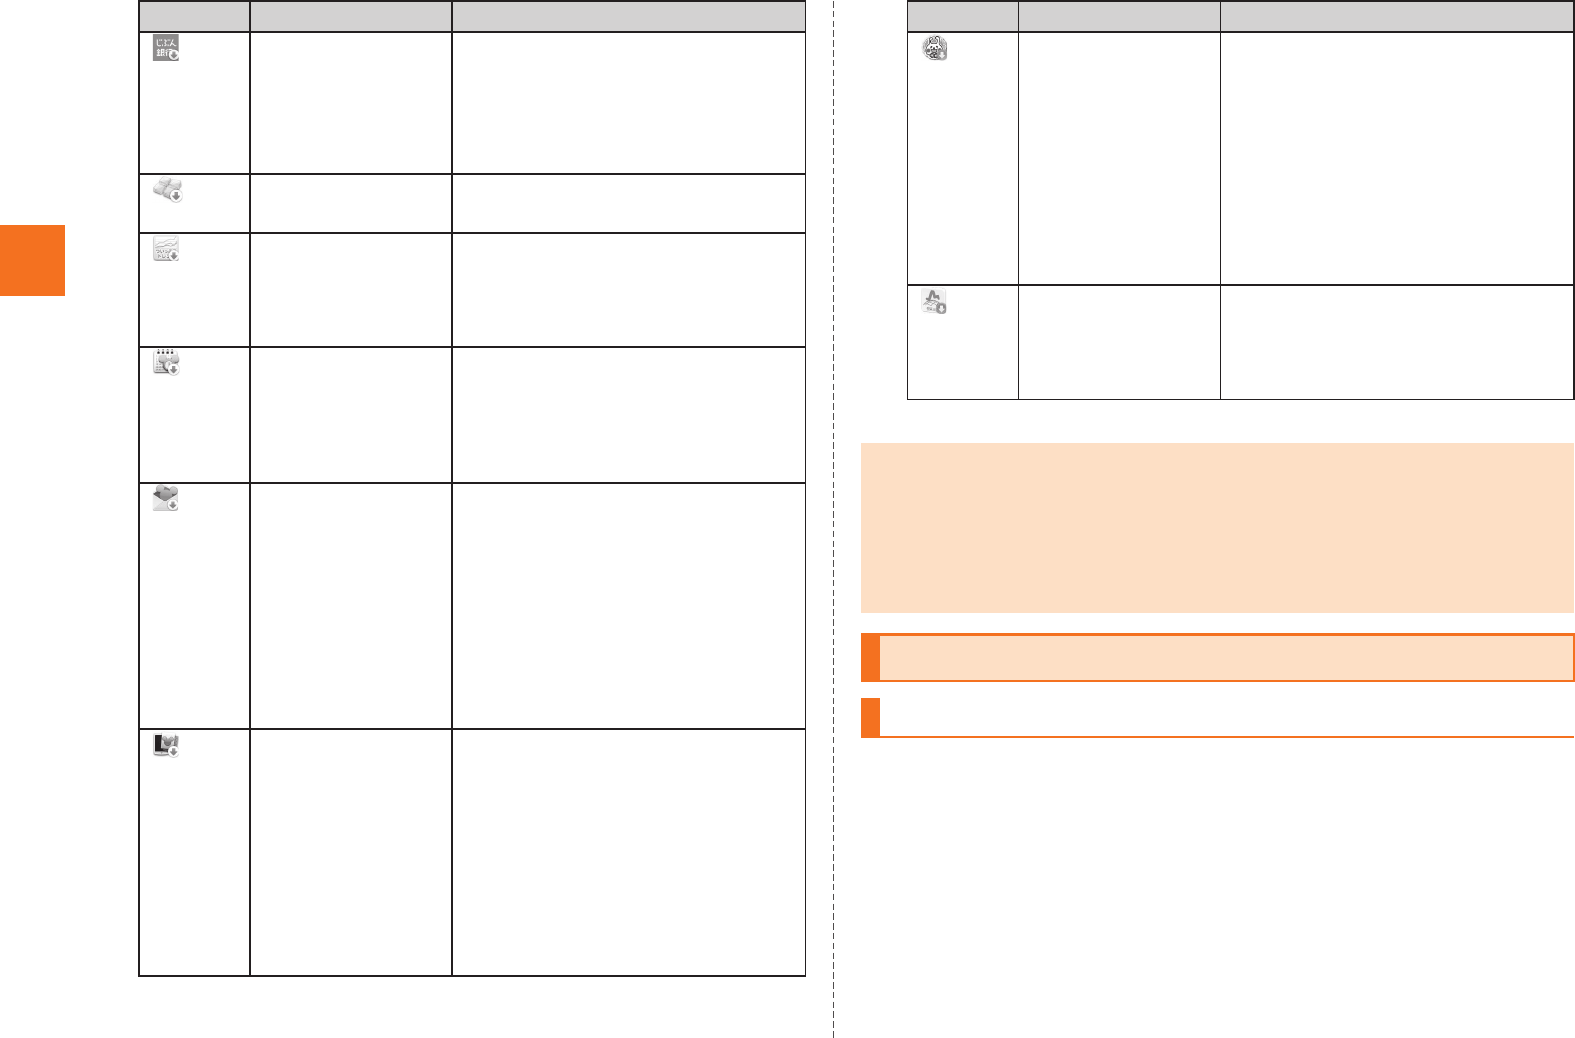
28
Learning the Basics
* Requires download and installation to use.
The notification indicators to notify you of a missed call, a new mail
message or a running operation are displayed on the left side of the
status bar, while the status indicators to show the status of the IS14SH
are on the right side.
*じぶん銀行
(JIBUN BANK)
Check the statement of your
account balance, search for
nearest available ATMs, and so
on through the screen optimized
for Smartphones.
*Sockets LIVE Watch videos about various
news of the world or Japan.
*トレンド(ついっ
ぷるトレンド)
(Trend (twipple
trend))
Displays issues which have
stolen the headlines in Twitter
(words, images, celebrities,
tweets, etc.) in ranking style.
*Disneyカレン
ダー (Disney
calendar)
This is a calendar application
with cute Disney characters.
Additional purchases of calendar
backgrounds are also available.
© Disney
*Disneyメール
(Disney mail)
This is a mail application for
sending decoration mail
massages with cute Disney.
Additional decoration items and
more applications are also
available (315 yen per month for
10 applications ※As of
November, 2011).
© Disney
*Disneyきせかえ
(Disney kisekae)
This is an application for
changing the home screen,
launcher and indicators to
Disney characters.
Additional Kisekae tools and
more applications are also
available (315 yen per month for
10 applications).
© Disney
Icon Name of icon Description
*デコとも★DX
(DecoTomo★DX)
This is an email decoration
application a.k.a. decome
application full of cute emoji
(pictograms) and decorated mail
for your Smartphone☆
You’ll be able to stay up to date
with the latest decome as we’ll
be updating brand new
decorations everyday♪
*ナビウォーク
(Navi Walk)
This is an application for
navigating you to the best suited
routes both for on foot and by
vehicle.
•Long-touch an icon and drag it to “Go App Info” at the bottom of the screen
to display the information of the application.
•Call fees may apply depending on the function of applications.
If you have not subscribed to IS NET, au.NET charges (525 yen including
tax for the used month) and communication charges apply.
•Icon designs may be changed without prior notice.
Using the Status Bar
Indicators
Icon Name of icon Description
KUUJAWGDQQMࡍࠫ㧞㧜㧝㧝ᐕ㧝㧞㧝ᣣޓᧁᦐᣣޓඦᓟ㧡ᤨ㧝㧥ಽ
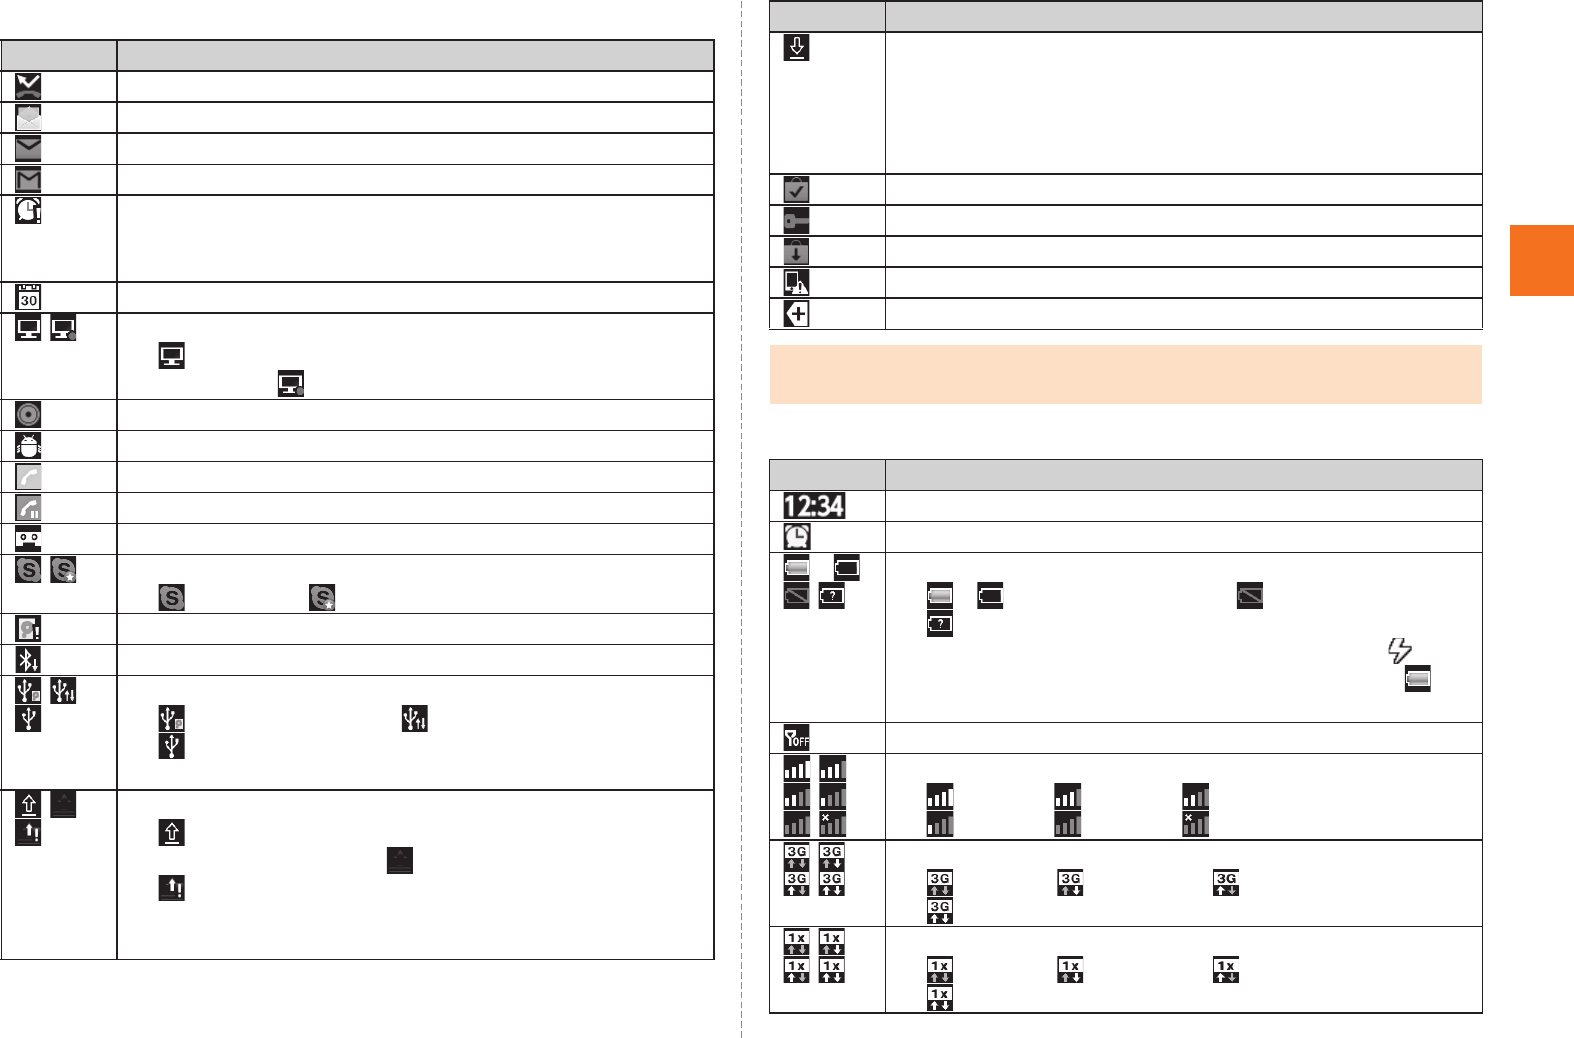
29
Learning the Basics
■Examples of notification indicator
■Examples of status indicator
Indicator Description
Missed call
New mail message (Mail)
New mail message (PC-mail)
New mail message (Gmail)
Alarm terminated
•Appears when the alarm is terminated without the
operation for terminating the alarm.
Schedule notification of the calendar
1Seg information
: Watching information, Recording reservation
information : Recording information
Playing music
USB debug connecting
Dialing, Calling, During an incoming call
Putting a call on hold
Answering memo
Skype™|au status
: Signed in : New event
Space available less than approx. 10 %
Bluetooth® file receiving request
USB connecting
: Card reader mode : Fast transfer mode
: USB connecting (in Card reader mode
connecting)
Data upload, File sending
: Uploading data, Sending file, Finished sending
file, Failed to send file : Finished uploading data
: Waiting to upload data
•The Uploading data indicator and Sending file
indicator are displayed as animations.
Downloading, Finished downloading, Installing data or
application, Receiving, Finished receiving file, Failed to
receive file
•The Downloading indicator and Receiving file indicator
are displayed as animations.
Finished installing
Connected, Unconnected to VPN
Update available
Major Update (OS Update) available
Indicators collected
•When multiple notifications of the same type exist, the number of them is
displayed on the lower right of some indicators.
Indicator Description
Time
Alarm set
~ Battery level
~ : Battery level display : No battery
: Battery level unknown
•While charging, the battery icon appears with
superimposed. The charge indicator other than is
displayed as an animation.
Offline mode set
Signal strength (Receiving electric field)*
: Level 4 : Level 3 : Level 2
: Level 1 : Level 0 : Out of service area
3G data communication status*
: Waiting : Receiving : Sending
: Sending and Receiving
CDMA 1X data communication status*
: Waiting : Receiving : Sending
: Sending and Receiving
Indicator Description
KUUJAWGDQQMࡍࠫ㧞㧜㧝㧝ᐕ㧝㧞㧝ᣣޓᧁᦐᣣޓඦᓟ㧡ᤨ㧝㧥ಽ

30
Learning the Basics
* Displayed in green when you login using your Google account.
In the notification/status panel, you can check the details on
notification indicators and status indicators or activate an application
corresponding to the indicator.
You can also set Manner mode, VeilView, etc.
ATap the status bar.
APower control
You can set Wi-Fi®, Bluetooth®, GPS, auto-sync, and
brightness of screen.
You can save power by switching the settings frequently when
you do not use functions.
BNotification area
You can check the status of the IS14SH and contents of
notifications. You can tap to activate a corresponding
application depending on the information.
CVeilView
You can set VeilView.
In roaming
Character type
: Kanji : Half-width alphabet
: Half-width numeric : Half-width Katakana
: Full-width alphabet : Full-width numeric
: Full-width Katakana : Character code
Manner mode status
: Standard manner mode : Drive manner mode
: Silent manner mode
During a call using hands-free
Microphone set to off during a call
Home Network status
: Suspending (Green): Preparing
(Blue): Running
Wi-Fi® signal strength*
: Level 4 : Level 3 : Level 2
: Level 1 : Level 0
Bluetooth® in use
: Waiting : Connecting
GPS in use
•The GPS information positioning indicator is displayed
as an animation.
Data synchronizing
Answering memo set
: No Answering memo
: Answering memo (one to nine entries)
: Answering memo (ten entries)
Energy saving setting
: Waza-ari mode : Emergency mode
Osaifu-Keitai® function locked
Indicator Description Using Notification/Status Panel
《Notification/Status panel》
KUUJAWGDQQMࡍࠫ㧞㧜㧝㧝ᐕ㧝㧞㧝ᣣޓᧁᦐᣣޓඦᓟ㧡ᤨ㧝㧥ಽ

31
Learning the Basics
DAuto-rotate
You can set the automatic rotation of the display when the
IS14SH is opened/closed.
ETime
Displays the current time. You can tap to set the alarm.
FClear
You can clear all the notifications by tapping the key.
GRunning Apps
Displays the running applications list screen.
HmicroSD Settings
You can set the microSD memory card and phone space.
IManner mode
You can set Manner mode.
JClose bar
You can hide the notification/status panel by tapping the tab.
Portrait and landscape display are switched according to the
orientation of the IS14SH.
Example: When rotating the IS14SH 90 degrees from Portrait
(Landscape) display to the left (right).
Switching Orientation
•Operate the IS14SH in the upright position. The screen display may not be
changed if the IS14SH is laid in parallel to the ground.
•On the home screen, tap [Settings [Display settings [Auto turn when
opened/Auto turn when closed to set whether to switch portrait display and
landscape display.
•In some applications such as Video Camera, the screen display may not be
switched regardless of the orientation or setting of the IS14SH.
《Landscape display》 《Portrait display》
KUUJAWGDQQMࡍࠫ㧞㧜㧝㧝ᐕ㧝㧞㧝ᣣޓᧁᦐᣣޓඦᓟ㧡ᤨ㧝㧥ಽ
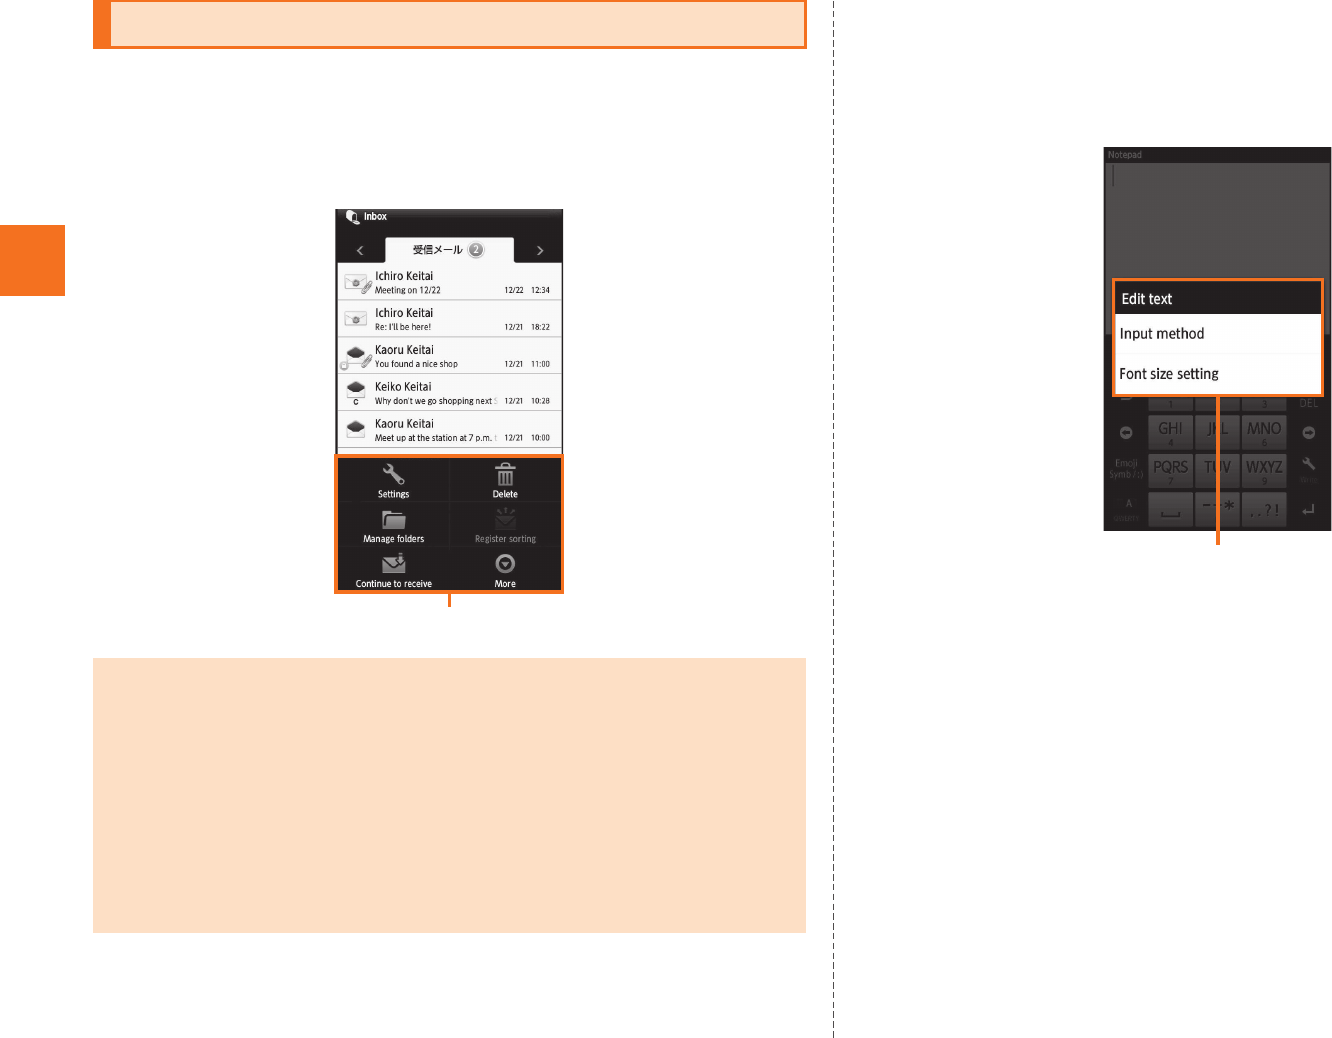
32
Learning the Basics
■Option Menu
The option menu is displayed by tapping e on the screen where the
menu is available.
Example: In the inbox screen
■Context Menu
The context menu is displayed by long-touching an item or a display
where the menu is available.
Example: In the character entry screen (Notepad)
Displaying Available Menu
More
•When the number of available option menus exceeds the number that can
be displayed on the screen as icon, More is displayed. Option menus that
cannot be displayed as icon are collected into More, and tap More to
display them.
•Even on the same screen, the number of items collected into More differs
depending on the setting and condition since the number of option menus
displayed differs depending on the setting and condition.
•In this manual, operation to tap More is not described for tables listing
option menu.
Option menu
Context menu
KUUJAWGDQQMࡍࠫ㧞㧜㧝㧝ᐕ㧝㧞㧝ᣣޓᧁᦐᣣޓඦᓟ㧡ᤨ㧝㧥ಽ
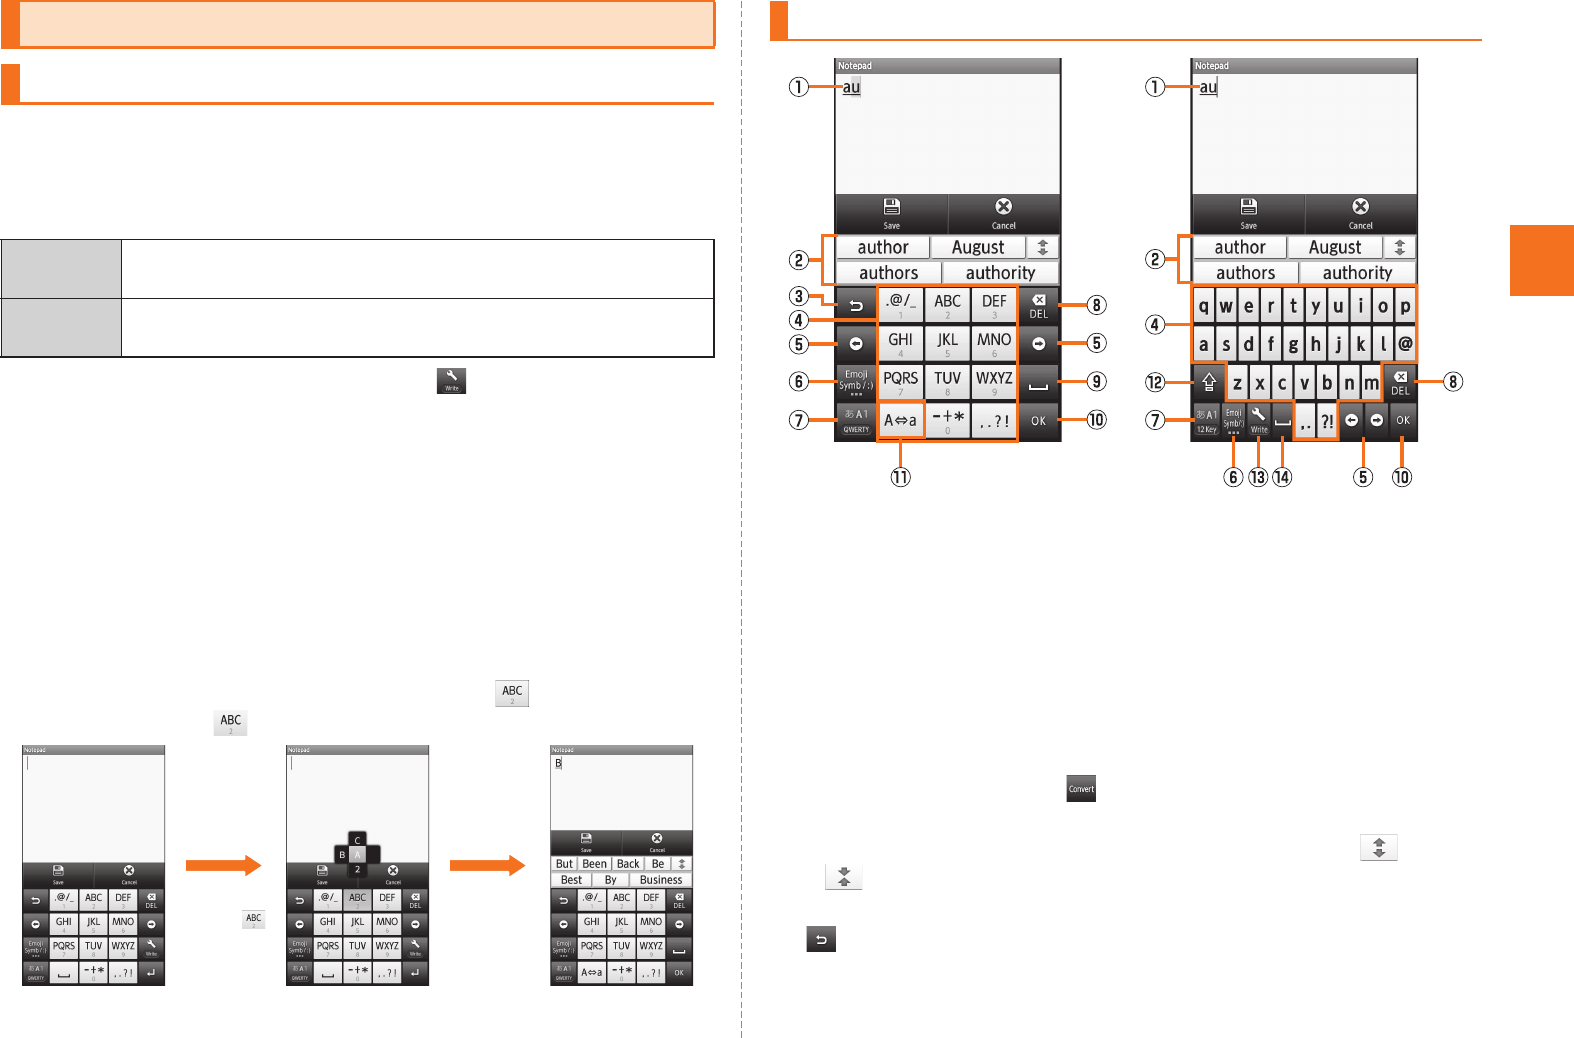
33
Learning the Basics
Tap the character entry field while the IS14SH is closed to display
software keyboard and enter characters by tapping keys on the
screen.
The following software keyboards are available for the IS14SH.
AOn the character entry screen, [Set QWERTY
keyboard[Portrait]/Set 12 keyboard[Portrait] [OK.
■Flick input
When the software keyboard is “12 Key”, you can enter a desired
character by flicking the key up, down, left or right without tapping the
key repeatedly.
By tapping a key, the candidates that can be entered by flick input are
displayed. By flicking the key in the direction of a desired character
being displayed, the character is entered in the character entry area.
For example, you can enter “A” by only tapping , and you can
enter “B” by flicking left.
ACharacter entry area
BPrediction candidates list/Relational prediction candidates list/
Normal conversion candidates list
If the word prediction function is enabled, the prediction
candidates list is displayed when characters are entered. If the
relational prediction function is enabled, the relational prediction
candidates list is displayed when an entry is selected from the
prediction candidates list.
Enter characters and tap to display the normal conversion
candidates list.
•You can enlarge the candidates list area by tapping . Tap
to return it to the original display.
CReverse toggle key/Undo key
: Displays the characters assigned to the same key in the
reverse rotation.
Character Input (Software Keyboard)
Switching Software Keyboards
12Key You can enter a character, changing characters by
repeatedly tapping the character entry key.
QWERTY You can enter a displayed character by tapping the
character entry key. Use romaji for entry.
Keep
touching
Flick left
Viewing the Character Entry Screen
《Character entry screen (12 Key)》 《Character entry screen (QWERTY)》
KUUJAWGDQQMࡍࠫ㧞㧜㧝㧝ᐕ㧝㧞㧝ᣣޓᧁᦐᣣޓඦᓟ㧡ᤨ㧝㧥ಽ
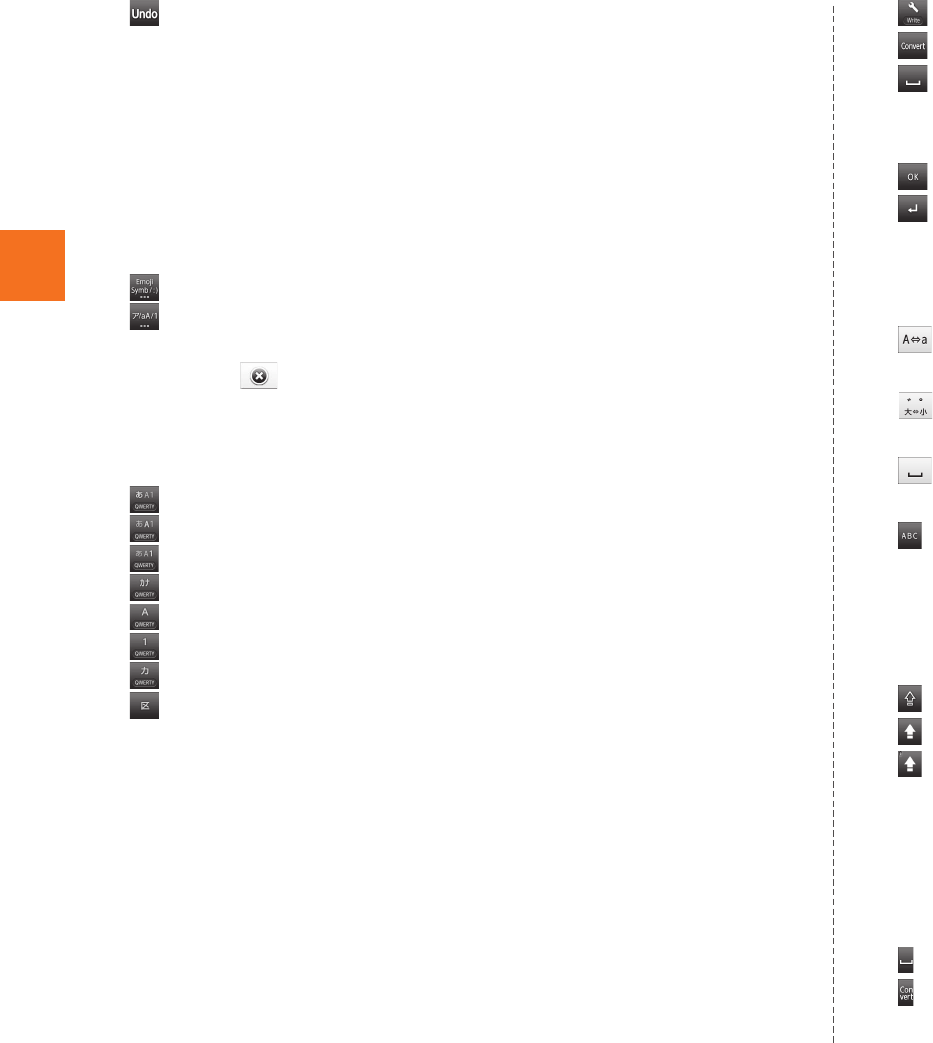
34
Learning the Basics
: You can cancel the last operation such as returning the
determined characters to the undetermined state by tapping
the key.
DSoftware keyboard
You can enter a character assigned to each key.
ECursor key
Moves the cursor to the left and right. Change the range of the
characters for character input and conversion.
FEmoji, Symbol, and Facemark key/Kana, Alphanumeric key
: Displays the emoji/decoration-emoji/symbol/facemark list.
: Displays katakana, alphabet, number and predicted date and
time assigned to the entered key as conversion candidates.
・Tap to return to the previous screen.
GCharacter entry mode key
When you switch the character types, the display changes as
follows.
: Kanji
: Half-width alphabet
: Half-width numeric
: Half-width Katakana
: Full-width alphabet
: Full-width numeric
: Full-width Katakana
: Character code
•Long-touch the character entry mode key to switch the keyboard.
“QWERTY” at the bottom of the character entry mode key is a
keyboard to switch when you long-touch the key. While using the
QWERTY keyboard, “12Key” appears.
HDelete key
Deletes the selected character or the character on the left of the
cursor. When the cursor is at the beginning, the character on the
right of the cursor is deleted.
ISettings key/Conversion key/Space key
: Displays iWnn IME menu.
: Displays the normal conversion candidates list.
: Enters the space.
・Appears in alphabet and katakana entry.
JOK key/Line feed key
: Determines the entering characters.
: Inserts a line feed at the cursor position.
•The display is changed depending on the application or entering
item.
KUppercase/Lowercase characters switch key/Space key
: You can switch the entered alphabet to the uppercase/
lowercase one.
: You can switch the entered character to the uppercase/
lowercase one, add dakuten/handakuten to the character, etc.
: Enters the space.
LAlphabet entry key/Shift key
: Switches the entering characters to the alphabet.
・Appears in kanji entry.
By tapping the shift key, you can switch uppercase characters
entry and lowercase characters entry. The display changes as
follows each time you tap it.
: Lowercase character entry
: Uppercase character entry
: Uppercase character entry lock
You can switch the symbols to enter by tapping the key in numeric
entry.
MSetting key
The iWnn IME menu is displayed.
NSpace key/Conversion key
: Enters space.
: Displays the normal conversion candidates list.
KUUJAWGDQQMࡍࠫ㧞㧜㧝㧝ᐕ㧝㧞㧝ᣣޓᧁᦐᣣޓඦᓟ㧡ᤨ㧝㧥ಽ

35
Learning the Basics
AOn the character entry screen, [Input mode.
BSelect the character type.
AOn the character entry screen, .
Tap when there is no conversion target on the character entry screen.
ACharacter switch tab
Switches the emoji/decoration-emoji/symbol/facemark.
BEmoji/Decoration-emoji/Symbol/Facemark list
Displays the emoji/decoration-emoji/symbol/facemark list
screen for each category.
•Long-touch a facemark to edit it. However, facemarks in
History cannot be edited.
CClose key
Returns to the character entry screen.
DPage switch key
Displays the previous/next categories or pages.
•While the prediction candidates list/relational prediction candidates list/
normal conversion candidates list is not displayed, tap ^ to hide the
keyboard.
Switching Character Entry Modes
•The character type is switched in order of “Half-width alphabet”
[“Half-width numeric” [“Kanji” each time you tap the character entry
mode key.
•Some character modes cannot be used depending on the screen or the
application.
Entering Emoji/Decoration-emoji/Symbol/
Facemark
《Emoji/Decoration-emoji/Symbol/
Facemark list screen》
KUUJAWGDQQMࡍࠫ㧞㧜㧝㧝ᐕ㧝㧞㧝ᣣޓᧁᦐᣣޓඦᓟ㧡ᤨ㧝㧥ಽ

36
Learning the Basics
ECharacter entry mode switch key
: Displays emojis converted automatically when sent to a
cell phone of other carrier.
: Displays normal emojis.
: Displays full-width symbols.
: Displays half-width symbols.
FDelete key
Deletes the selected character or the character on the left of
the cursor. When the cursor is at the beginning, the character
on the right of the cursor is deleted.
BSelect an emoji/a decoration-emoji/symbol/facemark
AOn the character entry screen, [Input method.
Alternatively, long-touch the character entry area [Input method to
switch input software.
BSelect an input software.
ACursor key
Moves the cursor.
j: While entering characters, moves the cursor to prediction
candidates list.
s: While entering characters, changes the range of the
characters.
BLeft guidance key
Selects/Performs the function displayed on the lower left of the
character input screen.
CMenu key
Displays the option menu.
DReverse toggle key
Displays the characters assigned to the same key in the reverse
rotation. You can return the determined characters to the
undetermined state.
ENumber key
0 to 9, /: Switches the character each time you press the
key, and enter the character.
.: Inserts a line feed at the cursor position. For conversion, you
can switch the entered character to the uppercase/
lowercase one, or for entering Hiragana/Katakana, add
dakuten/handakuten to the character.
•There are some lists that cannot be displayed and some emojis/
decoration-emojis/symbols/facemarks that cannot be entered depending
on the screen you operate.
Switching Input Software
•When using an installed application, enable it in Language & keyboard in
advance. Refer to “Using Android Market” to install an application.
Character Input (Hardware Keyboard)
KUUJAWGDQQMࡍࠫ㧞㧜㧝㧝ᐕ㧝㧞㧝ᣣޓᧁᦐᣣޓඦᓟ㧡ᤨ㧝㧥ಽ

37
Learning the Basics
FDetermination key
Determines the entering characters.
GRight guidance key
Selects/Performs the function displayed on the lower right of the
character input screen.
HBack key
Returns to the previous state.
While entering characters, deletes the character on the left of the
cursor. When the cursor is at the beginning, the character on the
right of the cursor is deleted.
IDEL key
Deletes the selected character or the character on the left of the
cursor. When the cursor is at the beginning, the character on the
right of the cursor is deleted.
AOn the character entry screen, hold down C
[Input mode.
BSelect the character type [c.
AOn the character entry screen, A.
The emoji/decoration-emoji/symbol/facemark list screen is displayed.
Press when there is no conversion candidate on the character entry
screen.
The character type is switched in order of Emoji [D-Emoji [Symbol
[Facemark each time you press A.
BSelect an emoji/a decoration-emoji/symbol/facemark
[c.
■Operations on the Emoji/Decoration-emoji/Symbol/
Facemark list screen
C: While displaying the emoji list, switches between the emoji list
converted automatically when sent to a cell phone of other
carrier and the normal emoji list.
While displaying the symbol list, switches between the list of
full-width symbols and half-width symbols.
While displaying the facemark list, edits the facemark to which
the cursor is pointed.
.//: Displays the previous/next category or page.
Switching Character Entry Modes
•Some character modes cannot be used depending on the screen or the
application.
Entering Emoji/Decoration-emoji/Symbol/
Facemark
•There are some lists that cannot be displayed and some emojis/
decoration-emojis/symbols/facemarks that cannot be entered depending
on the screen you operate.
KUUJAWGDQQMࡍࠫ㧞㧜㧝㧝ᐕ㧝㧞㧝ᣣޓᧁᦐᣣޓඦᓟ㧡ᤨ㧝㧥ಽ

38
Phone
AOn the home screen, [Phone.
APhone number entry field
Enter numbers of up to 32-digit.
BNumber key
CAddress book key
Make a call by selecting a contact information from the
address book. Or you can register the entered phone number
to the address book.
DCall key
Make a call. Also, if there is an outgoing history, the latest
outgoing history is entered by tapping when the phone
number has not been entered.
EScreen switching tab
Switches the phone number entry screen/incoming history list
screen/outgoing history list screen.
FDelete key
Deletes a single-digit on the left side of the cursor. If you
long-touch it, all the numbers on the left side of the cursor are
deleted and all the numbers are deleted when there is no
number on the left side of the cursor.
BEnter a phone number.
When calling to a fixed-line phone, enter the phone number starting
with the area code even if you are in the same area.
CCall [Talk.
Press u or d during a call to adjust the other party’s voice.
DEnd call
Making a Call
《Phone number entry screen》
•If you cover the screen while dialing or calling, it may be turned off
depending on the orientation of the IS14SH.
•The call fees when calling with “1401” will be subtracted from the balance
registered by purchasing the au prepaid card.
•Note that even if you cover the mouthpiece, the sound can be conveyed to
the other party.
•Even if, on the home screen, tap [Settings [Wireless & networks
[Mark Offline mode, you can call to the emergency number (110, 119, 118)
and the Customer Service Center (157).
•If you want to return to the calling screen after activating another application
during a call, execute the following operations.
•Tap # to return to the home screen, activate Phone and tap Return to call
in progress.
•Tap the status bar and tap Current call.
KUUJAWGDQQMࡍࠫ㧞㧜㧝㧝ᐕ㧝㧞㧝ᣣޓᧁᦐᣣޓඦᓟ㧡ᤨ㧝㧥ಽ
39
Phone
Available without any additional application from IS14SH.
Example: To call 212-123-XXXX in the USA from IS14SH
AOn the home screen, [Phone.
BEnter the international access code “001010” or
“010”.
Long-touch the “0” to enter “+” and “001010” is automatically added
when calling.
CEnter the country code of America “1”.
DEnter the city code “212”.
If the area code starts with “0”, dial it without including the “0” (There
are some exceptions such as fixed-line phones in some countries or
regions including Italy and Moscow).
EEnter the phone number of the other party “123XXXX”
[Call.
Dial services available from au phones
•The following dial services are available.
•Call with fixed-line phones all over Japan
•Call with cell phones, PHS, and car phones all over Japan
•001 (au international call service: Subscription is unnecessary)
•171 (Disaster emergency message dial)
•177 (Weather forecast: The area code is necessary)
•117 (Time signal)
•104 (Directory assistance)
•115 (Sending telegram)
•110 (Emergency call to Police)*
•119 (Emergency call to Fire and Ambulance)*
•118 (Emergency call to Regional Coast Guard)*
•157 (Customer Service Center)
•Maritime telephone
* The numbers are emergency call numbers. The IS14SH notifies your present location to
the emergency call destination with a signal from a base station when you call to the
agency that received the emergency call.
•The following NTT services are unavailable.
•Collect call
•Message service
•Dial Q2
•116 (NTT business information)
Making an International Call
(au International Call Service)
•The monthly limit fee is set for the au International Call Service. The au
International Call Service is unavailable from when the limit fee is confirmed
to be exceeded until the end of the same month.
•Even if you cannot use the service by exceeding the limit fee, you can use
from the first day of the next month. Also, you can use the domestic call as
usual while the service is stopped.
•The international call fee is charged together with other monthly fees from
au.
•If you do not wish to use the service, you can set not to use the au
International Call Service.
For au International Call Service:
From au phones 157 (area code not required) (toll free)
From fixed-line phones 0077-7-111 (toll free)
Open 9:00 to 20:00 (everyday)
KUUJAWGDQQMࡍࠫ㧞㧜㧝㧝ᐕ㧝㧞㧝ᣣޓᧁᦐᣣޓඦᓟ㧡ᤨ㧝㧥ಽ

40
Phone
ASlide to the right during an incoming call.
When you get an incoming call while the backlight illuminates (except
for when the unlock screen is displayed), tap Answer.
BTalk [End call.
ASlide to the left during an incoming call.
When you get an incoming call while the backlight illuminates (except
when the unlock screen is displayed), tap Answer Holding.
The call is put on hold. The other party will hear voice guidance
indicating that the call is put on hold.
BAnswer while the call is put on hold.
The hold state is released.
You can answer a call with the message of the Answering memo and
record the other party’s message.
Ae [Absence Memo during an incoming call.
Tap e while recording an Answering memo [Rcv. ON/Rcv. OFF to
turn ON/OFF the other party’s voice.
AOn the home screen, [Phone [Outgoing History/
Incoming History.
ACalled/Received date and time
BContents of the phone number/name/reason of user unset call/
network service
CImage (Face) registered in address book
DOutgoing call icon
Tap to make a call.
EGroup icon
The histories are collected in a group when the outgoing call
histories/incoming call histories from the same party are
continued. Tap a group icon to switch displaying/hiding of the
history in the group.
Answering a Call
Answering an Incoming Call
Putting the Call on Hold
•The call fee is charged on the other party who has made a call to you while
the call is put on hold as well.
•If you disable the hold state once, you cannot put the call on hold again.
•You can put the call on hold only when Area settings is set to Japan.
Answering with the Message of Answering
Memo
Returning a Call (Outgoing History/
Incoming History)
《Outgoing call history list screen》 《Incoming call history list screen》
KUUJAWGDQQMࡍࠫ㧞㧜㧝㧝ᐕ㧝㧞㧝ᣣޓᧁᦐᣣޓඦᓟ㧡ᤨ㧝㧥ಽ
41
Phone
FTalk time
GIncoming call status icon
: Normal incoming call
: Missed call
: Missed call (One-ring call*)
: Rejecting call
HCalling time
* The missed call cut off in approximately 3 seconds is considered as one-ring call. Note
that it may make customers call back to connect to malicious paid programs.
BSelect the entry to call back.
The outgoing history/incoming history detail screen is displayed.
CCall.
You can tap Mail to create C-mail.
Set not to disturb others around you in public places.
AOn the home screen, [Settings [Sound settings
[
Manner mode.
BSelect Manner mode.
The ring tone/receiving tone/operation sound does not sound when the
Manner mode is set. Also, the vibrator when an incoming call or a mail
message is received does not operate when Drive manner mode or
Silent manner mode is set.
The answering message is fixed to Drive, the answering time is fixed to
3secs and the Answering memo is fixed to ON when the Drive manner
mode is set.
When you cannot answer calls, this function automatically plays a
message and allows callers to record messages.
AOn the home screen, [Settings [Call settings
[Call/Ans Memo [Answering memo setting.
•The IS14SH can store up to 100 entries in each of the outgoing and
incoming call histories. If the history exceeds 100 entries, Exceeded entries
are automatically deleted from the oldest one. The number of the saved
entries may be reduced depending on the amount of free space.
Turning On Manner Mode
•The use of cell phones while driving a car/motorcycle is dangerous and is
prohibited by law. Set Manner mode to Drive manner mode while driving or
riding.
•Hold down K for at least two seconds [Manner mode or hold down
d on the unlock screen to enable/disable Manner mode.
•Even in Manner mode, a shutter sound, recording start/end tone of the
camera or recording start/end tone of the voice recorder are operated.
•When playing the data in Contents Manager or checking the function setting
by playing the data in Manner mode, the data is played on mute.
Depending on the function, you can adjust the volume by pressing u/
d while playing the data.
Turning On the Answering Memo
•When you set the same length of answering time for Answering memo and
Auto Answer, Answering memo takes priority.
•The IS14SH can record a maximum of ten messages of up to approximately
60 seconds per message. When ten messages have already been
recorded, the messages that are already played but not protected are
deleted from the oldest one. When all of them have not been played or are
protected, the Answering memo does not answer the call.
KUUJAWGDQQMࡍࠫ㧞㧜㧝㧝ᐕ㧝㧞㧝ᣣޓᧁᦐᣣޓඦᓟ㧡ᤨ㧝㧥ಽ

42
Phone
AOn the home screen, [ Settings [Call settings
[Call/Ans Memo [Answering Memo List.
AIcons to indicate the playing status of the Answering memo
: Answering memo which has not been played (red)
: Answering memo which has already been played (green)
Icon of the protected Answering memo has .
BOther party’s name/phone number/reason of user unset call
CDate and time when the Answering memo is recorded
BSelect the Answering memo to play.
The Answering memo is played.
Playing a Message in Answering Memo
Stop Stop playing the Answering memo.
On/Off Protect/Unprotect the Answering memo not
to be automatically deleted.
Delete Delete the Answering memo being played.
《Answering memo list screen》
Speaker on/
Speaker off
The Answering memo can be heard on the
speaker/earpiece.
•When multiple Answering memos are recorded, tap / while
playing a message to play the previous/next Answering memo.
KUUJAWGDQQMࡍࠫ㧞㧜㧝㧝ᐕ㧝㧞㧝ᣣޓᧁᦐᣣޓඦᓟ㧡ᤨ㧝㧥ಽ

43
Address Book
AOn the home screen, [Address Book [e
[Add new entry.
If you have set an account, select the destination to register a contact
to.
B
CSave [Yes.
Adding an Address Book Entry
(Face) Register the image of the face.
(Whole body) Register the image of the whole body.
Family name Register the family name.
Given name Register the given name.
Read last Register “reading” of the family name.
•The “reading” is automatically entered
when the family name is entered.
Read first Register “reading” of the given name.
•The “reading” is automatically entered
when the given name is entered.
Phone number Register the phone number.
Mail Register the mail address.
mixi Register the information of a person
registered in the friend list of mixi.
Twitter Register the information of a person who you
follow on Twitter.
Chat Resister the chat address.
Group setting Set the group.
Birthday Register the birthday.
Nickname Register the nickname.
Postal Register the address.
GPS Register the GPS information.
Organization Register the company/part/post.
Website Register the URL.
Memo Register the memo.
Event Register the date.
Internet call Register the address for the internet calling.
Ring Set Set the sound, the lamp and the vibration
when an incoming call and a mail message is
received.
•Tap to display the entry items which are not displayed.
•Tap / to add/delete the item.
•If the phone number is for a fixed-line phone, enter the phone number
starting with the area code.
•If you save multiple phone numbers/mail addresses, tap to change it to
so that you can set a phone number/mail address for usual use.
•Depending on an item, you can change its type. Tap the icon displayed on
the left of the item and select a type. By tapping Custom when you change
the type, you can save the entered string as a type.
•For the chat address type, set the application which is activated when the
operation (on the address book details screen, tap ) is executed.
•If you save the name in the following characters, it is displayed in order of
given name, and family name on the address book.
•Half-width alphabet only or half-width alphabet and half-width numeric for
given name and family name
•Half-width alphabet only or half-width alphabet and half-width numeric for
family name/Kanji only or Kanji and half-width alphanumeric for given
name
•To register GPS information, enable Use wireless networks/Use GPS satellites in
advance. On the home screen, tap [Settings [Location & security
[Check Use wireless networks/Use GPS satellites to enable it.
•If the other party’s phone number is not notified, Ring Set is not enabled.
KUUJAWGDQQMࡍࠫ㧞㧜㧝㧝ᐕ㧝㧞㧝ᣣޓᧁᦐᣣޓඦᓟ㧡ᤨ㧝㧥ಽ