Sharp HRO00163 Cellular Phone with Bluetooth, WLAN and Felica User Manual English version part 2
Sharp Corporation Cellular Phone with Bluetooth, WLAN and Felica English version part 2
Sharp >
Contents
English version part 2
44
Address Book
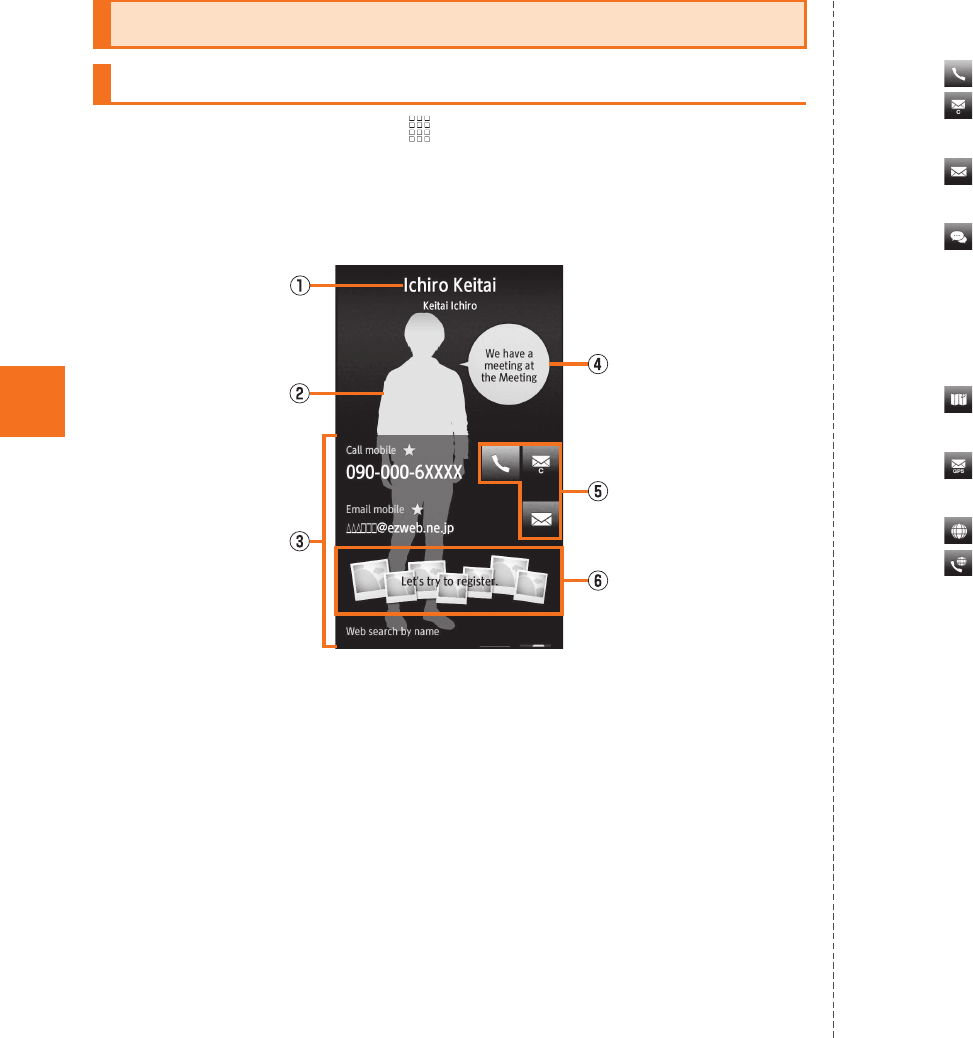
AOn the home screen, [Address Book
[Select a contact information.
Tap image (face) on the address book list screen (newly arrived
order).
AName
Tap to display the available applications.
BImage (Whole body)
CRegistered contents
Slide upward to check or use all the registered contents.
DSpeech bubble
Displays messages such as incoming calls, received mails
and mixi from the contact. If you tap, you can use the
message pack.
EAction icons
Tap to retrieve the following functions.
: Call to the selected phone number.
: Create a C-mail message using the selected phone
number as an address.
: Create a mail message using the selected mail address
as an address.
: The application set in the chat address type starts and
start a chat with the selected chat address.
When a corresponding application has not been installed,
you have not signed in your account, etc., the application
may not start.
: The Google map starts based on the selected address/
GPS information.
: Displays the mail creation screen on which the GPS
information is entered in the message.
: Displays the site of the selected URL.
: Call to the address for the selected internet calling.
FPicture field
You can register the people category of pictures and display
the data.
Long-touch the picture field [tap Yes to cancel the
registration.
Using an Address Book
Viewing the Address Book Details Screen
《Address book details screen》
KUUJAWGDQQMࡍࠫ㧞㧜㧝㧝ᐕ㧝㧞㧝ᣣޓᧁᦐᣣޓඦᓟ㧡ᤨ㧝㧥ಽ
45
Address Book
AOn the home screen, [Address Book
[Select a contact information.
■When calling/sending to a phone number
BSelect the phone number.
C
■When setting a phone number
BLong-touch the phone number.
C
AOn the home screen, [Address Book
[Select a contact information.
■When sending a mail message to a mail address
BSelect the mail address.
■When setting a mail address
BLong-touch the mail address.
C
Using Phone Number
Call Call to the selected phone number.
Edit and call Displays the phone number entry screen with
the selected phone number entered.
Create mail Create a C-mail message using the selected
phone number as an address.
Call added
special number
Add the specific number to the selected
phone number.
Set main phone
number
Set the phone number for usual use.
Create shortcut Create a shortcut to call to the selected
phone number or to activate C-mail message
using the selected phone number as an
address.
Using Mail Address
Set main mail
address
Set the mail address for usual use.
Create shortcut Create a shortcut to activate mail message
using the selected mail address as an
address.
KUUJAWGDQQMࡍࠫ㧞㧜㧝㧝ᐕ㧝㧞㧝ᣣޓᧁᦐᣣޓඦᓟ㧡ᤨ㧝㧥ಽ
46
Mail
E-mail (~@ezweb.ne.jp) is a service that you can exchange e-mail
with other cell phones and with PCs that support e-mail. In addition to
text messages, you can also send data such as photos and movies by
e-mail.
C-mail is a service that uses phone numbers as the destination to
exchange messages between cell phones which support C-mail and
between cell phones of other carriers which support short messages.
•Connecting to the packet communication is required to use e-mail.
Also, initial settings must be done in advance. For details, refer to
Setting Guide (Japanese).
•Subscription to IS NET is required to use e-mail. Those who did not
subscribe to the service at the time of the purchase can contact an
au shop or Customer Service Center for the service.
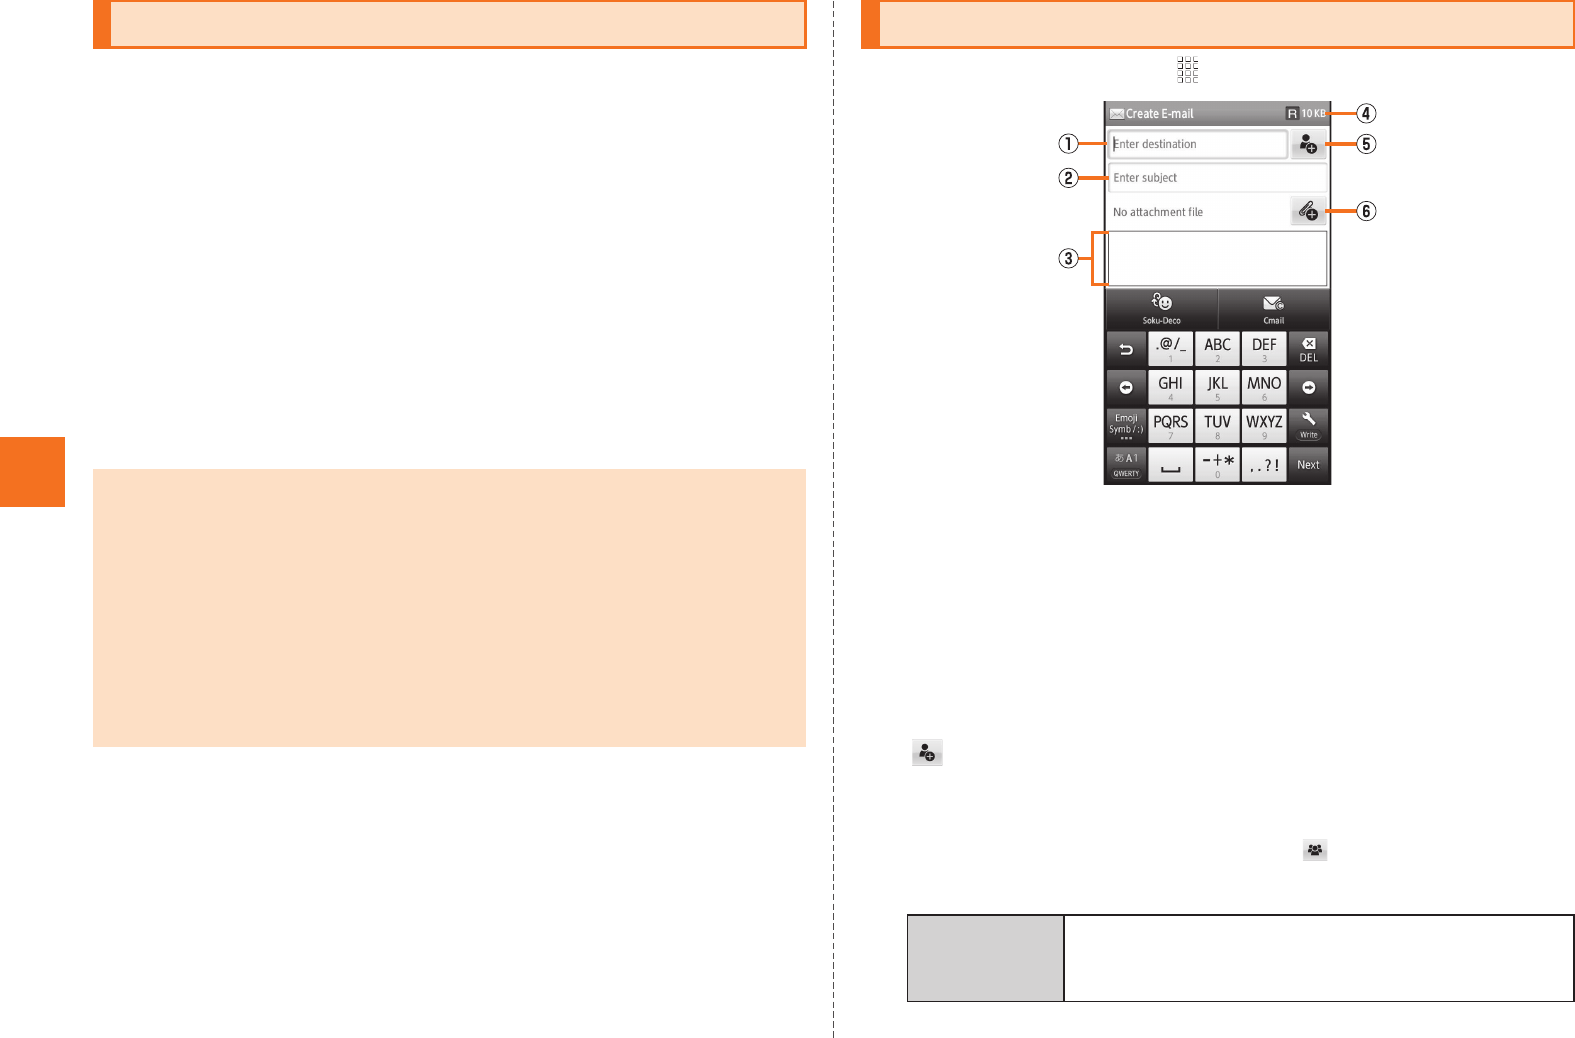
AOn the home screen, [Mail [Create.
ADestination entry field
BSubject entry field
CMessage entry field
DRemaining space for entry
EContacts quotation menu key
FFile attachment key
B.
You can also enter an address directly by tapping the destination entry
field.
If you have already entered destinations, is displayed. Tap it to
display the destination list screen.
C
Using E-mail/C-mail
•E-mail/C-mail can be used overseas, too. For details, refer to Global
Passport Owner’s Guide (Japanese).
•The packet communication charge for sending and receiving e-mail varies
according to the amount of data sent and received. For using overseas,
high charges can be incurred. For details, refer to the au comprehensive
catalogue or au homepage.
•Sending and receiving e-mails may take some time if attached data are
included in them or depending on radio wave status of the area where the
phone is used.
•Receiving C-mail is free.
Sending E-mail Messages
Address
Book
Enter a mail address in the destination entry
field by selecting one included in an entry from
the address book.
《E-mail creation screen》
KUUJAWGDQQMࡍࠫ㧞㧜㧝㧝ᐕ㧝㧞㧝ᣣޓᧁᦐᣣޓඦᓟ㧡ᤨ㧝㧥ಽ
47
Mail
DTap the subject entry field [Enter a subject.
Up to 50 full-width/100 half-width characters can be entered in the
subject entry field.
ETap the message entry field [Enter a message.
Up to approximately 5,000 full-width/10,000 half-width characters can
be entered in the message entry field.
FSend.
You can send a message consisting of kanji/hiragana/katakana/
alphanumeric/symbols/pictograms/facemarks.
AOn the home screen, [Mail [Create [Cmail.
The C-mail creation screen is displayed.
Send/
Receive
history
Enter a mail address in the destination entry
field by selecting one included in the list of
entries from the send/receive history.
•On the send/receive history selecting screen,
tap e [Set secrecy not to display Send/Receive
history when selecting destinations etc.
Mail Group Enter a mail address in the destination entry
field by selecting one included in a mail group.
Profile Enter a mail address in the destination entry
field by selecting one registered in the profile.
Secrecy Disable secrecy setting of the send/receive
history temporarily.
•The decoration animation is not supported.
•If a mail message which includes half-width katakana and half-width
symbols is sent, those characters may not be displayed properly on the
receiving side.
•You can send a maximum of 1,000 e-mails per day, which is the total
number of mails with all the destinations combined.
•You can send an e-mail to a maximum of 30 different destinations at the
same time (including To/Cc/Bcc. 64 half-width characters per message).
•If you send pictograms of au version to cell phones of other carriers, those
pictograms will be converted to other carriers’ version before they are
received by the other party.
* Some pictograms will not be converted.
•Part of pictograms sent to cell phones of different models, PCs, etc. may not
be displayed properly on the receiving side.
•On the e-mail creation screen, tap e [Save [Save to unsent box. After
that, the mail message is saved to the unsent box without being sent.
•
If you enter a destination or a name in the destination entry field, the destination
candidates are searched for automatically from the send/receive history or the
address book and displayed. Select one of them to be set as the destination.
After setting, you can enter and add another destination successively.
Auto resend, Sending reservation
•
On the home screen, tap
[
Mail
[e
[
Settings
[
General settings
[
Send/create settings
[
Mark
Auto resend
. After that, a mail message will be
resent to the other party up to twice automatically if it fails to be sent. A mail for
which Sending reservation is set will also be resent automatically if it fails to be
sent.
•
Mail messages will not be sent automatically during roaming.
•
On the e-mail creation screen, tap
e
[
Sending reservation
. After that, the mail
transmission is reserved and will be sent to the other party whenever the
IS14SH enters within the service area or at the specified time.
•
A mail for which Sending reservation is set will not be sent if the power is turned
off at the specified time. On the home screen, tap
[
Mail
[e [
Settings
[
General settings
[
Send/create settings
[
Mark
Auto resend
. After that, the
mail will be sent automatically whenever the power is turned on.
•
A mail may not be sent automatically depending on the status of the server. Try
again after a while.
•
The number of mails (with e-mails and C-mails combined) which can be
reserved or sent automatically is up to 20.
•
Select a mail whose setting for Auto resend or Sending reservation you want to
disable in unsent folder
[
Yes
to disable the setting.
Sending C-mail Messages
KUUJAWGDQQMࡍࠫ㧞㧜㧝㧝ᐕ㧝㧞㧝ᣣޓᧁᦐᣣޓඦᓟ㧡ᤨ㧝㧥ಽ
48
Mail
B.
You can also enter a phone number as the destination directly by
tapping the destination entry field.
If you have already entered destinations, is displayed. Tap it to
display the destination list screen. You can edit/delete destinations in
the same way as e-mail.
C
DTap the message entry field [Enter a message.
ESend.
Address
Book
Enter a phone number in the destination entry
field by selecting one included in an entry from
the address book.
Send/
Receive
history
Enter a phone number in the destination entry
field by selecting one included in an entry from
the send/receive history.
•On the send/receive history selecting screen,
tap e [Set secrecy not to display Send/Receive
history when selecting destinations etc.
Profile Enter a phone number in the destination entry
field by selecting one registered in the profile.
Secrecy Disable secrecy setting of the send/receive
history temporarily.
•A C-mail with 51 or more full-width/101 or more half-width characters may
be divided into two separate C-mails depending on the receiving side.
•On the C-mail creation screen, tap Save. After that, the mail message is
saved to the unsent box without being sent.
•On the C-mail creation screen, tap Email to switch C-mail in process of
creation to e-mail. When switched, part of information such as the
destination will be deleted and half-width katakana will be converted to
full-width one.
•Each item of the option menu in the C-mail creation screen can be operated
in the same way as in the e-mail creation screen.
•If you enter the name in the destination entry field, the destination
candidates are searched for automatically from the send/receive history or
the address book and displayed. Select one of them to set as the
destination.
•The caller ID will be notified when a C-mail is sent regardless of the setting
(On the home screen, tap [Settings [Call settings [Uncheck Send
caller ID).
•There is the limit for the number of C-mails which can be sent due to the
conditions during the contract period. For details, refer to au homepage.
•Part of pictograms sent to cell phones of different models may not be
displayed properly on the receiving side.
•Even when a C-mail is successfully sent, a message indicating that sending
the mail failed may appear infrequently.
C-mail center
•A message to ask whether to store a C-mail to the C-mail center is
displayed if the C-mail failed to be received due to such reasons as the
number of characters in the C-mail sent is beyond the limit, the cell phone of
the other party is out of reach of radio waves and the power is turned off.
Yes: You can store the C-mail to the C-mail center. The C-mail will be resent
whenever the other party enters within the service area.
No: The C-mail sending will be terminated. The unsent C-mail will be saved
in unsent folder.
On the home screen, tap [Mail [e [Settings [C-mail settings
[Mark Auto-storage. After that, C-mails are automatically sent to the C-mail
center.
•C-mails will be kept (stored) in the C-mail center for up to 72 hours. C-mails
kept in the C-mail center beyond that period will automatically be deleted.
Also, there is no limit for the number of C-mails kept.
•C-mails may not be kept in the C-mail center depending on usage of the
receiving users or types of the cell phones of the sending users.
KUUJAWGDQQMࡍࠫ㧞㧜㧝㧝ᐕ㧝㧞㧝ᣣޓᧁᦐᣣޓඦᓟ㧡ᤨ㧝㧥ಽ
49
Mail
AA mail message is received.
When a mail message is received, appears on the status bar, and
the mail ring tone sounds.
•The name, mail address and phone number are displayed on the
status bar.
BTap the status bar.
CSelect mail information.
If you receive multiple mail messages, the inbox screen is displayed
■Receiving Mail Message by Inquiring
If you set the cell phone not to receive mail messages automatically
(on the home screen, tap [Mail [e [Settings [E-mail
settings [Receive/display settings [Uncheck Auto-receive mail) or the
mail reception fails, you can receive the mail messages by inquiring
them.
AOn the home screen, [Mail [Receive new mails.
Check whether new mail messages have been received.
Received mail messages are saved in the inbox. Sent mail messages
are saved in the outbox. If the received mail messages and sent mail
messages match a condition for sorting mail messages, they are
saved in the set folders. Mail messages saved without being sent and
failed to be sent are saved in the unsent box.
AOn the home screen, [Mail.
The inbox screen is displayed. Select a mail message to check the
received mail.
•C-mails stored in the C-mail center will be sent in the following conditions.
•Immediately after a C-mail is stored: All the C-mails stored in the C-mail
center will be sent every time a new C-mail is stored in the C-mail center.
•Via the retry function: A C-mail will be sent via the retry function which
keeps sending one repeatedly for a maximum of 72 hours if the C-mail
failed to be sent immediately after a C-mail is stored due to such reasons
as the cell phone of the other party is out of reach of radio waves and the
power is turned off.
•When a call is ended: If a C-mail failed to be sent immediately after a
C-mail is stored, all the C-mails stored in the C-mail center will be sent
after the user ends a call with the IS14SH.
Auto resend, Sending reservation
•You can use Auto resend or Sending reservation in the same way as e-mail.
•A C-mail may be stored in the C-mail center and be sent regardless of the
setting (on the home screen, tap [Mail [e [Settings [C-mail
settings [Mark Auto-storage) if Sending reservation is set for the C-mail.
Receiving E-mail/C-mail Messages
•Mail messages will be received in the background even during operations
of mail or other functions. On the home screen, tap [Mail [e
[Settings [E-mail settings [Receive/display settings [Uncheck
Auto-receive mail. After that, mail messages will not be received in the
background.
•If a name of the sender is set for the received e-mail message, the set name
is displayed on the status bar. If the mail address is registered in the
address book, the name registered in the address book takes priority and it
is displayed.
•Packet communication charges may apply even if mail messages are not
properly received depending on the reception status and data received.
•The maximum data capacity of an e-mail’s message that can be received is
approximately 5,000 full-width/10,000 half-width characters (approximately
10 KB). If the number of the characters exceeds the capacity, a notice to
inform you that the exceeded characters have not been received will be
displayed.
•Some contents of the received mail message will not be properly displayed.
Reading Received E-mail/C-mail Messages
KUUJAWGDQQMࡍࠫ㧞㧜㧝㧝ᐕ㧝㧞㧝ᣣޓᧁᦐᣣޓඦᓟ㧡ᤨ㧝㧥ಽ
50
Mail
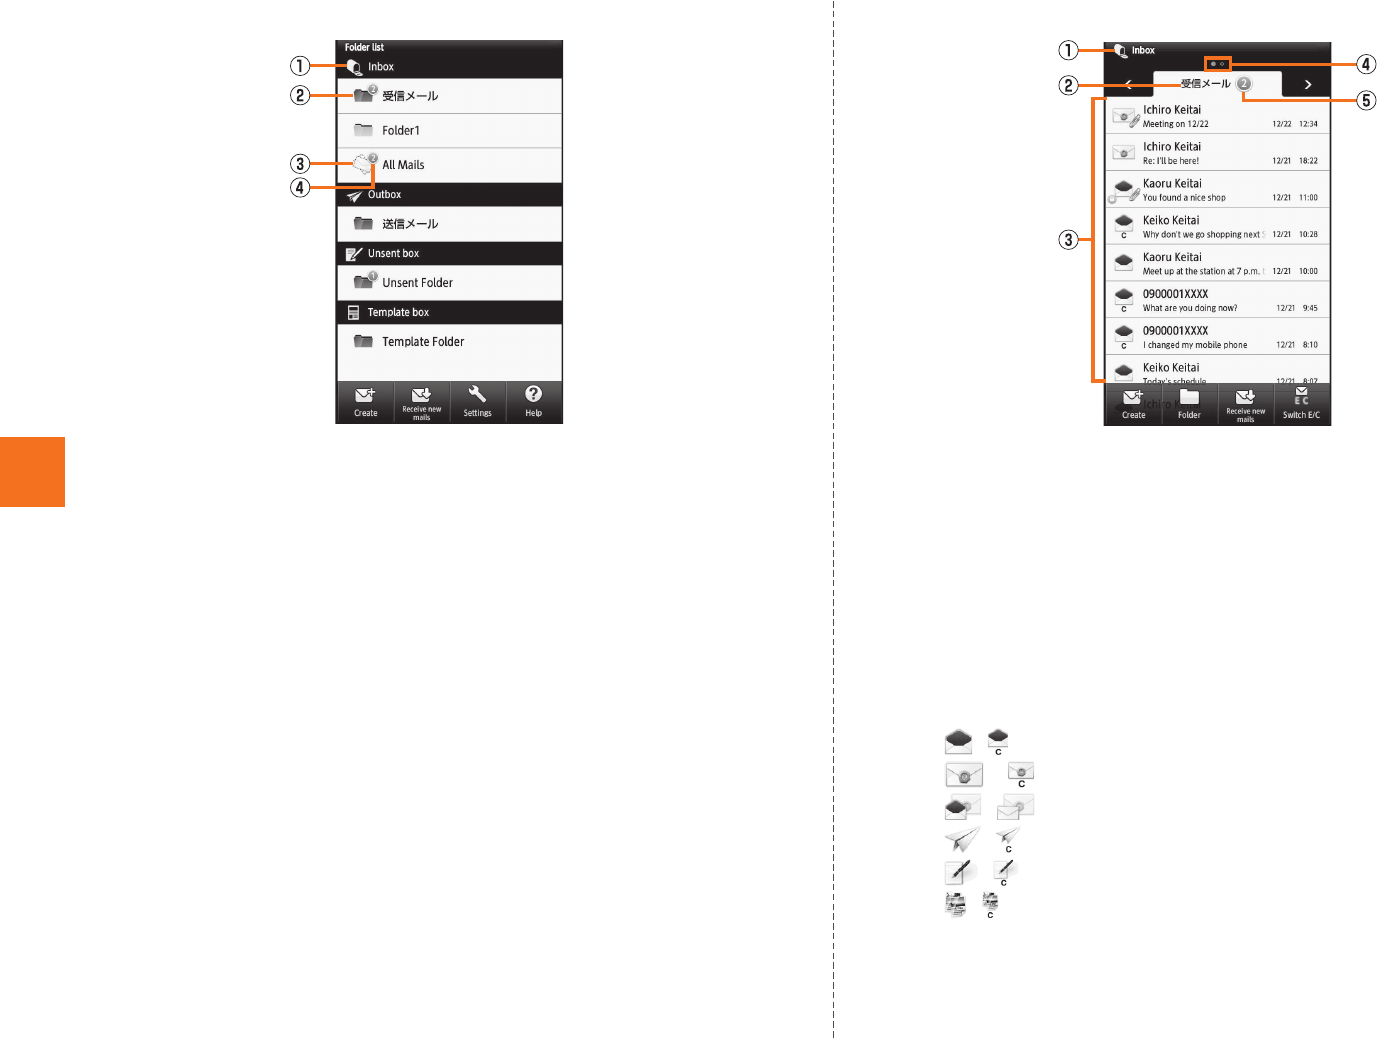
BFolder.
AMail box name
BFolder
CAll mails
Appears when a folder is created. All mail messages saved in
the inbox/outbox are displayed.
DUnopened mail messages/Number of failed sending mail
messages
CSelect a folder.
Example: In the inbox screen
AMail box name
BFolder name
CMail messages/Templates list
Mail messages/Templates saved in the selected folder are
displayed as a list.
If you tap Switch E/C in the inbox/outbox screen, the type of
displayed mail messages is switched in order of “only C-mail”
[“only E-mail” [“all mails”.
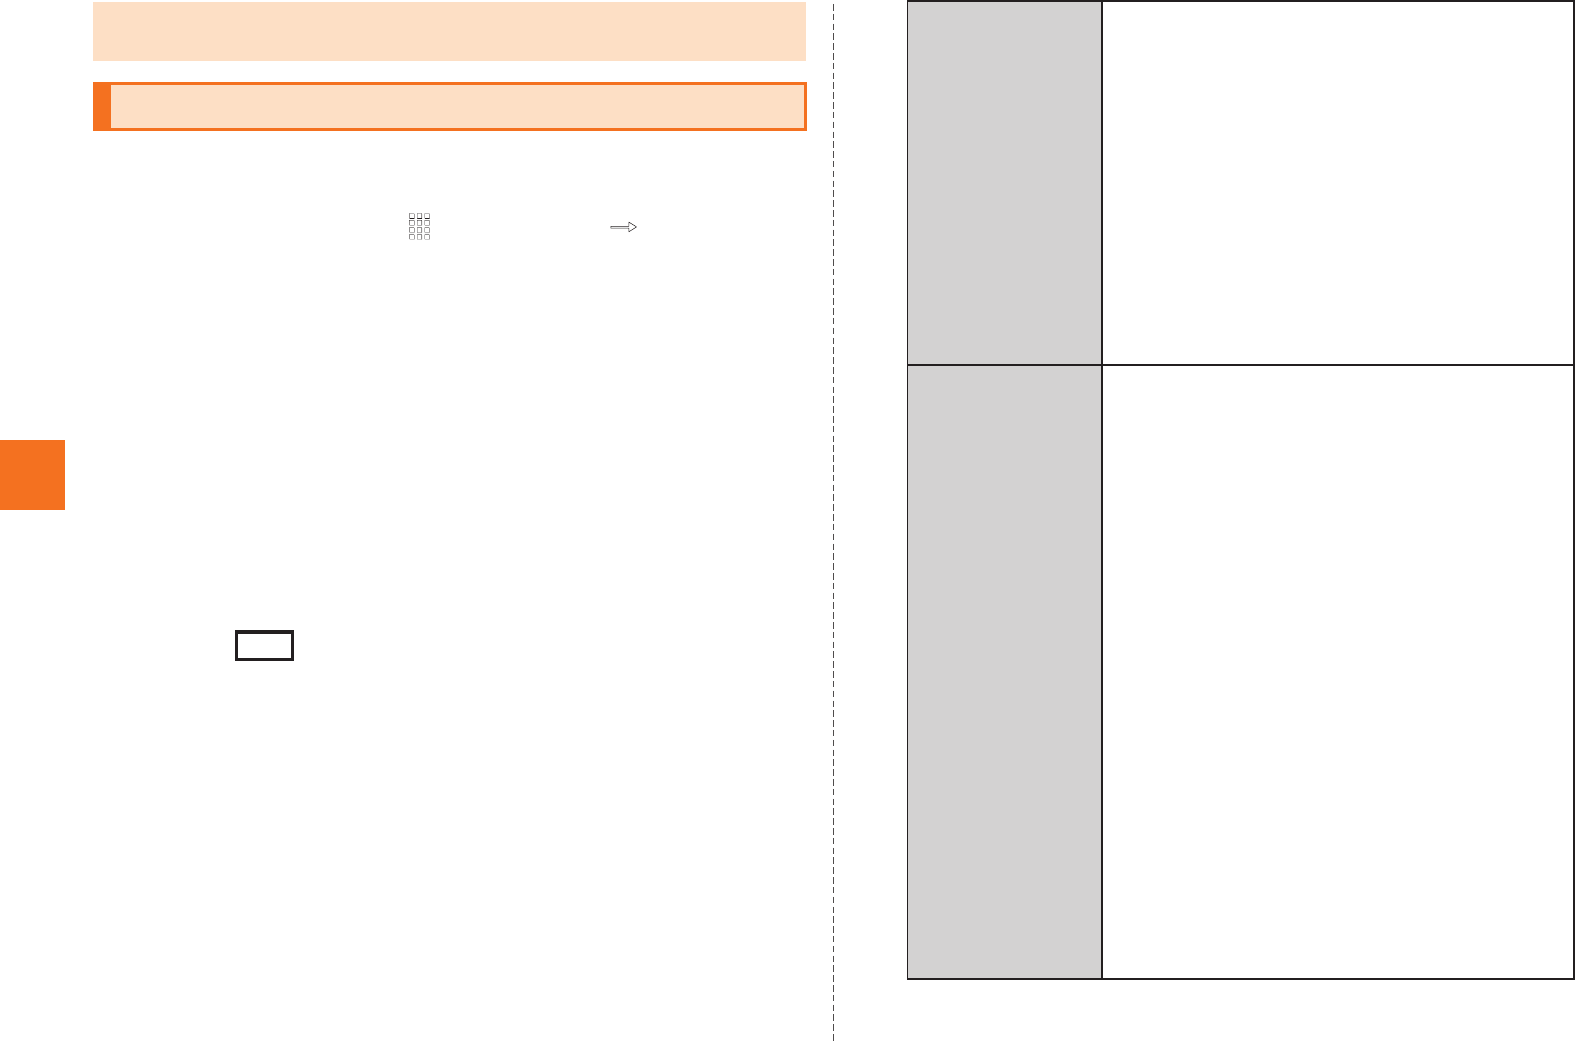
/ : Received e-mail/C-mail which is opened
*/ *: Received e-mail/C-mail which is unopened
/ *: Unfinished e-mail which is opened/unopened
/ : Sent e-mail/C-mail
/ : Unsent e-mail/C-mail
/ : Template of e-mails/C-mails
* Turns to opened state if tapped.
The following icons are attached to mail icons depending on
the states.
《Folder list screen》《Inbox screen》
KUUJAWGDQQMࡍࠫ㧞㧜㧝㧝ᐕ㧝㧞㧝ᣣޓᧁᦐᣣޓඦᓟ㧡ᤨ㧝㧥ಽ

51
Mail
: Received mail message which are replied
: Received mail message which are forwarded
: Mail message with attached files
: Protected mail message
: Mail message with Auto resend/Sending reservation set
: Failed sending mail message
DIndicator
Appears when there are multiple folders and it indicates the
currently displayed folder.
A folder in which unopened mails are saved is displayed in
orange.
ENumber of unopened mail messages/failed sending mail
messages
DSelect mail messages/templates list.
If you select an unsent mail messages, the e-mail creation screen/
C-mail creation screen is displayed.
If you select a template, the preview screen is displayed. Tap Select in
the preview screen to display the mail creation screen.
Example: In the received mail contents display screen
AName/Mail address/Phone number
BSubject*
CMessage
DAttached file*
Long-touch to receive/play/save the attached file.
EAddress details key*
Appears when there are multiple destinations. Tap to display
addresses as a list.
FDate and time information indicator
Appears when a subject or message has a date and time
information. Tap to register schedules by using the date and
time information.
* Not appears in C-mail messages
•If mail messages are received while the inbox is full, received mail
messages will be deleted from the oldest ones which are unprotected and
opened. If there is no opened mail messages, received mail messages will
be deleted from the oldest ones which are unprotected and unopened.
《Received mail message screen》
KUUJAWGDQQMࡍࠫ㧞㧜㧝㧝ᐕ㧝㧞㧝ᣣޓᧁᦐᣣޓඦᓟ㧡ᤨ㧝㧥ಽ
52
Mail
Mail filters have functions to receive and reject specific e-mail
messages and to reject e-mail messages spoofing cell phones or PHSs.
AOn the home screen, [Mail [e [Settings
[E-mail settings [Other settings [OK.
■Setting the mail filter as recommended
B(See Recommended Settings)
[(Register).
Set the mail filter that enables to reject spoofing or auto-forwarded mail
messages, and to receive mail messages from cell phones, PHSs or
PCs.
■Setting details of the mail filter
B(Mail Filter)
[Tap (Entry field) [Enter your security code
[(Send).
The mail filter screen is displayed.
C
•If mail messages are sent while the outbox is full, sent mail messages will be
deleted from the oldest ones which are unprotected.
Setting Mail Filters
オススメの設定はこちら
登録
迷惑メールフィルター
送信
カンタン設定
(Simple Settings)
1.「携帯」「PHS」「PC」メールを受信
(1. Receive Mail Messages from Cell
Phone, PHS or PC)
Reject spoofing or auto-forwarded mail
messages, and receive mail messages
from cell phones, PHSs or PCs.
2.「携帯」「PHS」メールのみを受信
(2. Receive only Mail Messages from Cell
Phone or PHS)
Reject mail messages from PCs, spoofing
mail messages or auto-forwarded mail
messages, and receive mail messages
from cell phones or PHSs.
詳細設定
(Advanced
Settings)
一括指定受信
(Collective Receive Setting)
Receive or reject all mail messages from
the Internet or cell phones.
迷惑メールおまかせ規制
(Nuisance Mail Automatic Restriction)
Detect mail messages suspected of being
nuisance mail messages automatically
from among PC mail messages received
via the mail server and restrict them.
なりすまし規制
(Spoof Restriction)
Reject mail messages sent with an alleged
sender address. You can set the following
levels; 高 (High), 中 (Medium), 低 (Low).
HTMLメール規制
(HTML Mail Restriction)
Reject e-mail messages in HTML format.
URLリンク規制
(URL Link Restriction)
Reject e-mail messages that include a
URL.
KUUJAWGDQQMࡍࠫ㧞㧜㧝㧝ᐕ㧝㧞㧝ᣣޓᧁᦐᣣޓඦᓟ㧡ᤨ㧝㧥ಽ
53
Mail
詳細設定
(Advanced
Settings)
ウィルスメール規制
(Virus Mail Restriction)
Perform the receiving restriction if any of
attached files of a mail message received
via the mail server is infected with viruses.
拒否通知メール返信設定
(Block Mail Notification Setting)
Sets whether to send a receiver error
(address unknown) mail message to the
sender of the rejected e-mail message.
指定拒否リスト設定
(Reject Mail Address List Setting)
Reject mail messages from certain e-mail
addresses, domains or parts of addresses
to the left of “@” that are contained in the
specified address list.
指定受信リスト設定
(Allowed Address List Setting)
Prioritize reception of mail messages from
certain e-mail addresses, domains or parts
of addresses to the left of “@” that are
contained in the specified address list.
•To block e-mail messages from
addresses other than the specified ones,
unmark all items in
(Collective Receive Setting).
指定受信リスト設定(なりすまし・転送メー
ル許可)
(Allowed Address List Setting (Spoofing or
Forwarded Mail Messages))
Avoid the mail block due to
(Spoof Restriction)
setting, and receive auto-forwarded mail
messages.
一括指定受信
なりすまし規制
詳細設定
(Advanced
Settings)
アドレス帳受信設定
(Address Book Receive Setting)
Receive mail messages sent from the mail
addresses saved on either au one
Address Book or au one Friends Note.
設定確認/設定
解除
(Check Settings/
Release
Settings)
Check the setting status of the mail filters
and release all the settings at one time.
PC設定用ワンタ
イムパスワード
発行
(Issue One Time
Password for PC
Setting)
Issue a one time password to set the mail
filter on your PC.
設定にあたって
(Notes on Setting
Mail Filter)
Display the explanation for setting mail
filters.
KUUJAWGDQQMࡍࠫ㧞㧜㧝㧝ᐕ㧝㧞㧝ᣣޓᧁᦐᣣޓඦᓟ㧡ᤨ㧝㧥ಽ

54
Mail
■Setting Mail Filters Using a PC
Mail filters can also be set using your PC. Access PCからメールフィ
ルター設定 (Mail Filter Settings From PC) (in Japanese only) inside the
screen of 迷惑メールでお困りの方へ (For Customers Bothered By
Unwanted Spam) (in Japanese only) on the au homepage and set the
mail filter after entering a one time password for PC setting.
You can check the one time password for PC setting by accessing PC
設定用ワンタイムパスワード発行 (Issue One Time Password for PC
Setting) in the mail filter screen.
Connect to the mail filter setting from a PC within 15 minutes after
issuance of the one time password for PC setting. When 15 minutes
has passed after that, the one time password for PC setting will
become invalid.
•If the security code is incorrectly entered three times consecutively during a
single day, the mail filter setting operation will be disabled until the next day.
•Note that you cannot receive e-mail messages once rejected by mail filters.
Be careful when you set mail filters.
•Mail filters functions apply to new e-mail messages in order of the
followings.
指定受信リスト設定(なりすまし・転送メール許可) (Allowed Address List
Setting (Spoofing or Forwarded Mail Messages)) >なりすまし規制 (Spoof
Restriction) >指定拒否リスト設定 (Reject Mail Address List Setting) >指定
受信リスト設定 (Allowed Address List Setting) >アドレス帳受信設定
(Address Book Receive Setting) >HTMLメール規制 (HTML Mail Restriction)
>URLリンク規制 (URL Link Restriction) >一括指定受信 (Collective
Receive Setting) >迷惑メールおまかせ規制 (Nuisance Mail Automatic
Restriction) >ウィルスメール規制 (Virus Mail Restriction)
• なりすまし規制 (Spoof Restriction) function judges whether received e-mail
messages are definitely from no other domains and restricts any e-mail
message whose domains it considers may be spoofing messages domains.
This function is limited to the occasions where the providers or e-mail
distributing companies controlling the domains written on the header of the
received e-mail messages are setting the domain authentication (SPF
record). For details on the setting conditions of the domain authentication,
contact the respective provider, e-mail distributing companies, etc.
* While e-mail messages received by a PC are being forwarded, the transmissions may
be blocked after those messages are judged not to be from proper domains. In that
case, register an address of the automatic forwarding source to 指定受信リスト設定(な
りすまし・転送メール許可) (Allowed Address List Setting (Spoofing or Forwarded Mail
Messages)).
• 指定受信リスト設定(なりすまし・転送メール許可) (Allowed Address List
Setting (Spoofing or Forwarded Mail Messages)) is a function to prevent
auto-forwarded e-mail messages from being rejected because of the setting
of なりすまし規制 (Spoof Restriction). E-mail messages whose mail
addresses are included in To (destination) or Cc (Carbon Copy) can be
received without being restricted by registering an address of the automatic
forwarding setting source to 指定受信リスト設定(なりすまし・転送メール許
可) (Allowed Address List Setting (Spoofing or Forwarded Mail Messages)).
* Note that this function does not apply to the e-mail messages (including some e-mail
magazines) whose mail address is included only in Bcc (Blind Carbon Copy).
•If you set HTMLメール規制 (HTML Mail Restriction), e-mail messages in the
HTML format may not be received when they are among other HTML e-mail
messages sent from e-mail magazines or PCs. Also, decorated e-mail
messages from cell phones and PHSs can be received even if HTMLメール
規制 (HTML Mail Restriction) is set.
•If you set URLリンク規制 (URL Link Restriction), you may not receive e-mail
messages on which a URL is written in the messages such as e-mail
magazines and information providing e-mail messages, or member
subscriptions to some cell phone sites etc. may not be available.
• 拒否通知メール返信設定 (Block Mail Notification Setting) is set to
(Reply) first time you set the mail filters. Also, spoofing e-mail messages will
not be replied to even if (Reply) is set.
返信する
返信する
KUUJAWGDQQMࡍࠫ㧞㧜㧝㧝ᐕ㧝㧞㧝ᣣޓᧁᦐᣣޓඦᓟ㧡ᤨ㧝㧥ಽ
55
Mail
You can register the phone numbers to reject C-mail messages. You
can also set to reject C-mail messages sent from the phone numbers
not registered in the address book.
AOn the home screen, [Mail [e [Settings
[C-mail settings [Receiving filter [Enter Lock No.
[OK.
B
You can use PC-mail by setting an account of au one mail etc.
•To use au one mail in PC-mail, acquiring au one mail account,
enabling IMAP setting, setting mail password are required in
advance. On the home screen, [au one [ (Support)
[ (au one mail help) and set after
confirming the contents of the help.
When you activate PC-mail for the first time, you need to register an
account. When the registration finishes, you can use the PC-mail.
AOn the home screen, [PC-mail.
BIn the mail address field, enter mail address.
CIn the password field, enter password.
■When setting a mail server automatically
DNext.
Set manually when the mail server of the mail account you use is not
automatically set.
ETap an account name entry field [Enter account
name.
FTap your name entry field [Enter your name
[Done.
■When setting a mail server manually
DManual setup.
Confirm the setting of the receiving mail server and sending mail
server by contacting the provider you use in advance.
Rejecting Spam C-mail Messages
Block
specified
numbers
Set Specified Numbers
Set whether to enable the Block specified
numbers.
If no phone number to be blocked is specified
in Specified Number List, the specified number
screen is displayed. Tap Add new and register
the phone number.
Specified Number List
Specify the phone number to be blocked.
•Tap Add new to register a phone number to be
blocked.
•Long-touch the registered phone number
[Change/Delete to change/delete the phone
number.
•Tap e [Delete [Delete selection/Delete all
to select the phone numbers to be deleted or
to delete all the phone numbers.
•Up to ten phone numbers can be registered.
Not in
address
book
Set whether to block C-mail from any phone
number not saved in the address book.
E-mail
notifications
Set whether to block e-mail notifications.
•Even when you reject receiving by receiving filter, the sender is supposed
to send the mail message correctly, and the charge applies.
Setting Account for PC-mail
サポート
au one メールヘルプ
KUUJAWGDQQMࡍࠫ㧞㧜㧝㧝ᐕ㧝㧞㧝ᣣޓᧁᦐᣣޓඦᓟ㧡ᤨ㧝㧥ಽ
56
Mail
ESelect an account type.
When setting by POP3 server, the PC-mail saved in the IS14SH
terminal may be deleted depending on the provider you use.
When using the mail server supporting IMAP (Gmail, au one mail, etc.),
set by IMAP server.
F
GNext.
H
* Besides the above mentioned items, the user information entry field and password entry
field are displayed.
INext.
J
KNext.
LTap an account name entry field
[Enter account name.
MTap your name entry field [Enter your name
[Done.
Username/
Domain¥Username
Enter the user information.
Password Enter the password.
POP3 server/IMAP
server/Server
Enter the server information.
Port Enter the port number.
Security type Set when necessary.
Delete email from server Set whether to remain the received
PC-mail in the server.
IMAP path prefix Enter when necessary.
Use secure connection
(SSL)
Set whether to use the SSL when
receiving PC-mails.
Accept all SSL
certificates
Set whether to accept all the SSL
certificates.
SMTP server Enter the server information.
Port Enter the port number.
Security type Set when necessary.
Require sign-in. Set when necessary.
Enter the Username and Password
when setting valid.
Inbox checking
frequency
Set the interval to confirm to the
server whether a new PC-mail is
received.
Send email from this
account by default.
Set to the priority account when
composing a PC-mail if multiple mail
accounts are set.
Notify me when email
arrives.
Set whether to display to the status
bar that a PC-mail is received.
•When the account type is “Exchange”, entering “¥UsernameDomain” in the
“Domain¥Username” area is required depending on the provider. Contact
the administrator of the server for details.
KUUJAWGDQQMࡍࠫ㧞㧜㧝㧝ᐕ㧝㧞㧝ᣣޓᧁᦐᣣޓඦᓟ㧡ᤨ㧝㧥ಽ

57
Mail
AOn the home screen, [PC-mail [e
[Compose.
ADestination entry field
BSubject entry field
CMessage entry field
BTap the destination entry field
[Enter the destination.
If you enter a name or a mail address in the address book, the address
book is automatically searched and the destination candidate is
displayed. After setting the destination, you can enter and add the
destination in a row.
CTap the subject entry field [Enter the subject.
DTap the message entry field [Enter the message.
ESend.
If you tap Save as draft, PC-mail is saved to draft without sending it.
If you tap Discard, PC-mail in process of composition is discarded.
APC-mail is received.
If PC-mail is received, appears on the status bar, and the mail ring
tone sounds.
BTap the status bar.
CSelect PC-mail information.
DSelect the received PC-mail.
Gmail is a mail service provided by Google. You can send and receive
Gmail with the IS14SH.
•Google account is required to use Gmail. For details on Google
account, refer to “Setting Up a Google Account”.
•On the home screen, tap [Settings [Accounts & sync to
synchronize Gmail saved in the server with one saved in the IS14SH.
•For using Gmail, refer to Google homepage.
AOn the home screen, [Gmail.
Sending PC-mail Messages
《PC-mail composition screen》
Receiving PC-mail Messages
Using Gmail
KUUJAWGDQQMࡍࠫ㧞㧜㧝㧝ᐕ㧝㧞㧝ᣣޓᧁᦐᣣޓඦᓟ㧡ᤨ㧝㧥ಽ
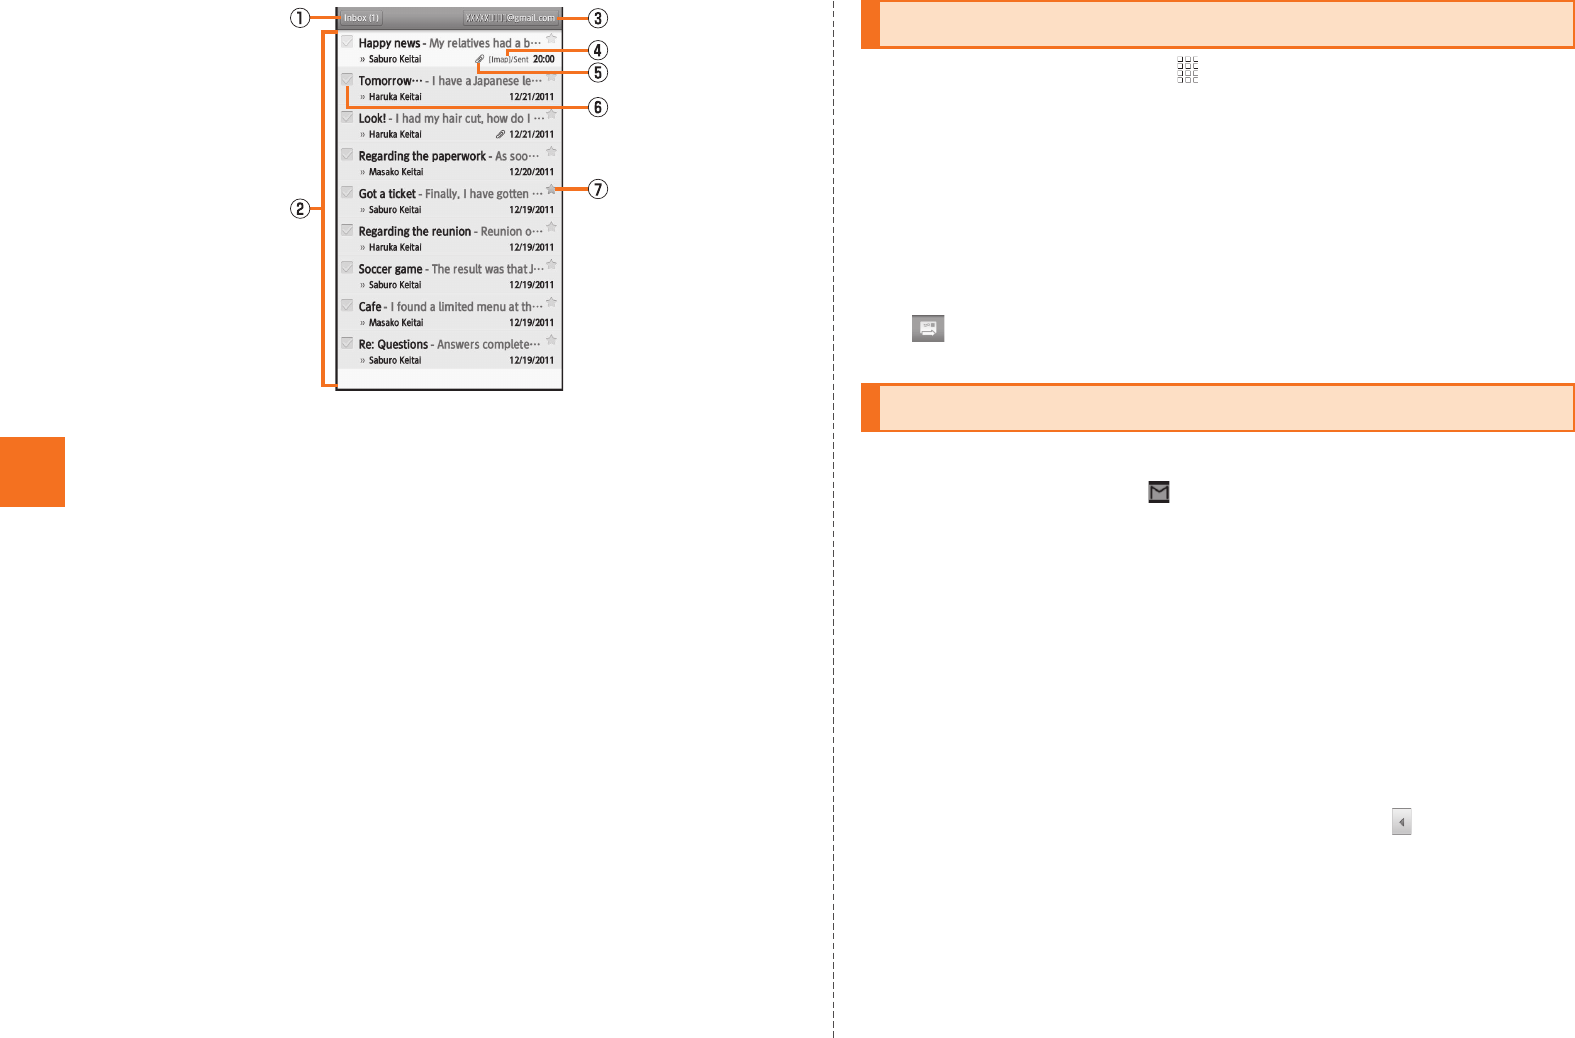
58
Mail
ATray/Label name, Number of unopened mail messages
Tap to display trays/labels as a list.
BMail message
CAccount name
Tap to display accounts as a list.
DLabel
Displayed on a mail message for which a label is set.
EAttached file icon
Displayed on a mail message with files attached.
FCheck box
Tap to make it marked and to display the menu.
Mark a mail message which you intend to make marked and
select the menu.
GStar icon
Tap to enable/disable the setting of starring a message.
AOn the home screen, [Gmail [e [Compose.
BTap the destination entry field
[Enter the destination.
CTap the subject entry field [Enter the subject.
DTap the message entry field [Enter the message.
E.
AGmail is received.
When Gmail is received, appears on the status bar, and the mail
ring tone sounds.
BTap the status bar.
CSelect mail information.
DSelect the received mail.
The received mail message screen is displayed.
■Replying/Forwarding Gmail
AOn the received mail message screen,
[Reply/Reply all/Forward.
《Inbox tray screen》
Sending Gmail
Receiving Gmail
KUUJAWGDQQMࡍࠫ㧞㧜㧝㧝ᐕ㧝㧞㧝ᣣޓᧁᦐᣣޓඦᓟ㧡ᤨ㧝㧥ಽ
59
Internet
AOn the home screen, [Browser.
The browser screen is displayed.
On the home screen, tap [au one to connect to the au one portal
site.
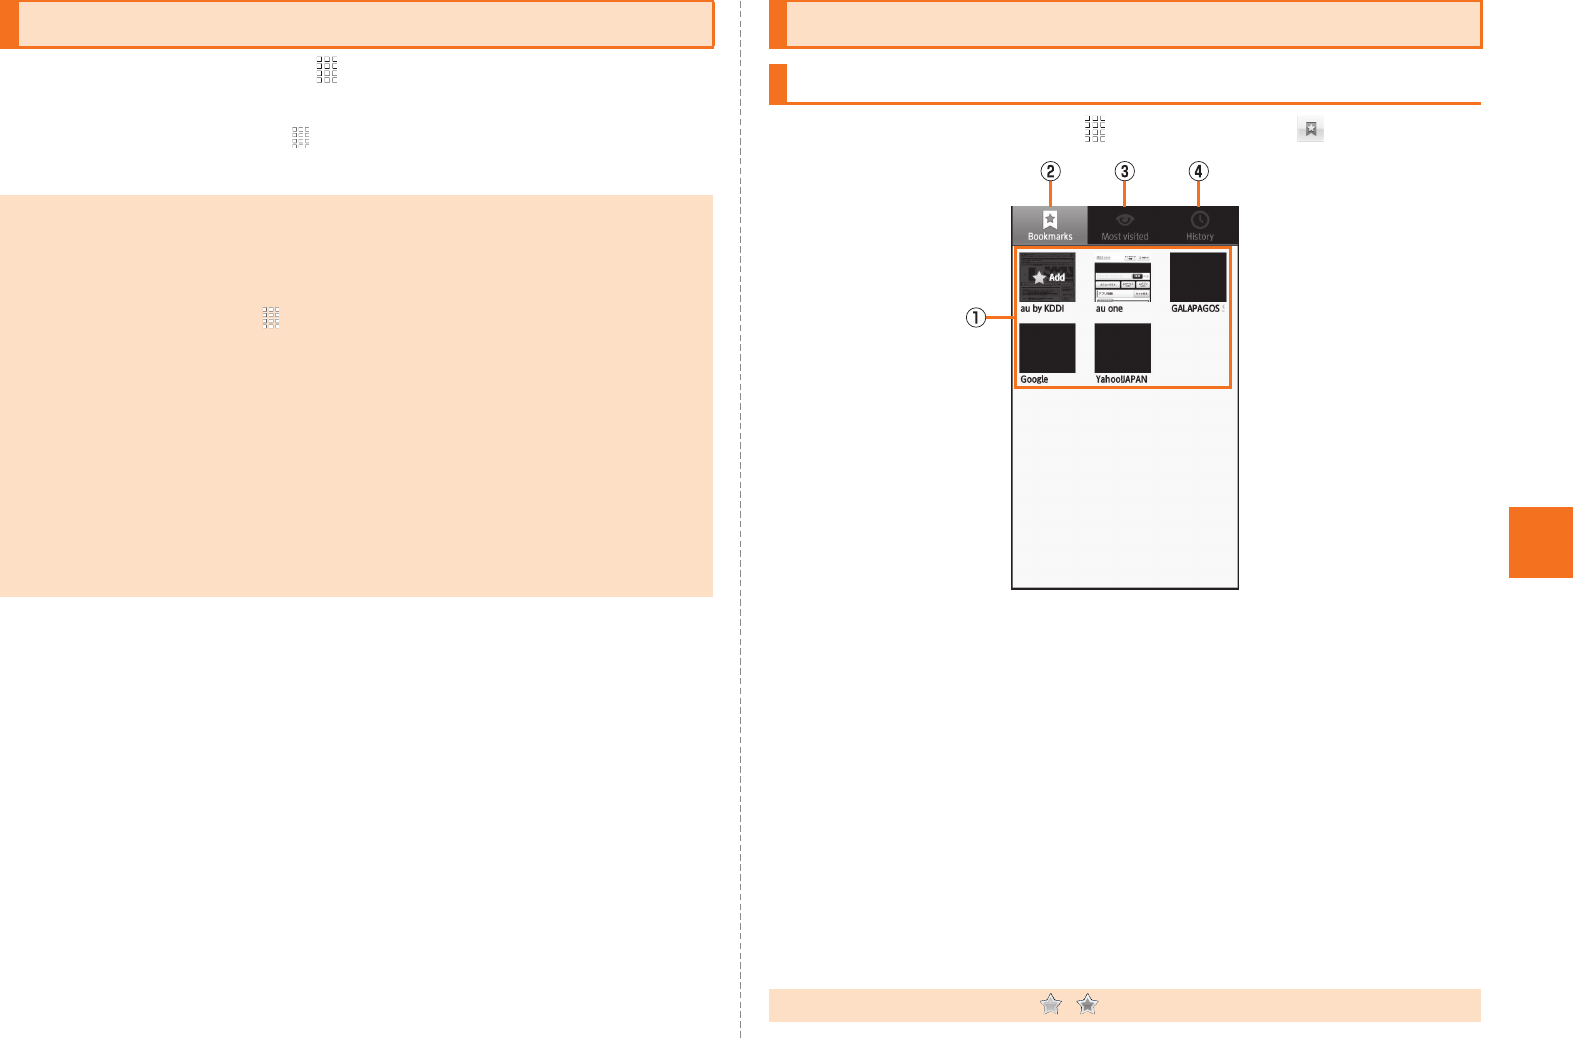
AOn the home screen, [Browser [.
ABookmark/History list
Displays the list of the bookmark/history.
B“Bookmarks” tab
Displays the registered bookmark.
C“Most visited” tab
Displays the viewing history of the site from the most
frequently viewed one.
D“History” tab
Displays the viewing history of the site.
BSelect a bookmark/history.
Viewing Sites with Browser
•When browsing a web page with a large amount of data, the application
may be terminated automatically.
Filtering function
•The filtering function blocks inappropriate web pages for young people.
On the home screen, tap [Settings [Wireless & networks [Filtering
settings [Yes [Enter a password [OK [Enter a password again
[OK.
•The filtering function is not compatible with the application communication
and the Wi-Fi® connection. It is recommended to use the filtering function
of “ウィルスバスター (VirusBuster)” and “安心アプリ制限 (Restrict
Applications)”.
•The password used when enabling the filtering function is necessary
when disabling the setting. Be sure to keep the password.
•Even if you enable the filtering function, you can display the sites that you
displayed them while disabling the filtering function and caches remain.
Using Bookmarks/History
Displaying a Site from Bookmarks/History
•On the history screen, tap / to bookmark/delete the selected history.
《Bookmarks/History screen》
KUUJAWGDQQMࡍࠫ㧞㧜㧝㧝ᐕ㧝㧞㧝ᣣޓᧁᦐᣣޓඦᓟ㧡ᤨ㧝㧥ಽ
60
Internet
Bookmark the displayed site.
AOn the home screen, [Browser
[ [Add.
BOK.
Bookmarking a Web Page
•On the home screen, tap [Browser [ [Long-touch a bookmark
[Delete bookmark to delete the bookmark. Likewise, on the home screen,
tap [Browser [ [History [Long-touch a history [Delete
from bookmarks to delete the bookmark.
KUUJAWGDQQMࡍࠫ㧞㧜㧝㧝ᐕ㧝㧞㧝ᣣޓᧁᦐᣣޓඦᓟ㧡ᤨ㧝㧥ಽ
61
Multimedia
IS14SH has a CMOS camera with approximately 8.04 effective
megapixels for shooting photos and movies.
•All the photos and movies shot are saved in a microSD memory
card. Insert a microSD memory card before using the camera.
•The mobile light flashes in red while each camera mode (except for
“mosimo camera”) is activated.
•If the camera lens is exposed to direct sunlight for a long time, the
internal color filter may discolor and it causes discoloration of shot
images.
•The quality of images may deteriorate when shot or saved after the
IS14SH has been left in a warm location for a long time.
•Although the camera are made of high-precision parts, some pixels
look constantly dark or bright. Further, blue, red, white dots, etc.
appear in images especially when shooting images in a very dark
place.
•Fingerprints, fats, etc. on the lens may cause the images to blur.
Wipe the lens with a soft cloth such as cloths for cleaning glasses
before shooting images. The lens may be damaged if you wipe it
strongly.
•Make sure that your fingers, hair, the straps of the IS14SH, etc. do
not obscure the camera lens when shooting images. If the straps
interrupt you when shooting images, hold the straps with your hand.
•Be careful of camera shakes. Hold the IS14SH tight or use the
self-timer function since such shakes may cause the images to blur.
Be careful of camera shakes especially in a place without enough
light such as inside of a room.
Also, images may blur when the subject of the images moves.
•Before shooting images, make sure that the subject is completely
displayed. If you shoot images while moving the camera, the images
may blur.
•Indoor fluorescent lighting may cause flickers (too fine to be seen
with human’s naked eyes) to be detected and light fringes may be
displayed. This is not a malfunction.
•When shooting images under incandescent lamps, the display may
become red. On the home screen, [Camera [ [White
Balance [Tungsten to solve this problem.
•Make sure that the microphone is not covered by your fingers etc.
when recording movies. Also, the quality of its sounds may
deteriorate depending on the voice volume and surrounding
environment during the recording.
•The color and brightness of the subject of images shot with the
IS14SH may differ from the actual color and brightness. Because of
the characteristics of the lens, some part of the images may appear
dark or light depending on the subject and light ray while shooting.
Also, note that some part of the subject in the images may be
distorted due to the usage of wide-angle lens.
•Purple lines and bars may be displayed on images while recording
strong light or shiny subject. This is not a malfunction.
•When you subject the camera to strong impacts when shooting
images, the images may be out of focus. In such case, reactivate
the camera.
•The following subjects may cause images to be out of focus.
・Subjects with few contrasts such as solid color walls
・Backlit subjects
・Subjects reflecting light brightly such as shiny objects
・Subjects with horizontal repetitive patterns such as blind
・In the case when there are many subjects located at different
distances from the camera
・Subjects in dark places
Using the Camera
Cautions for Using the Camera
KUUJAWGDQQMࡍࠫ㧞㧜㧝㧝ᐕ㧝㧞㧝ᣣޓᧁᦐᣣޓඦᓟ㧡ᤨ㧝㧥ಽ
62
Multimedia
・Subjects which move quickly
•Do not position the mobile light close to your eyes. Do not look at the
mobile light directly while it is on. Do not point on the mobile light
toward the eyes of others. It may harm eyesight.
•The tone for locking AF and the shutter tone sounds, even if you set
Manner mode. The tone for starting and stopping movies also
sounds. You cannot change the tone volume.
•While the camera is operating, such as activating the camera, you
may hear small sound made from the operation of the inner parts.
This is not a malfunction.
•The IS14SH may be warm after displaying the photo monitor screen
or recording movies repeatedly for a long time. Be careful of
touching for a long time which may result in a low temperature burn.
Also you may not be able to use camera when the temperature of
the IS14SH is increased.
•When shooting images of strong light sources such as the sun or a
lamp, the images may appear dark, distorted, etc.
•When shooting images of moving subjects or changing the place
from light place to dark place, the display may whiten or darken for a
moment. Also, the display may be distorted for a moment.
•When shooting images in a dark place, noises may increase and
shot photos may become rough etc.
•Note that if the self-timer shooting is set and the IS14SH is left on an
unstable place, it may fall due to the vibration etc.
•It may take time to display the brightness and color properly right
after displaying the preview screen, switching the camera mode,
changing the camera settings, etc.
•When the battery level is (approximately 10 %) or lower, Camera
cannot be activated.
•You may not be able to use the camera when the battery level is low
or when using the camera in a cold place such as outdoors in
winter.
•If you use the IS14SH camera in a wrongful manner, you may be
subject to punishment according to laws or ordinances/nuisance
prevention ordinance etc.
•You cannot use VeilView while using the camera.
•You may not be able to use the camera when using other
applications.
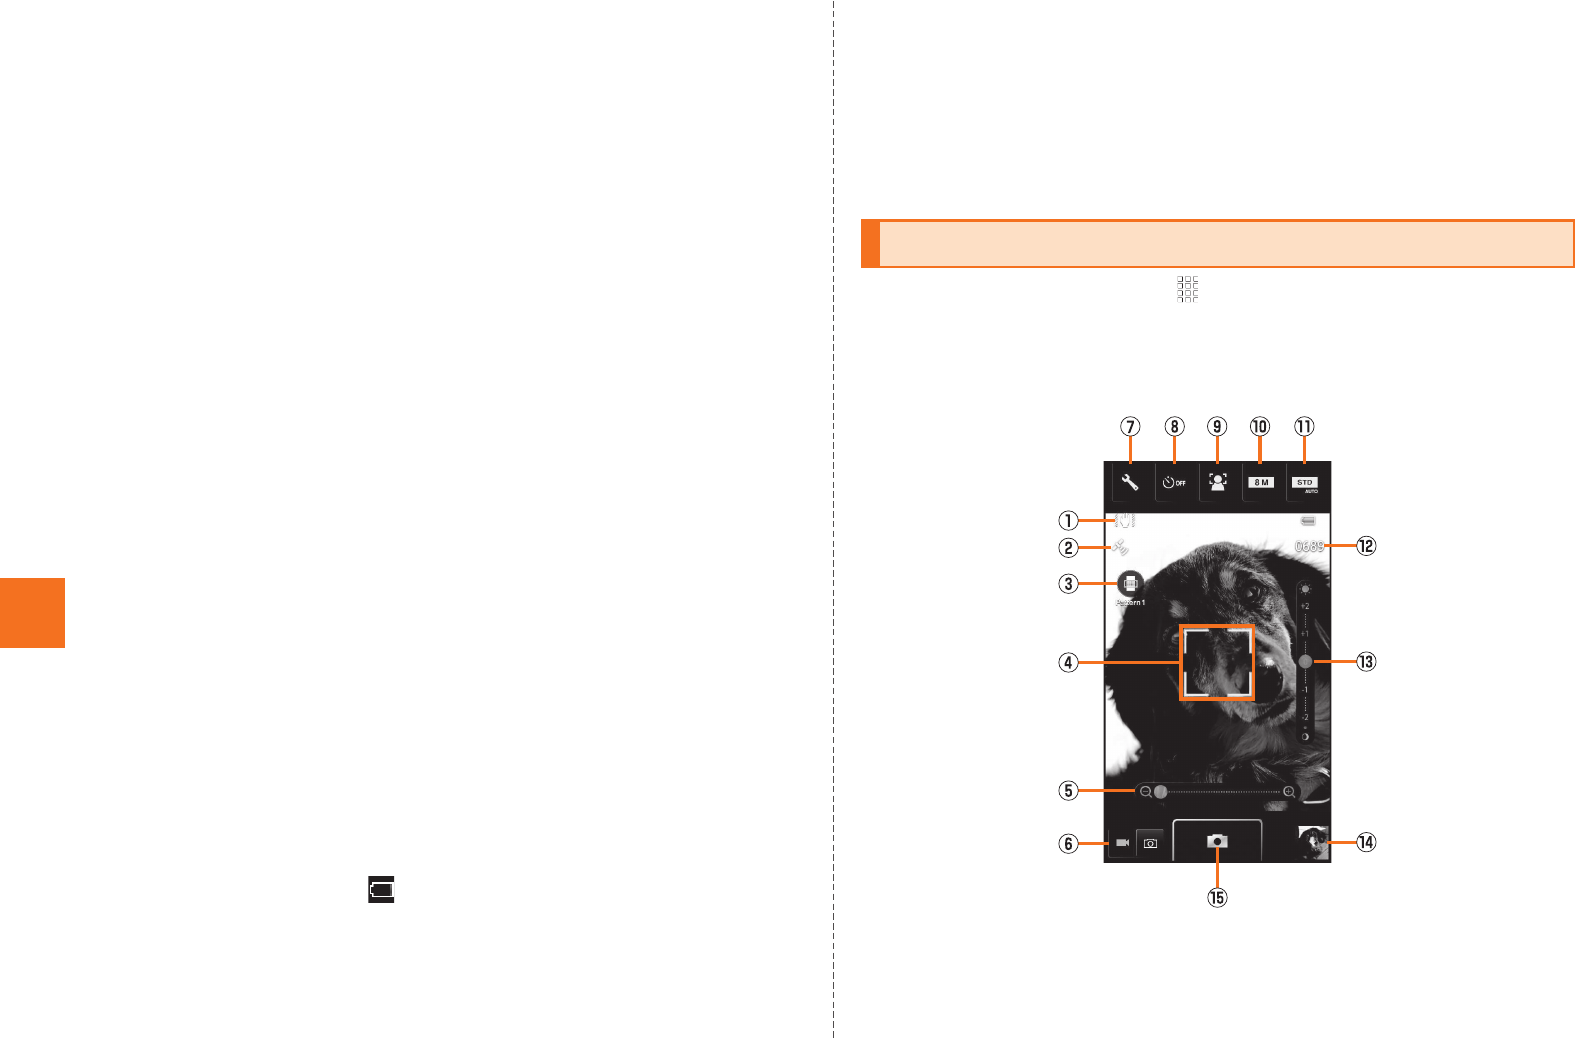
AOn the home screen, [Camera.
A confirmation screen asking whether to attach location informations to
a data shot appears. Check the content and follow the instructions on
the screen.
Taking Photos
《Photo monitor screen》
KUUJAWGDQQMࡍࠫ㧞㧜㧝㧝ᐕ㧝㧞㧝ᣣޓᧁᦐᣣޓඦᓟ㧡ᤨ㧝㧥ಽ
63
Multimedia
AShake reducing icon
On the home screen, tap [Camera [ [Shake
Reducing [ON. After that, the icon is displayed.
BAutomatic current location adding icon
On the home screen, tap [Camera
[
[Save
Settings [Location info [Automatic added [ON. After that,
the icon is displayed.
CMiniature setting/Blog mode setting key
•On the home screen, tap [Camera [ [Switch
camera [Miniaturize Cam* [ [Miniaturize Set to
change the pattern of the blurring. Also, you can change the
setting each time you tap the miniature setting key.
•On the home screen, tap [Camera [ [Blog mode
sets [Blog mode ON/OFF [ON [ [Blog mode sets
[Upload settings to set the upload destination.
* After selecting Miniaturize Cam, you can edit shot images to make them look like they
are miniatures by blurring some parts of them.
DAF mark
On the home screen, tap [Camera [ [Face AF to
detects and focuses on a person’s face.
EZoom bar
Zoom in/out the subject.
Slide your finger to the left/right to display and set the bar.
FVideo camera switching key
GVarious setting key
Change the various settings.
HSelf-timer key
Set the self-timer. Shoot images if the set time has passed
after is tapped.
•The mobile light flashes while counting down.
•Tap ^ to stop a countdown.
IFocus setting key
Set the type of the AF and design of the AF mark.
JPicture size switching key
Set the picture size.
KScene setting key
Set the scene setting.
LRemaining number of images for shooting
MBrightness adjusting bar
Adjust the brightness.
Slide your finger up/down to display and set the bar.
NPreviously shot data
Displays the thumbnail of previously shot data. Tap the
thumbnail to confirm the data.
OShoot
B.
On the home screen, tap [Camera [ [Save Settings [Auto
Save [ON to automatically save the shot image. When the setting is
set to OFF, the photo preview screen is displayed.
•On the photo preview screen, tap Save to save the shot image.
•On the photo preview screen, tap Cancel to delete the shot image
and return to the photo monitor screen.
When Blog mode sets is set to ON, Auto Save is set to OFF and the photo
preview screen is displayed.
•Tap Upload to upload the shot image to photo services or SNS on the
Internet, etc.
•Tap Edit to edit the shot image.
•If you operate nothing for approximately three minutes, Camera is
terminated.
•If the mobile light is set to ON, the mobile light is turned on and it is
automatically turned off after approximately three minutes.
KUUJAWGDQQMࡍࠫ㧞㧜㧝㧝ᐕ㧝㧞㧝ᣣޓᧁᦐᣣޓඦᓟ㧡ᤨ㧝㧥ಽ
64
Multimedia
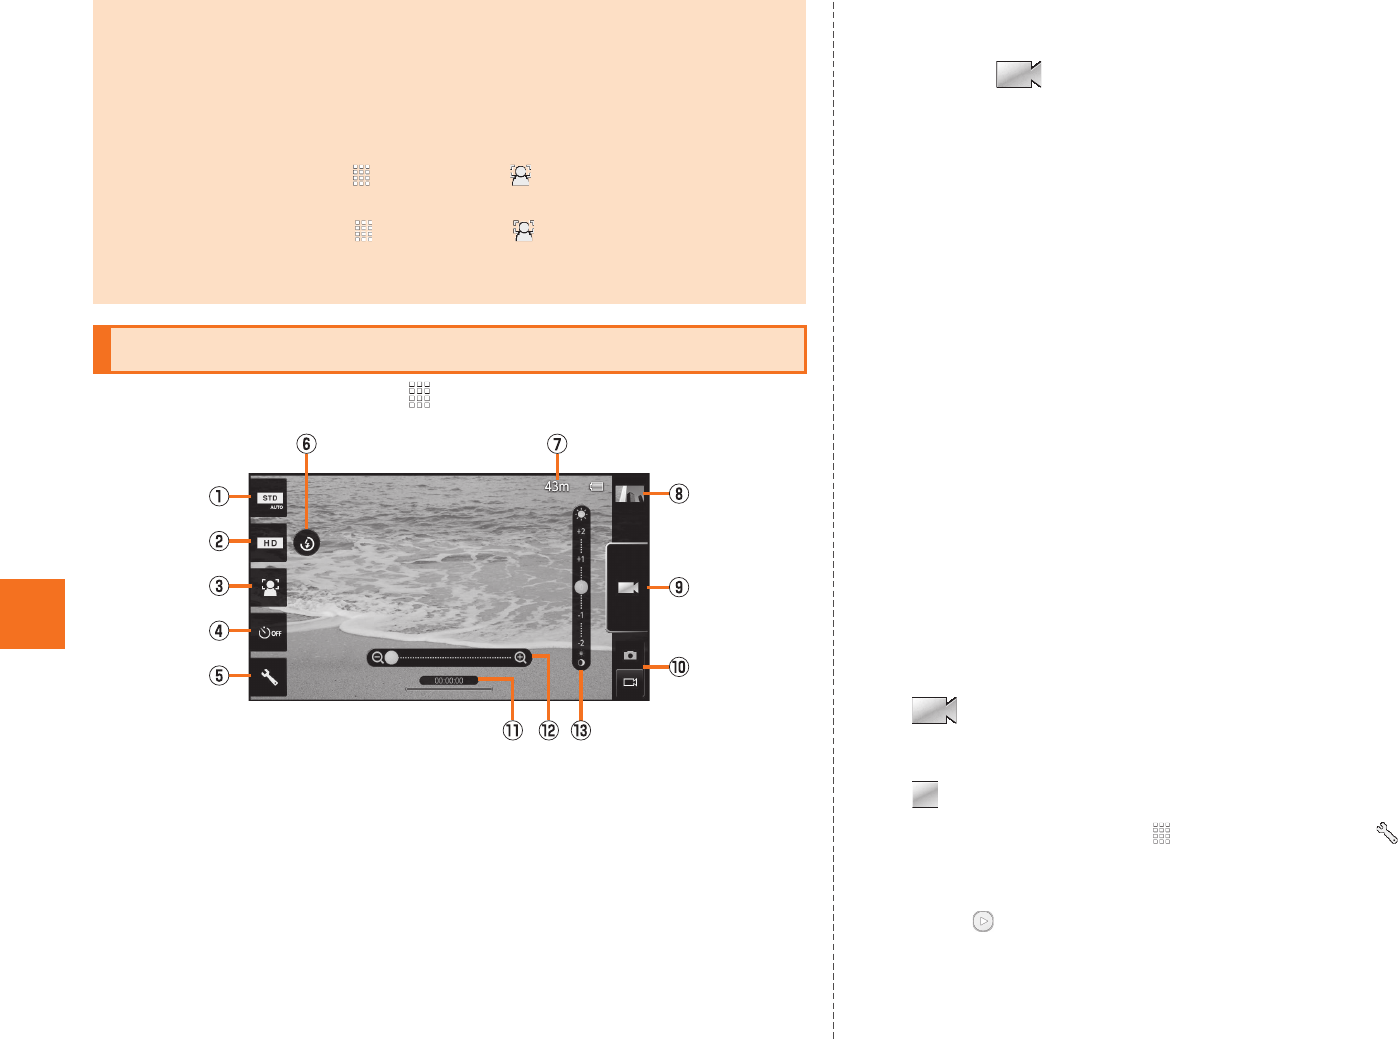
AOn the home screen, [Video Camera.
AScene setting key
Set the appropriate scene setting.
BPicture size switching key
Set the picture size.
CFocus setting key
Set the type of the AF.
DSelf-timer key
Set the self-timer. Start recording if the set time has passed
after is tapped.
•The mobile light flashes while counting down.
•Tap ^ to stop a countdown.
EVarious setting key
Change the various settings.
FMobile light ON/OFF
GAmount of the time left for recording.
HPreviously recorded data
Displays the thumbnail of previously recorded data. Tap the
thumbnail to confirm the data.
IRecord/Stop
JCamera switching key
KRecording time
LZoom bar
Zoom in/out the subject.
Slide your finger to the left/right to display and set the bar.
MBrightness adjusting bar
Adjust the brightness.
Slide your finger up/down to display and set the bar.
B.
Recording starts.
C.
On the home screen, tap [Video Camera [ [Auto Save
[ON to automatically save the recorded data. When the setting is set
to OFF, the movie preview screen is displayed.
•Tap to play the recorded data.
•On the movie preview screen, tap Save to save the recorded data.
•On the movie preview screen, tap Cancel to delete the recorded data
and return to the movie monitor screen.
AF lock
•By tapping the section on which you want to set the focus in the photo
monitor screen, you can hold it in the state that it focuses on the tapped
section. When the focusing is locked, the AF mark is displayed and focus
lock tone sounds. If the focusing is failed, the AF mark is displayed in red. If
you tap the screen while the focusing is locked, the focusing is unlocked.
•On the home screen, tap [Camera [ [Chase Focus [ON. After
that, the AF mark chases the subject even if the subject is moving.
•On the home screen, tap [Camera [ [Infinity Fixed. After that,
you cannot use the AF lock.
•You can take a photo by tapping the AF mark.
Recording Movies
《Movie monitor screen》
KUUJAWGDQQMࡍࠫ㧞㧜㧝㧝ᐕ㧝㧞㧝ᣣޓᧁᦐᣣޓඦᓟ㧡ᤨ㧝㧥ಽ
65
Multimedia
In the Gallery, you can share the images and the movies saved in the
microSD memory card, display them as a list or edit the images.
AOn the home screen, [Gallery.
The album selection screen is displayed.
Camera is activated by tapping .
BSelect an album.
The thumbnail display screen is displayed.
Tap to return to the album selection screen.
Tap to switch the date display and the thumbnail display of the
images.
Slide to the left/right to slide the thumbnails.
CSelect an image or movie.
When you select an image, the one image display screen is displayed.
When you select a movie, an application corresponding to its data
type is activated and the movie is played. If there are multiple
applications to play the movie, the application selection screen may be
displayed. Select an application to play the movie.
If you tap an image or movie, you can hide/show the informations
except for the image/movie informations.
Tap to show the thumbnail display screen.
You can categorize and list, display/play, check, and manage data on
a microSD memory card, using Contents Manager.
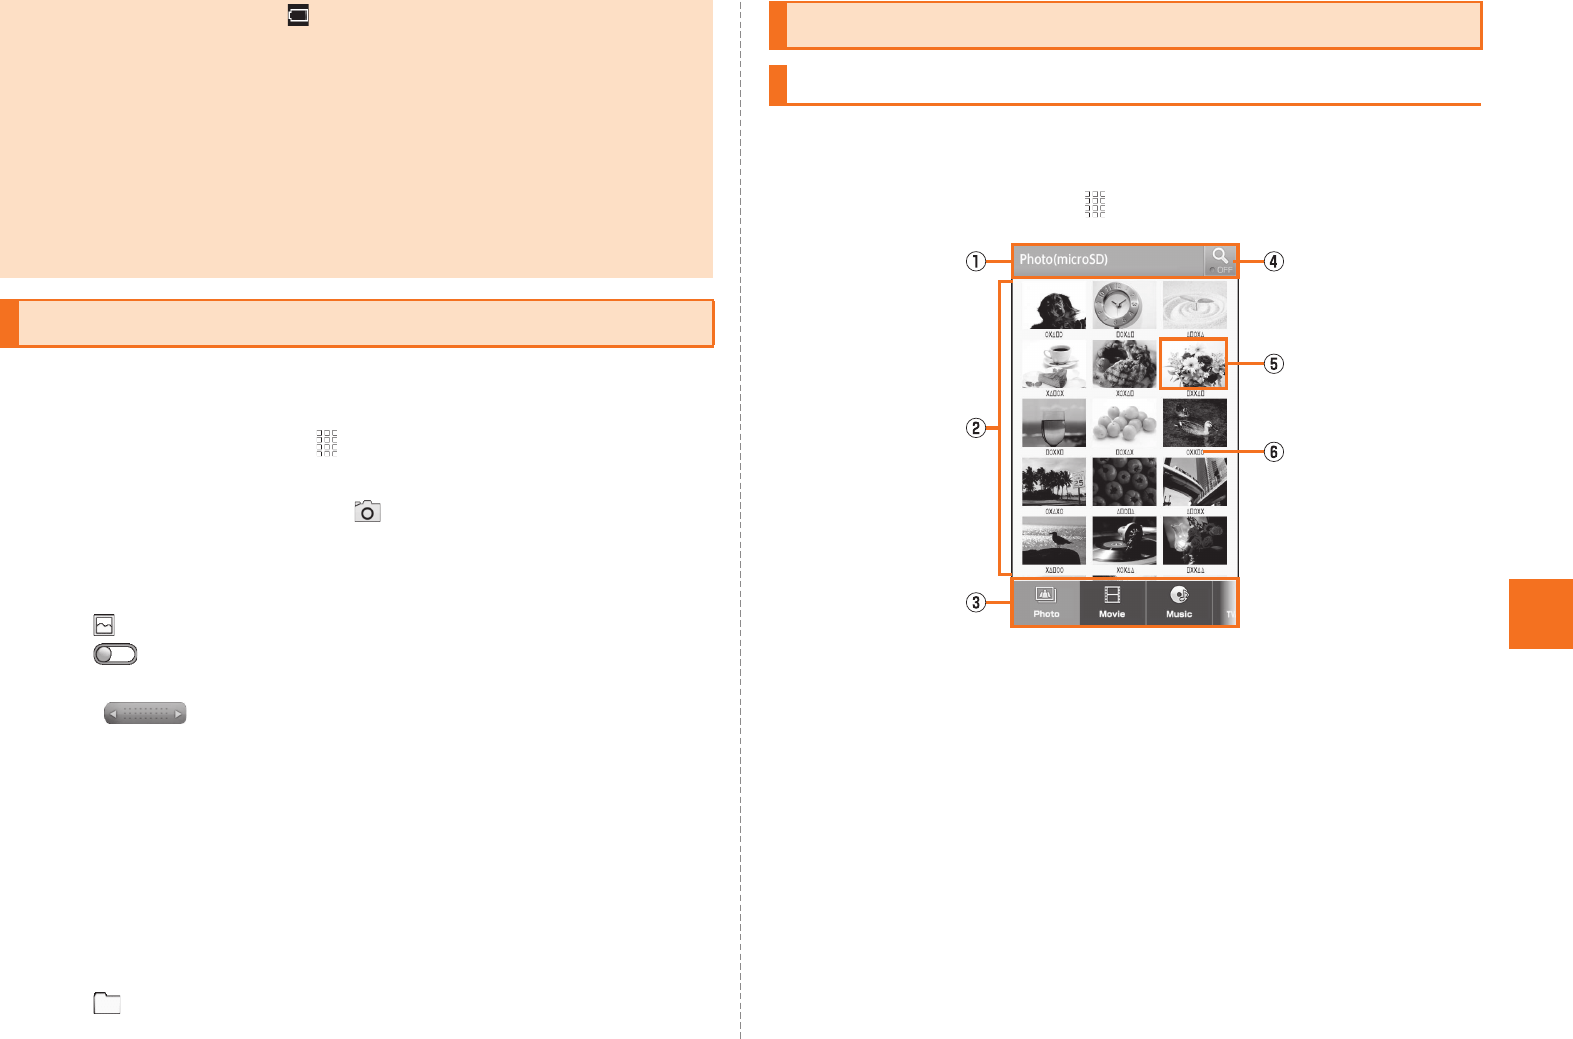
AOn the home screen, [Contents Manager.
ATitle area
Displays a selected category name or save location.
BContents display area
Displays a list of the data.
CCategory
Photo: Displays photos shot by the built-in camera, decorated
pictograms and other images.
Movie: Displays data recorded by the built-in video camera
and other movies.
•If the battery level becomes (approximately 10 %) or lower while
recording, recording is stopped and saved automatically.
•
When you get an incoming call while recording, the recording is stopped and
saved, and then the incoming call screen is displayed. If
Auto Save
is set to
OFF
, the recording is stopped, and then the incoming call screen is displayed.
After the incoming call or the call, the movie preview screen is displayed.
•If you operate nothing for approximately three minutes, Video Camera is
terminated.
•If the mobile light is set to ON, the mobile light is turned on and it is
automatically turned off after approximately three minutes.
Using Gallery
Using Contents Manager
Displaying/Playing Data
《Contents display screen (grid display)》
KUUJAWGDQQMࡍࠫ㧞㧜㧝㧝ᐕ㧝㧞㧝ᣣޓᧁᦐᣣޓඦᓟ㧡ᤨ㧝㧥ಽ
66
Multimedia
Music: Displays voice data recorded by the built-in voice
recorder, music and sounds.
TV/SD-Video: Displays recorded data of 1Seg or recorded
data such as data cooperated with recorders.
Doc.: Displays Office and text data.
Others: Displays other data.
DSearching icon
Set the search criteria.
EThumbnail
Displays thumbnails of the data. If the thumbnail is not
available, displays an icon for data type.
FFile name
Displays title name if the data contains title information.
Displays the program name if the data is recorded TV
program.
BSelect data.
An application corresponding to the data type is activated and the
data is displayed/played.
Regardless of displaying/playing the data from the contents screen, if
there are multiple applications to play/display, the application
selection screen may be displayed. Select an application to display/
play the data.
AOn the contents screen, [Contents Manager.
Be.
C
•Some data displayed in Contents Manager cannot be played/displayed.
•You cannot play data on which is displayed.
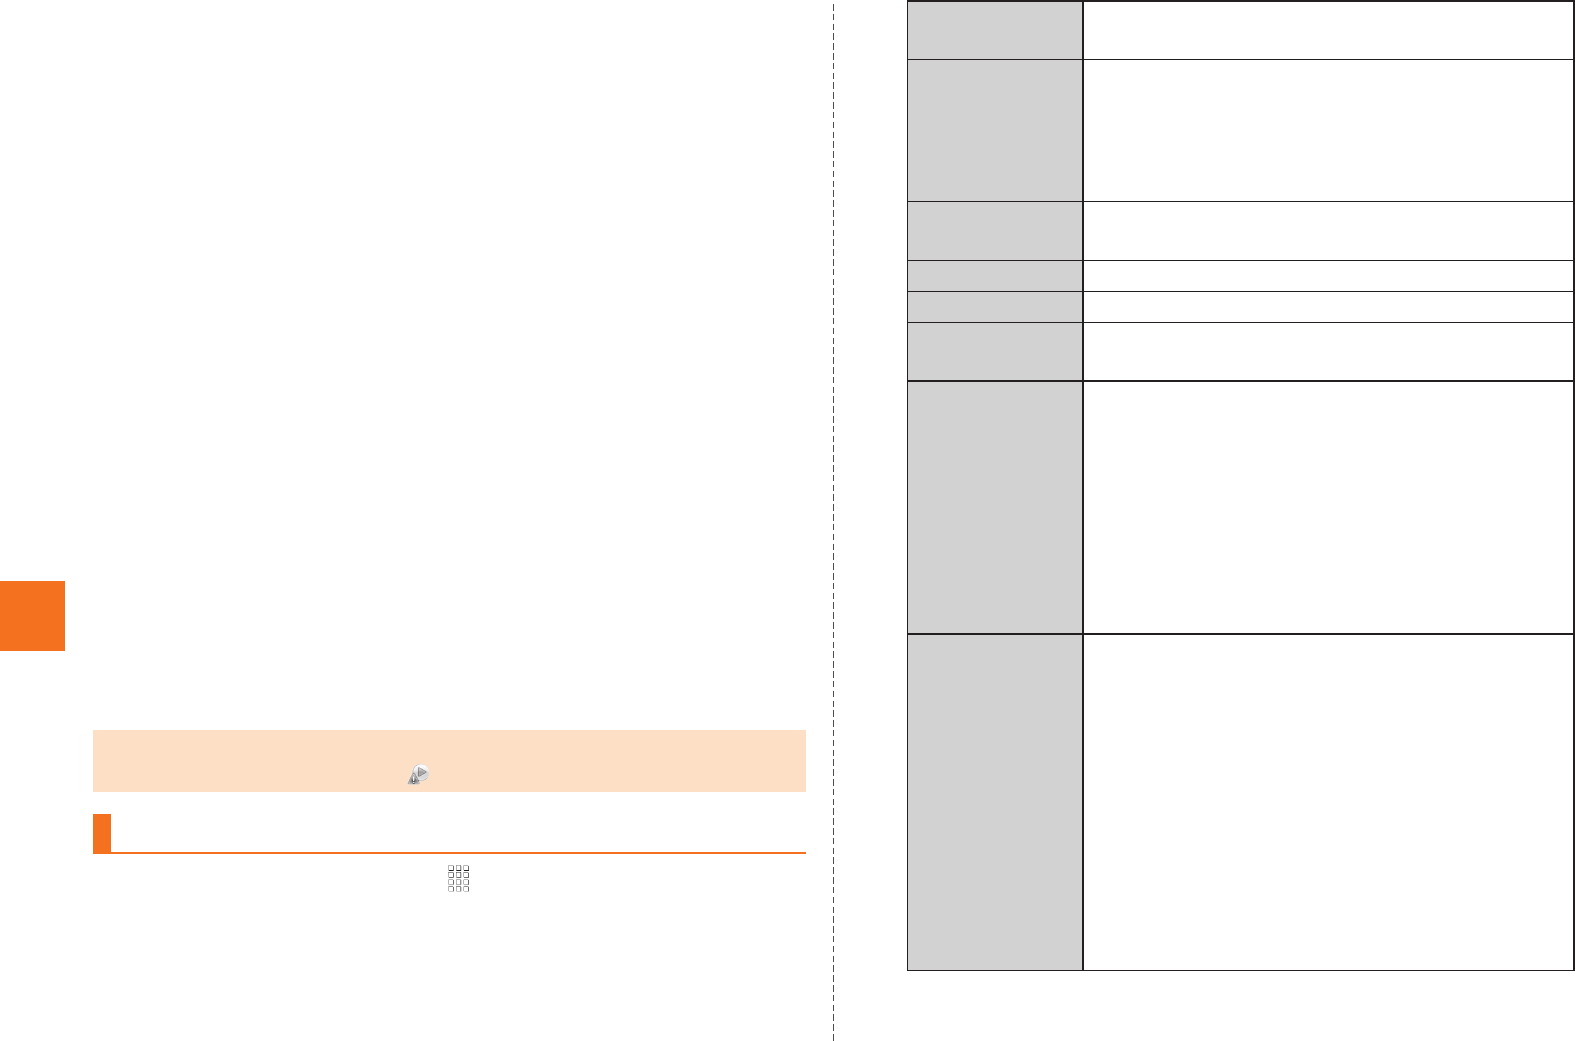
Using Menu in the Contents Screen
Delete
selected
Delete data.
List Players Display types of applications related to file
format.
•If you long-touch a file format, you can
change the application related to the file
format.
Switch grid/list Switch grid display and list display to display
the contents display screen.
Sort Sort saved data.
Slideshow Display the taken pictures by slideshow.
microSD/
phone space
Display the space of the microSD memory
card and the IS14SH.
App setting Retrieval condition setting
Set the search range under various search
criteria and whether to save the search
criteria.
Initialize settings
Reset the settings to default.
Update Information
Update the information of the microSD
memory card.
Slideshow
settings
Slideshow interval
Set the interval of the slideshow.
Slideshow transition
Set the operation of the slideshow.
Photo block settings
Set the size and color of block for photo
block.
Repeat setting
Set whether to repeat the slideshow display.
Shuffle setting
Set whether to display the slideshow in
random order.
KUUJAWGDQQMࡍࠫ㧞㧜㧝㧝ᐕ㧝㧞㧝ᣣޓᧁᦐᣣޓඦᓟ㧡ᤨ㧝㧥ಽ
67
1Seg
■Cautions for using 1Seg
•No communication charges apply for watching 1Seg. However,
when you use an additional service using communication on a data
broadcast, packet communication charges apply.
•1Seg is only for the terrestrial digital TV broadcasting in Japan. You
cannot watch 1Seg overseas due to the differences in the system
and frequency of the broadcasting. Also, you cannot watch BS and
110 degree CS digital broadcasting.
•The IS14SH may be warm while watching 1Seg. Be careful of
touching for a long time which may result in a low temperature burn.
•Do not watch 1Seg while driving a car, motorcycle and bicycle or
walking. It prevent you from hearing the ambient sounds, and you
are distracted by the video images and sounds. It may cause a
traffic accident.
•Be careful not to watch 1Seg for a long time at a loud volume. It may
harm your hearing.
■Behavior by Battery Level
•If the battery level becomes (approximately 10 %) or lower while
activating 1Seg, it is terminated automatically. If the battery level
becomes so while recording TV programs, the recorded content is
saved and 1Seg ends.
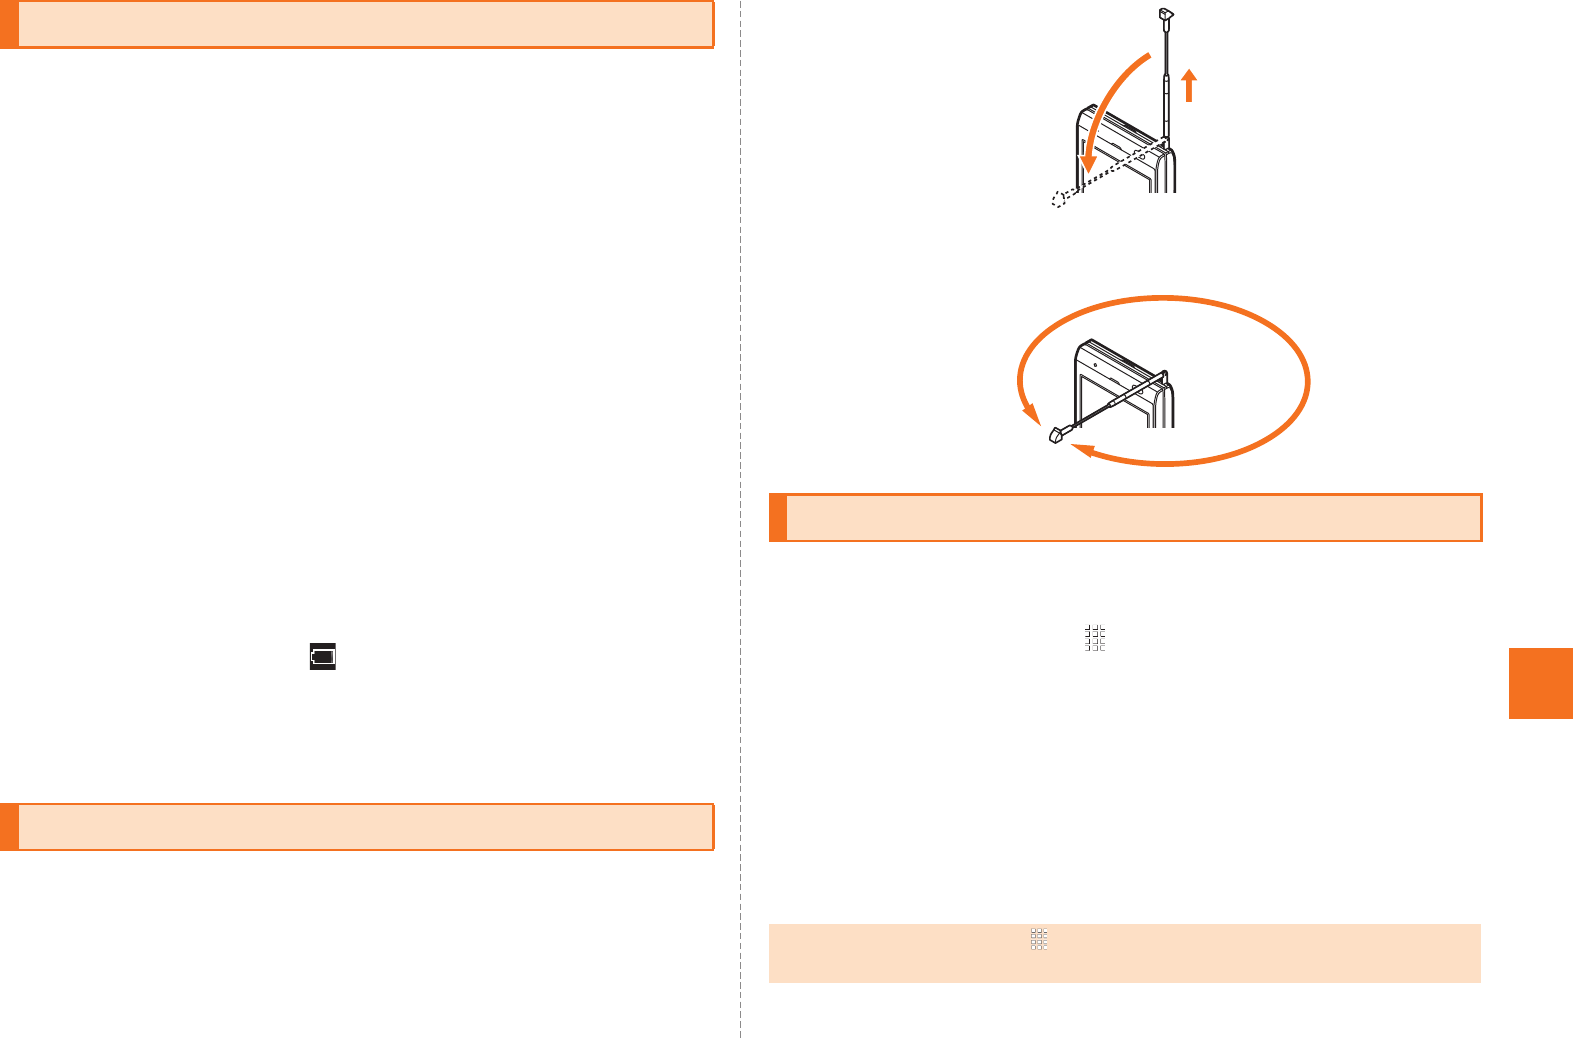
•When watching 1Seg, extend the TV antenna to ensure that you can
receive an adequate signal.
•Sufficiently pull out the TV antenna until it is fixed into position.
Also, the TV antenna can be rotated for 360-degree. Please rotate the
TV antenna to the direction having good receiving sensitivity.
Set the watching area when you activate 1Seg for the first time. After
you have finished to set, you can watch 1Seg.
AOn the home screen, [One Seg [Yes.
BSelect a region.
CSelect a prefecture.
DSelect a locality.
Searching for local channels begins.
EOK.
Cautions for Using 1Seg
TV antenna
Initial Setup of 1Seg
•On the home screen, tap [One Seg [One Seg TV [e [More
[Channel setting [Switch area to change the area.
KUUJAWGDQQMࡍࠫ㧞㧜㧝㧝ᐕ㧝㧞㧝ᣣޓᧁᦐᣣޓඦᓟ㧡ᤨ㧝㧥ಽ
68
1Seg
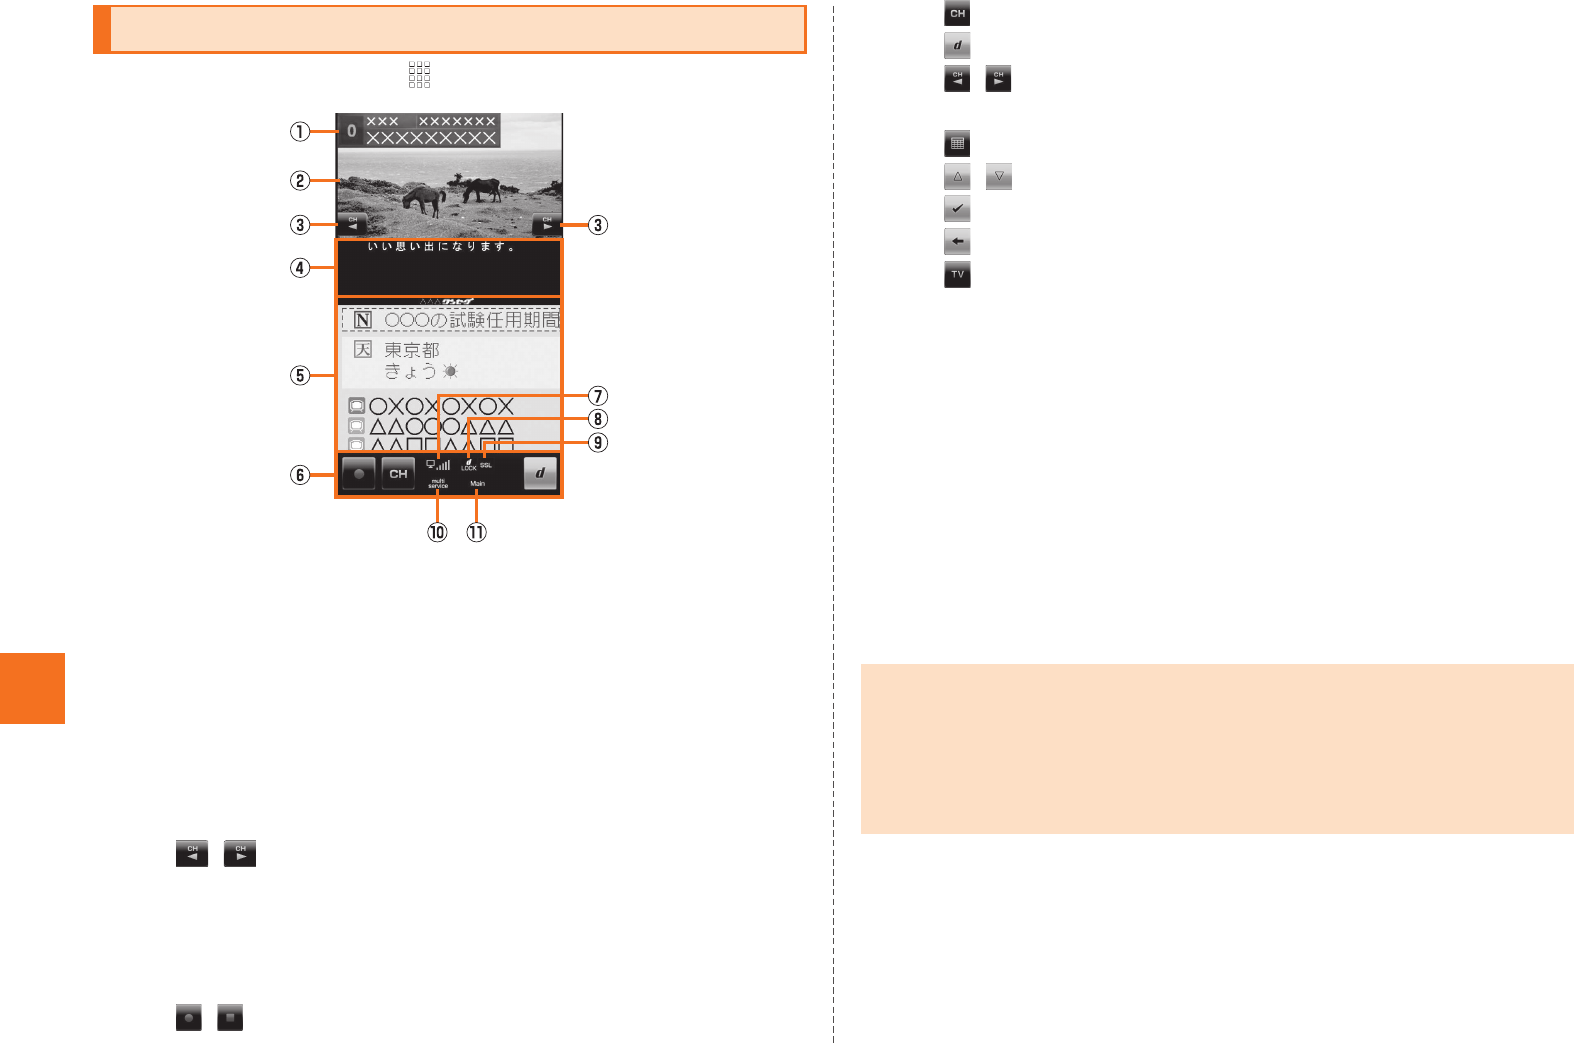
AOn the home screen, [One Seg [One Seg TV.
AProgram information
Tap to display the program name.
BVideo image
Tap to show/hide the program information and operation key.
Double-tap to switch image sizes.
Long-touch to display the channel list.
Slide/Flick to the left/right to switch channels.
COperation key
/ : Switches channels or searches for a channel by
long-touch.
DSubtitle
EData broadcast
F1Seg operation panel/Data broadcast operation panel
/ : Starts/Stops recording.
: Displays the channel list.
: Displays the data broadcast operation panel.
/ : Switches channels or searches for a channel by
long-touch.
: Displays the program guide.
/ : Moves the cursor.
: Selects an item.
: Returns to the previous screen.
: Displays the 1Seg operation panel.
GSignal strength
HData broadcast lock indicator
Indicates that the data broadcast lock content is displayed on
a data broadcast.
ISSL indicator
Indicates that the page protected by the advanced security is
displayed on a data broadcast.
JMultiple services indicator
Indicates that another service (program) is broadcast in a
channel being received.
KLanguage
Watching 1Seg
《1Seg screen》
•When you activate 1Seg or switch channels, it may take time to get the
video image or data broadcast data due to the characteristics of the digital
broadcasting.
•The video image or sound may be interrupted depending on the signal
strength.
•Camera is not available while activating 1Seg.
KUUJAWGDQQMࡍࠫ㧞㧜㧝㧝ᐕ㧝㧞㧝ᣣޓᧁᦐᣣޓඦᓟ㧡ᤨ㧝㧥ಽ

69
1Seg
■Operations while displaying Channel List
Select the broadcast station name: Switches to the selected
broadcast station.
Long-touch the broadcast station [Channel overwrite registration
[Yes: Assigns the broadcast station being watched to the selected
remote control number.
Long-touch the broadcast station [Delete channel [Yes: Deletes the
broadcast station from the selected remote control number.
Long-touch the unset remote control number: Assigns the broadcast
station being watched to the selected remote control number.
KUUJAWGDQQMࡍࠫ㧞㧜㧝㧝ᐕ㧝㧞㧝ᣣޓᧁᦐᣣޓඦᓟ㧡ᤨ㧝㧥ಽ
70
Applications
au Disaster Countermeasure is an application in which you can use
Disaster Message Board and Early warning mail (earthquake early
warnings and disaster/evacuation information).
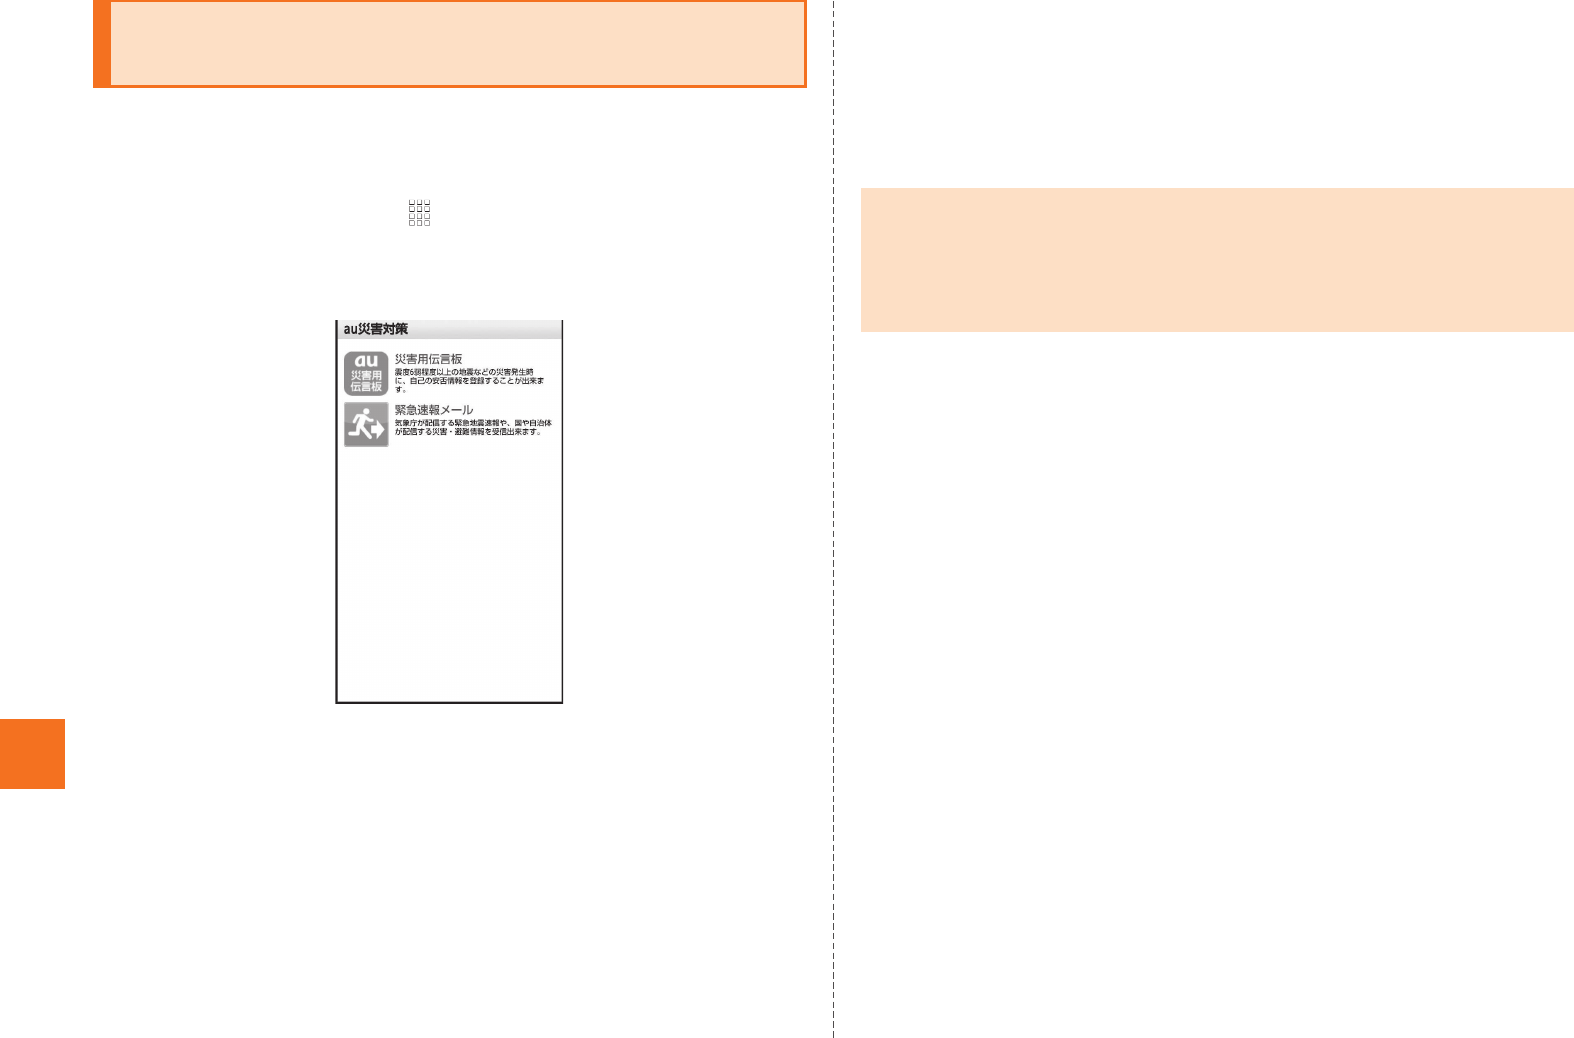
AOn the home screen, [ (au Disaster
Countermeasure).
The au disaster countermeasure menu is displayed.
■Using Disaster Message Board
Disaster Message Board is a service to enable customers in disaster
areas to register their safety information via IS NET when large-scale
disasters, such as an earthquake whose Japan seismic scale is
approximately 6-lower or more, occur. The registered safety
information can be checked by customers using au phones, and also
from other carriers’ mobile phones, PC, etc.
For details, refer to “Disaster Message Board Service” on au
homepage.
AFrom the au disaster countermeasure menu,
(Disaster Message Board).
Follow the instructions on the screen for registration/confirmation.
■Using Early Warning Mail
Early warning mail is a service to collectively deliver earthquake early
warnings and disaster/evacuation information to au phones in the
specified areas.
* From the spring of 2012, we will start providing “Disaster/evacuation
information” as early warning mail. You will be notified on the au
homepage for details.
At the time of purchase, receiving setting of early warning mail
(earthquake early warnings and disaster/evacuation information) is
set to (Receive).
When you receive an earthquake early warning, secure your safety
and act composedly according to the surrounding situations.
AFrom the au disaster countermeasure menu,
(Early warning mail).
The inbox is displayed.
Select a mail you want to check to check the details of the mail.
Using au Disaster Countermeasure
Application
au災害対策
《au disaster countermeasure menu》
•To register the safety information, an e-mail address (~ezweb.ne.jp) is
required. Set the mail address in advance.
•It is unavailable while connecting via Wi-Fi®.
•The notification mail function of safety information will be provided from the
spring of 2012.
災害用伝言板
受信する
緊急速報メール
KUUJAWGDQQMࡍࠫ㧞㧜㧝㧝ᐕ㧝㧞㧝ᣣޓᧁᦐᣣޓඦᓟ㧡ᤨ㧝㧥ಽ
71
Applications
削除 (Delete) Delete received mails.
設定 (Settings) 緊急地震速報 (Earthquake Early Warning) (At
the top)
Set whether to receive earthquake early
warnings.
災害・避難情報 (Disaster/Evacuation
information) (At the top)
Set whether to receive disaster/evacuation
information.
音量 (Volume)
Set the volume of the receiving sound for
earthquake early warnings.
バイブ (Vibrator)
Set whether to activate the vibrator when
receiving earthquake early warnings.
マナー時の鳴動 (Linkage to Manner mode)
Set whether to notify you with Manner mode
settings applied while Manner mode is set.
緊急地震速報 (Earthquake Early Warning) (At
the bottom)
Check the operations of the receiving sound
and vibrator.
災害・避難情報 (Disaster/Evacuation
information) (At the bottom)
Check the operations of the receiving sound
and vibrator.
•When you receive an early warning mail, the dedicated alarm tone rings.
The alarm tone cannot be changed.
•An earthquake early warning is a warning to show the areas where a strong
shaking (Japan seismic scale 4 or more) is expected when an earthquake
whose maximum Japan seismic scale is predicted of 5-lower or more has
been detected.
•This service detects an earthquake (P-wave, preliminary tremors) near the
seismic center immediately after the earthquake occurs and automatically
calculate its location, scale and predicted strength of the shaking. After that,
you will be notified of the earthquake as soon as possible within a few
seconds to dozens of seconds before a strong shaking from the earthquake
(S-wave, principal shock) occurs.
•In the vicinity of the seismic center, a strong shaking may reach you before
an earthquake early warning.
•Disaster/Evacuation information is to notify information related to the safety
of citizens, such as evacuation advisories, evacuation orders, various
alarms delivered by the national government or the local governments, etc.
•This service is available only in Japan (Not available overseas).
•Early warning mail is free of both information charges and communication
charges.
•As for this service, au shall not be liable to any damage incurred on the
users resulted from communication disturbance, failure or delay of
information delivery due to system failure, contents of the information or
other problems that are not supposed to be blamed on our company.
•For details on earthquake early warnings provided by the Japan
Meteorological Agency, refer to the Japan Meteorological Agency
homepage.
http://www.jma.go.jp/
•Early warning mails cannot be received during a call. Also, they may not be
received during communication such as while sending and receiving
C-mails/e-mails and while using the browser.
•Early warning mails may not be received when you turn off the power or you
are in a place where the signal cannot be received or the signal is weak,
even within the service area.
•Early warning mails which failed to be received will not be able to be
received again.
•The earthquake early warning distribution system provided by this service is
different from that provided by TV, radio and other communication media
and thus the arriving time of earthquake early warnings may be different
among those media.
•Information intended for the areas of other than your present location may
be received.
KUUJAWGDQQMࡍࠫ㧞㧜㧝㧝ᐕ㧝㧞㧝ᣣޓᧁᦐᣣޓඦᓟ㧡ᤨ㧝㧥ಽ
72
Applications
You can download and install various applications such as useful
tools or games from Android Market offered by Google.
•Google account is required to use Android Market. For details on
Google account, refer to the “Setting Up a Google Account”.
•For details, on the Android Market screen, tap e [Help to refer to
Android Market Help.
AOn the home screen, [Market.
The Android Market screen is displayed.
When you activate Android Market for the first time, the terms of
service are displayed, so tap Accept after confirming the contents.
You can install Android-based applications recommended by au.
•au one-ID is required to use some functions. For setting au one-ID,
refer to “Setting an au one-ID”.
AOn the home screen, [au one Market.
The au one Market screen is displayed.
When you activate au one Market for the first time, the terms of service
and cautions for using au one Market are displayed, so tap
(Agree) [OK after confirming the contents.
You can search for games and contents provided by au one GREE.
You can search them easily without login.
AOn the home screen, [GREE_MARKET.
The GREE Market screen is displayed.
You can search for games etc. you want to use from the section on the
screen.
You can be supported for the security of the Android phone totally
using three types of applications, “3LM Security”, “Remote Support”
and “VirusBuster™ mobile for au”.
•The Anshin Security Pack is a paid service.
Using Android Market
Using au one Market
•Follow the terms of service to use au one Market. Procedures on
downloading applications and making payment for fee-based applications
differ depending on the distributor of au one Market.
同意
Using GREE Market
•To use games searched from GREE Market, registering as an au one GREE
member may be required.
Using Anshin Security Pack
Anshin Security Pack
Before using location search of Anshin Security Pack
•Note that au shall not be liable for any loss of the users caused by provided
GPS informations.
Precautions
•Even if you are within the service area, you may not be able to obtain the
accurate location information in a location where the signal from GPS
satellites and base stations is weak.
•The location information may not be notified if, on the home screen, tap
[Settings [Location & security [Uncheck Use GPS satellites.
•You can search a terminal whose information of the subscribed au IC-Card
matches that of the au IC-Card which is inserted at the time when you use
the service for the first time.
KUUJAWGDQQMࡍࠫ㧞㧜㧝㧝ᐕ㧝㧞㧝ᣣޓᧁᦐᣣޓඦᓟ㧡ᤨ㧝㧥ಽ
73
Applications
■3LM Security
•If the IS14SH is stolen or lost, you can delete data on the IS14SH.
Contact the Customer Service Center to delete the data.
•If the IS14SH is stolen or lost, you can lock the IS14SH remotely.
Also, you can unlock the IS14SH remotely.
•When activating “3LM Security” or the IS14SH is locked remotely,
the location information of the IS14SH will be sent to the server. Also,
you can set the location information to be always sent.
•The terminal information of IS14SH is sent to the server periodically.
■Remote Support
•When you contact us about the operations of the cell phone, the
operator will share the screen of your IS14SH with you, and solve the
problems directly by supporting your operations.
■VirusBuster™ mobile for au
•Countermeasure against improper applications: When you install
applications, scan the files and prevent installing improper
applications. Also, you can scan applications already installed
manually and delete the applications.
•WEB filter: Prevent young people from accessing inappropriate sites
such as gambling and dating sites.
•Countermeasure against dangers in WEB: Prevent you from
accessing improper sites such as sites which distribute virus and
improper applications and phishing sites.
•Blocking incoming calls/SMS: Other than rejecting nuisance calls
and SMS, you can also reject messages which contain specific
keywords.
AOn the home screen, [3LM [For Consumer.
Alternatively, on the home screen, tap [au (au
Customer Support) [ (Support & Services)
[ (Anshin Security Pack) [3LM Security
[For Consumer.
When you activate 3LM Security for the first time, the terms of service
for 3LM Security are displayed, so tap I Accept [Activate after
confirming the contents.
BSelect and set items.
AContact the Customer Service Center.
BOn the home screen,
[ (Remote Support).
Alternatively, on the home screen, tap [au (au
Customer Support) [ (Support & Services)
[ (Anshin Security Pack)
[ (Remote Support).
C(Agree).
DFollow the instructions from the operator.
Using 3LM Security
Using Remote Support
お客さまサポート
サポート & サービス
安心セキュリティパック
リモートサポート
お客さまサポート
サポート & サービス
安心セキュリティパック
リモートサポート
同意する
KUUJAWGDQQMࡍࠫ㧞㧜㧝㧝ᐕ㧝㧞㧝ᣣޓᧁᦐᣣޓඦᓟ㧡ᤨ㧝㧥ಽ
74
Applications
AOn the home screen,
[ (VirusBuster).
Alternatively, on the home screen, tap [au (au
Customer Support) [ (Support & Services)
[ (Anshin Security Pack)
[ for au (VirusBuster mobile for au).
When you activate VirusBuster for the first time, the license agreement
for VirusBuster is displayed, so tap (Agree) after confirming
the contents. Also, if you have not set up a Google account, a
message asking you to set up a Google account appears. Follow the
screen to set up one.
BSelect an item.
CFollow the instructions on the screen.
You can delete data, clear cache or stop installed applications
forcefully.
AOn the home screen, [Settings [Applications
[Manage applications.
The installed applications list is displayed.
BSelect an application.
The detailed application information is displayed.
CSelect the operation to perform.
Follow the on-screen instructions to perform it.
Using VirusBuster™ mobile for au
•Web filter is enabled when you use Android standard browser connected
via IS NET or Wi-Fi®.
ウイルスバスター
お客さまサポート
サポート & サービス
安心セキュリティパック
ウイルスバスター モバイル
同意する
Managing Applications
•When you select an application installed from Android Market etc., Uninstall
is displayed. Tap it to remove the application.
KUUJAGAHOࡍࠫ㧞㧜㧝㧝ᐕ㧝㧞㧝ᣣޓᧁᦐᣣޓඦᓟ㧡ᤨ㧟㧝ಽ
Settings of IS14SH
75
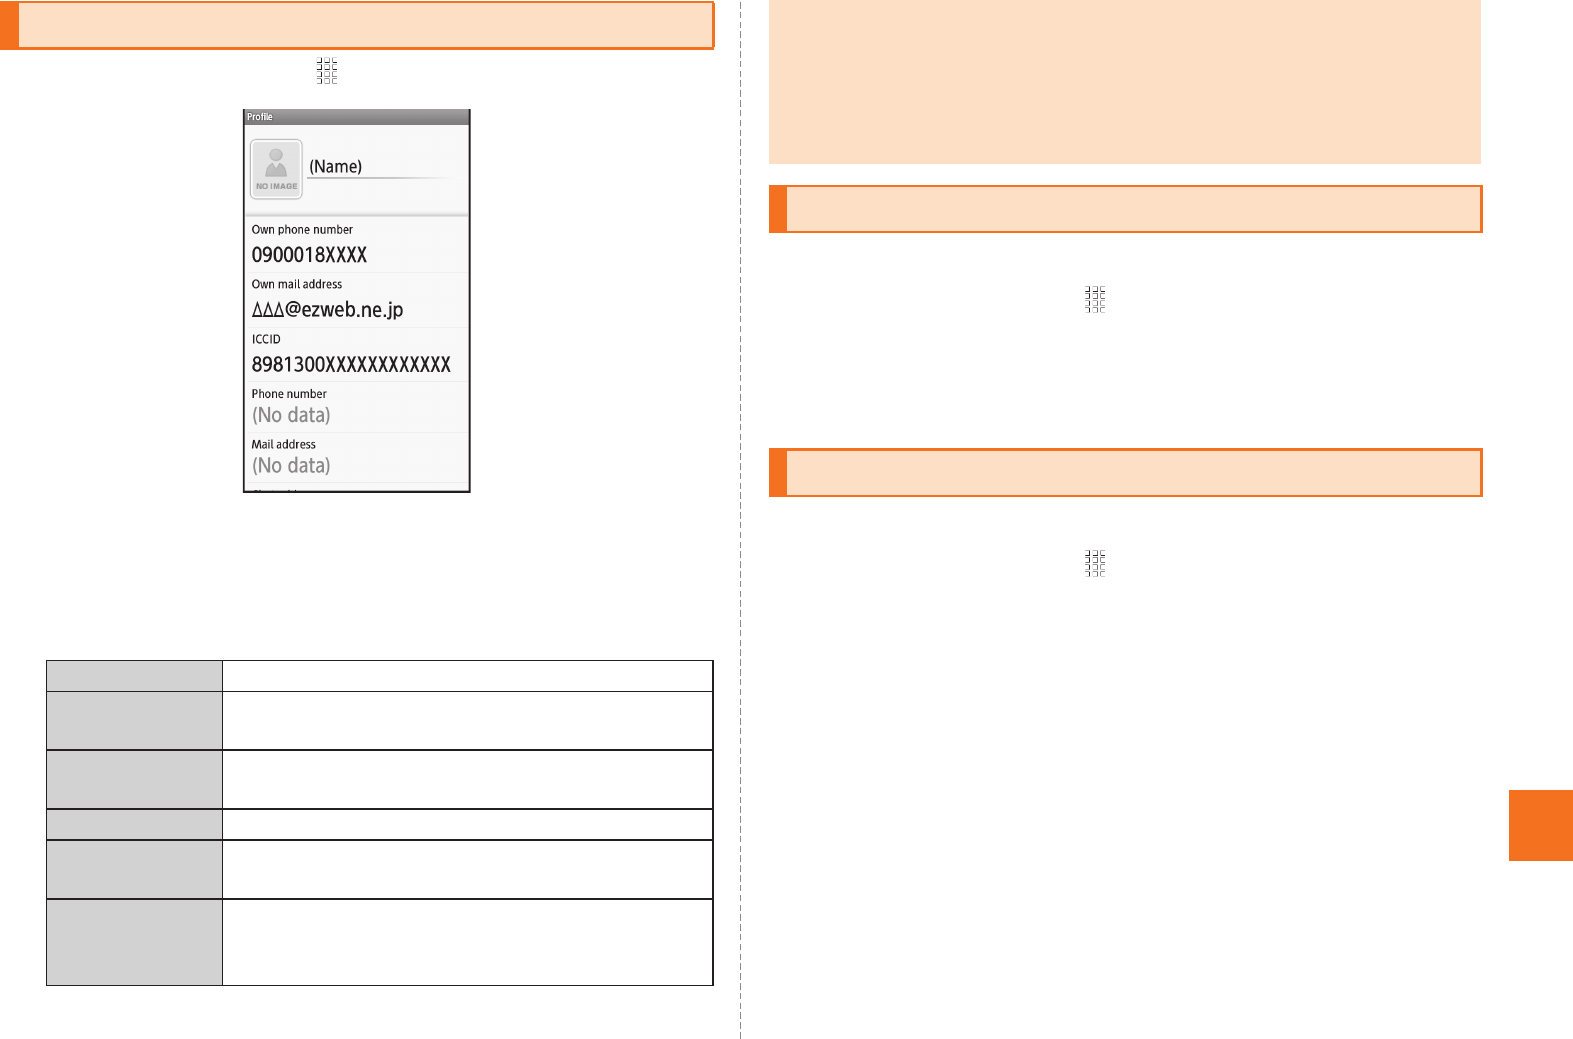
AOn the home screen, [Settings [Profile.
■Using Menu in the Profile Screen
AOn the profile screen, e.
B
You can select and set data for the incoming ring tone.
AOn the home screen, [Settings [Sound settings
[Melody.
BSelect the data.
You can select and set an image to display as the wallpaper.
AOn the home screen, [Settings [Display settings
[Wallpaper.
BSelect the application.
CSelect the data [Save/Set wallpaper/Set to wallpaper.
Checking Your Profile
Edit Edit your profile.
Send by
Infrared
Send your profile using infrared
communication.
Send by
Bluetooth
Send your profile using Bluetooth®.
Send by IC Send your profile using IC communication.
Attach to Mail Create a mail message using your profile as
an attached data.
Send Setting Set the sending settings.
You cannot disable Name and Own phone
number.
《Profile screen》
•If au IC-Card is not inserted or different au IC-Card is inserted, auIC
Card(UIM) error. Please insert card appears for checking your profile. Tap OK
to display the profile screen. However, information such as Own phone
number, Own mail address or ICCID is not displayed. Also, some
operations, such as attaching the profile to mail, may not be carried out.
Insert your au IC-Card and turn on power again.
Changing the Incoming Ring Tone
Changing the Wallpaper
KUUJAWGDQQMࡍࠫ㧞㧜㧝㧝ᐕ㧝㧞㧝ᣣޓᧁᦐᣣޓඦᓟ㧡ᤨ㧝㧥ಽ

76
Settings of IS14SH
When initializing a microSD memory card, all data (including
applications) saved on the microSD memory card is deleted.
AOn the home screen, [
Settings
[
microSD & phone storage
[
Unmount microSD
[
OK
.
BErase microSD [Erase microSD [Enter Lock No.
[OK [Erase everything.
Initializing microSD Memory Card
•Initialize a microSD memory card while charging or with the battery fully
charged.
•To have the microSD memory card recognized after having unmounted it,
tap Mount microSD.
•Do not unmount the microSD memory card while saving data on it since it
may result in damage to data on the microSD memory card or data loss.
KUUJAWGDQQMࡍࠫ㧞㧜㧝㧝ᐕ㧝㧞㧝ᣣޓᧁᦐᣣޓඦᓟ㧡ᤨ㧝㧥ಽ

77
Global Function
■When the IS14SH is Stolen or Lost
If the IS14SH is stolen or lost while overseas, please contact
Customer Service Center immediately to suspend phone service.
Please be aware that any calling charges and packet
communication charges incurred after theft or loss of a phone are
the responsibility of the customer.
If the au IC-Card inserted into the IS14SH is stolen or lost, the card
may be inserted into another mobile phone (including GSM mobile
phone for overseas use) by a third party. So, it is recommended to
set the PIN code to protect from improper use by a third party.
■Using the IS14SH Properly by Knowing About
Calling and Communication Services Overseas
Calling charges differ depending on the country/region.
Discount services do not apply to calling charges incurred while
overseas.
Calling charges are also incurred when receiving calls overseas.
Depending on the country/region, calling charges may be incurred
from the time that you tap Call.
■Obtaining the PRL (Roaming Area Information)
To use the IS14SH overseas, you are required to change to the
telecommunications carrier’s networks that you connect to at your
travel destination.
Please obtain the latest PRL before traveling.
The PRL (roaming area information) contains information on roaming
areas of overseas partner providers who have signed an international
roaming contract with KDDI (au).
AOn the home screen, [Settings
[Wireless & networks [Mobile networks
[Roaming settings [PRL settings
[Update PRL version.
The PRL is obtained. Download the PRL data by following the
on-screen instructions.
Using Global Passport CDMA
For Overseas Use without Anxiety
The overseas network condition is available on the au homepage.
Make sure to check the condition before leaving Japan.
http://www.au.kddi.com/service/kokusai/tokomae/
Configuring the Overseas Settings
•When you download the PRL data, packet communication charges apply.
•Be aware that service may be unavailable in some areas if you do not
update the PRL.
KUUJAWGDQQMࡍࠫ㧞㧜㧝㧝ᐕ㧝㧞㧝ᣣޓᧁᦐᣣޓඦᓟ㧡ᤨ㧝㧥ಽ
78
Global Function
■Setting the Area
You can set the area where you use the IS14SH.
AOn the home screen, [Settings
[Wireless & networks [Mobile networks
[Roaming settings [Area settings.
B
■Setting the data roaming
You can use the packet communication during roaming.
AOn the home screen, [Settings
[Wireless & networks [Mobile networks
[Data roaming.
Tap OK to enable the data roaming.
■Making a Call to Another Country (Including Japan)
from Your Travel Destination
You can make a call to Japan or another country from your travel
destination.
Example: To call “212-123-XXXX” in USA from South Korea
AOn the home screen, [Phone.
BEnter “002” as the international access code for
South Korea.
Long-touch the “0” to enter “+” and the international access code of
your travel destination is automatically added when calling.
CEnter “1” as the country code for USA.
DEnter “212” as the area code.
If the area code starts with “0”, dial it without including the “0” (There
are some exceptions such as fixed-line phones in some countries or
regions including Italy and Moscow).
EEnter “123XXXX” as the other party’s phone number
[Call.
Japan Set for using within Japan.
Roaming Set for using overseas (Automatic setting in
accordance with the PRL).
•The country selection screen may be displayed if Area settings is set to
Roaming. Select the travel country.
•To enable the data roaming, set Area settings to Roaming in advance.
•If you have not subscribed to IS NET, au.NET charges (525 yen including
tax for the used month) and communication charges apply.
Making a Call at Your Travel Destination
•If the person you are dialing is using Global Passport, enter the country
code “81” (Japan) regardless of his/her travel destination.
KUUJAWGDQQMࡍࠫ㧞㧜㧝㧝ᐕ㧝㧞㧝ᣣޓᧁᦐᣣޓඦᓟ㧡ᤨ㧝㧥ಽ
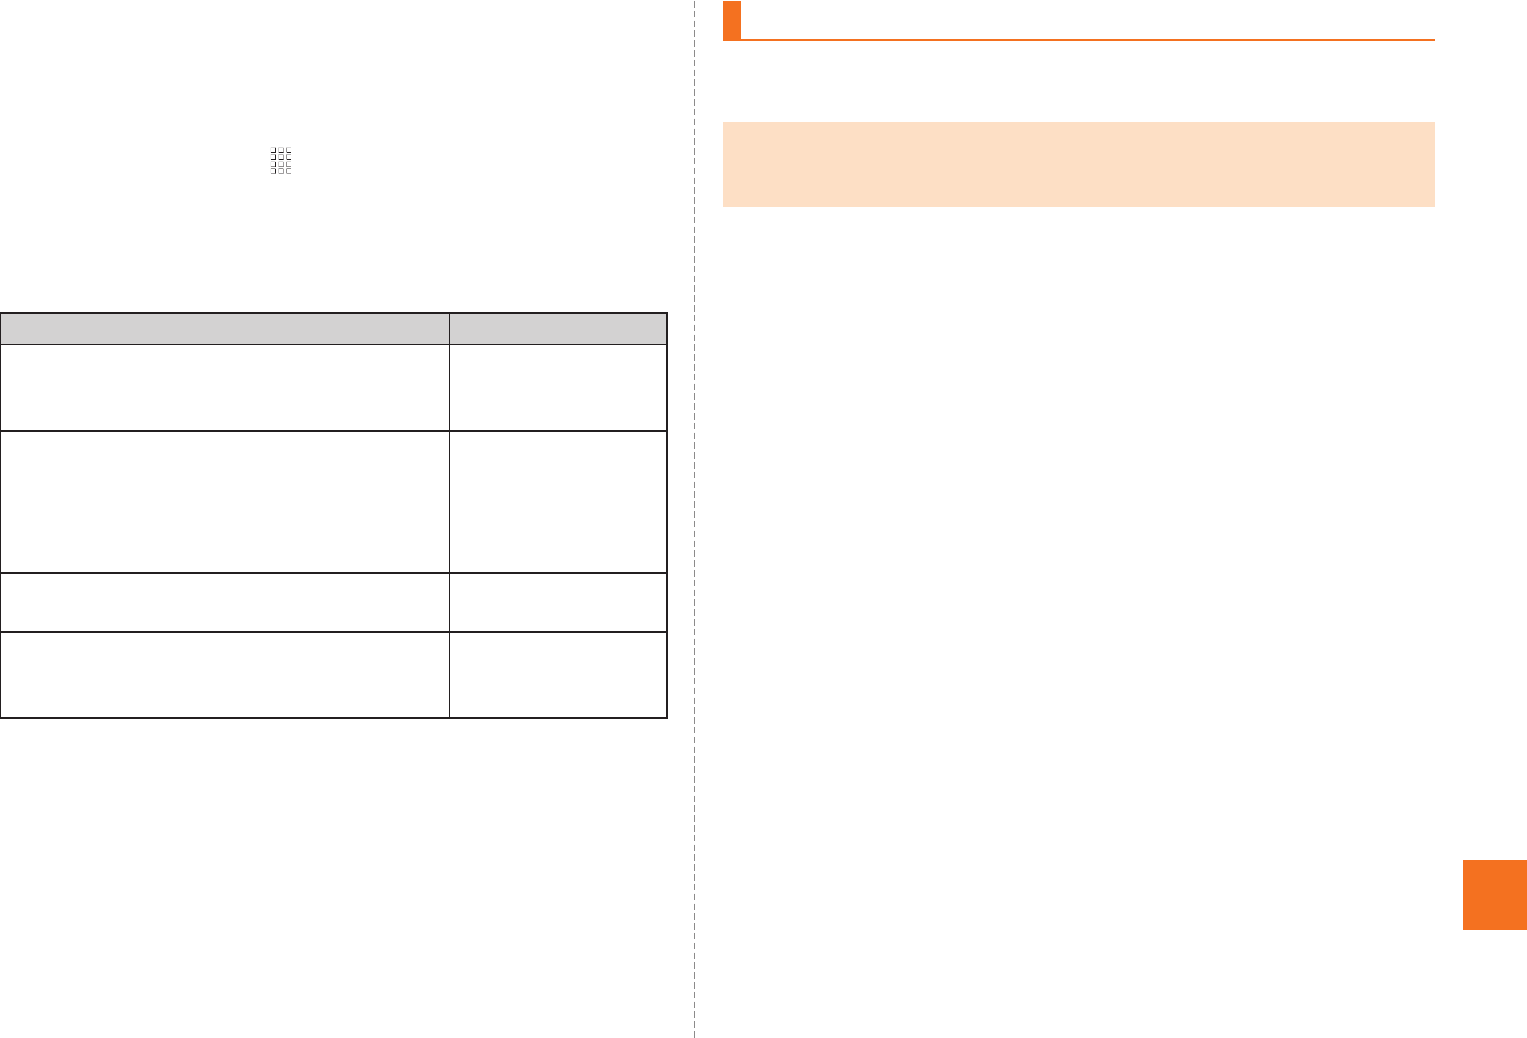
79
Global Function
■Making a Call within the Same Country While
Overseas
You can call to general fixed-line phones or mobile phones with the
same method as when calling in Japan.
AOn the home screen, [Phone.
BEnter a phone number.
The method for making calls varies depending on where you are
calling.
CCall.
You can receive calls with the same method as when receiving calls in
Japan.
■Having Calls Made to Your Travel Destination from
Japan
People calling you can use the same method as when calling you from
Japan.
■Having Calls Made to Your Travel Destination from
Countries Other Than Japan
International access code and “81” (Japan) have to be dialed
regardless of the travel destination since the call is made through
Japan.
Example: To have a call made to your au phone in Japan
“090-1234-XXXX” from the USA
AEnter “011” as the international access code for USA.
BEnter “81” as the country code for Japan.
COmit the first “0” and enter “901234XXXX” as the
phone number of au phone [Call.
Travel destination Number
U.S. Mainland, Hawaii, Saipan “1” + Area code +
Other party’s
phone number
New Zealand, South Korea, China, Hong
Kong, Macau, Thailand, Taiwan,
Indonesia, Vietnam, Israel, India,
Bermuda Islands, Bangladesh, Bahamas,
Venezuela
Area code + Other
party’s phone
number
Mexico (Local call) Other party’s
phone number
Mexico (Toll call) “01” + Area code +
Other party’s
phone number
Receiving a Call at Your Travel Destination
•If you receive a call while overseas, the call is forwarded from Japan no
matter where the call is made from. Call charges to Japan are incurred by
the caller and receiving charges by the receiver.
KUUJAWGDQQMࡍࠫ㧞㧜㧝㧝ᐕ㧝㧞㧝ᣣޓᧁᦐᣣޓඦᓟ㧡ᤨ㧝㧥ಽ
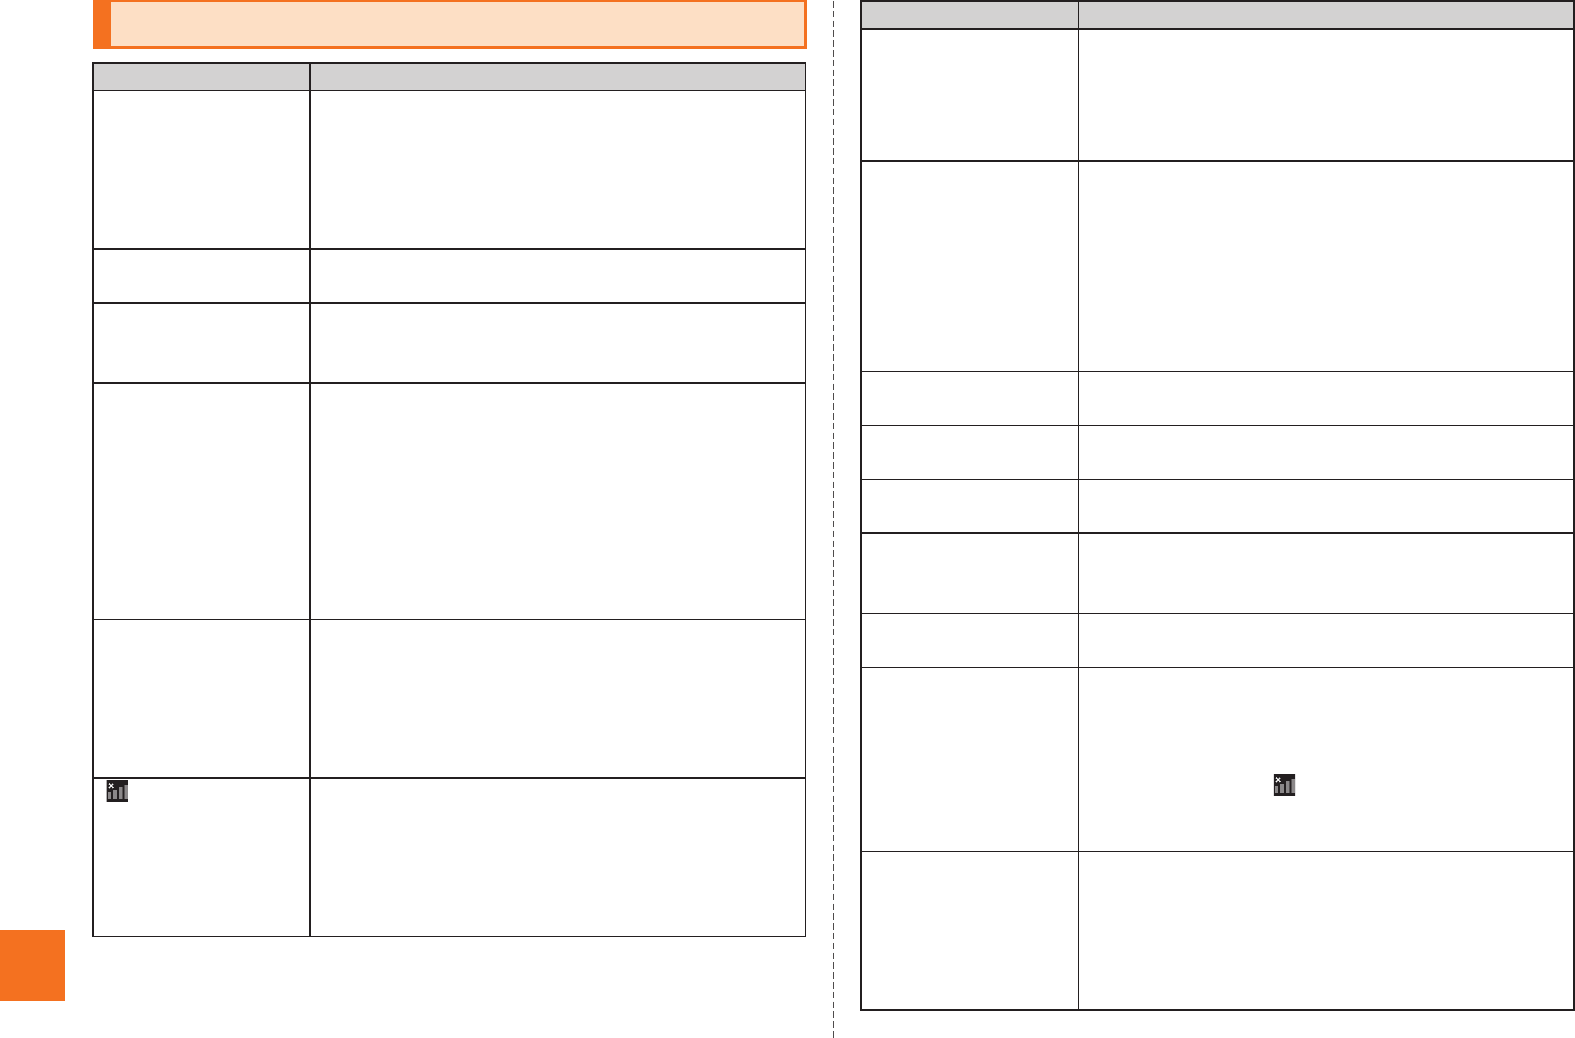
80
Appendix/Index
Troubleshooting
Trouble Detail
Cannot turn on the
power by pressing
K.
Is the battery pack charged? (zP.16)
Is the battery pack attached properly? (zP.12)
Is the jack of the battery pack clean?
Wipe the external connection jack with a dry swab
etc. periodically.
Did you hold down K? (zP.18)
The power is turned
off automatically.
Is there enough power left in the battery pack?
(zP.16)
The power is turned
off while the wake-up
logo is displayed.
Is there enough power left in the battery pack?
(zP.16)
Cannot make calls. Is the power turned on? (zP.18)
Is an au IC-Card inserted? (zP.13)
Did you enter the correct phone number? (Did you
enter the phone number starting with the area
code?) (zP.38)
Did you tap Call after entering a phone number?
(zP.38)
Did you set the correct setting in Area settings?
(zP.78)
Cannot receive calls. Is the IS14SH within the service area or in a location
where the signal is strong? (zP.29)
Is the power turned on? (zP.18)
Is an au IC-Card inserted? (zP.13)
Did you set the correct setting in Area settings?
(zP.78)
(out of service
area indicator)
appears.
Is the IS14SH within the service area or in a location
where the signal is strong? (zP.29)
Is your finger off the area around the internal
antenna? (zP.8)
Did you set the correct setting in Area settings?
(zP.78)
Display and charging/
incoming indicator
illuminates or flashes,
but ring tone does not
sound.
Is the ring tone volume set to other than minimum?
Is Manner mode disabled? (zP.41)
Cannot charge the
battery pack.
Are the charging devices connected properly?
(zP.17)
Is the battery pack attached properly? (zP.12)
If you use Fast transfer mode, make sure the USB
driver is installed to the PC.
For the USB driver and install manual, refer to the
Support page in SH DASH (http://k-tai.sharp.co.jp/
support/).
Cannot operate key/
touch panel.
Is the power turned on? (zP.18)
Restart the IS14SH. (zP.18)
Cannot operate touch
panel as intended.
Check the proper operation of touch panel. (zP.21)
Restart the IS14SH. (zP.18)
auIC card(UIM) error. is
displayed.
Is an au IC-Card inserted? (zP.12)
Is a proper au IC-Card inserted? (zP.12)
A message indicating
that charging is
necessary appears.
The battery pack is almost empty. (zP.16)
Calls are answered
automatically.
Is Answering memo disabled? (zP.41)
Is Manner mode disabled? (zP.41)
Battery usage time is
short.
Is the battery pack charged enough? (zP.16)
Make sure the battery does not approach the end of
its service life.
Make sure the IS14SH is not left in the place for a
long period where (out of service area indicator)
appears. (zP.29)
Suspend the functions not being used. (zP.30)
When making a call, a
beeping sound is
heard from the
earpiece and a
connection cannot be
established.
Are you within the service area or in a location where
the signal is strong? (zP.29)
The wireless line is busy or the other party is on
another line. Try again later.
Trouble Detail
KUUJAWGDQQMࡍࠫ㧞㧜㧝㧝ᐕ㧝㧞㧝ᣣޓᧁᦐᣣޓඦᓟ㧡ᤨ㧝㧥ಽ
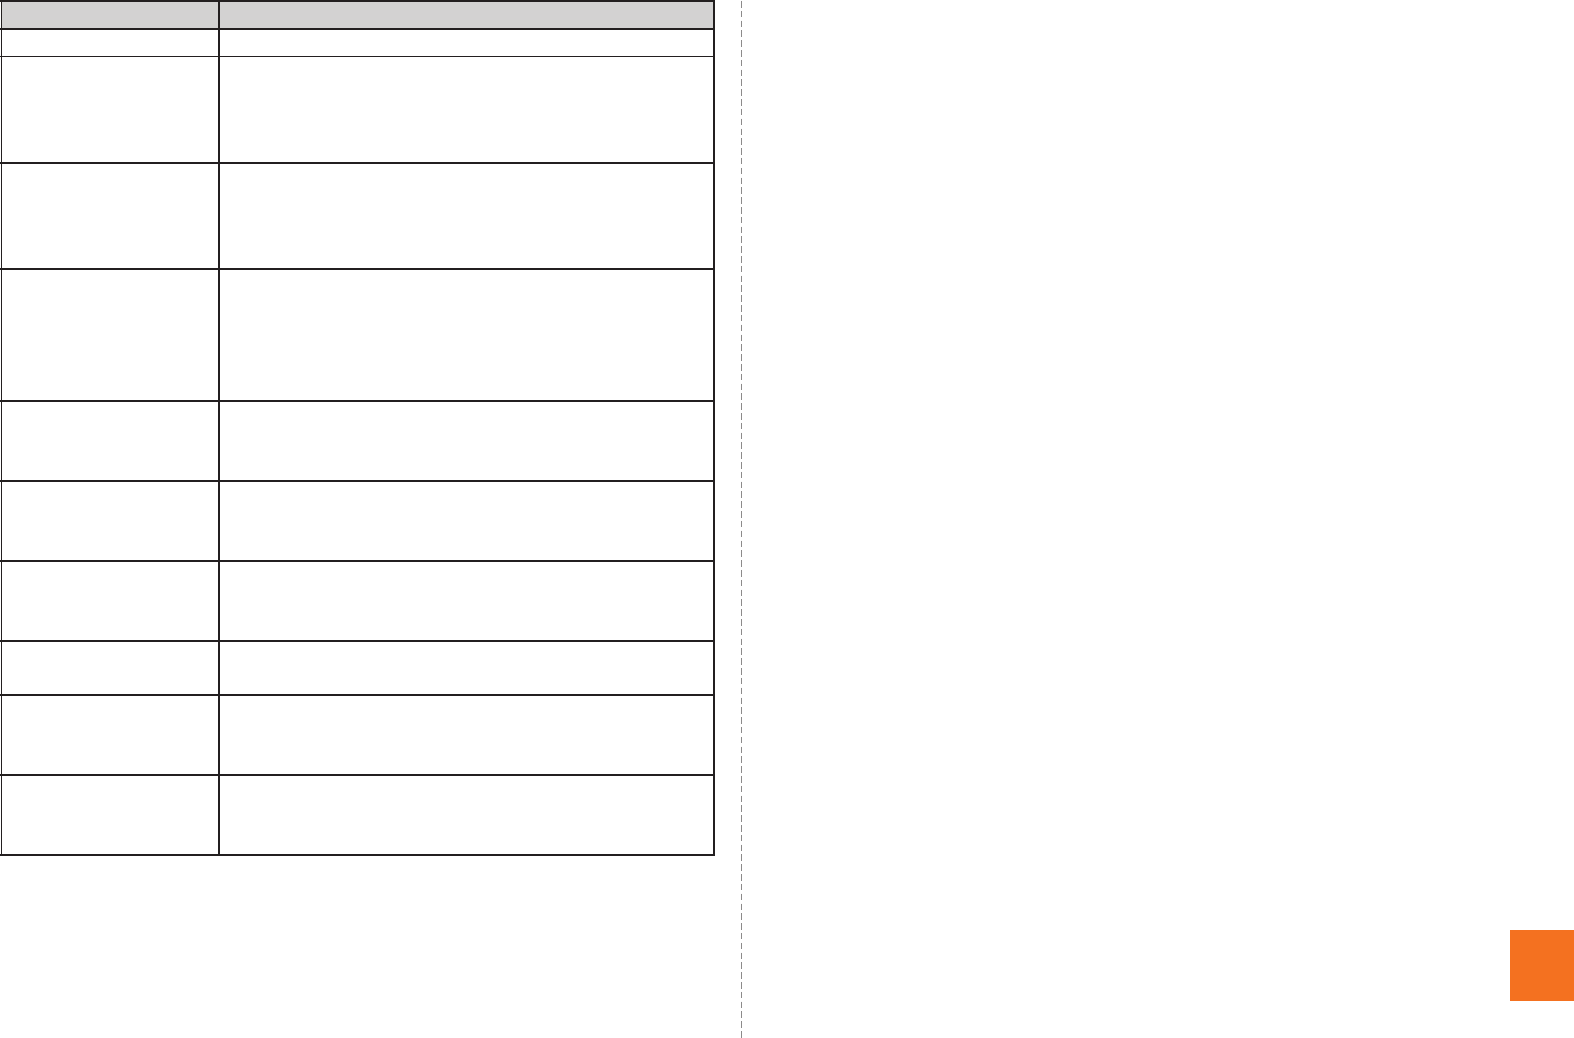
81
Appendix/Index
For more detailed information, visit auお客さまサポート (au Customer
Support) on the au homepage.
http://www.kddi.com/customer/service/au/trouble/kosho/
index.html
Display is dark. Is VeilView disabled? (zP.30)
Cannot hear the other
party.
Is the earpiece volume set to other than minimum?
(zP.38)
Make sure your ear is not covering the earpiece.
Put your ear on the earpiece.
Cannot use the
microphone of
earphone/
microphone.
Is the connector of the microphone inserted
properly?
Insert the connecter securely.
Cannot watch 1Seg,
images or sounds are
interrupted or noise
occurs.
Does the IS14SH receive an adequate digital
broadcasting signal? (zP.67)
Is TV antenna extended? (zP.67)
Is the selected area for the area where you use the
IS14SH?
Cannot operate any
key and the screen is
frozen.
Press the reset button with a pointed end of an
object for at least two seconds. The IS14SH restarts.
Cannot operate the
respective address
book settings.
Is the other party’s phone number notified?
If there is no notification, the settings of the address
book are not enabled.
Images are not
displayed on web
page.
Make sure the settings is not set to hide images.
Cannot create a
PC-mail.
Did you Register a PC-mail account? (zP.55)
Cannot recognize a
microSD memory
card.
Is a microSD memory card inserted properly?
(zP.15)
Is the microSD memory card mounted? (zP.76)
Cannot operate the
camera.
Is there enough power left in the battery pack?
(zP.16)
Confirm for using the camera. (zP.61)
Trouble Detail
KUUJAWGDQQMࡍࠫ㧞㧜㧝㧝ᐕ㧝㧞㧝ᣣޓᧁᦐᣣޓඦᓟ㧡ᤨ㧝㧥ಽ
82
Appendix/Index
Numeric
3LM ................................................73
A
Absence Memo .............................40
Accept all SSL certificates...........56
Accessories ....................................2
Add.................................................60
Address Book
Address Book .............................43
Cmail...........................................48
Create .........................................46
Advanced Settings .......................52
Anshin Security Pack...................72
Answer...........................................40
Answer Holding ............................40
Answering an incoming call........40
Answering Memo List ..................42
Answering memo setting.............41
App setting....................................66
Area settings.................................78
Attach to Mail................................75
Attaching the battery pack ..........12
au IC-Card .....................................12
au international call service ........39
au one Market ...............................72
au one-ID setting ..........................20
B
Battery pack ................................. 10
Battery pack cover....................... 10
Birthday ........................................ 43
Block specified numbers ............ 55
Bookmarks ................................... 59
Browser......................................... 59
C
Call ................................................ 45
Call added special number ......... 45
Camera
Camera....................................... 62
Using .......................................... 61
Camera lens.................................... 9
Cautions for using 1Seg.............. 67
Cautions for using the camera ... 61
Cell phone etiquette....................... 2
Character entry screen................ 33
Character Input (Hardware
Keyboard).................................. 36
Character input (Software
Keyboard).................................. 33
Charging
Battery pack ............................... 16
Charging with the AC adapter.... 17
Charging with the DC adapter ... 17
Charging indicator ......................... 8
Charging with a PC ...................... 18
Index
Chat ............................................... 43
Check Settings/Release Settings
.................................................... 53
C-mail
C-mail.......................................... 46
Cmail........................................... 47
Compose
Gmail........................................... 58
PC-mail messages...................... 57
Contents Manager ........................ 65
Context menu ............................... 32
Create ............................................ 46
Create mail .................................... 45
Create shortcut
Mail address ............................... 45
Phone number ............................ 45
D
Data roaming ................................ 78
Delete
Answering Memo List ................. 42
Early warning mail....................... 71
Delete email from server.............. 56
Delete selected ............................. 66
Disabling sleep mode .................. 18
Disaster Message Board.............. 70
Display............................................. 8
Display settings............................ 24
Displaying a site from bookmarks
.................................................... 59
Displaying a site from history ..... 59
Displaying data............................. 65
Displaying menu........................... 32
Domain¥Username ...................... 56
Double-tap .....................................21
Drag................................................22
E
Early warning mail ........................70
Earpiece...........................................8
Edit .................................................75
Edit and call...................................45
E-mail .............................................46
E-mail notifications.......................55
Entering decoration-emoji
Hardware keyboard ....................37
Software keyboard ......................35
Entering emoji
Hardware keyboard ....................37
Software keyboard ......................35
Entering facemark
Hardware keyboard ....................37
Software keyboard ......................35
Entering symbol
Hardware keyboard ....................37
Software keyboard ......................35
Erase microSD ..............................76
Event ..............................................43
External connection jack ...............9
External connection jack cover.....9
F
Family name ..................................43
FeliCa mark ...................................10
Flick................................................21
For overseas use without anxiety
....................................................77
KUUJAWGDQQMࡍࠫ㧞㧜㧝㧝ᐕ㧝㧞㧝ᣣޓᧁᦐᣣޓඦᓟ㧡ᤨ㧝㧥ಽ

83
Appendix/Index
Forward......................................... 58
G
Gallery........................................... 65
Given name................................... 43
Global passport CDMA................ 77
Gmail ............................................. 57
Google account............................ 20
GPS ............................................... 43
GREE_MARKET............................ 72
Group setting................................ 43
H
Hardware keyboard........................ 8
History........................................... 59
Home key ........................................ 8
Home screen................................. 22
Home settings .............................. 23
Home Switcher ............................. 24
I
Illustrations and descriptions....... 3
IMAP path prefix........................... 56
IMAP server .................................. 56
Inbox checking frequency........... 56
Incoming History.......................... 40
Incoming indicator......................... 8
Infrared port.................................... 9
Initial setup
Initial setup ................................. 19
Initial setup of 1Seg.................... 67
Input method ................................ 36
Input mode
Hardware keyboard ....................37
Software keyboard ......................35
Inserting au IC-Card .....................13
Inserting microSD Memory Card
....................................................15
Internal antennas..........................10
Internet call ...................................43
Issue One Time Password for PC
Setting ........................................53
J
Japan .............................................78
L
Launcher .......................................24
Light sensor....................................8
List Players ...................................66
Lock key ..........................................9
Long-touch....................................21
M
Mail
Address Book .............................43
E-mail/C-mail messages .............49
Mail address..................................45
Mail Group.....................................47
Making a call to another country
from your travel destination.....78
Making a call within the same
country while overseas ............79
Manage applications ....................74
Manner mode................................ 41
Market ........................................... 72
Melody........................................... 75
Memo............................................. 43
Menu in the contents screen ...... 66
Menu in the home screen............ 23
Menu key......................................... 8
microSD memory card................. 13
microSD memory card slot ......... 10
microSD/phone space ................. 66
mixi................................................ 43
Mobile light ................................... 10
Mouthpiece ..................................... 8
Moving folders ............................. 24
Moving shortcuts ......................... 24
Moving widgets ............................ 24
N
Names and functions of parts ...... 8
Nickname ...................................... 43
Not in address book .................... 55
Notes on Setting Mail Filter......... 53
Notification indicator ................... 29
Notification/Status panel............. 30
Notifications ................................. 24
Notify me when email arrives. .... 56
O
Off.................................................. 42
On .................................................. 42
One Seg TV................................... 68
Opening the IS14SH..................... 11
Operating the touch panel .......... 21
Option menu ................................. 32
Organization ................................. 43
Outgoing History .......................... 40
P
Password ...................................... 56
PC-mail .......................................... 55
Phone ............................................ 38
Phone number
Address Book .............................43
Phone number ............................ 45
PIN code .......................................... 4
Pinch.............................................. 22
Playing data .................................. 65
POP3 server .................................. 56
Port ................................................ 56
Postal............................................. 43
Power key........................................ 8
Power off ....................................... 18
PRL settings ................................. 77
Profile
Cmail........................................... 48
Create ......................................... 47
Profile .......................................... 75
Proximity sensor ............................ 8
R
Read first....................................... 43
Read last ....................................... 43
Reboot ........................................... 18
Receive new mails........................ 49
Receiving a call at your travel
destination................................. 79
KUUJAWGDQQMࡍࠫ㧞㧜㧝㧝ᐕ㧝㧞㧝ᣣޓᧁᦐᣣޓඦᓟ㧡ᤨ㧝㧥ಽ

84
Appendix/Index
Receiving calls from countries
other than Japan .......................79
Receiving filter.............................. 55
Receiving Gmail............................58
Receiving mail ..............................49
Receiving PC-mail ........................57
Remote Support............................73
Removing au IC-Card...................12
Removing folders .........................24
Removing microSD memory card
....................................................14
Removing shortcuts.....................24
Removing the battery pack..........11
Removing widgets........................24
Reply..............................................58
Reply all.........................................58
Require sign-in. ............................56
Reset button..................................10
Return key.......................................8
Ring Set.........................................43
Roaming ........................................78
S
Search............................................24
Search key....................................... 8
Secrecy
Cmail...........................................48
Create .........................................47
Security code..................................4
Security type.................................56
Select language ............................19
Send by Bluetooth........................75
Send by IC.....................................75
Send by Infrared ...........................75
Send email from this account by
default........................................ 56
Send Setting................................. 75
Send/Receive history
Cmail .......................................... 48
Create......................................... 47
Server............................................ 56
Set main mail address ................. 45
Set main phone number.............. 45
Setting mail filter.......................... 52
Settings
Early Warning Mail...................... 71
Menu in the home screen........... 24
Simple Settings............................ 52
Sleep mode................................... 18
Slide .............................................. 21
Slideshow ..................................... 66
Slideshow settings ...................... 66
SMTP server ................................. 56
Sort................................................ 66
Speaker ......................................... 10
Speaker off ................................... 42
Speaker on.................................... 42
Status bar ..................................... 28
Status indicator............................ 29
Stop............................................... 42
Strap eyelet..................................... 9
Switch grid/list ............................. 66
Switching desktops ..................... 23
Switching orientation .................. 31
Switching software keyboards ... 33
T
Tap................................................. 21
Tray................................................ 10
Troubleshooting ........................... 80
Turning the power on................... 18
Turning the power on/off ............. 18
TV antenna
Names and Functions of Parts...... 9
TV antenna.................................. 67
Twitter............................................ 43
U
Undo .............................................. 24
Unlock Screen .............................. 19
Unmount microSD........................ 76
Use secure connection (SSL)...... 56
Username ...................................... 56
V
Video Camera ............................... 64
Viewing the address book details
screen ........................................ 44
VirusBuster ................................... 74
Volume up/down key...................... 9
W
Wallpaper ...................................... 75
Wallpapers .................................... 23
Website.......................................... 43
KUUJAWGDQQMࡍࠫ㧞㧜㧝㧝ᐕ㧝㧞㧝ᣣޓᧁᦐᣣޓඦᓟ㧡ᤨ㧝㧥ಽ

Getting Ready
Contents
Introduction
Learning the Basics
Phone
Address Book
Mail
Internet
Multimedia
Applications
1Seg
Settings of IS14SH
Global Function
Appendix/Index
Basic Manual
For inquiries, call: Customer Service Center
For general information and charges
(toll free)
From fixed-line phones: From au cell phones:
From fixed-line phones: From au cell phones:
In case above numbers are not available,
0120-977-033 (except Okinawa)
0120-977-699 (Okinawa)
For loss, theft or damage and operation information
(toll free)
PRESSING ZERO WILL CONNECT YOU TO AN OPERATOR
AFTER CALLING 157 ON YOUR au CELLPHONE.
area code not required
area code not required
Sales: KDDI CORPORATION・
OKINAWA CELLULAR TELEPHONE COMPANY
Manufactured by: SHARP CORPORATION
Cell phone and PHS operators collect and recycle unused
telephones, batteries and battery chargers at stores
bearing the logo regardless of brand and manufacturer
to protect the environment and reuse valuable resources.
November 2011 Edition