Sharp HRO00197 Cellular Phone User Manual 12 Operation Manual SH 01F APYHRO00197
Sharp Corporation Cellular Phone 12 Operation Manual SH 01F APYHRO00197
Sharp >
Contents
- 1. Users Manual
- 2. manual
- 3. operational manual
- 4. operation manual
Users Manual
Don’t forget your mobile phone… or your manners!
When using your mobile phone in a public place, don’t forget to show common courtesy and consideration for others around you.
Sales:
Manufacturer: SHARP Corporation
For loss, theft, malfunction, and inquiries while overseas (24-hour reception)
ɡFrom DOCOMO mobile phones
ɡFrom land-line phones <Universal number>
International call access code
for the country you stay -81-3-6832-6600* (toll free)
* You are charged a call fee to Japan when calling from a land-line phone, etc.
ɦ If you use SH-01F, you should dial the number +81-3-6832-6600 (to enter “+”, touch and hold “0”).
Universal number
international prefix -8000120-0151*
* You might be charged a domestic call fee according to the call rate for the country you stay.
ɦ For international call access codes for major countries and universal number international prefix, refer to DOCOMO
International Services website.
ɜġIf you lose your handset or have it stolen, immediately take the steps necessary for suspending the use of
the handset.
ɜġIf the handset you purchased is damaged, bring your handset to a repair counter specified by DOCOMO
after returning to Japan.
Repairs
(Business hours: 24 hours (open all year round))
(No prefix) 113 (toll free)
ɡFrom DOCOMO mobile phones
(In Japanese only)
ɡFrom land-line phones (In Japanese only)
ɦ Unavailable from part of IP phones.
0120-800-000 (toll free)
ɦ Unavailable from land-line phones, etc.
General Inquiries
<docomo Information Center>
(Business hours: 9:00 a.m. to 8:00 p.m.)
0120-005-250 (toll free)
ɦ Service available in: English, Portuguese, Chinese,
Spanish.
ɦ Unavailable from part of IP phones.
(Business hours: 9:00 a.m. to 8:00 p.m. (open all year
round))
(No prefix) 151 (toll free)
ɡFrom DOCOMO mobile phones
(In Japanese only)
ɦ Unavailable from land-line phones, etc.
ɦ Unavailable from part of IP phones.
0120-800-000 (toll free)
ɡFrom land-line phones (In Japanese only)
ɜ Please confirm the phone number before you dial.
ɜ For Applications or Repairs and After-Sales Service, please contact the above-mentioned information center or the docomo
Shop etc. near you on the NTT DOCOMO website.
NTT DOCOMO websiteȁhttp://www.nttdocomo.co.jp/english/
SH-01F
INSTRUCTION MANUAL
’13.ɜ (1st Edition)
13ɜ SM***ȁ
1
’13.ɜ
Introduction
Thank you for purchasing “SH-01F”.
Be sure to read this manual before and during use to ensure proper operation.
For details on other optional parts nP. 83 “Introduction of
options and related devices”
Checking operation method
Quick Start Guide (Basic package)
(in Japanese only)
This guide describes operations of basic functions.
User’s Manual (App of the handset)
(in Japanese only)
This manual describes detailed guidance and
operations of functions.
In the home screen, [R]/[Instruction Manual]
To display help: [z]/[ུͺίς͈ঀ̞̥̹] (How to
use this app)
User’s Manual (in PDF format)
This manual describes detailed guidance and
operations of functions.
Download from the DOCOMO website
(http://www.nttdocomo.co.jp/english/support/trouble/
manual/download/index.html)
ɦThe URL and contents of this manual are subject to
change without prior notice.
The screens and illustrations in this manual are shown as
examples. The actual screens and illustrations may differ.
The explanations in this manual are based on the case when
the home app is docomo LIVE UX. If you change the home
app, operation procedures etc. may be different from the
explanations of this manual.
Note that “SH-01F” is referred to as “handset” in this manual.
This manual refers to microSD Card, microSDHC Card or
microSDXC Card as “microSD Card” or “microSD”.
Reproduction of this manual in part or in whole is prohibited.
The contents of this manual are subject to change without
prior notice.
Basic package
SH-01F
(includes warranty)
Quick Start Guide
(in Japanese only)
Notes on usage
(in Japanese only)
4Contents/Precautions
Before use, read these “Precautions” carefully and use your
handset properly.
Keep this manual in a safe place for future reference.
These precautions contain information intended to prevent bodily
injury to the user and to surrounding people, as well as damage
to property, and must be observed at all times.
The following symbols indicate the different degrees of injury
or damage that may occur if information provided is not
observed and the handset is used improperly.
The following symbols indicate specific directions.
“Precautions” is explained in the following six sections.
Handling the handset, adapters and docomo mini UIM card
(general) . . . . . . . . . . . . . . . . . . . . . . . . . . . . . . . . . . . . . . . . P. 4
Handling the handset . . . . . . . . . . . . . . . . . . . . . . . . . . . . . . P. 5
Handling adapters . . . . . . . . . . . . . . . . . . . . . . . . . . . . . . . . . P. 6
Handling docomo mini UIM card . . . . . . . . . . . . . . . . . . . . . . P. 7
Handling near electronic medical equipment . . . . . . . . . . . . P. 7
Material list . . . . . . . . . . . . . . . . . . . . . . . . . . . . . . . . . . . . . . P. 7
Precautions (ALWAYS FOLLOW
THESE DIRECTIONS)
Danger
This symbol indicates that
“death or serious bodily injury
may directly and immediately
result from improper use”.
Warning
This symbol indicates that
“death or serious bodily injury
may result from improper use”.
Caution
This symbol indicates that
“minor injury and/or property
damage may result from
improper use”.
Indicates a
prohibited action.
Indicates not to
handle the device
with wet hands.
Indicates not to
disassemble the
device.
Indicates that
instructions
specified are
compulsory (must
be followed).
Indicates not to use
the device near
water or get it wet.
Indicates that the
power cord must be
unplugged from the
outlet.
Handling the handset, adapters and docomo
mini UIM card (general)
Danger
Do not use, store or leave the equipment in
locations subject to high temperatures (near a fire
or heating unit, in a kotatsu, under direct sunlight,
inside a vehicle on a hot day, etc.).
May cause fires, burns or bodily injury.
Do not place the equipment inside cooking
appliances such as microwave ovens or pressure
cookers.
May cause fires, burns, bodily injury or electric shock.
Do not attempt to disassemble or modify the
equipment.
May cause fires, burns, bodily injury or electric shock.
Do not get the equipment wet with water, drinking
water, pet urine, sweat, etc.
May cause fires, burns, bodily injury or electric shock.
Refer to the following for details on waterproofness.
nP. 10 “Waterproof”
Do not allow liquids (water, drinking water, pet
urine, sweat, etc.) to get inside the charger terminal
or external connector terminal.
May cause fires, burns, bodily injury or electric shock.
Use only optional parts specified by NTT DOCOMO
for use with the handset.
May cause fires, burns, bodily injury or electric shock.
Warning
Do not subject the equipment to strong force or
impacts or throw it.
May cause fires, burns, bodily injury or electric shock.
Do not allow conductive materials (such as metal
objects and pencil lead) to come into contact with
the charger terminal, external connector terminal or
earphone/microphone terminal. In addition, do not
insert such objects.
May cause fires, burns, bodily injury or electric shock.
Do not cover or wrap the equipment with bedding
etc. when using or charging.
May cause fires or burns.
Be sure to turn off the handset and not to charge
the battery in locations such as gas stations where
flammable gas is generated.
May cause a gas explosion or fire.
To use Osaifu-Keitai in locations such as gas stations, be
sure to turn off the power in advance (If NFC/Osaifu-Keitai
lock is set, disable the lock before turning off the power).
If you notice anything unusual, such as an unusual
odor, overheating, discoloration or deformation
during use, charging or storage, immediately follow
the instructions below.
Unplug the power plug from the outlet or
cigarette lighter socket.
Turn off the handset.
May cause fires, burns, bodily injury or electric shock.
5Contents/Precautions
The following is the type of the internal battery built into the
handset.
Caution
Do not leave the equipment on unstable surfaces,
such as on a wobbly table or sloped surface.
May fall and cause injury.
Do not store the equipment in locations that are
subject to humidity, dust or high temperatures.
May cause fires, burns or electric shock.
If being used by a child, have a guardian teach him/
her the proper handling procedures. In addition,
check that the child is using the equipment as
directed.
May result in bodily injury etc.
Keep the equipment out of the reach of young
children.
A young child may swallow the equipment or suffer bodily
injury etc.
Be very careful when using the handset connected
to adapters repeatedly or for long periods of time.
The handset or adapters may become warm if you watch TV
etc. for a long time while charging.
Touching high temperature areas for a prolonged period of
time may cause skin irritations, itchiness or low-temperature
burns in some people.
Handling the handset
Label Battery type
Li-ion00 Lithium-ion
Danger
Do not throw the handset into a fire.
The internal battery may catch fire, explode, overheat or
leak.
Do not puncture, hit with a hammer or step on the
handset.
The internal battery may catch fire, explode, overheat or
leak.
If the battery fluid etc. comes into contact with your
eyes, do not rub your eyes but immediately rinse
your eyes with clean water. Then seek prompt
medical treatment.
May result in loss of eyesight.
Warning
Do not point the illuminated light directly at
someone’s eyes. Especially when you shoot still
pictures or videos of young children, keep 1 m or
more distance from them.
Do not use Mobile light near people’s faces. Eyesight may
be temporarily affected leading to accidents.
Do not allow water or other liquids, metal,
flammable material or other foreign objects to enter
the docomo mini UIM card slot or microSD Card
slot on the handset.
May cause fires, burns, bodily injury or electric shock.
Do not shine the light at anyone driving a car or
other vehicles.
May prevent a driver from driving safely and cause a traffic
accident.
Turn off the handset in areas where the use of
mobile phones is prohibited, such as in aircraft or
hospitals.
May interfere with the operation of electronic devices and
electronic medical equipment.
Follow the instructions given by the respective medical
facilities regarding the use of mobile phones on their
premises.
Actions such as using a mobile phone aboard aircraft are
prohibited and punishable by law.
However, follow the instructions on use of the handset given
by the airline if the handset can be used aboard aircraft by
setting the handset not to emit radio wave etc.
Keep the handset away from the ears during a call
in which hands-free is set or while the ringtone is
ringing.
When you attach the earphone/microphone etc. to
the handset to play games, music, etc., do not
make the volume too loud.
Excessively high volume may damage your hearing.
Also, it may prevent you from hearing ambient sounds and
cause an accident.
If you have a weak heart, take extra precautions
when setting functions such as the vibrator and
ringtone volume for incoming calls.
May have harmful effects on your heart.
If you are using electronic medical equipment,
contact the respective manufacturer or dealer to
check whether the operation of the equipment is
affected by signals.
May interfere with the operation of electronic medical
equipment etc.
Turn off the handset near high-precision electronic
devices or devices that use weak electronic
signals.
May interfere with the operation of electronic devices.
Take particular care with the following devices
Hearing aids, implanted cardiac pacemakers, implanted
cardioverter-defibrillators or other electronic medical
equipment. Fire alarms, automatic doors, and other
equipment controlled by electronic signals. If you use an
implanted cardiac pacemaker, implanted
cardioverter-defibrillator or other electronic medical
equipment, contact the respective manufacturer or dealer to
check whether the operation of the equipment is affected by
signals.
If the display part or camera lens is damaged, be
careful of broken glass and the exposed inside of
the handset.
Tape is pasted on the back of the display while the surface
of the display is covered by a protective film and the surface
of the camera lens is covered by a plastic panel so as to
minimize the possibility of glass scattering. However,
touching the broken or exposed parts may cause bodily
injury.
If the internal battery leaks or emits an unusual
odor, immediately stop using the handset and
move it away from any naked flames or fire.
The battery fluid is flammable and could ignite, causing a
fire or explosion.
6Contents/Precautions
Caution
Do not swing the handset by its antenna, strap, etc.
May hit you or others around you, resulting in an accident
such as bodily injury.
Do not use a damaged handset.
May cause fires, burns, bodily injury or electric shock.
For using a motion sensor and geomagnetic
sensor, check the safety around, hold the handset
and do not swing them more than necessary.
May cause injury etc.
If the display is broken and the liquid crystal then
leaks, do not get the liquid on your skin (face,
hands, etc.).
May result in loss of eyesight or harm to your skin.
If the liquid comes into contact with your eyes or mouth,
immediately rinse your eyes or mouth with clean water and
see a doctor.
If the liquid comes into contact with your skin or clothes,
immediately wipe it off with alcohol, and wash with water
and soap.
The surface of the display is covered with a
protective film for ensuring the security
(shatterproof property of reinforced glass panel)
against any damages caused by the handset being
dropped or receiving a strong impact etc. Do not
remove the film forcibly or damage it.
Using the handset with the film removed may cause bodily
injury if the display gets damaged.
Do not dispose of the handset in ordinary garbage.
May cause fires or damage to the environment. Take the
unnecessary handset to a sales outlet such as a docomo
Shop or follow the instructions by a local institution that
handles used handsets.
If you use the handset in a vehicle, contact the
vehicle manufacturer or dealer to check whether
the operation of the vehicle is affected by signals.
May interfere with the operation of electronic equipment in
some vehicle models. In this case, stop using the handset.
Use of the handset may cause skin irritations such
as itchiness, rashes or eczema in some people. If
this occurs, immediately stop using the handset
and seek medical treatment.
For details on materials of each part nP. 7 “Material list”
Look at the display in a well-lit place, keeping a
certain distance from the screen.
Otherwise, eyesight may be weakened.
If the battery fluid etc. leaks, do not get the liquid on
your skin (face, hands, etc.).
May result in loss of eyesight or harm to your skin.
If the liquid comes into contact with your eyes, mouth, skin
or clothes, immediately rinse them with clean water.
If the liquid etc. comes into contact with your eyes or mouth,
see a doctor immediately after rinsing your eyes or mouth.
Handling adapters
Warning
Do not use if the cord of the adapter is damaged.
May cause fires, burns or electric shock.
Never use the AC adapter in humid locations such
as a bathroom.
May cause fires, burns or electric shock.
The DC adapter should only be used in negative
grounded vehicles. Never use it in positive
grounded vehicles.
May cause fires, burns or electric shock.
Do not touch adapters if you hear thunder.
May cause electric shock.
Take care not to short-circuit the charger terminal
when connected to an outlet or cigarette lighter
socket. Also, take care not to allow any part of your
body (hands, fingers, etc.) to come into contact
with the charger terminal.
May cause fires, burns or electric shock.
Do not place heavy objects on the cord of the
adapter.
May cause fires, burns or electric shock.
When plugging/unplugging an AC adapter into/from
the outlet, do not allow metallic straps or other
metallic objects to come into contact with the
prongs of the plug.
May cause fires, burns or electric shock.
Do not apply excessive force on an adapter by
moving it up/down or to the left/right with the
adapter connected to the handset.
May cause fires, burns, bodily injury or electric shock.
Never try to charge the battery when the handset is
wet.
The adapter is not waterproof. May cause electric shock,
short circuit, etc. and lead to a malfunction, fires or burns.
Do not handle the cord or charger terminal of the
adapters or outlet with wet hands.
May cause fires, burns or electric shock.
Always use the specified power supply and
voltage.
When using overseas, use the AC adapter that is
available overseas.
Using the incorrect voltage may cause fires, burns or
electric shock.
AC adapter: 100V AC
DC adapter: 12/24V DC (for negative grounded vehicles
only)
AC adapter available overseas: 100 to 240V AC (Connect
only with a household AC outlet)
If the fuse in the DC adapter blows, always replace
it with a fuse of the specified type.
May cause fires, burns or electric shock. Refer to the
respective manuals for information on the correct fuse
specifications.
Wipe off any dust on the power plug.
May cause fires, burns or electric shock.
Fully plug the AC adapter into the outlet.
May cause fires, burns or electric shock.
Always grasp the adapters when unplugging the
power plug from the outlet or cigarette lighter
socket. Do not forcibly pull by the cord of the
adapter.
May cause fires, burns or electric shock.
7Contents/Precautions
Handset
SH-01F is waterproof, however, do not allow water to get
inside the handset and do not allow optional parts to get
wet.
The adapter and docomo mini UIM card are not waterproof. Do not
use in humid or steamy areas such as bathrooms and avoid exposing
to rain and other forms of moisture. If they are carried close to the
skin, perspiration may cause internal components to corrode and
result in malfunction. Note that if a problem is found to be due to
moisture, the handset and parts are not covered by warranty and in
some cases may be irreparable. Even when repairs are possible,
repair charges will be incurred, since the damage is not covered by
warranty.
Clean only with a soft and dry cloth (such as the type used
for eyeglasses).
ƦForceful rubbing of the LCD with a dry cloth may scratch its surface.
ƦNote also that LCD coating may stain if moisture or soiling is left on
the surface for a long period.
ƦNever use chemicals such as alcohol, thinners, benzene or
detergents, as these agents may erase the printing or cause
discoloration.
Occasionally clean terminals with a dry cotton swab etc.
Dirty terminals may result in poor connections and loss of power or
insufficient battery charge. Keep the terminals clean with a dry cotton
swab etc.
Be careful with the terminals while cleaning them.
Do not place the equipment near an air conditioning vent.
Condensation formed due to rapid changes in temperature may
cause internal corrosion and lead to a malfunction.
Do not apply excessive force on the handset etc. when
using it.
Carrying the handset in a tightly packed bag or sitting on the handset
in your pocket may cause damage to the display, internal
components, etc. or result in a malfunction.
When plugging/unplugging an adapter into/from
the handset, plug/unplug the adapter horizontally
and straightly, not applying excessive force on it.
May cause fires, burns, bodily injury or electric shock.
Unplug the power plug from the outlet or cigarette
lighter socket when not using for a long time.
May cause fires, burns or electric shock.
Should water or other liquids enter the equipment,
remove the power plug from the outlet or cigarette
lighter socket immediately.
May cause fires, burns or electric shock.
Always unplug the power plug from the outlet or
cigarette lighter socket before cleaning the
equipment.
May cause fires, burns or electric shock.
Handling docomo mini UIM card
Caution
Be careful with the cutting surface when removing
the docomo mini UIM card.
May cause bodily injury.
Handling near electronic medical equipment
Warning
If you have electronic medical equipment such as
an implanted cardiac pacemaker or an implanted
cardioverter-defibrillator, always carry or use your
handset at least 15 cm away from your implant.
Electromagnetic signals may have harmful effects on the
operation of the electronic medical equipment.
Patients receiving medical treatment away from a
hospital or medical facility (e.g. home treatment)
who are using electronic medical equipment other
than implanted cardiac pacemakers or implanted
cardioverter-defibrillators should consult the
respective manufacturers for information regarding
the effects of signals on the equipment.
Electromagnetic signals may have harmful effects on the
operation of the electronic medical equipment.
If there is any chance that the distance between the
handset and a person closest to you may get
shorter than 15 cm such as when you cannot freely
move around, set the handset not to emit radio
wave in advance (by setting Airplane mode, turning
the power off, etc.).
Somebody nearby may be equipped with electronic medical
equipment such as an implanted cardiac pacemaker or an
implanted cardioverter-defibrillator. Electromagnetic signals
may have harmful effects on the operation of the electronic
medical equipment.
Follow the instructions given by the respective
medical facilities regarding the use of the handset
on their premises.
Material list
Part Material/Surface treatment
Display side Reinforced glass/Shatterproof
sheet of surface
Surrounding area of display side PA resin/UV coating for
surface
Back PC + ABS resin/UV coating for
surface
docomo mini UIM card slot SUS/Ni plating
microSD Card slot SUS/Ni plating
docomo mini UIM card/microSD
Card slot cover
PC resin/UV coating for
surface
Gasket of docomo mini UIM card/
microSD Card slot cover Silicon rubber
IMEI tray PP
Surrounding area of earphone/
microphone terminal Aluminum/Anodizing
Power key Aluminum/Anodizing
Camera panel Acrylic resin/Printing on the
back
Decoration of camera Aluminum/Anodizing
Mobile light PC resin
Mobacas/TV antenna Brass/Trivalent Cr plating,
SUS
External connector terminal SUS/Sn plating, Copper alloy/
Gold plating
Handling precautions
General notes
8Contents/Precautions
Keeping an external connector device plugged into the external
connector terminal or earphone/microphone terminal may cause
damage to the connector or result in a malfunction.
Do not rub or scratch the display with metal etc.
May scratch it and cause malfunction or damage.
Read the respective manuals or user’s guides supplied with
the optional parts carefully.
Do not forcefully press the surface of the touch panel or
operate with a pointed object such as a fingernail, ballpoint
pen or pin.
May damage the touch panel.
Avoid using the handset in extremely high or low
temperatures.
Use the handset within the range of a temperature between 5°C and
35°C and a humidity between 45% and 85%.
Using the handset close to land-line phones, TVs, radios,
etc. may have harmful effects on the operation of such
equipment. Move as far away as possible from such items
before use.
Keep a separate memo noting information stored on the
handset.
DOCOMO shall not be liable for any loss of content.
Do not drop or otherwise subject the handset to severe
impact.
May damage the handset or cause a malfunction.
When connecting an external connector device to the
external connector terminal or earphone/microphone
terminal, do not put it in obliquely and do not pull it while it
is plugged in.
May damage the handset or cause a malfunction.
The handset becomes warm during use or charging but this
is not a malfunction.
Do not leave the camera in direct sunlight.
May cause discoloration or burn-in of pixels.
Use the handset with the docomo mini UIM card/microSD
Card slot cover closed.
Dust, water, etc. may get inside and cause a malfunction.
While using a microSD Card, do not remove the card or turn
off the handset.
May cause data loss or a malfunction.
Never place a magnetic card near the handset.
The stored magnetic data in cash cards, credit cards, telephone
cards, floppy disks, etc. may be erased.
Never place magnetized items near the handset.
Putting highly magnetized items closer may cause an error.
The handset has a function to judge whether a proper
internal battery is used. Do not replace the internal battery
by yourself.
When an improper internal battery is used, you cannot
charge the battery.
DOCOMO shall not be liable for any accident or malfunction
arising from using an improper internal battery.
The internal battery is a consumable product.
Though the battery life varies with use, change the battery if the
battery life is extremely short even after being fully charged. For
details on replacing the internal battery, contact the number listed in
“Repairs” (in Japanese only) on the last page or a repair counter that
DOCOMO specifies.
Charge battery in areas where ambient temperature is
between 5°C and 35°C.
The battery life depends on the usage and deterioration of
the battery.
Avoid the following situations when the handset is stored.
Storage with the internal battery fully charged (immediately after
charging is completed)
Storage with no battery level (cannot turn the main body on)
May lower the performance or shorten the usable life of the internal
battery.
Approximately 40% is recommended as the proper battery level for
storage.
The surface of the handset uses the aluminum material.
Note that dent and abrasion are easily remained as
aluminum is a soft material.
Charge the battery in areas where the ambient temperature
is between 5°C and 35°C.
Do not charge the internal battery in the following locations.
Areas with high humidity or dust, or in areas exposed to frequent
vibrations
Close to land-line phones, TVs, radios, etc.
Adapters may become warm during charging but this is not
a malfunction.
Do not use the DC adapter to charge the battery when the
car engine is not running.
May cause the car battery to run down.
When using an outlet with a feature to prevent the plug from
being removed accidentally, follow the instructions in the
outlet user’s guide.
Do not subject to strong force or impacts. Also, do not
deform the charger terminals.
May cause a malfunction.
Do not apply unnecessary force when inserting/removing
the docomo mini UIM card.
Customer is responsible for malfunctions arising from
inserting docomo mini UIM card into a different IC card
reader/writer etc.
Always keep IC area clean.
Clean only with a soft and dry cloth (such as the type used
for eyeglasses).
Keep a separate memo and note information stored on the
docomo mini UIM card.
DOCOMO shall not be liable for any loss of content.
To protect the environment, please take any unneeded
docomo mini UIM cards to a sales outlet such as a docomo
Shop.
Do not damage, touch haphazardly or short-circuit the IC.
May cause data loss or a malfunction.
Do not drop or otherwise subject the docomo mini UIM card
to severe impact.
May cause a malfunction.
Never bend the docomo mini UIM card or place heavy
objects on it.
May cause a malfunction.
Do not insert the docomo mini UIM card to the handset with
a label or sticker attached on the card.
May cause a malfunction.
The handset supports the security function that meets the
Bluetooth specification for security during communication
using Bluetooth functions. However, the security may not
be sufficient depending on the configuration etc. Take care
of the security while making communication using
Bluetooth function.
Even if any leak of data or information occurs while making
communication using Bluetooth function, DOCOMO shall
not be liable for any loss of content.
Notes about the handset
Notes about adapters
Notes about docomo mini UIM card
Notes on using Bluetooth function
9Contents/Precautions
Radio frequencies
In the home screen, [R]/[Settings]/[Device info]/
[Authentication] to confirm the radio frequencies the
Bluetooth function of the handset uses. The followings are
the descriptions:
ӱ2.4: This radio equipment uses the 2400 MHz band.
ӲFH: The modulation system is the FH-SS system.
ӳ1: The estimated coverage distance is 10 m or less.
ӴXX: Another modulation system is used.
ӵ4: The estimated coverage distance is 40 m or less.
Ӷ: All radio frequencies between 2400 MHz and 2483.5
MHz are used and the frequencies for mobile object identifiers
shall not be avoided.
Cautions on using Bluetooth devices
Bluetooth operates at radio frequencies assigned to the
in-house radio stations for a mobile object identifier that
have to be licensed and is used in production lines of a
factory, specific unlicensed low power radio stations, and
amateur radio stations (hereafter, referred to as “another
radio station”) in addition to industrial, scientific and
medical devices or home electric appliances such as
microwave ovens.
1. Before using the handset, make sure that “another radio
station” is not operating nearby.
2. If radio interference between the handset and “another
radio station” occurs, avoid interference by moving
immediately to another place or “turning off the power”.
3. Contact the number listed in “General Inquiries” on the
last page for further details.
Wireless LAN (WLAN) uses radio waves to communicate
information. Therefore, it has an advantage of freely
connecting to the LAN within the service area. On the other
hand, if security setting is not set, it is possible for a
malicious third party to intercept the communication
contents or hack. It is recommended to set security setting
at your own risk and judgement.
Wireless LAN
Do not use wireless LAN near magnetic devices such as electric
appliances or AV/OA devices or in radio waves.
ƦMagnetism or radio waves may increase noises or disable
communications (especially when using a microwave oven).
ƦWhen used near TV, radio, etc., reception interference may occur
or channels on the TV screen may be disturbed.
ƦIf there are multiple wireless LAN access points nearby and the
same channel is used, search may not work correctly.
Radio frequencies
In the home screen, [R]/[Settings]/[Device info]/
[Authentication] to confirm the radio frequencies the
WLAN-installed devices use. The followings are the
descriptions:
ӱ2.4: This radio equipment uses the 2400 MHz band.
ӲDS: The modulation system is the DS-SS system.
ӳOF: The modulation system is the OFDM system.
Ӵ4: The estimated coverage distance is 40 m or less.
ӵ: All radio frequencies between 2400 MHz
and 2483.5 MHz are used and the frequencies for mobile object
identifiers shall be avoided.
Available channels for the handset’s wireless LAN are between 1 and
13. Note that other channel access points cannot be connected.
Available channels may vary depending on the country.
For use in an aircraft, contact the airline beforehand.
Cautions on using 2.4 GHz devices
WLAN-installed devices operate at radio frequencies
assigned to the in-house radio stations for a mobile object
identifier (radio stations requiring a license) used in
production lines of a factory, specific unlicensed low power
radio stations (radio stations requiring no license), and
amateur radio stations (radio stations requiring a license) in
addition to industrial, scientific and medical devices or
home electric appliances such as microwave ovens.
1. Before using this device, make sure that the in-house
radio stations for a mobile object identifier, specific
unlicensed low power radio stations and amateur radio
stations are not operating nearby.
2. If the device causes harmful radio interference to the
in-house radio stations for a mobile object identifier,
immediately change the radio frequency or stop use, and
contact the number listed in “General Inquiries” on the
last page for crosstalk avoidance, etc. (e.g. partition
setup).
3. If the device causes radio interference to specific
unlicensed low power radio stations for a mobile object
identifier or amateur radio stations, contact the number
listed in “General Inquiries” on the last page for further
details.
Cautions on using 5 GHz devices
In the 5 GHz frequency band, three bands of 5.2 GHz/5.3
GHz/5.6 GHz band (W52/W53/W56) are available.
Ʀ
W52 (5.2 GHz band/36, 40, 44, 48 ch)
Ʀ
W53 (5.3 GHz band/52, 56, 60, 64 ch)
Ʀ
W56 (5.6 GHz band/100, 104, 108, 112, 116, 120, 124, 128,
132, 136, 140 ch)
Using 5.2 GHz/5.3 GHz band wireless LAN (W52/W53)
outdoors is prohibited by the Radio Law.
The FeliCa reader/writer function of the handset uses weak
radio waves whose handling does not require a license of
radio station.
The frequency in use is the 13.56 MHz band. When another
reader/writer is being used nearby, keep enough distance
from it. Make sure that there is no radio station using the
same frequency band in the nearby area.
The FM transmitter function of the handset uses weak radio
waves requiring no licenses for radio stations.
It uses 77.4 to 85.0 MHz frequency band. To avoid adversely
affecting surrounding FM radio users, do not set the same
frequency band as an FM broadcasting station in your area
for using.
Notes about wireless LAN (WLAN)
ӱġ Ӳġ ӳġ Ӵġ ӵġ
Ӷġ
ӱġ Ӳġ ӳġ Ӵġ
ӵġ
FeliCa reader/writer
FM transmitter
10 Contents/Precautions
Never use the handset that is modified. Using a modified
device violates the Radio Law and/or the
Telecommunications Business Law.
The handset has acquired the certification of conformity with technical
regulations for the specified radio station based on the Radio Law and
authentication of conformity with technical regulations for the handset
based on the Telecommunications Business Law, and the “Technical
Conformity Mark ” can be displayed on the electronic nameplate of
the handset as a proof. You can see it by operating as follows.
In the home screen, [R]/[Settings]/[Device info]/[Authentication]
If the screws of the handset are removed and a modification is given
to the inside, the certification of conformity with technical regulations
etc. will become invalid. Never use the handset without the valid
certification etc. Doing so violates the Radio Law and/or the
Telecommunications Business Law.
Be careful when using the handset while driving a motor
vehicle.
Using a mobile phone in hand while driving is regarded as a
punishable act.
However, the punishment has no application in some cases such as
when rescuing sick and injured people or maintaining public safety.
Use the FeliCa reader/writer function only in Japan.
The FeliCa reader/writer function of the handset conforms to the
domestic radio wave standards. Using the function overseas may
result in punishment.
Use the FM transmitter only in Japan.
The FM transmitter of the handset is compliant with radio wave
standards and is authorized for use only in Japan. Using the function
overseas may result in punishment.
Never change the basic software improperly.
This may be regarded as a conversion of software and repairs may be
refused.
Be careful not to connect the handset to a PC using Micro
USB Cable 01 (sold separately) in areas where the use of
mobile phones is prohibited.
Power may automatically turn on.
SH-01F is waterproof to IPX5*1 and IPX7*2 standards if the
docomo mini UIM card/microSD Card slot cover is securely
closed.
*1 IPX5 means that phone keeps functioning after being subjected
to a jet flow (approximately 12.5 liters/min) discharged from a
nozzle (inner diameter: 6.3 mm), from all directions
(approximately 3 m from the handset) for 3 minutes or more.
*2 IPX7 means that SH-01F phone keeps functioning after it is
slowly submerged to depth of 1 m in static tap water at room
temperature, left there for approximately 30 minutes and then
taken out.
You can call without using an umbrella in the rain (for rainfall of
approximately 20 mm per hour).
You can rinse off dirt from the handset. Wash the handset with
low-pressure water flow (6 liters/min or lower and tap water at
room temperature (between 5°C and 35°C)), holding it
approximately 10 cm below faucet or shower head. Wash by
using only your hands, not a brush or sponge, with the docomo
mini UIM card/microSD Card slot cover held in position. Drain the
handset before use (nP. 11 “Draining water when the handset
gets wet”).
You can use the handset at a poolside. Do not throw water in a
swimming pool on the handset or soak the handset in the water
of a swimming pool.
To maintain waterproof performance, check the followings.
Securely close the docomo mini UIM card/microSD Card slot
cover. Be careful not to apply excessive force on the rubber
gasket when opening and closing it.
Make sure that the docomo mini UIM card/microSD Card slot
cover is completely closed without floating.
To maintain waterproof performance, the handset has the
docomo mini UIM card/microSD Card slot cover that allows you
to close securely. May cause injuries to your nails or fingers if
you try to open it forcibly.
For details on how to open/close the docomo mini UIM card/
microSD Card slot cover nP. 13 “Inserting docomo mini UIM
card”
When your hands or the handset is wet, do not open/close the
docomo mini UIM card/microSD Card slot cover.
Close the docomo mini UIM card/microSD Card slot cover
securely. Even a fine obstacle (one hair, one grain of sand, tiny
fiber, etc.) put between contact surfaces may allow water to get
inside.
If the handset gets wet with water or other liquids with the
docomo mini UIM card/microSD Card slot cover opened, the
liquid may get inside causing electric shocks or malfunction. Stop
using the handset, turn off the power and contact a repair
counter that DOCOMO specifies.
The rubber gaskets of contact surfaces between the main body
and docomo mini UIM card/microSD Card slot cover play an
important role in maintaining waterproof performance. Do not
remove or scratch them. Also, prevent dust from adhering to
them.
If a rubber gasket is damaged or deformed, replace it at a repair
counter that DOCOMO specifies.
Do not insert a pointed object through the docomo mini UIM card/
microSD Card slot cover gaps. It may cause damage to the
rubber gasket and allow water to get inside.
Do not use the handset underwater (including key operations).
May cause malfunction.
Do not apply water flow stronger than allowed (over 6 liters/min).
May cause malfunction though SH-01F provides waterproof
performance of IPX5.
Do not let the handset get wet with liquids other than water at
room temperature (between 5°C and 35°C) or do not soak the
handset in the liquids. If you let the handset get wet with liquids
other than water at room temperature or soak the handset in the
liquids, stop using the handset and wash it with water at room
temperature.
Do not wash the handset in a washing machine etc.
To prevent condensation, do not bring the handset from a cold
place to a warm place without letting the handset warmed to
room temperature.
Never soak the handset in hot spring water or water containing
soap, detergent or bath powder.
Do not soak the handset in hot water, use it in a sauna or apply
hot air (from a hair dryer etc.) to it.
Do not soak the handset in seawater.
Do not put the handset directly on sand/dirt.
Do not leave the handset wet. In cold places, water may freeze
and cause malfunction.
Caution
Waterproof
What you can do with waterproof of SH-01F
Things to keep in mind
To maintain waterproof performance, replacement of parts is
recommended every 2 years regardless of whether the
handset appears normal or abnormal. DOCOMO replaces the
parts as a chargeable service. Bring the handset to a repair
counter that DOCOMO specifies.
Precautions
13 Before Using the Handset
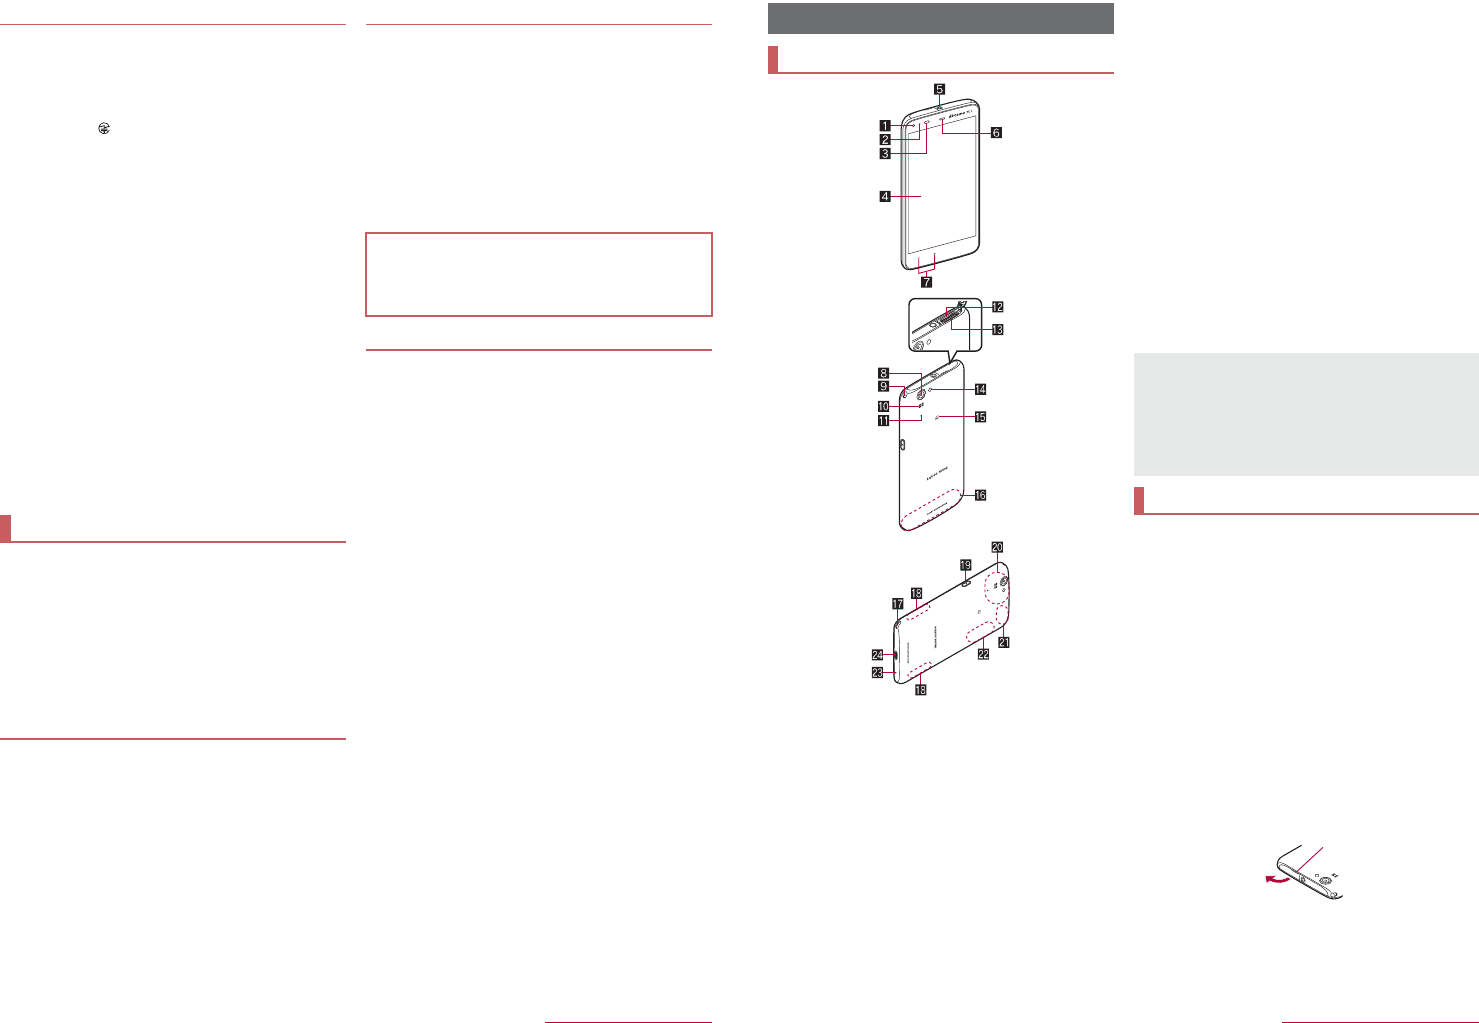
1In-camera
2Incoming/Charging lamp
3Proximity sensor/Brightness sensor*1
The proximity sensor detects the distance to the face and
prevents inadvertent operation of touch panel during a call.
The brightness sensor detects the brightness of the
surrounding area and adjusts the brightness of the backlight.
4Display/Touch panel
5Earphone/Microphone terminal
6Earpiece
7x/y: Volume UP/DOWN key
Adjusts the volume in each function.
8Out-camera
9Mobacas/TV antenna
aSpeaker
Ringtone, music, etc. can be heard from here.
The other party’s voice can be heard from here during a
hands-free call.
bOut-microphone
Use as a sub microphone when recording videos.
Use to measure ambient noises for communicating by making
your voices sound clear when using Noise suppression.
cmicroSD Card slot
ddocomo mini UIM card slot
eMobile light
fa mark
IC card is contained (It cannot be removed).
gFOMA/Xi antenna*2
hStrap hole
iGrip sensor
jH: Power key
Use to turn the power on/off, etc.
Use to turn the display on/off.
kFM transmitter antenna*2
lGPS antenna*2, FOMA/Xi sub antenna*2
mWi-Fi/Bluetooth antenna*2
nMouthpiece/Microphone
oExternal connector terminal
*1 Do not cover the sensor area with your hand or paste a sticker
etc. on the sensor area. The sensor may not work properly.
*2 The antenna is built into the main body. Covering the antenna
area with your hand may influence the quality.
A docomo mini UIM card is an IC card that records personal
information, such as phone numbers.
You cannot make a call and use functions such as packet
communication etc. without inserting a docomo mini UIM card.
You cannot use the docomo mini UIM card with devices other
than compatible ones and may not be able to use a part of the
website and data when you change from the UIM.
In Japan, you cannot call to the emergency number (110, 119 or
118) without inserting a docomo mini UIM card.
A docomo mini UIM card has a security code called PIN code
(nP. 68 “PIN code”).
The handset supports only docomo mini UIM card. Change the
UIM at a docomo Shop.
Before inserting or removing the docomo mini UIM card, turn off
the power. Hold the handset securely with your hand.
ɡInserting docomo mini UIM card
1Open the docomo mini UIM card/microSD Card
slot cover
:Hook the tip of a finger into the slot to open.
2Hold the docomo mini UIM card with the IC
(gold) side turned down and insert it slowly into
the docomo mini UIM card slot
:Push it slowly towards inside until a click is heard.
Before Using the Handset
Part names and functions
Earphone/Microphone terminal
For details on the corresponding earphone/microphone, refer to
the following website.
(http://k-tai.sharp.co.jp/support/d/sh-01f/peripherals.html#!/
earphone_support) (in Japanese only)
Out-microphone
When using functions which support the out-microphone, do not
cover the hole of the out-microphone.
docomo mini UIM card
Slot
15 Before Using the Handset
For details on the battery life nP. 89 “Package”
ɡInternal battery usable life
Internal battery is a consumable product. Battery life per charge
is gradually reduced every time the battery is charged.
When battery life per charge is reduced to about half of the
default time, this means that the internal battery is approaching
the end of its usable life. In this case, it is recommended to
replace the battery as soon as possible. For details on replacing
the internal battery, contact the number listed in “Repairs” (in
Japanese only) on the last page or a repair counter that
DOCOMO specifies.
If you watch TV etc. while charging for a long time, the usable life
of the internal battery may become shorter than estimated.
ɡAC adapter and DC adapter
Refer to user’s guide of AC Adapter 03/04 (sold separately) or
DC Adapter 03 (sold separately).
AC Adapter 03/04 covers from 100 to 240V AC.
The shape of the plug for the AC adapter is for 100V AC (for
domestic use). To use the AC adapter of 100 to 240V AC
overseas, a conversion plug adapter applicable to your country
of stay is required. Do not use a voltage converter for overseas
travel to charge the battery.
[Read the user’s guides of AC Adapter 03/04 (sold
separately) and DC Adapter 03 (sold separately)]
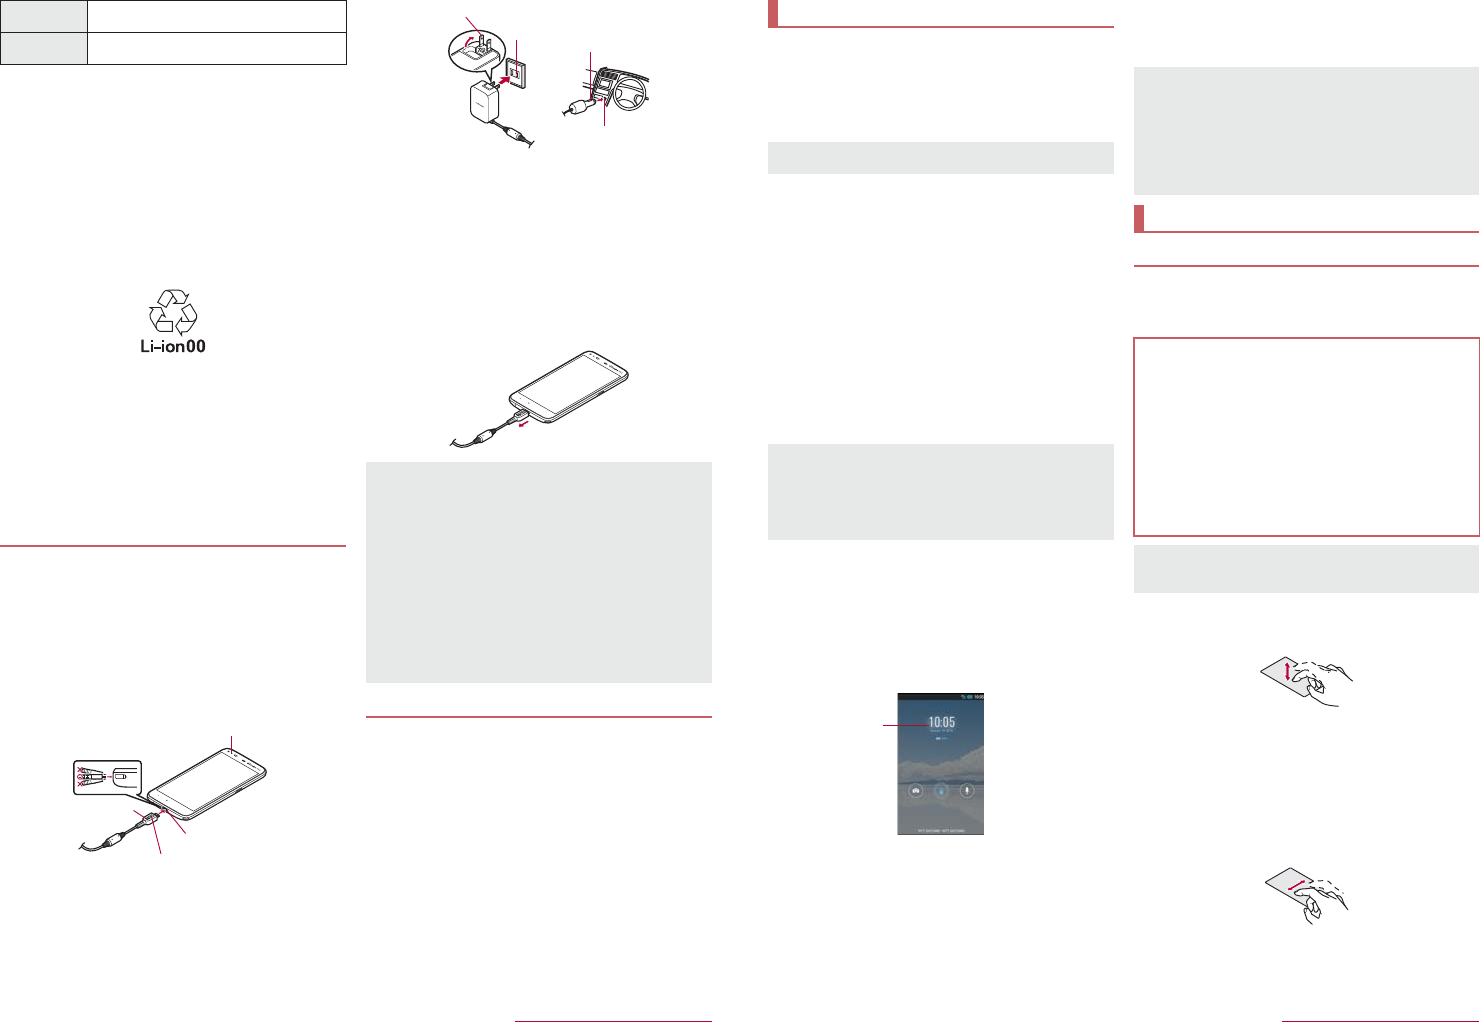
Following operations describe how to charge with AC Adapter 04
or DC Adapter 03.
1Insert the microUSB plug of the AC adapter/DC
adapter horizontally into the external connector
terminal on the handset with the side marked
with “B” turned up
:Check the direction (front or rear) of the microUSB plug and
insert it horizontally.
2When you erect the AC adapter power plug and
insert it into an outlet or insert the DC adapter
power plug into a car cigarette lighter socket,
the charging lamp illuminates and charging
starts
3When charging is complete, the charging lamp
turns off
4Remove the AC adapter power plug from the
outlet, or remove the DC adapter power plug
from the car cigarette lighter socket
5Remove the microUSB plug of the AC adapter/
DC adapter horizontally from the external
connector terminal
When the handset is turned on, you can charge the handset by
connecting the handset to a PC with Micro USB Cable 01 (sold
separately).
For details on connecting to a PC nP. 76 “Connecting the
handset and PC”
Mobacas
watching time
Approx. $$ min
1Seg watching
time
Approx. $$ min
Charging with AC adapter/DC adapter
Charging lamp
microUSB plug
Keep side marked with “B” up
External connector
terminal
Do not forcibly insert or remove. May cause damage to the
external connector terminal and the microUSB plug or result in
a malfunction.
Do not place objects near the handset when charging. May
damage the handset.
When using a DC adapter
The DC adapter should only be used in negative grounded
vehicles (12 and 24V DC).
Do not use with the car engine shut off. May drain the car
battery.
The DC adapter fuse is a consumable product. For
replacement, purchase a new fuse at a nearest auto parts
retailer etc.
Refer to the user’s guide of DC Adapter 03 for details.
Charging with Micro USB Cable 01
100V AC
outlet
Cigarette
lighter socket
AC adapter DC adapter
Power plug
Power plug
16 Before Using the Handset
ɡTurning power on
1H (for at least 2 seconds)
:If Google & location is displayed, check the content, follow
the instructions on the screen and operate.
:When you turn the power on for the first time, make the initial
settings (nP. 21 “Initial setting”).
ɡTurning power off
1H (for at least 1 second)/[Power off
completely]/[OK]
ɡTurning power off forcibly
You can forcibly turn the power off if the screen does not respond or
the power cannot be turned off.
1H (for at least 8 seconds)
:Release your finger after the vibrator is activated to turn the
power off.
ɡSleep mode
You can quickly activate the handset when turning the power on
again by setting the sleep mode.
1H (for at least 1 second)/[To sleep]/[OK]
ɡTurning display on/off
The display is turned off when H is pressed or the handset is not in
use for a set length of time.
Press H while the display is turned off to turn it on.
ɡTouch panel lock
When the power or the display is turned on, the touch panel is
locked.
Touch [J] to unlock.
Operations in touch panel lock screen
To set/disable the manner mode: Touch and hold [y]
To turn on the mobile light: Touch and hold [x]
ƦPress any of the keys or touch the screen to turn it off. Press H
if the display is turned off.
To activate the camera: [K]
To activate ̱͓̽̀͝ϋΏͿσ (Shabette-Concier)/Google:
[W]/select an app/select an activation method
To add a widget: Slide the left edge of the screen to the right/
[+]/select a widget
ƦTo delete a widget: Slide the left edge of the screen to the
right/touch and hold a widget/drag it to [Remove]
The followings describe the operations to use the display
(touch panel).
Operations may differ depending on the function and screen in
use.
ɡTouch
Touch a key or an item displayed on the screen and then release
your finger from it to select or set it.
ɡTouch and hold
When you keep your finger on the touch panel, a menu may appear
depending on the function and screen in use.
ɡSlide/Drag
Move your finger while keeping it on the touch panel to scroll the
screen or move an icon, widget, etc. to the desired position.
In addition, when you touch a menu or item by mistake, move your
finger away from it to cancel the selection.
Turning power on/off
Precautions about inserting and removing a microSD Card are
displayed every time the handset power is turned on.
Do not set the sleep mode but turn the power off when an
airplane you are aboard is about to take off/land, the battery
level is low, etc.
Even if you set the sleep mode, the handset may not be quickly
activated depending on its status such as when it has not been
used for a long time.
Widget
The status panel can be displayed when Screen lock is set to
[Slide or Touch].
Mobile light
The mobile light will automatically turn off approximately 30
seconds after it turns on.
Adding widgets
When Screen lock is set to an item other than [Slide or Touch],
unlock the touch panel after you touch [+].
Basic operation
Operation of touch panel
Cautions when using the touch panel
The touch panel is designed to be lightly touched with your
finger. Do not forcefully press with your finger or a pointed
object (fingernail, ballpoint pen, pin, etc.).
In the following cases, the touch panel may not work even if
you touch it. May cause a malfunction.
Operation with a gloved finger
Operation with the tip of a fingernail
Operation with foreign objects placed on the operation pad
Operation on the touch panel on which a protective sheet or
a sticker is put
Operation while the touch panel is wet
Operation with fingers wet with sweat or water
Operations may be interrupted if you touch an area other than a
confirmation screen or the status bar while the confirmation
screen etc. is displayed.
17 Before Using the Handset
ɡFlick
Move your finger like sweeping the touch panel in the home screen
etc. to switch pages.
ɡPinch out/Pinch in
You may be able to zoom an image in/out etc. by putting two fingers
on the touch panel and moving them with putting a distance
between two fingers apart (pinch out)/closer (pinch in) depending
on the function and screen in use.
When you put your finger over the touch panel, you can
operate the handset without touching the touch panel.
Enable [Air Operation] of Touch Panel in advance
(nP. 64 “Useful”).
Operate with your finger approximately 5 mm off the touch panel.
ɡAir Zoom
When you put your finger over the touch panel while viewing a
screen in the “Browser” app, you can enlarge the selected section.
Enable [Air Zoom] of Touch Panel in advance
(nP. 64 “Useful”).
ɡAir Pattern
If you set Screen lock to [Pattern], you can enter the pattern by
putting your finger over the touch panel.
Set Screen lock to [Pattern] and enable [Air Pattern Unlock] of
Lock & Security in advance (nP. 66 “Lock & security”).
ɡNavigation keys
Use the navigation keys displayed at the bottom of the screen to
perform the basic operations.
1{/v: Back key/Close key
Return to the previous screen.
Close the keyboard.
2|: Home key
Display the home screen.
3z: Menu key
Display available functions (menus).
4}: Recent Apps key
Display Quick Launcher or Recent Apps (nP. 26 “Quick
Launcher”, P. 27 “Recent Apps”).
ɡUsing user-aid function
You can quickly activate apps supporting the user-aid function.
1Slide any of the navigation keys up
:If you have set the activation method of an app to [Always],
the app is activated.
2Select an app/select an activation method
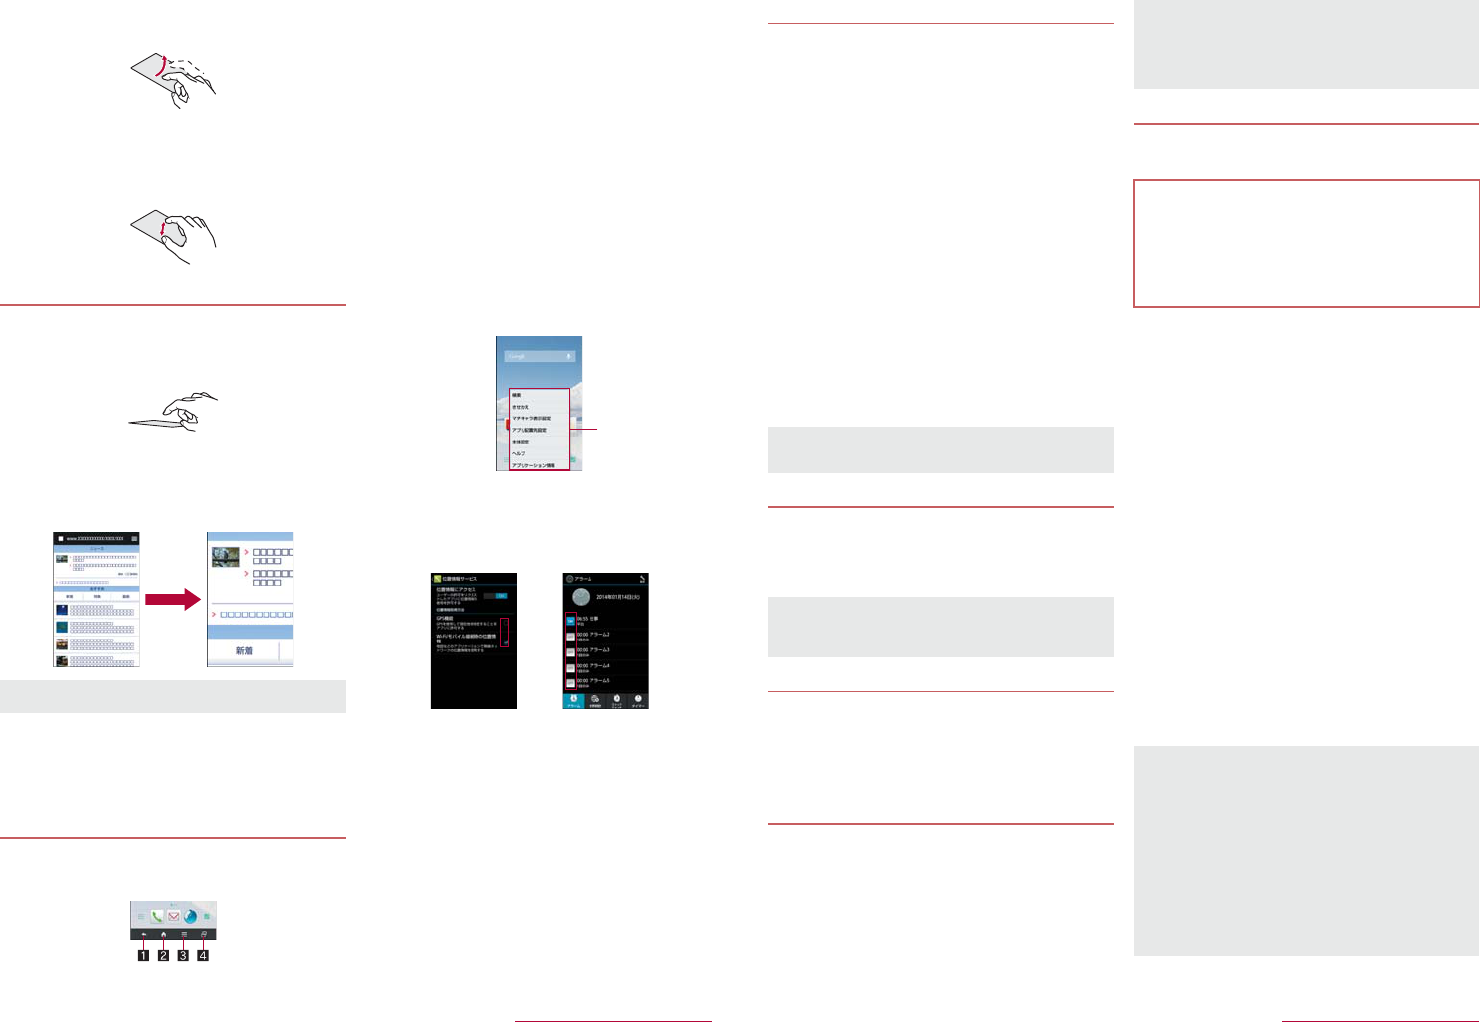
ɡRetrieving menu
When you touch [z] or touch and hold the screen, functions
(menus) available in that screen appear.
Example: Home screen
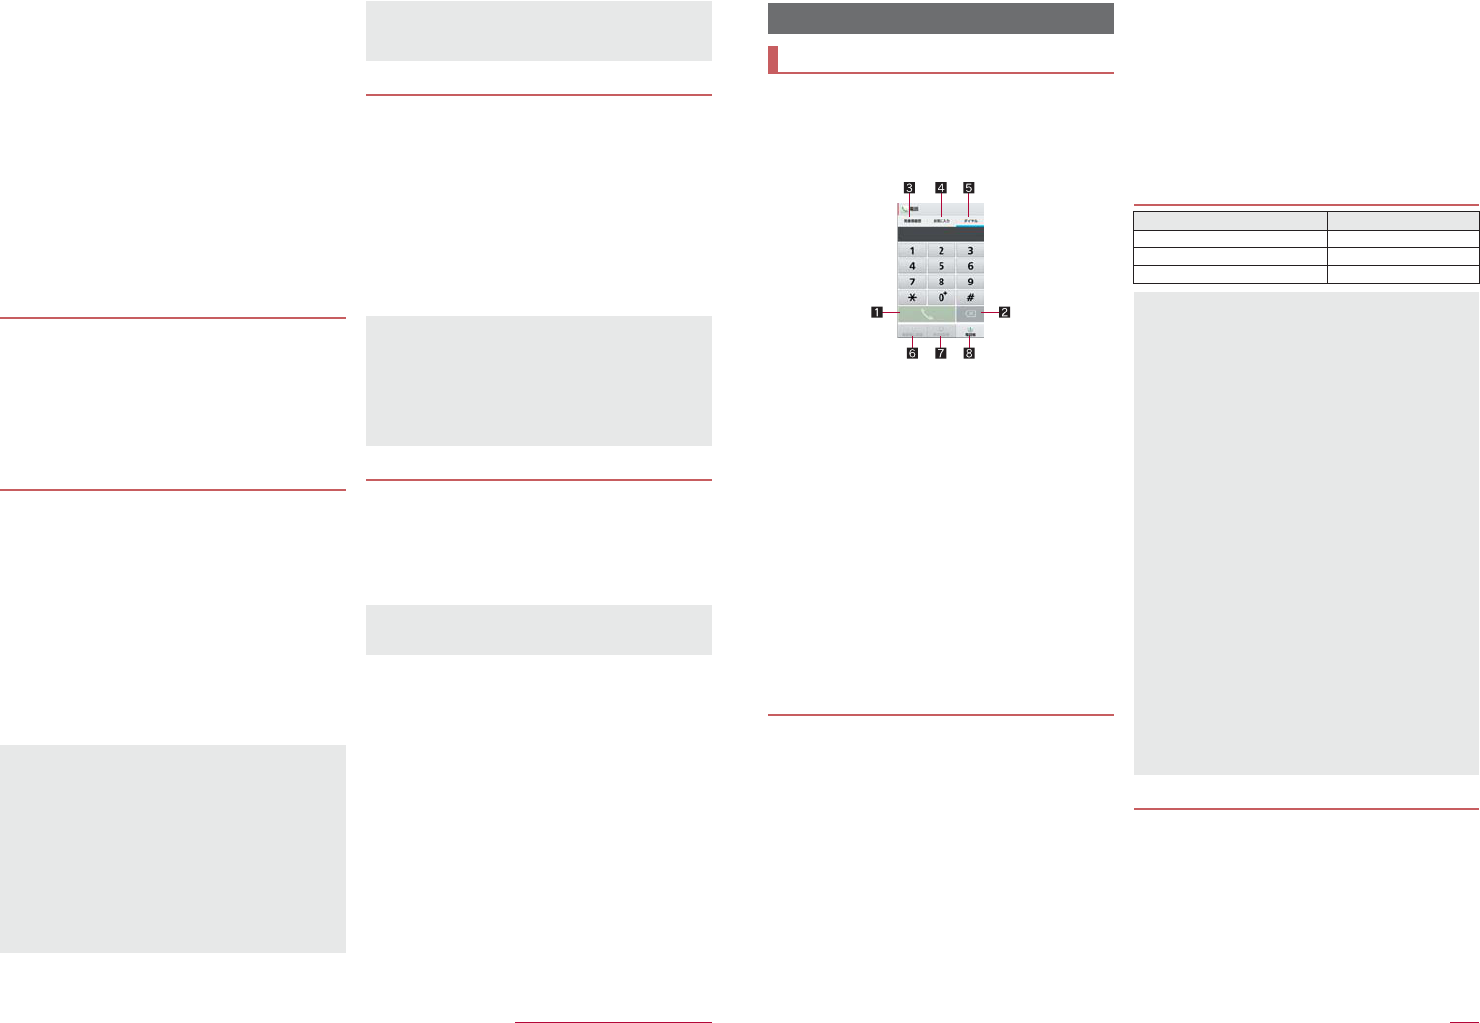
ɡSwitching the settings
When a check box is displayed beside the setting item, you can set
it enabled/disabled or [ON]/[OFF] by touching it.
Example: Location services screen, Alarm screen
[0]: Enabled, [1]: Disabled
ɡVertical/Horizontal display
The screen display is switched when you tilt the handset.
Vertical/Horizontal display is not switched if the handset is turned
in the place parallel to the ground.
The screen display may not be switched properly when a sound
or a vibration is being activated.
Vertical/Horizontal display may not be switched properly right
after the screen or power is turned on.
You can set the display not to automatically switch
(nP. 63 “Display”).
Screens may be displayed in the full screen depending on the
app when switching the vertical display to the horizontal display.
ɡShooting screenshot
Hold H + [y] down for at least 1 second to save the screen being
displayed to the handset.
The shutter sounds when shooting a screenshot.
Air Operation
Operations may not be available depending on the displayed
screen.
Operation while using function
Set item list
22 Before Using the Handset
The access point (sp-mode and mopera U) for Internet
connection is registered by default. You can add or change it if
necessary.
At the time of purchase, an access point of sp-mode is set for
usual connection.
ɡChecking an access point in use
1In the home screen, [R]/[Settings]/
[More...]/[Mobile networks]/[Access Point
Names]
ɡSetting additional access points
Never set the MCC to a figure other than 440 or the MNC to a
figure other than 10. They do not appear on the screen.
1In the home screen, [R]/[Settings]/
[More...]/[Mobile networks]/[Access Point
Names]/[z]/[New APN]
2[Name]/enter the name of the network profile
to create/[OK]
3[APN]/enter the access point name/[OK]
4Enter other items required by network
operators/[z]/[Save]
Reset an access point to default setting.
1In the home screen, [R]/[Settings]/
[More...]/[Mobile networks]/[Access Point
Names]/[z]/[Reset to default]
sp-mode is an ISP owned by NTT DOCOMO for the
Smartphone. In addition to the Internet connection, mail
service with the same address you use on i-mode
(@docomo.ne.jp) or other services are available. sp-mode is a
paid service that requires subscription. For details on
sp-mode, refer to the DOCOMO website.
mopera U is an ISP owned by NTT DOCOMO. If you subscribe
to mopera U, you can use Internet with simple setting. mopera
U is a paid service that requires subscription.
ɡSetting mopera U
1In the home screen, [R]/[Settings]/
[More...]/[Mobile networks]/[Access Point
Names]/[mopera U]/[mopera U
୭
] (mopera
U settings)
If you use Wi-Fi function of the handset, you can use mail or
Internet by connecting to your home, corporate network or
access points of public wireless LAN service.
Packet communication is also available while Wi-Fi is set to [ON].
Wi-Fi connection is prioritized while Wi-Fi connection is set, but
the connection is automatically switched to that of LTE/3G/GPRS
network once Wi-Fi connection is terminated. Note that packet
communication charges may be incurred in this case.
Refer to the manual of your wireless LAN base unit when using
the access point at home etc.
Operate access point registration near the access point.
If you use the docomo service by using Wi-Fi function, set
DOCOMO Wi-Fi option password in advance. In the home
screen, [R]/[Settings]/[docomo service/cloud]/[Wi-Fi
settings for docomo apps] to set it.
1In the home screen, [R]/[Settings]/[Wi-Fi]
2Slide [OFF] to the right
3Select an access point
:If you select an access point protected by security, enter the
password (security key) and select [Connect].
:To register access points manually: [ADD NETWORK]/
enter the network SSID/set security/[Save]
:WPS compatible access points can be easily registered. In
the home screen, [R]/[Settings]/[Wi-Fi]/[EASY
SETTINGS]/[WPS Push Button]/[WPS Pin Entry] to
register an access point.
:Alternatively, in the home screen, [R]/[Settings]/[Wi-Fi]/
[EASY SETTINGS]/[AOSS] to connect to an access point.
Follow the instructions on the screen and operate after this
step.
Setting an access point
If the settings of MCC and MNC are changed and they do not
appear on the screen, reset the settings or set the access point
manually.
Resetting an access point
When sp-mode is not subscribed or if you failed to make
automatic setting of an access point due to signal status such
as outside the service area, you are required to set the access
point again manually.
sp-mode
mopera U
mopera U ୭ (mopera U settings) is an access point for
mopera U settings. When you use the access point for mopera
U settings, packet communication charges are not incurred.
Note that you can connect to only the initial setting screen or
the change setting screen. For details on mopera U settings,
refer to the mopera U website.
Wi-Fi settings
The radio interference with Bluetooth devices
Wireless LANs (IEEE 802.11b/g/n) use the same frequency
band (2.4 GHz) as Bluetooth devices. Therefore, using the
wireless LAN device near a Bluetooth device may cause radio
interference, lowering of communication speed, noise or
connection failure. In this case, turn off the Bluetooth device or
keep the handset and the wireless LAN device at least
approximately 10 m away from the Bluetooth device.
When you select an access point and connect to it with a wrong
password (security key), [Avoided poor Internet connection],
[Authentication problem] or [Connected (Limited)] is displayed.
Confirm the password (security key). When [Avoided poor
Internet connection] or [Connected (Limited)] is displayed after
entering the correct password (security key), you may not have
acquired the correct IP address. Connect to the access point
again after confirming signal status.
The registration process using WPS takes a few minutes. After
completion of the registration of the access point, check that the
proper connection to the access point is acquired.
As for the manual registration of an access point, this function
supports WEP, WPA/WPA2 PSK and 802.1xEAP as the
security setting.
23 Before Using the Handset
ɡDetailed settings
1In the home screen, [R]/[Settings]/[Wi-Fi]/
[z]/[Advanced]
2Select an item
Network notification: Set whether to display a notification
icon when an open network is detected.
ƦSet it after setting Wi-Fi to [ON].
Wi-Fi sleep policy: Set when to switch the Wi-Fi function to
the sleep mode.
Wi-Fi frequency band: Set the frequency band to use.
MAC address: Confirm the MAC address.
IP address: Confirm the IP address.
ɡDisconnecting
1In the home screen, [R]/[Settings]/[Wi-Fi]
2Select the connected access point/[Forget]
:Disconnect with the password retained.
docomo Wi-Fi is a public wireless LAN service provided by
DOCOMO. You can use docomo Wi-Fi with a simple setting.
docomo Wi-Fi is a paid service that requires subscription.
For details on docomo Wi-Fi, refer to the DOCOMO website.
1In the home screen, [R]/[docomo Wi-Fi Easy
Connection]
:Follow the instructions on the screen and operate after this
step.
Tethering function that connects Wi-Fi compatible devices or a
PC connected via Micro USB Cable 01 (sold separately) to the
Internet by using the handset as an access point is available.
You can connect up to 11 devices in total at the same time: ten
Wi-Fi compatible devices and a PC connected via Micro USB
Cable 01.
1In the home screen, [R]/[Settings]/
[More...]/[Tethering & hotspot]
2Select an item
USB tethering: Set whether to use the USB tethering.
ƦCheck the details of the precautions before use.
Wi-Fi tethering: Set whether to use the Wi-Fi tethering.
ƦCheck the details of the precautions before use.
Set up Wi-Fi hotspot: Make settings for Wi-Fi tethering such
as network SSID and security.
1In the home screen, [R]/[Email]
:Only when an account is not set, the account setting screen
appears.
2Enter mail address and password/[Next]
:Provider information is preset for some mail accounts, and a
receiving mail server and a sending mail server are
automatically set.
:When you use an account whose provider information is not
preset, it is necessary to set a receiving mail server and a
sending mail server manually. For details on those settings,
contact the Internet service provider you use.
3Set an account/[Next]
4Enter an account name and your name/[Next]
1In the home screen, [R]/[Settings]/[Add
account]
2Select the account type
3Set up an account
:In the home screen, [R]/[Settings] to find the added
account on the displayed menu.
ɡDeleting your account
1In the home screen, [R]/[Settings]
2Select an account/[z]/[Remove account]/
[Remove account]
:Operation methods may differ depending on the account.
ɡRetrieving your Google account password
If you forget your Google account password, retrieve it.
1In the home screen, [_]
2Enter “(http://www.google.co.jp/) ” in the URL
entry field/[Go]/[Google.com]/[English]/
[Sign in]/[Need help?]/follow the
instructions on the screen
:If the URL entry field is hidden, slide the browser screen
down.
docomo Wi-Fi
Tethering
[USB tethering]
The tethering function is available on Windows Vista, Windows
7, Windows 8 and Linux.
A microSD Card inserted in the handset cannot be mounted on
a PC during USB tethering.
For details on USB tethering, refer to the following website.
(http://www.android.com/tether#usb)
[Wi-Fi tethering]
While the handset is functioning as an access point, it cannot
access the Internet via Wi-Fi connection.
Make settings for Wi-Fi access points in [Set up Wi-Fi hotspot].
For details on Wi-Fi tethering, refer to the following website.
(http://www.android.com/tether#wifi)
[Set up Wi-Fi hotspot]
At the time of purchase, Network SSID is set to [SH-01F_AP]
and Security is set to [WPA2 PSK] while Password is set
randomly. Change the settings if necessary.
Setting up mail account
The account which is registered first is automatically given
priority to normal use. When registering multiple accounts, you
can set an account as prioritized one by enabling [Send email
from this account by default.] at the time of the registration.
When the account type is Exchange, entering
“¥UsernameDomain” in the “Domain¥Username” area may be
required to set a receiving mail server manually depending on
the provider to use. Contact the administrator of the server for
details.
Setting up Google account etc.
When activating the app that requires an account without
setting the account, the account setup screen appears.
Keep a separate memo of the set account and password.
32 Call
1In the home screen, []]/[Dial]
2Enter a phone number
:Always enter the city code, even when it is a local number.
:You can set to notify/not to notify the other party of your
phone number for each call by adding “186”/“184” to the
head of the phone number.
1Call
Make a call. Also, if there is an outgoing call history,
touch to enter the latest outgoing call history when the
phone number has not been entered.
2Delete
Delete an entered number.
Touch and hold it to delete all the entered numbers.
3Outgoing/Incoming call history
4Favorites
Display the contacts set as favorites.
5Dial
Display the dial screen.
6Add to phonebook
7Koe-no-Takuhaibin
For details of Koe-no-Takuhaibin, refer to the DOCOMO
website.
8Phonebook
Display the phonebook.
3[0]
4[End] to end the call
When using services in which you are required to enter
numbers additionally during a call, such as inquiry about the
balance in your bank account or ticket reservation, enter
pause (,)/wait (;) after entering a phone number to make a call
with an additional number added to the main phone number.
ɡAdding 2 seconds pause
After making a call to a main phone number, the handset
automatically pauses for 2 seconds and an additional number is
sent.
1In the home screen, []]/[Dial]
2Enter a phone number/[z]/[Add 2-sec
pause]
3Enter a number to send/[0]
ɡAdding wait
After making a call to a main phone number, the handset
automatically waits and then a screen asking whether to send an
additional number is displayed. Touch [Yes] to send an additional
number.
1In the home screen, []]/[Dial]
2Enter a phone number/[z]/[Add wait]
3Enter a number to send/[0]
4[Yes] during the call
WORLD CALL is an international calling service available from
DOCOMO devices in Japan.
Contact the number listed in “General Inquiries” on the last page
for details on WORLD CALL.
To make an international call through a company other than
DOCOMO, contact the respective companies for instructions.
The caller ID may not be notified or displayed correctly
depending on overseas network operators. In this case, making
a call with incoming call history is not available.
Call
Making a call
Entering touch-tone signals
Emergency call
Emergency calls Phone number
Police 110
Fire and ambulance 119
Marine emergency 118
The handset supports “Location notification of emergency call”.
When you make a call to an emergency number such as 110,
119, and 118, the information of your location (location
information) is automatically notified to the agency that received
the emergency call (e.g. the police station). Depending on your
location and the reception status of the signal, the agency that
received the emergency call may not be able to confirm the
exact location.
If you are not sending your caller ID by calling with “184” added
or other means, your location information and phone number
are not notified. However, if the agency that received the
emergency call considers your location information and phone
number necessary for important purposes, such as life saving,
the agency may retrieve them regardless of your settings.
In addition, the area/timing to introduce “Location notification of
emergency call” depends on the state of preparation in each
agency that receives emergency calls.
In Japan, you cannot make a call to the emergency number
(110, 119 or 118) when a docomo mini UIM card is not inserted,
while the PIN code is locked or from the PUK (PIN Unlock Key)
entry screen.
When calling 110, 119, and 118 from your handset, the police
or fire stations may return your call for verification purposes.
State that you are calling from a mobile phone, and give your
phone number and exact present location.
Remain stationary to ensure that the call is not disconnected
while you are on the line, and keep the handset turned on to
receive calls for approximately 10 minutes afterwards.
Depending on the region, calls to the police or fire station of the
local area may not be made.
When you make a call to the emergency number (110, 119 or
118) while Not registered in address book in Call blocking is
set, Not registered in address book is set to [OFF].
International call (WORLD CALL)
33 Call
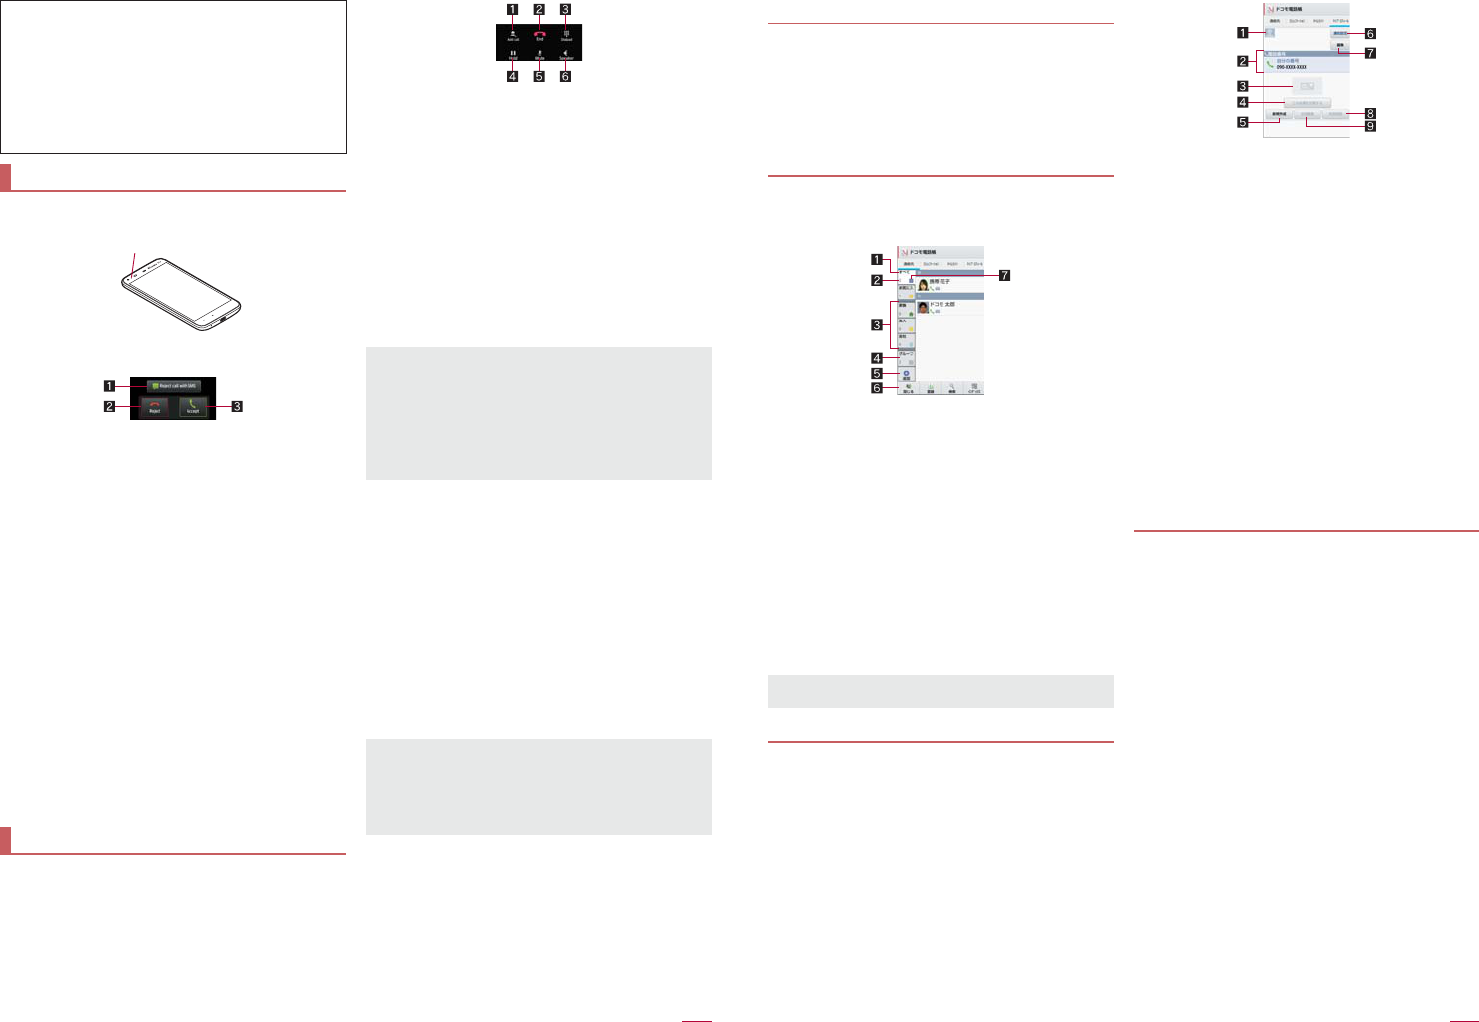
1When a call is received, the ringtone sounds
and the incoming lamp flashes
2Receive the call
:Operate after touching [Activate].
1Reject call with SMS
You can reject an incoming call and send a selected SMS
message to the other party.
2Reject
You can reject the incoming call.
3Accept
You can receive the call.
3[End] to end the call
ɡPlacing a call on hold
1When a call is received, the ringtone sounds
and the incoming lamp flashes
2[z]/[On hold]
ɡAnswering by answering memo
1When a call is received, the ringtone sounds
and the incoming lamp flashes
2[z]/[Absence Memo]
Playing an answering memo
1In the home screen, []]/[z]/[Call settings]
2[Call/Ans Memo]/[Answering Memo List]/
select an answering memo
You can carry out operations such as using a hands-free call
and adjusting the in-call volume according to the using
condition during a call.
1Add call*
Place a current call on hold and make a call to another party.
2End
End a call.
3Dialpad
You can enter touch-tone signals.
4Hold
Hold/Unhold a current call.
If you have added a call, [Switch] is displayed. Touch it to
switch to whom you talk.
5Mute
Enable or disable mute setting on a current call.
6Speaker
You can talk with hands-free.
When a Bluetooth device is connected, you can switch sound
emitting parts.
* Subscription to Call Waiting Service is required.
ɡAdjusting the in-call volume
1[x]/[y] during a call
2[+]/[-]
:Alternatively, touch [x]/[y] to adjust the volume.
3[Close]
ɡUsing Noise suppression
When Noise suppression is set to [ON], you can measure ambient
noises using the out-microphone and communicate by making your
voices sound clear during a call.
1[x]/[y] during a call
2[OFF]/[ON] of Noise suppression
3[Close]
ɡUsing Slow Talk
When Slow talk is set to [ON], you can slow down the speed of the
other party’s voice during a call so that you can hear the voice well.
1[x]/[y] during a call
2[OFF]/[ON] of Slow talk
3[Close]
[Calling Method]
When calling to a land-line phone: 010/country code/area
code (city code)/the other party’s phone number/[0]
When calling to a mobile phone: 010/country code/the other
party’s phone number/[0]
ƦAs for the other parties’ phone numbers and area codes (city
codes) that begin with “0”, omit the first “0” when entering
(except some countries or regions such as Italy).
ƦAlternatively, enter “009130-010” as usual or “+” instead of
“010”.
Receiving a call
Operation during a call
Incoming lamp
Note the following to use hands-free.
ƦSpeak approximately 20 to 40 cm away from the mouthpiece.
When the surroundings are noisy, the sound may break up
and the call may not be satisfactory.
ƦWhen calling outdoors, in a location where surroundings are
noisy and where the sound echoes loudly, use an earphone/
microphone.
ƦIf the sound breaks up during a hands-free call, lower the
in-call volume.
Noise suppression processes voices to make conversations
sound clear. Sound quality may vary depending on the
surrounding noises and the tone of the voice.
When using Noise suppression, make sure not to cover the
hole of the out-microphone and move the mouthpiece as close
to your mouth as possible for speaking.
37 Call
1In the home screen, [R]/[docomo
phonebook]/[Contacts]
2Select the name/[Edit]
3Set each item/[Save]
:For details of each item that can be set nP. 35 “Adding
contacts to phonebook”
1In the home screen, [R]/[docomo
phonebook]/[Contacts]/[Groups]
2Use groups
1Group name
2Number of contacts registered in the group
3Group
4No group
5Add
Add a group.
6Close
Hide groups.
7Group icon
ɡGrouping/Ungrouping contacts
1In the home screen, [R]/[docomo
phonebook]/[Contacts]/[Groups]
2Touch and hold a contact/drag it to a group
:Drag it to the group into which it has already been registered
to ungroup it.
You can display your phone number registered on the docomo
mini UIM card. You can also register your name, mail
addresses, etc.
1In the home screen, [R]/[docomo
phonebook]/[My profile]
2Check/Use the profile
1Image
2Registered contents
3Business card
Display the created business card.
4Exchange this name card
Exchange the registered business cards via a network.
5Create new
Create a business card.
Download the “Name card creator” app to create a
business card. Follow the instructions on the screen and
operate after this step.
6Notice
Make settings for Friends notice.
7Edit
8Delete business card
9Edit business card
Edit the business card with the “Name card creator” app.
ɡEditing My profile
1In the home screen, [R]/[docomo
phonebook]/[My profile]/[Edit]
2Set each item/[Save]
You can back up/restore the phonebook by using docomo
backup (Save on the microSD Card).
For details on docomo backup (Save on the microSD Card)
nP. 60 “docomo backup (Save on the microSD Card)”
Editing phonebook
Using groups
The group function is available on contacts created with a
docomo/Google account.
My profile
Backing up/Restoring phonebook

38 Mail/Browser
You can send and receive mails using mail address of i-mode
(@docomo.ne.jp). Pictograms and Deco-mail are available.
Automatic reception is also supported.
For details on docomo mail, refer to the DOCOMO website.
1In the home screen, [^]
:Follow the instructions on the screen and operate after this
step.
You can send and receive text messages that include up to 70
double-byte characters (up to 160 characters for single-byte
alphanumeric only) by addressing to mobile phone numbers.
You can also exchange messages with users of overseas
network operators. Refer to “Mobile Phone User’s Guide
[International Services]” or the DOCOMO International Services
website for information on countries where this service is
available and available overseas network operators.
1In the home screen, [R]/[Messaging]
2[0]/enter a destination and a message/[@]
1In the home screen, [R]/[Messaging]
2Select a thread
:Messages are grouped into a thread by destination/sender
and displayed.
1Image
It is displayed if an image of the other party is registered
in the phonebook. Touch to select and use an app
supporting the registered contents of the phonebook. If
the sender is not registered in the phonebook, you can
register the person in the phonebook by touching it.
2Number of unread messages
3Destination/Sender
4Number of messages in thread
5Date and time of the message exchange
3Check the message
1Destination/Sender
2Phone call
3Date and time of the message exchange
4Message
1In the home screen, [R]/[Messaging]
2Select a thread
3Enter the message/[@]
1In the home screen, [R]/[Messaging]
2Select a thread
3Touch and hold the message/[Forward]/
enter the destination and message/[@]
1In the home screen, [R]/[Messaging]
2Select a thread
3Touch and hold the message/[Delete]/
[Delete]
1In the home screen, [R]/[Messaging]
:To delete all threads: [z]/[Delete all threads]/[Delete]
2Touch and hold the thread/[1]/[Delete]
1In the home screen, [R]/[Messaging]
2[z]/[Settings]
3Select an item
Delete old messages: When the number of saved messages
reaches its limit, messages are automatically deleted from
the oldest one.
Text message limit: Set the number of messages to be saved
by thread.
Delivery reports: Notify you that sent messages have been
received every time a message is received.
Manage SIM card messages: Manage messages saved on
the docomo mini UIM card.
Notifications: Notify you that messages have been received
in the status bar.
Mail/Browser
docomo mail
SMS
If destinations are devices of overseas network operators, enter
“+”, the country code and the recipient’s mobile phone number.
If the phone number begins with “0”, omit the first “0”.
Alternatively, enter “010”, the country code and the phone
number.
Single-byte katakana and special symbols in SMS messages
may not appear correctly for recipient.
SMS cannot be sent when “186” or “184” is added.
Displaying message
Replying message
Forwarding message
Deleting message
Deleting thread
Setting message
39 Mail/Browser
Sound: Set the ringtone to be rung when a message is
received.
Vibrate: Set the vibrator to be activated when a message is
received.
You can send and receive mails by setting a mail account
provided by a service provider.
Set the account in advance (nP. 23 “Setting up mail account”).
1In the home screen, [R]/[Email]
2[(]
3Compose the mail
:To attach a file: [z]/[Attach file]/select a file
1Destination
When you enter part of a mail address or a name
registered in the phonebook, destination candidates are
displayed.
2Subject
3Message
4Account
4[@]
Example: When a mopera U account is set
1In the home screen, [R]/[Email]
2Select a mail
1Folder name/Account name being displayed
Touch to switch folders and accounts.
2Unread mail
The background color of an opened mail turns gray.
3Check box
Apply the settings for mails to be deleted/unread/opened/
starred on the checked mails collectively.
4Number of unread mails
5Star icon
Use it as a mark indicating that the mail is special or
supposed to be dealt with later.
You can check starred mails in the Starred folder.
6Newly compose mail
7Display all folders
8Refresh
3Check the mail
1Subject
2Sender
Touch the image to select and use an app supporting the
registered contents of the phonebook. If the sender is not
registered in the phonebook, you can register the person
in the phonebook by touching it.
3Destination/Date and time of reception
Touch to display the details.
4Message
5Reply
6Reply all/Forward
7Star icon
Use it as a mark indicating that the mail is special or
supposed to be dealt with later.
You can check starred mails in the Starred folder.
8Attached file
Touch to display the attached file.
9Delete
aUnread
bDisplay new mail
[Delivery reports]
When you send a message to mobile phones of other carriers,
the notification for confirming that it has been received may not
be sent to you.
Email
Some receiving side models may not be able to receive the
subject completely.
Mail sent from a Gmail account is treated as one from a PC.
When receiving side models set PC-mail rejection, mails cannot
be sent.
Mail that could not be sent for any reason will be saved in the
Outbox as unsent mail.
Text for recipient may not appear correctly depending on signal
status.
Attaching file
A mail can include 5 MB worth of file attachments together with
the message. There are no limits to the number of files to be
attached.
Depending on the receiving side device, files may not be
received or correctly displayed/played. Also, the quality of
videos may deteriorate or videos may be converted to
continuous still pictures.
Displaying mail
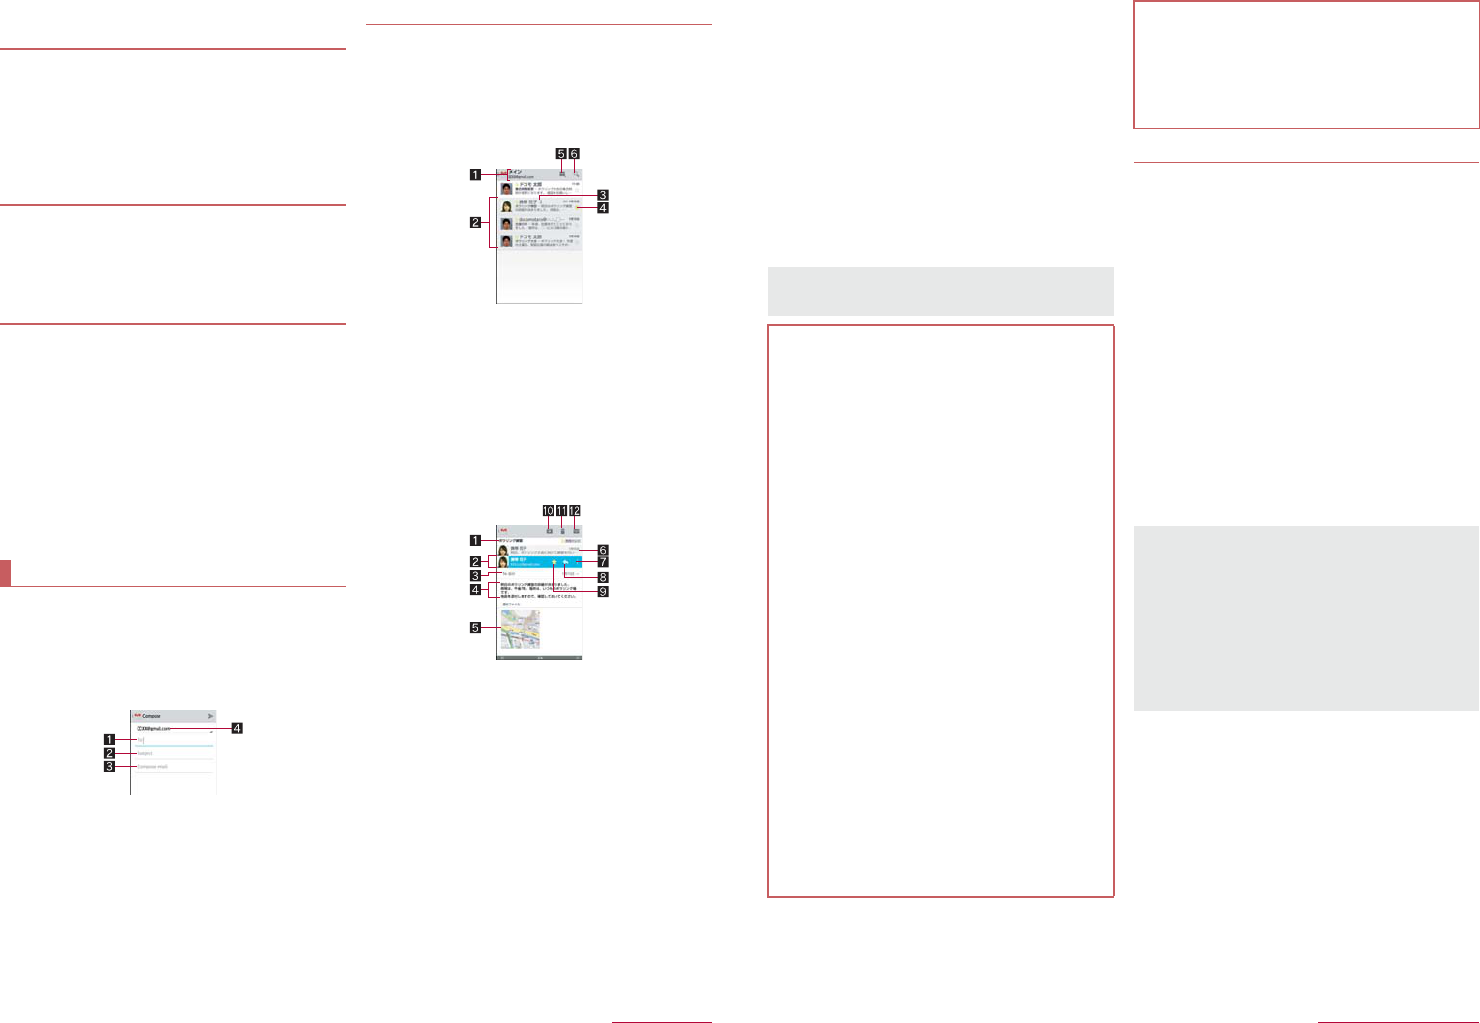
40 Mail/Browser
cDisplay old mail
1In the home screen, [R]/[Email]
2Select a mail
3[)]
:To reply to all: [*]/[Reply all]
:To forward: [*]/[Forward]
4Compose the mail/[@]
1In the home screen, [R]/[Email]
:To delete selected mails: Touch check boxes/[+]
2Select a mail
3[+]
1In the home screen, [R]/[Email]/[z]/
[Settings]/[General]
:Select an account to make settings for the details on each
account such as Signature and Email notifications.
:Touch [ADD ACCOUNT] to add an account.
2Select an item
Auto-advance: Set a screen to be displayed after a mail is
deleted.
Message text size: Set the font size of mail.
Reply all: Set whether to reply a mail to all when replying it.
Ask to show pictures: Disable the settings to have the
handset automatically display images attached on a mail.
Confirm before deleting: Set whether to display the
confirmation screen before deleting a mail.
Gmail is a mail service provided by Google.
Set up a Google account in advance (nP. 23 “Setting up
Google account etc.”).
1In the home screen, [R]/[Gmail]
2[(]
3Compose the mail
1Destination
When you enter part of a mail address or a name
registered in the phonebook, destination candidates are
displayed.
2Subject
3Message
4Account
If you set multiple accounts, you can switch accounts.
4[@]
1In the home screen, [R]/[Gmail]
2Select a thread
:In Gmail, mails are grouped into a thread by reply and
displayed. If new mails are replied ones of an existing mail,
they are grouped into the same thread. New thread is
created for newly composed mails or mails whose subjects
have been changed.
1Label/Account name being displayed
Touch to switch displaying type and accounts.
2Thread with no unread mails
The background color is displayed in gray.
3Number of mails in thread
4Star icon
Use it as a mark indicating that the mail is special or
supposed to be dealt with later.
You can check starred mails in the Starred folder.
5Newly compose mail
6Mail search
3Check the mail
1Subject
2Sender
Touch the image to select and use an app supporting the
registered contents of the phonebook. If the sender is not
registered in the phonebook, you can register the person
in the phonebook by touching it.
3Destination/Date and time of reception
Touch to display the details.
4Message
5Attached file
6Opened mail
If the thread has multiple mails inside, touch to check the
opened mails by displaying their senders, first lines, etc.
7Reply to all/Forward
8Reply
9Star icon
Use it as a mark indicating that the mail is special or
supposed to be dealt with later.
You can check starred mails in the Starred folder.
aArchive
bDelete
Replying/Forwarding mail
Deleting mail
Setting mail
Gmail
Displaying mail
73 Data Communication
*10 Transfer phonebook data on the handset to a Bluetooth device.
Data may not be displayed correctly on the other party’s device
depending on the contents of the transferred phonebook data.
*11 Join a PC network etc. and share the Internet connection.
*12 Communicate data with a commercially available health
appliance compatible with Bluetooth such as a weighing
machine.
*13 Make a Bluetooth device ring or vibrate when the Bluetooth
connection is terminated after it is moved away from the
handset.
*14 Make the handset/a Bluetooth device ring or vibrate by
operating the handset/the Bluetooth device.
*15 Notify you of incoming calls, new mails, etc. through a
Bluetooth device.
*16 Stop the ringtone or the vibrator of the handset by operating a
Bluetooth device.
*17 Synchronize clocks between a Bluetooth device and the
handset.
To register/connect a Bluetooth device, the Bluetooth passkey
may need to be entered. Before starting the registration, decide
one- to sixteen-digit number. Enter the same number on the
handset and the other party’s Bluetooth device.
Set the other party’s Bluetooth device to the registration stand-by
status in advance.
1In the home screen, [R]/[Settings]/
[Bluetooth]
2Slide [OFF] to the right
3Select a Bluetooth device/[Pair]
:The confirmation screen for connection may be displayed.
:Entering the Bluetooth passkey may be necessary
depending on the other party’s Bluetooth device. Also, some
Bluetooth devices may start connecting after completing
registration.
:To display/hide the handset’s name on other Bluetooth
devices: [SH-01F]
ƦThe handset name is automatically hidden when the period
of time set for Visibility timeout has passed.
:To search for Bluetooth devices: [SEARCH FOR DEVICES]
:Touch [B] of a paired Bluetooth device to change the name
and the connection type of the other party’s Bluetooth device.
ɡWhen receiving registration request from Bluetooth
device or connection request from unregistered
Bluetooth device
1Registration request/Connection request from
Bluetooth device
2Drag the status bar down/[Pairing request]/
[Pair]
:When the confirmation screen about the settings on pairing
appears, select [Pair].
:Entering the Bluetooth passkey may be necessary
depending on the other party’s Bluetooth device.
:The confirmation screen for connection may be displayed.
Refer to the manual for the Bluetooth device as well.
You may not hear TV audio etc. with Bluetooth devices which
are not compatible with SCMS-T.
Precautions about handling the Bluetooth device
Note the followings when using the Bluetooth device.
Note the followings to make good connection.
Keep the distance between the handset and another
Bluetooth device within approximately 10 m with no
obstructions in sight. The distance within which you can
make connection may be shorter when there are
obstructions between them or depending on the conditions
of the surroundings (such as walls or furniture) and the
structure of a building. Especially when there is a wall or
floor of reinforced concrete between them, they may be
unable to connect with each other. Note the above
mentioned distance is not guaranteed.
Move the handset and another Bluetooth device as far away
as possible from home electric appliances, AV devices, OA
devices, etc. before connection. The Bluetooth device is
liable to be adversely affected by a microwave oven, so
move it as far away as possible from the microwave oven
while using it. Otherwise, normal connection cannot be
performed when other electric devices are powered on or
Bluetooth devices may cause noises or reception failure on
a TV or radio set.
Move the Bluetooth device to a place where connection is
possible when there is a broadcast station or radio near the
Bluetooth device and the handset cannot be connected to
the device. Strong radio waves may prevent connection
between Bluetooth devices.
Wireless connection is available with Bluetooth device put in
a bag or pocket. However, lowering of communication speed
or noise may result when you are in between the Bluetooth
device and the handset.
Electromagnetic signals from the Bluetooth device may affect
the operation of electronic medical equipment etc. As some
cases may result in accident, turn off the handset and other
Bluetooth devices in the following place.
On trains On airplanes In hospitals
Near automatic doors or fire alarms
In places such as gas stations where flammable gas is
generated
The radio interference with Wi-Fi compatible devices
The Bluetooth devices use the same frequency band (2.4
GHz) as wireless LANs (IEEE 802.11b/g/n). Therefore, using
the Bluetooth device near a wireless LAN device may cause
the radio interference, lowering of communication speed, noise
or connection failure. In this case, turn off the wireless LAN
device or keep the handset and the Bluetooth device at least
approximately 10 m away from the wireless LAN.
Bluetooth
If you fail to connect, connection may become available after
re-registration of Bluetooth devices.
When the Bluetooth function is set to [ON], the handset is set to
receive a registration request/connection request from other
Bluetooth devices. Make the setting for displaying the handset’s
information on other Bluetooth devices in advance to allow the
handset to be searched for by other Bluetooth devices.
While in connection stand-by, even if a connection request from
a Bluetooth device is received, connection may not be made
depending on the signal status etc.
For details on the operations of the other party’s Bluetooth
device, refer to the manuals of the Bluetooth device to be used.
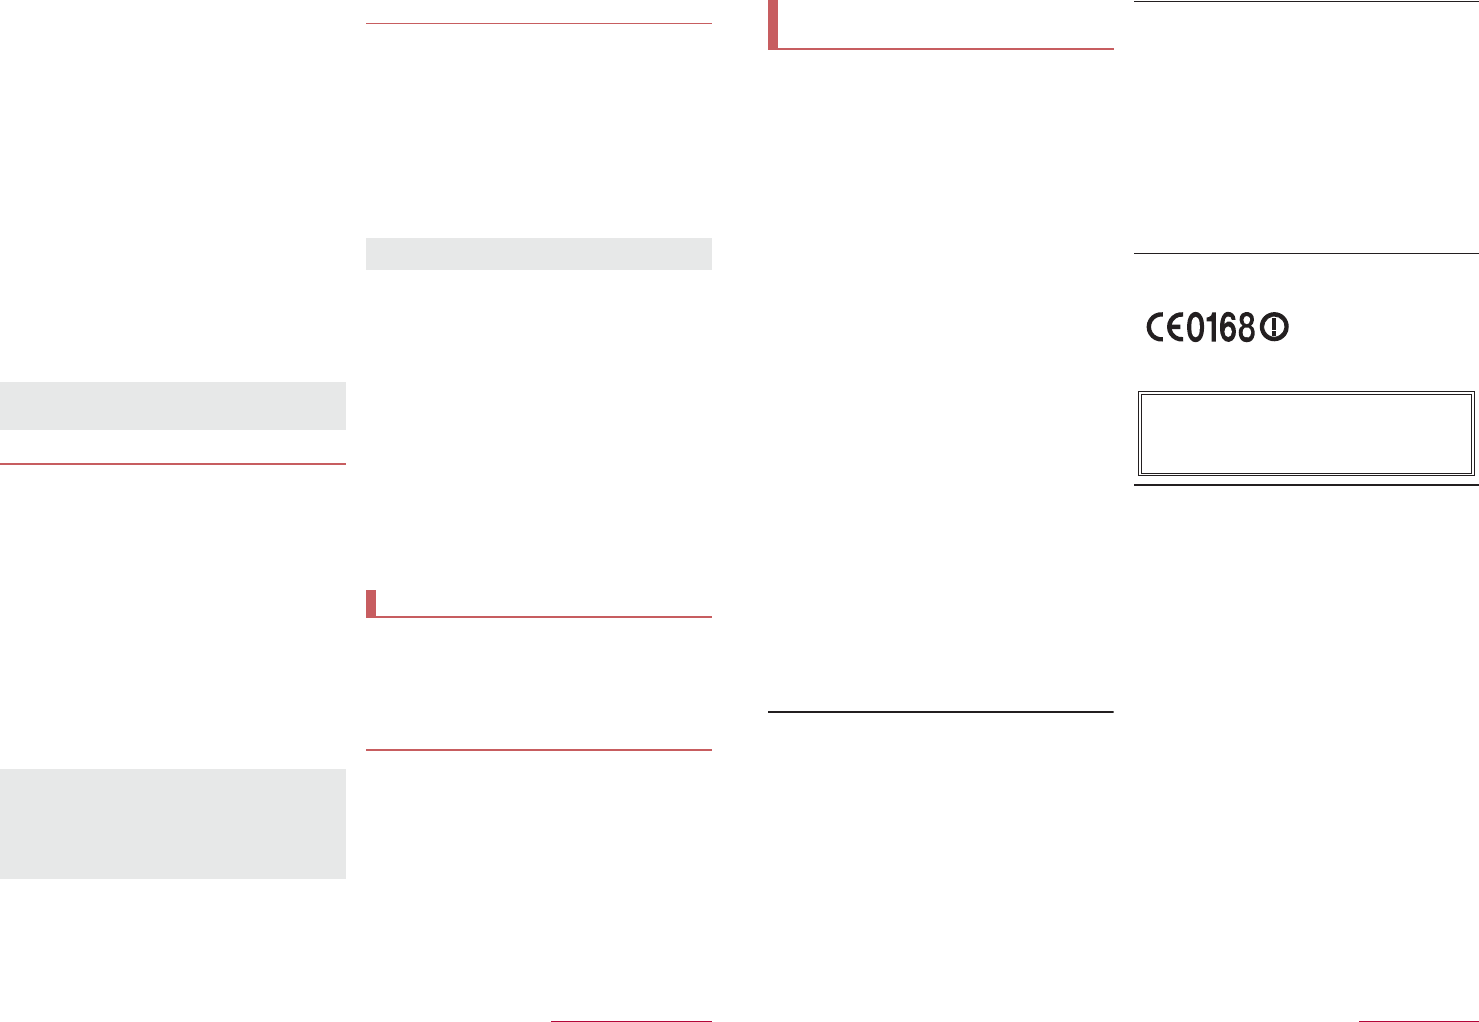
74 Data Communication
ɡDisabling registration of Bluetooth device
1In the Bluetooth screen, [B] of the Bluetooth
device to unregister/[Unpair]
ɡDisabling connection of Bluetooth device
1In the Bluetooth screen, select the Bluetooth
device to disconnect/[OK]
ɡSetting Bluetooth
Set after setting the Bluetooth function to [ON].
1In the Bluetooth screen, [z]
2Select an item
Rename phone: Change the handset’s name.
Visibility timeout: Set how long the handset’s information will
be displayed on the other party’s Bluetooth device.
aptX: Set whether to use aptX®.
Handsfree setting: Set whether to always have voices
emitted from the connected Bluetooth compatible hands-free
device during a voice call.
Disable BT Smart settings: Enable/Disable the BT Smart
settings.
Show received files: Display the history of data received via
Bluetooth connection.
ɡSending data
Example: Still picture
1In the home screen, [R]/[Contents
Manager]/[Photo]
2Touch and hold a still picture/[Share]/
[Bluetooth]
:Set the receiver’s Bluetooth device to receive data.
3Select a Bluetooth device to connect to
ɡReceiving data
1Data is sent from the sender’s Bluetooth device
2Drag the status bar down/select the incoming
notification/[Accept]
3Drag the status bar down/select the received
data
You can make a Bluetooth Smart device respond to the
handset operations or notify you of incoming calls or new
mails by operating the handset if you connect the handset to
the Bluetooth Smart device.
ɡNotifying this device
If you have connected the handset to a Bluetooth Smart device, you
can make the Bluetooth Smart device ring or vibrate by operating
the handset.
1In the Bluetooth screen, [B] of a connected
Bluetooth Smart device/[Notify this device]
2Select a notification method
ɡAdvanced settings
You can make settings for operations available when the handset is
connected to a Bluetooth Smart device.
1In the Bluetooth screen, [B] of a connected
Bluetooth Smart device/[Advanced settings]
2Select an item
Incoming call notification: Set whether to notify you through
the Bluetooth Smart device when receiving a call.
Mail reception notification: Set whether to notify you through
the Bluetooth Smart device when receiving a mail.
Alarm notification: Set whether to notify you through the
Bluetooth Smart device when an alarm rings.
Schedule notification: Set whether to notify you of schedule
notifications from the calendar through the Bluetooth Smart
device.
Time change notification: Set whether to synchronize clocks
between the Bluetooth Smart device and the handset.
Link loss notification: Set how to notify you when the
Bluetooth connection is temporarily disabled.
NFC stands for Near Field Communication and is a near field
wireless communication system which conforms to the
international standards set by ISO (International Organization
for Standardization). You can use the contactless IC card
function, reader/writer function (R/W), Peer to Peer function
(P2P), etc. on the handset.
You can send and receive data to and from devices which
support Reader/Writer, P2P function.
Enable [Reader/Writer, P2P] and set Android beam to [ON] in
advance (nP. 45 “NFC/Osaifu-Keitai settings”).
Android beam is not available when NFC/Osaifu-Keitai lock is
set.
Android beam may not be available depending on the app.
Communication with all devices which support Reader/Writer,
P2P function is not completely guaranteed.
The precautions about using Android beam are the same as
those about iC communication (nP. 72 “When using iC
communication”).
Other precautions are the same with the precautions for when
you hold the handset over the other device
(nP. 45 “Precautions about holding over the other device”).
[aptX]
When you enable [aptX], sounds may not be emitted depending
on the Bluetooth device. In this case, disable [aptX].
Sending and receiving by Bluetooth
Note that if you select [Delete all before registration] when
receiving all data, all data registered to the target function are
deleted.
Some data cannot be received all.
When available space in the save destination becomes
insufficient while receiving data, the data being received to that
point are saved and receiving ends.
Bluetooth Smart device connection
This is available only on Bluetooth Smart devices supporting
FMP (Find Me Profile).
NFC communication
Android beam
91 Appendix/Index
This model SH-01F mobile phone complies with Japanese
technical regulations and international guidelines regarding
exposure to radio waves.
This mobile phone was designed in observance of Japanese
technical regulations regarding exposure to radio waves (*1) and
limits to exposure to radio waves recommended by a set of
equivalent international guidelines. This set of international
guidelines was set out by the International Commission on
Non-Ionizing Radiation Protection (ICNIRP), which is in
collaboration with the World Health Organization (WHO), and the
permissible limits include a substantial safety margin designed to
assure the safety of all persons, regardless of age and health
condition.
The technical regulations and international guidelines set out limits
for radio waves as the Specific Absorption Rate, or SAR, which is
the value of absorbed energy in any 10 grams of tissue over a
6-minute period. The SAR limit for mobile phones is 2.0 W/kŨ. The
highest SAR value for this mobile phone when tested for use at the
ear is 0.334 W/kŨ. There may be slight differences between the
SAR levels for each product, but they all satisfy the limit.
The actual SAR of this mobile phone while operating can be well
below that indicated above. This is due to automatic changes to the
power level of the device to ensure it only uses the minimum
required to reach the network. Therefore in general, the closer you
are to a base station, the lower the power output of the device.
This mobile phone can be used in positions other than against your
ear. This mobile phone satisfies the international guidelines when
used with a carrying case or a wearable accessory approved by
NTT DOCOMO, INC. (*2). In case you are not using the approved
accessory, please use a product that does not contain any metals,
and one that positions the mobile phone at least 1.5 cm away from
your body.
The World Health Organization has stated that “a large number of
studies have been performed over the last two decades to assess
whether mobile phones pose a potential health risk. To date, no
adverse health effects have been established as being caused by
mobile phone use.”
Please refer to the WHO website if you would like more detailed
information.
(http://www.who.int/docstore/peh-emf/publications/facts_press/
fact_english.htm)
Please refer to the websites listed below if you would like more
detailed information regarding SAR.
Ministry of Internal Affairs and Communications Website:
(http://www.tele.soumu.go.jp/e/sys/ele/index.htm)
Association of Radio Industries and Businesses Website:
(http://www.arib-emf.org/index02.html) (in Japanese only)
NTT DOCOMO, INC. Website:
(http://www.nttdocomo.co.jp/english/product/sar/)
SHARP Corporation Website:
(http://www.sharp.co.jp/products/menu/phone/cellular/sar/
index.html) (in Japanese only)
*1 Technical regulations are defined by the Ministerial Ordinance
Related to Radio Law (Article 14-2 of Radio Equipment
Regulations).
*2 Regarding the method of measuring SAR when using mobile
phones in positions other than against the ear, international
standards (IEC62209-2) were set in March of 2010. On the
other hand, technical regulation is currently being deliberated
on by national council (As of October, 2011).
European RF Exposure Information
Your mobile device is a radio transmitter and receiver. It is
designed not to exceed the limits for exposure to radio waves
recommended by international guidelines. These guidelines were
developed by the independent scientific organization ICNIRP and
include safety margins designed to assure the protection of all
persons, regardless of age and health.
The guidelines use a unit of measurement known as the Specific
Absorption Rate, or SAR. The SAR limit for mobile devices is
2W/kŨ and the highest SAR value for this device when tested at
the ear was 0.429 W/kŨ*.
As SAR is measured utilizing the devices highest transmitting
power the actual SAR of this device while operating is typically
below that indicated above. This is due to automatic changes to the
power level of the device to ensure it only uses the minimum level
required to reach the network.
* The tests are carried out in accordance with international
guidelines for testing.
Declaration of Conformity
In some countries/regions including Europe, there are restrictions on the use
of 5GHz WLAN that may limit the use to indoors only.
If you intend to use 5GHz WLAN on the device, check the local laws and
regulations beforehand.
FCC Notice
This device complies with part 15 of the FCC Rules.
Operation is subject to the following two conditions:
(1) This device may not cause harmful interference, and (2) this
device must accept any interference received, including
interference that may cause undesired operation.
Changes or modifications not expressly approved by the
manufacturer responsible for compliance could void the user’s
authority to operate the equipment.
Information to User
This equipment has been tested and found to comply with the limits
of a Class B digital device, pursuant to Part 15 of the FCC Rules.
These limits are designed to provide reasonable protection against
harmful interference in a residential installation. This equipment
generates, uses and can radiate radio frequency energy and, if not
installed and used in accordance with the instructions, may cause
harmful interference to radio communications.
However, there is no guarantee that interference will not occur in a
particular installation; if this equipment does cause harmful
interference to radio or television reception, which can be
determined by turning the equipment off and on, the user is
encouraged to try to correct the interference by one or more of the
following measures:
1. Reorient/relocate the receiving antenna.
2. Increase the separation between the equipment and receiver.
3. Connect the equipment into an outlet on a circuit different from
that to which the receiver is connected.
4. Consult the dealer or an experienced radio/TV technician for
help.
Specific Absorption Rate (SAR) of
Mobile Phone
Hereby, Sharp Telecommunications of Europe Ltd, declares that this
SH-01F is in compliance with the essential requirements and other
relevant provisions of Directive 1999/5/EC.
A copy of the original declaration of conformity can be found at the
following Internet address:
(http://www.sharp.co.jp/k-tai/) (in Japanese only)
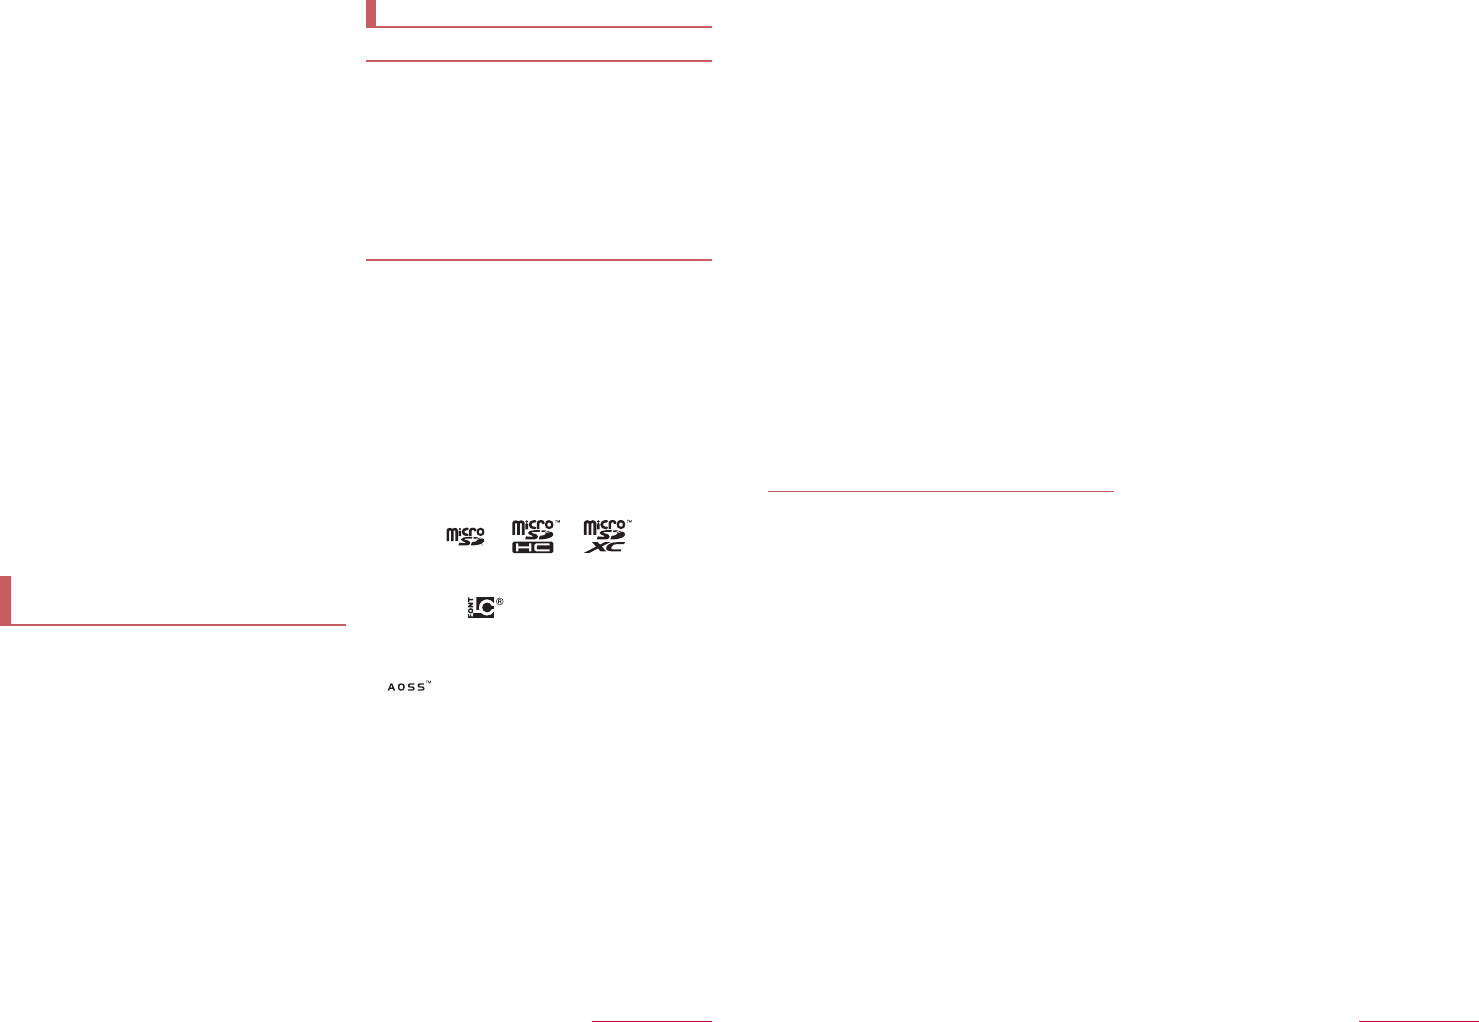
92 Appendix/Index
5 GHz WLAN Operation in USA
Within the 5.15-5.25 GHz band, UNII devices are restricted to
indoor operations to reduce any potential for harmful interference to
co-channel Mobile Satellite Services (MSS) operations.
FCC RF Exposure Information
Your handset is a radio transmitter and receiver.
It is designed and manufactured not to exceed the emission limits
for exposure to radio frequency (RF) energy set by the Federal
Communications Commission of the U.S. Government.
The guidelines are based on standards that were developed by
independent scientific organizations through periodic and thorough
evaluation of scientific studies. The standards include a substantial
safety margin designed to assure the safety of all persons,
regardless of age and health.
The exposure standard for wireless handsets employs a unit of
measurement known as the Specific Absorption Rate, or SAR. The
SAR limit set by the FCC is 1.6 W/kŨ.
The tests are performed in positions and locations (e.g., at the ear
and worn on the body) as required by the FCC for each model. The
highest SAR value for this model handset when tested for use at
the ear is 0.40 W/kŨ and when worn on the body, as described in
this user guide, is 0.68 W/kŨ.
For body worn operation, this phone has been tested and meets the
FCC RF exposure guidelines. Please use an accessory designated
for this product or an accessory which contains no metal and which
positions the handset a minimum of 1.5 cm from the body.
The use of accessories that do not satisfy these requirements may
not comply with FCC RF exposure requirements, and should be
avoided.
The FCC has granted an Equipment Authorization for this model
handset with all reported SAR levels evaluated as in compliance
with the FCC RF emission guidelines. SAR information on this
model handset is on file with the FCC and can be found under the
Display Grant section of (http://www.fcc.gov/oet/ea/fccid/) after
searching on FCC ID APYHRO00197.
Additional information on Specific Absorption Rates (SAR) can be
found on the FCC website at (http://www.fcc.gov/).
The Japan Export Administration Regulations (“Foreign
Exchange and Foreign Trade Act” and its related laws) will be
applied to this product and its accessories under certain
conditions. The Export Administration Regulations are also
applied. To export or reexport the handset and its accessories,
conduct all legally required procedures at your own risk and
expense. For details on the procedures, contact the Ministry of
Economy, Trade and Industry or the US Department of
Commerce.
Data with third party copyrights such as text, images, music and
software that is downloaded via Internet web pages, acquired by
TV, video, etc. or shot by the handset cannot be duplicated,
altered or publicly transmitted without rightful party’s consent.
Only duplicating, quoting, etc. for personal use are permitted
under the Copyright Act.
Even if for personal use, filming and recording may be prohibited
for demonstrations, performances and exhibitions.
Also, shooting another’s image or posting another’s image on
Internet web pages without their consent may constitute a
violation of one’s right to their image.
“FOMA”, “dιΣνȜ”, “dζȜΉΛΠ”, “̤ͼέΉȜΗͼ”,
“ToruCa”, “mopera U”, “++ΫΐΥΑmopera”, “Deco-mail”,
“i-appli”, “i-mode”, “̅ΙλΥσ”, “iD”, “WORLD WING”, “WORLD
CALL”, “ςͺιȜσ”, “̅ϋΏͿσ”, “sp-mode”, “eΠςΓΜ”,
the “iD” logo and the “Xi” logo are trademarks or registered
trademarks of NTT DOCOMO, INC.
“Catch Phone (Call waiting service)” is a registered trademark of
Nippon Telegraph and Telephone Corporation.
Microsoft®, Windows®, Windows Media®, Windows Vista® and
Exchange® are trademarks or registered trademarks of Microsoft
Corporation in the United States and/or other countries.
Oracle and Java are registered trademarks of Oracle and/or its
affiliates.
Other names may be trademarks of their respective owners.
QR code is a registered trademark of Denso Wave Inc.
microSD Logo, microSDHC Logo and microSDXC Logo are
trademarks of SD-3C, LLC.
The handset features LCFONT, developed by Sharp
Corporation, to make the LCD easier to view and read. LCέϋ
Π/LCFONT and are registered trademarks of Sharp
Corporation.
OBEX™ is a trademark of Infrared Data Association®.
a is a registered trademark of FeliCa Networks, Inc.
PhotoScouter® is a registered trademark of Morpho, Inc.
and AOSS™ are the trademarks of BUFFALO INC.
Wi-Fi® is a registered trademark of Wi-Fi Alliance®.
Wi-Fi Direct™, Miracast™, Wi-Fi Protected Setup™ and Wi-Fi
Protected Setup logo are trademarks of Wi-Fi Alliance®.
The Wi-Fi Protected Setup Mark is a mark of the Wi-Fi Alliance.
“mixi” is a registered trademark of mixi, Inc.
Twitter and Twitter logo are trademarks or registered trademarks
of Twitter, Inc.
DLNA®, the DLNA Logo and DLNA CERTIFIED™ are
trademarks, service marks, or certification marks of the Digital
Living Network Alliance.
Sharp Corporation has acquired DLNA certification for the
device.
This product includes software developed by the OpenSSL
Project for use in the OpenSSL Toolkit. (http://www.openssl.org/)
This product includes cryptographic software written by Eric
Young (eay@cryptsoft.com)
Export Administration
Regulations
Intellectual Property Right
Copyrights and rights of portrait
Registered trademarks and trademarks
93 Appendix/Index
Portions Copyright © 2004 Intel Corporation
This product partly uses the software of Intel Corporation.
iWnn of OMRON SOFTWARE Co., Ltd. is used for conversion
methods for Japanese language, and for phrase prediction
methods for English.
iWnn © OMRON SOFTWARE Co., Ltd. 2008-2013 All Rights
Reserved.
iWnn IME © OMRON SOFTWARE Co., Ltd. 2009-2013 All
Rights Reserved.
Shin Go M, the font type installed in this product, is provided by
Morisawa & Company, Ltd.
* Shin Go is a registered trademark of Morisawa & Company,
Ltd.
aptX is a registered trademark of CSR plc.
DigiOn and DiXiM are trademarks of DigiOn, Inc.
X-Men, all character names and their distinctive likenesses: TM
& © 2013 Marvel Entertainment, LLC and its subsidiaries. All
Rights Reserved.
© 2013 Twentieth Century Fox Film Corporation and TSG
Entertainment Finance LLC. All Rights Reserved.
© 2014 Twentieth Century Fox Home Entertainment LLC. All
Rights Reserved. TWENTIETH CENTURY FOX, FOX and
associated logos are trademarks of Twentieth Century Fox Film
Corporation and its related entities.
“AQUOS PHONE”, “ZETA”, “Feel UX”, “Slow Talk”, “VeilView”,
“ܿ”, “Bright Keep”, “Sweep ON”, “Air Operation”, “Air Zoom”,
“AQUOS PHONE” logo and “ܿ” symbol are trademarks or
registered trademarks of Sharp Corporation.
All other company names and product names are trademarks or
registered trademarks of the respective companies.
FeliCa is a contactless IC card technology developed by Sony
Corporation. FeliCa is a registered trademark of Sony
Corporation.
Under the MPEG-4 Visual Patent Portfolio License, customers
have licensed permission for the following use of this product to
engage in non-profit personal use. Other uses are not permitted.
Encoding MPEG-4 standard video (henceforth referred to as
MPEG-4 video).
Decoding an MPEG-4 video that a customer not engaged in
personal commercial activities has encoded.
Decoding an MPEG-4 video obtained from a licensed provider.
For details on other intended uses, contact MPEG LA, LLC.
This product is licensed under the MPEG-4 Systems Patent
Portfolio License for encoding in compliance with the MPEG-4
Systems Standard. An additional license and payment of
royalties are necessary in the following cases.
Data stored or replicated in physical media which is paid for on
a title by title basis.
Data which is paid for on a title by title basis and is transmitted
to an end user for permanent storage and/or use.
Such additional license may be obtained from MPEG LA, LLC.
Contact MPEG LA, LLC for additional details.
This product is licensed under the AVC patent portfolio license
for the personal and noncommercial use of a consumer to (i)
encode video in compliance with the AVC standard (henceforth
referred to as AVC video) and/or (ii) decode AVC video that was
encoded by a consumer engaged in a personal and
noncommercial activity and/or was obtained from a video
provider licensed to provide AVC video. No license is granted or
shall be implied for any other use. Additional information may be
obtained from MPEG LA, L.L.C.
See (http://www.mpegla.com)
This product is licensed under the VC-1 Patent Portfolio License
for the personal and noncommercial use of a consumer to (i)
encode video in compliance with the VC-1 standard (henceforth
referred to as VC-1 video) and/or (ii) decode VC-1 video that was
encoded by a consumer engaged in a personal and
noncommercial activity and/or was obtained from a video
provider licensed to provide VC-1 video. No license is granted or
shall be implied for any other use. Additional information may be
obtained from MPEG LA, L.L.C.
See (http://www.mpegla.com)
Content owners use Microsoft PlayReady™ content access
technology to protect their intellectual property, including
copyrighted content. This device uses PlayReady technology to
access PlayReady-protected content and/or WMDRM-protected
content. If the device fails to properly enforce restrictions on
content usage, content owners may require Microsoft to revoke
the device’s ability to consume PlayReady-protected content.
Revocation should not affect unprotected content or content
protected by other content access technologies. Content owners
may require you to upgrade PlayReady to access their content. If
you decline an upgrade, you will not be able to access content
that requires the upgrade.
The abbreviations of operating systems (Japanese versions)
below are used in this manual.
Windows 8 stands for Microsoft® Windows® 8, Microsoft®
Windows® 8 Pro and Microsoft® Windows® 8 Enterprise.
Windows 7 stands for Microsoft® Windows® 7 (Starter, Home
Basic, Home Premium, Professional, Enterprise and Ultimate).
Windows Vista stands for Windows Vista® (Home Basic,
Home Premium, Business, Enterprise and Ultimate).
Windows XP indicates the Microsoft® Windows® XP
Professional operating system or Microsoft® Windows® XP
Home Edition operating system.
The Bluetooth word mark and logos are owned by the Bluetooth
SIG, INC. and any use of such marks by NTT DOCOMO, INC. is
under license. Other trademarks and trade names are those of
their respective owners.
Google, Google logo, Android, Android logo, Google Play,
Google Play logo, Google+, Google+ logo, Gmail, Gmail logo,
Calendar logo, Google Maps™, Google Maps logo, Google
Talk™, Google Talk logo, Google Chrome™, Google Chrome
logo, Google Voice Search™ logo, Picasa™, Picasa logo,
YouTube and YouTube logo are trademarks of Google Inc.
Others
Please be considerate of those around you when using the
handset.
When in an area where use is prohibited
When you are on an airplane or in a hospital, follow the instructions
given by the respective airlines or medical facilities. Turn off the
handset in areas where the use of mobile phones is prohibited.
While driving
Using a mobile phone in hand while driving is regarded as a
punishable act.
However, some cases such as when rescuing sick and injured people
or maintaining public safety are exempted.
When in public places such as theaters, movie theaters or
museums
Using the handset in public places where you should be quiet results
in disturbing others.
Be aware of the volume of your voice when using the
handset in quiet places such as restaurant and hotel lobby.
Use in places where you do not block a passage in the
town.
The handset has convenient functions such as setting not to
answer a call and setting to mute sound of the handset.
Manner mode (nP. 62 “Mode settings”)
Mutes sound of the handset.
ɦHowever, the manner mode cannot mute camera shutter sound.
Public Mode (Phone OFF) (nP. 35 “Network service”)
When a call is received, a message stating that you are in a place that
does not allow the use of mobile phone is played and the call is
automatically disconnected.
Phone vibe (nP. 62 “Sound”)
Notifies you of incoming call with vibration.
Answering memo (nP. 34 “Voice/Answering memo”)
Records callers’ messages when you cannot answer the call.
ɦAdditionally, optional services such as Voice Mail Service
(nP. 35 “Network service”) and Call Forwarding Service
(nP. 35 “Network service”) are available.
Check/Change the subscription, apply for various services,
and request various information materials online.
From sp-mode dmenu/
̤ݖအεȜΠ
(Support)/
ڎਅ̤૭ࣺȆ
̧̤
(Various Applications/Procedures) (free of packet
communication charges) (in Japanese only)
From a PC My docomo (http://www.mydocomo.com/) /
ڎਅ̤૭
ࣺȨ̤̑
(Various Applications/Procedures) (in Japanese
only)
ɦUse “network security code” to access from sp-mode.
ɦSome services may be charged when you access the website from
sp-mode.
ɦUse “docomo ID/Password” to access from a PC.
ɦIf you do not have or you have forgotten your “network security code” or
“docomo ID/Password”, contact the number listed in “General Inquiries”
on the last page.
ɦThe websites may not be available depending upon the content of your
subscription.
ɦYou may not be able to access some website services due to system
maintenance etc.
Using mobile phone with your manners!
Turn off your handset in the following places
Set the Public mode in the following places
Be aware of the place to use a mobile phone and the
volume of your voice and ringtone
Be considerate of the privacy of the individuals around
you
Please be considerate of the privacy of individuals
around you when taking and sending photos using
camera-equipped mobile phones.
These functions ensure the manner in public
We collect your unnecessary mobile phones
and other devices irrespective of carrier.
Bring them to a docomo Shop near you.
ɦIntended devices: Mobile phone, PHS, battery pack,
charger and desktop holder (irrespective of carrier)