Sharp HRO00204 Smart Phone User Manual manual
Sharp Corporation Smart Phone manual
UserManual.wiki
>
Sharp
>
HRO00204 User Manual
>
manual
Contents
1.
Manual_Important Information_v2
2.
manual
manual
Navigation menu
Upload a User Manual
Namespaces
Wiki Guide
HTML
PDF
Info
Views
User Manual
Discussion / Help
Navigation
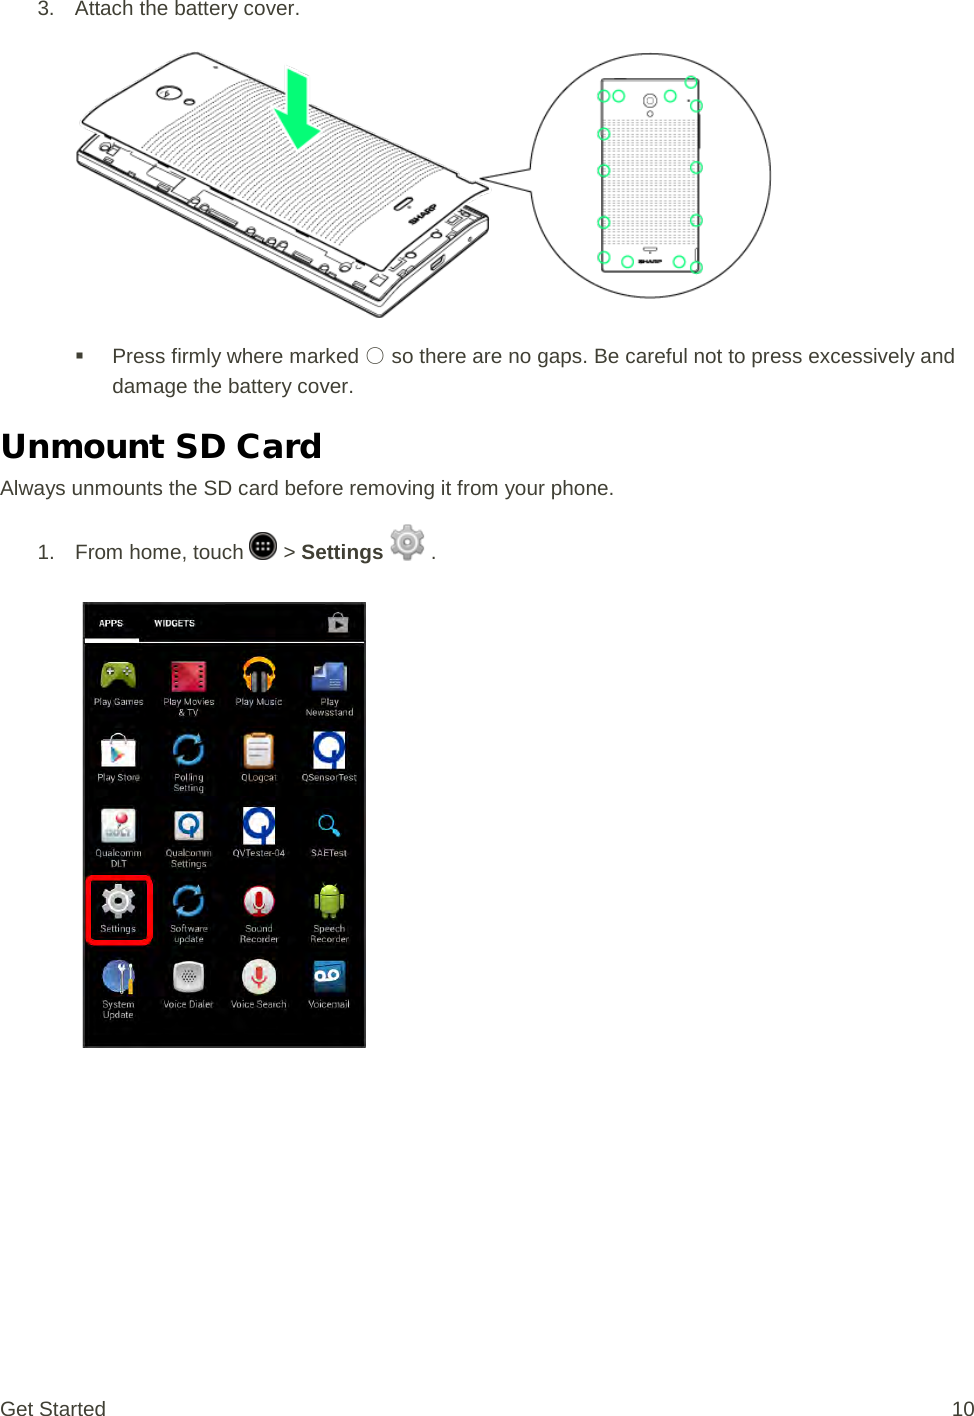
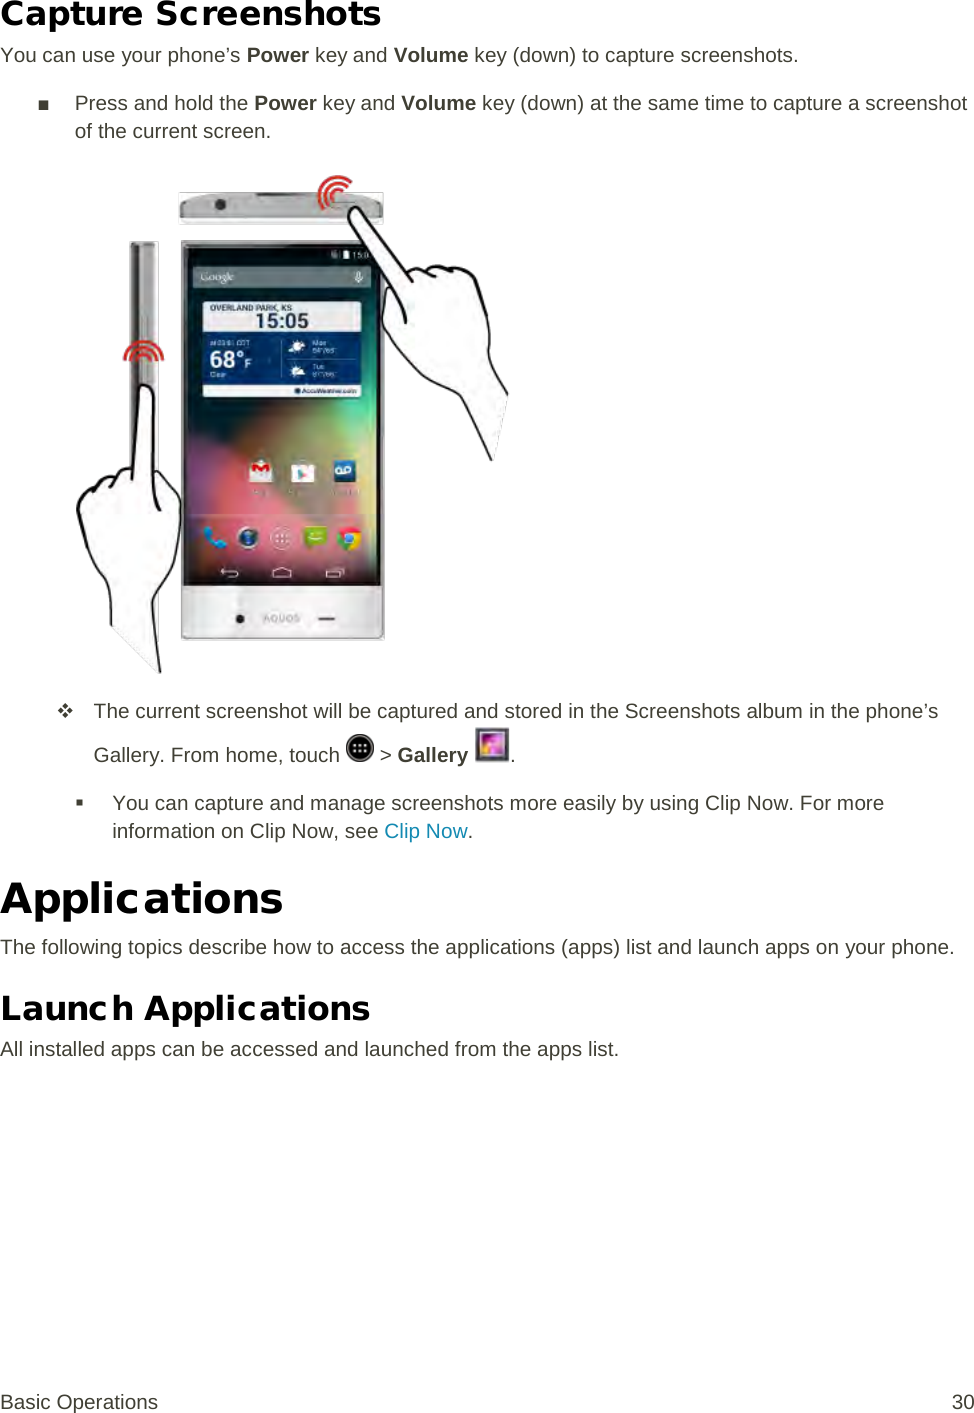
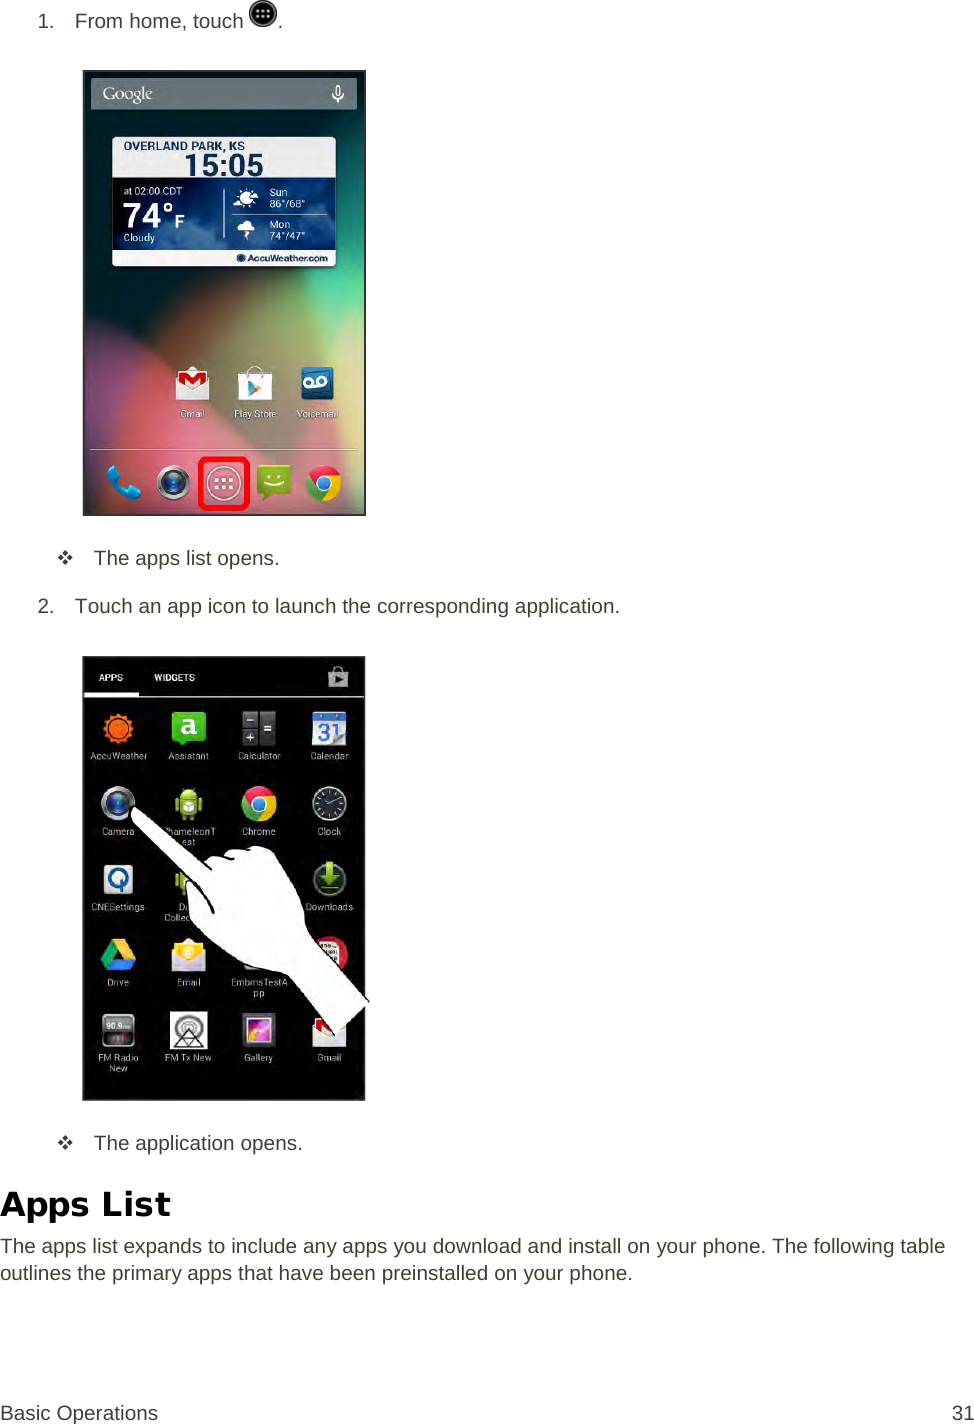
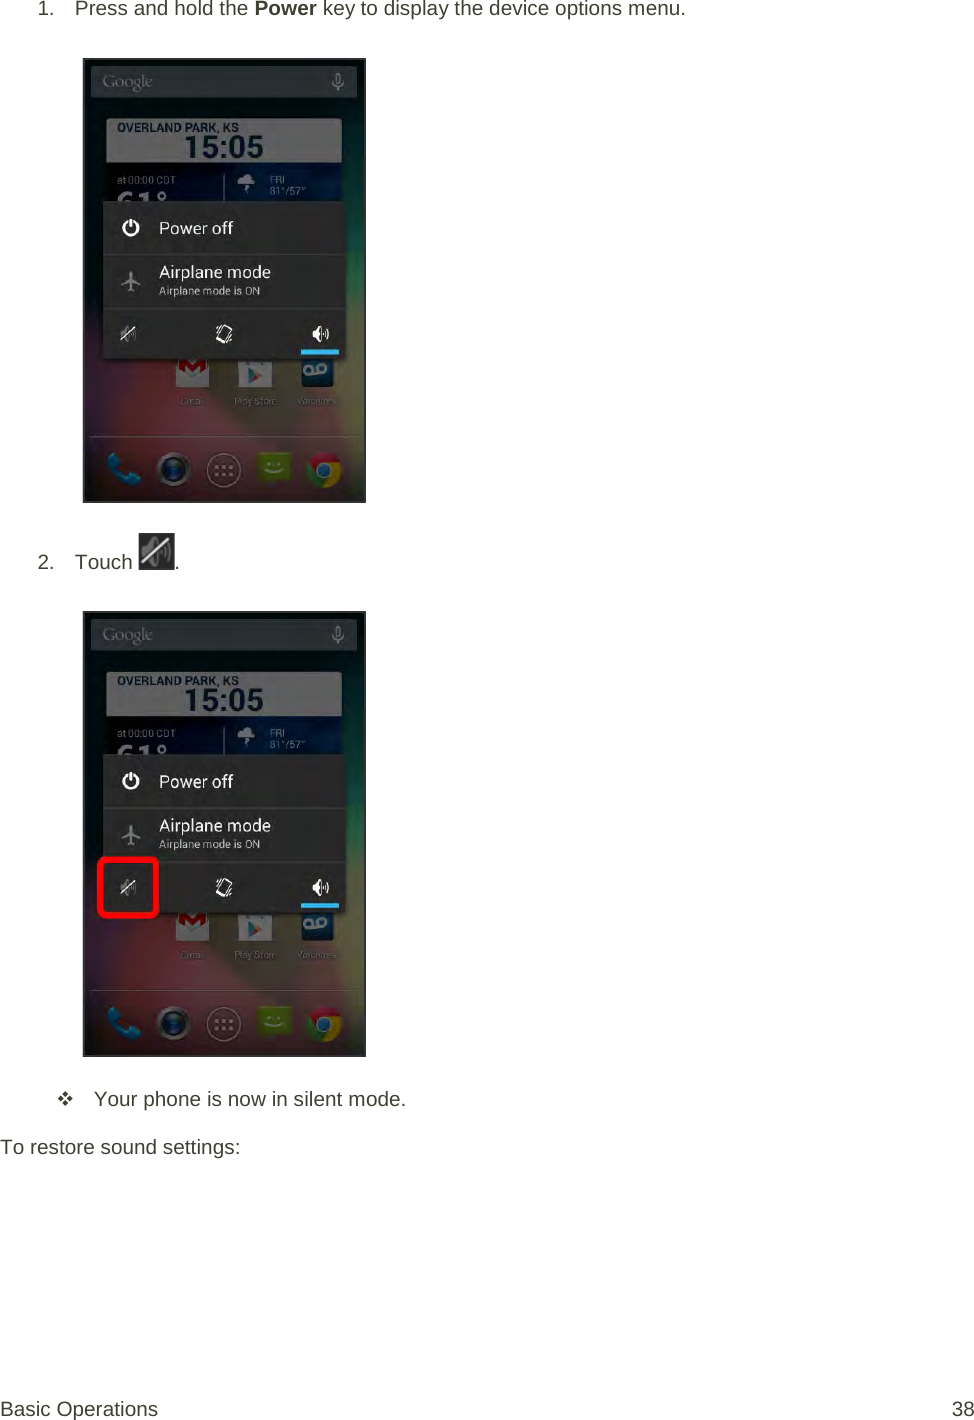
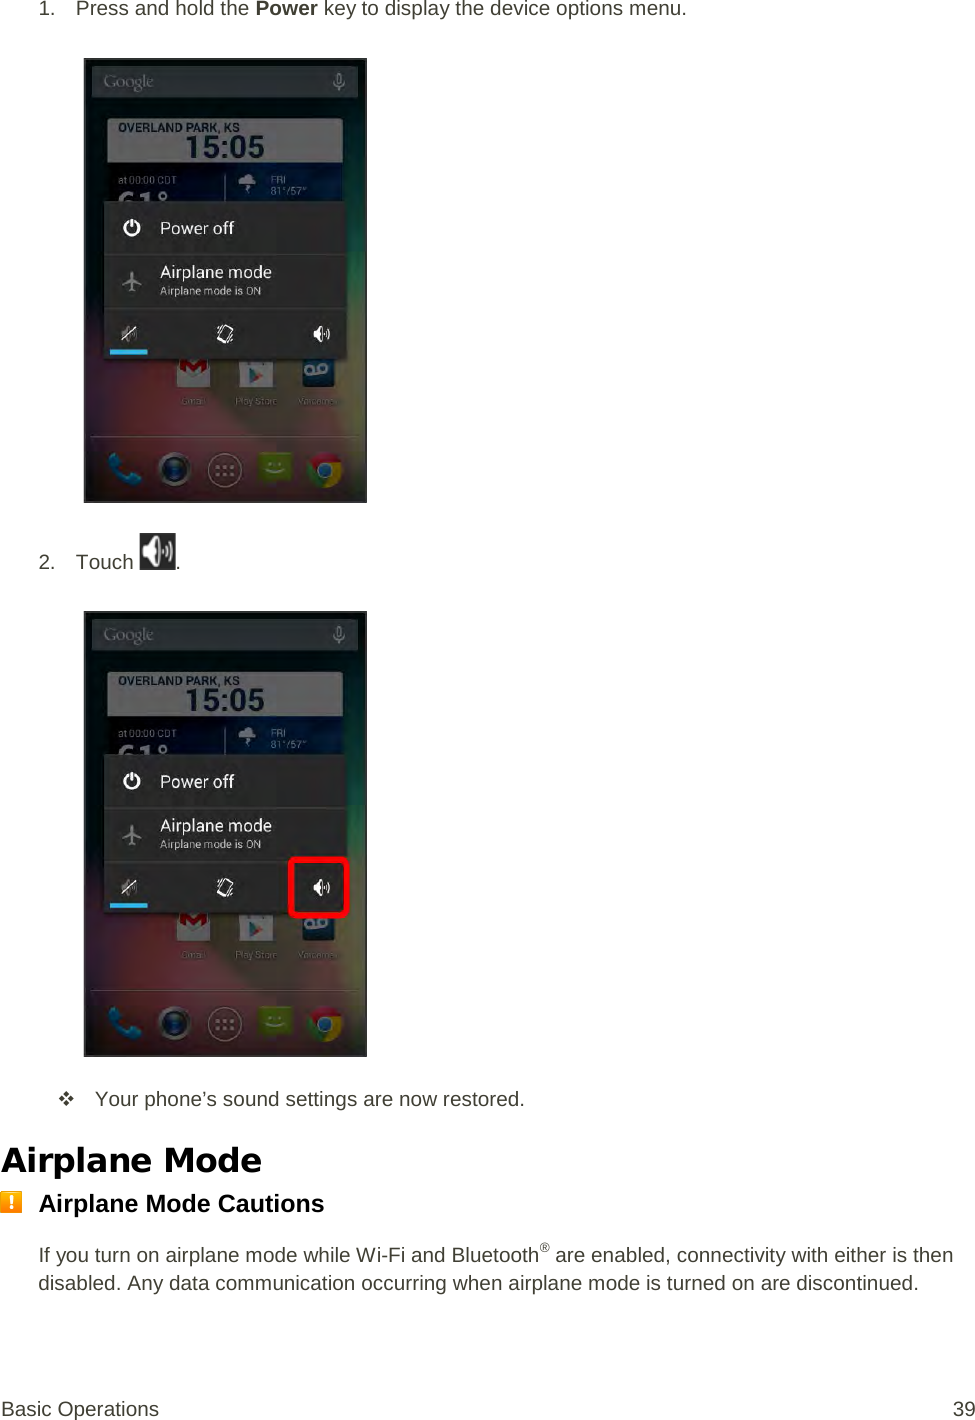
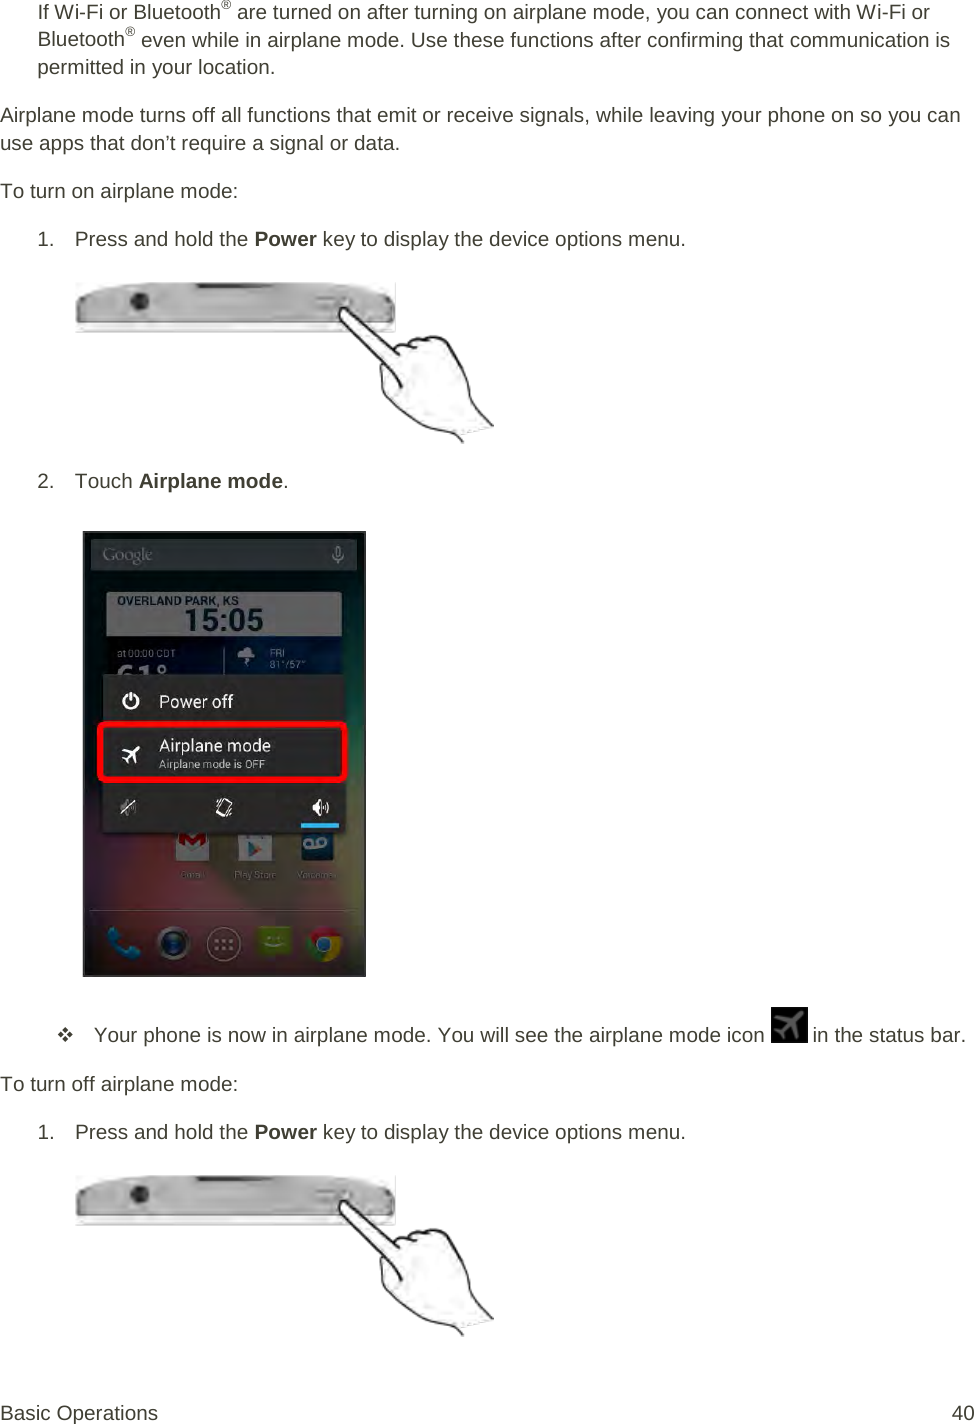
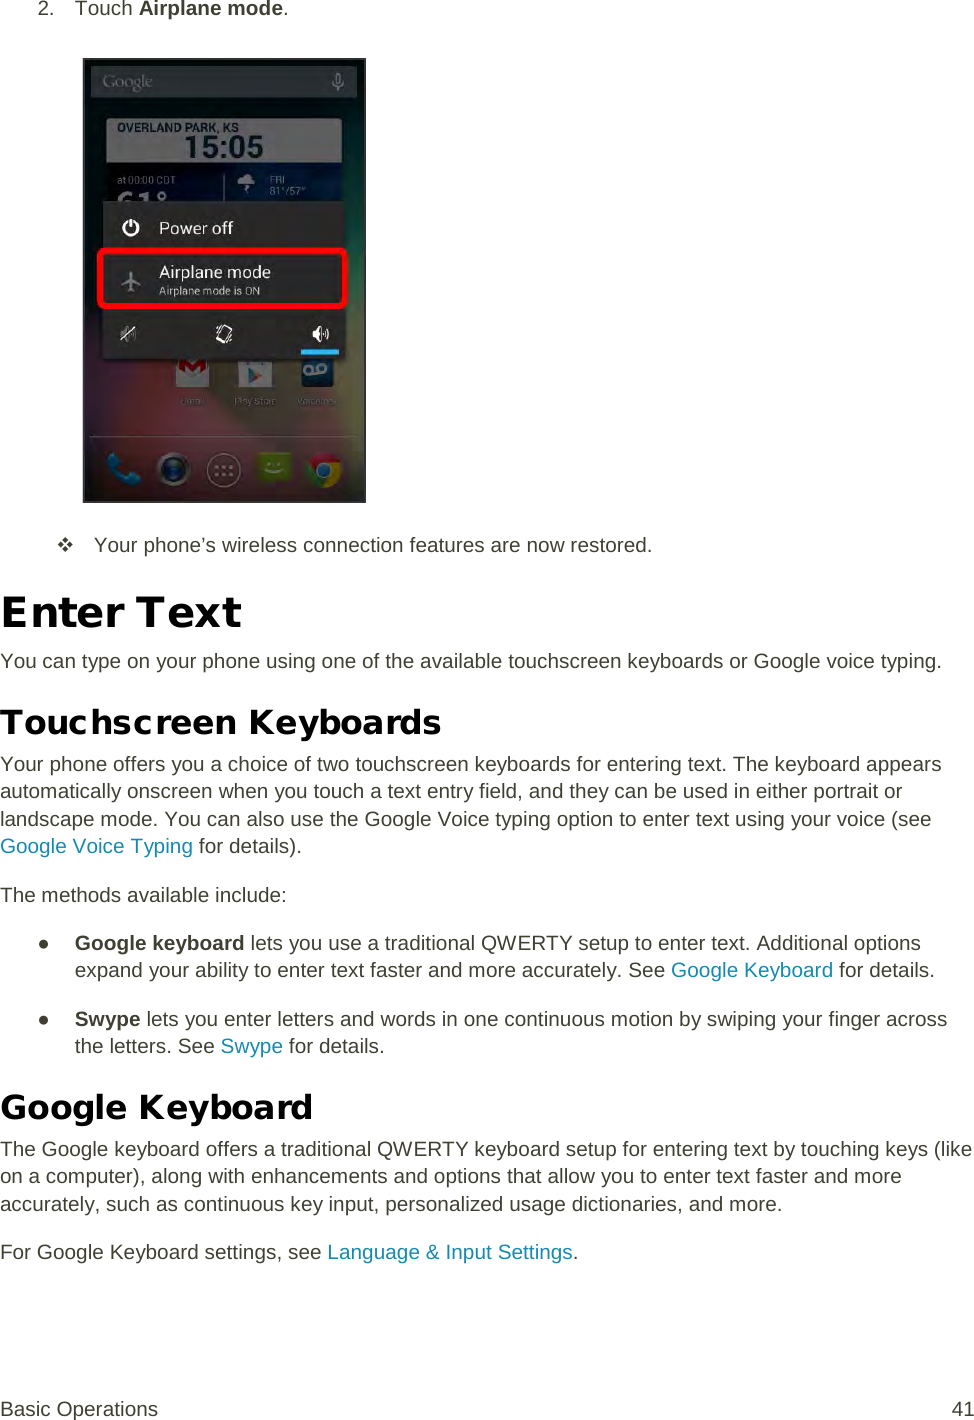
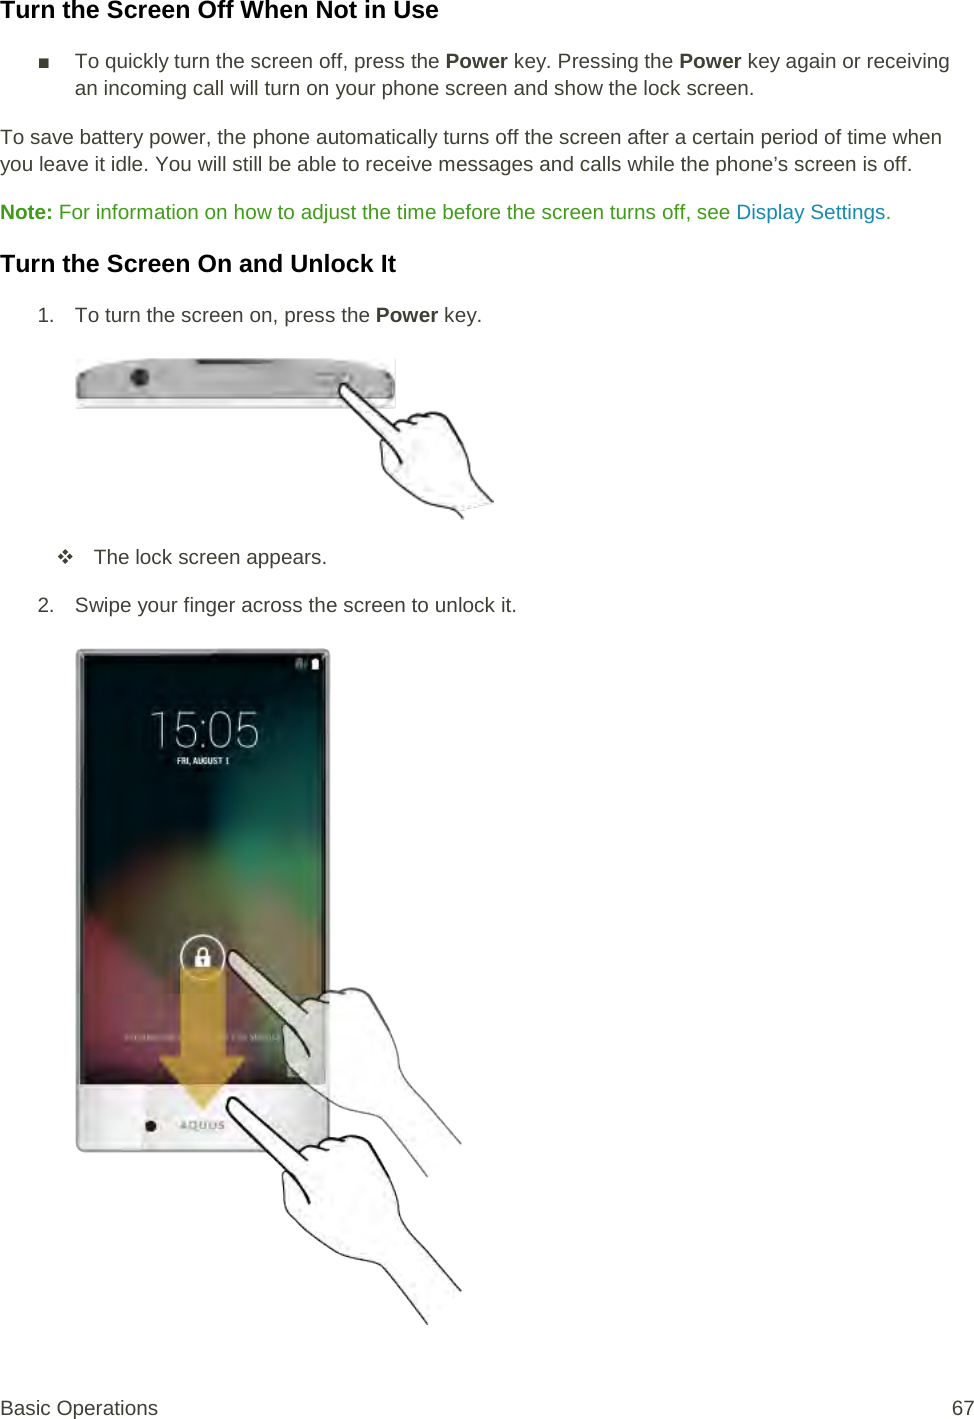
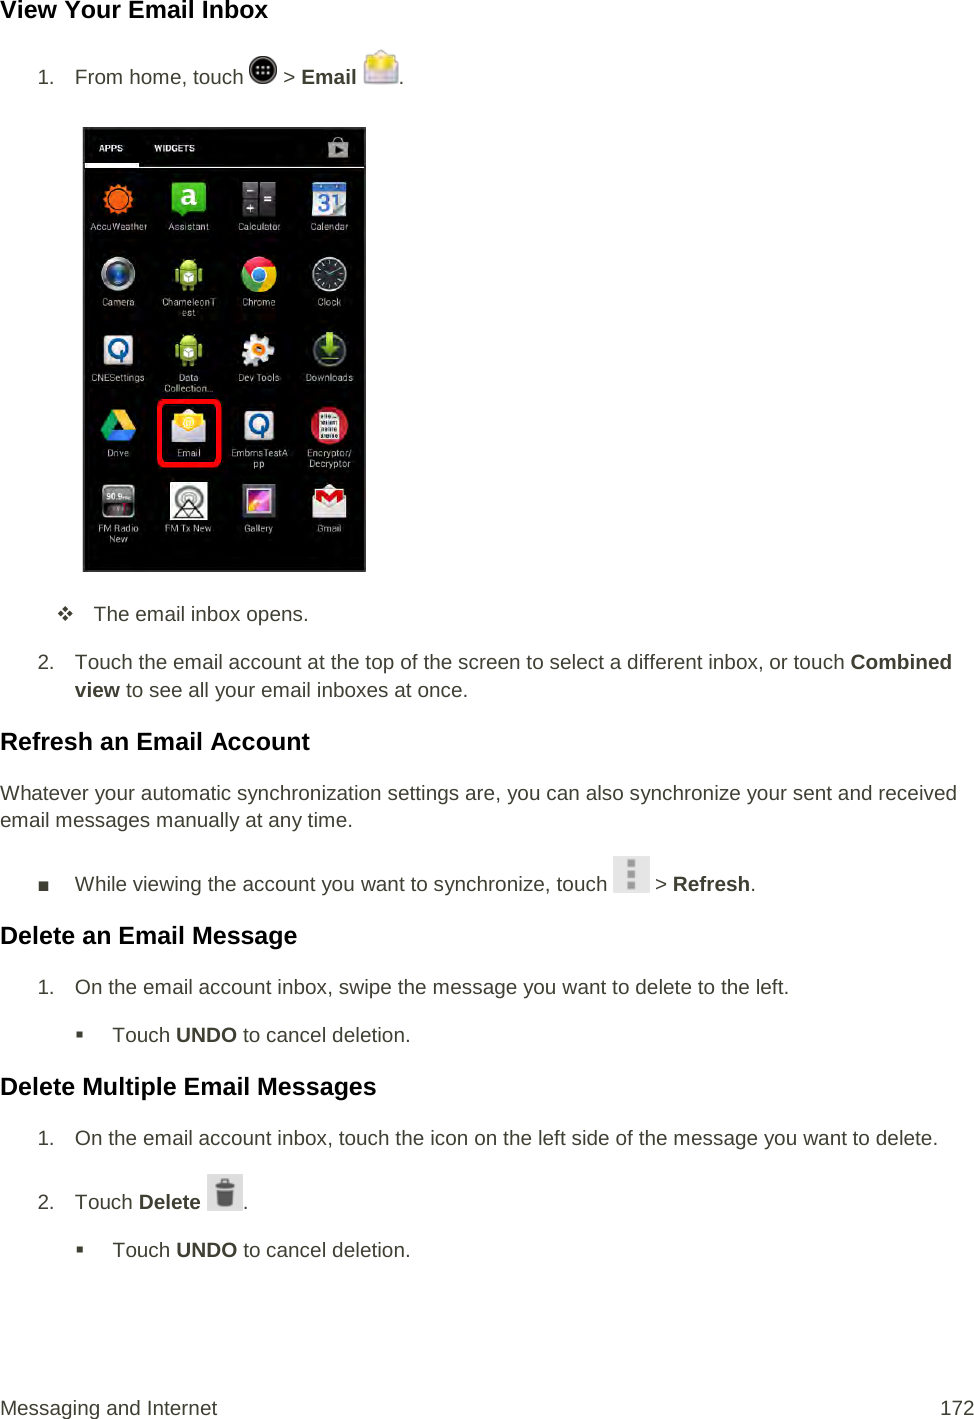
![AQUOS Crystal User Guide [UG template version 14b] [sprint_HDK_PB25_ug_en_060214_d2]](https://usermanual.wiki/Sharp/HRO00204.manual/User-Guide-2330332-Page-1.png)

![Introduction The following topics describe the basics of using this guide and your new phone. About the User Guide Thank you for purchasing your new AQUOS Crystal. The following topics explain how best to use this guide to get the most out of your phone. Before Using Your Phone Read “Get Started” and “Important Information Booklet” thoroughly for proper usage. Accessible services may be limited by subscription contract conditions. Descriptions in the User Guide Note that most descriptions in this guide are based on your phone’s setup at the time of purchase. Unless otherwise noted, instructions begin from the phone’s home screen, which is displayed by touching Home . Some operation descriptions may be simplified. Screenshots and Key Labels Screenshots in the user guide may appear differently on your phone. The status bar and keys displayed at the bottom of the display are omitted from screenshots where unrequired in explanations. Key labels in the user guide are simplified for description purposes and differ from your phone’s display. Other Notations In the user guide, the phone may be referred to either as “phone,” “device,” or “handset.” microSD™, microSDHC™ or microSDXC™ card is referred to as an “SD Card” or “memory card.” How to Use This Guide You can easily navigate this user guide, which is displayed in a browser window that is divided into three areas. These topics will teach you how to navigate the guide and use the features for each area. Header and Toolbar Areas [content from Flare project] Search This Guide [content from Flare project] Introduction 1](https://usermanual.wiki/Sharp/HRO00204.manual/User-Guide-2330332-Page-11.png)
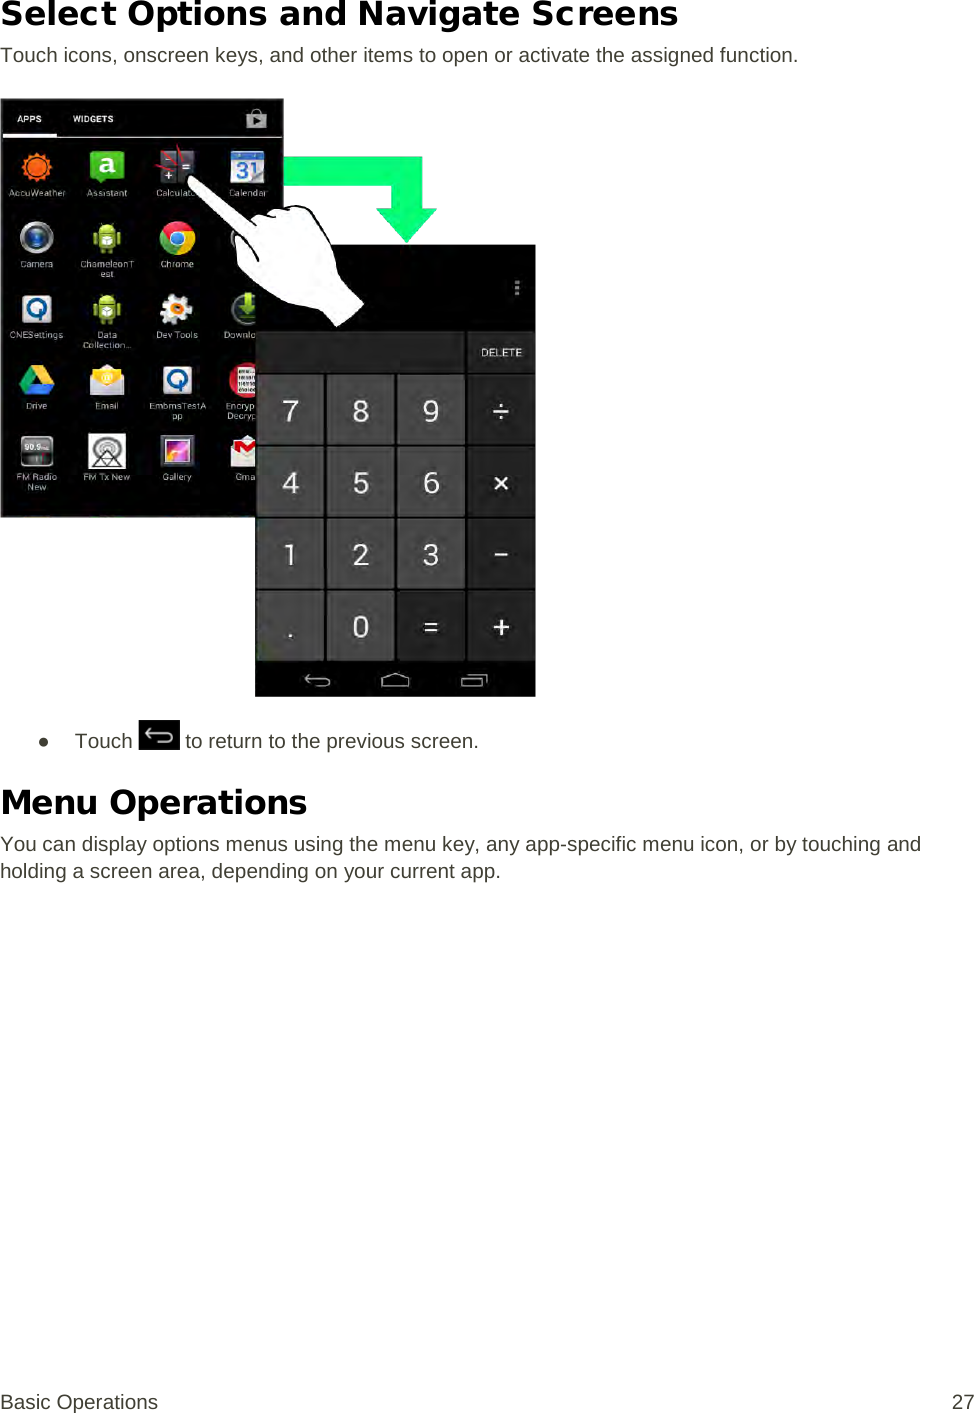
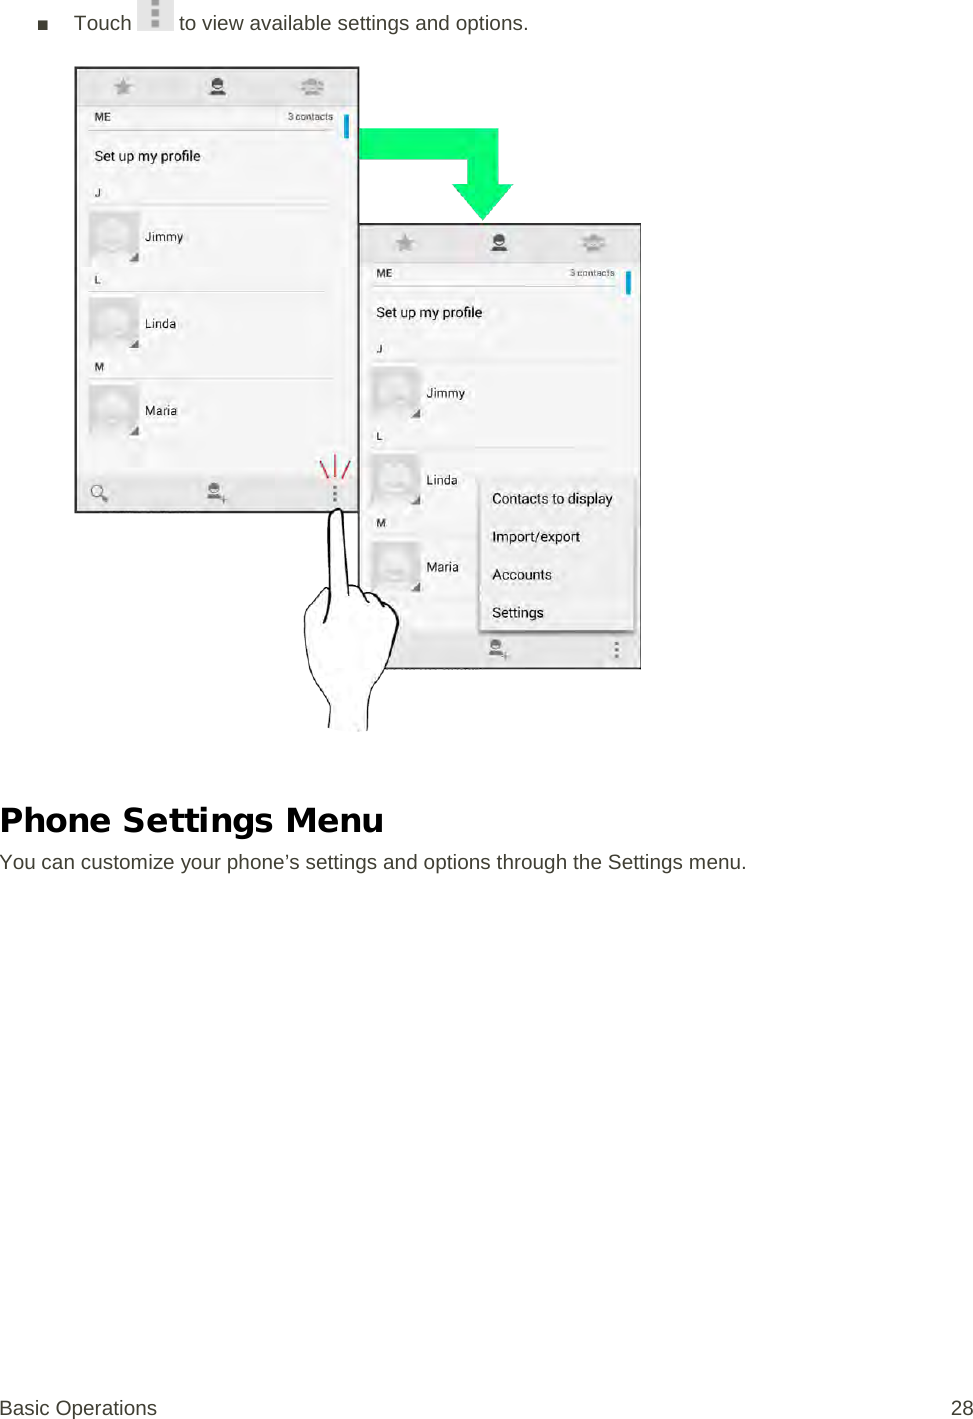
![Topic Area [content from Flare project] Contents and Index Area [content from Flare project] Resizing Areas [content from Flare project] Access Instructions on Phone [content per instructions of each carrier] These topics will help you find help on your new phone and will introduce the basics of using your phone’s touchscreen if you are a new user. Launch the Guide [customize content] Launch the Guide from the Notifications Window [customize content] Hide Status Bar Indicators [customize content] Using the Phone Guide [customize content] Check Basic Operations [customize content] Screen Use for First-Time Users [customize content] Introduction 2](https://usermanual.wiki/Sharp/HRO00204.manual/User-Guide-2330332-Page-12.png)
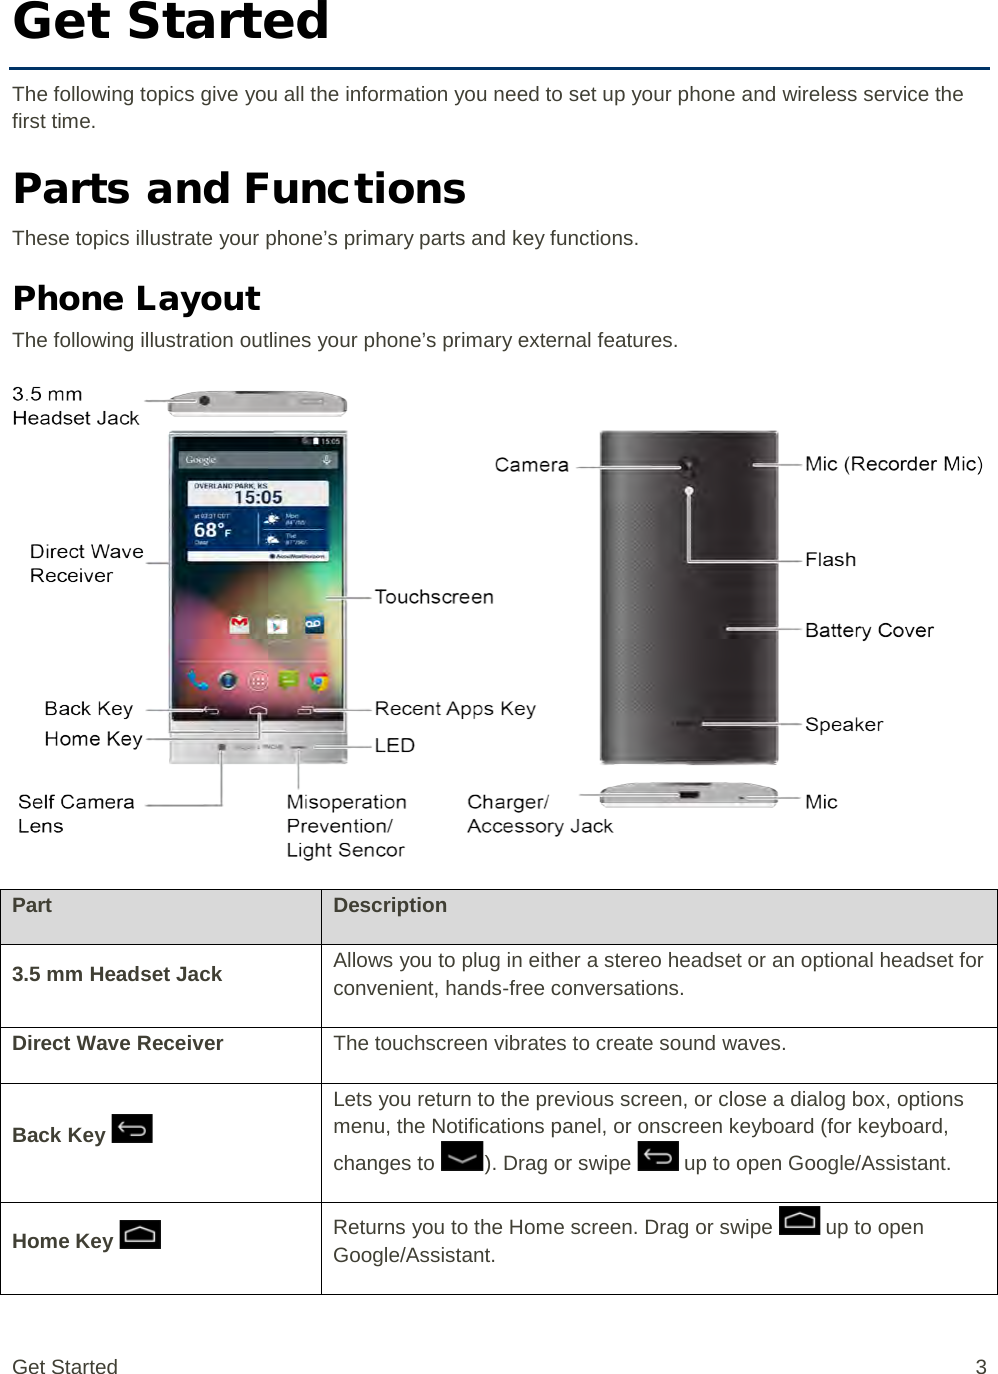
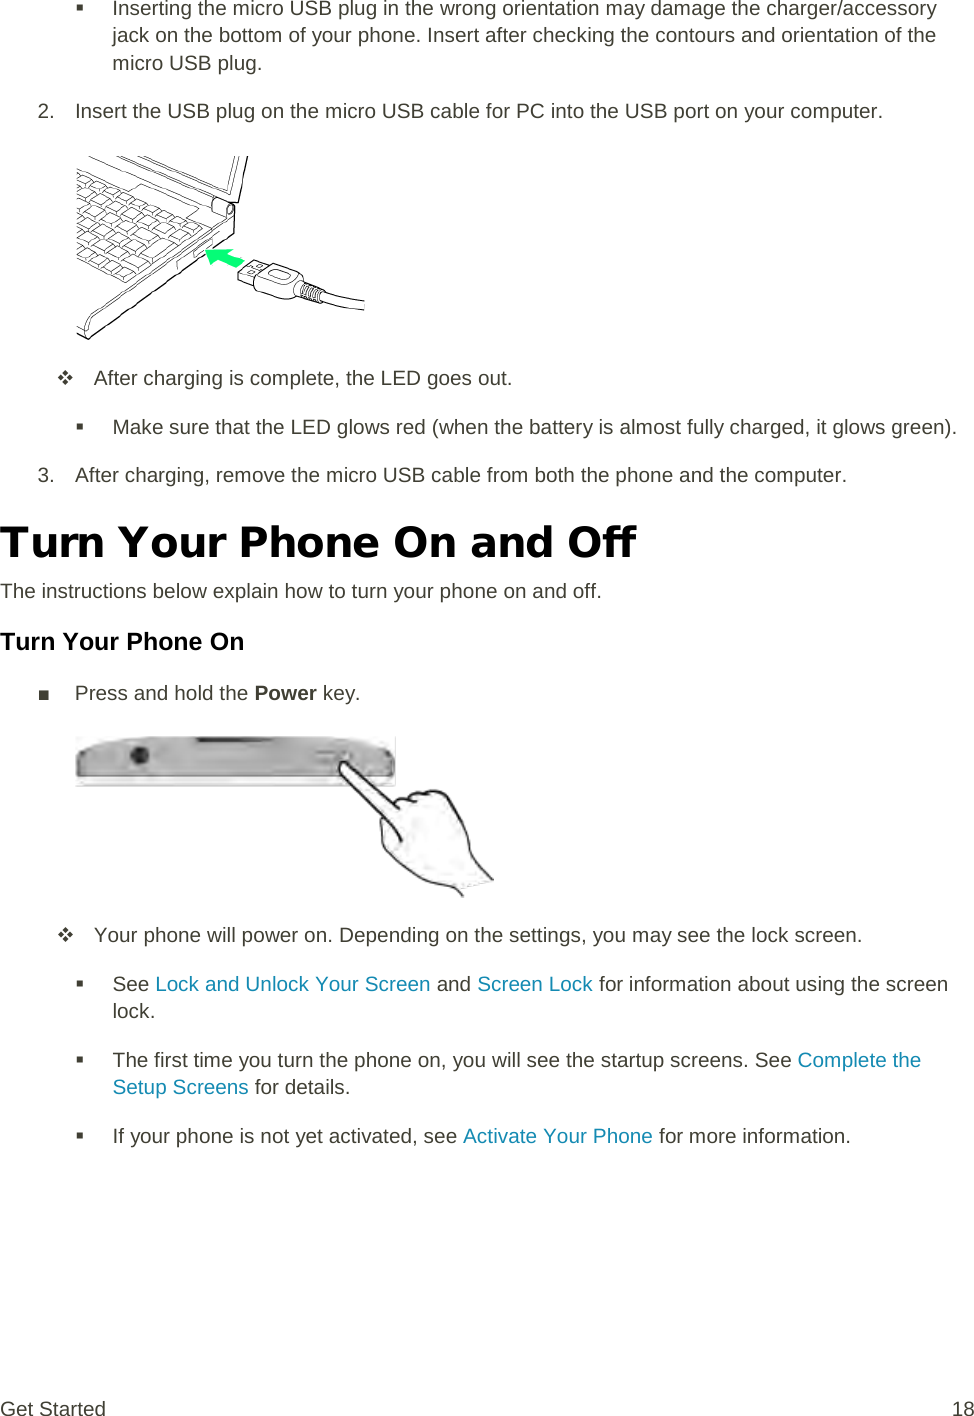
![Keys The following illustration outlines your phone’s keys. Part Description Power Key Lets you turn the phone on or off or turn the screen on or off, or switch your phone to silent mode, vibration mode, or airplane mode. Volume Key Allows you to adjust the ringtone or media volume or adjust the voice volume during a call. Direct Wave Receiver The phone is equipped with a “Direct Wave Receiver” which transmits sound by vibrating the display area. You can use the phone normally although there is no hole in the receiver. Holding the Phone to Your Ear As shown below, hold the receiver so that it covers your ear and blocks out surrounding noise for clearer sound. Adjust the position of the phone up, down, left or right to suit your hearing and the surrounding environment. [illustration] Get Started 5](https://usermanual.wiki/Sharp/HRO00204.manual/User-Guide-2330332-Page-15.png)

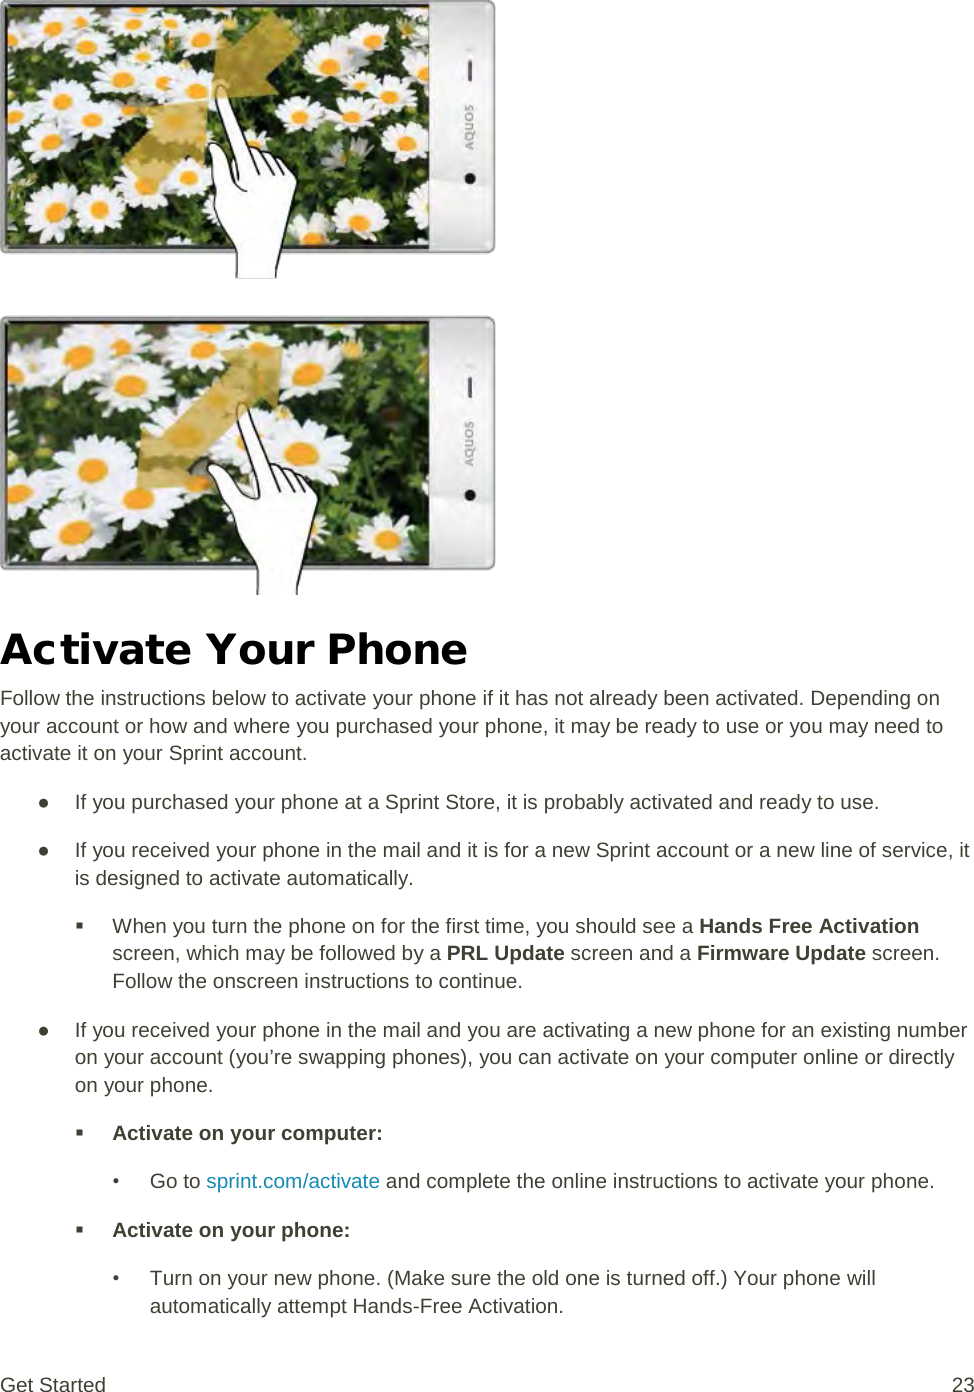
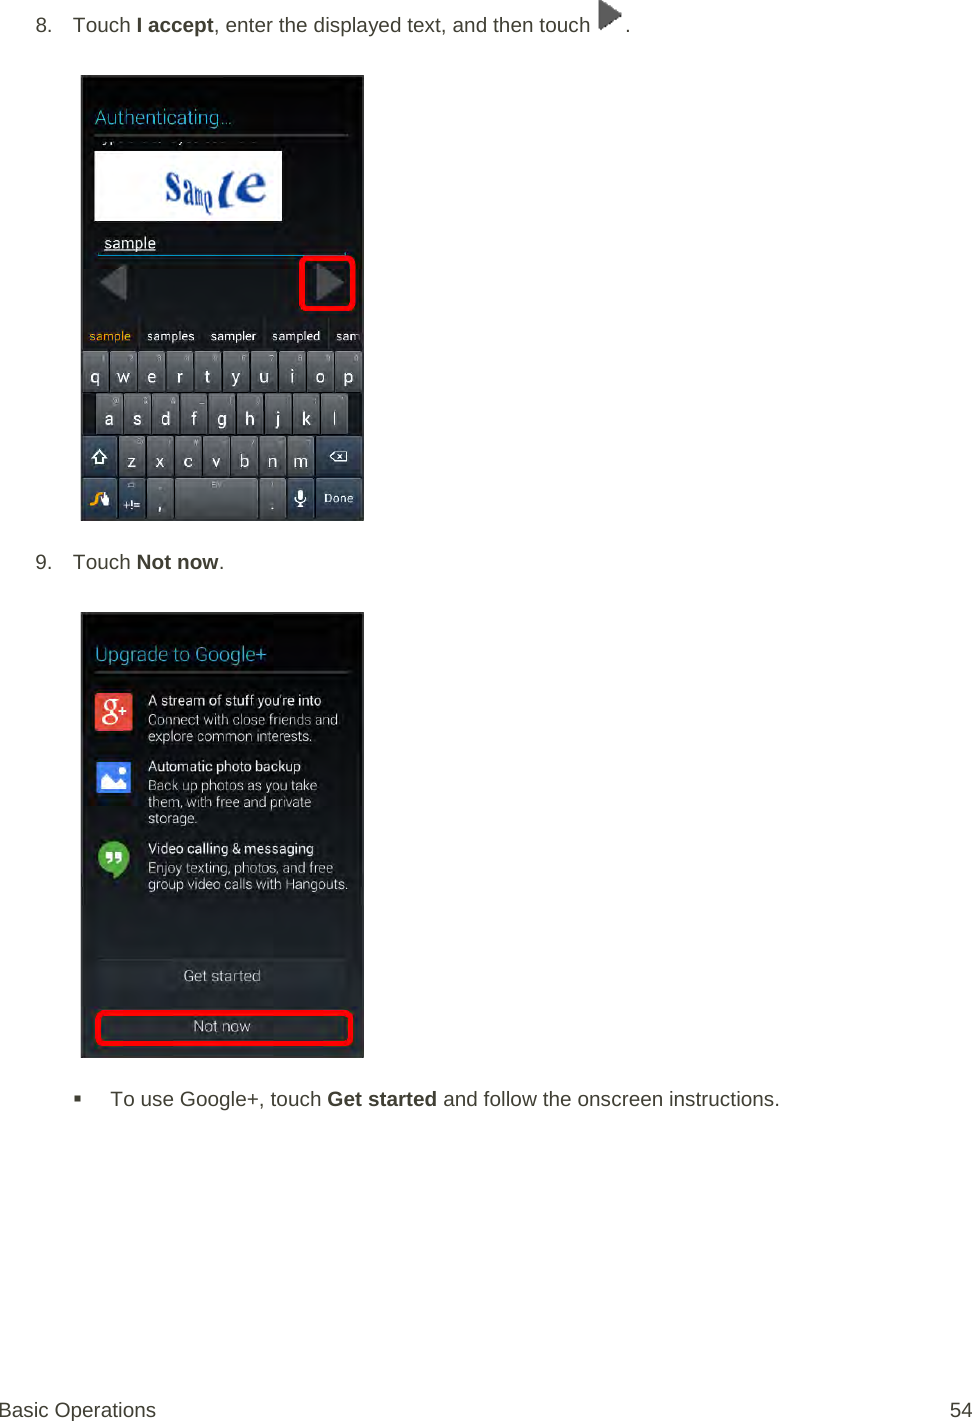
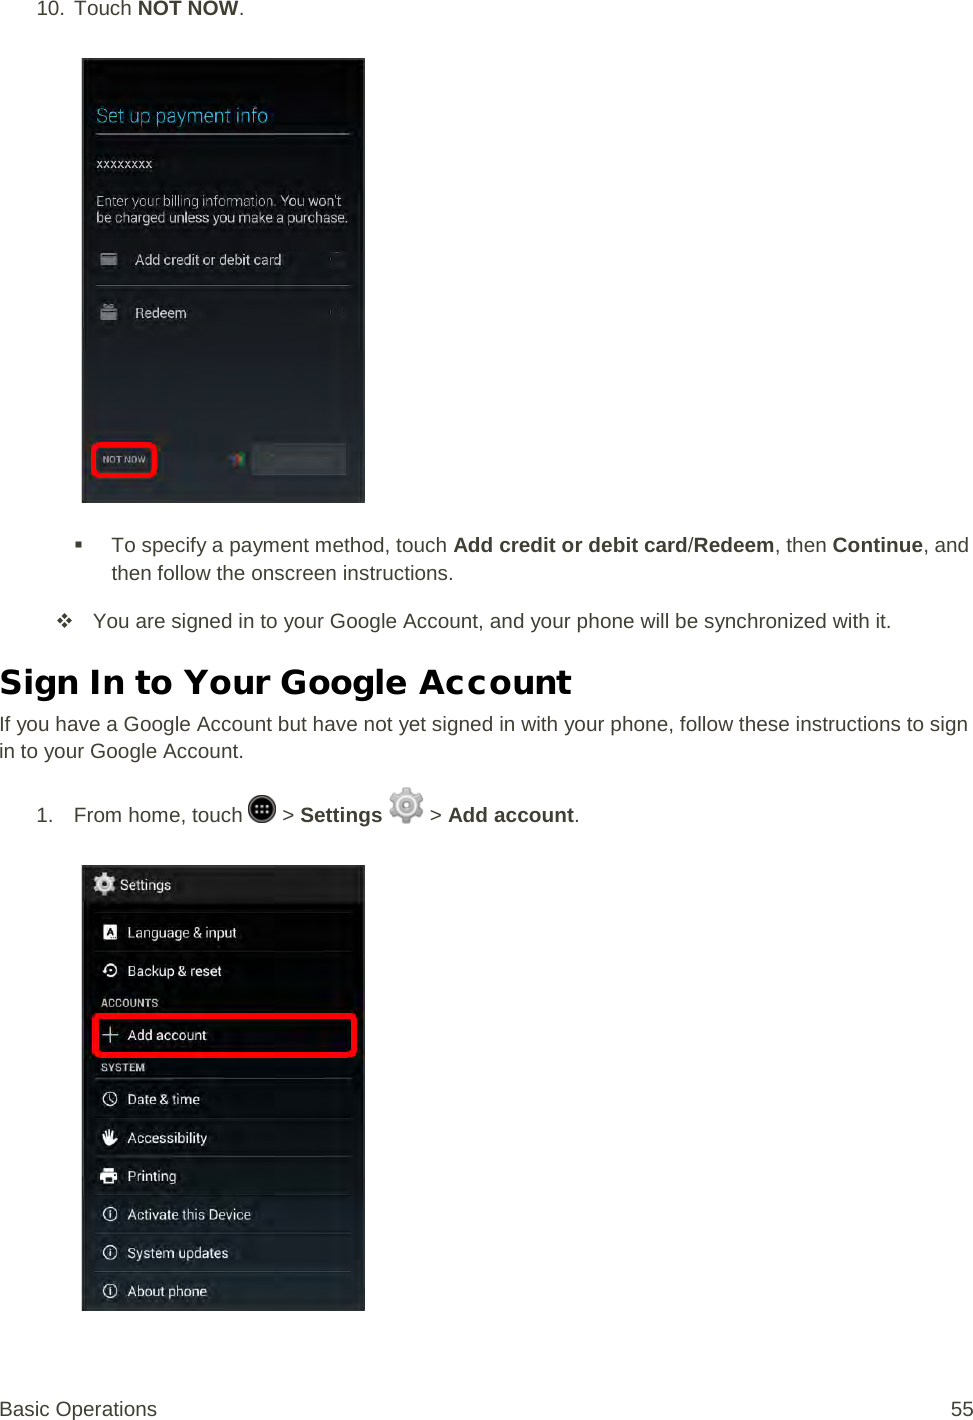
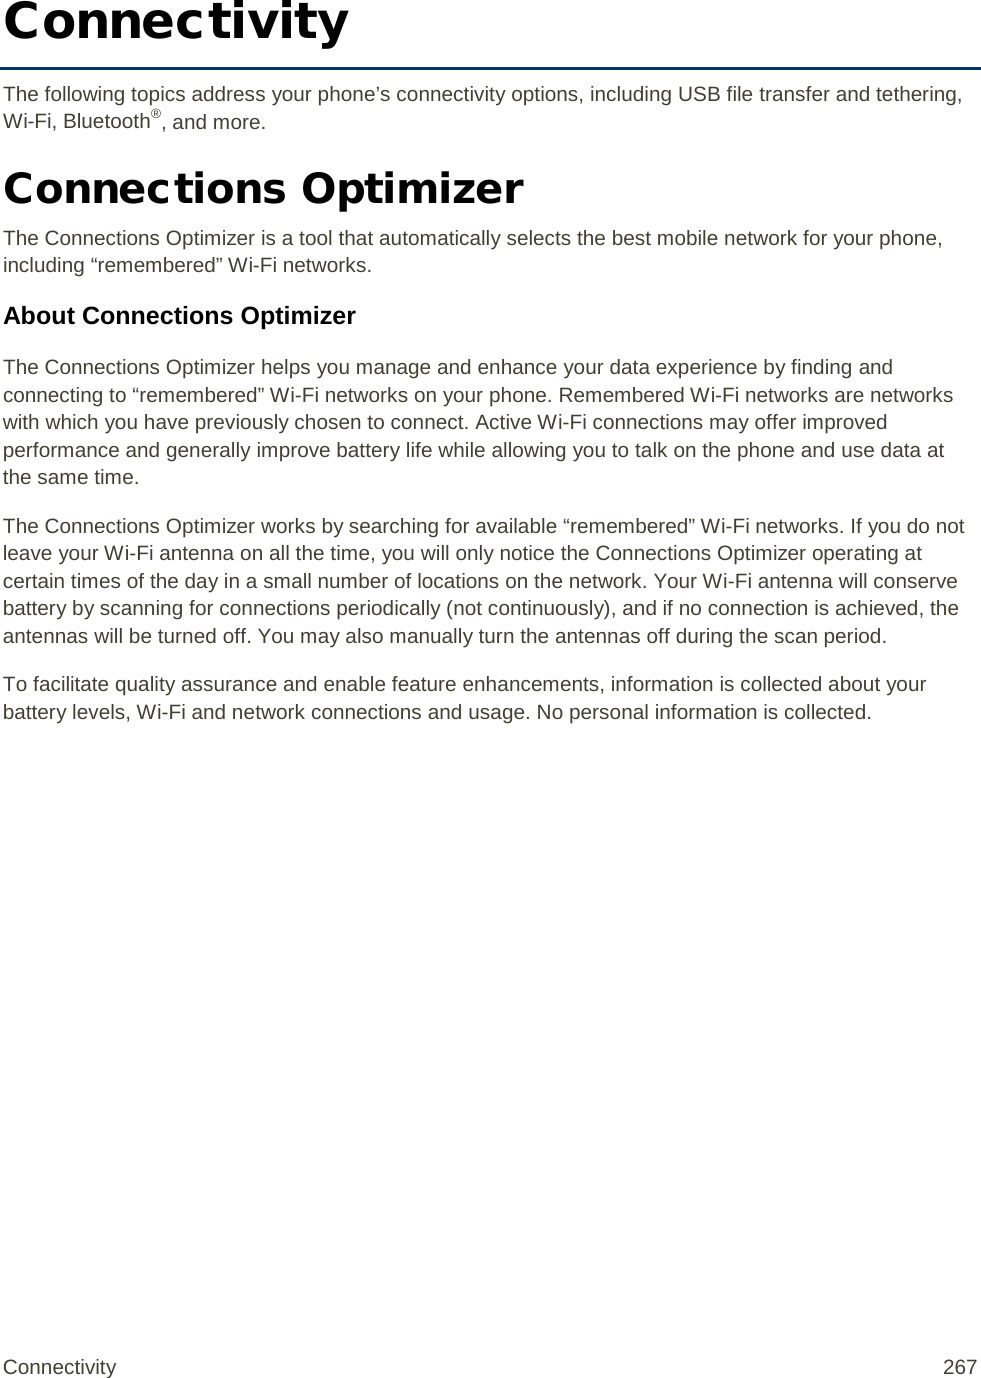
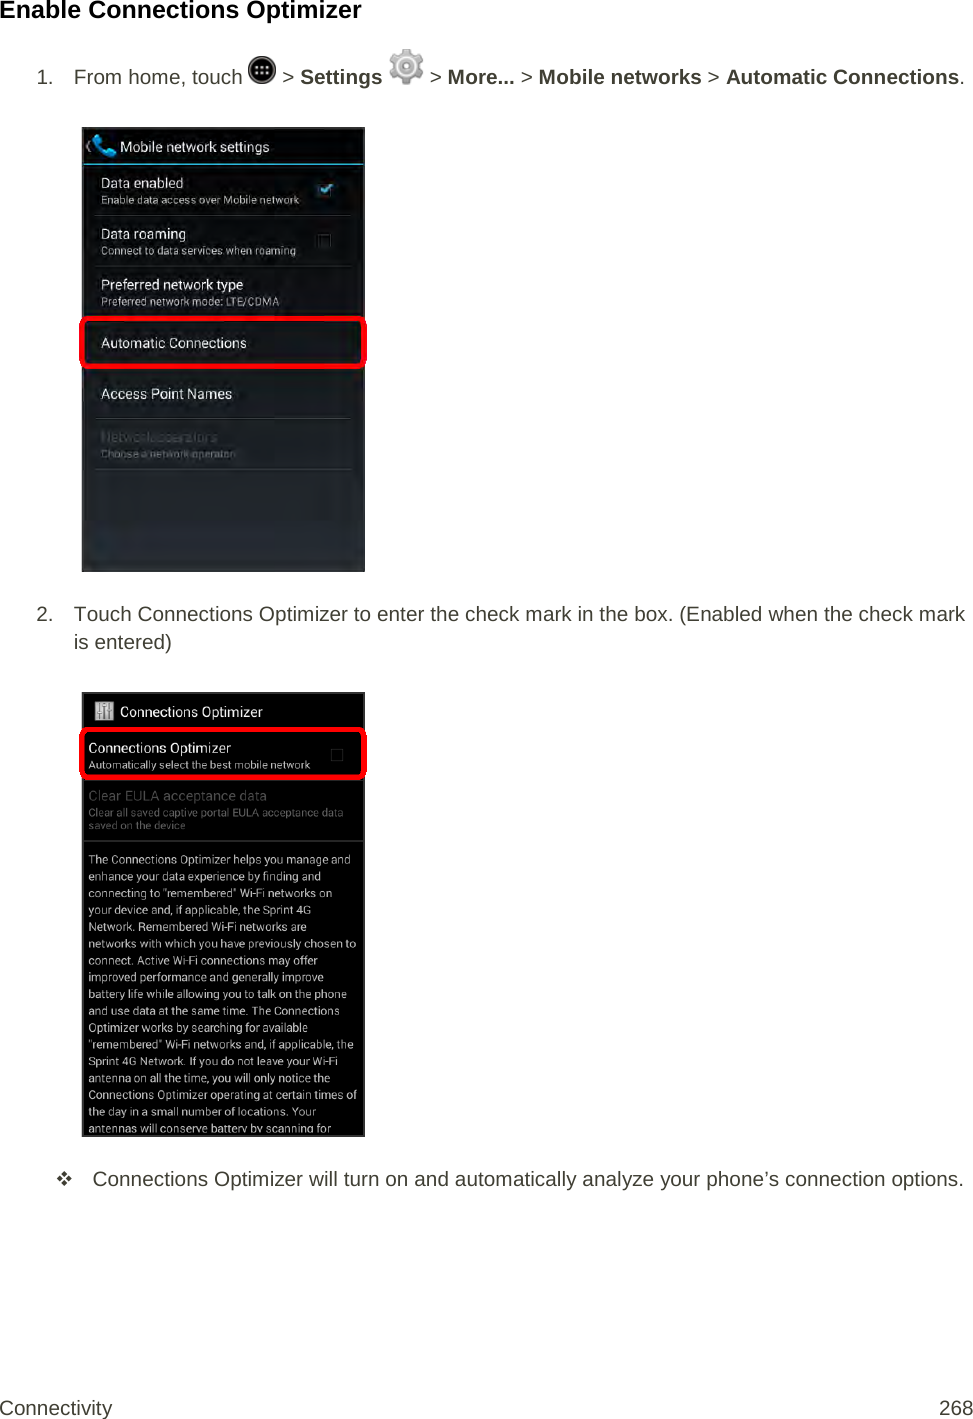
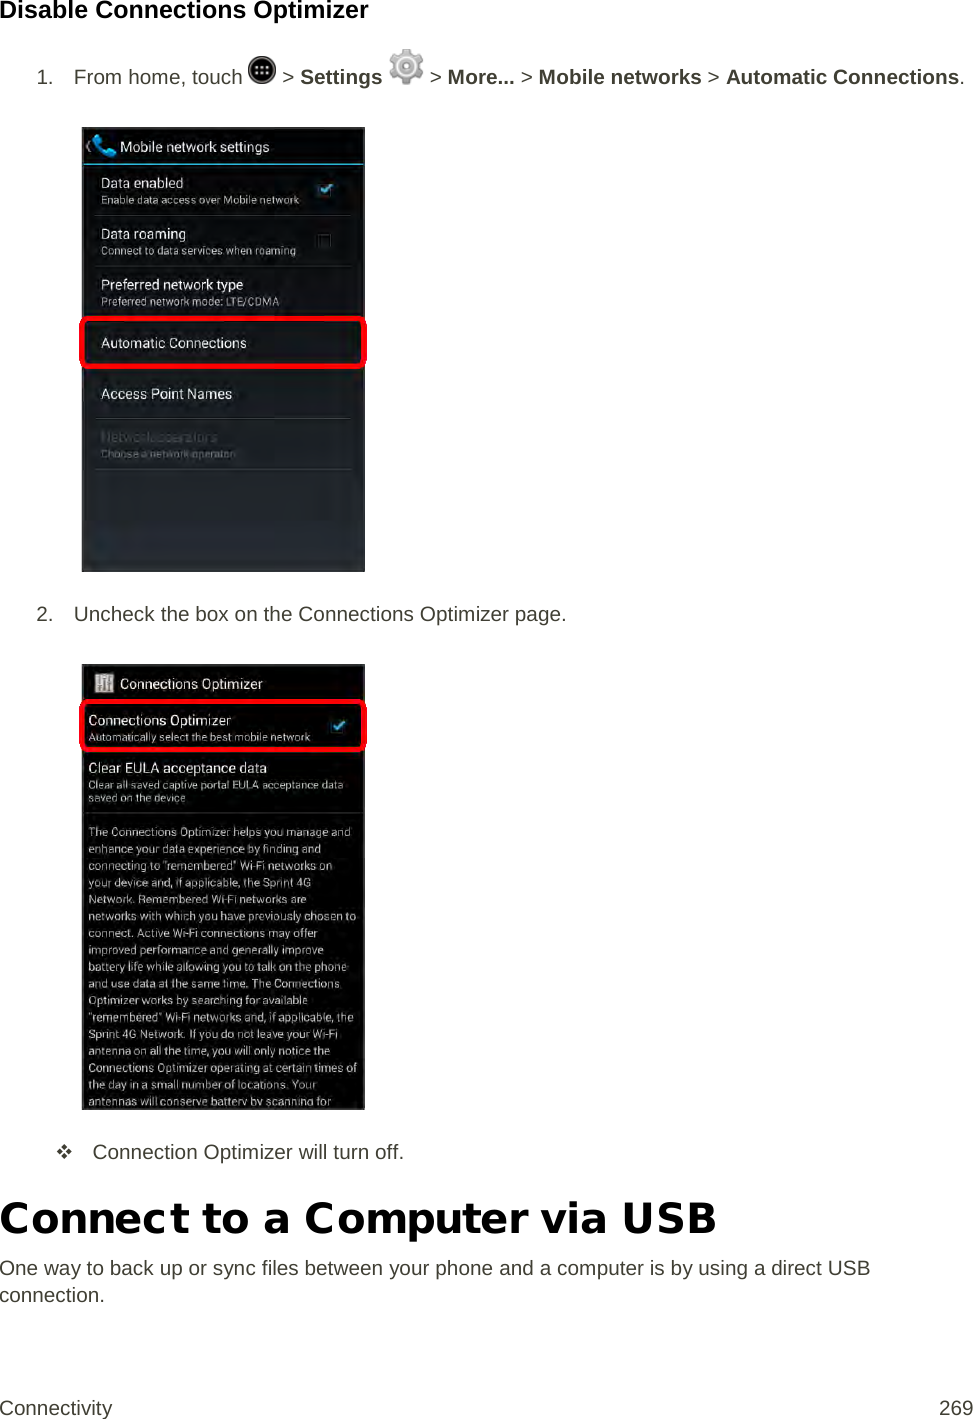
![• Touch Activate to override auto-activation and start the manual activation wizard. • Follow the on-screen prompts to complete the activation process. To confirm activation, make a phone call. If your phone is still not activated, visit sprint.com/support for assistance. If you do not have access to the Internet, call Sprint Customer Service at 1-888-211-4727 from another phone. Tip: Do not press the Power key while the phone is being activated. Pressing the Power key cancels the activation process. Note: If you are having any difficulty with activation, visit sprint.com/support. Complete the Setup Screens The setup screens help you set up certain features and preferences on your phone. Once your phone has been turned on, you will see a Welcome message. You can then complete the setup process. Note: You may be able to complete the setup screens before your phone has been activated on your Sprint account. Note: During or after setup, you may see a Connections Optimizer notice. Read the notice and touch I Agree to allow your phone to connect automatically to the best available data network, including Wi-Fi. To turn Connections Optimizer off at any time, from home, touch > Settings > More… > Mobile networks > Automatic Connections > Connections Optimizer and uncheck the box. See Connections Optimizer for details. 1. From the Welcome screen, select a language (if prompted) and touch Next to get started. [illustration] To skip any section, touch Next or Skip. Note: On the Welcome screen, there may also be an Accessibility button. If you are visually impaired or hard of hearing, touch Accessibility to change the accessibility settings. 2. Follow the onscreen instructions to complete each section. For each topic, you will have the option to skip it and continue to the next screen. Wi-Fi – If prompted, follow the prompts to sign in to an available Wi-Fi network. For secured Wi-Fi networks, you will need to enter a password. See Wi-Fi for more details. [illustration] Got Google? – Touch Yes and complete the steps to sign in to your current Google Account, or touch No and then touch Get an account (to set up a new Google Account) or Not now to skip Google setup. The following options may apply depending on your selection: [illustration] Get Started 24](https://usermanual.wiki/Sharp/HRO00204.manual/User-Guide-2330332-Page-34.png)
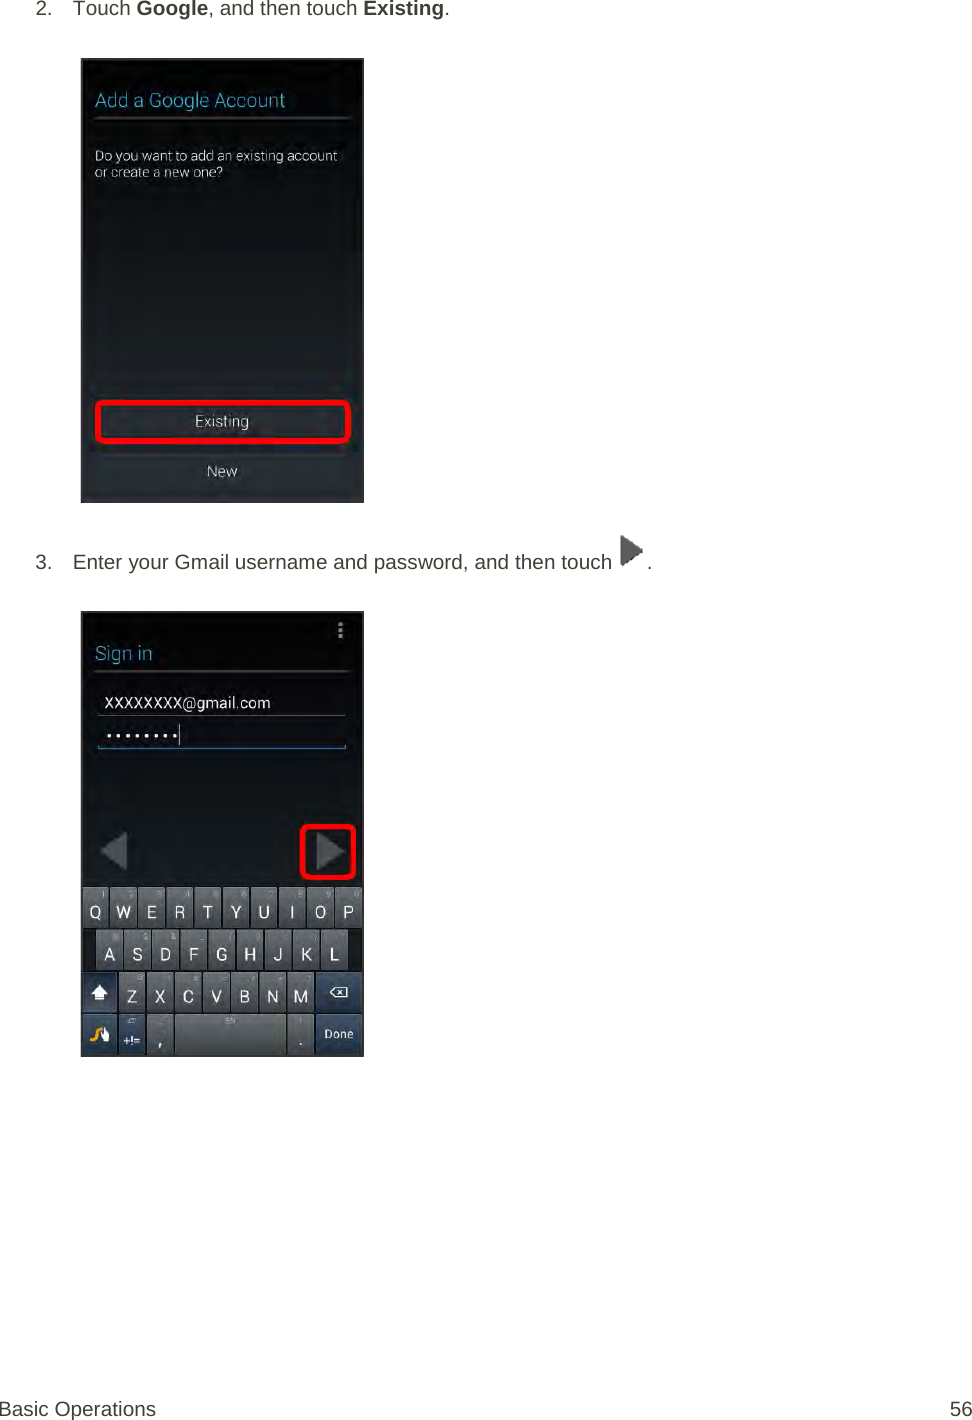
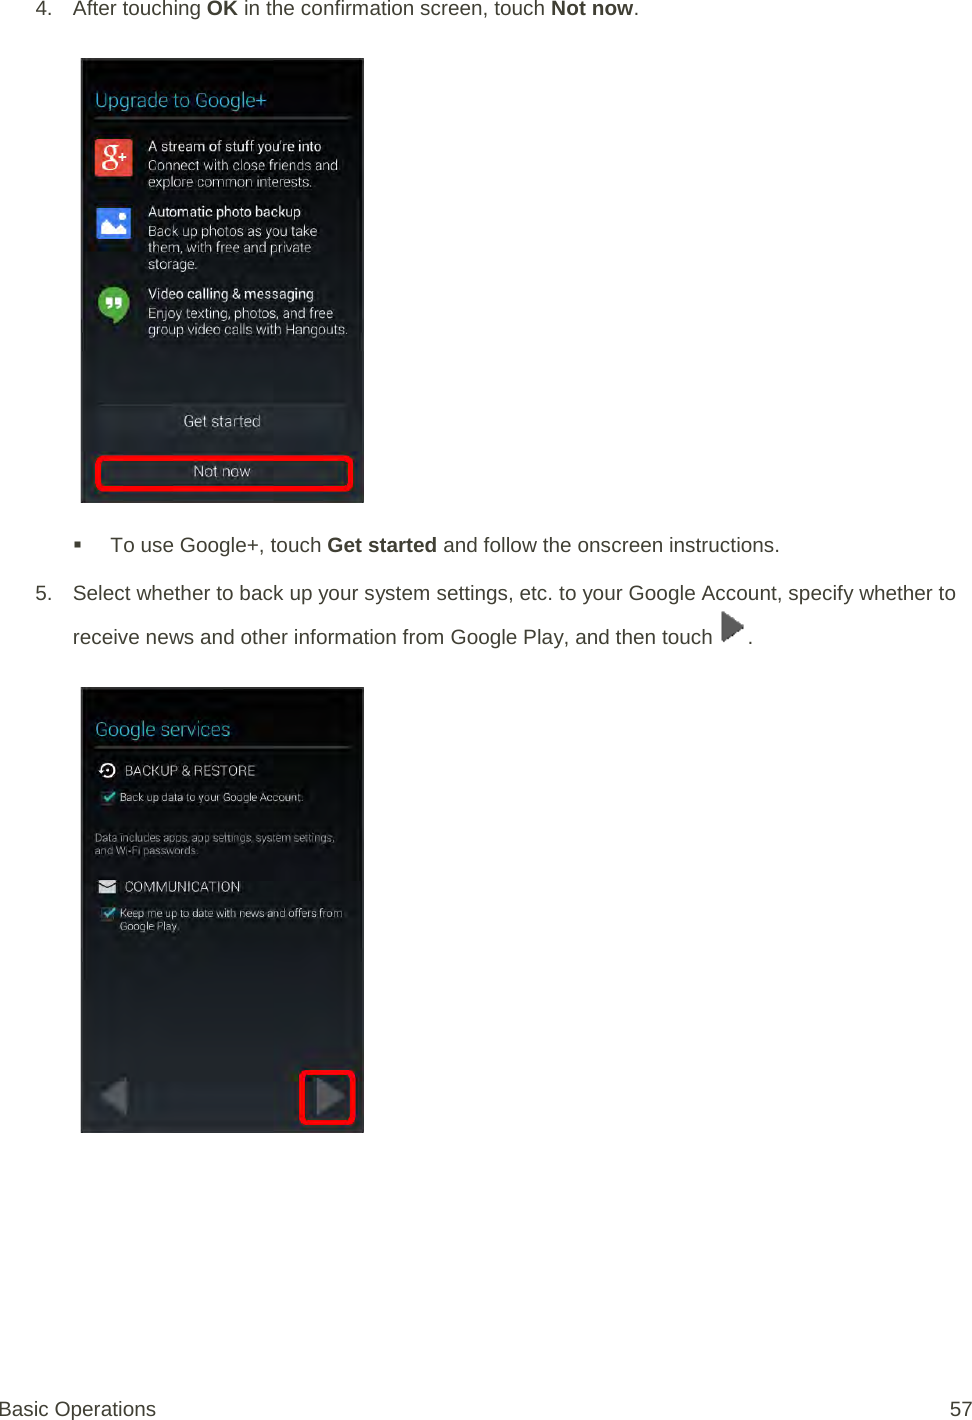
![• Sign in – Enter your Gmail address and password and touch Sign in to sign in to your current Google Account. • Get an account – Follow the instructions to sign up for a new Google Account. There will be screens to enter your first and last names, create an email address (Gmail), create a password, enter recovery information (including a backup email address and recovery question), an option to join Google+, and an option to enable purchases from the Google Play Store app. Touch Next between each screen. • Use Google location – Select your Google location options and then touch Next. This phone belongs to… – If applicable, enter your first and last name and touch Next. This information is used by the phone to personalize certain apps. [illustration] 3. Touch Finish. Your setup is now complete. Follow the onscreen instructions to learn about basic touch menu navigation, view tutorials, or just get started. [illustration] Your phone is now set up for use. If you skipped any part of the setup, you can access additional options through the Apps screen or through Settings. Note: You do not need to sign up for a Google Account to use your phone. However, to download apps from the Google Play Store app, you must link your phone to a Google Account. Get Started 25](https://usermanual.wiki/Sharp/HRO00204.manual/User-Guide-2330332-Page-35.png)

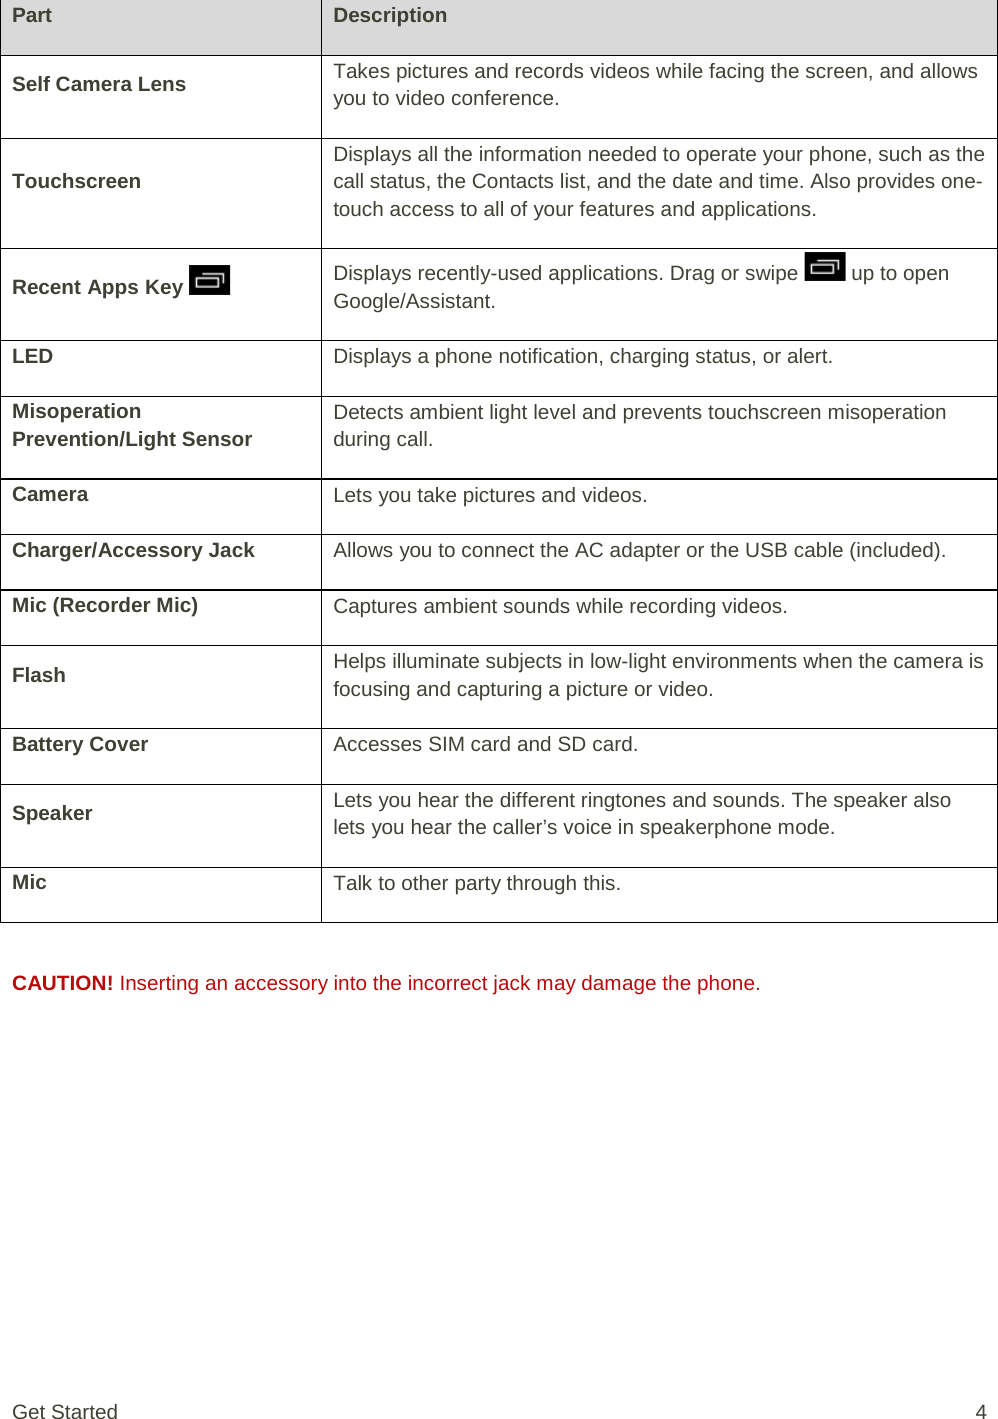
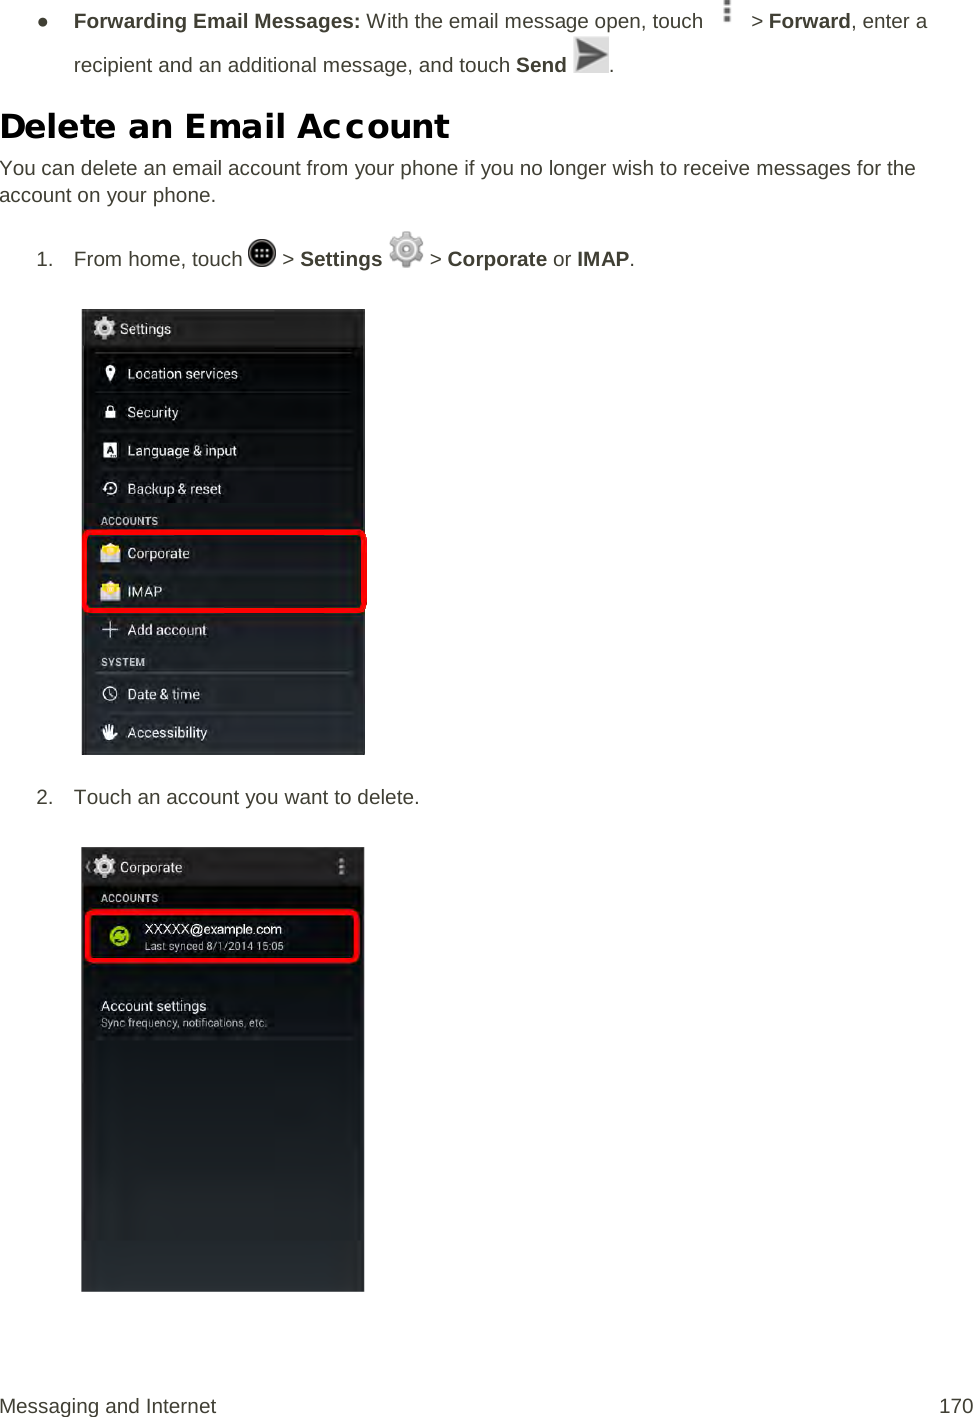
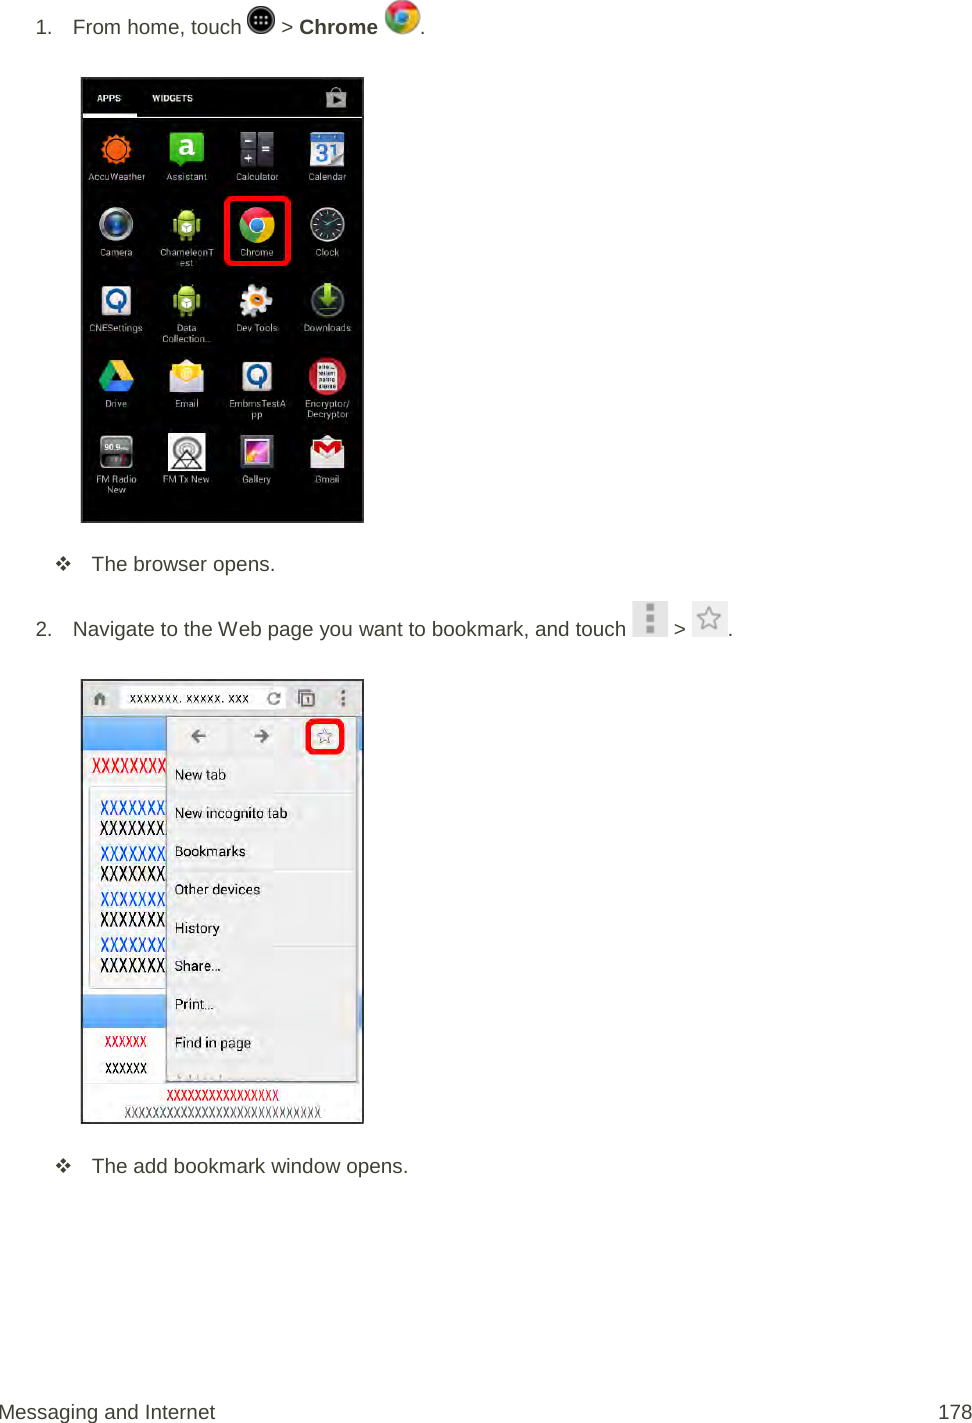
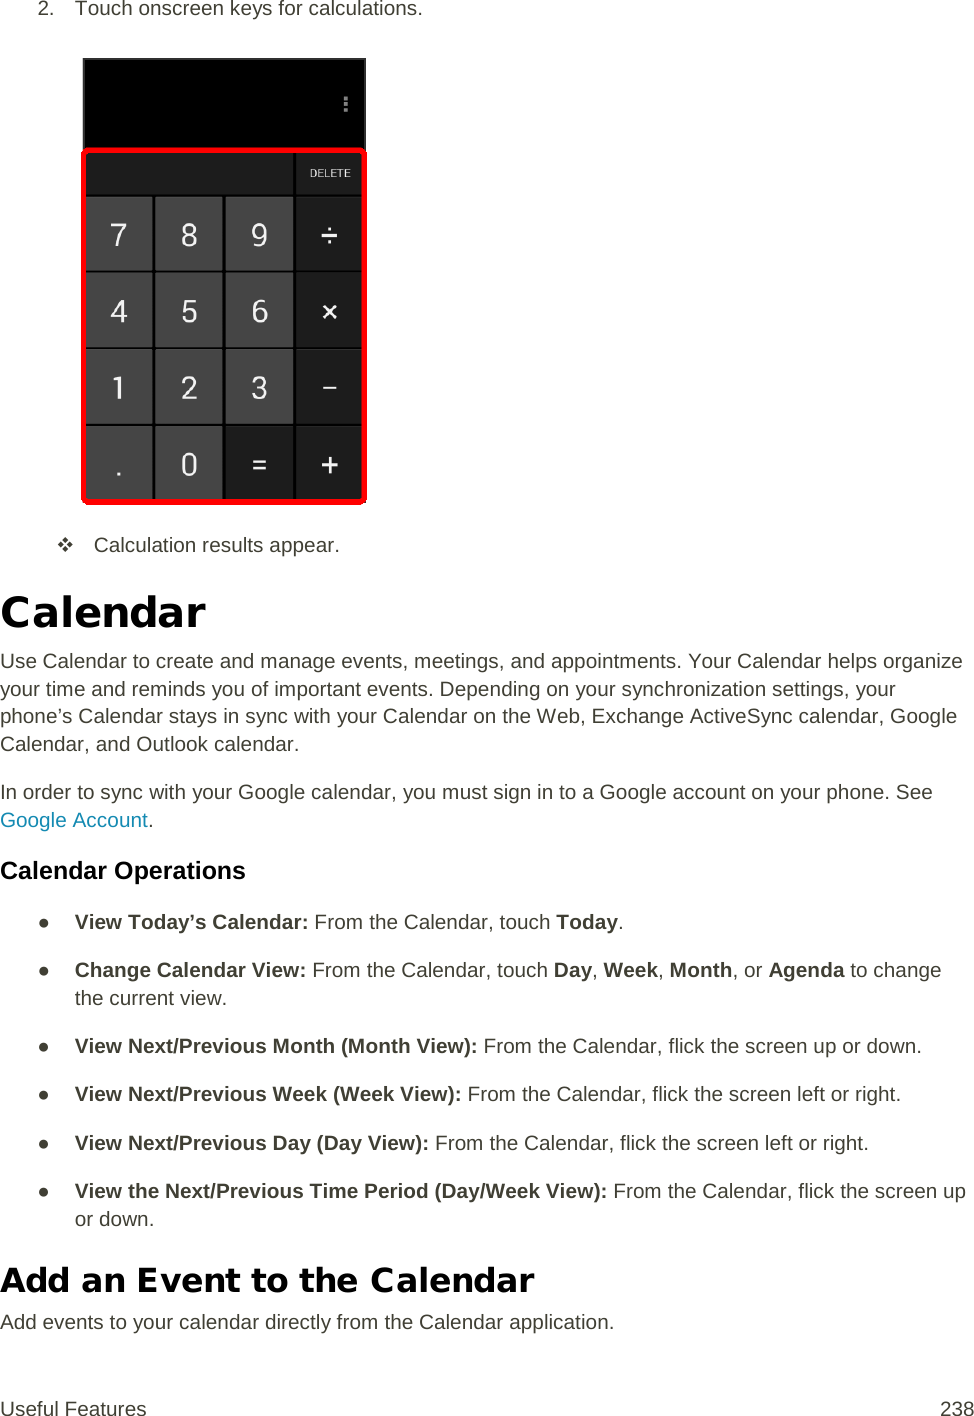
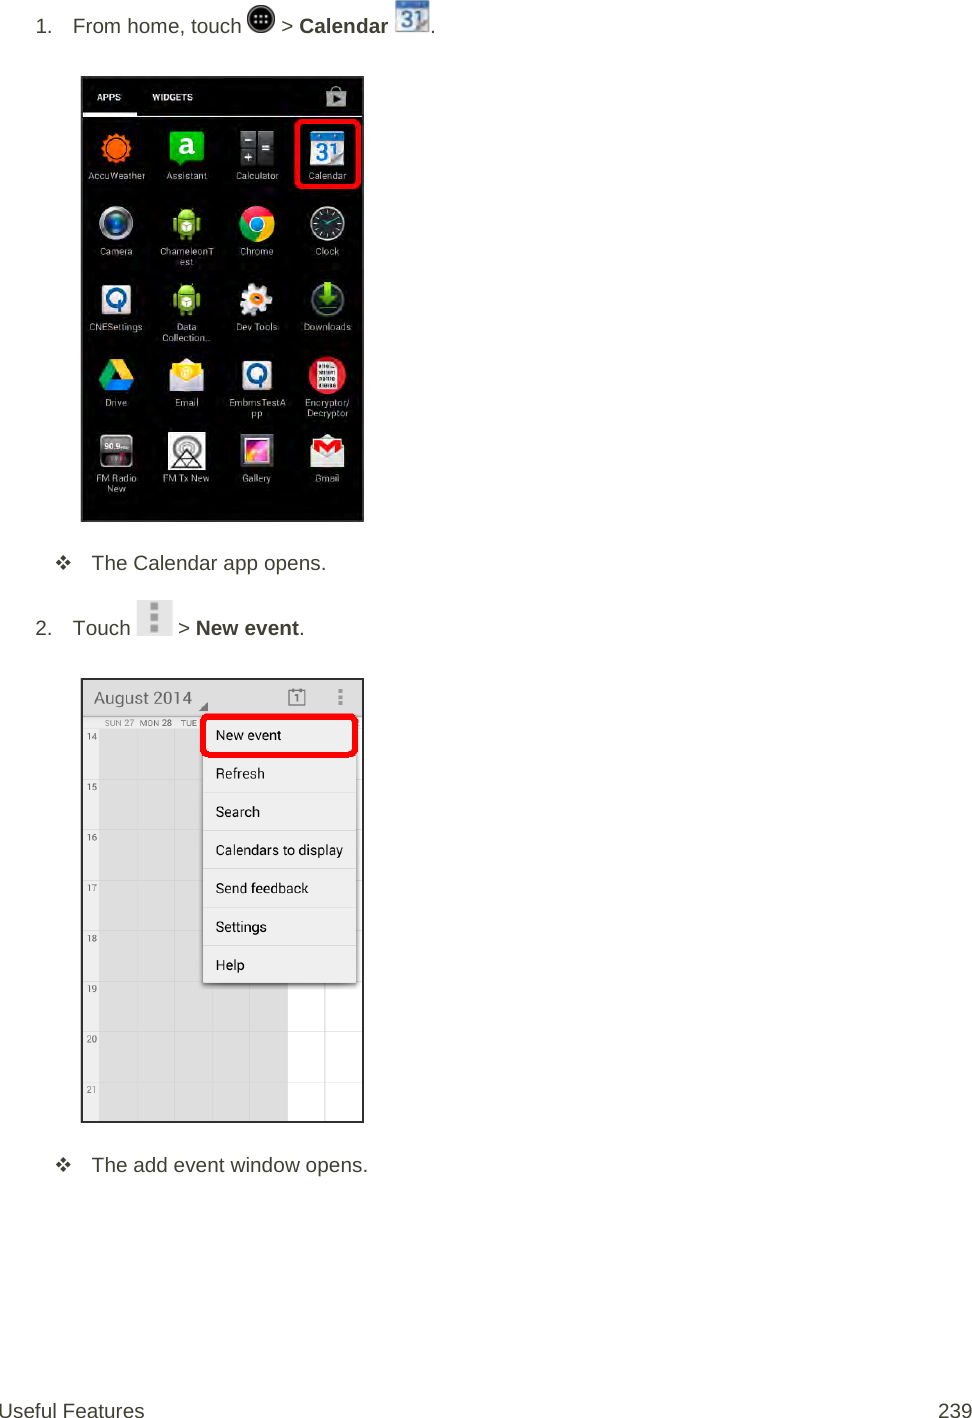
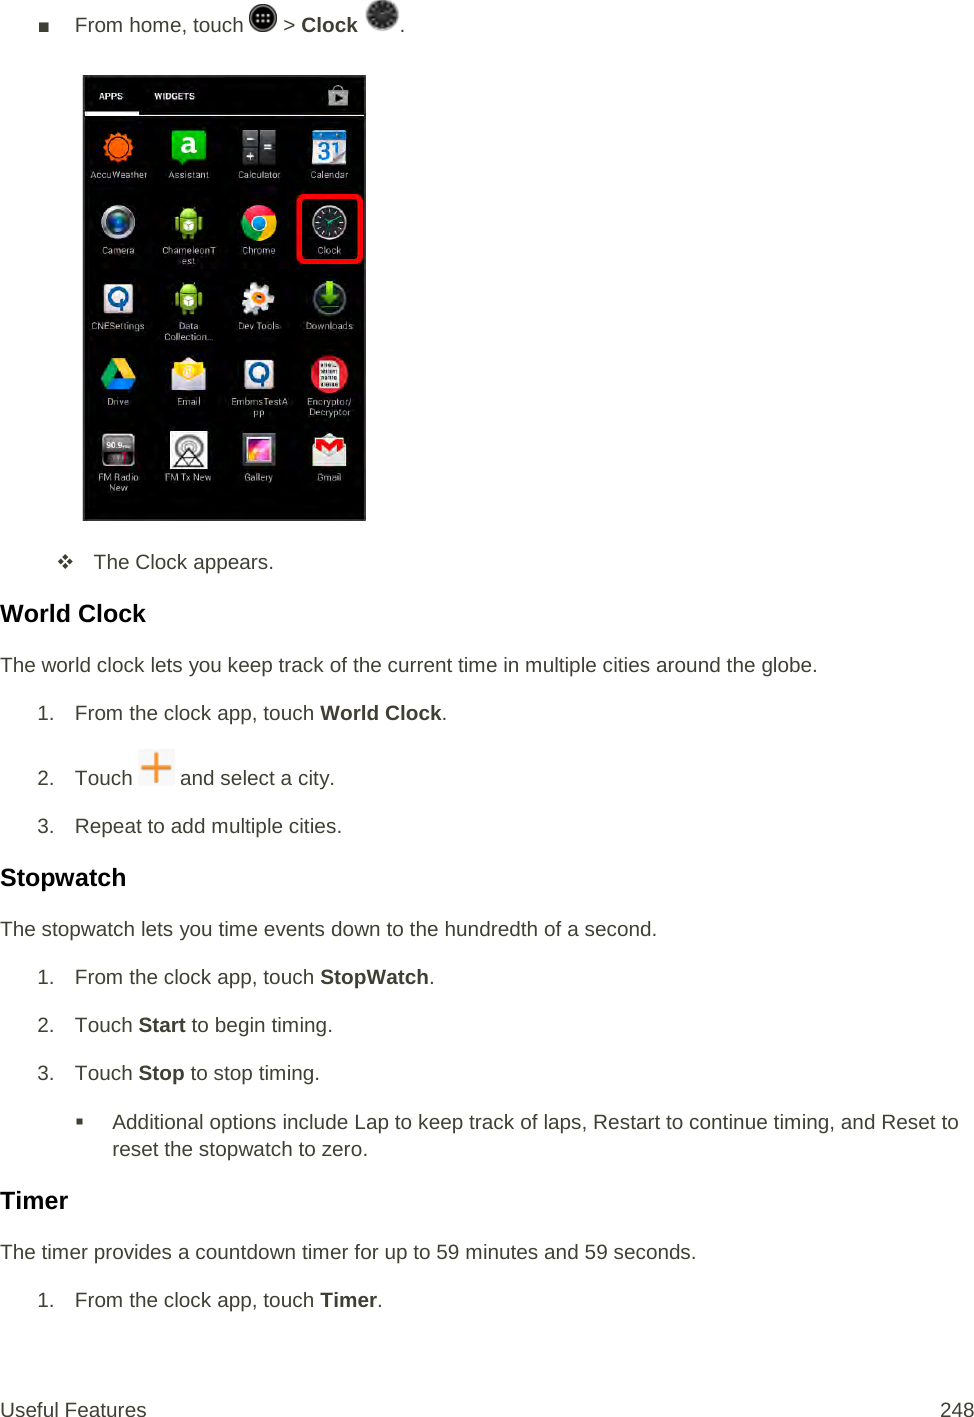
![App Function/Service [icon] 1Weather [description] [icon] Apps Unlimited [description] [icon] BaconReader [description] Calculator Use basic math, percent, and root operations. Includes memory function for a variety of operations. Calendar Check a calendar and manage a scheduled events. Toggle between day, week, and month calendar views. You can also sync online with Google Calendar. Camera Take pictures or videos with the autofocus-capable camera. You can change picture size, white balance, and other settings to take pictures/videos. Continuous shooting is also possible. You can also display setting icons to make setting changes easily. [icon] CBS Sports [description] Chrome Access the Internet for web searches and surfing. Supports syncing with the COMPUTER-version Chrome app to link with bookmarks and other data. Also supports privacy features such as an incognito tab. Clip Now You can view and manage screenshots captured using Clip Now. Clock Use the alarm, world clock, stopwatch, and timer. Check times in different regions around the world with the world clock. You can also add regions and check times for several regions simultaneously. [icon] Direct Connect [description] Downloads Use the browser to check a list of all downloaded files. Files that are sorted by time can be re-sorted by size, and you can select and delete several downloaded files together. Drive Google Drive is Google’s online storage service. You can save and share files with Google Drive. [icon] eBay App [description] Email Registering an email account allows you to send and receive home and office Internet mail from outside. You can register several Internet mail accounts on your phone. Basic Operations 32](https://usermanual.wiki/Sharp/HRO00204.manual/User-Guide-2330332-Page-42.png)
![App Function/Service [icon] Eureka [description] Gallery You can view and edit pictures or videos taken with your phone or downloaded, as well as share them with friends. [icon] GLMS [description] Gmail Allows you to use Gmail, Google’s email service, anywhere and at any time. Enter keywords to search mail and add labels to sort your mail. Google Use Google Search to look for Internet information and apps for your phone. View web pages around the world as well as different information such as maps, videos, and business locations, and train routes. Google+ Google’s social networking service. You can group and register your friends, family, friends with the same interest, etc. in circles and share information with users in those circles. Hangouts Use pictures, emoji, video hangout, etc. to enjoy free-of-charge conversations one-on-one or in a group. [icon] Home [description] [icon] Lookout [description] Lumen Toolbar Install the Lumen Toolbar in your browser for more enjoyable and convenient browsing, including web page sharing (Facebook, Twitter, etc.), app searches/downloads, etc. You can also customize the Lumen Toolbar. Maps You can display a map of your current location or search for a route to a destination. You can view traffic information and aerial views. Street view, 3D view, as well as a compass mode are available. Messaging Use SMS (Short Message Service) and MMS (Multimedia Message Service). SMS allows short messaging between mobile phones. MMS allows you to send/receive pictures, audio, videos, etc. together with your message. [icon] Messaging Plus [description] Mobile ID Mobile ID is a single pack containing apps, ringtones, wallpapers, widgets, etc. You can easily install several ID packs, and switch between ID packs in a few simple touches. [icon] Mobile Sync [description] Basic Operations 33](https://usermanual.wiki/Sharp/HRO00204.manual/User-Guide-2330332-Page-43.png)
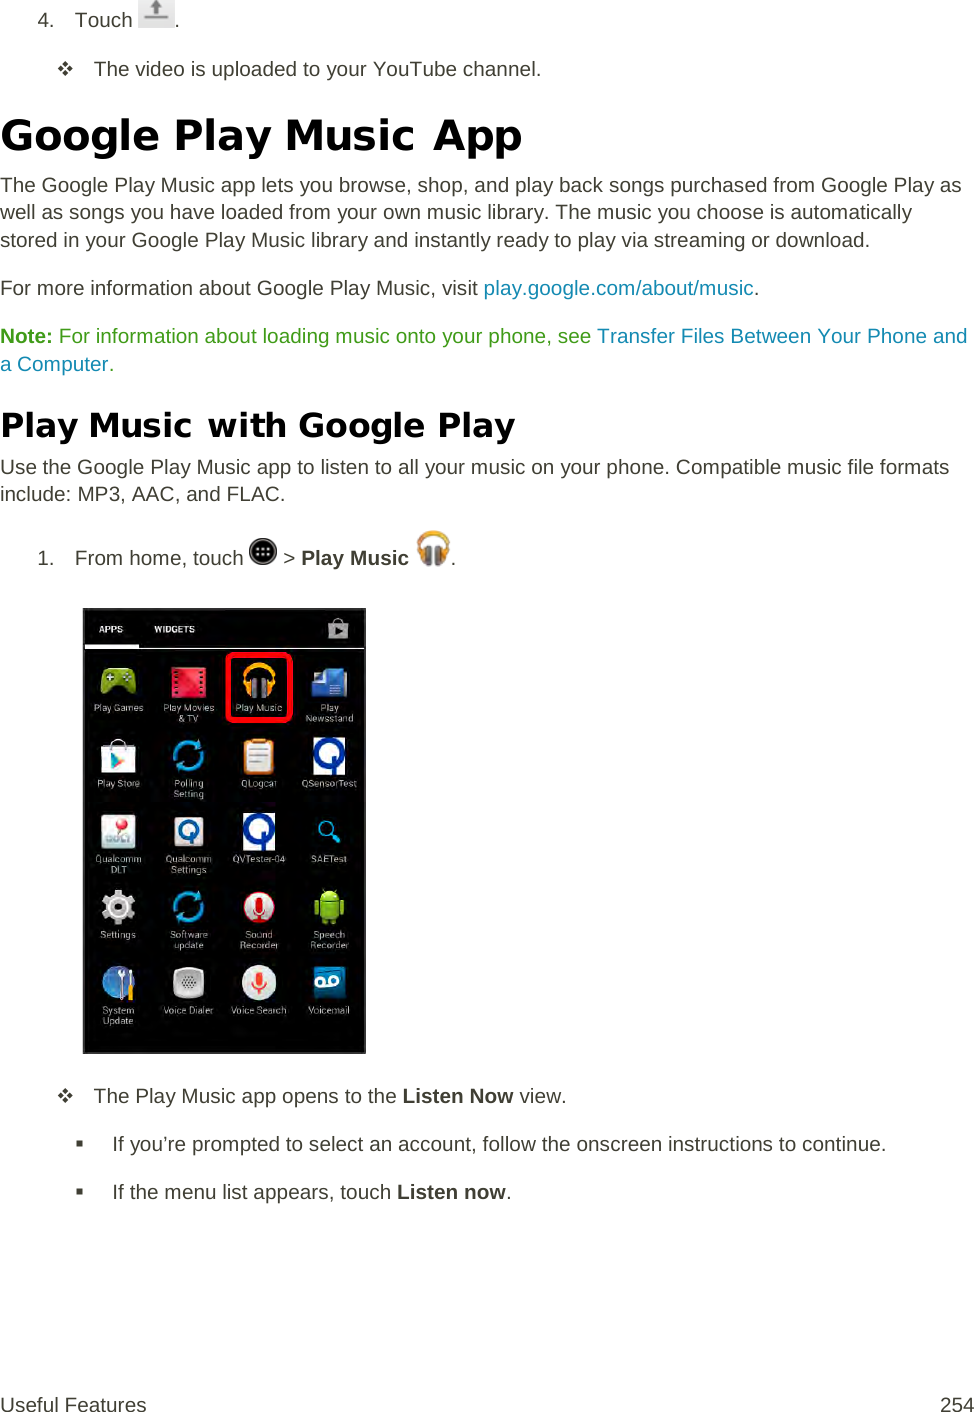
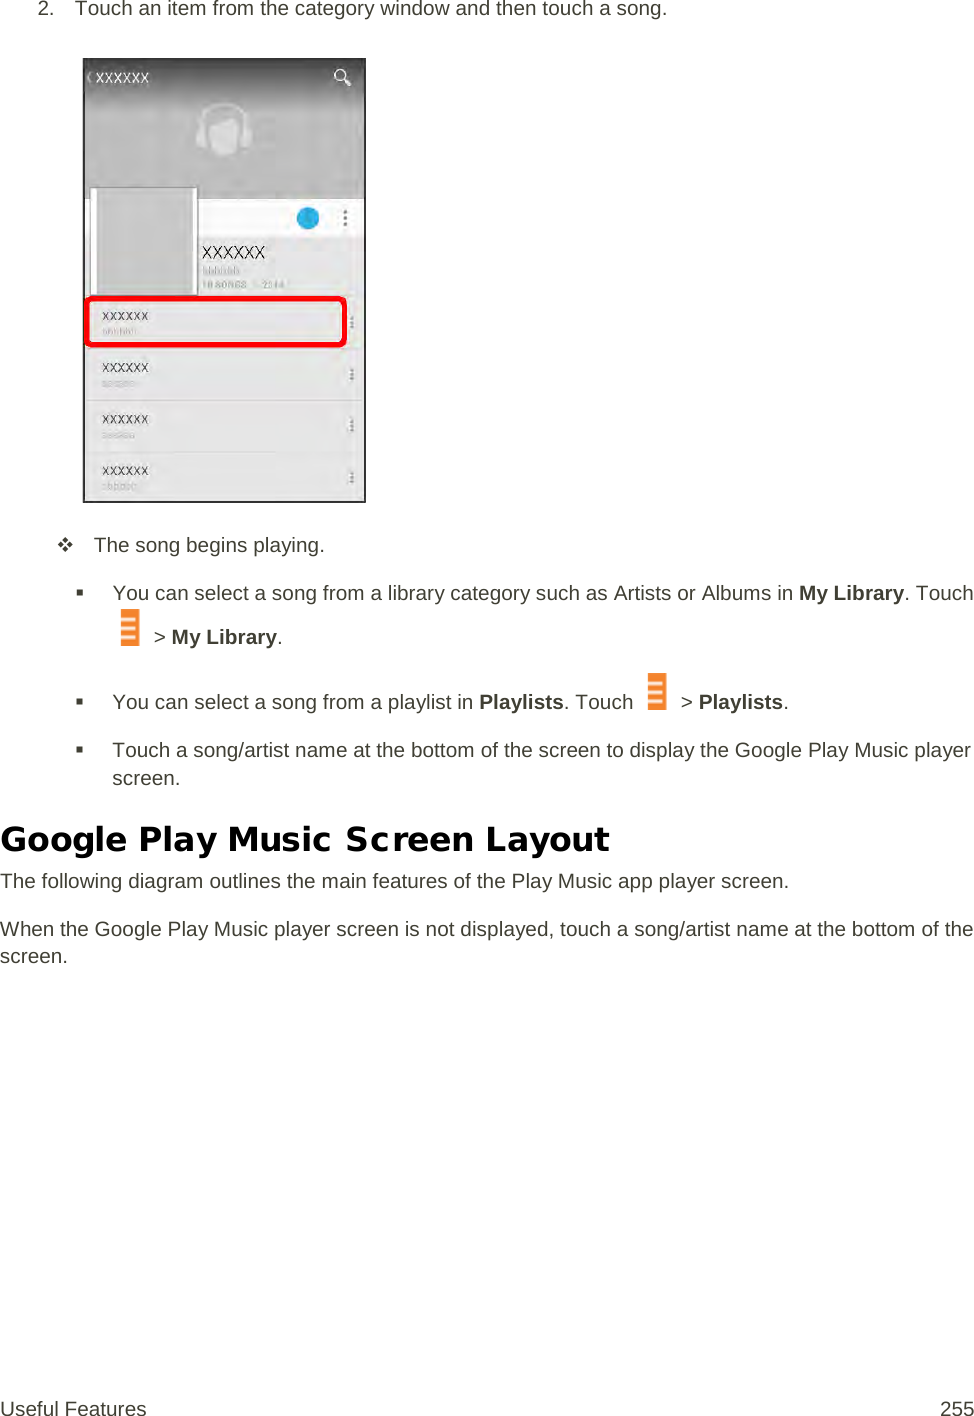
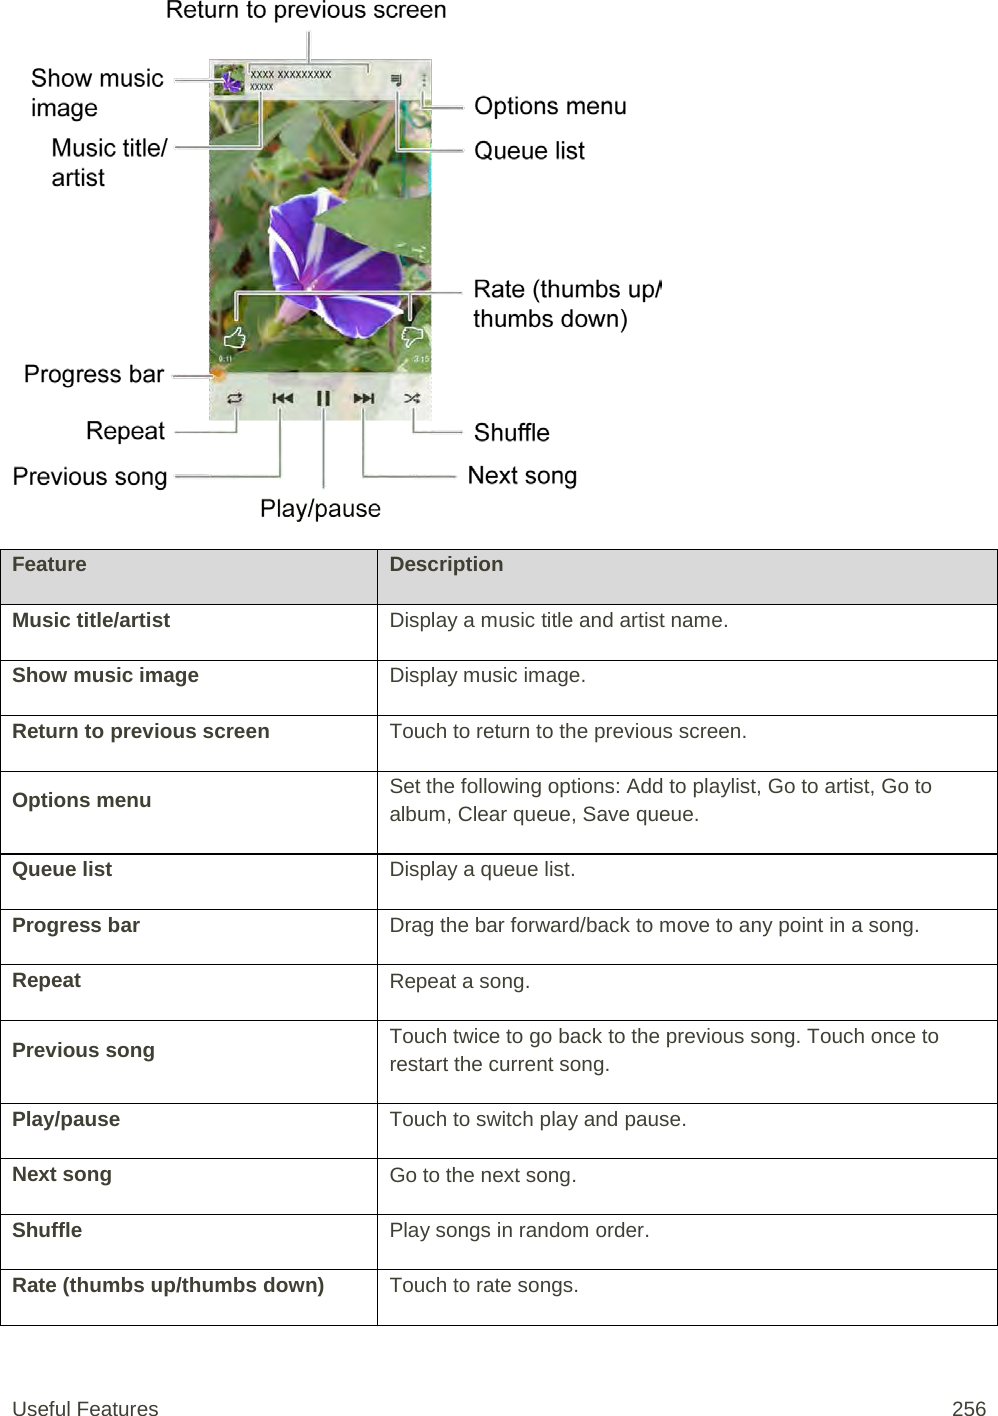
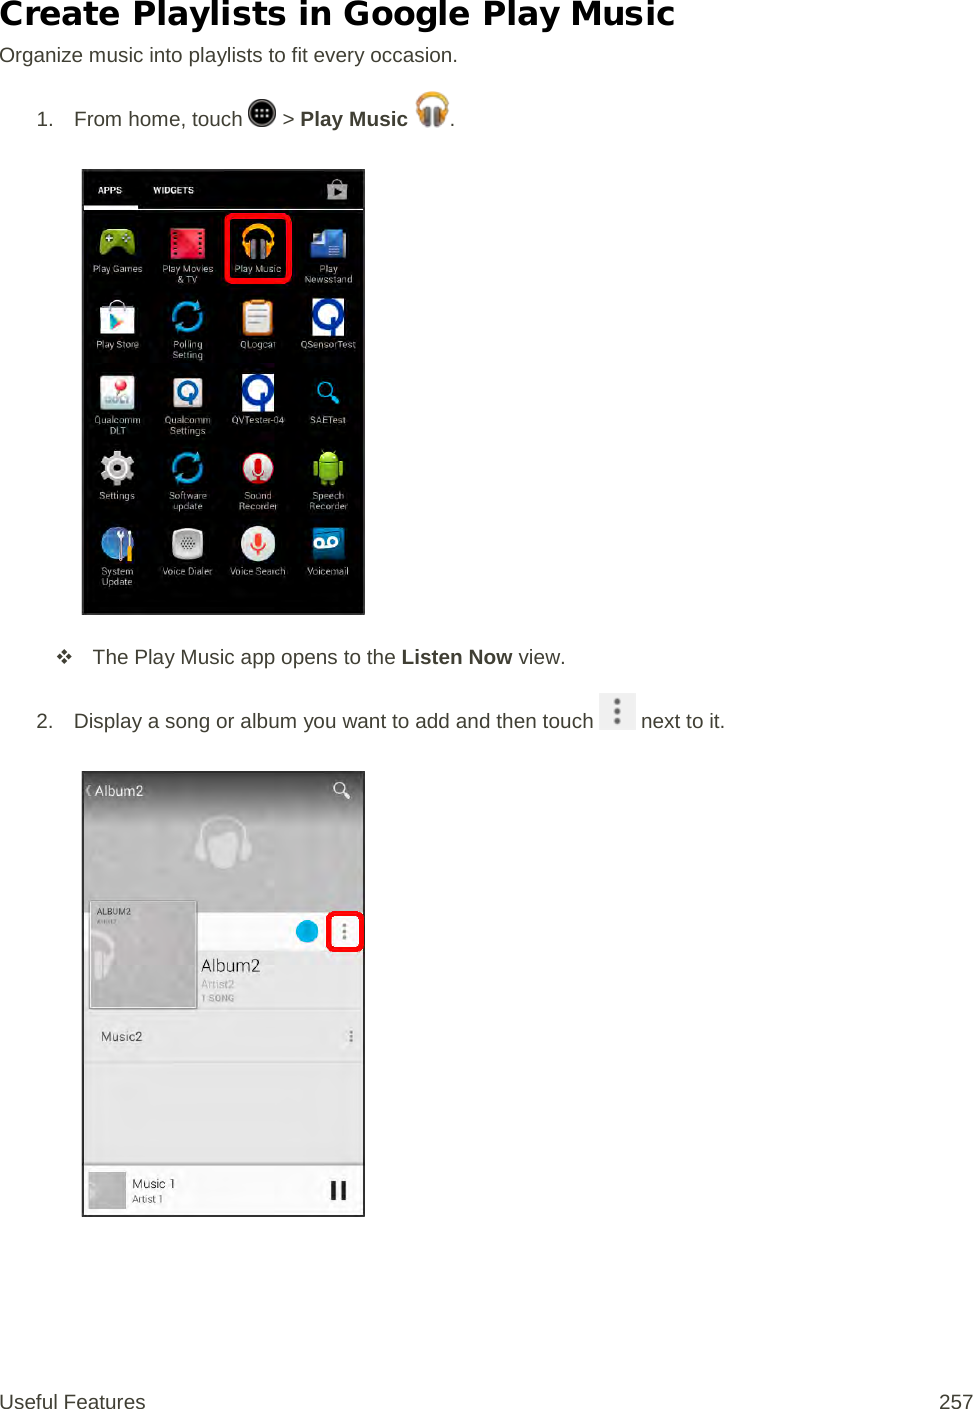
![App Function/Service [icon] Mobile Zone [description] [icon] NASCAR NASCAR Mobile is the official app of NASCAR. This app provides easy enjoyment of the latest news, videos, LIVE NASCAR events, Live Leaderboard, etc. [icon] NBA [description] NextRadio Enjoy FM radio. Check album covers and music information, purchase new favorites, share music on Facebook or Twitter, etc. OfficeSuite This application allows display of Microsoft® Word/Excel®/PowerPoint® and PDF files created on a computer, etc. You can use this application easily to view/check applicable files. People Add phone numbers and email addresses. In addition to an email address, you can add a birthday, nickname, etc. You can also set a ringtone for each added contact. Personal Assistant Personal Assistant is a talking personal assistant. By speaking to your phone, your assistant finds information, launches applications, etc. Also, it can connect you to web services such as Google, Twitter, Facebook, and more. Phone Place and receive phone calls. Also allows you to call abroad. You can view incoming and outgoing call logs to check calls, or place a call from the logs. Photos You can view and edit pictures or videos taken with your phone, as well as back up them on Google+. Play Books Read your favorite books and authors from anywhere. Select from among millions of books, including new titles, New York Times best sellers, up-and-coming authors, and free books. Play Games Enjoy Google Play games in one place. You can discover new games, manage your game playing and scores, and enjoy multiplay with friends around the world easily. Play Movies & TV Allows you to manage your server-based rental video content and video content you recorded. Play Music Play back music saved on your phone/SD card. View by album or by artist. You can also make your own playlists of preferred songs. Play Newsstand Check a variety of news information (free/paid) at one location. Also enjoy audio and video. Basic Operations 34](https://usermanual.wiki/Sharp/HRO00204.manual/User-Guide-2330332-Page-44.png)
![App Function/Service [icon] Play Services [description] Play Store Download a variety of apps (free/paid) from Google Play. Change your phone setting for manual/automatic updating of downloaded apps. [icon] Scout [description] Settings You can change and check all phone settings, including sound/vibration, wallpaper/display, basic settings, as well as app settings for calls, email, and browser. [icon] Setup [description] [icon] Sprint Money Express [description] [icon] Sprint Music Plus [description] [icon] Sprint TV & Movies [description] Voice Dialer [description] Voice Search Speak search keywords into your phone instead of typing to search for a variety of information. Displays a range of information including web sites, maps, videos, locations/train routes to businesses, etc. Voicemail You can quickly access messages from the message list without dialing voicemail. Easily select, play back, and erase messages as well as call back, etc. YouTube Enjoy the many different video contents uploaded to YouTube. You can play back videos on your phone in high-quality mode. Phone Number Follow the instructions below to display your phone’s wireless phone number. Basic Operations 35](https://usermanual.wiki/Sharp/HRO00204.manual/User-Guide-2330332-Page-45.png)
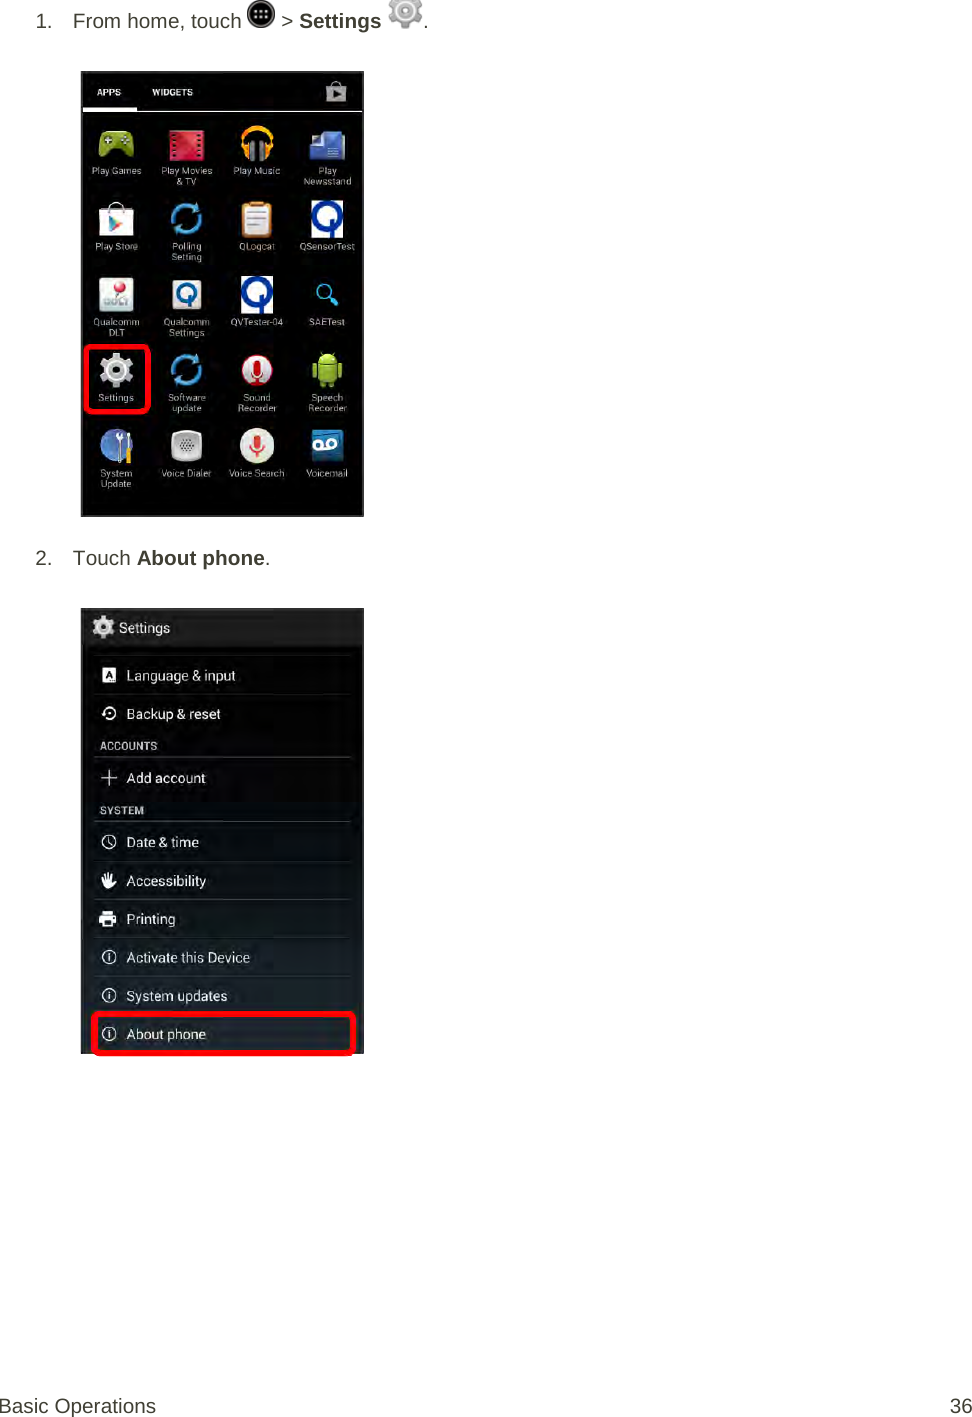
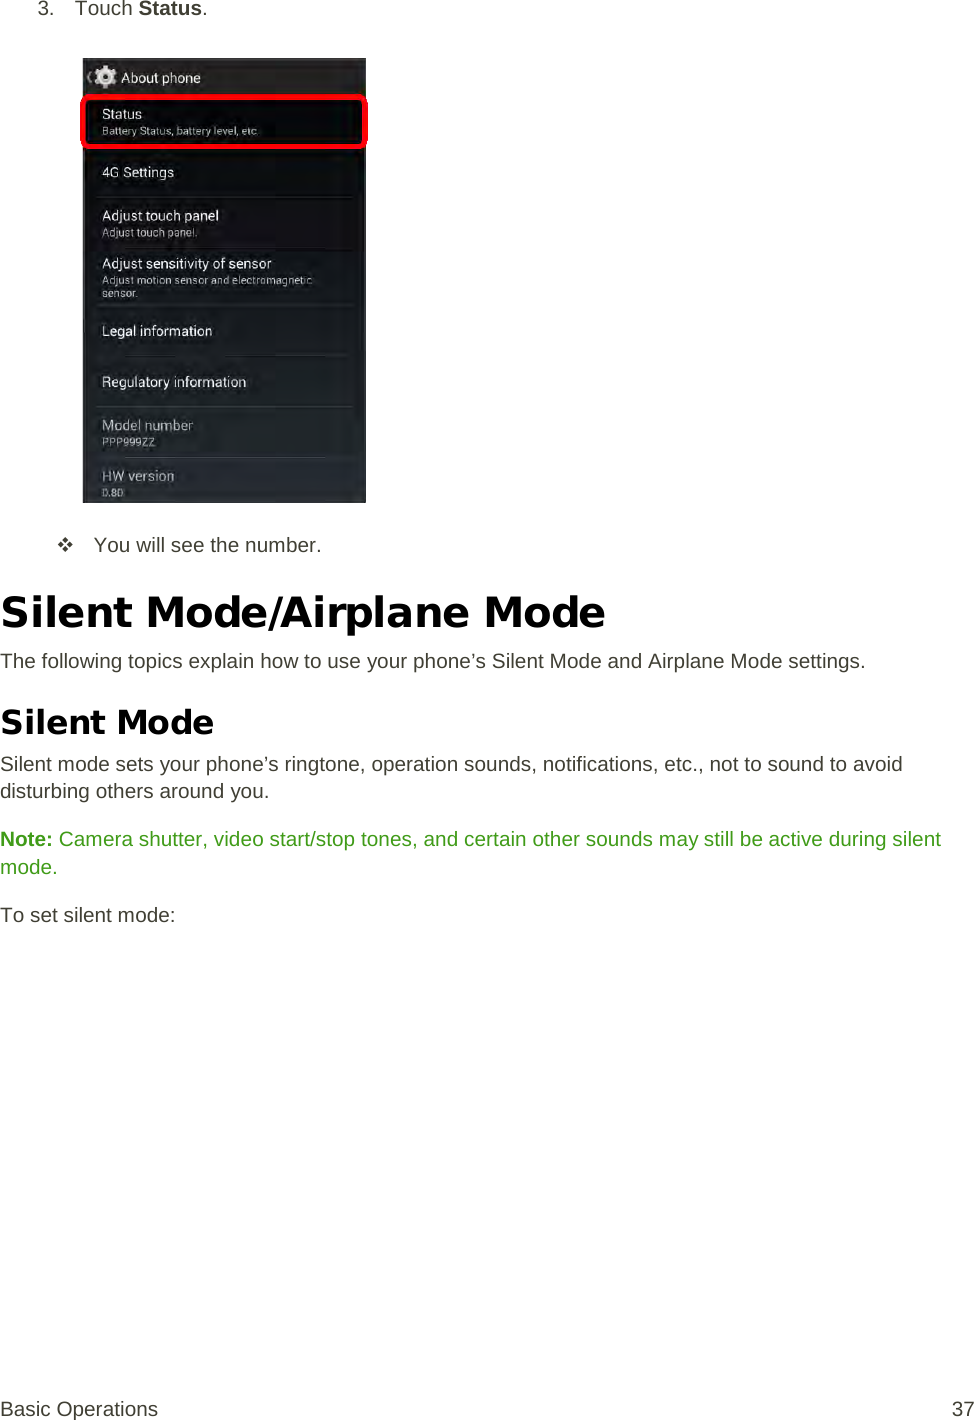


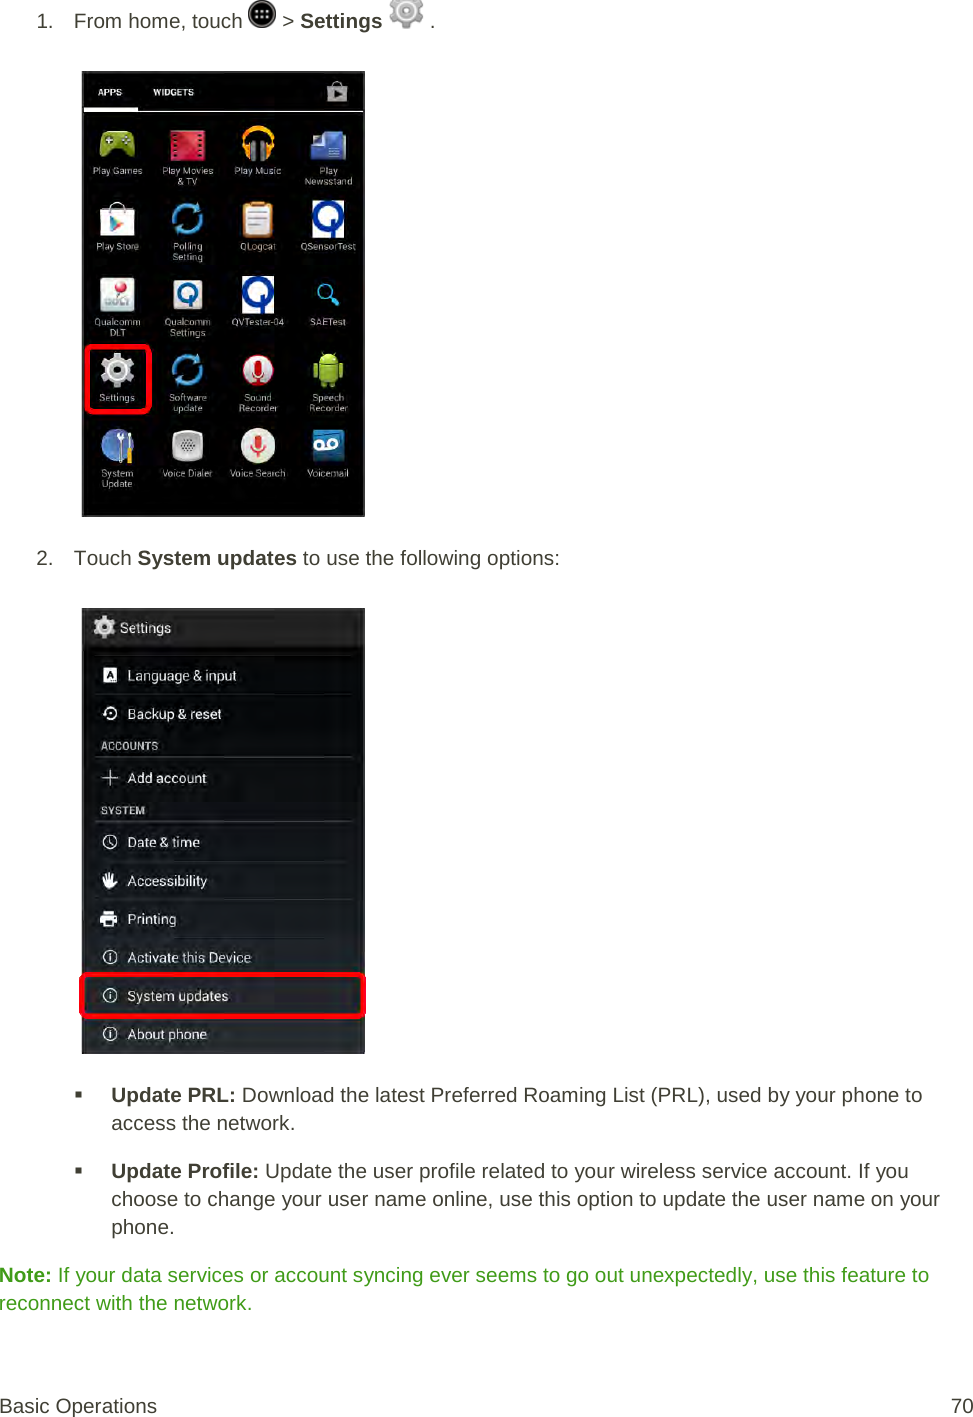
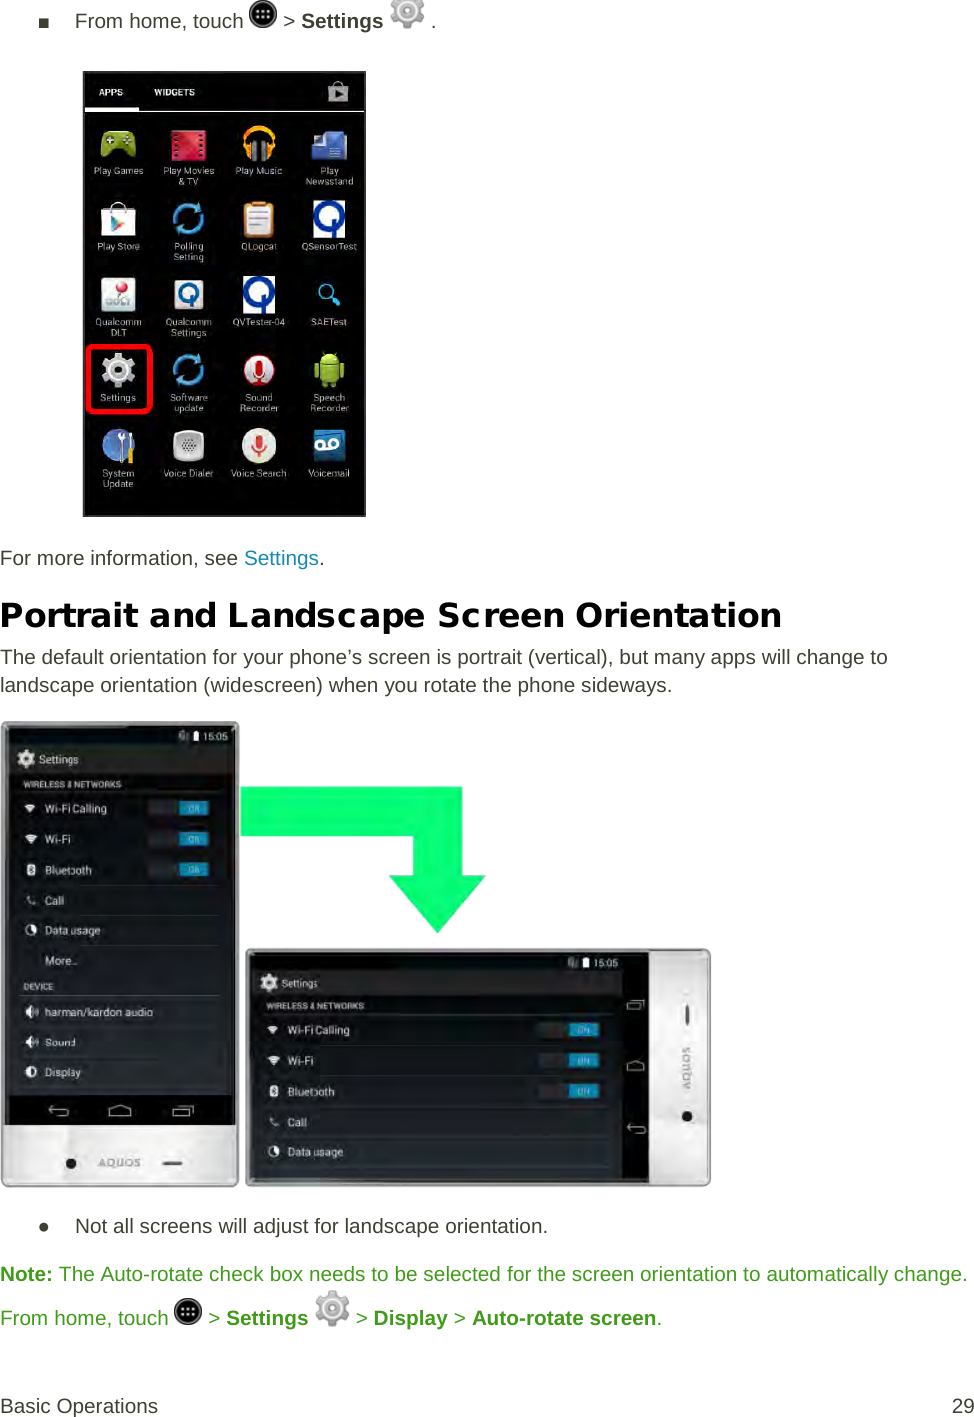
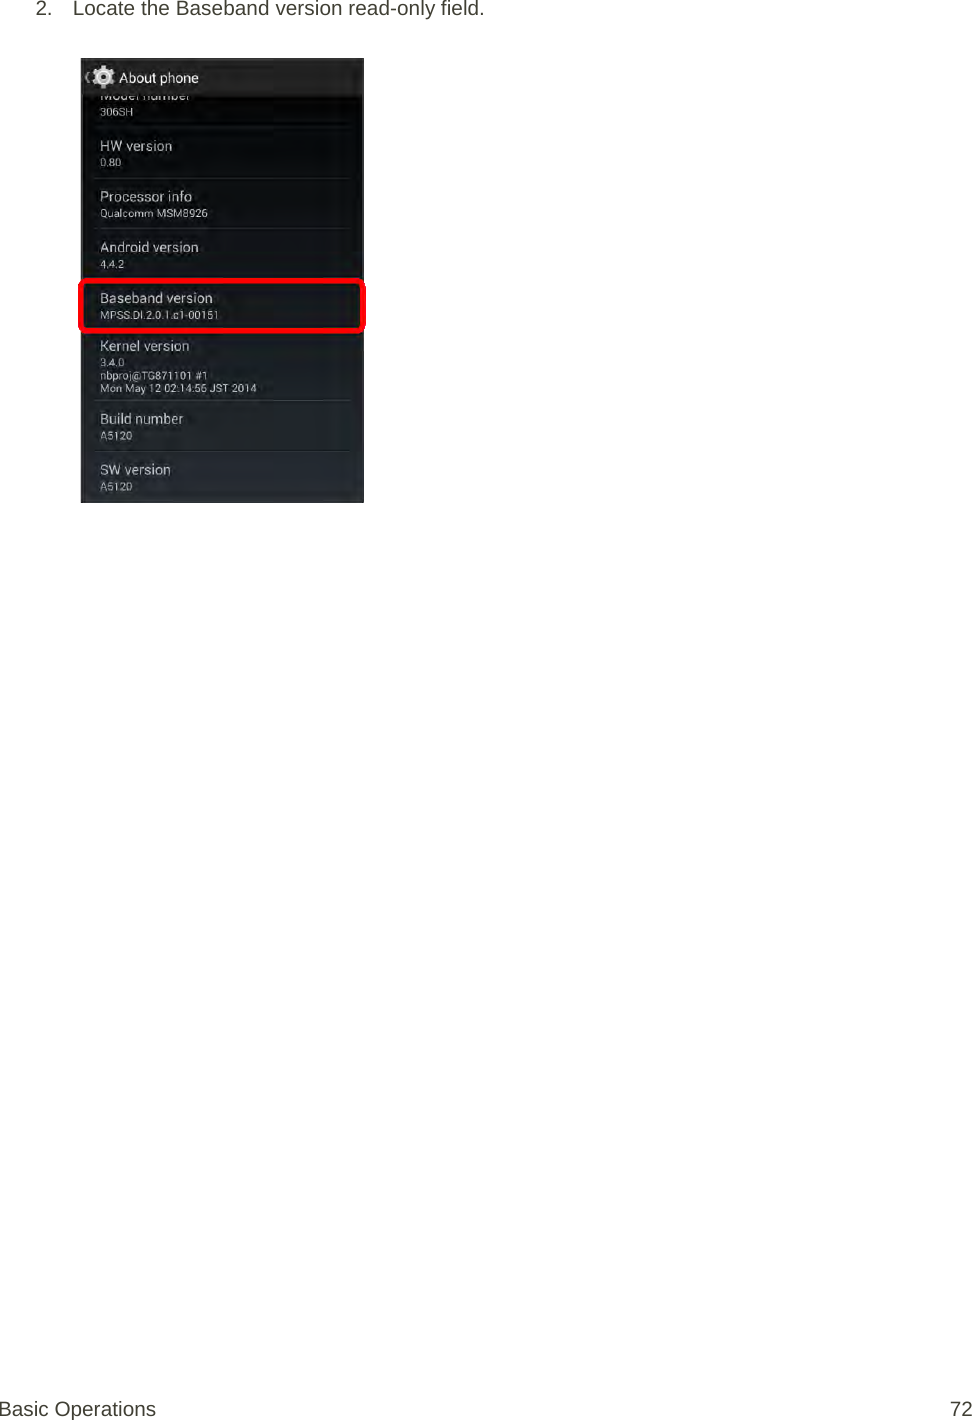
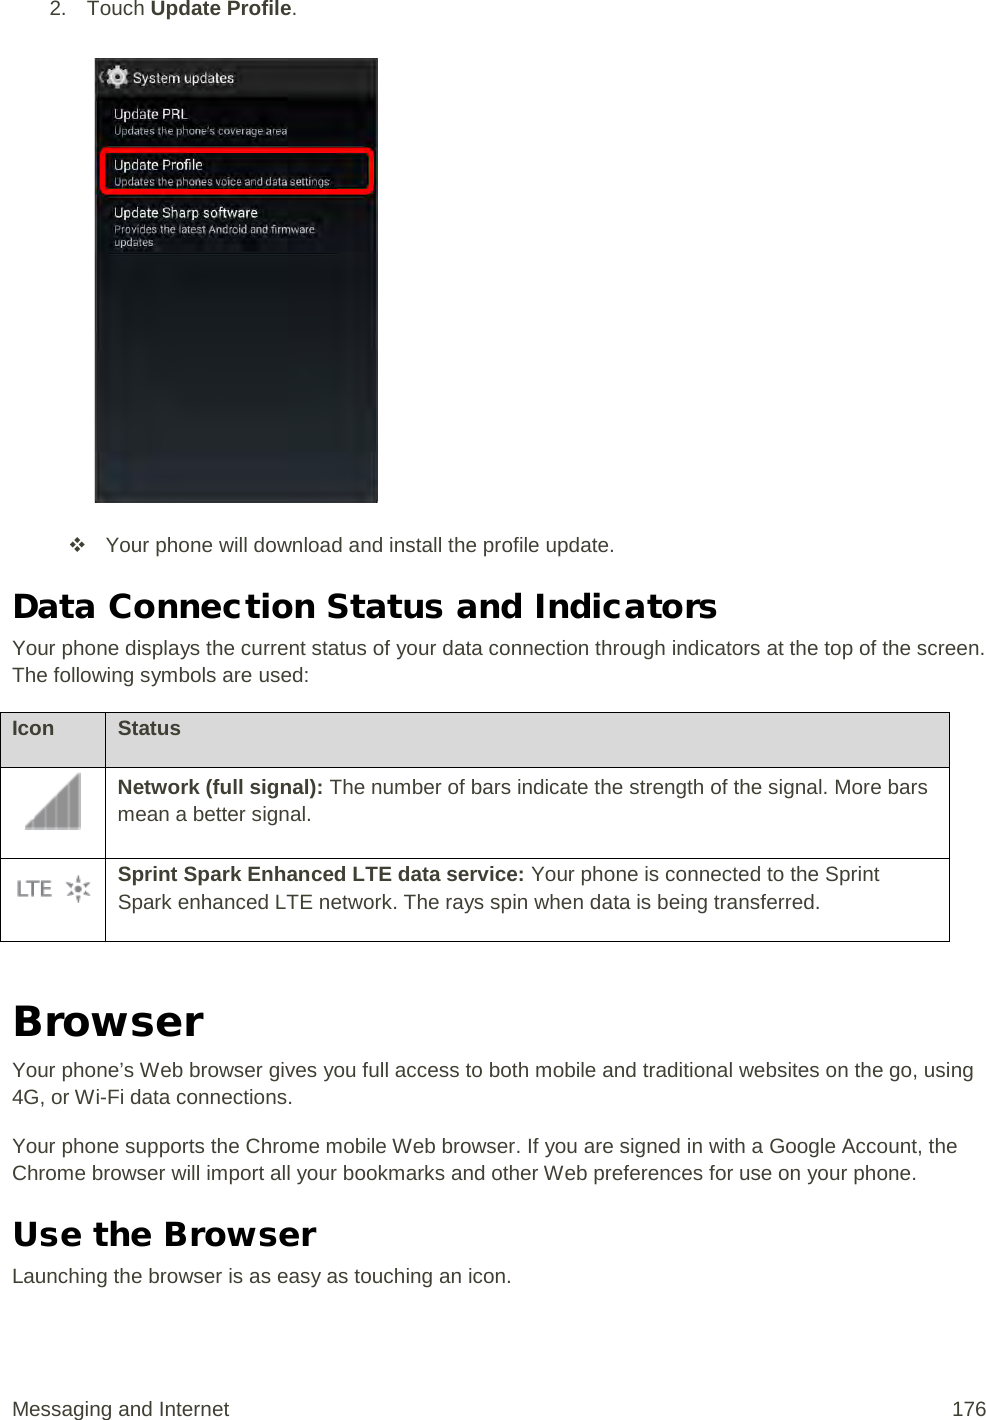
![ Update Sharp software: Upgrade to the latest software available for your phone. – or – 1. Locate the System Update Available icon ([icon]) in notifications. [illustration] 2. Drag the status bar down. 3. Touch [icon] to open the System Updates screen. [illustration] 4. Touch Download and follow the onscreen instructions. [illustration] The downloading icon ([icon]) appears within the status bar to indicate the phone is downloading the necessary files. 5. Touch Restart and install to complete the process. Confirm Your Current Phone Firmware 1. From home, touch > Settings > About phone. Basic Operations 71](https://usermanual.wiki/Sharp/HRO00204.manual/User-Guide-2330332-Page-81.png)
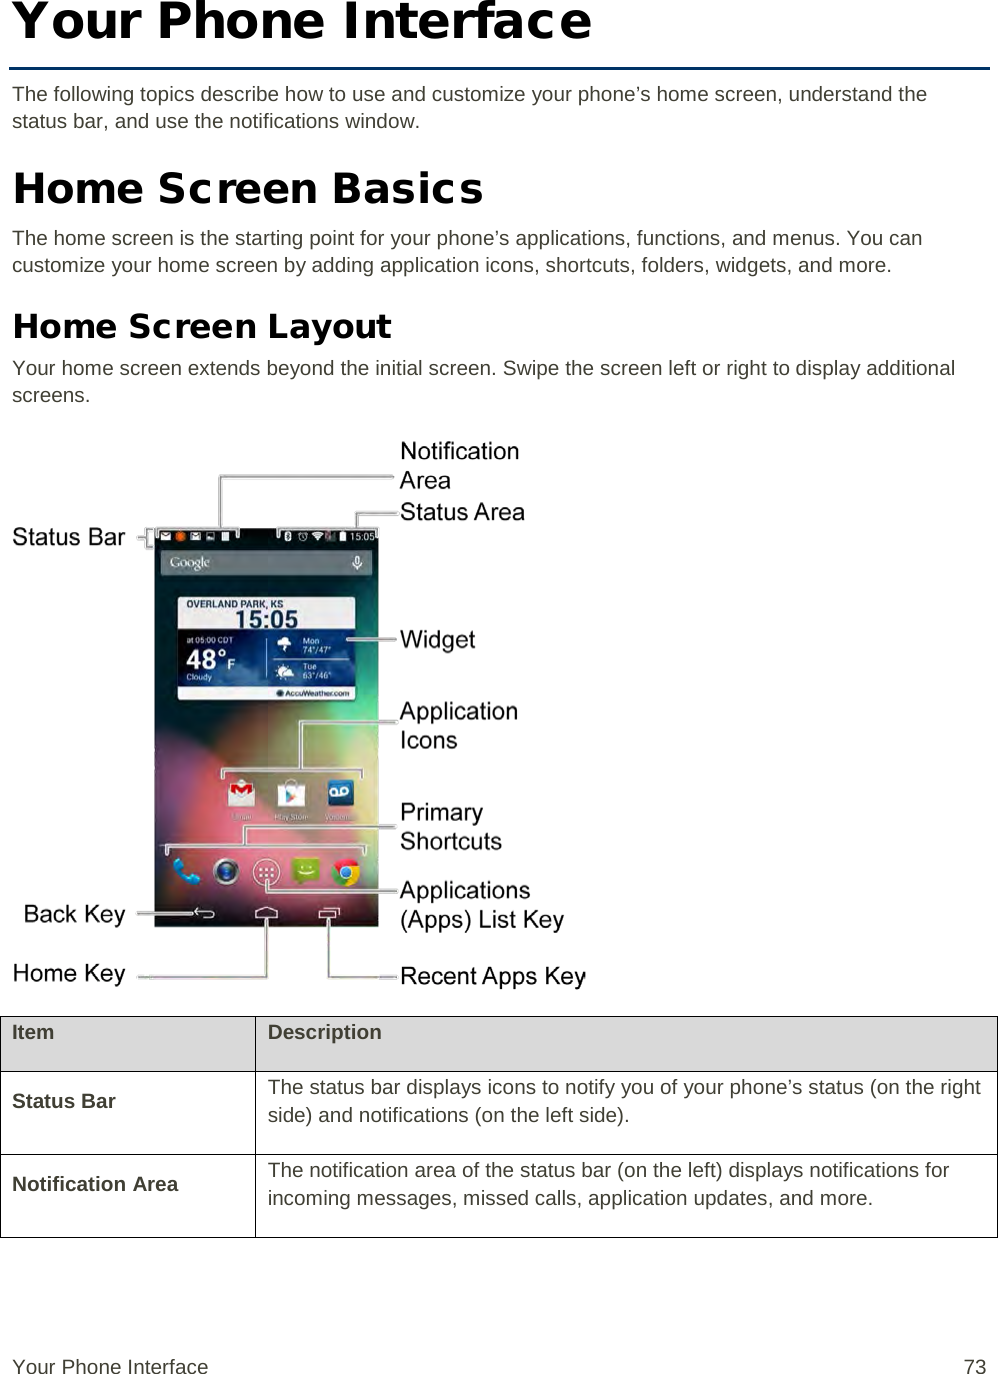
![Status Bar Layout Main Notification Icons Icon Notification [icon] new emergency notification [icon] arriving call/mail [icon] on hold missed call new voicemail new email new Gmail new text or MMS message new Hangout message new Sprint Zone message Your Phone Interface 75](https://usermanual.wiki/Sharp/HRO00204.manual/User-Guide-2330332-Page-85.png)
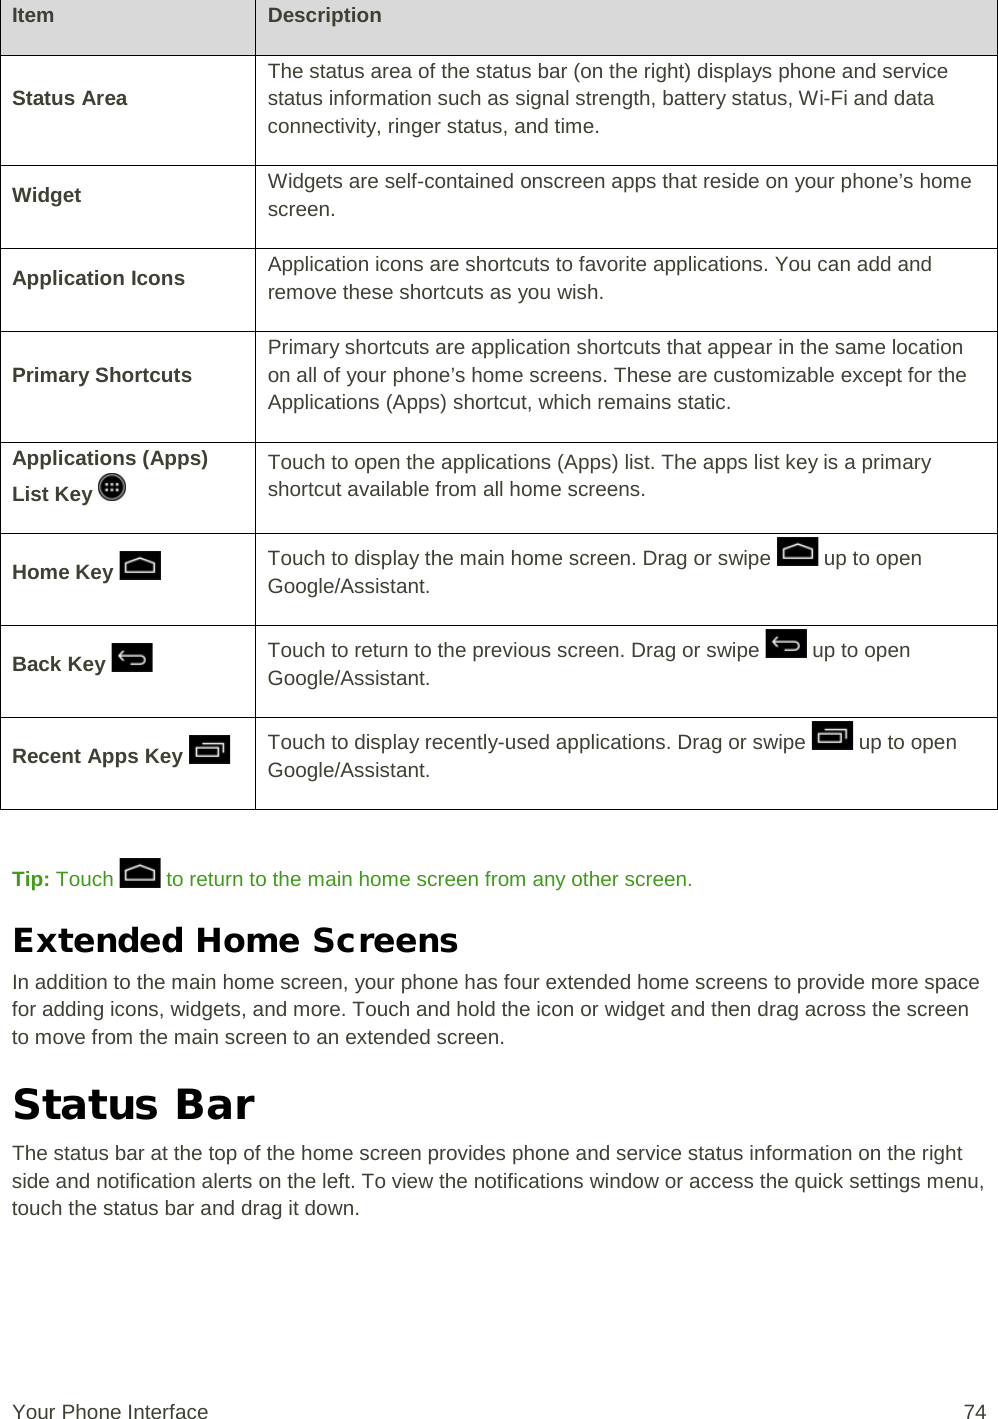
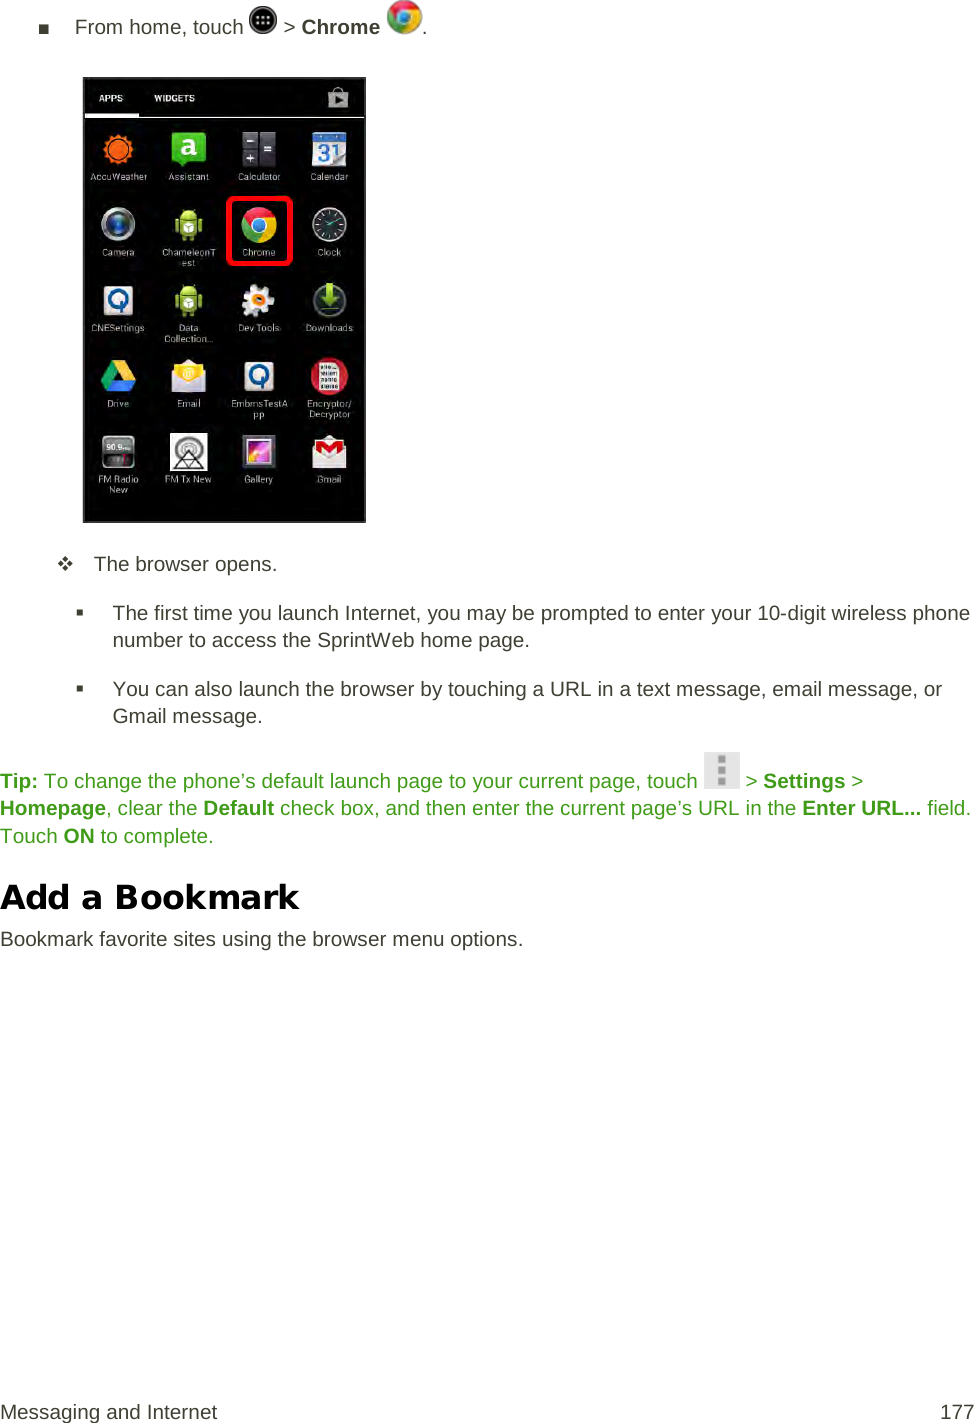
![Icon Notification more notifications available (drag down to view) Main Status Icons Icon Status Bluetooth® active Bluetooth® connection GPS active Wi-Fi® active downloading vibrate speakerphone active network (full signal) network (roaming) [icon] Out of service area Sprint Spark enhanced 4G LTE data service airplane mode Your Phone Interface 77](https://usermanual.wiki/Sharp/HRO00204.manual/User-Guide-2330332-Page-87.png)


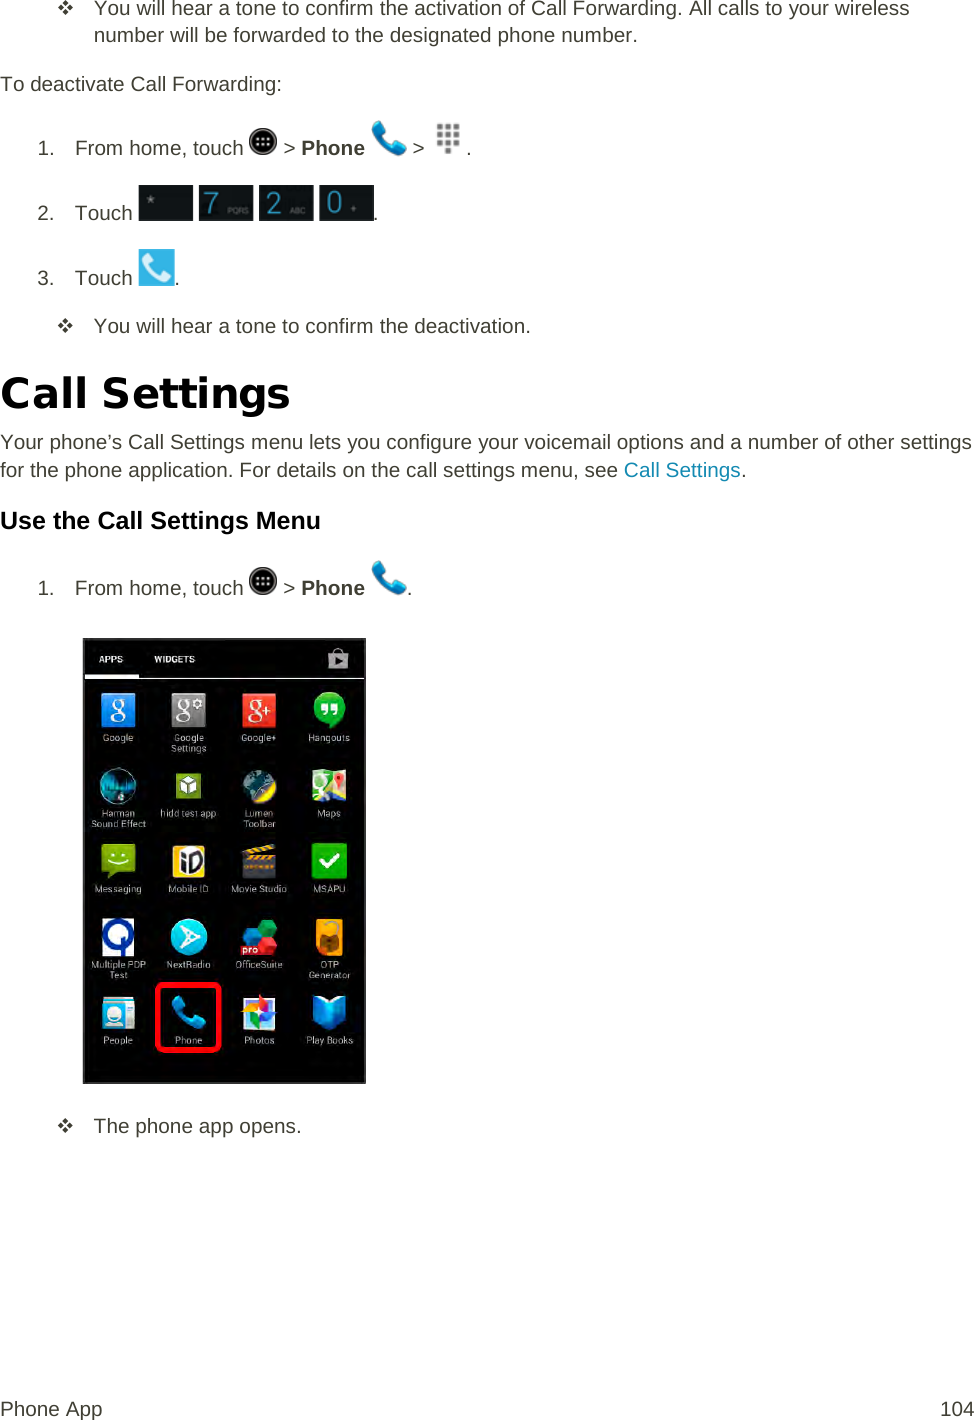
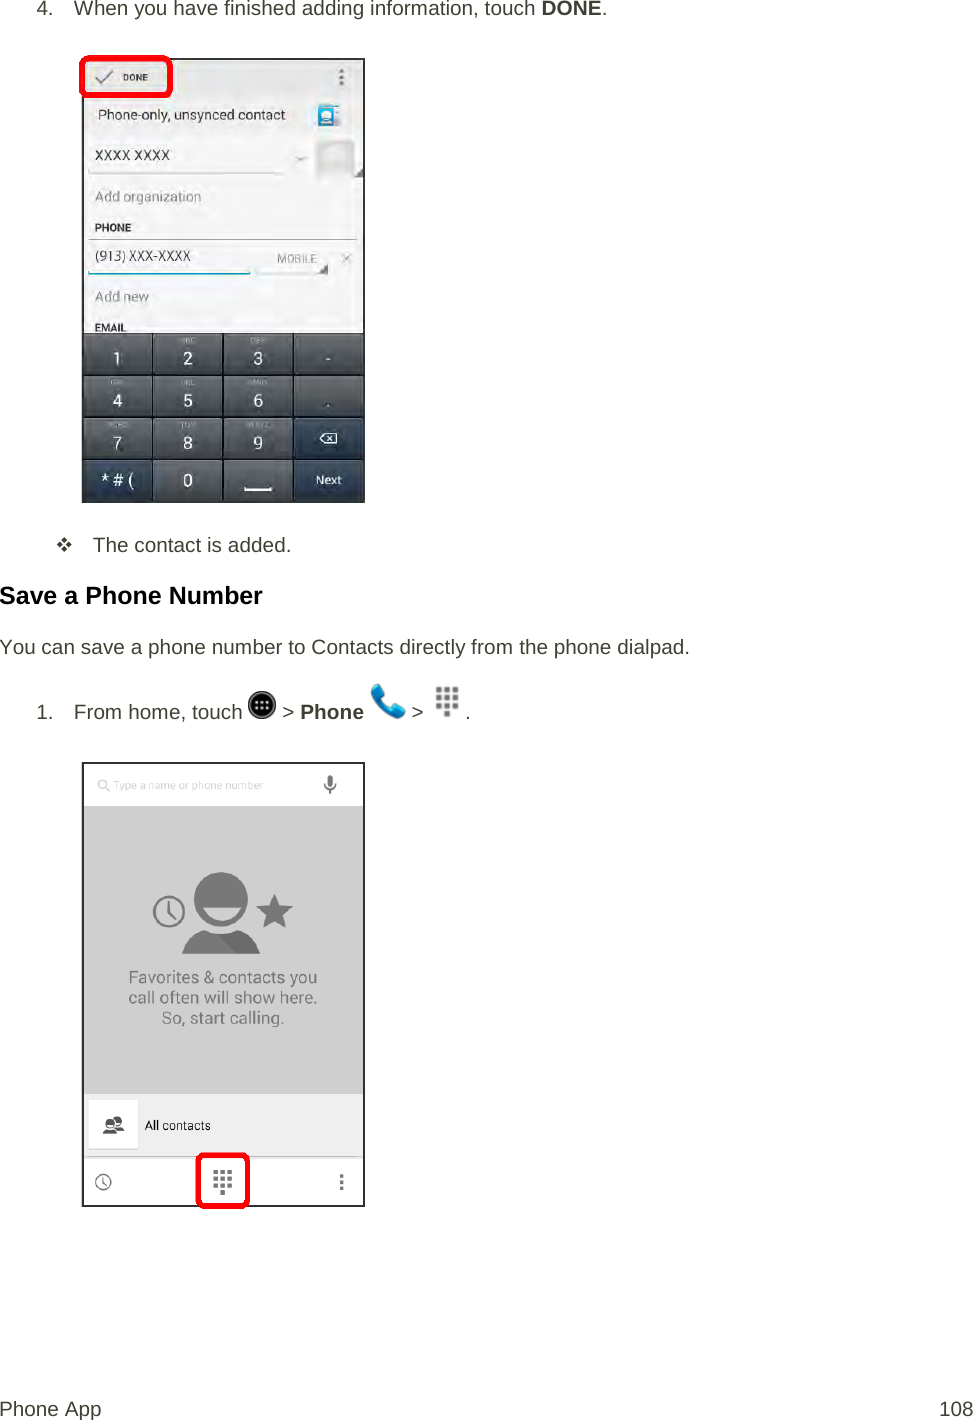
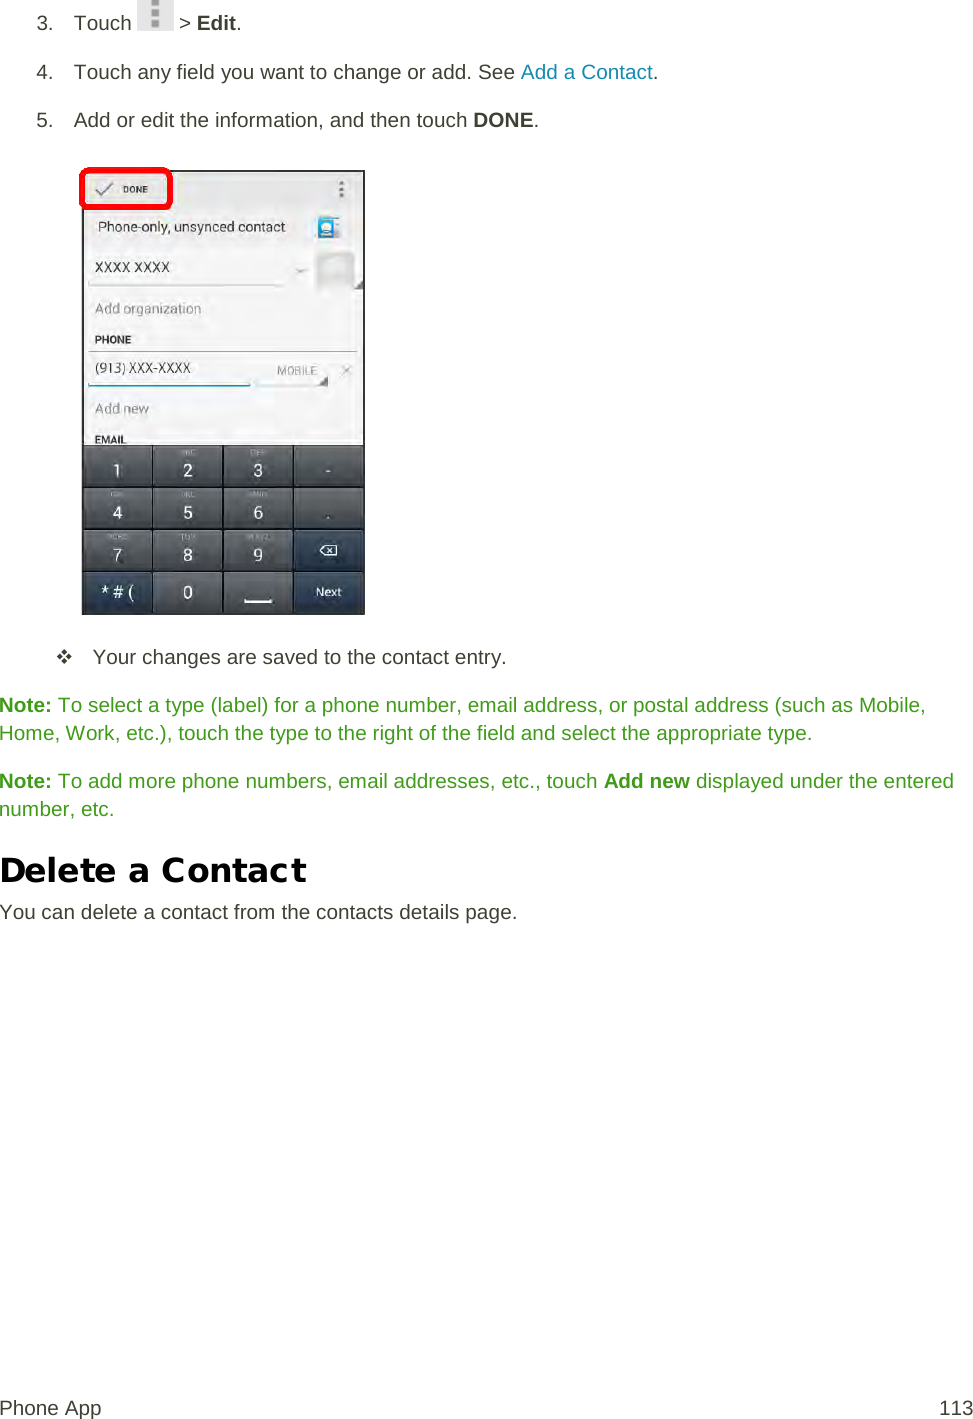
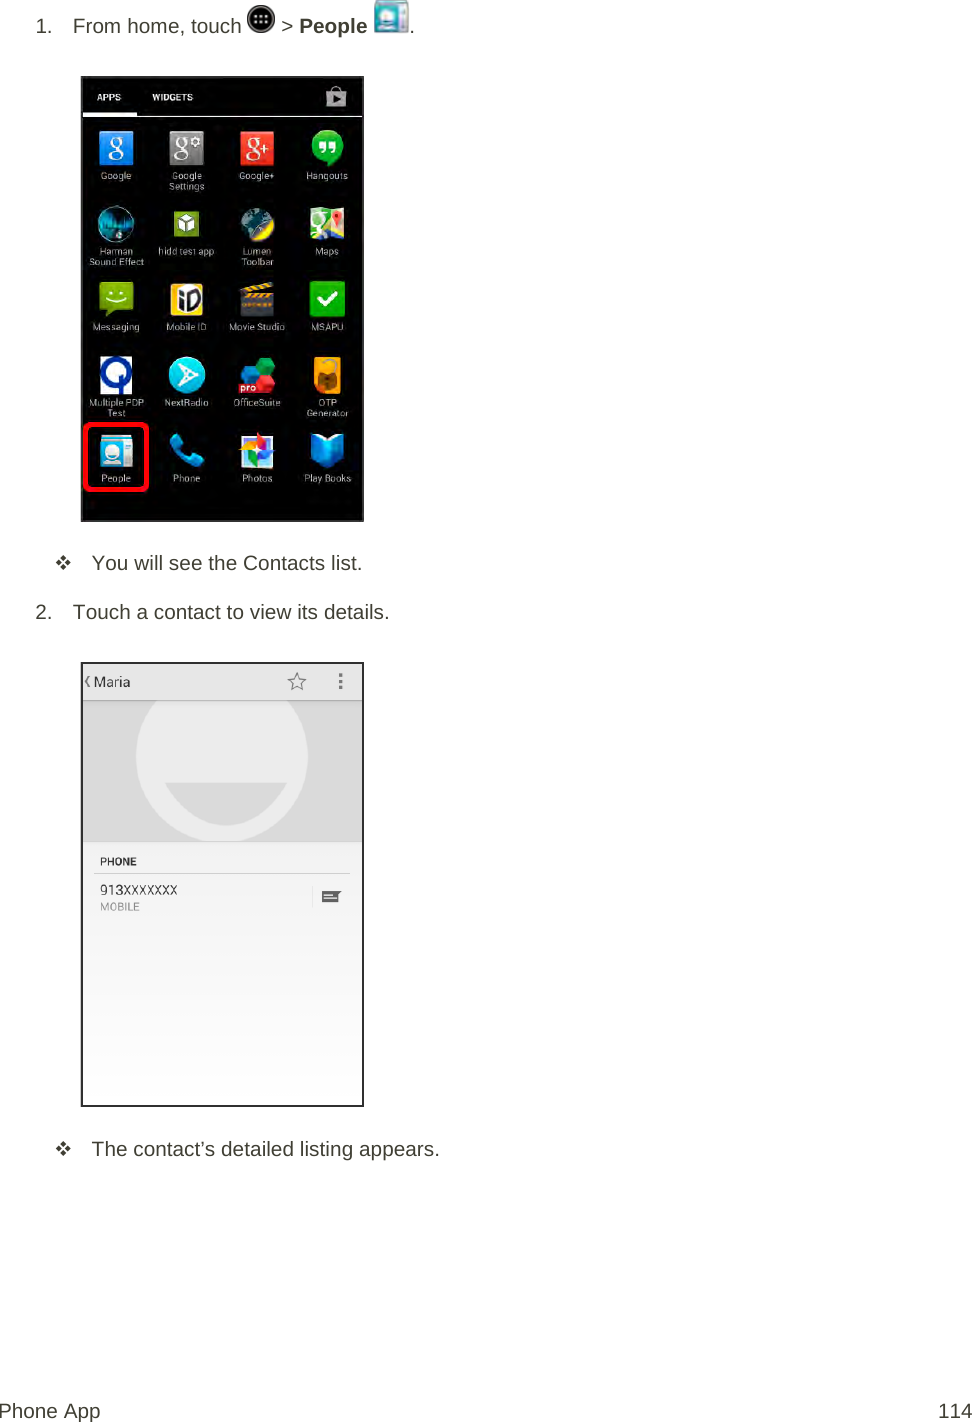
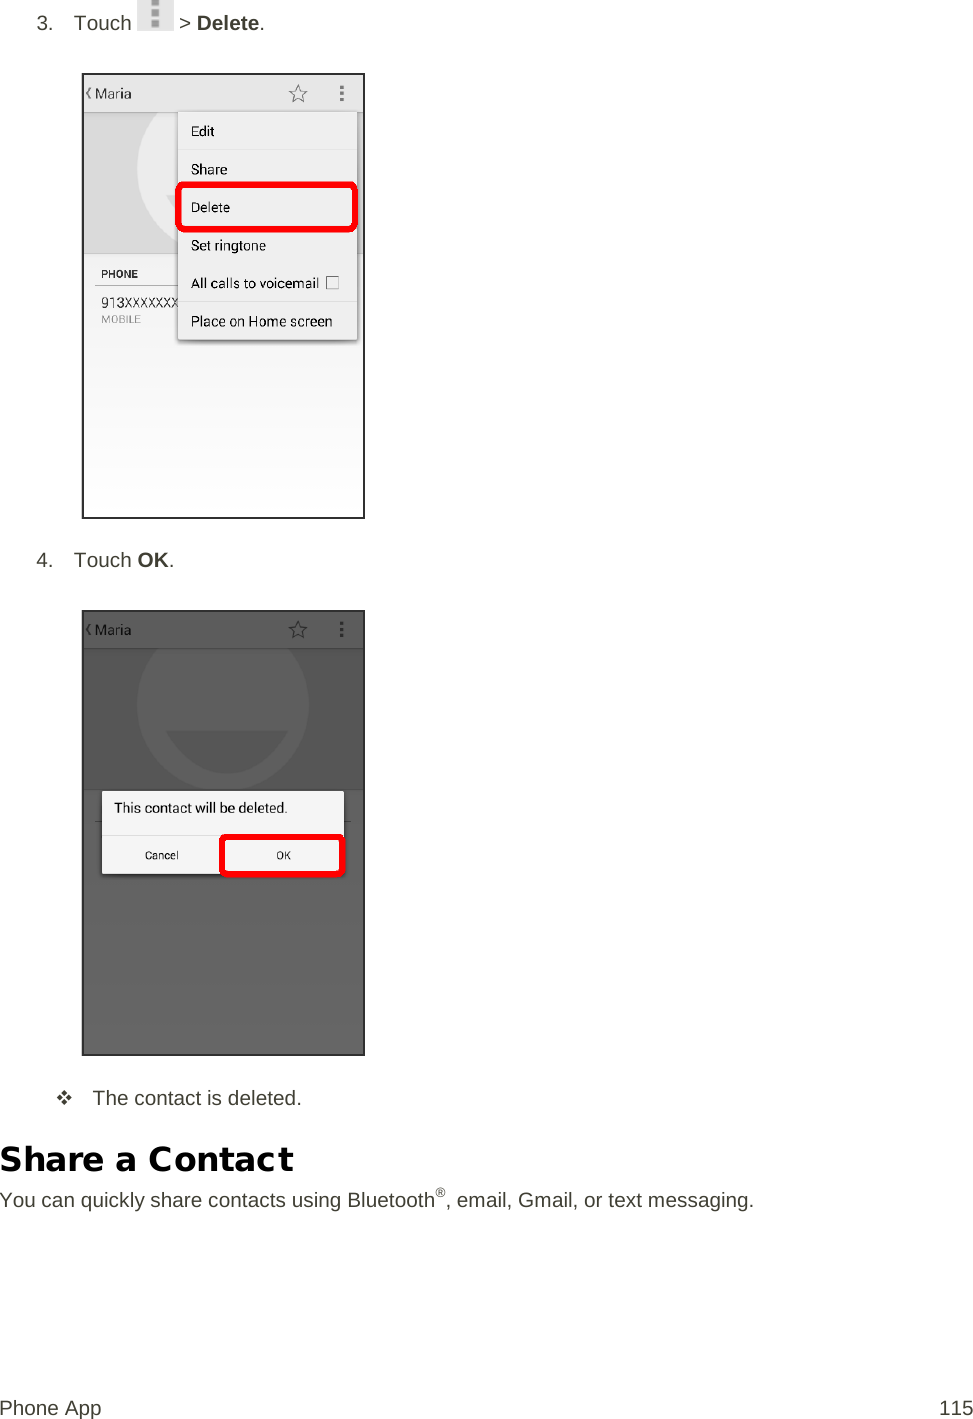
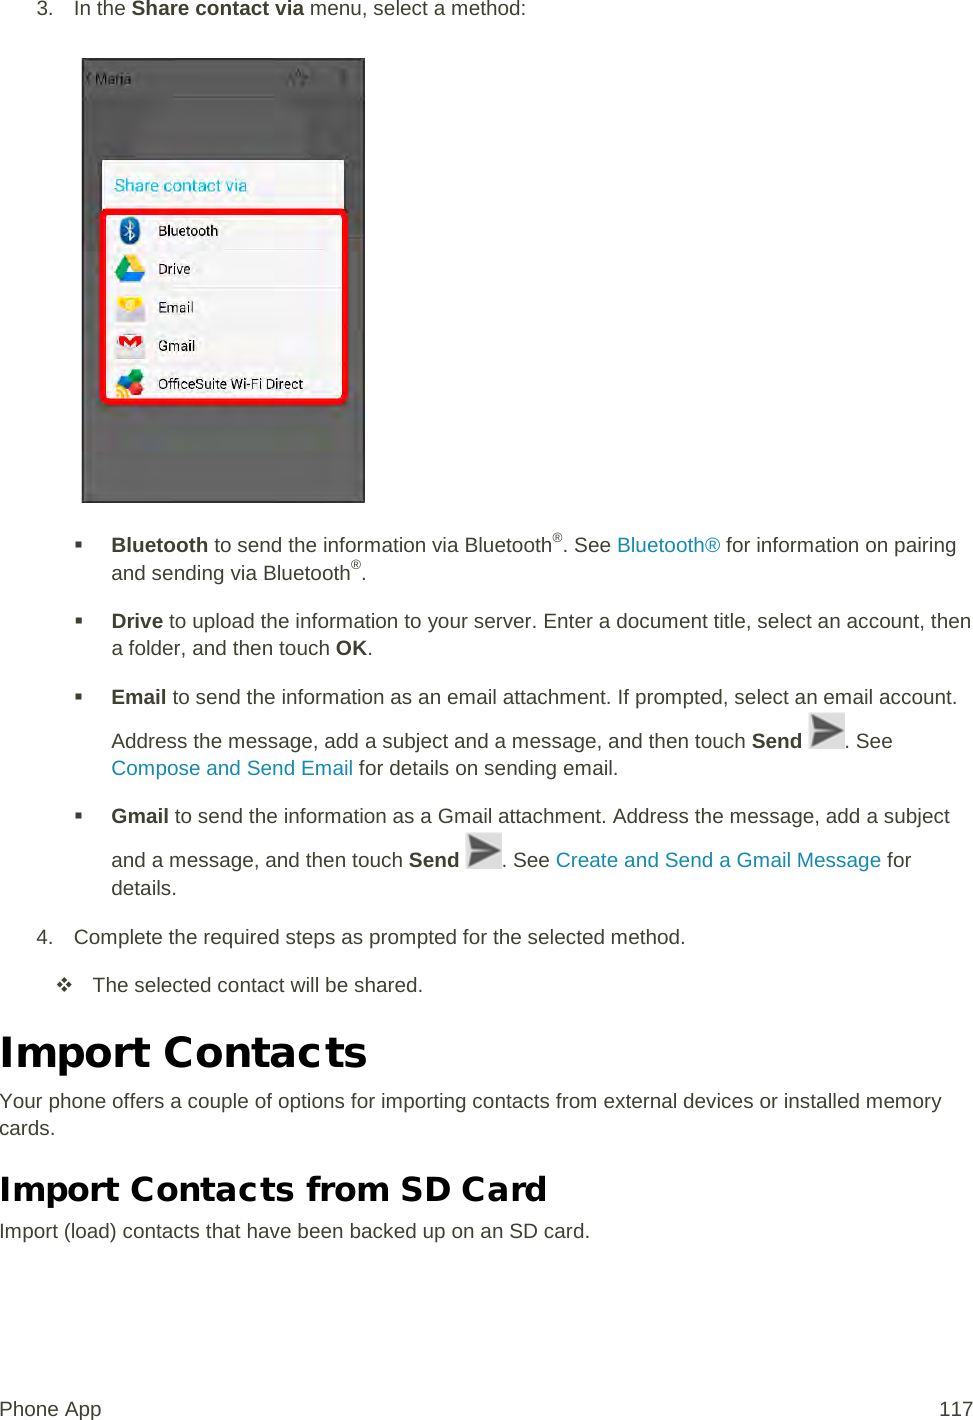
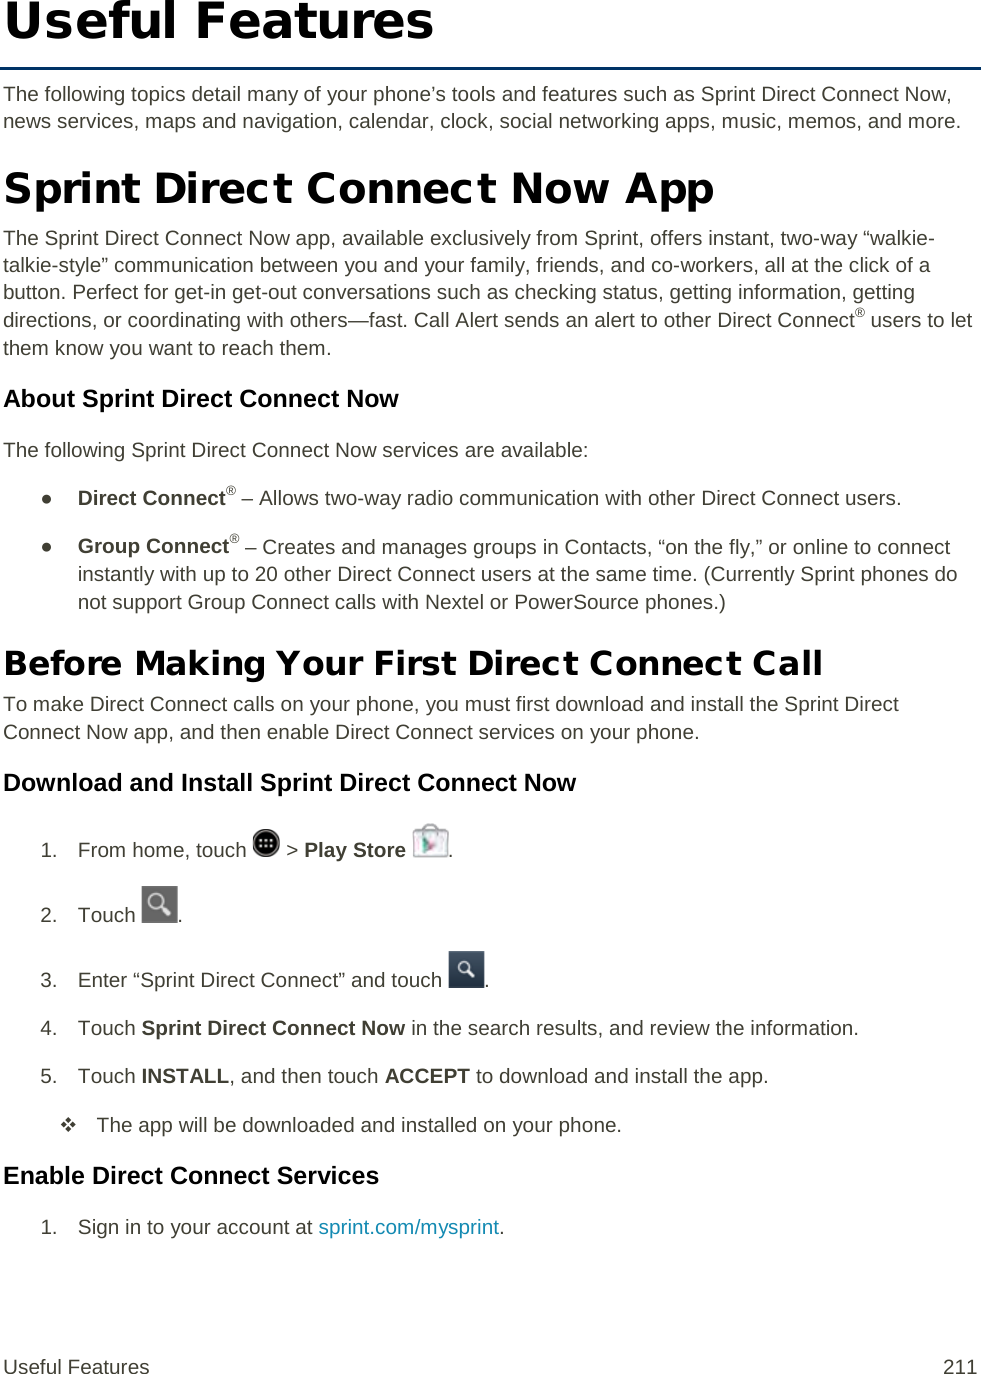
![ The phone dials the number. The call begins when the other party answers. 4. To end the call, touch . [illustration] The call ends. Call Emergency Numbers You can place calls to 9-1-1 even if the phone’s screen is locked or your account is restricted. To call the 9-1-1 emergency number when the phone’s screen is locked with a screen lock: 1. From the lock screen, touch Emergency call. 2. Touch . As long as you are in an area covered by wireless service, the emergency call is placed. To call the 9-1-1 emergency number normally or when your account is restricted: 1. Unlock the screen. For more information, see Lock and Unlock Your Screen. 2. From home, touch > Phone > . 3. Touch . As long as you are in an area covered by wireless service, the emergency call is placed. Enhanced 9-1-1 (E9-1-1) Information This phone features an embedded Global Positioning System (GPS) chip necessary for utilizing E9-1-1 emergency location services where available. When you place an emergency 9-1-1 call, the GPS feature of your phone seeks information to calculate your approximate location. Depending on several variables, including availability and access to satellite signals, it may take up to 30 seconds or more to determine and report your approximate location. Important: Always report your location to the 9-1-1 operator when placing an emergency call. Some designated emergency call takers, known as Public Safety Answering Points (PSAPs), may not be equipped to receive GPS location information from your phone. Answer Phone Calls The following information lets you know how to answer incoming calls, mute the ringer on incoming calls, reject incoming calls, and more. When you receive a phone call from a contact, the Incoming call screen appears and displays the caller ID icon, name, and phone number of the calling party. When you receive a phone call from someone who Phone App 87](https://usermanual.wiki/Sharp/HRO00204.manual/User-Guide-2330332-Page-97.png)
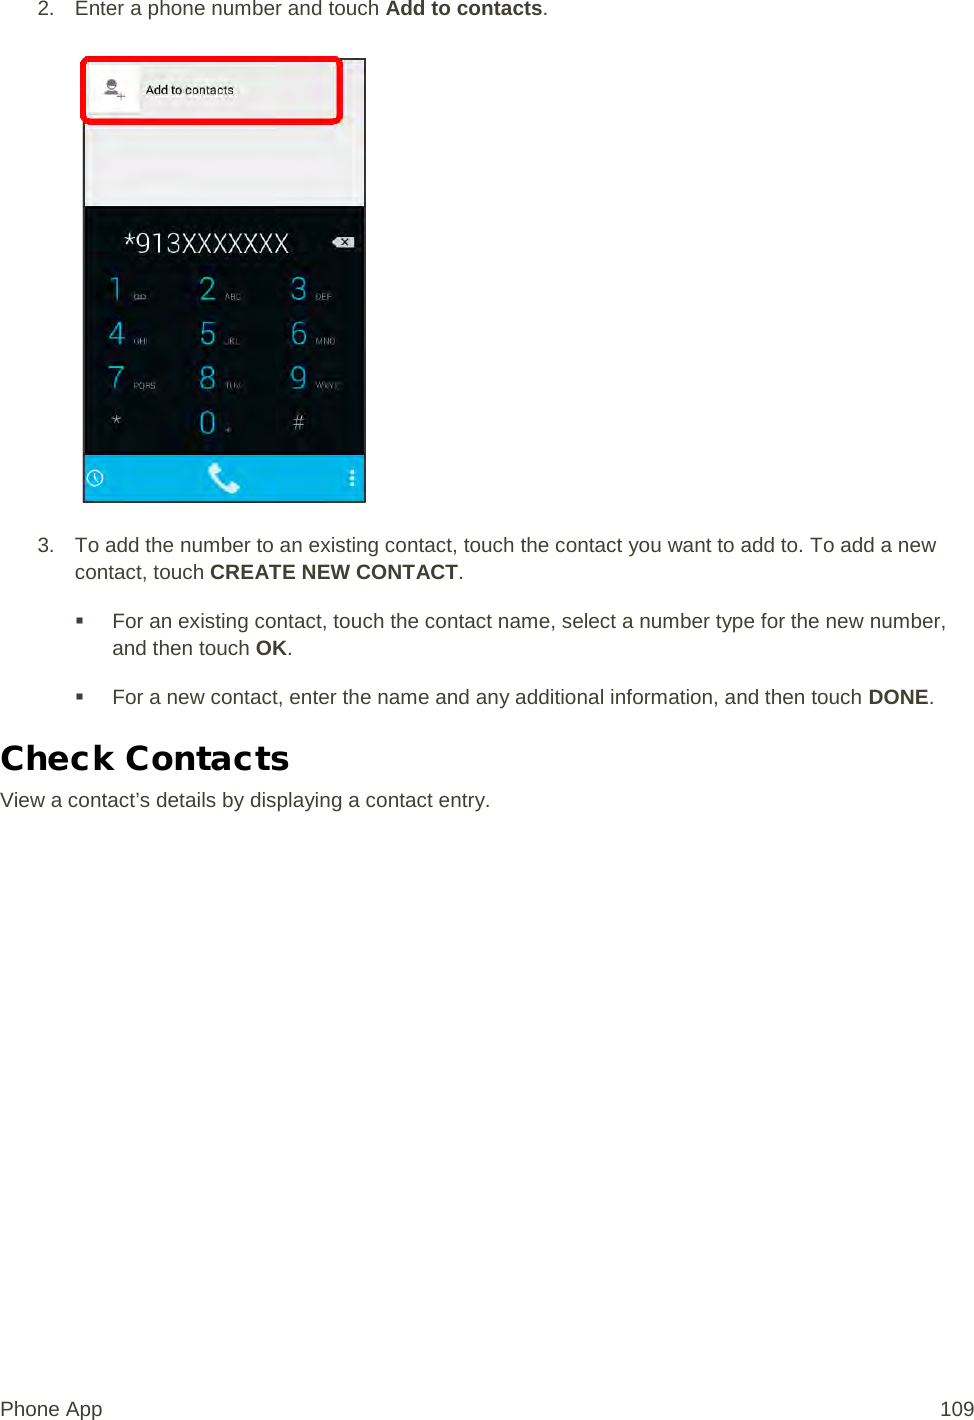
![is not stored in People, only the default caller ID icon and phone number appear on the Incoming call screen. Note: If your phone is turned off, all calls automatically go to voicemail. Answer an Incoming Call 1. When a call arrives, drag [Call_icon] to [Answer_call_icon] to answer it. [illustration] The call begins. 2. To end the call, touch . [illustration] The call ends. Mute the Ringing Sound To mute the ringer without rejecting the call, you can do any of the following: ● Press the Volume key down. ● Place the phone face down on a level surface. Reject an Incoming Call ■ When a call arrives, drag [Call_icon] to [reject_call_icon] to reject it. [illustration] The ringtone or vibration will stop and call will be sent directly to voicemail. Reject a Call and Send a Text Message You can reject an incoming call and automatically send a text message to the caller. 1. When a call arrives, drag [Call_icon] to [Message_icon]. [illustration] The ringtone or vibration will stop and you will see a list of preset text messages. 2. Touch Send next to one of the messages to send it to the caller. [illustration] The selected message will be delivered to the caller. Phone App 88](https://usermanual.wiki/Sharp/HRO00204.manual/User-Guide-2330332-Page-98.png)
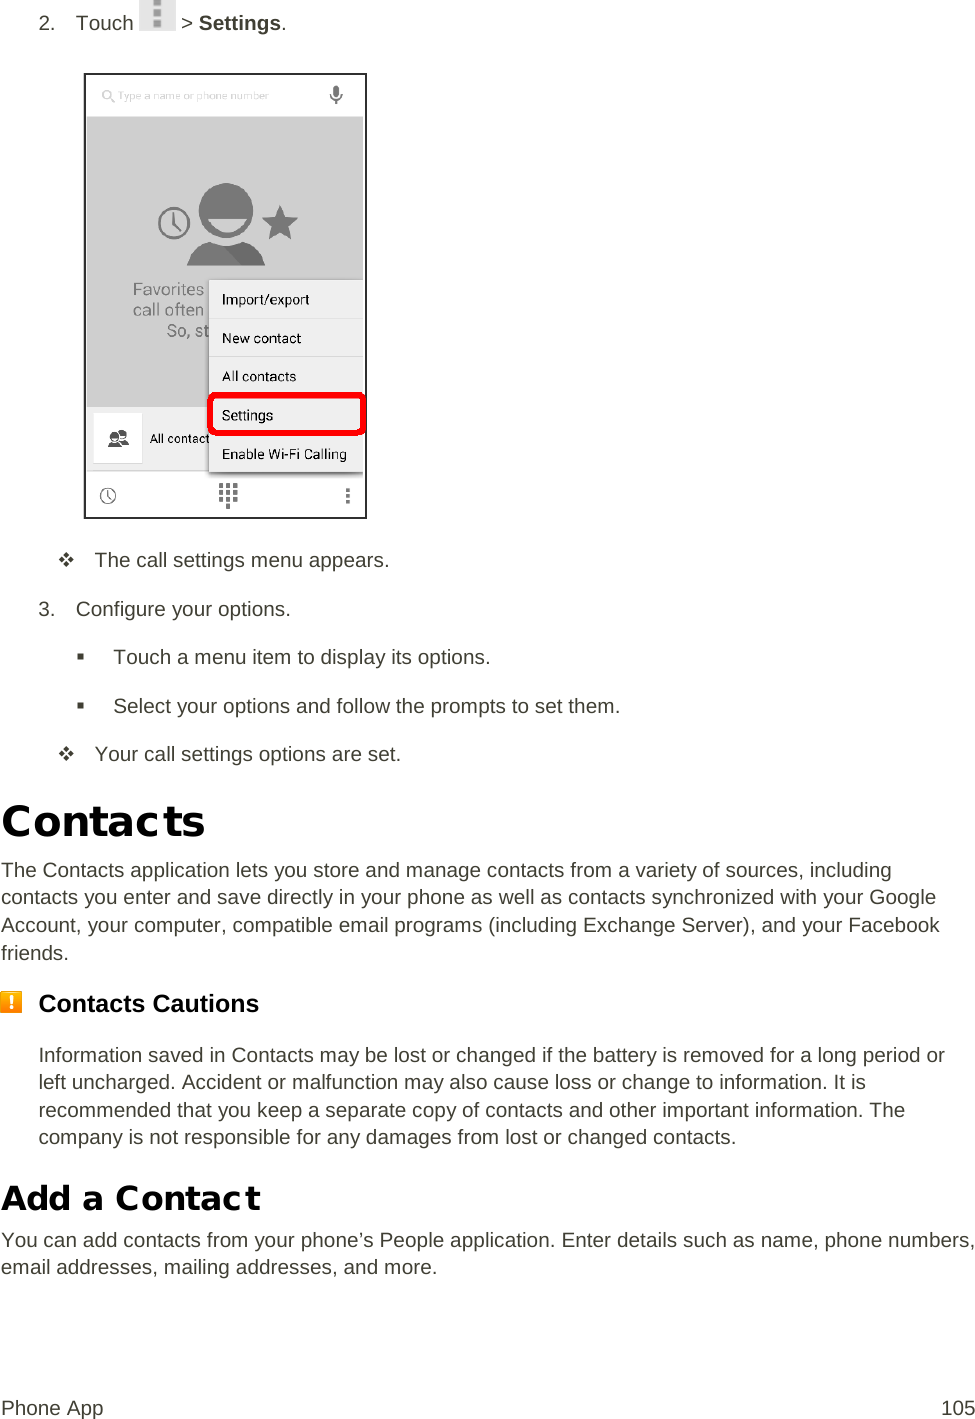
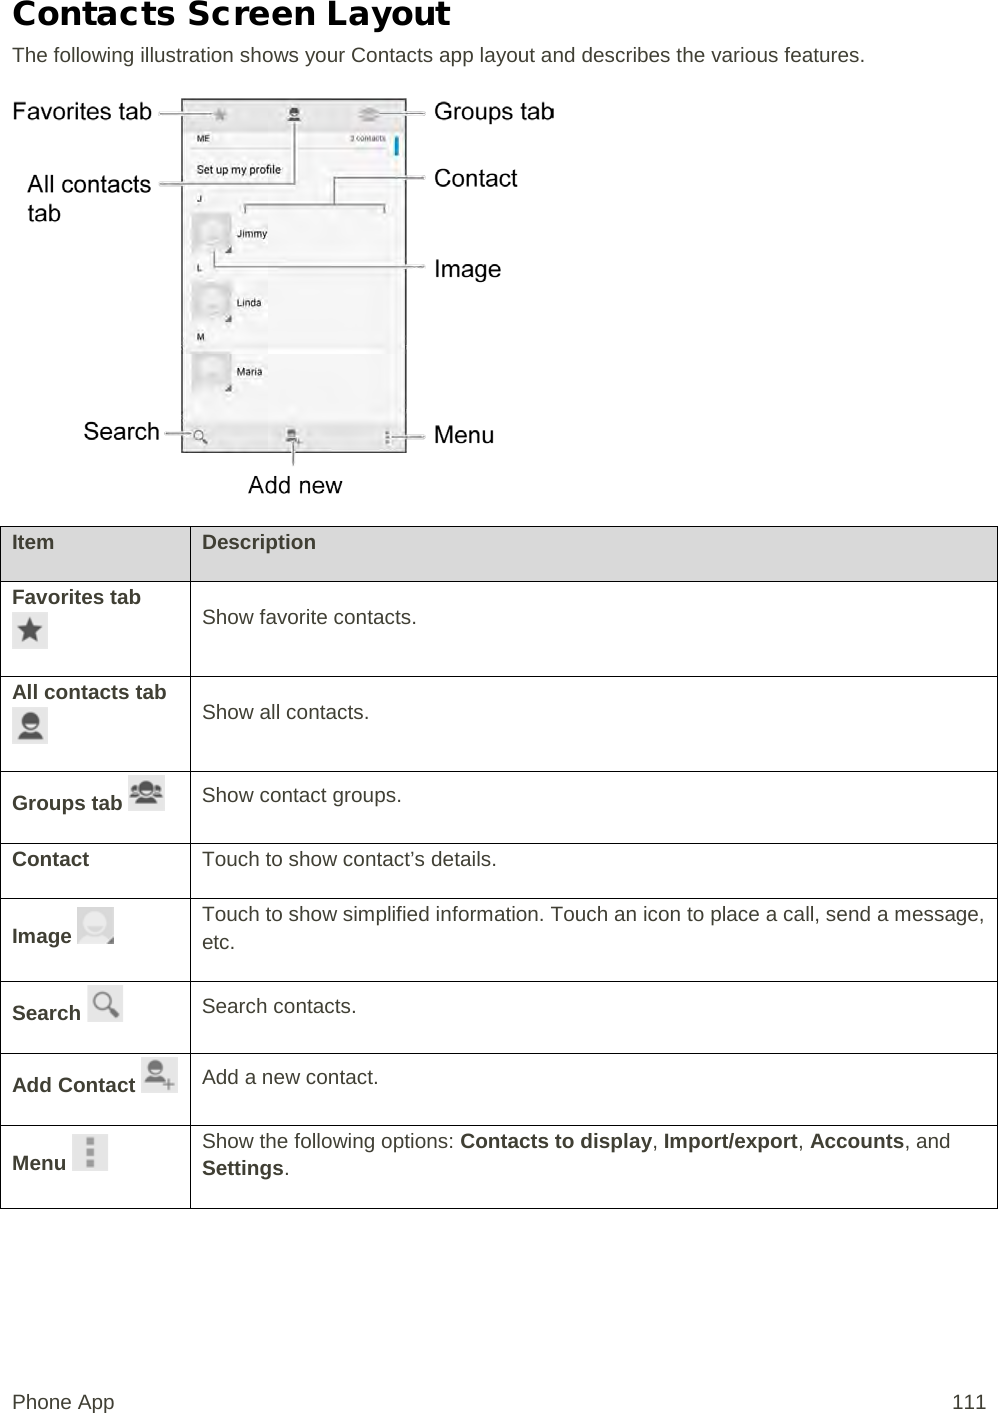
![ You can edit the reject messages through the Call settings menu. From the phone app, touch > Call settings > Set reject messages and edit or create the reject messages. In-Call Screen Layout and Operations While you’re on a call, you will see a number of onscreen options. Misoperation Prevention Screen Your phone switches to the Misoperation Prevention screen during a call. To operate the screen during a call, cancel the Misoperation Prevention screen. 1. Drag [icon] down in the Misoperation Prevention screen. [illustration] The in-call screen appears. In-Call Screen Layout Touch options to activate them during a call. ● Add call: Touch and hold to initiate a conference call (3-way call). ● Merge: Join two currently active calls (conference). ● Keypad/Hide: Toggle the appearance of the onscreen keypad. Phone App 89](https://usermanual.wiki/Sharp/HRO00204.manual/User-Guide-2330332-Page-99.png)
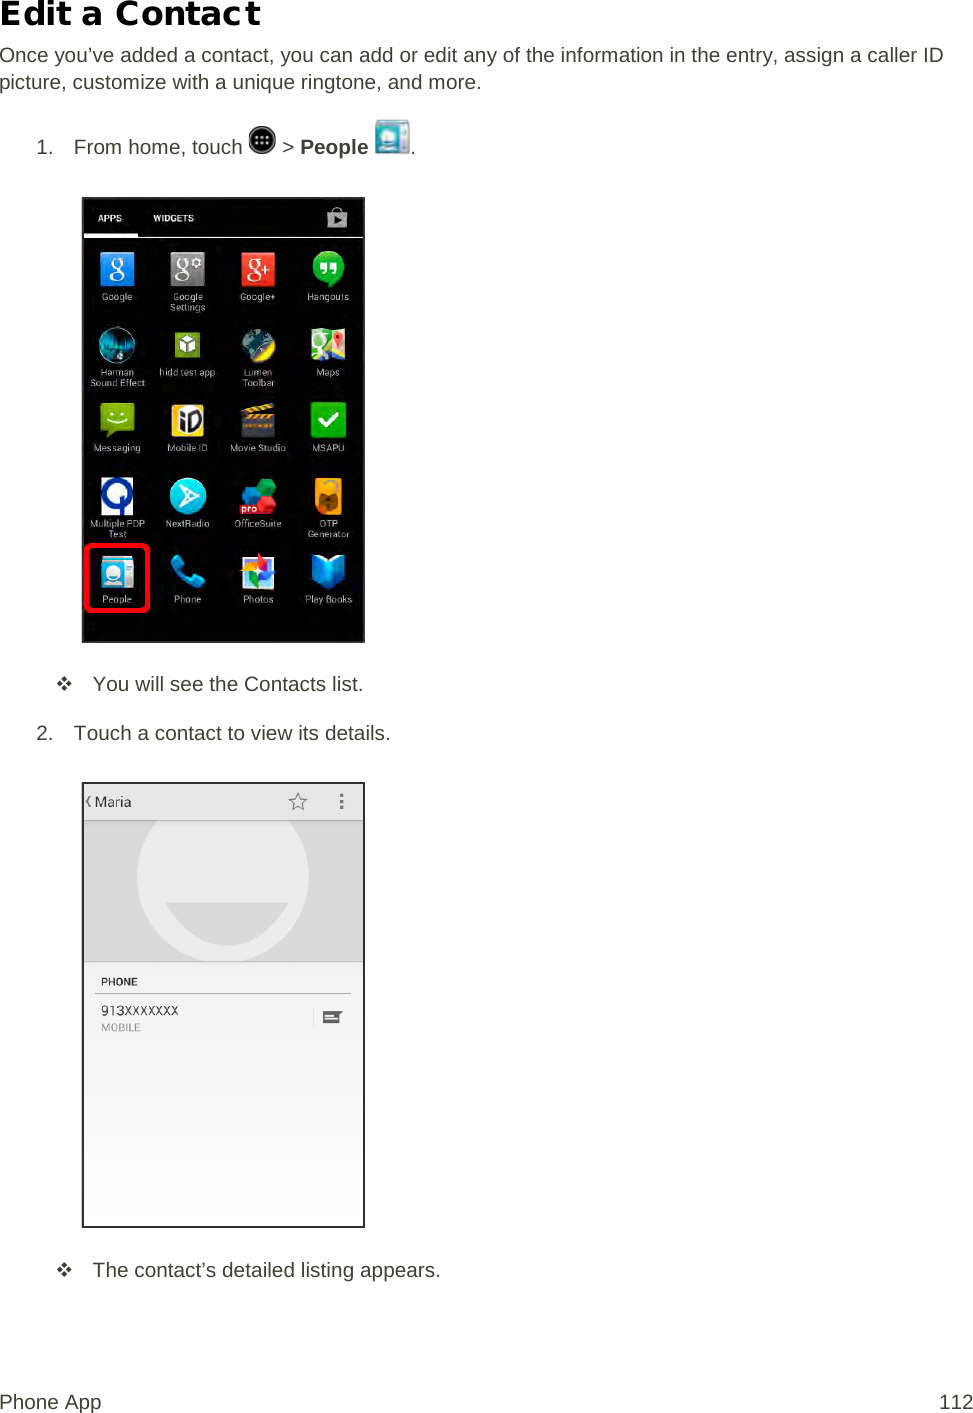
![● End call: End the current call. ● Speaker: Route the phone’s audio through the speaker (On) or through the earpiece (Off). Activate Speaker to route the phone’s audio through the speaker. (You can adjust the speaker volume using the Volume key.) Deactivate Speaker to use the phone’s earpiece. Warning: Because of higher volume levels, do not place the phone near your ear during speakerphone use. ● Mute: Mute the microphone during an active call. Touch again to unmute the microphone. Note: If Mute is activated, the speaker mode is deactivated. ● Bluetooth: Route the phone’s audio through a connected Bluetooth® headset (On) or through the speaker (Off). When the call is routed to a Bluetooth® headset, the current call area shows the Bluetooth® call icon ([icon]). Note: The Headset button is activated to show the current call is routed to the connected Bluetooth® headset. To route the current call back to the phone, touch Headset to temporarily use the phone. Touch it again to route the call back to the connected Bluetooth® headset. When Bluetooth® or the Bluetooth® headset is turned off, the call is routed through either the earpiece or speaker and shows ([icon]). ● Dialpad: Use the onscreen dialpad to enter additional numbers, for example, an extension or access code. For example: When you call your bank’s 800 number, use your dialpad to enter your account number and PIN. Additional In-Call Options ■ Adjusting Call Volume: Press the volume key up or down during the call. ■ Touch during a call to display a list of additional in-call features. Touch an option to select it. Contacts: Display your contacts list. Memo: Create a new memo while remaining on the call. Troubleshooting Question: Difficulty during call. Answer 1: It may not be possible to make a call properly in a noisy location. Phone App 90](https://usermanual.wiki/Sharp/HRO00204.manual/User-Guide-2330332-Page-100.png)
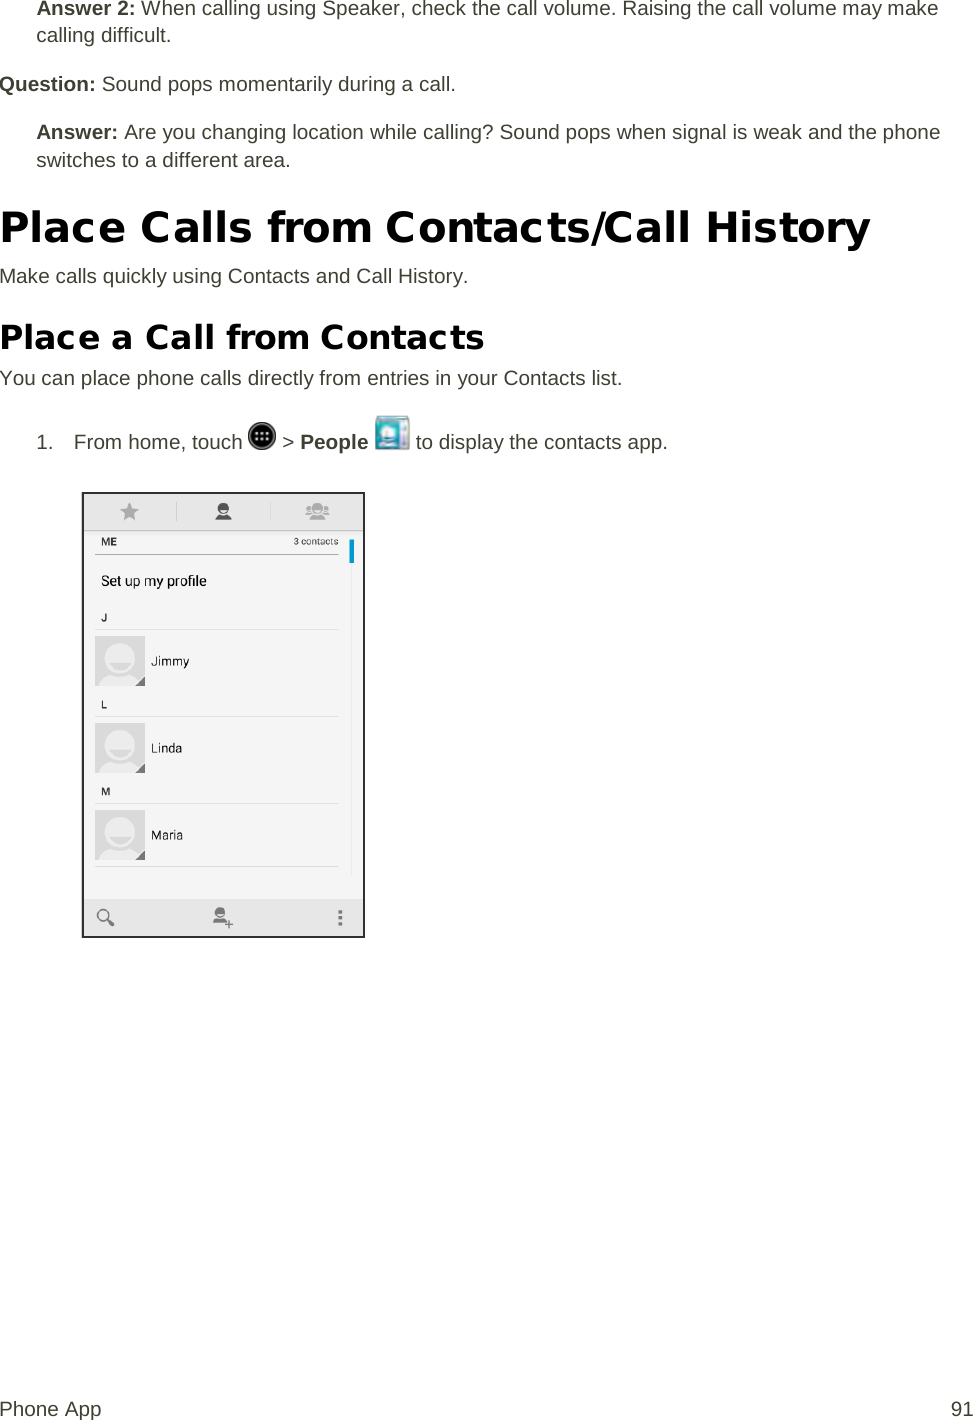
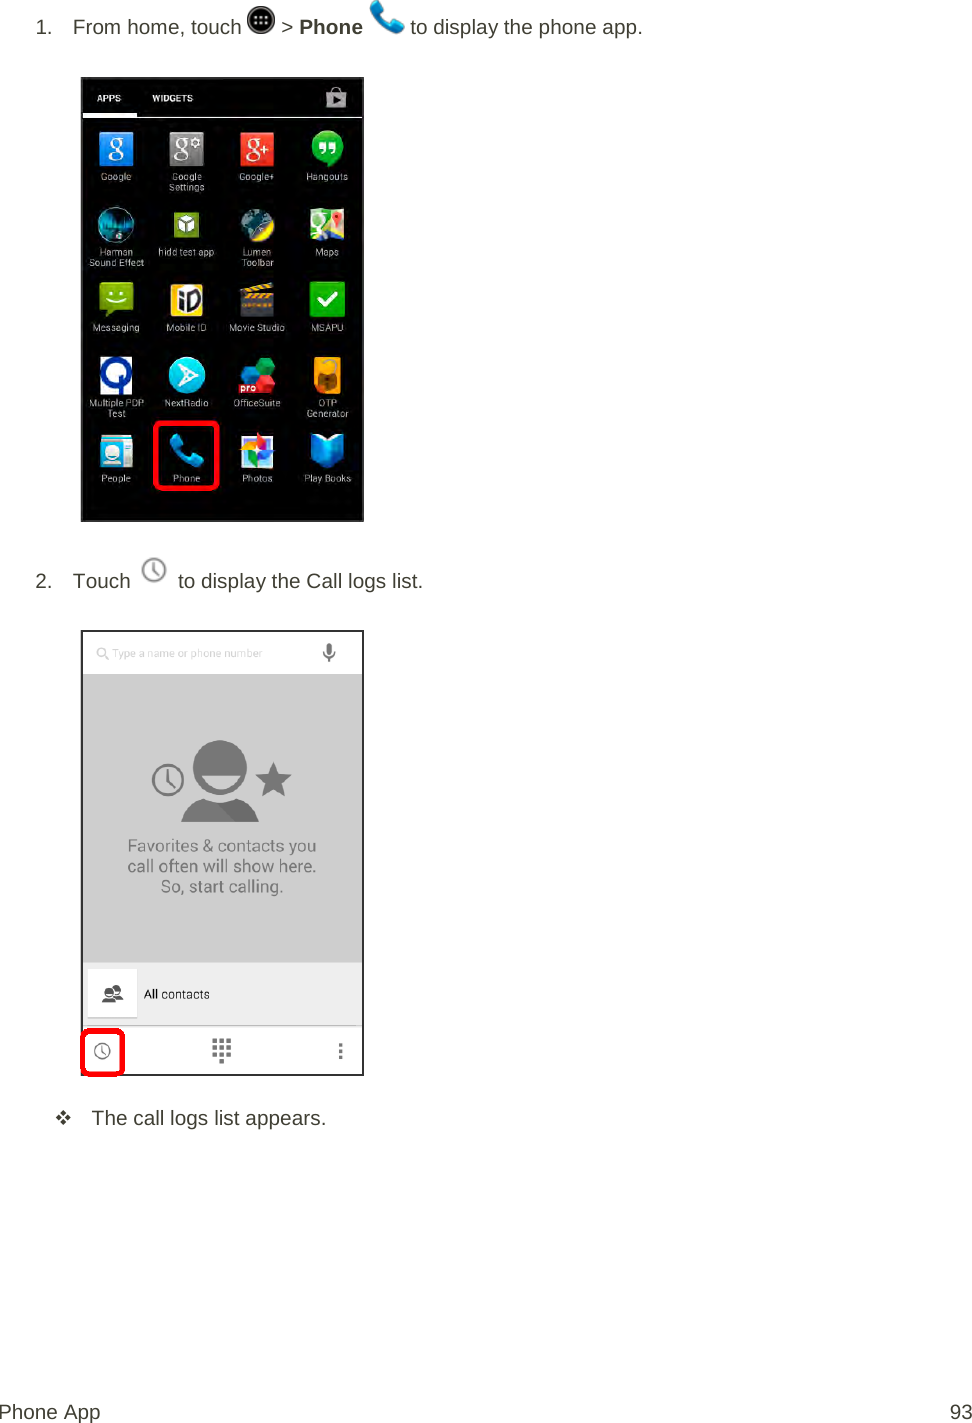
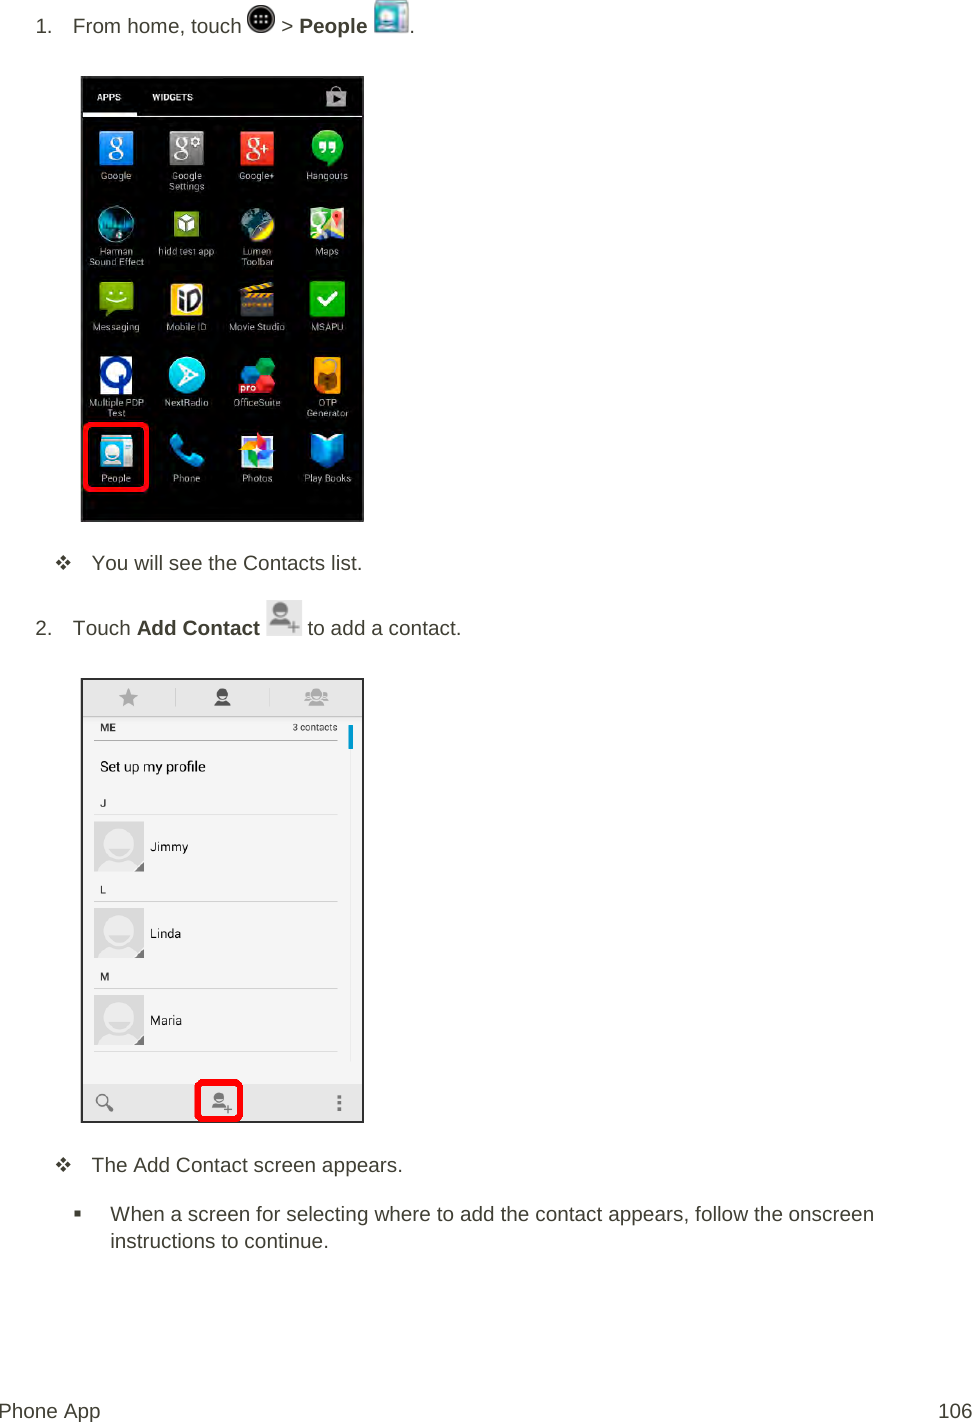
![2. Touch a contact and then touch the number you want to call. The phone dials the number. The call begins when the other party answers. 3. To end the call, touch . [illustration] The call ends. For additional information on Contacts, see Contacts. Call from Call Logs The Call logs list lets you quickly place calls to recent incoming, outgoing, or missed numbers. Phone App 92](https://usermanual.wiki/Sharp/HRO00204.manual/User-Guide-2330332-Page-102.png)
![3. Touch Call of the entry you want to call. The phone dials the number. The call begins when the other party answers. Touch an entry to display the call details. 4. To end the call, touch . [illustration] The call ends. Optional Services The following topics outline additional voice-related services available with your phone, including call services, voicemail, and more. Voicemail Setup You should set up your voicemail and personal greeting as soon as your phone is activated. Always use a password to protect against unauthorized access. Your phone automatically transfers all unanswered calls to your voicemail, even if your phone is in use or turned off. Phone App 94](https://usermanual.wiki/Sharp/HRO00204.manual/User-Guide-2330332-Page-104.png)
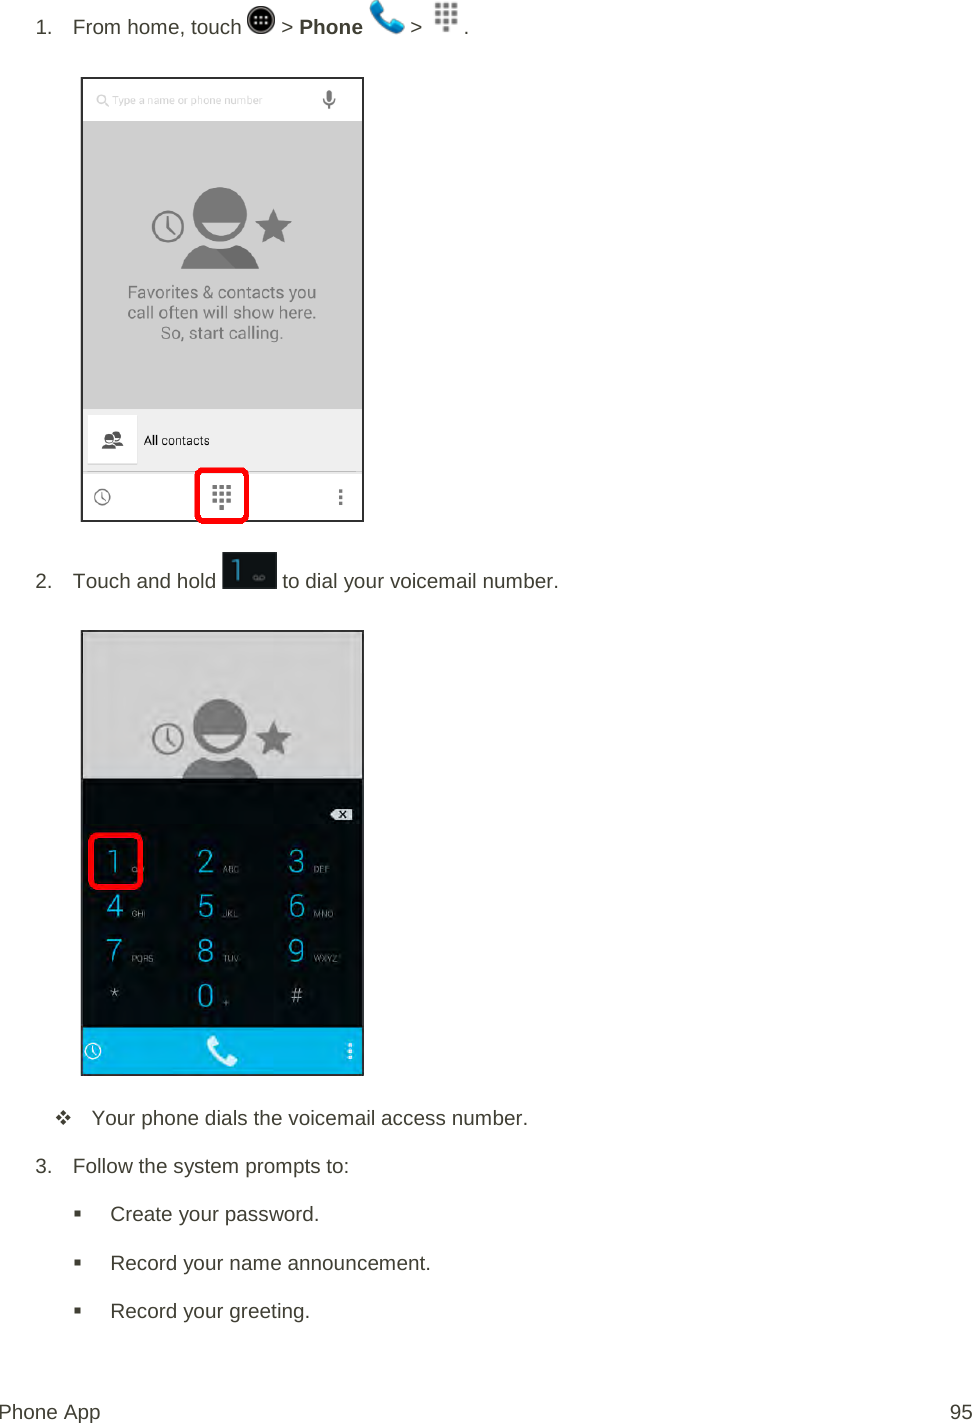
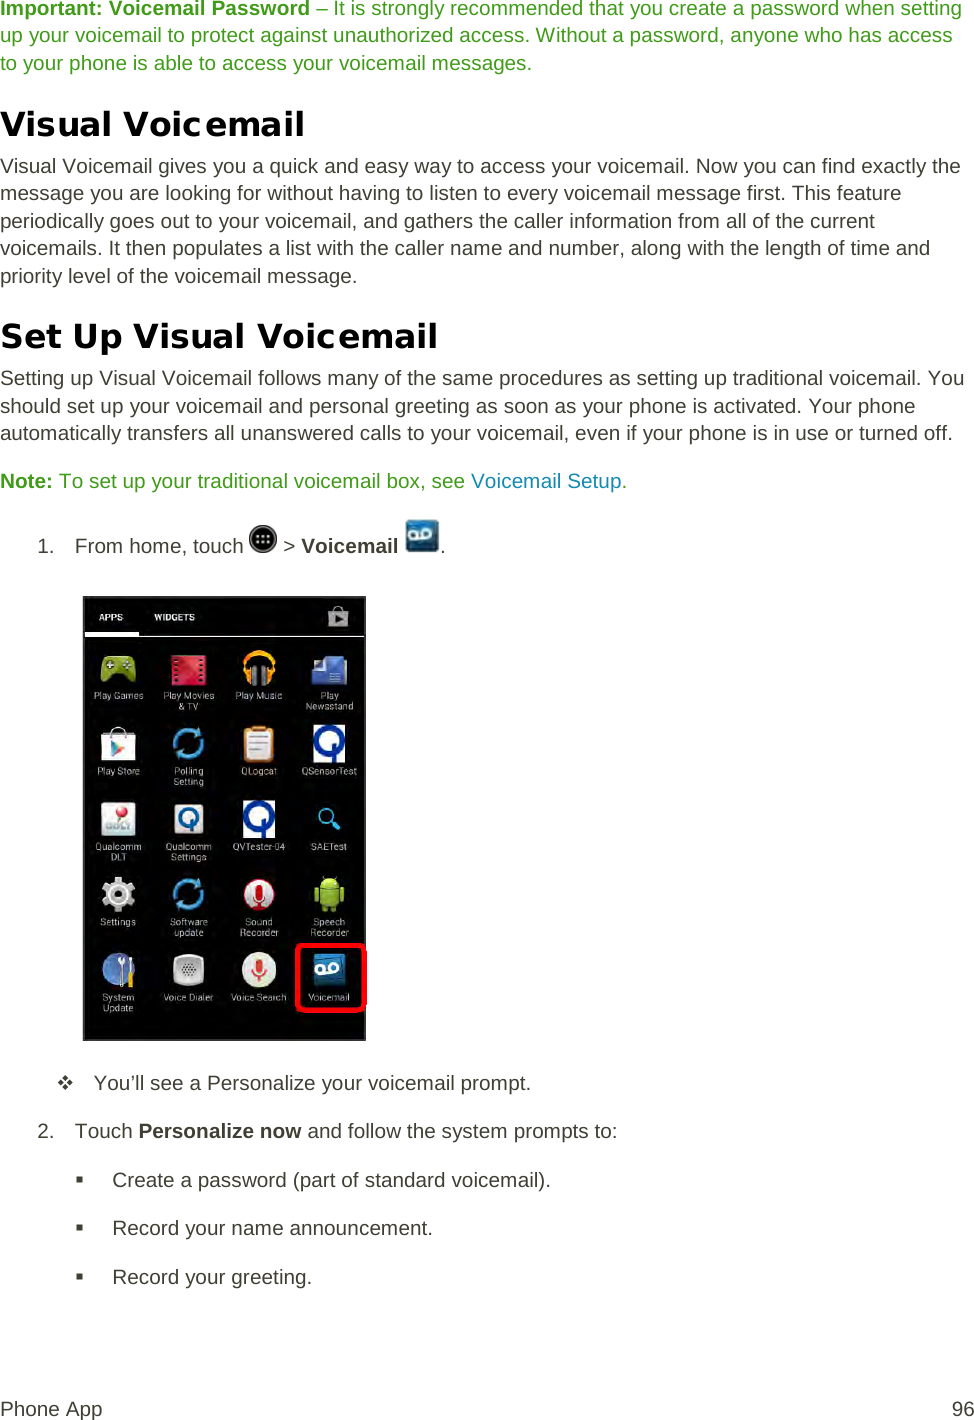
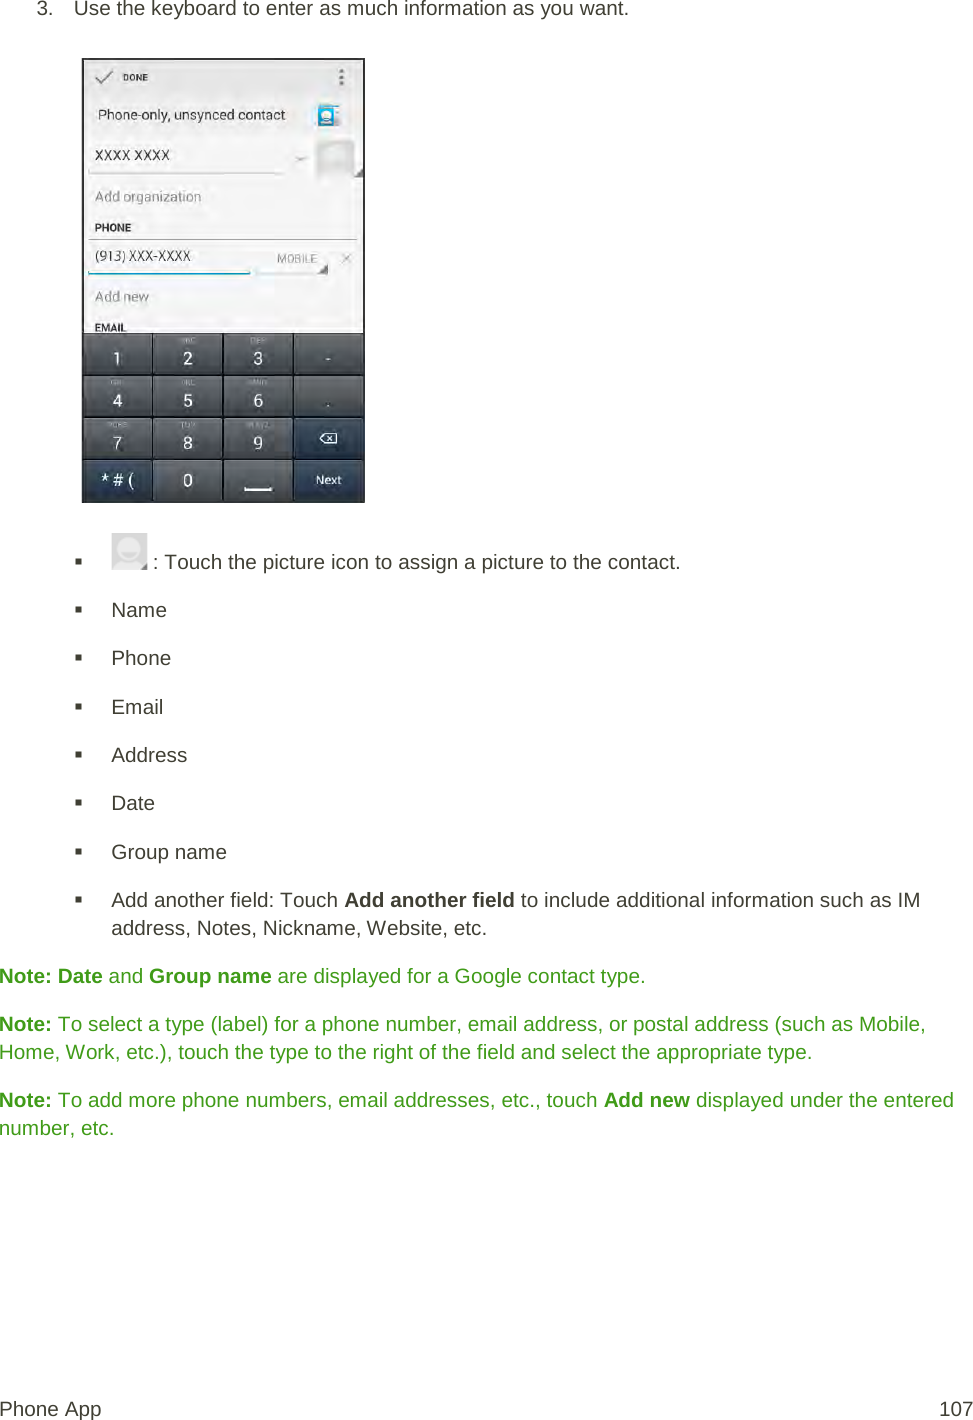
![Important: Voicemail Password – It is strongly recommended that you create a password when setting up your voicemail to protect against unauthorized access. Without a password, anyone who has access to your phone is able to access your voicemail messages. 3. Touch the Welcome to Voicemail message on the screen to play a brief explanation of the voicemail services. [illustration] Review Visual Voicemail Visual Voicemail lets you easily access and select which messages you want to review. 1. From home, touch > Voicemail . You will see the voicemail inbox. 2. Touch a message to review it. Tip: There are several icons at the bottom of the review screen for maintenance, storage, messaging, and other options. For an explanation of all your options, touch > Help > Visual Voicemail Menu > Visual Voicemail Menu. Listen to Multiple Voicemail Messages When you are done listening to a voicemail message you can easily access other voicemail messages without returning to the main voicemail screen. 1. Listen to the current voicemail message. Phone App 97](https://usermanual.wiki/Sharp/HRO00204.manual/User-Guide-2330332-Page-107.png)
![2. Swipe your finger left or right to display the next or previous message. [illustration] You can navigate through voicemail messages as frequently as you’d like. You can even move to the next or previous message before you’re finished listening to the current one. Visual Voicemail Options Your visual voicemail options appear as icons at the bottom of the voicemail review screen. 1. From home, touch > Voicemail . 2. Touch a message to review it. The following options are available while reviewing a voicemail message: [Call icon] Call to call the number the message came from. Share to send the message via Bluetooth®, Gmail, etc. Delete to delete selected messages from your current list of available voicemail messages. [Reply icon] Reply to reply to the message via text or voice message. Note: Not all options are available for all messages. Configure Visual Voicemail Settings The Visual Voicemail settings menu lets you access settings for notifications, pictures, greetings, and more. Phone App 98](https://usermanual.wiki/Sharp/HRO00204.manual/User-Guide-2330332-Page-108.png)
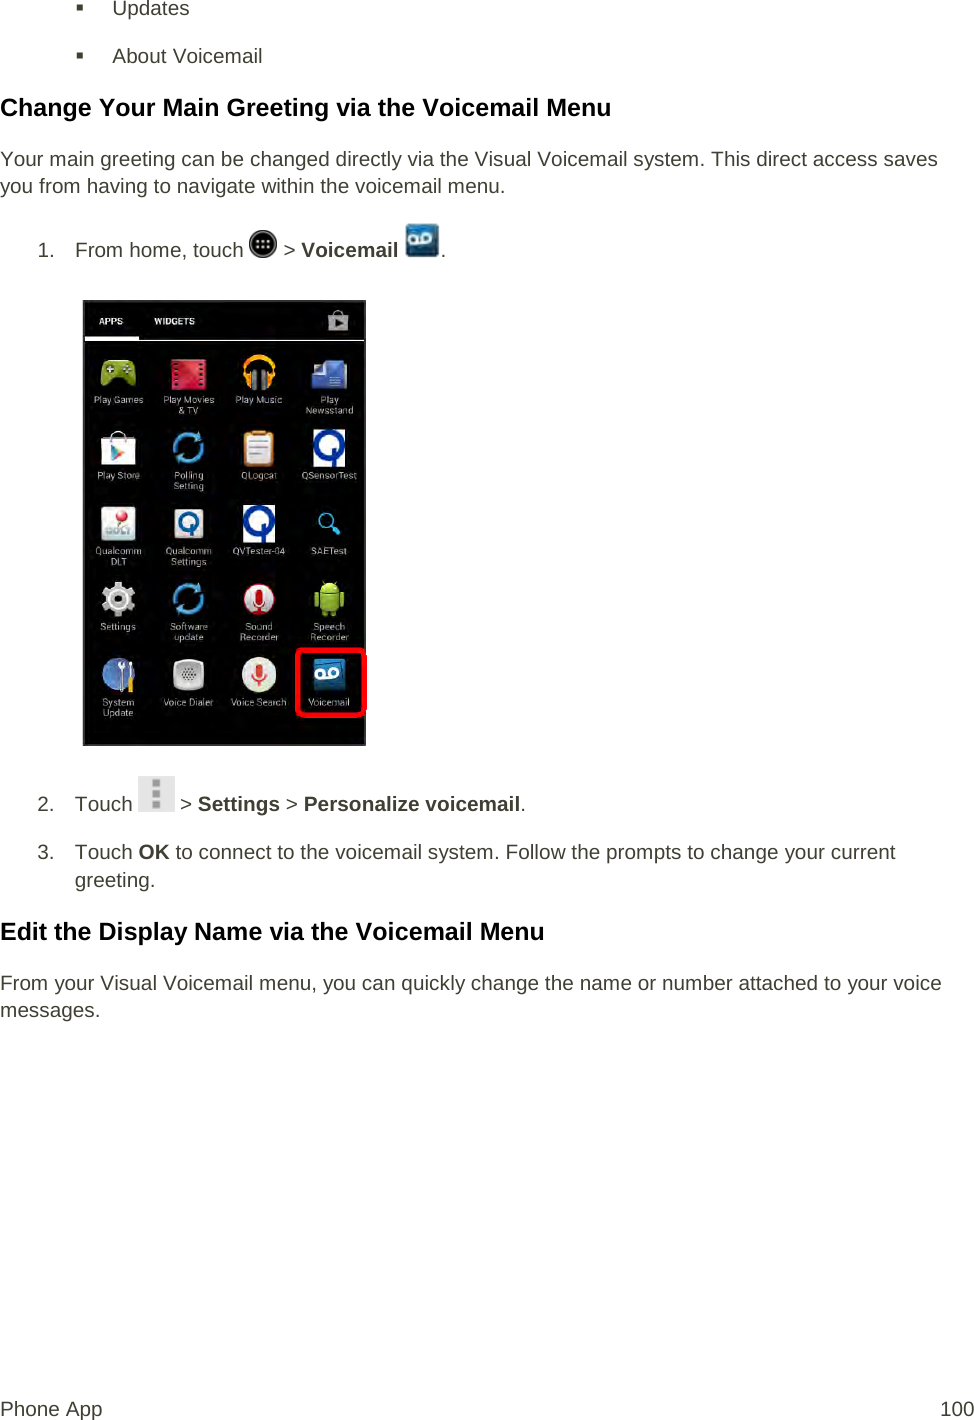
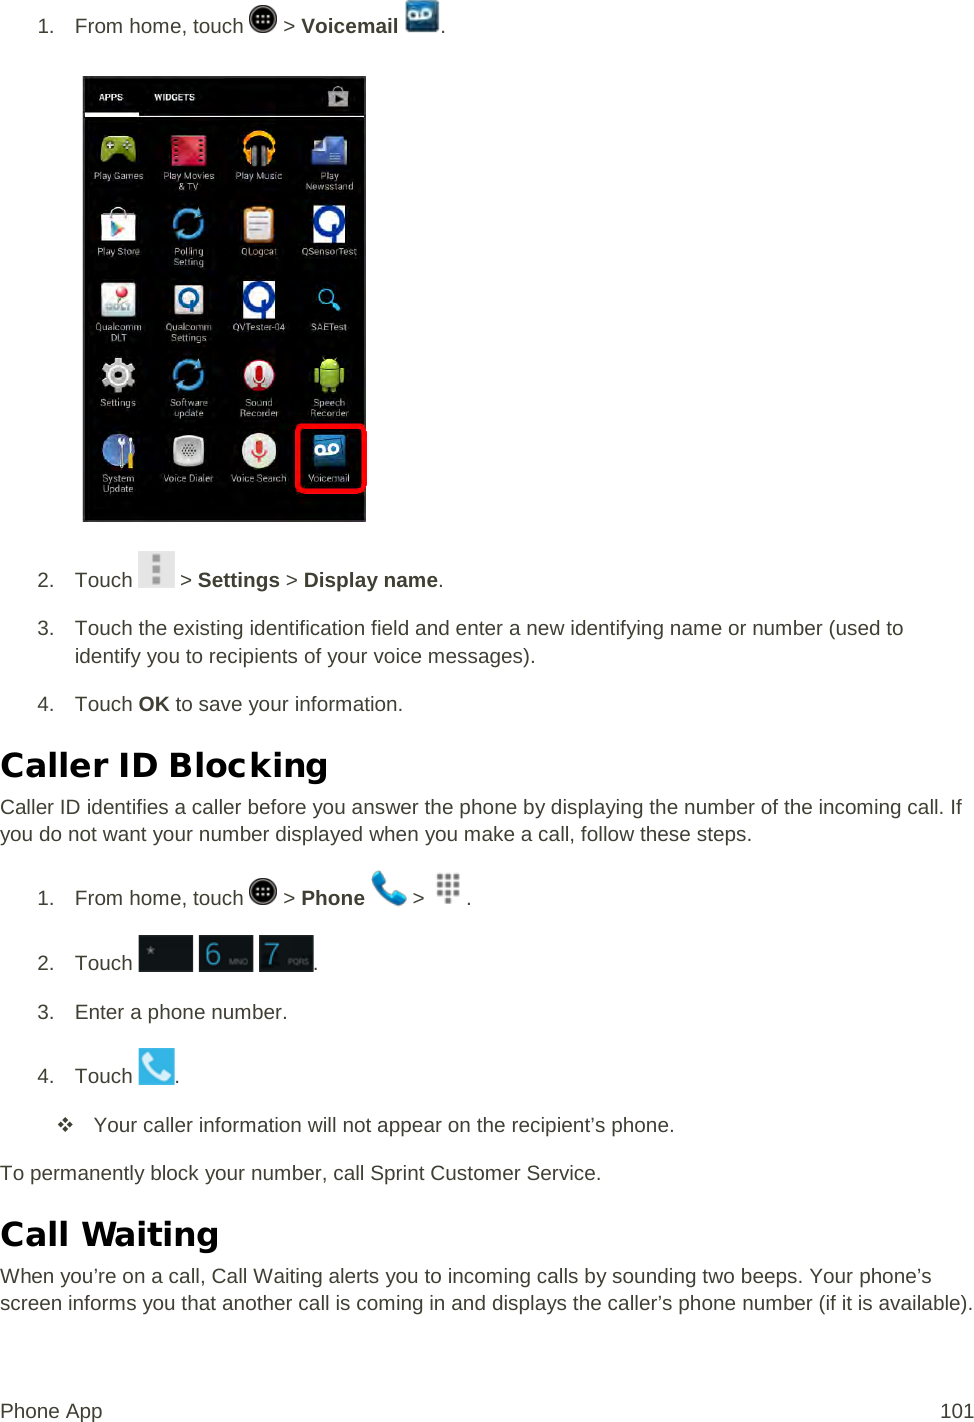
![1. From home, touch > Voicemail . 2. Touch > Settings. [illustration] You will see the voicemail settings menu. 3. Select an option to change its settings. Manage subscription Auto forward to email Personalize voicemail Notifications Delete messages Display name Speakerphone Transcriptions displayed Themes View quick tips tutorial Help Send feedback Phone App 99](https://usermanual.wiki/Sharp/HRO00204.manual/User-Guide-2330332-Page-109.png)
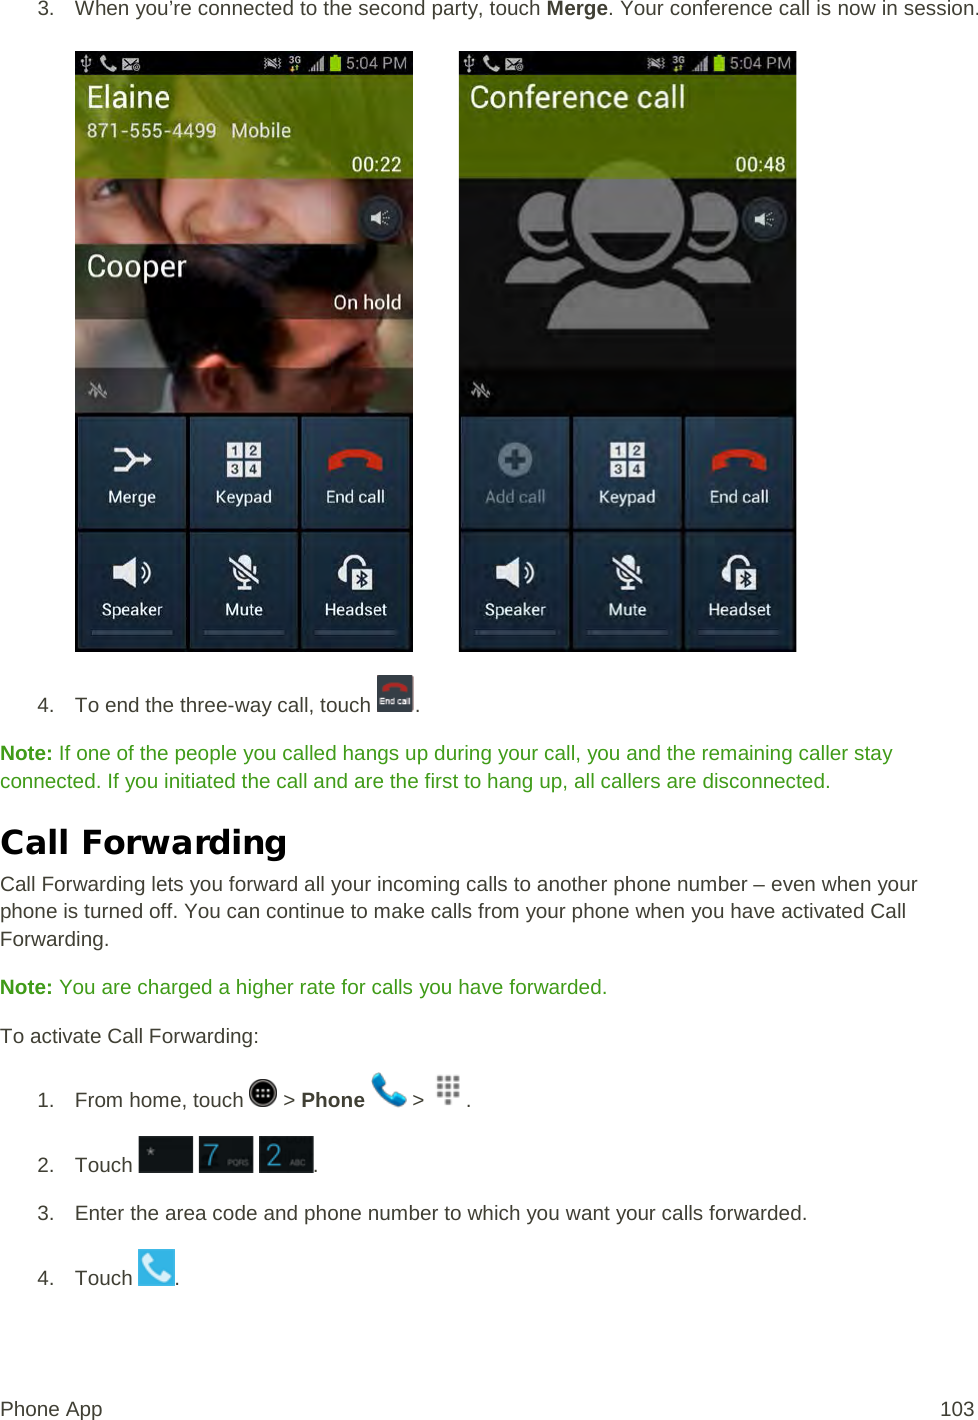
![To respond to an incoming call while you’re on a call: ■ Slide to the right. (This puts the first caller on hold and answers the second call.) To switch back to the first caller: ■ Touch Swap. Note: For those calls where you don’t want to be interrupted, you can temporarily disable Call Waiting by pressing before placing your call. Call Waiting is automatically reactivated once you end the call. Conference Calling With conference calling, also known as 3-way calling, you can talk to two people at the same time. When using this feature, the normal airtime rates will be charged for each of the two calls. 1. On the Phone screen, enter a number and touch (or place a call from Log or Contacts). 2. Once you have established the connection, touch Add call, and dial the second number (or place the call from Logs or Contacts). [illustration] This puts the first caller on hold and dials the second number. Phone App 102](https://usermanual.wiki/Sharp/HRO00204.manual/User-Guide-2330332-Page-112.png)


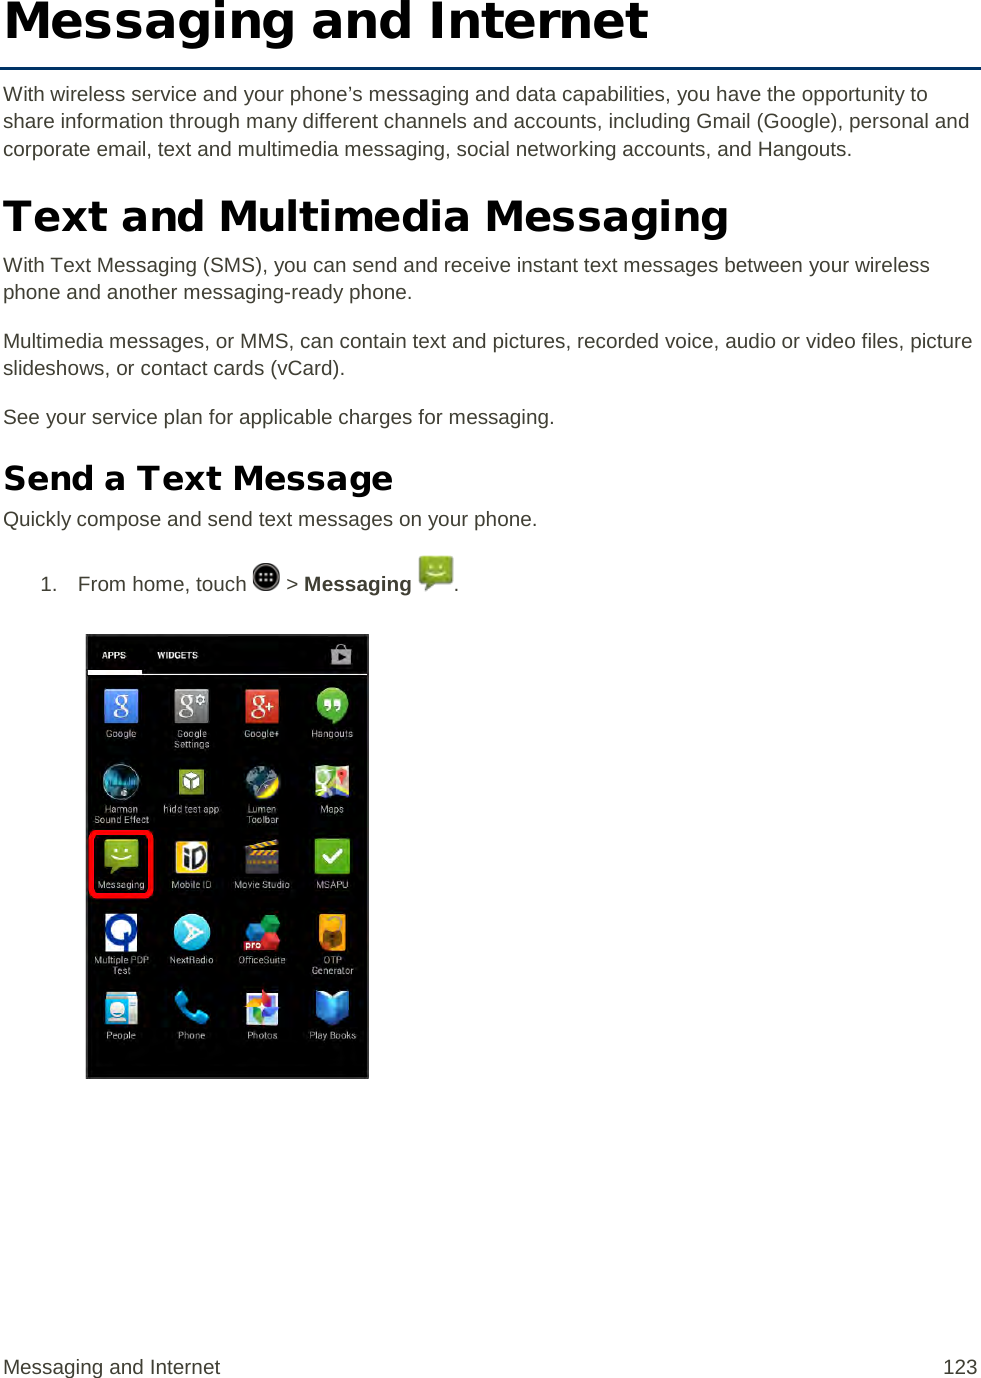
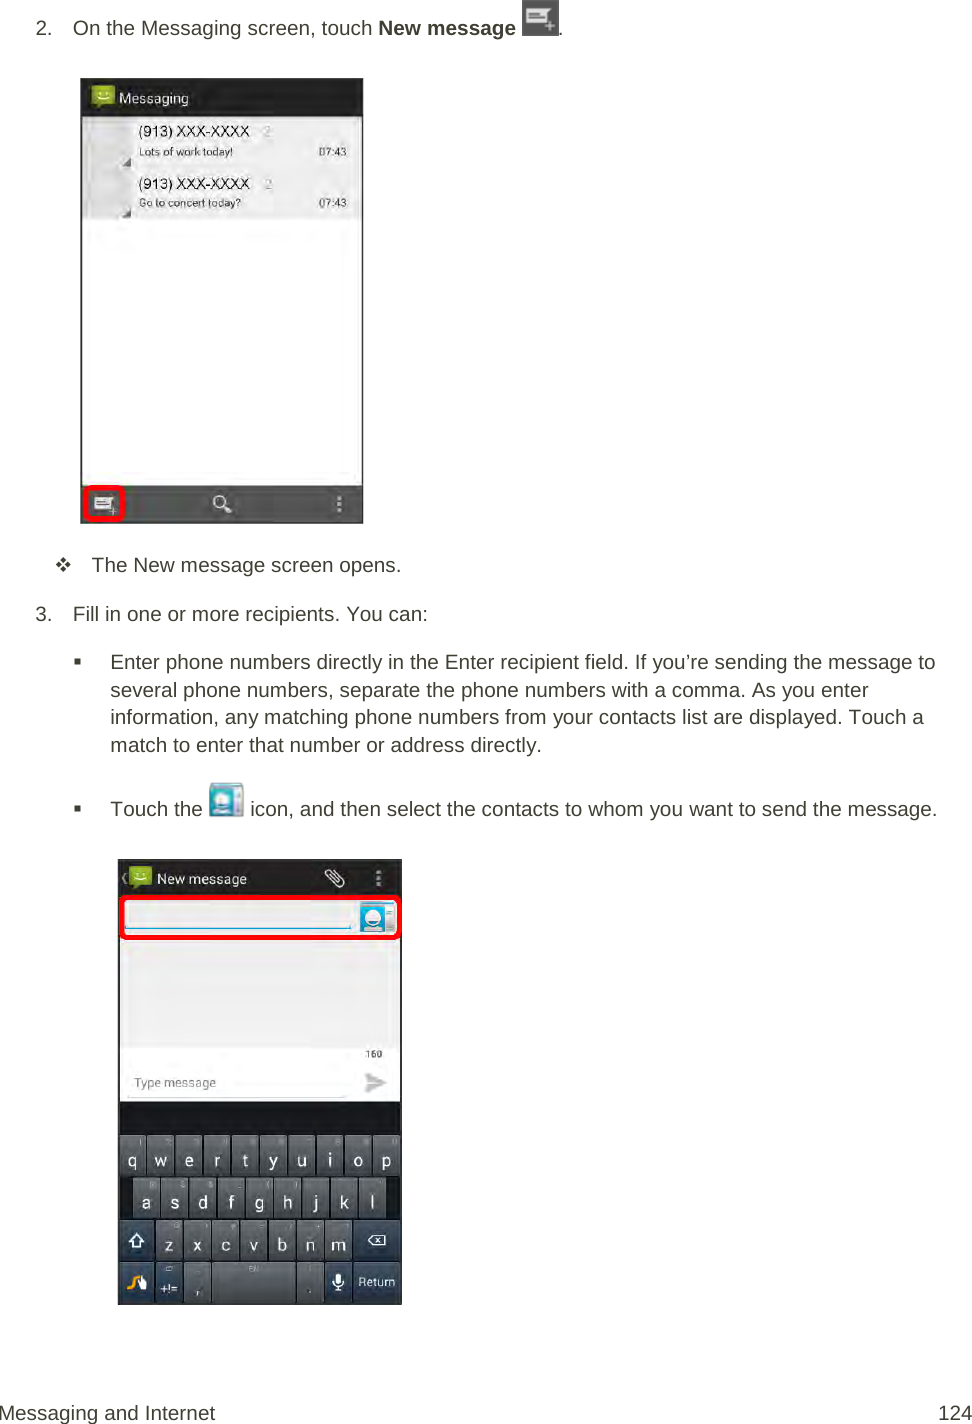
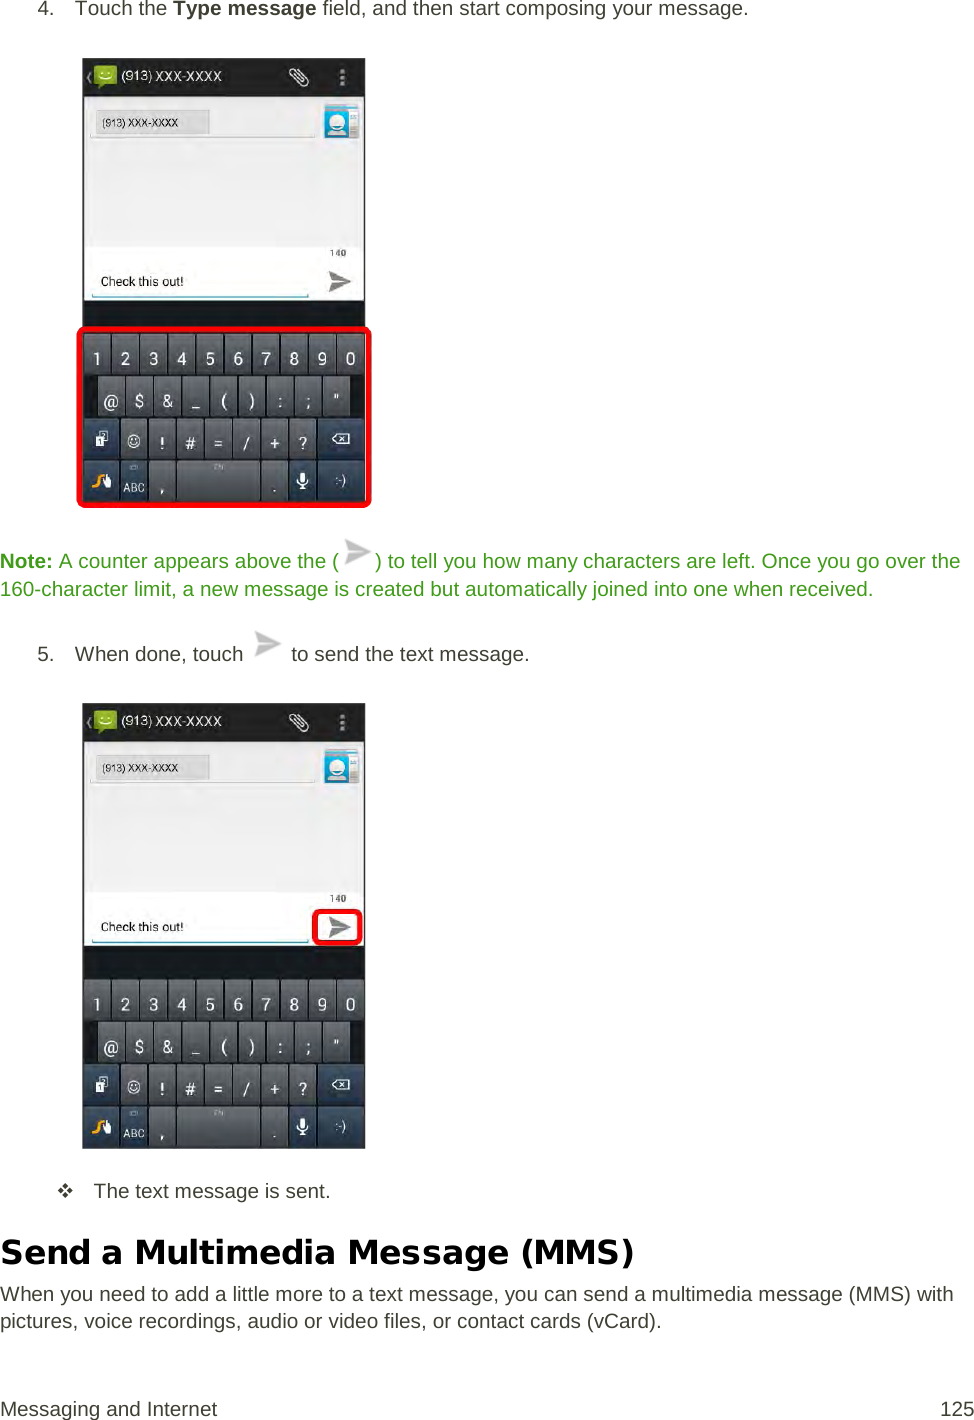
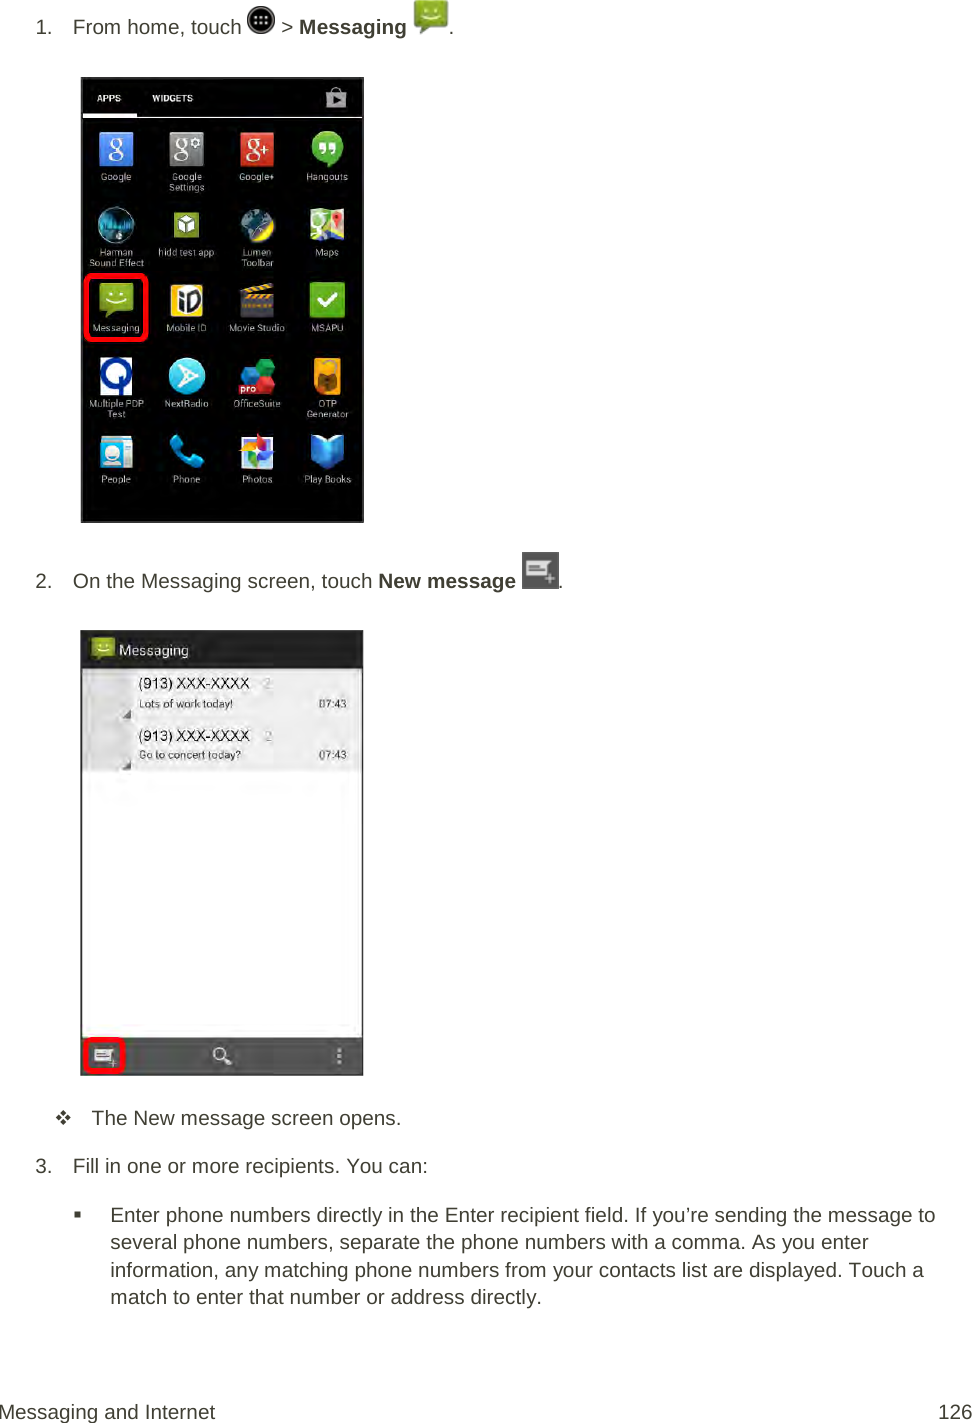
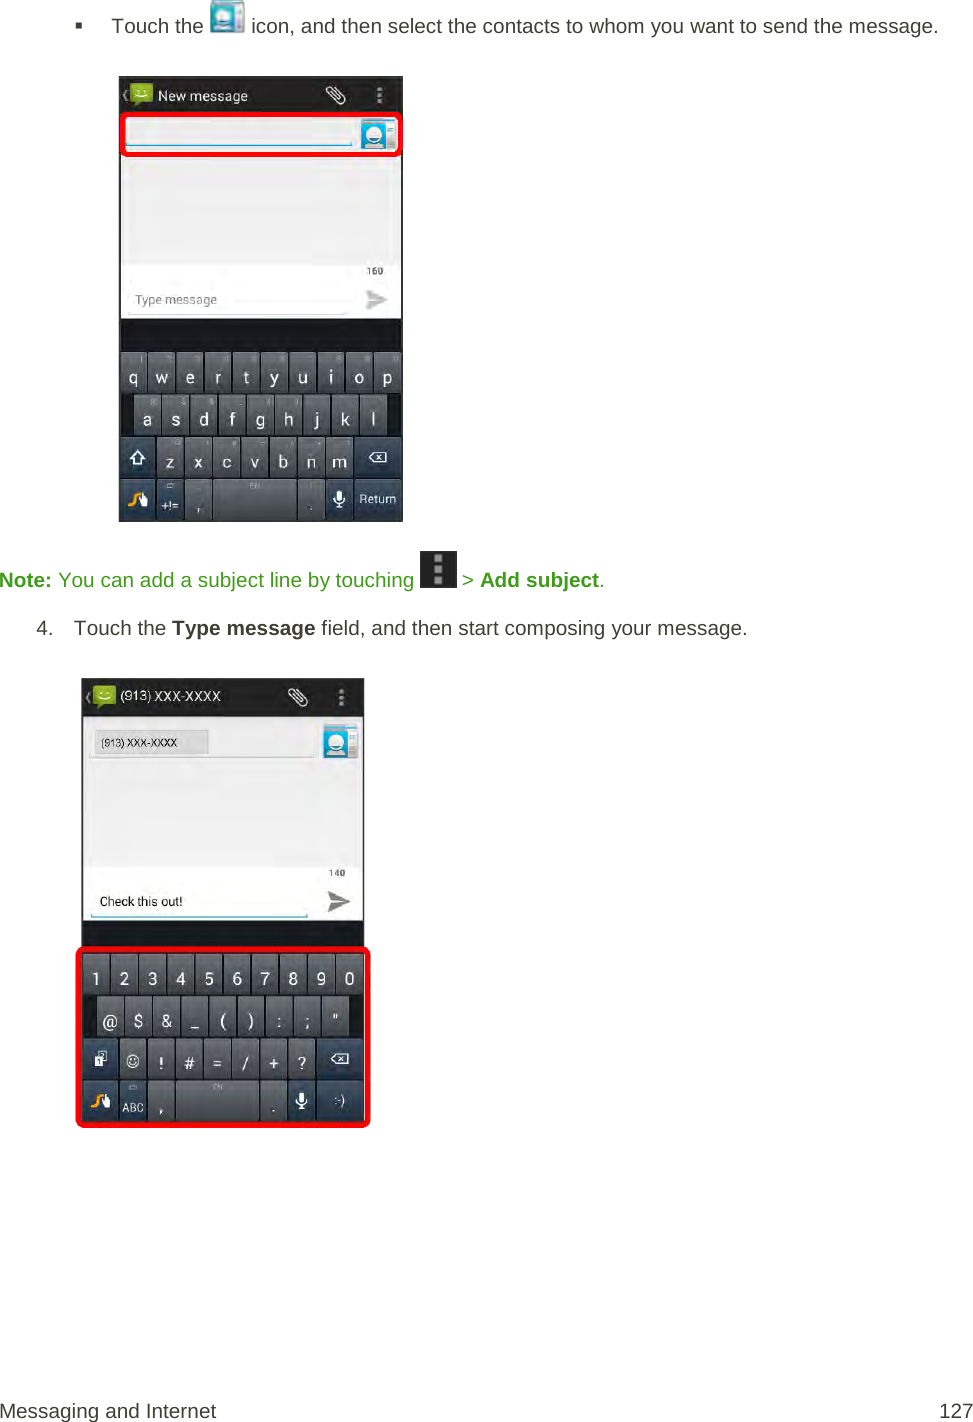
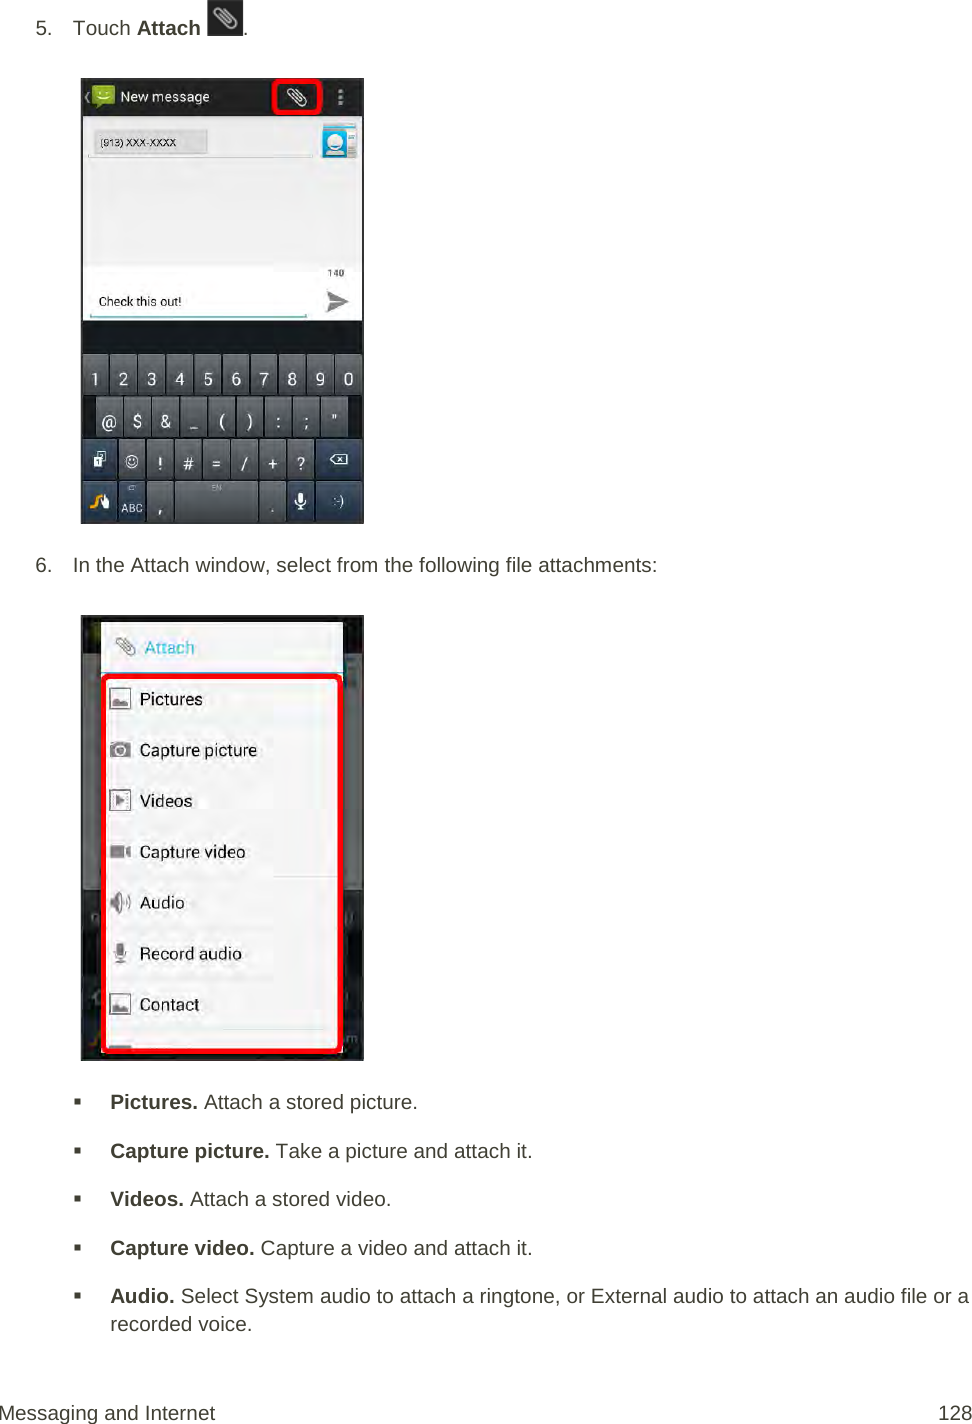
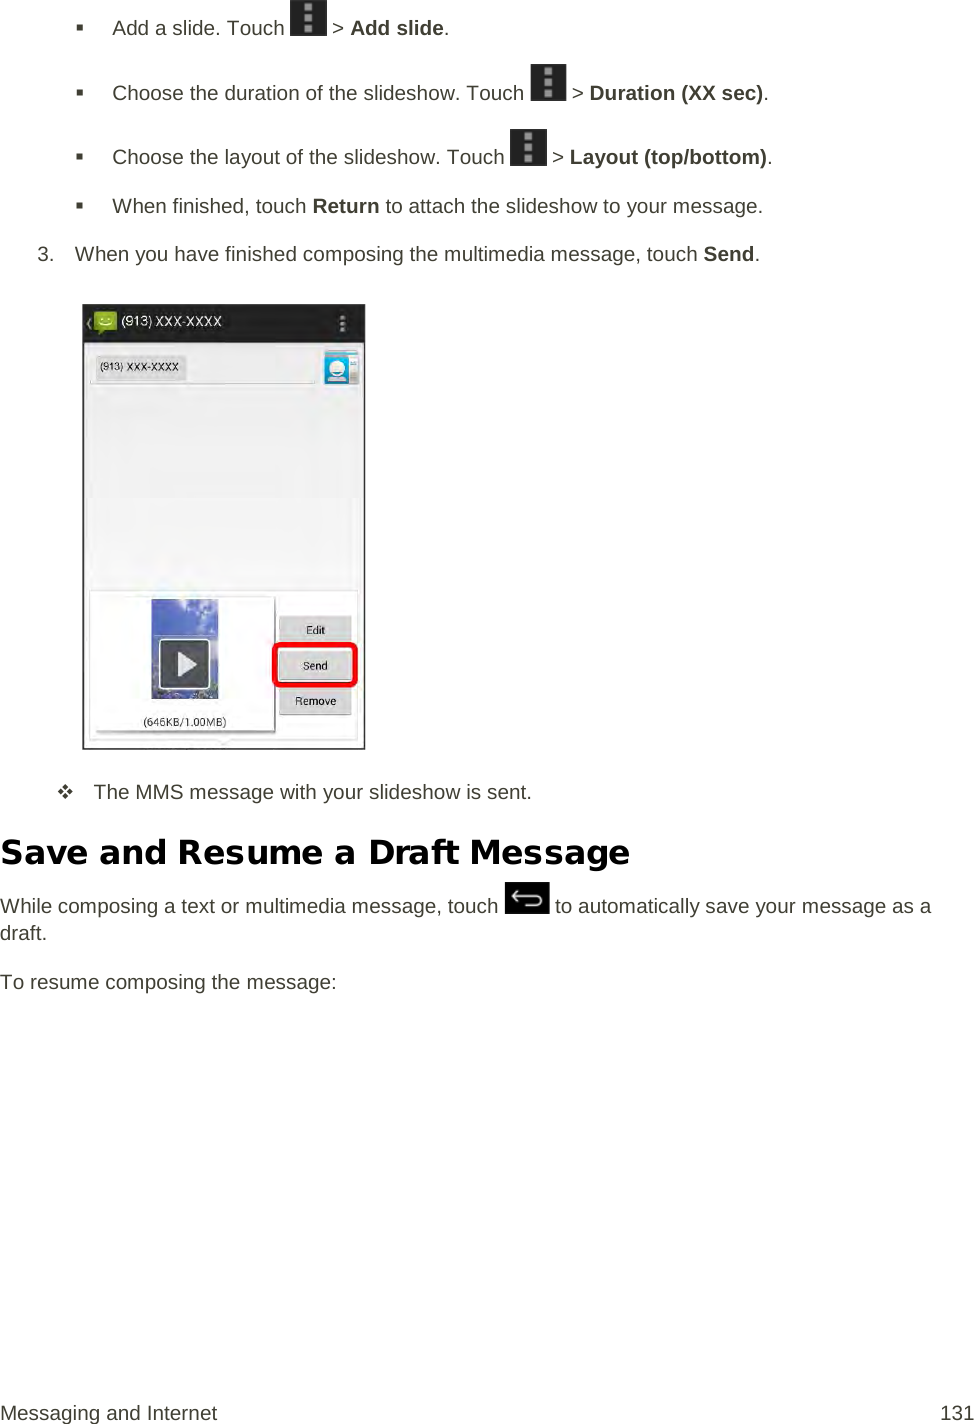

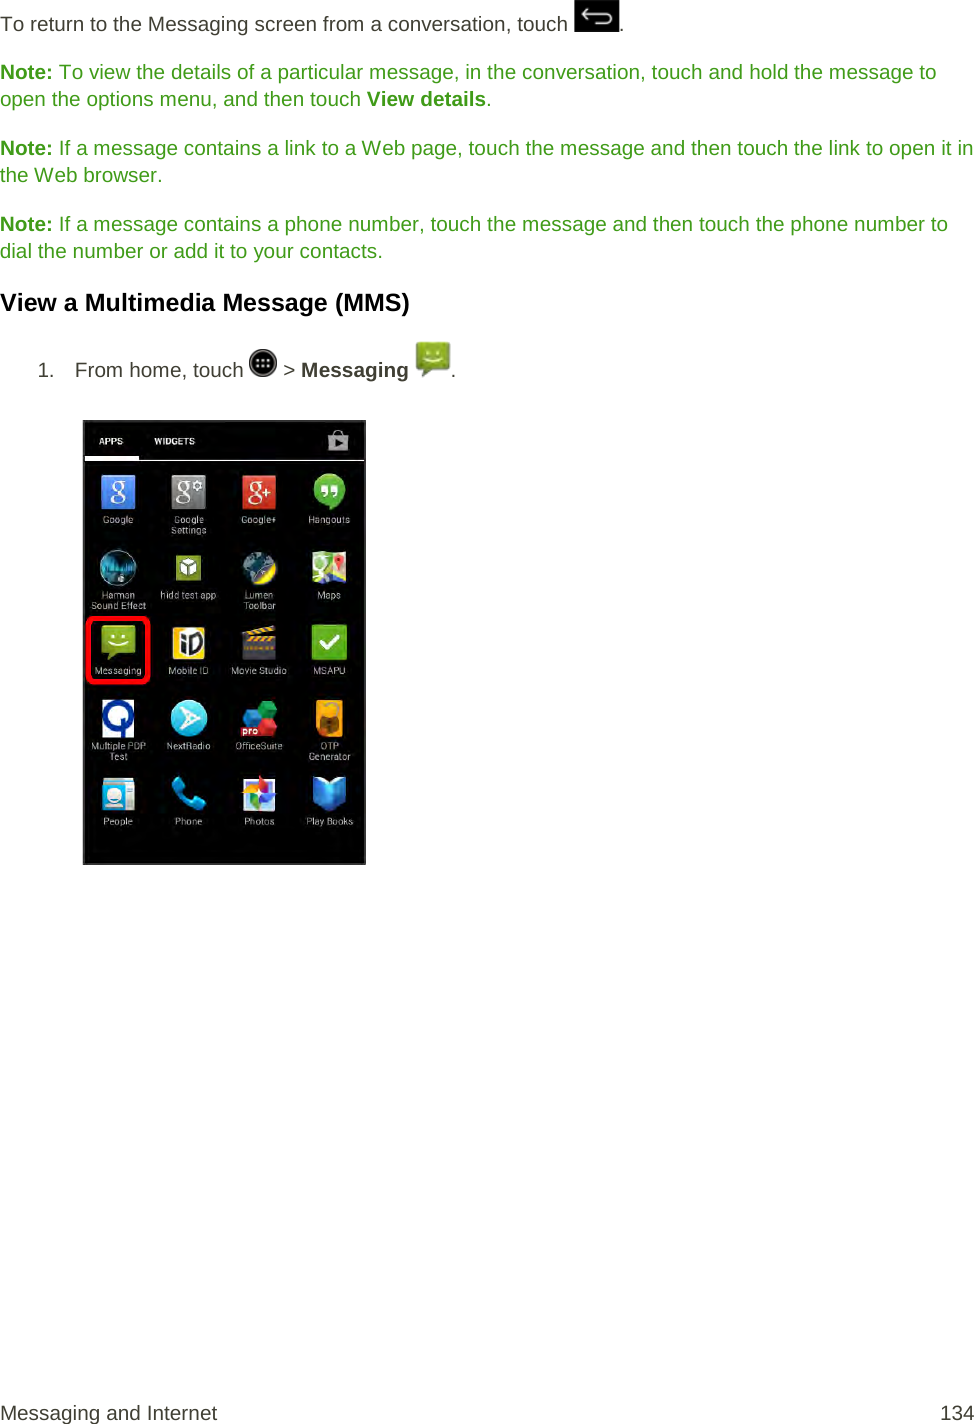
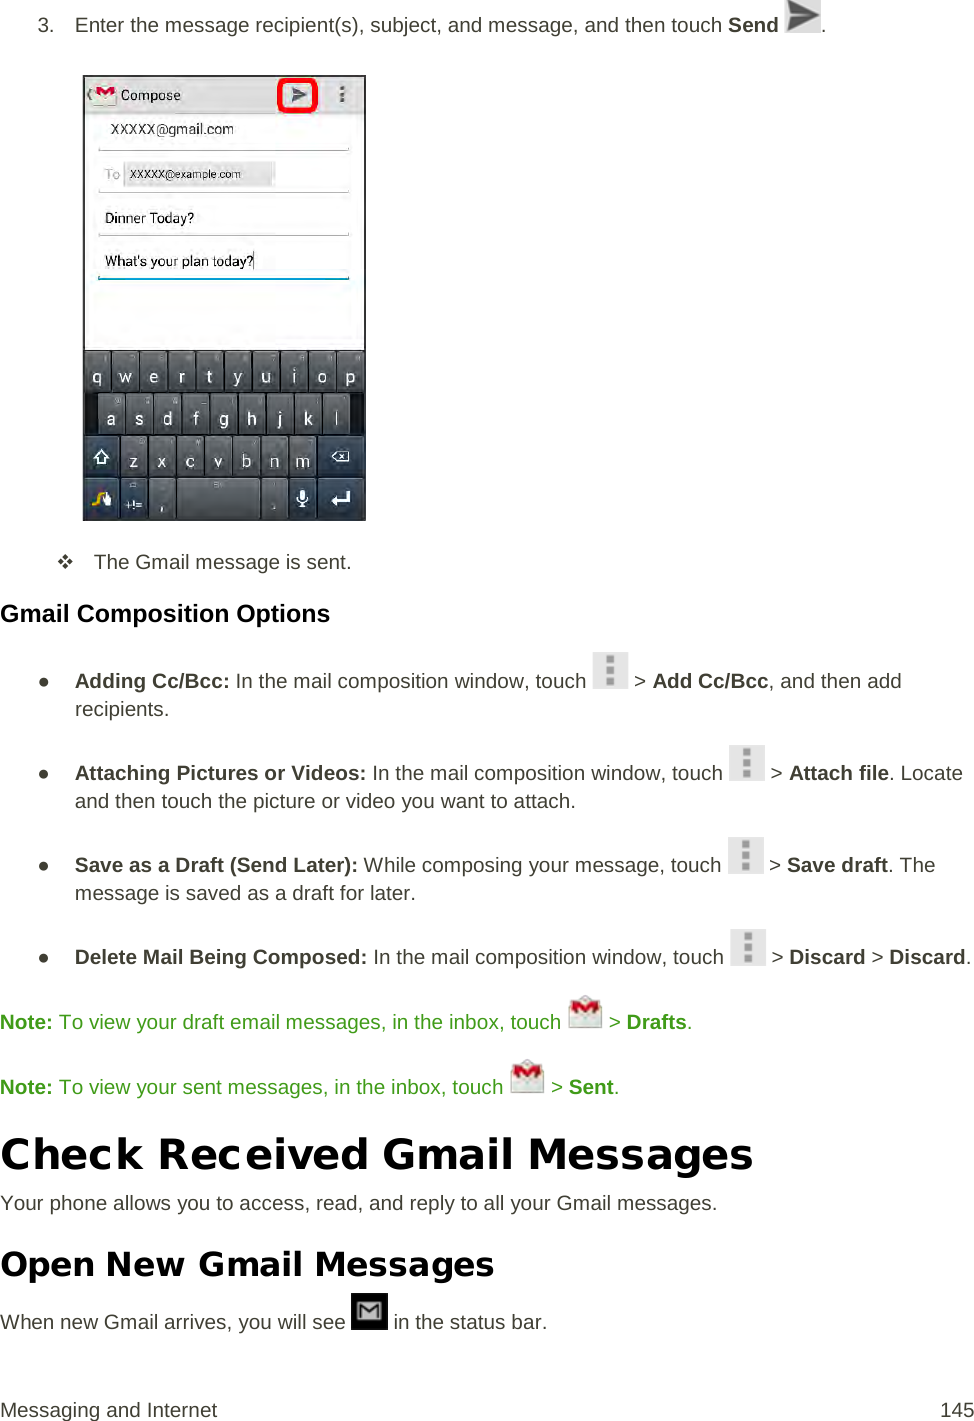
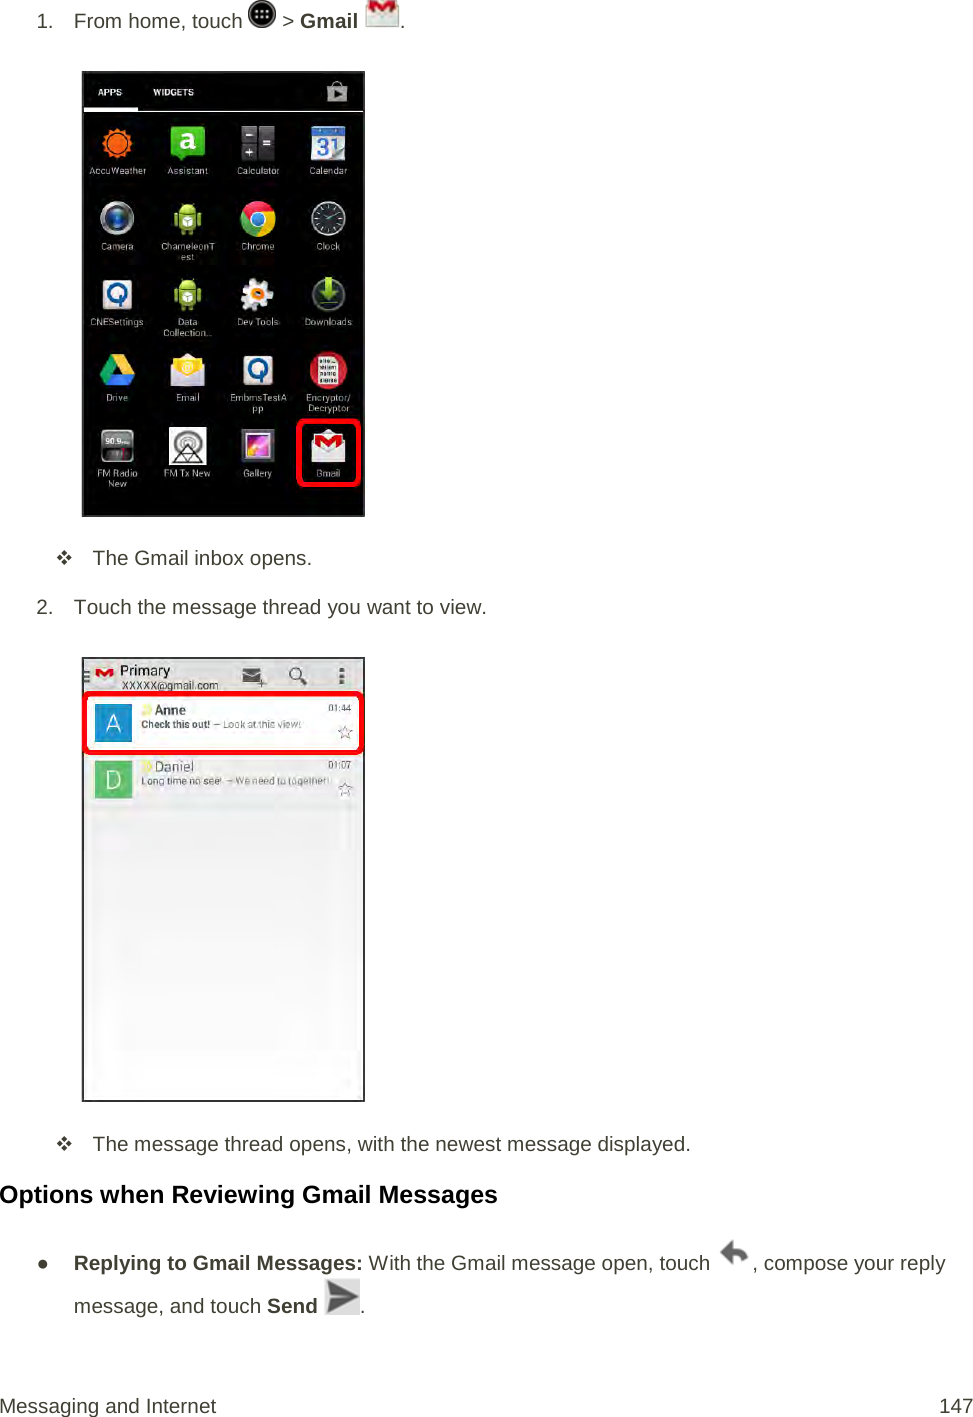
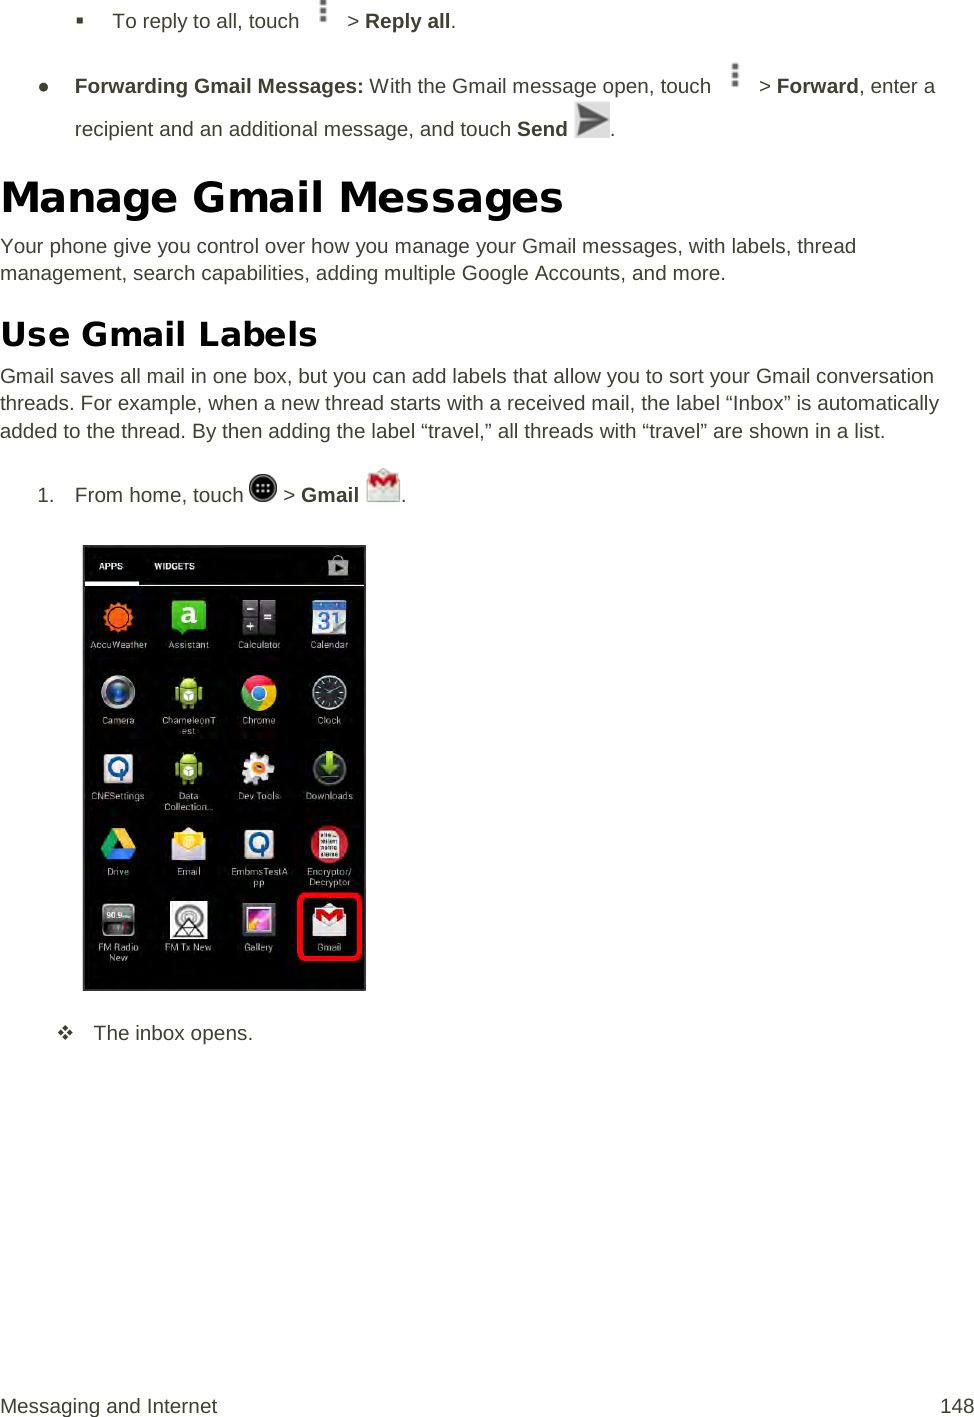
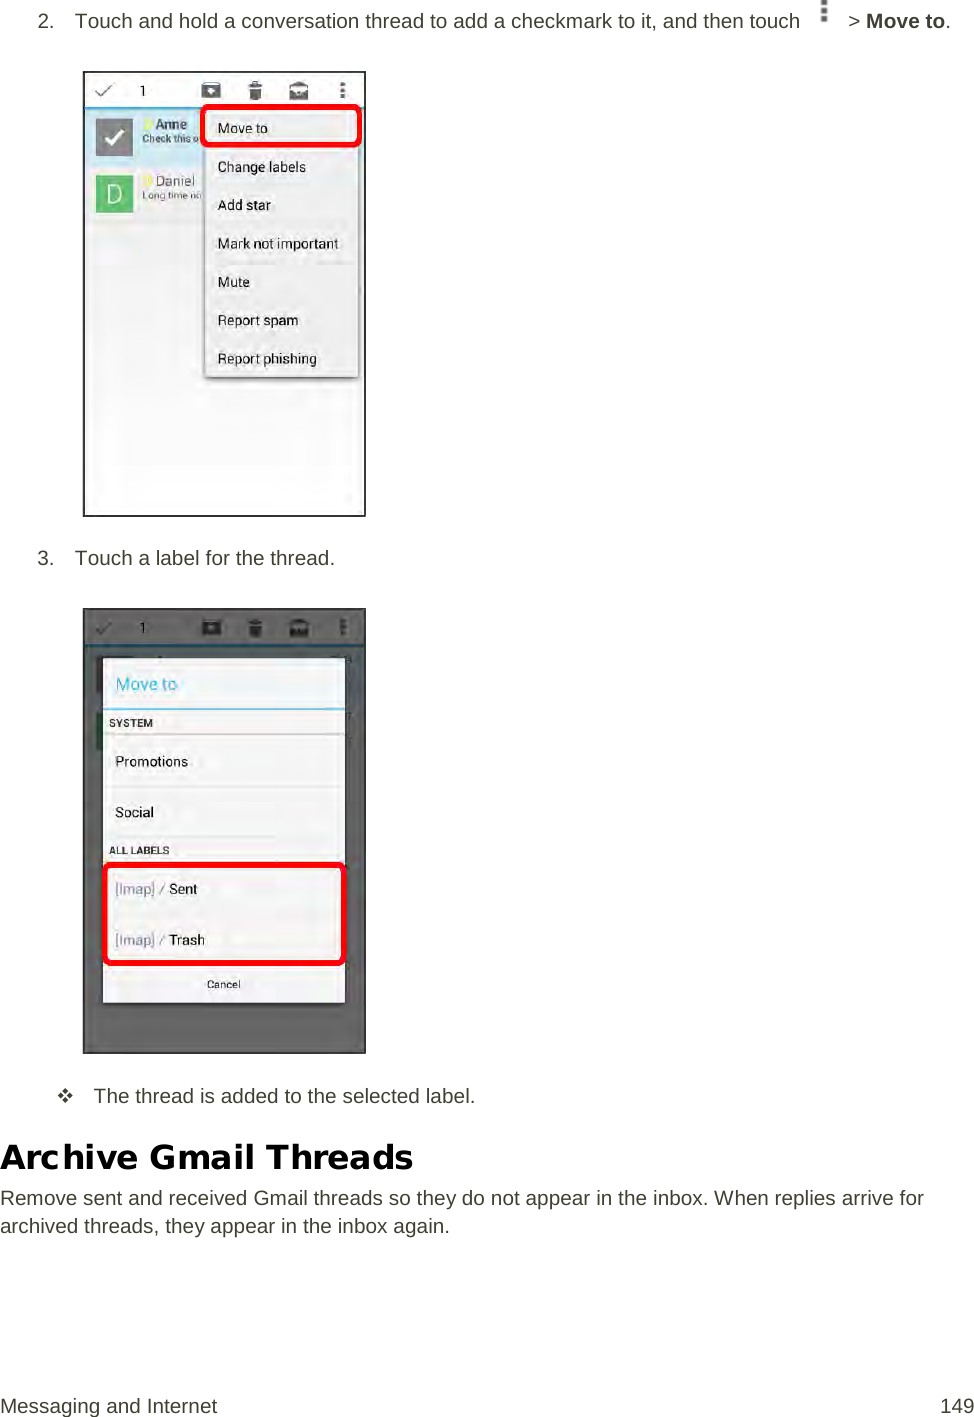
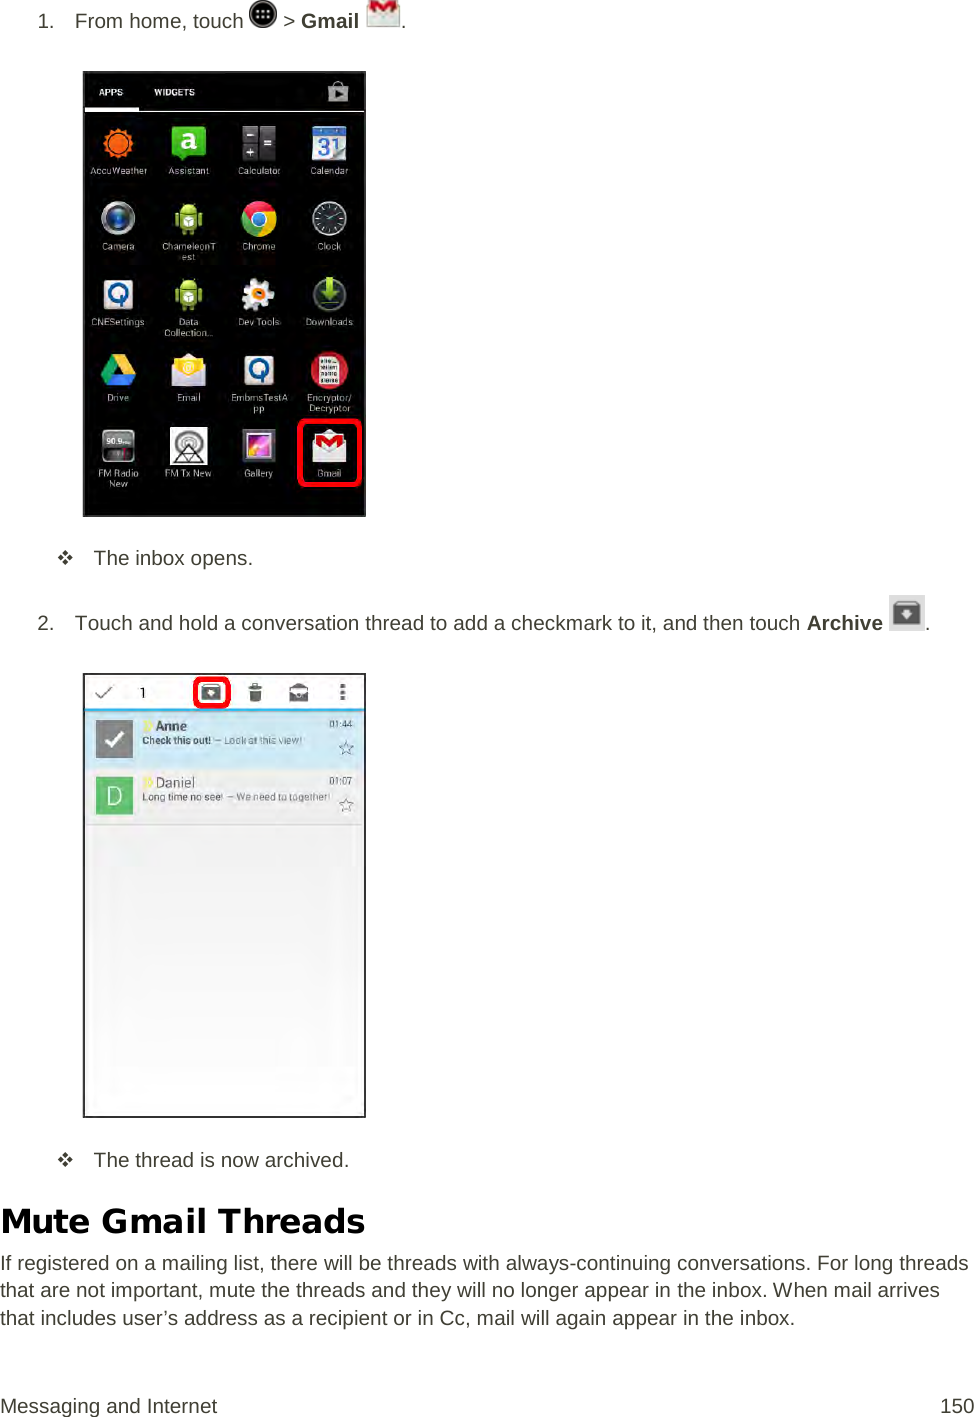
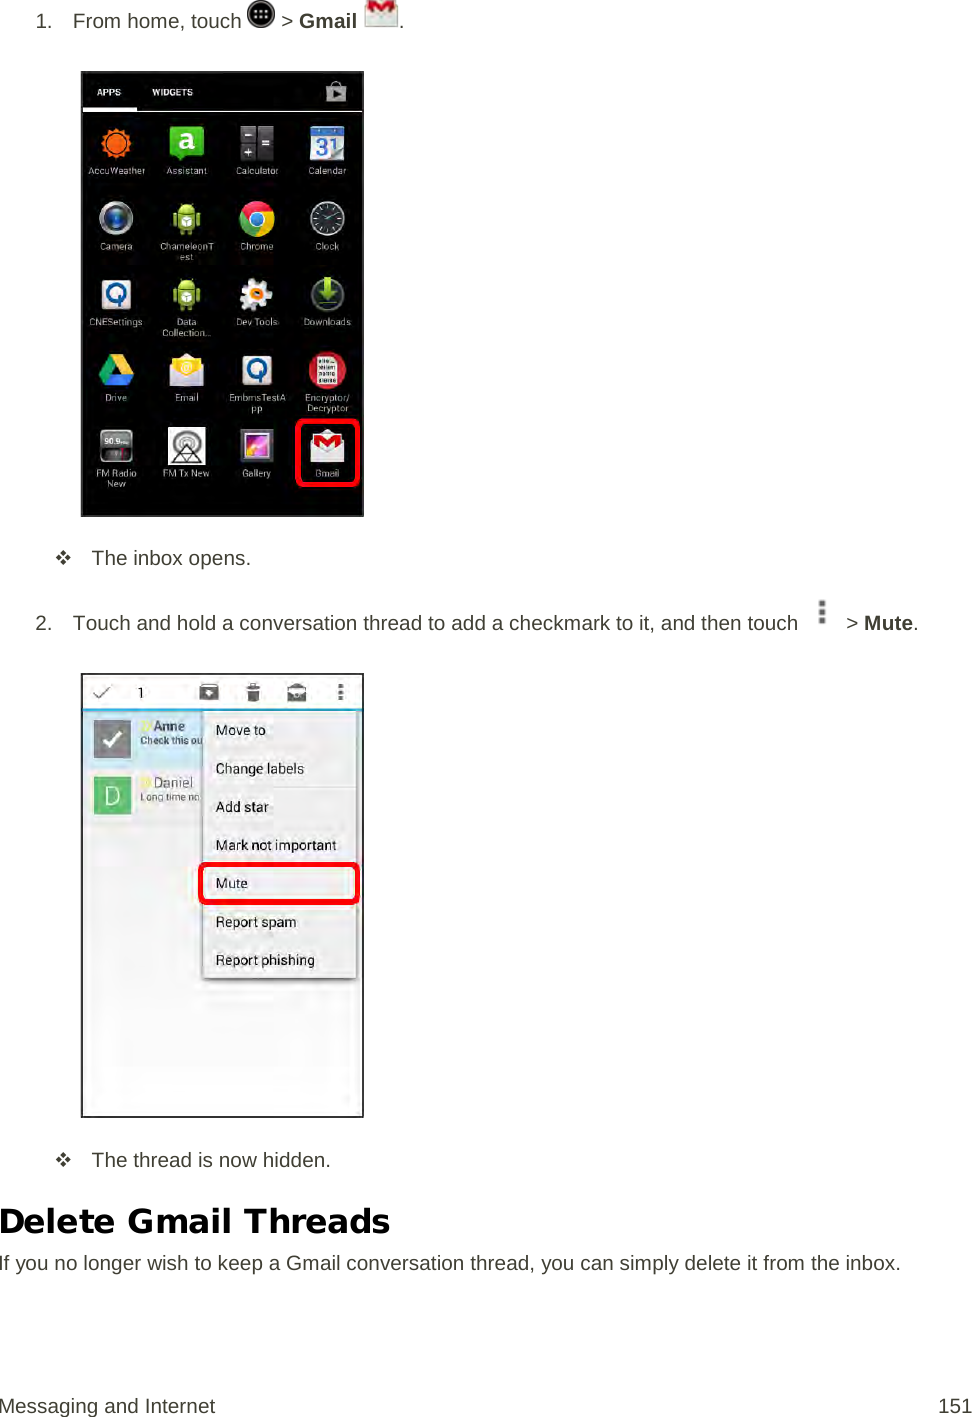
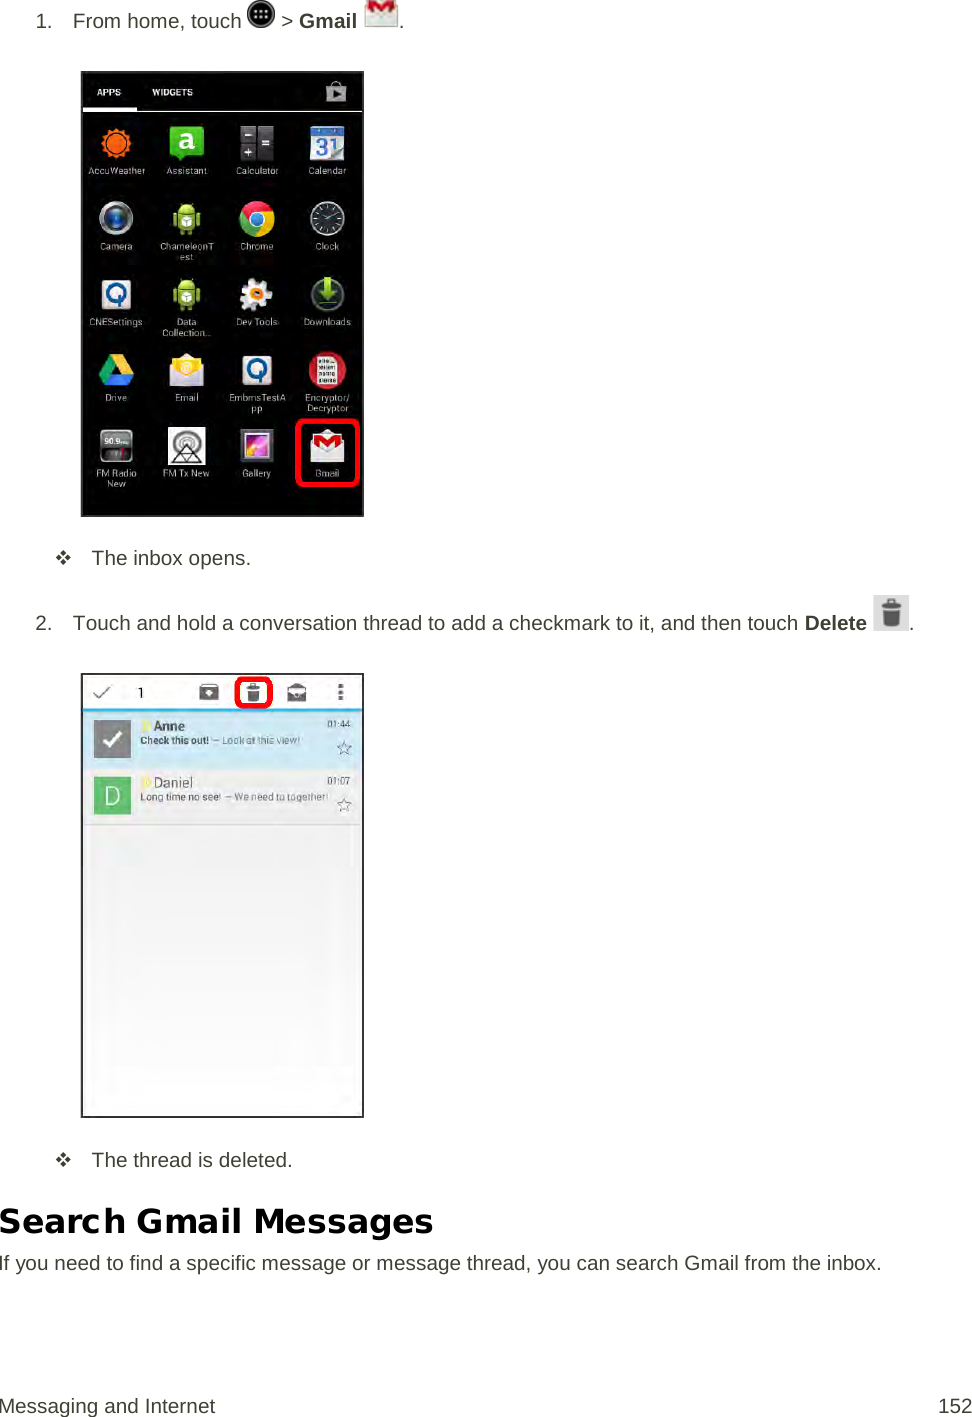
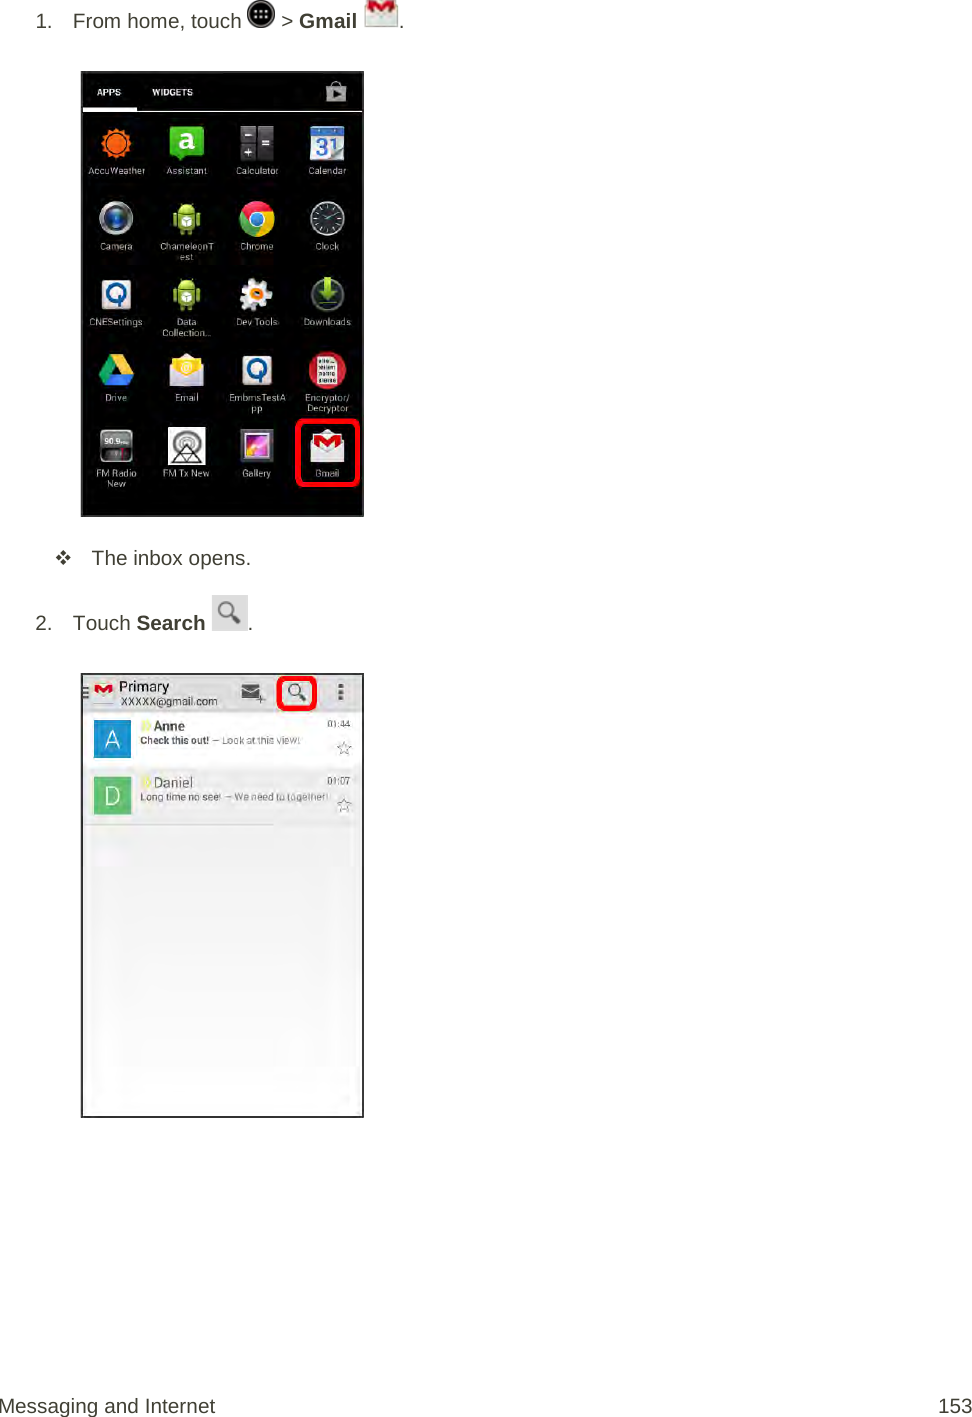
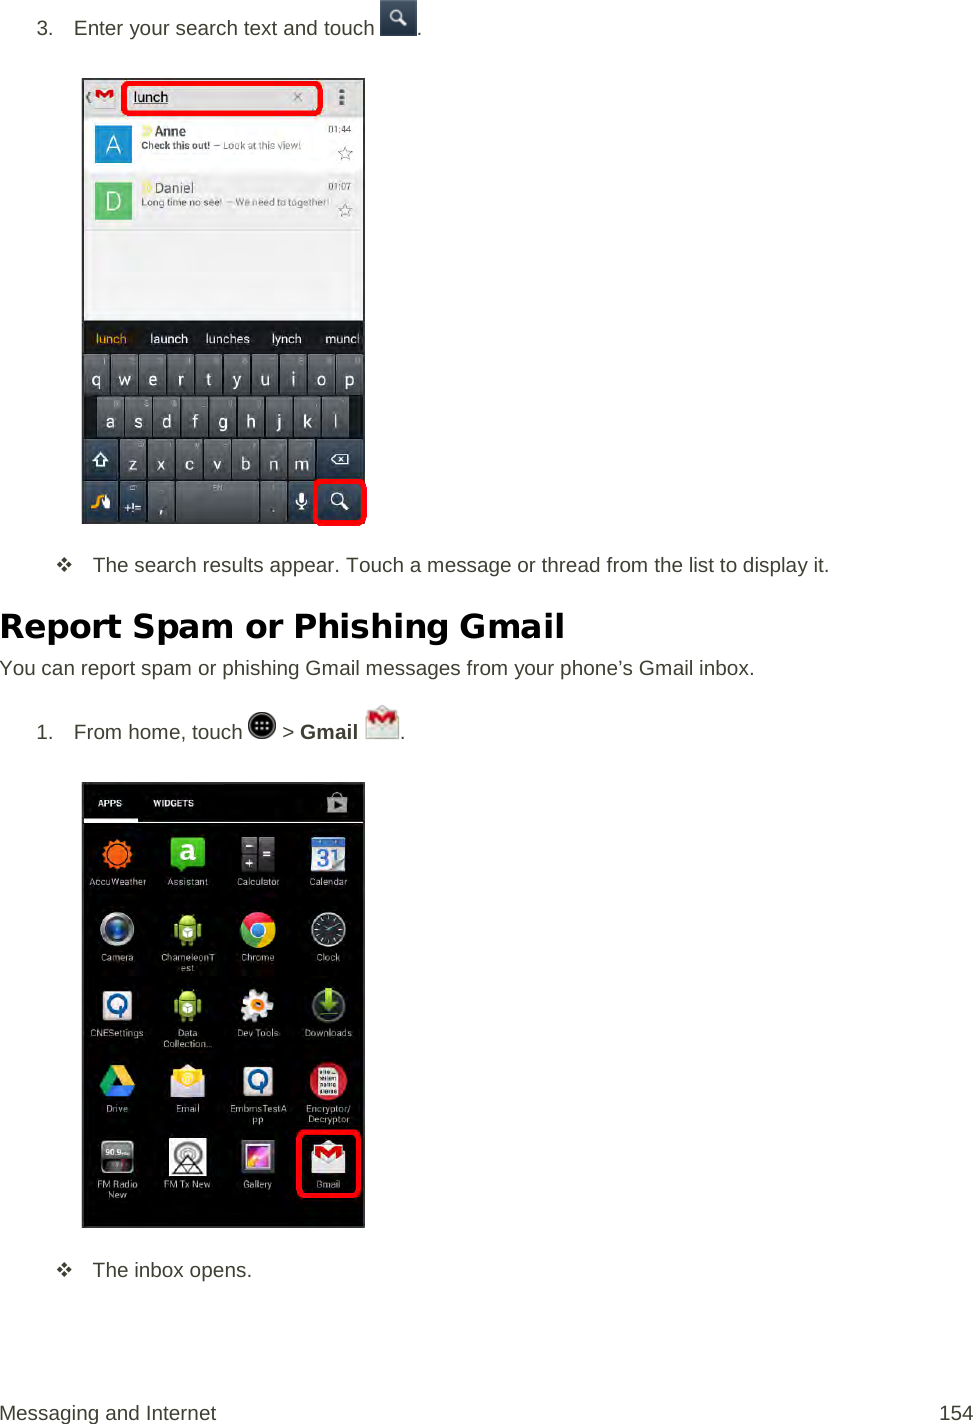
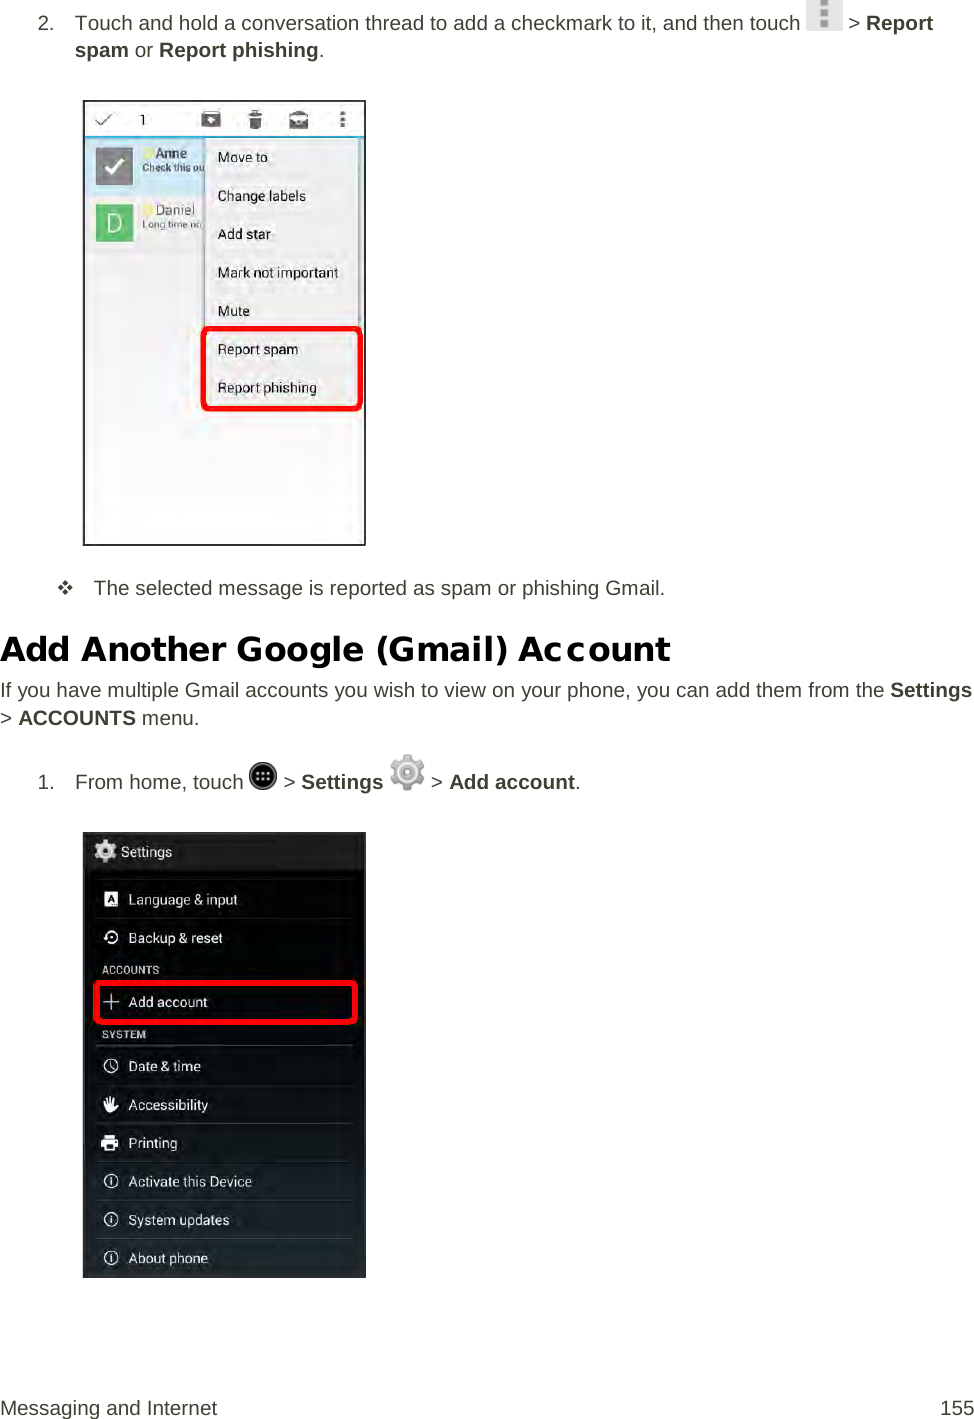
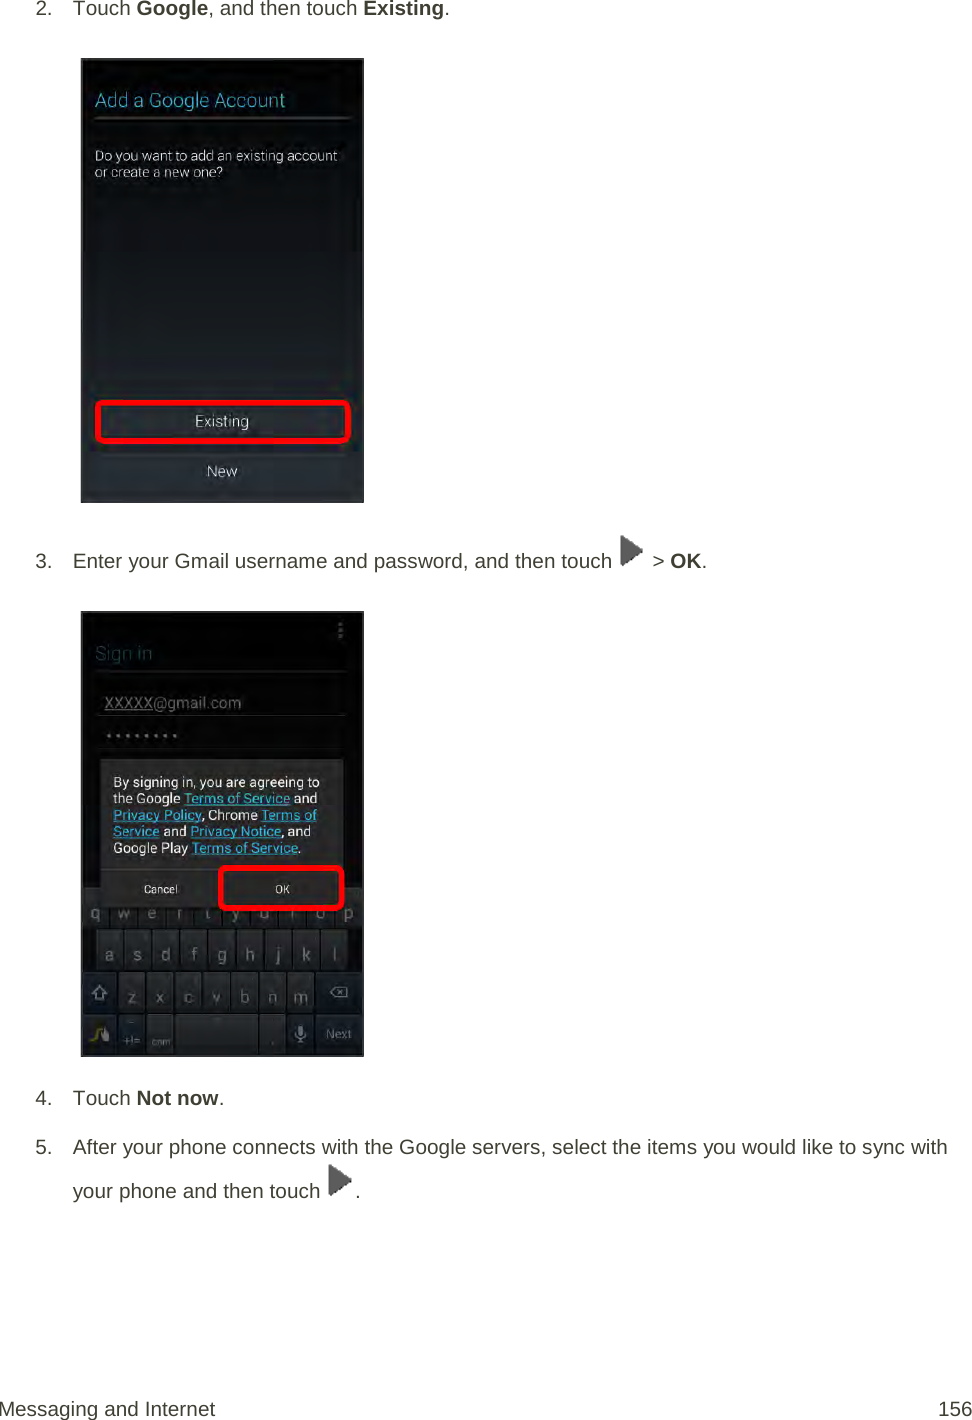
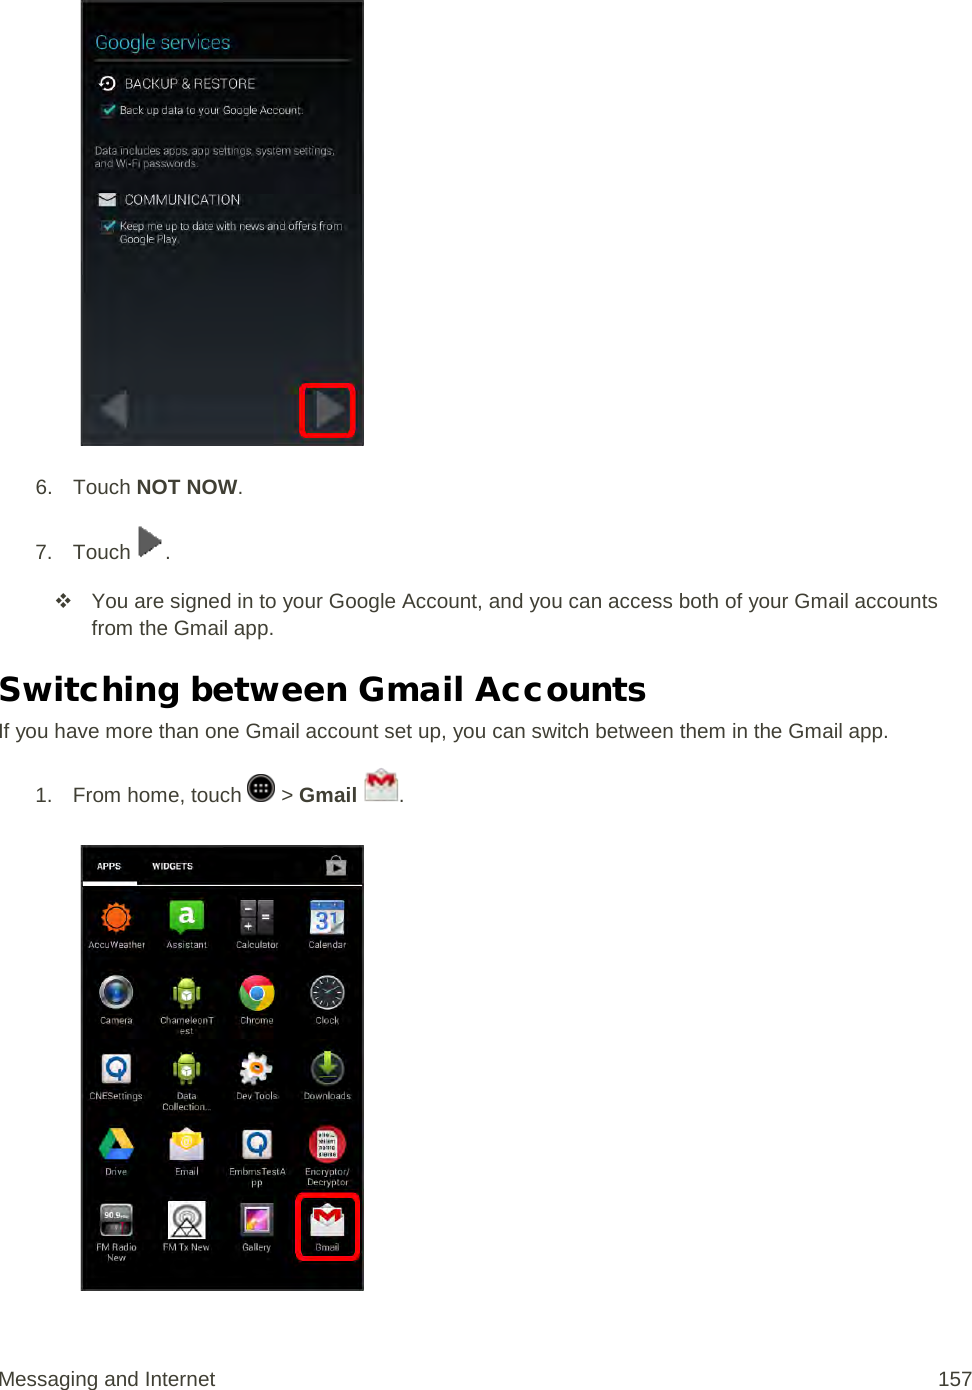
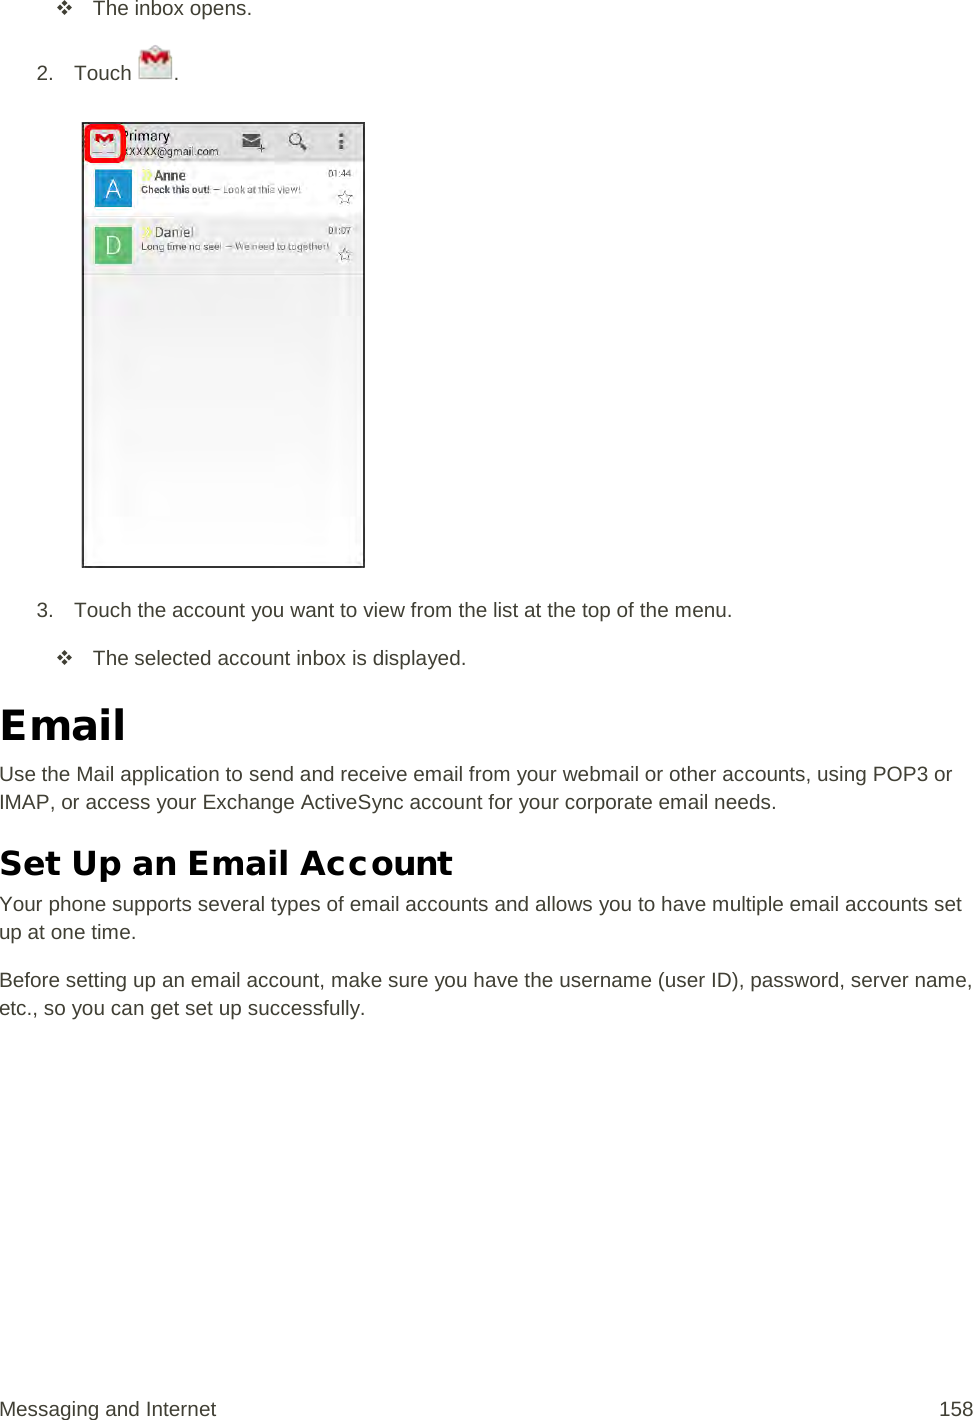
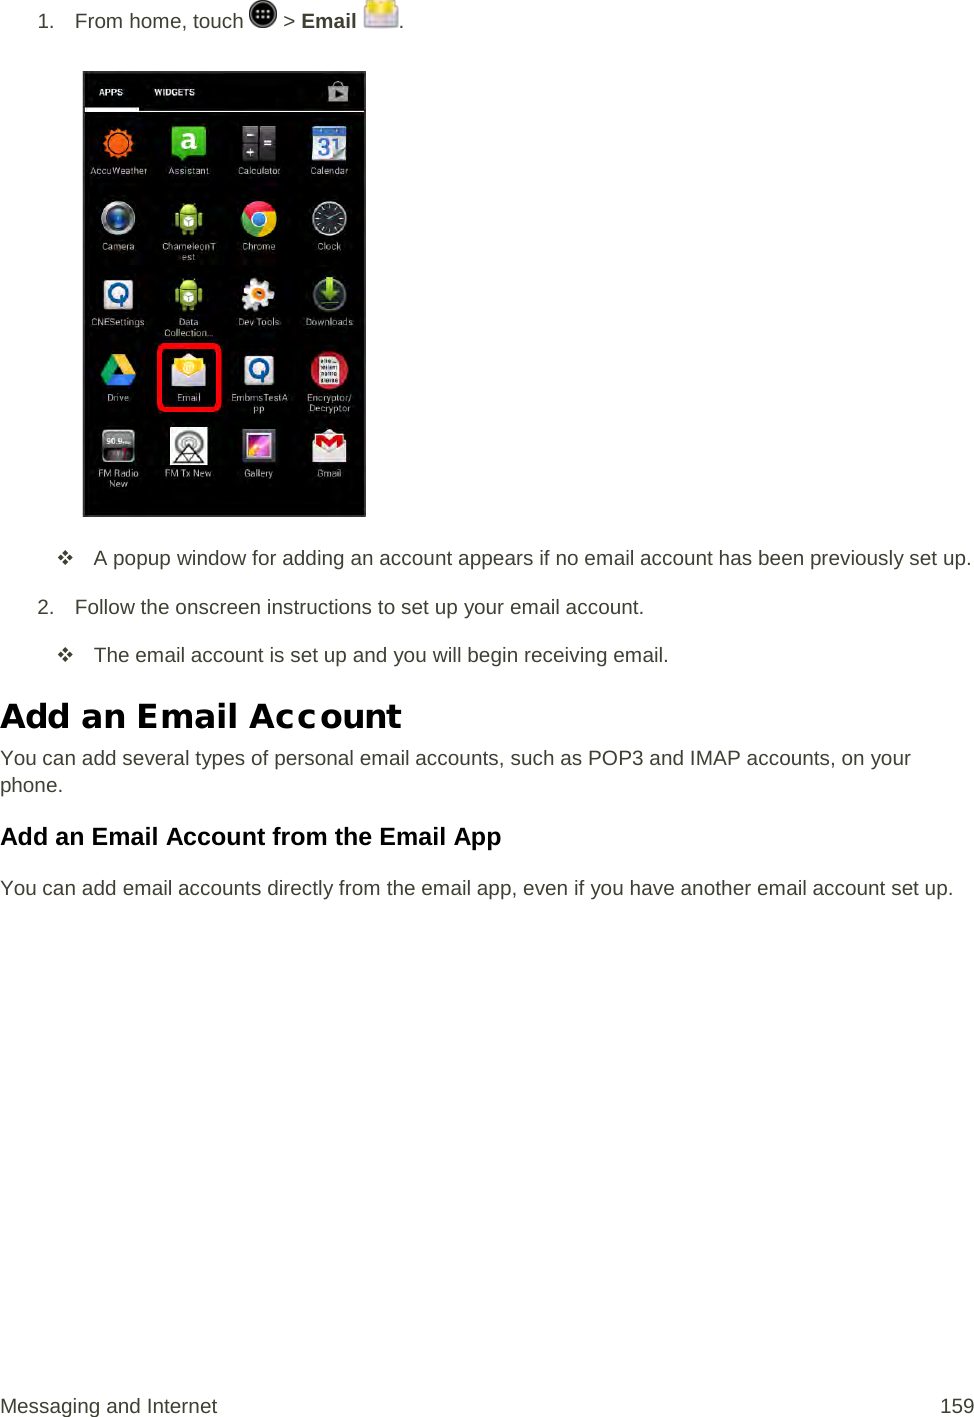
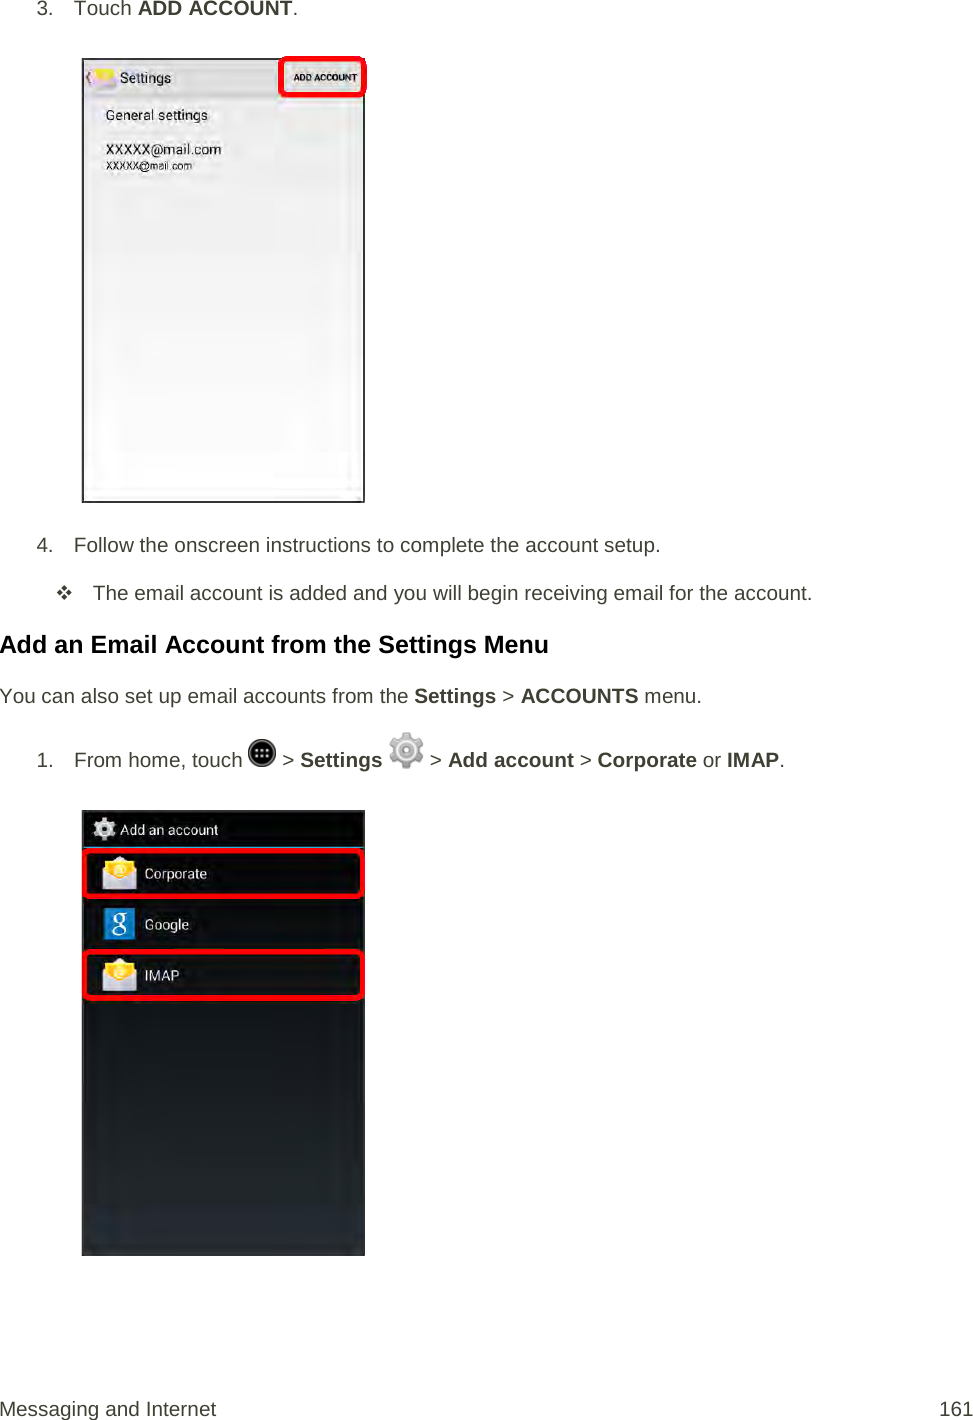
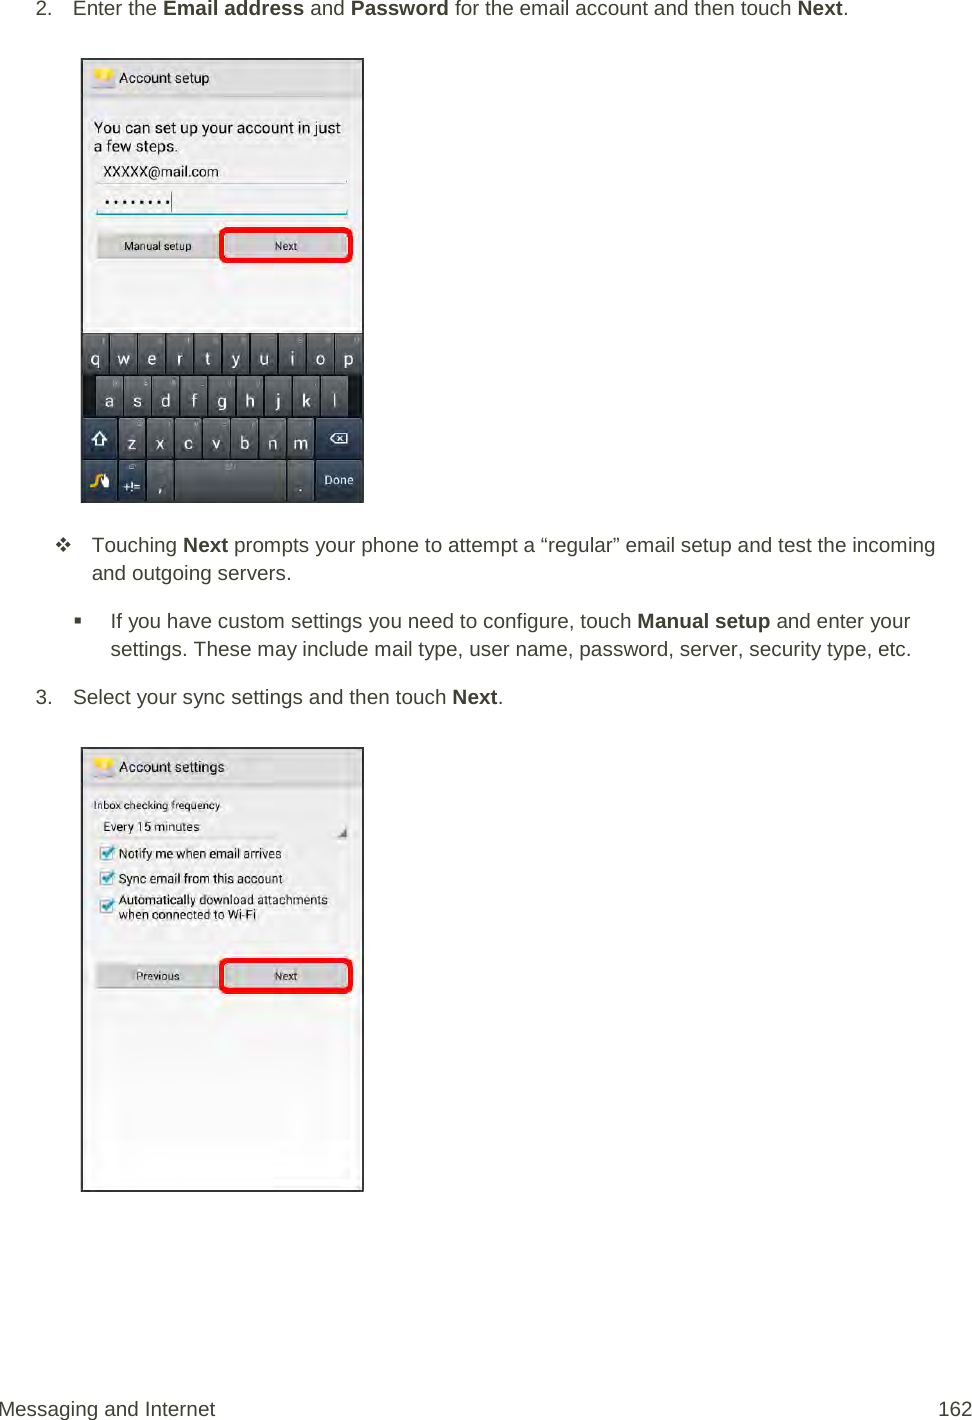
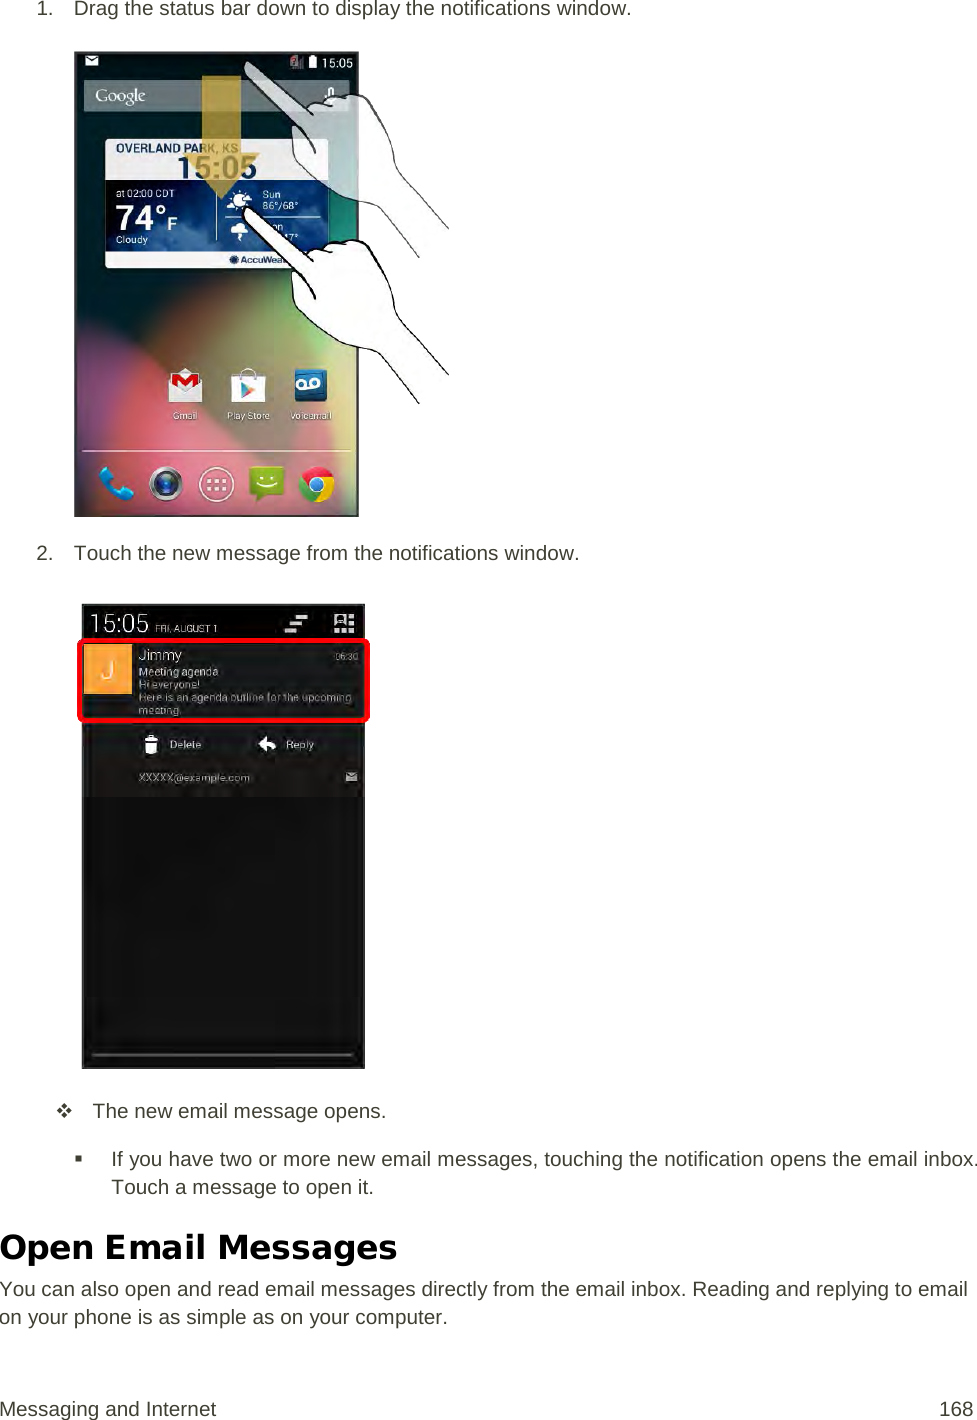
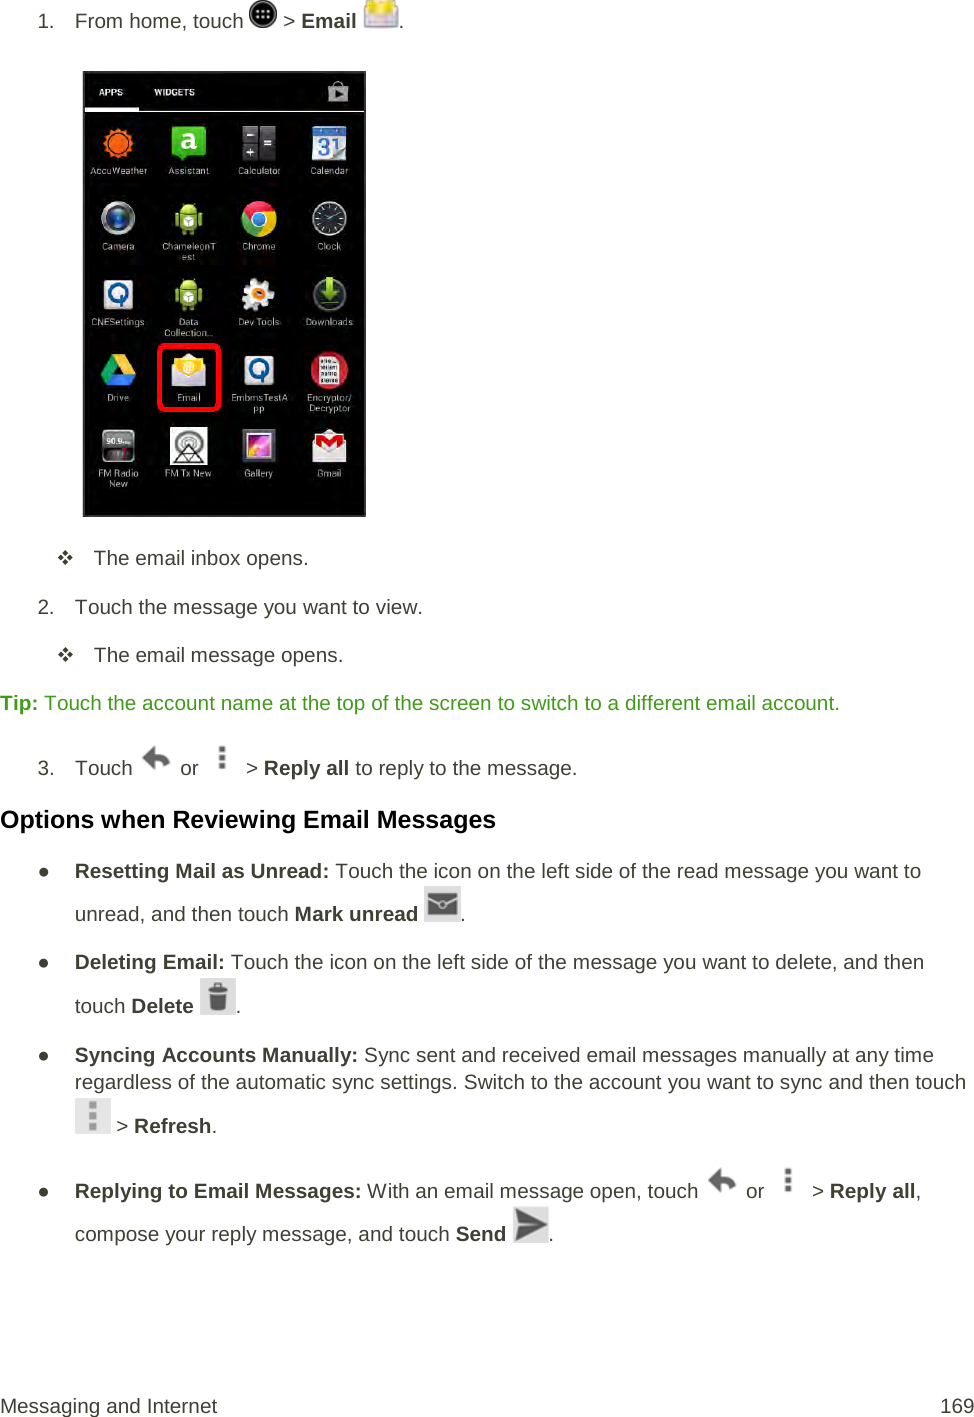
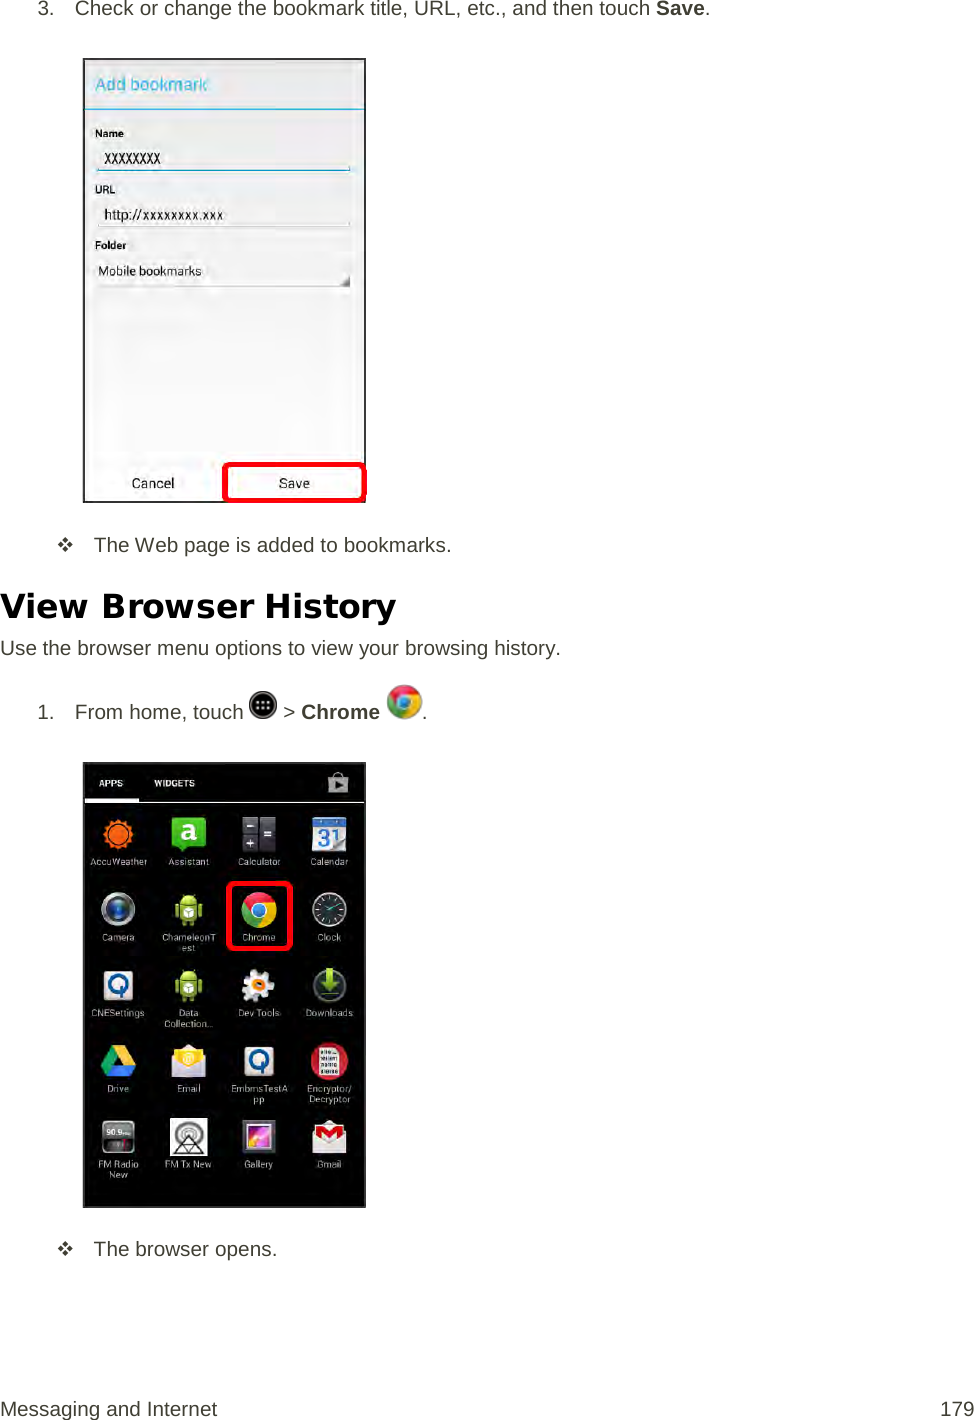
![2. On the Messaging screen, touch a multimedia message or conversation to open it. 3. Touch the attachment to open it. [illustration] If the attachment is a vCard contact, it is imported to your phone’s contacts list. For more information, see Contacts. 4. To save the attachment to device memory or a memory card, touch and hold the sender’s name or number, and then touch Save [attachment type] on the options menu. [illustration] Note: When Auto-retrieve in MMS settings is disabled, only the message header is downloaded. To download the entire message, touch the Download at the right side of the message. For details, see Text and MMS Options. Note: If you are concerned about the size of your data downloads, check the multimedia message size before you download it. Messaging and Internet 135](https://usermanual.wiki/Sharp/HRO00204.manual/User-Guide-2330332-Page-145.png)
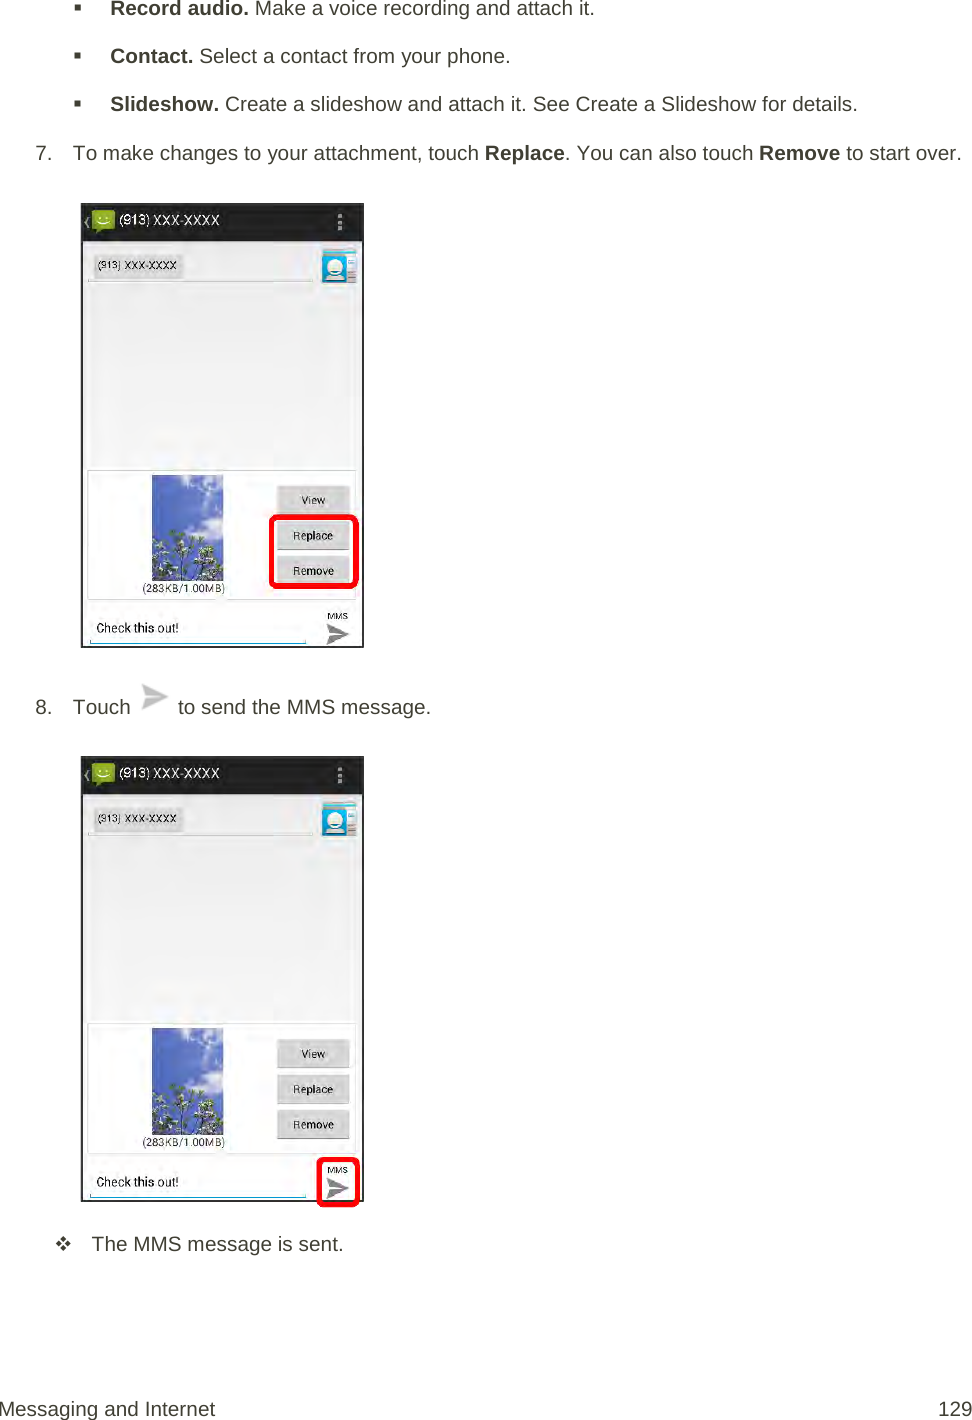
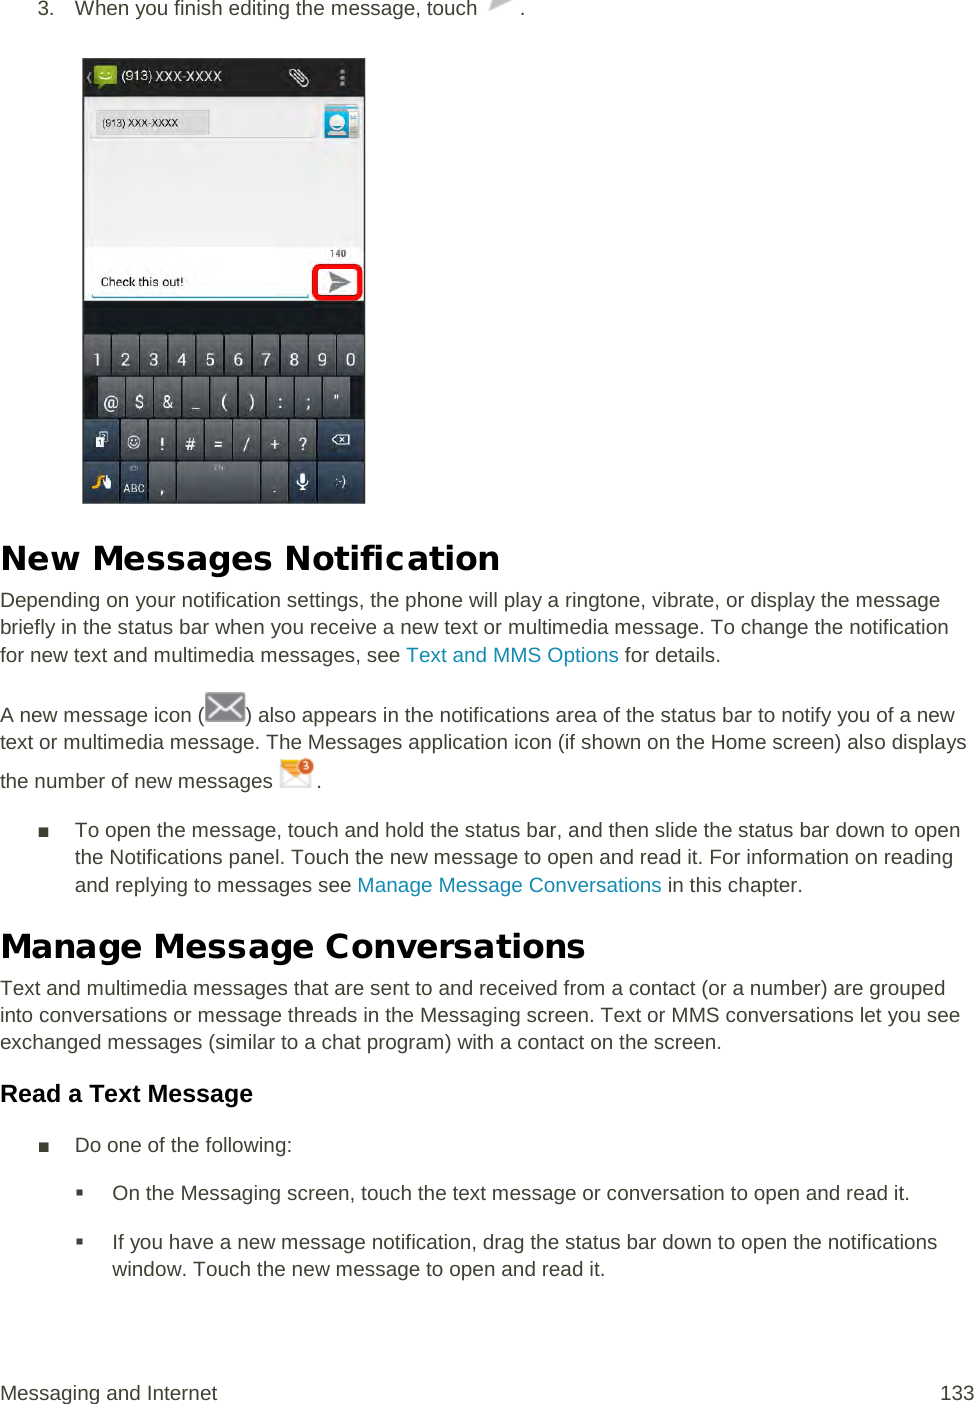
![Reply to a Message 1. From home, touch > Messaging . 2. On the Messaging screen, touch a conversation to open it. 3. Touch the Type message field at the bottom of the screen, enter your reply message, and then touch . [illustration] The MMS message is sent. Messaging and Internet 136](https://usermanual.wiki/Sharp/HRO00204.manual/User-Guide-2330332-Page-146.png)
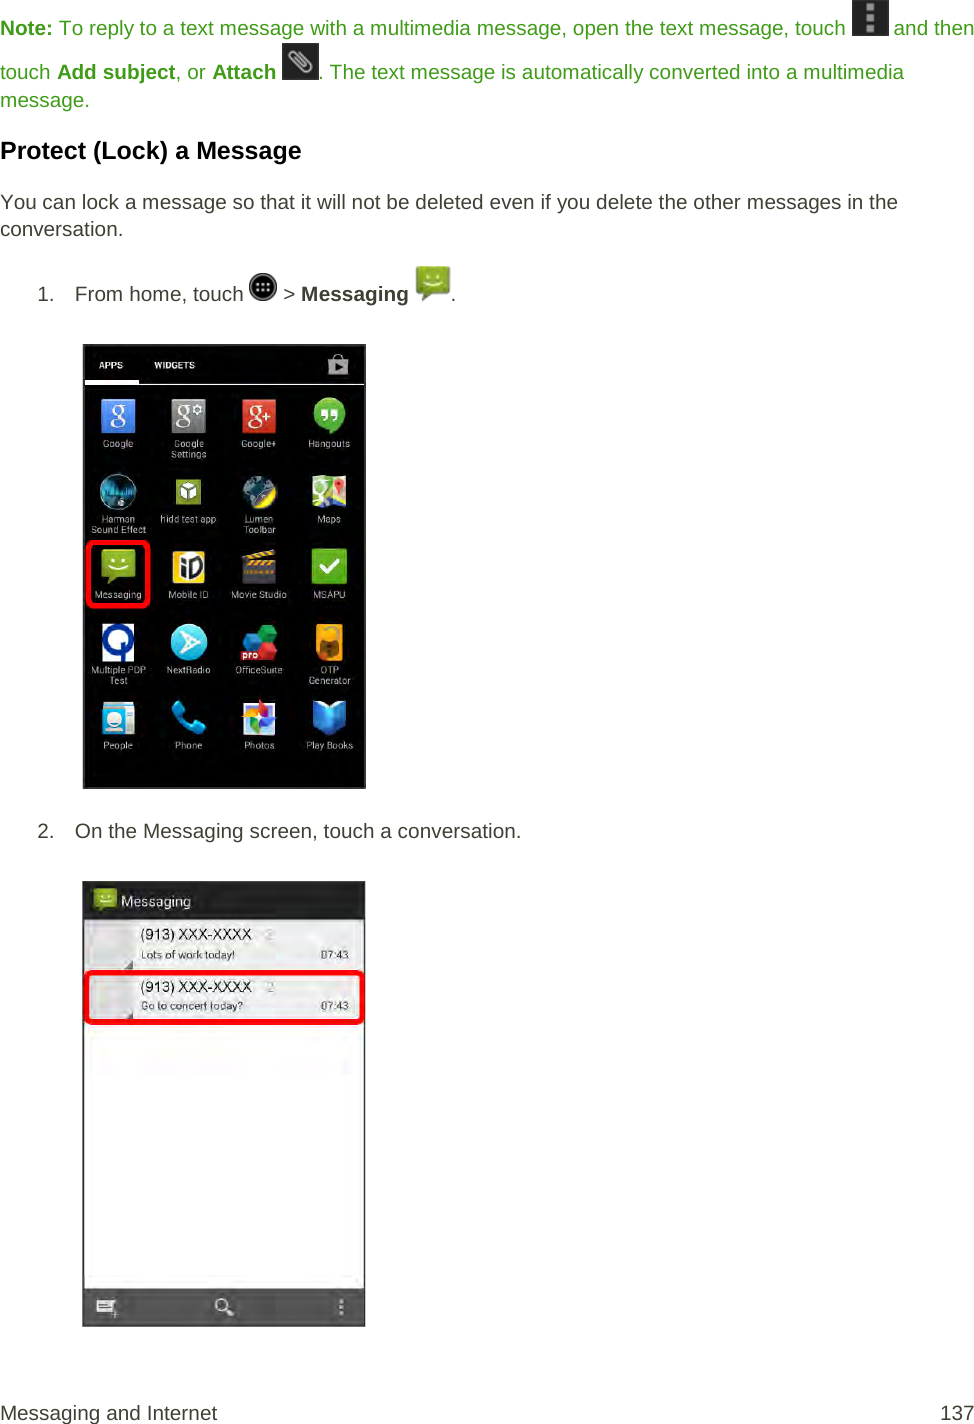
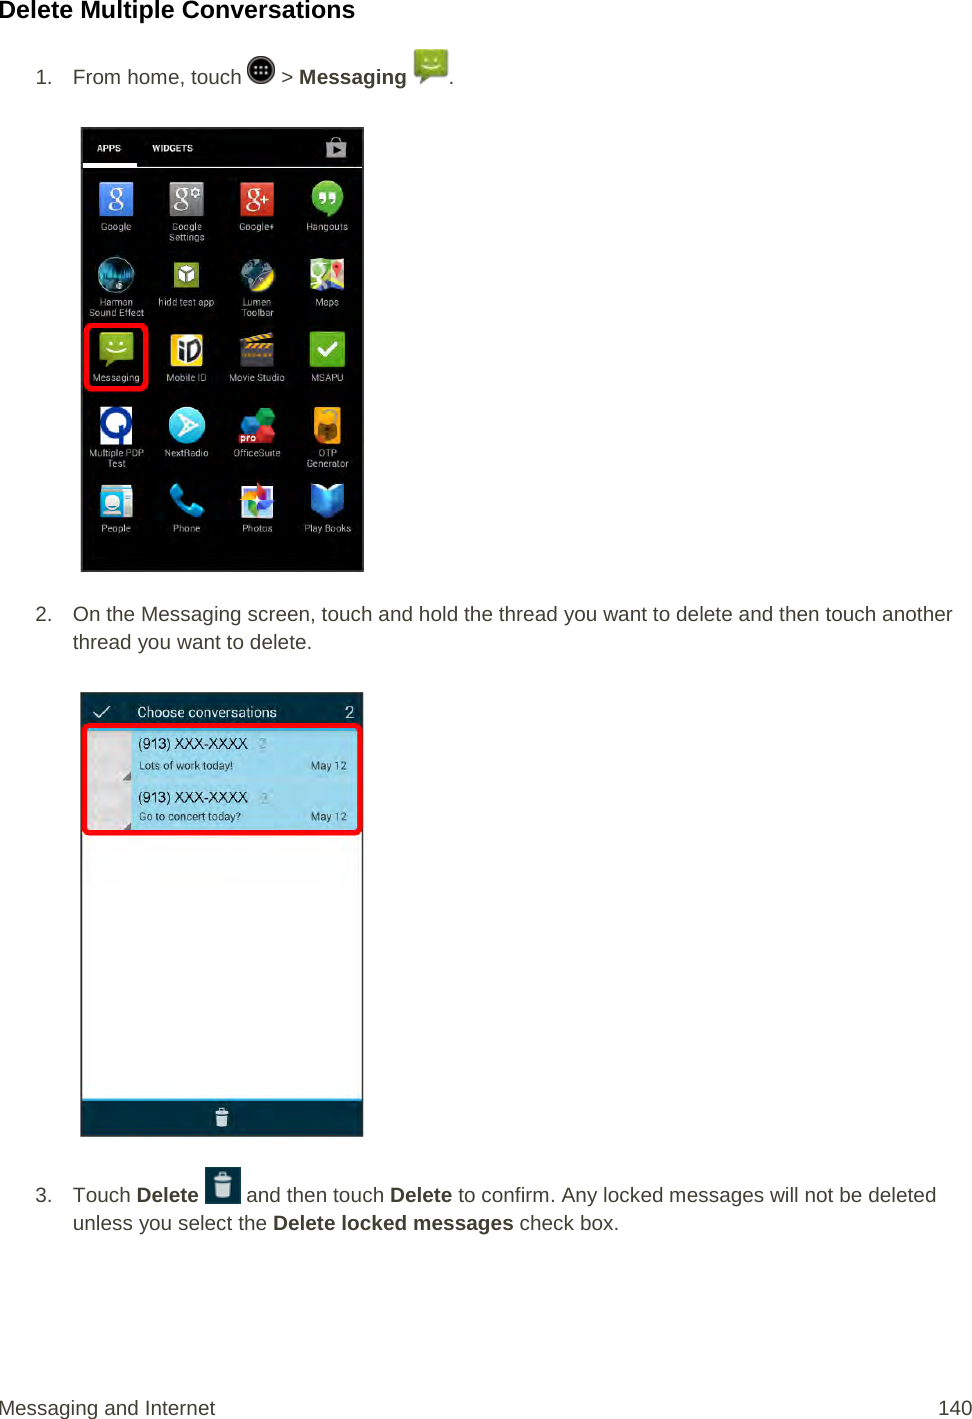
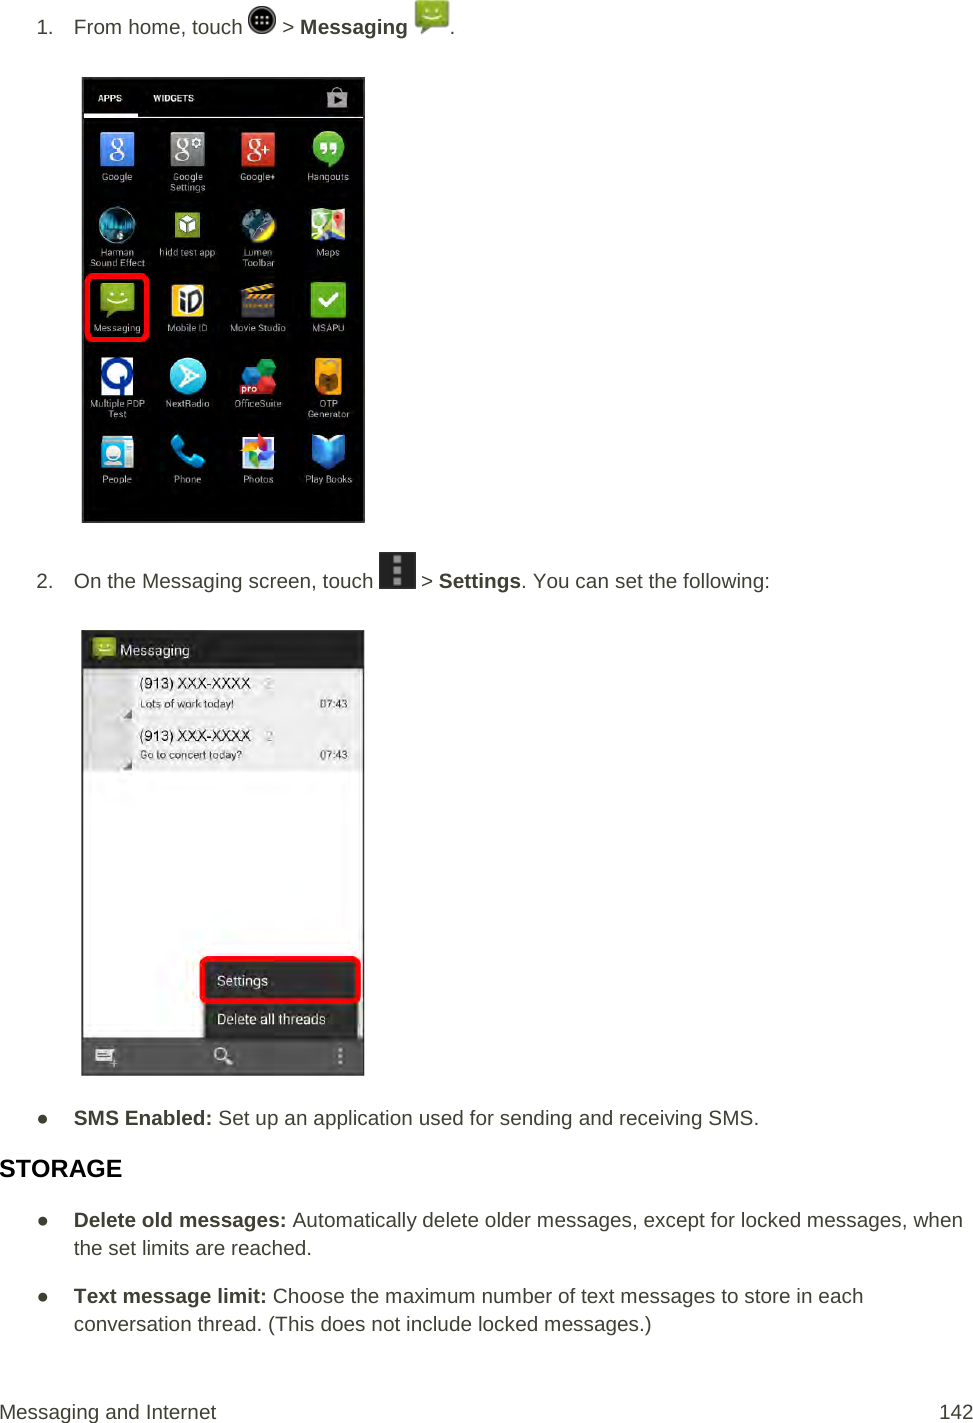
![3. Touch and hold the message that you want to lock. [illustration] 4. Touch Lock on the Message options menu. A lock icon is displayed at the right hand side of the message. [illustration] The message is locked. Delete a Conversation 1. From home, touch > Messaging . Messaging and Internet 138](https://usermanual.wiki/Sharp/HRO00204.manual/User-Guide-2330332-Page-148.png)
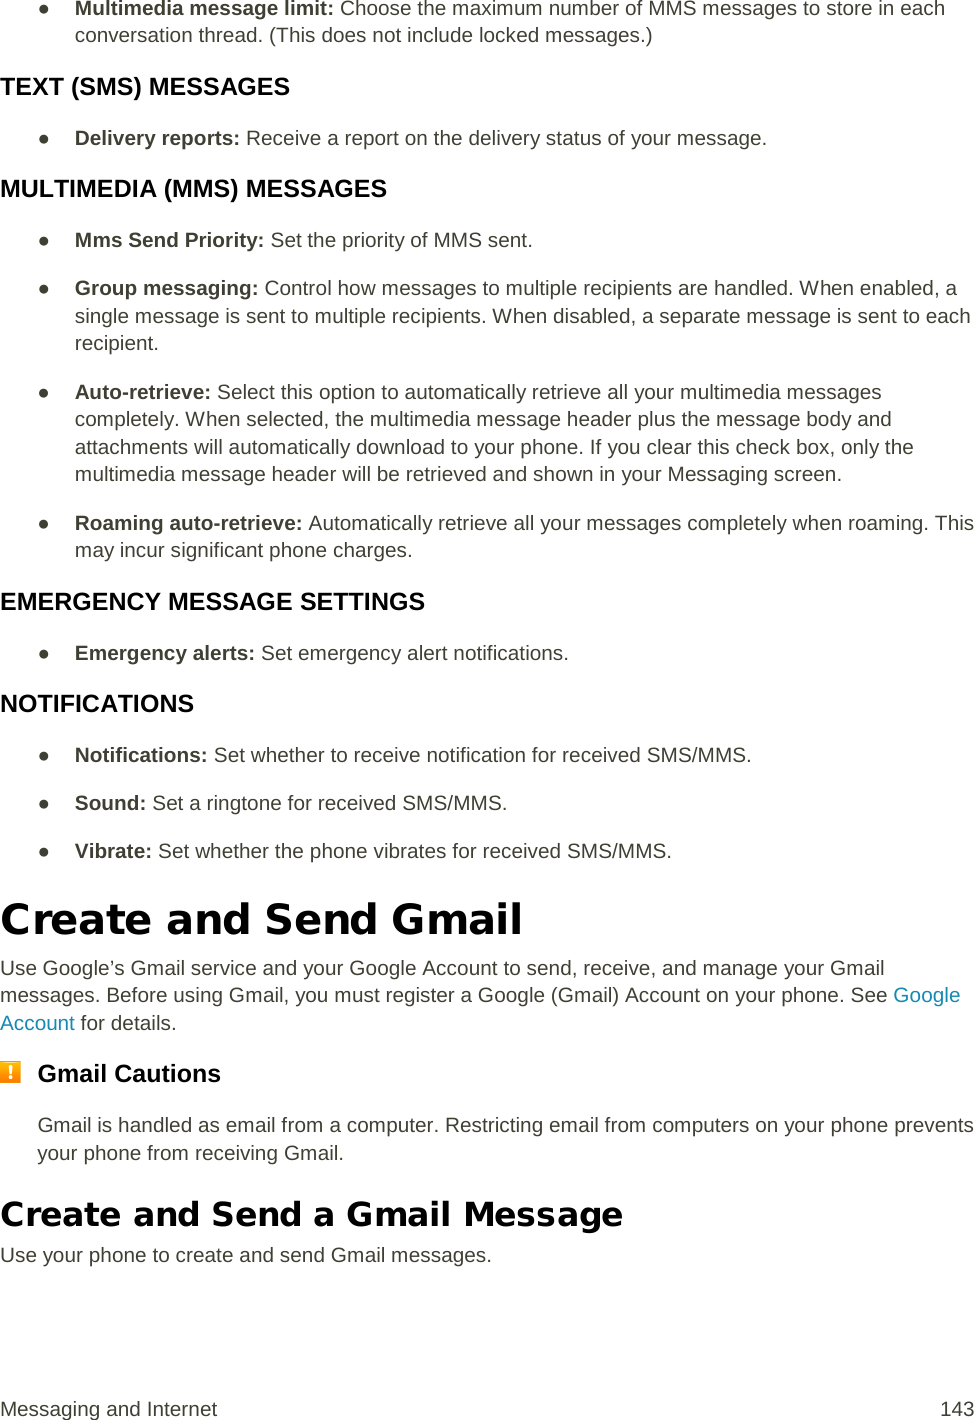
![2. On the Messaging screen, touch the conversation that you want to delete. 3. Touch > Delete thread. [illustration] 4. When prompted to confirm, touch Delete. Any locked messages in the thread will not be deleted unless you select the Delete locked messages check box. [illustration] The conversation is deleted. Messaging and Internet 139](https://usermanual.wiki/Sharp/HRO00204.manual/User-Guide-2330332-Page-149.png)
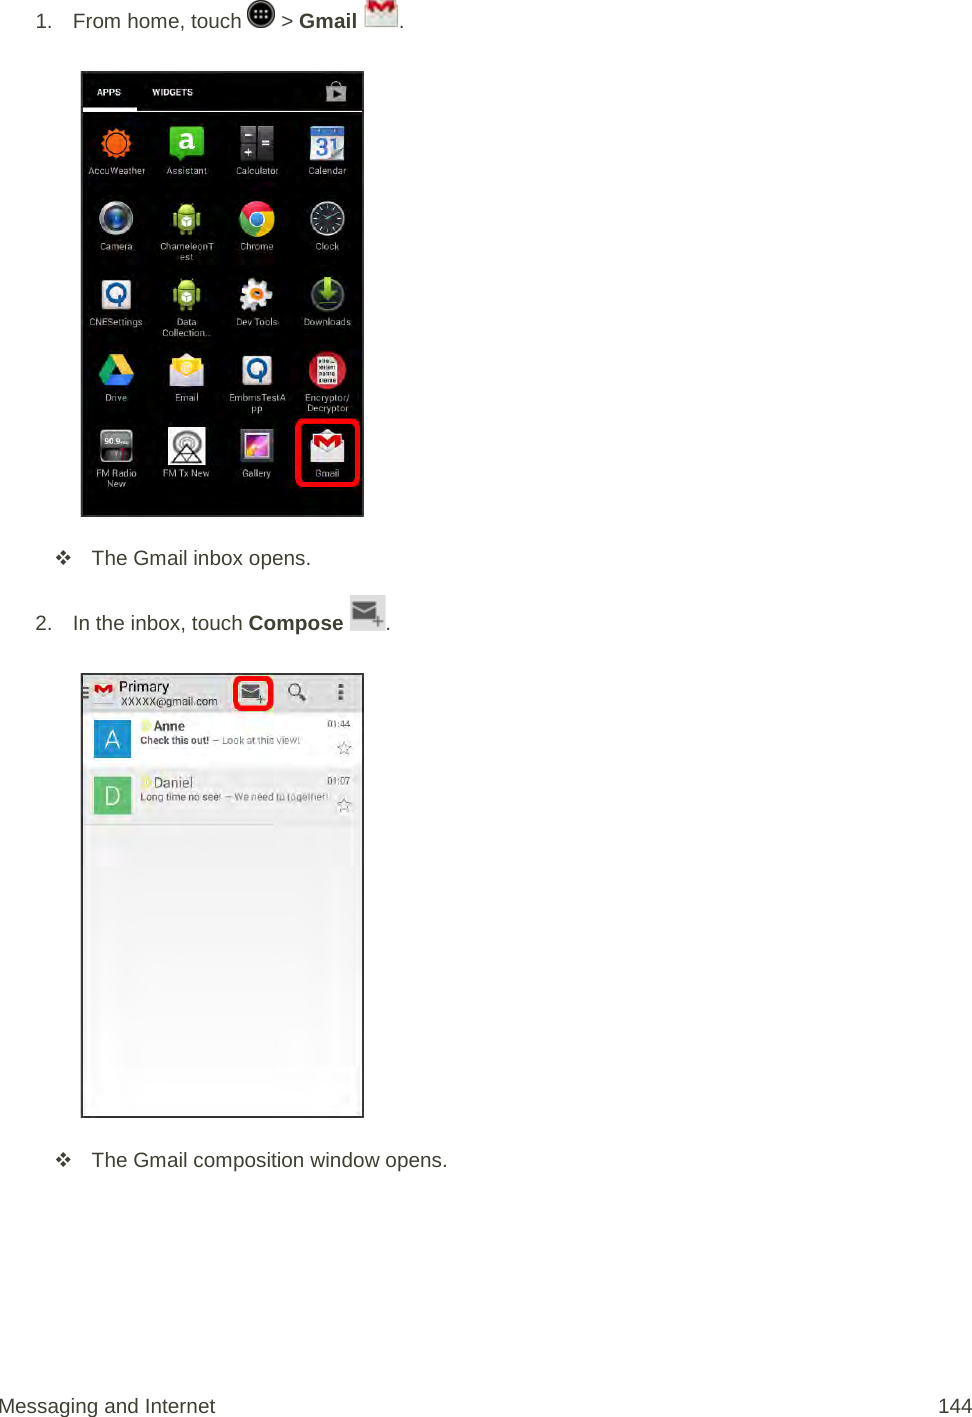
![ The multiple conversations are deleted. Delete a Single Message 1. While viewing a conversation, touch and hold the message that you want to delete. [illustration] If the message is locked, touch Unlock on the options menu and hold the message to display the options menu again. 2. Touch Delete on the options menu. [illustration] 3. When prompted to confirm, touch Delete. [illustration] The message is deleted. View Contact Information from a Message When you have received a message from someone in your stored contacts, you can touch the contact’s picture or icon in the conversation to open a menu of options. Depending on the stored contact information, you can view the contact details, place a phone call or send an email message to the contact, and more. Text and MMS Options The messages settings menu lets you control options for your text and MMS messages including message limits, size settings, and notifications. Messaging and Internet 141](https://usermanual.wiki/Sharp/HRO00204.manual/User-Guide-2330332-Page-151.png)


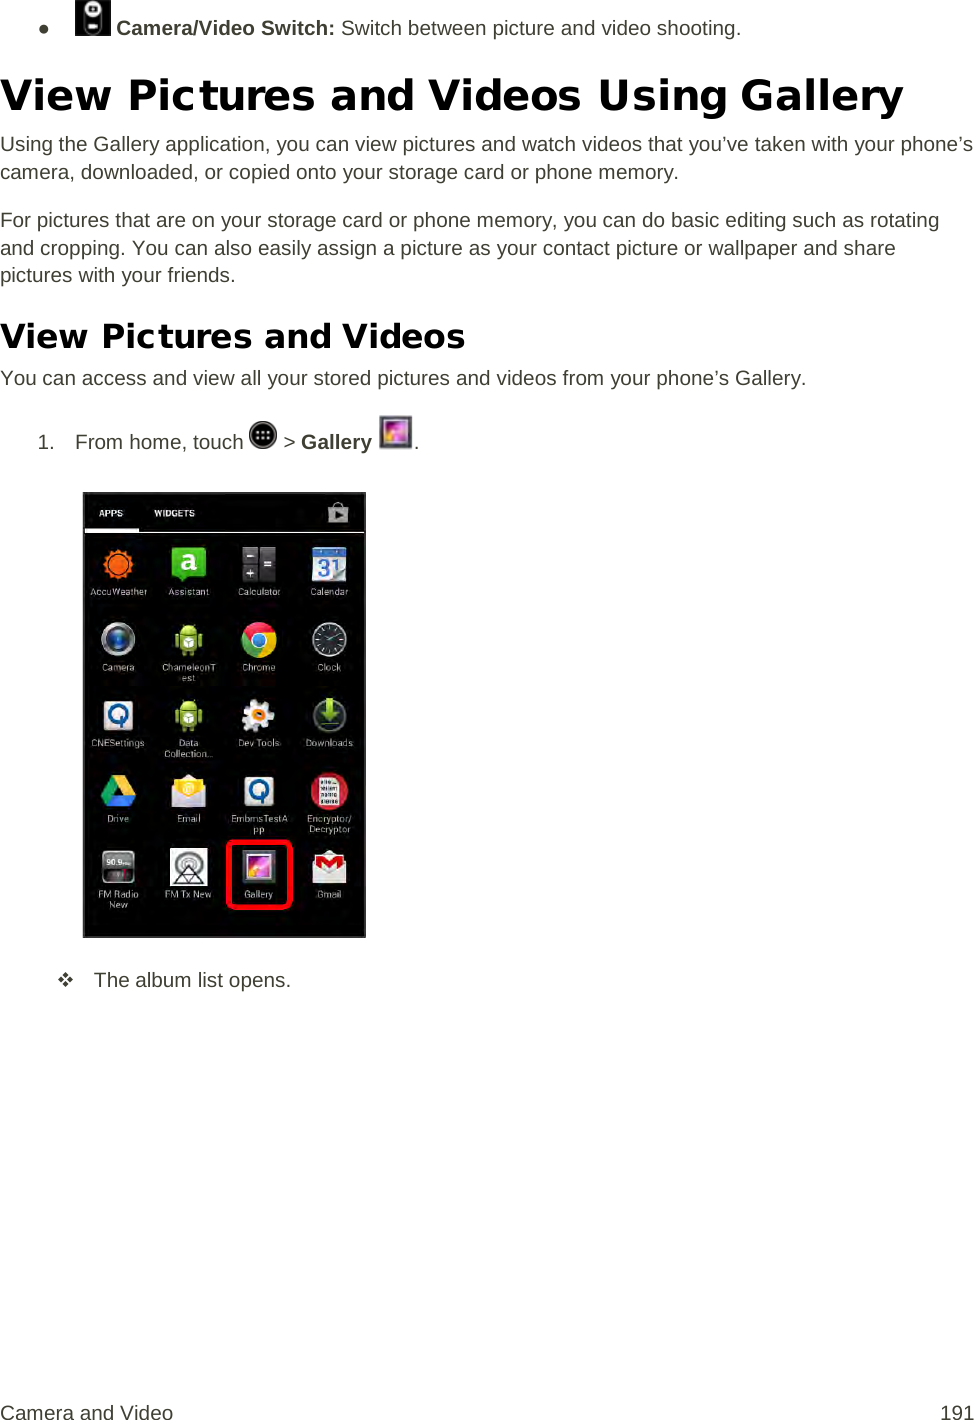
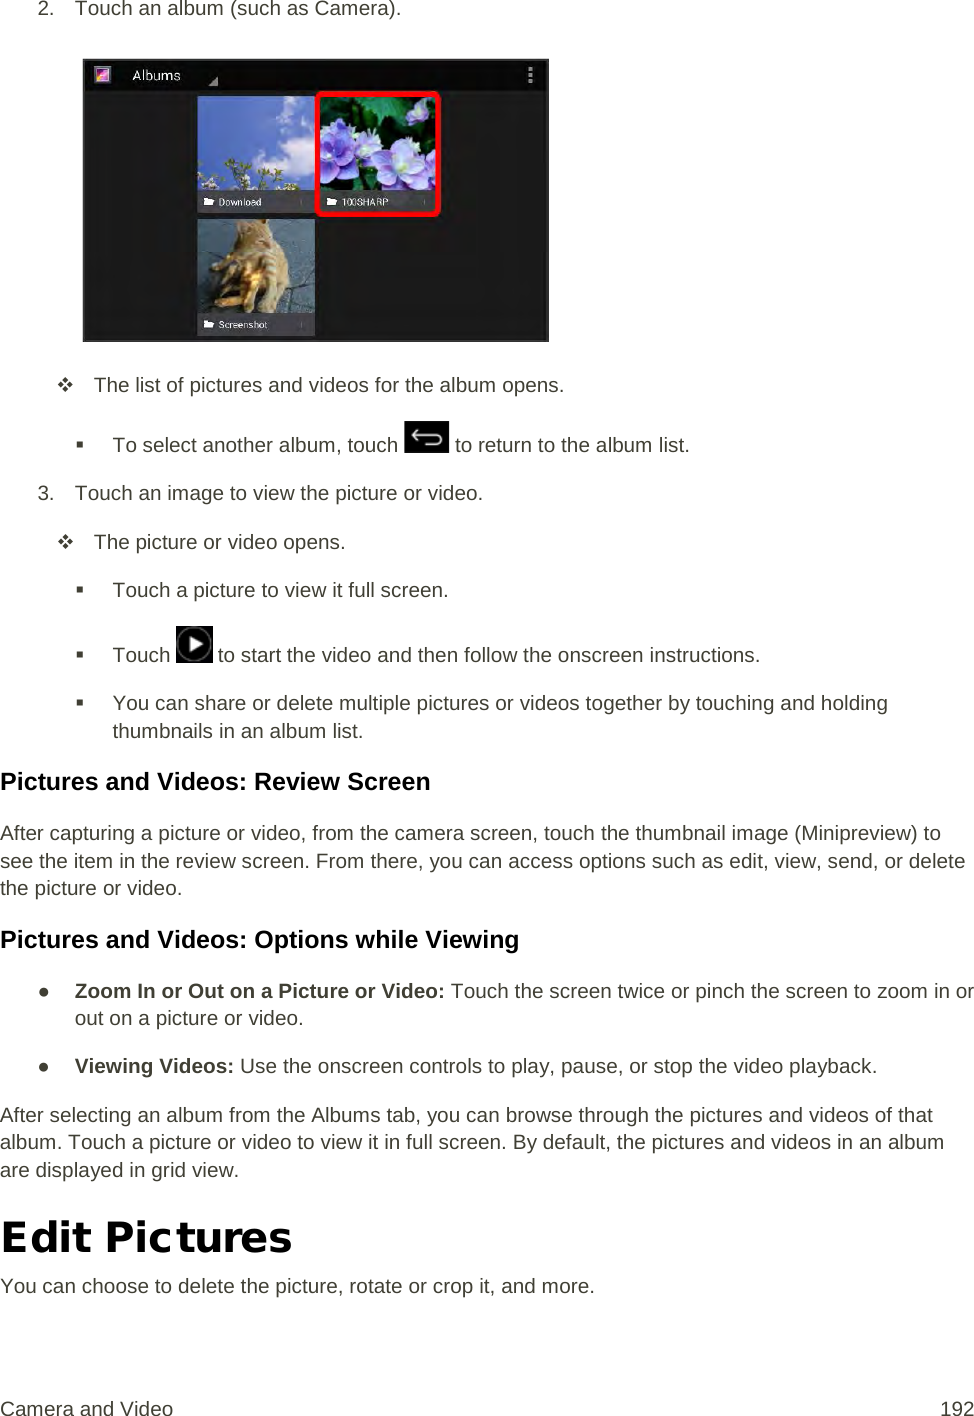
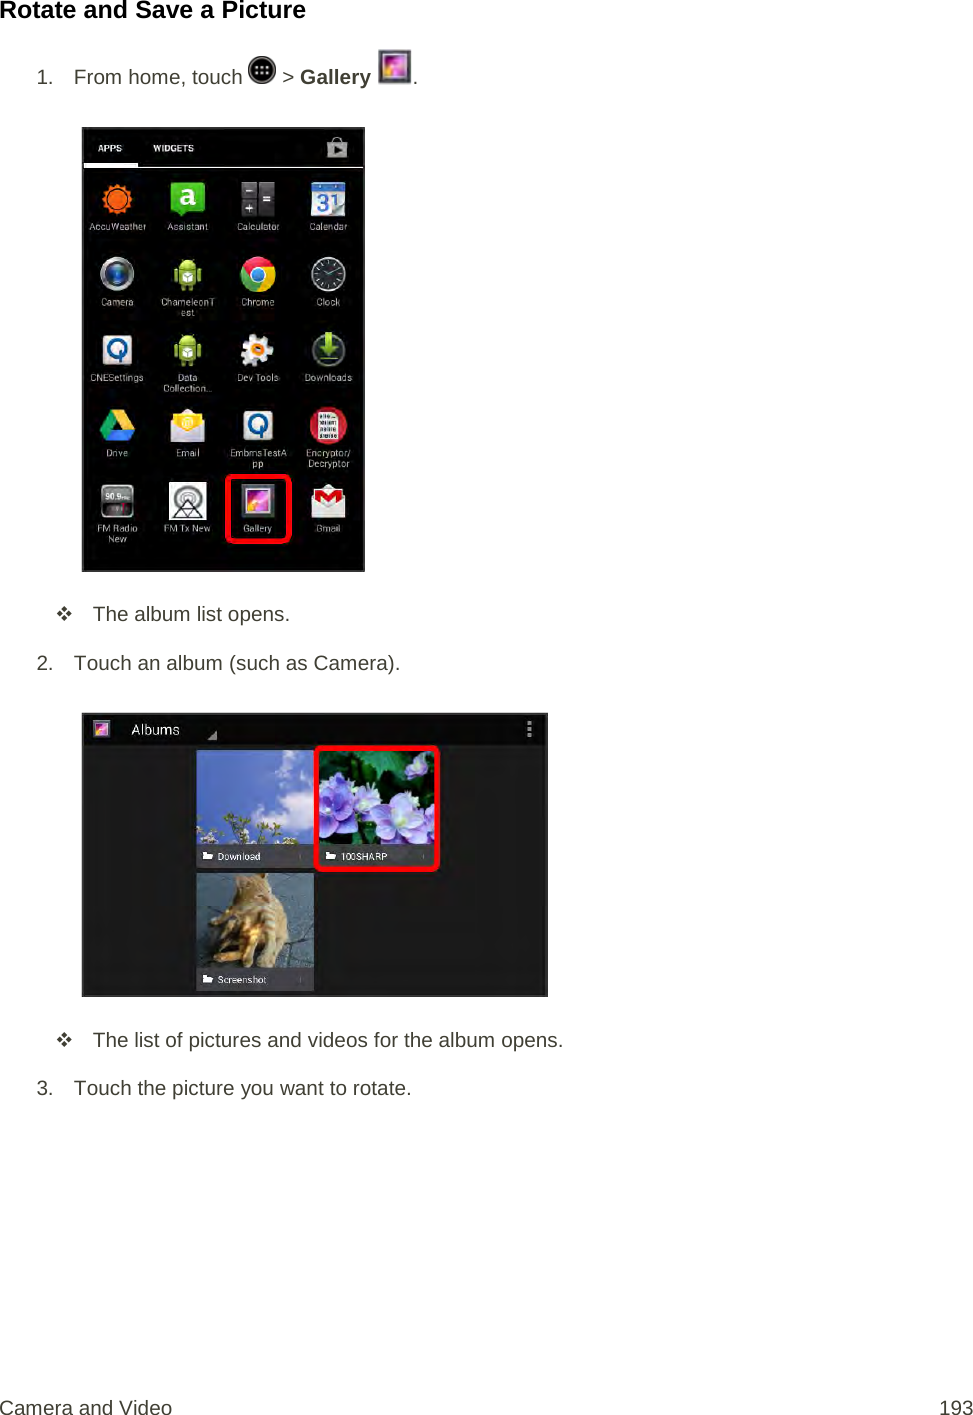
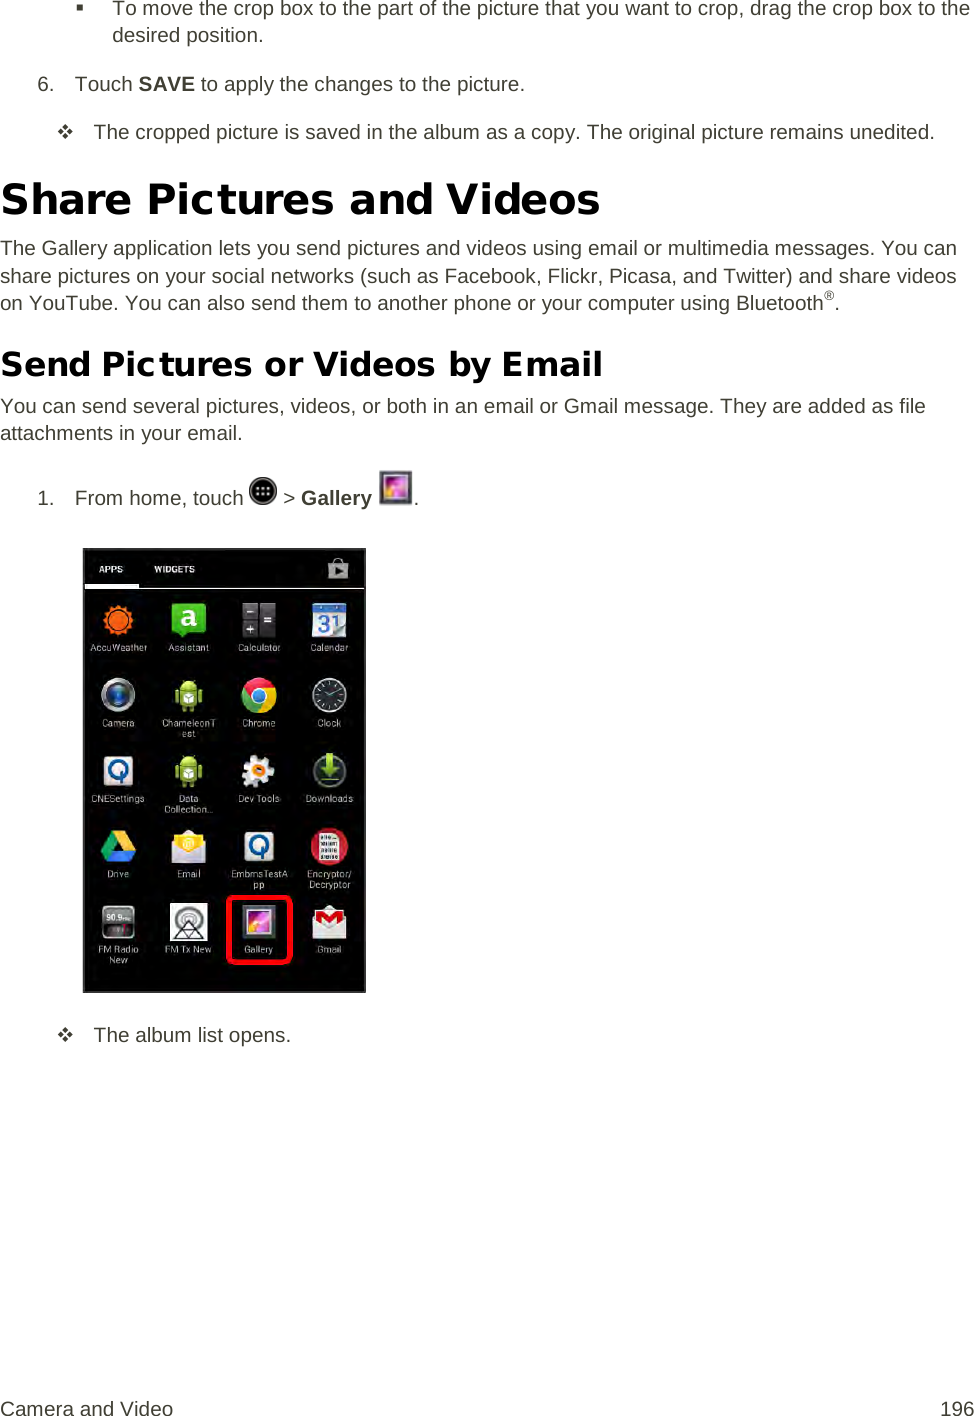
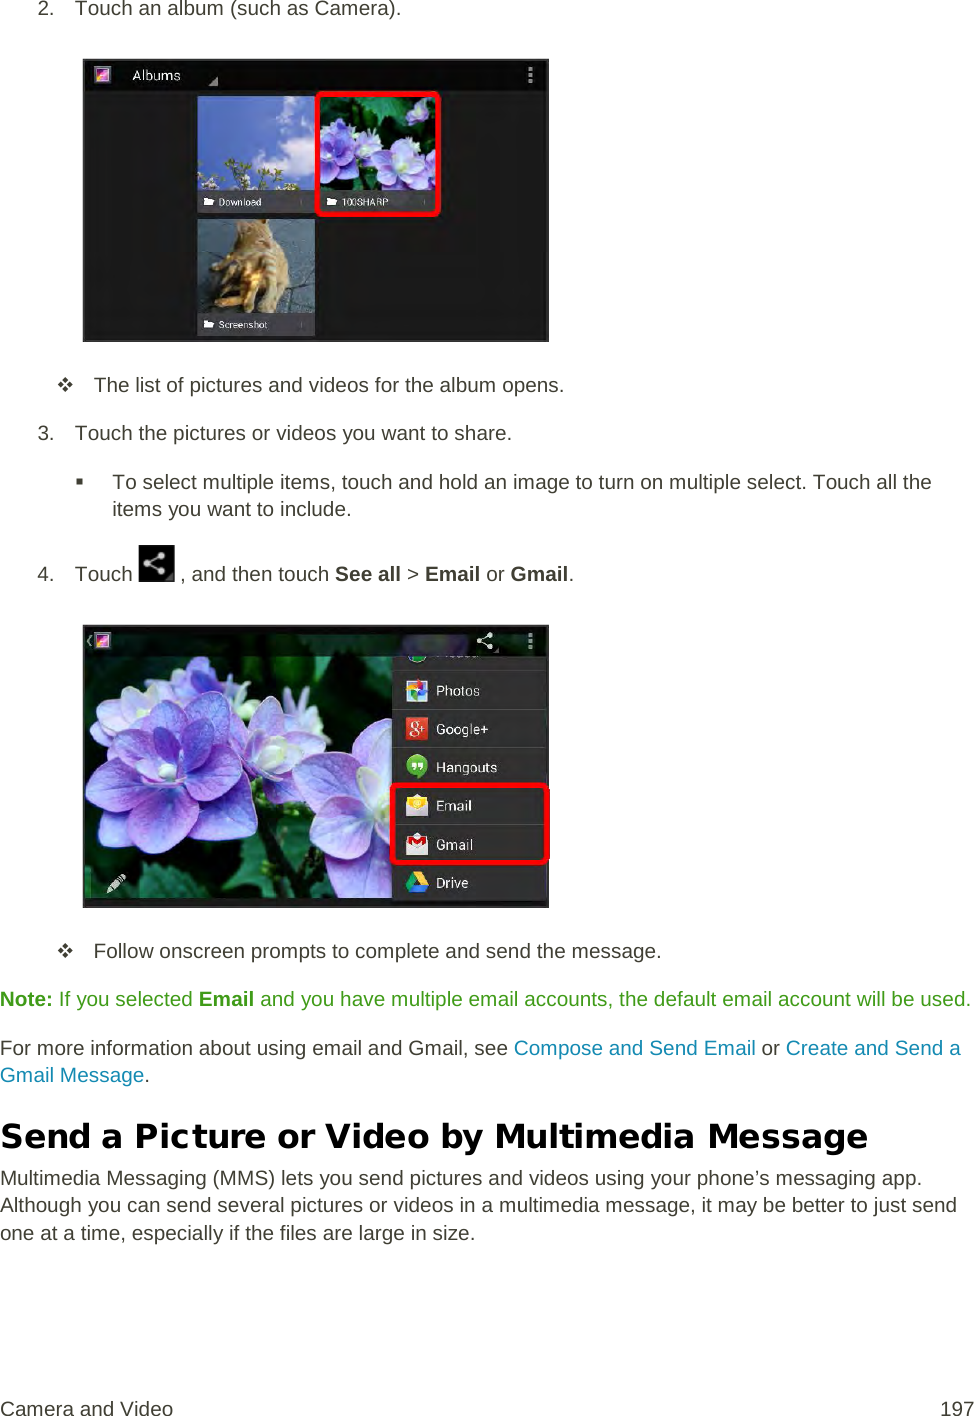
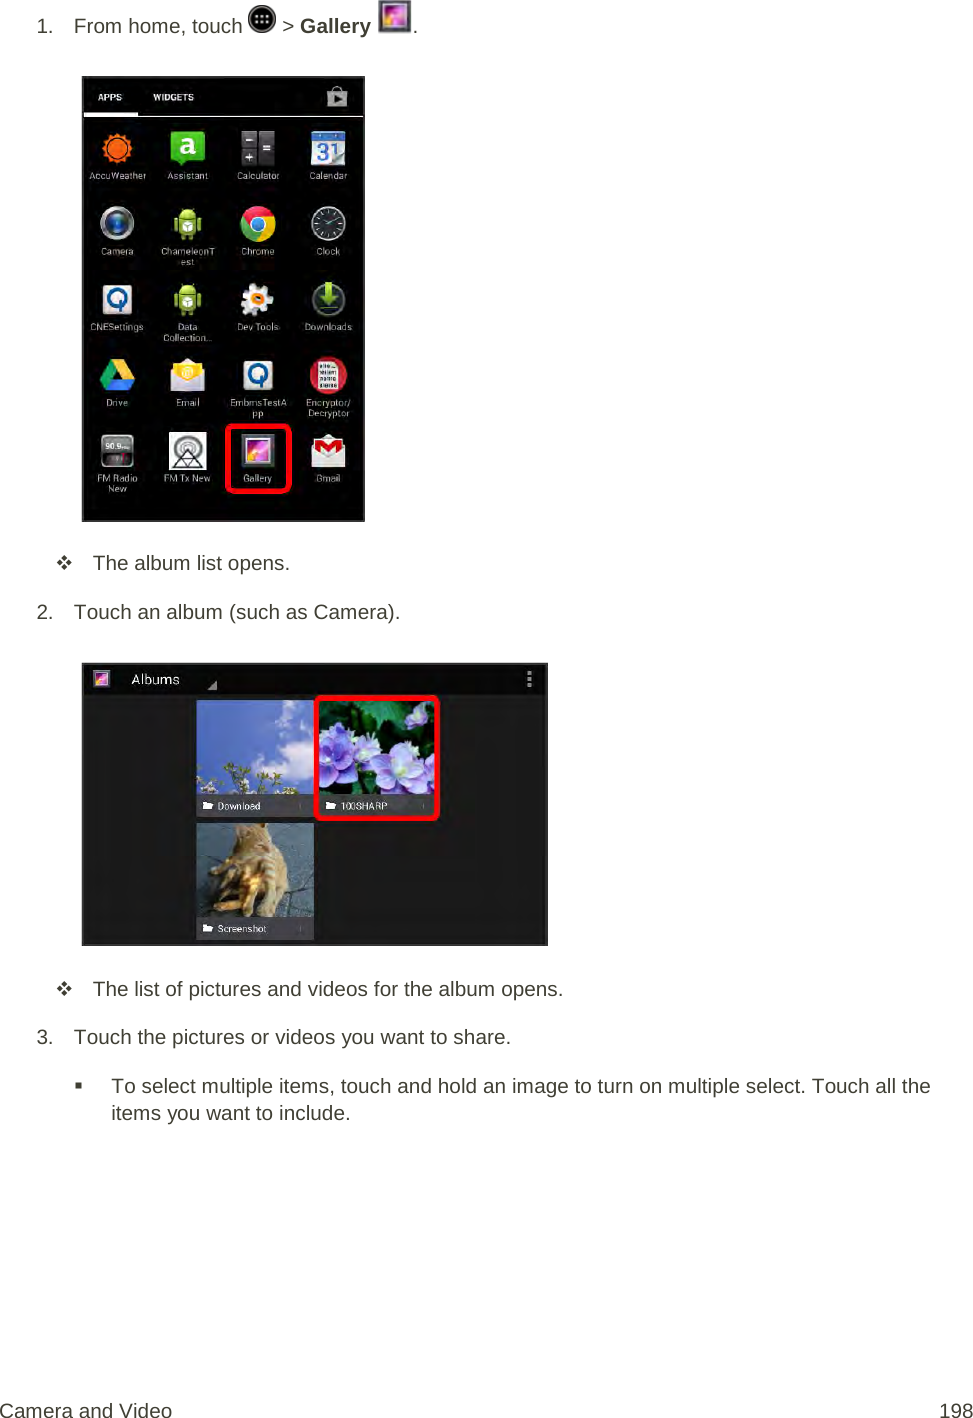
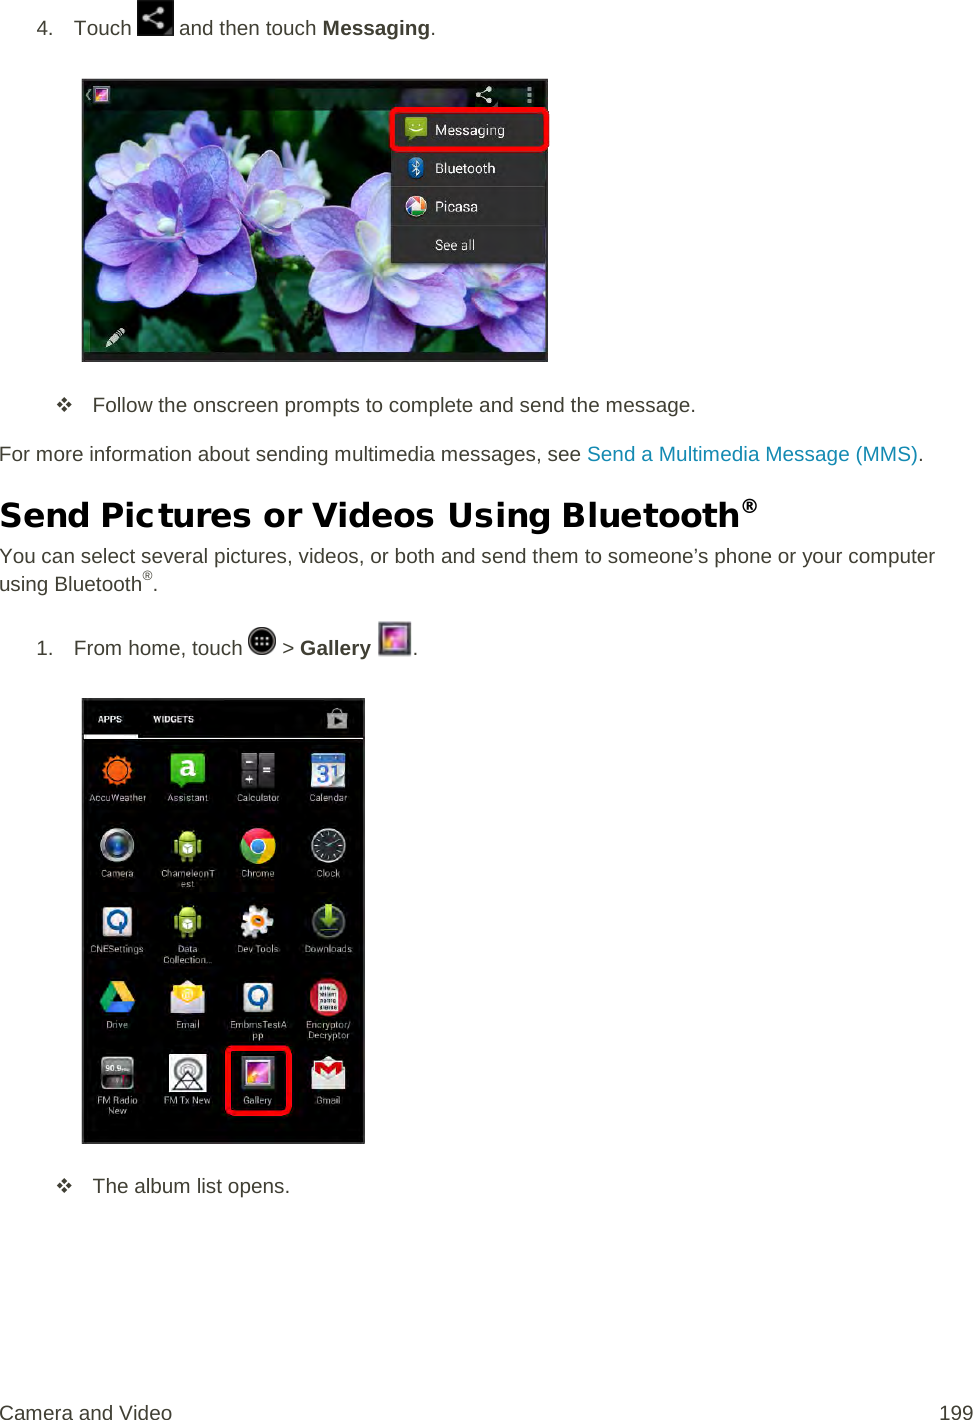
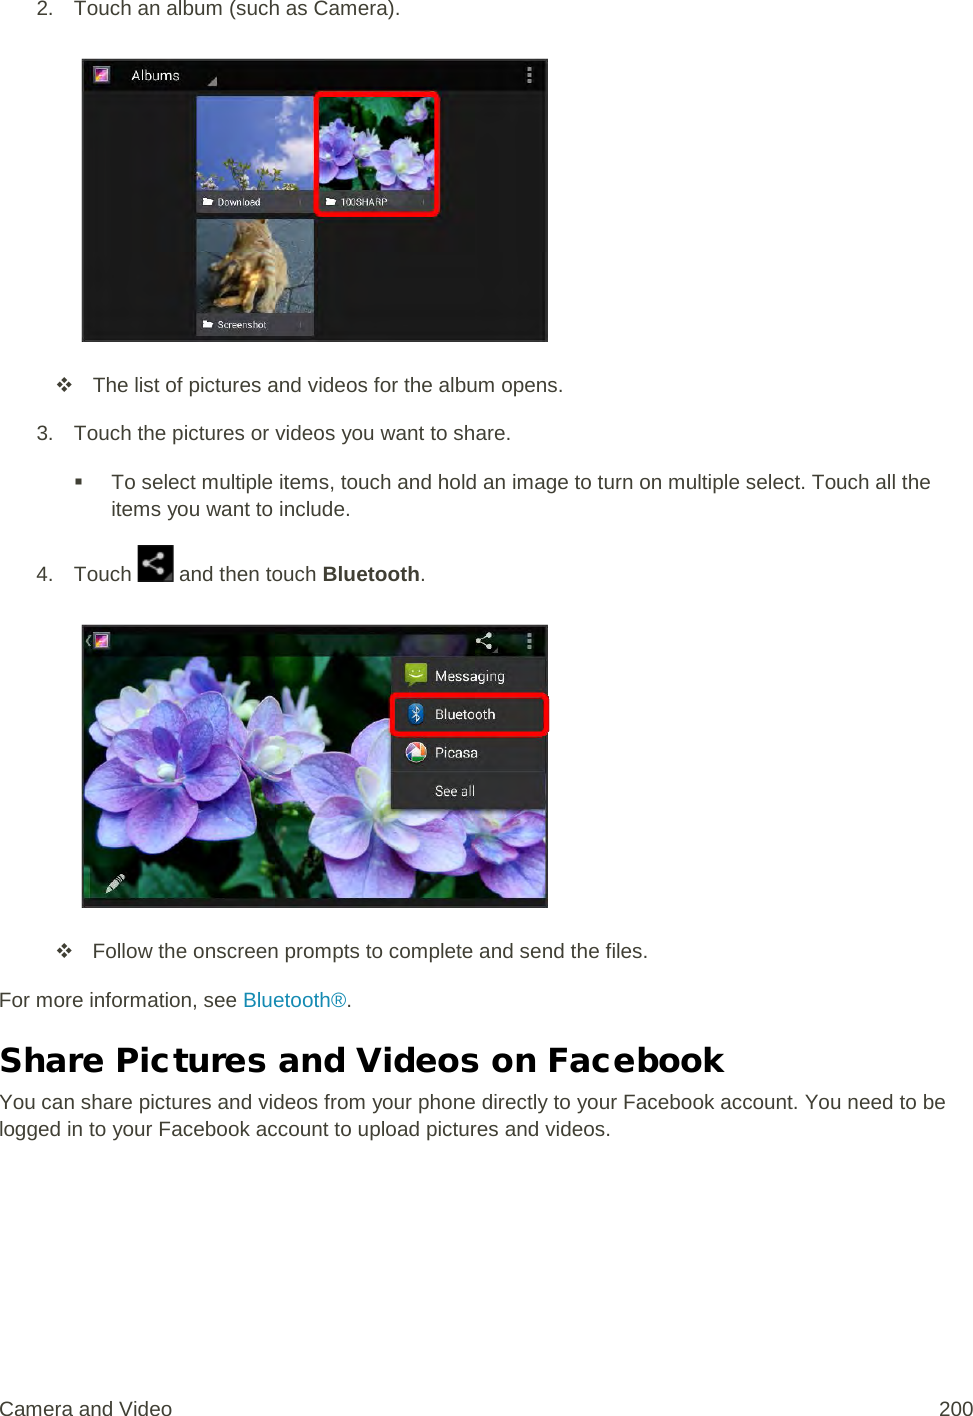
![1. From home, touch > Gallery . The album list opens. 2. Touch an album (such as Camera). The list of pictures and videos for the album opens. 3. Touch the pictures or videos you want to share. To select multiple items, touch and hold an image to turn on multiple select. Touch all the items you want to include. 4. Touch , and then touch See all > Facebook. [illustration] 5. Add a caption and then touch Post. The upload is completed. Camera and Video 201](https://usermanual.wiki/Sharp/HRO00204.manual/User-Guide-2330332-Page-211.png)
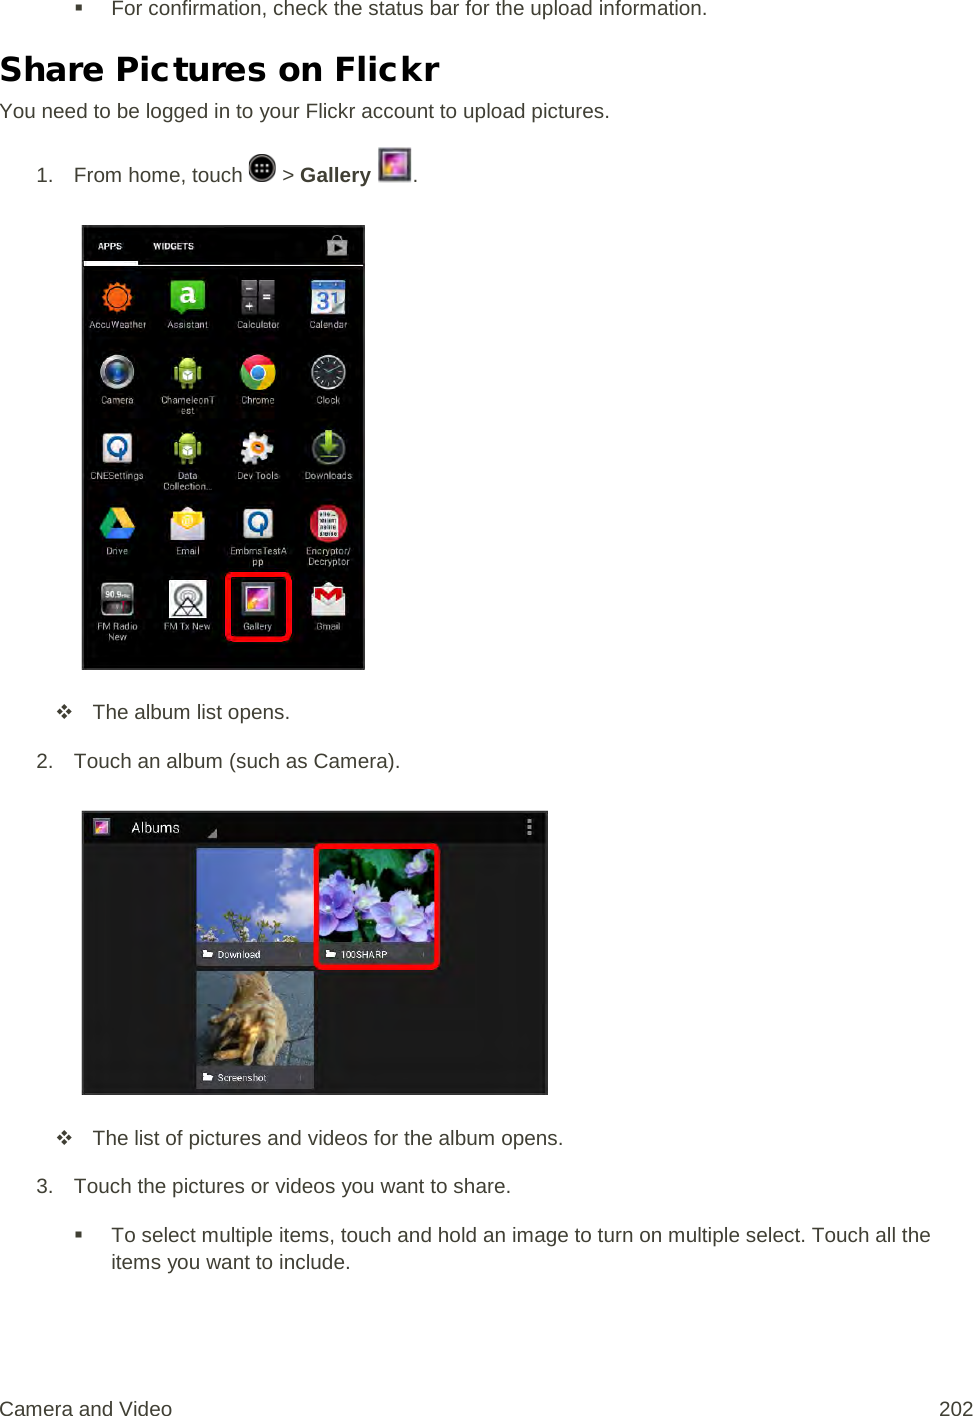
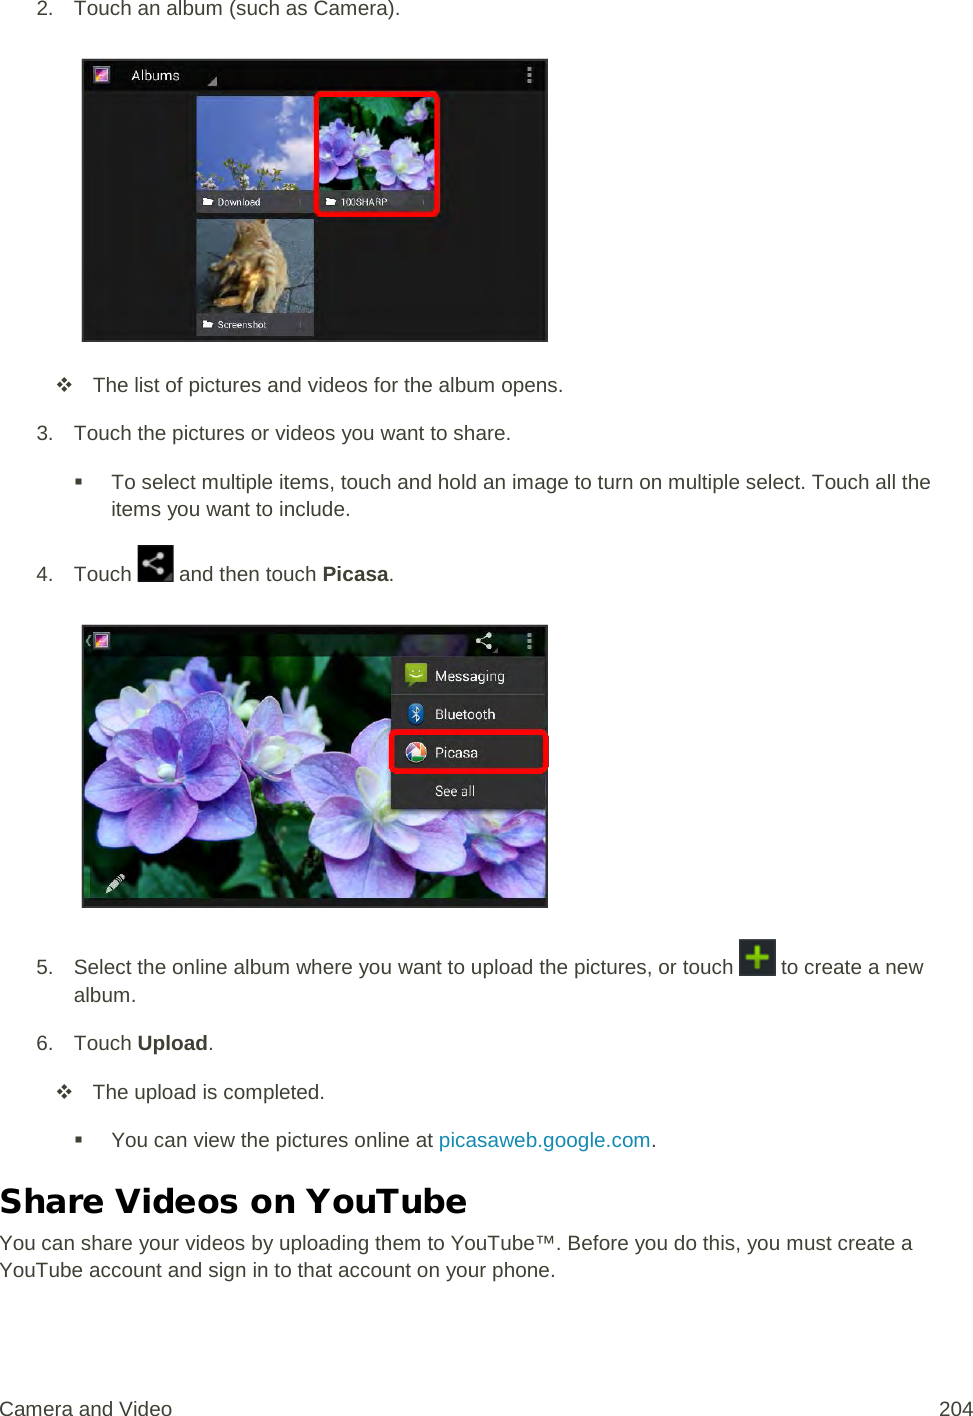
![4. Touch , and then touch See all > Flickr. [illustration] 5. Add a description for the pictures and then touch Upload. Note: If you are not logged in to your Flickr account, you will be prompted to log in and download the Flickr Downloader application. Follow the onscreen instructions to proceed. 6. Select which album to upload to and set privacy settings for the uploaded pictures. 7. Touch Done. The upload is completed. Share Pictures on Picasa You need to be signed in to a Google Account to upload pictures to the Picasa™ picture organizing service. 1. From home, touch > Gallery . The album list opens. Camera and Video 203](https://usermanual.wiki/Sharp/HRO00204.manual/User-Guide-2330332-Page-213.png)
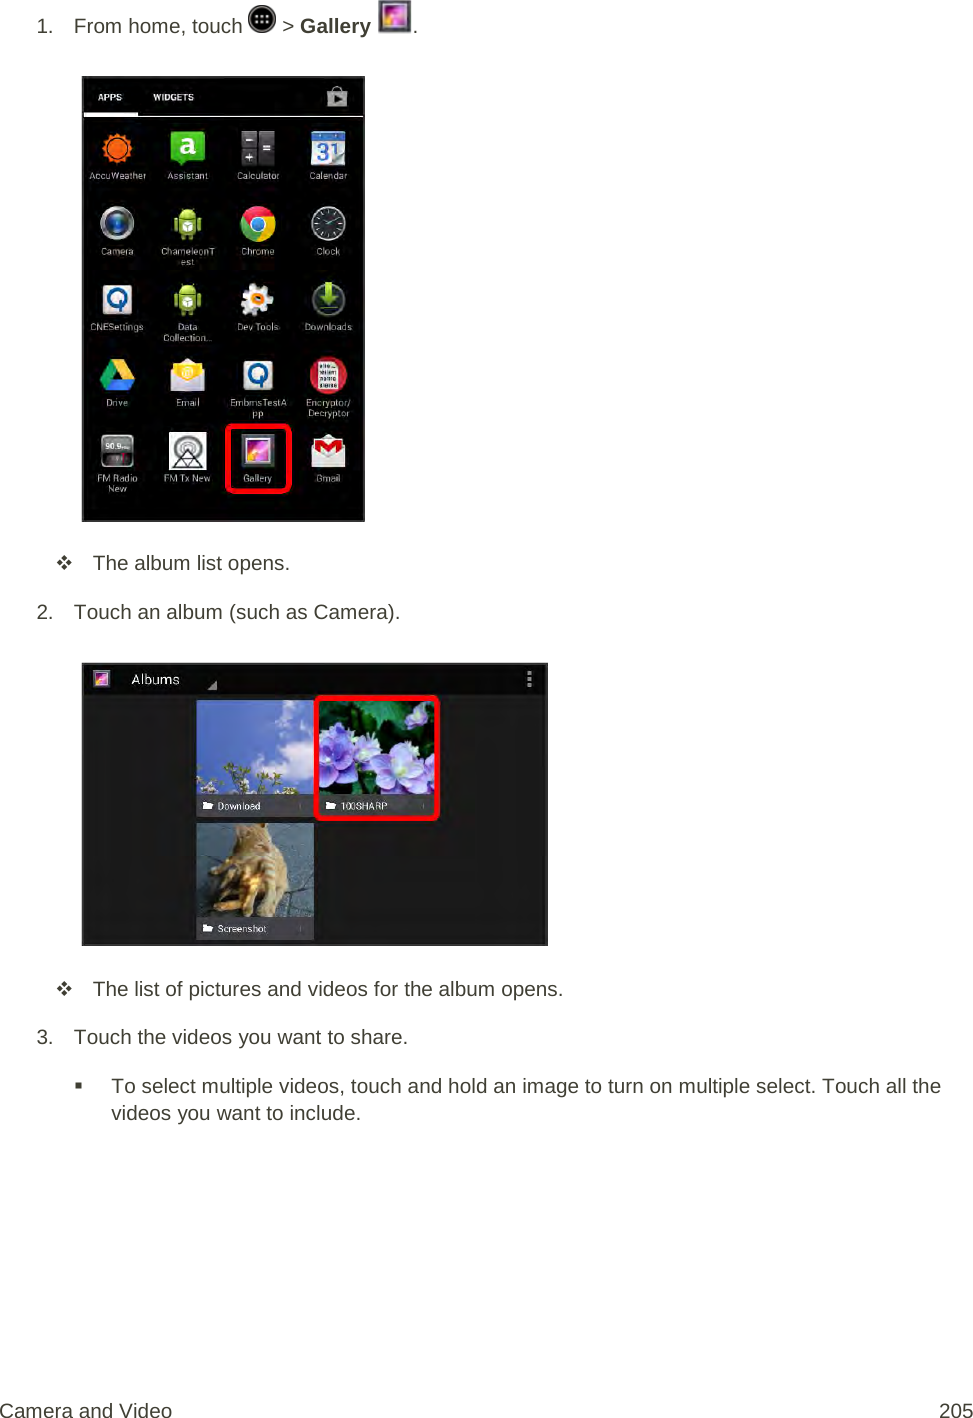
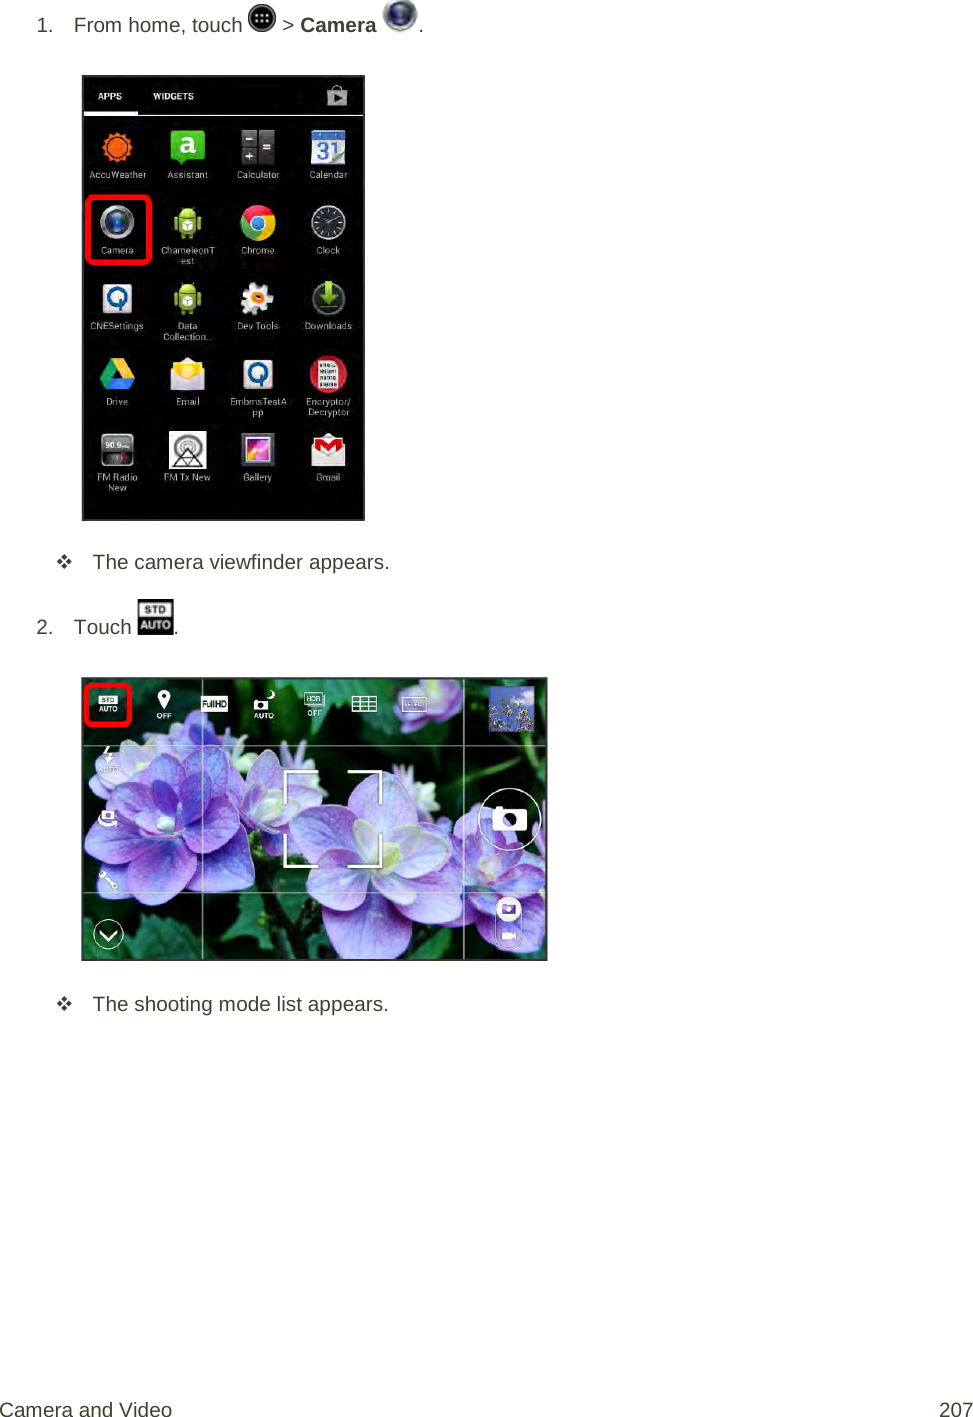
![4. Touch , and then touch See all > Youtube. If prompted, select an account and then touch OK. 5. Enter the prompted information, such as description and tags, and select a privacy option. 6. Touch [Upload icon]. The upload is completed. Camera Settings You can adjust your camera’s settings using the icons on the main camera screen and the full camera settings menu. Switch Cameras Your phone lets you use different types of cameras. Camera and Video 206](https://usermanual.wiki/Sharp/HRO00204.manual/User-Guide-2330332-Page-216.png)
![Save a Direct Connect Number You can store Direct Connect numbers in All Contacts just like traditional phone numbers. Note: Direct Connect numbers can also be stored in the phone’s Contacts app. See Contacts for details. All numbers stored in Contacts will also appear in the Direct Connect app All Contacts list. 1. From home, touch > Sprint Direct Connect Now. [illustration] 2. Touch the Keypad tab in the header row to display the Direct Connect keypad. You may need to swipe the row left or right to display the Keypad tab. 3. Enter a Direct Connect Numbers. The Direct Connect number may be the ten-digit wireless phone number of the contact. – or – The Direct Connect number may be a unique number made up of three sets of digits separated by asterisks (for example, 444*5555*111). When saving this type of number, always include the asterisks (*). 4. Touch > OK. [illustration] 5. Do one of the following: If you want to add the number to an existing contact, scroll to and touch the entry. • Select Mobile for the type of phone number. If you want to save the number to a new contact entry, touch Create New Contact. Useful Features 213](https://usermanual.wiki/Sharp/HRO00204.manual/User-Guide-2330332-Page-223.png)
![• Enter the name for the contact and any additional information. 6. Touch Done to save your changes. Note: All Direct Connect users with Nextel or PowerSource phones must ALWAYS use an asterisk (*) between sets of digits, even if they are calling another user whose Direct Connect number is the same as their wireless phone number. Make sure to include the asterisks when giving your number to a Nextel or PowerSource user (for example, if your number is 555-555-1234, when giving it to a Nextel or PowerSource user, it should be 555*555*1234). Assign Direct Connect Contacts as Favorites For easy access to your Direct Connect contacts, you can assign contacts with Direct Connect numbers to your Favorites. To assign a Direct Connect contact as a Favorite: 1. From home, touch > Sprint Direct Connect Now. [illustration] 2. Touch the All Contacts tab. [illustration] 3. Touch the image on the left side of a contact to display the options menu, and then touch Add to favorites. Tip: To add multiple favorites at once, touch the Favorites tab > Add to favorites, and then touch the check marks next to the entries you want to add. If a contact contains multiple numbers, you’ll be prompted to select a number. When you’re finished, touch Done. To make a Direct Connect call to a Favorite: 1. From home, touch > Sprint Direct Connect Now. [illustration] 2. Touch the Favorites tab. [illustration] 3. Touch a contact and then touch and hold the Push To Talk icon on the screen. [illustration] For details on Direct Connect calls, see Make Direct Connect Calls. Useful Features 214](https://usermanual.wiki/Sharp/HRO00204.manual/User-Guide-2330332-Page-224.png)
![Make Direct Connect Calls You can make a Direct Connect call by entering a Direct Connect number manually or by selecting an entry containing a Direct Connect number in your SDC Now All Contacts, Recents, or Favorites. For information on saving Direct Contact numbers to All Contacts, see Direct Connect Contacts. Make a Direct Connect Call by Entering a Number Place a Direct Connect call by entering a Direct Connect number with your keypad. 1. From home, touch > Sprint Direct Connect Now. [illustration] 2. Touch Keypad, and enter a Direct Connect Numbers. I 3. Touch Connect. [illustration] 4. Touch and release the Push To Talk icon on the screen. Touching and releasing the Push To Talk icon “pings” the recipient. The recipient’s phone emits an incoming tone and displays your name or number. If available, he or she can choose to respond and begin the conversation. Alternatively, you can touch and hold the icon and speak after you hear a tone (and the icon turns green). In this case, your voice will broadcast instantly over the recipient’s speaker. Pinging the recipient’s phone by touching and releasing may avoid unintentional interruptions. Useful Features 215](https://usermanual.wiki/Sharp/HRO00204.manual/User-Guide-2330332-Page-225.png)
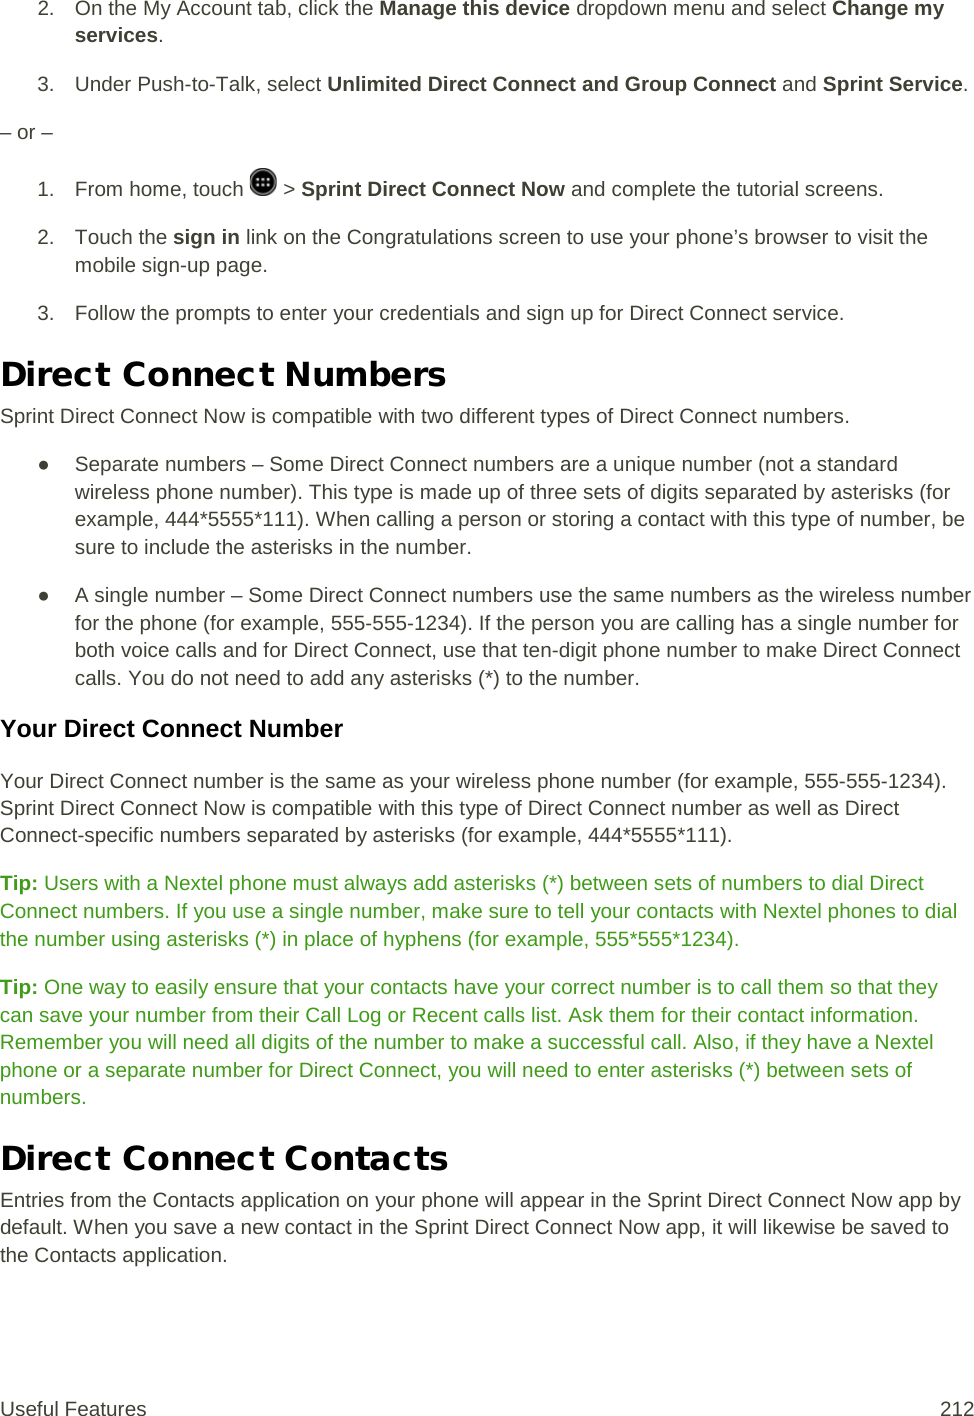
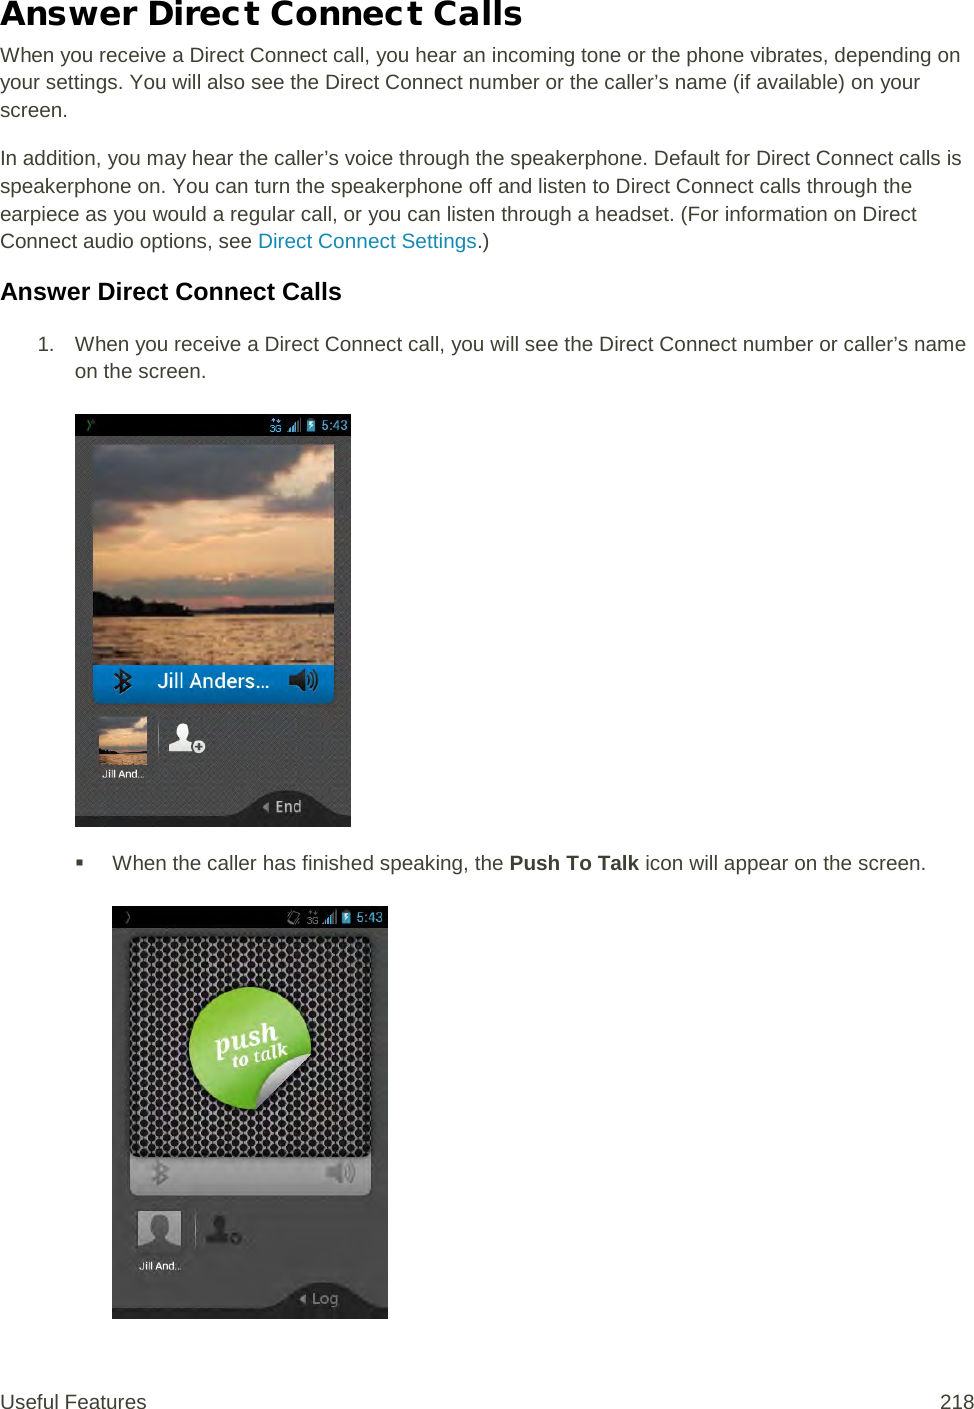
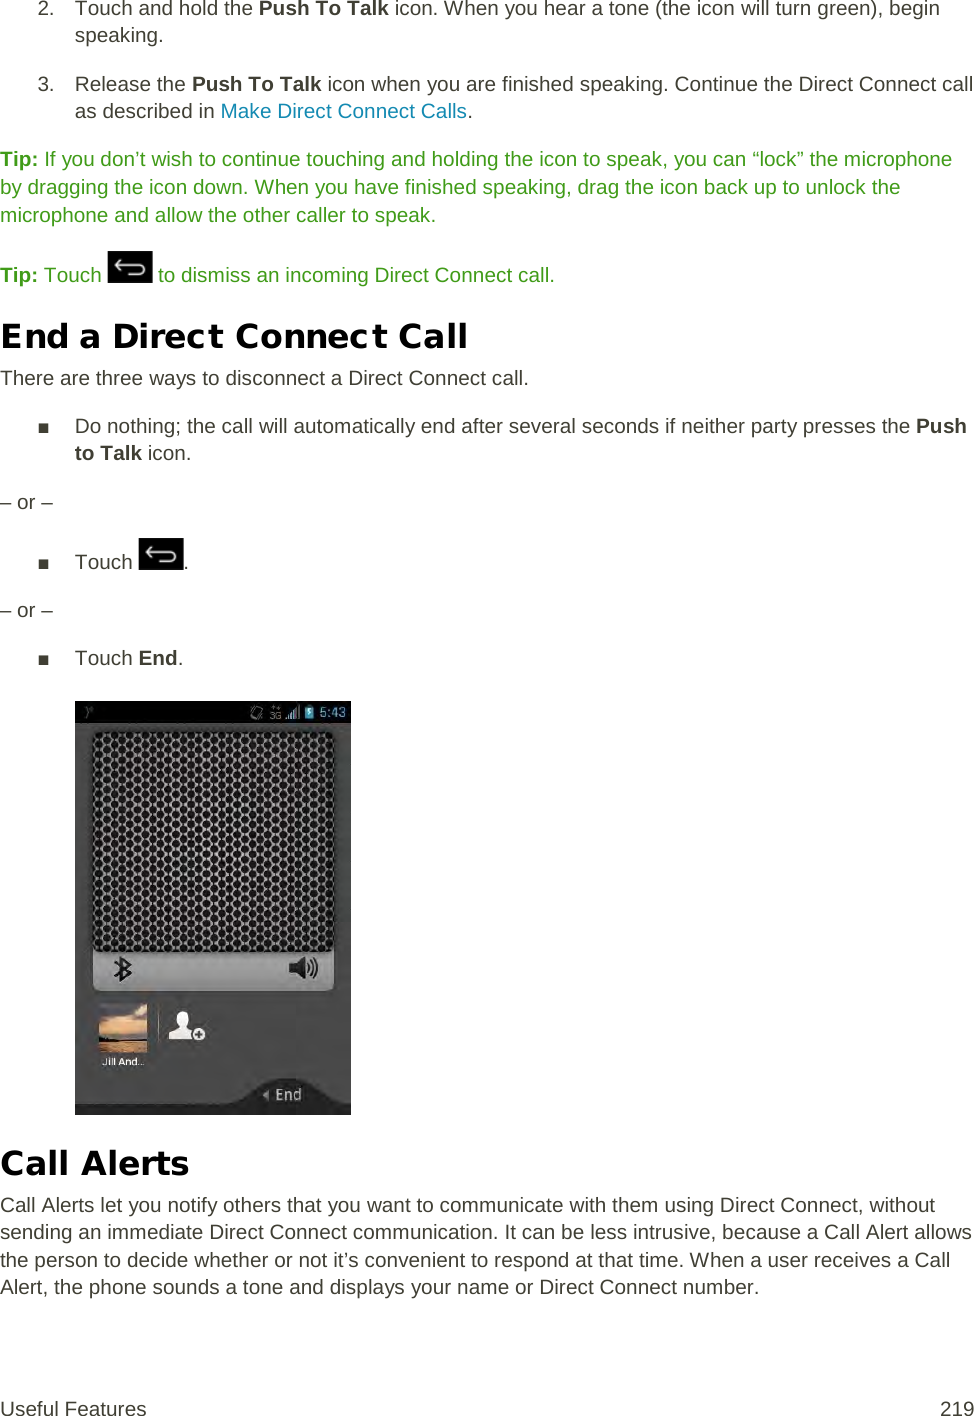
![Note: To redial your most recent Direct Connect call, touch and hold the Push To Talk icon. 5. Release the Push To Talk icon to listen. 6. Touch End to end the call. [illustration] Note: All Direct Connect calls end automatically if there is no activity on the call for several seconds. Make a Direct Connect Call from All Contacts 1. From home, touch > Sprint Direct Connect Now. [illustration] 2. Touch All Contacts. Useful Features 216](https://usermanual.wiki/Sharp/HRO00204.manual/User-Guide-2330332-Page-226.png)
![3. Touch the contact you’d like to talk to via Direct Connect. 4. Touch and hold the Push To Talk icon on the screen to initiate the call. [illustration] Follow the directions above, under “Make a Direct Connect Call by Entering a Number,” to continue and complete the Direct Connect call. Make a Direct Connect Call from Recents 1. From home, touch > Sprint Direct Connect Now. [illustration] 2. Touch Recents. 3. Touch the Direct Connect entry you’d like to talk to. 4. Touch and hold the Push To Talk icon on the screen to initiate the call. [illustration] Follow the directions above, under “Make a Direct Connect Call by Entering a Number,” to continue and complete the Direct Connect call. Tip: In addition to touching and holding the icon to speak, you can “lock” the microphone by dragging it down. When you have finished speaking, drag the icon back up to unlock the microphone and allow the other caller to speak. Useful Features 217](https://usermanual.wiki/Sharp/HRO00204.manual/User-Guide-2330332-Page-227.png)
![Send a Call Alert by Entering a Number 1. From home, touch > Sprint Direct Connect Now. [illustration] 2. Touch Keypad, and enter a Direct Connect Numbers. [illustration] 3. Touch Send Alert. [illustration] 4. Touch Send to send the Call Alert immediately. Tip: If you get an error message saying that the “Alert failed,” please check to see that you have entered a valid Direct Connect number. Send a Call Alert from Contacts 1. From home, touch > Sprint Direct Connect Now. [illustration] 2. Touch All Contacts. [illustration] 3. Touch the image on the left side of a contact to display the options menu. [illustration] 4. Touch Send Alert. Useful Features 220](https://usermanual.wiki/Sharp/HRO00204.manual/User-Guide-2330332-Page-230.png)
![5. Touch Send to send the Call Alert immediately. Tip: If you get an error message saying that the “Alert failed,” please check to see that you have selected a contact with a valid Direct Connect number. Preset Text Feature with Call Alert You may attach a brief preset text message to a Call Alert. 1. Enter a Direct Connect number or select a number from Recents, All Contacts, or Favorites. [illustration] 2. Follow the steps above on how to initiate an alert. 3. After you touch Send Alert, touch the message you want to include, and then touch Send to initiate the Call Alert. Note: Preset text messages with Call Alerts can only be sent to and from Direct Connect users with Sprint phones. If you send a Call Alert with text to another Direct Connect subscriber without this capability (such as a Nextel user), the user will receive the Call Alert but will not receive the text message. Note: There is no additional charge to send preset text messages with Call Alerts. Reply to a Call Alert When someone sends you a Call Alert, you hear an incoming tone or the phone vibrates, depending on your settings. The Alert message will appear on your screen with the name or Direct Connect number of the person who sent the alert. To respond to a Call Alert: Useful Features 221](https://usermanual.wiki/Sharp/HRO00204.manual/User-Guide-2330332-Page-231.png)
![1. With the Call Alert displayed, touch Connect. 2. Touch and hold the Push To Talk icon to return the call. [illustration] To dismiss a Call Alert: ■ Touch Dismiss. Make Group Connect Calls A Group Connect call is a Direct Connect call made to up to 20 Direct Connect users with Sprint phones nationwide at one time. You can make a Group Connect call by setting up a group entry in the All Contacts, Favorites, or Groups tabs of the Sprint Direct Connect Now app. For information on creating and storing groups, see Create a Group Entry. Important: When making a Group Connect call or creating a group list for Group Connect calls, you must select an entry’s Direct Connect–capable number. If you select a number that is not Direct Connect–capable, the name will be added to the list, but Group Connect calls will not go through to that group member. You can make Group Connect calls by selecting saved groups from the Groups tab or by selecting from group calls saved in Recents. Make Group Connect Calls from Groups 1. From home, touch > Sprint Direct Connect Now. [illustration] Useful Features 222](https://usermanual.wiki/Sharp/HRO00204.manual/User-Guide-2330332-Page-232.png)
![2. Touch the Groups tab. 3. Touch the group you’d like to talk to via Group Connect. 4. Touch and hold the Push To Talk icon on the screen to initiate the call. [illustration] 5. Continue the Group Connect call in the same manner as a one-to-one Direct Connect call. Note: Only one person at a time may speak on a Group Connect Call. For more information on how Direct Connect calls work, see Make Direct Connect Calls. Note: Currently Sprint phones do not support Group Connect calls with Nextel and PowerSource phones. If your calls are not going through, please check to see whether your contact is using a Sprint phone. Make Group Connect Calls from Recents 1. From home, touch > Sprint Direct Connect Now. [illustration] 2. Touch the Recents tab. [illustration] 3. Touch the group you’d like to talk to via Group Connect. 4. Touch and hold the Push To Talk icon on the screen to initiate the call. [illustration] 5. Continue the Group Connect call in the same manner as a one-to-one Direct Connect call. Useful Features 223](https://usermanual.wiki/Sharp/HRO00204.manual/User-Guide-2330332-Page-233.png)
![For more information on how Direct Connect calls work, see Make Direct Connect Calls. Join or Rejoin a Group Connect Call If you are not available at the beginning of a Group Connect call, or if you drop off the call temporarily, you can rejoin the in-progress Group Connect call. 1. Touch the Recents tab. [illustration] 2. Touch the group call, and touch the Push To Talk icon. [illustration] 3. Continue the Group Connect call as described previously. Note: If the Group Connect call has already ended, touching the Push To Talk icon initiates a new Group Connect call. Set Group Termination Options For Group Calls that you start, you can select whether they automatically end when you exit the call. 1. From home, touch > Sprint Direct Connect Now. [illustration] 2. Touch the Settings tab and then touch Group call options. 3. Select one of the following: Let continue – to allow the group calls to continue without you End – to end group calls when you exit Useful Features 224](https://usermanual.wiki/Sharp/HRO00204.manual/User-Guide-2330332-Page-234.png)
![Create a Group Entry You can create a group by assigning personal Contacts entries as members and then naming the new group. Each group entry can contain up to 20 members for making Group Connect calls. Currently, the Sprint Direct Connect Now app does not support Group Connect calls with Nextel or PowerSource phones. When creating a group entry, please make sure to include only users with Sprint phones or the Sprint Direct Connect Now app. Important: When making a Group Connect call or creating a group list for Group Connect calls in Contacts, you must select an entry’s Direct Connect–capable number. If you select a number that is not Direct Connect–capable, the name will be added to the list, but Group Connect calls will not go through to that group member. 1. From home, touch > Sprint Direct Connect Now. [illustration] 2. Touch the Groups tab. Useful Features 225](https://usermanual.wiki/Sharp/HRO00204.manual/User-Guide-2330332-Page-235.png)
![3. Touch New Group. 4. Touch each entry you want to add to the group. A check mark will appear in the box next to the selected entry. If the entry has more than one number, you will be asked to select the number you want to add. Select a number and press OK. Note: When creating a group for Group Connect calls, you must select an entry’s Direct Connect–capable number. If you select a number that is not Direct Connect–capable, the name will be added to the list, but Group Connect calls will not go through to that group member. 5. When you have selected all the entries you want to add, touch Add. 6. Enter a group name and touch Done. Note: Group names are limited to 15 characters, including spaces. Group Connect Invites You can send an invite to initiate a Group Connect call. When the group members receive an invite, their phones sound a tone and display your name or Direct Connect number. Send an Invite to Start a Call 1. From home, touch > Sprint Direct Connect Now. [illustration] 2. Touch the Groups tab. [illustration] Useful Features 226](https://usermanual.wiki/Sharp/HRO00204.manual/User-Guide-2330332-Page-236.png)
![3. Touch the image next to the group you’d like to invite. [illustration] 4. Touch Invite to send the invite. Reply to an Invite When someone sends you a Group Connect invite, you hear an incoming tone or the phone vibrates, depending on your settings. The invite message will appear on your screen with the name or Direct Connect number of the person who sent the invite. To respond to an invite: 1. With the invite displayed, touch Join. [illustration] 2. Touch and hold the Push To Talk icon to reply to the group. [illustration] To dismiss an invite: ■ Touch Ignore. Direct Connect Settings Some Direct Connect settings menus are available when you subscribe to Sprint Direct Connect Now services. Audio Routing Options You can set whether the audio for Sprint Direct Connect Now calls comes through the earpiece (including an optional Bluetooth® headset, if connected) or speakerphone. 1. From home, touch > Sprint Direct Connect Now. [illustration] Useful Features 227](https://usermanual.wiki/Sharp/HRO00204.manual/User-Guide-2330332-Page-237.png)
![2. Touch the Settings tab and then touch Audio routing. 3. Select an option and touch OK. Group Call Options For Group Calls that you start, you can select whether they automatically end when you exit the call. 1. From home, touch > Sprint Direct Connect Now. [illustration] 2. Touch the Settings tab and then touch Group call options. 3. Select one of the following: Let continue – to allow the groups calls to continue without you. Useful Features 228](https://usermanual.wiki/Sharp/HRO00204.manual/User-Guide-2330332-Page-238.png)
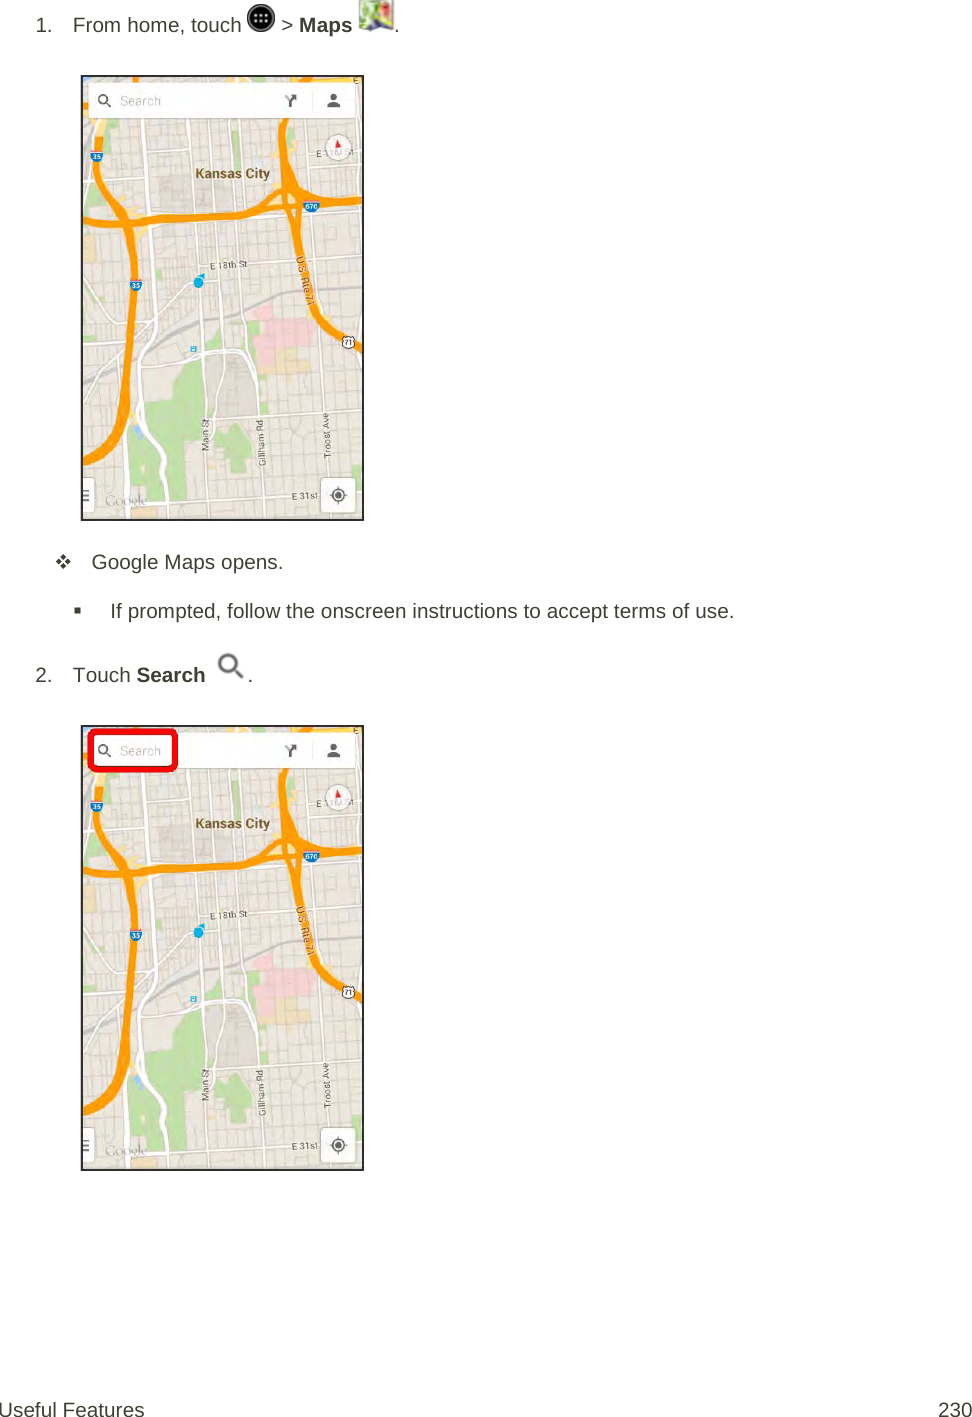
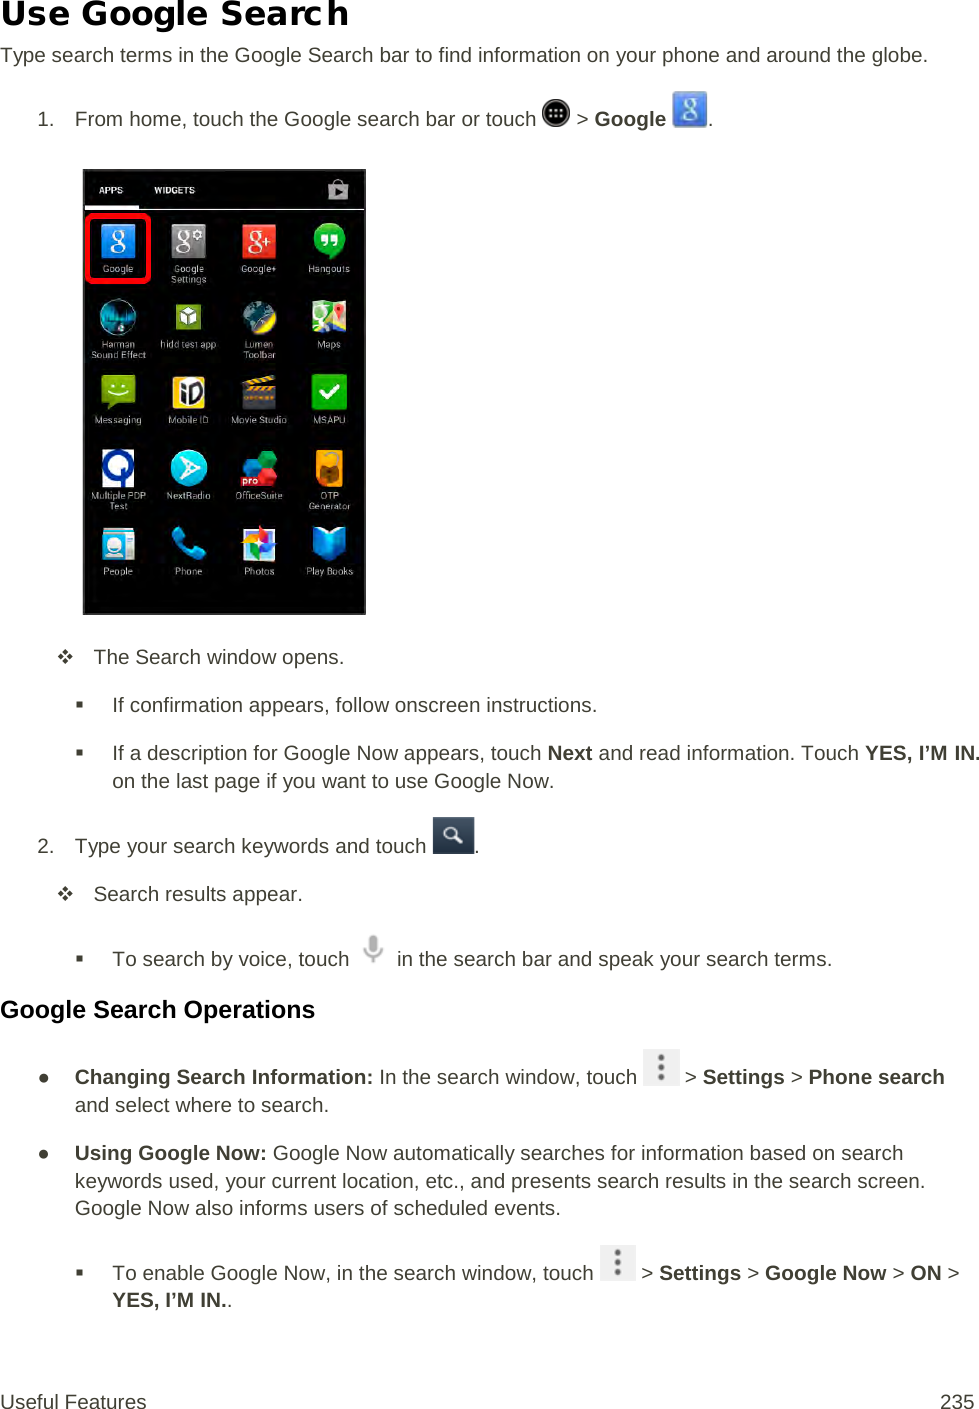
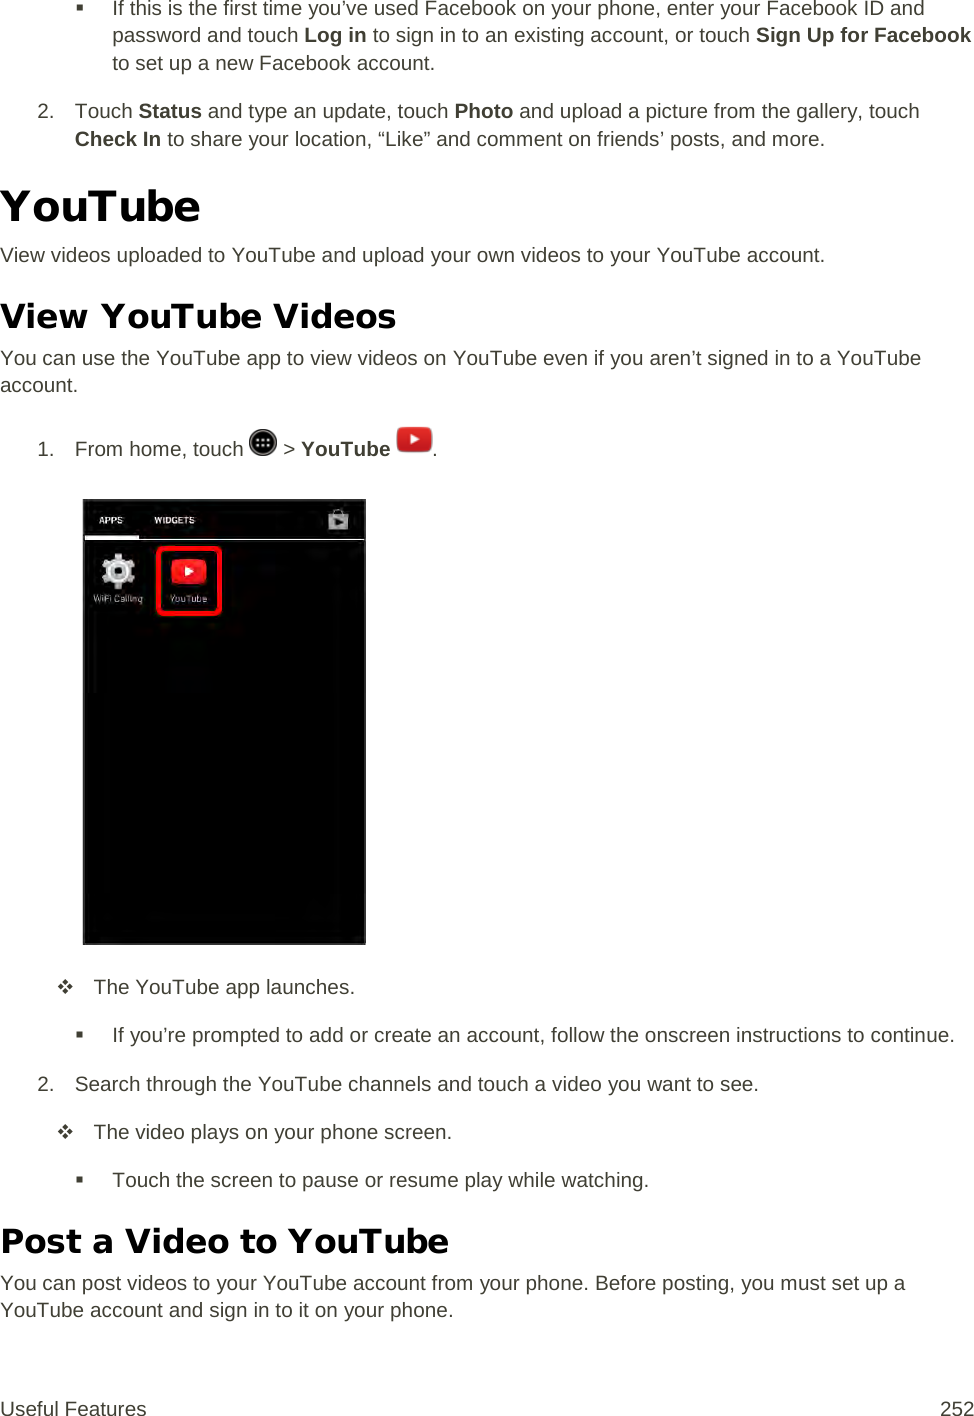
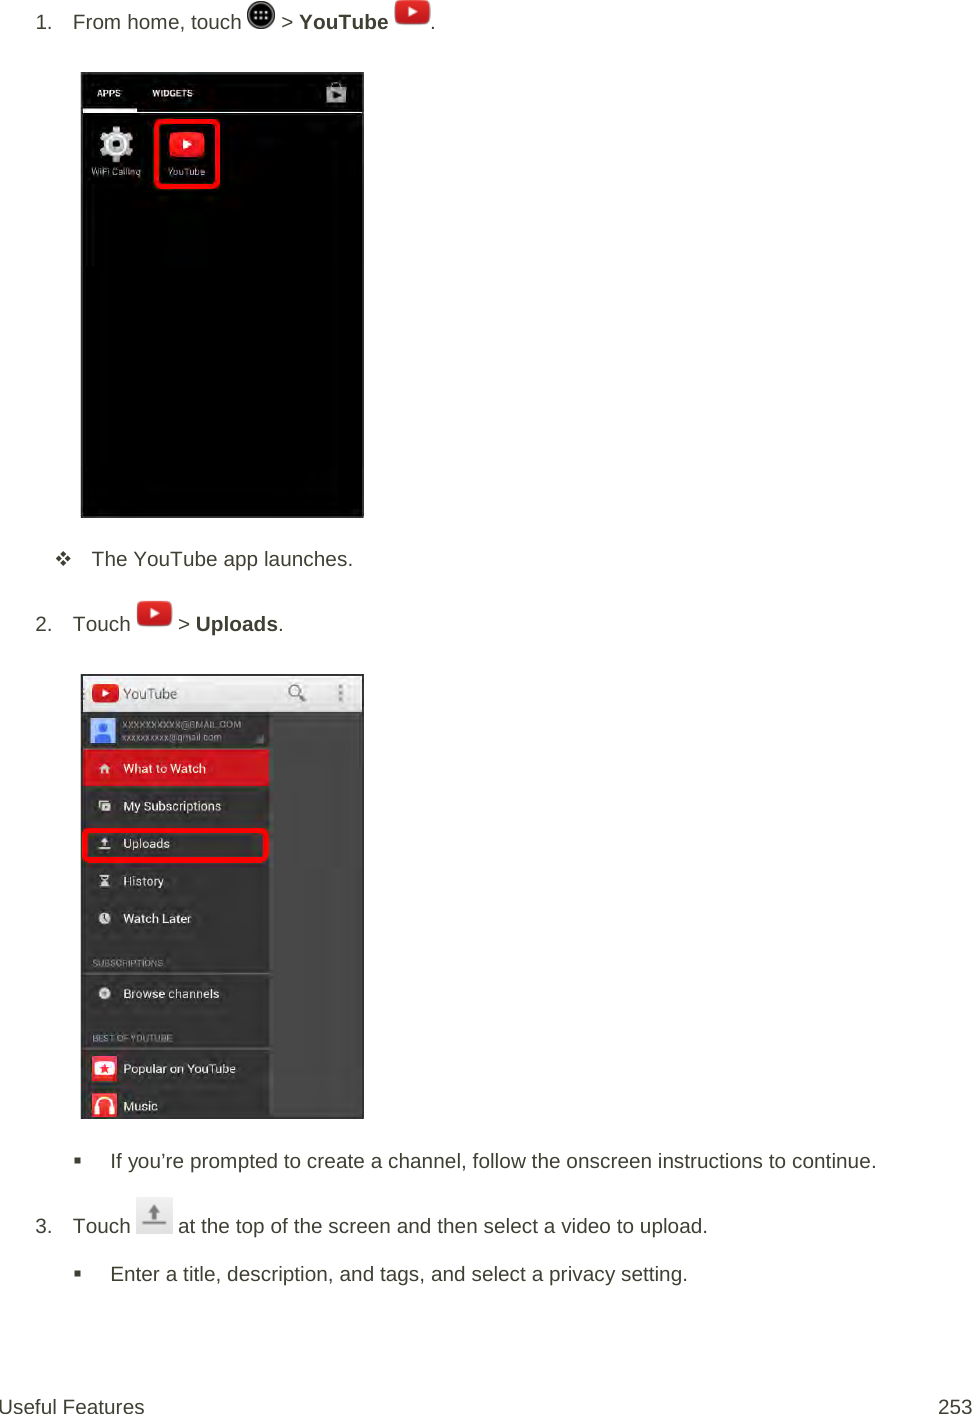
![ End – to end group calls when you exit. NASCAR MOBILE Now you have the ability to get every bit of NASCAR coverage, news, and stats right on your phone. Use the NASCAR MOBILE App 1. From home, touch > NASCAR. [illustration] The NASCAR Mobile app opens. 2. Follow the prompts to customize your app and begin following your favorite racers. Navigation Your phone offers a number of location-based navigation programs to help you figure out where you are and get you where you’re going. Enable Location Services on Your Phone Before using any location-based services, you must enable your phone’s location feature. For information about setting your phone’s location options, see Location Access Settings. Google Maps Use the Google Maps app to determine your location, find directions, browse local businesses and attractions, rate and review places, and more. View Maps of Specified Places Use Google Maps to locate and map a specific address or destination. Useful Features 229](https://usermanual.wiki/Sharp/HRO00204.manual/User-Guide-2330332-Page-239.png)
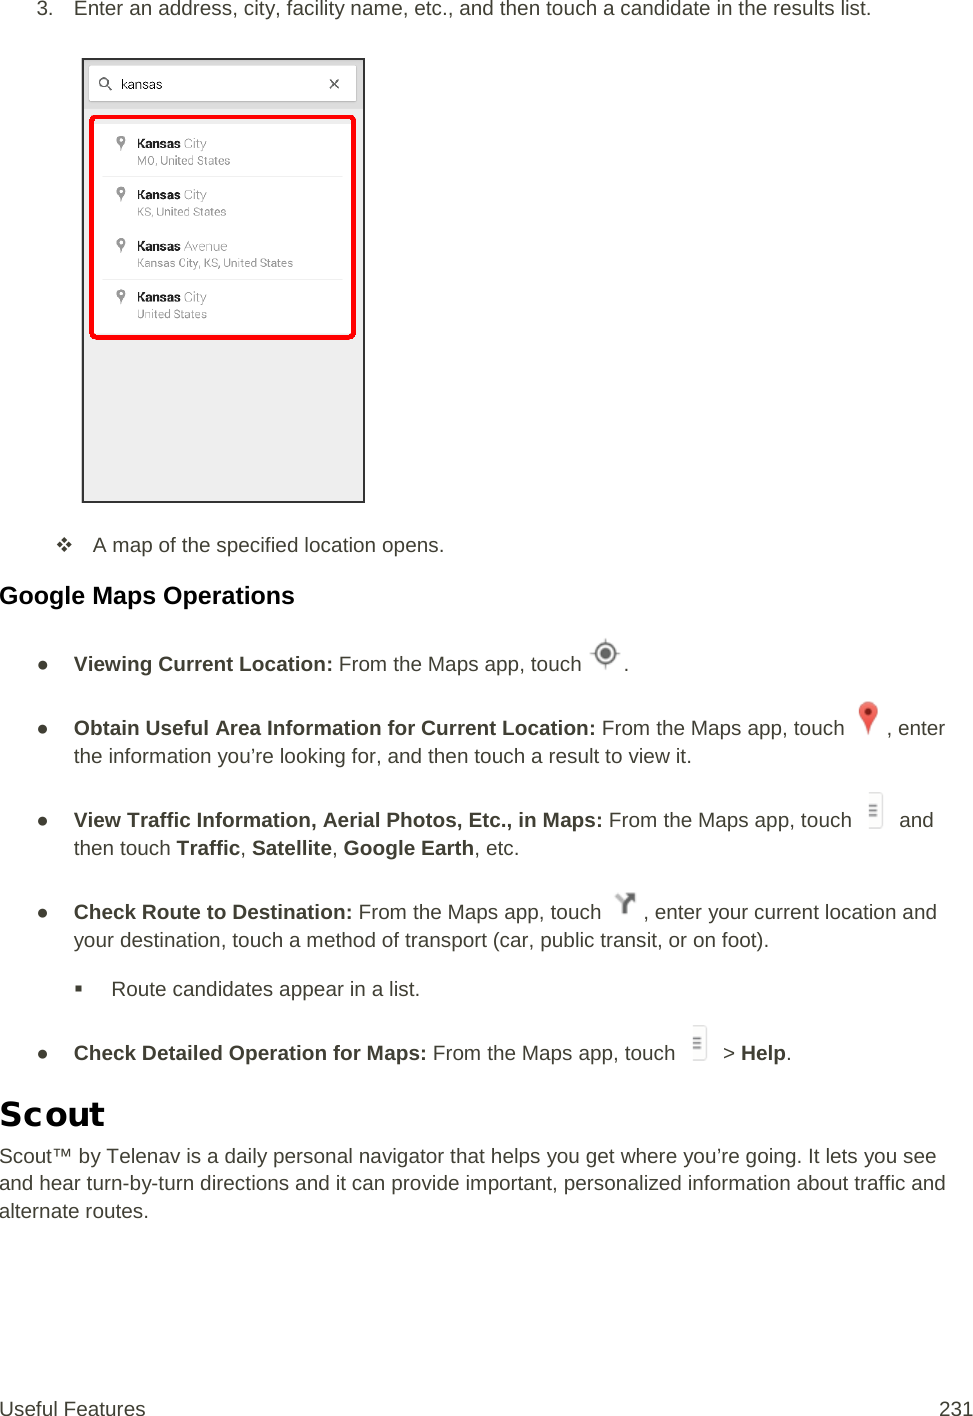
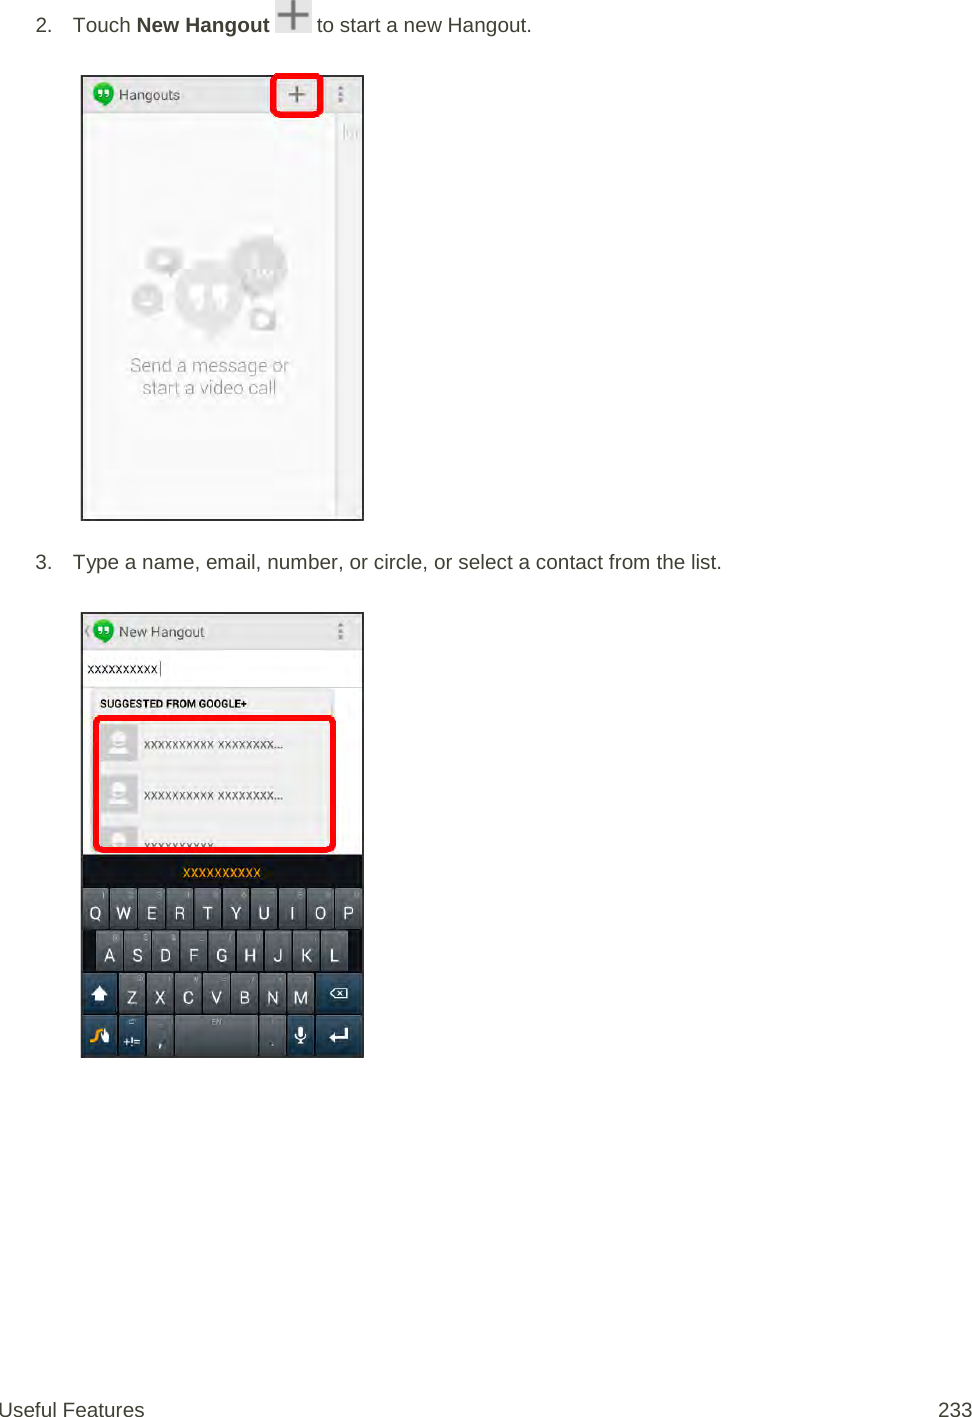
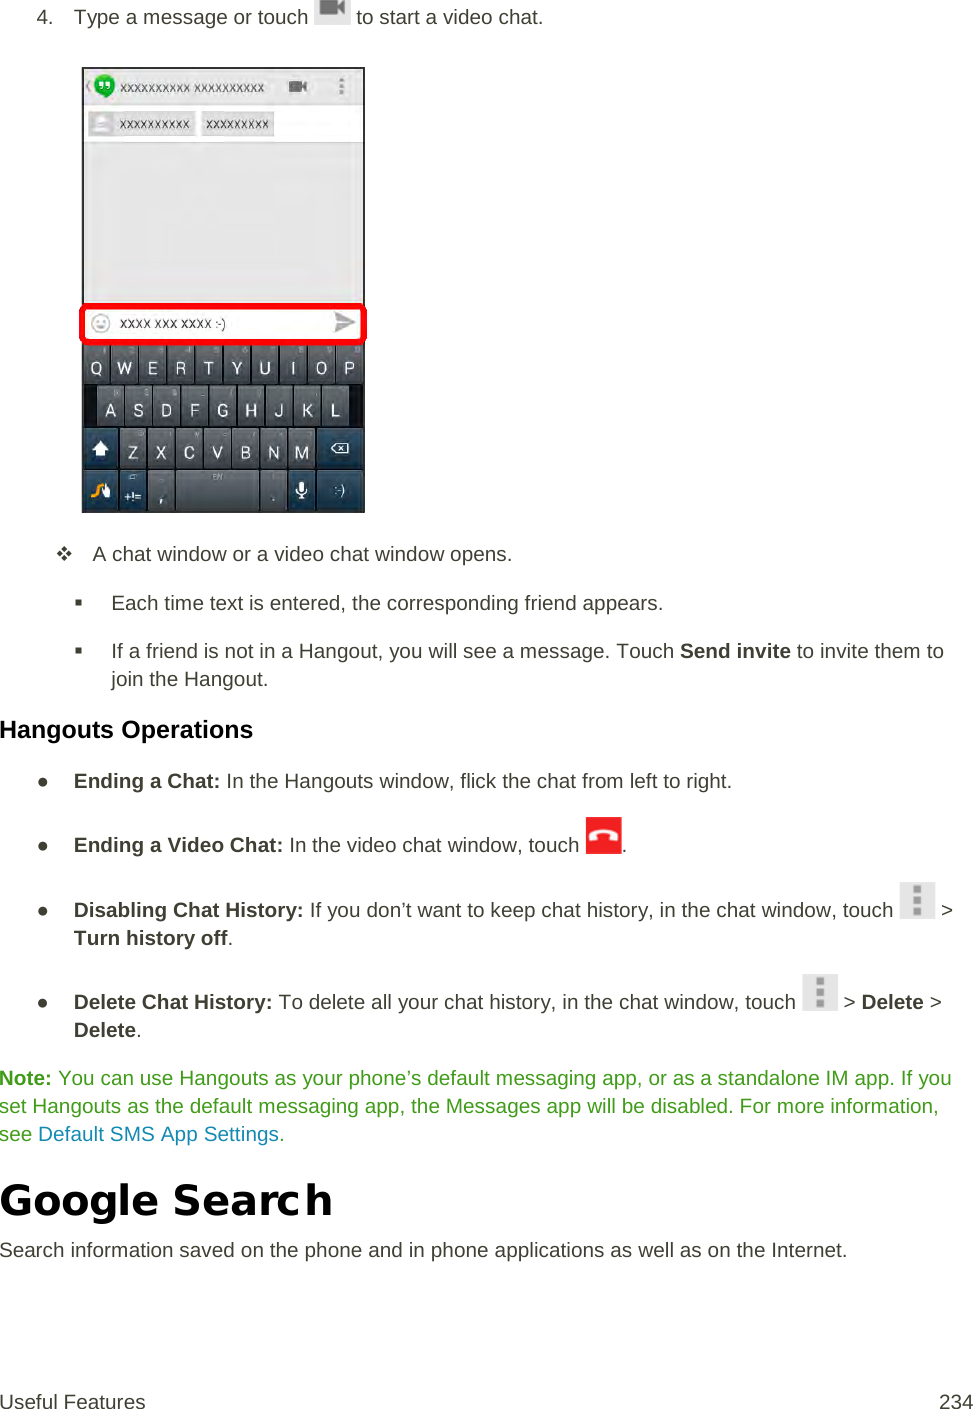
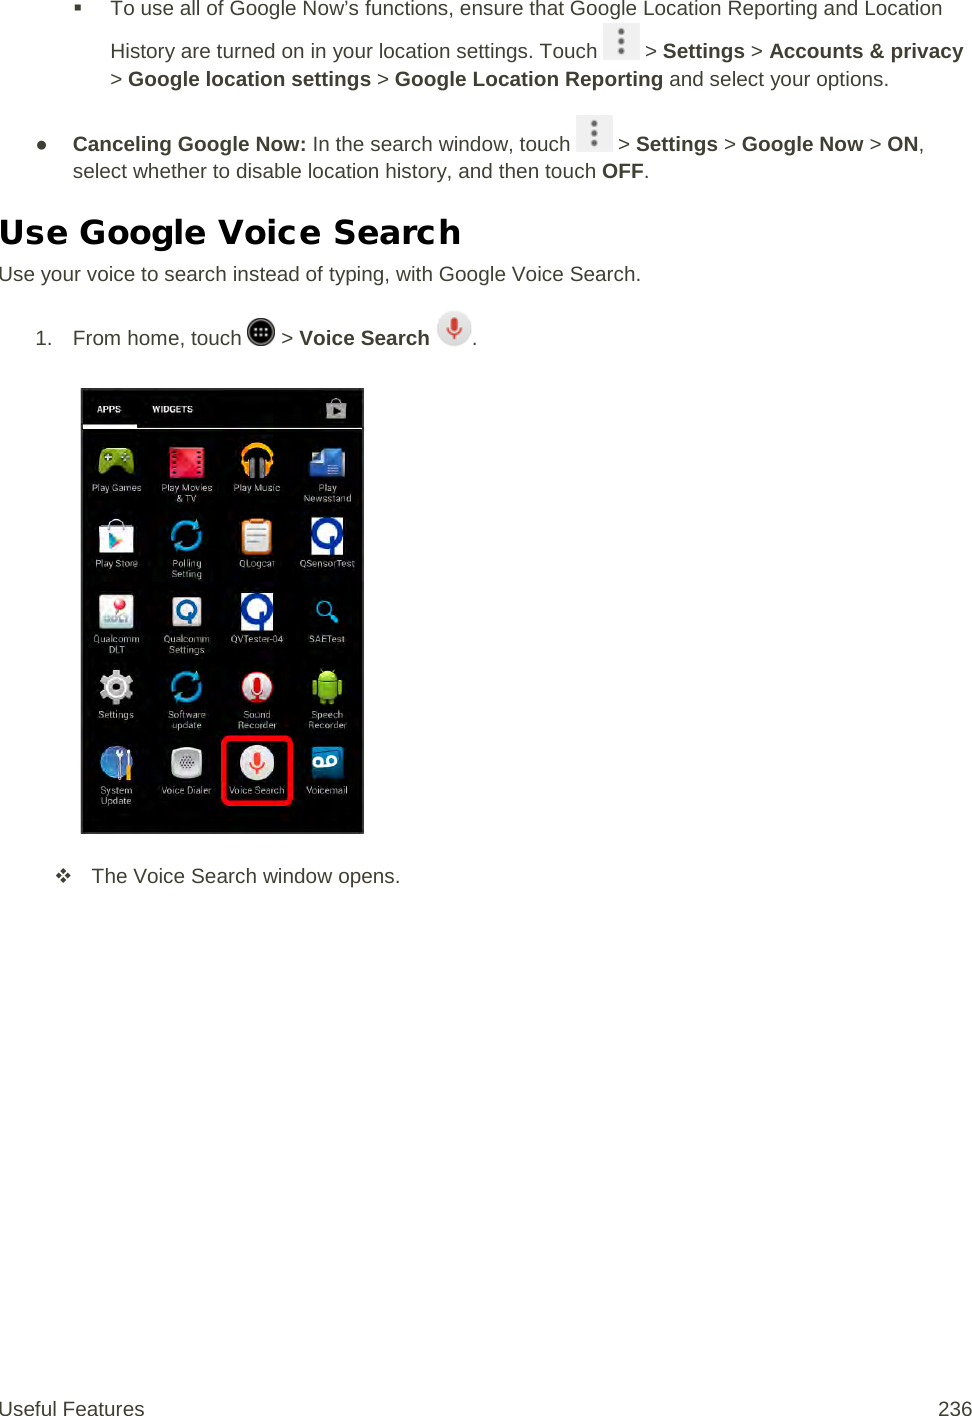
![Use Scout as Your Personal Navigator 1. From home, touch > Scout . [illustration] The Scout app will open. If prompted, accept the terms of use before continuing. Hangouts Hangouts is Google’s instant messaging service. Use to communicate with other Hangout users, and also use video calling. Log in to a Google account beforehand (see Google Account). Using Hangouts 1. From home, touch > Hangouts . The Hangouts app will open. When prompted, follow the onscreen instructions to continue. Useful Features 232](https://usermanual.wiki/Sharp/HRO00204.manual/User-Guide-2330332-Page-242.png)

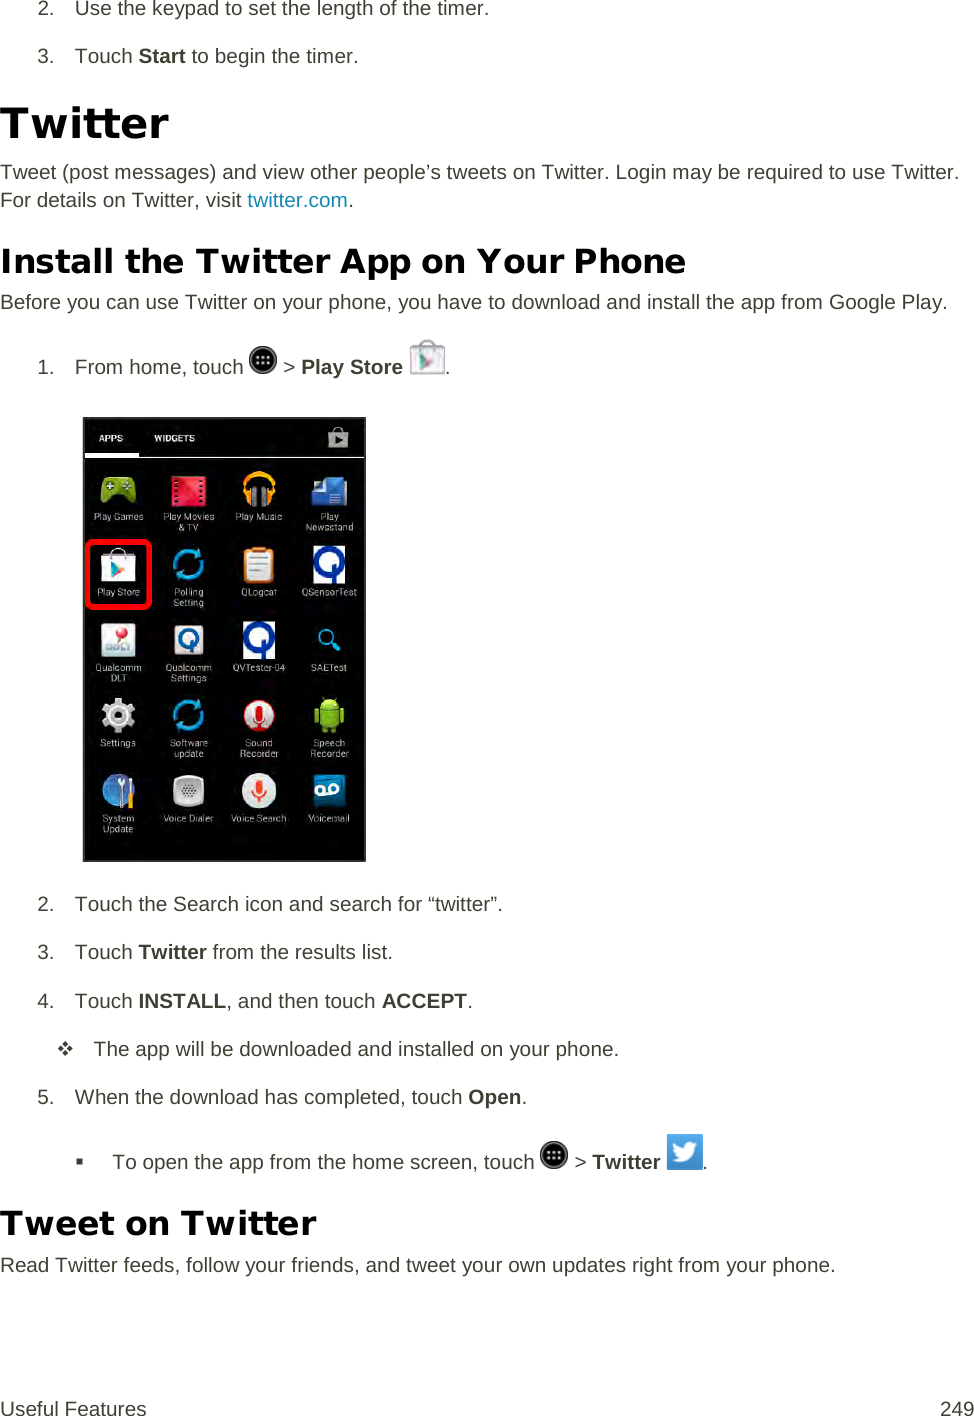
![1. From home, touch > Twitter . [illustration] The Twitter app launches. If this is the first time you’ve used Twitter on your phone, touch Sign in to sign in to an existing account, or touch Create my account or Sign up a different account to set up a new Twitter account. 2. Touch the “What’s happening?” text box, type a tweet, and touch TWEET. The tweet is sent and appears on your Twitter feed. Facebook Post updates, read what your friends are up to, upload pictures and check-ins, and more with on-the-go Facebook access. Install the Facebook App on Your Phone Before you use Facebook on your phone, you must download and install the app from the Google Play Store app. 1. From home, touch > Play Store . 2. Touch the Search icon and search for “facebook”. 3. Touch Facebook from the results list. 4. Touch INSTALL, and then touch ACCEPT. Useful Features 250](https://usermanual.wiki/Sharp/HRO00204.manual/User-Guide-2330332-Page-260.png)
![ The app will be downloaded and installed on your phone. 5. When the download has completed, touch Open. To open the app from the home screen, touch > Facebook . Sign in to Your Facebook Account from Account Settings 1. From home, touch > Settings > Add account. 2. Touch Facebook. [illustration] 3. Read the disclaimer and touch I accept to continue. 4. Enter your Facebook username and password and touch Next. 5. Touch Done. Your Facebook account is added to your phone. Use Facebook Once you’ve downloaded the app and signed in, you can post and read updates, upload pictures, tag locations, and more, all from your phone. 1. From home, touch > Facebook . [illustration] The Facebook app launches. Useful Features 251](https://usermanual.wiki/Sharp/HRO00204.manual/User-Guide-2330332-Page-261.png)
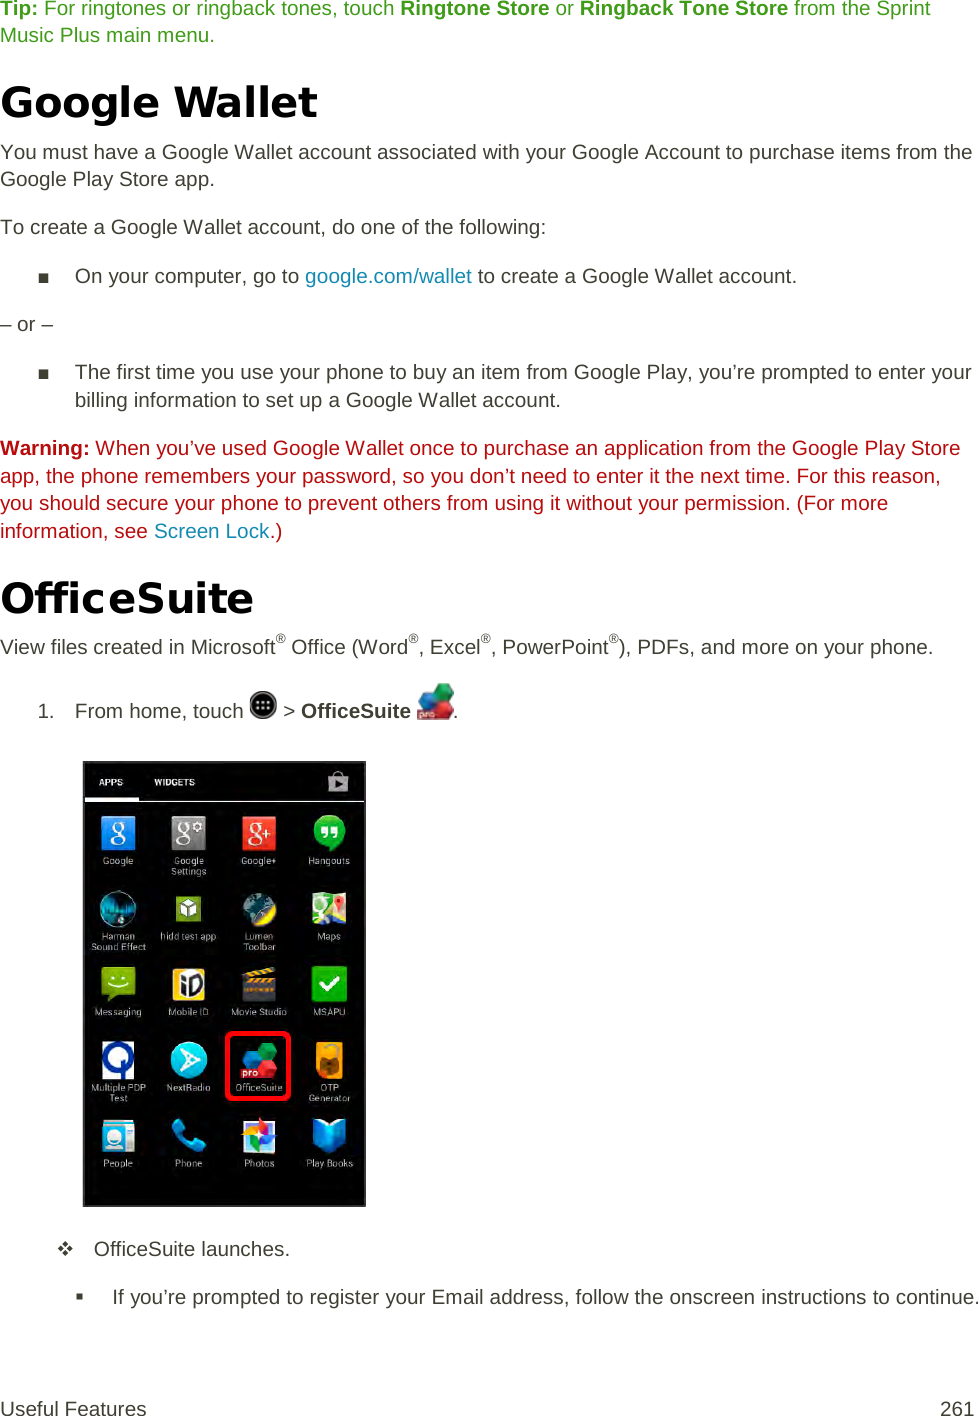
![5. When the download has completed, touch Open. To open the app from the home screen, touch > Sprint Music Plus . Access Sprint Music Plus 1. From home, touch > Sprint Music Plus . [illustration] The app opens. The first time you use the app, touch Accept to agree to the Premium Services Terms of Use. 2. Touch a store option from the main page (Ringbacks Store, Music Store, or Ringtones Store), or touch > Music (under Library) to access your music. [illustration] Touch the onscreen navigation tools to skip ahead or rewind. Touch at any time to see additional options. For more information, touch > Settings > About or Help. Purchase and Download Music from the Sprint Music Plus Store From the Sprint Music Plus Store, you can shop for songs to purchase and download to your phone. 1. From home, touch > Sprint Music Plus > Music Store. [illustration] The app will open and display the Music Store. 2. Enter a song or artist in the search field or browse through options in the tabs in the center of the screen. [illustration] 3. Touch a song to select it. [illustration] The song information screen is displayed. 4. Follow the onscreen instructions to preview or purchase the song. Touch at any time to display the Sprint Music Plus menu. Useful Features 260](https://usermanual.wiki/Sharp/HRO00204.manual/User-Guide-2330332-Page-270.png)

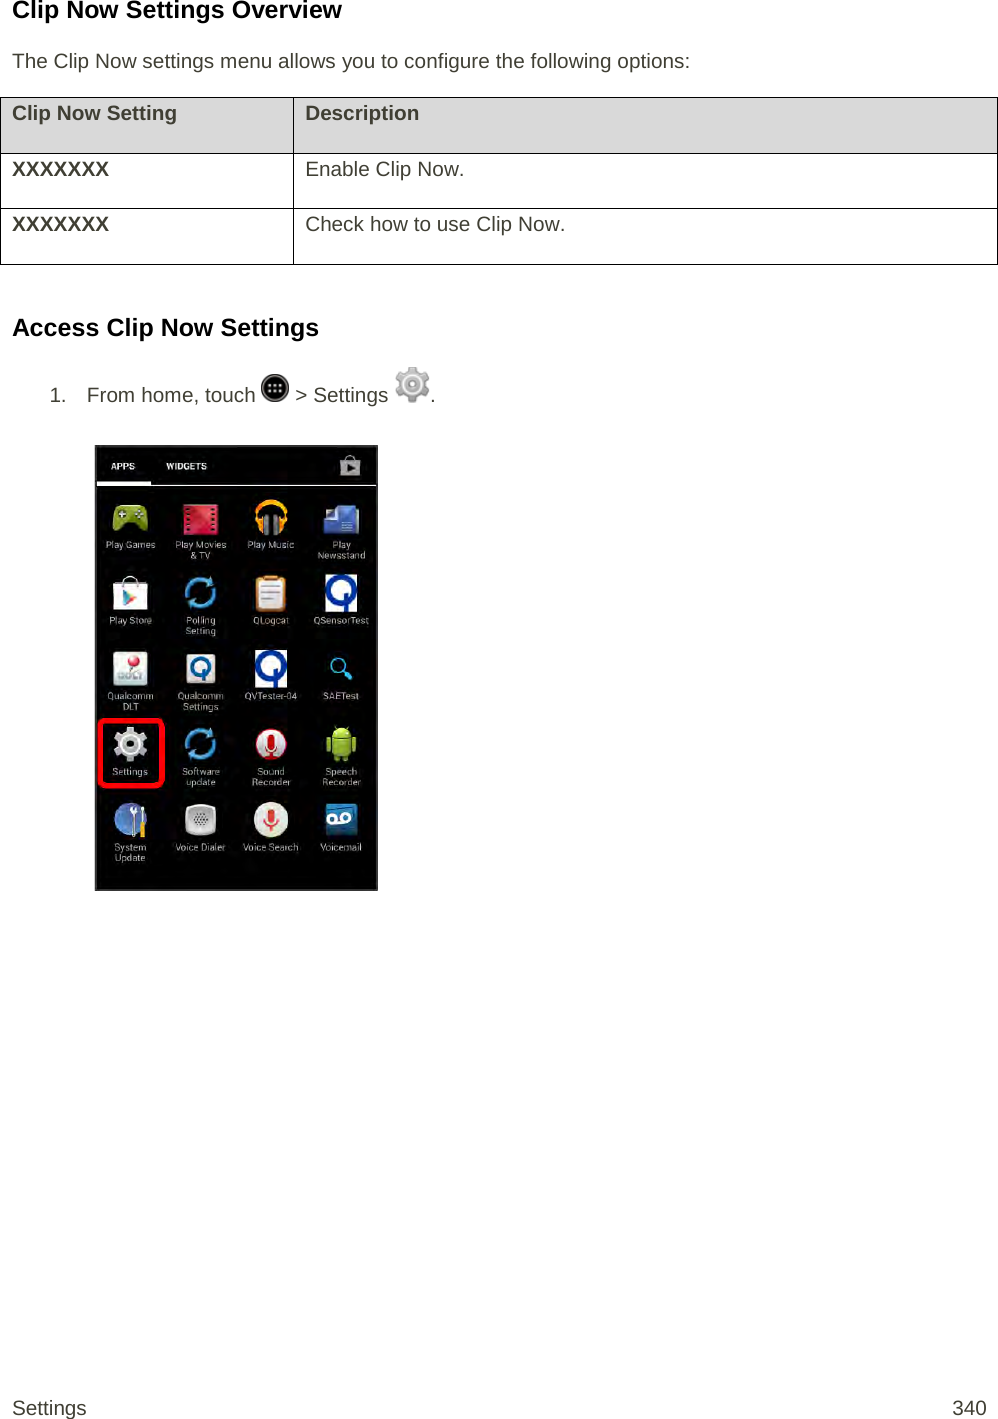
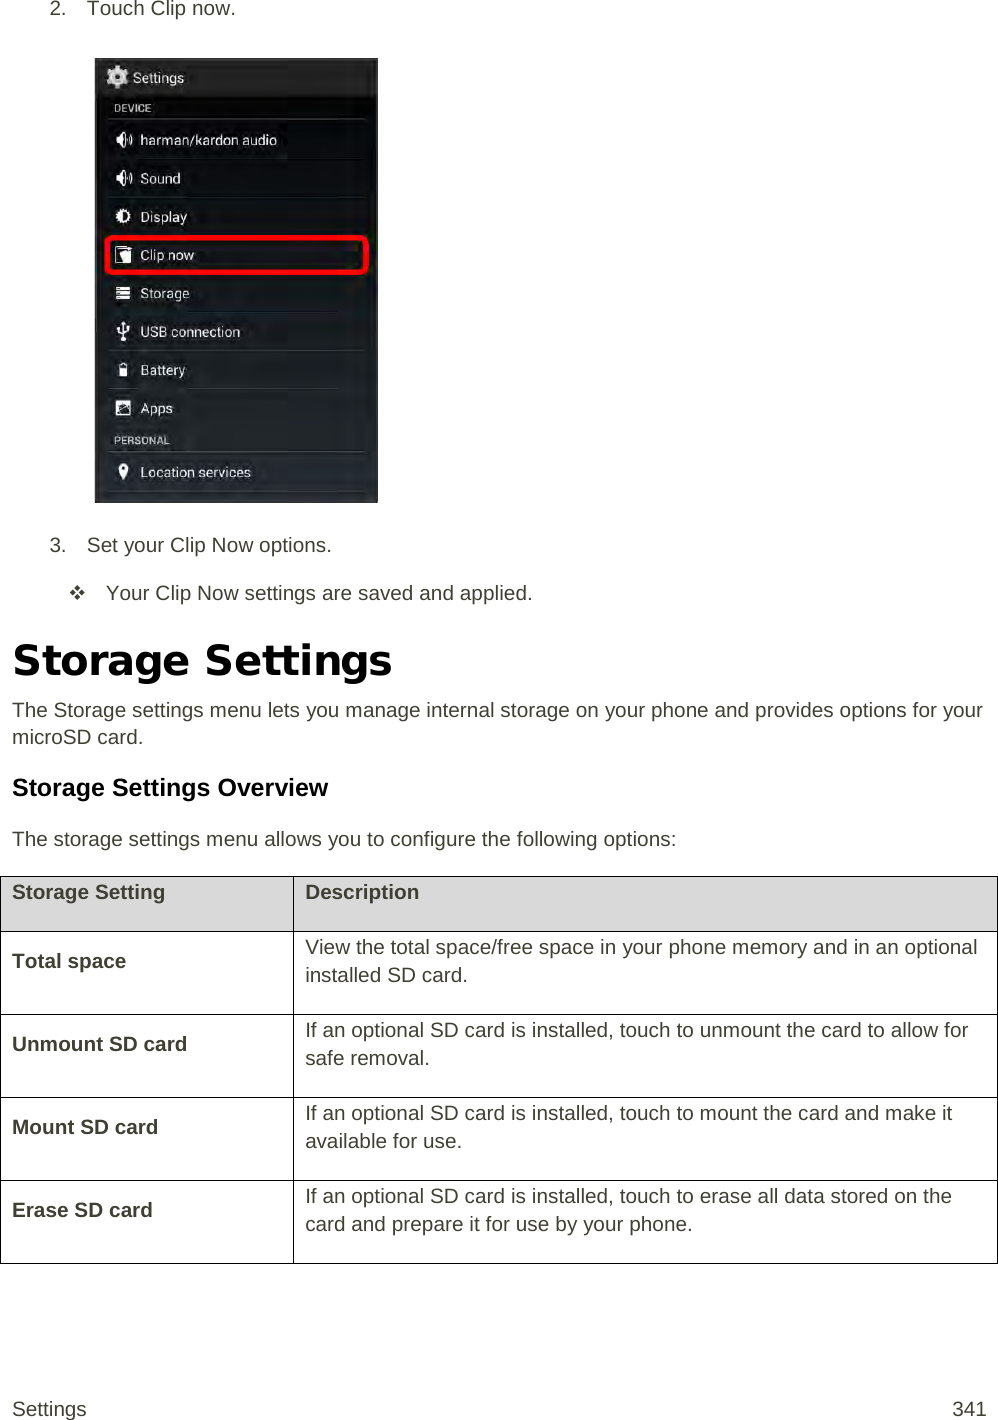
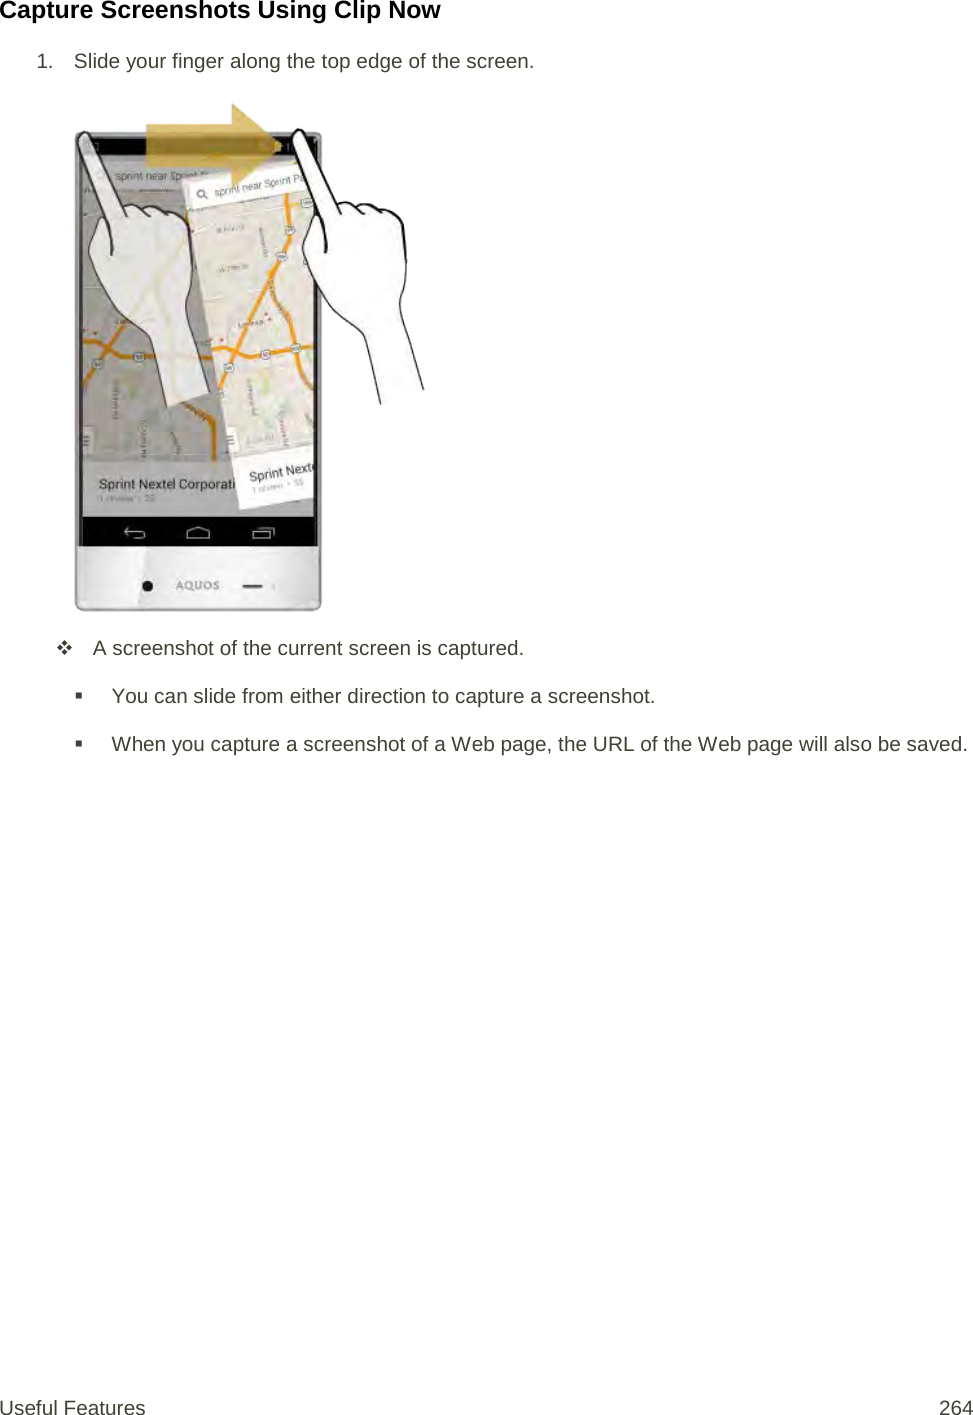
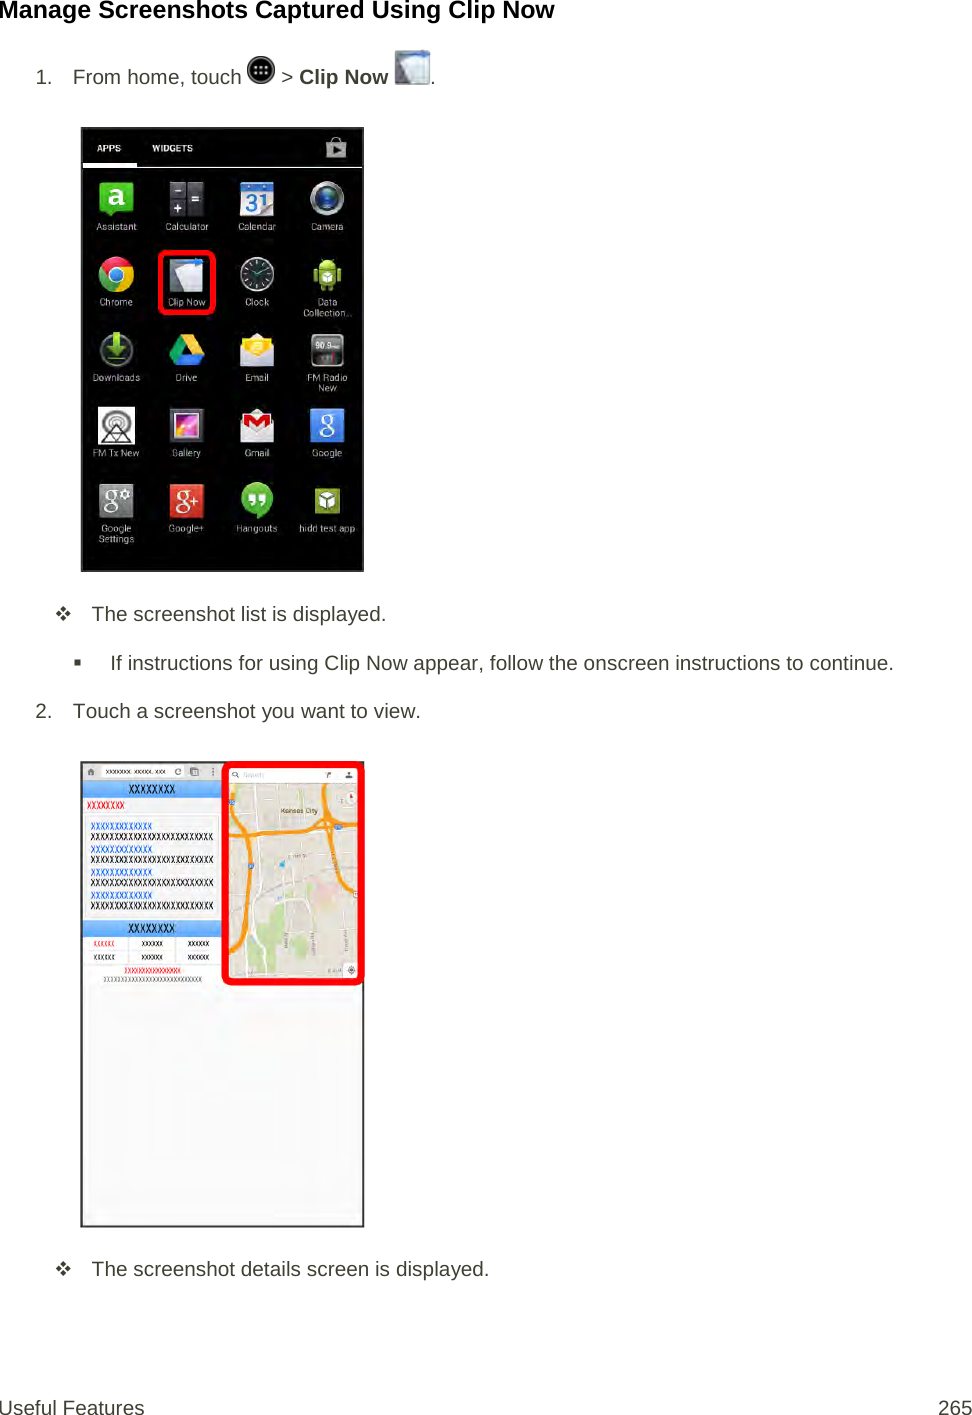
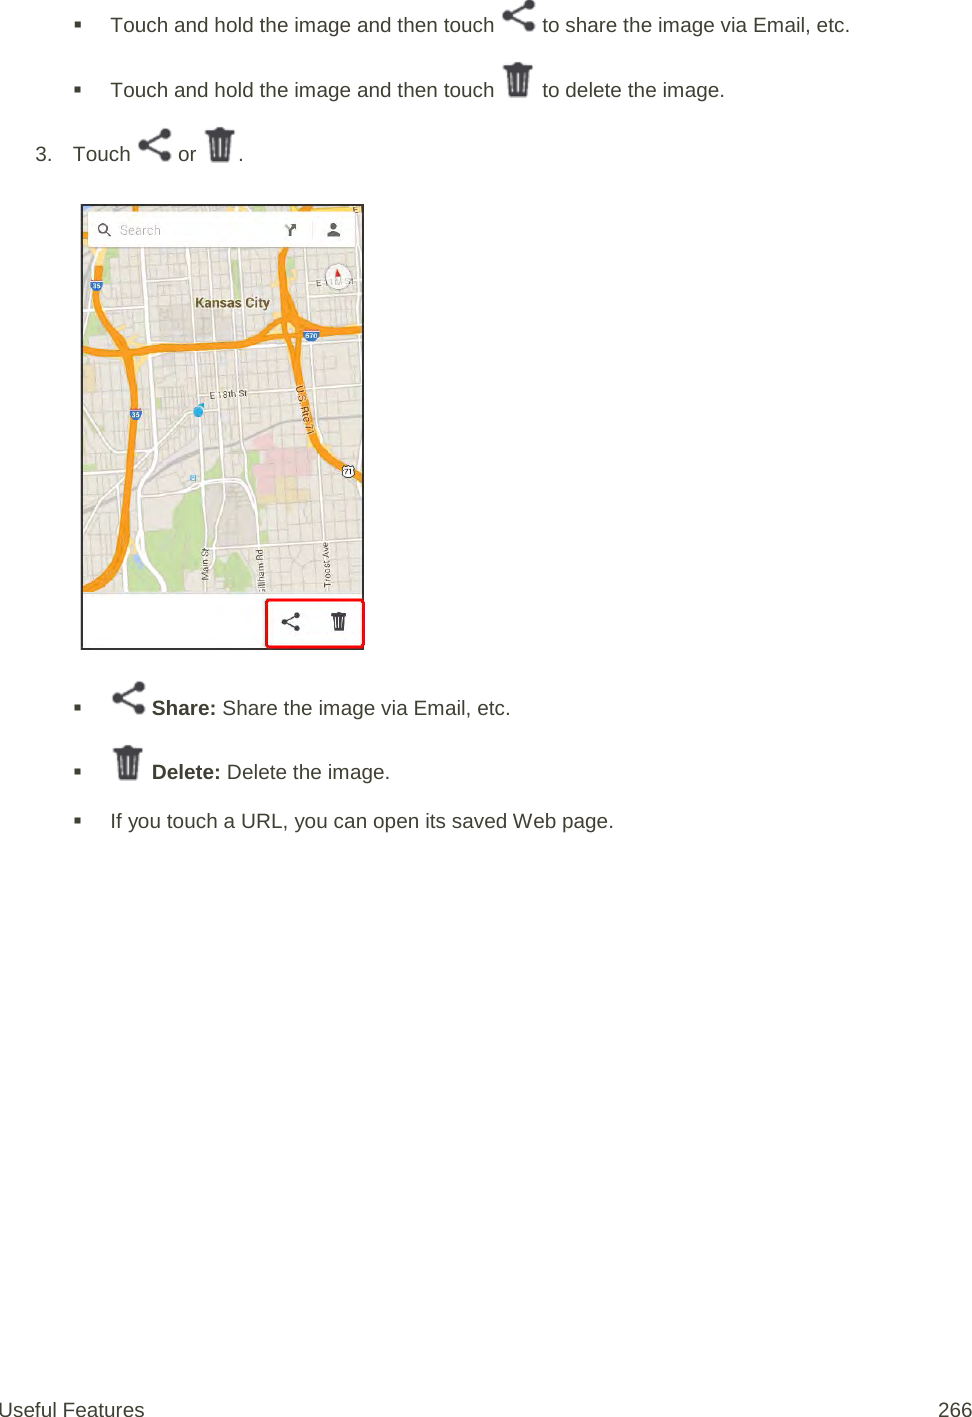
![Enable Clip Now 1. From home, touch > Settings . 2. Touch Clip Now. 3. Touch Clip Now. (Enabled when the check mark is entered) [illustration] Clip Now is ready to use. Useful Features 263](https://usermanual.wiki/Sharp/HRO00204.manual/User-Guide-2330332-Page-273.png)

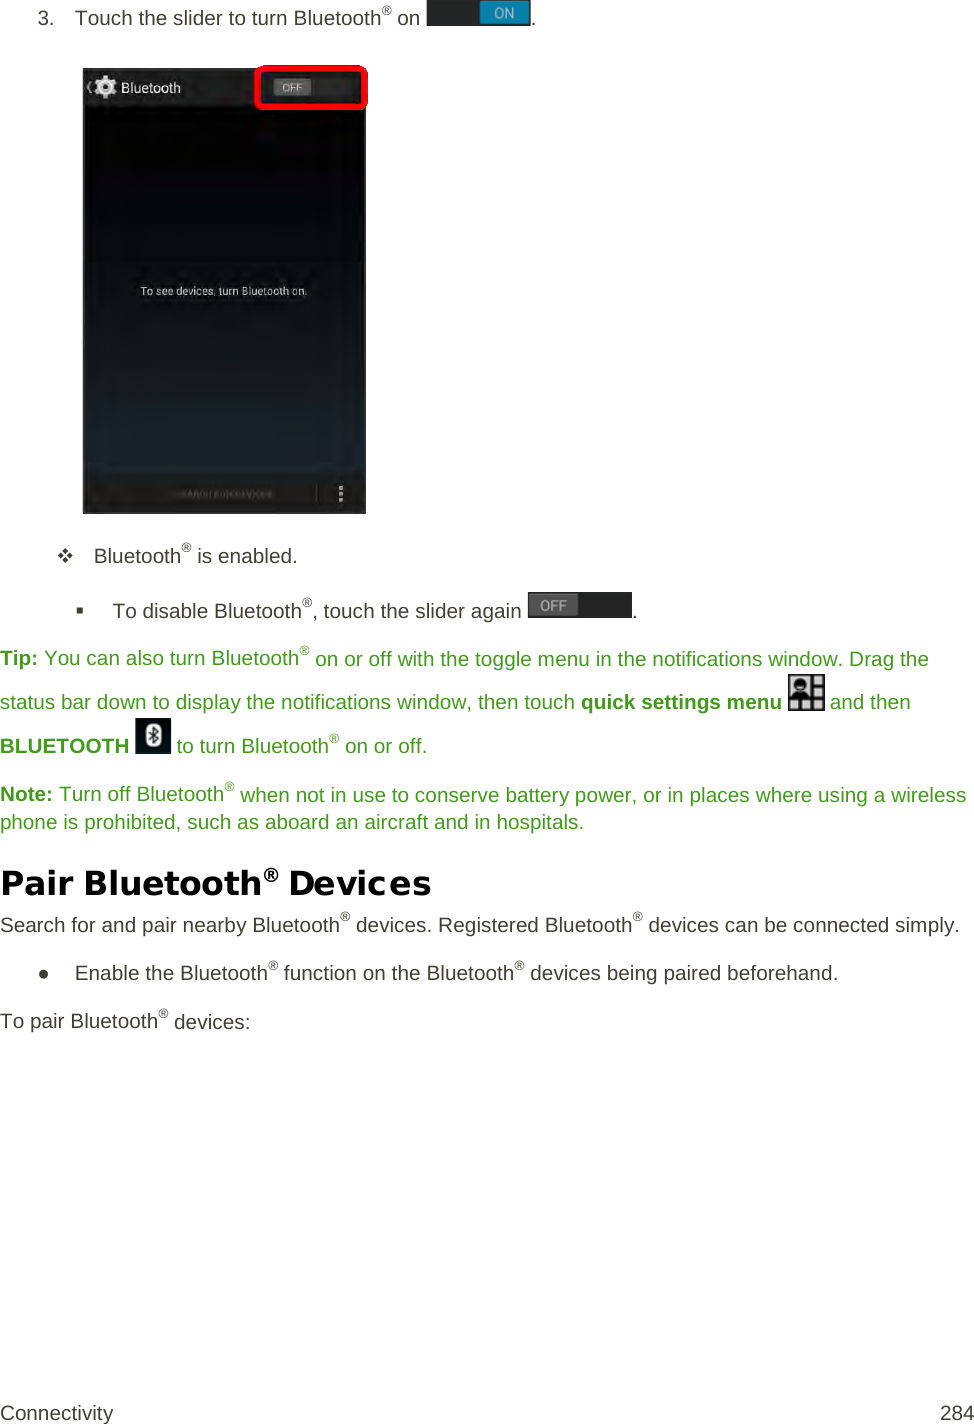
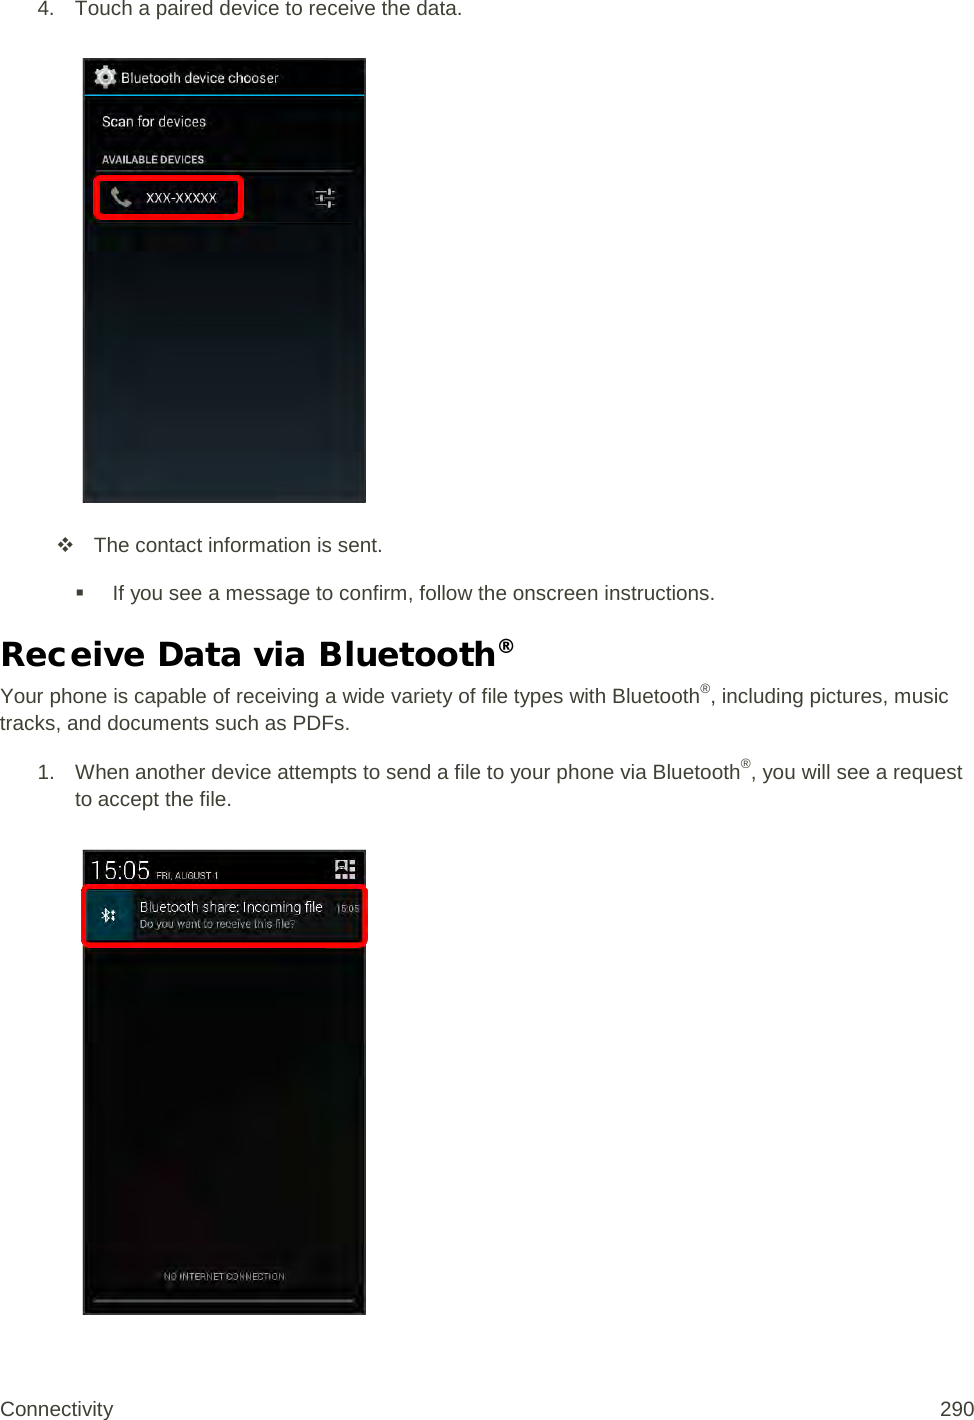
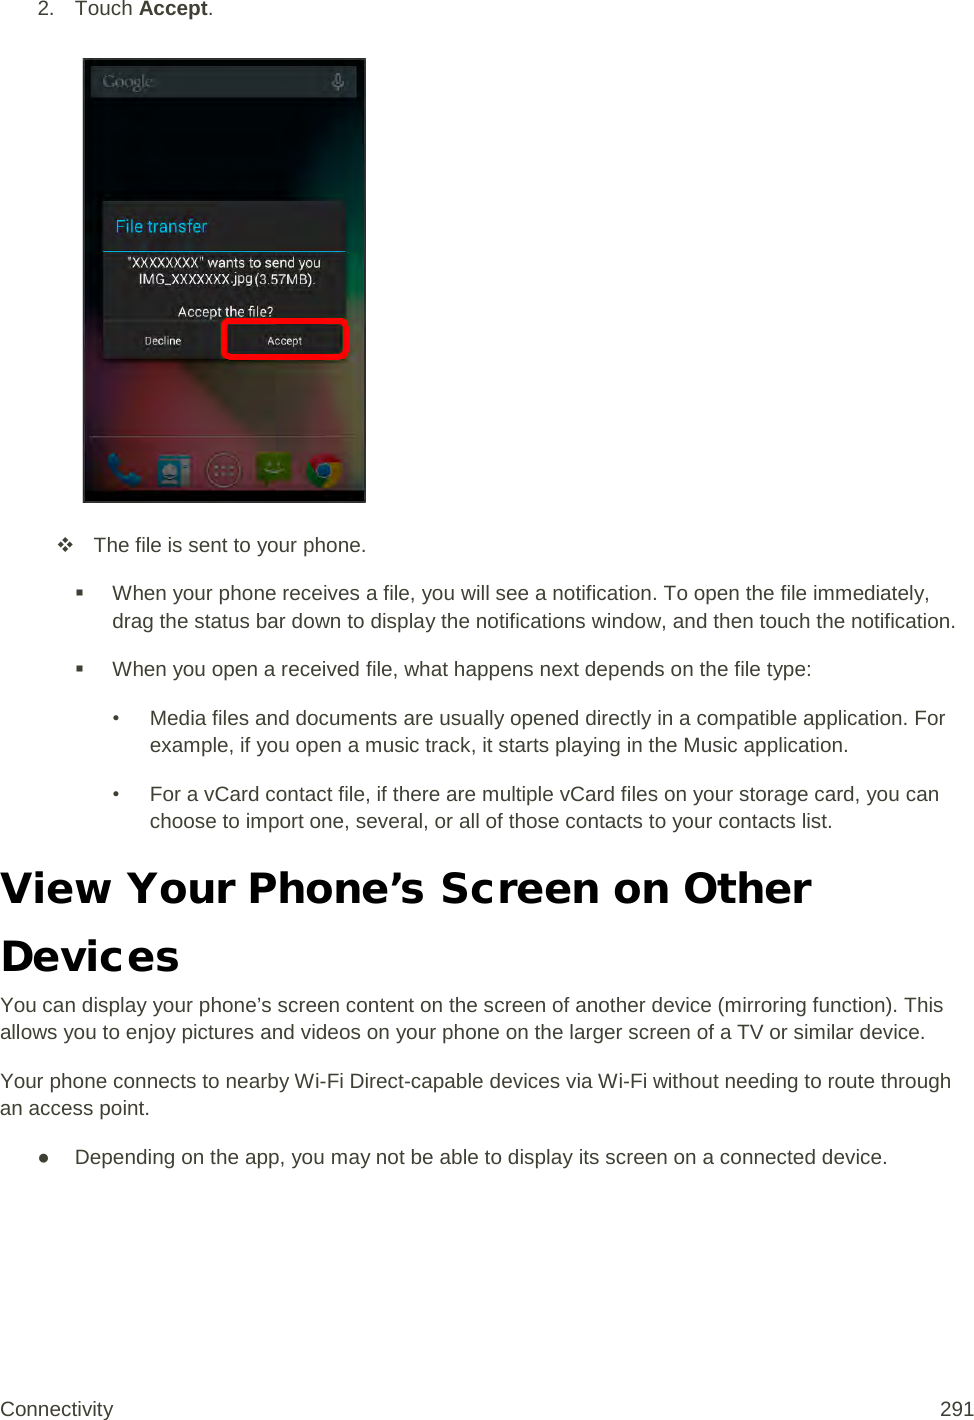
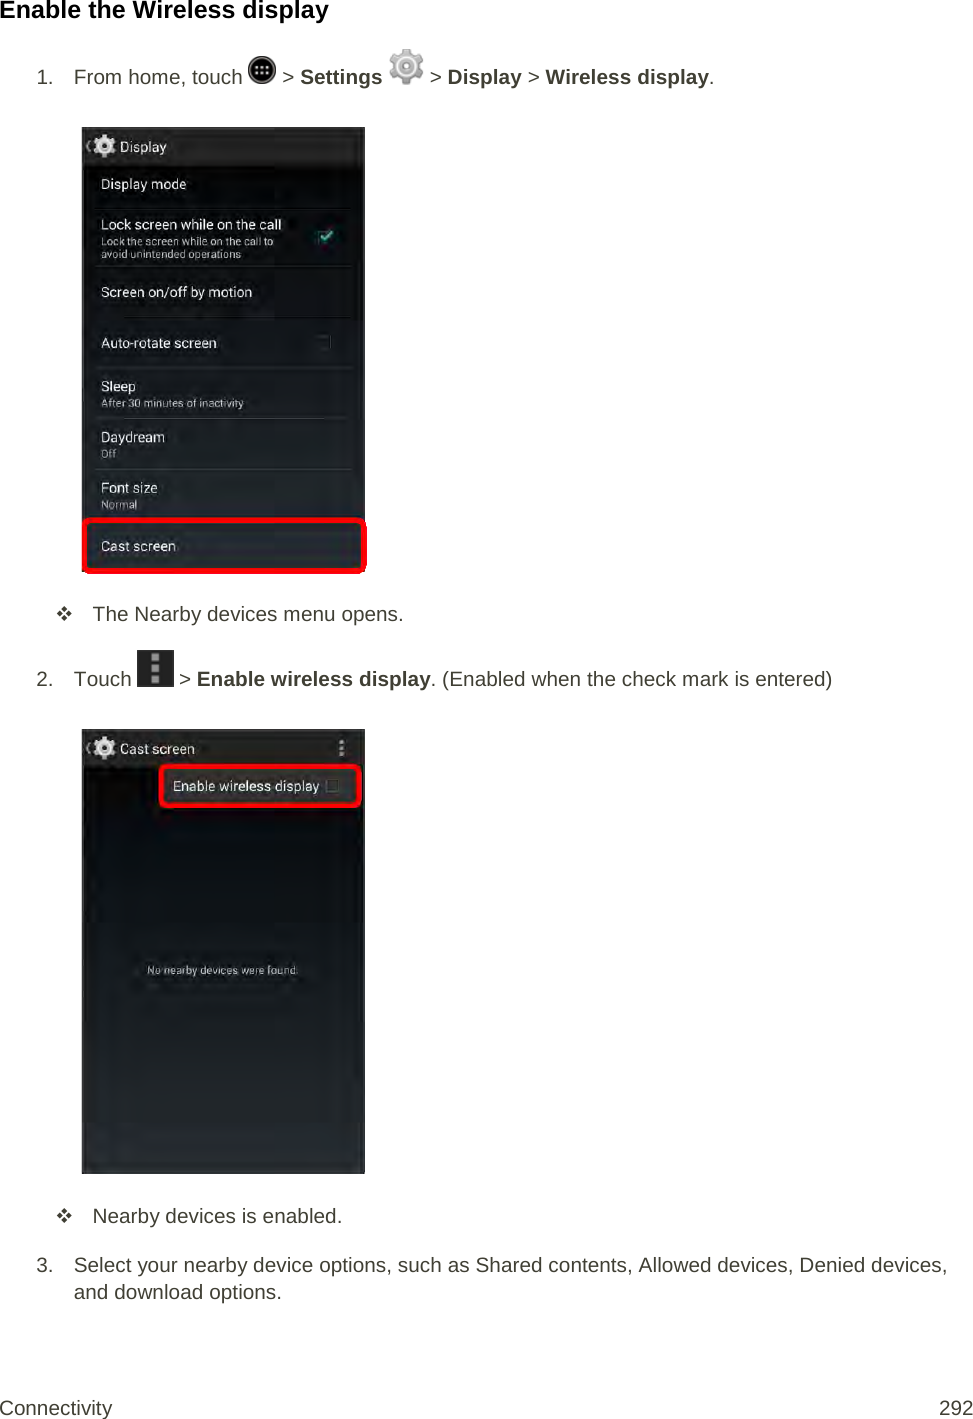
![[illustration] The Nearby devices settings are saved. Connectivity 293](https://usermanual.wiki/Sharp/HRO00204.manual/User-Guide-2330332-Page-303.png)

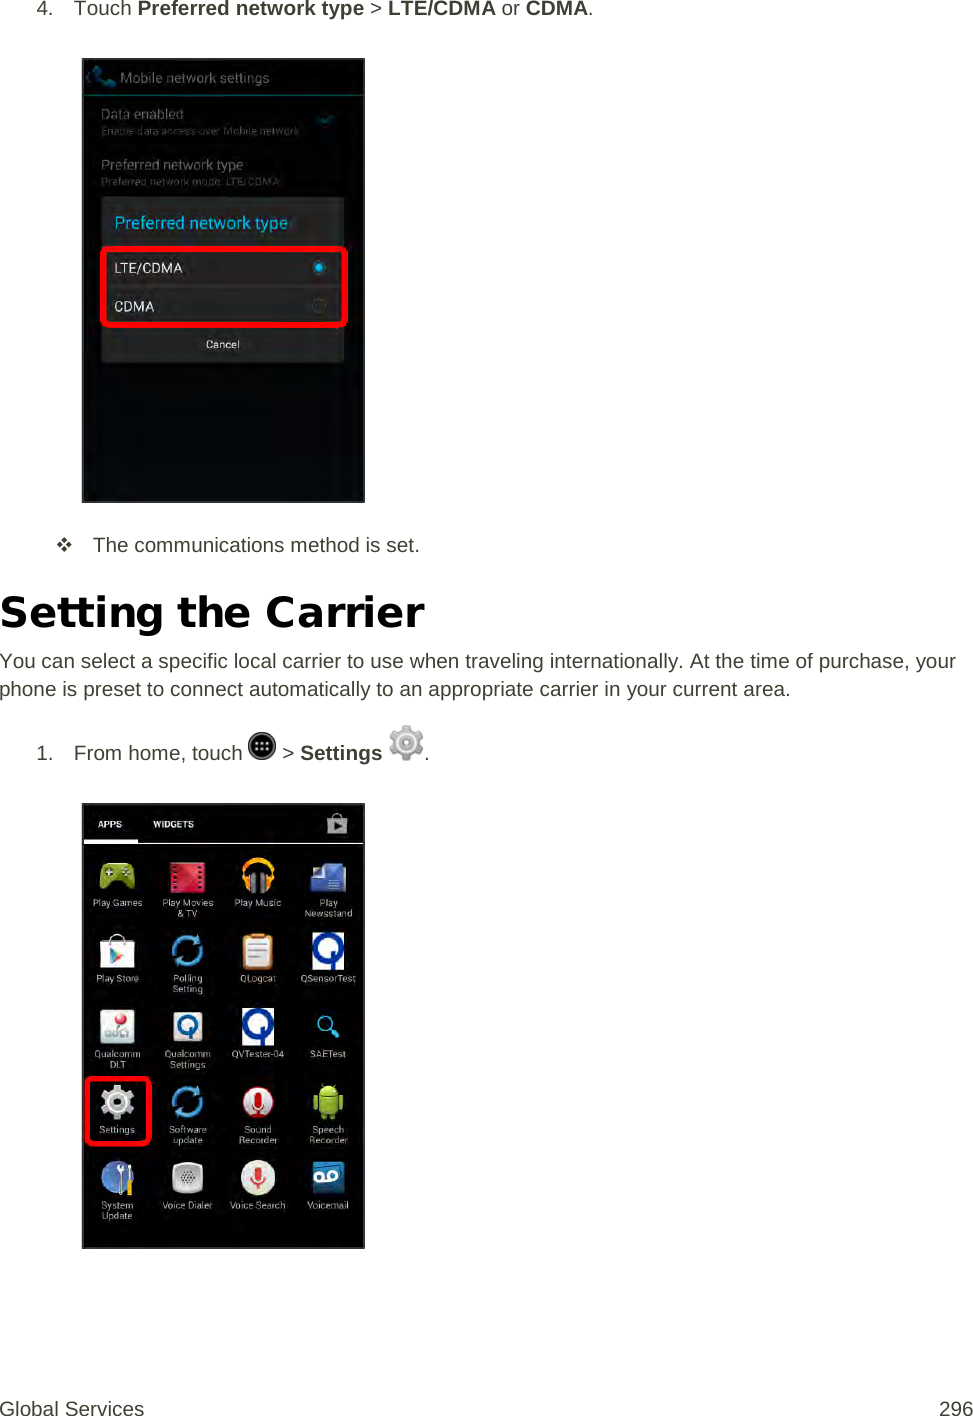
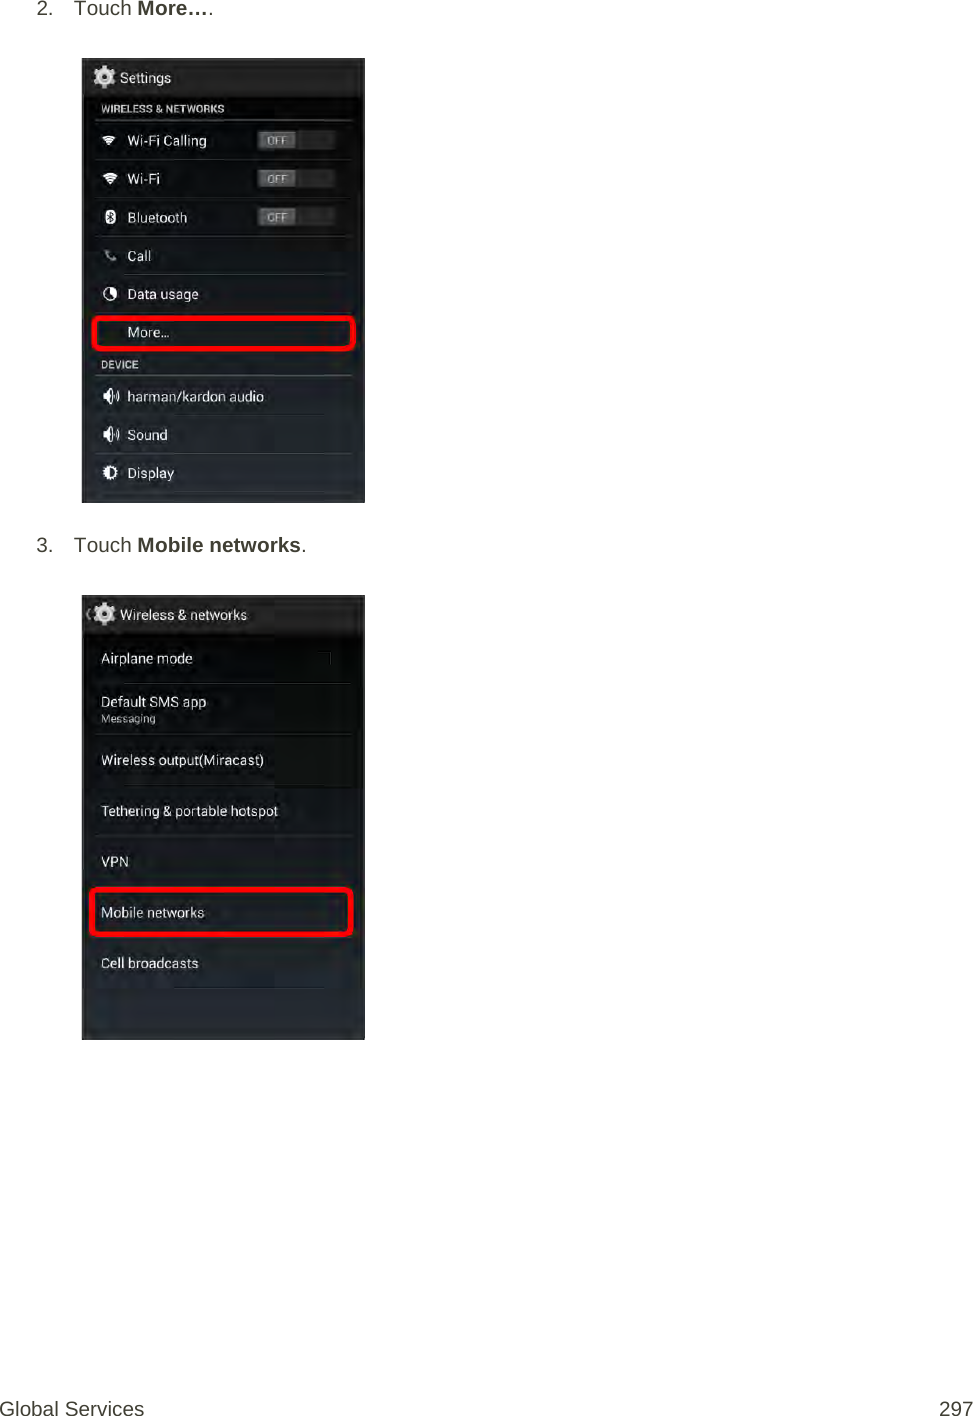
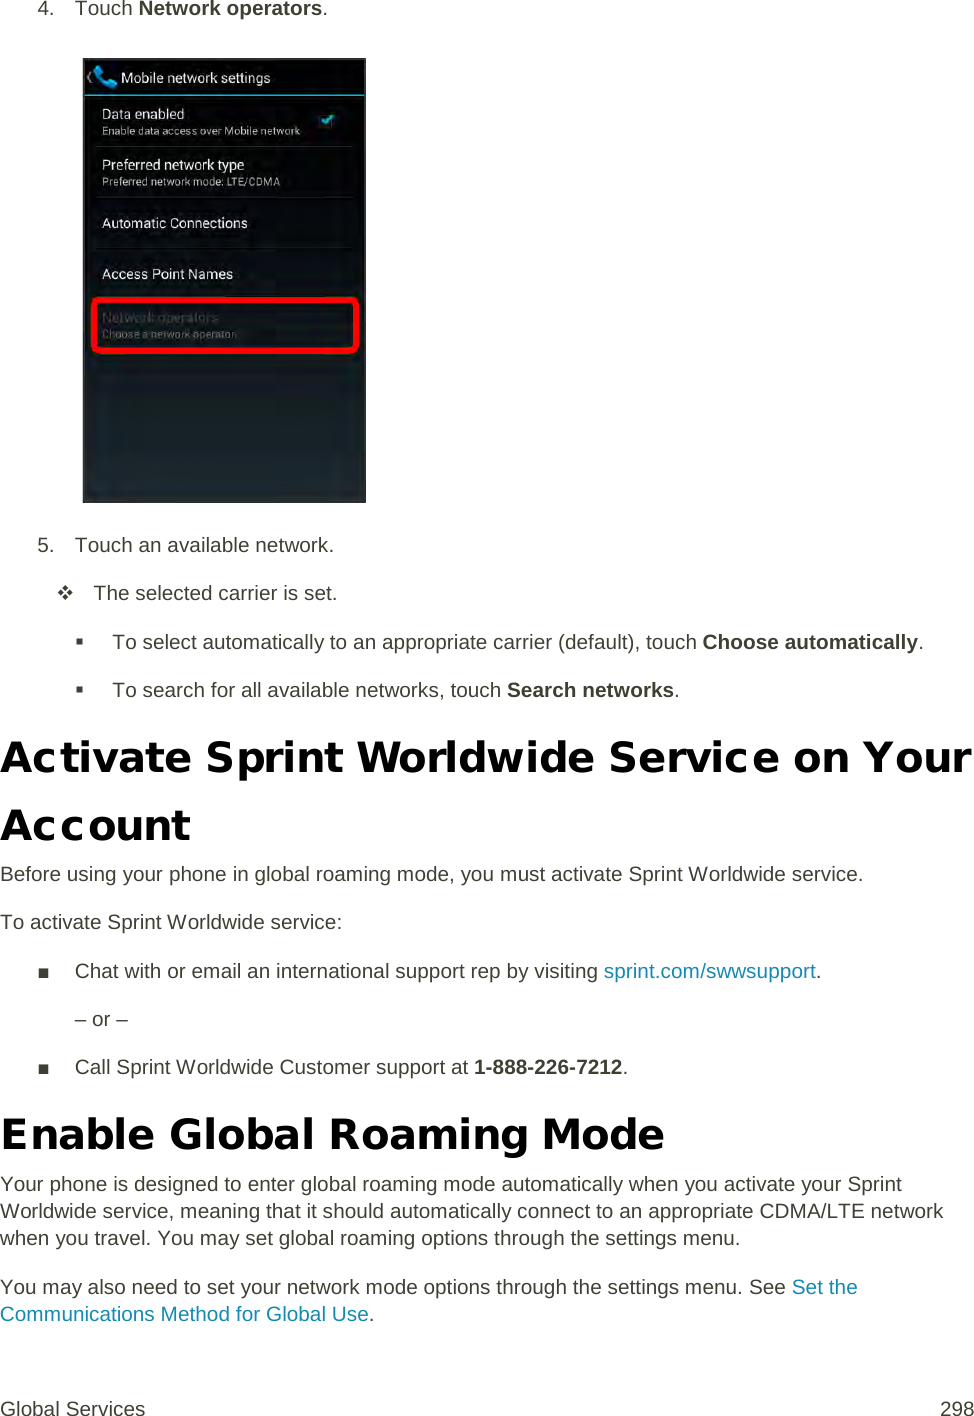
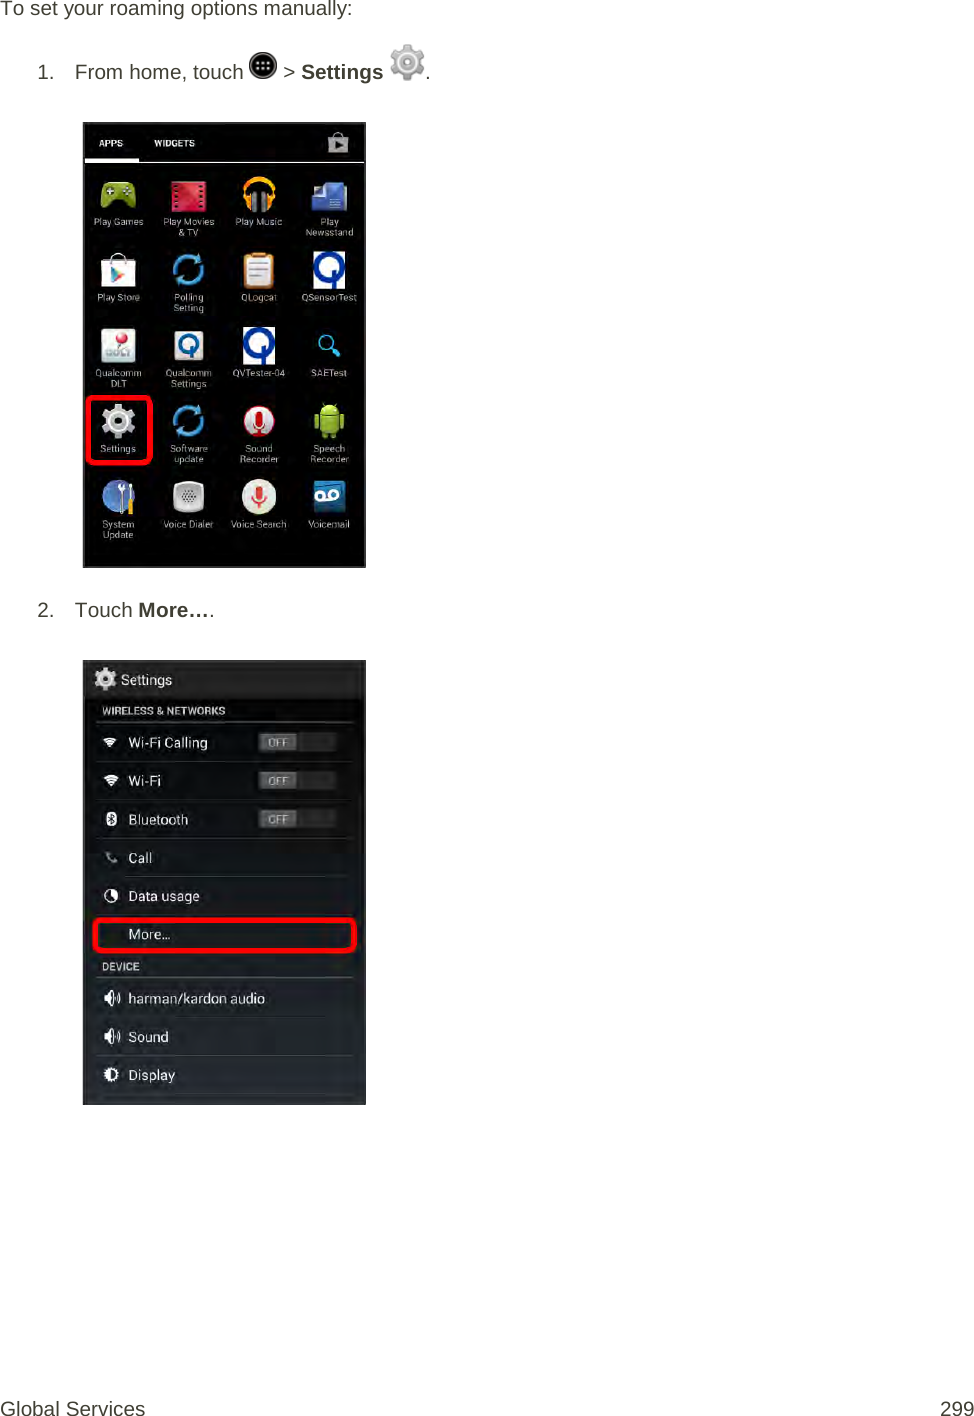
![3. Touch Mobile networks. 4. Touch Roaming. [illustration] 5. Touch Roaming mode. [illustration] 6. Touch Sprint only or Automatic. [illustration] The selected roaming method is set. 7. Touch Roaming Settings. [illustration] 8. Touch Roaming guard. [illustration] 9. Select roaming guard options for each category. [illustration] The selected options are set. Global Services 300](https://usermanual.wiki/Sharp/HRO00204.manual/User-Guide-2330332-Page-310.png)
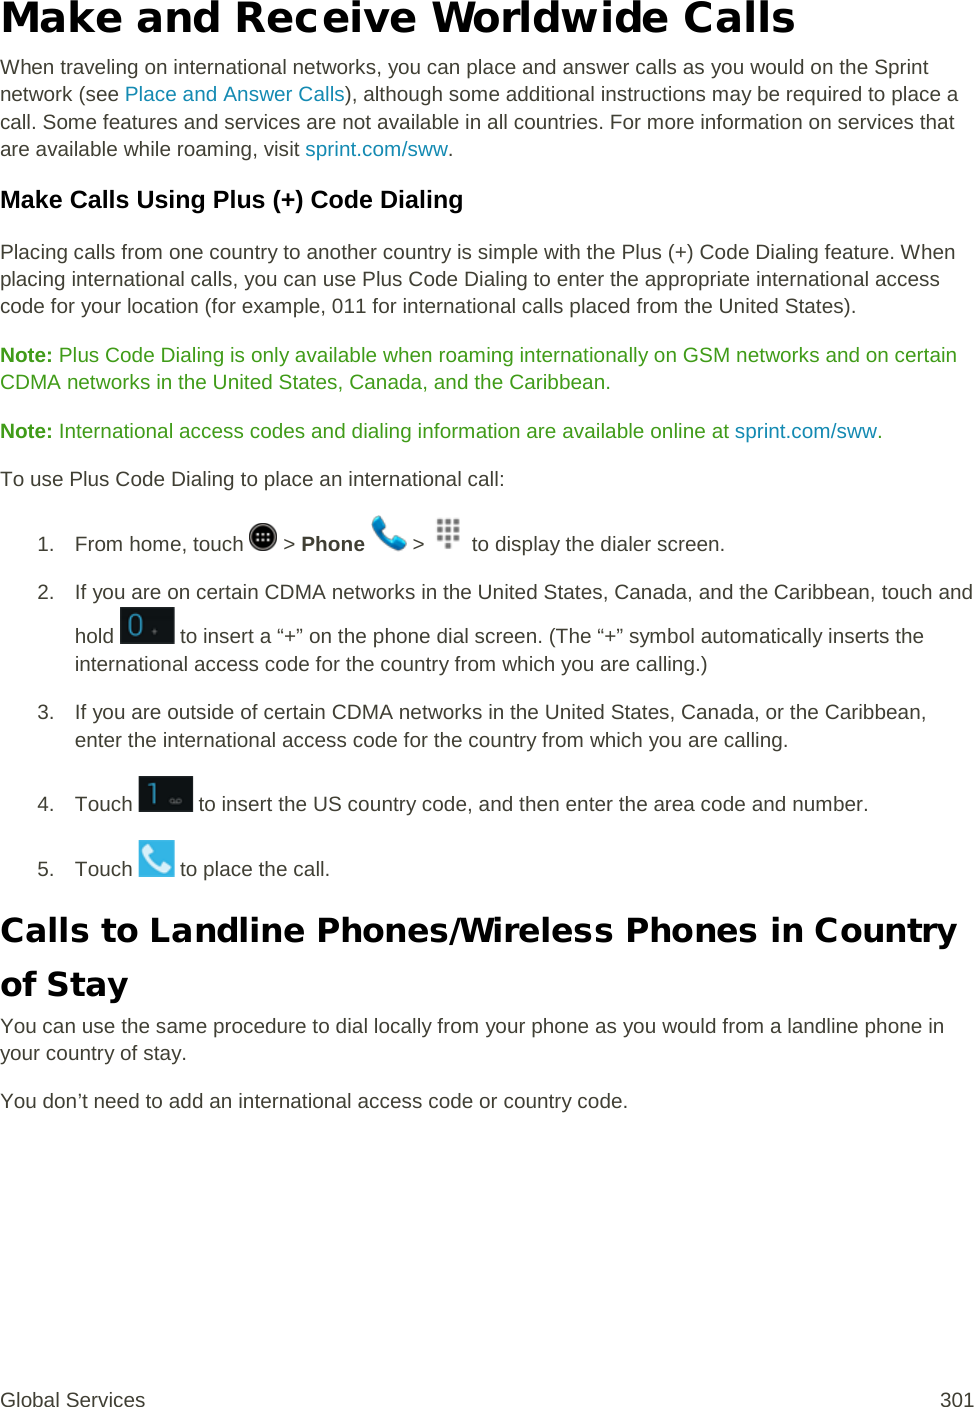
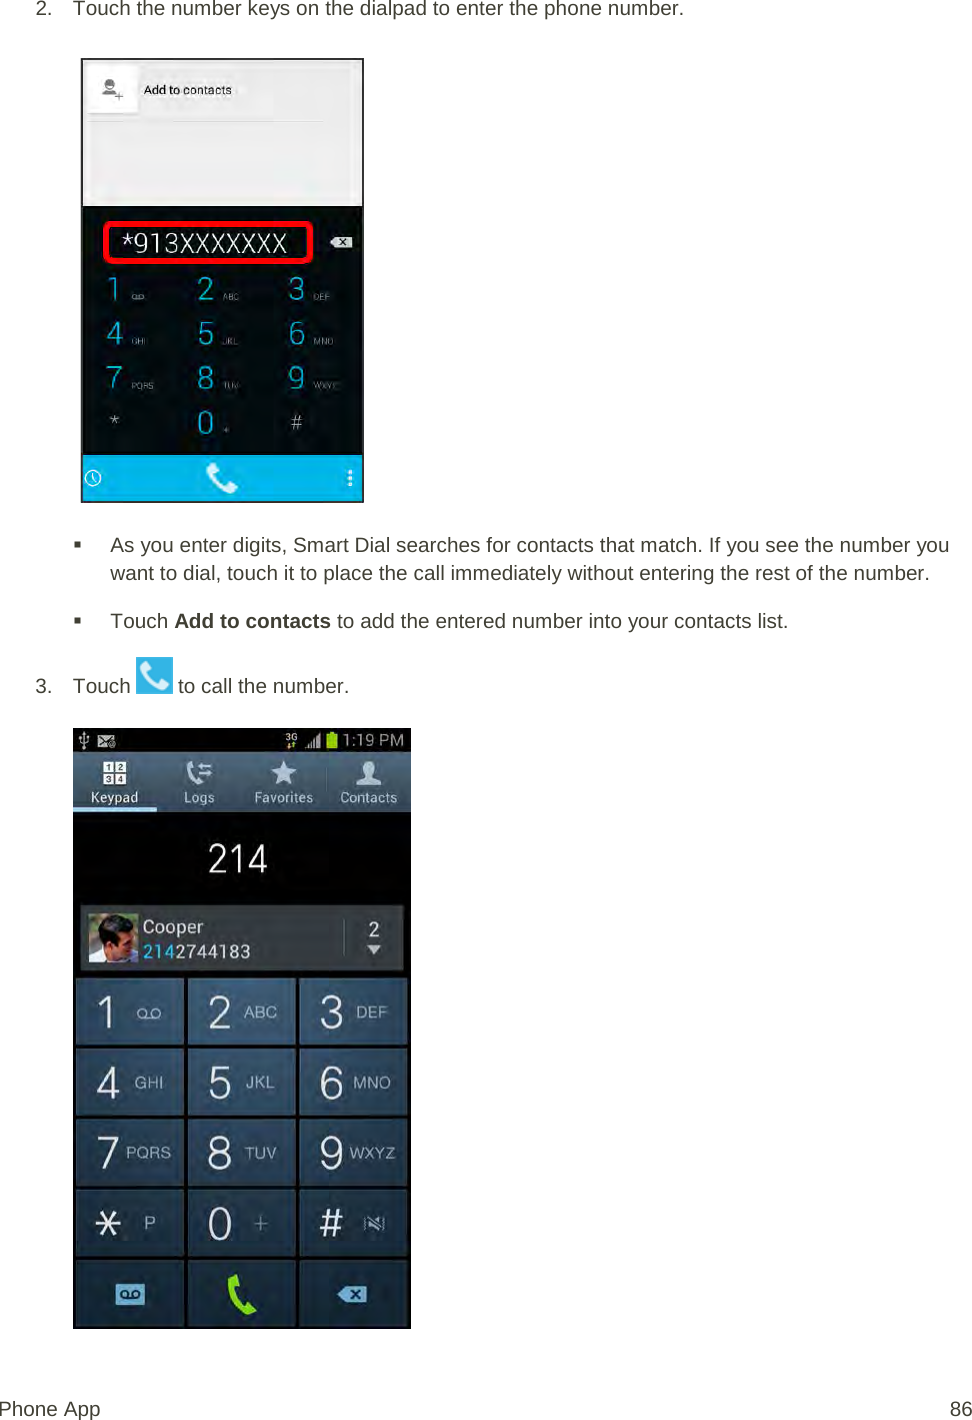
![1. From home, touch > Phone > to display the dialer screen. The phone app opens. 2. Touch the number keys on the dialpad to enter the phone number. 3. Touch to call the number. [illustration] The phone dials the number. The call begins when the other party answers. Global Services 302](https://usermanual.wiki/Sharp/HRO00204.manual/User-Guide-2330332-Page-312.png)
![4. To end the call, touch [End call icon]. [illustration] The call ends. Sprint International Voicemail Service Your Sprint voicemail will follow you as you travel. All of your unanswered calls will be forwarded to your Sprint voicemail. You will need to be sure your voicemail box is already set up and that you know your voicemail password. Note: Sprint voicemail may not be available on all networks; check sprint.com/sww for service information. International Voicemail Troubleshooting There are a few tips to keep in mind when using Sprint voicemail while traveling. ● Some carriers may not support voicemail indicators. It may be necessary to call your voicemail to see if you have any new messages. ● If you hear the message “Please enter the number of the subscriber you wish to call,” enter your 10-digit wireless phone number. Set Up Your Voicemail Access Number for International Use To simplify accessing your Sprint Voicemail while traveling, you can set up your voicemail access number as a Contacts entry. This will make it faster and easier to access your messages while roaming internationally. Global Services 303](https://usermanual.wiki/Sharp/HRO00204.manual/User-Guide-2330332-Page-313.png)
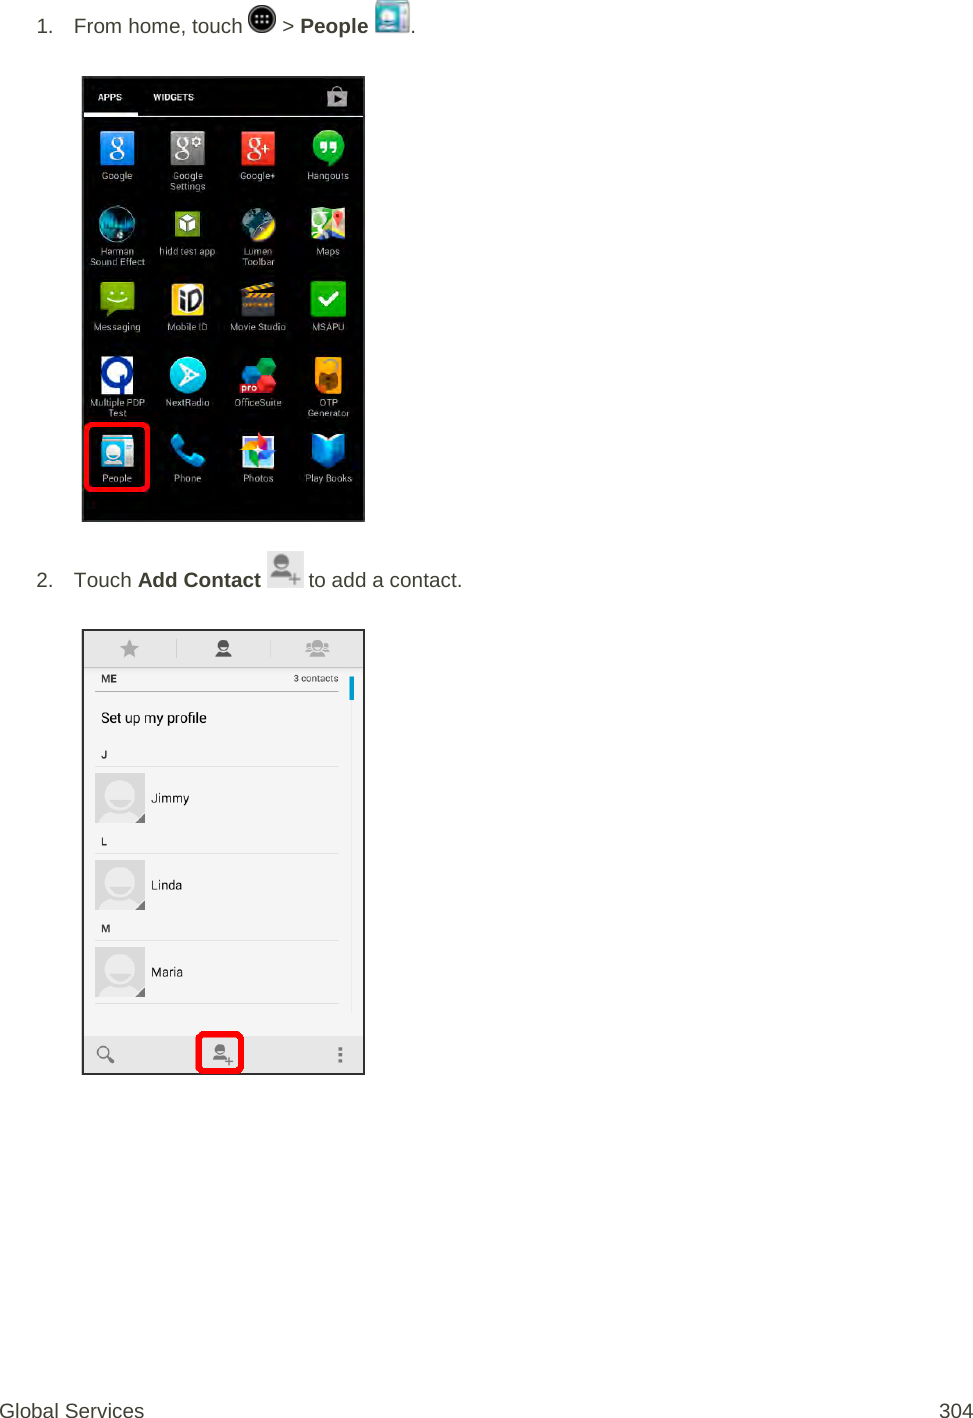
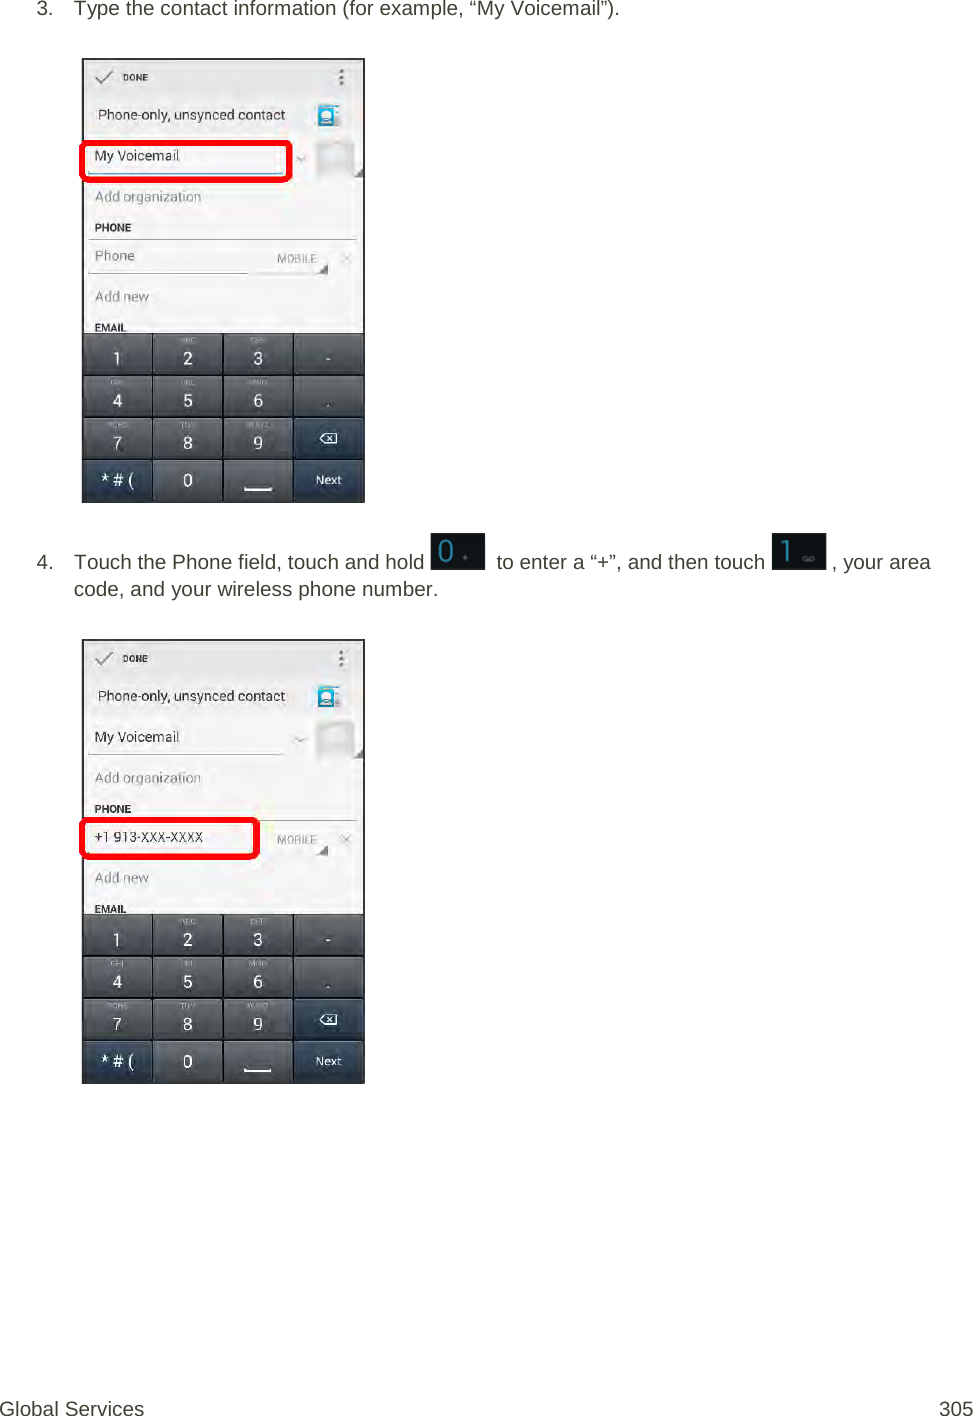
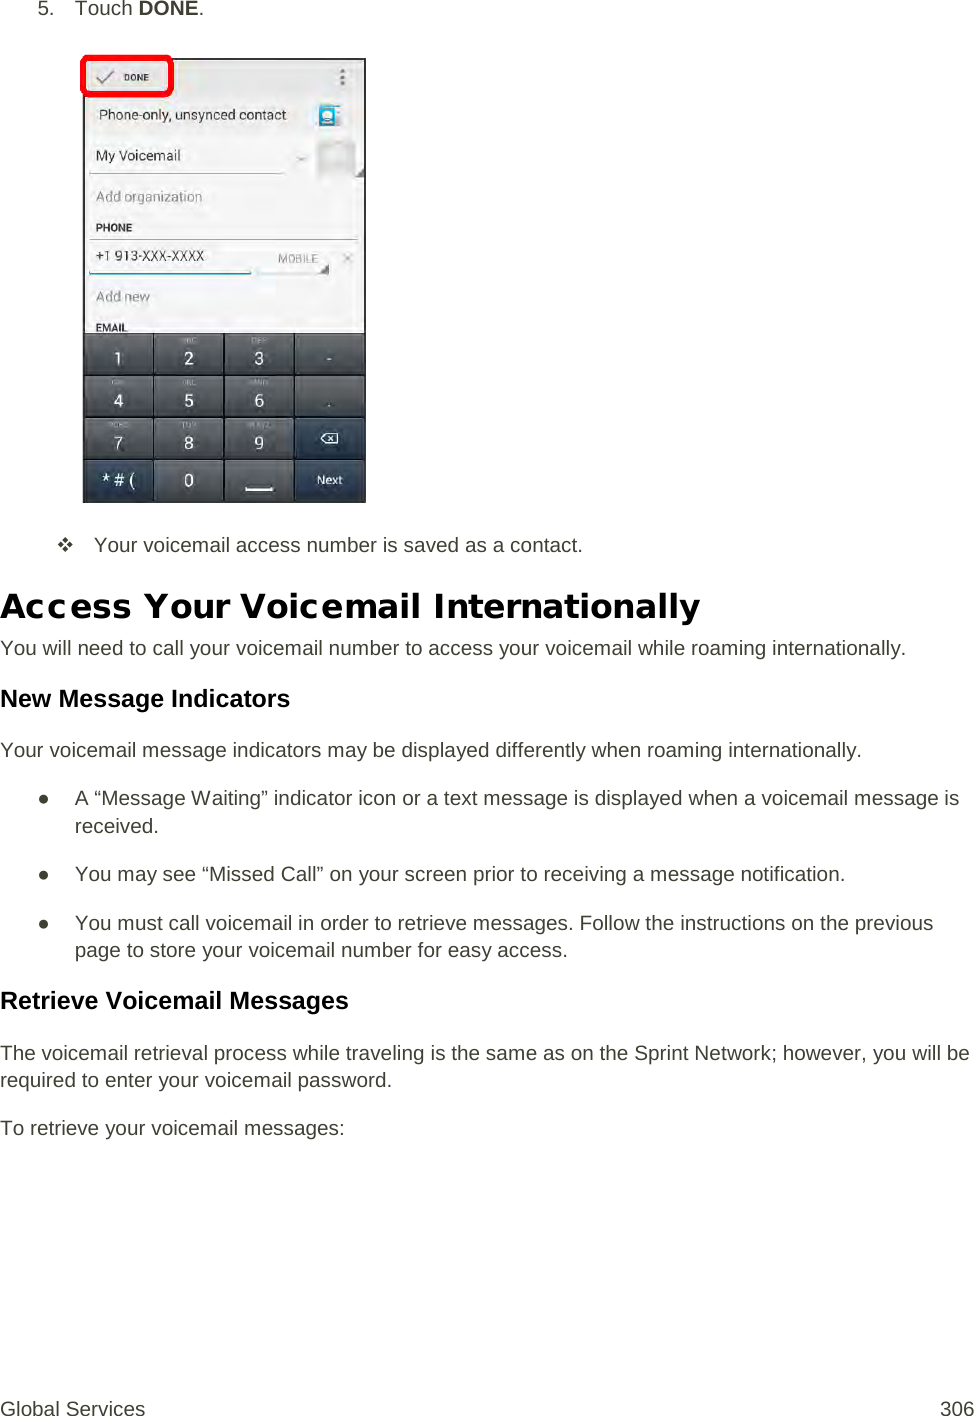
![1. From home, touch > People . 2. Touch the voicemail entry and then touch the number to call it. [illustration] Your phone dials your voicemail number. 3. When your voicemail answers, touch , enter the password, and touch to access your voicemail. [illustration] Your voicemail box is accessed. Contact Sprint for Assistance with International Service If you experience any issues with voice or data services while outside of the United States, Sprint offers customer support 24 hours a day. In the event that you do experience an issue, try the following actions: ● First try powering your phone off and then back on; this will force your phone to reregister with the network. ● Try manually selecting another network. Information for selecting networks can be found in the phone guide. If neither of these actions resolves your issue, you will need to contact customer service (see below). When calling to report an issue, the following information will be beneficial in trying to resolve your issue as quickly as possible: Global Services 307](https://usermanual.wiki/Sharp/HRO00204.manual/User-Guide-2330332-Page-317.png)
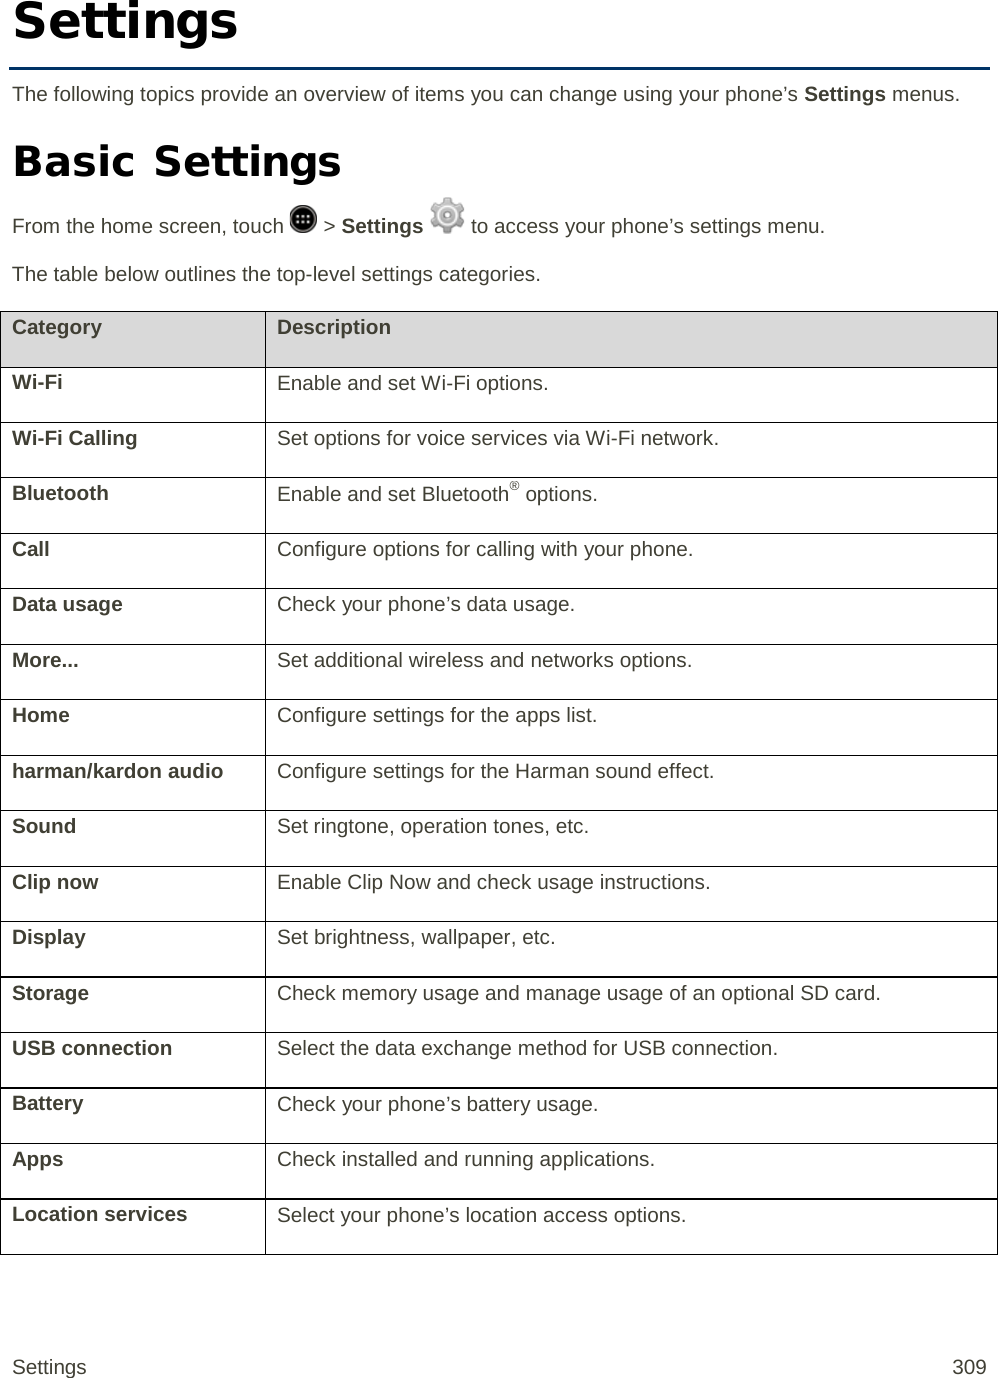
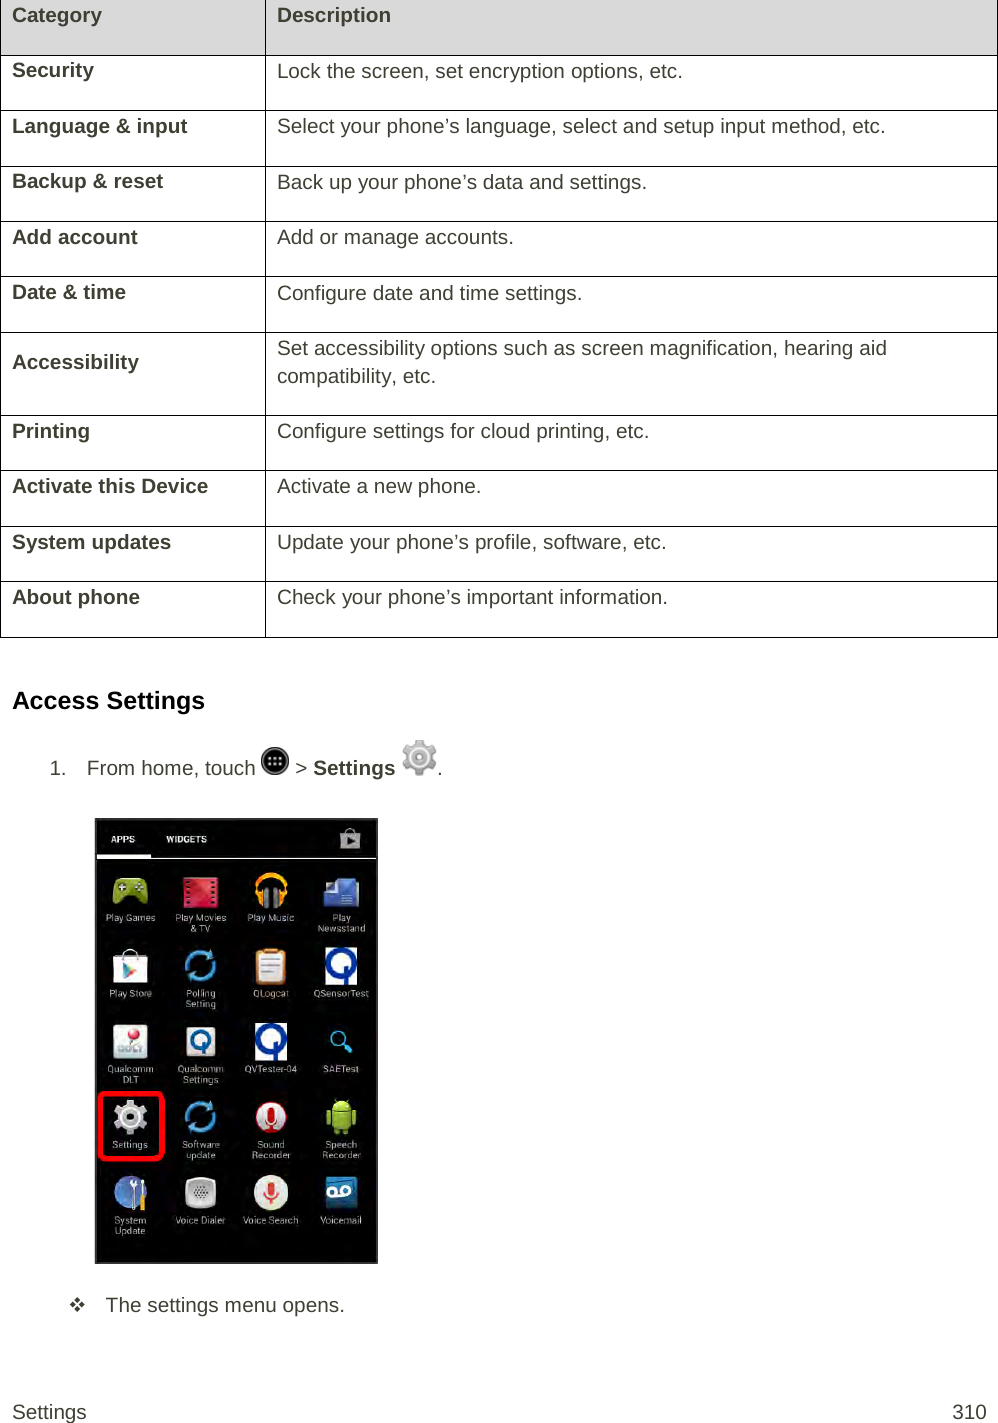
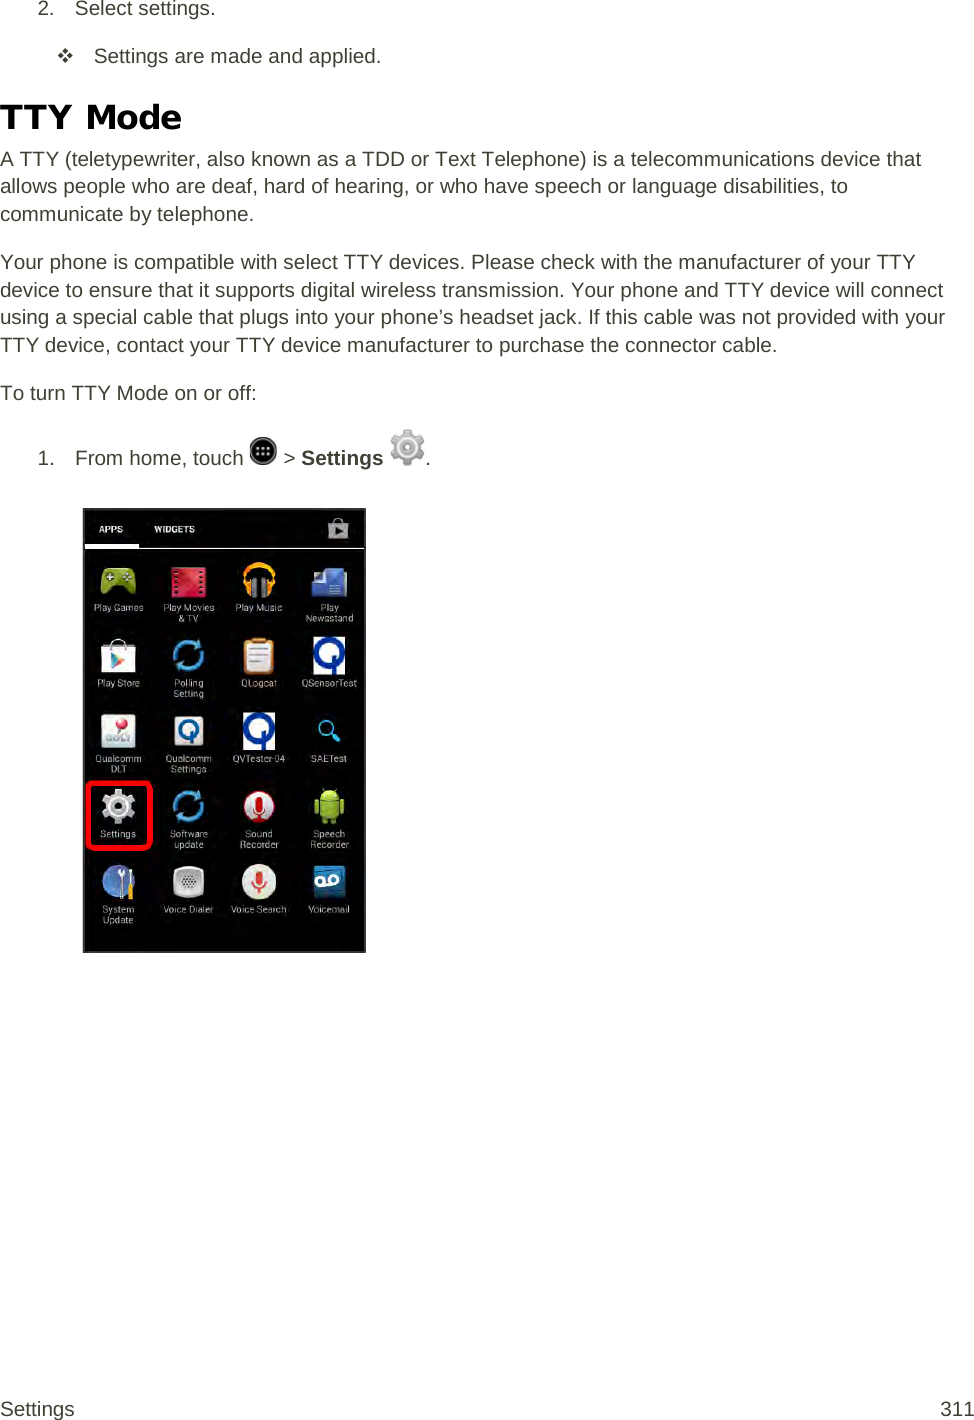

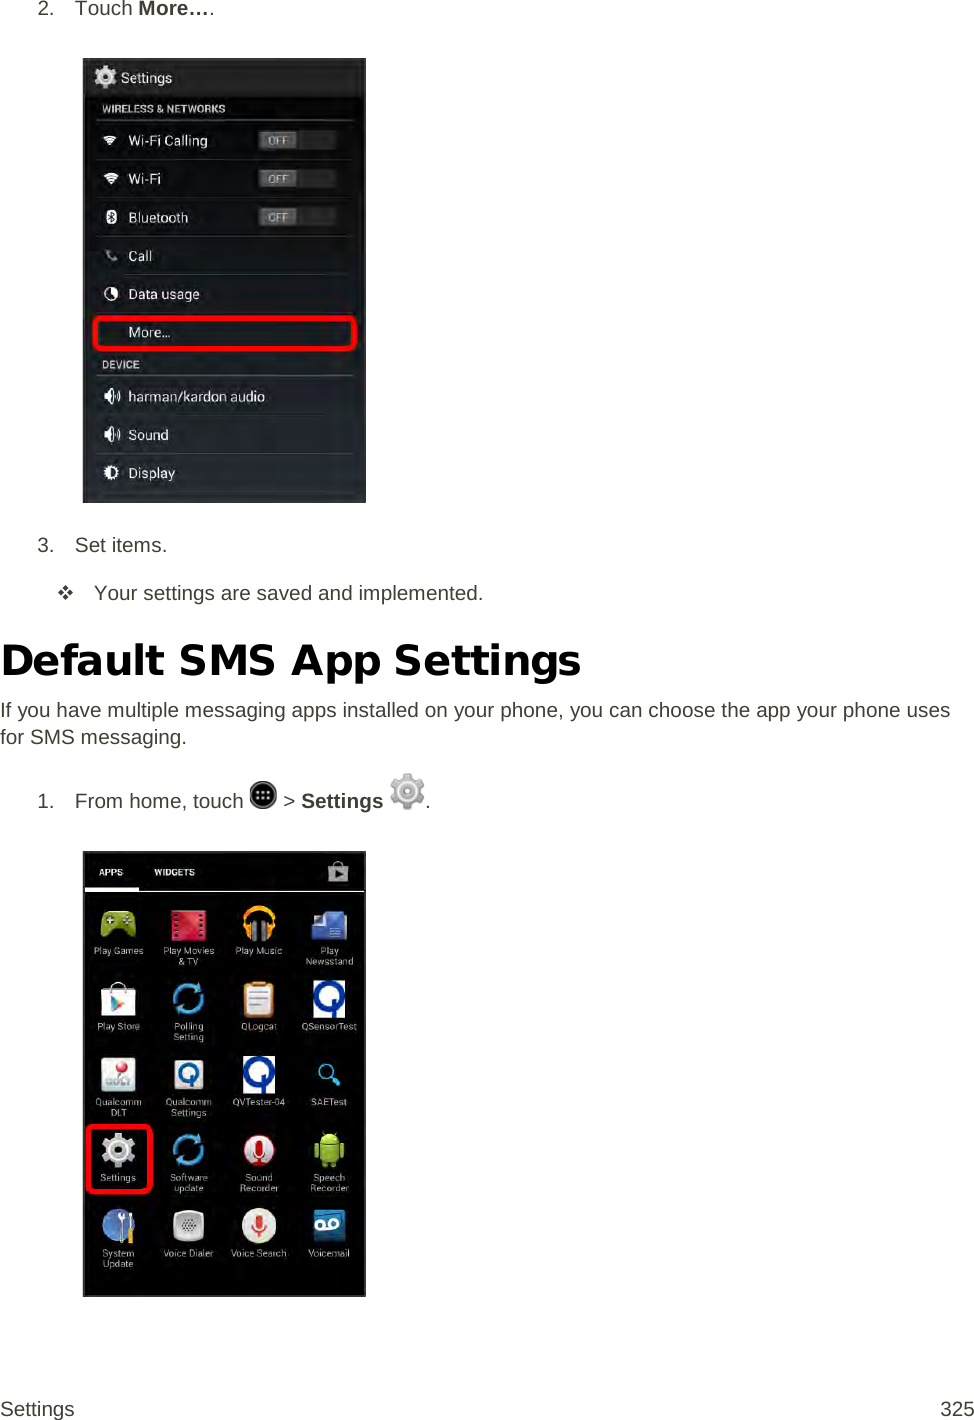
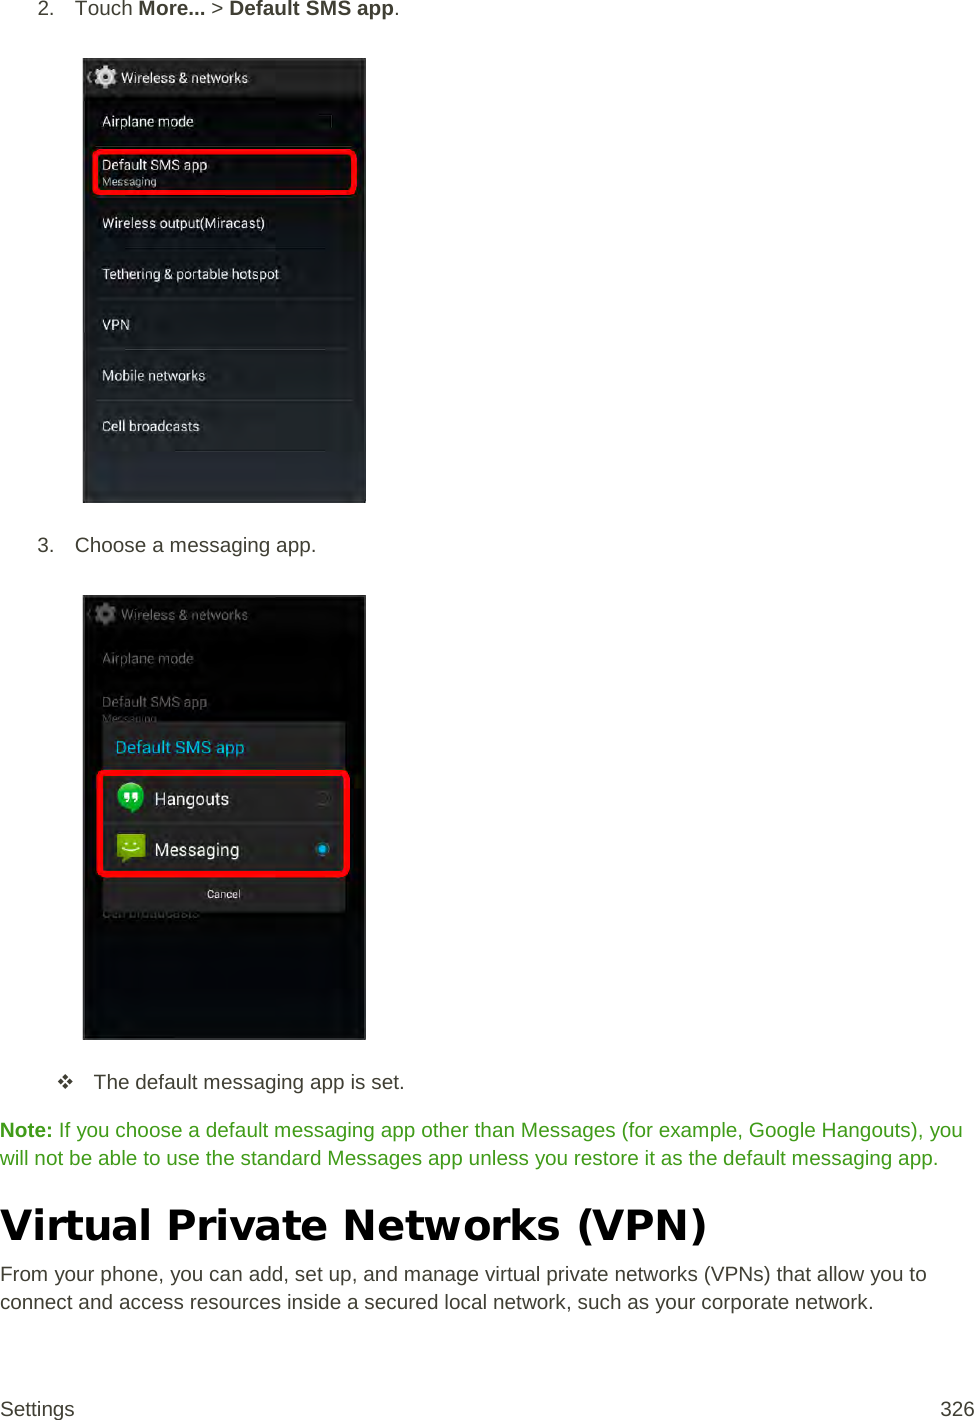
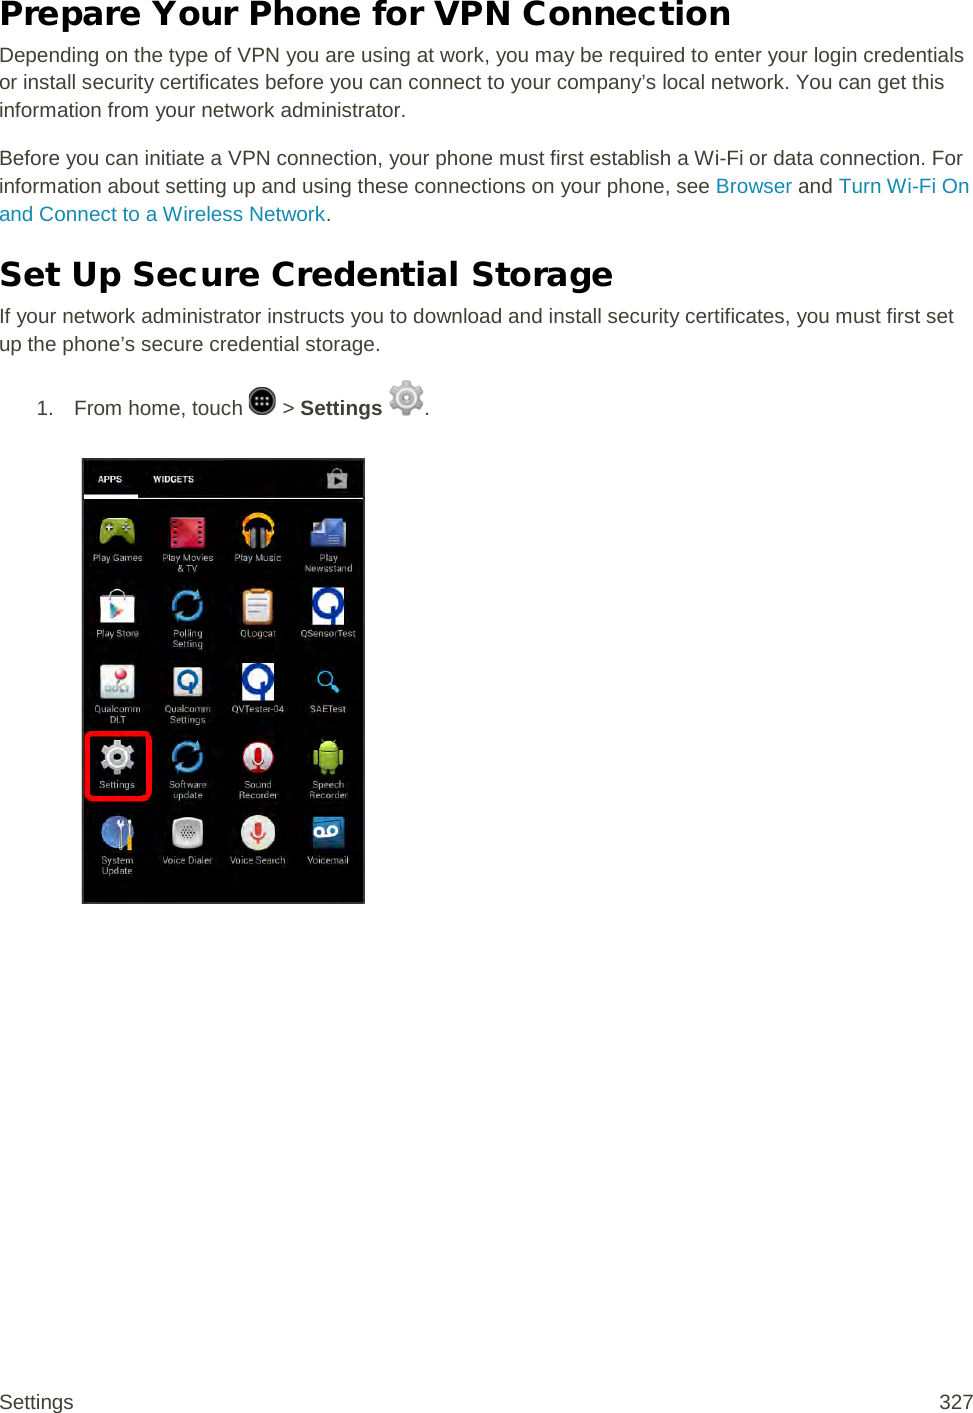
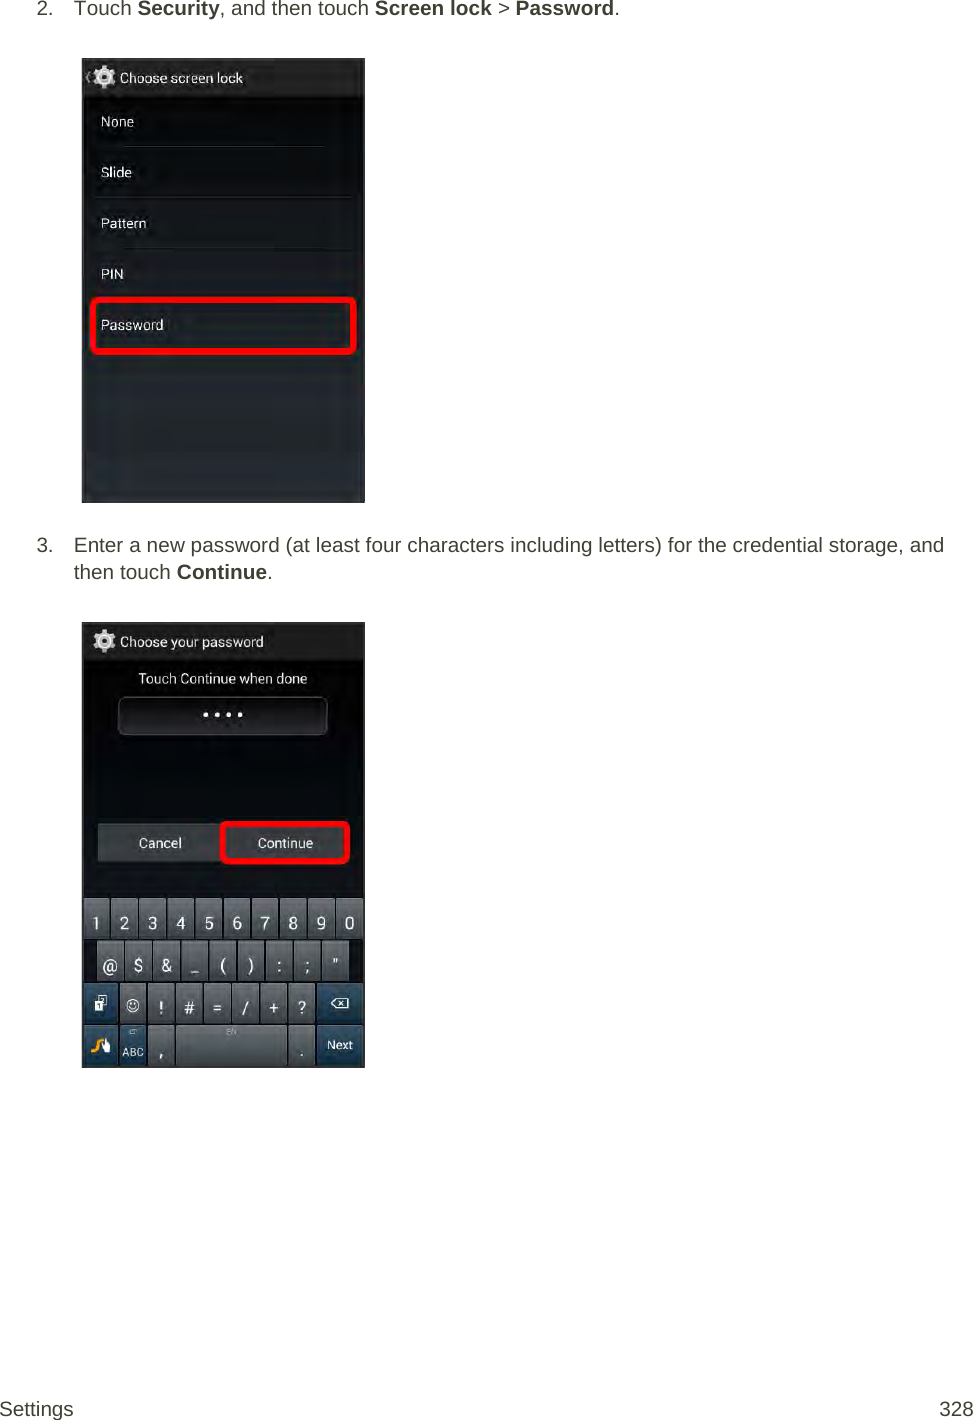
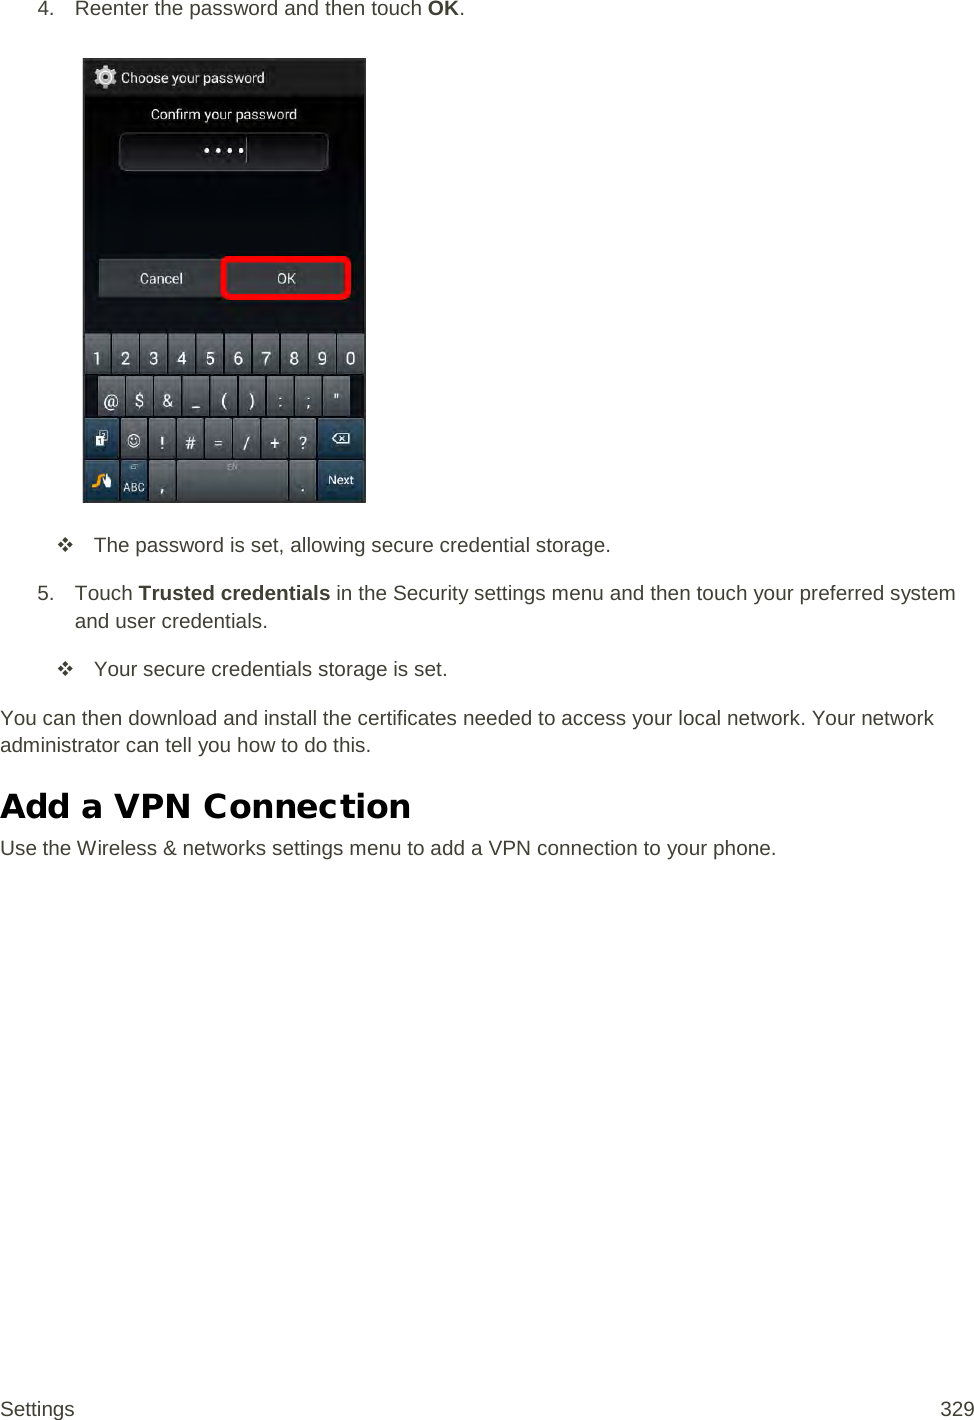
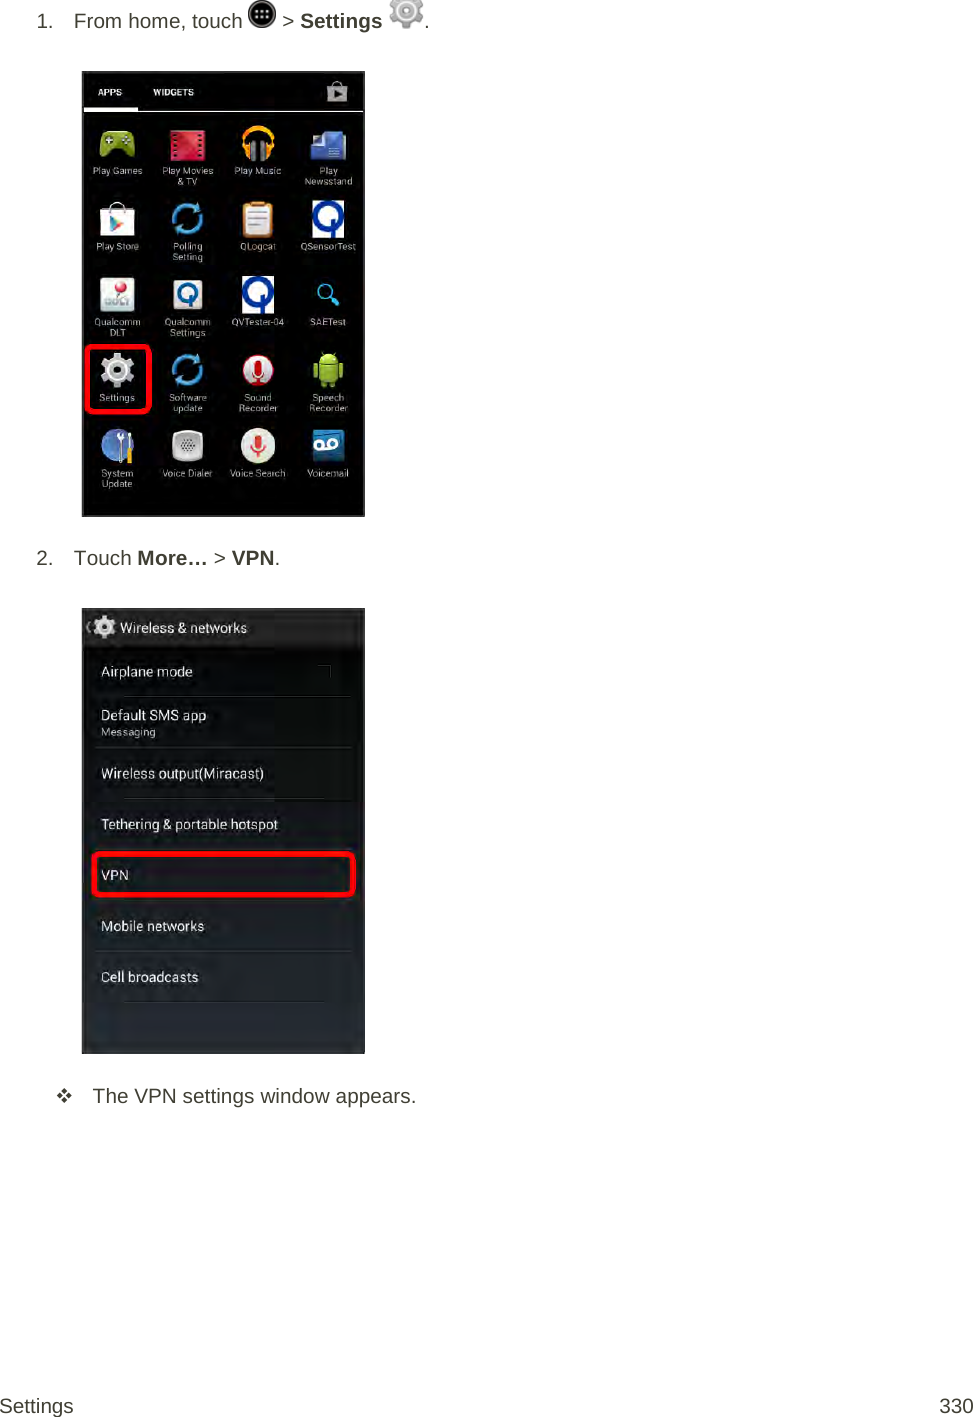

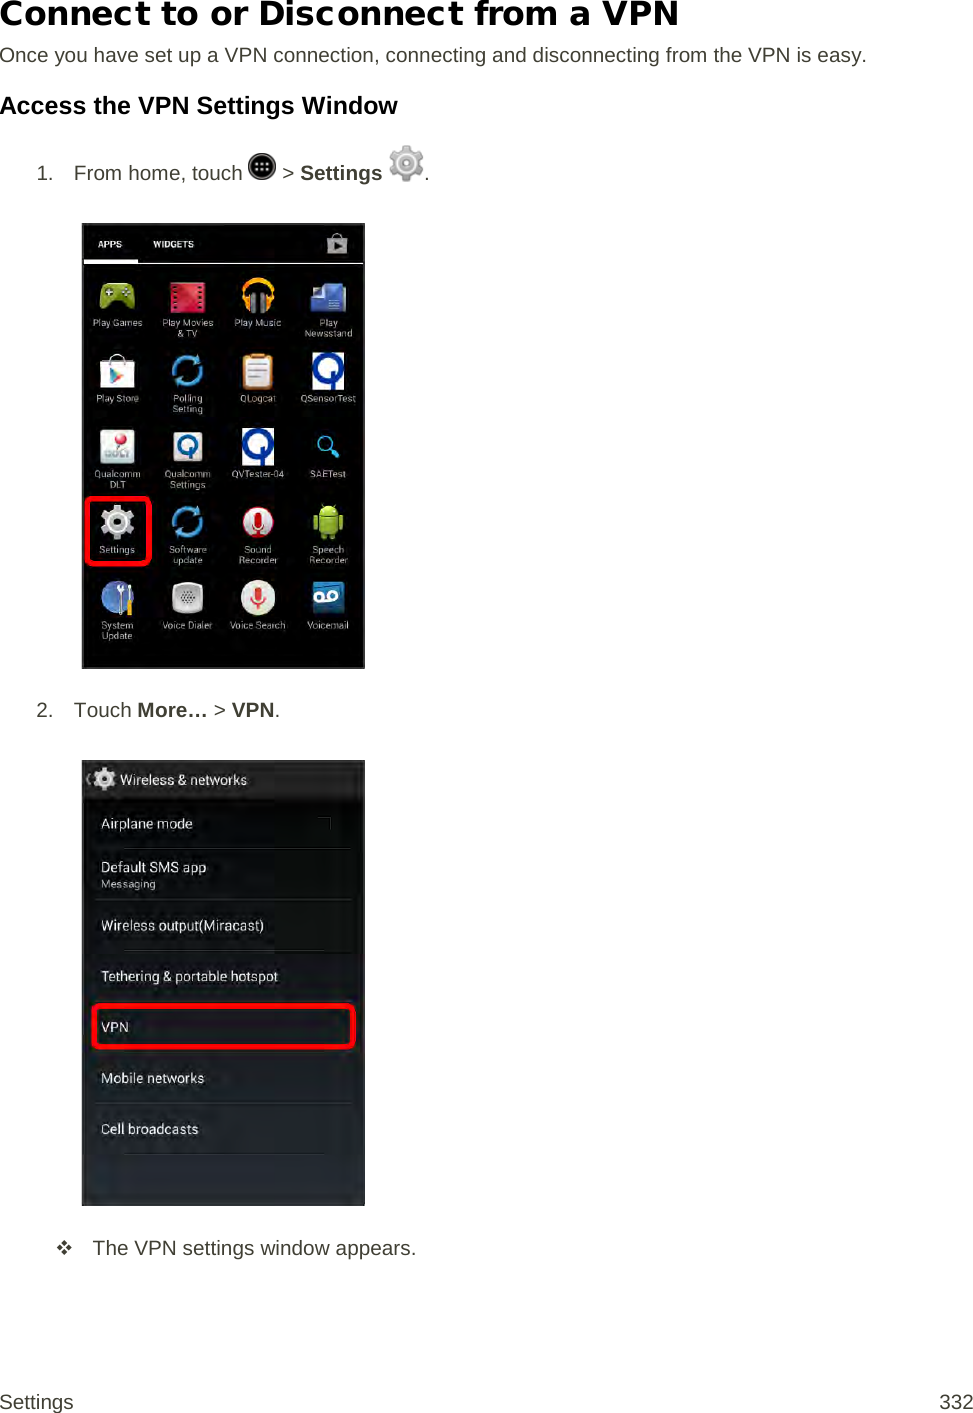
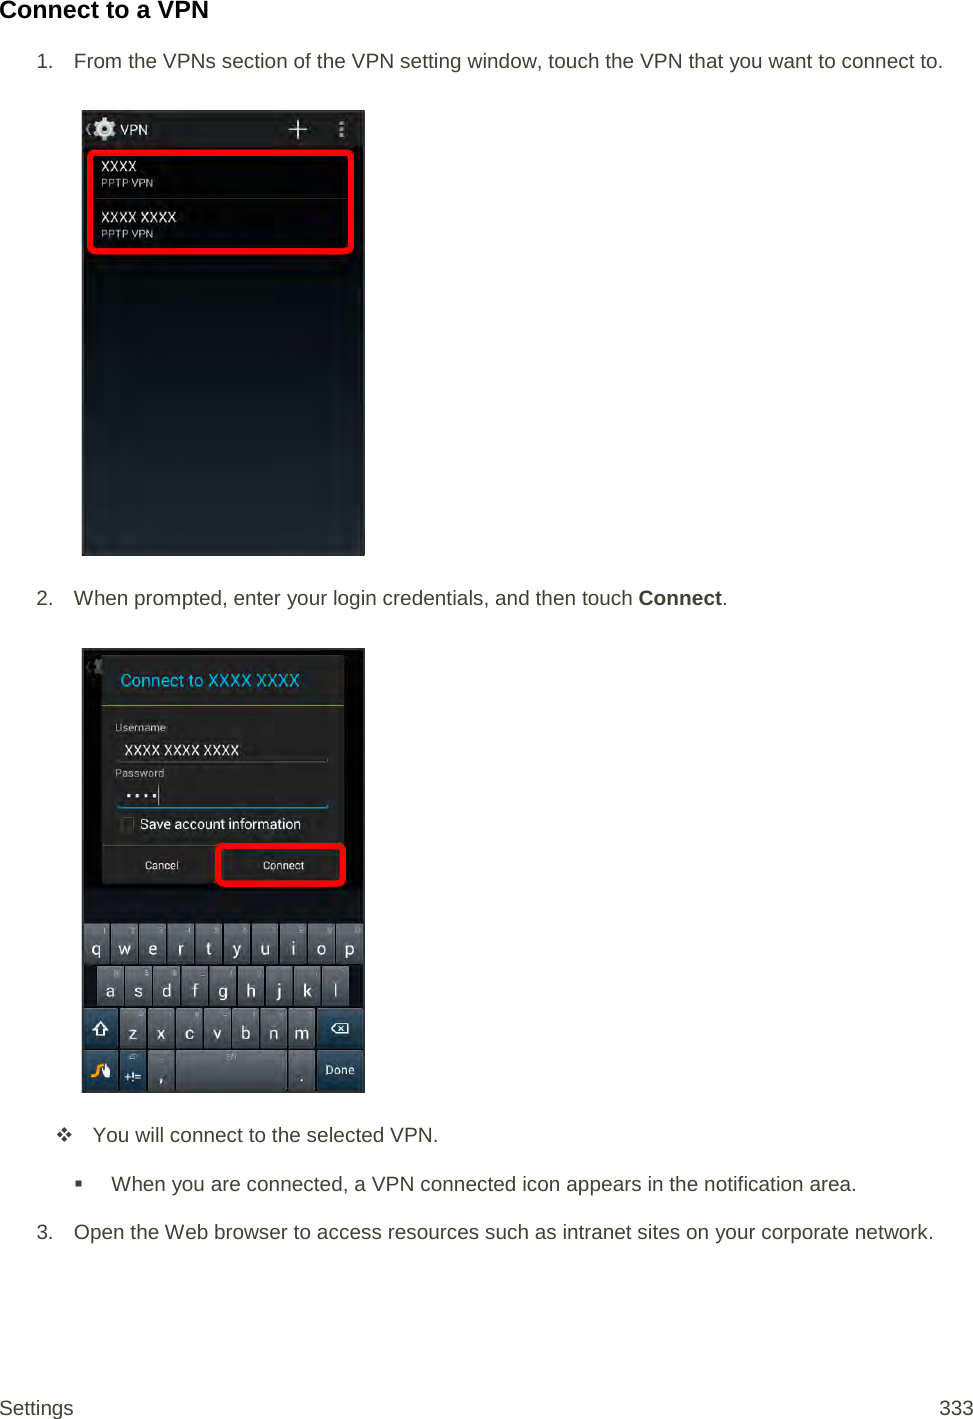
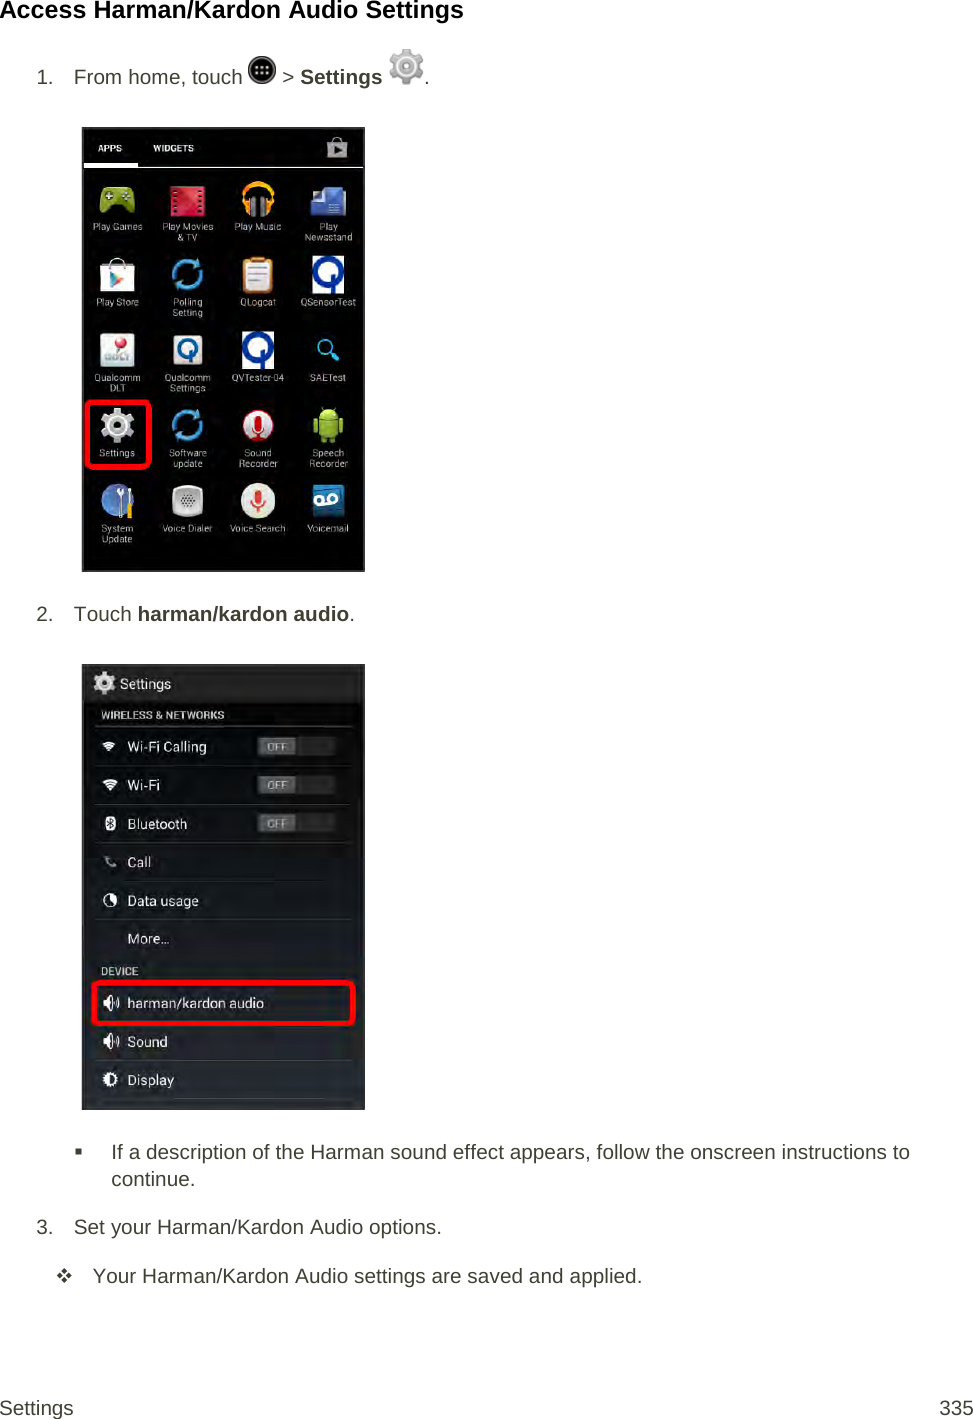
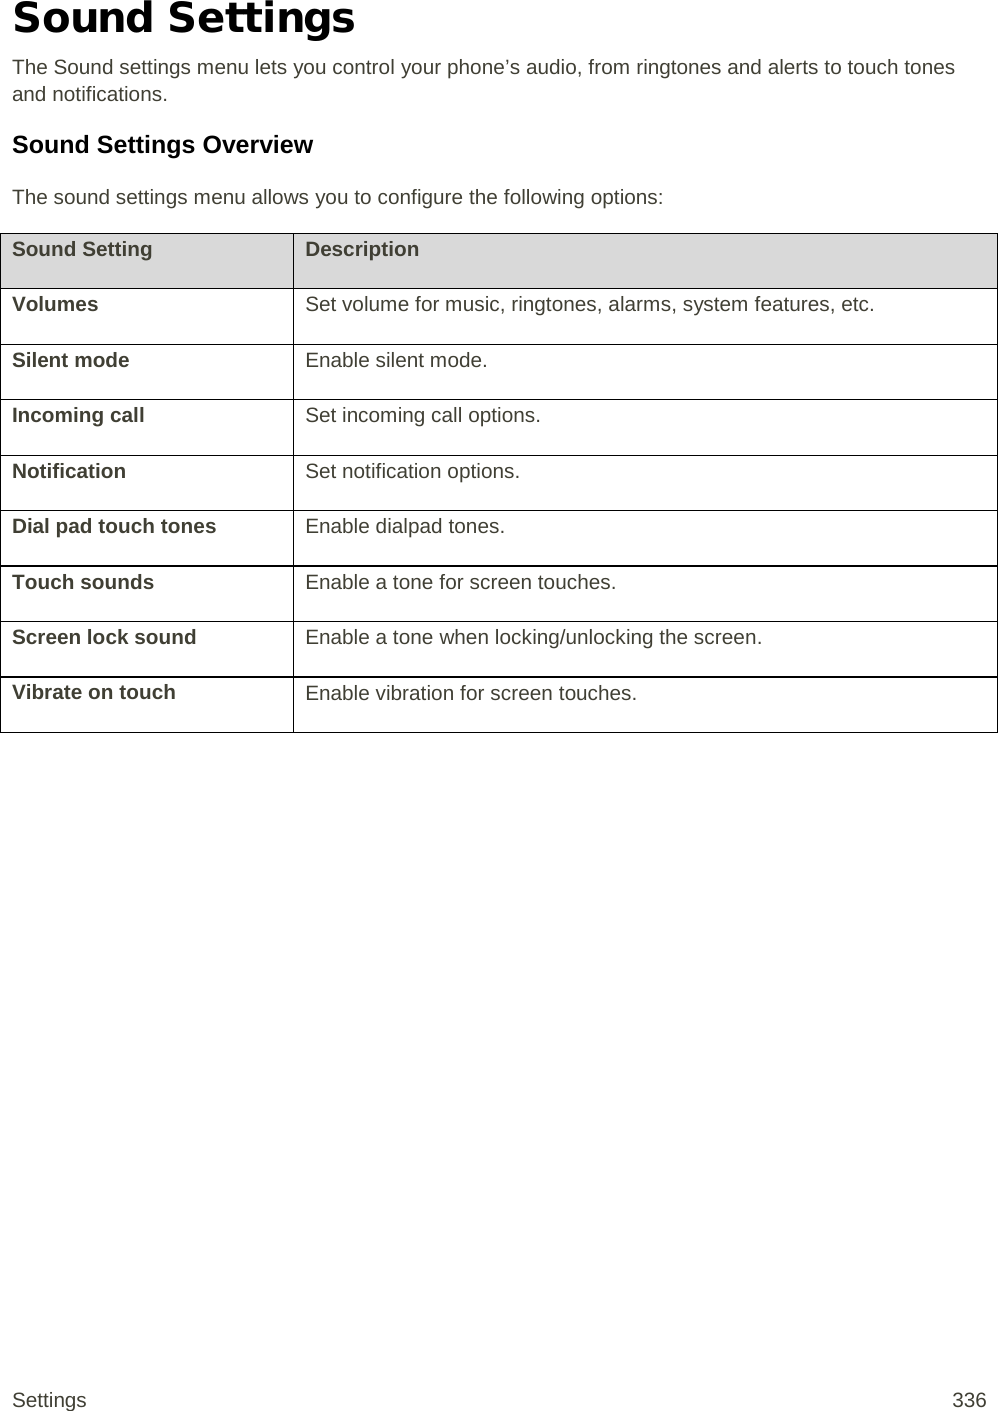
![Disconnect from a VPN 1. Drag the status bar down to open the notifications window. [illustration] 2. Touch the VPN connection to return to the VPN settings window. [illustration] 3. Touch the VPN connection to disconnect from it. [illustration] Your phone disconnects from the VPN. When your phone has disconnected from the VPN, you will see a VPN disconnected icon in the notification area of the status bar. Home TBD Harman/Kardon Audio Settings You can enable improved sound quality with the Harman sound effect feature. Harman/Kardon Audio Settings Overview The Harman/Kardon Audio Settings menu allows you to configure the following options: Harman/Kardon Audio Setting Description Enable sound effect Set to ON to recover sound information lost during compression for improved sound quality. Enabled when an earphone, Bluetooth® device, etc. is connected. Enable visualizer Set to ON for a visual display of the sound effect. XXXXXXX Set to ON for more impressive sound rendering. Help View a description of the Harman sound effect. Settings 334](https://usermanual.wiki/Sharp/HRO00204.manual/User-Guide-2330332-Page-344.png)