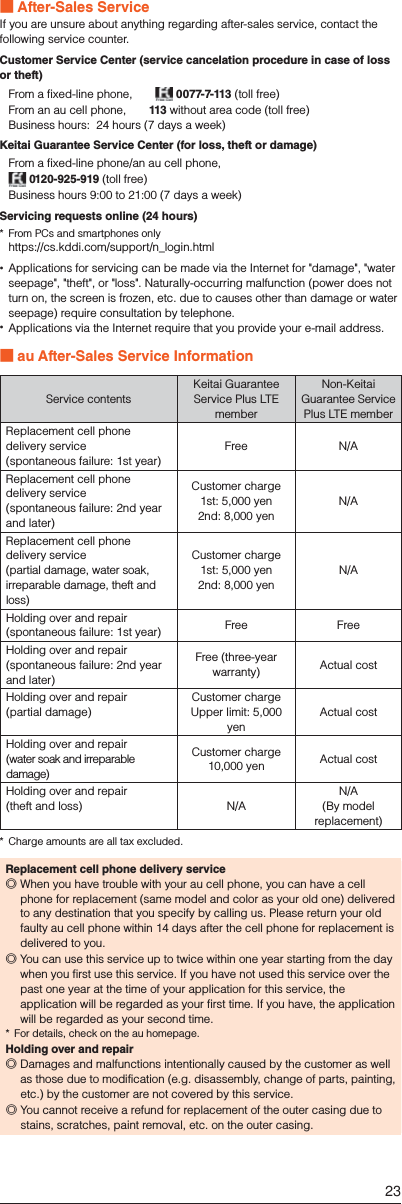
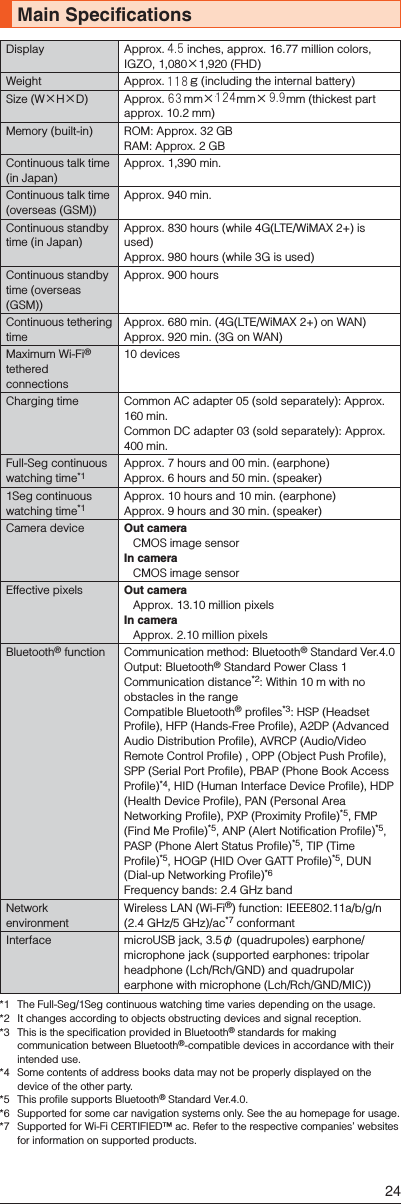
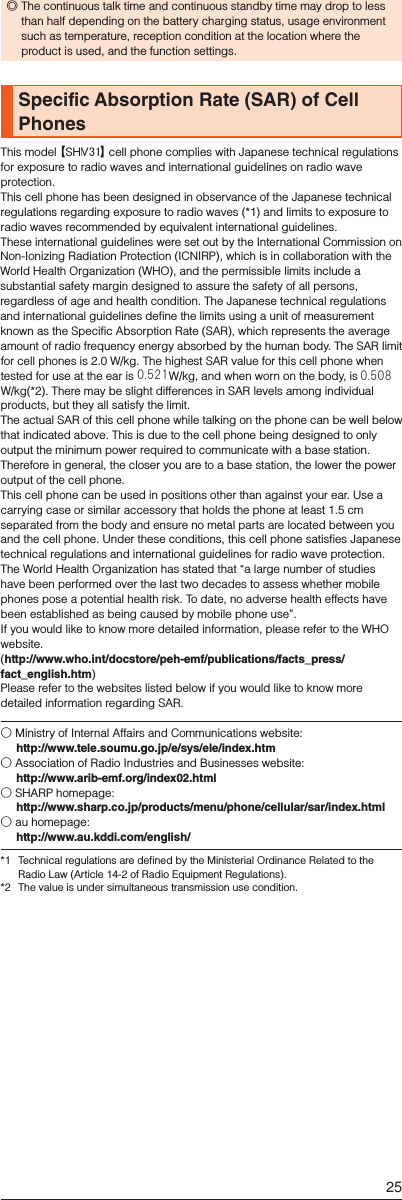
Sharp HRO00214 Dual-band UMTS (FDDI, FDDV) & Quad-band GSM (GSM850/GSM900/DCS1800/PCS1900) & Quad-band LTE (B1, B3, B17, B26) & AXGP (TDD41) multi mode cellular phone with Bluetooth, ANT+, WLAN, SRD (NFC, FeliCa) and GPS User Manual
Sharp Corporation Dual-band UMTS (FDDI, FDDV) & Quad-band GSM (GSM850/GSM900/DCS1800/PCS1900) & Quad-band LTE (B1, B3, B17, B26) & AXGP (TDD41) multi mode cellular phone with Bluetooth, ANT+, WLAN, SRD (NFC, FeliCa) and GPS
Sharp >
User Manual
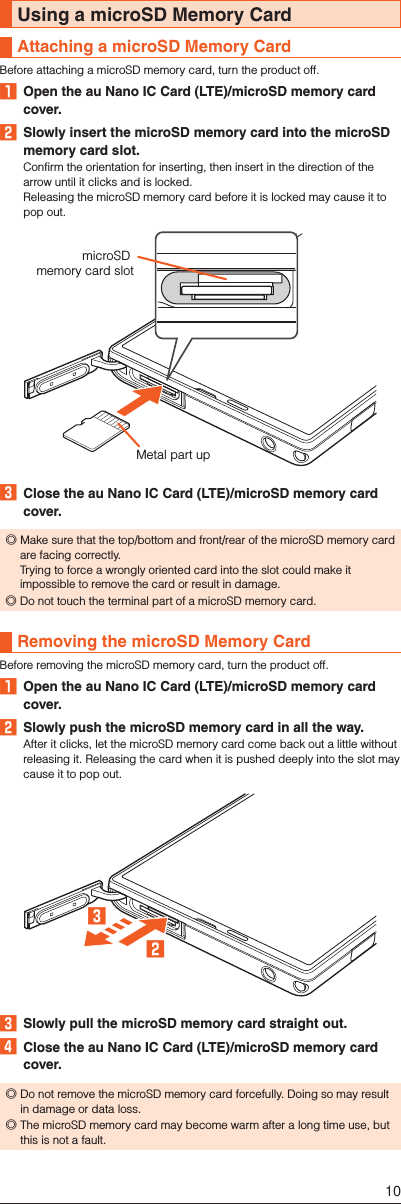
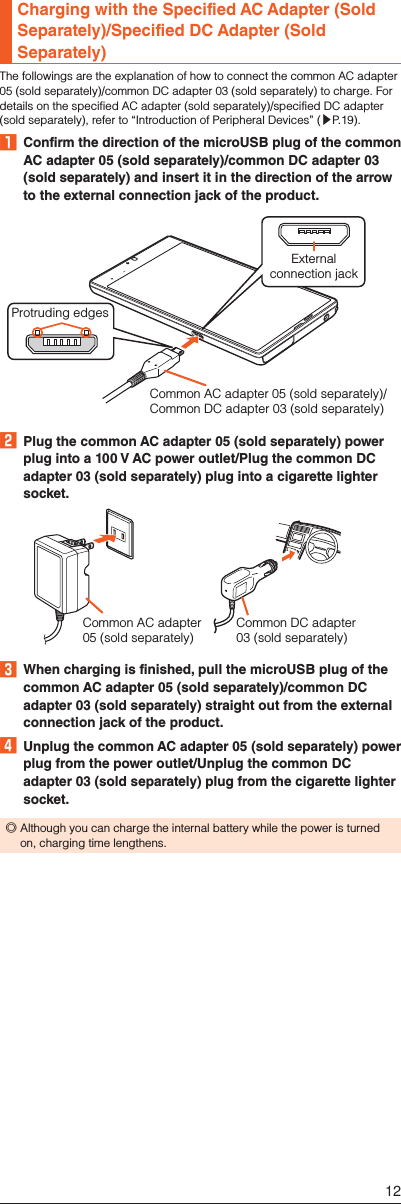
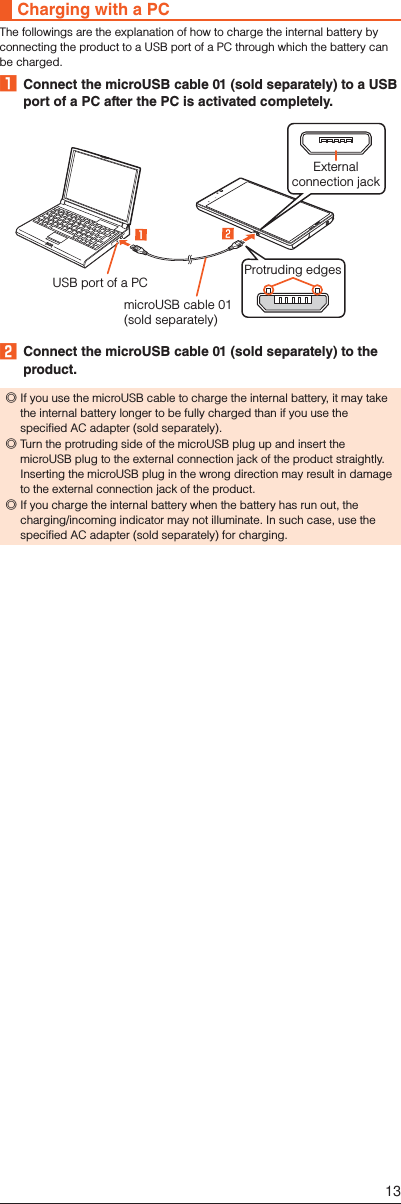
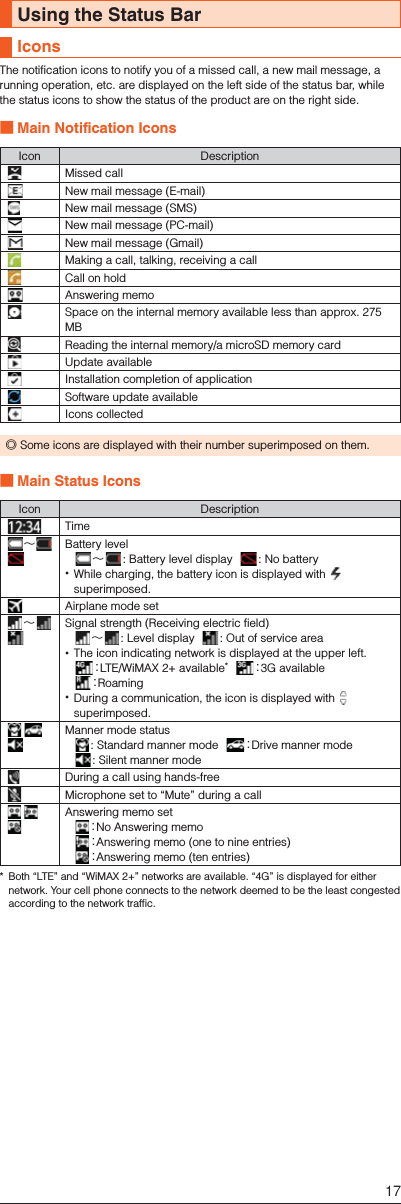
![PrefaceThank you for buying the “AQUOS SERIE SHL25” (simply called the “SHL25” or the “product” from here on).Before using the product, be sure to read the “Basic Manual” (this manual) and “Notes on Usage”/“Setting Guide” available on the au homepage to ensure correct use. After you have finished reading the manuals, be sure to keep them accessible and store the printed manuals (“取扱説明書” (Basic Manual), “ご利用にあたっての注意事項” (Notes on Usage) and “設定ガイド” (Setting Guide)) (Accessories) in safe places so that you can refer to them whenever you need them. If you lose the printed manuals (Accessories), contact an au shop or Customer Service Center.Operating Instructions ■“Basic Manual” and “Setting Guide”The “Basic Manual” (this manual) and “Setting Guide” available on the au homepage describe basic operations of major functions.For detailed descriptions of various functions, refer to the “Instruction Manual application” (Japanese version) that can be used on the product or “Full Instruction Manual” (Japanese) available on the au homepage:(http://www.au.kddi.com/english/support/manual/) ■“Instruction Manual Application” (Japanese/English Version)You can use the “Instruction Manual application” (Japanese version) on the product to check detailed operational procedures.Also, you can activate intended functions from an explanation screen depending on the functions.On the home screen, “Apps Sheet” → [取扱説明書] (Instruction Manual).Also, you can use the “Instruction Manual application” (English version) on the product to check operational procedures. On the home screen, “Apps Sheet” → [Basic Manual] after switching the display language to English (▶P. 15). To use the application for the first time, you need to download and install it by following on-screen instructions.Safety PrecautionsBefore you start using the product, be sure to read the “Notes on Usage” available on the au homepage to ensure correct use.Before you assume that the product is malfunctioning, check for possible remedies in the following au Customer Support site of au homepage:(http://www.au.kddi.com/english/support/)When Using the Product Communication is not possible even inside the service area in places where the signal does not reach (e.g. tunnels and basements). Also, communication may not be possible in poor reception areas. Communication may be interrupted if you move into a poor reception areas during communications. Since this product uses radio waves, the possibility of communication intercepts by third parties cannot be eliminated. (Though the LTE/WiMAX 2+/CDMA/GSM/UMTS system has highly secure confidential communication features.) The product is compatible with the international roaming service. Each network service varies depending on the area and service content. For details, refer to “auのネットワークサービス・海外利用” (au Network Services/International Roaming) described in “Instruction Manual application” (Japanese) or “Full Instruction Manual” (Japanese) available on the au homepage. Since the product is a radio station under the Radio Law, you may be asked to temporarily submit the product for inspection in accordance with the Radio Law. The IMEI information of your cell phone is automatically sent to KDDI CORPORATION for maintenance and monitoring operational status of your cell phone. Since the battery is built into the product, you cannot replace it yourself. For replacing the battery, contact an au shop or Customer Service Center. Take care not to inconvenience people around you when you use the product in a public place. If you are using the product overseas, check the relevant laws and regulations of the country/region you visit.1V31V31](https://usermanual.wiki/Sharp/HRO00214/User-Guide-2490828-Page-2.png)
![Using au Disaster Countermeasure Applicationau Disaster Countermeasure is an application in which you can use Disaster Message Board, Emergency Rapid Mail (Earthquake Early Warning, Disaster and Evacuation Information, and Tsunami Warning), Disaster Voice Messaging Service and Disaster Information/Donation website. On the home screen, “Apps Sheet” → [au災害対策] (au Disaster Countermeasure).The au Disaster Countermeasure menu is displayed. ■Using Disaster Message BoardDisaster Message Board is a service to enable customers in disaster areas to register their safety information via LTE NET when large-scale disasters, such as an earthquake whose Japan seismic scale is approximately 6-lower or more, occur. The registered safety information can be checked by customers using au phones, and also from other carriers’ cell phones, PCs, etc.For details, refer to “Disaster Message Board Service” on the au homepage. From the au Disaster Countermeasure menu, [災害用伝言板] (Disaster Message Board).Follow the on-screen instructions for registration/confirmation. ◎To register the safety information, an e-mail address (∼ezweb.ne.jp) is required. Set the e-mail address in advance. ◎Deletion of the safety information and configurations for Safety Notification Mail are not available during wireless LAN (Wi-Fi®) connection. ◎The Company does not guarantee the quality of this service. The Company, regardless of the cause, shall not be liable for any problems related to registration of safety information due to the concentration of access to this service or equipment errors, any loss due to the damage, ruination, etc. of safety information or any loss arising from registered safety information. ■Using Emergency Rapid MailEmergency Rapid Mail is a service to collectively deliver Earthquake Early Warning and Tsunami Warning provided by the Japan Meteorological Agency, and Disaster and Evacuation Information provided by the national government or the local governments to au phones in the specified areas. At the time of purchase, receiving setting of Emergency Rapid Mail (Earthquake Early Warning, and Disaster and Evacuation Information) is set to “受信する” (Receive). You can receive Tsunami Warning by setting 災害・避難情報 (Disaster and Evacuation Information). When receiving Earthquake Early Warning, secure your safety and act composedly according to the surrounding situations. When receiving Tsunami Warning, leave sea coasts immediately and evacuate to safe places such as hills and strongly-built tall buildings. From the au Disaster Countermeasure menu, [緊急速報メール] (Emergency Rapid Mail).The inbox is displayed.Select a mail to check to display the details of the mail.削除 (Delete) Delete received mails.設定 (Settings) 緊急地震速報 (Earthquake Early Warning)Set whether to receive Earthquake Early Warning. Tap [受信する] (Receive)/[受信しない] (Not receive) → [OK].災害・避難情報 (Disaster and Evacuation Information)Set whether to receive Disaster and Evacuation Information, and Tsunami Warning. Tap [受信する] (Receive)/[受信しない] (Not receive) → [OK].音量 (Volume)Set the volume of the receiving sound.バイブ (Vibrator)Set whether to activate the vibrator at the time of reception.マナー時の鳴動 (Linkage to the manner mode)Set whether to notify you with the manner mode settings applied in the manner mode.緊急地震速報 (Earthquake Early Warning)Check the receiving sound and vibration of the product for Earthquake Early Warning.3](https://usermanual.wiki/Sharp/HRO00214/User-Guide-2490828-Page-4.png)
![設定 (Settings) 災害・避難情報 (Disaster and Evacuation Information)Check the receiving sound and vibration of the product for Disaster and Evacuation Information, and Tsunami Warning. ◎This service is available only in Japan (Not available overseas). ◎Emergency Rapid Mail is free of both information charges and communication charges. ◎Emergency Rapid Mail cannot be received while the power is turned off or during a call. ◎Emergency Rapid Mail may not be received during communication such as while sending and receiving e-mails/SMSs and while using the browser or when you are in a place where the signal cannot be received (e.g. tunnels and basements) or the signal is weak, even within the service area. ◎Emergency Rapid Mail which failed to be received will not be able to be received again. ◎When you receive Emergency Rapid Mail, you will be notified by the dedicated alarm tone and the vibrator. The alarm tone cannot be changed.* When you receive Earthquake Early Warning, you will be notified by the alarm tone, voice (“地震です” (Jishin-desu)) meaning that an earthquake has occurred and the vibrator. ◎Information intended for the areas of other than your present location may be received. ◎As for this service, the Company shall not be liable for any damage incurred on the users resulted from failure or delay of information delivery due to communication disturbance or system failure, contents of the information or other problems that are not supposed to be blamed on the Company. ◎For details on Earthquake Early Warning and Tsunami Warning provided by the Japan Meteorological Agency, refer to the agency’s homepage. (http://www.jma.go.jp/jma/indexe.html)Earthquake Early Warning ◎Earthquake Early Warning notifies areas where a strong shaking (Japan seismic scale 4 or more) is expected when an earthquake whose maximum Japan seismic scale is predicted of 5-lower or more has been detected. ◎This service detects an earthquake (P-wave, preliminary tremors) near the seismic center immediately after the earthquake occurs and automatically calculates its location, scale and predicted strength of the shaking. After that, you will be notified of the earthquake as soon as possible within a few seconds to dozens of seconds before a strong shaking from the earthquake (S-wave, principal shock) occurs. ◎In the vicinity of the seismic center, a strong shaking may reach you before Earthquake Early Warning. ◎The Earthquake Early Warning distribution system provided by this service is different from that provided by TV, radio and other communication media and thus the arriving time of Earthquake Early Warning may be different among those media.Tsunami Warning ◎Tsunami Warning notifies areas including target sea coasts of Major Tsunami Warning and Tsunami Warning provided by the Japan Meteorological Agency.Disaster and Evacuation Information ◎Disaster and Evacuation Information notifies information related to the safety of citizens, such as evacuation advisories, evacuation orders or various alarms delivered by the national government or the local governments. ■Using Disaster Voice Messaging ServiceDisaster Voice Messaging Service is a service to record voices with a smartphone and deliver them as a voice message to people to whom you want to deliver the information that you are safe when large-scale disasters occur. From the au Disaster Countermeasure menu, [災害用音声お届けサービス] (Disaster Voice Messaging Service).Follow the on-screen instructions. ◎To use this service via Wi-Fi®, making initial settings via 4G(LTE/WiMAX 2+)/3G networks is required. ◎Voice messages can be recorded for up to 30 seconds. ◎Voice messages can be exchanged among au phones as well as other carriers’ cell phones and PHS devices. ◎Voices may not be heard when the media sound volume is set to low.4](https://usermanual.wiki/Sharp/HRO00214/User-Guide-2490828-Page-5.png)
![◎When no free space is left on the internal memory, voice messages may not be saved or played. ◎Some cell phones cannot receive voice messages. For details, refer to the au homepage. ■Using Disaster Information/Donation WebsiteYou can check the histories of Disaster and Evacuation Information delivered by the local governments, Disaster Information portal and donation website. From the au Disaster Countermeasure menu, [災害情報/義援金サイト] (Disaster Information/Donation website).Select an item to check.Illustrations and Descriptions in This Manual ■Note on Key IllustrationsIn this manual, the key illustrations are simplified as shown below.fdu ■Description of Operations for Selecting Item/Icon/Key etc.In this manual, operation procedures are described as below.Description ExplanationOn the home screen, “Apps Sheet” → [Phone] → Enter “141” → [Call].Slide/flick the Feel UX home screen to switch to the Apps Sheet, and then tap “Phone”. Continue by tapping “ ”, “ ”, and “ ”, and finally “ ”.f (hold down for at least 2 seconds).Hold f down for at least 2 seconds.* Tapping is to select a key or icon displayed on the screen by lightly tapping it with your finger. ■Notes on Illustrations/ScreenshotsThe screenshots in this manual are simplified and may look different from the actual screens. Also, part of the screen may be omitted.Actual screen In this manualIn this manual, part of the screen such as icons are omitted. ◎Explanations of this manual are based on the case when the color of the main unit is “White” as an example.5](https://usermanual.wiki/Sharp/HRO00214/User-Guide-2490828-Page-6.png)
![Checking the IMEIAn IMEI (international mobile station equipment identity) is a special identification code assigned to each phone. You can pull the IMEI tray out to confirm the IMEI of the product. Turn the product off and remove the au Nano IC Card (LTE) tray.For details on removing the au Nano IC Card (LTE) tray, refer to “Removing the au Nano IC Card (LTE)” (▶P. 9). Slowly pull the IMEI tray straight out by hooking a finger on it.au Nano IC Card (LTE) tray slotIMEI tray ◎The IMEI is information required when requesting servicing or repairs. ◎The IMEI tray cannot be removed from the main unit. Take care not to apply force when handling. ◎You can also operate the product to confirm the IMEI. On the home screen, “Apps Sheet” → [Settings] → [Device info] → [Status] and confirm the IMEI field.ChargingChargingWhen you purchase the product, the internal battery is not fully charged. Be sure to charge the internal battery before use. If the performance of the battery does not recover (e.g. the usable time after each charge has become extremely short), the internal battery may be at the end of service life. On the home screen, “Apps Sheet” → [Settings] → [Device info] → [Status] → [Battery status] to check the charging performance of the internal battery. While charging, the charging/incoming indicator illuminates in red, and the battery icon is displayed with superimposed. When the battery is charged to approximately 95%, the charging/incoming indicator illuminates in green. When charging is finished, the charging/incoming indicator goes out. ◎Depending on the operation procedure and usage environment, the temperature inside the product may get high and the product may even get heated. In such case, charging may stop for security reasons. ◎Charging the internal battery while using the camera function etc. may lengthen the charging time. ◎If you perform various operations with a specified charger (sold separately) connected to the product, charging/discharging may take place repeatedly in a short time. Frequently charging the internal battery shortens its service life. ◎If you charge the internal battery when the battery has run out, the charging/incoming indicator may not illuminate soon. However, charging is in progress. ◎If the charging/incoming indicator flashes in red, force the power off (▶P. 14) and turn the product on again. If the indicator continues to flash, stop charging the internal battery and contact an au shop or the Keitai Guarantee Service Center. ◎If you stop charging while the charging/incoming indicator still illuminates during charging, the cell phone may be left not fully charged even if is displayed on it. In such case, the usage times shorten.11](https://usermanual.wiki/Sharp/HRO00214/User-Guide-2490828-Page-12.png)
![Turning the Power On/Off ■Turning the Power On f (hold down for at least 2 seconds). ◎The initial setting of the touch panel will be executed until “AQUOS” disappears from the screen after the power is turned on. Do not touch the screen, otherwise touch panel operations may not be performed properly. ■Turning the Power Off f (hold down for at least 2 seconds). [Power off] → [OK]. ■Restarting the ProductYou can restart the product after turning it off. f (hold down for at least 2 seconds). [Reboot] → [OK]. ■Turning the Power Off ForciblyYou can force the product to turn off if the screen freezes or you are unable to turn the product off. f (hold down for at least 8 seconds).Release your finger after the product vibrates to turn the power off. ◎If the power is turned off forcibly, unsaved data will be deleted. Do not turn the power off forcibly unless you cannot operate the product. ■Booting in Safe ModeTurn the product off then boot it in a state close to that at time of purchase.If operation of the product is unstable, it may be due to applications installed after purchasing the product. If symptoms improve when booted in safe mode, uninstalling the applications you installed may remedy symptoms. f (hold down for at least 2 seconds). Long touch “Power off” → [OK].“Safe mode” is displayed at the bottom of the screen when the product is booted in safe mode.To end safe mode, reboot the product. ◎When the product is turned off, you can boot it in safe mode by f (hold down for at least 2 seconds) to turn it on, and then long touching “d” until the Welcome Sheet (Lock Screen) is displayed after the au logo disappears. ◎It is recommended that you back up your data on the product before booting in safe mode. ◎Widgets that you yourself created may be deleted. ◎Safe mode is not a normal state for the product to be booted in. End safe mode before normal use.Turning the Screen On/OffIf you press f or no operation is made for a specified time, the screen is turned off. ■Turning the Screen On f while the screen is turned off. ◎When you put the product in your pocket, bag, etc., turn the screen off. Putting the product in while the screen is turned on may cause inadvertent operations.14](https://usermanual.wiki/Sharp/HRO00214/User-Guide-2490828-Page-15.png)
![Welcome Sheet (Lock Screen)The Welcome Sheet (Lock Screen) is displayed if you turn the screen on.《Welcome Sheet (Lock Screen)》Slide “ ” to the bottom of the screen to unlock.Tap, long touch or slide “ ” up to display “Video tutorial”, “Welcome sheet setting” and shortcuts.① Wallpaper② Owner info key Tap to display texts according to items set for “Owner info” in “Lock & Security”.③ Info Area Flick to the left/right to switch the weather, stock prices information, Clock & information and widgets.Switching the Display Language to EnglishYou can switch the display language for function names and other items to English. On the home screen, “Apps Sheet”. [設定] (Settings). [言語と文字入力] (Language & input). [言語(Language)を選択] (Select language). [English].15](https://usermanual.wiki/Sharp/HRO00214/User-Guide-2490828-Page-16.png)
![Using the Feel UX HomeFeel UX Home is a home screen that consists of the Desktop Sheet, the Apps Sheet, and the Doc.You can tap widgets/shortcuts on the Desktop Sheet and icons on the Apps Sheet to use functions. You can also register shortcuts for favorite apps in the Doc. Slide/flick the home screen to the left/right to switch between the Desktop and Apps Sheets.《Desktop Sheet》《Apps Sheet》Switching sheets ■Viewing the Feel UX Home① Status bar② Desktop Sheet/Apps Sheet③ Dock You can when you register a shortcut for the application in the dock, to start quickly.④ Navigation Bar⑤ Guide Tab When you switch the Desktop Sheet/Apps Sheet, the sheet name will be displayed.⑥ Page Indicator The current position of the Desktop Sheet/Apps Sheet will be displayed. ◎Slide/flick the Desktop and Apps Sheets up/down to switch pages. ◎Slide the navigation bar up to access applications compatible with the assist function. Drag to the application then release to launch. You can drag to “ ” or “ ” and then release to use the fullscreen shrink mode. ■Arranging the Home Screen On the home screen, [e]. [Home settings].16](https://usermanual.wiki/Sharp/HRO00214/User-Guide-2490828-Page-17.png)
![Using the Notification/Status PanelIn the notification/status panel, you can check the details on notification icons and status icons or activate an application corresponding to the icon.You can also set the manner mode, VeilView, etc. Slide the status bar down.《Notification/Status panel》① Function buttonsSwitch settings of the frequently used function by one touch.② Function button displaying/hiding barTap it to display/hide function buttons on the second and subsequent row.③ Music controllerPlay music with LISMO.④ Notification areaCheck the status of the product and contents of notifications. Depending on the information, you can pinch out/pinch in to enlarge/shrink notifications or tap notifications/functions to activate a corresponding application. Flick a notification to the left/right to delete it. You may not be able to delete a notification depending on the notification.⑤ Customize keyChange or rearrange the displayed function buttons.⑥ Settings keyTap it to make various settings for the product.⑦ Clear AllTap it to clear all the notifications. You may not be able to delete a notification depending on the notification.⑧ Close barSlide it up to hide the notification/status panel.Switching Input MethodsYou can switch input methods for character entry. Following operation explanations use “Japanese - iWnn IME - SH edition”. While the keyboard is displayed, open the notification panel. [Choose input method] → [English (US)]/[Japanese].Switching Software Keyboards On the character entry screen, [ ] → [Change input UI] → [Set QWERTY keyboard]/[Set 12 keyboard].18](https://usermanual.wiki/Sharp/HRO00214/User-Guide-2490828-Page-19.png)
![Updating SoftwareThe product supports the software update.The software update function can also be used for operating system updates. An operating system update is a software update which also includes updating of the product’s operating system. On the home screen, “Apps Sheet” → [Settings] → [Device info] → [Software update].Software update Check whether software update is necessary or not. The confirmation starts when you tap “Yes”. When it is necessary, you can download data for software update.Auto-check settingsSet whether to regularly check presence of data for software update available. ■Notes on Software Update You are charged for data communication when connecting to the Internet from the product by using packet communication. Large-volume data communication occurs in particular for operating system updates. Use of Wi-Fi® is recommended. When software update is necessary, you will be informed on au homepage, etc. For details, contact an au shop or Customer Service Center (call toll-free 157). In addition, users of the SHL25 will receive a notice from au, when software update is necessary to improve the functionality of the SHL25. It is recommended to back up your data before updating software. If the software update is performed, the product will restart before and after the update. If the software update has failed or stopped, perform the same procedures again. If the software update fails, it may become impossible to operate the product. If this happens, bring it to an au shop or PiPit (not accepted by some shops). Charge the battery sufficiently before starting update. If the battery level is insufficient or the battery runs out during the update, the software update will fail. Check out the signal reception status. The software update may fail if the product is in a place with bad signal reception status. Various data registered on the product (address books, mails, still pictures, music data, etc.) and information of settings will not be changed even after software is updated. However, note that data may not be protected depending on the state of the product (fault, damage, getting wet with water, etc.). After software is updated, the download of next update software may automatically start (consecutive update). During international roaming, the software update function can only be used with a Wi-Fi® connection. As this function cannot be used without a Wi-Fi® connection, be sure to first connect via Wi-Fi® before updating software. After you have updated the operating system, you cannot return it to the previous version.Do not conduct the following operations during the software update Do not move during software update.The following operations are not available during the software update Operations are not available during software update. Making a call to 110 (Police), 119 (Fire and Ambulance), 118 (Regional Coast Guard Headquarters) or 157 (Customer Service Center) is not available either. Also, the alarm etc. does not function.21V31V31](https://usermanual.wiki/Sharp/HRO00214/User-Guide-2490828-Page-22.png)